

Page 1
Dear Customer,
Thank you for choosing this quality product from ASKO.
We hope it will meet your expectations and fulfil your needs for many years to
come. Scandinavian design combines clean lines, everyday functionality and
high quality. These are key characteristics of all our products and the reason
they are greatly appreciated throughout the world.
To get the most from your new dishwasher, we recommend that you read the
operating instructions before using the dishwasher. The operating instructions
also include information on how you can help protect the environment.
Read the instructions before using this machine.
Operating Instructions
Dishwasher
ASKO DWC5936 XL FS
Page 2
Contents
0:05
32 321 4 75 6
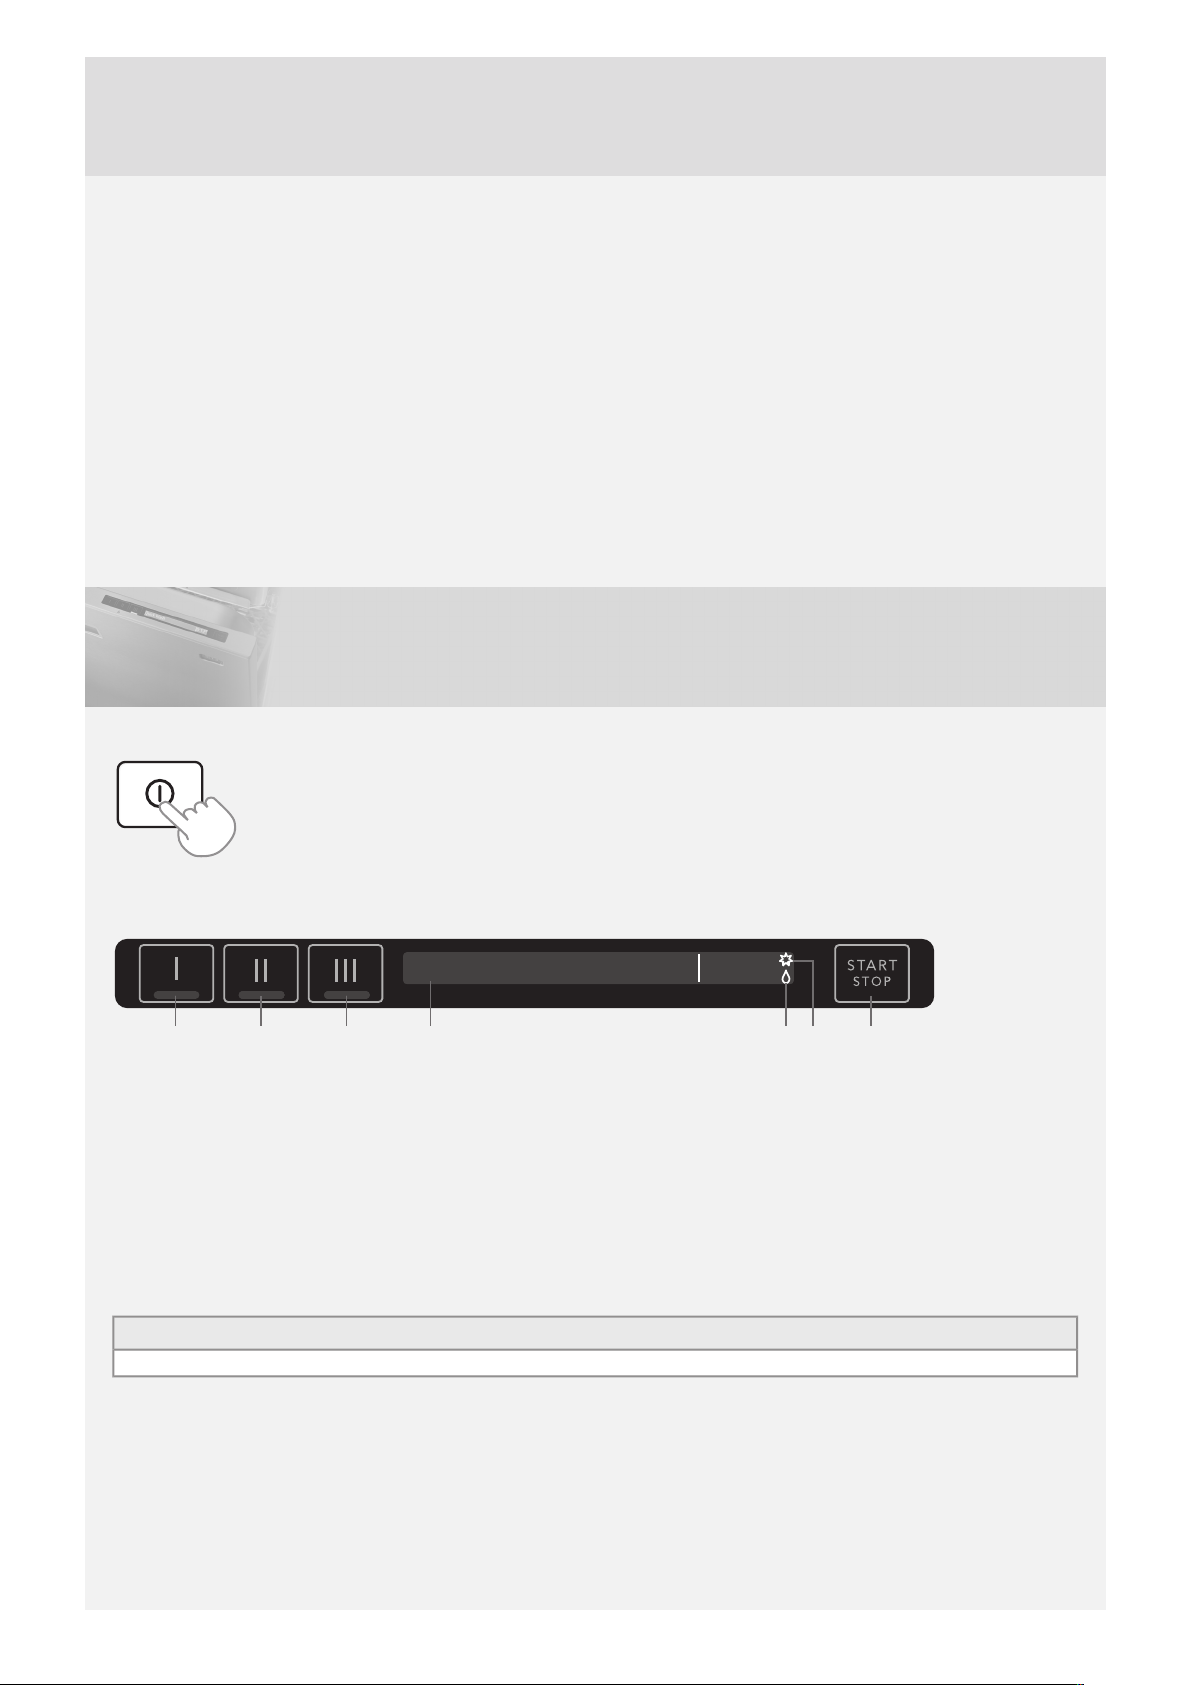
Front panel
2Front panel
3Safety instructions
4Before washing for the first time
5Loading the dishwasher
7Using the dishwasher
9Settings
14Troubleshooting
18Technical information
19Installation
23Service
24Program chart
25Your notes
12Care and cleaning
To start the machine, press and hold the main power switch until the display lights up.
1 Program button 1*
2 Program button 2*
3 Program button 3*
4 Display
5 Rinse aid indicator (not active if an automatic dosing system is connected)
6 Salt indicator
7 Start/Stop (Start/Stop)
*Optional program. (To program the program buttons, see Select programs in section Settings on page 9.)
The panel is fitted with touch buttons with audible feedback (see the chapter Settings).
NOTE!
• 60 minutes after the last button press, the machine will switch off to save power.
Translation of the original instructions.
2
Page 3
Safety instructions
General
• Read the operating instructions and keep them in a safe place!
• Never use the dishwasher for any purpose other than that
specified in these operating instructions.
• Do not load the dishwasherdoor, basket carriers or dishwasher baskets with anything other than dishes.
• Never leave the dishwasher door open as someone may trip
on it.
• Only use powder and liquid dishwasher detergent in the
dishwasher’s detergent compartment. (If an automatic dosing
system is connected, the dishwasher’sdetergent compartment
must not be used).
• Only use commercial detergent and rinse aid in external
compartments if an automatic dosing system is connected.
(Commercial dishwasher detergent adapted for automatic
dosing systems should notbe used in the dishwasher’s detergent dispensing compartment. Commercial rinse aid adapted
for automatic dosing systems should not be used in the dishwasher’s rinse aid dispensing compartment.)
• Follow the supplier’s safety instructions for the handling and
storage of the detergent and rinse aid.
• Place knives and other sharp items so that they cannot harm
anyone or damage the dishwasher.
• The inside of the dishwasher reaches high temperatures when
a program is in progress. Be careful when opening the door.
Let the dishes cool before unloading.
• Do not touch the heating elements in the bottom of the dishwasher, as they are very hot during and just after a dishwashing program has ended.
• This appliance is not intended for use by persons (including
children) with reduced physical,sensory or mental capabilities,
or lack of experience and knowledge, unless they have been
given supervision or instruction concerning use of the appliance by a person responsible for their safety.
• Damaged mains cables must only be replaced by a qualified
electrician.
• This dishwasher is for household or similar use, such as:
- staff kitchens in shops, offices and other workplaces.
- farms.
- for guests at hotels, motels and other types of accommo-
dation.
- bed & breakfast hotels.
The dishwasher can also be used in commercialenvironments
such as restaurants, cafés/bistros, bars, bed & breakfast hotels, camp sites and marinas.
• Never place dishes with solvent residues in the dishwasher
due to the risk of explosion. Nor may dishes that contain ash,
wax or lubricants be washed in the dishwasher.
• For repairs and maintenance, original spare parts must be
used.
WARNING!
The building’s main power switch must be switched off or
power to the socketturned off duringcleaning, maintenance
or when replacing parts!
Child safety
• Always close the door andstart the program immediately after
you have added the detergent.
• Keep children away from the dishwasher when the door is
open. Some detergent may remain inside!
• Do not allow children to use or play with the dishwasher. Be
especially vigilant when the door is open.
WARNING!
Dishwasher detergents are strongly alkaline. They can be extremely dangerous if swallowed. Avoid contact with skin and
eyes and keep children away from the dishwasher when the
door is open.
Check that the detergent compartment is empty after completion of the wash cycle.
Activate child lock (button lock)
You can activate the child lock (button lock) to prevent children
from starting the dishwasher (see the section Settings on page
9).
Winter storage/transport
• Store the dishwasher where the temperature remains above
freezing.
• Avoid long transport distances in very cold weather.
• Transport the dishwasher upright.
Overflow guard function
The overflow protection starts draining and ends any program in
progress if the water level in the dishwasher exceeds the normal
level. If the protective cap is triggered, turn off the water supply
and call the service department.
Cleaning
When cleaning the edge around the door, use only a slightly
damp cloth. Do not spray water around the edge! Moisture can
make its way into the lock, which contains electrical components.
Packing material
Sort waste materials in accordance with local guidelines.
Disposal
• When the dishwasher has reached the end of its service life
and is to be disposed of, it should immediately be made unusable. Pull out the power cable and cut it as short as possible.
• The dishwasher is manufactured and labelled for recycling.
• Contact your local authority for information about where and
how your dishwasher should be correctly recycled.
Installation
Read the safety instructions before installing. See section Installation.
3
Page 4
Before washing for the
Salt compartment lid
first time
Automatic dosing system
The dishwasher can be connected to an automaticdosing system
for commercial detergent and rinse aid, making day-to-day use
easier and reducing the risk of overdosing.
The process for connecting and activating an automatic dosing
system is described in section Installation on page 19 and in
section Settings on page 9.
Add commercial detergent and rinse aid suitable for automatic
dosing systems to their respective external compartments in good
time to prevent air getting into the system. Acidic rinse aid is
recommended forhard water (water with ahigh mineral content).
WARNING!
Note that there are risks involved in handling commercial detergent and rinse aid. Protective gloves and goggles must be
worn when handling these products.
Follow the supplier’s safety instructions for the handling and
storage of the detergent and rinse aid.
The water softener
In order to achieve good dishwashing results, the dishwasher
needs soft water (water with low mineral content). Hard water
leaves a white coating on dishes and the dishwasher.
Water hardness is specified using the following scales: the German water hardness scale (°dH) and the French water hardness
scale (°fH). A water supply with a water hardness in excess of
6°dH (9°fH) must be softened. This is done automatically with
the aid of the built-in water softener. For the water softener to
function optimally, it must be adjusted to the hardness of the
water supply. If the water hardness exceeds 20°dH (36°fH), we
recommend connecting an external water softener.
Contact the local waterworks, or measure the water hardness
using the supplied test strip, to check the water hardness in your
area. Once you have adjusted the water softener, use detergent
and rinse aid doses suitable for soft water.
How to use the test strip:
1 Turn on the water tap and let the water run for a minute or so.
2 Fill a glass with cold water.
3 Remove the test strip from its packaging.
4 Dip the test strip in the water for about one second.
5 Wait one minute. Now compare the colours of the squares
with the water hardness table.
°fH°dHTest strip
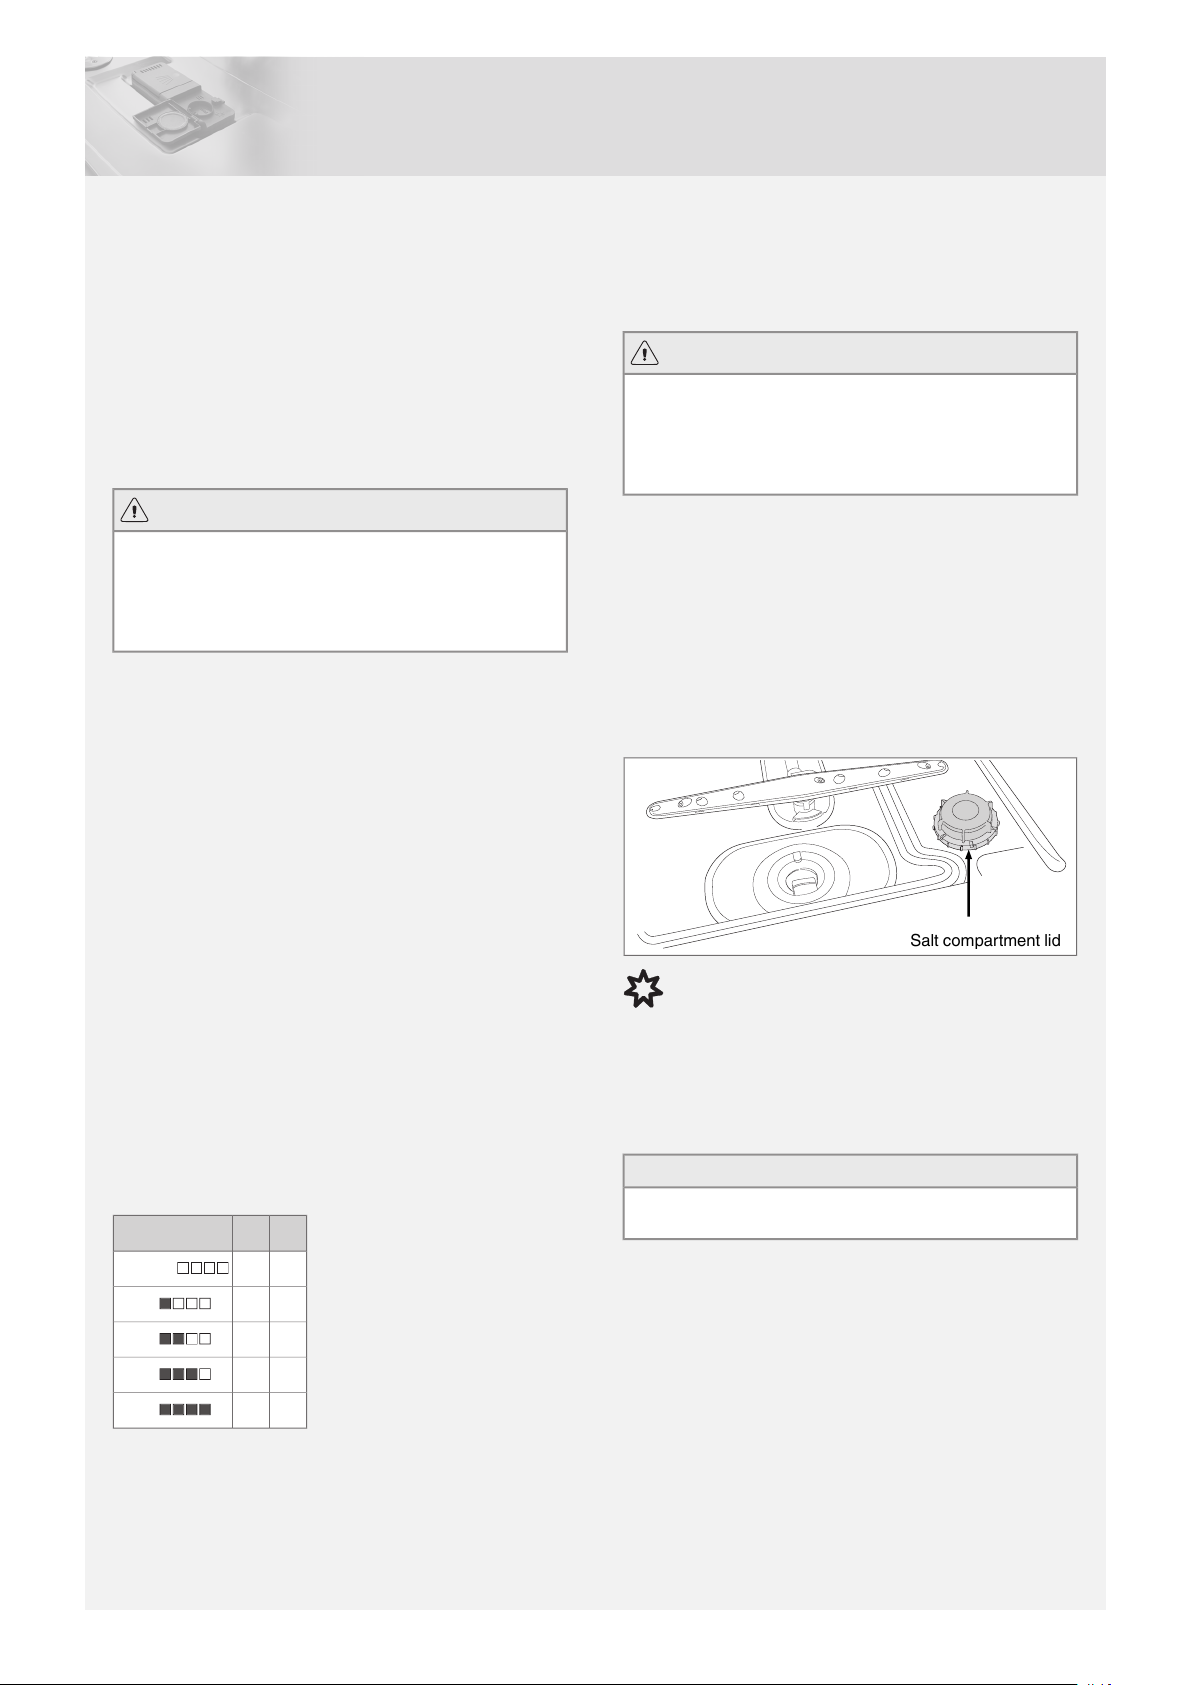
Fill up the salt
Before you begin using a dishwasher with a water softener, you
must fill the salt compartment with salt. Use large grain salt or
special dishwasher salt.
WARNING!
Top up the salt just before running a program. To avoid the risk
of rust stains, the dishwasher must be rinsed immediately after
topping up the salt.
Never pour dishwasher detergent into the salt compartment.
This destroys the water softener!
Do as follows the first time:
1 Unscrew the lid as illustrated.
2 Place the funnel supplied with the dishwasher in the salt
compartment top-up hole. First, pour in about 1 l of water.
3 Then add salt, a maximum of 1.5 kg, until the compartment is
full.
4 Wipe up any excess salt so that the lid can be screwed on
firmly.
5 Run a program to ensure that any salt in the dishwasher is
rinsed away.
Refill salt indicator
When the salt needs topping up, the above symbol lights on the
display.
When the salt runs out, unscrew the cap and fill the container
with salt. Water is only needed the first time! Wipe clean and
tighten. Run a program to ensure that any salt in the dishwasher
is rinsed away.
NOTE!
After topping up, it may take a while before the symbol goes
out.
<5<34 green
>7>41 red
>15>82 red
>25>143 red
>38>214 red
Adjusting the water softener
The process for setting the water softener is described in section
Settings on page 9. Don't forget to put salt in the salt compartment after you have set the water softener.
4
Page 5

Loading the dishwasher
Top up with rinse aid
Add rinse aid to the rinse aid compartment if the dishwasher is
not connected to an automatic dosing system for commercial
rinse aid.
Drying is faster and a better result is achieved if you use rinse
aid. You will also achieve a better dishwashing result with clear
glasses and spotless dishes. Acidic rinse aid is recommended
for hard water (water with a high mineral content).
1 Open the rinse aid compartment lid.
2 Carefully top up with rinse aid. Only add rinse aid to the level
marked max.
3 Wipe up any splashes of rinse aid around the compartment.
4 Close the lid firmly.
NOTE!
Commercial rinse aid adapted for automatic dosing systems
should not be used in the dishwasher’s rinse aid dispensing
compartment.
Refill rinse aid indicator
When the dishwasher’s rinse aid compartment needs topping
up, the above symbol lights on the display.
Fragile dishes
Some cookware is not dishwasher safe. This can be for several
reasons. Some materials cannot withstand strong heat, others
can be damaged by dishwashing detergent.
Fragile decoration
Porcelain with decoration on top of the glazing (the items feel
rough) should not be washed in a dishwasher.
Crystal/Glass
Place items so that they do not touch each other during the wash.
Use a short program with the lowest possible wash temperature.
Delicate and very fragile items should not be washed in a dishwasher.
Glassware washed in a dishwasher at high temperatures can
gradually develop a grey film that cannot be removed. Wash fine
glassware at a low temperature and with a small amount of detergent.
Silver
Silver and stainless steel items should not come into contact, as
the silver can become discoloured.
Cutlery with glued handles
Some types of glue are not dishwasher safe. In such cases, the
handles may loosen.
Wood
Wooden items should only be washed in a dishwasher if marked
dishwasher safe.
Aluminium
Aluminium can lose its shine if washed in a dishwasher. However,
good quality aluminium pans can be washed in a dishwasher,
even if some of the shine will be lost.
Plastic items
Avoid washing plastic items that cannot withstand high temperatures.
NOTE!
After topping up, it may take a while before the symbol goes
out.
Setting the rinse aid dosage
The section Settings describes how to set the rinse aid dosage.
Rinse aid dispensing can be set to On or Off.
Activate rinse aid dosage:
• If the dishes have water marks.
• Spots or films on the dishes.
Deactivate rinse aid dosage:
• If the dishes have a sticky white/blue film.
• If the dishes are streaked.
• Build-up of foam. If you have very soft water, the rinse aid can
be diluted 50:50 with water.
Dishwasher baskets and basket carriers
There is space for two standard-sized plastic dishwasher baskets
in the dishwasher 500 x 500 mm. The dishwasher baskets are
placed into the dishwasher’s basket carriers.
NOTE!
Check that the plastic dishwasher baskets are placed inside
the edges of the basket carriers.
5
Page 6
Upper basket carrier
Place dishes into a plastic dishwasher basket with the dirty surfaces facing inwards and downwards. Place the dishwasher
basket onto the dishwasher’s upper basket carrier.
Check that the spray arms can rotate freely.
The upper basket carrier is supplied in the lower position, but
can be moved up to make more space for the lower dishwasher
basket if large items are being washed.
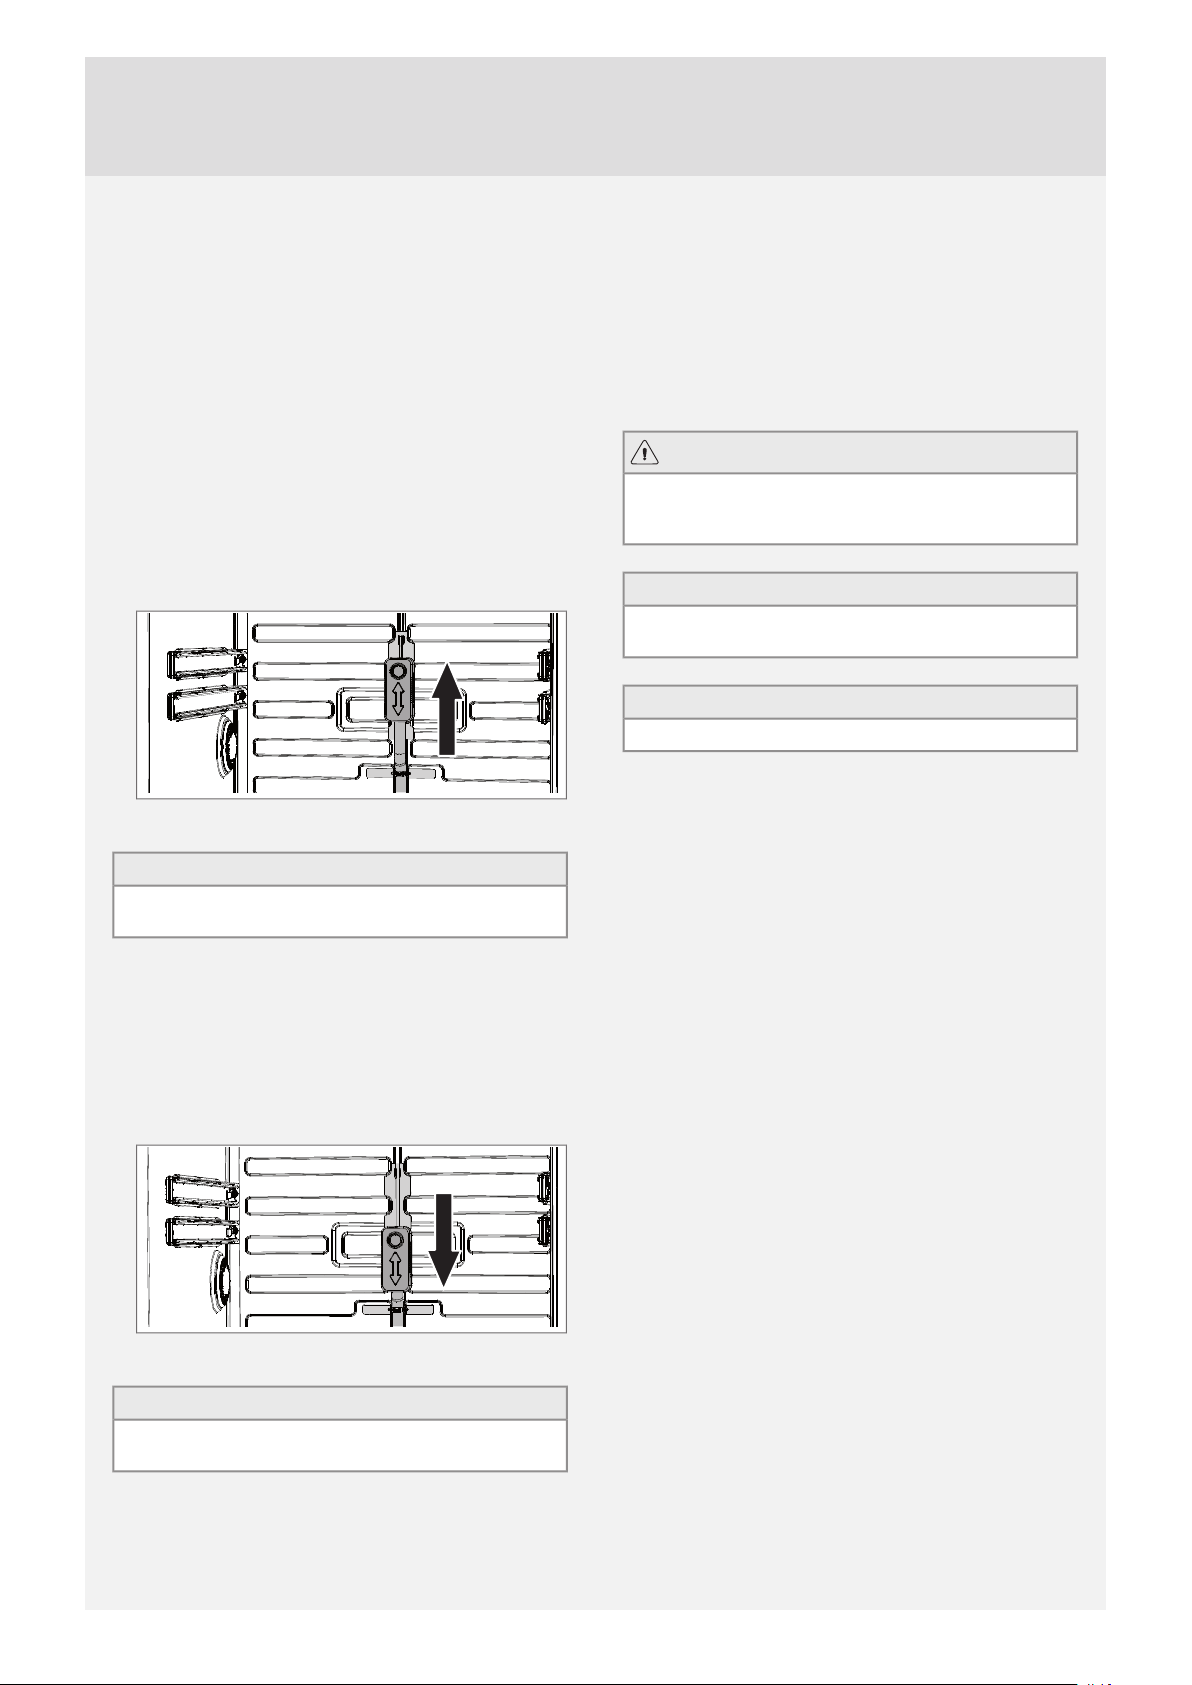
Raising the upper basket carrier
1 Pull out the basket carrier. (Lift out any plastic dishwasher
baskets.)
2 Turn the basket catch outwards at the end of both runners.
3 Grip the basket carrier with both hands, pull it out and move
the basket carrier to the upper position.
4 Slide the rinsing pipe connection up to the upper position to
connect it with the upper spray arm.
basket onto the dishwasher’s lower basket carrier. Check that
the spray arms can rotate freely.
Cutlery
Use the provided cutlery baskets. Place cutlery with the handles
facing down, except for knives, and spread them out as much
as possible. Ensure that spoons do not stack against and inside
each other. Alternatively, lie the cutlery horizontally in a dishwasher basket.
WARNING!
Knives and other pointed items must be placed with the points
down in an provided cutlery basket or placed horizontally in a
dishwasher basket.
NOTE!
Do not place cutlery made of different materials, such as silver
and stainless steel, in the same place (risk of discolouration).
NOTE!
Check that the spray arms can rotate freely.
5 Turn back the basket catch at the end of both runners.
NOTE!
Check that the rinsing pipe connection is connected to the
upper spray arm.
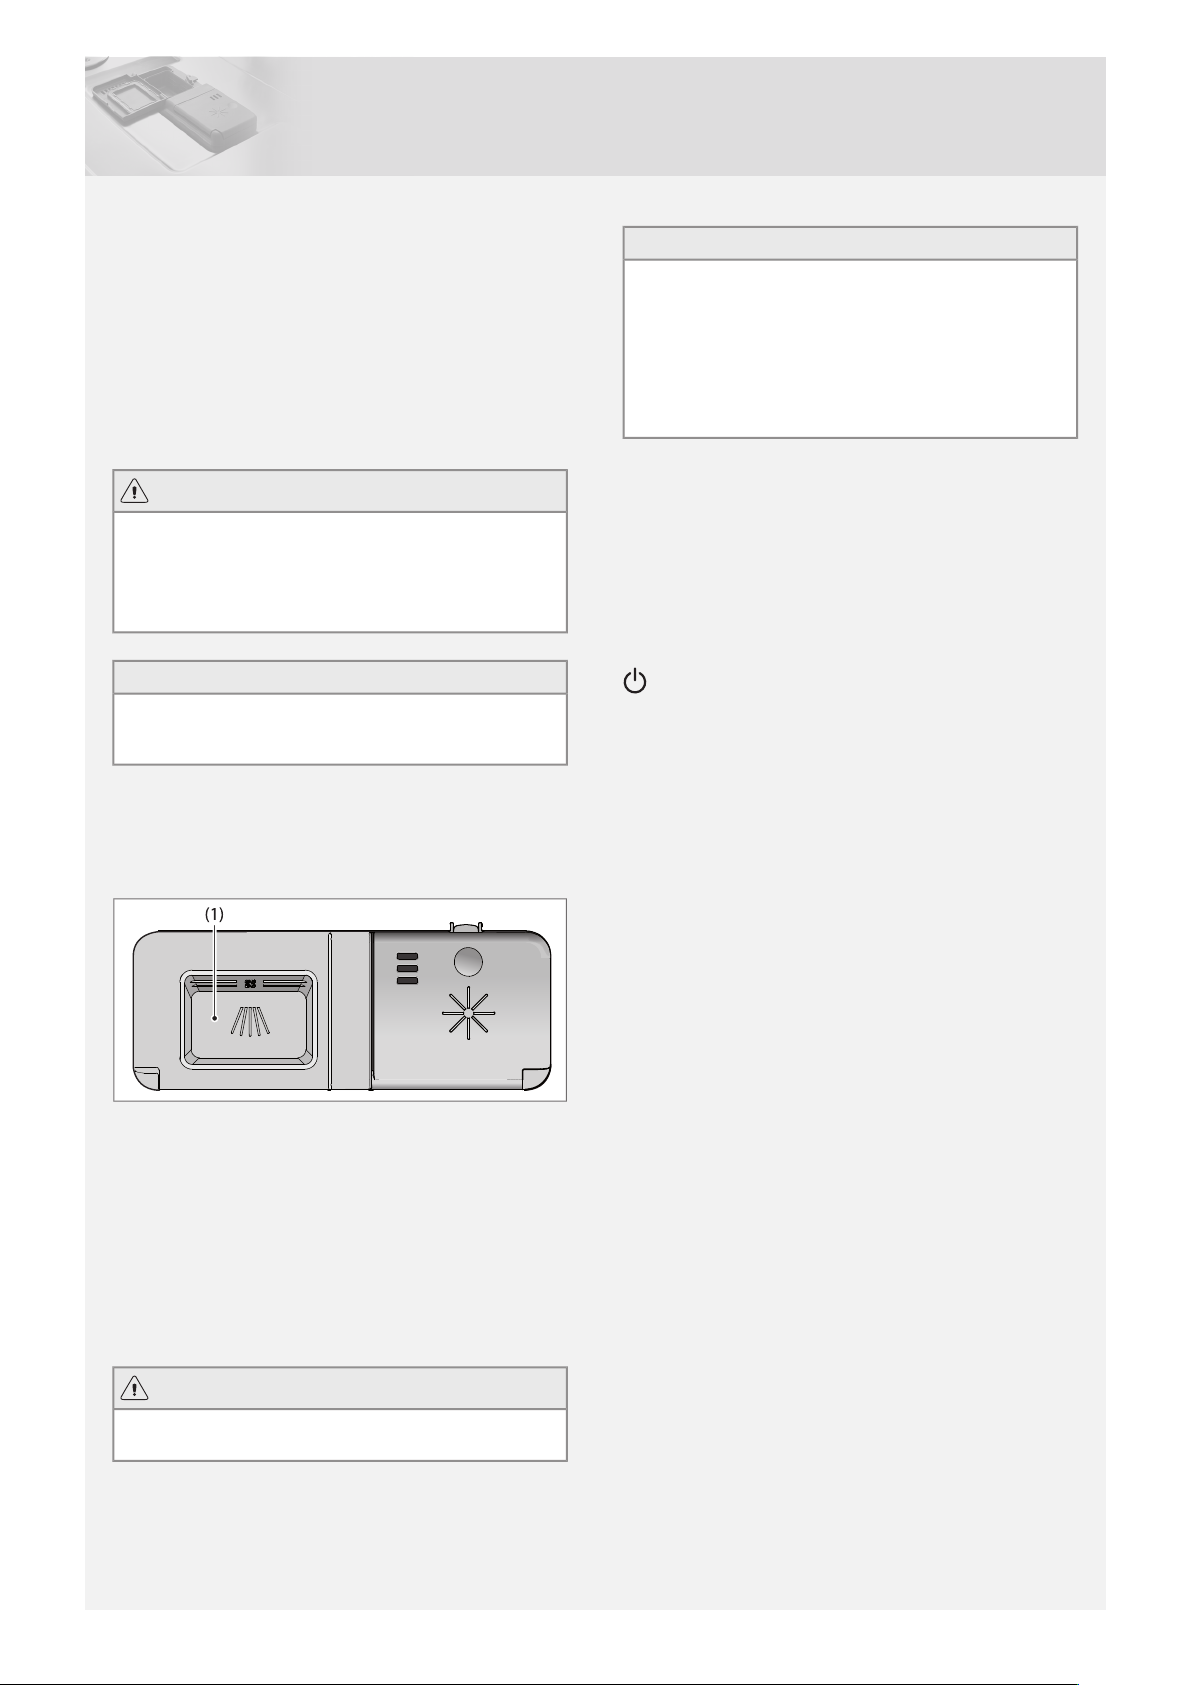
Lowering the upper basket carrier
1 Pull out the basket carrier. (Lift out any plastic dishwasher
baskets.)
2 Turn the basket catch outwards at the end of both runners.
3 Grip the basket carrier with both hands, pull it out and move
the basket carrier down to the lower position.
4 Slide the rinsing pipe connection down to the lower position
to connect it with the upper spray arm.
5 Turn back the basket catch at the end of both runners.
NOTE!
Check that the rinsing pipe connection is connected to the
upper spray arm.
Lower basket carrier
Place dishes into a plastic dishwasher basket with the dirty surfaces facing inwards and downwards. Place the dishwasher
6
Page 7
Using the dishwasher
Automatic dosing system
The dishwasher can be connected to an automatic dosing system
for commercial detergent and rinse aid, making day-to-day use
easier and reducing the risk of overdosing.
The process for connecting and activating an automatic dosing
system is described in section Installation on page 19 and in
section Settings on page 9.
Add commercial detergent and rinse aid adapted for automatic
dosing systems to their respective external compartments in good
time to prevent air getting into the system.
WARNING!
Note that there are risks involved in handling commercial detergent and rinse aid. Protective gloves and goggles must be
worn when handling these products.
Follow the supplier’s safety instructions for the handling and
storage of the detergent and rinse aid.
NOTE!
Powder or liquid dishwasher detergent must not be used in the
dishwasher’s detergent compartment if the dishwasher is connected to an automatic dosing system.
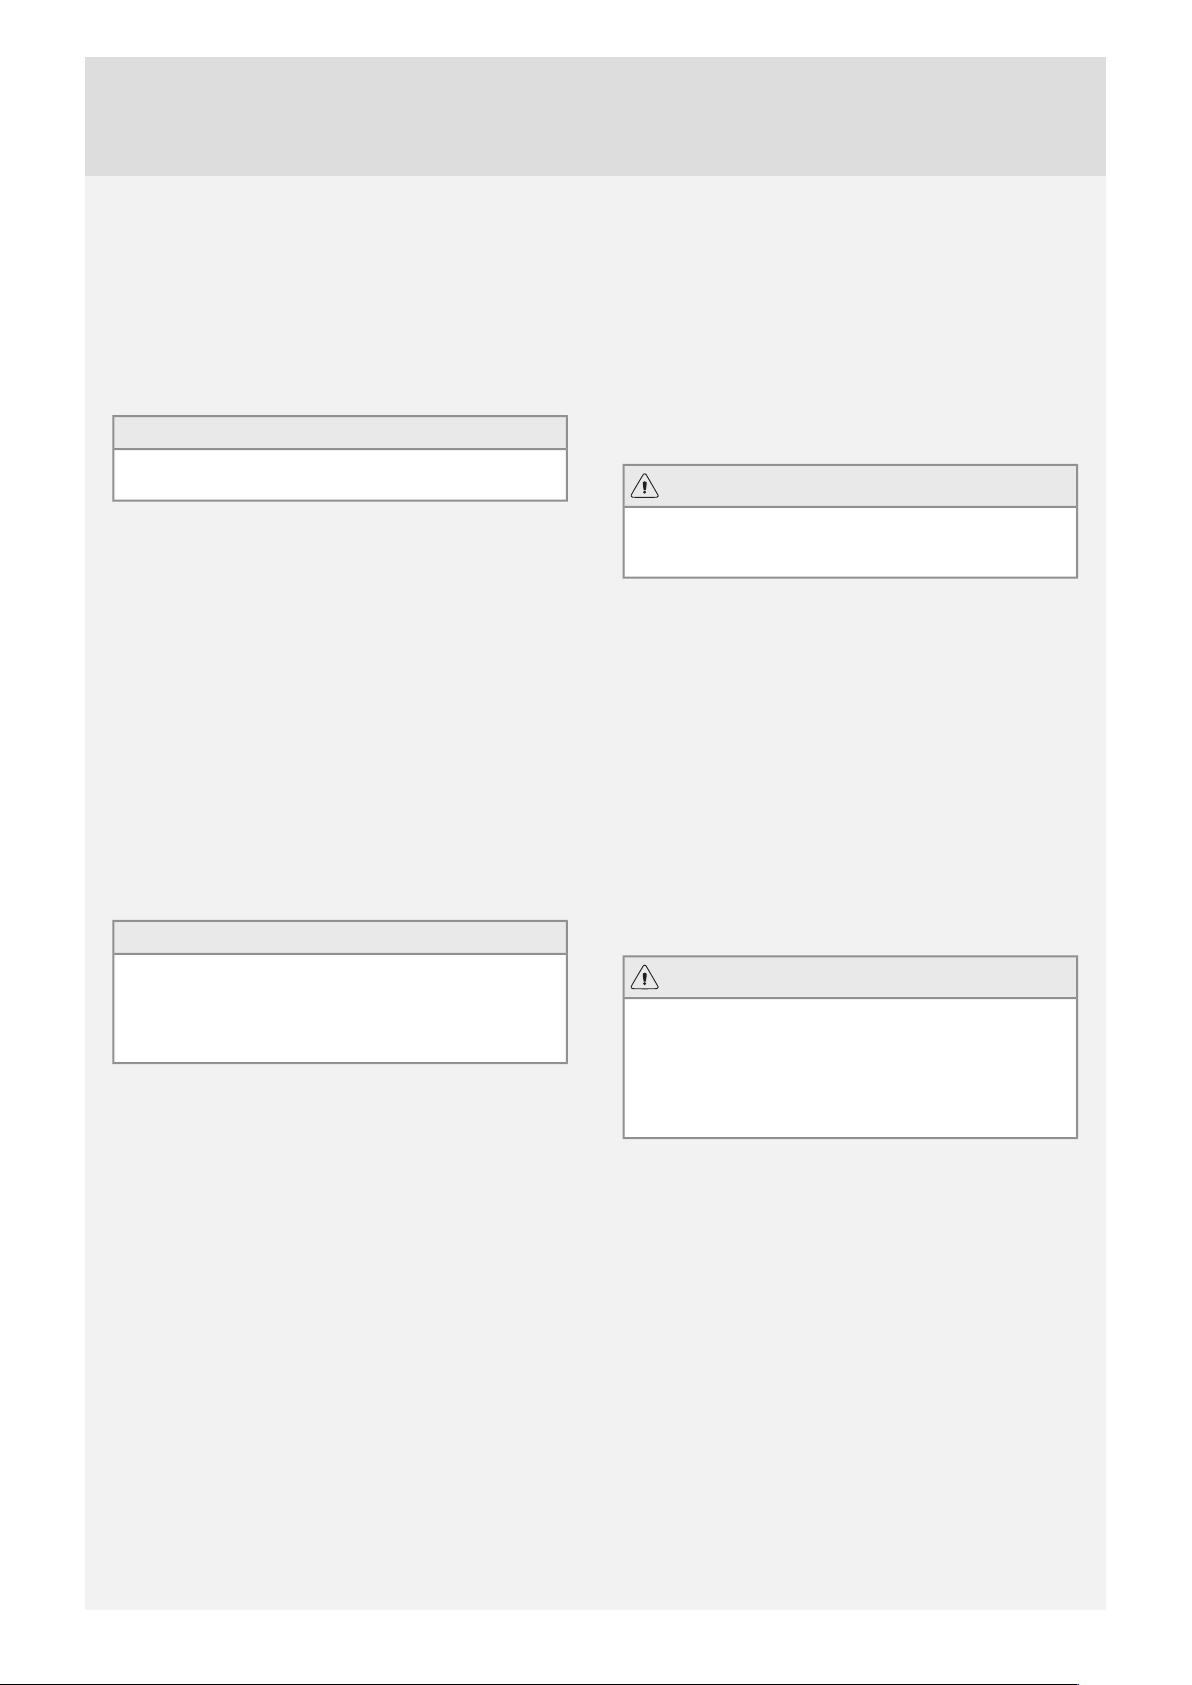
Add detergent
Add the detergent to the detergent compartmentif the dishwasher
is not connected to an automatic dosing system for commercial
detergent.
1 Main wash detergent compartment
Detergent is added according to water hardness.
Follow the instructions on the detergent packaging. This dishwasher is fitted with a water softener, so use detergent and rinse aid
doses suitable for soft water.
Too much detergent can result in less effective dishwashing and
also entails greater environmental impact.
Add the detergent to the detergent compartment. Contact the
detergent manufacturer if you have any questions about the detergent.
WARNING!
Children must be supervised – dishwasher detergent is corrosive!
NOTE!
Only use powder and liquid dishwasher detergent in the dishwasher’s detergent compartment. Dishwasher tablets are not
recommended. Washing up liquid must not be used as the
foam that forms prevents the dishwasher from operating effectively.
Commercial dishwasher detergent adapted for automatic dosing systems should not be used in the dishwasher’s detergent
dispensing compartment.
Detergent with high enzyme content
If a detergent with a high enzyme content is going to be used,
we recommend a program with a low temperature for the main
wash and a high temperature for the final rinse. Program A, Program B and Program C can be designed according to the business’s specific needs. Create a program with prewash, long main
wash at a low temperature (40 °C) and final rinse at a high temperature (60 °C or 70 °C). See “Create program” in section Settings on page 9.
The main power switch
Press and hold the main power switch until the display lights up.
The message “Open to unlock” is shown on the display. Open
the door to activate the panel.
Program selection
Press one of the program buttons 1, 2 and 3. (To program the
program buttons, see Select programs in section Settings on
page 9.)
Quick Wash
Short programs for lightly soiled/rinsed dishes such as glasses
and coffee cups.
Quick Wash Universal
Short programs for rinsed dishes. (No dried leftovers.)
Universal
Standard program for normally soiled/scraped dishes. (No dried
leftovers.)
Universal Plus
Efficient program for very dirty dishes with some dried leftovers.
(Not burnt-on food such as in gratin dishes.)
Intensive
Powerful program for extremely dirty dishes.
Wine Glasses
Gentle program for fragile items such as fine glassware.
Beer Glasses
Programe specially adapted for robust beer glasses. No rinse
aid is dispensed during the final rinse. The final rinse is automatically in cold water if connected.
Rinse
Program for rinsing dishes.
Drain
Program for pumping out water, for example in the event of a
program being interrupted.
1)
1)
1)
An automatic dosing system for detergent must be connected for the program to function optimally in both prewash and main wash
cycles (otherwise the program’s prewash will be deactivated). The process for connecting and activating an automatic dosing system
is described in section Installation on page 19 and in section Settings on page 9.
7
Page 8
Program A / Program B / Program C
Programs that can be adapted for specific needs. See “Create
program” in section Settings on page 9.
1)
Start the dishwasher
Press and hold Start/Stop until the display shows “Program
started”. This indicates that the dishwasher is ready to start. Close
the door properly, or the dishwasher will not start.
NOTE!
If the machine does not start within 2 minutes of the last button
press, the display returns to showing the last program run.
Information on the front display.
The front display shows Showremaining time, Show temperature
and/or Show wash sequence. Select the information you want
displayed on the front display. See “Operating information” in
section Settings on page 9.
Show time
Once you have selected a program, the display indicates how
long the program took last time it was used. Once you have
started thedishwasher, the display indicates howmuch program
time remains.
This may differ somewhat from time to time depending on the
temperature of the water supply, the amount of dishes, the ambient temperature and other factors.
The time counts down while the program is running and the remainder of the program is displayed. The remaining time is displayed e.g. 1:15, meaning that 1 minute 15 seconds of the program remains.
NOTE!
During the first run of each program, the remaining time displayed can be slightly misleading, as the dishwasher is estimating the time. When you run the program a second time, the
dishwasher will calculate the remaining time based on the
previous duration of the program.
Show temperature
The washing water’s current temperature is shown on the display.
Show dishwashing step
The current dishwashing step is shown on the display.
Stopping or changing a program
A program should only be interruptedif it is absolutely necessary.
Open the door, press and hold the Start/Stop for three seconds
if you want to interrupt the program after you have started the
dishwasher. Refill the detergent (this happens automatically if an
automatic dosing system is connected). Then select a new program, press the Start/Stop and close the door.
WARNING!
There is a risk of burns if the dishwasher door opens while a
program is in progress. Note that the inside of the dishwasher
reaches a high temperature, especially during the final rinse.
If the dishwasher is switched off using the main power switch or during a power outage
If the dishwashing program was not finished, the interrupted
program continues when power is restored.
Once the program has finished
Once the program has finished, “END” appears on the display.
A buzzer also sounds at the end of the program. See the section
Settings, which describes how to change this function.
The dishwasher switches off automatically 60 minutes after the
program ends. Turn off the water tap if the dishwasher is not going
to be used for a long time.
WARNING!
The inside of the dishwasher reaches high temperatures when
a program is in progress. Be careful when opening the door.
Let the baskets cool before taking them out.
Do not touch the heating elements in the bottom of the dishwasher, as they are very hot during and just after a dishwashing
program has ended.
8
Page 9
Settings
1.
Function Menu
x 5
x 5
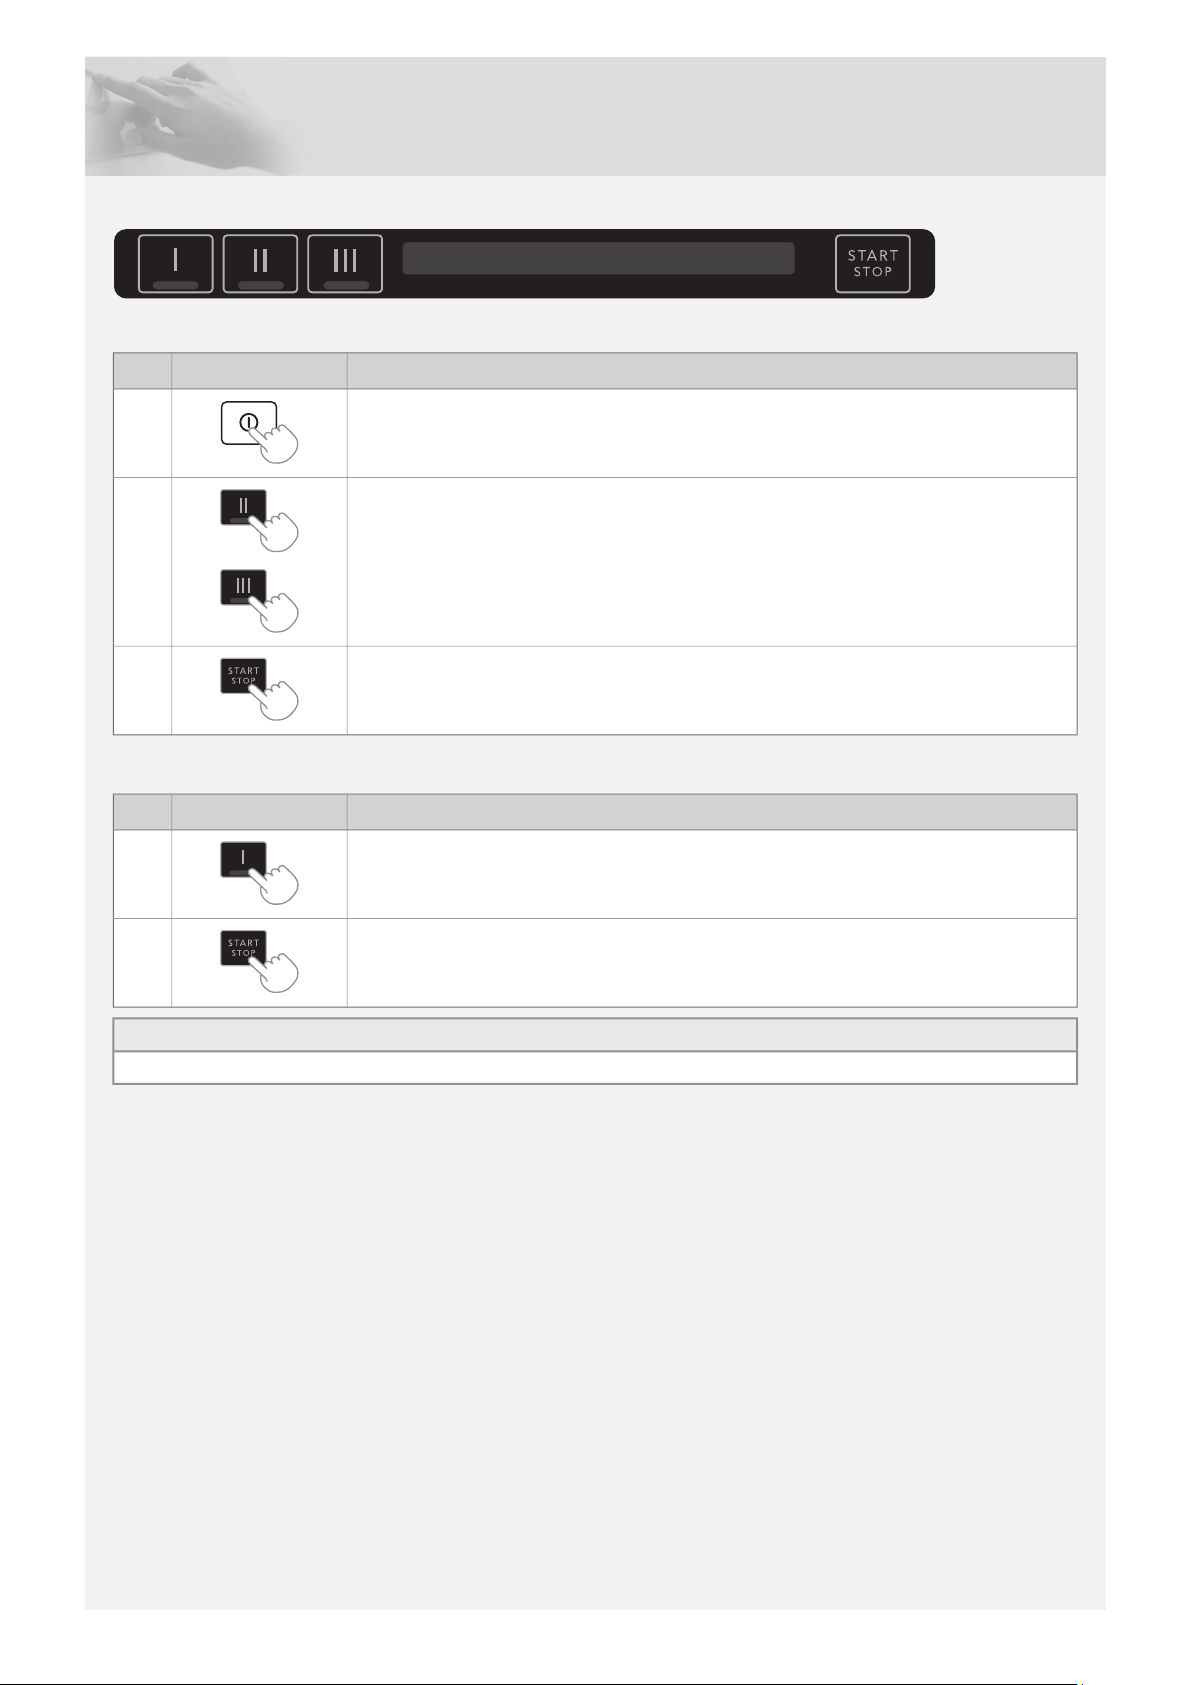
Open the Function Menu:
DescriptionButton press
1.
2.
Turn off the machine.
Open the door.
Press and hold the main power switch until the display lights up.
Within 20 seconds:
- press the button 2, 5 times.
- press the button 3, 5 times.
The display shows Function Menu. Confirm your selection by pressing Start/Stop.3.
(Exit the menu by pressing the PROG button until Exit? is shown on the display. Confirm your selection
by pressing Start/Stop.)
Navigate the Function Menu:
DescriptionButton press
Press the program button 1 to scroll through the settings.
Press Start/Stop to save the setting and continue to the next menu stage.
(Exit the menu by pressing the PROG button until Exit? is shown on the display. Confirm your selection
by pressing Start/Stop.)
TIP!
To make any future servicing easier, make a note of the selected settings in the Function Menu.
9
Page 10

You can change the following settings in the Function Menu:
°dH
0-3
4-5
6-8
9-11
12-14
15-19
20-24
25-29
30-39
40+
0-5
6-9
10-14
15-20
21-25
26-34
35-43
44-52
53-70
71+
°fH
°dH
°fH
OptionsSettings
1. Language
2. Temp. in last program
Suomi/Français/Deutsch/Italiano/
Español/Nederlands/Русский
Dispense detergent3. Automatic dosing system
Dispense rinse aid
Detergent: On/Off
Rinse aid: On/Off
Spray pressure: High/Normal
Child lock: On/Off4. Child lock
You can choose the language used for the display.English/Svenska/Dansk/Norsk/
The washing water’s highest temperature in the last run program is shown in the display.
Vent the automatic dosing system by activating Dispense
detergent and Dispense rinse aid.
Activate Detergent if the dishwasher is connected to an automatic dosing system.
Detergent will be added for 30 seconds during the main wash.
Activate Rinse aid if the dishwasher is connected to an automatic dosing system.
Rinse aid will be added for 30 seconds during the final rinse.
Only select High if the dishwasher is connected to an automatic dosing system.
You can activate the child lock (button lock) to prevent children from starting the dishwasher.
To temporarily deactivate and activate the child lock, press
and hold the button above the symbol for five seconds. (The
child lock activates automatically again after two minutes.)
Celsius/Fahrenheit5. Temperature unit
Show remaining time: On/Off6. Operating information
Show temperature: On/Off
Show wash sequence: On/Off
Off/Low/Mid/High7. Signal volume
Rinse aid: On/Off10. Rinse aid
Water hardness: 0-911. Water hardness
Temperatures can be displayed in °C (Celsius) or °F
(Fahrenheit).
Select what information should be shown on the front display
during the program in progress. (If Off is selected on all programs, the remaining time will be shown.)
The dishwasher uses a buzzer to indicate when a program is
finished or when a fault has occurred.
This sound is used to confirm each button press.Off/Low/Mid/High8. Button volume
For adjusting the contrast in the displays.LCD contrast: 1/2/3/49. LCD contrast
Settings for dispensing rinse aid. (Only active if Automatic
dosing system for rinse aid is set to Off.)
Adjusting the water softener. Read off the appropriate setting
from the water hardness table below.
High setting for the water softener if you are getting white
10
coatings on the dishes and in the dishwasher.
Page 11

OptionsSettings
13. Create program
–Create program A
–Create program B
–Create program C
Water connection: Single/Mix12. Water connection
Select Single if the dishwasher is connected to cold or hot
water. Select Mix if the dishwasher is connected to both cold
and hot water.
Design your own dishwashing program (Program A, Program B and Program C) according to your
business’s specific needs.
NOTE!
If an automatic dosing system is connected or disconnected, check the following settings for each
program: Spray pressure, Prewash 1, Prewash 2.
Pre-programmed: Prewash 1: Off, Prewash 2: Off, Main wash temp.: 45 °C, Main wash time: 5 min.,
Spray pressure: Normal, Rinse 1: Cold, Rinse 2: Off, Rinse 3: Off, Final rinse temp.: 45 °C, Final rinse
hold. time: 1 min.
Pre-programmed: Prewash 1: Warm, Prewash 2: Off, Main wash temp.: 60 °C, Main wash time: 20 min.,
Spray pressure: Normal, Rinse 1: Warm, Rinse 2: Cold, Rinse 3: Off, Final rinse temp.: 65 °C, Final rinse
hold. time: 5 min.
Pre-programmed: Prewash 1: Cold, Prewash 2: Warm, Main wash temp.: 70 °C, Main wash time: 45
min., Spray pressure: Normal, Rinse 1: Warm, Rinse 2: Cold, Rinse 3: Off, Final rinse temp.: 75 °C, Final
rinse hold. time: 15 min.
1)
1)
Off/Cold/Warm (50 °C)1. Prewash 1
Only activate Prewash if the dishwasher is connected to an
automatic dosing system.
Off/Cold/Warm (50 °C)2. Prewash 2
Only activate Prewash if the dishwasher is connected to an
automatic dosing system.
Select the temperature for the main wash (20 °C-70 °C).3. Main wash temp.
Select the time for the main wash (5-45 min.).4. Main wash time
5. Spray pressure: High/Normal
Only select High if the dishwasher is connected to an automatic dosing system.
Off/Cold/Warm (50 °C)6. Rinse 1
Off/Cold/Warm (50 °C)7. Rinse 2
Off/Cold/Warm (50 °C)8. Rinse 3
Select the temperature for the final rinse (40 °C- 85 °C).9. Final rinse temp.
The maximum temperature may increase somewhat (2 °C) to
guarantee that the final rinse maintains a fixed temperature
the entire time.
10. Final rinse hold. time
Select a holding time for the selected temperature during the
final rinse (1-15min.).
Confirm the settings by pressing the Start/Stop.
Select the program to be active on the program buttons 1, 2
and 3.
14. Select programs
–Save Program
Quick Wash, Quick Wash Universal,
Universal, Universal Plus, Intensive, Wine
Glasses, Beer Glasses, Rinse, Drain,
Program A, Program B, Program C
1)
An automatic dosing system for detergent must be connected and in the Function Menu Automatic dosing system must be set to
Detergent:On, otherwise the program’s Prewash 1 and Prewash 2 will be deactivated.
11
Page 12

Care and cleaning
Coarse filter
1x
Fine filter
1x
WARNING!
The building’s main power switch must be switched off or
power to the socket turned off while work is being carried out!
Coarse filter
The coarse filter traps larger food particles, which cannot get
past the drainage pump. Empty the coarse filter as necessary.
1 Lift the coarse filter by the handle.
2 Empty the coarse filter. Remember to replace it!
Fine filter
Debris that collects on the fine filter is automatically rinsed away
during each wash. Clean the fine filter when necessary.
1 Turn the handle anticlockwise once.
NOTE!
The dishwasher must not be used without the filter in place!
Diswashing efficiency can be affected if the course filter is incorrectly fitted. After cleaning ensure that filter handle is fully
locked with the handle pointing out of the dishwasher.
Drainage pump
If the water has not been pumped out of the dishwasher when
the dishwashing program ends, the drainage pump may be
blocked by foreign matter. The pump can be accessed from inside the dishwasher.
1 Cut the power to the dishwasher by switching off the building’s
main power switch.
2 Remove the coarse filter and the fine filter.
3 Remove the small yellow fitted piece in the left side of the
bottom drain by depressing the catch in the direction of the
arrow (see illustration below).
2 Lift the filter straight up using the handle. Free the coarse filter
to clean the fine filter.
3 Replace in reverse order. Check that the edges seal properly
when replacing the fine filter.
4 Lock the filter in place by turning the handle clockwise to the
stop position. The handle should point straight out from the
dishwasher.
4 By inserting your finger into the hole you can turn the pump
blade to release anything blocking it.
5 Reinstall the fitted piece and then the filters.
6 Switch on the building’s main power switch.
If the dishwasher still does not start and a whirring sound is
heard, the overflow protection has been activated.
• Shut off the water.
• Switch off the building’s main power switch.
• Call the service division.
NOTE!
Do not forget to reinstall the fitted piece.
12
Page 13

Spray arms
Spray arm bearings
Holes and bearings can sometimes become blocked. Remove
any debris using a pin or something similar. The spray arms also
have holes on their undersides.
To facilitate cleaning, you can remove the spray arms. Do not
forget to replace them.
Lower spray arm
• Pull the lower spray arm straight up to release it.
Upper spray arm
1 Pull out the basket carrier.
2 Unscrew the spray arm bearings as illustrated to remove the
spray arm from the upper basket carrier.
Door
When cleaning the edge around the door, use only a slightly
damp cloth (with a little cleaner if necessary).
WARNING!
Do not use a spray bottle or the like around the door lock. This
is to ensure that water does not penetrate the door catch and
come into contact with the electrical components.
Limescale deposits
The dishwasher tub is made of stainless steel and is kept clean
through normal use. If you have hard water, lime scale deposits
may build up inside the dishwasher. If this happens, run a program with two tablespoons of citric acid in the detergent compartment (with no dishes in the machine). (If an automatic dosing
system is connected, it should be deactivated when cleaning
with citric acid to achieve the desired effect.)
Cleaning the outside of the machine
Clean the outside of the machine and the program panel with a
mild cleaner. Do not use any solvents, as these can damage the
machine.
NOTE!
Do not hose down the machine with water!
Front panel
Keep the sensor buttons clean and free from grease. Dry them
with a dry or slightly damp cloth. Never use cleaning agents –
these may scratch the surface. Turn off the dishwasher using the
main power switch when cleaning the sensor buttons to avoid
pushing the buttons accidentally.
13
Page 14

Troubleshooting
Front display
F43
F47
display
Overfilling 1F10
Water outlet faultF11
Water inlet faultF12
Temp. stop fault 3F41
1
2
ActionType of fault on the
Clear the drainage pump. See the section Care and cleaning. If the problem persists, call
the service department.
See “Water remains in the dishwasher” in the table“Problem” below. If the problem persists,
call the service department.
Check whether dishwasher inlet hose is connected to a pressure limiting valve (some
pressure limiting valves may restrict the supply of water to the dishwasher).
Check that the water tap is on. Check that the outer filter on the inlet hose is not blocked.
If the problem persists, call the service department.
Turn off the water tap and call the service division.Inlet valve leakageF40
Check plugs/fuses. If the problem persists, cut the power using the building’s main power
switch and call the service department.
Call the service division.Thermistor fault 1F42
Call the service division.Pressure sensor fault
Call the service division.Pressure sensor fault
Call the service division.Thermistor fault 2F48
Temp. stop fault 4F51
Water level faultF52
Circulation faultF53
F55
MCU
F58
UIC
Press any button to clear the error message.
Call the service division.Temp. stop fault 1F49
Call the service division.Temp. stop fault 2F50
Check plugs/fuses. If the problem persists, cut the power using the building’s main power
switch and call the service department.
Check that the outer filter on the inlet hose is not blocked. If the problem persists, call the
service department.
Interrupt the program by opening the door, then press and hold Start/Stop for threeseconds.
Restart the dishwasher. If the problem persists, call the service department.
Turn off the water tap and call the service division.Overfilling 2F54
(MCU is an abbreviation of "Motor Control Unit"). Call the service department.Communication fault
Call the service division.Circulation faultF56
(MCU is an abbreviation of "Motor Control Unit"). Call the service department.Version MCU FaultF57
(UIC is an abbreviation of "User Interface Control"). Call the service department.Communication fault
(UIC is an abbreviation of "User Interface Control"). Call the service department.Version UIC faultF59
Call the service division.Unknown faultF60
14
Page 15

product.
ActionPossible causesProblem
Remove the arms and clean them.The spray arms do not rotate.The dishes are not clean.
Check that the dishes are not blocking the
spray arms.
Avoid large packages.Old detergent. Detergent is a perishable
Incorrect detergent dosage.
Dishes loaded incorrectly.
the program.
The filter is not correctly fitted.
The water softener is leaking salt.Spots or films on the dishes.
Incorrect rinse aid dosage setting.
Dose according to water hardness. Far too
much or far too little detergent results in
poorer dishwashing results.
Select a more powerful program.Dishwashing program too weak.
Do not cover porcelain with large bowls or
the like. Avoid placing very tall glasses inthe
corners of the baskets.
Avoid arranging large items like big plates
and pots in such a way that the water cannot
pass from the inside out towards the dishwasher door.
Place dishes to sit steady.Glasses and cups have toppled over during
Screw the filter firmly into place. See the
section Care and cleaning.
Check that the salt compartment lid is properly tightened. Otherwise call the service division.
See “Water hardness” in section Settings.Incorrect water softener setting.
See section Before washing for the first time
and “Rinse aid” in section Settings.
Spots on stainless steel or silver.
Salt compartment empty.
hard (water with high mineral content).
Too high temperature and/or too much detergent can cause etching on crystal. Unfortunately, this cannot be repaired, only prevented.
Rinse aid dosage setting too high.The dishes have a sticky white/blue film.
Some foodstuffs, such as mustard, mayonnaise, lemon, vinegar, salt and dressings,
can mark stainless steel if left for too long.
All stainless steel can cause spots on silver
if they come into contact during dishwashing.
Aluminium can also cause spots on dishes.
Top up with salt. See the section Before
washing for the first time.
Switch to an acidic rinse aid.Lime scale deposits due to water that is too
See section Limescale deposits in chapter
Care and cleaning.
Wash crystal at a low temperature and with
a conservativeamount of detergent. Contact
the detergent manufacturer.
Lower the dosage. See section Before
washing for the first time and “Rinse aid” in
section Settings. If the water is very soft, you
may want to dilute the rinse aid 50:50 with
water.
Rinse off these types of foodstuffs if not
starting the dishwasher immediately. Why
not use the Rinse program.
Silver and stainless steel items should not
come into contact during dishwashing.
Use a detergent with a bleaching agent.Lipstick and tea can be difficult to wash off.Spots left after washing.
15
Page 16

ActionPossible causesProblem
dishwasher.
Rattling sound when dishwashing.
The dishwasher does not start.
The Function Menu is set incorrectly.Residue from the detergent remains in the
The Function Menu is set incorrectly.Noises when dishwashing.
The dishes are not correctly placed or the
spray arms are not rotating.
The Start/Stop start button has not been
pressed for long enough.
off.
Check that the Spray pressure setting under
Automatic dosing system is correct.
Check that the Spray pressure settings under
Program A, Program B and Program C are
correct.
Check that the Spray pressure setting under
Automatic dosing system is correct.
Check that the Spray pressure settings under
Program A, Program B and Program C are
correct.
Check that the dishes are placed securely.
Spin the spray arms to make sure they can
rotate.
Press and hold Start/Stop until “Program
started” is shown on the display. This indicates that the dishwasher is ready to start.
Check.The door is not properly closed.
Check.A fuse/circuit breaker has been tripped.
Check.The building’s main power switch is turned
A whirring sound (the drainage pump) is
heard from the dishwasher and does not stop
when the main power switch is turned off.
The program is taking longer than estimated.1 minute appears in the display.
Regeneration of the water softener occurs,
extending the program duration.
Blocked drainage hose.Water remains in the dishwasher.
Kink in drainage hose.
The filter is not locked in completely.
Debris in the drainage pump.
Check.The water tap is turned off.
Check.Overflow/leaks
Turn off the water tap. Switch off the building’s main power switch and then call the
service department.
None, next time the program is run the corrected time will be displayed.
Loosen the drainage hose where it connects
to the sink unit's water trap. Check that no
debris has fastened. Is the cone-shaped part
of the pipe cut to an inner diameter of at least
14 mm?
Check that the hose is free from kinks and
sharp bends.
Clear the coarse and fine filters.The filters are blocked.
Ensure filter is completely locked withhandle
pointing towards the door.
Clean the drainage pump. See the section
Care and cleaning.
Dirt around the seals and in corners.Bad odour in dishwasher.
Clean with washing-up brush and low foaming cleaner.
Low temperature programs have been selected for a prolonged period.
16
Run a program with a higher temperature
about once a month.
Page 17

ActionPossible causesProblem
Fully load the dishwasher.The dishwasher is not fully loaded.The dishes are not dry enough.
The touch buttons do not react when
pressed.
Rinse aid needs topping up or dosage is set
too low.
The baskets are not correctly positioned.Cannot close door.
after opening the door.
Top up or increase the rinse aid dosage. See
section Before washing for the first time and
“Rinse aid” in section Settings.
Select a program with a higher temperature
in the final rinse.
Open the door a little once the program has
finished.
Check that the plastic dishwasher baskets
are placed within the edges of the basket
carriers and that these are in the correct
horizontal position.
Check that the dishes are not preventing the
basket carriers with dishwasher baskets from
sliding properly into place.
Wait a moment then try again.You have pressed the touch buttons too soon
Clean with a dry or slightly damp cloth.Dirt on the touch buttons.
Open the door to activate the panel.The door is not open wide enough.
17
Page 18

Technical information
Technical data
ASKOBrand:
847-902 mmHeight:
600 mmWidth:
596 mmDepth:
1)
Weight:
1)
Weight can vary due to different specifications.
67 kg
0.03–1.0 MPaWater pressure:
0.3–10 kp/cm
3–100 N/cm
See type plate.Electrical connection:
See type plate.Rated power:
51 dB(A) re 1 pWNoise emissions:
2
2
18
Page 19

Installation
600
670
717
700
1235
596
556
93
30
32
861 -902
127-167
831
[mm]
*Remove rubber feet and locking nuts for an installed
height of 850-861 mm.
2x
Safety instructions
• Connections to electricity, water and drainage must be performed by a qualified professional.
• Always follow applicable regulations for water, drainage and
electricity.
• An incorrect or flawed installation can resultin higher consumption of energy, water and detergent, which can result in increased costs and poor dishwashing results. In order to minimise noise it is important that you follow the instructions.
• Take care during installation! Wear protective gloves! There
must always be two people!
• Before screwing the dishwasher into place, test thedishwasher
by running the Rinse program. Check that the dishwasher fills
with water and drains. Check also that none of the connections
leak.
WARNING!
Turn off the water supply when installing the dishwasher!
WARNING!
The building’s main power switch must be switched off or
power to the socket turned off while work is being carried out!
Transport protection for the door
Do not forget to remove the transport protection for the door when
unpacking the dishwasher.
19
Page 20

Suggested machine installations
Steel feet
24 mm
The dishwasher is intended for freestanding installation, but can
also be installed under a worktop. Check that there is an air gap
of 10 mm between the underside of the worktop and the top edge
of the dishwasher, as well as behind the dishwasher when it is
built in.
The cable and hose hole does not need to be larger than 38 mm
in diameter. Increase the cable and hose hole to 50 mm in diameter if the dishwasher is also going to be connected to an automatic dosing system. Make sure that the edges of the cable and
hose hole’s are smooth and will not damage the drainage and
inlet hoses or the power cable.
The interior design around the dishwasher should be adapted
for commercial use to enable evacuation of the hot condensation.
Adjust the height and slide the dishwasher into place
Freestanding
1 Make sure the area on which the dishwasher is to be installed
is firm. Adjust the dishwasher'sheight using the foursteel feet
so that the dishwasher is level. The dishwasher may lean no
more than 5 mm.
2 Lock the steel feet with the lock nuts.
4 Check that there is an air gap of 10 mm between the underside
of the worktop and the top edge of the dishwasher, as well as
behind the dishwasher.
5 Tighten the lock nuts (lock nut) on the rear feet.
6 Slide the dishwasher into place.
• Pull through the drainage and supply hoses when the machine has been slid into place. Also pull through the hoses
and wiring for the automatic dosing system, if one is connected.
• Check that the hoses have no kinks or sharp bends, and
check that there is nothing that can damage the hoses.
7 Make any final adjustments to the front feet (the dishwasher
may lean no more than 5 mm) and tighten the lock nuts.
8 Once the steel feet are properly adjusted, tighten the two
rubber feet against the floor. The rubber feet now prevent the
machine from tipping over.
3 Once the steel feet are properly adjusted, tighten the two
rubber feet against the floor. The rubber feet now prevent the
machine from tipping over.
Built-in
1 Start by measuring the height from the floor to the bottom
edge of the worktop.
2 Measure the height from the floor to the top edge of the dish-
washer.
3 Adjust all feet by turning them clockwise to raise or anticlock-
wise to lower the dishwasher.
20
Page 21

Attach the light shielding film
Max. 950 mm
Min. 350 mm
Min. 14 mm
Figure 1
Max. 950 mm
Min. 350 mm
Max. 3 m
Figure 2
Max. 950 mm
Min. 350 mm
Figure 3
Mount the light shielding film (enclosed documents) above the
touch buttons below the worktop. The purpose of the light
shielding film is to get the touch buttons to function optimally,
and to protect the worktop from moisture.
NOTE!
The surface on which the light shielding film is affixed must be
clean and dry.
Drainage connection
The dishwasher can pump out up to 20 l waste water per minute,
which the drain must have the capacity to receive.
When the drainage hose is routed to a connection nipple on the
sink unit's water trap (see illustration 1), please note that the hose
must be attached at the same height as the underside of the sink
unit, otherwise dishwater from the sink may flow back into the
dishwasher. The drainage hose is threaded onto the cone-shaped
connection pipe on the sink unit's water trap. The cone-shaped
pipe must be cut to an internal diameter of at least 14 mm. For
other connection alternatives, see illustrations 2 and 3.
The drainage hose may be extended by a maximum of 3 m (the
total length of the drainage hose must not exceed 4.5 m). Any
joins and connecting pipes must have an internal diameter of at
least 14 mm. However, the drainage hose should ideally be replaced with a new hose without joins.
No part of the drainage hose may be more than 950 mm above
the bottom of the dishwasher. The hose must not be routed directly to a floor drain or the like. In such cases, the hose can act as
a siphon and empty the dishwasher.
The hose must always discharge at least 350 mm above the
bottom of the machine.
Ensure that the drainage hose has no kinks.
NOTE!
The hose must be attached at the same height as the underside
of the sink.
Connection to water supply
The dishwasher can be connected to hot and/or cold water. The
dishwasher adjusts automatically to the connected water in order
to achieve the best dishwashing result. To achieve shortest
dishwashing time, the dishwasher should be connected to hot
water.
The water pressure must be between 0,03–1,0 MPa. To achieve
the shortest dishwashing time, the water pressure must be at
least 0,3 MPa.
21
Page 22

60-100
87
42,5
[mm]
2
1
213
1 Connection for hot or cold water (Water connection: Single).
95
35
340-390
[mm]
1
2
3
4
170
2 Connection for cold water when connecting to both hot and
cold water (Water connection: Mix). The connection must be
blocked with a plug when not in use.
Installation must be carried out by qualified professionals.
The supply pipe must be fitted with a stopcock. The stopcock
must be easily accessible, so that the water can be shut off if the
dishwasher has to be moved.
Use only the supply hoses supplied with the dishwasher. Do not
re-use old hoses or other loose supply hoses. Do not use hoses
not supplied by the manufacturer.
Once the installation is complete, the stopcock should be opened
for a while to allow the pressure to equalise and to check that all
connections are sealed.
er’s service agent or someone with similar professional qualifications.
NOTE!
The manufacturer is not responsible for damage caused by
inadequate or incorrect electrical installation.
Connection to automatic dosing system
The dishwasher can be connected to an automatic dosing system
for commercial detergent and rinse aid, making day-to-day use
easier and reducing the risk of overdosing.
Connection to an automatic dosing system must be carried out
by the system's supplier or someone with similar professional
qualifications.
Connect the dosing system to the back of the dishwasher. Always
reinstall protective caps and plugs if the dosing system is disconnected.
NOTE!
Connecting a dishwasher to the water supply via certain types
of pressure limiting valves may restrict the water supply!
This may cause F12 error code/ Water inlet fault to be displayed.
Electrical connection
Information about the electrical connection can be found on the
serial number plate This specification must match the electricity
supply.
During installation, the electrical connection must be carried out
by the manufacturer’s service agent or someone with similar
professional qualifications.
The dishwasher must be connected to residual current devices
as per the relevant safety regulations.
The building’s main power switch must be multi pole and placed
outside the installation area to be easily accessible after installing
the dishwasher. Multi-way sockets, extension leads or timers
must not be used.
Potential equalisation must be carried out if required when the
machine is installed. There is a potential equaliser on the back
of the machine that must be connected using a locking washer
or a ring terminal.
The manufacturer recommends that the dishwasher is connected
as per the existing design upon delivery. In the event of any
change in the electrical cables, terminal sleeves corresponding
to those supplied with the machine should be used. Refer to the
wiring diagram supplied with the machine. In the event of any
change in the electrical cables to 1-phase, H05V5V2-F 3x1.0
mm2must be used.
A change of electrical cable and repairs and maintenance relating
to safety or performance must be carried out by the manufactur-
22
1 Connection for detergent (hose diameter 6 mm). Remove the
plug and connect the hose.
2 Connection for rinse aid (hose diameter 4 mm). Remove the
plug and connect the hose.
3 Connection to cable for detergent pulse (230-240 V).
4 Connection to cable for rinse aid pulse (230-240 V).
The process for activating an automatic dosing system and
venting the system is described in section Settings on page 9.
WARNING!
Risk of contact with highvoltage! The supplied protective caps
must be fitted on the dishwasher’s cables for the automatic
dosing system during installation and also if the dosing system
is disconnected. The protective cap prevents contact with high
voltage and stops water and dirt getting into the wiring.
WARNING!
Note that there are risks involved in handling commercial detergent and rinse aid. Protective gloves and goggles must be
worn when handling these products.
Follow the supplier’s safety instructions for the handling and
storage of the detergent and rinse aid.
Page 23

Service
SERIAL NO.
1
2
ART. NO.
Read chapter Troubleshooting before contacting the service
department. Note down the details on the rating plate positioned
on the right inside the dishwasher. Note down the item number
(1) and serial number (2).
23
Page 24

Program chart
tion (liter)
2)
Consumption values
Water consump-
4)
Energy
Hot water
Dishwashing
3)
Energy
(approx. kWh)
time5)(approx.
(approx. kWh)
80.80:051.20:1082 °C60 °CQuick Wash
hrs:mins)
120.80:151.30:2082 °C70 °C60 °CQuick Wash Universal
120.90:151.40:2082 °C70 °C60 °CUniversal
150.90:201.50:2582 °C70 °C60 °C60 °CUniversal Plus
181.21:002.01:0082 °C65 °C / 70 °C65 °C40 °CIntensive
120.30:150.80:1550 °C50 °C55 °CWine Glasses
120.30:100.50:15--- °C--- °C55 °CBeer Glasses
50.010:020.010:02--- °CRinse
00.010:020.010:02Drain
Cold water
Final rinse
temperature
Rinse
temperature
Main wash
temperature
1)
Prewash
temperature
Dishwashing
time5)(approx.
hrs:mins)
Program
An automatic dosing system for detergent must be connected for the program to function optimally in both prewash and main wash cycles (otherwise the program’s prewash will be deactivated).
Consumption values vary depending on the temperature of the incoming water, room temperature, load size, selected options, etc.3)Connection to cold water, approx. 20 °C.4)Connection to hot water, approx. 65 °C.5)The dishwashing time is prolonged somewhat if the dishwasher requires softened water, which is most notable with shorter programs.
1)
2)
24
Page 25

Your notes
25
Page 26

Your notes
26
Page 27

Your notes
27
Page 28

Quick guide ASKO DWC5936 XL FS
1x
Place the dishwasher baskets on the basket carriers
Check that the plastic dishwasher baskets are placed inside the edges of
1.
the basket carriers.
Check that the spray arms can rotate freely
2.
Check/add detergent and rinse aid
Check/add detergent and rinse aid to achieve good washing and drying
3.
results.
4.
5.
6.
Check/add salt
Replenish salt to achieve good washing and drying results.
Refill salt indicator.
Check/clean the filter
Empty the course filter and clean the fine filter when necessary.
Lock the filter in place by turning the handle clockwise to the stop position.
The handle should point straight out from the dishwasher.
ASKO APPLIANCES AB • SOCKERBRUKSGATAN 3, SE-531 40 LIDKÖPING, SWEDEN • WWW.ASKO.COM
en (08-15)
Art. No.: 506468. Rev. 01. We reserve the right to make changes.
 Loading...