

Page 1
Instructions for use
OVEN
OCS8664A / BO6SA2S3-42
OCS8664B / BO6SA2S3-42
OCS8664S / BO6SA2S3-42
OCS8664A1 / BO6SA2S3-42
OCS8464A / BO4CS2S3-42
OCS8464B / BO4CS2S3-42
OCS8464S / BO4CS2S3-42
OCS8464A1 / BO4CS2S3-42
Page 2

EN User manual EN 3 - EN 34
Pictograms used
Important information
Tip
Page 3

CONTENTS
Your oven
Introduction 4
Description of the appliance 5
Guide rails/Telescopic guide rails 5
Accessories 6
Door 7
Cooling fan 7
Control panel 8
Control panel general use 9
First use
Before first use 11
Explanation of the knobs and the keys 13
Use
Description of the main functions 15
Description of the sub functions 16
Plus menu 21
Steam function 22
Operation
Using the appliance cooking functions 24
Culisensor (when available) 25
Settings
Settings menu 26
Maintenance
Cleaning the appliance 27
Cleaning function (Steam clean) 27
Cleaning the Water Tank Filter 28
Descaling 28
Removing and cleaning the guide rails 29
Replacing the oven lamp 29
Removal and installation of the oven door 30
Malfunctions
General 32
Environmental aspects
Disposal of the appliance and packaging 34
EN 3
Page 4

YOUR OVEN
Introduction
Congratulations on choosing this oven. This product is designed with simple operation and
optimum comfort in mind.
This manual shows how you can best use this oven. In addition to information about operating
the appliance, you will also find background information that may be useful when using the
appliance.
Please read the separate safety instructions carefully before
using the appliance!
Read this manual before using the appliance and keep it in a safe place for future use.
Installation instructions are supplied separately.
EN 4
Page 5
YOUR OVEN
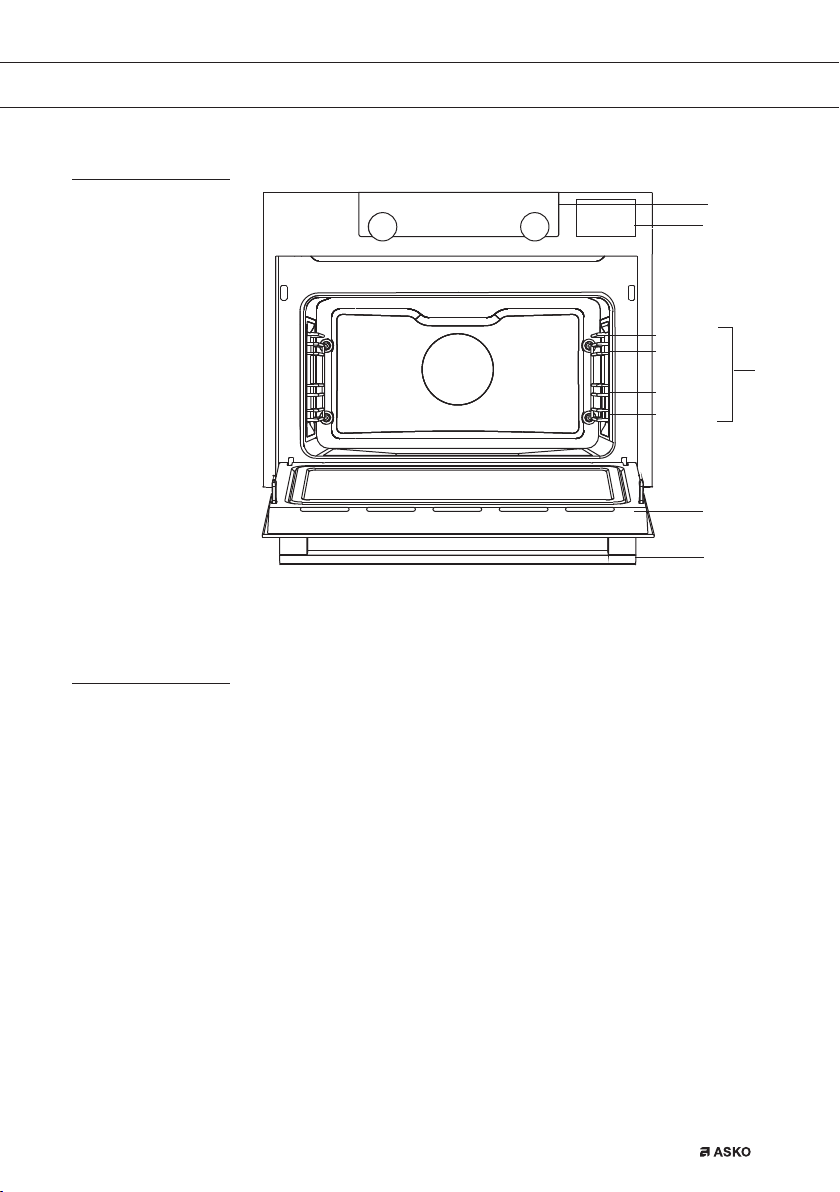
Description of the appliance
Level 4
Level 3
Level 2
Level 1
1
2
4
5
1. Control panel
2. Water reservoir cover
Push to open!
3. Oven levels
4. Oven door
5. Door handle
Guide rails/Telescopic guide rails
• The oven has four or five guide rails (Level 1 to 4/5), depending on the model. Level 1 is
mainly used in combination with bottom heat. The two upper levels are mainly used for the
grill function.
• Place the oven rack, baking tray or steam dish in the gap between the guide rail sliders.
• A number of shelf levels can have fully-retractable telescopic guide rails, depending on the
model.
▷ Pull the telescopic guide rails out of the oven cavity completely and place the oven rack
/ baking tray / steam dish on them. Then slide the oven rack / baking tray / steam dish
on the telescopic guide rails, back into the oven cavity.
▷ Only close the oven door when the telescopic guide rails have been returned completely
back into the oven cavity.
3
EN 5
Page 6
YOUR OVEN
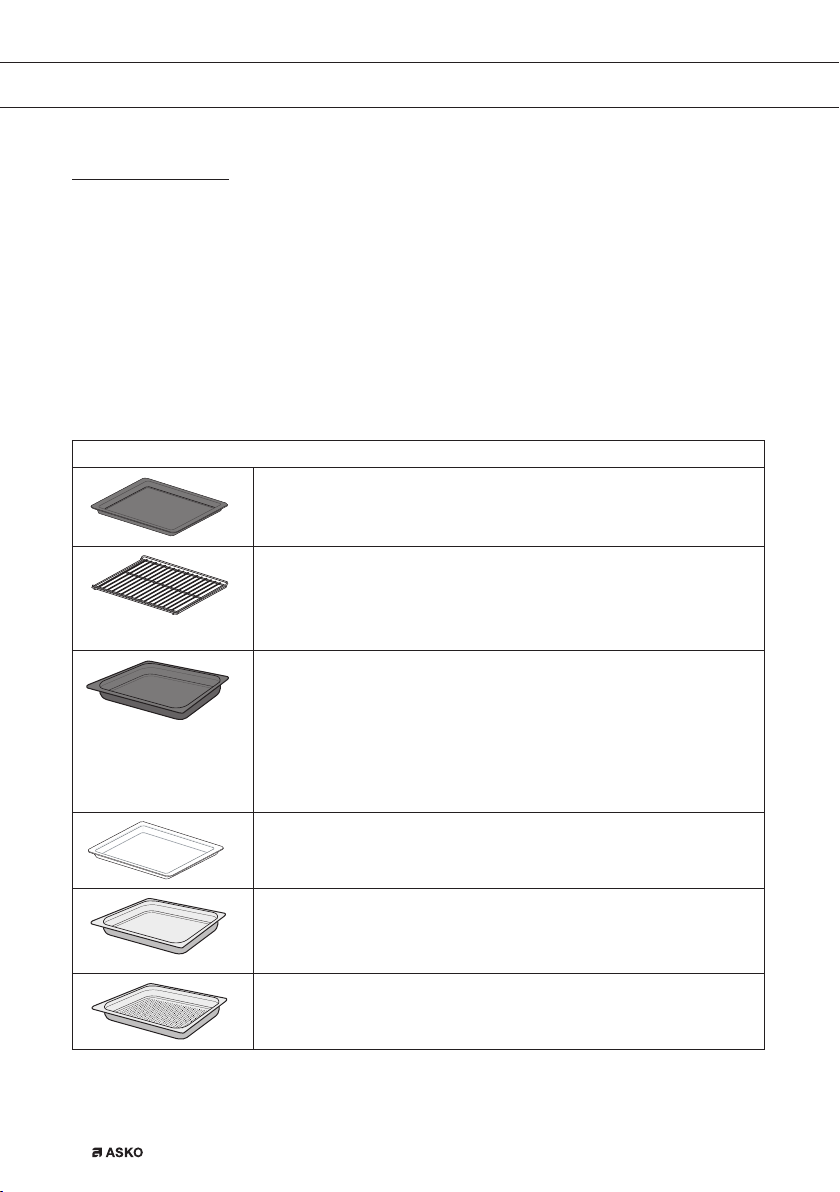
Accessories
Your appliance is accompanied by a range of accessories, depending on the model. Only use
original accessories; they are specially suited toyour appliance. Be sure that all the accessories
that are being used are able to withstand the temperature settings of the chosen oven function.
Note: not all accessories are suitable/available for every appliance (itmay also differ by country).
When purchasing, always provide the exact identification number of your appliance. Please see
the sales brochures or check online for more details about optional accessories.
Note: never place an accessory on the bottom of the oven!
Accessories that can be supplied with your appliance (depending on the model)
Enamelled baking tray; to be used for pastries and cakes.
• Do not use the enamelled baking tray for microwave functions!
• Suitable for pyrolysis cleaning.
Oven rack; mainly used for grilling. A steam dish or pan with food
can also be placed on the oven rack.
• The oven rack is equipped with a safety peg. Lift the rack slightly
at the front to slide it out of the oven.
• Do not use the oven rack for microwave functions!
Deep enamelled baking tray; to be used for roasting meat and
baking moist pastry.
• Do not place the deep baking tray on the lowest level during
a cooking process, except when using it as a drip tray during
grilling, roasting or roasting with a spit roast (when available).
• Do not use the deep enamelled baking tray for microwave
functions!
• Suitable for pyrolysis cleaning.
Glass baking tray; for microwave and oven use.
• NOT suitable for pyrolysis cleaning.
EN 6
Non-perforated steam dish; 40 mm deep (useful for collecting
moisture during steaming).
• Note: discolouration may occur at temperatures above 180 °C!
Thiswill not influence the proper function of the oven.
Perforated steam dish; 40 mm deep (useful for steam settings).
• Note: discolouration may occur at temperatures above 180 °C!
Thiswill not influence the proper function of the oven.
Page 7
YOUR OVEN
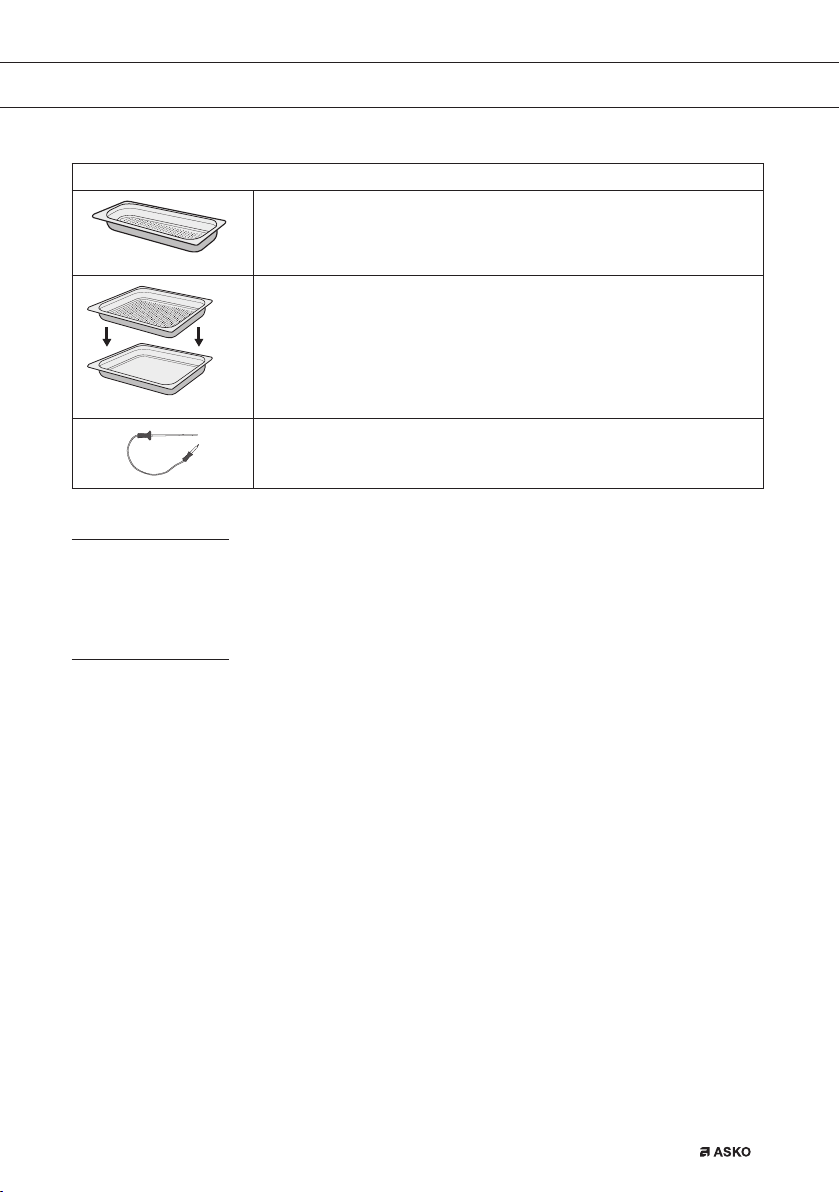
Accessories that can be supplied with your appliance (depending on the model)
Perforated steam dish; 1/3GN.
Perforated steam dish; 1/2GN.
• Note: discolouration may occur at temperatures above 180 °C!
This will not influence the proper function of the oven.
• The steam dishes can be used simultaneously on two levels.
Place the perforated steam dish in the middle of the oven and the
non perforated steam dish one level below the perforated steam
dish.
• For steaming you can place the perforated steam dish in the nonperforated steam dish. They can only be used together on a level
with telescopic guide rails.
Culisensor; can be used to measure the core temperature of the
dish. When the desired temperature is reached, the cooking process
will be stopped automatically.
Door
• The door switches interrupt the operation of the oven when the door is opened during use.
The oven continues operating when the door is closed.
Cooling fan
• The appliance is equipped with a cooling fan that cools the casing and control panel.
EN 7
Page 8
YOUR OVEN
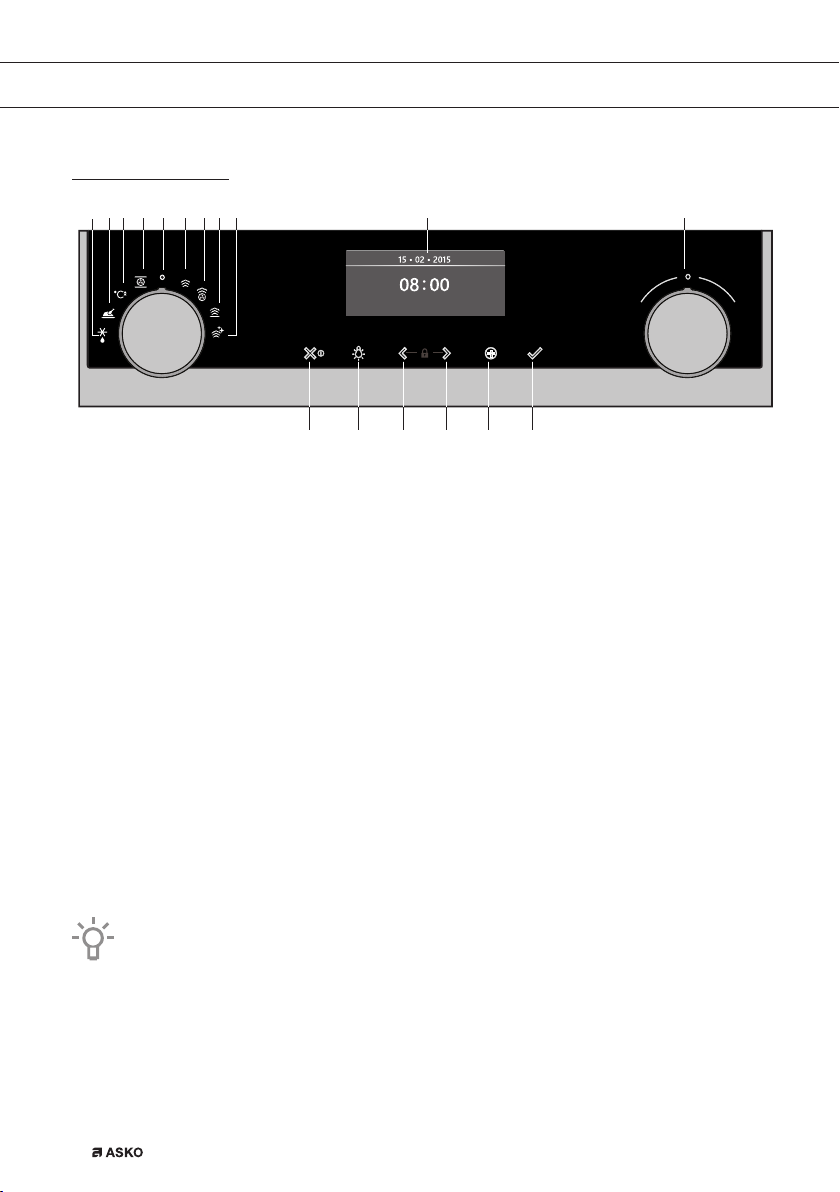
Control panel
1 10 116 7 8 95432
12 13 14 15 16 17
1. Function knob (in ‘Off’ position)
2. Defrost
3. Auromatic programs
4. Fast preheat
5. Oven
6. Steam
7. Combi steam
8. Warming
9. Cleaning
10. Display
11. Selection knob
12. On/off key and stop key (cancel)
13. Light key
14. Navigation key left
15. Navigation key right
16. Plus key
17. Confirm key
EN 8
The keys respond best if you touch them shortly with a large area of your fingertip.
Every time you touch a key during use, a short acoustic signal will sound.
Page 9
YOUR OVEN
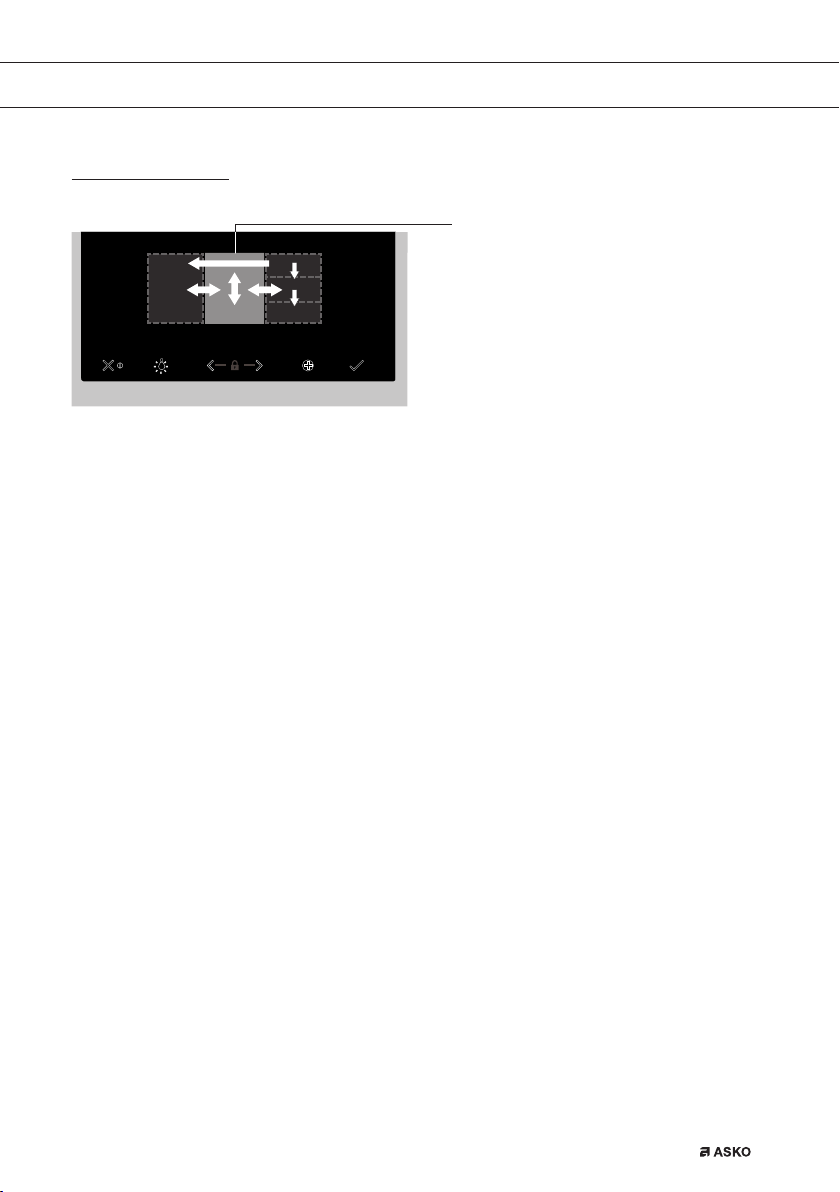
Control panel general use
Activated area (grey background)
Set a function and settings
1. Touch and hold the on/off key to switch on the appliance.
2. Turn the function knob to set a main oven function.
The main oven functions are visible around the oven function knob and in the display.
The function icon is displayed larger. The ‘active area’ (recognizable by a grey background)
moves to the right.
3. Turn the selection knob to select a sub oven function.
The ‘active area’ shows the several different sub oven functions. Scroll up or down to view
the different functions. If a chosen main function does not have a sub function then the next
available setting appears in the active area.
4. Touch the selection knob (or the right navigation key) to confirm the chosen sub oven
function or setting.
The ‘active area’ (grey background) moves to the right.
5. Turn the selection knob to change the next available settings (left = decrease, right =
increase) and confirm by touching the selection knob or touching the right navigation key.
• When all elements in the screen are set, then confirm these settings by touching the confirm
key.
• When the confirm key is blinking it is possible to start the oven with the default settings.
• Touch the left navigation key to move the active area to the left to change an already made
setting. Change the setting by turning and touching the selection knob.
• Touch the stop key to go one-step back in the menu.
Follow the instructions on the display.
EN 9
Page 10
YOUR OVEN
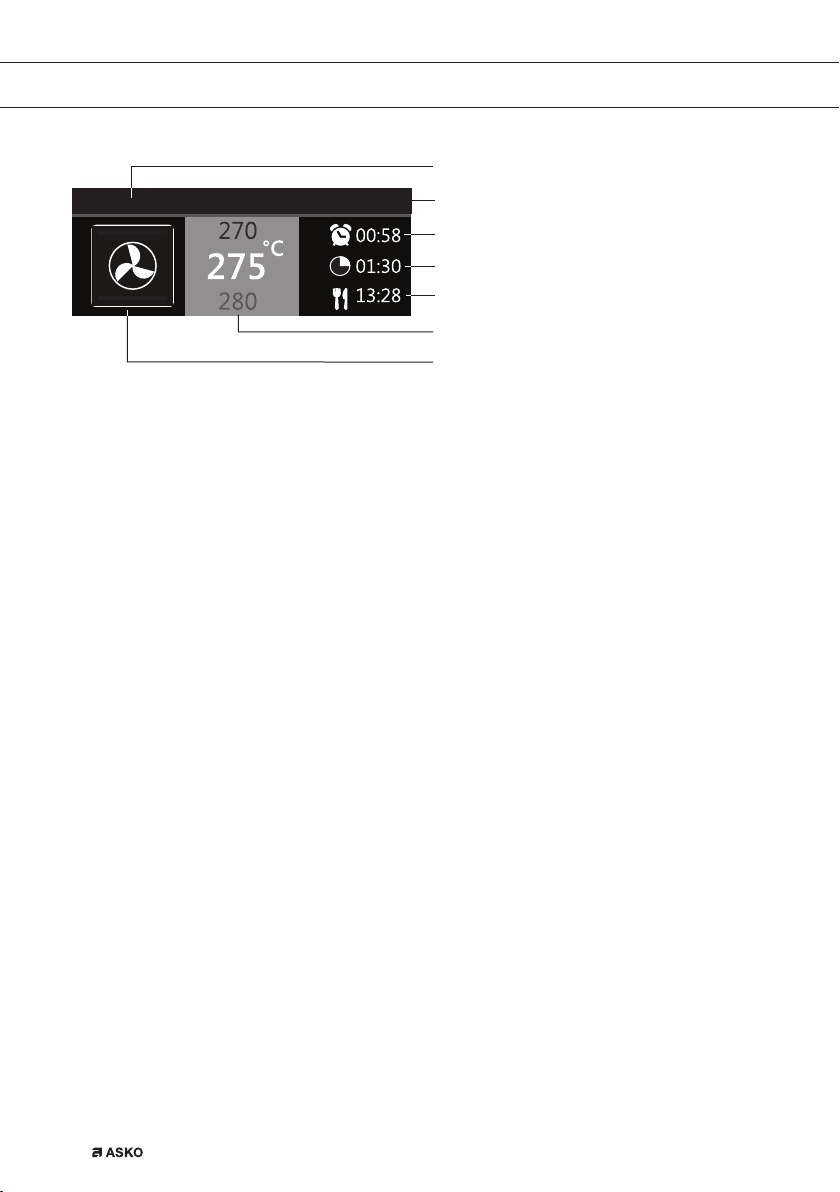
Feedback bar
Temperature 14:30
• The display will show the icon and name of the activated function for about 1.5 seconds.
• The feedback bar shows what setting you are changing. .
Delayed start
• Set an desired cooking time and finishing time to start cooking at a later time.
Display
When the appliance is in progress you see the following information in the display:
• Active oven (sub) function
• Temperature
• Egg time (when set / See ‘Plus menu’)
• Cooking time (cooking time counting up or counting down when cooking time has been set)
• Finishing time (when cooking time has been set)
Clock
Egg timer
Cooking time
Finishing time
Active area (grey background)
Main function icon
Stand-by mode
The stand-by display will show the time, date and the timer (if set). The appliance goes to stand-
by mode after turning the function knob to 0 (‘off’ position).
Switching on the appliance
• Touch and hold the on/off key to switch on the appliance.
• The appliance can also be switched on by turning the function knob to a function.
Shutting down the appliance
• Touch and hold the stop key to shut down the appliance manually.
• Default the appliance will shut down when there has been no action during 30 minutes.
EN 10
Page 11
FIRST USE
Before first use
• Clean the appliance interior and accessories with hot water and washing-up liquid.
Do not use aggressive cleaning agents, abrasive sponges and similar.
• The appliance will emit a particular odor when it is used for the first time; this is normal.
Make sure that there is good ventilation during initial use.
When the appliance is first plugged in or after connection when the appliance was
disconnected from the power mains for a long period of time, you have to set ‘Language’,
‘Date’ and ‘Time’.
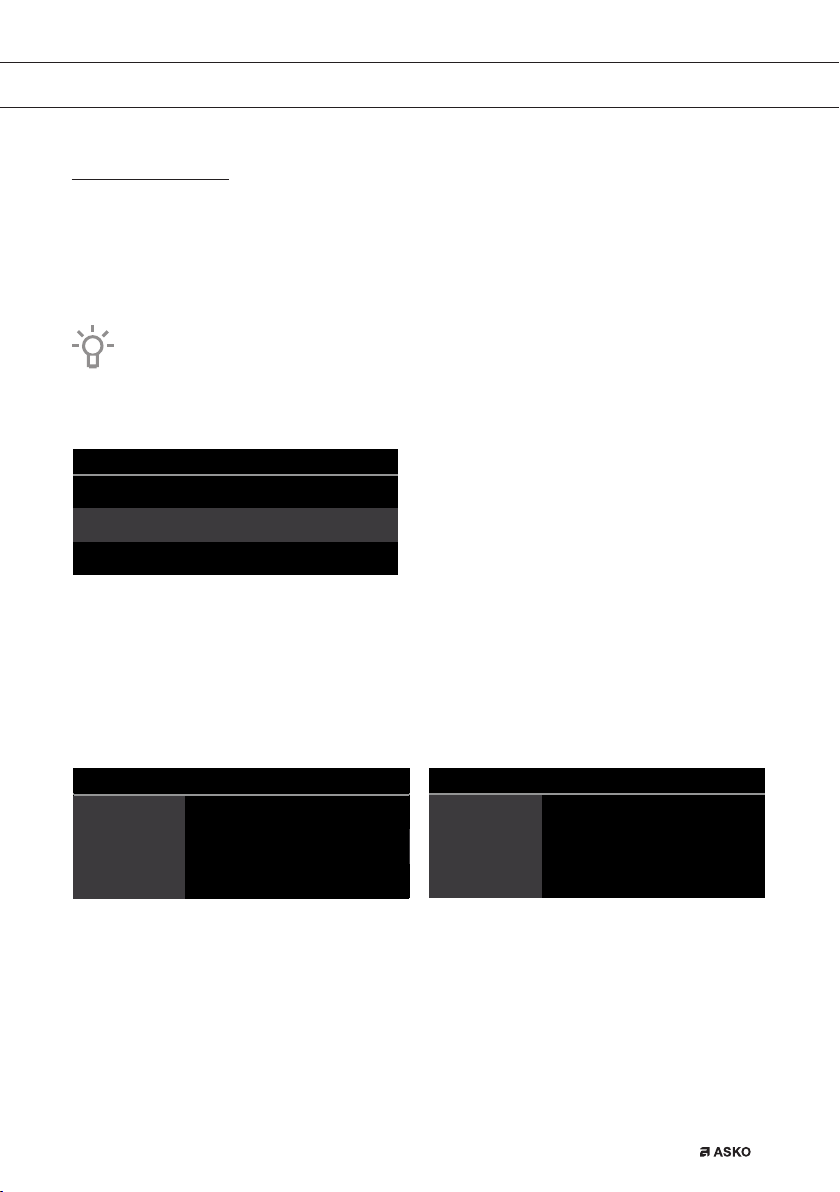
Setting the language
12:00Language
English
Français
Nederlands
In case you are not comfortable with the language on the display, you can select another
language. The default setting is ‘English’.
1. Turn the selection knob and select your preferred language from the displayed list.
2. Confirm the setting by touching the confirm key.
The next screen will be displayed.
Setting the date and time
12:00Language
12:00Year
English
Français
2017
2018
Nederlands
1. Turn the selection knob and change the first setting (Year).
2. Confirm this setting by touching the right navigation key or by touching the selection knob.
3. Turn the selection knob and change the next setting (Month).
4. Confirm this setting by touching the right navigation key or by touching the selection knob.
5. Turn the selection knob and change the last setting (Day).
6. Confirm this setting by touching the confirm key.
The next screen will be displayed. Now set the hours and minutes with the selection knob
and navigation key. Confirm your setting by touching the confirm key.
01
01
11
12
13
30
12:00Hours
EN 11
Page 12
FIRST USE
All the start-up settings are now set and the display will show the stand-by screen. The appliance
is now ready for use.
The language, time and date can be adjusted in the settings menu (see ‘Settings menu’
chapter). The settings menu can be opened from the start display via the ‘Plus’ menu.
Setting the water hardness
The water hardness must be set prior to initial use. If the water is softer or harder than the default
setting, you can alter the set hardness level.
Checking the water hardness
• You can measure water hardness using the ‘paper test strip’ supplied with your appliance.
For information about water hardness in your region please contact your local water board.
Using the ‘paper test strip’
• Dip the test strip in water for 1 second. Wait 1 minute and read the number of bars on the
paper strip. Check the table for the correct water hardness setting.
Setting the water hardness
1. Compare the test strip with the image on the display.
2. Turn the selection knob until the bars on the screen correspond with those on the test strip.
3. Touch the confirm key to save the set water hardness.
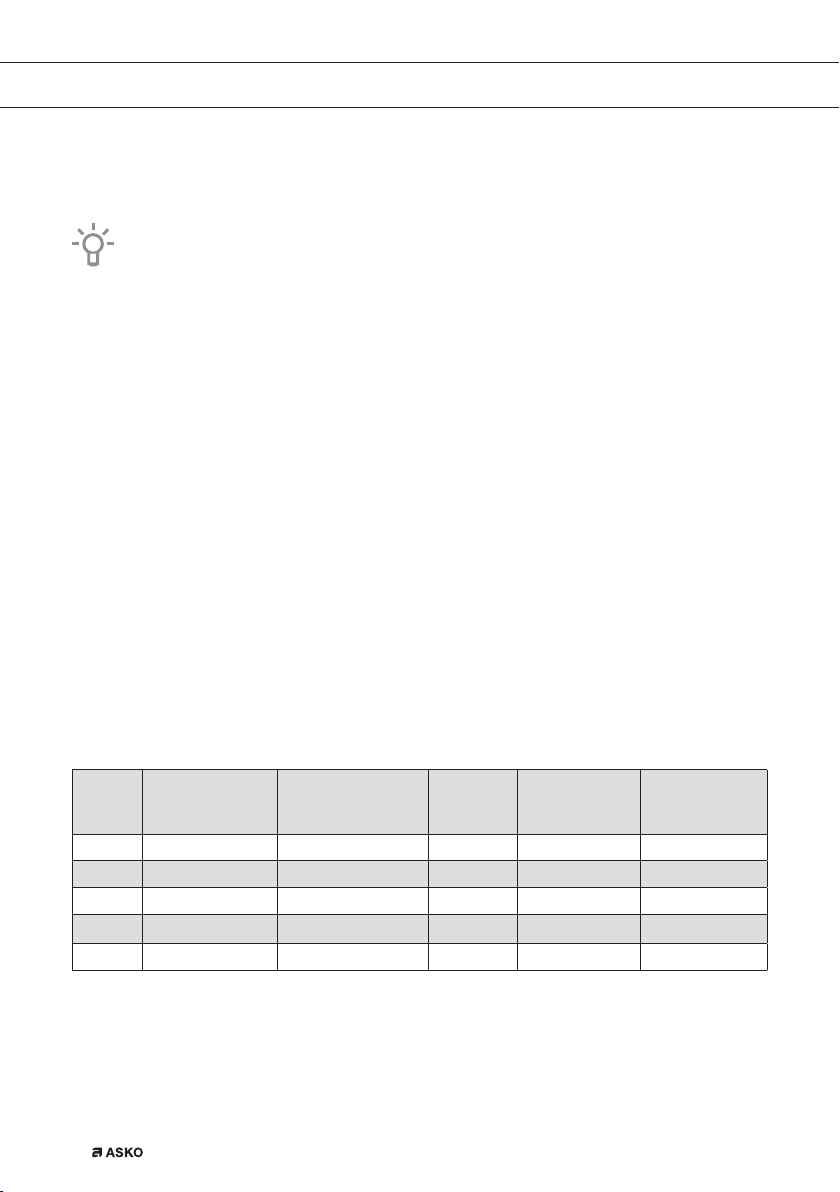
Water hardness table
Display
1 4 green bars Very soft water 0 - 90 0 - 9 0 - 5
2 1 red bar Soft water 90 -178 9 - 18 5 - 10
3 2 red bars Rather hard water 178 - 267 18 - 26 10 - 15
4 3 red bars Hard water 267 - 356 26 - 35 15 - 20
5 4 red bars Very hard water
The appliance has now been programmed so that the descaling notification will appear in
accordance with the actual water hardness.
EN 12
Test strip
number/colour
of the bars
Type PPM
> 356 > 35
French
hardness (°df)
German
hardness (°dH)
> 20
Page 13
USE
Explanation of the knobs and the keys
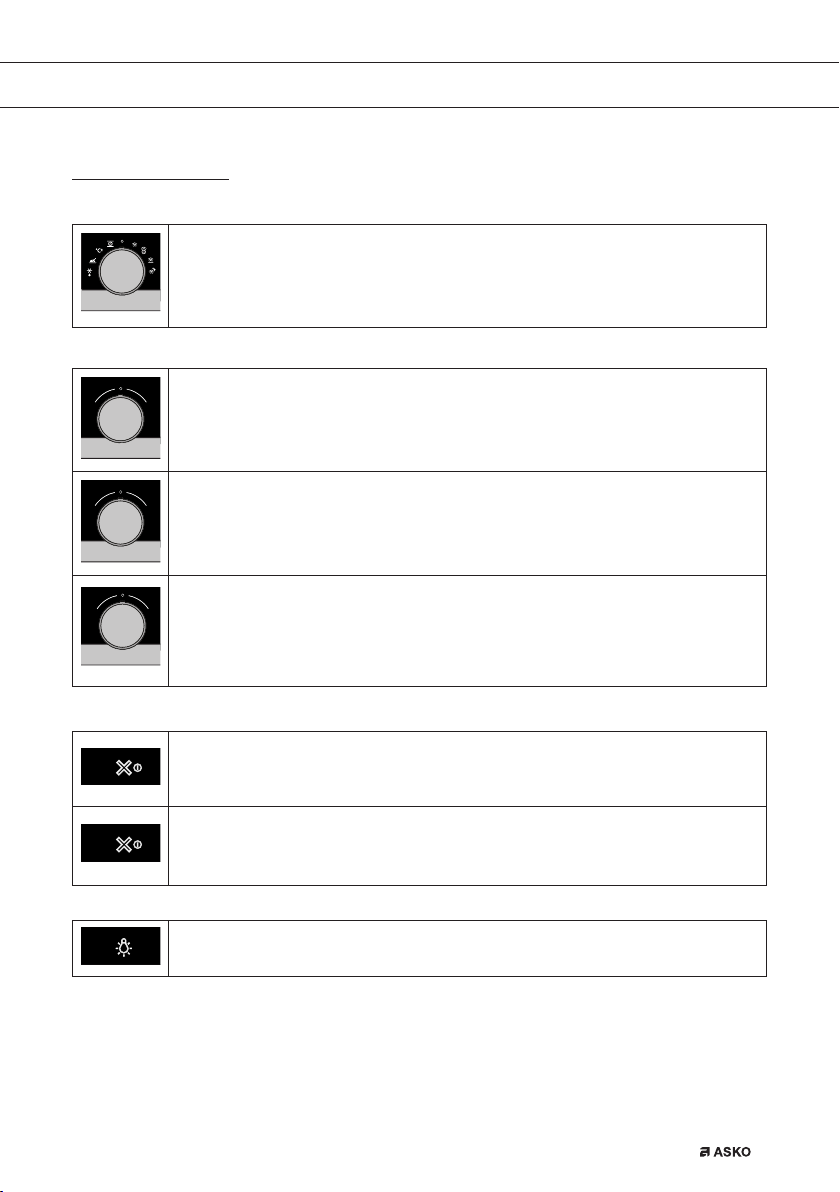
Function knob
Select a function
Turn this knob to select the desired function.
• See ‘Description of the functions’ for more information.
Selection knob
To choose a sub oven function
Turn this knob to choose a sub oven function.
• See ‘Control panel general use’ for more information.
Change the settings
Turn this knob to change the settings that are in the active area.
• See ‘Control panel general use’ for more information.
Go to the next setting
Touch this knob to go to the next setting.
• The next to change setting will be in the grey active area.
On/off key and stop key
To switch the appliance on or off
Touch and hold the key for several seconds to switch the appliance on or off.
To cancel or go back in the menu
Touch this key to cancel an operation or to go back one-step in the menu.
Lighting key
Switch the lighting on/off
Touch this key to switch the cavity lighting on or off.
EN 13
Page 14
USE
Navigation keys
Plus key
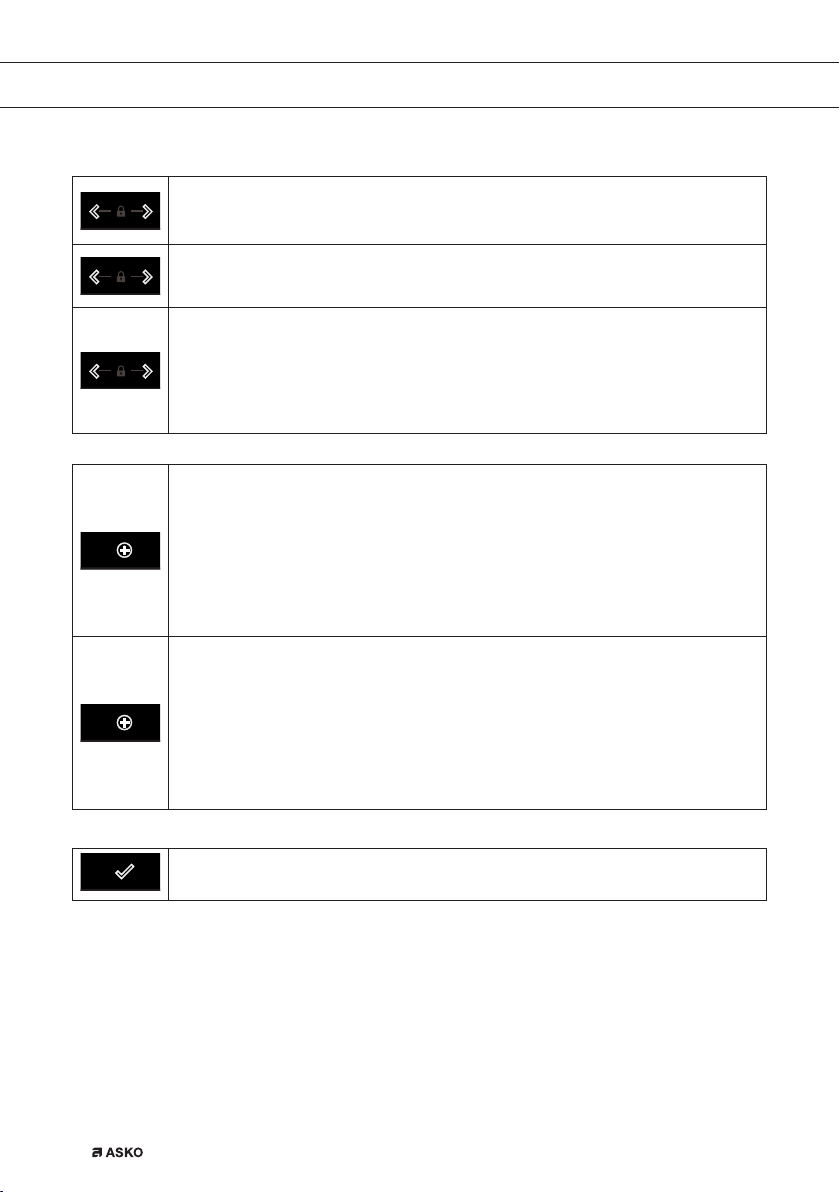
Navigate to the right
Touch the right navigation key to confirm the setting and to move the active area
to the right.
Navigate to the left
Touch the left navigation key to move the active area to the left.
Turn on/off the child lock function
Touch and hold the navigation keys simultaneously to activate/deactivate the
child lock function.
• The oven’s control panel can be locked by means of the Child Safety Lock,
to protect the oven against unintended use.
To open the settings menu (see ‘Settings’)
Touch this key in stand-by mode to open or exit the settings menu:
• Egg timer
• General
• Display
• Cooking
• System
To open extra options (see ‘Plus menu’)
Touch this key in operation mode to open or exit the extra options possible at
that moment:
• Egg timer
• Fast preheat
• Add steam 123
• Add direct steam
EN 14
Confirm key
Confi rm key
To confirm all the white settings/elements in the screen.
Page 15
USE
Description of the main functions
Consult the tables to select the preferred function. Also consult the instructions for preparation
on the dish packaging. Some main functions have sub functions.
Main functions (to select with the function knob)
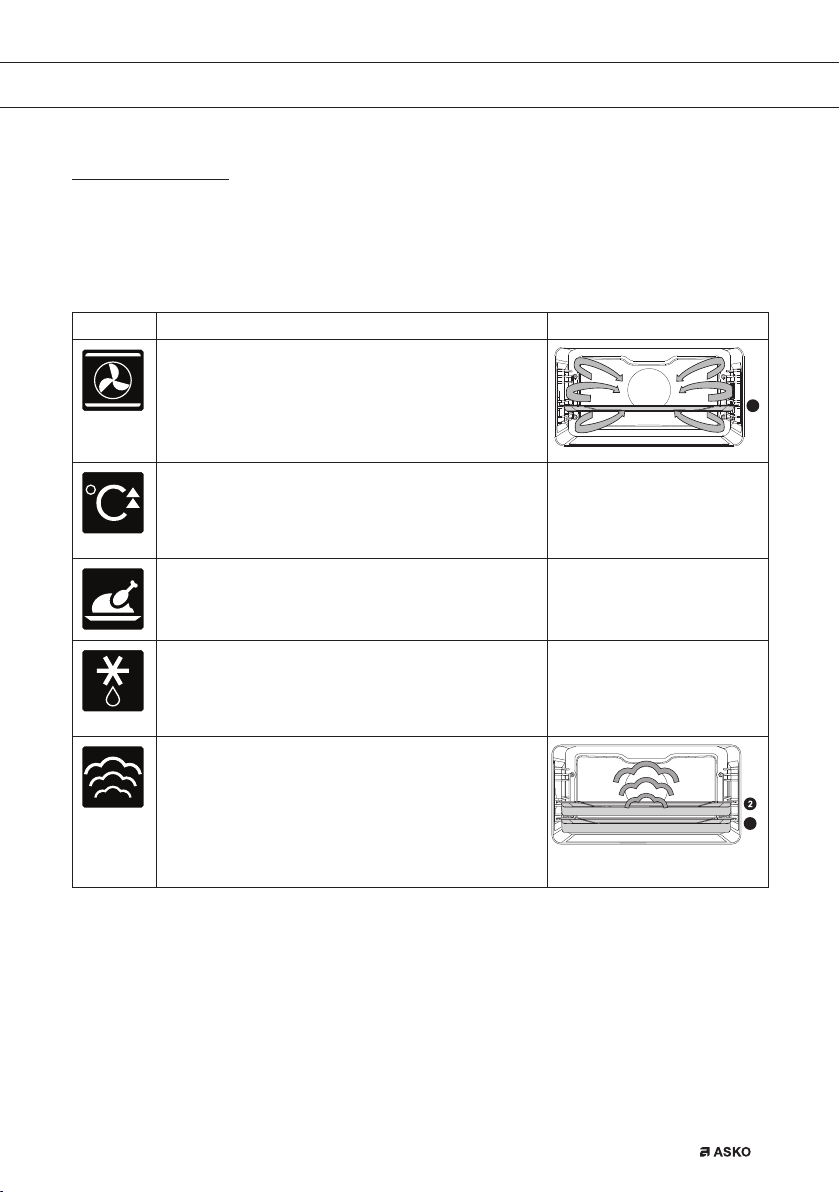
Function Description
Oven
• Use one of the functions available for grilling,
baking or roastig.
• Sub functions are available (consult Oven
functions table).
Fast preheat
• With this function, the oven space quickly reaches
the desired temperature. Do not use this setting
when you have a dish in the oven space.
Programs
• Use ‘Programs’ for baking and roasting by selecting
a dish from a list of pre-programmed dishes.
Defrost
• With this function, the air circulates by means of the
fan. The air will be heated to a temperature of
30 °C. Dishes are defrosted quickly and efficiently.
Steam
• Heating by means of steam.
• See chapter ‘Steam function’ for more information.
• Steam of 100 °C is sprayed into the oven cavity at
regular intervals.
• Sub functions are available (consult steam
functions table).
2
1
EN 15
Page 16
USE
Function Description
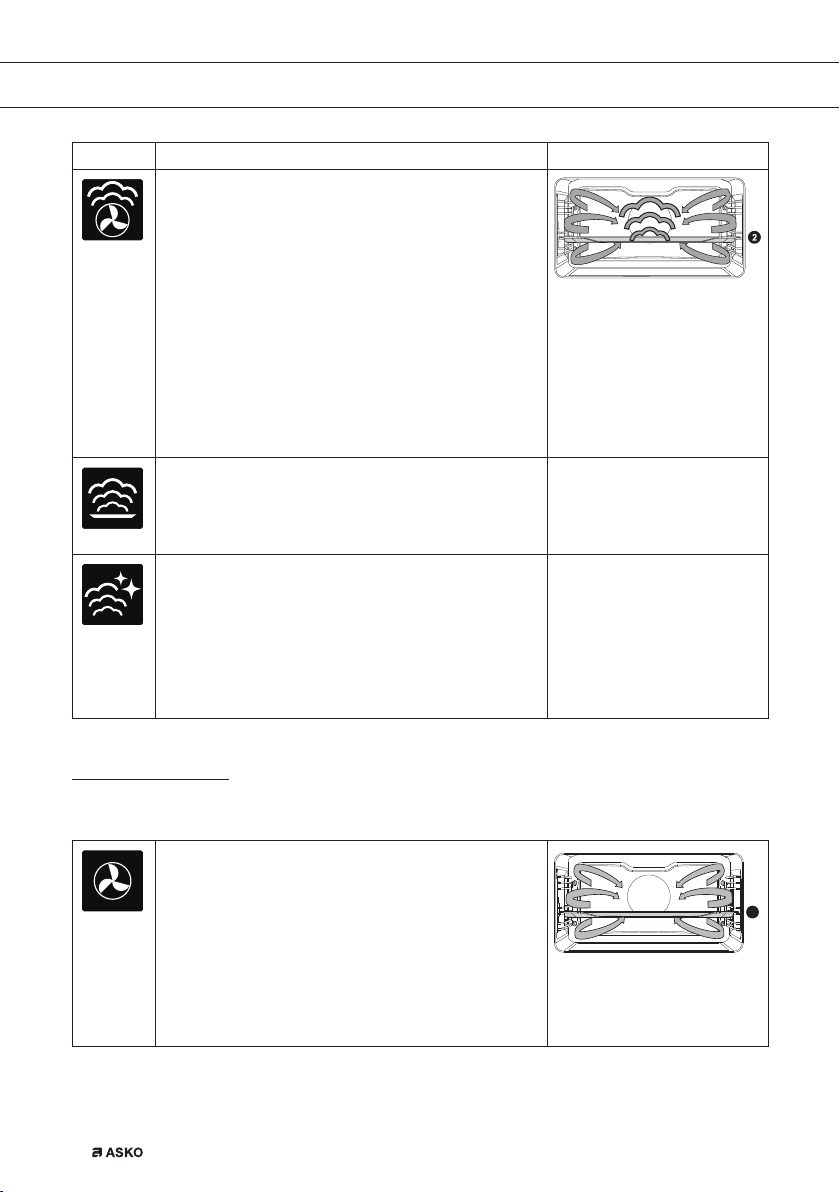
Combi steam
• Heating by means of hot air in combination with
steam.
• The steam is sprayed into the oven cavity at regular
intervals.
• This mode can be used for baking types of pastry
such as puff pastry, brioche pastry, yeast dough
buns, French bread, gratins and roasting meat.
The hot steam ensures a nice crispy brown top
and an airy texture. Meat and fish remain nice and
juicy inside. For this mode always make sure that
the water reservoir is filled with fresh water.
• Sub functions are available (consult combi-steam
functions table).
Regenerate
• Use one of the functions for (keep) warm dishes.
• Sub functions are available (consult Warming
functions table).
Cleaning
• With this function and a damp cloth, you can
easily remove grease and dirt from the oven walls.
• Use this function only when the oven has cooled
down fully. Steam is sprayed into the oven cavity
at regular intervals.
• After soaking, food residues can be removed
using a damp cloth.
Description of the sub functions
Oven functions (to select with the selection knob)
Hot Air
• Heating by means of hot air from the back of the
oven.
• This mode provides uniform heating and is ideal
for baking.
• Place the baking tray or oven rack on the middle
of the oven.
• Suggested temperature: 180 °C
• Preheating is recommended.
EN 16
2
Page 17
USE
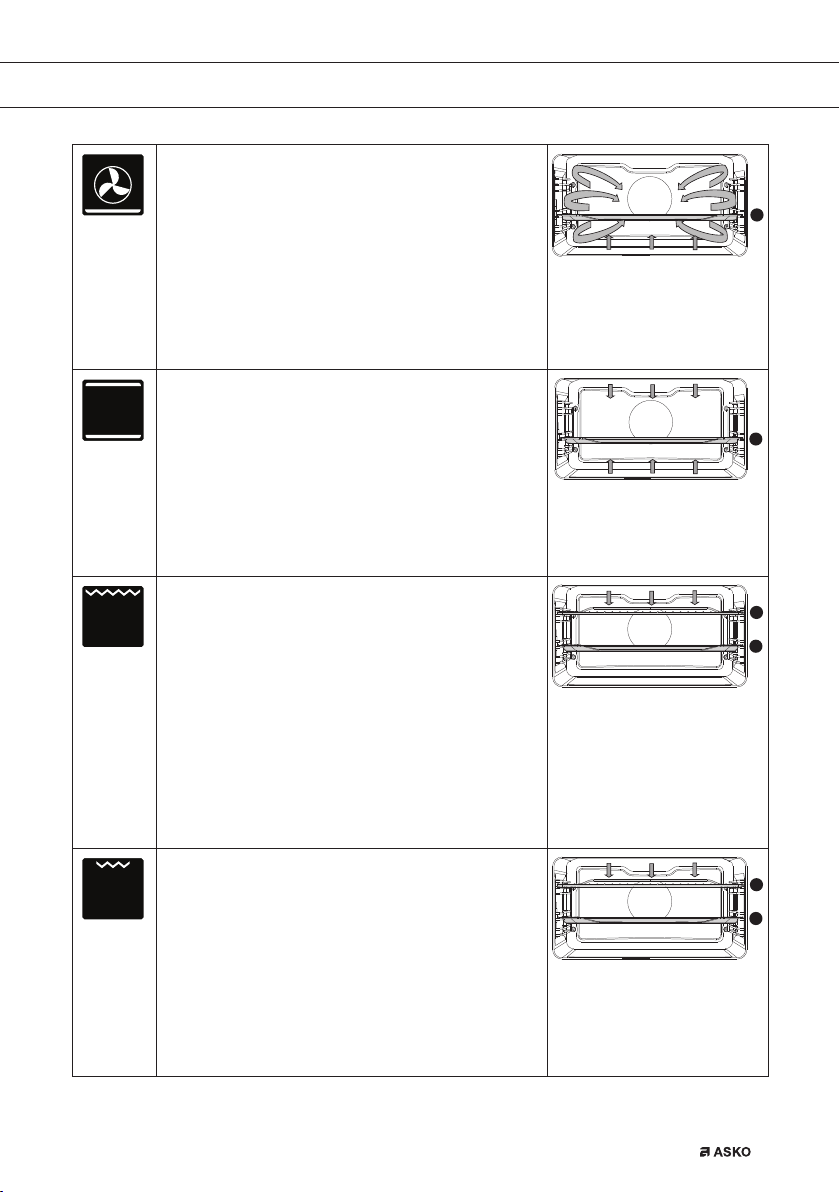
Hot Air + Bottom Heat
• Heating by means of hot air from the back of the
oven and the bottom heating element.
• This mode can be used to bake pizza, moist
pastry, fruitcakes, leavened dough and short
crust.
• Place the baking tray or oven rack in the middle
of the oven.
• Suggested temperature: 200 °C
• Preheating is recommended.
Top Heat + Bottom Heat
• Heating by means of the upper and lower heating
elements.
• This mode can be used for traditional baking and
roasting.
• Place the baking tray or oven rack in the middle
of the oven.
• Suggested temperature: 200 °C
• Preheating is recommended.
Large Grill
• Heating by means of the upper element and grill
element.
• This mode can be used with dishes and baked
goods that require a distinctive bottom crust or
browning. Use just before the end of the baking
or roasting time.
• Place the oven rack in the upper part of the oven
and the baking tray in the middle of the oven.
• Monitor the cooking process at all times. The dish
may burn quickly due to the high temperature.
• Preheating is recommended.
Grill
• Heating by means of the grill element.
• This mode can be used for grilling a smaller
amount of open sandwiches, beer sausages, and
for toasting bread.
• Place the oven rack in the upper part of the oven
and the baking tray in the middle of the oven.
• Monitor the cooking process at all times. The dish
may burn quickly due to the high temperature.
• Preheating is recommended.
2
2
4
2
4
2
EN 17
Page 18
USE
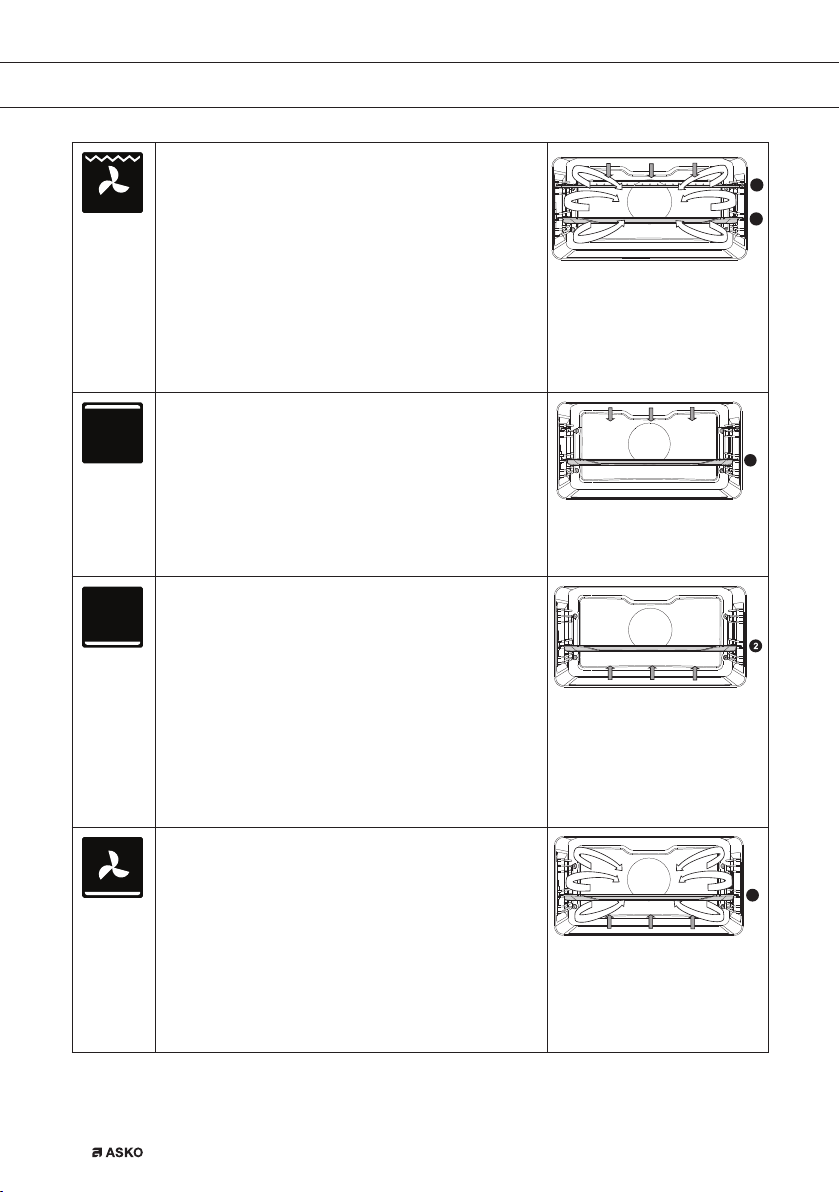
Large grill + Fan
• Heating by means of the top heating elements.
The heat is distributed by the fan.
• This mode can be used for grilling meat, fish and
vegetables.
• Place the oven rack in the upper part of the oven
and the baking tray in the middle of the oven.
• Suggested temperature: 170 °C
• Monitor the cooking process at all times. The dish
may burn quickly due to the high temperature.
• Preheating is recommended.
Top Heat
• Heating only by means of the upper heating
element.
• This mode can be used when you wish to bake/
roast the top part of your dish.
• Place the baking tray or oven rack in the middle
of the oven.
• Suggested temperature: 150 °C
Bottom Heat
• Heating only by means of the lower heating
element.
• This mode can be used with dishes and baked
goods that require a distinctive bottom crust or
browning.
• Use just before the end of the baking or roasting
time.
• Place the baking tray or oven rack in the lower part
of the oven.
• Suggested temperature: 160 °C
Fan + Bottom Heat
• Heating by means of the lower heating element.
The heat is distributed by the fan.
• This mode can be used for baking low leavened
cakes, as well as for preservation of fruit and
vegetables.
• Place a not too high baking tray in the lower part
of the oven, so that hot air can also circulate over
the upper surface of the food.
• Suggested temperature: 180 °C
4
2
2
2
EN 18
Page 19
USE
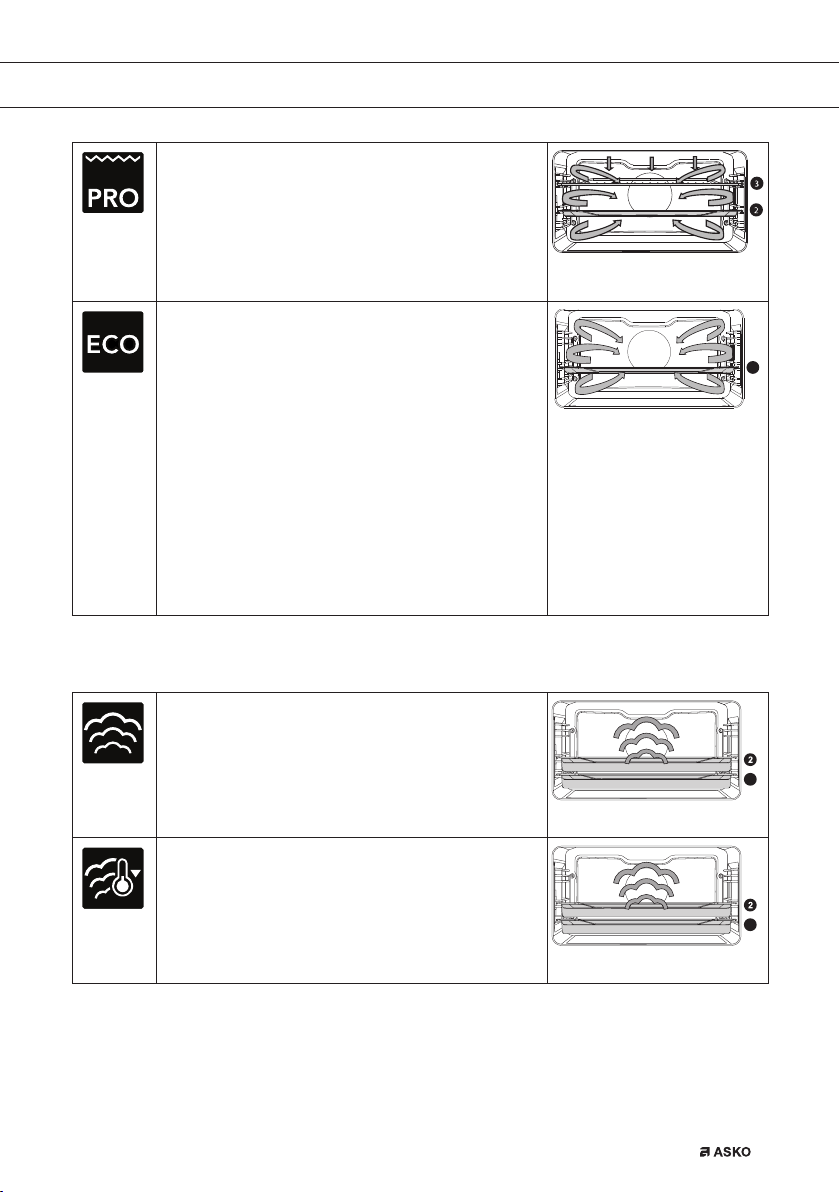
Pro Roasting
• Heating by means of the upper heating element
in combination with the grill heating element and
hot air.
• This mode can be used for roasting all types of
meat.
• Suggested temperature: 180 °C
ECO Hot air
• Heating by means of hot air. ECO hot air uses
less energy but gives the same result as the hot
air setting. Cooking takes a few minutes longer.
• This mode can be used for roasting meat and
baking pastry.
• Place the baking tray or oven rack in the middle
of the oven.
• Suggested temperature: 180 °C
• This setting makes use of the residual heat
(heating is not on the whole time) to achieve
low energy consumption (in accordance with
energy class EN 60350-1). In this mode the actual
temperature in the oven is not displayed.
Steam functions table (to select with the selection knob)
2
Steam
• Heating by means of steam.
• See chapter ‘Steam function’ for more information.
• Steam of 100 °C is sprayed into the oven cavity at
regular intervals.
• This mode can be used to steam vegetables,
eggs, fruit and rice, for example.
Steam - Low temperature
• Heating by means of steam.
• See chapter ‘Steam function’ for more information.
• Steam is sprayed into the oven cavity at regular
intervals.
• This menu can be used to steam vegetables and
fish, to keep food warm and defrost food.
1
1
EN 19
Page 20
USE
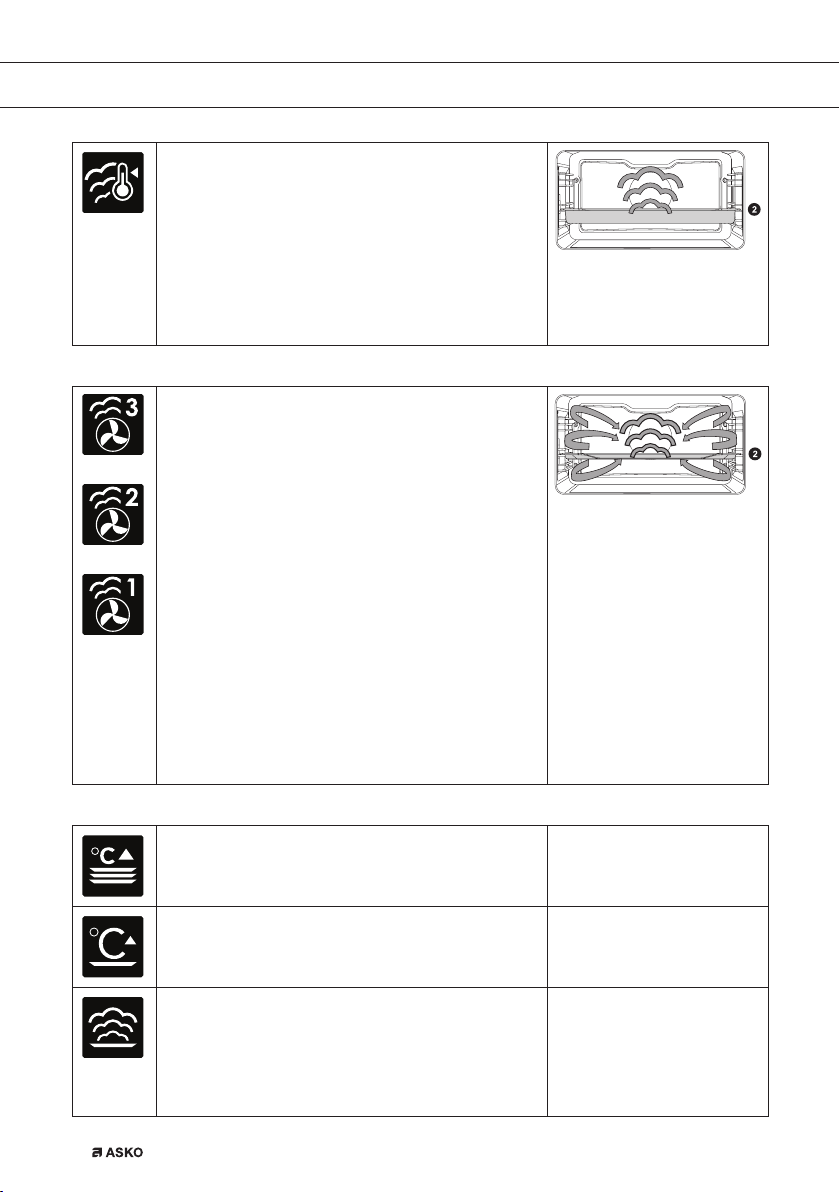
Sous vide
• Heating by means of steam.
• See chapter ‘Steam function’ for more information.
• The vacuum-sealed food is slow-cooked at a low
temperature.
• With this method the food’s flavour, vitamins and
minerals are preserved. Vacuum sealing gives the
dish a longer shelf life.
• Use this function to cook vegetables, fruit, meat,
poultry and fish.
Combi-steam functions table (to select with the selection knob)
Hot air + Steam density 1 / 2 / 3
• Heating by means of hot air in combination with
steam.
High 3
Medium 2
Low 1
• The steam is sprayed into the oven cavity at regular
intervals.
• This mode can be used for baking types of pastry
such as puff pastry, brioche pastry, yeast dough
buns, French bread, gratins and roasting meat.
The hot steam ensures a nice crispy brown top
and an airy texture. Meat and fish remain nice and
juicy inside. For this mode always make sure that
the water reservoir is filled with fresh water.
• HIGH: cooking escalopes, steaks and smaller
chuncks of meat
• MEDIUM: reheating cool/frozen meals, cooking
fish fillets and vegetables au gratin
• LOW: cooking large chuncks of meat (roast,
whole chicken), baking risen dough (bread and
rolls), cooking lasagna etc.
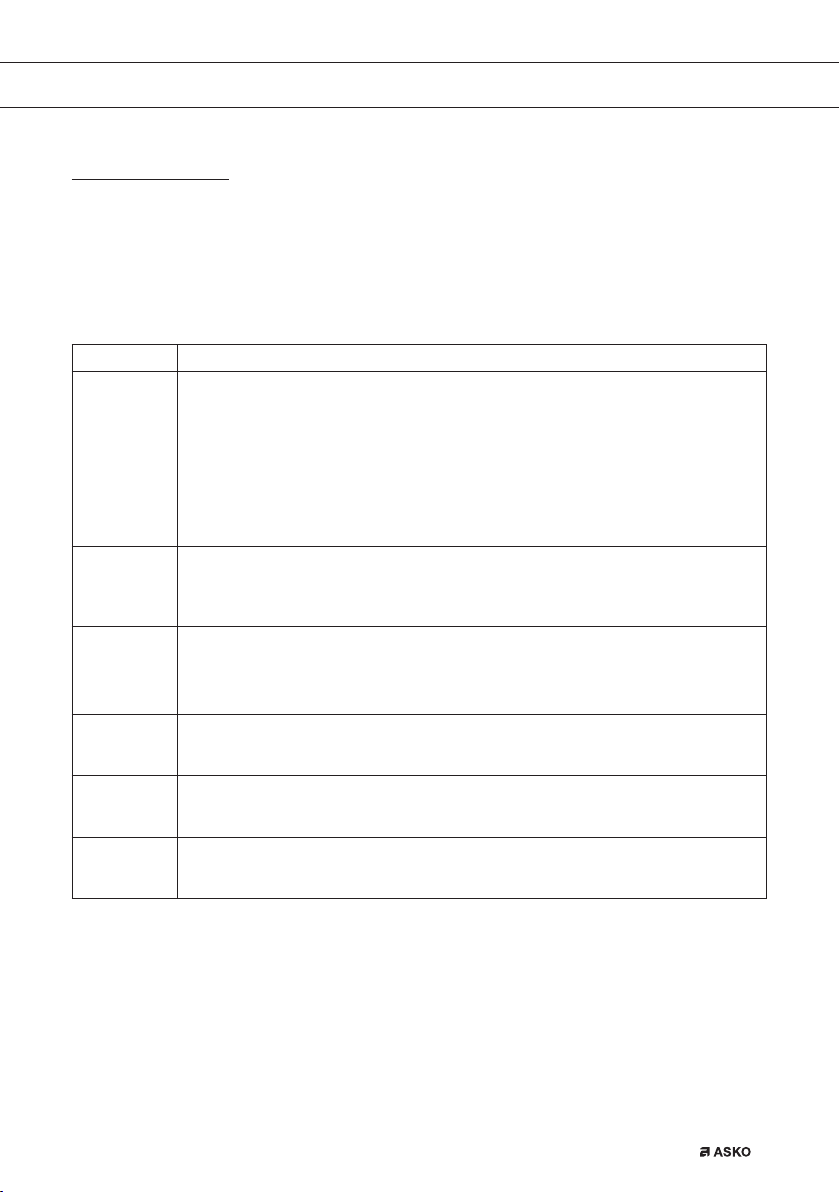
Warming functions table (to select with the selection knob)
Plate warming
• This function is used for warming tableware, so
that the served food stays hotter for longer.
Keep warm
• This mode is used to keep already cooked dishes
warm.
Regenerate
• Regenerate: this mode is used to warm already
cooked dishes. The use of steam means there is
no loss of quality. Taste and texture are preserved
as though the dish is freshly-cooked. Various
dishes can be regenerated simultaneously.
EN 20
Page 21
USE
Plus menu
Touch the Plus key to choose extra functionality (after you have chosen a main function and
settings).
• Select a function by turning the selection knob and confirm with the confirm key.
• To exit the plus menu, touch the ‘stop key’ or ‘plus key’; the display will show the previous
screen again.
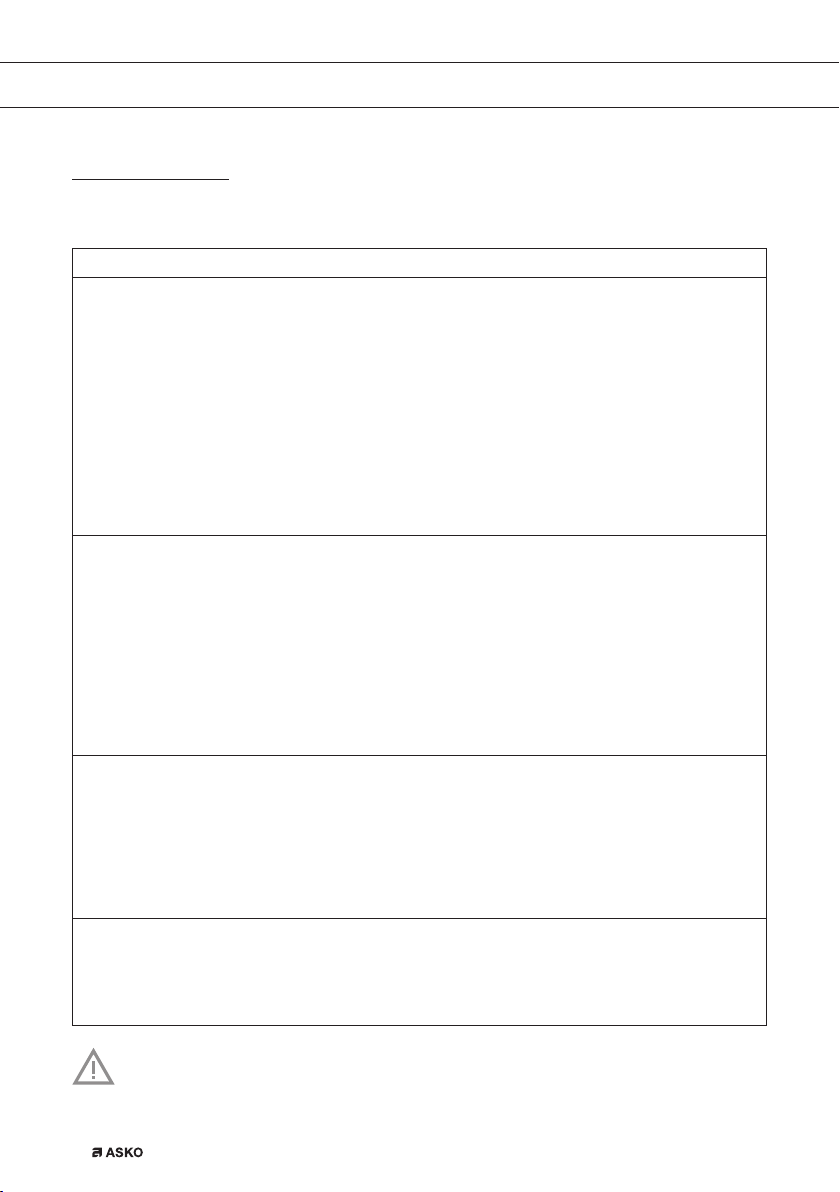
Plus Menu Description
Egg timer
The egg timer can be used independently of the oven function.
• When the egg timer goes off, a message pop-up will appear and an acoustic
signal will sound.
• Touch the stop key to switch off the signal and close the pop-up menu.
• The sound will stop automatically after approximately two minutes.
• To cancel the timer, set the time to 0:00.
Fast preheat
Switch default fast preheat on/off (only available in oven functions).
Add steam 123
• Divide up to three steam cycles evenly over the cooking process.
• Only available when a cooking time has been set.
• Choose at least 10 minutes cooking time.
Add direct steam
• Add a steam cycle to the cooking process.
Cancel steam 123
• If the function is activated.
Cancel direct steam
• If the function is activated.
Starting with fast preheat
• When a program is started and fast preheat is set default ‘on’ in the settings menu,
a pop-up will appear. After 15 seconds the pop-up will automatically disappear.
The progress screen will show the fast preheat icon, the time will be greyed out.
• If the set temperature is reached a message will pop-up. Insert the dish and the program will
start automatically when the door is closed.
EN 21
Page 22

USE
Steam function
Warning – Risk of scalding! Leave the door closed during steam functions, hot
steam can escape in case of opening. Condensation in the oven will increase
when opening the door.
Note: Let the oven cool down after every steam function and dry the inside of the oven
with a soft cloth.
Note: The water system empties each time the steam function is finished. This action is
audible and is part of the steam oven’s normal operation.
Advantages of steam cooking
• Healthy and natural, steam cooking retains the colour and taste of the dish. No odors are
released using this cooking method.
• Steam cooking (stewing, cooking, roasting) starts before the oven cavity temperature
reaches 100 °C.
• Slow cooking (stewing, cooking, roasting) is also possible at lower temperatures.
• It is healthy:
▷ vitamins and minerals are preserved as only a small proportion of these dissolve in the
hot moisture of the dish.
• It is not necessary to add any form of fat or oil during steam cooking.
• Steam does not distribute smell or taste, enabling meat or fish to be cooked together with
vegetables.
• Steam is also suitable for blanching, defrosting and warming or keeping a dish warm.
Sous vide
Using the sous vide steam function:
• Vacuuming
▷ First vacuum the food in plastic using a vacuuming machine. This process removes
most of the air from the plastic bag. The bag preserves nutrients and taste during
cooking, resulting in food that is juicier, softer and tastier.
• Vacuum cooking
▷ Cook the dish at the correct temperature and the correct time using the oven’s Sous
Vide steam setting (see ‘Recipes and cooking times’).
▷ Most dishes can be kept at serving temperature (around 60 °C)
for a few hours, which makes mise en place very easy: you simply remove the dish from
the oven when you need it.
EN 22
Page 23

USE
Filling the water reservoir
• Always fill the reservoir prior to using a steam function.
• Use clean and cold tap water, bottled water without added minerals or distilled water
suitable for consumption.
1. Press the ‘water reservoir’ cover to access the water reservoir.
2. Use the handle to remove the reservoir from the oven.
3. Remove the water reservoir lid and clean the water reservoir with clean water.
4. Fill the reservoir with water up to the ‘MAX’ mark on the reservoir (around 1.2 litres).
5. Push the water reservoir back in the oven until a click is heard (position switch is activated).
6. Close the water reservoir cover.
Any water remaining in the steam system after cooking will be pumped back into the
water reservoir. Empty, clean and dry the water reservoir after using the steam function.
Only fill the reservoir just prior to using it!
EN 23
Page 24

OPERATION
Using the appliance cooking functions
Consult ‘Control panel general use’ to get information about the general operation of
the appliance.
1. Touch the ‘On/off key to switch on the appliance.
2. Turn the function knob to select a main function.
▷ Consult ‘Description of the functions’ to select the appropriate (available) function.
3. Turn the selection knob to select a sub function (when available) or to adjust a setting.
▷ The first sub-function setting is active (when available).
4. Start directly the selected function (with pre-set values) by touching the confirm key (this key
is blinking if it is possible to start the program).
Available functions or settings to adjust:
• the function (sub oven function);
• the oven temperature;
• the cooking time.
The next sub-function or setting becomes active (if available). Go back to a previous
selection or setting by touching the left navigation key.
If preferred, select any additional setting (for example ‘Fast preheat’) using the plus menu.
See ‘Plus menu’ for more information.
5. Touch the confirm key to start preparing your meal with the chosen settings.
At the end of the cooking you can:
• Stop cooking
▷ Touch the confirm key.
The finish display will be closed and the stand-by screen will be shown. If there is no action
within 10 minutes, the display will switch to stand-by mode.
• Add extra time
▷ Touch the right navigation key to select ‘Add extra time’.
The time setting becomes active and can be changed directly by rotating the selection knob.
▷ Touch the confirm key.
▷ The previous process is activated again.
EN 24
Page 25
OPERATION
Changing settings during the progress
• During progress, touching the navigation keys will show the active area. The selected setting
can now be changed. After confirmation with the confirm key the progress screen will be
shown with the changed settings.
• After 5 seconds without actions the progress settings are cancelled and the display will
return to the progress screen.
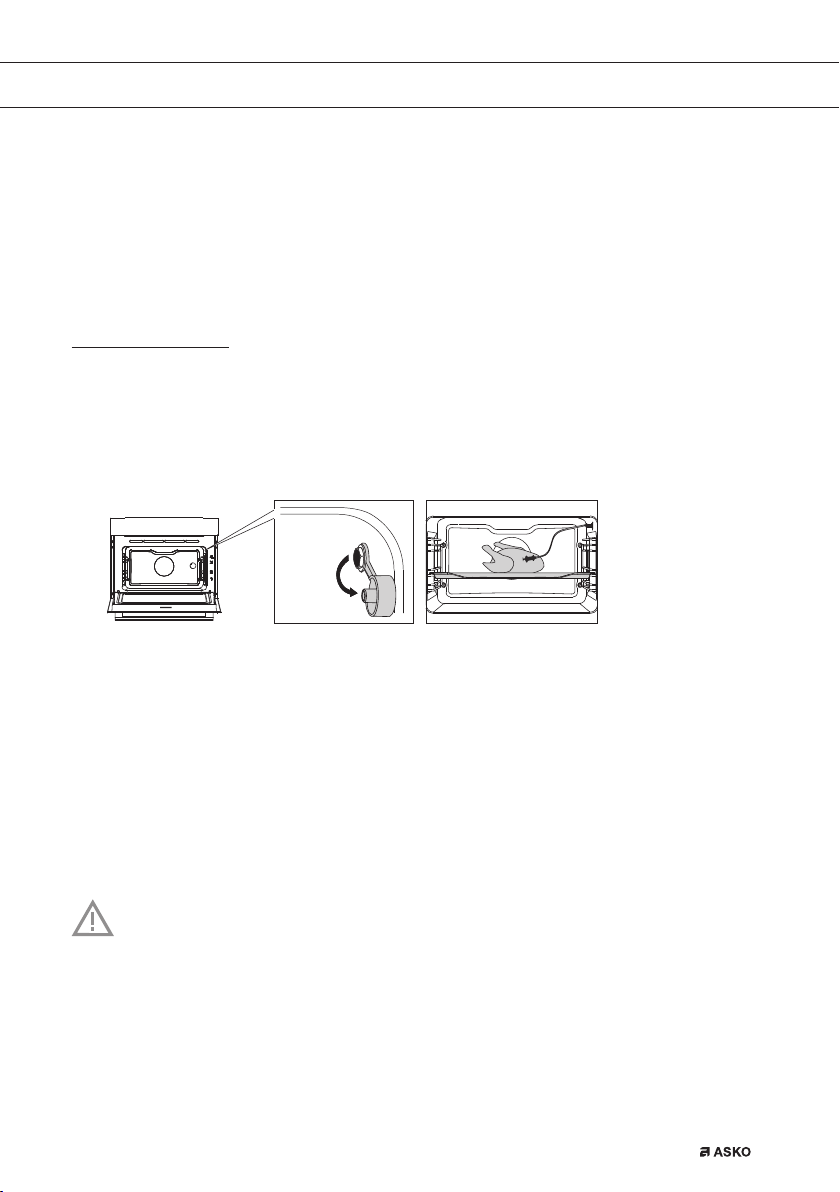
Culisensor (when available)
If the culisensor is plugged in, the culisensor screen will be shown and a small culisensor icon
will appear next to the time. The oven operates until the food core reaches the set temperature.
The core temperature is measured by means of the temperature probe.
1. Remove the rubber cap from the socket (right upper corner of the oven cavity).
2. Put the culisensor plug in the connection and insert the culisensor completely into the food.
The display will show the culisensor screen and icon.
3. Set the function and temperature. Instead of the time, you need to set the core temperature
(between 30 -100 °C).
4. Start the progress by touching the confirm key.
5. During cooking, the rising temperature of the core will be displayed (the desired core
temperature may be adjusted during the cooking process).
6. When the set core temperature is reached, the cooking process will stop. An acoustic signal
will sound, which you may turn off by touching any key. After one minute, the acoustic signal
will be switched off automatically. The current time appears on the display.
Please note!
• Always place the culisensor’s entire metal sensor in the dish.
• After the cooking process always replace the metal cap on the culisensor’s connection.
• Only use the culisensor in your oven.
• Ensure that the culisensor does not come into contact with the heating element during
cooking.
• The culisensor will be extremely hot after the cooking process. Be careful! Avoid burns.
EN 25
Page 26
SETTINGS
Settings menu
The settings menu is only available by touching the plus key when the appliance is in
stand-by mode.
Egg timer (setting an alarm time)
General
• Language of the display
• Time
▷ Set time
▷ Hour format
▷ Clock size
• Date
▷ Date yy-mm-dd
▷ Date format
• Sound
▷ Volume (low-mid-high)
▷ Key sound (on / off)
▷ Welcome sound (on / off)
Display
• Brightness low, mid, high
• Oven light
▷ Auto. switch off after 1 min.
▷ Switch off manually
• Night mode
▷ Start and end time for lower display brightness:
▷ First display set start timer, second display set end time
• Appliance to stand-by
▷ Auto. switch off after 1 hour
▷ Always on*
Cooking
• Setting
▷ Descale
▷ Water hardness
• Preheat settings
▷ Default on / off
• Program intensity
▷ Low / medium / high
System
• Appliance information
▷ Appliance name and SW version
• Factory settings
▷ Return to factory settings
EN 26
*Changing to manually switch off will increase energy consumption.
If the oven is switched off manually (or when an interruption of the power supply
occurs) this function will be reset (the display will automatically switch off).
Page 27
MAINTENANCE
Cleaning the appliance
Clean the oven regularly to prevent fat and food particles from accumulating, especially
on the surfaces of the interior and the exterior, the door and the seal.
• Activate the child lock (to prevent that the appliance is switched on accidentally).
• Clean the exterior surfaces with a soft cloth and warm soapy water.
• Next wipe with a clean, damp cloth and dry the surfaces.
• Remove splashes and stains on the interior surfaces with a cloth and soapy water.
• Next wipe with a clean, damp cloth and dry the surfaces.
Important!
Make sure that no water enters the vents. Never use abrasive cleaning materials
or chemical solvents. Always make sure that the seal of the door is clean.
This prevents accumulation of dirt and allows you to close the door properly.
Cleaning function (Steam clean)
With Steam clean and a damp cloth, you can easily remove grease and dirt from the oven walls.
Using Steam clean
• Only use Steam clean when the oven has cooled down fully. It is more difficult to remove
dirt and grease if the oven is hot.
• The program takes 30 minutes. Food remains on the enamel walls will be sufficiently soaked
after 30 minutes so that they can be removed with a damp cloth.
1. Remove all accessories from the oven.
2. Select ‘Cleaning’ with the function knob.
3. Touch the confirm key to start Steam clean.
Do not open the door during the cleaning program.
EN 27
Page 28
MAINTENANCE
Cleaning the Water Tank Filter
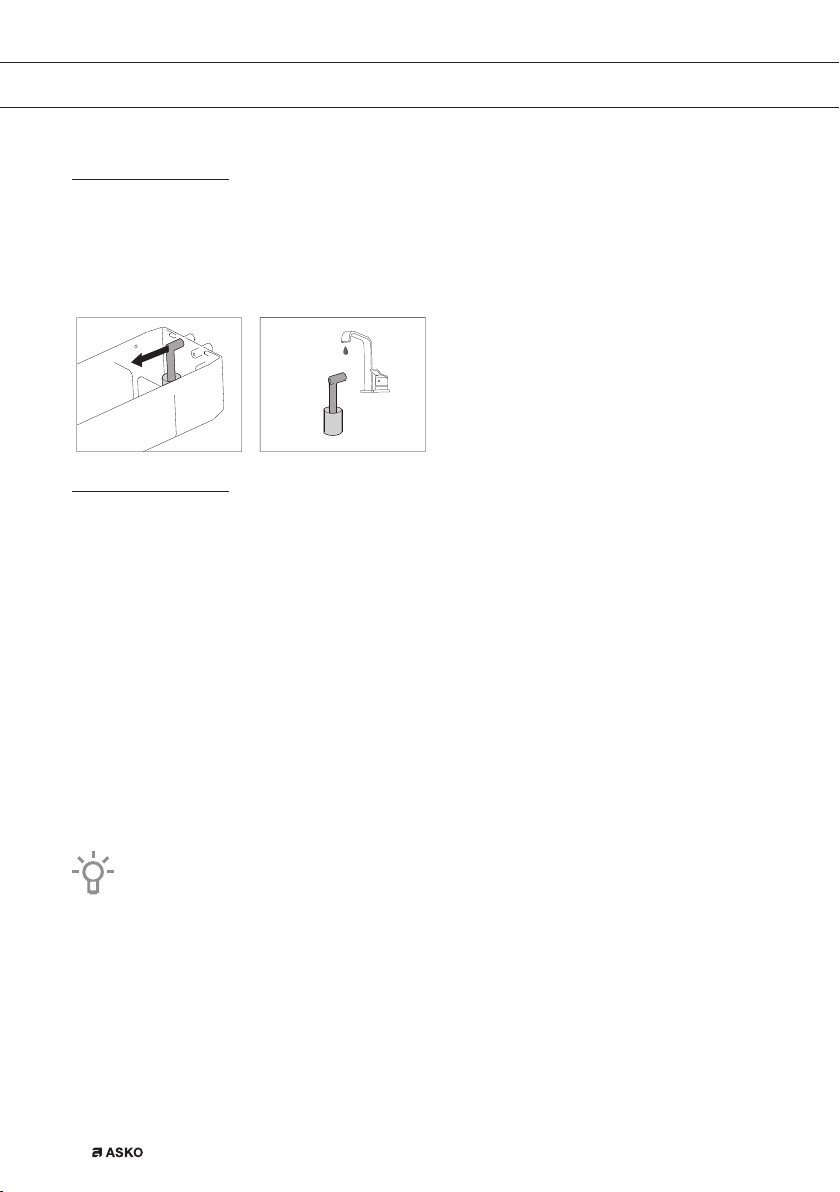
If the water tank filter is dirty, you can clean it under the tap.
1. Remove the suction tube with the filter.
2. Clean it out under the tap and put it back into position. Ensure that the filter touches the
base of the water tank.
Descaling
During the steam process, there can be an accumulation of mineral deposit in the steam system.
This needs to be removed from time to time. You need to carry out this task when the ‘Appliance
needs descaling’ notification is shown. If the appliance is not descaled after three notifications,
the steam functions will no longer be available. Use this function only when the oven has cooled
down fully. The descaling process comprises descaling and rinsing. Notifications with information
and requests for actions will be shown on the display during the process.
1. Pour water mixed with descaling agent into the water reservoir. Consult the descaling agent
instructions for the correct mixing ratio.
2. Open the ‘Settings’ menu and select ‘Cooking settings’.
3. Select ‘Steamer settings’.
4. Select ‘Descaling’ to select the function.
5. Touch the confirm key to start descaling.
We advise using NOKALK for descaling. NOKALK is an extremely efficient descaling
agent based purely on natural, entirely biodegradable ingredients. The solution is
non-corrosive, not aggressive and is environmentally-friendly. As well as an effective
descaling action, it also has a cleansing and anti-bacterial effect, ensuring that the
appliance’s internal components are preserved in an optimum hygienic state. Therefore
food’s good taste is preserved and the appliance’s service life is extended.
• Water is used for the steaming process. Water contains calcium and magnesium.
Heat causes the water to condense, leaving a mineral deposit (not harmful to humans).
• If the descaling cycle is interrupted prior to the end of the cycle, the program must be
restarted from the beginning.
EN 28
Page 29
MAINTENANCE
Removing and cleaning the guide rails
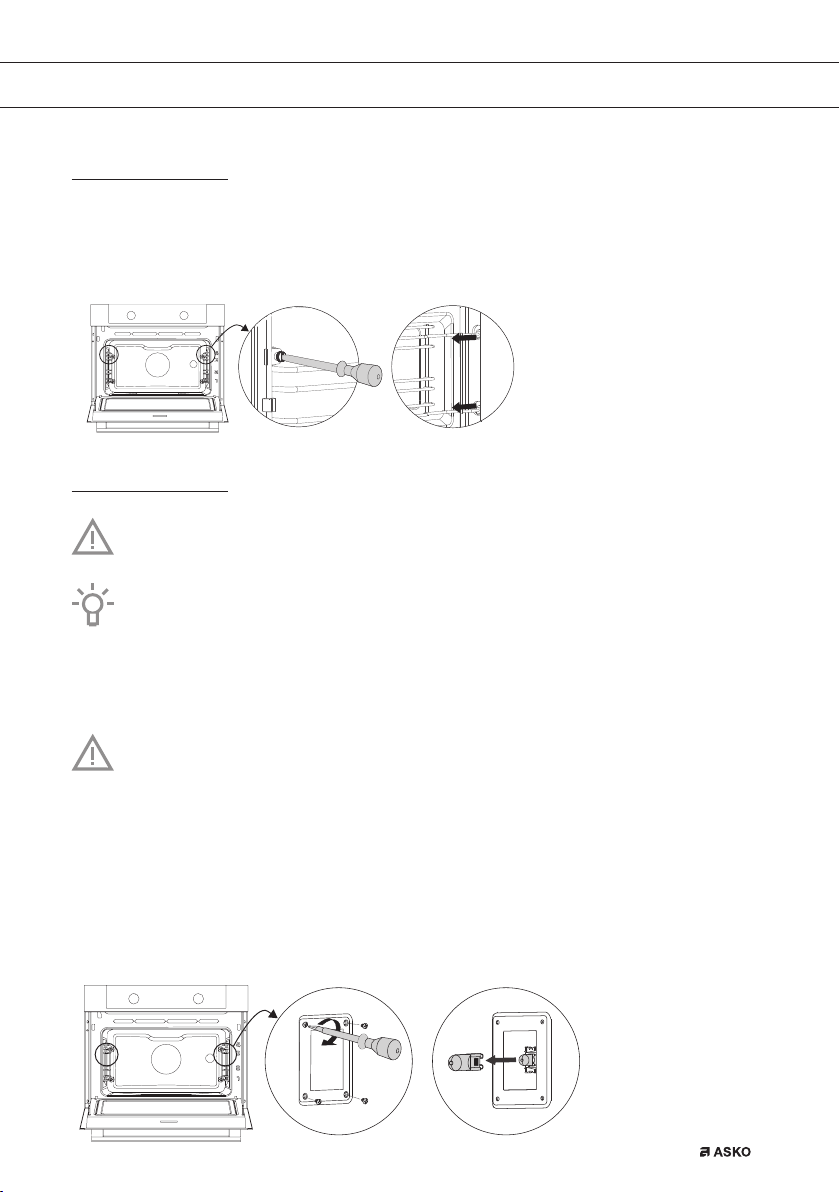
Use conventional cleaning products to clean the guide rails.
1. Remove the screw using a screwdriver.
2. Remove the guide rails from the holes in the back wall.
Replacing the oven lamp
The lamp in this household appliance is only suitable for illumination of this
appliance. The lamp is not suitable for household room illumination.
The lamp is a consumer item and therefore not covered by warranty. Replace the
defective lamp with a lamp of the same type.
Halogen lamp: G9, 230 V, 25 W
The oven is fitted with a halogen lamp.
This product contains a light source of energy efficiency class (G).
Disconnect the appliance from the power supply by removing the plug from the
socket or by switching off the circuit breaker in the fuse box.
Please note: the light bulb can be very hot! To prevent burns, use protection to
remove the light bulb.
3. Remove the four screws from the cover panel. Remove the cover panel, the glass and the
sealing ring.
4. Remove the faulty halogen lamp and replace it with a new one.
5. Replace the cover panel, the glass and the sealing ring.
Attention: The sealing ring needs to fit perfectly in the oven wall recess.
EN 29
Page 30
MAINTENANCE
Removal and installation of the oven door
Keep your fingers away from the hinges of the oven door. The hinges are spring loaded and can
cause injury if they spring back. Make sure that the hinge latches are applied correctly to lock the
hinges.
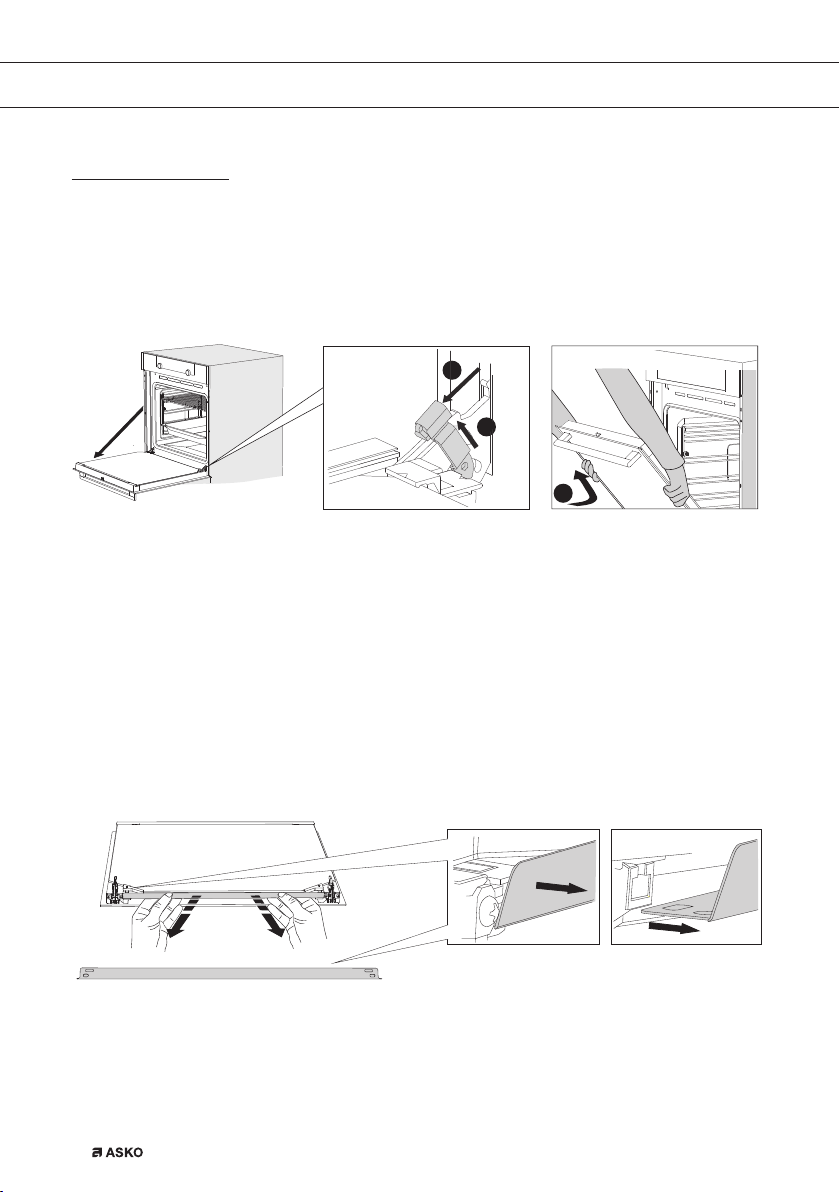
Remove the oven door
B
A
C
1. Open the door to the fully open position.
2. Lift both hinge latches (A) and pull them towards the oven door (B). The hinges will be
locked in the 45° position.
3. Gently close the door until it reaches a 45° angle.
4. Remove the door by lifting and tilting it towards the oven (C). The hinges need to come out
of the slots in the oven.
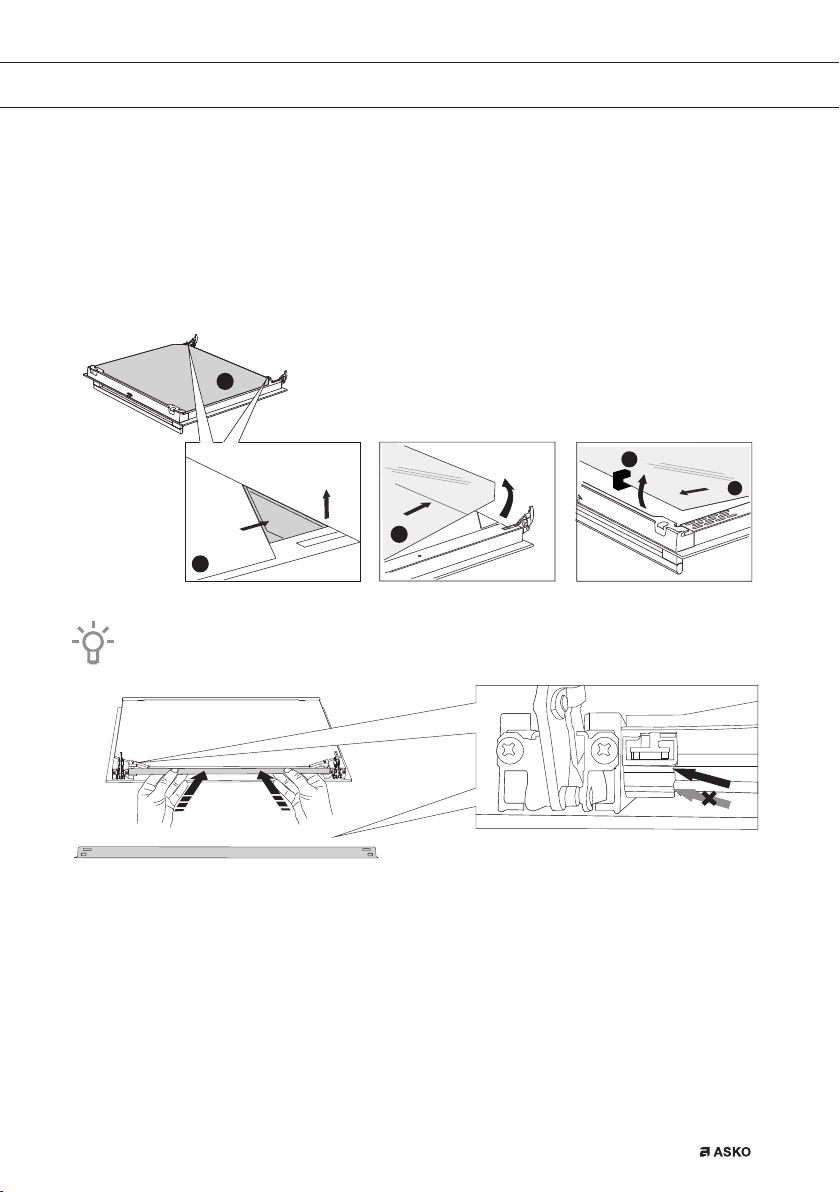
Removal and installation of the oven door glass
Oven door glass may be cleaned from the inside, but you will have to remove the glass from the
door.
EN 30
Page 31
MAINTENANCE
1. Slightly lift (1) and shift (2) the clamps at the lower left and right of the door to release the
glass (A).
2. Grab the glass (A) at the bottom and gently lift (3) and shift (4) it to remove it from the upper
support.
3. The inner glass (B) (depending on the model) can be removed by carefully lifting (5) and
shifting (6) it to removing it from the lower support. Also remove the rubber spacers (C) from
the inner glass.
A
C
6
B
1
2
A
Install the glass in reverse order.
4
3
5
A
Install the oven door
1. Hold the door at an angle of approximately 45° in front of the oven.
2. Insert the hinges into the slots and make sure they are both positioned correctly.
3. Open the door to the fully open position.
4. Lift both hinge latches and move them towards the oven.
5. Gently close the oven door and make sure that it closes correctly. If the door does not open
or close correctly, then make sure that the hinges are positioned correctly in their slots.
EN 31
Page 32

MALFUNCTIONS
General
If you have problems with your oven, consult the error overview below. Should the problems
persist, please contact the Customer Services Department.
The food stays raw
• Check whether the timer has been set and you have touched the confirm key.
• Is the door closed properly?
• Check whether a fuse has blown and whether a circuit breaker has been activated.
The food is overcooked or undercooked
• Check whether the correct cooking time has been set.
• Check whether the correct power has been set.
The keys do not respond; the display does not respond to the keys.
• Disconnect the appliance from the power supply for a few minutes (remove the mains plug
from the socket or switch the circuit breaker to off); then reconnect the appliance and switch it on.
Sparking in the oven space.
• Ensure that all cover panels from the lamps are secure and that all spacers are placed on
the guide rails.
Power failure can cause the display to reset.
• Remove the plug from the socket and put it back in again.
• Set the time again.
There is condensation in the oven.
• This is normal. Wipe the oven clean after use.
The fan keeps working after the oven is switched off.
• This is normal. The fan will keep working for a while after the oven is switched off.
Air flow can be felt at the door and the exterior of the appliance.
• This is normal.
Light reflects on the door and the exterior of the appliance.
• This is normal.
Steam escapes from the door or the vents.
• This is normal.
EN 32
Page 33
MALFUNCTIONS
Clicking sounds can be heard when the oven is working, particularly in the defrost setting.
• This is normal.
The circuit breaker switches off regularly.
• Consult a service technician.
The display gives an error code, ERROR XX ...
(XX indicates the number of the error).
• There is a fault in the electronic module. Disconnect the appliance from the power supply for
a few minutes. Then reconnect it and set the current time.
• Consult a service technician if the error persists.
Storing and repairing the oven
• Repairs should only be performed by a qualified service technician.
If maintenance is required, take the plug from the socket and contact the ASKO customer
service.
Have the following information to hand when you call:
• The model number and serial number (stated on the inside of the oven door)
• Guarantee details
• A clear description of the problem
Choose a clean, dry place if you have to store the oven temporarily, as dust and moisture
can damage the appliance.
When steam function is in use, opening the door will release an amount of steam.
It’s recommended to not open the door until the program is finished.
EN 33
Page 34
ENVIRONMENTAL ASPECTS
Disposal of the appliance and packaging
This product is made from sustainable materials. However, the appliance must be disposed of
responsibly at the end of its useful life. The government can provide you with information about this.
The appliance packaging can be recycled. The following materials have been used:
• cardboard;
• polyethylene film (PE);
• CFC-free polystyrene (hard PS foam).
Dispose of these materials responsibly in accordance with legal provisions.
The product has a pictogram of a crossed-out waste container. This
indicates that household appliances must be disposed of separately.
This means that the appliance may not be processed via the regular
waste flow at the end of its useful life. You should take it to a special
municipal waste depot or a sales outlet that offers to do this for you.
Collecting household equipment separately prevents harm to the environment and public health.
The materials used in manufacturing this appliance can be recycled, which provides considerable
savings inenergy and raw materials.
EN 34
Declaration of Conformity
We hereby declare that our products satisfy the applicable European Directives, Orders
and Regulations, as well as the requirements stated in the referenced standards.
Page 35

EN 35
Page 36

The appliance rating label is located on the inside of the appliance.
When contacting the service department,
have the complete type number to hand.
You will find the addresses and phone numbers of the service
organisation on the guarantee card.
The instructions for use can also be found on our website:
www.asko.com
en (09-23)
687728 / VER 6 / 31-08-2023
 Loading...