

Page 1
How to use
7004
Page 2
^ the machkts
ah these instructions.
Read right throug
jt,e machine must ^ t drycleaned at
contammg anspun
Instructions for use
Follow the figures in the strip
through these instructions for a
brief summary of how to use the
machine. Further details and
hints are given below the strip.
Contents Page
Instructions for use
Parts of the tumble dryer.............................. 2
Sorting fabrics
Which program to use................................... 4
If the machine will not work
Cleaning the lint filter.................................... 5
How the dryer works
Safety
..............................................................
Electrical installation. . . ,
Specifications
Drying times
and energy consumption
Installation............................................ 8-11
Positioning the tumble dryer. . . . 8-9
Changing the door hingeing
“"Warranty
Instructions summary................................. 12
.....................................................
......................................
...............................................
..............................
.....................................
.............................
................................................
.............................
.............................
11
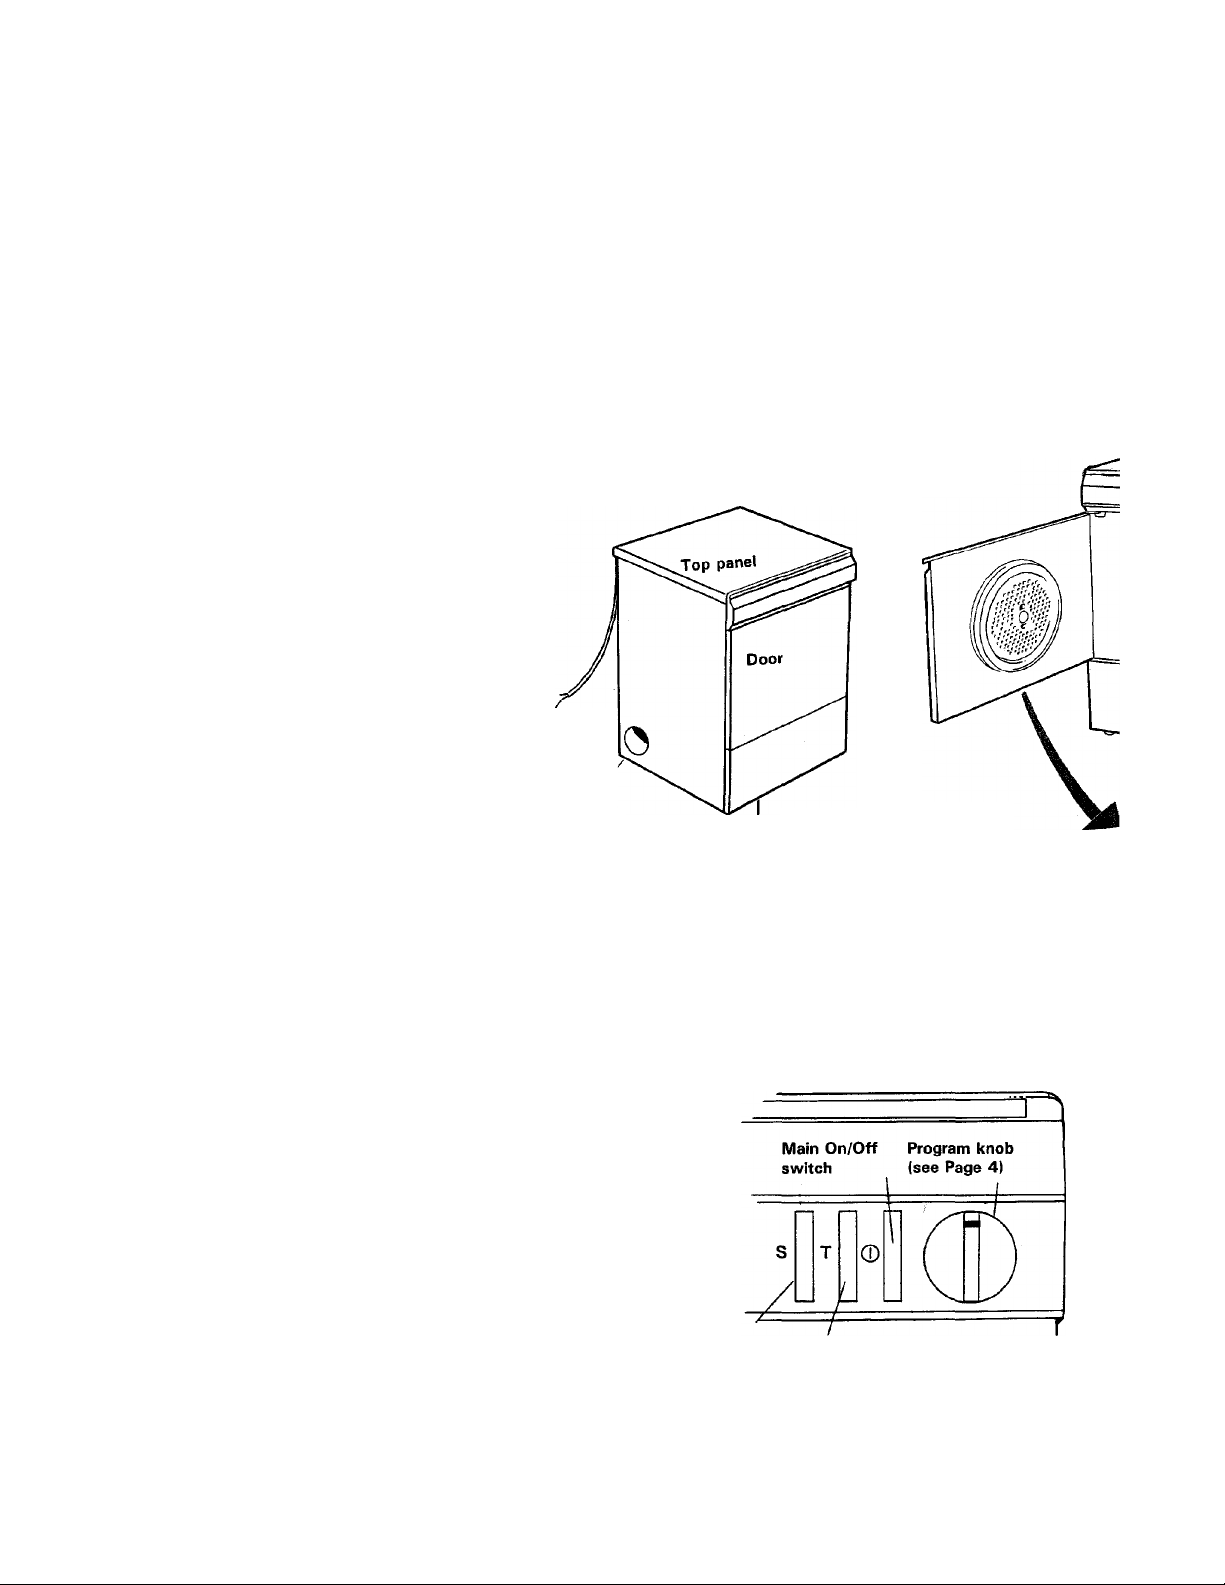
Parts of the tumble dryer
2
3
5
6
6
7
7
7
10
Main electric
supply cable
(see Page 11)
Hole for exhaust
air. (see page 7)
Pull off removable front cover
for access to the resetting
switch for the overheating
'^otection located behind it
(see page 5)
Control panel
Indicator light
NOTE!
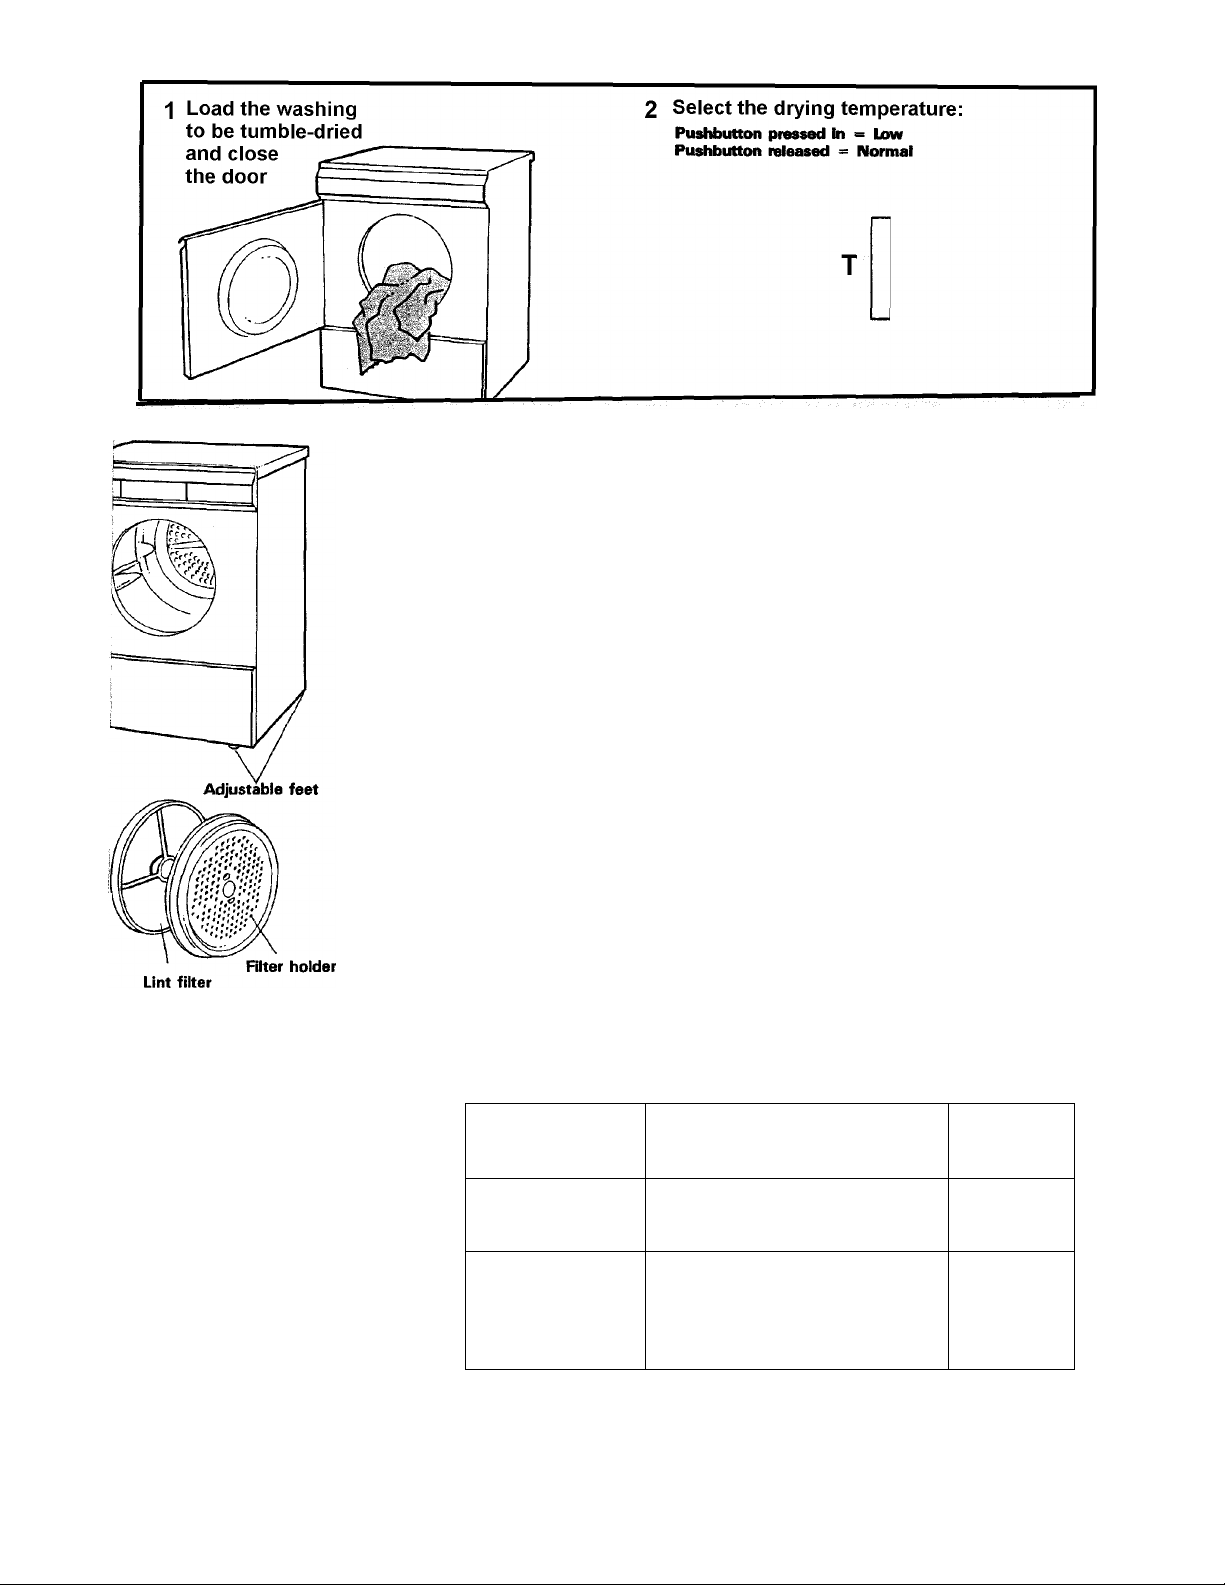
Items to be tumble-dried must first
have been spin-dried, and preferably
at 800 r/min or more.
d~r—
Start Pushbutton for selecting
pushbutton, drying temperature,
spring return «button pressed in = Low temperature
•button released = Normal Temperature
Page 3
Sorting fabrics
(2) Materials suitable for tumble drying
For the best drying results, clothes should be sorted properly. Separate
the lint shedders (chenille and terry cloth) from the lint collectors
(synthetics, flannel and fabrics with a nap, such as velveteen and
corduroy). Separate non-colorfast from light colored items, heavy fabrics
from light weight fabrics and permanent press from heavy, bulky items.
Do not tumble dry
Read all permanent care labels carefully. If a garment's care label
says "Drip Dry", "Line Dry" or "Dry Flat", do not dry in the dryer.
Certain materials will melt or become dangerously flammable if heated,
while others may lose their shape. Other items that should not be tumble
dried are:
• Items that have been dry-cleaned at home
• Wool (unless the garment's manufacturer recommends it)
• Fiberglass
• Laminated or rubber coated items
• Vinyl and plastic
• Do not use fabric softeners or products to eliminate static
unless recommended by the manufacturer of the fabric
softener or product.
Do not allow children to play on or in the appliance. Close supervision of
children is necessary when the appliance is used near children.
Type of washing Recommended size of load
White wash,
colored wash
(cotton, linen)
Synthetics
Permanent press
(Polyester, cotton)
Delicate wash.
Mild delicate wash.
Temperature-sensitive
materials such as acry
lics, rayon and acetate
Use the T button to set the machine for tumbling at low temperatura Otherwise the
temperature will automatically go up to normal temperature (la the T button is released).
Corresponds to the wash
from a FULL drum in an Asko
washing machine
Corresponds to the wash
from a HALF-FULL drum in an
Asko washing machine
Corresponds to the wash
from a HALF-FULL drum in an
Asko washing machine.
Temperature
Normal
Normal
Low
Page 4
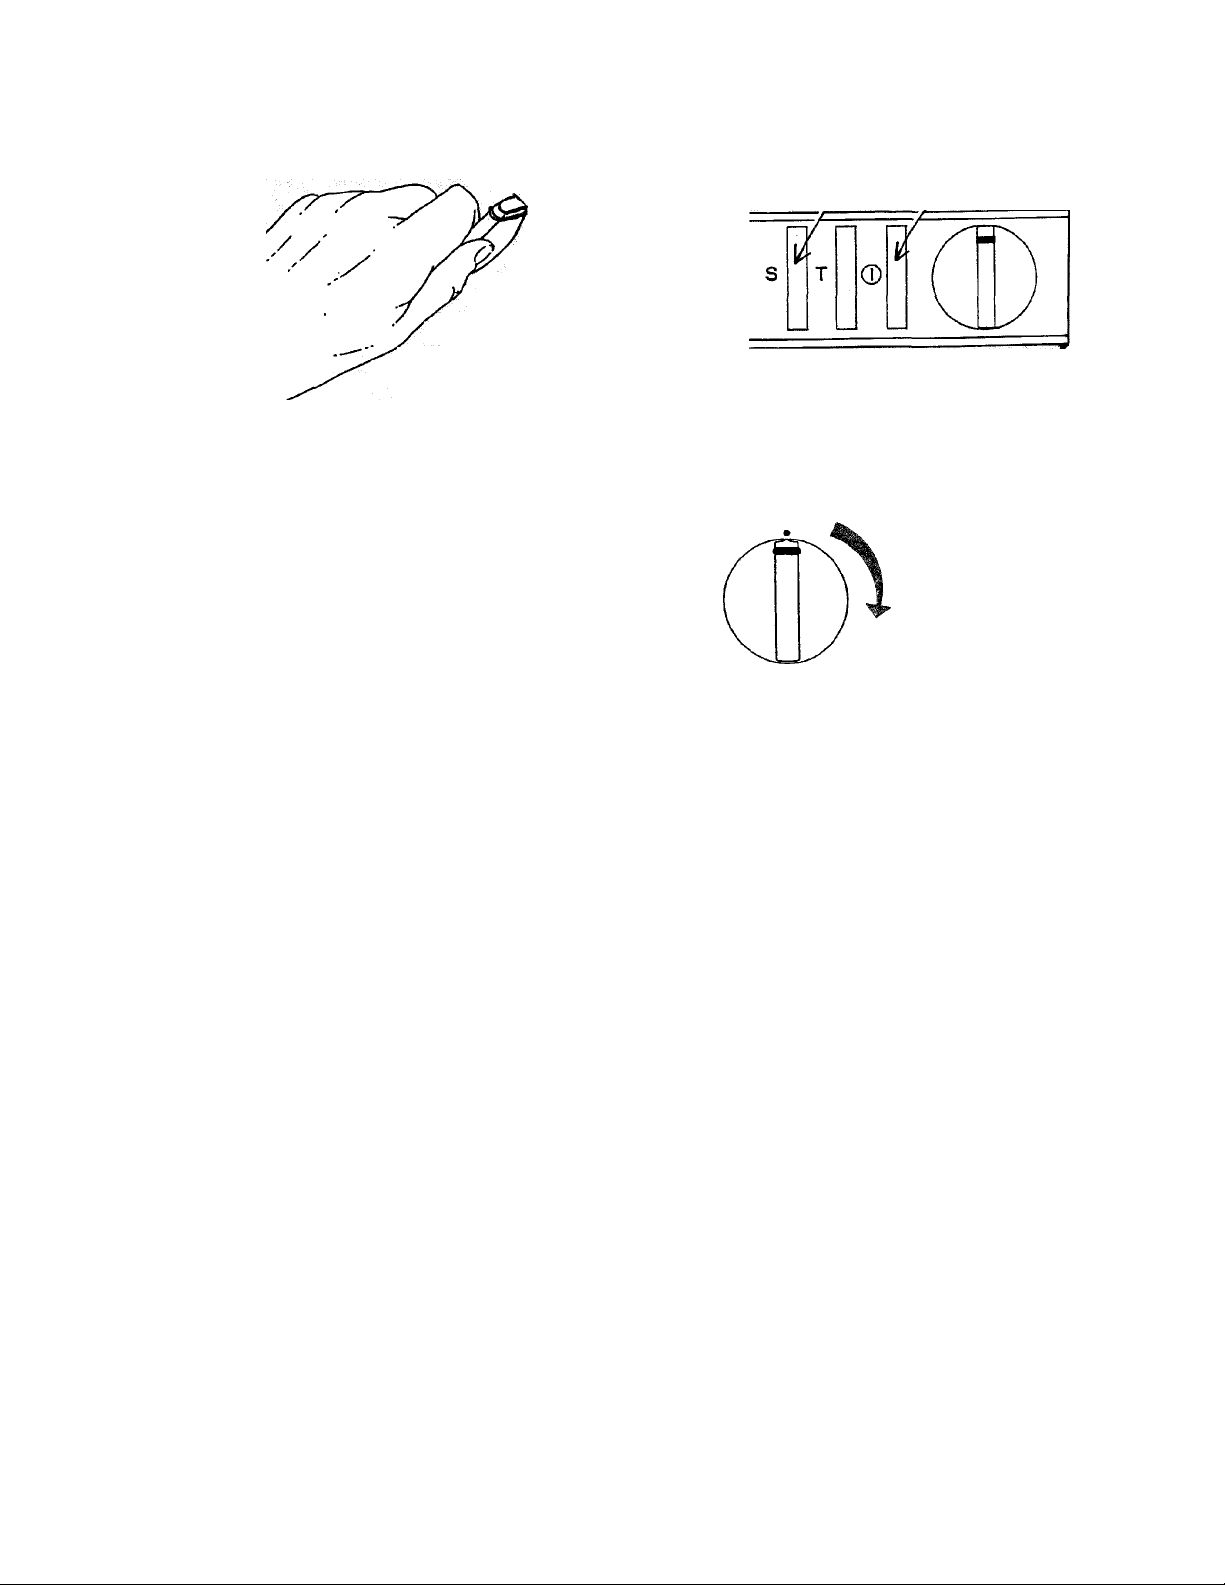
3 Set the required program
using the program knob
Which program to use
The program to be used depends on what is to be
done with the washing after tumbie-drying. Two
automatic programs are provided: 'Extra Dry' and
'Dry', if washing is not to be dried compieteiy,
i.e. because it is to be ironed, it is a good idea to
use the time program instead. Either of the
operating temperatures (Low or Normai) is avaiiabie
with either of the automatic programs or with the
time program.
4 Press the main On/Off switch
and the Start pushbutton
(The indicating lamp will light)
The Start pushbutton springs out
again after use.
Turn the program
knob clockwise to
the required pro
gram. A program
can be stopped at
any time by turn
ing the knob to
the 0 position
When you want
dry fabrics:
2) Dry
This program turns off the heat
when the washing is dry but not
absolutely bone-dry. It is then
cooled for about 15 minutes. This
is the program to use when you
want dry fabrics.
1) Extra dry
This automatic program is intended
for use with washing that is ex
tremely difficult to dry, i.e. jeans
with very thick seams. The heat
is turned off when the washing is
completely dry, and is followed
by a cooling period of about
15 minutes.
If washing is not dry after tumble-drying
When using the automatic pro
grams, it can happen that not all of
the washing is properly dry. This
may be due to such reasons as
very heavy fabrics or thick seams.
To dry these items, give them a
further period of drying in the
timed program for about 10
minutes. Also, do not overload the
dryer. If a dryer is overloaded, its
efficiency is lessened and clothes
may not dry evenly.
When you want
to iron:
3) Timed program
The timed program can be set for
any desired heating time up to one
hour. At the end of the preset time,
the washing is cooled for
about a further 15 minutes.
Permanent press hints
For the most wrinkle free perma
nent press drying, only dry one
half load at a time to assure
enough room for items to tumble
freely. Do not combine perma
nent press items with other very
heavy clothes in the dryer.
Remove clothes immediately
after the drying cycle is complete
and either hang them up or lay
them flat.
Do not over-dry
When using the timed program, it
is possible to over-dry fabrics, if
too long a time has been set. This
can cause the fabrics to wrinkle,
shrink, or feel harsh. Synthetic
materials can also become charged
with static electricity.
When you want
to air fabrics:
4) Airing program,
cold
This program cannot be combined
with heating. It is used to shake
the dust out of garments, air them
or soften them up.
Dryer added fabric softeners
Because some dryer added fabric
softeners may cause damage to
automatic dryers, use only one
that the manufactures give a
written assurance that their
softener can safely be used in
your dryer.
Single items
Use the timed program when there
is only one item to be dried. This
is because the automatic program
may turn off the heating too early,
so that the item is not properly
dried.
Page 5

If you want to check how
dry washing is:
Open the door.
The drum stops automatically
and will not restart until you
close the door and press
the Start pushbutton.
When the dryer has stopped:
• Remove the washing
• Clean the lint filter
• Turn off the power at the main On/Off pushbutton switch
If the machine
does not work
The machine will not start
Check that:
•The front door is properly closed.
•The main On/Off pushbutton is
pressed in.
•The electric plug is firmly inserted in
its socket (if the machine is not
permanently wired in).
•Aii fuses are intact.
NOTEi
If the machine still fails to start, it is
probable that the overheating cutout
has operated. It switches off the
tumbler if the temperature is too high.
For example if dust has blocked the
lint filter. Clean the filter and reset the
overheating protection switch by
pressing the rubber disc on the back
of the machine.
Cleaning
the lint filter
The lint filter must be cleaned after
each time the machine has been
used. If this is not done, drying
performance will suffer, as insuffi
cient air will pass through the drum.
The machine may also overheat: this
will cause it to stop automatically.
Clean the filter as follows:
© Grasp the filter holder by the two
holes near the center and pull it
off the peg on which it is
supported in the front door.
Take the filter out of the holder
and brush away the lint in it by
hand.
NOTE: Wear and tear of fabrics in a
tumble dryer is insignificant.
The lint caught in the lint
filter is dust and fiber
residue that has been
formed when the garments
have been used.
Replace the filter in the holder
and refit the holder in position on
the peg in the door.
The machine starts, but will not continue to run
If the machine starts when the Start
button is pressed, but stops as soon
as the button is released, it indicates
that the overheating cutout has
operated. Clean the lint filter and
allow the machine to cool down.
Excessive drying times
Check that the lint filter is not block
ed. Do not overload the dryer. Items
to be tumble-dried must first have
been spin-dried, preferably at 800
r/min or more
Note!
Clean lint collecting near the
tumble dryer as it can be sucked
into the air intake.
Other user service
About once a year, remove the
flexible exhaust air hose and clean it
and the outlet from the machina
Page 6

How the dryer works
® Air is drawn in from the
room through the bottom of
the machine.
@ An electric heater heats the
air passing into the drum.
(D Warm air enters the drum
through holes in the back
and dries the washing. The
drum rotates, and the two
paddles prevent garments
from becoming tangled.
@ The air passes through the
lint filter at the front of the
drum and enters the fan.
Air is forced out through the
outlet you have selected
through a fixed duct (see
page 11).
The temperature remains at
approximately 40°C (104°F) as
long as the clothes are moist.
When the clothes dry, the
temperature rises and the heater
element is automatically switch
ed off at the preset temperature.
The air that is not heated is
then drawn through the drum
and cools the clothes for about
15 minutes.
The thermostats which switch
off the heating at normal and
low temperature (60°C (140°F)
Safety
The dryer must not be used to
dry fabrics which may contain
residues of flammable liquids.
The dryer door has a magnetic
lock, which means that it can
be opened from the inside. A
door switch automatically stops
the dryer if the door is opened.
The machine does not start
automatically if the door is
45°C (113°F)) are fitted next to
the fan. There are also two
thermostats next to the heater
element. One switches off the
heater element if the tempera
ture becomes too high and the
other switches off the complete
tumble dryer if a fault occurs.
closed, i.e. if a child should get
into the drum and close the
door from the inside. In order to
restart the machine, the Start
pushbutton must be pressed.
The machine is protected by a
thermostat fitted by the heating
element, which turns the
machine off if the temperature is
too high.
This overheating protection,
which is fitted at the rear of the
machine, can be reset when the
temperature has fallen. Refer to
the section entitled "If the
machine does not work" (pg. 5).
Energy saving hints
• Dry consecutive loads to avoid
reheating the dryer.
• Do not overload the dryer.
• Do not put unspun, very wet items in
the dryer.
• Clean the lint filter after each load.
• Do not over dry clothes when using
the timed program.
• If you plan on ironing items, remove
them while still slightly damp
• Leave the door closed while the dryer
is in operation.
Page 7

Specifications
Height
Width
Depth 23 1/2” (595 mm),
Weight 86 lbs. (39 kg)
Drum volume
Speed
Power
requirement
For connection
as supplied
Heater power
Air flow
Drum material Stainless steel
Outer casting
Installation
32 1/4" (820 mm)
23 1/2" (595 mm)
plus exhaust
connection
including control
panel and program
knob
29.3 gallons (111 1)
52 rpm
2200/3150 W
Single-phase, 15 A
Single-phase,
2850 W
196-222
cubic yds./hr.
(150-170 m=/h)
Galvanized steel
sheet
Free-standing, builtin or on top of a
washing machine
Drying times and energy consumption
Drying times and
energy consumption
The table on the right shows drying
times and energy consumption in
accordance with the following
conditions:
• Program 2 has been used
(the normal, 'Dry' automatic
program).
• Drying temperature: Normal.
• Fabrics dried are of cotton,
previously spun at 800 r/min.
• The dryer is in a room with a
temperature of 20“C (68“F), and
the exhaust hose supplied with
the machine is in use.
Drying times
Drying time depends on many factors
such as the amount of washing,
moisture content, type of fabric,
incoming air temperature and
humidity. Performance can also be
affected by how the machine has
been installed. Drying time is also
naturally affected by how dry the
washing is to be when removed from
the machine.
Connection to a ventilation duct
Electrical
Installation
Electrical installation must be
carried out by a skilled electri
cian. As supplied, the machine is
arranged for single-phase.
Connection as delivered:
1-phase, 208/230 V,
heater power 2850 W,
15 A fuse required.
NOTE: Follow all state and
local codes.
To install washer/dryer into a single
30A 208/240V wall receptical:
1. Remove top of washer - by
removing three 25 torx screws.
2. Using power cord attached to
dryer, thread through power cord
restraint on washer. Attach to
terminal block on bulk Head.
NOTE: This should be at the top of
the terminal block.
3. Remove knock-out plug on bulk
head of washer. Install dryer cord
30A 250V AWG 10/3 through
knock-out to terminal block.
4. Replace top to washer and
test units.
Connect the exhaust hose from
the tumble dryer to a ventilation
exhaust fitting or to a discharge
through the wall.
Secure the hose joint to the outlet
stub on the machine.
Run the hose, with as few bends as
possible to the point of discharge. If
necessary, it can be extended to a
maximum of 8.75 yards of 4"
diameter hose.
Make any bends as gentle as possi
ble. A maximum of four 90® bends
may be fitted in the hose. The more
bends and the longer the hose, the
less will be the amount of air pass
ing through the machine.
If more than 8.75 yards of hose is
needed, diameter must be increased.
If the hose is taken to a wall outlet,
a ventilation grille should be fitted to
prevent reverse flow of cold air.
IMPORTANT:
The appliance should
not be exhausted into
a chimney, a wall, a
ceiling, or a concealed
space of a building.
The only rigid of flexible metal duct should be
used for exhausting, unless the appliance has
been investigated for use with nonmetallic duct.
Fit the
ventilation
grHIe to
the inside
or outside
of the wal
Page 8

Installation
Positioning the tumble dryer
(It is essential that the machine is leveled
and the locknuts are tight.)
A Free-standing
B Built in
The dryer can be built in beneath a
countertop with a height of 33 1/2
- 35 1/2". At least 23 5/8" width
is needed. Space must also be
available for the exhaust hose on
the left, right or rear of the
machine. See the diagram for hole
sizes and positions.
NOTE:
Height Adjustment:
32-1/4" - 33-1/2"
Do not Raise Higher
than 33-1/2"
How much air does the dryer need?
The dryer needs about 196 cubic yds.
of fresh air per hour. The room in
which it is installed must therefore
have a sufficient air change rate to
ensure that the machine receives
enough fresh air.
/'"“n
I jj I Diameter of holei
--------
5/16"
5 1/2" p
4 23/32"
Page 9

Stacked installation
The dryer can be mounted on top of
any ASKO matching washing machine.
Use the mounts supplied with the
machine.
These parts are supplied with the tumble dryer:
How to install the tumble dryer on
top of a washing machine
® Remove the screws shown
from the back of the washing
machine, and use them to
‘secure the two brackets.
iwo metal brackets for
securing the tumble dryer
Two plastic cups
® Fix the plastic cups which
locate the front feet of the
tumble dryer on top of the
washing machine. This is
important, as they ensure that
the machine is safely positioned
on top of the washing
machine.
® Lift the tumble dryer into position, raise the
front edge and push the machine backwards
until it engages with the brackets.
the machine. Remove the pro
tective paper from the selfadhesive surface beneath the
cups. Taking care not to press
the exposed adhesive surface
against the top of the washing
machine, so that the cups
fasten before being properly
located, position the cups so
Lower the front of the dryer, making sure
that its feet drop into the plastic cups.
locate the cup exactly with
respect to the front and sides
of the machine. When the cups
are properly positioned as
shown, press them firmly down
on to the top of the washing
machine Finish by breaking off
the plastic tabs, which have
now served their purpose
Tumble dryer
Washing machine
Page 10

Changing the door hinging.
Switch off the main power supply first!
Tools: Phillip screwdriver, 10 mm wrench.
1. Remove the lower panel A.
2. Unscrew the upper screw B + C.
3. The upper hinge is now loose. Raise the door a little
so that it comes away from the bottom hinge.
Remove the top hinge.
4. Move the hinge pin J to the other hole in the hinge
using 10 mm wrench.
5. Push out the hinge bearings from the old holes in
the door.
6. Take the door apart by removing all screws which
are around the edge of the door.
7. Undo magnet cap D.
8. Remove the cover washer from the magnet position
E on the other side.
9. Screw the magnet tight at E (spring plus washer plus
screw) and insert cover washer in the hole at D.
10. Screw the door together.
11. Remove the plug from the new hole for the hinge at
the upper edge of the door at H. Insert this plug in
the old hinge hole.
12. Knock out the hole at the lower hinge hole K using a screwdriver. Insert the plug supplied in the old hinge hole.
13. Fit the hinge bearings in the new hinge hole.
14. Unscrew the lower hinge and move the hinge pin as shown in Item 5 above.
15. Remove the plastic protection at F and G and place this where the hinge was previously fitted.
16. Tighten the top hinge.
17. Screw in screw B for the bottom hinge a few turns.
18. Insert the lower hinge pin in the door hole. Place the door's top hinge hole on the upper hinge pin. Place the
door and the lower hinge in position in screw B that has already been fitted. Screw in screw C.
19. Adjust the lower hinge so that the door hangs straight. Tighten screws B and C.
20. Refit the lower panel.
Air venting
There are three positions where the air evacuation
can be connected: at the rear, on the right hand
side and on the left, hand side. When the machine is
supplied, one hole at the rear is open. The other
two are covered.
The tumble dryer is supplied with a stub pipe
and a plastic band. (A flexible hose must be
supplied by consumer.)
Fit the air evacuation as follows:
• Push the hose onto the stub pipe
and fasten with the plastic band.
• Remove the cover as necessary.
• Insert the stub pipe with
the hose into the hole.
• Fit the cover to the open hole.
WARNING — To reduce the risk of fire this appliance
MUST BE EXHAUSTED OUTDOORS or the equivalent.
10
If you want to change
the outlet:
• Remove the cover from
the hole where you wish
to fit the hose.
• Fit the stub pipe with
the hose connected
to it.
• Insert the stub pipe into
the new opening.
• Fit the cover to the hole
where the hose was
previously fitted.
Page 11

ASKO Product Warranty
Home Clothes Washers and Dryers
For Residential Installations
Length of warranty
ONE YEAR FULL WARRANTY
From date of purchase
FIVE YEAR LIMITED WARRANTY
One year full plus second through fifth
year limited from date of purchase.
TWENTY-FIVE YEAR LIMITED
WARRANTY
One year full plus second through twentyfive year limited from date of purchase.
For Non-Residentia! Installations
SIX MONTHS FULL WARRANTY
FROM DATE OF PURCHASE
ASKO will not pay for:
A. Service calls to: 1. Correct the installation of the washer or dryer
2. Instruct how to use the washer or dryer
3. Replace house fuses or correct housing wiring
4. Correct house plumbing
5. Cleaning or servicing of the button trap, outlet pump of the washer
6. Cleaning or servicing of the lint filter or condensing unit of the dryer
B. Repair and/or parts for failure of product if washer or dryer is used in other than normal use.
C. Damage resulting from accident, fire, floods, acts of God, alteration, misuse abuse, improper installation
or installation not in accordance with local electrical or plumbing codes.
D. Any labor or shipping costs for parts during the limited warranty.
E. Replacement parts or repair labor costs for units operated outside the Continental United States.
F. Pick-up and delivery. ASKO products are designed to be repaired in the home.
ASKO will pay for:
ASKO replacement parts and/or repair labor to correct defect in
materials or workmanship. Service must be provided by an
authorized ASKO service outlet.
ASKO replacement parts (repair labor costs not included) for any
defective solid state controls, timers, motors, pumps.
ASKO replacement parts (repair labor costs not included) for the
stainless steel inner and outer drum/tub if it fails to hold water
due to a manufacturing defect such as cracking or rusting.
ASKO replacement parts and/or labor to correct defect in
materials or workmanship. Service to be provided by an
authorized ASKO service outlet.
________________________________
IN NO EVENT SHALL ASKO INC. BE RESPONSIBLE FOR ANY INCIDENTAL OR CONSEQUENTIAL DAMAGES.
Some states will not allow the exclusion or limitation of incidental or consequential damages, so this exclusion
or limitation may not apply to you. This warranty gives you specific legal rights and you may also have other
rights which vary from state to state.
For warranty service, contact the dealer from whom you purchased the unit or an authorized ASKO service
outlet. Service will be provided during normal business hours. Should you have a service problem that is not
resolved locally write:
ASKO USA INC.
P.O. Box 851805
Richardson, TX 75085-1805
11
Page 12

When the dryer has stopped;
• Remove the washing.
• Clean the lint filter
(see Page 5).
• Turn off the power at the
We reserve the right to make changes.
Do not tumble dry items
labeled "Drip Dry", "Line Dry"
or "Dry Flat".
Clean the lint filter each time
the machine has been used.
It is not permitted to make any
changes to the specifications of
the machine without the written
permission of the manufacturer.
Art.nr 80 580 22
ASKO CYLiNDA 96-08
 Loading...