

Page 1
How to
"'ÎÎian/ Cycles
your
-Шз
Page 2
Contents
Important Safety Instructions 2
Parts and Features 3
What can be washed 5
Preparing Dishes 6
Loading Dishes and Flatware 6
Water Temperature 8
Dishwasher Detergents 8
Rinse Aids and Dispenser 9
How to Operate Model 1653 10
Energy Saving Tips 11
Safety 12
Front Panel Installation 12
Maintenance 13
Troubleshooting 14
Poor Results and Remedies 15
Warranty and Service Information 19
Review 20
Important Safety Instructions
WARNING: When using your dishwasher, follow basic
precautions, including the following:
1. Read all instructions before using the dishwasher.
2. This dishwasher must be properly grounded: see
installation instructions for details.
3. Use the dishwasher only for its intended function.
4. Use only detergents or rinse aids recommended
for use in a dishwasher, and keep them out of
reach for children.
5. When loading items to be washed:
a. Locate sharp items, so that they are not likely to
damage the door seal.
b. Load sharp knives with the sharp points down
to reduce risk of cut-type injuries.
6. Do not wash plastic items unless marked "dish
washer safe": or the equivalent. For plastic items
not so marked, check the manufacturer's recom
mendations.
7. Do not touch the heating element during or im
mediately after use.
8. Do not operate your dishwasher unless all
enclosure panels are properly in place.
More about SAFETY on page 12
9. Do not tamper with controls.
10. Do not abuse, sit on or stand on the door or
dish rack of the dishwasher.
11. To reduce the risk of injury, do not allow
children to play in or on a dishwasher.
12. Under certain conditions, hydrogen gas may
be produced in a hot water system that has
not been used for two weeks or more. Hydro
gen gas is explosive. If the hot water system
has not been used for such a period, turn on
all hot water faucets and let the water flow
from each for several minutes. This will re
lease any accumulated hydrogen gas. Since
the gas is flammable, do not smoke or use an
open flame during this process.
13. Remove the door to the washing compartment
when removing an old dishwasher from
service or discarding it.
More about SAFETY on page 12
Page 3
Specifications
Height
Width
Depth
Weight
Capacity
Water
pressure
Power
Eiement power
Max loading
32 1/4"-34 1/4" (850-870 mm)
23 1/2" (595 mm)
22 7/16" (570 mm)
103.4 lbs (47 kg)
12 international place settings
18-176 PSI
120 Volts, 60 Hz, 20 Amps
1800 Watts
2050 Watts
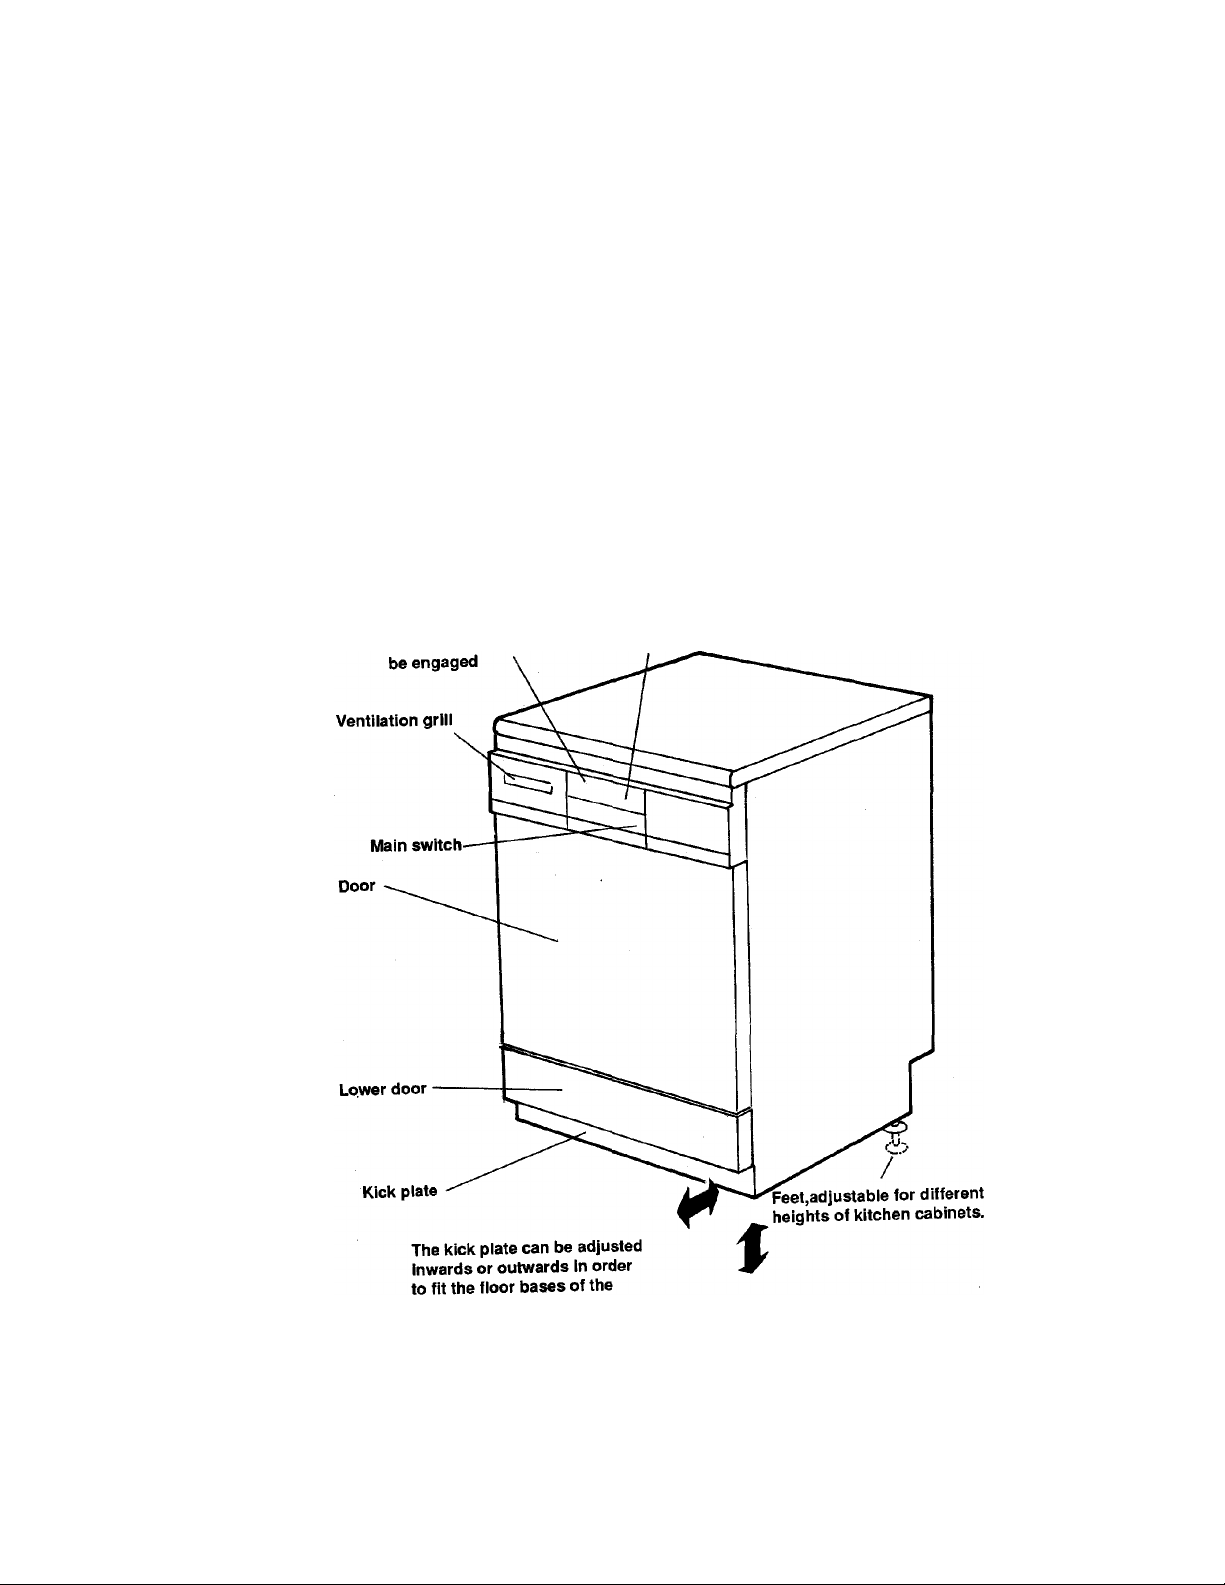
Parts and Features
Child safety catch can Door latch
Water consumption:
Heavy wash 6.6 gal (25 liters)
Normal wash 5.3 gal (20 liters)
Light wash 3.9 gal (15 liters)
Cabinet opening:
Height 32 1/2--35" (825-890 mm)
Width 23 5/8"-24" (600-608 mm)
Depth 22 7/16" (570 mm)
kitchen cabinets.
The kick plate can be adjusted up or down to lit
the height of the kitchen cabinets
Page 4
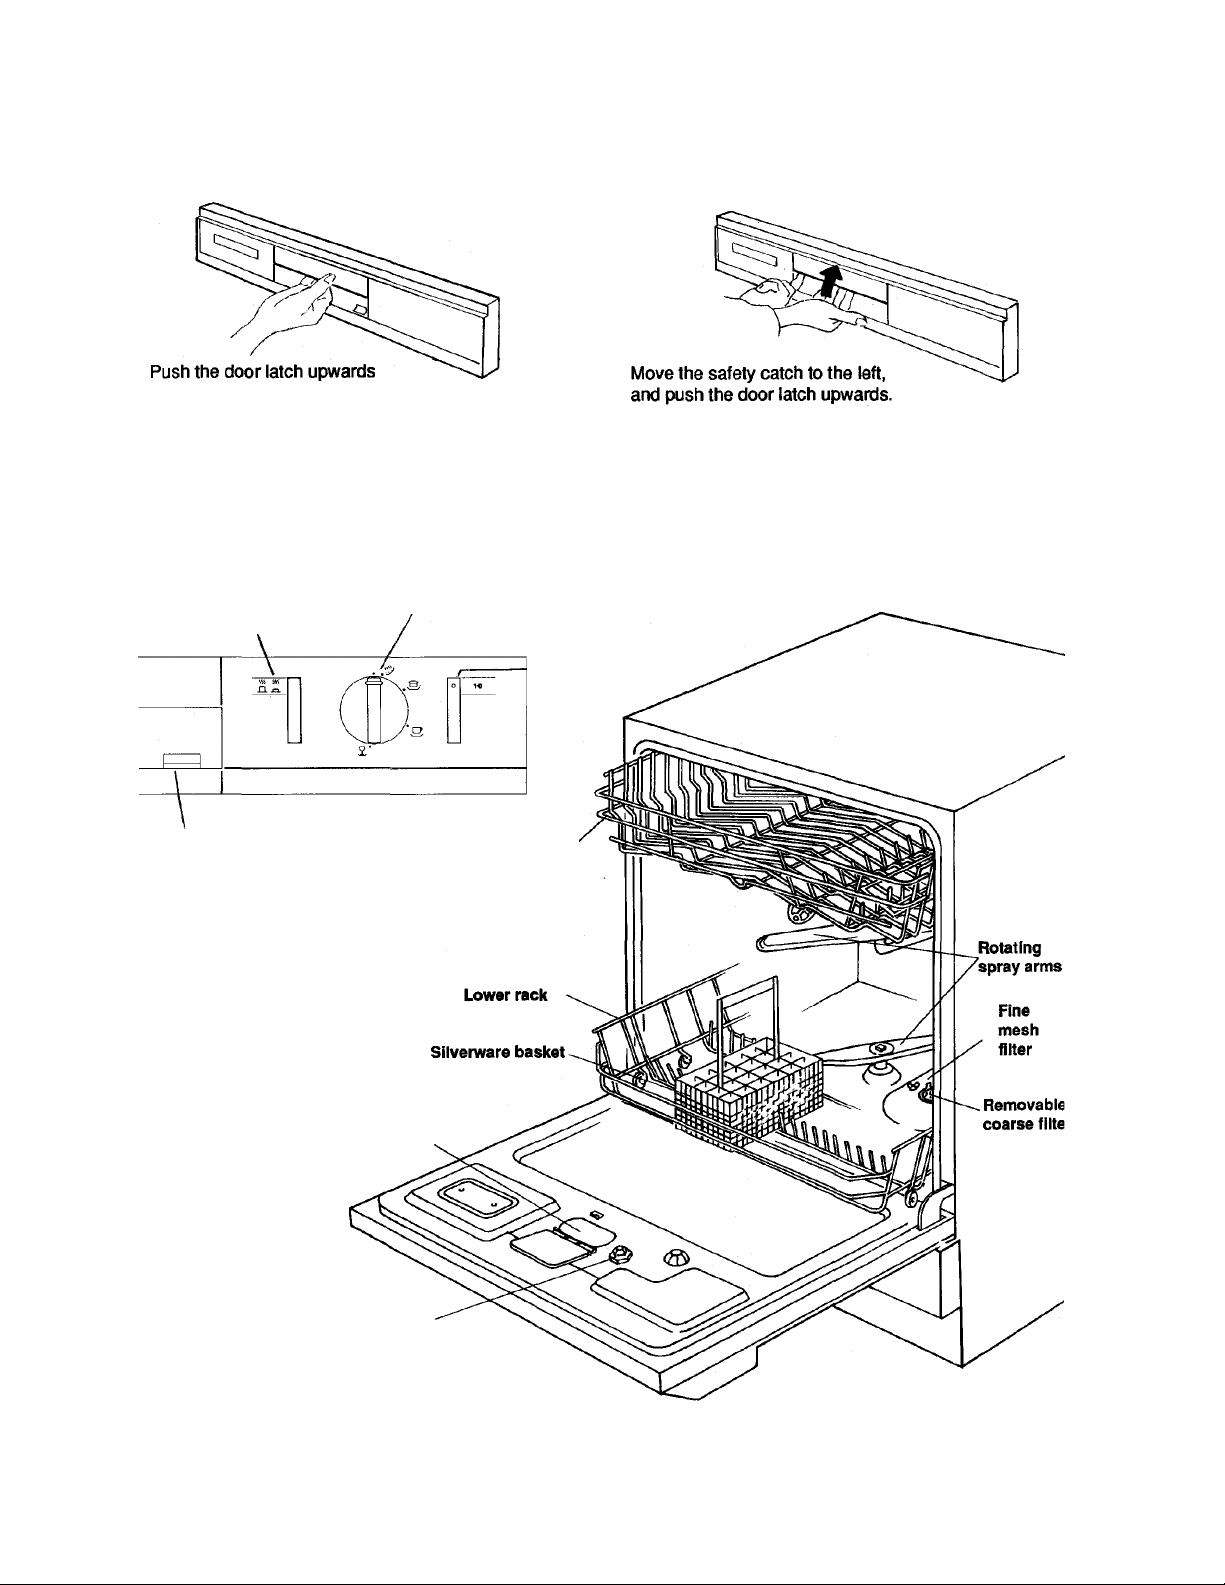
To open the door
Program panel
Heat /No heat dry switch
Press in for No Heat Dry
If the child catch has been engaged:
For more information on the child
safety catch, see ’’safety” page 12.
Sani Cycles
Program Control Knob
Main power
indicator light
Main on/off switch
Press in to turn power on and off
Compartment for
detergent, main
wash
Rinse aid dispenser with
adjustment indicator. See
page 9.
Upper rack
Page 5
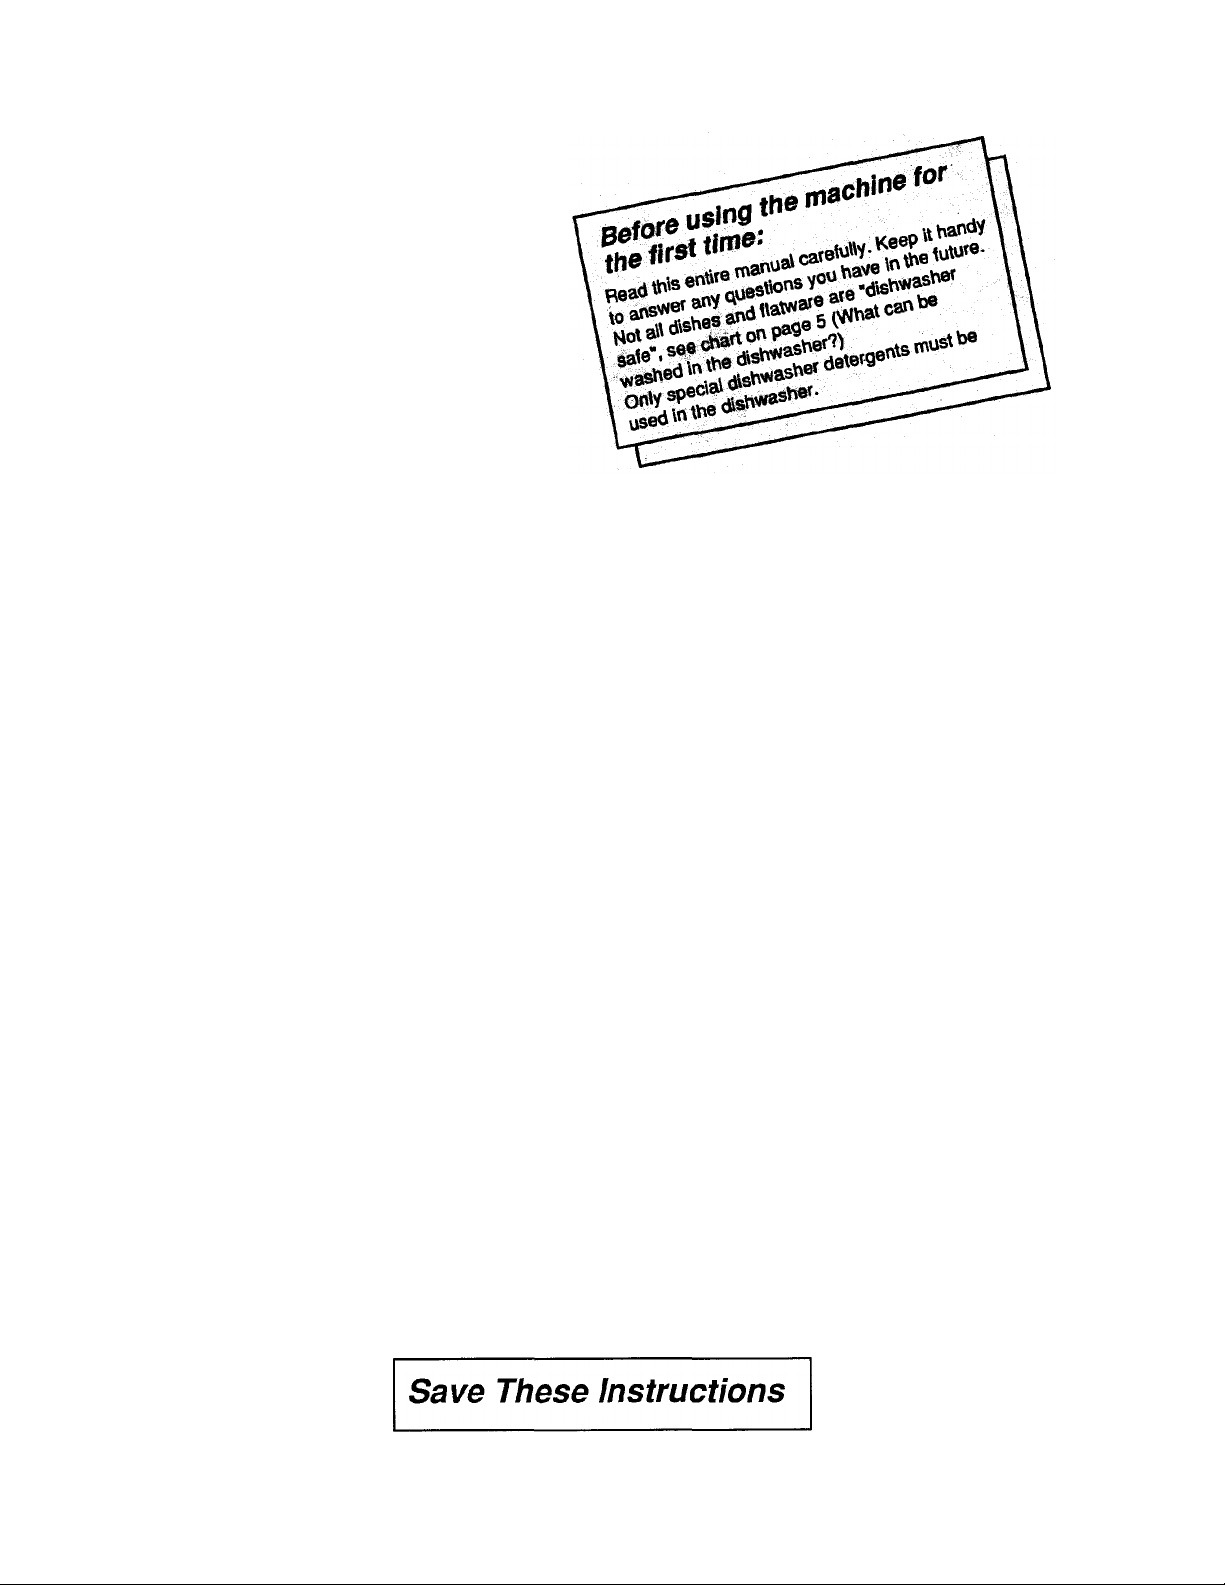
What can be washed in the dishwasher?
Most household goods such as plates, saucepans and flatware can be machine washed. If you are unsure, check with
the manufacturer or, if this is not possible, wash one item of a set over an extended period and then compare it with the
rest of the set.
The user is responsible for what he or she washes in the dishwasher.
Material
Dishwasher
safe?
Aluminum Yes
Cast iron
China
No
Yes
Stoneware
No
Crystal
Dirilyte
Glass
Flatware
Yes
No
Yes
No
with bonded
handles
Pewter
Disposable
No
No
plastic item
Plastic
Stainless
Yes
Yes
steel
Information
Anodized aluminum may fade or darken. Patches and discoloration may appear but these can be removed
with wire wool. Remember not to position aluminum utensils so that they can come in direct contact with the
dishwasher detergent since this may result in black spots and small erosion holes.
The seasoning is lost and the iron rusts. Hand wash.
China without decor or with decor protected by glaze is dishwasher safe. Remember however to place the
objects so they are not in contact with each other, othenwise they can be damaged
China with a pattern on top of the glaze, or with gold leaf decor may fade. Check with the manufacturer. If
this is not possible, try with one of the items over an extended period. Then compare its colors and pattern
with the rest of the set.
Antiques and very delicate china should not be washed In the dishwasher.
Place the Items so that they cannot fall over or knock against each other while being washed.
Certain types of lead crystal may etch if they are machine washed. Check with your supplier.
Refer to china above for colored patterns or gold leaf decor. Antiques and very delicate items should not
be machine washed.
Use a low wash temperature.
Gold-colored flatware can become discolored.
Milk glass may become yellowed.
Certain types of adhesives cannot withstand machine washing and may loosen.
Pewter tarnishes.
Cannot withstand machine washing.
If the item is not marked "Dishwasher safe", test one of the items before the whole set is washed.
Place plastic items in the top basket. Use drying without heat.
Rinse the items if they are not going to be washed immediately. Salty or acidic foods can stain if left on. Dry
dishwasher detergent can also produce black marks which are difficult to remove.
Do not let copper items come in contact with stainless steel. Do not mix different types of stainless steel.
Silver and
silver plate
Non-stick
coatings
Tin
Wood
Non-dishware
ilems-such as
electronic air
cleaner filters,
furnace filters,
paint bnjsh, etc.
Sharp kitchen
(carving) knives
Yes
Yes
No
No
No
No
Rinse the items if they are not going to be washed immediately. Food which contains a lot of salt or acids
produces marks. Dry dishwasher detergent can also product black marks which are difficult to remove.
Do not put in same silvenvare basket with stainless steel. Contact between the metals can damage silver.
Do not wash copper utensils in the same load. Silver may get a brown film. Adhesive used to attach some
hollow-handle knives can loosen.
After washing, wipe the non-stick coating area with vegetable oil to keep it from loosing its non-stick quality.-
Can rust.
Check the manufacturer's recommendation before washing. Vtfood can warp, crack or loose its shape with
any kind of washing.
Do not wash in dishwasher. Damage to dishwasher may result.
May become dull if washed in very hot water or allowed to contact other items during the washing process.
Wood handles may also warp, crack or loosen. Check manufacturer's washing instructions.
Page 6
Preparing dishes for washing
It is not necessary to rinse normal food soils off the dishes before putting them in the dishwasher although
larger solid particles, such as bones, seeds, skins, pits and toothpicks, should be removed.
If you are not going to run the dishwasher immediately after loading it, it is best to first rinse salty and highly
acidic foods off stainless steel, silver and silver plate flatware. Prolonged contact of foods, including lemon
juice, salt, vinegar, mustard, mayonnaise and salad dressings, with stainless steel can cause corrosion
(pitting).
If dishes have baked-on or burned-on foods, they may need to be soaked in a solution of one tablespoon
dishwasher detergent per quart of hot water. (Do not soak silver items. It will cause black spots on silver.)
Loading the dishwasher The top rack*
The top rack is best for glasses, cups, bowls, small plates and saucers. To provide the best results, load all items so
that the force of the water and detergent reachs soiled surfaces.
Arrange stemware between prongs so that it cannot move easily. Do not let china, crystal and other delicate items
touch each other during dishwasher operation. The top rack is also best for dishwasher safe plastics. Make sure
small plastic items are held firmly in place. Small bowls, pans and other utensils can also be placed in the top rack.
Make sure the movement of the spray arm is not blocked by items hanging below the rack. Long utensils may also
be placed in the upper rack. Make sure knives do not touch other items or they may become dull. Also, make sure
the sharp edges do not damage the graphite nylon coating of the rack.
With the shelf In a fold down position
cups can be placed on it as well as
under it. There is space for full glasses
with the shelf In the raised position.
All soiled surfaces must be
facing downwards and In
towards the center.
Page 7

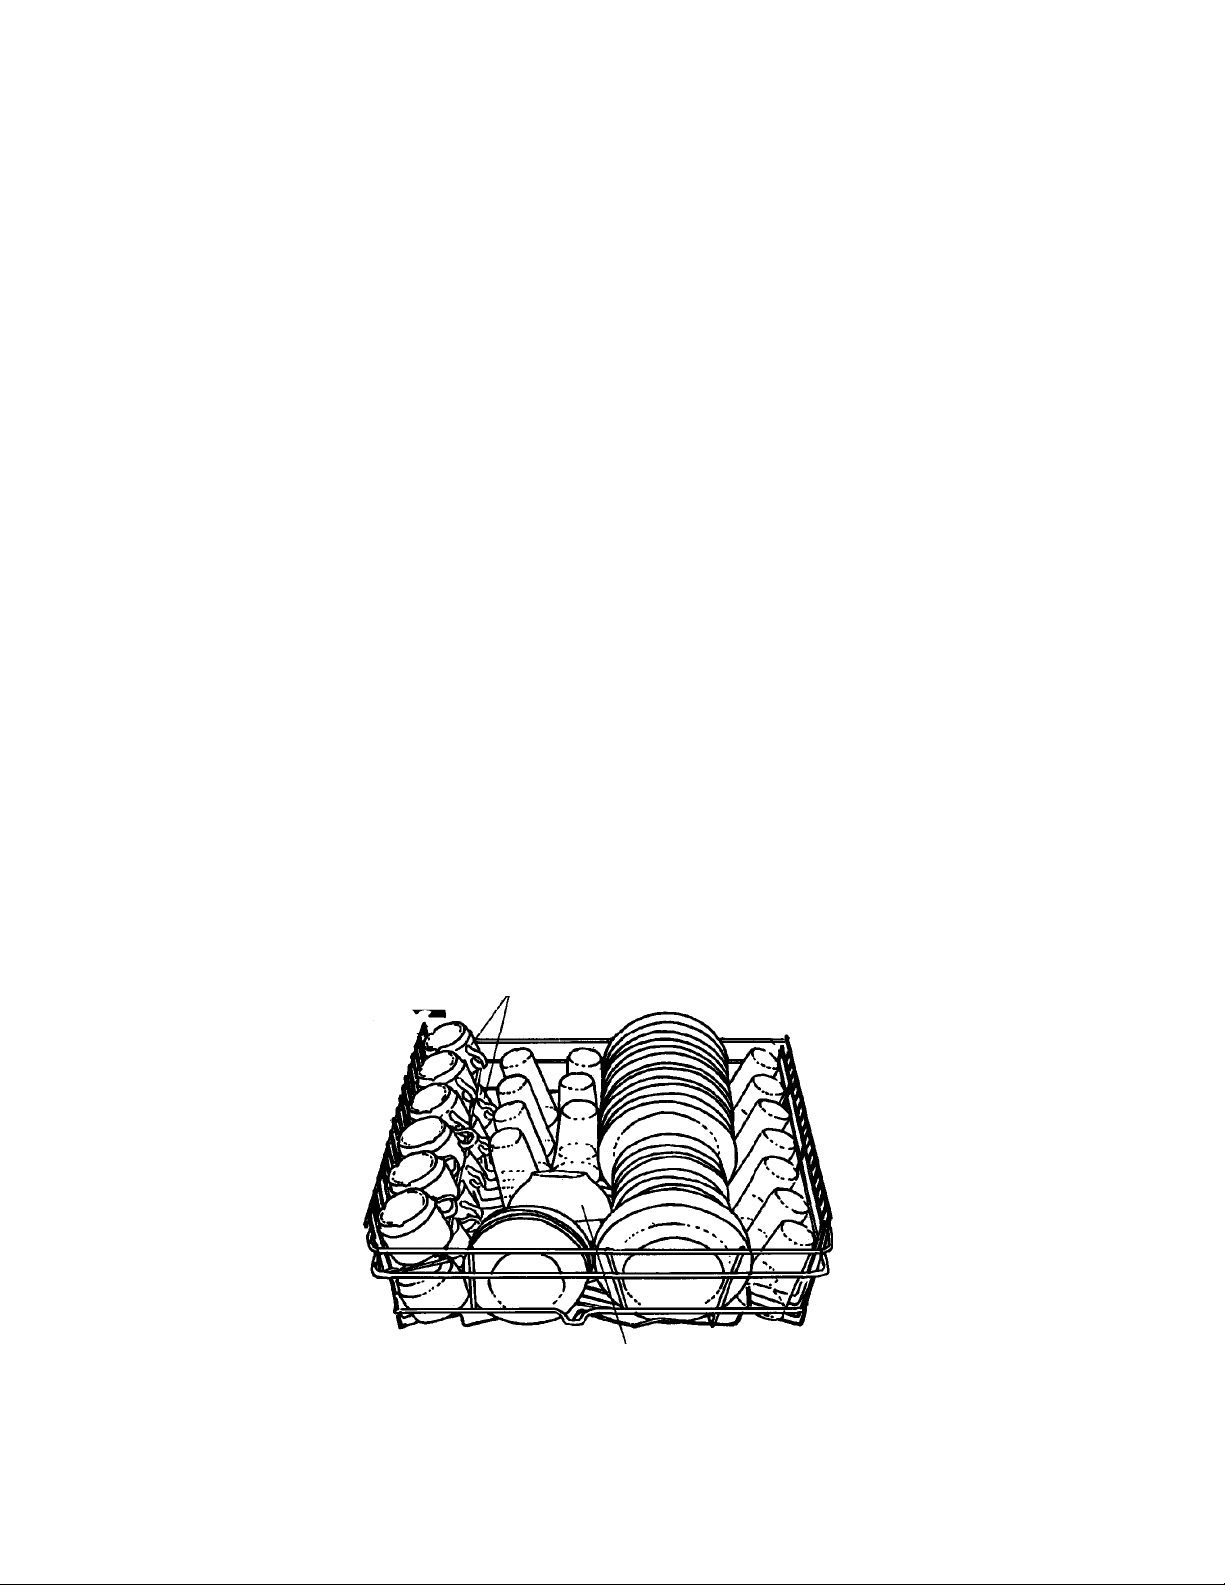
The bottom rack*
Place dinner plates, smaller plates, serving plates,
larger bowls and pans in the lower rack. The lower
spray arm sprays up with a more powerful pressure
to clean more heavily soiled items.
Make sure pot handles and other items do not stop
rotation of either spray arm by hanging below the
rack or by sticking up too far. Securely place
heavily soiled cookware facedown in the rack.
The silverware basket*
Arrange flatware in the silverware basket with handles down.
Sharp or pointed items, such as knives, should be put in with the
point down to protect your hands. Distribute items evenly and
mix knives, forks and spoons so that items won't nest together.
Take out anything, such as long meat knives or skewers that
might fall or extend through the bottom of the basket. Do not put
sterling silver or silver-plate flatware in the same compartment
with stainless steel. Contact between the metals can damage
silver. It is also not advisable to place stainless steel of different
qualities close to each other. Load sharp knives so that they are
not likely to damage the door seal.
* Also see pages 5,15-18 ("What can be washed in the
dishwasher?" and "Poor dishwashing results?")
Extra quiet operation hints
Your dishwasher has been designed and engineered to not only give superior cleaning results, but also to
operate extremely quietly. To avoid any extra clattering or thumping noises during operation:
• Keep sink drain plugs inserted during dishwasher operation to prevent noise transfer through drains.
• Load dishes so they do not touch another.
• Make sure light weight items are secured in the rack.
• Make sure pot lids and handles, pizza pans, cookie sheets, etc., do not touch interior walls or interfere with
either of the spray arms'rotation.
Page 8

The importance of hot water
Hot water dissolves and activates dishwashing detergent, dissolves grease on dishes and helps glasses dry
spot-free. Your dishwasher has a 1400 watt heating element to heat the water to the designated settings of HI
(150 degrees) and LO (130 degrees).
To obtain proper washing results, a varying temperature of the water is necessary. Extremely hot water is good
for normal to heavily soiled dishes, pots and pans. Washing lightly soiled items, such as glasses and pre-rinsed
dishes. It requires a tower water temperature to do an adequate job. Since extremely high temperatures can
damage fine china or delicate crystal, use the tower temperature settings for these items.
If the incoming water is extremely cold, due to unusually cold temperatures outside, if you've recently done
laundry or run hot water for showers, or if your water travels a tong distance from the water heater to the dish
washer, the running time of the dishwasher may be longer to allow for a heating-up period for the water.
Checking the wash temperature
To get the best possible result, the water should be warm enough. It does not matter if the temperature of the
incoming water is tow since the machine has an element which heats the water to the required temperature.
You can, however, check that the temperature of the incoming water is not too high as follows:
1. Turn on the water faucet to the highest temperature possible and let the water run into the sink.
2. Place a dish or other object in the sink and let the water fill it and run over for at least a minute.
3. Measure the temperature with a meat thermometer or similar device. The temperature should not be higher
than 140°F (60°C).
4. If the temperature is too high, adjust the setting on the hot water heater.
Warning!
Dishwasher detergent is corrosive.
Dishwasher detergents
Use only dishwasher detergents
Use only a detergent designed for an automatic dishwash
er. Never use soap, laundry detergent or hand washing
detergent in your dishwasher, as they are too mild and will
cause severe over sudsing and possible leaking. The foam
produced prevents the machine from working properly.
How much Detergent to Use
The amount of detergent you use depends on
the hardness of the water and on the cyotfi
you select.
Keep out of the reach of children.
If swallowed, drink plenty of milk or water.
Do not induce vomiting.
Seek medical advice without delay.
If dishwasher detergent gets into the eyes, rinse
immediately with plenty of water.
Water hardness
Grains per Gallon
Soft water
0-4 gpg
Med. hard water
4-8 gpg
Hard water
8-above gpg
Amount of detergent
(Powder or Liquid)
1 tablespoon
1-2 1/2 tablespoons
2 1/2-4 tablespoons
Hardness of water
Water has a different "hardness", or mineral content, in different locations. The hardness is measured in grains
per gallon (gpg). Find out your waters' hardness by asking your local water department, county extension
agent or water softening company. Ask how many "grains" of hardness are in your water.
The harder the water is, the more detergent you need. For the recommended detergent amounts to use with
your water, follow the guidelines on :he above chart. With hard water, you need more detergent to get dishes
clean. With soil water, you need less detergent.
Too much detergent with soft water can cause "etching", a permanent cloudiness of glassware.
If you have "hard" water, the dishes as well as the machine itself may accumulate a grey deposit after some
time. This deposit can be remedied by using a mild citric acid solution instead of detergent in the heavy wash
program. (See also "Poor dishwashing results?" pages 19 to 22).
Page 9

Cycle selection
Rinse and hold
No detergent
Pots and Pans
(Heavy Wash)
Normal Wash
Delicate
(Light Wash)
Adding the detergent
• Use no detergent for Rinse and Hold.
• Detergent should be poured loosely on the
inside surface of the door for the Prewash in the
Pots and Pans program and Normal Wash.
• For all other programs with a main wash, pour
detergent into the detergent compartment. Close
the cover when you have put in the correct
amount of detergent.
• Put the detergent on the door (if necessary)
and detergent compartment just before you start
the dishwasher to make certain it is fresh.
Storing the detergent
• For best results, keep your detergent container tightly closed after each use, out of reach of children , and
stored in a cool, dry place. Storage under the sink is not advisable for powdered detergents, because this area
is generally too warm and moist to keep detergent fresh.
• If your detergent gets old or lumpy, throw it away. Old detergent looses its strength and lumpy detergent may
not dissolve.
>
>
Detergent on door for prewash plus detergent in
compartment for main wash.
Detergent on door for prewash plus detergent in
compartment for main wash.
Detergent in compartment for main wash only.
Note: Close cover after you have added the detergent
Rinse aids
A rinse aid causes water to flow off the dishes quicker, preventing droplets that dry as spots and making the
drying process faster. Rinse aids come in solid and liquid forms. Your dishwasher's rinse aid dispenser uses
the liquid form. For the best results, use a liquid rinse aids only if you have moderately hard to hard water.
Rinse aids used with soft water can cause a cloudy film on dishes.
Filling the rinse aid dispenser
The drying sequence is quicker if you use rinse aid. In the middle of
the filler cap there is an inspection eye (see picture to right). If the eye
is completely black there is sufficient rinse aid in the container. If the
eye is clear more rinse aid needs to be added.
Use of rinse aid may not be necessary if you have a water softener.
Adjusting the dosage of the rinse aid
The rinse aid dosage is set by the manufacturer and is dispensed automa
tically at the end of a wash program.
If necessary the rinse aid dosage can be adjusted by inserting a screwdri
ver inside the filler hole where the adjustment device is set on "1". How
ever when using hard water (above 8 gpg) a rinse aid containing citric acid
can be used. Under these circumstances the dosage can be increased by
setting the dial to "3" or "4".
Note: Too much rinse aid is not advisable as this might result in the
formation of foam, especially if the machine is connected to cold water
SUDOlv.
Inspection eye -
Page 10

How to use your 1653
Before Operation Review
1. Load the dishes properly.
2. Add proper amount of detergent. Close the detergent
compartment cover.
3. Make sure that the rotating arms can move freely.
4. Make sure the water supply faucet is open.
5. Close the door tightly, otherwise the dishwasher will not
start. Press firmly until you hear a click.
Which setting to use?
Rinse and Hoid
This program provides a single, unheated rinse to be used when
waiting to start a complete wash cycle. For example, it is useful in
rinsing salty or highly acidic foods off stainless steel, silver and
silver plate if you are not planning on running the dishwasher
through a wash cycle immediately after loading such items.
Pots and Pans (Heavy Wash)
This Sani Cycle setting includes two prewashes for extra cleaning.
Use it for cleaning heavily soiled items, such as pots, pans and
baking dishes.
Normal Wash
Use this Sani Cycle setting, with its single prewash, for normally
soiled dishes.
Delicate (Light Wash)
This Sani Cycle setting, with prewash, is used for washing lightly
soiled and/or delicate items.
Heat / No Heat Dry
You may select heated or ”No Heat” drying with any wash cycle.
Dishes will dry more completely with heated drying, however
nonheated drying is more economical. When using "No Heat Dry”,
the dishwasher will go through the same, entire timed drying cycle,
but with no added heat.
Heat Dry No Heat Dry
Program
Rinse and Hold
Pots and Pans
(Heavy Wash)
Normal Wash
Delicate
(Light Wash)
• Turn on the • Select Heat Dry
power switch or Not Heat Dry
Sani
Cycle
Symbol
Prewe
□
s
£
= Working cycle
without heat
□ [
[
Sanitizing effects of Asko Modei 1653
with Sani Cycies
Model 1653 Asko dishwasher has been designed to maintain a minimum water temperature and time duration
for single tank, stationary rack, single temperature, door type machines. Temperature and time of the 1653 is
designed to meet sanitization requirements which specify a minimum of the following.
Water temperature
The 1800 Watt water heating element is controlled by a 170°F (74°C) thermostat in both the main wash and final
rinse portions of the wash cycles. This insures that the wash and rinse temperatures exceed a minimum of 165°F.
10
Page 11

Turn the control knob to either
Rinse and Hold or one of the
wash settings. The dishwasher
wiil start.
Main Power Indicator Light
Want to change your mind?
If you want to change a program after you have started the machine,
select a new program by turning the program control.
If you want to stop the machine during a wash cycie
for instance in order to add more dishes
Press the door latch upwards. Then wait until the sound of circula
ting water stops and the spray arms stop rotating. Then open the
door and add the forgotten item. Press the door closed completely.
The cycle will continue from the point where it was interrupted.
Items should be added during the prewash or as early as possible
during the main wash cycle for the best results.
If you turn off the machine at the main on/off switch
(or if there is a power failure) before the program has finished, the
program will continue when power is restored.
When the wash is finished
• When the machine has stopped, it consumes only an extremely
low current. To turn it off completely, turn off the main on/off
switch.
• The indicator light remains on as long as the switch is in the On
position. It is a good rule never to leave a switched-on machine
unattended.
• Empty the coarse filter and occationally check the fine mesh filter
if necessary.
sh Main Wash Rinses Drying
---- ---
Zl
J
1
□ E3
I IM
□ O
: Water is heated
to 170°F (74°C)
State and local sanitization codes and ruies
You will find sanitization codes and rules available from your State Health Department. They will usually be found
in the Mechanical Cleaning and Sanitization section fo the Food Service or Food Sanitization Rules. Some states
have separate rules for Bed and Breakfast establishments. Be sure to check the rules for your particular
application. The rule will appear somewhat like this:
Machines using hot water for sanitizing may be used providing wash water and pumped rinse
water be kept clean and water shall be maintained at not less than the temperature stated in
this section of the rules.
a. Single-tank, stationary-rack, single temperature machine:
The 1653 has been designed to meet or exceed rules which require the above sanitizing standards for commer
cial applications of dishwashers, these regulations may vary from state to state. Should you have any questions
regarding this unit meeting the requirements of a specific application, please consult your area Public Health
Department.
= You select Heat
or No Heat Dry
A. Wash temperature 165°F
B. Final rinse temperature 165°F
How to save energy
Only start a wash when the machine
is compieteiy fuii
In order to save energy, it is best to wait until you have a full load
thus saving energy.
Seiect a program without drying heat
If you select a program without heated drying, the dishes will take
somewhat longer to dry. However, if you open the door during the
drying sequence to release the humid air the dishes will dry quicker.
(Note: Do not open the door during a heated dry cycle or the cycle
will be interrupted and the heating element will not come back on.)
11
Page 12

Safety
Door switch
Level control
Child safety catch
The machine is equipped with a door switch, breaking the current and internipting the
wash cycle if the door is opened while the machine is in operation. The door is also
equipped with a child safety catch (see text below).
Furthermore the machine is equipped with a level control (over flow), automatically starting
the drain pump should the water level reach a level higher than normal. This level control
functions only If the machine is in operation.
The machine is fitted with a child safety catch to prevent children from opening the door
and risking injury from hot water or steam..ll also prevents children from getting at the
corrosive detergent, or sharp knives which may be inside.
o
This is how you engage the child safety catch
Slide the catch to the left, then back
wards and then to the right. To open the
door, hold the catch with your left hand
and pull the main catch with your right
hand in the usual way.
This is how you disengage the child safety catch
Slide the catch to the left, then
fonvards and then to the right.
How to fit a new Front Panel
CAUTION! Turn the power supply to the machine off first.
Lower panel
1. Undo the lower panel by unscrewing the attachment screws at the
2. Remove the screws from the lower decor molding and loosen the
3. Screw the molding in position and tighten the remaining screws.
Fit the upper panel belore refitting the lower panel to the machine.
Upper panel
1. Remove the attachment screws and the molding on one side (ielt
2. Loosen the other screws and pull out the panel carefully.
3. Push in the new one carefully. Screw the molding in position and
4. Refit the lower panel.
12
bottom.
other screws. Remove the panel and replace it with the new one.
or right).
tighten the other screws.
Page 13

Maintenance
The inner casing of the machine is manufactured of
stainiess steei and kept clean in the course of normal
use. From timé to time the fine mesh filter should be
removed for cleaning. The machine may be cleaned
after a period of inactivity or wrong adjustment by
adding a tablespoon of citric acid crystals to a wash.
The wash arm holes and bearings
can be clogged by dirt. Remove the plastic
locks on top of the flushing arms and lift
them off. Use a needle or similar device to
push the dirt out of the holes.
The fine filter
Litter being collected in the fine filter is
automatically flushed off at each run of the
machine. If the net of the fine filter is
ctogged, e.g. by lime sediment or dirt, it
must be cleaned. This cannot always be
seen on top of the screen. Therefore
remove the filter now and then and check
the underside. Remove the 2 retaining
screws and lift up the fine filter. Use a brush
to clean it. When installing the fine filter
again, make sure that the edges of the filter
seal properly against the bottom. This will
prevent food particals from getting into the
circulation pump.
The lower strainer
If the lower strainer, too, is dirty, it can be
removed and rinsed clean. It is clipped into
position, and can be removed by squeezing
the "ears“ and pulling it straight upwards.
Make sure that the clips are properly located
when replacing the strainer.
Air gap
To prevent dirty water from being sucked back
into the dishwasher, certain? local plumbing
codes demand that you install an Air Gap. This
is not part of the dishwasher however, but is part,
of the plumbing.
It is very Important to keep the Air Gap clean.
You should check it at least once a week to
make sure that it is working as it should. If this is
not the case, lift up the chrome cover and plastic
cap, and clean with something suitable like a
toothpick.
The coarse filter
Retaining screws
Always check the Air Gap first if the drain beco
mes blocked and there is water left in the dishwas
her.
Large food left-overs, which cannot
pass through the drainage pump,
are collected in the coarse fifter. Lift
out and empty the coarse filter when
necessary. Don't forget to put it
back again. It is normal for a small
amount of water to remain in the
coarse filter area.
Note that Air Gap is not part of the dishwasher
and Is not covered by this warranty!
How to clean the pump
Unscrew the bottom front plate and the kick-plate.
Unkink the drain pump line.
MM Remove the plug from the pump's draining hose.
Water left in the pump will then drain out.
Therefore hold a bowl under the hose.
Then loosen the pumphousing lid by moving the
locking-bolt upwards(colored arrow). Move the lid
sideways and clean the pump.
Replace the pump housing lid. Be sure drain house is in
the downward position. Fold the drainline up so the plastic
end does not rattle on the bottom base pan.
17
Page 14

Trouble shooting
A simple fault may prevent the machine from working. You may be able to
remedy this yourself. Trace the fault with the help of the points listed below.
Also, be sure to read "Poor dishwashing results?", pages 15 to 18 for more
problems, possible causes and suggested remedies.
There is water left In the machine
If the machine is taking in too
much water, the drainage
pump starts automatically. If
the water, in spite of this, is
not drained off, it might de
pend on any of the following
reasons:
The filter system Is clogged
Lift out the coarse filter and
empty it. Place back in
dishwasher before starting.
Air Gap
If the machine is equip
ped with an Air Gap, see
Page 13. Be sure the air
gap is not blocked or
plugged.
The drain hose has a fold
Check to make sure that
there are no folds or sharp
bends on the drain hose.
The pump is blocked
Pieces of bone or other
foreign particles might be
stuck in the drainage
pump. The picture below
shows you how to clean
the pump.
The drain hose Is clogged (blocked)
Check to make sure that there are no
obstacles in the hose where it connects to
the water lock. Foreign particles can get
stuck in the entrance of the connection
line, see the picture. Also check to make
sure that the cone-shaped connection line
has been cut to an inner diameter of at
least 3/4" (15 mm).
Check for a kink in the drain hose.
The machine does not start
If the machine does not start it might depend on any of the following reasons:
Push in main on/off button. Main Power @ A fuse has blown. Check the circuit breaker.
Indicator Light will come on.
The door is not closed completely.
14
© The plug-in contact is not inserted in the wall socket
or is wired incorrectly.
Page 15

Poor dishwashing results
Try the following remedies:
Poor resuits may not always be caused by the machine. Read through the chart below before contacting your
servicer.
Problem
Spotting and
filming
Possible Cause
Hard water
Filter system Check filter system to be sure it is clean and properly installed.
No rinse aid
Water not hot
enough
Too little water Check that the water valve is fully open. Make sure thaf the wafer
Suggested Remedy
Use the maximum recommended amount (3 tablespoons) of dishwasher
detergent. You may need a home water softener.
To remove hard water spots, try a vinegar rinse:
• Wash and rinse load as usual.
• Remove all metal items from dishwasher.
• Do not add detergent.
• Pour two cups of vinegar into a bowl and set it on the bottom rack of
the dishwasher.
• Run the dishes through an entire wash program.
If the vinegar rinse doesn't work, repeat the above process substituting
1/4 cup citric acid crystals (available at most drug stores) for the vinegar.
Wiping with a damp cloth should remove spots from metal items. For
sterling and silver plated flatware, rub with a towel, or use a good cream
silver polish.
Does the rinse aid dispenser need to be filled? (Note: Used only in hard
water areas.)
Use the HI water temperature for best results when washing heavily soiled
or greasy items, except for fine china and delicate crystal.
pressure is befween 18 and 176 PSI.
Dishwasher
detergent
Items not loaded
properly
Spray arms rotate
poorly or stand still
Strainer blocked
Excessive loam in
the machine
Flatware incorrectly
loaded
Check the filter in the inlet valve.
Use only the correct amount of dishwasher detergent according to the
hardness of the water and the wash program you have selected. Do not
use old or caked detergent. Store the dishwasher detergent in a dry place
and in a closed container.
Change the dishwasher detergent, if the result is still unsatisfactory.
Check that you have loaded the items according to the instructions on
pages 6 and 7.
Do not overload. Make sure spray can reach all soiled surfaces.
Check that both spray arms can rotate freely and that items do not ob
struct the movement of the spray arms. Lift the arms and make sure that
no grains of dirt etc. retard the rotation of the spray arms. If necessary,
clear the obstruction, refit the arms and check that they rotate freely.
Make sure that the holes in the spray arms are not blocked by dirt. If
necessary, clear fhe holes with a pointed object.
Check the strainer. Clean if necessary. See the instructions on page 13.
Use only dishwasher detergent.
Pay particular attention to spoons so that they do not nest in each other
and prevent water penetration.
15
Page 16

Problem
Possible Cause
Suggested Remedy
Small particles
deposited on
items
Marks and
discoloration
Yellow or brown
marks
Spray arm or arms
not rotating freely
Detergent
Low water
pressure
Improper loading
of dishes
Aluminum utensils
rubbing against
items during
washing
Iron or manganese
in water
Be sure a utensil or handle has not prevented their turning.
Use only fresh detergent, stored in a tightly closed container in a cool dry
place. Fill dispenser only when ready to start the dishwasher. Use the
recommended amount of detergent, especially with hard water.
Check that the wafer valve is fully open. Make sure that the water pressure
is between 18 and 176 PSI.
Load dishes to prevent water and detergent from being trapped in or
between items. Water should circulate freely.
Be sure aluminum utensils, especially light weight foil-type pans, do not
touch dishes.
To remove spots, use a non-abrasive cleaner.
Temporary solution: Pour 1 teaspoon to 1 tablespoon of citric acid crystals
in instead of the prewash detergent directly on the inside of the door.
Follow this preWash with a full detergent wash. Use the heavy wash pro
gram.
Discoloration of
stainless steel,
silver plate or
sterling silver
16
Copper with
sterling silver
Tea or coffee
(tannic acid)
Allowing salty or
acidic foods to
remain on flatware
Stainless steel
contacting silver
Permanent solution: Install an iron removal system in the water supply.
Yellow film on sterling silver results when you wash copper utensils in the
same load. Silver polish will usually remove this stain.
Tea or coffee can stain cups. Remove stains by hand, using a solution of
1/2 cup bleach and 3 cups warm water. (Do not use on sterling silver or
silver plate.)
Rinse flatware that is to stand several hours before washing.
Do not put stainless steel and silver flatware in the same silverware basket
compartment. Direct contact between these metals can cause permanent
damage to silver.
Clean stained items with silver polish.
Do not use abrasives on stainless steel or silver.
Page 17

Problem
Possible Cause
Suggested Remedy
Distortion of
plastics
Marks on mela
mine and plastics
Cloudy film on
glassware-etching
of glass
Dishes not dry
Plastic item has
low heat tolerance
Porous material
Too much deter
gent, especially in
soft water
Rinse aid used
with soft water
Non-heated drying Be sure to select heated drying for the driest results. Allow more drying
Plastics vary in their ability to tolerate heat. Check washing instructions for
all plastic items to be sure they are dishwasher safe. If they are, place in
top rack, away from the heating element.
Use a special cleaner for plastic.
DO NOT use bleach or scouring powder on these materials.
If vinegar or citric acid rinse doesn't remove film, the cloudiness is "etching"
This is permanent. To prevent etching, use the least amount (one teaspoon)
of recommended dishwasher detergent if you have soft water.
Use a good quality dishwasher detergent and rinse aid. Do not overload the
machine. Water should drculate freely to assure adequate rinsing and
draining.
Use drying without heat.
Use rinse aid in hard water areas only.
time when using non-heated drying.
No rinse aid
Plastic items
Improper loading or
unloading
Water not hot
enough
Dry cycle
interrupted
(Door opened too
soon)
Fill rinse aid dispenser. Rinse aids help dishes to dry faster.
(Note: Used only in hard water areas).
Certain plastic materials are difficult to dry. Plastics may need towel drying.
Do not overload or nest items. Be sure all surfaces drain well. Load items
with concave bases so as much water as possible can run off. Unload the
bottom rack first. Water from dishes in the top rack may be spilling into the
bottom rack.
Dishes washed with the HI water temperature setting will dry the fastest.
If the door is opened during the heated dry cycle, the heating element does
come back on after the door is re-closed. If the dishwasher door is opened
immediately after the dry cycle is compieted and then shut again, the dam
per door is closed, trapping warm humid air. It is best then to leave door
open slightly.
17
Page 18

Problem
Possible Cause
Suggested Remedy
Detergent left in Compartment
detergent com- cover blocked
partment
(Detergent com
partment will not
open)
Chipping or
breaking of
glassware
Unusual noise
Water left in
bottom of dishwasher near
filters
Dishwasher will
not drain
Old detergent
Improper loading
Improper loading Utensils may not be secure or something small may have dropped from the
Dishwashing
cycle not
complete
Some is normal
Air Gap
Drain hose
The cover may not be opening because of improperly loaded items. Move
dishes that may be blocking it.
If detergent is hard or caked in the box, throw it away. Use only fresh
detergent. Add detergent to dishwasher right before starting it.
Do not overload. Load between prongs, not over them. Glasses loaded
over prongs will not be supported and may chip or break. Make sure
glassware is secure and can't come loose. Always use the top rack for
delicate items. Use the delicate program for fine china.
rack. Water may cause utensils to rattle. Make sure everything is securely
placed in the dishwasher.
Allow dishwasher to complete cycle.
Water left in removable coarse filter is normal.
Be sure air gap is not blocked or plugged.
Check for kink in drain hose.
Dishwasher will
not start
Dishwasher will
not fill
Water backs up
in sink when
dishwasher
drains
Filter system
Clogged drain
pump
Blown fuse or
tripped circuit
breaker
Door not comple
tely closed
Plugged in incor
rectly
Control on "OFF"
Door open
Controls
Water feed line
Water supply
Garbage disposer
and trap
Be sure there is no blockage in filter system. Remove, clean and place
back in dishwasher before starting dishwasher.
Clean drain pump. See page 14.
Replace fuse or reset circuit breaker. Remove any other appliances from
the circuit.
Close tightly until you hear a click.
Make sure plug-in contact is inserted in the wall socket or wired correctly.
Turn the main on/off switch from "OFF”. Be Sure a cycle has been
selected.
Check that door is firmly closed.
Check that dishwasher is on. (See "Dishwasher will not start" page 14.)
Check to see that the water feed line to dishwasher is not crimped.
Be sure water is available and turned on.
Check garbage disposer and trap at sink for blockage or food particles.
18
Page 19

ASKO Product Warranty
MODEL 1353-1,1374,1474,1504,1653, 760, 770
For Residential Installations
Length of warranty
ONE YEAR FULL WARRANTY
From date of purchase
FIVE YEAR LIMITED WARRANTY
One year full plus second through fifth year
limited from date of purchase.
TWENTY-FIVE YEAR LIMITED
WARRANTY
One year full plus second through twentyfive year limited from date of purchase.
ASKO will pay for:
ASKO replacement parts and/or repair labor to correct defect in
materials or workmanship. Service must be provided by an
authorized ASKO service outlet.
ASKO replacement parts (repair labor costs not included) for any
defective solid state controls, timers, motors, pumps or dishwasher
racks.
ASKO replacement parts (replacement labor cost not included) of
the stainless steel tank or stainless steel inner door panel if it fails
to hold water due to a manufacturing defect such as cracking or
rusting.
For Non-Residential Installations
SIX MONTHS FULL WARRANTY
From date of purchase
ASKO will not pay for:
A. Service calls to: 1. Correct the installation of the dishwasher
2. Instruct how to use the dishwasher
3. Replace house fuses or correct housing wiring
4. Correct house plumbing
5. Clean or service air device in drain line
6. Clean drain pump
B. Repair and/or parts due to shipping and/or handling damage.
C. Repair and/or parts for failure of product if dishwasher is used in other than normal use.
D. Damage resulting from accident, fire, floods, acts of God, alteration, misuse, abuse, improper installation
or installation not in accordance with local electrical or plumbing codes.
D. Any labor or shipping costs for parts during the limited warranty.
E. Replacement parts or repair labor costs for units operated outside the Continental United States.
F. Pick-up and delivery. ASKO dishwashers are designed to be repaired in the home.
ASKO replacement parts and/or repair labor to correct defect in
materials or workmanship. Service must be performed by an
authorized ASKO service outlet.
______
IN NO EVENT SHALL ASKO USA INC. BE RESPONSIBLE FOR ANY INCIDENTAL OR CONSEQUENTIAL DAMAGES.
Some states will not allow the exclusion or limitation of incidental or consequential damages, so this exclusion or limitation
may not apply to you. This warranty gives you specific legal rights and you may also have other rights which vary from
state to state.
For warranty service, contact the dealer from whom you purchased the unit or an authorized ASKO service outlet. Service
will be provided during normal business hours. Should you have a service problem that is not resolved locally write:
ASKO USA INC.
903 N. Bowser, Suite 200
Richardson, Texas 75081
Page 20

Operation review:
washed and add
recommended
amount of detergent.
spray arms can
move freely...
How to choose program:
water supply faucet
is open.
3. Close the door and
choose program.
Start the machine.
Program
Rinse and Hold
Pots and Pans
(Heavy Wash)
Normal Wash
Delicate
(Light Wash)
Drying Selection
Heat Dry
No Heat Dry
Symbol ]
©
S
g
OC
Symbol
n
Art.nr 80 562 48
 Loading...