


IMPORTANT SAFETY INSTRUCTIONS
WARNING: In order to avoid property damage, serious bodily injury or death, it is important that you read, understand and
follow ALL safety instructions. Please keep the safety instructions for future reference.
1.

 WARNING: Always check under and around the chair before lowering from a raised position to make sure no children, household pets or objects are under the chair. Never allow children to operate or play on, under or around
the chair. Failure to clear the area under and around the chair before lowering may result in serious bodily injury, death or property damage. Always store the controller out of reach of children and unplug the chair to prevent children from using the controller.
2. WARNING: To reduce the risk of electric shock, always unplug the chair from the electrical outlet before moving, cleaning or servicing.
3.
 WARNING: To reduce the risk of electric shock, fire, serious bodily injury, death or property damage, only use the chair indoors in locations free of water. The chair should never be used outdoors.
4.
 WARNING: To reduce the risk of electric shock, fire, serious bodily injury, death or property damage, never plug in, use or operate the chair if the cord has been damaged or if the chair becomes wet or has been damaged. Do not use an extension cord with the chair.
5. WARNING: Do not use the chair to store or support any items including, without limitation, televisions or video equipment as such items can fall off the chair and cause serious bodily injury or death.
6. WARNING: Use the chair only for its intended use and in accordance with these Safety Instructions and all other product instructions. Failure to do so may result in serious injury, death or property damage.
7. WARNING: The maximum weight limit of the chair is 300 pounds. Only allow one person to sit on or use the chair and always sit on the bottom seat cushion only. Never sit on the back of the chair, chair arms or leg rest (if equipped). Using or operating chair with more than the maximum weight limit or sitting on a part of the chair other than the bottom seat cushion could damage the chair and/or cause the chair to tip over or collapse resulting in serious bodily injury or death.
8. WARNING: Your chair is equipped with air openings. Always keep air openings free of lint, hair or other blockage. Failure to do so may cause the chair motor to overheat resulting in fire, property damage, bodily injury or death.
9. WARNING: Do not operate chair near or around flammable gases, liquids or vapors. Failure to follow this instruction may cause a fire or explosion resulting in personal injury, death or property damage.
SIGNATURE DESIGN BY ASHLEY® |
All Rights Reserved. |
January,2016 |
Page 1 Of 14 |

8 |
NOTE: YOUR UNIT MAY LOOK DIFFERENT IN APPEARANCE FROM THE ONE SHOWN IN THE ILLUSTRATIONS ON THIS INSTRUCTION SHEET.
NOTA: LA UNIDAD PUEDE PRESENTAR UNA APARIENCIA DIFERENTE DE LA QUE SE MUESTRA EN LAS ILUSTRACIONES DE LA HOJA DE INSTRUCCIONES.
REMARQUE: VOTRE MEUBLE PEUT ETRE DIFFERENT DE CELUI MONTRE SUR L'ILLUSTRATION DE CETTE FEUILLE D'INSTRUCTIONS.
•*L6&%T!M !V5PQ&'PQ()*
5jk:;"<!no!M=
=>!M?@A?+,/5]BZC$?@=
D?E"FGHA2ygIJZ[\KL?MMNO/5PQRSMMTU= VWXYGHZ[/5'N\],^F_`PabZ[GH= !"#$%&' ()=
67RSPO-cAdefFgh/giJKjklm=
5 no-pqLM"#/Prst)*Nuv=
,DE\k)wx:ym/LMN5Ez{|/P}wxbym~• ,!"= 5]/0LM#$wxbcym=
>?@ABC"DEFGH/IHJK/LMN5O-PQRST LMUVO-BWXY=
LMZ[\5]^_BC= LM`abcBdeN/5]fgh(`aiLMi(`a/jklmn
oLM=
5]fIgpq/rqbcstUu"tmi/vwtmxyz{|}~
• =
!M"#\$%&'($LM)*R)*}+,/5x*-./0LM/ v12y3>4}5L67,89=
+,T>?-y./=>!M"#0!M/-y1O!MDE/bc-y1OjkDE2 ,"3[b!"/


 sx4567C= !"#$%&'()*+,-./01234/56789:;< !=
*+, -./0123456789:;<=>?@ABCDEFGH
January,2016
FABRIC CARE INSTRUCTIONS
The fabric covering this piece of furniture is very durable for everyday living. It is recommended by the fabric manufacture to only clean this fabric with water-based cleaning agents or soap. Lightly scrubbing will help with any tougher spots that may have developed. Always check a small spot of fabric in an area that is unseen to be sure the cleaning agent being used will not discolor or fade the fabric’s finishing. Let the chair air dry and vacuum for the best result.
Chair Assembly
Once the chair has removed from the box, you’ll notice the back is lying on the top of the seat. Follow the steps below:
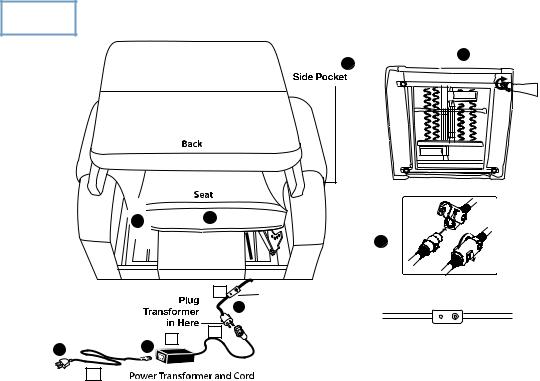
1.Some models have back wings that attach to the back, when unpacking your chair you will find these back wings packed in the back of the chair base, Figure A #1. Please unpack the back wings and set them aside for installation later.
2.Locate the RED plastic bag that contains the power transformer, power cord, four adjustable legs and the control wand. This can be done by turning the base over on its arms, you will see the RED plastic bag tied to the inside of the unit, Carefully cut the ties that hold the bag remove it. Dispose of the ties and bag properly. Figure A #2
3.With the chair still on its back, remove the 4 adjustable legs from the bag and install them onto the base of the chair and then turn the chair upright so it is sitting on the adjustable legs Figure A #3.
4.Remove the control wand from the plastic bag and connect it to the female plug located in the left side pocket of the chair, Figure A #4.
Figure A
3


 4
4
|
21 |
|
1 |
4 |
|
|
|
|
|
|
|
|
D |
Power Button |
|
|
|
|
|
|
|
|
|
5 |
|
|
B |
C |
Power Button |
7 |
6 |
|
||
|
|
|
A
This Class B digital device complies with part 15 of FCC rules. “Operation is subject to following two conditions: (1) this device may not cause interference, and (2) this device must accept any interference, including interference that may cause undesired operation of the device.
5. To install the back, align the female brackets in the back with the male brackets in the chair base, slide the back down on the base. See
Figure B. Push down on the top of the back to lock the back into position. You will hear a click from each side of the chair to ensure the back is locked in properly.
SIGNATURE DESIGN BY ASHLEY® |
All Rights Reserved. |
January,2016 |
Page 3 Of 14 |
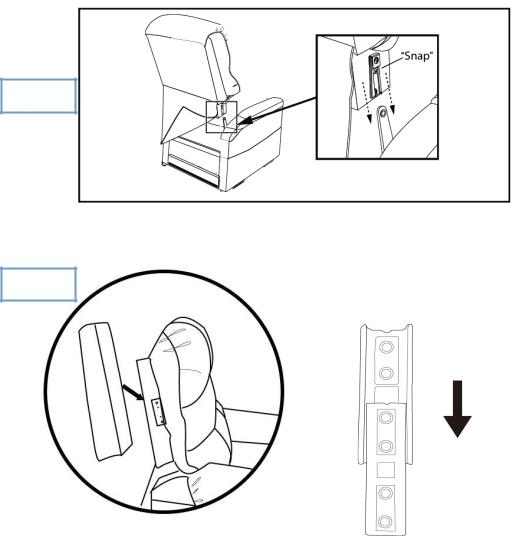
Figure B
6. If your model has back wings, align the male the female brackets and slide the wing down into place, See Figure C
Figure C
7.Connect the Power Transformer cable to the corresponding plug coming from the back of the chair Figure A #5
8.Connect the Power Cord into the Power Transformer Figure A #6
9.Connect the power cord into an electrical outlet near where the chair will be used Figure A #7.

 WARNING: Clear area below chair before lowering to reduce risk of injury or death.
The power button is intended to allow you to disable the chair functions.
To stop the chair from functioning using the power button, press the Power Button so the LED light is off.
If the chair is not functioning, check the plug in and connection of the cords first (The order is A-B-C-D), see the Figure A. If all connections are good, verify the LED is lit on the power button. See illustration on bottom of page Figure A.
Be sure cords are clear from the chair prior to operation.
SIGNATURE DESIGN BY ASHLEY® |
All Rights Reserved. |
January,2016 |
Page 4 Of 14 |
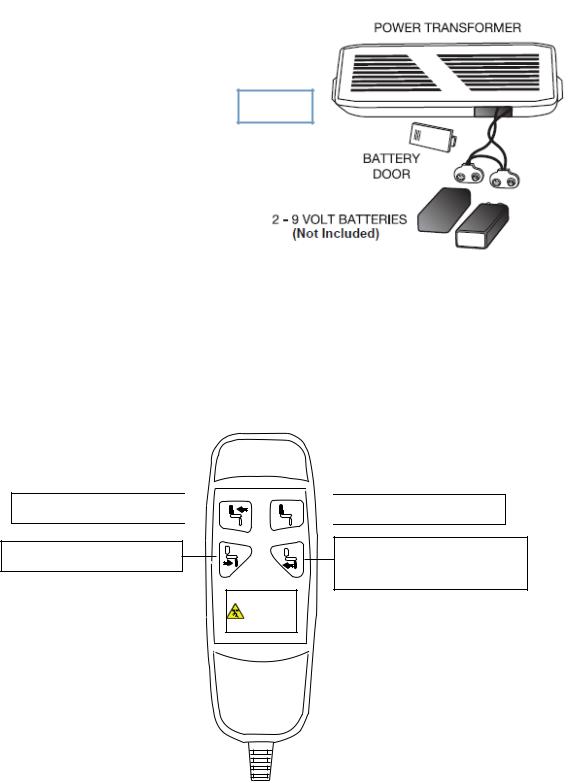
INSTALLATION OF BACK-UP BATTERIES - Batteries not included.
2-9 Volt back-up batteries will operate the chair from the reclined position to the seating position. The batteries will operate one cycle in case of a power failure. Replace the batteries once per year or if used during a power failure
Remove the sliding door on the side of transformer to locate where the 2-9 volt batteries install. Figure D.
1.Install 2-9 volt batteries.
2.Replace door on the transformer.
TROUBLE SHOOTING
PROBLEM
Chair will not operate
Figure D
POSSIBLE FACTORS
Transformer may not be connected
OLUTIONS
Check the transformer has been correctly connected to the socket
Confirm with the wire from chair to transformer is firmly
connected
CONTROL WAND OPERATION
 WARNING: Always check under and around the chair before lowering from a raised position to make sure no children, household pets or objects are under the chair. Never allow children to operate or play on, under or around the chair. Failure to clear the area under and around the chair before lowering may result in serious bodily injury, death or property damage. Always store the controller out of reach of children and unplug the chair to prevent children from using the controller.
Press and hold to recline the back. 
Press and hold to raise the footrest.

 Press and hold to raise the back.
DOWN |
UP |
Press and hold to lower the footrest. |
|
|
Continue to press to raise the lift chair |
|
|
to standing position |
WARNING
Clear area below chair before lowering to reduce risk of injury or death.
SIGNATURE DESIGN BY ASHLEY® |
All Rights Reserved. |
January,2016 |
Page 5 Of 14 |
 Loading...