

Page 1
2000 01 25 /Rev.A 1
User Manual
Transceiver U922 TD 91836GB
User Manual
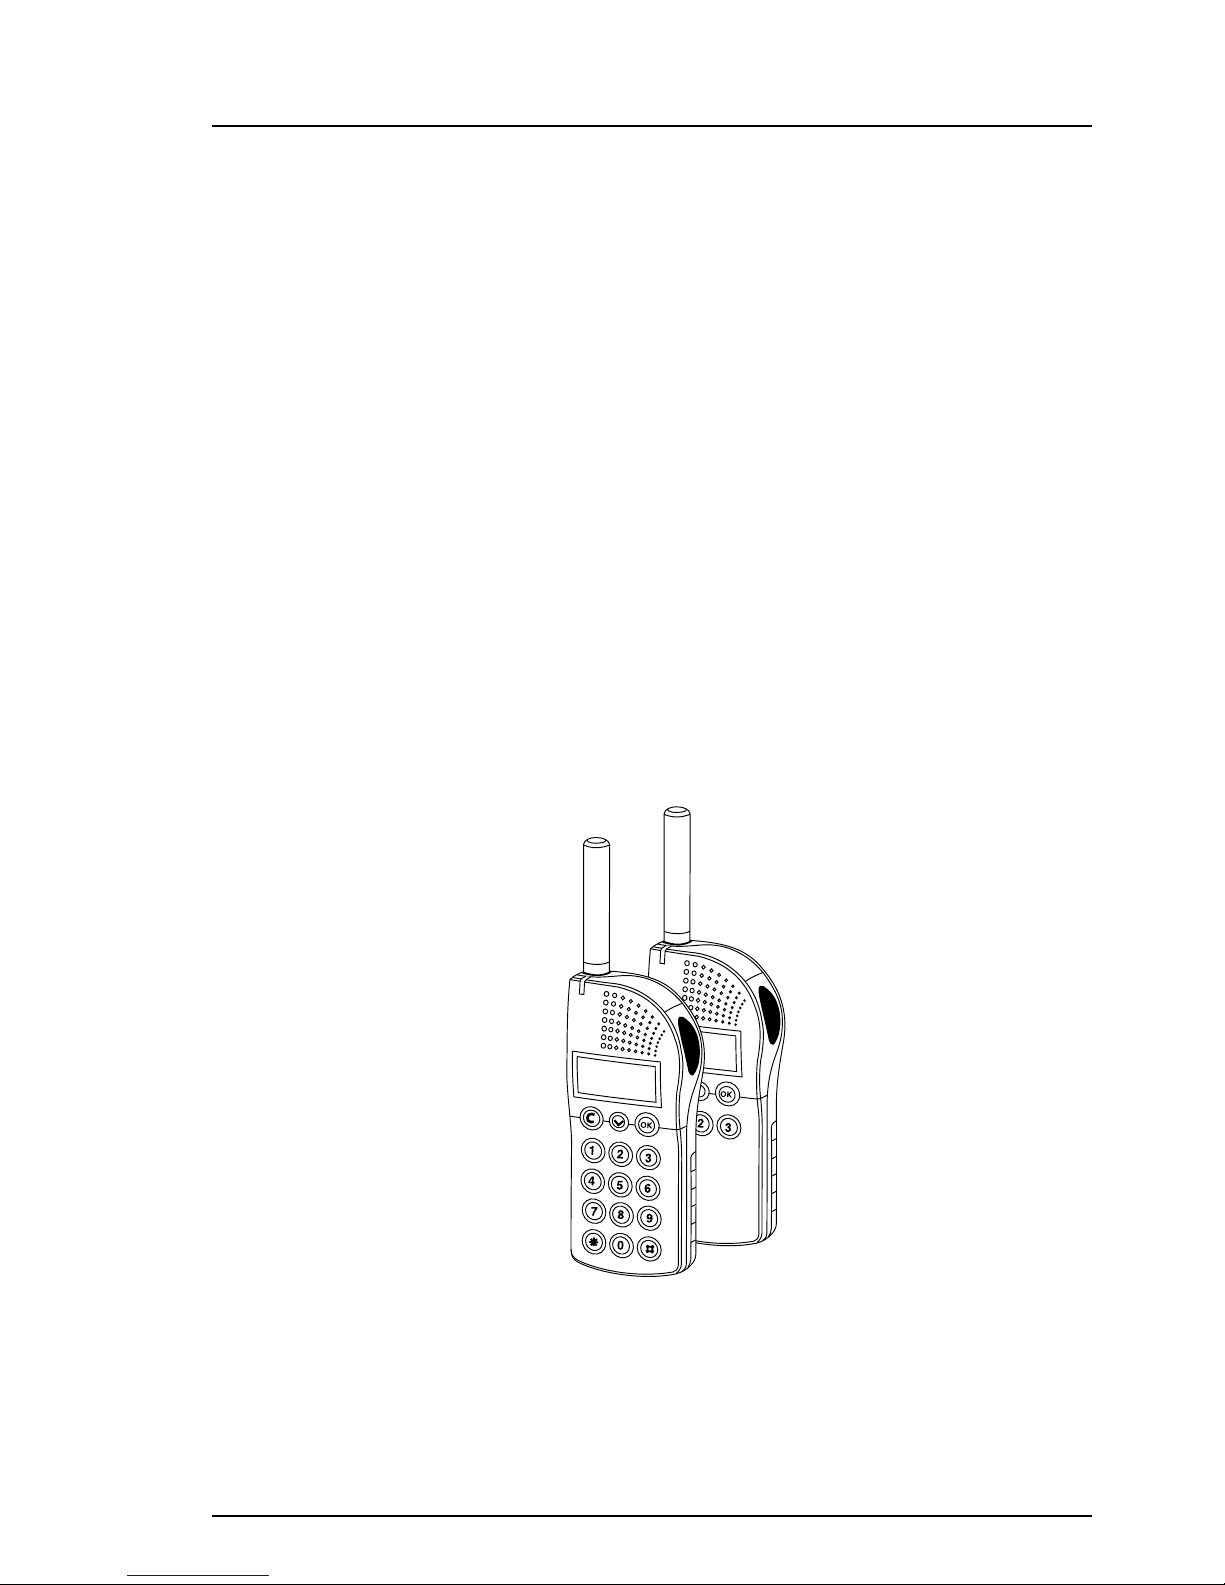
Pocket Transceiver U922
This document provides a description of the pocket transceiver U922 and
its functionality. The U922 is included in the teleCOURIER 900 radio paging
system and the telePROTECT 900 alarm system. This User Manual describes
the U922 in the default programmed version. Additional functions and
factory settings are also included, providing a full description of the functionality. Your system may not have all functions described in this document. For information about your system, please contact your system
administrator.
The following documents are recommended as a supplement:
• System Description teleCOURIER 900 Paging System, document number
TD 91034GB.
• System Description Personal Security System telePROTECT 900,
document number TD 90677GB
We also recommend reading the User Guide for the U922.
U922 Transceiver
ascom
ascom
Page 2

2000 01 25 /Rev.A 2
User Manual
Transceiver U922 TD 91836GB
Introduction
U922 comes as either a speech transceiver, for use in the teleCOURIER 900 radio
paging system, or an alarm transceiver, for use in the telePROTECT 900 alarm
system.
Transmission of speech and alarm is made in the UHF 425-475 or the VHF 140-175
MHz range. Paging and speech is received in the UHF 425-475 MHz range. The
speech transceiver can transmit and receive voice as well as text messages, allowing both mobile-to-central and mobile-to-mobile calls. The alarm transceiver can, in
addition to the functions of the speech transceivers, transmit different alarms. It
can also receive an acknowledgement paging confirming that the alarm has been
received.
The alarm transceiver can be equipped with a location receiver that stores the
location code transmitted by fixed LF or IR Locators. When an alarm is sent, the
location codes are also sent by the transceiver to the alarm central. Another
security function is that the alarm transceiver can be supervised continuously.
All transceivers, except those with a LF receiver, vibrator and one-way speech
transceivers without acknowledge are available in intrinsically safe versions that
comply with classification EEx ib IIC T4. The unit is water resistant according to
IP64.
U922 Versions
The U922 transceiver comes in the following basic versions:
• Alarm transceiver with no-speech and 6-button keypad.
• Speech/Alarm transceiver with one-way speech and 6-button keypad.
• Speech/Alarm transceiver with two-way speech and full keypad.
Functions Speech Alarm
Characters per message 120 120
Stored messages 10 10
Characters in memory 480 480
"Group numbers" 5 5
Absent indication Yes Yes
Time Stamp Yes Yes
Vibrator Option Option
Keypad 6/15 6/15
Acknowledge Option Yes
EX-classification Option Option
Push button alarm — Yes
Pull-cord alarm — Option
Man-down alarm — Option
No-movement alarm — Option
IR-receiver — Option
LF-receiver — Option
Page 3
2000 01 25 /Rev.A 3
User Manual
Transceiver U922 TD 91836GB
Description
Transceiver Description
Symbols in the Display:
New message (the symbol flashes)
More than one message stored
The message is longer than two lines
Speech call
Muted beep signal
Low battery warning. Charge as soon as possible
Low battery, speech transmission turned off. Charge
immediately
Time stamp, see the chapter Display menu functions
Function and RTC, Time stamp
Hot-key function activated
Manual acknowledgement request
I I Info-page message
The message is addressed to one of the group numbers
The message is diverted from other call number
Error indication, contact system administrator
ascom
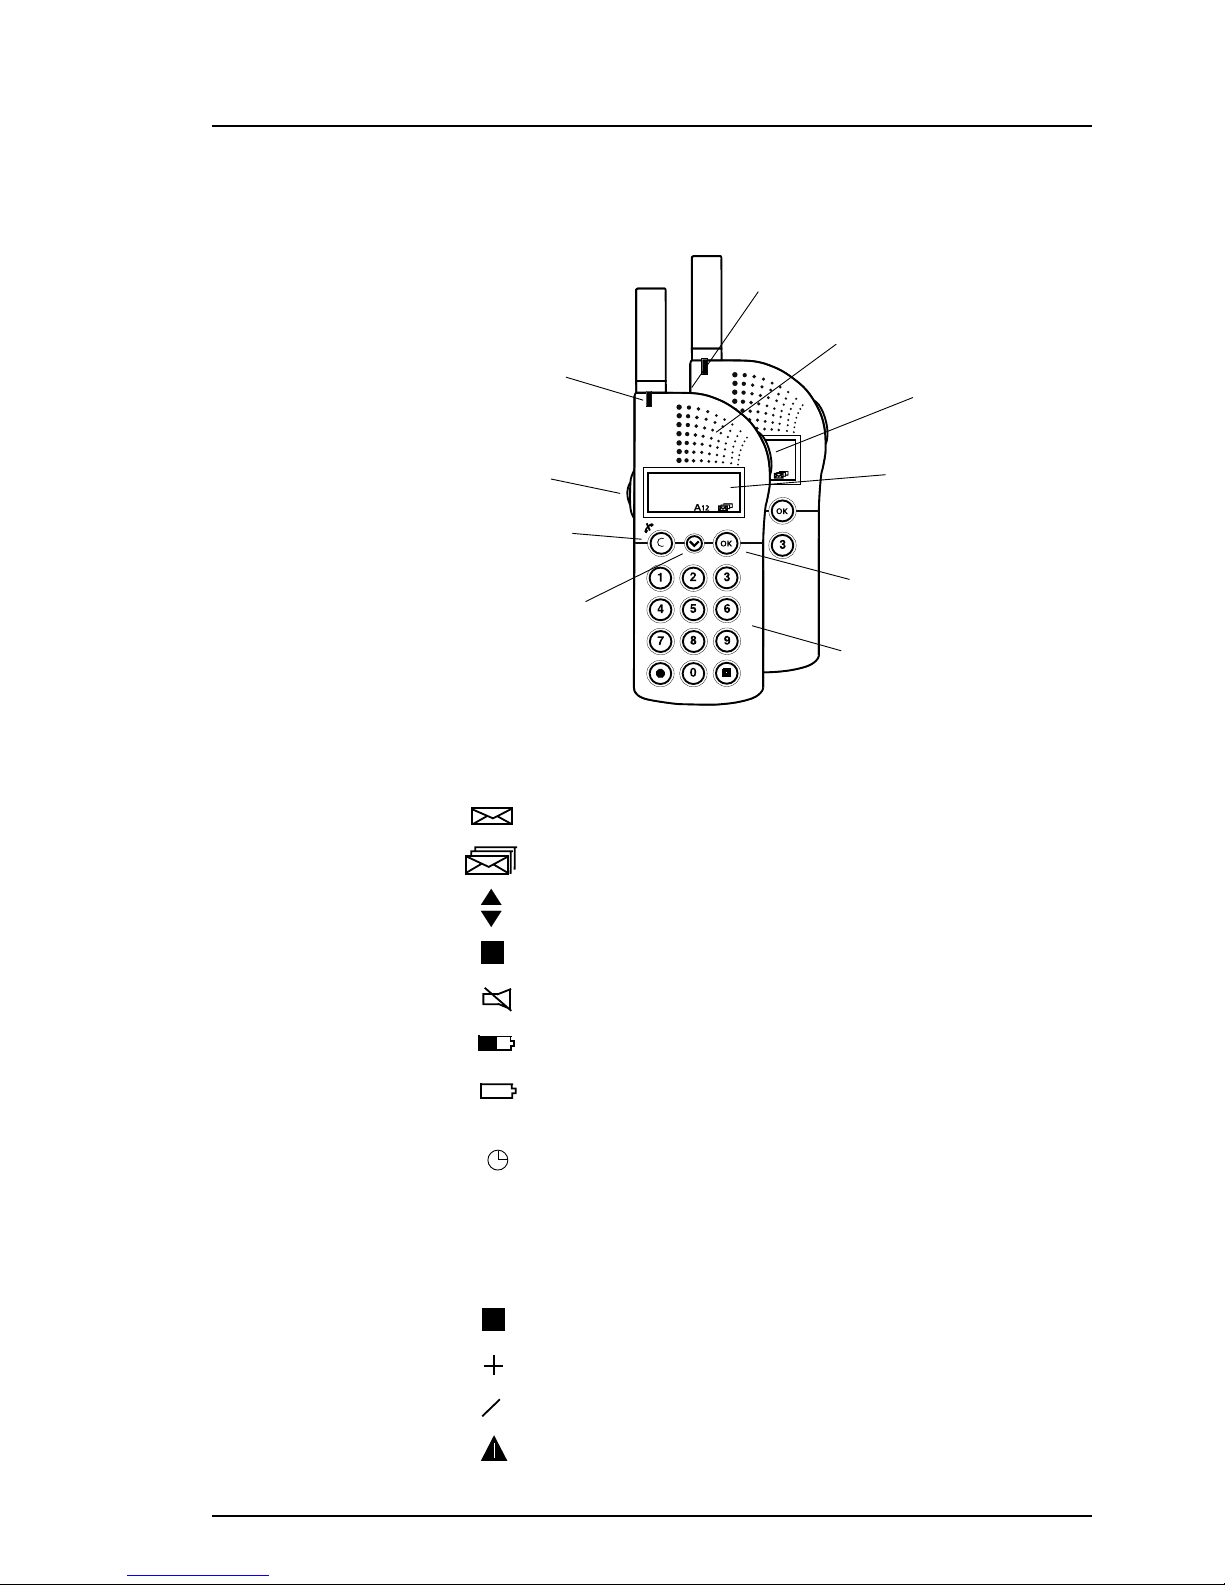
ascom
LED
Push-To-Talk (PTT)
Button
C-key
Step-key
OK-key
Number- and hotkeys
IR Receiver
Loudspeaker and
Microphone
Red Alarmbutton (Alarm
Transceiver)
Display
1 2 3
A
I
s
Page 4
2000 01 25 /Rev.A 4
User Manual
Transceiver U922 TD 91836GB
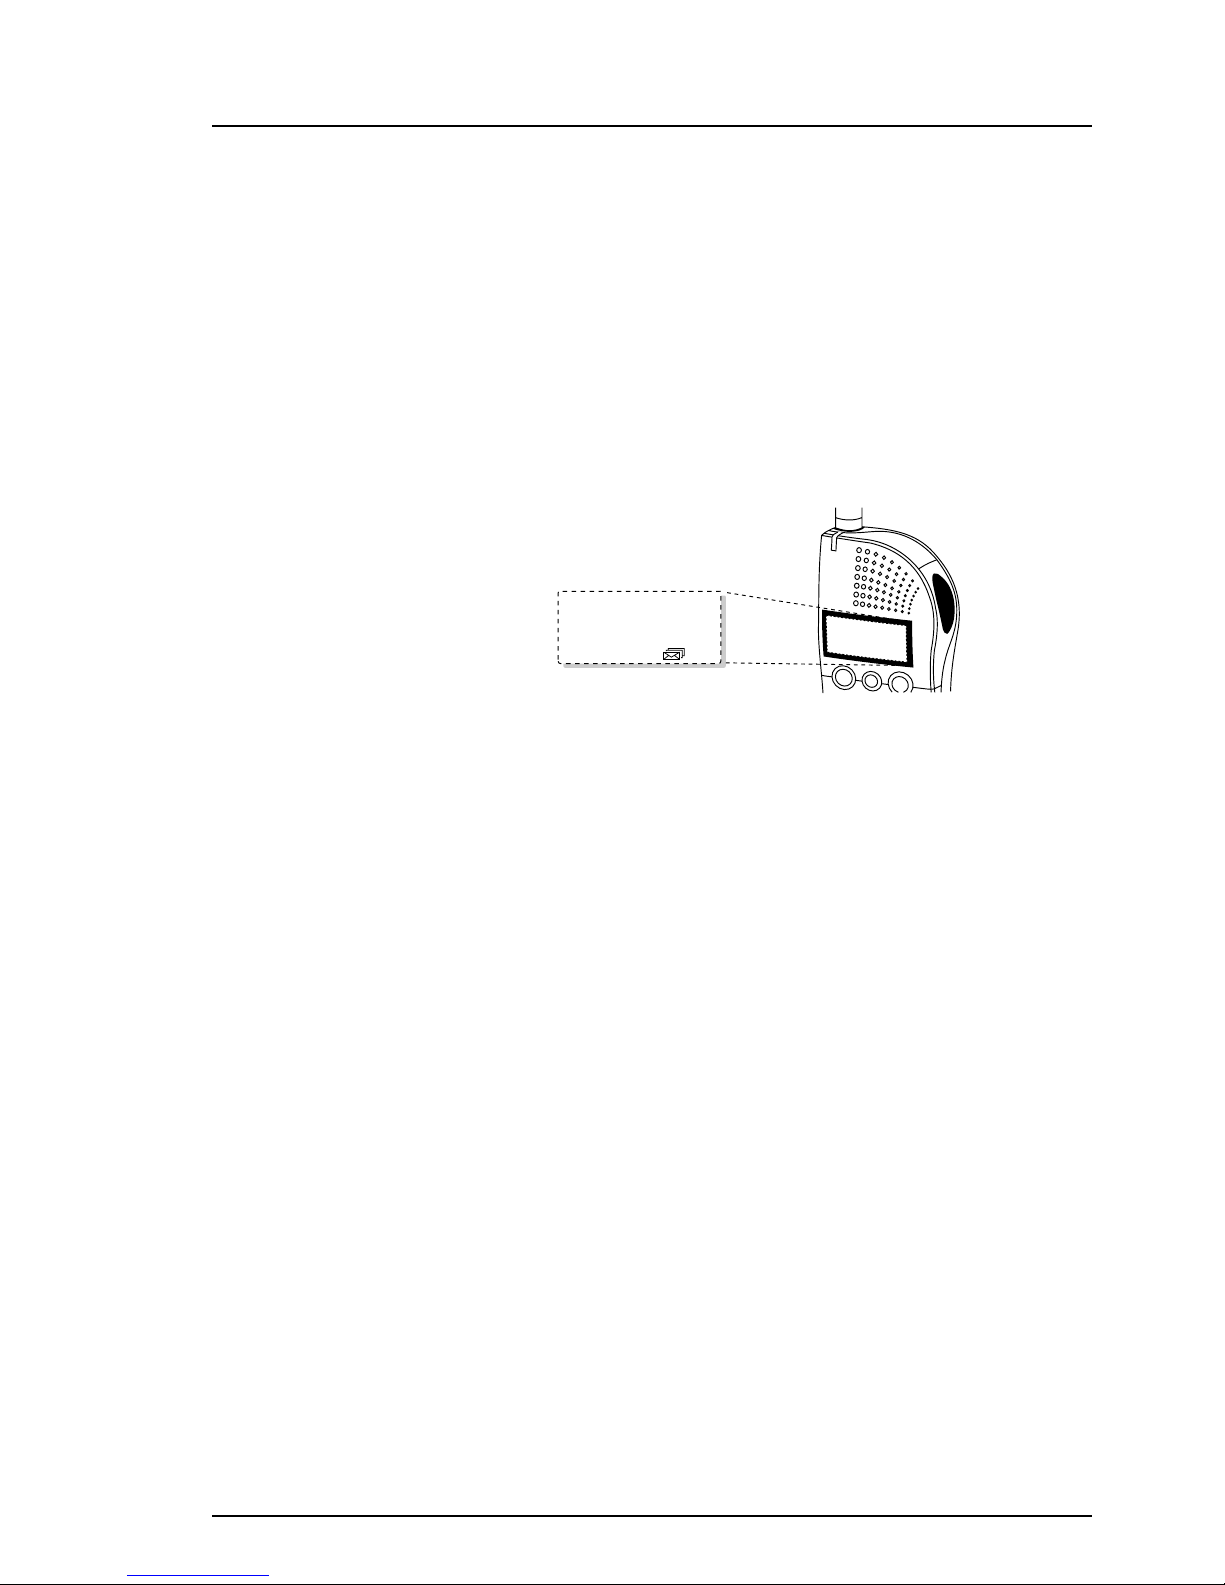
Display
U922 has an alphanumerical display with 2x12 characters. Longer messages
automatically scroll on the display, two lines at a time, up to 120 characters. The
user can start the scrolling manually by pressing the OK button once. The display is
illuminated. The text is clear and easy to read and consists of both lower and upper
case characters. The system administrator can change all preprogrammed texts.
Normally the display shows the identity and the text "Menu". The transceiver is
programmed with an identity unique within the system. The identity can be your
call number, name or other. Below this text, the icons appear. The icons keep track
of activated functions and notify the user, for example, that a new message is
received. If an error occurs, the Error Indication icon appears.
Rescue
coming
Example of paging with acknowledgement message "A"
Four different character sets can be used in the transceiver:
• 910/910T
• Full Roman
• Roman+Cyrillic+Greek
• Roman+Arabic+Hebrew.
C-key
The C-key is used to return to previous menu level, to erase paging messages and
to end speech calls.
Step-key
The Step-key is used to scroll between messages and to step between the menu
options.
OK-key
The Blue OK-key is used to mute and acknowledge pagings and enter the main
menu to change the transceiver's settings. It is also used when storing or recalling
a call number.
If the function of the OK button is set to "Send", it is possible to send commands
to the system to perform an activity, for example to open a door. This is done by
sending special codes. The codes are supplied by the system administrator. Enter
the preprogrammed code. When “Send” is displayed, press OK.
Number- and Hot-keys
The keys numbered 1-6 are pre-programmable Hot-keys. They are used to activate
various alarm functions and to enter paging numbers. See also the section Pocket
Unit Programmer. Keys numbered 7-9 are only used to enter paging numbers.
A
Page 5

2000 01 25 /Rev.A 5
User Manual
Transceiver U922 TD 91836GB
Red Alarm-button
The alarm transceivers are equipped with a red alarm-button. It is used to transmit
alarms and to test the alarm transceiver and the system.
Red light-emitting diode
Indicates that an alarm/message is sent, and a message and/or new location code is
received. It also shows the charging status when the unit is placed in T962.
Clip
922 is equipped with a clip so that the unit can be fastened to a pocket or another
piece of clothing.
Basic Functions
Press OK to enter the menu and to select menu options. Press the C-key once to
return to the previous menu level. Press and hold the C-key to return to the main
display. Press the Step-key to step between the menu options.
Turning the Transceiver ON
The transceiver is turned on by pressing the
OK button. It automatically starts in the (NORMAL)
initial start-up mode and the pocket unit identity
appears in the display.
Turning the Transceiver OFF
Press OK to enter the menu. Press the Step-key until “OFF?” is displayed, then
press OK.
NOTE: Turning off the unit will erase all messages, unless the Memo function
(option) is activated by the system administrator.
NOTE: The unit consume some current when it is in OFF mode. The battery can
thereby be discharged.
Receiving Text Messages
When U922 receives a paging this is indicated with a beep signal, flashing LED and
vibrator (optional). The new message icon flashes in the display until the
message is accepted. Press OK to stop the beep signal. If the "A" icon is displayed
you are required to acknowledge within a certain period of time. An acknowledgement beep sounds during that time period. If the message is not acknowledged,
pre-defined actions set in the system are initiated. Press OK to accept/acknowledge
the message. An acknowledge message is then sent.
The symbol " " indicates that the message is longer than 24 characters. A
message can consist of up to 120 characters, i.e. 10 lines (max 12 characters per
line). The transceiver can store up to 10 text messages (max. 480 characters).
Messages longer than two lines are scrolled two lines at a time. When the message is accepted, the display will show the next new message. The New message
icon will continue to flash until all messages are accepted.
If all 10 memory positions are occupied when a new paging is received, the oldest
acknowledged message is erased. If all 10 messages are unacknowledged the
oldest unacknowledged message is erased. Depending on the length of the new
message several messages might be erased. The messages are also erased when
batteries are replaced.
Michael 344
0 Msgs.
Menu
Page 6

2000 01 25 /Rev.A 6
User Manual
Transceiver U922 TD 91836GB
Note: To distinguish between different types of pagings the transceiver can be
programmed to flash and beep in different ways, for example with different beep
tones, and with different beep and LED sequences. It is also possible to program
the tone messages. This is done in the application Pocket Unit Programmer which
is included in the Win900 Base Kit software package. See also the section Pocket
Unit Programmer and the document Win900 User Guide, TD 90838GB.
Viewing and Stepping through Messages
Press the Step-key to view and step between the messages.
Deleting Messages
Display the message to be deleted. Press and hold the C-key until the message is
erased. "*******" is shown briefly when a message is erased.
Receiving Speech Calls
A flashing LED, beep signal and the icon indicates incoming speech call. Press
the PTT-button to speak, release the PTT-button to listen. Press and hold the C-key
to end.
Storing and Recalling a call number
If the function of the OK button is set to "Store", it is possible to store a call
number for future use. See the section Pocket Unit Programmer. Enter the call
number using the number-keys. Press the Step-key until "Store" is displayed and
then press OK.
The number can be recalled by pressing a number key and then pressing the Stepkey until "Recall" is displayed. Press OK to recall the call number. Press the PTTbutton to call.
Sending Speech Calls
Enter the call number and press the PTT-button. If “Busy” is displayed, press the
PTT-button twice to redial.
A hot-key can be programmed to send a speech call, a so called speed call. The
programming is done in the application Pocket Unit Programmer. The speech call is
initiated by pressing the hot-key until the call number is displayed and sent.
Changing Speaker Volume during Speech Call
Press the Step-key to toggle between high/low volume.
Switching the Audible Signal Off
Press OK to enter the menu. Press the Step-key until “Tone?” is displayed. Press
OK to switch between On/Off. A flashing icon indicates that the signal is off.
s
s
Page 7

2000 01 25 /Rev.A 7
User Manual
Transceiver U922 TD 91836GB
Charging the Battery
Beep signals and the icon indicate a low battery warning. The unit should
then be charged as soon as possible. Beep signals and the icon indicate low
battery. The unit should then be charged immediately. At low battery, it is not
possible to start a speech call - only to receive speech. However, the alarm functions are not affected.
When placed in a desktop charger, the LED on the U922 flashes until the battery is
fully charged. A red LED on the charger indicates a fully charged battery.
In a charging rack, the LED on the U922 flashes until the battery is fully charged. A
steady LED on the U922 indicates a fully charged battery. Keep the unit in the
charger when not in use.
Changing Beep Volume
Press OK to enter the main menu. Press the Step-key until “Set?” is displayed and
then press OK until “Vol” appears. Press and hold OK until the required signal is
reached. The “ ” symbol indicates a gradually increasing volume. “Vol 0 + Vib”
indicates vibrator without beep signal. “Vol 1 + Vib” indicates vibrator and beep
volume level one.
Activating Time Stamp
At the end of each message, the time stamp shows the time when the message
was received, . Press OK to enter the main menu, then press the Step-key until
“Set” is displayed. Press OK and step to “Time Stamp”. Press OK to toggle between On/Off.
Activating Reminder Beep
The reminder beep sounds every five minutes until the message is accepted. Press
OK to enter the main menu, then press the Step-key until “Set?” is displayed. Press
OK and step until “Remind Beep” is displayed. Press OK to toggle between On/Off.
Enabling Group Number
To enable/disable pagings to group numbers, press OK to enter the main menu.
Press the Step-key until “Set? is displayed and press OK. Press the Step-key to
display the group numbers, the group numbers are displayed after your call
number. Press OK to toggle between On/Off. On indicates that the number is
enabled.
Activating Manual Absence
Press and hold the preprogrammed key until “Absence” is displayed. Press OK to
switch between On/Off.
Activating Hot-key
Press and hold the preprogrammed key until the call number appears and is
transmitted.
Special Codes
If the function of the OK button is set to "Send", it is possible to send commands
to the system to perform an activity, for example to open a door. This is done by
sending special codes. The codes are supplied by the system administrator. Enter
the preprogrammed code. When “Send” is displayed, press OK.
Page 8

2000 01 25 /Rev.A 8
User Manual
Transceiver U922 TD 91836GB
Alarm Functions
Alarms can be generated manually and automatically from U922 alarm transceivers. At alarm activation, a code is sent to the alarm central with information on the
transceiver identity, alarm type and, if available, location information. An error
alarm is presented if the radio connection is interrupted or if the transceiver ceases
to function. An alarm can also generate pagings to other mobile transceivers/
receivers in the system. For example, the transceiver can be part of a pre-defined
group consisting of a number of selected work groups equipped with U922 units.
The code format of the telePROTECT 900 personal security system is compatible
with the teleCOURIER 900 paging system which means that functions and units
from the two systems can be integrated with each other.
Push-button Alarm
Two or more short presses on the red alarm-button activate an alarm that is sent
to the central equipment. When the alarm is transmitted,
the red LED on the top of the transmitter flashes
and the text “ALARM“ appears in the display.
The alarm is transmitted silently, unless the
Acoustic Location Signal (ALS) is activated.
If a system is programmed for technical alarm,
the text “ALARM“ will remain until the central
equipment has received the alarm and an
automatic acknowledgement is sent to the pocket
unit. If no acknowledgement occurs, the transceiver
will repeat the alarm transmission automatically until
an acknowledgment is received. This applies to all alarm types.
Test/Assistance Alarm
A press of longer than one second activates a test alarm that does not lead to any
alarm measures. If the test alarm is not presented by the central equipment or if an
error is indicated, another test alarm must be sent. If the test alarm is still not
presented or the error indication remains, the transmitter must be sent to the
supplier for service. To check the alarm transmitter and the system, a test alarm
should be activated every day. The test alarm can also be reprogrammed and used
as assistance alarm.
Pull-Cord Alarm (option)
A pull cord alarm is activated by snatching
away a catch that is mounted at the
bottom of the transceiver. The catch is
fastened with a cord to a clip. The clip can
be fastened to a belt or pocket or other
article of clothing. If someone tries to
snatch the transceiver away from the user
the catch releases and the alarm is
activated.
NOTE: Make sure that the clip of the Pull-cord is
firmly attached, for instance at your belt.
NOTE: To remove the Pull-cord without triggering
an alarm, the Pull-cord alarm must be turned off.
Alarm
Pushbutton
Page 9

2000 01 25 /Rev.A 9
User Manual
Transceiver U922 TD 91836GB
Man-Down Alarm (option)
The U922 can be equipped with an tilt sensor. If the user falls down or if the alarm
transmitter is tilted more than 60º, a warning tone is heard after 7 seconds. The
alarm can be interrupted by pressing the OK-button or by moving the transceiver
to an upright position again. If the alarm is not interrupted, a two-tone localisation
signal is generated confirming that the alarm has been sent. When the warning
signal is heard, the alarm can be delayed for ten minutes by pressing the
OK-button.
Note: The transceiver can either have a man-down alarm option or a no-
movement alarm option, not both.
No-Movement Alarm (option)
The alarm transceiver can be equipped with a sensor for no-movement alarms. The
no-movement alarm is activated if the transceiver has not been moved within a
preset time period. Before the alarm is transmitted, a warning signal continuously
sounds. If the unit has not moved during this time, the warning signal sounds and
an alarm is transmitted. To prevent the alarm transmission, move the unit or press
the OK-button, while the warning signal is heard.
Note: The transceiver can either have a man-down alarm option or a no-
movement alarm option, not both.
External Alarm (option)
The U922 can be ordered with an external alarm input. It is located at the bottom
of the cover on the battery pack. The alarm can be programmed for an opening or
closing function. The input is intended for connection to any kind of external alarm
device, for example a gas or smoke detector.
Alarms are normally
generated by connecting the input to
ground (< 5 kohm ).
Tele-plug, 2,5 mm
Activating and Deactivating Different Alarm Functions
To activate and deactivate the different alarms, press and hold one of the three
hot-keys 1-2-3 for one second or more. Provided that the alarm options are
available, the buttons are default programmed as follows:
• Button 1: Man-down alarm or No-movement alarm
• Button 2: Pull-cord alarm
• Button 3: unprogrammed
However, it is possible to select other combinations to activate the different alarm
types when programming the pocket unit. The hot-keys can also be reserved for
other functions. For example, they can be used to activate different system
functions.
I
External
input
Ground
Page 10

2000 01 25 /Rev.A 10
User Manual
Transceiver U922 TD 91836GB
Man-down/No-movement alarm
Press and hold the hot-key number 1 to set the Man-down alarm or No-movement
alarm. Press OK to toggle between On/Off. When the alarm function is switched
on, the hot-key number is displayed in the display window.
Pull-cord alarm
Attach the Pull-cord to the alarm transceiver. Press and hold the hot-key number 2
to activate the alarm. Press OK to toggle between On/Off. When the alarm function is switched on, the hot-key number is displayed in the display window. Make
sure that the clip of the Pull-cord is safely attached. If the Pull-cord is pulled off, a
silent alarm will be transmitted.
NOTE: To remove the Pull-cord without triggering an alarm, the Pull-cord alarm
must be switched off.
Acknowledge
An Acknowledge is a response either to or from the transceiver. It indicates that
the message or alarm has been received and processed. When a transceiver has
sent an alarm, it can receive an acknowledgement from the fixed equipment
confirming that the alarm has been acknowledged by someone. This is called
Technical Acknowledge. The response is sent as a paging. The paging is generated
manually or automatically via an alarm module or an alarm computer and usually
includes a text message.
A paging with a request for manual acknowledgement is indicated by the symbol
“A“ which appears at the bottom of the display. The symbol remains until the OK
button is pressed. When it is pressed, an acknowledge response is sent to the fixed
equipment.
Supervision
The telePROTECT 900 software application PCPRO has an automatic supervision
function to check the transceivers. A paging is transmitted at regular intervals. The
paging contains a request for automatic acknowledgement from the transceivers,
but it is not presented for the user. If a transceiver does not respond to the paging
within a preset time, this will be presented as a system alarm. If the transceiver is
equipped with a location receiver, its latest known location can be presented as
well.
In addition to the supervision function, the system can be programmed to perform
a self check as follows: The user is requested to send a test alarm when the transceiver is taken out of the charging rack. If he does not, he will receive a second
request from the system as a paging. If the request does not reach the transceiver,
or the user still does not activate a test alarm, this will be registered as a system
error by PCPRO.
Page 11

2000 01 25 /Rev.A 11
User Manual
Transceiver U922 TD 91836GB
Location Function
IR and LF location
An alarm transceiver equipped with a location code receiver continuously receives
location codes that are sent out via IR light or LF magnetic field from fixed locators
in the system. The location codes are stored in the alarm transceiver and sent with
the alarm when it is activated. On the alarm computer, the transceiver's two latest
locations and direction of movement can be seen. The direction of movement and
speed can be determined by using the unit's last two location codes and the time
elapsed between them.
The pocket unit can also be used to test the fixed locators. The unit is then set to
indicate with beep and LED signals that a location code has been received. See also
the section Pocket Unit Programmer.
NOTE: The IR-receiver is situated
underneath the coloured transparent
plastic top. A transceiver with an
IR-receiver must always be carried visibly,
never covered!
Manual Location
If the function of the OK button is set to "Store", it is possible to store a manual
location. Enter the manual location code with the number keys. Press the Step-key
until "Store" is displayed and then press OK. The number can be recalled/displayed
by pressing a number key and then press the Step-key until "Recall" is displayed.
Press OK to recall the code.
The manual location code will be stored and sent with the alarm until a location
code that does not exist is entered, even if new IR- or LF location codes are received.
Special Location
If the fixed locators are set to send a Special Location code, the pocket unit can
send an alarm directly after it has received the code. See also the section Pocket
Unit Programmer.
IR-Receiver
Page 12
2000 01 25 /Rev.A 12
User Manual
Transceiver U922 TD 91836GB
Special Functions
Memo Function
The memo function is a storage function for text messages. All messages received
are stored in the pocket unit's memory. If the memo function is activated, the
pagings in the memory will be kept when the pocket unit is turned off. The messages are erased manually or automatically according to the FIFO principle (First In
First Out). However, if the battery is removed or completely discharged, the stored
messages will be erased.
Watchdog Function
The transceiver has a so-called watchdog function. It is an internal hardware and
software function check that is executed at fixed time intervals.
INFO Page Message
An INFO-page contains information that is updated frequently, such as measurements in a production process, exchange rates, stock market notations, etc. An
INFO-page can, for example, be sent from a PC via a serial interface. U922 can
receive one info-page per call number i.e. altogether six. When an info-page is
displayed the symbol appears. By selecting the beep code, it is possible to
choose if the transceiver shall beep or not when an info message is received.
Call-Number Presentation
If a paging has been received on one of the
five extra call numbers, U922 can show which
number received the paging. The call number
is shown at the end of the message preceded
by the symbol +. The symbol and number
information are added by the pocket unit.
Example of Call-Number Presentation
Call Diversion
A paging can be directed to another pocket
unit via the central unit of the system. This is
indicated in the display by showing the call number
of the pocket unit that the call was directed from at
the end of the message, preceded by the symbol /.
The symbol and number information are added by
the system.
Example of Call diversion
Out of Range
This is a warning function that checks that the pocket unit is within the coverage
area. A special test paging is sent from the central unit at regular intervals. If the
test paging has not been received by the pocket unit within a preset time, the
symbol appears in the window. The function is selected in Pocket Unit Programmer
and the time interval can be set from 5 to 75 minutes.
Error Indication
If the symbol appears in the window, the transceiver may be out of range. If
the symbol does not disappear when the transceiver is brought back into the
coverage area, the transceiver must be sent to the dealer for service.
MEETING
/ 300
MEETING
+ 300
Page 13

2000 01 25 /Rev.A 13
User Manual
Transceiver U922 TD 91836GB
Operation and Maintenance
Operation Modes
The transceiver operates in one of six modes. The user moves between the different menu modes by using the STEP and OK buttons.
• OFF
In this mode the transceiver is turned off and all functions are deactivated
except for the built-in clock.
• NORMAL
This is the normal operation mode where all functions can be active.
The transceiver can transmit alarms and receive, indicate, and store pagings.
The transceiver always enters this mode when it is turned on.
• CHARGE
The transceiver automatically enters this operation mode when it is placed in a
charging rack. Depending on how the function parameters are set in the
transceiver, it either can receive pagings or be turned off.
• CHANGE
Here the user can change all changeable settings.
• TEST (not included in default programming)
Used only to test the transceiver's functions in production and service. All
functions are turned off except for those that are specifically being tested. Test
mode is entered by a long press (>2 sec) on the STEP button while the pocket
unit is in (NORMAL) initial start-up, i.e. while the transceiver's identity appears
in the display.
• PROGRAMMING
The transceiver is set into this mode before parameter programming via radio.
In this mode, no other functions are active. After a preset time the transceiver
automatically leaves the PROGRAMMING mode and enters NORMAL mode.
Display Menu
The display menu is your aid when you set your personal parameters. It is possible
to change a number of settings in the pocket unit. To change a user parameter,
enter the main menu by pressing the OK button. Each selection possibility is listed
by the parameter name, normally followed by the text “CHANGE“ at the lower
right portion of the display.
The OK button is also used to change operation mode from “CHANGE“ to “PROGRAM“ or “OFF“. Each selection possibility is listed by the operation mode name
followed by the text “ACCEPT“ at the lower right portion of the display.
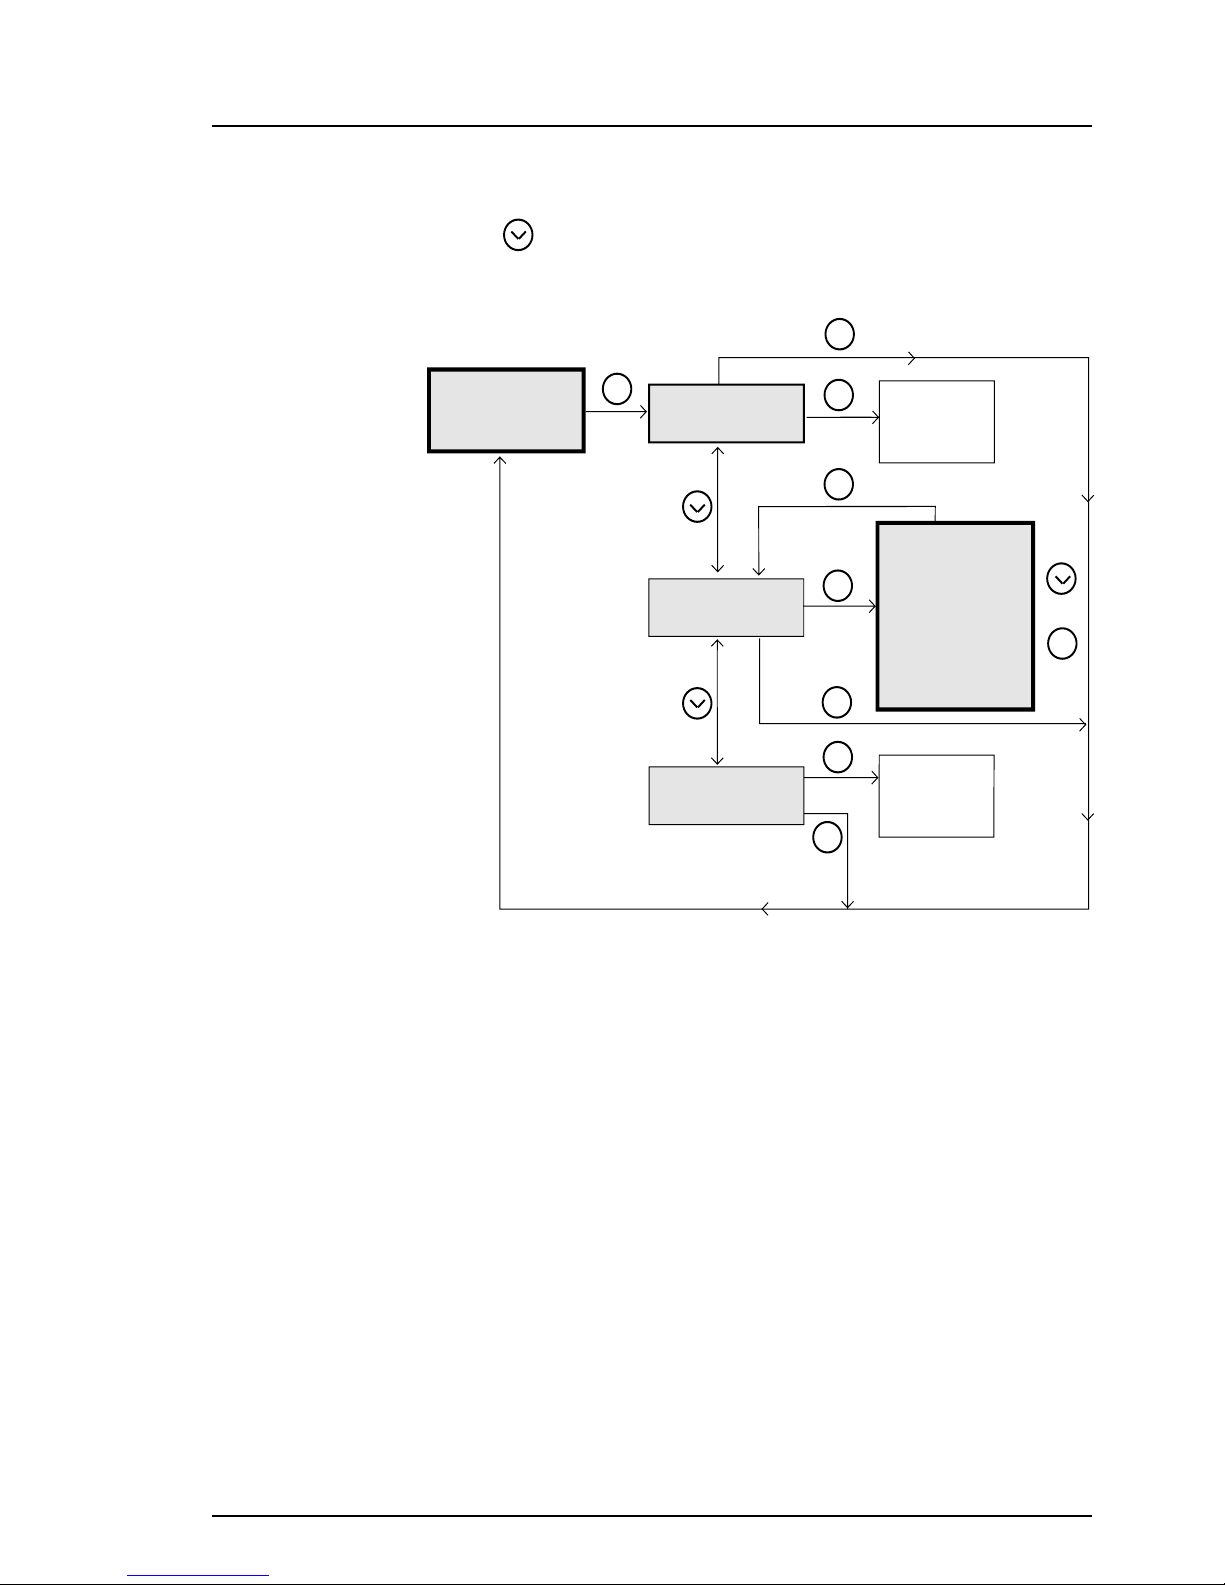
The following flow charts illustrate how the user moves between the different
menu options:
Page 14
2000 01 25 /Rev.A 14
User Manual
Transceiver U922 TD 91836GB
NOTE: Depending on your
system, your receiver may
not have all functions
described.
NOTE: All texts can be
changed.
"NORMAL"
Pocket unit identity
is displayed
"Identity"
Tone?
CHANGE
"Identity"
Set?
ACCEPT
"Identity"
Off?
ACCEPT
C
OK
"Turned Off"
CHANGE
"On/Off"
Volume
"Call Number"
"Group Number"
Time Stamp
Remind Beep
Program?
Press and hold to step upwards in the menus
Short press to step downwards in the menus
Step-key,
OK
OK,
to set
C
OK
OK
C
C
to step
Page 15

2000 01 25 /Rev.A 15
User Manual
Transceiver U922 TD 91836GB
Volume=
CHANGE
Volume=1
CHANGE
Volume=2
CHANGE
ACTIVE
Call. no. 1
Call. no. 5
Call. no. 4
Call. no. 3
Call. no. 2
Call. no. 6
On
CHANGE
CHANGE
CHANGE
CHANGE
CHANGE
CHANGE
On
On
On
On
On
Remind Beep
Time Stamp
CHANGE
CHANGE
Program?
ACCEPT
On
On
AV
Call. no. 5
Call. no. 4
Call. no. 3
Call. no. 2
Call. no. 6
Off
CHANGE
CHANGE
CHANGE
CHANGE
CHANGE
Off
Off
Off
Off
Remind Beep
Time Stamp
CHANGE
CHANGE
Off
Off
Operation mode
"CHANGE"
Operation mode
"PROGRAM"
Volume=3
CHANGE
Volume=0 VIB
CHANGE
Volume=1 VIB
CHANGE
Volume=2 VIB
CHANGE
Volume=3 VIB
CHANGE
Volume=
CHANGE
VIB
If vibrator is
used as option
OK
OK
OK
OK
OK
OK
OK
OK
OK
OK
OK
OK
OK
OK
OK
OK
OK
"Call
Page 16

2000 01 25 /Rev.A 16
User Manual
Transceiver U922 TD 91836GB
Display Menu Functions
Volume
This function changes the beep signal volume. It is possible to choose between
three volume levels, a gradually increasing volume option and a vibrator (optional).
The system administrator can change the melody of the beep signal in the Pocket
Unit programmer.
"Call number"
This is the individual call number set by the system administrator (Call. no. 1 in the
display).
"Group number"
In addition to the individual call number the transceiver can receive pagings on up
to five additional call numbers. You can be a part of a group paging or have
messages diverted to you. It is possible to enable/disable each of these five numbers (Call. no. 2-6 in the display).
Time Stamp
The time when the message was received is shown at the end of each message.
This function is indicated by the Time stamp symbol. The Time stamp is not displayed if the message is older than 24 hours or is longer than 108 characters. The
Real Time Clock (RTC) in the paging system provides the transceiver with the time.
Remind Beep
The Remind beep function gives a beep signal on regular intervals until you have
accepted the message.
Program
The transceiver has to be in Program mode while remote programming via radio.
Intrinsically Safe Versions
U922 is available in an intrinsically safe version that complies with classification EEx
ib IIC T4. For the user this means that the battery cover is locked with Allen-head
or Torx screws that require special tools so that these units are to be opened by
authorized personnel only. EX approved transmitters are marked with information
by classification category, approving authority and a classification number. The
marking is engraved on the cover so that it cannot be removed or erased.
To use EX approved alarm transmitters certain regulations must be considered. See
the document General Description - Apparatus for Potentially Explosive Atmos-
pheres (EX), doc. no. TD90842GB.
Page 17

2000 01 25 /Rev.A 17
User Manual
Transceiver U922 TD 91836GB
Power Supply
Battery Pack
U922 is powered by a battery pack
that includes two Ni-MH accumulators. The battery pack is
fastened with two screws. The
battery pack normally lasts 2-5 days,
but can last less. This depending on
which functions that are activated in
the transceiver, the number of
pagings and the length of the calls.
922BP
ascom Tateco
Made in Sweden
40395C-2
Battery pack
Charging Rack and Desktop Charger
When a low battery warning is displayed,
the battery pack must be recharged as
soon as possible. If the battery is
completely discharged, it can be
damaged. The battery pack is recharged
by placing the pocket unit in the
T962M/T962E charging rack or the
desktop charger T963. T962M/E Charging Rack
Charging takes about one hour. To place
the transceiver in the charging rack, open the
clip and put it into the slot on the rack.
When the unit is placed in a desktop charger,
the green LED on the charger indicates a fully
charged battery. In a charging rack, a steady
LED on the U922 indicates a fully charged battery. T963 Desktop Charger
The unit should be charged every 24 hours. Keep the unit in the charger when not
in use. If the rack is connected to the system bus, the system can give an automatic
absence indication when the transceiver is in the charging rack. The absent can be
indicated in the unit that initiated the paging (for example a control keyboard in
the teleCOURIER 900 paging system).
Antenna Replacement
U922 has an external rubber antenna.
The antenna can be easily replaced
by unscrewing it with the fingers.
Page 18

2000 01 25 /Rev.A 18
User Manual
Transceiver U922 TD 91836GB
Clip Replacement
U922 has a belt clip on the back.
The clip can be easily replaced
by lifting the top of the clip out
from the unit and then pushing
the clip upwards.
For System Administrators
The system administrator uses the software application Pocket Unit Programmer,
included in the software package Win900 Base Kit, to facilitate programming and
for administration of pocket units. See section Pocket Unit Programmer below. For
example, some functions can be open to the user and others locked.
Programming the 922
The parameter memory consists of an EEPROM (SIM-card). The transceiver can be
programmed in the storage/charging rack via the system bus or via radio with a socalled programming paging. See also the document Win900 User Guide, document
number TD90838 in Volume 7 “Software”. To program a transceiver in a charging
rack, the transceiver must be switched on. The transceiver is programmed from
Pocket Unit Programmer via the system bus.
The transceiver system identity and the call number can also be programmed via
radio. When the transceiver is set to the “PROGRAM“ operation mode it can
receive a programming paging that is generated from a control keyboard or a
telephone (via a PBX interface).
The transceiver memory consists
of a SIM card located behind the
battery pack.
The SIM card can easily be
removed for replacement or to
be put in another unit.
Slide the locking plate to the
right and lift the card holder to
remove the SIM card
Rx 431. 025 MHz
Tx 429. 450 MHz
3628598
OPEN>
<LOCK
Page 19

2000 01 25 /Rev.A 19
User Manual
Transceiver U922 TD 91836GB
Pocket Unit Programmer
The Pocket Unit Programmer is an Windows based software application sorted
under the software package Win900 base Kit. The Pocket Unit Programmer is used
to read, modify and set parameters in the pocket units. It is started from the Site
manager or from Pocket Units application in the Win900 base Kit. When setting
the parameters in the pocket unit, it is possible to work with a site database (Site
Database Mode) or directly with the pocket unit placed in a storage/charging rack
(Direct Mode). In Site Database Mode, the parameter settings are stored in a
database file. In Direct mode, the parameter settings are only stored in the pocket
unit. It is only available if a Win900 base kit for Service license is used.
With the Pocket Unit Programmer it possible to set:
• The unit's identity, call number and five additional call numbers
• The maximum time for not receiving an out of range check paging.
• Character set to be used in the display.
• The unit's prefix and transmitter frequency.
• Whether the call number presentation, memo function and test paging (when
the pocket unit is removed from a charging rack) is to be enabled.
• The function of the OK button when it is pressed immediately after numbers
have been entered, "Send" or "Store".
• The modes accessible in the pocket unit (Off, Silent, Set, Program, User input
and Test mode). It is also possible to set if error area should be shown at
start-up.
• Which functions the user is allowed to change in the pocket unit (Volume, Time
stamp, Additional call numbers and Remind beep).
• Number of sequences the beep and LED signal is to be signalling.
• The beep code to be used (one beep, two beeps, three tone chime, internal
telephone ring signal, external telephone ring signal, siren or same siren as the
910 receivers).
• The beep volume and if the volume should be rising by time.
• Whether the Vibrator and Remind beep should be enabled.
• Whether the time stamp function should be enabled and how it should be
presented (as 12 am/pm or 24 hours)
• The mode, information and warning texts to be used in the pocket unit.
• Which function of each hot key no. 1-6 that should be enabled (System mode
change, Speed call, Man down alarm/No movement on/off or Pull/external
alarm on/off). With the system mode change enabled it is possible to control
some system functions in the central equipment, e.g. manual absent indication.
• Whether it should be possible to initiate a speech call from the unit and if
predial or not should be used. Without predial, the first call number is transmitted when initiating a call. With predial, a number can be entered that is transmitted, when a call is initiated. If no number is entered, the last transmitted
number, if any, will be transmitted again. It is also possible to set if speech
transmission should be allowed during low battery.
• The maximum speech time allowed.
• The default speech volume.
Page 20

2000 01 25 /Rev.A 20
User Manual
Transceiver U922 TD 91836GB
• Whether the pocket unit should check if the radio channel is occupied or not to
ensure that the speech call will be received.
• The Sub tone frequency and the time from control tone time-out until the
pocket unit shuts off the loudspeaker and terminates the reception.
• Whether the pocket unit should receive location codes and if so, in what
interval the unit should receive the codes. Intervals is used in order to save
battery.
• Whether the pocket unit should send a strong acoustic signal after a Man
down, Push button, Pull cord, or an External alarm has been transmitted.
• Whether the pocket unit should wait for Technical acknowledgement and if so,
how and the number of times the unit is to repeat the alarm transmission.
• Whether the stored location codes should be erased when the unit is in OFF
mode.
• Whether the unit should send an alarm directly when receiving a Special
Location Transmission.
• Whether the unit should be used to test fixed locators and thereby indicate
when receiving a location code
• Whether the man down, pull cord and external alarms should be enabled. With
mandown alarm means either tilt alarm or no movement alarm. If the
mandown alarm is enabled it is also possible to set the delay and alarm duration
time of the alarm.
• The One push and two Push functions of the alarm push-button and the time
the push-button must be pressed.
Page 21

2000 01 25 /Rev.A
User manual
Transceiver U922 TD 91836GB
Contents
Introduction......................................................................... 2
U922 Versions ............................................................................ 2
Description........................................................................... 3
Transceiver Description ............................................................... 3
Basic Functions ........................................................................... 5
Alarm Functions ......................................................................... 8
Location Function ..................................................................... 11
Special Functions ...................................................................... 12
Operation and Maintenance ............................................ 13
Operation Modes ..................................................................... 13
Display Menu ........................................................................... 13
Display Menu Functions ............................................................ 16
Intrinsically Safe Versions .......................................................... 16
Power Supply ........................................................................... 17
Antenna Replacement .............................................................. 17
Clip Replacement ..................................................................... 18
For System Administrators ........................................................ 18
Page 22

User Manual
Transceiver U922
 Loading...