

Page 1

Ascotel Office Terminals by a
Office 130/130pro
Operating instructions
Page 2

Page 3

I
Congratulations!
Congratulations on the purchase of your
Ascom Office 130/130pro. This handset
affords you the freedom of movement
you desire. The digital technology of the
Office 130/130pro guarantees excellent
speech quality.
Contents
Operation and display elements..................1
Concept of operation .................................3
Safety Advice..............................................5
Installation and putting into service ............7
Before you telephone for the first time.....10
Telephoning..............................................12
Using the extended-feature functions.......17
Programming your telephone ...................28
Troubleshooting........................................39
Function codes .........................................40
Index ........................................................44
English
Page 4

13
1
2
12
11
10
3
M
3
123
456
G
C
F
D
E
C
A
B
L
J
K
I
H
S
789
R
P
Q
O
M
N
Z
Y
W
X
V
T
U
4
55
6
0
9
87
II
Page 5

Operation and display elements
1 LED
Visual display during call, incoming message and in handsfree / open listening
mode.
2 Display
The backlit display consists of 3 lines of text, each with 15 symbols/characters.
The first line consists only of symbols, the two others consist of information or
menu options.
3 Foxkeys
The current function is indicated in the bottom display line.
4 C/End key (delete / correct or disconnect key)
Delete / correct or disconnect key (clear). Return to previous menu option or to the
idle state. Seizure for dialling anew.
5 i-key (information key)
Pressed to obtain further information (active i-symbol).
6 Keypad with 0 to 9 (A to Z), * and #
Used for entering characters, selecting extended-feature functions utilising */#
procedures.
Input of names and/or texts in alpha mode. The keypad is backlit
7 Hotkey
Freely-programmable key for up to 6 numbers/names or functions.
8 Charge socket
For direct-charging the inserted batteries with the appropriate plug-in power
2)
.
supply
9 Headset socket
1)
1)
For connecting a headset2) to the handset.
1)
.
10 Loudspeaker key
Switches the loudspeaker respectively the handsfree mode on/off.
11 Call key
Has the same effect as lifting or replacing the handset of a corded terminal.
Also used for switching on the handset.
12 M-key (menu key)
This key is used to search for a menu option you desire. It operates cyclically, i.e.
each depression of the menu key will scroll you through the menu options.
13 Volume adjustment keys
Adjust the volume during conversation in handset or in handsfree / open listening
mode.
1) Office 130pro only
2) Optional accessory
III 20317845en_ba_a0
The usable services and features depend on the installed software release.
Specifications subject to change without notice.
Page 6

Page 7

Operation and display elements
Special display symbols
Charge state of batteries
a
b / c
d
e
m
Battery icon full: Charge is ok, handset is ready
3
Battery icon
Battery icon
slowly blinking: Charge is low (warning)
Battery icon empty,
slowly blinking + warning tone: Charge is very low
Fast-blinking battery icon: Batteries are being charged
Antenna symbol
Not displayed: Outside of radio coverage range
Continuous display: Ready for incoming and outgoing calls.
Quality of the radio connection (only on idle display)
/4 / 1/2: Batteries are almost charged /
1
/4,
for operation.
half charged
H Very good connection quality
G Good connection quality
F Telephone calls possible, interference probable
E Telephone calls possible only in part, severely restricted
I No telephone calls possible
You can also obtain the connection quality reading using "Long
Click 4". The number of the relevant radio unit is displayed at the
same time.
)
A(B, C, D
ABCD
ABC
i
j
20317845en_ba_a0 1
Continuous display: Handset is registered and ready for
operation in system A (B, C, or D).
Blinking: Handset is not ready for operation.
Blinking: Handset is not registered in any system.
Continuous display: Alpha dial feature is activated
Supplementary information (accessed by pressing i-key)
A function stored under the Hotkey/Foxkey is active.
English
Page 8

Operation and display elements
M
o/ n
P
l
h
v
LED signalling
In addition to acoustic signalling, Office 130 also features visual signalling via a light emitting diode (LED). There are three different ways of signalling, each indicating a particular
operating state:
– Slowly blinking: During a call or receipt of a message
– Fast blinking: Re-entry into radio range within 20 seconds of disconnection
– Interval blinking: Handsfree or open listening is active
Other symbols on the information or menu line:
12¥
Further menus (trigger with M-key)
Microphone on/off
Programming mode
Handsfree or open listening active
Continuous display: Connection made
Blinking: Visual signal indicating a call
Trembler on
Scrolling forwards through a list (the digit shows the entry’s number)
S
U
|
2 20317845en_ba_a0
Call for user group (internal subscriber group)
Diverted call
Function is active
Page 9

Concept of operation
You can program your new handset to meet your own requirements. Besides mobility, it
offers you every telephony function you could wish for. The menu technique and the
clever Foxkeys see to that. To make full use of the extended-feature functions, please refer
to the chapter "How to program your telephone" and the special programming instructions. Note: The number of characters used for individual menu items depends on the
software and the PBX type (applies to all the operating instructions).
General rules of operation
There are two types of menus:
– Everyday operating menus for telephony functions.
– Programming menus for setting your telephone to meet your requirements.
Display in idle state In the idle state the display features a number of symbols, the qual-
ity indicator, the date and time as well as a personal standby text
(e.g. name, department, tel. no., etc.). (The display immediately
switches to "Discreet" or to "Enqui" "Micro" if a call comes in or
during a call.)
—> —> —> Press the M-key (briefly once or several times) to proceed to the
menu option you desire.
————————> A "Long click" of the M-key (at least 2 seconds) takes you to the
programming mode.
————————> A "Long click" of the Foxkey under "¥" changes the search direc-
tion to "ß".
Idle state
Call up the desired menu using the M-key
M
M
M
M
M
1) Office 130pro only
20317845en_ba_a0 3
Press M-key once
Press M-key a second time
Press M-key a third time
Press M-key a fourth time
Press M-key a fifth time
10.Apr 11:55
10.Apr 11:55
ABC Redial
10.Apr 11:55
Div. Discr
10.Apr 11:55
Pick_up Page
10.Apr 11:55
Msg. Announ
10.Apr 11:55
Programming
English
Page 10

Concept of operation
Entering names or texts in alpha mode
There are letters and symbols on the * key, the # key and the numeric keys to allow you
to enter names or texts in alpha mode. After selecting a particular menu item (e.g. storing
names in the private file) the system automatically returns to alpha mode.
Key Symbol
1-.?1
2ABC2
3DEF3
4GHI4
5JKL5
6MNO6
7PQRS7
8TUV8
9WXYZ9
0+0
**/()
# SPACE #
Examples: 1x key 3 = D, 2x key 3 = E, 3x key 2 = C, 1x key 8 = T
4x key 8 = 8, 1x key 0 = +, 1x key # creates a blank space
"Long click" functions
A "long click" is a click on a key which you keep pressed for at least 2 seconds. This
makes it possible to directly skip to certain menus, show information on the display or
immediately carry out certain functions.
"Long click" Function Page
0
1
2
4
5
6
8
9
Handset off 35
Set PBX system 11
Display IPEI and PARK 11
Connection quality 1
SW version number 11
Charge state 9
Key lock (variant 1) 31
Key lock (variant 2) 31
Tone dialling (DTMF) on 22
#
M
C
Set display contrast 10
Programming mode 3, 23
Return to the previous menu 30
Trembler on 38
Hotkey programming 32, 33
Programming of Foxkeys 34
Change search direction 3
4 20317845en_ba_a0
Page 11
Safety advice
Read this operating instructions booklet carefully and keep it in a safe place. Please make
a thorough study of the safety advice presented here. Not following these guidelines may
be hazardous and may violate existing laws.
Medical devices
Your telephone should not be used near pacemakers, hearing aids or other personal medical devices of this type.
Availability of service
The base network is not always available. Do not depend on a mobile phone as
your only means of communication in critical situations.
Ambient conditions
Only use your telephone in a temperature range from +5°C to approx. +40°C.
Avoid exposing it to direct sunlight and other heat sources.
Protect your telephone from moisture, excessive dust, aggressive liquids and
vapours.
Do not place your telephone near electromagnetic fields (electrical motors,
household appliances). The voice quality could be reduced. Avoid positioning it
close to computers, radios, TVs, video players and phones, in order to avoid
noise during a call .
Do not use your telephone in areas where there is a risk of explosions.
Do not use your telephone in areas where blasting work is going on. Observe the
restrictions and follow the pertinent regulations.
Maintenance and repairs
Use original accessories only. Call on an expert to do installation and repairs.
Never touch the recharging contacts with optioned, metallic and/or greasy objects.
Clean your telephone with a soft, slightly moist or antistatic cloth. Do not use
cleaning solvents or other chemical substances.
20317845en_ba_a0 5
English
Page 12

Safety advice
Important information
There is a constant code exchange between radio base and handset to ensure that no one
with another handset can telephone at your expense. If the codes do not match, the call
is disconnected or no connection is established.
Locking the keypad
Your handset can be locked to prevent the accidental activation of keys. You can still receive calls using the Call key. The keypad must be unlocked before outgoing calls can be
made.
Changing the code/password
When the handset is turned on for the first time, the code/password is "0000". We recommend that you immediately programme a personal code consisting of 2 to 10 digits so
the personal settings of your handset and the data stored in it are protected from unauthorized use.
Batteries
The handset is supplied with two rechargeable batteries.
• Using other types of batteries or non-rechargeable batteries/primary cells may be
hazardous and could cause your phone to malfunction or be damaged.
• Always insert the batteries in the correct position!
• Do not immerse batteries in water or throw into a fire.
• For the charging base and for direct charging
provided with the telephone.
• The batteries must be charged for at least 9 hours without interruption before being
used for the first time.
1)
use only the plug-in power supply
Notes
• Batteries may become warm during charging; this is normal and perfectly safe.
• It takes several days for batteries to reach their full capacity and thus the full standby
and calling time.
After a prolonged period of non-use as a result of a power shutoff (e.g. while you are on
holiday), the handset (i.e. the batteries) should be recharged prior to being used again.
Please dispose of defective batteries correctly (they are not household refuse).
1) Office 130pro only
6 20317845en_ba_a0
Page 13
Installation and putting into service
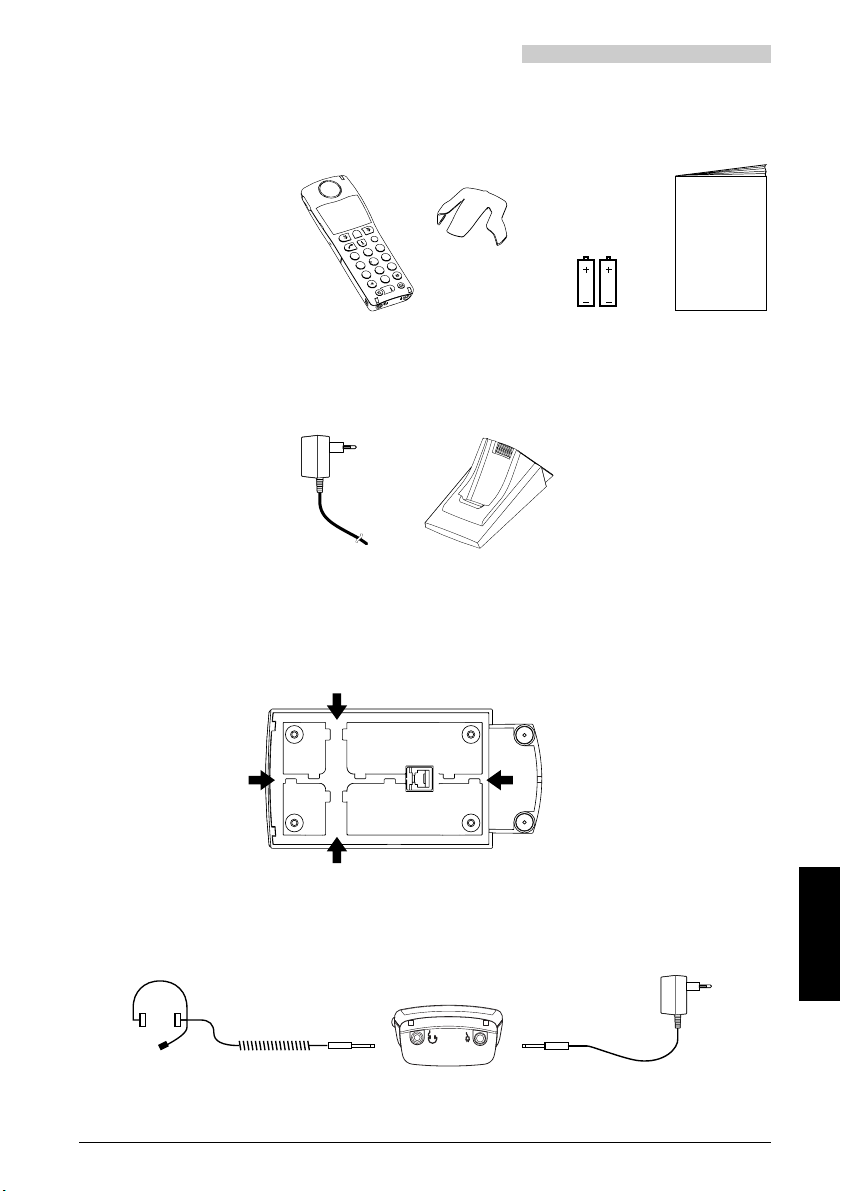
Contents of package, handset
The following items are included with your telephone in the package:
• Handset
• Clip
M
C
F
D
E
C
A
B
123
O
M
N
L
J
• 2 batteries
• Operating instructions booklet
K
456
I
G
H
W
X
V
T
U
S
789
R
P
Q
0
Z
Y
Bedienungsanleitung
Mode d'emploi
Istruzioni per l'uso
Operating instructions
Contents of package, charging base
• Plug-in power supply
for charging base
• Charging base
Connecting the plug-in power supply
Feed the cord through the channel, placing it under the tabs so that it cannot be pulled
out. The cord can be routed through any one of the four outlet positions shown.
Connecting the headset and the plug-in power supply for direct charge
1)
On the inside of the clip there are cable retention tabs to prevent the headset cable from
being pulled out.
1) Optional accessory; for connection to Office 130pro only
20317845en_ba_a0 7
English
Page 14

Installation and putting into service
Optional accessories
• Headset
1)
• Leather case
• Replacement clip
• Spare batteries
• Plug-in power supply for direct charge
1)
1) For connection to Office 130pro only
8 20317845en_ba_a0
Page 15
Installation and putting into service
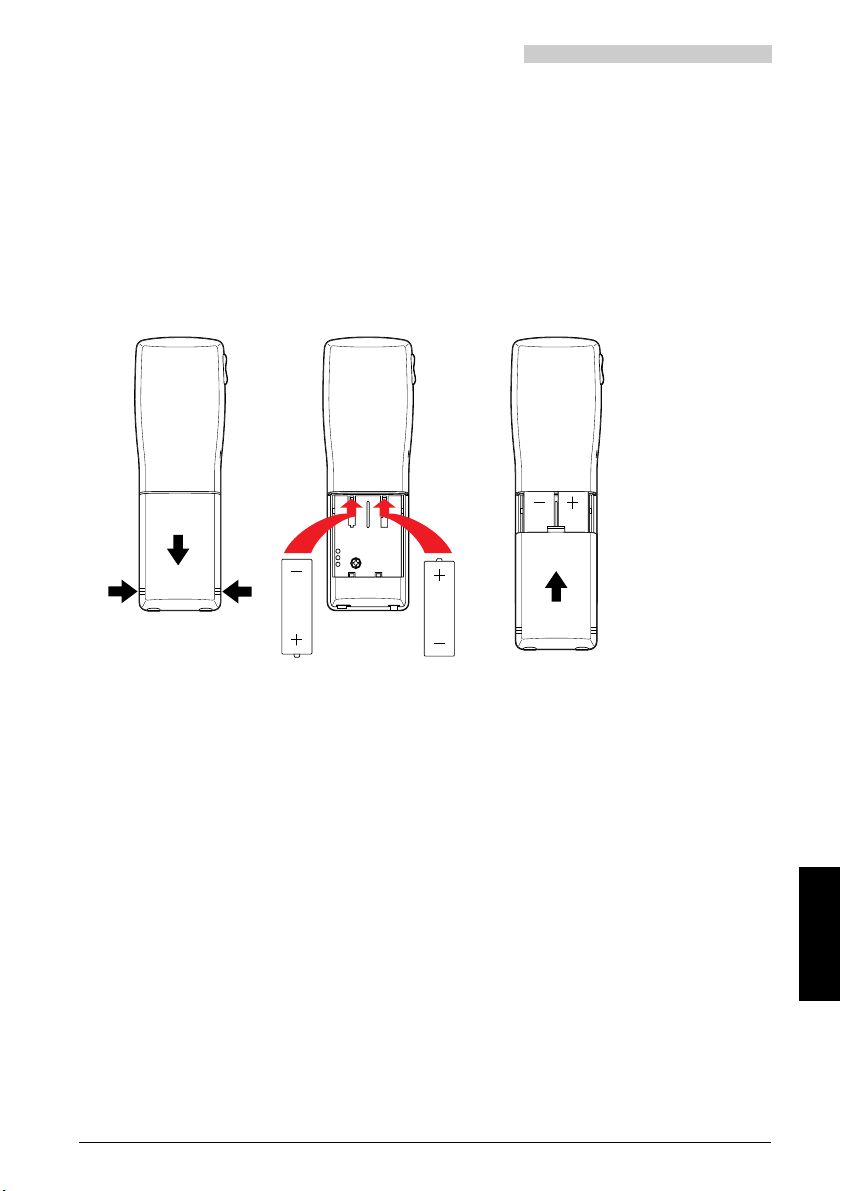
Installation and charging of battery packs in handset
Installing the batteries
1. Remove the battery compartment cover of the handset by applying light pressure
to the lateral ribs and then pulling it downward.
2. Insert the two batteries in the compartment as indicated in the figure. Make sure
the poles are placed as shown in the compartment.
3. Slide the cover to the handset battery compartment over the batteries until it snaps
audibly into place.
Warning
When inserting the batteries be sure to maintain correct polarity as shown. Incorrect insertion of the batteries may damage your handset.
Charging the batteries
The batteries are delivered uncharged. To charge them, place the handset in the charging
base.
For direct charging (charging the batteries without the charging base) connect the plug-in
power supply directly to the handset
1)
.
One battery charge lasts for approx. 120 hours of standby or
for approx. 12 hours of talk time
Charging takes approx. 1 hour for 1 day in use
approx. 4 hours for a full charge
Note
Press "Long click 6" to show the charge state. After a change of batteries, reliable
information on the charge state is only available after 10–15 minutes charge time.
1) Office 130pro only
20317845en_ba_a0 9
English
Page 16

Before you telephone for the first time
Setting the display language
The language spoken in the area is usually preset in your handset. If you prefer another
one, you can select among several different languages.
*Lang ¥
M
Ok
C
Setting the display contrast
For improved legibility of the display under various light conditions, you can change the
display contrast.
#
¥
OK
Register the PBX system
You can register your handset for as many as 4 different PBX systems (A, B, C, D). So, you
can be reached on your handset even while you are at a branch of your company.
System
M
Delete
M
¥
New Home
Press the M-key repeatedly in programming
1)
until, "*Language" appears. (look for the
mode
"*" symbol with a foreign language). Press the
Foxkey under "*Language". By pressing the
Foxkey under "¥" select the desired language.
Confirm the selected language by pressing the
Foxkey under "Ok". Press the C/End key to return to the standby display.
"Long click” the # key to skip to the menu item
”Contrast”.
Press the Foxkey under "¥" repeatedly until the
desired contrast is obtained
Press the Foxkey under "OK" to confirm the
contrast setting.
Press the M-key repeatedly in programming
1)
mode
until "System" appears. Then press
Foxkey under "System". "Auto" or the current
system (A, B, C, or D) will appear in the display.
Press the M-key. If "Register: A" and "Delete"
appear, the handset is registered with PBX system
"A" (this registration could be canceled by pressing the Foxkey under "Delete").
Using the Foxkey under "¥", the handset can be
registered with another three PBX systems (B, C
or D). The display then changes to "Register: B (C
or D)" and "New". Pressing the Foxkey under
"New" and "Home" causes the handset to be
registered in system "B" (provided this is allowed
and the system is available).
1) See section Programming mode, page 23
10 20317845en_ba_a0
Page 17

Before you telephone for the first time
New GAP
1 32
4 65
7 98
0
The handset can also be registered with a PBX
system from a different manufacturer by using
GAP (Generic Access Profile) and the required
"Authentication code.
Press the Foxkey under "New" and "GAP".
Ok
When "AC: _____" appears, enter the authentication code and acknowledge by pressing the
Foxkey under "Ok".
GAP log-on, compatibility with other DECT products
Ascotel DECT supports all the basic telephony features as defined in the Generic Access
Profile (GAP) standard (end 1997 version). They include setting up and clearing down outgoing and incoming calls, inquiry call, DTMF and */# procedures. In other words:
• You can log on and use your DECT system terminal on a third-party PBX. The only requirement to be able to use all the basic features defined in the GAP standard is that
they are fully implemented on the relevant PBX.
• Third-party DECT handsets that comply with the GAP standard can also be logged on
to and used on your system. However, they will provide only the functionality limited
by the GAP standard and not the same quality of radio connection. In particular the
software for Mobility Management with handover/roaming is virtually fully dependent
on the handset used and cannot be adapted 100% to your system.
Setting the PBX system
System
M
Press the M-key repeatedly in programming
1)
until "System" appears. Then press
mode
Foxkey under "System". "Auto" or the current
system (A, B, C, or D) will appear in the display.
¥Ok
Select the desired system or „Auto“ with the
Foxkey under "¥" and confirm by pressing "Ok".
(If more than one system is available, and "Auto"
is selected the handset automatically establishes
a connection with the system that offers the best
radio connection.)
Notes
• With "Long Click 1" (min. 2 seconds) you can switch your handset over to the next
available PBX system (A, B, C or D). Provided the switchover is not set on "Auto",
manual switchover of the PBX system is compulsory to ensure that your handset is
ready to operate in the new PBX system.
• "Long Click 2" is used to display the International Portable Equipment Identity (IPEI)
and PARK (Portable Access Right Key).
• "Long Click 5" displays the software version number of the handset along with the
date.
1) See section Programming mode, page 23
20317845en_ba_a0 11
English
Page 18

Telephoning
Answering an incoming call
An incoming call is signalled on the handset.
If the handset is not in the charging base, simply
press the Call key to answer the call.
Or
The handset is in the charging base. The call can
be answered directly by lifting the handset (see
"How to program your telephone", "Direct seizure").
Note
The call can also be answered by activating the handsfree mode (see "Handsfree mode").
Pick up a call
Under "Pick_up" the system offers you "Sub" (Subscriber), "Bell" (Central bell with
coded ringing) and "Page" (paging system).
To answer for instance a call directed to a terminal of a absent subscriber, press the M-key
repeatedly until "Pick_up" appears, press the Foxkey at this position and enter the subscriber number of the called terminal.
During the call
During a call, you can use the M-key to execute other functions, for example, initiating an
enquiry call, muting the microphone ("Mic mute"), switching the volume on the receiver
from "Quiet" to "Loud" (or vice versa)
Press the M-key once or twice in order to execute
M
Ending a call
A call is ended by pressing the Call key, the C/End key or by returning the handset to the
charging base. Of course, the party you are talking to can also end the call. The handset
returns to idle state shortly afterwards.
Adjusting the receiver volume during a call
The volume can be set to ”loud” ”medium” or ”quiet” via the volume adjustment keys
on the side of the handset or via the menu.
Quiet Loud
M
Note
The new setting is retained until changed back.
12 20317845en_ba_a0
other functions.
Press the M-key repeatedly until "Loud" appears.
Press the Foxkey under "Loud" or ”Quiet” once
or several times.
Page 19

Telephoning
Handsfree mode
Handsfree mode allows you to make a call without having to hold the handset (e.g. while
it is in the charging base). Furthermore, several people can take part in a call.
Before call setup or during a call, press the Loudspeaker key and
adjust the volume as desired.
Note
• You can answer a call directly by activating handsfree mode:
– The handset is in the charging base: press the Loudspeaker key or the Call key.
– The handset is not in the charging base: press the Loudspeaker key.
• In the case of long-distance calls or in a noisy environment, the quality obtained in
handsfree mode may not be optimal. If this is the case, continue the call in ”normal
mode”:
– The handset is in the charging base: as soon as it is removed, the handset auto-
matically changes to ”normal mode”.
– The handset is not in the charging base: press the Loudspeaker key to quit
handsfree operation without ending your call.
• In handsfree mode the call is not terminated when the handset is placed in the charging base.
• If handsfree mode is active and the handset is in the charging base, to end a call press
the Loudspeaker key or the Call key.
Open listening
In the open listening mode, information services (e.g. currency exchange rates) can be
called up and listened to at the same time by several people in the room. In this way, particularly in a noisy environment, reduction of the loudspeaker volume is avoided. (Note:
open listening corresponds to handsfree operation with the microphone switched off.
Open listening can only be activated via handsfree mode.)
Press the Loudspeaker key to activate open listening.
Mikro
Press the Foxkey under ”Microphone” to activate open listening
and adjust the volume as desired.
Note
To reactivate handsfree mode, press the Foxkey under ”Microphone” again.
20317845en_ba_a0 13
English
Page 20

Telephoning
Dialling with dialling preparation
Dialling preparation reduces the chance of misdialling.
Without pressing the Call key or the Loudspeaker key beforehand, enter the desired
number, check it and make any corrections using the C-key. Then press the Call key or the
Loudspeaker key. It is only at this point that the number is dialed.
Dialling using digits
This is just like traditional dialling, but dialling is not commenced until you press the Call
key or the Loudspeaker key.
1 32
4 65
7 98
or
0
Enter digits and press the Call key or the
Loudspeaker key.
Dialling using repeat dialling function (redial)
The numbers and the names of up to the last 10 subscribers called are stored in the "Last
Number Redial" memory.
Redial
M
Press the M-key.
Press the Foxkey under "Redial". The display
shows the number and possibly the name of the
last subscriber called.
¥
or
Press Foxkey under "¥" until the number of the
desired subscriber appears. Press the Call key or
the Loudspeaker key.
Note
The i-symbol refers to additional information, which you can call up by pressing this key.
Dialling using the Hotkey
You can store up to 6 names/numbers of frequently called subscribers in the Hotkey
memory.
Press the Hotkey repeatedly until the desired
name is displayed.
Meier
or
Press the Foxkey under the desired name and
then press the Call key or the Loudspeaker key.
14 20317845en_ba_a0
Page 21

Telephoning
Dialling with a name from a directory
There are up to three telephone directories: an internal directory (with all subscribers
connected to PBX), a directory containing abbreviated dialling numbers, and a private
directory. The desired call can be made with the subscriber name without having to enter
his or her number.
ABC
M
¥
Note
Entering initials is the simplest way of dialling a number stored in the index; you do not
need to know either the phone number or the abbreviated dialling number.
Example:
E
F
D
M
If you only know the surname:
M
ABC
ABC
2
2x 1x 1x
E
D
2
2x 3x 2x
F
1 32
4 65
7 98
0
or
B
A
1
H
N
I
G
M
3
5
C
Press the M-key. Press the Foxkey under
ABC; the menu for selecting the directory
appears. ("All" runs a search in all directories).
Enter the initials of the surname and first name,
- e.g. E # A for Einstein Albert.
Press the Foxkey under "¥" to scroll to the
desired name and press the Call key or the
Loudspeaker key to start dialling.
C
Einstein Albert:
Key 2: twice
# key: once (generates a blank)
Key 1: once
O
etc.
. . .
Correct numbers or names entered in dialling
preparation using the correction key (deletes last
character).
C
Dialling the conventional way
or
20317845en_ba_a0 15
1
. . .
9
A "Long Click" of the C-key ends the call
preparation.
Needless to say, you can also dial the
conventional way with your handset by simply
pressing the Call key or the Loudspeaker key and
dialling the number.
If you wait more than 10 seconds between digit
inputs, dialling is automatically terminated.
English
Page 22

Telephoning
Call list
Your handset automatically stores the numbers of the last 10 unanswered calls in the call
list. The i-symbol in the display draws your attention to the unanswered calls.
You can check these numbers and use this list to call back the corresponding persons.
Call–list ¥
Keep pressing the i-key until "Call_list" appears.
Press the Foxkey under "Call_list" and scroll to
the desired number with the Foxkey under "¥".
Delete
or
Press the Call key or Loudspeaker key to call the
number in the display.
Pressing the Foxkey under "Delete"
deletes the entry from the call list.
Switching off the microphone (Mute)
If you wish to speak for a moment to somebody else in your office without the person on
the telephone listening in, you switch off the microphone of your handset.
Micro
Press the Foxkey under "Microphone". The
microphone is switched off. (The following
symbol appears in the display: "n").
Micro
Press the Foxkey under "Microphone" again,
the microphone is switched back on again. (The
following symbol appears in the display: "o").
Switching on the discreet ringing feature
During a meeting a call to your handset can be intrusive. When the discreet ringing
feature is activated, the handset beeps just once to signal a call. You can identify the
caller by the name on the display and decide whether you want to answer the call. If you
decide not to, his/her number is entered in the call list. The i-symbol on the display will
remind you of this later. The discreet ringing feature remains activated until it is cancelled.
This i-symbol on the display also reminds you of this fact.
Discr
M
Press the M-key repeatedly until "Discreet"
appears. The discreet ringing is switched on by
pressing the Foxkey under "Discreet".
Note
The discreet ringing feature can also be switched on during a call. The menu option
"Discreet" appears on the display in conjunction with each call. The ring (only the ringing
itself, not the actually call) is switched off as soon as the discreet ringing is switched on.
16 20317845en_ba_a0
Page 23

Using the extended-feature functions
Switching off the discreet ringing feature
Reset
Parking a call
During a conversation, you may hear a "Call waiting" tone indicating that another
subscriber is trying to call you. If you answer the call, the connection with the first person
you were talking to is put on "Hold". Before you can transfer the second connection, you
must "Park" the connection which is on hold.
Press the i-key repeatedly until "Discreet" and
"Reset" appears in the display.
Press the Foxkey under "Reset" and the discreet
ringing feature is switched off.
2.–conv Park
M
Press the Foxkey under "2nd conversation" to reestablish the connection to the caller on hold.
Press the M-key repeatedly until "Park" appears.
Press the Foxkey under "Park" to park the
current connection.
2nd–convers.
Press the Foxkey under "2nd conversation" to
switch to the second caller. You can now transfer
the call.
Take–back
Press the Foxkey under "Take back" to reestablish the connection with the waiting caller.
Note
Parking requires no channel, unlike a connection on hold where both call channels are
busy. The advantage of this is that you can transfer the "call waiting" party (if necessary).
If [P] apears, a call is already parked.
Brokering
After initiating an enquiry call, you can return to the first caller without ending the
enquiry call connection. Afterwards, you can then switch back and forth between the two
subscribers as many times as you wish (brokering).
2.–conv
Press the Foxkey under "2nd conversation" to
switch to the first caller.
English
2.–conv
Press the Foxkey under "2nd conversation" to
switch back to the enquiry call subscriber, etc.
(and repeat this as often as desired or necessary).
20317845en_ba_a0 17
Page 24

Using the extended-feature functions
Transferring a call
After initiating an enquiry call, you can connect your two callers with each other directly.
Press the Call key, your handset automatically
reverts to idle state.
Conference
You have an enquiry call on the line and would now like to conduct a joint conference call
with your original caller (3-way).
Conf.
M
Press the M-key and then the Foxkey under
"Conference".
Note
There is no need to worry about calls being disconnected when you set up the conference
call. The only way calls are disconnected is when the C-key or the Call key is pressed.
Call diversion
You can divert calls to another telephone or to the switchboard unit.
Div. ¥
Press the M-key repeatedly until "Diversion"
appears and then press the Foxkey under
M
"Diversion". Press the Foxkey under "¥" to select
the diversion type (i.e. "Div. on busy" or "Fwd.
to Sub.").
1 32
4 65
7 98
0
Ok
Dial the diversion target and if necessary the new
number.
Confirm with "Ok".
Note
If you only want calls to be diverted when you are busy with another call, select
"Div. on busy".
Twin Mode (present/absent)
If you have a stationary set along with your handset, Twin Mode is an easy way to make
sure you can always be reached. When Twin Mode is programmed (see "Programming
your telephone"), call diversion is automatically activated as soon as you remove the
handset from the charging base.
18 20317845en_ba_a0
Page 25

Using the extended-feature functions
Leaving a message
You leave your workplace (without your handset) and wish to leave any callers a message.
Div. ¥
M
Press the M-key repeatedly until "Diversion"
appears. Press the Foxkey under "Diversion" and
then under "¥" until "Div. to Msg." appears in
the display.
Ok ¥
Press the Foxkey under "Ok" and repeatedly
under "¥" until a suitable message appears (isymbol on the display).
Press the i-key once or several times to display
the entire message.
1 32
C
4 65
7 98
0
Ok
Edit the message using the C-key and the
alphanumeric dialling keypad (if necessary, see
"Dialling with a name").
Press the Foxkey under "Ok".
Note
If you wish, you can also delete the entire message with the C-key and write your own.
Call back requested (calling back)
A subscriber has an important message for you and was unable to reach you despite your
having a handset. He/she requests a call back.
"Call back" and "Call" "Delete" appears on the display of your handset.
Call Delete
Press the Foxkey under "Call" to return the call
or under "Delete" if you think it no longer
necessary to return the call.
Paging
To page a person directly or after trying to phone.
Page
M
1 32
4 65
7 98
Press the M-key repeatedly until "Page" appears.
0
Press the Foxkey at this position, enter the
number of the person sought and confirm with
Ok
20317845en_ba_a0 19
"Ok".
English
Page 26

Using the extended-feature functions
Requesting a call back
You request a call back from an internal subscriber whose line is busy or who is not
answering.
C–back
Press the Foxkey under "Call_back". The
message "Call expected from the number nnn"
appears in the display.
Reset
By pressing the Foxkey under "Reset" you can
cancel the requested call back.
Note
Only one call back can be activated at a time.
Sending a message
Standard messages are stored in the PBX. After failing to reach a subscriber, you can
select one of these messages, add to it or change it if necessary and then send it to the
subscriber or a group you are trying to reach.
Msg. ¥
M
Press the M-key repeatedly until "Message"
appears. Press the Foxkey under "Message".
Press the Foxkey repeatedly under "¥" until a
suitable message appears (i-symbol on the
display).
Press i-key once or several times to display the
entire message.
1 32
C
4 65
7 98
1 32
4 65
7 98
0
0
Ok
Ok
Edit the message using the C-key and the
alphanumeric dialling keypad (if necessary, see
"Dialling with a name").
Press the Foxkey under "Ok".
Dial the number of the subscriber/the group to
whom the message is directed. Press the Foxkey
under "Ok" to send the message.
Notes
• This procedure can also be initiated with "Dialling preparation", i.e. enter the number
first and then select the message.
• If you wish, you can also delete the entire message with the C-key and write your
own.
20 20317845en_ba_a0
Page 27

Using the extended-feature functions
Read message
If you have received a message, the display will contain the word "Message" (the number
of its sender can be seen if the i-key is pressed) and the menu options "Read" and
"Delete".
Read
Press the Foxkey under "Read". The "+" sign
indicates that more infomation is available.
Press the i-key to view the next line.
At the end of the message, the display switches to the initial menu options "Read" and
"Delete".
Delete
Press the Foxkey under "Delete".
Note
To display other messages you may have received, the messages already read must first be
deleted.
Announcement
You can make announcements to one or several internal subscribers from your handset,
provided their system terminals have a loudspeaker.
M
1 32
4 65
7 98
Announ
Group
0
Ok
Press the M-key repeatedly until
"Announcement" appears. Press the Foxkey
under "Announcement".
Enter the desired subscriber number. (Or press
the Foxkey under "Group" and enter the
announcement group number.
Press the Foxkey under "Ok" and make your
announcement.
English
20317845en_ba_a0 21
Page 28

Using the extended-feature functions
Transparent mode (Tone dial mode DTMF)
During a call connection the tone dial mode can be used ta activate a function such as,
for example, the remote control of an answering machine.
1 32
4 65
7 98
"Long Click" of the * key until "Tone Dial"
appears. Enter the character sequence of the
0
desired function.
After carrying out this procedure:
C
Press the C-key to switch the tone dial mode off
again
or
Reset
Press the Foxkey under "Reset".
Beginning and ending enquiry calls
The caller you are talking to on the telephone asks a question you cannot answer. You
wish to call a fellow employee for information, without cutting off your connection with
the caller.
1 32
4 65
7 98
Enqui
0
Enter the number of the subscriber you wish to
call for the information.
Press the Foxkey under "Enquiry"; the subscriber
is called (while the other connection is put on
hold).
After obtaining the information you needed:
C
Press the C-key to switch back to your call with
the waiting caller.
Note
If the Call key is pressed after an enquiry call, a continuous tone will sound for 10
seconds. Press the Call key while this tone is sounding to reconnect the handset to
the waiting subscriber.
22 20317845en_ba_a0
Page 29

Programming your telephone
Points to consider when programming your phone
Programming is an integral part of the concept of operation. Before you start
programming, read the chapter "Concept of operation" at the beginning of these
operating instructions.
Programming mode
You can advance to the beginning of the programming mode in one of two ways:
M
Programming
M M
…
Note
"Long Clicks" depend on the software and the PBX type.
Menu key
With the Menu key (M-key) you can initially access all the programming parameters, once
a parameter has been selected (e.g. Keys), the M-key is used to access the various options
for the selected parameter, such as "Number key" etc.
You can exit either level by pressing the C/End key.
Storing
The contents of a menu option you have programmed or changed yourself will be stored
if you press the Foxkey under "Ok". If you press another key, the programming you have
carried out will not be stored.
"Long click" (at least 2 seconds) of the M-key
or
Press the M-key several times until
"Programming" appears and then press the
Foxkey under "Programming".
20317845en_ba_a0 23
English
Page 30

Programming your telephone
Div. Discr
2. Sep 13:39
PRG Menu 1
Dir. Text
Name:_
New Search
PRG Menu 2
Keys Mobile
ABC Redial
Idle text:
Ok ABC
En:Number
Ok ABC
032 624 21 11
Modify n ¥
En:Name
Ok ABC
Peter
Read Delete
Programming
Chrg.contct
Prog. Answer
Diversion
Ok ¥
Direct: No
Ok ¥
Subscriber
Ok ¥
Me1:+1N#PX
Ok ABC
Me2:I#21PX
Ok ABC
Pick_up Page
Msg. Announ
M-key
Foxkey
Foxkey (Ok)
Overview
1)
1) Word length of individual menu items depends on the software and the PBX type.
24 20317845en_ba_a0
Page 31

Programming your telephone
30. Juli 13:40
Unlock
Unlock Keys?
No Yes
HotkeyPrg:
Hk5 Hk6
Hotkey
Ok ¥
HotkeyPrg:
Hk1 Hk2
HotkeyPrg:
Hk3 Hk4
Me1:Name
Ok ABC
Nn: Number
Ok ¥
Me1:Number
Ok ABC
Me1:I*26PX
Ok ABC
Me1:Name
Ok ABC
Me2:I#26PX
Ok ABC
Fn: Funct.
Ok ¥
No disturb
Ok ¥
Me1:Number
Ok ABC
Me1:Name
Ok ABC
Foxkey
Ok ¥
Foxkey
Fox1 Fox2
Nn:Number
Ok ¥
No disturb
Ok ¥
Me1:I*26PX
Ok ABC
Me1:Name
Ok ABC
Me2:I#26PX
Ok ABC
Fn:Function
Ok ¥
Confirm tone
Ok ¥
Tone: No
Ok ¥
Tone: Yes
Ok ¥
Fn: Delete
Ok ¥
KeyLock
Ok ¥
Fn: Delete
Ok ¥
Overview (continuation)
20317845en_ba_a0 25
English
Page 32

Programming your telephone
PRG Menu 3
Term. Code
Switch off
Ok ¥
Barring
Ok ¥
Code: ****
Ok Back
free
Ok ¥
Old code: ****
Ok Back
New code: ****
Ok Back
Confirm: ****
Ok Back
Melody
Ok
4
ß
Ring speed
Ok
3
ß
Prog. barred
Ok ¥
barred
Ok ¥
PRG Menu 4
Ring *Lang
English
Ok ¥
Ringing vol.
Ok 3
ß
Melody
Ok 4ß
Ring speed
Ok
2
ß
Discr ring
Ok ¥
Ringing vol.
Ok 1
ß
Trembler
Ok ¥
Trembl. only
Ok ¥
Both
Ok ¥
Ring only
Ok
¥
Normal ring
Ok ¥
1)
1)
Office 130pro only.
The appearance of the menu depends on the software and the PBX type.
The "Trembler" menu item can also be displayed by a "Long Click" on the Loudspeaker key .
Overview (continuation)
26 20317845en_ba_a0
Page 33

Programming your telephone
PRG-Menu 5
Test System
System: A
Ok ¥
Register: A
>< ¥
Test:
Look Show_HO
Register: B
Home GAP
Register: B
New ¥
The menu point "Test" is reserved for
the technician handling installation.
1)
1)
AC:
Ok Back
Show_HO: None
Ok ¥
Overview (continuation)
20317845en_ba_a0 27
English
Page 34

Programming your telephone
Twin Mode (present/absent)
If you have a stationary set along with your handset, Twin Mode is an easy way to make
sure you can always be reached.
The recharging contact acknowledges 2 states:
a) Handset in charging base (present)
b) Handset not in charging base (absent)
Based on these states automatic call diversion is executed as soon as the handset is taken
out of the charging base.
After returning the handset to the base, the diversion is automatically switched off.
Activating Twin Mode
¥ Mobile
M
In programming mode, keep pressing the M-key
until "Mobile" appears. Press the Foxkey under
"Mobile".
Prog. ¥ Ok
Press the Foxkey under "Prog.", then use the
Foxkey under "¥" to scroll to "Twin" and then
confirm with "Ok".
1 32
4 65
7 98
Ok
0
Under "TwinNo:" enter the access number of the
corded terminal that is to be diverted to the
handset. Activate Twin Mode with the Foxkey
under "Ok".
Deactivating Twin Mode
Mobile
M
Prog. ¥ Ok
In programming mode, keep pressing the M-key
until "Mobile" appears. Press the Foxkey under
"Mobile".
Press the Foxkey under "Prog.", then use the
Foxkey under "¥" to scroll to "No function" and
use the Foxkey under "Ok" to deactivate the
Twin Mode.
Notes
• If call diversion/call forwarding to secretary, voice mail or your own GSM set, etc. is
intentionally activated on the corded terminal with the handset still in the charging
base, that particular setting takes priority over Twin Mode, i.e. calls will not be
automatically diverted to the handset when you remove it from the charging base.
Twin Mode is reactivated as soon as the call diversion/call forwarding activated on the
corded terminal is reset.
• Other functions besides Twin Mode can also be set (see "Mobile" programming
instructions)
28 20317845en_ba_a0
Page 35

Programming your telephone
Private directory
In addition to the directories of available PBX subscribers and abbreviated dialling
numbers, you can also set up a private directory with up to 30 telephone numbers and
names. You can protect the entries from being accessed by unauthorized parties by
barring the programming functions of your handset.
M
Dir.
Press the M-key repeatedly in programming
mode until "Directory" appears.
Press Foxkey under "Directory" and then under
"New" or "Search".
New Ok
1 32
4 65
7 98
0
With "New", the next free directory entry is
shown. Enter the number, acknowledge by
pressing "Ok" and enter the name.
Press the Foxkey under "Ok" to have the entry
stored in memory.
Search ¥
With "Search", you can use Foxkey under "¥" to
page to the desired entry.
Modify Ok
1 32
4 65
7 98
0
Press the Foxkey under "Modify", change the
stored entries, and then restore in memory by
pressing the Foxkey under "Ok".
Notes
• If a directory entry has been previously entered, the current entry details are displayed.
You can of course edit it.
• We advise you to enter the name corresponding to each number; this enables you to
use the convenient name dialling feature.
• If the number of the caller is displayed during a call (CLIP), the system looks for the
number through all directories. If it is already stored with a name, this name is also
displayed.
English
20317845en_ba_a0 29
Page 36

Programming your telephone
Macro language
The macro language allows you to store several functions in succession under one key.
I Seizes line
X Hangs up receiver (disconnect)
P Pause (1 second)
N Inserts the number entered/displayed in dialling preparation
. Activates control key
Z Switches Tone Dial Mode ON/OFF
R Redials last number dialed
Examples:
I201 Seize and call internal subscriber 201
I*21201X Seize, divert call to internal subscriber 201, and hang up receiver.
Programming the text display for idle state
You can programme text string for the display in idle state instead of just displaying the
time and date.
Text
Ok
C
Ok
Note
A "Long Click" of the C/End key (min. 2 seconds) takes you straight back to the previous
menu.
30 20317845en_ba_a0
Press the Foxkey under "Text" in programming
mode and enter text (maximum of 15
characters).
Press the Foxkey under "Ok" to store the input in
the memory.
Edit the standby text (if necessary).
The correction key (C/End) can be used to delete
the characters to the left of the cursor.
After editing the standby text, press the Foxkey
under "Ok".
Page 37

Programming your telephone
Locking the keypad
You can lock your keypad from accidental activation. Incoming calls are signaled and can
be taken by pressing the Call key. Unlock the keypad prior to making outgoing calls.
After the call you have 5 seconds within which to set up an outgoing call. The key lock
(Variant 1) is reactivated after the 5 seconds.
Press the M-key repeatedly in programming
M
Keys
Ok
mode until "Keys" appears.
Press the Foxkey under "Keys",
"Keylock" appears.
Press the Foxkey under "Ok" to activate the
"Keylock" feature.
"Unlock" appears on the display.
Unlock
Press the Foxkey under "Unlock".
The handset asks you "Unlock keys?" to confirm
that the keypad should be unlocked.
Yes
If you press "Yes", the standby display appears
and the handset is ready again for operation.
Notes
• "Long Click 8" (min. 2 seconds) can also be used to switch on Variant 1 of the
key lock.
• "Long Click 9" can be used to switch on Variant 2 of the key lock. This variant is not
automatically disabled when you receive a call and has to be disabled manually (see
above) to be able to answer the call with the Connect key.
English
20317845en_ba_a0 31
Page 38

Programming your telephone
Programming the Hotkey
The Hotkey is a freely programmable key where up to 6 numbers/names or functions can
be stored. You can even store whole operating sequences using the macro language.
Storing numbers/names under the Hotkey
Keys
M
Press the M- key repeatedly in programming
mode until "Keys" appears.
Press the Foxkey under "Keys".
¥Ok
Press the Foxkey repeatedly under "¥" until
"Hotkey" appears. After pressing the Foxkey
under "Ok" the strings "HotkeyPrg." and
"Hk1", "Hk2" will appear.
Ok
M
Press the M-key one or two times to call the
memories "Hk3" and "Hk4" or "Hk5" and
"Hk6", respectively.
Select the desired memory (Hk1…Hk6) by
Ok
pressing the Foxkey.
Confirm again with "Ok" in the menu
"Number : Nr.".
1 32
4 65
7 98
0
Ok
Enter the number, acknowledge by pressing
"Ok" and enter the name.
Press the Foxkey under "Ok" to have the entry
stored in memory.
Note
The program jumps directly to the Hotkey Programming when you "Long click" the
Hotkey.
32 20317845en_ba_a0
Page 39

Programming your telephone
Storing functions under the Hotkey
Same procedure as under Number/Name until it comes time to select the memory
Hk1...Hk6. From that option:
¥Ok
Press Foxkey under "¥" to call the menu
"Fn: Funct." (Function) and confirm by pressing
"Ok".
¥Ok
Press the Foxkey under "¥" repeatedly until the
desired function is displayed and confirm with
"Ok".
Ok
The contents of memory 1 for this function are
displayed (activate function).
Press Foxkey under "Ok" to store the function in
memory.
1 32
4 65
7 98
0
Ok
If desired, enter a name and acknowledge with
"Ok". The contents of memory 2 are displayed
(deactivate function).
Ok
The function is stored in memory using "Ok".
Notes
• The corresponding function codes are entered in the two memory locations
automatically and can be added to/amended as required.
• If you do not enter a name when storing, a short default name will be used, e.g.
"DND" for "Do not disturb".
• The symbol "j" in the symbol line and a "|" next to the function indicate that a
programmed function is active.
• The program jumps directly to the Hotkey Programming when you "Long click" the
Hotkey.
20317845en_ba_a0 33
English
Page 40

Programming your telephone
Programming the Foxkeys
You can also use both Foxkeys as freely programmable keys. The display in standby mode
contains very frequently used numbers or functions which can be conveniently dialled or
executed by means of a single keystroke (of the corresponding Foxkey). If a function is
stored under the Foxkey, its active state is indicated with the "|" symbol.
Storing Numbers/names or functions under the Foxkey
Keys
M
Press the M-key repeatedly in programming
mode until "Keys" appears.
Press the Foxkey under "Keys".
¥
Press the Foxkey repeatedly under "¥"
repeatedly until "Foxkey" appears.
Ok
Fox1 Fox2
Note
A "Long click" of the Foxkey takes you directly to the Foxkey programming.
Key confirmation tone
If you wish, the handset can confirm every keystroke with a short confirmation tone.
Keys
M
¥Ok
¥Ok
Note
Whenever you place the handset into the charging base, a short tone always sounds to
confirm this action. During a call, the volume of the key confirmation tone is reduced.
Press Foxkey under "Ok" and then select the
desired key ("Fox1" or "Fox2").
Proceed as under "Hotkey programming."
Press the M-key repeatedly in programming
mode until "Keys" appears.
Press the Foxkey under "Keys".
Press the Foxkey repeatedly under "¥" until
"Confirmation tone" appears and confirm with
"Ok".
Press the Foxkey repeatedly under "¥" to select
"Tone: Yes" or "Tone: No".
Press Foxkey under "Ok" to store the setting
34 20317845en_ba_a0
Page 41

Programming your telephone
Direct answer
If the handset is set at "Direct" answering, you can answer incoming calls automatically
by simply taking the handset out of the charging base. You need not press the Call key.
Returning the handset to the charging base always causes a connection to be ended
unless this was already done by pressing the Call key.
Mobile Answer
M
¥Ok
Switching handset (terminal) ON/OFF
Switching OFF
M
Term.
Ok
Notes
• You can also switch off the handset with a "Long click" (at least 2 seconds) of the 0
(zero) key.
• If you are outside the range for radiocommunications, the handset will make repeated
attempts to establish a connection with a radio base. If you plan on being out of
range for an extended period, switch off the handset to save your battery.
Press the M-key repeatedly in programming
mode until "Mobile" appears, press the Foxkey
under "Mobile" and then under "Answer".
Press the Foxkey under "¥" to switch to "Direct:
Yes" and confirm this setting by pressing the
Foxkey under "Ok".
Press the M-key repeatedly in programming
mode until "Terminal" appears.
Press the Foxkey under "Terminal"; "Switch off"
will appear.
Press the Foxkey under "Ok" to switch off the
handset.
The connection to the radio base is terminated
(display is empty).
English
Switching ON
Yes
20317845en_ba_a0 35
Press the Call key and switch on the set with the
Foxkey under "Yes".
Page 42

Programming your telephone
Barring and unbarring your handset (terminal)
You can protect your handset from being used by unauthorized persons. Your system
manager can tell you which numbers (for example, emergency numbers) can be dialled
whilst your handset is barred.
When your handset is barred, you can still answer incoming calls at any time by pressing
the Call key. The handset must be unbarred before an outgoing call can be made.
It is recommended that you bar the programming functions of your handset using "Prog.:
barred". This protects the entries in your private directory, among other data.
Term.
M
¥Ok
1 32
4 65
7 98
Ok
Press the M-key repeatedly in programming
mode until "Terminal" appears and press the
Foxkey under "Terminal"; "Switch off" will
appear.
Use the Foxkey under "¥" to select "Barring";
press "Ok" and enter the code (password).
0
Press the Foxkey under "Ok" to verify the
password.
¥Ok
Press the Foxkey under "¥" to select "free",
"Prog.barr" (Programming barred) or "barred"
("free" cancels the barred state) and confirm
with "Ok".
Changing code/password
The first time you switch on your handset the code/password is set at "0000". It is
recommended that you immediately reprogramme a personal password of from 2 to
10 digits to protect the personal settings in your handset and the data stored from
unauthorized use (change, deletion).
M
Code
1 32
4 65
7 98
Press the M-key repeatedly in programming
mode until "Code" appears. Press the Foxkey
under "Code" and enter the current code.
0
Ok
Ok Ok
1 32
4 65
7 98
0
1 32
4 65
7 98
Press the Foxkey under "Ok" and enter the new
code.
0
Press the Foxkey under "Ok"; "Confirm" will
appear. Enter the new code again and confirm
with "Ok".
36 20317845en_ba_a0
Page 43

Programming your telephone
Adjusting ringing signal and setting the discreet ringing feature
Your handset can signal a call with different volumes, ring melodies, and speeds. You
select the version you like best. These features make it easier for you to distinguish
whether a call is for you or possibly for a person nearby.
When the discreet ringing feature is activated, your handset sounds just a single ring
tone.
Press the M-key repeatedly in programming
M
mode until "Ring " appears.
Ring ¥
Press the Foxkey under "Ring " and then use the
Foxkey under "¥" to select "Normal ring" or
"Discr ring".
Ok
Press the Foxkey under "Ok" to activate the
current ring signal.
ß
Press the Foxkey repeatedly under "ß" until the
desired volume is reached.
Ok ß
Press the Foxkey under "Ok" to store the setting
and in the next menu, use the Foxkey under "ß"
to select a melody.
Ok ß Ok
After storing the melody by pressing "Ok", press
the Foxkey under "ß" in the "Ring_speed" menu
in order to set the desired ring speed; then
confirm with the Foxkey under "Ok".
Notes
• You can use the M-key to scroll between the menu options "Ringing_vol.", "Melody"
and "Ring_speed" without having to make any changes.
• The ringing signal may be set to be very loud. For safety reasons, the volume of the
first ring tone is always lower than that of the following ring tones.
20317845en_ba_a0 37
English
Page 44

Programming your telephone
Switching the trembler on
The trembler is a discrete and reliable way of being made aware of a call, should you fail
to hear the call because of a noisy environment and not notice the call LED either.
M
Ring ¥
¥Ok
Notes
• The display symbol "
• "Long click" the Loudspeaker key to skip to the "Trembler" menu
1)
M
Ok
In programming mode keep pressing the M-key
until "Ring" appears.
Press the Foxkey under "Ring" and then use the
Foxkey under "¥" to select "Trembler".
Press the Foxkey under "OK" to proceed to the
menu "Trembler".
With the Foxkey under "¥" you can select
either "Ring only", "Trembler only" or "Both"
by pressing the Foxkey under "OK" at the
appropriate display.
v" indicates that the trembler is switched on.
2)
.
1) Office 130pro only. The appearance of the menu depends on the software and the PBX type.
2) Always functions with Office 130pro, irrespective of the software and the PBX type.
38 20317845en_ba_a0
Page 45

Troubleshooting
Leaving the radio coverage area
You will hear a warning tone if you are about to leave the area of radio coverage. Once
you have left the area the message "No System" will appear and the aerial symbol "m"
will disappear.
If during a call you move out of range completely, your call will be interrupted but the
connection will not be cleared down immediately. The system will then attempt for
around 20 s to set up a new radio connection with the same - or another - radio unit.
Only then will the connection be cleared down in the PBX.
Outside radio coverage range, you have the following M-key programming functions at
your disposal:
"Prog.", "Keys", "Mobile", "Term.", "Ring", "*Language", "Test" and "System".
Display showing but no connection
The handset may be barred (see "Barring/unbarring handset").
The Hotkey and/or Foxkey cannot be programmed
Programming may be barred (see "Barring/unbarring handset").
Unbarring the handset if password is forgotten
Ask the system manager to unbar your handset and default the password to "0000".
Special display contents
"Please wait"
This message may appear during the registration procedure. It also appears when a caller
puts the call on hold.
"Handset unknown"
The registration of the handset with the PBX system has failed. Please contact the system
manager.
"Overload"
No free resources, please wait and try again.
"System Busy"
Temporarily, calls cannot be set up via the current radio unit. The handset is trying to
establish a better radio connection with the same - or another - radio unit. The message
appears only in the idle state.
"No System"
You are out of radio coverage range; the connection with the PBX system was broken off.
"Registration"
The registration procedure on the PBX system is in progress.
"Defective" / permanent progressive ringing
Each time the handset is placed on the charging box, its parameters are checked. If a
parameter error is detected, you will hear an acoustic fault signal and the display will read
"Defective". The handset must then be sent back to the supplier for repairs/replacement.
Note
If other messages appear, ask your system manager about them.
20317845en_ba_a0 39
English
Page 46

Function codes
Which prefix code numbers to dial
Standard dialling Key sequence
Abbreviated dialling numbers generally PBX .............. 7000…7999
Door intercoms ............................................................... 851… 852
Emergency codes............................................................ 12 .........
External line
business .......................................................................... 0 .........
private ............................................................................ 10 .........
to include cost centre code ............................................. 13 CC no. .........
Routing codes ................................................................. 170… 199
Switchboard attendant.................................................. 11 .........
User group codes ........................................................... 860… 888
Suffix dialling
Brokering (switching between
two connections) ............................................................ 2
Call back
activate while subscriber is busy ...................................... 9 or *37
activate while subscriber is free ....................................... 9 or *37
1)
1)
1)
1)
.........
.........
.........
.........
Call back reg. no. / MESSAGE
activate ........................................................................... *38
Call waiting..................................................................... 6 or *43
reject .............................................................................. 0
answer with hold ............................................................ 2
answer without hold ....................................................... 1
answer with conference .................................................. 3
Coded ringing
activate ........................................................................... 8 or *81
Conference
establish from connection ............................................... 3
exclude internal subscribers ............................................ *31
Intrusion.......................................................................... 7 or *44
reject .............................................................................. 0
answer with hold ............................................................ 2
answer without hold ....................................................... 1
Paging system on ........................................................... 8 or *81
1) The definition and the number range are software and PBX dependant
40 20317845en_ba_a0
Page 47

Function codes
Re-booking ongoing call to cost centre number ......... *78 CC no.
Parking a call .................................................................. *76
Transfer call .................................................................... 1
Prefix dialling
Announcement
to a single subscriber ...................................................... *7998 subs. no.
to a group ...................................................................... *79 group no.
answer announcement to a group .................................. *89
Answer circular call ........................................................ *83
Appointments reminder call (wake-up call)
activate standing order ................................................... *56 hh mm
cancel standing order...................................................... #56
activate one-off order ..................................................... *55 hh mm
cancel one-off order ....................................................... #55
Call back reg. no. / MESSAGE
2)
activate ........................................................................... *38 subs. no.
cancel (target terminal) ................................................... #38 subs. no.
2)
Call diversion
suppress incoming
enable incoming 2).......................................................... #02
activate unconditional
cancel unconditional
2)
....................................................... *02
2)
.................................................. *21 dest. no.
2)
.................................................... #21
activate to most recently defined subs. no., uncond. ....... *21#
cancel to most recently defined subs. no., uncond. ......... #21
activate to pre-defined subs. no.
cancel to pre-defined subs. no. 2).................................... #22
activate when busy
cancel when busy
2)
...................................................... *67 dest. no.
2)
......................................................... #67
2)
.................................. *22
activate to most recently
defined subs. no., when busy ....................................... *67#
cancel to most recently
defined subs. no., when busy ....................................... #67
activate to standard text
cancel to standard text
activate to pager or circular call with ring code 2)............. *28
cancel to pager or circular call with ring code
Call forwarding (automatic call transfer if no answer)
suppress incoming
enable incoming
activate 2)........................................................................ *61 dest. no.
2)
cancel
.......................................................................... #61
2)
............................................... *24 text no.#
2)
................................................. #24
2)
............... #28
2)
....................................................... *02
2)
.......................................................... #02
activate to most recently defined subs. no....................... *61#
2) Remote control possible
20317845en_ba_a0 41
English
Page 48

Function codes
cancel to most recently defined subs. no. ........................ #61
activate to pre-defined subs. no.
cancel to pre-defined subs. no.
activate to pager or circular call with ring code 2)............. *68
cancel to pager or circular call with ring code
2)
.................................. *62
2)
.................................... #62
2)
............... #68
Call pick up ......................................................................... *86 subs.no.
Call waiting indication
2)
suppress incoming .......................................................... *04
enable incoming ............................................................. #04
Cancel call back .............................................................. #37
Code call
activate ........................................................................... *81 subs. no.
answer ........................................................................... *82
Conference
variable ........................................................................... *71 subs. no. 1*
… subs. no. 5#
pre-defined ..................................................................... *70 conf. no
Connection
park ................................................................................ *76
recall parked ................................................................... #76
Courtesy Service
switch on group 1........................................................... *931
switch off group 1 .......................................................... #931
switch on group 2........................................................... *932
switch off group 2 .......................................................... #932
1)
1)
1)
Day, night, weekend answer connection (Switch group 1)
day (Position 1) ............................................................... *8511
night (Position 2) ............................................................ *8512
weekend (Position 3) ...................................................... *8513
2)
Deactivate all activated services
................................ *00
(except user group)
Do not disturb (station guarding)
2)
activate ........................................................................... *26
cancel ............................................................................. #26
External line
activate with charge recall............................................... *32 subs. no.
1) The definition and the number range are software and PBX dependant
2) Remote control possible
42 20317845en_ba_a0
Page 49

Function codes
Follow me
activate ........................................................................... *23 subs. no.
cancel ............................................................................. #23
Intrusion
2)
suppress incoming .......................................................... *04
enable incoming ............................................................. #04
Messages (standard messages with/without
defined parameters)
2)
send to a single subscriber .............................................. *3598 subs. no text no.#
send to a group .............................................................. *35 group no. text no.#
broadcast........................................................................ *3599 text no.#
Open doors ..................................................................... *751… *752
1)
Paging
page ............................................................................... *81 subs. no.
answer with one search path .......................................... *82
answer with multiple search paths .................................. *82 subs. no.
Relays
activate ........................................................................... *755… *757
deactivate ....................................................................... #755… #757
1)
1)
Remote control
activate (from another set) ............................................ *06 subs. no. *21 dest. no.
activate remote control /
enter remotely controllable number /
enter desired *-procedure (e.g. *21 dest. no.)
deactivate (from another set) ........................................ *06 subs. no. #21
activate remote control /
enter remotely controllable number /
enter desired #-procedure (e.g. #21)
deactivate (from own set) ............................................. #21
enter #-procedure (e.g. #21)
Switch groups (incoming)
switch group x, pos. 1..................................................... *85x1
switch group x, pos. 2..................................................... *85x2
switch group x, pos. 3..................................................... *85x3
1)
1)
1)
Note: x = 2 to 9
User group
2)
join ................................................................................. *48
leave ............................................................................... #48
1) The definition and the number range are software and PBX dependant
2) Remote control possible
20317845en_ba_a0 43
English
Page 50

Index
A
ABC ............................................................. 15
Adjusting ringing signal ................................ 37
Alpha mode ................................................... 4
Announcement ............................................ 21
B
Back to the previous menu ........................... 30
Barring and unbarring your terminal ............. 36
Batteries .................................................... 6, 9
Brokering ..................................................... 17
C
Call back ............................................... 19, 20
Call diversion ................................................ 18
Call list ......................................................... 16
Changes the search direction.......................... 3
Code/password ....................................... 6, 36
Conference .................................................. 18
D
Dialling .................................................. 14, 15
Dialling with a name from a directory ........... 15
Direct answer ............................................... 35
Discreet ringing ............................................ 16
Display ......................................... 1, 2, 10, 11
Diversion ...................................................... 18
DTMF ........................................................... 22
E
Enquiry calls ................................................. 22
F
Foxkey programming .................................... 34
Function codes ............................................. 40
G
General rules of operation .............................. 3
H
Handsfree mode ........................................... 13
Hotkey Programming.................................... 33
I
Installation ........................................... 7, 8, 9
K
Key confirmation tone .................................. 34
L
Leaving a message ....................................... 19
Leaving the radio coverage range ................. 39
LED signalling ................................................. 2
Locking the keypad ...................................... 31
"Long click" functions .................................... 4
M
Macro language ........................................... 30
Message ................................................ 20, 21
Mute ............................................................ 16
O
Open listening .............................................. 13
P
Paging .......................................................... 19
Parking a call ................................................ 17
PBX system ................................................... 11
Pick up a call ................................................ 12
Private directory............................................ 29
Programming ............................................... 23
Programming the Foxkeys............................. 34
Programming the Hotkey .............................. 33
Programming the text display for idle state ... 30
R
Read message .............................................. 21
Receiver volume ........................................... 12
Redial ........................................................... 14
Register the PBX system ........................ 10, 11
S
Safety Advice ............................................ 5, 6
Sending a message ....................................... 20
Setting the display contrast .......................... 10
Setting the display language ......................... 10
Setting the PBX system ................................. 11
Software version number .............................. 11
Switching handset (terminal) ON/OFF ........... 35
Switching off the microphone ...................... 16
Switching the trembler on ............................ 38
T
Text display for idle state .............................. 30
Tone Dial Mode ............................................ 22
Transferring a call ......................................... 18
Transparent mode ........................................ 22
Trembler ....................................................... 38
Troubleshooting ........................................... 39
Twin Mode ............................................ 18, 28
V
Variant 2 of the key lock............................... 31
44 20317845en_ba_a0
Page 51

Page 52

ABSC 20317845_A.060_V4.50
Office 20 Office 30
Office 40 Office 100
Office 10
a thinks ahead
Office 150
 Loading...