

Page 1
Ascotel Office Terminals by ascom
Office 10
User Guide
20316549en_ba_a0 ascom Office 10 1
Page 2

Contents
(in alphabetical order)
Acknowledgement tone ON/OFF . . . . . . . . . . . . . . . . . . . . . . . . . . . 10
Activating callback if subscriber busy . . . . . . . . . . . . . . . . . . . . . . . . . 6
Answering a call . . . . . . . . . . . . . . . . . . . . . . . . . . . . . . . . . . . . . . . . 4
Answering a callback if no reply . . . . . . . . . . . . . . . . . . . . . . . . . . . . 6
Answering call waiting . . . . . . . . . . . . . . . . . . . . . . . . . . . . . . . . . . . 7
Answering the callback . . . . . . . . . . . . . . . . . . . . . . . . . . . . . . . . . . . 7
Appliance functions . . . . . . . . . . . . . . . . . . . . . . . . . . . . . . . . . . . . . 8
Appointment reminder call (wake-up call) . . . . . . . . . . . . . . . . . . . . 11
Basic functions . . . . . . . . . . . . . . . . . . . . . . . . . . . . . . . . . . . . . . . . . 4
Brokering . . . . . . . . . . . . . . . . . . . . . . . . . . . . . . . . . . . . . . . . . . . . . 6
Call forwarding . . . . . . . . . . . . . . . . . . . . . . . . . . . . . . . . . . . . . . . . 11
Call transfer (switching) . . . . . . . . . . . . . . . . . . . . . . . . . . . . . . . . . . . 6
Conference . . . . . . . . . . . . . . . . . . . . . . . . . . . . . . . . . . . . . . . . . . . . 6
Dialling a call number from the private directory . . . . . . . . . . . . . . . . 4
Dialling a call number via the digit keys . . . . . . . . . . . . . . . . . . . . . . . 4
Dialling an outside destination . . . . . . . . . . . . . . . . . . . . . . . . . . . . . 5
Dialling via a user-programmable key . . . . . . . . . . . . . . . . . . . . . . . . 4
Display and keyboard . . . . . . . . . . . . . . . . . . . . . . . . . . . . . . . . . . . . 3
Ending a call . . . . . . . . . . . . . . . . . . . . . . . . . . . . . . . . . . . . . . . . . . . 4
Function . . . . . . . . . . . . . . . . . . . . . . . . . . . . . . . . . . . . . . . . . . . . . 11
Function codes . . . . . . . . . . . . . . . . . . . . . . . . . . . . . . . . . . . . . . . . 11
Glossary . . . . . . . . . . . . . . . . . . . . . . . . . . . . . . . . . . . . . . . . . . . . . . 3
Important Telephone Numbers . . . . . . . . . . . . . . . . . . . . . . . . . . . . 12
Inquiry call . . . . . . . . . . . . . . . . . . . . . . . . . . . . . . . . . . . . . . . . . . . . 5
Installation . . . . . . . . . . . . . . . . . . . . . . . . . . . . . . . . . . . . . . . . . . . 12
Keying in digits during a call . . . . . . . . . . . . . . . . . . . . . . . . . . . . . . . 7
Last-number redialling . . . . . . . . . . . . . . . . . . . . . . . . . . . . . . . . . . . . 4
LED display . . . . . . . . . . . . . . . . . . . . . . . . . . . . . . . . . . . . . . . . . . . . 8
Other functions . . . . . . . . . . . . . . . . . . . . . . . . . . . . . . . . . . . . . . . . 11
Preprogrammed call diversion . . . . . . . . . . . . . . . . . . . . . . . . . . . . . 11
Programming user-programmable keys . . . . . . . . . . . . . . . . . . . . . . . 9
Putting a call on hold . . . . . . . . . . . . . . . . . . . . . . . . . . . . . . . . . . . . 5
Safety advice . . . . . . . . . . . . . . . . . . . . . . . . . . . . . . . . . . . . . . . . . . .2
Scope of delivery . . . . . . . . . . . . . . . . . . . . . . . . . . . . . . . . . . . . . . .12
Setting the handset volume . . . . . . . . . . . . . . . . . . . . . . . . . . . . . . . .8
Setting the ringing pattern . . . . . . . . . . . . . . . . . . . . . . . . . . . . . . . .10
Setting the ringing rate . . . . . . . . . . . . . . . . . . . . . . . . . . . . . . . . . . .10
Setting the ringing volume . . . . . . . . . . . . . . . . . . . . . . . . . . . . . . . .10
Telephony functions . . . . . . . . . . . . . . . . . . . . . . . . . . . . . . . . . . . . . .5
Using the memory locations (private directory) . . . . . . . . . . . . . . . . . .8
Safety advice
General
This telephone is to be operated on an Ascotel private branch exchange
only.
Please follow the instructions in this User Guide and keep the User Guide
handy and in a safe place.
Connection
Plug the telephone's connecting cables into the appropriate sockets
only. Never try and change the plugs on the connecting cables.
Location
Place your telephone on a non-slip surface.
Choose a location with an ambient temperature between +5 °C and
approx. +35 °C.
Do not expose the telephone to direct sunlight or other sources of heat.
Avoid wet or dusty locations.
Avoid locations where your telephone is exposed to aggressive liquids or
vapours/steam.
2 ascom Office 10 20316549en_ba_a0
Page 3
Avoid locations in the immediate vicinity of HiFi and video equipment,
END
domestic appliances, monitors and electric motors (influence of electromagnetic fields).
Avoid locations in areas with an explosion hazard.
Operation
Never carry the telephone by its connecting cord.
Never telephone in the immediate vicinity of water.
Clean the set with a soft, slightly damp or anti-static cloth.
Do not use any detergents or chemicals to clean the set.
Defects
If your telephone is faulty or defective, please contact your system
supplier. Never dismantle the telephone yourself.
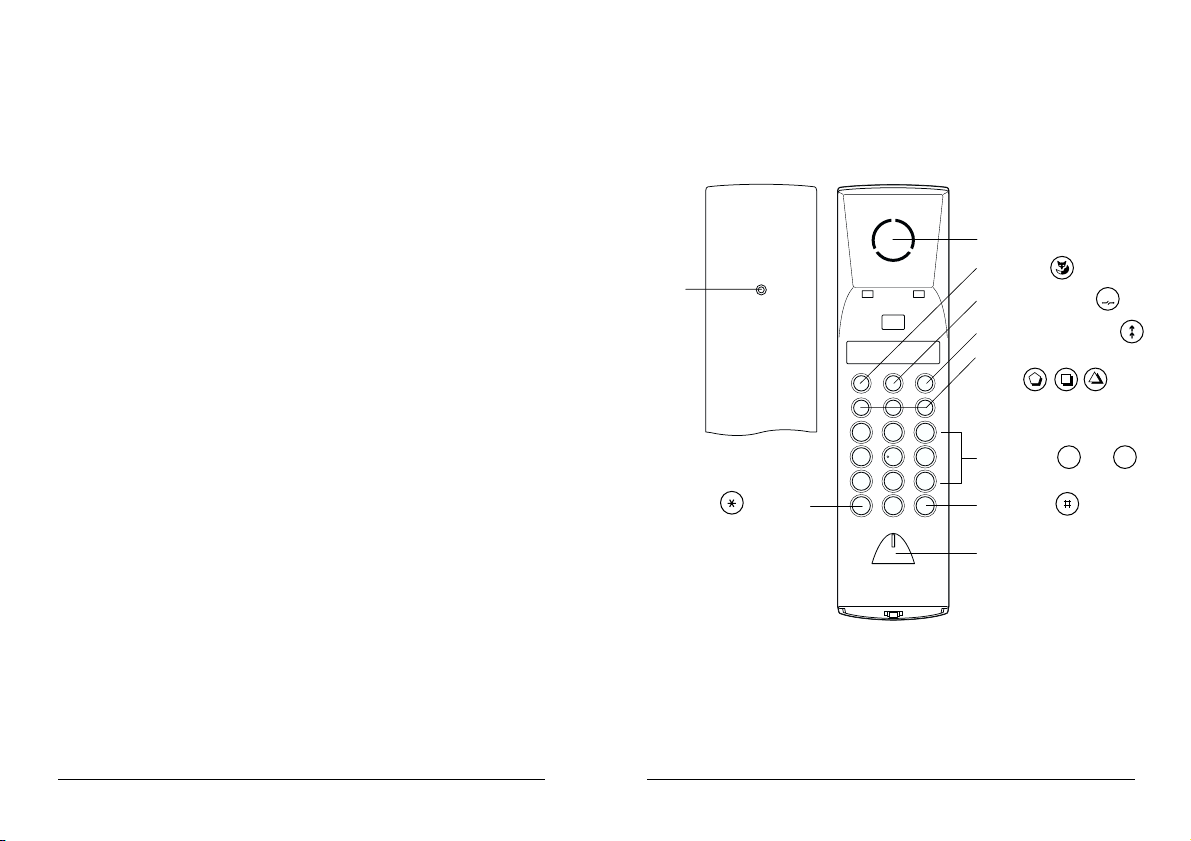
Glossary
Display and keyboard
LED
Loudspeaker
Fox-key
Disconnect key
END
Last-number redial
3 user-programmable
keys
Idle tone
Dial tone when the handset goes off-hook. Signals that your telephone
Digit keys
W
0
. . .
is ready for dialling
Exchange free-to-dial tone
Dial tone for the public network. Signals that your telephone is ready to
dial into the public network.
Star key
Hash key
Microphone
DTMF or transparent mode
Each keystroke sends a specific tone. Automated attendant systems such
as voice mail boxes evaluate these tones to control switching sequences.
20316549en_ba_a0 ascom Office 10 3
Y
X
Z
9
Page 4

Basic functions
END
Answering a call
The telephone rings:
Make the call.
Ending a call
You are making a call:
The call is ended.
or
You are making a call:
END
The call is ended. You hear the idle tone (
You dial a new connection.
☛
Dialling a call number via the digit keys
The handset is on-hook:
You hear the idle tone (
Dial the call number.
☛
+Glossary).
+Glossary).
Dialling a call number from the private directory
The handset is on-hook:
You hear the idle tone.
0..9 Dial one of the 10 stored call numbers.
☛
Dialling via a user-programmable key
The handset is on-hook:
You hear the idle tone.
1 x or
1 x or
1 x
or
The handset is on-hook:
2 x or
2 x or
2 x
Dial the first stored call number of a userprogrammable key.
You hear the idle tone.
Dial the second call number of a user-
programmable key.
(Press the key twice in quick succession).
Last-number redialling
The handset is on-hook:
You hear the idle tone (
The call number last dialled is re-dialled.
4 ascom Office 10 20316549en_ba_a0
+Glossary).
Page 5

Dialling an outside destination
END
The handset is on-hook:
You hear the idle tone (
0
You hear the exchange free-to-dial tone (
Dial the call number.
☛
"0" is the prefix dialling digit for accessing the public network. On your
particular installation you may have to dial a different digit. Ask your
system supplier and enter the digit under "Important Telephone Numbers", page 12.
+Glossary).
+Glossary).
Telephony functions
Putting a call on hold
You wish to interrupt the call temporarily without disconnecting it:
You are making a call:
The call is on hold; the other party hears the hold tone.
The call can be resumed.
Inquiry call
You wish to make a second call while the first call is on hold:
You are making a call:
The call is on hold; the other party hears the hold tone
(
+Putting a call on hold).
Set up the new connection.
☛
Make your second call.
END
End your second call and resume your first call.
20316549en_ba_a0 ascom Office 10 5
Page 6

Call transfer (switching)
You wish to connect two call partners with one another:
You are making a call:
Conference
You wish to hold a three-party conference with two other call partners:
You are making a call:
The call is on hold, the other party hears the hold tone
(
+Putting a call on hold).
Set up the new connection.
☛
Make your second call.
The call partners are connected with one another.
Brokering
You wish to switch back and forth between two calls:
You are making a call:
The call is on hold, the other party hears the hold tone
+Putting a call on hold).
(
Set up the new connection.
☛
Make your second call.
Switch to the first call.
Switch to the second call.
The call is on hold, the other party hears the hold tone
(
+Putting a call on hold).
☛
Set up the new connection.
Make your second call.
Set up the three-party conference
(Keep pressing the key until you hear the acknowledgement tone).
Activating callback if subscriber busy
The subscriber you have called is busy. You can activate a callback.
You have dialled a number and obtained the busy tone:
Callback is now activated.
As soon as the subscriber you called has finished with his call, your telephone will start ringing. If you pick up your handset, your destination
subscriber's phone will also start ringing.
Activating a callback if no reply
The subscriber you have called does not answer your call. You can
activate a callback.
You have dialled a number and obtained the ringing tone:
Callback is now activated.
6 ascom Office 10 20316549en_ba_a0
Page 7

A callback request is signalled on the destination subscriber's set
END
(
+Answering the callback).
Answering the callback
You were unable to answer a call and the call has activated a callback
request (
+Activating a callback if no reply). This is signalled by the fact that
the LED on your telephone is lit. You now wish to call the caller back:
The handset is on-hook and the LED is lit:
You hear the idle tone (
+Glossary).
The caller's number is now dialled.
You can also make a number of other calls before responding to the callback request. The callback request will remain active until you do so.
Answering call waiting
You are making a call and hear a call-waiting tone (a call-waiting tone
tells you that someone is trying to reach you). You wish to answer the
call:
You are making a call and hear the call-waiting tone:
Keying in digits during a call
Whenever you are prompted to key in digits during a call (for example to
operate a voice mail box), you need to activate the transparent mode
(DTMF):
You are making a call:
The transparent mode is activated. The digits you press will
be transmitted to the call partner as tones (DTMF).
(Keep pressing the key until you hear an acknowledgement
tone.)
Besides the digits 0 to 9 you can also transmit * and #.
To deactivate the transparent mode:
The transparent mode is activated:
The transparent mode is deactivated.
(Keep pressing the key until you hear the acknowledgement tone.)
The first call goes on hold (
+Putting a call on hold) and you are
connected through to the second caller.
You wish to reject the call:
You are making a call and hear the call-waiting tone:
END
The call is rejected and the caller obtains the busy tone. You are
still through to your first caller.
20316549en_ba_a0 ascom Office 10 7
Page 8

Appliance functions
END
LED display
The handset is on-hook:
LED lit:
• A caller was unable to reach you and asks you to call
him back (
• A subscriber used *38 to activate the LED (
functions) and asks you to call him back (+Answering the
callback)
LED flashing slowly:
Telephone is not logged in (
LED flashing quickly:
Call pending (
+Answering the callback).
+Answering a call)
+Installation)
+Other
Activating/deactivating the programming mode
To make the following settings you need to activate the programming
mode:
The handset is on-hook:
You hear the idle tone (+Glossary).
You no longer hear the idle tone.
The programming mode is activated.
(Keep pressing the key until you hear the acknowledgement tone.)
Now adjust the settings. Once you are finished, deactivate the programming mode once again:
The programming mode is activated:
The programming mode is deactivated.
Setting the handset volume
You are making a call:
1
C
B
A
2
There are four volume levels.
Quieter.
Louder.
(Keep pressing the key until you hear an acknowledgement tone.)
Using the memory locations 0 to 9 (private directory)
Your telephone set has 10 memory locations, under which you can store
any call numbers or functions of your choice:
The programming mode (
+Activating/deactivating the programming
mode) is activated:
Y
X
Z
0
☛
W
. . . Select a memory location.
9
Key in the call number or function
of your choice.
or Confirm the new setting and save.
END
8 ascom Office 10 20316549en_ba_a0
The previous setting is retained.
Page 9
Besides the characters 0 to 9, * and #, a number of preset functions
are also available:
1 second interdigital pause.
Control key on up-circuit PBX.
Activate transparent mode (
+Glossary).
Example 1:
Occupying memory location 1 with a call number:
Activate the programming mode.
(Keep pressing the key until you hear the
acknowledgement tone).
1
00326243838 Call number to be saved.
☛
Select memory location 1.
Confirm and save.
Example 3:
Occupying memory location 3 with a call to the voice mail box to
listen to your voice mails:
Activate the programming mode.
(Keep pressing the key until you hear the
acknowledgement tone).
E
F
D
3
6666 Mailbox call number.
☛
1234 Password for your voice mail box.
☛
Select memory location 3.
Activating the transparent mode.
1 second pause.
1 Menu selection of your voice mail box for
☛
listening to new voice messages.
Confirm and save.
Example 2:
Occupying memory location 2 with a call diversion to your voice mail
box:
Activate the programming mode.
(Keep pressing the key until you hear the
acknowledgement tone).
C
B
A
2
Select memory location 2.
Programming user-programmable keys
Your telephone has 3 user-programmable keys with 2 memory locations
each, which you can program individually with call numbers or functions:
The programming mode (
+Activating/deactivating the programming
mode) is activated:
1 x or
1 x or
1 x Select memory location 1.
*216666 Function code and destination number for the
☛
call diversion (6666 being the call number for
your voice mail box).
☛
Confirm and save.
20316549en_ba_a0 ascom Office 10 9
Key in the call number or function you want.
Confirm and save the new setting.
Page 10

or
END
4
END
4
END
4
END
END
2 x or
2 x or
2 x
Select memory location 2.
(Select the key twice in quick succession.)
☛
or
END
Key in the call number or function you wish.
Confirm and save the new setting.
The previous setting is retained.
As with the memory locations of the private directory, you have at your
disposal not only the characters 0 to 9, * and # but also a number of
preset functions (
+Using the memory locations 0 to 9 (private directory)).
Setting the ringing volume
The programming mode (+Activating/deactivating the programming
mode
) is activated:
Setting the ringing rate
The programming mode (+Activating/deactivating the programming
mode) is activated:
C
B
A
2
1
G
. . . Slow (1) to rapid (4).
4
H
I
Rate settings.
or Confirm and save the new setting.
END
The previous setting is retained.
Setting the ringing pattern
The programming mode is activated:
E
F
D
3
1
H
I
G
. . . Select one of the 4 patterns.
4
or Confirm and save the new setting.
END
Pattern settings.
The previous setting is retained.
1
1
. . . Quiet (1) to loud (4).
Setting the ringing volume.
H
I
G
4
or Confirm and save new setting.
END
The previous setting is retained.
Acknowledgement tone ON/OFF
The keyclick acknowledgement tone can be activated and deactivated:
The programming mode (
+Activating/deactivating the programming
mode) is activated.
H
I
G
4
1
0
or ON (1) / OFF (0).
Activating, deactivating the acknowledgement
tone.
or Confirm and save the new setting.
END
10 ascom Office 10 20316549en_ba_a0
The previous setting is retained.
Page 11

Function codes
Function codes are used to activate other Ascotel functions.
The most important function codes are described below. Please note
the following:
• Certain functions need to be enabled first by your system
administrator.
• Certain functions are not available on all Ascotel types.
For more information please contact your system administrator.
Preprogrammed call diversion
All incoming calls are routed to the diversion destination.
ON OFF
Call diversion to a subscriber
(e.g. with No. 4444)
Call diversion to the subscriber last diverted *21# #21
Call diversion to a preprogrammed subscriber *22# #22
Call diversion to a preprogrammed pager *28 #28
Call diversion to a message (e.g. No. 5) *24 05 # #24
Follow me: From telephone A, activating a call
diversion to telephone A from telephone B
(e.g. 4444)
Deactivating "Follow me" on telephone B #21 or
Protecting against call diversions *02 #02
*21 4444 #21
*23 4444
#23
Call forwarding
(Delayed) call forwarding with simultaneous ringing on your telephone.
ON OFF
Call forwarding to a subscriber
(e.g. with No. 4444)
Call forwarding to the subscriber last diverted *61# #61
Call forwarding to a preprogrammed subscriber
Call forwarding to a preprogrammed pager *68 #68
*61 4444 #61
*62# #62
Appointment reminder call (wake-up call)
ON OFF
Permanent order (daily call) *56 hh mm #56
Single order (one-off call) *55 hh mm #55
Other functions
Resetting all activated function codes *00
Fetch call: Fetching a call on telephone B (e.g. 4444) from
telephone A
Activating call waiting on one’s own telephone *04 / #04
Do not disturb: ON / OFF *26 / #26
User group: logging in / logging out *48 / #48
Search via pager (paging system) (suffix dialling) 8 or *81
Answer coded ringing *82
Answer general call *83
Message display
(activating the LED, e.g. on subscriber 4444)
Deactivating the message display (LED lit) on your own
telephone
*86 4444
*38 4444
#38
20316549en_ba_a0 ascom Office 10 11
Page 12

Installation
Important Telephone Numbers
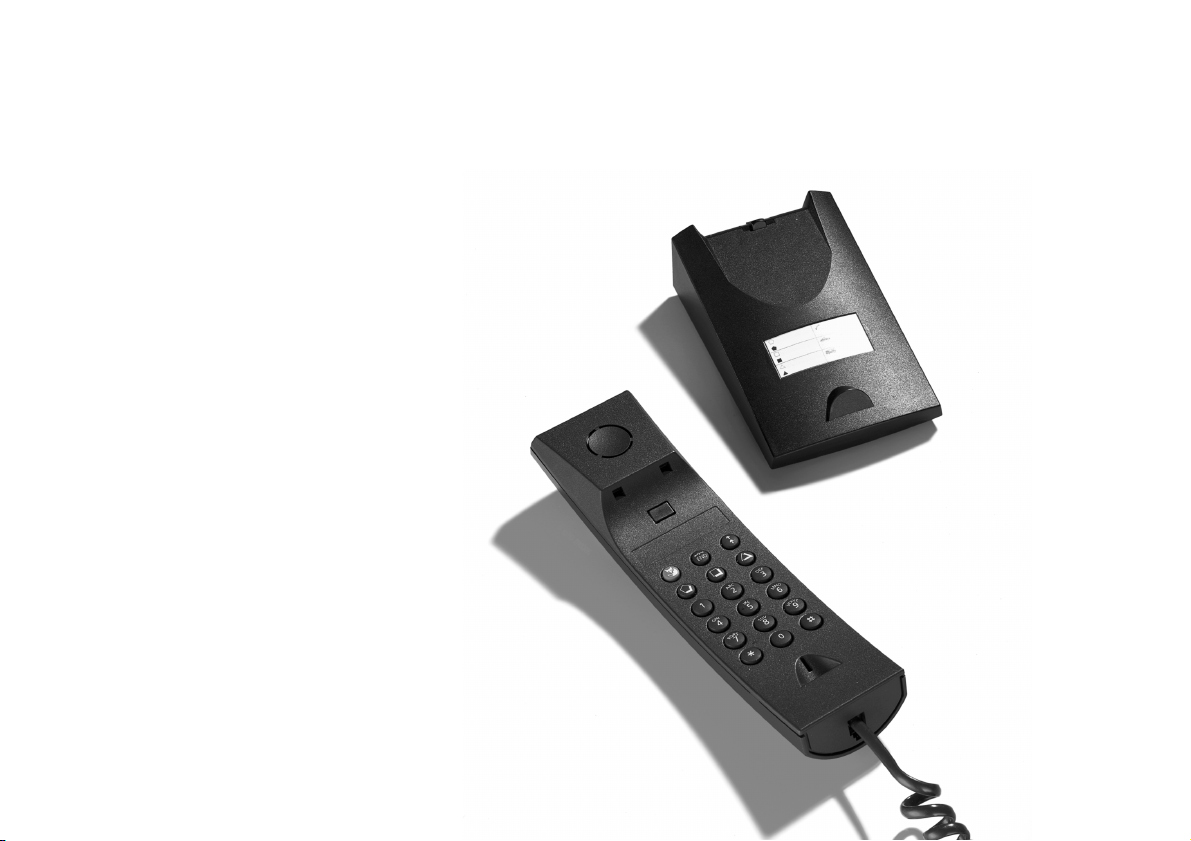
This telephone is available as a desktop or wall-mounted set.
Scope of delivery
Handset, handset cradle (desktop set) or wall bracket (wall-mounted
set), 3 m connecting cable with plug, and User Guide.
Installation
1. Feed the connecting cable through the handset cradle/wall bracket.
2. Desktop set: position the handset cradle, place the handset in the
handset cradle.
Wand-mounted set: mount the wall bracket to the wall using the
screw supplied. Hook the handset into place.
3. Set the AD2 bus address.
4. Plug the connecting plug into the socket.
5. Logging in the telephone:
Press the Fox-key twice until you hear the acknowledgement tone.
6. Test the function.
7. Label the telephone.
EAZ1
Fig. 2. Setting the AD2 bus address.
EAZ2
Name Number
Prefix dialling digit to access the
public network
Fig. 1. Feeding the connecting
cable into place.
Fig. 3. Designation label:
Please copy an cut out.
12 ascom Office 10 20316549en_ba_a0
 Loading...