

Page 1

TD 93066EN
User Manual
Ascom Myco Wi-Fi and Cellular Smartphone
26 April 2016 / Ver. D
Page 2

User Manual
Ascom Myco Wi-Fi and Cellular Smartphone /Remove "Wi-Fi and
About this document
Safety precautions
It's important to read the safety precautions in Appendix A. Safety Precautions before using
the handset.
Save this manual. It includes important safety information and operating instructions. Save
all instructions for future reference.
Cross-references in the document
Throughout this document you will find cross-references in the text which indicate further
details that can be found in other sections of this document. The cross-references are
colored blue and linked to the relevant place in the document (example: see 20. Document
History User Manual on page 87). Click the blue link to read the relevant section.
To return to the original page after viewing a cross-referred page in Adobe Reader, press on
Alt + left arrow key.
Related documents
When referred to another document, for example, the Configuration Manual, the document
and its document number (TD XXXXX) is listed at the end of this document, 19. Related
Documents User Manual.
TD 93066EN
Trademarks
Android™ is a trademark of Google Inc.
Address
Ascom Wireless Solutions
Ascom (Sweden) AB
Grimbodalen 2
SE-417 49 Göteborg
Sweden
26 April 2016 / Ver. D
Page 3

User Manual
Ascom Myco Wi-Fi and Cellular Smartphone
Contents
1. Introduction User Manual............................................................................................. 1
1.1 Abbreviations and Glossary User Manual .............................................................. 2
1.2 Features................................................................................................................... 2
2. Quick Installation Steps for Administrators ............................................................... 4
2.1 Insert SIM Card ........................................................................................................ 4
2.2 Install and Configure the Handset........................................................................... 4
3. Handset Description...................................................................................................... 7
3.1 Handset Overview ................................................................................................... 7
3.1.1 Home button................................................................................................... 8
3.1.2 Volume button, up and down......................................................................... 8
3.1.3 Power button.................................................................................................. 8
3.1.4 Proximity sensor............................................................................................. 8
TD 93066EN
3.1.5 Alarm or Multifunction button ....................................................................... 8
3.1.6 Top display...................................................................................................... 9
3.1.7 Color pad for clip............................................................................................. 9
3.2 Accessories .............................................................................................................. 9
4. Basics............................................................................................................................ 10
4.1 Switch the Handset On or Off................................................................................ 10
4.2 Wake and Unlock the Handset, or Lock and Put it to Sleep.................................. 11
4.3 Adjust the Volume................................................................................................. 11
4.4 Switch to Silent or Vibrator only mode................................................................. 11
4.5 Use the Touchscreen ............................................................................................. 12
4.6 Use the Keyboard .................................................................................................. 13
4.7 Navigate the User Interface .................................................................................. 14
4.7.1 Alert view...................................................................................................... 14
4.7.2 App view ....................................................................................................... 15
4.7.3 Conversation view ........................................................................................ 16
4.8 Use apps ................................................................................................................ 16
4.9 Battery level indication ......................................................................................... 17
4.10 Charge the Handset Battery ............................................................................... 17
4.10.1 Charge the handset in a Charging Rack ..................................................... 18
4.10.2 Charge the battery in a Battery Charging Rack ......................................... 18
4.10.3 Charge with a Micro USB cable ................................................................... 18
4.10.4 Charging indication .................................................................................... 19
4.11 Change Battery ...................................................................................................
4.12 Log in or Log out ................................................................................................. 21
4.12.1 Log in .......................................................................................................... 21
4.12.2 Log out ....................................................................................................... 22
26 April 2016 / Ver. D
20
Page 4

User Manual
Ascom Myco Wi-Fi and Cellular Smartphone
4.12.3 Recent users list ......................................................................................... 23
4.13 Availability status ............................................................................................... 25
4.13.1 Availability status indication...................................................................... 25
4.13.2 Set the availability status .......................................................................... 25
5. Calling........................................................................................................................... 27
5.1 Answer or Reject a Call.......................................................................................... 27
5.2 Make a Call............................................................................................................. 28
5.2.1 Call using the keypad.................................................................................... 28
5.2.2 Call using the call list .................................................................................... 28
5.2.3 Call using the central phonebook ................................................................. 29
5.2.4 Call using the local phonebook..................................................................... 29
5.2.5 Advanced dialing .......................................................................................... 29
5.3 End a Call ............................................................................................................... 31
5.4 Functions During a Call.......................................................................................... 31
5.4.1 Enable loudspeaker and adjust volume........................................................ 32
5.4.2 Mute microphone.......................................................................................... 32
TD 93066EN
5.4.3 Show the keypad .......................................................................................... 32
5.4.4 Put call on hold ............................................................................................. 32
5.4.5 Add a second call .......................................................................................... 32
5.4.6 Receive a second call while in a call.............................................................. 32
5.4.7 Switch between calls .................................................................................... 32
5.4.8 Transfer call .................................................................................................. 32
5.4.9 Navigate the handset during a call .............................................................. 33
5.4.10 The phone bar............................................................................................. 33
5.5 Voicemail ............................................................................................................... 34
5.5.1 Indication of new voicemail messages......................................................... 34
5.5.2 Listen to voicemail messages....................................................................... 34
5.6 Push-to-talk Group Call ......................................................................................... 35
5.6.1 Join a PTT call session ................................................................................... 35
5.6.2 Use the PTT call screen ................................................................................. 36
5.6.3 Reject a PTT invitation.................................................................................. 37
5.6.4 Rejoin a PTT call session ............................................................................... 37
5.6.5 Initiate a PTT group call session ................................................................... 38
6. Phonebook ................................................................................................................... 39
6.1 Look up a Contact in the Central Phonebook
6.2 Look up a Contact in the Local Phonebook........................................................... 39
6.3 Add a New Local Contact....................................................................................... 40
7. Alerts ............................................................................................................................ 41
7.1 Alert View.............................................................................................................. 41
7.2 Alert Indication...................................................................................................... 42
26 April 2016 / Ver. D
........................................................ 39
Page 5

User Manual
Ascom Myco Wi-Fi and Cellular Smartphone
7.2.1 Top display.................................................................................................... 42
7.2.2 Alert priority beacon..................................................................................... 42
7.2.3 Lock screen ................................................................................................... 42
7.2.4 Top priority bar............................................................................................. 42
7.2.5 Notification bars ........................................................................................... 43
7.3 Alert Classification................................................................................................. 43
7.3.1 Priority level and color.................................................................................. 43
7.3.2 Category color............................................................................................... 44
7.3.3 Alert type icons............................................................................................. 44
7.4 Alert Response Options......................................................................................... 45
7.5 View Alerts on a Locked Handset.......................................................................... 46
8. Messaging .................................................................................................................... 47
8.1 Write and Send Message....................................................................................... 47
8.2 Reply to Message .................................................................................................. 48
8.3 Search for Message ............................................................................................... 48
8.4 Copy, Delete and Forward Messages..................................................................... 48
TD 93066EN
8.5 Delete Conversations............................................................................................. 48
8.6 Call a Contact from Message ................................................................................. 48
9. Personal Alarm ............................................................................................................ 50
9.1 Top Button Alarm.................................................................................................. 50
9.2 Man-down and No-movement Alarm ................................................................... 50
9.2.1 Activate or deactivate the Man-down or No-movement alarms ................. 51
9.2.2 Man-down and No-movement indication .................................................... 51
9.2.3 Cancel a Man-down or No-movement alarm................................................ 52
9.3 Automatic Call after Alarm.................................................................................... 52
10. Notifications .............................................................................................................. 53
10.1 Sound and vibration............................................................................................ 53
10.2 Color-coded LED Signals...................................................................................... 53
10.3 Top Display Notification...................................................................................... 54
10.4 Lock Screen Notification...................................................................................... 54
10.5 Status Bar............................................................................................................ 55
10.6 Notification Bars.................................................................................................. 55
10.7 Notification Drawer............................................................................................. 57
10.8 Icons used for notification
.................................................................................. 57
11. Apps ........................................................................................................................... 59
11.1 List of apps.......................................................................................................... 59
12. Camera and Gallery ................................................................................................... 61
12.1 Camera ................................................................................................................ 61
12.2 Gallery ................................................................................................................. 61
26 April 2016 / Ver. D
Page 6

User Manual
Ascom Myco Wi-Fi and Cellular Smartphone
12.3 Take a Screenshot ............................................................................................... 61
13. Barcode Scanning...................................................................................................... 62
14. My Services ................................................................................................................ 63
14.1 Access the My Services app ................................................................................ 63
14.2 My Services functionality.................................................................................... 63
14.2.1 URI action shortcut..................................................................................... 63
14.2.2 Call action shortcut..................................................................................... 63
14.2.3 Data Send action shortcut.......................................................................... 63
15. Settings...................................................................................................................... 64
15.1 Display Settings .................................................................................................. 64
15.1.1 Change brightness...................................................................................... 64
15.1.2 Set font size................................................................................................ 64
15.1.3 Owner ID and name .................................................................................... 65
15.1.4 Sleep timeout ............................................................................................. 65
TD 93066EN
15.1.5 Rotate top display ...................................................................................... 65
15.2 Sound Settings.................................................................................................... 65
15.2.1 Volumes...................................................................................................... 65
15.2.2 Ringtones ................................................................................................... 65
15.2.3 Notification sound...................................................................................... 66
15.2.4 Set tones..................................................................................................... 66
15.2.5 Hearing Aid Compatibility .......................................................................... 66
15.3 Languages Settings ............................................................................................ 66
15.4 Time and Date Settings....................................................................................... 66
15.5 Telephony Settings ............................................................................................. 66
15.5.1 Use the power button to end calls ............................................................. 66
15.6 Admin settings.................................................................................................... 67
15.7 About phone Settings......................................................................................... 67
16. Operation Notice ....................................................................................................... 68
16.1 Accessibility and Voice Quality ........................................................................... 68
17. Maintenance .............................................................................................................. 69
17.1 Cleaning the Handset.......................................................................................... 69
17.2 Battery Maintenance........................................................................................... 69
17.3 Replace the Color Pad for the Hinge-type Clip .................................................... 69
18. Troubleshooting User Manual.................................................................................. 70
18.1 Operational Problems ......................................................................................... 71
18.2 Error or Warning Messages.................................................................................
19. Related Documents User Manual............................................................................. 72
20. Document History User Manual............................................................................... 73
26 April 2016 / Ver. D
71
Page 7

User Manual
Ascom Myco Wi-Fi and Cellular Smartphone
Appendix A. Safety Precautions .................................................................................... 76
A.1 Frequency Range................................................................................................... 76
A.2 Regulatory Information (EU and EFTA) ................................................................ 76
A.2.1 Exposure to Radio Frequency Signals .......................................................... 76
A.3 Regulatory Compliance Statements (USA and Canada only) .............................. 77
A.3.1 FCC and IC Compliance Statements .............................................................. 77
A.3.2 Exposure to Radio Frequency Signals........................................................... 77
A.4 Precautions and Environmental Requirements .................................................... 78
A.4.1 Handset ........................................................................................................ 78
A.4.2 Battery......................................................................................................... 78
TD 93066EN
26 April 2016 / Ver. D
Page 8

User Manual
Ascom Myco Wi-Fi and Cellular Smartphone
1. Introduction User Manual
1. Introduction User Manual
Ascom Myco is a durable, robust and to carry smart device handset for nurses, caregivers
and clinicians. Alerts from patient monitors, and communication from patients, or staff in
the healthcare team are available, wherever they are.
The Ascom Myco handset has a top display with a color coded LED priority beacon and
touchscreen, to prioritize the alerts, and the ability to quickly accept, reject or forward alerts.
The handset is available in two versions:
• Ascom Myco Wi-Fi
• Ascom Myco Wi-Fi and Cellular
Read Appendix A. Safety Precautions on page 76 before using the handset.
For a list of:
• Abbreviations and glossary used in the manual, see 1.1 Abbreviations and Glossary User
Manual on page 2.
• Handset features, see 1.2 Features on page 2.
TD 93066EN
Target group
This document is targeted at personnel responsible for handling the administration and
distribution of handsets at the end customer site.
It is also intended for the end user, or anyone interested in acquiring deeper knowledge
about the handset.
Prerequisites
Before the handset can be used, an administrator must do the following:
1 If the Cellular handset version is used, insert a micro-SIM card from a mobile network
operator into the handset, refer to 2.1 Insert SIM Card on page 4.
2 Register the handset in the PBX for voice, in the applicable Unite module(s) for
messaging, and the optional central management (Easy deployment) for setup and
configuration of handsets. Refer to the handset Configuration Manual.
3 Read the safety precautions in Appendix A. Safety Precautions on page 76.
How to use this document
This document describes the features and settings of the Ascom Myco Wi-Fi and Wi-Fi &
Cellular smart device. It is referred to as the "handset" in the manual, and especially marked
with "Wi-Fi only", or "Cellular only", whenever the functionality differs between the different
versions.
All assigned locations and alerts in this document are according to default programmed
versions, but additional functions, and factory settings are also included to cover additional
functionality.
The images can differ, depending on the software version.
For software download and parameter set up, refer to the handset Configuration Manual.
NOTE: Some functions are dependent on the PBX and protocol (SIP) versions, and your
system may not support all functions described in this document. For more
information about your system, please contact the person (or department)
responsible for the system in your organization, or contact your supplier.
26 April 2016 / Ver. D
1
Page 9
User Manual
Ascom Myco Wi-Fi and Cellular Smartphone
1. Introduction User Manual
1.1 Abbreviations and Glossary User Manual
1G, 2G, 3G, 4G Common naming of the generations of mobile
communication evolution.
Cellular GSM/3G
Device Manager Application for management of portables, editing of
parameters and updating the portables with new software,
running on Unite CM.
GUI Graphical User Interface.
GSM Global System for Mobile Communication (often called 2G)
IP Internet Protocol is the principal communications protocol
in the Internet protocol suite.
LAN Local Area Network
MDM Mobile device management
micro-SIM A SIM card standard with smaller form factor compared to
a full-size SIM or mini-SIM card.
PBX Private Branch Exchange. A telephone system within an
enterprise that switches calls between local lines, and
allows all users to share a certain number of external lines.
HSPA High Speed Packet Access
SIM Subscriber Identity Module
SIP Session Initiation Protocol
SNMP Simple Network Management Protocol
UMTS Universal mobile telecommunications system - a third
generation mobile cellular system for networks based on
the GSM standard.
Unite CM Unite Connectivity Manager:
Unite module that enables messaging and alarm handling
in a WLAN system. It also includes the Device Manager.
VoIP Voice over IP
VoWiFi Voice over Wi-Fi:
is a wireless version of VoIP and refers to IEEE 802.11a,
802.11b or 802.11g network.
Wi-Fi The commonly understood name for wireless LAN
networks. Used generically when referring of any type of
802.11 network.
WLAN Wireless Local Area Network (LAN):
A type of LAN in which data is sent and received via highfrequency radio waves rather than cables or wires.
TD 93066EN
1.2 Features
Both handset versions (Wi-Fi, and Wi-Fi & Cellular) share the same features, apart from the
cellular functionality.
Features
Professional Smartphone designed for mission critical communication
3G Cellular with HSPA data support (cellular handset version only)
26 April 2016 / Ver. D
2
Page 10

User Manual
Ascom Myco Wi-Fi and Cellular Smartphone
1. Introduction User Manual
Features
Wi-Fi 802.11a/b/g/n support
Seamless Wi-Fi roaming i.e. on-call handover between access points
Centralized management using Ascom Unite or 3rd party MDM tools
Supports Over-the-Air administration
Android OS 4.4 KitKat
3rd party App support
Supports integration to other systems using Ascom Unite middleware
Smart alert handling
Top display with color-coded LED priority beacon
Easily exchangeable battery
Durable, robust, and easy to carry
Optimized for single hand use, and regular disinfection
Multifunction/Alarm button (optional)
Hearing aid compatible (HAC)
IP54 rated
Professional barcode reader API, supporting 1D and 2D barcodes
(optional)
Easy deployment via QR-code
Man-down and No-movement alarms
Push-to-talk (PTT) group call
Location (AP, Ekahau RTLS, and Cisco MSE)
TD 93066EN
26 April 2016 / Ver. D
3
Page 11

User Manual
Ascom Myco Wi-Fi and Cellular Smartphone
2. Quick Installation Steps for Administrators
2. Quick Installation Steps for Administrators
An administrator should perform the following steps to get the handset started:
NOTE: Remove the protective plastic sheet that is attached to the display at delivery before
using the touchscreen to ensure proper function.
1 Insert the micro-SIM card (Cellular handset versions only). Refer to 2.1 Insert SIM Card
on page 4.
NOTE: Only micro-SIM size cards can be used in the handset.
2 Close the battery cover, and lock it. Refer to 4.11 Change Battery on page 20.
TIP: The battery has an approximately 50% charge at delivery, and doesn't need to be
charged before use.
3 If desired, change the language. Refer to 15.3 Languages Settings on page 66.
4 Enter the handset ID (Easy deployment). Refer to 2.2 Install and Configure the
Handset on page 4.
NOTE: If not already done as prerequisite, perform Easy deployment. Refer to the handset
Configuration Manual.
TD 93066EN
5 If desired, configure parameter settings for the site or user. Refer to the handset
Configuration Manual for more information.
2.1 Insert SIM Card
NOTE: Cellular handset version only. Only micro-SIM size cards can be used in the handset.
1 If needed, unlock the battery cover, and remove it.
2 The SIM card slot is located under the clip. Press on the clip to open it fully, and insert
the micro-SIM in the SIM card slot, in the direction as shown on the label.
TIP: If needed, use a tweezer to hold it, then push it into the slot.
3 Close the battery cover, and lock it. The handset starts within seconds if the battery is
charged.
TIP: If the handset does not start, charge the battery, and then long press the Power
button to switch the handset On.
Remove SIM card
1 Open the battery cover lock. Press on the clip to open it fully, and remove the Battery
Pack.
2 Remove the micro-SIM card by using a 3-4 mm screwdriver, or similar tool, in the hole
above the SIM card slot, and pull outwards, until the micro-SIM card can be removed
(with fingers, or a tweezer).
CAUTION: Be careful not to damage the inside of the SIM card slot.
2.2 Install and Configure the Handset
The recommended method to install and configure a handset is through Easy Deployment,
using a pre-configured staging WLAN. If Easy Deployment isn't configured in the system, QR
code setup or manual installation methods can be used. Follow the instructions in the
applicable section below:
26 April 2016 / Ver. D
4
Page 12
User Manual
Ascom Myco Wi-Fi and Cellular Smartphone
2. Quick Installation Steps for Administrators
Setup using Easy Deployment
A handset is automatically installed and configured, if the VoWiFi system is configured for
Easy Deployment. Refer to the handset Configuration Manual for information on how to
configure Easy Deployment in the VoWiFi system.
If the handset is successfully installed after the Easy Deployment process, but hasn't
received a messaging number automatically, do the following:
1 If the handset is switched On, switch it Off and then On again.
2 When the handset displays: "No messaging number configured for this device", tap
"Setup number".
TD 93066EN
3 When the handset displays: "enter messaging number", that is, the phone number of
the handset, enter the number.
4 Press "Done".
CAUTION: If a wrong number is entered, a factory reset must be done, and all handset
configuration parameter settings are restored to the default values. Refer to the
handset Configuration Manual.
If the unite system is configured for User log in, enter user log in and password supplied by
the system administrator.
Setup using QR codes
Quick installation and setup can be done by scanning a QR code, if Easy Deployment is
unavailable. The Setup QR code can be created by a system administrator and contains the
parameters necessary to install the handset in the system. Refer to the handset
Configuration Manual for instructions on how to create Setup QR codes.
To scan a Setup QR code, do the following:
1 Locate the "Setup" app, and tap to open it.
26 April 2016 / Ver. D
5
Page 13
User Manual
Ascom Myco Wi-Fi and Cellular Smartphone
2. Quick Installation Steps for Administrators
2 Turn the handset horizontally and position the handset so that the QR code fits
within the scanning window in the center of the screen.
3 If the scan is successful the Setup app closes automatically and the text "Deployment
data applied successfully" appears on screen.
If needed, follow the steps in Setup using Easy Deployment on page 5 to add a messaging
number to the handset after installation.
TD 93066EN
Manual setup
If neither QR codes nor Easy Deployment is available, a manual installation method must be
used. Refer to the installation chapter of the handset Configuration Manual.
26 April 2016 / Ver. D
6
Page 14
User Manual
Ascom Myco Wi-Fi and Cellular Smartphone
3. Handset Description
3. Handset Description
Both handset versions (Wi-Fi, and Wi-Fi & Cellular) share the same external characteristics.
• For an overview of the handset hardware, see 3.1 Handset Overview on page 7.
• For a list of available handset accessories, see 3.2 Accessories on page 9.
3.1 Handset Overview
TD 93066EN
1Speaker.
2 Front microphone (main)
3 Charging connectors
4 Home button (3.1.1 Home button on page 8)
5 Main display with Touchscreen
6 Volume button (Up and Down) (3.1.2 Volume button, up and down on page 8)
7 Power button (3.1.3 Power button on page 8)
8Proximity sensor (3.1.4 Proximity sensor on page 8)
9 Alarm/Multifunction
10 Top display (3.1.6 Top display on page 9)
11 Color-coded LED priority beacon (10.2 Color-coded LED Signals on page 53)
12 Loudspeaker
26 April 2016 / Ver. D
a
button (3.1.5 Alarm or Multifunction button on page 8)
7
Page 15

User Manual
Ascom Myco Wi-Fi and Cellular Smartphone
3. Handset Description
13 Rear microphone
14 Camera (12. Camera and Gallery on page 61.)
15 GSM antenna
16 Battery cover lock
17 Battery Pack
18 Clip
19 WLAN antenna, and GPS antenna
20 Color pad for clip (3.1.7 Color pad for clip on page 9.)
a.This feature is system dependent.
3.1.1 Home button
• Press to return to the Alert view (refer to 4.7.1 Alert view on page 14).
• Press to wake the display from sleep mode (refer to 4.2 Wake and Unlock the Handset,
or Lock and Put it to Sleep on page 11). The "Power" button can also be used for this
functionality.
• Long press to show running apps, with the possibility to close apps, or switch between
apps (refer to 4.8 Use apps on page 16).
TD 93066EN
3.1.2 Volume button, up and down
• Press up to increase or press down to decrease the speaker and loudspeaker volume
(refer to 4.3 Adjust the Volume on page 11).
• Press several times to mute the notification sounds or silence the ring signal for an
incoming call (refer to 4.4 Switch to Silent or Vibrator only mode on page 11).
To set the default volume, refer to 15.2.1 Volumes on page 65.
3.1.3 Power button
• Long press to switch the handset on (refer to 4.1 Switch the Handset On or Off on page
10).
• Press to wake the display from sleep mode (refer to 4.2 Wake and Unlock the Handset,
or Lock and Put it to Sleep on page 11). The “Home” button can also be used for this
functionality.
• Press to put it to sleep (refer to 4.2 Wake and Unlock the Handset, or Lock and Put it to
Sleep on page 11).
• Long press to switch off the handset (refer to 4.1 Switch the Handset On or Off on page
10).
3.1.4 Proximity sensor
Puts the screen automatically into sleep mode when holding the handset close to the head,
to avoid unintentional screen presses. When moving the handset away from the head the
screen turns back on automatically.
3.1.5 Alarm or Multifunction button
The button located on the top of the handset can be programmed for alarm functionality (9.
Personal Alarm on page 50), or other functionality such as placing a call or communicate in a
Push-to-talk group call (5.6 Push-to-talk Group Call on page 35). Some third-party apps can
also be configured to use the top button for input.
The button has two input modes, long press and multi-press mode:
26 April 2016 / Ver. D
8
Page 16
User Manual
Ascom Myco Wi-Fi and Cellular Smartphone
3. Handset Description
•Long press mode
- Press and hold the button for longer than a second.
• Multi-press mode
- Press the button multiple times under a short period of time.
The functionality for these two input modes is set by the system administrator.
3.1.6 Top display
The top display is used to quickly get information about incoming calls, messages or alerts,
without having to use the main display.
• Refer to 7.2.1 Top display on page 42 for details on how alerts are shown in the top
display.
• Refer to 10.2 Color-coded LED Signals on page 53 for details on how other notifications
are shown in the top display.
3.1.7 Color pad for clip
TD 93066EN
Used to differentiate the handsets between, for example, workgroups, shifts, or roles. The
blue color pad is attached by default, and it can be exchanged by one of the colors, red,
yellow, or green. See 17.3 Replace the Color Pad for the Hinge-type Clip on page 69.
3.2 Accessories
The following accessories are available for the handset:
Battery Pack A replacement Battery Pack may be replaced and charged
separately in the battery pack charger.
Spare clip The replacement hinge-type clip is especially designed to fit
one-layered fabric, like shirt pockets.
Safety cord The Safety Cord is attached around the clip to prevent from
dropping the handset.
Color pad kit for clip The color pad can be attached to the clip, and is used to easily
identify the handset belonging to, for example, a workgroup,
shift, or role.
CR5 Charging Rack The Charging Rack (CR5) charges up to six handsets at the
same time.
CR6 Battery Charging Rack The Battery Charging Rack(CR6) charges up to six spare
batteries at the same time.
Table adapters for
Charging Rack (CR5/CR6)
Micro USB cable Can be used to charge one handset at a time, for example at
USB Power supply The USB Power supply is used with the Micro USB cable.
With the attachable feet the charging racks can be placed
standing on a table.
own desk. Used with the USB Power supply.
26 April 2016 / Ver. D
9
Page 17
User Manual
Ascom Myco Wi-Fi and Cellular Smartphone
4. Basics
The following chapter describes how to use the handset. Read it through before using the
handset for the first time.
This chapter explains how to do the following:
• 4.1 Switch the Handset On or Off on page 10
• 4.2 Wake and Unlock the Handset, or Lock and Put it to Sleep on page 11
• 4.3 Adjust the Volume on page 11
• 4.4 Switch to Silent or Vibrator only mode on page 11
• 4.5 Use the Touchscreen on page 12
• 4.6 Use the Keyboard on page 14
• 4.7 Navigate the User Interface on page 14
• 4.8 Use apps on page 16
• 4.9 Battery level indication on page 17
• 4.10 Charge the Handset Battery on page 17
• 4.11 Change Battery on page 20
• 4.12 Log in or Log out on page 21
• 4.13 Availability status on page 25
TD 93066EN
4. Basics
4.1 Switch the Handset On or Off
Switch the handset on
NOTE: The handset is automatically switched on when a battery is inserted.
1 Long press the power button. Wait until the lock screen is shown.
2 Swipe the icon in any direction to unlock the screen.
3 Wait for the handset to start.
Switch the handset off
1 Long press the power button.
2 Tap "Power off".
26 April 2016 / Ver. D
Or, enter a PIN or password (set by the system administrator).
10
Page 18

User Manual
Ascom Myco Wi-Fi and Cellular Smartphone
4. Basics
3 Tap OK.
4.2 Wake and Unlock the Handset, or Lock and Put it to Sleep
The handset automatically turns to sleep after 1 minute (default), to save battery time. This
setting can be configured in the handset, refer to 15.1.4 Sleep timeout on page 65. If the
screen lock functionality is enabled (default) the handset will be locked automatically when
entering sleep mode.
By default the lock screen shows the current time and date, but can also be set to show
alerts, warnings, messages, and missed calls if lock screen widgets are enabled. Refer to
10.4 Lock Screen Notification on page 54 for information on how to use lock screen
notifications.
NOTE: Incoming calls can be answered, and the personal alarm button can be pressed while
the handset is locked. An emergency call can also be made while the screen is locked,
depending on configuration. All alerts appear in the top display, even when the
handset is in sleep mode. Refer to 7. Alerts on page 41 or 5. Calling on page 27 for
details on how to handle alerts and calls.
TD 93066EN
Wake/unlock the handset
To wake the handset from sleep mode, do the following:
1 Press the power or home button.
2 If needed, swipe the icon in any direction to unlock the screen.
NOTE: If set by the system administrator, a PIN or password might be needed to unlock the
handset.
Put to sleep/lock the handset
• Press the power button, or wait until the handset automatically turns to sleep.
TIP: When not using the handset, put it to sleep mode. This avoids unintentional display taps
as it locks the screen.
4.3 Adjust the Volume
Adjust the volume by pressing the volume button (up or down), or by changing the volume
in the Settings app. Refer to 15.2.1 Volumes on page 65.
4.4 Switch to Silent or Vibrator only mode
Ringtones and notification signals can be switched off by setting the handset to either
Silent or Vibrator only mode. In Silent mode the vibrator is also switched off.
NOTE: The handset can be configured to not allow settings below a certain volume, refer to
the handset Configuration Manual for details.
To set the handset to Vibrator only/Silent mode, do one of the following:
• Make a long press on the volume down button. After the lowest volume level the
handset enters Vibrator only mode, then Silent mode.
• Long press the power button, and tap for Vibrator only, or for Silent mode.
26 April 2016 / Ver. D
11
Page 19

User Manual
Ascom Myco Wi-Fi and Cellular Smartphone
• Decrease the volume in the Settings app, refer to 15.2.1 Volumes on page 65.
NOTE: Alerts and incoming messages are still indicated by the top display and colored LED
flashes, even if the handset is set to Silent mode.
4.5 Use the Touchscreen
The main handset display has a touchscreen with full support for standard Android
gestures, like tap, drag, swipe, and pinch/stretch.
NOTE: Third-party apps may use additional gestures.
Tap
Tap (touch) the display with a finger to:
TD 93066EN
4. Basics
• Open or select an item.
• Select, or clear a check box, or option.
• Place the cursor to enter text with the keyboard.
Tap and hold
Tap (touch) and hold the finger to the display to:
• Move an item.
• Show a menu.
• Enable selection mode, for example, to select several items from a list.
Double tap
Tap the display twice to:
• Zoom in and center on a block of content or an image. Double tap the display again to
zoom in further.
• Zoom out (if already zoomed in).
26 April 2016 / Ver. D
12
Page 20

User Manual
Ascom Myco Wi-Fi and Cellular Smartphone
Drag
Some objects can be moved, for example apps, or unhandled alerts in the Alert view.
• Tap and hold, and drag the object to move it.
Swipe
TD 93066EN
4. Basics
Swipe to answer a call, unlock or change view.
• Tap the display and at the same time, move the finger in any direction.
Flick
• Flick the display to quickly to scroll up or down a list. Stop scrolling by tapping the
display.
Stretch and pinch
• Stretch the display to zoom in.
• Pinch the display to zoom out.
26 April 2016 / Ver. D
13
Page 21
User Manual
Ascom Myco Wi-Fi and Cellular Smartphone
4.6 Use the Keyboard
The handset uses the standard Android keyboard for text input. Third-party keyboards with
additional functionality can be installed by the system administrator.
Enter text
• Tap an text entry field to display the keyboard.
• Tap individual letters to enter text.
• Use the word-prediction feature to write words faster.
• Tap and hold a letter to select an alternate character from the pop-up menu.
• Tap the "Shift", "123" or "+=$"-buttons to switch to uppercase, number, or special
character entry modes.
Edit text
Do the following to edit a text:
1 Long tap the text to enter the text selection mode. The text editing tools appear in
the application bar, see Figure 1.
2 Drag the selection handles left or right to select more or less text.
3 Tap the respective icon in the application bar to "select all", "cut", "copy" or "paste"
text.
TD 93066EN
4. Basics
Figure 1. The text editing tools in the application bar
4.7 Navigate the User Interface
The user interface on the handset provides functionality to access central functions such as
alert handling, messaging, and launching apps. The handset user interface replaces the
standard Android user interface, while still providing access to Android functionality.
The user interface is divided into three separate views.
Swipe left, or right to change between the different views, or tap in the upper left, or
, upper right corner.
• Alert view: Respond, and get complete information on alerts, see 4.7.1 Alert view on
page 14.
• App view: View apps, see 4.7.2 App view on page 15.
• Conversation view: Send and receive messages, see 4.7.3 Conversation view on page 16.
4.7.1 Alert view
The Alert view is the default view in the user interface.
• Press the home button to return to the alert view.
26 April 2016 / Ver. D
14
Page 22
User Manual
Ascom Myco Wi-Fi and Cellular Smartphone
Figure 2. Alert view.
In the Alert view, alerts from external systems, such as patient monitors, and patient calls,
are shown in order of in order of arrival. The highest prioritized and oldest alert that has not
been handled is indicated in the top priority bar. A counter indicating the number of
unhandled alerts is also shown here.
TD 93066EN
4. Basics
Additional information, such as number of unread messages in the conversation view, and
notifications from apps (such as missed phone calls) are shown in the upper left or right
corner of the Alert view.
For information about how to work with alerts, refer to 7. Alerts on page 41.
4.7.2 App view
The App view shows all the installed apps on the handset. The app selection is system
dependent and set by the system administrator, refer to 11. Apps on page 59.
Figure 3. App view.
• Swipe right or tap from the Alert view to show the App view.
• To launch an app, tap on the app.
26 April 2016 / Ver. D
15
Page 23
User Manual
Ascom Myco Wi-Fi and Cellular Smartphone
• Scroll the screen to show any additional apps.
• Press the home button while in an app, or in the App view, to return to the Alert view.
The app shortcut bar, visible in the top of the App view, is used to add shortcuts to often
used apps. The app shortcut bar can contain up to five app shortcuts.
NOTE: App shortcuts may already be configured or locked by the system administrator.
Add an app shortcut
1 Tap and hold an app and drag it to the desired position in the app shortcut bar.
Remove an app shortcut
1 Tap and hold the app and drag it outside the app shortcut bar.
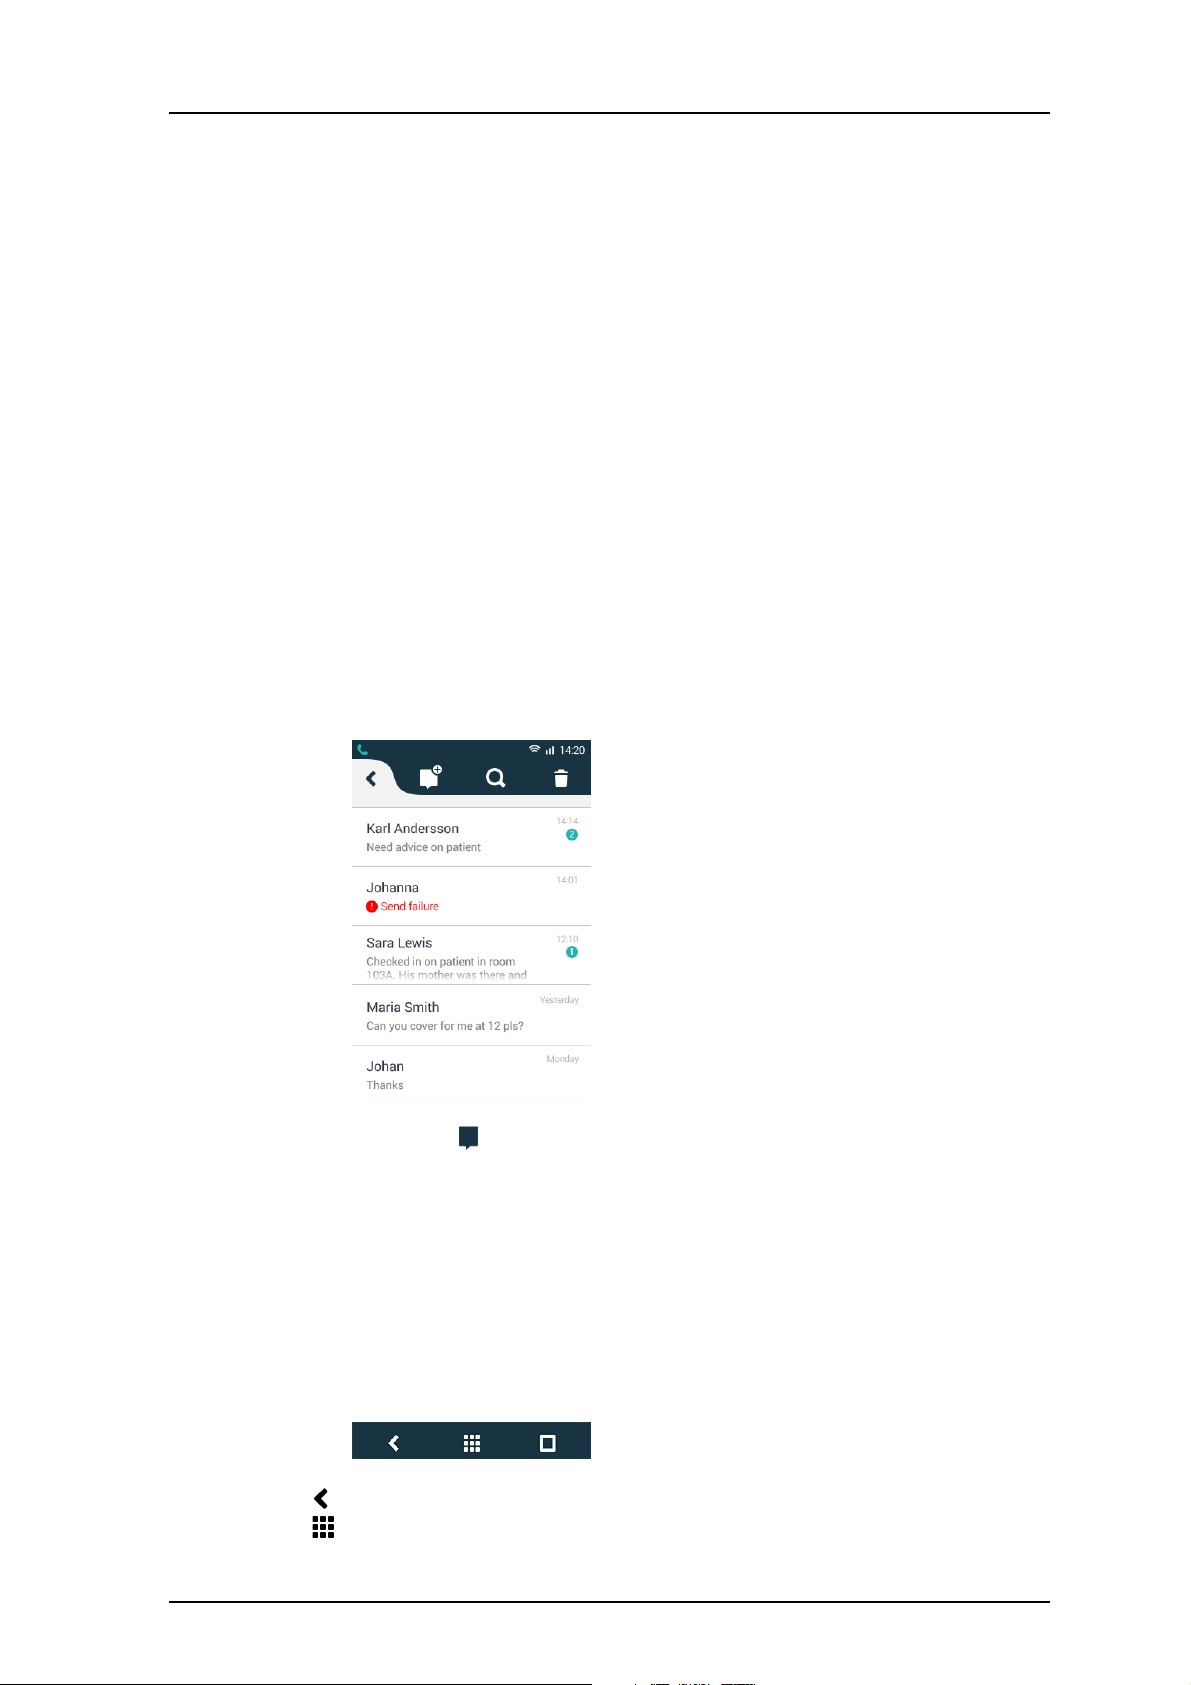
4.7.3 Conversation view
The Conversation view is used to receive and send messages to other handsets, refer to 8.
Messaging on page 47.
TD 93066EN
4. Basics
Figure 4. Conversation view.
• Swipe left or tap from the Alert view to show the Conversation view.
4.8 Use apps
App navigation bar
When working with apps, the app navigation bar is shown on the bottom of the display. The
buttons provide functionality to navigate in, or switch between apps.
Figure 5. App navigation bar.
• : Return to the previous screen within an app, or close the app.
• : Returns to the App view.
26 April 2016 / Ver. D
16
Page 24
User Manual
Ascom Myco Wi-Fi and Cellular Smartphone
• : Open a list of recently used apps. Tap to switch to an app. Remove an app by swiping
left or right.
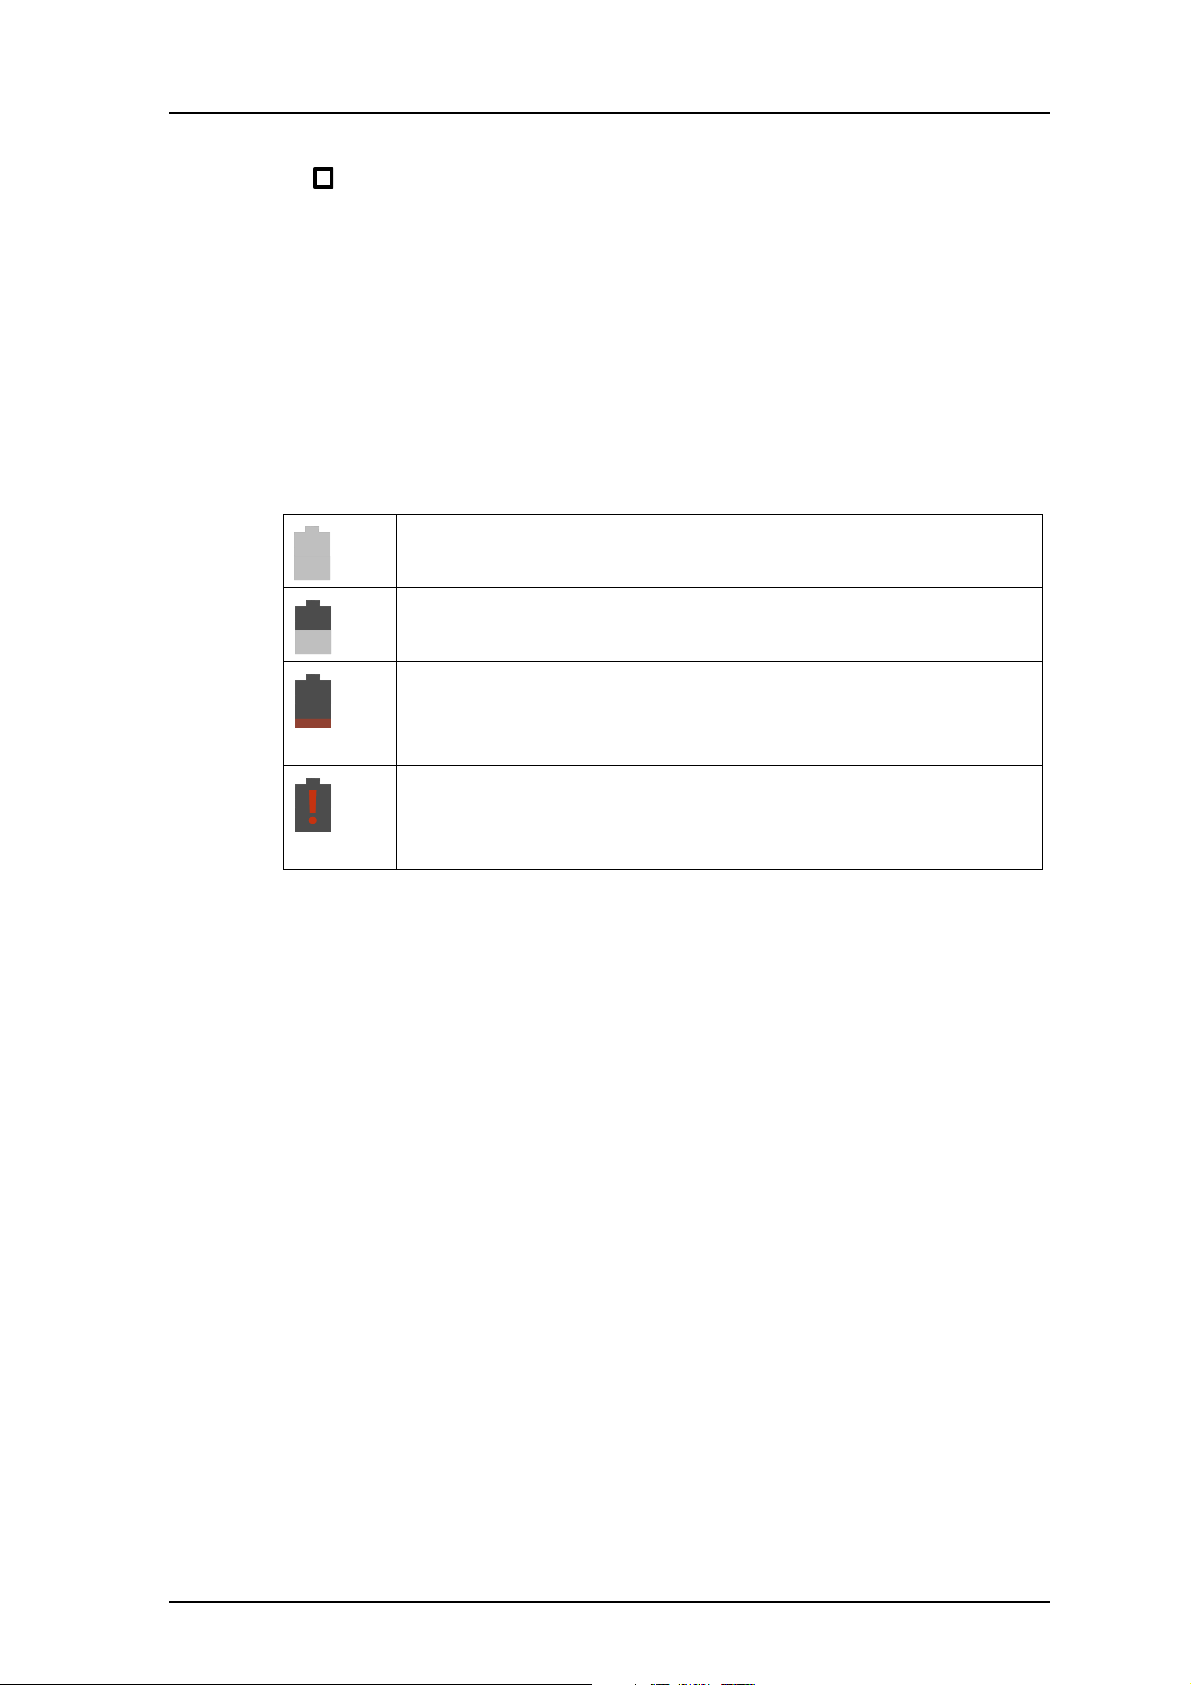
4.9 Battery level indication
NOTE: The battery life indication shown on the handset might not always be a reliable
measure of how much charge the battery has left, especially after exchanging
batteries. Connect the handset to a charger to receive a more reliable measure, see
4.10 Charge the Handset Battery on page 17.
The battery level on the handset is shown through the following indications and warnings:
The "Full battery" icon is displayed in the status bar when the battery is fully
charged.
The "Half battery" icon is displayed in the status bar when the battery has
50% of its charge left.
TD 93066EN
4. Basics
The "Low battery" icon is displayed in the status bar, and a warning signal is
given when the battery has 15% or lower of its charge left. In addition, the
LED flashes orange, and the dialog window "Battery low! Charge now!"
appears.
The "Empty battery" icon is displayed in the status bar when the battery has
5% or less charge left. In addition; a warning signal sounds every two
minutes, the LED flashes red, and the dialog window "Battery empty!
Shutting down!" appears.
During a call, only the corresponding battery warning signal notifies the user. The battery
warning signal cannot be silenced during a call. When not in call, the battery warning signal
can be silenced by pressing the volume down button.
4.10 Charge the Handset Battery
TIP: The handset is delivered with an approximately 50% battery charge, and doesn't need
to be charged before use.
The handset has a rechargeable lithium-ion battery. To charge it, use either a Charging Rack,
or a Micro USB cable. A Charging Rack is recommended for fastest and most reliable
charging.
• For charging the handset in a Charging Rack, see 4.10.1 Charge the handset in a
Charging Rack on page 18.
• For charging the battery in a Battery Charging Rack, see 4.10.2 Charge the battery in a
Battery Charging Rack on page 18.
• For charging the handset with a Micro USB cable, see 4.10.3 Charge with a Micro USB
cable on page 18.
Battery and charging status is shown through different handset indications.
• The handset shows the current battery level in the status bar, and alerts when the
battery level is low by displaying battery warnings, see 4.9 Battery level indication on
page 17.
26 April 2016 / Ver. D
17
Page 25

User Manual
Ascom Myco Wi-Fi and Cellular Smartphone
• The status of a charging handset can be indicated through a special charging screen, or
on the regular user interface, depending on the configuration, see 4.10.4 Charging
indication on page 19.
4.10.1 Charge the handset in a Charging Rack
TIP: The handset can be configured to clear all existing messages and alerts, be set to mute,
or to automatically log out the user when placed in a Charging Rack. Refer to the handset
Configuration Manual.
Do the following to charge the handset in a Charging Rack:
1 Place the handset in a Charging Rack slot. The charging screen appears as soon as the
handset is correctly inserted, and shows the current charge level, refer to 4.10.4
Charging indication on page 19.
2 Allow the handset to charge fully. It takes approximately three and a half hours with
a fully depleted battery.
The handset is fully charged, and ready to use, when the charging screen shows
100%, and the top LED light is fixed green.
TIP: It is recommended to always charge the battery fully to extend the battery life,
although no harm is made to the handset if removed from the Charging Rack before
the battery has been 100% recharged.
3 To remove it from the Charging Rack, lean the handset forward slightly and pull.
TD 93066EN
4. Basics
4.10.2 Charge the battery in a Battery Charging Rack
TIP: For instructions on how to remove and insert the handset battery, see 4.11 Change
Battery on page 20.
Do the following to charge the battery in a Battery Charging Rack:
1 Place the Battery Pack in one of the charging slots.
2 Slide the battery lock to the left.
The LED under the slot turns red when the battery is correctly inserted.
3 Allow the battery to fully charge. It takes approximately three hours with a fully
depleted battery.
The battery is fully charged, when the LED under the charging slot turns green.
TIP: It is recommended to always charge the battery fully to extend the battery life,
although there's no harm made to the battery if removed from the Battery Charging
Rack before fully charged (when the LED is still red).
4 Slide the battery lock to the right.
5 Remove the battery by lifting it up.
NOTE: The Battery Pack can be difficult to remove from the slot the first few times of usage.
4.10.3 Charge with a Micro USB cable
WARNING: It is strongly recommended to use the Micro USB cable together with the USB
NOTE: The handset must be switched on to use full charging speed when charging with a
Micro USB cable. Charging with a Micro USB cable is always slower than charging in a
26 April 2016 / Ver. D
Power supply unit available from Ascom (Art.No. 660468, delivered with
interchangeable plugs for EU, UK, USA/CA, and AU/NZ). To use a non-tested or
budget USB charger could cause serious injury or death.
18
Page 26
User Manual
Ascom Myco Wi-Fi and Cellular Smartphone
Charging Rack. Some USB chargers are unsupported by the handset. If an
unsupported charger is connected the text "Unsupported charger" appears on the top
of the screen, and in the notification drawer.
Do the following to charge the handset with a Micro USB cable:
1 Carefully open the USB charging connector cover on the bottom of the handset.
2 Attach the Micro USB cable to the micro USB slot on the handset.
3 Assemble the Micro USB cable and the USB Power supply.
TIP: The Micro USB cable can be used separately to connect to a computer USB port
(disassemble the Micro USB cable from the USB Power supply by pressing the button
on the back of the USB Power supply, and pull). Note that the battery may drain
instead of charge, if the handset is connected to a computer that's switched off, or is
in sleep mode.
4 Connect the handset, using the assembled Micro USB cable, and USB Power supply, to
a power outlet.
5 Allow the handset to charge fully. It takes approximately four and a half hours with a
fully depleted battery.
6 Remove the handset from the Micro USB cable first, and close the USB charging
connector cover to ensure full protection against dust and splashing water (IP54).
TD 93066EN
4. Basics
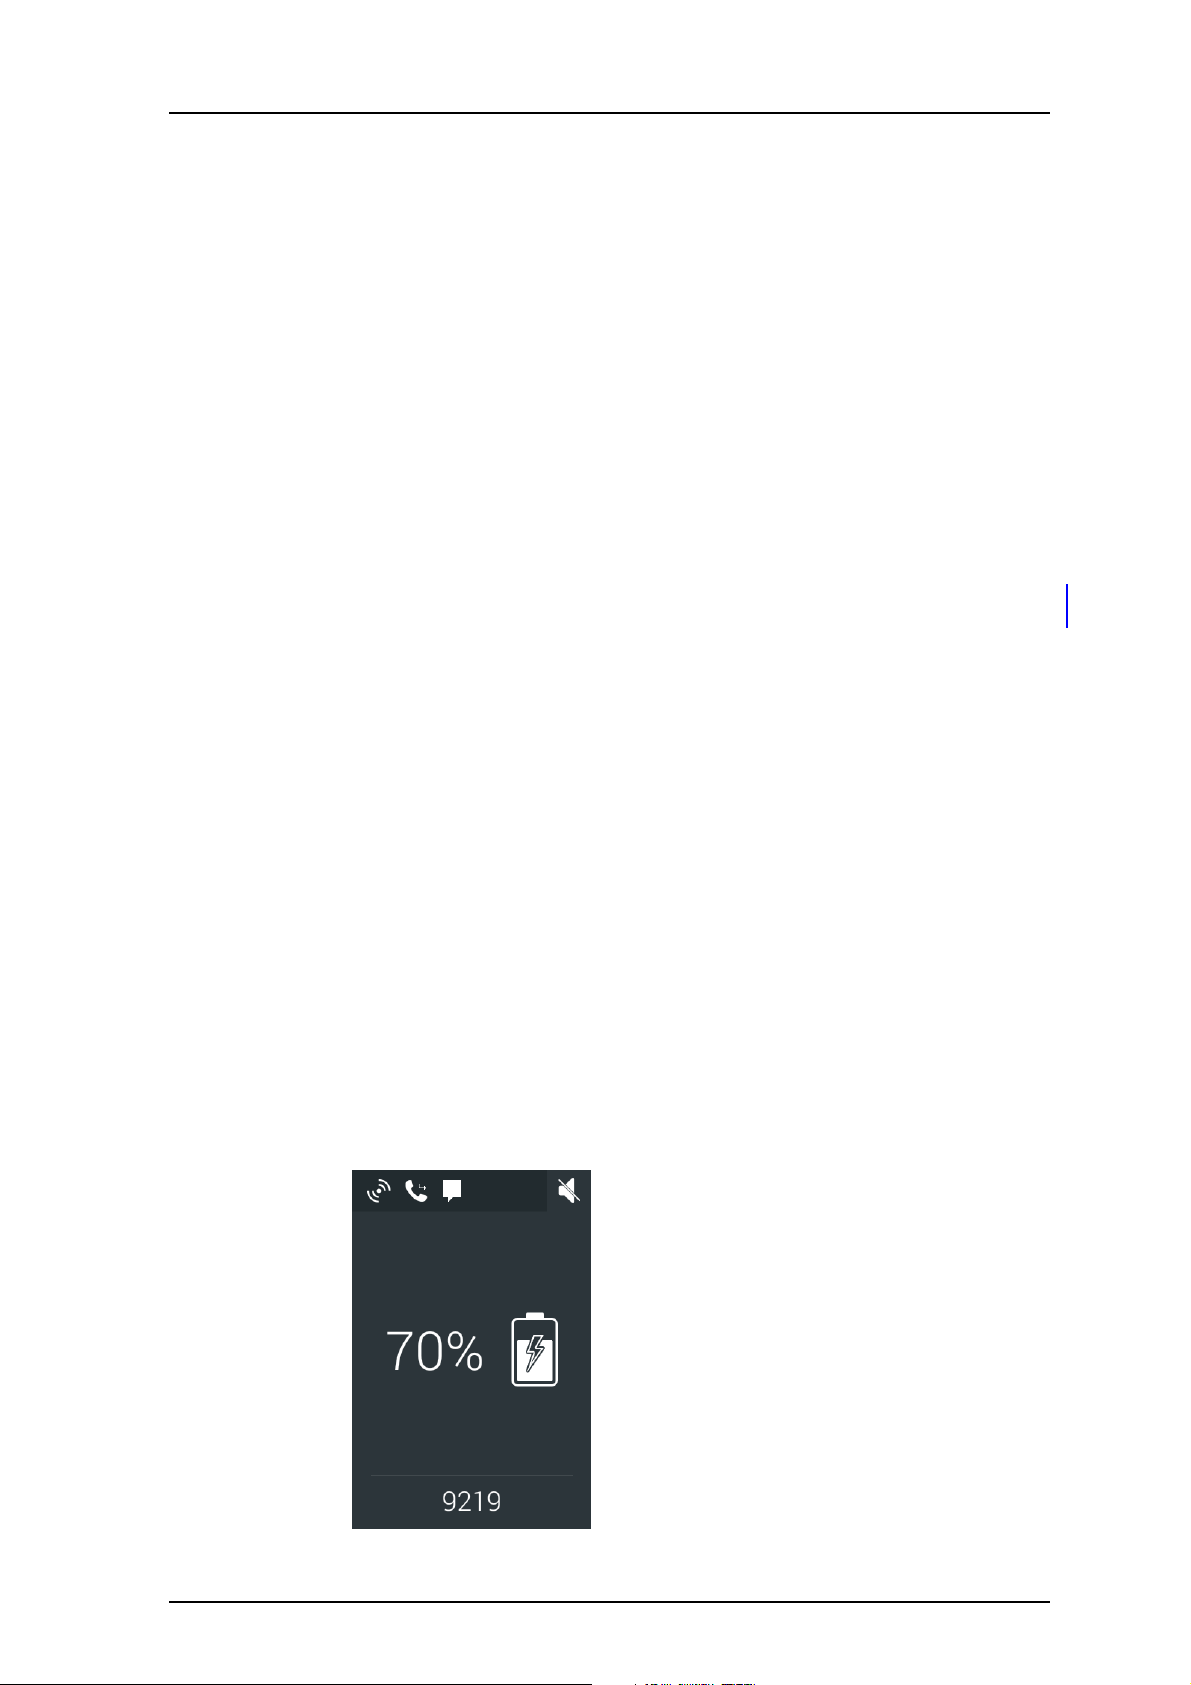
4.10.4 Charging indication
The handset can indicate charging differently depending on configuration and charging
method. The default configuration is to show a special charging screen on the handset
display while placed in a Charging Rack. This charging screen is not shown by default when
charging with a USB cable.
When the handset battery has been fully charged, the top LED emits a fixed green light.
The charging screen
The battery charge level, owner ID/name, and number are shown on the handset while
charging, if the charging screen is enabled. Missed calls, text messages, and unhandled
alerts are shown as icons on the charging screen.
NOTE: The handset must be switched on to show the charging screen.
Figure 6. Charging screen while charging.
26 April 2016 / Ver. D
19
Page 27

User Manual
Ascom Myco Wi-Fi and Cellular Smartphone
Figure 7. Charging screen when fully charged.
The following icons are used to show status on the charging screen:
TD 93066EN
4. Basics
Indicates that a personal alarm is configured for the alarm button (refer
to 9. Personal Alarm on page 50).
Unhandled alert.
New message.
Missed call.
New voicemail.
Muted handset.
Charging complete.
Charging without a charging screen
If the charging screen is disabled for the charging method used, charging is only indicated
with a battery icon in the status bar, and a "Charging, XX%" text on the lock screen.
4.11 Change Battery
The handset Battery Pack can be exchanged easily, for example when there is limited time
for charging, or if additional battery time is needed.
To remove the Battery Pack:
1 Switch off the handset to prevent data loss or damage to the handset, refer to 4.1
2 Slide the battery lock to the right.
3 Press the upper part of the clip to open it fully.
4 Remove the Battery Pack.
To insert a Battery Pack:
1 Insert a fully charged Battery Pack.
26 April 2016 / Ver. D
Switch the Handset On or Off on page 10.
20
Page 28

User Manual
Ascom Myco Wi-Fi and Cellular Smartphone
2 Slide the battery lock to the left.
The handset starts automatically once the battery is connected.
3 Release the clip.
4.12 Log in or Log out
NOTE: The login functionality is system dependent and is enabled through the Unite CM,
refer to the Unite CM Configuration Manual.
If login is required for the handset, users must log in to gain access to features such as
messaging, alert handling, and the My Services app.
IMPORTANT: The login functionality is mainly intended as a method to use a personal
messaging and alerts number on different handsets. It cannot be used to
transfer phone numbers, services, messages, or alerts between handsets.
Alerts and messages stored on the handset are visible to all users logging in on
the handset.
For instructions on how to:
TD 93066EN
4. Basics
• Log in, see 4.12.1 Log in on page 21.
• Log out, see 4.12.2 Log out on page 22.
• Use the recent users list, see 4.12.3 Recent users list on page 23.
4.12.1 Log in
To log in and gain access to the alert, messaging, and My Services functionality:
1 Activate the display by pressing the home or power button.
2 Unlock the screen.
3 Tap the "Log in" button.
26 April 2016 / Ver. D
21
Page 29

User Manual
Ascom Myco Wi-Fi and Cellular Smartphone
4 If previous users have logged in on the handset, and the recent users list is enabled, a
login screen similar to the image below is shown. Otherwise, skip to step 6.
• If the correct user name is preselected, enter the password and tap "Log in".
• If the wrong user name is preselected, tap "Change" and continue with the next
step.
5 The recent users list is shown, see 4.12.3 Recent users list on page 23.
• If the user name exists in the list, tap it.
• If the user name cannot be found in the list, tap "Enter other name" and continue
with the next step.
6 Enter the user name and password in the corresponding fields.
TD 93066EN
4. Basics
4.12.2 Log out
TIP: The handset can be configured to automatically log out when placed in a Charging Rack,
refer to the handset Configuration Manual.
26 April 2016 / Ver. D
• Tap "Log in" to log in.
• Tap , or press the home button, to cancel the login.
NOTE: Logging in on a second device will automatically log out the user from the first
device.
22
Page 30

User Manual
Ascom Myco Wi-Fi and Cellular Smartphone
To log out and restrict access to the alert, messaging, and My Services functionality:
1 Swipe down from the top of the screen to open the notification drawer (10.7
Notification Drawer on page 57). Tap "Log out user name".
TD 93066EN
4. Basics
2 Tap the Log out button in the dialog window to confirm. Alerts and messages stored
on the handset are hidden.
NOTE: Alerts and messages stored on the handset are visible to any user logging in
on the handset, and will not be transferred over when logging in on another handset.
4.12.3 Recent users list
If enabled, user names are kept in a recent users list on the handset, to save users from
having to re-enter their user name each time. To open the recent users list:
1 Tap in the User ID box, or tap "Change" if a previous user name has been selected
26 April 2016 / Ver. D
automatically.
23
Page 31

User Manual
Ascom Myco Wi-Fi and Cellular Smartphone
2 The recently used user names are sorted chronologically, with the most recently used
user name on top. Select a user name, or tap "Enter other name" to return to the login
screen without choosing a user name.
TD 93066EN
4. Basics
26 April 2016 / Ver. D
24
Page 32
User Manual
Ascom Myco Wi-Fi and Cellular Smartphone
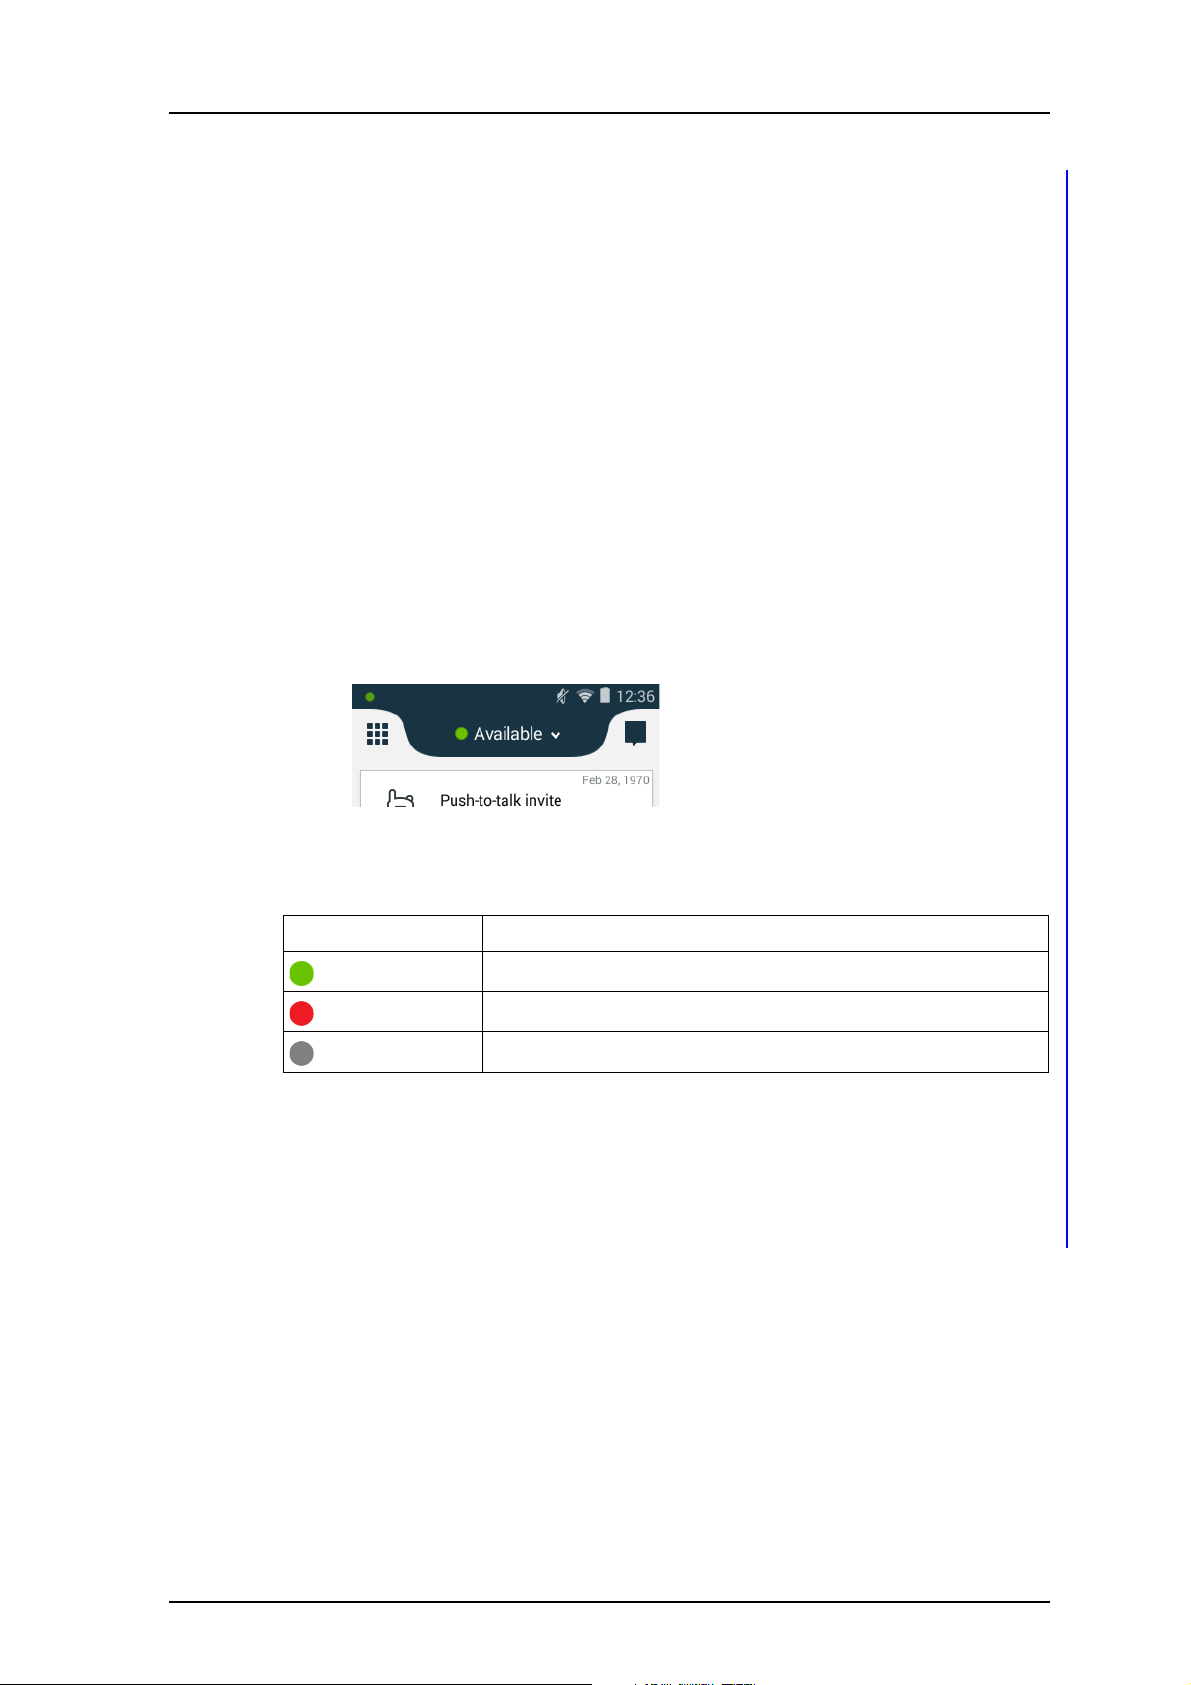
4.13 Availability status
NOTE: This is a system dependent feature.
If the system is configured for it, users can set their availability status from the handset.
This availability status can be used by the system for example when deciding which
handsets to send an alert to.
In some cases, system applications can change the availability status for the handset
automatically, for example after accepting an alert message.
Refer to the handset Configuration Manual, and the Unite CM Configuration Manual for
instructions on how to enable and configure the availability status feature for the handset.
4.13.1 Availability status indication
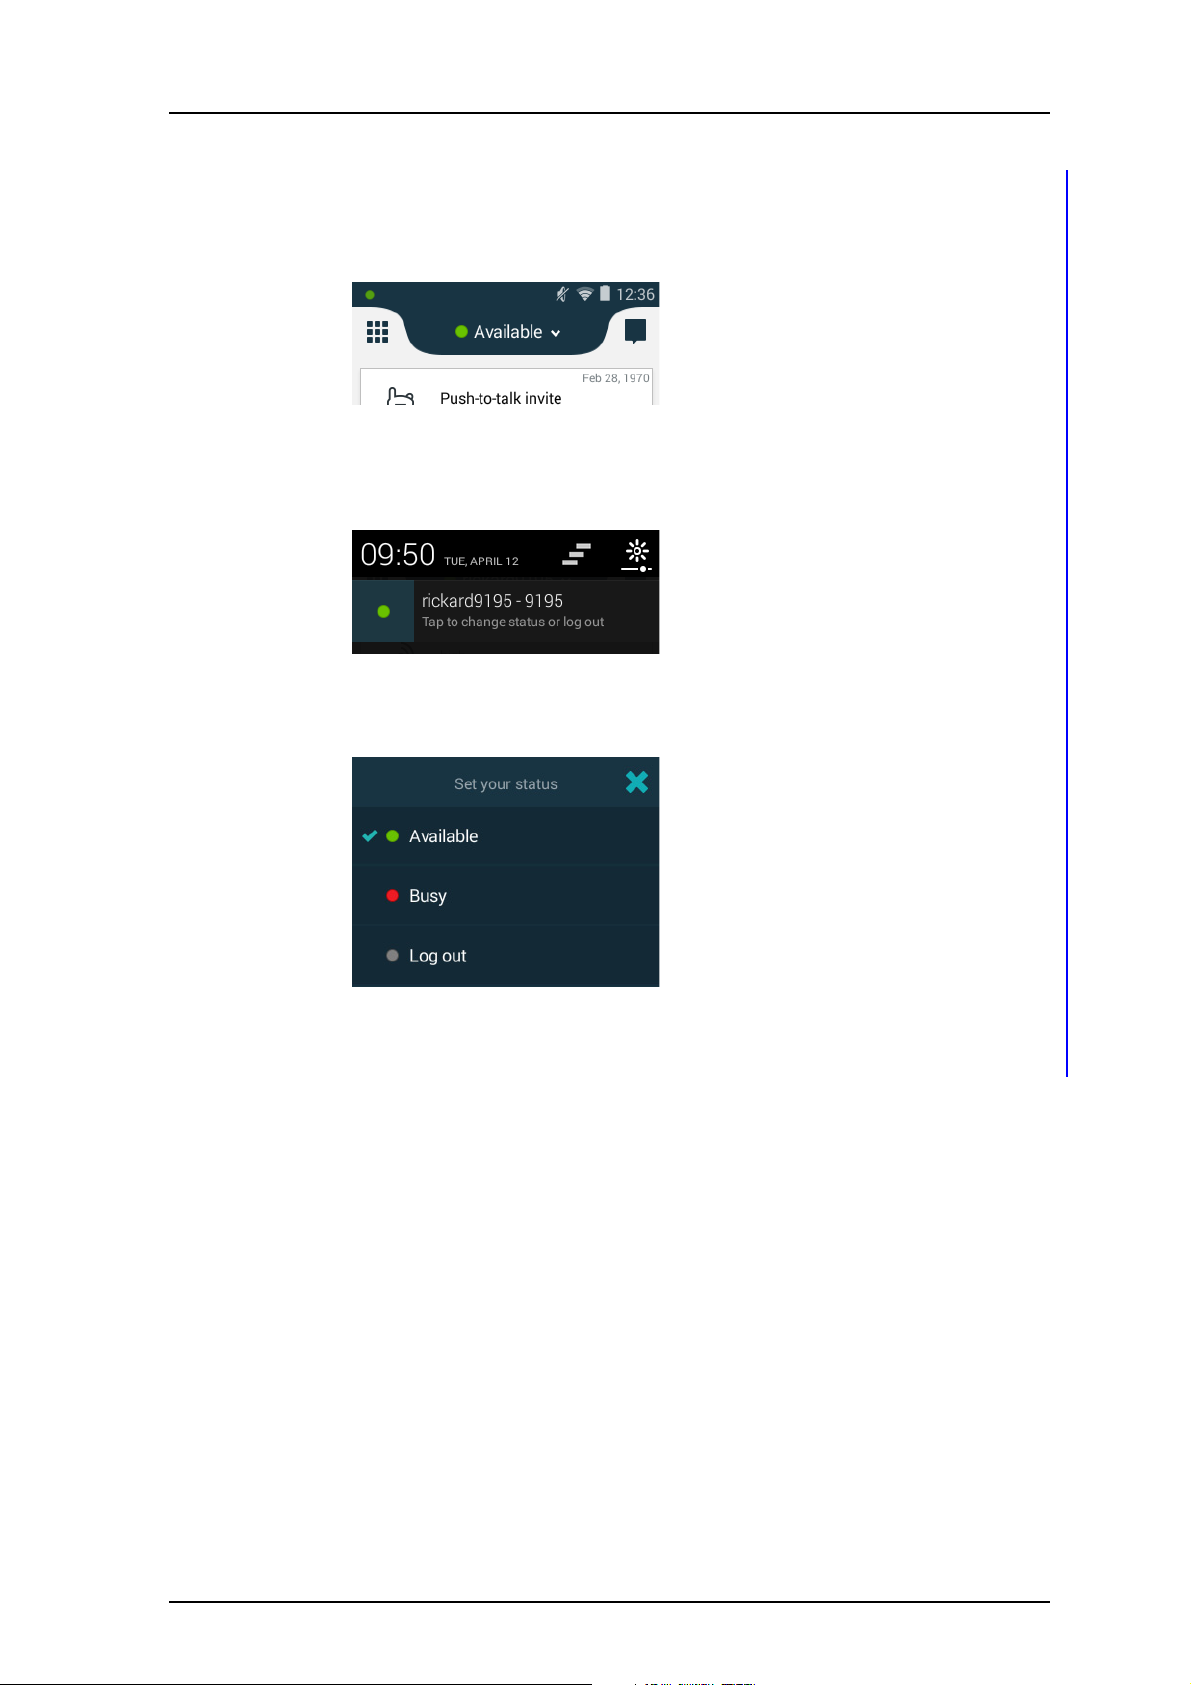
The current availability status is shown as a colored dot on the left side in the status bar on
all views, and in the top priority bar in the Alert view.
Figure 8. Availability status indication.
TD 93066EN
4. Basics
The following colors are used to indicate the availability status:
Color Availability status
Green Available
Red Busy
Grey Logged out
4.13.2 Set the availability status
NOTE: If login is enabled on the handset, log in first to access the availability functionality
(refer to 4.12 Log in or Log out on page 21).
Do the following to change the current availability status:
26 April 2016 / Ver. D
25
Page 33
User Manual
Ascom Myco Wi-Fi and Cellular Smartphone
1 The availability status can be set from either the Alert view, or through the
notification drawer:
• In the Alert view, tap the top priority bar:
NOTE: If login is enabled, the user name is shown in the top priority bar.
• In the notification drawer, tap the row that says "Tap to change status or log out":
TD 93066EN
4. Basics
2 In the Set your status menu, tap to change the availability status, or tap "Log out" to
log out (if login is enabled on the handset):
NOTE: The handset can be configured to automatically log out when placed in a Charging
Rack, refer to the handset Configuration Manual.
26 April 2016 / Ver. D
26
Page 34
User Manual
Ascom Myco Wi-Fi and Cellular Smartphone
5. Calling
NOTE: Depending on whether Cellular or VoWiFi is used for calling, appearance and
functionality may differ. Available functionality also depends on the system
configuration.
The following call related topics are described in this chapter:
• 5.1 Answer or Reject a Call on page 27
• 5.2 Make a Call on page 28
• 5.3 End a Call on page 31
• 5.4 Functions During a Call on page 31
• 5.6 Push-to-talk Group Call on page 35
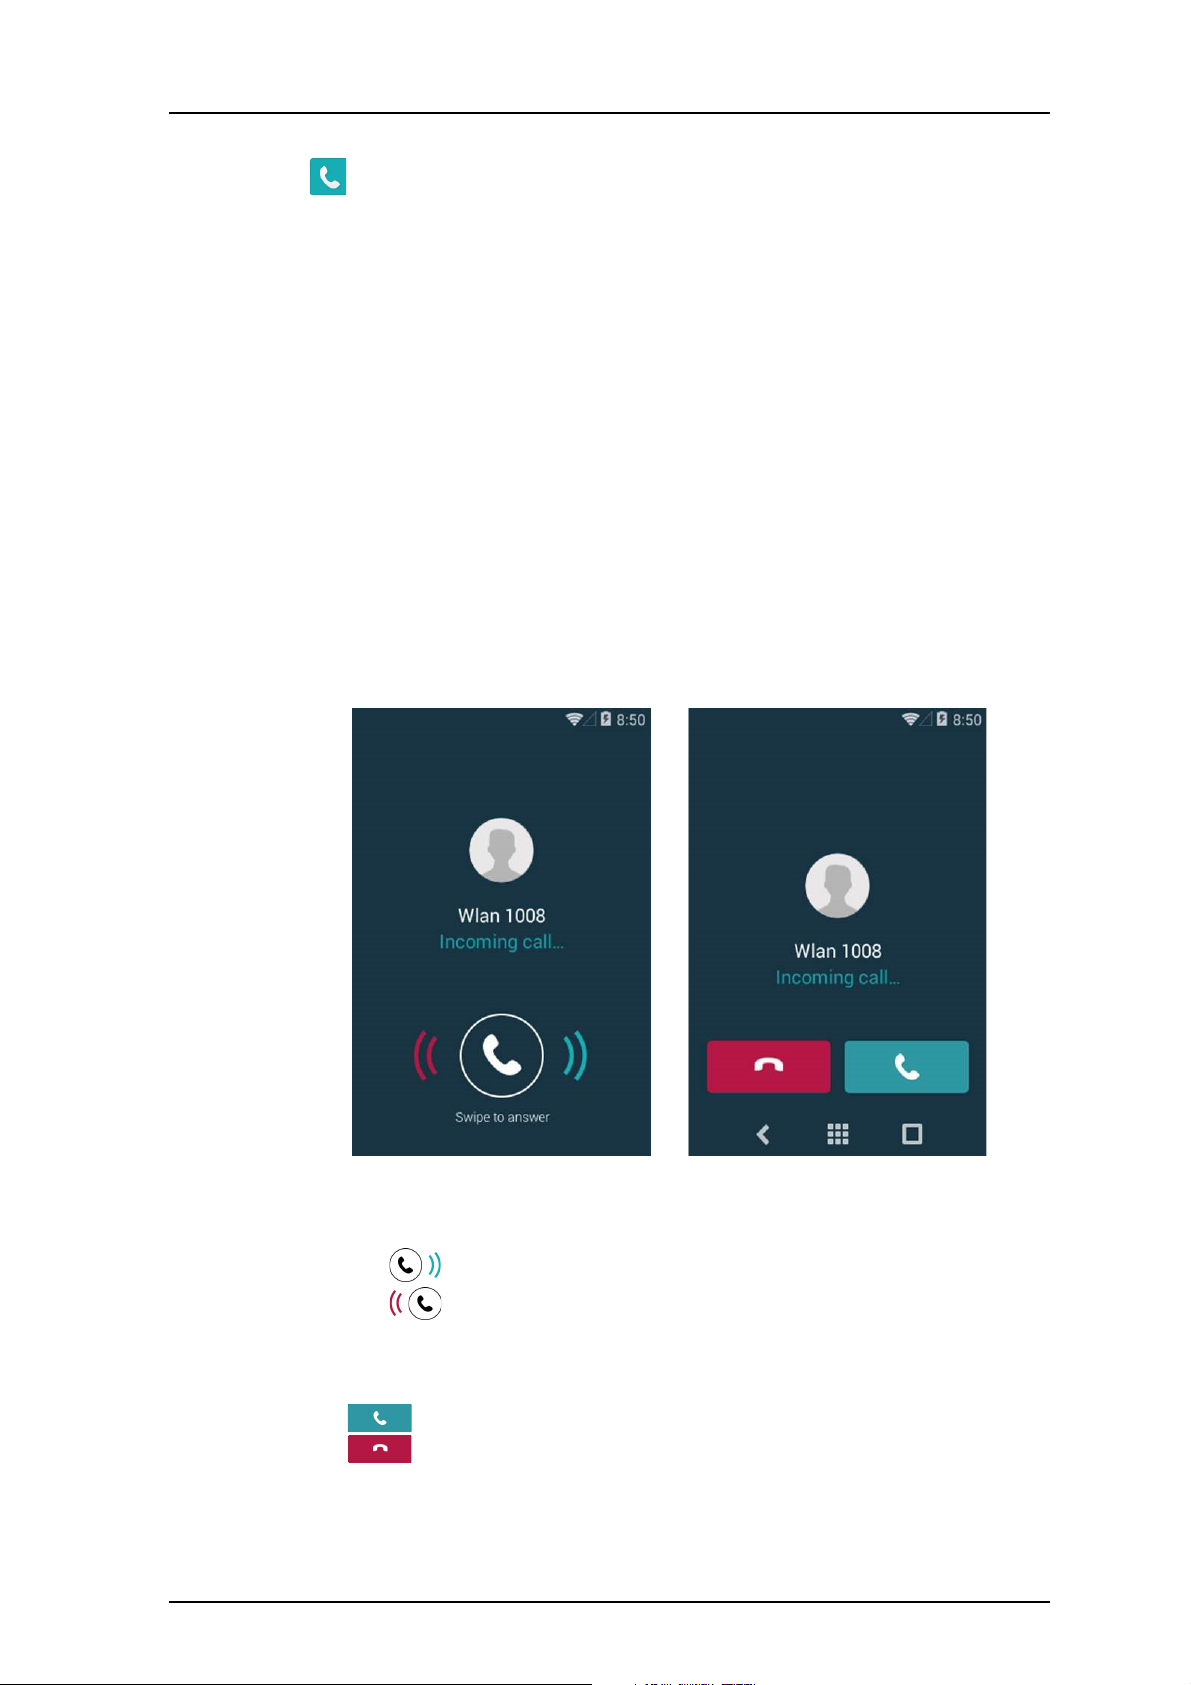
5.1 Answer or Reject a Call
An incoming call is handled differently depending on if the screen is locked or unlocked.
TD 93066EN
5. Calling
Figure 9. Incoming calls on a locked and unlocked screen.
Locked screen
On the incoming call screen:
• Drag the icon to the right side of the screen and drop it to answer the call.
• Drag the icon to the left side of the screen and drop it to reject the call.
Unlocked screen
On the incoming call screen:
• Tap to answer the call.
• Tap to reject the call.
26 April 2016 / Ver. D
27
Page 35
User Manual
Ascom Myco Wi-Fi and Cellular Smartphone
5.2 Make a Call
Calls can be made by manually dialing a phone number, tapping a recent call in the call list,
or by using the phonebook.
• 5.2.1 Call using the keypad on page 28.
• 5.2.2 Call using the call list on page 28.
• 5.2.3 Call using the central phonebook on page 29.
• 5.2.4 Call using the local phonebook on page 29.
• 5.2.5 Advanced dialing on page 29.
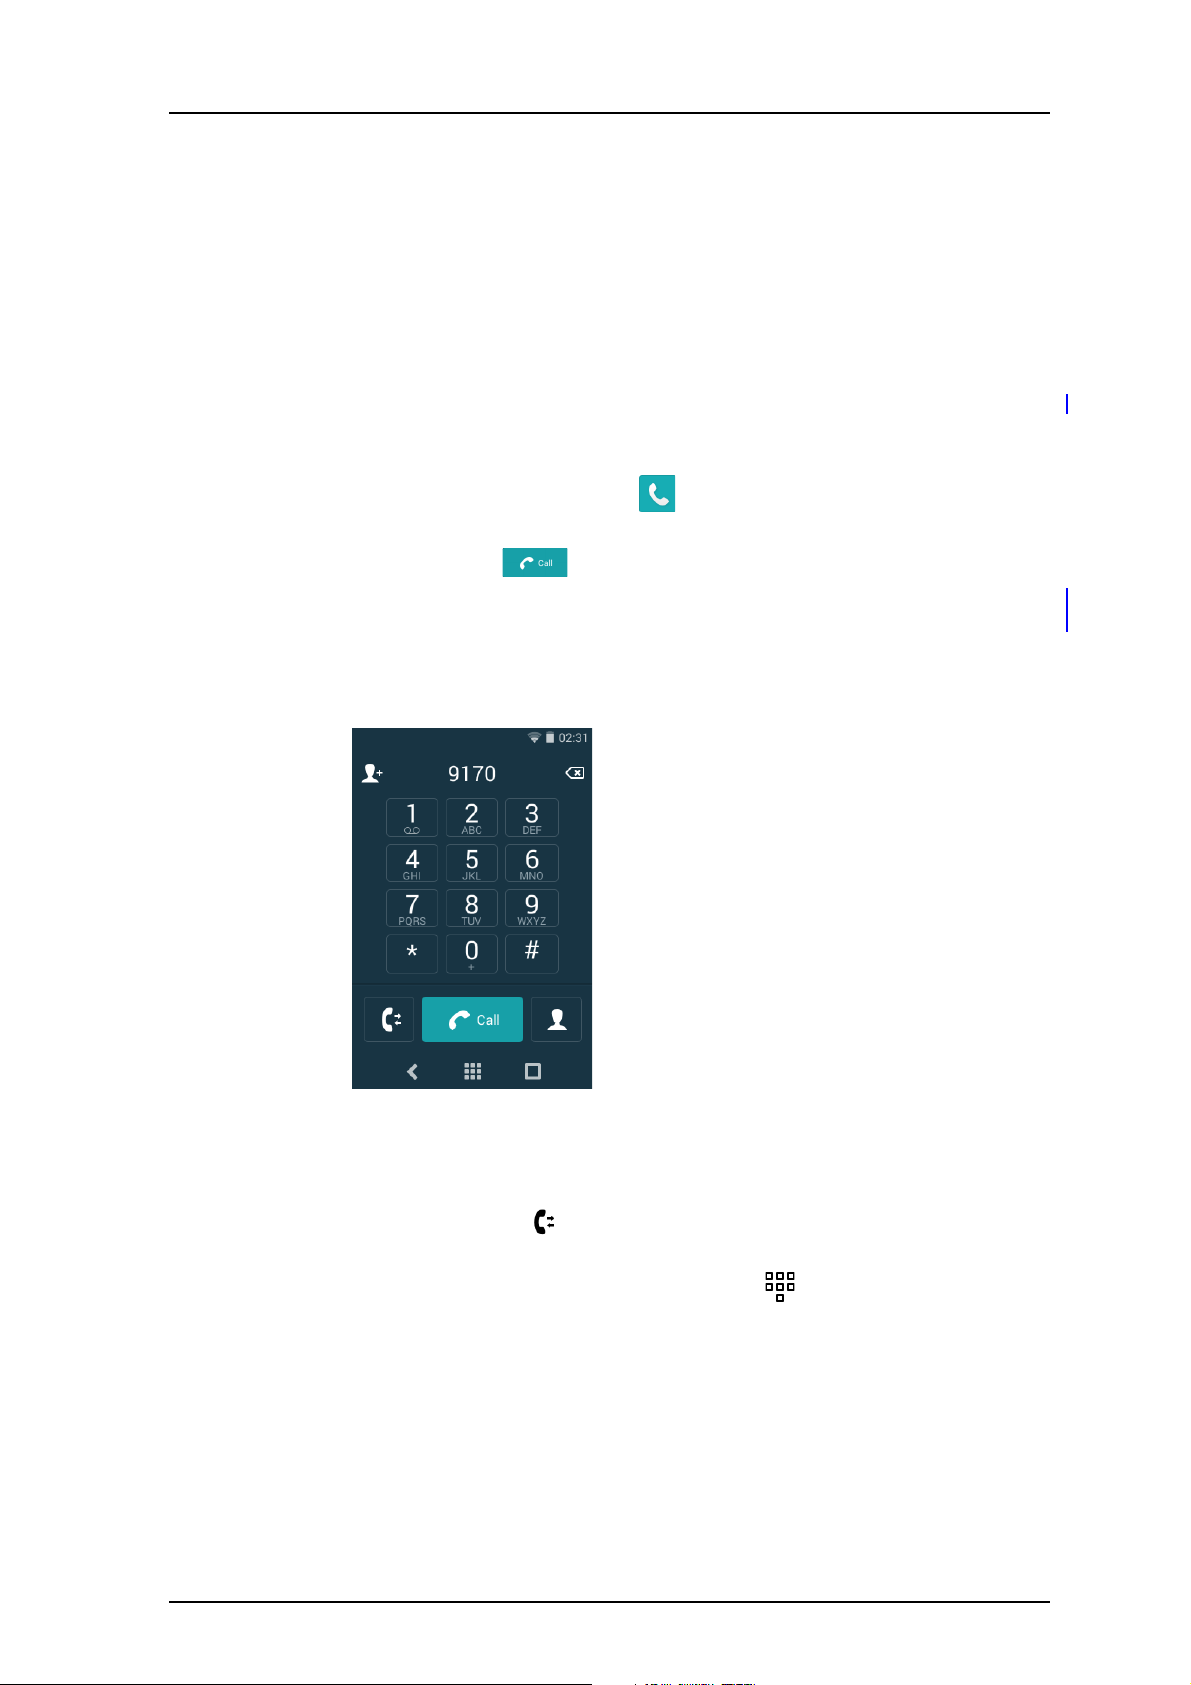
5.2.1 Call using the keypad
1 In the App view, tap the Phone app .
2 Use the keypad to enter a phone number.
3 Tap the call button to call the number.
TIP: Tapping the call button without entering a number will bring back the last called
number.
TD 93066EN
5. Calling
Figure 10. The keypad screen in the Phone app.
5.2.2 Call using the call list
The call list is a list of previously received or dialed calls.
1 In the Phone app, tap .
2 Scroll the list to find a contact or phone number.
3 Tap a contact/phone number to place a call, or tap to return to the keypad.
26 April 2016 / Ver. D
28
Page 36

User Manual
Ascom Myco Wi-Fi and Cellular Smartphone
5.2.3 Call using the central phonebook
TD 93066EN
5. Calling
NOTE: If login is enabled on the handset, the user must log in to access the central
phonebook.
The central phonebook is a list of contacts stored remotely on the system. Only system
administrators can add or remove contacts from this list. Refer to 6. Phonebook on page 39
for details.
1 In the Phone app, tap the phonebook button .
2 Tap " Central Phonebook".
3 Enter a name in the "First Name", or "Last Name" field.
4 Tap the search button on the keyboard to search the central phonebook.
5 A list of contacts is shown below the search fields. Tap a contact to make a call.
5.2.4 Call using the local phonebook
The local phonebook is the list of contacts added through the People app on the handset.
Refer to 6. Phonebook on page 39 for details.
1 In the Phone app, tap the phonebook button . All contacts stored in the local
phonebook are shown as a list on this screen.
2 Tap a contact to make a call.
Search the local phonebook
The search functionality can be used to quickly find contacts in the local phonebook:
1 In the Phone app, tap the phonebook button .
2 Tap " Search".
3 Start writing a name or number to search for. Contacts containing that name or
4 Tap a contact to make a call.
5.2.5 Advanced dialing
The keypad screen in the Phone app has additional functionality that can be used for
advanced dialing:
26 April 2016 / Ver. D
number appear below the search field.
29
Page 37

User Manual
Ascom Myco Wi-Fi and Cellular Smartphone
Call the last called number
To bring back the last called number:
1 Tap the call button on the keypad screen, without entering a number. The
last called number appears above the keypad.
2 Tap the button again to make a call to the number.
Call internationally
To call internationally:
1 Tap and hold the 0 button on the dialer until a "+" appears.
2 Enter the country code, followed by the phone number.
Add pauses
Pauses can be inserted anywhere in a number sequence to pause the call before sending the
rest of the numbers. This can be useful when calling a call service that requires number
input.
NOTE: At least one number must be entered in the dialer before adding a pause.
TD 93066EN
5. Calling
Do the following to add pauses to a call or contact number:
1 Tap and hold the * button on the dialer when entering a number sequence. The two
second long pause is indicated with a "," in the number sequence.
2 Add another two seconds to the pause by repeating step 1.
Figure 11. Number sequence with pauses.
TIP: Several pauses can be added at different places in a number sequence. Both pauses and
wait prompts can be used in the same number sequence.
Add wait prompts
One or more wait prompts can be inserted in a number sequence to require the user to tap a
button before sending the rest of the numbers. This can be useful when calling a call service
that requires number input.
NOTE: At least one number must be entered in the dialer before adding a wait prompt.
Do the following to add wait prompts to a call or contact number:
1 Tap and hold the # button on the dialer when entering a number sequence. The wait
prompt is indicated with a ";" in the number sequence.
Figure 12. Number sequence with wait prompts.
TIP: Several wait prompts can be added at different places in a number sequence. Both wait
prompts and pauses can be used in the same number sequence.
26 April 2016 / Ver. D
30
Page 38

User Manual
Ascom Myco Wi-Fi and Cellular Smartphone
When the call is connected, a "SEND numbers" button is shown to the right of the transfer
button, see Figure 13. Tap the button to send the numbers indicated on the button.
Figure 13. The wait prompt button.
5.3 End a Call
1 Tap to end an ongoing call.
5.4 Functions During a Call
TD 93066EN
5. Calling
Several functions can be used while in a call.
NOTE: Functionality may differ depending on whether Cellular or VoWiFi is used for calling.
NOTE: If an alert is received while in a call, it is shown as an overlay in the Phone app, until it
is accepted or rejected. Tap the overlay to act on the alert. To mute and dismiss the
notification, tap X, or swipe up. Refer to 7. Alerts on page 41. Closing the alert returns
to the Phone app.
Figure 14. Functions during a call.
The following functionality is available during a call:
• 5.4.1 Enable loudspeaker and adjust volume on page 32
• 5.4.2 Mute microphone on page 32
• 5.4.3 Show the keypad on page 32
• 5.4.4 Put call on hold on page 32
• 5.4.5 Add a second call on page 32
• 5.4.6 Receive a second call while in a call on page 32
26 April 2016 / Ver. D
31
Page 39

User Manual
Ascom Myco Wi-Fi and Cellular Smartphone
• 5.4.7 Switch between calls on page 32
• 5.4.8 Transfer call on page 32
• 5.4.9 Navigate the handset during a call on page 33
• 5.4.10 The phone bar on page 33
5.4.1 Enable loudspeaker and adjust volume
• Tap the speaker icon during a call to enable/disable the loudspeaker.
• Use the volume up or down buttons to adjust the volume.
5.4.2 Mute microphone
• Tap the mute icon during a call to mute/enable the microphone.
5.4.3 Show the keypad
• Tap the keypad icon during a call to show the keypad screen.
• Tap "Back" on the keypad screen to return to the call screen.
TD 93066EN
5. Calling
5.4.4 Put call on hold
• Tap " HOLD" during a call to put the call on hold.
• To return to the call, tap " HOLD" again.
5.4.5 Add a second call
It's possible to add a second call. The first call is automatically put on hold while the second
call is active.
During a call:
1 Tap the add call icon .
2 Enter a phone number or search for a contact in the phonebook.
3 Tap the call button to add the call.
5.4.6 Receive a second call while in a call
A second call can be received while in a call. If the second call is accepted, the first call is
automatically put on hold while the second call is active.
5.4.7 Switch between calls
Tap the on hold call to make it active. The previously active call is put on hold.
TIP: The on hold call is always displayed at the top of the list.
5.4.8 Transfer call
A call can be transferred to another number. Different methods can be used to transfer calls.
Transfer an ongoing call
During a call:
1 Tap " TRANSFER".
26 April 2016 / Ver. D
32
Page 40
User Manual
Ascom Myco Wi-Fi and Cellular Smartphone
2 Choose one of the following options:
• Immediately - Input a number or choose a contact, then tap the transfer button
to transfer the call immediately to that number.
• Call first - Input a number or choose a contact to add a second call, then follow the
instructions in Transfer the first call to the second call on page 33 to transfer the
calls.
NOTE: Call first transfer is not available when having two ongoing calls.
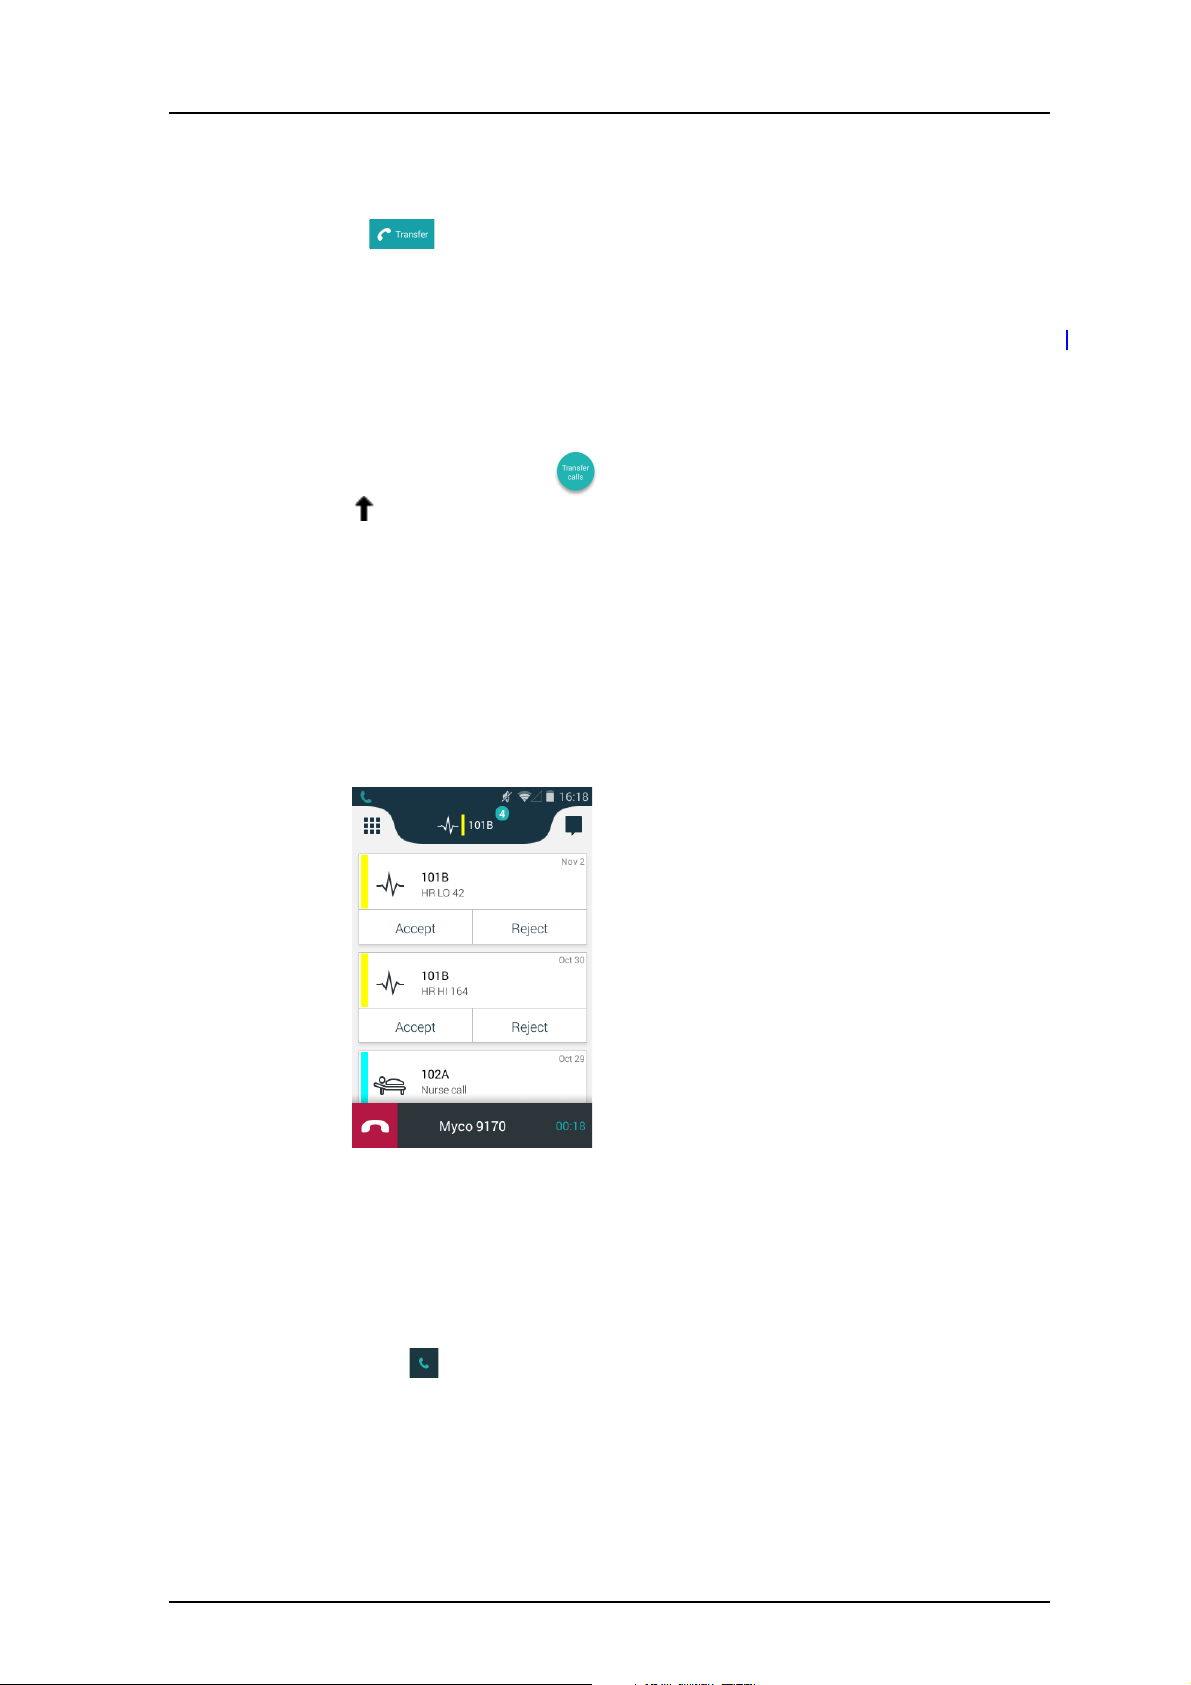
Transfer the first call to the second call
It's possible to transfer two calls to each other. The following transfer options are available
when more than one call exists:
• Tap the transfer calls button to transfer the first call to the second call.
• Tap " TRANSFER" to transfer the first call to another device (other than the second
call), see Transfer an ongoing call on page 32.
5.4.9 Navigate the handset during a call
It's possible to exit the phone app and navigate the handset user interface without
disconnecting from an ongoing call. Information about the call is presented in the phone bar
at the bottom of the screen, see 5.4.10 The phone bar on page 33 for details.
TD 93066EN
5. Calling
Figure 15. Navigating the user interface while in a call.
Do the following to navigate the handset user interface while in a call:
1 Press the home button to exit the Phone app.
2 The user interface can now be navigated in the same way as normally. Information
about the call is presented in the phone bar at the bottom of the screen. If an app is
opened the phone bar is hidden.
3 To return to the Phone app tap the phone bar, or swipe down the notification drawer
and tap . If the phone bar is hidden, press the home button to return to the Alert
view.
NOTE: The call is disconnected if the red phone icon on the phone bar is tapped.
5.4.10 The phone bar
Call status is shown through a phone bar on the bottom of the screen while navigating the
user interface.
26 April 2016 / Ver. D
33
Page 41
User Manual
Ascom Myco Wi-Fi and Cellular Smartphone
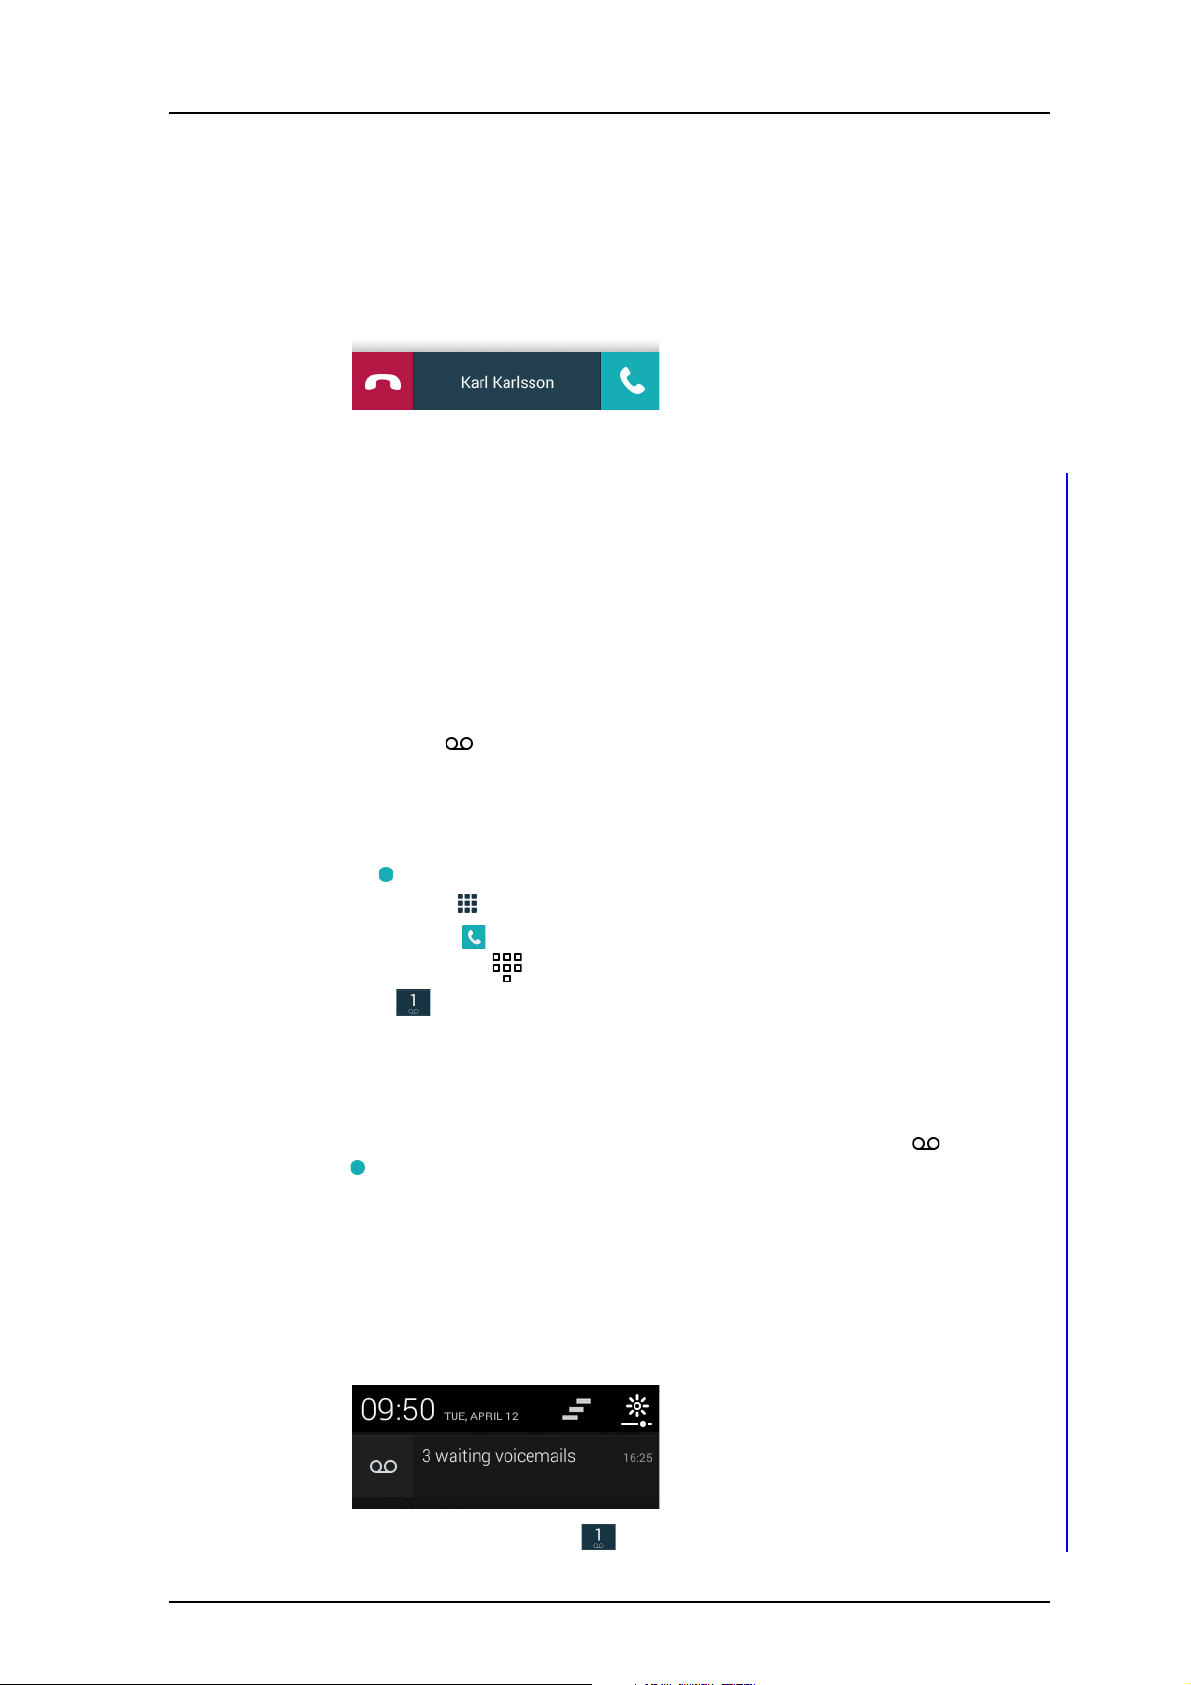
• Tap the icons on the phone bar to interact directly with the call (for example to accept/
end the call, or to push-to-talk).
• Tap the middle of the phone bar to open the call screen.
Figure 16. Phone bar showing an incoming call.
5.5 Voicemail
NOTE: This is a system dependent feature.
If the system is connected to a voicemail service, handset users can record and listen to
voicemail messages.
TD 93066EN
5. Calling
5.5.1 Indication of new voicemail messages
New voicemail messages are indicated in the following ways:
• Voicemail icons in the:
- status bar
- notification drawer
- charging screen
•Badges on the:
- App view icon in the Alert view
- Phone app icon in the App view
- keypad screen icon in the Phone app.
- "1" key on the Phone app keypad screen.
TIP: The number of waiting voicemail messages is shown on the badges. The number on the
Alert and App view badges also includes missed calls.
When all new voicemail messages has been listened to, the voicemail icons and the
badges indicating voicemail messages disappear.
5.5.2 Listen to voicemail messages
Call the voicemail inbox to listen to your voicemail messages:
1 Call the voicemail inbox using one of the following methods:
26 April 2016 / Ver. D
• Tap the voicemail message notification in the notification drawer:
• Tap and hold the "1" key on the Phone app keypad screen.
34
Page 42

User Manual
Ascom Myco Wi-Fi and Cellular Smartphone
2 Follow the instructions presented by the voicemail service.
TIP: The keypad is accessed by tapping the keypad icon on the call screen.
5.6 Push-to-talk Group Call
A Push-to-talk (PTT) group call provides instant voice connectivity to a group of persons.
When a person in the group wants to talk, the person taps and holds a button to activate
the microphone on the handset.
NOTE: The handset cannot receive other calls while in a Push-to-talk group call.
• To participate in a PTT session the handset must first receive an invitation, see 5.6.1 Join
a PTT call session on page 35.
• The PTT call screen is used to communicate in a PTT session, see 5.6.2 Use the PTT call
screen on page 36.
• Incoming PTT session invitations can be rejected, if not set to be accepted automatically,
see 5.6.3 Reject a PTT invitation on page 37.
• A rejected/ignored PTT invitation can be used to rejoin the session later (as long as the
session remains active), see 5.6.4 Rejoin a PTT call session on page 37.
• A group of users can be invited to participate in a PTT call by initiating a session, see
5.6.5 Initiate a PTT group call session on page 38.
TD 93066EN
5. Calling
NOTE: PTT sessions must be defined in the Device Manager, and messaging groups in the
Unite CM configuration tool. Refer to the handset Configuration Manual, and the Unite
CM Configuration Manual. For further details about Push-to-talk, refer to the Push to
Talk Function Description.
5.6.1 Join a PTT call session
NOTE: A PTT session invitation can be configured to be automatically accepted by the
handsets in the group. Refer to the handset Configuration Manual for details.
An invitation to join a PTT session can be received in two different ways:
• As an incoming call (see 5.1 Answer or Reject a Call on page 27).
• As an alert message (see 7.4 Alert Response Options on page 45).
Both PTT invitation types includes a description and ways to join the session.
To accept a PTT invitation
1 Accept the incoming call, or tap "Accept" or "Join" on the alert message to accept the
invitation and join the call.
NOTE: The handset can accept the invitation automatically, start in mute mode, or
start in loudspeaking mode, depending on the configuration of the invitation.
2 The handset is connected to the PTT session, and the Push-to-talk call screen is
shown. See 5.6.2 Use the PTT call screen on page 36 for instructions on how to use
the call screen to communicate in the PTT session.
NOTE: Invitations disappear from the screen if not accepted within 60 seconds. All
previously received invitations are stored in the alert view, and can be joined later (as
long as the session remains active), see 5.6.4 Rejoin a PTT call session on page 37.
26 April 2016 / Ver. D
35
Page 43

User Manual
Ascom Myco Wi-Fi and Cellular Smartphone
Accept an invitation during an ongoing call
If a PTT invitation is received during an ongoing call, the call is disconnected and the PTT
session is connected automatically if the following conditions are true:
• The invitation is configured to be accepted automatically
• The invitation is of higher priority than the priority of the ongoing call
NOTE: When a PTT invitation has the highest possible priority level (priority 1), the ongoing
call is always disconnected immediately.
If the priority of the PTT invitation is lower than the ongoing call, or if the invitation is not
configured to be accepted automatically, the invitation must be accepted like a regular PTT
invitation (see To accept a PTT invitation on page 35). If the invitation is accepted while the
call is still ongoing, the call is automatically disconnected.
5.6.2 Use the PTT call screen
The Push-to-talk call screen is used when communicating in a PTT group call session.
Figure 17. The Push-to-talk call screen.
TD 93066EN
5. Calling
The following options are available during a PTT session:
• Tap and hold the push-to-talk button to open the microphone for transmitting. The
microphone is muted again when the button is released.
TIP: If configured, the Multifunction button on the top of the handset can also be used as
a push-to-talk button.
• Tap the speaker icon to enable/disable the loudspeaker. Use the volume up or down
buttons to adjust the volume.
• Tap the end call icon to disconnect from the PTT session. For instructions on how to
rejoin a disconnected session, see 5.6.4 Rejoin a PTT call session on page 37.
NOTE: A PTT session can be terminated remotely by the system. All users are
automatically disconnected from a terminated session.
• Press the home button to hide the call screen temporarily, without disconnecting from
the PTT session. Information about the ongoing session is displayed in the phone bar
(see 5.4.10 The phone bar on page 33 for details about the phone bar). The push-to-talk
button on the phone bar can be used to open the microphone for transmitting, in the
same way as on the call screen.
26 April 2016 / Ver. D
36
Page 44

User Manual
Ascom Myco Wi-Fi and Cellular Smartphone
Figure 18. The Push-to-talk phone bar.
5.6.3 Reject a PTT invitation
TD 93066EN
5. Calling
Most incoming PTT session invitations can be rejected, if not set to be automatically
accepted. Invitations are rejected differently depending on the invitation type.
Invitation as an incoming call:
• Reject the call invitation the same way as a regular incoming call, see 5.1 Answer or
Reject a Call on page 27.
Invitation as an alert:
• Tap "Reject" on the PTT invitation to reject the PTT session.
Some alert type invitations can be closed without rejecting the session. After 60 seconds, all
types of invites are automatically either closed or rejected.
All PTT invitations received can be found in the alert view. Even if the PTT session invitation
was rejected it can be rejoined later, as long as the session remains active (see 5.6.4 Rejoin a
PTT call session on page 37).
CAUTION: If the invitation is deleted from the alert view, the session cannot be rejoined.
5.6.4 Rejoin a PTT call session
If a PTT session invitation was rejected or ignored, or if the session was disconnected from,
the session can be rejoined later by doing the following:
1 Tap the invitation in the alert view (indicated by a push-to-talk icon ).
2 Tap "Rejoin" or "Join" to connect to the PTT session (see Figure 19).
NOTE: A PTT session can be terminated by the system. A terminated PTT session cannot be
rejoined.
26 April 2016 / Ver. D
37
Page 45

User Manual
Ascom Myco Wi-Fi and Cellular Smartphone
Figure 19. Rejoin a PTT session.
5.6.5 Initiate a PTT group call session
TD 93066EN
5. Calling
A new PTT group call session can be initiated from the handset, if one or more PTT group
calls has been pre-configured.
Do the following to initiate a PTT session:
1 Tap the "Push-to-talk" app in the App view.
2In the Select session to initiate list, tap the session to initiate.
3 The session group members receive invitations.
NOTE: PTT group calls are configured in the Device Manager, refer to the handset
Configuration Manual for details.
26 April 2016 / Ver. D
38
Page 46

User Manual
Ascom Myco Wi-Fi and Cellular Smartphone
6. Phonebook
Contacts can be found in both a local and a central phonebook on the handset.
• The local phonebook contains contacts added by the handset user, and is unique for each
handset.
• The central phonebook is a list of contacts stored remotely on the system, and is shared
by all handsets. The handset users cannot add or remove contacts from the central
phonebook.
Both phonebooks can be accessed from the People app, or from the Phone app. This chapter
describes how to find, or add contacts through the People app. For instructions on how to
use the Phone app to search for contacts, refer to 5.2 Make a Call on page 28.
This chapter explains how to do the following:
• 6.1 Look up a Contact in the Central Phonebook on page 39
• 6.2 Look up a Contact in the Local Phonebook on page 39
• 6.3 Add a New Local Contact on page 40
TD 93066EN
6. Phonebook
6.1 Look up a Contact in the Central Phonebook
NOTE: If login is enabled on the handset, the user must be logged in to access the Central
phonebook, refer to 4.12 Log in or Log out on page 21.
1 Tap the People app in the App view.
2 Tap the phonebook icon on the top of the screen to open the central phonebook.
3 Enter a name in the "First Name", or "Last Name" field.
4 Tap the search button on the keyboard to search the central phonebook.
5 A list of contacts is shown below the search fields. Tap a contact to make a call, send
a message, or to add the contact to the local phonebook. Tap "Cancel" to return to the
search result list.
6.2 Look up a Contact in the Local Phonebook
1 Tap the People app in the App view.
2 Tap the contacts icon on the top of the screen to open the local phonebook. All
contacts stored in the local phonebook are shown as a list.
3 Tap a contact to open the contact card. Calls can be placed, or messages can be sent
from the contact card.
Search the local phonebook
The search functionality can be used to quickly find contacts in the local phonebook:
1 Tap the search icon on the bottom of the screen.
2 Start writing a name or number to search for. Contacts containing that name or
3 Tap a contact to open the contact card. Calls can be placed, or messages can be sent
26 April 2016 / Ver. D
number appear below the search field.
from the contact card.
39
Page 47

User Manual
Ascom Myco Wi-Fi and Cellular Smartphone
6.3 Add a New Local Contact
1 Tap the People app in the App view.
2 Tap the contacts icon on the top of the screen to open the local phonebook.
3 Tap the "Create a new contact" button (if the local phonebook is empty), or the add
contact icon on the bottom of the screen (if contacts already exists).
4 Enter a name, phone number, e-mail, or address to the contact.
5 Tap "Add another field" and select a field type to add additional fields such as notes
and website address to the contact. Repeat this step to add additional fields as
required.
6 Tap " Done" on the top of the screen to save the new local contact.
TD 93066EN
6. Phonebook
26 April 2016 / Ver. D
40
Page 48
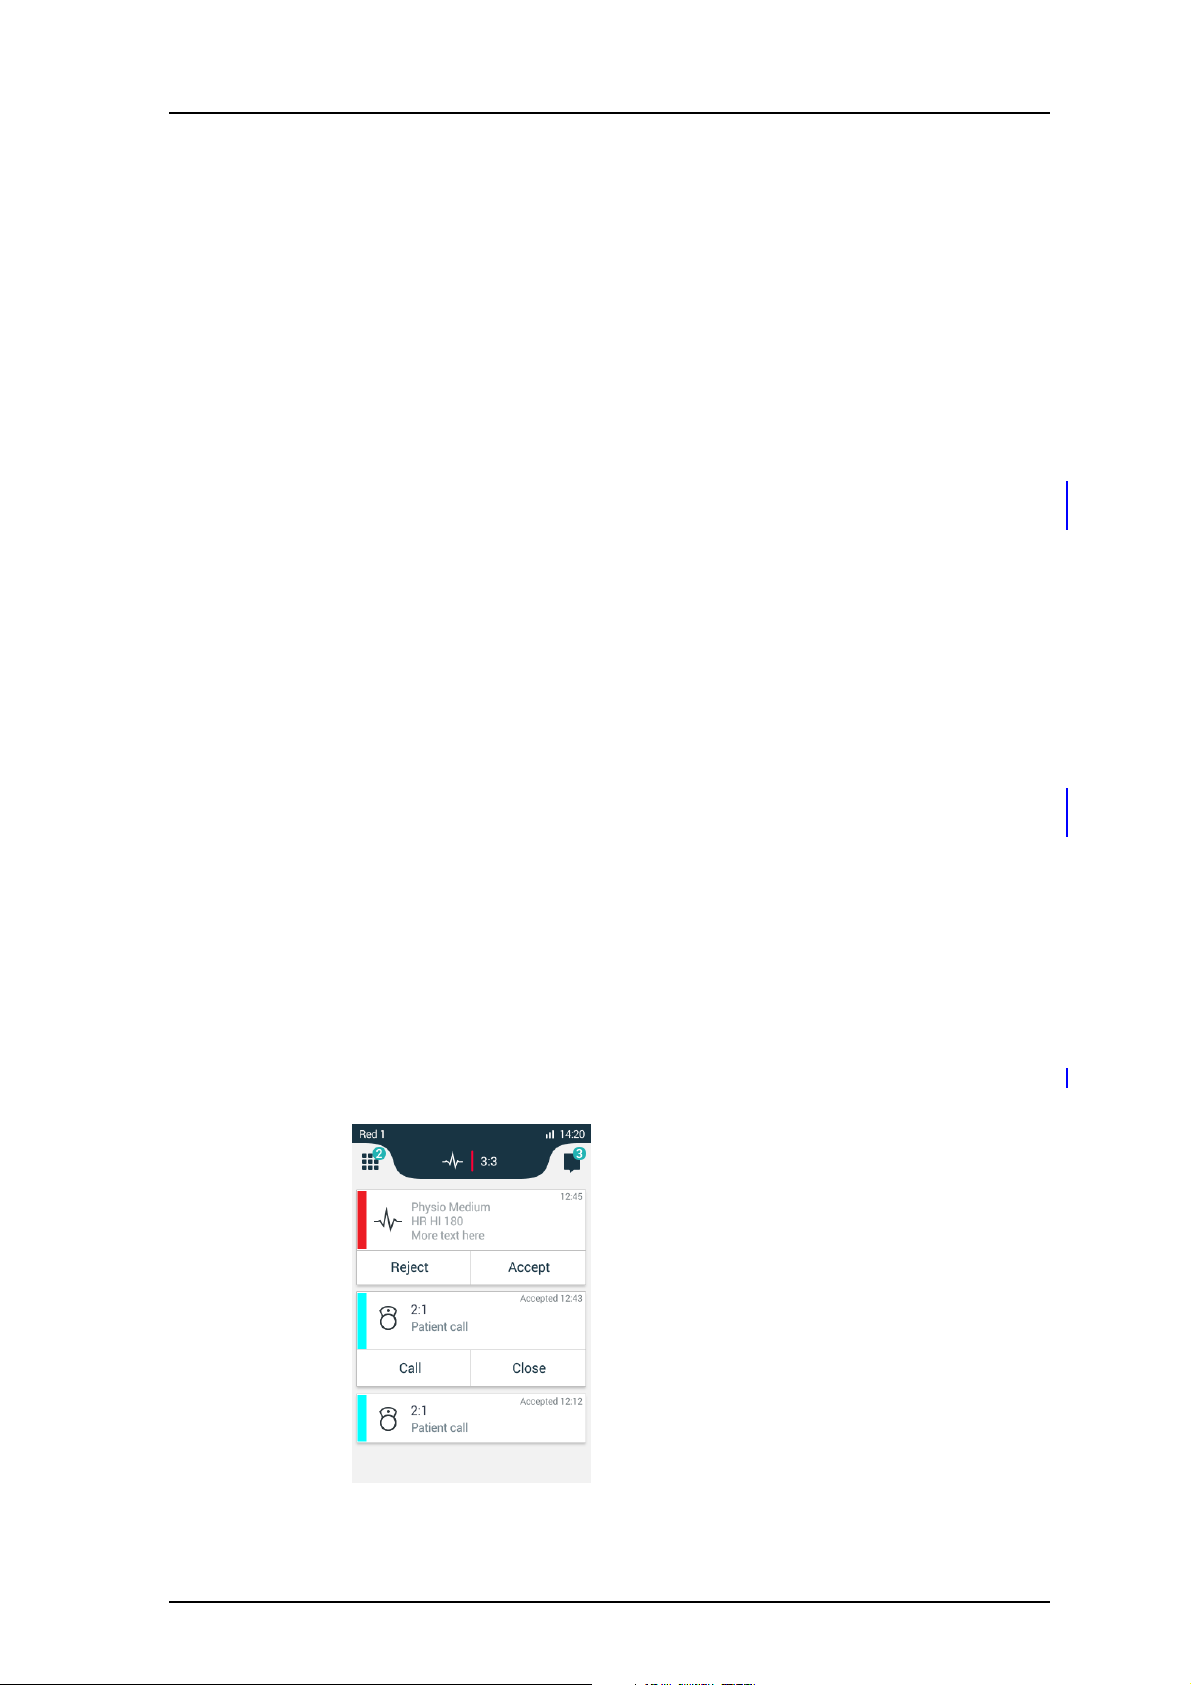
User Manual
Ascom Myco Wi-Fi and Cellular Smartphone
7. Alerts
The Alert view is the default view in the Ascom Myco user interface. From the Alert view, it's
possible to view and respond to alerts initiated from third-party equipment, such as patient
monitors and patient call systems. It's also possible to receive information from other
sources, such as system broadcast messages and lab results.
NOTE: Depending on system setup and configuration, the appearance and functionality of
the Alert view may differ from what's described in this chapter.
The following alert related topics are described in this chapter:
• 7.1 Alert View on page 41
• 7.2 Alert Indication on page 42
• 7.3 Alert Classification on page 43
• 7.4 Alert Response Options on page 45
• 7.5 View Alerts on a Locked Handset on page 46
7.1 Alert View
TD 93066EN
7. Alerts
Press the home button to return to the Alert view.
The Alert view shows incoming alerts in a list sorted in order of arrival. A new alert can be
indicated with (depending on system configuration):
• priority or category color
•alert type icon
• location information
•alert time
Scroll the alert list to show additional alerts.
In the example shown in Figure 20 below, a high priority alert has just been triggered in
room 3, bed 3 by a patient monitor signalling a high heart rate.
Figure 20. Example of alerts in the Alert view.
26 April 2016 / Ver. D
41
Page 49

User Manual
Ascom Myco Wi-Fi and Cellular Smartphone
View alert
Tap the alert to view additional information.
Respond to alert
Tap the appropriate button, such as "Reject" or "Accept". Refer to 7.4 Alert Response
Options on page 45 for a list of possible response options.
7.2 Alert Indication
New alerts are indicated in the:
• 7.2.1 Top display
• 7.2.2 Alert priority beacon
• 7.2.3 Lock screen
• 7.2.4 Top priority bar
• 7.2.5 Notification bars
7.2.1 Top display
TD 93066EN
7. Alerts
When the front display is in sleep mode, the alert type, location and priority of active alerts
is shown in the top display. If several alerts are active at the same time, the alerts are cycled
with the highest prioritized and oldest alert presented first, followed by additional lower
prioritized alerts. Alert notifications remain in the top display until they are handled.
The icons used for alert types are the same in both the top display and the main display,
refer to 7.3.3 Alert type icons on page 44.
The top display turns off:
• After one minute of inactivity.
• When unlocking the front display.
7.2.2 Alert priority beacon
When the front display is in sleep mode, the alert priority or category is shown with
different colors on the alert priority beacon. The alert priority beacon flashes for 10 seconds
and is then turned off, in order to save battery life.
7.2.3 Lock screen
When the front display is in sleep mode, and lock screen widgets are enabled on the
handset, the front display automatically lights up to show newly received alerts directly on
the lock screen.
Refer to 10.4 Lock Screen Notification on page 54 for details about lock screen notification.
7.2.4 Top priority bar
The alert with the highest priority is shown in the top priority bar. If there are several active
alerts with the same priority, the oldest is shown.
By tapping the top priority bar a detailed view of the alert with acknowledge options is
shown. By handling the alert, the next alert in line (oldest or highest priority) is shown in the
top priority bar.
26 April 2016 / Ver. D
42
Page 50
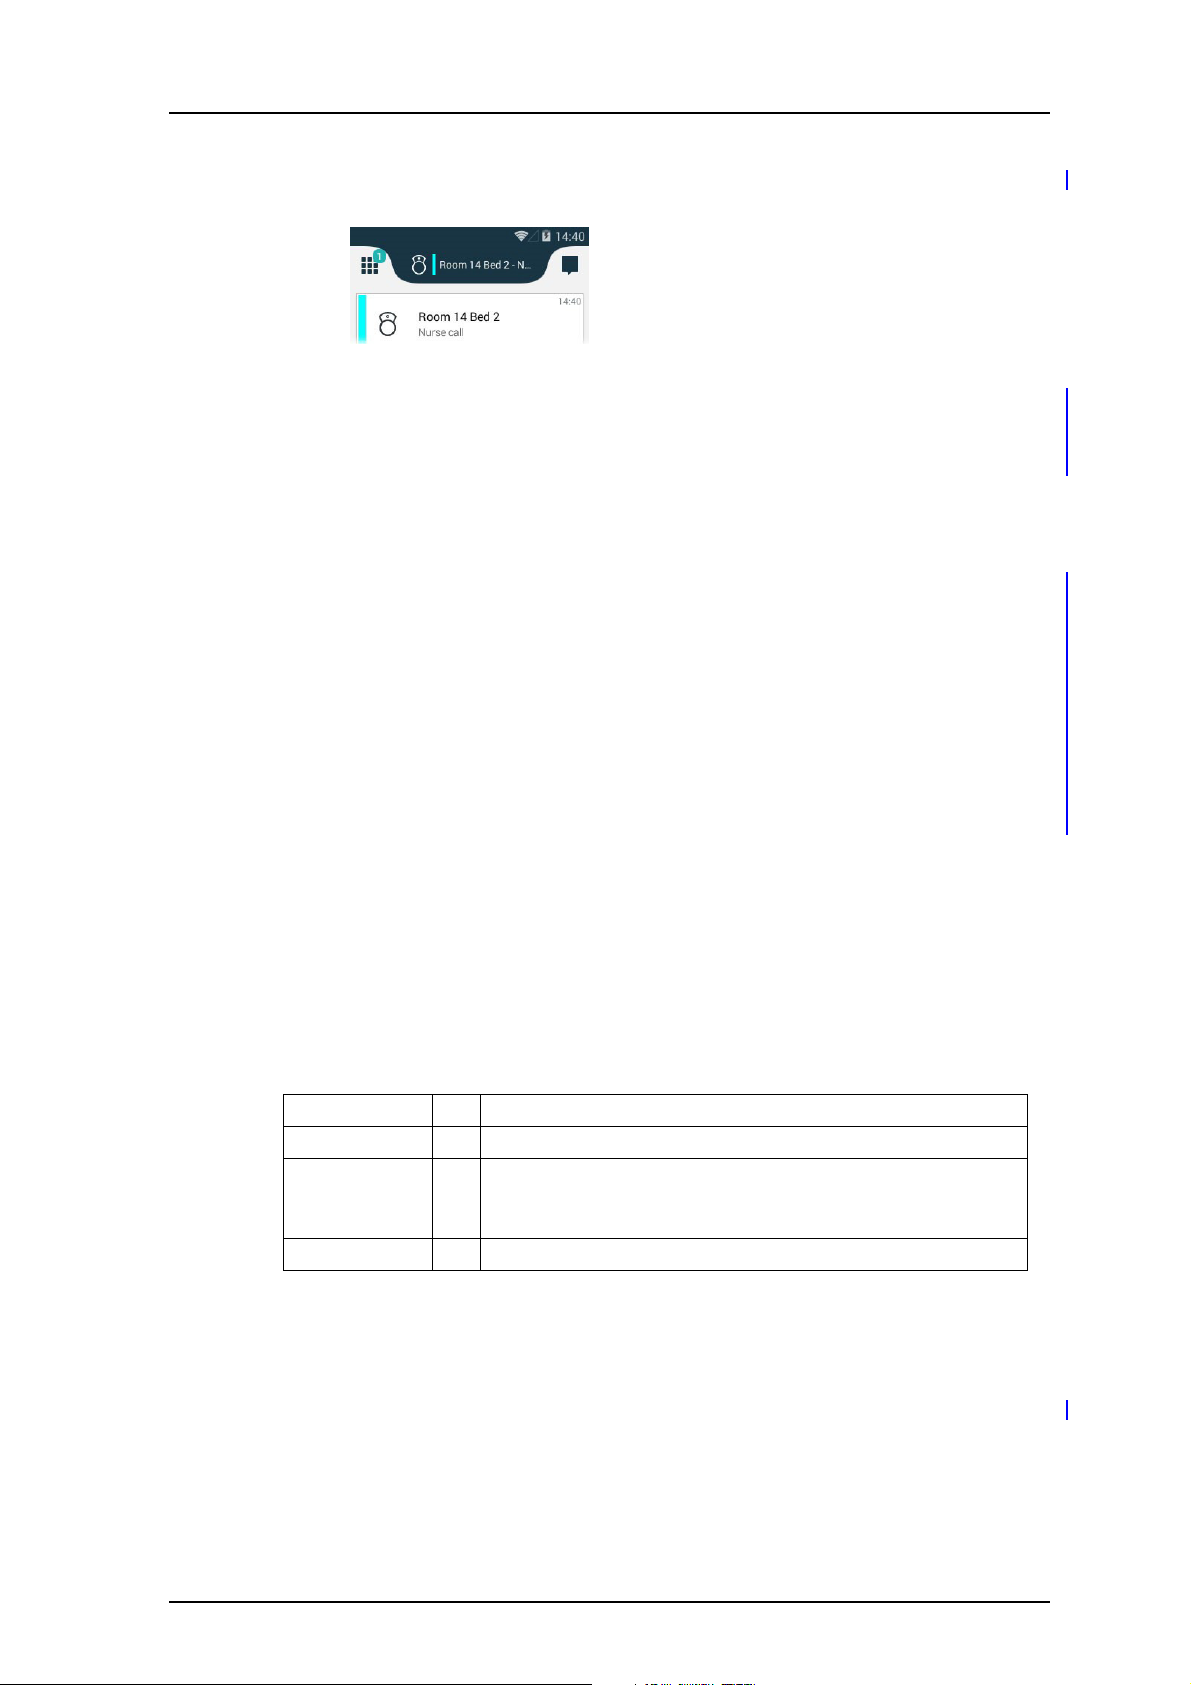
User Manual
Ascom Myco Wi-Fi and Cellular Smartphone
Figure 21. An active alert shown in the top priority bar.
7.2.5 Notification bars
When an alert is received, it may appear on screen as a notification bar, refer to 10.6
Notification Bars on page 55.
7.3 Alert Classification
The following can be used to classify alerts:
• 7.3.1 Priority level and color
- Only used for alerts from patient monitoring systems. Each priority level is indicated by
a specific color.
TD 93066EN
7. Alerts
• 7.3.2 Category color
- Categories can be used to label alerts with a color, for example to differentiate
between alerts coming from different rooms or patient groups.
• 7.3.3 Alert type icons
- Indicates the alert type, for example a patient call, or a lab result notification.
7.3.1 Priority level and color
Alerts from patient monitoring systems are prioritized depending on their priority level, in
the order shown below (from high (1) to low (4) priority):
IMPORTANT: A "Code Blue" (crisis), or high priority alert is always prioritized as high priority
(1), and always overrides any system warning, or phone call.
High priority 1 "Code Blue" (crisis) alert/high priority alert/system warning
2Phone call
3 (Medium/Low) Alert
IMPORTANT: A "Code Blue" (crisis) alert, or high priority alert is
always prioritized as (1).
Low priority 4 Conversation message
The alert priority is shown by use of colors, as follows:
• The color-coded LED priority beacon always show the priority color of incoming alerts.
• A bar with the priority color to the left of each alert in the Alert view.
IMPORTANT: The alert priority colors follow the MDD standards and cannot be altered.
26 April 2016 / Ver. D
43
Page 51

User Manual
Ascom Myco Wi-Fi and Cellular Smartphone
Priority color Priority Used for event Indications (if enabled)
Red Crisis/
High
Yellow Medium Medium priority alert Top display notification, yellow
Cyan Low Low priority alert Top display notification, fixed cyan LED
7.3.2 Category color
IMPORTANT: There is no priority handling for category colors, they are used for information
only. Alerts from patient monitoring systems will always use their priority
color, and cannot be labeled with a category color.
"Code Blue" crisis alert/
High priority alert
TD 93066EN
7. Alerts
Top display notification, red flashing
LED priority beacon, sound, and
vibrator.
IMPORTANT: These indications are
always enabled, and cannot be turned
off
flashing LED priority beacon, sound,
and vibrator.
priority beacon, sound, and vibrator.
Categories can be used to label alerts with a color, for example to differentiate between
alerts coming from different rooms or patient groups.
Figure 22. Alerts labeled with category colors.
The following category colors are available:
•Red
• Green
•Blue
•Yellow
•Orange
• Cyan
• Purple
NOTE: The category colors are dependant on configuration, and can differ between system
setups. Contact your site administrator for details about the use of category colors at
your site.
7.3.3 Alert type icons
The alert type icons indicate the alert type, for example a patient call, or a lab result
notification.
26 April 2016 / Ver. D
44
Page 52
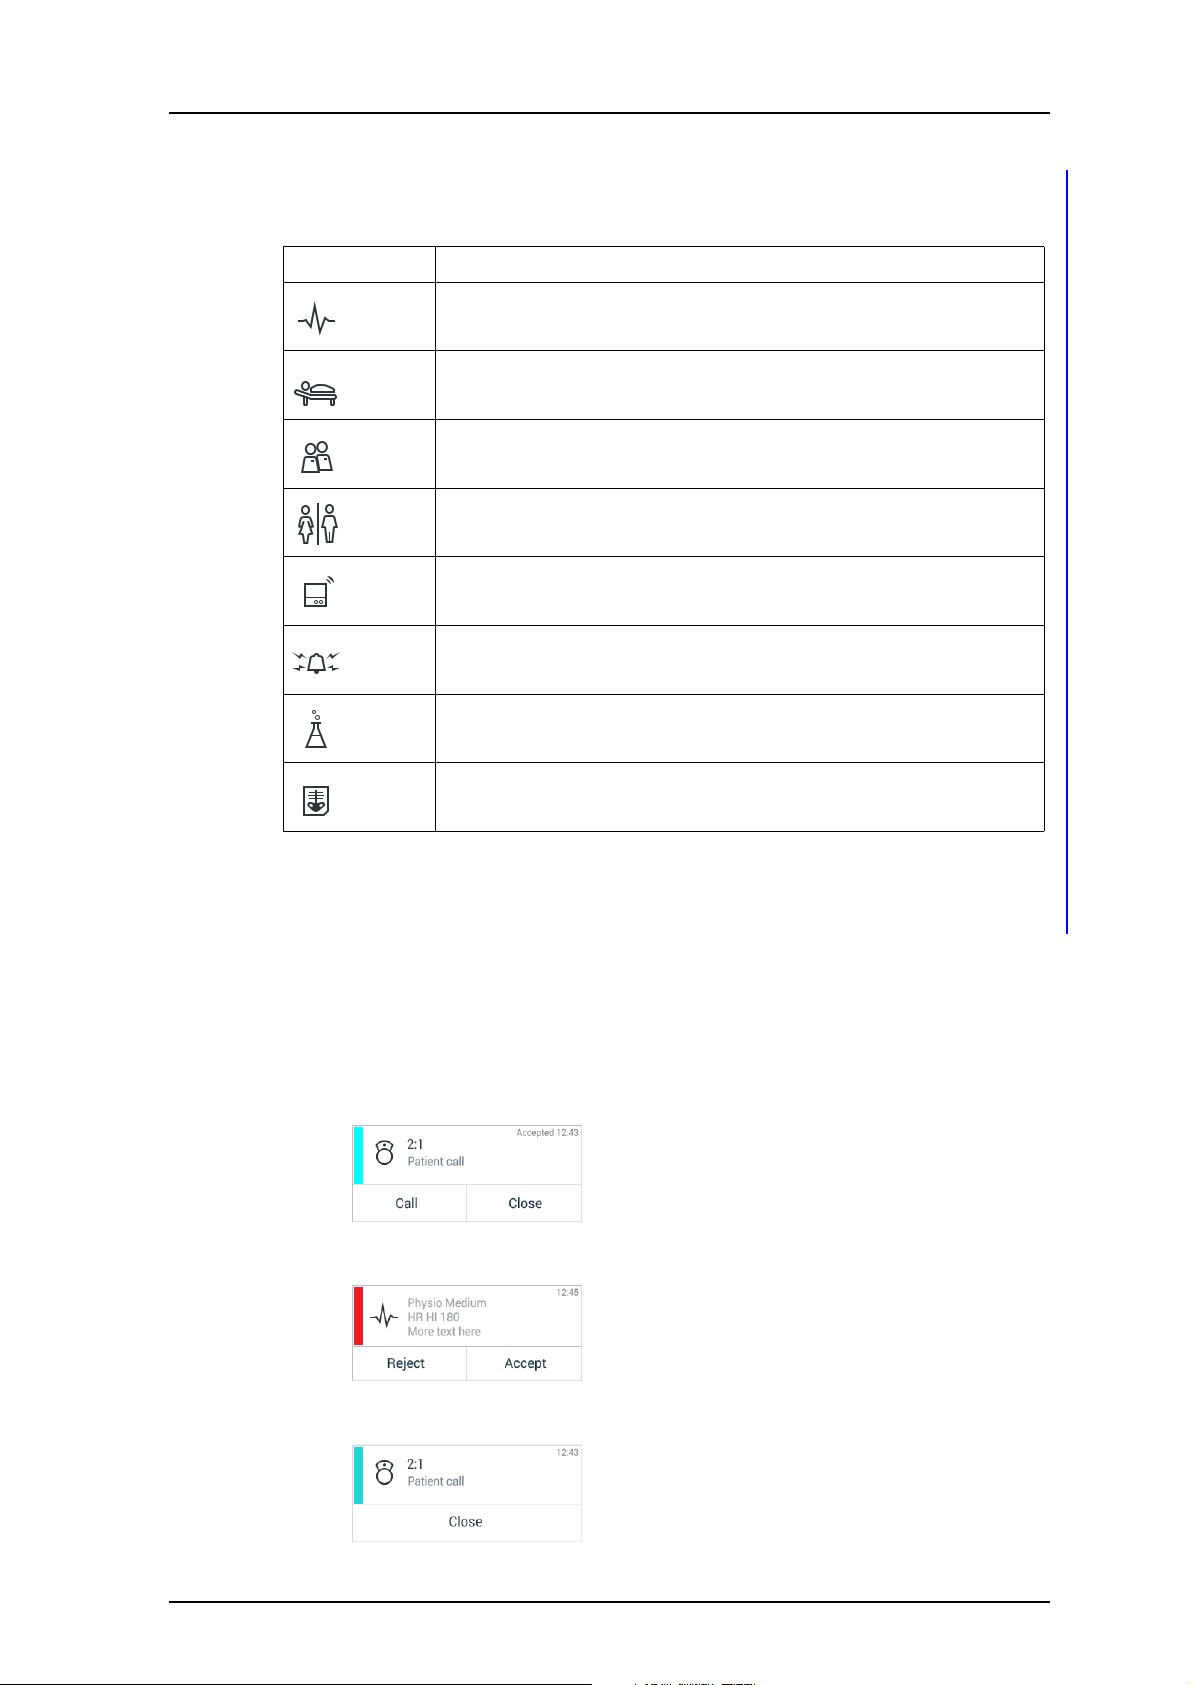
User Manual
Ascom Myco Wi-Fi and Cellular Smartphone
The following are examples of alert type icons that can be used at a site:
Icon Alert type
Monitoring
Patient call
Assistance call
Lavatory call
Medical call
Emergency call
TD 93066EN
7. Alerts
Lab result
X-ray result
NOTE: The alert type icons are dependant on configuration, and can differ between system
setups. Contact your site administrator for details about the use of alert type icons at
your site.
7.4 Alert Response Options
Alerts often requires a user to respond, for example, by accepting or rejecting the alert. The
following alert response options are available:
26 April 2016 / Ver. D
45
Page 53

User Manual
Ascom Myco Wi-Fi and Cellular Smartphone
NOTE: Both the available alert types and individual response options for each alert type is
dependant on the system configuration.
7.5 View Alerts on a Locked Handset
Active alerts are shown on the lock screen if lock screen widgets are enabled. Refer to 10.4
Lock Screen Notification on page 54 for details on how to use lock screen notifications.
TD 93066EN
7. Alerts
26 April 2016 / Ver. D
46
Page 54

User Manual
Ascom Myco Wi-Fi and Cellular Smartphone
8. Messaging
The Conversation view provides functionality to send messages to other handsets in the
system.
The Conversation view is accessed by swiping left from the alert menu, or by tapping in
the upper right corner.
In the Alert view and App view, incoming messages are shown as notification bars for 5
seconds. In sleep mode, incoming messages are shown in the top display, together with a
top LED indication. New messages are also shown on the lock screen if lock screen widgets
are enabled, refer to 10. Notifications on page 53.
Tap the notification bar to open the message. Received messages can always be accessed by
tapping them in the Conversation view. Individual messages to a recipient or group of
recipients are sorted in conversations.
TD 93066EN
8. Messaging
This chapter explains how to do the following:
• 8.1 Write and Send Message on page 47
• 8.2 Reply to Message on page 48
• 8.3 Search for Message on page 48
• 8.4 Copy, Delete and Forward Messages on page 48
• 8.5 Delete Conversations on page 48
• 8.6 Call a Contact from Message on page 48
8.1 Write and Send Message
1 In the Conversation view, tap .
2 Enter a name or phone number in the "To:" field, or tap and select a contact, then
tap "OK" to add the contact as recipient for the message.
For more information about the phonebook, refer to 6. Phonebook on page 39.
3 Tap the "Message" field and type a message with the keyboard. Tap to send the
message.
TIP: A message can contain up to 5000 characters.
• Tap to return to the main conversation view without sending the message.
26 April 2016 / Ver. D
47
Page 55
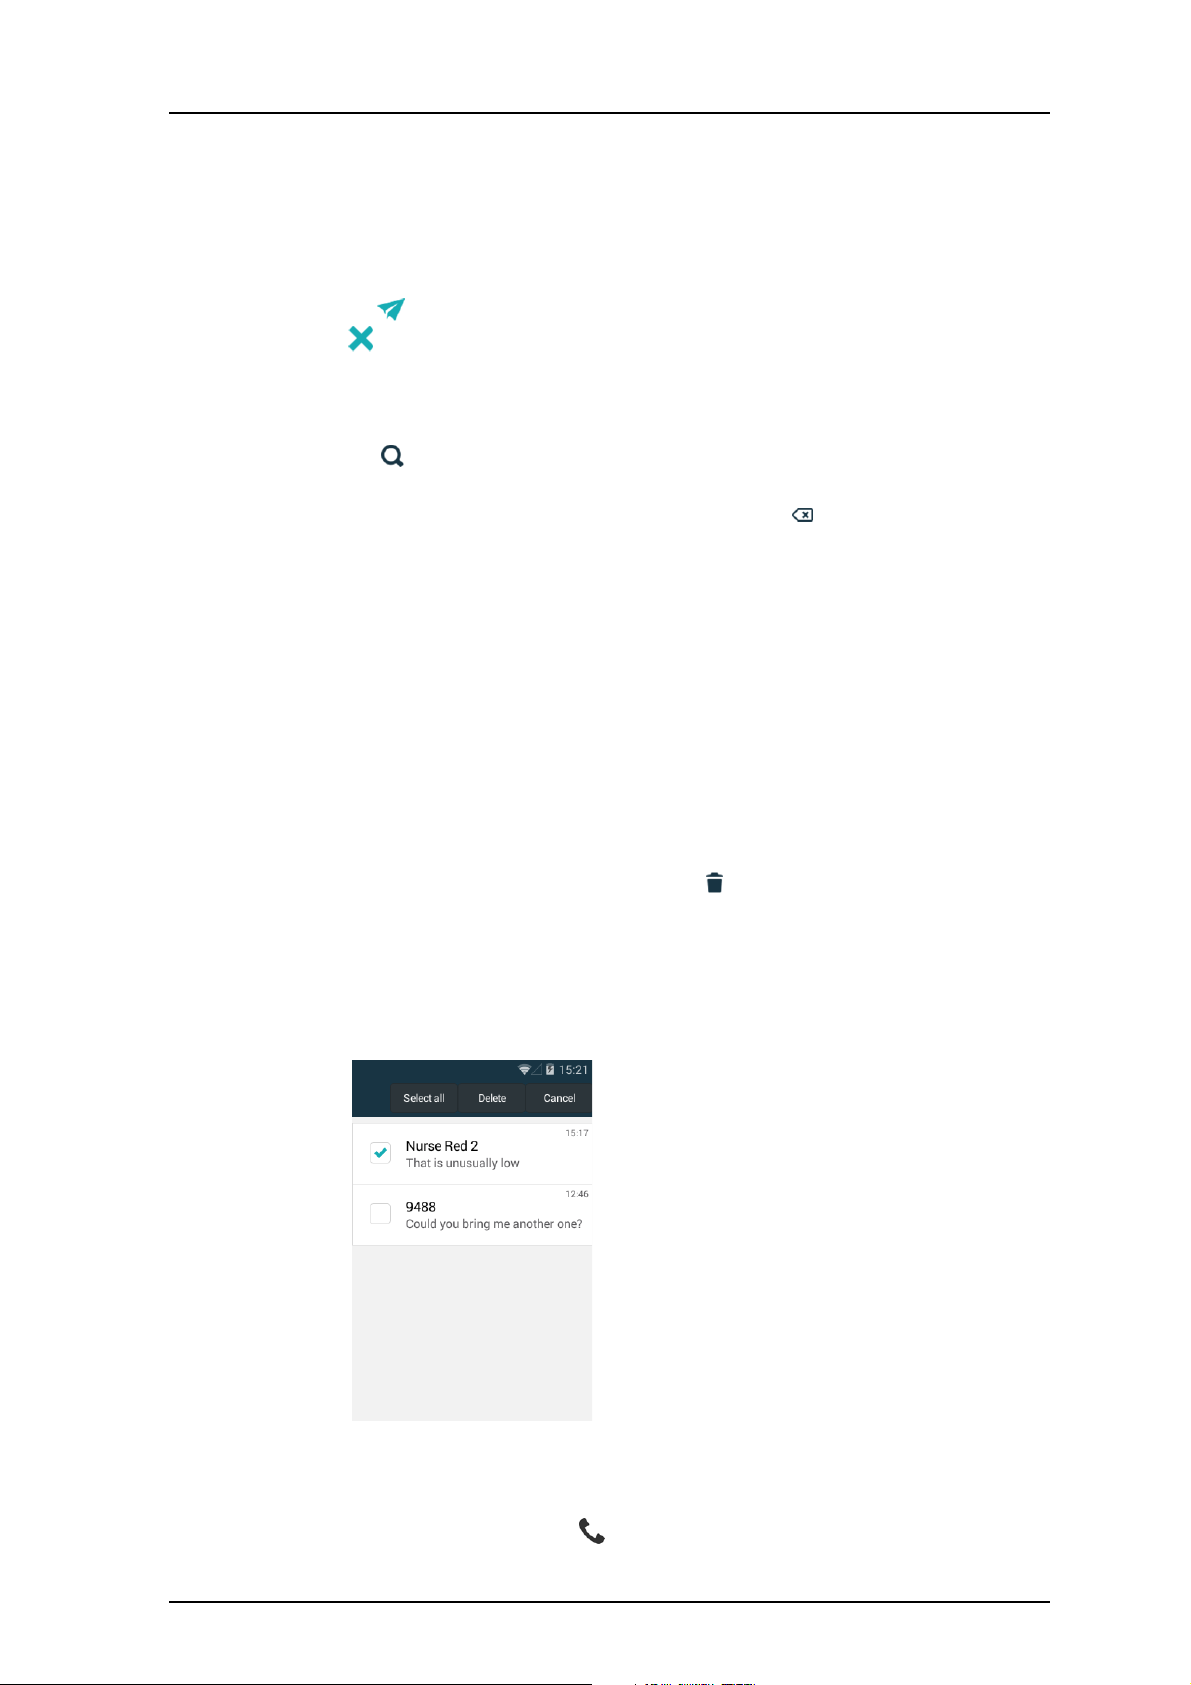
User Manual
Ascom Myco Wi-Fi and Cellular Smartphone
8.2 Reply to Message
1 Tap the incoming message notification bar, or tap the message in the main
conversation view.
2 Tap the "Message" field and type a message.
3 Tap to send the message.
• Tap to return to the main conversation view without sending the message.
8.3 Search for Message
1 Tap .
2 Enter a search criteria, such as phone number in the "Search" field. The messages are
dynamically filtered to match the search criteria. Tap to clear the "Search" input
field, or tap "Cancel" to return to the main Conversation view.
8.4 Copy, Delete and Forward Messages
1 Tap and hold a message to show the message option menu.
2 Tap the corresponding action.
TD 93066EN
8. Messaging
8.5 Delete Conversations
CAUTION: When deleting a conversation, all messages included in that conversation are
deleted.
1 To delete one or several conversations tap in the main conversation menu.
2 Select one or several conversations to delete. Tap "Select all" to select all
conversations.
3 Tap "Delete" to delete the selected conversations, then tap "Delete" again.
Tap "Cancel" to return to the conversations view without deleting the conversations.
8.6 Call a Contact from Message
1 Open the message, and tap .
26 April 2016 / Ver. D
48
Page 56

User Manual
Ascom Myco Wi-Fi and Cellular Smartphone
2 In the menu that appears, tap "Call [contact name/number]" to call the contact.
TD 93066EN
8. Messaging
26 April 2016 / Ver. D
49
Page 57

User Manual
Ascom Myco Wi-Fi and Cellular Smartphone
9. Personal Alarm
This chapter describes the following alarm related topics:
• 9.1 Top Button Alarm on page 50
• 9.2 Man-down and No-movement Alarm on page 50
• 9.3 Automatic Call after Alarm on page 52
9.1 Top Button Alarm
Multi-press or long press the top handset button to send out a personal alarm (for
instructions on how to use the multi-press and long press input modes, refer to 3.1.5 Alarm
or Multifunction button on page 8). Two different alarms can be set, one for each input
mode. An alarm can be either a personal alarm with a functionality, or a test alarm to test
the personal alarm. The type of alarms used are set by the system administrator. Refer to
the handset Configuration Manual for information on how to configure personal alarms.
When an alarm is sent an information text is displayed in the top display (by default
"Personal alarm" or "Test alarm"), and a notification bar with the same text is shown in the
main display. The alarm is sent to the alarm central that distributes it further. If the personal
alarm, or test alarm, is successfully sent the top display text and notification bar confirm
that with a or marker.
TD 93066EN
9. Personal Alarm
The handset can be programmed to automatically call a predefined number after the alarm
has been sent, see 9.3 Automatic Call after Alarm on page 52.
NOTE: It is always possible to send out a personal alarm, even when speaking, using apps, or
while the handset is locked.
9.2 Man-down and No-movement Alarm
The Man-down and No-movement alarms provide personal safety monitoring with accident
alerts. These alarms are suitable for workplaces where maximum security and accessibility is
required. If an accident occur, colleagues and management are informed within seconds and
the person in need can be located quickly.
• The Man-down alarm reacts if the handset is tilted (default 45°) from the vertical for a
predefined period of time (default 7 seconds).
• The No-movement alarm will react if no movement is detected during a predefined
period of time (default 30 seconds).
TIP: The handset can be programmed to automatically call a predefined number after the
alarm has been sent, see 9.3 Automatic Call after Alarm on page 52.
For information on how to:
• Activate or deactivate the Man-down or No-movement alarms, see 9.2.1 Activate or
deactivate the Man-down or No-movement alarms on page 51.
• Read the alarm indications, see 9.2.2 Man-down and No-movement indication on page
51.
•Cancel a Man-down or No-movement alarm, see 9.2.3 Cancel a Man-down or No-
movement alarm on page 52.
26 April 2016 / Ver. D
50
Page 58
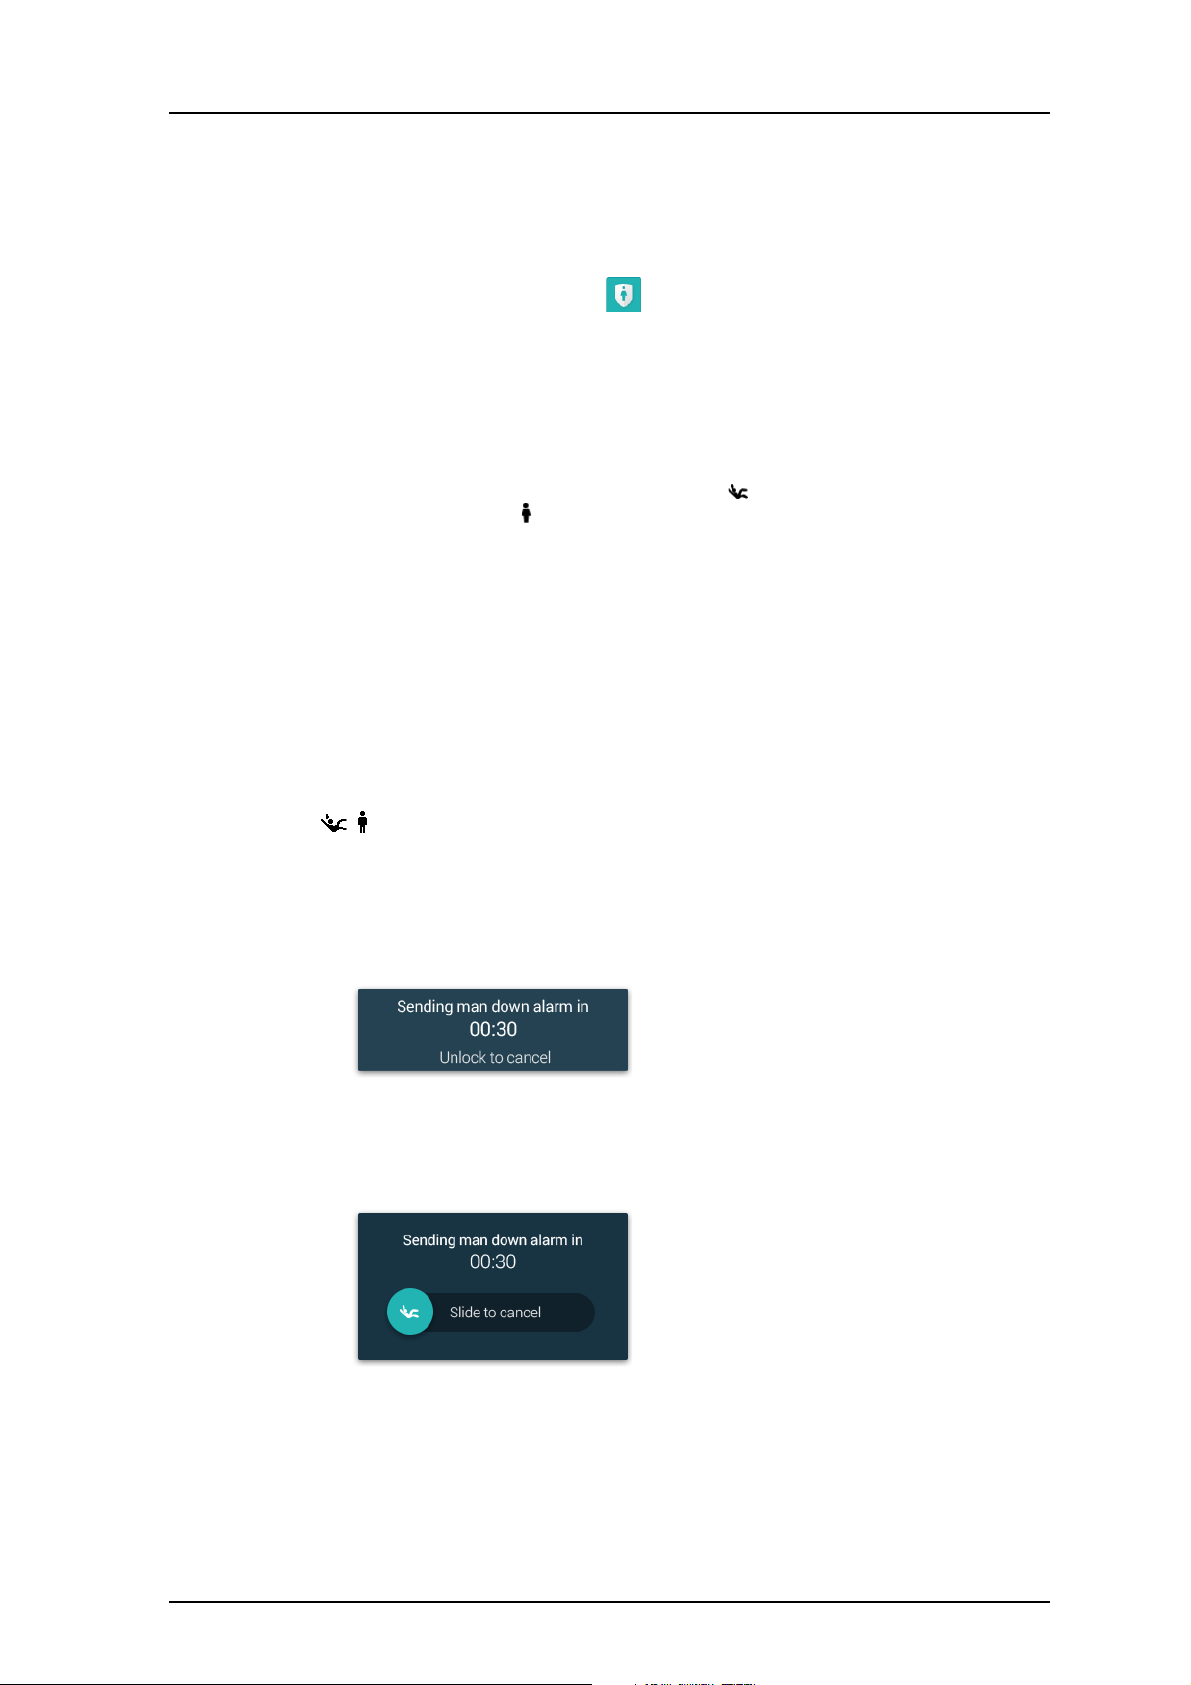
User Manual
Ascom Myco Wi-Fi and Cellular Smartphone
9.2.1 Activate or deactivate the Man-down or No-movement alarms
NOTE: The Personal security app can be hidden on the handset by the system administrator.
If the app is hidden, the alarms cannot be activated or deactivated from the handset.
1 Tap the "Personal security" app in the App view.
2 Tap:
• "Man down tracking" to activate/deactivate the Man-down alarm.
• "No movement tracking" to activate/deactivate the No-movement alarm.
TIP: If not hidden, the Personal security app can also be reached through the notification
drawer when Man-down or No-movement tracking is activated.
An active Man-down alarm tracking is indicated with in the status bar, and Nomovement is indicated with .
The Man-down and No-movement alarms are automatically deactivated while the handset
is placed in a Charging Rack.
9.2.2 Man-down and No-movement indication
TD 93066EN
9. Personal Alarm
When a Man-down or No-movement situation has been detected, the handset enters a
warning phase (usually seven seconds long). During the warning phase, the handset alerts
with:
• beep and vibrator signals
• an orange LED flash
• " / Warning..." on the top display
• a warning message popup on the main display (see Figure 24 and Figure 24)
Figure 23. Man-down warning message popup on a locked handset with PIN or
password protection.
Figure 24. Man-down warning message popup on an unlocked handset, or on a handset
with swipe lock protection.
To cancel the alarm before it's sent out, refer to 9.2.3 Cancel a Man-down or No-movement
alarm on page 52.
A successfully sent alarm is indicated with:
• beep and vibrator signals
• an orange LED flash
26 April 2016 / Ver. D
51
Page 59

User Manual
Ascom Myco Wi-Fi and Cellular Smartphone
• " / Sent" on the top display, and on the message popup on the main display.
9.2.3 Cancel a Man-down or No-movement alarm
A Man-down or No-movement detection can be cancelled before the alarm is sent out. When
the handset indicates Man-down or No-movement, do one of the following to cancel the
alarm:
• On the warning message popup (see Figure 24 on page 51), slide the to the right
before the counter reaches 00:00.
• Press the volume button (up or down).
NOTE: If the handset is locked with a PIN or password it needs to be unlocked before the
alarm can be cancelled.
9.3 Automatic Call after Alarm
A handset can be set up to call a predefined number after an alarm has been sent.
Depending on the settings, the call can be established in the following modes:
TD 93066EN
9. Personal Alarm
• Normal mode - The call is established as an ordinary call.
• Loudspeaker mode - Loudspeaker mode is used by default during the call.
• Monitor mode - A one-way "hidden" call where the called party can listen in but cannot
communicate with the calling handset.
Refer to the handset Configuration Manual for instructions on how to configure the
automatic call after alarm.
26 April 2016 / Ver. D
52
Page 60

User Manual
Ascom Myco Wi-Fi and Cellular Smartphone
10. Notifications
New messages, phone calls, alerts and status information are all indicated by notifications
from the handset.
The following can be used for notifications:
• 10.1 Sound and vibration on page 53
• 10.2 Color-coded LED Signals on page 53
• 10.3 Top Display Notification on page 54
• 10.4 Lock Screen Notification on page 54
• 10.5 Status Bar on page 55
• 10.6 Notification Bars on page 55
• 10.7 Notification Drawer on page 57
• 10.8 Icons used for notification on page 58
10.1 Sound and vibration
Incoming alerts and messages, as well as different status notifications, can be indicated by
sound and vibration.
TD 93066EN
10. Notifications
10.2 Color-coded LED Signals
The LED priority beacon in front of the top display is used to indicate the priority level, or the
category, of incoming alerts. It's also used to indicate incoming text messages and phone
calls, and to show the battery and charging status.
Figure 25. LED and top display notifications.
The following colors can be shown in the LED priority beacon:
NOTE: The colors used may differ depending on system configuration.
Color Light pattern Type Level
Red Flashing, then steady Priority Crisis/high
Yellow Flashing, then steady Priority Medium
Cyan Flashing, then steady Priority Low
26 April 2016 / Ver. D
53
Page 61

User Manual
Ascom Myco Wi-Fi and Cellular Smartphone
Blue Flashing, then steady Category
Purple Flashing, then steady Category
White Flashing Information
Orange Single flash Battery Battery level low (15%)
Green Steady Battery Charge complete (100%)
10.3 Top Display Notification
The top display shows active alerts, warnings, incoming calls, and incoming text messages,
without the need to look at the main display (see Figure 25 on page 53). For further details
on how alerts are indicated in the top display, refer to 7.2.1 Top display on page 42.
10. Notifications
(phone call or message)
Network status Network connection lost
Man-down/Nomovement alarm
TD 93066EN
Battery level critical (5%)
Alarm sent
A top display notification usually consists of both an icon to indicate the notification type,
and a short text describing the content and sender. The text can be presented in one or two
rows.
NOTE: The top display text can be flipped upside down if the handset is carried in a way that
makes it difficult to read, refer to 15.1.5 Rotate top display on page 65.
10.4 Lock Screen Notification
If lock screen widgets are enabled on the handset newly received alerts, warnings,
conversation messages, and missed calls are shown directly on the lock screen.
Figure 26. Lock screen notifications.
To open a message or respond to an alert directly from the lock screen, do the following:
1 Tap a message or alert in the lock screen widget.
2 Unlock the handset by swiping the icon in any direction.
26 April 2016 / Ver. D
54
Page 62

User Manual
Ascom Myco Wi-Fi and Cellular Smartphone
TIP: The lock screen widget can be expanded by swiping down from the center of the widget.
If a message or alert is tapped in an expanded lock screen widget it opens up without the
need to unlock the handset.
Refer to the handset Configuration Manual for instructions on how to enable lock screen
widgets.
10.5 Status Bar
The status bar is in the upper top part of the display, and shows pending notifications from
apps (in the upper left corner), and handset system status, such as time, battery level, or
Wi-Fi/Cellular signal strength (in the upper right corner).
Figure 27. Status bar.
TD 93066EN
10. Notifications
10.6 Notification Bars
Notification bars appear as overlays on the top of the screen to indicate new alerts,
conversation messages, alarms, or warnings. Up to four different notification bars can be
stacked on top of each other (one of each notification type). Tap or swipe up on the bar
to close it.
NOTE: Closing an alert notification bar does not dismiss the alert.
Figure 28. Example of a notification bar.
There are four types of notification bars:
Alerts
The alert notification bar show color coded alerts when they reach the handset. Tapping on
the bar will open up the alert in the same way as in the alert view. See chapter 7. Alerts on
page 41 for details on how to handle alerts.
26 April 2016 / Ver. D
55
Page 63

User Manual
Ascom Myco Wi-Fi and Cellular Smartphone
If additional unhandled alerts are waiting in the handset, the text "And X more..." will be
shown underneath the notification bar.
NOTE: Alert notification bars will not appear while in the Alert view.
Figure 29. Alert notification bar.
Conversations
The conversation notification bar appears when a new conversation message is received.
Tap the notification bar to open up the conversation view. See chapter 8. Messaging on
page 47 for details on how to view and reply to conversation messages. The bar disappears
after five seconds if not tapped.
TD 93066EN
10. Notifications
NOTE: Conversation notification bars will not appear while in the Conversation view, or when
receiving a message from a currently open conversation.
Figure 30. Conversation notification bar.
Alarms
When a personal alarm is sent from the handset, notification bars describe the status of the
alarm. The bars stay on screen until the alarm has been sent successfully. A successfully sent
alarm is indicated with a marker on the notification bar.
Figure 31. Alarm notification bar.
Warnings
Warnings from the system are shown as colored notification bars. The bars can be expanded
to show further instructions by tapping on them. A warning remains in the handset until the
problem is solved, and sends out a beep once every minute for 30 minutes as a reminder.
TIP: The beep can be silenced by pressing the volume down button.
26 April 2016 / Ver. D
56
Page 64
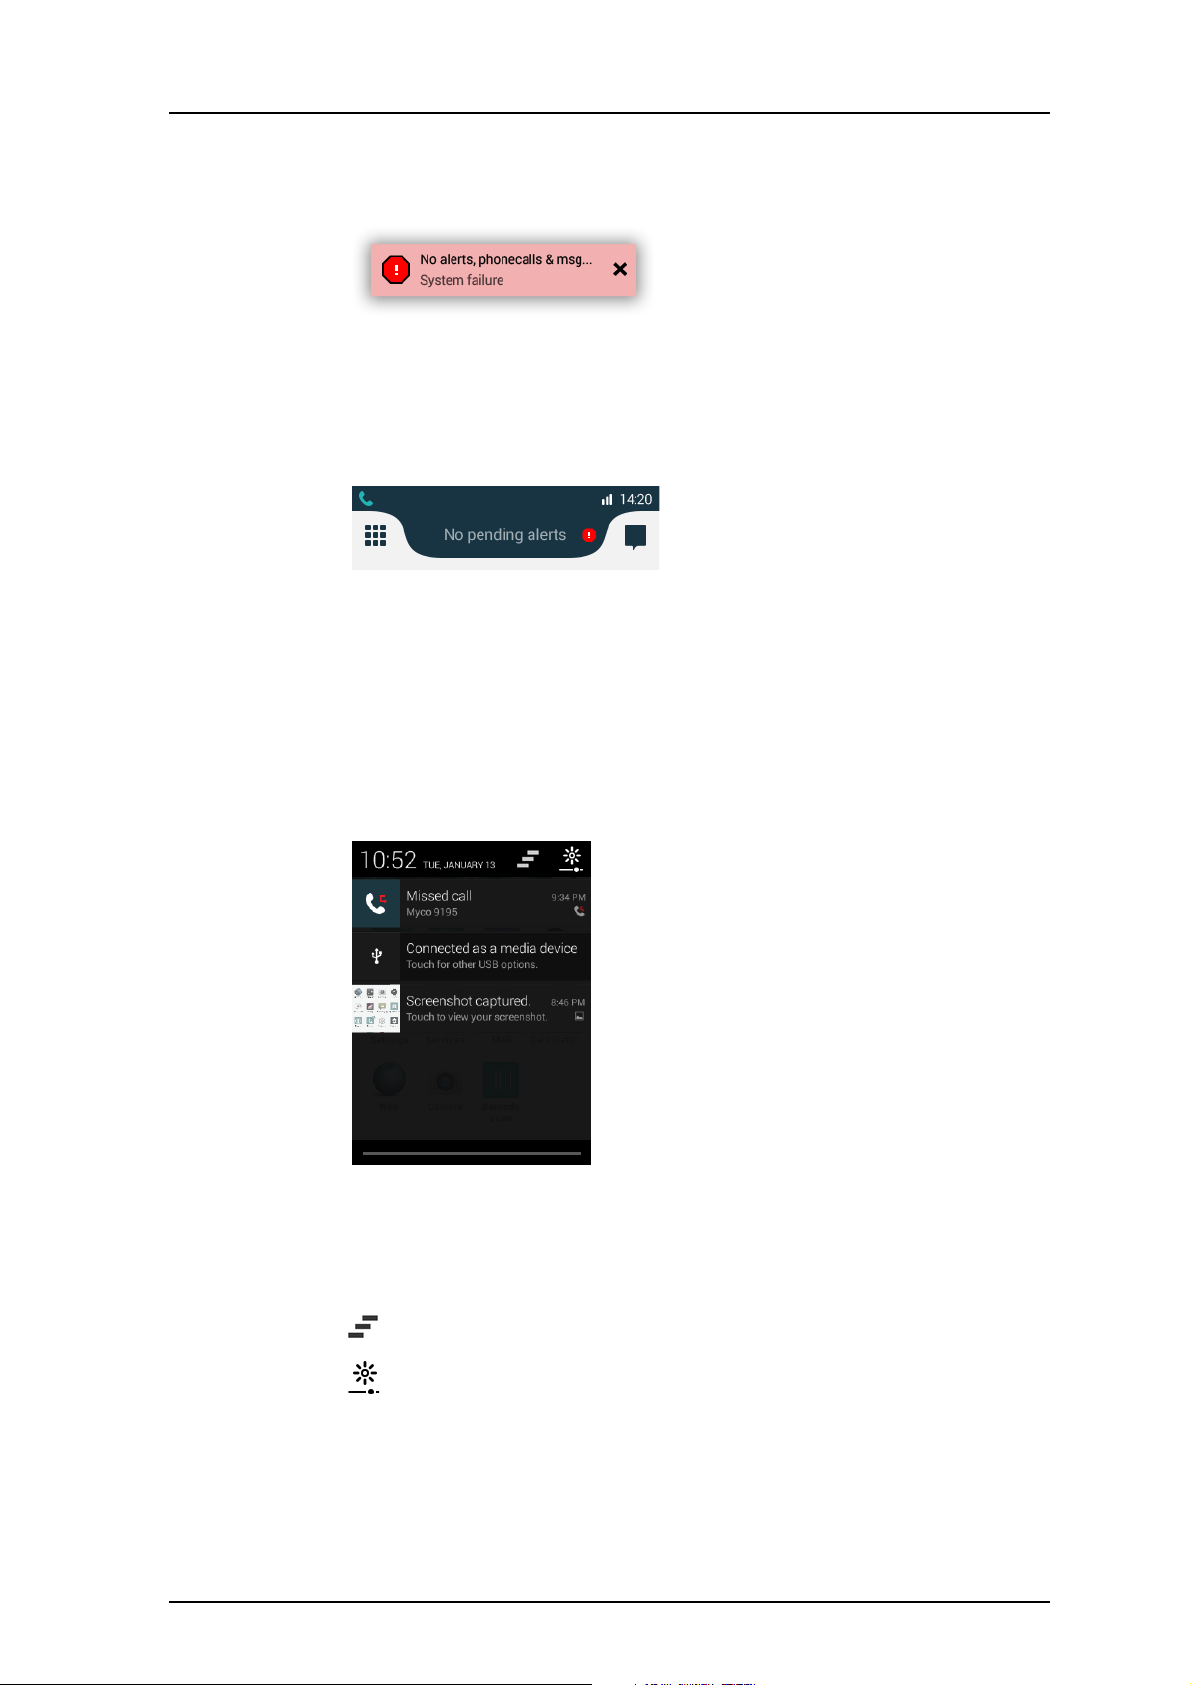
User Manual
Ascom Myco Wi-Fi and Cellular Smartphone
Figure 32. Warning notification bar.
If the bar is closed the warning will stay in the top priority bar until solved. Tap the warning
icon in the top priority bar to reopen the notification bar.
Figure 33. Warning indication in the top priority bar.
10.7 Notification Drawer
TD 93066EN
10. Notifications
Swipe down from the status bar to open the notification drawer. The notification drawer
show information about missed calls and cellular text messages (cellular handset version
only), or other handset status notifications.
Figure 34. Notification drawer.
While in the notification drawer:
• Tap the notification to take action on it.
• Flick the notification to the left or right to dismiss a notification from the notification
drawer.
• Tap to clear all notifications from the notification drawer (some status notifications
cannot be cleared).
• Tap to change the display brightness.
• Tap the Log out button to logout.
• Swipe the notification drawer up to close it.
26 April 2016 / Ver. D
57
Page 65

User Manual
Ascom Myco Wi-Fi and Cellular Smartphone
10.8 Icons used for notification
The following are examples of icons that can be used for notification. For alert type icons,
refer to 7.3.3 Alert type icons on page 44.
NOTE: This is not a complete list of icons. Icons used for notification can differ depending on
the system configuration.
Notification icon Indicates
System warnings
No network (no alerts)
Logged out
Calls
a
Alerts
TD 93066EN
10. Notifications
a
System dependent.
Conversations
Push-to-talk group call
Man-down alarm
No-movement alarm
a
26 April 2016 / Ver. D
58
Page 66
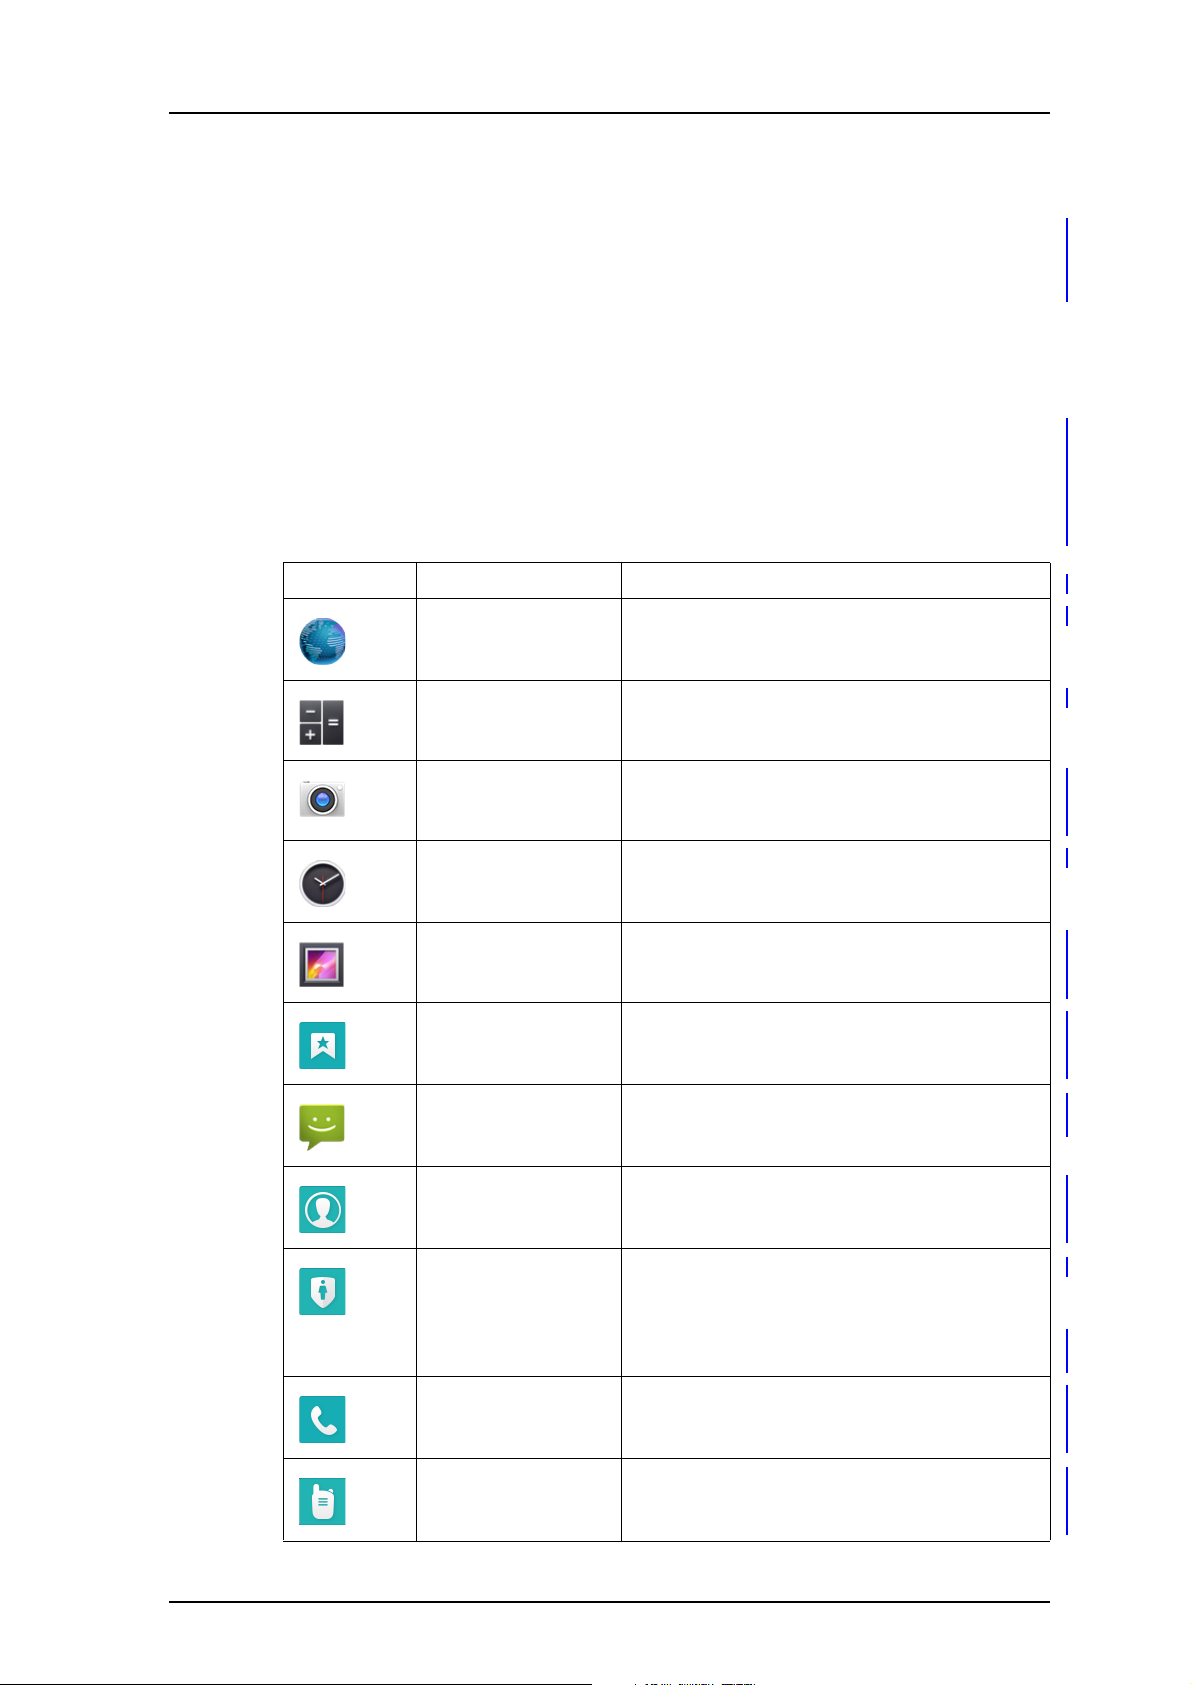
User Manual
Ascom Myco Wi-Fi and Cellular Smartphone
11. Apps
Apps installed on the handset can be found in the App view (4.7.2 App view on page 15).
Available apps on the handset are set remotely by a system administrator, and cannot be
changed by the user. Refer to the handset Configuration Manual for instructions on how to
add and remove handset apps.
For further instructions on how to work with apps, refer to 4.8 Use apps on page 16.
11.1 List of apps
The following are examples of apps that can be added to the handset by a system
administrator. The actual apps on the handset will differ depending on configuration.
Icon App name Functionality
Browser Access the Internet.
TD 93066EN
11. Apps
Calculator Use the calculator.
Camera Take a photo, or record a movie.
12. Camera and Gallery on page 61
Clock View the time, or set the alarm or timer.
Gallery View photos and images stored on the handset.
12. Camera and Gallery on page 61
My Services Access the My Services shortcuts.
14. My Services on page 63
Messaging Read or send SMS messages (applicable for the
cellular handset version only).
People Search the local and central phonebooks.
6. Phonebook on page 39
Personal security Enable or disable the Man-down and No-
movement alarm.
26 April 2016 / Ver. D
9.2 Man-down and No-movement Alarm on page
50
Phone Make a phone call.
5. Calling on page 27
PTT Start a Push-to-talk group call.
5.6 Push-to-talk Group Call on page 35
59
Page 67
User Manual
Ascom Myco Wi-Fi and Cellular Smartphone
Settings Change the handset configuration.
TD 93066EN
11. Apps
15. Settings on page 64
26 April 2016 / Ver. D
60
Page 68

User Manual
Ascom Myco Wi-Fi and Cellular Smartphone
12. Camera and Gallery
12. Camera and Gallery
The handset is equipped with a camera to scan barcodes, take photos and record movies.
See the following sections for details about:
• 12.1 Camera on page 61.
• 12.2 Gallery on page 61.
• 12.3 Take a Screenshot on page 61.
12.1 Camera
To open the camera view:
• Tap the Camera app in the App view.
12.2 Gallery
The gallery contains all photos and images stored on the device.
TD 93066EN
To open the gallery:
• Tap the Gallery app in the App view.
12.3 Take a Screenshot
Do the following to capture an image of the handset screen:
• Press and hold the power and volume down buttons until the screen has been captured
(indicated by an animation).
Captured screenshots can be found in the "Screenshot" folder in the Gallery app.
26 April 2016 / Ver. D
61
Page 69

User Manual
Ascom Myco Wi-Fi and Cellular Smartphone
13. Barcode Scanning
13. Barcode Scanning
NOTE: To use the barcode scanning function an optional barcode scanning license is
required. Refer to the handset Configuration Manual for instructions on how to add
licenses to a handset.
The handset is equipped with a professional barcode scanning functionality that can be
used to efficiently scan 1D and 2D barcodes, for example located on Patient ID wristbands
and medicine labels.
Scanning apps with different features and functionality can be used on the handset.
Available apps are set by the system administrator.
NOTE: Third-party scanning apps must be developed using the Myco Barcode Scanning API.
Refer to the Android App Developers Program page on the Ascom Partner Web for
instructions on how to develop apps for the handset.
Scanning barcodes
1 In the App view, tap the barcode scanning app installed on the handset and follow
the instructions to open up the barcode scanning view.
2 Point the handset camera towards the barcode to scan. Use the display to verify that
the barcode is well within the barcode scanning app seeker window. The app
continuously scans for a barcode. A successful scan is indicated with a message tone
and a vibrating handset.
3 The result from a successful scan is displayed in the app. The actual functionality
depends on the app being used.
TIP: The app continuously scans for a barcode. If the scanner is unable to detect a barcode,
try to reposition the camera by moving it closer or farther away from the barcode, or try
scanning in better light conditions.
TD 93066EN
26 April 2016 / Ver. D
62
Page 70
User Manual
Ascom Myco Wi-Fi and Cellular Smartphone
14. My Services
The My Services app contains shortcuts that can be used to launch different functionality,
such as open an app or web page, communicate with external equipment, or setup a phone
call. The My Services shortcuts are configured in the Device Manager, refer to the handset
Configuration Manual.
14.1 Access the My Services app
To open the My Services app:
1 Swipe to the right or tap the app view icon in the upper left corner to open the
App view.
2 Tap the My Services app .
14.2 My Services functionality
The My Services app can provide three shortcut types with different functionality:
TD 93066EN
14. My Services
• 14.2.1 URI action shortcut on page 63
- Open an app or web page.
• 14.2.2 Call action shortcut on page 63
- Call a number.
• 14.2.3 Data Send action shortcut on page 63
- Send data to communicate with external equipment.
14.2.1 URI action shortcut
A URI action shortcut can be used to launch an app on the handset, or to open up a specific
web page in the browser.
If user added information is provided with the shortcut, it could be used to access apps or
web pages in specific ways.
14.2.2 Call action shortcut
A call action shortcut can be used to call a predefined number.
14.2.3 Data Send action shortcut
A data send action shortcut can be used to send data from the handset. The sent data can
be used for example to open a door, or to start or stop external equipment. The data can
either be predefined or entered after the shortcut is selected.
26 April 2016 / Ver. D
63
Page 71

User Manual
Ascom Myco Wi-Fi and Cellular Smartphone
15. Settings
NOTE: Some settings may be unavailable or locked, depending on the system configuration.
The Settings app provides the possibility to customize the handset:
1 Swipe to the right or tap the app view icon in the upper left corner to open the
App view.
2 Tap the Settings app icon .
The different settings in the Settings app sub-menus are explained below:
• 15.1 Display Settings on page 64
• 15.2 Sound Settings on page 65
• 15.3 Languages Settings on page 66
• 15.4 Time and Date Settings on page 66
• 15.5 Telephony Settings on page 66
• 15.7 About phone Settings on page 67
TD 93066EN
15. Settings
15.1 Display Settings
Settings related to the handset displays, such as brightness and text size, can be configured
in the Display settings sub-menu.
The following can be set:
• 15.1.1 Change brightness on page 64
• 15.1.2 Set font size on page 64
• 15.1.3 Owner ID and name on page 65
• 15.1.4 Sleep timeout on page 65
• 15.1.5 Rotate top display on page 65
15.1.1 Change brightness
The display brightness can be adjusted either automatically or manually:
Automatic adjustment
1 Tap "Display".
2 Select the "Automatic brightness" check box to let the handset automatically adapt
the brightness of the display to the brightness of the surrounding light in the room.
Manual adjustment
1 Tap "Display".
2 Tap "Brightness".
3 Drag the slider to manually adjust the brightness level.
The brightness can also be set from the notification drawer, refer to 10.7 Notification
Drawer on page 57.
15.1.2 Set font size
The size of some of the text in the user interface can be adjusted to improve readability.
1 Tap "Display".
26 April 2016 / Ver. D
64
Page 72

User Manual
Ascom Myco Wi-Fi and Cellular Smartphone
2 Tap "Font size" and choose a desired font size.
15.1.3 Owner ID and name
The Owner ID/Name is displayed on the lock screen and charging screen.
1 Tap "Display"
2 Tap "Owner ID/name" and enter a ID or name for the device.
3 Tap "OK".
15.1.4 Sleep timeout
The display is automatically turned off after a set sleep time.
1 Tap "Sleep timeout" and choose the sleep time for the device.
TIP: For the longest battery time between charges, use the shortest convenient sleep
timeout.
15.1.5 Rotate top display
TD 93066EN
15. Settings
The text on the top display can be rotated. If rotation is set to off (default) the text on the
top display is readable when the front of the handset is facing the user. Set the top display
rotation to on if the handset is normally carried with the front away from the body.
1 Tap "Rotate top display" and set to "On" or "Off".
15.2 Sound Settings
Sound settings such as volume and ringtones can be configured in the Sound settings submenu.
The following can be set:
• 15.2.1 Volumes on page 65
• 15.2.2 Ringtones on page 65
• 15.2.3 Notification sound on page 66
• 15.2.4 Set tones on page 66
• 15.2.5 Hearing Aid Compatibility on page 66
15.2.1 Volumes
1 Tap "Sound".
2 Tap "Volumes".
3 Tap the notification to change.
•Music & video
• Ringtones & notifications
•Reminders
4 Drag the slider to the required level.
15.2.2 Ringtones
1 Tap "Sound".
2 Tap "Ringtones" and select a ringtone.
26 April 2016 / Ver. D
65
Page 73

User Manual
Ascom Myco Wi-Fi and Cellular Smartphone
15.2.3 Notification sound
NOTE: The notification sound setting does not affect the sounds used for alerts, warnings, or
conversation messages.
1 Tap "Sound".
2 Tap "Notification sound" and select a notification sound.
15.2.4 Set tones
1 Tap "Sound".
2 Select one or several of the check boxes to enable vibration or tones:
• Vibrate when ringing
• Dial pad touch tones
•Touch sound
• Screen lock sound
15.2.5 Hearing Aid Compatibility
TD 93066EN
15. Settings
1 Tap "Sound".
2 Select the "Hearing Aid Compatibility" check box.
15.3 Languages Settings
Language
1 Tap "Language"
2 Select a language.
15.4 Time and Date Settings
1 Tap "Time & Date".
2 Tap the "Use 24-hour format" to use 24 hour time format.
3 Tap "Choose date format" and select a date format from the list.
TIP: Select "Regional" to use the date format most suitable for the current language
configured in the handset.
15.5 Telephony Settings
15.5.1 Use the power button to end calls
NOTE: This functionality is only applicable for the cellular handset version.
The power button can be used to end calls:
1 Tap "Telephony".
2 Select the "Power button ends call" check box to enable the functionality.
26 April 2016 / Ver. D
66
Page 74

User Manual
Ascom Myco Wi-Fi and Cellular Smartphone
15.6 Admin settings
The admin settings menu can only be accessed by system administrators, refer to the
handset Configuration Manual for details.
15.7 About phone Settings
Tap "About phone" to show information about the handset, such as the software version.
TD 93066EN
15. Settings
26 April 2016 / Ver. D
67
Page 75

User Manual
Ascom Myco Wi-Fi and Cellular Smartphone
16. Operation Notice
• 16.1 Accessibility and Voice Quality on page 68.
16.1 Accessibility and Voice Quality
The WLAN network is not always available. If you do not get in contact with your system,
contact your system administrator. For best voice quality, avoid positioning yourself close to
a computer, radio or similar equipment.
Operating Area
The handset can only be used in the area that is covered by the system. Outside this area
the handset lose contact with the system. The signal strength icon is low. The notification
bar shows more information about the warning.
Out of Range (No network)
When you leave the area that is covered by the system, the handset will, by default indicate
with a short beep, and the text "Warning" appears in the top display in idle mode. To switch
off the beep indication, press the volume down button once.
TD 93066EN
16. Operation Notice
The indication is by default repeated every minute for 30 minutes.
When re-entering the coverage area, it can take a couple of minutes before the handset
automatically has registered in the system.
26 April 2016 / Ver. D
68
Page 76

User Manual
Ascom Myco Wi-Fi and Cellular Smartphone
17. Maintenance
This chapter describe the following topics:
• 17.1 Cleaning the Handset on page 69
• 17.2 Battery Maintenance on page 69
• 17.3 Replace the Color Pad for the Hinge-type Clip on page 69
17.1 Cleaning the Handset
Chemical resistance
The exterior of the handset have been tested and found resistant to chipping, fading or
wearing off when the handset is treated with common cleaners, disinfectants, or
perspiration. The following chemicals have shown no harmful effect:
•3% Hydrochloric Acid
• M-alcohol (85 % Methylated Ethanol)
• 60 % Chlorhexidine 0.5 mg/ml
TD 93066EN
17. Maintenance
CAUTION: Acetone can be damaging to the plastic casing of the handset and should not be
used.
17.2 Battery Maintenance
Battery life
Refer to the Battery Storage and Maintenance Guidelines (TD 92982) document.
17.3 Replace the Color Pad for the Hinge-type Clip
The colored clip pads may be attached to the clip to easily identify the handset belonging to
a workgroup or shift.
Use a thin 3-4 mm flat screwdriver or paper clip to remove the old color pad.
Use the screwdriver to press in the fastener. Check behind the clip to be sure it is entirely
inserted at both sides.
26 April 2016 / Ver. D
69
Page 77

User Manual
Ascom Myco Wi-Fi and Cellular Smartphone
18. Troubleshooting User Manual
18. Troubleshooting User Manual
This section contains information on how to solve common operational problems and
warnings.
Go through the following lists, if you encounter any problems. If this checklist does not solve
the problem, contact your system administrator.
If other handsets are having similar problems, it might be a system error.
This chapter describes the following:
• 18.1 Operational Problems on page 71
• 18.2 Error or Warning Messages on page 71
TD 93066EN
26 April 2016 / Ver. D
70
Page 78

User Manual
Ascom Myco Wi-Fi and Cellular Smartphone
18. Troubleshooting User Manual
18.1 Operational Problems
Fault Probable cause Action or comment
No network.
The handset beeps
once a minute (for max
30 minutes) in a low
tone, followed by a
high tone (if enabled,
the vibrator also
follows the beeps).
No display. The battery level is low, or the
No ringtone when a call
is received.
Not possible to set the
ring volume to "Silent".
Wrong time or date. The handset hasn't received the
The handset calls an
emergency number
when trying to call
another handset, or
when calling an
international number.
NOTE: Cellular handset
version only.
The handset has lost connection
and is in one of the following
states:
- No network
- No access
- Voice only
- Messaging only
handset is defective.
The ringtones and notifications
volume is set to silent or vibrator
only, or the handset is defective.
Minimum volume is set to a value
other than "Silent (no
restriction)", restricting the
handset from setting the volume
down to silent.
right time and date from the NTP
server.
The number sequence begins with
the same numbers as an
emergency number. Usually the
handset receives a list of locally
used emergency numbers from
the SIM card, but if no SIM card is
inserted a general list of possible
emergency numbers is used
instead.
TD 93066EN
Acknowledge the warning
notification bar or press the
volume down button (the later
keeps the dialog window
visible).
You can configure the beep to
Sound off or Sound once (for
each new state), contact the
system administrator.
Note: When leaving a bad state
for another bad state, the
warning notification bar
reopens, and the beep sounds
again (if enabled).
Charge the battery, or contact
the system administrator.
Increase the volume by
pressing the volume up button,
or by adjusting the slider in
Settings > Sound > Volumes >
Ringtones & notifications.
An administrator must set the
Minimum volume parameter to
"Silent (no restriction)", refer
to the Configuration Manual for
the handset.
Restart the handset. If the time
or date is still wrong, contact a
system administrator.
If the handset is used without a
SIM card, insert a SIM card to
limit the number of possible
emergency numbers.
18.2 Error or Warning Messages
Refer to the handset Configuration Manual.
26 April 2016 / Ver. D
71
Page 79

User Manual
Ascom Myco Wi-Fi and Cellular Smartphone
19. Related Documents User Manual
19. Related Documents User Manual
Data Sheet, Ascom Myco VoWiFi Smartphone TD 93097EN
Data Sheet, Ascom Myco VoWiFi and Cellular Smartphone TD 93057EN
Configuration Manual, Ascom Myco VoWiFi and Cellular
Smartphone
Data Sheet, Unite Connectivity Manager TD 92739EN
Configuration Manual, Unite Connectivity Manager TD 92735EN
Data Sheet, CR5 Charging Rack TD 93053EN
Data Sheet, CR6 Battery Charging Rack TD 93054EN
Installation and Operation Manual, CR3 and CR5 Charging Racks TD 92480EN
Installation Guide, CR4 and CR6 Battery Charger Racks TD 92724EN
Function Description, Push to Talk TD 92493EN
TD 93066EN
TD 93072EN
Battery Storage and Maintenance Guidelines, For Ascom LiIon/LiPol
battery packs
TD 92982EN
26 April 2016 / Ver. D
72
Page 80

User Manual
Ascom Myco Wi-Fi and Cellular Smartphone
20. Document History User Manual
20. Document History User Manual
For details in the latest version, see change bars in the document.
Version Date Description
A 2 April 2015 First version.
B 14 October 2015 New:
TD 93066EN
2. Quick Installation Steps for Administrators on page
4 (partly based on sections from the removed "Getting
Started" chapter).
4. Basics on page 10 (based on sections from the
removed "Getting Started" and "Using the Ascom
Myco Launcher").
9. Personal Alarm on page 50.
10. Notifications on page 53 (partly based on the
"Notifications" section from the removed "Using the
Ascom Myco Launcher" chapter).
13. Barcode Scanning on page 62.
Renamed:
Chapter "Description" to "Handset Description".
Chapter "Alert View" to "Alerts".
Chapter "Conversation" to "Messaging".
Moved:
Appendix A. Safety Precautions on page 76 where
moved from chapter 2 to the Appendix.
Several other chapters and sections where moved
around in the manual.
Updated:
1.1 Abbreviations and Glossary User Manual on page
2.
2.2 Install and Configure the Handset on page 4.
3.1.5 Alarm or Multifunction button on page 8.
7.5 View Alerts on a Locked Handset on page 46.
11. Apps on page 59.
8. Messaging on page 47.
4.9 Battery level indication on page 17. [MYCO-3196]
Other changes:
Added several new images and icons.
Specified that the Myco uses micro-SIM cards.
General quality checks and text improvements.
Removed Appendix B.
Added "Exposure to Radio Frequency Signals for EU
and EFTA."
Changed Frequency Range.
Removed redundant text about SAR.
Minor editorial changes.
26 April 2016 / Ver. D
73
Page 81
User Manual
Ascom Myco Wi-Fi and Cellular Smartphone
20. Document History User Manual
Version Date Description
C 15 December 2015 Updated:
TD 93066EN
1.2 Features on page 2
3.1 Handset Overview on page 7
Added the Battery Storage and Maintenance
Guidelines document to 19. Related Documents User
Manual on page 72.
Edit text on page 14
4.10 Charge the Handset Battery on page 17
4.11 Change Battery on page 20
5.1 Answer or Reject a Call on page 27
5.2.2 Call using the call list on page 28
5.2.3 Call using the central phonebook on page 29
5.4 Functions During a Call on page 31
19. Related Documents User Manual on page 72
Removed "SH1" from the document title.
Added:
3.1.6 Top display on page 9
4.12 Log in or Log out on page 21
5.4.8 Transfer call on page 32
5.4.9 Navigate the handset during a call on page 33
5.4.10 The phone bar on page 33
5.6 Push-to-talk Group Call on page 35
9.2 Man-down and No-movement Alarm on page 50
14. My Services on page 63
Other:
Added link sections to the beginning of each chapter/
section to make navigation on Confluence easier.
Document links now link to the corresponding
document on Confluence.
Other fixes related to Confluence publishing.
D 26 April 2016 New:
About this document on page -5. Added a "save this
manual" section.
4.13 Availability status on page 25. New section about
"Availability status". MYCO-4797
5.2.5 Advanced dialing on page 29. New section about
advanced dialing techniques. MYCO-3910
5.4.3 Show the keypad on page 32. New section
describing how to show the keypad during a call.
5.5 Voicemail on page 34. New section about
voicemail. MYCO-4694
7.2.3 Lock screen on page 42
11.1 List of apps on page 59. Added icons and
descriptions, and more apps to the list
12.3 Take a Screenshot on page 61. New section with
instructions on how to take a screenshot.
15.6 Admin settings on page 67. New short section
describing the Admin settings menu.
26 April 2016 / Ver. D
74
Page 82

User Manual
Ascom Myco Wi-Fi and Cellular Smartphone
20. Document History User Manual
Version Date Description
TD 93066EN
Updated:
3.1.5 Alarm or Multifunction button on page 8. Added
text about using the top button for third-party apps.
MYCO-3461
4.10 Charge the Handset Battery on page 17. Changed
the charging time estimations.
4.10.3 Charge with a Micro USB cable on page 18.
Added text saying that the USB power supply unit is
delivered with interchangeable plugs.
4.10.4 Charging indication on page 19. Added a
voicemail icon to the icon list table. MYCO-4694
4.12 Log in or Log out on page 21. Changed the
description regarding the Login functionality a bit (it
can now be used to transfer messaging and alert
numbers between handsets).
5.2.3 Call using the central phonebook on page 29/
5.2.4 Call using the local phonebook on page 29.
Updated the instructions about using the phonebooks
to make a call.
5.6 Push-to-talk Group Call on page 35. Added a Note
saying that the handset cannot receive call while in a
PTT call.
6. Phonebook on page 39. Updated the whole chapter.
7.2 Alert Indication on page 42. Minor updates.
7.3 Alert Classification on page 43. Re-arranged this
section and added several new parts. Sort color is now
called "category color" instead. MYCO-2669
8.1 Write and Send Message on page 47. Added the
maximum number of characters a message can
contain. MYCO-5228
10.2 Color-coded LED Signals on page 53. Updated this
section with new text, and a table describing the
different LED colors. MYCO-2669
10.8 Icons used for notification on page 58. Moved the
list of icons used for notification here (from the Alert
chapter), and updated the text.
14. My Services on page 63. Minor text updates.
18.1 Operational Problems on page 71. Added the
emergency call issue to the table. MYCO-5086
Appendix A. Safety Precautions on page 76. Removed
and re-arranged several parts in the Safety
precautions appendix.
26 April 2016 / Ver. D
75
Page 83
User Manual
Ascom Myco Wi-Fi and Cellular Smartphone
Appendix A. Safety Precautions
Appendix A. Safety Precautions
Read through this chapter before using the handset.
NOTE: The Product Designator for regulatory purposes of the Ascom Myco handset is SH1.
Safe operation
For safe and efficient operation of the handset, observe the guidelines given in this manual
and all necessary safety precautions when using the handset. Follow the operating
instructions and adhere to all warnings and safety precautions located on the product, the
Safety Information delivered with the handset, and this User Manual.
Do not disassemble the handset. Disassembling the handset voids the warranty. The
handset consists of no consumer serviceable components. Service should be performed by
an Authorized Service Center only.
Changes or modifications to the equipment not expressly approved by the party responsible
for compliance could void the user's authority to operate the equipment.
A.1 Frequency Range
TD 93066EN
The handset is a radio transmitter and receiver. When it is on, it receives and sends out radio
frequency (RF) energy. The handset operates on different frequency ranges depending on
market and employs commonly used modulation techniques:
EU (ETSI): b/g: 2.4–2.4835 GHz (Ch 1-13), and
a: 5.15–5.35 GHz (Ch 36-64), 5.47–5.725 GHz (Ch 100-140)
USA/
Canada
(FCC):
b/g: 2.4–2.4835 GHz (Ch 1-11), and
a: 5.15–5.35 GHz (Ch 36-64), 5.47–5.71 GHz (Ch 100-140),
5.725–5.850 GHz (Ch 149-165)
A.2 Regulatory Information (EU and EFTA)
A.2.1 Exposure to Radio Frequency Signals
Close to ear Handheld/body mounted
SH1-ACAA 0.468 W/kg (10 g) 0.848 W/kg (10 g)
SH1-ABAA 0.117 W/kg (10 g) 0.144 W/kg (10 g)
THIS MOBILE DEVICE MEETS GUIDELINES FOR EXPOSURE TO RADIO WAVES. Your mobile device
is a radio transmitter and receiver. It is designed not to exceed the limits for exposure to
radio waves recommended by international guidelines. These guidelines were developed by
the independent scientific organization ICNIRP and include safety margins designed to
assure the protection of all persons, regardless of age and health.
The exposure guidelines for mobile devices employ a unit of measurement known as the
Specific Absorption Rate or SAR. The SAR limit stated in the ICNIRP guidelines is 2.0 W/kg
averaged over 10 grams of tissue. Tests for SAR are conducted using standard operating
positions with the device transmitting at its highest certified power level in all tested
frequency bands. The actual SAR level of an operating device can be below the maximum
value because the device is designed to use only the power required to reach the network.
That amount changes depending on a number of factors such as how close you are to a
network base station. The highest SAR value under the ICNIRP guidelines for use of the
device at the ear is 0.201 W/kg and at the body is 0.278 W/kg (The measure distance of
1.5 cm). Use of device accessories and enhancements may result in different SAR values.
26 April 2016 / Ver. D
76
Page 84

User Manual
Ascom Myco Wi-Fi and Cellular Smartphone
Appendix A. Safety Precautions
SAR values may vary depending on national reporting and testing requirements and the
network band.
A.3 Regulatory Compliance Statements (USA and Canada only)
FCC ID:
SH1-ABAA: BXZSH1B
SH1-ACAA: BXZSH1C
IC:
SH1-ABAA: 3724B-SH1B
SH1-ACAA: 3724B-SH1C
A.3.1 FCC and IC Compliance Statements
This equipment has been tested and found to comply with the limits for a Class B digital
device, pursuant to part 15 of the FCC Rules. These limits are designed to provide reasonable
protection against harmful interference in a residential installation. This equipment
generates, uses and can radiate radio frequency energy and, if not installed and used in
accordance with the instructions, may cause harmful interference to radio communications.
However, there is no guarantee that interference will not occur in a particular installation. If
this equipment does cause harmful interference to radio or television reception, which can
be determined by turning the equipment off and on, the user is encouraged to try to correct
the interference by one or more of the following measures:
TD 93066EN
• Reorient or relocate the receiving antennas.
• Increase the separation between the equipment and receiver.
• Connect the equipment into an outlet on a circuit different from that to which the
receiver is connected.
• Consult the dealer or an experienced radio/TV technician for help.
This Class B digital apparatus complies with Canadian ICES-003.
Cet appareil numérique de la Classe B conforme á la norme NMB-003 du Canada.
Privacy of communications may not be ensured when using this handset.
A.3.2 Exposure to Radio Frequency Signals
This equipment complies with FCC radiation exposure limits set forth for an uncontrolled
environment. This device complies with FCC SAR limit of 1.6 W/kg. The maximum SAR value
measured, see below.
Head Body
SH1-ACAA 0.580 W/kg 1.229 W/kg
SH1-ABAA 0.405 W/kg 0.544 W/kg
The handset is designed to be worn with the display towards the body for best radio
performance. SAR testing is made with no separation, to approve the device to be carried
close to the body.
This device must not be co-located or operating in conjunction with any other antenna or
transmitter.
Use of non-Ascom approved accessories may violate the FCC and IC guidelines for RF
exposure and should be avoided.
26 April 2016 / Ver. D
77
Page 85

User Manual
Ascom Myco Wi-Fi and Cellular Smartphone
Appendix A. Safety Precautions
A.4 Precautions and Environmental Requirements
A.4.1 Handset
• Avoid volume levels that may be harmful to your hearing. Exposure to excessive sound
pressure from a handset's earpiece or headset may cause permanent hearing loss.
• Low volume levels might result in missed alerts.
• Only use the handset in temperatures between:
-5 °C and +45 °C (23 °F and 113 °F).
• Avoid exposing the handset to direct sunlight, heat sources, or moisture.
• Do not place a cold handset in a charger.
• Avoid sudden temperature changes to prevent condensation in the handset. It is
recommended to put the handset in an air tight plastic bag until the temperature is
adjusted, for example, when entering or leaving a cold/heated building on a warm/cold
day.
• If the handset has been exposed to water or condense, remove the battery immediately
and let it dry completely before re-inserting the battery.
• Do not expose the handset to an open flame.
• Protect your handset from aggressive liquids and vapors.
• Remove the handset from the charger before cleaning the handset to reduce risk of an
electric shock.
• Keep the handset away from strong electromagnetic fields.
• The handset may retain small metal objects around the earpiece region.
• Do not place heavy objects on the handset.
• Do not allow children to play with the product packaging material. This could cause
choking and/or suffocation.
• Do not allow children to play with the handset. It is not a toy.
TD 93066EN
A.4.2 Battery
• Do not immerse the battery into water. This could short-circuit and damage the battery.
• Do not expose the battery to an open flame. This could cause the battery to explode.
• Do not allow the metal contacts on the battery to touch another metal object. This could
short-circuit and damage the battery.
• Do not leave the battery where it could be subjected to extremely high temperatures,
such as inside a car on a hot day.
• Use the Micro USB cable (together with the USB power supply), the Charging Rack, or the
Battery Charging Rack for charging. Charge the battery for at least one hour the first
time you use the battery.
• Do not charge the battery when the ambient room temperature is above 40 °C or below
5 °C (above 104 °F or below 41 °F).
• Do not attempt to take the battery apart.
• Do not remove the battery unless it needs to be replaced.
• Power off the handset before removing the battery.
Battery Disposal
Defective batteries must be returned to a collection point for chemical waste disposal.
26 April 2016 / Ver. D
78
 Loading...