

Asaklitt 401-SI21L User Manual [de]
Cycle Computer
Art.no 31-9473 Model 401-SI21L
Please read the entire instruction manual before using the
product and save it for future reference. We reserve the right for
any errors in text or images and any necessary changes made
to technical data. If you have any questions regarding technical
problems please contact Customer Services.
Product description
Features
• Service program
• Current speed (0–99.9 km/h or mph)
• Average speed (0–99.9 km/h or mph)
• Max. speed (0–99.9 km/h or mph)
• Relation to (over or under) average speed
• Speed tendency; accelerating or decelerating
• Trip timer (up to 9:59:59 hours)
• Clock (12/24 hour)
• Trip distance (0–999.99 km or miles)
• Total distance travelled (odometer)
• The odometer can be reset after battery changes
or if the cycle computer is reset to factory settings
• Scan function (alternates between trip meter, max speed,
average speed and trip timer every 4 seconds)
• Temperature in ºC or ºF
• Memory of min/max temperature
• Stopwatch
• Approximate fat burn
• Approximate calorie burn
• Auto ON/OFF
• Backlight
Contents
1. Computer
2. Handlebar bracket with cable and sensor
3. Magnet
4. Battery (1 × CR2032, 3 V)
5. 6 cable ties
.
38
32.5
KM/hr
2
2
4
GREAT BRITAIN
1
3
5
For consumer contact, please visit www.clasohlson.co.uk and click on customer service.
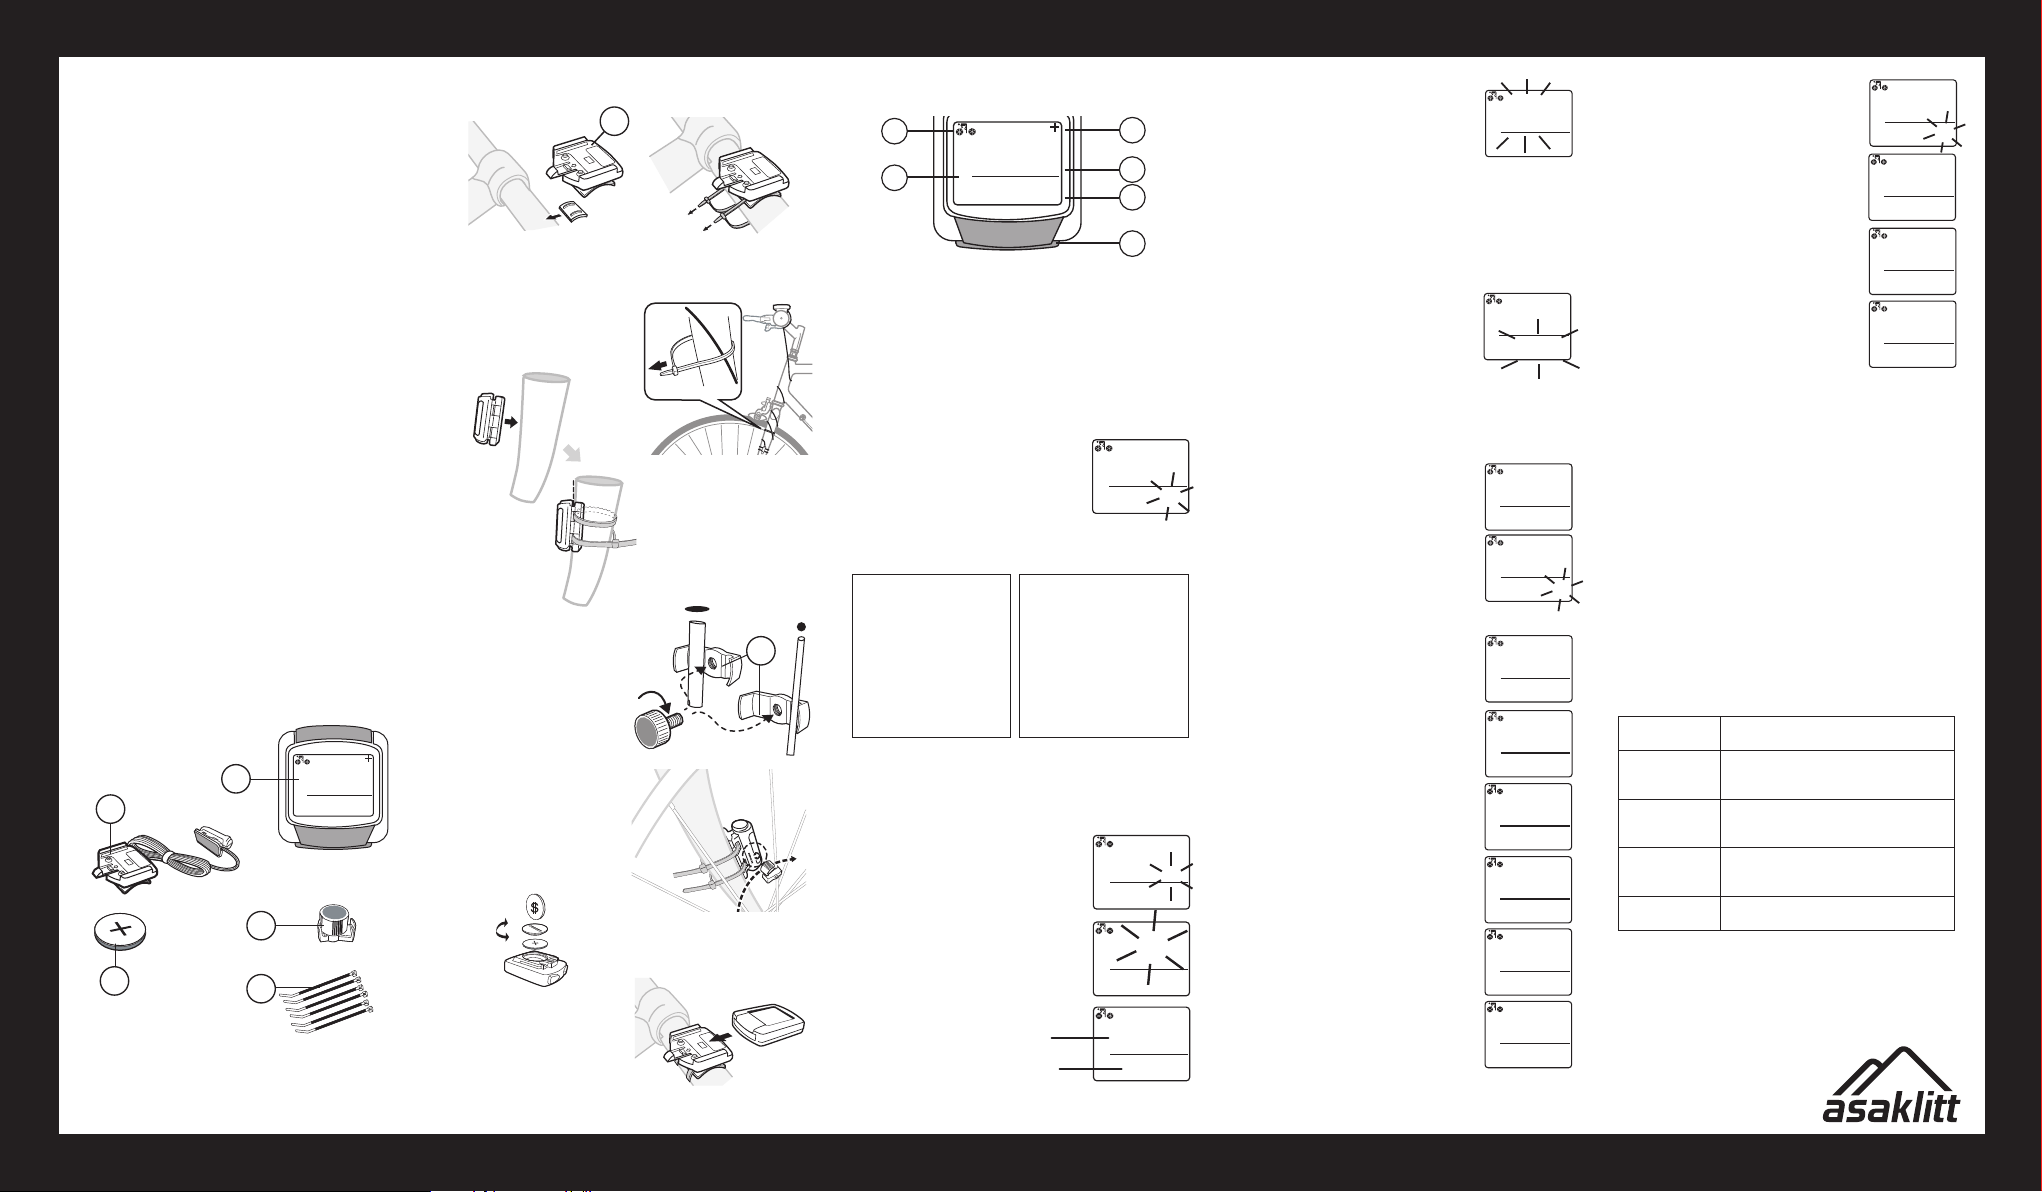
Assembly
2
1. Attach the bracket to the handlebar. Make sure that the
rubber spacer is between the bracket and the handlebar and
that the snap buckle is facing the saddle.
2. Run the cable down to
the front fork and secure
it using a cable tie.
3. Attach the sensor to the front
fork and make sure that it is
parallel to the spokes.
NB Don’t completely tighten
the cable ties straight away.
You might need to adjust the
sensor angle a little after the
magnet has been fitted.
4. Attach the magnet (3) to
one of the spokes (the
clamp fits different spoke
thicknesses).
5. Adjust the magnet and
the sensor so that they
face each other, max
2 mm apart.
6. Insert the battery into
the computer, making
sure that the + is facing
upwards.
7. Slide the computer into
the bracket until it clicks
into place. To remove
the computer, press in
the snap buckle and lift
out the computer.
3
ENGLISH
Computer setup
2
.
8
I3
1
KM/hr
I2:32
1. Shows which menu is open. This field is empty in
setup mode.
2. Shows if speed is increasing (wheel spins forwards)
or decreasing (wheel spins backwards).
3. “+” appears if speed is above average speed;“–” appears
if speed is below average speed.
4. Shows current speed.
5. Clock.
6. Settings: This button has 3 functions, press left, right or both
(the whole button).
The following settings must be made
when the battery is inserted for the first
time or after the computer has been reset
to factory settings:
3
4
5
6
2I24
Wheel size input
Use the tables below to set the correct wheel factor.
Wheel Circumdiameter ference of
wheel (mm)
-----------------------------------20″ 1596
22″ 1759
24″ 1916
26″ (650A) 2073
26.5″ (Tubular) 2117
26.8″ (700x25C) 2124
26.8″ (700x28C) 2136
27″ (700x32 C) 2155
28″ (700B) 2237
For example, if the wheel is 26″ the input factor is 2073. Set the
factor with the right button and change digits with the left button.
When the wheel factor has been entered, go to the next menu by
press the left button. Display shows:
Km or miles
Select with the right button, confirm and
advance with the left button to:
Age and weight
Set age and weight with the right button
and advance with the left button. If you
selected km in the previous menu, the
weight will appear in kg. If you selected
miles in the previous menu, the weight will
appear in pounds. Advance with the left
button to:
(w/tire)
Wheel Circum-
diameter ference of
wheel (mm)
---------------------------------------ATB 24″x1.75 1888
ATB 26″x1.4 1995
ATB 26″x1.5 2030
ATB 26″x1.75 2045
ATB 26″x2 (650B) 2099
27″x1 2136
27″x1 1/4 2155
23
0:80
Age
Weight
23
0:80
KM
KM/hr
KM/hr
Reminder to service your bicycle
200, 400, 600 or 800 km. A spanner will start
to flash in the display when the preset distance
is reached. Press the left button to stop the
spanner flashing. Set the desired distance
using the right button. Advance with the left
button to:
Note! If you begin any of the above settings and do not confirm
them, the computer shuts off automatically after 5 minutes.
Pressing any button will turn the computer back on and revert to
the wheel size input setting.
Setting the clock
Hold in the left button for 3 seconds to enter the clock setting.
Select a 12 or 24 hour display using the right
button. Press the left button to adjust the
time. Change the hours with the right button
and advance to the minutes with the left
button. Change the minutes with the right
button. Press the left button when you have
finished (the minutes stop flashing).
Note!
Press the right button to advance through
the menus.
ODO: Total distance travelled
Holding in the left button for 3 seconds while
in ODO menu will take you to:
Odometer reset
In order to restore the total distance travelled
following battery changes, adjust the value
with the right button and move with the left
button as before. Press the left button to
go back to ODO. Press the right button to
advance to:
DST: Trip distance
Holding in the left button for 3 seconds while
in DST menu will zero-reset the trip distance,
trip timer and average speed. Press the right
button to advance to:
MXS: Max. speed
Holding in the left button for 3 seconds will
zero-reset the max speed. Press the right
button to advance to the next menu:
AVS: Average speed
Holding in the left button for 3 seconds while
in DST menu will zero-reset the average
speed. Press the right button to advance to:
TM: Trip time
Holding in the left button for 3 seconds while
in DST menu will zero-reset the trip time.
Press the right button to advance to:
Temperature
Holding in the left button for 3 seconds will
show the selection of ºC or ºF, select using
the right button, confirm with the left button.
Memory of min/max. temperature
Press the left button to view the highest
temperature, press the left button once
more to view the lowest temperature.
Hold in the left button for 3 seconds to
zero-reset each value respectively.
Press the right button to advance to:
ODO
DST
MXS
AVS
TM
H:25.0˚C
0
60
KM
0
0
KM/hr
24:H
+
8
23
KM/hr
37.2 38
+
0
0
KM/hr
00000
+
8
23
KM/hr
37.2 38
+
8
23
KM/hr
72.3
+
8
23
KM/hr
72.3
+
8
23
KM/hr
9:5 9:59
+
8
23
KM/hr
24.5˚C
+
8
23
KM/hr
SW: Stopwatch
Press the left button to start and stop. Hold
in the left button for 3 seconds to zero-reset.
Press the right button to advance to:
CAL: Calories
Hold in the left button for 3 seconds to zeroreset. Press the right button to advance to:
F: Fat burn
Displayed in grams. Hold in the left button
for 3 seconds to zero-reset. Press the right
button to advance to:
SCAN
Press the right button whilst riding. The
display alternates between trip meter, max
speed, average speed and trip timer every
4 seconds. Press the right button to exit the
setup menus.
Resetting the computer
The computer resets to factory settings if:
• The battery is removed.
• Both the left and right buttons are held in for 3 seconds.
On/Off
• The computer starts automatically when you start riding
or when any of the buttons is pressed.
• If the computer is not used for 5 minutes it will automatically
enter standby mode to preserve the battery. The display will
go off. Press any button to turn the computer back on again.
Backlight
The light can be turned on in 2 ways:
• Holding in the right button for 3 seconds will light the backlight
for 8 seconds and the computer will go to scan mode and show
the trip distance, max speed, average speed and trip time.
• Pressing in the left button once will light the backlight
for 4 seconds.
0.
SW
00000
23
CAL
0.375
23
CAL
F: 25.I
SCAN
23
AVS
0
72.3
Troubleshooting guide
Inaccurate max
speed reading.
No speedometer
reading.
Black display. • The temperature is too high.
No distance
reading.
Display shows
irregular figures.
Disposal
Follow local ordinances when disposing of this product. If you
are unsure of how to dispose of this product, please contact
your local authority.
• Unknown atmospheric interference.
• RF interference.
• Check distance between magnet
and sensor.
• Check the battery.
• Display has been exposed to sunlight
too long.
• Check distance between magnet
and sensor.
• Check the battery.
• Remove the battery and insert it again.
+
KM/hr
+
8
KM/hr
8
KM/hr
8
KM/hr
Ver. 20130926
Cykeldator
Art.nr 31-9473 Modell 401-SI21L
Läs igenom hela bruksanvisningen före användning och spara den
sedan för framtida bruk. Vi reserverar oss för ev. text- och bildfel
samt ändringar av tekniska data. Vid tekniska problem eller andra
frågor, kontakta vår kundtjänst.
Produktbeskrivning
Cykeldator med följande funktioner:
• Serviceprogram
• Aktuell hastighet (0–99,9 km/h eller miles/h)
• Medelhastighet (0–99,9 km/h eller miles/h)
• Max. hastighet (0–99,9 km/h eller miles/h)
• Visar om man ligger över eller under medelhastighet
• Visar tendensen om man ökar eller minskar farten
• Tripptimer (upp till 9:59:59 timmar)
• Klocka (12/24 timmar)
• Trippmätare (0–999,99 km eller miles)
• Total körsträcka (0–999,99 km eller miles)
• Möjlighet att återställa total körsträcka efter batteribyte
eller efter att datorn återställts till fabriksinställningarna
• Funktionsskanning (trippmätare, max. hastighet, medelhastighet
och tripptimer visas var 4:e sekund)
• Temperaturvisning i ºC eller ºF
• Minne för högsta/lägsta temperatur
• Stoppur
• Visar ungefärlig fettförbränning
• Visar ungefärlig kaloriförbränning
• Auto ON/OFF
• Bakgrundsbelysning
Förpackningen innehåller
1. Dator
2. Fäste för dator med kabel och sensor
3. Magnet
4. Batteri (1 × CR 2032 3 V)
5. 6 Buntband
.
1
2
3
4
5
38
32.5
KM/hr
2
SVENSKA
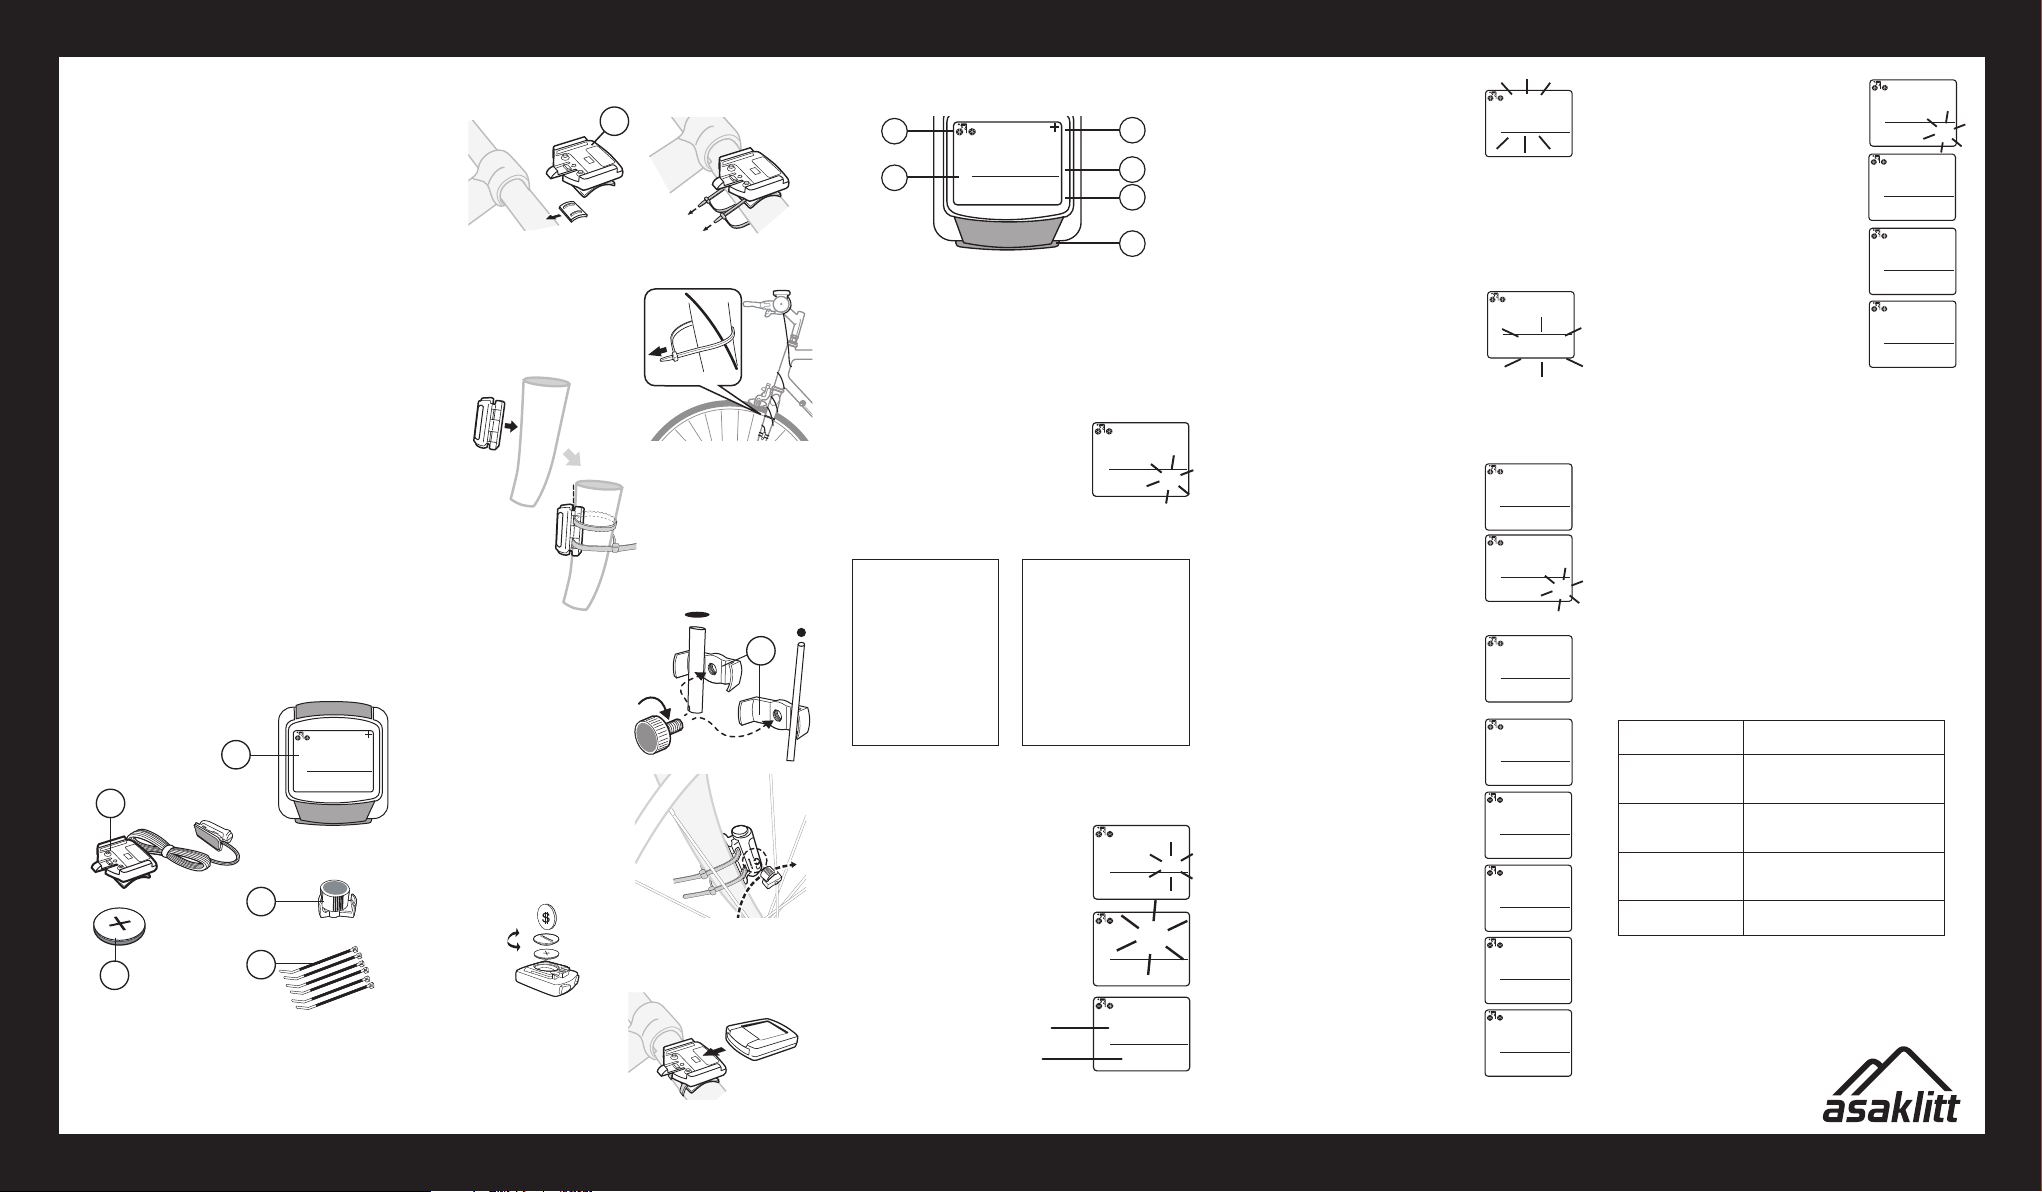
Montering Inställning av datorn
2
2
.
8
I3
1
KM/hr
I2:32
1. Montera fästet (2) på styret. Se till att gummibrickan på fästet
sitter mellan fäste och styre och att snäpplåset är vänt mot dig.
2. Dra ner kabeln till
framgaffeln och fäst den
med buntbanden.
3. Montera sensorn på
framgaffeln och se till att
den sitter rakt mot ekrarna.
Obs! Vänta med att dra åt
buntbanden som ska hålla
sensorn. Möjlighet måste
finnas för justering så att
sensor och magnet kommer
tillräckligt nära varandra.
4. Montera magneten (3)
på en eker. Fästet passar
olika ekertjocklekar.
5. Justera in magnet och
sensor så att de sitter
mitt för varandra, max.
2 mm ifrån.
6. Montera batteriet i datorn,
se till att + på batteriet är
vänt uppåt.
7. Skjut in datorn i fästet
tills den klickar fast i
snäpplåset. För att ta
loss datorn, tryck ner
snäpplåset och dra ur
datorn ur fästet.
3
1. Här visas vilken meny som är öppen. Fältet är tomt i grundläget.
2. Visar tendensen om farten ökar (hjulen snurrar framåt) eller
minskar (hjulen snurrar bakåt).
3. Visar ett ”+” om man ligger över medelhastighet eller
ett ”–” om man ligger under.
4. Visar aktuell hastighet.
5. Klocka.
6. Inställningar. Knappen har 3 funktioner, tryck vänster, höger
eller båda (hela knappen).
När batteriet sätts i första gången eller
efter att datorn återställts till fabriksinställningarna visas:
Inställning av hjulstorlek
Använd tabellerna nedan för att ställa in rätt värde.
Hjul Hjulets
diameter omkrets
i mm
--------------------------------20″ 1596
22″ 1759
24″ 1916
26″ (650A) 2073
26.5″ (Tubular) 2117
26.8″ (700x25C) 2124
26.8″ (700x28C) 2136
27″ (700x32 C) 2155
28″ (700B) 2237
Om hjulet är t.ex. 26″ ska värdet sättas till 2073. Ställ in värdet
med höger och byt siffra med vänster. När hela värdet är inställt,
gå vidare till nästa meny genom att trycka in vänster. Då visas:
Km/miles
Välj med höger, bekräfta och gå vidare
med vänster till:
Ålder och vikt
Ställ in värden med höger och gå vidare
med vänster. Om du ställde in km-visning
i föregående meny kommer vikten att visas
i kg. Om du ställde in miles kommer vikten
att visas i pound. Gå vidare med vänster till:
(w/tire) Hjulets
Hjul omkrets
diameter i mm
------------------------------------ATB 24″x1.75 1888
ATB 26″x1.4 1995
ATB 26″x1.5 2030
ATB 26″x1.75 2045
ATB 26″x2 (650B) 2099
27″x1 2136
27″x1 1/4 2155
Ålder
Vikt
3
4
5
6
2I24
23
0:80
23
0:80
KM
KM/hr
KM/hr
Påminnelseintervall för service av cykeln
200, 400, 600 eller 800 km. Ett verktyg
blinkar i displayen när inställd körsträcka
uppnåtts. Tryck vänster för att verktyget ska
sluta blinka när detta sker. Välj önskat intervall med höger. Gå vidare med vänster till:
Obs! Om man börjar göra någon av ovanstående inställningar
och slutar utan att färdigställa, stängs datorn automatiskt av efter
5 minuter. Genom att trycka på valfri knapp startar datorn och
börjar om från inställning av hjulstorlek.
Inställning av klockan
Håll in vänster i 3 sek. för att aktivera klockinställningen.
Välj först 12 eller 24 timmars visning med
höger. Tryck sedan vänster och ställ in
klockan (timmar och minuter).
Ändra timmar med höger och gå vidare till minuter med vänster. Ändra minuter med höger.
Tryck vänster när du är klar (minutvisningen
slutar blinka).
Obs!
Tryck nu höger för att gå vidare i datorns
menyer. Först kommer.
ODO: Total körsträcka
Om man håller in vänster i 3 sek. när man
är i ODO-menyn kommerman till:
Återställning av total körsträcka
För att kunna återställa total körsträcka vid
t.ex. batteribyte, ändra värden med höger
och flytta med vänster på samma sätt som
tidigare. Tryck vänster för att gå tillbaka till
ODO. Tryck höger för att gå vidare till:
DST: Trippmätare
Om man håller in vänster i 3 sek. när man är
i DST-menyn nollställs trippmätaren, tripptimern och medelhastigheten. Tryck höger
för att gå vidare till:
MXS: Max. hastighet
Om man håller in vänster i 3 sek. nollställs
max.hastighet. Tryck höger för att gå vidare till:
AVS: Medelhastighet
Nollställs om man håller in vänster i 3 sek.
när man är i DST-menyn. Tryck höger för
att gå vidare till:
TM: Tripptimer
Nollställs om man håller in vänster i 3 sek.
när man är i DST-menyn. Tryck höger för
att gå vidare till:
Temperatur
Om man håller in vänster i 3 sek. visas
inställning av ºC eller ºF. Välj med höger,
bekräfta med vänster.
Minne för högsta/lägsta temperatur
När man är i temperaturmenyn, tryck vänster
för att visa högsta temperatur. Tryck vänster
igen för att visa lägsta temperatur. Håll in vänster i 3 sek. för att nollställa respektive värde.
Tryck höger för att gå vidare till:
ODO
DST
MXS
AVS
TM
H:25.0˚C
0
60
KM
0
0
KM/hr
24:H
+
8
23
KM/hr
37.2 38
+
0
0
KM/hr
00000
+
8
23
KM/hr
37.2 38
+
8
23
KM/hr
72.3
+
8
23
KM/hr
72.3
+
8
23
KM/hr
9:5 9:59
+
8
23
KM/hr
24.5˚C
+
8
23
KM/hr
SW: Stoppur
Tryck vänster för att starta och stoppa.
Håll in vänster i 3 sek. för att nollställa.
Tryck höger för att gå vidare till:
CAL: Kalorier
Håll in vänster i 3 sek. för att nollställa.
Tryck höger för att gå vidare till:
F: Fettförbränning
Visas i gram. Håll in vänster i 3 sek. för att
nollställa. Tryck höger för att gå vidare till:
SCAN
Tryck höger under färd. Trippmätare, max.
hastighet, medelhastighet och tripptimer
visas då var 4:e sek. Tryck höger för att
gå ur menyerna till displayens grundläge.
Återställ datorn till fabriksinställningarna
Datorn återställs om:
• Batteriet tas ur.
• Både vänster och höger (hela knappen) hålls in i 3 sek.
På/Av
• Datorn startar automatiskt när man börjar cykla eller
om någon knapp trycks in.
• Om inte datorn används på 5 min. går den ner i viloläge
för att spara batteri och displayen släcks. Tryck in valfri knapp
för att väcka datorn igen.
0.
SW
00000
23
CAL
0.375
23
CAL
F: 25.I
SCAN
23
AVS
Bakgrundsbelysning
Tänds på två sätt:
• Håll in höger i 3 sek. Belysningen tänds i 8 sek. och
trippmätare, max. hastighet, medelhastighet och tripptimer
visas en gång.
• Tryck in vänster en gång och belysningen tänds i 4 sek.
Felsökningsschema
Felaktig visning av
max. fart.
Hastigheten
visas inte.
Svart display. •Temperaturen är för hög.
Trippmätaren
visas inte.
Displayen visar oregelbundna tecken.
Avfallshantering
När du ska göra dig av med produkten ska detta ske enligt
lokala föreskrifter. Är du osäker på hur du ska gå tillväga,
kontakta din kommun.
• Okänd atmosfärisk störning.
• Störning från radiofrekvens.
• Kontrollera avståndet mellan
sensor och magnet.
• Kontrollera batteriet.
• Displayen har varit utsatt för direkt
solljus för länge.
• Kontrollera avståndet mellan
sensor och magnet.
• Kontrollera batteriet.
• Ta ur batteriet och sätt i det igen.
+
0
KM/hr
+
8
KM/hr
8
KM/hr
8
KM/hr
72.3
Ver. 20130926
SVERIGE • KUNDTJÄNST Tel: 0247/445 00, Fax: 0247/445 09, E-post: kundtjanst@clasohlson.se, internet: www.clasohlson.se
 Loading...