

Aruba 2E Installation Manual

Aruba 2E
Wired Access Point
Installation Guide

ii Aruba 2E 0510189-01
Installation Guide September 2006
Copyright
© 2006 Aruba Wireless Networks, Inc. All rights reserved.
Aruba Networks and Aruba The Mobile Edge Company are trademarks of Aruba
Wireless Networks, Inc.
Specifications are subject to change without notice.
Trademarks
Sygate On-Demand Agent and Sygate Enforcer are trademarks of Sygate
Technologies.
All other trademarks or registered trademarks are the property of their respective
holders.
Legal Notice
The use of Aruba Wireless Networks, Inc. switching platforms and software, by
all individuals or corporations, to terminate Cisco or Nortel VPN client devices
constitutes complete acceptance of liability by that individual or corporation for
this action and indemnifies, in full, Aruba Wireless Networks, Inc. from any and all
legal actions that might be taken against it with respect to infringement of
copyright on behalf of Cisco Systems or Nortel Networks.

Aruba 2E iii
Installation Guide
Contents
Chapter 1 Introduction. . . . . . . . . . . . . . . . . . . . . . . . . . . . . . . . . . . . . . . . . . . . . . 1
Front View . . . . . . . . . . . . . . . . . . . . . . . . . . . . . . . . . . . . . . . . . . . . . . . . 2
Back View
. . . . . . . . . . . . . . . . . . . . . . . . . . . . . . . . . . . . . . . . . . . . . . . . 4
Chapter 2 Configuring Access Points. . . . . . . . . . . . . . . . . . . . . . . . . . . . . 5
Connecting the Console Terminal . . . . . . . . . . . . . . . . . . . . . . . . . . 5
Setting Aruba 2E Parameters
. . . . . . . . . . . . . . . . . . . . . . . . . . . . . . . . 8
Chapter 3 AP Deployment. . . . . . . . . . . . . . . . . . . . . . . . . . . . . . . . . . . . . . . . . 11
Mounting the Aruba 2E . . . . . . . . . . . . . . . . . . . . . . . . . . . . . . . . . . . . . 11
Using the Built-In Mounting Slots
. . . . . . . . . . . . . . . . . . . . . . . . . 11
Using the Optional Mounting Kits
. . . . . . . . . . . . . . . . . . . . . . . . . 13
Selecting an FE Cable
. . . . . . . . . . . . . . . . . . . . . . . . . . . . . . . . . . . . 14
Connecting Cables and Power
. . . . . . . . . . . . . . . . . . . . . . . . . . . . 14
Appendix A Port Specifications. . . . . . . . . . . . . . . . . . . . . . . . . . . . . . . . . . . . . 17
FE Port . . . . . . . . . . . . . . . . . . . . . . . . . . . . . . . . . . . . . . . . . . . . . . . . . . . . 17
Serial Breakout Adapter
. . . . . . . . . . . . . . . . . . . . . . . . . . . . . . . . . . . . . 18
DB-9 Specification
. . . . . . . . . . . . . . . . . . . . . . . . . . . . . . . . . . . . . . . 19
“To AP” Specifications
. . . . . . . . . . . . . . . . . . . . . . . . . . . . . . . . . . . 19
“To Network” Specifications
. . . . . . . . . . . . . . . . . . . . . . . . . . . . . . 19
USB Port
. . . . . . . . . . . . . . . . . . . . . . . . . . . . . . . . . . . . . . . . . . . . . . . . . . . 20
Appendix B Troubleshooting . . . . . . . . . . . . . . . . . . . . . . . . . . . . . . . . . . . . . . . . 21
Accessing the AP Support Prompt . . . . . . . . . . . . . . . . . . . . . . . . . . 21
Direct SPOE Connection to Mobility Controller
. . . . . . . . . . . . 21
Direct Terminal Connection
. . . . . . . . . . . . . . . . . . . . . . . . . . . . . . . 22
Remote Telnet Connection
. . . . . . . . . . . . . . . . . . . . . . . . . . . . . . . 22
AP Support
. . . . . . . . . . . . . . . . . . . . . . . . . . . . . . . . . . . . . . . . . . . . . . . . 23
Access Levels
. . . . . . . . . . . . . . . . . . . . . . . . . . . . . . . . . . . . . . . . . . . 23
User Commands
. . . . . . . . . . . . . . . . . . . . . . . . . . . . . . . . . . . . . . . . . 23
Privileged Commands
. . . . . . . . . . . . . . . . . . . . . . . . . . . . . . . . . . . . 24
Appendix C Product Specifications . . . . . . . . . . . . . . . . . . . . . . . . . . . . . . . . 25
Compliance . . . . . . . . . . . . . . . . . . . . . . . . . . . . . . . . . . . . . . . . . . . . . . . . 25

Contents
iv Aruba 2E 0510189-01
Installation Guide September 2006
Certifications. . . . . . . . . . . . . . . . . . . . . . . . . . . . . . . . . . . . . . . . . . . . . . . 27
Product Features
. . . . . . . . . . . . . . . . . . . . . . . . . . . . . . . . . . . . . . . . . . . 27
Ethernet Compatibility
. . . . . . . . . . . . . . . . . . . . . . . . . . . . . . . . . . . . 27
Power Over Ethernet
. . . . . . . . . . . . . . . . . . . . . . . . . . . . . . . . . . . . . 28
Physical Description
. . . . . . . . . . . . . . . . . . . . . . . . . . . . . . . . . . . . . . . . 28
Package Contents
. . . . . . . . . . . . . . . . . . . . . . . . . . . . . . . . . . . . . . . 28
Optional Items
. . . . . . . . . . . . . . . . . . . . . . . . . . . . . . . . . . . . . . . . . . . 28
Aruba 2E Wired Access Point
. . . . . . . . . . . . . . . . . . . . . . . . . . . . . . . 29
Related Documents
. . . . . . . . . . . . . . . . . . . . . . . . . . . . . . . . . . . . . . . . . 31
Text Conventions
. . . . . . . . . . . . . . . . . . . . . . . . . . . . . . . . . . . . . . . . . . 32
Contacting Aruba Networks
. . . . . . . . . . . . . . . . . . . . . . . . . . . . . . . . 33
Proper Disposal of Aruba Equipment
. . . . . . . . . . . . . . . . . . . . . . . . 33

Aruba 2E 1
Installation Guide
Introduction
1
The Aruba 2E is part of a comprehensive network solution. The device work s in
conjunction with the Aruba Mobility Controller and acts as a wired access point.
As a wired access point, the Aruba 2E provides transparent, secure, high-speed
data communications between wired network devices.
N
OTE: Service to all Aruba Networks equipment must be performed by trained
service personnel only.

Introduction
Chapter 1
2 Aruba 2E 0510189-01
Installation Guide September 2006
Front View
FIGURE 1-1 Aruba 2E Front View
Air Vents
These vents promote proper air circulation for cooling the device. Do not obstruct
these vents with mounting equipment, network cables, or any other material.
FE Ports
The ENET0 and ENET1 ports attach the Aruba 2E to a 10Base-T/100Base-TX
(twisted-pair) Ethernet LAN segment. Both ports support Power over Ethernet
(POE). ENET0 also supports Serial Over Ethernet (SOE).
1
2
3
4
5
1
2

Aruba 2E 3
Installation Guide
Introduction
Chapter 1
USB Port
This port is used to connect the AP to a host computer to support application
specific functionality and for future applications in the RF environment such as
RFID tracking or spectrum analysis.
DC Power Socket
This socket is used to connect the optional AC power adapter (not included). If
POE supplying power to the Aruba 2E, the power adapter is not necessary.
Kensington Security Slot
This slot is compatible with a Kensington MicroSaver Security Cable (not
included) which can be used to prevent the unauthorized removal of the Aruba 2E
from its installed location. To secure the Aruba 2E, wrap a security cable around
an immovable object, insert the cable’s lock into the Kensington Security Slot,
and turn the key.
To use the Kensington Security Slot while the Aruba 2E is mounted by the
mounting slots, the fold-out panel must be open.
See Appendix A, “Port Specifications” for port and cable specifications.
3
4
5

Introduction
Chapter 1
4 Aruba 2E 0510189-01
Installation Guide September 2006
Back View
FIGURE 1-2 Aruba 2E Back View
Mounting Slots
The keyhole-shaped slots on the back of the chassis are used for mounting
the Aruba 2E.
Air Vents
These vents promote proper air circulation for cooling the device. Do not obstruct
these vents with mounting equipment, network cables, or any other material.
NOTE: The serial number and the model number are on the bottom of the fold
out panel.
1
2
2
1
2
Aruba 2E 5
Installation Guide
Configuring Access Points
2
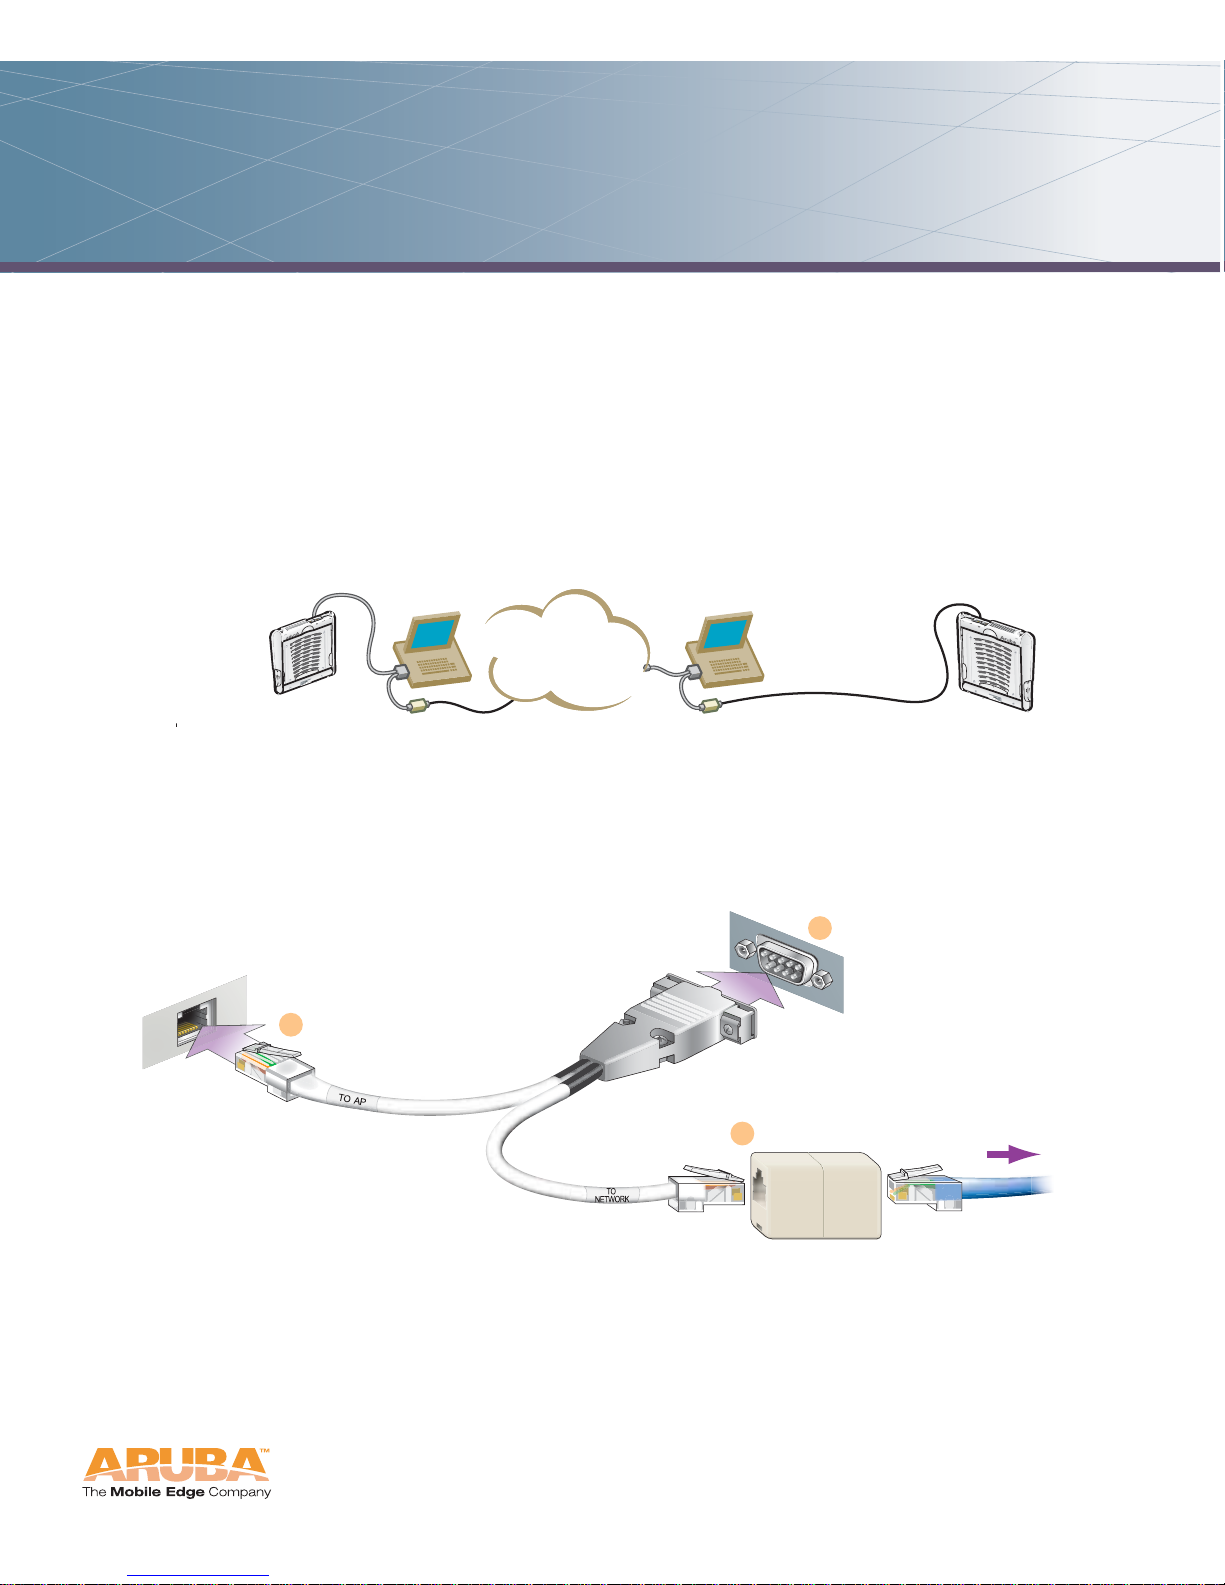
Connecting the Console Terminal
Manual provisioning requires this procedure. You must use the serial console
breakout adapter cable to access the serial console interface to the Aruba 2E
while allowing the device to be powered by the AC adapter or POE (from an
Aruba Mobility Controller).
FIGURE 2-1 Aruba 2E Console Topologies
NOTE: The LAN connections are optional unless POE is used to power the AP.
Console Access to the AP
FIGURE 2-2 Connecting Directly to the AP
1. Connect the adapter’s “To AP” RJ-45 connector to the Aruba 2E FE Port.
2. Connect the adapter’s DB-9 connector to the serial port on the console
terminal.
LAN
Console Connection
via networking closet
Console Connection
via direct access to AP
Deployed
Location
Console
Terminal
Serial
Breakout
Serial
Breaout
Console
Terminal
Aruba AP
Aruba AP
DB-9 Connector
to Console Terminal
"To AP" Connector
to AP FE Port
"To Network" Connector
to FE Coupler
to LAN FE Cable
1
2
3
To LAN
Configuring Access Points
Chapter 2
6 Aruba 2E 0510189-01
Installation Guide September 2006
3. Connect the adapter’s “To Network” RJ-45 connector to the LAN.
The LAN connection is optional unless POE is being used to power the AP.
For convenience, the adapter kit includes an FE coupler to connect RJ-45
cable ends together.
4. Connect power to the Aruba 2E.
The Aruba 2E can receive electrical power using the following options:
POE–If connecting the Aruba 2E to a device that supplies IEEE 802.3af
compliant POE, no additional power connection is necessary.
Power Outlet
N
OTE: When the Aruba 2E is installed in an air-handling space, as described
in NEC (2002) Article 300.22(C), POE must be used instead of a
power outlet.
If local regulations and practices permit, connect the optional AC power
adapter (not included) to the DC power socket on the rear panel of the Aruba
2E and plug it into an appropriate power outlet.
N
OTE: The indicator LEDs on the Aruba 2E will remain dark during this
procedure.
5. Set your local terminal to use the following communications:
6. Establish console communication.
Press <Enter> a few times to establish communication between the Aruba 2 E
and terminal.
CAUTION: Be sure to comply with electrical grounding standards
during all phases of installation and operation of the AP.
Do not allow the Aruba 2E or optional power adapter (if
used) to be connected to or make contact with metal or
power outlets on a different electrical ground than the
device to which it is connected. Also, never connect the
AP to external storm grounding sources.
CAUTION: To prevent personal injury or damage to equipment,
use only the AC power adapter certified for this device
in the country where it is used.
TABLE 2-1 Console Terminal Settings
Baud Rate Data Bits Parity Stop Bits Flow Control
9600 8 None 1 None

Aruba 2E 7
Installation Guide
Configuring Access Points
Chapter 2
7. From the Aruba 2E console, access the apboot prompt.
Depending on the Aruba 2E status, one of the following screens appears:
Autoboot countdown—The countdown prompt allows you to interrupt the
normal startup process and access the apboot prompt where provisioning is
performed.
To access the apboot prompt, press any key (such as <Enter>) before the timer
expires. If the countdown expires before you can interrupt it, turn the device
off and then back on.
TFTP time out—If the Aruba 2E cannot locate an Aruba Mobility Controller on
its network port, the following type of output is repeatedly displayed:
Press <Control-C> to interrupt this process and access the apboot prompt.
When the apboot prompt displays, perform provisioning (see next section).
APBoot 1.3.7 (build ....)
Built: 2004-10-08 09:59:57 (with gcc 3.3.1)
CPU: RC32434 MIPS-32 at 266 MHz: 8 kB I-Cache 8 kB D-Cache
Board: Muscat Local Bus at 133 MHz
DRAM: 32 MB
POST: passed
FLASH: 4 MB
PCI: scanning bus0 ...
dev fn venID devID class rev MBAR0 MBAR1 MBAR2 MBAR3
0a 00 100b 0020 000002 00 000fff01 07fff000 00000000 00000000
0b 00 1106 3038 00000c 61 00000000 00000000 00000000 00000000 000ffee1
0b 01 1106 3038 00000c 61 00000000 00000000 00000000 00000000 000ffec1
0b 02 1106 3104 00000c 63 07ffef00 00000000 00000000 00000000
0c 00 168c 0013 000002 01 07fe0000 00000000 00000000 00000000
0d 00 168c 0013 000002 01 07fd0000 00000000 00000000 00000000
Net: en0 en1 br0 lo0
Bridg: en0 en1
Hit <Enter> to stop autoboot: 0
apboot>
Loading FLASH image...
Verifying checksum... passed
BOOTP broadcast 1
DHCP IP address: 10.1.2.250
DHCP subnet mask: 255.255.255.0
DHCP def gateway: 10.1.2.1
DHCP DNS server: 10.1.1.2
DHCP DNS domain: arubanetworks.com
DHCP Aruba server: 10.1.2.11
Loading elf file: 10.1.2.11:mips.ari
Loading: T T T T T T T T T
Retry count exceeded; starting again

Configuring Access Points
Chapter 2
8 Aruba 2E 0510189-01
Installation Guide September 2006
Setting Aruba 2E Parameters
1. From the apboot prompt, configure the host information, if necessary.
In order to provide centralized management of the APs, each Aruba AP
downloads its software image and configuration files from a master Mobility
Controller.
Setting the correct host information depends on the following:
Does your network use direct IP addresses or DNS with host names?
If using host names, is aruba-master acceptable for the master Mobility
Controller, or do you need to define a different name?
Depending on your answers, select one of the following steps:
z My network uses DNS and the aruba-master host name is acceptable.
This is the default. It requires your DNS to be configured to resolve
“aruba-master” to the IP address of the master Mobility Controller. Unless
your system has been previously configured for different settings, you
can skip to Step 2.
Otherwise, if your system was previously configured for a different
setup, manually set the servername environment variable to the default
host name:
N
OTE: The master and serverip environment variables also affect how AP
source files are selected and should be cleared when using this
approach. To clear a variable, enter the setenv variable command with
no host name or address value:
apboot> setenv master
apboot> setenv serverip
When finished, proceed to Step 2.
z My network uses DNS, but I will use a different host name for the
Mobility Controller.
This requires that the servername variable be configured with your chosen
host name for the master Mobility Controller. It also requires that your
DNS be configured to resolve the specified host name to the IP address
of the master Mobility Controller.
To manually set the host name, use the following command:
apboot> setenv servername aru ba-master
apboot> setenv servername
<Mobility Controller host name>
 Loading...