

Page 1

AMG28TKB
OPERATION MANUAL
APPLIANCES
FOR LIVING
Page 2

Congratulations, you are now the proud owner of an ARTUSI cooking appliance. Thank you for purchasing ARTUSI
and welcome to the ARTUSI Family.
This instruction manual has been specially created to inform you of the full range of features your ARTUSI appliance
has to offer and serves as an introduction to getting the very best out of your ARTUSI appliance.
We present detailed information on each of the features your ARTUSI appliance consists of. Once you have read
this section you will be able to choose the most appropriate settings for your appliance when cooking different
types of food.
We ask you to read the instructions in this booklet very carefully as this will allow you to get the best results from
using your appliance. KEEP THE DOCUMENTATION OF THIS PRODUCT FOR FUTURE REFERENCE.
TO REGISTER YOUR PRODUCT WITH ARTUSI, PLEASE FILL OUT THE WARRANTY CARD AT THE END OF
THIS BOOKLET AND POST IT TO: REPLY PAID 83617
LEICHHARDT NSW 2040
Dear Artusi Customer, please read this user manual carefully before using the product and, keep it permanently at
your disposal.
Note: This user manual is prepared for more than one model. Some of the features specified in this Manual may not
be available on your appliance.
All our appliances are only for domestic use, not for commercial use. Products marked with (*) are optional.
“THIS APPLIANCE SHALL BE INSTALLED IN ACCORDANCE WITH THE REGULA TIONS FORCE AND ONLY USED
IN A WELL VENTILATED SPACE. READ THE INSTRUCTIONS BEFORE INSTALLING OR USING THIS APPLIANCE”
“Conforms with the WEEE Regulations.”
Page 3
PRECAUTIONS TO AVOID POSSIBLE EXPOSURE
2
TO EXCESSIVE MICROWAVE ENERGY
(a) Do not attempt to operate this oven with the door
open since this can result in harmful exposure to
microwave energy. It is important not to break or tamper
with the safety interlocks.
(b) Do not place any object between the oven front face
and the door or allow soil or cleaner residue to accumulate
on sealing surfaces.
(c) WARNING: If the door or door seals are damaged, the
oven must not be operated until it has been repaired by
a competent person.
ADDENDUM
If the apparatus is not maintained in a good state of
cleanliness, its surface could be degraded and affect the
lifespan of the apparatus and lead to a dangerous situation.
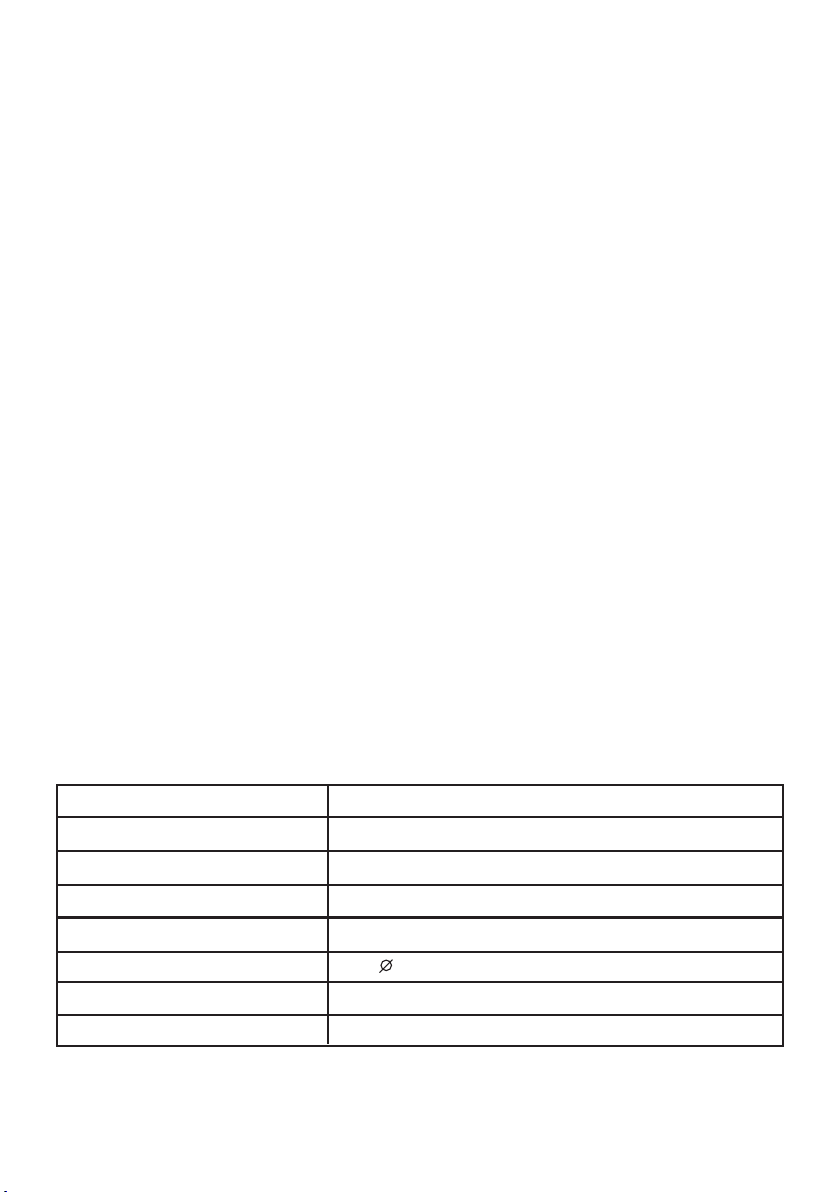
Specifications
Model:
Rated Voltage:
Rated Input Power(Microwave):
Rated Output Power(Microwave):
Oven Capacity:
Turntable Diameter:
External Dimensions:
Net Weight:
240V~ 50Hz
1450W
900 W
28 L
315 mm
595x400x388mm
Approx. 18.5kg
Page 4

IMPORTANT SAFETY INSTRUCTIONS
3
WARNING
To r e duce t h e risk o f fir e , elec t r ic sh o c k, inj u r y to
persons or exposure to excessive microwave oven
energy when using your appliance, follow basic
precautions, including the following:
1. Read and follow the specific:"PRECAUTIONS TO
AVOI D POSSIBLE EXPOSU RE TO EXCESSIVE
MICROWAVE ENERGY".
2. This appliance can be used by children aged from 8
years and above and persons with reduced physical,
sensory or mental capabilities or lack of experience
and knowledge if they have been given supervision or
instruction concerning use of the appliance in a safe way
and understand the hazards involved. Children shall not
play with the appliance. Cleaning and user maintenance
shall not be made by children unless they are older than 8
and supervised. Children less than 8 years of age shall be
kept away unless continuously supervised.
3. Keep the appliance and its cord out of reach of children
less than 8 years.
4. If the supply cord is damaged, it must be replaced by
the manufacturer, its service agent or similarly qualified
persons in order to avoid a hazard.( For appliance with
type Y attachment)
Page 5

5. WARNING: Ensure that the appliance is switched off
4
before replacing the lamp to avoid the possibility of
electric shock.
6. WARNING: It is hazardous for anyone other than a
competent person to carry out any service or repair
operation that involves the removal of a cover which
gives protection against exposure to microwave energy.
7. WARNING: Liquids and other foods must not be heated
in sealed containers since they are liable to explode.
8. When heating food in plastic or paper containers,
keep an eye on the oven due to the possibility of ignition.
9. Only use utensils that are suitable for use in microwave
.ovens
10. If smoke is emitted, switch off or unplug the appliance
and keep the door closed in order to stifle any flames.
11. Microwave heating of beverages can result in
delayed eruptive boiling, therefore care must be taken
when handling the container.
12.The contents of feeding bottles and baby food jars
shall be stirred or shaken and the temperature checked
before consumption, in order to avoid burns.
13. Eggs in their shell and whole hard-boiled eggs should
not be heated in microwave ovens since they may
explode, even after microwave heating has ended.
14. The oven should be cleaned regularly and any food
deposits removed.
15. Failure to maintain the oven in a clean condition
could lead to deterioration of the surface that could
Page 6

adversely affect the life of the appliance and possibly
5
result in a hazardous situation.
16.Only use the temperature probe recommended for
this oven.(for ovens provided with a facility to use a
temperature-sensing probe.)
17.The microwave oven must be operated with the
decorative door open. (for ovens with a decorative door.)
18.This appliance is intended to be used in household
and similar applications such as:
-staff kitchen areas in shops, offices and other working
environments;
-by clients in hotels, motels and other residential type
environments;
-farm houses;
-bed and breakfast type environments.
19.The microwave oven is intended for heating food and
beverages. Drying of food or clothing and heating of
warming pads, slippers, sponges, damp cloth and similar
may lead to risk of injury, ignition or fire.
20. Metallic containers for food and beverages are not
allowed during microwave cooking.
21. The appliance shall not be cleaned with a steam
cleaner.
Page 7

22. The appliance must not be installed behind a
6
decorative door in order to avoid overheating. (This is not
applicable for appliances with decorative door.)
23. The microwave oven is intended to be used built-in.
24. Care should be taken not to displace the turntable
when removing containers from the appliance. (For fixed
appliances and built-in appliances being used equal or
higher than 900mm above the floor and having detacha le
b
turntables. But this is not applicable for appliances with
horizontal bottom hinged door.)
READ CAREFULLY AND KEEP FOR FUTURE
REFERENCE
Page 8

To Reduce the Risk of Injury to Persons
7
Grounding Installation
DANGER
Electric Shock Hazard
Tou c h ing s o m e of t h e
internal components can
cause serious personal
injury or death. Do not
disassemble this
appliance.
WARNING
Electric Shock Hazard
Improper
can
Do not plug into an outlet
until appliance is properly
installed and grounded.
This appliance must be
grounded. In the event of
an electrical short circuit,
grounding reduces the
risk of electric shock by
providing an escape wire
for the electric current.
This appliance is equipped
with a cord having a
grounding wire with
a grounding plug. The
plug must be plugged into
an outlet that is properly
installed and grounded.
use of the grounding
result in electric shock.
Consult a qualified
electrician or serviceman
if the grounding instructions
are not completely
understood or if doubt exists
as to whether the appliance
is properly grounded.
If it is necessary to use an
extension cord, use only
a 3-wire
1. A short power-supply cord
is provided to reduce the risks
resulting from becoming
entangled in or tripping over a
longer cord.
2. If a long cord set
cord is used:
1)The marked electrical rating
of the cord set or extension cord
should be at least as great as
the electrical rating of the
appliance.
2)The extension cord must be
a grounding-type 3-wire cord.
3)The long cord should be
arranged so that it will not drape
over the counter top or tabletop
where it can be pulled on
by children or tripped over
unintentionally.
extension cord.
or extension
Page 9

CLEANING
8
Be sure to unplug the
1. Clean the cavity of the oven after using with a slightly damp
cloth.
2. Clean the accessories in the usual way in soapy water.
3. The door frame and seal and neighbouring parts must be
cleaned carefully with a damp cloth when they are dirty.
4. Do not use harsh abrasive cleaners or sharp metal scrapers
to clean the oven door glass since they can scratch the surface,
which may result in shattering of the glass.
5. Cleaning Tip---For easier cleaning of the cavity walls that the
food cooked can touch: Place half a lemon in a bowl, add 300ml
(1/2 pint) water and heat on 100% microwave power for 10
minutes. Wipe the oven clean using a soft, dry cloth.
appliance from the power
supply.
UTENSILS
CAUTION
Personal Injury Hazard
It is hazardous for
anyone other than a
competent person to
carry out any service
or repair operation that
involves the removal of
a cover which gives
protection against
exposure to microwave
energy.
See the instructions on "Materials you can use in
microwave oven or to be avoided in microwave oven."
There may be certain non-metallic utensils that are not
safe to use for microwaving. If in doubt, you can test the
utensil in question following the procedure below.
Utensil Test:
1. Fill a microwave-safe container with 1 cup of cold
water (250ml) along with the utensil in question.
2. Cook on maximum power for 1 minute.
3. Carefully feel the utensil. If the empty utensil is
warm, do not use it for microwave cooking.
4. Do not exceed 1 minute coo king t ime.
Page 10

Materials you can use in microwave oven
9
Utensils Remarks
Browning dish
Dinnerware
Glass jars
Glassware
Oven cooking
bags
Paper plates
and cups
Paper towels
Parchment
paper
Plastic
Plastic wrap
Thermometers Microwave-safe only (meat and candy thermometers).
Wax paper Use as a cover to prevent splattering and retain moisture.
Follow manufacturer’s instructions. The bottom of browning dish must be
at least 3/16 inch (5mm) above the turntable. Incorrect usage may cause
the turntable to break.
Microwave-safe only. Follow manufacturer's instructions. Do not use
cracked or chipped dishes.
Always remove lid. Use only to heat food until just warm. Most glass jars
are not heat resistant and may break.
Heat-resistant oven glassware only. Make sure there is no metallic trim.
Do not use cracked or chipped dishes.
Follow manufacturer’s instructions. Do not close with metal tie. Make
slits to allow steam to escape.
Use for short–term cooking/warming only. Do not leave oven unattended
while cooking.
Use to cover food for reheating and absorbing fat. Use with supervision
for a short-term cooking only.
Use as a cover to prevent splattering or a wrap for steaming.
Microwave-safe only. Follow the manufacturer’s instructions. Should be
labeled "Microwave Safe". Some plastic containers soften, as the food
inside gets hot. "Boiling bags" and tightly closed plastic bags should be
slit, pierced or vented as directed by package.
Microwave-safe only. Use to cover food during cooking to retain
moisture. Do not allow plastic wrap to touch food.
Materials to be avoided in microwave oven
Utensils Remarks
Aluminum tray
Food carton with
metal handle
Metal or metaltrimmed utensils
Metal twist ties
Paper bags
Plastic foam
Wood
May cause arcing. Transfer food into microwave-safe dish.
May cause arcing. Transfer food into microwave-safe dish.
Metal shields the food from microwave energy. Metal trim may
cause arcing.
May cause arcing and could cause a fire in the oven.
May cause a fire in the oven.
Plastic foam may melt or contaminate the liquid inside when exposed
to high temperature.
Wood will dry out when used in the microwave oven and may split
or crack.
Page 11

SETTING UP YOUR OVEN
10
Names of Oven Parts and Accessories
Remove the oven and all materials from the carton and oven cavity.
Your ov en co me s wi th the fo llow in g ac ce ssor ie s:
Glass tray 1
Turntable ring assembly 1
Instruction Manual 1
F
A
G
Turntable Installation
Hub (underside)
Glass tray
Turntable shaft
Turntable ring assembly
E
a. Never place the
tray should never be restricted.
b. Both
always be used during cooking.
c. All food and containers of food are always placed
on the
d. If
breaks, contact your nearest authorized service
center.
glass tray
glass tray
glass tray
or
turntable ring assembly
C B
D
A) Control panel
B) Turntable shaft
C) Turntable ring assembly
D) Glass tray
E) Observation window
F) Door assembly
G) Safety interlock system
glass tray
and
for cooking.
upside down. The glass
turntable ring assembly
cracks or
must
Page 12

Installation and connection
11
1.This appliance is only intended for domestic use.
2.This oven is intended for built-in use only. It is not intended
for counter-top use or for use inside a cupboard.
3. Please observe the special installation instructions.
4.The appliance can be installed in a 60cm wide wallmounted cupboard.
5.The appliance is fitted with a plug and must only be
connected to a properly installed earthed socket.
6.The mains voltage must correspond to the voltage
specified on the rating plate.
7.The socket must be installed and connecting cable must
only be replaced by a qualified electrician. If the plug is no
longer to accessible following installation, an all-pole
disconnecting device must be present on the installation
side with a contact gap of at least 3mm.
8.Adapters, multi-way strips and extension leads must not
be used. Overloading can result in a risk of fire.
The accessible surface may
be hot during operation.
Page 13

Installation Instructions
12
Please Read the Manual Carefully Before Installation
!"#$%# &'(#
)"#*(+,*$" *'&&#*(,'&
!"# $%#& '( )'**#+ ,'*" - ./01 -&+ 20(* $&/3
($57#*8 !"# ($57#* 20(* $&/3 4# '&(*-//#+
6#./-5#+ 43 - 90-/')'#+ #/#5*6'5'-&: -&+ '&
;) *"# ./01 '( &$ /$&1#6 -55#(('4/# )$//$,'&1
4# .6#(#&* $& *"# '&(*-//-*'$& ('+# ,'*" -
!"# )'**#+ 5-4'&#* 20(* &$* "-%# - 4-57
A g a p m u s t b e m a in t a in e d b e tw e e n
Sp ecific
ga p s ize
?'&'202 '&(*-//-*'$& "#'1"*@ AB>528
C$ &$* 5$%#6 %#&*'/-*'$& (/$*( -&+ (05*'$&
-'(#.
C$ &$* *6-. $6 4#&+ *"# .$,#6 5-4/#8
could be referenced by the diagrams.
Screw
4# 5$&*#+ *$ - .6$.#6/3 '&(*-//#+ #-6*"#+
-&+ *"# 5$&*'&1 5-4/# 20(* $&/3 4#
-55$6+-&5# ,'*" *"# -..6$.6'-*# 6#10/-*'$&(8
'&(*-//-*'$&: -&
5$&*-5* 1-. $) -* /#-(* =>228
,-// 4#"'&+ *"# -../'-&5#8
the wall and the ba se of the
"$/#(8
-//<.$/# '($/-*'&1 (,'*5" 20(*
unit above .
Mounting Plate
Page 14

13
Page 15

B.Prep are the cabi inet
14
1. Read the instruction on the BOTTOM CABINET TEMPLATE ,
put the template on the bottom plane of cabinet.
"a "" seloH
PN:261800316968
2. Make the marks on the bottom plane of cabinet according to marks"a" of
the template
3. Remove the bottom cabinet template and fix the mounting plate w
Screw
Mounting Plate
ith screw.
Page 16

C . I n s t a l l t h e o v e n
15
4. Install the oven to the cabinet
- Make sure the back of the oven is locked by mounting plate .
- Do not trap or kink the power cord.
Mounting
Plate
5. Open the door, fix the oven to the cabinet with Screw , at the installation hole.
rew
Sc
Installation Hole
Page 17

Control Panel
16
Page 18

Operation Instructions
17
1. Clock Setting
When the microwave oven is electrified, the LED will display "0:00", buzzer will ring once.
1) Press " " twice to select clock function, the hour figures will flash.
2) Turn " " to adjust the hour figures, the input time should be within 0--23.
Kitchen Timer/Clock
3) Press " ", the minute figures will flash.
4) Turn " " to adjust the minute figures, the input time should be within 0--59.
5) Press " " to finish clock setting. ":" will flash, and the time will light.
No te: 1)
2) During the process of clock setting, if you press " ", the oven
will go back to the previous status automatically.
Kitchen Timer/Clock
Kitchen Timer/Clock
The clock will not work if it is not set when powered.
Stop/Clear
2. Microwave Cooking
Press " " the LED will display "P100".Press " "
repeatedly or turn " "to choose the power you want, and "P100", "P80" "P50",
"P30" or "P10" will display for each added press. Then press" "
to confirm, and turn " " to set cooking time from 0:05 to 95:00. Press
Start/+30Sec./Confirm
" " again to start cooking.
Example: If you want to use 80% microwave power to cook for 20 minutes, you can
operate the oven as the following steps.
1) Press " " once, the screen display "P100".
2) Press " " once again or turn" " to choose 80% microwave
power.
wave Micro
wave Micro
wave Micro
wave Micro
Start/+30Sec./Confirm
3) Press " " to confirm, and the screen displays "P 80".
4) Turn " " to adjust the cooking time until the oven displays "20:00".
5) Press " " to start cooking .
Note: the step quantities for the adjustment time of the coding switch are as follow:
0---1 min : 5 seconds
1---5 min : 10 seconds
5---10 min : 30 seconds
10---30 min : 1 minute
30---95 min : 5 minutes
Start/+30Sec./Confirm
Start/+30Sec./Confirm
Page 19

4. Quick Start
18
1) In waiting state, Press " " to start cooking with 100% power,
each added press will increase 30 seconds cooking time up to 95 minutes.
2) In microwave cooking or time defrost state, each press of
Start/+30Sec./Confirm
" " can increase 30 seconds of cooking time.
3) In waiting state, turn " " left to set cooking time with 100%
microwave power, then press " " to start cooking.
Start/+30Sec./Confirm
Start/+30Sec./Confirm
5. Defrost By Weight
1) Press " " once, and the oven will display "dEF1".
2) Turn " " to select the weight of food from 100 to 2000 g.
W.T./Time Defrost
3) Press " " to start defrosting.
Start/+30Sec./Confirm
6. Defrost By Time
1) Press " " twice, and the oven will display "dEF2".
2) Turn " " to select the defrost time. The MAX time is 95 minutes.
3) Press " " to start defrosting.The defrost power is P30 , and
it will not be changed.
W.T./Time Defrost
Start/+30Sec./Confirm
7. Kitchen Timer
(1) Press " "
(2) Turn " " to enter the correct timer.(The maximum cooking time is 95 minutes.)
(3) Press " " to confirm setting.
(4) When the kitchen time is reached, clock indicator will go out. The buzzer will ring 5 times.
If the clock be set(24-hour system), LED will display the current time.
Note: The kitchen Time is different from 24-hour system,Kitchen Timer is a timer.
Kitchen Timer/Clock
Start/+30Sec./Confirm
once, LED will display 00:00.
Page 20

8. Auto Menu
19
1) Turn " " right to choose the menu, and "A-1" to "A-8" will display, which
means pizza,meat, fish,beverage and popcorn.
vegetable,pasta, potato,
2) Press " " to confirm.
Start/+30Sec./Confirm
3) Turn " " to choose the default weight as the menu chart.
4) Press " " to start cooking.
Start/+30Sec./Confirm
Example: If you want to use "Auto Menu" to cook fish for 350g.
1) Turn " " clockwise till "A- " display.
2) Press " " to confirm.
Start/+30Sec./Confirm
6
3) Turn " " to select the weight of fish till "350" display.
4) Press " " to start cooking.
Start/+30Sec./Confirm
Auto Menu
Menu
A-1
Pizza
A-2
Meat
A-3
Vegetable
A-4
Pasta
A-5
Potato
A-6
Fish
A-7
Beverage
A-8
Popcorn
50g(with 450 cold water)
100g(with 800 cold water)
Weight
200 g
400 g
250 g
350 g
450 g
200 g
300 g
400 g
200 g
400 g
600 g
250 g
350 g
450 g
1(about 120ml)
2(about 240ml)
3(about 360ml)
50
85
100
Display
200
400
250
350
450
200
300
400
50
100
200
400
600
250
350
450
1
2
3
50
85
100
Page 21

9. Multi-section cooking
20
At most 2 sections can be set for cooking. In multi-section cooking, if one section is
defrosting, then defrosting shall be placed in the first section.
Example: If you want to defrost food for 5 minutes and then cook with 80% microwave
power for 7 minutes, operate it as the following:
1) Press " " twice, and the oven will display "dEF2".
2) Turn " " to select the defrost time till "5:00" display.
3) Press " " once, the screen display "P100".
4) Press " " once again or turn " " to choose 80%
5) Press " " to confirm, and the screen displays "P 80".
6) Turn " " to adjust the cooking time till the oven displays "7:00".
7) Press " " to start cooking, and buzzer will sound once for the
first section, defrosting time counts down; buzzer will sound once again entering
the second cooking. when cooking finish, buzzer sounds five times.
W.T./Time Defrost
wave Micro
wave Micro
Start/+30Sec./Confirm
Start/+30Sec./Confirm
microwave power.
10. Inquiring Functio n
(1) In states of microwave cooking, press " ",
displayed
for 3 seconds. After 3 seconds, the oven will turn back
(2) In cooking state, press " " to inquire the time and the time will
display for 3 seconds.
Kitchen Timer/Clock
wave Micro
the current power will be
to the former state;
11. Lock-out Function for Children
Lock: In waiting state, press " " for 3 seconds, there will be a long beep
denoting entering the children-lock state and the current time will diplay if the time
has been set, otherwise, the LED will display " ".
Lock quitting: In locked state, press " " for 3 seconds, there will be a long
"beep" denoting that the lock is released.
Stop/Clear
Stop/Clear
Page 22

Trouble shooting
21
It is forbidden to run the unit without any food inside.
It is very dangerous.
According to Waste of Electric al and Electronic Equipm ent
(WEEE) directive, WEEE sh ould be separately collected and
treated. If at any t ime in future you need to dispose of this
product pl ease do NOT dispose of this p roduct with househo ld
waste. Please send t his product to WEEE coll ecting points
where available.
Page 23

Warranty Card
Worldwide Appliances Pty Limited
A.B.N. 45868077422
Oce:
48-50 Moore Street, Leichhardt N.S.W 2040
Post:
Locked Bag 3000, Annandale, N.S.W 2038
P: 1300 694 583
WARRANTY REGISTRATION
Your ongoing satisfaction with your artusi
product is important to us. We ask that you
complete the enclosed Warranty Registration
Card and return it to us so that we have a record
of the artusi product purchased by you.
PRIVACY
Worldwide Appliances respects your
privacy and is committed to handling your
personal information in accordance with the
National Privacy Principles and the Privacy
Act 1988 (Cth). A copy of the Worldwide
Appliances Privacy Policy is available at
www.artusi.com.au. Worldwide Appliances will
not disclose any personal information set out
in the Warranty Registration Card (“Personal
Information”) without your consent unless
required by:
1. law;
2. any Worldwide Appliances related company;
3. any service provider which provide services
to artusi or assist artusi in providing services
(including repair and warranty services) to
customers. Our purpose in collecting the
Personal Information is
to keep a record of the artusi product purchased
by you, in order to provide a better warranty
service to you in the unlikely event that there is
a problem with your artusi product. Worldwide
Appliances may contact you at any one or more
of the address, email address or telephone
numbers set out in the Warranty Registration
Card. Please contact artusi on 1300 694
583 should you not wish to be contacted by
Worldwide Appliances.
WARRANTY
1. Warranty
Worldwide Appliances warrants that each artusi
product will remain, for a period of either 12
months or 24 months of warranty. All Warranties
are valid from the original date of purchase, And
warranty claims must be accompanied by the
proof of purchase.
24 months warranty products:
All Built-in Appliances – Limited to Ovens,
Gas, Induction and Electric Cooktops, and All
Rangehoods
Freestanding Cookers - Gas and Electric Models
(900mm Width)
artusi.com.au
Dishwashers - Freestanding, Fully Integrated,
Semi Integrated and built-in
12 months warranty products:
Freestanding Cookers - Gas and Electric Models
in 50cm, 54cm and 60cm Widths
Portable Appliances* – Benchtop Models and
Portable Gas Models
2. What is not Covered by the Warranty.
The Warranty does not apply if an artusi product
is defective by a factor other than a defect arising
in the manufacture of the artusi product, including
but not limited to:
(a) damage through misuse (including failure
to maintain, service or use with proper care),
neglect, accident or ordinary wear and tear
(including deterioration of parts and accessories
and glass breakage);
(b) use for purpose for which the artusi product
was not sold or designed;
(c) use or installation which is not in accordance
with any specied instructions for use or
installation;
(d) use or operation after a defect has occurred or
been discovered;
(e) damage through freight, transportation or
handling in transit (other than when Worldwide
Appliances is responsible);
(f) damage through exposure to chemicals, dusts,
residues, excessive voltage, heat, atmospheric
conditions or other forces or environmental
factors outside the control or Worldwide
Appliances;
(g) repair, modication or tampering by the
purchaser or any person other than Worldwide
Appliances, an employee of Worldwide
Appliances or an authorised artusi service
contractor*;
(h) use of parts, components or accessories
which have not been supplied or specically
approved by artusi.
(i) damage to surface coatings caused by cleaning
or maintenance using products not recommended
in the artusi product handbook provided to the
purchaser upon purchase of the artusi product;
(j) damage to the base of an electric oven due to
items having been placed on the base of the oven
cavity or covering the base, such as aluminium
foil (this impedes the transfer of heat from the
element to the oven cavity and can result in
irreparable damage); or
(k) damages, dents or other cosmetic
imperfections not aecting the performance of the
artusi in respect of an artusi product purchased
as a “factory second” or from display
The Warranty does not extend to light globes
used in artusi products.
3. Domestic Use
Each artusi product is made for domestic use.
This Warranty may not extend to artusi products
used for commercial purposes.
Continued over...
Page 24

Warranty Card continued
artusi.com.au
4. Time for Claim under the Warranty
You must make any claim under this Warranty
within twenty eight (28) days after the occurrence
of an event which gives rise to a claim pursuant
to the Warranty, by booking a service call on the
telephone number below.
5. Proof of Purchase
Customers must retain proof of purchase in order
to be eligible to make a warranty claim in respect
of an artusi product.
6. Claiming under the Warranty
Customers will bear the cost of claiming under
this Warranty unless Worldwide Appliances
determines the expenses are reasonable, in which
case the customer must claim those expenses
by providing written evidence of each expense
to Worldwide Appliances at the address on the
Warranty Registration Card.
7. Statutory Rights
(a) These terms and conditions do not aect your
statutory rights.
(b) The limitations on the Warranty set out in this
document do not exclude or limit the application
of the consumer guarantees set out in the Act or
any other equivalent or corresponding legislation
in the relevant jurisdiction where to do so would:
(i) contravene the law of the relevant jurisdiction;
or
(ii) cause any part of the Warranty to be void.
(c) Worldwide Appliances excludes indirect or
consequential loss of any kind (including, without
limitation, loss of use of the artusi product) and
(other than expressly provided for in these terms
and conditions) subject to all terms,
conditions and warranties implied by custom, the
general law, the Act or other statute.
(d) The liability of Worldwide Appliances to you
Warranty Card tear off
for a breach of any express or non-excludable
implied term, condition or warranty is limited at
the option of Worldwide Appliances to:
(i) replacing or repairing the defective part of the
artusi product;
(ii) paying the cost of replacing or repairing the
defective part of the artusi product;
(iii) replacing the artusi product; or
(iv) paying the cost of replacing the artusi
product.
(e) Our goods come with guarantees that cannot
be excluded under the Australian Consumer
Law. You are entitled to a replacement or refund
for a major failure and for compensation for any
other reasonably foreseeable loss or damage.
You are also entitled to have the goods repaired
or replaced if the goods fail to be of acceptable
quality and the failure does not amount to a
major failure.
8. Defects
Any part of an artusi product deemed to be
defective and replaced by Worldwide Appliances
is the property of Worldwide Appliances.
Worldwide Appliances reserves the right to
inspect and test artusi products in order to
determine the extent of any defect and the
validity of a claim under the Warranty.
*To locate your closest artusi authorised service
agent please contact us on 1300 652 100 or visit
www.artusi.com.au
ALL SERVICE CALLS MUST BE BOOKED
THROUGH AN AUTHORISED DEALER OR
WARRANTY DEPARTMENT ON 1300 652 100
OR stokesaps.com.au/artusi-service
01032014
WARRANTY REGISTRATION CARD
01052013
Last Name: First Name:
Address:
State: Postcode: Email:
Home Phone: Mobile:
Purchase Date: / / (Please attach proof of purchase to validate warranty)
MODEL NUMBER
1
2
3
4
Please complete and send to ARTUSI at: REPLY PAID 83617
LEICHHARDT NSW 2040
SERIAL NUMBER
(if you cannot locate the serial number please call ARTUSI on 1300 694 583)
01032014
4
Page 25

Page 26

DISCLAIMER
Worldwide Appliances PTY LTD, trading as ARTUSI, is continually seeking ways to improve the design specifications, aesthetics and production
techniques of its products. As a result alterations to our products and designs take place continually. Whilst every effort is made to produce
information and literature that is up to date, this brochure should not be regarded as an infallible guide to the current specifications, nor does it
constitute an offer for the sale of any particular product. Product dimensions indicated in our literature is indicative only. Actual product only
should be used to define dimension cutouts. Distributors, and retailers are not agents of ARTUSI and are not authorised to bind ARTUSI by any
express or implied undertaking or representation.
ARTUSI OFFICES ARE OPEN DAILY FROM 9AM–5PM AND SATURDAYS 10AM–4PM
NSW & ACT (HEAD OFFICE)
48-50 MOORE STREET
LEICHHARDT
F 02 8569 4699
P: 13 00 6 49 5 83
VIC, TAS & SA
1211 TOORAK ROAD
CAMBERWELL
F 03 9809 2155
QLD
1/42 CAVENDISH ROAD
COORPAROO
F 07 3397 0850
WA & NT
UNIT 10/55 HOWE STREET
OSBORNE PARK
F 08 9201 9188
NZ
PO BOX 11.160
SOCKBURN CHRISTCHURCH
F 03 344 5906
ARTUSI.COM.AU
 Loading...