

Page 1
AFC547W
AFC607W
AFC607B
AFC607X
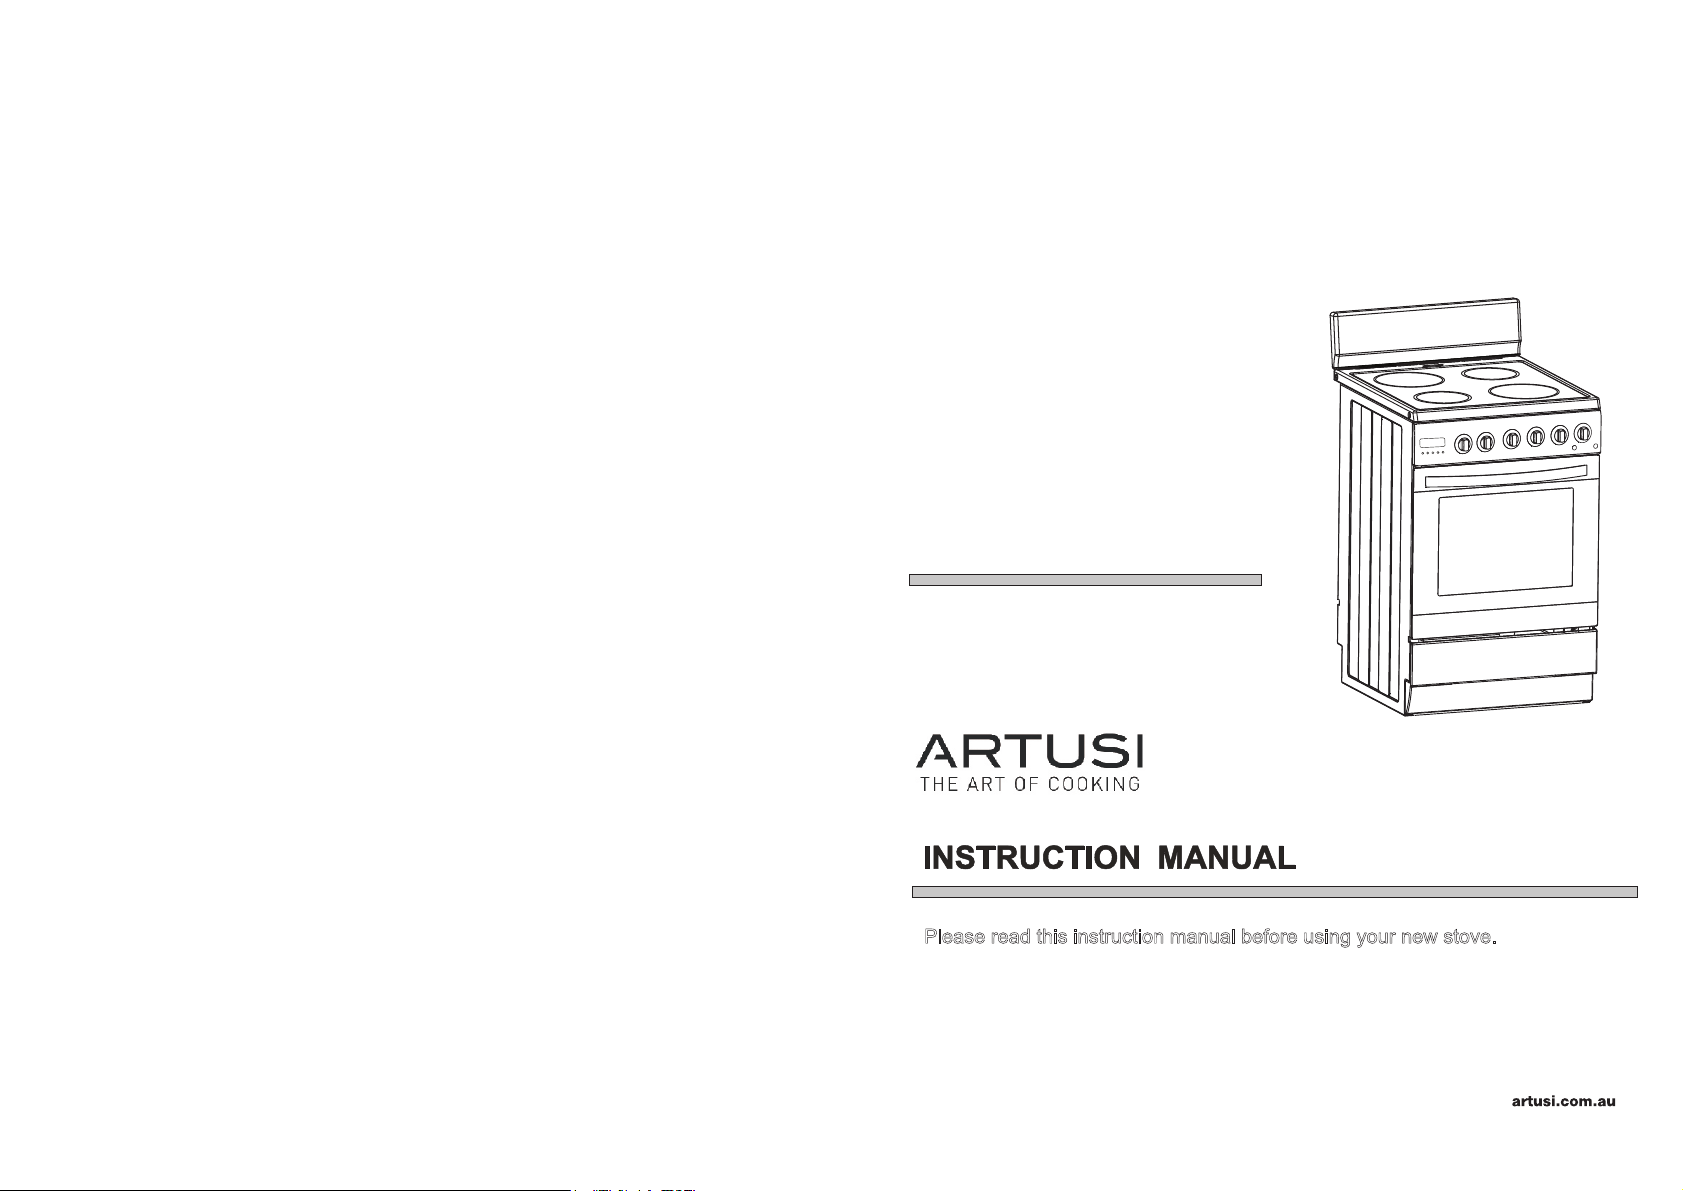
Please read this instruction manual before using your new stove.
Cod:0040302783
Page 2

DEAR CUSTOMER
TABLE OF CONTENTS
The cooker is exceptionally easy to use and extremely efficient. After reading the
instruction manual, operating the cooker will be easy.
Before being packaged and leaving the manufacturer, the cooker was thoroughly checked
with regard to safety and functionality.
Before using the appliance, please read the instruction manual carefully.
By following these instructions carefully you will be able to avoid any problems in using the
appliance.
It is important to keep the instruction manual and store it in a safe place so that it can be
consulted at any time.
It is necessary to follow the instructions in the manual carefully in order to avoid possible
accidents.
Caution!
Do not use the cooker until you have read this instruction manual.
The cooker is intended for household use only.
The manufacturer reserves the right to introduce changes which do not affect the operation
of the appliance.
Safety instructions......................................................................................................
How to save energy..............................................................................................................4
Unpacking............................................................................................................................5
Disposal of the appliance.....................................................................................................5
3
Description of the appliance...................................................................................6
Installation......................................................................................................................7
Operation...................................................................................................................... .9
Before first use........................................................................................................................9
Controlling the heating zones of the ceramic hob. ..... .........................................9
Electronic programmer................................................................................................................10
Oven functions and operation.............................................................................................14
Cleaning and maintenance...................................................................................17
Operation in case of emergency........................................................................18
Baking in the oven....................................................................................................19
Technical information..............................................................................................25
Electrical connection
.............................
...................................................................26
1
2
Page 3

SAFETY INSTRUCTIONS
l The appliance becomes hot during operation. Take care not to touch the hot parts
inside the oven.
l Always keep children away from the cooker.
the cooker may cause burns!
l Ensure that small items of household equipment, including connection leads, do not
touch the hot oven or the hob as the insulation material of this equipment is usually
not resistant to high temperatures.
l Do not leave the cooker unattended when frying. Oils and fats may catch fire due to
overheating.
l Do not allow the cooktop to get soiled and prevent liquids from boiling over onto the
surface of the cooktop, Any spillages should be cleaned up as they happen.
l Do not place pans with a wet bottom on the warmed up heating zones as this can
cause irreversible changes to the cooktop(irremovable stains).
l Do not switch on the cooktop until a pan has been placed on it.
l Do not put pans weighing over 15kg on the opened door of the oven and pans over
25kg on the cooktop.
l Do not use harsh cleaning agents or sharp metal objects to clean the doors as they
can scratch the surface, which could then result in the glass cracking.
l Do not use the cooker in the event of a technical fault. Any faults must be fixed by an
appropriately qualified and authorized person.
l In the event of any incident caused by a technical fault, disconnect the power and
report the fault to the service centre to be repaired.
l The rules and provisions contained in this instruction manual should be strictly
observed. Do not allow anybody who is not familiar with the contents of this instruction
manual to operate the cooker.
l The cooker should not be cleaned using steam equipment.
WARNING:Accessible parts may become hot during use.Young children should be
kept away.
WARNING:In order to prevent accidental tipping of the appliance ,for example by a
child climbing onto the open door,the stabilizing means must be installed.
The oven must be switch off before removing the guard and that,after cleaning,the
guard must be replaced in accordance with the instrctions.
Ensure that the appliance is switch off before replacing the lamp to avoid the possibility
of electric shock.
WARNING:Accessible parts will become hot when the grill is in use .Children shoule be
kept away.
The appliance is not intended to be operated by means of an external timer or separate
remote-control system.
This appliance is not intended for use by persons (including children) with reduced
physical, sensory or mental capabilities, or lack of experience and knowledge,unless
they have been given supervision or instruction concerning use of the appliance by a
person responsible for their safety.
Children should be supervised to ensure that they do not play with the appliance.
If the supply cord is damaged, it must be replaced by the manufacturer or its service
agent or a similarly qualified person in order to avoid a hazard.
Use pans that are specified by the manufactruer as designed for use with a ceramic hob.
If the surface is cracked,switch off the appliance to avoid the possibility of electric shock.
While in operation direct contact with
Do not use pans with sharp edges that may
cause damage to the ceramic hob.
Do not look directly at the halogen heating
zone (not covered with a pan)when they are
warming up.
If the appliance used in New Zealand,this
cooking range must be connected to the
supply by a supply cord fitted with an
appropriately rated plug that is compatible
with the socket-outlet fitted to the final
sub-circuit in the fixed wiring that is
intended to supply this cooking range.
HOW TO SAVE ENERGY
Using energy in a responsible
way not only saves money
but also helps the environment
So let’s save energy!
And this is how you can do it:
● Use proper pans for cooking.
Pans with thick, flat b ases can save up to
1/3 on electric energy. Remember to cover
pans if possible otherwise you will use four
times as much energy!.
● Match the size of the saucepan to the
surface of the heating plates.
A saucepan should never be smaller than
a heating plate.
● Ensure heating plates and pan bases
are clean.
Soils can prevent heat transfer-and
repeatedly burnt-on spillages can often
only be removed by products which cause
damage to the environment.
● Do not uncover the pan too often(a
watched pot never boils!).
Do not open the cover door unnecessarily
often.
● Switch off the oven in good time and
make use of residual heat.
For long cooking times,switch off heating
zones 5 to 10 minutes before finishing
cooking.This saves up to 20% on energy.
● Only use the oven when cooking larger
dishes.
Meat of up to 1 kg can be prepared more
economically in a pan on the cooker burner.
● Make use of residual heat from the
oven.
If the cooking time is greater than 40minutes
it is recommended to switch off the oven
10 minutes before the end time.
Caution!
When using the timer set appropriately
shorter cooking times according to the dish
being prepared.
● Only grill with the ultrafan after closing
the oven door.
● Make sure the oven door is properly
closed.
Heat can leak through spillages on the door
seals.Clean up any spillages immediately.
● Do not install the cooker in the direct
vicinity of refrigerators/freezers.
Otherwise energy consumption increases
unnecessarily.
3
4
Page 4
During transportation,
protective packaging was
used to protect the appliance
against any damage.
After unpacking, please dispose of all
elements of packaging in a way that will
not cause damage to the environment.
All materials used for packaging the
appliance are environmentally friendly;
they are 100% recyclable and are marked
with the appropriate symbol.
C au tio n!
During unpacking, the packaging materials
(polythene bags, polystyrene pieces, etc.)
should be kept out of reach of children.
Old appliances should not
simply be disposed of with
normal household waste,
but should be delivered to a
collection and recycling centre
for electric and electronic
equipment.
A symbol shown on the product,the
instruction manual or the packaging shows
that it is suitable for recycling.
Materials used inside the appliance are
recyclable and are labelled with information
concerning this. By recycling materials or
other parts from used devices you are
making a significant contribution to the
protection of our environment.
Information on appropriate disposal centres
for used devices can be provided by your
local authority.
13
1
12
2
11
3,4 ,
5,6
7
8
9
10
1
12
9
2
13
11
3,4,5,6
7
8
10
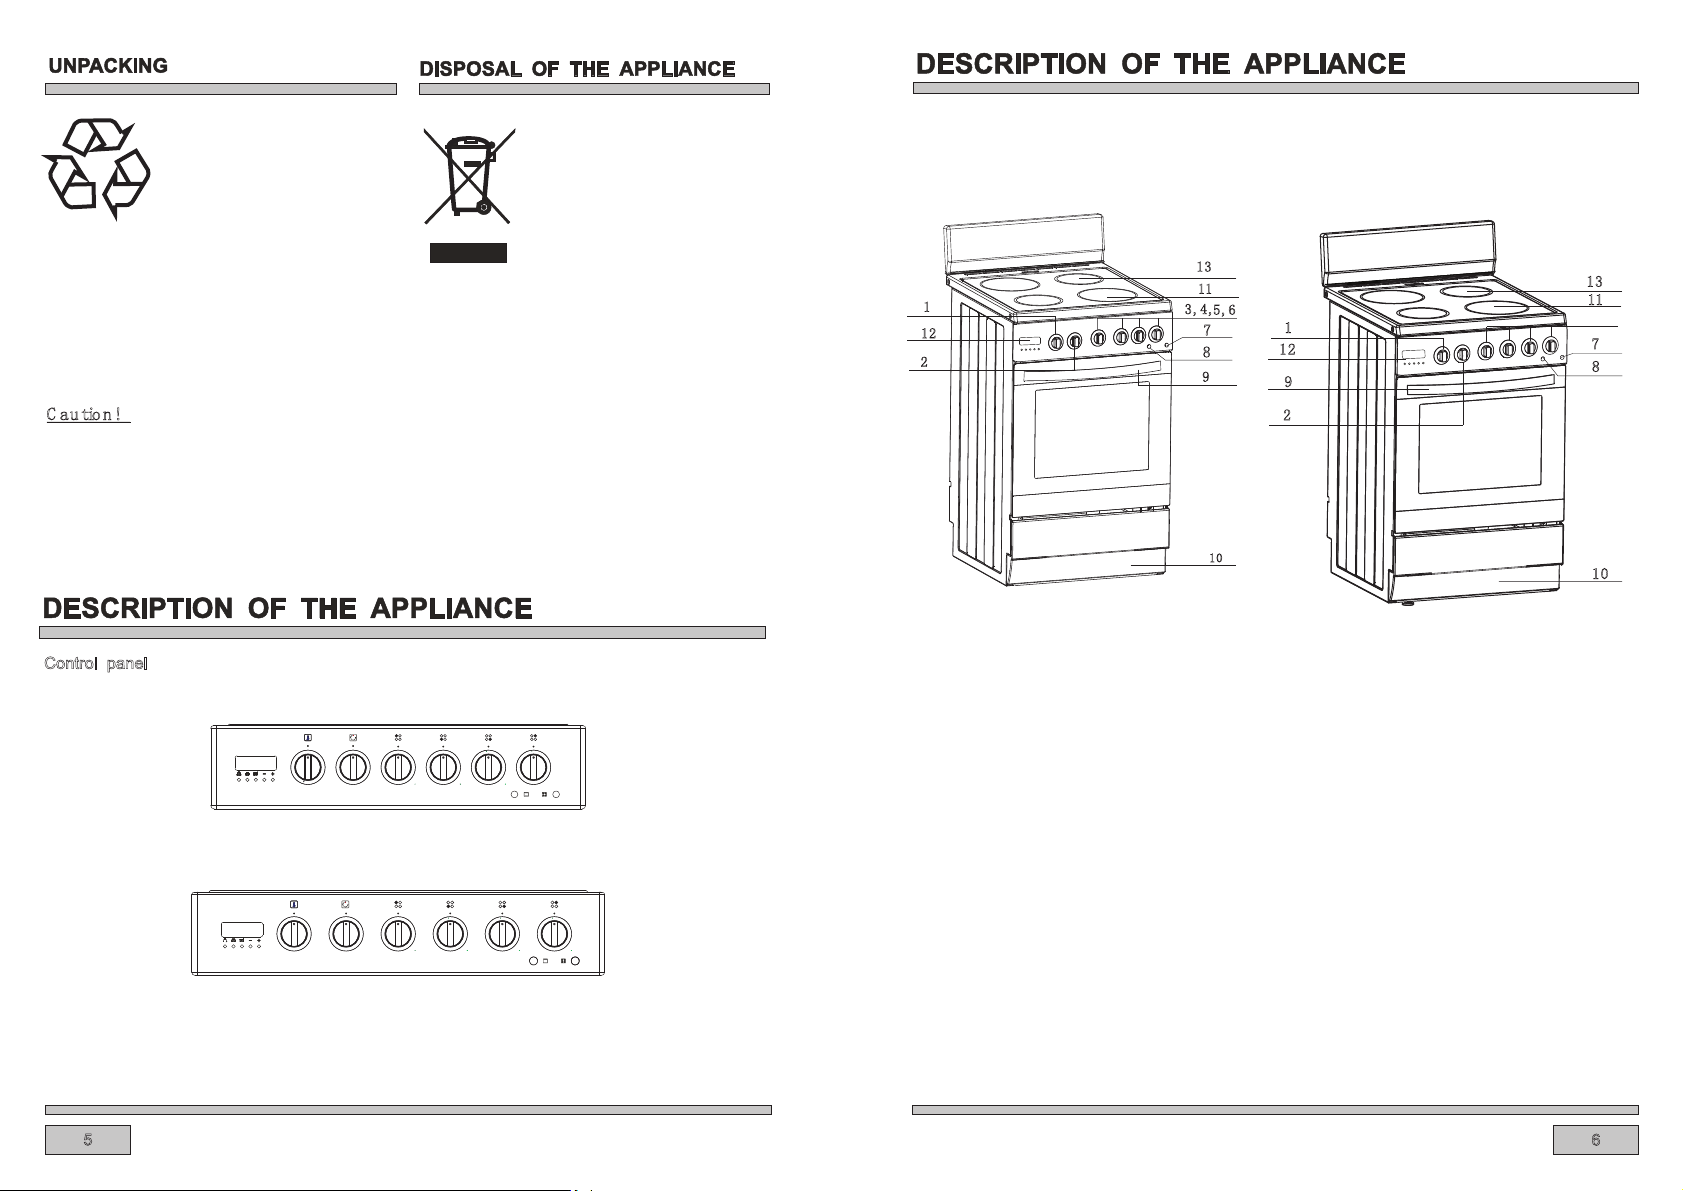
Control panel
5
1
AFC547W
AFC607W
AFC607B
AFC607X
AFC547W
1 Temperature control knob
3,4,5,6 Heating zone control knobs
8 Oven temperature signal light red
10 Drawer
12
Electronic programmer
AFC607W
AFC607B
AFC607X
2 Oven function selection knob
7 Cooker operation signal light orange
9 Oven door handle
11 180mm Hi-light heater
13 145mm Hi-light heater
6
Page 5
INSTALLATION
INSTALLATION
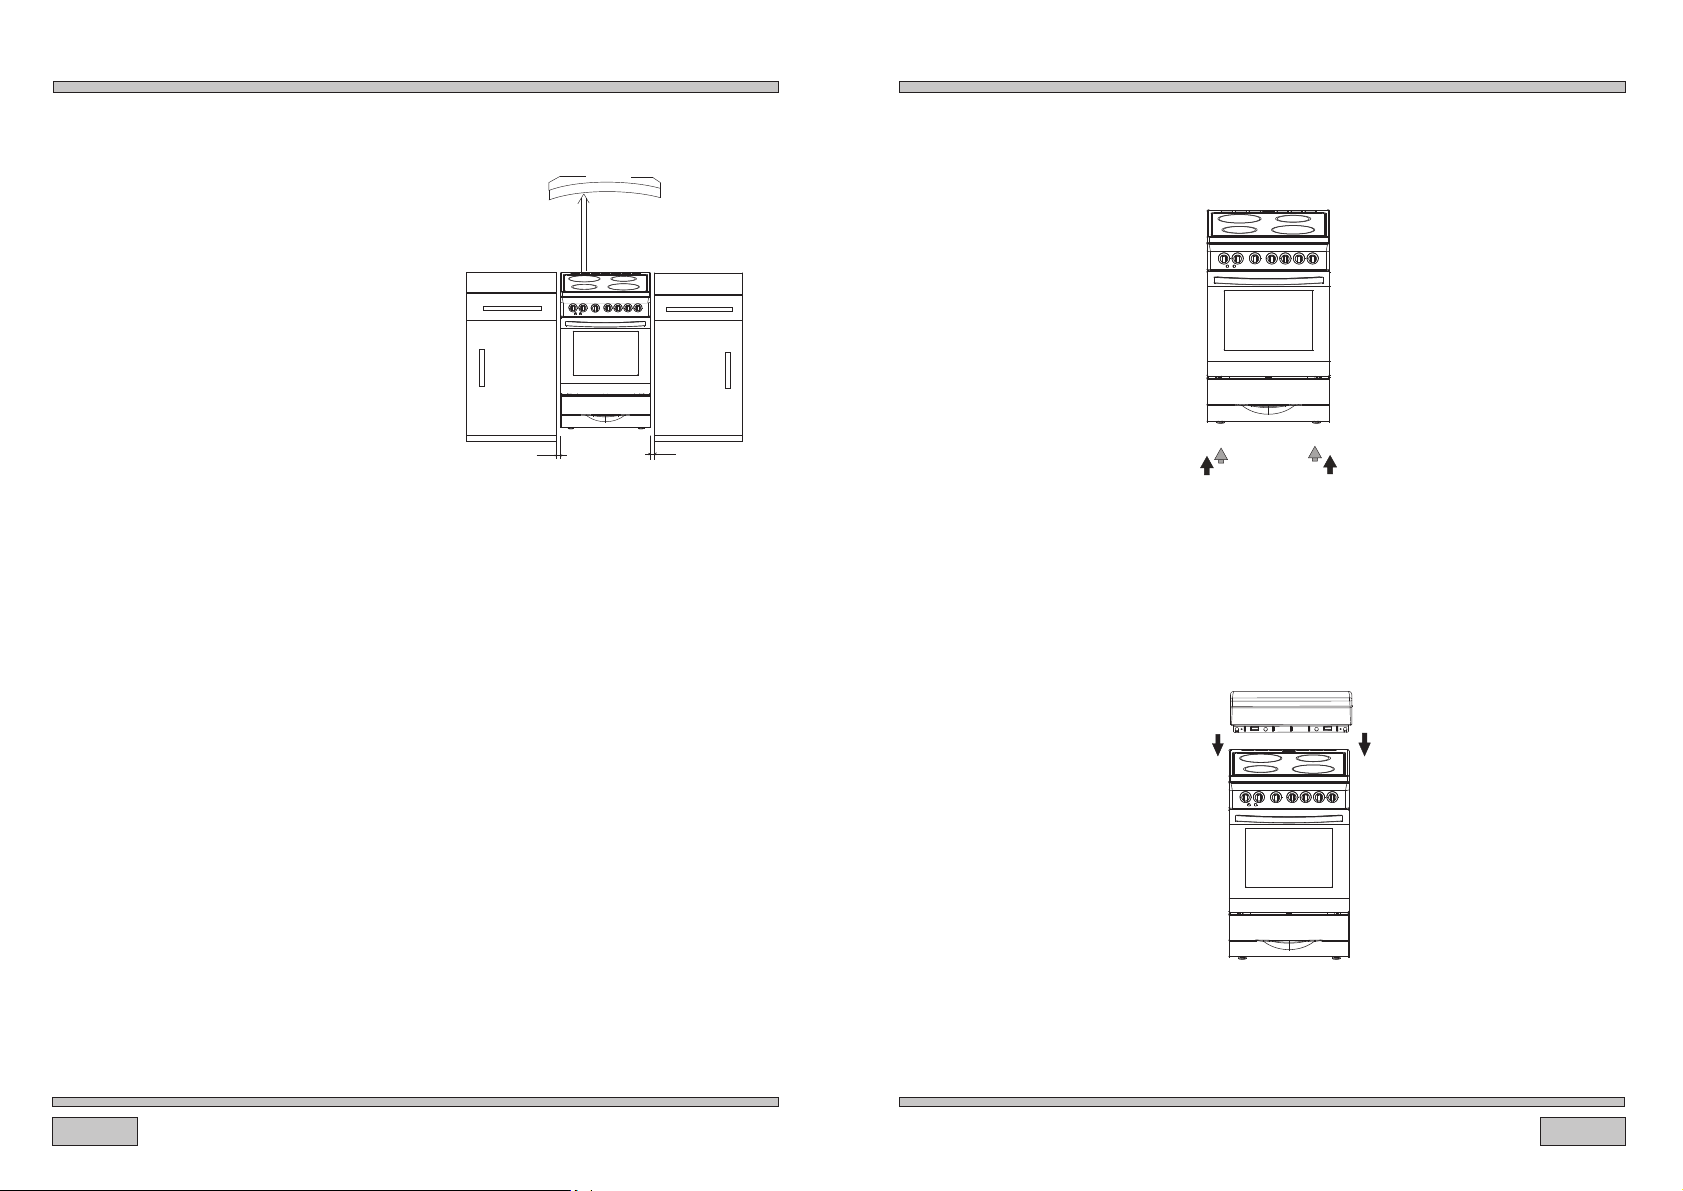
Installing the cooker
The kitchen should be dry and airy
and have effective ventilation
according to the existing technical
provisions.
The room should be equipped with a
ventilation system that pipes away
exhaust fumes created during
combustion.This system should
consist of a ventilation grid or hood.
Hoods should be installed according
to the manufacturer’s instructions.
The cooker should be placed so as to
ensure free access to control
elements.
Coating or veneer used on fitted
furniture must be applied with a heat
resistant adhesive (100℃). This
prevents surface deformation or
detachment of the coating. If you
are unsure of your furniture’s heat
resistance, you should leave
approximately 2 cm of free a pace
around the cooker. The wall behind
the cooker should be resistant to
high temperatures.During operation,
its back side can warm up to around
50℃ above the ambient temperature.
750mm750mm
2cm2cm
2cm2cm2cm2cm
The cooker should stand on a hard,
even floor (do not put it on a base.)
Before you start using the cooker it should be leveled,which is particularly Important for
distribution in a frying fat pan. To this purpose,adjustable feet are accessible after
removal of the dra wer. The adjustment range is +/-5mm.
●
Install the cover Take the cover and cooker out of the packaging.Select a
proper place,and steadily level the cooker.
To fit the rear panel/splashback, slide the lugs on the bottom of the panel into the
matching slots on rear of stove and fix with screws provided.
7
8
Page 6

OPERATION
Before first use
Remove packaging and empty the drawer. Clean the interior of the oven with
l
warm soapy water and wipe clean with moistened cloth or sponge. Wipe clean the
cooktop.
l
Take out and wash the oven fittings with warm water and a little washing-up liquid.
l
Switch on the ventilation in the room or open a window.
l
Heat the oven (to a temperature of 250, for approx. 30 min.), remove any stains and
wash carefully. The hotplates should be heated for around 4 minutes without
a pan or pot on them.
l
When heating the oven for the first time it is normal for the stove to give
off smoke and manufacturing odours.These will disappear after about 30
Minutes.
OPERATION
Zone heating indicator
If the temperature of a heating zone exceeds 65
degree this is signalled by an indicator which lights
up for that zone.
When the heating indicator lights up it warns the
person using the cooker against touching a hot
heating zone.
For about 5 to 10 minutes after a heating zone is
switched off it will still have residual heat that can
be used,for example to warm up or keep dishes
warm without switching on another heating zone.
Controlling the heating zones of the ceramic hob
Choice of cookware
Choose a pan with a diameter that is at least as large as the heating zone.Do not use
pans with a concave and convex base.Always remember or put a proper cover on the
pan.We recommend the use of pans with thick,even bases.
If the heating zones and pans are solied it is impossible to make full use of the heat.
Right
Wrong
WrongWrong Wrong
Heat level selection
The heating zones have different levels of heat. The level of heat can be adjusted
gradually by turning the appropriate knob to the right or left.The knov are unfold on
the control panel,to select it you should:
-push the knob gently and then turn it;
-set it to the right position.
The marks at the knob show the different levels reached by the heating zones.
Step
0
1-2
3
4-5
6
7-8
9
hot plate off,use of remaining heat
maintaining temperature,slow cooking,small quantities of food(min power)
slow cooking
slow cooking of large quantities,slow frying of large big chunks
frying,preparing soup basis
fry
boiling,browning,frying(maxmium power)
Suitable for
9
Electronic programmer
1 - Display field
2 - Functions
- 60Hz indication
A
- Automatic operation
indication
- Cooking indication
- Running indication
- Timer
A
Zone heating indicator
2
3 -Buttons
- Timer
- Cooking time
- End of cooking time
1
- To decrease the
numbers on the
digital diaplay.
- To increase the
numbers on the
3
digital diaplay.
Caution!
Before any setting,press buttons 2 and
3 simultaneously to start the oven.
5
3
4
2
1
Setting the time
1. After connection to the mains or
reconnection after a power cut,the
display, shows flash “ 0.00” and
“A”.
A
3. The signal function is flashing, set
the current time using buttons 4 and 5.
5 seconds after the time has been set,
the new data wil
l be saved. The signal
function is on.
1 2
2. Press buttons 2 and 3 simultaneously,
the signal function
5
is on.
1
4
2
5
3
4
3
10
Page 7

Timer
The timer can be activated at any time and
any function. The timer can be set for from
1 minute to up to 23 hours and 59 minutes.
To set the timer you should:
Press button 1, the display will show
1.
“0.00” and flashing .
1 2
2. Set the timer using buttons 4
1
3. 5 seconds after the time
signal function
4
5
3
and 5.
3
5
4
2
is set, the
is on. The new data
will be saved and the display will show
the current time.
5
1
4. Press button 1, the remanent
be shown on the display. (
minute, the display will
4
3
2
time will
In the last
show the
remanent seconds)
4
5
3
2
1
If you want to reset the timer, repeat
step 2 and set time to 0:00 .
5. When the set time is up the alarm
signal will be activated and the signal
function
starts flashing again.
5
3
1 2
and alarm signal will go off.if
signal is not turned off
alarm
manually,it will
automatically after 7
Caution!
be turned off
4
the
minutes.
Besides timer alarm, any other alarms can
be turned off by pressing button1, 2 or 3. If
the alarm signal is not turned off manually,
it will be turned off automatically after 7
minutes.
There are three different clarm sounds for
your choice. When the display field shows
the current time, press button 4, you can
select the alarm sound you want. Once the
alarm sound is set, it will be introduced to
the memory.
Semi- automatic operation
If the oven is to be switched off at a given
time, or after defined period, you should:
1. Set the oven function knob and the
temperature regulator knob to the
setting at which you want the oven to
operate.
2. Press buttons 2 and 3 simultaneously,
the oven will begin to work and the
function signal is on.
3. Press button 2 or 3, then the display
will show flashing “A”.
4. Set the required time using buttons 4
and 5, within a range from 1 minute to
10 hours.
5. The set time is introduced to the
memory after 5 seconds, then the
display will show the current time. At
the same time, the function signal “A”
is on.
6. When the set time has passed , the
oven is switched off automatically, the
alarm is activated, the signal function
is off, and the signal function “A”
starts flashing again.
7. Press button 1, 2 or 3 , the alarm signal
will go off. The signal “A” still flashing.Or if
the alarm signal is not manually,turned off
it will be turned off after 7automatically
minutes.
Caution!
● The cooking time and switch-off time
range
Cooking time range: 0 < t ≤10 hours
Switch-off time range: current time <
switch-off time ≤ current time + 10
hours
Switch-off time = current time +
cooking time
● Set the cooking time or switch-off time
When use the semi-automatic
operation, set either the cooking time
or the switch-off time.
● If set the cooking time to be 0 or set
the switch-off time to be the current
time, the auto function will be off.
:
For example:
The current time is 2:00, the maximum
switch-off time is set to be 12:00
(2:00+10:00=12:00).
1
3
2
5
6
5
3
4
4
2
1
There are two methods to achieve this
setting:
First method:
1. Press button 2, then the display will
show flashing “A”.
A
1 2
3
4
5
Set the cooking time using buttons 4
and 5.
A
4
3
1 2
Press button
3, then the display will
show flashing “A”.
A
1
2
5
5
3
4
Set the switch-off time using buttons 4
and 5.
A
5
3
1 2
4
5 seconds after the setting, the auto
function is on.
10 hours later, the current time shows
“12.00” The alarm signal is activated, the
signal function is off, and the signal
function “A” starts flashing.
Automatic operation
If the oven is to be switched on for a
specified period of time and switched off at
a fixed hour then you should set the cooking
time and the stop time:
1. Set the oven function knob and the
temperature regulator knob to the
setting at which you want the oven to
operate.
2. Press buttons 2 and 3 simultaneously,
the oven will begin to work and the
function signal
is on.
3. Press button 2 , then the display will
show flashing “A”. Set the cooking
time using buttons 4 and 5, within a
range from 1 minute to 10 hours
.
4. Press button 3, s et the switch-off time
using buttons
4 and 5.
11
12
Page 8

5. The set time is introduced to the
memory after 5 seconds , then the
function signal “A” is on . When the
work time is reached, the oven will
begin to work and the display will
show the current time. At the same
time, the function signal
is on.
6. When the set time has passed, the
oven is switched off automatically, the
alarm signal is activated, the signal
function is off, and the signal
function”A” starts flashing again.
7. Press button 1, 2 or 3 , the alarm signal
will go off. The signal “A” still flashing.Or if
the alarm signal is not manually,turned off
it will be turned off after 7automatically
minutes.
Caution!
● work time = switch-off time –cooking time
For example:
If the current time is 2:00; cooking time set
to be 3 hours ; s witch-off time set to be
10:00, the work time will be 7:00
(7:00=10:00-3:00).
1
3
4
2
1. Press button 2 and 3 simultaneously,
the oven begin to work, and the signal
function is on.
1
2
2. Press button 2, then the display will
show flashing”A”.
A
1
2
5
5
3
4
3
4
5
3. Set the cooking time to be “3.00”
with buttons 4 or 5.
4.
Press button 3.
5.
Set the switch-off time to be “10.00”
A
A
1 2
1
4
5
3
3
4
2
5
with buttons 4or5, the signal function
goes out.
A
3
4
2
1
5
6. 5 seconds after setting, the auto
function “A” is on.
7. When it up to 7:00
A
5
3
1
4
2
, the oven will begin
to work and the signal function is on.
8.
When it up to 10:00, the alarm signal is
A
1 2
3
4
5
activated, the signal function is off,
and the signal “A” starts flashing.
A
2
1
5
3
4
● If the cooking time set to be 0 or the
switch-off time set to be the current
time, the auto function will be off.
Cancel settings
Cancel any function
Turn the oven function selection knob to
“0”. 10 seconds later, run the oven again.
Cancel automatic function
Press button 2 and 3 simultaneously, the
auto function will be cancelled, and the
function signal ’A’ will go out. Then the
display will show the current time.
Cancel timer settings
Press button 1 to select timer settings,
and then press button 4 set time to 0:00,
5 seconds later the timer is cancelled.
Oven and operation functions
Oven is controlled by the function knob and
mechanical timer
selection knob.
Temperature selection knob
and the temperature
The function knob
Caution!
When selecting any oven function, the
oven will only be switched on after the
t
emperature has been set by the
emperature selection knob.
t
Possible settings of the oven function
knob
Bottom heater
At this oven function knob position, the
oven activates the bottom heater.
Fan, bottom and top
heaters on
At this knob position the oven executes the
cake function. Conventional oven with a
fan.
Fan grill heaters
process to be speeded and
an improvemyou should only
door shut.
Bottom and top heaters on
Setting the knob to this position allows the
oven to be heated conventionally.
ent in the taste of the dish,
use the gillwith the oven
13
14
Page 9

OPERATION
OPERATION
Fan only
This function for defrosting
Circular heater fan
At this function ,allows the oven to be
heating up in a forced way with the thermofan, which is in the central part of the oven
heating method is:
Redution of ovenheating-up time and
of the initial heating stage.
Possibility to bake at two cooking levels
simultaneously.
Caution!
When the functions with fan have been
selected but the temperature knob is set to
zero only the fan will be on.
With this function you can cool the dish or
the oven chamber.
Changing the Oven Lamp
Before any maintenance is started
involving electrical parts, the
appliance must be disconnected
from the power supply.
If the oven has been in use, let the
oven cavity and the heating elements
cool down before attempting any
maintenance.
Changing the bulb
Unscrew the protective cover. We
l
recommend that you wash and dry the
glass cover at this point.
l
Carefully remove the old bulb and
insert the new bulb suitable for high
temperatures (300ºC) having the
following specifications: 230-240V,
50Hz, 25W, G9 fitting.
l
Refit the protective cover.
Use of the grill
The grilling process operates through infrar ed rays emitted onto the dish by the
incand escent grill heater.
In order to switch on the grill you need to:
● Set the oven knob to the position mark ed grill.
● Heat the oven for approx. 5 minutes(with the oven door shut).
● Insert a tray with a dish onto the appropr iate cooking level; and if you are grilling on
the grate insert a tray for dripping on the le vel immediately below (under the grate).
● Close the oven door.
For grilling with the function grill and combined grill the temperature must be set to 250
℃, but for the function fan and grill it must be set to a maximum of 200℃.
Warning!
When using function grill it is recommended that the oven door is closed.
When the grill is in use accessible parts can become hot.
It is best to keep children away from the oven.
Oven guide levels
Baking pans and accessories (oven grid, baking tray, etc) may be inserted into the oven in
5 guiding levels.
Appropriate levels are indicated in the tables that follow.
Always count levels from the bottom upwards!
15
IMPORTANT
Never use screwdrivers or other
utensils to remove the light cover.
This could damage the enamel of the
oven or the lampholder. Remove only
by hand.
IMPORTANT
Never replace the bulb with bare
hands as contamination from your
fingers can cause premature failure.
Always use a clean cloth or gloves.
Please note:
The bulb replacement is not covered
by your guarantee
55
44
33
22
11
16
Page 10

CLEANING AND MAINTENANCE
CLEANING AND MAINTENANCE
By ensuring proper cleaning and maintenance
of your oven you can have a significant influence
influence on the continuing fault-free operation
of your appliance.
you start cleaning, the oven must be
Before
switched off and you should ensure that all
knobs are set to the “0”position. Do not start
cleaning until the oven has completely cooled.
Oven
The oven should be cleaned after each
.
use
Cool the oven completely before
cleaning.
Never clean the appliance with
pressurised hot steam cleaner!
The oven chamber should only be wash-
ed with warm water and a small amount
Steam cleaning
-pour 250m l of water (1 cup) into a
bowl placed in the oven on the first level
from the bottom.
-Close the oven door,
-Set the temperature knob to 50 ℃, and
the function knob to the bottom heater
position,
-heat the oven chamber for approximately
30 minutes,
-Open the oven door, wipe the chamber
inside with a cloth or sponge and wash
using warm water with washing-up liquid.
After cleaning the oven chamber wipe it
dry.
Caution!
Do not use cleaning products containing
abrasive materials for the cleaning and
maintenance of the glass front panel.
When cleaning do not use cleaning
agents with a strong abbrasive effect,such
as e.g. scouring powders containing an
abrasive,abrasive compounds,abrasive
stones,pumice stones,wire brushes and
so on.They may scratch the hob surface,
causing irreversible damage.
Large spillages that are firmly stuck to the
hob can be removed by a special scraper;
but be careful not to damage the ceramic
hob frame when doing this.
Scraper for cleaning the hob
Caution!
The sharp blade should always be
protected by adjusting the cover(just
push it with you thumb).Injuries are
possible so be careful when using this
instrument-keep out of reach of children.
Appropriate light cleaning or washing
products are recommended,such as
e.g. any kind of liquids emulsions for
fat removal.Alternatively a solution of
warm water with a little washing-up liquid
or cleaning products for stainless steel
sinks can be used.
Door removal
In order to obtain easier access to the oven
chamber for cleaning , it is possible to
remove the door.
To do this, tilt the safety catch part of the
hinge upwards. Close the door lightly, lift
and pull it out towards you. In order to fit the
door back on to the cooker, do the reverse.
When fitting, ensure that the notch of the
hinge is correctly placed on the protrusion
of the hinge holder. After the door is fitted
to the oven, the safety catch should be
carefully lowered down again. If the safety
catch is not set it may cause damage to the
hinge when closing the door.
Removal of the internal glass
panel
Unscrew and unfasten the plastic latch that
is in the corner at the top of the door. Next
take out the glass from the second blocking
mechanism and remove.After cleaning,
sert and block the glass panel,and screw in
the blocking mechanism.
Removal of the internal glass panel
Install door
Regular inspections
Besides keeping the cooker clean, you
should:
● Carry out periodic inspections of the
control elements and cooking units of the
cooker. After the guarantee has expired you
should have a technical inspection of the
cooker carried out at a service centre
at least once every two years.
● Fix any operational faults.
● Carry out periodical maintenance of the
cooking units of the cooker.
Caution!
All repairs and regulatory activities should
be carried out by the appropriate service
centre or by an appropriately authorized
fitter.
OPERATION IN CASE OF EMERGENCY
In the event of an emergency, you should:
switch off all working units of the oven
17
18
Page 11

BAKING IN THE OVEN
BAKING IN THE OVEN
disconnect the mains plug
call the service centre
some minor faults can be fixed by referring to the instructions given in the table below.
Before calling the customer support centre or the service centre check the following
points that are presented in the table.
PROBLEM REASON ACTION
1. The appliance
does not work.
2. The programmer
display is flashing
“0.00”.
3. The oven lighting
does not work.
The appliance was disconnected from the
or there was a tempo mains rary power cut.
Break in power supply. Check the household fuse box; if there is
The bulb is loose or damaged. Tighten up or replace the blown bulb(see
a blown fuse replace it with a new one.
Set the current time (see Use of the
programmer ).
Cleaning and Maintenance)
Baking tips
Baking cakes and loaves
Warning!
The baking parameters given in Tables
are approximate and can be corrected
based on your own experience and
cooking preferences.
In case you may not find any particular
type of cake in the tables , use the
information available for the next most
similar type of cake.
Baking with upper and lower
heaters
Use only a single guide level.
This baking position is especially suitable
for baking dry pastry, bread and teacakes.
Use dark baking pans. Light pans
reflect heat and pastry is not adequately
browned.
Always place baking pans on the grid
rack. Remove the grid only of baking in
the flat biscuit tray, supplied with the
appliance.
Preheating shortens the baking time. Do
not put the cake in the oven until proper
temperature is obtained.
gradually by turning the appropriate knob
to the right or left.The knov is unfold on
Is cake cooked?
Pierce the cake with a wooden peg at the
thickest part, if the dough does not stick to
it, the cake is baked. You may switch off
the oven and use the remaining heat.
cake has fallen
Check the recipe. Use less fluid next time.
Follow the mixing times, especially when
using powered kitchen mixers.
cake is too light on the bottom
Use dark baking pan next time, or place the
pan one level lower, or switch on the lower
heater a while before the completion.
Cheese cake is undercooked
Next time reduce the baking temperature
and extend the baking time.
Warnings regarding the baking
tables
The tables indicate the temperature range.
Always select lower temperature first.
You may always increase the
temperaturein case pastry needs more
baking.
Baking times are indicative only. They
may vary in dependence of individual
characteristics.
The asterix indicates that the oven
requires preheating.
Baking Table is for cakes and loaves
Type of pastry Guide level
(from down
upwards)
Sweet pastry
Raisin cake 2 160-170 2 150-160 55-70
Ring cake 2 160-170 2 150-160 60-70
Tree cake (tart
form)
Cheese cake
(tart form)
Fruit cake 2 190-200 3 170-180 50-70
Fruit cake with
icing
Sponge cake 2 180-190 2 160-170 30-40
Flake cake 3 190-200 3 170-180 25-35
Fruit cake mix
dough
Cherry cake 3 190-210 3 170-200 30-50
Jelly roll 3 190-200 3 170-180 15-25
Fruit fan 3 160-170 3 150-160 25-35
Plait bun 2 190-210 3 180-210 35-50
Christmas cake 2 180-190 3 170-200 45-70
Apple pie 2 190-210 3 170-200 40-60
Puff paste 2 180-190 3 160-170 40-60
Salted pastry
Bacon roll 2 190-200 3 170-180 45-60
Pizza 2 220-240 3 210-230 30-45
Bread 2 200-220 3 180-210 50-60
Rolls 2 210-230 3 200-220 30-40
Cookies
Caraway roll 3 180-190 3 160-170 15-25
Biscuits 3 180-190 3 160-170 20-30
Danish pastry 3 190-210 3 170-200 20-35
Flaky pastry 3 200-210 3 180-200 20-30
Cream puff 3 190-210 3 170-200 25-45
Deep frozen
pastry
Apple pie,
cheese pie
Cheese cake 2 190-200 3 170-180 65-85
Pizza 2 210-230 3 200-220 20-30
Chips for oven 2 210-230 3 200-220 20-35
Potato fries for 2 210-230 3 200-220 20-35
Temp(℃)
2 160-170 2 150-160 45-60
2 180-190 3 160-170 60-80
2 180-190 3 160-170 60-70
3 180-190 3 160-170 50-70
2 190-210 3 170-200 50-70
Guide level
(from down
upwards)
Temp(℃)
Baking time
(in min.)
19
20
Page 12

BAKING IN THE OVEN
BAKING IN THE OVEN
Roasting
Best heating mode for each type of
roasting pan is indicated by bold print
in the Roasting Tables.
Tips regarding roasting pans
Use light enamel pans,temperature
resistant glass pans,clay dishes or
wrought iron dishes.
Stainless steel dishes are not
recommendable because they
excessively reflect heat.
Cover your roast or wrap it in foil. It will
preserve its juice and the oven will
remain cleaner.
If you leave the pan uncovered the roast
will be cooked sooner.Roast large
chunks of meat directly on the grid, with
intercepting pan underneath.
Attention when roasting!
Roasting tables indicate suggested
temperatures,guide guide and roasting
times.Roast time largely depends upon the
type of meat, its size and quality. So you
may expect some variations.
Roasting of large chunks of meat may
produce excessive steaming and dew
formation at the oven door. This is quite
normal,and does not affect the operation
of the oven.
However,after the completion of roasting
wipe the oven door and the glass
thoroughly.
Roasting of red meat, poultry and fish is
rational if the roast exceeds one kilogram
in size.
Add as much liquid as necessary to
prevent burning of juice, dripping from neat.
Roast must be surveyed at all times. And
liquid added if necessary.
At approximately the middle of the indicated
time turn the roast round,especially if
you use the deep roast dish.
When roasting on the grill grid, place the
grid in the deep roasting pan and insert
both into the sliding guide. The bottom
pan will intercept dripping fat.
Never leave roast to cool in the oven, as
it might produce dew and corrosion of the
oven.
Roasting table
Pork roast with
Type of meat Weight
Beef
Beef loin
Beef loin
Roast beef,
rare
Roast beef,
well done
Pork
skin
Flank
Flank
Pork loin
Meat roll
Pork cutlet
Minced meat
roast
Veal
Veal roll
Veal knuckle 1700
Lamb
Lamb prime
ribs
Mutton blade
bone
Ham
Poultry
Chicken entire 1200
Hen
Duck
Goose
Turkey
Fish
Fish, entire
Fish soufflé
Shelf
position
(from down
upwards)
2
2
2
2
(in grams)
1000
1500
1000
1000
Temp
(℃)
210-230
210-230
230-240
230-240
1500
1500
2000
1500
1500
1500
1500
1500
1500
1500
1500
1500
1700
4000
5000
1000
1500
2
2
2
2
2
2
2
2
2
2
2
2
2
2
2
2
2
2
2
190-200
200-210
190-210
210-230
210-230
190-210
220-230
190-210
190-210
200-210
200-210
200-220
210-220
210-220
190-210
170-180
160-170
210-220
190-210
Roasting
time
(in min.)
100-120
120-150
30-40
40-50
140-160
120-150
150-180
120-140
120-140
100-120
60-70
90-120
120-130
100-120
120-130
100-120
60-70
70-90
120-150
180-200
180-240
50-60
50-70
temp
(℃)
200-220 100-120
200-220 120-150
220-230 30-40
220-230 40-50
170-180 140-160
180-190 120-150
170-200 150-180
200-220 120-140
200-220 120-140
170-200 100-120
210-220 60-70
170-200 90-120
170-200 120-130
180-200 100-120
180-200 120-130
180-210 100-120
200-210 60-70
200-210 70-90
170-200 120-150
150-160 180-200
140-150 180-240
200-210 50-60
170-200 50-70
Roasting
time
in min.)
(
temp
(℃)
Roasting
in min.)
(
200-220 100-120
200-220 120-150
220-230 30-40
220-230 40-50
time
170-180 140-160
180-190 120-150
170-200 150-180
200-220 120-140
200-220 120-140
170-200 100-120
210-220 60-70
170-200 90-120
170-200 120-130
180-200 100-120
180-200 120-130
180-210 100-120
200-210 60-70
200-210 70-90
170-200 120-150
150-160 180-200
140-150 180-240
200-210 50-60
170-200 50-70
21
22
Page 13

BAKING IN THE OVEN
BAKING IN THE OVEN
BAKING IN THE OVEN
Grilling
Take extra precautions when grilling.
Intensive heat from infrared heater makes
the oven and the accessories extremely
hot. Use protective gloves and barbecue
accessories!
Perforated roast may produce spurting
of hot grease(sausages).Use long grill
tongs to prevent skin burns and protect
your eyes.
Supervise the grill at all time. Excessive
heat may quickly burn your food and
provoke fire!
Do not let the children in the vicinity of
the grill.
Grill heater is especially suitable for the
preparation of low-fat sausages, meat and
fish fillets and steaks, and for browning
and crisping the roast skin.
Tips for grilling
Grilling should be carried out with the
oven door closed.
Grilling tables indicate the recommended
temperature, guide levels and grilling
times,which may vary according to the
weight and quality of meat.
Grill heater should be pre-heated for 3
minutes.
Oil the grill grid before placing the food,
otherwise food might stick to the grid.
Place the meat upon the grid, then place
the grid upon the grease interception
pan.Insert both trays into the oven guides.
Turn the meat round after half of the
roasting g time has expired. Thinner
slices will require only one turn,for larger
chunks you might need to repeat the
procedure.Always use barbecue tongs
to avoid losing excessive juice from meat.
Dark beef meat is grilled quicker than
lighter pork or veal.
Clean the grill,the oven and the access-
ories each time after use.
Grill table
Type of meat for grill Weight
Meat and sausages
2 beefsteaks, rare 400 5
2 beefsteaks, medium 400 5
2 beefsteaks, well done 400 5
2 pork scrag fillets 350 5
2 pork chops 400 5
2 veal staeks 700 5
4 lamb cutlets 700 5
4 grill sausages 400 5
2 slices of meat cheese 400 5
1 chicken, halved
Fish
Salmon fillets 400 4
Fish in aluminium foil 500 4
Toast
4 slices of white bread 200 5
2 slices of whole meal 200 5
Toast sandwich 600 5
Meat/poultry
Chicken 1000 3
Pork roast 1500 3
Pork scrag 1500 3
Pork knuckle 1000 3
Roast beef/ beef fillet 1500 3
(in grams)
1400
Shelf
position
(from
bottom up)
3
Temp(℃)
240 14-16
240 16-20
240 20-23
240 19-23
240 20-23
240 19-22
240 15-18
240 9-14
240 9-13
240-
250
240 19-22
230 10-13
240 1,5-3
240 2-3
240 4-7
180-200 60-70
160-180 90-120
160-180 100-180
160-180 120-160
190-200 40-80
Grill time
(in min.)
28-33(1.side)
23-28(2.side.)
23
24
Page 14

TYPE
Dimensions
(height/width/depth) cm
Cooktop
180mm Hilight heater(kW)
145mm Hilight heater(kW)
Oven
Temperature regulator /
function mode switch
Guide levels (telescopic
guides in 3levels-only
certain models)
Top/bottom heater(kW)
Grill heater(kW)
Oven illumination(W)
Function modes
Top/bottom heater(kW)
bottom heater(kW)
Top/bottom heater/fan
Separate oven lighting
Bottom heater/fan(KW)
Top/grill (kW)
Grill heater(kW)
Max. temperature
Electric connection
Nominal voltage of
Total connected
power(kW)
Oven total(kW)
Hotplate total(kW)
Weight(kg)
(kW)
(W)
heaters
90/54/60
1.8
1.2
1/1
5
0.85/1.15
1.1
1.1
25
25
2.0
0
1.15
1.15
2.0
25
25
1.2
1.95
1.95
1.1
1.1
250℃
250℃
400V 3N-,50Hz
220-240V
8.0
2.0
6
44
AFC607WAFC547W
90/60/60
1.8
1.2
1/1
1/1
5
5
0.85/1.15
1.1
1.1
25
25
2.0
1.15
1.15
2.0
25
25
1.2
1.95
1.95
1.1
1.1
250℃
250℃
400V 3N-,50Hz
220-240V
8.0
8.0
2.0
6
6
45
AFC607B AFC607X
90/60/60
1.8
1.2
1/1
5
0.85/1.15
1.1
25
2.0
1.15
2.0
25
1.2
1.95
1.1
250℃
400V 3N-,50Hz
220-240V
8.0
2.0
6
45
90/60/60
1.8
1.2
1/1
5
0.85/1.15
1.1
25
2.0
1.15
2.0
25
1.2
1.95
1.1
250℃
400V 3N-,50Hz
220-240V
8.0
2.0
6
45
Complies with EU regulations EN 50304, EN 60335 -1, EN 60335-2-6 standards
Caution!
All electrical work should be carried out by a suitably qualified and authorized electrician.
No alterations or willful changes in the electricity supply should be carried out.
The fixing line connected must be equipped with the all-pole disconnection device
provided by breakaway the contact under overvoltage category III according to the
the wiring rules.
Fitting guidelines
The cooker is manufactured to work with three-phase alternating current (380-415V 3N~50
Hz). The voltage rating of the cooker heating elements is 220-240V. Adapting the cooker
to operate with one phase current is possible by appropriate bridging in the connection box box according to the connection diagram below. The connection diagram is also found on t
he cover of the connection box. Remember that the connection wire should match the co-
nnection type andthe power rating of the cooker.
CONNECTION DIAGRAM
aution! Voltage of heating elements 220-240V
C
aution! In the event of any connection the safety
C
W
ire must be connected to the E terminal.
For 220-240V earthed one-phase connecti-
1
bridges connect 1-2-3 on, terminals and
4-5 terminals, safety wire to
F
or 380-415/220-240V earthed two-phase
2
connection, bridges connect 2-3 terminals
and 4-5 terminals, the safety wire to
.
F
or 380-415/220-240V earthed three-phase-
connection, bridges connect 4-5 terminals,
3
phases in succession 1,2 and 3, earth to
4
-5, the safety wire to
.
L1=R, L2=s, L3=T, N=earth terminal, E=safety wire terminal
.
1
L1
E
L1L1
E
L1L1
2 3
N
L2
N
L2 L3
NN E
ecommended
R
t
ype of
onnection
c
l
ead
H
05VV-F3G4
H
05VV-F4G2,5
H
05VV-F5G1,5
4
The connection cable must be secured in a strain-relief clamp.For the connection leads,
the grounding wire must be longer than the other wires.
Caution!
Remember to connect the safety circuit to the connection box terminal marked with
.
Before connecting the cooker to the power supply it is important to read the informatIion
on the data plate and the connection diagram.
00.01
2625
Page 15

Warranty Card
Worldwide Appliances Pty Limited
A.B.N. 45868077422
Ofce:
48-50 Moore Street, Leichhardt N.S.W 2040
Post:
Locked Bag 3000, Annandale, N.S.W 2038
P: 1300 856 411
WARRANTY REGISTRATION
Your ongoing satisfaction with your artusi
product is important to us. We ask that you
complete the enclosed Warranty Registration
Card and return it to us so that we have a record
of the artusi product purchased by you.
PRIVACY
Worldwide Appliances respects your
privacy and is committed to handling your
personal information in accordance with the
National Privacy Principles and the Privacy
Act 1988 (Cth). A copy of the Worldwide
Appliances Privacy Policy is available at
www.artusi.com.au. Worldwide Appliances will
not disclose any personal information set out
in the Warranty Registration Card (“Personal
Information”) without your consent unless
required by:
1. law;
2. any Worldwide Appliances related company;
3. any service provider which provide services
to artusi or assist artusi in providing services
(including repair and warranty services) to
customers. Our purpose in collecting the
Personal Information is
to keep a record of the artusi product purchased
by you, in order to provide a better warranty
service to you in the unlikely event that there is
a problem with your artusi product. Worldwide
Appliances may contact you at any one or more
of the address, email address or telephone
numbers set out in the Warranty Registration
Card. Please contact artusi on 1300 694
583 should you not wish to be contacted by
Worldwide Appliances.
WARRANTY
1. Warranty
Worldwide Appliances warrants that each artusi
product will remain, for a period of either 12
months or 24 months of warranty. All Warranties
are valid from the original date of purchase, And
warranty claims must be accompanied by the
proof of purchase.
24 months warranty products:
All Built-in Appliances – Limited to Ovens,
Gas, Induction and Electric Cooktops, and All
Rangehoods
Freestanding Cookers - Gas and Electric Models
(900mm Width)
artusi.com.au
Dishwashers - Freestanding, Fully Integrated,
Semi Integrated and built-in
12 months warranty products:
Freestanding Cookers - Gas and Electric Models
in 50cm, 54cm and 60cm Widths
Portable Appliances* – Benchtop Models and
Portable Gas Models
2. What is not Covered by the Warranty.
The Warranty does not apply if an artusi product
is defective by a factor other than a defect arising
in the manufacture of the artusi product, including
but not limited to:
(a) damage through misuse (including failure
to maintain, service or use with proper care),
neglect, accident or ordinary wear and tear
(including deterioration of parts and accessories
and glass breakage);
(b) use for purpose for which the artusi product
was not sold or designed;
(c) use or installation which is not in accordance
with any specied instructions for use or
installation;
(d) use or operation after a defect has occurred or
been discovered;
(e) damage through freight, transportation or
handling in transit (other than when Worldwide
Appliances is responsible);
(f) damage through exposure to chemicals, dusts,
residues, excessive voltage, heat, atmospheric
conditions or other forces or environmental
factors outside the control or Worldwide
Appliances;
(g) repair, modication or tampering by the
purchaser or any person other than Worldwide
Appliances, an employee of Worldwide
Appliances or an authorised artusi service
contractor*;
(h) use of parts, components or accessories
which have not been supplied or specically
approved by artusi.
(i) damage to surface coatings caused by cleaning
or maintenance using products not recommended
in the artusi product handbook provided to the
purchaser upon purchase of the artusi product;
(j) damage to the base of an electric oven due to
items having been placed on the base of the oven
cavity or covering the base, such as aluminium
foil (this impedes the transfer of heat from the
element to the oven cavity and can result in
irreparable damage); or
(k) damages, dents or other cosmetic
imperfections not affecting the performance of the
artusi in respect of an artusi product purchased
as a “factory second” or from display
The Warranty does not extend to light globes
used in artusi products.
3. Domestic Use
Each artusi product is made for domestic use.
This Warranty may not extend to artusi products
used for commercial purposes.
Continued over...
Page 16

Warranty Card continued
artusi.com.au
4. Time for Claim under the Warranty
You must make any claim under this Warranty
within twenty eight (28) days after the occurrence
of an event which gives rise to a claim pursuant
to the Warranty, by booking a service call on the
telephone number below.
5. Proof of Purchase
Customers must retain proof of purchase in order
to be eligible to make a warranty claim in respect
of an artusi product.
6. Claiming under the Warranty
Customers will bear the cost of claiming under
this Warranty unless Worldwide Appliances
determines the expenses are reasonable, in which
case the customer must claim those expenses
by providing written evidence of each expense
to Worldwide Appliances at the address on the
Warranty Registration Card.
7. Statutory Rights
(a) These terms and conditions do not affect your
statutory rights.
(b) The limitations on the Warranty set out in this
document do not exclude or limit the application
of the consumer guarantees set out in the Act or
any other equivalent or corresponding legislation
in the relevant jurisdiction where to do so would:
(i) contravene the law of the relevant jurisdiction;
or
(ii) cause any part of the Warranty to be void.
(c) Worldwide Appliances excludes indirect or
consequential loss of any kind (including, without
limitation, loss of use of the artusi product) and
(other than expressly provided for in these terms
and conditions) subject to all terms,
conditions and warranties implied by custom, the
general law, the Act or other statute.
(d) The liability of Worldwide Appliances to you
for a breach of any express or non-excludable
implied term, condition or warranty is limited at
the option of Worldwide Appliances to:
(i) replacing or repairing the defective part of the
artusi product;
(ii) paying the cost of replacing or repairing the
defective part of the artusi product;
(iii) replacing the artusi product; or
(iv) paying the cost of replacing the artusi
product.
(e) Our goods come with guarantees that cannot
be excluded under the Australian Consumer
Law. You are entitled to a replacement or refund
for a major failure and for compensation for any
other reasonably foreseeable loss or damage.
You are also entitled to have the goods repaired
or replaced if the goods fail to be of acceptable
quality and the failure does not amount to a
major failure.
8. Defects
Any part of an artusi product deemed to be
defective and replaced by Worldwide Appliances
is the property of Worldwide Appliances.
Worldwide Appliances reserves the right to
inspect and test artusi products in order to
determine the extent of any defect and the
validity of a claim under the Warranty.
*To locate your closest artusi authorised service
agent please contact Worldwide Appliances on
1300 856 411 or visit www.artusi.com.au
ALL SERVICE CALLS MUST BE BOOKED
THROUGH THE Worldwide Appliances
SERVICE AND WARRANTY DEPARTMENT ON
1300 856 411
01052013
Warranty Card tear off
WARRANTY REGISTRATION CARD
01052013
Last Name: First Name:
Address:
State: Postcode: Email:
Home Phone: Mobile:
Purchase Date: / / (Please attach proof of purchase to validate warranty)
MODEL NUMBER
1
2
3
4
Please complete and send to ARTUSI at: REPLY PAID 83617
LEICHHARDT NSW 2040
SERIAL NUMBER
(if you cannot locate the serial number please call ARTUSI on 1300 85 64 11)
01052013
2
 Loading...