

Page 1
ADW7000X
Page 2

Fordetailed operatingmethodr eadthe correspondingcontenton the instructionmanual.
Switch on the appliance Press the On/Off button to switch on the appliance,Open the door.
Compartment A:
Fill main-wash detergent.
Fill the detergent dispenser
Compartment B:
Fillpre-washdetergent.
(Follow the user instructions!)
C
B
A
Check the rinse aid level
Load the baskets
Select a programme
Runningthe dishwasher
Changing t he programme
Add forgottendishes in the
dishwasher.
Mechanical indicator C.
Electric indicator on control panel (if provided).
Scrape off any large amount of leftover food. Soften remnants of burnt food in pans,
then load the baskets. Refer to the dishwasher loading instructions.
Close the door,power on, press the Prog. button to select the desired program.
( See the section entitled“Operation instruction”).
Turn o n the w ater tap, Press t he Start/Pausebutton, The m achine willstart workingafter about 10
seconds.
1.A running cycle can only be modified if it has been running for a short time. Otherwise the detergent
may have already been released and the water already drained. If this is the case, the detergent
dispenser must be refilled.
2. Press the current programme button for more than 3 seconds to cancel the running programme.
3.Selecta new program.
4. Restart the dishwasher.
1.Open the door a little to stop the dishwasher.
2.After the spray arms stop working, you can open the door completely.
3.Add the forgotten dishes.
4.Close the door, the dishwasher will start running again after 10 seconds.
Open the door carefu lly.
Hot steam may esc ape
when the doo r is opened!
If the appliance is switched
off during a wash cycle.
Switch off the appliance
Turn off the water tap,
unload the baskets
If the appliance is switched off during a wash cycle, when switched
on again, please re-select the washing cycle and operate the dishwasher
according to the original Power-on state.
When the working cycle has finished, the buzzer of the dishwasher will sound 8 times, then stop.
Turn off the appliance using the ON/OFF button.
Warning: wait a few minutes (about 15 minutes) before unloading the dishwasher to avoid handling
the dishes andutensilswhilethey arestillhot and more susceptible to break.
They will also dry better. Unload the appliance, starting from the lower basket.
Page 3
Dear Cus tom er ,
This appliance is intended to b e used in h ousehol d
andsimilarapplicationssuchas:
-staff kitchen areas in s hop s, off ices and other
workin g enviro nme nts;
-farm houses;
-by clients in h otels , mo tels and other resident ial
ty pe env ir o nments;
-bed andbreakfasttype environments.
Pleasecarefully read this manualbeforeu singthe
dishwasher,i t will helpyouto use and maintainthe
dishw ash er prope rly.
Keepit toreferto it at a laterdate.
Passit on to any s ubsequent owner of the appliance.
This ma nua l con tain s secti ons on safety In structio ns ,
Operating Instructions, Installation Instructions and
Troubles hooti ng Tips, etc .
Con tro l Pan el.... . .. ........ . ... . ... ....... ........ ....... . ... . .2
Dishwasher Features...................................... .2
A. Fillt he RinseAid Dispenser............. .. ..3..... ....
B.Functionof Detergent ..........................4........
Attentio n before o r after loading the Dish wash er
Baskets..........................................................6
Loading t he uppe r ............ .... ........... ...7Baske t ...
Load ing the Lowe r .. ...... ... ...... ... . . .........7Basket ..
CutleryBasket................................................8
Wash Cycle Table...........................................9
Turningon theAppliance................................10
ChangetheProgramme.............. ................10....
At the end of the WashCycle...........................10
Toreview the section on t roublesho oting Tips
willhelpyou t osolvesome commonproblems
byyourself .
Ifyou can not solve t he problems by yourself ,
please ask fo r t he help o f professiona l technician s.
The man ufacturer, f ollowing a policy of c onstant
development and u pdati ng of the product, may
make m odifications witho ut giving prior notice.
FilteringSystem.............................................11
Caringforthe Dishwasher..................... .........12.
Positio ni ng the Applia n ce. ..... . ... .. .... .. . ....... ... 13..
About Power Connection........................ .......13.
Water Connec ti on.... ... . ..... . ... ........ .... ... .. .......1 4.
Startof dishwasher................................ ......15..
Before c al l ing fo r ser vic e.. ... .. ... . ... ... ....... . .. . ....16.
Errorcodes.................................... ..............17.
Technical information.............................. .....18..
Page 4

When usin g your dishwasher, follow the precauti ons listed below:
This appliance must be grounded. In the event of a
malfunction or breakdown, grounding will reduce
the risk of anelectric shock by providing a path of
least resistance of electric current. This appliance
is equipped with a cord having an equipmentgrounding conductor and a grounding plug.
The plug must be plugged into an appropriate outlet
that is installed and grounded in accordance with
all local codes and ordinances.
Do not abuse, sit on, or stand on the door or dish
rack of the dishwasher.
Do not touch the heating element during or
immediately after use.
(This instruction is only applicable to machines
with a visual heating element.)
Do not operate your dishwasher unless all
enclosure panels are properly in place. Open
the door very carefully if the dishwasher is
operating, there is a risk of water squirting out.
Do not place any heavy objects the
door when it is open. The appliance could tip
forward.
When load in g items to b e w ashed:
1) L ocatesharp items so thatthey are notlikely
todamage thedoorseal;
2 Warning: Knives and other u te nsils with
)
sh a rp points must be loa d ed in t he ba sket
with their points d own or p lace din a
horizontalposition.
When us ing your dishwasher, yo u should
prevent plastic items from coming into co ntact
with t he heating element.(T his instruction is only
applicable to machines with a visual heat ing
element.)
Check thatthedetergentcomparmentis empty
after c ompletio n o f the wash cycle.
Do not wash plastic items unless they are marked
dishwasher safe or the equivalent. For plastic items
n
ot so marked, check the manufacturer's
recommendations.
Use o nly detergent and rinse additiv es
designed for an aut omatic dishwasher.
Never use s oap, laundr y detergent, or hand
washing detergent in your dishwasher.Keep
these products out of the reach of chi ldren.
on or stand on
Improper connection of the equipment-grounding
conductor can result in the risk of an electric shock.
Check with a qualified electrician or service
representative if you are in doubt whether the
appliance is properly grounded. Do not modify the
plug provided with the appliance; If it does not fit
the outlet. Have a proper outlet installed by a
qualified electrician.
Keep children away from detergent and rinse aid, keep
child awayfromthe opendoorof the dishwasher,
ren
there could still be some detergent left inside.
This appliance is not intended for use by persons
(including children with reduced physical, sensory or
mental capabilities, or lack of experience and
knowledge ,unless they have been given supervision
or instruction concerning use of the appliance by a
person responsible for their safety.
Children shouldbe supervised to ensure that they do
not play with the appliance.
Dishwasherdetergents arestrongly alkaline,they
can be extrem e ly dange r ous if s wallow e d.Av oid
contact with skin and eyes and keep children away
from the dishwasher when the door is open.
The doo r sh ould not be left o pen,
since th is could increase the risk of trippi ng.
If th e s upply cord is d am aged, it must be replace d
by th e m anufact urer or its se rvice agent or a
similar ly qual ifi ed person i n orde r to avoid a
hazard.
Remove the door to the washingcompartmentwhen
removing an old dishwasher from service or discarding it.
Please d ispose of packing materials proper ly.
Use the dishwasher only for its intended function.
Duringinstallation, t hepowersupplymust not
beexcessivelyordangerously bentorflattened.
Do not tamper with controls.
The app liance i s to b e connected to t he water
mainsu sing new hose sets andthatoldhose-sets
sho ul d not be re u sed.
Themaximum number of placesettings to be
washed is 1 2 .
Themaximum permissibleinlet waterpressure is
1Mp a .
Theminimumpermissible inletwaterpressure is
0.04Mpa.
)
1
Page 5
Toget the bestperformancefrom yourdishwasher,read alloperating ins tructions
before u sing it fo r the f irst tim e.
Delay
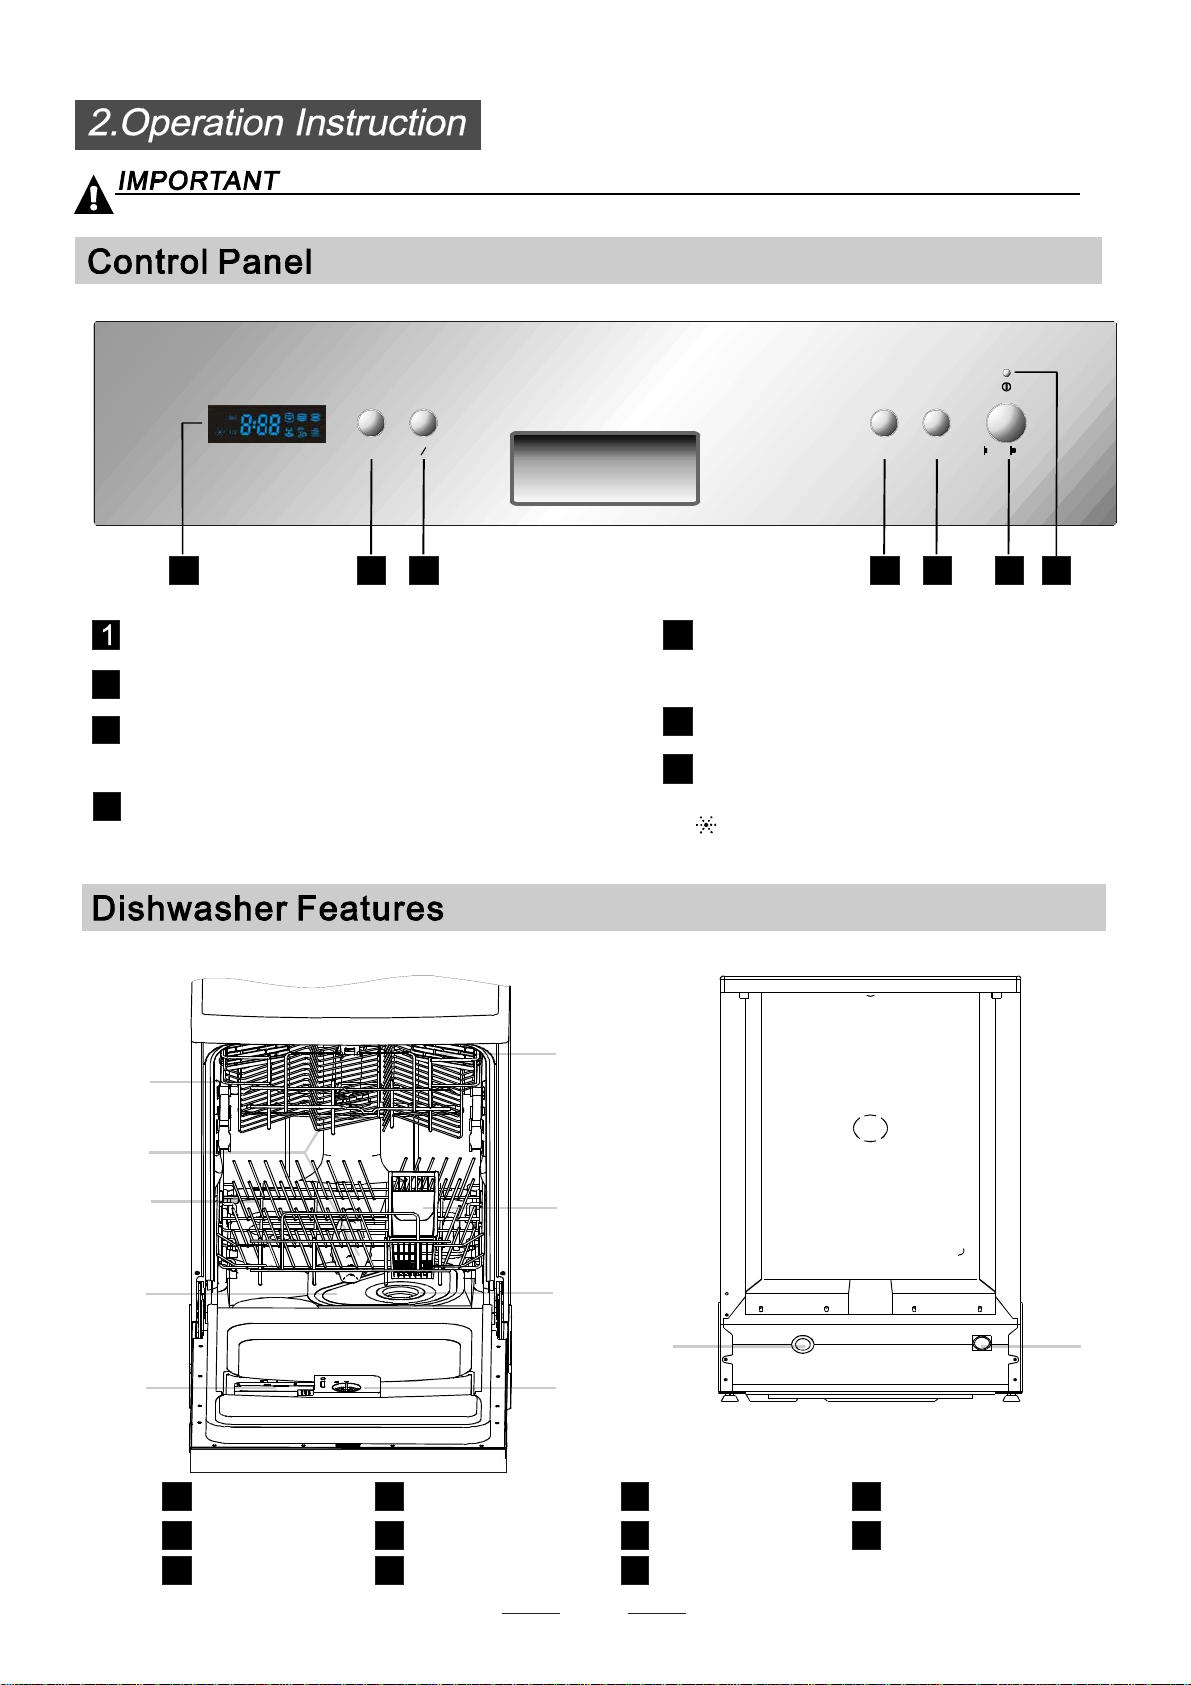
Power indicator light: Toshow the p owe r supply.
Power switch: To tur n on/off the power supply.
2
Start /Pa use button: Tostart the selected
3
washing program o r pause the washing program
whenthe machineis working.
WashingProgramSelector:Toselectoneof
4
the washingprograms.seven
Front view
12
Prog.
Start/Pause
HalfloadfunctionButton:ToselectHalfload
5
func tion . (H al f lo ad fu nc ti on m ean s th e low e r
sprayarm willnot run, so you shouldload the
upperbasket only ).
Delay Button: to delaythe washingtime.
6
Display window: Display the program, pr ogram
7
remaining time, de lay time, fau lt codes, half l oad
function and fill ri nse aid etc.
Rin se aid w a r n ing lights: Toshow when
the dispe nser need to be refille d.
Back View
On Off/
17 23456
6
1
2
3
4
7
8
10 11
5
Upper Baske t
1
Spray A rms
2
Lower Basket
3
Main Filter
4
Detergent D ispense r
5
Cup Shelf
6
9
Cutlery Basket
7
Coarse Filter
8
Ri ns e Ai d Dispenser
9
2
Drainpipeconnector
10
Inletpipeconnector
11
Page 6
Before u sing your dishwasher for the first time:
A. Fillthe rinse aid dispenser
B. Fillindetergent
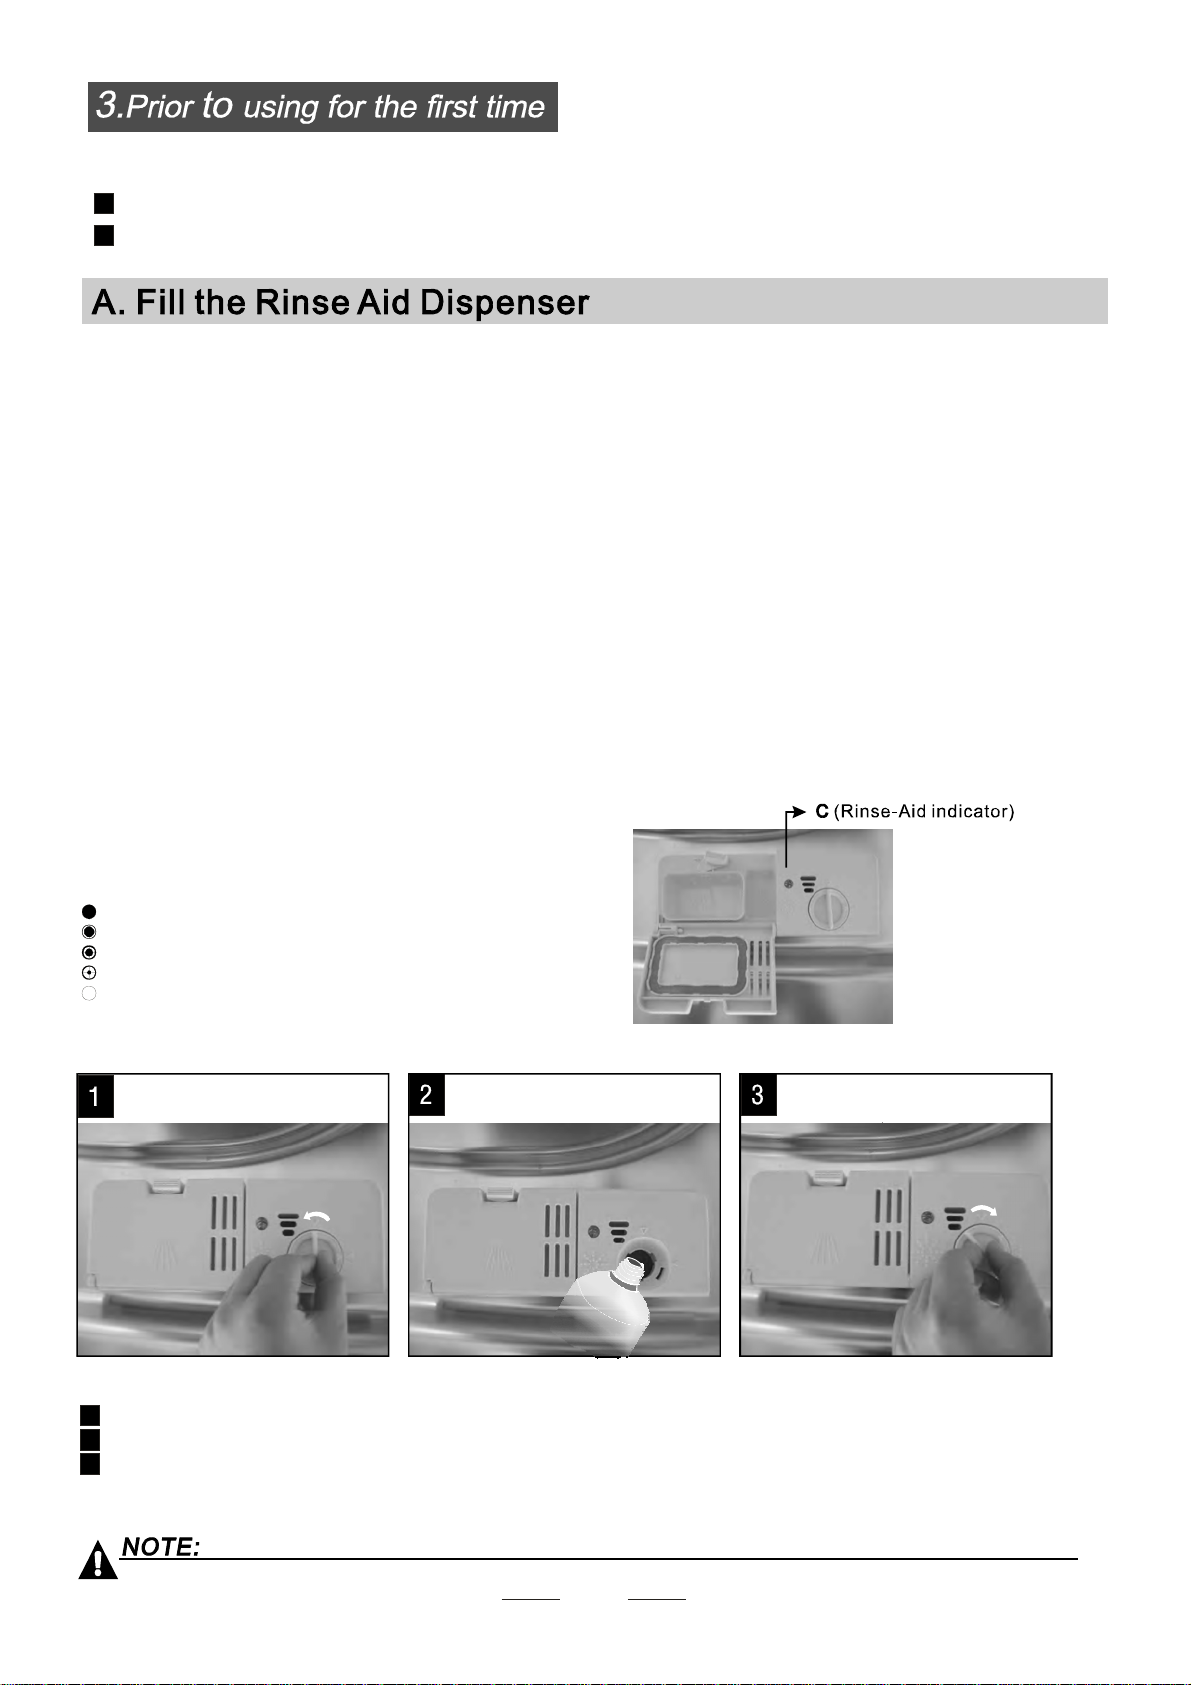
RinseAid Dispenser
The r inse a id is r elea se d d u ring the fin al rinse to preve nt water fro m for ming droplet s o n y our dis hes, whic h can leave
spots andstrea ks. It al so improves dryi ng by allowing water to roll off the d ishes. Your di shwasher i s designed to
usel iquid r inse aids. The rin se aid di spenser is l ocated inside the d oor next to the detergent d ispenser. To fill the
dispenser, open thecapand pourthe rinseaid i ntothedispenser until thelevelindicatorturns completelyblack.
Thevol ume of t he rinse aid container is about 110ml.
Function of Rinse Aid
Rinse ai d is automat ically added during the last rins e, ensur ing thorough rinsi ng, and spot and streak free dryi ng.
Attention!
Onlyusebrandedrinseaidfordishwasher.Neverfillthe rinseaiddispenserwithany o thersubstances
(e.g. Dishwasher cleaning agent, liqu id d eterge nt). This would damage the app liance.
Whento Refillthe RinseAid Dispenser
Ifthere is no r inse-aid warninglight inthecontrolpanel,you c anestimatetheamountfromthe colour
of t he opti c al leve l ind ic at or C loc ated nex t to the ca p . When the ri nse- aid co ntaine r i s ful l, the whol e
indicator will be da rk .A s the rinse-aid diminishes , th e size of the dark dot decreases. Youshou ld ne ver let
therinseaidlevel fall1 / 4 full.
""
As t he rinse aid d iminis hes, t he size of the b lack dot
on t he rinse aid l evel indica tor changes , as i llustrate d b elow.
Full
3/4full
1/2full
1 / 4 full - S hould refill to elimin ate s potti ng
Empty
RINSEAID DISP ENSER
Toope n t he dispen ser, turn the cap to the "open" (le ft) arr ow and lift it out .
1
Pour t he rinse ai d into the dispe nser,be ing careful not to overfi ll.
2
Replace the ca p by inserting it aligned with " open" arrow and t urning it to the closed (right) arrow.
3
Be c ar eful no t to overf ill the di sp ense r, bec ause t his co uld cau se over s uds ing. Wi pe away an y spills
with a dampcloth.Don't forgettoreplacethecapbefore you close the dishwasherdoor.
Clean up a ny rinse aid spilt wh i le du ring fill ing w ith a n abs orbent c loth t o avoid ex cessive foa m ing
during the n ext wash. Don't forget to replace the cap befo re you c lose dishwasher door.
3
Page 7
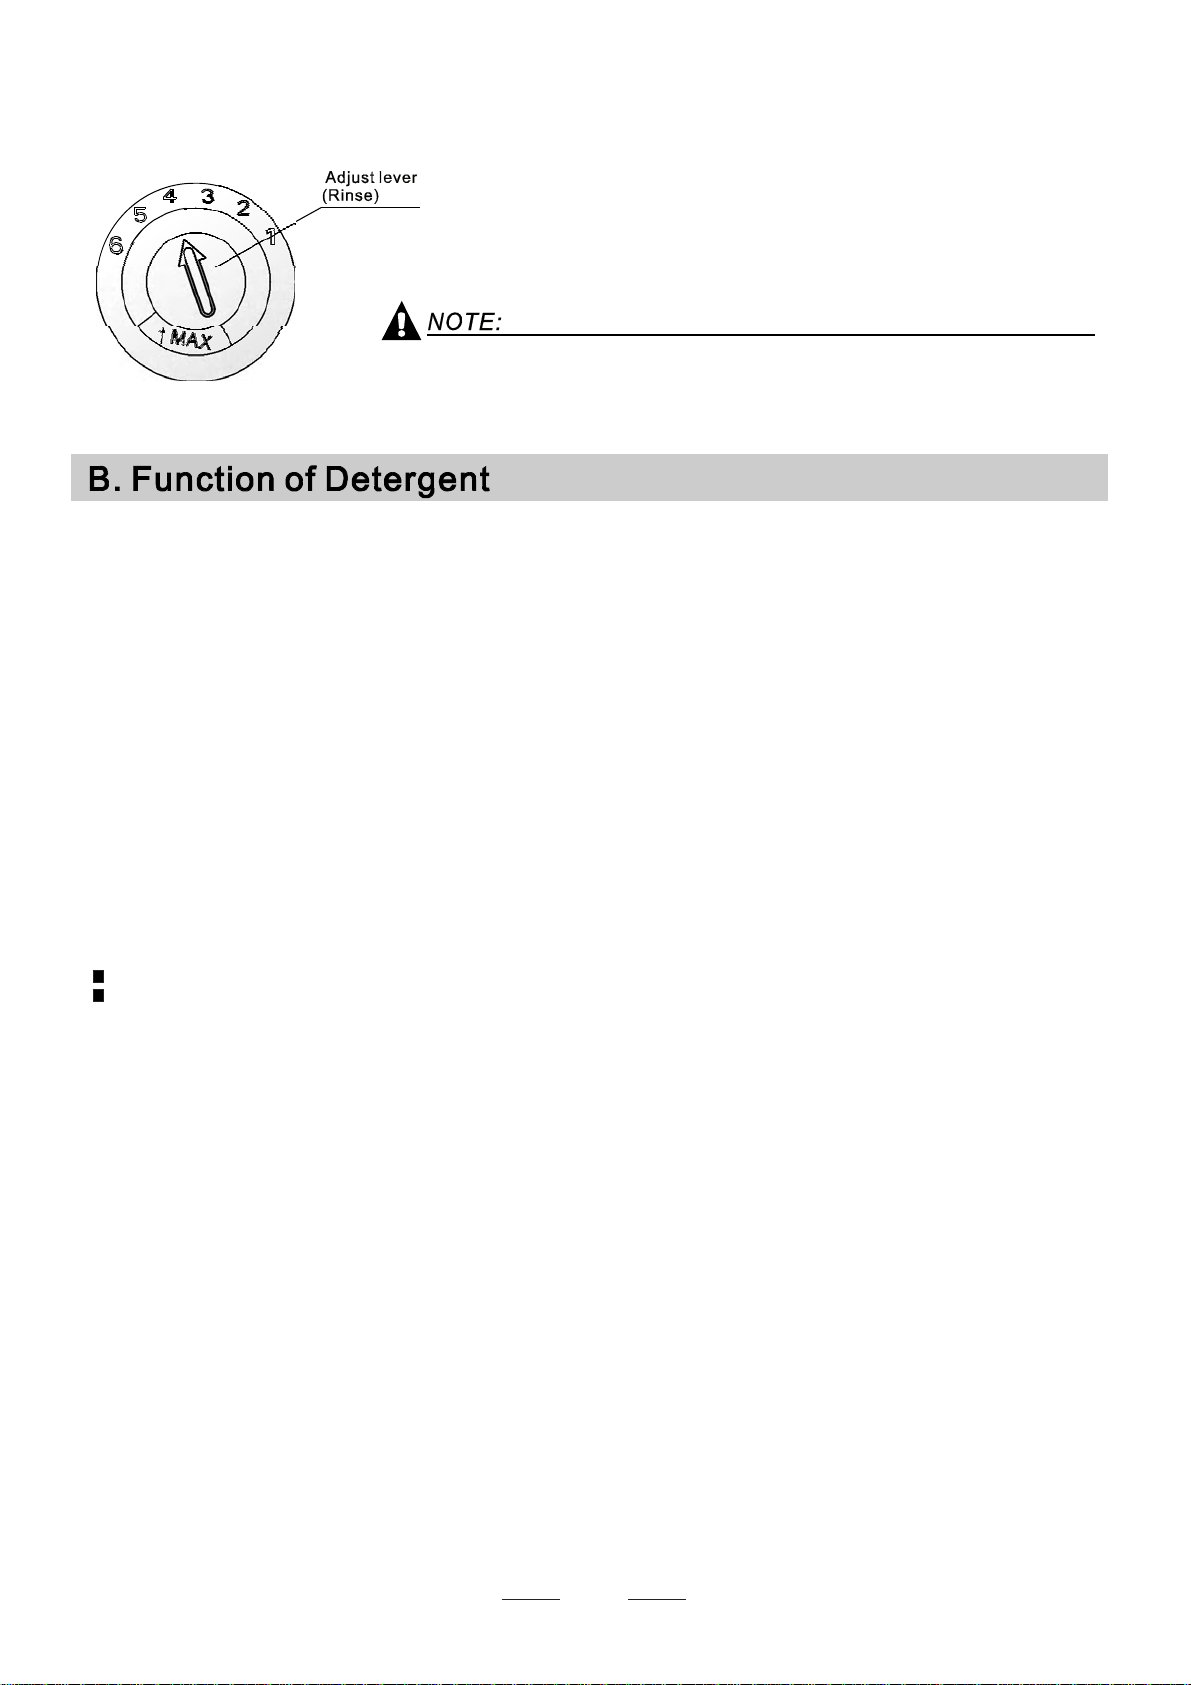
Adjusti ng RinseA id Dispense r
The r inse aid dispenser has six or four settings. Always start with the d ispens er
set o n "4". If spots and poor dr ying are a p roblem, increa se t he amount of r inse
aid d ispensed by removin g the di spenser li d an d rotating the d ial to "5". If the
dishes a re still not drying prope rly o r spots, adjust the dial to the next
higher lever until your dishes are spot-free. The recommend ed setting is "4".
(Factoryvalueis "4".)
Increasethe dose if therearedrops of water o rlime spotsonthedishesafterwashing.
Reduce i tifthereare sticky whitishstainson yourdishes o r a bl uishfilm onglasswareor
knifeblades.
Detergents with its chemic al ingredients a re necessary to remove dirt , c rus h dir t and transport it ou t of t he dishwasher.
Use onl y detergen t speci fically made for the use in d ishwashe rs.
showing
Deterg ents
The re ar e 3 sort s of dete rgents
1.With phosphateand with ch lorine
2.Withphosphate and without chlorine
3.Withoutphosphate and without chlor ine
Normally ne w pulverised detergent is without phospha te. T hus the water so ftener function of
phosphate is no t giv en. In t h is ca se we r e comm e nd to fill salt in the salt conta i n er ev en w he n
the hard ness o f water is only 6 dH. I f detergents witho ut ph osphate are used in the caseof hard water
often wh ite s pots appear on dishes and glasses. In this cas e please add more detergent to r each
better r esul ts. D etergen ts wi thout ch lorine d o onl y blea ch a li t tle. Stro ng and colou red sp o t s will not
bere moved completely.In this case please choose a program with a hi gher tempera ture.
°
Concentr ated Deterge nt
Basedon theirchemical composition,detergents canbesplitin two basictypes:
conventional,alkalinedetergents withcausticcomponents
lo w alk al i ne concentrated d et erge nts wit h natu ral enzymes
The use of normal washing programsincombinationwith concentrated detergents
reduces pol luti on an d is g oo d for you r dishes ; the s e w ash programs are s pec i f i cally matched
toth e dirt- diss olvin g pro pert ies o f t he enz yme s of the concen t rated de terg ent. For this reason
normal washprograms in whichconcentrateddetergentsareused canachievethesame
“”
results thatcanotherwiseonlybe achieved using intensive programs.
“”
“”
DetergentTa blets
Detergent tabletsof differentbrands dissolve atdifferentspeeds.Fort his reasonsome
detergent t ablets cannot dissolve and develop their f ul l cl eaning power during short
programs. T herefore please use long programs wh enu sing detergent tablet s, t o
ens ure t he com plet e remov a l of de t erg e n t residu als.
DetergentDispenser
The disp enser m ust be refilled before the start of e ach wash cy cle following the instructions
provided i n t he wash cycle table . Yourdis hwasher uses less de tergent and rinse aid than
Conventionaldishwasher.Generally,only one tablespoon of detergentisneededfor
anormalwashload.More heavily soiled itemsneedmoredetergent. Always add the
detergen t just be fore star ting the dishwas her, otherwis e it coul d get damp and w ill not
dissol v e proper ly.
4
Page 8

AmountofDe tergentto Use
If th e l id is cl osed: press release button. T he lid will spring open.
Always a dd the d etergent just before starting each w ash cycle.
Only use bran ded detergent and rinse aid for dishwasher.
Dishwasher detergent is corrosive! Takecare to keep i t out of reach of c hildren.
Proper U se of De terg ent
Use only detergent speci fical l y m a de for the us e i n dis hwas her s. Keep your deterge nt fre sh and dry.
Don'tputpowdered detergent intothedispenser u ntilyou'reready towash dishes.
A
B
Fill in Detergent
Fillt he d etergen t dis penser with detergent.
The ma rki n g i n dicate s t he do si n g lev e l s , as
illustratedontheright:
Theplaceof mainwash cycledetergentplaced.
A
The pl ace of pre-wash cycle detergent placed.
B
Please observethe manufacturers dosing and storage
Recommendations as stated on t he detergent pac kaging.
Close the lid and pre ss until i t locks in pla ce.
Ifth e dis hes are heavily soiled, place an a dditiona l
detergent do se in the pre -wash deter gent ch amber.This detergen t w ill take e ffect during the pre-wash phase.
The in formation about the amount of detergent for the single programme please refer to the Wash Cycle
Table on the page 9.
Please a ware, that according to the level soiling and t he specific hardness of water differences are possible.
Please o bserve the manufactur er's recommendati ons on the de tergent packaging.
5
Page 9

Consider buying utensilswhich are identified as dishwasher-proof.
Use a milddetergentthat is describedas'kind to dishes'.Ifnecessary, seek further
informationfromthedetergentmanufacturers.
Forparticularitems, selectaprogramw ith as lowatemperatureas possible.
To pr even t dama ge, take gl ass and cut l ery out of the dis hwa sher as so on as possi ble
after the p rogram has ended.
Are not suitable
Cutlerywithwooden,horn chinaor
mother-of-pearl han dles
Plastic items that are n ot heat resistant
Older cutlery with glued parts t hat are n ot
temperature resistant
Bonded c utler y i tems or dishes
Pewter or cooper i tems
Crystal gl ass
Steel items subject to r usting
Wooden pl atters
Itemsmadefromsyntheticfibres
(For b est performance of the dishwasher,follow the se l oading guide lines.
Features and ap pearance of baskets and cutlery baskets may vary from your mod el.)
Scrape off any larg e a mounts of leftover food. Soften remnants of burnt food in pa ns.
It i s not necessary to ri nse the d ishes under running water.
Place objects in the dis hwasher in following way :
1.Itemssuch as cups, gla sses, pots/pans, etc. a re faced downwards.
2.Curveditems, or ones with r ecess es, shoul d be l oaded aslant so that w ater can run off.
3.Allutensils are stacked securely and can not tip ov er.
4.Allutensils are placed in the way t hat the spray arms can rotat e freely during washing.
Very sm all items should n ot be washed in the dishwasher as they could eas ily fal l out o f the basket.
Are oflimitedsuitability
Some ty pes of g lasses can become
dull after a large nu m b e r of w ashe s
Silver and alumi num p arts ha ve a
tendency to discolourduringwashing
Glazedpatternsmayfadeif machine
washed frequently
Load h ollow i tems such as cups, glasses, pans etc. With the openi ng facing downwards so that
wat e r cannot col lect i n the c onta iner or a deep base .
Dishesanditems of cutlery mustnot lieinside one another, orcover each other.
Toavoi d d amage to glasse s, th ey m us t not t ouch.
Load large items w hich are most difficult to c lean into the lower basket.
The u pper basket is designed to hold m ore delicate and lighter dishware such as glasses, coffee
andt eacups
Long bladed knives stored in an upright position are a p otenti al hazard!
Long and/or sharp items of cutlery such as carving knives must be p ositione d
horizon tally in the upper b asket .
Please do not overload your dishwashe r. This is important for g ood result s a nd for
reasonab le consumption of energy.
Toprevent water drippi ng from t he upper basket into the lower basket, we recommend that you
empty the lower ba sket first and then the upper ba sk et.
6
Page 10

7
Page 11

Adju sting the Upp er Basket
The heig ht o f the upper b asket can be ad justed in order to create m ore space for l arge utensils
both for the upper/l ower basket. The he ight of the u pper basket can be adjusted by pl acing the
wheels on different height of the rails. Long items, se rving cutlery, sala d se rvers and knives
should b e pl aced on the shelf so that they do not obstruct the r otati on o f the s pray arms.
The she lf can be folded back or be removed when not requ ired for use.
Foldin g Spikes of Lower Bask et
For better stacki ng o f po ts and pa ns,
the spikes can be folded down as
show in th e pict u re right.
Cutlery should be pla ced in t he cutlery basket with the handles at the bo ttom. If the r ack has side bas kets , th e
spoons shoul d be loaded separately into the ap pr opriate slots, especially long utensils shoul d b e placed in the
horizontal p osition at the front of t he upper basket as s hown in the p icture.
4
44 44
1
3
3
2
3
2
3
2
3
2
3
3
2
5255
555
1
1
1
1
1
1
1
1
1
1
1
555
555
41
2
3
2
3
2
3
2
3
2
3
4
Forks
2
Soup spoons
Dessert spoons
3
Teaspoons
4
Knife
5
Do not let any item e xtend through the bottom.
Always load s h arp u tensils with the sharp point down!
444244
8
Page 12
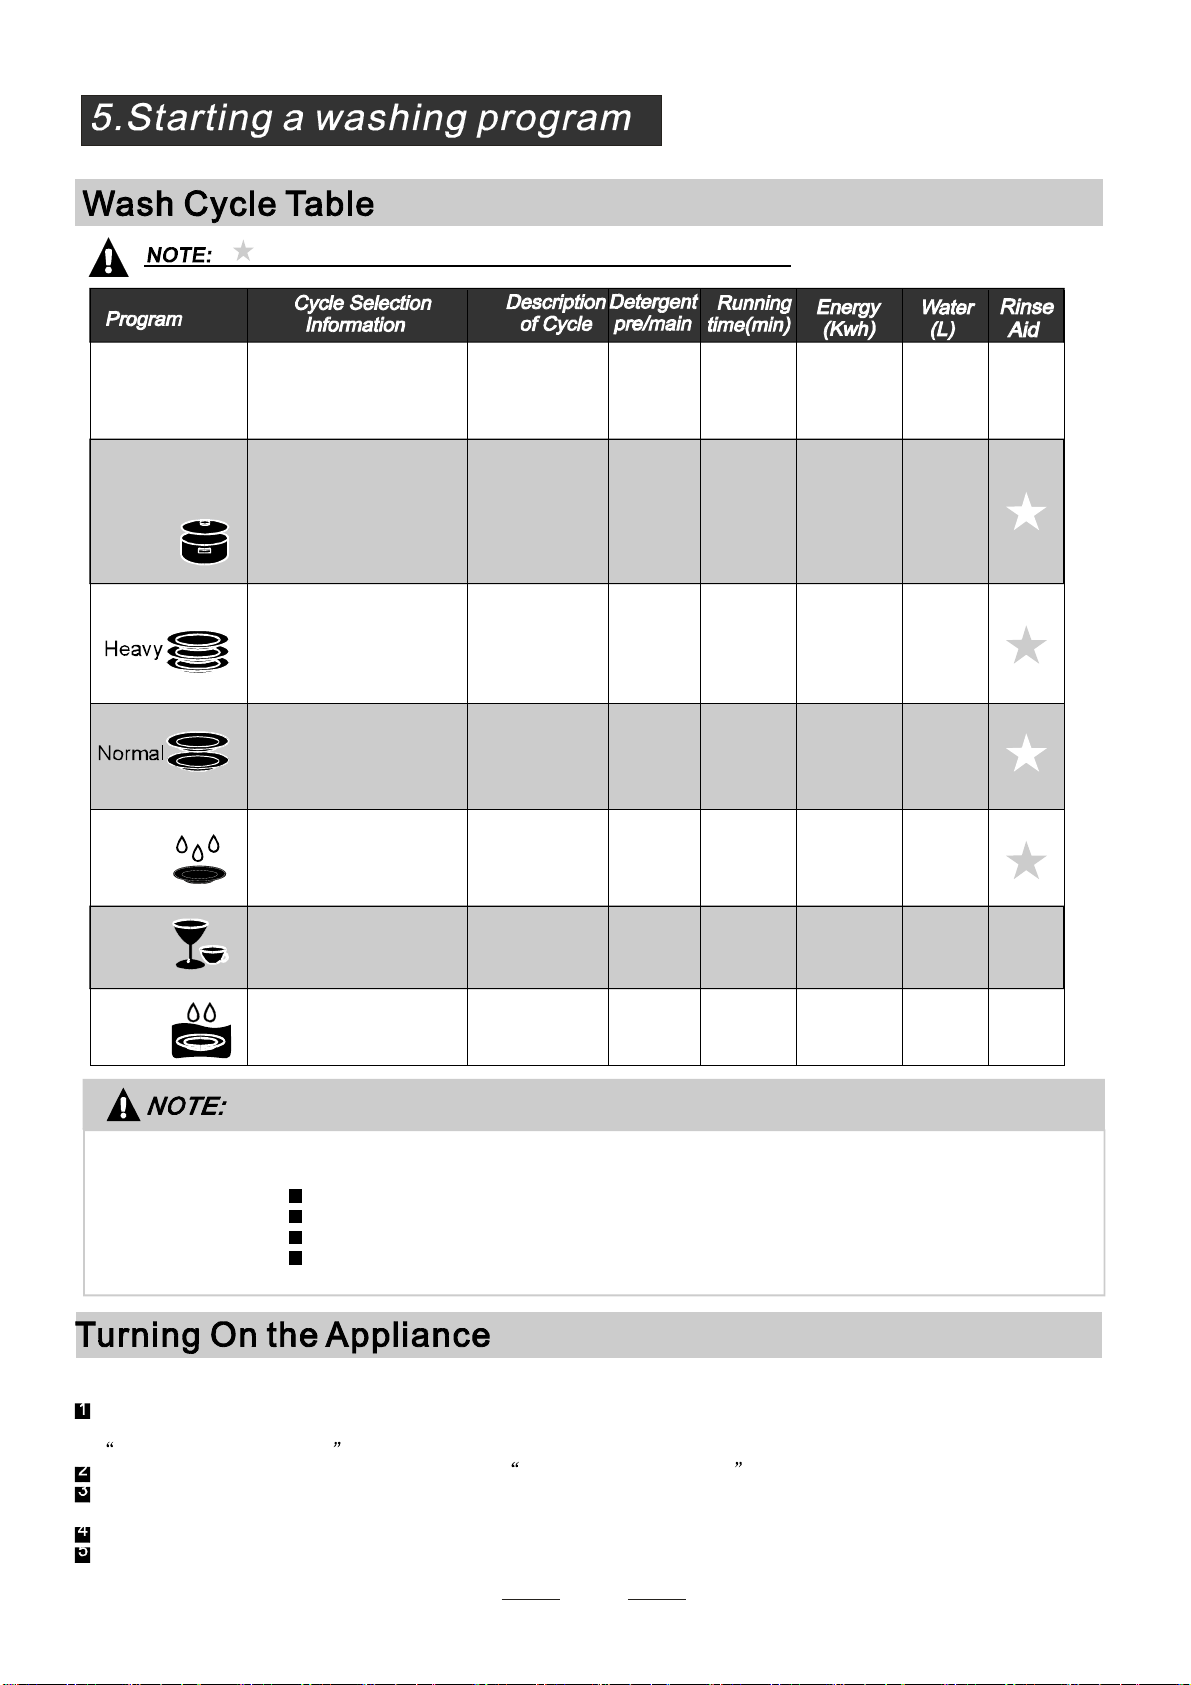
()
Means:need tofill rinseintothe Rinse-AidD ispenser.
3in1
Intensive
(AS/NZS 2007. 1 )
Rinse
Rapid
For soiled l oads ,
commonly
such as ,p lat es,glasses
pots
and lig htl y soile d pans .
standard dailycycle.
For the heaviestsoiledl oads,
suchas pots,pans,casserole
dishesand dishesthathave
beensitting withdried food
onthem for a while.
Fo r heav y so i led load s,
such as ,plates,glasses
pots
and lightly soiledp ans.
standarddailycycle.
For normal soiled loads,such
as plates,glasses,bowlsand
lightly soiled pans.
For dishes that need to be
rinsed an d dried o nly.
Ashorterwash for li ghtly
soiled loa ds thatdo not
needdrying.
Pre-wash 50
was h 50
rinse 70
(℃)
(℃)
(℃)
drying
Pre-wash(50 )
℃
Pre-wash
Wash (65 )
℃
Rinse
Rinse
Rinse(55 )
℃
Drying
Pre-wash(50 )
Wash (50 )
℃
℃
Rinse
Rinse(65 )
℃
Drying
Wash (55 )
℃
Rinse
Rinse
(55 )℃
Rinse
Drying
Pre-wash
Wash (40 )
Rinse
Rinse (60 )
Drying
Wash (40 )
℃
℃
℃
Rinse
Rinse(45 )
℃
3in1
5/25g
5/25g
5/25g
/
20g .
150
130
160
110 0.90 12.0
80
30
1.2
1.4
1.2
0.8
0.45
12
22
15
8
12
Soak
* :This program is the test cycle. The info rmation for c omparabil ity test
AS/NZS2007.1
To rinse dishes that you
plan to wash later that day.
in ac c ordanc e wi th , as fol low s:
Pre-wash
AS/NZS2007.1
/
8
Capacity:12setting
Position Upper basket: upper wheels on r ails
Rinseaid setting: 6
Op en the door s l i ghtl y 50mm to as s i s t in dr ying of the di shes a f t e r e very wash
St ar ting a cyc le wa sh
Draw outthelower andupperbasket,loadthedishesand push themback.
Iti srecommended to load the lower b asket first,t henthe upperone(see the sectionentitled
Loading the Dishwashe r ).
Pour in the dete rgent (see th e section entitled Detergent and Rin seA id ).
Insert the p lug into the socket. T he power supply is 220-240 VAC/ 50 HZ, the specificatio n
of theso cket is 1 0A 250VAC. Make sure that t he water supply is tu rned on to fu ll pressure.
Closethedoor,pressthePower button,and thePower lightw ill turnon.
Press thepr ogram selector to select your desired program.
0.01
4
9
Page 13

When you pressth e Start/Reset buttonto pause d uringw ashing,the programlight will
stopblinking andthe dishwasherwill mooingevery minuteunlessyo u pressthe
Start/Reset button to sta rt.
PREMISE:
You can modified the washing program, just the dishwasher has been
running for a short time.
and the appliance may have already drained the wash water. If this is the case,
the detergen t dispenser must b e refill ed (see the s ection entitled " Loadin g the
Detergent" ).
There are two w ays of changin g the programme :
1. Presst hebuttonofrunningprog. morethan3 secondstocancelit,t henpush thebutton of desiredprog.
and it willru n af t er 10 seco nds.(see the section enti tled " S tarting a wash cycle " ).
2. Pre ss B utto n of desir ed prog. (except bu ttom of ru nning pro. ) mor e t han 3 seconds to c hange
the running prog. into the prog. which you press, it w ill run after 10 seconds.
Ot herwis e, th e det er ge nt ma y have al r eady been rele a sed ,
Ifyou open thedoor , the machinewillpause. The program light will
duringa wash cycle
stopblinkingand the buzzerwillsou ndevery minuteunlessy ouclose the door. After
youcloset hedoor ,the machinewill keepon workingafter 10 seconds.
The progr am li ght s sh ow the sta te of the d is hwa sher :
a) Allprogramlights off--------------------------------------------standby
b) One of the p rogram lights on--------------------------------------pause
c) One ofthe programlights blinking-----------------------------------run
c) Some ofthe up three p rogramlightsblinking fleetly------------error
Aforgotten dish can be added any time before the detergent cup opens.
Open the door a little to stop the washing.
1
After the spray arms stop working,you can open the door
2
completely.
Add forgotten dishes.
3
When the worki ng cycle has fini s hed, the b uzz er of th e dis hwashe r wil l s o u nd for 8 secon d s , then stop. Tur n off
the appliance using the O N/O FF b utton, shut off th e water supply and op en the door of t he dishwashe r.
Wait for a few m inutes bef ore unloading the dis hwashe r t o a voi d ha ndlin gth e di shes and utensils while they
are still hot a nd m ore suscept ible to br eakage. They w ill also dry be tter.
Close the door
4
The dishwasher will run after 10 seconds.
5
SwitchOffthe Dishwasher
The f ,only in t his case the programme has ended.
inish l igh t is on
1.Switchoff the dishwasher by pressing the ON/OFF button.
2.Turn off thewater tap!
Openthedoor carefully.
Hot di shes are sensitive to kn ocks. The di shes should therefore be allowed to cool d own around 15 minutes
beforeremovingfrom the appliance.
Open t he dishwasher's door, l eave it ajar and w ait a f ew minutes before removing the dishes. In this way they
will be cool er and the dryi ng will b e improved.
Unloadingthe dishwasher
Itis normal that the dishwasher is wet inside.
Empty the low er basket first a nd then the upper o ne. This will avoid water dripping from the upper Bas ket onto
the dishes in the lower one.
It i s d an gerous to ope n th e do or w hen w as hi ng , bec aus e the hot wate r may s cal d y ou.
10
Page 14

The filter prevents larger remn ants of food or other objects from gett ing inside th e pump.
Theresidues may blockthe filter,inthis casetheymustberemoved.
The fi lter system c onsists of a coar se f ilter,aflat (Main filter)
An d a mic rofilter(F i ne filte r ) .
1
2
3
2
1
3
Main filter
Foodand soilparticles trappedinthisfilterarepulverized by a
special jet ont he l ower spray arm and w ashed down to d rain.
Coarse filter
Larger items, suc h as p iece s o f bones o r glas s , that could b lock
thedrainare trapped in thecoarse filter. Toremovethe items
caught by the filter,gently squeeze the tap on th e t op of this
filterandl ift out.
Fine filter
This filterholdssoiland foodresidues in thesump areaand
prevents it frombeing r edepositonthedishesduringwash cycle.
Filterassembly
Thefilterefficiently
For best performance and results, the filter must b e cleane d re gularly. t his reason, it is a goodide a t o
remove the l arger food particl es tr app ed in the filter after each wash cycle by rinsing the semicirc ular filter an d
cup u nder runnin gwa ter.Tore move th e f ilter device , p ull the c up handle in t he upward d irect ion.
removes f ood particle s fromth e wa sh w ater, all owing it to be rec ycled d uring the cycle.
For
Th e dish washer must never b e u sed w i tho ut t he filt er s.
Improper replace ment of the f ilter may reduce the performance level of t he appliance
anddamagedishes andutensils.
When following this procedure from step1 to step 3, the filter system will be removed;
when followingit from Step 3 to Step 1, the filter systemwill be installed.
11
Page 15

Remarks:
- Inspec t the filters fo r blocking after e ver y time th e dishwasher has been used.
- By unscrew ing the c oarse filter, you can remove the filter syst em. Remove a ny f oo d re mnants and
cleanthefiltersunderrunning water.
Theentirefilter assembly shouldbe cleanedonce a week.
Cleaning the Filter
To c lean the coa rse filter a nd the fin e fil te r , us e a cl eani n g brush. Reassem ble t he fi l t er par t s as s ho wn in the figures
on th e last pa ge and reins ert t he entire ass emb ly in the dis hwa sher, positio ning it in it s s eat and pressing downwar ds.
Whencleaning thefilters, don't knockon them. O therwise,thefilters couldbe
contorted andtheperformanceofthedishwasher could bedecreased.
The cont rol panel can be cleaned by u sing a lig htly dampened cloth.
Aftercle aning, make sure to dry it thoroug hly.
For t he ext e ri or, use a g ood a pp liance polish wax.
Neveruse sharp objects, scouring pads or harsh cleaners on a ny part of t he dishwasher.
CleaningThe Door
Toclean the e dge around the door, you should use only a soft warm, d amp cloth.
Toavoid penetrati ono f water i nto the door l ock and electrical components, do not
usea spray cleaner of any kind.
Never u se a spr ay cleaner to cl ean the door panel as it m ay dam age the door lock
and electrical c omponents.
Abrasive ag ents or some pa per towels should not b e used because o f the ri sk of
scra tch ing or l eaving s pots on th e stainless steel su r f a ce.
Protec tA gain st Freezing
please take frost protection measures on t he dishwasher in winter. Ev ery fter washing c ycles,
please operate as follows
1.Cutoff the electricalpowerto the dishwasher.
2.Turnoff th e water supply and d isconnec t the wat er inlet pipe from the wate r valve.
3.Drainthewaterfromtheinletpipeand watervalve.(Use a pantocatch thewater)
4.Reconnect t he water inlet pipe to the wate r v alve.
5.Remove the filter at the bottom o f the tub and use a sponge to soak up water in the sump.
:
If y ou r dish wa sher cannot wor k bec a u se of the i c e, pl e a se co ntac t p rofes s io nal servic e perso ns.
timea
Cleani ng the SprayAr ms
To remove the upper spray arm, screw off the nut clockwise then remove
the ar m.
12
Page 16

AfterEveryWash
After every wash, turn offt he w ater supply to the
appliance and leave the door s lightl y op en so th at
moisture and odours are n ot trapped inside .
Removethe Plug
Before cleaning or p erformi ng maintenance, always
remove th e p lug from t he socket.
No Solve nts orAbra sive C leani ng
To clean theexterior and rubber parts of the dishwasher,
donotusesolvents or abrasivecleaning products.
Only use a c lo th w ith w arm soapy wate r.
Tore m ove spots o r stains f rom the sur f ace of the
interior,usea clothdampenedwithwateran a little
vinegar,or a cleaning product made s peci fically for
dishwashers.
Position the appliance in the desired location. The back should rest against the wall behind it, and the sides,
along the adjacent cabinets or walls. T he dishwasher is equippe dwi th water supply and d rain hoses that can
be pos itioned eith er to the righ t or the l eft s ides to facilitate prop er i nstallati on.
Whennot in Use foraLongTime
It isrecommend that yourun a washcyclewiththe
dishwasher e mpty and t he nremov e t he plug f rom the
socket, t urn offth e wa ter supply and leave the door of
the appl ianc e sli ght ly op en. This w ill help t h e door
sealstolast l ongerandprevent odours fromforming
withinth eappliance.
Moving t heAppli ance
If th e appliance must be moved, tr y to keep i t in t he
vertical position.Ifabsolutelynecessary, itcanbe
positioned on its back.
Seals
Oneofthefactorsthatcauseodourstoforminthe
dishwasher is foo d that r emains trappe din the seals .
Periodic cleaning with a damp sponge will prevent this
fro m occ urri ng.
Once the appl iance is positioned for levelling, the height of the di shwashe r
may be altered via adjust ment o f the scre wing level of the fe et. In any cas e,
the appl iance should not b e inclined more than 2 .
For personal safety:
DO NOT USE AN EXTENSION CORD OR AN ADAPTER PLUG WITH THIS APPLIANCE.
DONOT, UNDER ANY CIRCUMSTANCES, CUTOR REMOVETHE EARTHING
CONNECTION FROM THE POWER CORD.
Please look at th e r ating labe l to know the rating voltage and connect the dishwasher to the appropr iate power s uppl y.
Use the r equired fuse 10 amp, time d elay fuse or circuit breaker recommend ed and provide separate circuit serving
only this appliance.
Ensure the v oltage and frequency of the p ower being cor respond sto
those on the rating plate. Only in sert the p lug into an electrica l socket which i s ea rthed
properly.If the el ectri cal socket t o which thea ppliance must be c onnecte d is not
appropriate f or the plug, replace the socket, rather thanusing a a daptors orthelikeas
theycouldcauseoverheatingand burns.
This appliance must be earthed. In the event of a malfunction or breakdown, earthing will reduce the risk of
electric shock by providing a path of least resistance for the electric current. This appliance is equipped with a
cord havingan equipment-earthing conductor andan earthing plug. The plugmustbe plugged into an
appropriate outlet that is installed and earthed in accordance with all local standards and requirements.
13
Page 17

Improper connection of the equipment earthing conductor can result in the risk of an
electric shock.
Check with a qualified electrician or service representative if you are in doubt whether the
appliance is properly earthed.
Do not modify the plug provided with the appliance. If the plug does not fit properly to the
for personal safety:
DO NOT USE AN EXTENSION CORD OR AN ADAPTER PLUG WITH THIS APPLIANCE.
DO NOT, UNDER ANY CIRCUMST ANC ES, CUT OR REMOVE THE
CONNECTION
FROM THE POWER CORD.
EARTHING
outlet, please have a qualified electrician to install a proper outlet.
Connect the c old water supply hose to a threaded 3/4(inch) connect or and m ake sure
that it isf astened tightly in place.
If the w ater pipes are new o r have n ot been used for an e xtended period of time, let the
water run to m ake sure that the water is clear. This precaut ion i s needed to avoid the
risk o f the water inlet to be bl ocked and damage the a pplian ce.
Please clos e the hydrant after using.
Insert the drainho se into a dra in pi pe with a minimum di amet er o f 4cm , o r let it run i nto the sink, making sure to
avoidbendingor crimping.Usethespecialplasticsupportthatcomeswith the appliance.The freeendofthehose
must be at a h eigh t be tween 40 and 100cm and must not beimme rsed in w ater.
SINK
DISHWASHER
POWEROUTLET
Inlet pipe connector Drain pipe connector
FRONT VIEW
Min 100mm
14
Page 18

How toDrain ExcessWaterFromHoses
If the sink is 1 000 mm h i gh er fr om the floor, th e exce s s water i n h o ses cannot be draine d direc t l y
intothesink. Itwillbe necessarytodrain excess waterfrom hoses into a bowlo r suitable
container that is held outsi de and lower th an t he sink.
Wat er Out l e t
Connect t he water d rain hose. The dr ain hose must be correctly fitted to avoid water leaks.
Ensure tha t the wat er inlet hose is n ot kinked or s quashed.
ExtensionHose
Ifyou need a dr ain hose extensio n, make sure to use a similar drain hose.
Itmust be no longer than 4metr es; ot herwise the cleaning effectof the dishwasher could be reduced.
Syph on Connection
The waste connection must b e at a height of be tween 4 0 cm (minimum) and 100 cm (maximum)
from the botto m o f the dish.T he w ater drain hose s hould be fixed by aho se clip.
Thefollowingthingsshould be checked before startingthe dishwasher.
1
Thedishwasher is leveland fixedproperly
2
The inle t val ve is ope n
3
Thereis a leakage at theconnectionsof the conducts
4
Thewiresaretightlyconnected
5
The power is switchedon
6
The inle t and drai n hoses are k notte d
7
Allpackingmaterialsand printingsshould be takenoutfromthe dishwasher
Afteri nstallation, please makesure to keep t his manual.
The content of this manual is very helpful to t he users.
15
Page 19

Fuse blown, or the
circuit breaker triggered
Replace fuse or reset circuit breaker. Remove any other
appliance s sharing the same circuit with the dishwasher
Power supply is not
turned on
Water pressure is low
Door of dishwasher
not properly closed.
Kink in drain hose
Filter clogged
Kitchen sink clogged
Improper detergent
Make sure the dishwasher is turned on and the door is
closed securely.
Make sure the power cord is properly plugged into the
wall socket.
Check that the water supply is connected properly and
the water is turned on.
Make sure to close the door properly and latch it.
Check drain hose.
Check coarse the filter
(see section titled )" Cleaning The Filter "
Check the kitchen sink to make sure it is draining well.
If the problem is the kitchen sink not draining ,you may
need a plumber rather than a serviceman for dishwashers.
Use only the special dishwasher detergentto avoid suds.
If this occurs, open the dishwasher and let suds evaporate.
Add 1 gallon of cold water to the tub. Close and latch the
dishwasher, then select any cycle. Dishwasher will drain
out the water at the first step.
Open the door after the
draining has stopped and check if the suds have
disappeared.
Repeat if necessary.
Spilled rinse-aid
Detergent with
colourant was used
Hard water minerals
The affected items are
notcorrosionresistant.
r
Aspayarmis
knocking against
an item in a basket
Items of crockery
are loose in the
wash cabinet
This may be caused
by on-site installation
or the cross-section of
the piping.
Always wipe up rinse-aid spills immediately.
Make sure that the detergent is the one without
colourant.
To clean the interior, use a damp sponge with
dishwasher detergent and wear rubber gloves.
Never use any other cleaner than dishwasher
detergent for the risk of foaming or suds.
The items should be corrosionresistant.
Interrupt the programme, and rearrange the items
which are obstructing the sp ay arm.r
Interrupt the programme,
and rearrange the items of crockery.
This has no influence on the dishwasher function.
if in doubt, contact a suitably qual ified plumber.
16
Page 20

The dishes were not
loaded correctly.
See notes in " Loading the Dishwasher Baskets ".
Unsa ti s
-factory
washin g
resu lt
Theprogramme was
notpowerfulenough.
Not enough detergent
wasdispensed.
Items are blocking
the path of sp ay arms.r
The filter combination
inthebaseofwash
cabinet is not clean or
is not correctly fitted.
This m ay cause
the sp ay arm jets
r
to get blocked.
Combination of soft
water andtoo much
detergent.
Aluminum utensils
have rubbed against
dishes.
Dishes block
detergentcups.
Improper loading
Too little rinse-aid
Select a more intensive programme.
See" Wash Cycle Table ."
Use more detergent, or change your detergent.
Rearrange the items so that the sp ay can rotate freely.r
Clean and/or fit the filter combination correctly.
Clean the sp ay arm jets. See "Cleaning the Spray
Arms".
Use less detergent if you have soft water and select
a shortest cycle to wash the glassware and to get
them clean.
Use a mild abrasive cleaner to eliminate those marks.
Re-loadin g the dishes properly.
Load the dishwasher as suggested in the directions.
Increase the amount of rinse-a id/refill the rinse-aid
dispenser.
r
Unsa ti s
-factory
dryi ng
resu lt
Dishes are removed
too soon
Wrong program
has been selected
Use of cutlerywith
a low-quality coating
Do not empty your dishwasher immediately after
washing. Open the door slightly so that the steam can
escape. Begin unloadingthe dishwasher only once t
he dishes are barely warm to the touch. Empty the low
basket first.This prevents water form dropping off
dishes in the upper basket.
In short program the washing temperature is lower.
This also lowers cleaning performance. Choose
a program with a long washing time.
Water drainage is more difficult with these items.
Cutlery or dishes of this type are not suitable for
washing in the dishwasher.
When some malfunctions come on, the appliance will display error codes to warn you:
Longer inlet time.
Longer heating time,
but not reaching required temperature
Overfilled.
Failure of temperature sensor
Faucets is not opened, or water intake is restricted,or water pressure
is too low.
Malfunction of temperature sensor or of heating element.
Too much inlet water. .
Opencircuit or break of temperature sensor
Failure of temperature sensor
If overflow occurs, turn off the main water supply before calling a service.
If there is water in the base pan because of an overfill or small leak,
the water should be removed before restarting the dishwasher.
Short circuit or break of temperature sensor
17
Page 21

Height : 850mm
Width : 600mm
Depth : 580mm
Voltage connected Load : see rating label
Water pressure: 0.04-1.0MPa
Power supply: see rating label
Capacity: 12 Place settings
18
Page 22

Warranty Card
Worldwide Appliances Pty Limited
A.B.N. 45868077422
Oce:
48-50 Moore Street, Leichhardt N.S.W 2040
Post:
Locked Bag 3000, Annandale, N.S.W 2038
P: 1300 694 583
WARRANTY REGISTRATION
Your ongoing satisfaction with your artusi
product is important to us. We ask that you
complete the enclosed Warranty Registration
Card and return it to us so that we have a record
of the artusi product purchased by you.
PRIVACY
Worldwide Appliances respects your
privacy and is committed to handling your
personal information in accordance with the
National Privacy Principles and the Privacy
Act 1988 (Cth). A copy of the Worldwide
Appliances Privacy Policy is available at
www.artusi.com.au. Worldwide Appliances will
not disclose any personal information set out
in the Warranty Registration Card (“Personal
Information”) without your consent unless
required by:
1. law;
2. any Worldwide Appliances related company;
3. any service provider which provide services
to artusi or assist artusi in providing services
(including repair and warranty services) to
customers. Our purpose in collecting the
Personal Information is
to keep a record of the artusi product purchased
by you, in order to provide a better warranty
service to you in the unlikely event that there is
a problem with your artusi product. Worldwide
Appliances may contact you at any one or more
of the address, email address or telephone
numbers set out in the Warranty Registration
Card. Please contact artusi on 1300 694
583 should you not wish to be contacted by
Worldwide Appliances.
WARRANTY
1. Warranty
Worldwide Appliances warrants that each artusi
product will remain, for a period of either 12
months or 24 months of warranty. All Warranties
are valid from the original date of purchase, And
warranty claims must be accompanied by the
proof of purchase.
24 months warranty products:
All Built-in Appliances – Limited to Ovens,
Gas, Induction and Electric Cooktops, and All
Rangehoods
Freestanding Cookers - Gas and Electric Models
(900mm Width)
artusi.com.au
Dishwashers - Freestanding, Fully Integrated,
Semi Integrated and built-in
12 months warranty products:
Freestanding Cookers - Gas and Electric Models
in 50cm, 54cm and 60cm Widths
Portable Appliances* – Benchtop Models and
Portable Gas Models
2. What is not Covered by the Warranty.
The Warranty does not apply if an artusi product
is defective by a factor other than a defect arising
in the manufacture of the artusi product, including
but not limited to:
(a) damage through misuse (including failure
to maintain, service or use with proper care),
neglect, accident or ordinary wear and tear
(including deterioration of parts and accessories
and glass breakage);
(b) use for purpose for which the artusi product
was not sold or designed;
(c) use or installation which is not in accordance
with any specied instructions for use or
installation;
(d) use or operation after a defect has occurred or
been discovered;
(e) damage through freight, transportation or
handling in transit (other than when Worldwide
Appliances is responsible);
(f) damage through exposure to chemicals, dusts,
residues, excessive voltage, heat, atmospheric
conditions or other forces or environmental
factors outside the control or Worldwide
Appliances;
(g) repair, modication or tampering by the
purchaser or any person other than Worldwide
Appliances, an employee of Worldwide
Appliances or an authorised artusi service
contractor*;
(h) use of parts, components or accessories
which have not been supplied or specically
approved by artusi.
(i) damage to surface coatings caused by cleaning
or maintenance using products not recommended
in the artusi product handbook provided to the
purchaser upon purchase of the artusi product;
(j) damage to the base of an electric oven due to
items having been placed on the base of the oven
cavity or covering the base, such as aluminium
foil (this impedes the transfer of heat from the
element to the oven cavity and can result in
irreparable damage); or
(k) damages, dents or other cosmetic
imperfections not aecting the performance of the
artusi in respect of an artusi product purchased
as a “factory second” or from display
The Warranty does not extend to light globes
used in artusi products.
3. Domestic Use
Each artusi product is made for domestic use.
This Warranty may not extend to artusi products
used for commercial purposes.
Continued over...
Artusi Warranty March 2014.indd 1 6/03/2014 10:08 am
Page 23

01032014
Warranty Card continued
artusi.com.au
4. Time for Claim under the Warranty
You must make any claim under this Warranty
within twenty eight (28) days after the occurrence
of an event which gives rise to a claim pursuant
to the Warranty, by booking a service call on the
telephone number below.
5. Proof of Purchase
Customers must retain proof of purchase in order
to be eligible to make a warranty claim in respect
of an artusi product.
6. Claiming under the Warranty
Customers will bear the cost of claiming under
this Warranty unless Worldwide Appliances
determines the expenses are reasonable, in which
case the customer must claim those expenses
by providing written evidence of each expense
to Worldwide Appliances at the address on the
Warranty Registration Card.
7. Statutory Rights
(a) These terms and conditions do not aect your
statutory rights.
(b) The limitations on the Warranty set out in this
document do not exclude or limit the application
of the consumer guarantees set out in the Act or
any other equivalent or corresponding legislation
in the relevant jurisdiction where to do so would:
(i) contravene the law of the relevant jurisdiction;
or
(ii) cause any part of the Warranty to be void.
(c) Worldwide Appliances excludes indirect or
consequential loss of any kind (including, without
limitation, loss of use of the artusi product) and
(other than expressly provided for in these terms
and conditions) subject to all terms,
conditions and warranties implied by custom, the
general law, the Act or other statute.
(d) The liability of Worldwide Appliances to you
for a breach of any express or non-excludable
implied term, condition or warranty is limited at
the option of Worldwide Appliances to:
(i) replacing or repairing the defective part of the
artusi product;
(ii) paying the cost of replacing or repairing the
defective part of the artusi product;
(iii) replacing the artusi product; or
(iv) paying the cost of replacing the artusi
product.
(e) Our goods come with guarantees that cannot
be excluded under the Australian Consumer
Law. You are entitled to a replacement or refund
for a major failure and for compensation for any
other reasonably foreseeable loss or damage.
You are also entitled to have the goods repaired
or replaced if the goods fail to be of acceptable
quality and the failure does not amount to a
major failure.
8. Defects
Any part of an artusi product deemed to be
defective and replaced by Worldwide Appliances
is the property of Worldwide Appliances.
Worldwide Appliances reserves the right to
inspect and test artusi products in order to
determine the extent of any defect and the
validity of a claim under the Warranty.
*To locate your closest artusi authorised service
agent please contact us on 1300 652 100 or visit
www.artusi.com.au
ALL SERVICE CALLS MUST BE BOOKED
THROUGH AN AUTHORISED DEALER OR
WARRANTY DEPARTMENT ON 1300 652 100
OR stokesaps.com.au/artusi-service
Warranty Card tear off
WARRANTY REGISTRATION CARD
01052013
Last Name: First Name:
Address:
State: Postcode: Email:
Home Phone: Mobile:
Purchase Date: / / (Please attach proof of purchase to validate warranty)
MODEL NUMBER
1
2
3
4
Please complete and send to ARTUSI at: REPLY PAID 83617
LEICHHARDT NSW 2040
SERIAL NUMBER
(if you cannot locate the serial number please call ARTUSI on 1300 694 583)
01032014
2
Artusi Warranty March 2014.indd 2 6/03/2014 10:08 am
 Loading...