

Page 1

ACH12BBQ
ACH12BBQB
OPERATION MANUAL
APPLIANCES
FOR LIVING
Page 2

Congratulations, you are now the proud owner of an ARTUSI cooking appliance. Thank you for purchasing ARTUSI
and welcome to the ARTUSI Family.
This instruction manual has been specially created to inform you of the full range of features your ARTUSI appliance
has to offer and serves as an introduction to getting the very best out of your ARTUSI appliance.
We present detailed information on each of the features your ARTUSI appliance consists of. Once you have read
this section you will be able to choose the most appropriate settings for your appliance when cooking different
types of food.
We ask you to read the instructions in this booklet very carefully as this will allow you to get the best results from
using your appliance. KEEP THE DOCUMENTATION OF THIS PRODUCT FOR FUTURE REFERENCE.
TO REGISTER YOUR PRODUCT WITH ARTUSI, PLEASE FILL OUT THE WARRANTY CARD AT THE END OF
THIS BOOKLET AND POST IT TO: REPLY PAID 83617
LEICHHARDT NSW 2040
Dear Artusi Customer, please read this user manual carefully before using the product and, keep it permanently at
your disposal.
Note: This user manual is prepared for more than one model. Some of the features specified in this Manual may not
be available on your appliance.
All our appliances are only for domestic use, not for commercial use. Products marked with (*) are optional.
“THIS APPLIANCE SHALL BE INSTALLED IN ACCORDANCE WITH THE REGULA TIONS FORCE AND ONLY USED
IN A WELL VENTILATED SPACE. READ THE INSTRUCTIONS BEFORE INSTALLING OR USING THIS APPLIANCE”
“Conforms with the WEEE Regulations.”
Page 3

HOOD DUCTING GUIDE
Here are some important points to consider when choosing and/or installing a range hood:
• An externally ducted range hood will generally outperform a recirculating range hood.
• We discourage the use of flexible ducting as this has a significant negative impact on airflow and noise due to turbulence
• caused by the ribs. Instead consider using semi-rigid or rigid duct.
• Avoid using a narrower duct than specified as this will reduce airflow; the best performance is obtained when the range hood is
installed with a short duct with minimal bends.
• To determine the required clearance between the cooktop and the range hood always consult the installation manual for both
the range hood and cooktop. The required clearance is the greater of the distance specified in either manual (and a minimum of
600mm between the highest point of the highest burner for gas cooktops).
• Five metres is the recommended maximum length for ducting (see diagram 1.). When the ducting exceeds five metres in length
the installation of a TD500 or TD350 in-line motor is required, which must be placed one metre from the external vent (see
diagram 2.).
1.0m
1.0m
1.0m
90˚ Bend = 1.0m
1.0m
2.0m
1.0m
1.0m
90˚ Bend = 1.0m
3.0m
1.0m
In-line Motor - this needs to
run o a separate activation
switch to the range hood
External Vent
External Vent
Diagram 1.
Diagram 2.
Page 4

2
IMPORTANT SAFETY INFORMATION
**Read the complete manual carefully before installation**
Warnings:
TO REDUCE THE RISK OF FIRE, ELECTRICAL SHOCK OR PERSONAL INJURY, PLEASE
OBSERVE THE FOLLOWING:
1. Installation and electrical work must be done by a qualified person in accordance with all applicable
codes and standards
2. If the supply cord is damaged, it must be replaced by the manufacturer, its service agent or a similarly
qualified person to avoid a hazard. Any modifications that may be required to the electrical system for the
installation of the range hood must only be made by qualified electricians.
3. Before servicing or cleaning unit, turn off the hood and pull out the power plug/cord.
4. Use this unit only in the manner intended by the manufacturer.
5. Sufficient air is needed for combustion and exhausting of gases through the chimney of fuel burning
equipment to prevent back drafting. Follow the heating equipment manufacturer's guidelines and safety
standards, and the local authorities’ codes.
6. When cutting or drilling into a wall or ceiling, be careful not to damage existing electrical wiring and
other hidden utilities.
7. Ducted fans must always be vented to the outdoors.
8. To reduce the risk of fire, use only metal ductwork.
9. This unit must be grounded.
10. The appliance is not to be used by persons (including children) with reduced physical, sensory or mental
capabilities, or lack of experience and knowledge, unless they have been given supervision or instruction.
11. Children being supervised not to play with the appliance
TO REDUCE THE RISK OF A RANGE TOP GREASE FIRE:
1. Never leave surface units unattended at high settings. Boil-overs cause smoke and greasy spillovers that
may ignite. Heat oils slowly on low or medium settings.
2. Always turn hood ON when cooking at high heat.
3. Clean ventilating fans frequently. Grease should not be allowed to accumulate on the fan or filter.
Suggest at least one time per month to clean.
4. Always use cookware appropriate for the size of the surface element.
Page 5

3
5. There shall be adequate ventilation of the room when the range hood is used at the same time as
appliances burning gas or other fuels.
6. The rangehood can be used on six cookers at most; The rangehood can be used on BBQ.
Page 6

4
CAUTION
1. To reduce the risk of fire and to properly exhaust air, be sure to duct air outside. Do not vent exhaust air
into spaces within walls or ceiling or into attics, crawl spaces or garages.
2. Take care when using cleaning agents or detergents.
3. Avoid using food products that produce flames under the range hood.
4. Do not flame under the range hood
5. The range hood must only be used for the exhaust of cooking fumes in home kitchens. The
manufacturer disclaims all liability for any other use of the appliance.
6. Two installers are recommended because of the large size and weight of this hood.
7. Use approved cord-connection kit only.
8. Accessible parts may become hot when used with cooking appliances.
9. Please read specification label on product for further information and requirements.
Page 7

5
INSTALLATION INSTRUCTIONS
Before You Start...
1.Read this manual carefully and completely.
2.The range hoods confirms to related appliance standards. Please check your local building codes for any
additional requirements.
3.The appliance has been manufactured as class I, therefore ground connection is necessary. The range hood
must be installed so that that the plug is easily accessible.
Unpacking
Remove the packaging with the product in place. Cut off the packing ribbons and carefully cut open the
packaging (do not cut too deeply), remove the packaging. Check that the product is free from transport
damage. Any damage shall be reported immediately to the carrier or seller. Damage, faults and missing
parts must be reported immediately to the seller
Installation preparation
1.Before mounting the hood, plug in and test all functions for proper operation.
2.Remove the filters from the bottom of the hood to prevent damage during the installation.
3.Connect duct tube (if included with the range hood) to the top of the range hood using duct tape on all seals.
3.Your range hood will need to be ducted to ensure it operates and complies with local and national
regulations.
DUCT MOUNTING OPTIONS
You will need some additional parts to complete these installations.
Ducting for the ACH12BBBQ requires 2 150mm ducts. The ACH12BBQB requires a single 200mm
diameter duct (a 200mm flex duct 2m long is included with this model)
The air must not be discharged into a flue that is used for exhausting fumes from appliances burning gas or
other fuels.
REAR TOP (ROOF) TOP (SOFFIT/EAVE)
(RECOMMENDED)
RANGEHOOD INSTALLATION
Page 8

6
The ideal position of the Rangehood is as follows:
1.Height above cooking surface – min. 650mm
2.Distance from cooking surface to Rangehood mounting bracket bottom screw holes:
Model: ACH12BBQ
Top mounting holes – Min1085mm
Bottom mounting holes – Min 710mm
Model: ACH12BBQB
Mounting holes – Min 1010mm
Mounting bracket is attached and part of the medium rangehood motor cover.
Note: Rangehood must be level, if not rangehood will not operate correctly.
Model:ACH12BBQ
1.Using a tape measure mark the top mounting holes C/L, min 1085mm, above cooking surface. This line
should be level.
2.Using a tape measure mark the bottom mounting holes C/L 375mm, down from the line discussed in item 1.
This line should be level.
3.Find the center of the BBQ cooking surface and using a plumb bob, mark this center on the above lines
discussed in Item 1 & 2.
4.Mark the top mounting holes on the line discussed in Item 1. This mark should be 155mm either side of the
center mark discussed in Item 3.
5.Mark the bottom mounting holes on the line discussed in Item 2. This mark should be 380mm either side of
the center mark discussed in Item 3.
Model:ACH12BBQB
1.Using a tape measure mark the mounting holes C/L, min 1010mm, above cooking surface. This line should
be level.
2.Find the center of the BBQ cooking surface and using a plumb bob, mark this center on the above lines
discussed in Item 1.
3.Mark the mounting holes on the line discussed in Item 1. This mark should be 230mmeither side of the
center mark discussed in Item 2.
Warning:
1.Your rangehood is very heavy. Please use suitable fixings and hole size for this weight.
ACH12BBQ – 38Kg
ACH12BBQB – 38Kg
2.If unsure of which fixings please discuss with your hardware stockist or rangehood installer.
3.Using two people, lift rangehood into place and secure to the wall using selected hardware. Ensure
rangehood is level.
Page 9

7 8
Page 10

Page 11

9
DUCTING
1.Remove all tapes from the duct’s butterfly flaps and ensure they move up and down freely.
2.Position the butterfly flaps up.
3.Position the ducting over the top of the collection box and butterfly flaps. Note: If unsure about the ducting
please contact a rangehood installer.
4.If using a rangehood installer or roof plumber duct through ceiling and roof in accordance with the local,
state and national regulations and laws.
POWER
Using a plumb bob or spirit level determine the vertical line the flue surrounds will take.
The position of the 240V AC wall socket is that it must be accessible to turn on/off without removing any
covers.
Note: All electrical work must be carried out by a licensed electrician.
1.Uncoil power cord.
2.Plug into wall socket and turn on.
3.Test the fans and lights as per “Using Rangehood”.
4.If all okay turn off wall socket and unplug power lead.
FLUE SURROUND
Provided are 2 x flue surrounds both 500mm high. These are used to finish and cover the motor box and
installed ducting.
1.Lift and fit bottom flue surround, this fits into the groove in the Rangehood flat top.
2.Mark 1 hole on each side for the flue surround. Remove flue surround and drill holes.
3.Replace flue surround and secure each side at the top with suitable screws.
4.Mounting the second flue surround, this goes on the inside of the one previously installed.
5.Using a spirit level, plumb bob and tape measure position the flue bracket as high as possible. Once in
correct position mark holes and drill.
6.Secure the flue bracket with suitable screws.
7.Slide the second flue cover inside the first. Make sure the power cord is clear of the flue surround. Now
fasten to the flue bracket, make sure not to damage power cord.
8.Push 240V AC plug into power socket and turn on.
Note: Do not damage the power cord during the flue surround installation.
Page 12
10
OPERATION
Press the to turn on the rangehood. The display backlight will come on and the power icon will be
displayed.
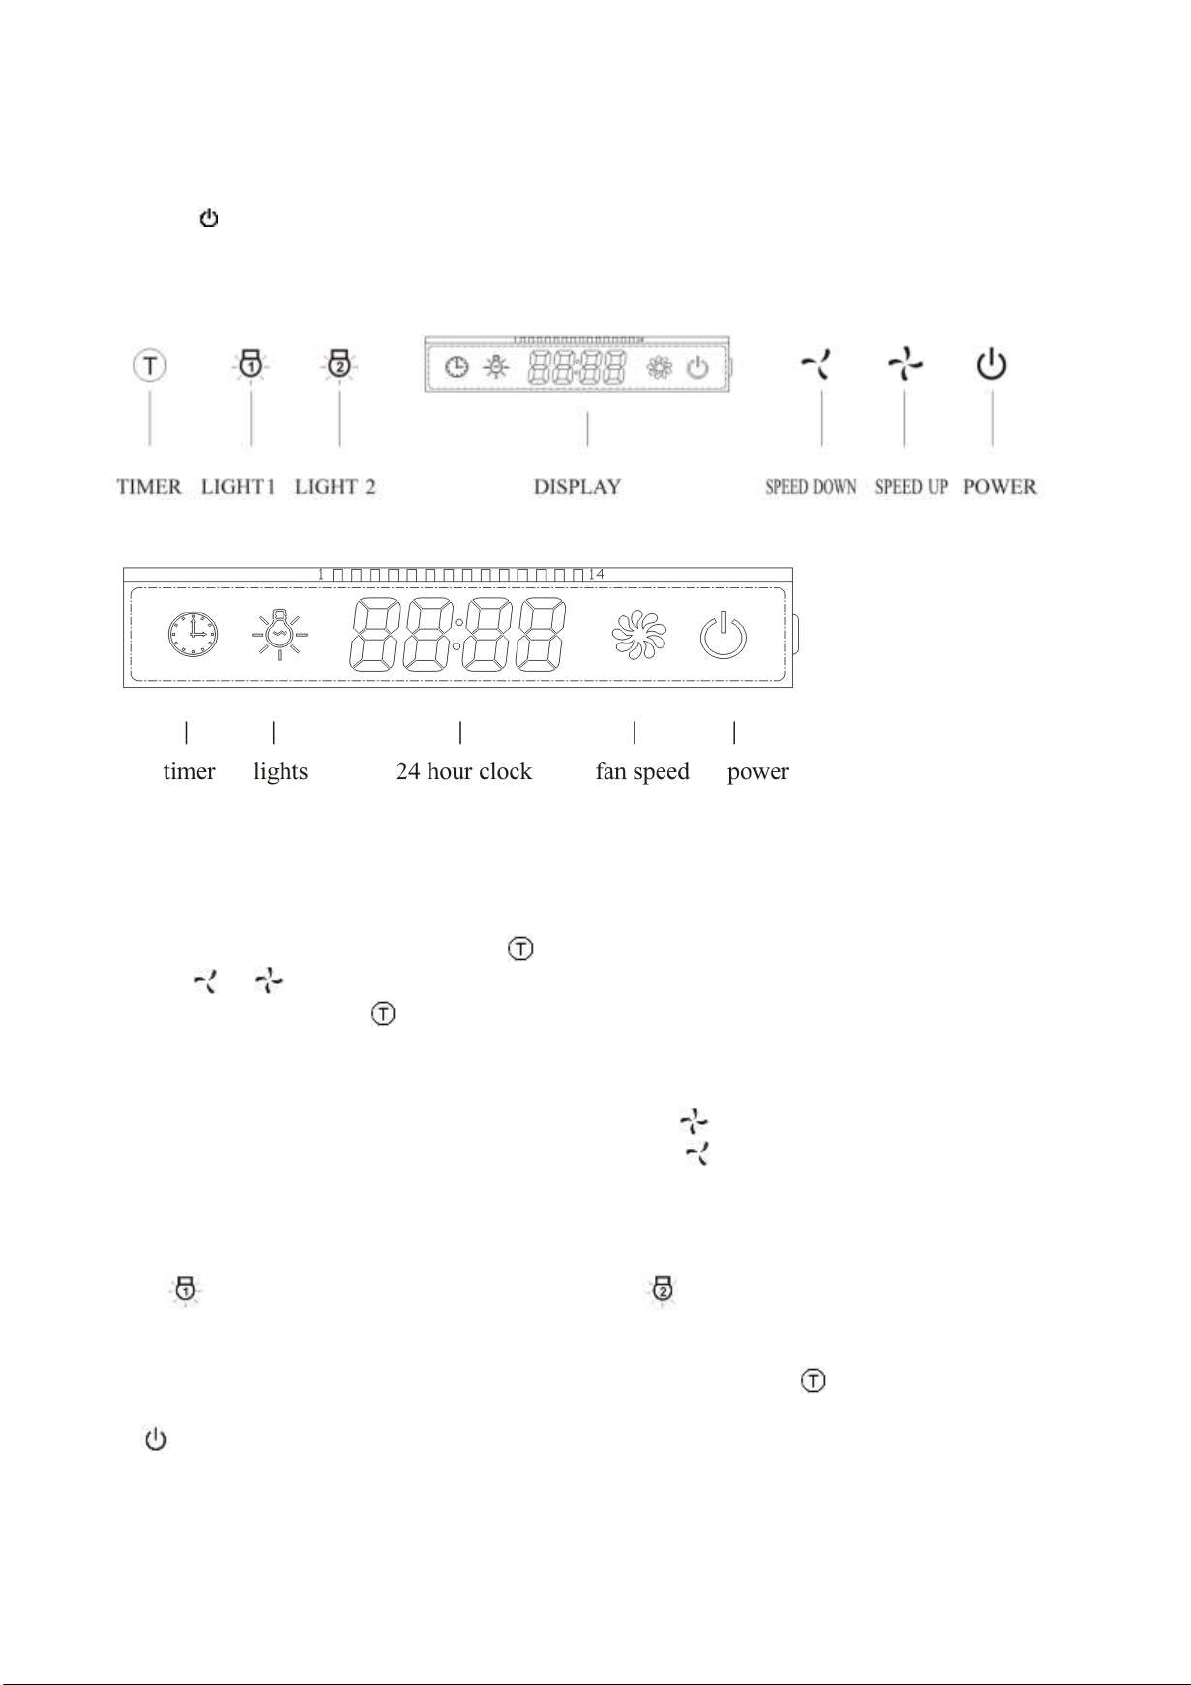
CONTROL PANEL FOR ACH12BBQ
DISPLAY PANEL
CLOCK
1.Each time the rangehood is reconnected to a power supply, the control panel will beep once. The clock will
reset and show 12:00. The rangehood will be in standby mode without lights or motors operating. The control
panel will not be backlit.
2.To set the time. In standby mode, press the button. The hour indicator will flash. Adjust the hour by
using the or buttons. Press the button once to change by one minute, or hold the button in for
continuous adjustment. If the button is not pressed for 10 seconds, the display will go back to standby
mode.
FAN
3.The fan speed cycles between F1-F2-F3 with each press of the button.
4.The fan speed cycles between F3-F2-F1 with each press of the button.
5.The fan icon will appear in the display whenever the fan is running. The fan icon will rotate to indicate the
fan speed.
LIGHTS
6.The button turns the three back lights on and off. The button turns the three front lights on and off.
TIMER BUTTON
7.To activate the 3 minute delayed shutdown. With the fans running, press the button. the display will
show 3.00 minutes,count down to zero, then switch off the fans. To cancel the delayed shut down,then press
the button.
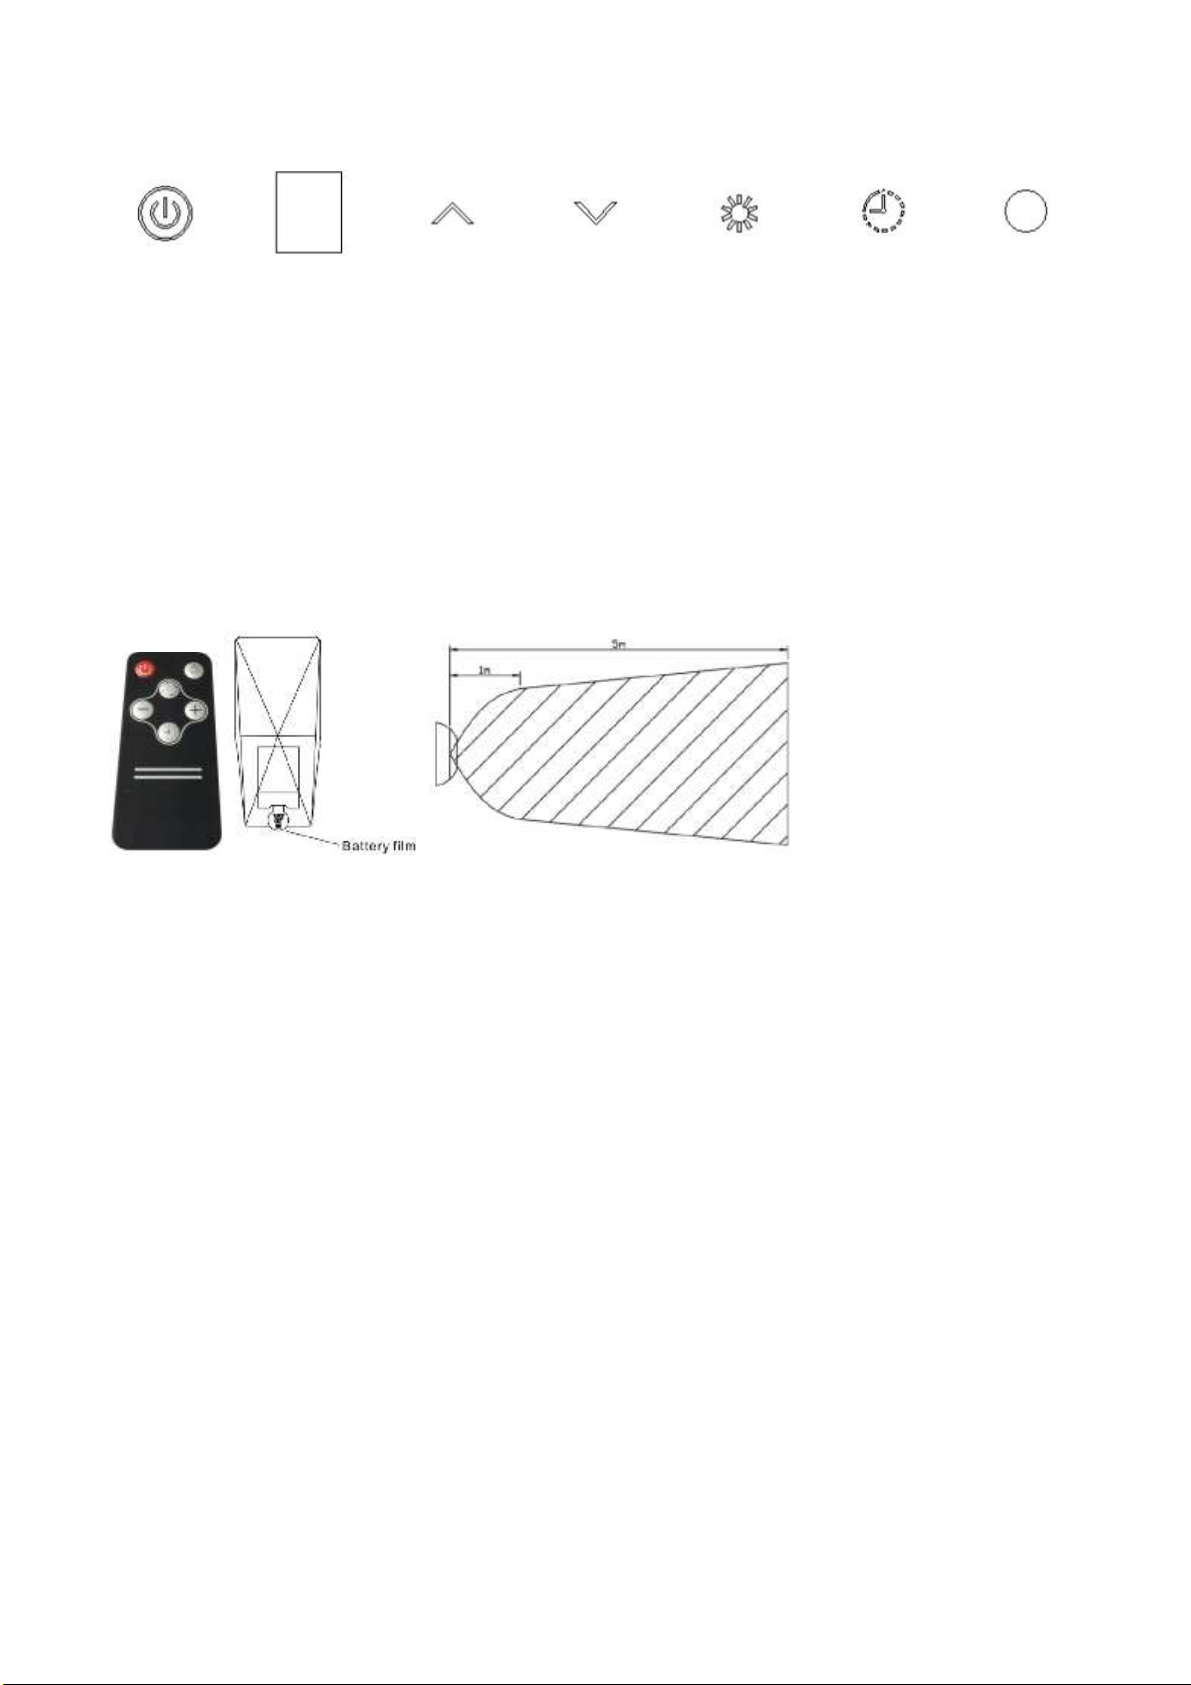
CONTROL PANEL FOR ACH12BBQB
Page 13
11
Button functions:
• Power: Power ON/OFF.
• Blower Speed Indicator: Shows current blower (motor) speed (1-3).
• Increase Value: Blower (motor) speed increase, Time setting increase.
• Decrease Value: Blower (motor) speed decrease, Time setting decrease.
• Light: Turns ON/OFF
• Power-Off Delay Digital Timer: Press the set/timer button for about 2 seconds to turn on the delay-off
timer.The range hood is set for 3 minutes delay-off timer.
Remote controller:
Your cooker hood equipped with remote controller to allow you operate the unit remotely.Before use the
remote control please remove the battery film!
Below shadow area is effective remote controlling area for better using the remote control.
CARE AND CLEANING
General
A build up of oil may occur if the Rangehood and baffle filters are not cleaned properly and regularly. Some
discolouration of the baffle filter may occur if cleaned in the dishwasher.
Regular maintenance is required to ensure the cooker hood functions properly.
Clean the fan and other surfaces of the cooker hood regularly with a cloth dipped in denatured alcohol or
a non-abrasive liquid cleaner. Suggest at least one time per month to clean.
There is a fire risk if cleaning is not carried out in accordance with the instructions.
RANGEHOOD SURFACES
Clean periodically with hot soapy water and a clean cotton cloth. Do not use abrasive detergent or steel
wool/scouring pads which will scratch and damage the surfaces.
For heavier deposits, use a liquid degreaser.
After cleaning, you may use nonabrasive stainless steel polish/cleaners to polish and buff the stainless lustre.
Always rub lightly, with a clean cotton cloth and with the grain of the stainless steel.
Note: Never wipe or rub across the grain as this will damage the surface finish.
Page 14

12
BAFFLE FILTERS
The baffle filters fitted by the factory are intended to filter out residue and grease from cooking. They are
required to be kept clean and should be cleaned after every 30 hours of use or more often if required or after
heavy cooking.
Note: Always turn the Range hood power off at the point before removing filters.
To Remove
Lift latch and gently pull down front of baffle filter and remove.
To Clean
1.Use warm soapy water and a soft cloth or put into dishwasher on a ‘normal’ cycle.
2.Thoroughly clean and wipe down the inside of Range hood canopy.
To Fit
1.Position the rear of the baffle filter into the 2 slots.
Gently rotate the baffle filter into position, lift latch and push into place and release latch
NOTES:
If you clean the baffle filter in the dishwasher: load only the baffle filter and no other items as food particles
from dishes can fasten in the filter.
-DO NOT let dirt build up on the hood
-DO NOT use steel wool or steel brushes to clean the hood
-DO NOT leave salt solutions, disinfectants, bleaches or cleaning compounds on the hood for any length of
time as they may damage the stainless steel. Rinse after use with clean water and wipe dry with a clean cloth
Replacing the LED lights
The illumination is designed for use during cooking and not for prolonged general illumination of your
outdoor kitchen. Prolonged use of the lights may reduce the life time of the LED lights.
WARNING: Do not touch or change lights while the hood is operating.
Use only the same LED lights as the original specification. Re-placement lights are available through
the dealers.
1. Take off the filters from hood.
2. Take off the two screws and replace the LED lights.
Page 15

13
3. Replace the screws and filters.
NB:
The light is only meant for use during cooking and not for illuminating the surroundings for longer
periods. If the light is used for longer periods, this will considerably shorten the burn time of the lights.
Read all instructions before installing and operating this appliance.
IMPORTANT SAFETY NOTICE
Read all instructions in this manual before operating the appliance. Save these instructions for future reference.
Always leave safety grills and filter in place. Without these components, operating blowers could catch on to
hair, fingers and loose clothing.
NEVER dispose cigarette ashes, ignitable substances or any foreign objects in to the blowers.
NEVER leave cooking area unattended. When frying, oil in the pan can easily overheat and catch fire. The
risk of self-combustion is higher when the oil has been used several times.
Note:
Dispose of this product responsibly. Irresponsible disposal can result in negative environmental impact
or personal injury.'
Under no circumstances may this extractor fan be disposed of as household waste. It must be taken to a
recycling centre for electrical and electronic equipment.
This product must be disposed of in accordance with local legislation.
For more information on disposal, recycling and reuse of this product, contact your local authority, your
household waste collection service or the store where you purchased the product
Hood Size & Wiring diagram:
Page 16

14
Page 17

15
Page 18
16
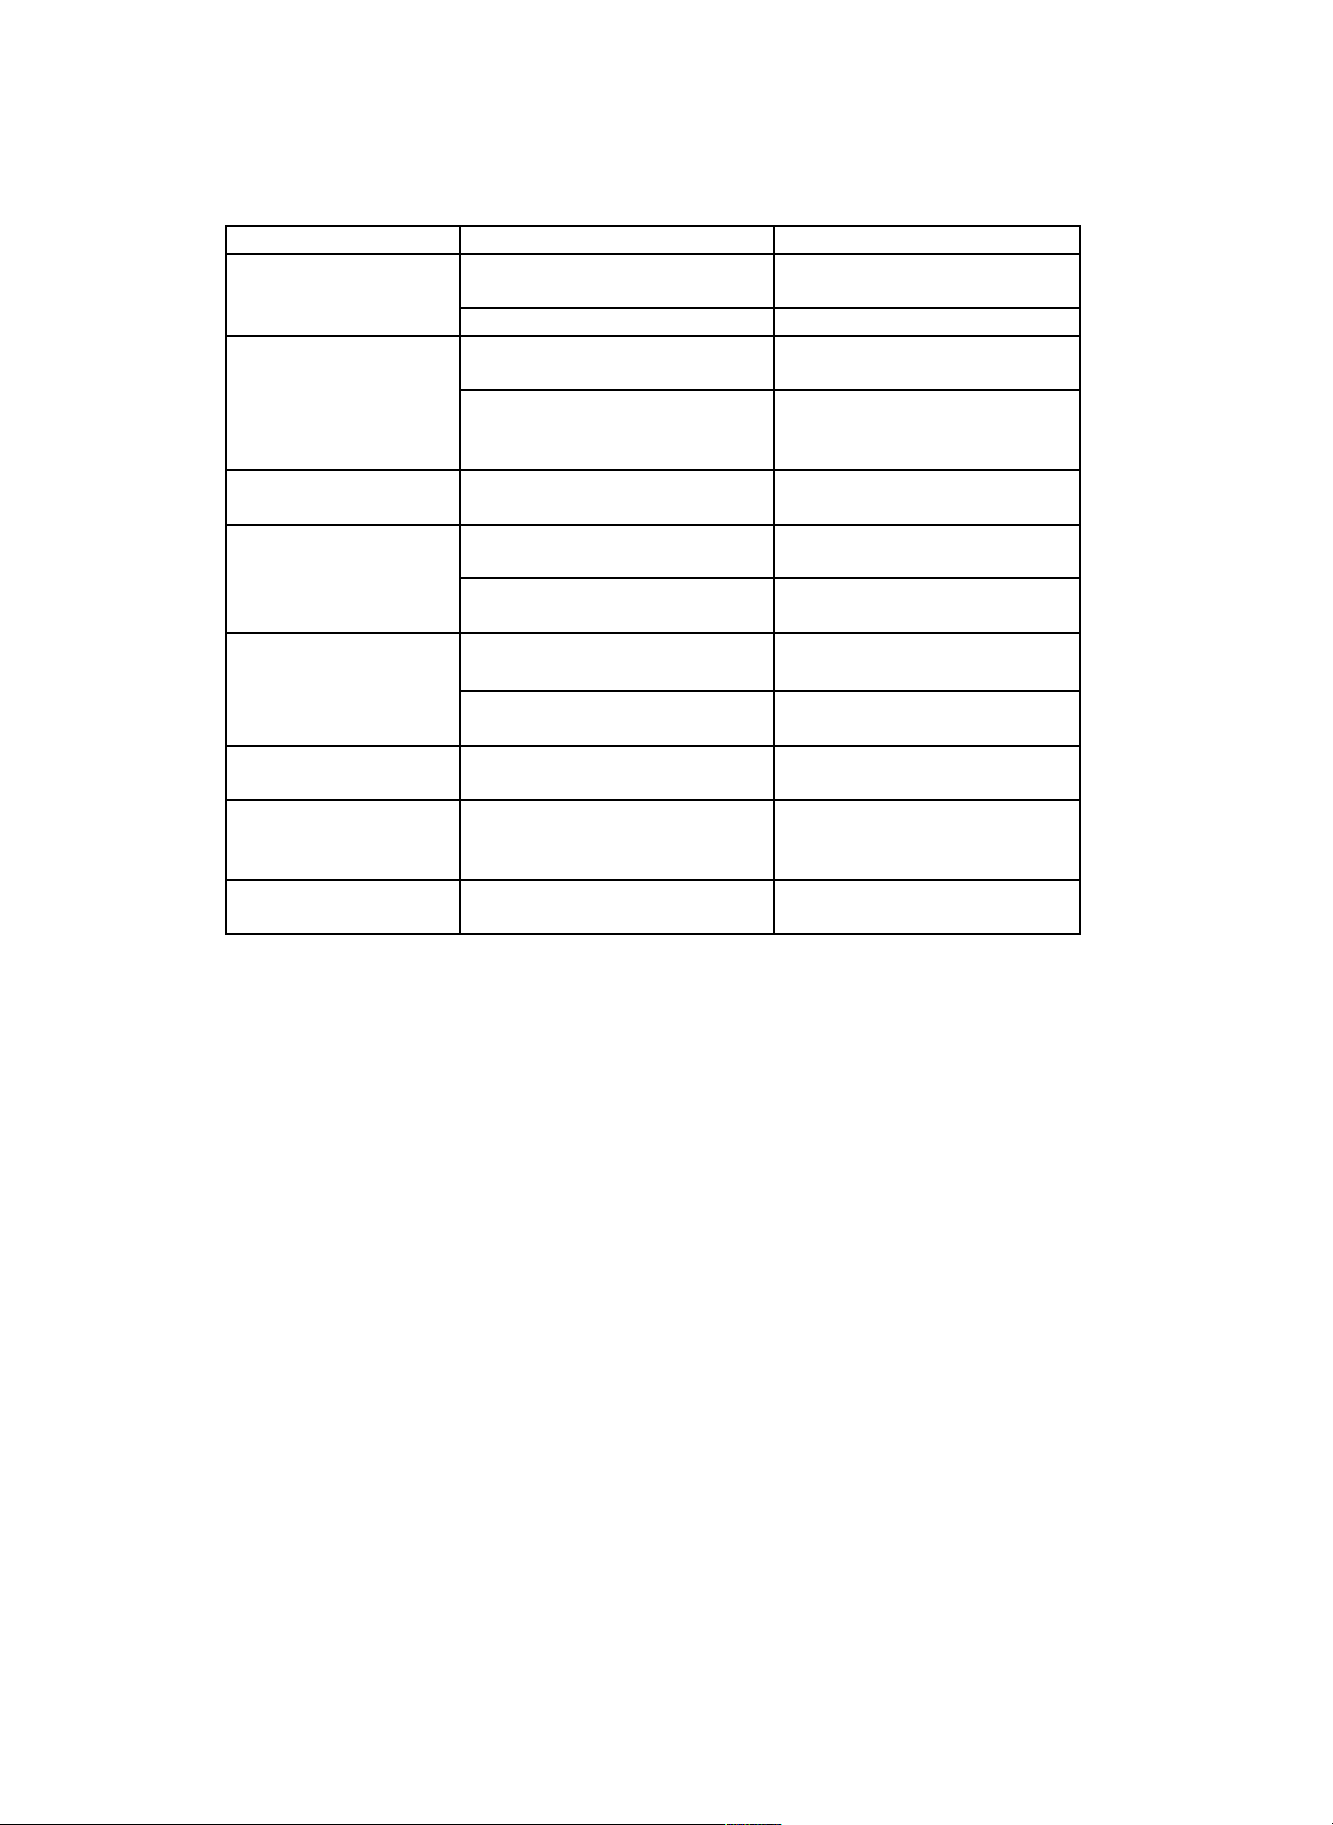
Trouble Shooting Guide
GUARANTEE AND SERVICE!
Before book a service call, read the Trouble Shooting Guide above , for more information on guarantee and service
conditions, please contact local dealer.
Problem
Possible Reason
Solution
No electrical supply.
Check the plug is connected.
Hood doesn't turn on.
Check the plug is connected.
Power cord is damaged
Contact technician service
Baffle filters
Clean the filters and replace
Poor Airflow
clogged
when dry.
Hood is not secured in place
Check the installation of
Hood is vibrating
hood.Tighten mounting
screws.
Motor running but no
Butterfly valve jammed.
Contact technician service
air flow
High temperature safety
The kitchen is not
Motor stops after a
device activated.
sufficiently ventilated.
few minutes
The hood is installed too near
The hood must be at least
the cooking surface.
650mm from the stove
Strong cooking smell.
Fan speed too low
Use one of the higher
settings.
Oil dripping onto
Baffle filters
Wash the baffle
BBQ.
saturated.
filters
Whirring sound
Something in contact with fan
Contact technician service
blade.
Lights are working
Contact technician service
but
fan isn't
Fan is working but
Contact technician service
lights are not
Page 19

Warranty Card
Worldwide Appliances Pty Limited
A.B.N. 45868077422
Oce:
48-50 Moore Street, Leichhardt N.S.W 2040
Post:
Locked Bag 3000, Annandale, N.S.W 2038
P: 1300 694 583
WARRANTY REGISTRATION
Your ongoing satisfaction with your artusi
product is important to us. We ask that you
complete the enclosed Warranty Registration
Card and return it to us so that we have a record
of the artusi product purchased by you.
PRIVACY
Worldwide Appliances respects your
privacy and is committed to handling your
personal information in accordance with the
National Privacy Principles and the Privacy
Act 1988 (Cth). A copy of the Worldwide
Appliances Privacy Policy is available at
www.artusi.com.au. Worldwide Appliances will
not disclose any personal information set out
in the Warranty Registration Card (“Personal
Information”) without your consent unless
required by:
1. law;
2. any Worldwide Appliances related company;
3. any service provider which provide services
to artusi or assist artusi in providing services
(including repair and warranty services) to
customers. Our purpose in collecting the
Personal Information is
to keep a record of the artusi product purchased
by you, in order to provide a better warranty
service to you in the unlikely event that there is
a problem with your artusi product. Worldwide
Appliances may contact you at any one or more
of the address, email address or telephone
numbers set out in the Warranty Registration
Card. Please contact artusi on 1300 694
583 should you not wish to be contacted by
Worldwide Appliances.
WARRANTY
1. Warranty
Worldwide Appliances warrants that each artusi
product will remain, for a period of either 12
months or 24 months of warranty. All Warranties
are valid from the original date of purchase, And
warranty claims must be accompanied by the
proof of purchase.
24 months warranty products:
All Built-in Appliances – Limited to Ovens,
Gas, Induction and Electric Cooktops, and All
Rangehoods
Freestanding Cookers - Gas and Electric Models
(900mm Width)
artusi.com.au
Dishwashers - Freestanding, Fully Integrated,
Semi Integrated and built-in
12 months warranty products:
Freestanding Cookers - Gas and Electric Models
in 50cm, 54cm and 60cm Widths
Portable Appliances* – Benchtop Models and
Portable Gas Models
2. What is not Covered by the Warranty.
The Warranty does not apply if an artusi product
is defective by a factor other than a defect arising
in the manufacture of the artusi product, including
but not limited to:
(a) damage through misuse (including failure
to maintain, service or use with proper care),
neglect, accident or ordinary wear and tear
(including deterioration of parts and accessories
and glass breakage);
(b) use for purpose for which the artusi product
was not sold or designed;
(c) use or installation which is not in accordance
with any specied instructions for use or
installation;
(d) use or operation after a defect has occurred or
been discovered;
(e) damage through freight, transportation or
handling in transit (other than when Worldwide
Appliances is responsible);
(f) damage through exposure to chemicals, dusts,
residues, excessive voltage, heat, atmospheric
conditions or other forces or environmental
factors outside the control or Worldwide
Appliances;
(g) repair, modication or tampering by the
purchaser or any person other than Worldwide
Appliances, an employee of Worldwide
Appliances or an authorised artusi service
contractor*;
(h) use of parts, components or accessories
which have not been supplied or specically
approved by artusi.
(i) damage to surface coatings caused by cleaning
or maintenance using products not recommended
in the artusi product handbook provided to the
purchaser upon purchase of the artusi product;
(j) damage to the base of an electric oven due to
items having been placed on the base of the oven
cavity or covering the base, such as aluminium
foil (this impedes the transfer of heat from the
element to the oven cavity and can result in
irreparable damage); or
(k) damages, dents or other cosmetic
imperfections not aecting the performance of the
artusi in respect of an artusi product purchased
as a “factory second” or from display
The Warranty does not extend to light globes
used in artusi products.
3. Domestic Use
Each artusi product is made for domestic use.
This Warranty may not extend to artusi products
used for commercial purposes.
Continued over...
Page 20
Warranty Card continued
artusi.com.au
4. Time for Claim under the Warranty
You must make any claim under this Warranty
within twenty eight (28) days after the occurrence
of an event which gives rise to a claim pursuant
to the Warranty, by booking a service call on the
telephone number below.
5. Proof of Purchase
Customers must retain proof of purchase in order
to be eligible to make a warranty claim in respect
of an artusi product.
6. Claiming under the Warranty
Customers will bear the cost of claiming under
this Warranty unless Worldwide Appliances
determines the expenses are reasonable, in which
case the customer must claim those expenses
by providing written evidence of each expense
to Worldwide Appliances at the address on the
Warranty Registration Card.
7. Statutory Rights
(a) These terms and conditions do not aect your
statutory rights.
(b) The limitations on the Warranty set out in this
document do not exclude or limit the application
of the consumer guarantees set out in the Act or
any other equivalent or corresponding legislation
in the relevant jurisdiction where to do so would:
(i) contravene the law of the relevant jurisdiction;
or
(ii) cause any part of the Warranty to be void.
(c) Worldwide Appliances excludes indirect or
consequential loss of any kind (including, without
limitation, loss of use of the artusi product) and
(other than expressly provided for in these terms
and conditions) subject to all terms,
conditions and warranties implied by custom, the
general law, the Act or other statute.
(d) The liability of Worldwide Appliances to you
Warranty Card tear off
for a breach of any express or non-excludable
implied term, condition or warranty is limited at
the option of Worldwide Appliances to:
(i) replacing or repairing the defective part of the
artusi product;
(ii) paying the cost of replacing or repairing the
defective part of the artusi product;
(iii) replacing the artusi product; or
(iv) paying the cost of replacing the artusi
product.
(e) Our goods come with guarantees that cannot
be excluded under the Australian Consumer
Law. You are entitled to a replacement or refund
for a major failure and for compensation for any
other reasonably foreseeable loss or damage.
You are also entitled to have the goods repaired
or replaced if the goods fail to be of acceptable
quality and the failure does not amount to a
major failure.
8. Defects
Any part of an artusi product deemed to be
defective and replaced by Worldwide Appliances
is the property of Worldwide Appliances.
Worldwide Appliances reserves the right to
inspect and test artusi products in order to
determine the extent of any defect and the
validity of a claim under the Warranty.
*To locate your closest artusi authorised service
agent please contact us on 1300 652 100 or visit
www.artusi.com.au
ALL SERVICE CALLS MUST BE BOOKED
THROUGH AN AUTHORISED DEALER OR
WARRANTY DEPARTMENT ON 1300 652 100
OR stokesaps.com.au/artusi-service
01032014
WARRANTY REGISTRATION CARD
01052013
Last Name: First Name:
Address:
State: Postcode: Email:
Home Phone: Mobile:
Purchase Date: / / (Please attach proof of purchase to validate warranty)
MODEL NUMBER
1
2
3
4
Please complete and send to ARTUSI at: REPLY PAID 83617
LEICHHARDT NSW 2040
SERIAL NUMBER
(if you cannot locate the serial number please call ARTUSI on 1300 694 583)
01032014
4
Page 21

Page 22

DISCLAIMER
Worldwide Appliances PTY LTD, trading as ARTUSI, is continually seeking ways to improve the design specifications, aesthetics and production
techniques of its products. As a result alterations to our products and designs take place continually. Whilst every effort is made to produce
information and literature that is up to date, this brochure should not be regarded as an infallible guide to the current specifications, nor does it
constitute an offer for the sale of any particular product. Product dimensions indicated in our literature is indicative only. Actual product only
should be used to define dimension cutouts. Distributors, and retailers are not agents of ARTUSI and are not authorised to bind ARTUSI by any
express or implied undertaking or representation.
ARTUSI OFFICES ARE OPEN DAILY FROM 9AM–5PM AND SATURDAYS 10AM–4PM
NSW & ACT (HEAD OFFICE)
48-50 MOORE STREET
LEICHHARDT
F 02 8569 4699
P: 1300 649 583
VIC, TAS & SA
1211 TOORAK ROAD
CAMBERWELL
F 03 9809 2155
QLD
1/42 CAVENDISH ROAD
COORPAROO
F 07 3397 0850
WA & NT
UNIT 10/55 HOWE STREET
OSBORNE PARK
F 08 9201 9188
NZ
PO BOX 11.160
SOCKBURN CHRISTCHURCH
F 03 344 5906
ARTUSI.COM.AU
 Loading...