

Page 1

ARTS PDF
Stamper
Version 3.0
Page 2

ARTS PDF Stamper User Guide
Contents
Contents
1. INTRODUCTION .............................................................................................. 4
2. SETUP .......................................................................................................... 5
2.1. System Requirements................................................................................ 5
2.2. Installation............................................................................................... 5
2.3. Activation................................................................................................. 6
2.4. Registration.............................................................................................. 7
2.5. Uninstalling ARTS PDF Stamper................................................................... 7
3. USING ARTS PDF STAMPER ............................................................................ 9
3.1. Starting ARTS PDF Stamper.......................................................................10
3.2. Menu......................................................................................................10
3.3. Toolbar...................................................................................................11
3.4. Stamp a document...................................................................................11
3.5. Undo Stamp ............................................................................................11
4. MANAGING STAMPS AND PROFILES .................................................................. 12
4.1. Creating a new Profile...............................................................................13
4.2. Creating a new Stamp ..............................................................................13
4.3. Previewing a Profile/Stamps ......................................................................13
4.4. Renaming Profiles/Stamps.........................................................................13
4.5. Deleting Profiles /Stamps ..........................................................................14
4.6. Rearranging Stamps.................................................................................14
4.7. Importing / Exporting Profiles ....................................................................14
4.8. Editing Stamps ........................................................................................15
4.9. Right Click Menus.....................................................................................15
5. DESIGNING STAMPS...................................................................................... 16
5.1. General Stamp Settings ............................................................................17
5.1.1. Layout........................................................................................................ 17
5.1.2. Pages Options.............................................................................................. 18
5.1.3. Border and Outline Font................................................................................ 18
5.1.4. Applying Actions to Stamps ........................................................................... 18
5.1.5. Using Absolute / Relative Addressing .............................................................. 20
5.2. Text Stamp Properties ..............................................................................21
5.2.1. Line spacing ................................................................................................ 21
5.2.2. Dynamic Text .............................................................................................. 22
5.2.3. Font........................................................................................................... 23
5.2.4. Adding Bates Numbers.................................................................................. 24
5.2.5. Adding Page Numbers................................................................................... 26
5.3. Image/PDF Stamp Settings........................................................................27
5.3.1. Size ........................................................................................................... 28
5.3.2. Page Number (PDF Stamps only).................................................................... 28
6. LOGGING .................................................................................................... 29
| CONTENTS |
Page 2 of 39
Page 3

ARTS PDF Stamper User Guide
Contents
6.1. View Log File ...........................................................................................29
6.2. Clear Log File...........................................................................................30
7. CONFIGURING PREFERENCES .......................................................................... 31
7.1. File Handling ...........................................................................................31
7.2. Defaults..................................................................................................31
8. BATCH PROCESSING...................................................................................... 32
9. CUSTOMIZE A TOOLBAR BUTTON...................................................................... 34
10. TROUBLESHOOTING....................................................................................... 36
10.1. Frequently Asked Questions....................................................................36
10.2. Forum .................................................................................................37
10.3. Known Issues .......................................................................................37
10.4. Updates...............................................................................................38
10.5. Maintenance.........................................................................................38
10.6. Technical Support .................................................................................39
| CONTENTS |
Page 3 of 39
Page 4
ARTS PDF Stamper User Guide
Introduction
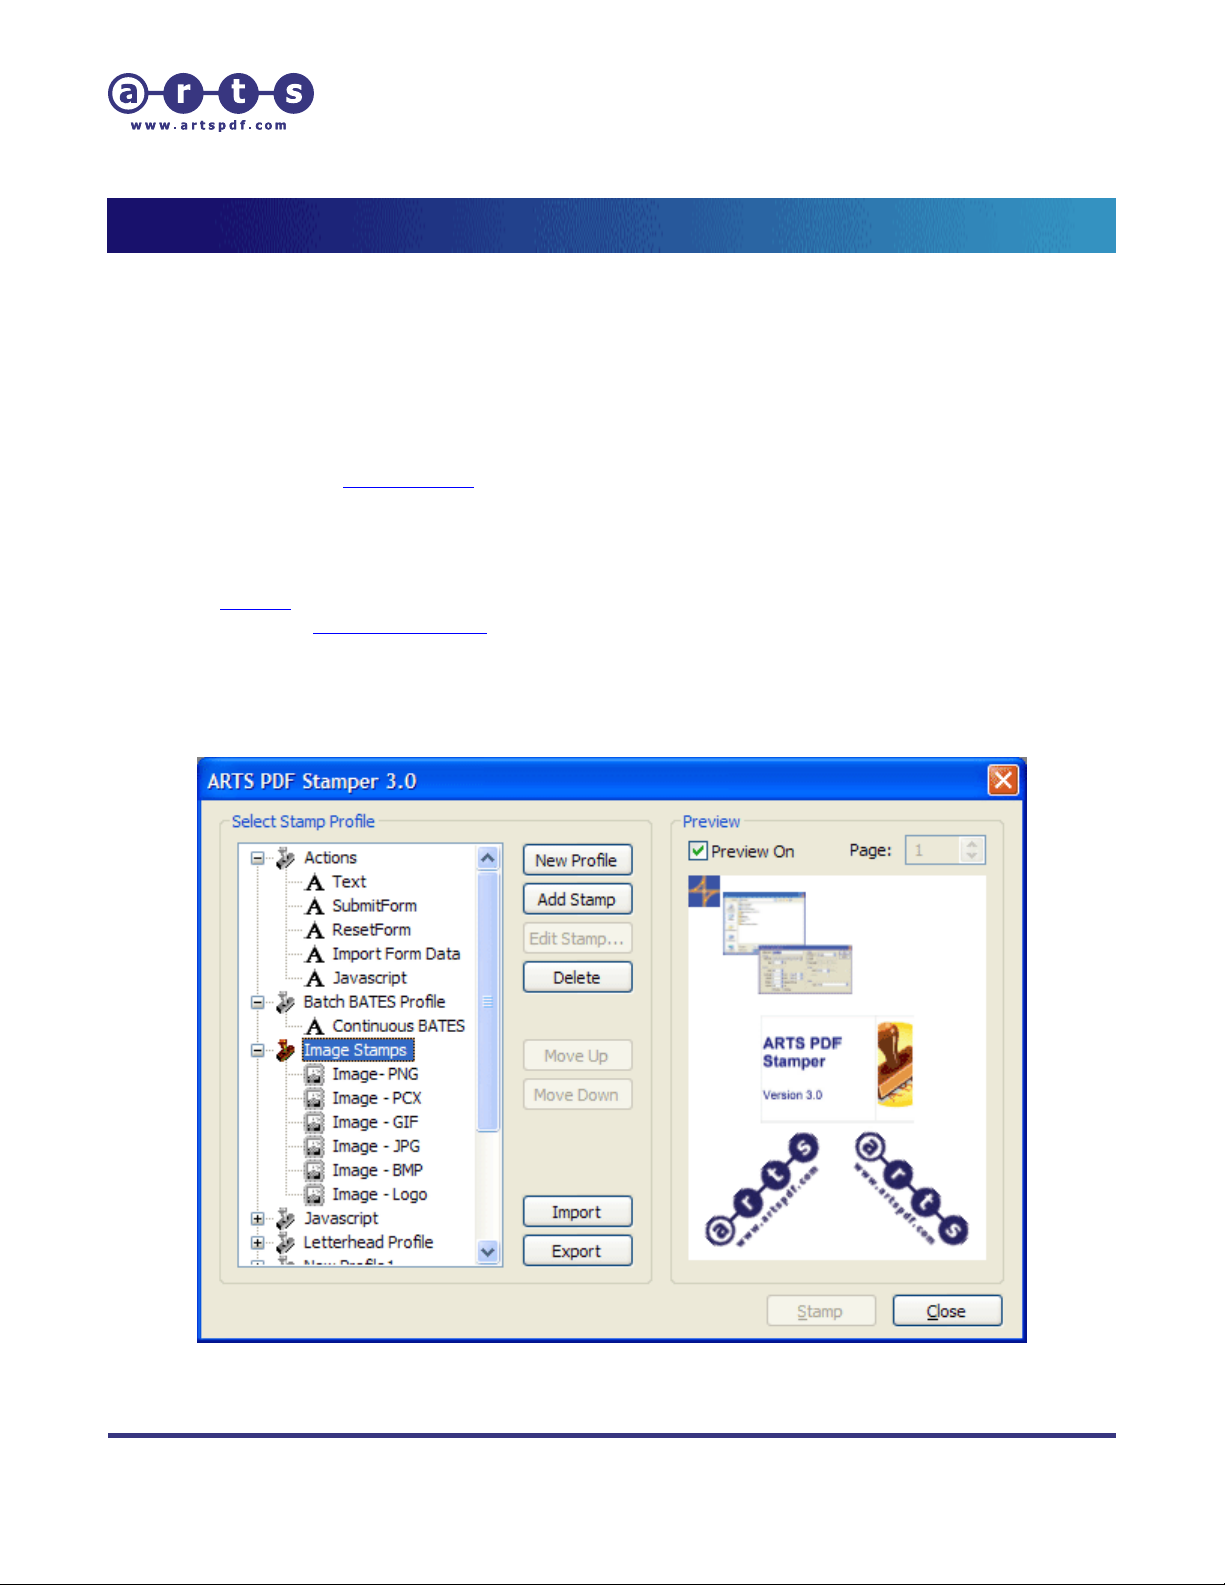
1. Introduction
ARTS PDF Stamper is a plug-in for Adobe Acrobat for stamping text, watermarks and backgrounds
to pages on a PDF document. With ARTS PDF Stamper, users can customize the content,
appearance and action of each stamp as well as combining multiple stamps into one stamp profile.
This includes aligning and setting the size of each stamp, or even making your stamps behave like
hyperlinks.
Using ARTS PDF Stamper, you can:
• Stamp text and
• Apply Page and Bates Numbers
• Apply image watermarks (BMP, RLE, DIB, GIF, JPG, PCX, PNG, EPS and TIFF)
• Stamp one PDF onto another
• Specify the position, scale and angle of rotation for text and image stamps
• Set
• Stamp using
• Combine single stamps into a profile for faster application.
• Copy and paste stamps between profiles
• Save profiles for later use
• Set up batch processes to apply stamps across many files.
actions for individual stamps.
dynamic text
Bates Numbering format
Figure 1. The ARTS PDF Stamper main window
| CONTENTS |
Page 4 of 39
Page 5

ARTS PDF Stamper User Guide
Setup
2. Setup
2.1. System Requirements
Windows
• Intel® Pentium® processor or equivalent
• For Acrobat 5.0 users:
Workstation 4.0 with Service Pack 6, Windows® 2000 with Service Pack 2,
Windows XP Professional or Home Edition, or Windows XP Tablet PC Edition
• For Acrobat 6.0 users: Microsoft Windows 98 SE, Microsoft® Windows NT®
Workstation 4.0 with Service Pack 6, Windows® 2000 with Service Pack 2,
Windows XP Professional or Home Edition, or Windows XP Tablet PC Edition
• For Acrobat 7.0 users: Microsoft® Windows® 2000 with Service Pack 2, Windows
XP Professional or Home Edition, or Windows XP Tablet PC Edition
• 64MB of RAM (128MB recommended)
• 50MB of available hard-disk space
• 1,024x768 screen resolution
• Adobe® Acrobat® 5.0 or later. Batch processing is only supported in Acrobat 5,
Acrobat 6 Professional and Acrobat 7 Professional.
Macintosh
• PowerPC® G3 processor
• Mac OS X v.10.2.2 or higher
• 64MB of RAM
• 50MB of available hard-disk space
• 1,024x768 screen resolution
• Adobe® Acrobat® 5.0 or later. Batch processing is only supported in Acrobat 5,
Acrobat 6 Professional and Acrobat 7 Professional.
For technical support queries, please consult the Troubleshooting section of this manual or email
techsupport@artspdf.com.
Microsoft Windows 98 SE, ME, Microsoft® Windows NT®
2.2. Installation
You may have received this software on either CD-ROM or as a downloaded file.
Macintosh (CD-ROM)
To install from a CD-ROM:
1. Verify that Adobe Acrobat is not running.
2. Insert the CD-ROM.
| CONTENTS |
Page 5 of 39
Page 6

ARTS PDF Stamper User Guide
Setup
3. Open the CD and double click the Install f ile.
4. Navigate to ARTS PDF Stamper.
5. Click install.
6. Follow the prompts to install ARTS PDF Stamper.
Macintosh (.hqx)
If you downloaded ARTS PDF Stamper, to install:
1. Verify that Adobe Acrobat is not running.
2. Decompress the distribution file provided.
3. Execute the installation file.
4. Follow the prompts to install ARTS PDF Stamper.
Windows (CD-ROM)
To install from a CD-ROM:
1. Verify that Adobe Acrobat is not running.
2. Insert the CD-ROM.
3. If the CD-ROM does not automatically start, navigate to the CD in Windows
Explorer and execute the Windows Installer.exe file.
4. Navigate to ARTS PDF Stamper.
5. Click Install.
6. Follow the prompts to install ARTS PDF Stamper.
Windows (.exe)
If you downloaded ARTS PDF Stamper, to install:
1. Verify that Adobe Acrobat is not running.
2. Execute the installation file provided.
3. Follow the prompts to install ARTS PDF Stamper.
2.3. Activation
If you have the demo version of ARTS PDF Stamper installed, activate the full version
using the following steps:
1. In Acrobat select ‘Help > About 3
2. Ensure you have a valid serial. To obtain a valid serial you must purchase the
product:
a. Select the ‘Register’ tab page and click on ‘Buy Now’ to purchase the full
version.
b. After your purchase has been confirmed, you will receive an email containing
your serial number.
3. Select the ‘Register’ tab page and click on ‘Activate’.
4. Enter your license details, including your serial n umber, and click “OK”.
| CONTENTS |
rd
Party Plug-Ins > ARTS PDF Stamper.
Page 6 of 39
Page 7

ARTS PDF Stamper User Guide
Setup
2.4. Registration
ARTS PDF provide the option of registering your copy of ARTS PDF Stamper online.
Online registration allows you to protect you r serial number. In the event you lose or
misplace your serial, we can locate and provide your serial to you on request.
Registered customers will also receive important upgrade information and notification of
product updates.
1. After activating your copy of ARTS PDF Stamper you will be prompted to register
online. Do one of the following:
• Click “Now” to register your product online
• Click “Later” to register at a later stage. After entering your license
details, you can register your product anytime by clicking on the “Register
Now” button of the Register tab.
2. When registering your product, complete the online form and click “Submit
Registration”.
3. You only need register your product with us once.
To manually register your ARTS PDF product, please visit our online registration page,
http://www.artspdf.com/register.asp.
1
.
2.5. Uninstalling ARTS PDF Stamper
Macintosh
To install on a Macintosh platform:
1. Execute the installation file
2. To continue with uninstalling ARTS PDF Stamper you must accept the software
license agreement.
3. Select the application ARTS PDF Stamper was installed under (eit her Acrobat 5 or
Acrobat 6) and click ‘Open’.
4. From the drop down menu, select the ‘Uninstall’ item.
Alternatively, to uninstall:
1. Verify that Adobe Acrobat is not running.
2. Locate the folder containing Acrobat plug-ins.
For example when installed on Acrobat 6.0, typically files can be found in Drive:
Applications: Adobe Acrobat 6.0 Professional: ARTS PDF Plug-ins: ARTS PDF
Stamper
3. Delete the ARTS PDF Stamper files.
1
You must be connected to the Internet.
2
If you installed ARTS PDF Stamper from a CD-ROM, insert the CD, launch the Install file, navigate to ARTS
PDF Stamper and click install (you can choose to uninstall at a later time).
2
.
| CONTENTS |
Page 7 of 39
Page 8

ARTS PDF Stamper User Guide
Setup
Windows
To install on a Windows platform:
1. Verify that Adobe Acrobat is not running.
2. Click Start > Settings > Control Panel.
3. Open Add/Remove Programs.
4. Select ‘ARTS PDF Stamper 3.0’ from the menu.
5. Click ‘Add/Remove’.
| CONTENTS |
Page 8 of 39
Page 9

ARTS PDF Stamper User Guide
Using ARTS PDF Stamper
3. Using ARTS PDF Stamper
The main features of ARTS PDF Stamper are:
• Stamp text on a PDF document.
Use Text Stamp feature to create single or multi-line text stamps.
for headers, footers and hyperlinks. A variety of
you to easily insert date, time, page numbers and document information such as Author, Title
and Subject at runtime.
Dynamic Text options are available to allow
• Stamp an Image on a PDF document.
Image Stamp feature enables you to stamp single or multiple images on PDF document.
The
ARTS PDF Stamper supports a number of different image types. These include BMP, RLE, DIB,
GIF, JPG, PCX, PNG, EPS and TIFF formats
3
.
• Stamp a page from a PDF document on another PDF document.
Stamp a page from a PDF onto another document using the
modify the placement, layout and action of the PDF stamp in the same way as text and the
image stamps.
PDF Stamp feature. You can
Text stamps are often used
3
Stamping with these image file formats is supported on Acrobat 6 only. Under Acrobat 5 only TIFF and JPEG
are supported. To stamp with an EPS or GIF first convert the file to PDF and recreate the stamp as a PDF
stamp.
| CONTENTS |
Page 9 of 39
Page 10
ARTS PDF Stamper User Guide
Using ARTS PDF Stamper
3.1. Starting ARTS PDF Stamper
To use ARTS PDF Stamper, first locate the ARTS PDF Stamper tool button or menu item
under the Acrobat Plug-in menu
Acrobat’s menu to create, edit, mange or apply a stamp to a document. Once a stamp
profiles is created, you can use it to easily stamp the active document by selecting it
from either the tool button drop down or ‘Plug-ins > ARTS PDF Stamper’ menu.
For any difficulties starting up ARTS PDF Stamper, please consult the Troubleshooting section of
this manual or email
techsupport@artspdf.com.
4
. Use either the toolbar5 or the menu items from
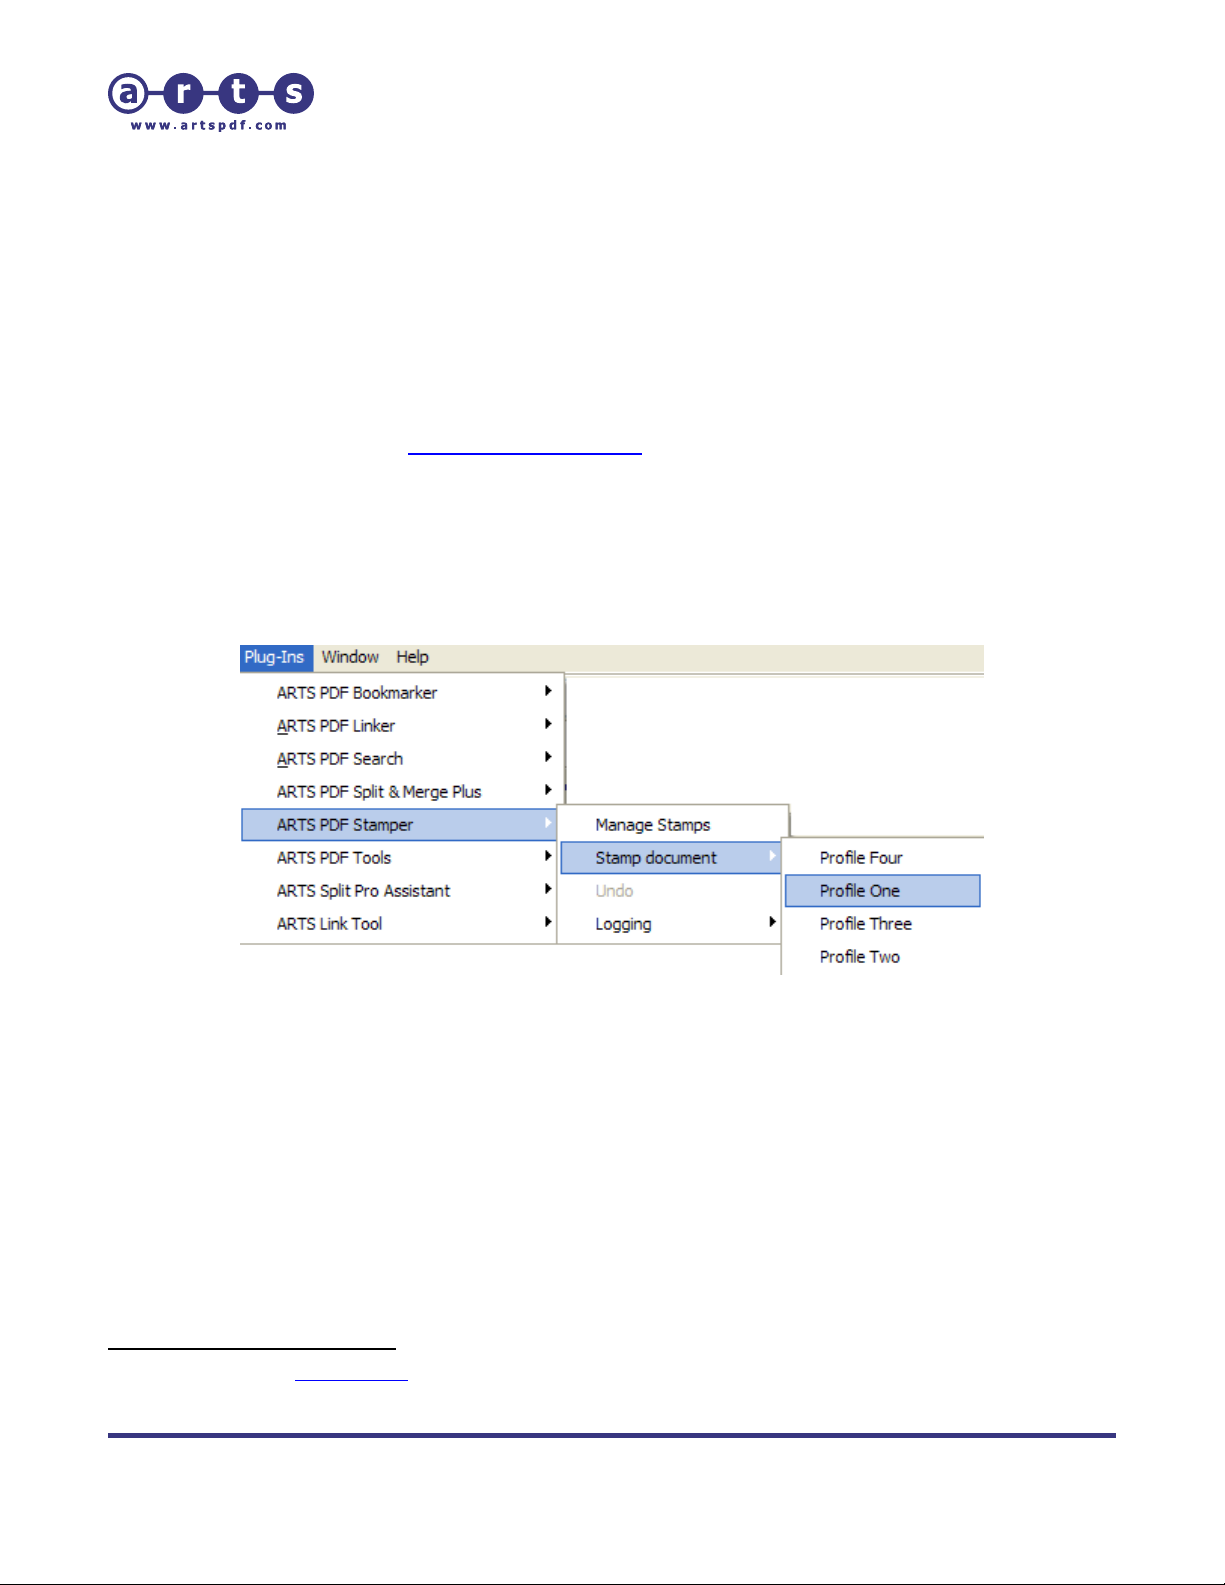
3.2. Menu
ARTS PDF Stamper can be accessed from the Plug-ins > ARTS PDF Stamper menu.
Figure 2. The ARTS PDF Stamper menu
4
Please refer to the FAQ section of this user guide for assistance with installing ARTS PDF Stamper.
5
Under Acrobat 5, left click and hold the ARTS PDF Stamper tool button to display the drop down menu.
| CONTENTS |
Page 10 of 39
Page 11
ARTS PDF Stamper User Guide
Using ARTS PDF Stamper
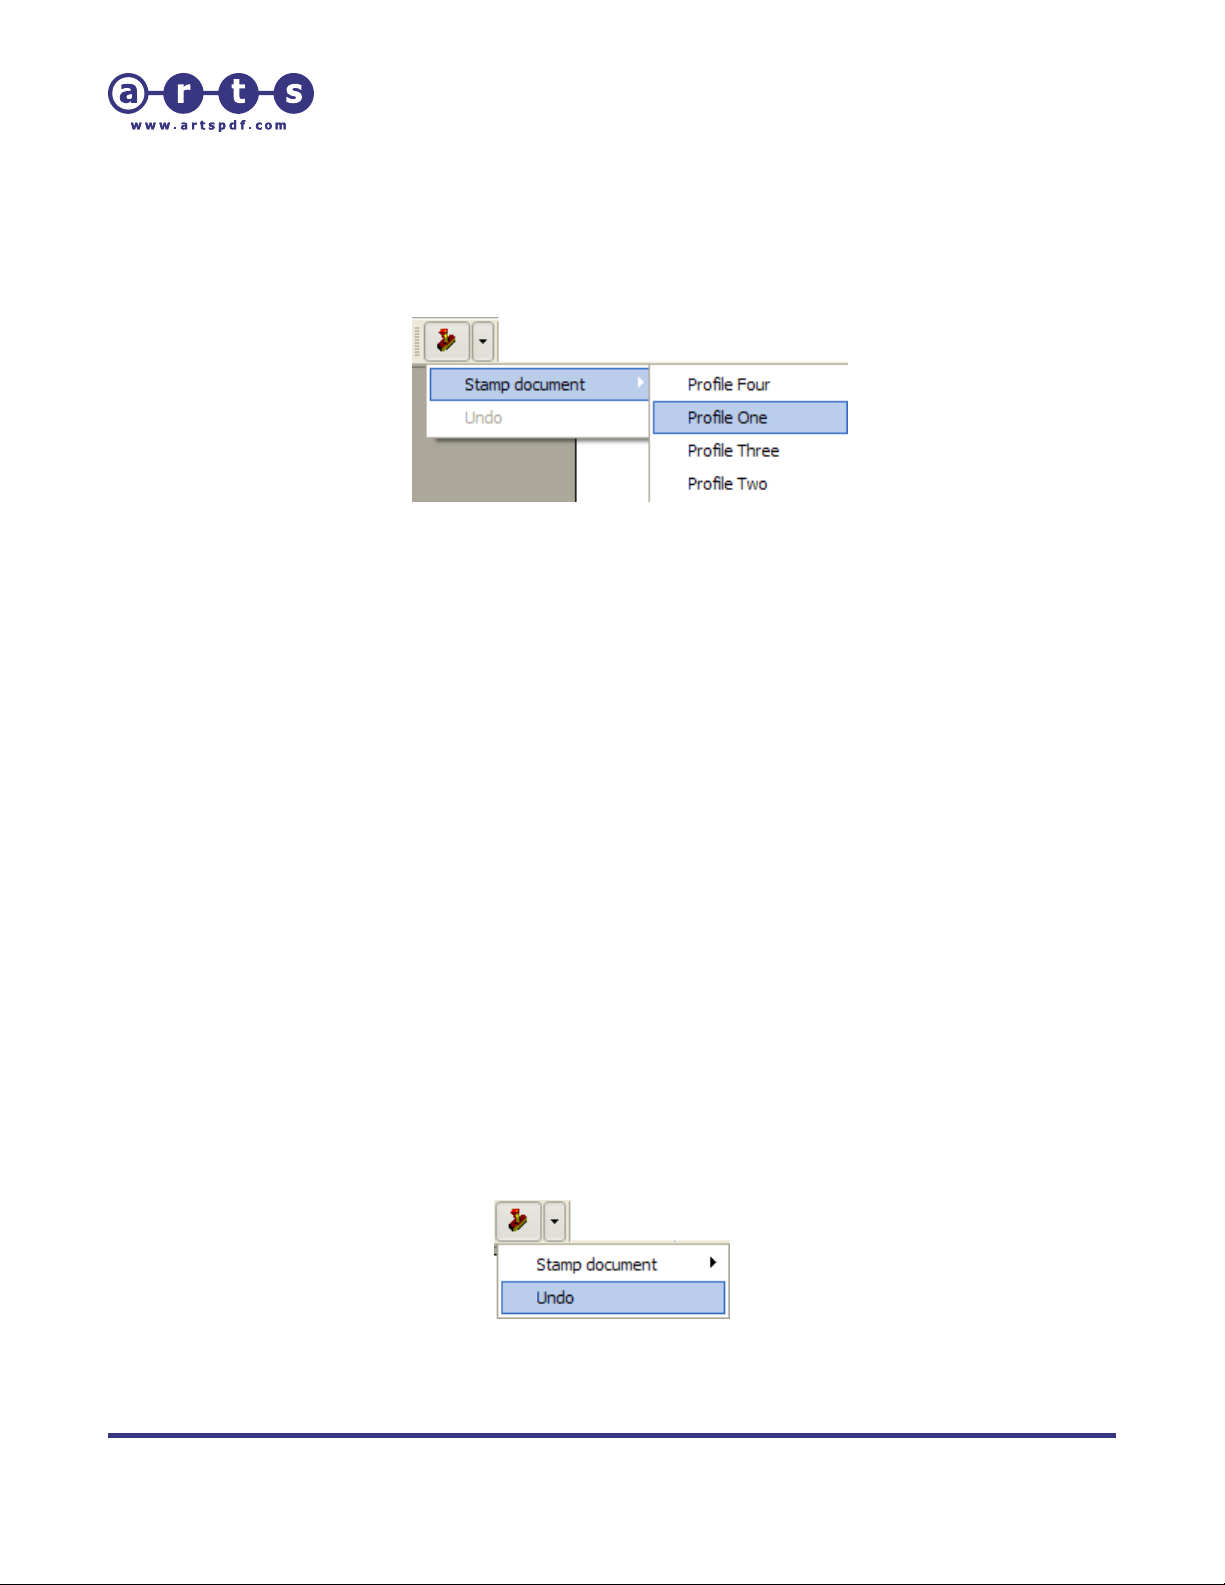
3.3. Toolbar
ARTS PDF Stamper can be accessed from the ARTS PDF Stamper toolbar.
Figure 3. The ARTS PDF Stamper toolbar
3.4. Stamp a document
To apply a stamp, open a PDF document and select or create your desired stamp profile.
To select a stamp either:
• Open the Manage Stamps dialog and select the profile from the list. Click ‘Stamp’
to process.
• Select a stamp profile from the ARTS PDF Stamper menu.
• Click the drop down tool button.
Once selected, the active document will be stamped with the chosen profile.
Note: All the stamps within a profile are applied to the document. If a stamp is selected rather
than the profile, the ‘Stamp’ button is disabled.
3.5. Undo Stamp
To remove or undo the last stamp applied simply select ‘Undo’ from the ARTS PDF
Stamper menu or tool button. You cannot undo a stamp if the document was saved
after being stamped.
Figure 4. Undo Feature
| CONTENTS |
Page 11 of 39
Page 12
ARTS PDF Stamper User Guide
Managing Stamps and Profiles
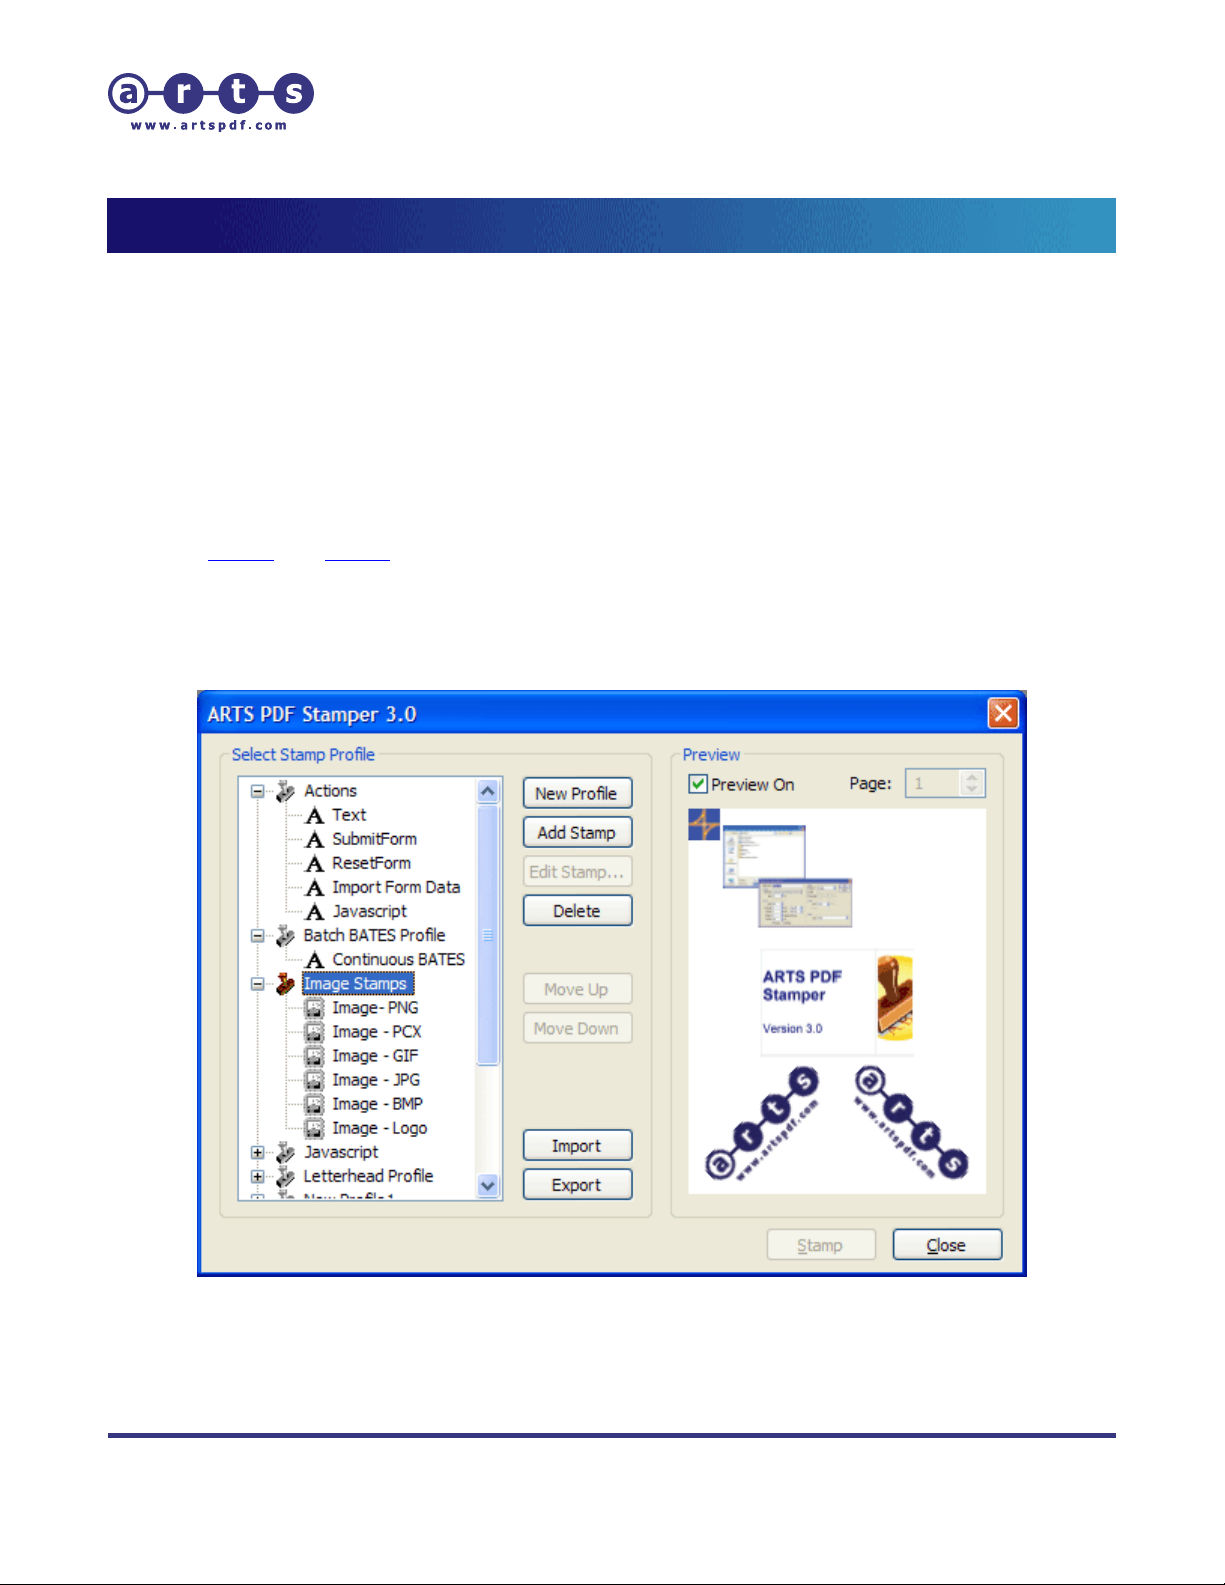
4. Managing Stamps and Profiles
To activate the Stamp Management dialog, click the ARTS PDF Stamper tool button or select
‘Manage Stamps’ from the ‘Plug-ins > ARTS PDF Stamper’ menu item.
ARTS PDF Stamper uses stamp profiles, allowing users to apply any combination of stamps in a
single action. Stamp profiles also allow users to copy and share stamps between profiles. For
example, an individual copyright footer, company logo and page numbers can be stored within a
single profile. When stamping with this profile, all stamps are applied to the open document(s)
when processed.
ARTS PDF Stamper profiles are saved for reuse. Profiles can also be shared by different users
using the
Profiles subfolder of the installation directory, e.g. C:\Program Files\Adobe\Acrobat
6.0\Acrobat\plug_ins\ARTS PDF Stamper\Profiles or Drive: Applications: Adobe Acrobat 6.0
Professional: ARTS PDF Plug-ins: ARTS PDF Stamper:Profiles.
import and export features. Saved profiles are stored (with a .nxp extension) in the
Figure 5. Main Dialog – Managing all stamp profiles
| CONTENTS |
Page 12 of 39
Page 13

ARTS PDF Stamper User Guide
Managing Stamps and Profiles
4.1. Creating a new Profile
To create a new Profile:
1. Open the Manage Stamp dialog.
2. Click ‘New Profile’.
3. Add stamps as required to this profile by clicking the ‘Add Stamp’ button (refer to
Designing your stamp).
4. The stamp is automatically saved.
4.2. Creating a new Stamp
To create a new Stamp:
1. Select the profile you want the stamp added to.
2. Click the ‘Add Stamps’ button and select a stamp type from the list (refer to
Designing your stamp).
4.3. Previewing a Profile/Stamps
To preview
1. Ensure that a PDF is open in Acrobat.
2. Select a profile to view all stamps. It is also possible to view individual or a
3. If the ‘Preview On’ checkbox is not already checked, check it to preview the
6
a Profile or a Stamp:
variety of stamps by clicking on the stamp rather than profile (hold the Ctrl key
to select multiple).
desired stamps and/or profile.
4.4. Renaming Profiles/Stamps
To rename a profile/stamp from the preview pane:
1. Right click the desired profile or stamp.
2. Select ‘Rename Stamp’ or ‘Rename Profile’ from the popup menu.
3. Enter in the new name.
6
Previewing large documents and profiles that contain a large number of stamps can result in performance
degradation. Refer to the
| CONTENTS |
FAQ section for tips on reducing this.
Page 13 of 39
Page 14

ARTS PDF Stamper User Guide
Managing Stamps and Profiles
4.5. Deleting Profiles /Stamps
To delete a profile/stamp from the preview pane:
1. Right click the desired stamp or profile
2. Select ‘Delete Profile’ or ‘Delete Stamp’ from the popup menu.
3. Press ‘Yes’ or ‘No’ to confirm the delete action.
Note: If the Profile contains several stamps, deleting the profile will delete all the stamps within
the profile. Delete actions cannot be undone.
4.6. Rearranging Stamps
ARTS PDF Stamper provides a number of ways to rearrange, edit and share stamps
between profiles.
To cut or copy stamps from one profile to another:
1. Select the desired stamps using the mouse cursor
2. Right click an item in the selection
3. Select ‘Cut’ or ‘Copy’
4. Right click the destination profile and select ‘Paste’
Note: Stamps can also be dragged from one profile to another by holding the left mouse button
and dragging the stamps to another document.
To create a copy of a profile:
1. Right click the desired profile
2. Select ‘Copy’
3. Right click somewhere within the frame and select ‘Paste’
4.7. Importing / Exporting Profiles
To export profiles to file to archive or share:
Select the desired profile from the Stamp Management dialog
Either right click and select ‘Export Profile’ or click the ‘Export’ button
Navigate to the desired destination and enter the filename
To import profiles:
Open the Stamp Management dialog
Click the import button
Navigate and select the desired profile to import
Note: When importing profiles only the settings are imported. Any links to the source image/PDF
files may be broken and it is important these are checked, validated and repaired as required.
| CONTENTS |
Page 14 of 39
Page 15

ARTS PDF Stamper User Guide
Managing Stamps and Profiles
4.8. Editing Stamps
To edit an existing stamp, select the desired stamp and click the edit button. The Edit
Stamp function allows users to modify the properties of individual stamps. Editing is
disabled unless a profile is selected. More detail in section
Designing Stamps.
4.9. Right Click Menus
As mentioned above, a number of editing features are available by right clicking a stamp
or profile.
Figure 6. Right-click Profile menu.
Figure 7. Right-click Stamp menu
| CONTENTS |
Page 15 of 39
Page 16

ARTS PDF Stamper User Guide
Designing Stamps
5. Designing Stamps
The stamp design dialogs are used to tailor the content, alignment, spacing and placement of a
stamp. These properties are described below.
Figure 8. Design your Text Stamp
| CONTENTS |
Page 16 of 39
Page 17

ARTS PDF Stamper User Guide
Designing Stamps
5.1. General Stamp Settings
Settings common to text, image and PDF stamps are outlined in th is section.
5.1.1. Layout
• Units
Select either ‘cm’, ‘mm’ or ‘inch’ from the drop down.
• Horizontal Position
Select the horizontal point of reference for the stamp. Adjust by entering a value in
the text box.
- From right (right justified): incrementing moves stamp to the left.
- From left (left justified): incrementing moves stamp to the right.
- From center (centered): positive increment moves stamp right, negative
move left.
• Vertical Position
Select the vertical point of reference for the stamp and using by ent ering a value in
the text box.
- From top: Stamp is applied to top of document. Incrementing moves stamp
down.
- From left: Stamp is applied to bottom of document. Incrementing moves
stamp up.
- From center (centered): positive increment moves stamp up, negative move
down.
• Rotation
Rotate your stamp by a value between -360
• Opacity
Apply opacity to your stamps to create a watermark effect. Enter a value in the
range of:
- 100% (no transparency)
- 0% (completely transparent)
• Overlay & Underlay Options
Select one of two options by checking the radio button next to it.
Overlay places the stamp on top of all objects on the PDF document.
Underlay places the stamp below all objects on the PDF document.
By adjusting the stamp order in the Profile dialog, it’s possible t o create a number of
different variations.
o
and 360o.
| CONTENTS |
Page 17 of 39
Page 18

ARTS PDF Stamper User Guide
Designing Stamps
5.1.2. Pages Options
Set which pages to stamp on by selecting a predefined range:
All pages
Odd pages
Even pages
First page
Last page
Alternatively, define your own page range, i.e. 2, 5, 9-16 or by page groups, stamp from
page 2 every 4 pages, i.e. 2, 6,10,14.
5.1.3. Border and Outline Font
Apply a rectangular border around the edge of your text, image or PDF stamp. Set the
color, line style (dashed) and weight. Fill the border with a color from the drop down or
define your own by selecting ‘Other Color…’
When using this option in conjunction with text stamps, there is a choice of including the
border as an outline to the text or to apply a border around the text.
Standard border Text outline
5.1.4. Applying Actions to Stamps
ARTS PDF Stamper also allows actions to be associated with stamps. To do this, select
one of the following actions:
• None
No action is related to the active stamp.
• Go To View
This action will jump to the specified page in the document. This page must be
specified using the ‘To Page’ spin box.
• Go To Remote View
This opens a specified PDF document at the designated page. Various page
magnification options are also available; see
configure using relative or absolute addressing, see
Magnification Options. This can be
Absolute / Relative Addressing.
| CONTENTS |
Page 18 of 39
Page 19

ARTS PDF Stamper User Guide
Designing Stamps
• Open File
Opens the specified file. This file can be of any type, but on ly files with a *.pdf
extension will be opened in Acrobat; all other file types will be opened in their default
viewers. The path to the file can be configured using an absolute or relative address,
Absolute / Relative Addressing.
see
• Open a web Link
Clicking on the bookmark opens a web browser to the URL specified within the WWW
Link textbox.
• Read Article
Selecting this action will link or display the bookmark to an article thread in the
active document.
• Show / Hide Field
Provides the option of either showing or hiding fields in a PDF document.
• Submit Form
This will send the form data to a specified URL.
• Reset Form
Resets all form fields to their original default value.
• Import Form Data
Imports in form data from another file and displays it in the active form.
• JavaScript
This option will run a specified JavaScript
• Execute Menu Item
Executes a specified menu command as the action when the bookmark is clicked.
• Movie
Plays a specified QuickTime or AVI movie
• Sound
Plays a specified sound file.
| CONTENTS |
Page 19 of 39
Page 20

ARTS PDF Stamper User Guide
Designing Stamps
5.1.5. Using Absolute / Relative Addressing
When creating stamps that execute an open file or GoTo remote page action it is
possible to specify whether to use absolute or relative file addresses.
• Absolute Addressing
Absolute Address is best used when it's likely that the stamped document may need
to be moved or copied to a different location in the file system, without any target
files moving in relation.
By default, browsing to the target file using the Open File dialog produces an
absolute address i.e. C:\target.pdf
• Relative Addressing
Relative Addressing is most appropriate for PDFs published to CDs/DVDs or when the
entire file system is copied and must remain relative to the sour ce. Relative
addresses describe the path to a file, relative to the source PDF.
To use relative addressing, please follow the syntax example below.
Example:
You have the stamped PDF file 'stamped.pdf' and is stored in a directory
C:\directory 1\directory 2\ (i.e. C:\directory 1\directory 2\stamped.pdf)
If the file to open with the action stamp is in the same directory as the stamped
document (‘stamped.pdf’)
i.e. C:\directory 1\directory 2\target.pdf
then use '.\ target.pdf'
If the file is in one directory above the stamped document
i.e. C:\directory 1\ target.pdf
then use '..\ target.pdf'
If the file is in two directories above the stamped document
i.e. C:\target.pdf
then use '..\..\ target.pdf'
If the file is in one directory below the stamped document
i.e. C:\directory 1\directory 2\directory 3\ target.pdf
then use'.\directory 3\ target.pdf'
| CONTENTS |
Page 20 of 39
Page 21

ARTS PDF Stamper User Guide
Designing Stamps
5.2. Text Stamp Properties
Figure 9. Designing Text Stamps
5.2.1. Line spacing
When creating multi-line text stamps, alter this setting to adjust the space between
lines. Lines are created using the enter key.
Note: Line spacing adjustments will appear only in the preview pane or output file – not in this
text box.
| CONTENTS |
Page 21 of 39
Page 22

ARTS PDF Stamper User Guide
Designing Stamps
5.2.2. Dynamic Text
Dynamic Text is used to insert variable data (such as document information fields) and
information that is calculated at runtime such as page numbers and time.
To use dynamic text, select an item from the drop down list and press ‘Insert’. A specific
macro to identify the dynamic text will be inserted into the text box.
Dynamic Text Macro Notes
Page Number $PageNo[1] Page number in document starting at 1
Total Pages $TotalPages Total pages in document
Batch Page Number $BatchPageNo[1] Current page in the batch process is 1
Batch Total Pages $BatchTotalPages Total pages in the batch process
Bates Number $BatesNo[1] A number in Bates format starting at 1
Bates Total Pages $BatesT o talPages Total number of pages in Bates format
Title $PDInfoTitle Document title field
Author $PDInfoAuthor Document author field
Subject $PDInfoSubject Document subject field
Keywords $PDInfoKeywords Document keyword
File Name $FileName Name of file with the file extension
File Path $FilePath Local path of the file
Date $Date Date format is dependent on regional settings
Time $Time Time format is dependent on regional settings
Day $Day Day of the month – numerical
Month $Month Month – numerical
Year $Year Year – numerical
Hour $Hour Hour – 24 hour
Minute $Min Minutes
Second $Sec Seconds
Dynamic text options can be concatenated with any text entered manually. For example,
entering ‘Page $PageNo[1] of $TotalPages’ will result in a stamp like, ‘Page 1 of 5’ for
example. The starting page number would be relevant to the number in the square
brackets of the $PageNo[] dynamic text.
For examples on using dynamic text within a stamp please refer to the following sections
of this user guide:
Adding Bates Numbers
Adding Page Numbers
| CONTENTS |
Page 22 of 39
Page 23

ARTS PDF Stamper User Guide
Designing Stamps
5.2.3. Font
ARTS PDF Stamper allows you to customize the appearance of your text stamp. Choose
from System or Standard fonts, change the color, size and even the underline style
used.
Note: Only one style can be set per stamp.
• Font type
Choose from either ‘System’ or ‘Standard’ font types. System refers to the fonts
present on your computer. Standard fonts (also known as Base 14) are those native
in Acrobat/Adobe Reader. When using system fonts, it may be desirable to select the
‘Embed font’ option. This will embed the appropriate font in the PDF so that all users
will see the font as intended.
Note: Embedding the font in the PDF may result in an increase in file size.
• Font Size
Set the size of your font.
• Font Color
There are a number of standard colors to choose from. Click the drop down arrow to
select a color. Choose ‘Other Color…’ to define a custom color. Colors are defined in
the RGB color space.
• Underline
Select from a number of underline types.
| CONTENTS |
Page 23 of 39
Page 24

ARTS PDF Stamper User Guide
Designing Stamps
5.2.4. Adding Bates Numbers
Numbers in Bates format contain padded zeros. When applied, like page numbers, a
Bates number increment by one throughout the document collection.
In ARTS PDF Stamper, Bates numbers can be implemented using the $BatesNo[1] and
$BatesTotalPages macros.
Bates Properties:
• Fixed Length
The fixed length (number of padded zeros) is configured in the options window. This
setting is applied to both $BatesNo[1] and $BatesTotalPages variables.
• $BatesNo
The Bates Number Dynamic text allows inputting the starting number. $BatesNo[3],
would mean that the Bates number start would be 3 instead of 1. The default is
however set to always start with 1.
• $BatesTotalPages
This variable equals the total number of pages in the job from the starting number.
If there are one hundred pages in the job, starting at point 00025, $BatesTotalPages
= 000125
• Applying in Batch
When applying Bates stamps in batch, the Bates number increments over
documents, the counter does not reset. When applying in batch you must stamp
over a folder, not a selection of files otherwise the tota l number of pages will not be
calculated correctly.
To add bates numbers:
1. Open the PDF document you wish to stamp.
2. Open ARTS PDF Stamper from Adobe Acrobat’s Plug-ins Menu ‘Plug-ins > ARTS
PDF Stamper > Manage Stamps’ or click on the ‘Manage Stamps’ toolbar button.
3. Click on the ‘New Profile’ button to add a new stamp profile.
4. With the new profile highlighted, click on the ‘Add Stamp’ button and select ‘Text’
to open the ‘Design your Text Stamp’ window.
5. Enter your Stamp name.
6. Under Settings for ‘Dynamic Text’, select ‘Bates No. [ ]’ . Click on the ‘Insert’
button to add $BatesNo[1] to the Text.
7. To set the value you wish the bates number to begin with, adjust the value within
the square brackets. For example, to set the starting number on 9, set the macro
to $BatesNo[9].
| CONTENTS |
Page 24 of 39
Page 25

ARTS PDF Stamper User Guide
Designing Stamps
Figure 10. Inserting Bates Dynamic Text
8. To set the length of the bates number, go to ‘Edit > Preferences > ARTS PDF
Stamper’ and adjust the ‘BATES fixed length’ to the desired length.
Figure 11. Bates Length
9. Change other properties for your text such as the layout, font style or action.
10. Click ‘OK’ to save your stamp and return to the main ARTS PDF Stamper window.
11. Select the profile name so that the profile is highlighted.
12. Click the ‘Stamp’ button when you are ready to stamp your PDF document.
| CONTENTS |
Page 25 of 39
Page 26

ARTS PDF Stamper User Guide
Designing Stamps
5.2.5. Adding Page Numbers
To add page numbers (i.e. “Page 1 of 10”):
1. Open the PDF document you wish to stamp.
2. Open ARTS PDF Stamper from Adobe Acrobat’s Plug-ins Menu ‘plug-ins > ARTS
PDF Stamper > Manage Stamps’ or click on the ‘Manage Stamps’ toolbar button.
3. Click on the ‘New Profile’ button and a new profile will be added.
4. With the new profile highlighted, click on the ‘Add Stamp’ button and select ‘Text’
to open the ‘Design your Text Stamp’ window.
5. Enter your Stamp name.
6. In ‘Text’ type: “Page “
7. Under Settings for ‘Dynamic Text’, select ‘Page No. [ ]’ . Click on the ‘Insert’
button to add $PageNo[1] to the ‘Text’.
8. In ‘Text’ type after $PageNo[1]: “ of “
9. Under Settings for ‘Dynamic Text’, select ‘Total pages’ . Click on the ‘Insert’
button to add $TotalPages to the ‘Text’.
Figure 12. Inserting Bates Dynamic Text
10. Change other properties for your text such as the layout, font style or action.
11. Click ‘OK’ to save your stamp and return to the main ARTS PDF Stamper window.
12. Select the profile name so that the profile is highlighted.
13. Click the ‘Stamp’ button when you are ready to stamp your PDF document.
| CONTENTS |
Page 26 of 39
Page 27

ARTS PDF Stamper User Guide
Designing Stamps
5.3. Image/PDF Stamp Settings
ARTS PDF Stamper allows you to apply image or PDF stamps to your documents.
Note: Image and PDF stamps share a number of similar properties. Some properties common to
both are described in this section.
Figure 13. Designing Image Stamps
| CONTENTS |
Page 27 of 39
Page 28

ARTS PDF Stamper User Guide
Designing Stamps
Figure 14. Designing PDF Stamps
5.3.1. Size
Adjust this setting to resize your image or PDF. The adjustment affects both horizontal
and vertical ratios.
Note: Changing the scale of your image/PDF may affect image quality.
5.3.2. Page Number (PDF Stamps only)
Adjust this setting to choose which page number of the PDF document to use for the PDF
stamp.
Note: The total number of pages is validated by the selected PDF.
| CONTENTS |
Page 28 of 39
Page 29

ARTS PDF Stamper User Guide
Logging
6. Logging
To enable logging, open the ARTS PDF Stamper preferences dialog
to enable logging is selected.
Figure 15. Enable logging preference
6.1. View Log File
To view the log file, from Acrobat menu:
Plug-Ins > ARTS PDF Stamper > Logging > View log
The log file records processing details. One log file is used to record details from all
stamp processes. The general structure being:
- Data/Time
- File(s) processed
- Status
- Summary
==========================================================================
Information : 19/06/03, 14:19:16
Processing Profile : LetterTemplate
Processing file : C:\temp\Introduction_3.pdf
Processed OK
--------------------------------------------------------------------------
Files to process: 1
Files processed: 0
Not processed files: 1
--------------------------------------------------------------------------
Insert Text: Text is out of the page. Select another position or angle
Insert Text: Text is out of the page. Select another position or angle
Source Image file does not exist
7
and ensure that the checkbox
7
On Windows ARTS PDF Stamper preferences can be accessed from the Acrobat menu, ‘Edit > Preferences >
ARTS PDF Stamper’. On Macintosh, go to ‘Acrobat > Preferences > ARTS PDF Stamper’.
| CONTENTS |
Page 29 of 39
Page 30

ARTS PDF Stamper User Guide
Logging
If any unexpected errors occur, refer to the log file for debugging details. Please contact
techsupport@artspdf.com if the problem persists.
Note: The log file will only be created if the “Enable Logging” option is checked in the ARTS PDF
Stamper Preferences.
6.2. Clear Log File
Selecting to run the Clear Log File feature will erase the log file saved previously.
To clear the log file, from Acrobat menu:
Plug-Ins > ARTS PDF Stamper > Logging > Clear log
| CONTENTS |
Page 30 of 39
Page 31

ARTS PDF Stamper User Guide
Configuring Preferences
7. Configuring Preferences
ARTS PDF Stamper preferences can be accessed from the Acrobat menu:
• On Windows, go to ‘Edit > Preferences > ARTS PDF Stamper’.
• On Macintosh, go to ‘Acrobat > Preferences > ARTS PDF Stamper’.
Figure 16. Preferences Dialog
7.1. File Handling
• Write stamp to new file
Creates a new file to apply stamp on.
• Enable logging
Choose to keep a log of all the processes in a text file.
• Ignore page rotations
Choose to apply stamps similar to on an A4 size page even if the pages in a
document are rotated.
7.2. Defaults
• BATES fixed length
Set the default length (zero padding) used with Bates numbers, i.e. entering 6 will
stamp Bates numbers of format 000001, 000002, 000003 etc. Please see below for
more details on
• Use Roman Numerals
Choose to have the numbering in roman numerals, opting for the lower case or
upper case. This option is unchecked by default.
Bates numbering.
| CONTENTS |
Page 31 of 39
Page 32

ARTS PDF Stamper User Guide
Batch Processing
8. Batch Processing
Acrobat’s Batch Processing allows you to perform ARTS PDF Stamper functions across multiple files
or folders rapidly and automatically. The Help file in Adobe Acrobat describes Batch Processing as
“allowing you to create and execute a series of commands on one document, several documents,
or an entire collection of documents in one automated process.”
Batch Processing with ARTS PDF Stamper allows you to:
1. Run all ARTS PDF Stamper commands on:
• Selected files/folders
• Files already open in Acrobat
• Files the user specifies when the Batch Process is run
2. Output the resulting PDF document to:
• Same folder as original
• A specified folder
3. Specify the output file name and file type
Figure 17. Creating a batch sequence
| CONTENTS |
Page 32 of 39
Page 33

ARTS PDF Stamper User Guide
Batch Processing
To create a batch process for ARTS PDF Stamper, follow these steps:
1. Open Adobe Acrobat.
2. In Acrobat 5.0, from the file menu go to ‘File > Batch Processing’ to open the Batch
Processing dialog.
In Acrobat 6.0 Professional, from the file menu go to ‘Advanced > Batch Processing’ to open
the Batch Processing dialog.
3. Create a New Sequence; choose a meaningful name for the new sequence. You will now be
taken to the Batch Edit Sequence dialog.
4. Click “Select Commands”; choose the ARTS PDF Stamper command called ‘Stamp
Document’.
5. Click “Add” to add it to the batch sequence.
6. Click “Edit” to open up the ARTS PDF Stamper dialog. Once you have supplied the details to
the create layers, click “OK”.
7. Select what to run the batch sequence on; a selected file/folder, the file currently open in
Acrobat, or a file specified when the sequence is run.
8. Select the output location of the process file/folder.
9. Finish filling out the properties of the batch sequence, then click “OK”.
10. You can now run or edit you batch sequence from Acrobat’s file menu.
You can also create a toolbar button that automatically runs the batch sequence with ARTS PDF
Aerialist.
Note: Acrobat’s Batch Processing does not allow you to perform other functions in Acrobat whilst it is open.
| CONTENTS |
Page 33 of 39
Page 34

ARTS PDF Stamper User Guide
Customize a Toolbar Button
9. Customize a Toolbar Button
ARTS PDF Stamper functions are accessible from within ARTS PDF Aerialist. ARTS PDF Aerialist is a
plug-in for Acrobat that contains a number of handy tools, and the Productivity feature allows you
to create customizable toolbars. For more information on ARTS PDF Aeria list, visit the ARTS PDF
website:
ARTS PDF Aerialist allows you to streamline your use of ARTS PDF Stamper by creating buttons
that can perform predefined functions with a single click. Using its Productivity Tools Editor, you
can create toolbar buttons that perform Acrobat commands like Execute JavaScript, Batch
Processing, PDF Consultant, etc. The Menu Item Execute command allows you to create a tool that
will emulate any Menu Item command in Acrobat with one click of a but ton.
http://www.artspdf.com/arts_pdf_aerialist.asp.
Figure 18. Creating a customized toolbar button
| CONTENTS |
Page 34 of 39
Page 35

ARTS PDF Stamper User Guide
Customize a Toolbar Button
To create an ARTS PDF Stamper toolbar button with ARTS PDF Aerialist, do the following:
1. In Acrobat, click the Productivity Add/Remove Tools button on the ARTS PDF Aerialist
toolbar, or use the menu system: ‘Plug-ins > ARTS PDF Aerialist > Productivity > Add or
Remove Tools’.
2. In the Add or Remove Tools dialog, click the “New” button. This will open up the Edit Tool
Properties dialog.
3. Enter in the name and other details of the tool; select a button image, etc. The bottom lefthand side of the dialog contains the list of commands available. Scroll down the list until you
reach the ARTS PDF Stamper function. Select the ‘Stamp Document’ function and click
“Add”.
4. The selected function’s dialog will now appear. Enter the properties you wish to set for the
command and then click ‘OK’.
Note: Like Acrobat’s Batch Processing function, you cannot operate any other functions whilst in ARTS
PDF Aerialist’s Productivity editing mode.
5. Once you have entered all the details required for your tool click ‘OK’. Your new tool button
will now appear in the customized toolbar. You can then run the ARTS PDF Stamper function
by clicking on that button.
| CONTENTS |
Page 35 of 39
Page 36

ARTS PDF Stamper User Guide
Troubleshooting
10. Troubleshooting
10.1. Frequently Asked Questions
This section provides some answers to common questions and details on what to do if a
problem is encountered concerning the following:
ARTS PDF Stamper not found
•
Wrong stamp applied
•
The preview pane
•
General
•
ARTS PDF Stamper not found
“I’ve installed ARTS PDF Stamper and everything appeared OK however I can’t appear to
find the application.”
Previous versions of ARTS PDF Stamper installed a link to open th e application under the
‘Start > Programs’ menu. Version 3.0 of ARTS PDF Stamper is a plug-in for Adobe
Acrobat and to use it you must have Acrobat open.
If you cannot locate ARTS PDF Stamper in the Acrobat toolbar palette or under the plugins menu please verify that ARTS PDF Stamper was correctly installed and restart
Acrobat. If you cannot find a folder for ARTS PDF Stamper in the Acrobat Plug-ins
directory and a file APStamper.api please contact our technical support team at
mailto:techsupport@artspdf.com.
Wrong stamp applied
“I’ve stamped my document and it wa s the wrong stamp. I need to remove the stamp,
how do I do it?”
To remove a stamp, select Undo Stamp from the ARTS PDF Stamper tool button or
‘Plug-ins > ARTS PDF Stamper’ menu. Stamps can only be removed using the undo
feature if the document has not been saved. If the document has been saved, use
Acrobat’s built in editing tools to remove unwanted stamp objects.
The preview pane
“I really like using ARTS PDF Stamper but switching between profiles in the Stamp
Management dialog results in the application taking some time to refresh the preview
pane. How can I improve this?”
The preview pane is designed to offer a very accurate representation of how the output
document will appear. It’s possible to navigate through pages in a document to verify
your stamp settings. Consequently clicking on multiple stamps requires th e preview
| CONTENTS |
Page 36 of 39
Page 37

ARTS PDF Stamper User Guide
Troubleshooting
pane to refresh at every click. For large documents or profiles with many stamps we
recommend that you uncheck the preview option to minimize unnecessary processing.
If you wish to preview the output, simply recheck it.
General
“I am having a problem with ARTS PDF Stamper and it is not covered in this FAQ. What
can I do?”
• Visit our ARTS PDF Forum (
technical support and other ARTS PDF product users. Search the existing discussions
and/or post your own questions. Each ARTS PDF product has it own dedicated
discussion area.
• Email
techsupport@artspdf.com and one of our team will reply as soon as possible.
http://forum.artspdf.com) to talk with ARTS PDF
10.2. Forum
Are you having a problem that you can’t find in the Frequently Asked Questions? Then
perhaps you’ll find it on the ARTS PDF Forum. Visit the ARTS PDF Forum on our website
http://forum.artspdf.com.
at
10.3. Known Issues
• When using a Text Stamp a broken (dashed) line to outline the font characters is
invalid.
• When creating a new Profile the drop down menu from ARTS PDF Stamper tool
button is not repopulated with new profiles. Once Acrobat is restarted the list is
displayed correctly.
• ARTS PDF Stamper only supports stamping JPEG and TIFF images in Acrobat 5.0. To
stamp other image file formats, we recommend first converting the image to PDF
then stamping as a PDF stamp.
| CONTENTS |
Page 37 of 39
Page 38

ARTS PDF Stamper User Guide
Troubleshooting
10.4. Updates
To ensure you are up-to-date with the most recently released bug fixes and new
features; check that you have the latest version of ARTS PDF Stamper installed.
To check if your version is the latest:
1. Start Adobe Acrobat.
2. On Macintosh, choose Acrobat > About Third-Party Plug-Ins > ARTS PDF
Stamper. On Windows, choose Help > About Third-Party Plug-Ins > ARTS PDF
Stamper.
3. Choose Product Info and click Updates.
10.5. Maintenance
At times ARTS PDF will release updates that may include significant enhancements to
the product. It is recommended that you take up annual maintenance to be entitled to
free upgrades (whether it be minor or major release versions) over a period of 12
months from the initial purchase. Annual Maintenance also entitles you to priority phone
and email support.
Annual maintenance can be purchased at the same time you buy the associated product
from your ARTS PDF reseller. If you wish to renew a subscription, or if you wish to
purchase a subscription for a product you already own, please contact your reseller or
ARTS PDF directly at
info@artspdf.com
| CONTENTS |
Page 38 of 39
Page 39

ARTS PDF Stamper User Guide
Troubleshooting
10.6. Technical Support
Before contacting us please read the complete Troubleshooting section as the answer to
your problem may be found in the FAQs or on the ARTS PDF Forum. To contact ARTS
PDF Technical Support, please e-mail
information below to help us replicate the problem you are experiencing .
a. The exact version of ARTS PDF Stamper you are using (this is located by running
ARTS PDF Stamper, and then clicking Help > About Third-Part y Plug-Ins > ARTS
PDF Stamper > Product Info). Please also specify whether you are using a demo
or full registered version.
b. Whether or not you purchased Maintenance with ARTS PDF Stamper. If you did
purchase Maintenance, please supply your ARTS PDF Stamper serial number.
c. The exact version of Adobe Acrobat you are using (this is located by running
Adobe Acrobat, and then clicking Help > About Acrobat).
d. Whether you are running it on a PC or Macintosh and the exact version of the
Operating System you are using.
e. The amount of free disk space remaining.
f. The CPU speed and amount of RAM for the system on which ARTS PDF Stamper
is running (e.g. Pentium 233 MMX, 32MB RAM).
g. Any other programs that are running at the time of the error (e.g. Outlook,
Internet Explorer, etc).
h. All error messages that were displayed when the error occurred.
i. The exact series of steps that led to the error.
j. Whether this error occurs on every PDF document or just a selected amount. If
possible, please send us a sample of the file that caused the error.
k. What program was used to create the PDF documents? E.g. Acrobat Distiller,
Crystal Reports, Zeon PDF Driver, etc.
Feedback If you have ideas and suggestions on how we could improve ARTS
PDF Stamper, we would love to hear your thoughts. Please send
them to
Legal Notes
Acrobat and Exchange are registered trademarks of Adobe
Systems Incorporated. ARTS PDF Stamper is Copyright © 2004
ARTS PDF.
info@artspdf.com
techsupport@artspdf.com and supply the
| CONTENTS |
Page 39 of 39
 Loading...