

Page 1

ARTS PDF
Aerialist
Version 1.2
Page 2

ARTS PDF Aerialist User Guide
Contents
Contents
1. INTRODUCTION .............................................................................................. 6
2. SETUP .......................................................................................................... 7
2.1. System Requirements................................................................................ 7
2.2. Installation............................................................................................... 7
2.3. Activation................................................................................................. 8
2.4. Registration.............................................................................................. 9
2.5. Uninstalling ARTS PDF Aerialist ................................................................... 9
3. PRODUCTIVITY............................................................................................. 11
3.1. Overview ................................................................................................11
3.2. Using Productivity ....................................................................................12
3.3. The Toolbar Manager ................................................................................13
3.3.1. Creating or Renaming Toolbars ...................................................................... 14
3.3.2. Deleting Toolbars......................................................................................... 14
3.3.3. Managing Toolbar Tools................................................................................. 15
3.3.4. Showing and Hiding Toolbars......................................................................... 16
3.3.5. Importing and Exporting Toolbars................................................................... 16
3.4. Add or Remove Tool – The Tool Manager.....................................................18
3.4.1. Creating or Editing Tools ............................................................................... 20
3.4.2. Deleting Tools.............................................................................................. 22
3.4.3. Importing and Exporting Tools ....................................................................... 23
3.4.4. Reordering Tools.......................................................................................... 24
3.5. Productivity Tutorials ................................................................................25
3.5.1. Using the Open File Command ....................................................................... 25
3.5.2. Using the Menu Item Execute Command.......................................................... 26
3.5.3. Using the Batch Sequence Execute Command .................................................. 27
3.5.4. Using the World Wide Web Link Command....................................................... 28
3.5.5. Using the Select Tool button Command........................................................... 29
3.5.6. Using Bookmark Commands .......................................................................... 30
3.5.7. Using Link commands................................................................................... 31
3.5.8. Using the Split command............................................................................... 32
3.5.9. Using the Stamp command ............................................................................ 32
3.6. Batch Processing......................................................................................34
3.6.1. Bookmarking in Batch................................................................................... 35
3.6.2. Splitting in Batch.......................................................................................... 36
3.6.3. Managing Links in Batch................................................................................ 36
3.6.4. Stamping in Batch........................................................................................ 37
3.7. Configuring Productivity Preferences ...........................................................38
3.8. Index of Toolbars and Tools.......................................................................39
3.8.1. Basic Toolbar............................................................................................... 39
3.8.2. Developer Toolbar........................................................................................ 41
3.8.3. Manage Toolbar ........................................................................................... 43
3.8.4. Print Toolbar ............................................................................................... 45
| CONTENTS | INDEX |
Page 2 of 155
Page 3

ARTS PDF Aerialist User Guide
Contents
4. CONTENT ASSEMBLY...................................................................................... 46
4.1. Overview ................................................................................................46
4.2. Using Content Assembly............................................................................47
4.3. Splitting PDF files.....................................................................................48
4.3.1. Split into files of n pages............................................................................... 49
4.3.2. Split by page marks...................................................................................... 50
4.3.3. Split by bookmarks....................................................................................... 54
4.3.4. Split by page range ...................................................................................... 55
4.3.5. General splitting options................................................................................ 57
4.3.6. Destination folder and filename settings .......................................................... 58
4.4. Merging Files ...........................................................................................59
4.4.1. Adding Files or Folders.................................................................................. 60
4.4.2. Using a control file ....................................................................................... 61
4.4.3. Saving the merged file.................................................................................. 63
5. BOOKMARKS ................................................................................................ 64
5.1. Overview ................................................................................................64
5.2. Using Bookmarks .....................................................................................65
5.2.1. Bookmark Features ...................................................................................... 65
5.3. Adding Bookmarks ...................................................................................67
5.3.1. The Preview Pane......................................................................................... 67
5.3.2. Add Bookmarks to PDF.................................................................................. 73
5.3.3. Importing/Exporting Bookmark Settings.......................................................... 74
5.4. Finding and Replacing Bookmarks............................................................... 77
5.4.1. Find Options................................................................................................ 78
5.4.2. Replace Options........................................................................................... 78
5.4.3. Using Text Masking ...................................................................................... 79
5.5. Building Bookmarks..................................................................................80
5.5.1. Creating Bookmarks ..................................................................................... 81
5.5.2. Importing/Exporting Bookmark Build Options................................................... 82
5.5.3. Bookmark Selection Properties....................................................................... 83
5.6. Deleting Bookmarks .................................................................................89
5.7. Sorting Bookmarks...................................................................................90
6. STAMPS ...................................................................................................... 92
6.1. Overview ................................................................................................92
6.2. Main Features..........................................................................................93
6.2.1. Text Stamps................................................................................................ 93
6.2.2. Image Stamps............................................................................................. 94
6.2.3. PDF Stamps ................................................................................................ 94
6.3. Using Stamps ..........................................................................................95
6.3.1. Stamp a document....................................................................................... 96
6.3.2. Undo Stamp................................................................................................ 96
6.4. Managing Stamps and Profiles....................................................................97
6.4.1. Creating a new Profile................................................................................... 98
6.4.2. Creating a new Stamp .................................................................................. 98
6.4.3. Previewing a Profile/Stamps .......................................................................... 98
6.4.4. Renaming Profiles/Stamps............................................................................. 98
| CONTENTS | INDEX |
Page 3 of 155
Page 4

ARTS PDF Aerialist User Guide
Contents
6.4.5. Deleting Profiles /Stamps .............................................................................. 98
6.4.6. Rearranging Stamps..................................................................................... 99
6.4.7. Importing / Exporting Profiles ........................................................................ 99
6.4.8. Editing Stamps ............................................................................................ 99
6.4.9. Right Click Menus........................................................................................100
6.5. Designing Stamps ..................................................................................101
6.5.1. General Stamp Settings ...............................................................................101
6.5.2. Text Stamp Properties .................................................................................105
6.5.3. Image/PDF Stamp Settings...........................................................................110
6.6. Logging ................................................................................................112
6.6.1. View Log File..............................................................................................112
6.6.2. Clear Log File .............................................................................................113
6.7. Configuring Stamp Preferences ................................................................ 114
6.7.1. File Handling .............................................................................................. 114
6.7.2. Defaults.....................................................................................................114
7. LINKS ...................................................................................................... 115
7.1. Overview ..............................................................................................115
7.2. Using Links ...........................................................................................116
7.3. Link Checking........................................................................................117
7.3.1. Show First Dead Link...................................................................................117
7.3.2. Show Dead Links On Next Page.....................................................................118
7.3.3. Show Dead Links On This Page......................................................................119
7.3.4. Dead Link Page Numbers..............................................................................120
7.4. Link Management...................................................................................121
7.4.1. Show / Hide Link Alignment Palette ...............................................................121
7.4.2. Make Links Like This One .............................................................................122
7.4.3. Make Notes Like This One.............................................................................124
7.4.4. Set Link Magnification..................................................................................126
7.4.5. Find And Replace Filenames..........................................................................127
7.4.6. Find And Replace URLs.................................................................................128
7.4.7. Set Base URL..............................................................................................130
7.4.8. Delete Links ...............................................................................................132
7.5. Reporting..............................................................................................133
7.5.1. Report on Bad Actions..................................................................................133
7.5.2. Report on Bad Bookmarks ............................................................................134
7.5.3. Report on All Links ......................................................................................135
7.5.4. Report on External Dependencies ..................................................................136
7.5.5. Report on Selected Link or Annot...................................................................137
7.5.6. Count Links................................................................................................139
7.6. Configuring Link Preferences....................................................................140
7.7. Additional Link Features..........................................................................142
7.7.1. Multiple – select and drag links .....................................................................142
7.7.2. Cut and paste links......................................................................................143
7.7.3. Paste links onto multiple pages or multiple files ...............................................144
8. TROUBLESHOOTING..................................................................................... 145
8.1. Frequently Asked Questions.....................................................................145
8.2. Forum ..................................................................................................149
| CONTENTS | INDEX |
Page 4 of 155
Page 5

ARTS PDF Aerialist User Guide
Contents
8.3. Known Issues ........................................................................................150
8.4. Updates................................................................................................150
8.5. Maintenance..........................................................................................151
8.6. Technical Support ..................................................................................152
INDEX ............................................................................................................... 153
| CONTENTS | INDEX |
Page 5 of 155
Page 6
ARTS PDF Aerialist User Guide
Introduction
1. Introduction
ARTS PDF Aerialist comprises features from the following functional groups:
Productivity – for developing your own macros, tools and toolbars.
•
Content Assembly – Split, merge and append pages and whole documents to create new
•
PDFs; split documents based on page groups, page ranges, bookmarks and page marks;
use merge functionality to sort and combine large PDF document collections.
Bookmarks – Make PDF documents more usable and easier to navigate. Add, edit, build,
•
replace and delete bookmarks across one or more PDF documents.
Links – Edit and update multiple links and their properties in batch; automate the
•
painstaking task of auditing links for validity; examine all links and bookmarks between
documents, to named destinations and to Web pages.
Stamps – Insert PDF, text and image stamps, watermarks and overlays -- Add page and
•
bates numbering; add headers and footers.
Figure 1. ARTS PDF Aerialist toolbar
| CONTENTS | INDEX |
Page 6 of 155
Page 7

ARTS PDF Aerialist User Guide
Setup
2. Setup
2.1. System Requirements
Windows
• Intel® Pentium® processor or equivalent
• For Acrobat 5.0 users:
Workstation 4.0 with Service Pack 6, Windows® 2000 with Service Pack 2,
Windows XP Professional or Home Edition, or Windows XP Tablet PC Edition
• For Acrobat 6.0 users: Microsoft Windows 98 SE, Microsoft® Windows NT®
Workstation 4.0 with Service Pack 6, Windows® 2000 with Service Pack 2,
Windows XP Professional or Home Edition, or Windows XP Tablet PC Edition
• For Acrobat 7.0 users: Microsoft® Windows® 2000 with Service Pack 2, Windows
XP Professional or Home Edition, or Windows XP Tablet PC Edition
• 64MB of RAM (128MB recommended)
• 50MB of available hard-disk space
• 1,024x768 screen resolution
• Adobe® Acrobat® version 5.0 or later. Batch processing is only supported in
Acrobat 5, Acrobat 6 Professional and Acrobat 7 Professional.
Macintosh
• PowerPC® G3 processor
• Mac OS X v.10.2.2 or higher
• 64MB of RAM
• 50MB of available hard-disk space
• 1,024x768 screen resolution
• Adobe® Acrobat® version 5 or later. Batch processing is only supported in
Acrobat 5, Acrobat 6 Professional and Acrobat 7 Professional.
For technical support queries, please consult the Troubleshooting section of this manual or email
techsupport@artspdf.com
Microsoft Windows 98 SE, ME, Microsoft® Windows NT®
2.2. Installation
You may have received this software on either CD-ROM or as a downloaded file.
Macintosh (CD-ROM)
To install from a CD-ROM:
1. Verify that Adobe Acrobat is not running.
2. Insert the CD-ROM.
3. Open the CD and double click the Install f ile.
| CONTENTS | INDEX |
Page 7 of 155
Page 8

ARTS PDF Aerialist User Guide
Setup
4. Navigate to ARTS PDF Aerialist.
5. Click install.
6. Follow the prompts to install ARTS PDF Aerialist.
Macintosh (.hqx)
If you downloaded ARTS PDF Aerialist, to install:
1. Verify that Adobe Acrobat is not running.
2. Decompress the distribution file provided.
3. Execute the installation file.
4. Follow the prompts to install ARTS PDF Aerialist.
Windows (CD-ROM)
To install from a CD-ROM:
1. Verify that Adobe Acrobat is not running.
2. Insert the CD-ROM.
3. If the CD-ROM does not automatically start, navigate to the CD in Windows
Explorer and execute the Windows Installer.exe file.
4. Navigate to ARTS PDF Aerialist.
5. Click Install.
6. Follow the prompts to install ARTS PDF Aerialist.
Windows (.exe)
If you downloaded ARTS PDF Aerialist, to install:
1. Verify that Adobe Acrobat is not running.
2. Execute the installation file provided.
3. Follow the prompts to install ARTS PDF Aerialist.
2.3. Activation
If you have the demo version of ARTS PDF Aerialist installed, activ a te the full version
using the following steps:
1. In Acrobat select ‘Help > About 3
2. Ensure you have a valid serial. To obtain a valid serial you must purchase the
product:
a. Select the ‘Register’ tab page and click on ‘Buy Now’ to purchase the full
version.
b. After your purchase has been confirmed, you will receive and email
containing your serial number.
3. Select the ‘Register’ tab page and click on ‘Activate’.
4. Enter your license details, including your serial n umber, and click “OK”.
| CONTENTS | INDEX |
rd
Party Plug-Ins > ARTS PDF Aerialist.
Page 8 of 155
Page 9

ARTS PDF Aerialist User Guide
Setup
2.4. Registration
ARTS PDF provide the option of registering your copy of ARTS PDF Aerialist online.
Online registration allows you to protect you r serial number. In the event you lose or
misplace your serial, we can locate and provide your serial to you on request.
Registered customers will also receive important upgrade information and notification of
product updates.
1. After activating your copy of ARTS PDF Aerialist you will be prompted to register
online:
a. Click “N ow” to register your product online
OR
b. Click “Later” to register at a later stage. After entering your license details,
you can register your product anytime by clicking on the “Register Now”
button of the Register tab.
2. When registering your product, complete the online form and click “Submit
Registration”.
3. You only need register your product with us once.
To manually register your ARTS PDF product, please visit our online registration page,
http://www.artspdf.com/register.asp.
1
.
2.5. Uninstalling ARTS PDF Aerialist
Macintosh
To install on a Macintosh platform:
1. Execute the installation file
2. To continue with uninstalling ARTS PDF Aerialist you must accept the software
license agreement.
3. Select the application ARTS PDF Aerialist was in stalled under (either Acrobat 5 or
Acrobat 6) and click ‘Open’.
4. From the drop down menu, select the ‘Uninstall’ item.
Alternatively, to uninstall:
1. Verify that Adobe Acrobat is not running.
2. Locate the folder containing Acrobat plug-ins.
For example when installed on Acrobat 6.0, typically files can be found in Drive:
Applications: Adobe Acrobat 6.0 Professional: ARTS PDF Plug-ins: ARTS PDF Aerialist
3. Delete the ARTS PDF Aerialist files.
1
You must be connected to the Internet.
2
If you installed ARTS PDF Aerialist from a CD-ROM, insert the CD, launch the Install file, navigate to ARTS
PDF Aerialist and click install (you can choose to uninstall at a later time).
2
.
| CONTENTS | INDEX |
Page 9 of 155
Page 10

ARTS PDF Aerialist User Guide
Setup
Windows
To install on a Windows platform:
1. Verify that Adobe Acrobat is not running.
2. Click Start > Settings > Control Panel.
3. Open Add/Remove Programs.
4. Select ‘ARTS PDF Aerialist 1.1’ from the menu.
5. Click ‘Add/Remove’.
| CONTENTS | INDEX |
Page 10 of 155
Page 11

ARTS PDF Aerialist User Guide
Productivity
3. Productivity
3.1. Overview
The Productivity feature set can be used to create customizable tools and toolbars. ARTS
PDF Aerialist comes with more than 50 predefined tools on 4 different toolbars. In
addition to these timesaving tools, you can create your own custom tools and toolbars -giving you quick access to your predefined tasks and shortcuts -- and lets you export
and share them with other users.
Creating new tools is as easy as selecting and setting commands and assigning a toolbar
button to them. You can copy or move your customized toolbar buttons to other predefined toolbars. Adding predefined tools or toolbars is as simple as selecting them and
importing them.
Features include:
• Predefined Toolbars - Use any of the more than 50 tools that come with ARTS
PDF Aerialist.
• Make toolbars and tools - Access commands, menu items and existing toolbar
buttons to create tools and build up your own toolbars.
• Share toolbars and tools - Copy and share tools with other users through the
Import/Export feature.
• Toolbar Manager – Create multiple user-defined toolbars and manage the tools.
• Copy a toolbar button – Use commands to select a toolbar button, copy it on to
an ARTS PDF Aerialist toolbar and change its tool properties.
| CONTENTS | INDEX |
Page 11 of 155
Page 12

ARTS PDF Aerialist User Guide
Productivity
3.2. Using Productivity
The Productivity feature has a main toolbar button called the 'Toolbar Manager'. See
The Toolbar Manager' section.
'
Using the Toolbar Manager you can create numerous toolbars
own tool manager button to add, edit or remove tools, it is known as the 'Add or
Remove Tool' button. See '
The Productivity feature has an import/export function, which allows you to copy and
share tools with other ARTS PDF Aerialist users. The toolbar and tool manager both have
an import/export feature allowing you to save/load tools and toolbars. See '
and Exporting Toolbars' and 'Importing and Exporting Tools' sections.
Add or Remove Tool - The Tool Manager' section.
3
. Each toolbar will have its
Importing
3
A maximum of 20 toolbars can be loaded at a time.
| CONTENTS | INDEX |
Page 12 of 155
Page 13
ARTS PDF Aerialist User Guide
Productivity
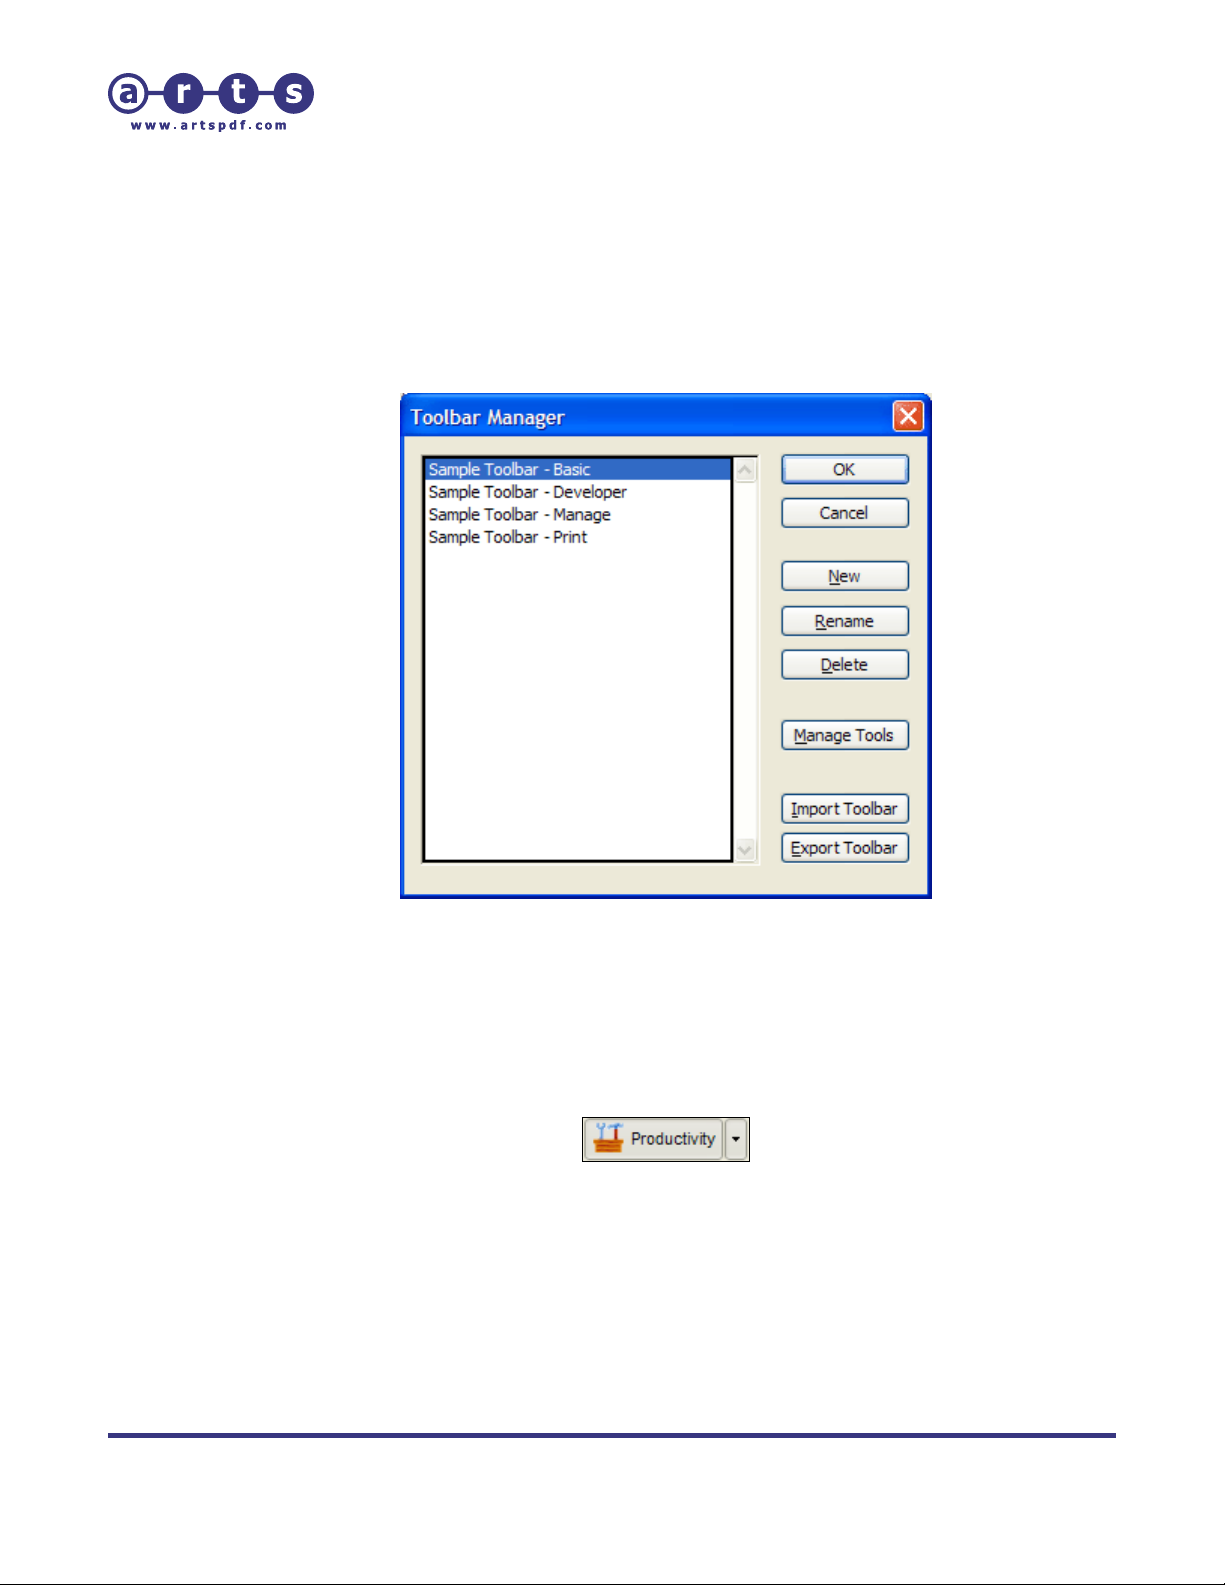
3.3. The Toolbar Manager
The Toolbar Manager lets you to create, edit or delete customized toolbars. Create your
own toolbar to contain frequently used tools and efficiently perform a range of
operations to complete a specific work task.
Figure 2. Toolbar Manager
To open the ‘Toolbar Manager’ dialog and manage your customized toolbars, click the
‘Productivity’ (Toolbar Manager) button on the ARTS PDF Aerialist toolbar or select it
from the drop down list.
Figure 3. The ‘Productivity’ (Toolbar Manager) tool button
| CONTENTS | INDEX |
Page 13 of 155
Page 14

ARTS PDF Aerialist User Guide
Productivity
Alternatively, go to ‘Plug-Ins > ARTS PDF Aerialist > Tools > Toolbar Manager’.
Figure 4. Accessing ‘Toolbar Manager’ in the Acrobat menubar
3.3.1. Creating or Renaming Toolbars
To create a new toolbar or to rename an existing toolbar:
1. Open the 'Toolbar Manager'.
2. Click ‘New’ or ‘Rename’.
3. Enter a new toolbar name.
4. Click ‘OK’ to accept the changes.
5. Restart Acrobat.
3.3.2. Deleting Toolbars
To delete a toolbar:
1. Open the 'Toolbar Manager'
2. Click ‘Delete’.
3. Click ‘OK’ to accept the changes.
4. Restart Acrobat.
| CONTENTS | INDEX |
Page 14 of 155
Page 15
ARTS PDF Aerialist User Guide
Productivity
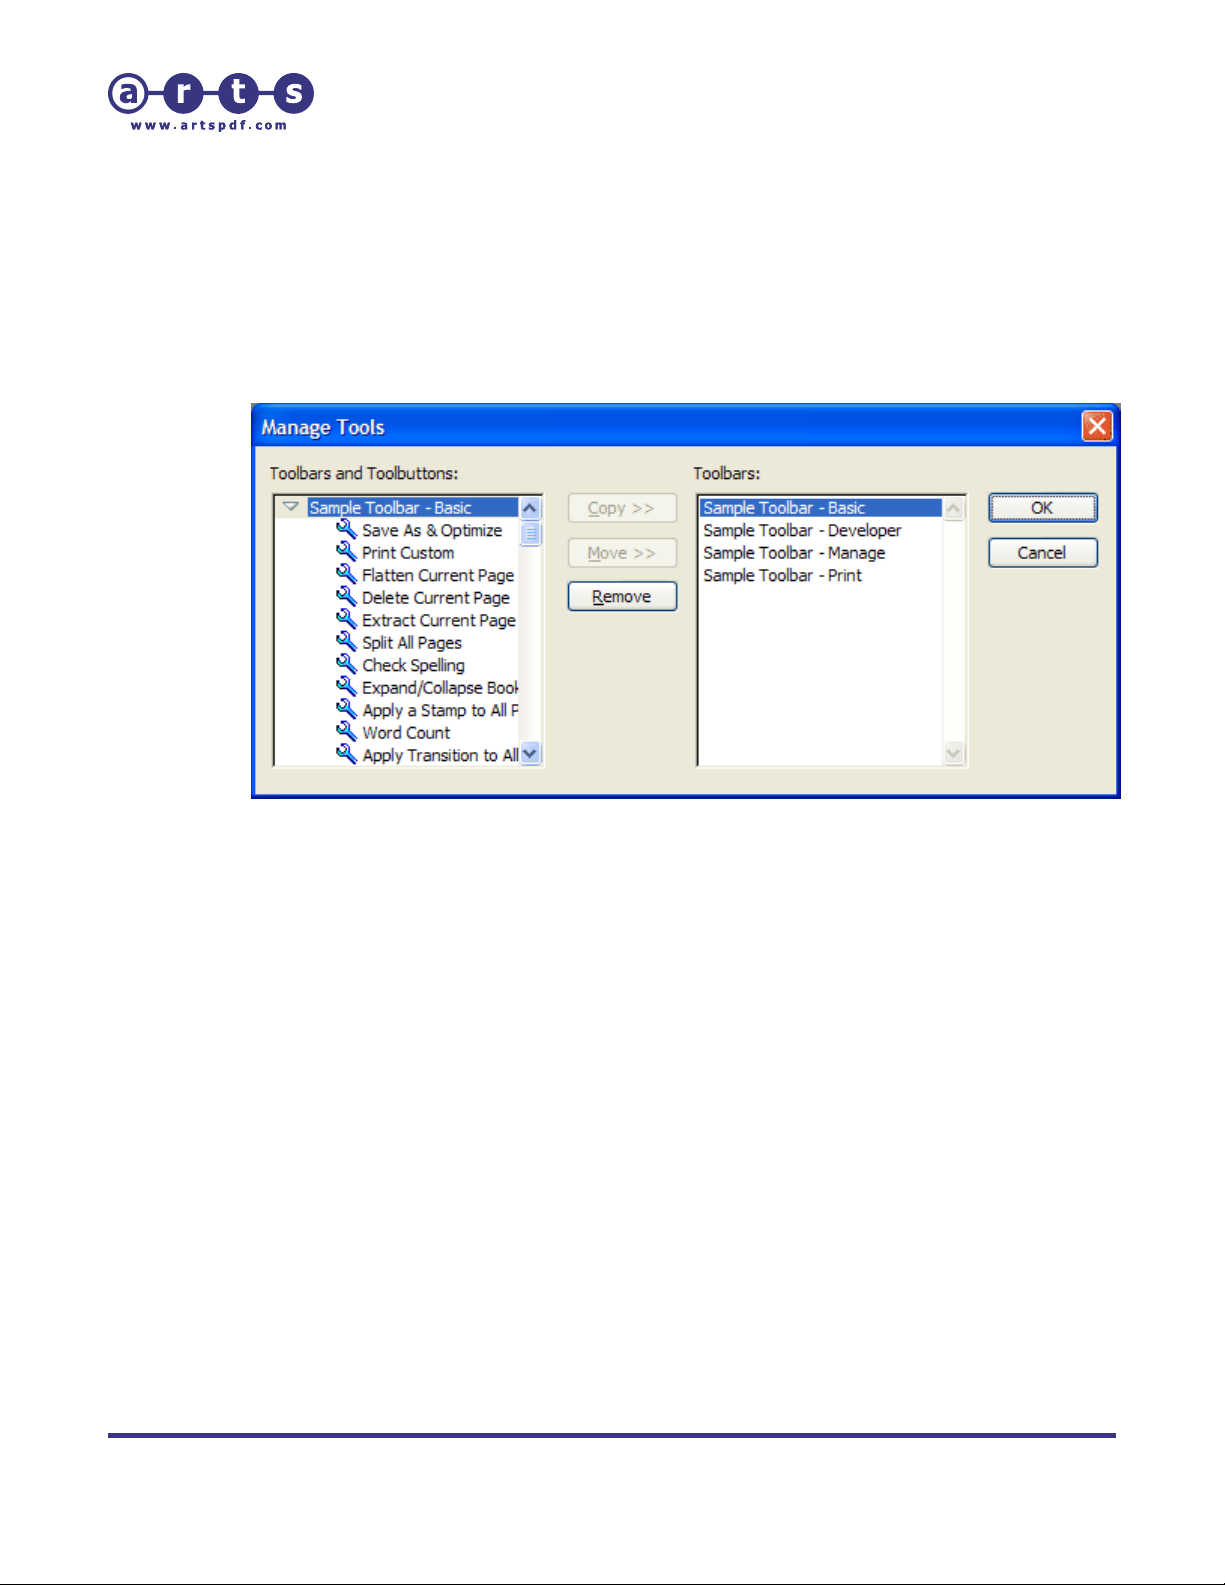
3.3.3. Managing Toolbar Tools
Use this feature to copy and share tools between multiple toolbars. With this you
can move, copy or remove tools from any customized toolbar.
On the 'Toolbar Manager' dialog, click 'Manage Tools' to open the dialog shown in the
figure below.
Figure 5. Manage Tools
3.3.3.1. Copying Toolbar Buttons
To copy a tool to another toolbar:
1. Open the 'Toolbar Manager' and click on the 'Manage Tools' button.
2. In the list on the left, select the tool button you wish to copy.
3. In the list on the right, select the toolbar where the copied tool button
will be placed.
4. Click ‘Copy>>‘ to copy the tool button (on the left list) to the toolbar
(on the right list).
5. If it is successfully copied, the tool button will appear under the toolbar
in the list on the left.
3.3.3.2. Moving Toolbar Buttons
To move a tool to another toolbar:
1. Open the 'Toolbar Manager' and click on the 'Manage Tools' button.
2. In the list on the left, select the tool button you wish to move.
3. In the list on the right, select the toolbar where the selected tool
button will be placed.
| CONTENTS | INDEX |
Page 15 of 155
Page 16

ARTS PDF Aerialist User Guide
Productivity
4. Click ‘Move>>‘ to move the tool button (on the left list) to the toolbar
(on the right list).
5. If it is successful, the tool button will appear under the toolbar in the
list on the left.
3.3.3.3. Removing Toolbar Buttons
To remove a tool from a toolbar:
1. Open the 'Toolbar Manager' and click on the 'Manage Tools' button.
2. In the list on the left, select the tool button you wish to move.
3. Click ‘Remove’.
4. If it is successfully removed, the tool button will no longer appear
under the toolbar in the list on the left.
To remove all tools from a toolbar:
1. Open the 'Toolbar Manager' and click on the 'Manage Tools' button.
2. In the list on the left, select the toolbar you wish to remove all tool
buttons.
3. Click Remove
4. If they are successfully removed, the tool buttons will no longer
appear under the toolbar in the list on the left.
3.3.4. Showing and Hiding Toolbars
To show or hide any of the customized toolbars you have created, follow these steps:
1. Do either one of the following:
• Using Acrobat 6.0, go to ‘View > Tools’.
• Using Acrobat 5.0, go to ‘Window > Toolbars’.
• Right-click on the toolbar area.
2. Search through the list of toolbars and select the toolbar name you wish to
show or hide. To show the toolbar, a tick should appear next to toolbar name.
To hide the toolbar, the tick should be hidden.
3.3.5. Importing and Exporting Toolbars
This feature lets you save and load customized toolbars. When a toolbar is exported
it is saved and embedded into a PDF file. This file will store the name of the toolbar
and all constituent tools. Importing the file will load the toolbar. This is an extremely
useful feature if you are close to the 20 toolbar limit; simply export toolbars for later
use and delete loaded toolbars to avoid exceeding the limit.
| CONTENTS | INDEX |
Page 16 of 155
Page 17

ARTS PDF Aerialist User Guide
Productivity
3.3.5.1. Importing Toolbars
To load or import your toolbar:
1. Open the Toolbar Manager dialog.
2. Click the 'Import Toolbar' button.
3. Browse to the location of the toolbar/s you wish to import.
4. Select the toolbar/s to import and click 'OK'.
See the '
Index of Toolbars and Tools' section for predefined toolbars.
3.3.5.2. Exporting Toolbars
To save or export your toolbar:
1. Open the ‘Toolbar Manager’ dialog.
2. Select the toolbar you wish to export and click the 'Export Toolbar'
button.
3. Browse to the location of the toolbar/s you wish to import.
4. Optionally, rename the toolbar file.
5. Click 'Save' to export the toolbar.
| CONTENTS | INDEX |
Page 17 of 155
Page 18
ARTS PDF Aerialist User Guide
Productivity
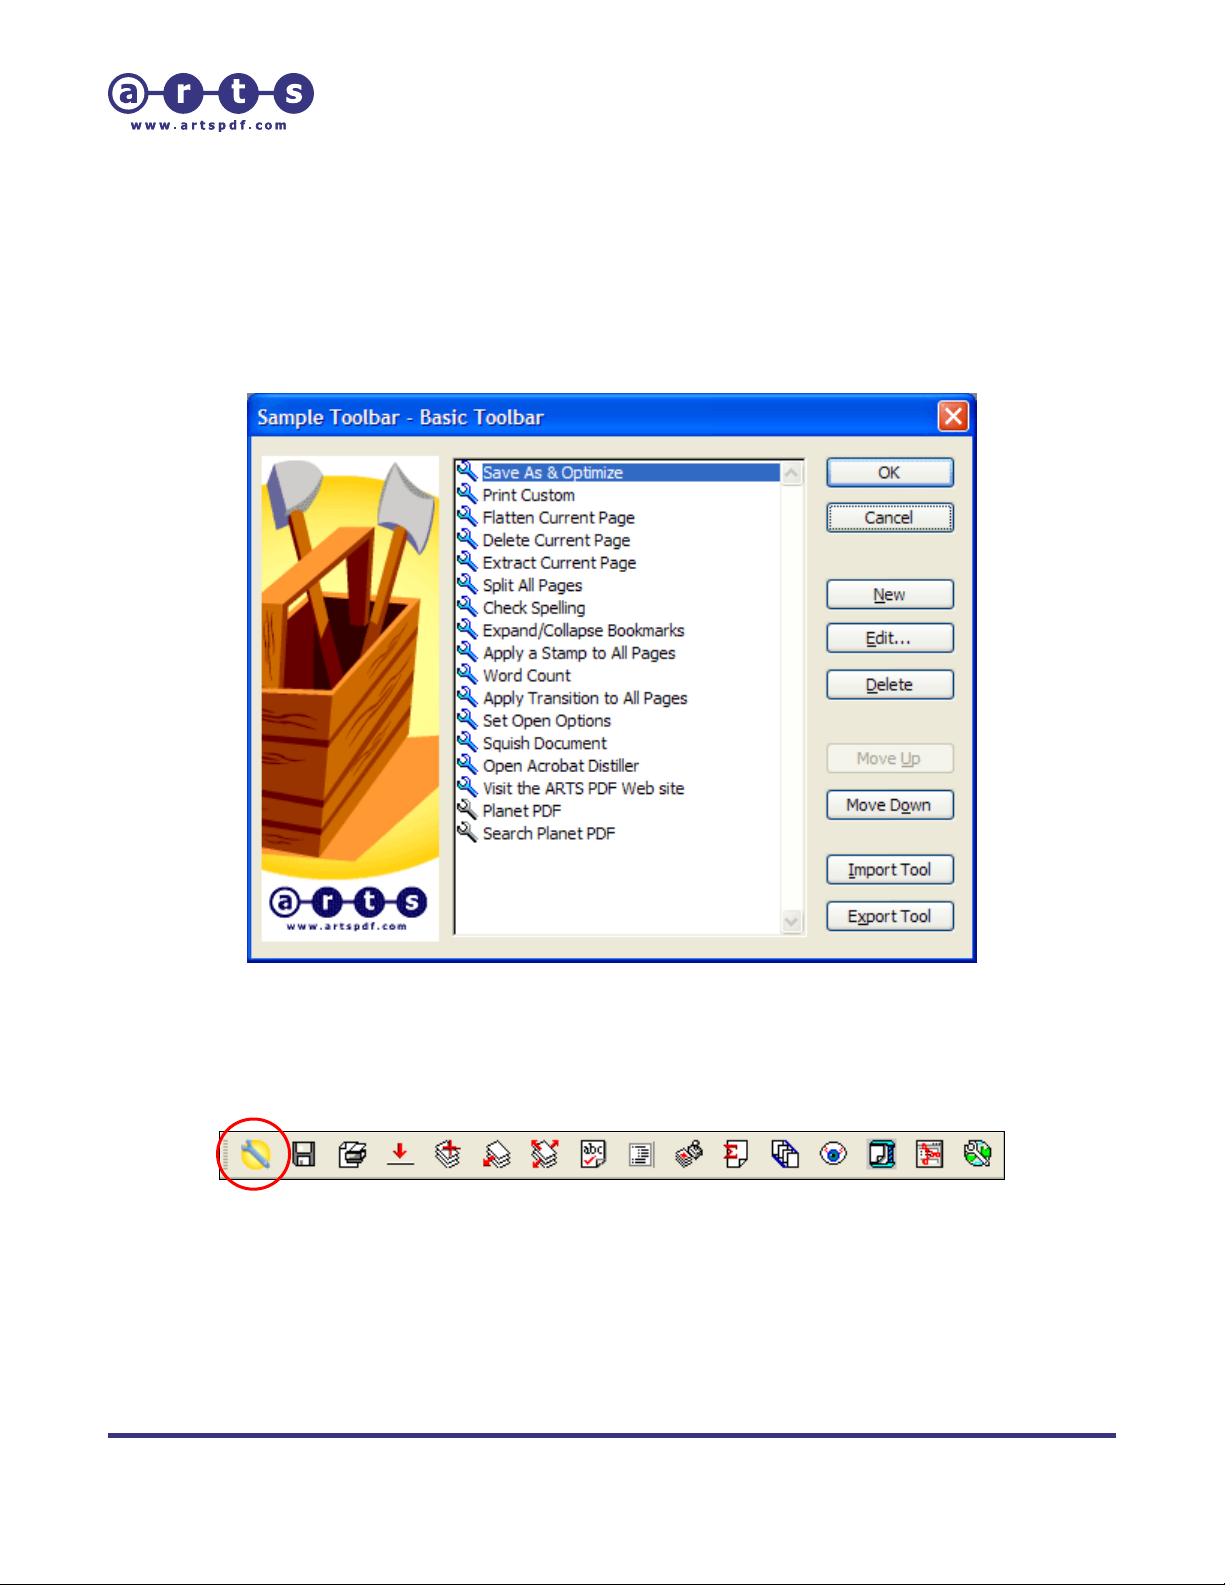
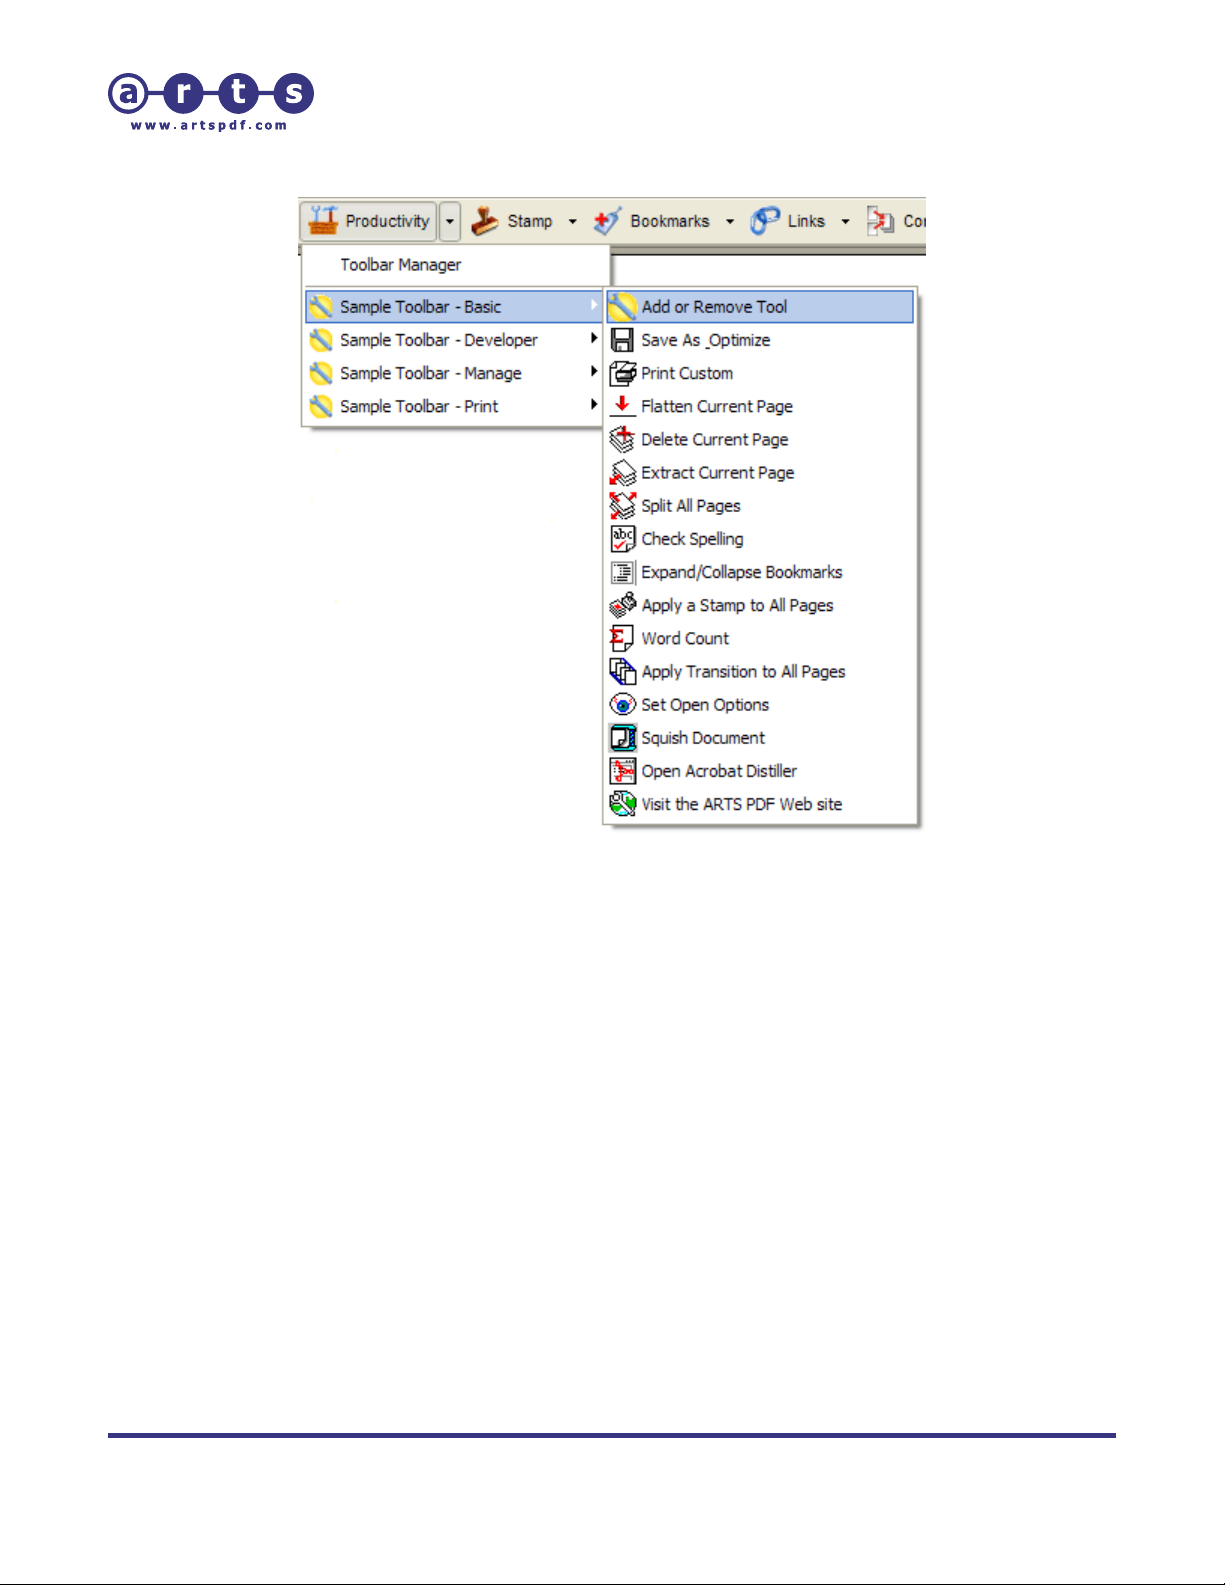
3.4. Add or Remove Tool – The Tool Manager
The 'Add or Remove Tool' enables you to manage tools on a particular toolbar. Not only
can you add or remove tools but you can also edit the tool icon, menu text, tool tip and
action performed.
Figure 6. Add or Remove Tool – The Tools Manager
To manage your tools on a toolbar, click on the ‘Add or Remove Tool’ button.
Figure 7. ‘Add or Remove Tool’ button highlighted by the red circle
Alternatively, go to ‘Plug-Ins > ARTS PDF Aerialist > Productivity > toolbar name > Add
or Remove Tool’ in the Acrobat menu.
| CONTENTS | INDEX |
Page 18 of 155
Page 19
ARTS PDF Aerialist User Guide
Productivity
Figure 8. Accessing ‘Add or Remove Tool’ from ARTS PDF Aerialist’s toolbar
| CONTENTS | INDEX |
Page 19 of 155
Page 20
ARTS PDF Aerialist User Guide
Productivity
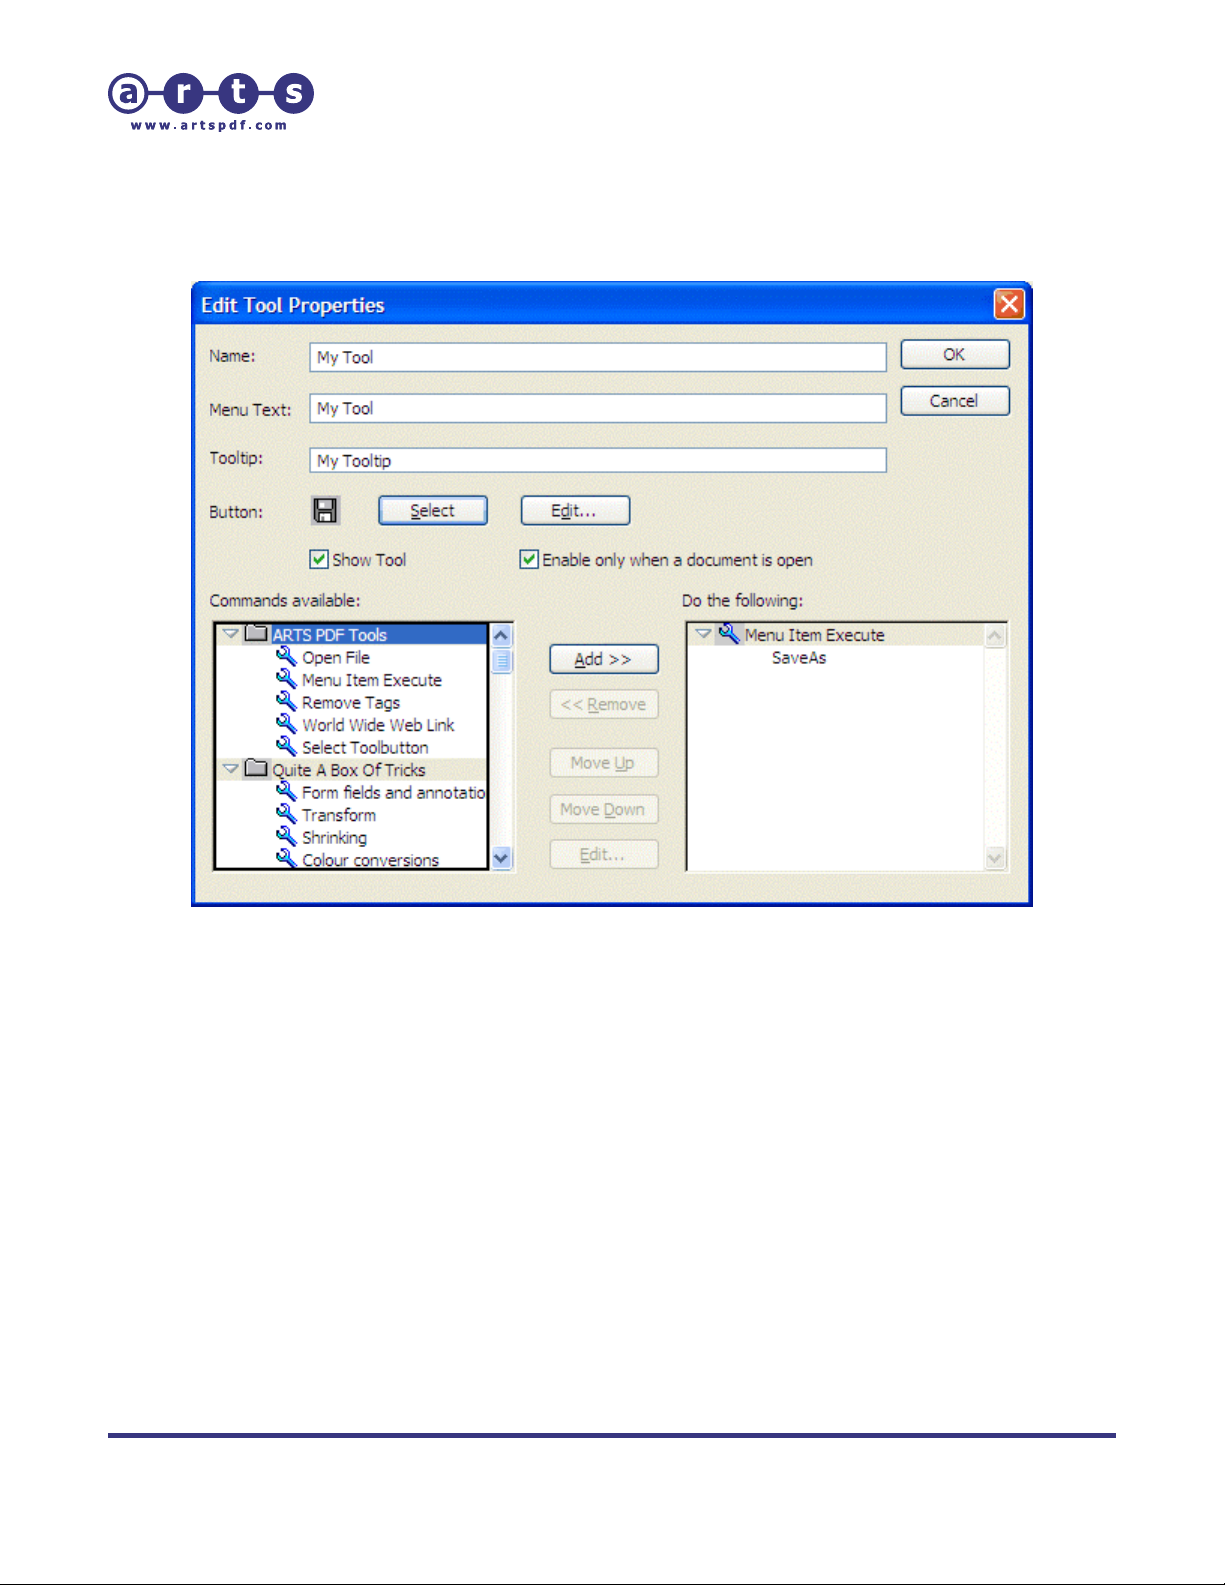
3.4.1. Creating or Editing Tools
Figure 9. Edit Tool Properties
1. On the toolbar, click on the ‘Add or Remove Tool’ button to view the list of tools.
2. Click ‘New’ or ‘Edit’.
3. Enter the tool properties.
4. Click ‘OK’ to save the changes.
3.4.1.1. Naming and Labeling Toolbar Buttons
There is one name and two labels for each tool.
• Name - The name of the actual tool. It will appear in the list of
available tools.
• Menu Text - The name that appears in the drop-down menu.
• Tooltip (optional) - The text that appears when the mouse hovers
above the button.
| CONTENTS | INDEX |
Page 20 of 155
Page 21
ARTS PDF Aerialist User Guide
Productivity
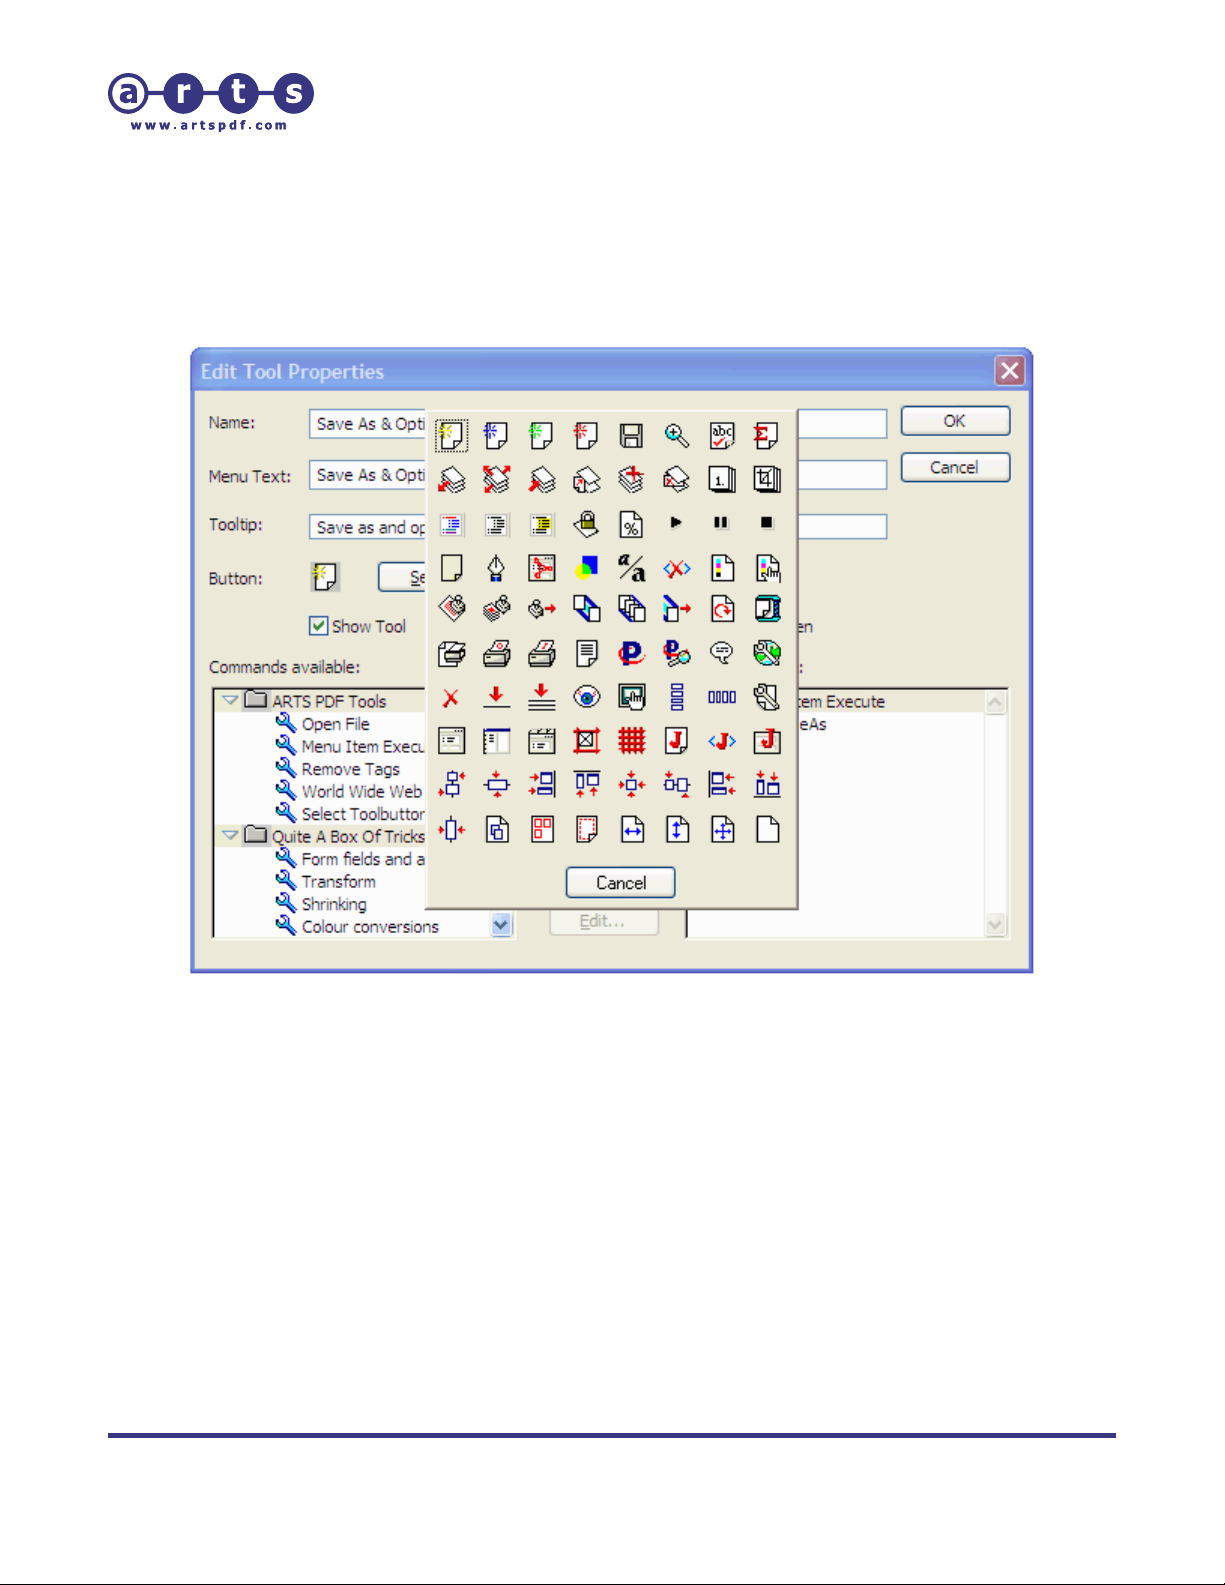
3.4.1.2. Selecting and Editing Toolbar Button Images
1. Click ‘Select’, and then select from the range of images available.
2. Optionally, modify the button image by clicking ‘Edit’.
Figure 10. Select a tool icon image
3.4.1.3. Showing and Hiding Toolbar Buttons
• Select the ‘Show Tool’ check box to show the tool.
• Turn the ‘Show Tool’ check box off to hide the buttons from the toolbar.
3.4.1.4. Enabling and Disabling Toolbar Buttons
• Select the ‘Enable only when a document is open’ checkbox, if you require
a document to be open when the tool command is used.
• Turn the ‘Enable only when a document is open’ check box off, if you do
not require a document be open.
| CONTENTS | INDEX |
Page 21 of 155
Page 22

ARTS PDF Aerialist User Guide
Productivity
3.4.1.5. Adding and Removing Tool Commands
To add a command:
1. Select the command you wish to add using the list on the left.
2. Click ‘Add >>‘ to add this command to your tool.
3. If it is successfully added, the command will appear in th e list on the
right.
To remove a command:
1. Select the command you wish to remove using the list on the right.
2. Click ‘<<Remove’ to remove this command from your tool.
3.4.2. Deleting Tools
To delete a tool:
1. On the toolbar, click on the ‘Add or Remove Tool’ button to view the list of
tools.
2. From the list of tools, select the tool you wish to remove.
3. Click ‘Delete’.
4. Click ‘OK’.
| CONTENTS | INDEX |
Page 22 of 155
Page 23

ARTS PDF Aerialist User Guide
Productivity
3.4.3. Importing and Exporting Tools
With the import and export tools feature you can save a copy of your tools to share
with other users. Similar to the export toolbars feature, exported tools are embedded
into PDF files making them easy to distribute. The PDF file will store the tool's name,
menu item, tooltip, icon and commands. To load your saved tool, simply import the
PDF file.
3.4.3.1. Importing Tools
To load or import your tool:
1. On the toolbar, click on the ‘Add or Remove Tool’ button to view the
list of tools.
2. Click the ‘Import Tool’ button.
3. Browse to the location of the tools you wish to import.
4. Select the tools to import and click ‘OK’.
3.4.3.2. Exporting Tools
To save or export your tool:
1. On the toolbar, click on the ‘Add or Remove Tool’ button to view the
list of tools.
2. Select the tool you wish to export, and click the ‘Export Tool’ button.
3. Browse to the location that you wish to store the tool in.
4. Optionally, rename the tool file.
5. Click ‘Save’ to export the tool.
| CONTENTS | INDEX |
Page 23 of 155
Page 24
ARTS PDF Aerialist User Guide
Productivity
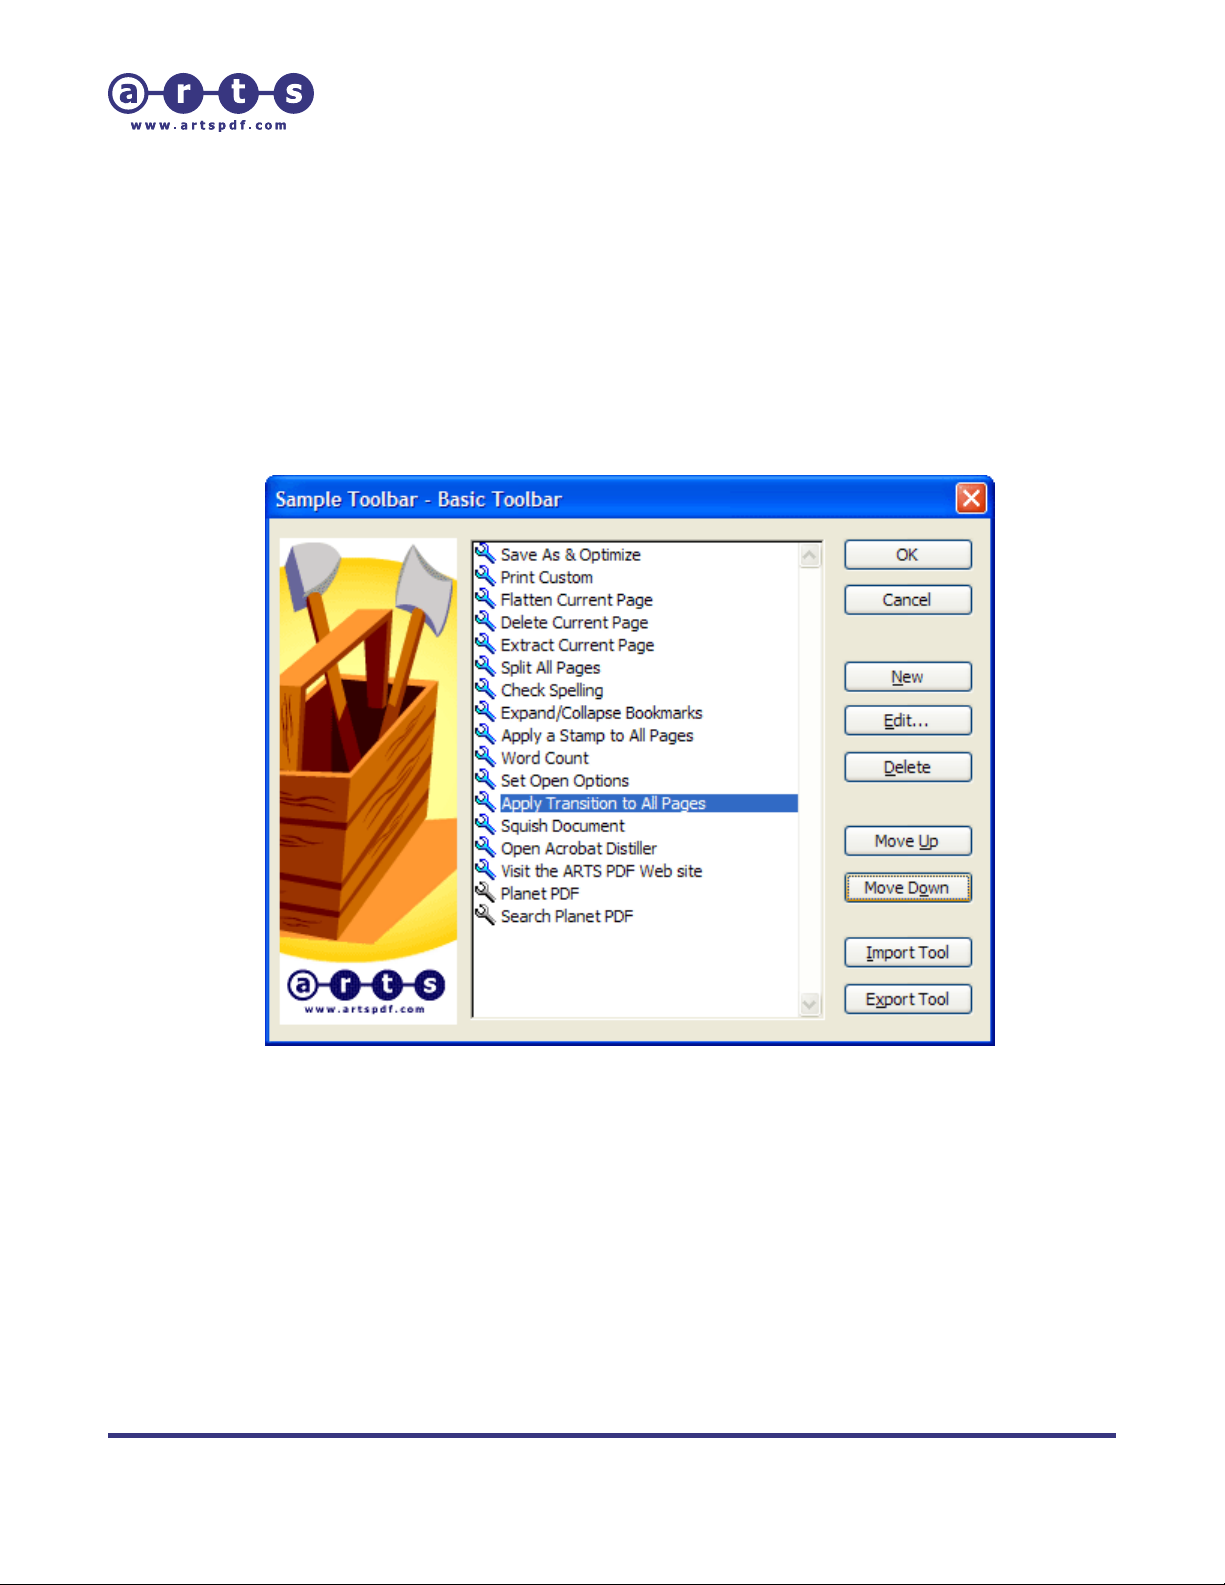
3.4.4. Reordering Tools
1. On the toolbar, click on the ‘Add or Remove Tool’ button to view the list of tools.
2. Select the tool that you wish to reorder.
3. Click the ‘Move Up’ button to move it further up the toolbar, or the ‘Move Down’
button to move it down.
4. Click ‘OK’.
Figure 11. Reordering tools within ARTS PDF Aerialist
| CONTENTS | INDEX |
Page 24 of 155
Page 25

ARTS PDF Aerialist User Guide
Productivity
3.5. Productivity Tutorials
Figure 12. Example custom toolbar
The Productivity feature set contains a number of handy tools, and it also allows you to
create customizable toolbars. Using its Tools Editor, you can create toolbar buttons that
perform Acrobat commands like Execute JavaScript, Execute Menu Item, PDF
Consultant, etc. The Menu Item Execute command allows you to create a tool that will
emulate any Menu Item command in Acrobat with one click of a button.
Functions internal to ARTS PDF Aerialist such as Build Bookmarks, Stamp Document,
Create Link Reports, and Split Document are also accessible from within the Productivity
feature set. This allows you to streamline your use of ARTS PDF Aerialist by creating
buttons that can perform predefined functions with a single click.
For example, if you are always receiving PDF documents with a consistent heading
structure, you could use the Productivity feature with Bookmark functions to create a
toolbar button that uses the Build function to build bookmarks from the document’s
headings, instead of always having to open the document and manually select the same
headings each time.
This section provides step-by-step information on how to add commands to user-defined
tools of the Productivity feature.
3.5.1. Using the Open File Command
The ‘File Open’ command allows you to open PDF files from the toolbar. It is very
useful for giving fast access to regularly accessed PDFs.
1. If you don’t have an existing cust omized toolbar, create or import a toolbar
using the ‘Toolbar Manager’.
2. On the customizable toolbar, click the ‘Add or Remove Tools’ button toolbar.
Alternatively, go to 'Plug-ins > ARTS PDF Aerialist > Productivity > toolbar
name > Add or Remove Tool' from ARTS PDF Aerialist’s Productivity toolbar.
3. Click ‘New’.
4. Enter the ‘Name’, ‘Menu text’ and ‘Tooltip’ for the tool.
5. Select an image for the tool (edit if required).
6. Under the ‘ARTS PDF Tools’ Available Commands, select ‘Open File’.
7. Click the ‘Add >>‘ button, and you will be pro mpted to select the PDF file that
the button will link to. Browse to the file and click ‘OK’.
| CONTENTS | INDEX |
Page 25 of 155
Page 26
ARTS PDF Aerialist User Guide
Productivity
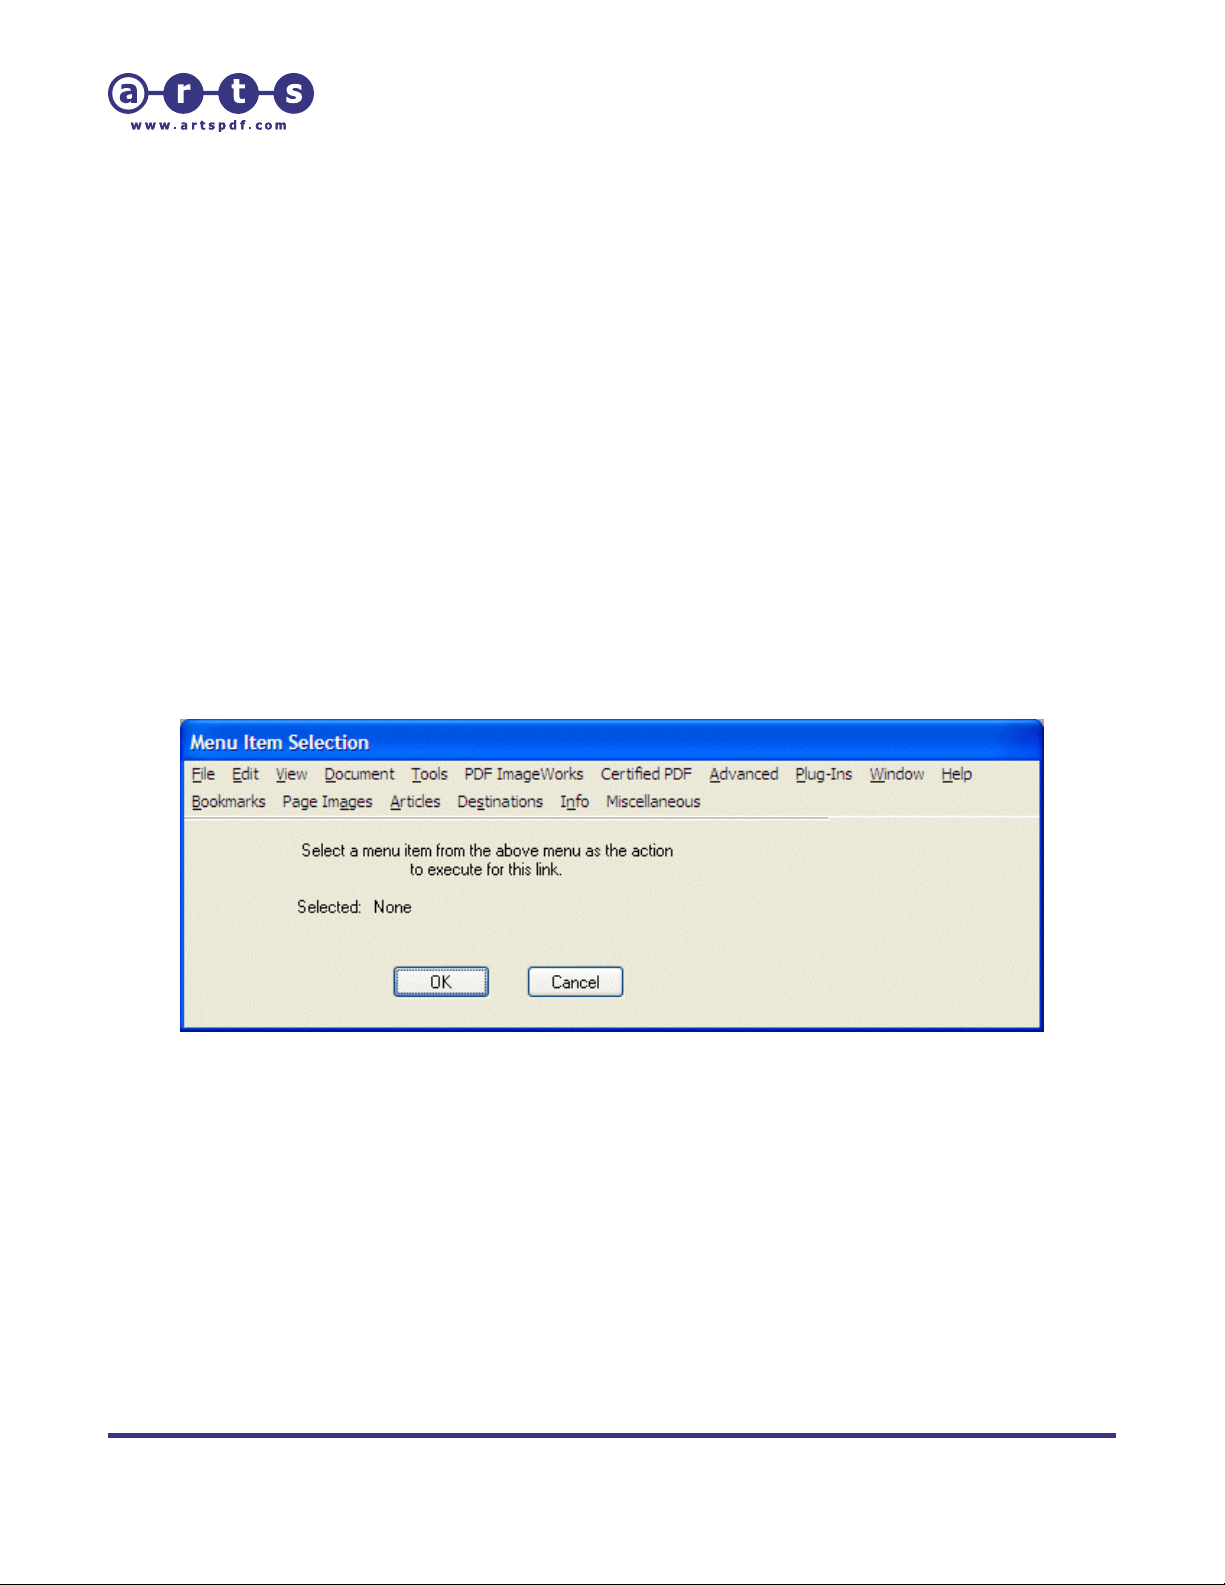
3.5.2. Using the Menu Item Execute Command
The ‘Menu Item Execute’ command allows you to select and make any command
from a menu item into a toolbar button. It's very useful for giving fast access to
regularly used commands.
1. If you don’t have an existing cust omized toolbar, create or import a toolbar
using the ‘Toolbar Manager’.
2. On the customizable toolbar, click the ‘Add or Remove Tools’ button toolbar.
Alternatively, go to 'Plug-ins > ARTS PDF Aerialist > Productivity > toolbar
name > Add or Remove Tool' from ARTS PDF Aerialist’s Productivity toolbar.
3. Click ‘New’.
4. Enter the ‘Name’, ‘Menu text’ and ‘Tooltip’ for the tool.
5. Select an image for the tool (edit if required).
6. Under the ‘ARTS PDF Tools’ Available Commands, select ‘Menu Item Execute’.
7. Click the ‘Add >>‘ button, and the ‘Menu Item Selection’ dialog will appear.
8. Select the desired menu item from the ‘Menu Item Selection’ dialog, then
click ‘OK’.
Figure 13. Selecting a Menu Item
| CONTENTS | INDEX |
Page 26 of 155
Page 27

ARTS PDF Aerialist User Guide
Productivity
3.5.3. Using the Batch Sequence Execute Command
Acrobat 5.0 lets you create, edit, rename, and delete batch sequences that can be
applied to groups of PDFs. These Batch Sequences can be added to your customized
toolbar by using the ‘Batch Sequence Execute’ command
1. If you don’t have an existing cust omized toolbar, create or import a toolbar
using the ‘Toolbar Manager’.
2. On the customizable toolbar, click the ‘Add or Remove Tools’ button toolbar.
Alternatively, go to 'Plug-ins > ARTS PDF Aerialist > Productivity > toolbar
name > Add or Remove Tool' from ARTS PDF Aerialist’s toolbar.
3. Click ‘New’.
4. Enter the ‘Name’, ‘Menu text’ and ‘Tooltip’ for the tool.
5. Select an image for the tool (edit if required).
6. Under the ‘ARTS PDF Tools’ Available Commands, select ‘Batch Sequence
Execute’.
7. Click the ‘Add >>‘ button, and the ‘Select Batch Sequence’ dialog will appear.
8. Select the ‘Batch Sequence’ to execute, and click ‘OK’.
4
.
4
‘Batch Sequence Execute’ command not available with Acrobat 6.0.
| CONTENTS | INDEX |
Page 27 of 155
Page 28
ARTS PDF Aerialist User Guide
Productivity
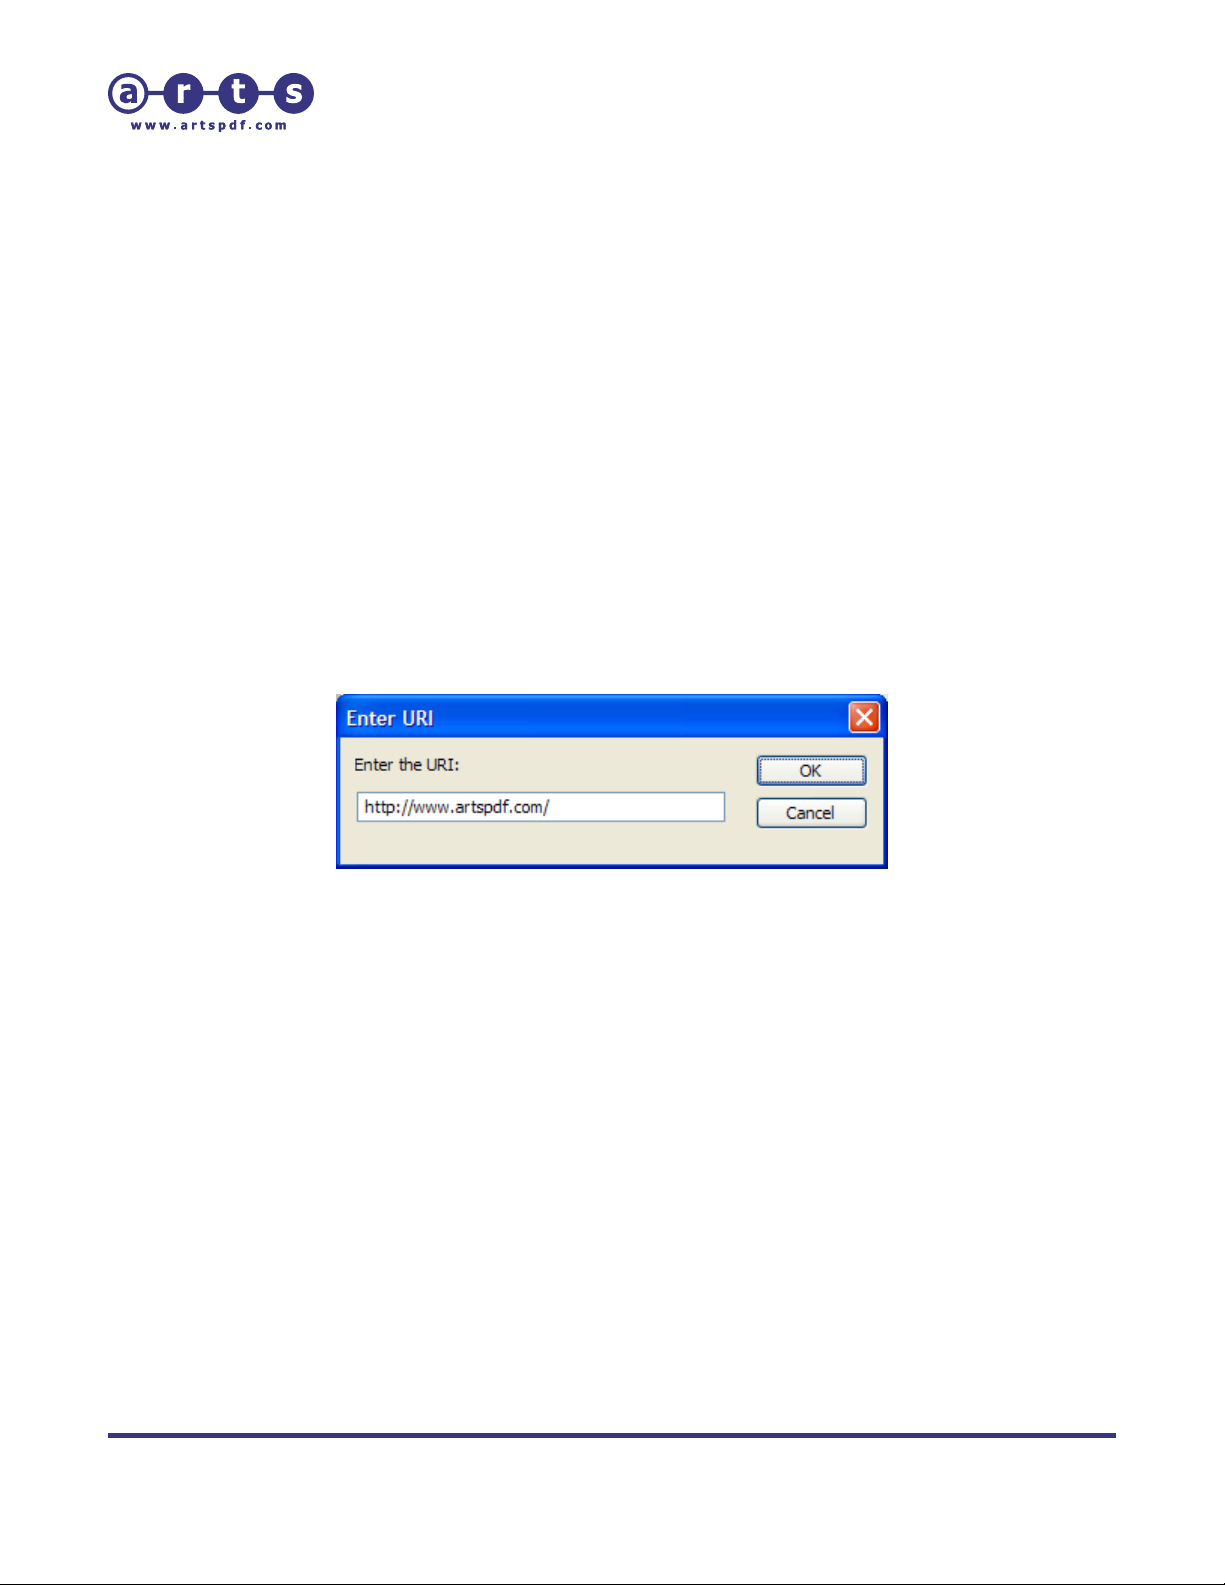
3.5.4. Using the World Wide Web Link Command
The ‘World Wide Web’ command allows you to make Web URIs into toolbar buttons.
It's very useful for giving fast access to regularly visited, related Web pages.
1. If you don’t have an existing cust omized toolbar, create or import a toolbar
using the ‘Toolbar Manager’.
2. On the customizable toolbar, click the ‘Add or Remove Tools’ button toolbar.
Alternatively, go to 'Plug-ins > ARTS PDF Aerialist > Productivity > toolbar
name > Add or Remove Tool' from the ARTS PDF Aerialist Productivity
toolbar.
3. Click ‘New’.
4. Enter the ‘Name’, ‘Menu text’ and ‘Tooltip’ for the tool.
5. Select an image for the tool.
6. Under the ‘ARTS PDF Tools’ Available Commands, select ‘World Wide Web
Link’.
7. Click the ‘Add >>‘ button, and the ‘Enter URI’ dialog will appear.
8. Enter the URI web link and click ‘OK’.
Figure 14. Entering a World Wide Web link
| CONTENTS | INDEX |
Page 28 of 155
Page 29
ARTS PDF Aerialist User Guide
Productivity
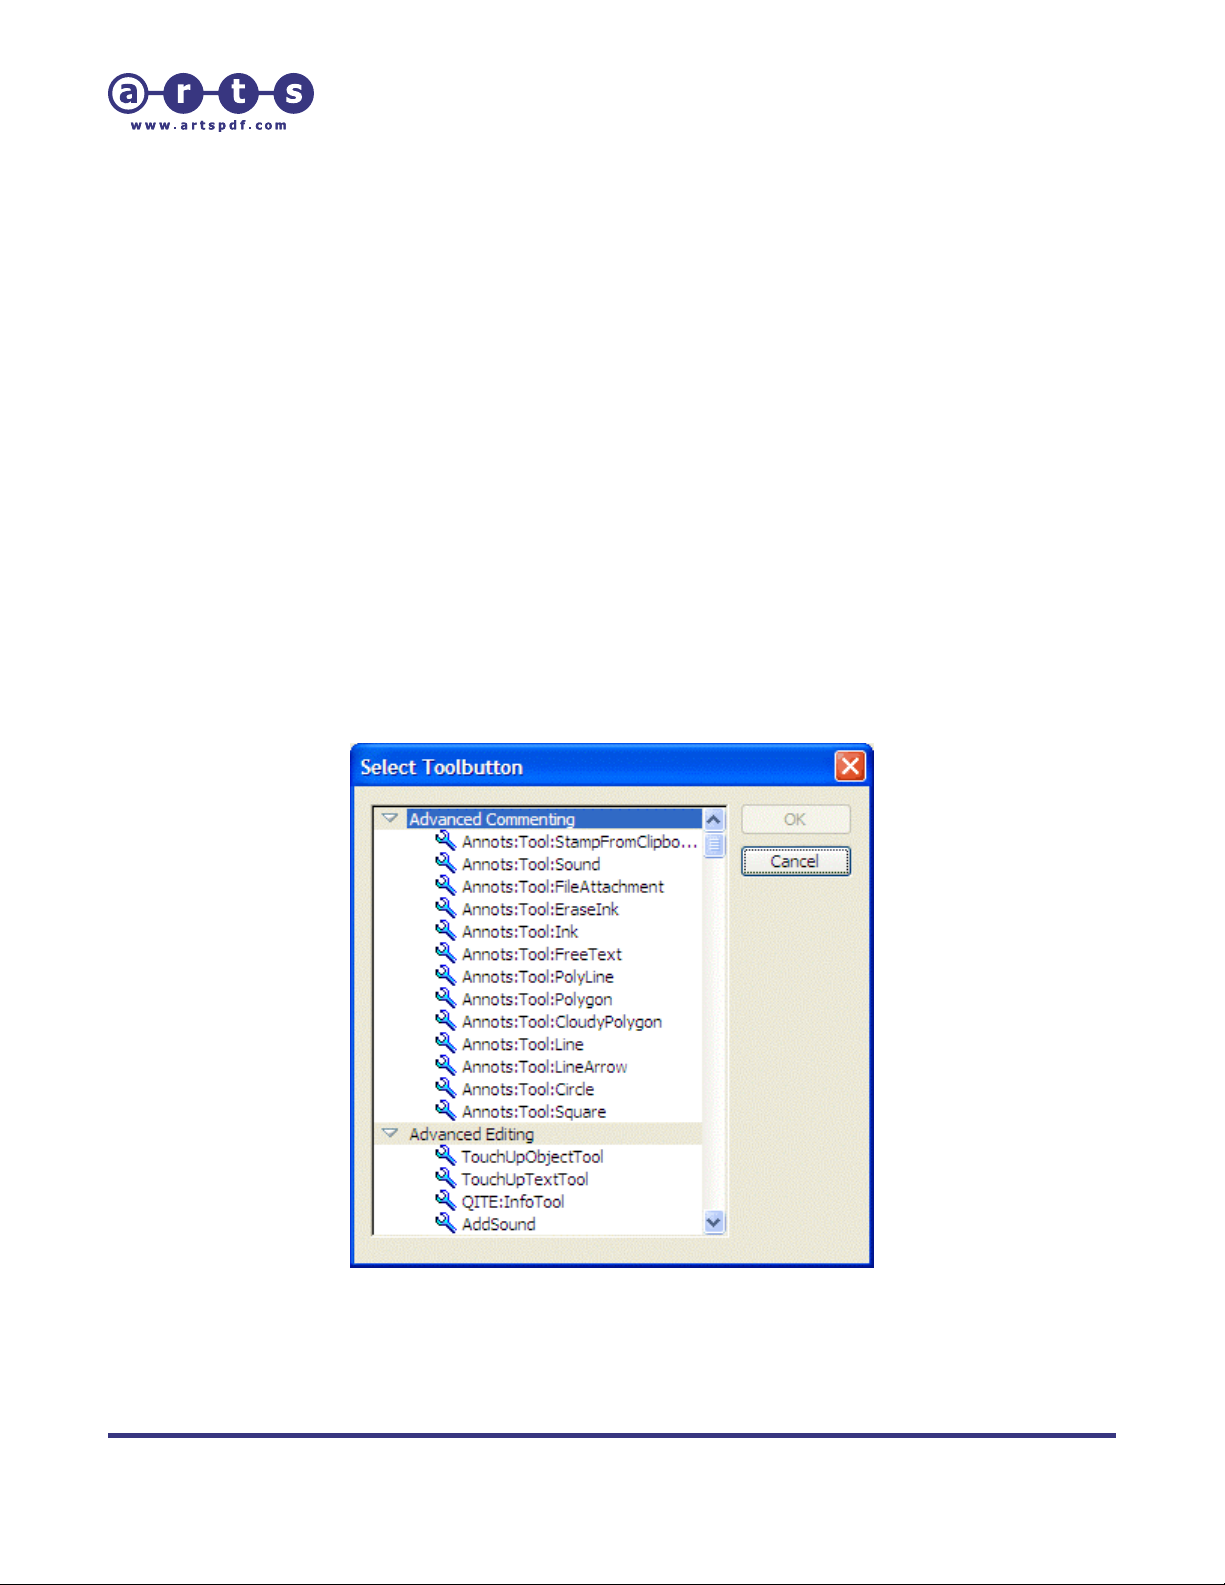
3.5.5. Using the Select Tool button Command
The 'Select Tool button' command allows you to select tools from existing toolbars to
make into a toolbar button. You can even use toolbar buttons of existing Acrobat
toolbars; place it onto your customized toolbar and assign it a new icon, menu text
and tooltip. This is a useful feature when creating your own toolbar of frequently
used toolbar buttons.
1. If you don’t have an existing cust omized toolbar, create or import a toolbar
using the ‘Toolbar Manager’.
2. On the customizable toolbar, click the ‘Add or Remove Tools’ button toolbar.
Alternatively, go to 'Plug-ins > ARTS PDF Aerialist > Productivity > toolbar
name > Add or Remove Tool' in the menubar.
3. Click 'New'
4. Enter the Name, Menu text and Tooltip for the tool.
5. Select an image for the tool.
6. Under the 'Command available', select 'Select Tool button'.
7. Click the 'Add>>' button, and the 'Select Tool button' dialog will appear.
8. Select the desired tool button from the 'Select Tool button' dialog, then click
'OK'.
Figure 15. Selecting a toolbar button
| CONTENTS | INDEX |
Page 29 of 155
Page 30
ARTS PDF Aerialist User Guide
Productivity
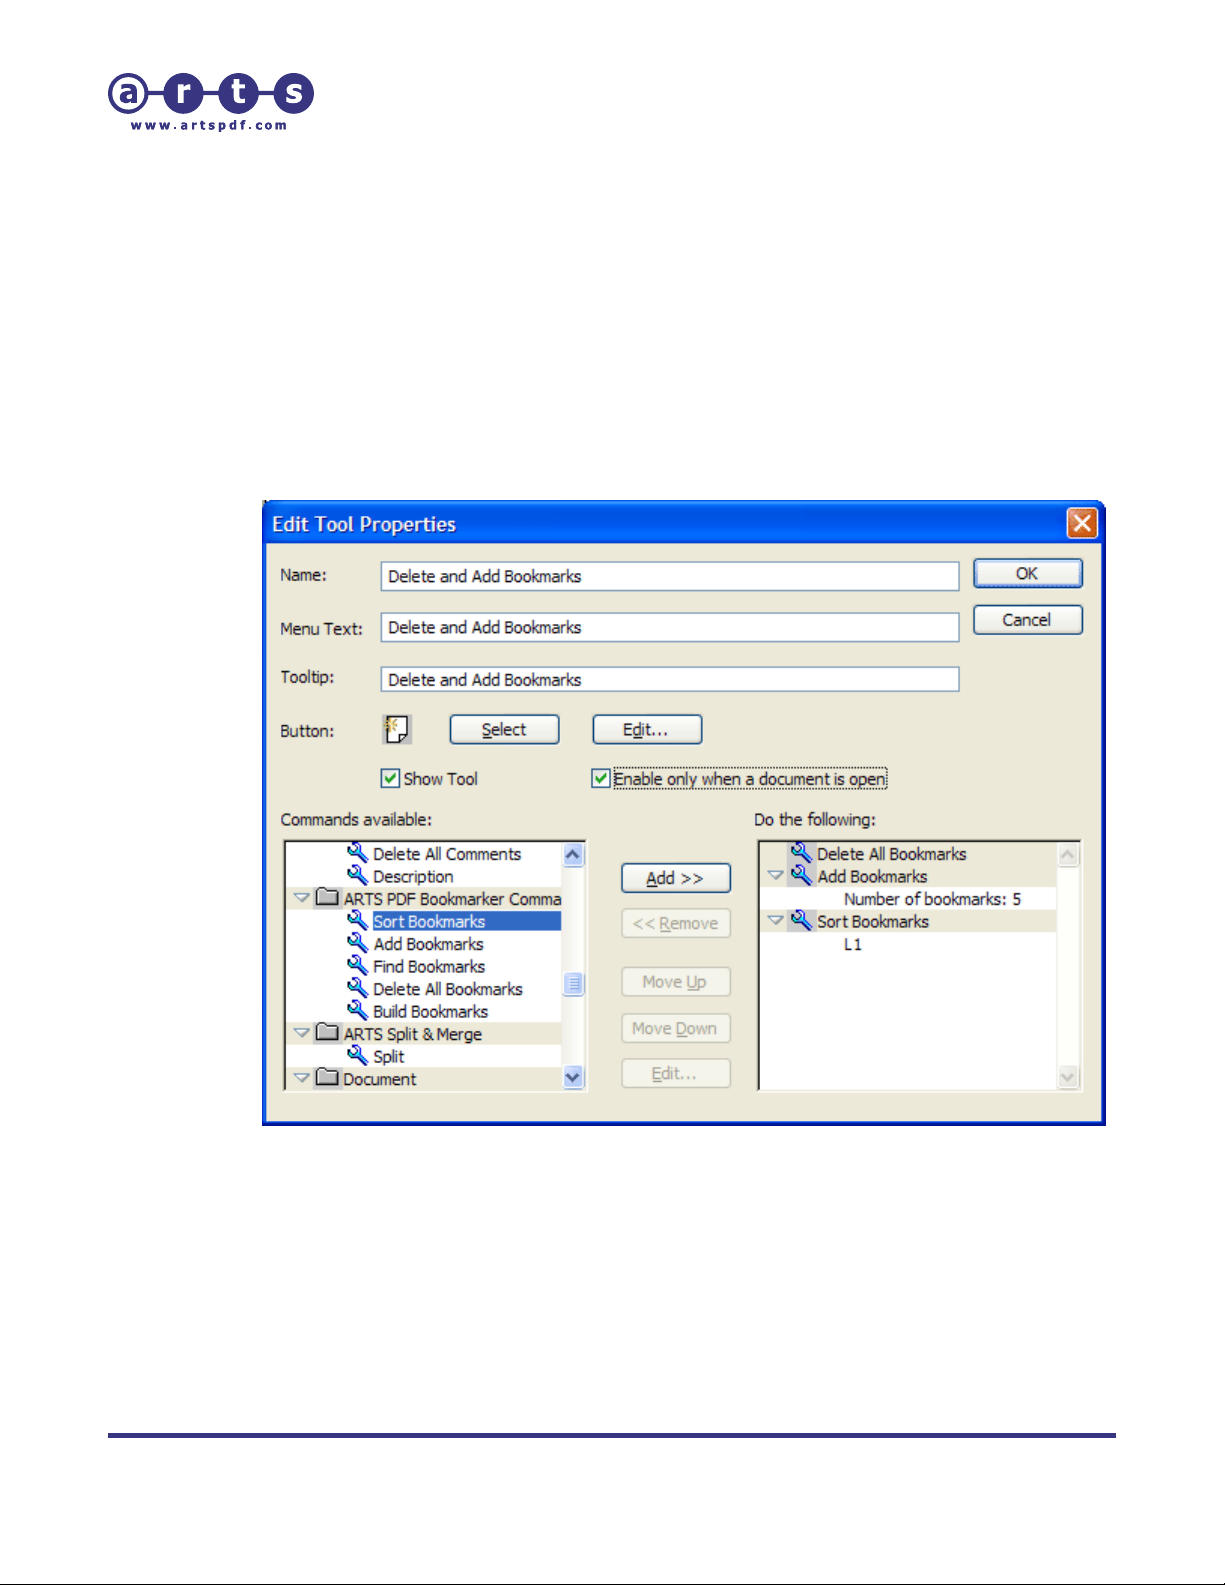
3.5.6. Using Bookmark Commands
To create a Bookmark function toolbar button with the Productivity feature, foll ow
the following steps:
1. In Acrobat, click the Add/Remove Tools button on the toolbar, or use the
menu system: ‘Plug-ins > ARTS PDF Aerialist > Productivity > toolbar name
> Add or Remove Tool’.
2. In the dialog box, click the “New” button. This will open up the Edit Tool
Properties dialog.
Figure 16. Creating a Bookmarks toolbar button
3. Enter in the name and other details of the tool; select a button image, etc.
The bottom left-hand side of the dialog contains the list of commands
available. Scroll down the list until you reach the Bookmark commands.
Select the desired function and click “Add”.
4. The selected function’s dialog will now appear. Enter the properties you wish
to set for the command and then click ‘OK’.
| CONTENTS | INDEX |
Page 30 of 155
Page 31

ARTS PDF Aerialist User Guide
Productivity
Note: Like Acrobat’s Batch Processing function, you cannot operate any other
functions whilst in the editing mode. Therefore when using Build Bookmarks function it
is best to have already created and saved (Exported) a Build Bookmarks profile. Then
when you are creating your toolbar button, you can simply Import the saved profile.
5. Once you have entered all the details required for your tool click ‘OK’. Your
new tool button will now appear in the toolbar. You can then run th e function
by clicking on that button.
3.5.7. Using Link commands
To create a Link function toolbar button with the Productivity feature, follow these
steps:
1. In Acrobat, click the Add/Remove Tools button on the toolbar, or use the
menu system: ‘Plug-ins > ARTS PDF Aerialist > Productivity > toolbar name
> Add or Remove Tool’.
2. Click the “New” button. This will open up the Edit Tool Properties dialog.
Figure 17. Creating a Links toolbar button
| CONTENTS | INDEX |
Page 31 of 155
Page 32

ARTS PDF Aerialist User Guide
Productivity
3. Enter in the name and other details of the tool; select a button image, etc.
The bottom left-hand side of the dialog contains the list of commands
available. Scroll down the list until you reach the Link command s. Select the
desired function and click “Add”.
4. The selected function’s dialog will now appear. Enter the properties you wish
to set for the command and then click ‘OK’.
Note: Like Acrobat’s Batch Processing function, you cannot operate any other
functions whilst in the editing mode.
5. Once you have entered all the details required for your tool click ‘OK’. Your
new tool button will now appear in the customized toolbar. You can then run
the function by clicking on that button.
3.5.8. Using the Split command
To create a Split function toolbar button with the Productivity feature, follow these
steps:
1. In Acrobat, click the Add/Remove Tools button on the toolbar, or use the
menu system: ‘Plug-ins > ARTS PDF Aerialist > Productivity > toolbar name
> Add or Remove Tool’.
2. Click the “New” button. This will open up the Edit Tool Properties dialog.
3. Enter in the name and other details of the tool; select a button image, etc.
The bottom left-hand side of the dialog contains the list of commands
available. Scroll down the list to select the ‘Split’ command and click “Add”.
4. The selected function’s dialog will now appear. Enter the properties you wish
to set for the command and then click ‘OK’.
Note: Like Acrobat’s Batch Processing function, you cannot operate any other
functions whilst in the editing mode.
5. Once you have entered all the details required for your tool click ‘OK’. Your
new tool button will now appear in the toolbar. You can then run th e function
by clicking on that button.
3.5.9. Using the Stamp command
To create a Stamp function toolbar button with the Productivity feature, follow these
steps:
1. In Acrobat, click the Add/Remove Tools button on the toolbar, or use the
menu system: ‘Plug-ins > ARTS PDF Aerialist > Productivity > toolbar name
> Add or Remove Tool’.
2. Click the “New” button. This will open up the Edit Tool Properties dialog.
| CONTENTS | INDEX |
Page 32 of 155
Page 33

ARTS PDF Aerialist User Guide
Productivity
Figure 18. Creating a Stamp toolbar button
3. Enter in the name and other details of the tool; select a button image, etc.
The bottom left-hand side of the dialog contains the list of commands
available. Scroll down the list to select the ‘Stamp Document’ function and
click “Add”.
4. The selected function’s dialog will now appear. Enter the properties you wish
to set for the command and then click ‘OK’.
Note: Like Acrobat’s Batch Processing function, you cannot operate any other
functions whilst in the editing mode.
5. Once you have entered all the details required for your tool click ‘OK’. Your
new tool button will now appear in the toolbar. You can then run th e function
by clicking on that button.
| CONTENTS | INDEX |
Page 33 of 155
Page 34

ARTS PDF Aerialist User Guide
Productivity
3.6. Batch Processing
Batch Processing allows you to perform Split, Merge, Bookmarks, Links and Stamp
functions across multiple files or folders rapidly and automatically. The Help file in Adobe
Acrobat describes Batch Processing as “allowing you to create and execute a series of
commands on one document, several documents, or an entire collection of documents in
one automated process.”
Batch Processing with ARTS PDF Aerialist allows you to:
1. Run all Bookmark commands on:
a. Selected files/folders
b. Files already open in Acrobat
c. Files the user specifies when the Batch Process is run
2. Output the resulting PDF document to:
a. Same folder as origin al
b. A specified folder
3. Specify the output file name and file type
Figure 19. Creating a batch sequence
You can also create a toolbar button that automatically runs the batch sequence with the
Productivity feature.
| CONTENTS | INDEX |
Page 34 of 155
Page 35

ARTS PDF Aerialist User Guide
Productivity
3.6.1. Bookmarking in Batch
To create a batch process for Bookmarks, follow these steps:
1. Open Adobe Acrobat.
2. In Acrobat 5.0, from the file menu go to ‘File > Batch Processing’ to open the
Batch Processing dialog.
In Acrobat 6.0 Professional, from the file menu go to ‘Plug-Ins > ARTS PDF
Aerialist > Productivity > Batch Processing’ to open the Batch Processing
dialog.
3. Create a New Sequence; choose a meaningful name for the new sequence.
You will now be taken to the Batch Edit Sequence dialog.
4. Click “Select Commands”; choose the Bookmark command you wish to
perform from the list of commands.
5. Click “Add” to add it to the batch sequence.
Note: You can add more than one function to a single batch sequence – for instance, you
could create a batch sequence that deleted all bookmarks before adding new ones. You
can also import saved bookmark profiles in both the Add and Build Bookmark functions,
using the “Import” command.
6. Click “Edit” to open up the Bookmark function’s dialog. Once you have
supplied the details to the function, click “OK”.
7. Select what to run the batch sequence on; a selected file/folder, the file
currently open in Acrobat, or a file specified when the sequence is run.
8. Select the output location of the process file/folder.
9. Finish filling out the properties of the batch sequence, then click “OK”.
10. You can now run or edit you batch sequence from Acrobat’s file menu, ‘File >
Batch Processing’.
You can also create a toolbar button that automatically runs the batch sequence with
the Productivity feature.
Note: Acrobat’s Batch Processing does not allow you to perform other functions in Acrobat
whilst it is open, so if you are creating a batch sequence that uses the Build Bookmark
function, it is generally best to have already created and saved your Bookmark properties.
Once you open Batch Processing, simply Import your saved properties.
| CONTENTS | INDEX |
Page 35 of 155
Page 36

ARTS PDF Aerialist User Guide
Productivity
3.6.2. Splitting in Batch
To create a batch process for Split and Merge, follow these steps:
1. Open Adobe Acrobat.
2. In Acrobat 5.0, from the file menu go to ‘File > Batch Processing’ to open the
Batch Processing dialog.
In Acrobat 6.0 Professional, from the file menu go to ‘Plug-Ins > ARTS PDF
Aerialist > Productivity > Batch Processing’ to open the Batch Processing
dialog.
3. Create a New Sequence; choose a meaningful name for the new sequence.
You will now be taken to the Batch Edit Sequence dialog.
4. Click “Select Commands”; choose the Split command from the list of
commands.
5. Click “Add” to add it to the batch sequence.
6. Click “Edit” to open up the Split function’s dialog. Once you have supplied the
details to the function, click “OK”.
7. Select what to run the batch sequence on; a selected file/folder, the file
currently open in Acrobat, or a file specified when the sequence is run.
8. Finish filling out the properties of the batch sequence, then click “OK”.
9. You can now run or edit you batch sequence from Acrobat’s file menu, ‘File >
Batch Processing’.
10. To run Batch Processing, Go to File > Batch Processing and select your batch
process.
3.6.3. Managing Links in Batch
To create a batch process for Link functions, follow these steps:
1. Open Adobe Acrobat.
2. In Acrobat 5.0, from the file menu go to ‘File > Batch Processing’ to open the
Batch Processing dialog.
In Acrobat 6.0 Professional, from the file menu go to ‘Plug-Ins > ARTS PDF
Aerialist > Productivity > Batch Processing’ to open the Batch Processing
dialog.
3. Create a New Sequence; choose a meaningful name for the new sequence.
You will now be taken to the Batch Edit Sequence dialog.
4. Click “Select Commands”; choose the Link command you wish to perform
from the list of commands.
5. Click “Add” to add it to the batch sequence.
Note: You can add more than one function to a single batch sequence – for instance, you
could create a batch sequence that deletes all the bad actions before generating an All Links
Report.
6. Click “Edit” to open up the Link function’s dialog. Once you have supplied the
details to the function, click “OK”.
| CONTENTS | INDEX |
Page 36 of 155
Page 37

ARTS PDF Aerialist User Guide
Productivity
7. Select what to run the batch sequence on; a selected file/folder, the file
currently open in Acrobat, or a file specified when the sequence is run.
8. Select the output location of the process file/folder.
9. Finish filling out the properties of the batch sequence, then click “OK”.
10. You can now run or edit you batch sequence from Acrobat’s file menu, ‘File >
Batch Processing’.
Note: Acrobat’s Batch Processing does not allow you to perform other functions in Acrobat
whilst it is open.
3.6.4. Stamping in Batch
To create a batch process for the Stamp function, follow these steps:
1. Open Adobe Acrobat.
2. In Acrobat 5.0, from the file menu go to ‘File > Batch Processing’ to open the
Batch Processing dialog.
In Acrobat 6.0 Professional, from the file menu go to ‘Plug-Ins > ARTS PDF
Aerialist > Productivity > Batch Processing’ to open the Batch Processing
dialog.
3. Create a New Sequence; choose a meaningful name for the new sequence.
You will now be taken to the Batch Edit Sequence dialog.
4. Click “Select Commands”; choose the ARTS PDF Aerialist command called
‘Stamp Document’
5. Click “Add” to add it to the batch sequence.
6. Click “Edit” to open up the Stamp function’s dialog. Once you have supplied
the details to the function, click “OK”.
7. Select what to run the batch sequence on; a selected file/folder, the file
currently open in Acrobat, or a file specified when the sequence is run.
8. Select the output location of the process file/folder.
9. Finish filling out the properties of the batch sequence, then click “OK”.
10. You can now run or edit you batch sequence from Acrobat’s menu.
Note: Acrobat’s Batch Processing does not allow you to perform other functions in Acrobat
whilst it is open.
| CONTENTS | INDEX |
Page 37 of 155
Page 38

ARTS PDF Aerialist User Guide
Productivity
3.7. Configuring Productivity Preferences
This feature allows users to add 3rd party plug-in features as commands (if applicable).
However, as this is a relatively involved process, it is not advised to us e this feature,
unless specifically advised to do so by ARTS PDF Technical Support,
techsupport@artspdf.com.
Figure 20. Productivity Preferences
| CONTENTS | INDEX |
Page 38 of 155
Page 39

ARTS PDF Aerialist User Guide
Productivity
3.8. Index of Toolbars and Tools
The Productivity feature comes with more than 50 tools on 4 standard toolbars:
• Basic
• Print
• Manage
• Developer
These toolbars are stored in the ‘Toolbars’ folder within the ARTS PDF Tools directory.
The default location for this folder may vary depending on where Acrobat is installed.
On Windows, for example, it may be installed under ‘C:\Program Fil es\Adobe\Acrobat
6.0\Acrobat\Plug_ins\ARTS PDF Tools\’. The toolbars folders can also be accessed by
way of ‘Start > Programs > ARTS PDF Tools’.
On Macintosh, for example, it may be installed under ‘Macinto sh HD:Applications:Adobe
Acrobat 6.0:Acrobat 6.0 Professional:ARTS PDF Plug-ins:ARTS PDF Tools:’
The following lists available predefined tools within each toolbar:
3.8.1. Basic Toolbar
Save As & Optimize Removes unused objects to minimize file size.
Print Custom Allows for the printing of all pages, even pages,
Flatten Current Page Flattens all interactive elements, on the current
Delete Current Page Deletes the current page.
Extract Current Page Extracts the current page into another PDF file.
Split All Pages Splits a PDF into a series of one-page PDF files.
Check Spelling Scans PDF file for spelling mistakes, underlining
Additionally, if the Save As Optimizes for Fast Web
View checkbox is selected in Preferences >
Options, then the PDF is prepared for page-at-atime downloading (byte-serving) from Web
servers.
odd pages, or the current page within the active
document.
page, making these part of the page contents (like
Notes, Links, Form Field, FreeText and Stamps).
potential mistakes and suggesting corrections in a
comment for each.
| CONTENTS | INDEX |
Page 39 of 155
Page 40

ARTS PDF Aerialist User Guide
Productivity
Expand/Collapse
Bookmarks
Apply a Stamp to All
Pages
Word Count Counts the number of words that appear in a PDF.
Apply Transition to All
Pages
Set Open Options Set a document’s Open Options -- how a document
Squish Document
Open Acrobat Distiller Opens Acrobat Distiller.
Visit the ARTS PDF
Web site
Planet PDF Takes user to Planet PDF Web site.
Search Planet PDF Takes user to the search page at the Planet PDF
Expands and collapses all bookmarks in the
bookmark palette. Expands to show all bookmarks,
including subtopics. Collapses to show only the
first level of bookmarks.
Applies a stamp, selected by the user, to all pages.
Applies the transition, selected by the user, to all
pages.
will appear when it is opened. Sets Open with the
page only, with bookmarks or with thumbnails; the
page number, magnification and layout; open in
normal of full screen mode; and hide or display the
menu, toolbar or window controls.
Removes document elements according to your
predefined settings. Includes forms, comments,
attachments, javascripts and external cross
references.
Takes user to ARTS PDF web site to get technical
support and product updates.
Web site.
| CONTENTS | INDEX |
Page 40 of 155
Page 41

ARTS PDF Aerialist User Guide
Productivity
3.8.2. Developer Toolbar
Open JavaScript
Console
Document JavaScript Opens JavaScript Functions dialog box.
Edit All JavaScripts Extracts all JavaScripts into a sing le file for
New Letter Doc Creates a new, one-page Letter document.
New A4 Doc Creates a new, one-page A4 document.
New Custom
Document
Duplicate Form Fields Opens Duplicate Field dialog box to apply selected
Set Document Actions Opens Document Actions dialog box to let you
Set Form Fields Tab
Order
Show/Hide Form
Fields Palette
Show/Hide Grid Shows and hides the layout grid for aligning
Snap To Grid Snaps objects, including form fields, comments
Align Bottom
Align Horizontally
Align Left
Align Right
Opens the JavaScript console.
simplified editing.
Creates a blank, one-page PDF according to the
size (in points) you specify.
fields to other pages.
apply JavaScript actions to entire document.
Opens the Set Tab Order command, allowing you
to set the order in which users move between
fields. Acrobat 5.0 only.
Shows and hides the Fields palette. For Acrobat
users working with PDF forms.
objects in a document.
and drawing objects, to the grid when added to
the PDF.
Aligns selected form fields along their bottom
edge. Acrobat 5.0 only.
Aligns selected form fields along a horizontal line.
Acrobat 5.0 only.
Aligns selected form fields along their left edge.
Acrobat 5.0 only.
Aligns selected form fields along their right edge.
Acrobat 5.0 only.
| CONTENTS | INDEX |
Page 41 of 155
Page 42

ARTS PDF Aerialist User Guide
Productivity
Align Top
Align Vertically
Center Both
Center Horizontally Centers selected form fields horizontally. Acrobat
Center Vertically
Distribute Horizontally Distributes selected form fields horizontally.
Distribute Vertically
Size Both
Size Height
Size Width
Aligns selected form fields along their top edge.
Acrobat 5.0 only.
Aligns selected form fields along a vertical edge.
Acrobat 5.0 only.
Centers selected form fields both horizontally and
vertically. Acrobat 5.0 only.
5.0 only.
Centers selected form fields vertically. Acrobat 5.0
only.
Acrobat 5.0 only.
Distributes selected form fields vertically. Acrobat
5.0 only.
Resizes selected form fields to both the same
height and width. Acrobat 5.0 only.
Resizes selected form fields to the same height.
Acrobat 5.0 only.
Resizes selected form fields to the same width.
Acrobat 5.0 only.
| CONTENTS | INDEX |
Page 42 of 155
Page 43

ARTS PDF Aerialist User Guide
Productivity
3.8.3. Manage Toolbar
Roman Number Pages Numbers all pages in the document with Roman
Rotate Pages 90
degrees
Delete Pages Deletes pages according to the page range you
Flatten Document Flattens all interactive elements on the entire
Planet PDF Forum Takes user to Planet PDF Forum Web site. The
Apply Stamp to
Current Page
Audit Space Usage
Remove Structure
Tags
Apply Transition to
Current Page
Display Current Page
Transition
Change Bookmark
Colors
Expand Current
Bookmark
Numerals.
Rotates all pages in the active document by 90
degrees.
predefine.
document.
discussion forum for Adobe Acrobat and PDF users.
Applies the stamp, selected by the user, to the
current page.
Opens PDF Consultant and runs the space usage
tool to calculate the size in percent and bytes of
document elements, including structure
information, forms, fonts, named destinations,
comments and images. Acrobat 5.0 only.
A special command that removes the structure and
tags from PDFs and reduces the size of the PDF.
The command can be used on individual files or in
Batch Sequences. PDFs are sometimes made with
embedded structure tags, to aid accessibility,
repurposing and reflow capabilities, but are not
always required.
Applies the transition, selected by the user, to the
current page.
Displays the name of the transition assigned to the
current page.
Changes color of all bookmarks at once. Lets user
choose between three colors -- red, blue and
yellow.
When the bookmark palette is open, the
highlighted bookmark is expanded to show any
subtopic bookmarks below it.
| CONTENTS | INDEX |
Page 43 of 155
Page 44

ARTS PDF Aerialist User Guide
Productivity
Read Page Uses text-to-speech software (when installed) to
Stop Reading Stops the Read Page command from reading aloud
Pause Reading Pauses the Read Page command.
Zoom to 150% Magnifies the view to exactly 150%.
Zoom to 200% Magnifies the view to exactly 200%.
read aloud text from current page.
the current page.
| CONTENTS | INDEX |
Page 44 of 155
Page 45

ARTS PDF Aerialist User Guide
Productivity
3.8.4. Print Toolbar
Print Current Page Prints the current page to the default printer.
Print Odd Pages Prints all odd pages of the open PDF to the default
Print Even Pages Prints all even pages of the open PDF to the
Crop Pages by 1 inch Crops all pages in the active document by 1 inch.
Open Text Attributes Opens the Open Text Attributes dialog box to
Overprint Preview
Proof Colors Uses the precision of color profiles to soft-proof
Proof Setup –
Simulate Ink Black
Proof Setup –
Simulate Paper White
Proof Setup Allows for the proofing space to be configured.
Set Document Info Sets the document’s Document Summary Info
Show/Hide Info
Palette
View Document Fonts Opens the Document Fonts dialog box to view
Zoom to 100% Magnifies the view to exactly 100%.
printer.
default printer.
make accessible options like embed/unembed,
type, size, alignment, margins and spacing of the
selected font. Acrobat 5.0 only.
Applies the Overprint Preview view to simulate
appearance Overprint colors and spot colors.
your document directly on the monitor.
Uses the relative colorimetric rendering intent with
no black point compensation.
Uses the absolute colorimetric rendering intent.
according to your predefined settings -- Title,
Subject, Author, Keywords and Binding.
Shows and hides the Info palette. Lets you see the
position of the cursor within the page as it moves
and you select an area and can give X-Y and
height-width co-ordinates in points, inches and
millimeters.
fonts and run the List All Fonts command. Acrobat
5.0 only.
| CONTENTS | INDEX |
Page 45 of 155
Page 46

ARTS PDF Aerialist User Guide
Content Assembly
4. Content Assembly
4.1. Overview
The Content Assembly feature is for splitting and merging batches of PD F files. The split
functionality lets you split one or more PDF files based on page groups, page ranges,
bookmarks and page marks. The merge functionality lets you quickly sort and then
combine a collection of files into a PDF document.
Features
• Split into files of n pages - split into files containing n pages per file
• Split by page marks - visually highlight sections of a PDF to split
• Split by bookmarks - split files based on bookmark hierarchy
• Split by page ranges - split individual pages and page ranges
• Advanced splitting - odd and even, complex file naming, updating bookmarks, links
and named destinations
• Merge files - merge files or folders of PDF files together into a single file
| CONTENTS | INDEX |
Page 46 of 155
Page 47

ARTS PDF Aerialist User Guide
Content Assembly
4.2. Using Content Assembly
Content Assembly consists of a collection of splitting methods and one mergin g
function: Split into files of n pages, Split by page marks, Split by bookmarks, Split by
page range, and Merge files/folder.
Split File
Merge Files
Figure 21. The Content Assembly toolbar buttons
Add / Edit Page Marks
Import Page Marks
Remove Marks
View/Edit Marks
Export Page Marks
Figure 22. The Content Assembly menu
| CONTENTS | INDEX |
Page 47 of 155
Page 48

ARTS PDF Aerialist User Guide
Content Assembly
4.3. Splitting PDF files
The Content Assembly feature offers a rich set of methods for extracting pages from a
PDF file to separate files.
• Split into files of n pages – split into files containing n pages per file
• Split by page marks – visually highlight sections of a PDF to split
• Split by bookmarks – split files based on bookmark hierarchy
• Split by page ranges – split individual pages and page ranges
• Advanced splitting - odd and even, complex file naming, updating bookmarks,
links and named destinations
Figure 23. Splitting methods in the Content Assembly feature
| CONTENTS | INDEX |
Page 48 of 155
Page 49

ARTS PDF Aerialist User Guide
Content Assembly
4.3.1. Split into files of n pages
This method splits the open PDF document into a series of files, which contain ‘n’
pages in each file.
Figure 24. Split into pages
To split into ‘n’ pages:
1. Select and open the source PDF file to be split.
2. Select ‘Split PDF Into files of’ by checking on the radio button.
3. Enter the number of pages in which to split the PD F file.
4. Select the destination folder where the PDF file s will be stored following
splitting. This can be set to the same as the source folder, or in the folder of
the user’s choice.
5. Enter the base filename and the destination folder. The base filename will be
used as a starting point in the file name of t he resulting output.
6. Click ‘Split’ to start processing.
| CONTENTS | INDEX |
Page 49 of 155
Page 50

ARTS PDF Aerialist User Guide
Content Assembly
4.3.2. Split by page marks
Using the Add Page Marks feature, add a page mark to pages in the document. Each
page mark indicates the start of a new file when the document is split. When splitting
by page marks, all subsequent pages will be added to the new PDF until the next
page mark or the end of the file is reached.
Page marks are added using the Add/Edit Page Mark feature.
Figure 25. Split by page mark
To split by page marks:
1. Select and open the source PDF file to be split.
2. Verify that the PDF to be split has page mark/s.
3. Select ‘By page marks’ as the method of splitting.
4. Select the destination folder where the PDF file s will be stored following
splitting. This can be set to the same as the source folder, or in the folder of
the user’s choice.
5. Click the ‘Split’ button to start processing.
Note: if you have specified the full path and filename within the page mark, rather
than just a filename, then you need to check the option ‘page mark contains full
path/filename’. This will ignore the destination folder settings and use the path
stored within the page mark for saving the target PDF file.
4.3.2.1. Adding page marks
To add a Page Mark:
1. Choose ‘Plug Ins > ARTS PDF Aerialist > Content Assembly > Add /
Edit Page Mark” from Acrobat’s Plug-ins menu.
2. Alternatively use the Add / Edit Page Mark button from the ARTS PDF
Aerialist toolbar.
3. The ‘Mark Page’ dialog opens. This contains properties of the page
mark. These include:
• File Name (of the document)
• Title
• Subject
• Author
• Keywords
The document information fields (metadata) will be applied to the resulting
PDF file.
| CONTENTS | INDEX |
Page 50 of 155
Page 51

ARTS PDF Aerialist User Guide
Content Assembly
Figure 26. Add / Edit Page Mark Dialog Box.
4.3.2.2. Removing page marks
To remove all of the page marks within a document:
1. Choose ‘Plug Ins > ARTS PDF Aerialist > Content Assembly > Remove
Marks’ from Acrobat’s Plug-ins menu.
2. Alternatively Click on the Remove Marks tool in the ARTS PDF Aerialist
toolbar.
3. This prompts to confirm if the page marks should be removed. Also
there is a warning that this action cannot be undone.
4. Clicking ‘OK’ removes the page marks on the PDF.
5. Clicking ‘Cancel’ returns to the document without removing the page
marks.
| CONTENTS | INDEX |
Page 51 of 155
Page 52

ARTS PDF Aerialist User Guide
Content Assembly
4.3.2.3. Viewing / editing page marks
To view and edit a list of all marked pages within a document:
1. Choose ‘Plug Ins > ARTS PDF Aerialist > Content Assembly >
View/Edit Marks’ from the Acrobat menu.
2. Alternatively check on the View/Edit Marks button from the ARTS PDF
Aerialist toolbar.
3. Edit a Page Mark
a. Highlight the page mark you want to edit by checking on the page
mark in the dialog box as shown below.
b. Click on ‘Edit’
c. The ‘Mark Page’ dialog opens. Users can then modify the
properties.
4. A list of Page Marks can be viewed / edited and removed.
Figure 27. View/Edit Page Marks dialog
| CONTENTS | INDEX |
Page 52 of 155
Page 53

ARTS PDF Aerialist User Guide
Content Assembly
4.3.2.4. Exporting page marks
This feature allows you to export page mark information into a tab delimited
text file. You can store the text file and apply your page mark settings onto a
PDF document by exporting the file.
The tab delimited file logs information for all the page marks present in the
document. The data logged in the text file includes:
• Page Number: The page number of the start of the fragment.
• File name: The name that the file fragment is to be called.
• Title: The title of the new file fragment.
• Subject: The subject of the new fragment
• Author: The author of the document
• Keywords: Any keywords for the new file fragment.
The format of the tab delimited text file is:
Page Number [tab] File Name [tab] Title [tab] Subject [tab] Author
[tab] Keywords [enter]
4.3.2.5. Import page marks
This feature allows you to import page marks from a tab delimited text file
your PDF document. Importing a tab delimited text file containing page mark
information will apply page marks to your PDF to prepare for splitting.
Importing page marks will enable you to apply your page mark settings at a
later stage or on other PDF documents.
5
to
5
A tab delimited text file can be created by the HExporting page marksH feature.
| CONTENTS | INDEX |
Page 53 of 155
Page 54

ARTS PDF Aerialist User Guide
Content Assembly
4.3.3. Split by bookmarks
This method will split a PDF file by its bookmarks. Each page that is book marked will
be the start of a new PDF, and the title of the bookmark will be used as the name of
the file.
All subsequent pages will be added to the new PDF stopping at the next bookmarked
page. You will be given a chance to choose the level of bookmarks to use in the Split
function.
Figure 28. Split by bookmarks
To split by bookmarks:
1. Select and open the source PDF file to be split.
2. Verify that the PDF to be split has bookmarks.
3. Select ‘By bookmarks starting at Level’ as the method of splitting.
4. Browse for the destination folder where the PDF files will be stored following
splitting. This can be set to the same as the source folder, or in the folder of
the users choice.
5. Click the ‘Split’ button to initiate processing.
| CONTENTS | INDEX |
Page 54 of 155
Page 55

ARTS PDF Aerialist User Guide
Content Assembly
4.3.4. Split by page range
This method of splitting will split a PDF file into smaller PDF files containing one or
more pages in the destination folder specified by the user.
Figure 29. Split by page range
To split by page range:
1. Select and open the source PDF file to be split.
2. Select Split PDF ‘by page range’.
3. Select the destination folder where the PDF file s will be stored following
splitting. This can be set to the same as the source folder, or in the folder of
the user’s choice.
4. Enter the page ranges you wish to split into each file. Page ranges should be
separated by commas and semicolon used to separate files. See the table
following for detailed instructions.
5. Enter the base filename for the split process, and then specify the destination
to save the files to. The base filename will be appended to the resulting
smaller PDF files after the split process.
6. Click the ‘Split’ button to initiate processing.
| CONTENTS | INDEX |
Page 55 of 155
Page 56

ARTS PDF Aerialist User Guide
Content Assembly
Parameter Function Example
(Semicolon) “;” File separator “1-20; 21-40” would
create two new PDFs –
one containing pages 120, the other containing
pages 21-40.
(Hyphen) “-“ From/To “1-5” would extract pages
1 through 5 into a new
PDF. “5-1” would extract
pages 5 through 1 into a
new PDF (reverse order
is + only).
(Comma) “,” Page separator “1-20, 30-40” would
create a single PDF
containing page 1-20 and
30-40.
“odd” (+ only) Odd page “1-20 odd” would create a
single PDF containing only
the odd pages within the
range of 1-20.
“even” (+ only) Even page “1-20 even” would create
a single PDF containing
only the even pages within
the range of 1-20.
An example string is shown below, inverted commas (“”) are for demonstration
purposes only:
“1-20 odd, 21-40 even, 41-45, 50; 50, 45-41, 40-21 even, 20-1 odd”
The example string would perform the following:
1. Create one PDF containing the following (in this order):
• All odd pages from 1-20.
• All even pages from 21-40.
• Pages 41-45.
• Page 50.
2. Create a second PDF containing the following (in this order):
• Page 50.
• Pages 45-41 (reverse order).
• All even pages from 40-21 (reverse order).
• All odd pages from 20-1 (reverse order).
| CONTENTS | INDEX |
Page 56 of 155
Page 57

ARTS PDF Aerialist User Guide
Content Assembly
4.3.5. General splitting options
Figure 30. General Options
Enable Fast Web View
Restructures the PDF file so that it can be served a page-at-a-time over the Web.
This is referred to as Fast Web View within Adobe Acrobat.
Update Navigational Elements
This is a Plus only feature that updates all of the bookmarks, links and named
destinations such that they remain connected to the proper page.
GoTo links, which are links within the document, are adjusted to stay connected to
the proper page, even if the pages end up in a different order in the final document.
If pages are arranged such that the page linked from ends up in a different file than
the page linked to, the GoTo link is changed into a GoToR link, which is a link that
goes from one file to another. GoToR links and Launch actions, both of which
reference an external file, that use a relative pathname will be adju sted to take into
account the difference if the files created by splitting are in a different directory from
the original file. If you split a file with named destinations, the named destinations
will be inserted into the files and each adjusted to continue pointing to the correct
page. Links that use named destinations within the original docu ment will be
changed from GoTo to GoToR links as necessary if source and destination end up in
different files. The links will still us e named destinations. Bookmarks are copied into
all files and are adjusted just as the links are.
Show Progress Report
This is a Plus only feature that, when selected, will show a descript ion of the split
process in the Acrobat status bar. Users may find that this will make the split process
run slower but it will give a description on the status of each stage of the splitting
process.
Support identical form field
Inserts pages into the target files, page-at-a-time. Whilst this is much slower, it will
ensure that PDF files that contain form fields with identical names will still function
correct.
Update title using output filename
Uses the filename (without the .pdf extension) as the document information’s title
for all output files.
| CONTENTS | INDEX |
Page 57 of 155
Page 58

ARTS PDF Aerialist User Guide
Content Assembly
Bookmarks
After processing, the following options can be applied to bookmarks within the target
file
s:
• Expand all
• Collapse all
•
Expand local
This advanced
each split file.
• Do not change
.3.6. Destination folder and filename settings
4
The filename for the files resulting f
uffix to a specified base filename.
s
The base filename can be specified in the Base filename edit box or derived from
each file dynamically by selecting the “Use f
elect this option during Batch Processing.
s
The r
ta get filename additions are as follows:
• A number – a number which is incremented for each new file
• g
A padded number starting at – an incrementing number padded with leadin
zeros. You can specify a starting point for the number or padded number
options in the box labeled Number, following the target filename combo bo
• x-pyy) – the start and end page of the pages from the
The page range (px
original document.
• A letter – an incrementing letter (eg. A-Z, AA-ZZ, etc…)
• okmarks or page marks where the base
Nothing – used in splitting by bo
filename changes for each file.
The files are saved in the folder s
lder, if that option is selected.
fo
option will expand the bookmarks that link to pages within
rom the split is constructed by adding a changin g
ilename” checkbox. You would normally
x.
pecified in the Destination Folder box or the source
| CONTENTS | INDEX |
Page 58 of 155
Page 59

ARTS PDF Aerialist User Guide
Content Assembly
4.4. Merging Files
The Merge function allows you to merge a set of files together into a single PDF
document. You can select either all pages, or a page range from a document you wish
to merge, as well as reordering the files as required. It supports a number of file types:
• Adobe PDF Files (*.pdf)
• AutoCAD (*.dwg, *.dwt)
• BMP (*.bmp, *.rle, *.dib)
• Compuserve GIF (*.gif)
• JPEG (*.jp,*.jpeg, *.jpe)
• JPEG2000 (*.jpf, *.jpx, *.jp2, *.j2k, *.j2c, *.jpc)
• Microsoft Excel (*.xls)
• Microsoft PowerPoint (*.ppt)
• Microsoft Project (*.mpp)
• Microsoft Visio (*.vsd)
• Microsoft Word (*.doc, *.rtf)
• PCX (*.pcx)
• PNG (*.png)
• PostScript/EPS (*.ps, *.eps)
• TIFF (*.tif, *.tiff)
Figure 31. Merge File Dialog
| CONTENTS | INDEX |
Page 59 of 155
Page 60

ARTS PDF Aerialist User Guide
Content Assembly
4.4.1. Adding Files or Folders
To add files or folders and merge the files into one PDF document:
1. Choose ‘Plug-Ins > ARTS PDF Aerialist > Content Assembly > Merge Files’
from Acrobat’s Plug-in menu.
2. Alternatively select the ‘Merge File’ tool from the ARTS PDF Aerialist toolbar.
3. Browse and add the files that you want to merge.
- Click “Add Files”, from the ‘Merge Files’ dialog to open the browser
window and select the files that have to be merged.
- The Merge Options dialog will open allowing you to enter a specific page
range for the selected file. See below for more information on the Merge
Options.
4. Additionally, you can browse and add a folder containing files that you want
to merge.
- Click “Add folder” from the Merge Files dialog to open the browse for
folder dialog.
Note:Only one folder can be selected at a time and all files w it hin the
folder (of supported file types) will be added.
- A complete list of the selected files will be displayed in the Merge dialog.
Selecting a file and clicking ‘Edit’ can modify the Merge Options. See
below for more information on the Merge Options.
5. Change the order in which the files are going to be merged.
- Click on “Move Up” and “Move Down” buttons to alter the position of the
files in the merge list.
6. Click ‘”Merge”.
4.4.1.1. Merge Options
Figure 32. Merge Options
| CONTENTS | INDEX |
Page 60 of 155
Page 61

ARTS PDF Aerialist User Guide
Content Assembly
The Merge Options dialog allows you to specify the pages of the file you want
added to the final merged file. You can set which pages to merge by selecting
a predefined range:
• All pages
• Odd pages
• Even pages
• Last page
• First page
Alternatively, you can define the pages (using hyphens and commas to
separate the pages) i.e. 2, 6, 10-20; or by page range from page 1 to 6 for
example.
The ‘Validate page range’ option is only used for files that are not of an Adobe
Acrobat file type (*.pdf). If selected, the Merge function will convert the file
prior to merging it and will determine whether the page range entered is
valid. If not selected, the page range will not be validated and if an error
occurs during the merge process it will be stopped. Once the Merge function
knows the page range of the file (i.e. the number of pages within the file is
known) this option will be disabled. It is recommended that, when possible,
always have this option selected to ensure that no out of range errors occur
during the merge process.
4.4.2. Using a control file
A control file lets you perform multiple merging of PDF documents in one process.
Using a control file you can specify the output filename and the pages to be copied
from other PDF documents into the merged file. A control file is simply a text file
detailing the output filename and files to be used in the merge process.
To use a control file:
1. Click on the ‘Merge files’ button from the ARTS PDF Aerialist toolbar or select
‘Plug-Ins > ARTS PDF Aerialist > Content Assembly > Merge Files’ f rom
Acrobat’s Plug-in menu.
2. In the Merge files dialog, click on the “C ontrol files” button.
3. Navigate to the desired control file (*.txt) and click “Open”.
4. A message in the ‘Merge files’ list box will appear. When you are ready to
start the process click “Merge”.
The structure of a merge within a control file is sh own below. Note the ‘-f’ switch will
start a new merge file and you can add an unlimited amount of pages to the file.
| CONTENTS | INDEX |
Page 61 of 155
Page 62

ARTS PDF Aerialist User Guide
Content Assembly
Merging a range of pages from a file:
-f [full pathname of the output merge file]
[page range] [tab] [full pathname of the source file]
Merging all pages from a file:
-f [full pathname of the output merge file]
[full pathname of the source file]
For the [page range] the following can be entered:
Parameter Function Example
(Hyphen) “-“ From/To “1-5” would extract pages
1 through 5 into a new
PDF.
(Comma) “,” Page separator “1-20, 30-40” would
merge pages 1-20 and 30-
40.
“odd” Odd page “1-20 odd” would create a
single PDF containing only
the odd pages within the
range of 1-20.
“even” Even page “1-20 even” would create
a single PDF containing
only the even pages within
the range of 1-20.
For example:
[page range] entered is: “1-20 odd, 21-40 even, 41-45, 50”
Pages from the source file to go in the merge file will be
• All odd pages from 1-20
• All even pages from 21-40
• Pages 41-45
• Page 50
[page range] entered is: “50, 45-41, 40-21 even, 20-1 odd”
Pages from the source file to go in the merge file will be
• Page 50
• Pages 45-41 (reverse order)
• All even pages from 40-21 (reverse order)
• All odd pages from 20-1(reverse order)
| CONTENTS | INDEX |
Page 62 of 155
Page 63

ARTS PDF Aerialist User Guide
Content Assembly
Examples of a Control File
Content of a control file specifying the page range:
-f C:\Sample Files\Output\Merge.pdf
1-10,15,18 C:\Sample Files\File1.pdf
C:\Sample Files\File2.pdf
1-20 odd C:\Sample Files\File3.pdf
odd C:\Sample Files\File4.pdf
Result is output file ‘Merge.pdf’ containing
• Only pages 1 to 10, page 15 and page 18 of File1.pdf
• All pages of File2.pdf
• Only the odd pages from page 1 to 20 of File3.pdf
• Only odd pages of File4.pdf
Content of a control file where all pages from a file is merged:
-f C:\MyDocuments\Invoice2xx.pdf
C:\MyDocuments\Invoice234.pdf
C:\MyDocuments\Invoice246.pd
-f C:\MyDocuments\Invoice3xx.pdf
C:\MyDocuments\Invoice354.pdf
C:\MyDocuments\Invoice321.pdf
-f C:\MyDocuments\Invoice4xx.pdf
C:\MyDocuments\Invoice478.pdf
Result is output file ‘Invoice2xx.pdf’ containing
• All pages of Invoice234.pdf
• All pages of Invoice 246.pdf
An output file ‘Invoice3xx.pdf’ containing
• All pages of Invoice354.pdf
• All pages of Invoice321.pdf
And output file ‘Invoice4xx.pdf’ containing
• All pages of Invoice478.pd
4.4.3. Saving the merged file
Once you have merged the files into a single PDF, to save the merged file for later use,
follow these steps:
1. Click on File > Save As.
2. Select the directory path where you want to save the merged PDF file.
3. Enter a filename.
4. Click on Save to initiate saving of the merged PDF file.
| CONTENTS | INDEX |
Page 63 of 155
Page 64

ARTS PDF Aerialist User Guide
Bookmarks
5. Bookmarks
5.1. Overview
The Bookmarks feature set provides the ability to add, edit, build, replace, delete and
sort bookmarks across one or more PDF files. The tool allows users make almost any
PDF file more usable and easier to navigate.
The Bookmarks feature set has been built to save time creating and managing
bookmarks. By allowing users to import and export build settings, bookmark trees and
by providing batch processing functionality, users can process and update large
collections of PDFs with a minimum of time and effort. Additionally, it has been
engineered to work with the Productivity feature set, making it even easier to quickly
access and run commonly used bookmark processes.
| CONTENTS | INDEX |
Page 64 of 155
Page 65

ARTS PDF Aerialist User Guide
Bookmarks
5.2. Using Bookmarks
There are four main Bookmark functions: Add Bookmarks, Find Bookmarks, Build
Bookmarks, Delete Bookmarks and Sort Bookmarks.
Find/Replace Bookmarks
Add Bookmarks
Delete All Bookmarks
Figure 33. Bookmark toolbar buttons
Figure 34. The Bookmark menu
Build Bookmarks
Sort Bookmarks
5.2.1. Bookmark Features
A brief rundown of each function has been provided below.
All these functions can be automatically performed across multiple documents using
Batch Processing. See the
| CONTENTS | INDEX |
Batch Processing section for more information.
Page 65 of 155
Page 66

ARTS PDF Aerialist User Guide
Bookmarks
If you wish to automate and customize Bookmark functions even more, or create
toolbar buttons that perform custom Bookmark jobs, read the section on
Bookmark Commands.
Using
5.2.1.1. Add Bookmarks
Use the Add Bookmarks feature to create a set of user-defined bookmarks;
save your set of bookmarks using the Import/Export functionality so you can
reuse them in batch processes.
5.2.1.2. Find Bookmarks
Use the Find Bookmarks feature to delete or replace only the bookmarks that
match the search criteria you specify; once you have entered the content to
search for, Find Bookmarks scans the bookmark text of all of the PDF files you
have selected and updates them based on the text and properties changes
you have specified.
5.2.1.3. Build Bookmarks
Use the Build Bookmarks feature to automatically generate bookmarks based
on the font styles and layout used in your PDFs. After setting the desired
combination of attributes for a bookmark to be generated, the Bookmark
feature can quickly scan one or more PDF files to build the bookmarks for
each document. Additionally, you can save your Build Bookmarks settings by
using the Import/Export functionality so you can reuse them to process large
collections of PDF files.
5.2.1.4. Delete Bookmarks
Delete Bookmarks allows the user to simply delete all the bookmarks
contained in the selected PDF file(s). This is a much easier way then having
to manually highlight all of the bookmarks and then delete them – especially
if you need to do this across multiple files.
5.2.1.5. Sort Bookmarks
The Sort Bookmarks feature automatically rearranges bookmarks in
alphabetical order. It has the flexibility to order all bookmarks or a selected
range of bookmarks in ascending or descending order.
| CONTENTS | INDEX |
Page 66 of 155
Page 67

ARTS PDF Aerialist User Guide
Bookmarks
5.3. Adding Bookmarks
The Add Bookmarks function creates a set of user-defined bookmarks. Use the
Import/Export features to save and reuse a set of bookmarks in other documents using
batch processes or with the Productivity feature.
5.3.1. The Preview Pane
The preview pane allows you to view and easily edit a bookmark structure. The
bookmark structure can then added to any PDF document.
Figure 35. Add Bookmarks Preview Pane
| CONTENTS | INDEX |
Page 67 of 155
Page 68

ARTS PDF Aerialist User Guide
Bookmarks
5.3.1.1. Add or Edit Bookmarks
To create or edit a bookmark in the Add Bookmark’s preview pane:
1. Click ‘Add’ or ‘Edit’ to open the ‘New Bookmark’ dialog.
2. In the ‘New Bookmark’ dialog, enter the name and bookmark
properties you wish the bookmark to have.
3. Click ‘OK’.
Details of bookmark properties can be in the next section,
Properties.
Bookmark
5.3.1.2. Bookmark Properties
Figure 36. Bookmark Properties
Bookmark properties can be viewed when adding or editing a bookmark in the
preview pane. The following table shows the properties that bookmarks can
have.
Name The bookmark’s name that will appear in the document.
Color The bookmark’s font color. You can create and use custom colors by
scrolling down the available list of colors, selecting “Custom” and
creating your custom color from the ‘Custom Color’ dialog.
Style Font style can be bold and/or italic.
| CONTENTS | INDEX |
Page 68 of 155
Page 69

ARTS PDF Aerialist User Guide
Bookmarks
Action This designates what action occurs when the user clicks on the
bookmark.
None Nothing occurs when the bookmark is
clicked.
Go To View This action will jump to the specified page in
the document. Various page magnification
options are also available; see Magnification
Options.
Go To Remote
View
Open File Opens the specified file. This file can be of
WWW Link Clicking on the bookmark opens a web
Read Article Selecting this action will link or display the
Show / Hide Field Provides the option of either showing or
Submit Form This will send the form data to a specified
Reset Form Resets all form fields to their original default
Import Form Data Imports in form data from another file and
JavaScript This option will run a specified JavaScript.
Execute Menu Item Executes a specified menu command as the
Movie Plays a specified QuickTime or AVI movie.
Sound Plays a specified sound file.
This opens a specified PDF document at the
designated page. Various page magnification
options are also available; see Magnification
Options. This can be configure using relative
or absolute addressing, see Absolute /
Relative Addressing.
any type, but only files with a *.pdf
extension will be opened in Acrobat; all other
file types will be opened in their default
viewers. This can be configure using relative
or absolute addressing, see Absolute /
Relative Addressing.
browser to the URL specified within the
WWW Link textbox.
bookmark to an article thread in the active
document.
hiding fields in a PDF document.
URL.
value.
displays it in the active form.
action when the bookmark is clicked.
| CONTENTS | INDEX |
Page 69 of 155
Page 70

ARTS PDF Aerialist User Guide
Bookmarks
Magnification Options:
This option is available in the action bookmark properties ‘Go To View’ and
‘Go To Remote View’. The option is also available when building bookmarks
using the Build Bookmarks feature.
The following magnification options are available:
• Inherit Zoom
Displays the destination window at the magnif ication level that the
user is using when they click on the bookmark.
• Zoom
Displays the page at a magnification specified by the user.
• Fit Width
Displays the width of the current page in the destination window.
• Fit Height
Displays the height of the current page in the destination window.
• Fit Page
Displays the current page in the window.
• Fit Visible
Displays the width of the visible contents of the current page in the
destination window. This usually means the margins are not display ed.
Absolute / Relative Addressing:
Absolute or relative addressing can be used in the action bookmark
properties: Open File and Go To Remote View. It allows users to configure the
method of referencing to a file.
• Absolute Addresses
These are best used when it's likely that the source document may
need to be moved or copied to a different location in the file system,
without any target files moving in relation.
Note: By default, browsing to the target file using the Open File dialog
produces an absolute address i.e. target.pdf
| CONTENTS | INDEX |
Page 70 of 155
Page 71

ARTS PDF Aerialist User Guide
Bookmarks
• Relative Addresses
These are most appropriate for PDFs published to CDs/DVDs or when
the entire file system is copied and must remain relative to the source.
Relative addresses describe the path to a file, relative to another file,
in most cases the Bookmarker file that was loaded last.
To use relative addressing, please follow the following syntax
For example:
If the file is in the same folder, then use
.\target.pdf
If the file is in one folder above, then use
..\target.pdf
If the file is in two folders above, then use
..\..\target.pdf
If the file is in one folder below, then use
.\directorybelow\target.pdf
5.3.1.3. Removing Bookmarks
To remove a single bookmark from the preview pane:
1. Select the bookmark you wish to remove.
2. Click the ‘Remove’ button.
3. Click ‘Yes’.
Note: If the bookmark has any child bookmarks (i.e. bookmarks with lower
level bookmarks attached to it) they will also be delet ed.
To remove multiple bookmarks from the preview pane:
1. Hold down Ctrl and click on the bookmarks you wish to remove.
Alternatively, you can press Ctrl + A to select all bookmarks.
2. Click the ‘Remove’ button.
3. Click ‘Yes’.
| CONTENTS | INDEX |
Page 71 of 155
Page 72

ARTS PDF Aerialist User Guide
Bookmarks
5.3.1.4. Import Bookmarks from a PDF
This function enables you to import existing bookmarks from the active PDF
document into the Add Bookmark’s preview pane. It will retain the same
bookmark level structure as displayed in the PDF document.
To copy or extract bookmarks from the open PDF document into the preview
pane:
1. Click on the ‘Import…’ button.
2. Select ‘From current PDF’.
3. Click ‘OK’.
Figure 37. Importing bookmarks from the current PDF
5.3.1.5. Moving Bookmarks
From the Add Bookmark’s preview pane, you can select and drag bookmarks
around using your mouse. To move a bookmark:
1. Select the bookmark you wish to move. If you wish to move a
bookmark that contains child bookmarks, then the child bookmarks
will also be moved.
2. Holding the mouse button down, drag the bookmark to the desired
location.
When dragging a bookmark the following symbols may appear:
R Indicates bookmark will be on the same bookmark level.
Q Indicates bookmark will become a child node.
[ Indicates that the bookmark cannot be moved to this location.
E.g. If you wish to move a bookmark (Bookmark#2) below
another bookmark (Bookmark#1):
a. Select Bookmark#2
b. Hold down the mouse and drag Bookmark#2 until
Bookmark#1 is highlighted and Q or R appears.
| CONTENTS | INDEX |
Page 72 of 155
Page 73

ARTS PDF Aerialist User Guide
Bookmarks
5.3.2. Add Bookmarks to PDF
To add bookmarks from the preview pane to the open PDF document, click ‘OK’.
Note: There are options available when adding bookmarks to the PDF document, see
Insertion Options and Expand / Collapse options
5.3.2.1. Insertion Options
The insertion options drop down box has three options that allow you to
choose how you want to display the new bookmarks. The three options are:
• Overwrite
Bookmarks will overwrite the existing bookmarks. Choosing this
option then clicking on Update will replace the whole bookmark
structure with the newly created one.
• After
Newly created bookmarks will be appended after the existing
bookmark structure.
• Before
Newly created bookmarks will be appended before the existing
bookmark structure.
5.3.2.2. Collapse Bookmarks Options
Use this option to set the display default of your bookmarks.
• Collapse Bookmarks
If you want to only display the first level bookmarks, the collapse
bookmarks option has to be checked. This means that the other levels
of the bookmarks structure will not be visible.
• Expand Bookmarks
If you want to display all the levels of the bookmarks structur e, then
uncheck the collapse bookmarks box. Result of this would be having
the bookmarks displayed in an expanded form, that is all the lev els of
the bookmark structure will be visible.
| CONTENTS | INDEX |
Page 73 of 155
Page 74

ARTS PDF Aerialist User Guide
Bookmarks
5.3.3. Importing/Exporting Bookmark Settings
With the Import feature you can save your current bookmark settings with the Add
Bookmarks preview pane. You can then load it at a later date using the Import
feature.
5.3.3.1. Importing Tools
To load or import your bookmark settings from a file:
1. Click the ‘Import…’ button.
2. Select ‘From settings file’
3. Click on the ‘…’ button and browse to the location of the file you wish
to import.
4. Select the file to import and click ‘OK’.
In the Add Bookmarks function you can import PDF, ARTS PDF Bookmarks
settings, Comma-delimited or Tab-delimited file types:
• PDF files (*.pdf)
The bookmarks will be copied from the selected PDF document.
• Add Bookmarks settings files (*.ina)
‘Add Bookmarks settings’ files can be created using the Export function of
Add Bookmarks.
• Comma-delimited files (*.csv)
Comma-delimited file types can be created using a text editor such as
Notepad or a spreadsheet application such as Microsoft Excel. These files
must have the following structure for each bookmark entry:
Bookmark level, Bookmark name, Zoom, Destination, Zoom
where:
o Bookmark level = a numeric value. “0” being the highest bookmark
level.
0 – Level 1 bookmark
1 – Level 2 bookmark
2 – Level 3 bookmark
o Bookmark name = the bookmark name displayed in the Bookmarks
tab of Acrobat’s Navigation pane
| CONTENTS | INDEX |
Page 74 of 155
Page 75

ARTS PDF Aerialist User Guide
Bookmarks
o Zoom = a numeric value.
0 – Custom Zoom Magnification (Fixed)
1 – Fit Width
2 – Fit Height
3 – Fit Page
4 – Fit Visible
o Destination = the page number where the bookmark will li nk in the
document.
o Zoom Magnification = the percentage level for zoom magnification.
This is required if “0” is set for Zoom.
Example:
0, Introduction, 0, 1, 100
0, Contents, 0, 2, 100
1, Part-1, 0, 3, 100
2, Part-1(a), 0, 4, 100
2, Part-1(b), 0, 5, 100
1, Part-2, 0, 6, 100
0, Index, 0, 7, 100
• Tab delimited files (*.txt)
Tab-delimited file types can be created using a text editor such as
Notepad or a spreadsheet application such as Microsoft Excel. Tabdelimited files must have the following structure for each bookmark entry:
Bookmark level [tab] Bookmark name [tab] Action [tab] Destination [tab]
Zoom
where:
o Bookmark level = a numeric value. “0” being the highest bookmark
level.
0 – Level 1 bookmark
1 – Level 2 bookmark
2 – Level 3 bookmark
o Bookmark name = the bookmark name displayed in the Bookmarks
tab of Acrobat’s Navigation pane
o Zoom = a numeric value.
0 – Custom Zoom Magnification (Fixed)
1 – Fit Width
2 – Fit Height
3 – Fit Page
4 – Fit Visible
o Destination = the page number where the bookmark will li nk in the
document.
o Zoom Magnification = the percentage level for zoom magnification.
This is required if “0” is set for Zoom.
| CONTENTS | INDEX |
Page 75 of 155
Page 76

ARTS PDF Aerialist User Guide
Bookmarks
Example:
0 LinkPage1 0 1 100
0 LinkPage2 0 2 100
0 LinkPage13 0 13 100
0 LinkPage20 0 20 100
5.3.3.2. Exporting Tools
To save or export your bookmark configuration to a file:
1. Click the ‘Export..’ button.
2. Browse to the location that you wish to store the file in.
3. Enter the filename.
4. Click ‘OK’.
| CONTENTS | INDEX |
Page 76 of 155
Page 77

ARTS PDF Aerialist User Guide
Bookmarks
5.4. Finding and Replacing Bookmarks
The Find Bookmark function allows you to delete or replace only the bookmarks that
match the search criteria you specify; once you have entered the content to search for,
Find Bookmarks scans the text of all the bookmarks of the PDF files you have selected
and updates them based on the text and properties changes you have specified.
Figure 38. Find and Replace Bookmarks
| CONTENTS | INDEX |
Page 77 of 155
Page 78

ARTS PDF Aerialist User Guide
Bookmarks
5.4.1. Find Options
When searching the Bookmark text the following two options are available, in order
to make it as relevant as possible.
• Is complete bookmark name
This will only perform Find/Replace actions on bookmarks that completely
match the specified search text
• Case sensitive
This will only perform the action on bookmarks whose text is exactly the
same case as that specified.
Figure 39. Finding Bookmarks
E.g. A case-sensitive search of “And” will not perform any actions on a bookmark
containing “and”.
5.4.2. Replace Options
• Delete
Deletes any bookmarks that match the Find criteria
• Replace with – Name
Replaces the text entered in the Find textbox with the text in the Replace
textbox. If you enable the “Replace whole text” checkbox, all of the bookmark
text is replaced.
• Replace with – Color
Replaces the bookmark font colors. You can choose from the standard Acrobat
colors, and also create your own custom colors using the custom color palette.
The custom color palette can be found by selecting ‘custom…’ from the color list .
• Replace with – Style
Replaces the current font style with:
o Plain
o Bold
o Italic
o Bold and Italic
| CONTENTS | INDEX |
Page 78 of 155
Page 79

ARTS PDF Aerialist User Guide
Bookmarks
• Replace with – Action
Replaces the current bookmark action with the specified one. For information on
what each action does, see the Action section in
o None
o Go To View
o Go To Remote View
o Open file
o Read Article
o Show/Hide Field
o Submit Form
o Reset Form
o Import Form Data
o JavaScript
o Execute Menu Item
o Movie (Play a movie)
o Sound (Play a sound)
o World Wide Web Link
Bookmark Properties:
5.4.3. Using Text Masking
Text masking can be used to perform complex find and replace matches. Text
masking would be used in the ‘Find’ text box. See section
details on the correct text masking syntax.
Using Text Masking for full
| CONTENTS | INDEX |
Page 79 of 155
Page 80

ARTS PDF Aerialist User Guide
Bookmarks
5.5. Building Bookmarks
The Build Bookmarks function can automatically generate bookmarks based on the font
styles and layout used in your PDFs. After specifying the combination of attributes that
must exist for a bookmark to be generated, the Bookmarks function can quickly scan
one or more PDF files to build the bookmarks for each document. Use the
Import/Export functionality so you can reuse Build Bookmarker settings to process large
collections of PDF files.
Figure 40. Building bookmarks
| CONTENTS | INDEX |
Page 80 of 155
Page 81

ARTS PDF Aerialist User Guide
Bookmarks
5.5.1. Creating Bookmarks
Creating bookmarks using the Build Bookmarks function is simple. Using t he
selection criteria you can be very selective in what text is created into bookmarks.
To build bookmarks follow this basic outline:
1. In the Build Bookmarks dialog, click “Level 1” . This will open up the Select
Bookmark Attributes dialog.
Figure 41. Bookmark Attributes
2. Enable the checkboxes of the properties that you wish to create the
bookmarks from. These properties are detailed in the
section.
3. Move the mouse over the PDF document. The pointer will change to a
crosshair. Select the text you wish to grab the properties from, and drag a
rectangle around it with the mouse.
Alternatively you can use the pull-down menus provided to select the
properties manually, or you can use a combination of both mouse and manual
selections.
4. Once you have made your selections, click “OK”
5. You can now create a Level 2 bookmark. To create a Level 2 bookmark just
follow Steps 1– 4.
Once you have created a Level 2 bookmark you can go on to create a Level 3
bookmark, and so on.
| CONTENTS | INDEX |
Bookmark Properties
Page 81 of 155
Page 82

ARTS PDF Aerialist User Guide
Bookmarks
6. If you wish to remove a bookmark level, simply click its corresponding “Clear”
button in the main dialog. If you clear a bookmark level when there are
bookmark levels created below it, they will also become unavailable.
7. Set the
with.
8. Set the
9. Set the Bookmark exact text only option. Select this option to create
bookmarks from text that matches the exact font style . If this option is not
selected, the whole line of text where this font sty le is found will be
bookmarked.
10. When you are happy with your configuration, click “Build” to commence
creating bookmarks.
Magnification Options you wish the bookmarks to open the pages
Insert Options and Expand / Collapse Options.
5.5.2. Importing/Exporting Bookmark Build Options
With the Import feature you can save your current bookmark settings with the Add
Bookmarks preview pane. You can then load it at a later date using the Import
feature.
5.5.2.1. Importing Bookmarks
To load or import your bookmark settings from a file:
1. Click the ‘Import…’ button.
2. Browse to the location of the file you wish to import.
3. Select the file to import and click ‘OK’.
Note: Importing will replace any current bookmark settings with those from the
imported file.
5.5.2.2. Exporting Bookmarks
To save or export your bookmark configuration from the Build Bookmarks
dialog to a file:
1. Click the ‘Export..’ button.
2. Browse to the location that you wish to store the file in.
3. Enter the filename.
4. Click ‘OK’.
| CONTENTS | INDEX |
Page 82 of 155
Page 83

ARTS PDF Aerialist User Guide
Bookmarks
5.5.3. Bookmark Selection Properties
There are five text properties that can be used when choosing the properties that the
bookmarks will be created from. Combining the various properties will create
bookmarks that only match the criteria of the combined properties. If the text in the
document does not meet the requirements of the properties then no bookmarks will
be created.
• Font Name
Creates bookmarks from the selected font. Clicking “Update Font Name” will
update the font menu listing to include all the fonts contained in the
document. Embedded fonts will not be included.
• Font Size
Creates bookmarks from text that conforms to the specified font size.
• Font Color
Creates bookmarks from text that matches the selected text’s color.
• Left Indentation
This will create bookmarks from text with its line indent startin g the specified
distance from the left-hand side of the page. An example of line indentation
are bullet headings – selecting these bullet headings with th e ‘Left
Indentation’ and ‘Font Name’ properties enabled would produce bookmarks
from the bullet headings: Font Name, Font Size, Font Color, Left Indentation
and Text Mask (if the ‘Font Name’ property wasn’t enabled, all text with the
same indentation as the bullets would be turned into a bookmark).
Note: the Bookmarks function will select text whose line indentation starts at the start
of the rectangle that you draw. It is important to know this, because if you select a
section of text whose line indent is not included inside your selection rectangle, then
the Bookmarks fucntion will not create a bookmark from that text. For more
information on using this property, visit the
• Text Mask
Creates bookmarks from text that matches the characters entered into the
Text Mask textbox. Text masking is great when there are no defining
bookmark properties, or if you need to selectively filter out certain text that
may otherwise become a bookmark.
As Text Masking contains a number of special characters that can be
complicated, a section of this User Guide has been dedicated to its use. See
section
characters.
• Keyword list
This feature allows users to include and exclude particular bookmarks based
on its name. The keyword list file is simply a text file with a list of words. If
the keyword list is excluded, it will only build bookmarks that do not have any
Using Text Masking section for more information on special Text Mask
Troubleshooting section.
| CONTENTS | INDEX |
Page 83 of 155
Page 84

ARTS PDF Aerialist User Guide
Bookmarks
of the words in the bookmark name. If the keyword list is included, then it will
only build bookmarks that contain the word in its name.
For example:
From the bookmark properties selected, the Build Bookmarks function
should build bookmarks named:
• Table Of Contents
• Introduction to ARTS PDF
• Part I - ARTS
• Part II - PDF
• Part III – Other
If the user chooses to include a keyword list (e.g. sample.txt) that
contains:
ARTS
PDF
The Build Bookmarks function will only build bookmarks:
• Introduction to ARTS PDF
• Part I - ARTS
• Part II - PDF
If the user chooses to exclude a keyword list (e.g. sample.txt) that
contains:
ARTS
PDF
The Build Bookmarks function will only build bookmarks:
• Table Of Contents
• Part III – Other
• Ignore repeated headings
Creates a bookmark for only the first occurrence of a repeated bookmark name.
• Multi-lined headings
Creates bookmarks from text spanning over more than one line.
• Leading numbers
This feature allows you to add or remove leading numbers to bookmarks.
| CONTENTS | INDEX |
Page 84 of 155
Page 85

ARTS PDF Aerialist User Guide
Bookmarks
For example:
#1.
Suppose ARTS PDF Bookmarker is to build bookmarks named:
• Introduction
• Contents
• Install
• Windows
• Macintosh
• Quick Start Up
• Where To Start
• Index
If you choose to add leading numbers, ARTS PDF Bookmark will build
bookmarks:
• 1 Introduction
• 2 Contents
• 2.1 Install
• 2.1.1 Windows
• 2.1.2 Macintosh
• 2.2 Quick Start Up
• 2.2.1 Where To Start
• 3 Index
#2.
Suppose ARTS PDF Bookmarker is to build bookmarks named:
• 1.0 Introduction
• 2.0 Contents
• 3.0 Install
If you choose to remove leading numbers, ARTS PDF Bookmark will build
bookmarks:
• Introduction
• Contents
• Install
5.5.3.1. Using Text Masking
The text masking property has a number of special characters allowing you to
selectively create bookmarks. They are described in detail below with simple
examples provided.
Note: The user should be aware that the Bookmarks feature processes text by lines of
text, and produces a bookmark out of the whole line of text. For example, if you
specified “sales” in the text mask field, and your PDF document had a line in it with
the text “and so to conclude, our company had no major sales this month”, this whole
line of text will be turned into a bookmark.
| CONTENTS | INDEX |
Page 85 of 155
Page 86

ARTS PDF Aerialist User Guide
Bookmarks
Macintosh
Macintosh users can simply enter partial words to bookmark a line of
text. Any line containing the characters will create a bookmark. It is
not case sensitive.
Example: Entering “en” will create bookmarks from any lines of text
containing “en” such as “Enjoy”, “entertain”, “content”, “burden” etc.
Windows
o Case sensitive: Text Masking is case sensitive, so entering “ABC” will
create different bookmarks from “abc”.
o . : The “.” matches one instance of any character.
Example: Entering the expression “P.F” into the Text Mask field, it
would create a bookmark from any lines of text containing “PDF, PeF,
PdF,” etc.
o ^: The “^” only creates a bookmark if the specified text appears at
the very start of the line.
Example: Entering the text “^abc” will only create a bookmark if the
line started with “abc”. If a line of text started with “1.0 abc” no
bookmark of it would be created.
o $: The “$” only creates a bookmark if the specified text appears at the
very end of the line.
Example: Entering the text “abc$” will create a bookmark only from
text with lines ending with “abc”, so “…xyzabc” would cause a
bookmark of that line to be created, but “abcxyz” would not have a
bookmark created.
o If you only want to create bookmarks from lines that only contain the
exact text you specify, use both the “^” and “$” characters.
o [ ] : Any lines containing characters inside the “[ ]” will be created
into a bookmark. Characters can be specified literally, or as a range of
characters.
Example: “[abc]” will create bookmarks from any lines containing
either a, b, or c. This is opposed to only creating a bookmark from text
containing abc if “abc” is entered.
”[a-dA-D]” will create bookmarks from lines containing any of the
characters between a-d (that is, a, b, c and d), in both lower and
upper-case.
| CONTENTS | INDEX |
Page 86 of 155
Page 87

ARTS PDF Aerialist User Guide
Bookmarks
o [^] : Any text containing characters inside the “[ ]” and after the “^”
will not be turned into bookmarks. This feature is very handy when
applied with in conjunction with other bookmark selection properties to
stop unwanted bookmarks from being created. Please be aware that
conversely this means that any other text not in the “[ ]” will be
considered as potential bookmark material. Therefore it is suggested
that another bookmark selection property is used in conjunction with
this one.
Example: Entering “[^0-9]” will still create bookmarks containing
numbers if the text line contains any other character – 1.0 will be
turned into a bookmark because it contains a “.”.
If you really want to exclude numbers like 1.0 you would need to
modify it to “[^0-9\.]. The “\” is explained below, and is needed
because “.” is a considered special character in text masking.
o \ : The “\” character is used when you wish to actually match a
special character, such as “.” Or “$”. These special characters are used
in the Text Mask field to perform special text matching.
Example: Entering “\$” will search and create a bookmark from text
on the document containing a “$”, ignoring the normal “$” text mask
command.
o * : Use the “*” character to create bookmarks from more than one set
of characters at the same time.
Example: Entering “a*b” will create bookmarks from any line of text
containing either a and/or b.
o + : Use the “+” character to create bookmarks from a set of
characters arrayed in a certain order. Bookmarks can be created from
the first character(s) before the “+”, however, characters after the “+”
can only be bookmarked if the characters before the “+” are also
present.
Example: Entering “a+b” will create bookmarks from any line of text
containing
o ? : Like the “+” character, the “?” character creates bookmarks from
a set of characters arrayed in a certain order, but in this case,
bookmarks can be created from characters before the “?” only if the
proceeding characters are also present. The characters after the “?”
can be used to create bookmarks, irrespective of whether characters
before the “?” are present.
Example: Entering “a?b” will create bookmarks from any line of text
containing ab, abb, or just b.
ab, aab, aaab¸ etc. Any text like ba, or cb, will be ignored.
| CONTENTS | INDEX |
Page 87 of 155
Page 88

ARTS PDF Aerialist User Guide
Bookmarks
o ( ) : Allows characters to be grouped together and be combined
with other special characters.
Example: “(a*b)$” will create bookmarks from lines of text
containing either a and/or b, but only if these lines end with a
or b.
o | : Creates bookmarks from either one set of characters or
another.
Example: Entering “a | b” into the Text Mask field will create
bookmarks from lines of text containing either a or b.
| CONTENTS | INDEX |
Page 88 of 155
Page 89

ARTS PDF Aerialist User Guide
Bookmarks
5.6. Deleting Bookmarks
This is the easiest function to use – simply click on the Delete Bookmarks button or the
menu item: Plug-ins > ARTS PDF Aerialist > Bookmarks > Delete Bookmarks.
Be careful when using this function, as Acrobat cannot undo the deletion of bookmarks.
If you have accidentally deleted them the only way to retrieve them is to exit the
document without saving, and then open it again.
| CONTENTS | INDEX |
Page 89 of 155
Page 90

ARTS PDF Aerialist User Guide
Bookmarks
5.7. Sorting Bookmarks
The Sort Bookmarks feature allows the user to sort their bookmarks in alphabetical
order. The bookmarks can be sorted in ascending or descending order. You can sort an
entire level of bookmarks or select a particular node of bookmarks.
Figure 42. Sorting bookmarks
• Level/Nodes
Entering a level:
To enter a level you must put ‘L’ in front of the bookmark level value.
Level one (L1) is the highest bookmark level.
For example:
If you want to sort all level one bookmarks, you would enter L1.
If you want to sort all level two bookmarks, you would enter L2.
Entering a node:
Enter a node value and separate node values with a comma.
For example:
If you only wanted to sort bookmarks that are in the third (3) bookmark’s
second (2) child bookmark, you should enter 3,2.
• Ascending or Descending
This option allows you to select whether you want to sort your bookmarks in
ascending or descending order.
• Apply to child nodes
If selected, all child bookmarks to the bookmarks specified in ‘Level/Node’ will
also be sorted.
| CONTENTS | INDEX |
Page 90 of 155
Page 91

ARTS PDF Aerialist User Guide
Bookmarks
For example:
Take the initial bookmark structure as follows.
- B
- A
- 3
- 2
- two
- four
- three
- one
- 1
Example #1:
Settings: Level/Node=L2; Apply to child nodes=not selected; Order=ascending.
Result: Only the level two bookmarks will be sorted.
- B
- A
- 1
- 2
- two
- four
- three
- one
- 3
Example #2:
Settings: Level/Node=2,2; Apply to child nodes=selected; Order=ascending.
Result: Bookmarks under the second bookmark’s second node will be sorted.
- B
- A
- 3
- 2
- four
- one
- three
- two
- 1
| CONTENTS | INDEX |
Page 91 of 155
Page 92

ARTS PDF Aerialist User Guide
Stamp
6. Stamps
6.1. Overview
Using ARTS PDF Aerialist stamp text, watermarks and backgrounds to pages on a PDF
document. With ARTS PDF Aerialist’s Stamp features, users can customize the content,
appearance and action of each stamp as well as combining multiple stamps into one
stamp profile. This includes aligning and setting the size of each stamp, or even making
your stamps behave like hyperlinks.
Using the Stamp feature, you can:
• Stamp text and
• Apply Page and
• Apply image watermarks (BMP, RLE, DIB, GIF, JPG, PCX, PNG, EPS and TIFF)
• Stamp one PDF onto another
• Specify the position, scale and angle of rotation for text and image stamps
actions for individual stamps.
• Set
• Combine single stamps into a profile for faster application.
• Copy and paste stamps between profiles
• Save profiles for later use
• Set up batch processes to apply stamps across many files.
dynamic text
Bates Numbering
Figure 43. ARTS PDF Aerialist’s stamp tool button
| CONTENTS | INDEX |
Page 92 of 155
Page 93

ARTS PDF Aerialist User Guide
Stamp
Figure 44. The Stamp feature’s main window
6.2. Main Features
The main features of ARTS PDF Aerialist’s Stamp set are:
• Stamp text on a PDF file
• Stamp an Image on a PDF file
• Stamp a page from a PDF document on another PDF document.
6.2.1. Text Stamps
Use this feature to create single or multi-line text stamps.
used for headers, footers and hyperlinks. A variety of
available to allow you to easily insert date, time, page numbers and document
information such as Author, Title and Subject at runtime.
Text stamps are often
Dynamic Text options are
| CONTENTS | INDEX |
Page 93 of 155
Page 94

ARTS PDF Aerialist User Guide
Stamp
6.2.2. Image Stamps
Image stamps enable you to stamp single or multiple images on PDF document .
ARTS PDF Aerialist supports a number of different image types. These include BMP,
RLE, DIB, GIF, JPG, PCX, PNG, EPS and TIFF formats
6
.
6.2.3. PDF Stamps
Stamp a page from a PDF onto another document. You can modify the placement,
layout and action of the
PDF stamp in the same way as text and the image stamps.
6
Stamping with these image file formats is supported on Acrobat 6 only. Under Acrobat 5 only TIFF and JPEG
are supported. To stamp with an EPS or GIF first convert the file to PDF and recreate the stamp as a PDF
stamp.
| CONTENTS | INDEX |
Page 94 of 155
Page 95

ARTS PDF Aerialist User Guide
Stamp
6.3. Using Stamps
To use the Stamp feature, first locate the Stamp tool button or menu item under
Acrobat’s Plug-in menu. Use either the toolbar
to create, edit, mange or apply a stamp to a document. Once a stamp profiles is
created, you can use it to easily stamp the active document by selecting it from either
the tool button drop down or ‘Plug-ins > ARTS PDF Aerialist > Stamp’ menu.
7
or the menu items from Acrobat’s menu
Figure 45. The Stamp toolbar button
Figure 46. The Stamp menu
7
Under Acrobat 5, left click and hold the Stamp tool button to display the drop down menu.
| CONTENTS | INDEX |
Page 95 of 155
Page 96

ARTS PDF Aerialist User Guide
Stamp
6.3.1. Stamp a document
To apply a stamp, open a PDF document and select or create your desired stamp
profile.
To select a stamp either:
• Open the Manage Stamps dialog and select the profile from the list. Click
‘Stamp’ to process.
• Select a stamp profile from the Stamp menu.
• Click the drop down tool button.
Once selected, the active document will be stamped with the chosen profile.
Note: All the stamps within a profile are applied to the document. If a stamp is
selected rather than the profile, the ‘Stamp’ button is disabled.
6.3.2. Undo Stamp
To remove or undo the last stamp applied simply select ‘Undo’ from the Stamp menu
or tool button. You cannot undo a stamp if the document was saved after being
stamped.
Figure 47. Undo a stamp
| CONTENTS | INDEX |
Page 96 of 155
Page 97

ARTS PDF Aerialist User Guide
Stamp
6.4. Managing Stamps and Profiles
To activate the Stamp Management dialog, click the Stamp tool button or select ‘Manage
Stamps’ from the ‘Plug-ins > ARTS PDF Aerialist > Stamp’ menu item.
The Stamp feature uses stamp profiles, allowing users to apply any combination of
stamps in a single action. Stamp profiles also allow users to copy and share stamps
between profiles. For example, an individual copyright footer, company logo and page
numbers can be stored within a single profile. When stamping with this profile, all
stamps are applied to the open document(s) when processed.
The stamp profiles are saved for reuse. Profiles can also be shared by different users
using the
in the Profiles subfolder of the installation directory, i.e. C:\Program Files\Adobe\Acrobat
6.0\Acrobat\plug_ins\ARTS PDF Stamper\Profiles.
import and export features. Saved profiles are stored (with a .nxp extension)
Figure 48. Main Dialog – Managing all stamp profiles
| CONTENTS | INDEX |
Page 97 of 155
Page 98

ARTS PDF Aerialist User Guide
Stamp
6.4.1. Creating a new Profile
To create a new Profile:
1. Open the Manage Stamp dialog.
2. Click ‘New Profile’.
3. Add stamps as required to this profile by clicking the ‘Add Stamp’ button
(refer to
4. The stamp is automatically saved.
Designing stamps).
6.4.2. Creating a new Stamp
To create a new Stamp:
1. Select the profile you want the stamp added to.
2. Click the ‘Add Stamps’ button and select a stamp type from the list (refer to
Designing stamps).
6.4.3. Previewing a Profile/Stamps
To preview
1. Ensure that a PDF is open in Acrobat.
2. Select a profile to view all stamps. It is also possible to view individual or a
3. If the ‘Preview On’ checkbox is not already checked, check it to preview the
8
a Profile or a Stamp:
variety of stamps by clicking on the stamp rather than profile (hold the Ctrl
key to select multiple).
desired stamps and/or profile.
6.4.4. Renaming Profiles/Stamps
To rename a profile/stamp from the preview pane:
1. Right click the desired profile or stamp.
2. Select ‘Rename Stamp’ or ‘Rename Profile’ from the popup menu.
3. Enter in the new name.
6.4.5. Deleting Profiles /Stamps
To delete a profile/stamp from the preview pane:
1. Right click the desired stamp or profile
2. Select ‘Delete Profile’ or ‘Delete Stamp’ from the popup menu.
3. Press ‘Yes’ or ‘No’ to confirm the delete action.
8
Previewing large documents and profiles that contain a large number of stamps can result in performance
degradation. Refer to the HFAQ section
| CONTENTS | INDEX |
H for tips on reducing this.
Page 98 of 155
Page 99

ARTS PDF Aerialist User Guide
Stamp
Note: If the Profile contains several stamps, deleting the profile will delete all the stamps
within the profile. Delete actions cannot be undone.
6.4.6. Rearranging Stamps
The Stamp feature provides a number of ways to rearrange, edit and share stamps
between profiles.
To cut or copy stamps from one profile to another:
1. Select the desired stamps using the mouse cursor
2. Right click an item in the selection
3. Select ‘Cut’ or ‘Copy’
4. Right click the destination profile and select ‘Paste’
Note: Stamps can also be dragged from one profile to another by holding the left mouse
button and dragging the stamps to another document.
To create a copy of a profile:
1. Right click the desired profile
2. Select ‘Copy’
3. Right click somewhere within the frame and select ‘Paste’
6.4.7. Importing / Exporting Profiles
To export profiles to file to archive or share:
1. Select the desired profile from the Stamp Management dialog
2. Either right click and select ‘Export Profile’ or click the ‘Export’ button
3. Navigate to the desired destination and enter the filename
To import profiles:
1. Open the Stamp Management dialog
2. Click the import button
3. Navigate and select the desired profile to import
Note: When importing profiles only the settings are imported. Any links to the source
image/PDF files may be broken and it is important these are checked, validated and repaired
as required.
6.4.8. Editing Stamps
To edit an existing stamp, select the desired stamp and click the edit button. The
Edit Stamp function allows users to modify the properties of individual stamps.
Editing is disabled unless a profile is selected. More detail in section
Stamps.
Designing
| CONTENTS | INDEX |
Page 99 of 155
Page 100

ARTS PDF Aerialist User Guide
Stamp
6.4.9. Right Click Menus
As mentioned above, a number of editing features are available by right clicking a
stamp or profile
9
.
Figure 49. Right click profile menu
Figure 50. Right click stamp menu
9
For Mac users, use standard shortcut keys to copy (Apple-C), cut (Apple-X) and paste (Apple-V)
| CONTENTS | INDEX |
Page 100 of 155
 Loading...