

Artograph LED 200 Owners Manual [en, es, fr]
Artist Operation Guide
model LED200


Contents
3 Features & Specifications
4 Thank You
5 Before You Start
6 Quick Start
7 Setup
8 Remote Features
9 Projection
10 Grid Patterns (RGB)
11 Grayscale / Color to Black & White & Image Orientation
12 Image Settings & Adjustments (Advance Control)
13 Image Settings & Adjustments (Expert Control)
14 USB Introduction & Image Selection
15 Photo List
16 Grid Patterns (USB)
17 Grayscale / Color to Black & White & Background Music
18 Quick Reference
19 Accessories to Expand Capabilities
Please note
This manual is put together in two sections.
The Artist’s Operations Guide, will guide you
through the special and unique features
built into the Artograph Digital Art Projector
LED200, and help you get started quickly
using this projector as an artist’s and
designer’s tool. The LED200 guide offers more
detailed technical information, and instructions
on how to operate the video and home theater
features which are not included in The Artist’s
Operations Guide portion.
Artograph Digital Art Projector LED200 Operation Guide
3

Features & Specifications
Model #225-990
•
200 lumen illumination LED lamp.
•
Projected image size ranges from 15 inches-80+ inches (38-203cm).
•
Maintenance-free LED lamps last up to 30,000 hours.
•
LED-based light offers a wide range of color adjustments for accurate image
reproduction.
•
Embedded grids aid in designing, composition, and layout.
•
Ability to switch color images into black and white for tone and contrast evaluation
while offering easier transfer/copying characteristics.
•
Input/output connectivity options: USB, HDMI, RGB, Video In, Audio In and Audio Out.
Easy transfer from SD cards, digital cameras, computers or other digital devices.
•
Built-in speakers for playing video and music.
•
FM Transmitter (wireless sound) allows music /sounds to be transmitted
to an FM based sound system.
•
Video compatibility: NTSC | PAL | SECAM | NTSC4.43 | PAL-M | PAL-N | PAL-60
•
800 X 600 SVGA native resolution.
•
2000:1 contrast ratio.
•
Manual focus, fixed zoom.
•
Digital keystone adjustment.
•
Menu languages: English | French | Spanish I German | Italian | Swedish | Portuguese I
Korean | Chinese Simplified | Polish | Russian | Turkish | Arabic
•
Aspect ratio control: 4:3, 16:9, Zoom, Cinema Zoom
•
Dimensions: 7.2” X 4.8” X 3.4” (183 X 122 X 86 mm)
•
Weight: 1.8 lbs. (0.8 kg)
•
Power supply: AC/DC adapter 100—240V, 50/60Hz
The LED200 Includes:
•
Digital Art Projector with Lens Cap
•
Remote Control/Battery
•
Power Supply
•
RGB-to-Computer &
Component-to-RGB Cables
•
Multi-Card USB Card Reader
•
Operation Manual (2)
•
Storage Bag
Artograph Digital Art Projector LED200 Operation Guide 4
Thank you...
for purchasing the Digital Art Projector LED200 from Artograph. This new digital projector
is designed exclusively to meet the needs of modern artists, designers or anyone
wanting to view, design or transfer their digital images. Featuring the latest technology in
LED illumination and image processing, this projector has been enhanced with 6 built-in
grids to aid in layout, design and composition. In addition, you now have precise and
total control over image color, size and orientation. With multiple input options you’ll be
able to access digital images from almost any source including computers, SD cards,
flash drives or other digital devices.
We hope you enjoy your new Digital Art Projector and we would greatly appreciate
your comments and suggestions, please email us at sales@artograph.com or
call toll free at 888-975-9555.
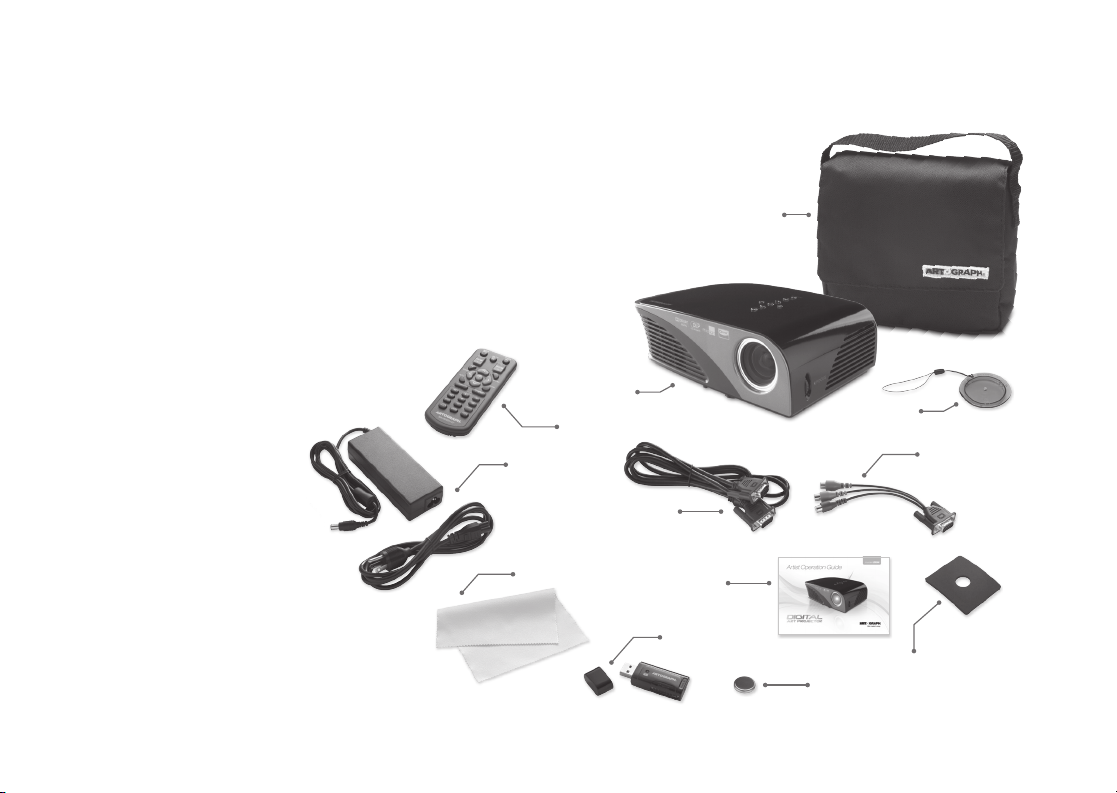
Included:
1. Projector with lens cap and strap (#100-915)
2. Remote (#100-914)
3. Power supply (#100-913)
4. RGB computer cable
5. Component to RGB cable
6. Storage Bag (#151-939)
7. Polishing cloth
8. User’s Guide (#306-181)
9. USB card reader (#100-910)
10. Tripod Spacer Pad (#151-801)
11. 3V Lithium Battery CR2032
Optional Artograph Accessories:
•
Artograph Mobile Projector Floor Stand (#225-359)
•
Artograph Projector Tripod (#225-995)
•
Artograph Gadget Bag (#225-701)
1. PROJECTOR
2. REMOTE
3. POWER
SUPPLY
4. RGB COMPUTER CABLE
7. POLISHING CLOTH
6. STORAGE BAG
8. USER’S
GUIDE
9. USB CARD
READER
1. LENS CAP
AND STRAP
5. COMPONENT
10. TRIPOD
11. 3V LITHIUM BATTERY
TO RGB CABLE
SPACER PAD
Artograph Digital Art Projector LED200 Operation Guide 5

Before You Start
Important Safety Information
•
Do not operate projector in wet or damp conditions or near water.
•
Do not handle projector with wet hands.
•
If projector becomes wet, unplug and do not use until inspected
by a qualified service person.
•
Keep projector free from dust, dirt, or debris.
•
Though the LED produces little heat, make sure the vents are not
blocked to allow air circulation.
•
Only plug into properly grounded outlet only. Do not cut off or remove grounding prong.
•
Make sure power cord is not where it can be stepped on or tripped over.
•
If using an extension cord, make certain it is a grounded cord with sufficient capacity.
•
Turn power off from projector or remote power button. Do not turn off by
pulling power plug.
•
Do not look directly into lens, light is very bright.
•
When cleaning, unplug the power. Wipe projector with a soft cloth. Do not use
cleanser, wax, spray water or wipe with a wet cloth.
•
Use an air spray or soft cloth that is slightly moist with a neutral detergent and water to
remove dust or stains on the projector lens.
•
Do not remove any covers. No user serviceable parts.
Product Warranty
Artograph projectors are guaranteed against
all defects in material and workmanship for
one year from the date of sale to the original
purchaser. Any part of the equipment
which becomes defective under normal
installation and use will be repaired or
replaced without charge for factory labor
and materials’, providing the equipment is
returned, shipping prepaid, to our factory
within this period along with proof of
purchase. CONTACT OUR OFFICE FOR
RETURN AUTHORIZATION. This warranty
does not apply to equipment which has
been subjected to abuse, accident, or
alteration, nor to equipment which has been
improperly installed or wired in violation of
the printed instructions furnished. You may
register your Artograph product online at
www.artograph.com.
Artograph Digital Art Projector LED200 Operation Guide 6

Quick Start
1. Thoroughly read the Important Safety Information before you proceed.
2. Open boxes and remove all materials.
3. Remove protective film from projector.
4. Install battery in remote control.
5. Plug in AC/DC power to projector and wall outlet.
6. Press power button on top of projector or on remote.
7. Attach input device of choice
RGB —connect RGB cable (included) from notebook/
computer to projector
USB— install card reader (included) with SD card or use
a USB flash drive.
Video—connect standard definition analog video cable
from camera/VHS/DVD to projector
HDMI—connect high definition digital video source via HDMI
cable (not included) from Blu-ray/HD video source to projector.
8. Call up images on your computer and project via the RGB connection,
or for USB use the USB button on the remote to navigate to image directories.
9. Aim projector at surface. To adjust image size, move the projector closer or further
away from the surface.Focus with dial on side of projector.
FOCUS
VIDEO IN
USB
MENU
OK
USB
POWER IN
RGB
HDMI
Artists…
Project photographs, digitized drawings,
or sketches directly onto canvas, paper,
wood, or virtually any other surface for
easy composing, layout, and transferring
of images. Project a video and freeze any
frame to capture the perfect moment. Take
all your work with you to a show. Project
your portfolio onto a blank canvas. Rear
screen project your art through a frosted
sheet or velum. Your images will show but
not the projector.
Artograph Digital Art Projector LED200 Operation Guide 7
Setup
Remove Projector from Box
In the box, you’ll find the projector well-wrapped. Take it out and take off the wrapping.
Remove the protective sheet from the top surface.
Take the two power cords out of their plastic bags, take off the twist ties, and connect
the cords to each other.
Plug the DC end of the power cord into the projector. Plug the other end into a (properly
grounded!) three-prong wall outlet.
Please note: When mounting the LED 200 to a tripod, attach the (included) Spacer Pad
to the bottom of the projector around the threaded collar to ensure a non-slip fit.
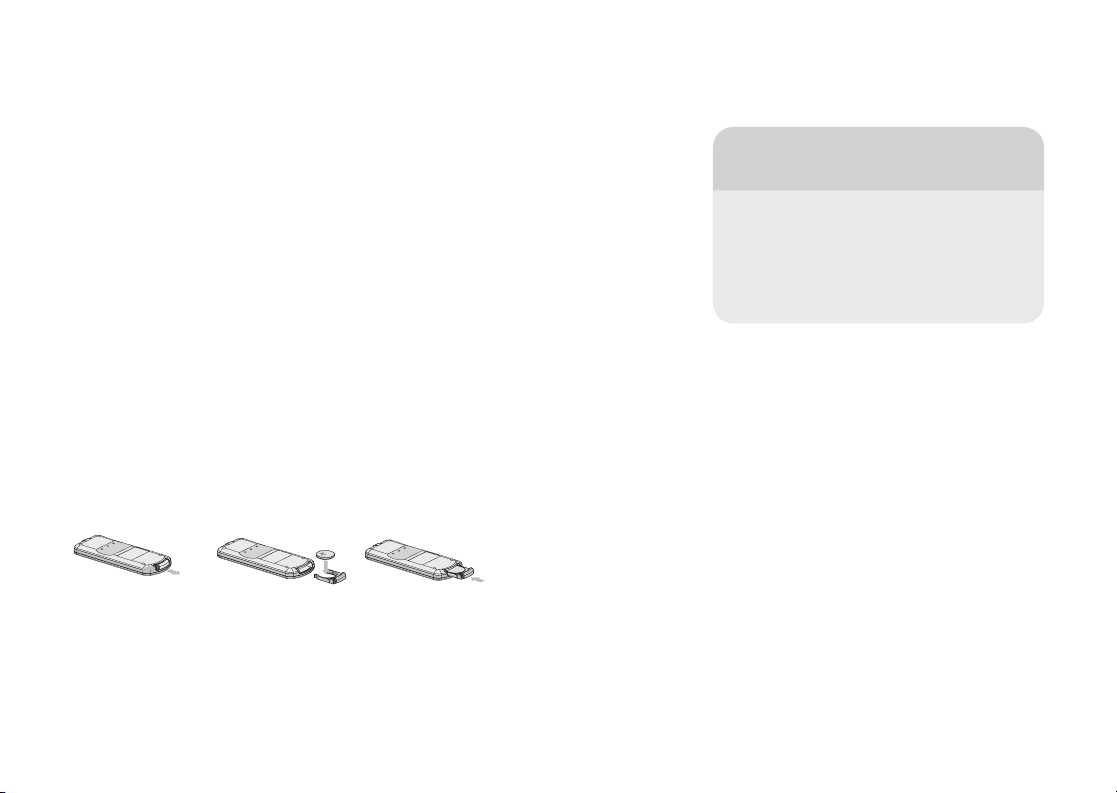
Install the Battery
To install the battery (3V lithium battery CR2032) into the remote control:
1. Open the battery compartment
2. Push tab 1 inward
3. Pull tab 2 out
4. Put the battery in with the + side up
5. Push the battery holder back in
Galleries…
Project art works onto your display window
with frosted plastic or velum mounted in a
frame for a continuous, vivid and unique,
after-hours sales display. The LED light lasts
for 30,000 hours.
Artograph Digital Art Projector LED200 Operation Guide 8

Remote Features
INPUT to choose between
USB, HDMI, VIDEO, or RGB
MUTE
RETURN, also called
EXIT in onscreen menus
POWER
Quick KEYSTONE adjust
MENU opens grid & advanced
image adjustment menus
OK to select
Watercolor Artists…
Rear project your photos onto watercolor
paper to make image transferring easy,
without hand shadows.
AUTO image quality for
computer connected via RGB
USB button for quick
access to USB menus
USB controls and USB video
controls, play, forward, and
rewind video clips
PAGE DOWN takes
you to the bottom of
your USB directory list
ARROW KEYS to navigate
Q MENU to adjust aspect
ratio, picture mode, sleep timer
and USB eject
MARK to put a check box by
images you want to select
PAGE UP takes you to the
top of the list
Artograph Digital Art Projector LED200 Operation Guide 9

Projection
RGB Input Features
Your greatest flexibility and control of the appearance of the images displayed on the
projector comes from using your computer—desktop or notebook—connected via
the RGB cable provided. You will be using the projector as a second monitor for your
computer. Most computer operating systems, Mac or Windows, will recognize the
projector immediately.
Please note: If you’re using Windows XP you may need to change your monitor
selection. It’s usually a function key marked with an icon with two little monitor screens,
but which function key varies by computer, so refer to your computer manual.
Press the power button on either the remote or the top of the projector.
A message will display “no signal”. Attach your computer to the
projector via the RGB cable.
The projector will now act as a monitor, or second monitor, for your computer. Open your
program or the files you want to use and you will see them projected. Aim the projector
and FOCUS. Use the KEYSTONE adjustment on the remote to make the image
square on your surface.
RGB Input Features
Muralists…
The embedded grids are the perfect tool for
composing and laying out images onto any
vertical surface. Images can be projected
to accommodate most size requirements
without the need to project the image in
separate sections.
Artograph Digital Art Projector LED200 Operation Guide 10

Grid Patterns
The built-in grid pattern is a tool you can use alone, or projected over your pictures.
To turn on the grid pattern:
Press MENU on the remote.
Arrow to SCREEN and press OK.
In the SCREEN menu, arrow down to GRID PATTERN.
Press OK.
A popup window opens. Use the right/ left arrows to move through the grid choices.
Choose your grid pattern and press OK. Arrow down to COLOR. Choose the grid color
that will be most visible over your background, BLACK, GRAY, or WHITE, and press
OK. Arrow down to CLOSE and press OK to hide the toolbar and the selected grid
pattern will now appear over your projected image.
The grid pattern may also be used alone, without any image input (disconnected RGB
cable). Just turn on the projector. Press MENU, then SCREEN, and OK. Arrow to the
grid pattern and select the GRAY or WHITE grid pattern you want to use (black grids
only work over other sources). Select OK and close the menus. The grid pattern will be
projected onto any surface.
Please note: Remember to turn grids off when finished.
There are Six Choices of Grid Patterns
RGB Input Features
Artograph Digital Art Projector LED200 Operation Guide 11
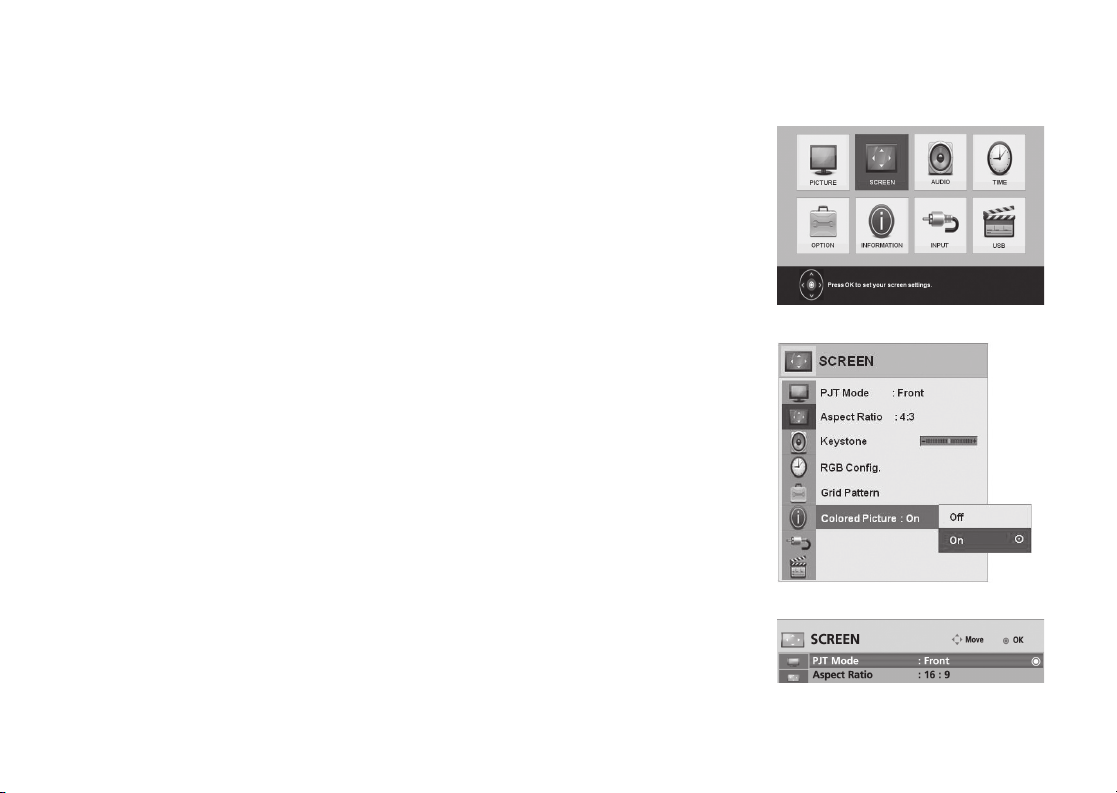
Grayscale / Color to Black & White
A valuable and unique tool of the Artograph Digital Art Projector LED200 is the
ability to easily change your projected images from color into black & white, with
no effect on your original image file. Color images can be shown in grayscale for
use in tone and contrast evaluation, as well as making it easier to trace.
Select MENU then SCREEN.
On the SCREEN menu, below the Grid Pattern is Colored Picture.
Press OK and arrow to choose color ON or OFF.
Press OK.
Image Orientation
Mirror or flip your images to match the orientation of your projection surface. Again, there
is no change made to your original image file or input source.
Select MENU then SCREEN
On the SCREEN select PJT MODE and press OK
RGB Input Features
Front, Front Ceiling, Rear, Rear Ceiling
Change the image to match the orientation you are projecting.
Choose your setting and press OK.
Artograph Digital Art Projector LED200 Operation Guide 12
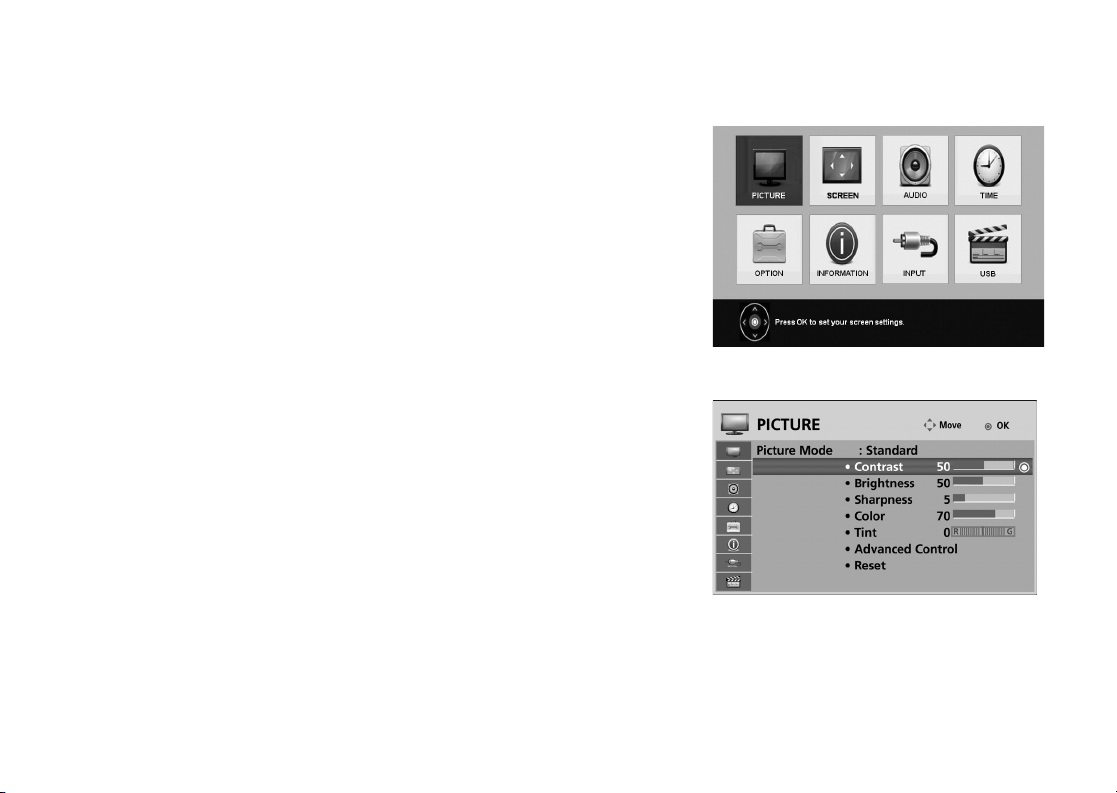
Image Settings & Adjustments
Custom image adjustments let you hone your projected image and artwork to suit your
exact needs and lighting conditions. Preset variations include Vivid, Standard, Cinema,
Sport, and Game.
Advance Control
The Advanced Control will give you basic Color Temp and Gamma settings.
Select MENU then PICTURE.
Select PICTURE MODE and press OK.
Any of the Picture Mode choices may be adjusted to your personal specifications, but
it’s recommended you begin with STANDARD. Choose STANDARD, or other Picture
Mode setting you wish to adjust and press OK.
Arrow down through Contrast, Brightness, Sharpness, Color, and Tint to set your
preferences. Click OK on each and use the arrows to adjust the setting. Press OK to
save the settings.
The Advanced Control will give you basic Color Temp and Gamma settings. RESET
returns you to the factory settings.
RGB Input Features
Artograph Digital Art Projector LED200 Operation Guide 13

Image Settings & Adjustments
Expert Control
The Expert Control gives you even more fine adjustments for your projected image,
including color temperature, and very exacting color, contrast, and brightness controls.
Go back to PICTURE MODE (as described on the previous page) Press OK toggle
down the list to EXPERT.
Select one of the Expert modes— EXPERT 1 or EXPERT 2. Press OK.
Advanced Control is now Expert Control. Select EXPERT CONTROL and press OK.
You’ll now see a wide range of color temperature, white balance, and color contrast
controls. Arrow down to scroll through the entire list.
Use the Q-MENU on your remote to quickly select the Picture Mode
setting that best suits your needs.
RGB Input Features
Artograph Digital Art Projector LED200 Operation Guide 14
USB Introduction & Image Selection
USB Input Features
The easiest and most portable way to display your images, individually or in a slideshow,
comes from using the included 5-in-1 SD card reader, or flash drive. You may also use
USB video cameras, or play AVI, m4v, Divx, MPEG1, and MPEG2 video files from a flash
drive. Music from MP3 music files can play either as background music for music during
a slideshow presentation, or to provide musical atmosphere while you create your art.
Press the power button on either the remote or the top of the projector.
Use the remote for most functions.
Find Your Images
Only JPG images will be projected via USB. Only supported file types will appear in the
onscreen directories. Folders with over 1000 files may not appear. Devices below USB
2.0 are supported but movie files may not work.
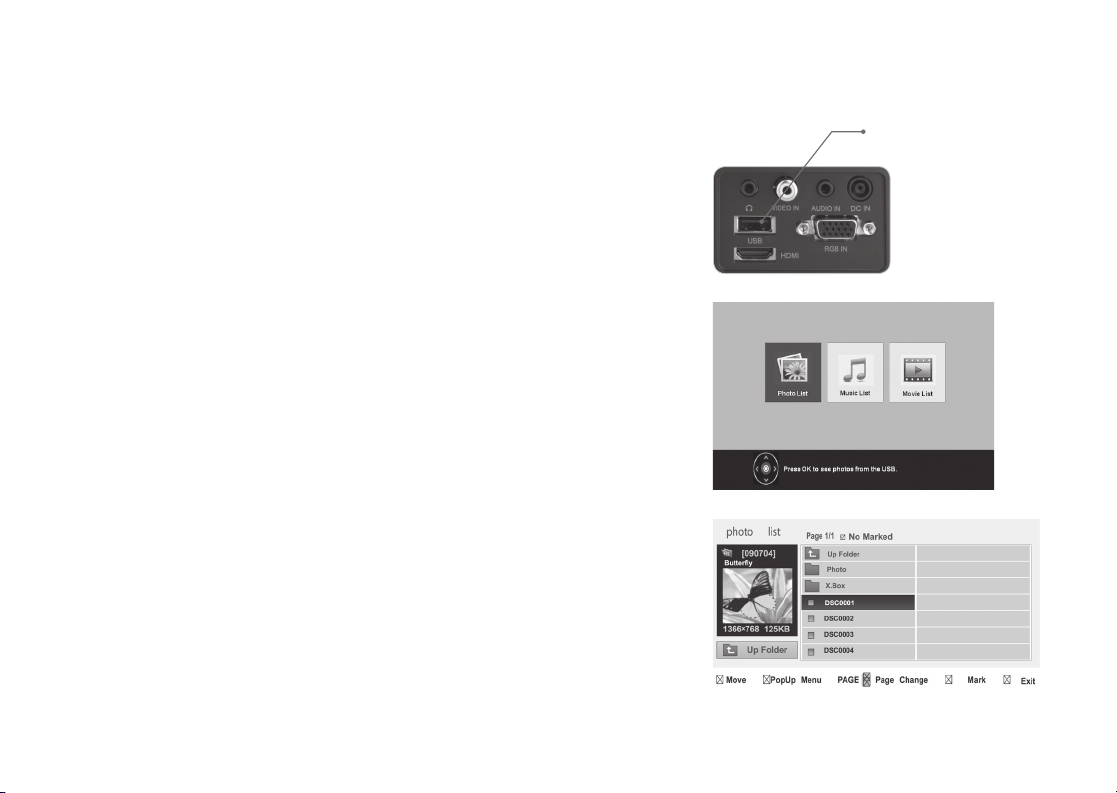
A message will display no “signal” or “no storage” units available. Insert your USB flash
drive, or the included SD card reader and SD card, to the projector via the USB connector.
A USB menu will appear after you plug into the USB port. Highlight the
desired menu and press OK.
You will now see your directory of file folders. Use the up/down and right/left arrows on
the remote to move through the directories. When you find the directory you want, such
as “My Pictures”, press OK to select it. Only supported images, JPGs, will appear in the
directory listing.
Please note: If a JPG image does not project and either a red screen or an obscure
small image appears, the file size or the compression algorithm is not compatible with the
projectors buffer size. Reduce the resolution/file size in any photo program.
USB
Artograph Digital Art Projector LED200 Operation Guide 15
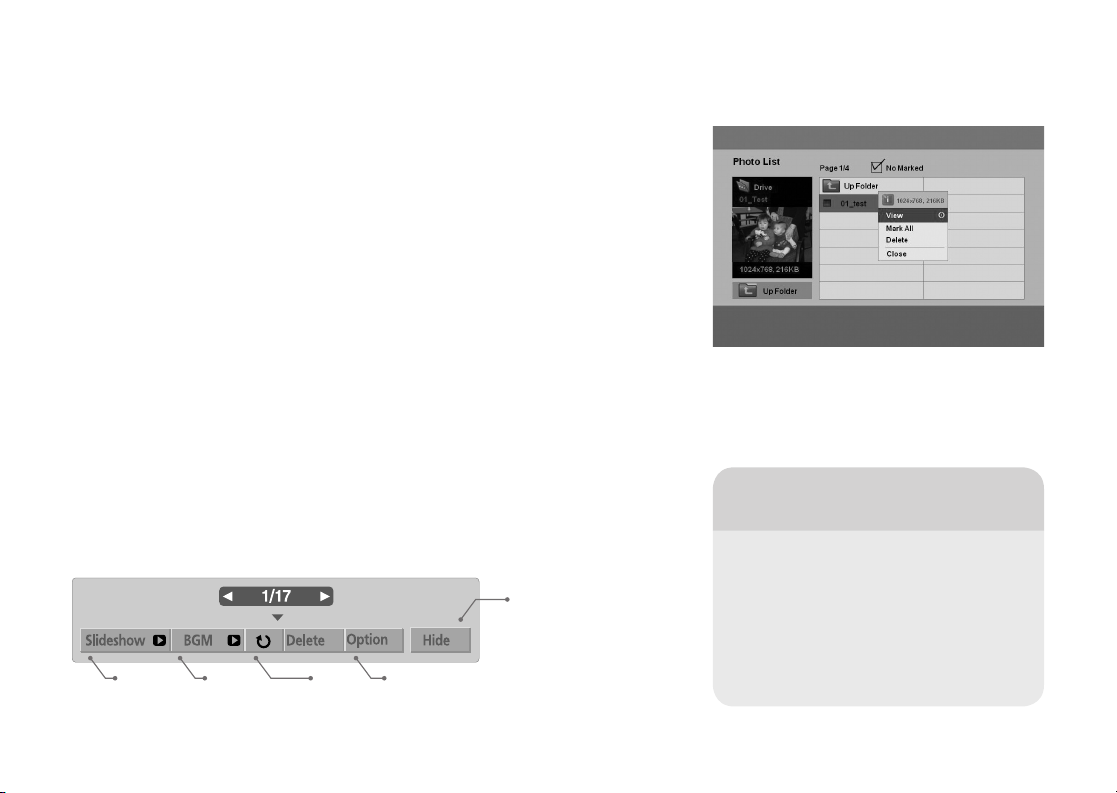
Photo List
Use the arrow keys to move through the directories. When you reach the image or
images you want to view click OK.
This opens a popup menu where you may select VIEW to view only the selected
image, MARK ALL to put a check by all images in the directory, or DELETE to
delete the selected image.
To select only certain images from the directory, use the MARK button on the remote to
put a check mark by the images you want to see. Press OK.
When you have selected your images, they will appear with the slideshow menu over
them. Use the right/left arrow keys to move through your selected images.
Or arrow down to SLIDESHOW, and press OK, to automatically show the images.
Arrow to OPTION to choose the Slideshow speed. Fast—3 seconds, Normal—5
seconds, Slow—7 seconds per image.
USB Input Features
Also from OPTION select your preselected (see next page) Background Music.
Arrow to HIDE and press OK to close the slideshow menu.
Hide menu press
OK again to get
menu back
Starts
slideshow
Starts
background music
Rotate
image
Select slideshow speed, choose
background music directory
Interior Designers…
Project a picture of any artwork, photograph,
or wall treatment onto the wall of your
client’s home in full original color and size for
easy appraisal right in the desired location.
Images can be stored on your flash drive
sorted by unlimited categories—color, cost,
size, pattern, etc.
Artograph Digital Art Projector LED200 Operation Guide 16
Grid Patterns
Start by setting the projector into the grid pattern setting.
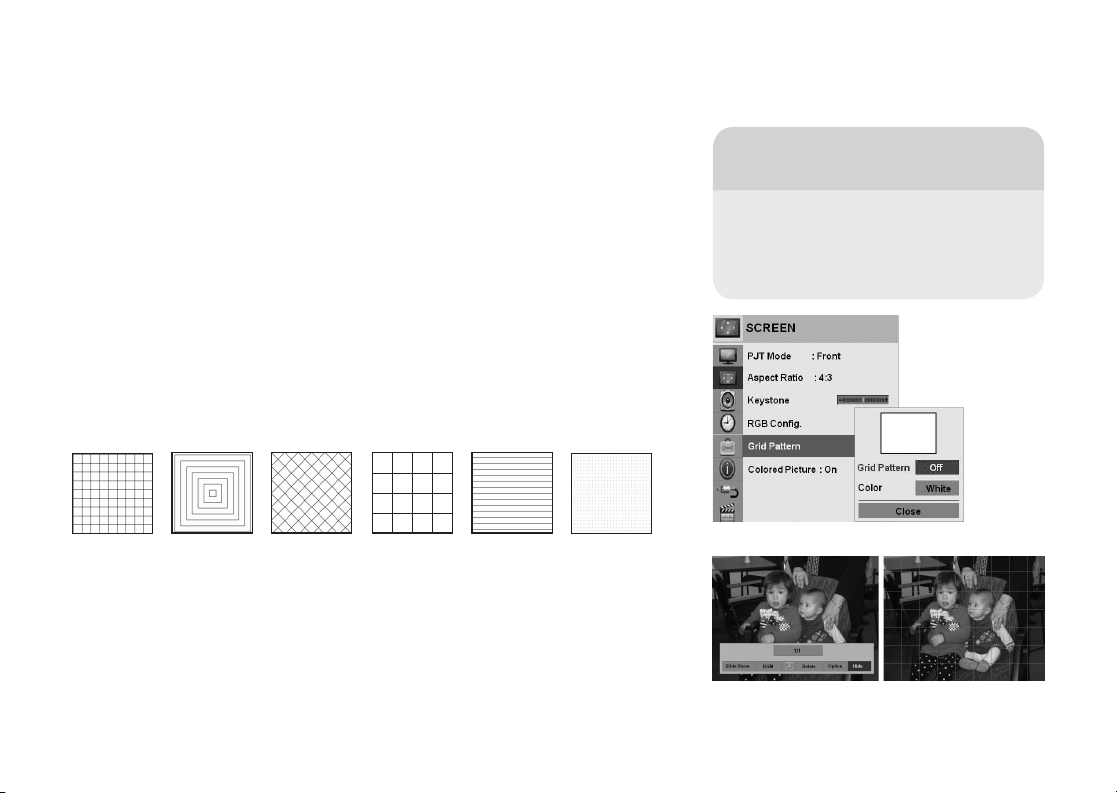
To turn on the grid pattern: Press MENU on the remote. Arrow to SCREEN
and press OK.
Arrow down to CLOSE and press OK. In the SCREEN menu, arrow down to GRID
PATTERN. Press OK. A popup window opens. Use the right/left arrows to move
through the grid choices.
The grid pattern may also be used alone, without any image input (disconnected RGB
cable). Just turn on the projector. Press MENU, then SCREEN, and OK. Arrow to the
grid pattern and select the GRAY or WHITE grid pattern you want to use (black grids
only work over other sources). Select OK and close the menus. The grid pattern will be
projected onto any surface.
Please note: Remember to turn grids off when finished.
There are Six Choices of Grid Patterns
Arrow down to COLOR. Choose the grid color that will be most visible over your image,
BLACK, GRAY, or WHITE, and press OK.
Press the RETURN button on the remote to go back to the main menu.
Select USB and OK.
Navigate back to your USB image directories. Select your image, or start slide show.
Press HIDE and the grid lines will appear over your image.
USB Input Features
Interior Decorators…
Project the grids to guide layout of tiles,
mosaics, murals, patterns, stencils, or
flooring. Project grids or images to guide
custom paint finishes, stripes and borders.
Artograph Digital Art Projector LED200 Operation Guide 17
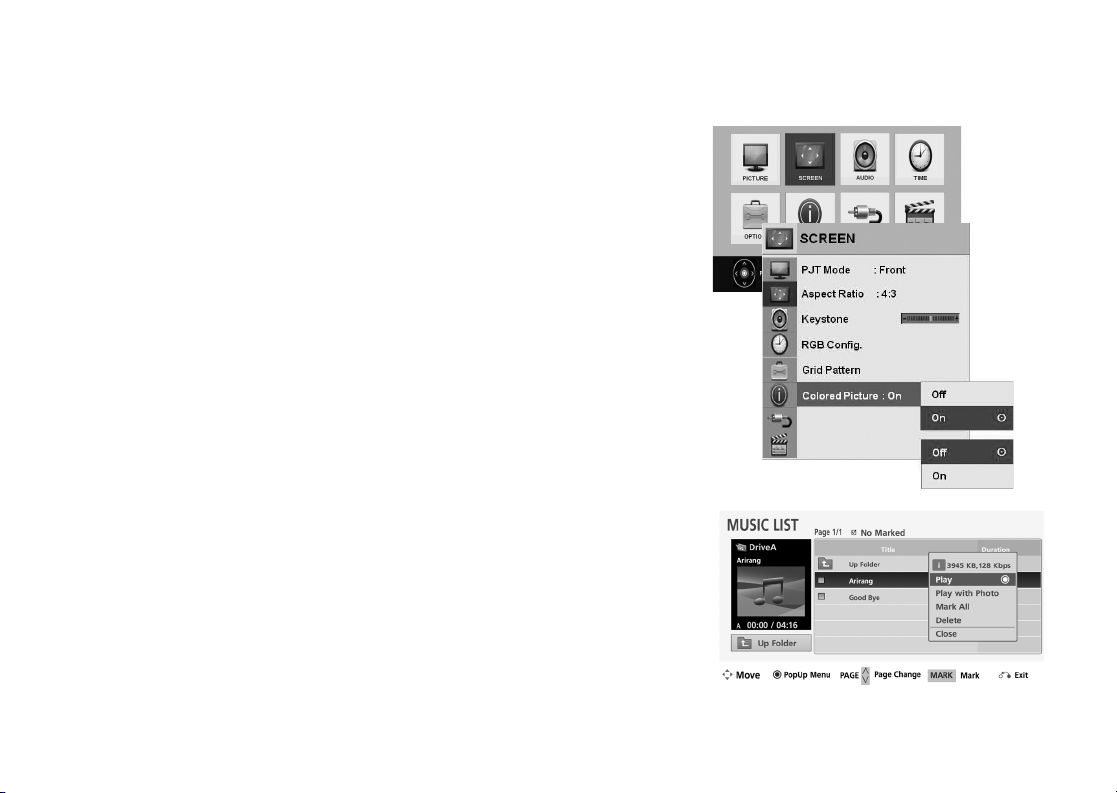
Grayscale/Color to Black & White
Start by setting the projector into the black & white setting.
Select MENU then SCREEN.
On the SCREEN menu, below the Grid Pattern is COLORED PICTURE.
Press OK and arrow to choose color ON or OFF. Press OK.
Now use the RETURN button on the remote to return to the main menu.
Select USB and OK.
Navigate back to your USB image directories.
Background Music
The projector is designed to play background music in MP3 format from
your USB drive to accompany your slideshow.
Press USB, arrow to MUSIC LIST, press OK.
Move through the directories like you did through the Photo List to find
your MP3 music files. Press OK to select.
USB Input Features
In the popup menu select PLAY WITH PHOTO to have background music with
your displayed image.
Artograph Digital Art Projector LED200 Operation Guide 18
 Loading...