

Page 1
Synergy
User’s Guide
Arthrex GmbH
© 2020 Arthrex, Inc. All rights reserved.
AR-8305
Resection™
The Arthrex Synergy
information for all components of the Arthrex Synergy
console (Model AR-8305), including the accessories. All operating
personnel must read this User’s Guide thoroughly prior to using
this system and follow all safety warnings, cautions, and notes.
Arthrex, Inc.
Naples, FL 34108-1945 USA
Toll Free: 1-(800) 934-4404
www.arthrex.com
Erwin-Hielscher-Strasse 9
81249 München, Germany
Resection
User’s Guide provides safety operation
Resection
Tel: +49 89 909005-0
www.arthrex.de
DFU-0213-8 Revision 0 03/2020
Page 2

This page intentionally left blank
Page 3

Table of Content
1.0 GENERAL WARNINGS AND SAFETY NOTICES - READ THIS FIRST ...... 1
Important Symbols and Conventions ................................................................................ 1
Symbol Definitions ............................................................................................................. 4
Shipping, Unpacking, and Warranty Information .............................................................. 6
2.0 PRODUCT DESCRIPTION .................................................................................. 7
Product Description and Intended Use ............................................................................. 7
Product Features ............................................................................................................... 8
AR-8305Console - Front View ................................................................................................. 8
AR-8305 Console - Rear View ................................................................................................. 9
AR-8305 Display Messages ..................................................................................................... 9
Applied Parts and Accessory Features ............................................................................ 13
Standard Footswitch (AR-8310) ............................................................................................ 13
3.0 TECHNICAL SPECIFICATIONS ........................................................................ 14
Console ............................................................................................................................ 14
Standard Footswitch ........................................................................................................ 14
Ambient Conditions for Operation .................................................................................. 14
Ambient Conditions for Storage (in shipping packaging) ................................................ 14
Safety, EMC, and Regulatory Requirements ................................................................... 15
4.0 SETUP.................................................................................................................... 16
How to Set Up the Console .............................................................................................. 16
AC Power Safety Considerations ..................................................................................... 16
Replacing the Fuses ......................................................................................................... 17
Electromagnetic Compatibility ........................................................................................ 17
Basic Setup Procedure for the AR-8305 Console ............................................................ 18
Setting up a Footswitch ................................................................................................... 19
Setting up the Shaver Handpieces ................................................................................... 19
Setting up Other Accessory Handpieces.......................................................................... 19
Shutdown Procedure ....................................................................................................... 19
5.0 OPERATION AND FREQUENTLY USED FUNCTIONS ............................... 20
Main Screen ..................................................................................................................... 20
Settings Menu Main Screen ............................................................................................. 21
Language Selection Screen .............................................................................................. 23
Oscillation Mode Selection Screen .................................................................................. 24
DFU-0213-8r0_fmt_en-US Page i
Page 4

Footswitch Override Screen ............................................................................................ 25
Reset Defaults Screen ...................................................................................................... 26
Information Screen .......................................................................................................... 27
Buttons ............................................................................................................................ 28
Buttons - Main Screen .......................................................................................................... 28
Speed Test Mode ............................................................................................................. 30
Speed Adjustment ........................................................................................................... 30
Oscillation Mode Adjustment .......................................................................................... 30
Accessory Handpiece Speed Limits and Deltas ............................................................... 31
Drill Speeds ........................................................................................................................... 31
Console Speed Controls ........................................................................................................ 31
Attachment Motor Control .............................................................................................. 32
Definition of Direction .......................................................................................................... 32
Forward, Reverse and Oscillation Modes ............................................................................. 32
Cruise Control ....................................................................................................................... 32
Toggle Function .................................................................................................................... 33
Footswitches .................................................................................................................... 35
Standard Footswitch ............................................................................................................. 35
Gas Pedal Footswitch ........................................................................................................... 35
Multi-Function Footswitches ................................................................................................ 35
Accessory Handpieces ..................................................................................................... 35
6.0 CLEANING AND DISINFECTING ..................................................................... 36
Console AR-8305 .............................................................................................................. 36
Footswitches .................................................................................................................... 36
Accessory Cable ............................................................................................................... 37
Accessory Handpieces ..................................................................................................... 37
7.0 STERILIZATION ................................................................................................. 39
8.0 TRANSMISSIBLE SPONGIFORM ENCEPHALOPATHY (TSE) AGENTS 40
9.0 MAINTENANCE ................................................................................................... 41
Life Expectancy ................................................................................................................ 41
Periodic Maintenance ...................................................................................................... 41
10.0 TECHNICAL SUPPORT ...................................................................................... 42
How to Display the Software Version .............................................................................. 42
Additional Technical Information .................................................................................... 42
11.0 TROUBLESHOOTING ........................................................................................ 43
Troubleshooting Interference with Other Devices .......................................................... 44
DFU-0213-8r0_fmt_en-US Page ii
Page 5

12.0 REPAIR POLICY .................................................................................................. 45
13.0 END OF LIFE, ENVIRONMENTAL DIRECTIVES ......................................... 45
14.0 ELECTROMAGNETIC EMISSIONS .................................................................. 46
List of Figures
Figure 1 Front Panel of Console ........................................................................................................ 8
Figure 2 Rear Panel of Console ......................................................................................................... 9
Figure 3 Standard Footswitch - Description .................................................................................. 13
Figure 4 Main Screen Display - One Tool Attached ..................................................................... 20
Figure 5 Main Screen Display - Two Tools Attached .................................................................. 20
Figure 6 Settings Menu Display - Operation ................................................................................. 21
Figure 7 Language Selection Display - Operation ........................................................................ 23
Figure 8 Oscillation Mode Selection Screen - Operation ............................................................. 24
Figure 9 Footswitch Override Selection Screen - Operation ....................................................... 25
Figure 10 Reset Defaults Screen - Operation ................................................................................... 26
Figure 11 Information Screen - Operation ....................................................................................... 27
Figure 12 Single Handpiece Screen Oscillation Mode Location ................................................... 28
Figure 13 Two Handpiece Buttons - Operation .............................................................................. 29
DFU-0213-8r0_fmt_en-US Page iii
Page 6

List of Tables
Table 1 Front Panel Elements .......................................................................................................... 8
Table 2 Rear Panel Elements ............................................................................................................ 9
Table 3 AR-8305 Display Messages .............................................................................................. 10
Table 4 *TOOL FAILURE* Error Code Definitions .................................................................... 12
Table 5 Elements of the Standard Footswitch ............................................................................. 13
Table 6 AR-8305 Console Specifications ...................................................................................... 14
Table 7 Standard Footswitch Specifications ................................................................................ 14
Table 8 AR-8305 Ambient Conditions for Operation ................................................................. 14
Table 9 AR-8305 Ambient Conditions for Storage ...................................................................... 14
Table 10 Safety, EMC, and Regulatory Requirements ................................................................. 15
Table 11 Main Screen Display Elements ........................................................................................ 20
Table 12 Settings Menu Display - Operation ................................................................................. 22
Table 13 Language Menu Display - Operation ............................................................................. 23
Table 14 Oscillation Mode Display - Operation ............................................................................ 24
Table 15 Footswitch Override Display - Operation ...................................................................... 25
Table 16 Reset Defaults Display - Operation ................................................................................. 26
Table 17 Information Screen Display - Operation ........................................................................ 27
Table 18 Oscillation Mode - Operation .......................................................................................... 28
Table 19 Two Handpiece Buttons - Operation .............................................................................. 29
Table 20 Accessory Handpiece Speed Limits and Delta .............................................................. 31
Table 21 Handpiece Accuracy ......................................................................................................... 31
Table 22 Toggle Function ................................................................................................................. 34
Table 23 Troubleshooting: Faults, their Causes and Solutions ................................................... 43
Table 24 Guidance and Manufacturer’s Declaration – Electromagnetic Emissions ................ 46
Table 25 System Cables .................................................................................................................... 46
Table 26 Guidance and Manufacturer's Statement - Electromagnetic Immunity .................... 47
Table 27 Guidance and Manufacturer's Statement – Recommend Separation Distance
between portable and mobile RF communications equipment and the
Model AR-8305 .................................................................................................................. 49
DFU-0213-8r0_fmt_en-US Page iv
Page 7
General Warnings and Safety Notices - Read This First
Synergy Resection User’s Guide
1.0 General Warnings and Safety Notices - Read This First
Important Symbols and Conventions
It is imperative that the symbols and conventions listed below be clearly
Resection
understood. The Synergy
useful information using these symbols and conventions.
Users of this device are encouraged to contact their Arthrex representatives if
they require a more comprehensive surgical technique.
User’s Guide identifies critical, important, and
WARNING!
The WARNING! is the most important safety symbol. It identifies critical
information that must be followed precisely to avoid injury or death.
1. Caution: Federal law restricts this device to sale by or on the order of a
physician.
2. This device is intended to be used by a trained medical professional. Use this
device only for purposes described in the User’s Guide, under the supervision
of a trained and licensed physician.
3. No modifications of the console (AR-8305) or accessories are allowed.
4. Use this device only under the supervision of a trained and licensed
physician. This device should not be used by untrained personnel or used for
indications other than those described in this User’s Guide.
5. Do not open or attempt to service this system, as this may void your
warranty. There are no user-serviceable parts inside. Removing the
cover may introduce an electric shock hazard by exposing you to
dangerous high voltages or other risks. If the system malfunctions,
return it for service immediately.
6. To avoid the RISK of electric shock, this equipment must only be connected
to a SUPPLY MAIN with protective earth ground.
7. Do not have device in direct contact with patient if high-frequency devices are
in use, or if the patient requires defibrillation.
8. DO NOT stack or place equipment adjacent to the AR-8305 console, if
possible. If such a configuration is necessary, carefully observe the
configuration in question to ensure that electromagnetic interference does not
degrade performance.
9. Use only Arthrex approved accessories. Other accessories may result in
increased emissions or decreased immunity of the system. Contact your
Arthrex representative for a complete list of accessories. DO NOT modify any
accessory. Failure to comply may result in patient and/or operating room staff
injury.
10. This equipment is NOT suitable for use in the presence of a flammable
anesthetic mixture with air or with oxygen rich or nitrous oxide environment.
11. Do not have device in direct contact with patient if high-frequency devices are
DFU-0213-8r0_fmt_en-US Page 1 of 50
Page 8

General Warnings and Safety Notices - Read This First
Synergy Resection User’s Guide
in use or if the patient requires defibrillation.
12. After autoclaving, the accessory devices are VERY HOT. Handle with care to
avoid burns.
13. Biohazard waste, such as explanted devices, needles and contaminated
surgical equipment, should be safely disposed of in accordance with the
institutions policy.
14. Serious incidents should be reported to Arthrex, Inc. or an in-country
representative, and to the health authority where the incident occurred.
The PRECAUTION! symbol identifies methods and procedures
that must be followed to avoid damaging the device or causing it
to malfunction.
1. DO NOT – under any condition or for any reason – open the console (AR-
8305) or any other shaver accessory.
2. Only use replacement power cords that meet medical grade standards
according to IEC 60320-1, Detachable Power Supply Cords or electrical
standards for the designated country where the AR-8305 is being used.
Contact your Arthrex representative for further information.
3. Avoid position console so that it is difficult to disconnect coupler or plug from
supply main.
4. Connecting an extension cord to the AR-8305 may result in a reduced level of
safety.
5. Always use fuses with the correct values to avoid allowing overcurrent to
enter the system.
6. An incorrect fuse may increase the risk of electrical shock or fire hazard.
7. This device has passed testing for EMI / RFI radiation and susceptibility and
EMC compatibility. This device may cause interference to other devices in the
near vicinity if not set up and used as Arthrex instructs.
8. Do not attach handpieces or footswitches during the Self Test or the
Programming Modes.
9. Only use footswitches developed by Arthrex specifically for the AR-8305
Synergy
10. Only use shaver handpieces and cables that have been developed by
Arthrex specifically for the Synergy
11. Only use handpieces and cables that have been developed by Arthrex
specifically for the Synergy
the console to prevent accidental separation during use. To avoid damage,
disconnect the footswitch by pulling on the cable connector shell (plug) only.
12. The accessory handpiece cable connects and locks to the console to prevent
accidental separation during use. To avoid damage, disconnect the
footswitch by pulling on the cable connector shell (plug) only.
13. Always comply with the instructions issued by the manufacturer of the
cleaning disinfectant regarding concentration, exposure times,
temperature and material compatibility.
Resection
console.
Resection
Resection
console.
. The footswitch cable connects and locks to
DFU-0213-8r0_fmt_en-US Page 2 of 50
Page 9

General Warnings and Safety Notices - Read This First
Synergy Resection User’s Guide
14. NEVER clean the console with liquid cleaners. If there is dust, remove it with
dry compressed air.
15. Do NOT clean the device with abrasive cleaning or disinfectant
compounds, solvents, or other materials that could scratch or damage
the device.
16. The footswitch is NOT suitable to be cleaned and disinfected in a
thermo washer disinfector.
17. NEVER allow the console receptacles to have any contact with liquids. If
there is dust or moisture on the receptacles, remove it with dry compressed
air. ONLY dry connectors should be plugged into the console.
18. Refer to the Instructions for Use package insert for detailed shaver handpiece
(DFU-0154-XX) and Adapteur Power System II Accessory Attachments
(DFU- 0149-XX) cleaning and sterilization instructions included with each
handpiece. Additional copies of this insert can be obtained from the Arthrex
website at www.arthrex.com
representative.
19. NEVER place the shaver handpiece in Cidex or other aldehyde disinfectant
solutions.
20. After sterilization in the autoclave, let the accessory device cool down slowly.
NEVER use cold water to cool the handpieces. This will damage the
electronic components and seals.
21. Liquid on the cable connector of the accessory device can damage the
device. Before connecting the cable, ensure the receptacles are clean and
dry.
22. Open the suction control completely to ensure proper circulation, if
applicable.
23. Open the chuck completely to ensure proper circulation, if applicable.
24. Remove all accessories, including shaver blades, drill bits and saw blades
before sterilizing a handpiece.
25. Surgeons are advised to review the product-specific surgical technique prior
to performing any surgery. Arthrex provides detailed surgical techniques in
print, video, and electronic formats. The Arthrex website also provides
detailed surgical technique information and demonstrations. Or, contact your
Arthrex representative for an onsite demonstration.
, or by contacting your local Arthrex
NOTE: This identifies information that can simplify the setup and
operation of this device.
1. Read this User’s Guide thoroughly before operating the device and save it for
future reference.
2. Extension cords must meet local electrical standard. Extension cords are not
recommended to be used with the AR-8305.
3. The AR-8305 console incorporates a universal AC input power supply. A
voltage selection switch is not required.
4. AR-8305 has been designed to accept EMC from other devices within the
limitations as described in section 14.0.
5. The setup for a footswitch is the same for all models. The console detects
which version is attached and allows the appropriate functions.
DFU-0213-8r0_fmt_en-US Page 3 of 50
Page 10
General Warnings and Safety Notices - Read This First
Synergy Resection User’s Guide
Caution: Federal Law
of a Physician.
Electrical Hazard,
components.
6. While operating the handpieces, the settings can be changed without risk of
damaging the motor or console.
In EU Only: Procedures carried out using these devices may be used on the general
population.
In EU Only: The clinical benefits associated with the use of these devices outweigh the known
clinical risks.
In the EU Only: There are no unacceptable residual risks or uncertainties associated with the
clinical use of these devices.
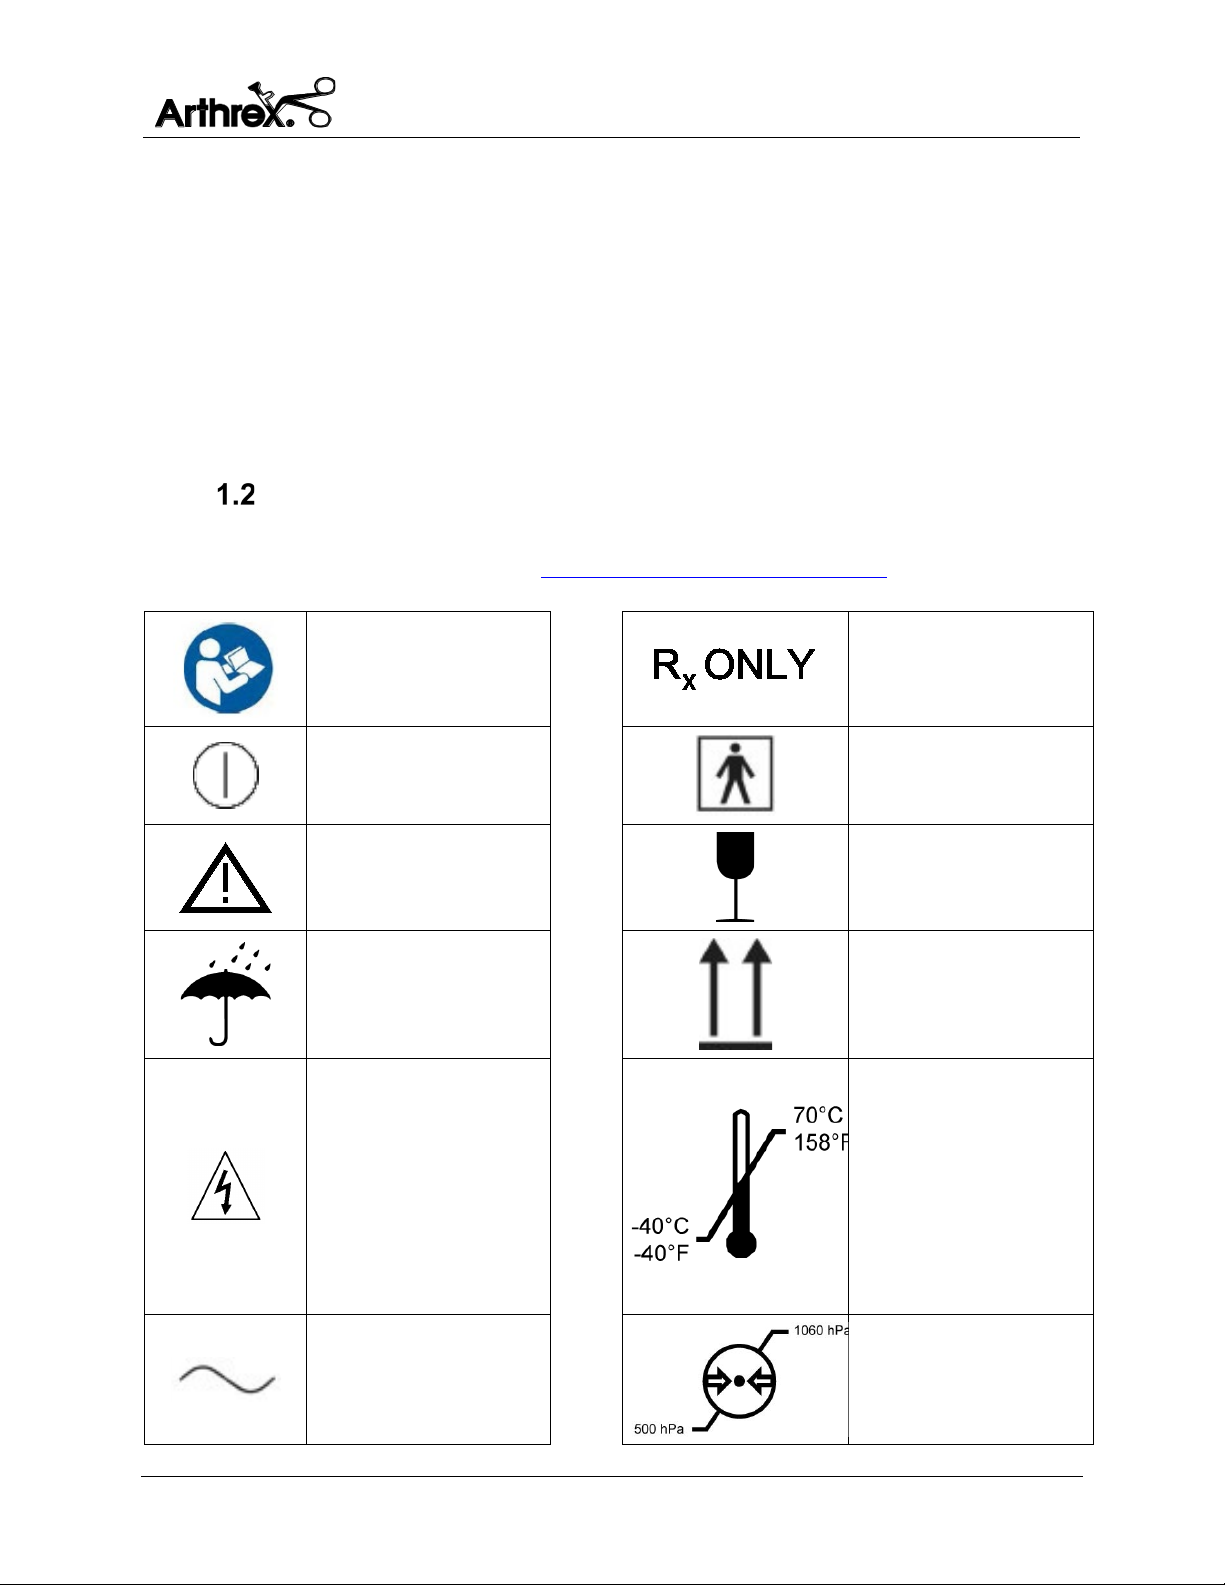
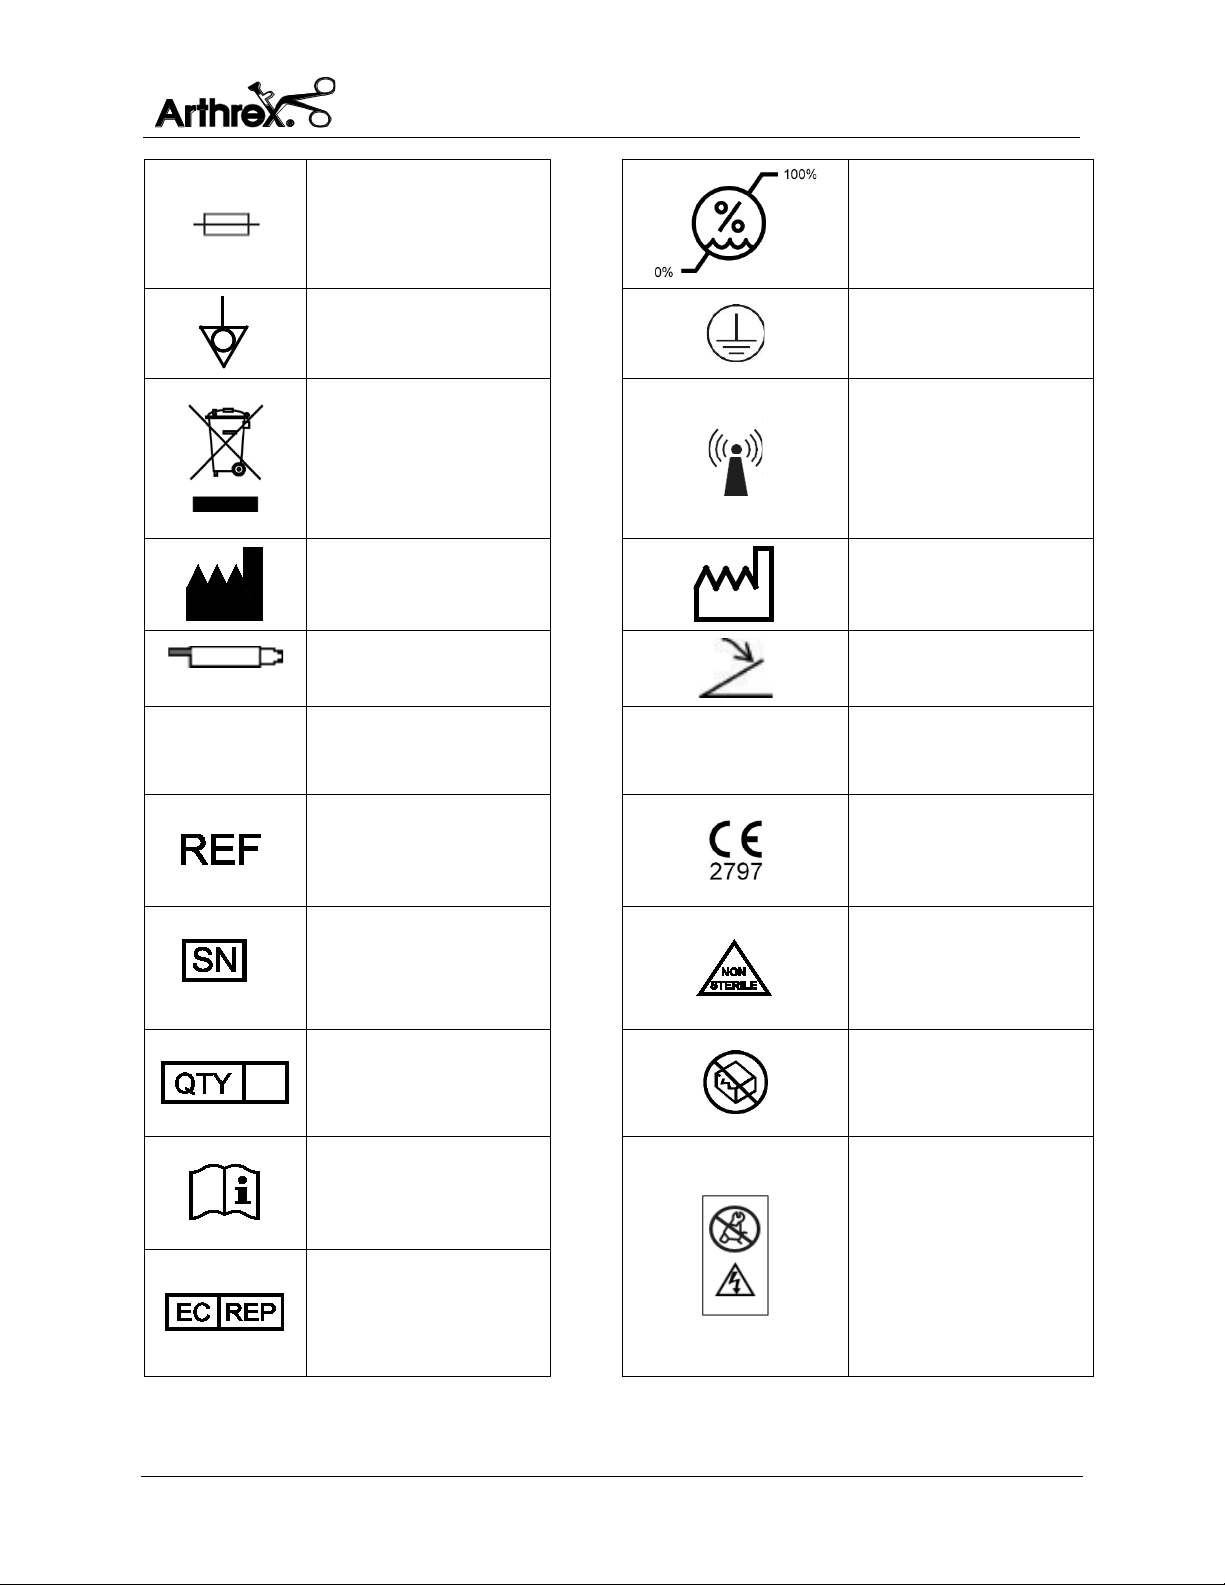
Symbol Definitions
All symbols used on the labeling along with the title, description and standard designation
number may be found on our website at www.arthrex.com/symbolsglossary
.
Safety Sign
Follow Operating
Instructions
On / Off (push-push)
Precaution of Warning
Dangerous Voltages
attempt to repair the
Personnel may remove
the cover, or obtain
Notice
Keep Dry
are Present. Never
equipment. Only
Trained Service
access to system
Restricts this device to
sale by or on the order
Type BF Equipment
Fragile
This Side Up
Temperature Limits
for Storage and
Transport
DFU-0213-8r0_fmt_en-US Page 4 of 50
Alternating Current
Pressure Limits for
Storage and Transport
Page 11
General Warnings and Safety Notices - Read This First
Synergy Resection User’s Guide
WEEE [Waste
of-Life of Product.
Universal Serial Bus
thumb drive]
The product meets the
Directive 93/42/EEC
USB
Fuse
Equipotential
[Equipment Potential]
Electronics and
Electrical Equipment]
Symbol. Regarding
European Union End-
Manufacturer
Handpiece connection
[For use ONLY with
RS-232
Humidity Limits for
Storage and Transport
Protective Earth
Ground [Functional]
RF Symbol. Non-
ionizing
Electromagnetic
Radiation
Date of Manufacture;
year and month.
Foot Pedal connection
Serial Port [Arthrex
Integration]
Catalog number
Serial number
Representative in the
European Community
Quantity
Consult Instructions
for Use
Authorized
essential requirements
of Medical Device
Non Sterile
Do not use if package
is damaged
No user-serviceable
parts inside
Electrical hazard
DFU-0213-8r0_fmt_en-US Page 5 of 50
Page 12

General Warnings and Safety Notices - Read This First
Synergy Resection User’s Guide
Shipping, Unpacking, and Warranty Information
Carefully unpack and inspect all components for shipping
damage. Any damage could compromise patient safety and
should be reported immediately to Arthrex or any authorized
Arthrex distributor. Warranty could be voided if shipping or firstinstallation damage is not reported within 7 business days of receiving the
device. Refer also to our General Terms of Business.
The warranty is not valid if modifications are made to the product or repairs are
completed outside of Arthrex or an authorized Arthrex distributor. Arthrex will
answer any questions referring to the quality, reliability and/or shelf life of any
product identified in this User’s Guide.
This is not a warranty document. For all warranty information, including
disclaimers, exclusions, terms, conditions and related provisions, refer to the
“Arthrex U.S. Product Warranty” section of the Arthrex, Inc. website, found at
www.arthrex.com whose provisions are incorporated herein by reference.
DFU-0213-8r0_fmt_en-US Page 6 of 50
Page 13

Product Description
Synergy Resection User’s Guide
2.0 Product Description
Product Description and Intended Use
The Arthrex AR-8305 Synergy
Resection
Shaver System is a motorized,
suction/cutting device used for the resection and aspiration of soft tissue,
cartilage and bone during arthroscopic surgical procedures.
The console is microprocessor controlled and features two fully functional
channels that allow optional simultaneous handpiece operation. Both channels
can be operated with a single foot switch or individually when a second foot
Resection
switch is attached to the console. The Synergy
has a maximum speed of
8,000 revolutions per minute providing precise burr control during surgical
procedures.
The Synergy
Resection
console is designed for continuous operation. The handpieces
are individually protected by a resetting thermal fuse. In the event of a motor
overload fault (e.g., excess current) the fuse heats up and the device is
deactivated. When the fault is removed and the fuse cools down (typically about
30 seconds) operation resumes at the pre-failure settings.
The cable and all handpieces can be sterilized, so handpieces can be changed
during the surgical procedure without endangering surgical sterility.
The AR-8305 Synergy
Resection
Console and included Applied Parts and
Accessories:
• AR-8305 Console with power cord
• User’s Guide Optional
Applied Parts
• Footswitch Controlled (FC) Shaver Handpieces
• Handpiece Controlled (HC) Shaver Handpieces
• Drill Handpiece with key for Jacobs chuck
• Sagittal Saw Handpiece with wrench
• Small Joint Shaver
Other Optional Accessories:
• Accessory Handpiece Cable
• Gas Pedal Footswitch
• Corded Multi-Function Footswitch
• Wireless Multi-Function Footswitch
Save the packaging for later transport of the device.
DFU-0213-8r0_fmt_en-US Page 7 of 50
Page 14
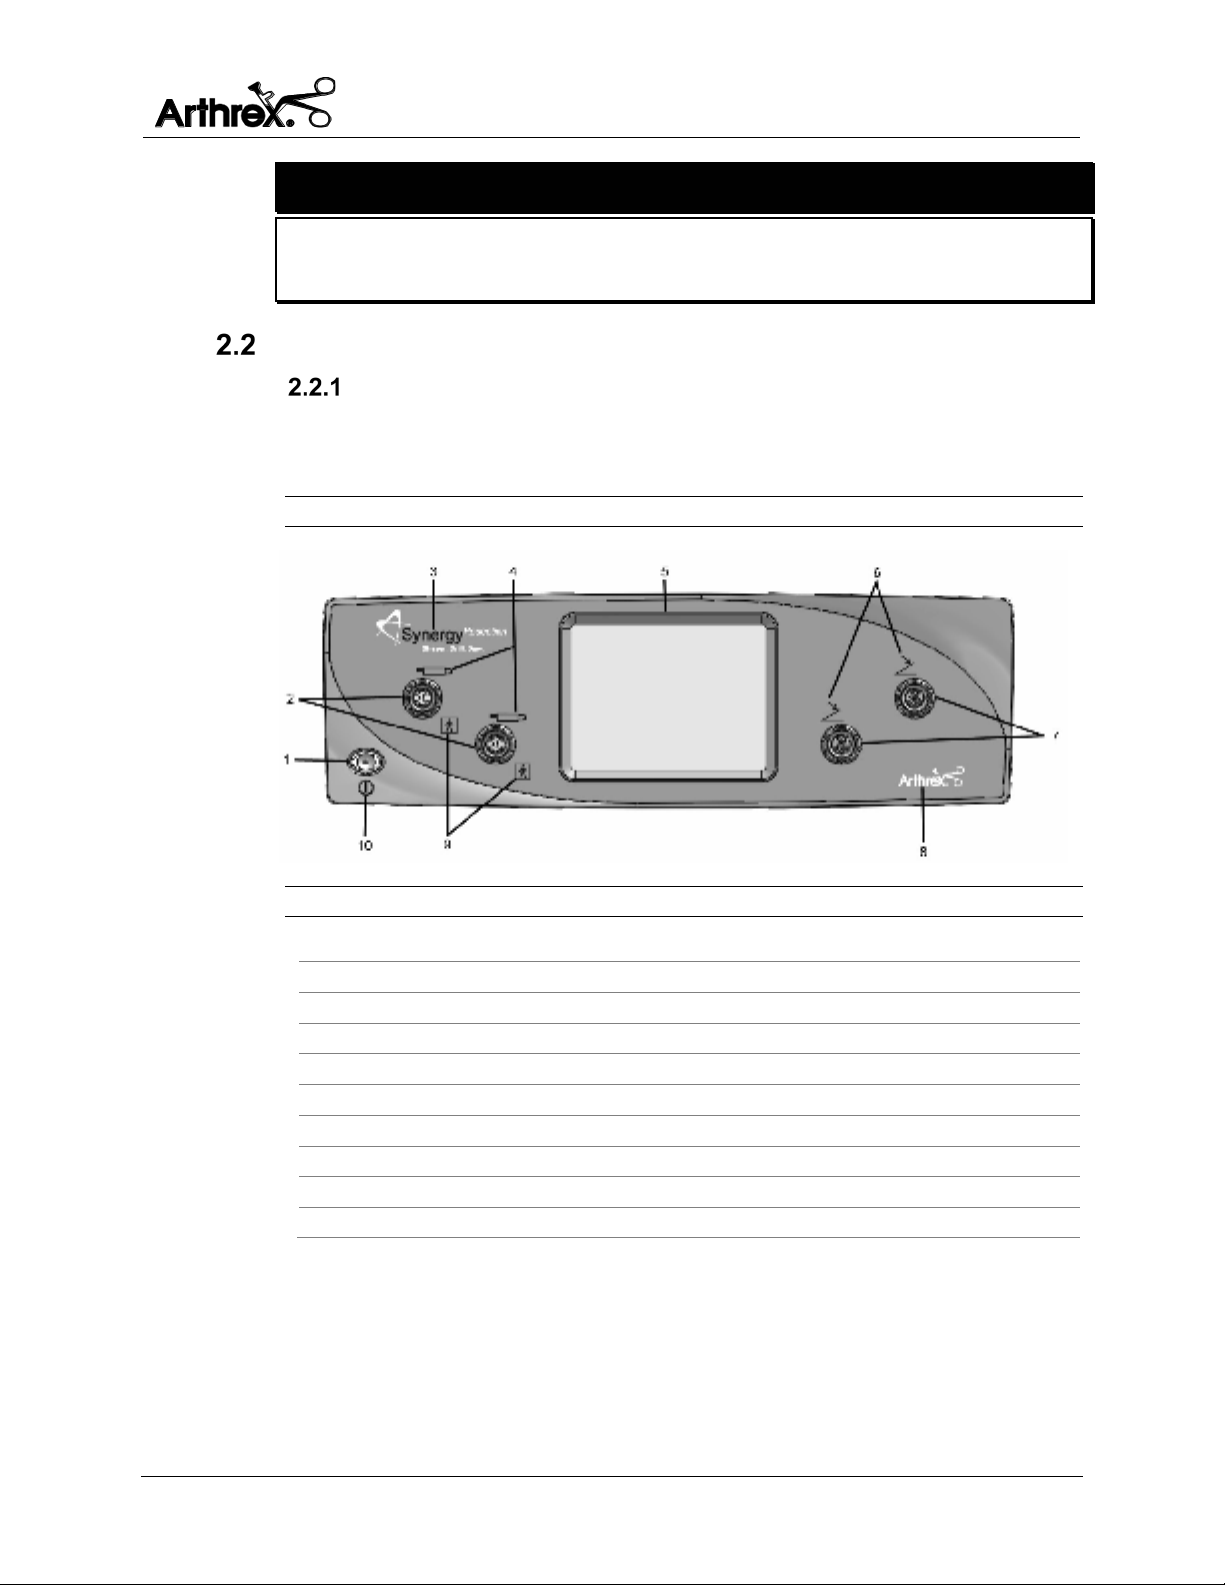
Product Description
Synergy Resection User’s Guide
1.
On / Off Power Switch
2.
Handpiece Connectors
3.
Synergy Product Logo
4.
Handpiece Symbols
5.
Touch Panel Visual Display
6.
Footswitch Symbols
7.
Footswitch Connectors
8.
Arthrex Logo
9.
Type BF Symbols (Electric Shock Protection)
10.
Power Switch IEC 60417-5010 symbol (On / Off)
WARNING!
Use this device only under the supervision of a trained and licensed physician.
This device should not be used by untrained personnel or used for indications
other than those described in this User’s Guide.
Product Features
AR-8305Console - Front View
Figure 1 shows the front panel of the AR-8305 console. Features and symbols are
identified in Table 1 below.
Figure 1 Front Panel of Console
Table 1 Front Panel Elements
DFU-0213-8r0_fmt_en-US Page 8 of 50
Page 15
Product Description
Synergy Resection User’s Guide
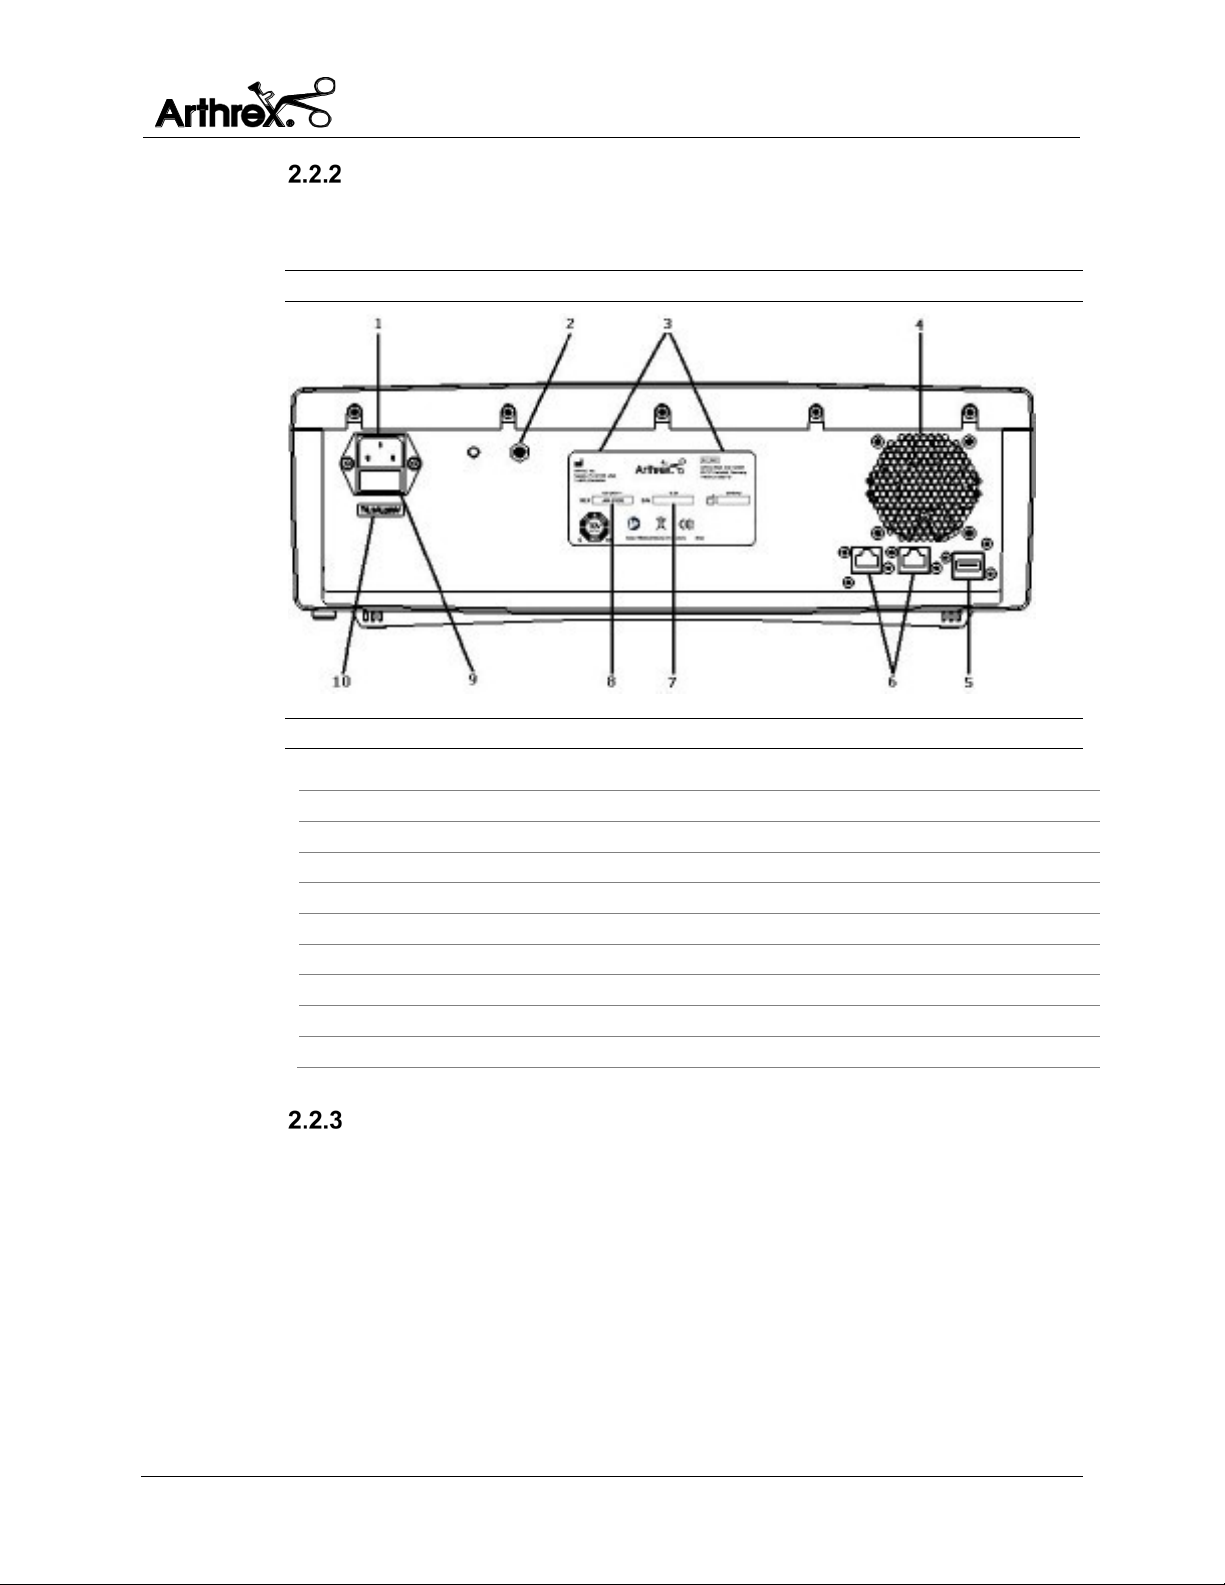
1. Main power input Plug
2. Equipotential Bonding Pin with Stamped Equipotential Bonding Symbol
3. Address
4. Fan
5. USB port (For use ONLY with thumb drive)
6. Serial ports for Arthrex integration
7. Serial number label
8. Model number label
9. Fuse holder for the Power Entry Module
10. Fuse label
AR-8305 Console - Rear View
Figure 2 shows the rear panel of the console. Features and symbols are identified
in Table 2 below.
Figure 2 Rear Panel of Console
Table 2 Rear Panel Elements
AR-8305 Display Messages
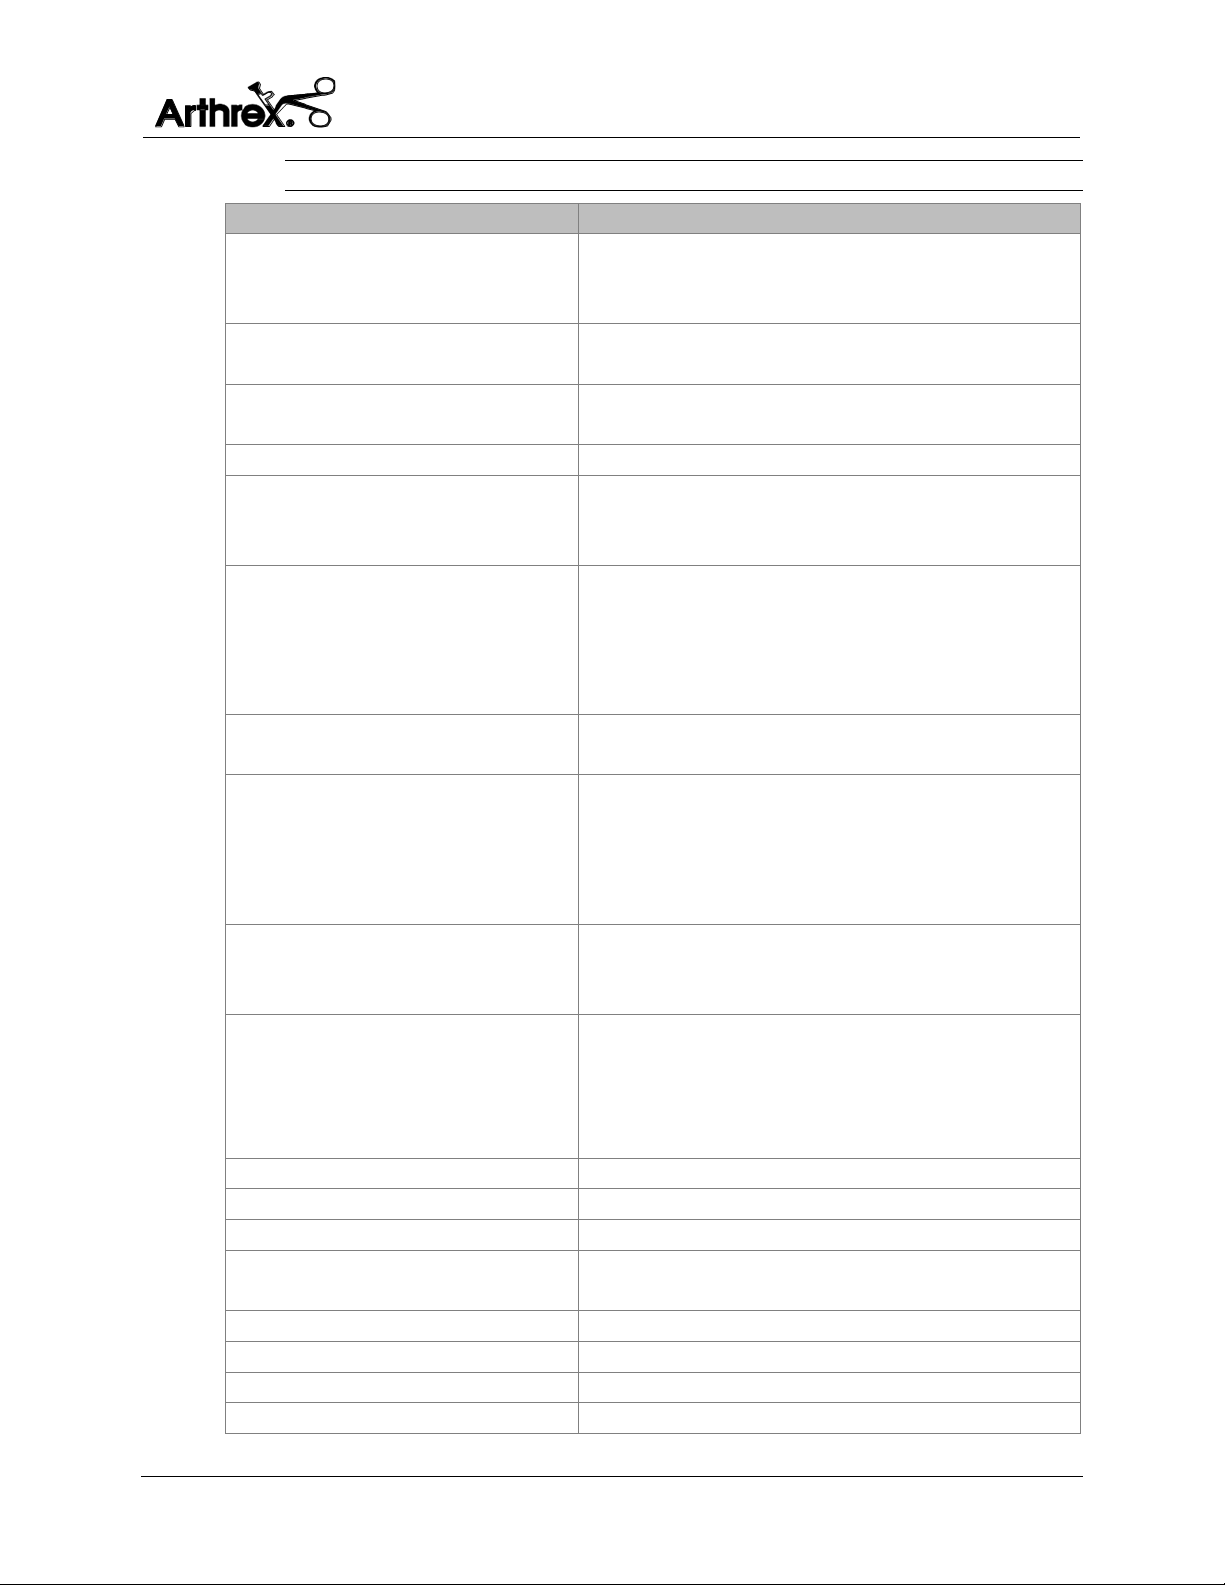
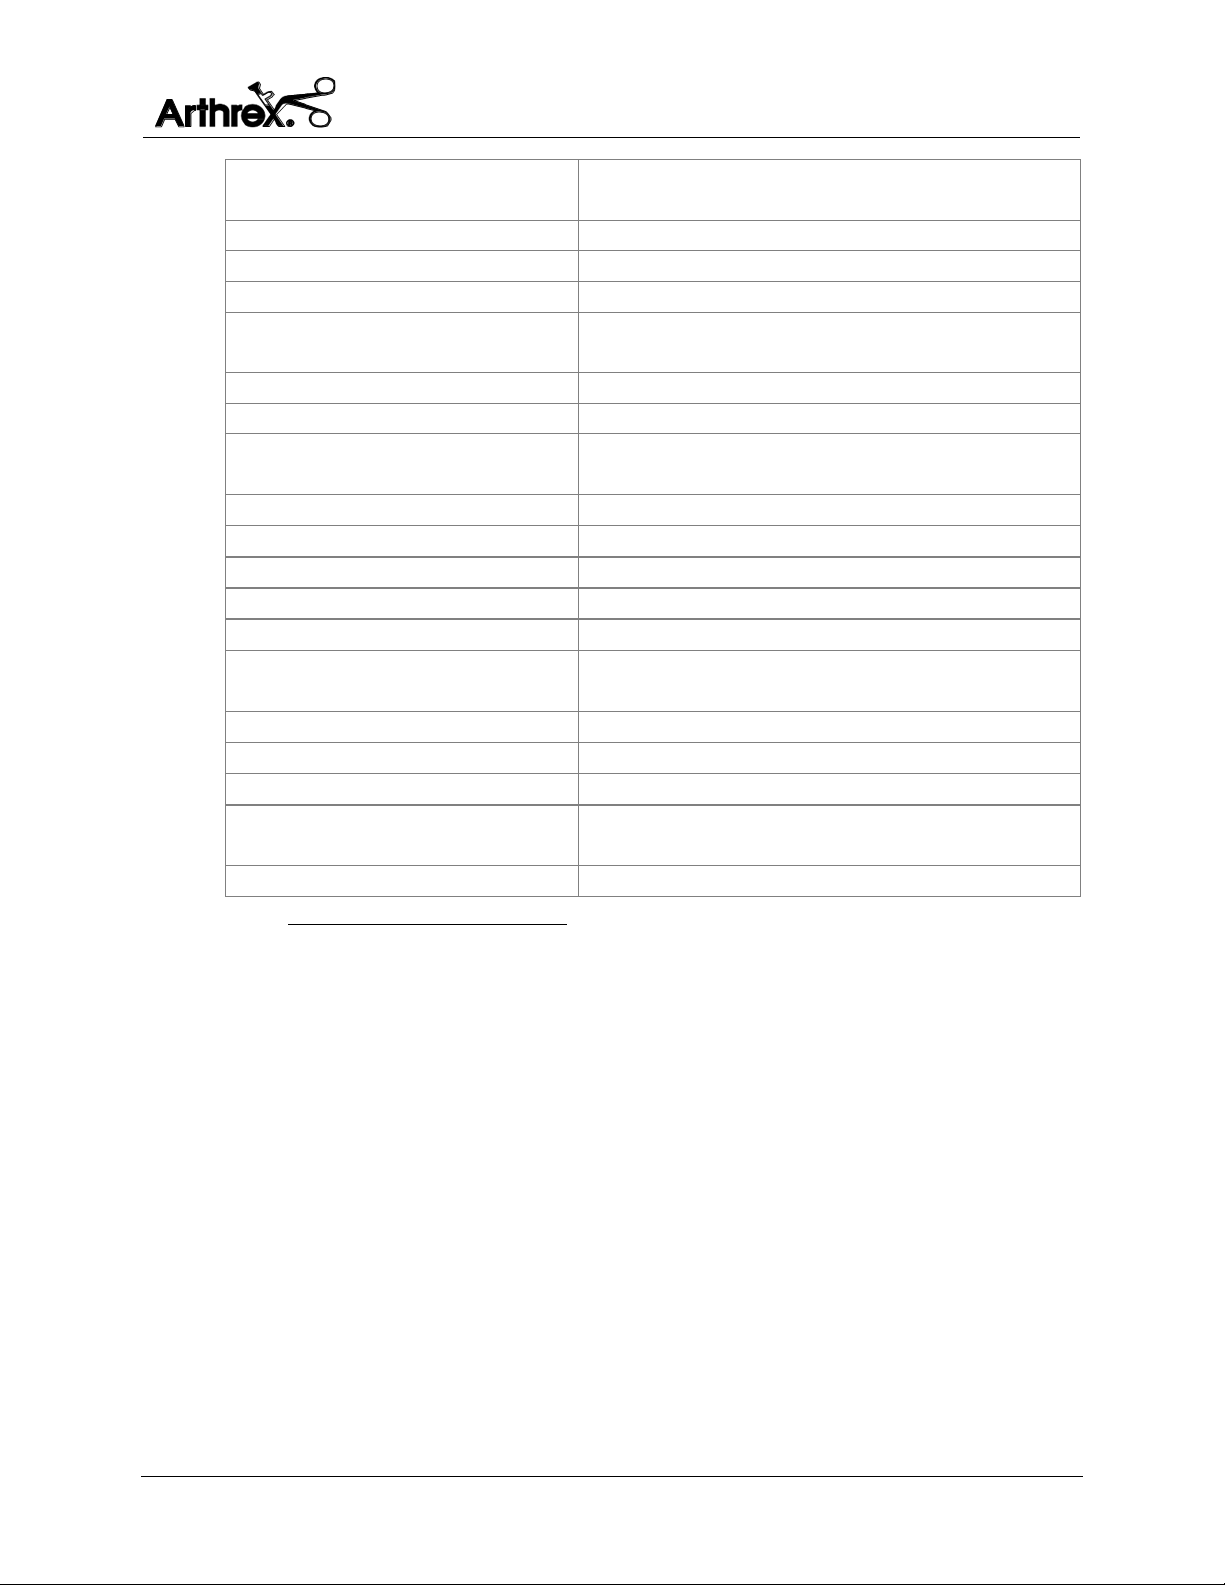
The console's Touch Panel Visual Display (TPVD) [5] provides information about
the status of the AR-8305 settings in real time. A list of informational and error
messages is shown in Table 3 and 4 below. Messages that represent the active
motor states are displayed in green on the TPVD.
DFU-0213-8r0_fmt_en-US Page 9 of 50
Page 16
Product Description
Synergy Resection User’s Guide
Message
Explanation
**EEPROM Reset**
Temporarily displayed first time micro-
has faulted and is reset.
**Motor Fault**
Temporarily displayed when motor fault
condition occurs.
**Overload**
Temporarily displayed when motor over**Self Test Fail**
Console has failed a critical power on test.
*CRUISE NOT ALLOWED*
Temporarily displayed when cruise button
control.
*FS PEDAL STUCK*
Either a footswitch pedal is being pressed or is
console.
*FWD or REV ONLY*
Temporarily displayed for tools that do not
support OSC mode.
*HP BUTTON STUCK*
Either a handpiece button is being pressed or is
console.
*TOGGLE NOT ALLOWED*
Temporarily displayed when toggle button
mode.
*TOOL FAILURE*
as defined in Table 4.)
Critical Tool Failure caused either by a faulty
*Unable to Install*
Handpiece is not recognized.
[CC]1
Speed locked on cruise control.
CC
Cruise control enabled, about to lock.
AGG
Current mode: Aggressive oscillation mode
(stopped).
Communication Error
Internal data communication error.
Critical Error
Critical error, unit will shut down.
DFS
Digital Footswitch Connected.
Drill
Drill connected.
Table 3 AR-8305 Display Messages
controller is programmed, or if internal memory
current condition occurs.
pressed with tool that doesn’t allow cruise
Remove FS, Repower System
Remove HP, Repower System
ERROR, XXX
(Where “XXX” is an error code
stuck while connecting to console.
Communication error results. Remove the
footswitch and repower the system to reset the
stuck while connecting to console.
Communication error results. Remove the
handpiece and repower the system to reset the
pressed with tool that doesn’t allow oscillation
sensor or an over current condition. Remove
and replace tool or repower console to reset.
DFU-0213-8r0_fmt_en-US Page 10 of 50
Page 17
Product Description
Synergy Resection User’s Guide
EFF
Current mode: Efficient oscillation mode
(stopped).
FC Shaver
Footswitch Controlling Shaver connected.
Fwd
Current mode: Forward (stopped).
Fwd
Current status: Motor is moving forward.
Gas Pedal Footswitch
Temporarily displayed when gas pedal
GFS
Gas Pedal Footswitch Connected.
HC Shaver
Handpiece Controlling Shaver connected.
No Footswitch
Temporarily displayed when footswitch
disconnected.
Osc1 Current status: Motor is oscillating.
Power Failure
Power supply error.
Rev
Current mode: Reverse (stopped).
Rev1
Current status: Motor is moving in reverse.
Run1
Current status: Motor is running (for saw).
Safe Mode
Excessive HP communication errors have
occurred.
Sag Saw
Sagittal Saw connected.
SFS
Standard Footswitch Connected.
SJ Shaver
Small Joint Shaver connected.
Standard Footswitch
Temporarily displayed when standard
footswitch connected.
STD
Current mode: Standard oscillation mode (stopped).
1
footswitch connected.
1
Displayed in green, denoting an active tool.
DFU-0213-8r0_fmt_en-US Page 11 of 50
Page 18
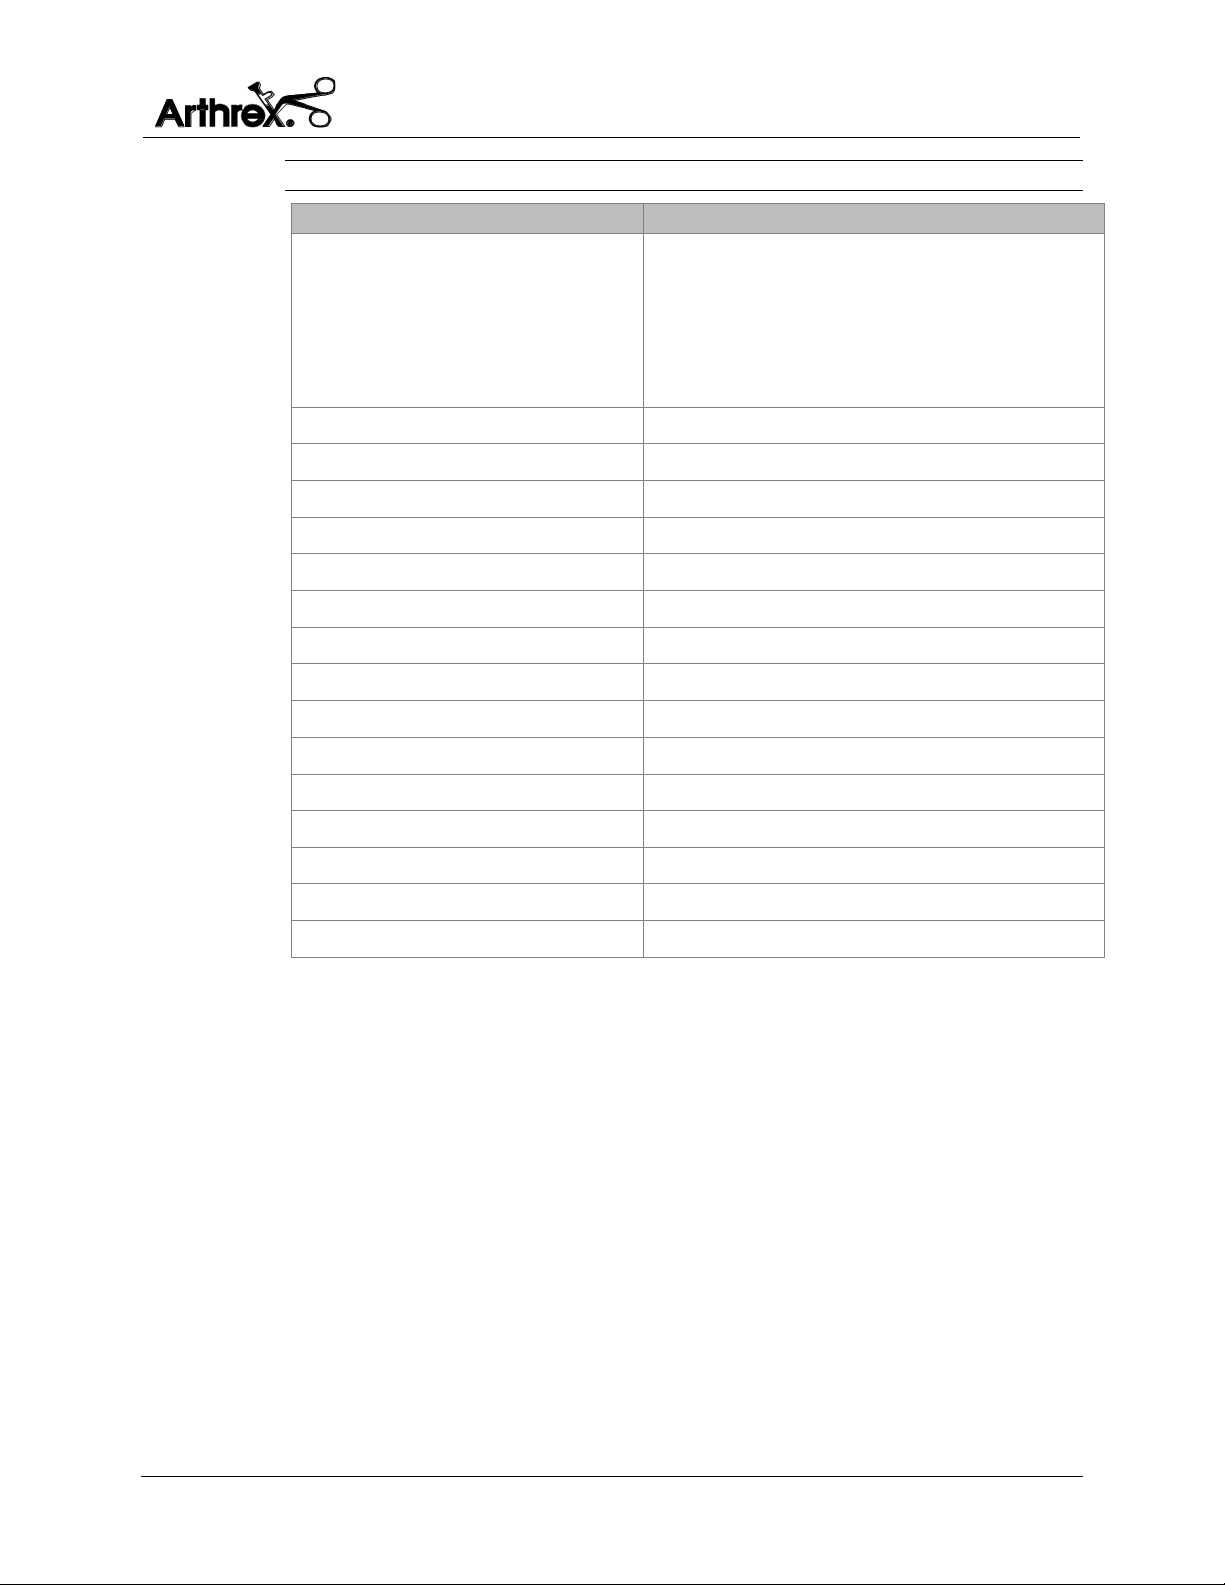
Product Description
Synergy Resection User’s Guide
Message
Explanation
# $ @
Sensor 1 = No Errors Found
Represents Handpiece Sensor Failures
H13
Multiple sensors shorted
H14
Multiple sensors stuck high/low
H15
Invalid Hall sensor states detected
C31
Over current 7.5A during retries
C32
Over current 5.0A during retries
C33
Over 5.0A for 6 seconds
C34
Over 7.0A for 3 seconds
C35
Over 7.5A for 1 second
C36
Over 8.0A for 250ms
C37
Over 8.1A in INT0
C38
Over 8.1A in A/D ISR
C39
Over 8.0A in FWD/REV ramp up
S52
Over restart tries
S54
General system failure
Table 4 *TOOL FAILURE* Error Code Definitions
# = Sensor 3, $ = Sensor 2, @ = Sensor 1
Example: 022
Sensor 3 = Stuck Low
Sensor 2 = No Errors Found
0 = Stuck Low,
1 = Stuck High,
2 = No Errors Found.
S51 Invalid Gear Ratio
DFU-0213-8r0_fmt_en-US Page 12 of 50
Page 19
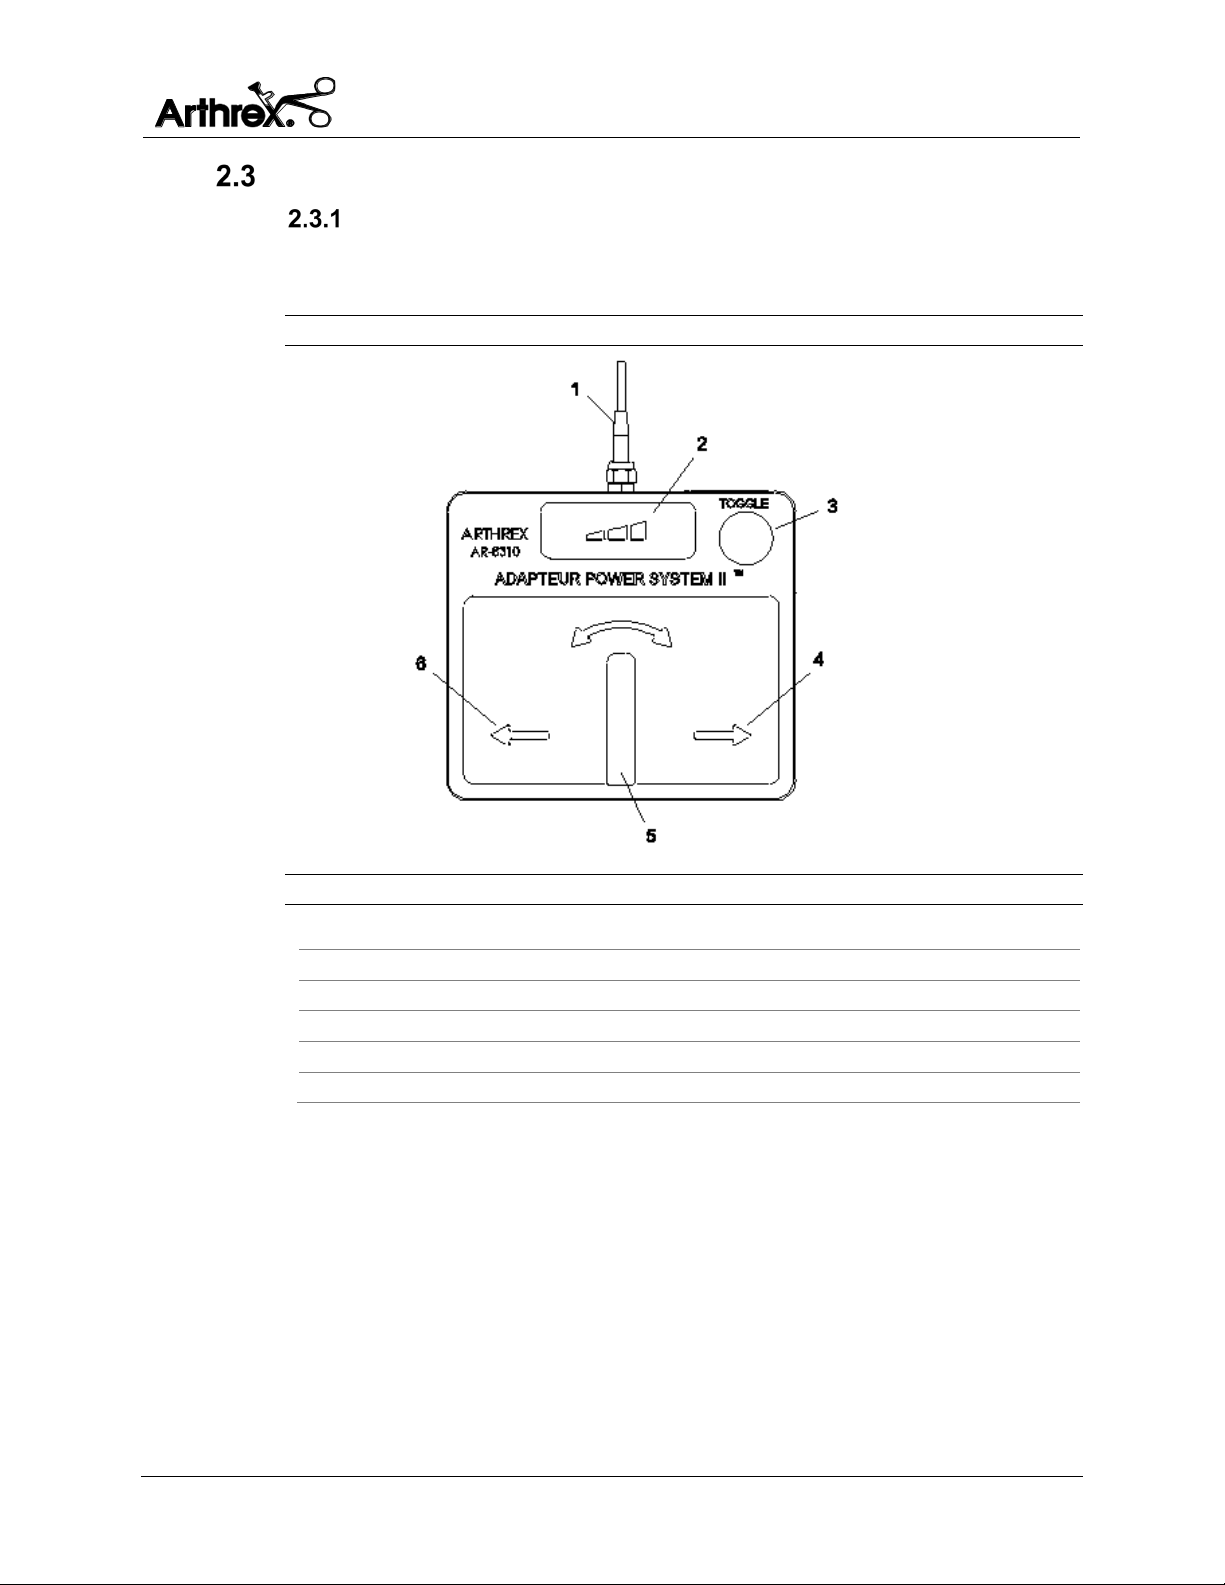
Product Description
Synergy Resection User’s Guide
1.
Cable
2.
Speed Increase button
3.
Toggle button
4.
Forward pedal
5.
Oscillation pedal
6.
Reverse pedal
Applied Parts and Accessory Features
Standard Footswitch (AR-8310)
Figure 3 shows the Standard Footswitch. Features and symbols are identified in
Table 5 below.
Figure 3 Standard Footswitch - Description
Table 5 Elements of the Standard Footswitch
DFU-0213-8r0_fmt_en-US Page 13 of 50
Page 20

Technical Specifications
Synergy Resection User’s Guide
Width
40.64cm (16.00 inches)
Height
13.335cm (5.250 inches)
Depth
30.686cm (12.081 inches)
Weight
6.8kg (15 lbs.)
Water protection
IP22
Mains cable
10 A/250 V
Power entry module
IEC 320/C13
Fuse value
6.3 A, 250 V~, 2.0 cm (0.75 inches) Type T
AC input
100-240V~, 50/60Hz, 6.3A
Applied Part Type
BF
Cleaning, disinfecting and
sterilization
Refer to Sections 6.0 Cleaning and
Disinfecting and 7.0 Sterilization
Functions
Reverse, Forward, Oscillation, Speed Increase,
and Toggle
Width
23.6 cm (9.3 inches)
Height
2.5 cm (1.0 inches)
Depth
20.8 cm (8.2 inches)
Weight
2.2 kg (5 lbs.)
Water protection
IP68
Cleaning, disinfecting, and
sterilization
Refer to Sections 6.0 Cleaning and Disinfecting
and Section 7.0 Sterilization
Temperature
10° to 40°C (50° to 104°F)
Relative humidity
30 % to 75 %
Air Pressure
700 hPa to 1060 hPa (21 in. Hg to 31.3 in. Hg)
Temperature
-30° to 70°C (-22° to 158°F)
Relative humidity
10 % to 90 %, non-condensing
Air Pressure
500 hPa to 1060 hPa (15 in. Hg to 31.3 in. Hg)
3.0 Technical Specifications
Console
Table 6 AR-8305 Console Specifications
Standard Footswitch
Table 7 Standard Footswitch Specifications
Ambient Conditions for Operation
Table 8 AR-8305 Ambient Conditions for Operation
Ambient Conditions for Storage (in shipping packaging)
Table 9 AR-8305 Ambient Conditions for Storage
DFU-0213-8r0_fmt_en-US Page 14 of 50
Page 21
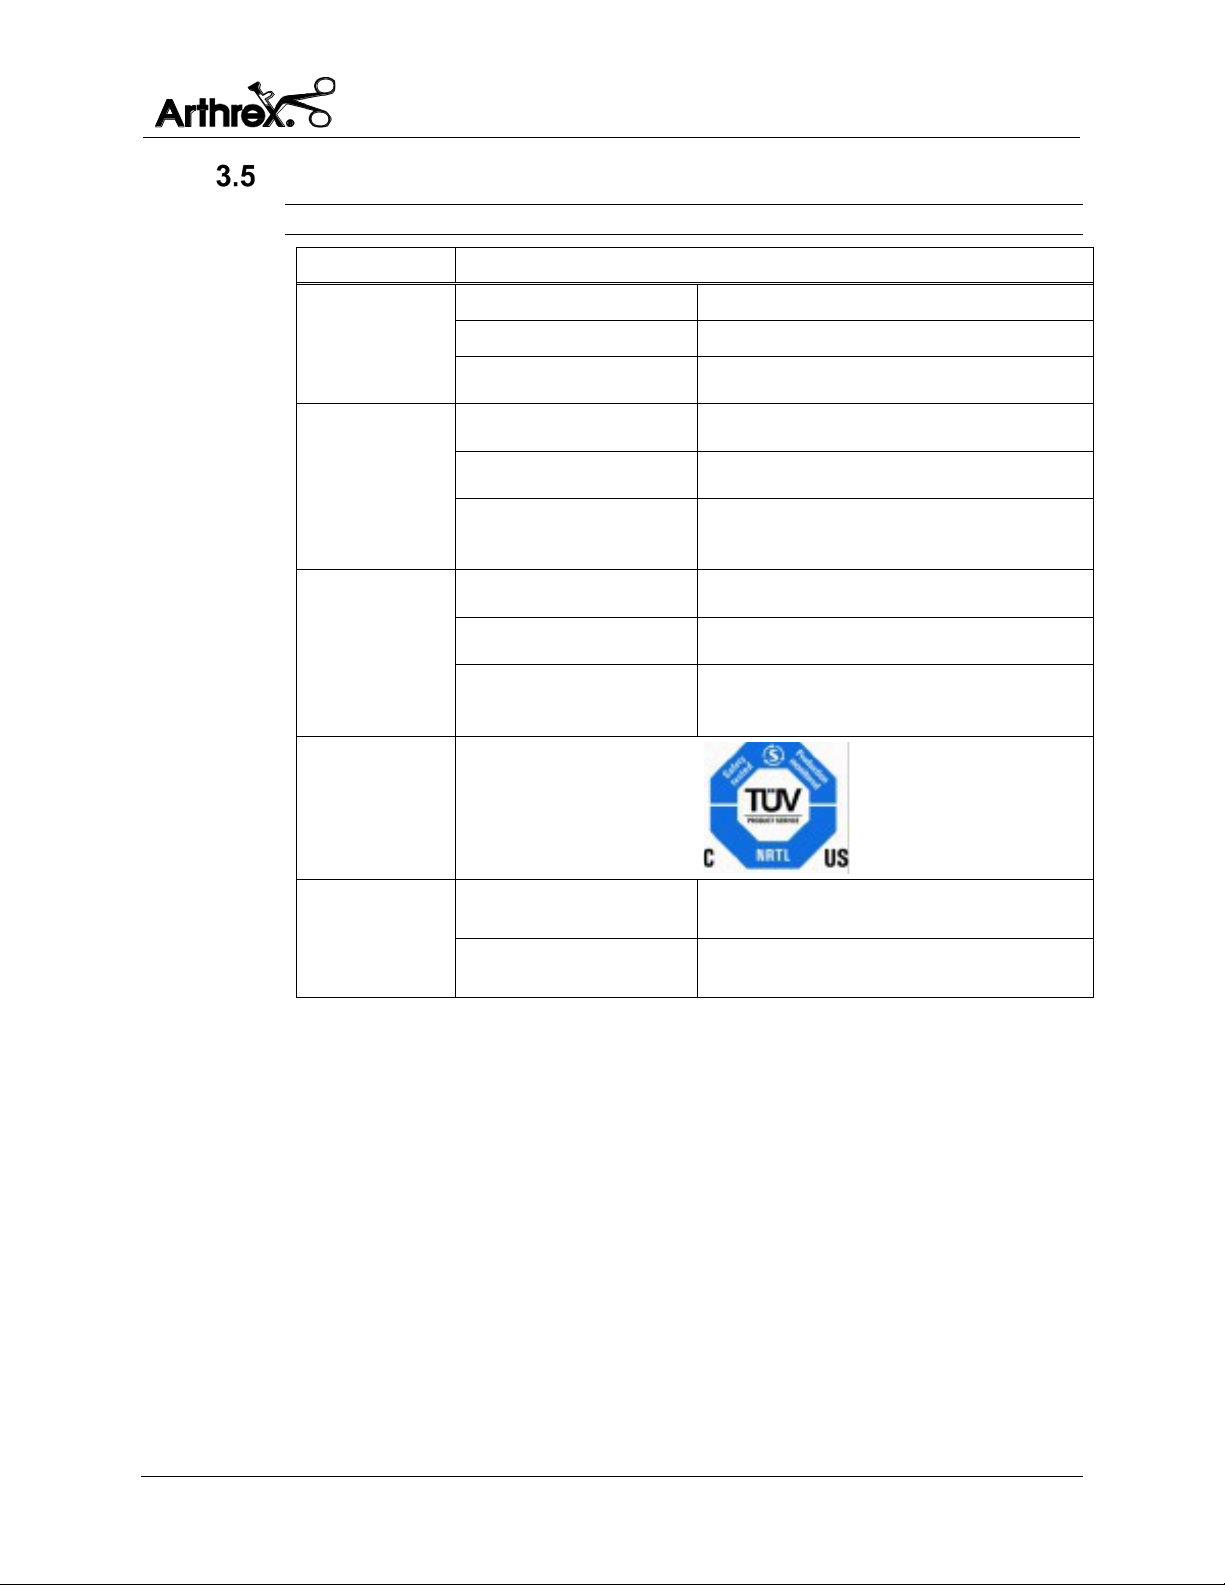
Technical Specifications
Synergy Resection User’s Guide
Parameter
Parameter Value
FDA Class
Class 1
EU Class
Class IIA
EU Certification
EN 60601-1:2006
EMC Certification
IEC 60601-1-2:2014 Class A
MDD Classification
CE Marking for MDD93/43/EEC
Class IIA
Safety, EMC, and Regulatory Requirements
Table 10 Safety, EMC, and Regulatory Requirements
System
Classification
Health Canada Class Class 2
Domestic Certification UL 60601-1:2003
Safety
Certifications
EMC
Certifications
Safety
Certification
Marking
CE Markings
Canadian Certification CAN/CSA C22.2 No. 60601-1-2008-02
IEC 60601-1 3rd Ed. + AM1 (2012)
CISPR 11 EMC Class Class A
CISPR 11 EMC Group Group 1
MDD Marking Rule 9
For all other accessories refer to accompanying DFUs for more information.
Refer to Section 14.0 Electromagnetic Emissions for further detail on EMC
Certification
DFU-0213-8r0_fmt_en-US Page 15 of 50
Page 22
Setup
Synergy Resection User’s Guide
4.0 Setup
How to Set Up the Console
Users are encouraged to contact their Arthrex representative if they require a
more comprehensive surgical technique.
AC Power Safety Considerations
The AR-8305 is powered by a medically rated universal AC input switching power
supply. This power supply allows users to connect the console to any local AC
mains outlet. Please use the appropriate plug and a reliable ground conductor.
Arthrex supplies separate power cords for the U.S. and Europe CEE 7/7with the
AR-8305. Contact your Arthrex representative if you need a power cord that
must meet the electrical standards of another country.
Only use replacement power cords that comply with medical
grade standards, IEC 60320-1, Detachable Power Supply Cords
or electrical standards for the designated country where the AR8305 is being used. Contact your Arthrex representative for
further information.
Avoid positioning the console so that it is difficult to disconnect
coupler or plug from supply main.
NOTE:
The console is designed to meet power-saving guidelines. The console has an AC
mains switch on the front panel. When the AC mains switch is OFF, no electrical
power is drawn by the console.
When the AC mains switch is ON, the console executes a series of self-diagnostic
tests. Upon successful completion of these tests, the console displays the name
and model number. If the tests discover a problem, the problem is shown on the
display. Refer to Tables 3 and 4 for a listing of Display Messages.
In the event of an AC power interruption, the console can run continuously
without a fault for up to 10 milliseconds. If an AC power failure lasts for longer
than 10 milliseconds, the system will return to the default settings when AC
power is restored.
Extension cords must meet the local electrical standard. Extension
cords are not recommended to be used with the AR-8305.
Connecting an extension cord to the AR-8305 may result in a
reduced level of safety.
DFU-0213-8r0_fmt_en-US Page 16 of 50
Page 23
Setup
Synergy Resection User’s Guide
1. Disconnect the device from the AC mains.
2. Open the fuse tray in the AC inlet, by pulling out on the tabs.
3. Replace the fuses with T6.3AL250v Line Fuses, as noted on the rear panel.
4. Push the fuse holder back into the AC inlet.
5. Ensure that fuse holder is fully seated and that the tabs snap back
WARNING!
To avoid the RISK of electric shock, this equipment must only be connected to a
SUPPLY MAIN with protective earth ground.
WARNING!
Do not have the device in direct contact with patient if high-frequency devices are
in use, or if the patient requires defibrillation.
Replacing the Fuses
The mains fuse is replaced with T6.3AL250v as follows:
Always use fuses with the correct values to avoid allowing
NOTE:
overcurrent to enter the system.
An incorrect fuse may increase the risk of electrical shock or fire
hazard.
The AR-8305 console incorporates a universal AC input power supply.
A voltage selection switch is not required.
Electromagnetic Compatibility
This device has passed testing for EMI / RFI radiation and
susceptibility and EMC compatibility. This device may cause
interference to other devices in the near vicinity, if not set up and
used as Arthrex instructs.
AR-8305 has been designed to accept EMC from other devices within the
limitations as described in section 14.0.
To determine if the AR-8305 is causing interference to other devices,
power OFF the AC main power switch and then ON again.
DFU-0213-8r0_fmt_en-US Page 17 of 50
Page 24
Setup
Synergy Resection User’s Guide
Try to correct the interference by following one or more of these measures:
1. Reorient or relocate the receiving device.
2. Increase the separation between devices.
3. Connect the device to an outlet on a different circuit than the other
device(s) are connected.
4. Consult the manufacturer or field service technician for receiving devices
for guidance.
Basic Setup Procedure for the AR-8305 Console
NOTE: Section 5.0, Operation, explains how to use the console.
1. Place the AR-8305 on a flat, dry surface, such as the AR-6481 Arthrex
Arthroscopy pump cart.
2. Connect the receiver end of the power cord for the AR-8305 into the AC
socket and the plug end to the facility AC mains supply.
3. Power ON the console.
4. Allow it to fully initialize.
5. Attach the shaver handpiece.
6. Attach a footswitch, if applicable.
WARNING!
DO NOT stack or place equipment adjacent to the AR-8305 console, if possible.
If such a configuration is necessary, carefully observe the configuration in
question to ensure that the electromagnetic interference does not degrade the
performance.
Do not attach handpieces or footswitches during the Self Test or
the Programming Modes.
WARNING!
Use only Arthrex approved accessories. Other accessories may result in
increased emissions or decreased immunity of the system. Contact your Arthrex
representative for a complete list of accessories. DO NOT modify any accessory.
Failure to comply may result in patient and/or operating room staff injury.
WARNING!
This equipment is NOT suitable for use in the presence of a flammable
anesthetic mixture with air or with oxygen rich or nitrous oxide environment.
DFU-0213-8r0_fmt_en-US Page 18 of 50
Page 25
Setup
Synergy Resection User’s Guide
Setting up a Footswitch
Only use footswitches developed by Arthrex specifically for the
AR-8305 Synergy
NOTE:
Insert the footswitch connector into the console’s footswitch receptacle. Align the
red dots on the connector and receptacle so they engage easily.
Setup for a footswitch is the same for all models. The console detects
which version is attached and allows the appropriate functions.
Resection
console.
Setting up the Shaver Handpieces
Only use shaver handpieces and cables that have been developed
by Arthrex specifically for the Synergy
Insert the handpiece connector into the console’s handpiece receptacle. Align the
red dots on the connector and receptacle so they engage easily.
Resection
console.
Setting up Other Accessory Handpieces
Only use handpieces and cables that have been developed by
Arthrex specifically for the Synergy
Resection
.
Other accessory handpieces are available with the SynergyResection
accessory cable. Specific instructions for use of a
Insert one end of the accessory cable connector into the cable receptacle of the
accessory handpiece. Align the red dots on the connector and receptacle so they
engage easily.
Connect the other end of the accessory cable to the handpiece receptacle of the
console. Align the red dots on the connector and receptacle so they engage easily.
n accessory are packaged with that handpiece.
and may require an
Shutdown Procedure
The AR-8305 can be safely shut down at any time by powering down the console.
DFU-0213-8r0_fmt_en-US Page 19 of 50
Page 26
Operation and Frequently Used Functions
Synergy Resection User’s Guide
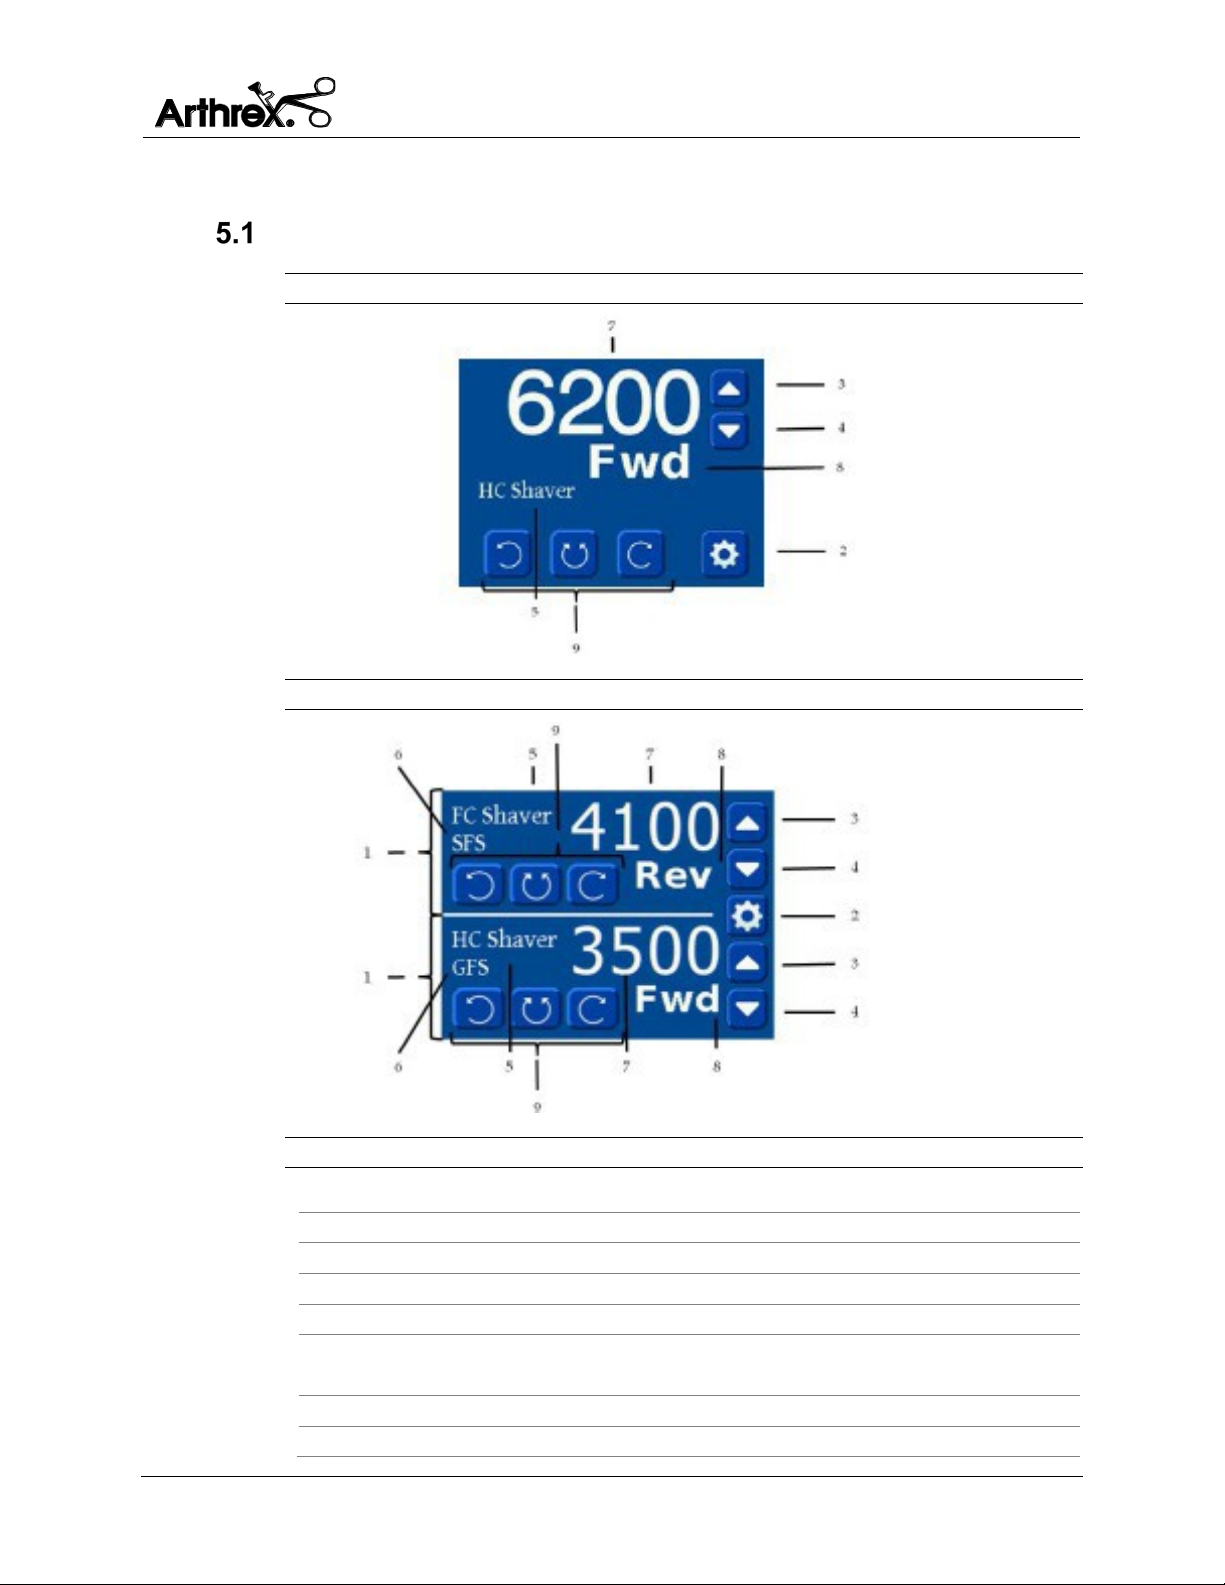
1. The main screen, divided into two sections when two tools are attached
2. Settings button (on the lower right corner in the single screen mode)
3. Up button
4. Down button
5. Tool name
6. Footswitch, displayed in green if Footswitch Override is disabled
(SFS = Standard Footswitch, GFS – Gas Footswitch)
7. Speed setting
8. Direction or Mode indicator, displayed in green if active
5.0 Operation and Frequently Used Functions
Main Screen
Figure 4 Main Screen Display - One Tool Attached
Figure 5 Main Screen Display - Two Tools Attached
Table 11 Main Screen Display Elements
DFU-0213-8r0_fmt_en-US Page 20 of 50
Page 27
Operation and Frequently Used Functions
Synergy Resection User’s Guide
9. Direction and Oscillation buttons
• The main screen is divided horizontally into two sections, one for
each channel, when tools are connected to both channels.
• Each section contains a display area for messages and five buttons.
• The Settings button on the right configures both main screens. It is on
the lower right corner in the single screen mode or between the two
sections’ Up and Down buttons in dual screen mode.
• The tool name is positioned as depicted in the above diagrams.
• Footswitch data is positioned below the tool name.
• The speed setting is displayed in large numeric digits. They are
visible from a distance by the surgeon in the OR.
• Direction or mode indicators are below the speed setting in large
characters. They are visible from a distance by the surgeon in the OR.
• Direction and oscillation buttons.
• Cruise control status is positioned next to the footswitch data.
Settings Menu Main Screen
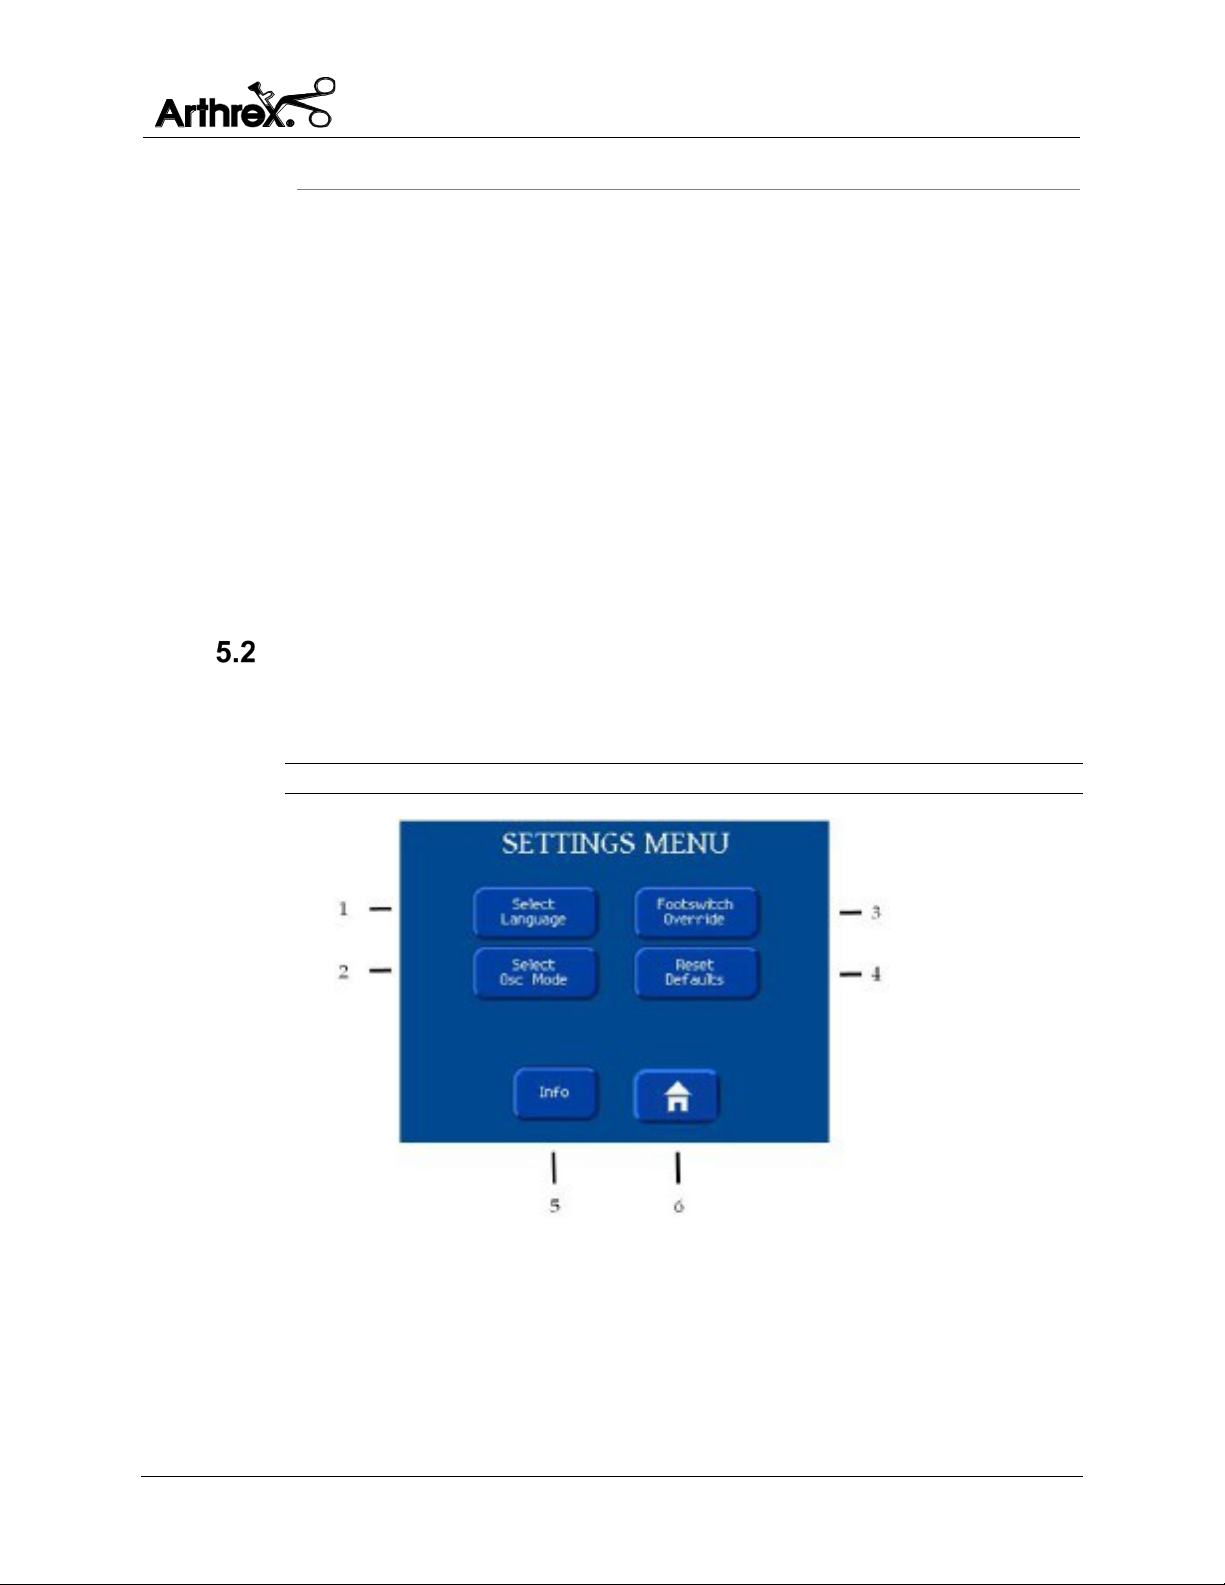
The Settings Menu provides access to settings and information screens. There
are six buttons described in Table 12 below.
Figure 6 Settings Menu Display - Operation
DFU-0213-8r0_fmt_en-US Page 21 of 50
Page 28

Operation and Frequently Used Functions
Synergy Resection User’s Guide
1.
Select Language
When the Select Language button is pressed, the
section 5.3 below.
2.
Select Oscillation
When the Select Oscillation Mode button is
Mode screen, section 5.4 below.
3.
Footswitch Override
When the Footswitch Override button is
Override screen, section 5.5 below.
4.
Reset Defaults button
When the Reset Defaults button is pressed, the
settings to the factory defaults, section 5.6 below.
5.
Information button
When the Information button is pressed, the
5.7 below.
6.
Home button
When the Home button is pressed, the software
displays the Main screen, section 5.1 above.
Table 12 Settings Menu Display - Operation
button
Mode button
button
software displays the Language Selection screen,
pressed, the software displays the Oscillation
pressed, the software displays the Footswitch
software displays the Reset Defaults screen
which asks for confirmation before resetting all
software displays the Information screen, section
DFU-0213-8r0_fmt_en-US Page 22 of 50
Page 29
Operation and Frequently Used Functions
Synergy Resection User’s Guide
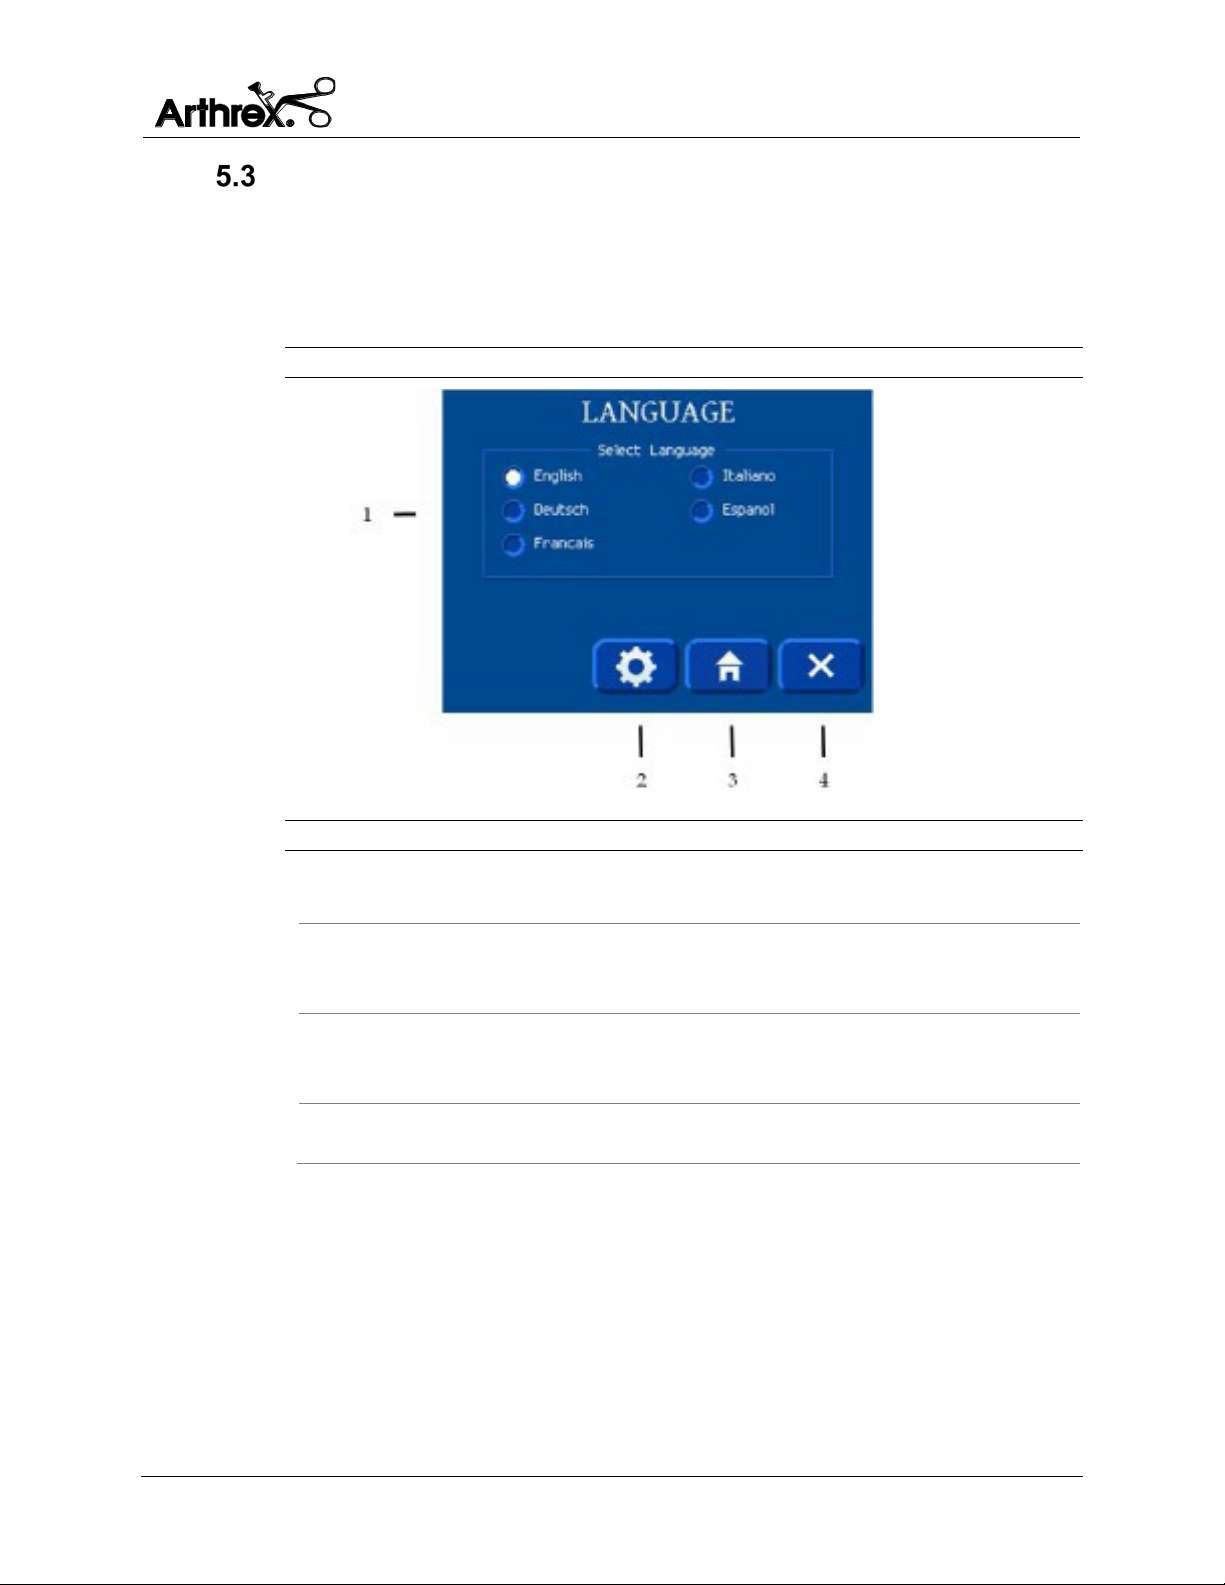
1. Select Language radio
buttons
Select the language of choice.
2. Menu button
When pressed, the software stores the
screen.
3. Home button
When pressed, the software stores the
screen.
4. Cancel button
When pressed, the software returns to the
Menu screen without making any changes.
Language Selection Screen
The Language Selection screen displays a list of available languages with radio
buttons. The software supports the following languages: English, German,
French, Italian and Spanish. It also includes three navigation buttons: Menu,
Home and Cancel as described in Table 13 below.
Figure 7 Language Selection Display - Operation
Table 13 Language Menu Display - Operation
selected language and returns to the Menu
selected language and returns to the Main
DFU-0213-8r0_fmt_en-US Page 23 of 50
Page 30
Operation and Frequently Used Functions
Synergy Resection User’s Guide
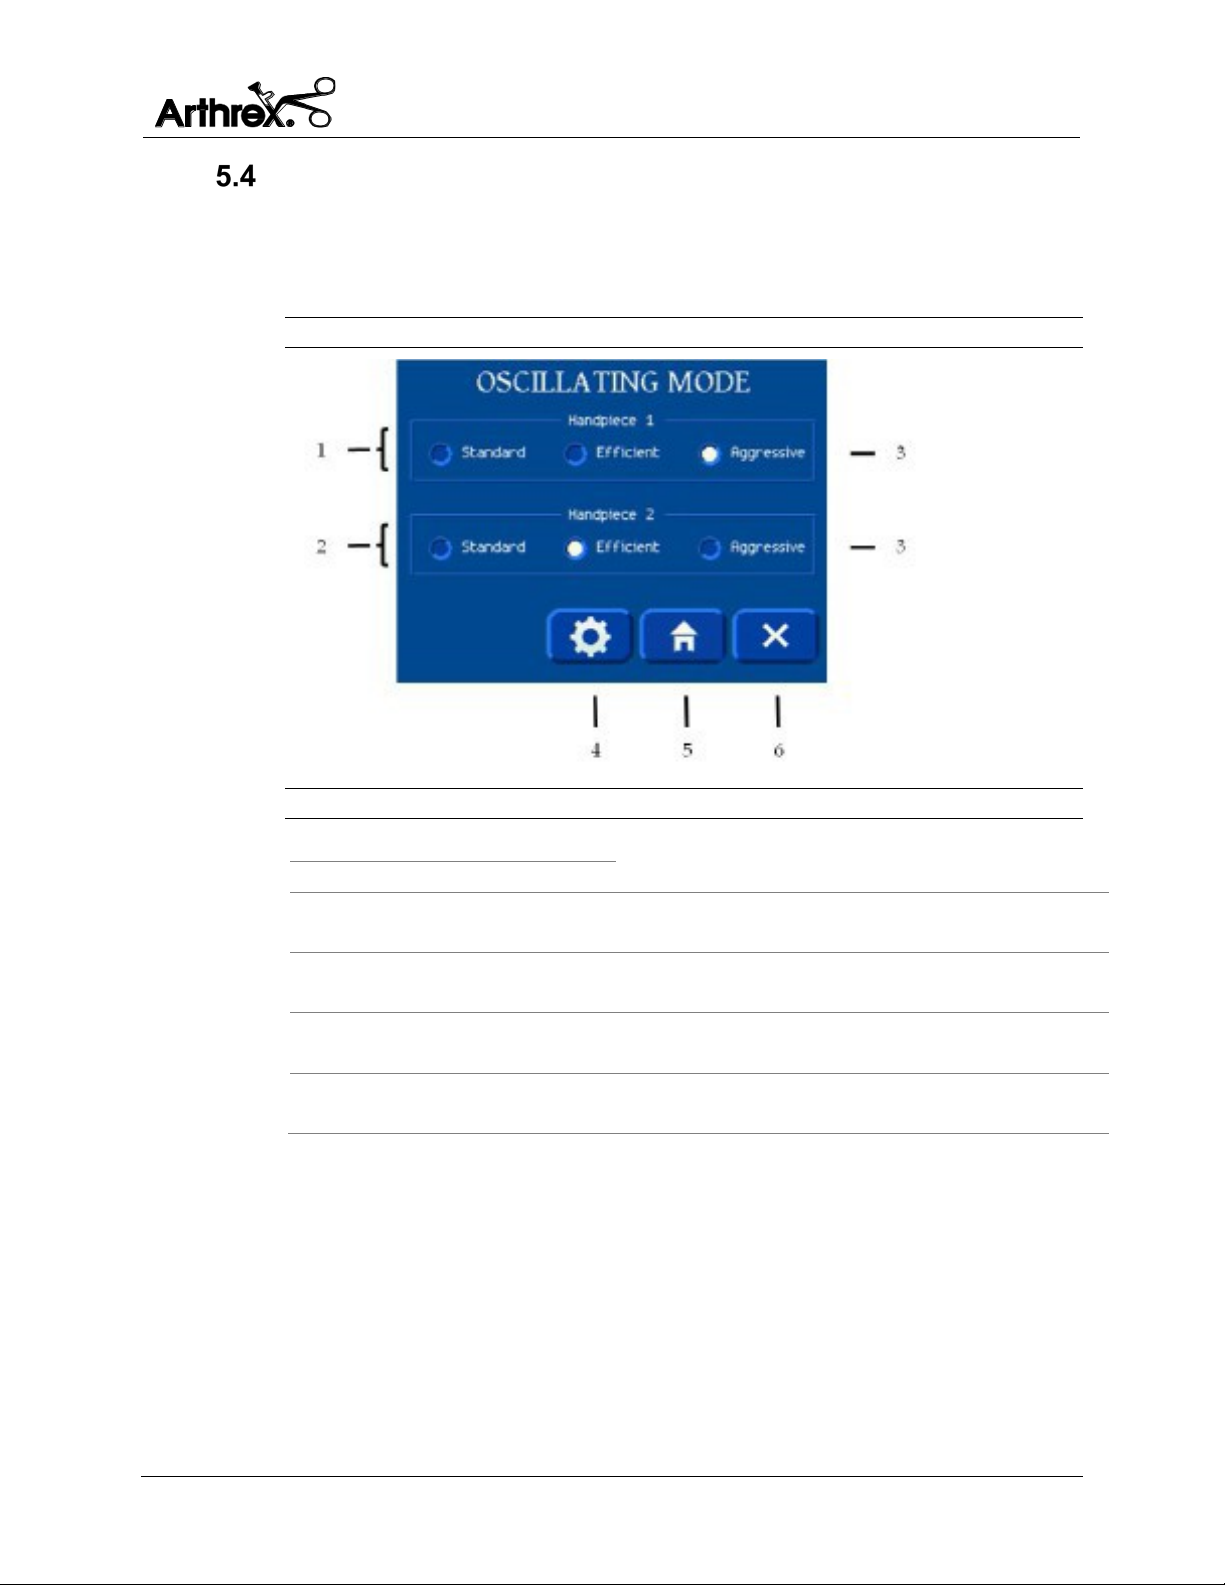
1.
Channel 1
The software supports each handpiece channel
with its own oscillation mode.
2.
Channel 2
3.
Oscillation Mode radio
buttons
Select the oscillation mode: Standard, Efficient
or Aggressive.
4.
Menu button
When pressed, the software stores the selected
mode and returns to the Menu screen.
5.
Home button
When pressed, the software stores the selected
mode and returns to the Main screen.
6.
Cancel button
When pressed, the software returns to the Menu
screen without making any changes.
Oscillation Mode Selection Screen
The Oscillation Mode selection screen has radio buttons for available oscillation
modes for each channel. This screen also includes Menu, Home and Cancel
buttons as described in Table 14 below:
Figure 8 Oscillation Mode Selection Screen - Operation
Table 14 Oscillation Mode Display - Operation
DFU-0213-8r0_fmt_en-US Page 24 of 50
Page 31
Operation and Frequently Used Functions
Synergy Resection User’s Guide
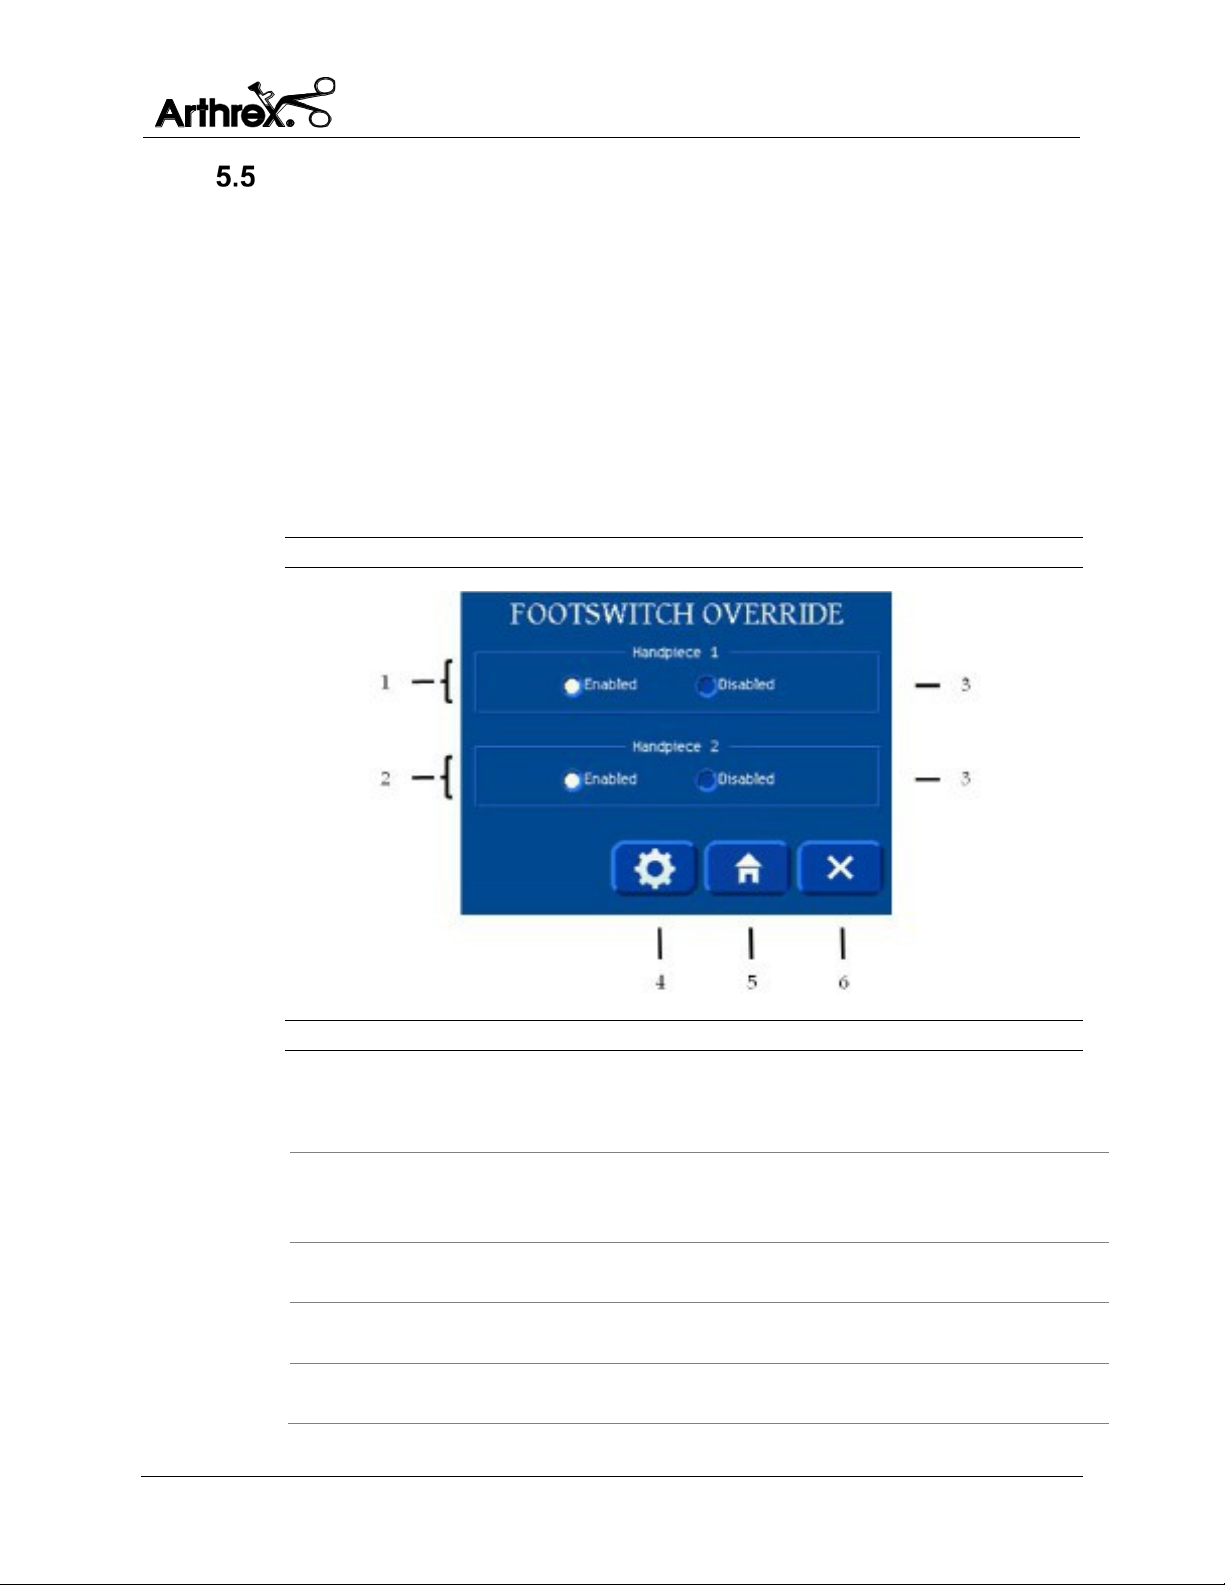
1.
2.
Channel 1
Channel 2
The software displays the current settings for
sets of radio buttons.
3.
Footswitch Override
Each channel has an Enabled and Disabled
Enabled.
4.
Menu button
When pressed, the software stores the selected
mode and returns to the Menu screen.
5.
Home button
When pressed, the software stores the selected
mode and returns to the Main screen.
6.
Cancel button
When pressed, the software returns to the Menu
screen without making any changes.
Footswitch Override Screen
The Footswitch Override screen has radio buttons to select the footswitch
override mode for each channel.
At the End User’s discretion, the default setting can be changed so that the
Shaver Handpiece can be controlled by both the Footswitch and/or the Hand
Controls as described below. If both the Footswitch and the Hand Controls are
enabled and activated simultaneously, the Footswitch control will be dominant.
In the default (enabled) mode, the buttons on the hand-control shaver handpiece
will not function when a footswitch is attached to the console. When disabled,
both buttons on the handpiece and the footswitch will function. This screen also
includes Menu, Home and Cancel buttons as described in Table 15 below:
Figure 9 Footswitch Override Selection Screen - Operation
Table 15 Footswitch Override Display - Operation
radio buttons
DFU-0213-8r0_fmt_en-US Page 25 of 50
footswitch override for each channel with two
radio button, with the factory default set to
Page 32
Operation and Frequently Used Functions
Synergy Resection User’s Guide
1.
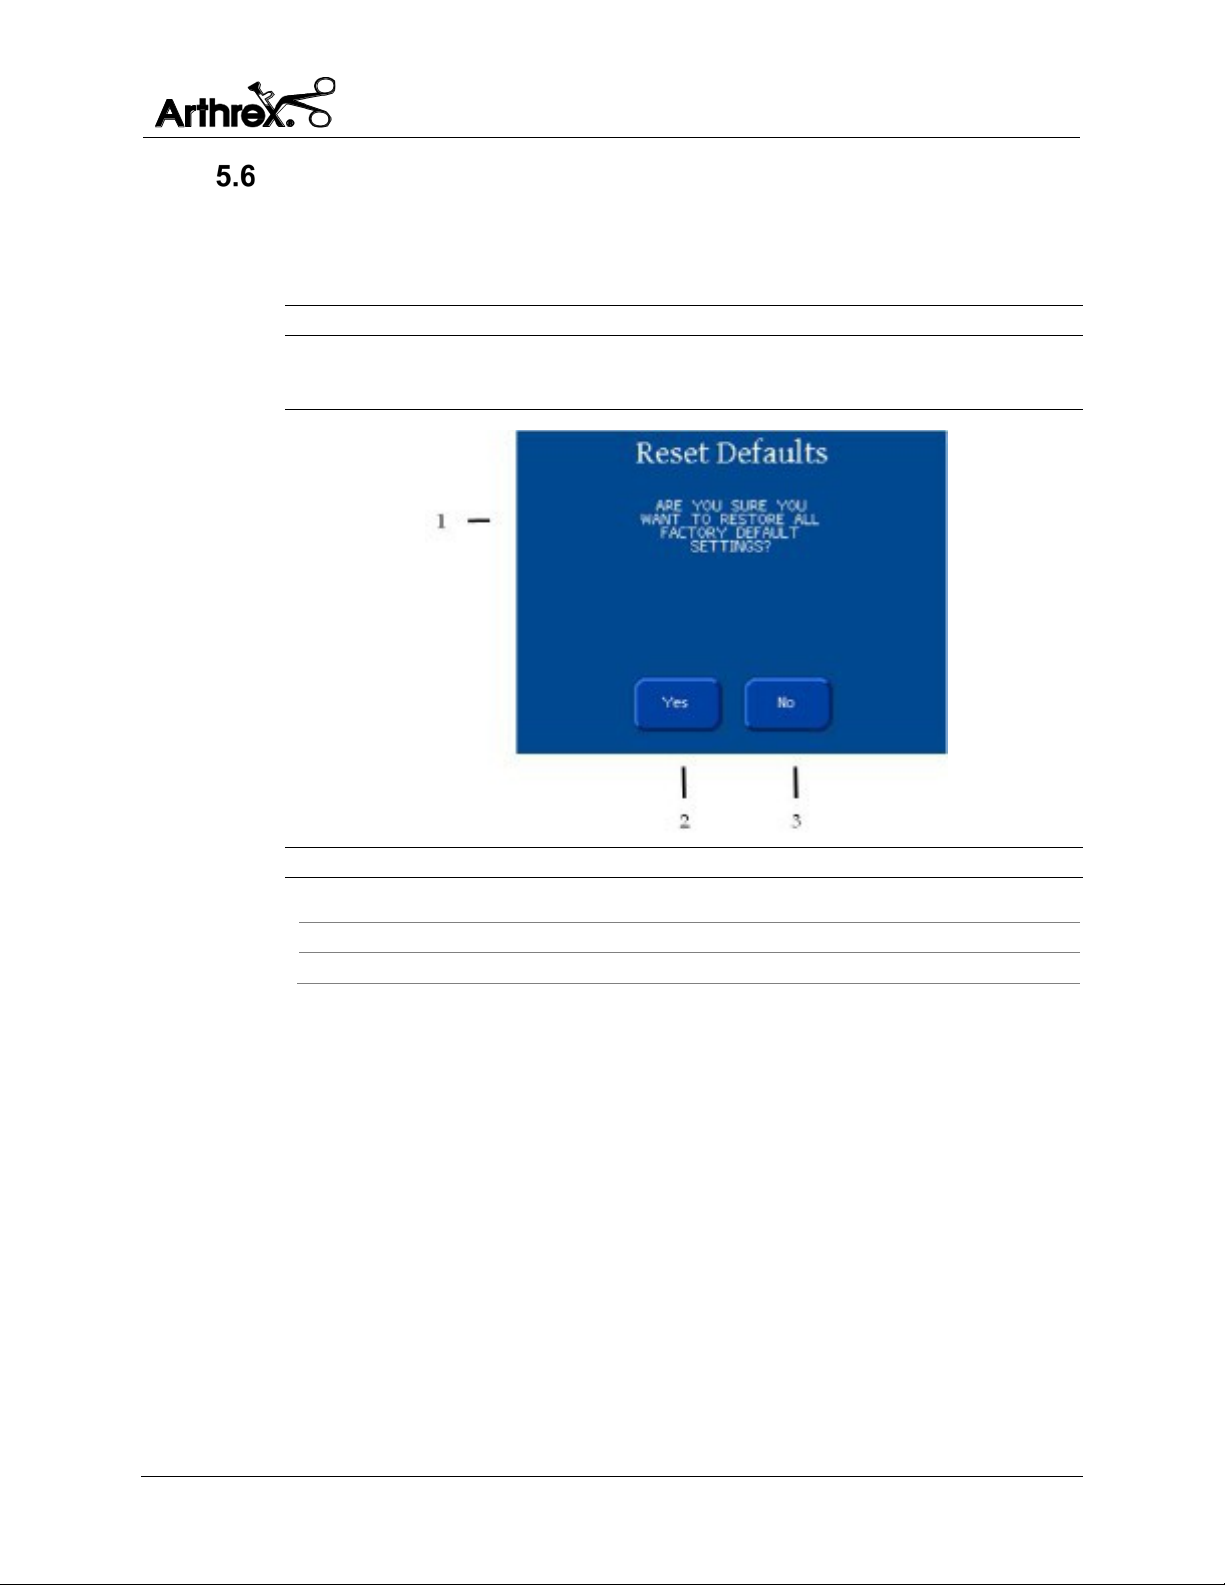
Prompt to confirm resetting to factory defaults.
2.
Yes to reset to factory defaults.
3.
No to exit without resetting.
Reset Defaults Screen
The Reset Defaults screen prompts the user to confirm resetting to factory
defaults. This screen is displayed when the Reset Defaults button is pressed on
the Settings screen.
Figure 10 Reset Defaults Screen - Operation
The software displays two buttons that allows the user to confirm resetting of
factory defaults as described in Table 16
below.
Table 16 Reset Defaults Display - Operation
DFU-0213-8r0_fmt_en-US Page 26 of 50
Page 33
Operation and Frequently Used Functions
Synergy Resection User’s Guide
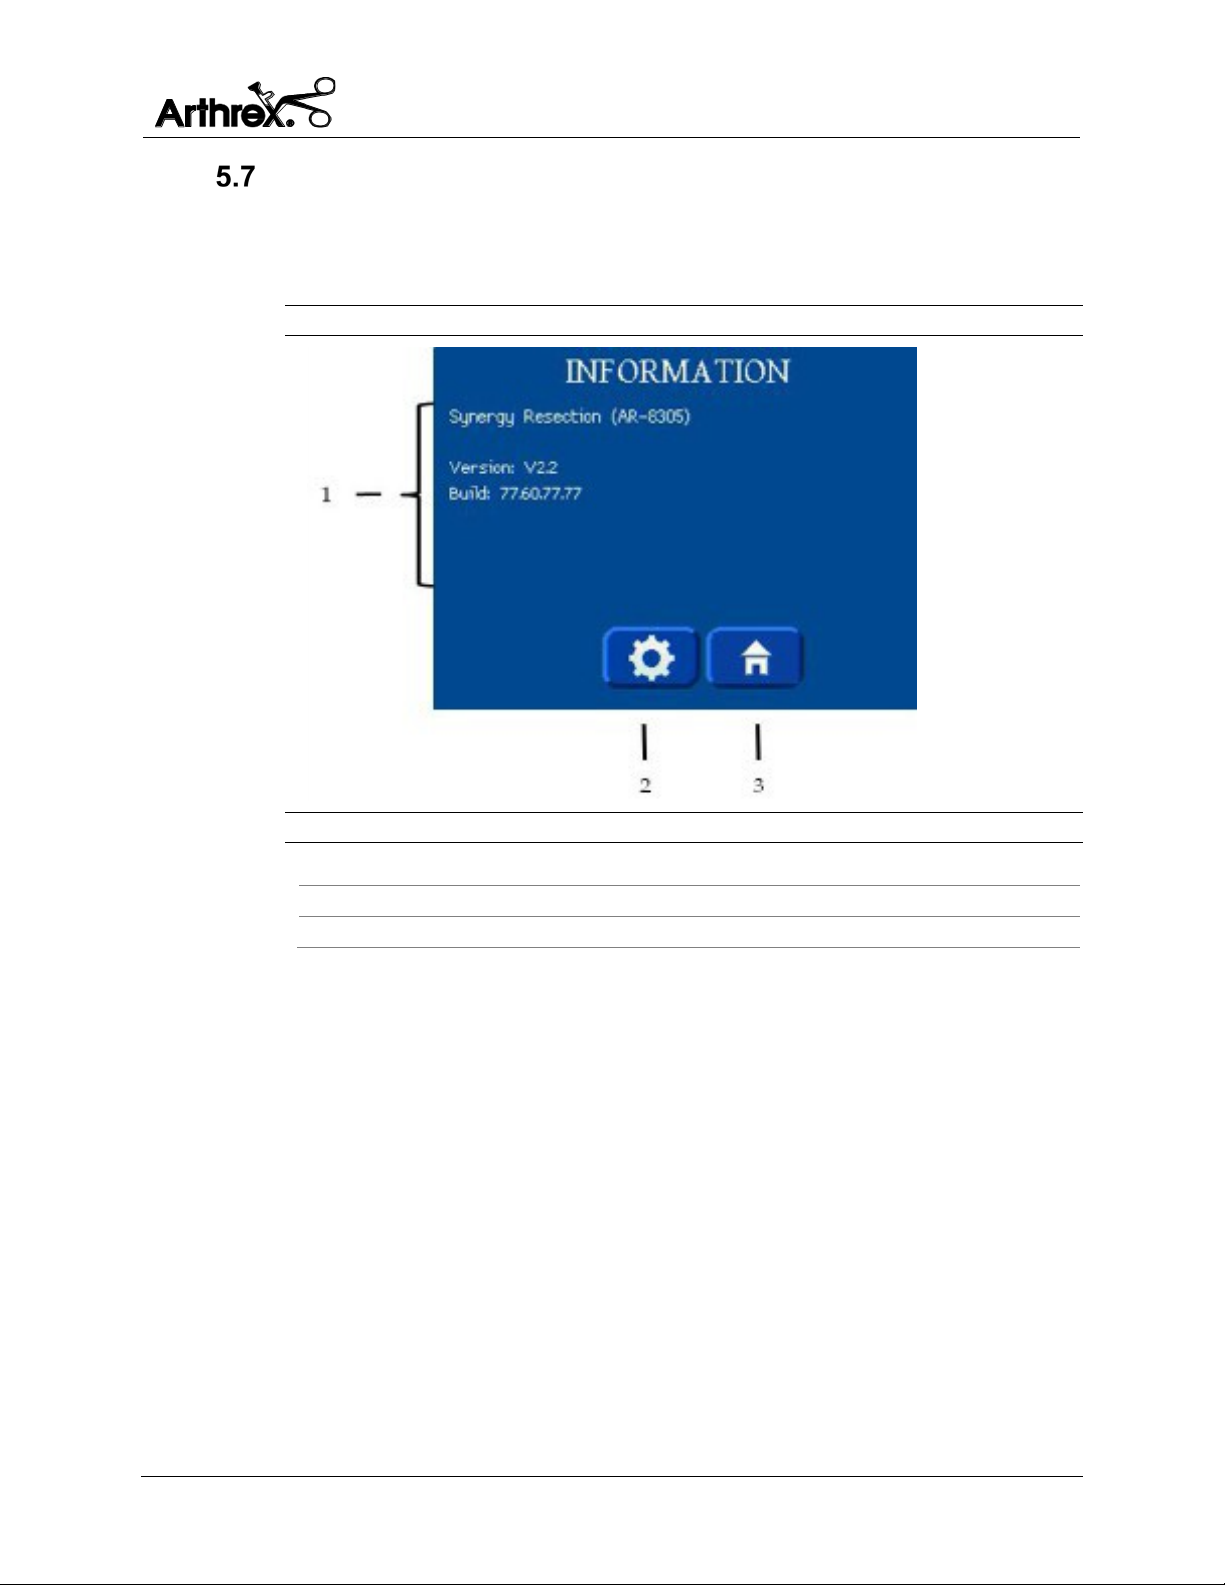
1. Model, Software Versions & Builds for each controller.
2. Menu button
Returns to the menu screen.
3. Home button
Returns to the main screen.
Information Screen
The Information screen displays the Model, Software Versions and Builds for
each controller, along with Menu and Home buttons as described in Table 17
below:
Figure 11 Information Screen - Operation
Table 17 Information Screen Display - Operation
DFU-0213-8r0_fmt_en-US Page 27 of 50
Page 34
Operation and Frequently Used Functions
Synergy Resection User’s Guide
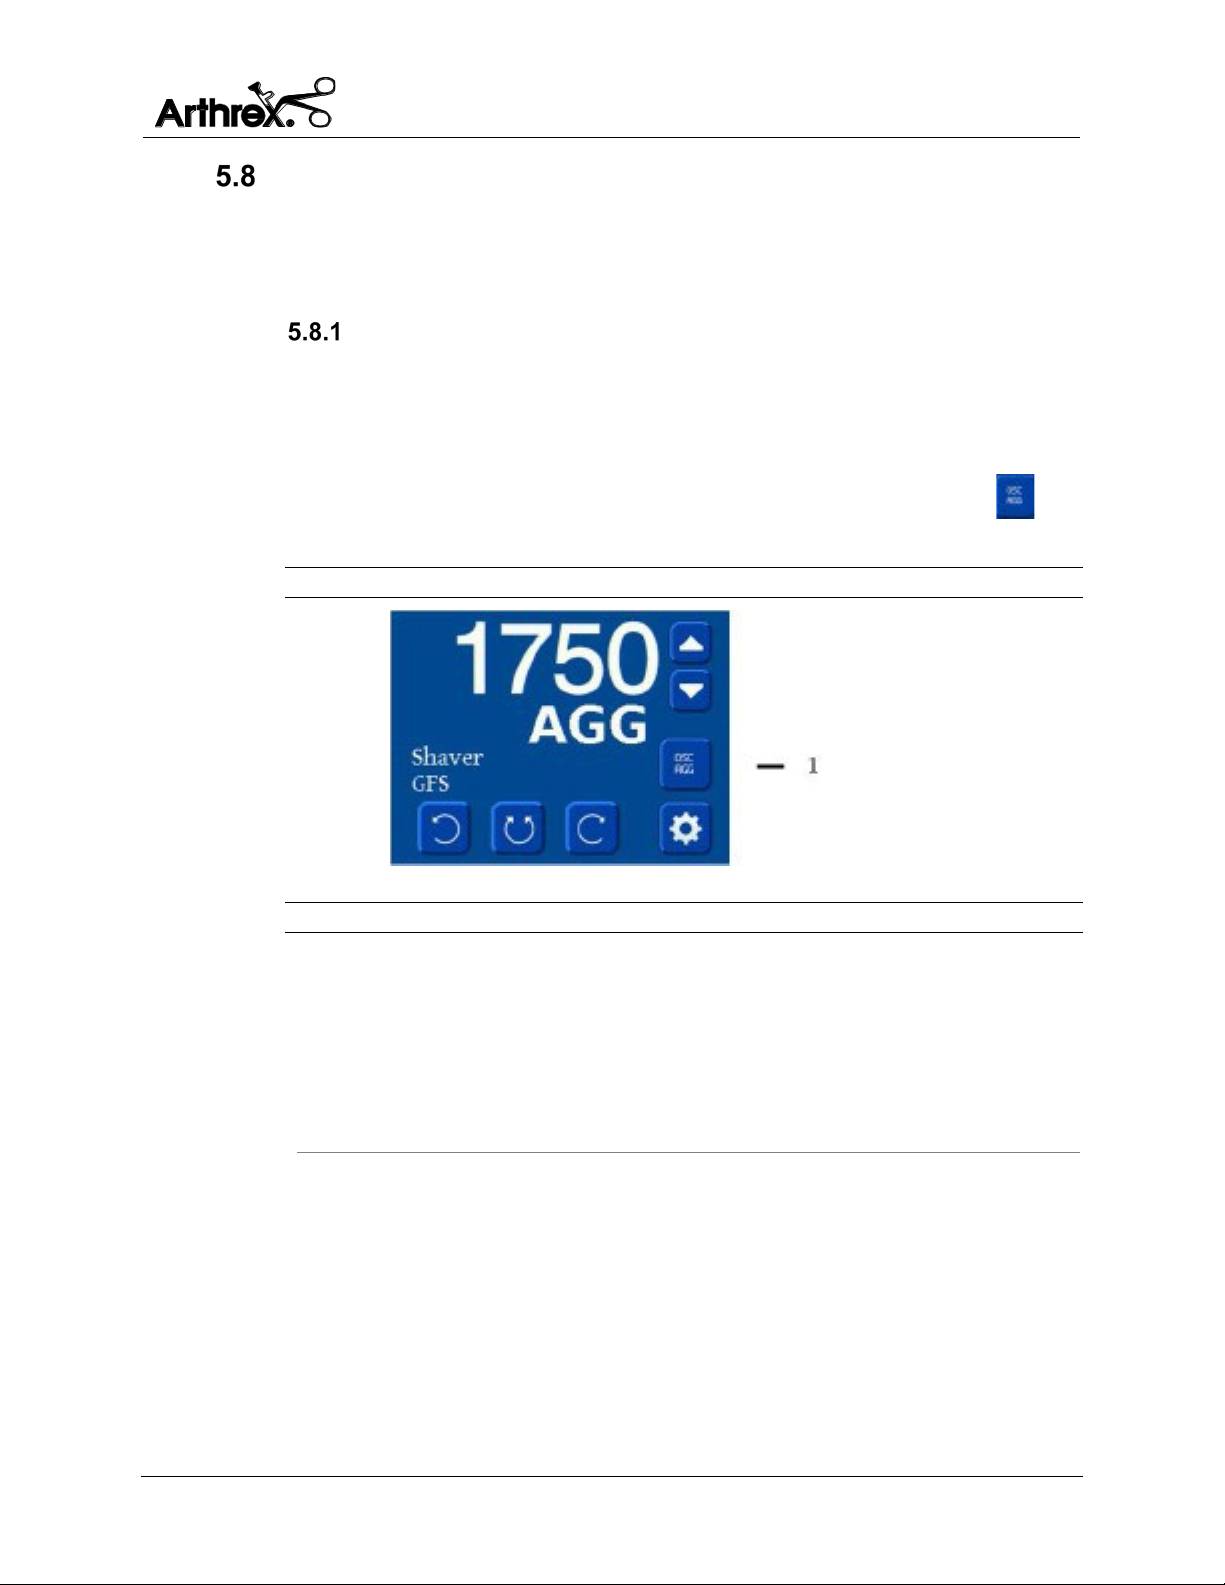
1. Oscillation Mode
The OSC Mode button is only displayed when
handpiece screen.
Buttons
Most buttons send a message to the controller when activated and/or released.
The Up and Down speed buttons auto repeat when pressure is maintained. The
selected speed is not sent to the controller until the button is released.
Buttons - Main Screen
The Main Screen is displayed in one of two configurations depending on how
many handpieces are connected to the system. A single handpiece screen is
displayed with a single screen while a two handpiece screen has two equally
sized sections, top and bottom. A single handpiece screen has the same content
as a dual handpiece screen section, with the exception of the OSC Mode
button on a single handpiece screen.
Figure 12 Single Handpiece Screen Oscillation Mode Location
Table 18 Oscillation Mode - Operation
button
a single handpiece is installed and the device is
in OSC mode.
When displayed, it can be pressed to toggle
between the different OSC modes.
This button is not displayed on a dual
DFU-0213-8r0_fmt_en-US Page 28 of 50
Page 35
Operation and Frequently Used Functions
Synergy Resection User’s Guide
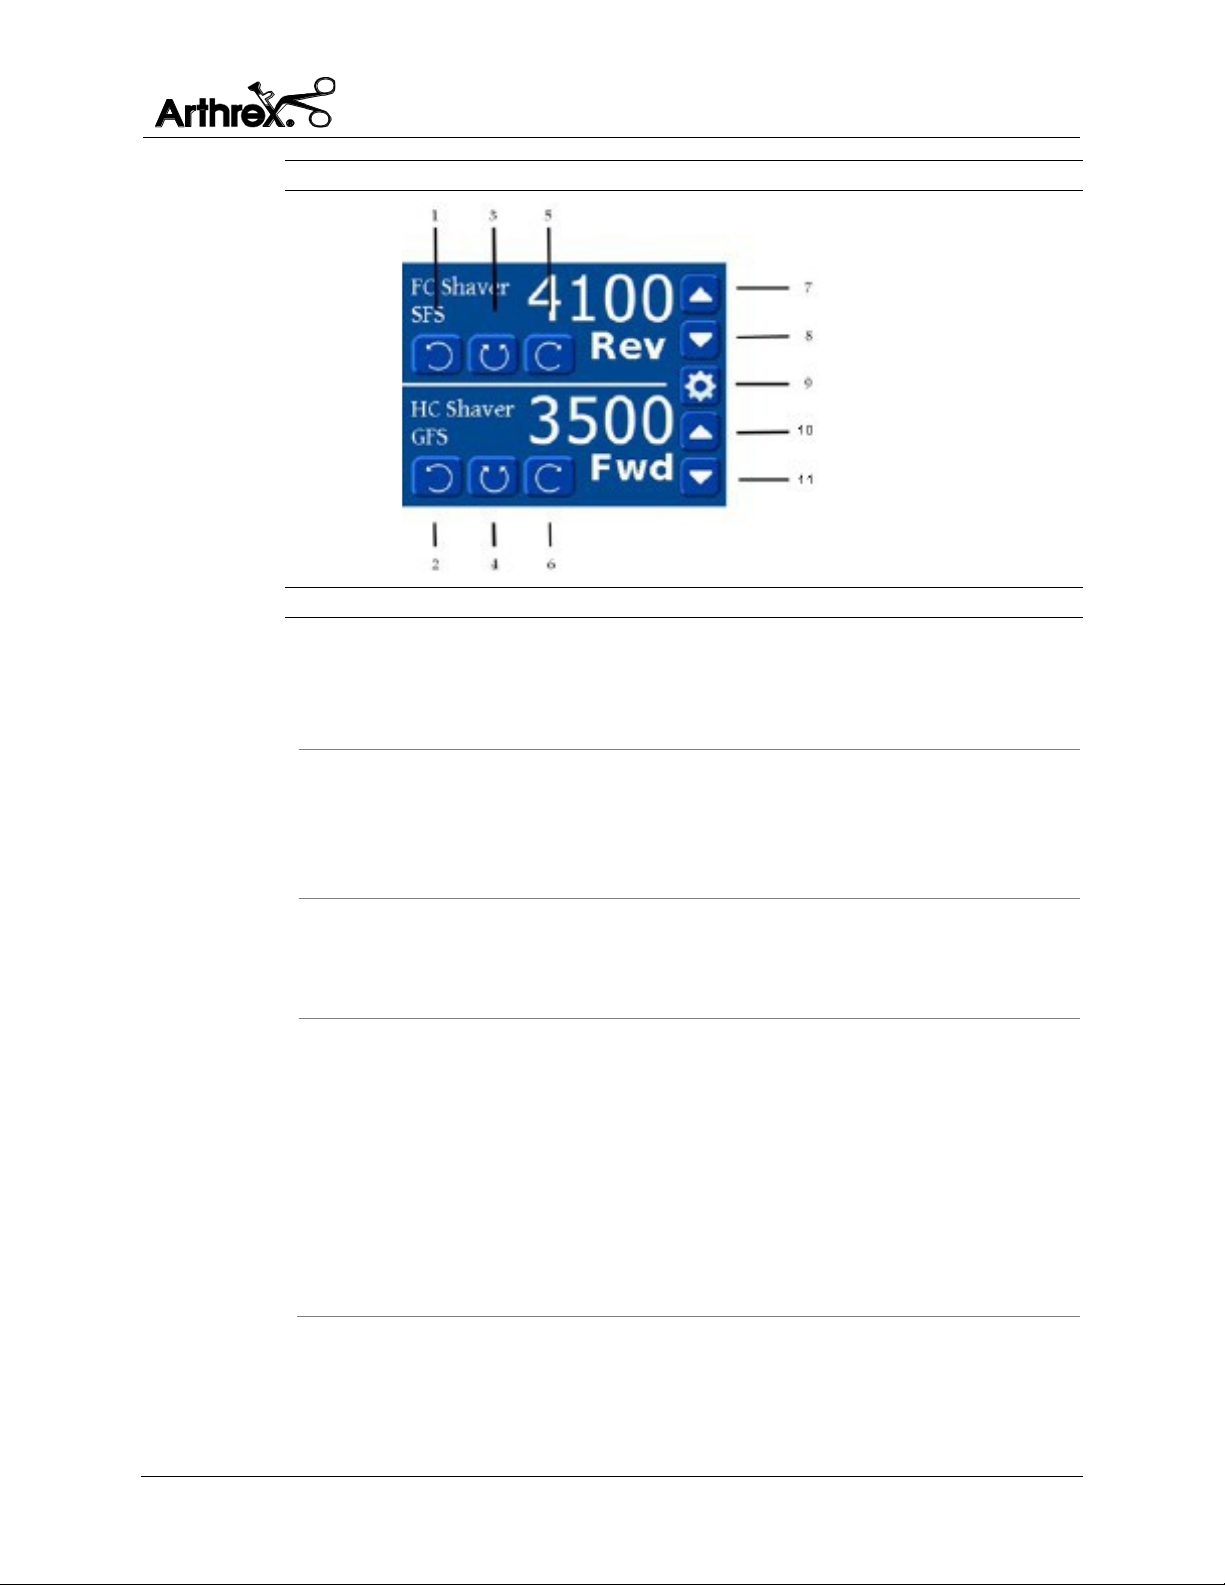
1. Channel 1 Reverse
button
When the Reverse button is pressed, the
shaver.
3. Channel 1 Oscillation
When the Oscillation button is pressed, the
Shaver Controller SRS document.
5. Channel 1 Forward
button
When the Forward button is pressed, the
shaver.
7. Channel 1 Up button
When the Up button is pressed, the speed of
the limit is reached.
Figure 13 Two Handpiece Buttons - Operation
Table 19 Two Handpiece Buttons - Operation
button
2. Channel 2 Reverse
button
4. Channel 2 Oscillation
button
button
6. Channel 2 Forward
8. Channel 2 Up button
handpiece motor moves in a counterclockwise
direction when observed from the tip of the
handpiece motor moves in an alternating
clockwise/counterclockwise direction. The
duration of each direction is specified in the
handpiece motor moves in a clockwise
direction when observed from the tip of the
the motor increases.
The increase of the motor speed depends on
the type of handpiece.
When the Up button is initially pressed, during
the first second, the speed changes by one
increment.
If the Up button is still pressed after the initial
second, the speed continues to increase until
DFU-0213-8r0_fmt_en-US Page 29 of 50
Page 36
Operation and Frequently Used Functions
Synergy Resection User’s Guide
9. Channel 1 Down
When the Down button is pressed, the speed
until the limit is reached.
11. Settings button
The Settings button is not displayed if
into speed test mode. See Speed Test Mode.
button
10. Channel 2 Down
button
of the motor decreases.
The decrease of the motor speed depends on
the type of the handpiece.
When the Down button is initially pressed,
during the first second, the speed changes by
one increment.
If the Down button is still pressed after the
initial second, the speed continues to decrease
either of the two motors are in motion.
When the motors are not in motion, the
Settings button is displayed between the Up
and Down buttons for both sections in a dual
screen mode, or in the lower right corner in a
single screen mode.
When the Settings button is pressed for 3
seconds, the software switches the controller
Speed Test Mode
The software enters the Speed Test mode when the Menu button is pressed and
held for 3 seconds until a triple beep is sounded.
Speed Adjustment
The Up and Down speed buttons auto-repeat when pressure is maintained. The
selected speed is not sent to the controller until the button is released.
Oscillation Mode Adjustment
The OSC Mode button is only displayed when a single handpiece is installed
and the device is in OSC mode.
When displayed, it can be pressed to toggle between the different OSC modes.
This button is not displayed on a dual handpiece screen.
DFU-0213-8r0_fmt_en-US Page 30 of 50
Page 37
Operation and Frequently Used Functions
Synergy Resection User’s Guide
Forward / Reverse Speeds
(RPM)
Oscillation Speeds
(RPM)
Handpiece
Min.
Max.
Speed Delta
Min.
Max.
Speed
Delta
Shaver
500
8000
300
500
3000
250
Drill
100
1400
See Drill Speeds
Section
N/A
N/A
N/A
Sag Saw
18000
18000
N/A
N/A
N/A
N/A
SJ Shaver
500
6200
300
500
3000
250
Handpiece
ACCURACY
All Shavers
±5 % OR ±100 RPM (greater of the two)
Drill
±5 % OR ±20 RPM (greater of the two)
Sag Saw
±6 %
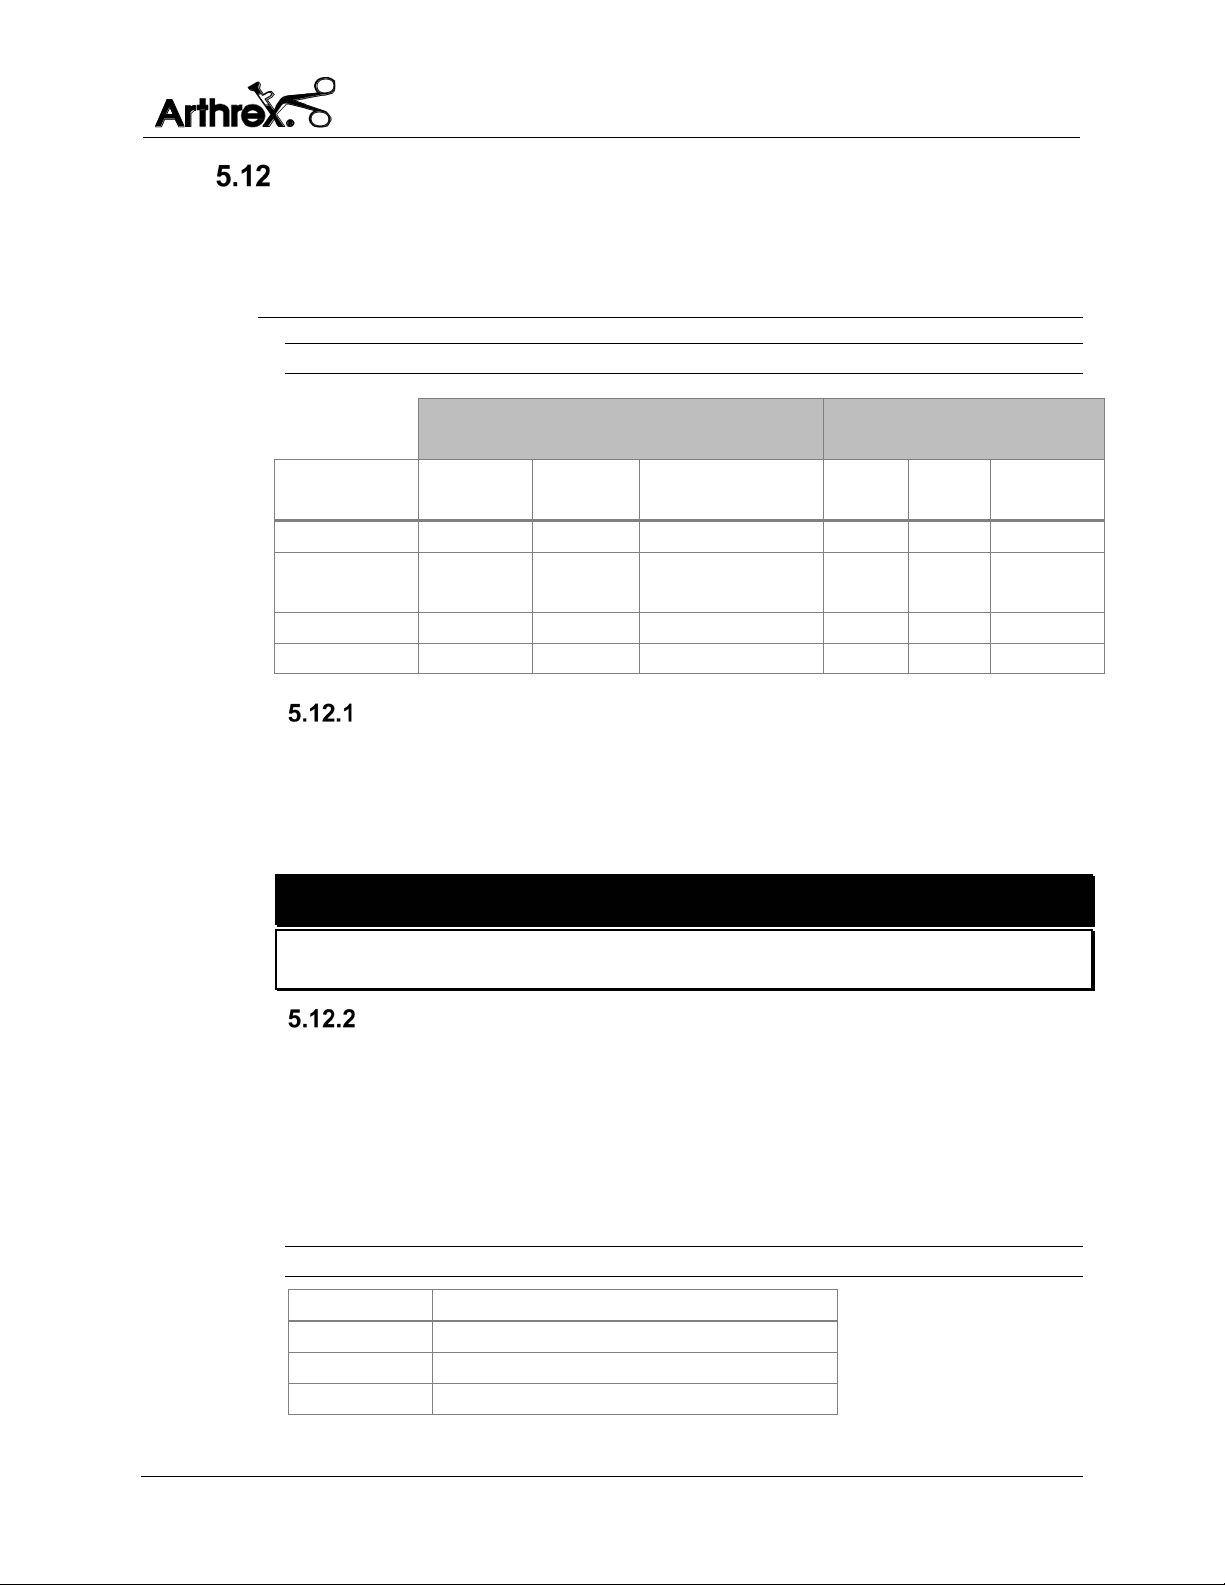
Accessory Handpiece Speed Limits and Deltas
The console supports individual handpiece motor-speed limits, defaults, and
speed increment and decrement “deltas”. These are defined below for the
supported handpieces.
Table 20 Accessory Handpiece Speed Limits and Delta
Drill Speeds
The drill supports only 100, 300, 500, 900, and 1400 (RPM). It does not cycle
through regular increments.
NOTE: While operating handpieces, the settings can be changed without risk
of damaging the motor or console.
WARNING!
Do not have the device in direct contact with patient if high-frequency devices are
in use or if the patient requires defibrillation.
Console Speed Controls
The Speed Increase and Speed Decrease buttons adjust the speed. Each time a
button is pressed, the speed is adjusted as shown in Table 20. The commands are
ignored if multiple buttons are pressed simultaneously.
To make the handpiece speed increase or decrease automatically, press the Speed
Increase or Speed Decrease button for more than 1 second. The values will not
exceed the minimum and maximum values defined for the attachment.
Table 21 Handpiece Accuracy
DFU-0213-8r0_fmt_en-US Page 31 of 50
Page 38
Operation and Frequently Used Functions
Synergy Resection User’s Guide
1. Reverse
Counterclockwise (CCW)
2. Forward
Clockwise (CW)
3. Oscillation
CW then CCW
4. Stop
No rotation
Attachment Motor Control
Definition of Direction
The definition of direction as viewed looking from the proximal to the distal (top
of the tip) of the shaver handpiece.
Forward, Reverse and Oscillation Modes
The buttons and pedals for the Reverse, Forward, and Oscillation modes select
which direction the motor rotates. If the Reverse and Forward buttons or pedals
are detected simultaneously then the motor defaults to Oscillation mode. During
Oscillation mode, the motor will rotate forward, then backward. Any other
combination of simultaneous button and pedal activations are ignored by the
device. This operation applies to both the console front-panel buttons and the
supported footswitch pedals.
Cruise Control
Use the Gas Pedal Footswitch to engage the cruise control function. The Gas
Pedal Footswitch is available as an optional system accessory. To operate the
cruise control, you must:
5.13.3.1 Cruise Set
When you select the Cruise Control Button, the Cruise function becomes
ARMED (signaled by a single audible 1 second alarm) but the LOCK IN
period does not start until one of the three pedals is pressed. If a pedal is
not pressed within 15 seconds then the Cruise function becomes
DISARMED (signaled by a single audible 1 second alarm).
If the Cruise button is pressed on an attachment that does not allow cruise
control, an error alarm occurs (3 fast tones), and displays the message
“*CRUISE NOT ALLOWED*”.
DFU-0213-8r0_fmt_en-US Page 32 of 50
Page 39

Operation and Frequently Used Functions
Synergy Resection User’s Guide
5.13.3.2 Cruise Lock
The LOCK IN period lasts for up to 15 seconds. During the LOCK IN
period the operator adjusts the speed and must hold the pedal steady for
3 seconds in order for the LOCKED state to occur. Steady is defined as
±500 RPM for forward or reverse, and ±400 RPM for oscillation. If the
pedal is held steady, the Shaver Console emits an audible double alarm
(2 brief tones) that indicates the LOCKED state has been entered, and
“*Lock*” is displayed. If the pedal was not held steady within the
15 second LOCK IN period, then the Cruise function becomes
DISARMED (signaled by a single audible 1 second alarm).
5.13.3.3 Remove Foot
The operator can move the same pedal for the next 3 seconds without
leaving the LOCKED state. This is necessary, since the act of taking the
foot off of the pedal moves the pedal position. Once the pedal is fully
released, or after 3 seconds have elapsed, the system again responds to
this pedal and disables the Cruise function.
5.13.3.4 Disable Cruise Lock
If any other footswitch or console panel button is activated while in the
LOCKED state, the Cruise function becomes DISARMED (with the
exception noted in item Remove Foot).
5.13.3.5 Disable Cruise Set
If the Toggle, Cruise Control, or Front Panel buttons are pressed at any
time after the Cruise Control button is selected (i.e. in the ARMED or
LOCKED state) then the Cruise function becomes DISARMED.
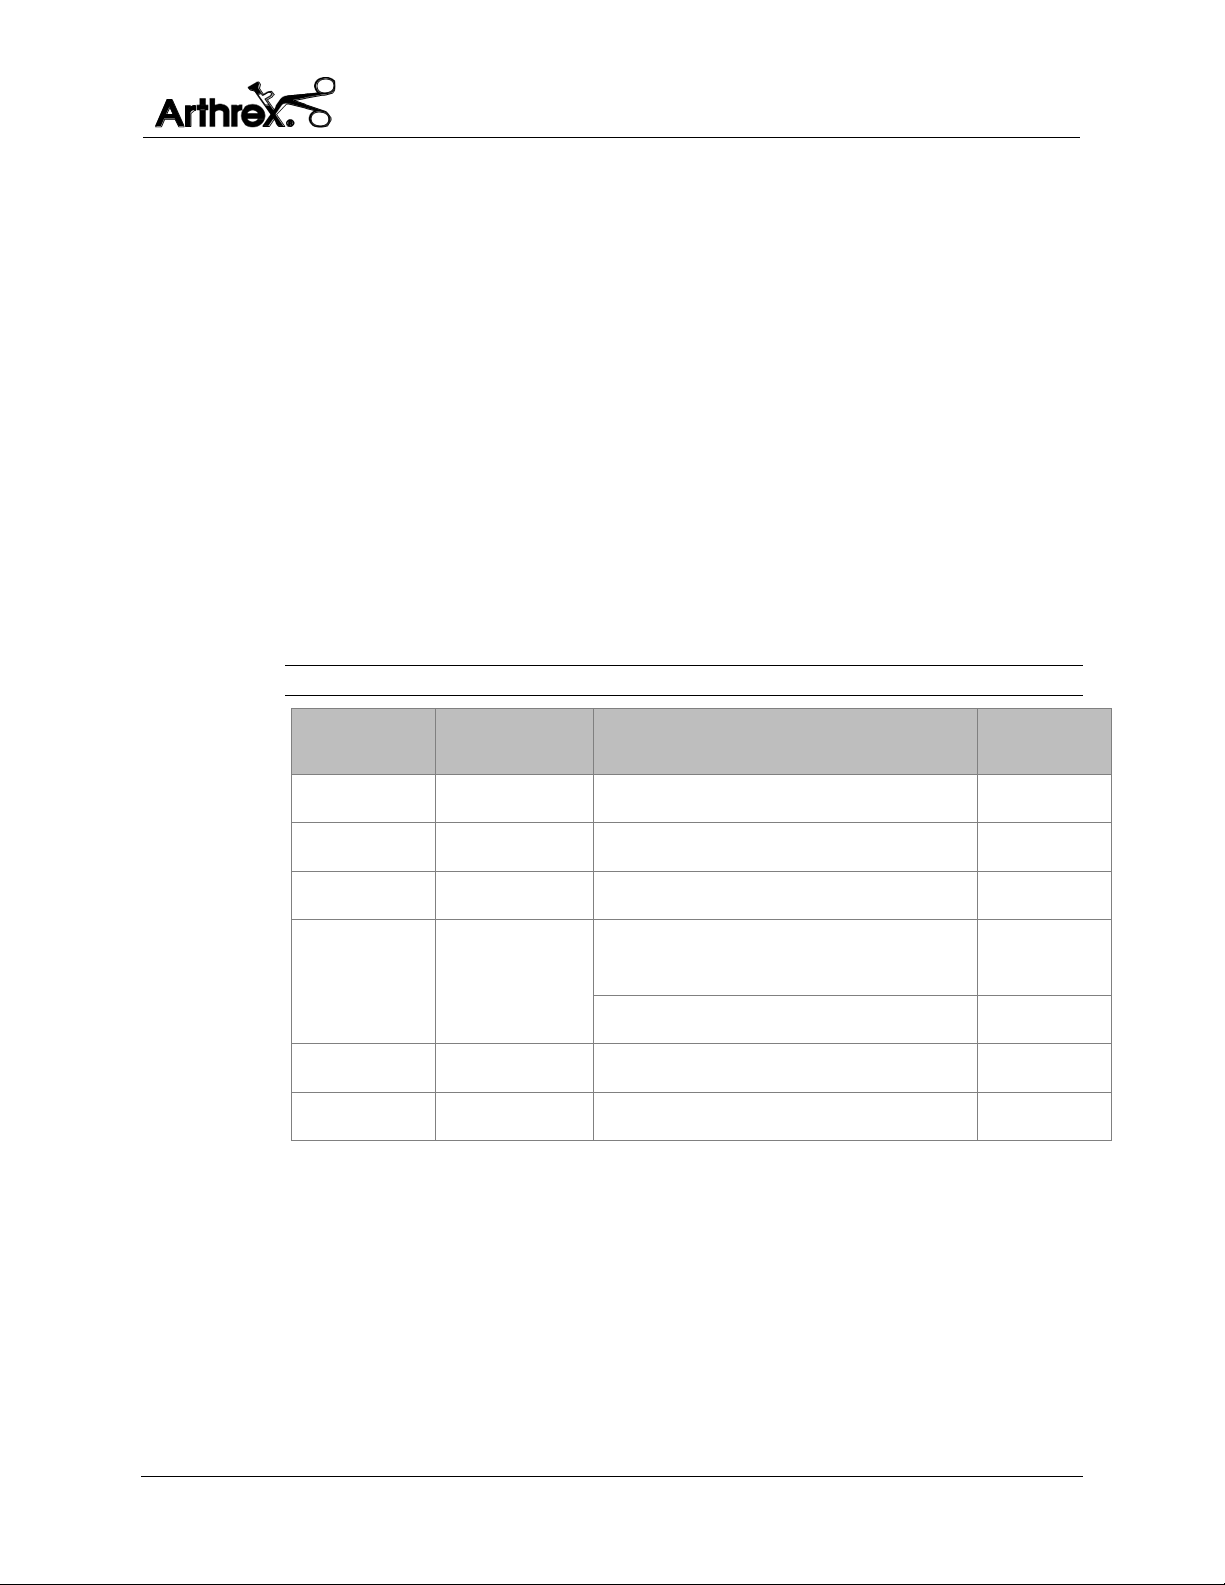
Toggle Function
A Toggle switch is available on both the Standard and the Gas Pedal
footswitches. The toggle function is performed by pressing a button on the
footswitch. The toggle function is available when one footswitch and two
Resection
handpieces are connected to the Synergy
allows the operator to control the handpieces in channel 1 and channel 2, without
moving the footswitch connection.
At power on, or at first connection, the footswitch controls the attachment which
is on the same channel as the one the footswitch is connected to. When the user
presses the Toggle switch, a beep indicates the footswitch has been toggled to the
attachment on the opposite channel. The handpiece on the same channel as the
footswitch is controlled by the front panel buttons only.
console. The toggle function
DFU-0213-8r0_fmt_en-US Page 33 of 50
Page 40
Operation and Frequently Used Functions
Synergy Resection User’s Guide
Installed
Handpieces
Installed
Footswitches
When the user presses Toggle again, the footswitch returns control to the
handpiece on the same channel as the footswitch. The channel on the opposite
side as the footswitch is controlled by front panel buttons only.
When controlled by the footswitch, the HC shaver is controlled by the
Footswitch Override setting. When not controlled by the footswitch, the
handpiece buttons and control panel are enabled.
If there is a connected attachment for each installed footswitch, and the
attachment supports oscillation mode, the toggle button switches to the next
oscillation mode in this sequence: efficient mode, aggressive mode, standard
mode and then back to efficient mode.
If two footswitches are installed with only one connected attachment, the
footswitch without a connected attachment is inactive.
If the Toggle switch is activated when only one attachment is connected and this
attachment does not support oscillation modes, an error beep sounds and
“TOGGLE NOT ALLOWED” message is temporarily displayed.
Table 22 Toggle Function
0 1 None None
0 2 None None
1 1 Change oscillation mode Single
1 2 Change oscillation mode (footswitch
2 1 Move control to next channel Single
2 2 Change oscillation mode Single
Action Beep type
Single
on installed HP channel)
None (footswitch with no installed HP) None
DFU-0213-8r0_fmt_en-US Page 34 of 50
Page 41

Operation and Frequently Used Functions
Synergy Resection User’s Guide
Footswitches
The footswitch cable connects and locks to the console to prevent
accidental separation during use. To avoid damage, disconnect
the footswitch by pulling on the cable connector shell (plug) only.
Standard Footswitch
The Speed Increase button adjusts the speed in the positive direction only. Each
time the button is pressed, the speed adjusts as shown in Table 20. When the
device is at maximum speed setting, the user can return to minimum speeds by
pressing the Speed Increase button one more time. The commands are ignored if
multiple buttons are pressed simultaneously.
If the Speed Increase button is continuously pressed for more than 1 second then
the speed auto-increments accordingly. The speed setting will not wrap when
auto-incrementing. Release the Speed Increase button and then press it again to
get the speed setting to cycle to the minimum setting.
Gas Pedal Footswitch
The Forward, Reverse, and Oscillation pedals linearly adjust the speed. When the
pedal is pressed, it returns an analog signal that is converted to a corresponding
RPM between the minimum and maximum speed of the attachment connected to
the footswitch.
Multi-Function Footswitches
Wireless and Corded Multi-Function Footswitches can operate as either a
Standard Footswitch or as a Gas Pedal Footswitch, as described in the preceding
sections. Function selection is made by pressing the button on the Multi-Function
Footswitch labeled “GFS” or “SFS’. These footswitches are available as optional
Resection
accessories. For more information on the Synergy
8315W), please see DFU-0320-XX. For the Synergy
Wireless Footswitch (AR-
Resection
Wireless Footswitch
Quick Start Guide, please see DFU-0323-XX-SUB.
Accessory Handpieces
The accessory handpiece cable connects and locks to the console
to prevent accidental separation during use. To avoid damage,
disconnect the footswitch by pulling on the cable connector shell
(plug) only.
DFU-0213-8r0_fmt_en-US Page 35 of 50
Page 42
Cleaning and Disinfecting
Synergy Resection User’s Guide
6.0 Cleaning and Disinfecting
Console AR-8305
The AR-8305 console is provided non-sterile and must not be
sterilized.
The AR-8305 console can be cleaned/disinfected using a cloth and commercially
available surfactants or surface disinfectants only. Use a commercially available
cleaning disinfectant for surfaces. Alkaline agents with a pH value > 8 are to be
avoided Do NOT clean the device with abrasive cleaning or disinfectant
compounds, solvents, or other materials that could scratch or damage the device.
The AR-8305 must not be submersed in any liquid.
Always place the Main Power Switch to “Off (O), position” and disconnect the
power before cleaning the AR-8305 console.
Always comply with the instructions issued by the manufacturer of
the cleaning disinfectant regarding concentration, exposure times,
temperature and material compatibility.
NEVER clean the console with liquid cleaners. If there is dust,
remove it with dry compressed air.
Do NOT clean the device with abrasive cleaning or disinfectant
compounds, solvents, or other materials that could scratch or
damage the device.
Footswitches
The footswitch is provided non-sterile and must not be
sterilized.
To clean and disinfect, unplug the cord from the console and add the protective
cap to the connector. Use a commercially available cleaning disinfectant for
surfaces. Alkaline agents with a pH value > 8 are to be avoided. Clean the
footswitch with an enzymatic cleaner without subsequent acid neutralization.
Rinse the footswitch thoroughly after cleaning.
After cleaning, disinfect the footswitch with a commercially available surface
disinfectant, thoroughly rinse the footswitch under lukewarm water.
Refer to the Multifunction Wireless Footswitch Operator's Manual, LM0659 for
additional cleaning instructions.
Always comply with the instructions issued by the manufacturer of
the cleaning disinfectant regarding concentration, exposure times,
temperature and material compatibility.
DFU-0213-8r0_fmt_en-US Page 36 of 50
Page 43
Cleaning and Disinfecting
Synergy Resection User’s Guide
NEVER allow the console receptacles to have any contact with
liquids. If there is dust or moisture on the receptacles, remove it
with dry compressed air. ONLY dry connectors should be plugged
into the console.
Do NOT clean the device with abrasive cleaning or disinfectant
compounds, solvents, or other materials that could scratch or
damage the device.
The footswitch is NOT suitable to be cleaned and disinfected in a
thermo washer disinfector.
Accessory Cable
Clean the cable with an enzymatic cleaner without subsequent acid
neutralization. Use a commercially available cleaning disinfectant for surfaces.
Alkaline agents with a pH value > 8 are to be avoided Do NOT clean the device
with abrasive cleaning or disinfectant compounds, solvents, or other materials
that could scratch or damage the device.
Rinse the cable thoroughly after cleaning.
After cleaning, disinfect the cable with a commercially available surface
disinfectant.
Thoroughly rinse the cable under lukewarm distilled water or preferably
demineralized sterile water. See Section 7.0 for sterilization information.
Refer to the Instructions for Use package insert for detailed Adapteur
Power System II Accessory Attachments (DFU-0149-XX) cleaning and
sterilization instructions included with each cable. Additional copies
of this insert can be obtained from the Arthrex website at
www.Arthrex.com, or by contacting your local Arthrex Representative.
Always comply with the instructions issued by the manufacturer of
the disinfectant.
NEVER allow the console plug pins to have any contact with
liquids. If there is dust or moisture on the receptacles, remove it
with dry compressed air. ONLY dry connectors may be plugged
into the console.
Accessory Handpieces
Refer to the Instructions for Use package insert for detailed shaver
handpiece (DFU-0154-XX, or DFU-0240-XX) and Adapteur Power
System II Accessory Attachments (DFU-0149-XX) cleaning and
sterilization instructions included with each handpiece. Additional
copies of this insert can be obtained from the Arthrex website at
www.Arthrex.com, or by contacting your local Arthrex
Representative.
DFU-0213-8r0_fmt_en-US Page 37 of 50
Page 44
Cleaning and Disinfecting
Synergy Resection User’s Guide
Remove any accessories in the device. This includes shaver blades, saw blades or
drill bits.
If the handpiece has suction control, make sure it is fully open.
Clean the handpiece with an enzymatic cleaner without subsequent acid
neutralization.
If the handpiece has suction control, clean the connection with a cleaning brush.
Rinse the handpiece thoroughly after cleaning.
Disinfect the handpiece with a commercially available disinfectant.
Thoroughly rinse the handpiece under lukewarm distilled water or preferably
demineralized sterile water.
See Section 7.0 for sterilization information.
Always comply with the instructions issued by the manufacturer of
the disinfectant.
NEVER place the shaver handpiece in Cidex or other aldehyde
disinfectant solutions.
NEVER allow the console plug pins to have any contact with
liquids. Remove dust or moisture with dry compressed air. Only
DRY connectors may be plugged into the console.
DFU-0213-8r0_fmt_en-US Page 38 of 50
Page 45
Sterilization
Synergy Resection User’s Guide
7.0 Sterilization
Sterilization capabilities, cleaning, disinfecting, handling, and storage of instrumentation
are the responsibility of qualified facility and/or user personnel. Qualified personnel
must still properly clean and disinfect the instruments prior to sterilization.
Refer to the Instructions for Use package insert for detailed Shaver
Handpiece (DFU-0154-XX or DFU-0240-XX) and Adapteur Power
System II Accessory Attachments (DFU-0149-XX) cleaning and
sterilization instructions included with each handpiece. Additional
copies of this insert can be obtained from the Arthrex website at
www.Arthrex.com, or by contacting your local Arthrex
Representative.
After sterilization in the autoclave, let the accessory device cool
down slowly. NEVER use cold water to cool the handpieces. This
will damage the electronic components and seals.
Liquid on the cable connector of the accessory device can damage
the device. Before connecting the cable, ensure the receptacles
are clean and dry.
WARNING!
After autoclaving, the accessory devices are VERY HOT. Handle with care to avoid burns.
The following special instructions are to be observed when sterilizing
accessory handpieces.
Open or remove the suction control completely to ensure proper
circulation, if applicable.
Open the chuck completely to ensure proper circulation, if
applicable.
Remove all accessories, including shaver blades, drill bits and saw
blades before sterilizing a handpiece.
DFU-0213-8r0_fmt_en-US Page 39 of 50
Page 46

Transmissible Spongiform Encephalopathy (TSE) Agents
Synergy Resection User’s Guide
8.0 Transmissible Spongiform Encephalopathy (TSE) Agents
It is outside the scope of this document to describe in detail the precautions that should
be taken for Transmissible Spongiform Encephalopathy (TSE) Agents.
The agents for transmission of Creutzfeldt-Jakob disease are believed to be resistant to
normal processes of disinfection and sterilization. Therefore, the normal processing
methods of decontamination and sterilization as described above may not be
appropriate where CJD transmission is a risk.
In general, the tissues that come into contact with orthopedic surgical instruments are
those of low TSE infectivity. However, take particular precautions when handling
instruments that have been used on known, suspected, or at risk patients.
References:
ANSI/AAMI ST79: Good Hospital Practice: Steam sterilization and sterility assurance.
DFU-0213-8r0_fmt_en-US Page 40 of 50
Page 47

Maintenance
Synergy Resection User’s Guide
9.0 Maintenance
Regular and proper maintenance of your Synergy
your investment and avoid non-warranty repairs.
Recommended care and handling of the Synergy
day operation, cleaning, and sterilization which are extremely important to ensure safe
and efficient operation. It is important to visually inspect the foot pedal and handpiece,
cable and connectors before each use.
Your authorized Arthrex service department is the most knowledgeable about the
Arthrex Medical Resection Systems and/ foot pedal and handpiece, and will provide
competent and efficient service. Any services and/or repairs done by any unauthorized
repair facility may result in reduced performance of the instruments or instrument
failure.
Resection
System is the best way to protect
Resection
System includes proper day- to-
Life Expectancy
Life expectancy for the console is approximately 5 years under normal use and
standard of care.
Periodic Maintenance
The product should be inspected prior to and after each use to ensure that the
foot pedal, handpiece, cable, strain relief, overmold, or connector contacts are not
damaged or worn. If it becomes necessary to return the foot pedal and / or
handpiece to Arthrex for service, please disinfect the foot pedal and/or sterilize
the handpiece before shipping.
DFU-0213-8r0_fmt_en-US Page 41 of 50
Page 48
Technical Support
Synergy Resection User’s Guide
10.0 Technical Support
For assistance in using the products identified in this User’s Guide, contact an Arthrex
representative or contact the Arthrex Technical Support Hotline at 1 (800) 391-8599,
Monday through Friday from 8:00 AM to 8:00 PM EST; at +49 89 909005-0 or
How to Display the Software Version
Technical Support may request the software version of the AR-8305. Follow these
instructions to display the software version.
1. Power On the AC mains power switch [3] on the AR-8305.
2. The software version is displayed on the TPVD during the power-up
sequence.
Additional Technical Information
from 8:00 AM to 5:00 PM CET
Contact your Arthrex representative if require more comprehensive technical
information. Circuit diagrams, component part lists, descriptions, calibration
instructions, or other information will be provided upon request by Arthrex
APPROVED SERVICE PERSONNEL
DFU-0213-8r0_fmt_en-US Page 42 of 50
Page 49
Troubleshooting
Synergy Resection User’s Guide
Fault
Cause
Solution
Unit does not power on.
1. Not receiving power from the wall
3. Console has an internal power failure.
1. Check the main power plug and wall
3. Send in for repairs.
Handpiece does not
1. Handpiece is not connected to the correct
1. Check the connector is plugged into the
9. Send in for repairs.
Motor runs but shaver
1. Shaver blade/burr incorrectly inserted.
1. Insert the shaver blade so that it engages.
3. Replace the shaver blade/burr.
No suction.
1. Clogged suction connection.
4. Damaged Suction Control.
1. Rinse with a syringe.
4. Send in for repairs.
11.0 Troubleshooting
Refer to Table 23 for device troubleshooting if problems occur after cleaning, transporting or changing operating staff.
Table 23 Troubleshooting: Faults, their Causes and Solutions
work.
blades/burrs do not
work.
receptacle or the power strip.
2. Blown fuses.
channel.
2. Not fully or properly connected or
connector is damaged.
3. Liquid in the receptacle or connector.
4. Connector is damaged.
5. Footswitch is defective.
6. Footswitch is functional.
7. Handpiece is too hot after sterilization.
8. Handpiece over-current is detected.
9. Defective handpiece.
2. Damaged hub.
3. Bent sleeve.
receptacle.
2. Check the fuses.
correct channel receptacle.
2. Check both connectors are plugged in
properly.
3. Dry thoroughly.
4. Replace the cable.
5. Operate the device using the console unit.
6. Replace the handpiece.
7. Allow it to cool down as indicated in the
WARNING in Section 7.0.
8. Allow 30 seconds for the console to reset the
affected channel.
Fully close the locking mechanism.
2. Replace the shaver blade/burr.
DFU-0213-8r0_fmt_en-US Page 43 of 50
2. Clogged shaver blade or burr.
3. Closed Suction Control.
2. Clean with a brush.
3. Open Suction Control.
Page 50
Troubleshooting
Synergy Resection User’s Guide
Fault
Cause
Solution
System runs with the
control unit but not with
the footswitch.
1. Not fully, properly connected or damaged
3. Defective Footswitch.
1. Check the connector from the footswitch to the
3. Send in for repairs.
Connected handpiece not
shown on display.
1. Not fully or properly connected or
1. Check that both connectors are plugged in
connector.
2. Liquid in receptacle or connector.
connector is damaged.
2. Defective handpiece or connector.
3. Connector is damaged.
4. Defective handpiece.
If the problems persist, disinfect the Synergy
Resection
System and send in to Arthrex using the original packaging. Always send
control unit.
2. Dry thoroughly.
properly.
2. Check the connector with another handpiece.
3. Replace.
4. Send in for repairs.
the corresponding handpiece together with the console, footswitch and cable. Please enclose a brief explanation of the
detected malfunction. Refer to Section 12.0 for more information.
Troubleshooting Interference with Other Devices
Try one or more of the following to correct interference:
• Reorient or relocate the receiving device.
• Increase the distance between devices.
• Connect the device to an outlet on a different circuit than the other device(s).
• Consult the manufacturer or field service technician for the receiving device for assistance.
DFU-0213-8r0_fmt_en-US Page 44 of 50
Page 51

Electromagnetic Emissions
Synergy Resection User’s Guide
12.0 Repair Policy
Contact Arthrex for a Return Authorization Number and instructions prior to returning
the device.
13.0 End of Life, Environmental Directives
WEEE Directive [2012/19/EU] on Waste Electrical and Electronic
Equipment
The Directive on Waste Electrical and Electronic Equipment obliges manufacturers,
importers, and/or distributors of electronic equipment to provide for recycling of the
electronic equipment at the end of its useful life.
Do not dispose of WEEE in unsorted municipal waste.
The WEEE symbol on the product or its packaging indicates that this product must not
be disposed of with other waste. Instead, it is your responsibility to dispose of your
waste equipment by handing it over to a designated collection point for the recycling of
Waste Electrical and Electronic Equipment. The separate collection and recycling of your
waste equipment at the time of disposal will help conserve natural resources and ensure
that it is recycled in a manner that protects human health and the environment. For
more information about where you can drop off your medical electronic equipment at
the end of its useful life for recycling, please contact Arthrex Customer Service
Department.
DFU-0213-8r0_fmt_en-US Page 45 of 50
Page 52
Electromagnetic Emissions
Synergy Resection User’s Guide
Emissions test
Complia
nce
Electromagnetic environment – guidance
AR-8305 Synergy
system uses RF energy only for its
not likely to cause any interference in nearby equipment.
RF emissions
CISPR 11
Harmonic
61000-3-2
Voltage
IEC 61000-3-3
Type
Use
Shielded
Ferrite
Maximum Length
Supply Line Power
to the Console
14.0 Electromagnetic Emissions
Table 24 Guidance and Manufacturer’s Declaration – Electromagnetic Emissions
The AR-8305 Shaver System is intended for use in the electromagnetic environment specified
below. The customer or the user of the AR-8305 Shaver System should assure that it is used in
such an environment.
Resection
RF emissions
CISPR 11
Group1
Class A
internal function. Therefore its RF emissions are very low and
emissions IEC
fluctuations/
flicker emissions
Class A
Complies
Table 25 System Cables
Power Cords
The AR-8305 Synergy
Resection
system is suitable for use in all
establishments other than domestic and those directly
connected to the public low-voltage power supply network
that supplies buildings used for domestic purposes.
No No 3.048 m
DFU-0213-8r0_fmt_en-US Page 46 of 50
Page 53

Electromagnetic Emissions
Synergy Resection User’s Guide
Immunity
test
IEC 60601 test
level
Compliance level
Electromagnetic environment guidance
Electrostatic
± 8 kV contact
± 8 kV contact
Floors should be wood, concrete or
humidity should be at least 30 %.
Electrical fast
± 2 kV for power
100
± 2 kV for power
Mains power quality should be that of
Surge
± 1 kV line(s) to
earth
± 1 kV line(s) to
earth
Mains power quality should be that of
Voltage dips,
UT= 0%,0.5 cycle
cycles (@0 degrees)
UT= 0%,0.5 cycle
Mains power quality should be that of
Power frequency
30 A/m
30 A/m @
Power frequency magnetic fields
Note: UT is the AC mains voltage prior to application of the test level.
Table 26 Guidance and Manufacturer's Statement - Electromagnetic Immunity
The AR-8305 Synergy
Resection
System is intended for use in the electromagnetic environment
specified below. The customer or the user of the AR-8305 Synergy
that it is used in such an environment.
discharge (ESD)
IEC 61000-4-2
transient/burst
IEC 61000-4-4
IEC 61000-4-5
± 15 kV air
supply lines
± 1 kV for
input/output lines
100khz Cycling
Frequency
line(s)
± 2 kV line(s) to
± 15 kV air
supply lines
± 1 kV for
input/output lines
100khz Cycling
Frequency
line(s)
± 2 kV line(s) to
ceramic tile. If floors are covered with
synthetic material, the relative
a typical commercial or hospital
environment.
a typical commercial or hospital
environment.
Resection
System should ensure
short
interruptions and
voltage variations
on power supply
input lines
(0, 45, 90,135, 180,
225, 270, and 315
U
UT= 70%;25/30
IEC 61000-4-11
UT= 70%;
250/300 cycles
(50/60 Hz)
magnetic field
IEC 61000-4-8
T= 0%;1 cycle
(0, 45, 90,135, 180,
0
)
225, 270, and 315
T= 0%;1 cycle
U
T= 70%;25/30
U
cycles (@0 degrees)
T= 70%;
U
250/300 cycles
50 & 60 Hz
a typical commercial or hospital
0
)
environment. If the AR-8305
Resection
Synergy
System requires
continued operation during power
mains interruptions, it is
recommended that the AR-8305
Resection
Synergy
System be powered
from an uninterruptible power
supply.
should be at levels characteristic of a
typical location in a typical
commercial or hospital environment.
DFU-0213-8r0_fmt_en-US Page 47 of 50
Page 54
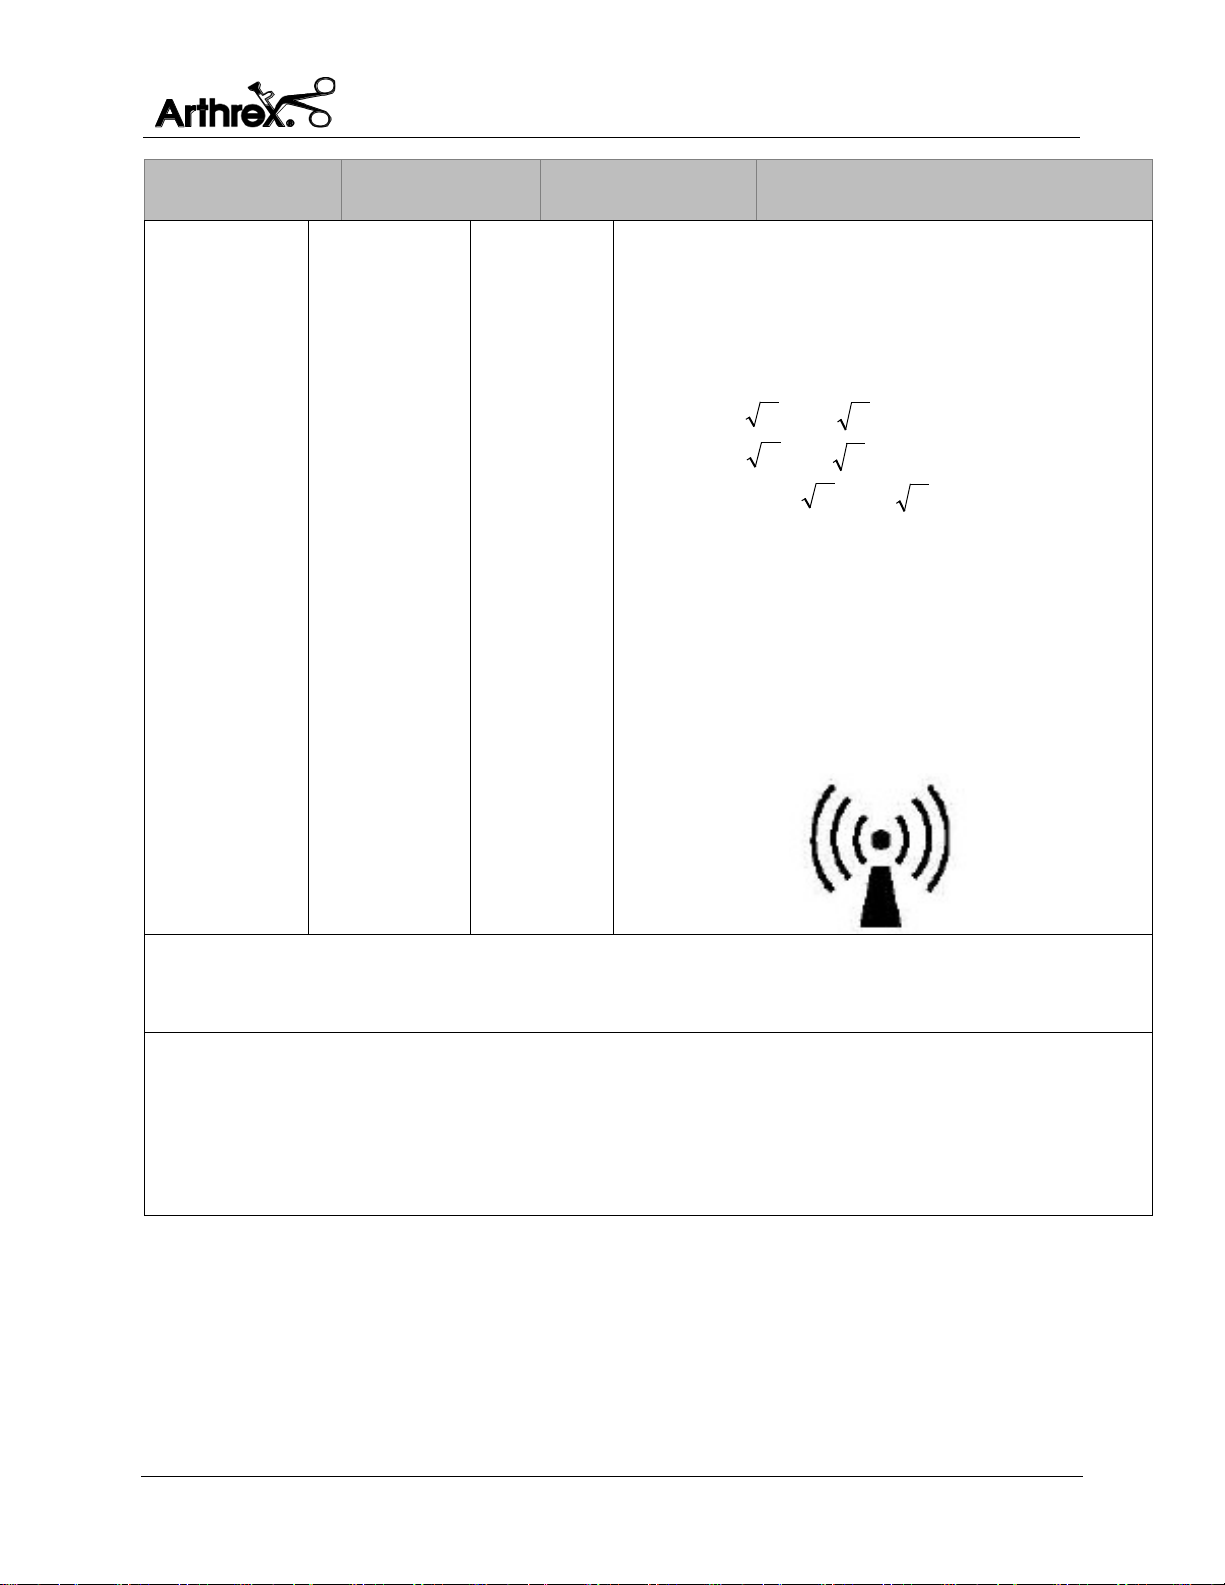
Electromagnetic Emissions
Synergy Resection User’s Guide
Immunity
test
IEC 60601 test
level
Compliance level
Electromagnetic environment guidance
Portable and mobile RF communications equipment
[ ]
PVd 1/5.3=
P
[ ]
PVd 1/5.3=
P
[ ]
PEd 1/7=
P
reflection from structures, objects and people.
a Field strengths from fixed transmitters, such as base stations for radio (cellular/cordless) telephones and land mobile
b Over the frequency range 150 kHz to 80 MHz, field strengths should be less than 3 V/m.
Conducted RF
IEC 61000-4-6
Radiated RF
IEC 61000-4-3
3 Vrms
150 kHz to 80
MHz
3 V/m
80 MHz to 2.7
GHz
3 Vrms
3 V/m
should be used no closer to any part of the Model
AR-8305, including cables, than the recommended
separation distance calculated from the equation
applicable to the frequency of the transmitter.
Recommended separation distance
= 1.17
=1.17
Where P is the maximum output power rating of the
transmitter in watts (W) according to the transmitter
manufacturer and d is the recommended separation
distance in meters (m).
Field strengths from fixed RF transmitters, as determined
by an electromagnetic site survey
compliance level in each frequency range.
Interference may occur in the vicinity of equipment
marked with the following symbol:
80 MHz to 800 MHz
= 2.33
800 MHz to 2.7 GHz
a should be less than the
b
NOTE 1 At 80 MHz and 800 MHz, the higher frequency range applies.
NOTE 2 These guidelines may not apply in all situations. Electromagnetic propagation is affected by absorption and
radios, amateur radio, AM and FM radio broadcast and TV broadcast cannot be predicted theoretically with accuracy. To
assess the electromagnetic environment due to fixed RF transmitters, an electromagnetic site survey should be considered.
If the measured field strength in the location in which the Model AR 8305is used exceeds the applicable RF compliance level
above, the Model AR-8305 should be observed to verify normal operation. If abnormal performance is observed, additional
measures may be necessary, such as re-orienting or relocating the Model AR-8305
DFU-0213-8r0_fmt_en-US Page 48 of 50
Page 55
Electromagnetic Emissions
Synergy Resection User’s Guide
Separation distance according to frequency of transmitter [m]
0.01
0.12
0.12
0.23
0.1
0.38
0.38
0.73 1 1.2
1.2
2.3
10
3.8
3.8
7.3
100
12
12
23
For transmitters rated at a maximum output power not listed above, the recommended separation
absorption and reflection from structures, objects and people.
Table 27 Guidance and Manufacturer's Statement – Recommend Separation Distance
between portable and mobile RF communications equipment and the
Model AR-8305
Recommended separation distances between portable and mobile RF communications
equipment and the ModelAR-8305
Resection
The ModelAR-8305 Synergy
environment in which radiated RF disturbances are controlled. The customer or the user of the
Model AR-8305 can help prevent electromagnetic interference by maintaining a minimum
distance between portable and mobile RF communications equipment (transmitters) and the
Model AR-8305 as recommended below, according to the maximum output power of the
communications equipment.
Rated maximum output
power of transmitter [W]
System is intended for use in an electromagnetic
150 kHz to 80 MHz
80 MHz to 800 MHz
800 MHz to 2.7 GHz
d = 1.2 √P
d = 1.2 √P
d = 2.3 √P
distance d in meters (m) can be estimated using the equation applicable to the frequency of the
transmitter, where P is the maximum output power rating of the transmitter in watts (W) according
to the transmitter manufacturer.
NOTE 1 At 80 MHz and 800 MHz, the separation distance for the higher frequency range applies.
NOTE 2 These guidelines may not apply in all situations. Electromagnetic propagation is affected by
Synergy Resection User’s Guide
DFU-0213-8r0_fmt_en-US Page 49 of 50
Page 56
Synergy Resection User’s Guide
Arthrex, Inc.
1370 Creekside Blvd.
Naples, FL 34108-1945 USA
www.arthrex.com
Customer Service
1-(800) 934-4404
Toll-Free Technical Support: 1-(888) 420-9393,
Monday through Friday, 9:00 AM – 5:00 PM EST.
Arthrex GmbH
Erwin-Hielscher-Strasse 9
81249 München, Germany
Tel: +49 89 909005-0
www.arthrex.de
All rights reserved. Printed in USA
DFU-0213-8r0_fmt_en-US Page 50 of 50
 Loading...