

Page 1

INDEX
1
SS-200
TRUE USB VoIP
(Voice Over Internet Protocol) SPEAKER
With Built-in Microphone & USB Hub
USER’S GUIDE
Index
Product Features
Product Overview
Controls
Connection
Installing The Software
1
2
3
4
4
6
Uninstalling The Software
Trouble Shooting
Frequently Asked
Questions
Product Specifications
Safety Instructions
11
14
18
20
22
Please read and understand all safety instructions before use.
Page 2

32
PRODUCT FEATURES
The ARTDIO SS-200 VoIP Speaker is a full duplex mono speaker with
built-in microphone, which designed for you to listen to music and
enjoy conversations through the Internet with a hands free experience.
DSP (Digital Sound Processing) with echo cancellation and noise
suppression technology assures best voice clarity and quality for
making calls through the Internet. The SS-200 speaker is truly USB
powered, no additional adapters required. Just plug into the USB port
on the computer, install the driver included, and start enjoying the
special features.
Designed to support VoIP soft phones such as Skype™, and support
the following functions: ( installation CD-ROM includes the supporting
features)
• Easy access Call Button on the speaker (make/ answer/ disconnect
Skype call)
• Auto Music Pause and Resume function when music plays with
Windows Media Player™ and Winamp™ for incoming/outgoing
Skype calls.
Designed to enhance Sound Effect provided by ArtDio USB 3D Sound
software. (installation CD-ROM includes the supporting features)
The 3-ports High Speed USB 2.0 hub provides plug and play feature
connectivity that allows additional connection of up to three USB
peripherals or devices, such as USB flash drive, MP3 players, web
cameras, card reader, USB mouse, or external hard drive with additional
power supply.
PRODUCT OVERVIEW
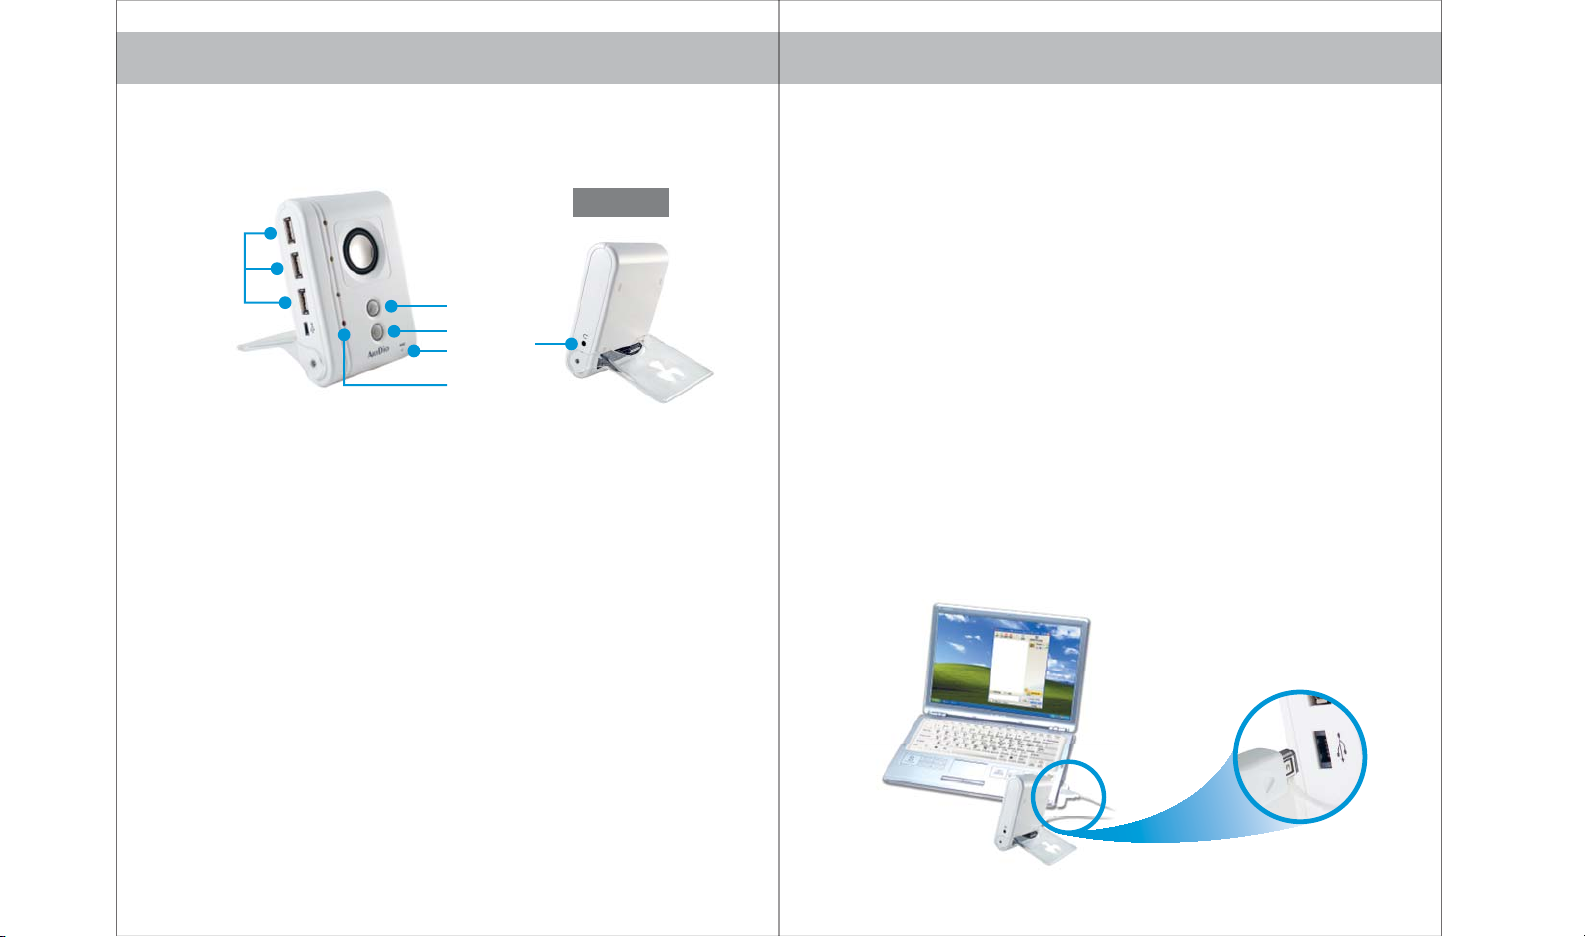
FRONT VIEW
3-Port High Speed
USB 2.0 Hub
True USB Connector
BACK VIEW
2.5mm Mono Headphone Jack
Speaker Stand
USB Port Power LED
Call Button & LED
Power LED
Microphone Mute & LED
Built-in Microphone
* All trademarks are registered trademarks of their respective companies in the United States and/ or
other countries.
Page 3
54
CONTROLS
(4)
(please refer to picture [A])
(1)
(2)
(3)
(5)
picture [A]
(6)
(1) Call Button & LED ( support Skype only )
Make a Call: Press to make an outgoing call.
Answer a Call: Press to answer an incoming call.
Disconnect a Call: Press to disconnect a call.
Green LED will flash when a call is ringing, it will light when the call is
connected.
(2) Microphone Mute & LED
Press to mute the microphone, the blue LED will light.
(3) Built-in Microphone
Talk directly with the built-in microphone on the speaker to enjoy your
conversation hands free.
(4) 3-Port High Speed 2.0 Hub & LED
Provides connectivity of up to 3 USB peripherals and devices simultaneously. The total power input for the USB Hub is 5V DC, maximum 600mA.
Orange LED will flash when a USB device is connecting to the USB port, it
will light when the USB device is powered and ready to use.
(5) Power LED
Red LED will light to indicate the speaker is connected properly to the
computer, powered and ready for use.
(6) 2.5mm Headphone Jack
Connect to headphone with 2.5mm connector for private conversation.
Note: A mono headphone with built-in microphone is included.
CONNECTION
1.Connect the mini USB connector to the mini USB jack located on the bottom
left panel of the speaker.
2.Plug in the USB cable from the speaker to the USB-port on your computer.
3.The red LED will light to indicate the power for SS-200 speaker is on.
4.Flip the speaker stand all the way to the back of the speaker, and place it on a
flat sturdy surface to stand.
NOTE: When the SS-200 speaker is connected to the computer, do not connect additional USB audio
devices such as ArtDio’s SS-168 or SS-100, and any other USB audio devices to the computer.
Page 4

76
INSTALLING THE SOFTW ARE
Note:Y ou must connect the SS-200 speaker to your computer before installing
the software.
1. Place the installation CD-ROM into the CD-ROM drive on your computer.
2.The setup program will start aut omatically;if the auto run does not start, please
install manually by double-click on the setup (.exe) file on the CD-ROM drive.
3. Please follow the instructions in the setup program to complete the
installation.
INSTALLATION SCREENSHOTS
1) Please wait while the setup
extracts the files needed to be
installed, SSCtrl Driver.
2) Note:Please connect the
SS-200 speaker to your
computer bef or e continue the
setup.
3) Please wait while the setup
prepares the installation for
SSCtrl driver, which will guide
youthroughtherestofthe
setup process.
4) Click“Next”to c ontinue the
setup.
Page 5
98
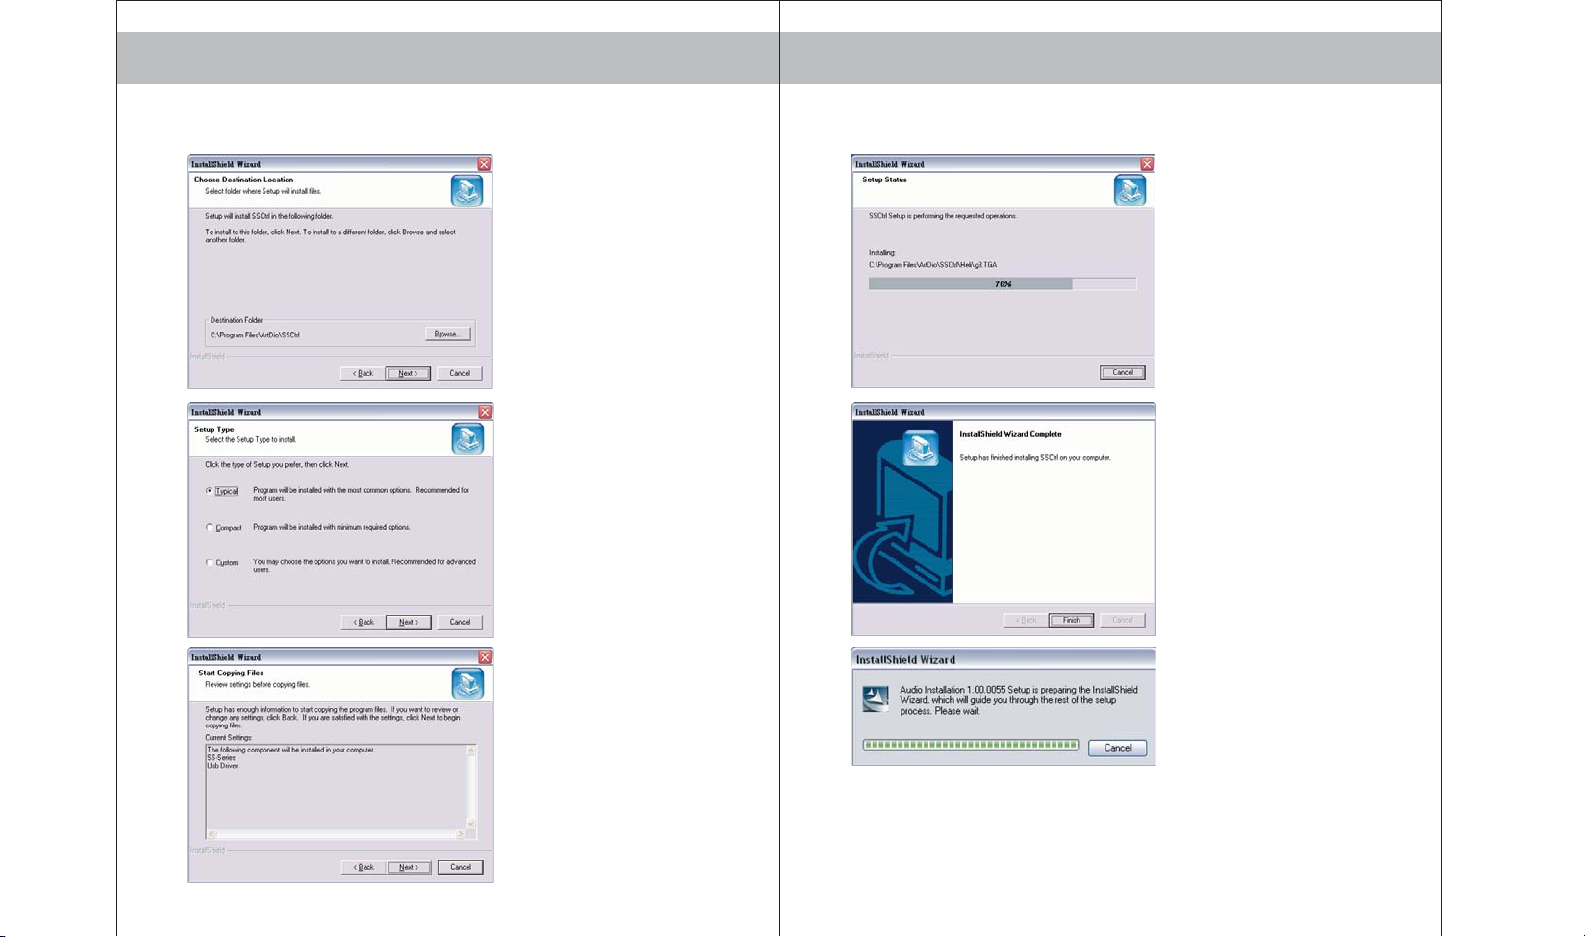
5) Select or create a folder to
install the SSCtrl driver, or the
setup will install in the following
folder C:/Program Files/ ArtDio/
SSCtrl
Click “Next” to continue the setup.
6) Select the installation method as
shown in the screenshot. Choose
“Typical” as recommended for
the installation.
Click “Next” to continue the setup.
7) Click “Next” to begin installation,
or “Back” to change any settings.
8) The installation for SSCtrl driver
begins.
9)The installation for SSCtrl driver
is completed.
10) Please wait while the setup
prepares the installation for
ArtDio USB Driver, which will
guide you through the rest of
the setup.
Page 6
1110
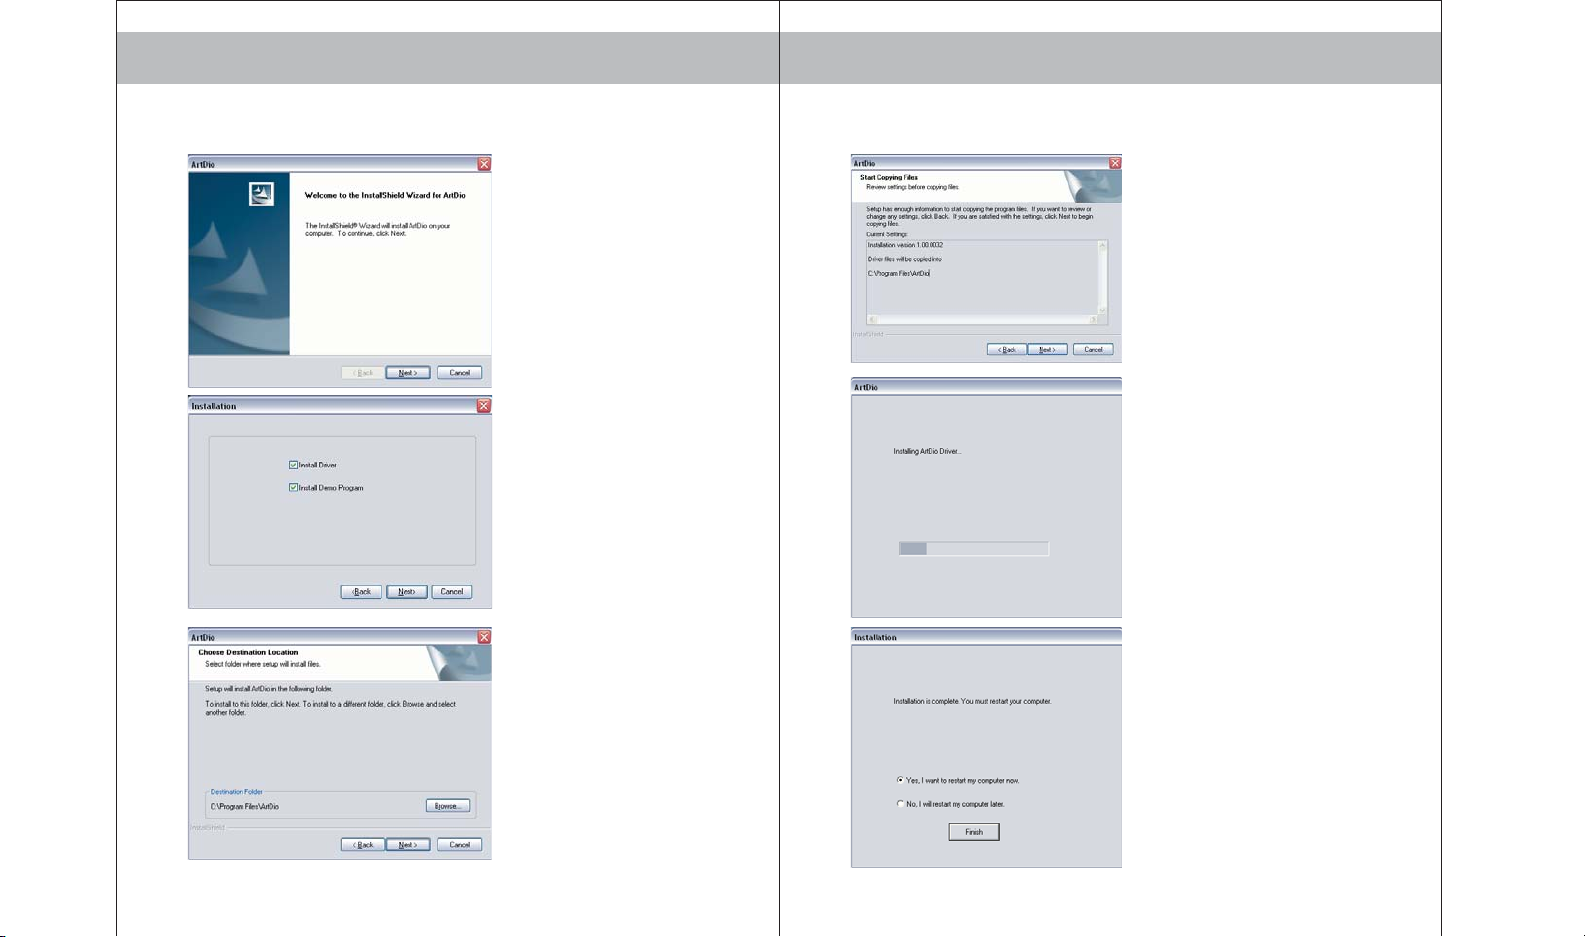
11) Then, continue with the
installation for ArtDio USB
driver.
Click “Next” to continue the setup.
12) Select the items to be installed
in your computer, including
√ Install ArtDio Driver
√ Install Demo Program
Click “Next” to continue the setup.
13) Select or create a folder to
install ArtDio USB Driver, or
the setup will install in the
following folder C:\Program
Files\ArtDio
Click “Next” to continue the setup.
14) Click “Next” to continue the
setup, or “Back” to change any
settings.
15) The installation for ArtDio USB
driver begins.
16) The installation for ArtDio USB
driver is completed.
Please “Restart” you computer
when the installation is completed.
Page 7
1312
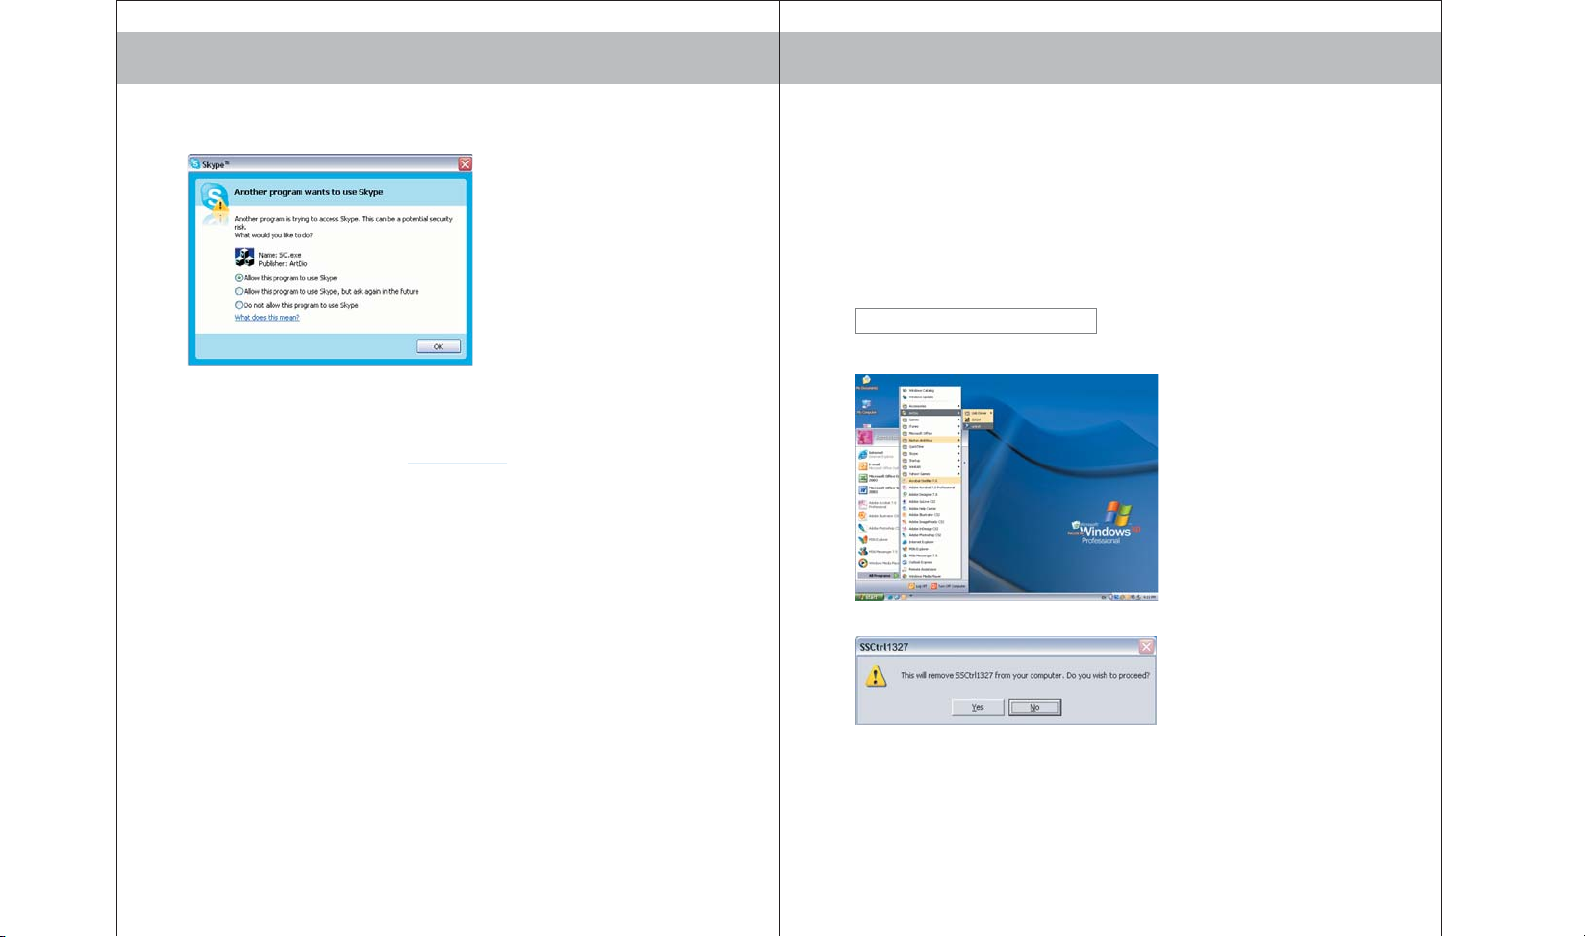
17) After restarting the computer,
click on Skype to execute the
program. A window will
pop-up to ask for permission
for the installed SSCtrl driver
to access Skype.
Click on“Allow this program to
use Skype”, to allow the SS-Ctrl
driver and the SS-200 VoIP
speaker to operate with Skype.
Please always visit our website at www.artdio.net to check out and download the
latest software and user’s guide.
UNINSTALLING THE SOFTW ARE
Note: Please exit all programs before uninstalling the software.
UNINSTALLING SS-CTRL DRIVER
Please follow the on-screen instructions to uninstall the software.
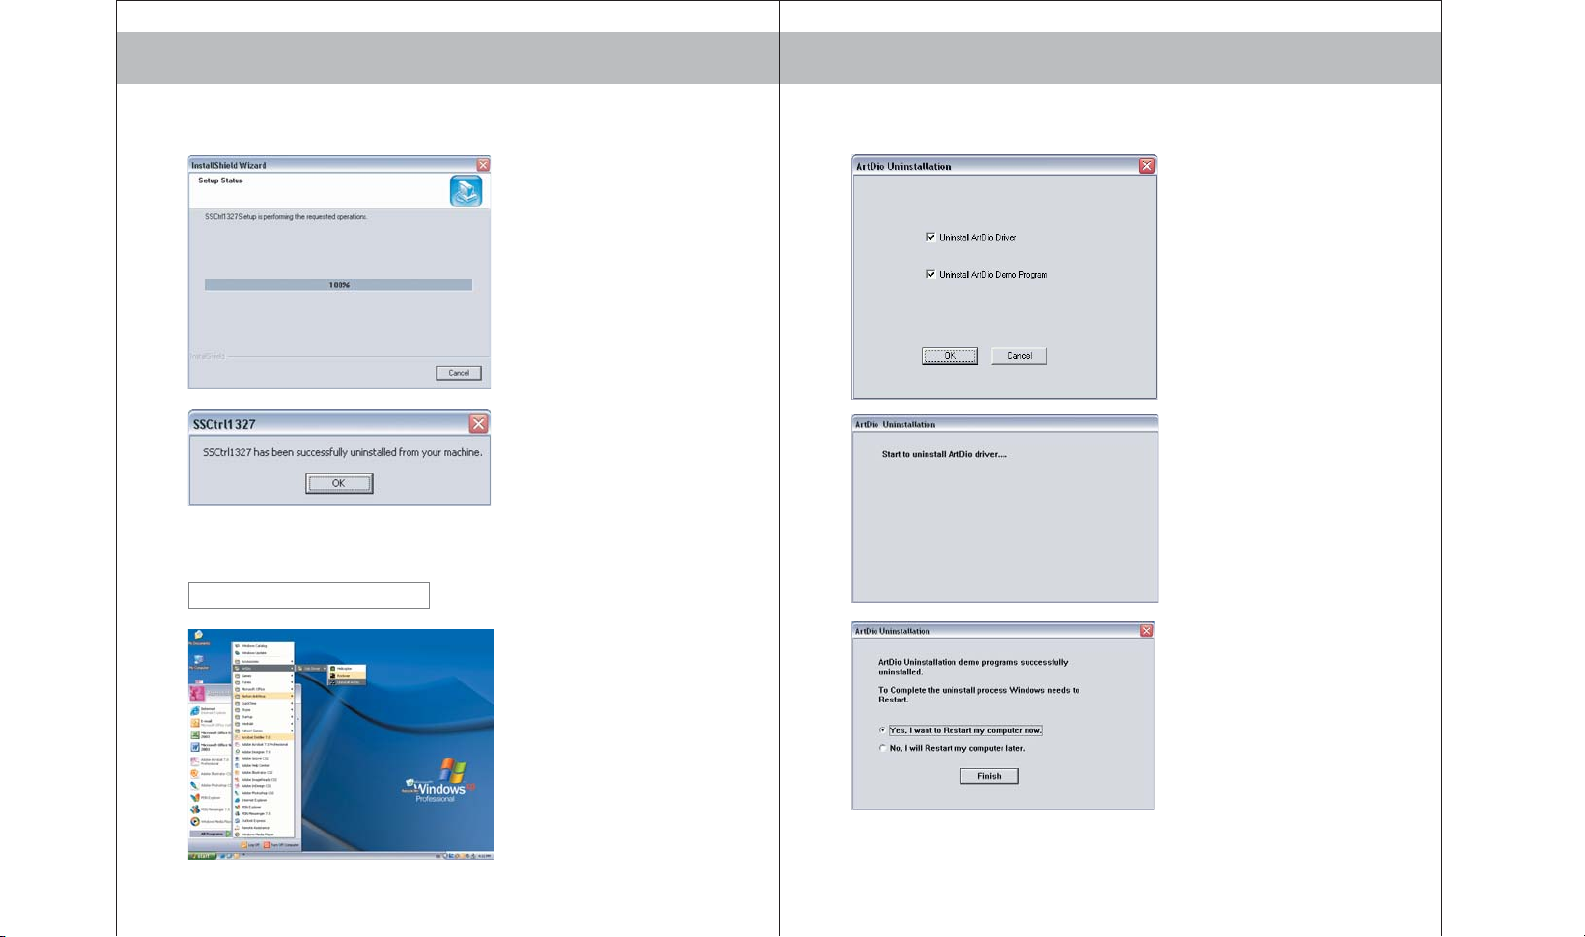
UNINSTALLATION SCREENSHOTS
1) Go to Windows Start> All
Programs>ArtDio,click on
“uninst”to uninstall the SSCtrl
driver.
2) Click“Yes”to continue
uninstallation, click “No” to
cancel.
Page 8
1514
3) The uninstallation for SSCtrl
driver begins.
4) The SSCtrl driver has been
successfully uninstalled.
Please “Restart” your computer
after the software is uninstalled.
UNINSTALLING ARTDIO USB DRIVER
Please follow the on-screen instructions to uninstall the software.
UNINSTALLATION SCREENSHOTS
1) Go to Windows Start>All
Programs> ArtDio> USB Driver,
click on “Uninstall ArtDio” to
uninstall the ArtDio USB driver.
2) Click “OK” to continue the
uninstallation.
3) The uninstallation for ArtDio USB
driver begins.
4) The ArtDio USB driver has been
successfully uninstalled.
Please “Restart” your computer
after the software is uninstalled.
Page 9
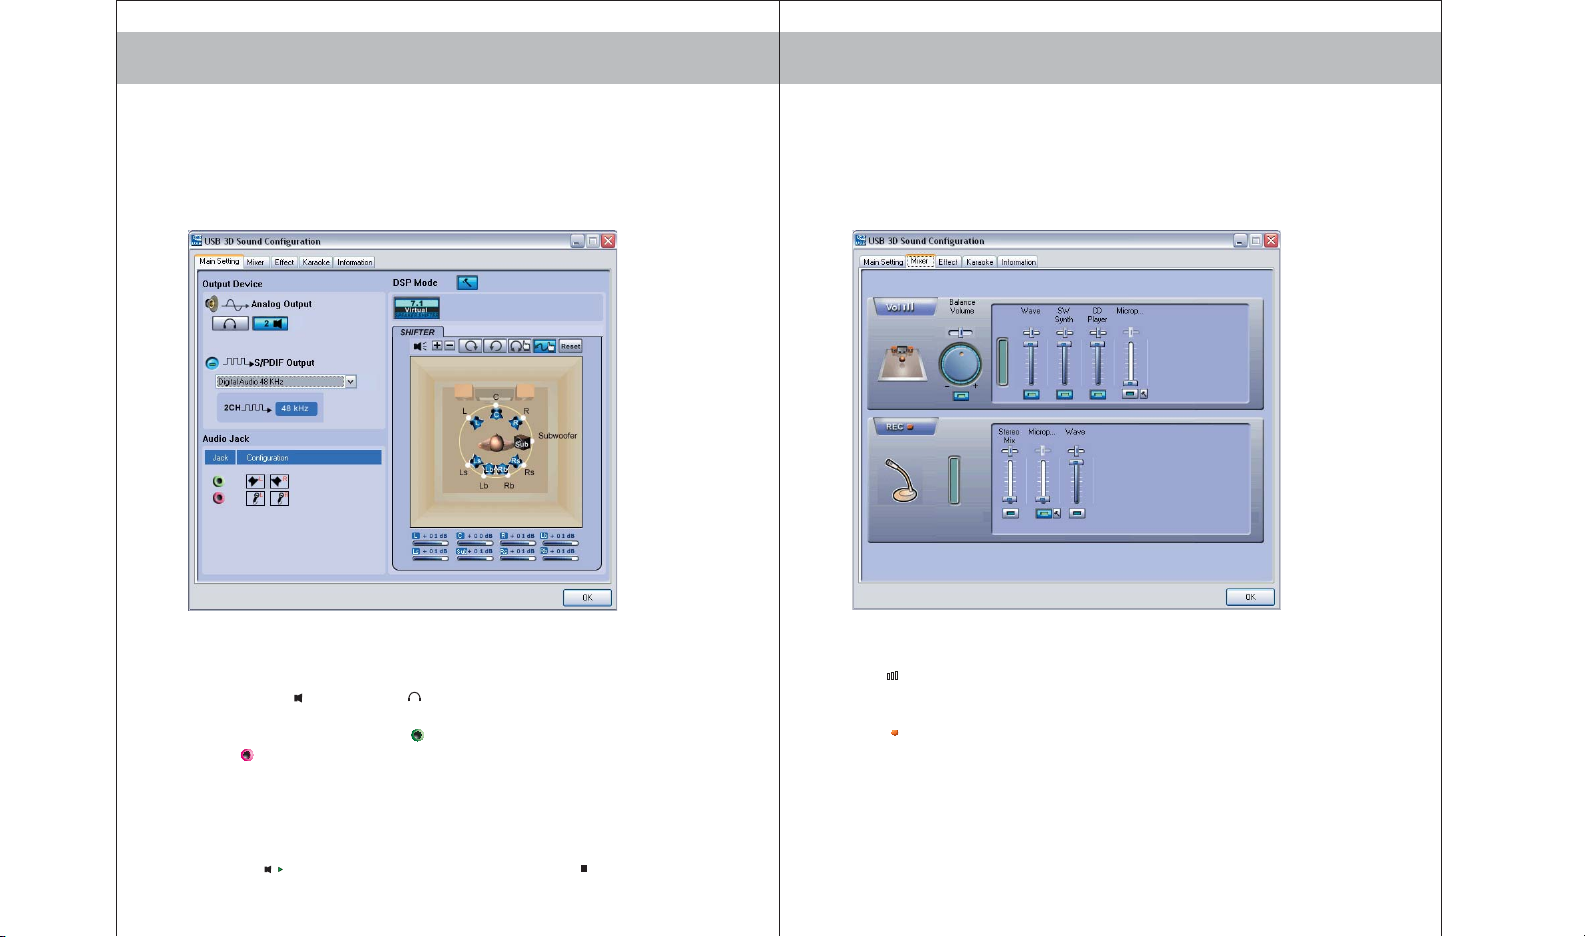
ARTDIO USB 3D SOUND CONFIGURATION SETTINGS
[1] MAIN SETTING [2] MIXER
1716
Output Device
Analog OutputǺSelect the appropriate audio output device, such as
Headphone “ ” and Speaker “ ”.
S/PDIF OutputǺSelect S/PDIF for digital audio output settings.
Audio JackǺAudio output jack “ ” (green) for speaker, and audio input
jack “ ” (red) for microphone.
DSP (Digital Sound Processing) ModeǺUse the settings below to change
the DSP mode.
1)Click on 7.1 Virtual Speaker Shifter button
2)Select to change the 7.1 virtual speaker system settings.
3)Use the Volume Control to adjust the volume.
4)Click on “ ” to test the 7.1 virtual speaker settings, or “ ” to stop.
Audio Settings
Vol “ ”: Use the Volume Control to increase or decrease the volume, drag
the Balance slider to change the balance between left and right speakers.
Rec “ ”: Use the Volume Control to adjust the recording volume.
Page 10
1918
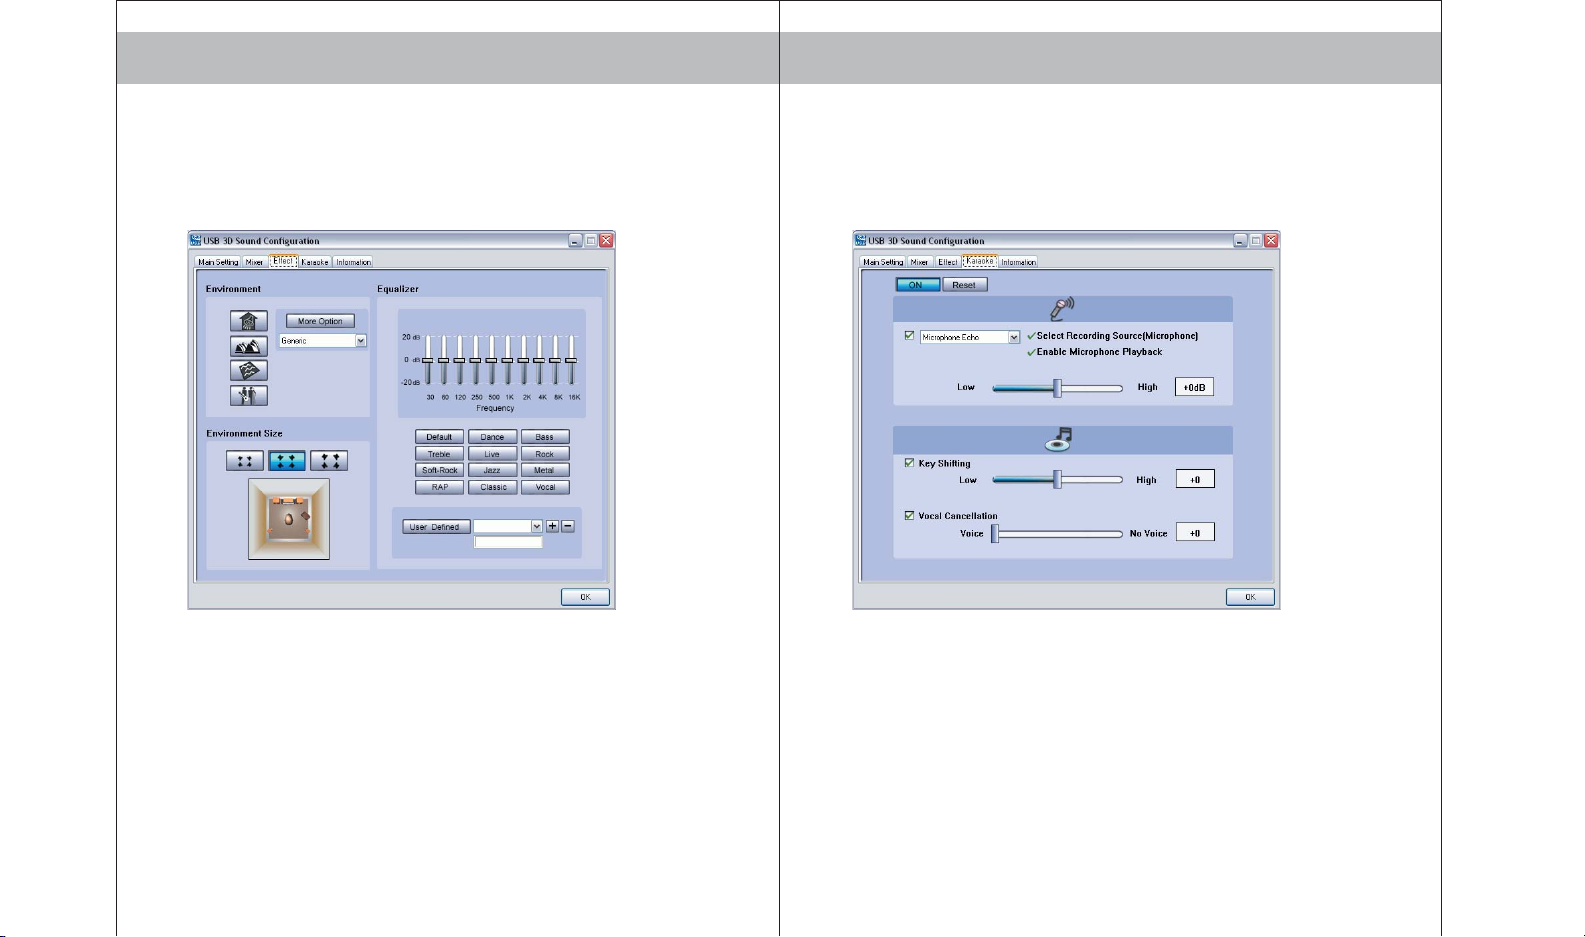
[3] EFFECT
EnvironmentǺChoose from the icon on the left menu or more options from
the drop-down menu to select the appropriate environment setting for
best audio performance.
Environment SizeǺSelect the appropriate environment size for best audio
performance.
EqualizerǺUse the Equalizer to tune for audio sound effects according to
your own preferences.
[4] KARAOKE
Microphone EchoǺUse the Microphone Echo slider to increase or decrease
microphone echo.
Key ShiftingǺUse the Key Shifting slider to increase or decrease key shifting
settings.
Vocal CancellationǺUse the Vocal Cancellation slider to adjust vocal
cancellation settings.
Page 11
1514
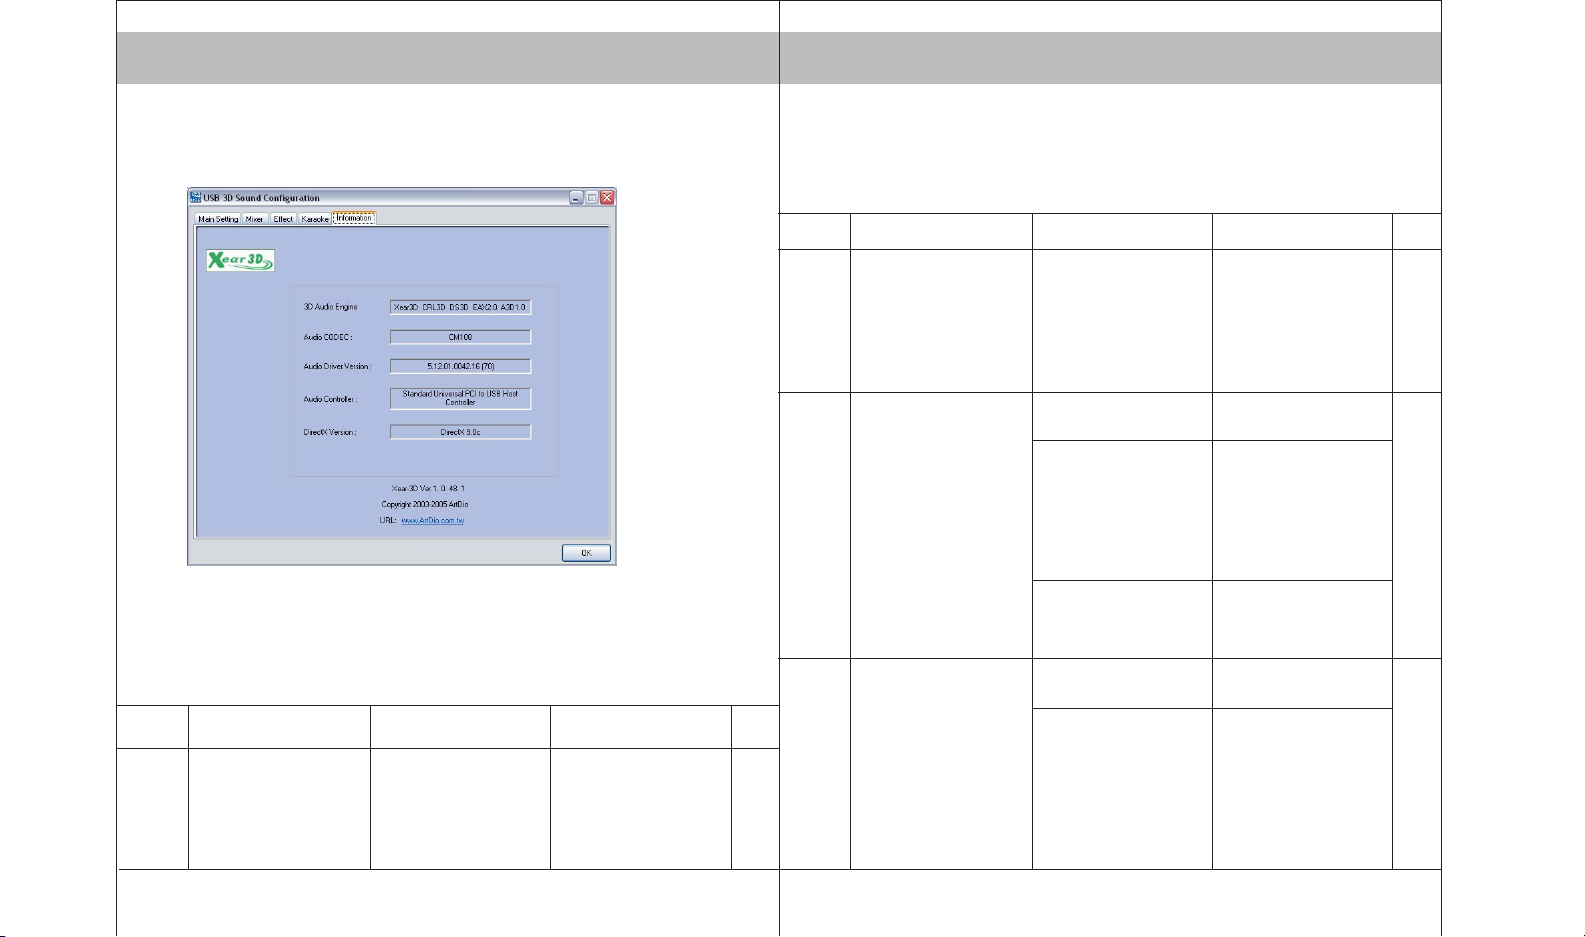
[5]INFORMATION
Display the information for ArtDio USB 3D Sound software.
TROUBLE SHOOTING
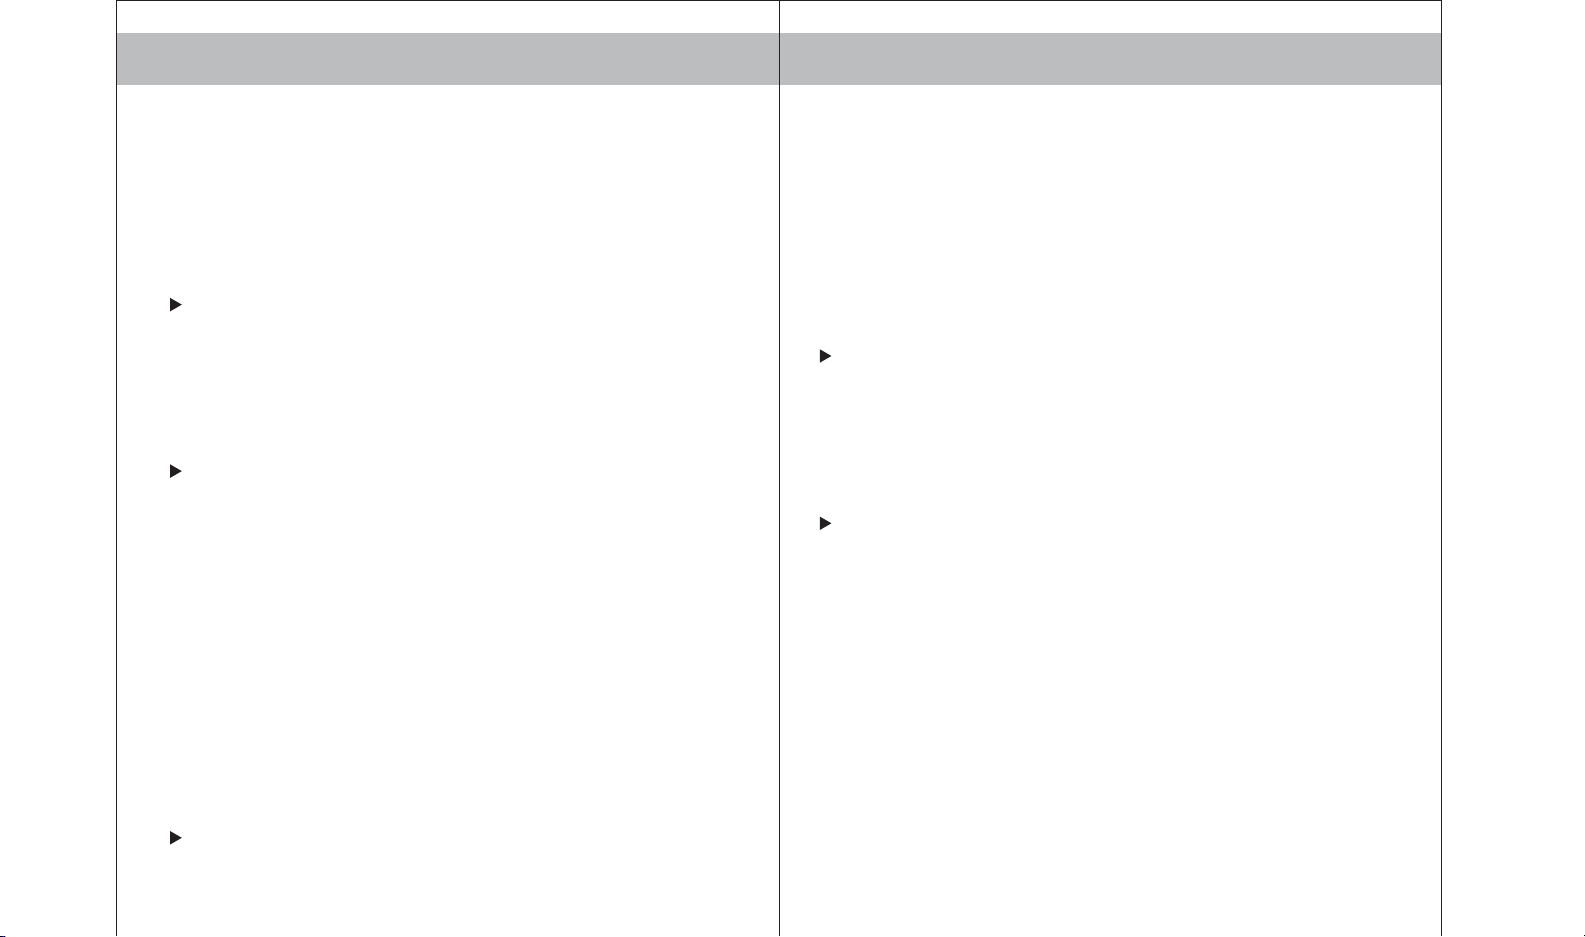
No.
1
Symptom Possible Problem Solutions
No LED (Red) is lit.
The USB cable isn’t
connected or it is
loosened.
Reconnect the USB
cable to the speaker
and plug it into the
USB port on the
computer.
TROUBLE SHOOTING
No.
2 The power isn’t
3 There is echo sound
Symptom Possible Problem Solutions
The USB driver is not
functioning.
No sound is coming
from speakers.
coming from speakers
when the music is
playing or while
making phone calls.
turned on.
The computer doesn’t
detect C-Media USB
Sound Device as Sound
and Audio Device.
The operating
system’s volume is
set too low.
The software CD- ROM
is not installed.
The Karaoke function
in the settings for
USB 3D Sound
Configuration,is
turned on.
Download the USB
driver from your
computer
manufacturer’s
website, or install the
software CD-ROM
included.
Repeat the step 1 - No
power LED is lit.
Go to control panel,
double click on Sound
and Audio Devices,
under the Volume
Output/ Input control,
choose C-Media USB
Sound Device.
Check the operating
system volume level and
increase it if necessary.
Follow the steps for
installing the software.
Double click on USB 3D
Sound Configuration
icon on the system task
bar, go to Karaoke tab,
turn off the Karaoke
function and make sure
the On button is not
highlighted.
Page 12

TROUBLE SHOOTING (con’t)
1716
Symptom Possible Problem Solutions
4
5
6 Music doesn’t stop
The Call Button on the
speaker does not
function.
Voice is breaking up
while talking through
the Internet.
automatically for
incoming and/or
outgoing calls.
The operating
system’s volume is
set too high.
The software CD-ROM
is not installed.
The VoIP soft phone
program used is not
Skype™.
Internet is busy or poor
bandwidth quality.
Too far from the
speaker.
The software CD- ROM
is not installed.
The USB cable is
loosened.
The media players
used is not Windows
Media Player™ or
Winamp™.
Check the operating
system volume level
and decrease it if
necessary.
Follow the steps for
installing the software.
The Call Button only
supports Skype™
currently.
Please consult with
your Internet Service
Provider.
Be in the range of 2-5
feet from the speaker
for best performance.
Follow the steps for
installing the software.
Reconnect the USB
cable to the speaker
and plug it into the USB
port on the computer.
The Auto Music Pause
and Resume feature
only support Windows
Media Player™ or
Winamp™ currently.
No.No.
7 When 2 parties are
8 Windows stop
9
10
Symptom Possible Problem Solutions
talking over the
internet phone call, the
Call Button on the
speaker doesn’t answer
the 3rd party incoming
call. ( with Skype™)
responding when
connecting the speaker
to the computer while
the music is playing or
while making internet
phone calls.
Once you connected
the speaker and run
Windows Media
Player™, it doesn’t play
the music.
The speaker cannot
control Spiderphone™
applications.
The Call Button on the
speaker does not
support to answer 3rd
party incoming call.
The speaker is
connected while the
music is playing or
while making internet
phone calls.
Windows Media
Player™ is executed
under “skin mode”
view.
The speaker is not
connected to the
computer or the USB
cable is loosened.
The speaker driver is
not select to control
Spiderphone.
Please use the mouse
and click directly on
the Answer Call button
on the program to
answer 3rd party
incoming call.
(with Skype™)
Please connect the
speaker to the
computer while all the
programs and
applications are close.
Please exit and restart
Windows Media
Player ™ again.
Reconnect the USB
cable to the speaker
and plug it into the USB
port on the computer.
Right click on SSCtrl
icon on the system task
bar, and click on
“Default Spider” to
choose to control
Spiderphone
applications.
Page 13
1918
FREQUENTLY ASKED QUESTIONS
1. Does the SS-200 VoIP speaker support instant messengers such as MSN
Messenger, Yahoo Messenger, QQ and more, other than Skype™?
Yes, the SS-200 VoIP speaker works just like any multimedia speaker to support
instant messengers as stated above and more, for you to talk to friends and
family through the Internet and listen to music.
2. Why there is no power on/ off button on SS-200 VoIP speaker?
The SS-200 VoIP speaker is powered by USB. When the USB cable is fully
connected to the USB port as the computer is turned on, the power for the
SS-200 VoIP speaker is turned on and the red LED will light.
The SS-200 speaker is powered off at the below stages:
• Before the computer start-up is ready.
• Before the computer enters the operating system and be ready to use.
• When the computer is standing by, hibernated or turned off.
• When the SS-200 VoIP Speaker is unplugged from the computer.
phones. Included with the package, is a specially designed 2.5mm mono
headphone with built-in microphone, for you to use it to listen to music and
enjoy your conversation through the Internet.
4. Does the feature of auto music pause and resume for incoming/ outgoing
calls support Mac or Linux operating system?
No, the software included only supports with Windows operating systems
currently , and does not support Mac or Linux operating systems.
5. Why after uninstalling the software, the SS-200 VoIP speaker still support the
function of Auto Music Pause and Resume for incoming/ outgoing call?
Possible Problem:
a) The users did not exit SS-series program before uninstalling the software,
therefore, the uninstalling program only remove the related documents in
the system but did not remove the function.
- Please close and exit the SS-series program before uninstalling the software
b) The users did not restart the computer after the software is uninstalled.
- Please restart the computer after the software is uninstalled.
3. There is a 2.5mm mono headphone jack on the SS-200 speaker, can I connect
with any multimedia headphones?
The mono headphone jack on SS-200 VoIP speaker is able to connect with any
headphones with a 2.5mm connector, which is mostly compatible with cell
Page 14
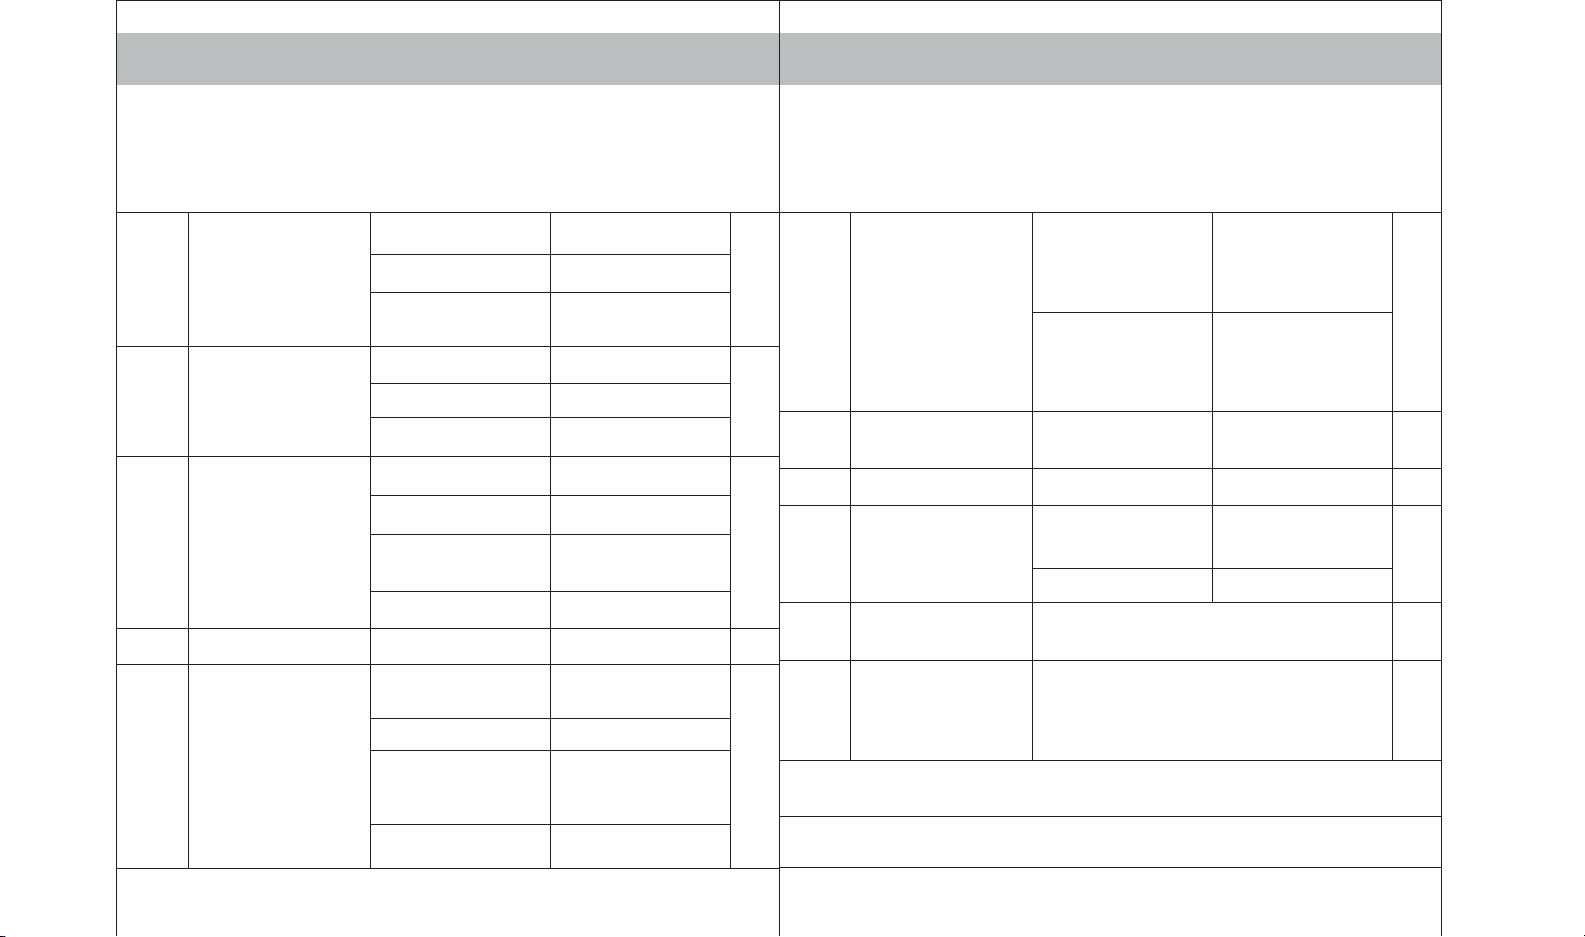
SPEAKER SPECIFICATIONS
2120
Built-in Speaker Total Power Output 2Watts
Frequency Response 120HZ-18KHZ
Driver
Built-in Microphone
Digital Sound
Processing
Audio Output Max Output Power 100mW
Function Keys/ LED
Indicator
Coverage 5 M (±60 degree)
Sensitivity -40dB
Frequency Response
Echo Cancellation Support
Noise Suppression
Microphone Auto
Volume Control
Full Duplex Satellite
Call Button
Microphone Mute Support
Power LED
Call LED
1 1/4 inches 4Ω NdFEB
Magnet
50HZ-10KHz
13dB
Support
Support
Make/ Answer/
Disconnect a Call
Red LED will light to
indicate the power is
on
Green LED will flash for
incoming/outgoing call,
green LED will light
when the call is
connected
Orange LED will light
when the USB storage
device is connected to
the USB port
2.5mm Mono
Headphone Input Jack
USB 2.0
(7.9cm) x D1.26” (3.2cm)
0.30 lbs ( 0.135kg)
Other
Connection Type
Physical Outlook
Compatible Operating
Systems
Accessories Included
USB Hub Power LED
Headphone Input
Connection
USB - Audio Support
Dimensions W1.33” (11cm) x H3.11”
Weight
Windows 2000/ XP & Windows Server 2003
Installation Software CD-ROM
Mono Headset with Microphone
Quick installation Guide
USB cable
SOFTWARE SPECIFICATIONS
•SS-series Driver and Utility •Control Utility •C-Media™ USB Sound
Page 15

USB HUB SPECIFICATIONS
USB Host Interface
USB Ports
Data Transfer Rate
Input Voltage
USB Port Status LED
USB 2.0 (backward compatibility with USB 1.1 and
1.0)
3 USB ports
*Do not connect ArtDio’s SS-168, SS-100 or any
other USB audio device to the USB port when the
SS-200 is connected to the computer.
Up to 480 Mbps
5V DC ( 1 port supports 5V DC,500mA; 3 ports
support up to maximum 600mA)
Orange LED will light when the USB peripherals or
devices is connected and powered.
IMPORTANT SAFETY INSTRUCTIONS
Please read and understand all safety instructions before use.
1. Read Instructions – All the safety and operating instructions should be read
before the appliance is operated.
2. Retain Instructions – The operating instructions should be retained for future
reference.
3. Heed Warning – All warnings on the appliance and in the operating instructions
should be adhered to.
4. Follow Instructions – All operating and use instructions should be followed.
5. Water and Moisture – The appliance should not be used near water – for example,
near a bathtub, washbowl, kitchen sink, laundry tub, in a wet basement, or near a
swimming pool, etc.
6. Outdoor Use – Warning: To reduce the risk of fire or electric shock, do not expose
this appliance to rain or moisture.
2322
7. Location – The appliance should be installed in a stable location.
8. Heat – The appliance should be situated away from heat sources such as radiators,
heat registers, stoves, or other appliances (including amplifiers) that produce heat.
9. Cleaning – The appliance should be cleaned only with a polishing cloth or a soft dry
cloth. Never clean with furniture wax, benzene, insecticides or other volatile liquids
since they may corrode the cabinet.
10. Object and Liquid Entry – Care should be taken so that objects do not fall and
liquids are not spilled into the enclosure through openings.
11. Accessories – Only use attachment accessories specified by ArtDio Co, Inc.
12. Damage Requiring Service – The appliance should be serviced by qualified service
personnel when:
• Objects have fallen, or liquid has been spilled into the appliance.
• The appliance has been exposed to rain.
• The appliance does not appear to operate normally or exhibits a marked change
in performance.
• The appliance has been dropped or the enclosure damaged.
13. Servicing – The user should not attempt to service the appliance. Servicing should
be referred to qualified service personnel or returned to the dealer or call the
ArtDio service line for assistance.
 Loading...