

ARRI SIGNATURE PRIME 25/T1.8, SIGNATURE PRIME 18/T1.8, SIGNATURE PRIME 21/T1.8, SIGNATURE PRIME 15/T1.8, SIGNATURE PRIME 29/T1.8 User Manual
...Page 1

Signature Prime
Signature Prime
USER MANUAL
USER MANUAL
November 14th, 2018
November 14th, 2018
Page 2

2
This page is intentionally left blank.
Page 3

Copyright 3
Copyright
All rights reserved.
This document is provided under a license agreement containing
restrictions on use and disclosure and is also protected by
copyright law.
Due to continued product development this information may
change without notice. The information and intellectual property
contained herein is confidential between ARRI and the client and
remains the exclusive property of ARRI. If you find any problems
in the documentation, please report them to us in writing. ARRI
does not warrant that this document is error-free.
Arnold & Richter Cine Technik GmbH & Co. Betriebs KG
Türkenstr. 89
D-80799 Munich
Germany
service@arri.com
http://www.arri.com
Page 4

4 Contents
Contents
1 Disclaimer.......................................................................... 5
2 About This Manual............................................................7
3 Scope..................................................................................8
4 Introduction to the ARRI SIGNATURE PRIMES.............. 9
5 ARRI SIGNATURE PRIME Layout.................................. 11
6 Precautions and Safety Guidelines............................... 12
7 LPL Mount........................................................................15
8 Mounting & Operation.................................................... 16
9 Cleaning........................................................................... 20
10 Technical Data................................................................. 23
11 Spare Parts...................................................................... 27
12 Declarations of Conformity............................................ 28
13 ARRI Service Contact Information................................ 30
14 SIGNATURE PRIME Drawings........................................31
Page 5

Disclaimer 5
1 Disclaimer
Before using the products described in this manual be sure to
read and understand all respective instructions.
The ARRI SIGNATURE PRIMES are only available to commercial
customers. The customer grants by utilization that the ARRI
SIGNATURE PRIMES or other components of the system are
deployed for commercial use. Otherwise the customer has the
obligation to contact ARRI preceding the utilization.
While ARRI endeavours to enhance the quality, reliability and
safety of their products, customers agree and acknowledge that
the possibility of defects thereof cannot be eliminated entirely. To
minimize risk of damage to property or injury (including death)
to persons arising from defects in the products, customers must
incorporate sufficient safety measures in their work with the
system and have to heed the stated canonic use.
ARRI or its subsidiaries do not assume any responsibility for
incurred losses due to improper handling or configuration of the
lens or other system components, due to contamination, defective
signal connections or incompatibilities with third party equipment.
ARRI assumes no responsibility for any errors that may appear
in this document. The information is subject to change without
notice.
For product specification changes since this manual was
published, refer to the latest publications of ARRI data sheets
or data books, etc., for the most up-to-date specifications. Not
all products and/or types are available in every country. Please
check with an ARRI sales representative for availability and
additional information.
Neither ARRI nor its subsidiaries assume any liability for
infringement of patents, copyrights or other intellectual property
rights of third parties by or arising from the use of ARRI products
or any other liability arising from the use of such products. No
license, express, implied or otherwise, is granted under any
patents, copyrights or other intellectual property right of ARRI or
others.
ARRI or its subsidiaries expressly exclude any liability, warranty,
demand or other obligation for any claim, representation, or
cause, or action, or whatsoever, express or implied, whether
Page 6

6 Disclaimer
in contract or tort, including negligence, or incorporated in
terms and conditions, whether by statue, law or otherwise. In
no event shall ARRI or its subsidiaries be liable for or have a
remedy for recovery of any special, direct, indirect, incidental, or
consequential damages, including, but not limited to lost profits,
lost savings, lost revenues or economic loss of any kind or for
any claim by third party, downtime, good-will, damage to or
replacement of equipment or property, any cost or recovering of
any material or goods associated with the assembly or use of our
products, or any other damages or injury of the persons and so
on or under any other legal theory.
In the case one or all of the foregoing clauses are not allowed by
applicable law, the fullest extent permissible clauses by applicable
law are validated.
ARRI is a registered trademark of Arnold & Richter Cine Technik
GmbH & Co Betriebs KG.
This product contains licensed technology from Linotype.
Page 7

About This Manual 7
2 About This Manual
ARRI recommends that all users of the SIGNATURE PRIMES
read the manual entirely prior to use. For experienced users, the
manual's structure also provides quick access for reference.
How to Use This Manual
All directions are given from a camera operator's point of view.
For example, camera-right side refers to the right side of the
camera or lens when standing behind the camera and operating it
in a normal fashion.
Connectors are written in all capital letters, for example, LPL.
This manual contains furthermore useful reference material
including the technical specifications and dimensional drawings.
Page 8

8 Scope
3 Scope
This instruction manual applies to all ARRI SIGNATURE PRIME
lenses.
Document-ID: K4.0019068
Page 9

Introduction to the ARRI SIGNATURE PRIMES 9
4 Introduction to the ARRI SIGNATURE
PRIMES
The ARRI SIGNATURE PRIME lenses are part of a complete
large-format system that meets and exceeds modern production
requirements. Based around a large format 4K version of the
ALEXA sensor, the system comprises the ALEXA LF camera,
ARRI Signature Prime lenses, new LPL lens mount and PL
adapter. These system elements have been designed to take
fullest advantage of the enlarged sensor.
Accompanying the ALEXA LF are 16 large-format ARRI
SIGNATURE PRIME lenses, ranging from 12 mm to 280 mm and
fitted with the ARRI LPL mount. While the ARRI SIGNATURE
PRIMES exemplify state-of-the-art optical precision, they have
been designed to render organic, emotionally engaging images,
gently softening and texturizing the large format with the natural
skin tones and creamy bokeh. A fast T-stop of T1.8 facilitates
shallow depth of field and the smooth focus fall-off gives subjects
heightened presence in the frame.
The ARRI SIGNATURE PRIME range is the first cine lens series
to feature machined magnesium lens barrels, making the optics
incredibly lightweight and robust. They are also incorporating
ARRI´s next-generation LDS-2 Lens Data System, with high data
rates and absolute encoders for fast initializing. LDS-2 extends
the possibilities of lens data and is being licensed to other lens
and camera manufacturers.
A crucial element of the new system is the LPL lens mount, with
dimensions optimized for large format sensors. A wider diameter
and shorter flange focal depth allows the ARRI SIGNATURE
PRIMES and all future large format lenses to be small and
lightweight with a fast T-stop and pleasing bokeh, a combination
of features that would not be possible within the confines of
the PL lens mount. The LPL mount will also be available for
other ARRI cameras such as the ALEXA Mini, so the ARRI
SIGNATURE PRIMES can be used for large format and Super
35. In addition, the LPL mount is being licensed to other lens
manufacturers, creating a new universal standard.
When comparing the full frame format with the Super 35 format,
a conversion factor has to be considered for one focal length to
get the same field of view on an ALEXA LF as for a certain focal
Page 10

10 Introduction to the ARRI SIGNATURE PRIMES
length on an ALEXA S35 camera. The table below shows the
corresponding conversion factors and equivalent focal lengths
for the different formats for the ARRI SIGNATURE PRIME focal
lengths.
Alexa LF 16:9 to Alexa LF Open Gate to
Signature
Prime
12 mm 9 10 11 8 9 9
15 mm 11 12 13 10 11 12
18 mm 14 15 16 12 13 14
21 mm 16 17 19 14 15 16
25 mm 19 21 22 16 18 19
29 mm 22 24 26 19 21 22
35 mm 26 29 31 23 25 27
40 mm 30 33 36 26 28 31
47 mm 35 39 42 30 33 36
58 mm 44 48 52 38 41 45
75 mm 56 62 67 49 53 58
95 mm 71 78 84 62 68 73
125 mm 94 103 111 81 89 96
150 mm 113 124 133 97 107 115
200 mm 150 165 178 129 142 154
280 mm 210 231 249 181 199 215
Con-
version
Factor
Alexa
2.8k
[mm]
1.33x 1.21x 1.12x 1.54x 1.40x 1.30x
Alexa
3.2k
[mm]
Alexa
3.4k
[mm]
Alexa
2.8k
[mm]
Alexa
3.2k
[mm]
Alexa
3.4k
[mm]
Example: If you normally use an ALEXA LF in Open Gate mode
and want to switch to ALEXA S35 3.2k mode, the corresponding
conversion factor is 1.40x. Hence, a 40mm lens on the ALEXA LF
is equivalent to a 40mm /1.40 = 28.6mm lens on the Alexa S35.
Probably a 28mm lens will do a good job.
Page 11

ARRI SIGNATURE PRIME Layout 11
5 ARRI SIGNATURE PRIME Layout
Page 12

12 Precautions and Safety Guidelines
6 Precautions and Safety Guidelines
Any violation of these safety instructions or non-observance
of personal care could cause serious injuries (including death)
to users and affiliates and damage to the equipment or other
objects.
General Safety Guidelines
CAUTION!
Always follow these guidelines to ensure against injury
•
to yourself or others and damage to the system or other
objects.
This safety information is in addition to the product
•
specific operating instructions in general and must be
strictly observed for safety reasons.
Read and understand all safety and operating
•
instructions before you operate or install the system!
Retain all safety and operating instructions for future
•
reference.
Heed all warnings on the system and in the safety and
•
operating instructions before you operate or install the
system. Follow all installation and operating instructions.
Do not use accessories or attachments that are not
•
recommended by ARRI, as they may cause hazards and
invalidate the warranty!
Do not attempt to repair any part of the system! Repairs
•
must only be carried out by authorized ARRI Service
Centers.
Page 13

Precautions and Safety Guidelines 13
Specific Safety Instructions
WARNING!
Do not remove any safety measures from the system!
•
Do not operate the system in areas with humidity above
•
operating levels, expose it to water or moisture!
Do not subject the lens to severe shocks.
•
Never insert objects of any kind into any part of the
•
lens if these are not clearly qualified for the task in the
manual.
Do not remove any paint marked screws.
•
Changing camera lenses should be done in a dry and
•
dust-free environment. If this is not possible, take extra
care that no dust enters the camera while the lens is off!
Keep the protective caps on the lens when not mounted
•
to the camera or not in operation.
Follow the cleaning instructions in this manual to avoid
•
damage of the lens.
Do not use any strong or aggressive cleaning detergents
•
like Methanol, Acetone, Benzine or acids, as they may
damage the optical coating or lens barrel!
DANGER!
DO NOT POINT THE LENS/CAMERA INTO DIRECT
•
SUNLIGHT, VERY BRIGHT LIGHT SOURCES, OR
HIGH-ENERGY LIGHT SOURCES (e.g. laser beams)!
This may cause permanent damage to the eyes and
furthermore may permanently damage the lens or the
camera.
Page 14

14 Precautions and Safety Guidelines
Storage and Transport Precautions
Keep the protective caps on the lens when not mounted to
•
the camera or not in operation. The rear cap secures the
net holder on the rear part of the lens.
The SIGNATURE PRIME lenses are delivered in a rugged
•
aluminum case. Always store and transport the lens in
the included aluminium case. A lock can be used on the
latches of the case to secure the case. The case can be
used for transport of the lens to the ARRI service centers.
Do not put the case underwater.
Do not store the lens in places where it may be subject
•
to extreme temperatures, direct sunlight, high humidity,
severe vibration, or strong magnetic fields.
Condensation: When moving the lens from a cool to
•
a warm location or when the lens is used in a damp
environment, condensation may form inside the lens port,
on glass surfaces, and on internal or external electrical
connections. Operating the lenses while condensation
is present may result in damage to the equipment.
Condensation on the optical components may have a
visible effect on the output images. To reduce the risk of
condensation, find a warmer storage location. After moving
the lens from cool to warm environment, wait for some
time for the lens to warm up to the ambient temperature to
avoid condensation.
Page 15

LPL Mount 15
7 LPL Mount
The SIGNATURE PRIME lenses are equipped with the ARRI LPL
lens mount. The ARRI LPL lens mount supports the ARRI Lens
Data System LDS-2, which is included in the ARRI SIGNATURE
PRIME lenses. Cameras with a PL mount can be refitted with a
LPL mount by ARRI service centers. A PL-to-LPL adapter offers
backwards compatibility with all PL mount lenses on camera side,
be they Super 35 or full frame. The adapter attaches securely
to the LPL lens mount without tools, allowing crews to rapidly
switch between PL and LPL lenses on set. Cinematographers
are therefore offered an unlimited lens choice, with complete lens
metadata accessible from LDS-2, LDS-1 or /i lenses.
The lens must be mounted in the 12 o'clock position to enable the
LDS functions. Take care not to damage the LDS contacts on the
lens and the camera when mounting or unmounting a lens or lens
port cover.
Page 16

16 Mounting & Operation
8 Mounting & Operation
Lens Rear Part
The rear part of the lens contains a magnetic holding system,
to attach different lens accessories. A net holder is included as
standard part with the lens.
1 To remove the accessory element, like the net holder,
simply lift it from the rear part of the lens by hand.
2 To secure a net on the net holder, use a small rubber
band. A slight rotation of the net holder will simplify this
operation.
3 To attach the accessory element to the lens, like the net
holder, put it on the rear part with the marking on the rear
part and the element aligned.
CAUTION!
Use the lens only with an element, like the net holder,
•
attached to the lens!
Be careful not to touch the rear lens when attaching or
•
removing accessory components of the rear part.
When using a net attached to the net holder, take
•
precautions that neither the rubber band or the net are
blocking or damaging the LDS-2 contacts, the LPL mount
or the image sensor on the camera.
Lens Mounting
1 Remove the rear cap of the lens.
2 Make sure the rear element of the lens is clean.
3 Always have the net holder or other accessory elements
installed on the rear part of the lens.
4 On camera side, turn the bayonet ring anti-clockwise until
it stops.
5 Remove the lens port cap of the camera.
Page 17

Mounting & Operation 17
6 Carefully insert the lens into the lens port. Align the notch
in the lens flange with the index pin on the mount, keeping
the lens rotated into a position where the lens markings
are visible from either side of the camera.
7 Press the lens flange flat onto the lens mount.
8 Turn the bayonet ring clockwise until the lens is locked
securely.
9 Ensure that the lens is properly mounted.
WARNING!
Do not use on PL mount cameras! The LPL lenses can
•
only be used on cameras with LPL mounts. Contact your
local ARRI service center to refit your camera with an
LPL mount.
Do not use strong forces to mount the lens. In case the
•
bayonet is not moving smoothly, check if the lens is
correctly positioned.
CAUTION!
When not attached to the camera, attach the protective
•
caps on the lens rear and front part to prevent dust from
entering the lens cavity.
LPL mount lenses can only be mounted in one
•
orientation into the camera (with the LDS-2 contacts in
12 o’clock position).
Lens Support
Heavy lenses may require additional lens support. Using a lens
support guarantees that the weight of the lens will not influence
the flange focal depth and reduces stress on the lens mount.
Before installing the lens, make sure that the lens support is
attached properly to the lens. To support a lens, use appropriate
studio rods and lens bridge.
Page 18

18 Mounting & Operation
Slide the bridge into position on the rods directly under the lens
support ring on the lens and fix it in place by tightening the lever
on its side. Align and tighten the center screw in the lens support
ring, adjusting the height of the center screw with the lever on the
back of the lens bridge.
The vertical position of the lens support mount from the optical
center of the lens is the same for all SIGNATURE PRIME lenses
as illustrated below:
Focus & Iris Ring
The focus and iris scales are calibrated at ambient temperature.
They can be adjusted continuously in the given ranges. External
motors can be used to control the focus and iris rings.
WARNING!
Do not exceed the maximum torque of 1.4 Nm, e.g.
•
when using external motors, otherwise the lens may be
damaged!
Page 19

Mounting & Operation 19
NOTICE
After a long storage period of the lens or exposure to low
•
temperatures, move the focus and iris rings several times
before using the lens to ensure proper movement.
Identification
On the bottom side of the lens, the GTIN number and serial
number of the lens are engraved as clear text and as data
matrix code, using the GS1 standard. The GS1 barcode can be
identified globally and makes rental check-ins and check-outs
easier. They provide proof of ownership and eliminate the need
for stickers that can fall off or leave residue.
Please be aware, the encoded information of ARRI’s GS1 GTIN
code is different to the usual ARRI product barcode labels.
Page 20

20 Cleaning
9 Cleaning
ARRI SIGNATURE PRIME lenses are precision optics carefully
designed to enable cinematographic image acquisition. To
maintain the lowest possible optical scatter, it is crucial to keep
your optics clean. Depending on the environment, dust and nonvolatile residuals from cleaning agents, etc., may deteriorate the
optical performance significantly. Although the optical coatings of
the ARRI SIGNATURE PRIME lenses have been designed to be
robust, it is recommended to follow the common rules of handling
precision optics proposed in this manual.
CAUTION!
Avoid touching optical surfaces!
•
Avoid wiping optical surfaces without air blow dusting
•
first. If particles or optical surfaces are electrostatically
charged, it may improve dusting efficiency to use
deionized air.
Avoid compressed air from cans: the chances of liquid
•
propellants within the can being expelled in liquid
droplets against the glass, thereby leaving contaminants
are quite great. If using compressed air, use it only in a
clean environment to avoid aerosols being pulled into the
air stream and propelled onto the surface. Always use
oil-free compressed air with less than 2 atm of pressure
and equipped with particle filter.
Avoid wiping dry optical surfaces with a dry tissue/cloth,
•
especially if surfaces are not clean.
Use clean, lint-free, and soft single-use paper-based
•
optics cleaning tissues/pads or ARRI Optics Cleaning
Cloth (Small 170 x 150 mm, Order Number: 50.0019066;
Large 14.6” x 17.7”, Order Number: K2.0016922). Avoid
abrasive particle contamination of your cleaning supplies
and cloths (e.g. by sand).
Always wipe gently in a single direction and take a new
•
tissue for each stroke if using disposable tissues.
Page 21

Cleaning 21
NOTICE
Have your equipment ready before starting the cleaning
•
process.
To determine the level of contamination, use a bright
•
lamp or bright daylight and change the angle of view of
the surfaces from normal to grazing incidence.
Always clean the barrel surface or the frame/mount first.
•
When cleaning mounted optics or frames, avoid that
•
cleaning agents are drawn into narrow spaces near
the retaining rings, etc., due to capillary forces. Use
moistened, but not soaking wet tissues.
Use manual air blowers and clean antistatic brushes.
•
Place the lens on a clean, soft surface or a clean ARRI
•
Optics Cleaning Cloth.
It may be difficult to clean an optical surface without
•
streaks and non-volatile residues when the relative
humidity exceeds 65%.
Always store your optics in the provided containers with
•
protective caps on when not in use. If not stored in a
container, store the lens with the optical surfaces upright
in a clean environment and protective covers on to limit
contamination.
Recommended Cleaning Agents
Use cleaning agents suitable for dielectric coated precision
optics to avoid streaking, non-volatile residues, or damaging
optical elements. Prepare three different liquids in spray or drop
dispensing bottles:
1 A neutral window detergent.
2 Deionized distilled water.
3 Spectroscopy grade isopropyl alcohol.
Always use these liquids in this sequence when cleaning.
Page 22

22 Cleaning
Recommended Cleaning Procedure
For minor particle contaminants like dust, pollen, rain residuals,
etc., and moderate contaminants like fingerprints or comparable
strains:
1 Dust blow the surface to remove dust and lint.
2 If the surface is still not clean, gently brush off residual
loose contaminants.
3 Use one dedicated tissue/cloth for each liquid: one for
neutral window detergent, one for deionized distilled water,
and one for spectroscopy grade isopropyl alcohol. The
liquids should be used in this sequence.
4 Using a bright light source, check for cleaning agent
residues, streaks, or other contaminants. It is common to
breathe carefully on the optical surface and then to gently
wipe off the condensed moisture with a soft cloth, e.g. a
clean ARRI Optical Cleaning Cloth. If you decide to do so,
avoid saliva droplets on the surface and do not firmly wipe
dry parts of the optical surface. If the surface is still not
clean, repeat the cleaning sequence.
WARNING!
Do not use any strong or aggressive cleaning detergents
•
like Methanol, Acetone, Benzine or acids, as they may
damage the optical coating or lens barrel!
Page 23

Technical Data 23
10 Technical Data
Signature Prime 12/T1.8 15/T1.8 18/T1.8 21/T1.8
Optical Parameters
Focal length
MOD
from sensor plane
(minimum marked
distance)
12 mm 15 mm 18 mm 21 mm
0.35 m / 14" 0.35 m / 14" 0.35 m / 14" 0.35 m / 14"
MOD from lens
front
Magnification ratio
at MOD
Entrance pupil position (related to image plan, in direction to object plane)
Angle of view H-V-D
for LF Open Gate
Physical Dimensions
Front diameter
Max. housing diameter
Length from flange
Weight (lens only)
Lens barrel
Interfaces
Lens mount
Lens data system
0.07 m / 2.6" 0.1 m / 4.3” 0.13 m / 5.1” 0.13 m / 5.1”
1:7.0 1:10.3 1:9.2 1:8.2
262.5 mm /
10.34"
114.2° /
94.0° / 124.0°
134 mm / 5.28" 156 mm / 6.14" 114 mm / 4.49" 114 mm / 4.49"
135 mm / 5.31" 157 mm / 6.18" 115 mm / 4.53" 115 mm / 4.53"
239 mm / 9.41” 197 mm / 7.75" 178 mm / 7.01” 178 mm / 7.01”
2.8 kg / 6.2lb 2.8 kg / 6.1lb 2.0 kg / 4.4lb 1.9 kg / 4.2lb
Magnesium Magnesium Magnesium Magnesium
LPL LPL LPL LPL
LDS-2 LDS-2 LDS-2 LDS-2
203.0
mm / 7.99"
102.0° /
81.2° / 112.9°
189.5
mm / 7.46"
91.4° / 71.0° /
102.6°
183.4
mm / 7.22"
82.7° /
63.0° / 94.0°
Flange focal distance
44 mm 44 mm 44 mm 44 mm
Page 24

24 Technical Data
Signature Prime 25/T1.8 29/T1.8 35/T1.8 40/T1.8
Optical Parameters
Focal length
MOD
from sensor plane
(minimum marked
distance)
25 mm 29 mm 35 mm 40 mm
0.35 m / 14" 0.35 m / 14" 0.35 m / 14" 0.35 m / 14"
MOD from lens
front
Magnification ratio
at MOD
Entrance pupil position (related to image plan, in direction to object plane)
Angle of view H-V-D
for LF Open Gate
Physical Dimensions
Front diameter
Max. housing diameter
Length from flange
Weight (lens only)
Lens barrel
Interfaces
Lens mount
Lens data system
0.13 m / 5.1" 0.13 m / 5.1" 0.13 m / 5.1" 0.13 m / 5.1"
1:7.1 1:6.4 1:5.4 1:4.8
177.6
mm / 7.01"
73.0° /
54.4° / 84.0°
114 mm / 4.49" 114 mm / 4.49" 114 mm / 4.49" 114 mm / 4.49"
115 mm / 4.53" 115 mm / 4.53" 115 mm / 4.53" 115 mm / 4.53"
178 mm / 7.01” 178 mm / 7.01” 178 mm / 7.01” 178 mm / 7.01”
1.9 kg / 4.2lb 1.8 kg / 4.0lb 1.7 kg / 3.7lb 1.8 kg / 4.0lb
Magnesium Magnesium Magnesium Magnesium
LPL LPL LPL LPL
LDS-2 LDS-2 LDS-2 LDS-2
165.8
mm / 6.53"
65.1° /
47.9° / 75.7°
162.1
mm / 6.53"
55.5° /
40.2° / 65.3°
159.3
mm / 6.27"
49.3° /
35.4° / 58.3°
Flange focal distance
44 mm 44 mm 44 mm 44 mm
Page 25

Technical Data 25
Signature Prime 47/T1.8 58/T1.8 75/T1.8 95/T1.8
Optical Parameters
Focal length
MOD
from sensor plane
(minimum marked
distance)
47 mm 58 mm 75 mm 95 mm
0.45 m / 18" 0.45 m / 18" 0.65 m / 26" 0.85 m / 2'9"
MOD from lens
front
Magnification ratio
at MOD
Entrance pupil position (related to image plan, in direction to object plane)
Angle of view H-V-D
for LF Open Gate
Physical Dimensions
Front diameter
Max. housing diameter
Length from flange
Weight (lens only)
Lens barrel
Interfaces
Lens mount
Lens data system
0.13 m / 5.1" 0.23 m / 9.0" 0.43 m / 16.9" 0.63 m / 2'1"
1:6.3 1:5.4 1:7.2 1:7.9
155.8
mm / 6.13"
42.6° /
30.4° / 50.8°
114 mm / 4.49" 114 mm / 4.49" 114 mm / 4.49" 114 mm / 4.49"
115 mm / 4.53" 115 mm / 4.53" 115 mm / 4.53" 115 mm / 4.53"
178 mm / 7.01” 178 mm / 7.01” 178 mm / 7.01” 178 mm / 7.01”
1.8 kg / 4.0lb 2.0 kg / 4.4lb 1.9 kg / 4.2lb 1.9 kg / 4.2lb
Magnesium Magnesium Magnesium Magnesium
LPL LPL LPL LPL
LDS-2 LDS-2 LDS-2 LDS-2
143.9
mm / 5.66"
34.9° /
24.8° / 41.8°
115.5
mm / 4.55"
27.5° /19.3° /
33.3°
85.4 mm / 3.36"
21.6° /
15.3° / 26.5°
Flange focal distance
44 mm 44 mm 44 mm 44 mm
Page 26

26 Technical Data
Signature Prime 125/T1.8 150/T1.8 200/T2.5 280/T2.8
Optical Parameters
Focal length
MOD
from sensor plane
(minimum marked
distance)
125 mm 150 mm 200 mm 280 mm
1.00 m / 3'4" 1.50 m / 5' 1.80 m / 6' 2.5 m / 8'3"
MOD from lens
front
Magnification ratio
at MOD
Entrance pupil position (related to image plan, in direction to object plane)
Angle of view H-V-D
for LF Open Gate
Physical Dimensions
Front diameter
Max. housing diameter
Length from flange
Weight (lens only)
Lens barrel
Interfaces
Lens mount
Lens data system
0.78 m / 2'7" 1.25 m / 4'2" 1.54 m / 5'1" 2.18 m / 7'2"
1:7.0 1:9.0 1:8.3 1:8.3
52.6 mm / 2.07" 54.5 mm / 2.15" 34.9mm / 1.37" 36.9 mm / 1.45"
16.6° /
11.6° / 20.2°
114 mm / 4.49" 114 mm / 4.49" 114 mm / 4.49" 134 mm / 5.28"
115 mm / 4.53" 135 mm / 5.31" 135 mm / 5.31" 135 mm / 5.31"
178 mm / 7.01” 208 mm / 8.19" 218 mm / 8.58"
2.3 kg / 5.1lb 3.25 kg / 7.3lb 3.1 kg / 6.13lb 4.3 kg / 9.48lb
Magnesium Magnesium Magnesium Magnesium
LPL LPL LPL LPL
LDS-2 LDS-2 LDS-2 LDS-2
13.9° /
9.7° / 16.9°
10.4° /
7.3° / 12.6°
7.4° / 5.2° / 9.0°
278 mm /
10.93"
Flange focal distance
44 mm 44 mm 44 mm 44 mm
Page 27

Spare Parts 27
11 Spare Parts
Please visit our website www.arri.com:
for product information & data sheets
•
for software updates
•
to locate your local dealer for Warranty/Repair/Spare part
•
inquiries.
The following spare parts are available for the Signature Prime
lenses:
Front Cap
•
Rear Cap
•
Net Holder
•
Shim Set
•
Aluminum Lens Case
•
Name Plate
•
Cleaning Cloth 170x150mm
•
Cleaning Cloth 14.6"x17.7"
•
Design, specifications & availability are subject to change without
notice.
Page 28

28 Declarations of Conformity
12 Declarations of Conformity
Note: Changes or modifications not expressly approved by the
party responsible for compliance could void the user's authority to
operate the equipment.
EU Declaration of Conformity
Directive 2014/30/EU of the European Parliament and
•
the Council of 26 February 2014 on the harmonisation of
the laws of the Member States relating to electromagnetic
compatibility - OJ L 96, 29.3.2014, p. 79–106
Directive 2011/65/EU of the European Parliament and
•
the Council of 8 June 2011 on the restriction of the use of
certain hazardous substances in electrical and electronic
equipment - OJ L 174, 1.7.2011, p. 88–110
The compliance with the requirements of the European Directives
was proved by the application of the following standards:
EN 55032: 2015; EN 55103-2: 2009
•
EN 50581:2012
•
To evaluate the respective information, we used:
http://ec.europa.eu/growth/single-market/european-standards/
harmonised-standards/index_en.htm
Munich, 15 May 2018
sign Walter Trauninger sign Dr. Sebastian Lange
Managing Director Head of Central Quality Management
FCC Compliance Statement
Class A Statement: This equipment has been tested and found
to comply with the limits for a Class A digital device, pursuant to
Part 15 of the FCC Rules. These limits are designed to provide
reasonable protection against harmful interference when the
equipment is operated in a commercial environment.
Page 29

Declarations of Conformity 29
Note: This equipment has been tested and found to comply with
the limits for a Class A digital device, pursuant to part 15 of the
FCC Rules. These limits are designed to provide reasonable
protection against harmful interference when the equipment
is operated in a commercial environment. This equipment
generates, uses, and can radiate radio frequency energy and, if
not installed and used in accordance with the instruction manual,
may cause harmful interference to radio communications.
Operation of this equipment in a residential area is likely to cause
harmful interference in which case the user will be required to
correct the interference at his own expense.
Industry Canada Compliance Statement
Complies with the Canadian ICES-003 Class A specifications.
Cet appareil numérique de la Classe A est conforme à la norme
NMB-003 du Canada.
This Class A device meets all the requirements of the Canadian
interference-causing equipment regulations
Cet appareil numérique de la Classe A respecte toutes les
exigences du Réglement sur le matériel brouilleur du Canada.
Page 30

30 ARRI Service Contact Information
13 ARRI Service Contact Information
In case you require support or assistance with your product, write
an Email to service@arri.com or contact one of the worldwide
ARRI Service Centers. Go to www.arri.com/service to find the
contact information of your closest ARRI Service Center.
Page 31

ARRI Signature Prime - 12/T1.8
Technical Da ta are subject to chan ge without notice.PRIME LENS DIMENSIONS – Version 2018-11
Overview
Accessory Mount
Focus Ring Iris Ring
Rear Part
LPL Mount
LDS-2 Contacts
Net Holder
(removeable)
5.31 in
ø 135 mm
5.28 in
ø 134 mm
10 mm
0.39 in
Left
283 mm
11.14 in
10 mm
0.39 in
202 mm
7.95 in
10 mm
0.39 in
156 mm
6.14 in
95.5 mm
3.76 in
44 mm
1.73 in
4.07 in
ø 103.5 mm
Image Plane
ø 115 mm
4.52 in
Page 32

ARRI Signature Prime - 12/T1.8
Technical Da ta are subject to chan ge without notice.PRIME LENS DIMENSIONS – Version 2018-11
RearRight
Contacts
Net Holder
(removeable)
LDS-2
Contacts
LPL MountLDS-2
Rear Part
Accessory Mount
Accessory Mount
Accessory Mount
LDS-2
Contacts
Focus RingIris Ring
Lens
Support
BottomTop
Accessory Mount
Page 33

ARRI Signature Prime - 15/T1.8
Technical Da ta are subject to chan ge without notice.PRIME LENS DIMENSIONS – Version 2018-11
Overview
Accessory Mount
Focus Ring Iris Ring
Rear Part
LPL Mount
LDS-2 Contacts
Net Holder
(removeable)
6.18 in
ø 157 mm
6.14 in
ø 156 mm
Left
10 mm
0.39 in
10 mm
0.39 in
240.95 mm
9.49 in
10 mm
0.39 in
156 mm
6.14 in
95.5 mm
37.6 in
44 mm
1.73 in
4.07 in
ø 103.5 mm
Image Plane
4.52 in
ø 115 mm
Page 34

ARRI Signature Prime - 15/T1.8
Technical Da ta are subject to chan ge without notice.PRIME LENS DIMENSIONS – Version 2018-11
RearRight
Contacts
Net Holder
(removeable)
LDS-2
Contacts
LPL MountLDS-2
Rear Part
Accessory Mount
Accessory Mount
Accessory Mount
LDS-2
Contacts
Focus RingIris Ring
BottomTop
Accessory Mount
Page 35

ARRI Signature Prime - Core Set 18...125/T1.8
Technical Da ta are subject to chan ge without notice.PRIME LENS DIMENSIONS – Version 2018-05
Overview
Accessory Mount
Focus Ring Iris Ring
Rear Part
LPL Mount
LDS-2 Contacts
Net Holder
(removeable)
4.52 in
ø 115 mm
4.49 in
ø 114 mm
Left
178 mm
7.01 in
10 mm
0.39 in
222 mm
8.74 in
10 mm
0.39 in
156 mm
6.14 in
95.5 mm
3.76 in
44 mm
1.73 in
4.07 in
ø 103.5 mm
Image Plane
Page 36

ARRI Signature Prime - Core Set 18...125/T1.8
Technical Da ta are subject to chan ge without notice.PRIME LENS DIMENSIONS – Version 2018-05
RearRight
Contacts
Net Holder
(removeable)
LDS-2
Contacts
LPL MountLDS-2
Rear Part
Accessory Mount
Accessory Mount
Accessory Mount
LDS-2
Contacts
Focus RingIris Ring
BottomTop
Accessory Mount
Page 37

ARRI Signature Prime - 150/T1.8
Technical Da ta are subject to chan ge without notice.PRIME LENS DIMENSIONS – Version 2018-11
Overview
Accessory Mount
Focus RingLens Support Iris Ring
Rear Part
LPL Mount
LDS-2 Contacts
Net Holder
(removeable)
5.31 in
ø 135 mm
4.49 in
ø 114 mm
Left
10 mm
0.39 in
252 mm
9.92 in
213.5 mm
8.40 in
10 mm
0.39 in
156 mm
6.14 in
95.5 mm
3.76 in
44 mm
1.73 in
4.42 in
ø 112.5 mm
Image Plane
4.85 in
ø 123.3 mm
Page 38

ARRI Signature Prime - 150/T1.8
Contacts
Net Holder
(removeable)
LPL MountLDS-2
Accessory Mount
RearRight
LDS-2
Contacts
Technical Da ta are subject to chan ge without notice.PRIME LENS DIMENSIONS – Version 2018-11
LDS-2
Contacts
Rear Part
Accessory Mount
Accessory Mount
Focus RingIris Ring
Lens Support
BottomTop
Accessory Mount Lens Support
Page 39

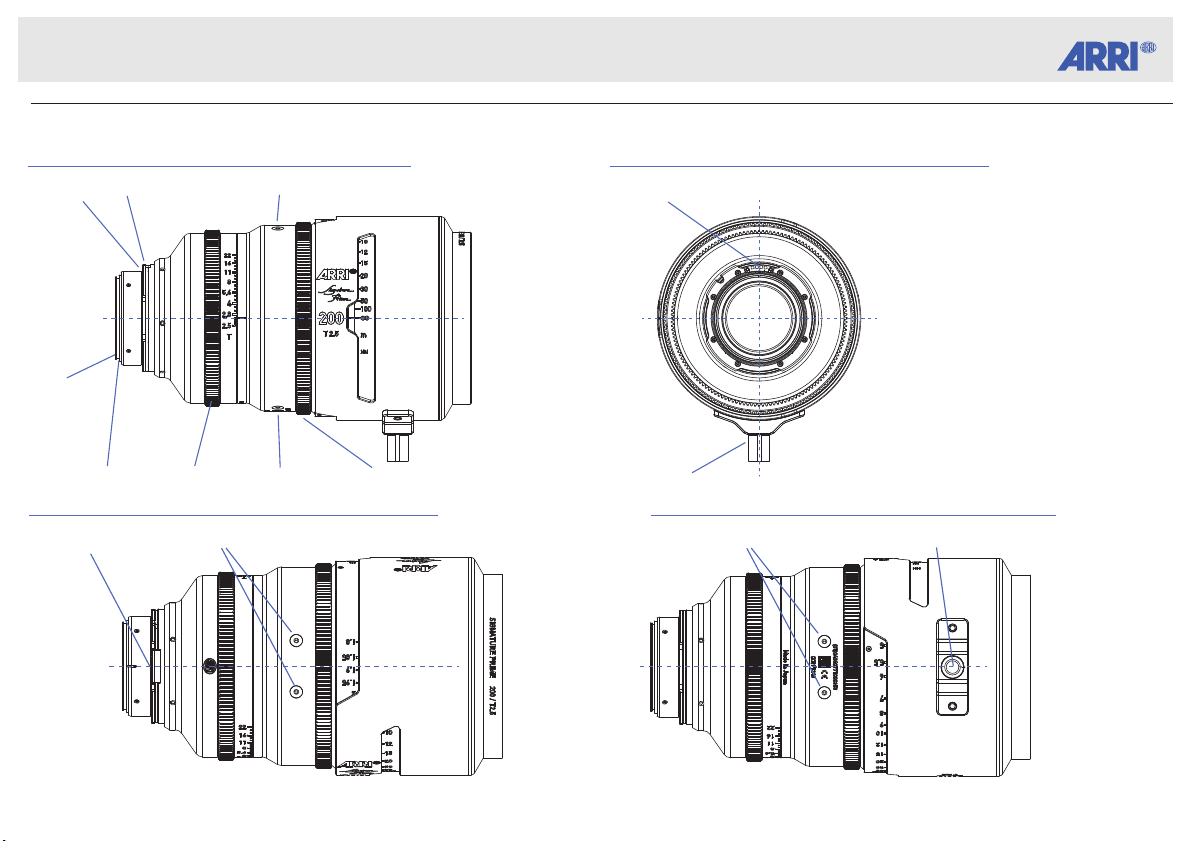
ARRI Signature Prime - 200/T2.5
Technical Da ta are subject to chan ge without notice.PRIME LENS DIMENSIONS – Version 2018-11
Overview
Accessory Mount
Focus RingLens Support Iris Ring
Rear Part
LPL Mount
LDS-2 Contacts
Net Holder
(removeable)
5.31 in
ø 135 mm
4.49 in
ø 114 mm
Left
262 mm
10.31 in
10 mm
0.39 in
213.5 mm
8.40 in
10 mm
0.39 in
156 mm
6.14 in
95.5 mm
3.76 in
44 mm
1.73 in
4.42 in
ø 112.5 mm
Image Plane
4.85 in
ø 123.3 mm
Page 40
ARRI Signature Prime - 200/T2.5
Contacts
Net Holder
(removeable)
LPL MountLDS-2
Accessory Mount
RearRight
LDS-2
Contacts
Technical Da ta are subject to chan ge without notice.PRIME LENS DIMENSIONS – Version 2018-11
LDS-2
Contacts
Rear Part
Accessory Mount
Accessory Mount
Focus RingIris Ring
Lens Support
BottomTop
Accessory Mount Lens Support
Page 41

ARRI Signature Prime - 280/T2.8
Technical Da ta are subject to chan ge without notice.PRIME LENS DIMENSIONS – Version 2018-11
Overview
Accessory Mount
Focus RingLens Support Iris Ring
Rear Part
LPL Mount
LDS-2 Contacts
Net Holder
(removeable)
5.31 in
ø 135 mm
5.28 in
ø 134 mm
10 mm
0.39 in
Left
321.5 mm
12.66 in
10 mm
0.39 in
243.1 mm
9.57 in
10 mm
0.39 in
156 mm
6.14 in
95.5 mm
3.76 in
44 mm
1.73 in
4.42 in
ø 112.5 mm
Image Plane
4.85 in
ø 123.3 mm
Page 42
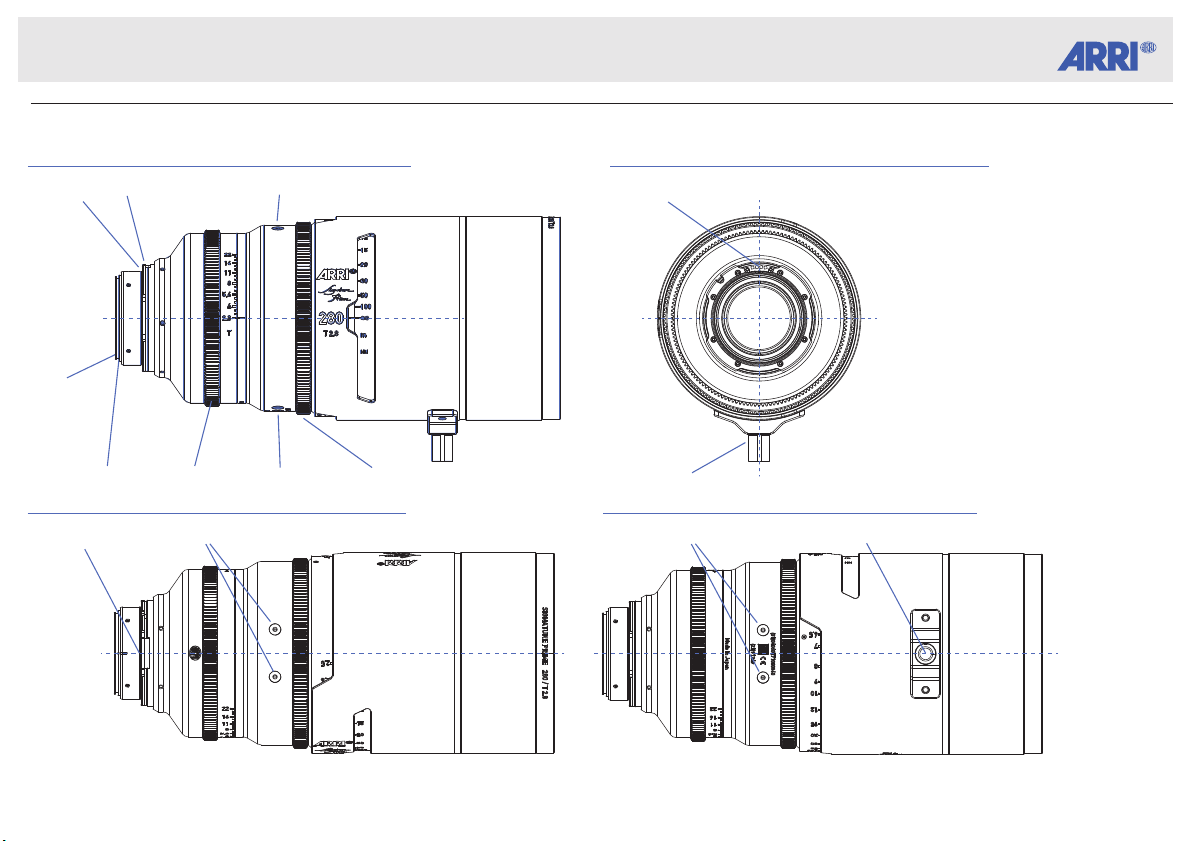
ARRI Signature Prime - 280/T2.8
Contacts
Net Holder
(removeable)
LPL MountLDS-2
Accessory Mount
RearRight
LDS-2
Contacts
Technical Da ta are subject to chan ge without notice.PRIME LENS DIMENSIONS – Version 2018-11
LDS-2
Contacts
Rear Part
Accessory Mount
Accessory Mount
Focus RingIris Ring
Lens Support
BottomTop
Accessory Mount Lens Support
Page 43

43
This page is intentionally left blank.
Page 44

44
20181114
Ident-No.: K4.0019068
 Loading...