

Page 1

HumidiClean
™
Series HC- 6100/6300/6500/6700
Humidifiers
Installation, Operation and
Maintenance Instructions
Table of Contents
Page
Warning Labels 2-3
Description of Model Number 4
Installation 6-12
Display Menu 13-16
Start-Up Procedure and Operation 16-17
Maintenance 18-22
Troubleshooting 22-27
Typical Wiring Schematic 28-37
Repair Parts 36-42
Software Update 43-46
Communication 46-51
Warranty 52
Please read and save these instructions.
Bulletin 539-A
Page 2
The Armstrong HumidiClean humidifier converts ordinary tap water or purified water to steam
for distribution to raise the relative humidity level.
To allow HumidiClean to function to its full capability, be certain to install in accordance with
Armstrong recommendations.
DANGER: ELECTRICAL SHOCK HAZARD HIGH VOLTAGES EXIST INSIDE THE HUMIDIFIER
TO PROTECT YOURSELF AND OTHERS FROM ACCIDENTAL SHOCKS:
1. Keep the humidifier locked during normal operation and store the key in a safe location away
from the humidifier.
2. ALWAYS DISCONNECT THE POWER SUPPLY AT THE CIRCUIT BREAKER OR SAFETY
SWITCH BEFORE OPENING ANY COVERS AND DOORS!
3. Before servicing the humidifier, learn where the high voltage parts are. KEEP HANDS AND
METAL TOOLS A WA Y FROM THESE AREAS!
Warning: All wiring and installation must be completed by qualified personnel
only and per the relevant local or national codes on electrical wiring. Negligence
of this warning might result in the loss of property or personal damage.
Warning: High Temperature! Material that is not resistant to high temperature
should not come in contact with these areas. Negligence of this warning might
result in the loss of property or personal damage.
2
6010-ISO Electrical
Shock-Electrocution
6043-ISO Burn Hazard
Hot Surface
Model HC-6100/HC-63000 Series
Model HC-6500/HC-67000 Series
Page 3

Warning: Do not operate the supplied humidifier in combustible or explosive surroundings.
Warning: Do not operate the supplied humidifier if there is any damage to the cabinet or any
components in humidifier are damaged.
Warning: The main switch should be a connection breaker which has over current and leakage
current protecting functions per code EN60947-3 or EN60947-2 if point gap required by EN60947-3
can be fulfilled.
4. Physical environment and operating conditions
• Ambient temperature + 4°C ~ + 38°C (40°F to 100°F)
• Humidity = 50 % at 40°C (104°F), = 90 % at 20°C (68°F)
• Altitude = 1000 m (above mean sea level) (3300 ft)
5. Transportation and storage conditions
Electrical equipment shall be designed to withstand, or suitable precautions shall be taken to
protect against, the effects of transportation and storage temperatures within a range of
-25°C to + 55°C (-15°F to 130°F) and for short periods not exceeding 24h, up to +70°C (160°F).
Suitable means shall be provided to prevent damage from humidity, vibration and shock.
6. Requirements
The supply disconnecting device (i.e. a switch-disconnect, a disconnect used in combination with
switching devices, or a circuit-breaker) shall fulfill all of the following requirements:
• Isolate the electrical equipment from the supply and have one OFF (isolated) and one ON
position only, clearly marked with "O" and "I" (symbols 60417-2-IEC-5008 and
60417-2-IEC-5007, see 10.2.2), with the actuating directions in accordance with IEC60447.
Circuit-breaker that, in addition, has a reset (tripped) position between "O" and "I" are also
deemed to satisfy this requirement
• Have a visible gap or a position indicator which cannot indicate OFF (isolated) until all contacts
are actually open and there is an adequate isolating distance between all the contacts in
accordance with IEC 60947-3
• Have an external operating means (e.g. handle), (exception: power-operated switchgear need
not be operable from outside the enclosure where there are other means to open it). The
handle should be BLACK or GREY (exception: see 10.7.4)
• Be provided with a means permitting it to be locked in the OFF (isolated) position
(e.g. by padlocks). When locked, remote as well as local closing shall be prevented
• Disconnect all live conductors of its power supply circuit. However, for TN supply systems, the
neutral conductor may or may not be disconnected. It is noted that in some countries,
disconnection of the neutral conductor (when used) is compulsory
• The handle of the supply-disconnecting switch shall be located between 0.6m and 1.7m
(2 ft. and 5-1/2 ft) above the servicing level
• The disconnecting switch must have over current and overload protecting functions and
initialize them as low as possible under normal running
3
Page 4

• This disconnecting switch should have leakage current protecting function. The max leakage
current should be less than 30mA
• The disconnecting switch should have a breaking capacity sufficient to interrupt the largest
normal running current of loads. The breaking capacity required should be selected according
to the table, 7-1, 7-2, 7-3 and 7-4 located on page 7.
Model Description
A = Rated voltage of unit is 208V D = Rated voltage of unit is 480V
B = Rated voltage of unit is 240V/220V E = Rated voltage of unit is 600V
C = Rated voltage of unit is 400V/380V
Pre-Installation
1. Check Shipment. A claim should be filed with the transportation company, (and reported to
Armstrong), if any items are missing or damaged.
2. Check Local Codes. The installation of HumidiClean should be in accordance with all applicable
building, plumbing, and electrical codes.
3. Site Selection. The humidifier should be installed in an easily accessible location. Do not install
the unit where malfunction of the humidifier might cause damage to non-repairable,
irreplaceable or priceless property. Refer to Installation section for other details regarding site
selection.
4
HC - XXXX (DI) - XXX X
Series HumidiClean™ Humidifiers
Type number
6100
6300
6500
6700
Quality of Water
Blank: Tap water
DI: Deionized or reverse osmosis
Rated Power
In KW. The minimum is 3 KW, and the maximum is 96KW.
Symbol of Rated Voltage
Page 5
5
Figure 5-1 HC-6100/6300 Installation
Figure 5-2 HC-6500/6700 Installation
Note: On all
HC6000 models
24” clearance is
required on both
sides and the
front of the unit.
Note: On all
HC6000 models
24” clearance is
required on both
sides and the
front of the unit.
Pitch Min. 1” Per
12” Back to Unit
See Detail “A”
2” Insulated Copper
“P” Trap Drain Every
20’ of Piping or at
Bottom of Vertical Run
Hose Clamp
Steam Hose or Copper
Hose
Soldered Joints
1/2” or 3/8”
Copper Tube
Full Size Tee
2” Copper Tee
Reducer
UP
6” Min.
1” Copper (Min) Pitched
1” per 12” (Min) to
Open Drain
“P” Trap Drain
Every 20’ of Piping
or at Bottom of Vertical Run
2” Insulated Copper
Air Gap
1” ID Hose
See Detail “A”
Pitch Min. 1” Per
12” Back to Unit
Pitch Min. 1” Per
12” Back to Unit
24”
Water in 3/8” Copper
Type with Ball Valve
24”
Clearance
Detail “A”
Hose Clamp
Steam Hose or Copper
Hose
Soldered Joints
1/2” or 3/8”
Copper Tube
Detail “A”
To Drain
Fused Disconnector
Magnetic Breaker
within Sight of Unit
UP
Full Size Tee
2” Copper Tee
Reducer
To Drain
24”
Water in 3/8” Copper
Type with Ball Valve
Fused Disconnector
Magnetic Breaker
24”
within Sight of Unit
1” ID Hose
Air Gap
1” Copper (Min) Pitched
1” Per 12” (Min) to Open Drain
Page 6

Installation
HC-6100/6300 Mounting
The HumidiClean models HC-6100/6300 are designed to be wall mounted. Awall mounting bracket
and lag screws are provided for mounting on 410 mm (16”) centers. The operating weight of the unit is
106 kg (233 lbs). Aclearance of 600 mm (23”) on the front and sides of the cabinet is required for
servicing.
1. Position wall mounting bracket level on wall and mark hole pattern. Make sure holes line up with
studs or other sturdy structure.
2. Use 3/8" x 1-1/2" lag screws provided to secure the bracket.
3. Hang the humidifier on the wall mounting bracket. The dry weight of the unit is 70 kg (154 lbs).
HC-6500/6700 Mounting
The HC-6500/6700 HumidiClean is designed to be floor mounted on a level surface. The operating
weight is 230 kg (507 lbs), a clearance of 600 mm (23”) is required for the front and sides.
Water Fill Supply
The humidifier can use any potable or purified water supply. Water pressure must be 25-120 psig.
Water temperature must be less than 60°C (140°F).
1. Install a shut-off valve near the unit.
2. Connect the water supply to the 3/8" compression fitting on the fill water solenoid valve on models
HC-6100/6300. The HC6500/6700 is supplied with a compression filling for 10mm plastic tubing. A
6’ piece of 10mm plastic tubing is included for the larger models. The knock-out for the water
supply tubing is under the fill valve in the bottom wall.
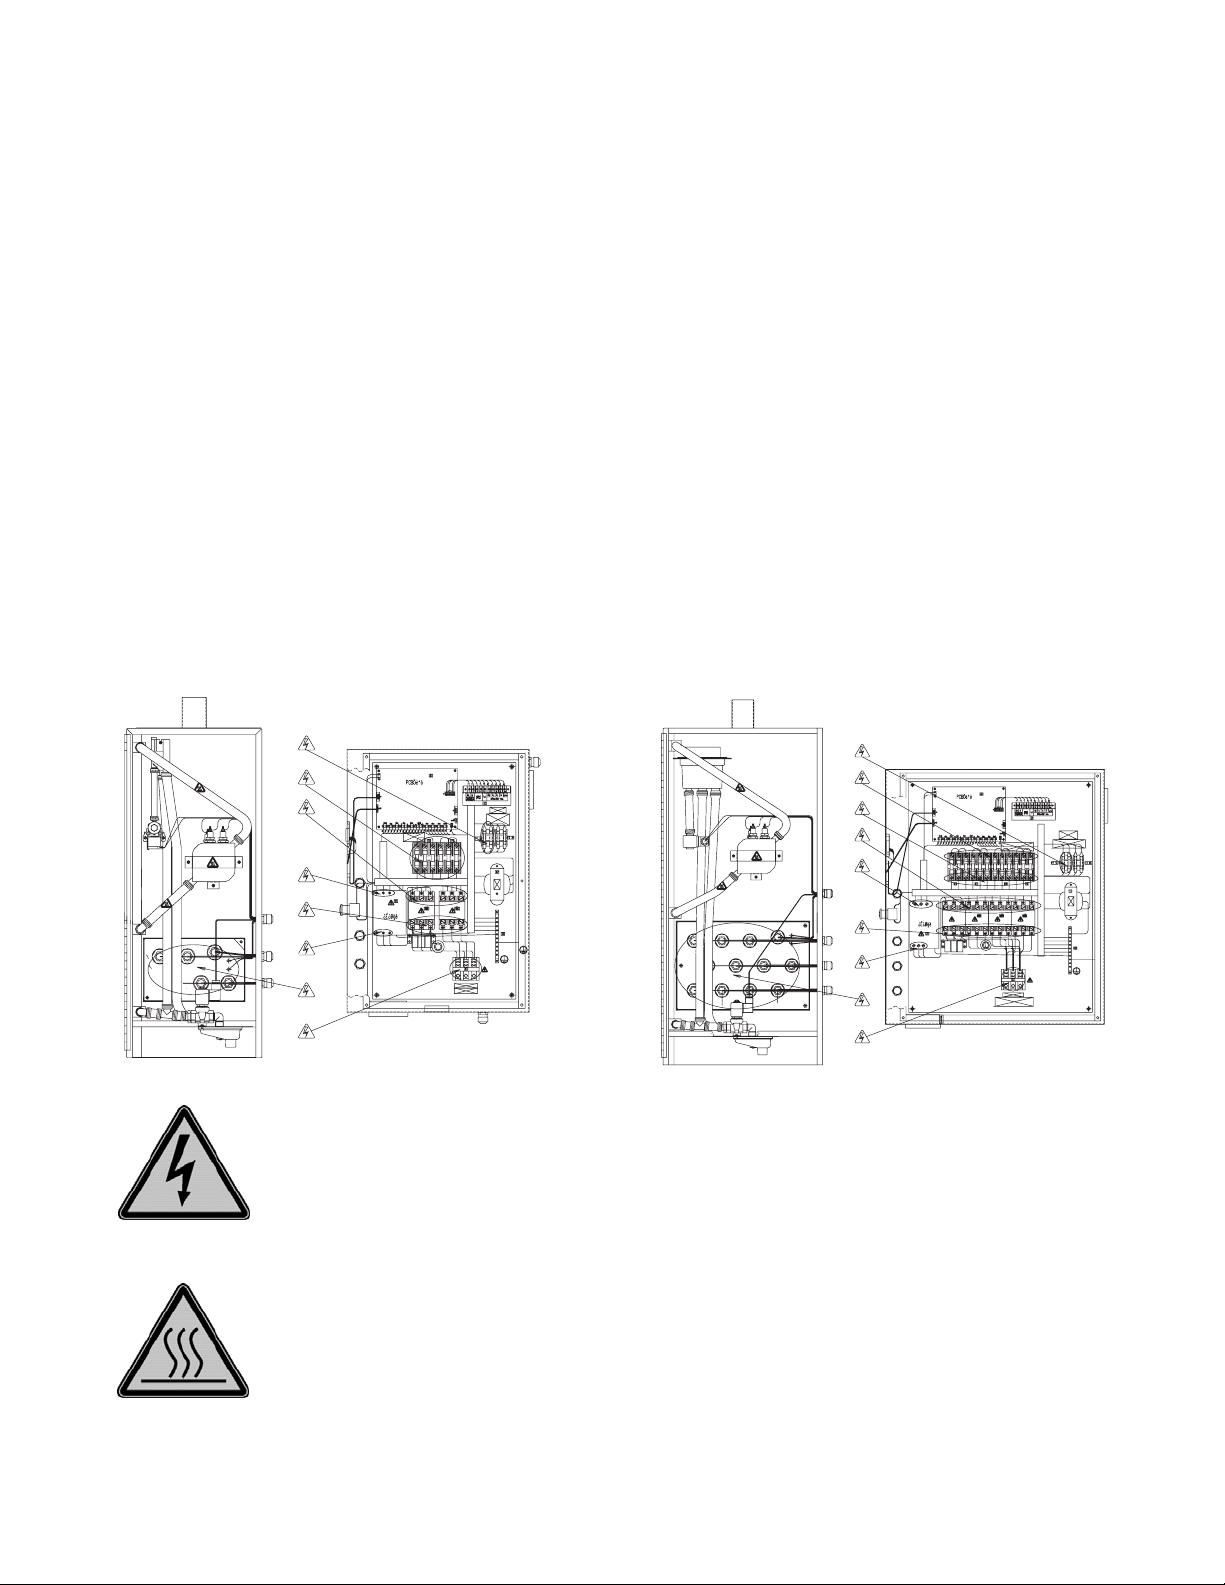
Electrical Service Wiring
1. Connect main power supply wiring to high voltage terminals in unit. Read breaker size required on
humidifier's nameplate and refer to Table 7-1 and 7-2 for HC-6100/6300 wire (gage) required; Table
7-1, 7-3 and 7-4 for HC-6500/6700. Make sure an interlocking circuit breaker or safety switch (not
furnished) is accessible and within sight of the unit.
2. The humidifier cabinet must be grounded. A ground lug is provided in the cabinet.
3. Use only wire with copper conductors rated at 90°C (194°F) or higher for power supply and
grounding.
6
Page 7
Drainage
Connect HC-6000 drain to suitable waste drainage
system. HC-6000 drain water may be as hot as 70°C
(158°F). Use clear drain hose provided and 25 mm (1”)
copper pipe pitched away from unit at 25 mm (1”)
inch per foot. An air gap to prevent back flow is required.
See Figure 7-1.
7
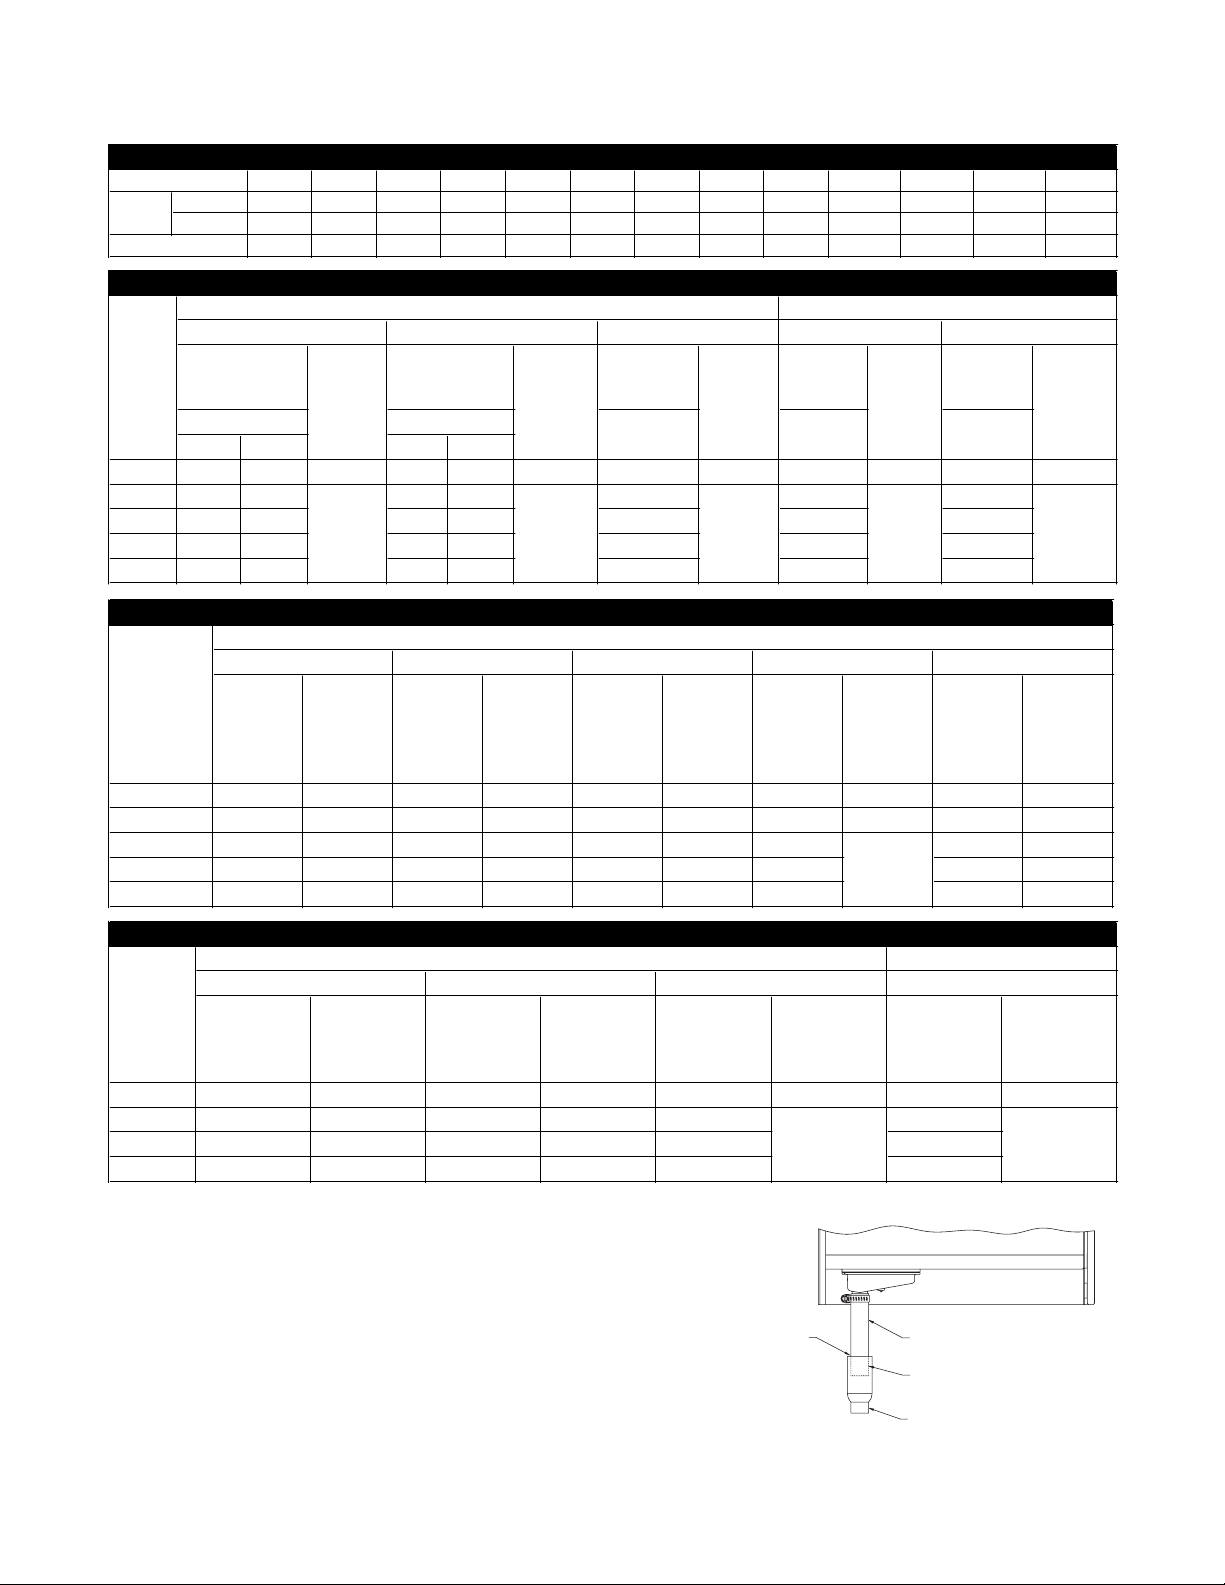
1-12 13-15 16-20 21-24 25-32 33-40 41-48 49-64 68-80 81-100 101-120 121-140 141-60
(AWG) 14 12 10 10 8 8 6 4 3 1 0 0 0
(mm2) 3 4 6 6 10 10 16 25 35 50 50 70 95
15 20 25 30 40 50 60 80 100 125 150 175 200
Table 7-1. Recommended Branch Circuits
Rating Amp
Wire
Circuit Breaker
Nominal
Amperage
Rating
Nominal
Amperage
Rating
Nominal
Amperage
Rating
Single Three Single Three
208 13.3 7.7 3.8 (8.3) 39 23 11 (24) 37 18 (40) 46 22 (48) 74 36 (80)
240 12.9 7.5 38 22 36 44 72
400 — 4.7 — 14 23 28 46
480 — 3.8 — 11 18 22 36
600 — 3 — 9 15 18 30
HC6100/HC6100DI
HC6300/HC6300DI
Table 7-2. Steam Capacities and Rating Amperages
Nominal
Amperage
Rating
Volts
(Vac)
Phase
3 KW Unit
15 KW Unit
Three
Phase
4.1 (9)
9 KW Unit
Nominal
Amperage Rating
Phase
12 (27)
Steam
Output
kg/hr
(lb/hr)
Steam
Output
kg/hr
(lb/hr)
20 (45)
25 (54)
41 (90)
Steam
Output
kg/hr
(lb/hr)
18 KW Unit
30 KW Unit
Three
Phase
Three
Phase
Steam
Output
kg/hr
(lb/hr)
Steam
Output
kg/hr
(lb/hr)
Nominal
Amperage
Rating Three
Phase
Steam
Output
kg/hr
(lb/hr)
Nominal
Amperage
Rating Three
Phase
Steam
Output
kg/hr
(lb/hr)
Nominal
Amperage
Rating Three
Phase
Steam
Output
kg/hr
(lb/hr)
Nominal
Amperage
Rating Three
Phase
Steam
Output
kg/hr
(lb/hr)
Nominal
Amperage
Rating Three
Phase
Steam
Output
kg/hr
(lb/hr)
208 84 41 (90) — — — — — — 125 61 (135)
240 — — — — 96 54 (120) — — — —
400 — — 51 45 (100) — — 73 — —
480 — — — — — — 58 — —
600 — — — — — — 47 — —
65 (144)
Table 7-3. Steam Capacities and Rating Amperages
Volts (VAC)
HC6500/6500DI
30 KW Unit
33.5 KW Unit
40 KW Unit
48 KW Unit
45 KW Unit
Nominal
Amperage
Rating
Three Phase
Steam
Output
kg/hr
(lb/hr)
Nominal
Amperage
Rating
Three Phase
Steam
Output
kg/hr
(lb/hr)
Nominal
Amperage
Rating
Three Phase
Steam
Output
kg/hr
(lb/hr)
Nominal
Amperage
Rating
Three Phase
Steam
Output
kg/hr
(lb/hr)
240/220 — — 144 82 (180) ————
400/380 77 30 (68) — — 110 145
480 — — — — 87 116
600 — — — — 70 93
98 (216)
130 (288)
Table 7-4. Steam Capacities and Rating Amperages
Volts
(Vac)
HC6500/HC6500DI
HC6700/HC6700DI
50.3 KW Unit
60 KW Unit
72 KW Unit
96 KW Unit
Figure 7-1 HC-6100/6300/6500/6700
Table 7-1. Recommended Branch Circuits
Table 7-2. Steam Capacities and Rating Amperages
Table 7-3. Steam Capacities and Rating Amperages
Table 7-4. Steam Capacities and Rating Amperages
Air Gap
1” I.D. Clear Hose
Supplied with Unit
Fit Hose Inside
1-1/2” Pipe
1” or Larger
Copper Pipe
Page 8

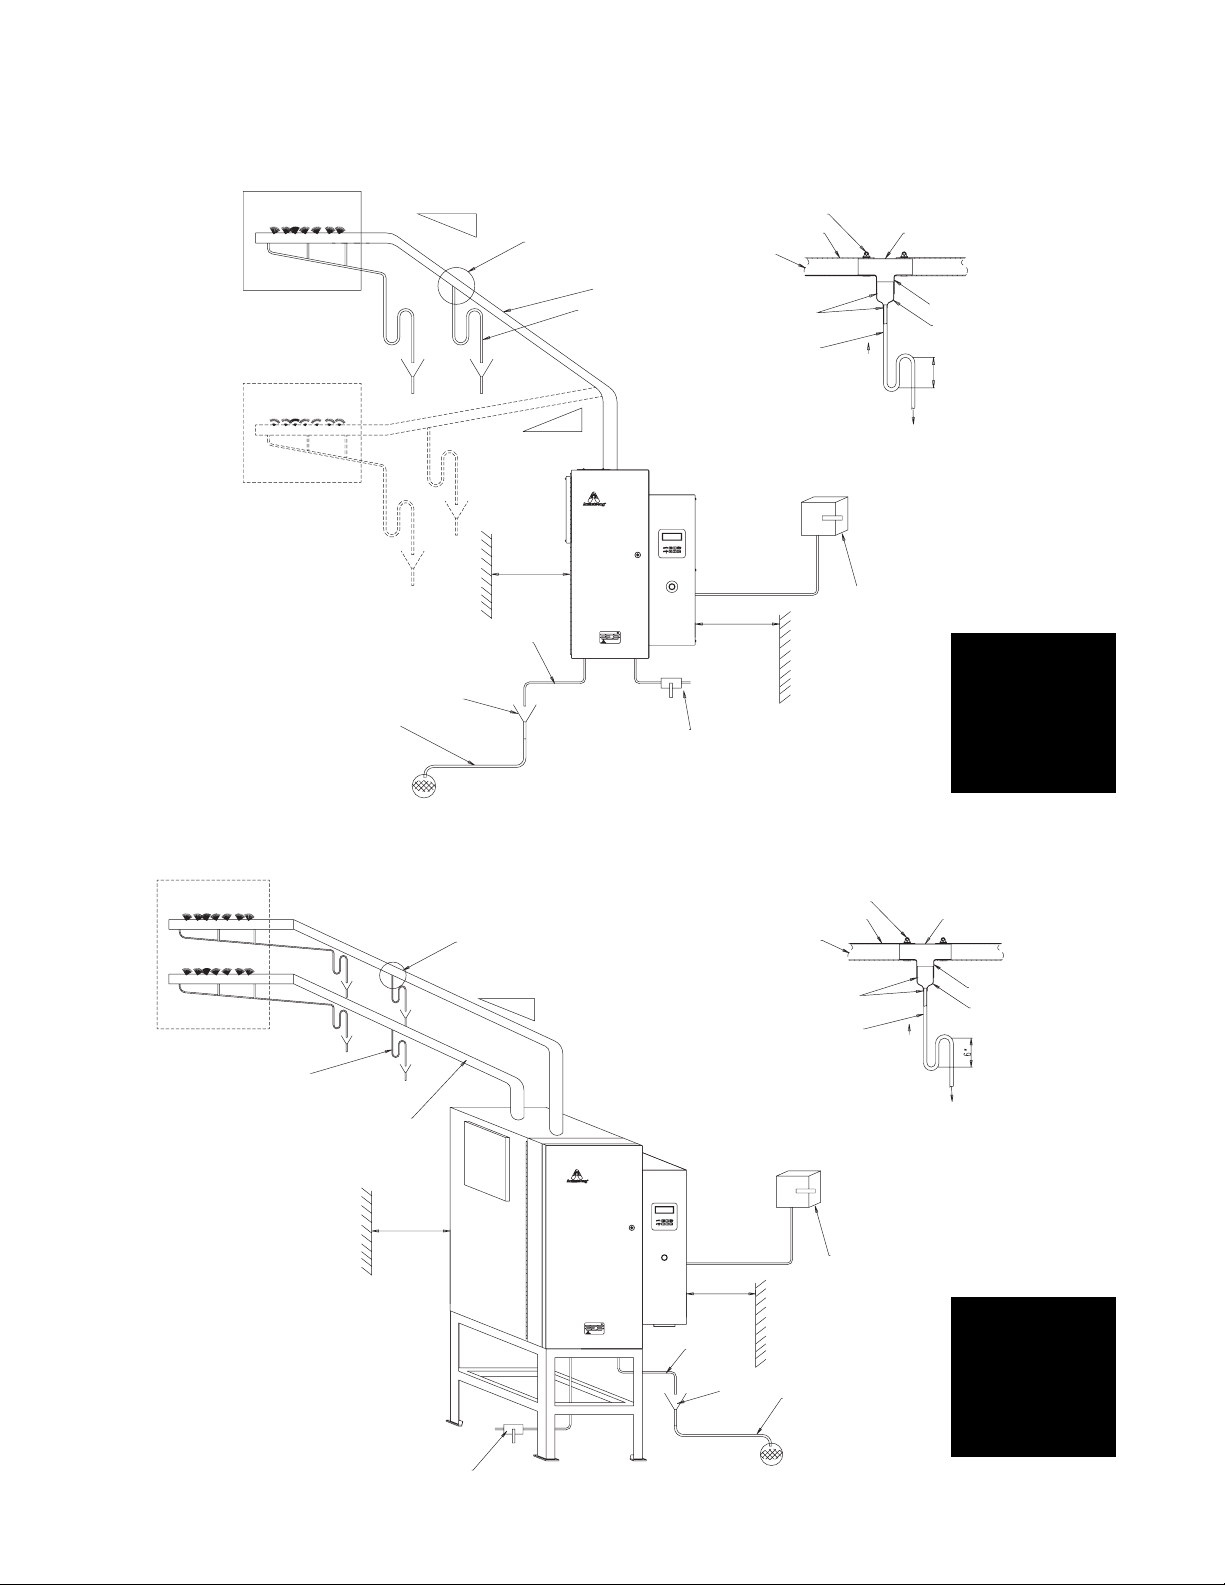
Duct Steam Distribution
1. The dispersion tube should be proper length. Verify correct size from Table 8-1.
2. Install dispersion tube(s) horizontally in duct so holes face upward. Air flow must be vertical up or
horizontal. Do not restrict duct with a height of 200 mm (8”) or less. Installations over 10 m/s
(2000 FPM) air velocity are not recommended. Consult factory if air flow is vertical down or air
velocity is over 10 m/s (2000 FPM). Do not install in ducted systems with static pressure exceeding
150 mm (6”).
3. The dispersion tube(s) should be located upstream of a straight duct run, without obstructions, 3 m
(10 feet) or more in length. Consult the factory if this distance is not available.
4. Use the template provided to cut dispersion tube installation holes. Fasten the mounting plate to
duct with sheet metal screws. If the dispersion tube is 900 mm (35”) or longer, support the far
end with threaded rod or similar means.
5. Note: For steam being generated from a deionized (DI) or reverse osmosis (RO) water source, the
use of 50 mm (2”) insulated stainless steel piping in lieu of copper is required. Pipe used for steam
dispersion piping must be oil and contaminate free. Premature element failure could result if oils or
contaminates are present. Contact the factory with questions. Connect dispersion tube(s) to
HumidiClean tank using 50 mm (2”) nominal insulated copper pipe and hose cuffs provided. We do
not suggest steam distribution piping of field supplied rubber based compounds to be used for any
HumidiClean application. Pitch pipe back to unit 25 mm (1”) per foot. The steam pipe must be free
of kinks and sags to allow for gravity drainage of condensate. Maximum pipe run distance from
tank to dispersion tube is 12 m (40 feet) equivalent piping length. Avoid excessive use of elbows or
45°changes in direction. A"P" trap drain should be installed every 6 m (20 feet), of piping run or at
the bottom of vertical runs that cannot drain back to the tank. See Fig. 8-3 for "P" trap detail.
6. If duct static pressure plus piping back pressure is greater than 0.5 in HG (6" WC), please consult
the factory.
8
Figure 8-3
Figure 8-2
Minimum
mm (in)
Maximum
mm (in)
D-1 DL-1 305 (12) 280 (11) 406 (16)
D-1.5 DL-1.5 457 (18) 432 (17) 559 (22)
D-2 DL-2 610 (24) 584 (23) 864 (34)
D-3 DL-3 914 (36) 889 (35) 1168 (46)
D-4 DL-4 1219 (48) 1194 (47) 1473 (58)
D-5 DL-5 1524 (60) 1499 (59) 1778 (70)
D-6 DL-6 1829 (72) 1803 (71) 2083 (82)
D-7 DL-7 2133 (84) 2108 (83) 2388 (94)
D-8 DL-8 2438 (96) 2413 (95) 2692 (106)
D-9 DL-9 2743 (108) 2718 (107) 2997 (118)
D-10 DL-10 3048 (120) 3023 (119) 3302 (130)
Table 8-1. Dispersion Tube Length
Steam Disp. Tube
Length "L"
mm (in)
Duct Width
1-1/2"
2-3/8"
Model
HC6100,
HC6100DI
Model
HC6100,
HC6100DI
"D" Dia.
Model HC6300,
HC6300DI, HC6500,
HC6500DI, HC6700,
HC6700DI
Model HC6300,
HC6300DI, HC6500,
HC6500DI, HC6700,
HC6700DI "DL" Dia.
Table 8-1. Dispersion Tube Length
Fitting Style
Equivalent Linear
Piping (feet)
2" - 45° Elbow 2.8
2" - 90° Elbow 5.5
2" - 90° Long Elbow 3.5
2" - Tee 12
Table 8-2. Linear Piping
Page 9
Area Steam Distribution
The EHF-3 fan package (minimum of 2 required for HC-6500/6700) is designed to be hung on a wall
to operate as a remote mounted, direct area discharge option. It incorporates a blower rated at 120v-
2.90 amps. CFM rating is 465 @ 1530 RPM. The fan package requires a separate 120 volt power supply (optional step down transformer available). Consult Armstrong Installation Bulletin IB-95 for more
information.
Alternative for shortened non-wettable vapor trail
For applications with particularly limited downstream absorption distance, Armstrong HumidiPack or
ExpressPack may be considered. HumidiPack is a prefabricated separator/header and multiple dispersion tube assembly. ExpressPack is a multi-tube steam dispersion panel which is shipped unassembled. The Armstrong HumidiPack or ExpressPack provide uniform distribution and shortened non-wetting vapor trail. Consult Armstrong Installation Bulletin No. 560 or Bulletin 573 for more information.
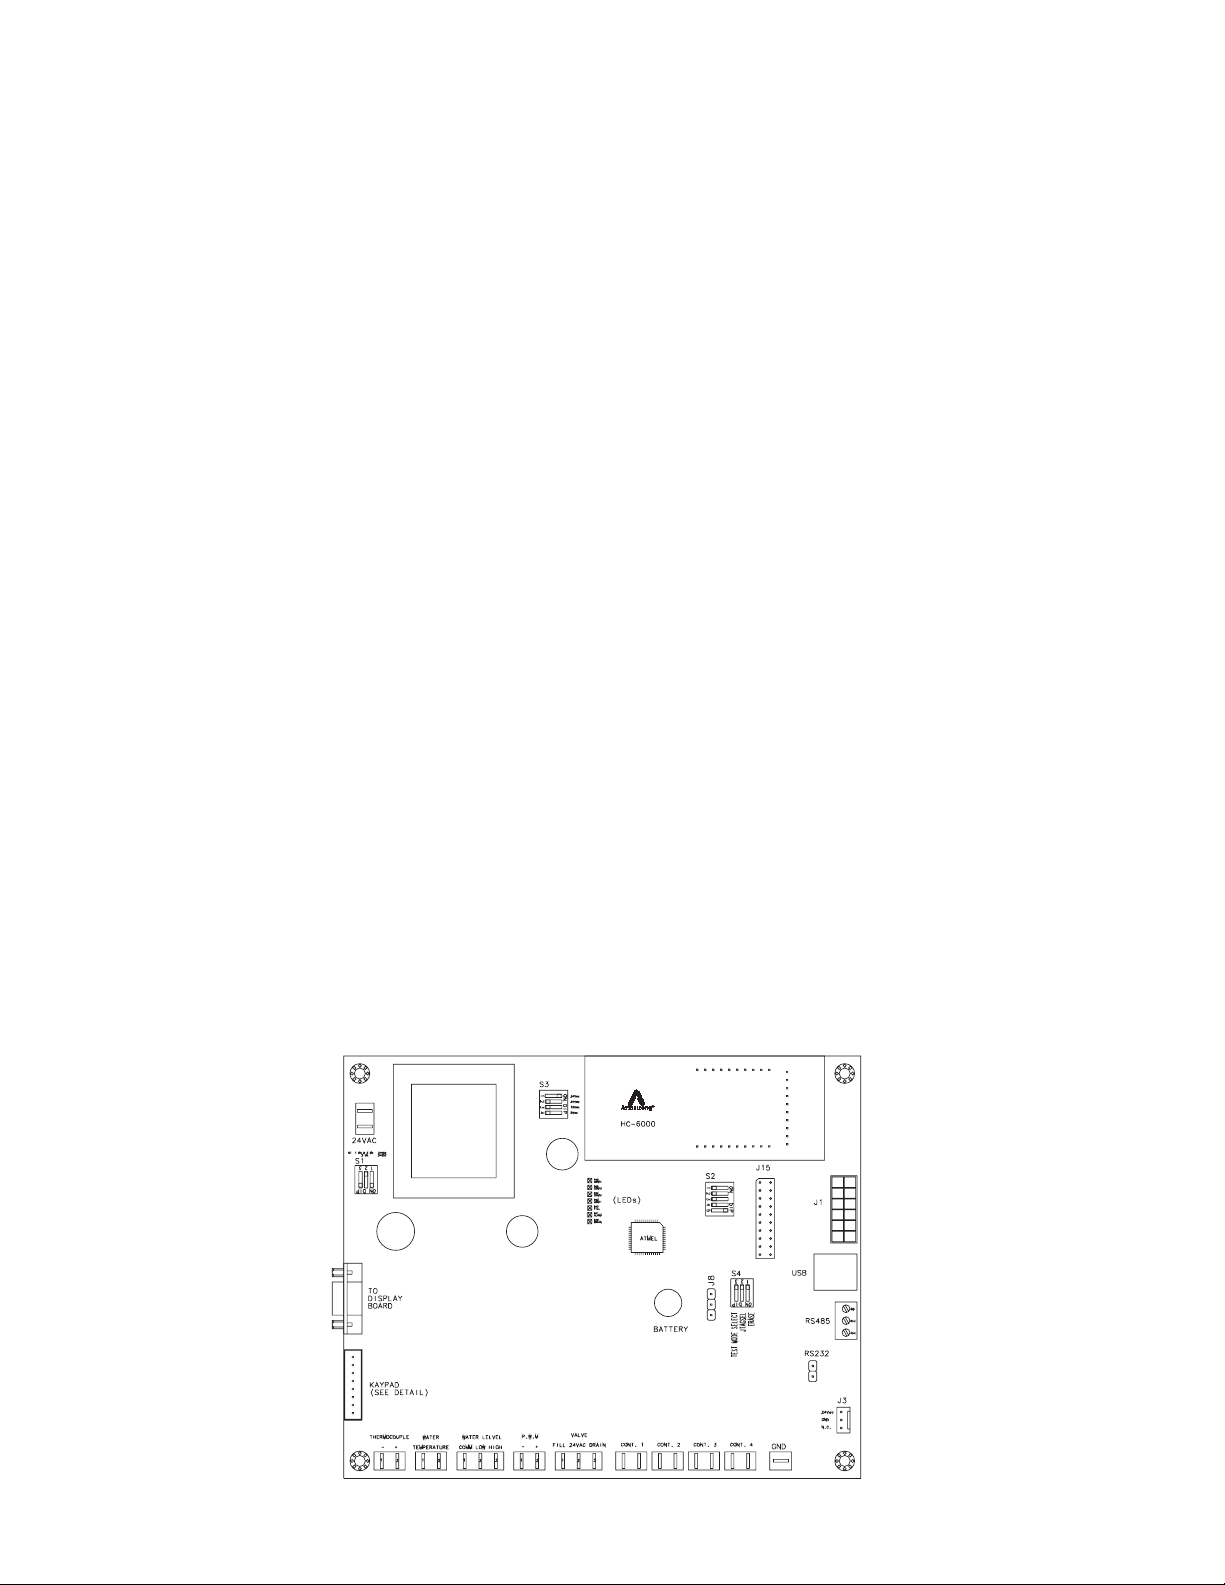
Control Wiring
When knock-out for sensor wiring is removed, an IP65 compliant cable bushing will be required to
keep the electric cabinet in compliance with IP32.
Wiring for low voltage controls should not be run in same conduit as the power supply. Use of shielded
wire or a separate dedicated metal conduit is required. When shielded cable is used, shield is to be
grounded at the humidifier only. The wire should not be longer than 30 meters (100 ft). If the wire is
out of this limit, please contact Armstrong. Refer to Figures 10-1 and 10-2 for wiring schematics.
Control Humidistat
1. Locate control humidistat where it will sense the average air condition of the space to be
humidified. Avoid areas of restricted circulation or locations where the sensor will be
subjected to drafts, localized heat or moisture sources.
2. Optional duct mounted humidistats are available to sense return or exhaust air, if
preferred.
3. Set DIP switch S-2 on the PC board to the proper range for the humidistat control signal to be
used. See Figure 9-1 . Also set voltage source DIP switch (S1 and S3) to proper range. See
Fig. 9-1 for location of switches and pages 10 and 11 in tandem with the applicable wiring diagram
below for correct switch settings.
4. Wire standard Armstrong 0-10 Vdc humidistat as shown in Figure 10-1. For use of alternative
humidistats or RH sensor, please refer to Figure 10-2.
9
Figure 9-1
Page 10

Figure 10-1
Standard Humidistat
H200-XX-XX-XX
10
A18609 or
A18610
0-10 Vdc
Stat
(Standard)
A8581
High Limit
Humidistat
A9023
Pressure Switch
Modulating High
Limit Sensor
Main Stat/Sensor In
Supply
Outdoor
Temperature Sensor
Ground
Ground
Class 2
Alarm
High Limit/
Air Flow Switch
To Set Up:
1) S1-1, 3 Off, S1-2 On
2) S3-1 On, S3-2, 3, 4 Off
3) S2-1, 2, 3 Off
4) Select 0-10vdc “Signal Type” in the Operational Setup Menu.
5) Select Humidistat Sensor Select in the Operational Setup Menu.
Figure 10-2
On/Off Humidistats
Main Stat/Sensor In
Modulating
High Limit Sensor
Outdoor
Temperature Sensor
Ground
1) S1-1, 3 On, S1-2 Off
2) S3-4 On, S3-1, 2, 3 Off
3) S2 Off (All)
4) Select “On/Off” Control Type
in the Unit Configuration Menu.
Supply
Brown
Orange
Part #: A8581
or A8581A
Page 11

11
Supply
Control
Signal
4-20ma Setup 10 vdc Setup
1) S3-1 On, 3-2, 3, 4 Off (Default)
2) S1-2 On, S1-1, 3 Off (Default)
3) S2-1 On, S2-2, 3 Off if 4-20ma
S2-1, 2, 3 All Off If 0-10vdc
4) Select Corresponding Control Signal
Type In Operation Setup Menu.
Main Stat/Sensor In
Modulating
High Limit Sensor
Outdoor
Temperature Sensor
Ground
S5079a,b,c
Figure 11-1
0-10 Vdc or 4-20mA Control Signal
Figure 11-2
RH Sensors/Transmitters
Supply
Main Stat/Sensor In
Modulating
High Limit Sensor
Outdoor
Temperature Sensor
Ground
SYM Function Description
Input Signal Type SelectS2
Power Supply
S1
and
For Sensors Select
S3
(S1 and S3 together)
At one time, only one digit of S3-1, 2, 3 or 4 should be on.
Main Control
Sensor
High Limit
Sensor
Outside
Temperature Sensor
(Optional)
Switch Positions
Settings
1: Stat/Main Sensor
2: High Limit Sensor
3: Outside Temp. Sensor
On: Current Signal
Off: Voltage Signal
4&5: Outside Temp. Sensor
4 on 5 off: Thermistor
4 off and 5 on: Temp. Sensor
24Vac: S4-2 on S4-1, 3 Off S3-1 on S3-2, 3, 4 off
24Vac: S4-1, 3 on S4-2 Off S3-2 on S3-1, 3, 4 off
10Vac: S4-1, 3 on S4-2 Off S3-3 on S3-1, 2, 4 off
5Vac: S4-1, 3 on S4-2 Off S3-4 on S3-1, 2, 3 off
S1 S3
Select RH sensor in sensor select window in operation setup menu
if using high limit sensor, select high limit sensor, set high limit set
point, 85% default.
If using out temperature sensor, select “outside temperature”.
Select signal type in operation setup menu.
Select desired RH in operation setup menu.
Verify PID settings in operation setup menu.
Page 12

High Limit Humidistat
Remove the jumper tab from ground and in of high limit/pressure switch connections and wire the high
limit stat between these terminals. Refer to Figure10-1 (the overall wiring diagram) for more inform
ation. Aduct mounted high limit humidistat is recommended to prevent over-saturation of the duct air.
Use an on-off controller that opens on fault (high humidity). Humidistat should be set for a maximum
of 90% RH. Alternately, a modulating high limit humidistat may be used on applications such as
variable air volume (VAV). Locate the high limit humidistat approximately 3m (10 feet) downstream of
the dispersion manifold. If 3m (10 feet) is not available, consult the factory. Note: High limit humidistat
will be wired in series with duct pressure switch, if used, see Figure 10-1.
Airflow/Pressure Switch
An airflow switch is recommended to deactivate the humidifier when there is insufficient air flow in a
duct system. Aduct pressure switch is preferred as an airflow sensor. The pressure switch should
open on insufficient airflow (opens on fault). Airflow switch should be mounted in supply air duct
upstream of humidifier dispersion. Remove the jumper tab from ground and in of high limit/pressure
switch connections and wire the airflow sensor between these terminals. See Figure 10-1 (the overall
wiring diagram) for more information. Complete installation and wiring instructions are contained in the
duct pressure switch package. Note: Duct pressure switch will be wired in series with high limit
humidistat, if used, see Figure 10-1.
State light will flash green if either high limit or air pressure switches are open.
Alarm Circuit
The terminals 3 & 4 (normally open relay external alarm) are connections for a class II NEC alarm
circuit (switch closure only, 1 amp. maximum @ 24 Vdc or 0.5 amp. @ 125 Vac). The switch will close
if the unit encounters an error or when service life has expired it will not engage if high humidity/sail
switch circuit is open.
12
Page 13

The menu can be accessed via the keypad below the LCD, on the front of electric cabinet. Use the UP
or DOWN to change the menu in current level; press ESC to previous menu level; press ENTER to
access the current menu. Pressing ENTER will activate selection cursor, press UP(DOWN) to increase
(decrease) the value, press ENTER to confirm the change or ESC to cancel.
13
Display Menu
Armstrong HC-6000
Enter to get into main menu
This screen will only display for 1 minute after the unit is
powered up; then it will automatically go to 'Unit Status'.
Language
Language select
Unit Status
Unit status display
Operation Setup
Operation variable setup
Unit Configuration
Unit configuration setup
English
English - Default
Chinese
Unit Status 1
Unit Demand: XXX% Demand
Steam Output: XXX lb/hr Steam Output
Unit Status 2
Water Level: Normal Water Level State: Low, Normal and High
Gen, Fill, Drain Idle = No demand; unit idle
Gen = Steam Generation
Fill = Filling
Drain = Draining
Heat = Elements are energized to heat water to selected
aquastat setting
Temperature
Wa ter Tem p: XXX C/XXX F Tem perature of water
Heat TEMP: XXX C/XXX F Temperature of heating elements
Timers
End of Life: 0:00 EOL-TMR:0000:00 (Default)
RUNTIME:0000:00
DRAIN-TMR: 0000:00
ONTIME:0000:00
OFFTIME:0000:00
RH Display
Room Current RH: XX% This menu will be displayed only when "RH Sensor" is selec ted
Room Current RH: XX% (Default)
Room Desired RH: XX%
Duct Current RH: XX%
High Limit Setpoint : XX%
Outside Temperature: XX°C/XX°F
Run Menu
Language
Unit Status
Run Menu
Language
Unit Status
Page 14

14
Enter Password 0000 (Default)
Desired RH
This menu is displayed when RH sens or i s selected
Desired RH: XX % Default: 50%
Current RH: XX%
Steam Generation
Steam Gen (Default)
Manual Drain
Manual Fill
Unit Stop
Modulating Fill Cycle
Enabled (Default)
Disabled
If modulating fill cycle is enabled:
Fill Valve Off Time
30 seconds
Fill Valve On Time
10 seconds
Error Reset Error Reset
Error Reset? Confirm Cancel
Aquastat
Temperature of water 180°F/80°C
The maximum is 80°C/180° F, the minimum is 4°C/40°F. If
the set point is lower than 40°F, t hen f unction is disabled. When
disabled the unit will go into a 3 minute warm-up when turned on.
Network Setup
Disabled Disabled (Default)
Enabled
Mode Change
Slave ID 1 (Default) Value: 1 to 127
Communication Type
MODBUS MODBUS (Default)
PSP (includes LonWorks/BACNet)
Password
New Password 0-9 Default: 0000
A-Z
a-z
End of Life
500
(Run Time Accumulation Hours) 750
1000 (Default)
1250
1500
1750
2000
2250
2500
2750
3000
No Beds
LT RT move the cursor UP DN to increase/decrease value
Operation Setup
Operation Setup
Page 15

15
Drain Frequency
6
Default: 12 hours 12 (Default)
244896
No Drain
Real Time
Real Time Set
24 Hour Clock
Drain Time
1
5 (Default)
10
Load Default
Reset all to Default? Confirm Cancel
Signal Type
0-10 Vdc (Default)
0-5VDC
1.9V - 3.9V
4-20mA
Sensor Select
Humidistat (Default)
RH Sensor
High Limit Sensor
High Limit Set Point 85% (Default)
Outside Temperature
High Limit Set 1°C / Low Limit Set 1°C
Lowest RH Set Point 15% (Default)
PID Settings
PB Proportion Brand 0-900
PID PB 10; PID IRV 10 IRV Integral Reset Value 0-500
PIDF DG 200; PID SI 10 DG Derivative Gain 0-500
SI Interval 0-30
Records
Error List 01 05-04-01 16:00 (example)
See Page 25 for list of possible errors.
Fill time out to low level
Display the RH graph RH graph of the last 30 days
This menu can be shown when RH sensor i s selected
Set Date and Time
YYYY-MM-DD; Time (24 Hr. Format) Date and Time from realtime IC
Save Settings
SAVE SETTINGS
Confirm Cancel
Must be done after any 'Ope
ration Setup' menu changes.
Operation Setup - Continued
Operation Setup - Continued
Page 16

16
Enter Password ARMH
Run Mode
Run (Default)
Test
Contactor Count
123
4
Control Type
PWM (Default)
On/Off
Power Settings
1000 W
3000 W
5000 W
6650 W
8000 W
Ionic Time Reset
Clear Ionic Time
Confirm Cancel
Error Record Clear
Clear Error List
Confirm Cancel
User Password Reset
User Password Reset
Confirm Cancel
Temperature Compensation Factory Use Only
Water Compensation
Heater Compensation
Unit Configuration
Start-Up Procedure (Before “Power On”)
1. Examine the electrical compartment for any loose or disconnected component wiring. Check all
high voltage screw terminal connections at contactor, terminal strip, fuse block & power module for
tightness.
2. Remove Side Panel. Remove tank access panel by unscrewing all black knobs. Make sure all
ionic beds are fastened securely to mounting pins. Position access panel on tank making sure the
gasket is in place and tighten all black knobs. Note: Ionic beds not used on DI/RO units.
3. Check and recheck incoming voltage source and control wiring for proper connections and
tightness of connections.
4. Turn on water supply and check for leaks.
5. Make sure access doors and panels are secure.
Page 17

Principle of Operation
The HumidiClean humidifier converts ordinary tap water or purified water to steam for distribution to
raise the relative humidity level. The demand for humidity is sensed by a humidistat or sensor which
sends a control signal to the HumidiClean. The HumidiClean is connected to the power supply (208,
220/240, 380/400, 480 or 600 Vac) through a separate circuit breaker supplied by the customer.
When power is initially supplied to the unit from the circuit breaker, the LCD will display "ARMSTRONG HC6000". The "POWER" LED will come on and the unit's fill valve solenoid is energized to
allow water to enter the tank at a rate of 1.5 L/min (.31 GPM)(HC-6500/6700 fill rate is 7.5 L/min (1
GPM)). Note: When unit is turned on the drain valve will energize for 6 sec. or until water level drops
below the high water probe. If water level in tank is above the low water level switch, assuming the air
proving switch is close, the high limit humidity switch is closed and the unit status is ‘STEAM GEN’, the
heating elements will be activated.
The water fill solenoid continues to be activated until the water level in the tank has energized the high
water switch. Note: If fill or drain valves are not energized when power is first applied, check LCD for
diagnostic code. See DIAGNOSTICS section. The heating elements will remain on to preheat the
water inside the tank until the temperature of water has reached the aquastat set point. During this
preheat cycle the amperage draw of the tank can be checked with a clamp on amp meter. The amperage draw on all high voltage wires connected to the main power supply terminal block should correspond to the value on the nameplate. If aquastat has been disabled, the humidifier will go into a 3
minute warm-up once the water hits the low water probe.
After the heat-up time, the HumidiClean will continue to produce steam based on the demand signal,
read from the humidistat or calculated by reading the relative humidity and setpoint. If the demand signal drops below 2% or the high limit/sail switch circuit opens, the contactor(s) will open and the unit
status will be "IDLE". Note: If the humidifier shuts off due to low humidistat demand, a demand signal
of 4% or greater is needed to re-initiate "STEAM GEN." If all the signals are consistent as stated
above, HumidiClean will produce steam continuously and refill the tank with water when the low water
level is reached. These fill intervals will operate based on modulating fill settings in software.
Power to the heating elements is switched on and off by the triacs in the power module to achieve a
modulating output based on the demand signal. The triac utilizes a 1/2 second cycle time. For example, with a 50% humidistat demand signal the triacs would be on for 1/4 second and off for 1/4 second.
If the triacs are fully on, the green "SIGNAL" LED on the power module will be on constantly. When
the triacs start to modulate (switch power to the heating elements on and off) the LED will show the
triac on condition and will appear to flicker or blink.
As HumidiClean continues to produce steam, the unit will accumulate and memorize the heating element active time for the purpose of defining a drain cycle and service life (this memory is not affected
by power outages). When the HumidiClean heating elements have been on for the drain frequency
setting, the unit activates the drain and fill solenoids and begins draining the tank. The tank will drain
with the water being tempered from an activated water fill solenoid. The drainage from the tank will
pass the low water switch, opening the switch and shutting off power to the heating elements. The
drainage from the tank should not exceed 70°C (158°F). The drain cycle is controlled by the user
inputted valves in the operation setup menu. Once the unit has timed out of the drain cycle and all of
the switches are still in position to generate steam, the water fill solenoid switch is activated to fill the
tank and the cycle starts over again.
17
Page 18

Completing a Service Life Cycle
When 90% of the setting service time has accumulated, the "STATE" LED on the control panel will
blink in yellow. (Refer to EOL settings, for bed life duration settings). If the HumidiClean is not serviced
at this time; the unit will continue to operate for the remaining 10% of the service life setting. When
100% of the bed life setting has been reached, the "STATE" LED will be on in red. The unit will drain
the tank and not respond to a call for demand.
A. Servicing the Unit
1) Save the settings, consult the OPERATION SETUP menu
2) Go to Steam Gen. Menu
a) Drain tank by operating menu from "STEAM GEN." to "MANUAL DRAIN" position.
b) Once the tank is drained, shut power off to unit and allow the tank to cool.
c) Remove the cabinet access panels, and slowly open tank access panel.
3)
Ionic Bed Inspection
Remove and inspect one of the ionic beds and inspect the drain screen at the bottom of the
tank. If the bed does not appear to be saturated with mineral deposit (a full bed will
weigh 1.1 kg (2.6 lbs) dry and if the drain screen is clear, you have two options.
a) Reset the Ionic Bed service life Proceed with Step 4.
b) Change the service life settings (see Operation Setup).
4)
Ionic Bed Replacement
If the beds are saturated, remove all of them. Remove any large pieces of scale from the tank.
Cleaning the side of the tank is advised at this point.
a) Chemically clean the unit with Rite-Qwik.
i) Pour 3.75L (1 gallon) of Rite-Qwik into tank followed by 3.8 L (1 gallon) of
fresh water. The HC-6500/6700 model requires 7.6 L (2 gallons) of Rite-Qwik
and 7.6 L (2 gallons) of water.
ii) Allow the solution to work until the bubbling action ceases, not to exceed 1
hour.
iii) Clean the water level electrodes, using an emery cloth. See Page 21 for
complete instructions.
iv) Check water level canister for debris.
v) Replace the electrodes.
vi) Ensure drain lines are free of leaks and secure.
vii) Check inlet screen on fill valve and remove any debris.
vii) Fill the tank with water and drain. (Perform this step several times.)
b) Install the new Ionic Beds.
18
Page 19

5) Restoring the Unit to Operation
a) Turn power on at breaker.
b) Unit should begin to fill. Maximum fill time is approximately 30-45 minutes before
contactor(s) will be closed.
c) If this does not take place, operate the menu, and change the status to "STEAM
GEN."
B.
Modifying the Bed Life Setting
1) Complete the steps for servicing the unit as outlined above.
2) Change the EOL settings to desired value in Unit Status menu.
3) Save settings in menu.
End of Season Drain
If at any time during normal operation there is not a demand for a continuous 72 hour period,
HumidiClean drains the tank and the PC Board initiates a drying cycle by cycling the heating elements
for short intervals in order to dry the ionic beds.
Maintenance
The HumidiClean is designed to minimize maintenance. As stated in the PRINCIPLE OF OPERATION
section, after the HumidiClean has accumulated 90% of the selected Service Life, in hours of heater
on time, the "STATE" LED will flash (blink) in yellow. At this time the ionic beds in the tank should be
replaced. If service is not performed, the unit will continue to operate for the remaining hours before
shutting down completely.
Note: Service Life can be adjusted based on water quality. If Ionic Beds are relatively free of scale
deposits or scale is forming on tank walls and elements because beds are saturated with scale, please
consult the factory for Service Life adjustment procedures.
Replacing the Ionic Beds
1) Save the settings, consult the OPERATION SETUP menu
2) Go to Steam Gen. Menu
a) Drain tank by operating menu from "STEAM GEN." to "MANUAL DRAIN" position.
b) Once the tank is drained, shut power off to unit and allow the tank to cool.
c) Remove the cabinet access panels, and slowly open tank access panel.
3) Unsnap ionic beds from support pins and slide them out through the access opening.
19
Page 20

Figure 20-1 HC-6100/6300
Figure 20-2 HC-6500/6700
4. Inspect tank drain screen and elements inside the tank. The elements should appear to be flaking
off scale. If the drain screen appears to building deposits in the screen holes it should be cleaned.
Remove any scale that appears in the bottom of the tank.
5. Install six (6) new ionic beds (14 for the HC-6500/6700), snapping them into place on the
support pins.
6. Make sure access panel gasket is lapped over all edges of tank access opening. Replace and
secure tank access panel.
7. Make sure both access doors/panels are secure.
8. Turn on power at circuit breaker.
20
Locating
Pins
Steam Outlet
Equalizing Connection
to Top of Level Canister
Cover
Ionic Beds
Equalizing Connection
to Bottom of Level Canister
Heating
Elements
Drain Oulet
Connection
Mounting Bolt
Locations
Steam Outet
Equalizing Connection
to Top of Canister
Cover
Ionic Beds
Equalizing Connection
to Bottom of Level Canister
Heating
Elements
Drain Outlet
Connection
Mounting Bolt
Locations
Locating
Pins
Page 21

9. Operate the unit configuration menu “Ionic Time Reset”, to reset the ionic bed life. All the
accumulated ionic bed time has been reset to zero. The unit should now be heard filling.
NOTE: The accumulated ionic bed time can be reset to zero at anytime. However, the unit
should not be reset without first inspecting the ionic beds.
10. After the unit has heated up and started making steam, turn main power off and double check tank
access panel gasket for steam leakage. Hand tighten wing nuts or reposition gasket if necessary.
Cleaning the Water Level Electrodes
1. If there is water in the steam generating tank, operate menu to "MANUAL DRAIN". The drain valve
should energize, and the unit should completely drain.
2. After the tank has drained, turn off the main
power at the disconnect.
3. Unclamp and remove the 5/8" ID Silicone tubing
from the top outlet of the level canister.
4. Disconnect wires #21 (high level probe), #20
(low level probe) and #19 (common probe) from
the probes, noting the probe and wire locations.
Note: Level control float switches are used
for DI, RO, or very pure water. Cleaning
should not typically be required.
5. Unscrew the probes from the level canister
using the hex nut fitting on the probe
(Note: Level canister bushings may be removed with the probes, if necessary).
6. Use a wire brush, wire wheel, or similar means to clean scale deposits off the stainless steel tip of
the probe. Cleaning of the Teflon insulating jacket (white portion) should not be needed.
7. Wipe probes with a clean dry cloth.
8. Inspect the interior of the level canister. If large amounts of scale or debris are present, remove the
canister from the cabinet by removing the two clamping bracket screws and disconnecting the 5/8"
ID Silicone hose at the bottom of the canister. Flush the canister with water to remove debris
and reinstall.
9. Reinstall the probes and probe wires in their proper locations. The high water probe (shortest)
goes in the right hole of the canister. The low water probe (medium length) goes in the left front
hole of the canister. The common probe (longest) goes in the left, rear hole of the canister.
10. Reconnect the 5/8" ID Silicone hose(s).
21
Page 22

Removing the Tank, HC-6100/6300 Only
1. Operate menu to "MANUAL DRAIN" and allow unit to complete a deep drain.
(Caution: Tank will still be quite warm).
2. Turn off circuit breaker.
3. Unlock and open front and side doors. Remove left side panel.
4. Disconnect 3 hoses from front of tank; rubber hose cuff at steam outlet; heating element leads at
contactor, fuses, or power module; and thermocouple wires.
5. Loosen and remove 2 mounting bolts at the bottom of tank. Slide tank out left side of cabinet
(be sure tank had time to cool after operation).
Troubleshooting
Notice: This troubleshooting guide is offered to aid in servicing the HC-6000 humidifiers. It is intended
for use by electricians and technical service personnel familiar with electrical and electronic equipment. Many steps in the troubleshooting procedures require measurements of high voltages and
involve working near exposed live parts. KNOW WHERE THE HIGH VOLTAGE PARTS ARE, AND
KEEP HANDS AND METAL TOOLS AW AY FROM THEM. All resistance checks should be made with
main power OFF and the component disconnected from wiring. All continuity checks should be made
with main power OFF. If unsure concerning any of the following procedures, PLEASE consult the
Armstrong Humidification Group at Phone: (269) 273-1415.
Humidifier will not fill with water when power is applied.
1. Make sure the status in menu is "Steam Gen.".
2. Make sure "STATE" LED is red. If so, refer to MAINTENANCE or DIAGNOSTICS section of
this manual.
3. Make sure "POWER" LED is lit. If not, check voltage at secondary side of the main power
transformer. Voltage should be 24-28 VAC. No or low voltage is an indication of a problem with the
supply voltage or transformer. Verify supply voltage and make sure it is the same as voltage rating
on humidifier nameplate. Check secondary power fuses.
4. Check the voltage to the fill valve. Voltage should be 24-28VAC (voltage should be taken with
wires connected). If voltage is present, fill valve solenoid coil is probably defective. Coil resistance
should be 18Ω (8.3Ω for HC-6500/6700) with wires disconnected.
5. Check for water in cabinet bottom or in fill cup overflow line. If present, see "Water in bottom of
cabinet" on page 24.
6. If no voltage is present to fill valve, check water level. If it is above 2/3 full in electrode level
canister (float canister for DI units), the drain valve has to open to drain water below high water
level before the fill valve is energized.
7. Check for 24-28 Vac power to drain valve (voltage should be taken with wires connected). If power
to drain valve is OK, check drain valve coil resistance with wires disconnected. It should be
approximately 10Ω (8.3Ω HC-6500/6700).
22
Page 23

8. If drain valve and fill valve are both energized and water is below the 1/3 full level in the electrode
canister (float canister for DI units), make sure the status of Steam Generation in menu is "STEAM
GEN.". Perform continuity check to be sure.
9. If drain valve only is energized and water level is below the 2/3 full level in electrode canister (float
canister for DI units), there may be excessive debris in electrode canister (float canister for DI
units). Inspect and clean if needed. See page 21 for Cleaning Procedure for Electrodes.
10. PC board may be defective. Consult the factory.
Humidifier fills with water, but does not turn "STEAM GEN" message on for 3 minutes
after reaching low water level.
1. Perform steps 1 through 3 from above "Humidifier will not fill..."
2. For Tap Water: Check AC voltage across the common electrode (longest) and the low level
electrode (medium length). The voltage will be approximately 17-20 VAC if the circuit is open.
When the water level closes, circuit voltage should drop to <5 volts.
(a) If voltage is not 17-20 VAC with circuit open, check continuity of wires from electrodes to
PC board. If continuity is OK, the PC board is likely defective.
(b) If voltage is 17-20 VAC with circuit open, but does not drop when water contacts the two
electrodes, the water may be too pure (consult factory) or if the voltage drops very slowly to
about 5 volts then the electrodes need cleaning. See page 21 for cleaning procedure for
electrodes.
3. For DI Water: Check continuity across the two wires to the low water float switch. If no continuity,
switch may be defective or "hung up". Make sure movement of switch is vertical so the float arm
swings freely.
4. If high limit/sail circuit is closed, low water level circuit is closed, and there is a calling for humidity,
the status of steam generation should be "STEAM GEN.". If not, PC board or wiring harness is
defective.
"STEAM GEN." turns on after initial fill to low water level, but amperage draw check
shows low or no amperage draw.
1. Check for line voltage to heating elements at secondary side of contactor and/or power module.
Verify power supply is same as voltage rating on humidifier nameplate.
2. If voltage is correct, the heating elements are likely defective. Turn off main power, disconnect all
elements and check element resistances (see resistance chart on Page 36 and 38). Look for open
circuits or elements with high resistance.
3. If voltage is not present at elements, check primary voltage fusing.
23
Page 24

4. If fuses are OK, check voltage to contactor coil.
(a) If voltage is 24-28VAC at contactor coil, check coil resistance. It should be 8Ω with wires
disconnected. If resistance is OK, check voltage drops across the contactor.
(b) If no voltage to contactor coil, check continuity of wires from PC board to contactor. If
continuity is OK, PC board is likely defective.
5. Check voltage signal to power module. The voltage across TAB8-1 and TAB8-2 (low voltage signal
to power module) should be 12 Vdc.
(a) If no or low voltage, the PC board is likely defective.
(b) If voltage is OK, but green "SIGNAL" LED on the power module is not on, power module is
defective.
6. If green "LOAD" LED on power module is on, check voltage drops across power module.
Humidifier overfills with water on initial fill.
1. Check electrode canister (float canister for DI units) and level electrodes for debris or scale build
up. Clean as needed. See Page 21 for cleaning procedure for electrodes. On DI Units, the high
water float switch may be defective or "hung up". Check continuity across wires to the switch.
Make sure switch movement is vertical so float lever arm swings freely.
2. The fill valve may be stuck open. Turn off power to the humidifier. If fill valve does not close,
clean or replace valve.
3. If the high water circuit is closed and the fill valve shuts off when the power is turned off, the PC
board is defective.
Humidifier runs continuously, %RH is well over set-point.
1. Verify humidistat signal isn't sending false 100% demand.
2. Verify humidistat or RH sensor is wired correctly and stat/sensor dip switches (S2 & S3, See
Fig. 10-1 and 11-1) on the PC board are set correctly for the humidistat signal.
3. If humidifier generates steam with the humidistat disconnected.
(a) Check for power at the contactor coil. If 24-28 VAC, PC board is defective.
(b) Check voltage drop across contactor. If voltage drop is low (it should be line voltage),
remove, disassemble and inspect contactor.
(c) Check green "SIGNAL" LED on power module. If it is ON or blinking, PC board is likely
defective.
(d) Check voltage drop across power module. If voltage drop is low (it should be line voltage),
power module triacs may be failed closed. Shut off main power and perform continuity check
across high voltage input and output terminals. Continuity indicates a shorted triac. Note:
Some power modules have two triacs rather than three. Check schematic on power module
to verify.
24
Page 25

Humidifier runs continuously, %RH is well under set-point.
1. Verify humidistat/RH sensor is wired correctly and dip switches (S2 & S3, See Fig. 10-1, 11-1
and 11-1) on the PC board are set correctly for the humidistat signal.
2. Check humidistat demand signal at low voltage terminal strip. It should be close or at 100%.
3. If humidifier is a three phase model, verify all three phases of power are present and equal.
4. Check amperage draw on all high voltage power lines with a clamp on amp meter. They should be
same or very close to amperage rating on the humidifier's nameplate if the humidistat demand is
100%.
5. Turn off power. Disconnect heating elements and check resistances - see Tables on Pages 35 and
37. If an open circuit or abnormally high resistance is measured, the heating element(s) is
defective. Also, check to see if heating element leads have shorted to ground.
6. If heating elements are OK, check voltages at secondary side of the power module and contactor.
If no or low voltage, check primary fusing.
7. If fuses are OK, check voltage to contactor coil.
(a) If voltage is 24-28VAC at contactor coil, check coil resistance. It should be approximately
8Ω? with wires disconnected. If resistance is OK, check voltage drops across the contactor.
(b) If no voltage to contactor coil, check continuity of wires from PC board to contactor. If
continuity is OK, PC board is likely defective.
8. Check voltage signal to power module. The voltage across TAB8-1 and TAB8-2 (low voltage signal
to power module) should be 12 Vdc at 100% power.
(a) If no or low voltage, the PC board is likely defective.
(b) If voltage is OK, but green "LOAD" LED on the power module is not on, power module is
defective.
9. If green "SIGNAL" LED on power module is on, check voltage drops across power module.
10. If supply voltage and amperage draws are correct and elements appear OK, unit is probably
undersized (not enough capacity for the application). Check sizing or consult factory.
Humidifier does not drain when manual drain.
1. Disconnect and check resistance of drain valve coil. Resistance should be approximately
10Ω (8.3Ω HC-6500/6700).
2. Make sure drain line is pitched and sized correctly. Check for blockage or obstructions in the drain
line. An air gap or funnel must be used as described in Drain Line Section. - See Figure 8-3.
3. If humidifier does not drain at specified interval or when service is to be performed and drain
valve and piping appear OK, there is blockage of the tank drain screen or the PC board may be
defective.
25
Page 26

Dispersion tube spits water or water is present in duct
Hint: It is very helpful to cut a small observation window in the duct and cover it with Plexiglas so the
steam discharge from the manifold can be observed. This way the problem can be narrowed down to
piping/steam quality (steps 1 and 2) or a condensation problem (steps 3 and 4).
1. Check distribution piping for proper pitch and size. Make sure there are no loops, dips or sags
where pockets of water can collect. If such conditions exist and are unavoidable, a 'P' trap is
needed to drain the low spots.
2. Make sure any drains are piped correctly and pitched to a floor drain.
3. Check duct downstream of manifold. If any obstructions (coils, elbows, fans) are within 10', the
vapor (condensed steam) discharged from the manifold may be impinging on the obstacle before it
has a chance to adsorb into air. This is especially true if the duct air is cold (<50°F), duct air
velocity is high (>2000 FPM), or duct %RH is high (>90%). If these conditions exist and
impingement is suspected, consult factory.
4. The duct air may be saturated with moisture (100% RH). Ahigh limit humidistat/RH sensor is
recommended to prevent this. See Installation section.
Water in bottom of cabinet
1. Verify that pressure equalizing tubing is hooked up from top of electrode level canister to the tank.
2. Check steam distribution piping for obstructions.
3. Verify duct air velocity is less than 2000 FPM and manifold is not in a vertical down air flow.
4. Check for leaks at fittings and clamps in water supply lines.
5. Verify that tank access panel gasket is on lip of access hole and the access panel is secured
tightly.
6. Make sure the duct pressure and steam distribution back pressure does not total more than
6" WC.
Diagnostics
There are some diagnostic routines programmed into the PC board. If these routines detect a problem
the unit will shut down and display the error message on LCD, the "STATE" LED will be on in red.
1 FILL TIME OUT TO LOW LEVEL - - The low level switch has not closed after 35 minutes of fill
valve on time. This is only on initial start-up or after a complete drain down. Check: defective fill
valve, debris in fill valve inlet screen or on tank drain screen, water leakage from tank or inlet tubing,
no water flow or low water pressure, drain valve stuck open or leaking, defective low water level switch
(electrodes need to be cleaned).
26
Page 27

2 WATER LEVEL DROPPED BELOW LOW LEVEL - - The low level switch has not closed after 5
minutes of fill valve on time. This is only after initial start-up fill and boil-down sequence.
Check: debris in water switch canister, defective fill valve, no water flow or low water pressure, drain
valve stuck open, defective low water level switch (electrodes need to be cleaned).
3 WATER LEVEL ABOVE HIGH LEVEL TIME OUT - - The high water switch is still closed 5 minutes
after the fill valve has turned off upon hitting the high water level and a 30 second drain does not drop
the water below the high water level. Check: defective high water level switch, debris in level canister,
fill valve stuck open, drain valve is defective or scale buildup in drain line.
4 ILLEGAL LEVEL SWITCH STATE - - The high level switch is closed and the low level switch is
open. Check: defective level switch(es), debris in electrode level canister, scale on electrodes or canister, improper wiring of electrodes or float switches.
5 OVER TEMPERATURE - - Internal temperature exceeds safe level. Check: low water in tank,
scale buildup on Thermocouple heating element surface, defective Thermocouple. See Clearing
"Error" Codes section.
6 WATER LEVEL HAS NOT DROPPED BELOW LOW LEVEL - - The low water level switch has not
opened after a complete drain. Unit drains frequency and duration can be set in menu. Check: defec-
tive low water level switch or electrodes, defective drain valve, debris on low water level float switch or
electrodes, tank drain screen, or in drain valve
Clearing "ERROR" codes
After correcting the problem, the error state must be cleared by depressing the button "Error Clearing".
Confirm the operation, the unit should resume normal operation (If the water level is above the low
water, the unit will drain below the low water level and refill before energizing the contactor). Turning
the power on and off will not clear the error condition.
Safety Switches
When the high limit or air proving (pressure) switch opens the state light will flash green and the
message “High Humidity/Sail Switch Circuit is Open” will be shown on the front display. This is a soft
error, it does not have to be reset. When the circuit closes the unit will go back to normal operation.
27
Page 28

HC6100-Wye Wiring layout
28
Page 29

HC6100-Delta Wiring layout
29
Page 30

30
HC6100-PAR Single Phase Wiring Layout
Page 31

HC6300-Wye Wiring layout
31
Page 32

HC6300-Delta Wiring layout
32
Page 33

HC6500-Wye Wiring layout
33
Page 34

HC6500-Delta Wiring layout
34
Page 35

35
HC6500-WYE (2 contactors) Wiring Layout
Page 36

36
HC6500-Delta (2 contactors) Wiring Layout
Page 37

HC6700-Wye Wiring layout
37
Page 38

Item No. Water Compartme nt Part No.
— PVC Tubing 5/8" A7618A
— Clamp Hose Flat .63 Olive B2716-11
— Hose Clamp, Minerature, Worm B2911-8
25
Kit Fill Valve Assy HC-6100 and
HC-6300 Tap Water
A23520
21 Tubing Rd 5/8" I. D. Silicon A19699
22 Tee Barbed HDPE 5/8 A23237
24 Elbow Barbed 5/8 A10579
27 Fill Cup for Series HC-6000 RDHC6000-038
27 Bracket For Fill Cu p B2929
28 Bracket for Liquid Level B5135
28 Brkt HC-6000 Liquid Level A22010
20 Drain Valve B2004C
18 Drain Cup RDEHU305-2021
17 Reducing Bushing Brass 1"-1/2" RDHC6000-041
30 Probe Level Assy Tap C4561
29 Container For Probe Level C4559
—
Long Probe For Water Level
(Low and Common)
B5268
— Short Probe For Water Level (High) B5269
— Reducing Bushing For Water Level A21391
— Float Level Assy DI/RO C4560
— Float Switch DI/Ro B5139
Item No. Steam Generator Part No.
1 SS Tank For HC-6100/6300 RDHC6000-009-1
—
Thermistor 5 KOHM
With Wire (Aquastat)
RDHC6000-006
— Tank (HC6100/6300) D6476
— Black Knob (6) Used with tank cover D6478
— Tank Cover D6477
— Tank Gasket B7872
— Ionic Bed B5213
— Lock and two keys for cabinet A10789
— 2-3/8" IDx12" EPDM hose cuff B2851A
— 2" IDx12" EPDM hose cuff B2851
— 1-1/2" IDx9-5/8" EPDM hose cuff B2250
— 1" IDx18" EPDM hose cuff A9620-1
— Hardware Assembly B5287
— Passivated Tank D2171
25
S-assy Ionic Bed HC-6000
(six required for HC-6100 and HC-6300)
B5213
HC-6000 Repair Parts
Item No. Electrical Compartment and Front Panel Part No.
31 Label Front Panel With Keypad RDHC6000-014
16 Emergency Stop Button (2 N.O.) RDEHU700-065
1 Main PCB For HC-6000 D5814
— Wire Harness For HC-6100 RDHC6000-013-1
— Wire Harness For HC-6300 RDHC6000-013-2
32 LCD & Display Board For HC-6000 RDHC6000-012
14 Fan DC24 (Sanyo 9A0924H4D03) With 2 Cover RDHC6000-004
12 Terminal Block #000 Wire B5607
11 Definite-Purpose Contactor 50AMP B2721
6 Fuse 3AMP A10718
7 Fuse 1A RDEHU700-073
5 Fuse Block 3AMP A8649
13 Module Power Din 9KW HC-6000 B5091
13 Module Power Din 15KW HC-6000 B5092
13 Module Power Din 9/15KW HC-6000 B5093
13 Module Power Din 15KW HC-6000 B5151
8 Trans Power 120/240-24V C1833
8 Trans Power 600-24V C1833A
8 Trans Power 480-24V C1833B
8 Trans Power 208-24V C1833F
8 Trans Power 380-24V C1833D
3 Fuse Holder 30AMP HC-6000 B4039
3 Fuse Holder 30AMP 250V HC-6000 B7494
4 Fuse 30AMP HC-6000 B4040
4 Fuse 30AMP HC-6000 250V B7495
38
Item No.
Electrical Compartment and Front Panel
Part No.
Item No.
Water Compartment
Part No.
Item No.
Steam Generator
Part No.
Page 39

39
Without TC
2PCS/Unit
With TC
1PCS/Unit
Without TC
2PCS/Unit
With TC
1PCS/Unit
208 B5808-1 B5809-1 B5810-1 B5811-1
240 B5808-2 B5809-2 B5810-2 B5811-2
380 B5808-1 B5809-1 B5810-1 B5811-1
480 B5808-3 B5809-3 B5810-3 B5811-3
600 B5808-4 B5809-4 B5810-4 B5811-4
Without TC
2PCS/Unit
With TC
1PCS/Unit
Without TC
2PCS/Unit
With TC
1PCS/Unit
208 B5047-1 B5048-1 B5043-1 B5044-1
240 B5047-2 B5048-2 B5043-2 B5044-2
380 B5047-1 B5048-1 B5043-1 B5044-1
480 B5047-3 B5048-3 B5043-3 B5044-3
600 B5047-4 B5048-4 B5043-4 B5044-4
Without TC
2PCS/Unit
With TC
1PCS/Unit
Without TC
2PCS/Unit
With TC
1PCS/Unit
208 B5049-1 B5050-1 B5045-1 B5046-1
240 B5049-2 B5050-2 B5045-2 B5046-2
380 B5049-1 B5050-1 B5045-1 B5046-1
480 B5049-3 B5050-3 B5045-3 B5046-3
600 B5049-4 B5050-4 B5045-4 B5046-4
Without TC
5PCS/Unit
With TC
1PCS/Unit
Without TC
5PCS/Unit
With TC
1PCS/Unit
208 B5047-1 B5048-1 B5043-1 B5044-1
240 B5047-2 B5048-2 B5043-2 B5044-2
380 B5047-1 B5048-1 B5043-1 B5044-1
480 B5047-3 B5048-3 B5043-3 B5044-3
600 B5047-4 B5048-4 B5043-4 B5044-4
Without TC
5PCS/Unit
With TC
1PCS/Unit
Without TC
5PCS/Unit
With TC
1PCS/Unit
208 B5049-1 B5050-1 B5045-1 B5046-1
240 B5049-2 B5050-2 B5045-2 B5046-2
380 B5049-1 B5050-1 B5045-1 B5046-1
480 B5049-3 B5050-3 B5045-3 B5046-3
600 B5049-4 B5050-4 B5045-4 B5046-4
HC-6100
Voltage
3kW
3kW DI
HC-6100
Voltage
9kW
15kW
HC-6100 DI
Voltage
9kW
15kW
HC-6300
Voltage
18kW
30kW
HC-6300 DI
Voltage
18kW
30kW
HC-6100
HC-6100
HC-6100 DI
HC-6300
HC-6300 DI
Heating Elements
TC= Thermocouple
Page 40

40
Item
No.
Electrical Compartment
and Front Panel
Part
No.
31 Label Front Panel With Keypad RDHC6000-014
16 Emergency Stop Button RDEHU700-065
1 Main PCB For HC-6000 D5814
— Wire Harness For HC-6500 RDHC6013-3
— Wire Harness For HC-6700 RDHC6000-013-4
32 LCD & Display Board For HC-6000 RDHC6000-012
14 Fan DC24 with 2 Cover RDHC6000-004
12 Terminal Block #000 Wire B5607
11 Definite-Purpose Contactor 50AMP B2721
6 Fuse 3AMP A10718
7 Fuse 1A RDEHU700-073
5 Fuse Block 3AMP A8649
13 Module Power Din 15KW HC-6000 B5092
13 Module Power Din 15KW HC-6000 B5151
8 Trans 208/240/380/480/600-24V B5605
3 Fuse Holder 30 AMP HC-6000 B4039
3 Fuse Holder 30 AMP HC-6000 A21882
4 Fuse 30 AMP HC-6000 B4040
4 Fuse 40 AMP HC-6000 A21883
4 Fuse 50 AMP HC-6000 A21884
Item
No.
Water Compartme nt
Part
No.
— PVC Tubing 5/8" A7618A
— Clamp Hose Flat .63 Olive B2716-11
— Hose Clamp, Minerature, Worm B2911-8
25 Fill Valve RDHC6000-001
21 Tubing Rd 7/8 Od Silicon A19699
23 Clamp Hose Flat .88 B2716-18
22 Tee Barbed HDPE 5/8 A23237
24 Elbow Barbed 5/8 A10579
27 Fill Cup for Series HC-6000 RDHC6000-038
27 Bracket For Fill Cup B2929
28 Bracket Liquid Level B5135
28 Brkt HC-6000 Liquid Level A22010
20 Drain Valve RDHC6000-002
18 Drain Cup RDEHU305-2021
17 Reducing Bushing Brass 1"-1/2" RDHC6000-041
30 Probe Level Assy Tap C4561
29 Container For Probe Level C4559
—
Long Probe For Water Level
(Low and Common)
B5268
— Short Probe For Water Level (High) B5269
— Reducing Bushing For Water Level A21391
— Float Level Assy DI/RO C4560
— Float Switch DI/Ro B5139
Item
No.
Steam Generator Part No.
26
S-assy Ionic Bed HC-6000
(14 required for Model HC-6500 and HC-6700)
B5213
— Thermistor 5 KOHM With Wire (Aquastat) RDHC6000-006
Item
No.
Electrical Compartment
and Front Panel
Part No.
Item
No.
Water Compartment
Part No.
Item
No.
Water Compartment
Part No.
Page 41

HC-6000 Repair Parts
41
Component Voltage Resistance Component Voltage Resistance
Fill Valve 24Vac 18
Ω
Fill Valve 24Vac 8.8
Ω
Drain Valve 24Vac 10
Ω
Drain Valve 24Vac 4.1
Ω
Contractor 24Vac 7-9
Ω
Thermocouple in Heating Elements - 0.51
Ω
Thermocouple in Heating Elements - 0.51
Ω
208, 240, 380V, 30/33, 5/40/45/50,3/60kW 240Vac 7.4-9.1
Ω
208Vac and 380Vac 3kW 220 Vac 46.0-48.6
Ω
380V 48/72kW 220Vac 5.2-6.3
Ω
240Vac and 380Vac 3kW 240 Vac 55-58
Ω
480V 48/72kW 277Vac 8.1-10.0
Ω
480Vac and 380Vac 3kW 277 Vac 72-78.2
Ω
600V 48/72kW 346Vac 12.8-15.7
Ω
600Vac and 380Vac 3kW 346 Vac 112.4-122.4
Ω
Power Transformer
208Vac and 380Vac15/30kW 220Vac 9.2-10.7
Ω
208Vac
18Ω across H1-H2
240Vac 15/30kW 240Vac 10.9-12.6
Ω
240Vac 21Ω across H1-H3
480Vac 15/30kW 277Vac 14.5-16.8
Ω
277Vac 24Ω across H1-H4
600Vac 15/30kW 346Vac 22.7-26.3
Ω
380Vac 40Ω across H1-H5
208Vac and 380Vac9/18kW 220Vac 15.3-17.7
Ω
480Vac 53Ω across H1H6
240Vac 9/18kW 240Vac 18.2-21.1
Ω
600Vac 97Ω across H1-H2
480Vac 9/18kW 277Vac 24.3-28.2
Ω
208Vac 1Ω across X1-X2
600Vac 9/18kW 346Vac 37.9-43.9
Ω
240Vac 1Ω across X1-X2
120Vac
13.6Ω across H1-H2
15.1Ω across H3-H4
277Vac 1Ω across X1-X2
208Vac 22Ω across H1-H2 380Vac 1Ω across X1-X2
240Vac 29Ω across H1-H2 480Vac 1Ω across X1-X2
380Vac 77Ω across H1-H2 600Vac 1Ω across X1-X4
480Vac 125Ω across H1-H2
600Vac 194Ω across H1-H2
Power Transformer
(secondary)
All
Voltage
0.6Ω across X1-X2
0.4Ω across X1-X2
Secondary Loop
Note:
All measurements should be made with the main power off and
the wires to the component being tested disconnected.
Resistance Value of 6100/6300 Components
Heating Elements
Power Transformer
Resistance Value of 6500-6700 Comoponents
Heating Elements
Primary Loop
Page 42

HC-6000 Repair Parts
42
HC6500/HC6700
30kW 33.5kW 40kW
Voltage
208
204
380
480
600
HC6500/HC6700
48kW
Voltage
HC6500/HC6700 DI
HC6500/HC6700 DI
Voltage
Without TC
5PCS/Unit
208---------204 - - - - B5438-1 B5438-1 - - - 380 B5437-1 B5438-1 B5438-1 B5438-1 - - B5437-1 B5438-1 B5437-1 B5438-1
480 B5437-2 B5438-2 - - - - B5437-2 B5438-2 B5437-2 B5438-2
600 B5437-3 B5438-3 - - - - B5437-3 B5438-3 B5437-3 B5438-3
Voltage
208
204
380
480
600
Without TC
5PCS/Unit
208---------204 - - - - B5440-1 B5440-1 - - - 380 B5439-1 B5440-1 B5440-1 B5440-1 - - B5439-1 B5440-1 B5439-1 B5440-1
480 B5439-2 B5440-2 - - - - B5439-2 B5440-2 B5439-2 B5440-2
600 B5439-3 B5440-3 - - - - B5439-3 B5440-3 B5439-3 B5440-3
With TC
1PCS/Unit
48kW 50.3kW 60kW 72kW 96kW
With TC
1PCS/Unit
Without TC
5PCS/Unit
B5433-1 B5434-1 - - - - B5433-1 B5434-1
- - - - B5433-1 B5434-1 - -
- - B5433-1 B5434-1 - - - -
--------
--------
Without TC
8PCS/Unit
Without TC
5PCS/Unit
B5435-1 B5436-1 - - - - B5435-1 B5436-1
- - - - B5435-1 B5436-1 - -
- - B5435-1 B5436-1 - - - -
--------
--------
Without TC
8PCS/Unit
With TC
1PCS/Unit
50.3kW 60kW 72kW
With TC
1PCS/Unit
30kW 33.5kW 40kW
With TC
1PCS/Unit
With TC
1PCS/Unit
Without TC
5PCS/Unit
Without TC
8PCS/Unit
Without TC
5PCS/Unit
Without TC
8PCS/Unit
With TC
1PCS/Unit
With TC
1PCS/Unit
With TC
1PCS/Unit
With TC
1PCS/Unit
Without TC
5PCS/Unit
Without TC
8PCS/Unit
Without TC
5PCS/Unit
Without TC
8PCS/Unit
With TC
1PCS/Unit
With TC
1PCS/Unit
With TC
1PCS/Unit
With TC
1PCS/Unit
Without TC
8PCS/Unit
Without TC
11PCS/Unit
Without TC
8PCS/Unit
Without TC
11PCS/Unit
45kW
With TC
1PCS/Unit
96kW
With TC
1PCS/Unit
45kW
With TC
1PCS/Unit
With TC
1PCS/Unit
Page 43

Procedure of HC6000 Version 7 Soft Refresh
This section is used for HC6000 software reprogramming only. Please follow the instructions carefully,
or pc board could become un-functional.
1. Install the driver program for Atmel MCU, SAM-BA on your computer first. The link for the Atmel
program AT91-ISP.exe and the latest version of can be found at the following location:
www.armstronginternational.com/hc6000refresh
2. Before refreshing the code, the old code in CPU must be erased:
a. Turn off the power supply from the breaker, and push the emergency stop button in.
b. Put Dip Switch S4-3 in the on position (Test Mode Select), turn on the breaker and pull out
emergency button. The indicator LED D47 on main board will remain ON. Keep the power
supply on for at least 8 seconds.
(This is the step to erase the old code.)
c. Turn off the power supply and put dip switch S4-3 to the off position.
d. Turn on the power supply, the indicator LED D47 will remain ON.
3. Loading the new code:
a. Connect the main board to computer with an USB cable. The computer should find the new
hardware, "ATMELAT91xxxxx Test Board "and install driver for board automatically. If system
can not find the board automatically, please install driver manual, the path of the install file
.inf is: c:/wingdows/info/atm6124.inf
b. Run program SAM-BA select the connection port as "\usb\ARM0", select board as
AT91SAM7S256-EK", please see figure 1 below.
Fig.1 SAM-BA Start Up Window
c. Click "Connect" button to enter the download window. Please see figure 2 on page 43.
43
Page 44

Fig.2 Code Download Window
d. Click the "open folder" button on the right of textbox "Send File Name" to open the latest code,
please see figure 3 below. You will then have to locate the .bin file that you downloaded from
the website and then hit open.
Fig. 3 Open the Latest Code Window
44
Page 45

e. Click the button "Send File" to send the latest code into board. You will be asked to unlock the
involved lock regions (0 to 7), click the button "Yes" to begin send code into board. Please see
figure 4 below.
Fig.4 Message Unlock Involved Lock Regions Window
f. When sending was finished, you will be asked to lock all locks that you have opened just now,
click the button "Yes" to lock these locks. You can verify that the code was send to the board
by scrolling up in the message box. See Figure 5 below.
Fig. 5 Verifying Code was Sent
45
Page 46

g. When operation has finished, close the "SAM-BA" window first, and then click the icon "remove
the USB hardware" to disconnect the link between computer and board. After reminder by
system, disconnect the power supply from breaker and pull out the USB cable.
h. The soft refresh of HC-6000 is complete restart the unit.
Introduction to Communications
HC6000 series provides two types of remote communication port: RS-485 and RS-232.
1) Run Modbus-RTU on RS-485 port
2) Run PSP on RS-232 port( the protocol was provided for ProtoCessor Module only, users
can select different modules to connect different port)
Please see instruction details for Modbus_RTU used in HC6000:
When you want to use modules, please change the configuration from communication to "PSP" per
menu (See section 3.2.3 communication setup).
When you need to use Modbus-485 in control board, please change the configuration from communi-
cation to "Modbus" per menu (See section 3.2.3 communication setup).
Modbus_RTU in HC6000, abiding by the order No. 02, 04 and 06 in Modbus, can read data in 10000
and 30000(address), and write data in 40000.
By using Modbus_RTU in HC6000, users can get PSP server end program and Modbus program. Part
of the PSP program will be written according to "ProtoCessor Simple Protocol (PSP) Specification"
provided by Protocessor. PSP Configuration from the Protocol module is as follows:
46
Page 47

Table 46-1 Modbus Variable Lists
47
data type attribute data address description
10001 Fill valve status 0:off 1:on
10002 Drain valve status 0:off 1:on
10003 contactor 1 status 0:off 1:on
10004 contactor 2 status 0:off 1:on
10005 contactor 3 status 0:off 1:on
10006 contactor 4 status 0:off 1:on
10008 Network control 0:Local 1:Remote
1 comm type 0:485 1:PSP
2 Sensor select 0:Humidistat 1:RH sensor
3 High limit sensor select 0:not use 1:use
4 Outside temperature 0:not use 1:use
5 Network enable 0:disable 1:enable
6 Modulating Fill enable 0:enable 1:disable
30001 Desired RH
30002 Output
30003 Water level 0:low 1:normal 2:high 3:exception
30004
Run status 0:Idle 1:Gen 10:frequent Draining 4:bed dring
5:Failure 6:Drain 7:heat 9:Fill
30005 Bed life (Hours)
30006 Bed life (Minutes)
30007 Run Time (Hours)
30008 Run Time (Minutes)
30009 Drain Freq (Hours)
30010 Drain Freq (Minutes)
30011 Idle Time (Hours)
30012 Idle Time (Minutes)
30013 RH value
30014 Duct value
30015 Outside temperature
30016 Water temperature
30017 Heat temperature
30018
Failure 1:Over temperature 2:High humidity/sail switch circuit is
open 3:Illegal level switch state 4:Unit have reached 100% of
bed life 5:Fill time out to low level 6:Water level dropped below
level during normal run 7:Fill time out from low to high level
8:Water level above high level time out 9:Water level has not
dropped below low level during an emptydrain 10:End of bed
dring
30019 Contactor number
30020 Contactor Power 0:1000W 1:3000 2:5000W 3:6650W 4:8000W
function 1,read only : function 5,15 write
MODBUS POLL: READ COILS
For modbus function number
function 2 , read only MODBUS POLL:
READ DISCRETE INPUT
function4 , read only MODBUS POLL:
READ INPUT REGISTERS
bit
read only
read write
bit
read only
16 bit
40001 Language Select
40002 Set RH(Set Desired RH)
40003 High set point
40004 Outside temperature high set point
40005 Outside temperature low set point
40006 Outside RH low set point
40007
Run mode 1:Steam Gen 2:Manual Fill 3:Manual Drain 4:Unit stop
40008 AQUASTAT
40009
Bed life 0:500Hours 1:750Hours 2:1000Hours 3:1250Hours
4:1500Hours 5:1750Hours 6:2000Hours 7:2250Hours
8:2500Hours 9:3000Hours 10:No bed
40010
Drain Freq 0:6Hours 1:12Hours 2:24Hours 3:48Hours
4:96Hours
40011 Drain time 0:1Minutes 1:5Minutes 2:10Minutes
40012 Signal type 0:0-10V 1:0-5V 2:1.9-3.9V 3:4-20mA
40013 PID_DIV
40014 PID_PB
40015 PID_SI
40016 PID_DG
40017 Modulating Fill Freq
40018 Modulating Fill time
40019 Water temperature compensate
40020 Heat temperature compensate
40021 First run
40022 Idle time
40023 Drain time 0:1Minutes 1:5Minutes 2:10Minutes
40024 Bed life
function 6 , for debug only
function3 read only,function 6,16 write
MODBUS POLL: READ HOLDING
REGISTERS
read write
16bit
Page 48

Table 47-1. BACnet Variable List
48
BACnet Data Type
Data
Address
Description Attribute
1 Fill valve status 0:off 1:on
2 Drain valve status 0:off 1:on
3 contactor 1 status 0:off 1:on
4 contactor 2 status 0:off 1:on
5 contactor 3 status 0:off 1:on
6 contactor 4 status 0:off 1:on
8 Network control 0:Local 1:Remote
1 comm type 0:485 1:PSP
2 Sensor select 0:Humidistat 1:RH sensor
3 High limit sensor select 0:not use 1:use
4 Outside temperature 0:not use 1:use
5 Network enable 0:disable 1:enable
6 Modulating Fill enable 0:enable 1:disable
1 Desired RH
2 Output
3 Water level 0:low 1:normal 2:high 3:exception
4 Run status 0:Idle 1:Gen 10:frequent Draini
ng 4:bed drying 5:Failure 6:Drain 7:heat 9:Fill
5
Bed life (Hours)
6
Bed life (Minutes)
7
Run Time (Hours)
8
Run Time (Minutes)
9
Drain Freq (Hours)
10
Drain Freq (Minutes)
11
Idle Time (Hours)
12
Idle Time (Minutes)
13
RH value
14
Duct value
15
Outside temperature
16
Water temperature
17
Heat temperature
18
Failure 1:Over temperature 2:High humidity/sail switch circuit is open 3:Illegal level switch state 4:Unit
have reached 100% of bed life 5:Fill time out to low level 6:Water level dropped below level during
normal run 7:Fill time out from low to high level 8:Water level above high level time out 9:Water level has
not dropped below low level during an emptydrain 10:End of bed dring
19 Contactor number
20 Contactor Power 0:1000W
1:3000 2:5000W 3:6650W 4:8000W
1 Language Select
2 Set RH(Set Desired RH) or Desired % Output
3 High set point
4 Outside temperature high set point
5 Outside temperature low set point
6 Outside RH low set point
7 Run mode 1:Steam Gen 2:Manual Fill 3:Manual Drain 4:Unit stop
8 AQUASTAT
9
Bed life 0:500Hours 1:750Hours 2:1000Hours 3:1250Hours 4:1500Hours 5:1750Hours 6:2000Hours
7:2250Hours 8:2500Hours 9:3000Hours 10:No bed
10
Drain Freq 0:6Hours 1:12Hours 2:24Hours 3:48Hours 4:96Hours
11 Drain time 0:1Minutes 1:5Minutes 2:10Minutes
12 Signal type 0:0-10V 1:0-5V 2:1.9-3.9V 3:4-20mA
13 PID_DIV
14 PID_PB
15 PID_SI
16 PID_DG
17 Modulating Fill Freq
18 Modulating Fill time
19 Water temperature compensate
20 Heat temperature compensate
Binary Input
Binary Output
Analog Input
Analog Output
Read Only
Read / Write
Read Only
Read / Write
Page 49

Table 48-1. LonWorks Variable List
49
Map Descriptor Name
Data Array
Name
Data Array
Offset
Lon Function Function
Node
Name
SNVT Type
SNVT
option
oFILLSTATUS BITA 0 NVPO Server Lon_1 SNVT_switch state
oDRAINSTATUS BITA 1 NVPO Server Lon_1 SNVT_switch state
oCON1 BITA 2 NVPO Server Lon_1 SNVT_switch state
oCON2 BITA 3 NVPO Server Lon_1 SNVT_switch state
oCON3 BITA 4 NVPO Server Lon_1 SNVT_switch state
oCON4 BITA 5 NVPO Server Lon_1 SNVT_switch state
oCOMTYPE BITB 0 NVPO Server Lon_1 SNVT_switch state
oRH_SELECT BITB 1 NVPO Server Lon_1 SNVT_switch state
oHL_SELECT BITB 2 NVPO Server Lon_1 SNVT_switch state
oOUTTEM_SELECT BITB 3 NVPO Server Lon_1 SNVT_switch state
oNETWORK_ENABLE BITB 4 NVPO Server Lon_1 SNVT_switch state
oMOD_FILL_ENABLE BITB 5 NVPO Server Lon_1 SNVT_switch state
oRH_REQUIRE SINTA 0 NVPO Server Lon_1 SNVT_lev_percent -
oOUTPUT SINTA 1 NVPO Server Lon_1 SNVT_count_f -
oWATER_LEVEL SINTA 2 NVPO Server Lon_1 SNVT_count_f -
oRUN_STATUS SINTA 3 NVPO Server Lon_1 SNVT_count_f -
oBEDLIFE_H SINTA 4 NVPO Server Lon_1 SNVT_count_f -
oBEDLIFE_M SINTA 5 NVPO Server Lon_1 SNVT_count_f -
oRUNTIME_H SINTA 6 NVPO Server Lon_1 SNVT_count_f -
oRUNTIME_M SINTA 7 NVPO Server Lon_1 SNVT_count_f -
oDRAINTIME_H SINTA 8 NVPO Server Lon_1 SNVT_count_f -
oDRAINTIME_M SINTA 9 NVPO Server Lon_1 SNVT_count_f -
oIDLETIME_H SINTA 10 NVPO Server Lon_1 SNVT_count_f -
oIDLETIME_M SINTA 11 NVPO Server Lon_1 SNVT_count_f -
oRH_VALUE SINTA 12 NVPO Server Lon_1 SNVT_lev_percent -
oDUCT_VALUE SINTA 13 NVPO Server Lon_1 SNVT_lev_percent -
oOUTSIDE_TEMP SINTA 14 NVPO Server Lon_1 SNVT_temp_p -
oWATER_TEMP SINTA 15 NVPO Server Lon_1 SNVT_temp_p -
oHEAT_TEMP SINTA 16 NVPO Server Lon_1 SNVT_temp_p -
oFAULT SINTA 17 NVPO Server Lon_1 SNVT_count_f -
oCON_NUMBER SINTA 18 NVPO Server Lon_1 SNVT_count_f -
oHEAT_POWER SINTA 19 NVPO Server Lon_1 SNVT_count_f -
oLANGUAGE SINTB 0 NVPO Server Lon_1 SNVT_count_f -
oRH_SET SINTB 1 NVPO Server Lon_1 SNVT_lev_percent -
oHL_POINT SINTB 2 NVPO Server Lon_1 SNVT_lev_percent -
oOUTTEMP_H SINTB 3 NVPO Server Lon_1 SNVT_temp_p -
oOUTTEMP_L SINTB 4 NVPO Server Lon_1 SNVT_temp_p -
oOUTRH_L SINTB 5 NVPO Server Lon_1 SNVT_lev_percent -
oRUN_MODE SINTB 6 NVPO Server Lon_1 SNVT_count_f -
oWATER_TEMP_SET SINTB 7 NVPO Server Lon_1 SNVT_temp_p -
oBED_LIFE SINTB 8 NVPO Server Lon_1 SNVT_count_f -
oDRAIN_FREQ SINTB 9 NVPO Server Lon_1 SNVT_count_f -
oDRAIN_TIME SINTB 10 NVPO Server Lon_1 SNVT_count_f -
oSENSER_TYPE SINTB 11 NVPO Server Lon_1 SNVT_count_f -
oPID_DIV SINTB 12 NVPO Server Lon_1 SNVT_count_f -
oPID_PB SINTB 13 NVPO Server Lon_1 SNVT_count_f -
oPID_SI SINTB 14 NVPO Server Lon_1 SNVT_count_f -
oPID_DG SINTB 15 NVPO Server Lon_1 SNVT_count_f -
oMOD_FILL_FREQ SINTB 16 NVPO Server Lon_1 SNVT_count_f -
oMOD_FILL_TIME SINTB 17 NVPO Server Lon_1 SNVT_count_f -
oWATER_TEMP_COMP SINTB 18 NVPO Server Lon_1 SNVT_temp_p -
oHEAT_TEMP_COMP SINTB 19 NVPO Server Lon_1 SNVT_temp_p -
iCOMTYPE BITB_in 0 NVUI Server Lon_1 SNVT_switch state
iRH_SELECT BITB_in 1 NVUI Server Lon_1 SNVT_switch state
iHL_SELECT BITB_in 2 NVUI Server Lon_1 SNVT_switch state
iOUTTEM_SELECT BITB_in 3 NVUI Server Lon_1 SNVT_switch state
iNETWORK_ENABLE BITB_in 4 NVUI Server Lon_1 SNVT_switch state
iMOD_FILL_ENABLE BITB_in 5 NVUI Server Lon_1 SNVT_switch state
iLANGUAGE SINTB_in 0 NVUI Server Lon_1 SNVT_count_f -
iRH_SET SINTB_in 1 NVUI Server Lon_1 SNVT_lev_percent -
iHL_POINT SINTB_in 2 NVUI Server Lon_1 SNVT_lev_percent -
iOUTTEMP_H SINTB_in 3 NVUI Server Lon_1 SNVT_temp_p -
iOUTTEMP_L SINTB_in 4 NVUI Server Lon_1 SNVT_temp_p -
iOUTRH_L SINTB_in 5 NVUI Server Lon_1 SNVT_lev_percent -
iRUN_MODE SINTB_in 6 NVUI Server Lon_1 SNVT_count_f -
iWATER_TEMP_SET SINTB_in 7 NVUI Server Lon_1 SNVT_temp_p -
iBED_LIFE SINTB_in 8 NVUI Server Lon_1 SNVT_count_f -
iDRAIN_FREQ SINTB_in 9 NVUI Server Lon_1 SNVT_count_f -
iDRAIN_TIME SINTB_in 10 NVUI Server Lon_1 SNVT_count_f -
iSENSER_TYPE SINTB_in 11 NVUI Server Lon_1 SNVT_count_f -
iPID_DIV SINTB_in 12 NVUI Server Lon_1 SNVT_count_f -
iPID_PB SINTB_in 13 NVUI Server Lon_1 SNVT_count_f -
iPID_SI SINTB_in 14 NVUI Server Lon_1 SNVT_count_f -
iPID_DG SINTB_in 15 NVUI Server Lon_1 SNVT_count_f -
iMOD_FILL_FREQ SINTB_in 16 NVUI Server Lon_1 SNVT_count_f -
iMOD_FILL_TIME SINTB_in 17 NVUI Server Lon_1 SNVT_count_f -
iWATER_TEMP_COMP SINTB_in 18 NVUI Server Lon_1 SNVT_temp_p -
iHEAT_TEMP_COMP SINTB_in 19 NVUI Server Lon_1 SNVT_temp_p -
Page 50

50
Physical Data, Capacities and Dimensional Drawings
Figure 49-1. Models HC-6100 and HC-6300
Table 134-1. Physical Data
Inches mm Inches mm
"A"-Width 21-15/16 557 26 660
"B"-Height 32-1/16 814 56-3/18 1428
"C"-Depth 22-1/3 576 32-3/32 815
"D"-Drain - Back 20 508 29-3/16 748
"E" Drain - Side 9-1/8 232 11-1/2 293
"F"-Steam Discharge Tube 2-3/8 60 2-3/8 60
"G"-Steam Outlet - Side 7-1/2 190 9-1/2 241
"H"-Steam Outlet - Front 14-1/3 364 12-7/8 328
"J"-Supply Water - Bottom 1-27/32 47 1-7/8 47
"K"-Water Supply - Front 2-13/32 61 2-3/8 60
"L"-Electrical Supply - Side 18 457 22-1/16 560
"M"-Electrical Supply - Back 10-3/16 254 16-1/4 413
"Q"-Steam Dispersion Outlets — — 12-3/16 310
Water Supply Connection 3/8 compression fitting 10 1/2 compression fitting 12
HC-6100 and HC-6300
HC-6500, HC-6700
and HC-6700DI
D
K
G
H
B
J
A
E
Knock-Out for
Humidistat
C
H
F
1” Drain
Electrical
Supply
M
L
Knock-Out for
Humidistat
R
Page 51

51
Figure 135-1. Models HC-6500 and HC-6700 — Front, Side, Top Views
Physical Data, Capacities and Dimensional Drawings
L
Water Supply
Port (Under
Cabinet)
E
M
Electrical Supply
(Under Cabinet)
1” Drain
(Under Cabinet)
Q
B
G
K
J
A
H
D
C
F
Knock-Out
for Humidistat
Knock-Out
for Humidistat
Page 52

Armstrong International, Inc.
Limited Warranty and Remedy
Armstrong International, Inc. ("Armstrong") warrants to the original user of those products supplied by
it and used in the service and in the manner for which they are intended, that such products shall be
free from defects in material and workmanship for a period of one (1) year from the date of installation,
but not longer than 15 months from the date of shipment from the factory, [unless a Special Warranty
Period applies, as listed below]. This warranty does not extend to any product that has been subject to
misuse, neglect or alteration after shipment from the Armstrong factory. Except as may be expressly
provided in a written agreement between Armstrong and the user, which is signed by both parties,
Armstrong DOES NOT MAKE ANY OTHER REPRESENTATIONS OR WARRANTIES, EXPRESS OR
IMPLIED, INCLUDING, BUT NOT LIMITED TO, ANY IMPLIED WARRANTY OF MERCHANTABILITY
OR ANY IMPLIED WARRANTY OF FITNESS FOR A PARTICULAR PURPOSE.
The sole and exclusive remedy with respect to the above limited warranty or with respect to any other
claim relating to the products or to defects or any condition or use of the products supplied by
Armstrong, however caused, and whether such claim is based upon warranty, contract, negligence,
strict liability, or any other basis or theory, is limited to Armstrong's repair or replacement of the part or
product, excluding any labor or any other cost to remove or install said part or product, or at
Armstrong's option, to repayment of the purchase price. As a condition of enforcing any rights or remedies relating to Armstrong products, notice of any warranty or other claim relating to the products must
be given in writing to Armstrong: (i) within 30 days of last day of the applicable warranty period, or (ii)
within 30 days of the date of the manifestation of the condition or occurrence giving rise to the claim,
whichever is earlier. IN NO EVENT SHALLARMSTRONG BE LIABLE FOR SPECIAL, DIRECT, INDI-
RECT, INCIDENTAL OR CONSEQUENTIAL DAMAGES, INCLUDING, BUT NOT LIMITED TO, LOSS
OF USE OR PROFITS OR INTERRUPTION OF BUSINESS. The Limited Warranty and Remedy
terms herein apply notwithstanding any contrary terms in any purchase order or form submitted or
issued by any user, purchaser, or third party and all such contrary terms shall be deemed rejected by
Armstrong.
Special Warranty Periods are as follows:
Series EHU-700 Electric Steam Humidifier, Series HC-6000 HumidiClean Humidifier and
GFH Gas Fired Humidifier with Ionic Beds:
Two (2) years after installation, but not longer than 27 months after shipment from Armstrong's factory.
www.armstronginternational.com
Bulletin 539-A 11/07
Printed in U.S.A
816 Maple Street, Three Rivers, Michigan 49094-USA, Phone: (269) 273-1415 Fax: (269) 273-9500
Armstrong Humidification Group
 Loading...