

Page 1

Eclipse Plug-in for RealView
Development Suite
Version 1.0
User Guide
®
Copyright © 2006 ARM Limited. All rights reserved.
ARM DUI 0330A
Page 2

Eclipse Plug-in for RealView Development Suite
User Guide
Copyright © 2006 ARM Limited. All rights reserved.
Release Information
The following changes have been made to this book.
Change History
Date Issue Confidentiality Change
March 2006 A Non-Confidential First release for Eclipse Plug-in v1.0 for RVDS
Proprietary Notice
Words and logos marked with
other countries, except as otherwise stated below in this proprietary notice. Other brands and names
mentioned herein may be the trademarks of their respective owners.
Neither the whole nor any part of the information contained in, or the product described in, this document
may be adapted or reproduced in any material form except with the prior written permission of the copyright
holder.
The product described in this document is subject to continuous developments and improvements. All
particulars of the product and its use contained in this document are given by ARM in good faith. However,
all warranties implied or expressed, including but not limited to implied warranties of merchantability, or
fitness for purpose, are excluded.
®
or ™ are registered trademarks or trademarks of ARM Limited in the EU and
This document is intended only to assist the reader in the use of the product. ARM Limited shall not be liable
for any loss or damage arising from the use of any information in this document, or any error or omission in
such information, or any incorrect use of the product.
Confidentiality Status
This document is Non-Confidential. The right to use, copy and disclose this document may be subject to
license restrictions in accordance with the terms of the agreement entered into by ARM and the party that
ARM delivered this document to.
Product Status
The information in this document is final, that is for a developed product.
Web Address
http://www.arm.com
ii Copyright © 2006 ARM Limited. All rights reserved. ARM DUI 0330A
Page 3

Contents
Eclipse Plug-in for RealView Development Suite
User Guide
Preface
About this book .............................................................................................. vi
Feedback ....................................................................................................... ix
Chapter 1 Introduction
1.1 About the Eclipse Plug-in for RVDS ............................................................ 1-2
1.2 Getting started ............................................................................................ 1-3
1.3 Installing the Eclipse Plug-in for RVDS ....................................................... 1-4
Chapter 2 Creating an ARM Project
2.1 Creating a new ARM project ....................................................................... 2-2
2.2 Adding files to the project ............................................................................ 2-4
2.3 Building the project ..................................................................................... 2-5
Chapter 3 ARM Project Types
3.1 About the ARM project types ...................................................................... 3-2
3.2 About the predefined configurations ........................................................... 3-4
Chapter 4 Configuring the Build Settings
4.1 Accessing configuration panels .................................................................. 4-2
ARM DUI 0330A Copyright © 2006 ARM Limited. All rights reserved. iii
Page 4

Contents
4.2 Accessing configuration panels for a specific file ....................................... 4-4
4.3 Configuring the RealView tools .................................................................. 4-5
4.4 Using the ARM fromelf utility ...................................................................... 4-6
4.5 Restoring defaults ....................................................................................... 4-8
4.6 Accessing online help ................................................................................. 4-9
Chapter 5 Creating an ARM Thumb Interworking Image
5.1 Creating an ARM Thumb interworking project ............................................ 5-2
5.2 Importing files into the project ..................................................................... 5-3
5.3 Building the interworking image .................................................................. 5-4
Chapter 6 Working with RealView Debugger
6.1 Loading your executable image into RealView Debugger .......................... 6-2
6.2 Creating your debug configuration ............................................................. 6-3
6.3 Setting up your debug configuration ........................................................... 6-4
6.4 Launching RealView Debugger using your debug configuration ................ 6-7
Chapter 7 Importing a CodeWarrior Project
7.1 About the CodeWarrior importer ................................................................. 7-2
7.2 Importing a CodeWarrior project ................................................................ 7-3
iv Copyright © 2006 ARM Limited. All rights reserved. ARM DUI 0330A
Page 5

Preface
This preface introduces the Eclipse Plug-in for RealView® Development Suite User
Guide. It contains the following sections:
• About this book on page vi
• Feedback on page ix.
ARM DUI 0330A Copyright © 2006 ARM Limited. All rights reserved. v
Page 6

Preface
About this book
Intended audience
Using this book
This book provides user information on the Eclipse Plug-in for RealView Development
Suite (RVDS). It describes how to use the Eclipse Integrated Development Environment
®
(IDE) to configure and build projects for ARM
targets. This book is not intended to
familiarize the user with all aspects of the Eclipse IDE.
This book is written for all developers who are using the Eclipse IDE to manage their
ARM-targeted development projects under Microsoft Windows (2000, XP), Red Hat
Linux or Sun Solaris (9, 10). It assumes that you are an experienced software developer,
and that you are familiar with the ARM development tools. It does not assume that you
are familiar with the Eclipse IDE.
This book is organized into the following chapters:
Chapter 1 Introduction
Read this chapter for an introduction to the Eclipse Plug-in for RealView
Development Suite.
Chapter 2 Creating an ARM Project
Read this chapter for a tutorial on creating an ARM project.
Chapter 3 ARM Project Types
Read this chapter for information about using different kinds of ARM
project types provided within the Eclipse IDE.
Chapter 4 Configuring the Build Settings
Read this chapter for information on how to configure the ARM
RealView tools, to modify how your project is built.
Chapter 5 Creating an ARM Thumb Interworking Image
Read this chapter for a tutorial on creating an ARM Thumb
®
interworking
image.
Chapter 6 Working with RealView Debugger
Read this chapter for information on how to use the ARM RealView
Debugger from Eclipse.
vi Copyright © 2006 ARM Limited. All rights reserved. ARM DUI 0330A
Page 7

Chapter 7 Importing a CodeWarrior Project
Typographical conventions
The following typographical conventions are used in this book:
italic Highlights important notes, introduces special terminology,
bold Highlights interface elements, such as menu names. Denotes
Preface
Read this chapter for information on importing existing CodeWarrior
projects into the Eclipse IDE.
denotes internal cross-references, and citations.
ARM processor signal names. Also used for terms in descriptive
lists, where appropriate.
®
Further reading
monospace
Denotes text that can be entered at the keyboard, such as
commands, file and program names, and source code.
monospace
Denotes a permitted abbreviation for a command or option. The
underlined text can be entered instead of the full command or
option name.
monospace italic
Denotes arguments to commands and functions where the
argument is to be replaced by a specific value.
monospace bold
Denotes language keywords when used outside example code.
This section lists publications from both ARM Limited and third parties that provide
additional information on developing code for the ARM family of processors.
ARM periodically provides updates and corrections to its documentation. See
http://www.arm.com
for current errata sheets, addenda, and the ARM Frequently Asked
Questions list.
ARM publications
See the following publications for detailed documentation on various components of
RVDS:
• RealView Development Suite v3.0 Getting Started Guide (ARM DUI 0255)
• RealView Compilation Tools v3.0 Essentials Guide (ARM DUI 0202)
ARM DUI 0330A Copyright © 2006 ARM Limited. All rights reserved. vii
Page 8

Preface
• RealView Compilation Tools v3.0 Compiler and Libraries Guide (ARM DUI
0205)
• RealView Compilation Tools v3.0 Linker and Utilities Guide (ARM DUI 0206)
• RealView Compilation Tools v3.0 Assembler Guide (ARM DUI 0204)
• RealView Compilation Tools v3.0 Developer Guide (ARM DUI 0203)
• RealView Debugger v3.0 Essentials Guide (ARM DUI 0181)
• RealView Debugger v3.0 User Guide (ARM DUI 0153)
• RealView Development Suite Glossary (ARM DUI 0324).
Other publications
This book provides information specific to the plug-in provided by ARM. For more
information on the Eclipse IDE, visit the Eclipse web site at
and http://www.eclipse.org/cdt.
http://www.eclipse.org
viii Copyright © 2006 ARM Limited. All rights reserved. ARM DUI 0330A
Page 9

Feedback
ARM Limited welcomes feedback on both the Eclipse plug-in for RVDS, and its
documentation.
Feedback on the Eclipse Plug-in for RealView Development Suite
If you have any problems with the Eclipse Plug-in for RVDS, please contact your
supplier. To help them provide a rapid and useful response, please give:
• your name and company
• the serial number of the RVDS product
• details of the RVDS release you are using
• the version numbers of the Eclipse C/C++ Development Tools, and The Eclipse
Plug-in for RealView Development Suite (to obtain this, in Eclipse, select
Help → About Eclipse Platform, and then click Plug-in Details)
• details of the platform you are running on, such as the hardware platform,
operating system type and version
• a small standalone sample of code that reproduces the problem
Preface
• a clear explanation of what you expected to happen, and what actually happened
• the commands you used, including any command-line options
• sample output illustrating the problem
• the version string of the tools, including the version number and build numbers.
Feedback on this book
If you have any problems with this book, please send email to
errata@arm.com
giving:
• the document title
• the document number
• the page number(s) to which your comments apply
• a concise explanation of the problem.
General suggestions for additions and improvements are also welcome.
ARM DUI 0330A Copyright © 2006 ARM Limited. All rights reserved. ix
Page 10

Preface
x Copyright © 2006 ARM Limited. All rights reserved. ARM DUI 0330A
Page 11

Chapter 1
Introduction
This book describes the Eclipse Plug-in for RealView® Development Suite (RVDS), and
how you can use it within Eclipse to develop software for ARM
not describe the Eclipse Integrated Development Environment (IDE). For a complete
description on how to use the Eclipse IDE, refer to the documentation available on the
Eclipse website (
for RVDS. It contains the following sections:
• About the Eclipse Plug-in for RVDS on page 1-2
• Getting started on page 1-3
• Installing the Eclipse Plug-in for RVDS on page 1-4.
ARM DUI 0330A Copyright © 2006 ARM Limited. All rights reserved. 1-1
http://www.eclipse.org
). This chapter introduces the Eclipse Plug-in
®
targets. This book does
Page 12

Introduction
1.1 About the Eclipse Plug-in for RVDS
The Eclipse Plug-in for RVDS integrates the RealView development tools into the
Eclipse IDE. It enables software developers to use the Eclipse IDE as a project manager
to create, build, debug, and manage C and C++ projects for ARM targets. The plug-in
provides ARM project types to simplify the creation of ARM projects, and provides
comprehensive configuration panels to specify options for the ARM compiler,
assembler, linker, debugger, and other tools.
1-2 Copyright © 2006 ARM Limited. All rights reserved. ARM DUI 0330A
Page 13

1.2 Getting started
Ensure that the following components are installed before beginning.
Eclipse platform
JRE Download and install the version of Java Runtime Environment (JRE)
CDT The C and C++ Development Tool (CDT) is a plug-in that integrates the
Eclipse Plug-in for RVDS
Introduction
Download and install Eclipse v3.1 or later. See
http://www.eclipse.org/downloads
that works best on your platform. See
http://www.eclipse.org/downloads
.
http://www.java.com
.
or
C and C++ build environment into the Eclipse IDE. This must be installed
because the RealView tools plug into the CDT. CDT v3.0 or higher is
required. For installing CDT v3.0, use the update site
http://download.eclipse.org/tools/cdt/releases/eclipse3.1
, and
follow the procedure described in Installing the Eclipse Plug-in for RVDS
on page 1-4.
Use the Software Updates feature of Eclipse to install the Eclipse Plug-in
for RVDS, from
http://www.arm.com/eclipse
. See Installing the Eclipse
Plug-in for RVDS on page 1-4.
GNU make GNU make v3.80 is required and can be obtained by installing MinGW
(see
http://www.mingw.org
) or Cygwin (see
http://www.cygwin.com
).
MinGW is recommended.
RVDS Install RealView Development Suite (RVDS) v3.0.
ARM DUI 0330A Copyright © 2006 ARM Limited. All rights reserved. 1-3
Page 14

Introduction
1.3 Installing the Eclipse Plug-in for RVDS
You must use the Software Updates feature in Eclipse to install the Eclipse Plug-in for
RVDS. The first time you use the Software Updates feature to install the Eclipse Plug-in
for RVDS, you must create an update site to download the plug-in from:
1. Launch the Eclipse IDE.
2. Select Help → Software Updates → Find and Install...
3. From the Install/Update dialog, select Search for new features to install. Click
Next.
4. You must create a new site to locate the plug-in. In the Install dialog box, click
New Remote Site...
5. In the New Update Site dialog box, enter any name, for example
RVDS
. In the URL field enter
http://www.arm.com/eclipse
and click OK.
Plug-in for
6. Eclipse automatically selects your newly created update site from the list of Sites
to include in search. Click Finish.
7. In the Updates dialog box, select your plug-in for RVDS update site, and click
Next.
8. Read the ARM license agreement and accept it. If you do not accept the license
agreement, you cannot install the plug-in. Click Next, and then click Finish.
9. In the Verification dialog box, click Install All. Eclipse installs the Eclipse
Plug-in for RVDS.
10. Eclipse requests your permission to restart. Click Ye s to restart Eclipse. The
Eclipse Plug-in for RVDS has been installed.
To update the plug-in, in the future, follow the same steps as for installing the plug-in,
without creating a new remote site. The same procedure can be used to install other
plug-ins.
Note
You can enable automatic updates in the Preferences panel. To display the preferences
panel, select Window → Preferences... from the Eclipse main menu.
1-4 Copyright © 2006 ARM Limited. All rights reserved. ARM DUI 0330A
Page 15

Chapter 2
Creating an ARM Project
You can use Eclipse to create Managed Make projects for ARM® targets. Eclipse
generates appropriate makefiles for your Managed Make projects. You can also create
Standard Make projects, for which you must create your own makefile. For more
information on creating a Standard Make project, see the C/C++ Development User
Guide in Eclipse Help. This chapter describes how to create a new Managed Make
ARM project in Eclipse. It contains the following sections:
• Creating a new ARM project on page 2-2
• Adding files to the project on page 2-4
• Building the project on page 2-5.
ARM DUI 0330A Copyright © 2006 ARM Limited. All rights reserved. 2-1
Page 16

Creating an ARM Project
2.1 Creating a new ARM project
You can create ARM projects using any of the ARM project types. This section
describes how to create a new Executable (ARM) project:
1. Launch the Eclipse IDE.
2. Select File → New → Project from the Eclipse main menu.
3. In the New Project window, expand the C folder.
4. Select the Managed Make C Project and click Next.
Note
For ARM projects, there is no difference between creating a Managed Make C
Project and a Managed Make C++ Project. You can have
within the same project.
5. Enter a name for the project.
6. Leave the Use Default option selected so that the project is created in the default
directory shown. Alternatively, deselect the Use Default option and enter a
directory for the contents of the new project.
.c
files and
.cpp
files
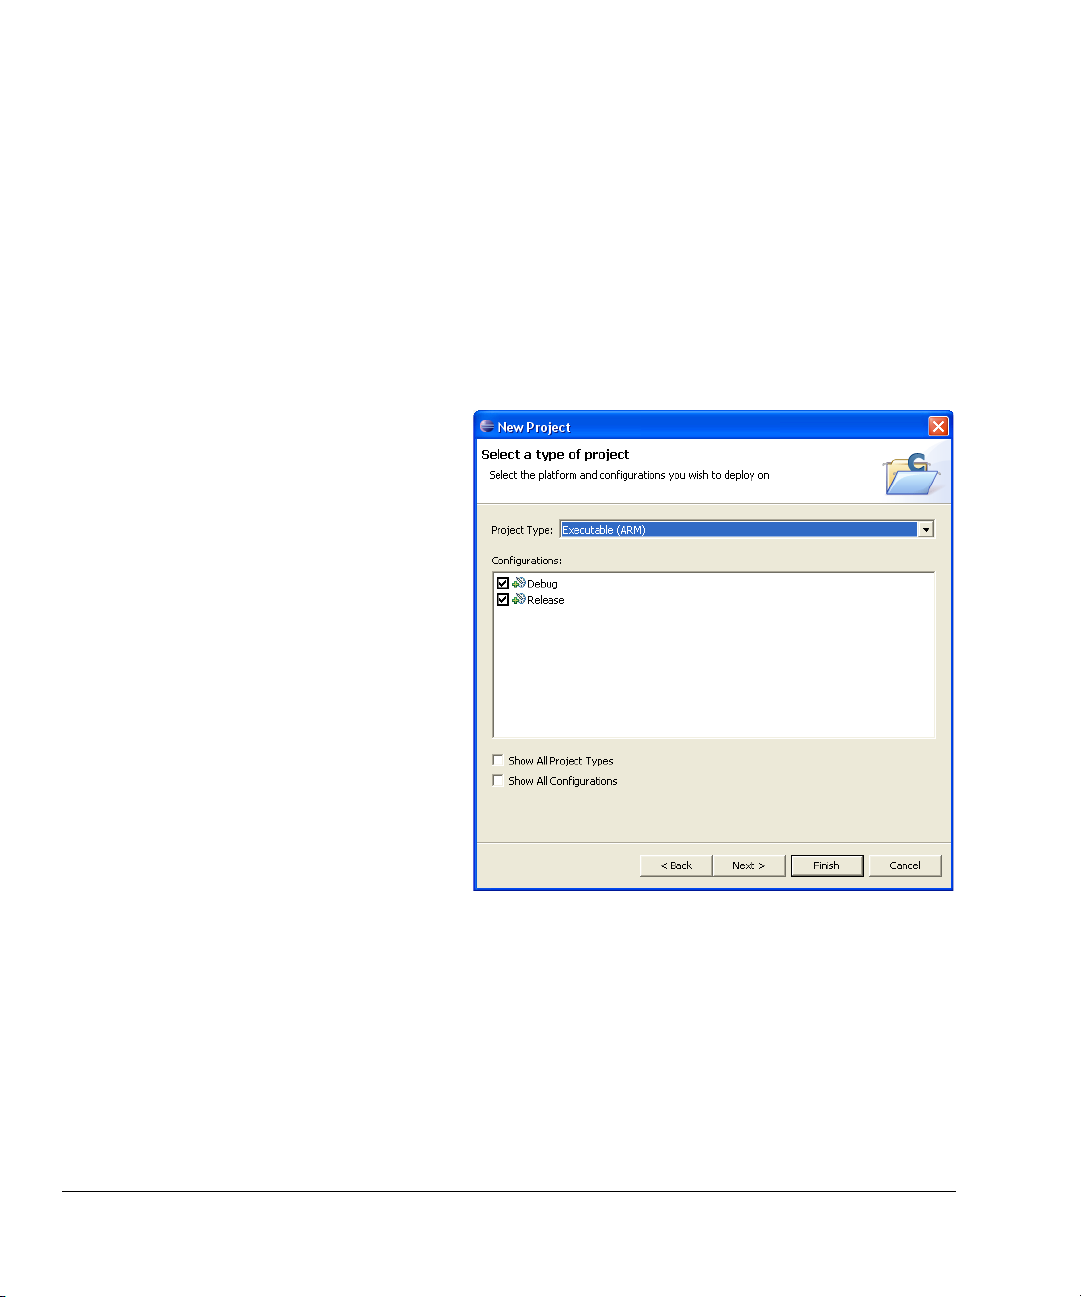
7. By default, Eclipse selects a GNU project type. So click Next to select an ARM
project type.
8. From the Project Type drop-down menu, select Executable (ARM) (Figure 2-1
on page 2-3).
2-2 Copyright © 2006 ARM Limited. All rights reserved. ARM DUI 0330A
Page 17

Creating an ARM Project
Figure 2-1 Select the Executable (ARM) project
9. In the Configurations panel, leave the Debug and Release options selected.
10. Click Finish to create the new ARM project.
11. Select Window → Show View → C/C++ Projects. The new project is visible in
the C/C++ Projects view.
ARM DUI 0330A Copyright © 2006 ARM Limited. All rights reserved. 2-3
Page 18

Creating an ARM Project
2.2 Adding files to the project
To add an empty source file to the newly created project:
1. Right-click on the project in the C/C++ Projects view.
2. Select New → File to display the New file dialog box. Select your project.
3. Enter a name and extension for the source file in the File name field.
4. Click Finish. The source file is displayed in the C/C++ Projects view.
Note
• You can also create files, or drag and drop files directly into the project
directory, using the file explorer. To view these files in Eclipse, right click
the project in the C/C++ Projects view and select Refresh.
• You can also drag and drop files directly into the project folder, in the
C/C++ Projects view in Eclipse.
2-4 Copyright © 2006 ARM Limited. All rights reserved. ARM DUI 0330A
Page 19

2.3 Building the project
Once you have added code to your project, to build the project:
1. Select the project folder from the C/C++ Projects view.
2. Select Project → Build Project from the Eclipse main menu. Alternatively, you
can right-click the project and select Build Project from the context menu.
By default Eclipse is configured to perform builds automatically when you save
files. To disable this feature and only perform manual builds, ensure that
Project → Build Automatically from the Eclipse main menu is not checked.
3. Eclipse builds the project. The build output has the name of the project by default.
A sub-directory gets created in the project directory for the active build
configuration, and the build output is saved in this sub-directory. By default, the
active build configuration is called
on page 3-4).
Note
Creating an ARM Project
Debug
(see About the predefined configurations
ARM DUI 0330A Copyright © 2006 ARM Limited. All rights reserved. 2-5
Page 20

Creating an ARM Project
2-6 Copyright © 2006 ARM Limited. All rights reserved. ARM DUI 0330A
Page 21

Chapter 3
ARM Project Types
This chapter provides information on the different ARM® project types provided by the
Eclipse Plug-in for RVDS. It contains the following sections:
• About the ARM project types on page 3-2
• About the predefined configurations on page 3-4.
ARM DUI 0330A Copyright © 2006 ARM Limited. All rights reserved. 3-1
Page 22

ARM Project Types
3.1 About the ARM project types
The Eclipse Plug-in for RVDS provides the following project types in the Eclipse IDE:
• Executable (ARM)
• Static Library (ARM)
• Executable (Thumb) on page 3-3
• Static Library (Thumb) on page 3-3.
You can select a project from the ARM project types when creating a new managed
make project (see Chapter 2 Creating an ARM Project). The ARM project types are
described in the following sections.
3.1.1 Executable (ARM)
Use the Executable (ARM) project type to create an executable ELF image from ARM
code (Figure 3-1). You can also have Thumb
(see Chapter 5 Creating an ARM Thumb Interworking Image). The Executable (ARM)
project uses:
• The ARM compiler (
• The ARM assembler (
• The ARM linker (
• RealView
build.
You can also configure Eclipse to call the ARM
from the executable ELF image. See Using the ARM fromelf utility on page 4-6.
3.1.2 Static Library (ARM)
®
code in your Executable (ARM) project
armcc
) to compile C and C++ source files in ARM state.
armasm
) to assemble files with
armlink
) to link an executable ELF image.
®
Debugger to debug and run executable images output by the project
fromelf
.s
filename extension.
utility to create a binary file
Figure 3-1 ARM project types
Use the Static Library (ARM) project type to build a library of ARM ELF object format
members. This project type is similar to Executable (ARM). The major differences are:
• The Static Library (ARM) project uses the ARM librarian (
armar
) to output an
object library.
3-2 Copyright © 2006 ARM Limited. All rights reserved. ARM DUI 0330A
Page 23

• It is not possible to debug or run a standalone library file until it is linked into an
image.
3.1.3 Executable (Thumb)
Use the Executable (Thumb) project type to build an executable ELF image from
Thumb code. You can also have ARM code in your Executable (Thumb) project (see
Chapter 5 Creating an ARM Thumb Interworking Image). The Executable (Thumb)
project uses:
ARM Project Types
• The ARM compiler (
• The ARM assembler (
Thumb state.
• The ARM linker (
• RealView Debugger to debug and run executable images output by the project
build.
You can also configure Eclipse to call the ARM
from the executable ELF image. See Using the ARM fromelf utility on page 4-6.
3.1.4 Static Library (Thumb)
Use the Static Library (Thumb) project type to build a library of Thumb ELF object
format members. This project type is similar to Executable (Thumb). The major
differences are:
• The Static Library (Thumb) project uses the ARM librarian (
object library.
• It is not possible to debug or run a standalone library file until it is linked into an
image.
armcc
armasm
armlink
) to compile C and C++ source files in Thumb state.
) to assemble files with .s filename extension in
) to link an executable ELF image.
fromelf
utility to create a binary file
armar
) to output an
ARM DUI 0330A Copyright © 2006 ARM Limited. All rights reserved. 3-3
Page 24

ARM Project Types
3.2 About the predefined configurations
Any project created using an ARM project type provides two separate build
configurations:
Debug The debug target is configured to build output binaries that are fully
debuggable, at the expense of optimization. It configures the compiler
optimization setting to minimum (level 0), to provide an ideal debug view
for code development. You can use other options to improve the debug
view.
Release The release target is configured to build output binaries that are highly
optimized, at the expense of debug information. It configures the
compiler optimization setting to high (level 2). However, the binary still
contains some debug information which can be used in RealView
Debugger.
In all ARM project types the
Debug
configuration is set active by default. The active
configuration can be changed in the C/C++ Build configuration panel. See Chapter 4
Configuring the Build Settings for information on modifying the tool options.
3-4 Copyright © 2006 ARM Limited. All rights reserved. ARM DUI 0330A
Page 25

Chapter 4
Configuring the Build Settings
This chapter describes how to configure the build properties using the configuration
panels. These settings determine how the ARM
executable image or library. This chapter contains the following sections:
• Accessing configuration panels on page 4-2
• Accessing configuration panels for a specific file on page 4-4
• Configuring the RealView tools on page 4-5
• Using the ARM fromelf utility on page 4-6
• Restoring defaults on page 4-8
• Accessing online help on page 4-9.
ARM DUI 0330A Copyright © 2006 ARM Limited. All rights reserved. 4-1
®
RealView® tools build the ARM
Page 26

Configuring the Build Settings
4.1 Accessing configuration panels
The configuration panels enable you to setup the RealView tools for a specific build
configuration, in your project. You can set options that apply to all source files in the
project, or to a specific file. This section describes how to access the build configuration
panels that affect all the source files in the project:
1. Import an existing ARM project into the workspace or create a new project using
an ARM project type (see Creating a new ARM project on page 2-2).
2. Select Window → Show View → C/C++ Projects from the Eclipse main menu.
3. Select the ARM project you want to configure from the C/C++ Projects view.
4. Select Project → Properties from the Eclipse main menu.
5. Select C/C++ Build from the list of properties in the Properties dialog box.
6. The RealView tools available for the project, and their respective configuration
panels are displayed in the Tool Settings tab of the Configuration Settings panel
(Figure 4-1 on page 4-3).
7. The Active configuration panel shows the current configuration. Use the
Configuration drop down menu to select Release. This shows the RealView tool
settings for the release build.
8. Use the Configuration drop down menu to select Debug. This shows the
RealView tool settings for the debug build.
4-2 Copyright © 2006 ARM Limited. All rights reserved. ARM DUI 0330A
Page 27

Configuring the Build Settings
Figure 4-1 Build configuration panel for an ARM project
ARM DUI 0330A Copyright © 2006 ARM Limited. All rights reserved. 4-3
Page 28

Configuring the Build Settings
4.2 Accessing configuration panels for a specific file
The RealView compiler and RealView assembler can be setup differently for each
source file. If you specify different tool options for a source file, it overrides the options
specified in the generic configuration panels that apply to all source files. See Accessing
configuration panels on page 4-2 for information on accessing the generic
configuration panels. This section describes how to access the configuration panel for
any specific source file in your project:
1. Import an existing ARM project into the workspace or create a new project using
an ARM project type (see Creating a new ARM project on page 2-2).
2. Select Window → Show View → C/C++ Projects and ensure that your project
is visible in the C/C++ Projects view.
3. If there are no source files in your project, add a new source file (with
.s
extension) to your project. See Adding files to the project on page 2-4.
.c, .cpp
, or
4. Right-click a source file in your project and select Properties from the context
menu to display the Properties dialog box for the file.
5. Select C/C++ Build from the Properties dialog box.
6. This displays the configuration panel specific to the selected file. The RealView
tool that you can configure is shown in the Tool Settings tab. If your source file
has a
.s
extension, the Tool Settings tab shows the ARM RealView Assembler
settings. If your source file has a
.c
or
.cpp
extension, the Tool Settings tab shows
the ARM RealView Compiler settings.
4-4 Copyright © 2006 ARM Limited. All rights reserved. ARM DUI 0330A
Page 29

4.3 Configuring the RealView tools
To enable you to view and set the options easily, a number of panels are provided for
each of the ARM RealView compiler (
librarian (
page 4-2.
• The ARM RealView Linker panels are only displayed for Executable (ARM)
• The ARM RealView Librarian panels are only displayed for Static Library
For descriptions of the options shown in each panel, see the online help (see Accessing
online help on page 4-9), or refer to the appropriate book from the RealView
Compilation Tools documentation suite. The parent panel of each tool contains an All
options text box that shows all the options that you set for that tool. This list of options
is what gets passed to the RealView tool when it is invoked.
• The All options text box contains additional options to enable the RealView tool
armar
). To access these panels, see Accessing configuration panels on
Note
and Executable (Thumb
(ARM) and Static Library (Thumb) project types.
Note
to work correctly in the Eclipse environment.
Configuring the Build Settings
armcc
), assembler (
®
) project types (see Chapter 3 ARM Project Types).
armasm
), linker (
armlink
), and
• Options that are set to their RealView tool defaults, do not need to get passed to
the tool when it is invoked, and thus are not included in the All options text box.
For example, if the compiler optimization level is set to the default (level 2), the
-O2
option does not appear in the All options text box.
Each tool has an Extras panel where you can specify options that cannot be set in the
other panels. The options that you set using the Extras panel override the options set in
the other panels.
ARM DUI 0330A Copyright © 2006 ARM Limited. All rights reserved. 4-5
Page 30
Configuring the Build Settings
4.4 Using the ARM fromelf utility
This section contains:
• Converting ELF images to other formats
• Disassembling code on page 4-7.
4.4.1 Converting ELF images to other formats
The ARM
fromelf
utility translates Executable Linkable Format (ELF) image files
produced by the ARM linker into other formats suited to ROM tools and to loading
directly into memory. See the RealView Compilation Tools Linker and Utilities Guide
for more information on using
fromelf
, including information on output formats. To
configure Eclipse to create a plain binary file from an executable ELF image:
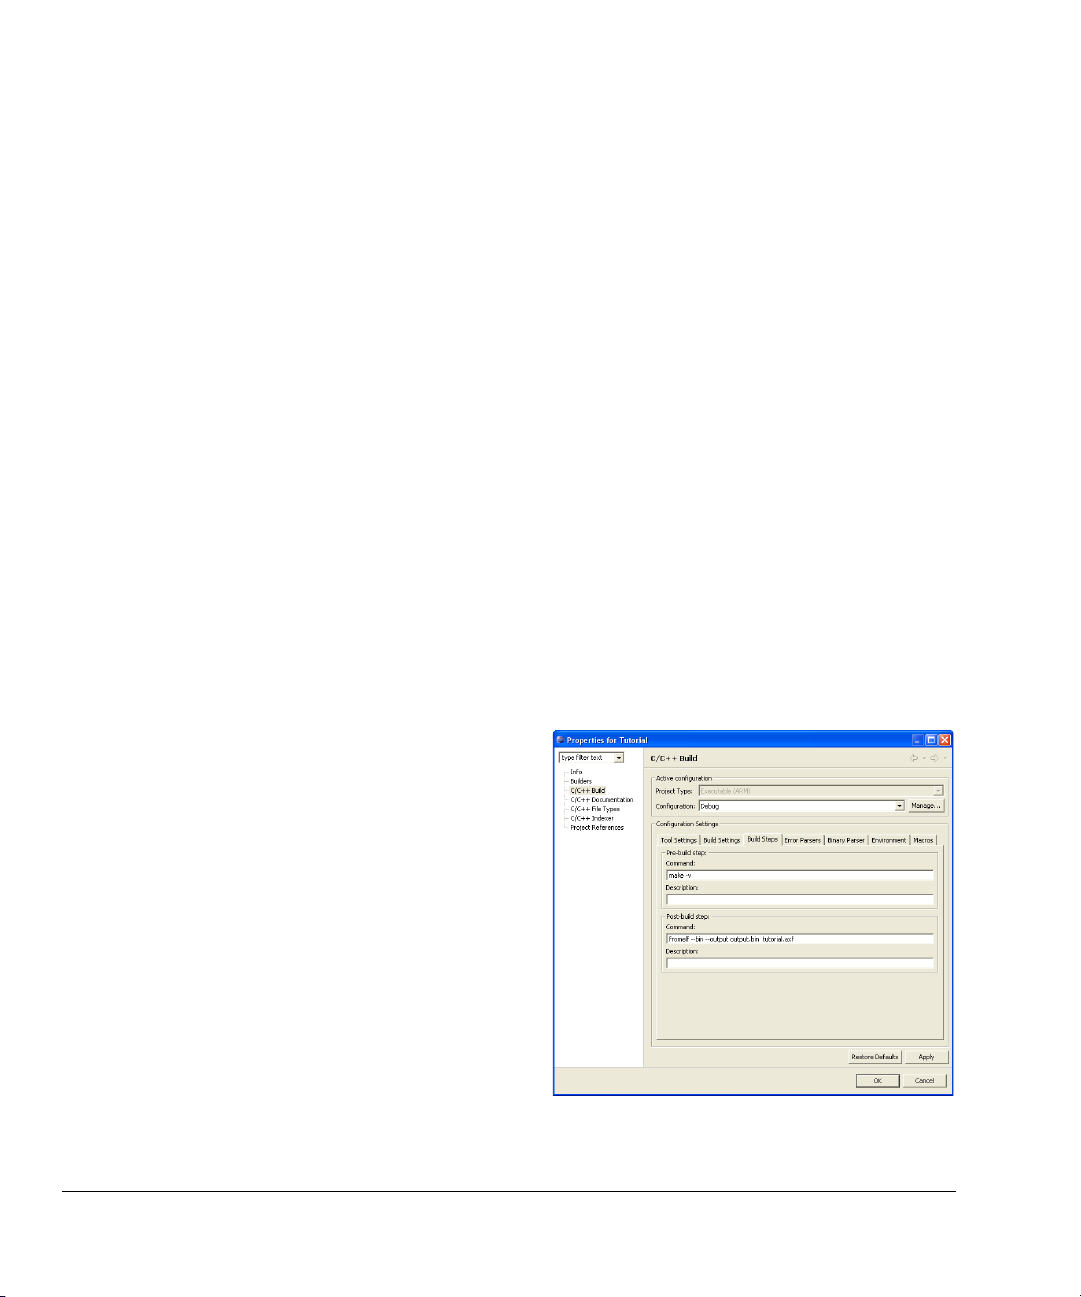
1. Go to the build configuration panel for your project. See Accessing configuration
panels on page 4-2.
2. Click the Build Steps tab in the C/C++ Build panel.
3. In the Command text box of the Post-build step, enter
output.bin inputfile.axf
, where inputfile is the name of the executable ELF
fromelf --bin --output
image. See Figure 4-2.
4. The binary file gets created when you build the project. The binary file is saved
as
output.bin
Debug
.
in the sub-directory for the active build configuration, for example
Figure 4-2 Calling
4-6 Copyright © 2006 ARM Limited. All rights reserved. ARM DUI 0330A
fromelf
from Eclipse
Page 31

4.4.2 Disassembling code
Configuring the Build Settings
You can also use the ARM
fromelf
utility to disassemble an ELF object file and display
various information. To disassemble an object file:
1. Expand your project in the C/C++ Projects view to show the object files.
2. Right-click on the object file you want to disassemble, and select OpenWith →
FromElfOpener. Alternatively, you can simply double-click the object file.
3. The disassembled object file is displayed in the Eclipse file editor.
4. You can save the disassembled file.
ARM DUI 0330A Copyright © 2006 ARM Limited. All rights reserved. 4-7
Page 32

Configuring the Build Settings
4.5 Restoring defaults
You can use the Restore Defaults button on the configuration panel (see Accessing
configuration panels on page 4-2) to reset the settings of all the RealView tools
displayed in the Too l Se t ti n gs tab. The tool options revert to the defaults specific to the
selected project type. It only affects the active build configuration. For example, if the
active configuration is Debug, all the tool settings are reset only for the debug
configuration. The release configuration is unaffected.
Note
• If you click Restore Defaults on the generic configuration panel (see Accessing
configuration panels on page 4-2), it does not reset any options that you set using
the file specific configuration panels (see Accessing configuration panels for a
specific file on page 4-4).
• If you click Restore Defaults on a file specific configuration panel, the settings
on this panel revert to the settings on the generic configuration panel. It also does
not affect any options that you set using the configuration panels of other files in
your project.
4-8 Copyright © 2006 ARM Limited. All rights reserved. ARM DUI 0330A
Page 33

4.6 Accessing online help
To access the online help on the ARM RealView tools and their options:
1. Select Help → Help Contents from the Eclipse main menu.
2. A help window opens. From the Contents, select RealView Development Suite
Plug-ins. Click on the ARM RealView tool that you want help on.
Configuring the Build Settings
ARM DUI 0330A Copyright © 2006 ARM Limited. All rights reserved. 4-9
Page 34

Configuring the Build Settings
4-10 Copyright © 2006 ARM Limited. All rights reserved. ARM DUI 0330A
Page 35

Chapter 5
Creating an ARM Thumb Interworking Image
This chapter presents a tutorial on creating and building an ARM® Thumb®
interworking project. It contains the following sections:
• Creating an ARM Thumb interworking project on page 5-2
• Importing files into the project on page 5-3
• Building the interworking image on page 5-4.
For more information on interworking, see the RealView
Guide.
®
Compilation Tools Developer
ARM DUI 0330A Copyright © 2006 ARM Limited. All rights reserved. 5-1
Page 36
Creating an ARM Thumb Interworking Image
5.1 Creating an ARM Thumb interworking project
To create an ARM Thumb interworking project in Eclipse:
1. Select File → New → Project from the Eclipse main menu to display the New
Project dialog box.
2. Select Managed Make C project and click Next.
3. Enter a name for the project in the Project Name field. For example, Tutorial.
Click Next.
4. From the Project type drop-down menu, select Executable (ARM) (Figure 5-1).
Figure 5-1 Select Executable (ARM)
5. Ensure that the Debug and Release configurations are selected. Click Finish. The
ARM Thumb interworking project is created and is visible in the C/C++ Projects
view.
5-2 Copyright © 2006 ARM Limited. All rights reserved. ARM DUI 0330A
Page 37

5.2 Importing files into the project
This tutorial uses source files from the RVDS interwork example project. The source
files are in:
install_directory\RVDS\Examples\...\interwork
Creating an ARM Thumb Interworking Image
To create an interworking project with
thumbmain.c
and
armsub.c
into your interworking project:
main()
in Thumb state, you must import the files
1. Right-click your project in the C/C++ Projects view and select Import.
2. From the Import dialog box, select File system and click Next.
3. In the From directory field, browse to the directory where the RVDS interwork
examples are.
4. Select the interwork folder, without adding a check in its box. All the files in the
interwork directory are now displayed.
5. Select
armsub.c
and
thumbmain.c
by adding a check in their respective boxes
(Figure 5-2).
6. In the Options category, select Create selected folders only. Click Finish.
Eclipse has copied
armsub.c
and
thumbmain.c
into your project directory and has
added them to your project.
Figure 5-2 Importing files into project
ARM DUI 0330A Copyright © 2006 ARM Limited. All rights reserved. 5-3
Page 38

Creating an ARM Thumb Interworking Image
5.3 Building the interworking image
All source files are automatically configured for interworking. However, the source files
must be configured for Thumb or ARM state accordingly (see the RealView
Compilation Tools Compiler and Libraries Guide for more information).
contains code that is to be compiled for Thumb state, and
to be compiled for ARM state. To configure these options and build the interworking
image:
armsub.c
Thumbmain.c
contains code that is
1. Right-click
2. Select Properties to display the properties panel for
thumbmain.c
from your project in the C/C++ Projects view.
thumbmain.c
.
3. Select C/C++ Build.
4. Select Debug from the Configurations drop down menu.
5. In the ARM RealView Compiler panel, select Tar ge t.
6. For the Initial State option, select Thumb (--thumb) (Figure 5-3). Click OK.
Figure 5-3 Configuring the Initial State to Thumb
5-4 Copyright © 2006 ARM Limited. All rights reserved. ARM DUI 0330A
Page 39

Creating an ARM Thumb Interworking Image
Note
By default, the initial state for
armsub.c
is set to ARM because you created an
Executable (ARM) project. It is therefore not necessary to change the initial state
for
armsub.c
.
7. Select your project from the C/C++ Projects view. Select Project → Build
Project from the Eclipse main menu (Figure 5-4).
8. The interworking executable image is created in the debug folder of your project.
Figure 5-4 Building the project
ARM DUI 0330A Copyright © 2006 ARM Limited. All rights reserved. 5-5
Page 40

Creating an ARM Thumb Interworking Image
5-6 Copyright © 2006 ARM Limited. All rights reserved. ARM DUI 0330A
Page 41

Chapter 6
Working with RealView Debugger
This chapter describes how to launch RealView® Debugger from the Eclipse IDE, and
how to configure the connection settings of RealView Debugger. It contains:
• Loading your executable image into RealView Debugger on page 6-2
• Creating your debug configuration on page 6-3
• Setting up your debug configuration on page 6-4
• Launching RealView Debugger using your debug configuration on page 6-7.
ARM DUI 0330A Copyright © 2006 ARM Limited. All rights reserved. 6-1
Page 42

Working with RealView Debugger
6.1 Loading your executable image into RealView Debugger
You can launch RealView Debugger from Eclipse to run or debug your executable
images. You must first create a connection to your target in RealView Debugger. When
you launch RealView Debugger from Eclipse, the image is loaded into the target and all
control passes to RealView Debugger. You must use the RealView Debugger interface
to perform debug operations such as stepping, inserting breakpoints, and examining
memory. For information on using RealView Debugger, see the RealView Debugger
User Guide. To load your executable image into RealView Debugger:
1. Start RealView Debugger.
2. In RealView Debugger, create a connection to your target.
3. Close RealView Debugger.
4. In Eclipse, ensure your project is built and contains an executable image (see
Building the project on page 2-5).
5. Right-click your executable file from the Binaries sub-folder of your project
folder, in the C/C++ Projects view in Eclipse.
6. From the context menu, select Debug As → Load into RealView Debugger.
7. Eclipse launches RealView Debugger automatically and loads your executable
image into it.
Eclipse remembers the last loaded executable image. If you wanted to reload the
executable from the same project, you can simply press F11 on the keyboard. The
project gets rebuilt if necessary, and the executable image gets reloaded into RealView
Debugger.
6-2 Copyright © 2006 ARM Limited. All rights reserved. ARM DUI 0330A
Page 43

6.2 Creating your debug configuration
You can create and setup your own debug configuration for each executable image in
Eclipse. To create a new debug configuration for your executable:
1. Select your project from the C/C++ Projects view.
2. Select Run → Debug from the Eclipse main menu to show the Create, manage,
and run configurations dialog box.
3. In the Configurations box, select RealView Debugger.
4. Click New to create a new debug configuration for your project. The name of the
executable image can be seen in the C/C++ Application box.
Note
If your project does not contain an executable image, or contains more than one
executable image, then the C/C++ Application box remains blank. Eclipse
complains that the program does not exist and disables the Debug button on the
panel. See Selecting a different image to debug on page 6-4, to set the executable
image to debug.
5. A new debug configuration is created and has the project name by default. It is
displayed under RealView Debugger in the Configurations box.
Working with RealView Debugger
ARM DUI 0330A Copyright © 2006 ARM Limited. All rights reserved. 6-3
Page 44

Working with RealView Debugger
6.3 Setting up your debug configuration
You can either create a new debug configuration or use an existing configuration to
debug your executable image. If you have not already created a debug configuration, see
Creating your debug configuration on page 6-3, to create a new configuration. This
section describes how to set up an existing debug configuration. It contains:
• Selecting an existing debug configuration
• Selecting a different image to debug
• Configuring RealView Debugger connection settings on page 6-5
• Specifying execution arguments on page 6-6.
6.3.1 Selecting an existing debug configuration
To select an existing debug configuration:
1. Select Run → Debug from the Eclipse main menu to display the Create,
manage, and run configurations dialog box.
2. Expand RealView Debugger in the Configurations box.
3. Select the debug configuration you want to use.
The Eclipse Plug-in for RVDS provides four tabbed panels to setup or modify the
selected configuration. The Main, Arguments, and Connection tabs are described in
following sections.
6.3.2 Selecting a different image to debug
The Main tab provides options to associate a different project or executable image to
the selected debug configuration:
Project You can either type the name of the project in the Project field, or click
the Browse... button and select from the list of available projects.
Note
You can only select a project that is currently open in the Eclipse IDE.
C/C++ Application
You can either type the name of the image you want to debug, in the
C/C++ Application field, or click the Browse... button to select the
image. The Search Project... button shows a list of executable images
available in the project, to choose from. The executable images from
different build configurations such as debug and release will appear in
this list.
6-4 Copyright © 2006 ARM Limited. All rights reserved. ARM DUI 0330A
Page 45

6.3.3 Configuring RealView Debugger connection settings
Use the Connection tab to configure the RealView Debugger load options:
Connections
If RealView Debugger is connected to more than one target, you can
select the target to load the image into, using the Connections drop-down
list. Click the Get Connections button for Eclipse to obtain a list of
available connections from RealView Debugger. Deselect the Load into
first target to view the available connections and select the one you
require. If Load into first target is checked, Eclipse loads the executable
image into the target that is shown first in the list of available connections.
Parts to load
Use this to select which part of the image to load into the target:
Symbols and Image
Use this to load all debug symbols and program image.
Image Only
Use this to load the program image only, and not the debug
symbols.
Symbols Only
Use this to load symbols only and not the program image.
Working with RealView Debugger
Loading mode
Use this to select whether to replace the executable image already
existing in the target:
Append Use this to append the new executable image to the existing
image.
Replace Use this to replace the existing image with the image being
loaded.
Sections You can use the Sections field to specify the sections you want to load
when the image is loaded. It is commonly used to reload the initialized
data section when starting a program. Select the Load all sections option
for the default.
Set Program Counter (PC) to start address from object module
You can use this to set the PC to the start address specified in the object
module, every time the image gets loaded into RealView Debugger.
ARM DUI 0330A Copyright © 2006 ARM Limited. All rights reserved. 6-5
Page 46

Working with RealView Debugger
6.3.4 Specifying execution arguments
You can specify arguments to the executable image in the Arguments tab:
C/C++ Program Arguments
You can specify a space-separated list of arguments to the executable, in
the C/C++ Program Arguments text box.
Var ia bl es You can use variables supplied by Eclipse, as arguments to your
executable. Click Variables... to select the ones you want or to create
your own variables.
6-6 Copyright © 2006 ARM Limited. All rights reserved. ARM DUI 0330A
Page 47

Working with RealView Debugger
6.4 Launching RealView Debugger using your debug configuration
If you do not want to change the debug configuration for the executable you want to load
into RealView Debugger, follow the simple steps in Loading your executable image into
RealView Debugger on page 6-2. If you wish to change any of the debug configuration
settings before loading the executable into RealView Debugger:
1. Ensure that RealView Debugger is already connected to your target. See the
RealView Debugger User Guide for more information. Close any instance of
RealView Debugger that is still running.
2. Select Run → Debug from the Eclipse main menu.
3. Select your RealView Debugger configuration from the Configurations box or
create a new debug configuration. See Creating your debug configuration on
page 6-3.
4. If you want to change the project or image you want to debug, use the Main tab
to select a different project or image.
5. If you want to modify or pass arguments to your executable image, use the
Arguments tab. See Specifying execution arguments on page 6-6.
6. Select the Connections tab. Click on Get Connections. RealView Debugger
launches and Eclipse tries to connect to RealView Debugger.
7. Once Eclipse connects to RealView Debugger, return to the Connection tab in the
Eclipse Debug dialog box. If you have more than one target connection to
RealView Debugger, deselect the Load into first target option. The available
target connections are visible in the Connection drop-down list. Select the
connection you want to use (see Figure 6-1 on page 6-8). Modify the load settings
as your require. See Configuring RealView Debugger connection settings on
page 6-5.
ARM DUI 0330A Copyright © 2006 ARM Limited. All rights reserved. 6-7
Page 48

Working with RealView Debugger
8. Click Debug. The project rebuilds if necessary.
Figure 6-1 Debug panel
9. Your executable image is loaded into the target and you can debug it in RealView
Debugger.
6-8 Copyright © 2006 ARM Limited. All rights reserved. ARM DUI 0330A
Page 49

Chapter 7
Importing a CodeWarrior Project
This chapter describes how to import existing CodeWarrior® ARM® projects into the
Eclipse IDE. It contains:
• About the CodeWarrior importer on page 7-2
• Importing a CodeWarrior project on page 7-3.
ARM DUI 0330A Copyright © 2006 ARM Limited. All rights reserved. 7-1
Page 50

Importing a CodeWarrior Project
7.1 About the CodeWarrior importer
The Eclipse Plug-in for RVDS enables you to import projects created using
CodeWarrior for RVDS, into the Eclipse environment. In order to do so, you must first
export your CodeWarrior project to an eXtensible Markup Language (XML) format,
with a
.xml
filename extension. It is recommended that you create the
same directory as the CodeWarrior project file (with the
to the RealView
how to export your CodeWarrior projects into XML. When you import CodeWarrior
projects in Eclipse, a new Eclipse Managed Make project is created. The ARM
RealView tool settings in the CodeWarrior project are applied to the new Eclipse
project. Most of these options are set in the Extras panel of each RealView tool (see
Accessing configuration panels on page 4-2).
®
Development Suite CodeWarrior IDE Guide for more information on
.xml
file in the
.mcp
filename extension). Refer
7-2 Copyright © 2006 ARM Limited. All rights reserved. ARM DUI 0330A
Page 51

7.2 Importing a CodeWarrior project
To import a CodeWarrior project into Eclipse:
1. From the Eclipse main menu, select File → Import to show the Import dialog
box.
2. In the Import dialog box, select CodeWarrior Project exported as XML. Click
Next.
Importing a CodeWarrior Project
3. Enter the name of the directory where your
.xml
file, exported from CodeWarrior,
is located. Then click in the Projects panel. Alternatively, you can use the Browse
button to select the directory containing the
.xml
file.
4. The Projects panel shows the projects that can be imported into Eclipse. By
default, all the projects that can be imported from the selected directory are
selected. If there are more than one projects shown, deselect the projects that you
do not want to import.
5. In the location text box, you can enter a different directory, or you can use the
Browse... button to select the directory where you want the Eclipse project to be
created. See Figure 7-1 on page 7-4.
Note
If you select the same location as .xml file(s) option, the Eclipse project files are
created in the same location as the
.xml
file, without creating a separate project
directory.
ARM DUI 0330A Copyright © 2006 ARM Limited. All rights reserved. 7-3
Page 52

Importing a CodeWarrior Project
Figure 7-1 Importing a CodeWarrior Project
6. Click Finish. Eclipse creates a new project directory in your chosen location, and
the project files are saved in it. The imported project is visible in the C/C++
Projects view.
7-4 Copyright © 2006 ARM Limited. All rights reserved. ARM DUI 0330A
 Loading...