

Page 1
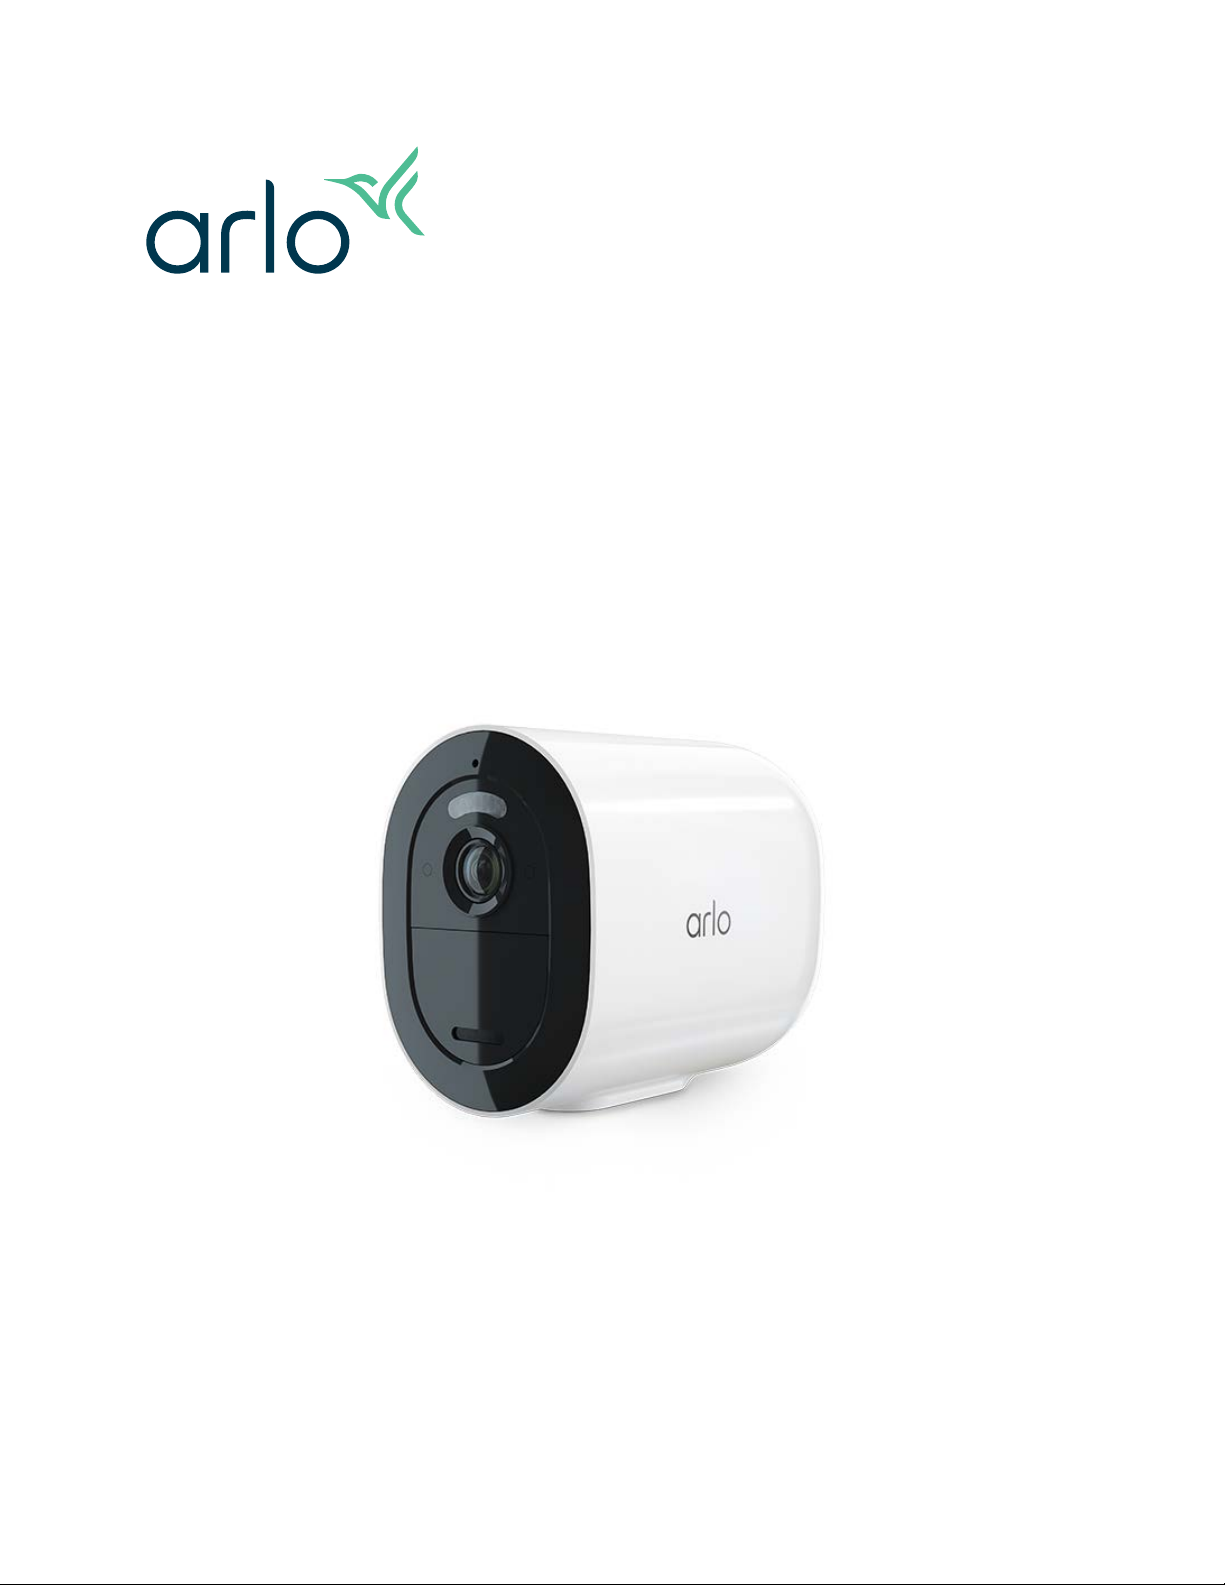
Go 2
WiFi/LTE Security Camera
User Manual
Page 2

Contents
1. Get to Know Your Arlo Go 2 Camera 5
Get the Arlo app ................................................................................................................................... 5
Meet your Go 2 Camera ...................................................................................................................... 6
Accessories ............................................................................................................................................ 7
2. Get Started 8
Mobile network requirements ........................................................................................................... 8
Go 2 can connect via mobile or WiFi ............................................................................................... 8
Install a SIM card into your Go 2 Camera ........................................................................................ 9
Use the Arlo app to set up your Go 2 Camera .............................................................................. 10
Check the LED .................................................................................................................................... 11
Check your Go 2 Camera’s mobile signal strength .....................................................................12
Optimize mobile broadband connectivity for your Go 2 Camera ........................................... 12
Mount your Arlo Go 2 Camera ......................................................................................................... 13
Test motion detection ...................................................................................................................... 15
Position your camera to detect motion in specic areas .......................................................... 15
Arm your camera to detect motion ................................................................................................ 17
3. LTE and WiFi network connections 18
LTE mobile network access ..............................................................................................................18
Turn roaming on or o for your mobile network .........................................................................18
Specify the mobile network access point name (APN) .............................................................. 19
Control whether your Go 2 Camera connects to mobile or WiFi .............................................. 19
Tips for optimal WiFi performance ................................................................................................20
Connect your mobile device to a 2.4 GHz WiFi network during setup .................................... 20
4. Access your Arlo account 23
Two-step verication ........................................................................................................................ 23
Use face or ngerprint authentication .......................................................................................... 24
Customize your prole ..................................................................................................................... 25
Change your Arlo password .............................................................................................................26
Reset a forgotten password ............................................................................................................. 26
Grant access to friends ..................................................................................................................... 27
2
Page 3

Arlo Go 2 LTE/WiFi Security Camera
5. Use Your Go 2 Camera 30
View your camera feeds ................................................................................................................... 31
Record clips from live video.............................................................................................................31
Take a snapshot from live video ..................................................................................................... 31
Turn the camera spotlight on and o manually .......................................................................... 32
Motion detection activity zones ...................................................................................................... 33
2-Way Audio ........................................................................................................................................ 34
Turn the camera’s siren on and o manually ............................................................................... 35
View recordings and snapshots ...................................................................................................... 35
6. Modes, Rules, and Alerts 38
Arm or disarm all your Arlo devices ............................................................................................... 38
Modes ................................................................................................................................................... 38
Select a mode ..................................................................................................................................... 39
Mute Notications ............................................................................................................................. 39
Rules for modes ................................................................................................................................. 40
Change motion sensitivity ............................................................................................................... 40
Control whether the spotlight turns on when motion is detected .......................................... 40
Use a rule to activate the camera’s siren ....................................................................................... 41
Manage alerts ..................................................................................................................................... 41
Schedule when your camera is armed .......................................................................................... 42
Set up Arlo Geofencing ..................................................................................................................... 43
Geofencing with multiple mobile devices .................................................................................... 45
Custom modes ................................................................................................................................... 46
7. Change Your Settings 48
Camera settings .................................................................................................................................48
Video Settings ..................................................................................................................................... 49
Adjust the audio settings ..................................................................................................................50
Adjust the icker setting ................................................................................................................... 51
Restart the camera from the Arlo app ........................................................................................... 51
View device information ................................................................................................................... 51
Remove a device from your account ............................................................................................. 51
8. SD Card Storage 52
Install a micro SD card in your Go 2 Camera ................................................................................ 52
3Contents User Manual
Page 4

Arlo Go 2 LTE/WiFi Security Camera
View the SD card status .................................................................................................................... 53
View available SD card storage ....................................................................................................... 53
Turn SD card recording o and on ................................................................................................. 54
Change the SD card Overwrite setting...........................................................................................54
Format a micro SD card ....................................................................................................................54
Remove a micro SD card .................................................................................................................. 55
View videos on a micro SD card ...................................................................................................... 56
9. Arlo Rechargeable Battery 57
Insert the camera battery ................................................................................................................. 57
Charge your camera battery indoors ............................................................................................. 58
Solar Panel charging ......................................................................................................................... 58
Arlo Dual Charging Station............................................................................................................... 58
Safe handling and usage guidelines for removable and rechargeable batteries 59
Optimize your camera’s battery life ............................................................................................... 60
10. Arlo Connect 61
Use Arlo with Amazon Alexa ............................................................................................................ 61
Add your camera to the Google Assistant app ............................................................................ 62
Use Arlo with IFTTT ........................................................................................................................... 63
11. Troubleshooting 64
Scan a QR code during setup .......................................................................................................... 64
Arlo doesn’t discover your camera during setup ........................................................................ 65
Firmware updates ..............................................................................................................................66
Go 2 Camera is oline ....................................................................................................................... 67
Troubleshoot Arlo Geofencing ........................................................................................................ 68
Can’t see video streams .................................................................................................................... 68
Reset the camera ............................................................................................................................... 71
4Contents User Manual
Page 5
1. Get to Know Your Arlo Go 2 Camera
Arlo Go 2 delivers security you can take anywhere. Connect to LTE or to WiFi, view or record
HD video day or night, and protect remote locations with 2-Way Audio or the built-in siren. To
access the mobile broadband network, your Go 2 Camera requires an activated SIM card.
Locate your camera with GPS positioning and retrieve locally-stored videos from a micro
SD card (sold separately) in the camera, or view live video or recorded cloud clips from your
phone with Arlo Secure
designed to protect your property, boat or RV, year round.
2
. Weather resistant to withstand heat, cold, rain or sun, Arlo Go 2 is
Get the Arlo app
Download the Arlo app. The Arlo app lets you create an Arlo account in the cloud and set up
and manage all your Arlo devices.
1
Note: If you already use the Arlo app, make sure that you’re using the latest version. To nd
out if an update is available, go to the app store and search for Arlo.
1 Mobile broadband access requires a compatible SIM card and wireless service plan. Additional restrictions and
data charges may apply. Coverage and service are dependent on the carrier.
2 For information about Arlo Secure subscriptions, visit www.arlo.com/ArloSecure.
5
Page 6
Arlo Go 2 LTE/WiFi Security Camera
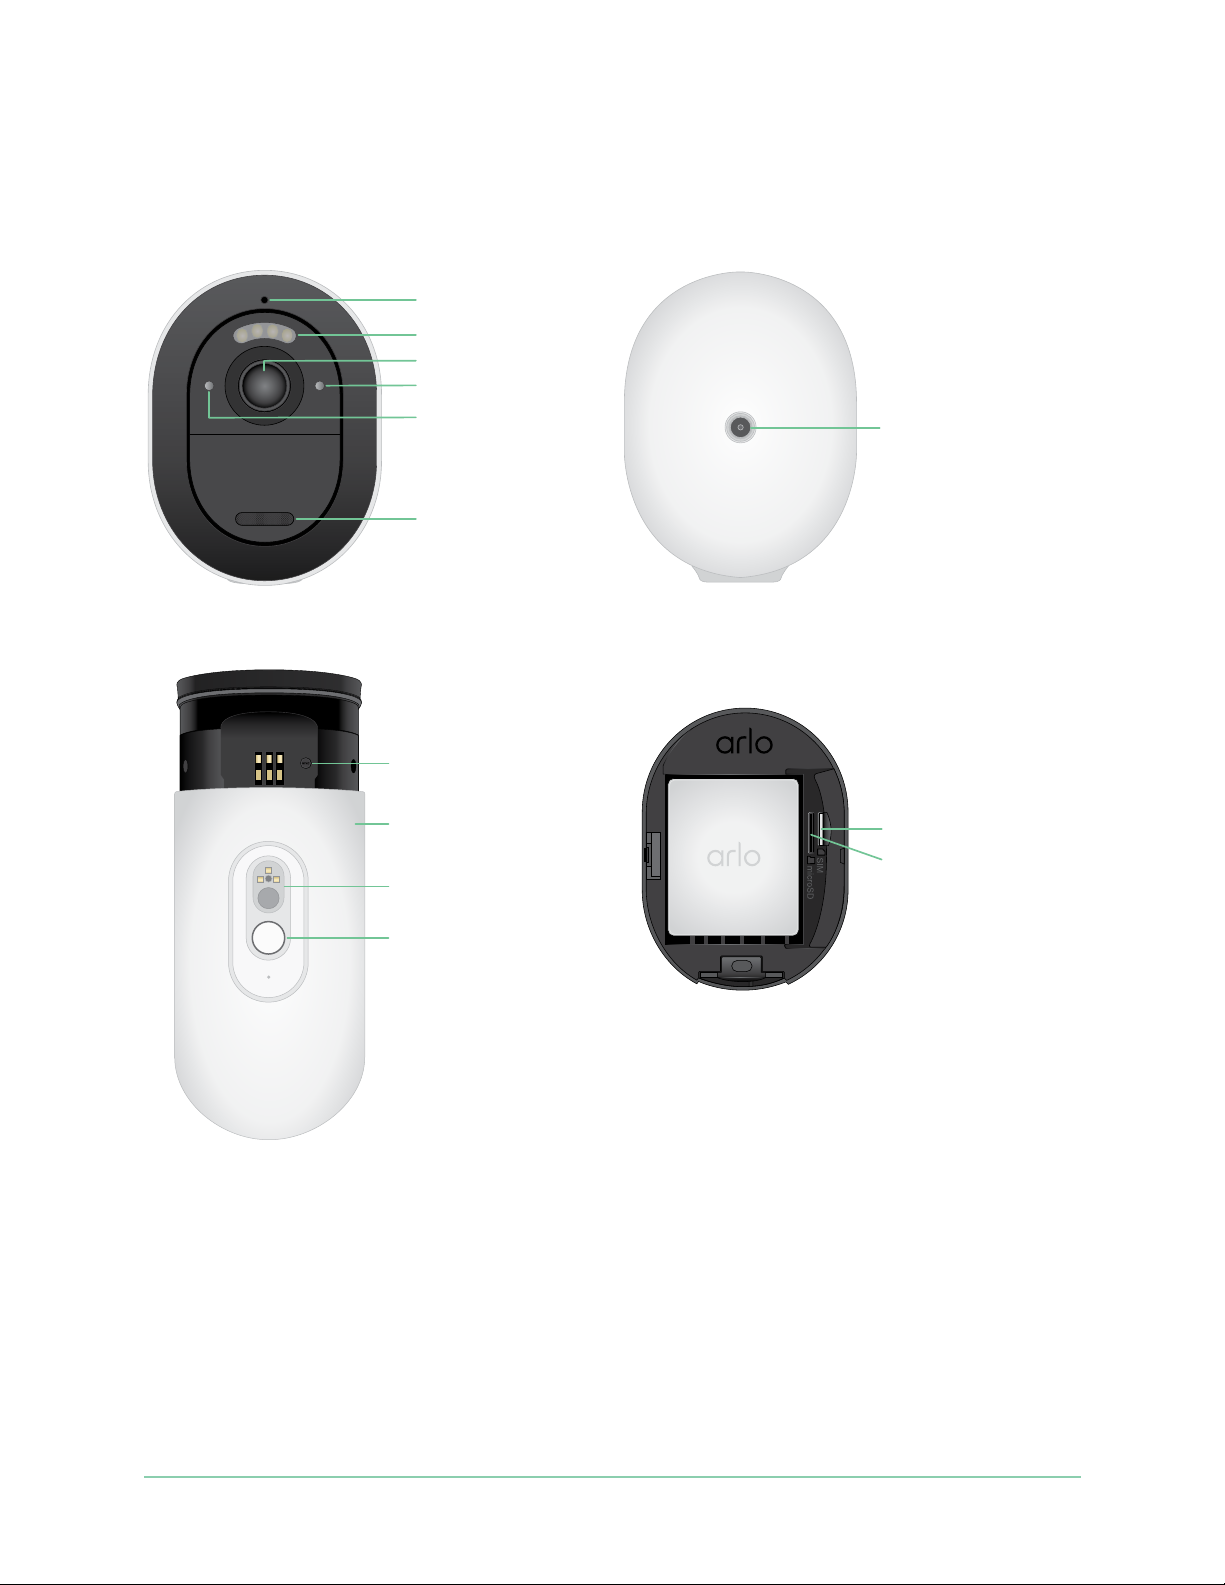
Meet your Go 2 Camera
Your Go 2 Camera includes these components.
Microphone
Spotlight
Camera lens
Status LED
Light sensor
Speaker
Screw mount hole
Sync button
Weather-resistant
camera housing
Charging port
Release button
SIM card slot
Micro SD
card slot
6Get to Know Your Arlo Go 2 Camera
User Manual
Page 7

Arlo Go 2 LTE/WiFi Security Camera
Features
• Connect to LTE or directly to WiFi. To access the mobile broadband network, your Go 2
Camera requires an activated SIM card.
• See more at night. View critical details in color night vision for better identication with
an integrated spotlight.
• See clearer images in HD. View, capture, and zoom into clear 1080P video.
• Get the bigger picture. Keep an eye on more of what matters with a wide 130-degree eld
of view.
• Secure local storage. Look back at what you missed from videos stored on an inserted
micro SD card (sold separately) in your camera to access later.
• 2-Way Audio. Hear and speak to visitors clearly with superior audio quality.
• Built-in siren. Trigger your siren remotely or automatically during an event.
• Locate your camera easily. Recover or track your camera placement with GPS
positioning.
3
3
• Upgrade your Arlo subscription. For more information, visit What are the available Arlo
subscription plans and how much cloud recording is available?
Accessories
Your Go 2 Camera works with these accessories, which are sold separately:
• Solar Panel Charger. Connect an Arlo Solar Panel charger to your camera and harvest
power from the sun to keep your camera battery charged. See Solar Panel charging on
page 58.
• Rechargeable battery. Keep fully charged spare batteries (sold separately) on hand.
• Dual Charging Station. Quickly charges up to two batteries at the same time. For more
information, see Arlo Dual Charging Station on page 58.
• Indoor magnetic charging cable and power adapter. Longer 8 feet (2.44 meters) magnetic
charging cable.
• Outdoor magnetic power cable and power adapter. A longer outdoor weather-resistant
cable 25 feet (7.62 meters) and power adapter can provide AC power your camera.
3 Mobile broadband access requires a compatible SIM card and wireless service plan. Additional restrictions and
data charges may apply. Coverage and service are dependent on the carrier.
7Get to Know Your Arlo Go 2 Camera
User Manual
Page 8

2. Get Started
Mobile network requirements
Arlo Go 2 Cameras use the SIM card inside the camera to connect to the mobile network and
access your Arlo account. Arlo Go 2 can also connect over WiFi as other Arlo cameras do. For
best results when connecting to the mobile network, Arlo recommends placing your camera
in a location where it has at least three bars of mobile signal strength.
Go 2 can connect via mobile or WiFi
How you connect your Go 2 Camera depends on your location and your security needs. Go 2
is designed to be exible. You can set up your camera in one spot and use it there, or you can
take it with you from place to place, using the available connection methods.
Note: During initial setup, your Go 2 Camera rst connects to the mobile network, and then
you have the option to also connect it to WiFi or skip the WiFi connection step.
Connecting Go 2 only to the mobile network works well when:
• Your Go 2 Camera is in a location where WiFi is unavailable or the WiFi signal is weak, such
as a cottage, cabin, large property, farm, or marina.
• You travel and want to bring your Go 2 Camera with you in your RV, on road trips, or on
hunting trips.
• You plan to use your Go 2 Camera to temporarily monitor dierent locations for pop-up
retail or job sites.
• You want continuous security coverage, even if the power goes out or during an internet
service outage.
Connecting Go 2 to WiFi works well when:
• The WiFi signal is strong at the Go 2 Camera location.
• Your Go 2 Camera mainly uses WiFi at your home or business, but you want peace of mind
8
Page 9
Arlo Go 2 LTE/WiFi Security Camera
in case of a power or internet service outage. Your Go 2 Camera automatically uses its
mobile connection if internet access via WiFi becomes temporarily unavailable. When your
WiFi is available again, your Go 2 Camera switches back to its WiFi connection.
Unless you change its settings to specify Cellular Network, your Go 2 Camera prioritizes
nding and connecting to a WiFi network. If you want Go 2 to always connect to the mobile
network, select Cellular Network in the Arlo app. This prevents your Go 2 from constantly
attempting to nd the WiFi network it connected to before, which can aect battery life. See
Control whether your Go 2 Camera connects to mobile or WiFi on page 19.
Install a SIM card into your Go 2 Camera
Your Arlo Go 2 Camera requires an activated SIM card with a mobile data plan to access the
mobile network.
For help with your Go 2 mobile service plan, contact the carrier of the SIM card that was
provided. If no SIM card was included, visit your local carrier to activate a service plan and
receive a SIM card.
To insert a SIM card into your Arlo Go 2 Camera:
1. Bring the Arlo Go 2 Camera indoors.
We recommend that you bring your camera indoors before removing its housing to avoid
potentially exposing the inside of the camera to water intrusion.
2. Press the button on the magnetic charging port to release the camera from its housing.
With a click sound, the camera slides partially out of the housing.
3. Pull the camera until it separates from the housing.
4. Remove the battery.
9Get Started
User Manual
Page 10
Arlo Go 2 LTE/WiFi Security Camera
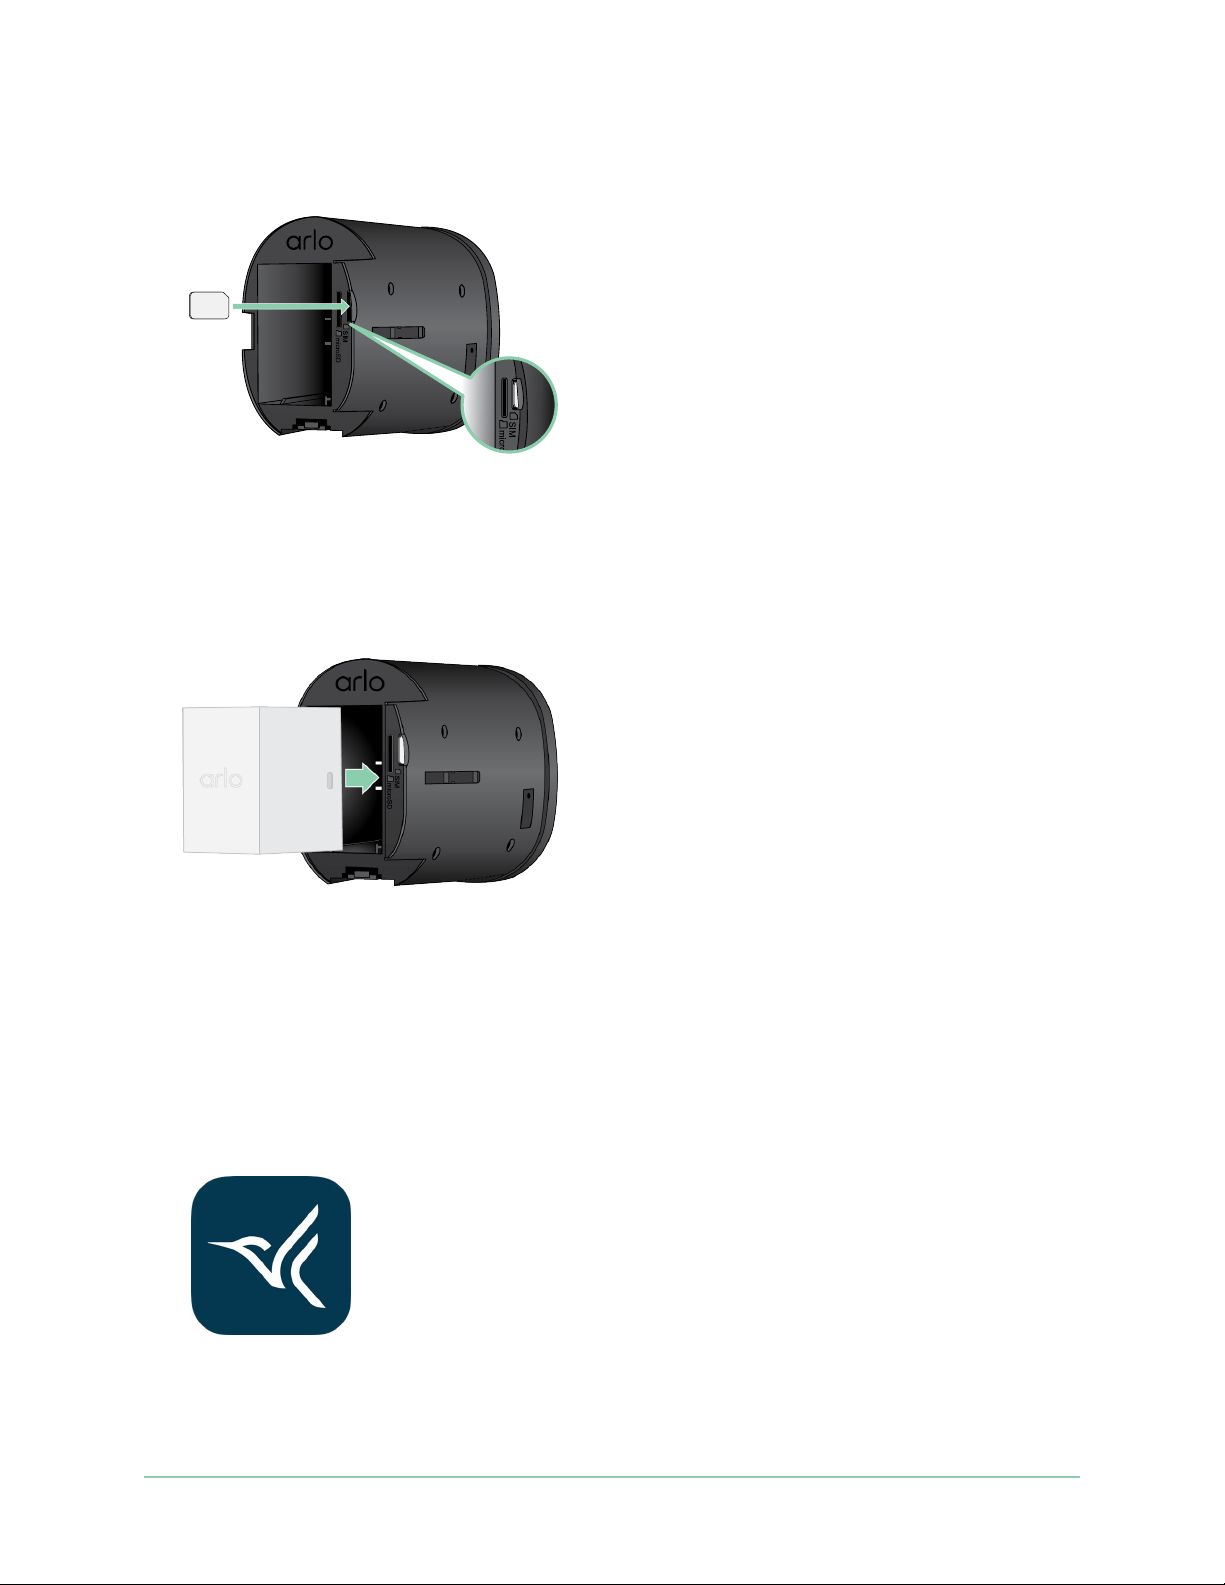
5. Insert the activated SIM card into the camera’s SIM card slot.
Align the SIM card so that the the side of the card with the notch is at the top, as shown.
6. Press the edge of the SIM card until it locks into place and you hear a click.
Note: The SD card slot is located next to the SIM card slot. For information about using an
optional SD card, see Install a micro SD card in your Go 2 Camera on page 52.
7. Replace the battery.
8. Slide the camera back inside the camera housing until it clicks.
Use the Arlo app to set up your Go 2 Camera
We recommend that you charge the battery before mounting your camera. The indoor
charging cable that came with your camera works with most power adapters.
1. Download the Arlo app on your smartphone or tablet.
2. Open the Arlo app.
3. Tap Add Device.
10Get Started
User Manual
Page 11
Arlo Go 2 LTE/WiFi Security Camera
4. Follow the Arlo app instructions to add your Arlo Go 2 Camera.
During the setup process, the Arlo app:
• Detects the activated SIM card in your camera and attempts to access the mobile
network associated with the SIM card.
• Prompts you to scan one or more QR codes displayed in the app with your Go 2
Camera.
• Discovers your camera and oers you the option to connect to a 2.4 GHz WiFi network.
Use this option when the camera is in range of a WiFi network.
• Guides you through camera positioning.
5. Place your Arlo Go 2 Camera in a location with good mobile network coverage.
Note: If you want your Arlo Go 2 Camera to use only LTE mobile connections aer initial
setup, you can change its settings so that it doesn’t connect to WiFi networks. For more
information, see Control whether your Go 2 Camera connects to mobile or WiFi on page 19.
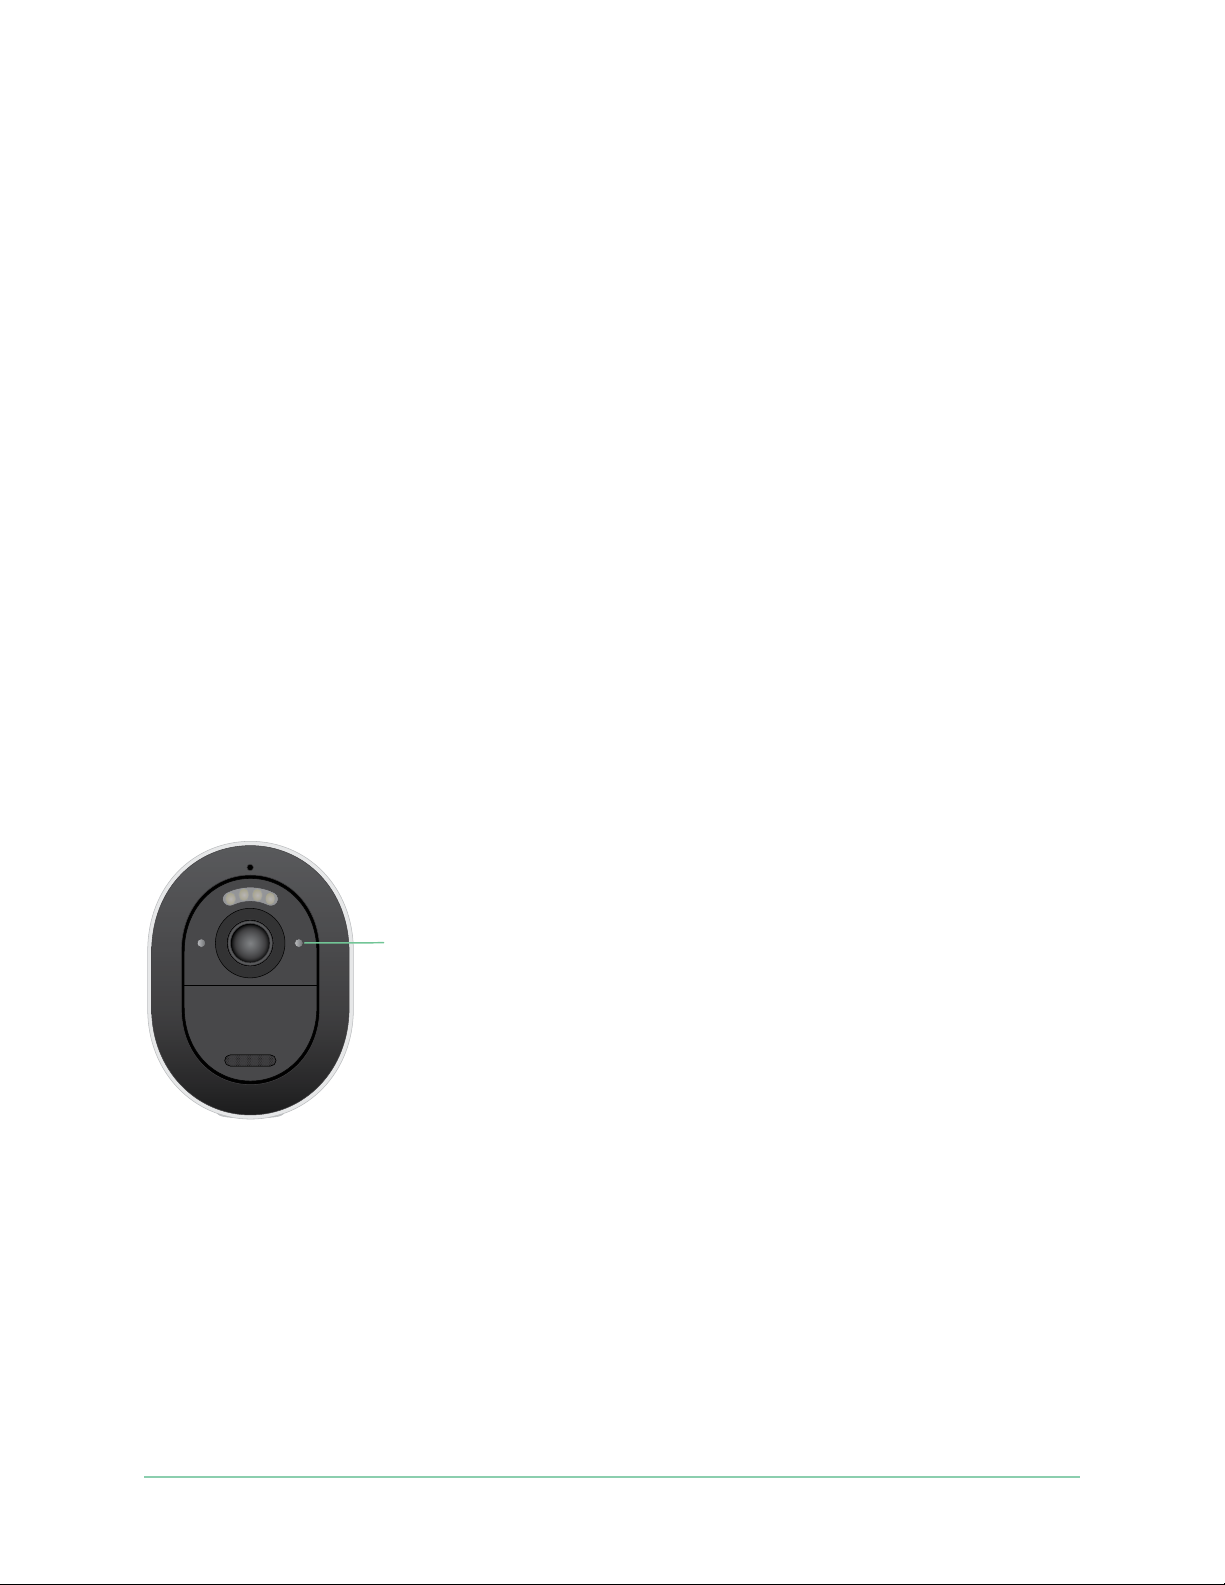
Check the LED
The LED on the camera lights when the camera is powered on. The LED changes color and
blinks depending on the camera’s charge level and to indicate the camera status.
Status LED
LED behavior during setup
• Slow blinking blue: The camera is attempting to connect to a WiFi network or is in QR
scanning mode.
• Fast blinking blue: The camera is establishing a WiFi or LTE network connection.
• Fast blinking amber: The camera did not connect to the WiFi network or it did not connect
to the LTE network.
• Solid amber: The camera does not detect an activated SIM card in its SIM card slot.
11Get Started
User Manual
Page 12

Arlo Go 2 LTE/WiFi Security Camera
LED behavior aer setup
• Solid blue: The LED lights solid blue when the camera is powered on and then turns o to
conserve battery power.
• Fast blinking blue: The camera’s charging cable is plugged in to a power adapter or the
camera is connected to the optional Arlo Solar Panel VMA5600 (sold separately).
• Single blink or double blink amber every 60 seconds: The battery charge is low. A single
blink every 60 seconds indicates a low battery charge. A double blink indicates a critical
battery charge level.
• Alternating blue and amber: A rmware update is in progress.
• Single blink amber, followed by restart: The camera has been factory reset. For more
information, see Reset using the sync button on page 71.
Check your Go 2 Camera’s mobile signal strength
1. Open the Arlo app.
2. Tap Settings > My Devices.
3. Select your camera.
4. Tap Connected To > Cellular Settings > Signal Strength.
If signal strength is consistently less than three bars, consider moving your camera to a
location with better signal strength.
Optimize mobile broadband connectivity for your Go 2 Camera
• Check your service provider’s data coverage map for the area in which you want to use
your camera.
Note: Cellular coverage, including LTE coverage, uctuates based on network traic
and weather conditions. If you place your camera near the edge of a coverage area, your
connection weakens or drops whenever the mobile network is carrying a lot of traic in
that area. Heavy rain, thunderstorms, and high humidity can also weaken your mobile
broadband connection.
• Check the mobile network signal strength in the location where you want to use your
camera aer setup.
12Get Started
User Manual
Page 13

Arlo Go 2 LTE/WiFi Security Camera
To view signal strength in the Arlo app aer your camera is set up, tap Settings > My
Devices. Select your camera, and tap Connected To > Cellular Settings > Signal Strength.
• Place your camera in an area where it has at least three bars of signal strength. In an area
with low signal strength, your camera’s battery life is much shorter because your camera
spends so much time trying to connect to the network.
• Make sure that your Arlo Go 2 is at least 6.5 feet (2 meters) away from any major electrical
equipment, large metal or concrete objects, or other sources of signal interference.
Note: For information about roaming, contact your mobile broadband service provider. Some
service providers do not allow roaming. In cases where roaming is allowed, it comes with
additional charges and oen requires additional services from your service provider.
Mount your Arlo Go 2 Camera
You can mount your Arlo Go 2 Camera on a wall or ceiling. Before you mount your camera,
make sure you’ve found a good location for LTE signal strength and motion detection.
Note: You must follow the instructions in the Arlo app when you rst install your Go 2
Camera. Do not begin mounting your camera before the Arlo app instructs you to during the
installation process.
You need the following items to mount your camera:
• A power drill with a 15/64 inch (6 mm) drill bit
• A Phillips-head screwdriver
• The screw mount that came in the package with your camera
• A pencil (optional)
Note: Mount your camera onto a at, supportive surface.
When mounting your camera, select a mounting surface that can support the weight of
your camera with the battery installed. Mounting your camera in an unstable location might
create a hazardous situation or damage your product, which might not be covered by Arlo’s
warranty.
To mount your Arlo Go 2 Camera:
1. Place the screw mount on the wall or ceiling where you plan to mount your camera.
2. On the wall or ceiling, mark the location of the three holes from the mount.
The marks can be used as a guide to drill pilot holes.
13Get Started
User Manual
Page 14
Arlo Go 2 LTE/WiFi Security Camera
3. Remove the screw mount.
4. Use a 15/64 inch (6 mm) drill bit to drill three holes into the wall or ceiling.
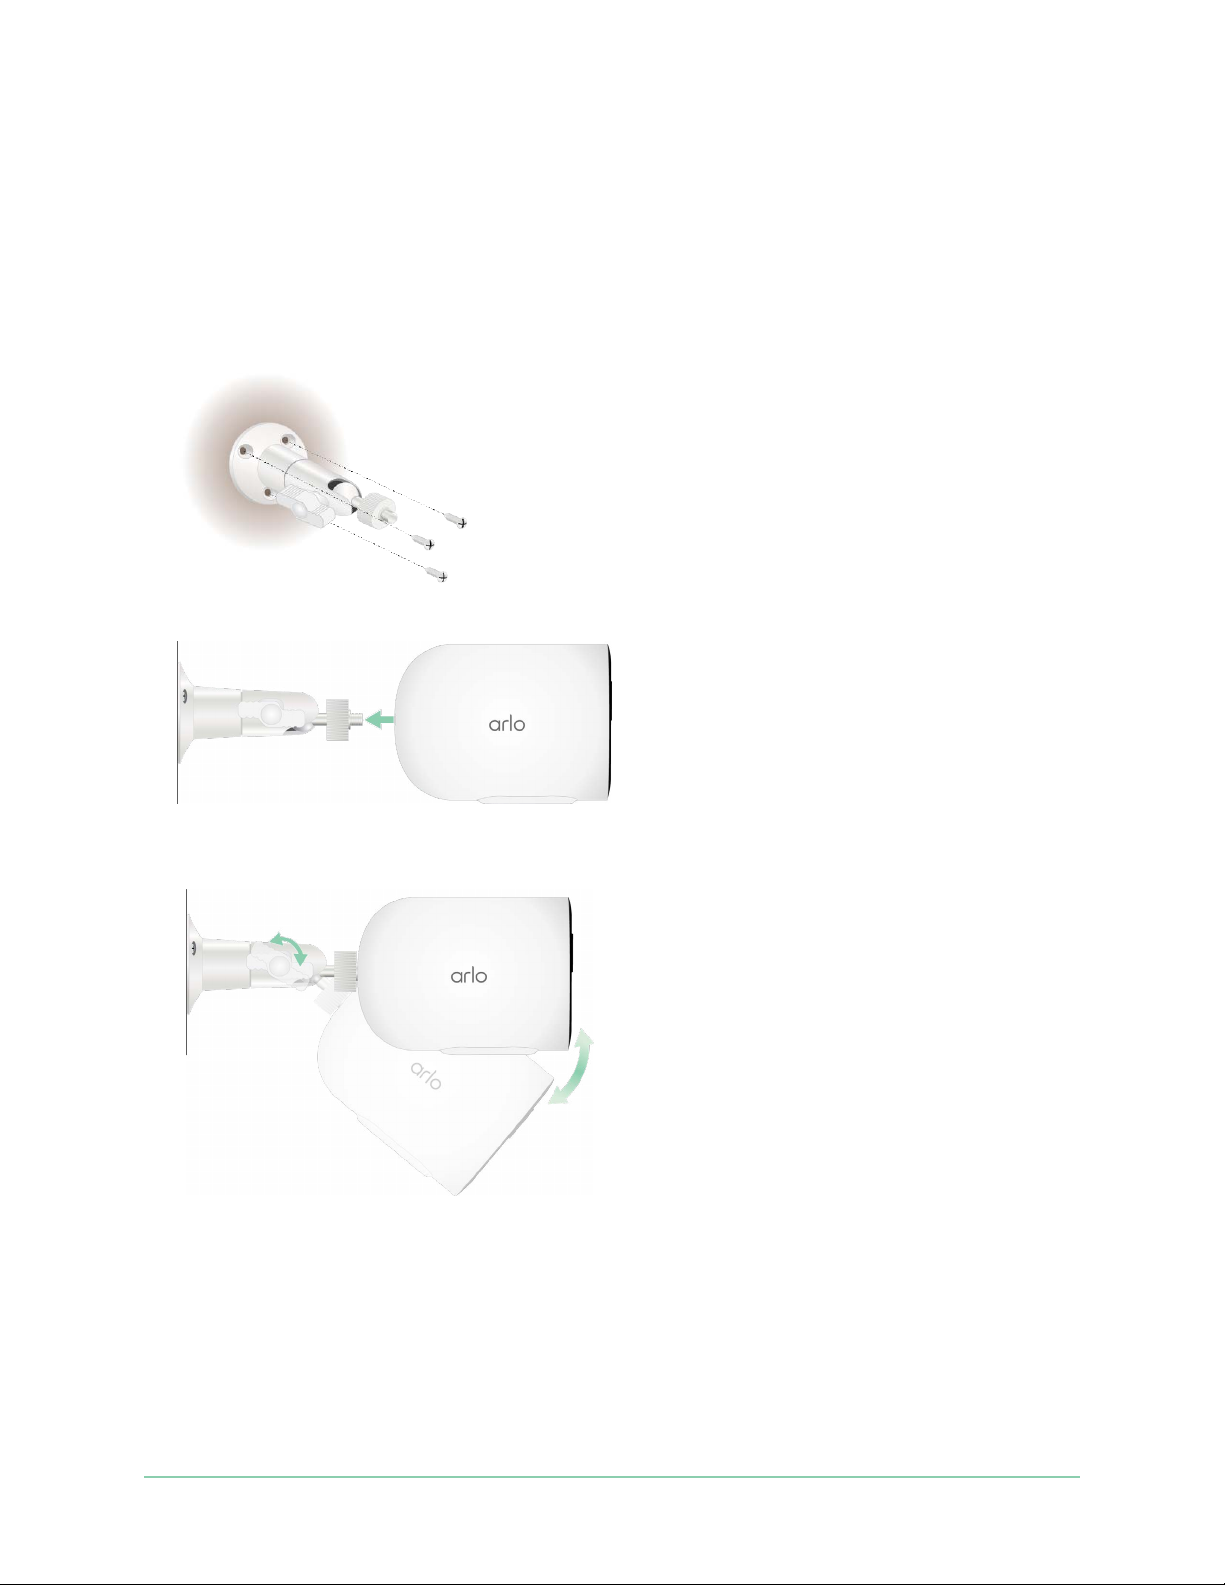
5. Place the screw mount back onto the wall or ceiling, and align it with the drilled holes.
6. While holding the wall plate, use a Phillips-head screwdriver to fasten a screw into each
hole.
7. Screw your Go 2 Camera clockwise into the screw mount.
8. Tilt and swivel to adjust the angle of the camera.
9. Twist the thumb screw and the grip clockwise to tighten the camera position.
14Get Started
User Manual
Page 15
Arlo Go 2 LTE/WiFi Security Camera
Test motion detection
You can use the motion detection test to nd the right motion sensitivity setting for your
camera.
1. Open the Arlo app.
2. Tap Settings > My Devices.
3. Select your camera.
4. Tap Device Utilities > Motion Detection Test.
5. Move in front of the camera.
During this test, the LED blinks amber when motion is detected.
6. Move the slider to adjust the motion sensitivity level as needed.
This motion sensitivity setting is used during the motion detection test. It is not
automatically applied to the camera rules used by modes to arm your camera. When you
are satised with a particular motion sensitivity level in the test, note the setting so that
you can add it to your rules.
7. Edit the rule for your camera to enter the motion sensitivity level that you want to use.
See Change motion sensitivity on page 40.
Position your camera to detect motion in
specic areas
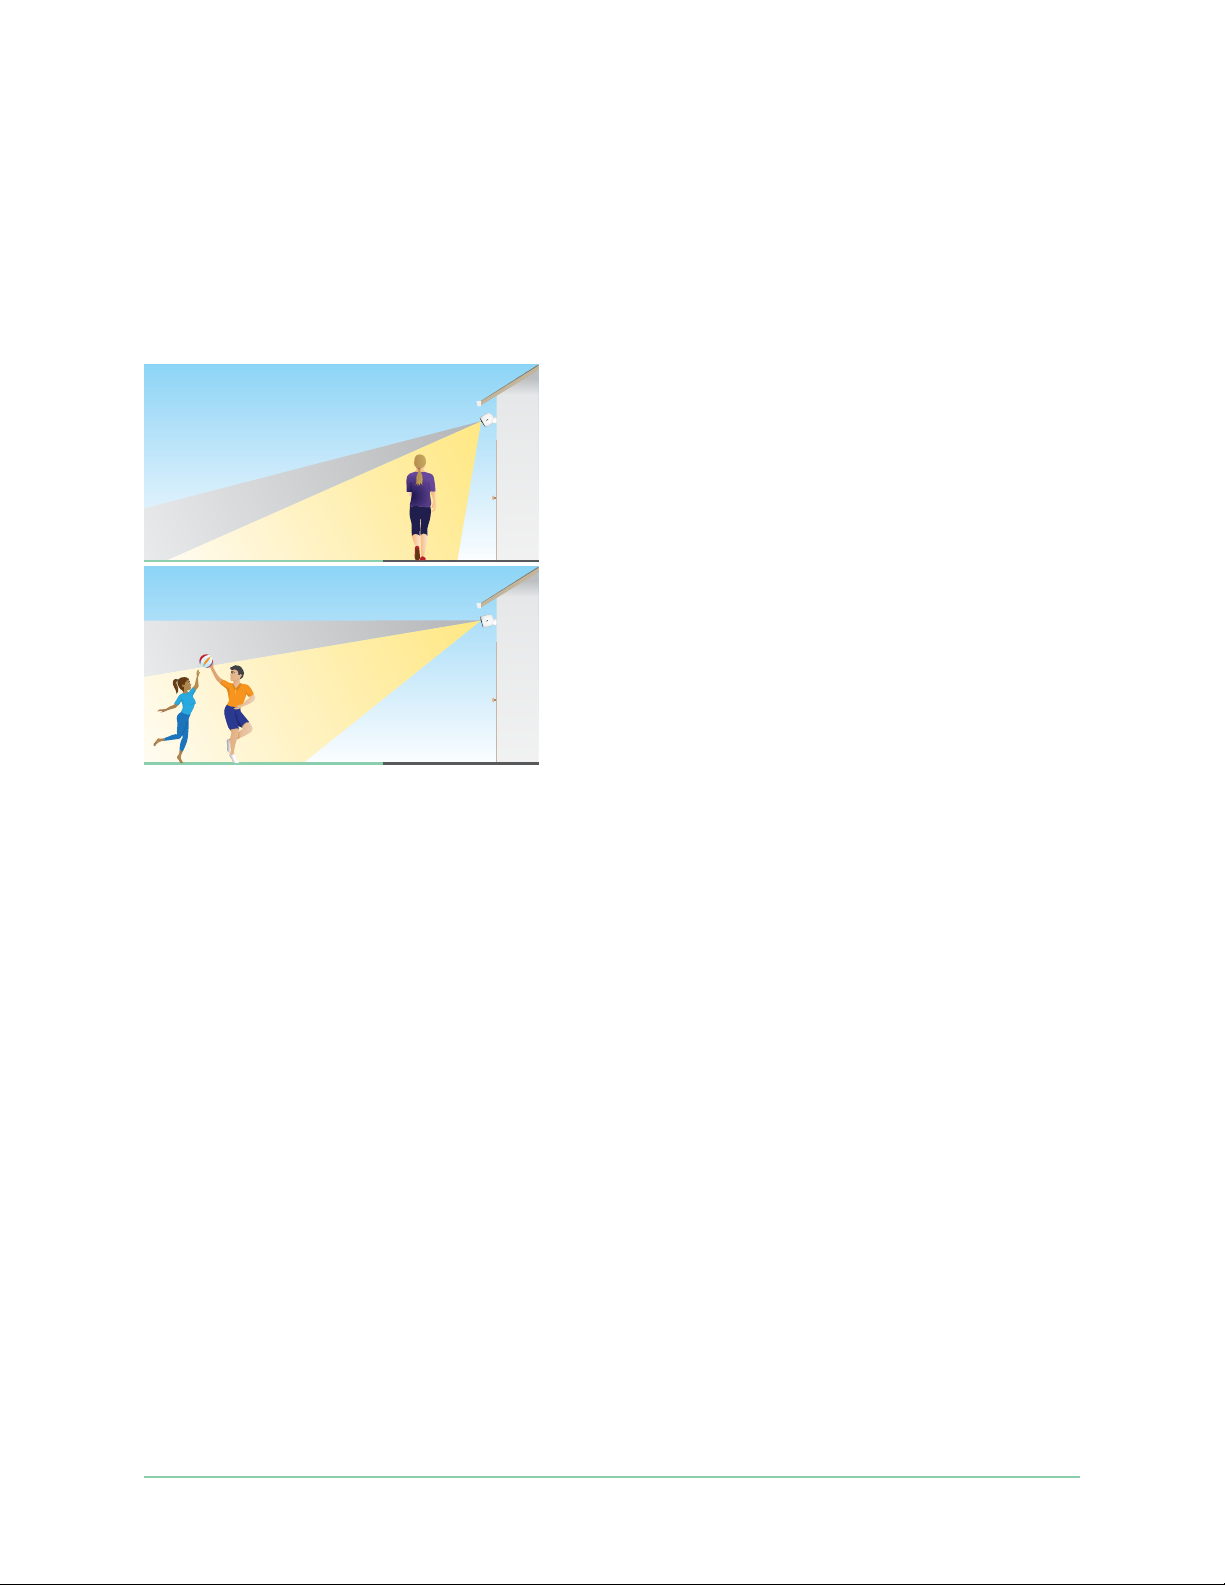
You can mount and aim your camera in dierent ways to optimize the camera’s ability to
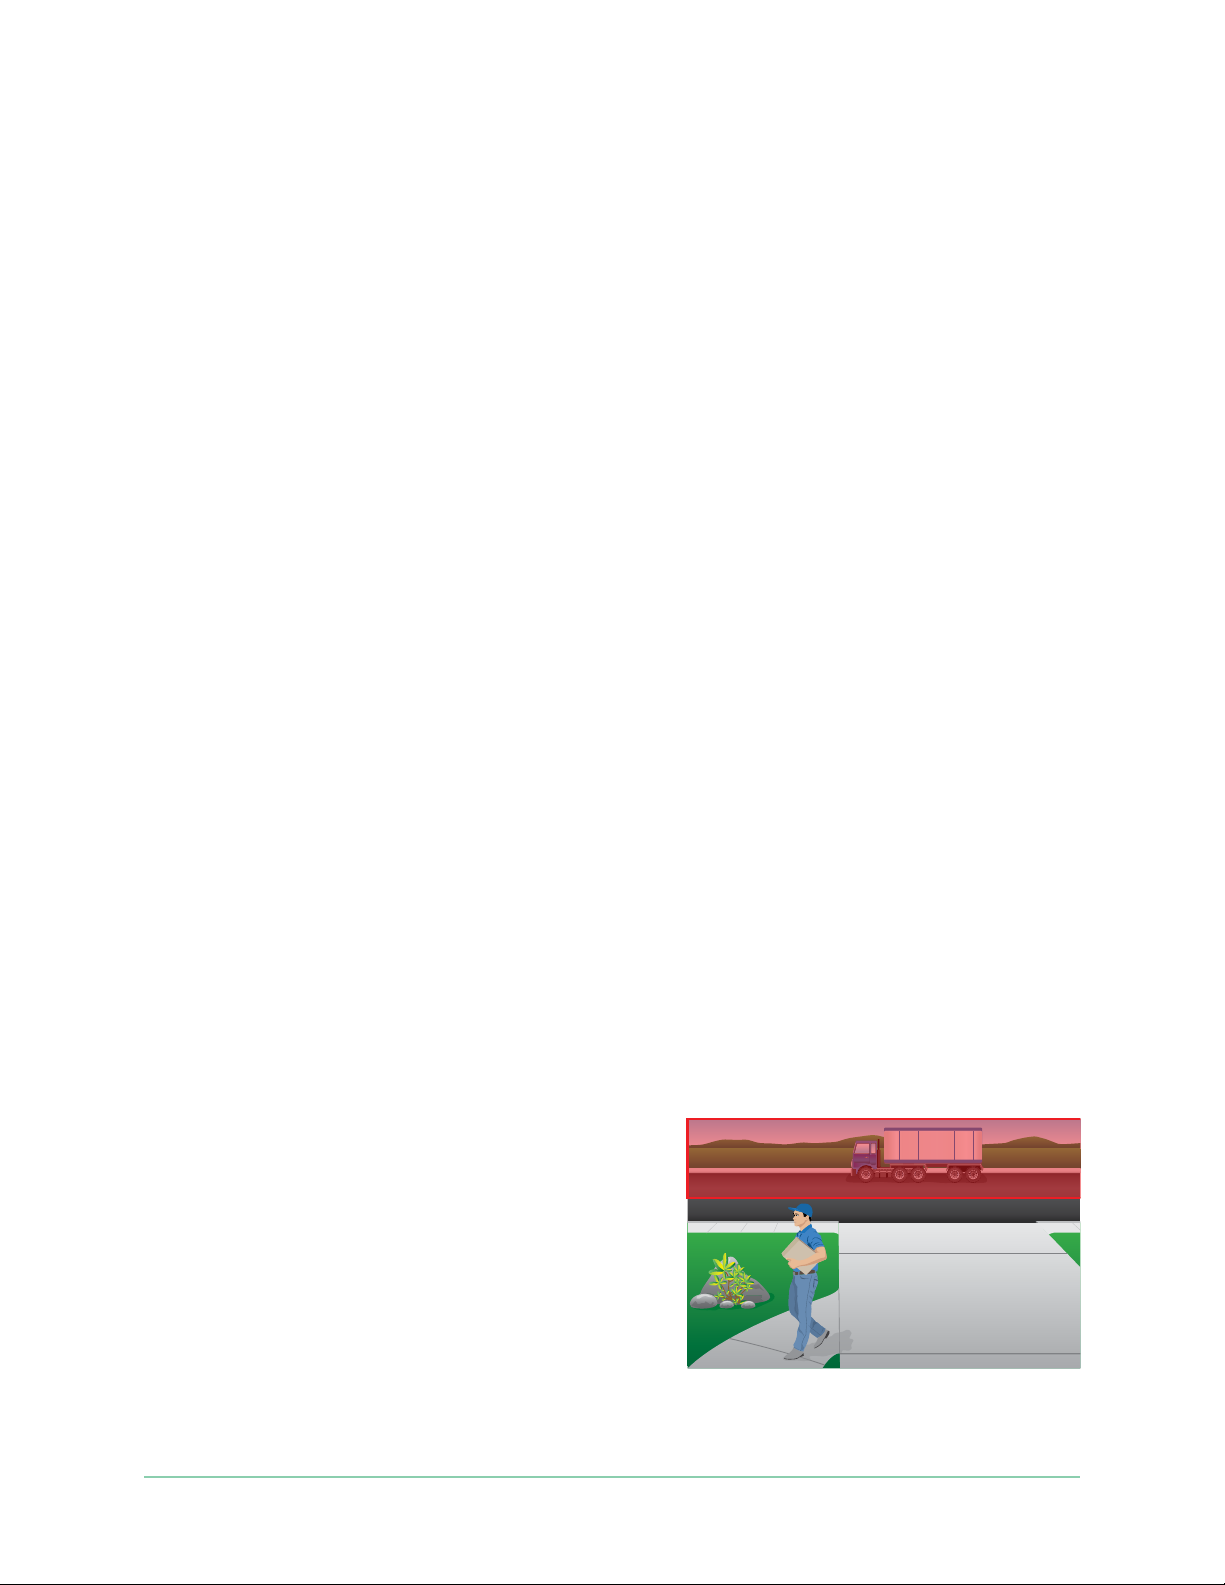
detect motion in specic areas. The lower two-thirds of the camera’s eld of view is the
motion-sensitive part of the image. Aim the camera so that any motion you wish to detect
appears within this part of the image.
If you want to monitor motion closer to the camera,
such as visitors to your front door, mount the
camera at least 6.5 feet (1.9 meters) high and aim it
so that visitors appear in the lower two-thirds of the
image. This angle works well to avoid motion alerts
for movement in the top third of the image, such as
vehicles driving by.
15Get Started
User Manual
Page 16
Arlo Go 2 LTE/WiFi Security Camera
To monitor motion occurring farther away, such as on a lawn, aim the camera higher to frame
the area within the lower two-thirds of the image.
It’s best to position the camera so that motion is moving from side-to-side across its eld of
view rather than directly toward or away from the camera. Also, although the camera can
detect motion up to 23 feet (7 meters) away, the best area for motion detection is 5 to 20 feet
(1.5 to 6 meters) from the camera position.
Use camera positioning to aim your camera
Camera positioning is available only when the camera is not streaming, recording motion, or
using the Motion Detection test. During camera positioning, the camera streams video as fast
as possible, without buering. You can aim your camera while watching on your smartphone
and make near real-time adjustments to the camera position. This means that you might see
lower-quality video while you are positioning your camera.
To position your camera:
1. Open the Arlo app.
2. Tap Settings > My Devices.
3. Select the camera.
4. Tap Device Utilities > Camera Positioning.
The camera starts streaming video. The signal strength bar indicates the WiFi signal that
your camera is receiving at its current location.
16Get Started
User Manual
Page 17

Arlo Go 2 LTE/WiFi Security Camera
Arm your camera to detect motion
When your camera is armed, it detects motion. You can control when your camera is armed
using these features:
• Arm or disarm all your Arlo cameras and devices. See Arm or disarm all your Arlo devices on
page 38.
• Select a mode such as Armed, Disarmed, Schedule, or Geofencing. See Select a mode on
page 39.
17Get Started
User Manual
Page 18
3. LTE and WiFi network connections
When you set up your Go 2 Camera, the Arlo app guides you through connecting the camera
to the mobile LTE network and, optionally a WiFi network.
LTE mobile network access
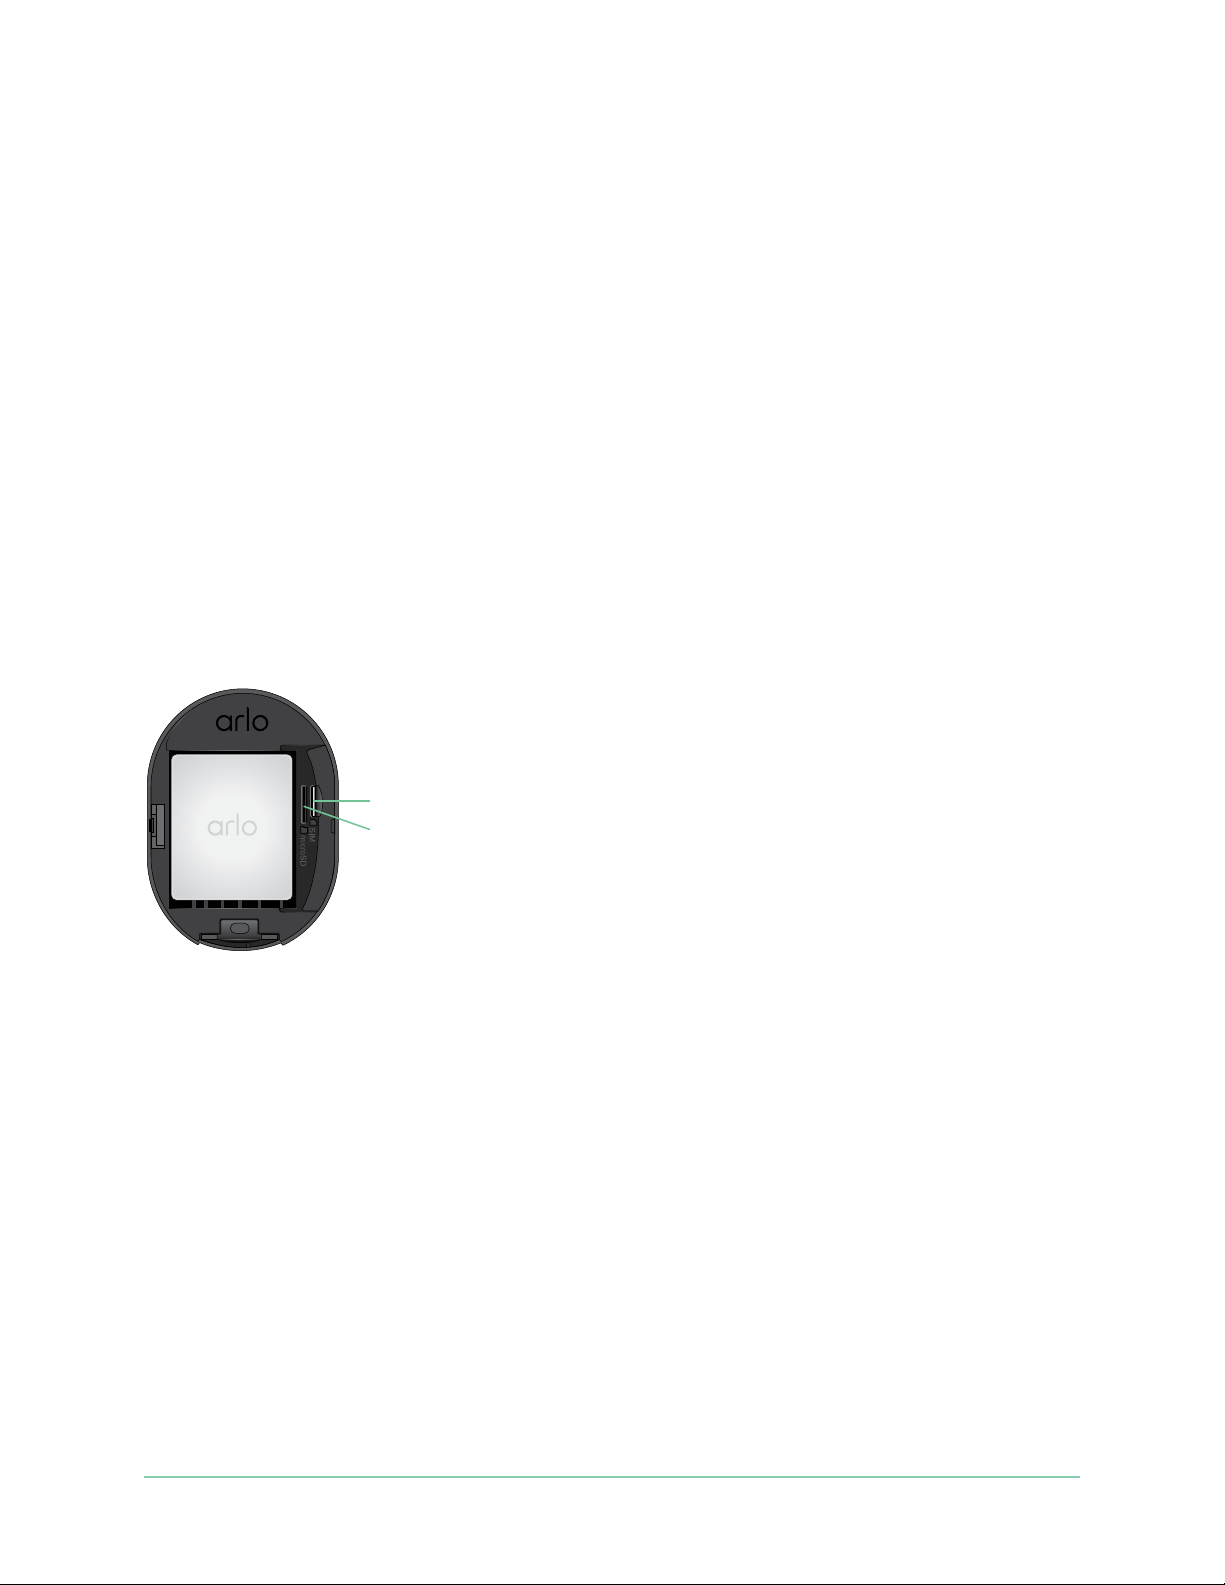
To access the LTE mobile network, your Go 2 Camera requires an activated SIM card inside
the Arlo Go 2 Camera. The mobile network service provider that activates the SIM can provide
information about your LTE service, coverage areas, and your mobile data plan.
SIM card
Micro SD card slot
(optional)
Turn roaming on or o for your mobile network
For information about the availability of roaming and associated costs, contact the mobile
network provider who activated the SIM inside your Go 2 Camera.
To turn roaming on or o for the SIM inside the Arlo Go 2 Camera:
1. Open the Arlo app.
2. Tap Settings > My Devices.
3. Select your camera.
4. Tap Connected To>Cellular Settings.
5. Tap Roaming.
18
Page 19

Arlo Go 2 LTE/WiFi Security Camera
Specify the mobile network access point name
(APN)
In most situations, the access point network (APN) settings are automatically set up and
you don’t need to enter them for the activated SIM card in your Go 2 Camera. If your mobile
network provider instructs you to enter the APN settings, you can use the Arlo app to do so.
To enter APN settings as directed by your mobile network provider:
1. Open the Arlo app.
2. Tap Settings > My Devices.
3. Select the camera.
4. Tap Connected to > Cellular Network > APN Settings.
Control whether your Go 2 Camera connects to
mobile or WiFi
When you set up your Go 2 Camera, the mobile network connection is handled rst. Then you
have the option to connect your camera to a 2.4 GHz WiFi network or skip the WiFi connection
steps. If you specify a WiFi connection, aer you nish setting up your camera, your Arlo Go
2 Camera prioritizes connecting to a WiFi network. If a WiFi network isn’t available, then it
connects to the mobile network.
During setup (and aerward), you can connect your Arlo Go 2 Camera to either a mobile
network, WiFi network, or both:
• Mobile: To access the mobile network, your Go 2 Camera requires an activated SIM card
with a mobile data plan. The SIM card must be installed in the Go 2 Camera.
• WiFi: Your camera connects to your WiFi network’s 2.4 GHz band when it’s available, and
uses its LTE connection as standby if the WiFi network goes down. (This is a WAN failover
scenario to ensure the camera has internet access.)
If you place your Go 2 Camera in a location where the WiFi network you specied isn’t
available, turn o the Connected to WiFi Network setting in the Arlo app. (Tap Settings > My
Devices, and select the camera. Tap Connected to > WiFi Network. Then toggle o Network.)
This disables WiFi in your Go Camera, which conserves your camera’s battery life. Constant
attempts to connect with WiFi drain the camera battery.
19LTE and WiFi network connections
User Manual
Page 20

Arlo Go 2 LTE/WiFi Security Camera
Change your Go 2 network mode
1. Open the Arlo app.
2. Tap Settings > My Devices.
3. Select the camera.
4. Tap Connected to.
5. Select the option you prefer:
• WiFi Network. Toggle Network on and o.
• Cellular Network. Toggle Cellular Data on and o.
Tips for optimal WiFi performance
The distance between WiFi devices can aect the WiFi signal:
• Maximum recommended distance. Check your WiFi router to verify its wireless range.
In general, we recommend placing your camera within 300 feet (90 meters) of your WiFi
router. The maximum line-of-sight range is reduced by each wall, ceiling, or other major
obstruction between the router and the camera.
• Minimum recommended distance. To reduce WiFi interference, allow at least 6.5 feet (2
meters) between your camera and any other Arlo cameras that you install.
These materials can reduce WiFi signal strength if they are located between WiFi devices:
• Unusually thick walls and ceilings
• Brick
• Concrete
• Stone
• Ceramic
• Glass, especially mirrors
• Metal
• Large quantities of water, such as the water in a sh tank or water heater
Connect your mobile device to a 2.4 GHz WiFi
network during setup
During setup, if you’re using a WiFi connection, the smartphone or tablet you’re using must
connect to the same WiFi network as the Arlo Go 2 Camera.
20LTE and WiFi network connections
User Manual
Page 21

Arlo Go 2 LTE/WiFi Security Camera
Many routers broadcast WiFi networks in both 2.4 GHz and 5 GHz bands, so your phone might
connect to the 5 GHz WiFi band. During setup, connect your phone to your 2.4 GHz WiFi
network, then connect your Go 2 Camera to that same 2.4 GHz WiFi network.
Find your 2.4 GHz WiFi network name and password
Your phone might connect to your 5 GHz WiFi network most of the time. If you’re not sure
about how to nd the 2.4 GHz WiFi network:
• Look on your WiFi router label.
Many routers have a label that shows the WiFi network name, which is also called an SSID.
Your 2.4 GHz network name might have a 2, 2.4, or 2G at the end. Your 5 GHz network
name might have a 5 or 5G at the end. If you changed your WiFi settings, then check the
place where you saved your custom settings.
• If your WiFi network name or SSID doesn’t indicate whether it’s 2.4 GHz or 5 GHz, ask your
Internet service provider (ISP) or the person who set up your WiFi router.
• If you have a mesh WiFi network, it uses only one WiFi network name for both WiFi bands.
The camera nds and connects to the 2.4 GHz WiFi band. As long as you connect your
phone to the same mesh network, Arlo can discover the camera.
Connect your iOS (Apple) device to a 2.4 GHz network
1. Unlock your device and tap Settings.
2. Tap Wi-Fi, near the top of the list of Settings options.
3. Turn on WiFi by tapping the switch next to Wi-Fi at the top.
Note: WiFi is activated when the switch is green.
4. Select a 2.4 GHz WiFi network.
This is commonly indicated by a 2, 2.4, or 2G at the end of the network name.
5. If prompted, enter the password for the network.
When you’re connected to the WiFi network, a blue check mark appears to the le of the
network name.
Connect your Android device to a 2.4 GHz network
1. Unlock your device and tap Settings.
2. Tap Network & Internet > Wi-Fi.
3. Turn on WiFi by tapping Use WiFi at the top.
4. Select a 2.4 GHz WiFi network.
21LTE and WiFi network connections
User Manual
Page 22

Arlo Go 2 LTE/WiFi Security Camera
This is commonly indicated by a 2, 2.4, or 2G at the end of the network name.
5. If prompted, enter the password for the network.
When you’re connected to the WiFi network, the word Connected appears under the
network name.
22LTE and WiFi network connections
User Manual
Page 23

4. Access your Arlo account
Once you set up your Arlo account, you can access it by using the Arlo app on a smartphone or
tablet, or from a computer using a web browser. If you’re using a computer, enter
https://my.arlo.com/#/login in the address bar of the browser.
Two-step verication
Two-step verication helps protect your account by adding another layer of security when you
log in to your Arlo account. Arlo will verify your identity anytime you sign in with a new device.
You can have up to ve dierent two-step verication methods, in addition to the email
address associated with your Arlo account.
Note: If you’re a Friend on someone’s Arlo account, and the account owner sets up two-step
verication, you don’t have to use two-step verication to log in. Likewise, if you set up twostep verication as a Friend on an Arlo account, the account owner is not aected.
To sign in with two-step verication, you must rst enter your email address and password.
Then, you must authenticate your identity with a security code (delivered by SMS text
message or email) or conrmation from an already trusted device. Requiring two pieces of
information helps to prevent an unwanted login, even if someone has your Arlo account
password.
• Push notication. When someone attempts to log in to your Arlo account on a new device,
Arlo sends a push notication to a previously trusted (and currently logged in) iOS or
Android device. Tap the push notication on the trusted device to approve or deny the log
in.
• SMS text message. When someone attempts to log in to your Arlo account, Arlo sends a
text message to the phone number that you veried for two-step verication. Enter the
security code from the text message to complete the log in.
• Email. If you can’t access a trusted device with push notications, or if you can’t receive
SMS text messages, you can request to have a security code sent to the email associated
with your Arlo account.
23
Page 24

Arlo Go 2 LTE/WiFi Security Camera
Set up two-step verication
1. Open the Arlo app.
2. Tap Settings.
3. In the ACCOUNT section, select Prole > Login Settings > Two-Step Verication.
4. Tap the switch next to Enable.
5. Select your verication method.
Note: Your Arlo account email is an automatic back-up option.
6. Follow the instructions in the app to complete your two-step verication setup.
Add a phone number or device to two-step verication
1. Open the Arlo app.
2. Tap Settings.
3. In the ACCOUNT section, select Prole > Login Settings > Two-Step Verication.
4. To add a phone number, tap Add SMS Verication and enter the phone number.
5. To add a trusted device, tap Add Trusted Device.
Remove a phone number or device from two-step verication
1. Open the Arlo app.
2. Tap Settings.
3. In the ACCOUNT section, select Prole > Login Settings > Two-Step Verication.
4. Tap the trashcan icon next to a phone number or trusted device.
Use face or ngerprint authentication
You can use Touch ID® or Face ID® with a compatible Apple device. With a compatible Android
device, you can use ngerprint authentication.
Your device must meet the following minimum requirements:
• Apple devices:
iOS version 10.3 or higher
A Touch ID compatible device (iPhone 5s, iPad Air 2, or newer)
24Access your Arlo account
User Manual
Page 25

Arlo Go 2 LTE/WiFi Security Camera
A Face ID compatible device (iPhone X, iPad Pro 2018, or newer)
• Android devices:
Android OS version 6.0 or higher
A compatible Android device with ngerprint authentication
Turn ngerprint authentication on and o for the Arlo app
1. Enable ngerprint authentication on your iPhone or Android device.
2. Open the Arlo app.
3. Tap Settings.
4. In the ACCOUNT section, select Prole > Login Settings.
5. Slide the toggle for ngerprint or Touch ID to the right (on) or le (o).
Turn face authentication on and o for the Arlo app
1. Enable Face ID authentication on your iPhone.
2. Open the Arlo app.
3. Tap Settings.
4. In the ACCOUNT section, select Prole > Login Settings.
5. Slide the toggle Face ID to the right (on) or le (o).
Customize your prole
You can enter your name, add a prole photo and home address, and opt-in or opt-out of Arlo
news and support updates.
Add a prole picture
1. Open the Arlo app.
2. Tap Settings.
3. In the ACCOUNT section, select Prole > Edit Prole.
4. Tap the prole picture at the top of the page.
5. Select Take Photo or Choose from Library.
25Access your Arlo account
User Manual
Page 26

Arlo Go 2 LTE/WiFi Security Camera
Note: If you already have a prole picture, you can also select Remove Current Photo.
6. Upload your preferred prole picture.
7. Tap Save at the bottom of the page.
Edit prole settings
You can enter your name, add a prole photo and home address, and opt-in or opt-out of Arlo
news and support updates.
1. Open the Arlo app.
2. Tap Settings.
3. In the ACCOUNT section, select Prole > Edit Prole.
4. Enter your prole settings.
5. Tap Save at the bottom of the page.
Change your Arlo password
You can change your password in the Arlo app or by logging in to my.arlo.com.
1. Open the Arlo app.
2. Tap Settings.
3. In the ACCOUNT section, select Prole > Login Settings.
4. Enter your old password.
5. Enter a new password and then conrm it.
6. Tap Change Password.
Your new password is saved.
Reset a forgotten password
If you forgot your Arlo password, you can reset it with a veried email address.
1. Open the Arlo app.
2. Tap Forgot Password?
3. Enter your email address.
26Access your Arlo account
User Manual
Page 27

Arlo Go 2 LTE/WiFi Security Camera
4. Tap Send Email.
An email is sent from [email protected] to your veried email address.
5. Tap the link provided in that email.
6. Enter a new password.
7. Tap Submit.
Your password is reset.
Grant access to friends
You can add friends to your Arlo account. Friends can view live streams from your cameras;
record video clips; view, share, mark as favorite, and delete clips from your library; and take
snapshots. Friends are granted limited access to some of the settings and features of your
Arlo account. You can select which cameras friends can see and what administrative rights are
available to them.
Friends without access rights can:
• Play and view library content.
• View live footage.
• Zoom and drag video footage.
• Control brightness.
• Enter full-screen view.
Friends who are granted access rights can also:
• Play and pause video footage.
• Record video footage.
• Mute the speaker.
• Access and change modes.
• View motion detection statuses.
• Manually record.
• Take snapshots.
• Mark as a favorite, share, download, and delete video footage.
• Use a camera’s microphone.
27Access your Arlo account
User Manual
Page 28

Arlo Go 2 LTE/WiFi Security Camera
Add a friend
1. Open the Arlo app.
2. Tap Settings.
3. Under ACCOUNT, tap Grant Access.
4. Tap Add or +.
5. Enter your friend’s rst name, last name, and email address.
6. Tap the Arlo devices that you want your friend to access.
7. To grant access rights to your friend, tap Allow Access Rights.
Selecting Allow Access Rights allows this friend to change your account and camera
settings.
8. Tap Send Invite.
An email message is sent inviting your friend to create an Arlo account. This friend’s name
is displayed with the status Pending. When the friend accepts your invitation, the status
changes to Accepted.
Edit a friend’s access privileges
1. Open the Arlo app.
2. Tap Settings.
3. Under ACCOUNT, tap Grant Access.
A list of your friends displays with the status of their accounts.
4. Tap the friend, and tap Edit
5. Tap cameras to select or deselect them.
6. Tap Allow Access Rights.
Selecting Allow Access Rights allows this friend to change your account and camera
settings.
.
7. Tap Done.
Delete a friend
1. Open the Arlo app.
2. Tap Settings.
28Access your Arlo account
User Manual
Page 29

Arlo Go 2 LTE/WiFi Security Camera
3. Under ACCOUNT, tap Grant Access.
4. Select the friend, and tap Edit
5. Tap Delete Friend.
6. Tap Yes.
.
29Access your Arlo account
User Manual
Page 30
5. Use Your Go 2 Camera
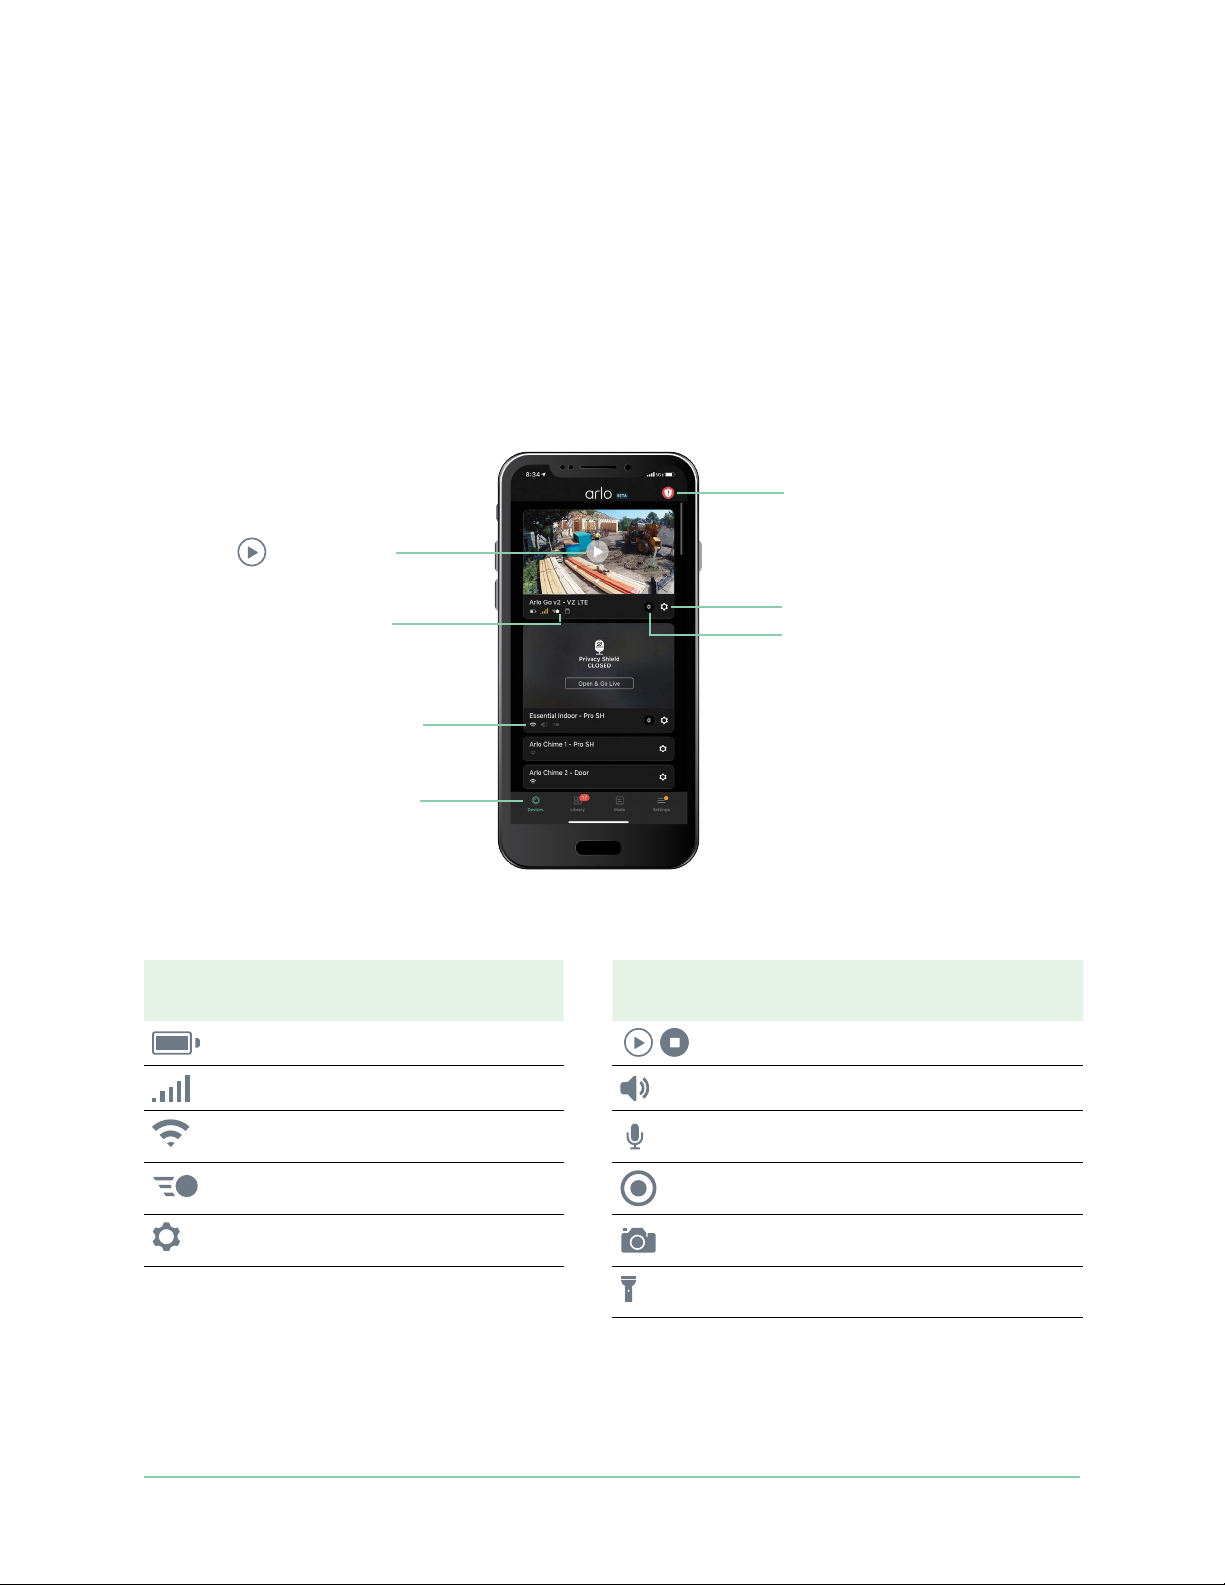
When you open the Arlo app, the Devices page displays your camera feeds.
Tap to turn the siren on and o
3m ago
manually
Tap Play
camera feed
The Go 2 Camera is armed
and detecting motion
This Arlo camera is disarmed
Tap a button to go to Devices,
Library, Modes, or Settings
to stream the
Camera
icon
Located below each camera
feed
Battery charge
LTE signal strength Mute the audio
WiFi signal, if your camera is currently
connected via WiFi
Motion detection is on Record video manually
View or change the camera settings Take a snapshot
Camera
feed icon
Tap to view device settings for
the camera
Number of new recordings
Tap the camera feed to display
these icons
Play/Stop
2-Way Audio
(requires cloud storage)
(requires cloud storage)
Turn the camera spotlight on and o
30
Page 31

Arlo Go 2 LTE/WiFi Security Camera
View your camera feeds
1. Open the Arlo app.
2. Tap Play
The camera feed updates and camera feed icons display.
3. To stop viewing and listening to the live feed, tap Stop
on the camera feed.
.
Pan and zoom video
You can pan and zoom your video feed.
1. Open the Arlo app.
2. Tap Play
On a mobile device, use the pinch gesture to zoom, and touch-and-drag to move around
the zoomed-in frame.
On a computer, double-click to zoom. Le-click and hold-and-drag to move around the
zoomed-in frame.
Aer zooming in, the image stops and buers for about ve seconds to improve the quality
of video. When the buering stops, your zoomed-in video renders in high quality.
on the camera feed.
Record clips from live video
1. Open the Arlo app.
2. Tap the camera feed image.
3. Tap Record
This icon turns red to indicate that you are recording the live feed.
4. To stop recording, tap Record
to begin recording.
again.
Take a snapshot from live video
1. Open the Arlo app.
2. Tap the camera feed image.
3. Tap Snapshot
The snapshot is saved in your library.
.
31Use Your Go 2 Camera
User Manual
Page 32

Arlo Go 2 LTE/WiFi Security Camera
Turn the camera spotlight on and o manually
When your camera is armed and detects motion at night the spotlight turns on automatically.
You can also adjust the spotlight behavior and turn it on and o.
To turn the spotlight on and o from the camera feed:
1. Open the Arlo app.
2. Tap the camera feed.
3. Tap Spotlight
4. To adjust the brightness, tap and hold the icon and adjust the slider.
5. To turn o the spotlight, tap Spotlight
For information about how to customize the spotlight settings, see Change the Low Light
settings on page 49.
.
.
Customize your camera feed image
If you use more than one camera, you can change the order in which the camera feeds display
on the Devices page. You can also zoom or rotate the camera feed image 180 degrees.
Change the camera order
1. Open the Arlo app.
2. Tap Settings.
3. Under DEVICE SETTINGS, tap Device Order.
4. If you’re using a smartphone or tablet, tap Edit at the top of the page.
A list icon displays.
5. Tap and hold the list icon and drag each device to the correct position on the list.
6. Tap Save.
Rotate a camera feed image 180 degrees
1. Open the Arlo app.
2. Tap Settings > My Devices.
3. Select the camera.
4. Tap Video Settings.
32Use Your Go 2 Camera
User Manual
Page 33

Arlo Go 2 LTE/WiFi Security Camera
5. Rotate the image.
If you’re using an iOS device, tap Rotate Image 180°.
If you’re using an Android device, tap the slider to OFF and then rotate the image.
Motion detection activity zones
You can designate zones within the camera view where you want the camera to detect and
record motion. An Arlo Secure subscription is required.
Add an activity zone
1. Open the Arlo app.
2. Tap Settings > My Devices.
3. Select the camera.
4. Under VIDEO, tap Activity Zones.
5. Tap +.
An activity zone box displays in the camera feed image.
6. Move the zone to the desired position in the camera feed image.
7. To reposition or resize the zone, tap and hold the zone and move it.
8. To customize the zone name, tap Edit
If you’re using a web browser, click > next to the zone name.
9. Tap Save.
and enter a name.
Change an activity zone
1. Open the Arlo app.
2. Tap Settings > My Devices.
3. Select the camera.
4. Under VIDEO, tap Activity Zones.
5. Tap a zone to select it.
6. Move the zone to the desired position in the camera feed image.
7. To reposition or resize the zone, tap and hold the zone and move it.
33Use Your Go 2 Camera
User Manual
Page 34

Arlo Go 2 LTE/WiFi Security Camera
8. To customize the zone name, tap Edit and enter a name.
If you’re using a web browser, click > next to the zone name.
9. Tap Save.
Delete an activity zone
1. Open the Arlo app.
2. Tap Settings > My Devices.
3. Select the camera.
4. Under VIDEO, tap Activity Zones.
5. Tap a zone to select it.
6. Delete the device.
On an iOS device, slide the motion detection zone to the le and tap Delete.
On an Android device, slide the motion detection zone to the le.
2-Way Audio
The camera includes a microphone that supports 2-Way Audio.
1. Open the Arlo app.
2. Tap the camera feed image.
3. Tap the microphone icon
4. The rst time you use 2-Way Audio, allow Arlo to use your phone’s microphone.
5. Tap the microphone button.
2-Way Audio is activated.
A Tap to mute microphone button displays below the camera feed. This button toggles
mute on and o.
6. To turn o 2-Way Audio, tap the x on the upper-le corner of the page.
.
34Use Your Go 2 Camera
User Manual
Page 35

Arlo Go 2 LTE/WiFi Security Camera
Turn the camera’s siren on and o manually
Your camera includes a built-in siren. You can turn this siren on and o manually and you can
also set up a rule for an armed mode to specify when the siren turns on if your camera detects
motion. For information about using a rule in a mode, see Use a rule to activate the camera’s
siren on page 41.
To turn the siren on and o manually:
1. Open the Arlo app.
2. Tap Siren
3. Tap Activate Siren.
If you have multiple cameras, you are prompted to select one.
4. Swipe the siren icon to the right.
The camera siren turns on.
5. To turn o the siren, tap the slider at the top of the Devices page.
on the upper right.
View recordings and snapshots
With an Arlo Secure subscription, your camera stores recordings and snapshots in the library.
You can use the lter and the calender to nd and view specic recordings.
Access cloud recordings
Cloud recording requires an Arlo Secure subscription. Cameras record when they are in an
armed mode and they detect motion or sound. Your Arlo recordings are sent to your Arlo
account in the cloud and stored in your library. Recordings are encrypted with your user name
and password.
You can access your recordings from the Arlo app on your mobile device or by using a web
browser to visit https://my.arlo.com/#/login. You can download recordings from the cloud and
save them.
Use the Library
You can use the library to nd and view recordings based on the date.
1. Open the Arlo app.
2. Tap Library.
35Use Your Go 2 Camera
User Manual
Page 36

Arlo Go 2 LTE/WiFi Security Camera
A green circle indicates the selected day. A green dot below the date indicates each day on
which a video clip was recorded.
3. Tap a highlighted date.
Recordings from that date display below the calendar.
Use the lter
You can use the lter to nd and view recordings based on criteria that you select.
1. Open the Arlo app.
2. Tap Library.
3. Tap Filter in the upper le corner of the page.
4. Tap the ltering criteria that you want to use.
5. Tap Done.
Turn o the lter
1. Open the Arlo app.
2. Tap Library.
3. Tap Filter in the upper le corner of the page.
4. Tap Reset.
5. Tap Done.
Download recordings
1. Open the Arlo app.
2. Tap Library.
3. Tap a recording.
4. Tap Download.
5. Tap OK to conrm.
Make a recording a favorite
1. Open the Arlo app.
2. Tap Library.
36Use Your Go 2 Camera
User Manual
Page 37

Arlo Go 2 LTE/WiFi Security Camera
3. Tap a recording.
4. Tap Favorite.
Share recordings
1. Open the Arlo app.
2. Tap Library.
3. Tap a recording.
4. Tap Share.
5. Share the le.
Donate recordings for research
You can donate video or snapshot les to Arlo to use for research and development of Arlo
products.
1. Open the Arlo app.
2. Tap Library.
3. Tap a recording.
4. Tap Donate.
5. Tap OK to conrm.
Delete recordings
1. Open the Arlo app.
2. Tap Library.
3. Tap a recording.
4. Tap Delete.
5. Tap OK to conrm.
37Use Your Go 2 Camera
User Manual
Page 38

6. Modes, Rules, and Alerts
You can arm or disarm your Arlo cameras and devices, and you can set up a schedule to
automatically arm each device. When your camera is armed, it detects motion. Modes and
rules let you tell your Arlo system what to do automatically in dierent situations. For
example, you can set your Arlo system to record a video when it detects motion and send you
an email alert.
Arm or disarm all your Arlo devices
You can arm or disarm all your Arlo devices simultaneously. Doing this deactivates other
modes, such as Schedule, Geofencing, and Custom modes for all your Arlo devices. To return
a device to another mode, select the device and then select a mode.
To arm or disarm all your Arlo devices:
1. Open the Arlo app.
2. Tap Modes.
3. Tap Arm All Devices or Disarm All Devices.
Modes
Arlo modes give you control over how your Arlo cameras respond to motion. For example, you
probably don’t want to receive an alert about motion in your yard in the daytime when you’re
gardening. You might want to turn on a dierent mode when you’re away on vacation. Modes
let you tell your cameras to respond dierently at dierent times.
The Arlo app comes with these modes:
Armed. Detection is on for this camera.
Disarmed. Detection is o for this camera.
Schedule. Manage detection based on a schedule.
Geofencing. You can arm, disarm, or resume a schedule mode when you
arrive at, or leave, a given location based on your mobile device location.
38
Page 39

Arlo Go 2 LTE/WiFi Security Camera
You can customize the Armed and Schedule modes and you can add new modes. You might
want to create a mode in which some cameras are active but others aren’t. For example, when
you’re sleeping, you might want to arm your outdoor camera and disarm your indoor camera.
You can create dierent modes for the same camera, but the camera can only use one mode
at a time.
Select a mode
You can select a mode or set modes to activate according to a schedule.
1. Open the Arlo app.
2. Tap Mode.
3. Select your camera.
A list of modes displays.
4. Tap a mode to activate it.
The mode turns on immediately. The mode stays active until you change it.
Mute Notications
Mute Notications temporarily silences push notications to your mobile device, while videos
continue to be recorded. This is great for a party when you don’t need to be notied of friends
in your backyard.
You can mute notications from the Arlo app. If you use Arlo Secure, you can also activate
Mute Notications directly from push notications.
To mute notications:
1. Open the Arlo app.
2. Tap Settings > Mute Notications.
3. Select the length of time to mute notications.
A message displays conrming that you are muting notications. The Mute Notication
status shows the amount of remaining time until notications resume.
To unmute notications
1. Open the Arlo app.
2. Tap Settings > Mute Notications > Unmute.
The Mute Notications status changes to O.
39Modes, Rules, and Alerts
User Manual
Page 40

Arlo Go 2 LTE/WiFi Security Camera
Rules for modes
Each mode uses one or more rules to control your Arlo system. You can set these options.
• Trigger device. The trigger device is the camera that detects motion. You can adjust the
motion sensitivity to minimize false alarms.
• Action device. The action device responds to motion detection on the trigger device. For
example, you might want your backyard camera or your driveway camera to trigger your
door camera to start recording video. You decide what action each camera takes when
motion is detected.
• Notications. When a trigger is detected, the Arlo can send you push notications, email
alerts, or both. You can also send email alerts to friends, family members, pet sitters, or
anyone who might need to respond when a camera is triggered.
Change motion sensitivity
You can edit a rule to change the motion sensitivity level for your cameras.
1. Open the Arlo app.
2. Tap Mode.
3. Select your camera.
A list of modes displays.
4. Tap Edit
5. Tap Edit
6. Under If the following, tap Edit
7. Move the slider to adjust the sensitivity level for motion detection for this camera.
If you used a mobile device to specify the settings, your settings are saved.
8. If you used a browser to specify the settings, click Save.
next to the mode.
next to the rule.
next to Motion is detected.
Control whether the spotlight turns on when motion is detected
Your Go 2 Camera includes an integrated spotlight. This spotlight is set to automatically turn
on when your camera detects motion at night. The spotlight improves video quality and
allows your camera to record video in color at night rather than in traditional black-and-
40Modes, Rules, and Alerts
User Manual
Page 41

Arlo Go 2 LTE/WiFi Security Camera
white. You can turn the spotlight on and o and you can adjust the spotlight behavior and
brightness.
Note: You can manually turn the spotlight on and o at any time from the camera feed by
tapping Spotlight
comes on automatically when your camera detects motion at night. For information about
Low Light settings, see Change the Low Light settings on page 49.
. You can also use the Low Light settings to control whether the spotlight
Use a rule to activate the camera’s siren
1. Open the Arlo app.
2. Tap Mode.
3. Tap the camera.
A list of modes displays.
4. Tap Edit
5. Tap Edit
6. Under Then do the following, tap Activate Siren and then tap Edit
The Siren Settings page displays.
7. Specify the Siren Duration and the Siren Loudness.
next to the mode.
next to the rule.
.
Manage alerts
Arlo can push notications to your smartphone, send you email alerts, or do both. To receive
Arlo notications on your phone, you must install the Arlo app on your phone.
Note: If you log out of the Arlo app on your smartphone or mobile device, you will stop
receiving push notications.
1. Open the Arlo app.
2. Tap Mode.
3. Tap the camera.
A list of modes displays.
4. Tap Edit
Note: The Disarmed mode does not send alerts.
next to the mode.
41Modes, Rules, and Alerts
User Manual
Page 42

Arlo Go 2 LTE/WiFi Security Camera
5. Under Alert, tap Push Notication to turn alerts on and o for your mobile device.
6. Under Alert, tap Email Alerts to turn email notications on and o.
7. To specify an email address, tap Edit
next to Email Alerts and enter the email address.
Schedule when your camera is armed
You can set a schedule to specify the days and times during the week when your camera is
set to respond to motion triggers. Schedules recur weekly. For example, the schedule for
Tuesday repeats every Tuesday as long as the schedule is turned on.
To schedule when your camera responds to motion triggers:
1. Open the Arlo app.
2. Tap Mode.
3. Tap the camera.
A list of modes displays.
4. Tap Schedule
5. Tap Edit
6. Tap Add or +.
.
next to Schedule.
7. Set the days and times for your new schedule.
Note: To add an overnight schedule such as 8:00 p.m. to 6:00 a.m., you need to add two
separate schedules. First, add 8:00 p.m. to 11:59 p.m., then add 12:00 a.m. to 6:00 a.m.
8. Tap Done.
Edit a schedule
1. Open the Arlo app.
2. Tap Mode.
3. Tap the camera.
A list of modes displays.
4. Tap Schedule
5. Tap Edit
6. Tap a green box.
.
next to Schedule.
42Modes, Rules, and Alerts
User Manual
Page 43

Arlo Go 2 LTE/WiFi Security Camera
7. Change the start and stop times and tap Save.
Set up Arlo Geofencing
Geofencing is a virtual fence around a location called a zone. You can use Arlo Geofencing to
arm, disarm, or resume schedule modes when your mobile device is in zone or out of zone.
To set up geofencing, you must use your mobile device and allow the Arlo app to use your
location.
Geofencing accuracy
For accuracy, geofencing uses a combination of GPS, cellular data, and WiFi data of your
mobile device.
• In urban environments, where the cell towers and WiFi routers are more dense, geofencing
accuracy can reach 100–200 meters.
Note: If you live in a skyscraper, geofencing might not work reliably due to GPS
inaccuracies. Using the Large radius setting might help.
• In rural areas, where cell towers and WiFi routers are sparse, geofencing accuracy can
reach several hundred meters.
To improve geofencing accuracy, make sure that your mobile device meets these conditions:
• WiFi is turned on.
• GPS or location services are turned on.
Prepare your mobile device for geofencing
1. Enable GPS or location services so that Arlo can locate your mobile device.
2. Enable WiFi.
3. Download the Arlo app and log in on each mobile device that you plan to enable for
geofencing.
For Arlo Geofencing to work on your device, you must adjust the settings on your Android or
iOS mobile device as follows:
Android devices
• Location permission = On
• Location services = On
• Battery saver = O
• Data limit = O
43Modes, Rules, and Alerts
User Manual
Page 44

Arlo Go 2 LTE/WiFi Security Camera
• Airplane mode = O
• Push notications = Enabled
iOS (Apple) devices
• Share my location = On
• Location services = Always
• Airplane mode = O
• Push notications = Enabled
• Background App Refresh = Enabled
• Cellular Data = Enabled
• Push notications = Enabled
Set up geofencing for the rst time and set up modes
1. Open the Arlo app.
2. Tap Mode.
3. Tap the camera.
A list of modes displays.
4. Tap Geofencing
5. Allow the Arlo app to use your mobile device’s location.
Geofencing works only if Arlo can locate your mobile device. The Location Address page
displays your current address.
6. To change the radius setting, tap Radius and select a radius size.
Radius sizes are Small, Medium, and Large (approximately 150 meters, 250 meters, and
500 meters, respectively).
7. Tap Device Location and enter a name for your location.
8. Tap Away Mode and select a mode.
Your camera uses the Away mode when your mobile device is outside the radius of your
camera’s location. Most people select Armed, Schedule, or Custom Mode so that the
camera detects motion while they’re gone.
.
9. Tap Home Mode and select a mode.
Your camera uses this mode when your mobile device is within the radius of your camera’s
location. Most people select Disarmed while they’re home.
44Modes, Rules, and Alerts
User Manual
Page 45

Arlo Go 2 LTE/WiFi Security Camera
If you use more than one enabled mobile device, you might be asked to select an Arlo
device to connect it to.
10. To select the preferred mobile device, tap the device and then tap Next.
11. Tap Save.
For troubleshooting tips, see Troubleshoot Arlo Geofencing on page 68.
Geofencing with multiple mobile devices
Arlo Geofencing works with multiple mobile devices.
Arlo uses the rst-in, last-out principal to manage households where more than one person
uses geofencing. If everyone leaves home with their mobile devices, this triggers an away
state. Since no one is inside the geofence, your cameras are armed. When the rst person
comes home (rst in), their mobile device is now inside the geofence, triggering the home
state and your cameras are disarmed. If one person leaves, but another is still home, the
cameras stay disarmed in the home state until the last person leaves (last out).
We recommend that you enable geofencing only for the mobile device that each person
carries every day. For example, if you use a smartphone and a tablet, and you take your phone
when you leave, set your phone as an Enabled Device in your Geofencing settings. Don’t set
your tablet as an enabled device, because Away mode won’t be triggered when you go out
and leave your tablet home.
The Geofencing mode only changes from Home to Away when all enabled mobile devices are
outside the Device Location in your Geofencing settings.
To review which mobile devices participate in geofencing, open the Arlo app and check the
Enabled Devices page in Geofencing settings (in the Modes section of the Arlo app). Remove
any devices that you don’t want to trigger Home/Away mode changes.
Make sure that these conditions are met:
• Your Arlo devices are online.
• Geofencing is enabled.
• Your friends’ and family’s mobile devices are added to your account.
For information about adding devices, see Enable or disable geofencing for friends’ mobile
devices on page 46.
• (Required when your friend wants to participate in geofencing.) Your friend is logged in to
the Arlo app on his or her mobile device and the GPS or location service is enabled on your
friend’s mobile device.
45Modes, Rules, and Alerts
User Manual
Page 46

Arlo Go 2 LTE/WiFi Security Camera
Enable or disable geofencing for friends’ mobile devices
1. Open the Arlo app.
2. Tap Mode.
3. Tap the camera.
A list of modes displays.
4. Tap Edit
5. Tap Enabled Devices.
A list of mobile devices displays. A check mark appears next to the device name when
geofencing is enabled.
6. Tap one or more mobile devices.
The device location displays as either In Zone, Out of Zone, or Unavailable (if there’s an
issue contacting that device).
7. To disable geofencing, tap the mobile device again.
The check mark disappears when geofencing is disabled.
For more information, see Set up Arlo Geofencing on page 43.
next to Geofencing.
Custom modes
You can add modes in addition to the modes that come with the Arlo app and give the new
modes custom names, such as Vacation. You can create one rule for each mode. You can
create multiple rules within the same mode, so that each camera performs dierent actions
and sends dierent alerts. You can also use Schedule mode to activate modes automatically
at dierent times of the day or week. (See Schedule when your camera is armed on page 42.
Add a mode
1. Open the Arlo app.
2. Tap Mode.
3. Tap the camera.
A list of modes displays.
4. Tap Add a Mode.
5. Enter the mode name and tap Next.
46Modes, Rules, and Alerts
User Manual
Page 47

Arlo Go 2 LTE/WiFi Security Camera
6. Select the trigger device and tap Next.
This is the camera that detects motion.
7. Enter the trigger device settings for the When motion is detected section and then tap
Next.
8. Use the slider to set the motion sensitivity for the trigger device and tap Next.
Higher motion sensitivity settings usually trigger your camera to capture videos more
frequently.
9. Select an action device and tap Next.
This is the Arlo device that performs an action when the trigger device detects motion. You
can select the same Arlo device you’re using as a trigger or a dierent Arlo device.
10. Select an action such as Record video and tap Next.
If you’re using a computer web browser, you can also specify the recording time setting.
11. Select the notications for Arlo to send when motion is detected and then tap Next.
12. Review your settings and tap Save.
47Modes, Rules, and Alerts
User Manual
Page 48

7. Change Your Settings
Once you set up your Arlo account, you can access it by using the Arlo app on a smartphone
or tablet, or from a computer using a web browser. If you’re using a computer, enter https://
my.arlo.com/#/login in the address bar of the browser.
Camera settings
You can view or change the settings for each camera using either of these methods:
• Tap Settings > My Devices and select the camera
• Tap the Menu icon
or the Device Settings icon below the camera feed.
Change the camera name
1. Open the Arlo app.
2. Tap Settings > My Devices.
3. Tap the camera.
4. Tap Edit
5. Enter a new name that reminds you of the camera’s location, such as Garage or Front
Door.
Camera names are limited to 32 characters.
6. Tap Save.
next to the camera name.
Turn o the camera LED
The LED on the camera lights in dierent colors. (See Check the LED on page 11.) You can
turn o this LED.
1. Open the Arlo app.
2. Tap Settings > My Devices.
3. Tap the camera.
48
Page 49

Arlo Go 2 LTE/WiFi Security Camera
4. Tap Camera LED.
5. Tap Battery Fully Charged Indicator to turn the LED o and on.
If you’re using a mobile device, your settings are saved.
6. If you’re using a computer, click Save.
Change the time zone
1. Open the Arlo app.
2. Tap Settings > My Devices.
3. Tap the camera.
4. Tap Time Zone.
5. Tap a time zone.
If you’re using a mobile device, your settings are saved.
6. If you’re using a computer, click Save.
Video Settings
Change the video quality and battery usage
You can set the video resolution as Best Video, Optimized, or Best Battery Life. Using the Best
Battery Life setting reduces the WiFi bandwidth that is required.
1. Open the Arlo app.
2. Tap Settings > My Devices.
3. Tap the camera.
4. Tap Video Settings > Power Management.
5. Tap to select Best Video, Optimized, or Best Battery Life.
Change the Low Light settings
The Go 2 Camera includes an integrated spotlight. This spotlight is set to automatically turn
on when your camera detects motion at night. The spotlight improves video quality and
allows your camera to record video in color at night rather than in traditional black and
white. You can turn the spotlight on and o and you can adjust the spotlight behavior and
brightness.
49Change Your Settings
User Manual
Page 50

Arlo Go 2 LTE/WiFi Security Camera
Note: You can manually turn the spotlight on and o at any time from the camera feed by
tapping Spotlight
comes on automatically when your camera detects motion at night.
To change the low light settings for the spotlight:
1. Open the Arlo app.
2. Tap Settings > My Devices.
3. Tap camera.
4. Tap Video Settings > Low Light Settings.
5. Adjust the settings to customize your spotlight:
• Spotlight. Toggle the spotlight on and o. When the Spotlight setting is set to the On
position, the spotlight automatically turns on when your Arlo camera detects motion
at night.
. You can also use the Low Light settings to control whether the spotlight
• Color. Toggle color video recording at night on and o.
• Behavior. Select the spotlight behavior that you prefer: Constant, Flash, or Pulsate.
• Brightness. Use the slider to adjust the brightness level
• Night Vision. Toggle Night Vision on and o.
Adjust the audio settings
You can adjust the settings to turn the microphone o and on, and adjust the speaker.
1. Open the Arlo app.
2. Tap Settings > My Devices.
3. Tap the camera.
4. If you’re using a mobile device, tap Audio Settings.
5. Adjust the settings:
• Microphone toggle turns the microphone o and on.
• Speaker toggle and volume. To turn the speaker o and on, tap Speaker. To change
the speaker volume, move the Speaker Volume slider.
50Change Your Settings
User Manual
Page 51

Arlo Go 2 LTE/WiFi Security Camera
Adjust the icker setting
The combination of certain articial light sources and the camera shutter speed might cause
ickering in the recorded video. The default setting is Auto, but you can change the icker
adjustment.
1. Open the Arlo app.
2. Tap Settings > My Devices.
3. Select the camera.
4. Tap Flicker Adjustment.
5. Tap a setting.
Restart the camera from the Arlo app
1. Open the Arlo app.
2. Tap Settings > My Devices.
3. Select the camera.
4. Scroll down to the bottom of the page and tap Restart.
View device information
You can view the rmware version, hardware version, and the serial number.
1. Open the Arlo app.
2. Tap Settings > My Devices.
3. Tap the device.
4. Tap Device Info.
Remove a device from your account
1. Open the Arlo app.
2. Tap Settings > My Devices.
3. Tap the camera.
4. Scroll down and tap Remove Device.
51Change Your Settings
User Manual
Page 52
8. SD Card Storage
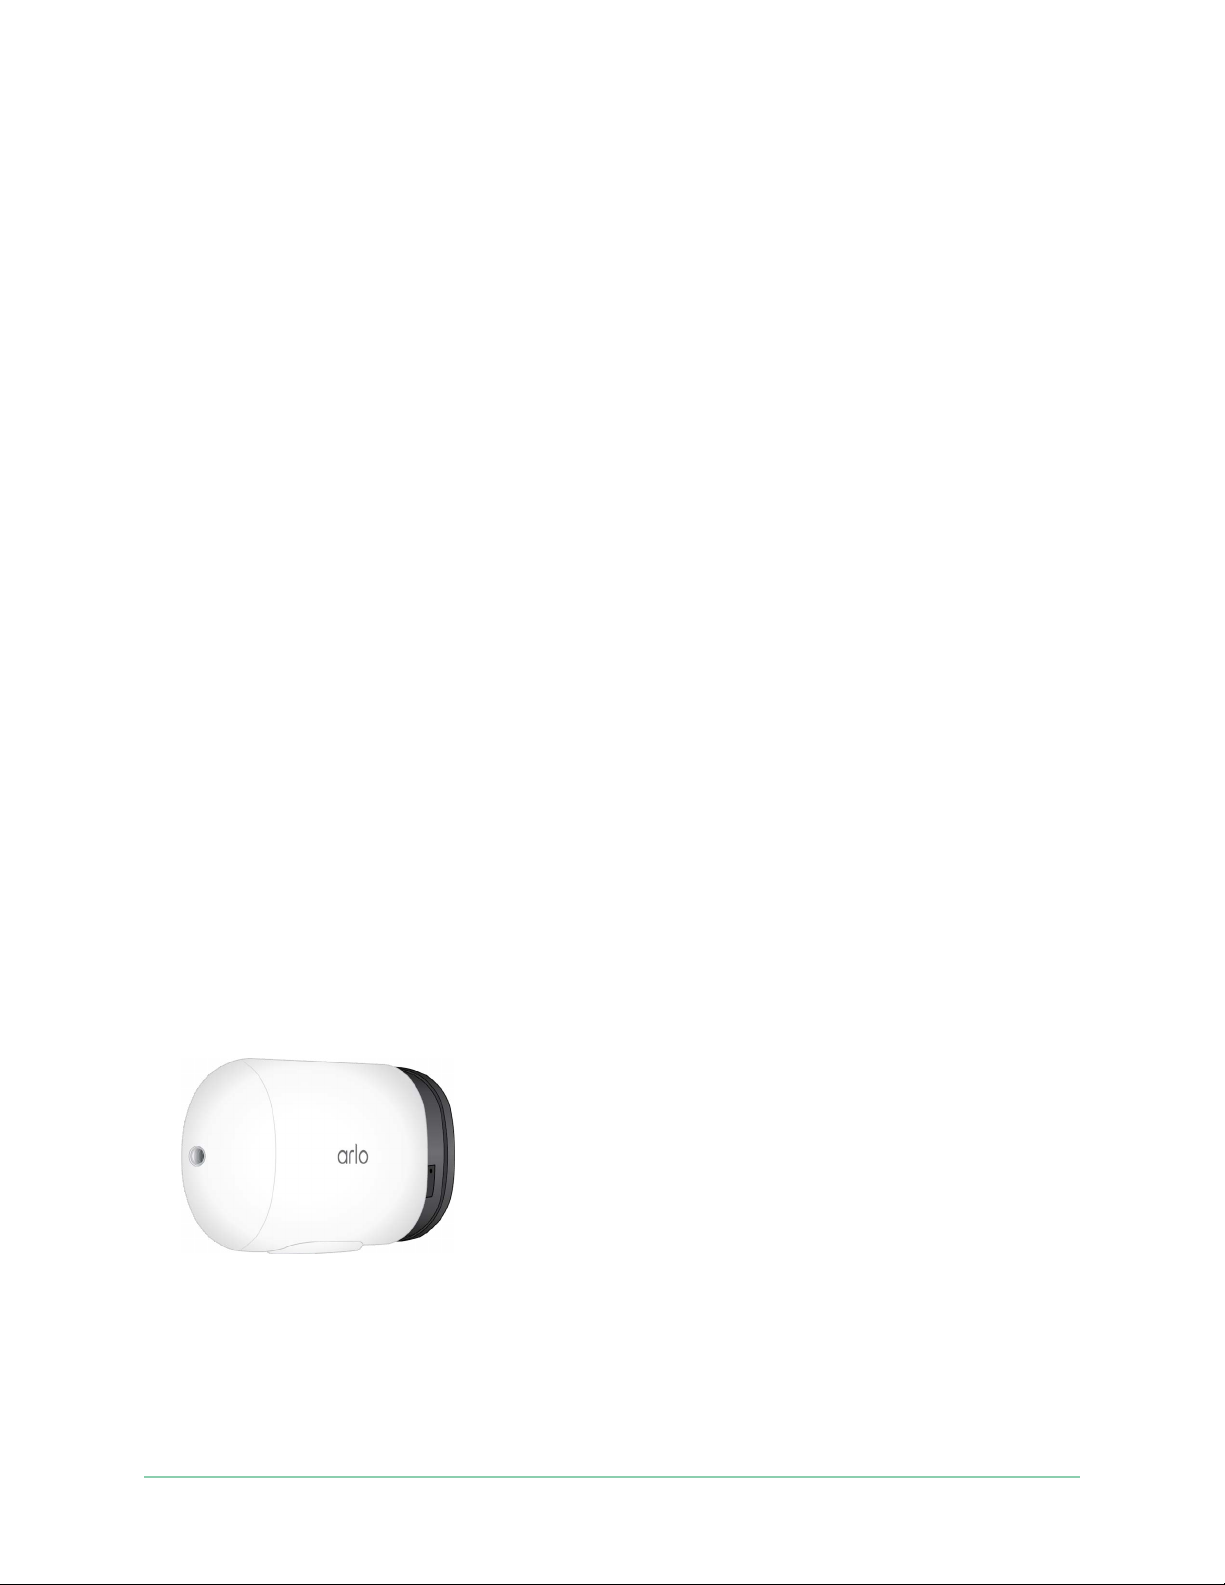
You can insert a micro SD card (sold separately) into the micro SD card slot in your Go 2
Camera and store your Arlo recordings either in the cloud or on the SD card. If your camera
isn’t connected to the internet, recordings continue to be saved on the micro SD card. Your
Arlo app noties you when the SD card is low on storage space or is full.
Micro SD card format
Your Go 2 Camera accepts SD, SDHC (UHS-I), or SDXC (UHS-I) micro SD cards, Speed Class 10,
UH1 or U3, with capacity up to 2 TB.
If your micro SD card isn’t formatted, or is formatted with an incompatible le system, you can
use your Arlo app to format the micro SD card. See Format a micro SD card on page 54.
Install a micro SD card in your Go 2 Camera
1. Bring the Arlo Go 2 Camera indoors.
We recommend that you bring your camera indoors before removing its housing to avoid
potentially exposing the inside of the camera to water intrusion.
2. Press the release button to release the camera from its housing.
With a click sound, the camera slides partially out of the housing.
3. Pull the camera until it separates from the housing.
52
Page 53
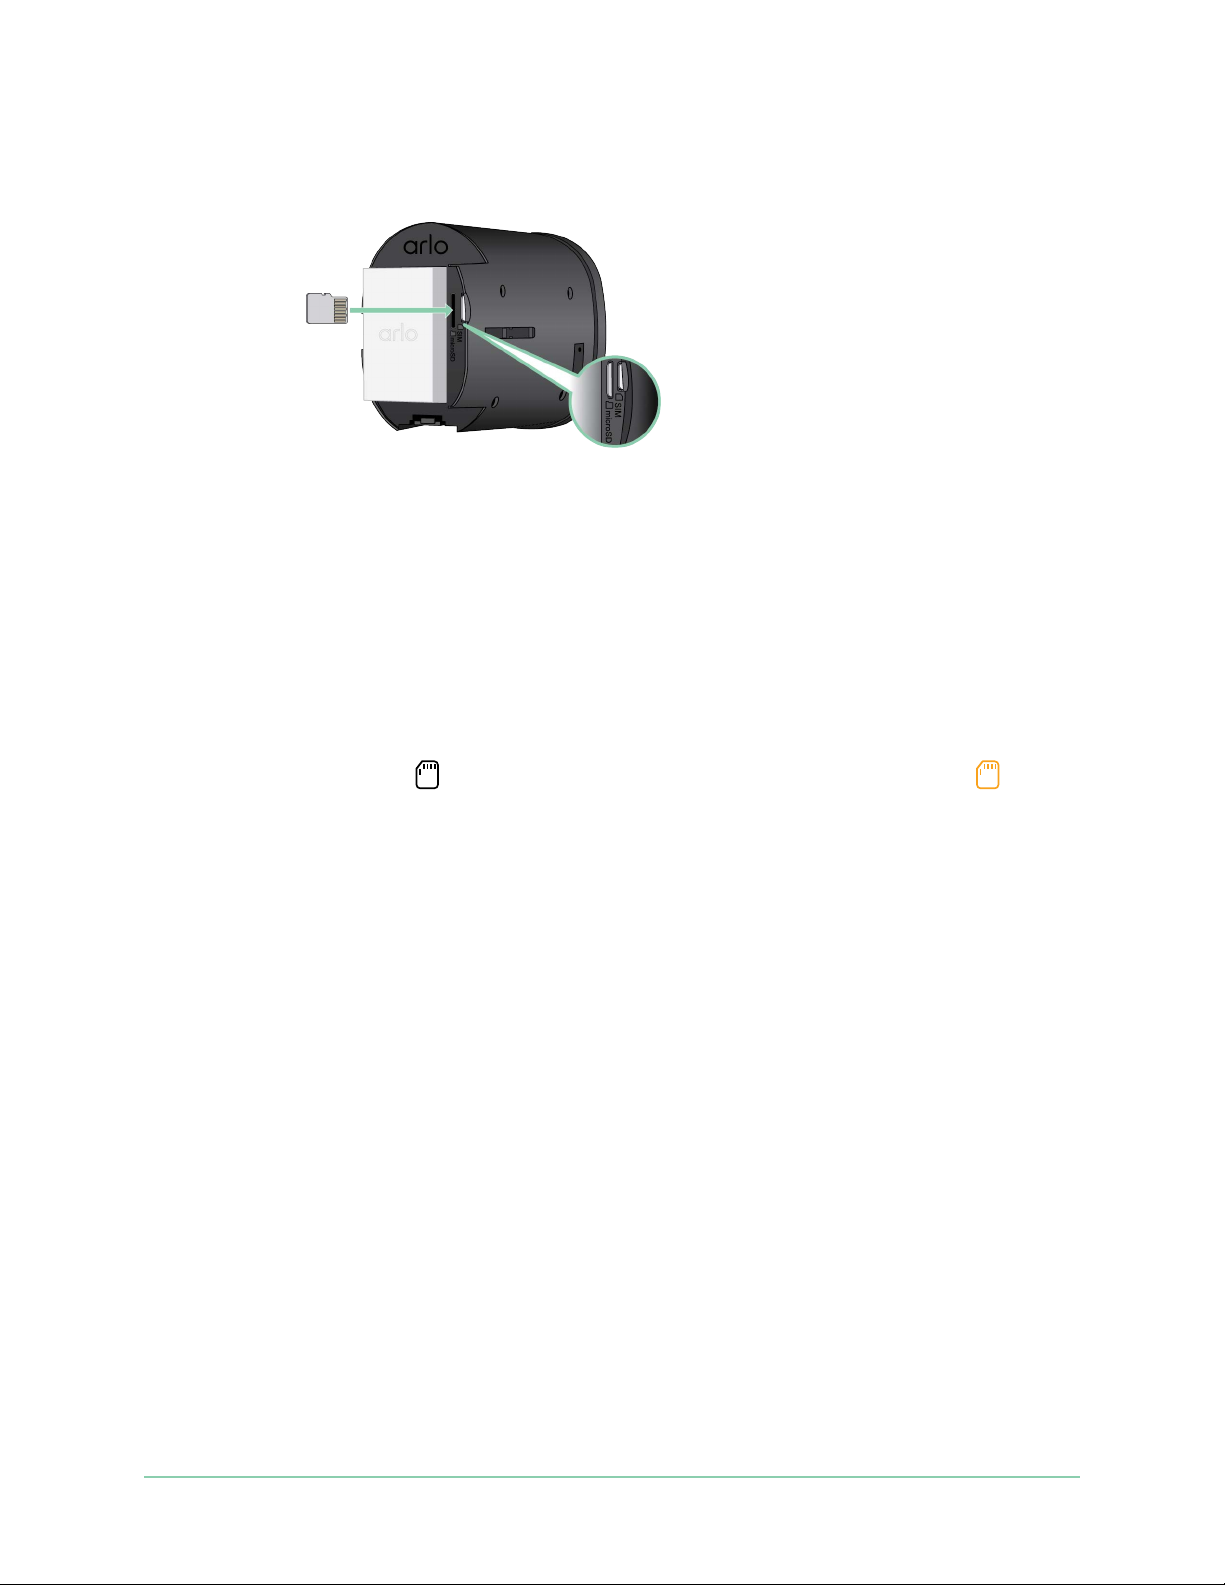
Arlo Go 2 LTE/WiFi Security Camera
4. Insert the micro SD card into the micro SD card slot.
Press the edge of the SD card until it’s completely seated in the slot.
Micro SD card
Note: The SIM card slot is located next to the micro SD card slot.
5. Slide the camera back inside the camera housing until it clicks.
View the SD card status
1. Open the Arlo app.
2. Tap your Go 2 Camera.
3. Check the SD card icon
4. To view more information about the micro SD card status, under LOCAL STORAGE, tap
Storage Settings.
The SD Card Status displays GOOD or indicates if the SD card needs to be formatted, or is
full. The Arlo app also noties you if the card needs to be formatted or is full.
. When a micro SD card is installed, this icon is amber .
View available SD card storage
The Arlo app noties you if the SD card is getting full, but you can also view the available
storage.
1. Open the Arlo app.
2. Tap your Go 2 Camera.
The Available Storage eld displays the amount of storage available on the SD card.
53SD Card Storage
User Manual
Page 54

Arlo Go 2 LTE/WiFi Security Camera
Turn SD card recording o and on
1. Open the Arlo app.
2. Tap your Go 2 Camera.
3. Tap Storage Settings > SD Card Recording.
SD card recording toggles o and on.
Change the SD card Overwrite setting
By default, if the SD card lls up, the oldest Arlo recording is erased to make room for new
recordings. Files on the SD card that aren’t in the Arlo folder aren’t deleted to make room
for Arlo recordings. You can change the setting so that no Arlo recordings are automatically
erased.
1. Open the Arlo app.
2. Tap your Go 2 Camera.
3. Tap Storage Settings > SD Card Recording.
4. Tap Overwrite Automatically.
The overwrite setting toggles o and on.
Format a micro SD card
The Arlo app displays a message to let you know if you need to format the SD card. The Go 2
Camera can format the SD card.
1. Open the Arlo app.
2. Tap your Go 2 Camera.
3. Tap Storage Settings > SD Card Recording.
4. Tap the red Format SD Card button.
54SD Card Storage
User Manual
Page 55
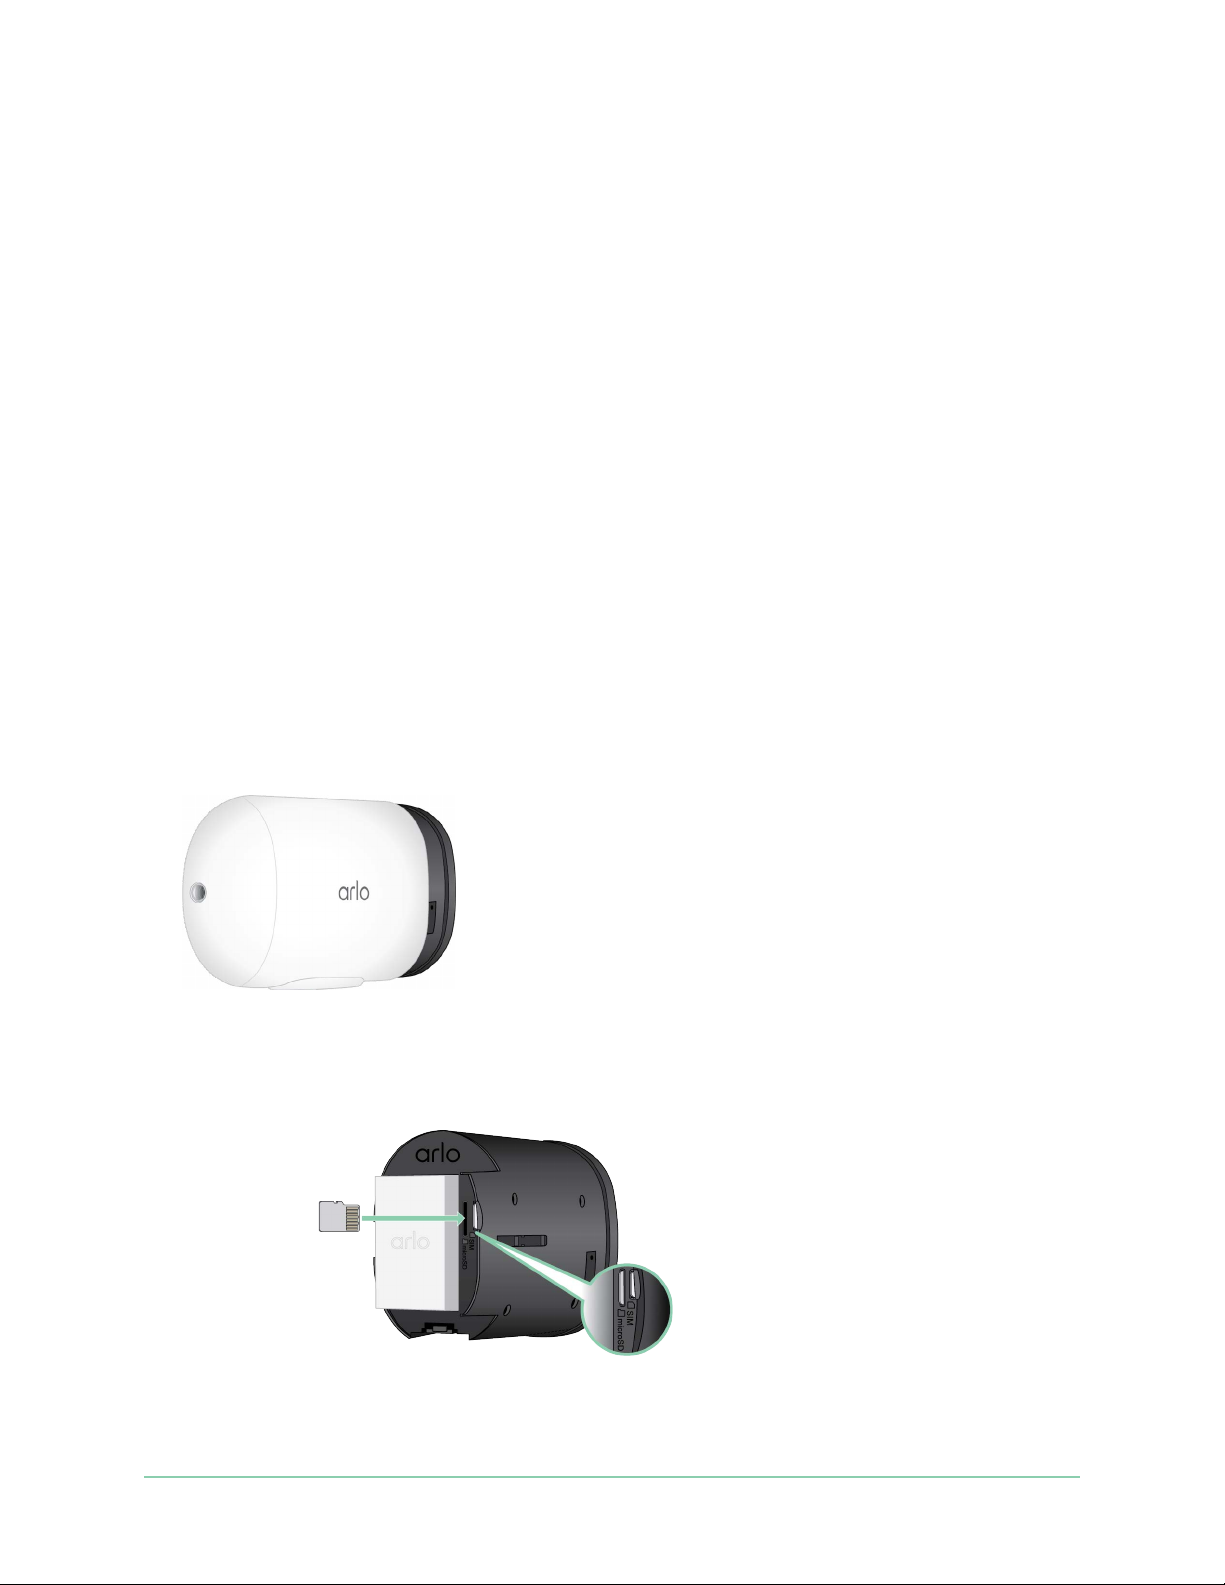
Arlo Go 2 LTE/WiFi Security Camera
Remove a micro SD card
It’s important to safely eject the micro SD card.
If you remove an SD card while information is being recorded on it, the SD card might become
permanently unusable or the les on the card might be corrupted.
1. Open the Arlo app.
2. Tap your Go 2 Camera.
3. Tap Storage Settings > SD Card Recording.
4. Tap Safely Eject SD Card.
5. Wait for the Unmounting SD Card progress message to close.
6. Bring the Arlo Go 2 Camera indoors.
We recommend that you bring your camera indoors before removing its housing to avoid
potentially exposing the inside of the camera to water intrusion.
7. Press the release button to release the camera from its housing.
With a click sound, the camera slides partially out of the housing.
8. Pull the camera until it separates from the housing.
9. Remove the SD card by pressing in on the edge of the card until it ejects.
Arlo SD card recording is disabled until you install an SD card.
Micro SD card
55SD Card Storage
User Manual
Page 56

Arlo Go 2 LTE/WiFi Security Camera
View videos on a micro SD card
To view Arlo videos saved on a micro SD card, you must remove the micro SD card from your
Go 2 Camera and use a micro SD card reader. (See Remove a micro SD card on page 55.)
The micro SD card reader can be part of your computer or a memory card reader with a USB
or micro USB connector. If you purchase an SD card reader, make sure that you choose one
that can read micro SD cards.
1. Safely remove the micro SD card.
For more information, see Remove a micro SD card on page 55.
2. Insert the micro SD card into the slot in your card reader.
3. Wait for the micro SD card to appear in the list of available drives on your computer, and
then open the drive folder to view the les on your micro SD card.
4. Open the Arlo folder.
Recorded videos are saved in this folder in MP4 format. Video les are named according
to this system: camera serial number_video number_date_video clip tag. Dates are in the
format YYYYMMDD.
Note: If you’re unable to play MP4 les on your computer, update your media player soware
to the latest version and try again. You can also download a free universal multimedia player,
such as VLC.
56SD Card Storage
User Manual
Page 57
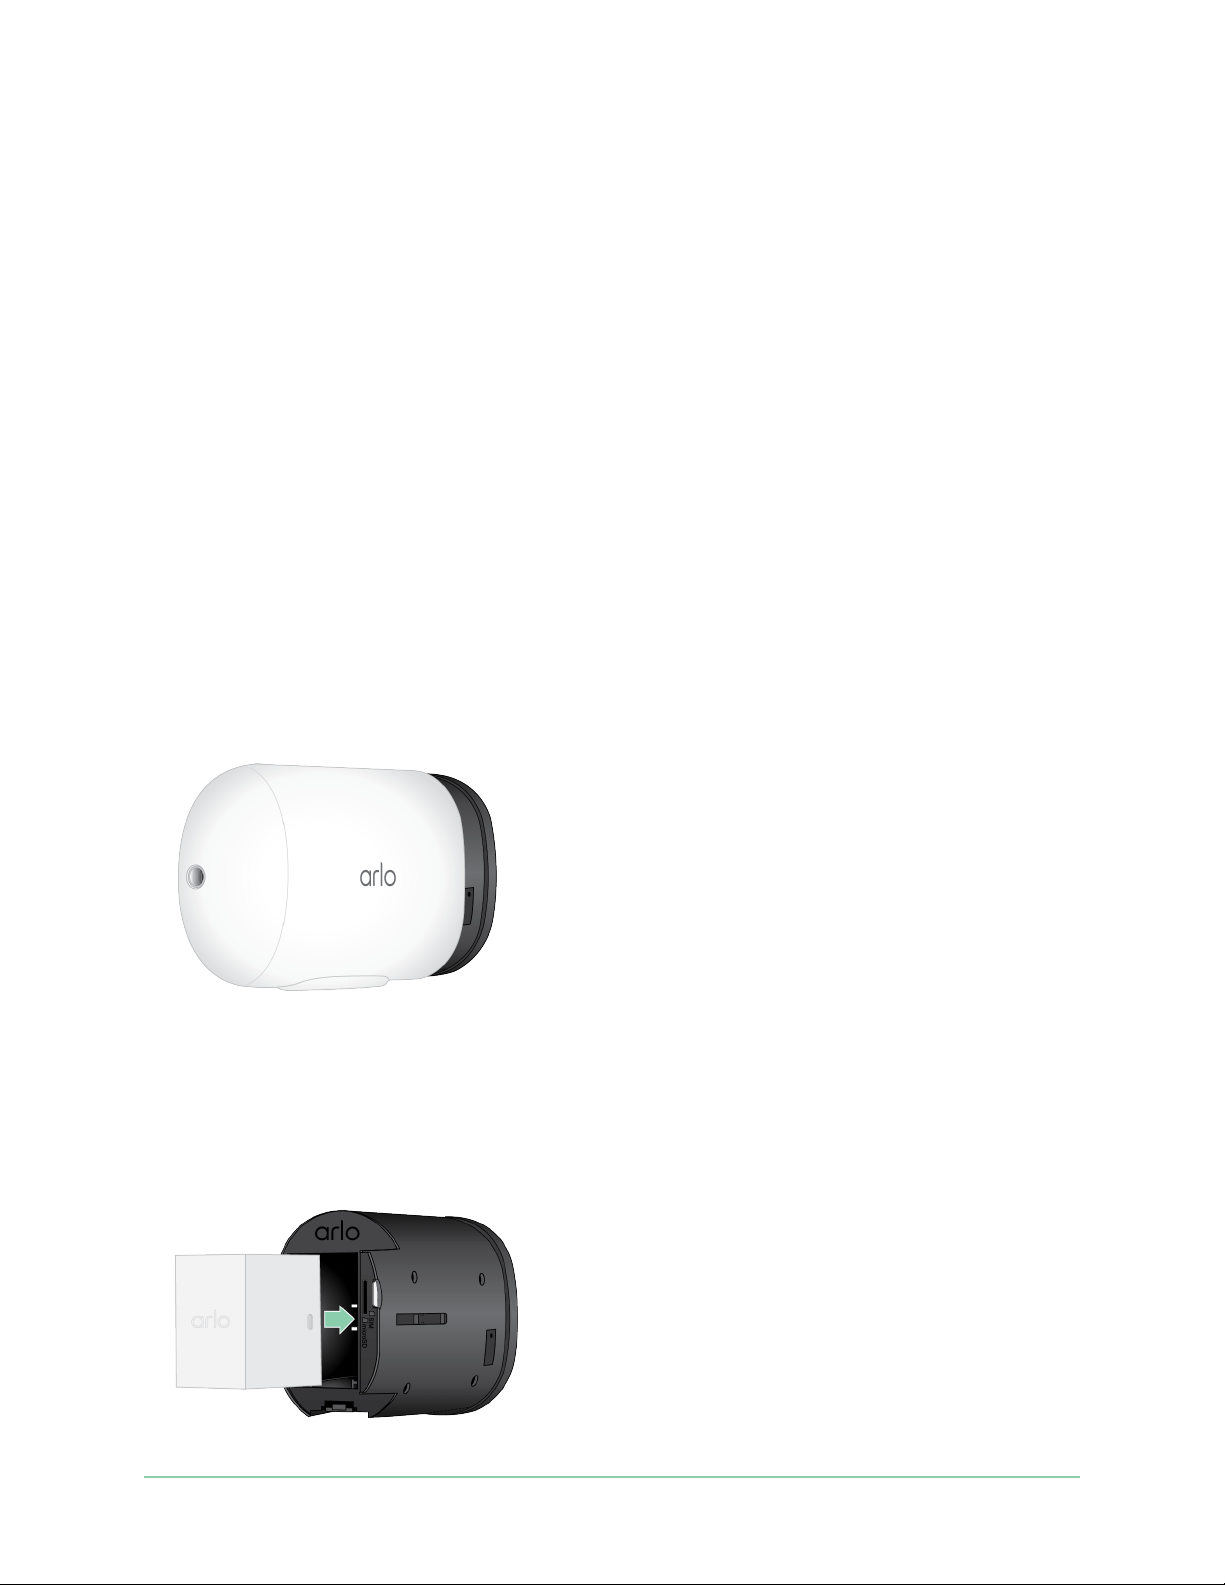
9. Arlo Rechargeable Battery
Your camera comes with an Arlo Rechargeable Battery. The battery is partially charged and
can be fully charged indoors using the charging cable that came in the package or by using
other Arlo accessories, which are sold separately.
Insert the camera battery
1. Bring the Arlo Go 2 Camera indoors.
2. Press the button on the magnetic charging port to release the camera from its housing.
With a click sound, the camera slides partially out of the housing.
3. Pull the camera until it separates from the housing.
4. Align the battery and insert it into the battery compartment.
The battery only inserts one way.
The LED on the camera blinks blue.
5. Insert the camera into the camera housing until it clicks into place.
57
Page 58
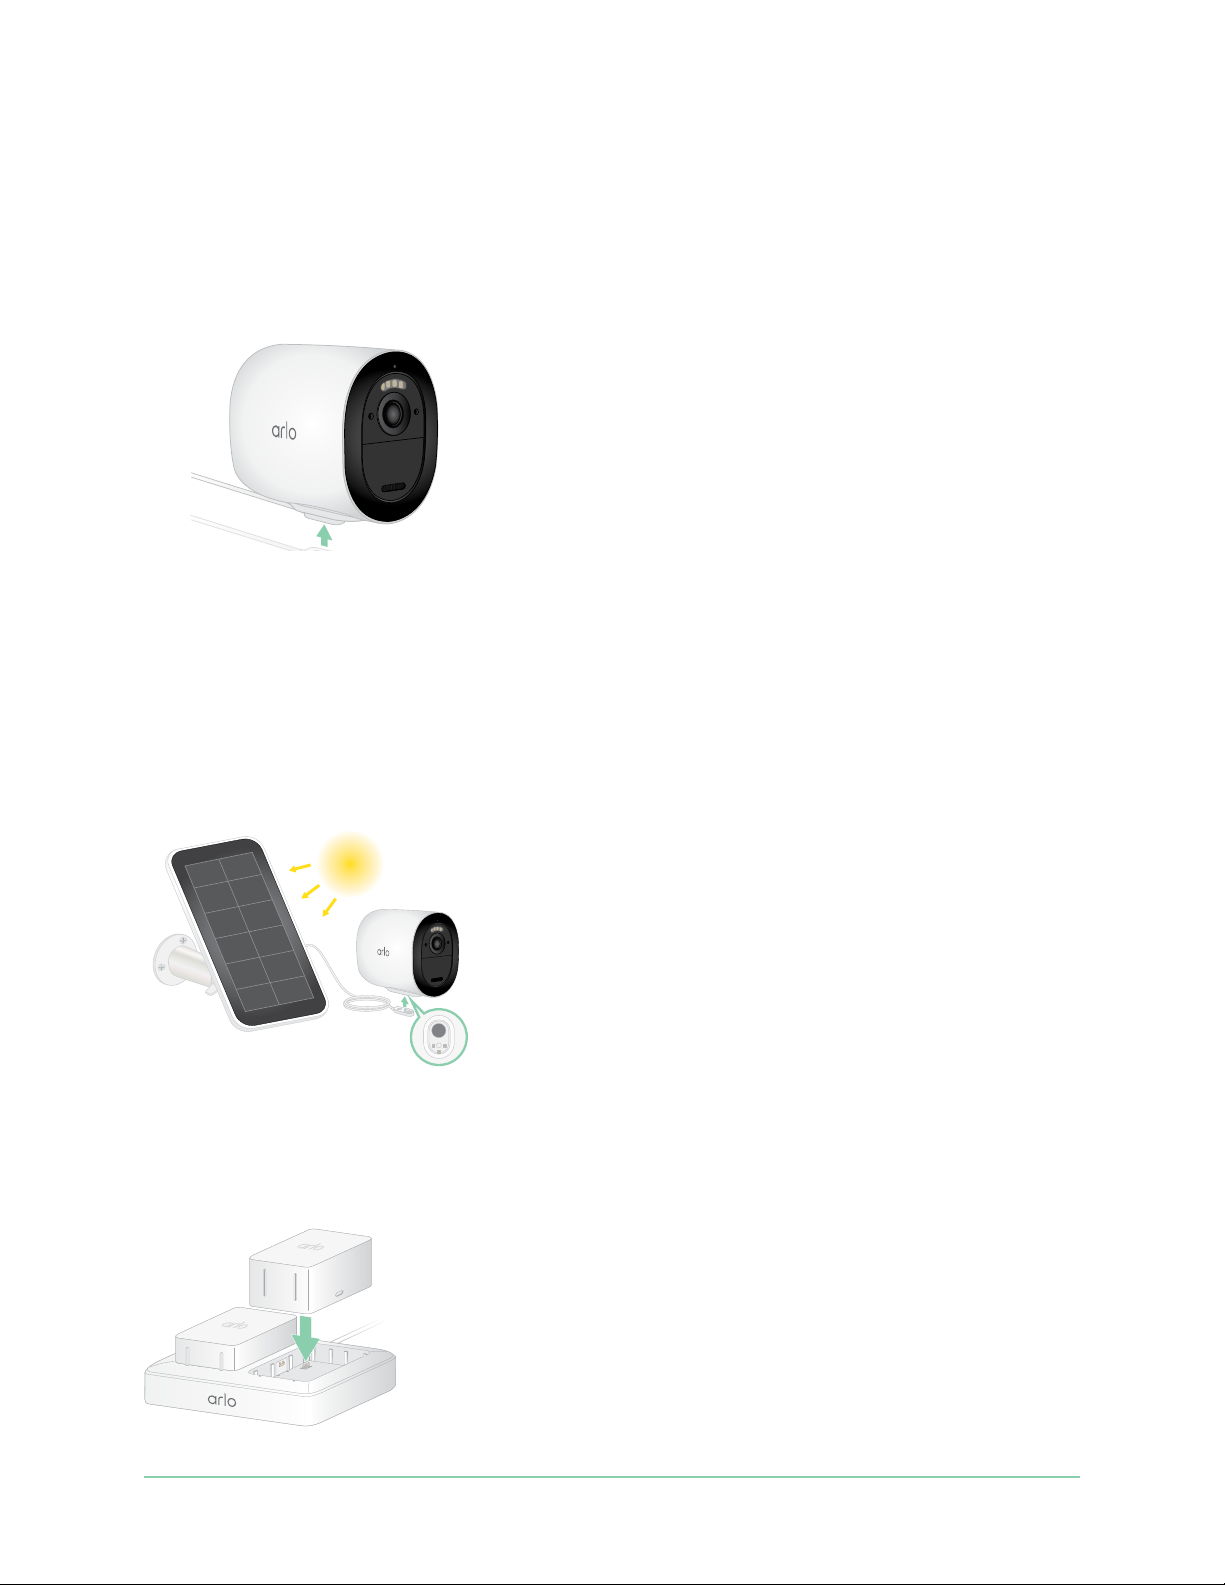
Arlo Go 2 LTE/WiFi Security Camera
Charge your camera battery indoors
You can charge the battery without removing it from the camera.
1. Snap the magnetic indoor charging cable onto the Go 2 Camera’s charging port.
The charging cable works with most AC power adapters.
2. Connect an AC power adapter to the charging cable and plug it in.
Solar Panel charging
You can use the Arlo Solar Panel VMA5600 (sold separately) to connect your camera to
continuous power. The solar panel uses direct sunlight to keep your battery charged. The
solar panel is weather-resistant and comes with an 8-foot magnetic power cable and
adjustable mount.
Arlo Dual Charging Station
You can purchase spare Arlo rechargeable batteries and an Arlo Dual Charging Station (sold
separately) to charge one or two Arlo rechargeable batteries.
58Arlo Rechargeable Battery
User Manual
Page 59

Arlo Go 2 LTE/WiFi Security Camera
Safe handling and usage guidelines for removable and rechargeable batteries
Batteries can EXPLODE, CATCH FIRE, and/or CAUSE BURNS if disassembled, punctured, cut,
crushed, short circuited, incinerated, recharged (disposable cells), or exposed to water, re, or
high temperatures
To ensure optimal safety and performance:
• Only use Arlo batteries. If you are unsure whether a replacement battery or charger is
compatible, contact Arlo.
• DO NOT use this battery for anything other than its intended purpose.
• DO NOT use a battery if its case appears damaged, swollen, or compromised. Examples
include, but are not limited to, leaking, odors, dents, corrosion, rust, cracks, swelling,
melting, and scratches.
• DO NOT disassemble, crush, puncture, short external contacts, or dispose of in re or
water.
• DO NOT expose the battery to re or temperatures greater than 60°C (140°F). Do not place
the battery next to areas that may become hot. Examples include, but are not limited to,
on or near a space heater, cooking surface, cooking appliance, iron, radiator, or replace.
• DO NOT get the battery or the Arlo device wet. Even though they might dry and appear to
operate normally, the circuitry can slowly corrode and defeat its safety circuitry.
• DO NOT place the battery in a pocket, purse, or other receptacle containing metal objects,
such as keys, jewelry, or tools.
• DO NOT store the battery with hazardous or combustible material. Store in a cool, dry,
ventilated area.
• ALWAYS keep the battery away from children.
• DO NOT load the battery backwards. MAKE SURE the battery compartment is empty and
free of any moisture or loose debris before inserting the battery.
• AVOID dropping the battery or the Arlo device. Dropping it, especially on a hard surface,
might cause damage to the battery or the Arlo device. If you suspect damage to the
battery or the Arlo device, replace it.
• ALWAYS follow the directions in the Quick Start Guide and/or written in the Arlo Product
User Manual.
• ALWAYS follow local waste and recycling laws and guidelines to dispose of used batteries.
59Arlo Rechargeable Battery
User Manual
Page 60

Arlo Go 2 LTE/WiFi Security Camera
Optimize your camera’s battery life
Arlo battery-powered cameras are not intended for continuous recording. The battery life of
your Arlo camera varies depending on usage.
Note: Cold temperatures can aect any battery’s capacity because of its chemistry. This
means that if you install your camera outside in cold temperatures, you might notice a shorter
battery duration, or a faster-than-expected drop in the displayed battery capacity.
Use these tips to maximize your camera’s battery life:
• Make sure that your camera’s rmware is up to date. For more information, see Firmware
updates on page 66.
• When you’re using your Go 2 Camera with a mobile connection, Arlo recommends placing
your camera in a location with at least three bars of mobile signal strength. You can check
the mobile signal strength from the Arlo app.
• If you’re using a WiFi connection, select a location for your camera with a strong WiFi
signal. You can check the strength of the WiFi signal from the Arlo app.
• Your Arlo camera lets you choose the quality level of the video it records. Cameras set
to high-quality video recording use more battery power than cameras set to low-quality
video recording.
• Fine-tune the position of your camera.
Angle the camera so that it only detects motion in areas of interest. This helps reduce
unwanted recordings and triggers from motion that occur in the background.
• Set a schedule for your camera.
If you don’t need your camera to activate during all hours of the day, you can set it to wake
up and use battery power only during the hours when you need it. See Schedule when
your camera is armed on page 42.
60Arlo Rechargeable Battery
User Manual
Page 61

10. Arlo Connect
Use Arlo with Amazon Alexa
With the Arlo Skill and Alexa, you can access your Arlo devices using voice commands and
view a live camera feed on your Echo Show, Fire TV, or Fire tablet. Alexa can also notify you
when motion is detected by your Arlo cameras.
To use the Arlo Skill, you need a connected camera and one of these Amazon devices:
• Echo Show
• Echo Spot
• Echo Dot
• Echo, Echo Plus
• Fire tablets (7th generation or newer)
• Fire TV (all generations)
• Fire TV stick (second generation only)
• Fire TV Edition smart TVs
Enable the Arlo Skill
Make sure that your camera is powered on and connected to the cloud.
Enable the Arlo skill in one of these ways:
• Tell Amazon Alexa, “Alexa, enable Arlo skill” to receive instructions in your Alexa app to
link your Arlo account with your Alexa account.
• In the Alexa app, search for the Arlo Skill and select Enable Skill to link your Arlo account
with your Alexa account.
61
Page 62

Arlo Go 2 LTE/WiFi Security Camera
Use the Arlo Skill
Aer you enable the Arlo Alexa Skill, you can try using these commands:
• “Alexa, show me <camera name>.” Start streaming a camera live.
• “Alexa, stop.” Stop an activity and return to your device’s home screen.
• “Alexa, hide <camera name>.” Stop streaming from a camera and return to your device’s
home screen.
• “Alexa, go home.” Return to your device’s home screen.
• “Alexa, show the last motion detected by my <camera name>.”
To use this command, your Arlo subscription must include viewing past video clips for
your camera.
Set up Alexa to notify you when the camera detects motion
You can use either of these methods:
• In the Smart Home section of the Alexa app, turn on Announcements for your Arlo camera.
• Create an Alexa Routine from the Alexa app main menu.
Add your camera to the Google Assistant app
To use your camera with Google Assistant, you need:
• A Google Home Hub, a Chromecast device, a TV with Chromecast, or a media player with
Chromecast
• The Google Assistant app on your mobile device. This app is included with most Android
devices, but you can also download it from the Apple App Store on iOS devices.
To connect your Arlo cameras to the Google Assistant app:
1. If you plan to use a voice-enabled speaker with the Google Assistant, set up that device.
2. Open the Google Assistant app to the home page.
3. Tap the + icon.
4. Tap Set up Device > Have something already set up?.
5. Select the Arlo icon from the list of device options.
You can search for Arlo or scroll down to nd Arlo on the list of devices.
6. Sign in with your Arlo account.
Your camera is added to Google Assistant.
62Arlo Connect
User Manual
Page 63

Arlo Go 2 LTE/WiFi Security Camera
7. To test your camera, say “Hey Google, show [name of room where camera is placed] on
[name of Google device].”
8. To end the stream, say “Hey Google, stop [name of Chromecast device].”
For more information, see Google Assistant Help: Control smart home devices.
Use Arlo with IFTTT
You can use the Arlo app with IFTTT (If This Then That), a free cloud-based service that
connects smart home devices and applications.
To add Arlo to your IFTTT app, visit itt.com/arlo.
To learn more about Arlo and IFTTT, visit arlo.com/community.
63Arlo Connect
User Manual
Page 64

11. Troubleshooting
Scan a QR code during setup
During setup, the camera must scan a QR code from the Arlo app when you’re setting up the
LTE connection or adding the camera to your 2.4GHz WiFi network. If your camera doesn’t
emit a chime sound aer scanning the QR code, then the QR code wasn’t successfully
scanned.
If your camera didn’t scan the QR code:
• Move your mobile device farther from, or closer to, the camera lens.
Position your mobile device about 6 in. (15 cm) from the camera lens, and slowly move it
closer. If that doesn’t work, try moving your mobile device farther away. You can also try
dierent angles.
• Decrease or increase the brightness on your mobile device.
Your mobile device’s brightness might be too high or too low for your camera to scan the
QR code.
If you’re in a low-light area, try setting the brightness on your mobile device to the 50
percent level.
If you’re in a bright area, try raising the brightness on your mobile device to the highest
level.
• Disable Dark Mode if you’re using an iOS device.
In your iOS Settings, scroll down to nd and select Display & Brightness. Choose Light
mode under the Appearance options.
• Scan the QR code in an evenly lit area.
Avoid scanning the QR code in the dark or in direct sunlight. If you are installing outside at
night, turn on porch lights. If your camera is exposed to direct sunlight during installation,
provide some shade.
• Check your mobile device’s camera permissions.
On your Android or iOS device, ensure that the Arlo app has access to the phone’s camera
in device settings.
• Try using a mobile device with a larger screen such as a tablet or iPad, if available.
• Clean the camera lens.
64
Page 65

Arlo Go 2 LTE/WiFi Security Camera
The camera lens might have debris or a smudge on it, hindering its ability to scan the QR
code. Try using a lint-free cloth to remove anything that might prevent the camera from
scanning the QR code.
• Factory reset your Arlo camera.
If you tried every other solution on this list, and your camera still doesn’t scan the QR
code, you can try factory resetting your Go 2 Camera. See Reset the camera on page 71.
Arlo doesn’t discover your camera during setup
If you’re using the Arlo app to add your camera and it doesn’t discover your camera, check the
following:
Discovery using an LTE connection
• An activated SIM card is inserted in your Go 2 Camera.
• Your camera is in range of your mobile network.
Discovery using a WiFi connection
• You’re connecting your Go 2 Camera and your mobile device to the same 2.4 GHz WiFi
network. When connecting via WiFi, your Go 2 connects only to a 2.4 GHz band network
(not a 5 GHz band WiFi network). For more information, see Connect your mobile device to
a 2.4 GHz WiFi network during setup on page 20.
• You typed the correct WiFi network SSID (network name) and password. The network SSID
and password are case-sensitive and must be exactly correct. You can tap the password
eye icon to view your password before submitting.
• Your mobile device and Go 2 Camera are within the WiFi signal range of your WiFi router. If
you want to use a WiFi connection during setup, we recommend placing your Go 2 Camera
within 10-15 feet (3-4.5 meters) of your WiFi router. Aer your camera is set up, you can
move it anyplace within range of your LTE network or WiFi network.
• Check the camera LED. When you press the sync button during setup, the LED blinks blue
for two minutes while the camera is being discovered and then blinks blue fast when it
connects to your WiFi network. If the camera doesn’t connect to your WiFi network within
two minutes, it times out and the LED stops blinking. The Arlo app might prompt you to
connect to an LTE mobile network if your Go 2 Camera does not connect via WiFi.
• You hear a chime noise, which indicates your camera successfully scanned the QR code.
If you don’t hear a chime noise and need help with scanning the QR code, see Scan a QR
code during setup on page 64.
65Troubleshooting
User Manual
Page 66

Arlo Go 2 LTE/WiFi Security Camera
Firmware updates
Your Go 2 Camera updates its rmware automatically as new rmware is released. You can
also manually check for new rmware, and if it’s available, update your camera.
Automatic rmware updates
If your Go 2 Camera is connected to only the LTE network (not WiFi), then the Go 2 rmware
updates use cellular data to download. Minor rmware updates, which occur roughly once
every three months, use about 14 MB of data. Larger updates, which usually happen about
once a year, can be as large as 65 MB.
Arlo Go 2 rmware updates happen automatically as long as the cameras are connected to
the LTE network or WiFi, are powered on, and have at least 15 percent battery. If a rmware
update is released while your camera is turned o or disconnected or while the battery is low,
the rmware update happens automatically within 24 hours aer you turn the camera back
on, if it is connected to the network, and the battery is not low.
Automatic updates happen between 3:00 a.m. and 5:00 a.m. to minimize camera downtime
during the day. If the rmware update is a major one, you cannot view your camera live
until the rmware is updated, but motion and sound detection still work and your camera
still records based on the currently selected mode. To view your camera live, you can wait
until the update happens automatically between 3:00 a.m. and 5:00 a.m., or you can update
manually. For more information about updating your rmware manually, see Update the Go 2
Camera firmware manually on page 67.
If a rmware update is in progress, the LED on the camera blinks alternating blue and amber.
Aer this, the camera’s LED turns o for one to two minutes while the camera installs the
rmware. Aer the camera rmware update nishes, the camera connects to the network
again and the LED blinks blue rapidly.
WARNING: Do not release the camera from its housing or remove the battery while your
Arlo camera is updating and installing rmware. Wait until the camera is viewable from
your Devices feed.
If you turned o your Arlo Go 2 Camera’s LED in the camera settings, the LED does not blink
to show that a rmware update is in progress. While the LED is turned o, always make sure
that you can view your camera live from the Arlo app or a web browser before interrupting
power to the camera. If you remove the battery or otherwise interrupt power while a rmware
update is in progress, your camera might become unusable.
66Troubleshooting
User Manual
Page 67

Arlo Go 2 LTE/WiFi Security Camera
Update the Go 2 Camera rmware manually
1. Open the Arlo app.
2. Tap Settings > My Devices.
3. Select the camera that you want to update.
4. Tap Device Info > Firmware > Update.
WARNING: Do not release the camera from its housing or remove the battery while
your Arlo camera is updating and installing rmware. Wait until the rmware update is
complete.
If you turned o your Arlo Go 2 Camera’s LED in the camera settings, the LED does not blink
to show that a rmware update is in progress. While the LED is turned o, always make sure
that you can view your camera live from the Arlo app or a web browser before interrupting
power to the camera. If you remove the battery or otherwise interrupt power while a rmware
update is in progress, your camera might become unusable.
The camera’s LED blinks amber and blue while the rmware is downloading and installing.
Aer the rmware is installed, the camera restarts and the LED is o. When the LED lights
again and the pattern stops changing, your camera is available to stream.
Go 2 Camera is oline
If your Go 2 Camera was working before and now is oline, try to identify where the problem
is coming from.
• Check the Status LED on your Go 2 Camera. See Check the LED on page 11.
• Verify whether your Go 2 Camera is set up for LTE only or LTE/WiFi. Arlo Go 2 is designed to
work with either LTE or WiFi connectivity. For more information, see Control whether your
Go 2 Camera connects to mobile or WiFi on page 19.
If your camera is set up for LTE only, make sure the mobile broadband account for the SIM
in your Go 2 Camera is still active. If your camera is set up for LTE/WiFi, make sure that
either your WiFi network is in range and available or the cellular coverage is available.
• To troubleshoot a mobile broadband connection, see Optimize mobile broadband
connectivity for your Go 2 Camera on page 12.
67Troubleshooting
User Manual
Page 68

Arlo Go 2 LTE/WiFi Security Camera
Troubleshoot Arlo Geofencing
Note: Selecting Modes > Arm All Devices or Disarm All Devices deactivates Geofencing mode.
To activate Geofencing mode, tap Modes, select your Arlo device, and then select Geofencing.
Each Arlo user has a unique setup environment. These are the most common geofencing
issues.
• Your mobile device isn’t sharing its location information with Arlo. See Prepare your mobile
device for geofencing on page 43.
• Away mode isn’t triggered when you leave because an extra mobile device that’s enabled
for geofencing is still in the Device Location. See Geofencing with multiple mobile devices
on page 45.
• Geofencing stopped working because the location sharing settings for a mobile device
changed. See Prepare your mobile device for geofencing on page 43.
• A task-killing app, such as Shutapp or Doze, can disable Arlo Geofencing. To use Arlo
Geofencing, disable any apps that suppress the Arlo app.
• Geofencing for your mobile device on your friend’s Arlo account isn’t working.
If you’re a friend on someone else’s Arlo account, your mobile device can only change
Home/Away modes if the Arlo account owner does the following:
• Turn on the Allow Access Rights setting. See Grant access to friends on page 27.
• Set your device as an Enabled Device in Geofencing settings. See Enable or disable
geofencing for friends’ mobile devices on page 46.
Still experiencing issues with geofencing? Contact Arlo Customer Support.
Can’t see video streams
A low battery can cause the camera to stream intermittently. If the battery’s charge level is
25 percent, the Arlo app displays a notication message. At 15 percent, the app sends you an
email and a push notication.
See the following sections for help troubleshooting network connections.
Troubleshoot streaming with an LTE only connection
Your Arlo Go 2 Camera requires an activated SIM card with a mobile data plan to access the
mobile network.
68Troubleshooting
User Manual
Page 69

Arlo Go 2 LTE/WiFi Security Camera
For best results when connecting to the mobile network, Arlo recommends placing your
camera in a location where it has at least three bars of mobile signal strength. To check the
signal strength in the Arlo app, tap Settings > My Devices and select your camera. Then tap
Connected To > Cellular Settings > Signal Strength.
If signal strength is consistently less than three bars, consider moving your camera to a
location with better signal strength. For more information, see Optimize mobile broadband
connectivity for your Go 2 Camera on page 12.
Troubleshoot streaming with a WiFi connection
Your router might be blocking the ports to which Arlo sends data. To make sure that Arlo can
stay connected, you must keep ports 443 and 80 open on your router.
WiFi signal interference
Environments with multiple WiFi networks, WiFi devices, or frequencies can cause signal
interference. If possible, minimize the number of networks, WiFi devices, and transmitted
frequencies in the area where you place your camera. For help with adjusting WiFi settings
such as the channel for your router, check the instructions that came with your router or
contact your internet service provider (ISP) if they installed your router.
We recommend that you place your camera at least 1 to 3 feet (30 to 100 cm) from your router.
Allow at least 6.5 feet (2 meters) between each camera to prevent WiFi signals between the
devices from interfering with each other.
WiFi range
Make sure that your camera is close enough to receive a strong WiFi signal. The range of your
router’s WiFi signal can vary depending on the router model and conditions in your local
environment.
Make sure that your camera displays three or four bars of signal strength in the area where
you intend to install it. The camera can work when signal strength is at one or two bars, but
might go out of range intermittently due to uctuations in the environment.
Not receiving push notications
You must be logged in to the Arlo app to receive Arlo alerts on your smartphone or mobile
device. Arlo registers your device for push notication when you log in. If you used the logout
option instead of exiting the app, you must log back in to the app. You receive Arlo alerts even
if your device is sleeping.
69Troubleshooting
User Manual
Page 70

Arlo Go 2 LTE/WiFi Security Camera
Check the rules for armed modes
Check the rules in your modes. Make sure that push notication is enabled in the mode you’re
using.
1. Open the Arlo app.
2. Tap the Mode button.
3. Select your camera.
A list of modes displays.
4. Tap Edit
5. Tap Edit
6. Under Alert, make sure that the Push Notication check box is selected.
7. If you made changes, tap Save.
next to Armed.
next to the rule.
Check the Arlo app notication settings on an iOS device
Make sure that you allow the Arlo app to receive push notications. The Arlo app push
notications can be disabled on iOS and Android devices.
1. Tap the Settings icon for your iOS device.
2. Tap Notications > Arlo.
3. Make sure that Allow Notication is selected.
Check the Arlo app notication settings on an Android device
Make sure that you allow the Arlo app to receive push notications. The Arlo app push
notications can be disabled on iOS and Android devices.
1. Tap the Settings icon for your Android device.
2. Tap Application Manager > Arlo.
3. Make sure that the Show Notications setting is selected.
70Troubleshooting
User Manual
Page 71
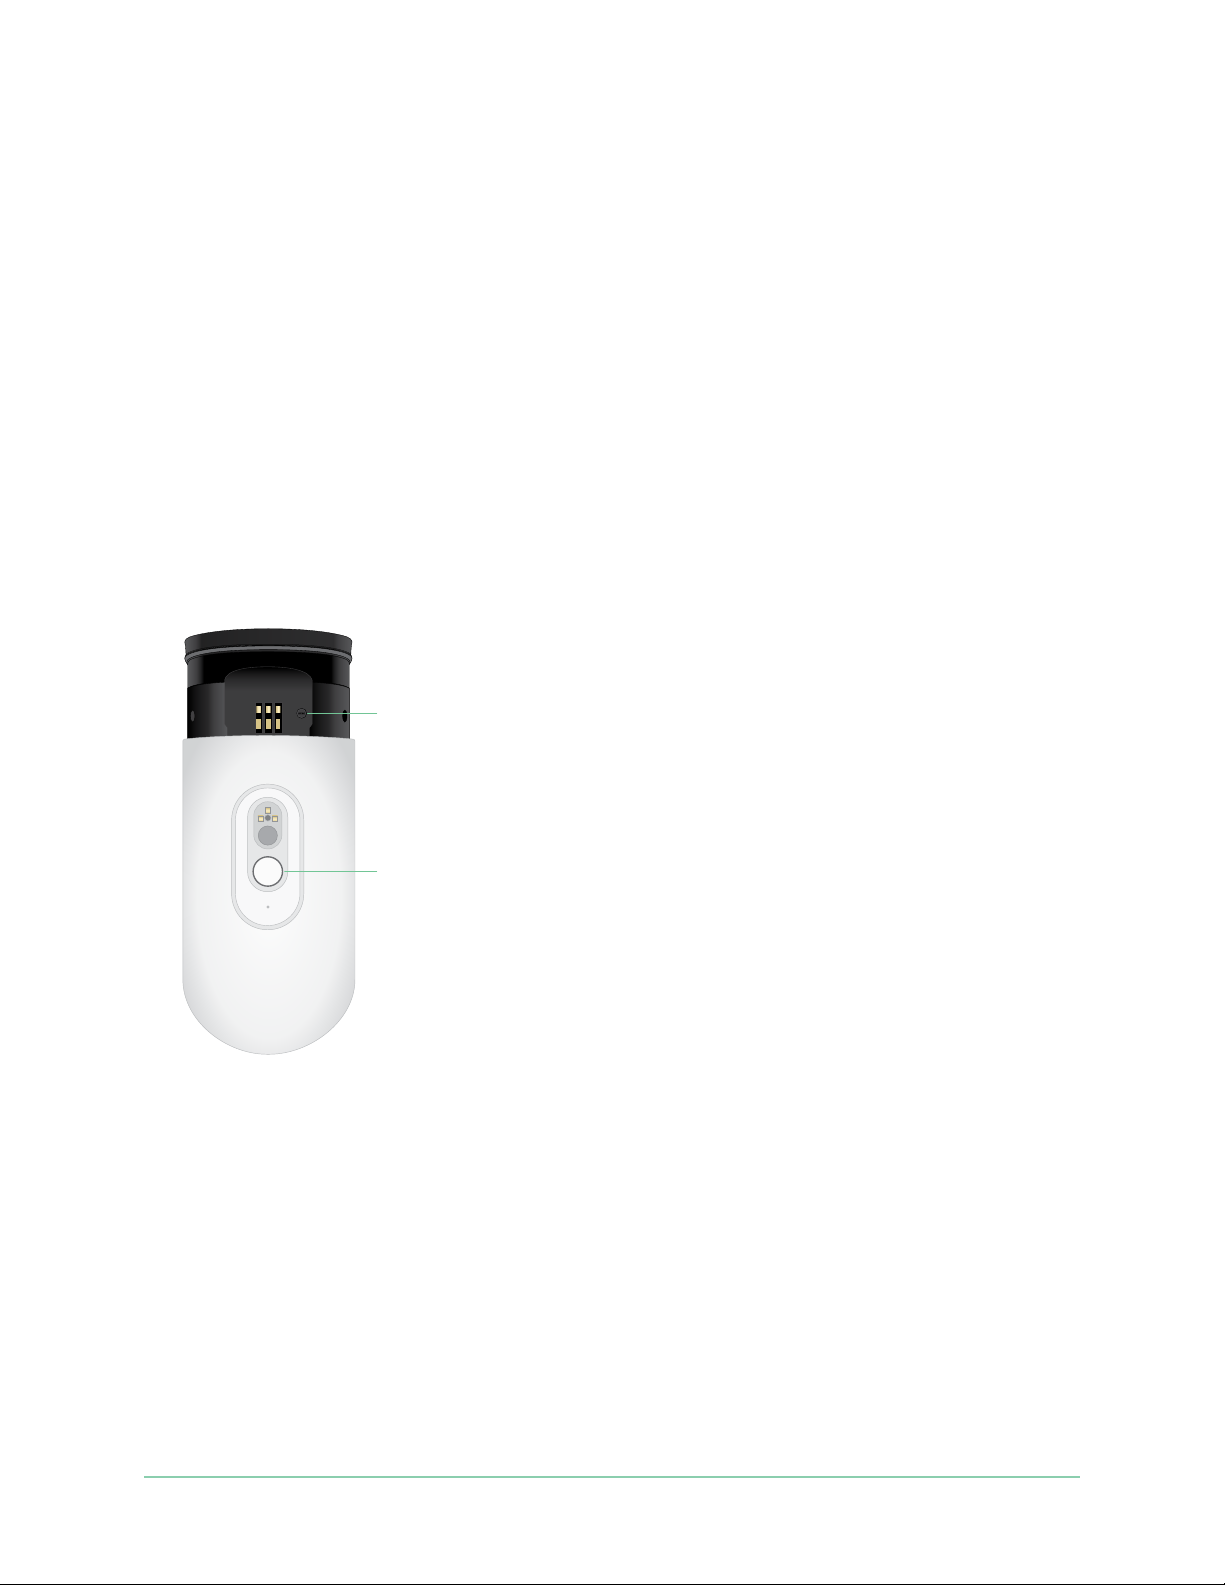
Arlo Go 2 LTE/WiFi Security Camera
Reset the camera
Factory resetting your Arlo Go 2 Camera returns it to default settings and removes the camera
from your account. This means that you must follow the Arlo app setup process to use your
camera aer a factory reset.
Reset using the sync button
1. Bring the Arlo Go 2 Camera indoors.
We recommend that you bring your camera indoors before removing its housing to avoid
potentially exposing the inside of the camera to water intrusion.
2. Press the release button on the bottom next to the magnetic charging port to release the
camera from its housing.
With a click sound, the camera slides partially out of the housing.
sync button
releasebutton
3. Pull the camera until you see the sync button.
4. Press and hold the sync button on the camera for about 15 seconds, until the camera LED
begins blinking amber, then let go.
Note: Make sure to let go of the sync button when the camera LED begins blinking amber.
If you hold the sync button too long, then you must restart the factory reset process until
the camera LED blinks amber three times aer letting go of the sync button.
5. Insert the camera back into its camera housing until it clicks into place.
71Troubleshooting
User Manual
Page 72

Arlo Go 2 LTE/WiFi Security Camera
Reset from the Arlo app
To reset your Arlo Go 2 Camera while it is connected to the cloud:
1. Open the Arlo app.
2. Tap Settings > My Devices and select the camera.
3. Tap Remove Device.
4. Tap Yes to conrm that you want to remove the Arlo Go 2 Camera from your account.
72Troubleshooting
User Manual
Page 73

Arlo Go 2 LTE/WiFi Security Camera
Support
For product updates and web support, visit http://www.arlo.com/en-us/support/.
Arlo Technologies, Inc.
2200 Faraday Ave. Suite 150
Carlsbad, CA 92008 USA
Document publication date: September 2021
PN 202-50035-01
Trademarks
© Arlo Technologies, Inc. Arlo, Arlo logo, and Every Angle Covered are trademarks of Arlo
Technologies, Inc. Apple is a trademark of Apple Inc., registered in the US and other countries.
App Store is a service mark of Apple Inc. Google Play and the Google Play logo are trademarks
of Google LLC. Any other trademarks are for reference purposes.
Compliance
For regulatory compliance information including the EU Declaration of Conformity and where
to nd e-label information for US FCC & Industry Canada, visit
www.arlo.com/about/regulatory/.
See the regulatory compliance document before connecting the power supply.
73
User Manual
 Loading...