

Page 1
Instructions for use
Coffee center
NA
English,1 Espanol, 53Français, 27
FR
MCA 15 NA
SP
Index
Installation 4
Positioning
Built-in installation
Ventilation
Centring and fixing
Electrical connection
Installing the power cable
Rating plate
Description of the appliance 6
Overall view
Control panel
Starting and using 7
The first time you switch on
Priming the water circuit
Regulating water hardness
Water filter
Installing the Water filter
Additional information for correct use of the Water filter
Grinding regulation
NA
Brewing 10
Crema control
Regulating the quantity of coffee per cup
Brewing coffee (1 cup)
Brewing coffee (2 cups)
Dispensing hot water
Brewing steaming/cappuccino
Maintenance and care 12
General cleaning
Descaling
Interrupting the descaling cycle
Programming 15
MENU command
Changing individual functions
Programmable functions
Factory settings
Display messages 23
Problems - causes - solutions 24
Precautions and recommendations 25
Statements of warranties 26
Page 2

NA
IMPORTANT SAFEGUARDS
When using electrical appliances, basic safety precautions should always be followed to reduce
the risk of fire, electric shock, and/or injury to persons, including the following:
1 Read all instructions and information in this instruction book and any other literature included
in this carton referring to this product before operating or using this appliance.
2 Do not touch hot surfaces. Use handles or knobs.
3 To protect against fire, electric shock and personal injury do not immerse cord, plugs or
appliance in water or other liquid.
4 Close supervision is necessary when any appliance is used by or near children.
5 Unplug from outlet when not in use and before cleaning. Allow to cool before putting on or
taking off parts, and before cleaning the appliance.
6 Do not operate any appliance with a damaged cord or plug or after the appliance malfunctions
or has been damaged in any way. Return appliance to the nearest authorized service centre
for examination, repair or adjustment.
7 The use of accessory attachments not recommended by the appliance manufacturer may
result in fire, electric shock or personal injury.
8 Do not use outdoors.
9 Do not let cord hang over edge of table or counter, or touch hot surfaces.
10 Do not place on or near a hot gas or electric burner, or in a heated oven.
11 Always turn appliance “OFF”, then plug cord into the wall outlet. To disconnect, turn switch to
“OFF”, then remove plug from wall outlet.
12 Do not use appliance for other then intended household use.
13 Use extreme caution when using hot steam.
SAVE THESE INSTRUCTIONS
2
Page 3

CAUTION
This appliance is for household use. Any servicing, other than cleaning and user maintenance,
should be performed by an authorized service centre. Do not immerse base in water. To reduce
the risk of fire or electric shock, do not disassemble the base. There are no user serviceable parts
inside. Repair should be done by authorized service personnel only.
1 Check voltage to be sure that the voltage indicated on the nameplate agrees with your
voltage.
2 Never use warm or hot water to fill the water tank. Use cold water only.
3 Keep your hands and the cord away from hot parts of the appliance during operation.
4 Never clean with scouring powders or hard implements. Simply use a soft cloth dampened
with water.
5 To avoid your coffee maker scaling up, use purified or bottled water.
NA
INSTRUCTIONS FOR THE POWER SUPPLY
CORD
A A short power-supply cord is provided to reduce risks of getting tangled up or tripping over
a longer cord.
B Longer extension cords are available and may be used if care is exercised in their use.
C If a long extension cord is used:
1 the marked electrical rating of the extension cord should be at least as great as the electrical
rating of the appliance.
2 if the appliance is of the grounded type, the extension cord should be a grounding type
3 the cable does not hang from the table to avoid the risk of getting caught up in it.
To obtain warranty services call 1-888-426-0825 or e-mail to: information@u8intl.com
3
Page 4

Installation
NA
! Keep this booklet for consultation at any time. In the
event of sale, transfer of the machine or of the owner
ensure that the booklet is kept with the machine so that
the new owner is informed of the operating instructions
and warnings.
! Read all instructions carefully. They contain important
information regarding installation, operation and safety.
Positioning
! Packaging is not a toy for children and should
be disposed of in accordance with regulations for
separated waste collection (see Precautions and
recommendations).
! Installation must be carried out in compliance with
these instructions by professionally qualified personnel.
Incorrect installation may cause damage to persons,
animals and/or objects.
Built-in installation
To ensure the correct functioning of the appliance, the
cabinet must have the right characteristics:
! Once the appliance has been encased, there must
be no contact possible with electrical parts. Declared
consumption values shown on the rating plate are
measured on the basis of this type of installation.
Ventilation
To ensure good ventilation, remove the rear panel of the
cabinet.
It is recommended to install the coffee machine so that
it is resting on a continuous surface with an opening of
at least 1¾” x 21¼” (45 x 540 mm) in the base.
Centring and fixing
To centre the coffee machine, position the shims
beneath the holes in the outer structure of the machine.
! All shims must be attached so that they ensure perfect
stability of the machine.
To attach the shims to the cabinet proceed as follows:
• remove the drip tray
from the machine;
• the panels next to the coffee machine must be in
heat-resistant material;
• veneered wood cabinets should be joined using
glues resistant to 100°C/212°F and must be steamresistant;
• for all installations of built-in coffee machines
cabinets should have the following dimensions:
• remove the lower
plastic protection;
• fasten the 2 wood
screws in the 2 holes
located to the rear of the
base.
4
Page 5
! All protective parts must be attached so that they
cannot be removed without the aid of a tool.
Next replace the protection and the drip tray.
Electrical connection
! Coffee machines with three-pole power cable are
regulated for alternating current, with voltage and
frequency shown on the rating plate attached to the
appliance.
! The installer is responsible for checking the correct
connection of components and observing safety
regulations.
Before connecting make sure that:
• the socket is earthed and is compliant with statutory
regulations:
• the socket is able to withstand the maximum power
load of the machine, shown on the rating plate;
• the supply voltage is within the values shown on the
rating plate;
• the socket is compatible with the appliance’s plug.
Otherwise replace the plug or the socket; do not use
extension leads or adaptors.
! Once the appliance is installed, the electric cable and
socket must be easy to reach.
! The power cable must not be subject to coiling or
compression.
! The cable must be checked regularly and replaced
only by authorised technicians.
! The company accepts no responsibility for noncompliance with these regulations.
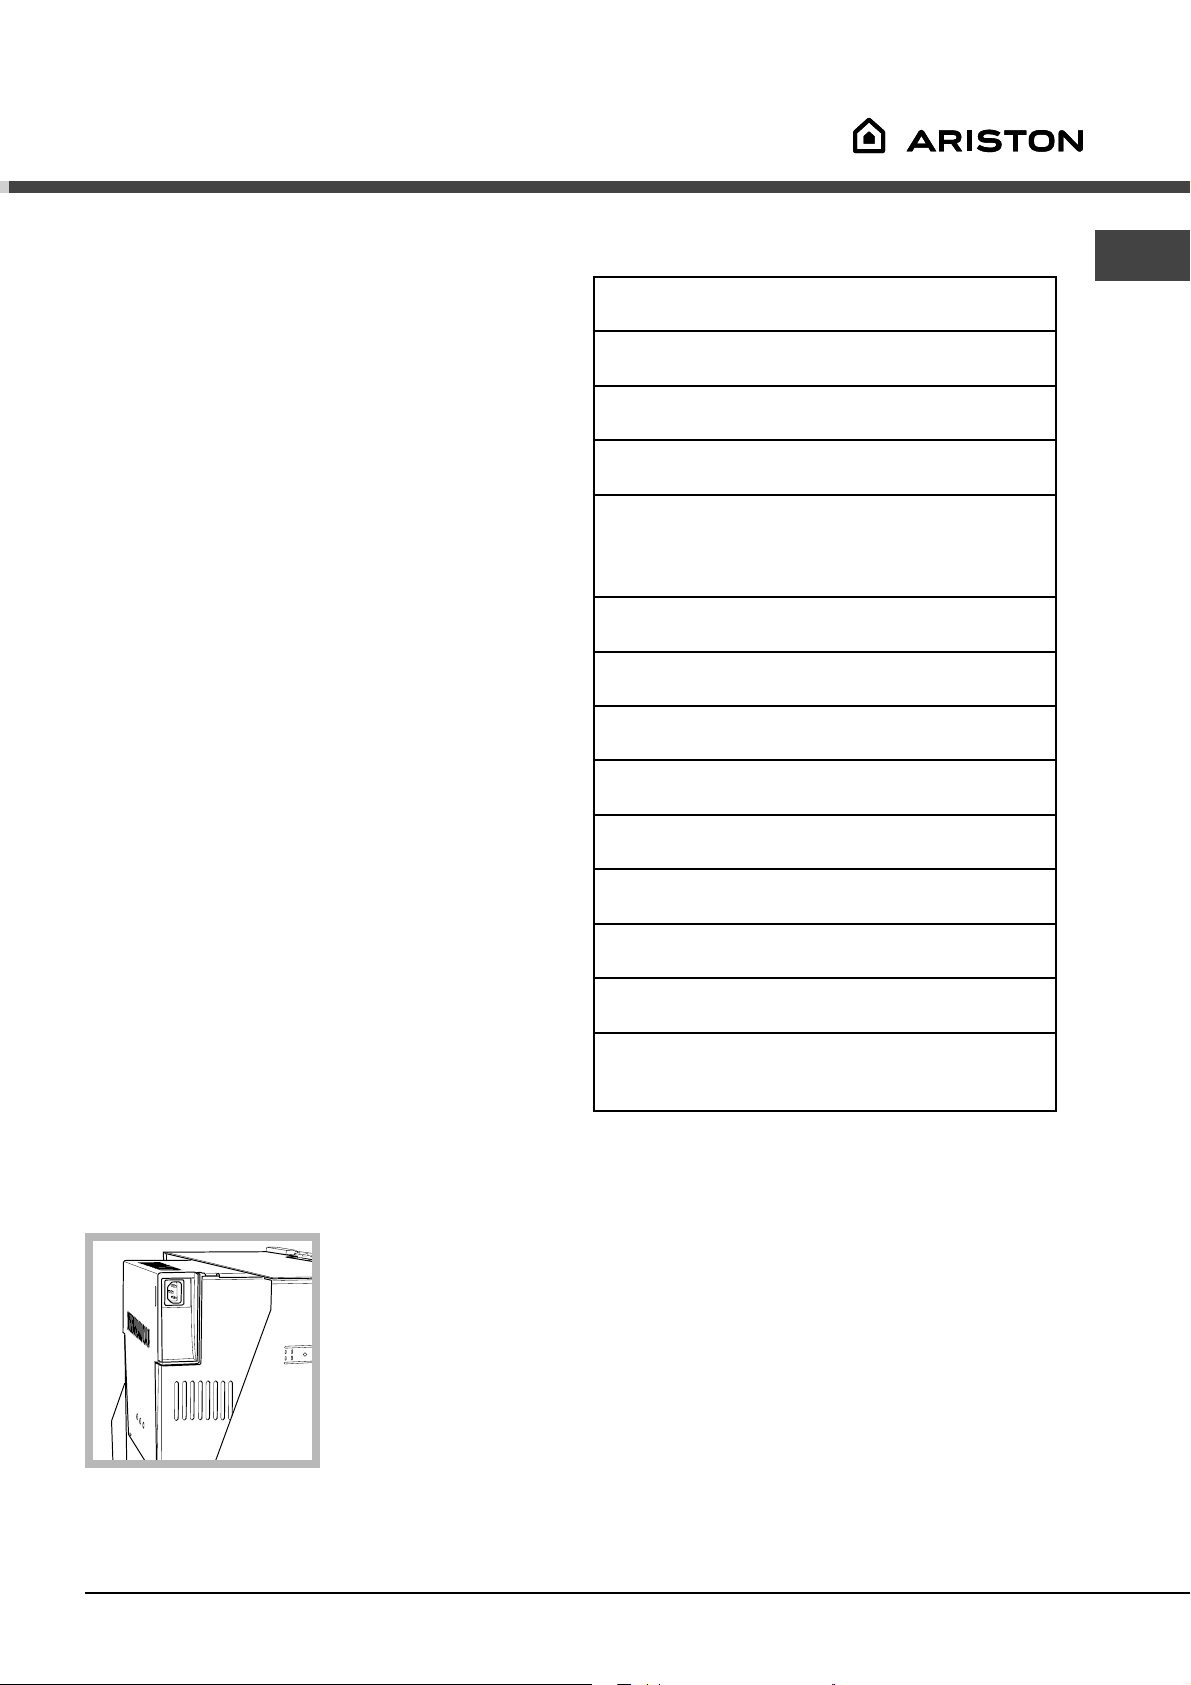
Rating plate
NA
• Nominal voltage
See plate on the appliance
• Power rating
See plate on the appliance
• Power supply
See plate on the appliance
• Shell material
Metal
• Dimensions (w x h x d)
595 x 460 x 320(mm)
Faceplate - 23.43” x 18.11” x 0.79”
Body - 21.26” x 18.11” x 11.89”
• Weight
23 kg / 51 lbs
• Cable length
1200 mm / 47¼”
• Control panel
Piezoelectric
• Water tank
Removable
• Water tank
1.75 liters / 59.17 fluid onces
• Coffee bean hopper capacity
300 g / 10 onces coffee beans
• Pump pressure
15 bars / 1500 KPa
• Boiler
2 - Stainless Steel - Aluminium
• Safety devices
Boiler pressure safety valve
Safety thermostat
Installing the power cable
• Put the plug in the
tray socket on the rear
of the machine
• Connect the power
cable to the mains
• Put the plug in the
power socket.
The position of the
power cable must be
such that no section of it is above room temperature
by more than 50°C/122°F.
Subject to engineering and manufacturing changes
due to technological developments.
The machine conforms to the European Directive
89/336/EEC (Italian Legislative Decree 476 dated
04/12/92) concerning electromagnetic compatibility.
5
Page 6
Description of the
appliance
NA
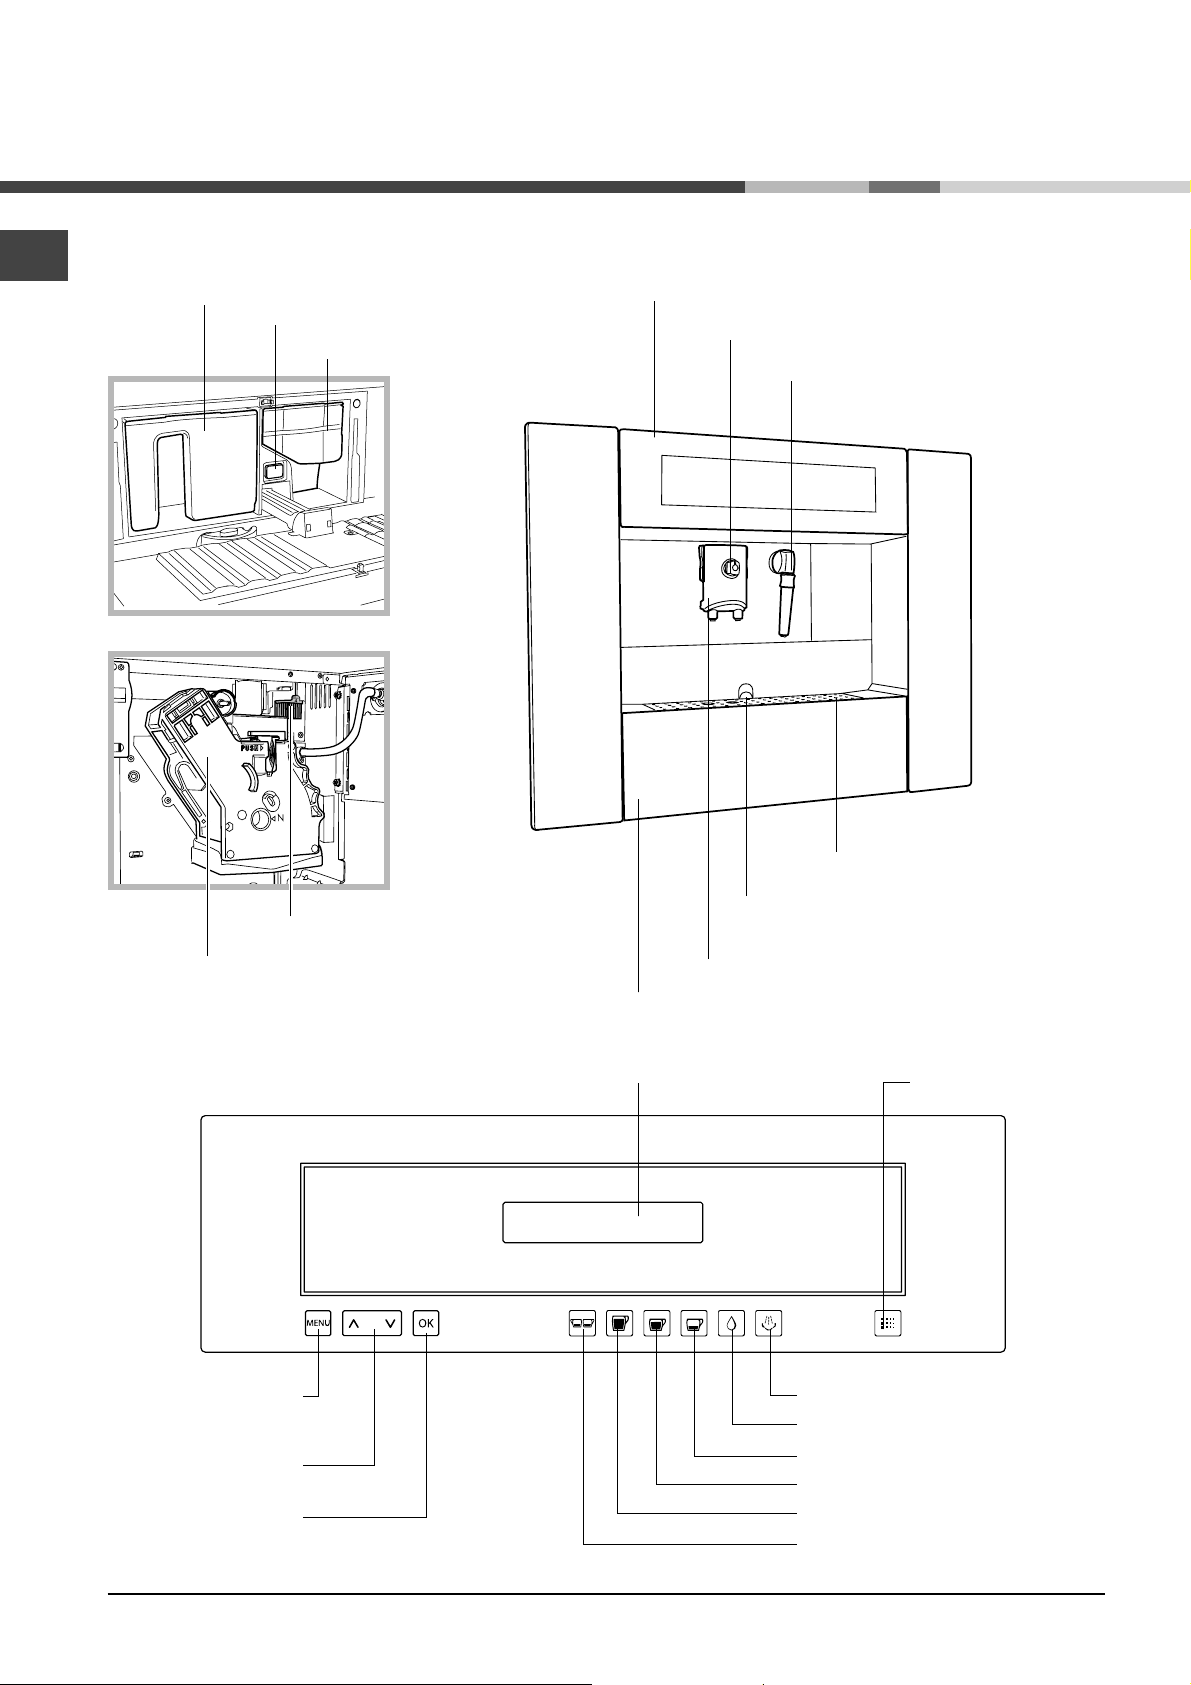
Overall view
Water tank
Main switch
Coffee bean container
Front control panel
Crema control
Hot water/steam spout
Grind regulator
Brewing group
Control panel
PROGRAMMING/EXIT
selection key
PAGE SCROLL
key
SELECT/CONFIRM
Key
Drip tray
Display
Grill
Tray
Adjustable-height brew unit
DESCALING
key
Select STEAM key
Select HOT WATER key
Select ESPRESSO key
Select REGULAR COFFEE key
Select LONG COFFEE key
Select DOUBLE COFFEE key
6
Page 7
Starting and using
! Before starting the machine make sure the containers
are filled with the amount described in the manual.
Prime the circuit immediately to prevent damage to the
machine.
! After starting the machine, regulate water hardness.
That will allow you to keep your machine in perfect
order (see Programming).
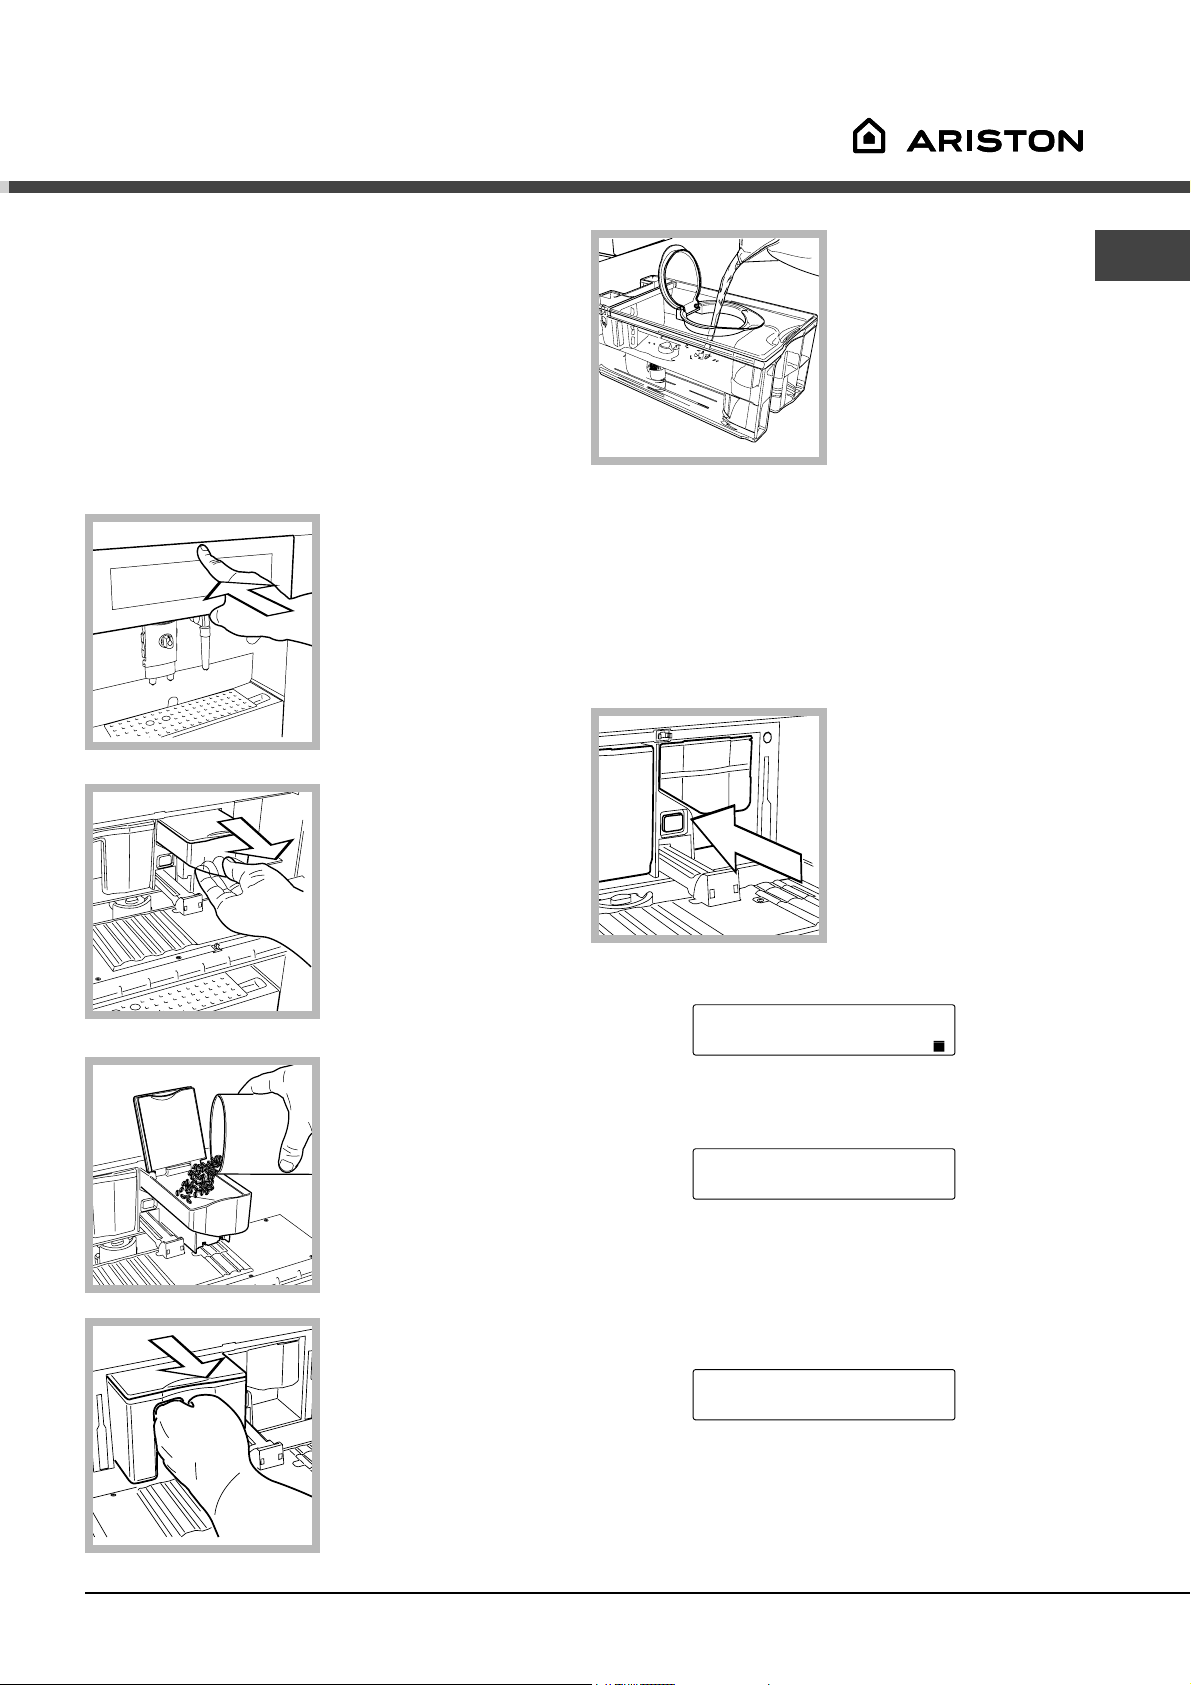
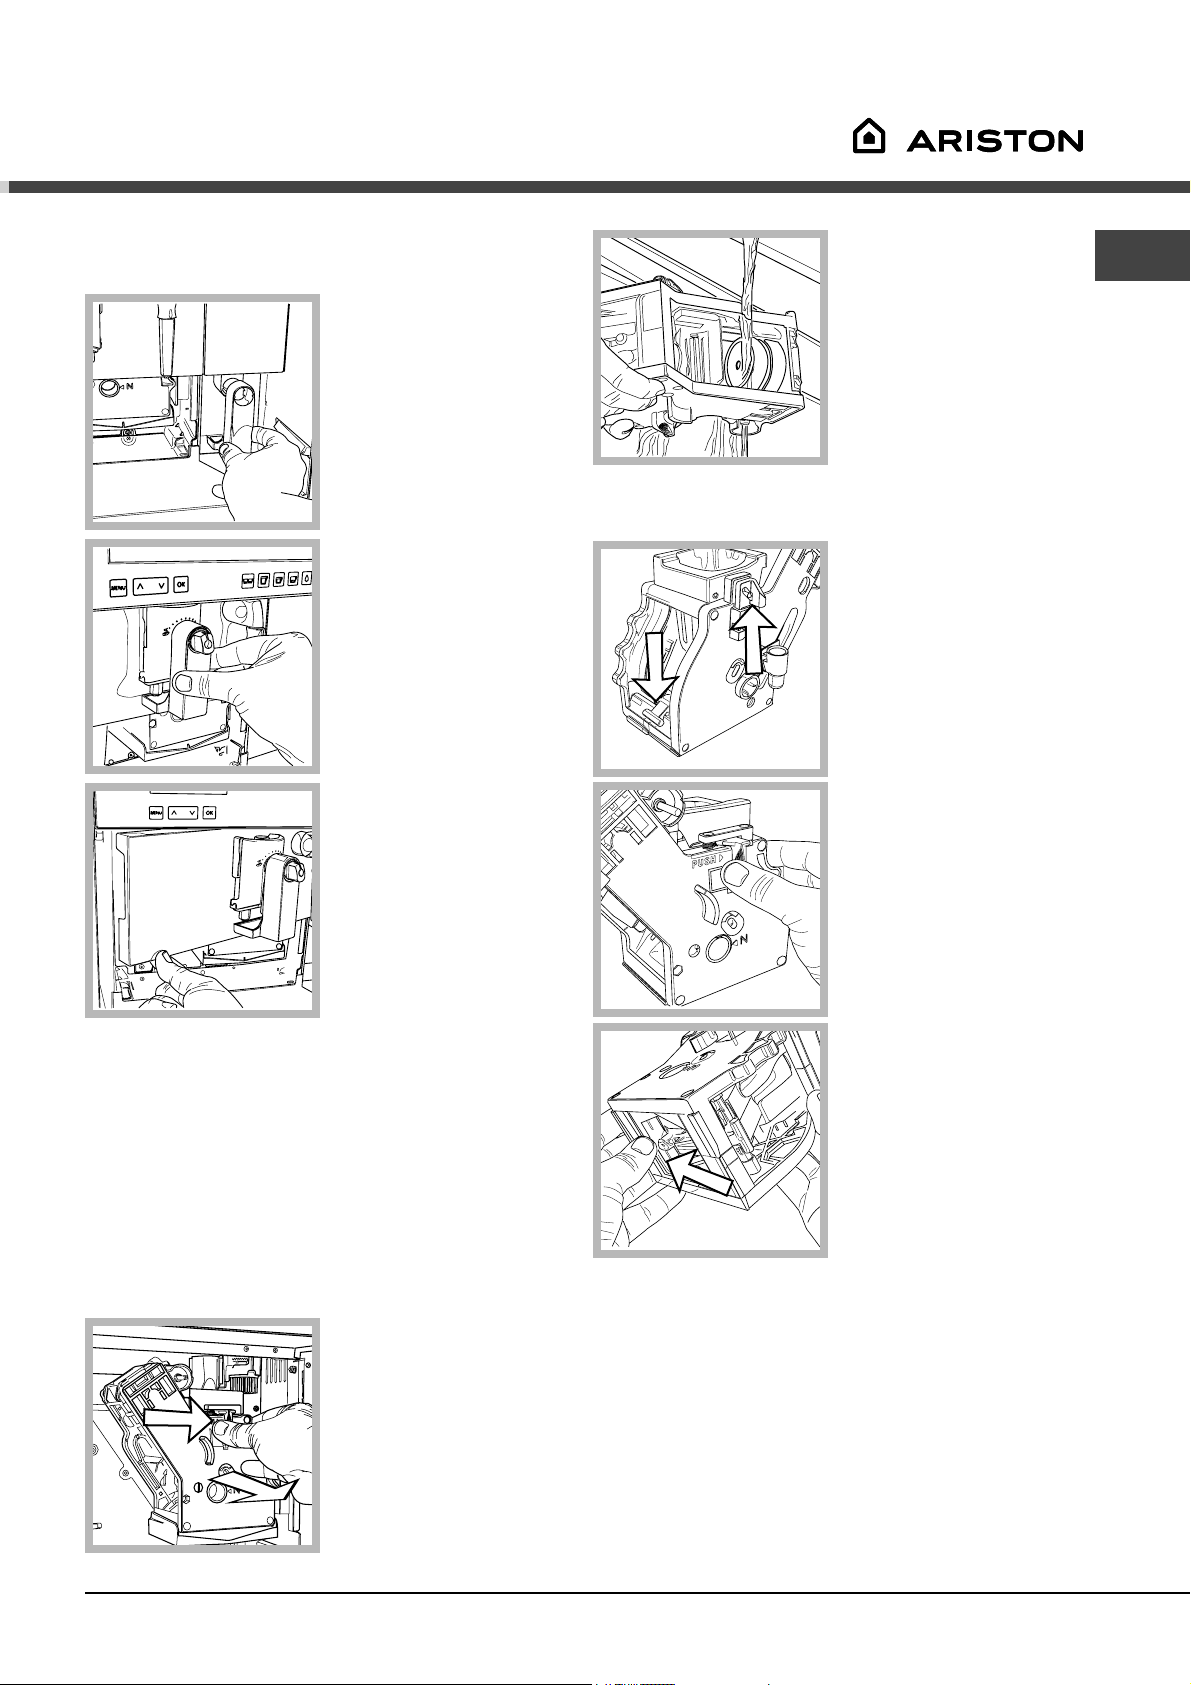
The first time you switch on
1. Open the front panel
by pressing firmly in the
center.
2. Remove the bean
container.
(to your convenience,
you can take out
complete container and
fill whenever you want
or even changhe the
container with another
one which is filled, for
example, with decaf
coffee).
Rinse and fill the
tank with fresh drinking
water, always up to the
max level.
Close the lid and
replace the tank in
position.
! Attention you will be
notified on the display
to fill the water tank.
This will happen already
when the tank is only half empty caused by the use of
the water filter which soften your water.
! Always use fresh, non-sparkling water to fill the tank.
Hot water or any other liquid may damage the tank
and/or the machine. Do not switch the machine on
without water: make sure that the tank is fully filled
with water.
The main switch is in
the “O” position. To
switch on, press the key
in the “I” position.
Close the front panel
by pressing firmly in the
centre. The machine
begins to heat up and the display shows:
RINSING
WARMING UP...
NA
3. Pour coffee beans
into the container being
careful not to add too
many.
Close the lid and replace the container inside
the machine.
4. Remove the water
tank fully from the
machine.
When the right temperature is reached, the machine
goes through a rinsing cycle.
RINSING
The machine dispenses water from the brew unit as it
rinses the internal circuits.
After rinsing, the machine returns to normal operating
conditions. The display shows:
SELECT PRODUCT
READY FOR USE
! To disable the rinse cycle, see the paragraph on
programming the machine.
7
Page 8
NA
Priming the water circuit
! Before starting the machine after long periods of
inactivity, it is essential to prime the machine circuit.
Moreover the circuit must be primed every time the
following is displayed:
Water filter
All Ariston non-plumbed coffee centers are equipped
with the water filter.
The water filter purifies the water used in the
preparation of coffee.
Its properties reduce the hardness of water and remove
the unpleasant taste of chlorine.
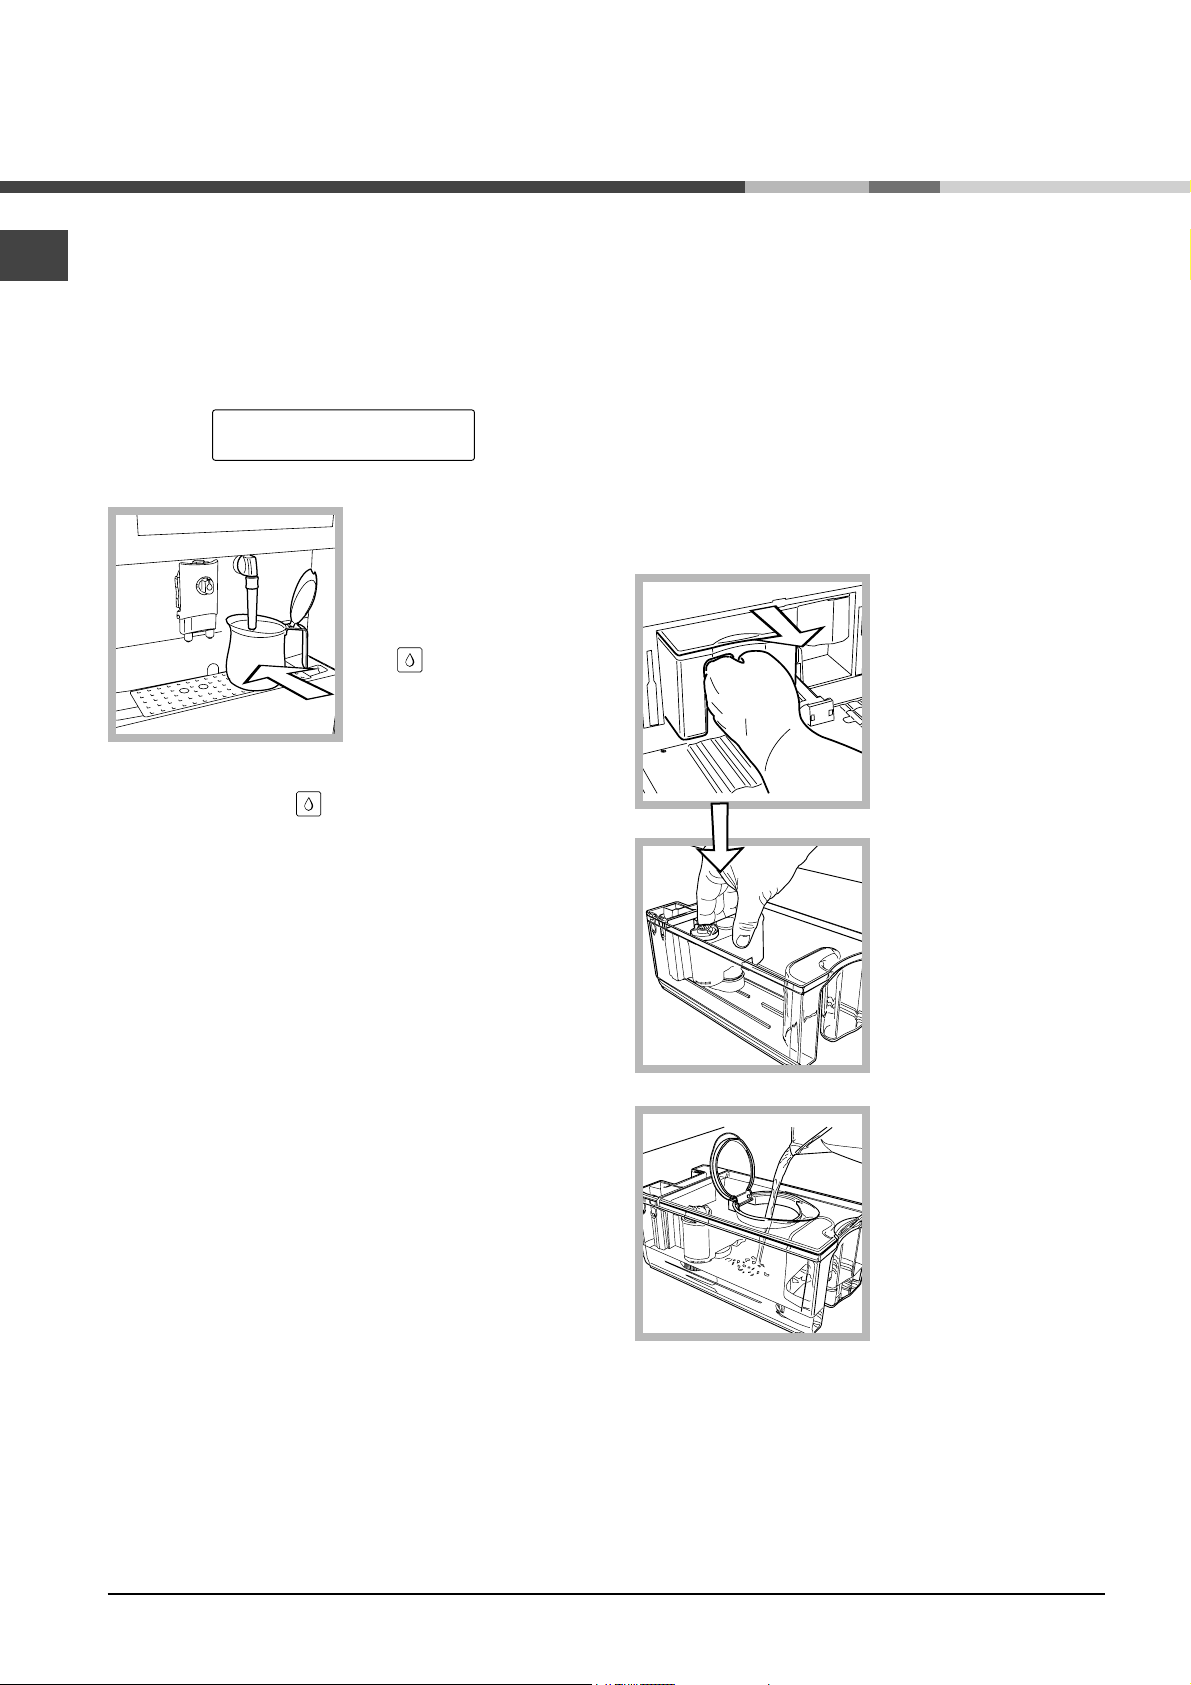
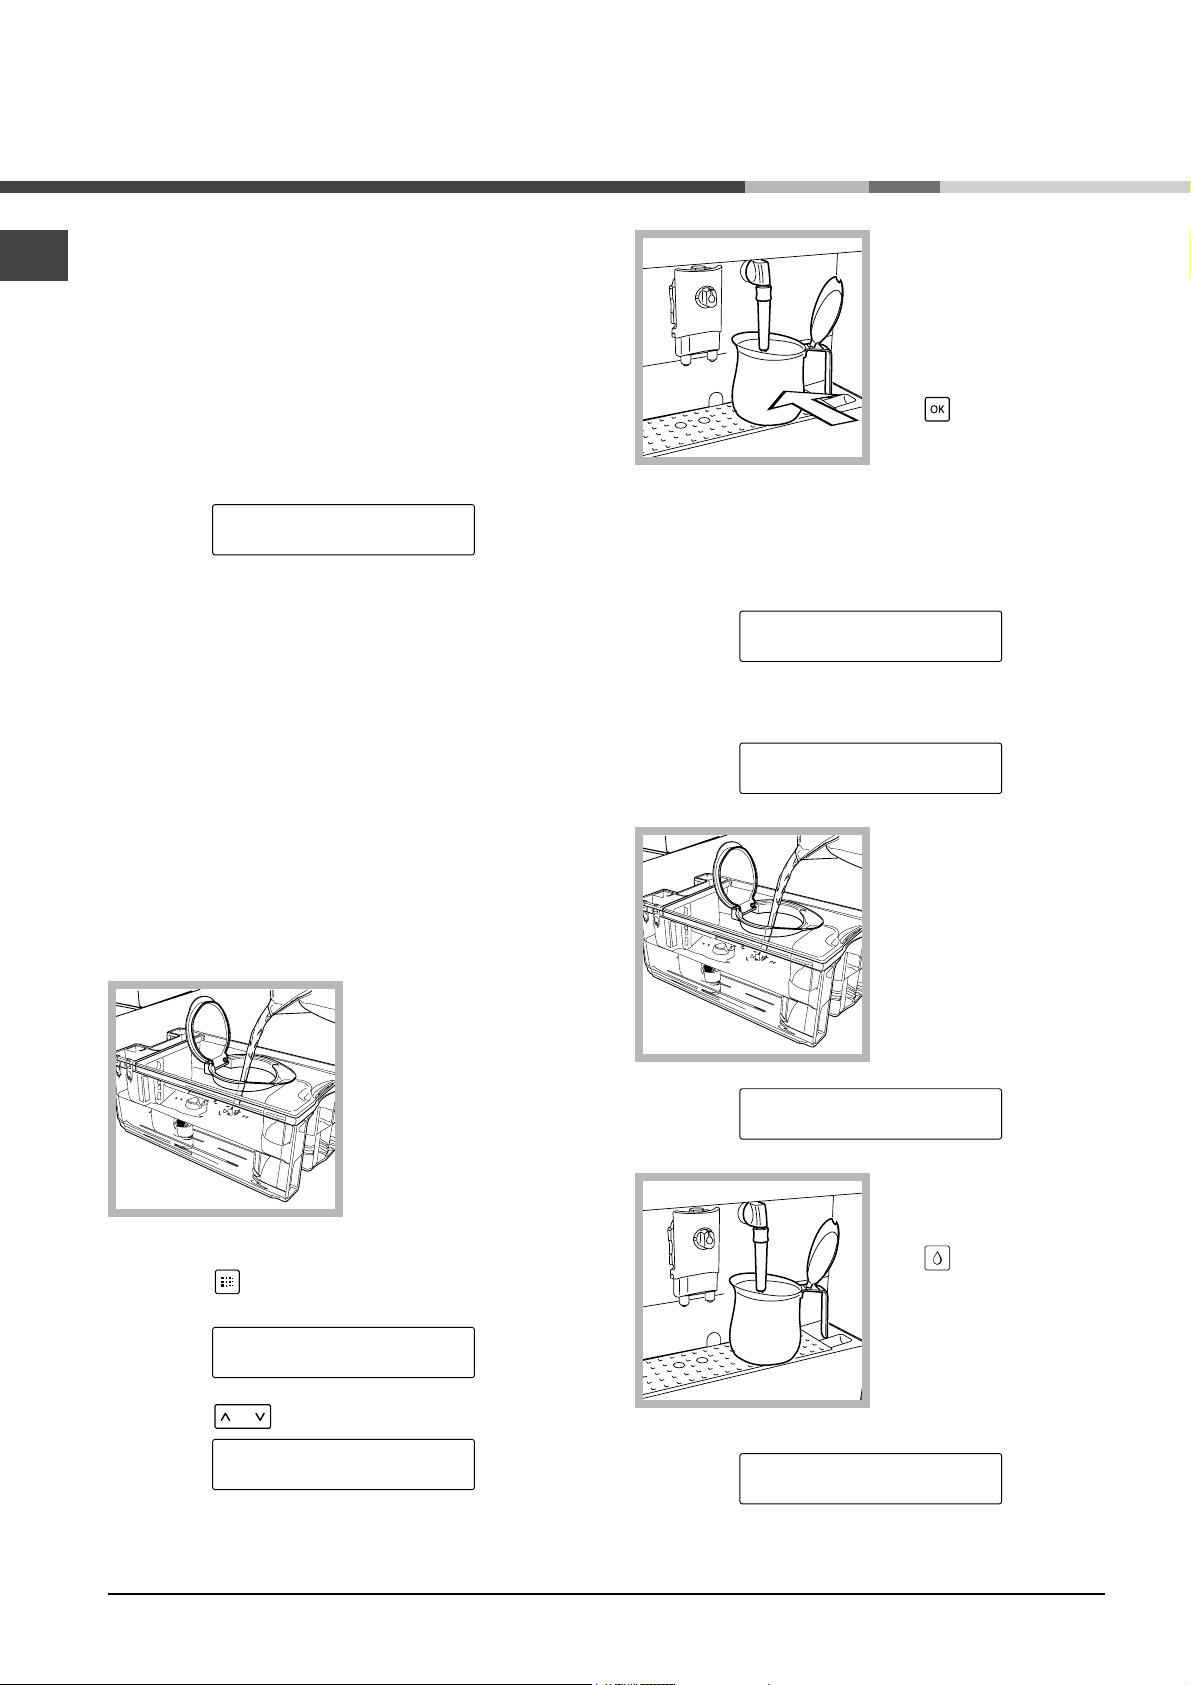
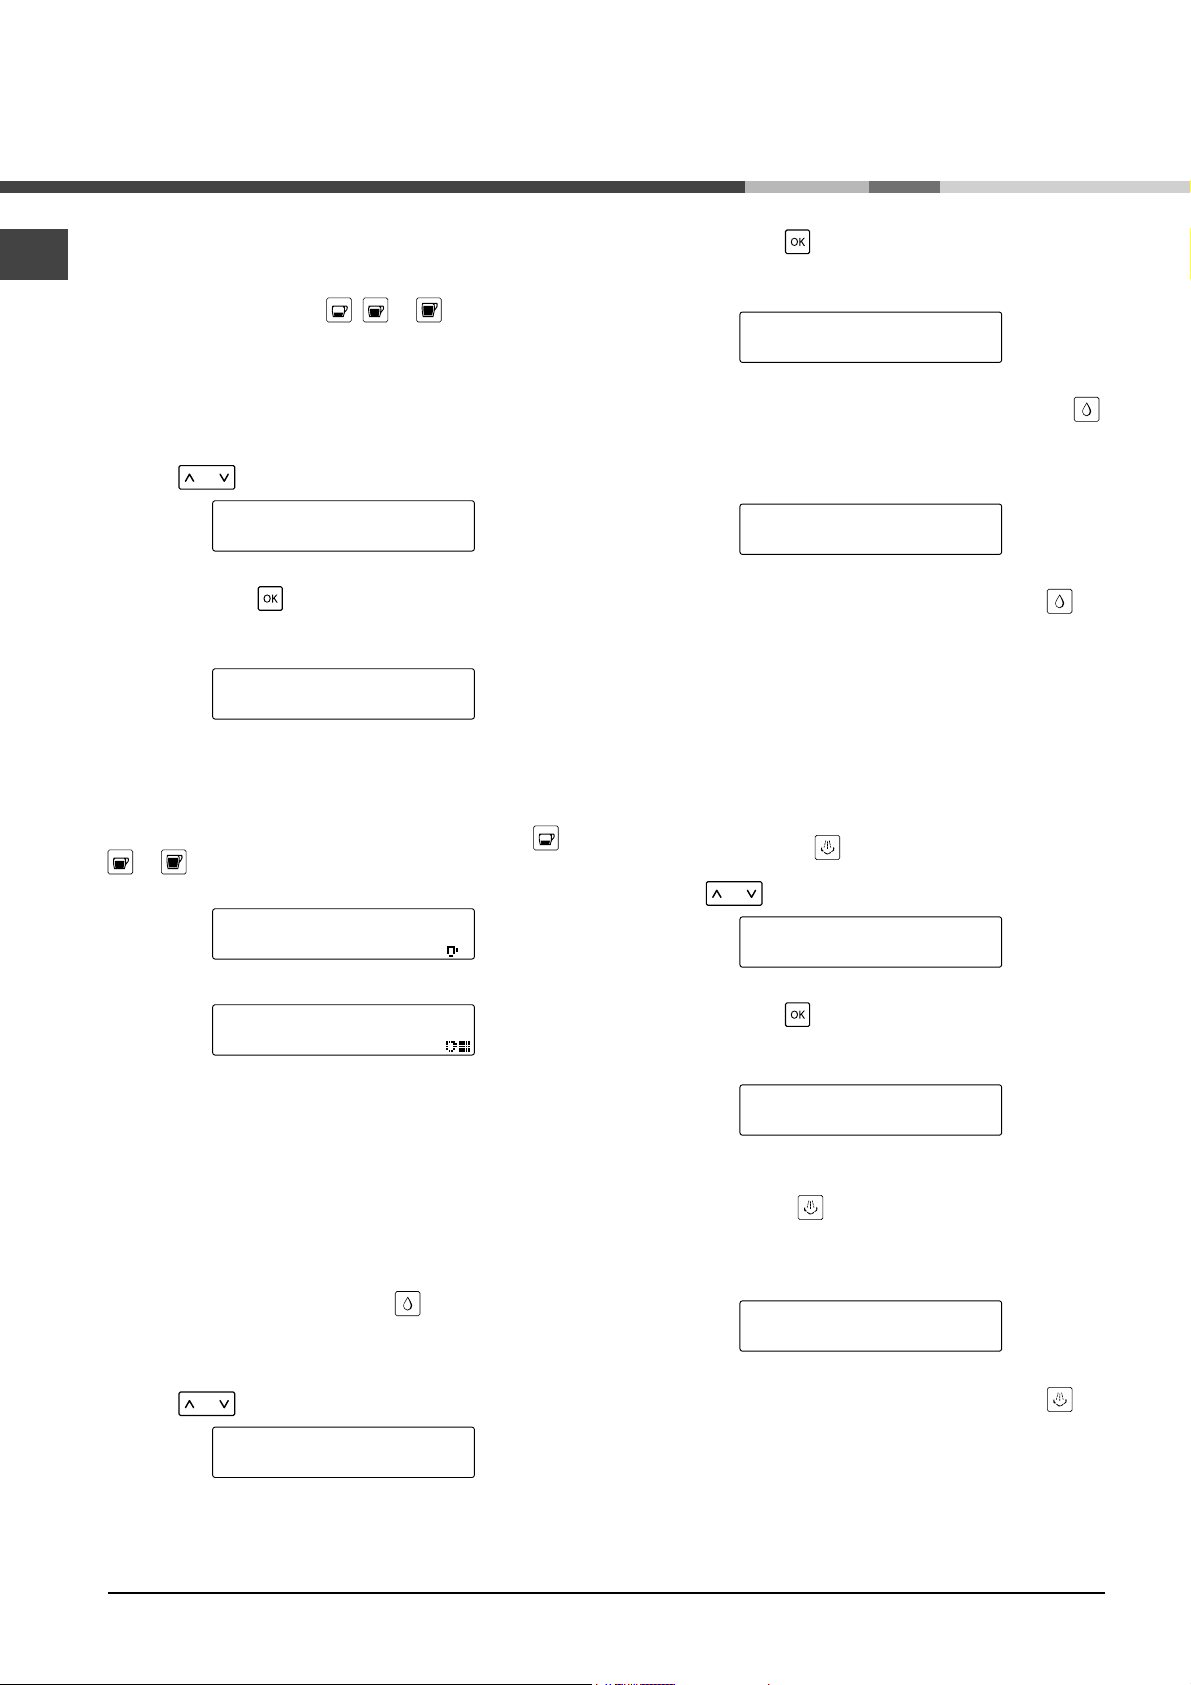
VENTILATE
1. To prime the circuit,
direct the steam spout
over the drip tray.
Place a cup or suitable
container below the
steam spout and press
key.
the
2. Wait until the water
runs smoothly out of the
steam spout.
To interrupt, press the
After the above operations have been completed the
machine is ready for use.
To dispense coffee, hot water or steam and for proper
use of the machine, carefully follow the instructions that
are provided.
key.
The water filter may be installed at any time.
Installing the water filter
1. Open the front panel
and remove the water
tank.
Empty the tank of any
water.
2. Remove the filter
packaging and set the
calendar to the current
month.
! Refer to the notes for
using the filter below.
3. Insert the filter into the
tank. The reference mark
and the groove should
coincide. Press down
completely.
Regulating water hardness
Regulate the machine to the right degree of water hardness that you will use.
According to this setting, the machine advises when it is
necessary to run a descaling cycle.
Read the sections on “Water hardness” in “Programming” to regulate hardness.
8
Fill up the tank with fresh
drinking water.
After 30 minutes, dispense all the water in
the tank into a container.
Afterwards fill the tank
again with water and
replace the tank in the
machine. Close the front
panel.
! The machine is already
programmed for use with the filter (see programming).
The machine informs the user when it is time to replace
the filter.
! The water filter must always be removed before
running the descaling cycle.
Page 9
We reccomend to replace the old filter with a new one
after every descaling cycle.
For information where to purchase the water filter,
please email to information@u8intl.com o call 888426-0825.
Grinding regulation
! Take care when rotating the knob that regulates
grinding, which is located above the brewing group. Do
not put ground and/or freeze-dried coffee in the bean
container.
NA
Additional information for correct use of
the water filter.
For correct use of the water filter (where installed),
here are a number of recommendations:
1. Store the water filter in a cool place away from the
sun, at a temperature of between +5°C/41°F and
+40°C/104°F;
2. Use in areas with temperature no higher than
60°C/140°F;
3. It is advisable to wash the water filter if the machine
has been inactive for 3 days or more;
4. Replace filter if the machine has been inactive for
20 days or more;
5. To preserve a filter that has already been opened,
place in a plastic airtight bag and store in the
refrigerator; do not store in freezer, as this will alter
the properties of the filter;
6. Before using the filter, place in water in the tank for
30 minutes;
7. Once removed from its package, do not store filter
in the open air;
8. The filter must be replaced 90 days after it has been
removed from its package.
9. To ensure proper functioning of the product, we
raccomend to replace the old filter witha new one
after every a descaling cycle.
! Do not put any material other than coffee beans in
the container.
Switch off at the mains before carrying out any type of
operation inside the machine.
The quality and flavour of coffee depend on the
grinding level, as well as the blend used.
The machine has a knob to regulate the coffee
grinding.
To regulate the grinding,
turn the knob one
setting at a time. The
figures indicate the
fineness of the grind.
The manufacturer
configures each
appliance on an
intermediate grinding
setting. If the grind is
too fine, rotate the knob to a higher setting; if the grind
is too coarse, turn the knob to a lower setting.
The variation in grind will only be seen after one or two
coffees have been brewed.
Use coffee bean blends for espresso machines. Try
not to use high grinding settings (e.g. 1/10). Use
different coffee blends for these settings. Keep the
coffee in a fresh place in a sealed, airtight container.
Grinding must only be regulated if coffee is not brewed
properly:
• if it is brewed too fast, this means that the grind is
too coarse; turn the knob to a lower setting;
• if it is brewed in drips and/or intermittently, this
means that the grind is too fine; turn the knob to a
higher setting.
9
Page 10

Brewing
NA
Crema control
With this knob, you can regulate the amount of water
pressure so that each cup is brewed to the right
strenght and consistency, from a mild, American style
coffee, to a robust Italian
espresso
! Regulation can even be
done while the coffee is
brewing.
Turn the knob to regulate.
Rotate knob:
• left for crème café;
• to the center for espresso;
• right for a strong coffee.
Regulating the quantity of coffee per cup
Wait for the cup to fill with the required amount. Press
the same key again.
In this way the machine is programmed to brew the
quantity of coffee you require.
Brewing coffee (1 cup)
! Before brewing coffee, make sure the water tank and
the coffee tank are full and that the display shows:
SELECT PRODUCT
READY FOR USE
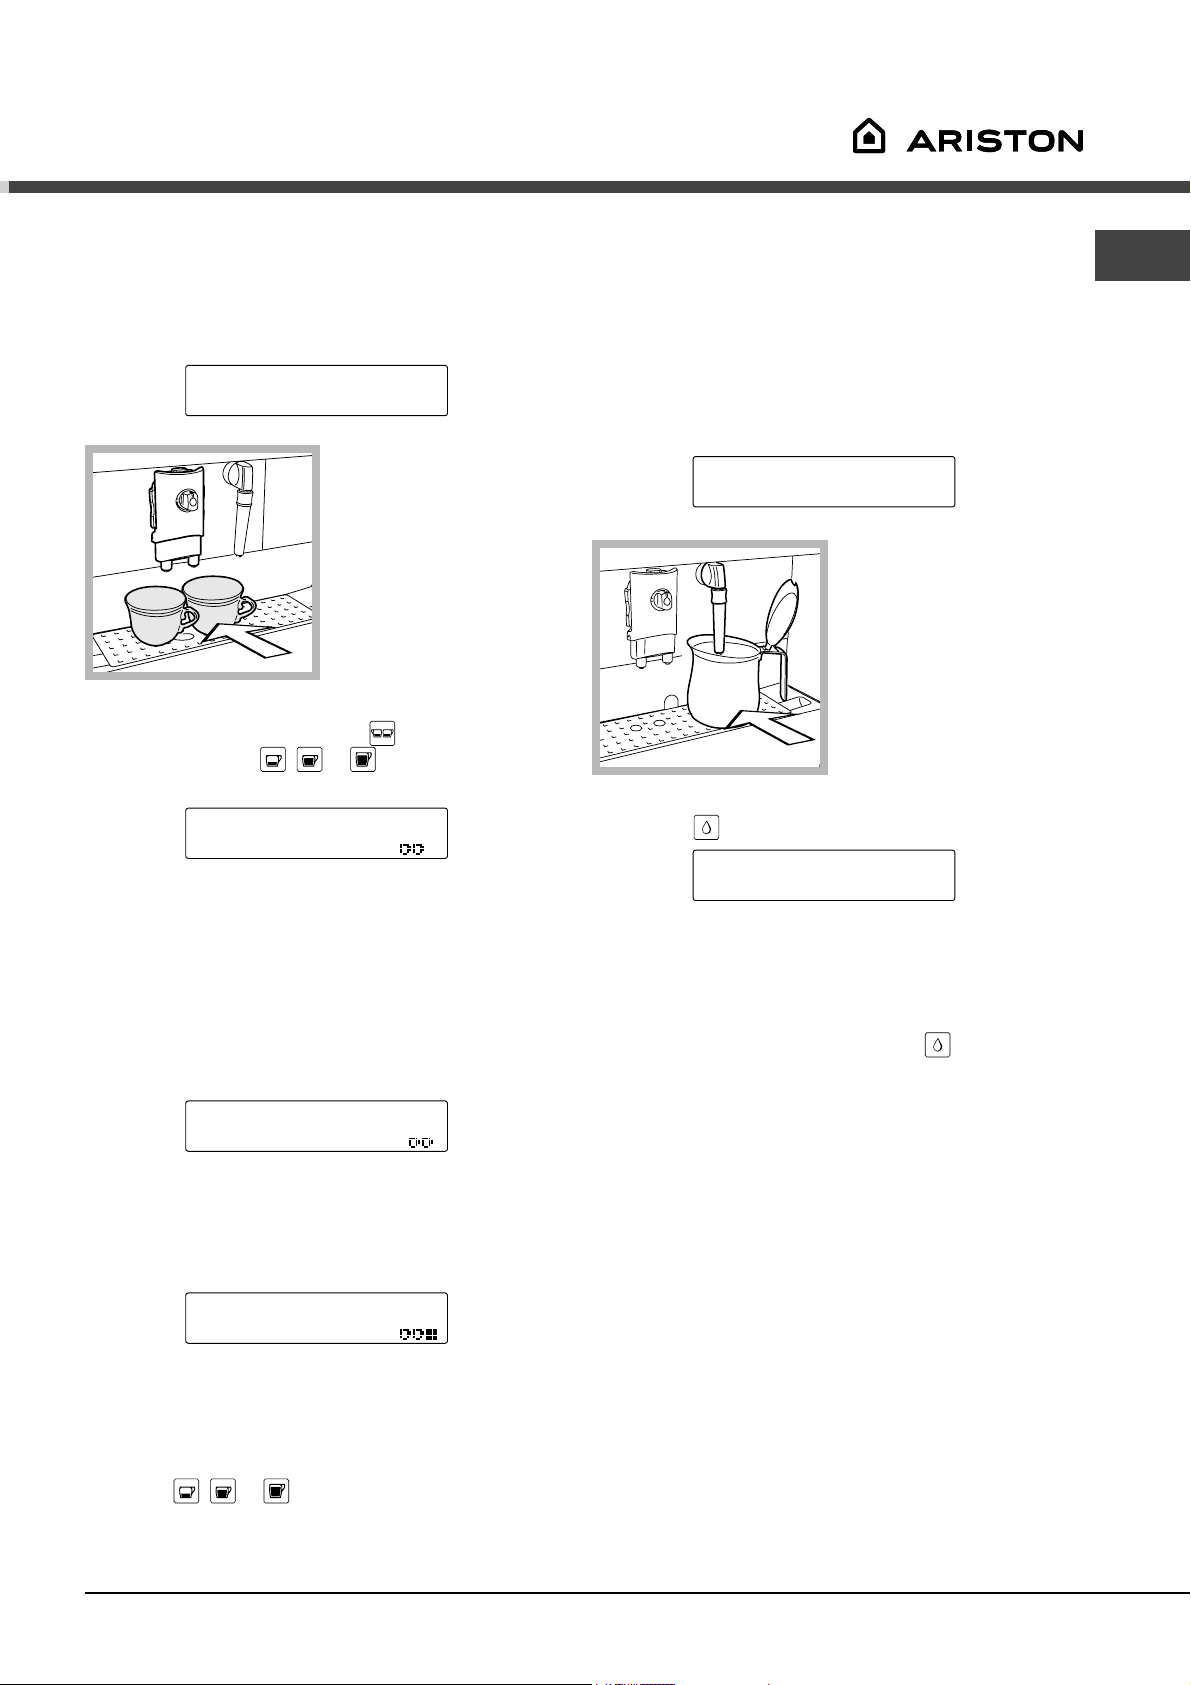
Place 1 cup beneath the
brew unit spouts.
You can adjust the height
of the brew unit to your
cups by shifting it up or
down manually.
The machine is programmed to brew 3 kinds of coffee:
key.
key,
key;
To adjust the
programmed values to
the size of the cup, place
the cup beneath the
brew unit.
Press the
and using the
key scroll through the
functions until you get to:
key
espresso coffee with the
regular coffee with the
long coffee with the
PROGR. COFFEE LENG.*
PROGR. WATER AMOUNT
Press the key; the display shows:
SELECT PRODUCT
PROGRAMM. COFFEE
press the key to brew the required type of coffee
, or ); this is shown on the display (e.g.):
(
To brew the coffee press the coffee brewing key (
or ). This is shown on the display (e.g.):
,
1 SMALL COFFEE
DISPENSING
In this operating mode the machine automatically grinds
and measures out the right amount of coffee.
Next the brew cycle is started.
1 SMALL COFFEE
PREBREWING...
After the prebrewing cycle, the coffee begins to come
out of the brew unit spout.
The display will show:
1 SMALL COFFEE
DISPENSING
Dispensing stops automatically when the set level is
reached.
! It is possible to interrupt dispensing coffee by pressing
the key (
, or ).
10
1 SMALL COFFEE
PROGRAMM. COFFEE
Page 11
Brewing coffee (2 cups)
! Before brewing coffee, make sure the water tank and
the coffee tank are full and that the display shows:
SELECT PRODUCT
READY FOR USE
Place 2 cups beneath
the brew unit spouts.
Dispensing hot water
! At the start, short spurts of hot water may be
dispensed. Danger of scalding. The hot water spout
can reach high temperatures. Do not touch it with
bare hands.
Before dispensing water, make sure the following is
shown on the display:
SELECT PRODUCT
READY FOR USE
NA
You can adjust the
height of the brew unit
to your cups by shifting
it up or down manually.
To brew the coffee, press first the
coffee brewing key (
the display, e.g.:
, or ). This is shown on
key, and then the
2 SMALL COFFEES
DISPENSING
In this operating mode the machine automatically
grinds and measures out the right amount of coffee.
! The preparation of two coffees requires two grinding
cycles and two separate brew cycles. These are
handled automatically by the machine.
Next the brew cycle is started.
When the machine is
ready to brew coffee,
proceed as follows:
1. Place a cup and/or a
container below the hot
water/steam spout.
2.Press the
key; the display shows:
HOT WATER
! A preset amount of water is dispensed. This may be
modified in the “PROGR. WATER AMOUNT” menu
described in the chapter on “Programming”.
To stop dispensing hot water, press the
The machine returns to normal operating mode.
key again.
2 SMALL COFFEES
PREBREWING...
After the prebrewing cycle, the coffee begins to come
out of the brew unit spout.
The display will show:
2 SMALL COFFEES
DISPENSING
Dispensing stops automatically when the set level is
reached.
! It is possible to interrupt dispensing coffee by
pressing (
interrupted, the second will not be dispensed.
, or ) key; If the first coffee is
Brewing steaming/cappuccino
Steam can be used to froth milk for cappuccino and
also to heat beverages.
! Danger of scalding! At the start, short spurts of hot
water may be dispensed. The brewing spout can reach
high temperatures: Do not touch it with bare hands.
11
Page 12
Maintenance and care
NA
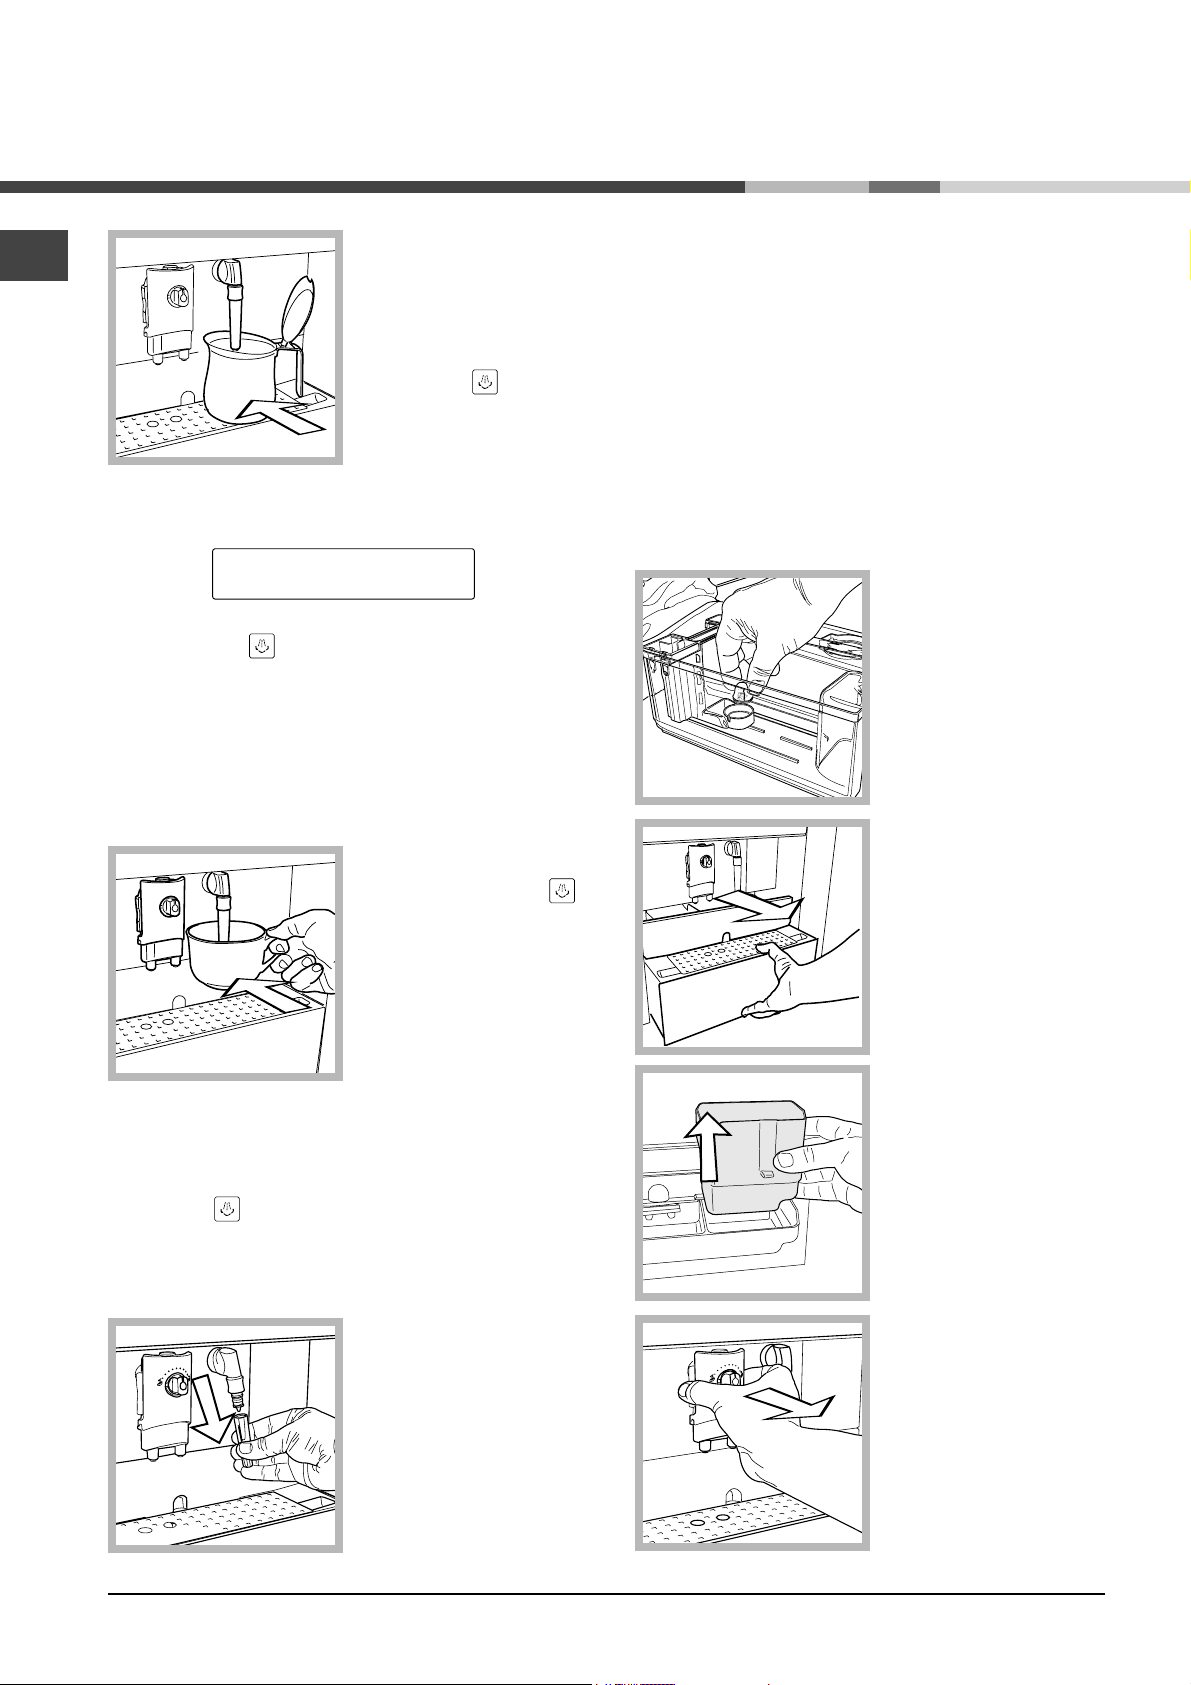
1. With the machine
ready to brew coffee,
place a cup and/or a
container below the hot
water/steam spout.
2. Press the
discharge any water left
in the steam spout; in a
short time, only steam
will come out of the
spout.
The display shows:
key to
STEAM
3. Press the key to stop dispensing steam.
4. Fill 1/3 of the container you wish to use to prepare
the cappuccino with cold milk.
! Use cold milk and a cold cup for better results
when preparing cappuccino.
5. Immerse the steam
spout in the milk to be
heated and press the
key. Move the container
gently up and down for
uniform foam formation.
General cleaning
! Maintenance and cleaning operations can only be
carried out when the machine is cold and disconnected
from the power supply.
• Do not immerse the machine in water or place any of
its parts in a dishwasher.
• Do not use sharp objects or harsh chemical products
(solvents) for cleaning.
• Do not dry the machine and/or its components in a
microwave and/or conventional oven.
• Clean the water tank
on a daily basis and
change the water.
• Remove and clean
the filter in the tank.
• Use a soft cloth
moistened with water to
clean the appliance.
• Clean the dispensing
outlet and the brew
group.
! Steam is dispensed for
a preset amount of time.
This may be modified
in the “PROGRAM
STEAM TIME” menu described in the chapter on
“Programming”.
6. Press the
! The same system can be used to heat other
beverages.
again to stop dispensing steam.
! After this operation,
clean the steam spout
with a wet cloth.
• We recommend
emptying and cleaning
the drip tray and the
dregs drawer on a daily
basis. To do this, extract
the drip tray then empty
and clean all parts.
• The brew unit may be
removed for cleaning:
1. Lower the brew unit
spouts
2. Grasp the brew unit as
shown and extract it from
its seat.
3. Wash the whole unit in
hot water.
12
Page 13
! Use the appropriate protection to open the service
door when the brew unit is assembled.
1. Remove the
protection located in
the lower part of the
machine.
• Wash the two steel
filters of all coffee
residues.
• The brew group
must be cleaned only
with warm water and
no detergents. Wash
all parts and dry
thoroughly.
• Thoroughly clean
the inside compartment of the machine.
NA
2. Install the protection
in the brew unit pushing
it inward.
3. Open the service
door leaving the
protection in the brew
unit.
! In the protection there
is a sponge which
collects the coffee
residues. When the
operations have been
completed, wash the sponge under running water.
! Once finished, remove the protection and restore the
brew unit correctly to its position.
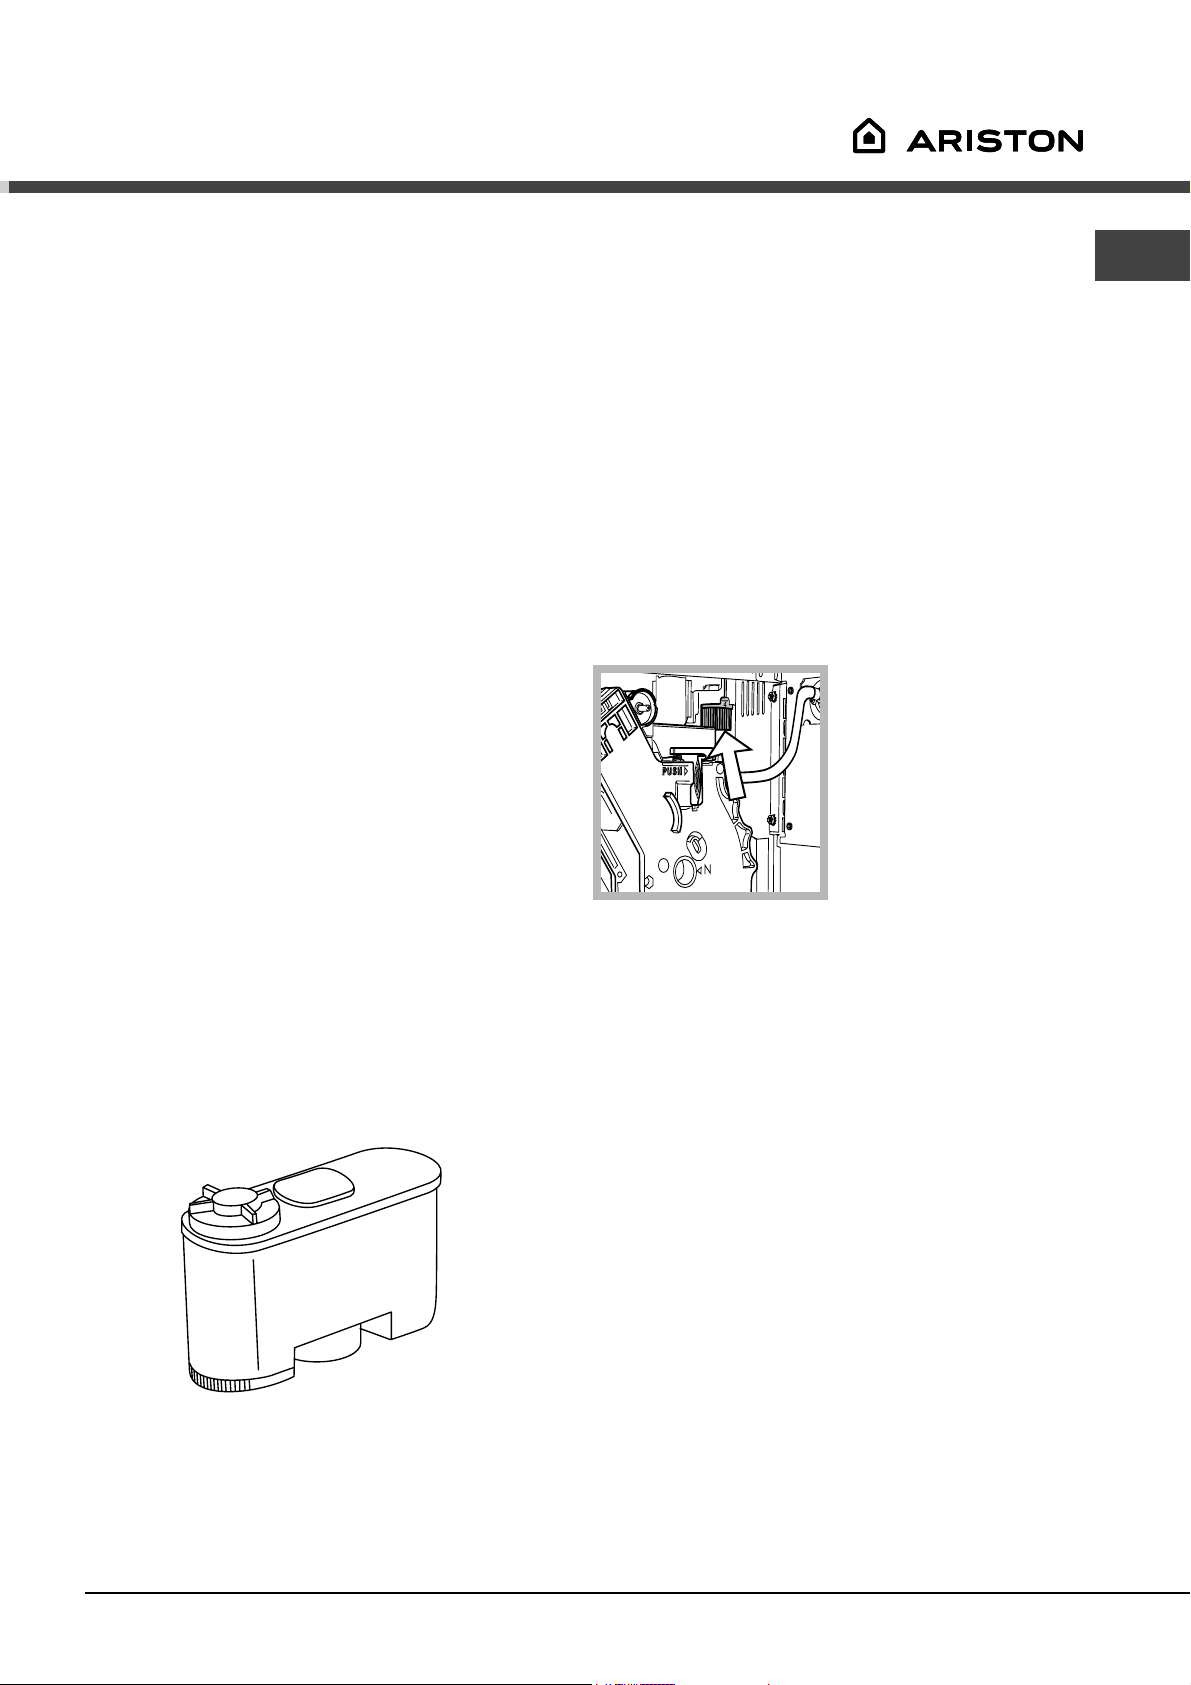
• Before inserting the
brew group, make sure
that all components are
correctly positioned;
hook in top position and
lever in bottom position.
• Press the “PUSH”
button firmly to move
the lever back to its
initial position.
• Press the group in
the indicated point to
move the lever back to
its correct position.
The brew group must be cleaned every time the coffee
bean container is filled and at least once a week.
• Switch off the machine by pressing the main switch
to “O”.
• Remove the drip
tray and the dregs
drawer. Open the
service door.
• Remove the brew
group by the handle
and press the key
marked “PUSH”.
• Take the handle and
return the brew group
to the compartment
clicking it into place.
Close the door.
• Place the dregs drawer and the grill in the drip tray
before inserting into the machine.
! For perfect efficiency of the brew group, a
maintenance kit is available.
We recommend to use the maintenance kit every 12
months of use.
For more information on where to purchase the
maintenance kit, please email to:
information@u8intl.com or call 1-888-426-0825.
13
Page 14
Maintenance and care
NA
Descaling
The product comes with one bottle of the decalcification
fluid which is enought for the first decalcification
process.
Scale normally forms with use of the appliance.
Descaling is necessary every 3 - 4 months (depending
on the water hardness and the use of the water filter)
when there is a reduction in water flow or when the
machine displays the following message:
READY FOR USE
DECALCIFY
! If you want to descale the machine yourself, you can
use a non-toxic and/or non-harmful descaling product
for coffee machines, commonly available in the shops.
Ariston descaling product is highly recommended.
! Never use vinegar as a descaler.
For more information on where to purchase the
decalcifiation fluid, please email to:
information@u8intl.com or call 1-888-426-0825.
! Remove the water filter before descaling (where
installed).
5. Direct the steam spout
towards the drip tray.
6. Place a suitably sized
container below the
steam spout and press
key.
the
The machine will start an automatic descaling cycle
with pauses programmed by the manufacturer and
automatically managed by the machine.
The display will show:
MACHINE IS DESCALING
7. At the end of the cycle, dispensing of the descaling
solution will stop and the display will show:
RINSE MACHINE
FILL WATERTANK
8. Rinse the water tank
thoroughly and fill it with
fresh drinking water.
Follow the instructions for descaling:
1. Mix the descaling
product with water
following the instructions
on the product package,
and fill the tank with
water.
2. Turn on the machine
at the main switch.
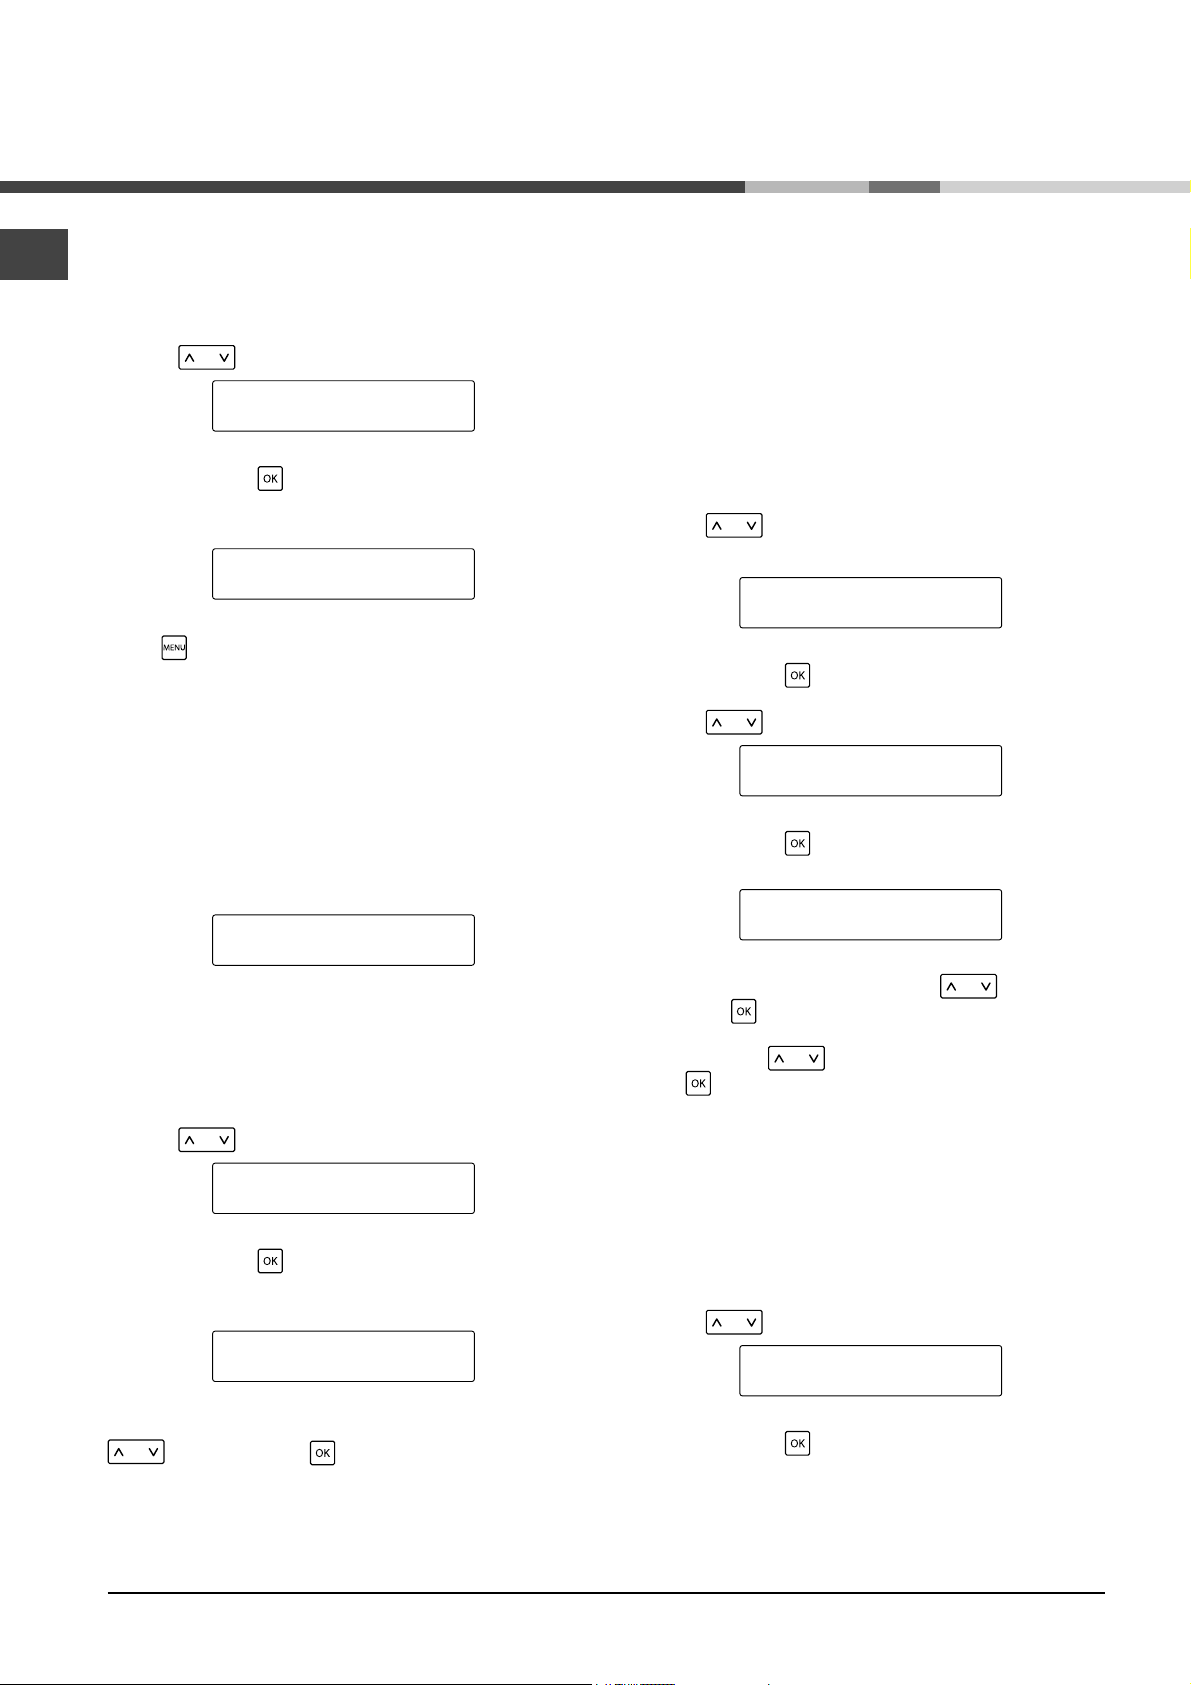
3. Press the
shows:
key to select the function. The display
DESCALING
NO
4. Using the keys, select:
DESCALING
YES
Replace the tank and
close the front panel.
The display will show:
RINSE MACHINE
PRESS WATER KEY
9. Place a suitably sized
container below the
steam spout and press
key.
the
Rinsing of the machine
circuits begins and the
display will show:
MACHINE IS RINSING
14
Page 15
Programming
10. When the rinse cycle is complete, the display will
show:
RINSING FINISHED
PRESS WATER KEY
11. Fill the water tank, press the key, reprime the
circuits and leave the machine to heat up.
Interrupting the descaling cycle
If the descaling cycle is interrupted by the machine
switching off, it is resumed when the machine is
switched on again.
The descaling cycle may be interrupted by pressing
key; the display shows:
the
MACHINE IS DESCALING
INTERRUPTED
press the key and the descaling cycle resumes. If
key and the key are pressed, the display
the
shows:
DESCAL. INTERRUPTED
EMPTY WATERTANK
Warning! After the operation, empty the water tank of
the descaling solution and wash it with fresh drinking
water. The machine’s circuit must be washed with a
rinse cycle.
Proceed as for a normal rinse cycle as described at
point 8 of the previous chapter.
Setting machine functions
The user can change a number of the machine’s
operating parameters according to personal
preference.
These functions are:
Standby, Rinsing, Language, Contrast, Water
hardness, Water filter, Temperature, Coffee Size,
Quantity of Water, Steam time, Espresso flavour,
Coffee flavour, Long coffee flavour, Pre-brewing,
Counter, Timer, Clock and Washing cycle.
MENU command
To change operating parameters, enter programming
mode with the
In programming, select the required function and press
the
available on the machine.
To exit the programming, press the
key. This scrolls you through the functions
key, when the machine is at rest.
key.
NA
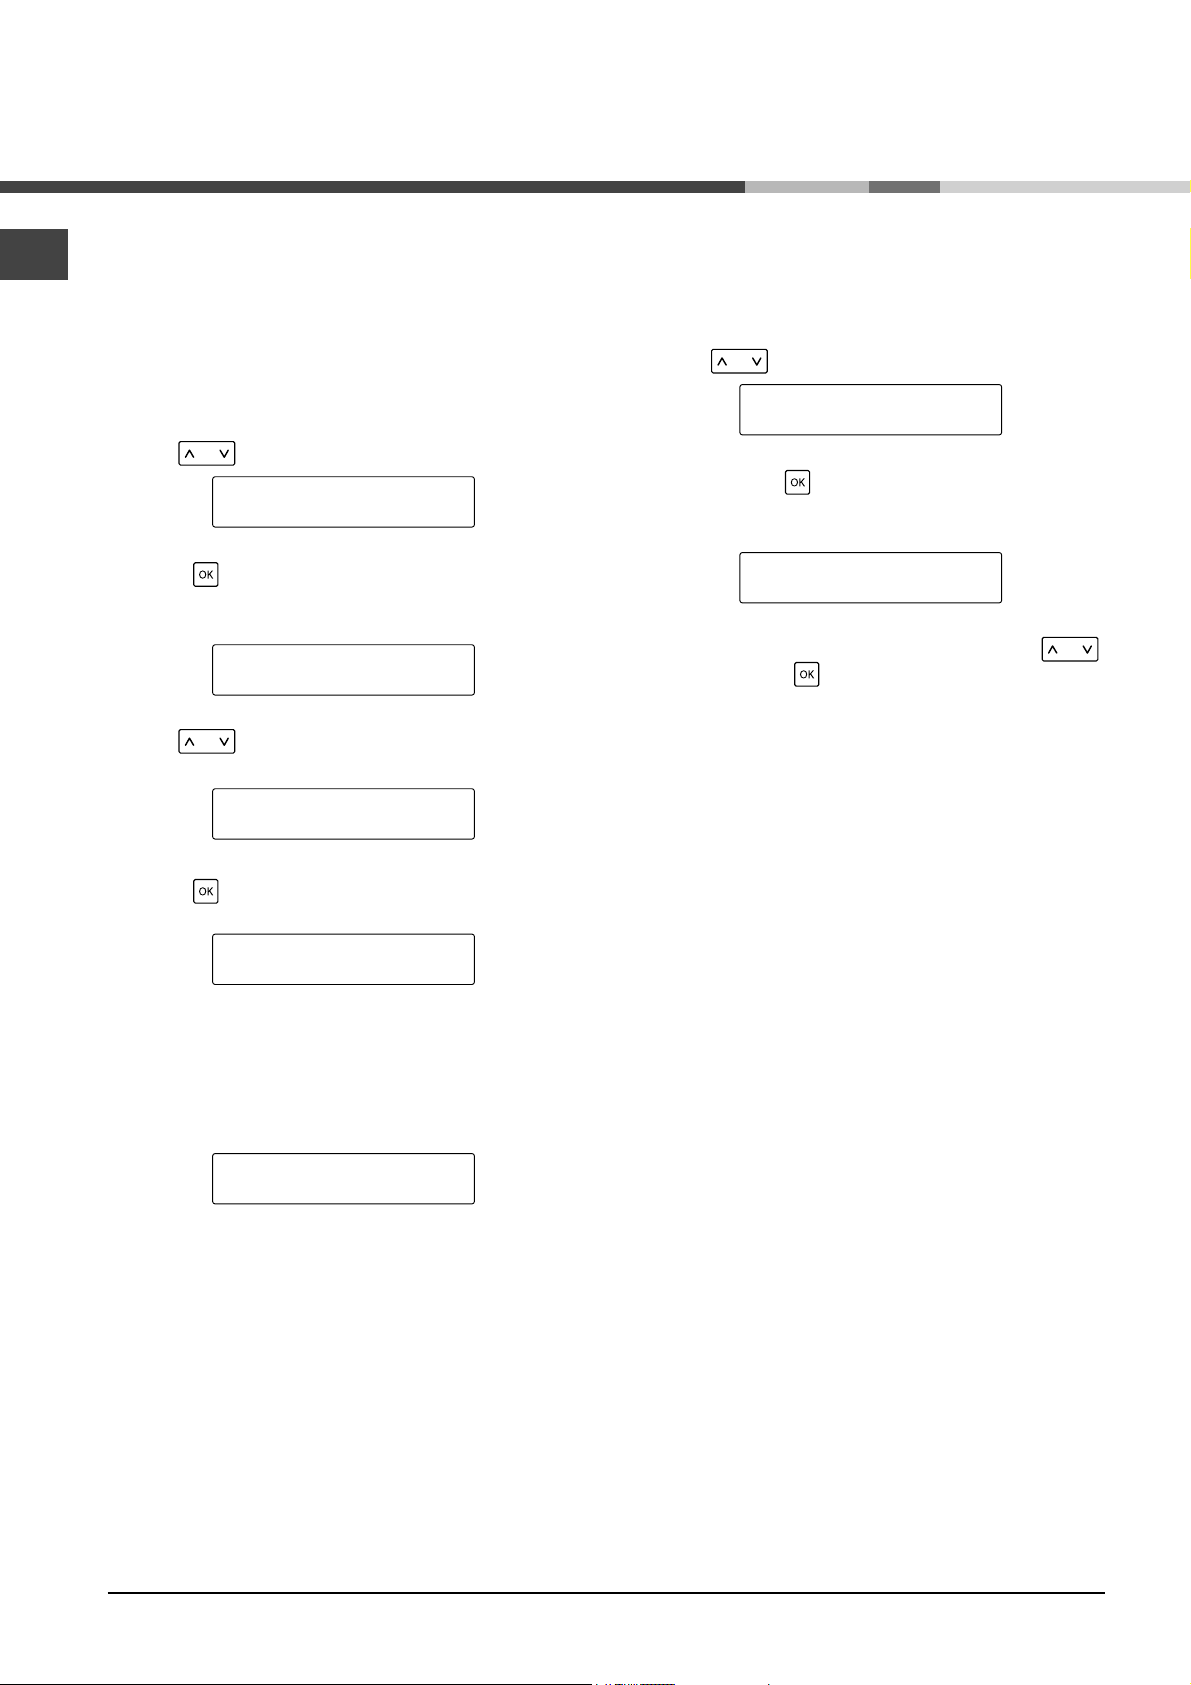
Changing individual functions
Select the required function by pressing the
key.
Enable the required function with the
through the variables using the
the required variable, press
Note: the
without saving changes. This operation is only possible
before pressing the
key interrupts programming at any time
key.
key.
key. Scroll
key. To save
15
Page 16
Programming
NA
Programmable functions
STANDBY
When the appliance is used very little, it is possible
to select the STANDBY mode. This function reduces
energy costs. Nevertheless, it is recommended to
switch off the appliance at the mains if it is to be out of
service for long periods. The machine reheats in just a
few minutes when reactivated.
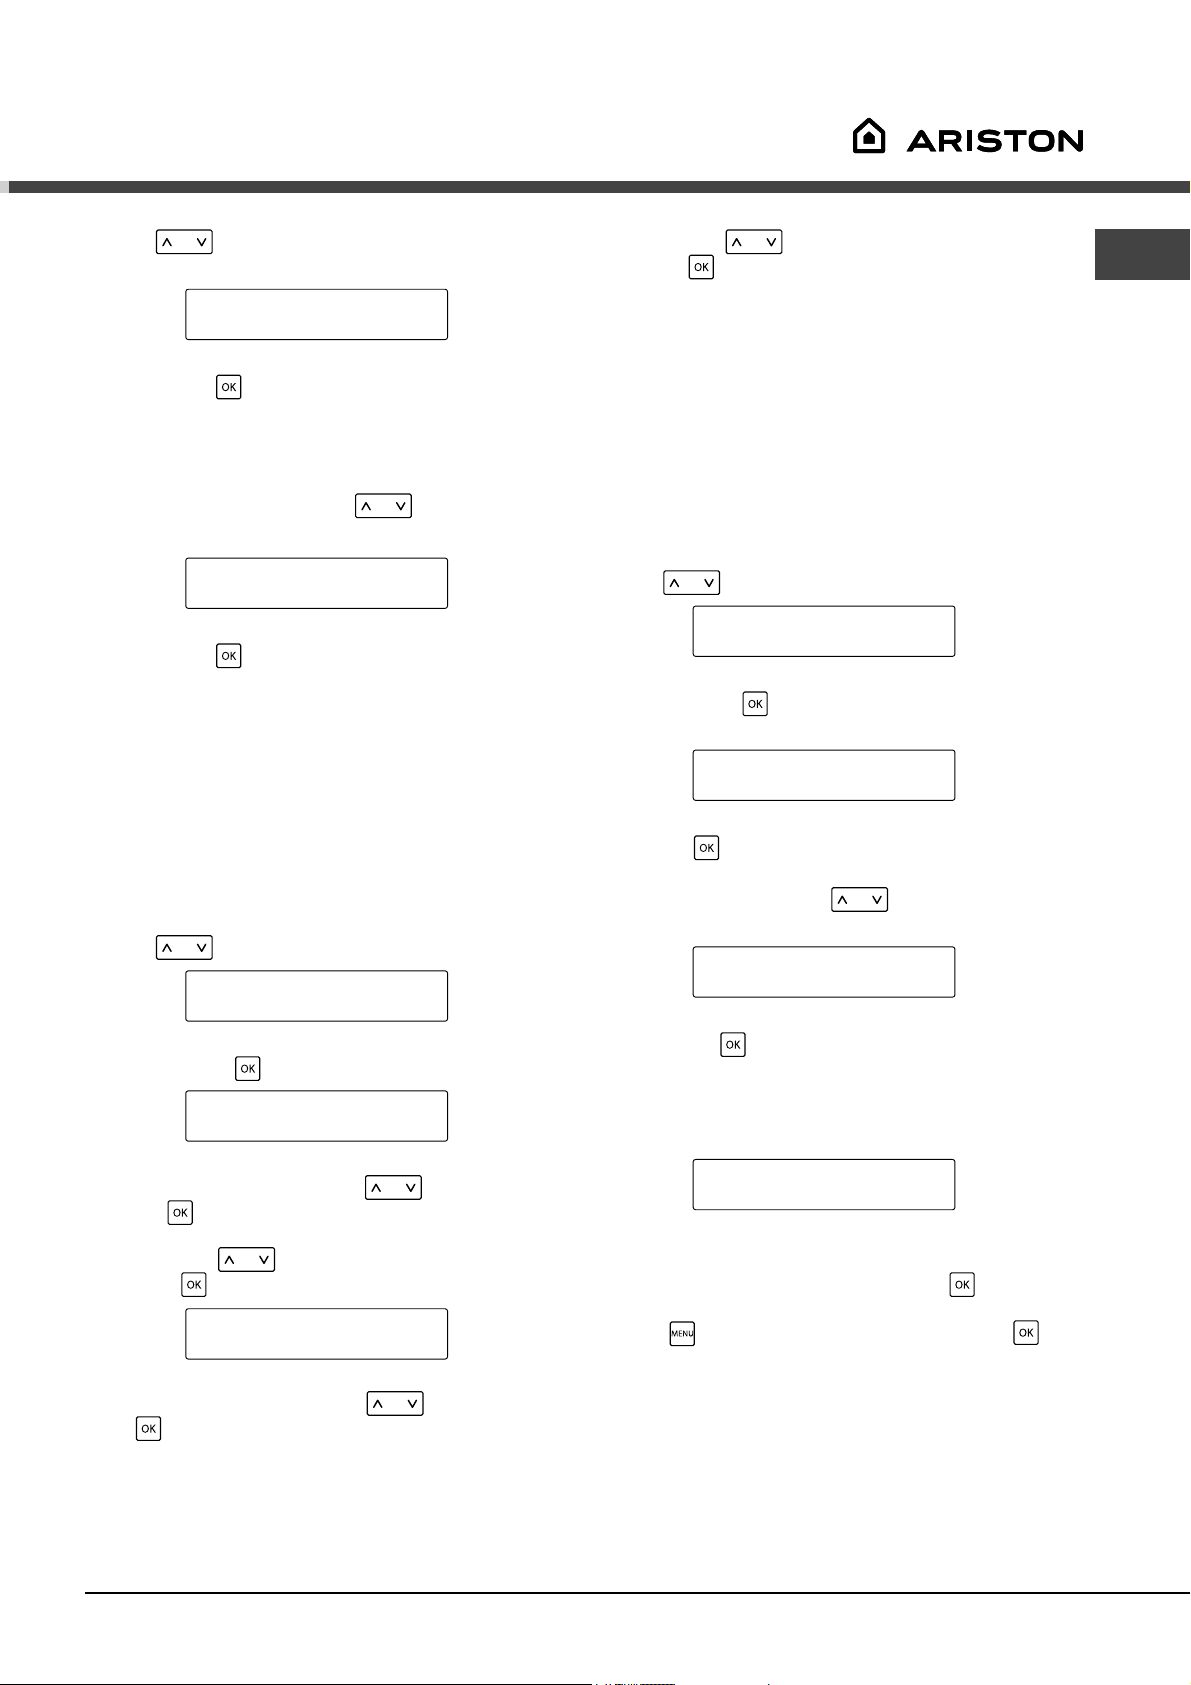
Select the function by pressing the
key
STANDBY *
RINSING
and enable with the key. The display shows:
STANDBY
The machine is on but none of its components is active.
LANGUAGE
This setting allows you to choose the machine
operating language. Moreover, it allows you to
adjust the parameters of the beverages to the typical
parameters of the country where the machine is used.
This is why some languages are differentiated also by
country. The machine is generally programmed with the
language of the country where it will be sold.
To change the language, use the
this function:
LANGUAGE *
key to choose
CONTRAST
and enable it with the key.
The display shows:
LANGUAGE
ENGLISH
Select the required language by pressing the
key and use the
key to save your choice.
To activate the machine press
RINSING
Immediately after heating, the appliance automatically
eliminates any water left in the internal ducts to ensure
that only fresh water is used to make coffee.
The function has been enabled by the manufacturer.
To disable the function, press the
function:
RINSING *
.
key, select this
LANGUAGE
and enable it with the key. The display shows:
RINSING
ON
Now, with the key select
RINSING
OFF
CONTRAST
Regulates display contrast for better viewing.
Use the
key to select this function:
CONTRAST *
WATER HARDNESS
Enable it with the key.
The display shows:
CONTRAST
>¢¢¢¢¢ < 50
Now select the required contrast by pressing the
key and use the
key to save your choice.
and save the choice using the key.
16
Page 17

WATER HARDNESS
Water hardness varies according to geographical
region. Hence, the machine must be regulated for
the hardness of the water used. This is expressed on
a scale of 1 to 4. The
appliance is already
programmed for
average hardness (3).
To regulate hardness,
briefly dip (1 second)
the strip provided in
water.
Next, shake the strip
gently to eliminate
excess water. After one
minute the test results are visible. Check the number
of squares that have changed colour.
Use the
key to select this function:
WATERFILTER *
TEMPERATURE
Enable it with the key.
The display shows:
WATERFILTER
OFF
Use the key to select
WATERFILTER
ON
and press the key to confirm.
NA
Use the
key to select this function:
WATER HARDNESS *
WATERFILTER
Enable it with the key.
The display shows:
WATER HARDNESS
HARDNESS 3
Select the right hardness using the key (e.g. 2
squares = Hardness 2) and save using the
! Warning: this setting allows the machine to notify
when it is time for descaling treatment.
The display shows:
READY FOR USE
key.
DECALCIFY
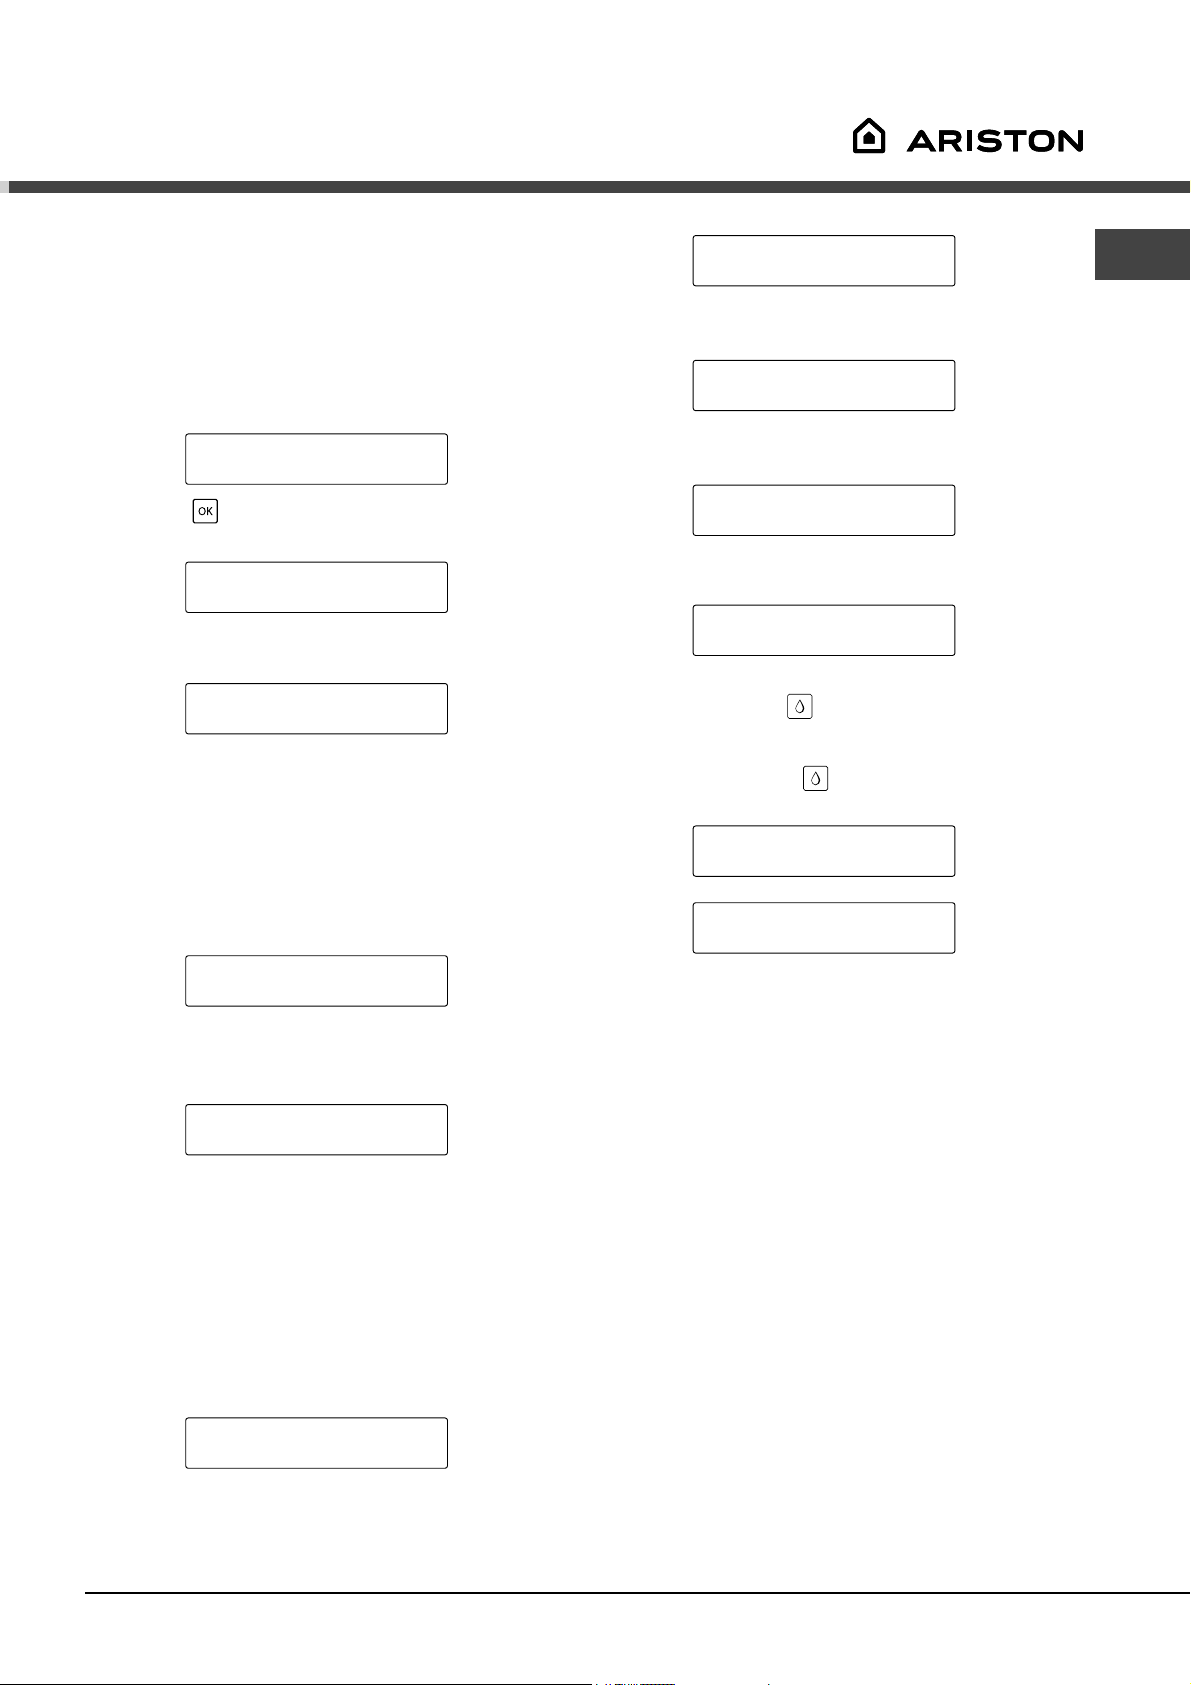
WATER FILTER (where installed)
! The “RESET” must be given whenever a new
cartridge filter is installed.
For this command, use the
function:
WATERFILTER
key to select the
RESET
Enable it with the key.
TEMPERATURE
This function regulates the temperature of the water
for coffee (high, medium and low).
Use the
key to select the function:
TEMPERATURE *
PROGR. COFFEE LENG.
Enable it with the key.
This function provides better management of the
“water filter (where installed), notifying the user when
the filter is to be replaced.
! The function must be enabled when installing the
water filter for the first time.
The display shows (e.g.):
TEMPERATURE
MEDIUM
Select the required temperature by pressing the
key and use the key to save your choice.
17
Page 18
Programming
NA
PROGRAMMING COFFEE SIZE
This function enables you to regulate the amount of
coffee brewed when the (
pressed.
You can program the amount dispensed one key at a
time Continue repeating the procedure described below
to program several keys.
Use the
key to select the function:
PROGR. COFFEE LENG.*
, or ) keys are
PROGR. WATER AMOUNT
Enable it with the key.
The display shows:
SELECT PRODUCT
PROGRAMM. COFFEE
! In this phase, if the display remains idle for a certain
amount of time, the machine exits the function.
Position the cup that you want to fill.
Press the key to brew the required type of coffee (
or ); this is shown on the display (e.g.):
,
1 SMALL COFFEE
DISPENSING
and then:
1 SMALL COFFEE
PROGRAMM. COFFEE
Wait for the cup to fill with the required amount. Press
the key again.
Enable it with the key.
The display shows:
SELECT PRODUCT
PROGRAMM. WATER
Position the container that you want to fill and press .
Water is dispensed from the steam spout and the
display shows:
HOT WATER
PROGRAMM. WATER
When the required amount is reached, press the
key again.
The machine is now programmed.
PROGRAMMING STEAM TIME
This function enables you to regulate how long steam is
dispensed whenever
Use the
key to select the function:
PROGRAM STEAM TIME *
is pressed.
AROMA SMALL COFFEE
Enable it with the key.
The display shows:
SELECT PRODUCT
PROGRAMM. STEAM
PROGRAMMING THE QUANTITY OF WATER
This function enables you to regulate the amount of
water that is dispensed whenever
need just one key to fill your container with the right
amount of water
Use the
key to select the function:
PROGR. WATER AMOUNT*
is pressed. You
PROGRAM STEAM TIME
18
Position the container with the drink that you want to
heat and press the
Steam is dispensed from the spout and the display
shows:
STEAM
key.
PROGRAMM. STEAM
When the required amount is reached, press the
key again.
The machine is now programmed.
Page 19
AROMA ESPRESSO
This function allows you to program a dosage
(quantity) setting for coffee beans to be ground for
espresso (strong, normal, mild).
AROMA LONG COFFEE
NA
This function allows you to program a dosage
(quantity) setting for coffee beans to be ground for
long coffee (strong, normal, mild).
Use the
key to select the function:
AROMA SMALL COFFEE *
AROMA COFFEE
Enable it with the key.
The display shows (e.g.):
AROMA SMALL COFFEE
STRONG
Select the required dose by pressing the key
and use the
AROMA COFFEE
This function allows you to program a dosage
(quantity) setting for coffee beans to be ground for
coffee (strong, normal, mild).
Use the
key to save your choice.
key to select the function:
AROMA COFFEE *
AROMA LARGE COFFEE
Use the
key to select the function:
AROMA LARGE COFFEE *
PREBREWING
Enable it with the key.
The display shows (e.g.):
AROMA LARGE COFFEE
STRONG
Select the required dose by pressing the key
and use the
PRE-BREWING
The pre-brewing process enhances the aroma of
coffee to give it an excellent taste. This function
moistens the coffee before it is actually brewed.
Use the
key to save your choice.
key to select the function:
PREBREWING *
TOTAL COFFEES
Enable it with the key.
The display shows (e.g.):
AROMA COFFEE
NORMAL
Select the required dose by pressing the key
and use the
key to save your choice.
Enable it with the key.
The display shows (e.g.):
PREBREWING
ON
Use the key to choose whether to disable the
function:
PREBREWING
OFF
or to extend the phase
PREBREWING
LONG
to enhance the flavour of your coffee.
Save your choice using the
key.
19
Page 20
Programming
NA
TOTAL COFFEES
This function displays the number of coffees already
dispensed by the appliance.
Use the
key to select the function:
TOTAL COFFEES *
TIMER
Enable it with the key.
The display shows (e.g.):
TOTAL COFFEES
81
Press key to exit.
TIMER
This function enables you to save energy when the
machine is not used for long periods.
This function is preset by the manufacturer and is
automatically enabled.
STANDBY
after 3 hours from the use.
! Switch-off time can be regulated at 15-minute intervals
with a minimum of 15 minutes. The function cannot be
disabled.
CLOCK
This function is enabled and/or disabled by the user
and:
- displays the exact time when the machine is in
“STANDBY” or “SELECT FUNCTION” mode.
- selects the on/off time.
To correctly program this function, the exact time must
be set
Use the
key to select this function:
CLOCK *
RINSING CYCLE
Enable it with the key.
Use the
key to select this function:
CLOCK TIME *
ON/OFF TIME
Enable it with the key.
CLOCK TIME
0:00
Set the current time by pressing the key and
save using
Next, press the
using
key;
key to set the minutes and save
key.
Use the
key to select the function:
TIMER *
CLOCK
Enable it with the key.
The display shows:
ENERGY SAVING
AFTER 3:00
Select the automatic switch-off interval by pressing the
key and use the key to save.
! Note: if automatic switch-on/off times are enabled in
“CLOCK” mode, this function will be ignored.
20
The time is set and the machine returns to the previous
menu.
! Note: the time is memorised when the machine is
switched off.
To display the time
Use the
key to select this function:
SHOW CLOCK TIME *
AUTOMATIC ON/OFF
Enable it with the key.
Page 21
Use the key to choose whether to enable the
function
SHOW CLOCK TIME *
ON
Save using the key.
! Note: the time is only displayed at certain times. This
function can only be disabled by the user.
Next, press the key to set the minutes and
save using
! Attention: if the on and off times coincide, the
machine ignores both settings. The clock must be
enabled after this programming in order to function
correctly.
To enable automatic on/off
key.
NA
To disable this function, use the
SHOW CLOCK TIME *
key to choose:
OFF
Save using the key.
Regulating on/off times
The machine can be programmed to switch on and off
automatically. Only one “on” time and one “off ” time
can be programmed on the machine.
! Note: this function is enabled only if the main switch
is in the “I” position (on).
Use the
key to select this function:
ON/OFF TIME *
SHOW CLOCK TIME
Enable it with the key.
ON/OFF TIME
ON TIME 0:00
Set the “on” time by pressing the key and save
using the
key.
! Note: this function is enabled only if on/off times has
been programmed.
Use the
key to select this function:
AUTOMATIC ON/OFF *
CLOCK TIME
Enable it with the key.
AUTOMATIC ON/OFF
NO
In this case disables this function.
Enable the function with the
display shows
AUTOMATIC ON/OFF
key and when the
YES
save using the key.
Check the parameter settings when exiting
programming. If the current time falls within the
disabled period the display shows:
STANDBY
Next, press the
save using
ON/OFF TIME
key.
key to set the minutes and
OFF TIME 0:00
Set the “off” time by pressing the key and save
using
key.
! Note: during the disabled phase the machine may
be reactivated at any time by pressing the
disable the machine again, go into programming by
pressing
key.
and exit immediately by pressing the
key. To
21
Page 22
Programming
NA
RINSING CYCLE
This function performs a rinsing cycle using water to
clean all components involved in brewing coffee.
! A person should be present during the rinsing cycle to
supervise the operation. Before performing the rinsing
cycle fill the water tank.
Use the
key to select this function:
RINSING CYCLE *
FACTORY SETTINGS
Press the key.
The display will show:
RINSING CYCLE
NO
Use the key to select
RINSING CYCLE
YES
Factory settings
This function resets the machine’s operating
parameters to the manufacturer’s settings.
Use the
key to select this function:
FACTORY SETTINGS *
EXIT
Enable it with the key.
The display then shows:
FACTORY SETTINGS
NO
Choose whether to restore parameters with the
key, and press the
! Warning: when all parameters are restored to factory
settings, all customised settings are lost.
key to confirm.
Press the key to start the rinsing cycle. The display
shows:
RINSING CYCLE
The machine dispenses about half the quantity of water
contained in the tank from the brew unit.
Then the cycle stops automatically, and the display
shows:
SELECT PRODUCT
READY FOR USE
22
Page 23
Display messages
Display messages
The machine’s display informs the user of how it is to
be used.
Here is a list of the alarm messages that prevent
coffee brewing and what the user should do to solve
the problem.
STANDBY
• Press the key.
READY FOR USE
DECALCIFY
• Descale the machine.
FILL WATERTANK
• Fill the water tank with fresh drinking water.
! The machine requires the tank to be filled even when
the level is still high. This happens because the tank
of the coffee machine has been preset to house the
optional “water filter”, thus requiring a minimum level of
water in the tank for filtering to be performed.
WASTE TRAY MISSING
• Insert the drip tray and the dregs drawer correctly.
CLOSE DOOR
• Close the front door.
CLOSE CONTROL PANEL
• Close the upper panel.
VENTILATE
• Place a cup or suitable container below the steam
spout and press the
Wait until the water runs smoothly out of the steam
spout.
To interrupt, press the
key.
key.
BREWUNIT BLOCKED
NA
COFFEE BEANS EMPTY
READY FOR USE
• Fill the container with coffee beans and start the
coffee brew cycle.
WASTE TRAY FULL
• Open the door, remove the dregs drawer and empty
the dregs into a suitable container.
! Important note: The dregs drawer must only be
emptied when the machine is switched on. The dregs
drawer must be removed for at least 5 seconds. If the
drawer is emptied when the machine is switched off, it
will not be possible to brew coffee when switched back
on.
BREWUNIT MISSING
• Insert the brew group correctly.
GRINDER BLOCKED
• Contact an authorised customer service center.
23
Page 24

Problems - causes - solutions
NA
Problem Cause Solution
The machine does not switch on The machine is not connected to the
power supply
Coffee is not hot enough The cups are cold Warm the cups with hot water
No hot water or steam is dispensed Steam spout clogged Pull the steam spout downwards to
Coffee brews too slowly Coffee too fine Change coffee blend
Brew group dirty Wash the brew group
SBS system knob turned all the way
to the right
Coffee brews too quickly Coffee too coarse Change coffee blend
SBS system knob turned all the way
to the left
The machine takes a long time to
heat up and the amount of water
dispensed from the spout is too
small
There are limescale deposits in the
circuit
Check connection to the power
supply
remove it, and clean
Rotate the grind regulation knob to
the highest number
Turn the knob to the left and when
the machine is brewing, turn toward
the right
Rotate the grind regulation knob to
a lower value
When the machine is brewing, turn
the knob to the right
Run descaling cycle
The brew group does not come out The brew group is off position Turn the machine on. Close the
front door; the group returns to
the starting position and can be
removed.
Drip tray inserted Remove the drip tray
Coffee leaks out of the brew unit Brew unit in the wrong position Reposition the brew unit
Brew unit clogged Remove brew unit and wash
Coffee has little foam Unsuitable coffee blend or coffee is
not freshly toasted
Coffee blend too coarse Regulate the grind
SBS system knob turned towards
the left
Water overflowing from the drip tray Drip tray too full Check the position of the float and
Change coffee blend
Turn the SBS system knob to the
right
empty the drip tray
CUSTOMER CARE, SERVICE OF PARTS: 1-888-426-0825 or e-mail to: information@u8intl.com
24
Page 25

Precautions and
recommendations
Intended use
• The coffee machine is intended only for domestic
use.
• Do not make any technical changes or use the
machine for unlawful purposes as this may lead to
hazards!
• This appliance is not intended for use by persons
(including children) with reduced physical, sensory
or mental capabilities, or lack of experience
and knowledge, unless they have been given
supervision or instruction concerning use of the
appliance by a person responsible for their safety.
Power supply
• Only connect the coffee machine to a suitable
power socket.
• The voltage must correspond to the value on the
rating plate.
Power cable
• Never use the coffee machine if the power cable is
defective.
• Do not pass the cable around corners, over sharp
edges or over hot objects and keep it away from oil.
• Do not pull out the plug by tugging at the power
cable or touch it with wet hands or feet.
Protecting others
• Children should be supervised to ensure that they
do not play with the appliance. Children are not
aware of the risks linked with electrical appliances.
• Do not leave the coffee machine packaging within
the reach of children.
Danger of burning
• Never direct the jet of hot water and/or steam
towards yourself or others. Danger of scalding.
Always use the handles or knobs provided.
• Do not insert objects into the openings on the
appliance.
Installation area, use and maintenance
• Do not obstruct the ventilation or heat discharge
openings.
• Choose a location that is sufficiently lit, clean and
near a socket that is easy to reach.
• Do not place the machine on hot surfaces and close
to open flames to prevent the casing from melting or
being damaged.
• Allow a distance of 10 cm between walls and
cooking hotplates.
• Do not keep the machine at a temperature below
0°C; freezing may damage the machine.
• There must be easy access to the socket at all
times.
• Do not use the coffee machine outdoors.
Cleaning
• Before cleaning the machine, it is indispensable
to put the main switch on “O” and remove the plug
from the power socket.
• Then, wait for the machine to cool down.
• Never immerse the machine in water! Prevent it
from being sprayed with water.
• It is strictly forbidden to tamper with the inside of the
machine.
Storing the machine
• If the machine is to remain out of use for a long
time, switch off and unplug it from the socket. Store
it in a dry place out of the reach of children.
• Keep it protected from dust and dirt.
• Do not lay heavy objects on the front panel while
open.
Servicing / Maintenance
• In case of failure, faults or suspected faults, unplug
immediately. Never attempt to operate a faulty
machine.
• Servicing and repairs must only be carried out by
Authorized Customer Service Centres.
• The manufacturer accepts no responsibility
for servicing and/or repairs not carried out by
authorised customer service centres.
Fire safety
• In the event of fire, use carbon dioxide extinguishers
). Do not use water or dry-powder
(CO
2
extinguishers.
Disposal
• Disposal of packaging materials: comply with local
regulations for recycling of used packaging.
• European Directive 2002/96/EC on waste electrical
and electronic equipment (WEEE), states that
electrical household appliances must not be
disposed of a normal solid urban waste. Old
appliances must be collected separately to optimise
the rate of recovery and recycling of the materials of
which they are composed, and to prevent potential
damage to health and the environment. The crossed
through basket symbol is used on all products as a
reminder that they must be disposed of separately.
Electrical appliances in disuse can be delivered
to the public refuse collection service or taken to
special municipal areas. Otherwise, depending on
national legislation, they may be taken to the retailer
at the time of purchase of a similar product.
All the main manufacturers of household
appliances are actively involved in the creation
and management of collection and disposal of
appliances in disuse.
NA
25
Page 26

Statements of warranties
Ariston Coffee Center MCA
NA
The warranties provided by (Ariston) in this statement of warranties apply only to Coffee Center units sold to
the first using purchaser by Ariston or its authorized distributors, dealers, retailers or service centers in the
United States or Canada. The Warranties provided herein are not transferable.
Length of Warranty
1 Years Full Limited Warranty from the date of installation*
Ariston will repair, replace or exchange, free of charge, the complete unit or any component part at their
discretion that proves defective in conditions of normal home use. Shipping and labor costs included. In
home warranty repair service must be performed by an authorized Ariston Service Center, or depending on
the complexity of the service work required the complete unit will be exchanged for a unit of similar or better
quality and the defective unit returned to the Ariston service facility.
10-day Warranty after purchase on cosmetic damages
Ariston will replace any cosmetic parts, free of charge – including service call, which are found and reported
damaged within 10 days after purchase. Any damages caused by improper handling, shipping, or installation
will not be covered under this clause.
* Date of installation shall refer to the earlier of the date the Coffee Center is installed or ten business days
after delivery date.
Exclusion:
This warranty does not cover repair or service calls to correct the installation, to provide instructions on the
use of your product, to replace house fuses or correct plumbing or the electric wiring in your home. In
addition any repair to the products that’s use was in a manner other than what is normal for home use is
void of any warranty claim. The warranties exclude any defects or damage arising form accident, alteration,
misuse, abuse, improper installation, unauthorized service work, or external forces beyond Ariston control,
such as fire, flood, and other acts of God, or installation not in accordance with local electric or plumbing
codes. Labor, shipping, and installation charges incurred in the repair or replacement of any product after a
period of one year from the date of installation shall not be covered by this warranty. Any and all replaced or
repaired parts shall assume the identity of the original for the purposes of the applicable warranty period. To
the extent permitted by law, this warranty is in lieu of all other express and implied warranties, including the
implied warranties of merchantability and fitness for a particular purpose. Ariston does not assume any
responsibility for incidental or consequential damages.
To obtain warranty services call 1-888-426-0825, or write to:
Ultra 8 International, 2505 Anthem Village Drive, Suite E – Box 562, Henderson Nevada 89052
Be sure to provide; model number, serial number, purchase date, and the dealers name and address.
26
Page 27

Mode d’emploi
Machine à café
GB
English,1 Espanol, 53Français, 27
FR
SP
Index
Installation 30
Mise en place
Encastrement
Aération
Centrage et fixation
Branchement électrique
Montage du câble d’alimentation
Plaquette des données
Description de la machine 32
Vue d’ensemble
Panneau de contrôle
Mise en marche et utilisation 33
Première mise en marche
Amorçage du circuit
Réglage dureté de l’eau
Filtre à eau (s’il est prévu)
Montage du filtre à eau
Informations complémentaires pour l’utilisation correcte
du filtre à eau (s’il est prévu)
Réglage de la mouture
FR
Distribution 36
Système SBS
Réglage de la quantité de café par tasse
Distribution du Café (1 tasse)
Distribution du Café (2 tasses)
Distribution d’Eau Chaude
Distribution de la Vapeur / Préparation du Cappuccino
Entretien et soin de la machine 38
Nettoyage général
Détartrage
Interruption du détartrage
Programmation 41
Commande MENU
Modification des différentes fonctions
Fonctions programmables
Configuration initiale
Signalisations sur l’afficheur 49
Problèmes - causes - remèdes 50
Précautions à prendre et conseils 51
Page 28

FR
IMPORTANT
Lors de l’utilisation d’appareils électriques, il est important de prendre les précautions suivantes,
afin d’éviter les décharges électriques, les courts circuits et les accidents corporels.
1 Lire toutes les instructions et les indications données dans cette brochure, ainsi que toute
autre information que contient l’emballage, avant de mettre la machine en marche.
2 Ne pas toucher les surfaces chaudes de la machine. Utiliser les poignées ou boutons.
3 Ne pas plonger le fil électrique, la prise ou l’appareil lui-même dans l’eau ou tout autre
liquide.
4 Faire très attention lorsque l’appareil est utilisé par ou près des enfants.
5 Débrancher l’appareil lorsqu’il n’est pas en service et laissez-le refroidir avant de retirer les
accessoires pour le nettoyage ou de les mettre en place.
6 Ne pas utiliser l’appareil avec un cordon ou une prise en mauvais état ou après que l’appareil
ait été endommagé de quelque manière que ce soit. Confiez votre appareil au service après-
vente autorisé le plus proche pour examen ou réparation.
7 L’utilisation d’accessoires non recommandés par le fabricant de l’appareil pourrait poser des
problèmes.
8 Ne pas utiliser à l’extérieur.
9 Ne pas laisser le cordon pendre de la table ou de la surface de travail, ni toucher des surfaces
chaudes.
10 Ne pas poser sur une cuisinière ou dans un four chaud.
11 Mettre toujours l’appareil en position «éteint» avant de le débrancher. Mettre aussi tous les
interrupteurs à «éteint» avant de le débrancher.
12 Usage domestique seulement.
13 Faire très attention en utilisant la vapeur.
GARDER CES ISTRUCTIONS
28
Page 29

PRÉCAUTIONS
Machine est réservée à un usage domestique. Tout entretien, en dehors du nettoyage et de
l’entretien usuel par l’usager, doit être fait par un centre de service autorisé. Ne pas plonger la
base dans l’eau. Pour éviter les courts-circuits et les décharges électriques, ne pas démonter
la base. Elle ne contient aucune pièce qui demande un entretien de la part de l’usager. Toute
réparation doit être effectuée par le personnel d’un service après-vente autorisé.
1 Vérifier si le voltage correspond bien aux spécifications apparaissant sur la plaque des
données techniques.
2 Ne jamais mettre de l’eau tiède ou chaude dans le réservoir; mais toujours de l’eau froide.
3 Ne pas toucher les surfaces chaudes de l’appareil pendant le fonctionnement et en écarter
le cordon électrique.
4 Ne jamais nettoyer avec des poudres à récurer ou des instruments durs.
5 Utiliser de l’eau purifiée ou en bouteille pour éviter la formation de tartre.
FR
INSTRUCTIONS SUR LE CORDON
ELECTRIQUE
A Votre appareil est muni d’un cordon électrique court afin d’éviter qu’il ne s’emmêle ou qu’on
ne s’y accroche.
B On peut utiliser une rallonge électrique en prenant certaines précautions.
C Si on utilise une rallonge, vérifier:
1 que sa tension est au moins égale à celle de l’appareil
2 qu’elle est munie d’une prise à trois fiches, avec mise à la terre, si c’est le cas pour le cordon
de l’appareil
3 que le câble ne pende pas de la table afin d’éviter de trébucher.
29
Page 30

Installation
FR
! Conserver cette notice pour pouvoir la consulter
à tout moment. En cas de vente, de cession ou
de déménagement, s’assurer qu’elle reste avec la
machine pour informer le nouveau propriétaire du
fonctionnement et des avertissements correspondants.
! Lire attentivement la notice : elle contient des
informations importantes sur le montage, l’utilisation et
la sécurité de la machine.
Mise en place
! Les emballages ne sont pas des jouets pour les enfants
et doivent être éliminés conformément aux normes pour
la collecte sélective (voir Précautions et conseils).
! Le montage doit être effectué d’après ces instructions
par du personnel qualifié. Un mauvais montage peut
provoquer un accident, blesser un animal domestique
et/ou faire des dégâts.
Encastrement
Pour que la machine fonctionne correctement, il faut
que le meuble ait des caractéristiques appropriées
• Les panneaux adjacents à la machine à café doivent
être constitués d’un matériau qui résiste à la chaleur ;
• en cas de meubles en bois plaqué, les colles doivent
résister à la température de 100°C et à l’action de la
vapeur ;
! Lorsque la machine est encastrée, il ne doit y avoir
aucun contact possible avec les parties électriques.
Les déclarations de consommation indiquées sur la
plaquette des données ont été mesurées avec ce type
de montage.
Aération
Pour garantir une bonne aération, il est nécessaire
d’éliminer la paroi arrière du logement.
Il est conseillé de monter la machine à café de façon
à ce qu’elle repose sur un plan continu ayant une
ouverture, à la base, d’au moins 45 x 540 mm.
Centrage et fixation
Pour centrer correctement la machine à café, mettre
des entretoises à la hauteur des trous prévus sur la
structure extérieure de cette dernière.
! Toutes les entretoises doivent être fixées pour garantir
la stabilité parfaite de la machine.
Procéder comme suit
pour fixer la machine au
meuble :
• enlever le bac
d’égouttement de la
machine ;
• pour pouvoir encastrer la machine, quel que soit le
type de montage, le meuble doit avoir les dimensions
suivantes :
• enlever la protection
inférieure en plastique ;
• visser les 2 vis à bois
dans les 2 trous situés à
l’arrière dans la base.
30
Page 31

! Toutes les parties servant à protéger doivent être
fixées de façon à ne pouvoir être enlevées qu’avec un
outil quelconque.
Placer le câble d’alimentation de façon à ce qu’il ne
dépasse en aucun point de 50°C la température ambiante.
FR
Ensuite, remettre correctement la protection et le bac
d’égouttement.
Branchement électrique
! Les machines à café équipées d’un câble
d’alimentation tripolaire sont prévues pour fonctionner
avec du courant alternatif, à la tension et à la
fréquence indiquées sur la plaquette des données
située sur la machine.
! L’installateur a la responsabilité d’effectuer un
branchement correct et de se conformer aux normes
de sécurité.
Avant de procéder au branchement, vérifier si :
• la prise est prévue avec mise à la terre et est
conforme aux normes ;
• la prise est en mesure de supporter la charge
maximale de puissance de la machine, indiquée sur
la plaquette des données ;
• la tension d’alimentation est comprise dans les
valeurs indiquées sur la plaquette des données ;
• la prise est compatible avec la fiche de la machine.
Si ce n’est pas le cas, remplacer la prise ou la fiche
; ne pas utiliser de rallonges ni de prises multiples.
! Lorsque la machine est montée, l’utilisateur doit
pouvoir accéder facilement au câble électrique et à la
prise de courant.
! Ne pas plier le câble ni le comprimer.
! Contrôler régulièrement le câble qui ne doit être
remplacé que par un technicien agréé.
! Le fabricant décline toute responsabilité si ces
indications ne sont pas respectées
Plaquette des données
• Tension nominale
Voir plaquette située sur la machine
• Puissance nominale
Voir plaquette située sur la machine
• Alimentation
Voir plaquette située sur la machine
• Matériau du corps
Métal
• Dimensions (l x h x p) (mm)
595 x 460 x 320
• Poids (kg)
23
• Longueur du câble (mm)
1200
• Tableau de commande
Piézoélectrique
• Réservoir d’eau
Amovible
• Réservoir d’eau (l)
1,75
• Capacité du réservoir à café (g)
300 de café en grains
• Pression de la pompe (bar)
15
• Chaudière
2 - Acier Inox - Aluminium
• Dispositifs de sécurité
Soupape de sécurité pression chaudière
thermostat de sécurité.
Montage du câble d’alimentation
• Introduire la fiche
dans la prise qui se
trouve au dos de la
machine
• Brancher le câble
d’alimentation au
secteur
• Brancher la fiche à
la prise de courant.
Sous réserve de modifications de construction et
d’exécution dues au progrès technologique.
Machine conforme à la Directive Européenne 89/336/
CEE (Décret législatif 476 du 04/12/92), relative à
l’élimination des perturbations radio et TV.
31
Page 32

Description
de la machine
FR
Vue d’ensemble
Réservoir d’eau
Interrupteur général
Panneau antérieur (de contrôle)
SBS
Réservoir à café en grains
Buse de vapeur/eau chaude
Réglage de la mouture
Groupe de distribution
Panneau de contrôle
Touche sélection
PROGRAMMATION/
QUITTER
Touche avancement
PAGES
Touche
SÉLECTION/CONFIRMER
Bac d’égouttement
Afficheur
Grille
Flotteur bac plein
Distributeur réglable en hauteur
Touche
DÉTARTRAGE
Touche sélection VAPEUR
Touche sélection EAU CHAUDE
Touche sélection EXPRESSO
Touche sélection CAFÉ NORMAL
Touche sélection CAFÉ ALLONGÉ
Touche sélection CAFÉ DOUBLE
32
Page 33

Mise en marche
et utilisation
! Avant de mettre la machine en marche, s’assurer
d’avoir rempli les réservoirs comme indiqué dans cette
notice.
Amorcer tout de suite le circuit pour éviter d’abîmer la
machine.
! Après avoir mis la machine en marche, régler la
dureté de l’eau. Ceci permet d’avoir une machine
toujours parfaitement efficace (voir Programmation).
Première mise en marche
1. Ouvrir le panneau
antérieur en appuyant
d’un coup sec sur la
partie centrale.
Rincer et remplir le
réservoir avec de l’eau
fraîche potable.
Fermer le couvercle et
remettre le réservoir
d’eau dans son
logement.
! La machine
demandera de remplir
le réservoir quand le
niveau d’eau est encore haut. Ceci est dû au fait que
le réservoir de la machine à café a été conçu pour
accepter l’option « filtre à eau », qui demande une
quantité minimale d’eau pour le filtrage.
! Ne remplir le réservoir qu’avec de l’eau fraîche
non pétillante. L’eau chaude ainsi que les autres
liquides peuvent abîmer le réservoir et/ou la machine.
Ne pas mettre en
marche la machine
sans eau : s’assurer
que le réservoir est
suffisamment plein.
FR
2. Extraire en partie
le réservoir à café en
grains.
3. Verser le café en
grains dans le réservoir
en veillant à ne pas en
mettre trop.
Fermer le couvercle et
remettre le réservoir
dans la machine.
4. Extraire entièrement
le réservoir d’eau de la
machine.
La machine se présente
avec l’interrupteur
général sur « O » ;
pour l’allumer, il suffit
de mettre le bouton sur
« I ».
Fermer le panneau antérieur en appuyant d’un coup
sec sur la partie centrale ; la machine commence à se
chauffer et le message suivant apparaît sur l’afficheur :
RINCAGE
CHAUFFER...
La machine fait un cycle de rinçage quand elle a
atteint la juste température.
RINCAGE
De l’eau sort du distributeur de façon à rincer les
circuits internes.
Quand le rinçage est terminé, la machine retourne à
la condition normale ; le message suivant apparaît sur
l’afficheur :
SELECTIONNER PRODUIT
MACHINE PRETE
! Pour désactiver le rinçage, consulter le paragraphe
de la programmation de la machine.
33
Page 34

FR
Amorçage du circuit
! Avant de remettre la machine en marche après une
longue période d’inactivité, il faut obligatoirement
amorcer le circuit, si le réservoir d’eau a été
entièrement vidé. Le circuit doit par ailleurs être amorcé
chaque fois que l’afficheur indique :
PURGER
1. Pour amorcer le
circuit, diriger la buse
de vapeur vers le
bac d’égouttement,
placer une tasse ou un
récipient approprié sous
la buse et appuyer sur la
touche
2. Attendre jusqu’à ce que l’eau sorte régulièrement de
la buse de vapeur.
Pour interrompre la distribution d’eau, appuyer sur la
touche
La machine est prête à l’emploi lorsque les opérations
ci-dessus ont été effectuées.
Suivre attentivement les instructions qui suivent pour
distribuer du café, de l’eau chaude ou de la vapeur
ainsi que pour utiliser correctement la machine.
.
.
Filtre à eau (s’il est prévu)
Le filtre à eau permet d’épurer l’eau utilisée pour
préparer le café.
Grâce à ses propriétés, il réduit la dureté de l’eau et
élimine la saveur de chlore désagréable.
Le filtre à eau peut être monté à tout moment.
Montage du filtre à eau
1. Ouvrir le panneau
antérieur et enlever le
réservoir d’eau.
Vider le réservoir s’il
contient de l’eau.
2. Déballer le filtre et
régler la date sur le mois
courant.
! Consulter les
remarques ci-contre sur
l’utilisation du filtre.
3. Introduire le filtre dans
le réservoir. Le point de
référence et les rainures
doivent coïncider.
Appuyer à fond.
Réglage dureté de l’eau
Ce réglage sert à sélectionner le degré correct de dureté de l’eau utilisée.
En fonction de ce réglage, la machine avertit l’utilisateur
quand il est nécessaire d’exécuter un cycle de détartrage.
Pour effectuer ce réglage, consulter la section « Dureté
de l’eau » du menu « Programmation ».
34
Remplir le réservoir avec
de l’eau fraîche potable
et le remettre dans la
machine. Refermer le
panneau antérieur.
Distribuer entièrement
l’eau du réservoir dans
un récipient. Ensuite,
remplir de nouveau le
réservoir d’eau.
! Programmer la machine pour qu’elle fonctionne avec
le filtre (voir programmation). La machine avertit l’utilisateur quand il est temps de remplacer le filtre.
! Toujours enlever le filtre à eau avant de procéder au
détartrage.
Page 35

Informations complémentaires pour
l’utilisation correcte du filtre à eau (s’il
est prévu)
Nous indiquons ci-dessous quelques avertissements à
prendre en compte pour utiliser correctement le filtre à
eau (s’il est prévu) :
1. conserver le filtre à eau dans un endroit frais et à
l’abri du soleil ; la température ambiante doit être
comprise entre 5 et 40°C ;
2. utiliser le filtre dans un endroit où la température ne
dépasse pas 60°C.
3. il est conseillé de laver le filtre à eau après 3 jours
d’inactivité de la machine à café ;
4. il est nécessaire de remplacer le filtre à eau après
20 jours d’inactivité de la machine ;
5. pour conserver un filtre déjà ouvert, le fermer
hermétiquement dans un sachet en nylon et le
mettre au réfrigérateur ; ne pas le conserver dans le
congélateur car les propriétés du filtre risquent de
s’altérer ;
6. avant d’utiliser le filtre, le plonger dans le réservoir
d’eau pendant 30 minutes ;
7. ne pas laisser le filtre à l’air après l’avoir enlevé de
son emballage ;
8. remplacer le filtre 90 jours après avoir ouvert
l’emballage ou après avoir traité 60 litres d’eau
potable.
Réglage de la mouture
! Tourner délicatement le bouton de réglage mouture
qui se trouve à côté du groupe de distribution. Ne pas
verser de café moulu et/ou lyophilisé dans le réservoir
à café en grains.
! Il est interdit d’y introduire une substance autre que
du café en grains.
Désactiver l’interrupteur général avant d’intervenir pour
une raison quelconque à l’intérieur de la machine.
La qualité et le goût du café dépendent du mélange
utilisé mais aussi du degré de mouture.
La machine est équipée d’un bouton pour régler le
degré de mouture.
Pour modifier le degré
de mouture, tourner
le bouton gradué d’un
cran à la fois ; les
chiffres reportés sur
le bouton indiquent le
degré de mouture.
Chaque machine est
réglée en usine sur un
degré de mouture moyen : si la mouture est trop fine,
tourner le bouton vers les valeurs plus hautes ; si la
mouture est au contraire trop grosse, tourner le bouton
vers les valeurs plus basses.
FR
On ne remarque la variation du degré de mouture
qu’après avoir distribué un ou deux cafés
Utiliser des mélanges de café en grains pour machines
expresso. Éviter d’utiliser des degrés de mouture
extrêmes (Ex. 1 – 10) ; dans ce cas, utiliser d’autres
mélanges de café. Conserver le café au frais, dans un
récipient fermé hermétiquement.
La mouture ne doit être réglée que si le café n’est pas
distribué de façon optimale.
• la mouture est trop grosse si le café est distribué
trop rapidement. Il est conseillé de tourner le bouton
vers des valeurs plus basses ;
• la mouture est trop fine si le café est distribué goutte
à goutte et/ou ne coule pas du tout. Il est alors
conseillé de tourner le bouton vers des valeurs plus
hautes.
35
Page 36

Distribution
FR
Système SBS
Un dispositif qui règle la densité du café distribué est
prévu dans la machine : il s’agit du système SBS.
Ce système assure une
distribution optimale
pour tous les types de
cafés vendus dans le
commerce
! Le réglage peut
être effectué ou bien
modifié même lors de la
distribution du café.
Il suffit pour cela de
tourner le bouton.
Tourner le bouton :
• à gauche pour un café crème ;
• au centre pour un expresso ;
• à droite pour un café serré.
Réglage de la quantité de café par tasse
Cette machine a été programmée pour distribuer 3
types de café :
café expresso au moyen de la touche
café normal au moyen de la touche
café allongé au moyen de la touche
Pour adapter les valeurs
programmées aux
dimensions des tasses,
placer la tasse sous le
distributeur.
Appuyer sur la touche
et faire défiler les
fonctions au moyen de la
touche
ce qu’apparaisse :
,
;
.
, jusqu’à
PROGRAM. CAFE LONG *
PROGR. QUANTI. EAU
Appuyer sur la touche ; le message suivant apparaît
sur l’afficheur :
SELECTIONNER PRODUIT
PROGRAMM. CAFE
appuyer sur la touche de distribution du type de café
souhaité (
exemple) :
, ou ) ; l’afficheur indique (par
1 PETIT CAFE
PROGRAMM. CAFE
Attendre que la tasse soit remplie avec la quantité
souhaitée ; appuyer de nouveau sur la même touche.
La machine est ainsi programmée pour distribuer la
quantité de café souhaitée.
Distribution du Café (1 tasse)
! Avant de distribuer le café, vérifier si le réservoir
d’eau et le réservoir à café sont pleins et si le message
suivant apparaît sur l’afficheur :
SELECTIONNER PRODUIT
MACHINE PRETE
Placer 1 tasse sous les
buses du distributeur
; ce dernier peut être
réglé en hauteur en le
déplaçant manuellement
vers le haut ou vers le
bas afin qu’il s’adapte à
la tasse.
Pour que le café soit
distribué, il faut appuyer
sur la touche correspondante (
l’afficheur indique (par exemple) :
, ou ) ;
1 PETIT CAFE
EN PREPARATION
Avec ce mode de fonctionnement, la machine mout et
dose automatiquement la juste quantité de café.
Le cycle de distribution démarre ensuite.
1 PETIT CAFE
PREINFUSION...
Après avoir terminé le cycle de préinfusion, le café
commence à s’écouler depuis la buse de distribution ;
le message suivant apparaît sur l’afficheur :
1 PETIT CAFE
EN PREPARATION
La distribution du café s’arrête automatiquement quand
le niveau présélectionné est atteint.
! Il est néanmoins possible d’interrompre la distribution
du café en appuyant sur la touche (
, ou ).
36
Page 37

Distribution du Café (2 tasses)
! Avant de distribuer le café, vérifier si le réservoir
d’eau et le réservoir à café sont pleins et si le message
suivant apparaît sur l’afficheur :
SELECTIONNER PRODUIT
MACHINE PRETE
Placer 2 tasses
sous les buses du
distributeur ; ce dernier
peut être réglé en
hauteur en le déplaçant
manuellement vers le
haut ou vers le bas
afin qu’il s’adapte aux
tasses.
Pour distribuer le café,
appuyer sur la touche
de distribution du café (
indique par exemple :
et ensuite sur la touche
, ou ) ; l’afficheur
Distribution d’Eau Chaude
! Il peut y avoir quelques éclaboussures d’eau chaude
au début : risque de brûlures. La buse de l’eau chaude
peut atteindre des températures élevées : éviter tout
contact direct avec les mains.
Avant de distribuer l’eau chaude, vérifier si le message
suivant apparaît sur l’afficheur :
SELECTIONNER PRODUIT
MACHINE PRETE
Procéder comme suit
lorsque la machine est
prête à distribuer du
café :
1. Placer une tasse
et/ou un récipient sous
la buse eau chaude/
vapeur.
FR
2 PETITS CAFES
EN PREPARATION
Avec ce mode de fonctionnement, la machine mout et
dose automatiquement la juste quantité de café.
! La préparation de deux cafés demande deux cycles
de mouture et deux cycles de distribution séparés.
Ceux-ci sont gérés automatiquement par la machine.
Le cycle de distribution démarre ensuite.
2 PETITS CAFES
PREINFUSION...
Après avoir terminé le cycle de préinfusion, le café
commence à s’écouler depuis la buse de distribution ;
le message suivant apparaît sur l’afficheur :
2 PETITS CAFES
EN PREPARATION
La distribution du café s’arrête automatiquement
quand le niveau présélectionné est atteint.
! Il est néanmoins possible d’interrompre la distribution
du café en appuyant sur la touche (
; si la distribution du premier café est interrompue, le
second ne sera pas distribué.
, ou )
2. Appuyer sur la touche
apparaît sur l’afficheur :
; le message suivant
EAU CHAUDE
! La quantité d’eau distribuée est présélectionnée ;
celle-ci peut être modifiée à l’aide du menu « PROGR.
QUANTI. EAU » du chapitre « Programmation ».
Pour arrêter la distribution d’eau chaude, appuyer à
nouveau sur la touche
au mode de fonctionnement normal.
; la machine retourne alors
Distribution de la Vapeur / Préparation
du Cappuccino
La vapeur peut servir à monter le lait pour le
cappuccino mais aussi à réchauffer les boissons.
! Risque de brûlures ! Il peut y avoir quelques
éclaboussures d’eau chaude au début. La buse de
distribution peut atteindre des températures élevées :
éviter tout contact direct avec les mains.
37
Page 38

Entretien et soin de la
machine
FR
1. Lorsque la machine
est prête à distribuer du
café, placer une tasse
et/ou un récipient sous la
buse eau chaude/vapeur.
2. Appuyer sur la touche
pour faire écouler
l’eau résiduelle de la
buse vapeur ; la vapeur
commence à sortir
au bout de quelques
secondes. Le message suivant apparaît sur l’afficheur :
VAPEUR
3. Appuyer sur la touche pour terminer la
distribution de vapeur.
4. Remplir 1/3 du récipient servant à préparer le
cappuccino de lait froid.
! Pour avoir un meilleur résultat lors de la préparation
du cappuccino, le lait et la tasse utilisée doivent être
froids.
5. Plonger la buse de
vapeur dans le lait à
chauffer et appuyer
sur la touche
tourner le récipient avec
des mouvements lents
du bas vers le haut pour
que la formation de
mousse soit uniforme.
! Le temps de distribution de la vapeur est
présélectionné ; celui-ci peut être modifié à l’aide du
menu « PROG. TEMPS VAPEUR » du chapitre «
Programmation ».
6. Pour arrêter la distribution de la vapeur, appuyer à
nouveau sur la touche
.
; faire
Nettoyage général
! Débrancher la machine et attendre qu’elle soit froide
avant d’effectuer toute opération d’entretien ou de
nettoyage.
• Ne pas plonger la machine dans l’eau. Ne pas laver
les composants au lave-vaisselle.
• Ne pas utiliser d’objets pointus ou de produits
chimiques agressifs (solvants) pour le nettoyage.
• Ne pas faire sécher la machine et/ou ses
composants dans un four à micro-ondes et/ou
traditionnel.
• Il est conseillé de
nettoyer le réservoir
d’eau chaque jour et de
changer l’eau.
• Enlever et nettoyer le
filtre qui se trouve dans
le réservoir.
• Nettoyer l’extérieur
de la machine avec un
chiffon doux légèrement
imbibé d’eau.
• Nettoyer le logement
de service et le groupe
de distribution.
• Il est conseillé de
vider et de nettoyer le
bac d’égouttement et le
tiroir à marc chaque jour
; il faut pour cela extraire
le bac d’égouttement
afin de pouvoir vider
et nettoyer tous les
composants.
38
! Procéder de la même
façon pour réchauffer
d’autres boissons.
! Il faut ensuite nettoyer
la buse de vapeur avec
un chiffon humide.
• Enlever le
distributeur de café pour
le nettoyer :
1. Abaisser les buses du
distributeur
2. Saisir le distributeur
comme indiqué et
l’extraire de son
logement.
3. Laver le tout à l’eau
chaude.
Page 39

! Pour ouvrir la porte de service quand le distributeur
est monté, utiliser le carter de protection prévu à cet
effet.
1. Prélever le carter de
protection situé en bas
de la machine.
2. Placer le carter
de protection dans
le distributeur en le
poussant vers l’intérieur.
• Éliminer tout résidu
de café des deux filtres
en acier.
• Ne laver le groupe
de distribution qu’à
l’eau chaude, sans
détergent.
Laver et essuyer
soigneusement tout ses
composants.
• Nettoyer soigneusement le logement interne de la
machine.
• Avant d’introduire le
groupe de distribution,
s’assurer que tous
les composants sont
mis correctement ; le
crochet doit se trouver
en haut et le levier en
bas.
FR
3. Ouvrir la porte de
service en laissant le
carter de protection
dans distributeur.
! Le carter de protection
contient une éponge qui
recueille les résidus de
café ; quand l’opération
est terminée, laver
l’éponge à l’eau courante.
! Enlever ensuite le carter de protection et remettre le
distributeur en place.
Nettoyer le groupe de distribution chaque fois qu’il faut
remplir le réservoir à café en grains et, en tout cas, au
moins une fois par semaine.
• Éteindre la machine en positionnant l’interrupteur
général sur « O ».
• Enlever le bac
d’égouttement et le tiroir
à marc et ouvrir la porte
de service.
• Extraire le groupe
de distribution en le
tenant par la poignée
prévue à cet effet et en
appuyant sur la touche
portant l’inscription
«PUSH».
• Appuyer d’un coup
sec sur le bouton «
PUSH » pour remettre
le levier dans sa
position.
• Appuyer sur le
groupe à l’endroit
indiqué pour remettre le
levier dans la position
correcte.
• Introduire à nouveau
le groupe de distribution
dans son logement en
le tenant par la poignée,
jusqu’à ce qu’il soit bien encastré ; refermer ensuite
la porte.
• Introduire le tiroir à marc et la grille dans le bac
d’égouttement et remettre ce dernier dans la
machine.
! Un kit d’entretien, pour que le groupe de distribution
soit toujours efficace, est disponible chez les
principaux revendeurs Ariston.
39
Page 40

Entretien et soin de la
machine
FR
Détartrage
Du calcaire se forme au fur et à mesure que l’on utilise
la machine ; le détartrage est nécessaire tous les
3-4 mois lorsque le débit d’eau se réduit ou quand le
message suivant apparaît sur l’afficheur :
MACHINE PRETE
DETARTRER
! Pour faire soi-même cette opération, utiliser un produit
détartrant pour machines à café de type non toxique ni
nocif vendu dans le commerce. Il est conseillé d’utiliser
le détartrant Ariston.
! Ne jamais utiliser de vinaigre pour détartrer la
machine.
! Avant de détartrer la machine, enlever le filtre à eau
(s’il est prévu).
Suivre les indications ci-dessous pour procéder au
détartrage de la machine.
1. Mélanger le produit
détartrant avec de l’eau
comme indiqué sur
l’emballage du produit
et verser cette solution
dans le réservoir d’eau.
2. Allumer la machine en
actionnant l’interrupteur
général.
Le cycle de détartrage automatique de la machine
commence, entrecoupé de pauses fixées par le
fabricant et contrôlées automatiquement par la
machine. L’afficheur indique :
MACHINE EN DETARTR.
7. La distribution de la solution détartrante s’arrête
à la fin du cycle et le message suivant apparaît sur
l’afficheur :
RINCER MACHINE
REMPLIR RESERV. EAU
8. Bien rincer le réservoir
d’eau et le remplir d’eau
fraîche potable.
Remettre le réservoir
en place et refermer le
panneau antérieur.
L’afficheur indique :
RINCER MACHINE
PRESSER TOUCHE EAU
9. Placer un récipient
ayant une capacité
appropriée sous la buse
de vapeur et appuyer sur
la touche
.
3. Appuyer sur la touche
pour sélectionner la fonction ; le message suivant
apparaît sur l’afficheur :
DETARTRAGE
NON
4. Au moyen des touches sélectionner :
DETARTRAGE
OUI
5. Orienter la buse
de vapeur vers le bac
d’égouttement.
6. Placer un récipient
ayant une capacité
appropriée sous la buse
de vapeur et appuyer sur
la touche
.
Le rinçage des
circuits de la machine
commence et le
message suivant
apparaît sur l’afficheur :
MACHINE EN RINCAGE
10. Quand le rinçage de la machine est terminé, le
message suivant apparaît sur l’afficheur :
RINCAGE FINI
PRESSER TOUCHE EAU
11. Remplir le réservoir d’eau, appuyer sur la touche ,
réamorcer le circuit et laisser chauffer la machine
! Si le produit utilisé n’est pas celui conseillé, il est
recommandé de s’en tenir aux indications figurant sur
l’emballage du produit détartrant.
40
Page 41

Programmation
Interruption du détartrage
Si le cycle de détartrage est interrompu parce que
l’on éteint la machine, il redémarre en rallumant cette
dernière.
Le cycle de détartrage peut être interrompu en
appuyant sur la touche
apparaît alors sur l’afficheur :
; le message suivant
MACHINE EN DETARTR.
INTERROMPU
le cycle de détartrage redémarre en appuyant sur la
touche
en appuyant sur la touche
; le message suivant apparaît sur l’afficheur
et sur la touche :
DETARTR. INTERROMPEE
VIDER RESERVOIR EAU
Attention ! Lorsque cette opération est terminée, vider
la solution détartrante et laver le réservoir d’eau à
l’eau fraîche potable ; laver le circuit de la machine en
faisant un cycle de rinçage.
Procéder comme pour le rinçage normal décrit au
chapitre précédent à partir du point 8.
Programmation des fonctions de la
machine
L’utilisateur peut modifier certains paramètres de
fonctionnement de la machine en fonction de ses
exigences personnelles.
Commande MENU
Pour modifier les paramètres de fonctionnement, il faut
entrer dans le mode de programmation en appuyant
sur la touche
repos.
Appuyer sur la touche
fonction souhaitée durant la programmation, ce qui
permet de faire défiler toutes les fonctions présentes
dans la machine.
Pour quitter la programmation, appuyer sur la touche .
de la machine quand celle-ci est au
pour sélectionner la
FR
Modification des différentes fonctions
Sélectionner la fonction souhaitée au moyen de la
touche
Activer la fonction souhaitée au moyen de la
touche
sélectionnées au moyen de la touche
appuyer sur la touche
souhaitée.
Remarque : la touche
programmation à tout moment sans mémoriser les
changements, à condition bien sûr de ne pas avoir
encore appuyé sur la touche
.
; faire défiler les variables pouvant être
;
pour mémoriser la variable
permet d’interrompre la
.
41
Page 42

Programmation
FR
Fonctions programmables
ÉCONOMIE D’ÉNERGIE
Il est possible de mettre la machine sur ÉCONOMIE
ÉNERGIE quand on ne l’utilise pas beaucoup. Cette
fonction permet de réduire la consommation d’énergie.
Il est toutefois conseillé d’éteindre complètement la
machine, en actionnant l’interrupteur général, si celle-ci
ne doit pas être utilisée pendant longtemps ; il ne faut
que quelques minutes pour chauffer la machine au
moment de la remettre en marche.
Au moyen de la touche
, sélectionner la fonction:
ECONOMIE ENERGIE *
RINCAGE
et l’activer au moyen de la touche ; le message
suivant apparaît.
ECONOMIE ENERGIE
À l’aide de la touche , sélectionner maintenant
RINCAGE
DECLENCHEE
et mémoriser votre choix au moyen de la touche .
LANGUE
Cette fonction permet de choisir la langue de
fonctionnement de la machine. De plus, elle permet
d’adapter les paramètres des boissons à ceux du Pays
d’utilisation. C’est pourquoi certaines langues sont
différenciées aussi en fonction du lieu. La machine est
généralement programmée dans la langue du pays
auquel elle est destinée.
Pour modifier la langue, sélectionner la fonction
suivante au moyen de la touche
LANGUE *
:
CONTRAST
la machine est alors allumée mais aucun composant
n’est activé
Pour remettre la machine en marche, appuyer sur
RINÇAGE
La machine élimine automatiquement l’eau restée
dans les conduites internes, juste après la phase
de chauffage, pour faire en sorte que le café ne soit
distribué qu’avec de l’eau fraîche.
Cette fonction est activée par le fabricant.
Pour la désactiver, sélectionner la fonction suivante au
moyen de la touche
RINCAGE *
LANGUE
et l’activer au moyen de la touche . Le message
suivant apparaît :
RINCAGE
ENCLENCHEE
et l’activer au moyen de la touche .
Le message suivant apparaît alors :
.
Sélectionner la langue souhaitée au moyen de la touche
CONTRASTE
Cette fonction permet de régler correctement le
contraste de l’afficheur pour mieux lire les indications.
Au moyen de la touche , sélectionner la fonction :
LANGUE
FRANCAIS
et la mémoriser au moyen de la touche .
CONTRAST *
DURETE D'EAU
L’activer au moyen de la touche .
Le message suivant apparaît :
CONTRAST
>¢¢¢¢¢ < 50
Sélectionner ensuite le contraste souhaité au moyen
de la touche
touche
.
et le mémoriser au moyen de la
42
Page 43

DURETÉ DE L’EAU
La dureté de l’eau utilisée pour distribuer les boissons
varie en fonction des régions. C’est la raison pour
laquelle il faut régler la machine sur le degré de
dureté correct de l’eau utilisée ; celle-ci est exprimée
avec une échelle de 1 à 4. La machine est déjà
programmée sur une valeur moyenne (dureté 3).
filtre à eau (s’il est prévu) pour la première fois.
Au moyen de la touch
, sélectionner la fonction:
FILTRE D'EAU *
TEMPERATURE
L’activer au moyen de la touche .
FR
Pour régler la dureté,
plonger brièvement
(1 seconde) la bande
de test fournie avec la
machine dans l’eau.
Secouer ensuite
légèrement la bande
pour éliminer l’eau
résiduelle. Le résultat
du test est visible au
bout d’une minute ;
vérifier combien de carrés ont changé de couleur.
Au moyen de la touche , sélectionner la
fonction:
DURETE D'EAU *
FILTRE D'EAU
L’activer au moyen de la touche .
Le message suivant apparaît :
DURETE D'EAU
DURETE 3
Le message suivant apparaît :
FILTRE D'EAU
DECLENCHEE
à l’aide de la touche , sélectionner
FILTRE D'EAU
ENCLENCHEE
et appuyer sur la touche pour confirmer.
! La commande « RESET » doit être exécutée chaque
fois qu’il faut monter un filtre à cartouche neuf.
Pour exécuter la commande, sélectionner la fonction
suivante au moyen de la touche
FILTRE D'EAU
:
RESET
L’activer au moyen de la touche .
Sélectionner la dureté correcte de l’eau au moyen
de la touche
mémoriser au moyen de la touche
! Avertissement : ce réglage permet à la machine de
signaler quand il faut faire le détartrage.
Le message suivant apparaît sur l’afficheur :
MACHINE PRETE
(ex. 2 carrés = Dureté 2) et la
.
DETARTRER
FILTRE À EAU (s’il est prévu)
Cette fonction permet de mieux contrôler le filtre à eau
(s’il est prévu) en avertissant l’utilisateur quand il faut
le remplacer.
! La fonction doit être activée au moment de monter le
TEMPÉRATURE
Cette fonction permet d’obtenir un café plus ou moins
chaud en réglant la température de l’eau (haute,
moyenne et basse).
Au moyen de la touch
TEMPERATURE *
, sélectionner la fonction:
PROGRAM. CAFE LONG
L’activer au moyen de la touche .
Le message suivant apparaît, par exemple
TEMPERATURE
MOYEN
Sélectionner la température souhaitée au moyen de
la touche
touche
et la mémoriser au moyen de la
.
43
Page 44

Programmation
FR
PROGRAMMATION DE LA DENSITÉ DU CAFÉ
Cette fonction permet de régler la quantité de café
distribuée en appuyant sur les touches (
Il est possible de programmer la quantité distribuée
d’une touche à la fois ; répéter plusieurs fois la
procédure décrite ci-dessous pour programmer
plusieurs touches.
Au moyen de la touch
PROGRAM. CAFE LONG *
, sélectionner la fonction:
, ou ).
PROGR. QUANTI. EAU
L’activer au moyen de la touche .
Le message suivant apparaît :
SELECTIONNER PRODUIT
PROGRAMM. CAFE
! La machine quitte la fonction, après un temps
préétabli, si aucune opération n’est faite durant cette
phase.
Placer la tasse à remplir sous la buse.
Appuyer sur la touche de distribution du type de café
souhaité (
exemple) :
, ou ) ; l’afficheur indique (par
1 PETIT CAFE
EN PREPARATION
et ensuite :
1 PETIT CAFE
PROGRAMM. CAFE
Attendre que la tasse soit remplie avec la quantité
souhaitée ; appuyer de nouveau sur la touche.
Le message suivant apparaît :
SELECTIONNER PRODUIT
PROGRAMM. EAU
Placer le récipient à remplir et appuyer sur la touche .
L’eau commence à s’écouler de la buse de vapeur et le
message suivant apparaît sur l’afficheur :
EAU CHAUDE
PROGRAMM. EAU
Quand la quantité souhaitée est atteinte, appuyer à
nouveau sur la touche
La machine est maintenant programmée.
PROGRAMMATION TEMPS VAPEUR
Cette fonction permet de régler le temps pendant lequel
la vapeur est distribuée chaque fois que l’on appuie sur
la touche
Au moyen de la touch
.
PROG. TEMPS VAPEUR *
.
, sélectionner la fonction:
AROME PETIT CAFE
L’activer au moyen de la touche .
Le message suivant apparaît :
SELECTIONNER PRODUIT
PROGRAMM. VAPEUR
Placer le récipient avec la boisson à chauffer sous la
buse et appuyer sur la touche
.
PROGRAMMATION QUANTITÉ D’EAU
Cette fonction permet de régler la quantité d’eau
distribuée chaque fois que l’on appuie sur la touche
. Le récipient peut être rempli avec la juste quantité en
n’appuyant que sur une seule touche.
Au moyen de la touch
PROGR. QUANTI. EAU *
, sélectionner la fonction:
PROG. TEMPS VAPEUR
L’activer au moyen de la touche .
44
La vapeur commence à sortir de la buse et le message
suivant apparaît sur l’afficheur :
VAPEUR
PROGRAMM. VAPEUR
Quand la quantité souhaitée est atteinte, appuyer à
nouveau sur la touche
La machine est maintenant programmée.
.
Page 45

ARÔME EXPRESSO
Cette fonction permet de régler la dose (quantité) de
café à moudre pour la préparation de l’expresso (fort,
normale et léger).
ARÔME CAFÉ ALLONGÉ
FR
Cette fonction permet de régler la dose (quantité) de
café à moudre pour la préparation du café allongé
(fort, normale et léger).
Au moyen de la touch
AROME PETIT CAFE *
, sélectionner la fonction:
AROME CAFE
L’activer au moyen de la touche .
Le message suivant apparaît, par exemple
AROME PETIT CAFE
FORT
Sélectionner la dose souhaitée au moyen de la touche
et la mémoriser au moyen de la touche .
ARÔME CAFÉ
Cette fonction permet de régler la dose (quantité)
de café à moudre pour la préparation du café (fort,
normale et léger).
Au moyen de la touch
AROME CAFE *
, sélectionner la fonction:
AROME GRAND CAFE
Au moyen de la touch
AROME GRAND CAFE *
, sélectionner la fonction:
PREINFUSION
L’activer au moyen de la touche .
Le message suivant apparaît, par exemple:
AROME GRAND CAFE
FORT
Sélectionner la dose souhaitée au moyen de la touche
et la mémoriser au moyen de la touche .
PRÉINFUSION
Le processus de préinfusion exalte l’arôme du café en
lui donnant un excellent goût. Cette fonction permet
d’humidifier le café avant l’infusion proprement dite.
Au moyen de la touch
PREINFUSION *
, sélectionner la fonction:
TOTAL CAFES
L’activer au moyen de la touche .
Le message suivant apparaît, par exemple
AROME CAFE
NORMALE
Sélectionner la dose souhaitée au moyen de la touche
et la mémoriser au moyen de la touche .
L’activer au moyen de la touche .
Le message suivant apparaît, par exemple:
PREINFUSION
ENCLENCHEE
À l’aide de la touche , choisir si désactiver la
fonction:
PREINFUSION
DECLENCHEE
ou si prolonger cette phase:
PREINFUSION
LONGUE
pour exalter le goût du café.
Mémoriser ensuite au moyen de la touche
.
45
Page 46

Programmation
FR
TOTAL CAFÉS
Cette fonction permet d’afficher le nombre de cafés
distribués par la machine.
Au moyen de la touch
TOTAL CAFES *
, sélectionner la fonction:
MINUTEUR
l’activer au moyen de la touche .
Le message suivant apparaît, par exemple:
TOTAL CAFES
81
Quitter en appuyant sur la touche .
TEMPORISATEUR
Cette fonction permet d’économiser de l’énergie quand
la machine n’est pas utilisée pendant une longue
période. Cette fonction, préréglée par le fabricant, met
automatiquement la machine en :
ECONOMIE ENERGIE
HORLOGE
Cette fonction, activée et désactivée par l’utilisateur,
permet :
- d’afficher l’heure courante quand la machine est en
« ECONOMIE ENERGIE » ou en « SELECTION
FONCTION »
- de sélectionner l’horaire d’allumage et d’arrêt de la
machine.
Pour que la programmation fonctionne correctement, il
est nécessaire de saisir l’horaire courant.
Au moyen de la touch
HORLOGE *
, sélectionner la fonction:
NETTOYAGE
L’activer au moyen de la touche .
Au moyen de la touche
HEURE HORLOGE *
, sélectionner la fonction:
HORAIRES ON/OFF
L’activer au moyen de la touche .
HEURE HORLOGE
0:00
3 heures après la dernière distribution.
! Le temps d’arrêt peut être réglé, par intervalles de
15 minutes, jusqu’à un minimum de 15 minutes ; cette
fonction ne peut pas être désactivée.
Au moyen de la touch
MINUTEUR *
, sélectionner la fonction:
HORLOGE
L’activer au moyen de la touche .
Le message suivant apparaît :
ECONOM. ENERGIE
APRES 3:00
Sélectionner le retard à l’arrêt au moyen de la touche
et le mémoriser au moyen de la touche .
! Remarque : si les horaires d’allumage et d’arrêt sont
activés dans la fonction « HORLOGE », cette fonction
sera ignorée.
Saisir l’heure courante au moyen de la touche et
la mémoriser au moyen de la touche
Saisir ensuite les minutes au moyen de la touche
et les mémoriser au moyen de la touche .
L’horaire est alors réglé et la machine retourne au menu
précédent.
! Remarque : l’horaire reste mémorisé même quand on
éteint la machine.
Pour faire apparaître l’heure sur l’afficheur
Au moyen de la touche
MONTRER HEURE HORL.*
, sélectionner la fonction:
;
HORLOGE
L’activer au moyen de la touche .
46
Page 47

À l’aide de la touche , choisir si activer la
fonction:
MONTRER HEURE HORL.*
ENCLENCHEE
Mémoriser au moyen de la touche .
! Remarque : l’heure ne peut être affichée qu’à
certains moments ; cette fonction ne peut être
désactivée que par l’utilisateur.
Saisir ensuite les minutes au moyen de la touche
et les mémoriser au moyen de la touche .
! Attention : si l’horaire d’allumage et d’arrêt
coïncident, la machine ignore les deux réglages.
L’horloge doit ensuite être activée pour pouvoir
fonctionner normalement.
Pour activer l’allumage et l’arrêt
FR
Pour désactiver la fonction, utiliser la touche
pour sélectionner:
MONTRER HEURE HORL.*
DECLENCHEE
Mémoriser au moyen de la touche .
Pour régler les horaires d’allumage et d’arrêt
La machine peut être allumée et éteinte
automatiquement sans l’intervention de l’utilisateur.
Un seul horaire d’allumage et un seul horaire d’arrêt
peuvent être programmés dans la machine.
! Remarque : cette fonction ne s’active que si
l’interrupteur général est sur « I » (allumé).
Au moyen de la touche
fonction:
HORAIRES ON/OFF *
, sélectionner la
MONTRER HEURE HORL.
! Remarque : l’activation de cette fonction n’a une
application concrète que si les horaires d’allumage et
d’arrêt ont été réglés.
Au moyen de la touche
fonction:
HORLOGE *
, sélectionner la
HEURE HORLOGE
L’activer au moyen de la touche .
HORLOGE
NON
Dans ce cas, la fonction se désactive en appuyant sur
la touche
Choisir d’activer la fonction au moyen de la touche
.
et, quand le message suivant est affiché,
HORLOGE
OUI
L’activer au moyen de la touche .
HORAIRES ON/OFF
ENCLENCHEE 0:00
Saisir l’heure d’allumage au moyen de la touche
et la mémoriser au moyen de la touche .
Saisir ensuite les minutes au moyen de la touche
et les mémoriser au moyen de la touche .
HORAIRES ON/OFF
DESENCLENCHEE 0:00
Saisir l’heure d’arrêt au moyen de la touche et
la mémoriser au moyen de la touche
;
mémoriser au moyen de la touche .
La machine vérifie les paramètres saisis au moment
de quitter la programmation. Si l’horaire courant fait
partie de la période de désactivation, le message
suivant apparaît sur l’afficheur :
ECONOMIE ENERGIE
! Remarque : durant la phase de désactivation, la
machine peut être réactivée à n’importe quel moment
en appuyant sur la touche
Pour désactiver à nouveau la machine, entrer dans
la programmation en appuyant sur la touche
la quitter tout de suite en appuyant sur la touche
.
et
.
47
Page 48

Programmation
FR
CYCLE DE RINÇAGE
Cette fonction permet d’exécuter un cycle de rinçage à
l’eau des parties intéressées à la distribution du café.
! Pendant le cycle de rinçage, il convient qu’une
personne supervise les opérations. Avant d’effectuer le
cycle de rinçage, remplir le réservoir d’eau.
Au moyen de la touch
NETTOYAGE *
, sélectionner la fonction:
CONFIG. INITIALE
Appuyer sur la touche .
L’afficheur indique :
NETTOYAGE
NON
À l’aide de la touche , sélectionner:
NETTOYAGE
OUI
Configuration initiale
Cette fonction permet de rétablir les paramètres de
fonctionnement de la machine mis au point par le
fabricant.
Au moyen de la touch
CONFIG. INITIALE *
, sélectionner la fonction:
SORTIE
L’activer au moyen de la touche .
Le message suivant apparaît alors :
CONFIG. INITIALE
NON
Sélectionner la touche pour rétablir les
paramètres et appuyer sur la touche
! Avertissement : les réglages personnalisés sont
perdus en rétablissant les paramètres mis au point en
usine.
pour confirmer.
Appuyer sur la touche pour faire démarrer le cycle de
rinçage, le message suivant apparaît sur l’afficheur :
NETTOYAGE
Environ la moitié de l’eau contenue dans le réservoir
s’écoule du distributeur.
Le cycle s’arrête ensuite automatiquement, et l’afficheur
indique :
SELECTIONNER PRODUIT
MACHINE PRETE
48
Page 49

Signalisations sur
l’afficheur
Signalisations sur l’afficheur
L’afficheur sert à guider l’utilisateur pour qu’il puisse
utiliser correctement la machine.
Nous reportons ci-dessous les messages d’alarme
qui ne permettent pas la distribution du café et ce
que l’utilisateur doit faire pour utiliser correctement la
machine.
ECONOMIE ENERGIE
• Appuyer sur la touche .
MACHINE PRETE
DETARTRER
• Détartrer la machine.
REMPLIR RESERV. EAU
• Remplir le réservoir d’eau avec de l’eau fraîche
potable
! La machine demandera de remplir le réservoir quand
le niveau d’eau est encore haut. Ceci est dû au fait
que le réservoir de la machine à café a été conçu pour
accepter l’option « filtre à eau », qui demande une
quantité minimale d’eau pour le filtrage.
TIROIR MARC ABSENT
• Introduire le bac d’égouttement et le tiroir à marc de
façon correcte.
FERMER LA PORTE
• Fermer la porte avant.
FERMER COMMANDES
• Fermer le panneau supérieur.
PURGER
• Placer une tasse ou un récipient approprié sous la
buse et appuyer sur la touche
Attendre jusqu’à ce que l’eau sorte régulièrement
de la buse de vapeur.
Pour interrompre la distribution d’eau, appuyer sur
la touche
.
.
GROUP BLOQUE
FR
MANQUE CAFE
MACHINE PRETE
• Remplir le réservoir à café de café en grains et faire
redémarrer le cycle de distribution du café.
TIROIR MARC PLEIN
• Ouvrir la porte, extraire le tiroir à marc et le vider
dans un bac approprié.
! Remarque importante : ne vider le tiroir à marc que
quand la machine est allumée. Attendre au moins 5
secondes avant de remettre le tiroir à marc. Le fait de
vider le tiroir, lorsque la machine est éteinte, bloque
la distribution du café au moment de rallumer cette
dernière.
GROUP ABSENT
• Introduire le groupe de distribution de façon correcte.
MOULIN BLOQUE
• Contacter le Centre d’assistance agréé le plus
proche.
49
Page 50

Problèmes - causes - remèdes
FR
Problèmes Causes Remèdes
La machine ne s’allume pas. La machine n’est pas branchée au
secteur.
Le café n’est pas assez chaud. Les tasses sont froides. Chauffer les tasses avec un peu
La machine ne distribue pas d’eau
chaude ni de vapeur.
Le café est distribué trop lentement. Le café est moulu trop fin. Changer de mélange.
Le café est distribué trop vite. Le café est moulu trop gros. Changer de mélange.
La buse de vapeur est bouchée. Extraire la buse de vapeur en la
Groupe de distribution encrassé. Laver le groupe de distribution
Le bouton du Système SBS est
entièrement tourné vers la droite.
Faire vérifier le branchement
électrique au secteur.
d’eau chaude.
tirant vers le bas et la laver.
Positionner le bouton de réglage
de la mouture sur une valeur plus
haute.
Tourner le bouton vers la gauche
et le tourner ensuite vers la droite
quand la machine distribue le café.
Positionner le bouton de réglage
de la mouture sur une valeur plus
basse.
La machine met trop de temps à se
chauffer et la quantité d’eau qui est
distribuée de la buse est limitée.
Impossible d’extraire le groupe de
distribution.
Le café coule en dehors du
distributeur.
Le café n’a pas beaucoup de
crème.
De l’eau s’écoule du bac
d’égouttement.
Le bouton du Système SBS est
entièrement tourné vers la gauche.
Le circuit de la machine est entartré. Faire un cycle de détartrage.
Le groupe de distribution n’est pas
dans la bonne position.
Le bac d’égouttement est inséré. Extraire le bac d’égouttement.
Le distributeur n’est pas dans la
bonne position.
Le distributeur est engorgé Enlever le distributeur et le laver.
Le mélange n’est pas approprié ou
il y a longtemps que le café a été
torréfié.
Le café est moulu trop gros. Régler la mouture.
Le bouton du système SBS est
tourné vers la gauche.
Le bac d’égouttement est trop plein. Vérifier la position du flotteur et
Tourner le bouton vers la droite
quand la machine distribue le café.
Allumer la machine. Fermer la porte
avant ; le groupe retourne dans sa
position initiale et peut alors être
extrait.
Bien placer le distributeur.
Changer de mélange.
Tourner le bouton du système SBS
vers la droite.
vider le bac d’égouttement.
50
Page 51

Précautions à prendre et
conseils
Usage prévu
• La machine à café n’est destinée qu’à un usage
domestique.
• Toute modification technique de la machine et toute
utilisation inappropriée sont interdites car elles
comportent des risques !
• L’appareil n’est pas destiné à être employé par des
personnes (y compris les enfants) avec de faibles
capacités physiques, mentales ou sensorielles
ou avec expérience et/ou des compétences
insuffisantes, à moins qu’elles ne soient sous la
supervision d’une personne responsable de leur
sécurité ou qu’elles ne soient instruites par cette
personne en ce qui concerne l’emploi de l’appareil.
Alimentation secteur
• Ne brancher la machine à café que sur une prise de
courant appropriée.
• La tension doit correspondre à celle indiquée sur la
plaquette de la machine.
Câble d’alimentation
• Ne jamais utiliser la machine à café si le câble
d’alimentation est défectueux.
• Ne pas faire passer le câble d’alimentation sur des
arêtes vives ou des objets très chauds et le tenir à
l’écart de l’huile.
• Ne pas débrancher la machine en tirant le câble
ni toucher la fiche avec les mains ou les pieds
mouillés.
Protection des personnes
• Garder les enfants sous supervision, afin d’éviter
qu’ils ne jouent avec l’appareil. En effet, les enfants
ne se rendent pas compte des risques liés aux
électroménagers.
• Ne pas laisser les matériaux utilisés pour emballer
la machine à la portée des enfants.
Risque de brûlures
• Ne pas orienter le jet d’eau chaude ou de vapeur
vers soi et/ou vers d’autres personnes. risque
de brûlures. Toujours utiliser les poignées ou les
boutons prévus à cet effet.
• Ne pas introduire d’objets dans les orifices de la
machine.
Espace pour le montage, l’utilisation et l’entretien
• Ne pas boucher les trous d’aération et d’évacuation
de la chaleur.
• Choisir un endroit suffisamment éclairé, propre et
avec une prise de courant à portée de la main.
• Ne pas placer la machine sur une surface trop
chaude ou à proximité d’une flamme nue : le bâti
pourrait fondre ou s’abîmer.
• Placer la machine à au moins 10 cm du mur ou
d’une plaque de cuisson.
• Ne pas laisser la machine à une température
inférieure à 0°C : le gel pourrait l’abîmer.
• L’utilisateur doit pouvoir accéder à la prise de
courant à tout moment.
• Ne pas utiliser la machine à café en plein air.
Nettoyage
• Positionner l’interrupteur général sur « O » et
débrancher la machine avant de la nettoyer.
• Attendre par ailleurs que la machine se refroidisse.
• Ne jamais plonger la machine dans l’eau ! Veiller à
ce qu’elle ne soit pas en contact avec un jet d’eau.
• Il est strictement interdit d’essayer d’intervenir à
l’intérieur de la machine.
Rangement de la machine
• Éteindre la machine et la débrancher, si elle doit
rester inutilisée pendant une longue période. La
ranger dans un endroit sec et non accessible aux
enfants.
• La protéger contre la poussière et la saleté.
• Ne poser aucun objet lourd sur le panneau antérieur
ouvert.
Réparations / Entretien
• Toujours débrancher la machine en cas de panne
ou de défaut certain ou possible. Ne jamais mettre
une machine défectueuse en marche.
• Seuls les Centres d’Assistance agréés peuvent
effectuer des interventions et réparer la machine.
• Le fabricant décline toute responsabilité pour les
dommages éventuels, si les interventions et/ou les
réparations ne sont pas effectuées par un Centre
d’Assistance agréé.
En cas d’incendie
• En cas d’incendie, utiliser des extincteurs à
anhydride carbonique (CO
d’extincteurs à poudre.
Élimination
• Élimination des matériaux d’emballage : se
conformer aux normes locales, ils pourront ainsi
être réutilisés.
• La directive européenne 2002/96/CE sur les
déchets provenant d’appareils électriques et
électroniques (RAEE) prévoit de ne pas éliminer
les électroménagers avec les ordures ménagères.
Les appareils devenus inutilisables doivent
être ramassés à part pour optimiser le taux de
récupération et de recyclage des matériaux qui
les composent et éviter de polluer l’environnement
ou de nuire à la santé. Le symbole de la corbeille
barrée est reporté sur tous les produits pour rappeler
l’obligation de se conformer à la collecte sélective.
L’utilisateur peut confier les vieux électroménagers
au service de ramassage public, les porter dans une
des zones aménagées à cet effet de la commune
ou les rendre au revendeur au moment d’acheter
un produit neuf du même genre, si c’est prévu par
la loi nationale en vigueur. Les principaux fabricants
d’électroménagers essaient de plus en plus de
créer et de gérer des systèmes de ramassage et
d’élimination des appareils devenus inutilisables.
). Ne pas utiliser d’eau ni
2
FR
51
Page 52

FR
52
Page 53

Instrucciones de uso
Máquina para café
GB
English,1 Espanol, 53Français, 27
FR
SP
Sumario
Instalación 54
Emplazamiento
Empotrado
Ventilación
Centrado y fijación
Conexión eléctrica
Montaje del cable de alimentación
Placa de características
Descripción del aparato 56
Vista general
Panel de mandos
Encendido y uso 57
Primer encendido
Carga del circuito
Regulación de la dureza del agua
Filtro de agua (si existe)
Instalación del filtro de agua
Información adicional para el correcto uso del filtro de
agua (si existe)
Regulación de molido
SP
Erogación 60
Sistema SBS
Regulación de la cantidad de café por taza
Erogación de café (1 taza)
Erogación de café (2 tazas)
Suministro de agua caliente
Suministro de vapor/ Preparación del capuchino
Mantenimiento y cuidados 62
Limpieza general
Descalcificación
Interrupción de la descalcificación 64
Programación 65
Mando MENU
Modificación de las funciones
Funciones programables
Valores iniciales
Mensajes del display 73
Problemas - Causas - Soluciones 74
Precauciones y recomendaciones 75
Page 54

Instalación
SP
! Es importante conservar este manual para poderlo
consultar en cualquier momento. En caso de venta, cesión
o traslado, asegurarse de que el manual acompaña
siempre al aparato para informar al nuevo propietario
sobre el funcionamiento y las advertencias pertinentes.
! Leer atentamente las instrucciones: contienen
información importante sobre la instalación, el uso y la
seguridad.
Emplazamiento
! Los embalajes no son juguetes para niños y se
deben eliminar siguiendo la normativa para la recogida
selectiva (véase Precauciones y recomendaciones).
! La instalación la deben realizar profesionales
cualificados siguiendo estas instrucciones. Una
instalación incorrecta puede provocar daños a personas,
animales o cosas.
Empotrado
Para garantizar un buen funcionamiento del aparato,
es necesario que el mueble tenga las características
adecuadas:
• Los paneles adyacentes a la máquina de café deben
ser de material resistente al calor;
! Una vez empotrado el aparato, el contacto con los
componentes eléctricos debe ser imposible. Las
declaraciones de consumo indicadas en la placa de
características han sido medidas con este tipo de
instalación.
Ventilación
Para garantizar una buena ventilación, es necesario
eliminar la pared posterior del alojamiento.
Es preferible instalar la máquina de café de forma que
quede apoyada sobre un plano continuo que tenga una
apertura sobre la base de al menos 450 x 540 mm.
Centrado y fijación
Para realizar el centrado de la máquina de café,
colocar los separadores de forma que coincidan con
los orificios presentes en la estructura externa de la
máquina.
! Los separadores se deben fijar de forma que
garanticen la perfecta
estabilidad de la
máquina.
Para fijar el aparato al
mueble, proceder de la
siguiente forma:
• en el caso de muebles de madera contrachapada,
las colas deben ser resistentes a temperaturas de
100° C y a la acción del vapor;
• para el empotrado de la máquina de café, en
cualquier tipo de instalación, el mueble debe tener
las siguientes dimensiones:
• retirar la cubeta de
goteo de la máquina;
• retirar la protección
inferior de plástico;
• atornillar los 2
tornillos en los 2 orificios
situados en la parte
posterior de la base.
54
Page 55

! Todas las piezas que sujetan la protección deben
quedar fijadas de forma que no sea posible retirarlas
sin ayuda de alguna herramienta.
El cable de alimentación se debe colocar de forma
que ningún punto sobrepase en 50° C la temperatura
ambiente.
SP
A continuación, volver a colocar en su sitio la protección y la cubeta de goteo.
Conexión eléctrica
! Las máquinas de café dotadas de cable de alimentación
tripolar están predispuestas para el funcionamiento con
corriente alterna, con la tensión y frecuencia indicadas en
la placa de características del aparato.
! El instalador es responsable de la correcta conexión
eléctrica y del cumplimiento de las normas de
seguridad.
Antes de realizar la conexión, asegurarse de que:
• la toma tenga puesta a tierra y respete la legislación
vigente;
• la toma pueda soportar la carga máxima de
potencia de la máquina, indicada en la placa de
características;
• la tensión de alimentación esté comprendida entre
los valores indicados en la placa de características;
• la toma sea compatible con el enchufe del aparato.
De lo contrario, sustituir la toma o el enchufe; no
utilizar alargadores o ladrones.
! Con el aparato instalado, debe existir fácil acceso al
cable eléctrico y a la toma de corriente.
! El cable no debe estar doblado ni aplastado.
! El cable se debe comprobar periódicamente y sólo
deben sustituirlo técnicos autorizados.
! La empresa declina cualquier responsabilidad si
no se respetan estas normas.
Placa de características
• Tensión nominal
Véase placa en el aparato
• Potencia nominal
Véase placa en el aparato
• Alimentación
Véase placa en el aparato
• Material cuerpo
Metal
• Dimensiones (l x h x p) (mm)
595 x 460 x 320
• Peso (Kg)
23
• Longitud cable (mm)
1200
• Panel de mandos
Piezoeléctrico
• Depósito de agua
Extraíble
• Depósito de agua (l)
1,75
• Capacidad del contenedor de café (gr)
300 de café en grano
• Presión bomba (bar)
15
• Caldera
2 – Acero inoxidable - Aluminio
• Dispositivos de seguridad
Válvulas de seguridad presión caldera
Termostato de seguridad.
Montaje del cable de alimentación
• Introducir el enchufe
en la toma situada en
la parte posterior de la
máquina.
• Conectar el cable de
alimentación a la red.
• Conectar el enchufe
a la toma de corriente.
Con reserva de modificaciones de construcción y
ejecución debidas al progreso tecnológico.
Máquina conforme a la Directiva Europea 89/336/CEE
(Decreto legislativo 476 del 04/12/92), relativa a la
eliminación de las interferencias radiotelevisivas.
55
Page 56

Descripción
del aparato
SP
Vista general
Depósito de agua
Interruptor general
Contenedor de café en grano
Panel frontal (de control)
SBS
Tubo de vapor/agua caliente
Regulación de molido
Grupo erogador
Panel de mandos
Tecla selección
PROGRAMACIÓN/
SALIDA
Tecla avance
PÁGINAS
Tecla
SELECCIÓN/CONFIRMAR
Cubeta de goteo
Pantalla
Rejilla
Flotador indicador de cubeta llena
Erogador de altura regulable
Tecla
DESCALCIFICACIÓN
Tecla selección VAPOR
Tecla selección AGUA CALIENTE
Tecla selección CAFÉ EXPRÉS
Tecla selección CAFÉ NORMAL
Tecla selección CAFÉ LARGO
Tecla selección CAFÉ DOBLE
56
Page 57

Encendido y uso
! Antes de encender la máquina, asegurarse de que
se ha introducido en los contenedores lo que se indica
en el manual.
Realizar de inmediato la carga del circuito para evitar
que la máquina sufra daños.
! Tras haber encendido la máquina, realizar la
regulación de la dureza del agua. Esto permitirá
mantener la máquina en perfecto rendimiento (véase
Programación).
Primer encendido
1. Abrir el panel frontal
apretando con firmeza
en la parte central.
2. Extraer parcialmente
el contenedor de café
en grano.
Enjuagar y rellenar
el depósito con agua
potable fresca.
Cerrar la tapa y volver
a meter el depósito de
agua en su sitio.
! La máquina pedirá que
se llene el depósito de
agua cuando el nivel de
agua aún sea elevado.
Esto ocurre porque el depósito de la máquina de café
ha sido diseñado para el “filtro de agua” opcional que
necesita una cantidad mínima de agua para el filtrado
! Introducir en el depósito siempre y sólo agua fresca
sin gas. El agua caliente y otros líquidos pueden dañar
el depósito y la máquina. No poner en funcionamiento
la máquina sin agua: asegurarse de que haya suficiente
agua en el depósito.
La máquina se entrega
con el interruptor
general en posición “O”;
para encenderla, basta
con llevar el interruptor
a la posición “I”.
SP
3. Verter el café en
grano en el contenedor
evitando introducir una
cantidad excesiva.
Cerrar la tapa y volver
a colocar el contenedor
dentro de la máquina.
4. Extraer totalmente de
la máquina el depósito
de agua.
Cerrar el panel frontal
apretando con firmeza
en la parte central;
la máquina comenzará a calentarse y en el display
aparecerá:
ENJUAGUE
ESPERAR...
Al alcanzar la temperatura adecuada, la máquina
realiza un ciclo di enjuague.
ENJUAGUE
La máquina suministra agua por el erogador
enjuagando los circuitos internos.
Una vez finalizado el enjuague, la máquina regresa
a las condiciones para su uso normal; en el display
aparecerá
SELECCIONAR FUNCION
MAQUINA LISTA
! Para desactivar el enjuague, consultar el apartado de
la programación de la máquina.
57
Page 58

SP
Carga del circuito
! Antes de proceder a la primera puesta en
funcionamiento, en caso de inactividad prolongada, si
el depósito de agua se ha vaciado completamente, es
necesario cargar el circuito de la máquina. Además, el
circuito se debe cargar cada vez que se indique en el
display:
Filtro de agua (si existe)
El filtro de agua permite depurar el agua que se utiliza
para la preparación del café.
Gracias a sus propiedades, reduce la dureza del agua
y elimina el desagradable sabor del cloro.
El filtro de agua se puede instalar en cualquier
momento.
CARGAR CIRCUITO
1. Para cargar el
circuito, dirigir el tubo de
vapor hacia la cubeta de
goteo, colocar una taza o
un recipiente adecuado
bajo la boquilla del tubo
de vapor y pulsar la
tecla
2. Esperar a que el agua salga por el tubo de vapor de
forma regular. Para interrumpir el suministro de agua,
pulsar la tecla
Una vez finalizadas las operaciones arriba descritas, la
máquina ya estará lista para el uso.
Para suministrar café, agua caliente o vapor y utilizar
correctamente la máquina, seguir atentamente las
instrucciones que se describen a continuación.
.
.
Regulación de la dureza del agua
Esta regulación se debe llevar a cabo para programar
el correcto grado de dureza del agua utilizada.
En función de esta regulación, la máquina avisará
cuando sea necesario realizar el ciclo de descalcificación.
Para realizar esta regulación, consultar las secciones
“Dureza del agua” de la “Programación”.
Instalación del filtro de agua
1. Abrir el panel frontal
y extraer el depósito del
agua.
Si contiene agua, vaciar
el depósito.
2. Retirar el filtro del
embalaje y poner el
calendario en el mes en
curso.
! Consultar las notas del
lateral sobre el uso del
filtro.
3. Introducir el filtro en
el depósito. El punto de
referencia y la ranura
deben coincidir. Apretar
hasta el fondo.
Rellenar el depósito con
agua fresca potable y
volver a meterlo en la
máquina. Cerrar el panel
frontal.
Suministrar el depósito
de agua entero en un
contenedor. Luego, llenar otra vez el depósito
del agua.
! Programar la máquina para el funcionamiento con
el filtro (véase programación). La máquina avisará al
usuario cuando llegue el momento de sustituir el filtro.
58
! El filtro de agua se debe retirar siempre antes de realizar la descalcificación.
Page 59

Información adicional para el correcto
uso del filtro de agua (si existe)
Para utilizar correctamente el filtro de agua (si
existe), se recomienda cumplir con las siguientes
advertencias:
1. conservar el filtro de agua en un lugar fresco
protegiéndolo de la luz solar; la temperatura
ambiente debe estar comprendida entre +5° C y
+40° C.
2. usar el filtro en un ambiente cuya temperatura no
supere los 60° C;
3. lavar el filtro de agua después de 3 días de no
utilización de la máquina de café;
4. es necesario sustituir el filtro después de 20 días
de no utilización de la máquina de café;
5. en caso de que se quiera conservar un filtro ya
abierto, es necesario cerrarlo herméticamente en
una bolsa de nailon y guardarlo en el frigorífico; no
se debe guardar en el congelador ya que se alteran
las propiedades del filtro.
6. antes de usar el filtro, dejarlo sumergido en el
depósito de agua durante 30 minutos;
7. una vez sacado de su envoltorio, no conservar el
filtro en un lugar abierto;
8. el filtro debe reemplazarse después de 90 días de
la apertura del embalaje, o bien tras haber tratado
60 litros de agua potable.
Regulación de molido
! El mando de regulación del grado de molido, que
se encuentra al lado del grupo suministrador, se
debe girar con cuidado. No introducir café molido y/o
liofilizado en el contenedor de café en grano.
! No se debe introducir ningún material que no sea
café en grano.
Antes de manipular el interior de la máquina, sea por
el motivo que sea, apagar el interruptor general.
La calidad y el sabor del café dependen, además de la
mezcla utilizada, del grado de molido.
La máquina está dotada de un pomo para la
regulación del grado de molido.
Para cambiar el grado
de molido, girar el pomo
graduado con un punto
cada vez; las cifras
grabadas en el mando
indican el grado de
molido.
Todos los apartaos
vienen regulados de
fábrica con grado de molido medio: si el molido resulta
ser demasiado fino, girar el pomo hacia valores más
altos; si el molido resulta ser demasiado grueso, girar
el pomo hacia valores más bajos.
SP
La variación del grado de molido se notará únicamente
tras la erogación de uno o dos cafés.
Utilizar mezclas de café en grano para máquinas
de café exprés. Evitar el uso de grados de molido
en posiciones extremas (ej.1 – 10); en estos casos,
utilizar distintas mezclas de café. Conservar el
café en un lugar fresco, en un contenedor cerrado
herméticamente.
El molido se debe regular siempre que el café no se
erogue de forma ideal:
• si la erogación es demasiado rápida significa que el
molido es demasiado grueso. Se recomienda girar
el pomo hacia valores más bajos;
• si la erogación es a gotas o inexistente, significa
que el molido es demasiado fino. Se recomienda
girar el pomo hacia valores más altos.
59
Page 60

Erogación
SP
Sistema SBS
La máquina está equipada con un dispositivo que
regula la densidad del café erogado: el sistema SBS.
Este sistema permite
obtener una erogación
óptima con todos
los tipos de café del
mercado.
! La regulación se puede
llevar a cabo o modificar
incluso durante la
erogación del café.
La regulación se
consigue girando el pomo.
Girar el pomo:
• hacia la izquierda para un café crème;
• a la posición central para un café exprés;
• hacia la derecha para un café fuerte.
Regulación de la cantidad de café por taza
Esperar a que la taza se llene con la cantidad deseada;
pulsar de nuevo la tecla.
De esta forma, se programa la máquina para erogar la
cantidad de café deseada.
Erogación de café (1 taza)
! Antes de erogar café, comprobar que el depósito de
agua y el depósito de café estén llenos y que en el
display se visualice:
SELECCIONAR FUNCION
MAQUINA LISTA
Colocar 1 taza bajo
las boquillas del
erogador; es posible
regular la altura del
erogador desplazándolo
manualmente hacia
arriba o hacia abajo para
adaptarlo a las tazas
utilizadas.
La máquina ha sido programada para erogar 3 tipos de
café:
café exprés con la tecla
café normal con la tecla
café largo con la tecla
,
;
.
Para adaptar los valores
programados a las
dimensiones de las
tazas, colocar la taza
bajo el erogador.
Pulsar la tecla
y con la tecla
pasar las funciones
hasta que aparezca:
PROGR. CAFE LARGO *
PROGR. CANTIDAD AGUA
Pulsar la tecla ; en el display aparecerá:
SELECCIONAR FUNCION
PROGRAM. CAFE
pulsar la tecla de erogación del tipo de café deseado
, o ); en el display se visualizará (por
(
ejemplo):
1 CAFE CORTO
PROGRAM. CAFE
Para erogar el café, es necesario pulsar la tecla de
erogación de café (
indicará (por ejemplo):
, o ); en el display se
1 CAFE CORTO
PREPARANDO
En este modo de funcionamiento, la máquina procede
automáticamente a moler y dosificar la cantidad
adecuada de café.
A continuación, se pone en marcha el ciclo de
erogación.
1 CAFE CORTO
PREINFUSION...
Una vez finalizado el ciclo de preinfusión, el café
empezará a salir por la boquilla del erogador;
en el display aparecerá:
1 CAFE CORTO
PREPARANDO
La erogación del café se detendrá automáticamente
cuando se alcance el nivel predefinido.
! No obstante, es posible interrumpir la erogación del
café pulsando la tecla (
, o ).
60
Page 61

Erogación de café (2 tazas)
! Antes de erogar café, comprobar que el depósito de
agua y el depósito de café estén llenos y que en el
display se visualice:
SELECCIONAR FUNCION
MAQUINA LISTA
Colocar 2 tazas bajo
las boquillas del
erogador; es posible
regular la altura del
erogador desplazándolo
manualmente hacia
arriba o hacia abajo
para adaptarlo a las
tazas utilizadas.
Para erogar el café, es necesario pulsar la tecla
a continuación, la tecla de erogación de café (
o
); en el display se indicará (por ejemplo):
y,
,
Suministro de agua caliente
! Al empezar el suministro pueden producirse breves
chorros de agua caliente: riesgo de quemaduras. El
tubo de agua caliente puede alcanzar temperaturas
elevadas: no tocarlo directamente con las manos.
Antes de suministrar agua caliente, comprobar que en
el display aparece:
SELECCIONAR FUNCION
MAQUINA LISTA
Con la máquina lista
para la erogación del
café, proceder de la
siguiente forma.
1. Colocar una taza o
un recipiente bajo el
tubo de agua caliente/
vapor.
SP
2 CAFES CORTOS
PREPARANDO
En este modo de funcionamiento, la máquina procede
automáticamente a moler y dosificar la cantidad
adecuada de café.
! La preparación de dos cafés requiere de dos ciclos
de molido y dos ciclos de erogación independientes.
La máquina gestiona automáticamente todos estos
ciclos.
A continuación, se pone en marcha el ciclo de
erogación.
2 CAFES CORTOS
PREINFUSION...
Una vez finalizado el ciclo de preinfusión, el café
empezará a salir por la boquilla del erogador;
en el display aparecerá:
2 CAFES CORTOS
PREPARANDO
La erogación del café se detendrá automáticamente
cuando se alcance el nivel predefinido.
! No obstante, es posible interrumpir la erogación
del café pulsando la tecla (
interrumpe la erogación del primer café, el segundo no
se suministrará.
, o ); si se
2. Pulsar la tecla
; en el display aparecerá:
AGUA CALIENTE
! La cantidad de agua suministrada está predefinida;
se puede modificar mediante el menú “PROGR.
CANTIDAD AGUA” del capítulo “Programación”.
Para detener el suministro de agua caliente, pulsar
de nuevo la tecla
funcionamiento normal.
; la máquina volverá al modo de
Suministro de vapor/ Preparación del
capuchino
El vapor puede utilizarse para montar la leche para el
capuchino pero también para calentar bebidas.
! ¡Riesgo de quemaduras! Al empezar el suministro
pueden producirse breves chorros de agua caliente. El
tubo de vapor puede alcanzar temperaturas elevadas:
no tocarlo directamente con las manos.
61
Page 62

Mantenimiento y
cuidados
SP
1. Con la máquina lista
para erogar café, colocar
una taza o recipiente
bajo el tubo de agua
caliente/vapor.
2. Pulsar la tecla
para que salga el
agua restante del tubo
de vapor; en breve,
comenzará a salir
únicamente vapor. En el display se visualizará:
VAPOR
3. Pulsar la tecla para finalizar el suministro de
vapor.
4. Llenar con leche fría 1/3 del recipiente que desee
utilizar para preparar el capuchino.
! Para obtener un mejor resultado en la preparación
del capuchino, la leche y la taza utilizadas deben estar
frías.
5. Sumergir el tubo de
vapor en la leche que se
desea calentar y pulsar
la tecla
recipiente de abajo para
arriba lentamente para
que la formación de
espuma sea uniforme.
! El tiempo de suministro del vapor está predefinido;
se puede modificar mediante el menú “PROGRAM.
TIEMPO VAPOR” del capítulo “Programación”.
6. Para interrumpir el suministro de vapor, pulsar de
nuevo la tecla
.
! El mismo sistema
puede ser utilizado para
el calentamiento de otras
bebidas.
! Tras el uso, limpiar el
tubo de vapor con un
paño humedecido.
; mover el
Limpieza general
! El mantenimiento y la limpieza pueden ser realizados
sólo cuando la máquina está fría y desconectada de la
red eléctrica.
• No sumergir la máquina en el agua ni introducir sus
componentes en el lavavajillas.
• No usar objetos puntiagudos o productos químicos
agresivos (disolventes) para limpiar.
• No secar la máquina ni sus componentes usando un
horno microondas o un horno convencional.
• Se recomienda
limpiar a diario el
depósito de agua,
procediendo a cambiar
el agua.
• Retirar y limpiar el
filtro instalado en el
depósito.
• Limpiar la máquina
usando un paño
humedecido con agua.
• Limpiar la zona
de servicio y el grupo
erogador.
• Se recomienda
vaciar y limpiar a diario
la cubeta de goteo y el
cajón de recogida de
los posos; para llevar
a cabo esta operación,
es necesario extraer
la cubeta de goteo; a
continuación, se puede
proceder con el vaciado
y la limpieza de todos los
componentes.
• El erogador de café
se puede extraer para su
limpieza:
1. Bajar las boquillas del
erogador
2. Sujetar el erogador
tal y como se indica
y extraerlo de su
alojamiento.
3. Limpiar el conjunto
con agua caliente.
62
Page 63

! Para abrir la puerta de servicio cuando el erogador
de café está montado, utilizar la protección diseñada a
tal efecto.
1. Retirar la protección
colocada en la parte
inferior de la máquina.
• Lavar los dos filtros
de acero eliminando
cualquier resto de café.
El grupo erogador
•
sólo se puede lavar
con agua caliente sin
detergente. Lavar el
grupo erogador y secar
escrupulosamente
todos sus componentes.
• Limpiar escrupulosamente el espacio interior de la
máquina.
SP
2. Instalar la protección
en el erogador de café
empujándola hacia el
interior.
3. Abrir la puerta
de servicio dejando
la protección en el
erogador de café.
! En la protección
se encuentra una
esponja que recoge
los residuos de café;
una vez terminadas las
operaciones, lavar la
esponja con agua corriente.
! Una vez terminadas las operaciones, quitar la
protección y volver a colocar correctamente el
erogador de café.
El grupo erogador se debe limpiar cada vez que se
rellene el contenedor de café en grano o, en cualquier
caso, al menos una vez a la semana.
• Apagar la máquina llevando el interruptor general a
la posición “O”.
• Retirar la cubeta
de goteo y el cajón de
recogida de los posos;
abrir la puerta de
servicio.
• Extraer el grupo
erogador sujetándolo
por el mango y pulsando
la tecla en la que se
puede leer “PUSH”.
• Antes de introducir
el grupo suministrador
comprobar que todos
los componentes
estén colocados
correctamente; gancho
arriba y palanca abajo.
• Presionar con
firmeza el botón
“PUSH” para volver a
llevar la palanca a su
posición.
• Presionar el grupo
en el punto indicado
para volver a llevar la
palanca a la posición
correcta.
• Sujetándolo por
el mango, introducir
de nuevo el grupo
erogador en su
alojamiento hasta que
quede perfectamente
fijado; cerrar la puerta.
• Introducir el cajón de recogida de los posos y la
rejilla en la cubeta de goteo y montar esta última en
la máquina.
! Para mantener el grupo erogador en perfecto estado,
puede adquirir un kit de mantenimiento en los mejores
distribuidores de Ariston.
63
Page 64

Mantenimiento y
cuidados
SP
Descalcificación
La formación de cal se produce con el uso del aparato;
la descalcificación es necesaria cada 3-4 meses,
cuando se observe una reducción del caudal del agua
o cuando en el display aparezca el mensaje:
MAQUINA LISTA
DESCALCIFICACION
! Si se desea efectuar la descalcificación personalmente,
se puede utilizar un producto descalcificante para
máquinas de café de tipo atóxico que se encuentra
normalmente en venta. Se recomienda el uso de la
solución descalcificante Ariston.
! Nunca utilizar vinagre como producto descalcificante.
! Antes de llevar a cabo la descalcificación, retirar el
filtro de agua (si existe).
Para proceder a la descalcificación de la máquina,
seguir estas instrucciones.
1. Mezclar el producto
descalcificante con agua,
tal y como se indica en
el embalaje del producto,
y verter la mezcla en el
depósito del agua.
2. Encender la máquina
mediante el interruptor
general.
La máquina comenzará un ciclo automático de
descalcificación alternado con pausas predefinidas por
el fabricante y gestionadas automáticamente por la
máquina. En el display aparece:
MAQUINA EN DESCALC.
7. Al finalizar el ciclo, se detiene el suministro de la
solución descalcificante y en el display aparece:
ENJUAGUE MAQUINA
LLENAR DEPOSITO
8. Enjuagar a fondo
el depósito del agua y
llenarlo de agua fresca
potable.
Volver a introducir el
depósito y cerrar el panel
frontal.
En el display aparece:
ENJUAGUE MAQUINA
PULSAR TECLA AGUA
9. Colocar un recipiente
de dimensiones
adecuadas bajo el tubo
de vapor y pulsar la
tecla
.
3. Pulsar la tecla
para seleccionar la función; en el display aparecerá:
DESCALCIFICACION
NO
4. Con las teclas seleccionar:
DESCALCIFICACION
SI
5. Dirigir el tubo de vapor
hacia la cubeta de goteo.
6. Colocar un recipiente
de dimensiones
adecuadas bajo el tubo
de vapor y pulsar la tecla
.
64
Comienza el enjuague
de los circuitos de la
máquina y en el display
aparece:
MAQUINA EN ENJUAGUE
10. Cuando el enjuague de la máquina haya finalizado,
en el display aparecerá:
ENJUAGUE TERMINADO
PULSAR TECLA AGUA
11. Llenar el depósito de agua, pulsar la tecla , volver
a cargar el circuito y dejar que la máquina se caliente.
! Si se usa un producto distinto del aconsejado,
se recomienda respetar siempre las instrucciones
del fabricante indicadas en el envase del producto
descalcificante.
Page 65

Programación
Interrupción de la descalcificación
Si el ciclo de descalcificación se interrumpe apagando
la máquina, se reanudará al volver a encenderla.
El ciclo de descalcificación se puede interrumpir
pulsando la tecla
; en el display aparecerá:
MAQUINA EN DESCALC.
INTERRUMPIDO
Pulsando la tecla se reanuda el ciclo de
descalcificación; si se pulsa la tecla
en el display aparecerá:
y la tecla ,
DESCALC.INTERRUMPADO
VACIAR DEPOSITO
Atención! Después de esta operación, se debe vaciar
la solución descalcificante del depósito del agua
y lavarlo con agua fresca potable; el circuito de la
máquina se debe lavar mediante un ciclo de enjuague.
Se debe proceder del mismo modo que para el
enjuague normal, descrito en el punto 8 del capítulo
anterior.
Programación de las funciones de la
máquina
El usuario puede modificar algunos parámetros de
funcionamiento de la máquina en función de sus
necesidades personales.
Mando MENU
Para modificar los parámetros de funcionamiento,
es necesario entrar en el modo de programación
pulsando la tecla
en reposo.
En programación, para seleccionar la función
deseada, pulsar la tecla
pueden visualizar todas las funciones presentes en la
máquina.
Para salir de la programación, pulsar la tecla
de la máquina cuando ésta esté
; de este modo se
.
SP
Modificación de las funciones
Seleccionar la función deseada pulsando la tecla
.
Con la tecla
visualizar las variables que se pueden seleccionar con
la tecla
pulsar la tecla
Nota: con la tecla
programación en cualquier momento, sin memorizar
los cambios; esta operación sólo se puede realizar
tras haber pulsado la tecla
activar la función deseada; es posible
; para memorizar la variable deseada,
.
se puede interrumpir la
.
65
Page 66

Programación
SP
Funciones programables
ECONOMÍA DE ENERGÍA
Cuando el aparato se utiliza poco, se puede cambiar
a la posición de ENERGIA SUSPENDIDA. Con
esta función, se reducen los costes energéticos. No
obstante, se recomienda apagar completamente
el aparato mediante el interruptor general si no se
va a utilizar durante largos períodos; cuando se
desee volver a encender la máquina, el tiempo de
calentamiento del aparato será de pocos minutos.
Pulsando la tecla
seleccionar la función
ENERGIA SUSPENDIDA *
ENJUAGUE
y activarla con la tecla ; aparecerá el mensaje:
ENERGIA SUSPENDIDA
Ahora, con la tecla seleccionar
ENJUAGUE
APAGADA
y memorizar la selección con la tecla .
IDIOMA
Esta configuración permite elegir el idioma de
funcionamiento de la máquina. Además permite
ajustar los parámetros de las bebidas al gusto propio
del país donde se usa la máquina. Por este motivo,
algunos idiomas están diferenciados también por país.
Generalmente, el aparato está configurado en el idioma
del país al que está destinado.
Para cambiar el idioma, con la tecla
la función:
IDIOMA *
seleccionar
CONTRASTE
de este modo, la máquina está encendida, pero ningún
componente está activo.
Para volver a activar la máquina, pulsar
ENJUAGUE
Inmediatamente después de la fase de calentamiento,
el aparato elimina automáticamente el agua restante de
los conductos internos para garantizar que la erogación
de café se lleve a cabo únicamente con agua fresca.
La función ha sido activada por el fabricante.
Para desactivarla, con la tecla
función:
ENJUAGUE *
.
, seleccionar la
IDIOMA
y activarla con la tecla . Aparecerá el mensaje:
ENJUAGUE
ENCENDIDA
y activarla con la tecla .
Aparecerá el mensaje:
IDIOMA
ESPANOL
Con la tecla seleccionar el idioma deseado y
memorizarlo con la tecla
CONTRASTE
Permite una correcta regulación del contraste del
display para una mejor lectura.
Con la tecla
seleccionar la función:
CONTRASTE *
.
DUREZA AGUA
Activarla con la tecla .
Aparecerá el mensaje:
CONTRASTE
>¢¢¢¢¢ < 50
66
Ahora, con la tecla seleccionar el contraste
deseado y memorizarlo con la tecla
.
Page 67

DUREZA AGUA
La dureza del agua utilizada para erogar las bebidas
varía en función de las zonas geográficas. Por ello,
es necesario regular la máquina con el grado correcto
de dureza del agua
utilizada, que se
expresa en una escala
del 1 al 4. El aparato
está programado con
un valor medio (dureza
3).
Para regular la dureza,
sumergir brevemente
(1 segundo) en el agua
la cinta proporcionada.
A continuación, sacudir la cinta ligeramente para
eliminar el exceso de agua. Transcurrido un minuto,
los resultados de la prueba estarán visibles;
comprobar cuántos cuadrados han cambiado de color.
Con la tecla
seleccionar la función:
DUREZA AGUA *
FILTRO AGUA
Activarla con la tecla .
Aparecerá el mensaje:
DUREZA AGUA
DUREZA 3
agua (si existe) por primera vez.
Con la tecla
seleccionar la función:
FILTRO AGUA *
TEMPERATURA
Activarla con la tecla .
Aparecerá el mensaje:
FILTRO AGUA
APAGADA
Con la tecla seleccionar,
FILTRO AGUA
ENCENDIDA
y pulsar la tecla para confirmar la selección.
! El mando “RESETTAR” se debe accionar cada vez
que se instale un nuevo filtro de cartucho.
Para accionar este mando, con la tecla
seleccionar la función:
FILTRO AGUA
RESETTAR
Activarla con la tecla .
SP
Seleccionar la dureza correcta del agua con la tecla
(ej. 2 cuadrados = dureza 2) y memorizarla con
la tecla
! Advertencia: esta configuración permite que la
máquina avise cuando sea necesario realizar la
descalcificación.
En el display aparecerá el mensaje:
.
MAQUINA LISTA
DESCALCIFICACION
FILTRO AGUA (si existe)
Esta función permite una mejor gestión del filtro de
agua (si existe), ya que avisa al usuario cuando el
filtro debe ser sustituido.
! La función se debe activar tras instalar el filtro de
TEMPERATURA
Esta función permite obtener un café más o menos
caliente, regulando la temperatura del agua (alta,
media y baja).
Pulsando la tecla
TEMPERATURA *
seleccionar la función
PROGR. CAFE LARGO
Activarla con la tecla .
Aparecerá el mensaje, por ejemplo:
TEMPERATURA
MEDIA
Con la tecla ,seleccionar la temperatura
deseada y memorizarla con la tecla
.
67
Page 68

Programación
SP
PROGRAMACIÓN CANTIDAD CAFÉ
Esta función permite regular la cantidad de café que se
erogará al pulsar las teclas (
Sólo se puede programar la cantidad de erogación de
una tecla cada vez; repetir el procedimiento descrito
a continuación tantas veces como teclas se deseen
programar.
Pulsando la tecla
PROGR. CAFE LARGO *
seleccionar la función:
, o ).
PROGR. CANTIDAD AGUA
Activarla con la tecla .
Aparecerá el mensaje:
SELECCIONAR FUNCION
PROGRAM. CAFE
! En esta fase, si no se lleva a cabo ninguna acción,
transcurrido un tiempo preestablecido, la máquina
saldrá de la función.
Activarla con la tecla .
Aparecerá el mensaje:
SELECCIONAR FUNCION
PROGRAM. AGUA
Colocar el recipiente que se desee llenar y pulsar la
tecla
Comenzará el suministro de agua desde el tubo de
vapor y en el display aparecerá:
.
AGUA CALIENTE
PROGRAM. AGUA
Cuando se haya alcanzado la cantidad deseada, pulsar
de nuevo la tecla
Ahora la máquina ya está programada.
PROGRAMACIÓN TIEMPO VAPOR
.
Colocar la taza que se desee llenar.
Pulsar la tecla de erogación del tipo de café deseado
, o ); en el display se visualizará (por
(
ejemplo):
1 CAFE CORTO
PREPARANDO
y, a continuación:
1 CAFE CORTO
PROGRAM. CAFE
Esperar a que la taza se llene con la cantidad deseada;
pulsar de nuevo la tecla.
PROGRAMACIÓN CANTIDAD AGUA
Esta función permite regular la cantidad de agua que
se eroga cada vez que se pulsa la tecla
llenar el recipiente con la cantidad deseada pulsando
sólo una tecla.
. Es posible
Esta función permite regular el tiempo durante el que
se suministrará vapor cada vez que se pulsa la
tecla
Pulsando la tecla
.
seleccionar la función:
PROGRAM.TIEMPO VAPO*
AROMA CAFE CORTO
Activarla con la tecla .
Aparecerá el mensaje:
SELECCIONAR FUNCION
PROGRAM. VAPOR
Colocar el recipiente con la bebida que se desee
calentar y pulsar la tecla
Comenzará el suministro de vapor desde el tubo y en el
display aparecerá:
VAPOR
.
PROGRAM. VAPOR
Pulsando la tecla
PROGR. CANTIDAD AGU*
PROGRAM.TIEMPO VAPOR
68
seleccionar la función :
Cuando se haya alcanzado la cantidad deseada, pulsar
de nuevo la tecla
Ahora la máquina ya está programada.
.
Page 69

AROMA CAFÉ CORTO
Esta función permite programar la dosis (cantidad)
de café a moler para la preparación del café exprés
(fuerte, normal y suave).
AROMA CAFÉ LARGO
SP
Esta función permite programar la dosis (cantidad) de
café a moler para la preparación del café largo (fuerte,
normal y suave).
Pulsando la tecla
AROMA CAFE CORTO *
seleccionar la función:
AROMA CAFE
Activarla con la tecla .
Aparecerá el mensaje, por ejemplo:
AROMA CAFE CORTO
FUERTE
Con la tecla seleccionar la dosis deseada y
memorizarla con la tecla
AROMA CAFÉ
Esta función permite programar la dosis (cantidad)
de café a moler para la preparación del café (fuerte,
normal y suave).
Pulsando la tecla
AROMA CAFE *
.
seleccionar la función:
AROMA CAFE LARGO
Activarla con la tecla .
Aparecerá el mensaje, por ejemplo:
AROMA CAFE
NORMAL
Pulsando la tecla
AROMA CAFE LARGO *
seleccionar la función:
PREINFUSION
Activarla con la tecla .
Aparecerá el mensaje, por ejemplo:
AROMA CAFE LARGO
FUERTE
Con la tecla , seleccionar la dosis deseada y
memorizarla con la tecla
PREINFUSIÓN
El proceso de preinfusión resalta el aroma del café
confiriéndole un magnífico sabor. Esta función permite
humedecer el café antes de la infusión propiamente
dicha.
Pulsando la tecla
PREINFUSION *
.
seleccionar la función:
TOTAL CAFE
Activarla con la tecla .
Aparecerá el mensaje, por ejemplo:
PREINFUSION
ENCENDIDA
Con la tecla , seleccionar la dosis deseada y
memorizarla con la tecla
.
Con la tecla seleccionar si se desea desactivar
la función:
PREINFUSION
APAGADA
o si se desea alargar esta fase
PREINFUSION
LARGA
para resaltar el sabor del café.
Memorizar la selección con la tecla
.
69
Page 70

Programación
SP
TOTAL CAFÉ
Esta función permite visualizar el número de cafés que
ya han sido erogados por el aparato.
Pulsando la tecla
TOTAL CAFE *
seleccionar la función:
TEMPORIZADOR
activarla con la tecla .
Aparecerá el mensaje, por ejemplo:
TOTAL CAFE
81
Salir pulsando la tecla .
TEMPORIZADOR
Esta función permite un ahorro de energía cuando la
máquina no se utiliza durante un largo período.
Esta función, predefinida por el fabricante, lleva
automáticamente la máquina a:
ENERGIA SUSPENDIDA
RELOJ
Esta función, activada y desactivada por el usuario,
permite:
- visualizar la hora actual cuando la máquina está
en “ECONOM. ENERGÍA” o en “SELECCIONAR
FUNCIÓN”
- seleccionar el horario de encendido y apagado de la
máquina.
Para que la programación funcione correctamente, es
necesario programar el horario actual:
Con la tecla
seleccionar la función:
RELOJ *
CICLO DE LAVADO
Activarla con la tecla .
Con la tecla
seleccionar la función:
HORA RELOJ *
HORAS ON/OFF
Activarla con la tecla .
HORA RELOJ
0:00
cuando han transcurrido 3 horas desde la última
erogación.
! El tempo de apagado se puede regular, con intervalos
de 15 minutos, hasta un mínimo de 15 minutos; esta
función no se puede desactivar.
Pulsando la tecla
TEMPORIZADOR *
seleccionar la función:
RELOJ
Activarla con la tecla .
Aparecerá el mensaje:
ECONOM.ENERGIA
DESPUES 3:00
Con la tecla , seleccionar el retardo de apagado
y memorizarlo con la tecla
! Nota: si se activan los horarios de encendido y
apagado en la función “RELOJ”, esta función será
ignorada.
.
Con la tecla , configurar la hora actual y
memorizarla con la tecla
A continuación, con la tecla
minutos y memorizarlos con la tecla
El horario ya está configurado y la máquina regresa al
menú anterior.
! Nota: la memorización del horario se mantiene incluso
cuando se apaga la máquina.
Para visualizar la hora en el display
Con la tecla
seleccionar la función:
INDICAR HORA RELOJ *
;
configurar los
.
RELOJ
Activarla con la tecla .
70
Page 71

Con la tecla seleccionar si se desea activar la
función:
INDICAR HORA RELOJ *
ENCENDIDA
Memorizar con la tecla .
! Nota: la visualización de la hora sólo es posible en
determinados momentos; esta función sólo la puede
desactivar el usuario.
A continuación, con la tecla
minutos y memorizarlos con la tecla
! Atención: si el horario de encendido y de
apagado coinciden, la máquina ignorará ambas
programaciones. Tras esta configuración, para que la
programación funcione correctamente, es necesario
activar el reloj.
Para activar el encendido y el apagado
configurar los
.
SP
Para desactivar la función, con la tecla
seleccionar
INDICAR HORA RELOJ *
APAGADA
Memorizar con la tecla .
Para regular los horarios de encendido y apagado
La máquina se puede encender y apagar
automáticamente sin la intervención del usuario. En la
máquina, sólo se puede programar un único horario
de encendido y un único horario de apagado.
! Nota: esta función se activa únicamente si el
interruptor general está en la posición “I” (encendido).
Con la tecla
HORAS ON/OFF *
seleccionar la función
INDICAR HORA RELOJ
! Nota: la activación de esta función tiene una
aplicación concreta únicamente disponible si se han
regulado los horarios de encendido y apagado.
Con la tecla
seleccionar la función:
RELOJ *
HORA RELOJ
Activarla con la tecla .
RELOJ
NO
En este caso, pulsando la tecla se desactiva la
función.
Seleccionar la activación de la función con la tecla
y, cuando se visualice:
RELOJ
SI
Activarla con la tecla .
HORAS ON/OFF
ENCENDIDA 0:00
Con la tecla , configurar la hora de encendido y
memorizarla con la tecla
A continuación, con la tecla
minutos y memorizarlos con la tecla
HORAS ON/OFF
.
configurar los
.
APAGADA 0:00
Con la tecla , configurar la hora de apagado y
memorizarla con la tecla
;
memorizar con la tecla .
Al salir de la programación, la máquina comprobará
los parámetros configurados. Si el horario actual
queda dentro del período de desactivación, en el
display aparecerá:
ENERGIA SUSPENDIDA
! Nota: durante la fase de desactivación, la máquina
se puede volver a activar en cualquier momento
pulsando la tecla
a desactivar la máquina, entrar en programación
pulsando la tecla
la tecla
.
. Posteriormente, para volver
ey salir inmediatamente pulsando
71
Page 72

Programación
SP
CICLO DE LAVADO
Con esta función, se ejecuta un ciclo de lavado con
agua de las piezas involucradas en la erogación del
café.
! Durante el ciclo de lavado, se recomienda la
presencia de una persona que supervise la operación.
Antes de efectuar el ciclo de lavado, llenar el depósito
de agua.
Con la tecla
seleccionar la función:
CICLO DE LAVADO *
VALORES INICIALES
Pulsar la tecla .
En el display aparece:
CICLO DE LAVADO
NO
Con la tecla seleccionar
CICLO DE LAVADO
SI
Valores iniciales
Esta función permite restablecer los parámetros de
funcionamiento de la máquina configurados por el
fabricante.
Con la tecla
seleccionar la función:
VALORES INICIALES *
SALIDA
Activarla con la tecla .
En este punto, aparecerá el mensaje:
VALORES INICIALES
NO
Seleccionar si se desean restablecer los parámetros
con la tecla
la selección.
! Advertencia: cuando se restablecen todos
los parámetros de fábrica, se pierden todas las
configuraciones personalizadas reguladas en la
máquina.
, y pulsar la tecla para confirmar
Pulsar la tecla para iniciar el ciclo de lavado; en el
display aparece:
CICLO DE LAVADO
La máquina suministra casi la mitad del contenido del
depósito de agua del erogador
Luego, el ciclo termina automáticamente y en el display
aparece el mensaje:
SELECCIONAR FUNCION
MAQUINA LISTA
72
Page 73

Mensajes del display
Mensajes del display
A través del display, la máquina guía al usuario para
su correcto uso.
A continuación, enumeramos los mensajes de alarma
que no permiten la erogación de café explicando
qué debe hacer el usuario para utilizar la máquina
correctamente.
ENERGIA SUSPENDIDA
• Pulsar la tecla .
MAQUINA LISTA
DESCALCIFICACION
• Descalcificar la máquina.
LLENAR DEPOSITO
• Llenar el depósito de agua con agua fresca potable.
! La máquina pedirá que se llene el depósito de agua
cuando el nivel de agua aún sea elevado. Esto ocurre
porque el depósito de la máquina de café ha sido
diseñado para el “filtro de agua” opcional que necesita
una cantidad mínima de agua para el filtrado
RECIP. POSOS FALTA
• Introducir correctamente la cubeta de goteo y el
cajón de recogida de los posos.
CERRAR PUERTA
• Cerrar la puerta anterior.
CERRAR PANEL
• Cerrar el panel superior.
CARGAR CIRCUITO
• Colocar una taza o un recipiente adecuado bajo la
boquilla del tubo de vapor y pulsar la tecla
Esperar a que el agua salga por el tubo de vapor
de forma regular. Para interrumpir el suministro de
agua, pulsar la tecla
.
.
GRUPO BLOQUEADO
SP
FALTA GRANOS
MAQUINA LISTA
• Llenar el contenedor de café en grano con café en
grano y reactivar el ciclo de erogación de café.
VACIAR POSOS
• Abrir la puerta, extraer el cajón de recogida de
los posos y vaciar los posos en un contenedor
apropiado.
! Nota importante: el cajón de recogida de los
posos se debe vaciar únicamente con la máquina
encendida. El cajón se debe extraer durante al menos
5 segundos. Si se vacía el cajón con la máquina
apagada, no será posible erogar café al volver a
encenderla.
GRUPO FALTA
• Introducir correctamente el grupo erogador.
MOLINO BLOQUEADO
• Contactar con un centro de asistencia autorizado.
73
Page 74

Problemas - Causas Soluciones
SP
Problemas Causas Soluciones
La máquina no se enciende. La máquina no está conectada a la
red eléctrica.
El café no está sufi cientemente
caliente.
No es posible suministrar agua
caliente o vapor.
La erogación del café es demasiado
lenta.
La erogación del café es muy
rápida.
Las tazas están frías. Calentar las tazas con un poco de agua
El tubo de vapor está obstruido. Extraer el tubo de vapor tirando de él
Café demasiado fi no. Cambiar la mezcla de café.
Grupo erogador sucio. Lavar el grupo erogador.
Pomo del sistema SBS
completamente girado hacia la
derecha.
Café demasiado grueso. Cambiar la mezcla de café.
Pomo del sistema SBS
completamente girado hacia la
izquierda.
Solicitar una comprobación de la
conexión a la red eléctrica.
caliente.
hacia abajo y lavarlo.
Girar el pomo de la regulación del
molido hacia un valor más alto.
Girar el pomo hacia la izquierda y,
cuando la máquina erogue, girarlo
hacia la derecha.
Girar el pomo de la regulación del
molido hacia un valor más bajo.
Cuando la máquina erogue, girar el
pomo hacia la derecha.
La máquina tarda demasiado
tiempo en calentarse o la cantidad
de agua que sale por el tubo es
escasa.
El grupo erogador no se puede
extraer.
El café sale por fuera del erogador. El erogador no está en posición
El café tiene poca crema. La mezcla no es adecuada o el café
Sale agua de la cubeta de goteo. La cubeta de goteo está demasiado
El circuito de la máquina tiene
incrustaciones de cal.
El grupo erogador no está en la
posición correcta.
La cubeta de goteo está instalada. Extraer la cubeta de goteo.
correcta.
Erogador obstruido Extraer el erogador y lavarlo.
no es reciente.
El molido del café es demasiado
grueso.
El pomo del sistema SBS está
girado hacia la izquierda.
llena.
Realizar la descalcifi cación.
Encender la máquina. Cerrar la puerta
anterior; el grupo regresa a la posición
inicial y se puede extraer.
Reposicionar el erogador.
Cambiar la mezcla de café.
Regular el molido.
Girar el pomo del sistema SBS hacia la
derecha
Comprobar la posición del fl otador y
vaciar la cubeta de goteo.
74
Page 75

Precauciones y
recomendaciones
Uso previsto
• Usar la máquina de café sólo en ámbito doméstico.
• ¡Se prohíbe toda modificación técnica y uso ilícito
por los riesgos que éstos conllevan!
• El aparato no está diseñado para que lo usen
personas (incluidos los niños) con reducidas
capacidades físicas, mentales o sensoriales o con
experiencia y/o competencias insuficientes, a no ser
que lo utilicen bajo la supervisión de una persona
responsable de su seguridad o que ésta les enseñe
a usarlo.
Alimentación de corriente eléctrica
• Conectar la máquina de café sólo a una toma de
corriente adecuada.
• La tensión debe corresponder al valor indicado en
la placa del aparato.
Cable de alimentación
• Nunca usar la máquina de café si el cable de
alimentación es defectuoso.
• Procurar que el cable de alimentación no pase por
esquinas o cantos agudos ni por encima de objetos
muy calientes. Protegerlo del aceite.
• No desenchufar la máquina tirando del cable ni
tocarla con manos y pies mojados.
Protección de otras personas
• Mantener fuera del alcance de los niños para evitar
que jueguen con el aparato. Los niños no se dan
cuenta de los peligros relacionados con el uso
indebido de un electrodoméstico.
• No dejar al alcance de los niños los materiales
usados para empaquetar la máquina.
Riesgo de quemaduras
• No dirigir contra si mismo ni contra los demás el
chorro de vapor sobrecalentado o de agua caliente:
riesgo de quemaduras. Usar siempre los mangos o
los pomos colocados para ello.
• No introducir objetos a través de las aberturas del
aparato.
Espacio para la instalación, el uso y el
mantenimiento
• No obstruir las aberturas de ventilación y extracción
del calor.
• Elegir un ambiente suficientemente iluminado e
higiénico. La toma de corriente debe ser de fácil
acceso.
• No apoyar la máquina sobre superficies muy
calientes ni cerca de llamas abiertas a fin de evitar
que su carrocería se derrita o que de cualquier
manera se dañe.
• Situar a 10 cm de distancia de paredes y placas de
cocción.
• No colocar la máquina en un lugar con temperatura
inferior a 0° C; se corre el riesgo de que las bajas
temperaturas estropeen la máquina.
• Tiene que ser posible acceder a la toma de
corriente en todo momento.
• No usar la máquina de café en lugares abiertos.
Limpieza
• Antes de proceder a la limpieza, es necesario llevar el
interruptor general a la posición “O” y, a continuación,
desconectar la máquina de la toma de corriente.
• Esperar a que la máquina se enfríe.
• ¡Nunca sumergir la máquina en el agua! Impedir
que entre en contacto con chorros de agua.
• Queda prohibido tratar de intervenir en la estructura
interna de la máquina.
Conservación de la máquina
• En caso de que no se vaya a usar la máquina
durante largos periodos de tiempo, deberá
apagarse y desconectarse de la toma de corriente.
Guardar la máquina en un lugar seco y fuera del
alcance de los niños.
• Proteger la máquina del polvo y de la suciedad.
• No apoyar objetos pesados sobre el panel frontal
abierto.
Reparaciones / Mantenimiento
• En caso de averías, desperfectos o sospecha
de desperfectos, se recomienda desconectar
en seguida la máquina de la toma de corriente.
Nunca poner en funcionamiento una máquina que
presente desperfectos.
• Sólo los Centros de Asistencia Autorizados pueden
realizar intervenciones y reparaciones en la
máquina.
• En caso de intervenciones o reparaciones no
realizadas por centros de asistencia autorizados, se
declina cualquier responsabilidad por posibles daños.
Antiincendio
• En caso de incendio, usar extintores de anhídrido
carbónico (CO
Desguace del aparato
• Eliminación del material de embalaje: respetar
las normativas locales para que los embalajes se
puedan reutilizar.
• En virtud de la directiva Europea 2002/96/CE sobre
los desechos de equipos eléctricos y electrónicos
(RAEE), los electrodomésticos no se deben desechar
en el flujo normal de desechos sólidos urbanos.
Los aparatos desguazados se deben desechar por
separado para optimizar el índice de recuperación
y reciclaje de los materiales que los componen
e impedir daños potenciales para la salud y el
medio ambiente. El símbolo de la papelera tachada
aparece en todos los productos para recordar la
obligación de recogida selectiva. Es posible entregar
los electrodomésticos de desecho al servicio de
recogida público, llevarlos a las instalaciones
municipales pertinentes o, si así lo dispone la
legislación nacional en materia, entregarlos a los
distribuidores en el momento de la compra de nuevos
productos del mismo tipo. Los principales fabricantes
de electrodomésticos participan activamente en
la creación y gestión de sistemas de recogida y
desguace de los aparatos de desecho.
). No usar agua ni extintores de polvo.
2
SP
75
Page 76

SP
Cod. 15000146
Rev. 02 - 15-01-07
INC002 MB
76
 Loading...