

Page 1

Istruzioni per luso
COMBINATO FRIGORIFERO/CONGELATORE
I F
Italiano, 1 Français, 29
E
GB
English,15
PT
Portuges, 57Espanol, 43
PL
Polski, 61
MBT 2022 CZ/HA
Sommario
I
Installazione, 2
Posizionamento e collegamento
Reversibilità apertura porte
Descrizione dellapparecchio, 3-4
Pannello di controllo
Vista dinsieme
Accessori, 5
Avvio e utilizzo, 6-7-8
Avviare lapparecchio
Come muoversi nel display
Pure Wind
Utilizzare al meglio il frigorifero
Utilizzare al meglio il congelatore
Manutenzione e cura, 9-10
Escludere la corrente elettrica
Pulire lapparecchio
Evitare muffe e cattivi odori
Sbrinare lapparecchio
Sostituire la lampadina
Assistenza, 10
Assistenza attiva 7 giorni su 7
Precauzioni e consigli, 11
Sicurezza generale
Smaltimento
Risparmiare e rispettare lambiente
Anomalie e rimedi, 12
Page 2

Installazione
! È importante conservare questo libretto per poterlo
I
consultare in ogni momento. In caso di vendita,
di cessione o di trasloco, assicurarsi che resti insieme
allapparecchio.
! Leggere attentamente le istruzioni: ci sono importanti
informazioni sullinstallazione, sulluso e sulla sicurezza.
Posizionamento e collegamento
Posizionamento
1. Posizionare lapparecchio in un ambiente ben aerato e
non umido.
2. Non ostruire le griglie posteriori di ventilazione:
compressore e condensatore emettono calore e
richiedono una buona aerazione per funzionare bene e
contenere i consumi elettrici.
3. Lasciare una distanza di almeno 10 cm tra la parte
superiore dellapparecchio ed eventuali mobili
sovrastanti e di almeno 5 cm tra le fiancate e mobili/
pareti laterali.
4. Lasciare lapparecchio lontano da fonti di calore (la
luce solare diretta, una cucina elettrica).
5. Per mantenere una ottimale distanza del prodotto
dalla parete posteriore, montare i distanzieri presenti
nel kit di installazione seguendo le istruzioni presenti
sul foglio dedicato.
Collegamento elettrico
Dopo il trasporto, posizionare lapparecchio
verticalmente e attendere almeno 3 ore prima di
collegarlo allimpianto elettrico. Prima di inserire la spina
nella presa della corrente, accertarsi che:
la presa abbia la messa a terra e sia a norma di legge;
la presa sia in grado di sopportare il carico massimo
di potenza della macchina, indicato nella targhetta
caratteristiche posta nel vano frigorifero in basso
a sinistra (es 150 W);
la tensione di alimentazione sia compresa nei valori
indicati nella targhetta caratteristiche, posta in basso
a sinistra (es 220-240 V);
la presa sia compatibile con la spina dellapparecchio.
In caso contrario richiedere la sostituzione della spina
a un tecnico autorizzato (vedi Assistenza); non usare
prolunghe e multiple.
! Ad apparecchio installato, il cavo elettrico e la presa
della corrente devono essere facilmente raggiungibili.
! Il cavo non deve subire piegature o compressioni.
! Il cavo deve essere controllato periodicamente
e sostituito solo da tecnici autorizzati (vedi Assistenza).
! Lazienda declina ogni responsabilità qualora
queste norme non vengano rispettate.
Livellamento
1. Installare lapparecchio su un pavimento piano e rigido.
2. Se il pavimento non fosse perfettamente orizzontale,
compensare svitando o avvitando i piedini anteriori.
Reversibilità apertura porte
Nel caso sia necessario cambiare il verso di apertura
delle porte, rivolgersi al servizio di Assistenza Tecnica.
2
Page 3

Descrizione
dellapparecchio
Pannello di controllo
FRIGORIFERO
Regolazione
temperatura
FRIGORIFERO
COOL CARE ZONE
Regolazione
temperatura
CONGELATORE
CONGELATORE
Display
Display
ON/OFF
I
ALLARMI
SUPER COOL
SUPER FREEZE
ICE PARTY
HOLIDAY
I CARE
ON/OFF
Premendo questo tasto è possibile accendere lintero
prodotto (sia vano frigo che vano freezer). Il LED rosso
indica che il prodotto è spento, il LED verde che è in
funzione. Per spegnere il prodotto occorre premere per
almeno 2 secondi il tasto ON/OFF.
I CARE
Gestisce lattivazione e la disattivazione della funzione I
Care (la temperatura ottimale a bassi consumi).
Allattivazione di questa funzione, si accendono
contemporaneamente il LED AUTO ed il LED I Care.
ALLARMI
Consente la segnalazione e la gestione di tutti gli allarmi
connessi al funzionamento del prodotto.
Child Lock
Consente di bloccare i tasti del pannello di controllo onde
evitare involontarie attivazioni da parte dei bambini tenendo
premuto il tasto ALLARMI per 2 secondi.
Regolazione Temperatura FRIGORIFERO + e -
Consentono la modifica dellimpostazione della
temperatura del frigorifero, con relativa conferma sul
display della temperatura selezionata. Attraverso questi
tasti è anche possibile disattivare il solo vano frigorifero (il
display visualizza - -).
Display FRIGORIFERO
Indica la temperatura impostata nel vano frigo o la sua
disattivazione (in questo caso il display visualizza - -).
Display CONGELATORE Indica la temperatura
impostata nel vano freezer.
COOL CARE ZONE
Mediante pressione del tasto è possibile impostare le 4
modalità di funzionamento della Cool Care Zone: la fragola
(8°C), il gelato (-12°C), la bottiglia (-18° C), se nessuna
delle tre icone è accesa la CoolCare Zone funzionerà come
un normale cassetto freezer.
SUPER COOL
Consente di attivare o disattivare la funzione SUPER
COOL (raffreddamento rapido). Il display frigo visualizza la
scritta SC.
SUPER FREEZE
Consente di attivare o disattivare la funzione SUPER
FREEZE (congelamento rapido). Il display
CONGELATORE visualizza la scritta SF.
HOLIDAY
Consente di attivare o disattivare la funzione HOLIDAY (si
accende il LED AUTO).
Regolazione Temperatura CONGELATORE + e -
Consentono la modifica dellimpostazione della
temperatura del congelatore, con relativa conferma sul
display della temperatura impostata.
ICE PARTY
Consente di attivare o disattivare la funzione ICE PARTY
(riduce la temperatura del congelatore per il tempo
necessario a raffreddare una bottiglia)..
3
Page 4

Descrizione
dellapparecchio
Vista dinsieme
I
Le istruzioni sulluso valgono per diversi modelli per cui è possibile che la figura presenti particolari differenti rispetto a
quelli dellapparecchio acquistato. La descrizione degli oggetti più complessi si trova nelle pagine seguenti.
Lampadina
(vedi Manutenzione)
PURE WIND
Balconcino estraibile
con coperchio e
con PORTAUOVA
RIPIANO
Scomparto
FRESH BOX
Cassetto
FRUTTA
VERDURA
COOL CARE ZONE
e Vano
CONGELAMENTO
Bacinella ghiaccio
Ice Care
Vano
CONSERVAZIONE
Balconcino
PORTALATTINE
Balconcino estraibile
PORTAOGGETTI
*
e
Balconcino
BOTTIGLIE
*
Bacinella ghiaccio
Ice Care
CONSERVAZIONE
PIEDINO
di regolazione
Vano
Variabili per numero e/o per posizione.
Presente solo in alcuni modelli.
*
4
Page 5

Accessori
RIPIANI: pieni o a griglia.
1
2
FRESH BOX
consente lunghi tempi di conservazione, fino anche a
una settimana, grazie alla bassa temperatura la più
fredda del frigorifero e allo sportello trasparente che
protegge da fenomeni di ossidazione e annerimento.
Può essere utilizzato anche per piatti freddi.
: per carne e pesce freschi. Lo scomparto
*
Sono estraibili e regolabili in
altezza grazie alle apposite
guide (vedi figura), per
linserimento di contenitori
o alimenti di notevole
dimensione. Per regolare
laltezza non è necessario
estrarre completamente il
ripiano.
I
Presente solo in alcuni modelli.
*
5
Page 6

Avvio e utilizzo
Avviare lapparecchio
I
!
Dopo il trasporto, posizionare lapparecchio verticalmente
ed attendere circa 3 ore prima di collegarlo alla presa di
corrente per favorire un buon funzionamento.
Prima di mettere gli alimenti nel frigorifero pulite bene
linterno con acqua tiepida e bicarbonato.
Tempo protezione motore.
Lapparecchio è provvisto di un controllo salvamotore
che fa avviare il compressore solo dopo circa 8 minuti
dallaccensione. Questo accade anche dopo ogni
interruzione dellalimentazione elettrica, volontaria o
involontaria (black out).
Scomparto congelatore
Allaccensione del prodotto (pressione per più di due
secondi del pulsante ON/OFF) il comparto congelatore si
porta nellimpostazione standard di 18°C. Si consiglia di
inserire la funzione SUPER FREEZE (il display del freezer
visualizza SF) per accelerare il raffreddamento del vano;
quando questultimo avrà raggiunto la sua temperatura
ottimale, la funzione si disattiverà e potrete introdurre nel
congelatore i surgelati.
Scomparto frigorifero
Allaccensione del prodotto il comparto frigorifero si porta
nellimpostazione standard di +5°C. Si consiglia di inserire
la funzione SUPER COOL (il display del frigo visualizza
SC) per accelerare il raffreddamento del vano: dopo
qualche ora potrete mettere i cibi nel frigorifero.
Cool Care Zone
Allaccensione del prodotto il vano variabile si porta
nellimpostazione standard di -12°C.
normale cassetto freezer.
Le temperature automaticamente impostate sono +5°C
per il comparto frigorifero e 18°C per il comparto
congelatore e sono quelle standard di conservazione. La
CoolCare Zone è automaticamente impostata a 12°C.
Quando è attiva la funzione I Care il prodotto regola
automaticamente le temperature in base alle condizioni
interne ed esterne al frigo, ciò viene segnalato
dallaccensione della scritta AUTO.
Qualora fosse necessario attivare la funzione I Care con
temperature differenti da quelle standard di conservazione,
è necessario, allattivazione della funzione, tenere premuto
il tasto I Care e impostare mediante i tasti + e le nuove
temperature. In queste condizioni le temperature
impostabili sono 4°, 5° e 6° per il vano frigo e 18°, -19° e
20° per il vano freezer.
Quando è attiva la funzione HOLIDAY non sono possibili
regolazioni di temperatura, ma il prodotto si posiziona
automaticamente alla regolazione ottimale per la
situazione: +12°C per il comparto frigorifero e 18°C per
il comparto congelatore, tale condizione è inoltre segnalata
dallaccensione della scritta AUTO.
Per attivare e disattivare le funzioni è sufficiente premere il
relativo tasto e laccensione o lo spegnimento del relativo
LED, segnalerà lo stato della funzione.
Alcune funzioni (SUPER COOL, SUPER FREEZE, ICE
PARTY, ICE CARE) sono incompatibili con altre
(HOLIDAY,..), in questo caso si tiene conto di una priorità
già stabilita in modo da aiutarvi nella gestione del prodotto.
Al termine della funzione Ice Party occorre premere il
tasto ICE PARTY per interrompere il lampeggio del led
relativo. Il lampeggio segnala il termine della funzione e
la necessità di rimuovere la bottiglia dal vano freezer.
Come muoversi nel display
Impostazione delle temperature:
Se il prodotto è acceso, i display del vano frigorifero e
congelatore visualizzeranno le temperature impostate in
quel momento. Per modificarle è sufficiente premere i tasti
+ e relativi al vano in cui si vuol cambiare la temperatura.
In particolare ogni pressione dei tasti incrementa o
diminuisce la temperatura di 1° ed in maniera equivalente
anche il numero di barre laterali accese. Le temperature del
vano frigo selezionabili sono +8°, +7°, +6°, +5°, +4°, +3°,
+2°, quelle del freezer sono 18°, -19°,-20°, -21°, -22°, 24°, -26°.
Mediante il tasto della Cool Care Zone è possibile
scegliere a quale temperatura far funzionare tale vano, le
temperature sono rappresentate dalle icone nella parte
centrale del display (Gelato 12°C, Bacche 8°, Alcolici
18°), le tre icone spente indicano il funzionamento come un
6
Child Lock
Per poter attivare la funzione Child Lock, è necessario
tenere premuto il tasto ALARM per 2 secondi, lattivazione
del blocco dei tasti viene confermata da un suono breve e
dalla visualizzazione delle scritte CH LO sui display
frigo e freezer, tale scritta viene poi sostituita dalle
temperature precedentemente selezionate per frigo e
freezer. Per disattivare la funzione premere il tasto ALARM
per 2 secondi, la disattivazione viene confermata da un
suono breve e dalla visualizzazione delle scritte CH LO
sui display frigo e freezer per 1 secondi.
! Il display CONGELATORE serve anche per segnalare un
anomalo aumento di temperatura nel vano congelatore
(vedi anomalie e rimedi).
Page 7
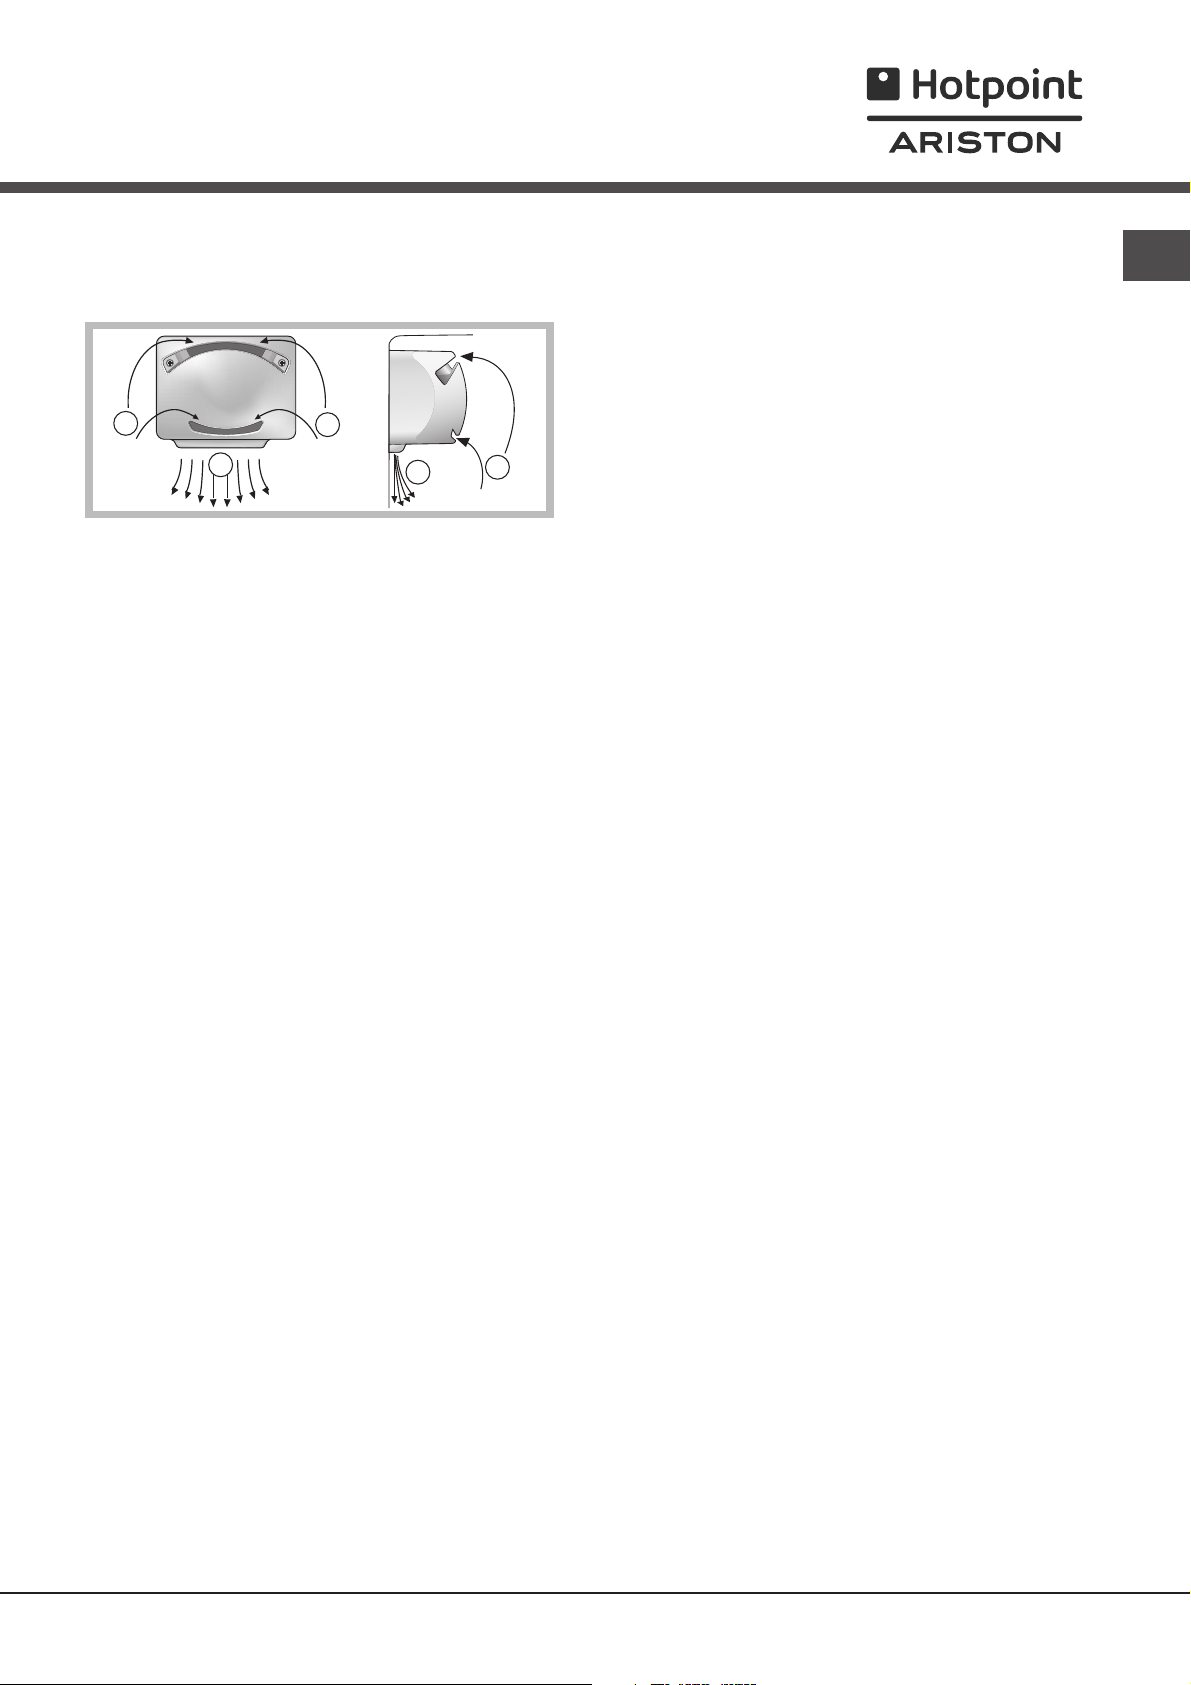
PURE WIND
È riconoscibile dalla presenza del dispositivo sulla parete
superiore del vano frigorifero (vedi figura).
B
A
Wind Pure ottimizza al massimo la circolazione dellaria,
migliorando lefficacia dellevaporatore e contribuendo a
raggiungere più rapidamente la giusta temperatura
allinterno del frigo dopo ogni apertura. Laria soffiata (A)
si raffredda a contatto della parete fredda, mentre laria
più calda (B) viene aspirata (vedi figura).
La parete posteriore si presenta coperta di brina o
goccioline dacqua a seconda che il compressore sia in
funzione o in pausa.
B
A
B
Utilizzare al meglio il frigorifero
Regolare la temperatura tramite il display.
Premere il tasto SUPER COOL (raffreddamento
rapido) per abbassare la temperatura in poco tempo,
per esempio quando il vano viene riempito dopo una
grossa spesa. La funzione si disattiva
automaticamente trascorso il tempo necessario.
Inserire soltanto alimenti freddi o appena tiepidi, non
caldi (vedi Precauzioni e consigli).
Ricordarsi che gli alimenti cotti non si mantengono più
a lungo di quelli crudi.
Non inserire liquidi in recipienti scoperti:
provocherebbero un aumento di umidità con
conseguente formazione di condensa.
Utilizzare al meglio il congelatore
I
Regolare la temperatura tramite il display.
La COOL CARE ZONE è un vano che permette di
conservare alla giusta temperatura alcune tipologie di
cibi (frutta, gelati e alcolici); gli altri due vani
conservazione (vedi vista dinsieme) sono adatti per
conservare normalmente gli alimenti congelati.
Per congelare i cibi nel modo più corretto e sicuro
occore procedere come di seguito indicato.
Per una piccola quantità (inferiore alla metà di quella
indicata sulla targhetta caratteristiche):
- se la COOL CARE ZONEè attiva, introdurre gli
alimenti nei due vani conservazione, facendo
attenzione che questi non vengano a contatto con i
cibi già presenti; premere il tasto SUPER FREEZE
(congelamento rapido, si accende il relativo LED), e
chiudere la porta; la funzione si disattiva
automaticamente trascorse 24 ore o raggiunte la
temperatura ottimale (LED si spegne);
- se la COOL CARE ZONE non è attiva anche il primo
vano è utilizzabile: inserire gli alimenti e ripetere gli
stessi passaggi visti nel caso precedente.
Per una grande quantità (superiore alla metà di quella
indicata sulla targhetta caratteristiche):
Disattivare la Cool Care Zone e svuotarla, tenere
premuto il tasto SUPER FREEZE per qualche
secondo finché il relativo LED inizia a lampeggiare.
Occorrono circa 24 ore affinchè il freezer raggiunga la
corretta temperatura per congelare al meglio.
Trascorso questo tempo il LED diventa fisso:
introdurre gli alimenti e chiudere la porta. Dopo altre
24 ore i cibi sono stati congelati correttamente, la
funzione si disattiva automaticamente (il LED si
spegne); ora gli alimenti possono essere spostati nei
due vani inferiori (così da poter utilizzare le funzioni
della Cool Care Zone) o anche lasciati nel vano Cool
Care Zone, che rimasto inattivo funziona come un
normale vano conservazione.
Non ricongelare alimenti che stanno per scongelare o
scongelati; tali alimenti devono essere consumati entro
24 ore o ricongelati previa cottura.
Gli alimenti freschi da congelare non devono essere
posti a contatto con quelli già congelati.
Non mettere nel congelatore bottiglie di vetro contenenti
liquidi, tappate o chiuse ermeticamente, perché
potrebbero rompersi.
La quantità massima giornaliera di alimenti da congelare
è indicata sulla targhetta caratteristiche, posta nel vano
frigorifero in basso a sinistra (esempio: Kg/24h 4).
Al fine di ottenere un spazio maggiore nel reparto
freezer potete togliere i cassetti dalle loro sedi (tranne
7
Page 8

I
ZONE a temperatura variabile), sistemando gli alimenti
direttamente sulle piastre evaporanti.
! Durante il congelamento evitare di aprire la porta.
quello più in basso e leventuale cassetto COOL CARE
Bacinella ghiaccio Ice
Care.
Il fatto di essere poste sulla parte superiore dei cassetti
riposti nel vano freezer assicura una maggiore pulizia: (il
ghiaccio non viene più a contatto con gli alimenti) ed
ergonomia (non si sgocciola in fase di caricamento).
! In caso di interruzione di corrente o di guasto, non aprire
la porta del congelatore: in questo modo congelati e
surgelati si conserveranno senza alterazioni per circa 9-14
ore.
Cool Care Zone
La Cool Care Zone è un vano speciale presente nel
freezer che consente di selezionare ed impostare 4
diverse modalità di funzionamento in base ai bisogni ed
alla tipologia di alimenti da conservare al suo interno. Le
temperature selezionabili sono -8°C, -12°C e -18°C;
contrassegnate rispettivamente dalle icone: fragola,
gelato e bottiglia presenti sul pannello di controllo. La
Cool Care Zone è dotata di un controllo indipendente da
quello degli altri cassetti interni al freezer, tramite il
pannello di controllo è anche possibile disattivare la Cool
Care Zone ed utilizzarla come un normale cassetto
freezer.
1. Estrarre la bacinella spingendola verso lalto.
Verificare che la bacinella sia completamente vuota e
riempirla dacqua attraverso lapposito foro.
2. Fare attenzione a non superare il livello indicato (MAX
WATER LEVEL). Troppa acqua ostacola la fuoriuscita
dei ghiaccioli (se succede, attendere che il ghiaccio si
sciolga e svuotare la bacinella).
3. Ruotare la bacinella di 90°: lacqua riempie le forme
per il principio dei vasi comunicanti (vedi figura).
4. Chiudere il foro con il coperchio in dotazione e riporre
la bacinella nellapposita sede.
5. Quando il ghiaccio sarà formato (tempo minimo circa
8 ore) battere la bacinella su una superficie dura e
bagnarne lesterno per far staccare i ghiaccioli; farli
poi uscire dal foro.
MAX
WATER LEVEL
WATER LEVEL
MAX
WATER LEVEL
MAX
8
Page 9

Manutenzione e cura
Assistenza
Escludere la corrente elettrica
Durante i lavori di pulizia e manutenzione è necessario
isolare lapparecchio dalla rete di alimentazione:
1. Tenere premuto il tasto ON/OFF per circa due
secondi, finché il display si spegne tutto eccetto il led
rosso del tast ON/OFF.
2. Staccare la spina dalla presa.
! Se non si segue questa procedura può scattare
lallarme: esso non è sintomo di anomalia. Per ripristinare
il normale funzionamento è sufficiente tenere premuto il
tasto ON/OFF per più di due secondi. Per isolare
lapparecchio procedere seguendo i punti 1 e 2.
Pulire lapparecchio
Le parti esterne, le parti interne e le guarnizioni in
gomma possono essere pulite con una spugnetta
imbevuta di acqua tiepida e bicarbonato di sodio o
sapone neutro. Non usare solventi, abrasivi,
candeggina o ammoniaca.
Gli accessori estraibili possono essere messi a bagno
in acqua calda e sapone o detersivo per piatti.
Sciacquarli e asciugarli con cura.
Il retro dellapparecchio tende a coprirsi di polvere, che
può essere eliminata utilizzando con delicatezza, dopo
aver spento l'apparecchio e staccato la presa di
corrente, la bocchetta lunga dellaspirapolvere,
impostato su una potenza media.
Evitare muffe e cattivi odori
Lapparecchio è fabbricato con materiali igienici
che non trasmettono odori. Per mantenere questa
caratteristica è necessario che i cibi vengano sempre
protetti e chiusi bene. Ciò eviterà anche la formazione
di macchie.
Sbrinare il vano frigorifero
I
Il frigorifero è dotato di
sbrinamento automatico:
lacqua viene convogliata
verso la parte posteriore
da un apposito foro di
scarico (vedi figura) dove
il calore prodotto dal
compressore la fa
evaporare. Lunico
intervento da fare
periodicamente consiste
nel pulire il foro di scarico affinché lacqua possa defluire
liberamente.
Sbrinare il vano congelatore
Se lo strato di brina è superiore ai 5 mm è necessario
effettuare lo sbrinamento manuale:
1. Il giorno precedente, premere il tasto SUPER FREEZE
(si accende la spia gialla SUPERFREEZE) per
raffreddare ulteriormente gli alimenti.
2. La funzione si disinserisce in automatico dopo 24 ore,
oppure può essere disinserita in qualsiasi momento
premendo di nuovo il tasto SUPER FREEZE. Tenere
premuto il tasto ON/OFF per più di due secondi,
finché il display si spegne tutto eccetto il led rosso del
tasto ON/OFF..
3. Avvolgere surgelati e congelati in carta da giornale e
metterli in un altro congelatore o in un luogo fresco.
4. Lasciare aperta la porta finché la brina non si sia
sciolta completamente; facilitare loperazione
sistemando nel vano congelatore contenitori con
acqua tiepida.
5. Alcuni apparecchi
sono dotati del SISTEMA
DRAIN per convogliare
lacqua allesterno (vedi
figura).
Nel caso si voglia spegnere lapparecchio per un lungo
periodo, pulire linterno e lasciare le porte aperte.
Sbrinare lapparecchio
! Attenersi alle istruzioni sottostanti.
Per sbrinare lapparecchio non usare oggetti taglienti ed
appuntiti che potrebbero danneggiare irreparabilmente il
circuito refrigerante.
6. Pulire e asciugare con cura il vano congelatore prima
di riaccendere lapparecchio.
7. Prima di inserire i cibi nel vano congelatore attendere
circa 2 ore per il ripristino delle condizioni ideali di
conservazione.
9
Page 10

Sostituire la lampadina
I
Per sostituire la lampadina di illuminazione del vano
frigorifero, staccare la spina dalla presa di corrente.
1 1
Seguire le istruzioni riportate qui sotto.
Accedere alla lampada togliendo la protezione come
indicato in figura. Sostituirla con una analoga di potenza
a quella indicata sulla protezione (15W o 25W)
Assistenza
Prima di contattare lAssistenza:
Verificare se lanomalia può essere risolta autonomamente (vedi Anomalie e Rimedi).
In caso negativo, contattare il Numero Unico Nazionale 199.199.199.
2
modello
numero di serie
Comunicare:
il tipo di anomalia
il modello della macchina (Mod.)
il numero di serie (S/N)
Queste informazioni si trovano
sulla targhetta caratteristiche posta
nel vano frigorifero in basso a sinistra.
RG 2330
Mod.
220 - 240 V- 50 Hz 150 W
340
Total
Gross
Bruto
Brut
Compr.
R 134 a
Syst.
kg 0,090
Kompr.
Made in Italy 13918
Gross
Bruto
Brut
75
Test
P.S-I.
TI
Net
Util
Utile
Pressure
HIGH-235
LOW 140
93139180000 S/N 704211801
Cod.
Gross
Bruto
Brut
W
Fuse
A
Freez. Capac
Poder de Cong
kg/24 h
4,0
Max 15 w
Class
Clase
Classe
N
Assistenza Attiva 7 giorni su 7
Se nasce il bisogno di assistenza o manutenzione basta chiamare il Numero Unico Nazionale 199.199.199* .
Un operatore sarà a tua completa disposizione per fissare un appuntamento con un tecnico del Centro Assistenza
Autrorizzato più vicino a casa tua.
È attivo 7 giorni su 7, sabato e domenica compresi, e non lascia mai inascoltata una richiesta.
*Al costo di 14,25 centesimi di Euro al minuto(iva inclusa) dal Lun. al Ven. dalle 08:00 alle 18:30, il Sab. dalle 08:00 alle
13:00 e di 5,58 centesimi di Euro al minuto (iva inclusa) dal Lun. al Ven. dalle 18:30 alle 08:00, il Sab. dalle 13:00 alle
08:00 e i giorni festivi, per chi chiama da telefono fisso.
Per chi chiama da radiomobile le tariffe sono legate al piano tariffario delloperatore telefonico utilizzato.
Le suddette tariffe potrebbero essere soggette a variazione da parte delloperatore telefonico; per maggiori
informazioni consultare il sito www.aristonchannel.com.
10
Page 11

Precauzioni e consigli
! Lapparecchio è stato progettato e costruito
in conformità alle norme internazionali di sicurezza.
Queste avvertenze sono fornite per ragioni
di sicurezza e devono essere lette attentamente.
Questa apparecchiatura è conforme
alle seguenti Direttive Comunitarie:
- 73/23/CEE del 19/02/73 (Bassa Tensione)
e successive modificazioni;
- 89/336/CEE del 03/05/89 (Compatibilità
Elettromagnetica) e successive modificazioni.
- 2002/96/CE..
Sicurezza generale
Lapparecchio è stato concepito per un uso di tipo
non professionale allinterno dellabitazione.
Lapparecchio deve essere usato per conservare
e congelare cibi, solo da persone adulte e secondo le
istruzioni riportate in questo libretto.
Lapparecchio non va installato allaperto, nemmeno
se lo spazio è riparato, perché è molto pericoloso
lasciarlo esposto a pioggia e temporali.
Smaltimento
I
Smaltimento del materiale di imballaggio: attenersi alle
norme locali, così gli imballaggi potranno essere
riutilizzati.
La direttiva Europea 2002/96/CE sui rifiuti di
apparecchiature elettriche ed elettroniche (RAEE),
prevede che gli elettrodomestici non debbano essere
smaltiti nel normale flusso dei rifiuti solidi urbani. Gli
apparecchi dismessi devono essere raccolti
separatamente per ottimizzare il tasso di recupero e
riciclaggio dei materiali che li compongono ed
impedire potenziali danni per la salute e lambiente. Il
simbolo del cestino barrato è riportato su tutti i
prodotti per ricordare gli obblighi di raccolta separata.
Per ulteriori informazioni, sulla corretta dismissione
degli elettrodomestici, i detentori potranno rivolgersi al
servizio pubblico preposto o ai rivenditori.
Risparmiare e rispettare lambiente
Installare lapparecchio in un ambiente fresco e ben
aerato, proteggerlo dallesposizione diretta ai raggi
solari, non disporlo vicino a fonti di calore.
Non toccare lapparecchio a piedi nudi o con le mani
o i piedi bagnati o umidi.
Non toccare le parti interne raffreddanti:
cè pericolo di ustionarsi o ferirsi.
Non staccare la spina dalla presa della corrente
tirando il cavo, bensì afferrando la spina.
È necessario staccare la spina dalla presa prima di
effettuare operazioni di pulizia e manutenzione. Non è
sufficiente spegnere il display (apparecchio spento)
per eliminare ogni contatto elettrico.
In caso di guasto, in nessun caso accedere ai
meccanismi interni per tentare una riparazione.
Non utilizzare, allinterno degli scomparti conservatori
di cibi congelati, utensili diversi dal raschietto fornito in
dotazione o apparecchi elettrici se non sono del tipo
raccomandato dal costruttore.
Non mettere in bocca cubetti appena estratti dal
congelatore.
Non permettere ai bambini di giocare con
lapparecchio. In nessun caso devono sedersi sui
cassetti o appendersi alla porta.
Per introdurre o estrarre gli alimenti, tenere aperta la
porta dell'apparecchio per il minor tempo possibile.
Ogni apertura delle porte causa un notevole dispendio
di energia.
Non riempire con troppi alimenti lapparecchio:
per una buona conservazione, il freddo deve
poter circolare liberamente. Se si impedisce la
circolazione, il compressore lavorerà continuamente.
Non introdurre alimenti caldi: alzerebbero la
temperatura interna costringendo il compressore a un
grosso lavoro, con grande spreco di energia elettrica.
Sbrinare lapparecchio qualora si formasse del
ghiaccio (vedi Manutenzione); uno spesso strato
di ghiaccio rende più difficile la cessione di freddo
agli alimenti e fa aumentare il consumo di energia.
Mantenere efficienti e pulite le guarnizioni, in modo
che aderiscano bene alle porte e non lascino uscire il
freddo (vedi Manutenzione).
Gli imballaggi non sono giocattoli per bambini.
11
Page 12

Anomalie e rimedi
195064503.00
05/2007 - Xerox Business Services
Può accadere che lapparecchio non funzioni. Prima di telefonare allAssistenza (
I
che non si tratti di un problema facilmente risolvibile aiutandosi con il seguente elenco.
Anomalie:
Il display è spento.
Il motore non parte.
Il display è debolmente acceso.
Suona lallarme, compare un
messaggio sul display, è acceso il
led ALLARMI e la lampadina nel
vano frigorifero lampeggia.
Suona lallarme, è acceso il led
ALLARMI e compare un
messaggio sul display.
Possibili cause / Soluzione:
La spina non è inserita nella presa della corrente o non abbastanza da
fare contatto, oppure in casa non cè corrente.
Lapparecchio è dotato di un controllo salvamotore
(vedi Avvio e utilizzo).
Staccare la spina e reinserirla nella presa dopo averla girata su se stessa.
La porta del frigorifero è rimasta aperta per più di due minuti.
Il segnale acustico cessa alla chiusura della porta o premendo il tasto
RESET ALARM.
Lapparecchio segnala un riscaldamento eccessivo del congelatore.
Il congelatore si manterrà a una temperatura intorno a 0°C per non far
ricongelare gli alimenti, permettendo di consumarli entro 24 ore o di
ricongelarli previa cottura.
Per spegnere il segnale acustico premere il tasto RESET ALARM.
Premere una seconda volta per cancellare il messaggio sul display,
spegnere il led ALLARMI e ripristinare il normale funzionamento.
vedi Assistenza
), controllare
Suona lallarme, lampeggia ol led
ALLARMI e compare un
messaggio sul display.
Il frigorifero e il congelatore
raffreddano poco.
Nel frigorifero gli alimenti si gelano.
Il motore funziona di continuo.
Lapparecchio emette
molto rumore.
Termine anticipato delle funzioni
Lapparecchio segnala un riscaldamento pericoloso del congelatore: gli
alimenti non devono essere consumati. Il congelatore si manterrà a una
temperatura intorno a 0°C.
Per spegnere il segnale acustico premere il tasto RESET ALARM.
Premere una seconda volta per cancellare il messaggio sul display,
spegnere il led ALLARMI e ripristinare il normale funzionamento.
Le porte non chiudono bene o le guarnizioni sono rovinate.
Le porte vengono aperte molto spesso.
Si è impostata una temperatura troppo calda (vedi Avvio e utilizzo).
Il frigorifero o il congelatore sono stati riempiti eccessivamente.
Si è impostata una temperatura troppo fredda (vedi Avvio e utilizzo).
Sono attive le funzioni SUPER COOL e/o SUPER FREEZE e/o ICE PARTY.
La porta non è ben chiusa o viene aperta di continuo.
La temperatura dellambiente esterno è molto alta.
Lapparecchio non è stato installato ben in piano (vedi Installazione).
Lapparecchio è stato installato tra mobili o oggetti che vibrano
ed emettono rumori.
Il gas refrigerante interno produce un leggero rumore anche quando
il compressore è fermo: non è un difetto, è normale.
Disturbi elettrici sulla rete o brevi interruzioni della tensione di alimentazione
Compare un messaggio sul
display (es. F01)
12
Contattare lAssistenza Tecnica
Page 13
Operating Instructions
REFRIGERATOR/FREEZER COMBINATION
I F
Italiano, 1 Français, 25
E
GB
English,13
PT
Portuges, 49Espanol, 37
PL
Polski, 61
MBT 2022 CZ/HA
Contents
GB
Installation, 14
Positioning and connection
Reversible doors
Description of the appliance, 15-16
Control panel
Overall view
Accessories, 17
Start-up and use, 18-19-20
Starting the appliance
Navigating the display
Pure Wind
Using the refrigerator to its full potential
Using the freezer to its full potential
Maintenance and care, 21-22
Switching the appliance off
Cleaning the appliance
Avoiding mould and unpleasant odours
Defrosting the appliance
Replacing the light bulb
Assistance, 22
Precautions and tips, 23
General safety
Disposal
Respecting and conserving the environment
Troubleshooting, 24
Page 14

Installation
! Before placing your new appliance into operation please
GB
read these operating instructions carefully. They contain
important information for safe use, for installation and for
care of the appliance.
! Please keep these operating instructions for future
reference. Pass them on to possible new owners of the
appliance.
Positioning and connection
Positioning
1. Place the appliance in a well-ventilated humidity-free
room.
2. Do not obstruct the rear fan grills. The compressor and
condenser give off heat and require good ventilation to
operate correctly and save energy.
3. Leave a space of at least 10 cm between the top part of
the appliance and any furniture above it, and at least 5
cm between the sides and any furniture/side walls.
4. Ensure the appliance is away from any sources of heat
(direct sunlight, electric stove, etc.).
5. In order to maintain the correct distance between the
appliance and the wall behind it, fit the spacers
supplied in the installation kit, following the instructions
provided.
Levelling
1. Install the appliance on a level and rigid floor.
2. If the floor is not perfectly horizontal, adjust the
refrigerator by tightening or loosening the front feet.
Electrical connections
After the appliance has been transported, carefully place it
vertically and wait at least 3 hours before connecting it to
the electricity mains. Before inserting the plug into the
electrical socket ensure the following:
The appliance is earthed and the plug is compliant with
the law.
The socket can withstand the maximum power of the
appliance, which is indicated on the data plate located
on the bottom left side of the fridge (e.g. 150 W).
The voltage must be in the range between the values
indicated on the data plate located on the bottom left
side (e.g. 220-240V).
The socket is compatible with the plug of the
appliance.
If the socket is incompatible with the plug, ask an
authorised technician to replace it (see Assistance). Do
not use extension cords or multiple sockets.
! Once the appliance has been installed, the power supply
cable and the electrical socket must be easily accessible.
! The cable must not be bent or compressed.
! The cable must be checked regularly and replaced by
authorised technicians only (see Assistance).
! The manufacturer declines any liability should
these safety measures not be observed.
Reversible doors
If it is necessary to change the direction in which the
doors open, please contact the Technical Assistance
Centre.
14
Page 15

Description of the
appliance
Control panel
REFRIGERATOR
Display
REFRIGERATOR
Temperature
Adjustment
COOL CARE ZONE
FREEZER
Temperature
Adjustment
FREEZER Display
ON/OFF
ON/OFF
It is possible to switch the whole product (both the
refrigerator and freezer compartments) on by pressing this
button. The red LED indicates that the product is
switched off, while the green LED shows that it is
operating. To switch the product off, press and hold the
ON/OFF button for at least two seconds.
I CARE
This is used to activate and deactivate the I Care function
(the optimal temperature for energy saving levels). When
activated, the AUTO LED and the I Care LED illuminate
simultaneously.
ALARMS
This controls all the alarm signals connected to product
operation.
Child Lock
Enables the buttons on the control panel to be locked in
order to avoid various functions being activated accidentally
by children. To enable the Child Lock function, the ALARM
button must be pressed for 2 seconds.
REFRIGERATOR + and - Temperature Adjustment
Enable the temperature setting of the refrigerator to be
modified, with the relative confirmation of the temperature
selected shown on the display. It is also possible to use
these buttons to deactivate the refrigerator compartment
only (the display shows - -).
FREEZER + and - Temperature Adjustment
Enable the temperature setting of the freezer to be
modified, with the relative confirmation of the temperature
selected shown on the display.
ALLARMS
SUPER COOL
SUPER FREEZE
ICE PARTY
HOLIDAY
I CARE
REFRIGERATOR Display
Indicates the set temperature relating to the refrigerator
compartment or shows that it has been deactivated (in
this case the display shows - -).
FREEZER Display
Shows the set temperature relating to the freezer
compartment.
COOL CARE ZONE
Used to set the Cool Care Zone. By pressing this button,
it is possible to set any of the 4 operating modes relating
to the Cool Care Zone: the strawberry (-8°C), the icecream (-12°C) or the bottle (-18°C). If none of the three
icons is illuminated, the Cool Care Zone will operate as a
normal freezer compartment.
SUPER COOL
Activates or deactivates the SUPER COOL function (rapid
cooling). The refrigerator display shows the text SC).
SUPER FREEZE
Activates or deactivates the SUPER FREEZE function
(rapid freezing), The freezer display shows the text SF).
HOLIDAY
Activates or deactivates the HOLIDAY function (the AUTO
LED illuminates).
ICE PARTY
Activates or deactivates the ICE PARTY function (
reduces the temperature of the freezer for the period of time
required to cool a bottle.)
.
It
GB
15
Page 16

Description of the
appliance
Overall view
GB
The instructions contained in this manual are applicable to different model refrigerators. The diagrams may not directly
represent the appliance purchased. For more complex features, consult the following pages.
LAMP
(see Maintenance)
PURE WIND
Removable lidded
shelf with EGG TRAY
SHELVES
FRESH BOX
Compartment
FRUIT and
VEGETABLE bin
COOL CARE ZONE
and FREEZER
compartment
ICE CARE ice tray
CAN RACK
Removable multipurpose
SHELVES
BOTTLE shelf
*
*
STORAGE
compartment
Levelling FEET
Varies by number and/or position.
Available only on certain models.
*
16
Page 17

Accessories
SHELVES: with or without grill.
1
2
Due to the special guides the
shelves are removable and the
height is adjustable (see
diagram), allowing easy storage
of large containers and food.
Height can be adjusted without
complete removal of the shelf.
GB
FRESH BOX
compartments low temperature (the coldest in the
refrigerator) and to the clear door that provides protection
against oxidation and blackening, food can be stored for
even up to one week. It can also be used for cold
meals.
: for fresh meat and fish. Due to the
*
Available only on certain models.
*
17
Page 18

Start-up and use
Starting the appliance
GB
! After transportation of the appliance, carefully place it in an
upright position and wait at least 3 hours before connecting
it to the electricity mains, to make sure it operates as it
should.
Clean the inside of the refrigerator well using warm water
and bicarbonate of soda before placing food inside it.
The appliance comes with a motor protection control
system which makes the compressor start
approximately 8 minutes after being switched on. The
compressor also starts each time the power supply is
cut off whether voluntarily or involuntarily (blackout).
Freezer Compartment
When the product is switched on (the ON/OFF button is
pressed for more than two seconds) the freezer
compartment is set to its default value of -18°C. We
recommend that the SUPER FREEZE function is set (the
freezer display shows the text SF) in order to accelerate
the cooling process of the compartment; when the inside of
the compartment has reached its optimal temperature the
function will be deactivated and the food may be placed
inside.
Refrigerator Compartment
When the appliance is switched on the refrigerator
compartment is set to its default value of +5°C. We
recommend that the SUPER COOL function is set (the
refrigerator display shows the text SC) in order to
accelerate the cooling process of the compartment. After a
few hours it will be cool enough for food to be placed
inside.
Cool Care Zone
When the appliance is switched on the variable temperature
compartment will be set to its default value of -12°C.
Navigating the display
Setting the temperatures:
If the product is switched on, the refrigerator and freezer
displays will indicate the temperatures set at that moment.
To change them, simply press the + and - buttons
corresponding to the compartment for which you wish to
change the set temperature. To be specific, each time one
of the buttons is pressed the temperature is increased or
decreased by 1°, and the number of illuminated horizontal
bars is adjusted accordingly. The temperature values that
may be selected for the refrigerator compartment are +8°C,
+7°C, +6°C, +5°C, +4°C, +3°C and +2°C, while the values
that may be set for the freezer are -18°C, -19°C, -120°C, 21°C, -22°C, -24°C and -26°C.
It is possible to select an operating temperature for the
Cool Care Zone compartment using the corresponding
button; the temperatures are represented by the icons on
the central part of the display (Ice Cream -12°C, Berries 8°C, Alcohol -18°C). When the three icons are switched off,
it is operating as a normal freezer compartment.
The temperatures are automatically set to +5°C for the
refrigerator compartment and -18°C for the freezer
compartment (these are standard food storage values). The
Cool Care Zone is automatically set to -12°C.
When the I Care function is active, the appliance
automatically adjusts the temperatures according to the
conditions inside and outside the refrigerator; the operation
of this function is signalled by the text AUTO.
Whenever it is necessary to activate the I Care function at
temperatures that are different to the standard storage
values, the I Care button must be pressed as soon as the
function is activated and held down while the new
temperatures are set using the + and - buttons. Under
these conditions, the temperatures may be set to 4°C, 5°C
and 6°C for the refrigerator compartment and -18°C, -19°C
and -20°C for the freezer compartment.
When the HOLIDAY function is active the temperature may
not be adjusted, however the appliance adjusts itself
automatically so that the optimal settings for the situation
are used: +12°C for the refrigerator compartment and 18°C for the freezer compartment. This function is indicated
by the text AUTO.
To activate and deactivate the functions simply press the
relevant button and the function status will be signalled by
the corresponding LED switching on or off.
Several functions (SUPER COOL, SUPER FREEZE, ICE
PARTY, ICE CARE) are incompatible with others
(HOLIDAY,...); remember that there is a pre-set order of
priority which will help you to use the product in the best
possible way.
When the Ice Party function has finished, press the ICE
PARTY button to stop the relevant LED from flashing. This
flashing indicates that the function is complete and that the
bottle should be removed from the freezer compartment.
Child Lock
To enable the Child Lock function, the ALARM button must
be pressed for 2 seconds; the button lock activation is
confirmed by a short beep and the text CH LO appears
on the refrigerator and freezer displays. This text is then
replaced by the refrigerator and freezer temperatures set
prior to when the child lock function was enabled.
To deactivate the function, press the ALARM button or 2
seconds; deactivation will be confirmed by a short beep
and the text CH LO will appear on the refrigerator and
freezer displays for 1 second.
18
Page 19

PURE WIND
It is recognizable due to the presence of the mechanism
on the top part of the refrigerator compartment (see
diagram).
B
A
Pure Wind maximises air circulation, improving the
efficiency of the evaporator and helping to achieve the
optimal temperature inside the refrigerator as quickly as
possible each time it has been opened. The blown air (A)
is cooled when it comes into contact with the cold wall,
whereas the hotter air (B) is sucked up (see diagram).The
back wall may be covered in frost or droplets of water,
depending on whether the compressor is in operation or
whether it is paused.
B
A
B
Using the refrigerator to its full potential
Adjust the temperature using the display.
Press the SUPER COOL button (rapid cooling) to lower
the temperature quickly. For example, when you place a
large number of new food items inside a fridge the
internal temperature will rise slightly. The function
quickly cools the groceries by temporarily reducing the
temperature until it reaches the ideal level.
Place only cold or lukewarm foods in the compartment,
not hot foods (see Precautions and tips).
Remember that cooked foods do not last longer than
raw foods.
Do not store liquids in open containers. They will
increase humidity in the refrigerator and cause
condensation to form.
Using the freezer to its full potential
Adjust the temperature using the display.
The Cool Care Zone is a compartment that allows
several types of food to be frozen at the most suitable
temperature (fruit, ice cream and alcoholic drinks); the
other two storage compartments (see overall view) are
designed to store frozen foods under normal
conditions.To freeze foods in safely and correctly, follow
the instructions below.
For a small quantity (less than half of the maximum
amount shown on the data plate):
- if the Cool Care Zone is activated, place the food in
the two storage compartments, making sure that it
does not come into contact with any food that has
already been frozen; press the rapid-freezing SUPER
FREEZE button (the corresponding LED lights up) and
close the door. The function deactivates automatically
after 24 hours or when the inside of the compartment
has reached the optimal temperature (the LED switches
off).
- if the Cool Care Zone is not activated the first
compartment may also be used: place the food inside
and repeat the same steps as detailed above.
For a large quantity (more than half of the maximum
amount shown on the data plate):
Deactivate the Cool Care Zone and empty it, hold
down the SUPER FREEZE button for a few seconds
until the corresponding LED begins to flash. After
approximately 24 hours the freezer will have reached
the optimal food freezing temperature. Once this time
has elapsed the LED remains lit constantly: place the
food inside the freezer and close the door. After 24
hours the food will have been frozen properly and the
function will be deactivated automatically (the LED
switches off); the food may now be moved into the two
lower compartments (so that the Cool Care Zone can
be used if necessary) or even left in the Cool Care Zone
compartment, which operates as a normal storage
compartment when the function has not been
activated.
Do not re-freeze food that is defrosting or that has already
been defrosted. These foods must be cooked and eaten
(within 24 hours).
Fresh food that needs to be frozen must not come into
contact with food that has already been defrosted.
Do not place glass bottles which contain liquids, and which
are corked or hermetically sealed in the freezer because they
could break.
The maximum quantity of food that may be frozen daily is
indicated on the plate containing the technical properties
located on the bottom left side of the refrigerator compartment
(for example: Kg/24h: 4).
In order to obtain a greater amount of space in the
freezer compartment, you may remove the bins (except
GB
19
Page 20

GB
WATER LEVEL
MAX
WATER LEVEL
MAX
WATER LEVEL
MAX
which has an adjustable temperature) and place the
food directly onto the evaporator plates.
! Do not open the door during freezing.
! If there is a power cut or malfunction, do not open the
freezer door. This will help maintain the temperature inside
the freezer, ensuring that foods are conserved for at least 9
-14 hours.
Cool Care Zone
The Cool Care Zone is a special compartment in the
freezer which allows the user to choose between 4
different operating modes that may be set according to
specific requirements and the type of food stored inside.
The temperature settings that may be selected are -8°C, 12°C and -18°C, indicated by the icons depicting a
strawberry, an ice cream and a bottle on the control
panel. The Cool Care Zone is equipped with controls that
may be operated independently from the other
compartments inside the freezer, by the Cool Care Zone
may also be deactivated using the control panel, so that it
can then be used as a normal freezer compartment.
the lowest bin and the special COOL CARE ZONE bin,
ICE CARE tray
The fact that they are situated on the top part of the
freezer drawers ensures greater cleanliness: the ice no
longer comes into contact with the food placed inside the
freezer compartment; furthermore, the dripping of the
water during filling is avoided (a lid to cover up the hole
after filling with water is also provided).
1. Pull out the tray by pushing it up.
Check that the tray is ompletely empty and fill it with
water through the opening provided.
2. Take care not to exceed the level indicated (MAX
WATER LEVEL). Excess water prevents the ice cubes
from dispensing (if this happens, wait for the ice to melt
and empty the tray).
3. Turn the tray 90°: due to the connected compartments
each mould fills with water (see diagram).
4. Close the opening with the lid provided and put the tray
back.
5. When the ice has formed (minimum time approximately
8 hours) knock the tray against a hard surface and wet
the outside so that the ice cubes come loose and take
them out through the opening.
20
Page 21

Maintenance and
care Assistance
Switching the appliance off
During cleaning and maintenance it is necessary to
disconnect the appliance from the electricity supply:
1. Press and hold the ON/OFF button for approximately
two seconds, until everything on the display switches off
apart from the red LED corresponding to the ON/OFF
button.
2. pull the plug out of the socket
!
If this procedure is not followed, the alarm may sound.
This alarm does not indicate a malfunction. To restore
normal operation, it is sufficient to hold the ON/OFF button
down for more than two seconds. To disconnect the
appliance, follow points 1 and 2.
Cleaning the appliance
The external and internal parts, as well as the rubber
seals may be cleaned using a sponge that has been
soaked in lukewarm water and bicarbonate of soda or
neutral soap. Do not use solvents, abrasive products,
bleach or ammonia.
The removable accessories may be soaked in warm
water and soap or dishwashing liquid. Rinse and dry
them carefully.
The back of the appliance may collect dust which can
be removed by delicately using the hose of a vacuum
cleaner set on medium power. The appliance must be
switched off and the plug must be pulled out before
cleaning the appliance.
Defrosting the refrigerator compartment
GB
The refrigerator has an
automatic defrosting
function: water is ducted
to the back of the
appliance by a special
discharge outlet (see
diagram) where the heat
produced by the
compressor causes it to
evaporate. It is necessary
to clean the discharge
hole regularly so that the water can flow out easily.
Defrosting the freezer compartment
If the frost layer is greater than 5 mm, it is necessary to
defrost manually:
1. The day before defrosting, press the SUPER FREEZE
button (the yellow SUPER FREEZE indicator light
illuminates) to further cool the food.
2. The function is automatically disabled after 24 hours, or
it may be disabled at any moment by pressing the
SUPER FREEZE button again. Press and hold the ON/
OFF button for approximately two seconds, until
everything on the display switches off apart from the red
LED corresponding to the ON/OFF button.
3. Wrap frozen foods in newspaper and place them in
another freezer or in a cool place.
4. Leave the door open until the frost has melted
completely. This can be made easier by placing
containers with lukewarm water in the freezer
compartment.
Avoiding mould and unpleasant odours
The appliance is manufactured with hygienic materials
which are odour free. In order to maintain an odour free
refrigerator and to prevent the formation of stains, food
must always be covered or sealed properly.
If you want to switch the appliance off for an extended
period of time, clean the inside and leave the doors
open.
Defrosting the appliance
! Follow the instructions below.
Do not use objects with sharp or pointed edges to defrost
the appliance as these may damage the refrigeration
circuit beyond repair.
5. Certain appliances are fitted with the DRAIN SYSTEM to
lead the water outside (see
diagram).
6. Clean and dry the freezer compartment carefully before
switching the appliance on again.
7. Wait for approximately 2 hours, i.e. until the ideal
storage conditions have been restored, before placing
food in the freezer compartment.
21
Page 22

1 1
2
Replacing the light bulb
GB
To replace the light bulb in the refrigerator compartment,
pull out the plug from the electrical socket. Follow the
instructions below.
Access the light bulb by removing the cover as indicated
in the diagram.
Replace it with a similar light bulb within the power range
indicated on the cover (15W or 25W).
Assistance
Before calling for Assistance:
Check if the malfunction can be solved on your own (see Troubleshooting).
If after all the checks, the appliance still does not operate or the problem persists, call the nearest Service
Centre
model serial number
Communicating:
type of malfunction
appliance model (Mod.)
serial number (S/N)
This information can be found on the data plate
located on the bottom left side of the
refrigerator compartment.
Gross
Bruto
Brut
TI
75
Test
P.S-I.
RG 2330
Mod.
220 - 240 V- 50 Hz 150 W
340
Total
Gross
Bruto
Brut
Compr.
R 134 a
Syst.
kg 0,090
Kompr.
Made in Italy 13918
93139180000 S/N 704211801
Net
Util
Utile
Pressure
HIGH-235
LOW 140
Cod.
Gross
Bruto
Brut
Fuse
W
A
Freez. Capac
Poder de Cong
kg/24 h
4,0
Max 15 w
Class
Clase
Classe
N
Never call on unauthorized technicians and always refuse spare parts which are not originals.
22
Page 23

Precautions and tips
! The appliance was designed and manufactured in
compliance with international safety standards. The
following warnings are provided for safety reasons and
must be read carefully.
This appliance complies with the following
Community Directives:
- 73/23/EEC of 19/02/73 (Low Voltage) and
subsequent amendments;
-89/336/EEC of 03.05.89 (Electromagnetic
Compatibility) and subsequent amendments;
- 2002/96/CE..
General safety
The appliance was designed for domestic use inside the
home and is not intended for commercial or industrial
use.
The appliance must be used to store and freeze food
products by adults only and according to the instructions
in this manual.
The appliance must not be installed outdoors, even in
covered areas. It is extremely dangerous to leave the
appliance exposed to rain and storms.
Do not touch the appliance with bare feet or with wet or
moist hands and feet.
Do not touch the internal cooling elements: this could
cause skin abrasions or frost/freezer burns.
Disposal
Observe local environmental standards when disposing
packaging material for recycling purposes.
The European Directive 2002/96/EC on Waste
Electrical and Electronic Equipment (WEEE), requires
that old household electrical appliances must not be
disposed of in the normal unsorted municipal waste
stream. Old appliances must be collected separately in
order to optimise the recovery and recycling of the
materials they contain and reduce the impact on
human health and the environment. The crossed out
wheeled bin symbol on the product reminds you of
your obligation, that when you dispose of the appliance
it must be separately collected.
Consumers should contact their local authority or
retailer for information concerning the correct disposal
of their old appliance.
Respecting and conserving the
environment
Install the appliance in a fresh and well-ventilated room.
Ensure that it is protected from direct sunlight and do
not place it near heat sources.
Try to avoid keeping the door open for long periods or
opening the door too frequently in order to conserve
energy.
GB
When unplugging the appliance always pull the plug from
the mains socket, do not pull on the cable.
Before cleaning and maintenance, always switch off the
appliance and disconnect it from the electrical supply. It
is not sufficient to set the temperature adjustment knobs
on OFF (appliance off) to eliminate all electrical contact.
In the case of a malfunction, under no circumstances
should you attempt to repair the appliance yourself.
Repairs carried out by inexperienced persons may cause
injury or further malfunctioning of the appliance.
Do not use any sharp or pointed utensils or electrical
equipment - other than the type recommended by the
manufacturer - inside the frozen food storage
compartments.
Do not put ice cubes taken directly from the freezer into
your mouth.
Do not allow children to tamper with the controls or play
with the appliance. Under no circumstance should they
be allowed to sit on the bins or to hang from the door.
Keep packaging material out of the reach of children! It
can become a choking or suffocation hazard.
Do not fill the appliance with too much food: cold air
must circulate freely for food to be preserved properly.
If circulation is impeded, the compressor will work
continuously.
Do not place hot food directly into the refrigerator. The
internal temperature will increase and force the
compressor to work harder and will consume more
energy.
Defrost the appliance if ice forms (see Maintenance). A
thick layer of ice makes cold transference to food
products more difficult and results in increased energy
consumption.
Regularly check the door seals and wipe clean to
ensure they are free of debris and to prevent cold air
from escaping (see Maintenance).
23
Page 24

Troubleshooting
195064503.00
05/2007 - Xerox Business Services
Malfunctions:
GB
The display is completely switched off.
The motor does not start.
The display is on but it is dim.
The alarm sounds, a message
appears on the display, the ALARM
LED lights up and the refrigerator
light flashes.
The alarm sounds, the ALARM LED
lights up and a message appears on
the display.
The alarm sounds, the ALARM LED
flashes and a message appears on
the display.
Possible causes / Solutions:
The plug has not been inserted into the electrical socket, or not far enough to
make contact, or there is no power in the house.
The appliance comes with a motor protection control (see Start-up and use).
Pull out and reverse the plug before putting it back in the socket.
The refrigerator door has been open for more than two minutes.
The buzzer stops when the door is closed or when the RESET ALARM
button is pressed.
The temperature inside the freezer is too high.
The freezer will maintain a temperature of around 0°C so that the food will
not refreeze, allowing you to eat it within 24 hours or to refreeze it after it has
been cooked.
To switch off the buzzer, press the RESET ALARM button. Press again to
delete the message on the display, switch off the ALARM LED and restore
normal operation.
The temperature of the freezer is dangerously high: the food inside must not
be eaten. The freezer will maintain a temperature of approximately 0°C.
To switch off the buzzer, press the RESET ALARM button. Press again to
delete the message on the display, switch off the ALARM LED and restore
normal operation.
The refrigerator and the freezer do not
cool well.
The food inside the refrigerator is
beginning to freeze.
The motor runs continuously.
The Aircooler fan does not rotate
The appliance makes a lot of noise.
Early ending of functions
The doors do not close properly or the seals are damaged.
The doors are opened too frequently.
The temperature that has been set is too high (see Start-up and use).
The refrigerator or the freezer have been over-filled.
The temperature that has been set is too low (see Start-up and use).
The SUPER FREEZE button has been pressed (rapid freezing): the yellow
SUPER FREEZE light is on or flashing (see Description).
The door is not closed properly or is continuously opened.
The outside ambient temperature is very high.
The thickness of the frost exceeds 2-3 mm (see Maintenance).
The refrigerator door is open.
The Aircooler system is only activated automatically when it becomes
necessary to restore perfect operational conditions inside the refrigerator
compartment.
The appliance has not been installed on a level surface (see Installation).
The appliance has been installed between cabinets that vibrate and make
noise.
The internal refrigerant makes a slight noise even when the compressor is off.
This is not a defect, it is normal.
Electrical disturbance on the network or brief interruptions of the power supply
A message appears on the display
(e.g. F01)
24
The water discharge hole is blocked (see Maintenance).
Page 25

Mode demploi
COMBINE REFRIGERATEUR/CONGELATEUR
I F
Italiano, 1 Français, 25
E
GB
English,13
PT
Portuges, 49Espanol, 37
PL
Polski, 61
MBT 2022 CZ/HA
Sommaire
F
Installation, 26
Mise en place et raccordement
Réversibilité des portes
Description de lappareil, 27-28
Tableau de bord
Vue densemble
Accessoires, 29
Mise en marche et utilisation, 30-31-32
Mise en service de lappareil
Comment se déplacer sur lafficheur
Pure Wind
Pour profiter à plein de votre réfrigérateur
Pour profiter à plein de votre congélateur
Entretien et soins, 33-34
Mise hors tension
Nettoyage de lappareil
Contre la formation de moisissures et de mauvaises
odeurs
Dégivrage de lappareil
Remplacement de lampoule déclairage
Assistance, 34
Précautions et conseils, 35
Sécurité générale
Mise au rebut
Economies et respect de lenvironnement
Anomalies et remèdes, 36
Page 26

Installation
! Conservez ce mode demploi pour pouvoir le consulter
F
à tout moment. En cas de vente, de cession ou de
déménagement, veillez à ce quil suive lappareil pour
informer le nouveau propriétaire sur son fonctionnement
et lui fournir les conseils correspondants.
! Lisez attentivement les instructions : elles contiennent
des conseils importants sur linstallation, lutilisation et la
sécurité de votre appareil.
Mise en place et raccordement
Mise en place
1. Placez lappareil dans une pièce bien aérée et non
humide.
2. Ne bouchez pas les grilles daération arrière : le
compresseur et le condensateur produisent de la
chaleur et exigent une bonne aération pour bien
fonctionner et réduire la consommation délectricité.
3. Prévoir au moins 10 cm entre le haut de lappareil et
les meubles installés au-dessus et au moins 5 cm
entre les côtés et les meubles/parois latérales.
4. Installez lappareil loin de sources de chaleur (rayons
directs du soleil, cuisinière électrique).
5. Pour maintenir une distance optimale entre le produit
et la paroi arrière, montez les cales despacement
comprises dans le kit dinstallation et suivez les
instructions de la notice spécialement prévue.
Mise à niveau
1. Installez lappareil sur un sol plat et rigide.
2. Si le sol nest pas parfaitement horizontal, vissez ou
dévissez les petits pieds avant pour bien niveler lappareil.
Raccordement électrique
Après le transport, placez lappareil à la verticale et
attendez au moins 3 heures avant de le raccorder à
linstallation électrique. Avant de brancher la fiche dans
la prise de courant, assurez-vous que :
la prise est bien munie dune terre conforme à la loi;
la prise est bien apte à supporter la puissance
maximale de lappareil, indiquée sur la plaquette
signalétique placée à lintérieur du compartiment
réfrigérateur en bas à gauche (ex. 150 W);
la tension dalimentation est bien comprise entre les
valeurs indiquées sur la plaquette signalétique, placée
en bas à gauche (ex.220-240 V);
la prise est bien compatible avec la fiche de lappareil.
En cas dincompatibilité, faites remplacer la fiche par
un technicien agréé (voir Assistance); nutilisez ni
rallonges ni prises multiples.
! Après installation de lappareil, le câble électrique et la
prise de courant doivent être facilement accessibles.
! Le câble ne doit être ni plié ni excessivement écrasé.
! Il doit être contrôlé prériodiquement et ne peut être
remplacé que par un technicien agréé (voir Assistance).
! Nous déclinons toute responsabilité en cas de
non respect des normes énumérées ci-dessus.
Réversibilité des portes
Si une inversion du sens douverture des portes savère
nécessaire, faire appel à notre service dassistance
technique.
26
Page 27

Description de
lappareil
Tableau de bord
Afficheur du
RÉFRIGÉRATEUR
F
ALARMES
Réglage de la
température du
RÉFRIGÉRATEUR
COOL CARE ZONE
Réglage de la
température du
FREEZER
Afficheur du
FREEZER
ON/OFF
ON/OFF
Cette touche sert à allumer lappareil tout entier
(compartiment réfrigérateur et compartiment freezer). Le
TEMOIN rouge indique que lappareil est éteint, le TEMOIN
vert quil est en service. Pour éteindre lappareil, appuyez au
moins 2 secondes de suite sur la touche ON/OFF.
I CARE
Cest elle qui sert à activer ou à désactiver la fonction I Care
(
la température optimale avec une faible consommation
délectricité)
AUTO et le TEMOIN I Care sallument simultanément.
ALARMES
Cette touche permet de brancher et de gérer toutes les
alarmes reliées au fonctionnement de lappareil.
Child Lock
Ce dispositif permet de verrouiller les touches du tableau de
commande pour éviter toute manipulation de la part des
enfants (appuyez 2 secondes de suite sur la touche ALARM).
Réglage de la température du REFRIGERATEUR + et -
Elles permettent de modifier le réglage de la température du
réfrigérateur, avec affichage de confirmation de la
température sélectionnée. Ces touches permettent aussi de
désactiver le compartiment réfrigérateur (lafficheur visualise
- -).
Réglage de la température du FREEZER + et -
Elles permettent de modifier le réglage de la température du
freezer, avec affichage de confirmation de la température
sélectionnée.
. Dès activation de cette fonction, le TEMOIN
SUPER COOL
SUPER FREEZE
ICE PARTY
HOLIDAY
I CARE
Afficheur du réfrigérateur
Indication de la température sélectionnée dans le
compartiment réfrigérateur ou de sa désactivation (dans ce
cas lafficheur visualise - -).
Afficheur du Freezer: compartiment congélateur
Affiche la température sélectionnée dans le compartiment
freezer.
ZONE COOl CARE
Elle permet de sélectionner la Zone Cool Care. Par pression
sur cette touche, vous pouvez sélectionner les 4 modes de
fonctionnement de la zone Cool Care : la fraise (8°C), la
glace (-12°C), la bouteille (-18° C), si aucune de ces trois
icônes nest allumée, la Zone Cool Care fonctionnera comme
un tiroir freezer ordinaire.
SUPER COOL
Elle permet dactiver ou de désactiver la fonction SUPER
COOL
(refroidissement rapide). Lafficheur du réfrigérateur
visualise le message SC).
SUPER FREEZE
Elle permet dactiver ou de désactiver la fonction SUPER
FREEZE (lafficheur du freezer visualise le message SF).
HOLIDAY
Elle permet dactiver ou de désactiver la fonction HOLIDAY (le
TEMOIN AUTO sallume).
ICE PARTY
Elle permet dactiver ou de désactiver la fonction ICE PARTY
(il abaisse la température du congélateur le temps nécessaire
au refroidissement dune bouteille).
27
Page 28

Description de
lappareil
F
Vue densemble
Eclairage
(voir Entretien)
PURE WIND
CLAYETTE
Compartiment
FRESH BOX
Bac FRUITS e
LEGUMES
*
Balconnet amovible à
abattant, contenant un
SUPPORT A OEUFS
Balconnet PORTECANETTES
Balconnet amovible
PORTE-OBJETS
Balconnet
BOUTEILLES
*
ZONE COOl CARE et
compartiment
CONGELATION
Bac à glaçons
Ice Care
Compartiment
CONSERVATION
de réglage
Leur nombre et/ou leur emplacement peut varier.
PIED
* Nexiste que sur certains modèles.
28
Page 29

Accessoires
CLAYETTES: pleines ou
1
2
besoin de sortir la clayette complètement.
FRESH BOX*: pour viandes et poissons frais. Ce
compartiment sert à prolonger la durée de conservation
jusquà une semaine, grâce à sa température très basse la
plus froide du réfrigérateur et à son volet transparent qui
protège contre les phénomènes doxydation et de
noircissement. Il peut aussi être utilisé pour conserver des
plats froids.
grillagées.
Elles sont amovibles et réglables
en hauteur grâce à des glissières
spéciales (voir figure), pour le
rangement de récipients ou
daliments de grande dimension.
Pour régler la hauteur, pas
F
Nexiste que sur certains modèles.
*
29
Page 30

Mise en marche et
utilisation
Mise en service de lappareil
F
! Après son transport, placez lappareil à la verticale et
attendez 3 heures environ avant de le brancher à une prise
de courant, son fonctionnement nen sera que meilleur.
Nettoyez bien lintérieur du réfrigérateur avec de leau
tiède et du bicarbonate avant dy ranger vos aliments.
Cet appareil est équipé dun système protège-moteur
qui ne fait démarrer le compresseur que 8 minutes
après son branchement. Cest ce qui se passera aussi
après toute coupure de courant, volontaire ou
involontaire (panne délectricité.
Compartiment congélateur
Lors de la mise en service de lappareil (pression pendant
plus de deux secondes sur la touche ON/OFF), le
compartiment réfrigérateur se programme sur une
température standard de 18°C. Sélectionnez la fonction
SUPER FREEZE (lafficheur du freezer visualise SF)
pour accélérer le refroidissement dans le compartiment.
Dès que ce dernier aura atteint sa température optimale,
la fonction se désactivera et vous pourrez ranger vos
surgelés à lintérieur du congélateur.
Compartiment réfrigérateur
Lors de la mise en service de lappareil, le compartiment
réfrigérateur se programme sur une température standard de
+5°C. Sélectionnez la fonction SUPER COOL (lafficheur du
réfrigérateur visualise SC) pour accélérer le refroidissement
dans le compartiment: au bout de quelques heures rangez
les aliments dans le réfrigérateur.
Zone Cool Care
A la mise en service de lappareil, le compartiment à
température variable se programme sur une température
standard de -12°C.
Comment se déplacer sur lafficheur
Les températures sont représentées par les icônes situées
au centre de lafficheur (Glace 12°C, Baies 8°, Alcools
18°), les trois icônes éteintes indiquent que le
compartiment fonctionne comme un tiroir freezer ordinaire.
Les températures automatiquement sélectionnées sont +5°C
dans le compartiment réfrigérateur et 8°C dans le
compartiment congélateur qui correspondent aux
températures standard de conservation. La température de
la Zone Cool Care est automatiquement réglée sur 12°C.
Quand la fonction I Care est activée, lappareil règle
automatiquement les températures selon les conditions
intérieures et extérieures au réfrigérateur, le tout étant
signalé par allumage du message AUTO.
En cas dactivation de la fonction I Care à dautres
températures que les températures standard de
conservation, il faut, dès activation de la fonction, garder la
touche I Care enfoncée tandis que vous sélectionnez les
nouvelles températures à laide des touches + et . Dans
ces conditions, les températures sélectionnables sont 4°,
5° et 6° dans le compartiment réfrigérateur et 18°, -19° et
20° dans le compartiment freezer.
Quand la fonction
température nest plus possible, lappareil se place
automatiquement au réglage optimal correspondant :
+12°C dans le compartiment réfrigérateur et 18°C dans le
compartiment congélateur, cette condition est aussi
signalée par allumage du message AUTO.
Pour activer ou désactiver les fonctions, il suffit dappuyer
sur la touche correspondante, le TEMOIN correspondant
sallume ou séteint pour signaler létat de la fonction.
Certaines fonctions (SUPER COOL, SUPER FREEZE,
ICE PARTY, ICE CARE) sont incompatibles avec dautres
(HOLIDAY,..), dans ce cas il y a une priorité déjà établie
pour faciliter la gestion de lappareil.
Une fois de la fonction Ice Party terminée, appuyez sur la
touche ICE PARTY pour interrompre le clignotement de la
LED correspondante. Le clignotement indique que la
fonction est terminée et que vous devez enlever la bouteille
du compartiment congélateur.
HOLIDAYHOLIDAY
HOLIDAY est activée, aucun réglage de
HOLIDAYHOLIDAY
Sélection des températures:
Si lappareil est branché, les afficheurs du compartiment
réfrigérateur et du compartiment congélateur visualiseront
les températures sélectionnées à ce moment-là. Pour les
modifier, appuyez sur les touches + et correspondant au
compartiment à lintérieur duquel vous voulez changer la
température. A chaque pression sur les touches la
température augmente ou diminue de 1° tout comme le
nombre de barres latérales allumées.
Les températures du compartiment réfrigérateur sont: +8°,
+7°, +6°, +5°, +4°, +3°, +2°. Celles du freezer sont: 18°,
-19°,-20°, -21°, -22°, -24°, -26°.
Vous pouvez choisir, à laide de la touche de la Zone Cool
Care, la température de fonctionnement du compartiment.
30
Child Lock
Pour activer la fonction Child Lock, appuyez 2 secondes
de suite sur la touche ALARM, lactivation du
verrouillage des touches est confirmée par un bip et par
la visualisation des messages CH LO sur les
afficheurs du réfrigérateur et du freezer, ils seront ensuite
remplacés par les températures sélectionnées
précédemment pour le réfrigérateur et le freezer.
Pour désactiver la fonction, appuyez 2 secondes de
suite sur la touche ALARM, la désactivation est
confirmée par un bip et par laffichage pendant 2
secondes des messages CH LO sur les afficheurs du
réfrigérateur et du freezer.
Page 31

PURE WIND
On le reconnaît à la présence dun dispositif appliqué à
la paroi dans le haut du compartiment réfrigérateur (voir
figure).
B
A
Wind Pure qui optimise au maximum la circulation de
lair, améliore lefficacité de lévaporateur et contribue à
rétablir très rapidement la température à lintérieur du
réfrigérateur après chaque ouverture. Lair soufflé (A)
refroidit au contact de la paroi froide, tandis que lair plus
chaud (B) est aspiré (voir figure).
La paroi arrière est tour à tour couverte de givre ou de
gouttelettes deau selon que le compresseur est en
marche ou à larrêt.
B
A
B
Pour profiter à plein de votre
réfrigérateur
Réglez la température à laide de lafficheur.
Appuyez sur la touche SUPER COOL (refroidissement
rapide) pour faire baisser la température rapidement, par
exemple quand vous remplissez le compartiment après
avoir fait de grosses provisions. Cette fonction se
désactive automatiquement une fois le temps écoulé.
Nintroduisez que des aliments froids ou à peine tièdes,
jamais chauds (voir Précautions et conseils).
Les aliments cuits contrairement à ce que lon croit ne se
conservent pas plus longuement que les aliments crus.
Nintroduisez pas de récipients non fermés contenant des
liquides : ces derniers entraîneraient une augmentation de
lhumidité et la formation deau condensée.
Pour profiter à plein de votre
congélateur
Réglez la température à laide de lafficheur.
La Zone Cool Care est un compartiment spécial qui
permet de congeler à la bonne température des
produits spéciaux (fruits, glaces et boissons
alcooliques), les deux autres compartiments (voir vue
densemble) sont prévus pour la conservation
normale daliments congelés.
Pour congeler correctement les aliments en toute
sécurité, suivez les indications suivantes.
Pour une petite quantité (inférieure à la moitié de la
quantité reportée sur létiquette):
- si la Zone Cool Care est activée, rangez les aliments
dans les deux compartiments de conservation en
évitant quils touchent à des aliments déjà stockés.
Appuyez sur la touche SUPER FREEZE (congélation
rapide, la LED correspondante sallume) et fermez la
porte. La fonction se désactive automatiquement au
bout de 24 heures ou dès que la température
optimale est atteinte (la LED séteint);
- si la Zone Cool Care nest pas activée, le premier
compartiment est utilisable lui aussi : rangez-y les
aliments et procédez comme expliqué dans le cas
précédent.
Pour une grande quantité (supérieure à la moitié de la
quantité reportée sur létiquette):
Désactivez la Zone Cool Care et videz-la, gardez la
touche SUPER FREEZE enfoncée pendant quelques
secondes jusquà ce que la LED correspondante se
mette à clignoter. Il faut compter 24 heures pour que
le freezer atteigne la bonne température pour une
congélation optimale. Passé ce délai, la LED passe à
lallumage fixe: introduisez les aliments et fermez la
porte. Au bout de 24 heures les aliments sont
congelés correctement, la fonction se désactive
automatiquement (la LED séteint). Vous pouvez à
présent déplacer les aliments dans les deux
compartiments inférieurs (pour pouvoir ainsi utiliser les
fonctions de la Zone Cool Care) ou bien les laisser
dans la Zone Cool care qui, étant désactivée,
fonctionne comme un compartiment de conservation
normal.
F
Ne recongelez pas des aliments décongelés ou en cours
de décongélation; il faut les faire cuire et les consommer
(dans les 24 heures).
Les aliments frais à congeler ne doivent pas être placés
au contact daliments déjà congelés.
Ne stockez pas dans votre congélateur des bouteilles en
verre contenant des liquides, bouchées ou fermées
hermétiquement, elles pourraient se briser.
31
Page 32

La quantité journalière maximale daliments pouvant être
F
congelée est indiquée sur létiquette des caractéristiques,
placée dans le compartiment réfrigérateur en bas à
gauche (exemple : 4 Kg/24h).
Pour gagner de la place à lintérieur du compartiment
congélation, vous pouvez enlever les tiroirs (sauf le
tiroir du bas et celui de la COOL CARE ZONE à
température variable si votre appareil en est équipé) et
stocker vos aliments directement sur les plaques
évaporantes.
! Evitez douvrir la porte pendant la phase de congélation.
! En cas de coupure de courant ou de panne, nouvrez
pas la porte du congélateur: les produits surgelés et
congelés se conserveront ainsi sans problème pendant
9 - 14 heures environ.
Zone Cool Care
La Zone Cool Care est un compartiment spécial du
freezer qui permet de sélectionner et de programmer 4
modes de fonctionnement selon les besoins et selon le
type daliments conservés. Vous pouvez sélectionner les
températures suivantes: -8°C, -12°C ou -18°C. Ces
dernières sont repérées respectivement par les icônes:
fraise, glace et bouteille situées sur le tableau de bord.
La Zone Cool Care est équipée dune commande
indépendante de celle des autres tiroirs intérieurs au
freezer, à partir du tableau de bord vous pouvez aussi
désactiver la Zone Cool Care et lutiliser comme un tiroir
freezer normal.
Bac à glaçons ICE CARE.
Placés dans la partie supérieure des tiroirs du compartiment
freezer, ils sont plus ergonomiques et garantissent davantage
de propreté: en effet, les glaçons ne touchent plus aux
aliments stockés dans le freezer; de plus, fini l'eau qui
dégouline lorsque vous rangez votre bac (un couvercle est
fourni pour boucher le récipient après l'avoir rempli).
1. Pour sortir le bac, poussez-le vers le haut .
Vérifiez que le bac est bien vide avant de le remplir en
introduisant leau par louverture prévue.
2. Attention à ne pas dépasser le niveau indiqué (MAX WATER
LEVEL). Une trop grande quantité deau gêne la sortie des
glaçons (si celase produit, attendez que la glace fonde et
videz le bac).
3. Faites pivoter le bac de 90° : leau envahit les cavités selon
le principe des vases communicants (voir figure).
4. Bouchez louverture à laide du couvercle fourni, remettez
le bac à sa place en introduisant dans le logement prévu.
5. Une fois que la glace sest formée (il faut compter au moins
8 heures) tapez le bac contre une surface dure et mouillezle à lextérieur pour détacher les glaçons que vous ferez
sortir par louverture prévue.
MAX
WATER LEVEL
32
WATER LEVEL
MAX
WATER LEVEL
MAX
Page 33

Entretien et soin
Assistance
Mise hors tension
Pendant les opérations de nettoyage et dentretien,
débranchez lappareil du réseau dalimentation :
1. Gardez la touche ON/OFF enfoncée pendant deux
secondes environ jusquà ce que lafficheur séteigne
complètement à part la LED rouge de la touche ON/
OFF.
2. débranchez la fiche de la prise de courant.
!
Si cette procédure nest pas respectée, lalarme peut se
déclencher : ceci ne dénote pas une anomalie. Pour
rétablir le fonctionnement normal, il suffit de garder la
touche ON/OFF enfoncée pendant plus de deux secondes.
Pour isoler lappareil, procédez comme indiqué aux points
1 et 2.
Nettoyage de lappareil
Nettoyez lextérieur, lintérieur et les joints en
caoutchouc à laide dune éponge imbibée deau
tiède additionnée de bicarbonate de soude ou de
savon neutre. Nutilisez pas de solvants, de produits
abrasifs, deau de Javel ou dammoniaque.
mettez tremper les accessoires amovibles dans de
leau chaude additionnée de savon ou de liquide
vaisselle. Rincez-les et essuyez-les soigneusement.
Le dos de lappareil a tendance à sempoussiérer,
pour éliminer la poussière avec délicatesse, après
avoir éteint lappareil et débranché la fiche, servezvous dun aspirateur montant un accessoire adéquat
et réglé sur une puissance intermédiaire.
Contre la formation de moisissures et
de mauvaises odeurs
Cet appareil est fabriqué dans des matériaux
hygiéniques qui ne transmettent pas dodeur. Pour
sauvegarder cette caractéristique, veillez à bien
emballer et couvrir vos aliments. Vous éviterez par la
même occasion la formation de taches.
Dégivrage du compartiment réfrigérateur
F
Le réfrigérateur est muni
dun système de
dégivrage automatique :
leau est acheminée vers
la paroi arrière par un trou
dévacuation (voir figure)
où la chaleur produite par
le compresseur la fait
évaporer. Il vous suffit de
nettoyer périodiquement
le trou dévacuation pour
permettre à leau de sécouler normalement.
Dégivrage du compartiment congélateur
Si la couche de givre dépasse 5 mm, procédez à un
dégivrage manuel :
1. le jour précédent appuyez sur la touche SUPER
FREEZE (le voyant jaune SUPERFREEZE sallume)
pour refroidir encore plus les aliments.
2. La fonction se désactive automatiquement au bout
de 24 heures mais vous pouvez choisir de la
désactiver à tout moment en réappuyant sur la
touche SUPER FREEZE. Gardez la touche ON/OFF
enfoncée pendant deux secondes environ jusquà
ce que lafficheur séteigne complètement à part la
LED rouge de la touche ON/OFF.
3. Enveloppez vos produits surgelés ou congelés dans
du papier et placez-les dans un endroit frais.
4. Laissez la porte ouverte jusquà ce que le givre fonde
complètement; pour accélérer cette opération placez
dans le compartiment congélateur des récipients
deau tiède.
5. Certains de nos
appareils sont équipés
du SYSTEME DRAIN
pour acheminer leau
vers lextérieur. Laissez
leau sécouler dans un
récipient (voir figure).
Si vous devez laisser votre appareil éteint pendant
une période de temps prolongée, nettoyez-le bien
lintérieur et laissez les portes ouvertes.
Dégivrage de lappareil
! Conformez-vous aux instructions suivantes.
Ne pas utiliser dobjets pointus et coupants pour
dégivrer lappareil, ils risqueraient dendommager
irréparablement le circuit réfrigérant.
6. Nettoyez et séchez soigneusement le compartiment
congélateur avant de rallumer lappareil.
7. Avant da ranger vos aliments dans le compartiment
congélateur, attendez environ 2 heures pour le
rétablissement des conditions idéales de conservation
des aliments.
33
Page 34

déclairage
F
Pour remplacer lampoule déclairage du compartiment
réfrigérateur, débranchez la fiche de la prise de courant.
1 1
Suivez les indications fournies ci-dessous.
Pour pouvoir remplacer lampoule, démontez le
couvercle de protection comme illustré (voir figure).
Remplacez-la par une ampoule semblable dont la
2
puissance doit correspondre à celle indiquée sur le
couvercle de protection (15 W ou 25 W).
Assistance
Avant de contacter le centre dAssistance :
Vérifiez si vous pouvez résoudre lanomalie vous-même (voir Anomalies et Remèdes).
Si, malgré tous ces contrôles, lappareil ne fonctionne toujours pas et si linconvénient persiste, appelez le
service après-vente le plus proche.
modèle
numéro de série
Signalez-lui :
93139180000 S/N 704211801
Gross
Bruto
Brut
75
Test
P.S-I.
TI
Net
Util
Utile
Pressure
HIGH-235
LOW 140
Cod.
Gross
Bruto
Brut
W
Fuse
A
Freez. Capac
Poder de Cong
kg/24 h
4,0
Max 15 w
Class
Clase
Classe
le type danomalie
le modèle de lappareil (Mod.)
le numéro de série (S/N)
Vous trouverez tous ces renseignements sur létiquette
signalétique placée dans le compartiment réfrigérateur en
bas à gauche.
RG 2330
Mod.
220 - 240 V- 50 Hz 150 W
340
Total
Gross
Bruto
Brut
Compr.
R 134 a
Syst.
kg 0,090
Kompr.
Made in Italy 13918
Ne vous adressez jamais à des techniciens non agréés et exigez toujours linstallation de pièces
détachées originales
N
34
Page 35

Précautions et conseils
! Lappareil a été conçu et fabriqué conformément aux
normes internationales de sécurité. Ces conseils sont
fournis pour des raisons de sécurité et doivent être lus
attentivement.
Cet appareil est conforme aux Directives
Communautaires suivantes :
- 73/23/CEE du 19/02/73 (Basse Tensione) et
modifications suivantes;
-89/336/CEE du 03/05/89 (Compatibilité
Electromagnétique) et modifications suivantes;
- 2002/96/CE..
Sécurité générale
Cet appareil a été conçu pour un usage familial, de
type non professionnel.
Cet appareil qui sert à conserver et à congeler des
aliments ne doit être utilisé que par des adultes
conformément aux instructions du mode demploi.
Cet appareil ne doit pas être installé en extérieur, même
dans un endroit à labri, il est en effet très dangereux
de le laisser exposé à la pluie et aux orages.
Mise au rebut
F
Mise au rebut du matériel demballage : conformez-
vous aux réglementations locales, les emballages
pourront ainsi être recyclés.
La Directive Européenne 2002/96/EC sur les Déchets
des Equipements Electriques et Electroniques (DEEE),
exige que les appareils ménagers usagés ne soient
pas jetés dans le flux normal des déchets municipaux.
Les appareils usagés doivent être collectés
séparément afin doptimiser le taux de récupération et
le recyclage des matériaux qui les composent et
réduire limpact sur la santé humaine et
lenvironnement. Le symbole de la poubelle barrée
est apposée sur tous les produits pour rappeler les
obligations de collecte séparée.
Les consommateurs devront contacter les autorités
locales ou leur revendeur concernant la démarche à
suivre pour lenlèvement de leur vieil appareil.
Economies et respect de
lenvironnement
Ne touchez pas à lappareil pieds nus ou si vos mains
ou pieds sont mouillés ou humides.
Ne touchez pas aux parties refroidissantes: vous
pourriez vous brûler ou vous blesser.
Pour débrancher la fiche de la prise de courant, sortez
la fiche, ne tirez surtout pas sur le câble.
Avant deffectuer toute opération de nettoyage ou
dentretien, débranchez la fiche de la prise de courant.
Il ne suffit
pendant plus de deux secondes
éliminer tout contact électrique.
En cas de panne, nessayez en aucun cas daccéder
aux mécanismes internes pour tenter de réparer
lappareil.
Ne pas utiliser, à lintérieur des compartiments de
conservation pour aliments congelés, dustensiles
pointus et coupants ou dappareils électriques dun
type autre que celui recommandé par le fabricant.
Ne pas porter à la bouche des glaçons à peine sortis
du congélateur.
Ne permettez pas aux enfants de jouer avec lappareil.
Il ne faut en aucun cas quils sasseyent sur les tiroirs
ou quils saccrochent à la porte.
de garder la touche ON/OFF enfoncée
(appareil éteint) pour
Installez votre appareil dans un endroit frais et bien
aéré, protégez-le contre lexposition directe aux rayons
du soleil et ne le placez pas près de sources de
chaleur.
Pour introduire ou sortir les aliments, nouvrez les
portes de lappareil que le temps strictement
nécessaire. Chaque ouverture de porte cause une
considérable dépense dénergie.
Ne chargez pas trop votre appareil: pour une bonne
conservation des aliments, le froid doit pouvoir circuler
librement. Si la circulation est entravée, le compresseur
travaillera en permanence.
Nintroduisez pas daliments chauds : ces derniers font
monter la température intérieure ce qui oblige le
compresseur à travailler beaucoup plus en gaspillant
un tas délectricité.
Dégivrez lappareil dès que de la glace se dépose (voir
Entretien); une couche de glace trop épaisse gêne
considérablement la cession de froid aux aliments et
augmente la consommation délectricité.
Gardez toujours les joints propres et en bon état pour
quils adhèrent bien aux portes et ne laissent pas le
froid séchapper (voir Entretien).
Les emballages ne sont pas des jouets pour enfants.
35
Page 36

Anomalies et remèdes
Il peut arriver que lappareil ne fonctionne pas. Avant de téléphoner au service de dépannage (voir Assistance), contrôlez
F
sil ne sagit pas dun problème facile à résoudre à laide de la liste suivante.
195064503.00
05/2007 - Xerox Business Services
Anomalies:
L'afficheur est totalement éteint.
Le moteur ne démarre pas.
Lafficheur est faiblement éclairé.
Lalarme retentit, un message est
affiché à lécran, la led ALARMES
est allumée et la lampe du
compartiment réfrigérateur
clignote.
Lalarme retentit, la led ALARMES
sallume et un message est affiché
à lécran.
Lalarme retentit, la led ALARMES
clignote et un message est affiché
à lécran.
Causes / Solution possibles:
La fiche nest pas branchée dans la prise de courant ou pas assez
enfoncée pour quil y ait contact ou bien il y a une coupure de courant.
Lappareil est équipé dun système protège-moteur (voir Mise en marche et
utilisation).
Débranchez la fiche et rebranchez-la dans la prise de courant après lavoir
retournée sens dessus dessous.
La porte du réfrigérateur est restée ouverte pendant plus de deux minutes.
Le signal acoustique cesse dès fermeture de la porte ou après avoir appuyé
sur la touche RESET ALARM.
Lappareil signale un réchauffement excessif du congélateur.
Le congélateur maintient une température denviron 0°C pour ne pas faire
recongeler les aliments et vous permettre de les consommer dans les 24
heures ou de les recongeler après cuisson.
Pour faire cesser le signal acoustique, appuyez sur la touche RESET
ALARM. Appuyez une deuxième fois pour effacer le message sur lécran,
éteindre la led ALARMES et revenir à un fonctionnement normal.
Lappareil signale un réchauffement dangereux du congélateur. ne pas
consommer les aliments. Le congélateur maintient une température aux
alentours de 0°C.
Pour faire cesser le signal acoustique, appuyez sur la touche RESET
ALARM. Appuyez une deuxième fois pour effacer le message sur lécran,
éteindre la led ALARMES et revenir à un fonctionnement normal.
Le réfrigérateur et le congélateur
refroidissent peu.
Les aliments gèlent à lintérieur du
réfrigérateur.
Le moteur est branché en
permanence.
Lappareil est très bruyant.
Arrêt anticipé des fonctions
Un message est affiché à lécran
(F01 par ex.)
Les portes ne ferment pas bien ou les joints sont abîmés.
Ouverture trop fréquente des portes.
Sélection dune température trop chaude (voir Mise en marche et utilisation).
Le réfrigérateur et le congélateur sont excessivement remplis.
Sélection dune température trop froide (voir Mise en marche et utilisation).
Les fonctions SUPER COOL et/ou SUPER FREEZE et/ou ICE PARTY.
La porte nest pas bien fermée ou trop souvent ouverte.
La température à lextérieur est très élevée.
Lappareil na pas été installé bien à plat (voir Installation).
Lappareil est installé entre des meubles ou des objets qui vibrent et font du
bruit.
Le gaz réfrigérant interne produit un léger bruit même quand le compresseur est
à larrêt : il ne sagit pas dun défaut, cest tout à fait normal.
Perturbations du réseau électrique ou coupures brèves de la tension
dalimentation.
Contactez le service dassistance technique.
36
Page 37

Manual de instrucciones
COMBINADO FRIGORÍFICO/CONGELADOR
I F
Italiano, 1 Français, 25
E
GB
English,13
PT
Portuges, 49Espanol, 37
PL
Polski, 61
MBT 2022 CZ/HA
Sumario
E
Instalación, 38
Colocación y conexión
Reversibilidad de la apertura de las puertas
Descripción del aparato, 39-40
Panel de control
Vista en conjunto
Accesorios, 41
Puesta en funcionamiento y uso, 42-43-44
Poner en marcha el aparato
Cómo moverse en el display
Pure Wind
Utilizar el refrigerador en forma óptima
Utilizar el congelador en forma óptima
Mantenimiento y cuidados, 45-46
Cortar la corriente eléctrica
Limpiar el aparato
Evitar la formación de moho y malos olores
Descongelar el aparato
Sustituir la bombilla
Precauciones y consejos, 46
Seguridad general
Eliminación
Ahorrar y respetar el ambiente
Anomalías y soluciones, 47
Asistencia, 48
Page 38

Instalación
! Es importante conservar este manual para poder
E
consultarlo cuando sea necesario. En caso de venta,
cesión o traslado, verifique que permanezca junto al
aparato para informar al nuevo propietario sobre su
funcionamiento y sobre las precauciones durante su uso
! Lea atentamente las instrucciones: contienen información
importante sobre la instalación, sobre el uso y sobre la
seguridad.
Colocación y conexión
Colocación
1. Coloque el aparato en un ambiente bien aireado y seco.
2. No obstruya las rejillas posteriores de ventilación: el
compresor y el condensador emiten calor y requieren
una buena aireación para funcionar bien y limitar el
consumo eléctrico.
3. Deje una distancia mínima de 10 cm. entre la parte
superior del aparato y los muebles situados encima y
de 5 cm., como mínimo, entre los costados y los
muebles o paredes laterales.
4. Mantenga el aparato lejos de fuentes de calor (por ej.
la luz solar directa o una cocina eléctrica).
5. Para mantener una distancia óptima entre el producto
y la pared posterior, coloque los distanciadores que se
encuentran en la caja de instalación siguiendo las
instrucciones presentes en la hoja correspondiente.
Conexión eléctrica
Después de su transporte, coloque el aparato
verticalmente y espere 3 horas como mínimo antes de
conectarlo a la red eléctrica. Antes de enchufarlo a la
toma de corriente, controle que:
la toma posea la conexión a tierra y que sea conforme
a la ley;
el enchufe sea capaz de soportar la carga máxima
de potencia de la máquina indicada en la placa de
características ubicada en la parte inferior izquierda
del frigorífico (ej. 150 W);
la tensión de alimentación esté comprendida entre los
valores indicados en la placa de características
ubicada abajo a la izquierda (ej. 220-240V);
la toma sea compatible con el enchufe del aparato.
Si no fuera así, solicite la sustitución del enchufe a un
técnico autorizado (ver Asistencia); no utilice
prolongaciones ni conexiones múltiples.
! Una vez instalado el aparato, el cable eléctrico y la
toma de corriente deben ser fácilmente accesibles.
! El cable no debe sufrir pliegues ni compresiones.
! El cable debe ser revisado periódicamente y sustituido
sólo por técnicos autorizados (ver Asistencia).
! La empresa declina toda responsabilidad en los
casos en que no hayan sido respetadas estas
normas.
Nivelación
1. Instale el aparato sobre un piso plano y rígido.
2. Si el piso no fuera perfectamente horizontal, compense los
desniveles atornillando o desatornillando las patas
delanteras.
Reversibilidad de la apertura de las
puertas
Cuando sea necesario cambiar el sentido de apertura de
las puertas, llame al servicio de Asistencia Técnica.
38
Page 39

Descripción del aparato
Panel de control
FRIGORÍFICO
Regulación de la
FRIGORÍFICO
COOL CARE ZONE
Regulación de la
CONGELADOR
CONGELADOR
ENCENDIDO/
Display del
Temperatura
Temperatura
Display del
APAGADO
E
ALARMAS
SUPER COOL
SUPER FREEZE
ICE PARTY
HOLIDAY
I CARE
ENCENDIDO/APAGADO
Presionando este botón es posible encender todo el aparato
(tanto el compartimento frigorífico como el congelador). El LED
rojo indica que el producto está apagado, el LED verde que está
en funcionamiento. Para apagar el aparato, es necesario
presionar el botón ENCENDIDO/APAGADO durante 2
segundos, como mínimo.
I CARE
Administra la activación y la desactivación de la función (la
temperatura óptima con bajo consumo).
activa esta función, se encienden simultáneamente el LED
AUTO y el LED I Care.
I Care. Cuando se
ALARMAS
Permite la señalación y la administración de todas las
alarmas conectadas al funcionamiento del producto.
Child Lock
Permite bloquear los botones del panel de control para
evitar que los niños realicen involuntarias activaciones (
es
necesario mantener presionado el botón ALARMA
durante 2 segundos)
.
Regulación de la Temperatura FRIGORÍFICO + y -
Permiten la modificación de los valores de temperatura del
frigorífico, con la correspondiente confirmación en el display
de la temperatura seleccionada. A través de estos botones
también es posible apagar sólo el compartimento frigorífico
(el display muestra - -).
Regulación de la Temperatura CONGELADOR + y -
Permiten la modificación de los valores de temperatura del
congelador, con la correspondiente confirmación en el
display de la temperatura seleccionada
.
Display FRIGORÍFICO
Indica la temperatura seleccionada en el compartimento
frigorífico o su desactivación (en este caso el display
muestra - -).
Display del CONGELADOR
Indicación del compartimento congelador
COOL CARE ZONE
Permite seleccionar la CoolCare Zone. Presionando el botón
es posible seleccionar las 4 modalidades de funcionamiento
de la Cool Care Zone: la fresa (8°C), el helado (-12°C), la
botella (-18° C), si ninguna de los tres iconos está encendido
la CoolCare Zone funcionará como un normal compartimento
congelador.
SUPER COOL
Permite activar o desactivar la función SUPER COOL
(enfriamiento rápido). El display del frigorífico muestra el
mensaje SC).
SUPER FREEZE
Permite activar o desactivar la función SUPER FREEZE (el
display del congelador muestra el mensaje SF).
HOLIDAY
Permite activar o desactivar la función HOLIDAY (se
enciende el LED AUTO).
ICE PARTY
Permite activar o desactivar la función ICE PARTY
(Disminuye la temperatura del congelador durante el
tiempo necesario para enfriar una botella).
39
Page 40

Descripción del
aparato
Vista en conjunto
E
Bombilla
(ver Mantenimiento
PURE WIND
Balconcito extraíble
con tapa y con
HUEVERA
ESTANTE
Compartimiento
FRESH BOX
Recipiente FRUTA y
VERDURA
COOL CARE ZONE y
compartimiento
CONGELAMIENTO
Cubeta de hielo
Ice Care
Balconcito
PORTALATAS
Balconcito extraíble
PORTAOBJETOS
*
Balconcito
BOTELLAS
*
Compartimiento
CONSERVACIÓN
PIE
de regulación
La cantidad y/o su ubicación pueden variar.
* Se encuentra solo en algunos modelos.
40
Page 41

Accesorios
BANDEJAS: enteras o tipo rejilla.
1
2
completamentes.
Son extraíbles y su altura es
regulable gracias a las guías
especiales (ver la figura), se
utilizan para introducir recipientes
o alimentos de gran tamaño. Para
regular la altura no es necesario
extraer las bandejas
E
FRESH BOX
compartimiento permite largos tiempos de conservación,
hasta de una semana, gracias a la baja temperatura la
más fría del refrigerador y a la puerta transparente que
protege de fenómenos de oxidación y ennegrecimiento. Se
puede utilizar también para platos fríos.
: para carne y pescado fresco. El
*
Se encuentra solo en algunos modelos.
*
41
Page 42

Puesta en
funcionamiento y uso
Cómo poner en marcha el aparato
E
! Después del transporte, coloque el aparato
verticalmente y espere aproximadamente 3 horas antes
de conectarlo a la toma de corriente para favorecer un
buen funcionamiento.
Antes de colocar los alimentos en el frigorífico, limpie
bien el interior con agua tibia y bicarbonato.
El aparato posee un control que lo protege contra
sobrecargas, que hace funcionar el compresor sólo
después de aproximadamente 8 minutos del
encendido. Esto sucede también después de cada
interrupción de la alimentación eléctrica, voluntaria o
involuntaria (black out).
Compartimento congelador
Cuando se enciende el aparato (presión durante más de
dos segundos del botón ENCENDIDO/APAGADO), la
temperatura del compartimento congelador se lleva al
valor estándar de 18°C. Se aconseja activar la función
SUPER FREEZE (el display del congelador muestra
SF) para acelerar el enfriamiento del compartimento;
cuando este último haya alcanzado su temperatura
óptima, la función se desactivará y podrá introducir los
alimentos en el congelador.
Compartimento frigorífico
Cuando se enciende el aparato, la temperatura del
compartimento frigorífico se lleva al valor estándar de
+5°C. Se aconseja activar la función SUPER COOL (el
display del frigorífico muestra SC) para acelerar el
enfriamiento del compartimento: después de algunas
horas podrá colocar los alimentos en el frigorífico.
Cool Care Zone
Cuando se enciende el aparato, el compartimento de
temperatura variable se lleva al valor estándar de 12ºC.
Cómo moverse en el display
Selección de las temperaturas:
Si el aparato está encendido, las pantallas del
compartimento frigorífico y congelador mostrarán las
temperaturas fijadas en ese momento. Para modificarlas
es suficiente pulsar los botones + y correspondientes
al compartimento en el que se desea cambiar la
temperatura. Cada presión de los botones aumenta o
disminuye la temperatura 1º y también, de modo
equivalente, el número de barras laterales encendidas.
Las temperaturas que se pueden seleccionar del
compartimento frigorífico son +8°, +7°, +6°, +5°, +4°,
+3°, +2°, las del congelador son 18°, -19°,-20°, -21°, 22°, -24°, -26°.
Mediante el botón de la CoolCare Zone es posible
elegir la temperatura a la que va a funcionar dicho
compartimento, las temperaturas están representadas
por los iconos en la parte central del display (Helado
12°C, Bayas 8°, Bebidas alcohólicas 18°), los tres
iconos apagados indican que está funcionando como un
compartimento congelador normal.
Las temperaturas que se fijan automáticamente son
+5°C para el compartimento frigorífico y 18°C para el
compartimento congelador y son las temperaturas
estándar de conservación. La temperatura de la
CoolCare Zone se fija automáticamente en 12ºC.
Cuando se activa la función I Care el producto regula
automáticamente las temperaturas en base a las
condiciones internas y externas del frigorífico, esto está
señalado por el encendido de la palabra AUTO.
Si fuera necesario activar la función I Care con
temperaturas diferentes a las estándar de conservación,
al activar la función, se debe mantener presionado el
botón I Care y fijar las nuevas temperaturas con los
botones + y -. En estas condiciones, las temperaturas
que se pueden fijar son 4°, 5° y 6° para el
compartimento frigorífico y 18°, -19° y 20° para el
compartimento congelador.
Cuando se activa la función HOLIDAY no se pueden
realizar regulaciones de temperatura, pero el aparato se
coloca automáticamente en la regulación óptima para la
situación: +12ºC para el compartimento frigorífico y
18ºC para el compartimento congelador, además, dicha
condición se indica con el encendido del mensaje
AUTO.
Para activar y desactivar las funciones, es suficiente
presionar el botón correspondiente y el encendido o
apagado del correspondiente LED, indicará el estado de
la función
Algunas funciones (SUPER COOL, SUPER FREEZE,
ICE PARTY, ICE CARE) son incompatibles con otras
(HOLIDAY,..), en ese caso se tiene en cuenta una
prioridad ya establecida para ayudarlo en la
administración del aparato.
Al finalizar la función Ice Party, se debe presionar el
botón ICE PARTY para interrumpir el centelleo del led
correspondiente. Dicho centelleo indica la finalización de
la función y la necesidad de extraer la botella del
compartimento congelador.
Child Lock
Para poder activar la función Child Lock, es necesario
mantener presionado el botón ALARMA durante 2
segundos, la activación del bloqueo de los botones se
confirma con un sonido breve y con la visualización de
los mensajes CH LO en las pantallas del frigorífico y
del congelador, dicho mensaje luego es sustituido por
las temperaturas precedentemente seleccionadas para
el frigorífico y congelador.
Para desactivar la función, presione el botón ALARMA
durante 2 segundos, la desactivación se confirma con
42
Page 43

un sonido breve y con la visualización de los mensajes
CH LO en las pantallas del frigorífico y del
congelador durante 2 segundos.
Utilizar el congelador en forma óptima
E
Regule la temperatura a través del display.
PURE WIND
Es identificable por la presencia del dispositivo en la
pared superior del compartimento frigorífico (ver la
figura).
B
A
B
A
B
Wind Pure optimiza al máximo la circulación del aire,
mejorando la eficiencia del evaporador y contribuyendo
a alcanzar con mayor rapidez la temperatura adecuada
dentro del frigorífico luego de su abertura. El aire
ventilado (A) se enfría en contacto con la pared fría,
mientras que el aire más caliente (B) se aspira (ver la
figura).
La paroi arrière est tour à tour couverte de givre ou de
gouttelettes deau selon que le compresseur est en
marche ou à larrêt.
Utilizar el refrigerador en forma óptima
Regule la temperatura a través del display.
Pulse el botón SUPER COOL (enfriamiento rápido) para
disminuir la temperatura en poco tiempo, por ejemplo
cuando el compartimiento se llena después de una
compra abundante. La función se desactiva
automáticamente una vez transcurrido el tiempo
necesario.
Introduzca sólo alimentos fríos o apenas tibios, nunca
calientes (ver Precauciones y consejos).
Recuerde que los alimentos cocidos no se mantienen
durante más tiempo que los crudos.
No introduzca recipientes destapados con líquidos:
produciría un aumento de humedad con la consiguiente
formación de condensado.
La Cool Care Zone es un compartimento que permite
congelar algunos tipos de alimentos (fruta, helados,
bebidas alcohólicas) a la temperatura justa; los otros
dos compartimentos de conservación (ver vista de
conjunto) son adecuados para conservar
normalmente los alimentos congelados.
Para congelar los alimentos de la forma más correcta
y segura, es necesario proceder como se indica a
continuación.
Para una pequeña cantidad (inferior a la mitad de la
indicada en la placa de características):
- si la Cool Care Zone ha sido activada, introduzca los
alimentos en los dos compartimentos de
conservación, cuidando que los mismos no entren en
contacto con los alimentos ya presentes; presione el
botón SUPER FREEZE (congelación rápida, se
encenderá el LED correspondiente) y cierre la puerta;
la función se desactivará automáticamente
transcurridas las 24 horas o una vez alcanzada la
temperatura óptima (el LED se apagará);
- si la Cool Care Zone no está activada también se
puede utilizar el primer compartimento: introduzca los
alimentos y repita los mismos pasos del caso
precedente. Para una gran cantidad (superior a la
mitad de la indicada en la placa de características):
Desactive la Cool Care Zone y vacíela, mantenga
presionado el botón SUPER FREEZE durante algunos
segundos hasta que el correspondiente LED
comience a centellear. Deben transcurrir
aproximadamente 24 horas para que el congelador
alcance la temperatura necesaria para congelar en
forma óptima. Transcurrido este tiempo, el LED se
mantiene fijo: introduzca los alimentos y cierre la
puerta. Después de otras 24 horas, los alimentos ya
han sido congelados correctamente y la función se
desactivará automáticamente (el LED se apagará);
ahora los alimentos se pueden colocar en los
compartimentos inferiores (para poder utilizar las
funciones de la Cool Care Zone) o también pueden
ser dejados en el compartimento Cool Care Zone,
que una vez inactiva, funciona como un
compartimento de conservación normal.
No vuelva a congelar alimentos que se están por
descongelar o descongelados; dichos alimentos deben
ser previamente cocinados para ser consumidos (dentro
de las 24 horas).
Los alimentos frescos por congelar no se deben colocar
en contacto con los ya congelados.
No coloque en el congelador botellas de vidrio que
contengan líquidos, tapadas o cerradas herméticamente
porque podrían romperse.
43
Page 44

La cantidad máxima diaria de alimentos por congelar está
E
indicada en la placa de características ubicada en el
compartimiento refrigerador abajo a la izquierda (por
ejemplo: 4 Kg/24h).
Para obtener un mayor espacio en el compartimento
congelador, podrá quitar los recipientes (excepto el
inferior y el recipiente COOL CARE ZONE de
temperatura variable) y colocar los alimentos
directamente en las placas evaporadoras.
! Durante el congelamiento evite abrir la puerta.
! Cuando se produzca una interrupción de corriente o una
avería, no abra la puerta del congelador: de este modo, los
alimentos congelados se conservarán sin alteración durante
aproximadamente 9-14 horas.
Cool Care Zone
La Cool Care Zone es un compartimento especial que
se encuentra en el congelador y que permite seleccionar
4 modalidades diferentes de funcionamiento de acuerdo
con las necesidades y con el tipo de alimentos que se
van a conservar en su interior. Las temperaturas que se
pueden seleccionar son -8°C, -12°C e -18°C;
reconocibles por los siguientes iconos: fresa, helado y
botella que se encuentran en el panel de control. La
Cool Care Zone posee un control independiente del
resto de los cajones internos del congelador, a través del
panel de control también es posible desactivar la Cool
Care Zone y utilizarla como un cajón normal del
congelador.
Cubeta de hielo ICE CARE.
Su colocación
freezer
en la parte superior de los cajones del
garantiza una mayor limpieza (el hielo no está en
contacto con los alimentos) y ergonomía (no gotea cuando
se carga).
1. Extraiga la cubeta empujándola hacia arriba.
Controle que la cubeta esté completamente vacía y
llénela de agua utilizando el orificio correspondiente.
2. Tenga cuidado de no superar el nivel indicado (MAX
WATER LEVEL). Demasiada agua obstaculiza la salida de
los cubitos de hielo (si esto sucede, espere hasta que el
hielo se derrita y vacíe la cubeta).
3. Gire la cubeta 90º: el agua llena las formas por el
principio de vasos comunicantes (ver la figura).
4. Cierre el orificio con la tapa que se suministra con el
aparato y vuelva a colocar la cubeta.
5. Después de que se haya formado el hielo (tiempo mínimo:
8 horas aproximadamente) golpee la cubeta sobre una
superficie dura y moje su parte externa para despegar los
cubitos; luego hágalos salir por el orificio.
MAX
WATER LEVEL
44
WATER LEVEL
MAX
WATER LEVEL
MAX
Page 45

Mantenimiento y cuidados
Asistencia
Cortar la corriente eléctrica
Durante los trabajos de limpieza y mantenimiento, es
necesario aislar el aparato de la red de alimentación
eléctrica:
1. Mantenga presionado el botón ENCENDIDO/
APAGADO durante aproximadamente dos segundos
hasta que el display se apague todo, excepto el led
rojo del botón ENCENDIDO/APAGADO;
2. desenchufe el aparato.
Si no se efectúa este procedimiento puede desconectar
!
la alarma: dicha alarma no es síntoma de anomalía. Para
restablecer el normal funcionamiento es suficiente
mantener presionado el botón ON/OFF durante más de
dos segundos. Para aislar el aparato proceda siguiendo
los puntos 1 y 2.
Limpiar el aparato
Las partes externas, las partes internas y las juntas de
goma se pueden limpiar con una esponja embebida
en agua tibia y bicarbonato de sodio o jabón neutro.
No utilice solventes, productos abrasivos, lejía o
amoníaco.
Los accesorios extraíbles se pueden colocar en
remojo en agua caliente y jabón o detergente para
platos. Enjuáguelos y séquelos con cuidado.
La parte posterior del aparato tiende a cubrirse de
polvo que se puede eliminar, después de haber
apagado y desenchufado el aparato, utilizando con
delicadeza la boca de la aspiradora y trabajando con
una potencia media.
Evitar la formación de moho y malos olores
El aparato está construido con materiales higiénicos
que no transmiten olores. Para mantener esta
característica es necesario que los alimentos estén
siempre protegidos y bien cerrados. Esto evitará
también la formación de manchas.
Si se debe apagar el aparato por un largo período,
limpie su interior y deje las puertas abiertas.
Descongelar el aparato
! Respete las instrucciones que se dan a continuación.
Para descongelar el aparato no utilice objetos cortantes
o con punta porque podrían dañar irremediablemente el
circuito refrigerante.
Descongelar el compartimiento refrigerador
E
El refrigerador posee
descongelamiento
automático: el agua se
envía hacia la parte
posterior por un orificio de
descarga (ver la figura)
donde el calor producido
por el compresor la hace
evaporar. La única
intervención que se debe
realizar periódicamente
consiste en limpiar el
orificio de descarga para que el agua pueda fluir libremente.
Descongelar el compartimiento congelador
Si la capa de escarcha es superior a los 5 mm es
necesario realizar una descongelación manual:
1. el día anterior pulse el botón SUPER FREEZE (se
encenderá la luz testigo amarilla SUPER FREEZE) para
enfriar ulteriormente los alimentos.
2. La función se desactiva automáticamente después de
24 horas o puede ser desactivada en cualquier
momento pulsando de nuevo el botón SUPER
FREEZE. Mantenga presionado el botón ENCENDIDO/
APAGADO durante aproximadamente dos segundos
hasta que el display se apague todo, excepto el led rojo
del botón ENCENDIDO/APAGADO
3. Envuelva los alimentos congelados en papel de
periódico y colóquelos en otro congelador o en un
lugar fresco.
4. Deje la puerta abierta hasta que la escarcha se haya
derretido completamente; facilite la operación
colocando en el compartimiento congelador
recipientes con agua tibia.
5. Algunos aparatos
poseen el SISTEMA
DRAIN para enviar el agua
hacia el exterior: deje que
el agua fluya recogiéndola
en un recipiente (ver la
figura).
6. Limpie y seque con
cuidado el compartimiento
congelador antes de
volver a encender el
aparato.
7. Avant da ranger vos aliments dans le compartiment
congélateur, attendez environ 2 heures pour le
rétablissement des conditions idéales de conservation
des aliments.
45
Page 46

Sustituir la bombilla
E
Para sustituir la bombilla de iluminación del compartimento
frigorífico, desenchufe el aparato. Siga las instrucciones que se
1 1
dan a continuación.
Acceda a la lámpara quitando la protección como se indica
en la figura. Sustitúyala con otra bombilla con una potencia
igual a la indicada en la protección (15 W o 25 W).
2
Asistencia
Antes de llamar al Servicio de Asistencia Técnica:
Verifique si la anomalía puede ser resuelta por Ud. mismo (ver Anomalías y Soluciones).
Si, no obstante todos los controles, el aparato no funciona y el inconveniente por Ud detectado continúa, llame al
Centro de Asistencia Técnico más cercano.
modelo
número de serie
Comunique:
93139180000 S/N 704211801
Gross
Bruto
Brut
75
Test
P.S-I.
TI
Net
Util
Utile
Pressure
HIGH-235
LOW 140
Cod.
Gross
Bruto
Brut
W
Fuse
A
Freez. Capac
Poder de Cong
kg/24 h
4,0
Max 15 w
Class
Clase
Classe
N
el tipo de anomalía
el modelo de la máquina (Mod.)
el número de serie (S/N)
Esta información se encuentra en la placa de características
ubicada en el compartimento frigorífico abajo a la izquierda.
RG 2330
Mod.
220 - 240 V- 50 Hz 150 W
340
Total
Gross
Bruto
Brut
Compr.
R 134 a
Syst.
kg 0,090
Kompr.
Made in Italy 13918
No recurra nunca a técnicos no autorizados y rechace siempre la instalación de repuestos que no sean
originales.
46
Page 47

Precauciones y consejos
! El aparato ha sido proyectado y fabricado en
conformidad con las normas internacionales sobre
seguridad. Estas advertencias se suministran por
razones de seguridad y deben ser leídas atentamente.
Este equipamiento es conforme con las
siguientes Directivas Comunitarias:
- 73/23/CEE del 19/02/73 (Baja Tensión) y
sucesivas modificaciones;
-89/336/CEE del 03/05/89 (Compatibilidad
Electromagnética) y sucesivas modificaciones;
- 2002/96/CE..
Seguridad general
El aparato ha sido pensado para un uso de tipo no
profesional en el interior de una vivienda.
El aparato debe ser utilizado para conservar y
congelar alimentos sólo por personas adultas y según
las indicaciones contenidas en este manual.
El aparato no se debe instalar al aire libre ni siquiera si
el lugar está protegido debido a que es muy peligroso
dejarlo expuesto a la lluvia y tormentas.
No toque el aparato estando descalzo o con las
manos o pies mojados o húmedos.
No toque las piezas refrigerantes internas: podría
quemarse o herirse.
No desenchufe el aparato tirando del cable sino
sujetando el enchufe.
Es necesario desenchufar el aparato antes de realizar
operaciones de limpieza y de mantenimiento. No es
suficiente llevar el mando para LA REGULACIÓN DE
LA TEMPERATURA hasta la posición OFF (aparato
apagado) para eliminar todo contacto eléctrico.
Eliminación
Eliminación del material de embalaje: respete las normas
locales, de esta manera los embalajes podrán ser
reutilizados.
En base a la Norma europea 2002/96/CE de
Residuos de aparatos Eléctricos y Electrónicos
(RAEE), los electrodomésticos viejos no pueden ser
arrojados en los contenedores municipales habituales;
tienen que ser recogidos selectivamente para
optimizar la recuperación y reciclado de los
componentes y materiales que los constituyen, y
reducir el impacto en la salud humana y el
medioambiente. El símbolo del cubo de basura
tachado se marca sobre todos los productos para
recordar al consumidor la obligación de separarlos
para la recogida selectiva.
El consumidor debe contactar con la autoridad local o
con el vendedor para informarse en relación a la
correcta eleminación de su electrodoméstico viejo.
Ahorrar y respetar el medio ambiente
Instale el aparato en una ambiente fresco y bien
aireado, protéjalo de la exposición directa a los rayos
solares y no lo coloque cerca de fuentes de calor.
Para introducir o extraer los alimentos, abra las puertas
del aparato el menor tiempo posible. Cada apertura
de las puertas produce un notable gasto de energía.
No llene con demasiados alimentos el aparato:
para una buena conservación, el frío debe poder
circular libremente. Si se impide la circulación, el
compresor trabajará continuamente.
No introduzca alimentos calientes: elevarían la
temperatura interior obligando al compresor a un
mayor trabajo con un gran gasto de energía eléctrica.
E
En caso de avería, nunca acceda a los mecanismos
internos para intentar una reparación.
En el interior de los compartimientos donde se
conservan alimentos congelados, no utilice utensilios
cortantes o con punta ni aparatos eléctricos, que no
sean los recomendados por el fabricante.
No introduzca en su boca cubitos apenas extraídos
del congelador.
No permita a los niños que jueguen con el aparato. No
se deben sentar en los cajones o colgarse de la
puerta.
Los embalajes no son juguetes para los niños.
Descongele el aparato si se formara hielo (ver
Mantenimiento); una espesa capa de hielo vuelve más
difícil la cesión de frío a los alimentos y hace que
aumente el consumo de energía.
Mantenga eficientes y limpias las juntas para que se
adhieran bien a las puertas y no dejen salir el frío (ver
Mantenimiento).
47
Page 48

Anomalías y
soluciones
195064503.00
05/2007 - Xerox Business Services
E
Puede suceder que el aparato no funcione. Antes de llamar al Servicio de Asistencia Técnica (ver Asistencia), controle que
no se trate de un problema fácilmente solucionable con la ayuda de la siguiente lista.
Anomalías:
El display está completamente
apagado
El motor no arranca.
El display está débilmente encendido.
Suena la alarma, aparece un mensaje
en el display, está encendido el led
ALARMAS y la bombilla en el
compartimento frigorífico centellea.
Suena la alarma, está encendido el
led ALARMAS y aparece un mensaje
en el display.
Posibles causas / Solución:
El enchufe no está introducido en la toma de corriente, no está lo suficiente
como para hacer contacto o bien en la casa no hay corriente.
El aparato posee un control que lo protege contra sobrecargas (ver Puesta en
funcionamiento y uso).
Desconecte el enchufe y vuelva a introducirlo en la toma de corriente después
de haberlo girado sobre sí mismo.
El frigorífico ha quedado abierto durante más de dos minutos.
La señal sonora cesa cuando se cierra la puerta o pulsando el botón
RESET ALARM.
El aparato señala un calentamiento excesivo del congelador.
El congelador se mantendrá a una temperatura cercana a 0ºC para no
recongelar los alimentos, permitiendo consumirlos dentro de las 24 horas o
volver a congelarlos previa cocción.
Para apagar la señal sonora pulse el botón RESET ALARM. Púlselo una
segunda vez para borrar el mensaje del display, apagar el led ALARMAS y
restablecer el normal funcionamiento.
Suena la alarma, centellea el led
ALARMAS y aparece un mensaje en
el display.
El frigorífico y el congelador enfrían
poco.
En el frigorífico los alimentos se
congelan.
El motor funciona continuamente.
El aparato hace mucho ruido.
Final anticipado de las funciones
El aparato señala un calentamiento peligroso del congelador: los alimentos
no deben ser consumidos. El congelador se mantendrá a una temperatura
cercana a los 0ºC.
Para apagar la señal sonora pulse el botón RESET ALARM. Púlselo una
segunda vez para borrar el mensaje del display, apagar el led ALARMAS y
restablecer el normal funcionamiento.
Las puertas no cierran bien o las juntas están dañadas.
Las puertas se abren demasiado frecuentemente.
Se fijó una temperatura demasiado alta (ver Puesta en funcionamiento y uso).
El frigorífico o el congelador se han llenado excesivamente.
Se ha fijado una temperatura demasiado baja (ver Puesta en funcionamiento y
uso).
Están activadas las funciones SUPER COOL y/o SUPER FREEZE y/o ICE PARTY.
La puerta no está bien cerrada o se abre continuamente.
La temperatura externa es muy alta.
El aparato no fue instalado en un lugar plano (ver Instalación).
El aparato ha sido instalado entre muebles u objetos que vibran y producen
ruidos.
El gas refrigerante interior produce un ligero ruido aún cuando el compresor
está detenido: no es un defecto, es normal.
Problemas eléctricos en la red o breves interrupciones de la tensión de
alimentación.
Aparece un mensaje en el display
(por ej. F01)
48
Llame al Servicio de Asistencia Técnica.
Page 49

Instruções para a utilização
COMBINADO FRIGORÍFICO/CONGELADOR
I F
Italiano, 1 Français, 25
E
GB
English,13
PT
Portuges, 49Espanol, 37
PL
Polski, 61
MBT 2022 CZ/HA
Índice
PT
Instalação, 50
Posicionamento e ligação
Reversibilidade da abertura das portas
Descrição do aparelho, 51-52
Painel de comandos
Vista geral
Acessórios, 53
Início e utilização, 54-55-56
Iniciar o aparelho
Como deslocar-se no ecrã
Pure Wind
Utilize melhor o frigorífico
Utilize melhor o congelador
Manutenção e cuidados, 57-58
Interromper a corrente eléctrica
Limpar o aparelho
Evite bolor e maus cheiros
Degelar o aparelho
Substituição da lâmpada
Assistência, 58
Precauções e conselhos, 59
Segurança geral
Eliminação
Economizar e respeitar o meio ambiente
Anomalias e soluções, 60
Page 50

Instalação
PT
! É importante guardar este folheto para poder consultálo a qualquer momento. No caso de venda, cessão ou
mudança, assegure-se que o mesmo permaneça junto
com o aparelho para informar ao novo proprietário sobre
o funcionamento e as suas respectivas advertências.
! Leia com atenção as instruções: há informações
importantes sobre a instalação, a utilização e a
segurança.
Posicionamento e ligação
Posicionamento
1. Posicione o aparelho num ambiente bem ventilado e
não húmido.
2. Não tape as grades traseiras de ventilação: o
compressor e o condensador emitem calor e
necessitam de uma boa ventilação para funcionarem
bem e os consumos de electricidade diminuírem.
3. Deixe uma distância de pelo menos 10 cm. entre a
parte superior do aparelho e os móveis que houver
acima, e de pelo menos 5 cm. entre as laterais e os
móveis/paredes aos lados.
4. Deixe o aparelho longe de fontes de calor (a luz do sol
directa, um fogão eléctrico).
5. Para manter uma distância ideal entre o produto e a
parede posterior, montar os distanciadores presentes
no kit de instalação seguindo as instruções presentes
na folha dedicada.
Nivelamento
1. Instale o aparelho sobre um piso plano e rígido.
2. Se o pavimento não for perfeitamente horizontal, para
compensar, desatarraxe ou atarraxe os pés dianteiros.
Ligação eléctrica
Depois do transporte, posicione o aparelho na vertical e
aguarde pelo menos 3 horas antes de ligar o sistema
eléctrico. Antes de colocar a ficha na tomada eléctrica,
certifique-se que:
a tomada tenha uma ligação à terra e seja em
conformidade com a legislação;
a tomada tenha a capacidade de suportar o carga
máxima.
de potência da máquina, indicada na placa de
identificação situada no compartimento frigorífico em
baixo à esquerda (p. ex.: 150 W);
a tensão de alimentação seja entre os valores
indicados na placa de identificação, situada embaixo
à esquerda (p. ex.: 220-240 V);
a tomada seja compatível com a ficha do aparelho.
Em caso contrário peça a substituição da ficha a um
técnico autorizado (veja a Assistência); não utilize
extensões nem tomadas múltiplas.
! Com o aparelho instalado, deve ser fácil o acesso ao
cabo eléctrico e à tomada eléctrica.
! O cabo não deve ser dobrado nem sofrer pressões.
! O cabo deve ser verificado periodicamente e
substituído somente por técnicos autorizados (veja a
Assistência).
! A empresa exime-se de qualquer
responsabilidade se estas regras não forem
obedecidas.
Reversibilidade da abertura das portas
50
No caso em que se torne necessário inverter o sentido
de abertura das portas, contacte o serviço de
Assistência Técnica.
Page 51

Descrição do
aparelho
Painel de comandos
Ecrã do
FRIGORÍFICO
Temperatura do
FRIGORÍFICO
COOL CARE ZONE
Temperatura do
CONGELADOR
Ecrã do
CONGELADOR
Botão
ON/OFF
Botão ON/OFF
Pressionando esta tecla é possível ligar e desligar o inteiro
aparelho (quer o compartimento frigorífico, quer o
compartimento congelador). O LED vermelho indica que o
aparelho está desligado, o LED verde que está a funcionar.
Para desligar o aparelho deve-se pressionar por mais de 2
segundos o botão ON/OFF.
I CARE
Realiza a gestão da activação e a desactivação da função I
Care (a temperatura ideal com consumos baixos). Quando
esta função for activada, acendem-se
contemporaneamente o LED AUTO e o LED I Care.
ALARMES
Possibilita a sinalização e a gestão de todos os alarmes
coligados ao funcionamento do aparelho.
Child Lock
Consente bloquear as teclas do painel de comandos para
evitar involuntárias activações por parte das crianças (
necessário manter 2 segundos pressionada a tecla de
Alarme)
Regulação da Temperatura do FRIGORÍFICO + e -
Possibilitam modificar a configuração da temperatura do
frigorífico, com a respectiva confirmação no display da
temperatura seleccionada. Mediante estas teclas também
é possível desactivar apenas o compartimento frigorífico
(no display aparecerá - -).
Regulação da Temperatura do CONGELADOR + e -
Possibilitam modificar a configuração da temperatura do
congelador, com a respectiva confirmação no display da
temperatura configurada.
é
ALARMES
SUPER COOL
SUPER FREEZE
ICE PARTY
HOLIDAY
I CARE
Ecrã do Frigorífico
Indica a temperatura configurada no compartimento
frigorífico ou que está desactivada (neste caso no display
aparecerá - -).
Ecrã do Congelador
Visualiza a temperatura definida para o compartimento
congelador.
Cool Care Zone
Possibilita configurar a CoolCare Zone. Se carregar nesta
tecla será possível configurar os 4 modos de funcionamento
da Cool Care Zone: o morango (8°C), o gelado (-12°C) e a
garrafa (-18° C), se nenhum dos três ícones estiver aceso a
CoolCare Zone funcionará como uma gaveta normal de
congelador.
SUPER COOL
Possibilita activar ou desactivar a função SUPER COOL
(refrigeração rápida). No display do frigorífico aparecerá a
escrita SC.
SUPER FREEZE
Possibilita activar ou desactivar a função SUPER FREEZE
(congelação rápida).
escrita SF.
HOLIDAY
Possibilita activar ou desactivar a função HOLIDAY (acendese o LED AUTO).
ICE PARTY
Possibilita activar ou desactivar a função ICE PARTY (reduz a
temperatura do congelador durante o tempo necessário a
esfriar uma garrafa). .
No display do congelador aparecerá a
PT
51
Page 52

Descrição do
aparelho
PT
Visão geral
Estas instruções sobre a utilização são válidas para vários modelos, portanto é possível que na figura haja pormenores
diferentes do aparelho que adquiriu. Há uma descrição dos assuntos mais complexos nas páginas seguintes.
LÂMPADA
(veja a Manutenção)
PURE WIND
PRATELEIRA
Scomparto
FRESH BOX
Gaveta para FRUTAS
e HORTALIÇAS
*
Prateleira extraível da
porta com tampa e
PORTA OVOS
Prateleira para
LATINHAS
Prateleira extraível da
porta VÃO PARA
GUARDAR
OBJECTOS
Prateleira para
GARRAFAS
*
COOL CARE ZONE e
compartimento para
CONGELAÇÃO
Recipiente para gelo
Ice Care
Compartimento para
CONSERVAÇÃO
PEZINHO
de regulação
Variáveis em número e/ou na posição.
* Presente somente em alguns modelos.
52
Page 53

Acessórios
PRATELEIRAS: vidro ou de
1
2
altura não é necessário retirar inteiramente a prateleira.
FRESH BOX
compartimento consente longos prazos de conservação,
de até uma semana, por causa da temperatura baixa a
mais fria do frigorífico e da porta transparente que
protege contra fenómenos de oxidação e escurecimento.
Também pode ser utilizada para pratos frios.
: para carne e peixe fresco. O
*
grade.
Podem ser extraídas e têm
altura regulável mediante as
guias para este fim (veja a
figura), para introduzir
recipientes ou alimentos de
tamanho grande. Para regular a
PT
Presente somente em alguns modelos.
*
53
Page 54

Início e utilização
PT
Como iniciar o aparelho duplo
! Depois do transporte, posicione o aparelho
verticalmente e aguarde cerca de 3 horas antes de ligálo à tomada eléctrica para facilitar o bom funcionamento.
Antes de guardar alimentos no frigorífico limpe-o bem
por dentro com água morna e bicarbonato.
Este aparelho é equipado com um controlo para
protecção do motor que deixa o compressor iniciar
somente cerca da 8 minutos depois de ser ligado.
Isto acontece também depois de qualquer
interrupção na alimentação eléctrica, voluntária ou
involuntária (corte).
Compartimento congelador.
Quando ligar este aparelho (carregue mais de dois
segundos no botão ON/OFF ) o compartimento
congelador passa para a definição padrão de 18°C. É
aconselhável activar a função SUPER FREEZE (no
display do congelador aparecerá a escrita SF) para
acelerar a refrigeração do compartimento; quando o
mesmo tiver chegado à temperatura ideal, esta função
se desactivará e será possível guardar congelados no
congelador.
Compartimento frigorífico.
Quando ligar este aparelho, o compartimento frigorífico
passa para a definição padrão de +5°C. É aconselhável
activar a função SUPER COOL (no display do frigorífico
aparecerá a escrita SC) para acelerar a refrigeração do
compartimento: depois de algumas horas será possível
guardar alimentos no frigorífico.
Cool Care Zone
Quando ligar este aparelho, o compartimento variável
passa à configuração padrão de -12°C.
Como deslocar-se no ecrã
Definição das temperaturas:
Quando este aparelho for ligado, no display do
compartimento frigorífico e no do congelador aparecem
as temperaturas que estiverem configuradas no
momento. Para modificá-las é suficiente carregar nas
teclas + e correspondentes ao compartimento do qual
se desejar mudar a temperatura. Cada pressão das
teclas incrementa ou decrementa a temperatura de 1ºC
e em modo equivalente também o número de barras
laterais acesas. Podem ser seleccionadas para o
compartimento frigorífico as seguintes temperaturas:
+8°, +7°, +6°, +5°, +4°, +3°, +2°; e para o congelador:
-18°, -19°,-20°, -21°, -22°, -24°, -26°.
Mediante a tecla da CoolCare Zone é possível escolher
a temperatura de funcionamento para o respectivo
compartimento, as temperaturas são representadas por
ícones na parte central do display (Gelado 12°C,
Frutinhas 8°, Alcoólicos 18°), os três ícones apagados
indicam um funcionamento como uma gaveta normal do
congelador.
As temperaturas automaticamente definidas são de
+5°C para o compartimento frigorífico e 18°C para o
compartimento congelador, são as padrões para
conservação. A CoolCare Zone é automaticamente
configurada para 12°C.
Quando a função I Care estiver activada, este
aparelho regulará automaticamente as temperaturas em
função das condições internas e externas do frigorífico,
isto será indicado pela escrita AUTO que se acende.
Se for necessário activar a função I Care com
temperaturas diferentes das padrão de conservação,
será necessário, quando activar a função, manter
pressionada a tecla I Care e mediante as teclas + e
definir as novas temperaturas. Nestas condições as
temperaturas que podem ser configuradas são 4°, 5° e
6° para o compartimento frigorífico, e 18°, -19° e 20°
para o compartimento congelador.
Quando estiver activa a função HOLIDAY não serão
possíveis regulações de temperatura, mas o aparelho
passará automaticamente para a regulação ideal para a
situação: +12°C para o compartimento frigorífico e
18°C para o compartimento congelador, esta condição
também é indicada pela escrita AUTO que se acende.
Para activar e desactivar as funções é suficiente carregar
na respectiva tecla e o respectivo LED acende-se ou
apaga-se para indicar o estado da função.
Algumas funções (SUPER COOL, SUPER FREEZE,
ICE PARTY, ICE CARE) são incompatíveis com outras
(HOLIDAY, ..), nestes casos será levada em
consideração uma prioridade já estabelecida para
ajudar-lhe na gestão do aparelho.
No fim da função Ice Party deve-se carregar na tecla
ICE PARTY para interromper a intermitência do
respectivo led. A intermitência sinaliza o fim da função e
a necessidade de remover a garrafa do compartimento
congelador.
Child Lock
Para poder activar a função de Child Lock, é necessário
manter 2 segundos pressionada a tecla de Alarme, a
activação do bloqueio das teclas é confirmada por um
som breve e pelas escritas CH e LO que aparecem
nos displays do frigorífico e do congelador, esta escrita
em seguida será substituída pelas temperaturas
precedentemente seleccionadas para o frigorífico e para
o congelador. Para desactivar a função carregue dois
segundos na tecla Alarme, a desactivação é confirmada
por um som breve e pelas escritas CH e LO que
aparecem 2 segundos no display do frigorífico e no do
congelador.
54
Page 55

PURE WIND
Pode ser reconhecido pela presença do dispositivo na
parede superior do compartimento frigorífico (veja a
figura).
B
A
B
A
B
Pure Wind optimiza ao máximo a circulação do ar,
melhorando a eficácia do evaporador e ajudando a
alcançar mais rapidamente a temperatura correcta no
interior do frigorífico após cada abertura.
O ar soprado (A) arrefece em contacto com a parede fria,
enquanto que o ar mais quente (B) é aspirado (veja a
figura).A parede posterior apresenta-se coberta de gelo
ou gotinhas de água, conforme o compressor esteja em
funcionamento ou em pausa.
Utilize melhor o frigorífico
Regule a temperatura através do display.
Prima a tecla de SUPER COOL (refrigeração rápida) para
baixar a temperatura em pouco tempo, por exemplo
quando encher o compartimento depois de muitas
compras. A função desactiva-se automaticamente depois
que tiver passado o tempo necessário.
Coloque somente alimentos frios ou levemente mornos,
mas não quentes (veja Precauções e conselhos).
Lembre-se que os alimentos cozidos não se mantêm mais
tempo do que os crus.
Não guarde líquidos em recipientes destampados: poderão
provocar aumento de humidade com consequente
formação de condensação.
Utilize melhor o congelador
Regule a temperatura através do display.
A Cool Care Zone é um compartimento que permite
congelar na temperatura correcta alguns tipos de
alimentos (frutas, gelados e alcoólicos); os outros dois
compartimentos de conservação (veja a Visão geral)
são adaptos para conservar normalmente os
alimentos congelados.
Para conservar os alimentos do modo mais correcto e
seguro deve-se proceder da seguinte maneira.
Para uma pequena quantidade (inferior à metade
daquela indicada na placa de identificação):
- se a Cool Care Zone está activa, introduzir os
alimentos nos dois compartimentos de conservação,
prestando atenção para que não entrem em contacto
com os alimentos já presentes; pressionar a tecla
SUPER FREEZE (congelação rápida, acende-se o
respectivo LED) e fechar a porta; a função irá
desactivar-se automaticamente após 24 horas ou
quando alcançar a temperatura ideal (o LED desligase);
- se a Cool Care Zone não está activa também o
primeiro compartimento é utilizável: introduza os
alimentos e repita as mesmas passagens do caso
anterior.
Para uma grande quantidade (superior à metade
daquela indicada na placa de identificação):
Desactive a Cool Care Zone e esvazie-a, mantenha
pressionada a tecla SUPER FREEZE por alguns
segundos até que o respectivo LED comece a piscar.
São necessárias aproximadamente 24 horas para que
o freezer alcance a correcta temperatura para
congelar do melhor modo possível. Passado este
tempo, o LED torna-se fixo: guarde os alimentos
dentro e feche a porta. Depois de outras 24 horas os
alimentos foram congelados correctamente, a função
desactiva-se automaticamente (o LED apaga-se);
agora os alimentos poderão se colocados nos dois
compartimentos inferiores (em modo de poder utilizar
as funções da Cool Care Zone) ou poderão ser
deixados no compartimento Cool Care Zone que, uma
vez que está inactivo, funciona como um normal
compartimento de conservação.
PT
Não congele novamente alimentos que estiverem a
descongelar-se ou descongelados; estes alimentos devem
ser cozidos para ser consumados (dentro de 24 horas).
Os alimentos frescos a serem congelados não devem ser
colocados encostados nos já congelados.
Não coloque no congelador garrafas de vidro contendo
líquidos, tampadas ou fechadas hermeticamente, porque
poderão partir-se.
55
Page 56

PT
A quantidade máxima diária de alimentos a ser congelada é
indicada na placa de identificação, situada no compartimento
frigorífico, embaixo à esquerda (por exemplo: Kg/24h 4).
A fim de obter um espaço maior no compartimento
congelador, é possível tirar as gavetas das suas
posições (excepto aquela mais baixa ou a eventual
gaveta COOL CARE ZONE com temperatura variável) e
guardar os alimentos directamente nas chapas de
evaporação.
! Durante a congelação evite abrir a porta.
! Em caso de interrupção de corrente ou de avaria, não abra
a porta do congelador: desta maneira os alimentos
congelados em casa ou industriais não sofrerão alterações
durante aproximadamente 9 ~ 14 horas.
Cool Care Zone
A Cool Care Zone é um compartimento especial que há
no congelador para possibilitar seleccionar e configurar
4 modos de funcionamento diferentes em função das
necessidades e do tipo de alimentos que for guardar
dentro. Podem ser seleccionadas as temperaturas -8°C,
-12°C e -18°C; indicadas pelos respectivos ícones:
morango, gelado e garrafa que há no painel de
comandos. A Cool Care Zone é equipada com um
comando independente das demais gavetas internas do
congelador, mediante o painel de comandos também é
possível desactivar a Cool Care Zone e utilizá-la como
uma gaveta normal de congelador.
Recipiente para gelo Ice Care
A posição na parte superior das gavetas no vão do
freezer assegura uma limpeza maior (o gelo não entra
mais em contacto com os alimentos) e ergonomia (não
goteja quando for carregado).
1. Para retirar o recipiente empurre-o para
cima.Certifique-se que o recipiente esteja
inteiramente vazio e encha-o de água pelo furo para
este fim.
2. Preste atenção para não ultrapassar o nível indicado
(MAX WATER LEVEL). Água demais dificulta a
extracção do gelo (se acontecer, aguarde o gelo
derreter-se e esvazie o recipiente).
3. Rode o recipiente 90°: a água enche as formas pelo
princípio dos vasos comunicantes (veja a figura).
4. Tape o furo com a tampa fornecida e guarde o
recipiente na respectiva sede.
5. Quando se tiver formato gelo (tempo mínimo
aproximadamente 8 horas) bata o recipiente sobre
uma superfície dura e molhe-o por fora para o gelo
soltar-se; em seguida deixe-o sair pelo furo.
MAX
WATER LEVEL
56
WATER LEVEL
MAX
WATER LEVEL
MAX
Page 57

Manutenção e cuidados
Assistência
Interromper a corrente eléctrica
Durante as operações de limpeza e manutenção é
necessário isolar o aparelho da rede eléctrica:
1. Mantenha pressionado o botão ON/OFF por
aproximadamente dois segundos, até que o display
se desliga completamente, excepto o Led vermelho
do botão ON/OFF.
2. desligue a ficha da tomada eléctrica.
! Se não se obedecer este processo, o alarme poderá
disparar: mas isto não será um sintoma de anomalia.
Para restabelecer o normal funcionamento, é suficiente
manter pressionado o botão on/off por mais de dois
segundos. Para isolar o aparelho realize as operações
apresentadas nos pontos 1 e 2.
Limpar o aparelho
As partes externas, as partes internas e as
guarnições de borracha podem ser limpadas com
uma esponja molhada de água morna e bicarbonato
de sódio ou sabão neutro. Não empregue solventes,
abrasivos, água de javel nem amoníaco.
Os acessórios removíveis podem ser colocados de
molho em água quente e sabão ou detergente para
pratos. Enxagúe-os e enxugue-os com cuidado.
Na parte de trás do aparelho tende a acumular-se
poeira, que pode ser eliminada, depois de ter desligado
o aparelho e retirado a ficha da tomada eléctrica,
utilizando delicadamente o bocal comprido de um
aspirador de pó, regulado numa potência média.
Evite bolor e maus cheiros
Este aparelho foi fabricado com materiais higiénicos
que não transmitem odores. Para manter esta
característica é necessário os alimentos serem
sempre protegidos e bem fechados. Isto também
evitará a formação de manchas.
Se for deixar o aparelho muito tempo desligado,
limpe-o por dentro e deixe as portas abertas.
Descongelar o compartimento frigorífico
PT
Este frigorífico é equipado
com degelo automático: a
água derretida é
conduzida para a parte
traseira através de um
furo de descarga (veja a
figura) desta maneira o
calor produzido pelo
compressor evapora-se.
A única intervenção a ser
realizada periodicamente
consiste na limpeza do furo de descarga para a água
poder defluir desimpedida.
Descongelar o compartimento congelador
Se a camada de gelo for superior a 5 mm. será
necessário degelar manualmente:
1. na véspera, prima a tecla de SUPER FREEZE (acende-
se o indicador luminoso amarelo de SUPERFREEZE)
para esfriar ainda mais os alimentos.
2. Esta função desactiva-se automaticamente depois de
24 horas, mas também pode ser desactivada a
qualquer momento se pressionar de novo a tecla de
SUPER FREEZE; Mantenha pressionado o botão ON/
OFF por aproximadamente dois segundos, até que o
display se desliga completamente, excepto o Led
vermelho do botão ON/OFF.
3. Envolva os alimentos congelados industrialmente ou
em casa com folhas de papel e guarde-os num sítio
fresco.
4. Deixe a porta aberta até o gelo ter-se derretido
inteiramente; para facilitar a operação coloque
recipientes com água morna dentro do compartimento
congelador.
5. Alguns aparelhos são
equipados com um
SISTEMA DE DRAIN para
conduzir a água para fora.
Deixe a água defluir para
um recipiente (veja a
figura).
Descongelar o aparelho
! Obedeça as seguintes instruções.
Para descongelar el aparato no utilice objetos cortantes
o con punta porque podrían dañar irremediablemente el
circuito refrigerante.
6. Limpe e enxugue o compartimento congelador com
cuidado antes ligar novamente o aparelho.
7. Antes de introduzir os alimentos no compartimento do
congelador, aguardar aproximadamente duas horas
para o restabelecimento das condições ideais de
conservação.
57
Page 58

PT
Substituição da lâmpada
Para substituir a lâmpada de iluminação do
compartimento frigorífico, desligue a ficha da tomada de
corrente. Obedeça as seguintes instruções.
1 1
Para obter acesso à lâmpada, retire a protecção da
maneira indicada na figura.
2
Substitua-a por uma de potência análoga à indicada na
protecção (15 W o 25 W).
Assistência
Antes de contactar a Assistência técnica:
Verifique se pode resolver sozinho a anomalia (veja as Anomalias e Soluções).
Se, apesar de todos os controlos, o aparelho não funcionar e o inconveniente detectado continuar, contactar o
Centro de Assistência mais próximo.
número de série
A
4,0
Max 15 w
Class
Clase
Classe
N
Comunique:
o tipo de anomalia
o modelo da máquina (Mod.)
o número de série (S/N)
Estas informações encontram-se na placa de
identificação situada no compartimento
frigorífico embaixo à esquerda.
modelo
Gross
Bruto
Brut
75
Test
P.S-I.
TI
Net
Util
Utile
Pressure
HIGH-235
LOW 140
Cod.
RG 2330
Mod.
220 - 240 V- 50 Hz 150 W
340
Total
Gross
Bruto
Brut
Compr.
R 134 a
Syst.
kg 0,090
Kompr.
Made in Italy 13918
93139180000 S/N 704211801
Fuse
W
Gross
Bruto
Brut
Freez. Capac
Poder de Cong
kg/24 h
Nunca recorrer a técnicos não autorizados e negar sempre a instalação de peças sobresselentes não
originais para reposição.
58
Page 59

Precauções e conselhos
! Este aparelho foi projectado e fabricado em
conformidade com as regras internacionais de
segurança. Estas advertências são fornecidas para
razões de segurança e devem ser lidas com atenção.
Esta aparelhagem é em conformidade com a
seguintes Directivas da Comunidade Europeia:
- 73/23/CEE do 19/02/73 (Baixa Tensão) e
sucessivas modificações;
- 89/336/CEE do 03/05/89 (Compatibilidade
Electromagnética) e sucessivas modificações.
Segurança geral
Este aparelho foi concebido para uma utilização de tipo
não profissional, no âmbito de uma morada.
Este aparelho deve ser utilizado somente por pessoas
adultas, para conservar e congelar alimentos, segundo
as instruções apresentadas neste folheto.
Este aparelho não deve ser instalado ao ar livre mesmo
se num sítio abrigado, porque é muito perigoso deixá-lo
exposto à chuva e temporais.
Não toque neste aparelho com os pés descalços nem
com as mãos ou os pés molhados ou húmidos.
Não toque nas partes de refrigeração internas:
há perigo de queimaduras e feridas.
Não puxe o cabo eléctrico para desligar a ficha da
tomada, mas pegue pela ficha.
É necessário desligar a ficha da tomada antes de
realizar operações de limpeza e manutenção. Não é
suficiente colocar os selectores de regulação da
temperatura na posição OFF (aparelho desligado) para
eliminar todos os contactos eléctricos.
No caso de avaria, nunca mexa nos mecanismos
internos para tentar reparar.
En el interior de los compartimientos donde se
conservan alimentos congelados, no utilice utensilios
cortantes o con punta ni aparatos eléctricos, que no
sean los recomendados por el fabricante.
Não coloque na boca cubos de gelo assim que os
retirar do congelador.
Não permita que crianças brinquem com este aparelho.
Em nenhum caso pode-se sentar-se nas gavetas ou
pendurar-se na porta.
Os embalagens não são brinquedos para as crianças.
Eliminação
PT
Eliminação do material de embalagem: obedeça as
regras locais, ou reutilize as embalagens.
A directiva Europeia 2002/96/CE referente à gestão
de resíduos de aparelhos eléctricos e electrónicos
(RAEE), prevê que os electrodomésticos não devem
ser escoados no fluxo normal dos resíduos sólidos
urbanos. Os aparelhos desactualizados devem ser
recolhidos separadamente para optimizar a taxa de
recuperação e reciclagem dos materiais que os
compõem e impedir potenciais danos para a saúde
humana e para o ambiente. O símbolo constituído por
um contentor de lixo barrado com uma cruz deve ser
colocado em todos os produtos por forma a recordar
a obrigatoriedade de recolha separada.
Os consumidores devem contactar as autoridades
locais ou os pontos de venda para solicitar
informação referente ao local apropriado onde devem
depositar os electrodomésticos velhos.
Economizar e respeitar o meio
ambiente
Instale este aparelho num ambiente fresco e bem
ventilado, proteja-o contra a exposição directa aos
raios do sol, não o coloque perto de fontes de calor.
Para colocar ou retirar alimentos, abra as portas
deste aparelho o mais rapidamente possível.
Cada vez que abrir as portas causa um notável gasto
de energia.
Não encha este aparelho com alimentos demais:
para uma boa conservação, o frio deve poder circular
livremente. Se impedir-se a circulação, o compressor
funcionará continuamente.
Não coloque dentro alimentos quentes: aumentarão a
temperatura interna forçando o compressor a
funcionar muito, com grande desperdício de energia
eléctrica.
Descongele este aparelho quando se formar gelo
(veja a Manutenção); uma camada grossa de gelo
torna mais difícil a transmissão do frio aos alimentos e
aumenta o consumo de energia.
Mantenha as guarnições eficientes e limpas, de
maneira que adiram bem nas portas e não deixem o
frio sair (veja a Manutenção).
59
Page 60

Anomalias e soluções
195064503.03
05/2007 - Xerox Business Services
PT
Pode acontecer que este aparelho não funcione. Antes de telefonar à Assistência técnica (veja a Assistência), verifique se
não se trata de um problema fácil de resolver com a ajuda da seguinte lista.
Anomalias:
O display está inteiramente
apagado.
O motor não inicia.
O display está aceso fraco.
Toca o alarme, aparece uma
mensagem no display, está aceso
o led ALARMES e a lâmpada do
compartimento frigorífico pisca.
Toca o alarme, está aceso o led
ALARMES e aparece uma
mensagem no display.
Possíveis causas / Solução:
A ficha não está ligada na tomada eléctrica ou não está bem ligada e portanto
não há contacto, ou então não há corrente em casa.
Este aparelho é equipado com um controlo de protecção para o motor (veja
Início e utilização).
Desligue a ficha e ligue-a novamente na tomada, depois da tê-la rodada para
inverter os pinos.
A porta do frigorífico permaneceu aberta mais do que dois minutos.
O aviso acústico pára de tocar quando a porta for fechada ou carregando no
botão RESET ALARM.
Este aparelho avisa se houver aquecimento excessivo do congelador.
Para não congelar novamente os alimentos, o congelador mantém-se a uma
temperatura ao redor de 0°C, para possibilitar-lhe os alimentos dentro de 24
horas ou para cozê-los e congelá-los.
Para desligar o sinal acústico carregar no botão RESET ALARM. Carregar uma
segunda vez para apagar a mensagem no display, desligar o led ALARMES e
restabelecer o normal funcionamento.
Toca o alarme, está aceso o led
ALARMES e aparece uma
mensagem no display.
O frigorífico e o congelador
refrigeram pouco.
Os alimentos congelam-se no
frigorífico.
O motor está a funcionar
continuamente.
O aparelho está a fazer ruído.
Final antecipado das funções.
Este aparelho avisa se houver aquecimento perigoso do congelador: os
alimentos não devem ser consumidos. O congelador irá manter-se a uma
temperatura ao redor dos 0ºC.
Para desligar o sinal acústico carregar no botão RESET ALARM. Carregar uma
segunda vez para apagar a mensagem no display, desligar o led ALARMES e
restabelecer o normal funcionamento.
As portas não se fecham bem ou as guarnições estão estragadas.
As portas são abertas com frequência excessiva.
Foi programada uma temperatura muito alta (veja Início e utilização).
O frigorífico ou o congelador foram enchidos demais.
Foi programada uma temperatura muito baixa (veja Início e utilização).
Estão activas as funções SUPER COOL e/ou SUPER FREEZE e/ou ICE
PARTY.
A porta não está bem fechada ou é aberta continuamente.
A temperatura do ambiente externo está muito alta.
O aparelho não foi instalado bem plano (veja a Instalação).
O aparelho foi instalado entre móveis ou objectos que vibram e emitem ruídos.
O gás refrigerante interno produz um ruído leve mesmo quando o compressor
estiver parado: não é um defeito, é normal.
Distúrbios eléctricos na rede ou breves interrupções da tensão de alimentação.
Aparece uma mensagem no
display (ex. F01).
60
Contacte a Assistência Técnica.
Page 61

Instrukcja obs³ugi
LODÓWKO - ZAMRA¯ARKA
GBI F
Italiano, 1 Français, 25
English,13
PE
Portuges, 49Espanol, 37
PL
Polski, 61
MBT 2022 CZ/HA
Spis treci
PL
Instalowanie, 62
Ustawienie i pod³¹czenie
Zmiana kierunku otwierania drzwi
Opis urz¹dzenia, 63-64
Panel kontrolny
Widok ogólny
Wyposa¿enie dodatkowe, 65
Uruchomienie i u¿ytkowanie, 66-67-68
W³¹czenie urz¹dzenia
Jak poruszaæ siê po ekranie
Pure Wind
Najlepszy sposób u¿ytkowania lodówki
Najlepszy sposób u¿ytkowania zamra¿arki
Konserwacja i utrzymanie, 69-70
Od³¹czenie pr¹du elektrycznego
Mycie urz¹dzenia
Unikanie pleni i nieprzyjemnych zapachów
Usuwanie oblodzenia w lodówko-zamra¿arce
Wymiana ¿arówki
Serwis, 70
Zalecenia i rodki ostro¿noci, 71
Ogólne zasady bezpieczeñstwa
Usuwanie odpadów
Oszczêdnoæ i ochrona rodowiska
Anomalie i ich usuwanie, 72
Page 62

Instalacja
PL
! Nale¿y zachowaæ niniejsz¹ ksi¹¿eczkê instrukcji dla
przysz³ych konsultacji. W razie sprzeda¿y,
odsprzedania, czy przeniesienia urz¹dzenia w inne
miejsce nale¿y upewniæ siê, by przekazane zosta³a ono
razem z instrukcj¹, aby nowy w³aciciel zapoznaæ siê
móg³ z dzia³aniem urz¹dzenia i z odnonymi
informacjami.
! Nale¿y uwa¿nie przeczytaæ instrukcjê obs³ugi gdy¿
zawiera ona wa¿ne informacje dotycz¹ce instalacji oraz
w³aciwego i bezpiecznego u¿ytkowania urz¹dzenia.
Ustawienie i pod³¹czenie
Ustawienie
1. Ustawiæ lodówko-zamra¿arkê w pomieszczeniu
przewiewnym i nie wilgotnym.
2. Nie zas³aniaæ kratek wentylacyjnych: sprê¿arka i
skraplacz wytwarzaj¹ ciep³o i wymagaj¹ dobrego
przewiewu powietrza w celu w³aciwego
funkcjonowania i oszczêdnoci energii elektrycznej.
3. Pomiêdzy górn¹ czêci¹ urz¹dzenia i ewentualnymi
meblami pozostawiæ co najmniej 10 cm, a co
najmniej 5 cm pomiêdzy ciankami bocznymi i
meblami.
4. Lodówko-zamra¿arkê ustawiaæ daleko od róde³
ciep³a (promieni s³onecznych, kuchenki elektrycznej).
5. Aby utrzymaæ optyamln¹ odleg³oæ produktu od
ciany mieszkania nale¿y zamontowaæ odpowiednie
czêci odleg³ociowe, które znajduj¹ siê na
wyposa¿eniu i wed³ug instrukcji.
Wypoziomowanie
1. Ustawiæ lodówko-zamra¿arkê na pod³odze p³askiej i
sztywnej.
2. Jeli pod³oga nie jest idealnie pozioma, dokonaæ
kompensacji poprzez dokrêcenie lub odkrêcenie
przednich nó¿ek.
Pod³¹czenie do sieci elektrycznej
Po transporcie ustawiæ lodówko-zamra¿arkê w pozycji
pionowej, a pod³¹czyæ do sieci elektrycznej dopiero po 3
godzinach. Przed w³o¿eniem wtyczki do gniazdka
sprawdziæ, czy:
gniazdko posiada odpowiednie uziemienie i zgadza
siê z obowi¹zuj¹cymi przepisami;
wtyczka jest w stanie wytrzymaæ maksymalne
obci¹¿enie mocy lodówko-zamra¿arki, jaka jest
wskazana na tabliczce znamionowej, znajduj¹cej siê
po lewej stronie u do³u w komorze lodówki (na
przyk³ad 150W);
napiêcie zasilania musi zawieraæ siê w wartociach
podanych na tabliczce znamionowej, znajduj¹cej siê
u do³u, po lewej stronie (na przyk³ad 220-240V);
gniazdko musi byæ kompatybilne z wtyczk¹
urz¹dzenia.
W przeciwnym wypadku za¿¹daæ od
autoryzowanego technika wymiany wtyczki (I> patrz
Serwis); nie u¿ywaæ przed³u¿aczy lub
rozga³êników.
! Tak ustawiæ lodówko-zamra¿arkê, aby przewód
elektryczny i gniazdko pr¹du by³y ³atwo dostêpne.
! Kabla nie wolno zginaæ i uwa¿aæ, aby nie zosta³
zgnieciony.
! Przewód elektryczny musi byæ okresowo sprawdzany
i wymieniany jedynie przez autoryzowanych techników
(patrz Serwis).
! W przypadku braku przestrzegania powy¿szych
warunków producent zwolniony zostanie z
wszelkiej odpowiedzialnoci.
Zmiana kierunku otwierania drzwi
W przypadku koniecznoci zmiany kierunku otwarcia
drzwi nale¿y zg³osiæ siê od Serwisu Technicznego.
62
Page 63

Opis urz¹dzenia
Panel kontrolny
COOL CARE ZONE
Wywietlacz
lodówki
Regulacja
temperatury
LODOWKA
Regulacja
temperatury
ZARAZARKA
Wywietlacz
zamra¿arki
ON/OFF
PL
ALARMY
SUPER COOL
SUPER FREEZE
ICE PARTY
HOLIDAY
I CARE
ON/OFF
Wduszaj¹c ten przycisk mo¿liwe jest w³¹czenie i wy³¹czenie
ca³ego urz¹dzenia (tak komorê lodówki jak i komorê
zamra¿arki). Czerwona DIODA wskazuje, ¿e urz¹dzenie jest
wy³¹czone, DIODA zielona, ¿e jest w³¹czone. W celu
wy³¹czenia produktu nale¿y przytrzymaæ wduszony przez
przynajmniej 2 sekundy przycisk ON/OFF.
I CARE
Steruje uruchamianiem i wy³¹czaniem funkcji I Care. Przy
uruchomieniu tej funkcji zapalaj¹ siê jednoczenie DIODA
AUTO oraz DIODA I Care.
ALARMY
Umo¿liwia sygnalizacjê i kierowanie wszystkimi alarmami
zwi¹zanymi z dzia³aniem urz¹dzenia.
Child Lock
Umo¿liwia zablokowanie przycisków panelu sterowania w
celu unikniêcia przypadkowemu uruchomieniu przez dzieci
(nale¿y przytrzymaæ wduszony przycisk ALARM przez 2
sekundy).
Regulacja temperatury LODOWKA + i -
Umo¿liwia zmianê wyboru temperatury lodówki, wraz z
odpowiednim potwierdzeniem na wywietlaczu wybranej
temperatury. Przy pomocy tych przycisków mozliwe jest tak¿e
wy³aczenie samej komory lodówki (na wywietlaczu pojawi
sie - -).
Wywietlacz lodówki
Wskazuje temperaturê ustawiona dla komory lodówki lub jej
wy³¹czenie (w tym przypadku na wywietlaczu pojawia siê - -).
Wywietlacz zamra¿arki: sygnalizacja komory zamra¿arki
Wywietla temperaturê ustawion¹ dla komory zamra¿arki.
COOL CARE ZONE
Umo¿liwia ustawienie CoolCare Zone. Poprzez wduszenie
przycisku mo¿liwe jest ustawienie 4 trybów pracy Cool Care
Zone: truskawka (8°C), lody (-12°C), butelka (-18° C), jeli
¿adna z trzech ikon nie jest w³¹czona CoolCare Zone pracowaæ
bêdzie jak normalna komora zamra¿arki.
SUPER COOL
Umo¿liwia uruchomienia lub wy³¹czenie funkcji SUPER COOL
(b³yskawiczne ch³odzenie). Na wywietlaczu lodówki pojawi siê
napis SC.
SUPER FREEZE
Umo¿liwia uruchomienie lub wy³¹czenie funkcji SUPER
FREEZE (b³yskawiczne ch³odzenie). Na wywietlaczu pojawi
siê napis SF.
HOLIDAY
Umo¿liwia uruchomienie lub wy³¹czenie funkcji HOLIDAY
(zapala siê dioda AUTO).
Regulacja temperatury ZARAZARKA + e -
Umo¿liwia zmianê wyboru temperatury zamra¿arki, wraz z
odpowiednim potwierdzeniem na wywietlaczu wybranej
temperatury.
ICE PARTY
Umo¿lkiwia uruchomienie lub wy³aczenie funkcji ICE PARTY
(Obni¿a temperaturê zamra¿arki przez czas konieczny do
sch³odzenia butelki).
63
Page 64

Opis urz¹dzenia
PL
Widok ogólny
¯arówka
(patrz Konserwacja)
PURE WIND
PÓLKI
Komora
FRESH BOX
Szfladka OWOCE i
WARZYWA
Wyjmowana pó³eczka
z pokrywk¹, z
wk³adk¹ na JAJKA
Pó³ka
NA PUSZKI
Wyjmowalna
pó³eczka NA RO¯NE
PRZEDMIOTY
*
Specjalna pó³ka na
BUTELKI
*
COOL CARE ZONE i
Komora
PRZECHOWYWANIE
Wanienka na lód
Ice Care
PRZECHOWYWANIE
NÓ¯KA
regulacyjna
Komora
Zmienna iloæ i pozycja.
* Znajduje siê tylko w niektórych modelach.
64
Page 65

Akcesoria
PÓ£KI: pe³ne lub kratki.
1
2
nawet o znacznych wymiarach. Aby wyregulowaæ
wysokoæ nie ma koniecznoci ca³kowitego wyjêcia
pó³ki.
FRESH BOX
s³u¿y do d³ugiego przechowywania produktów, nawet do
jednego tygodnia, poniewa¿ jest tutaj utrzymana niska
temperatura najni¿sza w lodówce a przeroczyste
drzwiczki chroni¹ przed utlenianiem i czernieniem
produktu. Mo¿e byæ tak¿e wykorzystany do potraw na
zimno.
: na wie¿e miêso i ryby. Ten schowek
*
Mo¿na je wyci¹gn¹æ, a
prowadnice s³u¿¹ do
wyregulowania wysokoci ich
umieszczenia (patrz rysunek)
tak, aby umo¿liwiæ ustawienie
na nich pojemników lub
produktów ¿ywnociowych
PL
Presente solo in alcuni modelli.
*
65
Page 66

Uruchomienie i
u¿ytkowanie
PL
Jak uruchomiæ lodówko-zamra¿arkê
! Po przywiezieniu ustawiæ urz¹dzenie w pozycji
pionowej i odczekaæ oko³o 3 godzin przed
pod³¹czeniem gniazdka pr¹du, aby zapewniæ w³aciwe
funkcjonowanie urz¹dzenia.
Przed w³o¿eniem ¿ywnoci do lodówki nale¿y
starannie umyæ lodówkê wewn¹trz przy u¿yciu
letniej wody i sody oczyszczanej.
Urz¹dzenie jest wyposa¿one w kontrolê
zabezpieczaj¹c¹ silnik, który uruchamia sprê¿arkê
dopiero po oko³o 8 minutach po w³¹czeniu
urz¹dzenia. Dzieje siê tak równie¿ po ka¿dej
przerwie w zasilaniu elektrycznoci¹,
spowodowanej wy³¹czeniem lub brakiem napiêcia w
sieci (black out).
Komora zamra¿arki
Po w³¹czeniu urz¹dzenia (przyciskaæ przez ponad
dwie sekundy przycisk ON/OFF) komora zamra¿arki
zamra¿arka ustawi siê w standardowym parametrze
18°C. Zaleca siê nastawienie funkcji SUPER FREEZE,
(na wywietlaczu zamra¿arki pojawi siê SF) w celu
przyspieszenia sch³odzenia komory, kiedy osi¹gnie
ona sw¹ optymaln¹ temperaturê, funkcja ta siê
wy³¹czy i bêdzie mo¿na w³o¿yæ mro¿onki do
zamra¿arki.
komora, temperatury przedstawione s¹ ikonami w
rodkowej czêci wywietlacza (lód 12°C, Je¿yny
8°, Alkohol 18°), trzy wy³¹czone ikony wskazuj¹ na
prace jako normalna szuflada zamra¿arki.
Automatycznie nastawione temperatury wynosz¹ +5°C
dla komory lodówki oraz 18°C dla komory zamra¿arki
i s¹ to standardowe temperatury przechowywania.
CoolCare Zone ustawione jest automatycznie na
12°C.
Kiedy uruchomiona jest funkcja I Care urz¹dzenie
reguluje automatycznie temperaturê na podstawie
warunków wewnêtrznych i zewnêtrznych lodówki, jest
to sygnalizowane w³¹czeniem siê napisu AUTO.
Gdyby zaistnia³a koniecznoæ uruchomienia funkcji I
Care w innej temperaturze ni¿ standard
przechowywania, koniecznym jest przy uruchamianiu
funkcji przytrzymaæ wduszony przycisk I Care i
ustawiæ przy pomocy przycisków + i nowe wartoci
temperatur. W tych warunkach mo¿liwe do wyboru
temperatury to 4°, 5° e 6° dla komory lodówki oraz
18°, -19° i 20° dla komory zamra¿arki.
Gdy aktywna jest funkcja HOLIDAY regulowanie
temperatury nie jest mo¿liwe, a urz¹dzenie ustawi siê
automatycznie na temperaturze optymalna dla danej
sytuacji. +12°C dla komory lodówki oraz 18°C dla
komory zamra¿arki, takie warunki sygnalizowane sa
ponadto w³¹czeniem siê napisu AUTO.
Komora lodówki
Po w³¹czeniu urz¹dzenia lodówka przyjmie
standardowy parametr +5°C. Zaleca siê nastawienie
funkcji SUPER COOL, ( na wywietlaczu lodówki
pojawi siê SC) aby przypieszyæ ch³odzenie komory.
po kilku godzinach mo¿na w³o¿yæ ¿ywnoæ do lodówki.
Cool Care Zone
Po w³¹czeniu urz¹dzenia komora zmienna ustawia siê
w standartowym po³o¿eniu -12°C.
Jak poruszaæ siê po ekranie
Nastawianie temperatur:
Jeli urz¹dzenie jest w³¹czone, wywietlacze lodówki i
zamra¿arki wywietlaj¹ temperatury wybrane w tej
chwili. Aby ja zmieniæ wystarczy wdusiæ przyciski +
oraz w³aciwe dla komory, w której chce siê zmieniæ
temperaturê. W szczególnoci ka¿de wduszenie
przycisków zwiêksza lub zmniejsza temperaturê o 1
odpowiednio tak¿e iloæ bocznych w³¹czonych kresek.
Mo¿liwe do wybrania temperatury komory lodówki sa
nastêpuj¹ce +8°, +7°, +6°, +5°, +4°, +3°, +2°, dla
zamra¿arki s¹ to 18°, -19°,-20°, -21°, -22°, -24°, -26°.
Przy pomocy przycisku CoolCare Zone mo¿liwe jest
ustalenia, w jakiej temperaturze pracowaæ ma ta
o
i
Zarz¹dzanie funkcjami:
W celu uruchomienia i wy³¹czenia funkcji wystarczy
wdusiæ odpowiedni przycisk i w³¹czenie lub wy³¹czenie
odpowiedniej diody zasygnalizuje stan funkcji.
Niektóre funkcje (SUPER COOL, SUPER FREEZE,
ICE PARTY,ICE CARE) nie s¹ mo¿liwe do pogodzenia
z innymi (HOLIDAY,..), w takim przypadku nale¿y braæ
pod uwagê pierwszeñstwo uprzednio ustalone aby
pomóc w sterowaniu prac¹ urz¹dzenia.
Po zakoñczeniu Ice Party nale¿y wcisn¹æ przycisk ICE
PARTY aby przerwaæ migotanie w³aciwej diody.
Migotanie sygnalizuje zakoñczenie funkcji i
koniecznoæ wyjêcia butelki z zamra¿arki.
Child Lock
Aby móc uruchomiæ funkcjê Child Lock, nale¿y
przytrzymaæ wduszony przycisk ALARM przez 2
sekundy, uruchomienie blokady przycisków
potwierdzane jest krótkim sygna³em i pojawieniem sie
napisów CH LO na wywietlaczu lodówki i
zamra¿arki, napis ten zostanie nastêpnie zast¹piony
temperaturami uprzednio wybranymi dla lodówki i
zamra¿arki.
Aby wy³¹czyæ funkcje wdusiæ przycisk ALARM przez 2
sekundy, wy³¹czenie potwierdzane jest krótkim
sygna³em i pojawieniem siê napisów CH LO na
wywietlaczach lodówki i zamra¿arki przez 2 sekundy.
66
Page 67

PURE WIND
Mo¿na go rozpoznaæ poprzez obecnoæ urz¹dzenia w
górnej czêci komory lodówki (patrz rysunek).
B
A
Wind Pure maksymalnie optymalizuje cyrkulacjê
powietrza, zwiêkszaj¹c skutecznoæ parownika i
umo¿liwiaj¹c szybsze osi¹gniêcie w³aciwej
temperatury wewn¹trz lodówki po ka¿dym jej otwarciu.
Dmuchane powietrze (A) ch³odzi siê po zetkniêciu z
zimn¹ ciank¹, natomiast cieplejsze powietrze (B) jest
zasysane (patrz rysunek).
Tylni acianka pokryta jest bia³ym szronem lub
skroplinami wody zale¿nie od tego, czy kompresor
pracuje czy nie
B
A
B
Najlepszy sposób wykorzystania lodówki
Ustawiæ temperaturê za pomoc¹ wywietlacza.
Wcisn¹æ przycisk SUPER COOL (b³yskawiczne
ch³odzenie), aby jak najszybciej obni¿yæ temperaturê
w przypadku, kiedy komora zostanie wype³niona po
du¿ych zakupach. Funkcja wy³¹cza siê
automatycznie po up³ywie niezbêdnego czasu.
Wk³adaæ artyku³y spo¿ywcze jedynie zimne lub
letnie, ale nie ciep³e (Zalecenia i rodki ostro¿noci).
Pamiêtaæ nale¿y, ¿e ugotowane artyku³y spo¿ywcze
nie mog¹ byæ przechowywane d³u¿ej od surowych.
Nie przechowywaæ p³ynów w otwartych pojemnikach:
zwiêksza³yby wilgotnoæ z konsekwencj¹
formowania siê skroplin.
Najlepszy sposób u¿ytkowania zamra¿arki
Ustawiæ temperaturê za pomoc¹ wywietlacza.
Cool Care Zone jest to specjalna komora
umo¿liwiaj¹ca zamra¿anie w odpowiedniej
temperaturze pewnych rodzajów ¿ywnoci (owoce,
lody, alkohole) dwie pozosta³e komory do
przechowywania (patrz widok ca³oci) dostosowane
s¹ do przechowywania normalnej mro¿onej
¿ywnoci.
W celu zamra¿ania ¿ywnoci w najbardziej
odpowiedni sposób postêpowaæ w sposób opisany
poni¿ej.
Dla drobnych iloci (mniejszych ni¿ po³owa
wskazanej na tabliczce z charakterystyk¹):
- jeli Cool Care Zone jest aktywna, nale¿y w³o¿yæ
¿ywnoæ do dwóch komór konserwacyjnych
uwa¿aj¹c, aby nie styka³a siê ona z ¿ywnoci¹ ju¿
tam siê znajduj¹c¹; wdusiæ przycisk SUPER
FREEZE (szybkie zamra¿anie, w³¹czy siê
odpowiednia DIODA) i zamkn¹æ drzwiczki; funkcja
wy³¹cza siê automatycznie po up³ywie 24 godzin lub
po osi¹gniêciu optymalnej temperatury (DIODA
ganie);
- jeli Cool Care Zone nie jest aktywna mo¿na
stosowaæ tak¿e pierwsz¹ komorê: w³o¿yæ ¿ywnoæ i
powtórzyæ te same kroki, co w poprzednnim
przypadku.
Dla du¿ej iloci (wiêkszych ni¿ po³owa wskazanej na
tabliczce z charakterystyk¹):
Wy³¹czyæ Cool Care Zone i opró¿niæ j¹, przytrzymaæ
wduszony przycisk SUPER FREEZE przez kilka
sekund a¿ odpowiednia DIODA zacznie pulsowaæ.
Potrzeba oko³o 24 godzin, aby zamra¿arka
osi¹gnê³a w³aciw¹ temperaturê do optymalnego
zamra¿ania. Po up³ywie tego czasu DIODA zaczyna
wieciæ sta³ym wiat³em. w³o¿yæ artyku³y spo¿ywcze
i zamkn¹æ drzwi. Po up³ywie kolejnych 24 godzin
¿ywnoæ jest ju¿ ca³kowicie zamro¿ona, funkcja
wy³¹cza siê automatycznie (ganie DIODA); teraz
¿ywnoæ mo¿e byæ przeniesiona do obu dolnych
komór ((dziêki czemu mo¿na ponownie skorzystaæ z
funkcji Cool Care Zone) lub pozostawiæ j¹ w
komorze Cool Care Zone, która po wy³¹czeniu
dzia³a jak normalna komora konserwacyjna.
PL
Nie zamra¿aæ ponownie artyku³ów spo¿ywczych, które
s¹ ca³kowicie lub w czêci rozmro¿one; takie artyku³y
nale¿y ugotowaæ lub zjeæ (w przeci¹gu do 24 godzin).
wie¿e artyku³y, które maj¹ byæ zamro¿one nie mog¹
stykaæ siê z ju¿ zamro¿onymi artyku³ami.
Nie wk³adaæ do zamra¿arki szklanych butelek z p³ynami
zamkniêtych hermetycznie lub korkiem poniewa¿ mog¹
popêkaæ.
67
Page 68

PL
Maksymalna iloæ artyku³ów spo¿ywczych jakie mog¹
byæ zamro¿one w danym dniu wskazana jest na
tabliczce znamionowej, znajduj¹cej siê we wnêce
lodówki u do³u po lewej stronie (przyk³ad: kg/24godz 4).
W celu uzyskania wiêkszej przestrzeni w komorze
zamra¿arki mo¿na wyj¹æ szuflady z ich komór (za
wyj¹tkiem najni¿szej oraz ewentualnie szuflady COOL
CARE ZONE o temperaturze zmienne), uk³adaj¹c
¿ywnoæ bezporednio na p³ytach parownika.
! Podczas fazy zamra¿ania nie otwieraæ drzwi.
! W przypadku przerwy w dop³ywie pr¹du lub w
przypadku usterki, nie otwieraæ drzwi zamra¿arki: w ten
sposób w ci¹gu do 9-14 godzin artyku³y zamro¿one i
mro¿onki nie ulegn¹ zniszczeniu.
Cool Care Zone
Cool Care Zone jest to specjalna komora znajduj¹ca
siê w zamra¿arce umo¿liwiaj¹ca wybranie i ustawienie
4 ró¿nych trybów pracy na podstawie potrzeb oraz
rodzaju ¿ywnoci, jaka jest w niej przechowywana.
Mo¿liwe do wyboru temperatury to -8°C, -12°C i -18°C;
oznaczone odpowiednimi ikonami: truskawka, lód,
butelka widocznymi na panelu kontrolnym. Cool Care
Zone wyposa¿ona jest sterowanie niezale¿ne od
pozosta³ych szuflad znajduj¹cych siê w zamra¿arce,
za pomoc¹ panelu kontrolnego mo¿liwe jest tak¿e
wy³¹czenie funkcji Cool Care Zone i u¿ytkowanie jej
jak normalnej szuflady komory zamra¿alnika.
Wanienka na lód ICE CARE.
! Lód nie styka siê z artyku³ami spo¿ywczymi
h Nie skrapla siê podczas fazy zamra¿ania).
1. Wyj¹æ wanienkê popychaj¹c j¹ do góry, a nastêpnie
w kierunku na zewn¹trz.
Sprawdziæ, czy wanienka zosta³a ca³kowicie
opró¿niona, a nastêpnie nape³niæ j¹ poprzez
odpowiedni otwór.
2. Uwa¿aæ, aby nie przekroczyæ wskazanego poziomu
(MAX WATER LEVEL). Zbyt du¿o wody blokuje
wyjcie kulek lodu (jeli tak siê dzieje, odczekaæ a¿
lód siê rozpuci i opró¿niæ pojemnik).
3. Obróciæ pojemnik o 90°: woda nape³ni przegrody
poniewa¿ d¹¿y do wyrównania poziomów (I>patrz
rysunek).
4. Zamkn¹æ otwór za pomoc¹ pokrywki jaka jest na
wyposa¿eniu i za³o¿yæ pojemnik.
5. Kiedy lód siê uformuje (czas minimalny to 8 godzin),
nale¿y uderzyæ wanienk¹ o tward¹ powierzchnie i
zwil¿yæ wnêtrze, aby kulki lodu odczepi³y siê;
nastêpnie wysypaæ je przez otwór.
MAX
WATER LEVEL
68
WATER LEVEL
MAX
WATER LEVEL
MAX
Page 69

Konserwacja i utrzymanie
Serwis Techniczny
Od³¹czenie pr¹du elektrycznego
Podczas czyszczenia i konserwacji nale¿y od³¹czyæ
urz¹dzenie od sieci elektrycznej:
1.
Przytrzymaæ wciniêty przycisk ON/OFF przez
d³u¿ej ni¿ 2 sekundy do momentu, kiedy
wywietlacz zganie ca³y za wyj¹tkiem czerwonej
diody przycisku ON/OFF
2. wyj¹æ wtyczkê z gniazdka.
!
Brak przestrzegania tej procedury mo¿e wywo³aæ
alarm: nie jest to oznak¹ anomalii. Aby przywróciæ
normalne funkcjonowanie wystarczy trzymaæ wciniêty
przez ponad 2 sek przycisk ON/OFF. Aby odizolowaæ
urz¹dzenie post¹piæ wed³ug punkt 1 i 2.
;
Mycie urz¹dzenia
Czêci zewnêtrzne, czêci wewnêtrzne i gumowe
uszczelki myæ g¹bki zmoczon¹ letni¹ wod¹ i sod¹
oczyszczan¹ lub neutralnym myd³em. Nie u¿ywaæ
rozpuszczalników, rodków ¿r¹cych, wybielaczy lub
amoniaku.
Czêci, które mo¿na wyj¹æ, mog¹ byæ myte w ciep³ej
wodzie z myd³em lub p³ynem do mycia talerzy. Ostro¿nie
wyp³ukaæ i dok³adnie wysuszyæ.
Ty³ urz¹dzenia pokrywa siê kurzem, który mo¿e byæ
usuniêty delikatnie odkurzaczem ustawionym na redni¹
moc, stosuj¹c do tego celu d³ugi przewód giêtki z
koñcówk¹ w formie dziobu i po od³¹czeniu lodówkozamra¿arki od pr¹du.
Unikanie pleni i nieprzyjemnych
zapachów
Urz¹dzenie zosta³o zbudowane z higienicznych
surowców, które nie wytwarzaj¹ zapachów. Aby
utrzymaæ t¹ w³aciwoæ, potrawy musz¹ byæ zawsze
zabezpieczone i dobrze zamkniête. W ten sposób unika
siê tak¿e tworzenia plam.
W przypadku, gdy urz¹dzenie zostanie wy³¹czone na
d³u¿szy czas nale¿y go umyæ, a drzwi pozostawiæ
otwarte.
Usuwanie oblodzenia w lodówkozamra¿arce
! Dostosowaæ siê do poni¿szych instrukcji.
Do rozmra¿ania urz¹dzenia nie u¿ywaæ ostrych im
spiczastych przedmiotów, gdy¿ mog³yby one
bezpowrotnie uszkodziæ system ch³odniczy.
Usuwanie oblodzenia z lodówki
Lodówka jest
wyposa¿ona w funkcjê
automatycznego
usuwania oblodzenia:
woda odprowadzana jest
za lodówkê za pomoc¹
odpowiedniego otworu
(patrz rysunek), gdzie
ciep³o wytworzone przez
sprê¿arkê powoduje jej
odparowanie. Jedyn¹
czynnoci¹ jak¹ nale¿y wykonaæ co jaki czas, to
wyczyszczenie otworu odp³ywowego tak, aby woda
mog³a swobodnie wyciekaæ.
Usuwanie oblodzenia z zamra¿arki
Jeli warstwa oblodzenia jest grubsza od 5 mm nale¿y
usun¹æ oblodzenie z zamra¿arki rêcznie:
1. w przeddzieñ wcisn¹æ przycisk SUPER FREEZE
(zapali siê ¿ó³ta lampka kontrolna SUPER FREEZE)
po to, aby dodatkowo sch³odziæ ¿ywnoæ.
2. Funkcja ta wy³¹cza siê automatycznie po up³ywie 24
godzin lub te¿ w jakimkolwiek momencie wciskaj¹c
ponownie przycisk SUPER FREEZE.
wciniêty przycisk ON/OFF przez d³u¿ej ni¿ 2
sekundy do momentu, kiedy wywietlacz zganie
ca³y za wyj¹tkiem czerwonej diody przycisku ON/
OFF.
3. Owin¹æ mro¿onki i zamro¿on¹ ¿ywnoæ w papier i
od³o¿yæ w ch³odne miejsce.
4. Pozostawiæ otwarte drzwi a¿ do momentu, kiedy
oblodzenie rozpuci siê ca³kowicie; mo¿na u³atwiæ
sobie pracê poprzez umieszczenie w zamra¿arce
pojemników z letni¹ wod¹.
5. Niektóre lodówkozamra¿arki wyposa¿one
s¹ w SYSTEM DRAIN
do odprowadzenia wody
na zewn¹trz (patrz
rysunek).
6. Przed w³¹czeniem
lodówko-zamra¿ki
wyczyciæ i wysuszyæ
dok³adnie komorê
zamra¿arki.
7. Przed w³oeniem produktu ¿ywnociowego do
zamra¿arki zaczekaæ co najmniej 2 godziny do
mpmentu przywrócenia optymalnych warunków
przechowywania.
Przytrzymaæ
PL
69
Page 70

PL
Wymiana ¿arówki
Aby wymieniæ ¿arówkê lodówki, nale¿y najpierw
wyci¹gn¹æ wtyczkê z gniazdka pr¹du. Postêpowaæ
zgodnie z instrukcjami podanymi poni¿ej.
1 1
Odmontowaæ zabezpieczenie, aby dojæ do ¿arówki i
tak jak wskazano na rysunku.
2
Wymieniæ na ¿arówkê o mocy takiej, jaka jest
wskazana na zabezpieczeniu (15 W lub 25 W).
Serwis Techniczny
Przed zwróceniem siê do Serwisu Technicznego:
Sprawdziæ, czy anomalia mo¿e byæ usuniêta samodzielnie (I> patrz Anomalie i ich usuwanie).
Jeli, pomimo wszystkich kontroli, urz¹dzenie nie dzia³a, a usterka nie zosta³a wykryta i dalej wystêpuje, wezwaæ
najbli¿szy serwis Techniczny.
model
numer seryjny
Nale¿y podaæ:
rodzaj anomalii
model urz¹dzenia (Mod.);
numer seryjny (S/N);
Te dane znajduj¹ siê na tabliczce znamionowej w lodówce,
po lewej stronie w dolnj jej czêci.
Gross
Bruto
Brut
TI
75
Test
P.S-I.
RG 2330
Mod.
220 - 240 V- 50 Hz 150 W
340
Total
Gross
Bruto
Brut
Compr.
R 134 a
Syst.
kg 0,090
Kompr.
Made in Italy 13918
93139180000 S/N 704211801
Net
Util
Utile
Pressure
HIGH-235
LOW 140
Cod.
Gross
Bruto
Brut
Fuse
W
A
Freez. Capac
Poder de Cong
kg/24 h
4,0
Max 15 w
Class
Clase
Classe
N
Zwracajcie siê wy³¹cznie do upowa¿nionego Serwisu Technicznego i domagajcie siê zainstalowania tylko i
wy³¹cznie oryginalnych czêci zamiennych:
70
Page 71

Zalecenia i rodki
ostro¿noci
! Urz¹dzenie zosta³o zaprojektowane i wyprodukowane
zgodnie z miêdzynarodowymi przepisami
bezpieczeñstwa. Maj¹c na wzglêdzie Wasze
bezpieczeñstwo podajemy Wam poni¿sze zalecenia,
które nale¿y uwa¿nie przeczytaæ.
Niniejsze urz¹dzenie zosta³o wyprodukowane
zgodnie z nastêpuj¹cymi przepisami EWG:
-73/23/CEE z dn. 19/02/73 (o Niskim Napiêciu)
wraz z kolejnymi zmianami;
- 89/336/CEE z 03/05/89 (o Zgodnoci
Elektromagnetycznej) wraz z kolejnymi zmianami;
- 2002/96/CE.
Ogólne zasady bezpieczeñstwa
Niniejsze urz¹dzenie przeznaczone jest do
zastosowañ domowych oraz nieprofesjonalnych.
Urz¹dzenie jest przeznaczone do przechowywania i
zamra¿ania ¿ywnoci, mo¿e byæ obs³ugiwane jedynie
przez osoby doros³e oraz wed³ug instrukcji podanych
w niniejszej ksi¹¿eczce.
Nie nale¿y instalowaæ urz¹dzenia poza domem, nawet
jeli miejsce to jest chronione daszkiem, gdy¿
wystawienie urz¹dzenia na dzia³anie deszczu i burz
jest bardzo niebezpieczne.
Nie dotykaæ urz¹dzenia, stoj¹c przy nim boso lub
maj¹c rêce czy stopy mokre lub wilgotne.
Nie dotykaæ wewnêtrznych czêci ch³odz¹cych:
istnieje mo¿liwoæ poparzenia lub zranienia.
Nie wyjmowaæ wtyczki z gniazdka, ci¹gn¹c za kabel,
lecz trzymaj¹c za wtyczkê.
Przed przyst¹pieniem do operacji czyszczenia lub
konserwacji wyj¹æ wtyczkê z gniazdka. Nie wystarczy
ustawiæ pokrêt³o do REGULACJI TEMPERATURY na
pozycjê OFF (urz¹dzenie wy³¹czone), aby wyeliminowaæ
ka¿dy kontakt z energi¹ elektryczn¹.
W razie usterek nie nale¿y w ¿adnym wypadku
próbowaæ dostaæ siê do wewnêtrznych czêci
urz¹dzenia, próbuj¹c samemu je naprawiaæ.
Nie u¿ywaæ w sektorach lodówki/zamra¿arki
przeznaczonych do przechowywania zamro¿onej
¿ywnoci, ostrych i spiczastych narzêdzi oraz
urz¹dzeñ elektrycznych, które nie s¹ dozwolone
przez producenta.
Nie wk³adaæ do jamy ustnej kubków lodowych dopiero
co wyjêtych z zamra¿arki.
Nie wolno dzieciom bawiæ siê urz¹dzeniem. W ¿adnym
wypadku nie wolno im siadaæ na szufladkach lub
wieszaæ siê drzwi.
Czêci opakowania nie nadaj¹ siê do zabawy dla
dzieci!
Usuwanie odpadów
PL
Pozbycie siê materia³ów opakowania: stosowaæ siê
do lokalnych przepisów; w ten sposób opakowanie
bêdzie mog³o zostaæ ponownie wykorzystane.
Europejska Dyrektywa 2002/96/EC dotycz¹ca
Zu¿ytych Elektrycznych i Elektronicznych Urz¹dzeñ
(WEEE) zak³ada zakaz pozbywania siê starych
urz¹dzeñ domowego u¿ytku jako nieposortowanych
mieci komunalnych. Zu¿yte urz¹dzenia musz¹ byæ
osobno zbierane i sortowane w celu
zoptymalizowania odzyskania oraz ponownego
przetworzenia pewnych komponentów i materia³ów.
Pozwala to ograniczyæ zanieczyszczenie rodowiska
i pozytywnie wp³ywa na ludzkie zdrowie.
Przekrelony symbol kosza umieszczony na
produkcie przypomina klientowi o obowi¹zku
specjalnego sortowania.
U¿ytkownicy finalni mog¹ dostarczyæ stare urz¹dzenia
do specjalnie do tego przygotowanych punktów zbiórki
odpadów lub do sklepów przy zakupie podobnych
nowych urz¹dzeñ.
Wszyscy czo³owi producenci urz¹dzeñ domowego
u¿ytku biora udzia³ w zarz¹dzaniu i utylizacji starych
produktów.
Oszczêdnoæ i ochrona rodowiska
Zainstalowaæ urz¹dzenie w pomieszczeniu ch³odnym i
przewiewnym, zabezpieczyæ przed bezporednim
wp³ywem promieni s³onecznych daleko od róde³ ciep³a.
Podczas wk³adania lub wyjmowania produktów drzwi
otwieraæ na jak najkrótszy okres czasu. Ka¿de
otwarcie drzwi powoduje znaczn¹ stratê energii.
Nie wk³adaæ do lodówko-zamra¿arki zbyt du¿o
¿ywnoci: dla dobrej konserwacji zimne powietrze
musi kr¹¿yæ bez przeszkód. Jeli cyrkulacja zostanie
utrudniona lub uniemo¿liwiona, to sprê¿arka bêdzie
pracowaæ w ci¹g³ym rytmie.
Nie wk³adaæ ciep³ej ¿ywnoci: podnios³aby siê
temperatura wewnêtrzna, zmuszaj¹c sprê¿arkê do
wysilonej pracy i z du¿¹ strat¹ energii elektrycznej.
Usun¹æ oblodzenie z lodówki (patrz Konserwacja);
du¿a warstwa lodu utrudnia dojcie zimna do
artyku³ów spo¿ywczych i zwiêksza zu¿ycie energii.
Uszczelki maj¹ byæ zawsze czyste i w dobrym stanie i
takie, aby dok³adnie przylega³y do drzwi i aby
hamowa³y ucieczkê zimna (patrz Konserwacja).
71
Page 72

Anomalie i rodki
zaradcze
195064503.00
05/2007 - Xerox Business Services
PL
W przypadku, gdy lodówko-zamra¿arka nie bêdzie funkcjonowa³a. Przed wezwaniem Serwisu Technicznego (I>patrz
Serwis) sprawdziæ, czy nie mo¿na rozwi¹zaæ problemu samemu i wed³ug poni¿szych wskazówek.
Anomalie:
Ekran jest zupe³nie zgaszony.
Silnik nie startuje.
Wywietlacz s³abo siê wieci.
Odzywa siê alarm, pojawia siê na
wywietlaczu komunikat, w³¹cza siê
dioda ALARMY, a ¿arówka w
komorze lodówki pulsuje
Odzywa siê alarm, w³¹cza siê dioda
ALARMY, a na wywietlaczu pojawia
siê komunikat.
Mo¿liwe przyczyny/Porady:
Wtyczka nie jest wsadzona do gniazdka z pr¹dem, albo jest w³o¿ona nie do
oporu tak, ze nie ma styku, albo w sieci domowej nie ma pr¹du.
Lodówko-zamra¿arka jest wyposa¿ona w zabezpieczenie silnika (patrz
Uruchomienie i u¿ytkowanie).
Wyj¹æ wtyczkê, obróciæ wokó³ swojej osi i w³o¿yæ ponownie do gniazda.
Drzwi lodówki pozosta³y otwarte d³u¿ej ni¿ dwie minuty.
Sygna³ dwiêkowy zanika po zamkniêciu drzwi lub po wciniêciu przycisku
RESET ALARM.
Urz¹dzenie sygnalizuje nadmierne rozgrzanie zamra¿arki.
Zamra¿arka utrzyma temperaturê oko³o 0°C po to, aby artyku³y nie uleg³y
rozmro¿eniu. Wówczas artyku³y mog¹ byæ zu¿yte w ci¹gu do 24 godzin
lub ponownie zamro¿one po uprzednim ich ugotowaniu.
Aby wy³¹czyæ sygna³ dwiêkowy wcisn¹æ przycisk RESET ALARM. Wdusiæ
po raz drugi, aby usun¹æ komunikat na wywietlaczu, wy³¹czyæ diodê
ALARMY i przywróciæ normalne funkcjonowanie.
Odzywa siê alarm, pulsuje dioda
ALARMY a na wywietlaczu pojawia
siê komunikat.
Lodówka i zamra¿arka s³abo
ch³odz¹.
Potrawy w lodówce zamra¿aj¹ siê.
Silnik pracuje bez przerwy.
Urz¹dzenie pracuje bardzo g³ono.
Urz¹dzenie sygnalizuje niebezpieczne rozgrzanie siê zamra¿arki: produkty
nie nadaj¹ siê do spo¿ycia. Zamra¿alnik utrzyma siê na temperaturze
zbli¿onej do 0°C.
Aby wy³¹czyæ sygna³ dwiêkowy wcisn¹æ przycisk RESET ALARM. Wdusiæ
po raz drugi, aby usun¹æ komunikat na wywietlaczu, wy³¹czyæ diodê
ALARMY i przywróciæ normalne funkcjonowanie.
Drzwi nie domykaj¹ siê lub uszczelki s¹ zniszczone.
Drzwi za czêsto s¹ otwierane.
Zosta³a ustawiona zbyt wysoka temperatura (patrz Uruchomienie i
u¿ytkowanie).
Lodówka lub zamra¿arka s¹ przepe³nione.
Zosta³a ustawiona zbyt niska temperatura (patrz Uruchomienie i u¿ytkowanie).
W³¹czone zosta³y funkcje SUPER COOL, SUPER FREEZE lub ICE
PARTY;
Drzwi nie s¹ domkniête lub s¹ ci¹gle otwierane.
Zbyt wysoka temperatura pomieszczenia.
Urz¹dzenie nie zosta³o zainstalowane w poziomie (brak wypoziomowania)
(I>patrz Instalowanie).
Urz¹d zenie zosta³o zainstalowane pomiêdzy meblami lub przedmiotami,
które drgaj¹ i wytwarzaj¹ ha³as.
Gaz ch³odz¹cy w instalacji wytwarza lekki ha³as nawet kiedy sprê¿arka nie
pracuje: to nie usterka lecz stan normalny.
Przypieszenie funkcji
Na wywietlaczu pojawia siê
komunikat (np. F01).
72
Zak³ócenia elektryczne w sieci lub krótkotrwa³e zaniki napiêcia
zasilaj¹cego.
Wezwaæ Serwis Techniczny.
 Loading...