

Page 1
Care, Use and
Installation Booklet
Contents
Installation, 2
EN
English
BDR 190 NA
F
Français, 11
ES
Espanol, 21
Positioning and connection
Description of the appliance, 5
Overall view
Accessories, 6
Start-up and use, 6
Starting the appliance
Chiller system
Using the refrigerator to its full potential
Maintenance and care, 7
Switching the appliance off
Cleaning the appliance
Avoiding mold and unpleasant odors
Defrosting the appliance
Replacing the light bulb
FRIDGE
GB
Precautions and tips, 8
General safety
Disposal
Respecting and conserving the environment
Troubleshooting, 9
Assistance, 10
www.aristonappliances.us
Page 2
Installation
EN
± 0,08
35,35
± 0,08
21,57
32,87÷34,84
When installing the product, pre-assemble the
wooden doors first.
Fix the six brackets supplied onto the back part of
the doors, using the measurements given in figure 1.
1
35,43 min
21,65 min
± 0,12
28,27
32,99÷34,96
4,72÷6,69
A
A
C
H
E
G
B
D
Fit 2 pins “A” onto each of the two refrigerator
compartments, as illustrated in figure 2.
Fit the doors by inserting the lower brackets
installed previously into the relevant places on both
the compartments.
Tighten the two screws “B” on each of the two upper
brackets on the compartments to complete the doorfixing procedure.
L - 32,63
A = =
2
H
B = - 13,7 =
2
2
A
B
C
F
L
L
- 1,77
C = =
2
D = 0,37 - =
G
2
E = 0,31 - =
F = - 13,64 =
G
2
H
2
2
www.aristonappliances.us
Page 3
Position the refrigerator in the niche and attach the
power plug.
Adjust the feet until the product comes into contact
with the top of the unit.
Fix the product at the sides, using the flat head
screws provided as shown in figure 4.
To align the refrigerator doors with the other panels
in the unit, adjust the pins and the screws (figure 2).
3
4
EN
If the product is recessed after it has been
assembled, fix the refrigerator at the sides towards
the back as well, using an extra bracket and the
screws provided as shown in figure 5.
N˚5
5
www.aristonappliances.us
3
Page 4

! Before placing your new appliance into operation
EN
please read these operating instructions carefully.
They contain important information for safe use, for
installation and for care of the appliance.
! Please keep these operating instructions for future
reference. Pass them on to new owners of the
appliance.
Positioning and connection
Positioning
1. Place the appliance in a well-ventilated humidity-free
room.
2. Do not obstruct the rear fan grills. The compressor
and condenser give off heat and require good
ventilation to operate correctly and save energy.
3. Ensure the appliance is away from any sources of
heat (direct sunlight, electric stove, etc.).
The product was designed exclusively for “built in”
4.
installation and must not be directly exposed to
atmospheric agents.
Levelling
1. Install the appliance on a level and rigid floor.
2. If the floor is not perfectly horizontal, adjust the
refrigerator by tightening or loosening the front or rear
feet.
Electrical connections
After the appliance has been transported, carefully
place it vertically and wait at least 3 hours before
connecting it to the electricity mains. Before inserting
the plug into the electrical socket ensure the following:
• The electrical outlet is grounded and compliant with
all electrical codes.
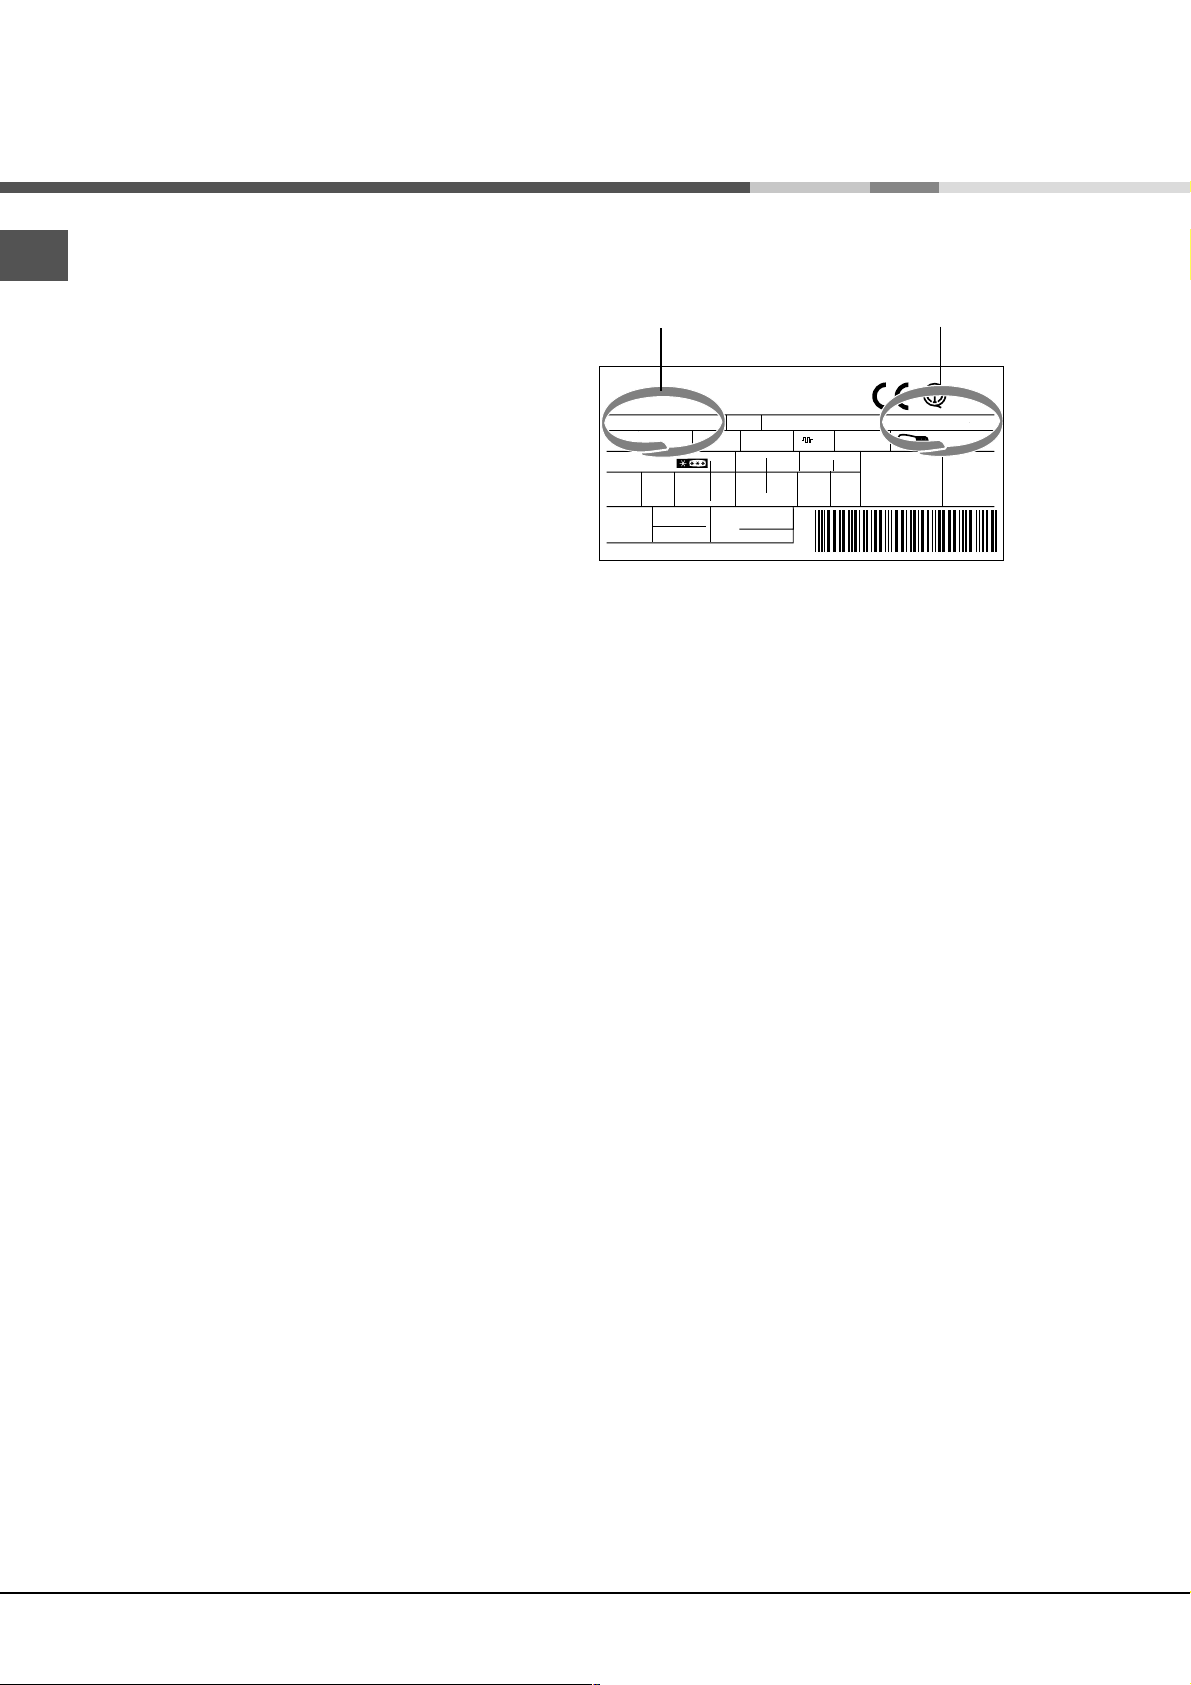
• The outlet can withstand the maximum power of the
appliance, which is indicated on the data plate
located on the right side of the horizontal surface in
the top compartment, under the thermostat (e.g. 150
W).
• The voltage is within the range of values indicated on
the data plate located on the right side of the
horizontal surface in the top compartment, under the
thermostat (e.g. 110V).
• The outlet is compatible with the plug of the
appliance.
If the outlet is incompatible with the plug, ask an
authorised technician to replace it (
Do not use extension cords or multiple sockets.
! Once the appliance has been installed, the power
supply cable and the electrical outlet must be easily
accessible.
! The cable must not be bent or compressed.
! The cable must be checked regularly and replaced by
authorised technicians only (see Assistance).
! The manufacturer declines any liability should
these safety measures not be observed.
see Assistance
).
4
www.aristonappliances.us
Page 5
Description of the
appliance
Overall view
The instructions contained in this manual are applicable to different model refrigerators. The diagrams may not
directly represent the appliance purchased. For more complex features, consult the following pages.
BOTTLE AREA
MULTI-USE box with
EGG TRAY and
BUTTER DISH
FRUIT and
VEGETABLE bin
LIGHT
TEMPERATURE
CONTROL
EN
PROFESSIONAL
containers
www.aristonappliances.us
BOTTLE SHELF
compartment
5
Page 6

Accessories
Start-up and use
EN
up just 1,25 inches of space inside the refrigerator.
MULTI-USE box: fixed at the
top of the compartment, was
designed to keep various foods
fresher for longer periods of
time (for example eggs, butter
or food in small containers); it
prevents food odors from
permeating into the refrigerator.
BOTTLE AREA: this special
accessory is fixed at the top of
the compartment and was
designed to hold up to 3 bottles
of wine or water, without taking
up extra space. Bottles may be
placed in the BOTTLE AREA
when it is open, yet when the
compartment is closed it takes
VEGETABLE BINS: two
practical vegetable bins are
located in the top compartment.
These are easy to remove and
may be taken out to be placed
on the worktop or to be washed.
PROFESSIONAL stainless steel
containers: two professional
containers (with covers) are
located in the lower
compartment. They were
designed to store meat,
cheeses or fish.
Starting the appliance
! Before starting the appliance, follow the
installation instructions (
! Before connecting the appliance, clean the
compartments and accessories well with lukewarm
water and baking soda.
1. Insert the plug into the outlet and ensure that the
internal light illuminates.
2. Turn the TEMPERATURE ADJUSTMENT knob to an
average value. After a few hours you will be able to
put food in the refrigerator.
see Installation
).
Setting the temperature
The temperature inside the refrigerator compartment
automatically adjusts itself according to the position of
the thermostat knob.
1 = warmest MAX = coldest
We recommend, however, a medium position.
The “cooling section” of the refrigerator is located
inside the back wall of the compartment, providing
increased space and improved aesthetics. The back
wall will be covered in frost or water droplets depending
on whether the compressor is operating or paused. This
is not a cause for concern; the refrigerator is
functioning normally.
If the TEMPERATURE ADJUSTMENT knob has been set
to a high value, with large quantities of food inside and
a high ambient temperature outside the refrigerator, the
appliance could operate continuously, resulting in high
frost formation and high energy consumption: this may
be counteracted by turning the knob towards lower
temperature values (defrosting will occur automatically).
Using the refrigerator to its full potential
BOTTLE SHELF compartment:
to keep two bottles in a stable
position, use the special
stainless steel grilles in the
lower compartment.
6
• Use the TEMPERATURE ADJUSTMENT knob to
adjust the temperature (
• Place only cold or lukewarm foods in the
compartment, not hot foods (
).
tips
• Remember that cooked foods do not last longer than
raw foods.
• Do not store liquids in open containers. They will
increase humidity in the refrigerator and cause
condensation to form.
see Description
see Precautions and
www.aristonappliances.us
).
Page 7
Maintenance and care
Switching the appliance off
During cleaning and maintenance it is necessary to
disconnect the appliance from the electricity supply:
It is not sufficient to set the temperature adjustment
knobs on
electrical contact.
(appliance off) since it will not eliminate all
Cleaning the appliance
• The external and internal parts, as well as the rubber
seals may be cleaned using a sponge that has been
soaked in lukewarm water and baking soda or
neutral soap. Do not use solvents, abrasive
products, bleach or ammonia.
• The removable accessories may be soaked in warm
water and soap or dishwashing liquid. Rinse and dry
them carefully.
Avoiding mould and unpleasant odors
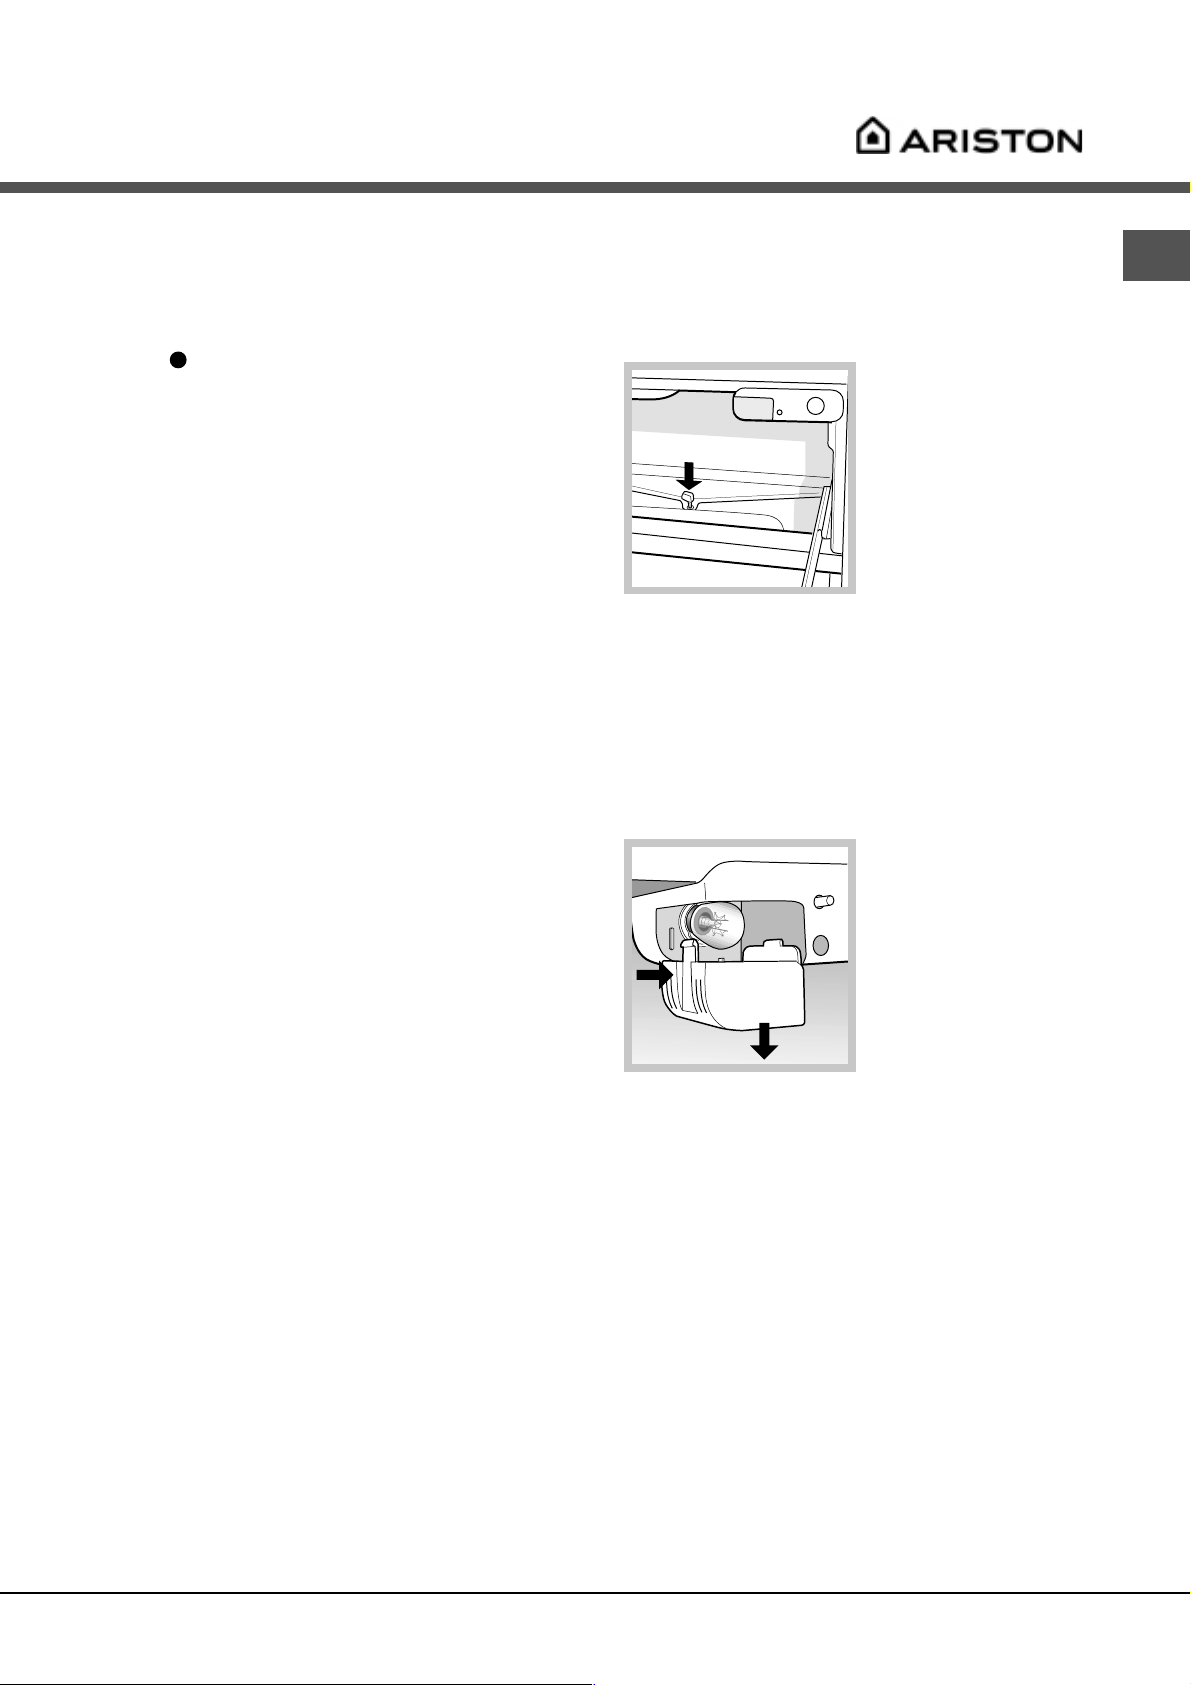
Defrosting the appliance
EN
The refrigerator has an automatic defrosting function:
water is ducted to the back of the appliance by a
special discharge outlet (see diagram) where the heat
produced by the
compressor causes it to
evaporate. It is not,
therefore, necessary to
defrost the refrigerator
manually. It is, however,
necessary to clean the
discharge hole regularly
so that the water can flow
out easily.
Replacing the light bulb*
To replace the light bulb in the refrigerator
compartment, pull out the plug from the electrical
outlet. Follow the instructions below.
• The appliance is manufactured with hygienic
materials which are odor free. In order to maintain an
odor free refrigerator and to prevent the formation of
stains, food must always be covered or sealed
properly.
• If you want to switch the appliance off for an
extended period of time, clean the inside and leave
the doors open.
Access the light bulb by
removing the cover as
indicated in the diagram.
Replace it with a similar
1
light bulb within the
power range indicated on
the cover (10 W).
2
Available only on certain models.
*
www.aristonappliances.us
7
Page 8

Precautions and tips
! The appliance was designed and manufactured in
EN
compliance with international safety standards. The
following warnings are provided for safety reasons and
must be read carefully.
DANGER: Risk of child entrapment. Before you throw
away your old refrigertor or freezer:
- Take off the doors.
- Leave the shelves in place so that children may not
easily climb inside.
General safety
• The appliance was designed for domestic use inside the
home and is not intended for commercial or industrial
use.
• The appliance must be used to store food products by
adults only and according to the instructions in this
manual.
• Do not touch the appliance with bare feet or with wet or
moist hands and feet.
• Do not touch the internal cooling elements: this could
cause skin abrasions or burns.
• When unplugging the appliance always pull the plug
from the mains outlet, do not pull on the cable.
• Before cleaning and maintenance, always switch off the
appliance and disconnect it from the electrical supply. It
is not sufficient to set the temperature adjustment knobs
(appliance off) since it will not eliminate all
on
electrical contact.
• In the case of a malfunction, under no circumstances
should you attempt to repair the appliance yourself.
Repairs carried out by inexperienced persons may
cause injury or further malfunctioning of the appliance.
• Do not use devices or tools other than the special
scraper provided inside the compartments.
• Do not allow children to tamper with the controls or play
with the appliance. Under no circumstance should they
be allowed to sit on the bins or to hang from the door.
• Keep packaging material out of the reach of children! It
can become a choking or suffocation hazard.
Disposal
• Observe local environmental standards when
disposing packaging material for recycling
purposes.
• Observe existing legislation when disposing of the
old appliance.
Refrigerants such as isobutane and cyclopentane
are located in the cooling zones and the isolation
system of the refrigerator and freezer. Ensure that the
pipes are not damaged. Leakage of these
refrigerants is harmful to the environment.
• Make the appliance unusable by cutting off the cable
and remove any door catches before disposal.
Respecting and conserving the
environment
• Install the appliance in a fresh and well-ventilated
room. Ensure that it is protected from direct sunlight
and do not place it near heat sources.
• Try to avoid keeping the door open for long periods
or opening the door too frequently in order to
conserve energy.
• Do not fill the appliance with too much food:
cold air must circulate freely for food to be preserved
properly. If circulation is impeded, the compressor
will work continuously.
• Do not place hot food directly into the refrigerator.
The internal temperature will increase and force the
compressor to work harder and will consume more
energy.
• Defrost the appliance if ice forms (
A thick layer of ice makes cold transference to food
products more difficult and results in increased
energy consumption.
• Regularly check the door seals and wipe clean to
ensure they are free of debris and to prevent cold air
from escaping (
see Maintenance
see Maintenance
).
).
8
www.aristonappliances.us
Page 9
Troubleshooting
If the appliance does not work, before calling for Assistance (
Malfunctions:
The internal light does not
illuminate.
The refrigerator does not cool well.
The food inside the refrigerator is
beginning to freeze.
The motor runs continuously.
The appliance makes a lot of noise.
Possible causes / Solutions:
• The plug has not been inserted into the electrical outlet, or not far
enough to make contact, or there is no power in the house.
• The doors do not close properly or the seals are damaged.
• The doors are opened too frequently.
• The TEMPERATURE ADJUSTMENT knob is not in the correct position
• The refrigerator has been over-filled.
• The TEMPERATURE ADJUSTMENT knob is not in the correct position.
• The door is not closed properly or is continuously opened.
• The outside ambient temperature is very high.
• The thickness of the frost exceeds 1/8 of an inch (
• The appliance has not been installed on a level surface (
)
Installation
• The appliance has been installed between cabinets that vibrate and
make noise.
• The internal refrigerant makes a slight noise even when the compressor
is off. This is not a defect, it is normal.
.
see Assistance
), check for a solution from the following list.
see Maintenance
see
).
EN
There is water at the bottom of the
refrigerator.
• The water discharge hole is blocked (
see Maintenance
).
www.aristonappliances.us
9
Page 10
Assistance
195055171.00
11/2005
EN
Before calling for Assistance:
•
Check if the malfunction can be solved on your own (
see Troubleshooting
).
• If after all the checks, the appliance still does not operate or the problem persists, call the Ariston
Customer Care Line at 1 888 426 0825
model serial number
Communicating:
• type of malfunction
• appliance model (Mod.)
• serial number (S/N)
This information can be found on the data
plate located on the right side of the horizontal
surface in the top compartment (under the
thermostat).
Gross
Bruto
Brut
TI
75
Test
P.S-I.
RG 2330
Mod.
220 - 240 V- 50 Hz 150 W
340
Total
Gross
Bruto
Brut
Compr.
R 134 a
Syst.
kg 0,090
Kompr.
Made in Italy 13918
93139180000 S/N 704211801
Net
Util
Utile
Pressure
HIGH-235
LOW 140
Cod.
Gross
Bruto
Brut
Fuse
W
A
Freez. Capac
Poder de Cong
4,0
kg/24 h
Max 15 w
Class
Clase
Classe
N
Never call on unauthorized technicians and always refuse spare parts which are not originals.
10
www.aristonappliances.us
Page 11

Notice d'emploi et
d'installation
EN
English
BDR 190 NA
F
Français, 11
ES
Espanol, 21
REFRIGERATEUR/
Sommaire
F
Installation, 12
Mise en place et raccordement
Description de lappareil, 15
Vue d’ensemble
Accessoires, 16
Mise en marche et utilisation, 16
Mise en service de l’appareil
Réglage de la température
Pour profiter à plein de votre réfrigérateur
Entretien et soins, 17
Mise hors tension
Nettoyage de l’appareil
Contre la formation de moisissures et de mauvaises odeurs
Dégivrage de l’appareil
Remplacement de l’ampoule d’éclairage
Précautions et conseils, 18
Sécurité générale
Mise au rebut
Economies et respect de l’environnement
Anomalies et remèdes, 19
Assistance, 20
Page 12

Installation
F
± 0,08
35,35
± 0,08
21,57
32,87÷34,84
Les opérations d’installation de l’appareil prévoient
en premier lieu le préassemblage des portes en
bois.
Fixer, en respectant les cotes indiquées à la figure
1, les six étriers fournis à l’arrière des portes.
1
35,43 min
21,65 min
± 0,12
28,27
32,99÷34,96
4,72÷6,69
A
A
C
H
E
G
B
D
Monter 2 goujons “A” sur les deux tiroirs du
réfrigérateur, comme illustré à la figure 2.
Installer les portes en introduisant les étriers
inférieurs montés précédemment dans les
logements prévus sur les deux tiroirs.
Pour terminer l’opération de fixation des portes,
insérer les deux vis “B” sur les deux étriers
supérieurs des tiroirs.
L - 32,63
A = =
2
H
B = - 13,7 =
2
2
A
B
C
F
L
L
- 1,77
C = =
2
D = 0,37 - =
G
2
E = 0,31 - =
F = - 13,64 =
G
2
H
2
12
www.aristonappliances.us
Page 13

Glisser le réfrigérateur dans la niche et brancher la
fiche d’alimentation.
Régler la hauteur des pieds pour amener l’appareil
tout contre le plan de travail de la cuisine.
Fixer l’appareil sur les côtés à l’aide des vis à tête
plate fournies comme illustré à la figure 4.
Pour aligner les portes du réfrigérateur aux autres
panneaux de la cuisine, se servir des goujons et
des vis (figure 2).
3
4
F
Si l’appareil est encastré en bout de composition,
fixer le réfrigérateur latéralement et à l’arrière aussi,
à l’aide d’une autre équerre et des vis fournies
comme illustré à la figure 5.
N˚5
5
www.aristonappliances.us
13
Page 14

! Conservez ce mode d’emploi pour pouvoir le consulter
F
à tout moment. En cas de vente, de cession ou de
déménagement, veillez à ce qu’il suive l’appareil pour
informer le nouveau propriétaire sur son fonctionnement
et lui fournir les conseils correspondants.
Raccordement électrique
Après le transport, placez l’appareil à la verticale et
attendez au moins 3 heures avant de le raccorder à
l’installation électrique. Avant de brancher la fiche dans
la prise de courant, assurez-vous que:
! Lisez attentivement les instructions: elles contiennent
des conseils importants sur l’installation, l’utilisation et la
sécurité de votre appareil.
Mise en place et raccordement
Mise en place
1. Placez l’appareil dans une pièce bien aérée et non
humide.
2. Ne bouchez pas les grilles d’aération arrière: le
compresseur et le condensateur produisent de la
chaleur et exigent une bonne aération pour bien
fonctionner et réduire la consommation d’électricité.
3. Installez l’appareil loin de sources de chaleur (rayons
directs du soleil, cuisinière électrique).
4. Cet appareil est exclusivement conçu pour installation
en encastré et ne doit pas être directement exposé aux
agents atmosphériques.
Mise à niveau
1. Installez l’appareil sur un sol plat et rigide.
2. Si le sol nest pas parfaitement horizontal, visser ou
dévisser les pieds de réglage avant et arrière pour bien
niveler lappareil.
• la prise est bien munie d’une terre conforme à la loi;
• la prise est bien apte à supporter la puissance
maximale de l’appareil, reportée sur la plaquette
signalétique placée sur la paroi de droite, en haut,
juste au-dessous du thermostat (150 W par ex.);
• la tension d’alimentation est bien comprise entre les
valeurs reportées sur la plaquette signalétique placée
sur la paroi de droite, en haut, juste au-dessous du
thermostat (110 V par ex.);
• la prise est bien compatible avec la fiche de l’appareil.
En cas d’incompatibilité, faites remplacer la fiche par
un technicien agréé (
rallonges ni prises multiples.
! Après installation de l’appareil, le câble électrique et la
prise de courant doivent être facilement accessibles.
! Le câble ne doit être ni plié ni excessivement écrasé.
! Il doit être contrôlé prériodiquement et ne peut être
remplacé que par un technicien agréé (voir Assistance).
! Nous déclinons toute responsabilité en cas de non
respect des normes énumérées ci-dessus.
voir Assistance
); nutilisez ni
14
www.aristonappliances.us
Page 15

Description de
lappareil
Vue densemble
Ces instructions d’utilisation s’appliquent à plusieurs modèles, il se peut donc que les composants illustrés
présentent des différences par rapport à ceux de l’appareil que vous avez acheté. Vous trouverez dans les pages
suivantes la description des objets plus complexes.
Boîte
MULTIFONCTION
avec CASIER A
OEUFS et BEURRIER
WINE AREA
Bac FRUITS et
LEGUMES
AMPOULE
DÉCLAIRAGE
Manette pour le
RÉGLAGE DE LA
TEMPÉRATURE
F
Bacs
PROFESSIONNELS
en acier
www.aristonappliances.us
Rangement
BOUTEILLES
15
Page 16

Accessoires
Mise en marche et utilisation
F
N’existe que sur certains modèles.
*
Boîte MULTIFONCTION: fixée au
plafond du compartiment
réfrigérateur, elle est
spécialement conçue pour
prolonger la durée de
conservation de certains aliments
(œufs, beurre et petits récipients)
et éviter la diffusion d’odeurs à
l’intérieur du réfrigérateur.
WINE AREA: cet accessoire
spécial, fixé au plafond du
réfrigérateur, permet de ranger
3 bouteilles de vin sans
occuper d’espace additionnel.
Ouverte, la WiNE AREA sert à
loger vos bouteilles, fermée,
elle se fait toute petite et
n’occupe que 1,25 pouces.
BACS A LEGUMES: deux
bacs à légumes très pratiques
occupent le tiroir du haut. Ils
sont amovibles et faciles à
sortir pour être posés sur un
plan de travail ou pour être
lavés.
Bacs PROFESSIONNELS en
acier: deux bacs
professionnels, munis de
couvercle, occupent le tiroir du
bas. Il sont spécialement
conçus pour conserver la
viande, le fromage ou le
poisson.
Rangement BOUTEILLES:
pour ranger deux bouteilles de
façon tout à fait stable, vous
pouvez vous servir des grilles
spéciales en acier inox placées
sur le tiroir du bas.
Mise en service de lappareil
! Avant de mettre lappareil en service, suivez bien
les instructions sur l’installation (
! Avant de brancher votre appareil, nettoyez bien les
compartiments et les accessoires à l’eau tiède
additionnée de bicarbonate.
1. Branchez la fiche dans la prise de courant et
assurez-vous que l’éclairage intérieur s’allume.
2. Amenez le bouton de REGLAGE DE LA
TEMPERATURE sur une valeur intermédiaire. Au
bout de quelques heures, vous pourrez commencer
à stocker des aliments dans le réfrigérateur.
voir Installation
).
Réglage de la température
Le réglage de la température à l’intérieur du
compartiment réfrigérateur est automatique en
fonction de la position du bouton du thermostat.
1 = moins froid MAX = plus froid
Nous conseillons toutefois une position intermédiaire
Pour augmenter la place disponible, simplifier le
rangement et améliorer l’aspect esthétique, cet
appareil loge sa “partie réfrigérante” à l’intérieur de la
paroi arrière du compartiment. Cette paroi est tour à
tour couverte de givre ou de gouttelettes d’eau selon
que le compresseur est en marche ou à l’arrêt. Ne
vous inquiétez pas ! Votre réfrigérateur fonctionne
normalement.
Si vous amenez le bouton de REGLAGE DE LA
TEMPERATURE sur des valeurs plus élevées, que
vous stockez de grandes quantités d’aliments et que
la température ambiante est élevée, votre appareil
risque de fonctionner de façon continue, ce qui
entraîne une formation abondante de givre et une plus
grande consommation d’électricité: pour résoudre ce
problème, amenez le bouton sur des valeurs plus
basses (un dégivrage automatique sera lancé).
Pour profiter à plein de votre
réfrigérateur
• Pour régler la température, utilisez le bouton de
REGLAGE DE LA TEMPERATURE (
• N’introduisez que des aliments froids ou à peine tièdes,
jamais chauds (
• Les aliments cuits contrairement à ce que l’on croit ne se
conservent pas plus longuement que les aliments crus.
• N’introduisez pas de récipients non fermés contenant
des liquides: ces derniers entraîneraient une
augmentation de l’humidité et la formation d’eau
condensée.
voir Précautions et conseils
voir Description
).
).
16
www.aristonappliances.us
Page 17

Entretien et soin
Mise hors tension
Pendant les opérations de nettoyage et d’entretien,
mettez l’appareil hors tension en débranchant la fiche
de l’appareil de la prise de courant. Il ne suffit pas de
placer le bouton de réglage de la température sur
(appareil éteint) pour éliminer tout contact électrique.
Nettoyage de lappareil
• Nettoyez l’extérieur, l’intérieur et les joints en
caoutchouc à l’aide d’une éponge imbibée d’eau
tiède additionnée de bicarbonate de soude ou de
savon neutre. N’utilisez pas de solvants, de
produits abrasifs, d’eau de Javel ou
d’ammoniaque.
• mettez tremper les accessoires amovibles dans de
l’eau chaude additionnée de savon ou de liquide
vaisselle. Rincez-les et essuyez-les
soigneusement.
Contre la formation de moisissures et
de mauvaises odeurs
• Cet appareil est fabriqué dans des matériaux
hygiéniques qui ne transmettent pas d’odeur. Pour
sauvegarder cette caractéristique, veillez à bien
emballer et couvrir vos aliments. Vous éviterez par
la même occasion la formation de taches.
Dégivrage de lappareil
Le réfrigérateur est muni d’un système de dégivrage
automatique : l’eau est acheminée vers le bas du
compartiment par un trou d’évacuation (voir figure) où
la chaleur produite par le compresseur la fait
évaporer. Aucune opération de dégivrage du
réfrigérateur n’est par conséquent nécessaire. Il vous
suffit de nettoyer périodiquement le trou d’évacuation
pour permettre à l’eau de s’écouler normalement.
Remplacement de lampoule
déclairage
Pour remplacer l’ampoule d’éclairage du
compartiment réfrigérateur, débranchez la fiche de la
prise de courant. Suivez les indications fournies cidessous.
1
*
Pour pouvoir remplacer
l’ampoule, démontez le
couvercle de protection
comme illustré (voir
figure). Remplacez-la
par une ampoule
semblable dont la
puissance doit
correspondre à celle
2
indiquée sur le
couvercle de protection
(max 10W).
F
• Si vous devez laisser votre appareil éteint pendant
une période de temps prolongée, nettoyez-le bien
l’intérieur et laissez les portes ouvertes.
N’existe que sur certains modèles.
*
www.aristonappliances.us
17
Page 18

Précautions et conseils
! L’appareil a été conçu et fabriqué conformément aux
F
normes internationales de sécurité. Ces conseils sont
fournis pour des raisons de sécurité et doivent être lus
attentivement.
DANGER: Les enfants risquent de rester enfermés.
Avant de mettre au rebut un vieux réfrigérateur ou un
congélateur:
- déposer les portes
- retirer les clayettes pour éviter que les enfants s’en
servent pour grimper à l’intérieur de l’appareil.
Sécurité générale
• Cet appareil a été conçu pour un usage familial, de
type non professionnel.
• Cet appareil qui sert à conserver des aliments ne
doit être utilisé que par des adultes conformément
aux instructions du mode d’emploi.
• Ne touchez pas à l’appareil pieds nus ou si vos
mains ou pieds sont mouillés ou humides.
• Ne touchez pas aux parties refroidissantes:vous
pourriez vous brûler ou vous blesser.
• Pour débrancher la fiche de la prise de courant,
sortez la fiche, ne tirez surtout pas sur le câble.
• Avant d’effectuer toute opération de nettoyage ou
d’entretien, débranchez la fiche de la prise de
courant. Il ne suffit pas de placer le bouton de
REGLAGE DE LA TEMPERATURE sur OFF (appareil
éteint) pour éliminer tout contact électrique.
• En cas de panne, n’essayez en aucun cas
d’accéder aux mécanismes internes pour tenter de
réparer l’appareil.
• A l’intérieur des compartiments, n’utilisez aucun
dispositif ou ustensile autre que la raclette fournie
avec l’appareil.
• Ne permettez pas aux enfants de jouer avec
l’appareil. Il ne faut en aucun cas qu’ils s’asseyent
sur les tiroirs ou qu’ils s’accrochent à la porte.
• Les emballages ne sont pas des jouets pour
enfants.
Mise au rebut
• Mise au rebut du matériel d’emballage : conformezvous aux réglementations locales, les emballages
pourront ainsi être recyclés.
• Mise au rebut de votre vieil appareil : conformezvous à la législation applicable en la matière.
Les réfrigérateurs et les congélateurs contiennent
en effet dans leur zone de refroidissement et au
niveau de leur isolation du gaz isobutane et
cyclopentane qui, libérés dans l’atmosphère sont
dangereux pour l’environnement. Evitez donc que
les tuyaux rigides soient endommages.
• Avant de mettre au rebut votre vieil appareil,
rendez-le inutilisable en coupant son câble
d’alimentation électrique et en démontant son
loquet.
Economies et respect de
lenvironnement
• Installez votre appareil dans un endroit frais et bien
aéré, protégez-le contre l’exposition directe aux
rayons du soleil et ne le placez pas près de
sources de chaleur.
• Pour introduire ou sortir les aliments, n’ouvrez les
portes de l’appareil que le temps strictement
nécessaire.
Chaque ouverture de porte cause une considérable
dépense d’énergie.
• Ne chargez pas trop votre appareil :
pour une bonne conservation des aliments, le froid
doit pouvoir circuler librement. Si la circulation est
entravée, le compresseur travaillera en
permanence.
• N’introduisez pas d’aliments chauds : ces derniers
font monter la température intérieure ce qui oblige
le compresseur à travailler beaucoup plus en
gaspillant un tas d’électricité.
• Dégivrez l’appareil dès que de la glace se dépose
voir Entretien
(
gêne considérablement la cession de froid aux
aliments et augmente la consommation
d’électricité.
); une couche de glace trop épaisse
18
• Gardez toujours les joints propres et en bon état
pour qu’ils adhèrent bien aux portes et ne laissent
pas le froid s’échapper (
voir Entretien
www.aristonappliances.us
).
Page 19

Anomalies et remèdes
Il peut arriver que l’appareil ne fonctionne pas. Avant de téléphoner au service de dépannage (
contrôlez s’il ne s’agit pas d’un problème facile à résoudre à l’aide de la liste suivante.
Anomalies:
Léclairage intérieur ne sallume
pas.
Le réfrigérateur
insuffisantinsuffisant
insuffisant.
insuffisantinsuffisant
Les aliments gèlent à lintérieur du
réfrigérateur.
Le moteur est branché en
permanence.
Lappareil est très bruyant.
a un rendementa un rendement
a un rendement
a un rendementa un rendement
Causes / Solution possibles:
• La fiche n’est pas branchée dans la prise de courant ou pas assez
enfoncée pour qu’il y ait contact ou bien il y a une coupure de courant.
• Les portes ne ferment pas bien ou les joints sont abîmés.
• Ouverture trop fréquente des portes.
• La position du bouton de REGLAGE DE LA TEMPERATURE n’est pas
correcte
• Le réfrigérateur et le congélateur sont excessivement remplis.
• La position du bouton de REGLAGE DE LA TEMPERATURE n’est pas
correcte
• La porte n’est pas bien fermée ou trop souvent ouverte.
• La température à l’extérieur est très élevée.
• L’épaisseur du givre dépasse 1/8 pouce (
• L’appareil n’a pas été installé bien à plat (
• L’appareil est installé entre des meubles ou des objets qui vibrent et font
du bruit.
• Le gaz réfrigérant interne produit un léger bruit même quand le
compresseur est à l’arrêt : il ne s’agit pas d’un défaut, c’est tout à fait
normal.
voir Entretien
voir Installation).
voir Assistance
).
),
F
Il y a de leau dans le fond du
réfrigérateur.
• Le trou d’évacuation de l’eau est bouché (
voir Entretien
).
www.aristonappliances.us
19
Page 20

Assistance
195055171.00
11/2005
F
•
Vérifiez si vous pouvez résoudre l’anomalie vous-même (
voir Anomalies et Remèdes
).
• Si, malgré tous ces contrôles, l’appareil ne fonctionne toujours pas et l’inconvénient persiste, faites appel
au service après-vente - Ariston Customer Care Line at 1 888 426 0825
Avant de contacter le centre dAssistance :
Signalez :
• le type d’anomalie
• le modèle de l’appareil (Mod.)
• le numéro de série (S/N)
Vous trouverez tous ces renseignements sur la
plaquette signalétique placée sur la paroi de
droite, en haut (juste au dessous du
modèle
Gross
Bruto
Brut
75
Test
P.S-I.
TI
Net
Util
Utile
Pressure
HIGH-235
LOW 140
Cod.
RG 2330
Mod.
220 - 240 V- 50 Hz 150 W
340
Total
Gross
Bruto
Brut
Compr.
R 134 a
Syst.
kg 0,090
Kompr.
Made in Italy 13918
93139180000 S/N 704211801
Fuse
A
W
Gross
Bruto
Brut
Freez. Capac
Poder de Cong
kg/24 h
numéro de série
Max 15 w
Class
Clase
N
Classe
4,0
thermostat).
Ne faites jamais appel à des techniciens non agréés et refusez toujours des pièces détachées non
originales.
20
www.aristonappliances.us
Page 21

Instrucciones de instalación,
uso y mantenimiento
Sumario
Instalación, 22
EN
English
BDR 190 NA
F
Français, 11
ES
Espanol, 21
Colocación y conexión
Descripción del aparato, 25
Vista en conjunto
Accesorios, 26
Puesta en funcionamiento y uso, 26
Poner en marcha el aparato
Regulación de la temperatura
Uso óptimo del frigorífico
Mantenimiento y cuidados, 27
Cortar la corriente eléctrica
Limpiar el aparato
Evitar la formación de moho y malos olores
Descongelar el aparato
Sustituir la bombilla
FRIGORÍFICO
ES
Precauciones y consejos, 28
Seguridad general
Eliminación
Ahorrar y respetar el medio ambiente
Anomalías y soluciones, 29
Asistencia, 30
Page 22

ES
Instalación
± 0,08
35,35
± 0,08
21,57
32,87÷34,84
Para instalar el producto, la primera operación que
se debe realizar es el pre-ensamblaje de las puertas
de madera.
Siguiendo las cotas indicadas en la figura 1, fije las
seis abrazaderas suministradas, a la parte posterior
de las puertas.
1
35,43 min
21,65 min
± 0,12
28,27
32,99÷34,96
4,72÷6,69
A
A
C
H
E
G
B
D
Coloque 2 pernos “A” en cada uno de los dos
cajones del frigorífico, como se muestra en la figura
2.
Instale las puertas introduciendo las abrazaderas
inferiores, precedentemente colocadas, en los
lugares correspondientes de cada cajón.
Introduzca los dos tornillos “B” en cada una de las
dos abrazaderas superiores de los cajones para
completar la fijación de las puertas.
L - 32,63
A = =
2
H
B = - 13,7 =
2
2
A
B
C
F
L
L
- 1,77
C = =
2
D = 0,37 - =
G
2
E = 0,31 - =
F = - 13,64 =
G
2
H
2
22
www.aristonappliances.us
Page 23

Introduzca el frigorífico en el hueco y enchúfelo.
Regule las patas hasta que el aparato esté en
contacto con la parte superior de la cocina.
Fije el aparato lateralmente, utilizando los tornillos
de cabeza plana suministrados, como se muestra
en la figura 4.
Para alinear las puertas del frigorífico con los otros
paneles de la cocina, accione los pernos y los
tornillos (figura 2).
3
4
ES
Si el aparato es empotrable, para instalarlo, fije
lateralmente el frigorífico incluso en la parte
posterior, utilizando una escuadra y los tornillos
suministrados con el aparato, como se muestra en
la figura 5.
N˚5
5
www.aristonappliances.us
23
Page 24

! Es importante conservar este manual para poder
ES
consultarlo cuando sea necesario. En caso de venta,
cesión o traslado, verifique que permanezca junto al
aparato para informar al nuevo propietario sobre su
funcionamiento y sobre las precauciones durante su uso.
Conexión eléctrica
Después de su transporte, coloque el aparato
verticalmente y espere 3 horas como mínimo antes de
conectarlo a la red eléctrica. Antes de enchufarlo a la
toma de corriente, controle que:
! Lea atentamente las instrucciones: contienen
información importante sobre la instalación, sobre el uso y
sobre la seguridad.
Colocación y conexión
Colocación
1. Coloque el aparato en un ambiente bien aireado y seco.
2. No obstruya las rejillas posteriores de ventilación: el
compresor y el condensador emiten calor y requieren
una buena aireación para funcionar bien y limitar el
consumo eléctrico.
3. Mantenga el aparato lejos de fuentes de calor (por ej. la
luz solar directa o una cocina eléctrica).
4. El aparato está proyectado exclusivamente para
instalación built in y no debe ser expuesto
directamente a los agentes atmosféricos.
Nivelación
1. Instale el aparato sobre un piso plano y rígido.
2.
Si el piso no fuera perfectamente horizontal, compense
los desniveles atornillado o desatornillando las patas
delanteras y traseras.
• la toma posea la conexión a tierra y que sea conforme
a la ley;
• La toma sea capaz de soportar la carga máxima de
potencia del aparato indicada en la placa de
características ubicada en la pared lateral del
compartimento, en la parte superior derecha, debajo
del termostato (por ej. 150 W);
• La tensión de alimentación esté comprendida dentro
de los valores indicados en la placa de características
ubicada en la pared lateral del compartimento, en la
parte superior derecha, debajo del termostato (por ej.
110 V);
• la toma sea compatible con el enchufe del aparato.
Si no fuera así, solicite la sustitución del enchufe a un
técnico autorizado (
prolongaciones ni conexiones múltiples.
! Una vez instalado el aparato, el cable eléctrico y la toma
de corriente deben ser fácilmente accesibles.
! El cable no debe sufrir pliegues ni compresiones.
! El cable debe ser revisado periódicamente y sustituido
sólo por técnicos autorizados (ver Asistencia).
! La empresa declina toda responsabilidad en los casos
en que no hayan sido respetadas estas normas.
ver Asistencia
); no utilice
24
www.aristonappliances.us
Page 25

Descripción del
aparato
Vista de conjunto
Las instrucciones sobre el uso son válidas para distintos modelos y por lo tanto es posible que la figura presente
detalles diferentes a los del aparato que Ud. ha adquirido. La descripción de las piezas más complejas se
encuentra en las páginas sucesivas.
WINE AREA
Recipiente
MULTIUSO con
HUEVERA y
RECIPIENTE PARA
MANTEQUILLA
Recipiente FRUTA y
VERDURA
BOMBILLA de
iluminación
Mando REGULACIÓN
DE LA
TEMPERATURA
ES
Recipientes de acero
PROFESIONALES
www.aristonappliances.us
Compartimento
PORTABOTELLAS
25
Page 26

Accesorios
Puesta en funcionamiento y uso
ES
produzcan olores en el frigorífico.
mientras que cuando está cerrado ocupa sólo 1,25
pulgadas de espacio.
Recipiente MULTI-USO: está
fijado en el techo del
compartimento y ha sido
concebido para conservar
varios alimentos durante largo
tiempo (por ejemplo huevos,
mantequilla o pequeños
recipientes); evita que se
WINE AREA: este accesorio
especial está fijado al techo
del compartimento y ha sido
diseñado para alojar hasta 3
botellas de vino sin ocupar
espacios adicionales. Cuando
el WINE AREA está abierto, se
pueden colocar las botellas,
RECIPIENTES PARA
VERDURAS: en el cajón
superior se encuentran dos
prácticos cestos para
verduras. Son fácilmente
extraíbles y se pueden quitar
para apoyarlos en la superficie
de trabajo o para lavarlos.
Recipientes de acero
PROFESIONALES: en el cajón
inferior se encuentran dos
recipientes profesionales con
tapa. Su función es conservar
carne, quesos o pescados.
Poner en marcha el aparato
! Antes de poner en funcionamiento el aparato, siga
las instrucciones sobre la instalación (
! Antes de conectar el aparato limpie bien los
compartimentos y los accesorios con agua tibia y
bicarbonato.
1. Enchufe el aparato en la toma de corriente y verifique
que se encienda la lámpara de iluminación interna.
2. Gire el mando de REGULACIÓN DE LA TEMPERATURA
hasta un valor medio. Después de algunas horas será
posible introducir alimentos en el frigorífico.
ver Instalación
).
Regulación de la temperatura
La temperatura interna del compartimento frigorífico se
regula automáticamente en base a la posición del
mando del termostato.
1 = menos frío MAX = más frío
Se aconseja, en todo caso, poner una posición media.
Para aumentar el espacio disponible y mejorar el
aspecto estético, este aparato posee el “área
enfriadora” ubicada dentro de la pared posterior del
compartimento.
Dicha pared se presentará cubierta de escarcha o de
gotitas de agua según si el compresor está en
funcionamiento o en pausa. ¡No se preocupe por ello!
El frigorífico está trabajando de forma normal.
Si el mando de REGULACIÓN DE LA TEMPERATURA
se coloca en valores altos, con grandes cantidades de
alimentos y con una temperatura ambiente elevada, el
aparato podría funcionar continuamente, favoreciendo
así una excesiva formación de escarcha y un alto
consumo de electricidad: evítelo desplazando el
mando hacia valores más bajos (se efectuará una
descongelación automática).
26
Compartimento
PORTABOTELLAS: para la
estabilidad de dos botellas se
pueden utilizar las parrillas de
acero inoxidable ubicadas en
el cajón inferior.
Uso óptimo del frigorífico
• Para regular la temperatura utilice el mando de
REGULACIÓN DE LA TEMPERATURA (
Descripción
• Introduzca sólo alimentos fríos o apenas tibios,
nunca calientes (
• Recuerde que los alimentos cocidos no se
mantienen durante más tiempo que los crudos.
• No introduzca recipientes destapados con líquidos:
produciría un aumento de humedad con la
consiguiente formación de condensación.
).
ver Precauciones y consejos
www.aristonappliances.us
ver
).
Page 27

Mantenimiento y cuidados
Cortar la corriente eléctrica
Durante los trabajos de limpieza y mantenimiento, es
necesario aislar el aparato de la red de alimentación
eléctrica, desenchufándolo:
No es suficiente llevar el mando para la regulación de
la temperatura hasta la posición
para eliminar todo contacto eléctrico.
(aparato apagado)
Limpiar el aparato
• Las partes externas, las partes internas y las juntas
de goma se pueden limpiar con una esponja
empapada en agua tibia y bicarbonato sódico o
jabón neutro. No utilice disolventes, productos
abrasivos, lejía o amoníaco.
• Los accesorios extraíbles se pueden colocar en
remojo en agua caliente y jabón o detergente para
platos. Enjuáguelos y séquelos con cuidado.
Evitar la formación de moho y malos
olores
• El aparato está fabricado con materiales higiénicos
que no transmiten olores. Para mantener esta
característica es necesario que los alimentos estén
siempre protegidos y bien cerrados. Esto evitará
también la formación de manchas.
• Si se debe apagar el aparato por un largo período,
limpie su interior y deje las puertas abiertas.
Descongelar el aparato
El frigorífico posee descongelación automática:
el agua se envía hacia la parte inferior del
compartimento a través de un orificio de descarga (ver
la figura) donde el calor producido por el compresor la
hace evaporar. Por lo tanto, no es necesaria ninguna
actividad para
descongelar el frigorífico.
La única intervención que
se debe realizar
periódicamente consiste
en limpiar el orificio de
descarga para que el
agua pueda fluir
libremente.
Sustituir la bombilla
Para sustituir la bombilla de iluminación del compartimento
frigorífico, desenchufe el aparato. Siga las instrucciones
que se dan a continuación.
1
*
Acceda a la lámpara
quitando la protección
como se indica en la
figura. Sustitúyala con otra
bombilla con una potencia
igual a la indicada en la
protección (max 10W).
2
ES
Se encuentra solo en algunos modelos.
*
www.aristonappliances.us
27
Page 28

Precauciones y consejos
ES
! El aparato ha sido proyectado y fabricado en
conformidad con las normas internacionales sobre
seguridad. Estas advertencias se suministran por
razones de seguridad y deben ser leídas atentamente.
PELIGRO: Existe el riesgo de que los niños queden
atrapados.
Antes de desguazar el viejo frigorífico o congelador:
- extraiga las puertas
- extraiga las bandejas para no permitir que los
niños trepen en el interior.
Seguridad general
• El aparato ha sido pensado para un uso de tipo no
profesional en el interior de una vivienda.
• El aparato debe ser utilizado para conservar
alimentos sólo por personas adultas y según las
indicaciones contenidas en este manual.
• No toque el aparato estando descalzo o con las
manos o pies mojados o húmedos.
• No toque las piezas refrigerantes internas: podría
quemarse o herirse.
• No desenchufe el aparato tirando del cable sino
sujetando el enchufe.
• Es necesario desenchufar el aparato antes de
realizar operaciones de limpieza y de
mantenimiento. No es suficiente llevar el mando
para LA REGULACIÓN DE LA TEMPERATURA hasta
la posición
contacto eléctrico.
• En caso de avería, nunca acceda a los mecanismos
internos para intentar una reparación.
• En el interior de los compartimentos no utilice
dispositivos o utensilios diferentes de la rasqueta
suministrada con el equipo.
• No permita a los niños que jueguen con el aparato.
No se deben sentar en los cajones o colgarse de la
puerta.
• Los embalajes no son juguetes para los niños.
(aparato apagado) para eliminar todo
Eliminación
• Eliminación del material de embalaje: respete las
normas locales, de esta manera los embalajes
podrán ser reutilizados.
• Eliminación del viejo aparato: RESPETE LAS LEYES
SOBRE LA MATERIA.
Los aparatos frigoríficos y congeladores contienen
en la zona de enfriamiento y en el aislamiento gas
isobutano y ciclopentano, que si son liberados, son
peligrosos. POR LO TANTO, EVITE QUE LAS
TUBERÍAS RÍGIDAS SEAN DAÑADAS.
• Antes de desguazar el viejo aparato, inutilícelo
cortando el cable de alimentación eléctrica y
eliminando las cerraduras de golpe.
Ahorrar y respetar el medio ambiente
• Instale el aparato en una ambiente fresco y bien
aireado, protéjalo de la exposición directa a los
solares y no lo coloque cerca de fuentes de
rayos
calor.
• Para introducir o extraer los alimentos, abra las
puertas del aparato el menor tiempo posible.
Cada apertura de las puertas produce un notable
gasto de energía.
• No llene con demasiados alimentos el aparato:
para una buena conservación, el frío debe poder
circular libremente. Si se impide la circulación, el
compresor trabajará continuamente.
• No introduzca alimentos calientes: elevarían la
temperatura interior obligando al compresor a un
mayor trabajo con un gran gasto de energía
eléctrica.
• Descongele el aparato si se formara hielo (
Mantenimiento
más difícil la cesión de frío a los alimentos y hace
que aumente el consumo de energía.
• Mantenga eficientes y limpias las juntas para que se
adhieran bien a las puertas y no dejen salir el frío
ver Mantenimiento
(
); una espesa capa de hielo vuelve
).
ver
28
www.aristonappliances.us
Page 29

Anomalías y soluciones
Puede suceder que el aparato no funcione. Antes de llamar al Servicio de Asistencia Técnica (
que no se trate de un problema fácilmente solucionable con la ayuda de la siguiente lista.
Anomalías:
La lámpara de iluminación interna
no se enciende.
El frigorífico enfría poco.
En el frigorífico los alimentos se
congelan.
El motor funciona continuamente.
El aparato hace mucho ruido.
Posibles causas / Solución:
• El enchufe no está introducido en la toma de corriente o no está lo
suficiente como para hacer contacto o bien en la casa no hay corriente.
• Las puertas no cierran bien o las juntas están dañadas.
• Las puertas se abren demasiado frecuentemente.
• El mando de REGULACIÓN DE LA TEMPERATURA no está en la posición
correcta.
• El frigorífico o el congelador se han llenado excesivamente.
• El mando de REGULACIÓN DE LA TEMPERATURA no está en la posición
correcta.
• Los alimentos están en contacto con la pared posterior.
• La puerta no está bien cerrada o se abre continuamente.
• La temperatura del ambiente externo es muy alta.
• El espesor de la escarcha supera los 1/8 de pulgada (
Mantenimiento
• El aparato no fue instalado en un lugar plano (
• El aparato ha sido instalado entre muebles u objetos que vibran y
producen ruidos.
• El gas refrigerante interior produce un ligero ruido aún cuando el
compresor está detenido: no es un defecto, es normal.
).
ver Asistencia
ver Instalación).
), controle
ver
ES
En el fondo del frigorífico hay agua.
• El orificio de descarga del agua está obstruído (
ver Mantenimiento
).
www.aristonappliances.us
29
Page 30

Asistencia
ES
Antes de llamar al Servicio de Asistencia Técnica:
•
Verifique si la anomalía puede ser resuelta por ud. mismo (
ver Anomalías y Soluciones
).
• Se, apesar de todos os controlos, o aparelho não funcionar e a anomalia que notou continuar a verificarse, llame a la linea de Atención al Cliente de Ariston: 1 888 426 0825
modelo
número de serie
Comunique:
• el tipo de anomalía
• el modelo de la máquina (Mod.)
• el número de serie (S/N)
Esta información se encuentra en la placa de
características ubicada en la pared lateral del
compartimento en la parte superior derecha
(debajo del termostato).
RG 2330
Mod.
220 - 240 V- 50 Hz 150 W
340
Total
Gross
Bruto
Brut
Compr.
R 134 a
Syst.
kg 0,090
Kompr.
Made in Italy 13918
Gross
Bruto
Brut
75
Test
P.S-I.
TI
Net
Util
Utile
Pressure
HIGH-235
LOW 140
93139180000 S/N 704211801
Cod.
Gross
Bruto
Brut
W
Fuse
A
Freez. Capac
Poder de Cong
kg/24 h
4,0
Max 15 w
Class
Clase
Classe
N
No recurrir nunca a técnicos no autorizados y rechazar siempre la instalación de repuestos no
originales.
30
www.aristonappliances.us
Page 31

ES
www.aristonappliances.us
31
Page 32

ES
195055171.00
11/2005
32
www.aristonappliances.us
 Loading...