


 Loading...
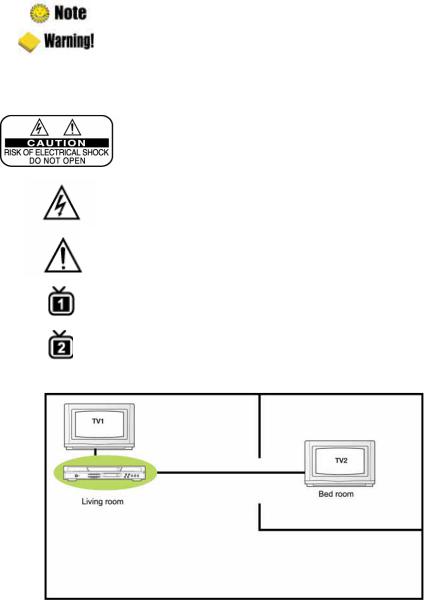
2 | AF-9400PV2R Users’ Manual
Notice
This manual can help you to become familiar with how-to-use and the many great features of the personal video recorder AF-9400PV2R. All the safety and operating instructions should be read before the AF-9400PV2R is operated. Please keep the manual in a fixed place so that it can be easily referred to later.
The following symbols will serve as follows:
|
Indicates any other additional important or helpful information. |
|
|
|
|
|
Indicates warning information. |
|
|
|
|
“MENU” |
Indicates a button on the remote control or the product. |
|
(Double quotation marks) |
||
|
||
|
|
|
|
To reduce the risk of electric shock, do not remove cover (or back). |
|
|
No user serviceable parts inside. Refer servicing to qualified service |
|
|
personnel. |
|
|
|
|
|
Indicates dangerous voltage inside the product that presents a risk of |
|
|
electric shock or personal injury. |
|
|
|
|
|
Indicates important-operating and maintenance instructions |
|
|
accompanying the product. |
|
|
|
|
|
Indicates the menu is provided to the only TV1. |
|
|
|
|
|
Indicates the menu is provided to the only TV2. |
|
|
|
Contents | 3
Safety and Precautions
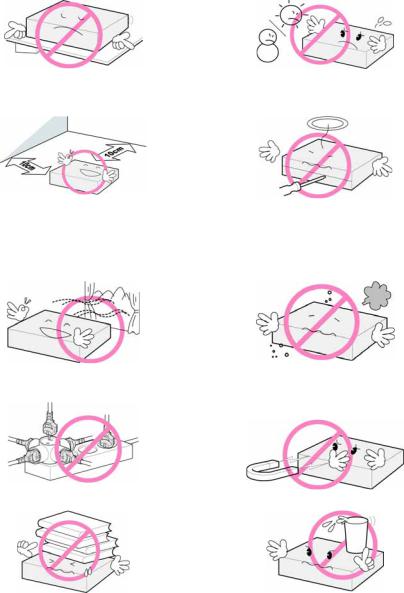
<Attentionwheninstallingtheproduct>
Install on an even plane. |
Don’t install in the cold or under direct sunlight. |
|
|
Leave a minimum 10cm gap all around the product. |
Don’t disassemble, repair, or reorganize the product. |
|
|
<Useandcareof theproduct>
Place the product in a well-ventilated area. |
Place the product where dust and other materials do not build up. |
|
|
Don’t plug in with several other power plugs. |
Don’tplacetheproductwherethereareextremevibrationsornearmagnetic |
|
forces. |
|
|
Don’t place objects on top of the product. |
Don’t place cups that hold water or other liquids on top of the product. |
|
|
4 | AF-9400PV2R Users’ Manual
Table of Contents
Chapter 1. Before You Begin ························ |
5 |
4.14 Recording & Playback ·················· |
50 |
|||||||
1.1 |
Features ············································ |
6 |
4.14.1 Instant Recording |
······················· |
50 |
|||||
1.2 |
Package Contents ···························· |
8 |
4.14.2 Normal Recording |
······················ |
51 |
|||||
1.3 |
Names of Each Part ························· |
9 |
4.14.3 Reservation Recording |
·············· |
53 |
|||||
1.3.1 Front Panel |
···································· |
9 |
4.14.4 Recorded File Playback |
············· |
54 |
|||||
1.3.2 Rear Panel ··································· |
10 |
4.14.5 MP3 File Playback |
····················· |
56 |
||||||
1.4 |
Names of Remote Button ··············· |
12 |
4.14.6 Bookmark ··································· |
57 |
||||||
1.4.1 Names of Remote Button ············ |
12 |
4.14.7 Cutting Data |
······························· |
57 |
||||||
1.4.2 Remote Control Extender ··············· |
15 |
4.15 Switching Rooms |
·························· |
58 |
||||||
Chapter 2. Connections ······························ |
19 |
4.16 Watching the Other Room |
············ |
58 |
||||||
2.1 |
Connecting a TV & VCR ················· |
20 |
4.17 Viewing Teletext ···························· |
59 |
||||||
2.2 |
Connecting a Dish ·························· |
23 |
4.18 Changing STB/TV |
························· |
59 |
|||||
2.3 |
Connect the Optical S/PDIF ··········· |
24 |
Chapter 5. Settings ····································· |
61 |
||||||
2.4 |
Connect the USB ···························· |
24 |
5.1 |
Search Channel ······························ |
63 |
|||||
2.5 |
Starting Up ······································ |
25 |
5.1.1 Antenna Setting |
··························· |
63 |
|||||
Chapter 3. Basic Settings ··························· |
27 |
5.1.2 Automatic Search |
························· |
65 |
||||||
3.1 |
Language ········································ |
28 |
5.1.3 Manual Search ····························· |
66 |
||||||
3.2 Time Setting ···································· |
29 |
5.1.4 Advanced Search |
························· |
67 |
||||||
3.3 |
Output Setting |
································· |
29 |
5.1.5 System Setup ······························· |
67 |
|||||
3.4 |
System Setup |
································· |
30 |
5.2 |
Edit Channel ··································· |
68 |
||||
3.5 |
Antenna Setting ································ |
31 |
5.2.1 Edit Channel |
································ |
68 |
|||||
Chapter 4. Operations |
··································33 |
5.2.2 Edit Favorite |
································· |
69 |
||||||
[Basic Functions] |
·································· |
34 |
5.2.3 Edit Transponder |
························· |
69 |
|||||
4.1 |
Changing Channels ························ |
34 |
5.2.4 Remove Satellite |
·························· |
70 |
|||||
4.2 |
Adjusting Volume ···························· |
34 |
5.3 |
Setup ··············································· |
71 |
|||||
4.3 |
Viewing Program Information ········· |
35 |
5.3.1 Language Setting |
························· |
71 |
|||||
4.4 |
Switching TV and Radio ················· |
36 |
5.3.2 OSD Setting |
································· |
72 |
|||||
4.5 |
Freezing Screen/Zooming Screen ·· |
36 |
5.3.3 Output Setting ······························ |
72 |
||||||
4.6 |
Changing Subtitle Language ·········· |
37 |
5.3.4 Time Setting |
································· |
73 |
|||||
4.7 |
Changing Audio Language ············· |
38 |
5.3.5 Timer Setting |
································ |
73 |
|||||
4.8 |
Selecting Audio Output Direction ···· |
38 |
5.3.6 Lock Control |
································· |
73 |
|||||
[Advanced Functions] ··························· |
39 |
5.3.7 MediaHighway EPG ····················· |
74 |
|||||||
4.9 |
Managing Channel List ··················· |
39 |
5.3.8 TV2 Control ·································· |
74 |
||||||
4.9.1 Displaying Channel List ··············· |
39 |
5.4 |
Tools ················································ |
75 |
||||||
4.9.2 Searching Channel ······················ |
40 |
5.5 |
Common Interface |
·························· |
75 |
|||||
4.9.3 Viewing Multi-Channels Window · |
41 |
5.6 |
HDD ················································ |
76 |
||||||
4.9.4 Changing Satellite Group ············ |
42 |
Chapter 6. Appendix ··································· |
77 |
|||||||
4.9.5 Editing Channels ························· |
43 |
6.1 |
Trouble Shooting ····························· |
78 |
||||||
4.10 Managing Favorite Channel Lists · |
44 |
6.2 |
Specification ···································· |
79 |
||||||
4.11Changing Channel Mode ·············· 46
4.12Viewing Program Guide ················ 47
4.13Viewing PIP ·································· 48

Chapter 1
Before You Begin
6 | AF-9400PV2R Users’ Manual
1.1 Features
With the new AF-9400PV2R you can watch different programs at two rooms simultaneously. You may also record two programs each other at the same time or watch one while recording the other on the built-in hard disk. Enjoy the convenience of Radio Frequency remote control! It doesn't get any better than this.
The AF-9400PV2R is a personal video recorder which makes it simple to control live TV (pause, rewind, forward, and slow motion, etc) and record favorite programs on its hard disk. You can enjoy watching adult program in your bedroom and your children enjoy watching kid program in their room at the same time. You can also watch the other room’s program or switch programs between TV1 and TV2 by pressing the remote control button. The simple connection and easy-of-use operation, user-friendly three-dimensional OSD, highest quality audio output with Dolby AC-3 DigitalAudio, and multi-channel screen are all designed to enrich the user experience.
Furthermore, the AF-9400PV2R provides the enhanced Electronic Program Guide(EPG), various utilities, and channel change effect modes.
<Main Features>
zMPEG-2 / DVB(Digital Video Broadcasting ) compliant
zMP Layer I and II, CD quality audio sound
zSupports RS-232 port for S/W upgrade (115,200 bps)
zSeparated TV/Radio/All List & Favorite Group List
zOffering 8,000 TV and radio channels
zDiSEqC 1.0/1.1/1.2 and USALS
zSupports multi-channel screen (Mosaic)
zVariable kind of utilities (Calendar, Calculator, Zoom In)
zChannel change effect mode (Blank, Fade-In/Out, Freeze)
zTwo tuners PVR with PIP
zSupports Switching Rooms and Watching the Other Room
zMulti-channel recording(the recorded files of TV1 and TV2 are summed up to 4 files simultaneously. ) with 1 channel playback
zWatch two live streams or 1channel playback & 1 channel live stream
zMP3, PCM playback
zTime shift playback( . This function is supported to only TV1.)
zPlayback( . This function isn’t supported to TV1 and TV2 simultaneously.) and edit the recorded file
zConnects to PC via USB 2.0
zSupports 2 CAMs of DVB Common Interface Standard
z |
1 IR Remote(hereafter “RC1”) X 1 RF Remote(hereafter “RC2”) Control for TV2 viewers |
zVacuum Fluorescent Display(VFD)
zSupports Multi-Picture Screen(Mosaic)
zSimple message transmition function
Ch1. Before You Begin | 7
<Other Features>
zCapable of receiving both SCPC and MCPC channels
zPowerfulandeasyfunctionsforediting(Lock,Delete,Move,RenameChannel&Favoritegroup)
zElectronic Program Guide (EPG) for On Screen Channel Information
z17 OSD Languages and 16Bit RGB OSD menu
zAuto searching & manual searching function
zParental lock function (Install Lock/Menu Lock/ IRD Lock)
zErgonomic full functions remote control & 8 buttons on the front panel
zTeletext and subtitle supported by VBI and OSD
zChannel editor & channel loader in PC environment
zSoftware transfer from receiver to receiver
zTotal 40 configurable timer control
zS/PDIF for digital audio
zPicture In Graphics(PIG)
zSupports Game : Tetris, Block Out, Sokoban
zUser Friendly OSD in your language with Help Sentence
zFree voltage (SMPS : AC100~240V/50~60Hz)

8 | AF-9400PV2R Users’ Manual
1.2 Package Contents
Please check to make sure the following contents are in the product package.
zProduct contents may be subject to change.
zCables not specified above must be purchased separately.

Ch1. Before You Begin | 9
1.3 Names of Each Part
1.3.1 Front Panel
1. Power
Switches the product on/off.
2. CH ▲/▼
Changes the TV/Radio channel Up/Down.
3. VOL ◄/►
Increases or decreases TV/Radio volume level or change the value of an item in menu mode.
4. OK
Selects a menu or confirms the user’s action and displays the channel list during watching a TV.
5. MENU
Displays the menu OSD.
6. EXIT
Exits from the current menu or cancels the current operation in menu mode.
7. CI Slots
Inserts two CI modules.
8. LED
zSTANDBY: Lights in red to indicate that AF-9400PV2R is in Standby mode. This light is turned off when the product is in operation.
zNormal: Lights in green to indicate that the channel is searched properly.
zRCU: Lights in orange to indicate that the remote control is operated properly.
10 | AF-9400PV2R Users’ Manual
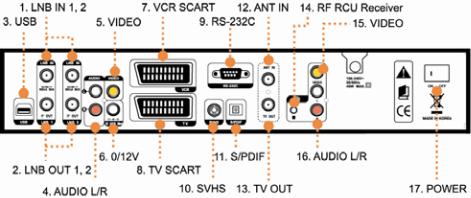
1.3.2 Rear Panel
1. LNB IN 1, 2
Connect a coaxial cable of your LNB to this connector up to two cables.
2. LNB OUT 1, 2
Connect LNB OUT to another set-top box or LNB OUT1 to LNB IN2 via a Loop-through cable
3. USB ( )
)
Connect USB to your PC to copy MP3 file on PC.
4. AUDIO L/R ( )
)
ConnectAUDIO L/R to the matchingAudio Inputs of your TV/VCR via a RCAcable.
5. VIDEO ( )
)
Connect VIDEO to video input of your TV or VCR via a RCAcable.
6. 0/12V
Connect 0/12V adapter to control output voltage for external switch.
7. VCR SCART ( )
)
Connect this connector to your VCR via a SCART cable.
8. TV SCART ( )
)
Connect this connector to your TV via a SCART cable.
9. RS-232C
Connect RS-232C to your PC via a serial cable to upgradeAF-9400PV2R software.
10. SVHS ( )
)
Connect S-VHS to S-VHS video input of your TV or VCR via a S-VHS cable.
Ch1. Before You Begin | 11
11. S/PDIF ( )
)
Connect S/PDIF to audio input of your amplifier with optical digital port via an optical cable.
12. ANT IN ( )
)
ConnectANT IN to your TV antenna or cable TV system.
13. TV OUT ( )
)
Connect TV OUT to your TV antenna input, and then the room changing function is in operation.
14. RF RCU RECEIVER ( )
)
Connect the port to the phone-jack of RF receiver.
15. VIDEO ( )
)
Connect VIDEO to video input of TV2 or VCR via a RCAcable.
16. AUDIO L/R ( )
)
ConnectAUDIO L/R to the matchingAudio Inputs of your TV2/VCR via a RCAcable.
17. POWER
Turn theAF-9400PV2R On/Off.
12 | AF-9400PV2R Users’ Manual
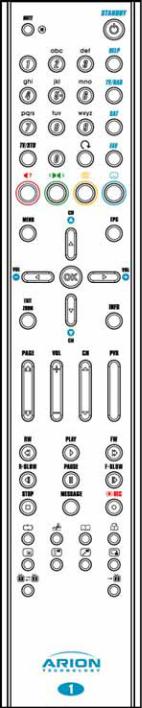
1.4 Names of Remote Button
1.4.1 Names of Remote Button
STANDBY
To switch the product On or Standby.
MUTE ( )
)
To mute the sound.
NUMERICAL BUTTONS
To enter a TV/Radio channel number or characters.
HELP
To display all help icons.
TV/RAD
To switch the product TV or Radio.
SAT
To select the specific satellite.
FAV
You can register the favorite channels by pressing the “MENU” button, and then change the channel mode by pressing the “FAV” button.
TV/STB
To select the input source between satellite and TV.
Recall ( )
)
To return to the previous chosen channel.
MENU
To display the menu OSD.
EPG
To display the Electronic Program Guide. Press again to return to the normal mode.
CH ▲/▼
To change the TV/radio channels Up/Down.
VOL ◄/►
To increase or decrease TV/Radio volume level or change the value of an item with preprogrammed values. The “◄” button can be used as a backspace to cancel the numerical input.
OK
To select a menu or confirm the user’s action and display the channel list during watching a program. You can watch all channels using the channel list.
EXIT/ZOOM
To exit from the current menu or cancel the current operation in menu state. To zoom in/out the screen during watching a program.
INFO
To display the information about the channel.
PAGE ( )
)
To change the TV/Radio channel lists by the page.
VOL (+ - )
To change the TV/Radio volume without displaying the OSD.
CH (▲/▼)
To change the TV/Radio channels without displaying the OSD.
Audio Language ( , hereafter “Red”)
To display the provided audio language lists of the current channel.
Sound Mode ( , hereafter “Green”)
To select the sound mode(stereo, left, or right).
Ch1. Before You Begin | 13
Teletext ( , hereafter “Yellow”)
To display the teletext information about the channel if applicable.
Subtitle ( , hereafter “Blue”)
To display the provided subtitle language lists of the current channel.
PVR
To show the recorded file or MP3 file list.
Fast Rewind/Forward ( )
)
To rewind/forward the playback during the recorded file playback. Whenever you press  , the forward playback speed increases by 4 steps (x 2, x 4, x 8, x16). And whenever you press
  , the rewind playback speed increases by 4 steps (x 1, x 2, x 4, x8). If you press the button in the progress bar state, AF-9400PV2R resumes to the playback with normal speed after 20 seconds backward/forward rewind.
Playback ( )
)
To show the progress bar. If you press the button in the trick mode or paused state, AF-9400PV2R resumes to the playback with normal speed.
Slow Rewind/Forward ( )
)
To change the playback speed into the slow motion mode.
Pause ( )
)
To pause the playback.
Stop ( )
)
To stop the playback or the recording.
Recording ( )
)
To record the current channel or show the record menu in the recording state.

14 | AF-9400PVR Users’ Manual
Repeat ( )
)
Whenever you press the button, the repeat mode changes sequentially such as a specified block repeat→all block repeat→the repeat mode Off.
Cutting Data ( )
)
To cut the desired section from the recorded file.
Bookmark ( )
)
To add or delete the current position as a bookmark. Up to 64 bookmarks for one recorded file can be set up.
Changing the Position of the Bookmark ( )
)
To go to the next bookmark position.
Showing and changing the Size of the PIP ( )
)
Whenever you press the button, the Picture in Picture(PIP) mode changes sequentially such as showing the PIP on the screen→changing the size of the PIP screen→the PIP mode Off.
Showing the PIP List ( )
)
To show the PIP channel list.
Swapping PIP and Main Screen ( )
)
To swap between the PIP screen and the Main screen.
Changing the Position of the PIP ( )
)
To change the position of the PIP screen.
Switching Rooms ( )
)
To switch rooms between the TV1 and the TV2. Whenever you press the button, you can watch the other room’s program and exchange the various configuration of TV such as Favorite channel, Lock, Language, and etc. At the other room, they can also watch your program.
Watching the Other Room (RC1: , RC2:
 )
)
Whenever you press the button, you can watch the other room’s(TV1 or TV2) program.
MESSAGE ( )
)
Users can choose and send a short message from the list for a simple dialogue
 : How to use of 2nd RF battery
2nd RF remote control is supplied two battery and RF module. You can show these under the RF receiver unit. You should open the cover under the RFreceiver. One is battery only, the other is battery unit. You must use the battery unit and only battery is have to charge over 8H (Actually all of battery are have to charge before using)
:Angle of remote control use
The IR remote control can be used at a distance of up to 7 to 10 meters, and at an angle of 30 degrees from the remote control led. The RF remote control(hereafter RC2) can be used at Maximum 30meters distance from the RF receiver.
Ch1. Before You Begin | 15
1.4.2 Remote ControlExtender 1)Introduction
This Remote Control Extender uses the smartest and easiest technology in extending the remote control operation. By installing the transmitter in the battery pocket only, your remote control now detects the key signals and transmits them far away.
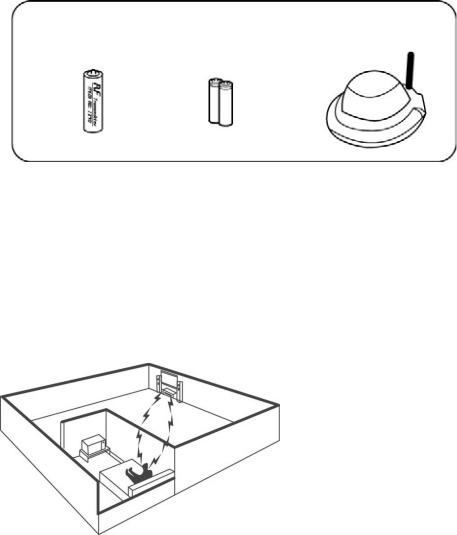
This extender kit (called Remote Control Extender) includes transmitter (battery type), receiver (UFO shape), two 2/3 rechargeable batteries and AAA sleeve.
*RF transmitter |
*3/2AAA |
*RF receiver |
|
Rechargeable battery |
|||
|
|
Then, the upgraded remote controls with RF transmitter can operate through door, windows, floors and walls. And this extender kit removes the worry about line of sight requirements. When the RF transmitter is installed, the remote control still transmits the normal infrared signal like a normal remote control. That is, your remote control will transmit radio frequency (RF), regardless of distance or line or sight.
2)Installing andOperating Cases.
1.living to bed room
-control satellite / cable in living room from bed room
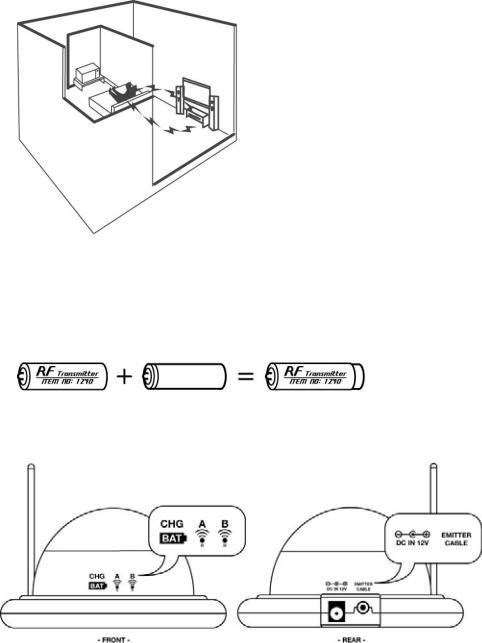
16 | AF-9400PV2R Users’ Manual
2.floor to floor
-control satellite / cable in living room from the second floor
3) Installing the RF Transmitter
Your remote control will use several AAA size batteries, normally 2 to 4. Please install RF transmitter instead of a battery (one of batteries only). Below shows the battery AAA size using in normal remote control.
zAAAbattery
:InstallAAAsize transmitter like a normalAAAbattery
4) Installing the Receiver

Ch2. Connections | 17
5) Function Switch Selection (A, B, C)
You will find slide switch on the bottom of receiver if you remove the plastic case. The positions A, B, C are used to set the receiver to different remote controls. The factory setting is on position C (Most of remote control use position C)
A:56KHz (a few special remote)
B:38KHz (most of remote controls)
C:sensitivity lower (external interference etc)
6) erference
To determine whether your extender is causing the interference. If your receiver does not function properly, the two LEDs(A&B) will blink continuously or one LED will blink even without you using a remote control. IF THIS OCCURS PLEASE SEE BELOW.
1.Move your extender away from the receiver and check + realign.
2.Connect your extender to an outlet on a different electrical circuit from the receiver
3.Reduce the antenna length.
4.Select position “C” of slide switch on the back of the receiver. Please remove the plastic cover first.
5.If you cannot eliminate the interference, please contact your dealer.
7) echarging Battery
Your RF transmitter is installed with small recharging battery (2/3 AAA size), and the performance of the extender deteriorates (the LEDs do not blink when you press the remote control), you need to recharge (replace) the battery.
1.Remove the RF transmitter from your remote control and take rechargeable battery out.
2.Find the recharging pocket on the bottom of receiver. There should be an extra battery, fully charged already in the pocket.
18 | AF-9400PV2R Users’ Manual
3.Install the full-charged battery in transmitter and insert old battery into the 2/3 AAA pocket for recharging. Lose the cover.
While the battery is recharging, the LED CHG (BAT) will blink in the receiver. LED will blink when the recharging battery is inserted in the pocket. Full recharging time is approx. 12 hours and 6-8 hours when the battery is not fully flat.
After replacement of rechargeable battery, you need to test the function. If you feel the same distance or working problem, replace normal battery (AAA) with new one.
--Caution --
1.Do not use a normal battery in recharging pocket.
2.Only use a rechargeable battery.
8) Care
Keep the extender dry, if it gets wet, wipe it dry immediately. Use and store the extender only in normal temperature environments. Handle the extender carefully and do not drop it. Keep the extender away from dust and dirt, and wipe it with a damp cloth occasionally to keep it looking new.
Specifications
Operating range: Up to 30+netres(100 feet)
Operating frequency: 433.92MHz
Battery (included): two 1.2V 2/3AAA(Rechargeable)
Worldwide patents pending.
CE certificate: EMC directive 89/336/EEC
FCC ID#: SB7AAA
IC#: 5216A-AAA

Ch2. Connections | 19
Chapter 2
Connections

20 | AF-9400PV2R Users’ Manual
This chapter describes how to connect the product to your home entertainment system. Choose the most appropriate procedure depending on your environments.
:If you encounter with any problems or have any questions during connecting the product, please contact your local product distributor.
2.1Connecting a TV & VCR
[ For TV1 ]
1.Connectinga TVwithRF ( )
)
1)Connect the TV antenna to theANT IN of the product.
2)Connect the RF-IN of TV to the TV OUT of the product.
3)Connect the Video andAudio of TV to the VIDEO andAUDIO L/R of the product.
4)Go to 2.2 Connecting to Dish, and then connect your dish.

Ch2. Connections | 21
2. Connecting a TV and VCR with RF ( )
)
1)Connect the TV antenna to theANT IN of the product.
2)Connect the RF-IN of VCR to the TV OUT of the product.
3)Connect the RF-OUT of VCR to the RF-IN of TV.
4)Connect the Video andAudio of TV to the VIDEO andAUDIO L/R of the product.
5)Go to section 2.2 Connecting to Dish, and then connect your dish.
3. ConnectingaTVandVCRwithaScartCable ( )
)
1)Connect the TV antenna toANT IN of the product.
2)Connect the RF-IN of VCR to the TV OUT of the product.
3)Connect the RF-OUT of VCR to the RF-IN of TV.
4)Connect the Video andAudio of TV to the VIDEO andAUDIO L/R of the product.
5)Connect the TV Scart of TV to TV SCART with fully featured Scart cable.
6)Go to section 2.2 Connecting to Dish, and then connect your dish.
22 | AF-9400PV2R Users’ Manual
[ For TV2 ]
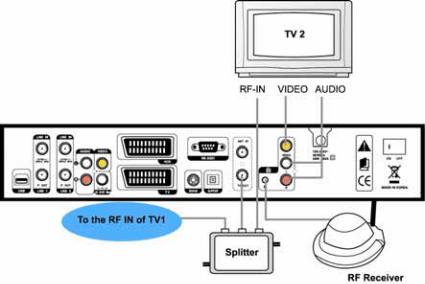
4.Connectinga TV2 withaRF ( )
)
1)To split antenna signal both TV1 and TV2, connect the Splitter to the TV OUT of the product.
2)Connect the RF-OUT of the Splitter to the RF-IN of TV2. And connect the other port of the Splitter to the RF IN of TV1.
3)Connect the Video andAudio of TV to the VIDEO andAUDIO L/R of the product.
4)To use the RF remote control for TV2 viewer, connect the RF RCU Receiver of the product to the RF remote control receiver.
Ch2. Connections | 23
2.2 Connecting a Dish
AF-9400PV2R provides three antenna modes(Loop, twin, T1/T2). Refer to Chapter 3.4 System Setup for detailed information.
Case1) One Antenna and a loop-through cable: If you connect one antenna cable to the LNB1 IN and connect the LNB1 Out to the LNB2 IN with a loop-through cable.
When the channel of LNB1 is recorded, you can switch and view channels which have the same polarity or transponder with the recorded channel.
Case2) Different Two Antennas: LNB 1 IN and LNB 2 IN have different signal sources. Even during recording, you can freely switch channels regardless of polarity or transponder.
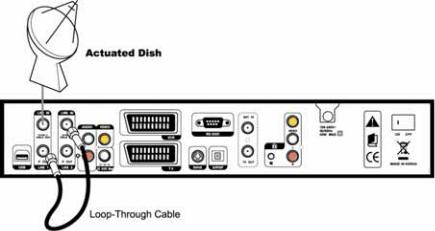
1.One Antennaanda loop-through cable
1)Connect the satellite antenna cable to the LNB1 IN.
2)Connect the LNB1 Out to the LNB2 IN with a loop-through cable.
3)Select ‘Loop’ in the antenna setting. Refer to Chapter 3.4 System Setup for detailed information.
2.Two Antennas
1)Connect the satellite antenna cable to the LNB1 IN.
2)Connect other satellite antenna cable to the LNB2 IN.
3)Set ‘T1/T2’ separately in the antenna setting. Refer to Chapter 3.4 System Setup for detailed information.
24 | AF-9400PV2R Users’ Manual
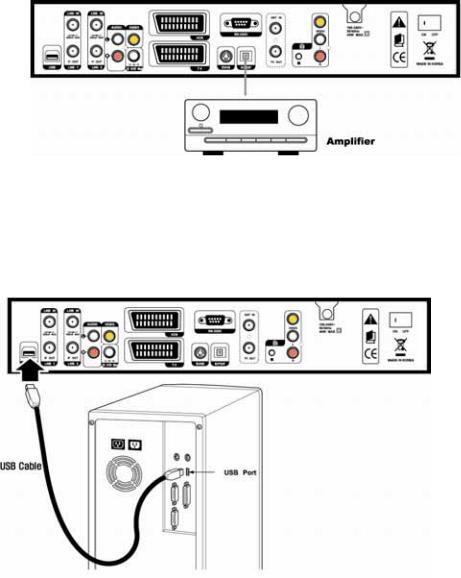
2.3 Connect the Optical S/PDIF
If you watch a program encoded by a Dolby Digital, you can enjoy the higher quality sound of the Dolby Digital audio.
Connect the optical S/PDIF to Dolby digital decoder or Digital television.
2.4 Connect the USB
Connect the USB to your PC to copy MP3 file from PC.
Ch2. Connections | 25
2.5 Starting Up
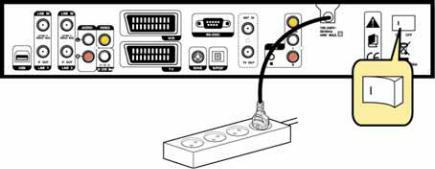
1.Connect the power cord of the product to a power outlet and press the “Power” button at the rear panel to turn the product on.
2.The first time you power up the product, it will display the initial screen, then some parameters for system configuration should be set. Refer to the following chapter for detailed information about the basic settings.
Loading...