

Page 1
IT
AVVERTENZE IMPORTANTI
LEGGERE ATTENTAMENTE LE ISTRUZIONI PRIMA DELL’USO.
• L’apparecchio è destinato solo ad un uso domestico, non deve essere adibito ad
un uso industriale o professionale.
• Non si assumono responsabilità per uso errato o per impieghi diversi da quelli
previsti dal presente libretto.
• Si consiglia di conservare gli imballi originali, poiché l’assistenza gratuita non è
prevista per i guasti causati da imballo non adeguato del prodotto al momento
della spedizione ad un Centro di Assistenza autorizzato.
• Questo apparecchio è conforme alla Direttiva 2006/95/CE e alla Direttiva EMC
2004/108/CE.
Pericolo per i bambini
• L’apparecchio può essere usato
da bambini con un età superiore
a 8 anni e da persone che hanno
capacità fi siche, sensoriali o men-
tali ridotte, oppure con mancanza
di esperienza o di conoscenza,
solo se sono seguiti da una persona responsabile o se hanno
ricevuto e compreso le istruzioni
e i pericoli presenti durante l’uso
dell’apparecchio.
• I bambini non devono giocare con
l’apparecchio.
• La pulizia e la manutenzione riportate in questo libretto non devono essere eseguite dai bambini
senza la supervisione di una persona adulta.
• Gli elementi dell’imballaggio non devono essere lasciati alla portata dei bambini in
quanto potenziali fonti di pericolo.
• Allorché si decida di smaltire come rifi uto questo apparecchio, si raccomanda di
renderlo inoperante tagliandone il cavo di alimentazione. Si raccomanda inoltre di
rendere innocue quelle parti dell’apparecchio suscettibili di costituire un pericolo,
specialmente per i bambini che potrebbero servirsi dell’apparecchio per i propri
giochi.
Pericolo dovuto a elettricità
• Non lasciate il ferro e il cavo di alimentazione alla portata di bambini con età inferiore a 8 anni se è
collegato alla presa di corrente o
mentre si sta raffreddando.
• Prima di collegare l’apparecchio alla rete di alimentazione controllare che la tensione indicata sulla targhetta corrisponda a quella della rete locale.
• Collegare sempre l’apparecchio ad una presa con messa a terra.
• NON IMMERGERE L’APPARECCHIO IN ACQUA O ALTRI LIQUIDI.
• Non iniziate a stirare se avete la mani bagnate o se avete i piedi nudi.
• Spegnere sempre l’apparecchio
e staccare la spina del cavo di
alimentazione dalla presa di corrente elettrica prima di riempire il
serbatoio con acqua.
Pericolo di danni derivanti da altre cause
• Riempire la caldaia con acqua prima di mettere in funzione l’apparecchio. Le operazioni di riempimento di acqua devono essere effettuate con la spina del cavo di
alimentazione elettrica staccata dalla presa.
• Per rifornire la caldaia usare sempre l’imbuto (J) in dotazione.
• Accendere l’apparecchio solo quando è in posizione di lavoro.
• Quando usate l’apparecchio per la prima volta può accadere che emani un po’ di
fumo; non preoccupatevi, è perfettamente normale perché alcune parti sono state
leggermente lubrifi cate, quindi dopo poco tempo il fenomeno scomparirà.
• Durante l’utilizzo posizionare l’apparecchio su di un piano orizzontale stabile e ben
illuminato.
• Non lasciare incustodito l’apparecchio mentre è collegato alla rete elettrica.
• L’apparecchio deve essere utilizzato e lasciato a riposo su una superfi cie stabile.
• Quando si ripone il ferro sul suo appoggia ferro, assicurarsi che la superfi cie su cui
è collocato l’appoggia ferro sia stabile.
• Quando vi dovete assentare anche per poco tempo, posizionare sempre il ferro da
stiro sull’apposita griglia appoggia ferro (I), spegnere l’apparecchio e scollegare
sempre il cavo di alimentazione elettrica dalla presa di corrente.
• Premendo il pulsante vapore prima che la caldaia abbia raggiunto la temperatura
ottimale o che il ferro sia caldo, potrebbe uscire acqua dai fori per il vapore.
• L’apparecchio non deve essere
utilizzato se è stato fatto cadere,
se vi sono segni di danni visibili o
se ha perdite di acqua. Non usare
l’apparecchio se il cavo elettrico
o la spina risultano danneggiati, o
se l’apparecchio stesso risulta difettoso. Tutte le riparazioni, compresa la sostituzione del cavo di
alimentazione, devono essere
eseguite solamente dal Centro
Assistenza Ariete o da tecnici autorizzati Ariete, in modo da prevenire ogni rischio.
• Non lasciare l’apparecchio esposto ad agenti atmosferici (pioggia, sole, ecc...).
• Mai tentare di stirare indumenti indosso.
• Per rifornire la caldaia durante l’uso utilizzare acqua di rubinetto. Inserire molto
lentamente acqua in caldaia. In tal modo eviterete l’improvvisa fuoriuscita di schizzi di acqua calda o vapore dalla caldaia. Tenere il viso lontano dal foro.
• Non toccare le parti metalliche del ferro quando è in funzione e nei minuti seguenti
Avvertenza relativa a ustioni
al suo spegnimento poiché potrebbero causare scottature.
• Non dirigere il getto vapore verso parti del corpo o verso animali domestici.
• Non rimuovere per nessun motivo
il tappo della caldaia (B) durante
l’uso.
• ATTENZIONE! Prima di svitare
il tappo (B) procedere sempre
come segue:
1) spegnere sempre l’apparecchio premendo il pulsante (L);
2) premere il pulsante vapore (D)
e lasciare uscire tutto il vapore residuo;
3) scollegare il cavo di alimentazione dalla presa di corrente;
4) svitare lentamente il tappo
(B) ed attendere, prima di averlo
completamente svitato, che cessi
un eventuale sibilo di vapore.
• Si consiglia di conservare gli imballi originali, poiché l’assistenza gratuita non è
prevista per i guasti causati da imballo non adeguato del prodotto al momento
della spedizione ad un Centro di Assistenza autorizzato.
• Prima di utilizzare l’apparecchio per la prima volta togliere eventuali etichette o
protezioni dalla piastra del ferro da stiro.
• Svolgere sempre il cavo prima dell’utilizzo.
• L’uso di prolunghe elettriche non autorizzate dal fabbricante dell’apparecchio può
provocare danni ed incidenti.
• Non utilizzare acqua gassata (addizionata di anidride carbonica).
• Non appoggiare il ferro da stiro caldo sul cavo di collegamento o sul cavo di alimentazione e fare molta attenzione a che essi non vengano in contatto con la
piastra calda del ferro.
• Non scollegare la spina dalla presa di corrente tirandola per il cavo.
• Dopo aver staccato la spina del cavo di alimentazione elettrica dalla presa e dopo
che tutte le parti si saranno raffreddate, l’apparecchio potrà essere pulito esclusivamente con un panno non abrasivo e appena umido di acqua. Non usare mai
solventi che danneggiano le parti in plastica.
• Eseguire il ciclo di pulizia della caldaia almeno ogni due mesi in modo da eli-
minare eventuali residui di calcare che possono compromettere il regolare
funzionamento dell’apparecchio.
• Non versare nella caldaia aceto, decalcifi canti o altre sostanze profumanti; pena
la decadenza della garanzia.
•
Non avvolgere il cavo di alimentazione attorno alla piastra quando il ferro è caldo.
• Non mettere la piastra a contatto con superfi ci metalliche.
• Prima di riporre l’apparecchio spegnerlo premendo l’interruttore (L), scollegare
la spina del cavo di alimentazione dalla presa, attendere che si sia raffreddato e
svuotare completamente la caldaia.
• Non si assumono responsabilità per uso errato o per impieghi diversi da quelli
previsti dal presente libretto.
CONSERVARE SEMPRE QUESTE ISTRUZIONI
Nota: al primo utilizzo del ferro, provatelo su un vecchio pezzo di stoffa per verifi care
che la piastra ed il serbatoio dell’acqua siano perfettamente puliti.
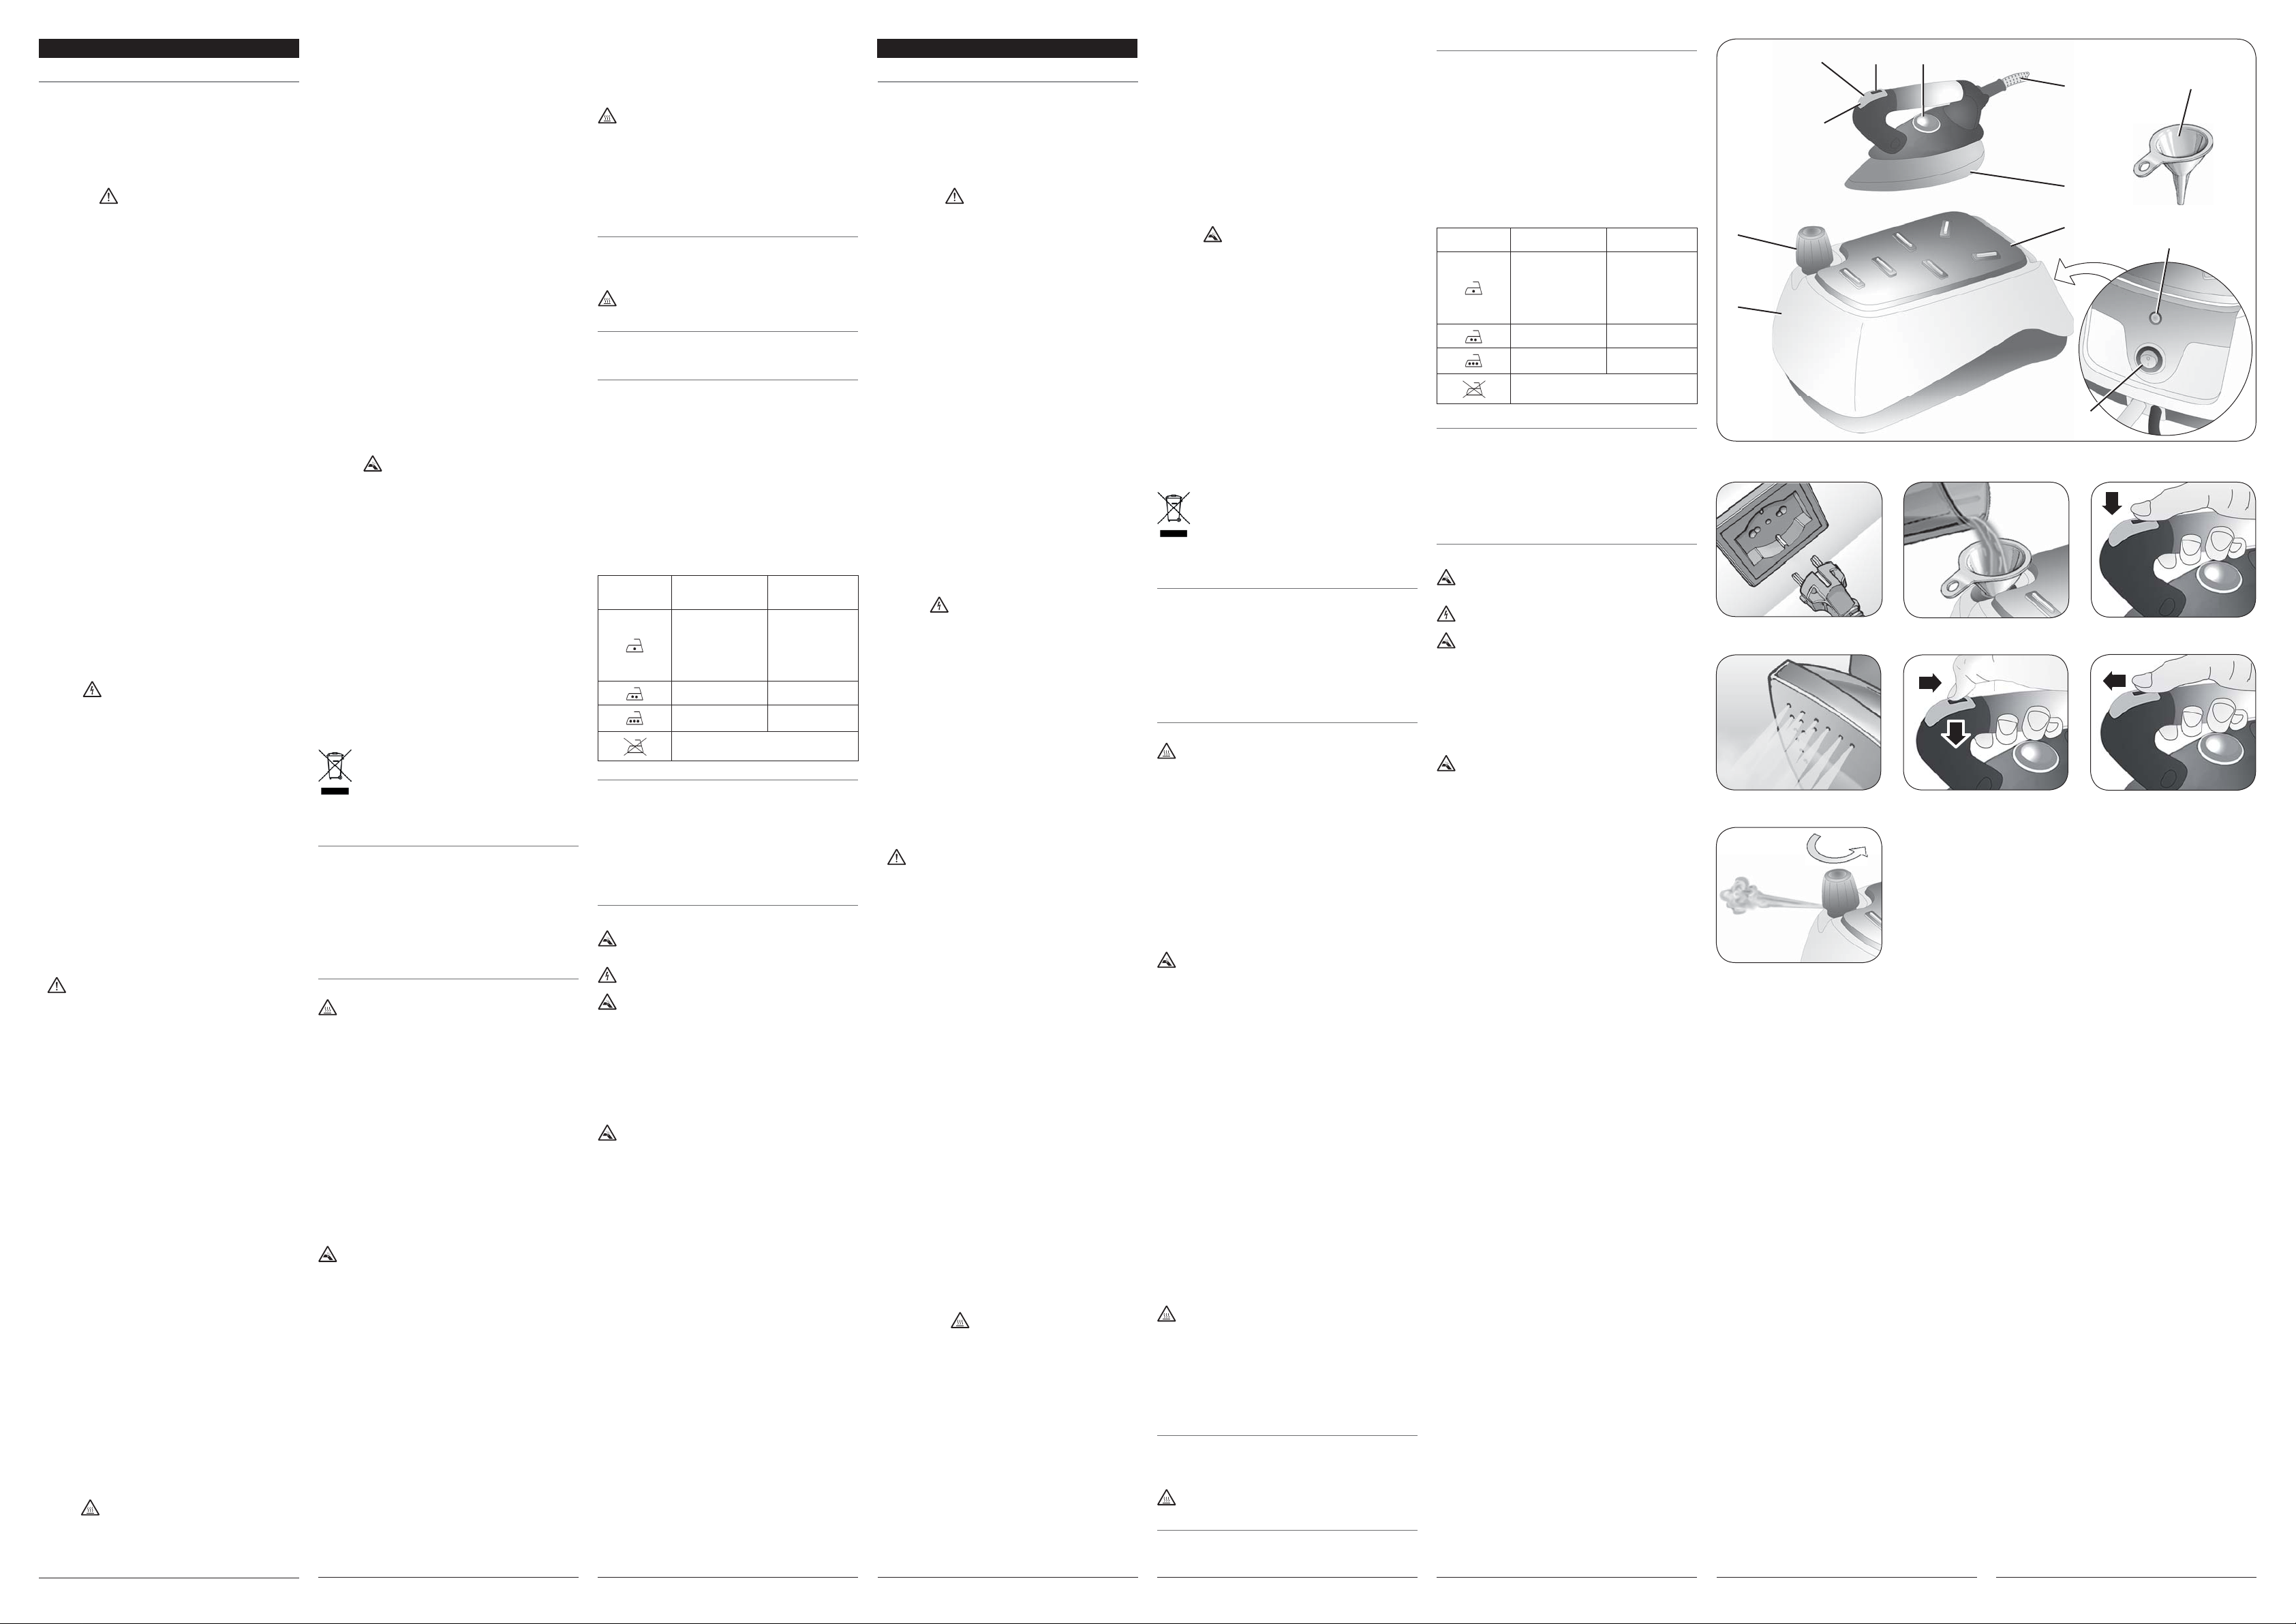
DESCRIZIONE DELL’APPARECCHIO
A - Caldaia
B - Tappo caldaia
C - Spia luminosa controllo temperatura ferro
D - Pulsante vapore
E - Cursore di blocco per vapore continuo
F - Manopola termostato
G - Cavo di collegamento ferro-caldaia
H - Piastra
I - Griglia appoggia ferro
J - Imbuto
K - Spia pronto vapore
L - Interruttore di accensione ferro/caldaia
ISTRUZIONI PER L’USO
Riempimento della caldaia prima dell’uso
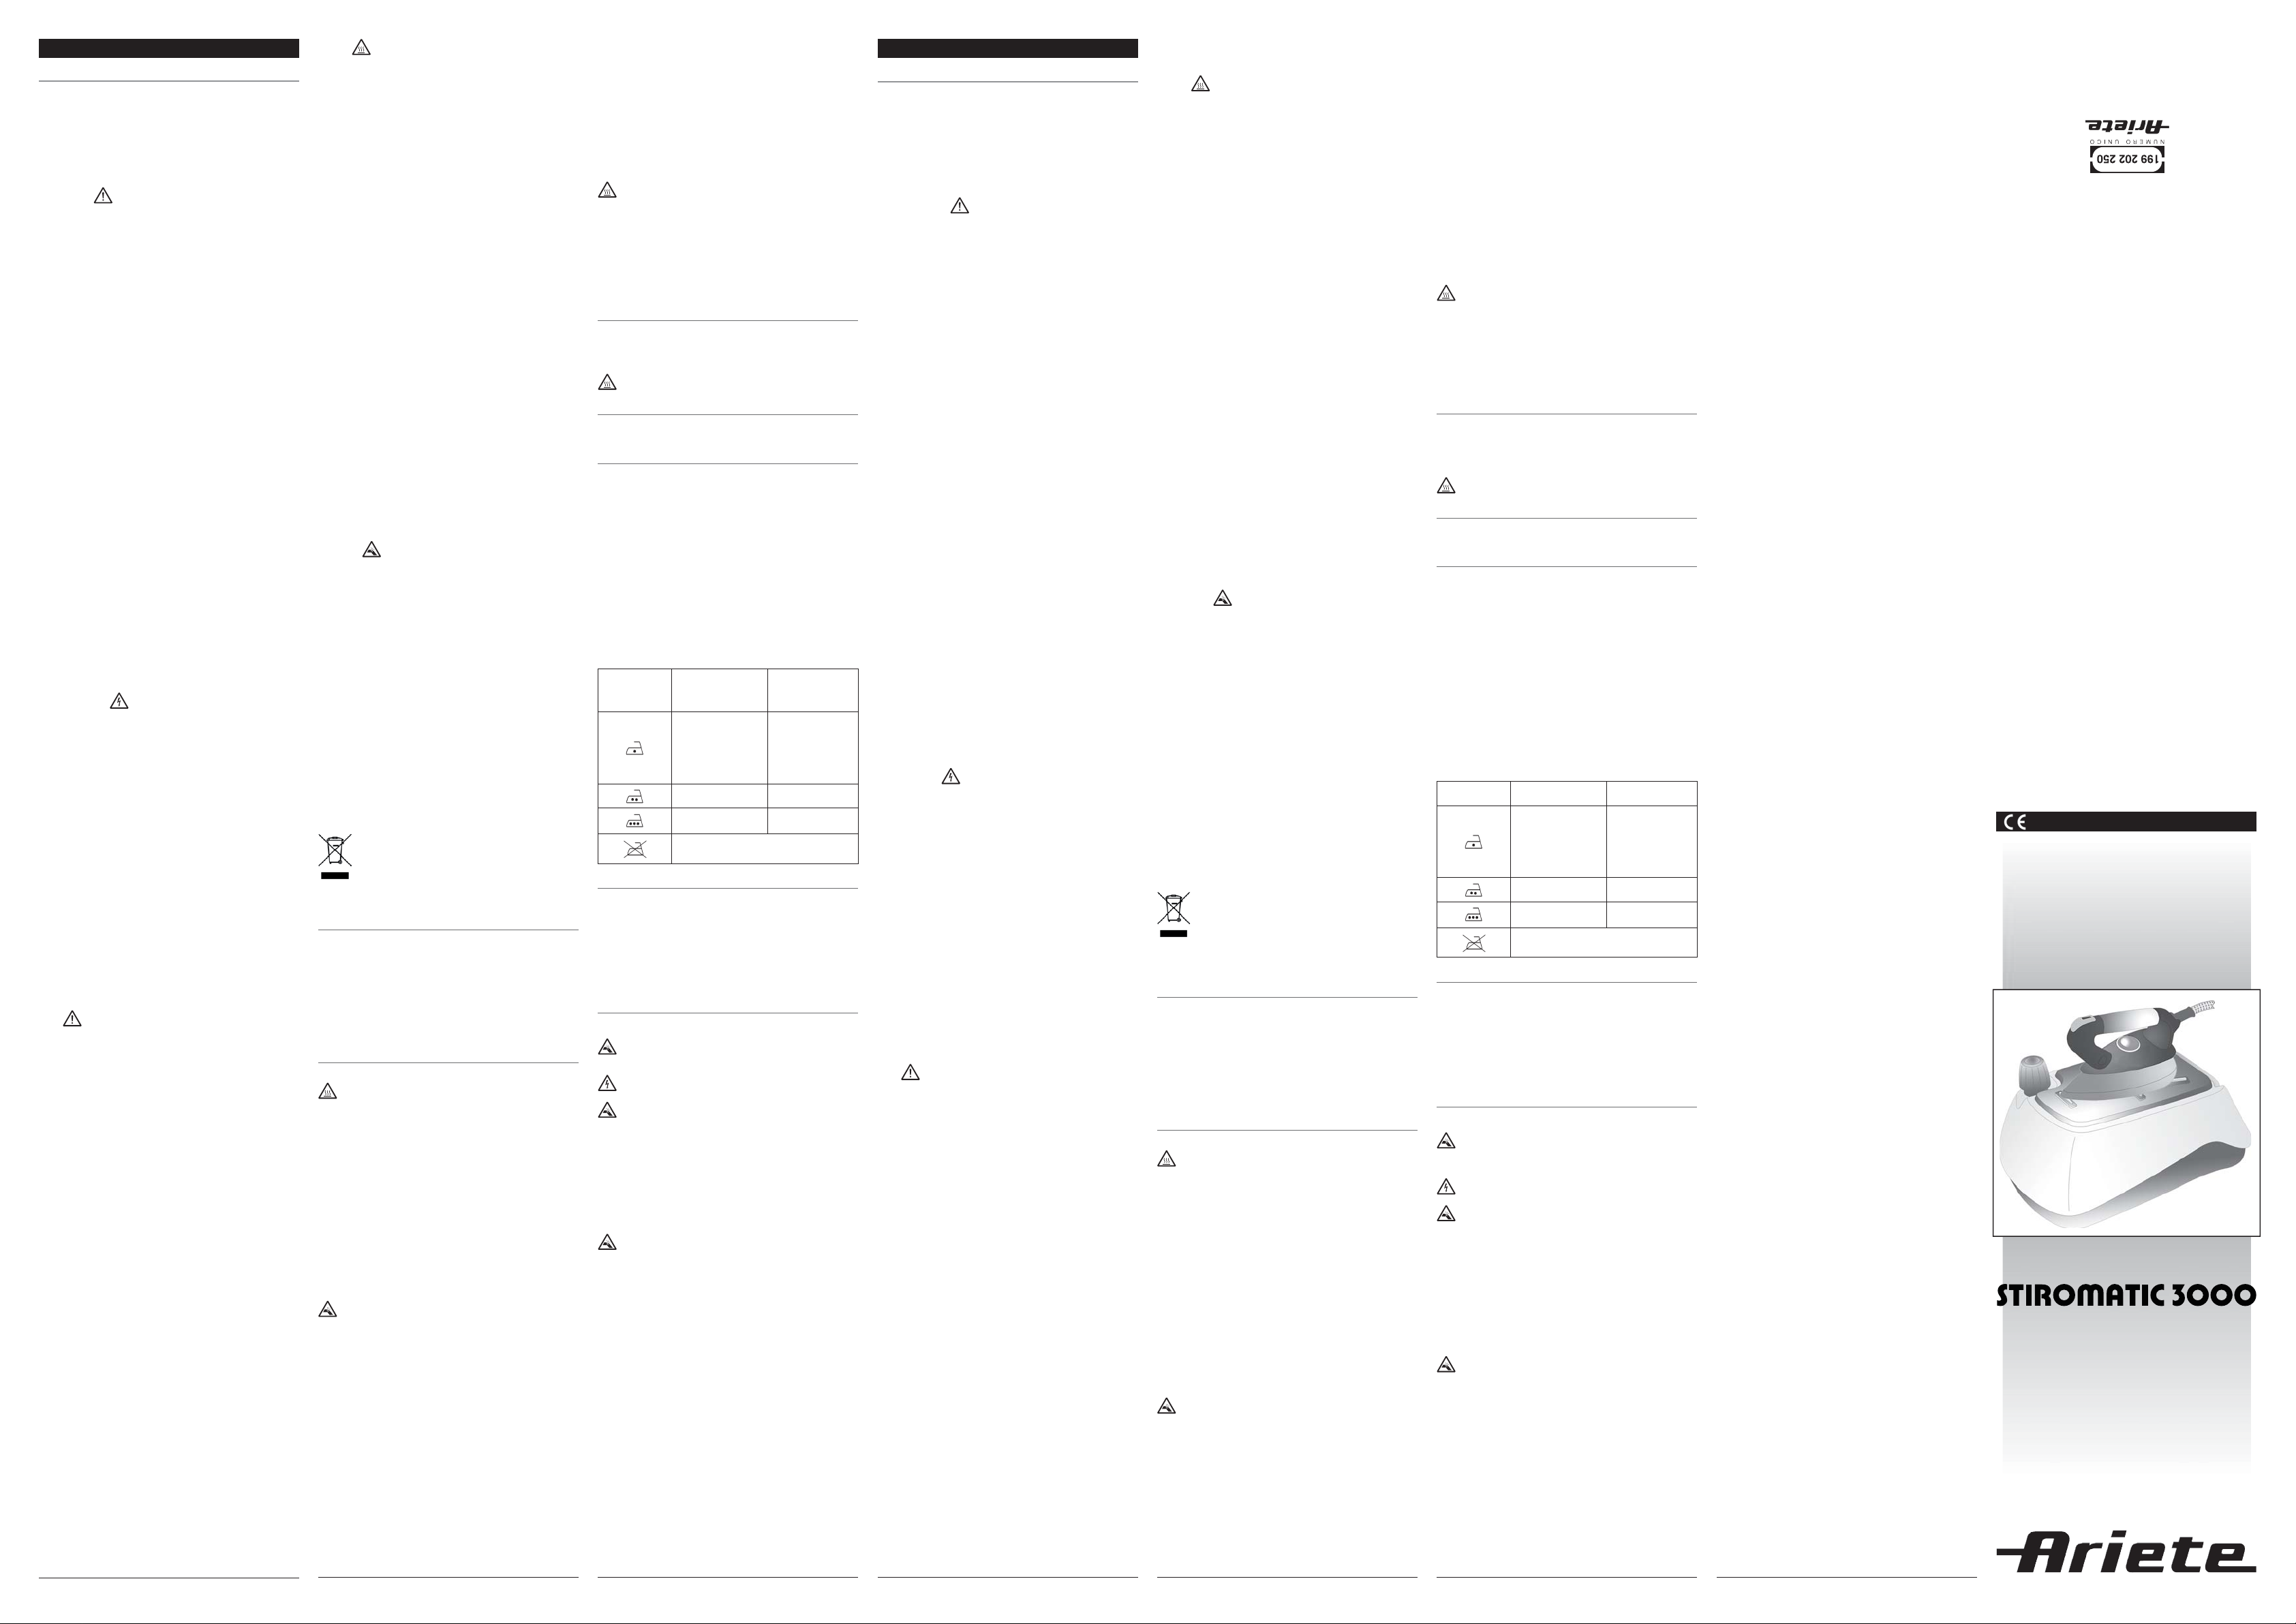
Ruotare in senso antiorario il tappo della caldaia (B). Versare acqua naturale nella
caldaia fi no al completo riempimento (Fig. 3). Utilizzare l’imbuto (J) in dotazione.
Riavvitare il tappo (B).
Il prodotto funziona con normale acqua di rubinetto.
In caso di acque particolarmente calcaree (con durezza superiore a 20°F) utilizzare
una miscela composta al 50% di acqua del rubinetto e al 50% di acqua demineralizzata.
Mai utilizzare acqua demineralizzata pura.
Accensione dell’apparecchio
Collegare l’apparecchio alla rete di alimentazione controllando che la tensione indicata sulla targhetta corrisponda a quella della rete locale.
Alla prima messa in funzione del ferro è possibile una leggera esalazione di fumo,
si tratta di un fenomeno perfettamente normale che scomparirà dopo brevissimo
tempo.
Tenere il ferro sull’apposita griglia appoggia ferro. Premere l’interruttore di accensione ferro/caldaia (L).
A questo punto selezionare la temperatura desiderata tramite la manopola termostato (F). Attendere l’accensione della spia (K) per utilizzare il vapore.
Prima di dirigere il getto di vapore sul capo da stirare, erogare due o tre colpi di
vapore prolungati verso terra per far stabilizzare il getto (Fig. 5).
Colpo vapore
Impostare la temperatura di stiratura tramite la manopola di regolazione (F) oltre il
simbolo (
della spia pronto vapore (K). Quando premete il pulsante vapore (D) dai 3 ai 5 secondi, un intenso getto di vapore sarà erogato al rilascio del pulsante. Se il pulsante
di erogazione vapore (D) viene azionato ininterrottamente per più di 30 secondi,
possono uscire delle gocce d’acqua dai fori di vapore della piastra del ferro da stiro,
pertanto non insistere eccessivamente sul pulsante (D).
Vapore continuo
Impostare la temperatura di stiratura tramite la manopola di regolazione (F) oltre il
simbolo (
della spia pronto vapore (K). Premere il pulsante vapore (D) e spostare il cursore (E)
verso il manico (Fig. 6). Il cursore (E) bloccherà il pulsante provocando l’uscita di un
getto di vapore continuo e costante. Per sbloccare il pulsante (D) e interrompere il
getto continuo spingere in avanti il cursore (E) Fig. 7.
Selezione della temperatura
Controllare prima di tutto che sul tessuto vi sia un’etichetta con le indicazioni per
la stiratura e confrontare il simbolo riportato sull’etichetta con la tabella riportata di
seguito. Se manca l’etichetta con le istruzioni di stiro del tessuto, ma conoscete il tipo
di tessuto, seguire le indicazioni riportate sulla tabella.
Si noti che la tabella fa riferimento ai tessuti non trattati con appretti o similari, se lo
fossero si può stirare anche ad una temperatura più bassa.
Riempimento della caldaia durante l’uso
Prima di svitare il tappo (B) spegnere l’apparecchio premendo l’interruttore
(L).
Premere il pulsante vapore (D) sul ferro e lasciare uscire il vapore fi no al completo
esaurimento. Facendo ciò non tenere il ferro sopra l’apposita griglia appoggia ferro.
Scollegare il cavo di alimentazione dalla presa elettrica (Fig. 2). Lasciare raffreddare
Attenzione - danni materiali
• Per il corretto smaltimento del prodotto ai sensi della Direttiva Europea 2009/96/CE si prega leggere l’apposito foglietto allegato al prodotto.
Attenzione!
Non svitare mai il tappo della caldaia prima di essersi assicurati che l’apparecchio sia scollegato dalla presa di corrente (Fig. 2) e che non ci sia
pressione all’interno.
Attenzione!
Non erogare mai vapore quando il ferro è appoggiato sopra l’apposita
griglia (I).
). Attendere che la spia (C) del ferro sia spenta. Attendere l’accensione
•••
). Attendere che la spia (C) del ferro sia spenta. Attendere l’accensione
•••
l’apparecchio per qualche minuto. Con molta attenzione, ruotare in senso antiorario
il tappo della caldaia (B) ed attendere, prima di svitarlo completamente, che cessi il
sibilo del vapore residuo (Fig. 8).
Rifornire la caldaia per mezzo dell’imbuto (J) in dotazione (Fig. 3).
Riavvitare in senso orario e a fondo il tappo (B), accertandosi che abbia esaurito
completamente la sua corsa.
Attenzione!
Non svitare mai il tappo della caldaia mentre l’apparecchio è collegato alla
presa di corrente e quando vi è ancora pressione all’interno.
Non svitare mai il tappo della caldaia mentre state stirando.
Se il ferro rimane inattivo per lungo tempo (più settimane) prima di stirare si consiglia
di tenerlo in posizione orizzontale ed azionare per circa 30 secondi il pulsante di
erogazione vapore (D) allo scopo di pulire i condotti interni del vapore.
Non eseguire l’operazione sopra la griglia appoggia ferro (I).
Per stirature di breve durata non è necessario che la caldaia venga riempita completamente. Una minor quantità di acqua in caldaia ridurrà infatti i tempi di attesa e, di
conseguenza, il consumo di energia elettrica.
STIRARE IN VERTICALE
Potete usare il getto di vapore continuo per stirare i tessuti in verticale. Questa speciale procedura di stiratura serve per rimuovere le pieghe dalle tende, dai tessuti ecc…
Impostare la temperatura di stiratura tramite la manopola di regolazione (F) oltre
il simbolo (
verticale e premere il pulsante vapore.
STIRATURA A SECCO
Per poter stirare a secco, ovvero senza vapore, dopo aver collegato l’apparecchio
alla rete di alimentazione, è suffi ciente accendere l’apparecchio e regolare la ma-
nopola termostato (F) alla temperatura desiderata. Non premere il pulsante vapore.
SUGGERIMENTI
Suddividere i capi da stirare in base al tipo di tessuto: lana con lana, cotone con
cotone, ecc...
Poiché il riscaldamento della piastra del ferro avviene molto più rapidamente del suo
raffreddamento è consigliabile iniziare a stirare tutti i tessuti che richiedono temperature più basse per poi passare a stirare quei tessuti che richiedono progressivamente temperature più elevate.
Se il tessuto è composto da più tipi di fi bre, regolare sempre la temperatura per la
fi bra che richiede il minor calore. Ad esempio se il tessuto è composto da un 70% di
fi bre sintetiche ed un 30% di cotone, bisognerà regolare la temperatura sulla posizio-
ne (
Se non siete a conoscenza della composizione del tessuto del capo da stirare,
cercare un punto del tessuto che non sia visibile. Fare una prova stirando questo
punto e stabilire la temperatura più adatta (iniziare sempre da una temperatura relativamente bassa ed aumentarla gradatamente fi no a raggiungere quella idonea).
I tessuti di pura lana (100%) si possono stirare anche con il ferro regolato su una
delle posizioni vapore. Per i tessuti di pura lana, seta e sintetici, abbiate l’accortezza,
per evitare che il tessuto stirato prenda il lucido, di stirarli a rovescio. Per gli altri tipi di
tessuto ed in special modo per il velluto, onde evitare che diventino facilmente lucidi,
stirarli in una sola direzione (con un telo), facendo una pressione molto leggera. Il
ferro da stiro deve essere mantenuto in costante movimento sul tessuto da stirare.
Etichetta istruzioni di
stiratura riportata sui
tessuti
DOPO AVER STIRATO
Spegnere l’apparecchio premendo l’interruttore (L). Con la spina inserita nella presa
l’apparecchio rimane in tensione ed è possibile, premendo il pulsante vapore (D),
eliminare la pressione residua nella caldaia. Scollegare la spina dalla prese di corrente. Attendere alcuni minuti per fare raffreddare l’apparecchio. Con molta attenzione, svitare il tappo della caldaia (B) ed attendere, prima di svitarlo completamente,
che cessi il sibilo del vapore residuo (Fig. 8). Lasciare raffreddare il ferro da stiro
sull’apposita griglia appoggia ferro avendo l’accortezza di non far toccare i cavi di alimentazione e di collegamento con le parti calde dell’apparecchio. Successivamente
svuotare completamente la caldaia in modo da evitare che il ristagno dell’acqua in
caldaia favorisca la formazione del calcare.
Riporre l’apparecchio su una superfi cie stabile e lontano dalla portata dei bambini.
PULIZIA DELL’APPARECCHIO
Prima di procedere alla pulizia dell’apparecchio scollegare sempre la spina dalla presa
di corrente (Fig. 2) e lasciare raffreddare il ferro sull’apposita griglia appoggia ferro (I).
Per la pulizia interna della caldaia procedere nella seguente maniera:
- staccare la spina dalla presa di corrente;
- riempire la caldaia con acqua del rubinetto e avvitare il tappo (B);
- agitare la caldaia in modo da rimuovere eventuali residui di calcare formatosi al
suo interno;
- svitare il tappo e svuotare la caldaia;
- ripetere nuovamente l’operazione fi nché l’acqua non esce limpida e pulita, dopo-
diché riporre il prodotto con la caldaia completamente vuota.
Per la pulizia dell’apparecchio servirsi solo di un panno umido.
LA GARANZIA NON COPRE DANNI DERIVATI DA INTASAMENTI DOVUTI AL
CALCARE.
). Posizionare la tenda o il tessuto nel modo in cui volete stirarlo in
•••
Attenzione!
Non stirate tessuti che vengono sorretti da altre persone.
) (vedi tabella) senza vapore, cioè quella per i tessuti sintetici.
•
Tipo di tessuto Termostato
Tessuti sintetici:
Acetati
Acrilici
Viscosa
Poliammide (Nylon)
Viscosa (Rayon)
Seta
Lana
Cotone
Lino
Il marchio sull'etichetta signifi ca non stirare
Attenzione!
Non fare uso di abrasivi per pulire la piastra. Fare in modo che la piastra
rimanga liscia: evitare il contatto con oggetti metallici.
Attenzione!
Non immergere mai l’apparecchio in acqua o altri liquidi.
Attenzione!
Controllare le condizioni del cavo di alimentazione del vostro ferro regolarmente prima di utilizzarlo e nel caso di danneggiamento portarlo al più vicino
centro di assistenza per farlo sostituire solo dal personale specializzato.
Attenzione!
Eseguire la pulizia della caldaia almeno ogni due mesi in modo da eliminare
eventuali residui di calcare che possono compromettere il regolare funzionamento dell’apparecchio.
•
••
•••
EN
IMPORTANT SAFEGUARDS
READ THESE INSTRUCTIONS CAREFULLY.
• The appliance has been designed for home use only and must not be used for
commercial or industrial purposes.
• We decline any responsibility resulting from misuse or any use other than those
covered in this booklet.
• We suggest you keep the original box and packaging, as our free-of-charge
service does not cover any damage resulting from inadequate packaging of the
product when this is sent back to an Authorised Service Centre.
• This product complies with the 2006/95/EC Directive and EMC Directive
2004/108/EC.
Danger for children
• This appliance can be used by
children aged from 8 years and
above and persons with reduced
physical, sensory or mental capabilities or lack of experience
and knowledge if they have been
given supervision or instruction
concerning use of the appliance
in a safe way and understand the
hazards involved.
• Children shall not play with the
appliance.
• Cleaning and user maintenance
shall not be made by children without supervision.
• Do not leave the packaging near children because it is potentially dangerous.
• In the event that this appliance is to be disposed of, it is suggested that the power
chord is cut off. It is also recommended that all potentially dangerous components
are rendered harmless to prevent children hurting themselves when playing with
the apparatus.
Danger due to electricity
• Do not leave the iron and the power cord within the reach of children under the age of 8 years if
the iron is connected to the outlet
or while it is cooling.
• Before plugging the appliance into the mains socket, ensure that the voltage
shown on the rating plate matches the local voltage supply.
• Always connect the iron to an earthed socket.
• Do not immerse the appliance in water or other liquids.
• Do not start ironing if your hands are wet or if you are barefoot.
• The plug must be removed from
the socket-outlet before the boiler
is fi lled with water.
Danger of damage originating from other
• Fill up the boiler with water before starting up the appliance. Be sure to unplug the
appliance before pouring water into the tank.
• When fi lling the boiler, always use the funnell (J) provided.
• Turn on the appliance only when it is in working position.
• The appliance may give out a little smoke when used for the fi rst time; this transi-
tory effect is perfectly normal and is due to the fact that some of components have
been slightly lubricated.
• During use, rest the appliance onto a horizontal and lit up surface.
• Never leave the appliance unattended when it is connected to the power supply.
• The appliance must be used and rested on a stable surface.
• When placing the iron on its stand, ensure that the surface on which the stand is
placed is stable.
• Before leaving the iron unattended, even for a short time, turn off the appliance,
always unplug it and place it on support base (I).
• Pressing the steam button before the boiler has reached the optimum temperature
or the iron has heated up may cause water to leak from the steam holes.
causes
• The appliance is not to be used if
it has been dropped, if there are
visible sign of damage or if it is
leaking. Do not use the appliance if the power cord or the plug
are damaged, or if the appliance
is faulty. To prevent any accident,
all repairs, including the replacement of the power cord, must
be carried out by an Authorised
Service Centre or , in any case, by
qualifi ed personnel.
• Do not expose the appliance to atmospheric agents (rain, sun…).
• Never try to iron garments being worn.
• Use tap water to refi ll the boiler during use. Add the water to the boiler very slowly.
In this way you will avoid splatters of hot water or steam from the boiler. Keep your
face away from the hole.
• Do not touch the metal parts of the iron when in operation and for several minutes
after it is turned off since it could cause burns.
• Do not aim the jet of steam towards parts of the body or pets.
Warning of burns
• Never remove the boiler cap (B)
during use.
• WARNING! Before unscrewing
the cap (B) proceed as follows:
1) always turn off the appliance
pressing the button (L);
2) press the steam button (D)
to allow any remaining steam to
escape;
3) disconnect the power supply
cable from the power point;
4) slowly unscrew the cap (B) and
before completely unscrewing it,
wait until the sound of escaping
steam has stopped.
• We suggest you keep the original box and packaging, as our free-of-charge
service does not cover any damage resulting from inadequate packaging of the
product when this is sent back to an Authorised Service Centre.
• Remove any labels and protections from the soleplate before using the appliance
for the fi rst time.
• Always unwind the power cord before use.
• The use of extensions not approved by the manufacturer can result in damage to
property and personal injury.
• Do not use sparkling (carbonated) water.
• When the iron is hot, do not rest it onto the connecting cable or the power cord.
Take special care in ensuring that the cable and the cord do not come into contact
with the soleplate when it is hot.
• Do not pull the power cord to unplug the appliance.
• The appliance must only be cleaned with a soft, slightly damped, cloth after unplugging the iron and allowing all its parts to cool down. Never use solvents which
may damage the plastic parts.
• Clean the boiler at least every two months so as to eliminate any residue of lime
that could jeopardize proper operation of the appliance.
• Do not pour vinegar, descalers or other scented substances into the boiler; Otherwise, the warranty may be revoked.
• Do not wrap the power cord around the soleplate when the iron is hot.
• Do not put the soleplate in contact with metal surfaces.
• Before storing the appliance, turn it off by pressing the switch (L), unplug it from
the mains and allow it to cool down before emptying the boiler completely.
• We decline any responsibility resulting from misuse or any use other than those
covered in this booklet.
SAVE THESE INSTRUCTIONS FOR FUTURE REFERENCE
Note: when using the iron for the fi rst time, test it on an old piece of fabric to ensure
that the sole plate and water tank are completely clean.
DESCRIPTION OF THE APPLIANCE
A - Boiler
B - Boiler cap
C - Iron temperature control indicator light
D - Steam button
E - Continuous steam lock slider
F - Thermostat knob
G - Iron/boiler connection cable
H - Soleplate
I - Iron stand
J - Funnel
K - Steam ready light
L - Iron/boiler on-off switch
INSTRUCTIONS FOR USE
Filling the boiler before use
Warning!
Do not unscrew the cap of the boiler without ensuring that the appliance is
disconnected from the power supply (Fig. 2) and that there is no pressure
inside.
Rotate the boiler cap (B) anti-clockwise. Pour natural mineral water into the boiler
until completely fi lled (Fig. 3). Use the funnell (J). Screw the cap again (B).
The product functions with normal tap water.
If the tap water is particularly hard (higher than 20°F), use a mixture of 50% tap water
and 50% demineralized water.
Never use pure demineralized water.
Switching on the appliance
Connect the appliance to the power supply, ensuring that the voltage indicated on the
identifi cation plate corresponds to your local power supply.
When fi rst used, the iron may give out a little smoke. This transitory effect is perfectly
normal and will disappear very soon.
Keep the iron on its grille rest. Press the iron/boiler on-off switch (L).
Now select the required temperature using the thermostat knob (F). Wait the light (K)
is on before using the steam.
Before applying a jet of steam to the article to be ironed, release two or three good
jets of steam towards the fl oor to stabilise the steam fl ow (Fig. 5).
Warning!
Do not release steam when the iron is standing on its grille rest (I).
Shot of steam
Set the ironing temperature by turning the adjustment knob (F) past the symbol
(
). Wait for the indicator lamp (C) of the iron to turn off. Wait for the steam
•••
ready light (K) to turn on. When you press the steam button (D) 3 to 5 seconds, a
concentrated jet of steam will be delivered when the button is released. If the steam
supply button (D) is operated continuously for more than 30 seconds, drops of water
may come from the steam holes in the plate of the iron. It is recommended that the
button (D) is used for shorter periods.
Continuous steam
Set the ironing temperature by turning the adjustment knob (F) past the symbol
(
). Wait for the indicator lamp (C) of the iron to turn off. Wait for the steam
•••
ready light (K) to turn on. Press the steam button (D) and move the cursor (E) toward
the handle (Fig. 6). The cursor (E) will lock the button, making the jet of steam exit
continuously and steadily. To unlock the button (D) and stop the continuous jet, press
the cursor (E) forward (Fig. 7).
Temperature selection
First check whether the fabric has a label containing ironing instructions and compare the symbol with the instructions which follow. If there is no label with instructions, but you know the type of material, follow the instructions below.
Note that the table refers to fabrics not treated with sizing agents or similar products;
if they have been, you can also iron at a lower temperature.
Filling the boiler during use
Before unscrew the cap (B) turn off the appliance by pressing the switch (L).
Press the steam button (D) on the iron and allow all the steam to escape. The iron
must not be on its stand during this operation.
Disconnect the power supply cable from the power point (Fig. 2). Let the appliance
to cool down for a few minutes. Rotate the boiler cap (B) anti-clockwise very carefully
and wait for the residual steam to stop hissing before emptying it completely (Fig. 8).
Top up the boiler using the funnell (J) provided (Fig. 3).
Replace the cap (B) and screw it right down in a clockwise direction, ensuring that
it is completely tight.
Warning!
Never unscrew the cap of the boiler while the appliance is connected to the
mains or when there is still pressure inside.
Never unscrew the cap of the boiler while you are ironing.
If the iron has not been used for a long time (many weeks), it is advisable to keep it
in a horizontal position and press the steam button (D) about for 30 seconds in order
to clean the inner dispensing lines of the iron.
Do not carry out this operation when the iron is on its stand (I).
For a short ironing session, it is not necessary to fi ll the boiler completely. In fact,
less water in the boiler will reduce the waiting time, and consequently electric energy
consumption.
VERTICAL IRONING
You can use the jet of continuous steam for ironing hanging fabrics. This special ironing procedure serves to remove creases from curtains, fabrics, etc...
Set the ironing temperature by turning the adjustment knob (F) past the symbol
(
). Put the curtain or fabric in the position you want to iron it vertically and press
•••
the steam button.
Warning!
Do not iron fabrics held by other people.
DRY IRONING
For ‘dry’ ironing, without steam, after connecting the apparatus to the power supply just switch on the appliance and adjust the thermostat knob (F) to the required
temperature. Do not press the steam button.
Warning – material damage
• For proper disposal of the product pursuant to the European Directive
2009/96/EC please read the relevant leafl et enclosed with the product
SUGGESTIONS
Divide the articles to be ironed according to the types of material: wool with wool,
cotton with cotton, etc...
Because the iron heats up much more quickly than it cools down, it is advisable
to start with those fabrics which require lower temperatures and move on to those
which require progressively higher temperatures.
If the material is made up of more than one type of fi bre, always set the temperature
to the fi bre which requires less heat. For example, if the material is made up of 70%
synthetics and 30% cotton, set the temperature control to position (
without steam, that is, the temperature for synthetic fabrics.
If you do not know the composition of the article to be ironed, choose a part of the
article which will not be seen. Do a test ironing on this part to establish the appropriate temperature (always start with a relatively low temperature and work up until the
ideal temperature is reached).
Pure (100%) wool articles can be ironed with the iron set to one of the steam positions. To avoid pure wool, silk and synthetic materials becoming shiny, it makes good
sense to iron them on the reverse side. For other materials, especially velvet, which
can become shiny very easily, cover them with a cloth and iron in one direction only,
using light pressure. The iron must be kept constantly moving over the fabric.
Label Ironing
instructions
AFTER IRONING
Turn off the appliance by pressing the switch (L). The appliance is still energized
when plugged in and it is possible to eliminate the pressure remaining in the boiler
by pressing the steam button (D). Remove the power cable from the socket-outlet.
Wait few minutes to make the appliance cool down. Very carefully unscrew the cap
of the boiler (B) and before unscrewing it completely wait until any sound of escaping steam has stopped (Fig. 8). Let the iron cool down on its stand, taking care
not to touch the power cables and connection with the hot parts of the appliance.
Afterwards empty the boiler completely so as to prevent water from stagnating in the
boiler, forming lime deposit.
Put the appliance back on top of a stable surface and out of the reach of children.
CLEANING THE APPLIANCE
Before cleaning, always disconnect the plug from the power point (Fig. 2) and allow
the iron to cool down on its stand grille (I).
Warning!
Do not use abrasives for cleaning the soleplate. Try and keep the soleplate
smooth: avoid contact with metal objects.
Warning!
Never immerse the appliance in water or other liquids.
Warning!
Check the state of the power cable of your iron on a regular basis before using it, and if it is damaged, take it to the service centre closest to you to have
it replaced only by specialised personnel.
To clean the inside of the boiler, follow these instructions:
- disconnect the plug from the socket-outlet;
- fi ll the boiler with normal tap water and screw the cap (B) back on;
- shake the boiler so as to remove any lime residue that may have formed inside;
- unscrew the cap and empty the boiler;
- repeat the operation again until the water comes out clear and clean, then store
the appliance with the boiler completely empty.
Clean plastic parts with a damp, non-abrasive cloth and dry them with a dry cloth.
Warning!
Clean the boiler at least every two months so as to eliminate any residue of
lime that could jeopardize proper operation of the appliance.
THE WARRANTY DOES NOT COVER DAMAGE CAUSED BY CLOGGING DUE
TO LIME.
Kind of fabric Thermostat
Synthetic fabrics:
Acetate
Acrylic
Viscose
Poliammide (Nylon)
Viscose (Rayon)
Silk
Wool
Cotton
Linen
The mark on the label means do not iron
) (see table)
•
•
••
•••
D
EF
G
J
C
H
B
I
K
A
L
Fig. 1
Fig. 2 Fig. 3 Fig. 4
Fig. 5
Fig. 6 Fig. 7
Fig. 8
1
2 3 4 5 6 7 8
Page 2
FR
CONSEILS DE SÉCURITÉ
LISEZ ATTENTIVEMENT CES INSTRUCTIONS.
• L’appareil est destiné uniquement à un usage domestique, il ne doit pas être affecté à un usage industriel ou professionnel.
• Le constructeur décline toute responsabilité pour une utilisation erronée ou pour
des emplois autres que ceux prévus par ce livret.
• Il est conseillé de conserver l’emballage d’origine vu que l’assistance gratuite ne
joue pas pour les dommages causés par un emballage du produit non adéquat
lors de l’expédition à un service après-vente agréé.
• Cet appareil est conforme à la directive 2006/95/CE et à la directive EMC
2004/108/CE.
Danger pour les enfants
• Cet appareil ne peut être utilisé par les enfants de plus de 8
ans et par les personnes ayant
des capacités physiques, sensorielles ou mentales réduites, ou
bien qui manquent d’expérience
et de connaissances, à condition
d’être accompagnés par un adulte responsable ou d’avoir reçu
et compris les instructions et les
dangers découlant de l’usage de
l’appareil.
• Les enfants ne doivent pas jouer
avec l’appareil.
• Les opérations de nettoyage et
d’entretien décrites dans cette
notice ne doivent pas être exécutées par les enfants sans la supervision d’un adulte.
• Les éléments de l’emballage ne doivent pas être laissés à la portée des enfants
car ils représentent une source de danger.
• Lorsqu’on décidera de jeter cet appareil, il est recommandé de le mettre hors
d’usage en coupant le câble d’alimentation. Il est également recommandé de
protéger les parties susceptibles de constituer un danger spécialement pour les
enfants qui pourraient se servir de l’appareil pour jouer.
Danger électrique
• Ne pas laisser le fer et son cordon d’alimentation à la portée des
enfants ayant moins de 8 ans, notament s’il est encore branché à
la prise de courant ou s’il est en
train de refroidir.
• Avant de brancher l’appareil, assurez-vous que la tension indiquée sur la plaquette corresponde effectivement à celle du réseau.
• Branchez toujours l’appareil à une prise pourvue de mise à terre.
• NE TREMPEZ PAS L’APPAREIL DANS L’EAU NI DANS TOUT AUTRE LIQUIDE.
• Ne pas repasser avec les mains mouillées ou les pieds nus.
• Toujours éteindre l’appareil et
débrancher la fi che du cordon
d’alimentation de la prise de courant avant de remplir la chaudière
avec de l’eau.
• Remplir le chaudière d’eau avant de faire fonctionner l’appareil. Le remplissage en
• Pour remplir la chaudière utiliser l’entonnoir (J) fournis.
• Allumez l’appareil uniquement lorsqu’il est en position de travail.
• La première fois que vous utilisez l’appareil à repasser, il peut arriver qu’un peu
• Durant l’utilisation, poser l’appareil sur un plan horizontal stable et bien éclairé.
• Ne laissez pas l’appareil sans surveillance lorsqu’il est branché.
• L’appareil doit être utilisé et laissé au repos sur une surface stable.
• Quand on repose le fer sur sa grille d’appui, s’assurer que la surface où se trouve
• Lorsque vous devez vous absenter ne serait ce que pour quelques instants, posez
• Si vous appuyez sur le bouton de vapeur avant que la chaudière ou le fer ne soient
Dangers provenant d’autres causes
eau s’effectue avec l’appareil débranché de la prise de courant.
de fumée se dégage; ne vous inquiétez pas car il s’agit d’un phénomène normal,
dû au fait que certaines parties ont été légèrement lubrifi ées, qui disparaîtra très
rapidement.
la grille est stable.
toujours le fer sur la grille d’appui (I) éteindre l’appareil et débranchez toujours le
cordon d’alimentation électrique de la prise.
en température, il pourrait sortir de l’eau par les trous de vapeur.
• L’appareil ne doit pas être utilisé
si il est tombé, s’il présente des
signes visibles de détérioration
ou s’il perd de l’eau. Ne pas utiliser l’appareil si le câble électrique
ou la fi che sont endommagés ou
si l’appareil est défectueux. Toutes les réparations, y compris le
remplacement du cordon d’alimentation, doivent exclusivement
être effectuées dans un centres
d’assistance après-vente Ariete
ou par des techniciens agréés
Ariete, de façon à prévenir les risques éventuels.
• Ne pas laisser l’appareil exposé aux agents atmosphériques (pluie, soleil ect...).
9
• Ne jamais essayer de repasser les vêtements que l’on a sur soi.
• Utiliser l’eau du robinet pour remplir la chaudière, pendant qu’on utilise l’appareil.
Verser très lentement de l’eau dans la chaudière. On évitera de cette façon de
faire gicler l’eau chaude ou de faire sortir de la vapeur à l’improviste de la chaudière. Ne pas approcher le visage du trou.
• Ne pas toucher les parties métalliques du fer lorsqu’il marche ou quelques minutes après l’avoir éteint car on pourrait se brûler.
• Ne pas diriger le jet vapeur vers des parties du corps ou vers les animaux domestiques.
Avertissements sur les brûlures
• N’ôter sous aucun prétexte le
bouchon de la chaudière (B) durant l’utilisation.
• ATTENTION! Avant de dévisser
le bouchon (B), toujours procéder
comme suit:
1) eteindre l’appareil en appuyant
sur la touche (L);
2) appuyer sur le bouton de vapeur (D) et laisser s’échapper toute la vapeur résiduelle;
3) débranchez le cordon d’alimentation de la prise de courant;
4) dévisser lentement le bouchon
(B) et, avant de l’avoir complètement dévissé, attendre la fi n du
siffl ement éventuel de la vapeur.
• Il est conseillé de conserver l’emballage d’origine vu que l’assistance gratuite ne
joue pas pour les dommages causés par un emballage du produit non adéquat
lors de l’expédition à un service après-vente agréé.
• Avant d’utiliser l’appareil la première fois, retirez les protections et les étiquettes
éventuelles sur la semelle chauffante du fer à repasser.
• Déroulez toujours le câble avant utilisation.
• L’utilisation de rallonges électriques non autorisées par le fabricant de l’appareil peut
provoquer des dégâts et des accidents.
• N’utilisez jamais d’eau gazeuse (additionnée d’anhydride de carbone).
• Ne posez jamais le fer à repasser chaud sur le cordon de branchement ou sur le
cordon d’alimentation, et faites très attention à ce que ceux-ci n’entrent pas en
contact avec la semelle chaude du fer.
• Ne débranchez pas le fer de la prise de courant en tirant sur le cordon.
• Une fois que l’appareil aura été débranché et que toutes les parties auront refroidi,
il sera possible de le nettoyer exclusivement avec un chiffon non abrasif et à peine
humide. N’utilisez jamais de solvants car ils altèrent les parties en plastique.
• Effectuer le nettoyage de la chaudière tous les deux mois minimum de façon
à éliminer les éventuels résidus de calcaire qui pourraient compromettre le
bon fonctionnement de l’appareil.
• Ne pas verser de vinaigre, décalcifi ant ou autres substances parfumées dans le
chaudière; peine de faire déchoir la garantie.
•
Ne pas enrouler le cordon d’alimentation autour de la semelle lorsque le fer est
encore chaud.
• Ne pas mettre la semelle en contact avec les surfaces métalliques.
• Eteindre l’appareil avant de le reposer en appuyant sur le interrupteur (L), toujours
débrancher la prise du cable d’alimentation, attendre qu’il ait refroidi puis vider
totalement la chaudière.
• Le constructeur décline toute responsabilité pour une utilisation erronée ou pour
des emplois autres que ceux prévus par ce livret.
CONSERVER CES INSTRUCTIONS
Remarque: lors de la première utilisation, essayez le fer sur un vieux morceau de
tissu pour vérifi er que la semelle et le réservoir d’eau sont parfaitement propres.
DESCRIPTION DE L’APPAREIL
A - Chaudière
B - Bouchon de la chaudière
C - Voyant lumineux de contrôle température de repassage
D - Bouton vapeur
E - Curseur de blocage pour vapeur continue
F - Bouton du thermostat
G - Câble de liaison fer/chaudière
H - Semelle
I - Grille d’appui du fer
J - Entonnoir
K - Voyant vapeur prête
L - Interrupteur marche fer/chaudière
MODE D’EMPLOI
Remplissage du chaudière avant l’emploi
Tourner le bouchon de la chaudière (B) dans le sens inverse des aiguilles d’une
montre. Verser de l’eau plate dans la chaudière jusqu’à ce qu’elle soit complètement
remplie (Fig. 3). Utiliser le doseur (J) entonnoir. Revisser le bouchon (B).
Le produit fonctionne avec l’eau du robinet.
Si l’eau est particulièrement calcaire (avec une duretée supérieure à 20°F), utiliser
un mélange composé à 50 % d’eau du robinet et 50 % d’eau déminéralisée.
Ne jamais utiliser d’eau déminéralisée pure.
Allumage de l’appareil
Brancher l’appareil en contrôlant que la tension indiquées sur la plaquette correspond à celle du réseau local.
A la première mise en fonction du fer, il peut y avoir une légère exhalation de fumée.
Il s’agit d’un phénomène normal qui disparaîtra rapidement.
Tenir le fer sur la grille de support. Appuyer sur l’interrupteur permettant d’allumer
la chaudière (L).
Sélectionner à présent la température souhaitée par l’intermédiaire du bouton du
thermostat (F). Attendre que le voyant (K) s’allume pour pouvoir utiliser la vapeur.
Avant de diriger le jet de vapeur sur la pièce à repasser, distribuer deux ou trois
coups de vapeur prolongés vers le sol pour le stabiliser (Fig. 5).
Jet de vapeur
Régler la température du repassage par le bouton de réglage (F) au-delà du symbole
). Attendre que le voyant (C) du fer se soit éteint. Attendre que le voyant de
(
•••
vapeur prête (K) s’allume. Quand on appuie sur le bouton vapeur (D) pendant 3,
5 secondes, un jet de vapeur intense est débité qund on relâche le bouton. Si le
bouton de débit vapeur (D) est actionné de façon ininterrompue pendant plus de
30 secondes, des gouttes d’eau peuvent sortir par les trous destinés à la vapeur,
sur la semelle du fer à repasser il est donc déconseillé d’agir avec insistance sur
le boutòn (D).
Vapeur continue
Régler la température du repassage par le bouton de réglage (F) au-delà du symbole
(
). Attendre que le voyant (C) du fer se soit éteint. Attendre que le voyant de va-
•••
peur prête (K) s’allume. Appuyer sur le bouton vapeur (D) et déplacer le curseur (E)
vers le manche (Fig. 6). Le curseur (E) bloquera le bouton provoquant ainsi la sortie
d’un jet de vapeur continu et constant. Pour débloquer le bouton (D) et interrompre
le jet continu, pousser le curseur (E) vers l’avant (Fig. 7).
Sélection de la température
Contrôler avant tout la présence sur le tissu d’une étiquette avec les indications pour
le repassage et comparer le symbole qui s’y trouve avec le tableau reporté ci-après.
En l’absence de cette étiquette, mais si vous connaissez le type de tissu, suivre les
indications reportées dans le tableau.
Remarque: le tableau se réfère aux tissus non traités avec de l’apprêt ou produits similaires. Dans le cas contraire, le repassage peut se faire à température plus basse.
Attention - dégâts matériels
• Pour éliminer correctement l’appareil, conformément à la Directive
Européenne 2009/96/CE, veuillez lire la notice qui accompagne le produit.
Attention!
Ne jamais devisser le bouchon du reservoir avant de vous etre assure que
l’appareil est debranche (Fig. 2) et qu’il n’y a plus de pression a l’interieur.
Attention!
Ne jamais distribuer de vapeur lorsque le fer est posé sur la grille (I) prévue
à cet effet.
10 11 12 13 14 15
Remplissage du chaudière durant l’emploi
Avant de dévisser le bouchon (B) éteindre la chaudière en appuyant sur le
bouton (L).
Appuyer sur le bouton de la vapeur (D) sur le fer et laisser échapper de la vapeur
jusqu’à l’épuisement complet. Pendant cette opération, ne pas laisser le fer sur la
grille de suppor.
Débrancher le cordon d’alimentation de la prise de courant (Fig. 2). Laisser refroidir
l’appareil quelques minutes. Tourner avec précaution le bouchon de la chaudière (B)
dans le sens inverse des aiguilles d’une montre et attendre la fi n du siffl et émis par
la vapeur résiduelle (Fig. 8) avant de le dévisser complètement.
When fi lling the boiler, always use the funnell (J) provided (Fig. 3).
Revisser à fond le bouchon (B) dans le sens des aiguilles d’une montre, en vous
assurant qu’il a complètement terminé sa course.
Attention!
Ne jamais dévisser le bouchon de la chaudière pendant que l’appareil est
branché et qu’il y a encore de la pression à l’intérieur.
Ne jamais dévisser le bouchon de la chaudière pendant que vous repassez.
Si le fer reste inactif pendant une longue période (plusieurs semaines), avant de repasser, il est recommandé de le tenir en position horizontale et d’actionner pendant
30 secondes le bouton de distribution de la vapeur (D) pour nettoyer les conduites
de la vapeur.
Ne pas effectuer cette opération au-dessus de la grille de support (I).
Pour des repassages de courte durée, il n’est pas nécessaire que la chaudière soit
complètement remplie. Une plus petite quantité d’eau das la chaudière réduira en effet
le temps d’attente et par conséquent, la consommation d’énergie électrique.
REPASSAGE VERTICAL
On peut utiliser le jet de vapeur continu pour repasser à la verticale. Ce procédé
spécial de repassage sert à éliminer les plis sur les rideaux, les tissus etc...
Régler la température du repassage par le bouton de réglage (F) au-delà du symbole
(
). Positionner le rideau ou le tissu de façon à pouvoir repasser à la verticale et
•••
appuyer sur le bouton vapeur.
Attention!
Ne pas repasser les tissus qui sont soutenus par une autre personne.
REPASSAGE À SEC
Pour repasser à sec ou sans vapeur, il suffi t de débrancher l’appareil du réseau d’ali-
mentation, allumer le appareil et lrégler le bouton thermostat (F) sur la température
désirée. Ne pas appuyer sur la touche vapeur.
CONSEILS
Répartir les pièces à repasser en fonction du type de tissu: laine/laine, coton/coton,
etc...
Etant donné que la semelle du fer chauffe plus vite qu’elle ne se refroidit, nous
conseillons de commencer à repasser tous les tissus qui exigent des températures
plus basses pour passer aux tissus qui exigent progressivement des températures
plus élevées.
Si le tissu est composé de plusieurs types de fi bres, toujours régler la température
en fonction de la fi bre qui exige le moins de chaleur. Par exemple, si le tissu est
composé de 70% de fi bres synthétiques et de 30% de coton, régler la température
sur la position (
pour les tissus synthétiques.
Si vous ignorez la composition du tissu à repasser, chercher un point de tissu qui
n’est pas visible. Faire un essai en repassant ce point et déterminer la température
la mieux appropriée (toujours commencer par une température relativement basse
et l’augmenter graduellement pour atteindre la température correcte).
On peut également repasser les tissus pure laine (100%) en réglant le fer sur une
des positions vapeur. Repasser à l’envers les tissus pure laine, soie, synthétiques,
pour éviter que le tissu repassé ne devienne brillant. Pour les autres types de tissu
et en particulier le velours, pour éviter qu’ils ne deviennent facilement brillants, les
repasser dans une seule direction (avec une toile), en appuyant très légèrement. Le
fer à repasser doit toujours être en mouvement sur le tissu.
Etiquette Instructions
pour le repassage
indiquées sur les
tissus
APRÈS AVOIR REPASSÉ
Eteindre l’appareil en appuyant sur l’interrupteur (L). Avec la prise branchée, l’appareil reste sous tension et il est possible d’éliminer la pression restée dans la chaudière en appuyant sur le bouton vapeur (D). Débrancher le cordon d’alimentation
de la prise de courant. Attendre quelques minutes pour laisser refroidir l’appareil.
Dévisser le bouchon de la chaudière (B) en faisant très attention, et avant de le
dévisser complètement, attendre la fi n du siffl ement de la vapeur (Fig. 8). Laisser
refroidir le fer à repasser sur son support en prenant garde à ne pas faire entrer en
contact les câbles d’alimentation et de liaison avec les parties chaudes de l’appareil.
Vider ensuite complètement la chaudière de façon à éviter que l’eau ne stagne à
l’intérieur de la chaudière et favorise ainsi la formation du calcaire.
Ranger l’appareil sur une superfi cie stable et loin de la portée des enfants.
NETTOYAGE DE L’APPAREIL
Avant de procéder au nettoyage de l’appareil, toujours retirer la fi che de la prise de
courant (Fig. 2) et laisser le fer refroidir sur la grille de support (I).
Pour le nettoyage interne de la chaudière procéder de la manière suivante:
- retirer la fi che de la prise de courant;
- remplir la chaudière avec l’eau du robinet et visser le bouchon (B);
- agiter la chaudière de façon à enlever les éventuels résidus de calcaire qui se
seraient formés à l’intérieur;
- dévisser le bouchon et vider la chaudière;
- recommencer la même opération jusqu’à ce que l’eau sorte de façon limpide et
propre, puis ranger avec la chaudière complètement vidée.
Utiliser exclusivement un linge humide pour nettoyer l’appareil.
LA GARANTIE NE COUVRE PAS LES DOMMAGES DUS AUX OBSTRUCTIONS
PROVOQUEES PAR LE CALCAIRE.
) (voir tableau) sans vapeur, c’est à dire celle qui est préconisée
•
Type de tissu Thermostat
Tissus synthétiques:
Acétates
Acryliques
Viscose
Polyamide (Nylon)
Viscose (Rayon)
Soie
Laine
Coton
Lin
Le symbole signifi e “ne pas repasser”
Attention!
Ne pas utiliser d’abrasifs pour nettoyer la semelle. Nettoyer de façon à ce
que la semelle reste lisse: éviter le contact avec les objets métalliques.
Attention!
Ne jamais immerger l’appareil dans l’eau ou dans un liquide quelconque.
Attention!
Contrôler régulièrement les conditions du cordon d’alimentation de votre fer
avant de l’utiliser, en cas de détérioration, l’apporter dans le service aprèsvente le plus proche et le faire remplacer par un personnel spécialisé.
Attention!
Nettoyer la chaudière au moins tous les deux mois pour éliminer les éventuels résidus de calcaire qui pourraient compromettre le bon fonctionnement
de l’appareil.
•
••
•••
DE
WICHTIGE HINWEISE
DIE BEDIENUNGSANLEITUNG VOR DEM GEBRAUCH AUFMERKSAM
LESEN.
• Das Gerät ist nur für den Hausgebrauch vorgesehen und darf nicht für gewerbliche oder industrielle Zwecke verwendet werden.
• Wir übernehmen keine Haftung bei einem falschen oder in dieser Anleitung nicht
vorgesehenen Einsatz.
• Wir empfehlen die Originalverpackungen aufzubewahren, da ein Gratis-Kundendienst nicht für Schäden vorgesehen ist, die durch falsche Verpackung bei der
Spedition zum Kundendienst entstehen.
• Das Gerät entspricht der Europäischen Richtlinie 2006/95/EG und der EMVRichtlinie 2004/108/EG.
Gefahr für Kinder
• Das Gerät darf von Kindern ab
dem 8. Lebensjahr oder von physisch, sensoriell oder geistig behinderten Menschen, oder von
Personen, die über die nötige
Erfahrung und Wissen nicht verfügen, verwendet werden, unter
der Bedingung, dass es eine angemessene Kontrolle durch einen
Verantwortlichen ausgeübt wird
oder dass sie die Anleitungen erhalten und verstanden haben und
der Gefahren, die von der Verwendung des Gerätes verursacht
werden können, bewusst sind.
• Kinder dürfen mit dem Gerät nicht
spielen.
• Die in dieser Anleitung beschriebenen Reinigungs und Wartungseingriffe dürfen nicht von Kindern
ohne die Überwachung eines Erwachsenen ausgeführt werden.
• Die Verpackungsteile von Kindern fernhalten, da diese eine mögliche Gefahrenquelle bilden.
• Soll das Gerät als Abfall entsorgt werden, empfehlen wir es durch Abschneiden
des Anschlusskabels unbrauchbar zu machen. Wir empfehlen außerdem die Geräteteile unschädlich zu machen, die besonders für Kinder beim Spielen mit dem
Gerät gefährlich sein könnten.
Gefahr wegen Strom
• Das Bügeleisen beim Abkühlen
und das angeschlossene Versorgungskabel immer außerhalb der
Reichweite von Kindern unter 8
Jahren aufbewahren.
• Bevor das Gerät angeschlossen wird, muss kontrolliert werden, ob die Netzspannung den Angaben auf dem Typenschild des Geräts entspricht.
• Das Gerät muss an eine geerdete Steckdose angeschlossen werden.
• DAS GERÄT NIE IN WASSER ODER ANDERE FLÜSSIGKEITEN TAUCHEN.
• Nicht mit dem Bügeln anfangen, wenn Sie nasse Hände oder nackte Füße haben.
• Bevor Sie den Kessel mit Wasser
auffüllen, das Gerät ausschalten
und den Stecker des Versorgungskabels aus der Steckdose
ziehen.
Gefahr von Schäden wegen anderer
• Den Dampferzeuger vor Inbetriebnahme des Gerätes mit Wasser füllen. Vorm
Nachfüllen von Wasser stets den Stecker des Anschlusskabels aus der Steckdose
ziehen.
• Benutzen Sie zum Wassereinfüllen immer den Trichter (J).
• Das Gerät nur am Arbeitsplatz einschalten.
• Beim ersten Gebrauch des Gerätes kann sich leichter Rauch bilden; dies geschieht, weil einige Teile leicht geschmiert wurden, aber seien Sie nicht beunruhigt, da solche Erscheinung sich nach kurzer Zeit nicht mehr wiederholt.
• Bei der Benutzung das Gerät auf einer waagerechten Fläche positionieren.
• Das Gerät nie unbeaufsichtigt lassen solange es am Stromnetz angeschlossen
ist.
• Das Gerät muss auf einer festen Unterlage benutzt und abgestellt werden.
• Wird das Bügeleisen auf dem Bügeleisenständer abgestellt, muss sichergestellt
werden, dass die Aufl agefl äche des Bügeleisenständers fest ist.
• Auch wenn Sie nur für kurze Zeit weggehen, das Bügeleisen immer auf der entsprechenden Bügeleisenablage (I) abstellen, das Gerät ausschalten und stets den
Stecker des Anschlusskabels aus der Steckdose ziehen.
• Vor Erreichen der Heizkessel-Betriebstemperatur oder bevor das Bügeleisen heiß
ist, kann bei Betätigung des Dampfschalters Wasser aus den Dampföffnungen
austreten.
Ursachen
• Das Gerät darf nicht benutzt
werden, wenn es runtergefallen
ist, wenn es sichtbare Schäden
aufweist oder wenn Wasser austritt. Das Gerät darf nicht benutzt
werden, wenn das Stromkabel,
der Stecker oder das Gerät beschädigt sind. Um jegliches Risiko vorzubeugen, dürfen alle
Reparaturen, einschließlich des
Stromkabelwechsels, nur durch
das Service Center Ariete bzw
autorisierte Ariete-Fachtechniker
durchgeführt werden.
• Das Gerät nicht Witterungseinfl üssen ausgesetzt lassen (Regen, Sonne usw...).
• Niemals Kleidungsstücke bügeln, solange jemand diese angezogen hat.
• Zum Auffüllen des Dampferzeugers Leitungswasser verwenden. Das Wasser sehr
langsam in den Kessel einfüllen. Auf diese Weise wird ein plötzliches Herausspritzen von heißem Wasser oder Dampf aus dem Dampferzeuger vermieden. Das
Gesicht fern vom Loch halten.
• Die Metallteile des Bügeleisens während des Betriebs und der ersten Minuten
nach dem Abschalten nicht anfassen, weil Verbrennungsgefahr besteht.
• Den Dampfstrahl nie auf Körperteile oder auf Haustiere richten.
Hinweise zu Verbrühungsgefahr
• Auf keinen Fall den Verschluss
(B) während des Gebrauchs entfernen.
• ACHTUNG! Bevor Sie den Verschluss (B) aufschrauben, gehen
Sie wie folgt vor:
1) Den Heizkessel durch Drücken
des Schalters (L) ausschalten;
2) Die Dampftaste (D) drücken
und den vorhandenen Restdampf
austreten lassen;
3) Das Anschlusskabel aus der
Steckdose ziehen;
4) Den Verschluss (B) langsam
aufschrauben; dabei abwarten,
bis ein eventuelles Zischen aufhört, bevor Sie den Verschluss
ganz aufschrauben.
• Wir empfehlen die Originalverpackungen aufzubewahren, da ein Gratis-Kundendienst nicht für Schäden vorgesehen ist, die durch falsche Verpackung bei der
Spedition zum Kundendienst entstehen.
• Vor dem ersten Gebrauch des Gerätes müssen eventuell vorhandene Etiketten
oder Schutzfi lme von der Bügelfl äche entfernt werden.
• Vor Gebrauch stets das Kabel abwickeln.
• Der Einsatz von nicht vom Hersteller zugelassenen Verlängerungskabeln kann
Schäden verursachen und ist eine Unfallgefahr.
• Kein Sprudelwasser verwenden (mit hinzugefügtem Kohlendioxyd).
• Das heiße Bügeleisen nie auf das Anschluss- oder Verbindungskabel stellen, und
darauf achten, dass diese die heiße Bügelfl äche nicht berühren.
• Nie den Stecker am Anschlusskabel aus der Steckdose ziehen.
• Zur Pfl ege des Gerätes als erstes den Stecker des Anschlusskabels aus der
Steckdose ziehen, anschließend warten, bis alle Teile abgekühlt sind Das Gerät
ausschließlich mit einem weichen und leicht feuchten Tuch reinigen. Keine Lösungsmittel verwenden, da diese die Plastikteile beschädigen.
• Der Dampferzeuger muss mindestens alle zwei Monate von eventuellen
Kalkresten gereinigt werden, die den richtigen Gerätebetrieb beeinträchtigen könnten.
• Keinen Essig, Entkalkungsmittel oder andere parfümierte Substanzen in den Tank
füllen; Andernfalls verfallen die Garantieansprüche.
•
Das Anschlusskabel nicht um die Bügelsohle wickeln, solange das Bügeleisen
noch heiß ist.
• Die Bügelsohle nicht auf Metallfl ächen stellen.
• Vorm Wegstellen des Gerätes muss dieses durch Druck auf den Schalter (L) ausgeschaltet werden. Stets den Stecker des Anschlusskabels aus der Steckdose
ziehen. Abwarten bis das Gerät abgekühlt ist und den Wassertank vollständig
entleeren.
• Wir übernehmen keine Haftung bei einem falschen oder in dieser Anleitung nicht
vorgesehenen Einsatz.
DIE GEBRAUCHSANWEISUNG GUT AUFBEWAHREN
Anmerkung: Beim erstmaligen Gebrauch des Bügeleisens sollte es zunächst auf
einem alten Stoffstück ausprobiert werden, um zu prüfen, dass die Bügelsohle und
Wasserbehälter vollständig sauber sind.
GERÄTEBESCHREIBUNG
A - Wasserkocher
B - Dampferzeugerdeckel
C - Kontrolllampe Bügelfl ächentemperatur
D - Dampfschalter
E - Regler für Dauerdampf
F - Temperaturregler
G - Verbindungskabel Bügeleisen - Dampferzeuger
H - Bügelsohle
I - Bügeleisenablage
J - Trichter
K - Kontrolllampe Dampfbereitschaft
L - Schalter zum Einschalten Bügeleisen/ Dampferzeuger
GEBRAUCHSANWEISUNGEN
Füllen des Dampferzeugers vor dem Gebrauch
Achtung!
Vergewissern Sie sich vor jedem Aufschrauben des Verschlusses des
Dampferzeugers, dass der Netzstecker des Gerätes gezogen ist (Fig. 2) und
dass es nicht unter Druck steht.
Den Kesselverschluss (B) gegen den Uhrzeigersinn drehen. Den Dampferzeuger
vollständig mit Leitungswasser füllen (Fig. 3). Den mitgelieferten Trichter (J) verwenden. Den Deckel (B) wieder festschrauben.
Das Gerät funktioniert mit normalem Leitungswasser.
Bei besonders kalkhaltigem Wasser (mit einer Wasserhärte von mehr als 20°F) ein
Gemisch aus 50% Leitungswasser und 50% destilliertem Wasser verwenden.
Niemals reines destilliertes Wasser verwenden.
Einschalten des Gerätes
Bevor das Gerät angeschlossen wird, muss kontrolliert werden, ob die Netzspannung den Angaben auf dem Typenschild des Geräts entspricht.
Beim ersten Anschalten des Bügeleisens kann eine leichte Rauchbildung auftreten.
Das ist normal und hört nach kurzer Zeit auf.
Das Bügeleisen auf dem entsprechenden Bügeleisenständer abstellen. Den Schalter zum Einschalten des Bügeleisens/Dampferzeugers (L) drücken.
Anschließend mit dem Temperaturschalter (F) die gewünschte Temperatur einstellen. Um den Dampf zu benutzen, abwarten, dass sich die Kontrolllampe Dampfbereitschaft (K) einschaltet.
Bevor Sie den Dampf auf die zu bügelnde Wäsche richten, geben Sie zwei bis drei
längere Dampfstöße gegen den Boden ab, um den Dampfausstoß zu stabilisieren
(Fig. 5).
Achtung!
Niemals Dampf abgeben, solange das Eisen auf der Bügeleisenablage (I)
steht.
Dampfstoß
Die Bügeltemperatur am Bügeleisen-Temperaturregler (F) über das Symbol (
stellen. Abwarten, bis sich die Kontrolllampe (C) des Bügeleisens ausgeschaltet hat.
Abwarten, dass sich die Kontrolllampe Dampfbereitschaft (K) einschaltet. Wenn der
Dampftaste (D) zwischen 3 und 5 Sekunden gedrückt wird, wird beim Loslassen
des Schalters ein kräftiger Dampfstrahl abgegeben. Wird der Dampftaste (D) ohne
Unterbrechung für mehr als 30 Sekunden betätigt, können Wassertropfen aus den
Dampföffnungen an der Bügelsohle austreten. Aus diesem Grund sollte der Dampftaste (D) nicht zu lange betätigt werden.
Dampf-Dauerbetrieb
Die Bügeltemperatur am Bügeleisen-Temperaturregler (F) über das Symbol (
stellen. Abwarten, bis sich die Kontrolllampe (C) des Bügeleisens ausgeschaltet
hat. Abwarten, dass sich die Kontrolllampe Dampfbereitschaft (K) einschaltet. Den
Dampfschalter (D) betätigen und den Regler (E) in die Richtung des Bügeleisengrif-
Achtung - Sachschäden
• Für die korrekte Entsorgung des Gerätes entsprechend der EGRichtlinie 2009/96/EG bitte die die dem Gerät beigelegten Anweisungen
beachten.
•••
•••
)
)
fes schieben (Fig. 6). Der Regler für Dauerdampf (E) blockiert die Taste und sorgt
damit für die Abgabe eines kontinuierlichen und konstanten Dampfstrahls. Zum Entsperren der Dauerdampftaste (D) und zum Unterbrechen des Dauer-Dampfstrahls
den Regler für Dauerdampf (E) nach vorne schieben (Fig. 7).
Temperaturauswahl
Als erstes auf dem Stoff nach dem Etikett mit den Bügelanleitungen suchen und
das Symbol auf denselben mit der weiter unten aufgeführten Tabelle vergleichen.
Sollte das Etikett mit den Bügelanleitungen fehlen und die Stoffart bekannt sein, die
nachstehende Tabelle beachten.
Wir weisen darauf hin, dass sich die Tabelle auf Stoffe bezieht, die nicht mit Appreturmitteln o. ä. behandelt sind. Falls dies der Fall sein sollte, kann auch mit einer
niedrigeren Temperatur gebügelt werden.
Auffüllen des Dampferzeugers während des Gebrauchs
Vor dem Aufschrauben des Verschlusses (B) den Dampferzeuger mit dem
Schalter (L) abschalten.
Die Taste (D) drücken und den gesamten Restdampf vollständig ablassen. Dabei
das Bügeleisen nicht über die Bügeleisenablage halten.
Das Anschlusskabel aus der Steckdose ziehen (Fig. 2). Das Gerät einige Minuten
abkühlen lassen. Den Kesselverschluss (B) gegen den Uhrzeigersinn vorsichtig drehen und ihn nicht komplett ausdrehen, bevor das Pfeifen des restlichen Dampfes
aufhört (Fig. 8).
Benutzen Sie zum Wassereinfüllen immer den Trichter (J) Fig. 3.
Den Verschluss (B) nach rechts fest bis zum Anschlag zuschrauben.
Achtung!
Nie den Verschluss aufdrehen, solange der Netzstecker nicht gezogen ist
und der Dampferzeuger unter Druck steht.
Nie den Verschluss beim Bügeln aufschrauben.
Wurde das Bügeleisen mehrere Wochen nicht gebraucht, ist es angebracht, das
Gerät in horizontaler Lage zu halten und 30 Sekunden lang die Dampftaste (D) zu
betätigen, um die inneren Dampfl eitungen zu reinigen.
Diese Arbeit nicht über der Bügeleisenablage (I) ausführen.
Für kurzes Bügeln braucht der Wasserbehälter nicht vollständig gefüllt zu werden.
Geringere Wassermengen im Dampferzeuger verkürzen die Wartezeit und damit den
Stromverbrauch.
SENKRECHT BÜGELN
Der Dauerdampfstrahl kann zum Bügeln von hängenden Stoffen verwendet werden.
Dieses besondere Bügelverfahren dient zum Entfernen von Falten aus Vorhängen,
Geweben usw.
Die Bügeltemperatur am Bügeleisen-Temperaturregler (F) über das Symbol (
stellen. Den Vorhang oder das Gewebe so positionieren, wie es hängend gebügelt
werden soll und dann den Dampfschalter drücken.
Achtung!
Keine Gewebe bügeln, die von anderen Personen gehalten werden.
TROCKEN BÜGELN
Trocken bügeln (d.h. ohne Dampf): Das Gerät an das Stromnetz anschließen, Temperaturwähler (F) auf die gewünschte Temperatur einstellen. Nicht den Dampfschalter drücken.
TIPPS
Die zu bügelnden Kleidungsstücke entsprechend der Stoffart trennen: Wolle zu Wolle, Baumwolle zu Baumwolle usw.
Da sich die Bügelsohle viel schneller erhitzt als abkühlt, sollte man zunächst die Stoffe bügeln, die eine niedrigere Temperatur erfordern und dann allmählich auf Stoffe
übergehen, die höhere Temperaturen erfordern.
Besteht das Gewebe aus verschiedenen Garnarten, ist die Temperatur immer auf
die Faser einzustellen, die die niedrigste Temperatur verlangt. Besteht ein Gewebe
z.B. zu 70% aus synthetischen Fasern und zu 30% aus Baumwolle, ist die Temperatur auf die Position (
synthetische Fasern.
Ist die Gewebe-Zusammensetzung des zu bügelnden Kleidungsstückes unbekannt,
eine nicht sichtbare Stelle am Gewebe suchen. Einen Versuch vornehmen, an dieser
Stelle bügeln und die geeignetste Temperatur auswählen (immer mit einer relativ
niedrigen Temperatur anfangen und dann nach und nach erhöhen, bis die geeignete
Temperatur erreicht ist).
Reine Wollstoffe (100%) können auch nur mit Dampf gebügelt werden. Um zu
vermeiden, dass das Gewebe glänzend wird, bei reinen Wollstoffen, Seide und
Kunstfasern darauf achten, dass auf der Rückseite gebügelt wird. Bei anderen
Gewebearten und besonders bei Samt sollte man, um zu vermeiden, dass sie glänzend werden, (mit einem Tuch) nur in eine Richtung mit leichtem Druck bügeln.
Das Bügeleisen sollte dabei auf dem zu bügelnden Gewebe ständig in Bewegung
gehalten werden.
Etikett mit Bügelanleitung am Stoff
NACH DEM BÜGELN
Das Gerät durch Druck auf den Schalter (L) ausschalten. Solange der Stecker n der
Steckdose bleibt, bleibt das Gerät unter Spannung und durch Druck auf den Dampftaste (D) kann der Restdruck aus dem Heizkessel abgelassen werden. Den Stecker
aus der Steckdose ziehen. E inige Minuten warten, damit das Gerät abkühlen kann.
Bitte warten Sie bis ein eventuelles Zischen aufhört, bevor Sie den Verschluss (B)
ganz aufdrehen (Fig. 8). Das Bügeleisen auf dem Abstellrost abkühlen lassen. Dabei
muss darauf geachtet werden, dass das Anschlusskabel und das Verbindungskabel
nicht die heißen Geräteteile berühren. Anschließend den Dampferzeuger vollständig
entleeren, so dass eine Bildung von Kalkablagerungen durch stehendes Wasser im
Dampferzeuger vermieden wird.
Das Bügeleisen auf einer festen Fläche und für Kinder unzugänglich wegstellen.
PFLEGE
Bevor Sie das Bügeleisen reinigen muss der Netzstecker aus der Steckdose gezogen
werden (Fig. 2) und das Bügeleisen auf dem Bügeleisenständer (I) abkühlen.
Achtung!
Keine Scheuermittel zum Reinigen der Bügelsohle verwenden. Dafür sorgen, dass die Bügelsohle immer glatt bleibt: Kontakt mit Metallgegenständen
vermeiden.
Achtung!
Das Gerät nie ins Wasser oder andere Flüssigkeiten tauchen.
Achtung!
Den Zustand des Anschlusskabel Ihres Bügeleisens vorm Gebrauch regelmäßig überprüfen und im Fall von Schäden zur nächstgelegenen Kundendienststelle bringen und nur durch Fachpersonal auswechseln lassen.
Für die Innenreinigung des Dampferzeugers wie folgt vorgehen:
- Den Netzstecker aus der Steckdose ziehen;
- Den Dampferzeuger mit normalem Leitungswasser füllen und den Deckel (B) festschrauben;
- Den Dampferzeuger schütteln, so dass eventuelle Kalkrückstände, die sich im
Inneren gebildet haben, beseitigt werden;
- Den Deckel abschrauben und den Dampferzeuger entleeren;
- Diesen Vorgang solange wiederholen, bis klares und sauberes Wasser austritt,
anschließend das Gerät mit vollständig entleertem Dampferzeuger wegstellen.
Die Plastikteile mit einem feuchten, nicht scheuernden Tuch reinigen und mit einem
trockenen Tuch trocknen.
Achtung!
Der Dampferzeuger muss mindestens alle zwei Monate von eventuellen
Kalkresten gereinigt werden, die den richtigen Gerätebetrieb beeinträchtigen
könnten.
DIE GARANTIELEISTUNGEN DECKEN KEINE SCHÄDEN AB, DIE DURCH VON
KALK VERURSACHTEN VERSTOPFUNGEN ENTSTANDEN SIND.
) (siehe Tabelle) ohne Dampf einzustellen, d.h. auf die für
•
Stoffart Temperaturregler
Synthetische Stoffe:
Azetat
Acryl
Viskose
Polyamid (Nylon)
Polyester (Rayon)
Seide
Wolle
Baumwolle
Leinen
Dieses Zeichen auf dem Etikett zeigt an, dass dieser Arti-
kel nicht gebügelt werden darf
•••
•
••
•••
827070
Internet: www.ariete.net
E-Mail: info@ariete.net
31100 Treviso (TV) - Italy
Via L. Seitz, 47
Divisione Commerciale Ariete
De’ Longhi Appliances Srl
COD. 2135103900 REV. 0 del 12/03/2012
)
MOD. 6310
Italiano
English
Deutsch
Français
 Loading...