


INSTRUCTIONS
FOR
OPERATING
•
argus
W
Model K
ClIMERlI
•
INTERNATIONAL RESEARCH
CORPORATION
Ann
Arbor
.
Michigan.
U.S.A.

ARGUS SERVI
CE
POLICY AND GUARANTEE
The
ARGUS Camera is g
uarant
eed against
defective material
and
workman
ship for 90
days after shipm ent.
This guarantee
is lim-
it
ed
to th
e re
turn
of the camera to the fac-
tor
y with
transportation
charges prepaid ,
where
any
defect s will be corrected
and
the
camera returned
with transportat
ion charges
pr
epaid .
I n order
that A RG
US
owners may be as-
sured of low
upkeep cost
of
our cameras
after expiration
of the above guarantee, the
facto
ry w
ill
put
in
fir
st cla
ss
condition
any
ARGUS
Model "K" Camera shipped
to
the m, wit h
transportation
charg
es
prepaid
to th
e owner
for the s
um
of
2.00.
Thi
s
po
li
cy is e
ffe
ctive fo r one
year
from
date
of
pur
chase.
Thi
s doe s n
ot
cover replacement
of
camera cases broken
through
misu
se
or
cameras which have been abused.
NOTICE TO ARGUS CAMERA OWNERS
In
order
that
you mig
ht
insure
yo
ur
camera
against defective m
aterial and work-
manship
for
90
days
after
shipment,
it
is
necessary
that you fill
out
the registration
card
supplied with
your
camera and
return
it
to
our facto ry within
15
day
s a
fter
pur-
chase.
When
writing
the
facto ry, please
mention
th
e model
and seri
al
number
of
yo
ur
camera.
ARGUS INSTRUCTIONS
FI
GURE
I
I.
Cartridge
Chambe r
Cover
5.
Focusing
Rin
g
2.. Sh
utter
Lever 6. Count
er
Dia
l
3· Shu
tter
Speed
Ring
7.
W in
ding
Knob
4.
Cab le Rel ease
Socket
8. E xposure
Meter
Exit
9. V i
ew
Finder Wi
ndow
IMPORTANT
Th
e Argus candid camera is a
preCISIOn
ins
trument.
The
ultim
ate
success
of
pictures
made with a miniature
camera
depends
largely upon the intelligent
use of the cam
era
and
the
careful handling of
35
mm
. negatives.
This instruction
book should be read care-
3

fully
and
the user should be
familiar
with
every
part
of
the
camera
together
with an
understanding
of
its function. I t
is
recom-
mended
that
the descriptions relative
to
ex-
posure
and
the
general handling of the cam-
era
be
studied carefully before loading the
camera with film.
There
are
many
excellent
35
mm. films on
the market. Some films are best when used
outdoors, and
others
are more
suitab
le
for
indoor
or
night
photography.
The
slower
or
medium speed films are noted
for
fine grain
and
full color renditions.
The
faster
films
have a slightly
larger grain size with less color
rendition,
but
are ideal
for
use in night pho-
tography
or
whenever light
conditions
are
unsatisfactory.
35
mm. film
may
be purchased
either
in
daylight loading cartridges,
or
in bulk lengths.
Film
manufacturers
furnish bulk film in
lengths
from
25
foot
to
100
foot
rolls. Some
films
are
notched
and
cut
into
36
exposure
lengths which assists
greatly
in
darkroom
loading
into
cartridges.
Eastman
or
Agfa
Cartridges are ideal
for
loading with
bulk
film.
Your
local
photo
finisher should be able
to
supply these
empty
magazines.
The
ARGUS
camera
is
so
constructed
that
all
types of
daylight
loading
35
mm. magazines
may
be used.
Daylight
loading cartridges
are
usually fil-
led with 36 exposures
of
35
mm. double
per-
forated
film.
4
The
success
of
miniature
negatives depends
large ly upon fine grain
development
and
careful handling. Careful developing in such
solutions as
ARGUS
AR-I will result in beau-
tiful grainless negatives.
If
fine grain develop-
ing
is
not
available locally forward
your
films
to
one
of
the
many
laboratories which spec-
ialize in
wnrk of
this
type.
LOADING
THE
CAMERA
I t
is
always advisable to load
the
camera
in subdued light.
Never
expose the
cartridge
to
bright
sunlight.
Open the back
by
pushing
the
catch
but-
ton (18, Fig. 3) up,
and
pulling
it
open
by
means of the
button
on the end.
Figure 2 shows a
standard
35
mm. day-
light loading
cartridge
being inserted
into
the
camera.
This
is
accomplished
by
pulling
off
the
cartridge
chamber
cover
(I,
Fig. I),
and
dropping
in the
cartridge
with the
round
spacer bushing up.
The
projecting end
of
the film should be held back
in
the opposite
direction from which
the
film
is
wound, as
shown,
so
that
when
the
cartridge
is
in the
case, the end will
not
be hidden behind
the
cartridge. Drop
the cartridge down
over
the
rewind shaft (12) engaging the slot on the
shaft
with the tongue
in
the
cartridge
and
compressing the
cartridge
ejector
spring. Re-
place the
cartridge
chamber
cover
taking
care
that
the round spacer bushing on
the
5

F
IGUR
E 2
top
of
the ca
rtri
dge goes up
into th
e hole in
the center of the bottom of the cove
r.
T he film mu st next be
thr
eaded into the
camera as shown in
Figur
e
3.
Dr
aw o
ut
enough film to reach the winding sha
ft
(17).
Slip the end of the film
und
er the film
holding spring (19)
far
enough
so
that it is
securely held.
If
the pr
ojecting end
of the
film is
trimm
ed
int
o a tongue which lies e
ith
er
at the
top
or bottom
of the film st rip, so
th
at it does not engage the holding sprin g,
thi s
will have to be torn or
trimm
ed off so
6
FI
GURE
3
th
at the longest po
int
of
the
film lies in the
center where
it
can slip
und
er the holding
sprin
g.
Wind
one
turn
of film onto the sha
ft
for sec
urit
y while holding down release
but-
ton (15, Fig. 2). Be sure
that the sprocket
is engaged with the perforation s of the film.
Push the latch
butt
on
up
toward the top of
th
e camera, close the back
and then permit
th
e latch to spring back a
nd
lock. Always
try th
e back
and
be sure it is completel y
lock ed.
7
After the back is in place, the film
mu
st
be advan
ced unti
l a new expo sure is in cor-
rec t place beh
in
d t he len
s.
T his is accom-
pli shed by
turni
ng the winding k
nob
(7, Fig.
I)
in the direction
of
the arrow until a click is
he
ar
d or the film counter dial (6, Fi
g.
I)
stops
rotatin
g.
Depress the co
unt
er dial re-
lease
(1
5, Fig 2) momentarily while adva nc-
ing t he
fi
lm a
nd advance
one fu
ll
rotation of
the co
unt
er dia
l.
Repeat this operation twi ce.
At
this point unexposed film is in correct ex-
pos
ur
e posit ion for the first picture.
Th
e
counter dial should n
ow
be rotated in a
cou
nt
er-cloc kwi
se
direct
ion wi
th
the th
umb
unt
il
the zero figure is
opposit
e the co
unt
er
dial i
nd
icator point. T he co
unt
er di al is
held in
pl
ace by a
frict
ion arrangeme
nt and
a firm pressure is necessary to set the dia
l.
Af ter the first
picture is
tak
en the film
sho
ul
d be advanced
at once
to form a habit
of preve nting double exposure, or bla
nk
frames. When t he film is
adv
an ced one
frame t he counter dial a
dva
nces nea rly a
full revol
ut
ion a
nd will
stop opposit e figure
I indicating th e
numb
er
of
ex posures made.
When
the 36
exposures have been com-
pleted, rewi
nd
the film by
turn
ing th e rewind knob (2 1, Fig. 4) in t he direct ion of
th e arrow
unt
il
the win ding knob (7, Fig. l)
sto
ps rotatin
g.
Never open the camera back
until the film has been rewo
und
.
CAUTION: When windin g or rewinding
the
film be sure t hat its movement is not
8
.
,-,'
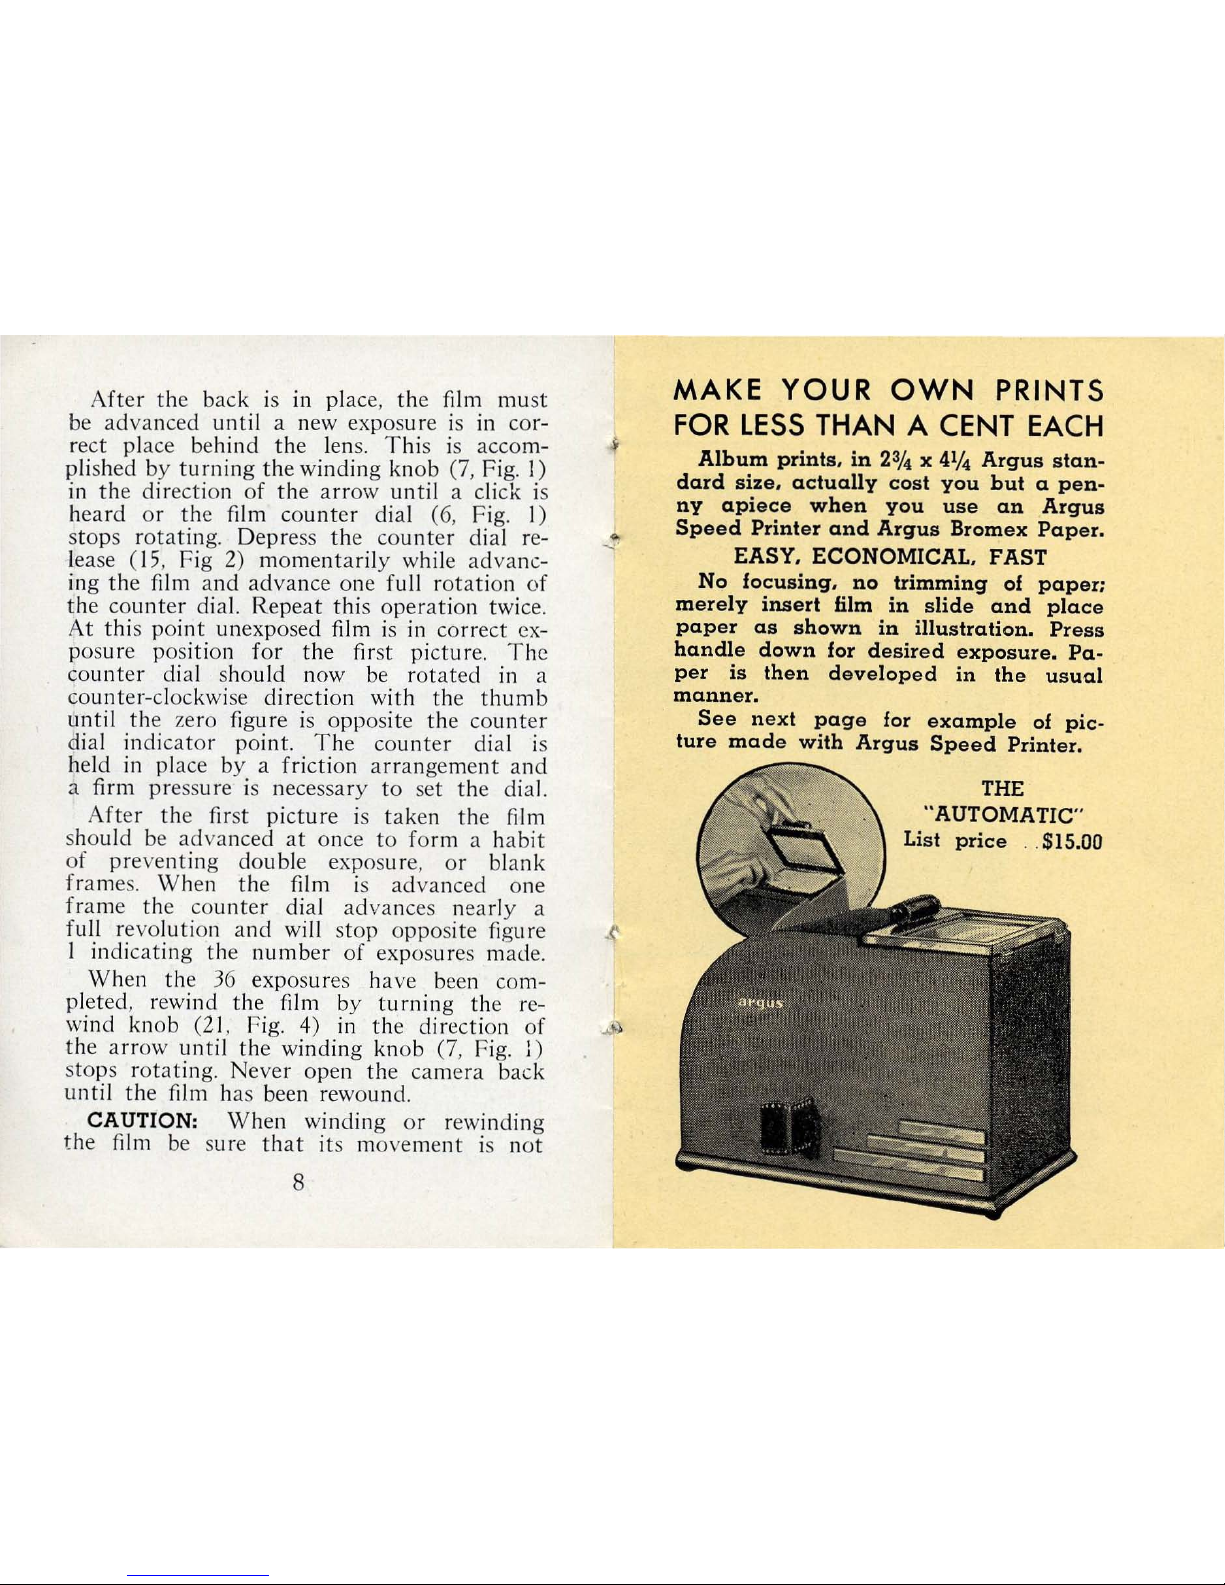
MAKE
YOUR
OWN
PRINTS
FOR
LESS
THAN A CENT EACH
Album
prints.
in
2% x 4
1
/4
Argus
stan-
dard
size.
actually
cost
you
but a pen
-
ny
apiece
when
you
use
an
Argus
Speed
Printer
and
Argus
Bromex
Paper.
EASY. ECONOMICAL. FAST
No
focusing.
no
trimming of
paper:
merely
insert film
in
slide
and
place
paper
as
shown
in
illustration.
Press
handle
down
for
desired
exposure.
Pa_
per
is
then
developed
in
the
usual
manner.
See
next
page
for
example
of
pic-
ture
made
with
Argus
Speed
Printer.
THE
"AUTOMATIC"
, .$15.00

ACTUAL
SIZE
OF
STANDARD
ARGUS
PRINTS
from 35
mm_
film
with
an
Argus
Speed
H ERE
is
the
actual
size
of
pictures
Printer
on
Argus
Bromex
paper.
Argus
Bromex
paper
comes
in
single
or
double
weight.
g.lossy.
semi-matt
or
silk
finish.
in
soft.
medium
or
hard.
It
is
cut
to
the
size
illustrated.
with
allowance
for
an
eighth
of
an
inch
border
around
picture.
made
specifically
for
use
in
Argus
printers.
Both
the
Argus
"Automatic"
printer, and
the
Argus
"Electromatic"
(illustrated
on
fol-
lowing
page)
operate
on
IIO,120
volt
AC
or
DC
and
handle
strip
film or
single
negatives.

NEW
ARGUS ELECTROMATIC
TAKES
All
GUESS-WORK
OUT
OF
PRINT-TIMING
The "Electromatic"
Speed
Printer
is
equipped
with
a
photo-electric
"eye"
which
"reads"
the
density
of
your
nega-
tive
and
gives
proper
exposure
or tim-
ing
in
making
prints.
Merely
set
one
indicator
for
negative
density.
another
for
paper
surface
being
used.
and
flip
the
starting
switch.
When
print
is
cor-
rectly
exposed.
the
light
goes
off.
Save
paper
by
getting a GOOD
PRINT EVERY
TIME;
eliminate
trial
and
error
methods.
List price
THE
"ELECTROMATIC"
..
. $35.00
restrained by pressing
the
hand against
the
free moving knob . Do
not
atte
mpt
to
force
the
film
after
the counter dial has stopped
or
the
full
numb
er
of
exposures are reached.
Atte
mpting
to
get more pictures
may
pull
the
film from the magazine, and prevent re-
winding.
If
thi s should occur
it
will be neces-
sary to remove the
fi
lm in
total
darkness.
SHUTTER SPEEDS
Shutter
speeds are set
by
turning
the
knurled ring (3, Fig. I)
until
the indicat
or
mark is directly above
the
desired speed. A
setting mid way between
marked
speeds will
resul
t in
that
fract
ion
of
a second. Fo r ex-
amp
le with
the
indicator between 1/
50
and
1/100
the shutt
er
will
operate
at
1/75 of a
secon
d.
T he
shutter
speeds are as follow s :
1
/2
5, 1/
50,
1/ 100, 1/
200, "B"
and "
T".
The
"T " is
the
proper setting
for time ex-
posure s. When
the shut
ter
is set for
"Ti
me"
one stroke
of
the lever (2) will cau
se
the
s
hut
ter to open and rema in open until a
second stroke of the lever
is
made.
When the s
hu
tter
speed ring is set oppo-
site
"B"
the s
hutter will
remain open as
long as
th
e lever is depressed and closes as
the pressure is released. When either a "B"
or
'T"
settin
g is used the camera mu
st
be
he
ld
on a tripod.
The
high s
hutt
er speed is
for
stopping
m
ot
ion,
but
the fastest s
hutter
speed pos-
sible shou
ld
be usee!
which will
permit
stop-
9

ping the lens down sufficiently
to
obtain
the
depth
of
field desired. 1/ 1
00
seco
nd
is
the
be
st all
aro
und
speed
for
miniature
camera
work.
The
adva
ntage
of
fast shutter
speeds
is in
cont
rolling
camera
movement.
F I
GURE
4
EXPOSURE
METER
The
Model K Argus
Camera
has a built-in ,
coupled to
th
e len
s,
exposure
meter.
The
ex-
posure met
er
is
of the extinction
typ
e,
and
is mechanically coupled to
the
diaphragm
"stop
ope ning"
of
the
len
s.
To use the
meter
, first decide
on the
proper
s
hutt
er speed as describ
ed
in the
paragraph
above.
Then
set
the
dial
pointer
(25, Fig. 4)
10
on the bottom
of
the exposure
meter
to this
speed
on
scale (24). Push
the
little
knob
(26)
clear
back to the position
opposite
f:4.5 on
sca
le
(23).
Turn the
camera
so
that the ex-
posure
met
er
window (8,
Fig
. I) is
turned
on
the
object
desired
to
photograph.
Point
the
m
eter at
the
subj ect
of
intere
st
and
be care-
ful
not
to
include more sky
or
backgro
und
than
necessary.
If
the
degree
of
brightn
ess
of
the subject varies conside
rably
or shadow
detail
is
desired aim the meter
at
the shaded
part
s and
app
roach as clo
se
as po
ssible
to
them.
Now l
ook
in
to
the
exposu re meter
tu
be
(10
, Fi
g.
2). A light
dot
will be n
oted
at
the
end
of
the
tube.
Pull
the
knob (24, Fig. 4) back
toward the
f:
II positi on until
the lig
ht
dot just
disap-
pears
or "extinguishes." Set the knob
at
the
exact
point
where
the
dot
disappears.
The
lens is now set
for
proper
exposu re if
the
shu tter speed dial is set
to
the
speed
at
which
point
er (25) is set.
If the lig
ht
dot
in
the
tube
is
not
visible
at the f
:4.5
position of lever (26)
it
means
too
fast
a s
hutter
speed has been chosen
for
the
amount
of light available.
Turn
the
shutter
speed
indicator
pointer
to
a low
er
speed. I n the same
mann
er if the
dot
will
not
disappear
eve n if
the
lever is pulled
clear back
to
f:
II
it
means
that
the shutt
er
speed is
too
slow for
the
amount
of light.
Thus th
e meter will not
permit
a bad expo-
s
ure
.
11

I f
it
is desired to
make
shots
without
using
th
e exposu re
meter, se
tting lever
(26)
to the
figures on scale (23) sets
the
diaphragm
in
the shutt
er
to
the
stop
indic
ated
on
the
sca le.
There
is no
diaphragm
or
"stop
openin g" scale
on
th
~
s
hutt
er itself as
this would
be a
dup-
li
cat
ion.
The
exposure meter is set
for use
wit
h
films
of a Weston
rating
of
approximate
ly
48-50
daylight. This
takes
in the mo
st
popular
a
ll
aro
und
films such as Agfa "S
upr
eme"
and
East
man "Plus
X"
. For
th
e ve ry
fast
films s
top
down to
the
next
stop
figure on the
dial in a counter-clockwise direction
th
an
that whi
ch the met
er
indi cates
byextingui
sh-
ing
the
dot. In the same m
anne
r when using
th
e slower films such as
East
man
Pan
ato
mic
X
and
Agfa Fin
opan and
Plenichrome
set
the
diaphra
gm ope ning to the next s
top
figure
in
th
e dial in a clockwise
direction
indi
cated
by
the mete
r.
T hu
s,
if the meter
stopped
at
f:8
and Agfa Fin
opa
n is in the camera move
th
e lever to f :5.6 befo re
taking the pictur
e.
I
f the
dia
l is al
ready
at the end
of
the
scale tu
rn
to th
e n
ext slower
shu tter speed,
reset
the meter
by the d
ot and
move one
sto
p in a clockwi
se
direction
(for
a slower
film ) .
Wh
en using
Kodachrome
the
leve r sh
ould
be set
thr
ee stop figures on
the
dial
in a
clockwi
se
direction
from that whi
ch the
meter
indic
ated.
As this is n
ot
possible direct ly
unless
the
meter
should st
op
at
f: II, n
ote
the
12
·
numb
er
of
figu res
that the lever could be
moved
including f :4.5
then subtr
act
thi
s fig-
ure
from 3.
Set
the lever
at
the
numb
er
of
figur
es
fro
m t he
f:
II end, including
f:
II,
indicated
by the result
of
the subtracti
on a
nd
set the shu
tter
speed
to
one speed slowe
r.
Thu
s if the
meter stopped
at f
:5.
6, 1/100
sec.
the
dia
phr
agm should be set
to
f:8 and
th
e s
hutter
to 1/50
sec. (f:4.5
is
the
on ly
st
op left.
Su
btrac
tin g I from 3 leaves
2.
f:8
is
the
second s
top
from
the
f:
I I end, in-
cluding
f:
II. 1
/50
sec. is
the
next slower
s
hutt
er speed. If
the
meter
had
stopped at
f :8, 1/ I
00
sec. the
pro
pe r
sett
ing would be
f:l
l, 1
/50
sec. etc.)
Rememb
er lever (26) sets
the
diaphragm
on
th
e lens
but
lever (25) does
110t
set
the shut-
ter
speed
of
the
camera.
Thi
s is done on
the
front
of
the
camera
as described.
THE DIAPHRAGM
The
iri s
diaphragm
regulates
the
amo
unt
of light
passing
th
ro ugh
the
lens. I t
is
set
di
rectly
by
turn
ing l
ever
(26, Fig. 4).
The
diaphr
agm size is
indicated
on scale (23) as
follows f :4.5, f :4.6, f :8,
and
f:
II.
The
f :
4.5
is the gr
eatest
ape r
atu
re possibl e
and admit
s
th
e m
ost light.
Eac
h smaller stop
ad
mits
abo
ut one-
half as much lig
ht
as
the
preceding
one
. Decreas in g
the
diaphragm
ope
nin g in-
creases
the depth
of
field. Scenes and la
nd-
scape should always be
sto
pped
down to at
least f :8.
13
I n this camera the dia
phr
agm will
usually
be
se
t by the u
se
of
the
exposure meter
as
described above. However, s
hutt
er speeds
should be
se
lected which will let the meter
stop th e diaphragm at openings which give
th
e required de
pth
of
fie
ld.
FOCUSING
T he lens is focuse
d by turning of ring
(5, Fig. 1). T he lens is
se
t to focus on an
obj
ec
t at the distan
ce from th e camera which
appears on
th
e ring opposite the arrow on
the core. For q
ui
ck focusing on candid sh
ots
the focusing sca le is divided up into "zo nes"
of d
iff
erent color
s. The
zone from infini
ty to
18 feet being for dista
nt
and landscape work ,
the 18 to 6 foot zone fo r nearb y groups and
object
s,
and the close up zone from 6 feet
to
3.5
feet is for po
rtraitur
e and very close
objects. T he de
pth
of focus of the Argus lens
is
so
great that very good results can be o
b-
tained by just foc using to the proper zone
an.d shootin
g. Thi
s permits
of great speed in
uSIng the camer
a.
Wh
ere critical sharpness of
a certain obj
ec
t and where maximum e
n-
largeme
nt
is desire
d. set the scale to the
exact footage.
TRIPOD SOCKET
. The trip od socket (2
2, Fig.
4) is tapped
with the standard Ame
ri
can
thr
ead. Any Am-
e
ri
can or Argus tripod wi
ll
fit Argus Ca meras.
14
AIM AND SHOOT
Th
e camera is aimed at the subje
ct
by
hold
lI1g th
e back of th e camera firmly aga inst
the face or fo rehead and sighting
throu
gh
the rear vI
ew
finder (1 I, Fig. 2). The vi
ew
fin
der shows the subject as
it
will appear
when photographed.
Th
e view
fin
der is pur-
posely d
es
igned to cover slight ly less of the
subj
ect th
an that actually photog raphed.
Thi
s di
ffe
ren
ce prov ides a safety factor and
jJreve
nt
s c
uttin
g o
ff
parts
of interes
tin g sub-
Jects.
Wh
en the subject has been correctly cen-
tered and composed
in the view finder you
are ready to make the actual
ex
posure.
T he s
hut
ter should be operated with a
steady squeezing action on the
le
ver,
(2, Fig.
1) while the camera is held firmly against
the face.
INTERNATIONAL INDUSTRIES. INC.
Ann
Arbor.
Michigan. U.
S. A.
CD"47
Printed in U.S .A.
15
 Loading...