

Page 1

DC-3190
USER MANUAL
Package Contents:
Argus DC-3190 3.2MP Digital Camera
3 AAA Alkaline Batteries
Camera Pouch
Driver and Software CD
Page 2

Table of Contents
Safety and General Information......................2
Getting to Know
Camera Setup........................................................6
Driver Installation...............................................13
Specifications.......................................................19
Troubleshooting.................................................19
Safety and General Information
Thank you for purchasing the
We hope that you enjoy this camera for years
of trouble-free operation. Please read this
manual carefully before using the camera
and follow the instruction to avoid any damage
that could be caused by improper operation.
Caution
The software CD-ROM packaged with the
camera is designed to be used with a personal
computer only. Do not attempt to play this
CD-ROM on a stereo or CD player as this may
cause damage to both the disc and the CD playe
This camera is a precision electronic device.
Do not attempt to service this camera yourself.
Opening or removing the cover may expose you
to dangerous voltages or other risks. Furthe
avoid exposing this camera to direct sunlight
as doing so could cause a fire.
Your Camera.........................4
Argus DC-3190.
r,
r.
re Using Your Camera
Befo
Use your camera to shoot several trial images
before taking pictures of important subjects
to ensure proper operation.
by the malfunction of this product (such as
Any loss caused
2
Page 3

costs of photography or loss of benefit generated
by the photography) is not the responsibility of
Argus Camera Company and no compensation
will be given for it.
Copyright Information
Unless agreed by the rightful owner, pictures
taken with this digital camera cannot be used in
violation of copyright la
is a “No Photography” restriction in place, you
cannot record any performance, improvisation, or
exhibit even for personal use.
pictures or memory cards with data must
conducted
Caution When Using the Camera
This product consists of intricate electrical parts.
To ensure that the camera photographs normally,
do not drop or hit the camera when taking
pictures.
the following locations:
1. Damp and dusty places.
2. Sealed vehicles or other places exposed to direct
sunlight or subject to extreme temperatures.
Turbulent environments.
3.
Do not open the battery cover when the power
is on as this may cause a loss of images.
If the camera has gotten wet, immediately turn
the power OF
attempt to dry it with an external heat source.
under the constraints of copyright law.
Avoid using or placing the camera in
F and remove the batteries. Do not
w. Moreover, when there
Any transfer of
be
How to Maintain Your Camera
1. If the lens, LCD display, or viewfinder is dirty,
please use the accompanying cleaning cloth to
wipe the surface clean.
areas with your fingers.
Avoid touching these
3
Page 4
2.
When not in use, keep the camera in its
carrying case, otherwise you risk scratching the
lens, LCD displa
y, orviewfinder.
3. Do not use soap, dete
to clean the camera; use a clean, soft cloth onl
rgent, or other solution
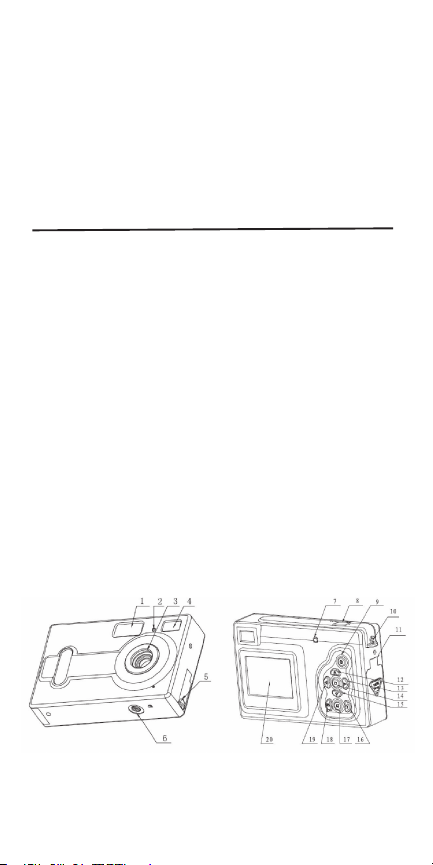
Getting to know Your Camera
Camera Components Guide
1. Flash
2. Self-timer LED
3. Lens
Viewfinder
4.
5. USB
6.
Tripod mount
7. Flash LED
8. Shutter button
9. ON/OFF button
10. Strap bar
11. Battery/Card slot cover
12. Up button
13. Right button
14. Menu button
15. Down button
16. Flash button
17. Playback button
18. Display button
19. Left button
20. LCD screen
y.
4
Page 5
LCD display
Prepare Your Camera for Use
Load Batteries and Memory Card
Open the battery cover and insert the batteries
according to the polarity indicated on the
battery door and close the cover. Optional:
insert an SD memory card (not included).
When the battery power is lo
appear on the screen.
what kind of battery you are using. If you use
alkaline batteries, you should select 1 and the
battery capacity icon will display half full
indicating that you will not be able to use the
flash but you will still be able to take pictures
until the icon displays empty; If you are using
rgeable batteries, select 2 and the battery
recha
capacity icon will display full indicating that you
can take pictures until the icon shows that the
battery capacity is empt
w, an icon will
You will need to select
y.
5
Page 6

Turning the Camera ON/OFF
To turn the camera on, press the ON/OFF button
for 2 to 3 seconds until the operation LED is lit.
To turn off the camera, press the ON/OFF button
for 2 seconds.The camera will also power o
automatically after 30 seconds of inactivity if not
connected to the computer via the USB cable.
The auto power o
as described in the
this manual.
ff time can be manually set
Auto Power Off section of
ff
Camera Setup
Taking Pictures and Recording Options
Image Captu
Pressing the menu button will enter the capture
select menu. Press the U
to select the desired capture mode, then press
menu button to confirm.
Color Options
From the Image Capture menu, press the RIGHT
button to enter the Color Options menu. Press
the UP or DOWN button to select the it
you wish to adjust and the menu button to
enter the selected item.
re
P or DOWN button
em that
6
Page 7
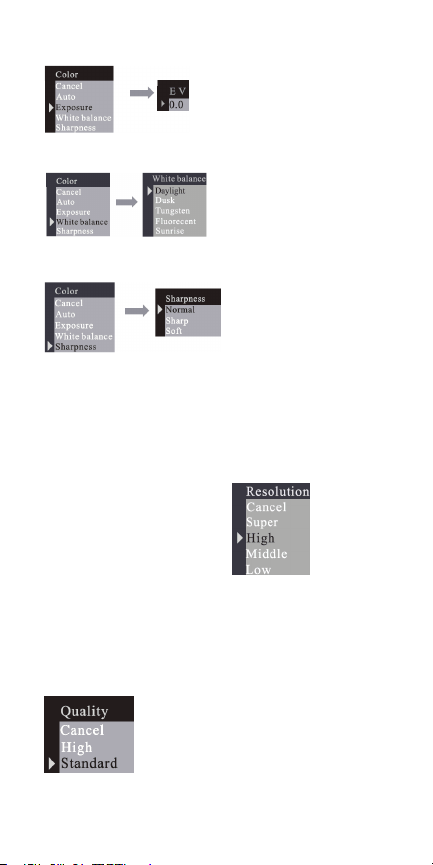
Adjusting Exposure
Selecting the desiredWhite Balance:
Adjusting the Sharpness:
Value:
Resolution
Press the UP or DOWN button to select the
desired resolution and press the menu
button to confirm.
Super: 230
High: 20
Middle: 1600X1200
Low: 1280X102
4X1728
48X1536
4
Quality
Press the UP or DOWN button to select the
preferred quality level and press the menu
button to confirm.
7
Page 8

Auto Power-Off Time
Press the DOWN button to set the Auto Power-Off
Time.
Set the Date and Time
Press the DOWN button to set date and time.
If DISPL
AY is selected, the date & time will show
on the captured images. If you do not want the
date and time on the pictures, select NO DISPL
AY.
Set Frequency
Changing the frequency may
help to reduce flicker if you
use fluorescent lights.
Language
Press the UP or DOWN button
to select the desired language and
press the menu button to confirm.
8
Page 9
Playback
Pressing the PLAYBACK button will put the
camera in preview mode.
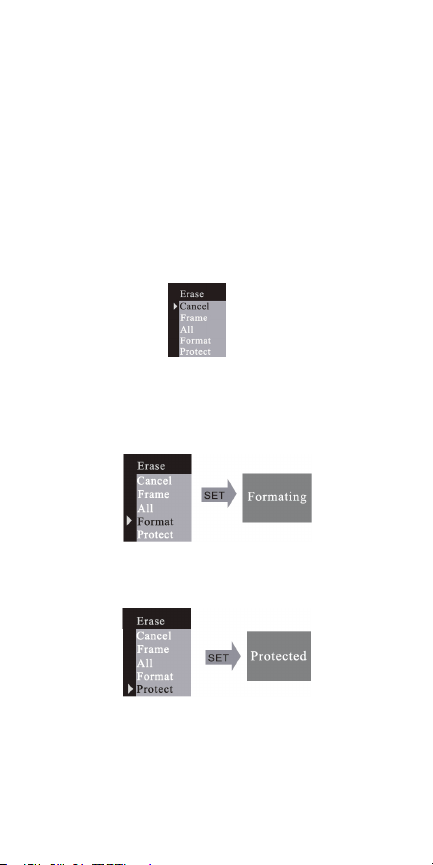
Erase, Format, and Protect
While viewing an image, you can press the menu
button to enter the erase menu. From this menu,
press the U
“One” frame or “All.” Selecting “All” will erase all
images currently stored in memory or on the
SD/MMC card. Press the main button to confirm
file deletion.
Selecting the format mode will format the
memory card inside camera. Formatting the
memory card will erase all images stored on it.
Selecting the protected mode will protect the
frame selected from deletion.
P or DOWN button to select erase
If you want unprotect an image, select go to the
protected picture, enter “Erase” mode as
previously described, and select “Unprotect” by
pressing the right button and pressing the menu
button to confirm
.
9
Page 10

DPOF (Digital Print Order Format)
By using DPOF, you can select an image for
printing and set the quantity that you want
to print.
Rotation
Press UP or DOWN button to select the rotation
angle, and menu button to enter the selected
angle.
ZOOM/PAN
In picture preview mode, you can ZOOM in
on an image and use the
move the display range of the image.
entering the ZOOM /
DOWN button to enter
menu button to confirm. Press the U
T, and RIGHT buttons to view the entire
LEF
display range of the picture.
PAN function, press the MENU button followed
by the DOWN button to Cancel.
PAN function to
After
PAN menu, press the
PAN mode and the
P, DOWN,
To cancel the PAN
10
Page 11

Using Your Digital Camera
Taking Pictures
To take a picture, frame your subject in either
the LCD display or the viewfinder and press the
shutter button.
to indicate that the snapshot is finished.
Simultaneousl
on the LCD display will decrease by one
Use the Self-Timer
To include yourself in a captured image, you
can set this camera to pause 10 seconds before
taking a picture.
press the menu button and select SELF-TIMER,
then press the menu button
you press the shutter button, the self-timer
LED will blink for 10 seconds and then take
a picture
Record Video
Your digital camera can be used to take short
video clips
capture
change to the
button to confirm.
press the shutter button to start recording
video.
You will here a beeping sound
y, the number of available images
.
To enter the SELF-TIMER mode,
to confirm. After
.
without sound. To enter video
mode, press the menu button and
VIDEO mode. Press the menu
After confirming VIDEO,
11
Page 12

Use the Flash
By pressing the flash button, you will enter the
FLASH menu.
ON, or OF
cause the camera to cha
flash is cha
and the operation LED will blink. When the
LED stops blinking and the LCD display turns
on, cha
The FLASH ON function will always use the
flash, while the FLASH
the flash only when required by the camera.
You can choose FLASH AUTO,
F. Choosing flash AUTO or ON will
rge the flash. While the
rging, the LCD display will be dark
rging is completed and the flash is ready.
AUTO function will use
Digital Zoom Feature
In the image/capture modes you can use the
digital zoom feature which will allow you to
take close-up images of your subject.
capture mode, press the U
and the DOWN button to zoom out.
P button to zoom in
While in
Playback
Pressing the Playback button enters Preview
mode which will allow you to view all captured
images one at a time
press the DISPL
picture viewing to a display of nine images at a
time.
While viewing a single picture, pressing the
UP or DOWN button will zoom in or zoom out the
picture and pressing the LEFT/RIGH
change to the next or previous image.
video while viewing the nine picture screen,
select the image with the directional buttons
and then press the DISPL
. While in preview, you can
AY button to change from one
T buttons will
To play a
AY button.
12
Page 13

Download Images to a Computer
Enter preview mode and connect the camera
to the computer via the USB cable.
need to install a driver for image download if
Windows 2000/ME/XP. Simply connect
you use
the camera to PC, the LCD screen will display
“MSDC” and the camera will be recognized as
a removable disk, allowing you can directly copy
the pictures from the camera to your compute
re using Windows 98SE, you must install
If you a
the camera driver befo
to the computer. To install the camera drivers,
please refer to the section on Installing Drivers.
After the driver is installed, connect the camera
to PC in while in preview mode and the
computer will find a USB mass storage device
and install the device driver automaticall
this process is complete, the camera will be
recognized as a removable disk and the pictures
can be copied to the compute
re attaching the camera
You will not
y. After
r.
Driver Installation
Insert the accompanying CD into the CD-ROM
drive and it should automatically open a Menu
screen (shown below)
r.
13
Page 14

Click on Install Camera Driver.
Click on the NEXT button to proceed to the
next step.
14
Page 15

Click on the Next button to install the driver
for the camera.
Once the installation is completed, click on
FINISH and it will close the window.
15
Page 16

Software Installation
On the Main menu, click on Install Arcsoft
Photo Impression 4 and the Choose Setup
Languare screen will appear.
Click on the OK button to proceed with
the software installation.
Click on the NEXT button to proceed to the
next step.
16
Page 17

Click on the YES button and the next screen
will ask for the location where you want to
save this program.
By default, this program will be saved within
C:\Programs Files\Arcsoft\PhotoImpression4.
Click on the Next button to proceed.
17
Page 18

Continue to click on the Next button.
Once the installation is completed, click
on FINISH.
18
Page 19

Chapter 5: Specifications:
*3 in 1 mode:
Digital Still Camera mode: image Captur
PC Camera mode: video Capturing / Conferencin
Camcorder mode:
*Sensor: CMOS senso
*Lens: F=3.0 f=8.3
*Focus Range: 1.5M to infinit
*Illumination: 100-16000(lux
*Shutter Speed: Electronic shutter 1/20-1/6000
*Image Resolution
Super (23
(1600X1200)
VGA (640X480)/QVGA (320X240) for PC camera mode
A (320X240)/QCIF(192X144) for Video Recording mode
QVG
*Memory: Internal 16MB Flas
External SD and MMC card compatibl
Timer: 10 secs *ZOOM:8X Digital Zoom
*Self
*Color LCD screen: 1.5 inch
*Flash mode: On/Auto/Off
*Battery: 3
*Interface: USB 1.
Minimum System Requi
CPU: Pentium III 800MHz and highe
Windows 98SE/2000/ME/XP
OS:
Memory: 128MB and highe
Disk Space:
Video clips
r, 3 Mega pixel
5
y
)
:
04X1728)/High (2048X1536)/ Medium
/Low (1280X1024 ) for image Capture
h
TFT Display
AAA (alkaline/1.5V)
1
rements
r
At least 250MB space free CD-ROM Drive
e
g
s
e
r
Troubleshooting
Camera will not turn on
Battery is not properly installed- remove
and reinstall the batteries.
Insufficient battery voltage- Do not use old
batteries or batteries with mixed battery life
19
Page 20

Flash will not fi
Flash set to OFF -Set the flash to
Flash has not been fully cha
a few seconds to cha
LED is blinking. Flash light is fully cha
when the Operation LED turns o
re
Auto or On.
rged The flash takes
rge up while the Operation
ff.
rged
Battery level is low does not show a fully cha
voltage is too low for the flash to work. Please
change batteries.
Image is blur
Subject is out of focal range. Ensure that there
is at least 1.5m ( 5ft ) between the camera lens
and subject. Camera moved during the shotHold the camera steady while taking the picture.
When flash is on, hold the camera steady until
flash has fired twice(
red-eye and to detect the brightness of the
ta
rget.)
Compute
Windows 98SE, The camera driver has to be
installed before picture download. In picture
preview mode, ensure that USB mode is set to
MSDC before connecting the camera to the
compute
camera is recognized as a plug -&-playable,
removable flash disk without driver installation
under MSDC mode. It is
disconnect your digital camera f
computer after use.
r does not recognize camera for
r. For Windows 2000/ ME /XP, the
When the battery indicator
rged battery, the
red / out of focus
The first flash is to reduce
recommended that you
rom your
20
Page 21

Subject in
Insufficient light for shooting Set the flash On,
or adjust the exposure compensation to a
positive (+) setting.
recorded image is too dark
Flickering on lcd sc
Incorrect frequency setting Check the correct
anti-flicker frequency ( 50Hz or 60Hz ) under
fluorescent light setting.
re download problem
Pictu
Flash disk does not display images recorded.
The camera will load two removable flash
drives on your computer under MSDC mode.
The first drive is the external SD or MMC
cartridge and the second drive is the recorded
images saved in the built-in memory of the
camera. In cases when the removable flash
drive names coincide with those already
assigned by the computer in the network,
you need to reassign the name for the
removable flash disks:
Right click <My Computer> Manage Disk
Management. Right click blue bar of
removable disk which is on line Change Drive
Letter & Paths Change
Drive Letter (assign an unused drive name) OK
Open the new renamed removable flash drive
to download recorded pictures
reen or recorded image
Assign the Following
21
 Loading...