

Page 1

Contents
Introduction 1
Overview 1
Product Package Contents 1
System Requirements 1
Getting to Know Your Digital Camera 1
Battery Installation 2
Software Installation 3
Taking Photos 7
Camera Function Control 8
Starting Your Camera 8
Deleting Photo 9
Flash 10
Photo Storage Capacity 12
Downloading Photos 12
Using Your Digital Camera as a PC Camera 13
Live Browse 13
Video Conference 14
Appendix 1: Specifications 15
Appendix 2: Answers to Frequently Asked Questions 15
“PhotoImpression ” User’s Manual 18
Page 2
Introduction
Thank you for purchasing the DC1730 digital camera. It can take photos
and it also has built-in PC camera functions. This camera is equipped with a
8MB SDRAM memory. Connect with USB cable and you can download
photos in the camera to your computer. Using the built-in PC camera
functions, you can have a videoconference over the Internet to have face-toface online chatting with friends
Product Package Contents
_Digital camera _CD - ROM ( User manual and software)
_USB cable _Quick user guide
System Requirements
1. Processor: PII 200 MHz or higher
2. Memory: 32MB or higher
3. Color Monitor: (recommended to use 800*600 24 or higher)
4. Operation System: MS Windows 98(Second Edition)\MS Windows Me\
Ms Windows 2000\MS Windows XP
5. Available USB cable and CD-ROM
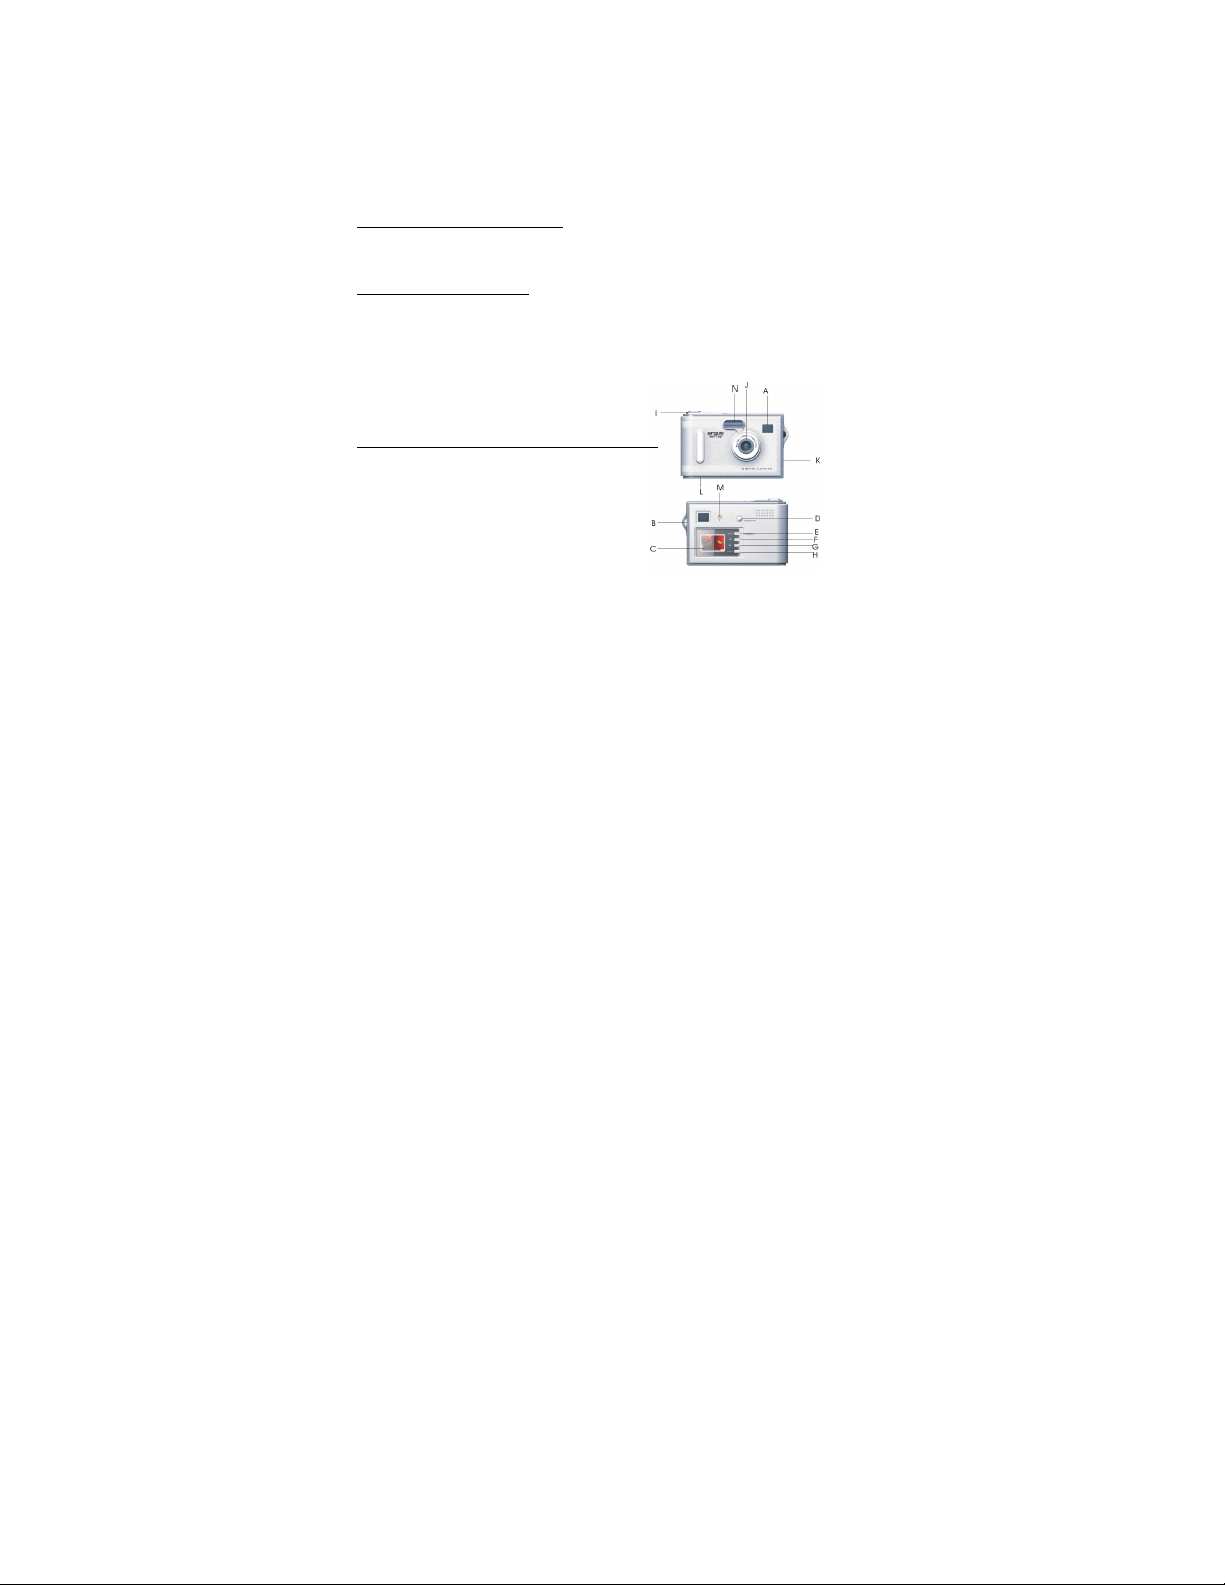
Getting to Know Your Digital Camera
A. Viewfinder
B. Strap holder
C. C-STN LCD panel
D. LCD panel ON/OFF switch
E. Mode button/Power on
- 1 -
Page 3

F. _ (UP) Photo select button
G. V (Down) Photo select button
H. Play back auto view
I. Shutter button
J. Lens
K. USB port
L. Battery door
M. LED light
N. Flash
Battery Installation
1. Open battery door.
2. Load two AA alkaline batteries according to the electrode directions
indicated on the battery compartment.
3. Cover battery door.
Note: When you use the USB cable to connect the camera with a computer, it is not
necessary to use batteries ,because the camera uses the power supplied by the
computer.
Warning:
1. To avoid loss of photos in the camera due to power loss, please don’t
open the battery compartment unless necessary.
2. If the camera is idle for a long period of time, please remove the
batteries to avoid battery leakage and corrosion.
3. To avoid explosion and hazard to environment, please don’t put the
battery into fire.
4. To avoid photo loss, please download photos to your computer as soon
- 2 -
Page 4

as possible.
Automatically enter energy saving status
If it is not operated in 60 seconds, the camera will automatically enter
energy saving status.
Software Installation
Insert installation CD into CD-ROM driver, and installation screen will appear
(as shown in figure below).
1. Install PhotoImpression; 2.. Install Driver; 3. Browse CD-ROM; 4. Exit
Prompt: PhotoImpression (See reference or other instructions for detail).
Select “Install Application” and follow promptings to install. After this
installation is completed, select “Install CD-ROM driver”. You may select
installation language as needed.
Note: In case of failure in automatic installation or if you want to share CD with
other computer, manual installation is required. See installation steps below:
1. Install installation CD into CD-ROM driver, and installation screen will
appear (as shown in figure below). Select “Install PhotoImpression”.
- 3 -
Page 5

2. You will be prompted to select an installation language. You may select
“English”.
3. Click “Next” button on “Welcome” screen.
4. Please read and accept the end user agreement.
- 4 -
Page 6

5. Select installation destination and click “Next” button.
6. Select “PhotoImpression 4” to install.
- 5 -
Page 7

7. Please select program folder. Then click “Next” to continue.
8. This will start the installation. Please do not click any button until it is
completed.
9. Click “Complete” to complete ArcSoft software installation.
(Note: You must select “Loading Camera Driver”.)
- 6 -
Page 8

10. Installation screen will appear. Click “Install Driver” to install camera
driver:
11. After the installation of driver is completed, it will activate the computer.
Taking Photos
Before using your digital camera, please check if the battery is low. To
take photos, please follow the following steps:
1. Press Shutter button and then press Mode button to start the camera. In
about 3 second, LCD on the back of your camera will display and buzzer
will give off a “Beep”. This means startup is completed.
2. Find objects to take via Viewfinder.
3. Hold the camera steadily, and press Shutter button to take photos.
4. You will hear one beep, indicating your photo has been taken. You may
continue taking photos.
5. When the camera is full of photos, the display will read “000”. When you
press Shutter, it will give off continuous “Beep” prompting.
Prompt:
1. Hold camera steadily while taking photos.
2. Insufficient light may affect the quality of photos. (In case of failure in
- 7 -
Page 9

photo taken, the camera will give off two “beeps”).
Camera Function Control
The functions of the digital camera are performed in operating mode. If it
is in energy-saving status, press Mode button and the camera will become
activated within about 3 seconds. In initial status, it can take 24 photos. After
the camera enters operating mode, other functions of the camera can be
operated.
Starting Your Camera
Press Shutter button and then press Mode button to start the camera.
In about 3 seconds, LCD on the back of your camera will display and buzzer
will give off a “Beep” . This means startup is completed.
Automatic Energy-saving Status
When your camera is not operated for 60 seconds, it will automatically enter
power-off status.
Taking Photos
After camera is activated, press Shutter once and it will take one photo and
give off two “beeps”. If it is not operated within 3 seconds, LCD will return to
Preview status from Menu options.
Self-timer
After the camera is activated, press Mode twice and the LCD will display
“ ”. Press Self-timer within 3 seconds and buzzer will “beep” first slowly and
then faster. It will take one photo in about 10 seconds. If it is not operated
within 3 seconds, LCD will return to Preview status from Menu options.
Taking 3 Photos Continuously
1. After camera is activated, press Mode and LCD will display “ ”.
- 8 -
Page 10

2. Hold down Shutter within 3 seconds and it will take 3 photos
continuously. If it is not operated within 3 seconds, LCD will return to Preview
status from Menu options.
Prompt:
Poor light in continuous shooting may cause incorrect exposure, affect
photo quality or result in failure in photo taking (in case of failure, your
camera will give off two “beeps”).
Deleting Last Photo
After camera is activated, press Mode four times and LCD will display “
”. Press Shutter within 3 seconds to delete the last photo. If it is not operated
within 3 seconds, LCD will return to Preview status from Menu options.
Deleting All
After camera is activated, press Mode three times and LCD will display
“ ”. Press Shutter within 3 seconds and LCD will flash continuously. Press it
again to delete all photos. If it is not operated within 3 seconds, LCD will
return to Preview status from Menu options.
Hi/Lo Shift
After camera is activated, press Mode Function 5 times and LCD will
display “ ”. Press Shutter within 3 seconds and LCD will display “ ”. This
mode shift between Hi ( ) and Lo ( ).LCD will return to Preview status
from Menu options if it is not operated within 3 seconds, To resume “ ”
status, just press Mode 5 times again and LCD will display “ ”. Press Shutter
within 3 seconds, LCD will display “ ”.
Image Compression/Processing Mode Shift:
After camera is activated, press Mode 6 times and CSTN will display “ ”
- 9 -
Page 11

(Ld). Press Shutter within 3 seconds to shift between Compression ( Hd)
and ordinary mode (Ld) (image is shifted to compression/processing mode
(Hd) from ordinary mode (Ld) to expand photo capacity from SXGA 24
photos or VGA 93 photos to SXGA 49 photos or VGA 187 photos. If it is not
operated within 3 seconds, LCD will return to Preview status from Menu
options.
Note: The below is a detailed description of the relation between shift in image
compression/processing mode and the shift between Hi/Lo:
Hi
Lo
Ld
SXGA (24 photos)
VGA (93 photos)
Hd
SXGA (49 photos)
VGA (187 photos)
50/60Hz
1. After camera is activated, press Mode 7 times and CSTN will display “50”.
Press Shutter within 3 seconds to shift between 50/60. If it is not operated
within 3 seconds, LCD will return to Preview status from Menu options.
Flash
After camera is activated, press Mode 8 times and press Shutter within 3
seconds to shift to Flash mode. The camera begins charging and LED lights up
in about 6 seconds, indicating it is fully charged. Press Shutter and the camera
will flash and LED goes out. LED will light up again in about 6 seconds (the
duration of LED lighting up varies depending on different charging duration
due to battery status) and it is ready to take photos. LCD will return to
Preview status from Menu options if it is not operated within 3 seconds, (To
avoid burning chip, waiting until completion of charging to press Shutter when
- 10 -
Page 12

selecting Flash mode).
Note: The camera cannot take photo if the ambient light is totally insufficient
Note: To make sure the quality of photo, it’s highly recommended to use the
flash indoors and at night. The best effective flash distance is within1.5M.
_(Page UP): Press _ on camera panel to browse photos from the first to
last . Press _ each time to browse one photo forward (for example, 5 photos
have been taken and digital display on the panel display 019. If you press _
now, it will display 019,020,021). Press Mode to return to Mode menu. Press
_ again and the camera will return to Preview status from Menu options.
V (Page Down): Press Page Down on camera panel to browse photos from the
first one. Press Page Down each time to browse one photo upward (for
example, 5 photos have been taken, and the digital display on the panel
displays 019. If you press Page Down now, it will display in the sequence of
019,024,023, namely, picture 019, picture 024 and picture 023).
Playback: Press Playback and it will display all photos from first to last. It will
count down 60 seconds and then turn off. During countdown, it will continue
to display pictures.
Photo Storage Capacity:
Normal mode: SXGA (24 photos) VGA 93 photos)
Compressed mode: SXGA (49 photos) VGA (187 photos)
Downloading Photos
When your camera has fully used up its memory capacity, you may download
photos to your computer for storage. Before downloading, be sure to use the
USB cable to connect your camera and computer. When your camera gives off
- 11 -
Page 13

Argus Digital Still Camera
a “beep”, it means the connection is OK.
1. Use USB cable to connect your camera and computer. When your camera
gives off a “beep”, it means the connection is OK.
2. Double clicks “PhotoImpressionTM4” icon on desktop and it will display
“PhotoImpressionTM4” main screen.
3. When you see a menu with 5 buttons at the lower corner of the screen, click
“DigiCam/Scanner” button.
4. Select Source and it will automatically select “Argus Digital Still
Camera”. Select Album and it will also automatically select “MVP
Sample”.
5. Click “ ” Select downloading photo software “Argus Digital Still
Camera” and it will display MVP Sample main screen:
- 12 -
Page 14

6. The computer is now ready to acquire pictures. All photos will be shown in
small ones in the lower part on the right screen.
7. Select the small photo you like and then click “OK” to zoom it out.
Camera Function
Live Browse
1. Select “Argus Digital Still Camera” in <Arcsoft PhotoImpression >.
2. Select video camera icon , and the video camera dialogue box will
appear:
Source: Adjust Frequency/Brightness
Argus Digital Still Camera
Argus Digital Still Camera
Argus Digital Still Camera
- 13 -
Page 15

Format: Adjust output size
Preview: Live browse
Capture: Capture pictures and store to the album
Finish: Finish live browse
Video Conference
This digital camera can be used as a PC camera to conduct image
transmission or hold online videoconferences. You are only required to:
1. Use the USB cable to connect your camera and computer.
2. Run videoconference software (such as Microsoft Netmeeting ) on your
computer.
3. Type in recipient’s IP address in the address field and dial to call.
5. Select [Tool] \ [Video] \ [Accept] and [Transfer] options. After recipient
receives your call, you can have a videoconference.
- 14 -
Page 16

Appendix 1: Specifications
Product Type: Digital camera
Electronic Coupling Element: CMOS Sensor 300K Pixels
Image Resolution: 640*480 (VGA) 1280*960 (SXGA)
Memory: Built-in 8MB (SDRAM)
Memory Capacity: Uncompressed: HI: 24pcs(SXGA); LO: 93pcs (VGA)
Compressed: HI: 49pcs (SXGA); LO: 187pcs (VGA)
Viewfinder: Built-in
Self-timer: 10 seconds
Shutter Speed: 1.8u seconds -1/30 seconds
Shoot Mode: Number of Photos/Self-timer/PC Camera/Delete Single
Photo/Delete All Photos
Automatic Energy Saving: automatically enter the energy saving mode in
60s
Image Process: Automatic Exposure / Automatic White Balance
Working Voltage: AA*2/USB5V
Flash: Force/Off
Transmission Interface: USB1.1 Interface
Working Temperature: 0-40_
Operation System: MS Windows 98(Second Edition)/MS Windows Me/ Ms
Windows 2000/MS Windows XP
Appendix 2: Answers to Frequently Asked Questions
1. Q: When I finish the standard software install processes, there is an icon
showing “no photos in cameras” after downloading.
A: First check the number of photos on LCD screen to make sure you
- 15 -
Page 17

have taken photos. Then check whether the USB cable is loose . If it
still does not work, please follow these steps:
(1) Execute Device Manager (Select desktop “My Computer” and
right-click Contents/Device Manager).
(2) Right-click/Readjust.
2. Q: The camera can’t work after connection. There is a yellow mark “!”
shown at Device Manager / Imaging Devices / Argus Digital Still
Camera.
A: There may be a conflict between your digital camera and computer’s
peripheral devices. Please follow the steps below:
(1) Select Argus Digital Still Camera in Device Manager.
(2) Right-click/Uninstall.
(3) Remove USB cable.
(4) Restart computer.
(5) Reinsert USB cable.
3. Q: After finishing installation software and connecting the camera to the
computer, there is “unknown USB device” in Device Manager.
A: Connect camera, execute Clear Registry, disconnect camera and
reinstall Driver.
4. Q: Can I connect the camera to the computer when I install the Driver?
A: No, please do not connect your camera to computer while you are
installing Driver.
5. Q: Why does my camera have no response when I press Shutter or Mode
Key?
A: Please unload the batteries and reload them.
- 16 -
Page 18

6. Q: There are such abnormal phenomena as color spots / stripes / layers /
segments when I download my photos.
A: This is a type of camera’s internal program lockup caused by wrong
operation or damaged batteries. Please turn off all power sources
(including USB cable and batteries), replace with new batteries after
10 seconds and then resume operation.
7. Q: Why can’t I download my photos? Why do I often have problems
when downloading photos?
A: Please open DR. file and download again. The DR. file will record all
the problems in downloading. Please fax or E-mail the file to
Customer Service Dept or your camera supplier as reference for
troubleshooting.
8.Q: How to deal with it when my camera is “locked up”?
A: Please take out the batteries and re-insert them
- 17 -
Page 19

Note: “PhotoImpression” and User’s Manual is enabled
by Acrobat Reader. If you cannot open them, please
install Acrobat Reader in your computer.
“PhotoImpression ” User’s Manual:
Please follow the four steps below to browse
“PhotoImpression ” User’s Manual
enclosed in the CD.
1. Double-click “My Computer” icon
2. Open CD-ROM.
3. Open folder “user manual” in the main
screen of CD-ROM.
4. You can read the manual of
"photoimpression" now.
Or refer to it as necessary.
- 18 -
 Loading...