

Page 1

p
Em
ower the Bar Code
用户手册
PT-90 手持式移动数据终端
(WinCE 6.0 版本)
DOC NO. UM-P9005-01
Mar . 2010
Version 1.0
Page 2

注意: 日后本产品手册若有任何修改、删订恕不另行通知。
Copyright 2009, Argox Informati on C o., L td.
All rights reserved.
本手册所含之所有信息未经立象科技股份有限公司正式书面授权,任何单位或个人不得
将部分或全部内容复制、拷贝、再制、翻译或转换成任何电子或机读形式。.
有限保固及声明
当您打开产品包装,即代表您同意接受下述保固声明条款及相关的责任义务。
在任何情况下使用或安装此产品之前,请仔细阅读此用户手册。ARGOX 对于直接、间
接、强制、偶然引起的使用或不能使用本产品软、硬件所造成的损害,不承担任何责
任,即使 ARGOX 已被通知有发生该等损害赔偿的可能性。
ARGOX 所有产品都会有序列号表示。在购买时请务必确认产品上的序列号贴纸没有损
毁或被移除。ARGOX 售后服务部门仅能根据产品序列号的判断来执行保固服务。
ARGOX 承诺在产品购买后的保固期间内,因任何材料或工艺上所造成的瑕疵提供保
固。在正常使用及保固期间内,ARGOX将负责提供产品修复或更换的材料及工艺。
一但客户自行对产品进行拆卸或经由非授权单位维修过,ARGOX 将一概不负责保固。
产品送修回 ARGOX,如经检测无损坏或经判定超出保固期间,均会向客户收取维修服
务费用,另实际维修材料费用由客户自行承担。
本手册所提及商标所有权皆属于相关厂商。
User’s Manual II
Page 3

目录
1. 介绍 ...................................................................................................错误!未定义书签。
1.1 关于此手册................................................................................错误!未定义书签。
1.2 用户及产品安全规范................................................................错误!未定义书签。
1.3 产品规格 ...................................................................................错误!未定义书签。
2. 入门指南 ...........................................................................................错误!未定义书签。
2.1 开箱检查 ...................................................................................错误!未定义书签。
2.1.1
2.1.2
2.2 详细视图 ...................................................................................错误!未定义书签。
2.2.1 PT-90
2.2.2
2.3 安装、替换电池及充电............................................................错误!未定义书签。
2.3.1
2.3.2
2.3.3
2.4 与主机连接................................................................................错误!未定义书签。
2.4.1
2.4.2
基本包装
基座及握把包装(选购)
基座
安装
利用电源适配器进行电池充电
利用基座进行电池充电
透过
透过
........................................................................
............................................
手持式移动数据终端
................................................................................
/
替换主电池
USB /RS-232线.................................................................................... 14
CRD-90
.........................................................
基座
........................................................................................ 14
.......................................................................... 8
................................................................... 12
................................................
错误!未定义书签。
错误!未定义书签。
错误!未定义书签。
错误!未定义书签。
错误!未定义书签。
3. 手持移动数据终端的操作................................................................错误!未定义书签。
3.1 键盘描述 ...................................................................................错误!未定义书签。
3.2 功能键描述................................................................................错误!未定义书签。
3.3 在 PT‐90 安装
3.4 PT-90 配置设定 ....................................................................................................... 18
3.4.1
3.4.2
3.4.3
3.4.4
3.5 资料输入 ...................................................................................错误!未定义书签。
3.5.1
3.5.2
3.5.3
3.6 电源管理 ...................................................................................错误!未定义书签。
3.6.1
3.6.2
3.6.3
3.6.4
3.7 重新启动 PT-90....................................................................................................... 25
3.7.1
3.7.2
3.7.3
3.8 F
3.8.1 Flash
3.8.2 Flash
3.9 蓝牙功能设置............................................................................错误!未定义书签。
3.10WLAN 无线设置 ..................................................................................................... 34
触摸屏校准
亮度调整
音效调节
使用笔针
透过键盘输入资料
透过面板上的软键盘输入资料
透过条码扫描输入资料
电源状态指示
省电设置
休眠模式
恢复正常状态
热启动
冷启动
清洁启动(
LASH 存储............................................................................................................... 27
MICRO SD 存储卡 ............................................................................ 17
....................................................................
........................................................................
........................................................................
........................................................................
........................................................
................................................................... 20
................................................
................................................................
....................................................................................................... 23
........................................................................
................................................................
............................................................................
............................................................................
CleanBoot
存储位置
存储大小
)
..............................................
............................................................................................. 27
............................................................................................. 27
错误!未定义书签。
错误!未定义书签。
错误!未定义书签。
错误!未定义书签。
错误!未定义书签。
错误!未定义书签。
错误!未定义书签。
错误!未定义书签。
错误!未定义书签。
错误!未定义书签。
错误!未定义书签。
错误!未定义书签。
4. 扫描功能 ...........................................................................................错误!未定义书签。
4.1 扫描设置 ...................................................................................错误!未定义书签。
4.2 扫描驱动 ...................................................................................错误!未定义书签。
User’s Manual I
Page 4

4.3 扫描测试 ...................................................................................错误!未定义书签。
4.4 读取条码 ...................................................................................错误!未定义书签。
4.5 条码读取问题排解....................................................................错误!未定义书签。
5. 实用工具 ...........................................................................................错误!未定义书签。
5.1 功能键设置................................................................................错误!未定义书签。
5.2 延迟时间及亮度设置............................................................................................... 40
6. 应用工具 ...........................................................................................错误!未定义书签。
NTERNET EXPLORER 浏览器.................................................................................. 41
6.1 I
EDIA PLAYER ........................................................................................................ 41
6.2 M
ICROSOFT WORDPAD 写字板............................................................................... 42
6.3 M
6.4 远程桌面联机............................................................................错误!未定义书签。
RANSCRIBER 手写识别 .......................................................................................... 42
6.5 T
INDOWS 档案总管................................................................................................. 43
6.6 W
7. 通讯 ...................................................................................................错误!未定义书签。
ICROSOFT ACTIVESYNC ....................................................................................... 44
7.1 M
ICROSOFT 移动设备管理中心 ............................................................................. 44
7.2 M
8. 概述 MICROSOFT WINDOWS CE 6.0....................................................................... 45
INDOWS 桌面 ....................................................................................................... 45
8.1 W
8.2 任务栏 .......................................................................................错误!未定义书签。
8.3 PT-90 属性设置 ....................................................................................................... 49
证书
8.3.1
8.3.2
8.3.3
8.3.4
8.3.5
8.3.6
8.3.7 Internet
8.3.8
8.3.9
8.3.10
8.3.11
8.3.12
8.3.13 PC
8.3.14
8.3.15
8.3.16
8.3.17
8.3.18
8.3.19
8.3.20
8.3.21
8.3.22
8.3.23
................................................................................
日期/时间
正在拨号
显示
................................................................................
功能键设置
输入面板
键盘
............................................................................................................... 56
鼠标
............................................................................................................... 57
网络和拨号连接
所有者
密码
............................................................................................................... 59
连接
电源选项
区域设置
删除程序
扫描配置
存储管理器
笔针
............................................................................................................... 64
系统
............................................................................................................... 65
系统资讯
延迟时间及亮度
音量和声音
..................................................................................................... 51
........................................................................
................................................................................................... 54
....................................................................................................... 54
选项
................................................................................................. 55
........................................................................................... 57
........................................................................................................... 58
......................................................................................................... 60
........................................................................
....................................................................................................... 61
....................................................................................................... 62
....................................................................................................... 63
................................................................................................... 63
........................................................................
............................................................
....................................................................
错误!未定义书签。
错误!未定义书签。
错误!未定义书签。
错误!未定义书签。
错误!未定义书签。
错误!未定义书签。
错误!未定义书签。
9. 问题排解 ...........................................................................................错误!未定义书签。
9.1 一般性问题................................................................................错误!未定义书签。
9.2 条码读取操作问题....................................................................错误!未定义书签。
9.3 手持数据终端问题....................................................................错误!未定义书签。
10. 附录: 透过 MICRO SD 卡更新作业系统 ...................................................................... 70
User’s Manual II
Page 5

1. 介绍
感谢您购买 PT-90, Microsoft Windows
能使其可以满足广大的各项应用。这些功能包括:
Microsoft Windows CE. Net操作系统
健全的扩充能力
802.11b 无线通讯
强大的电池使用寿命
低功率透放射式(Transflective type)彩色显示器
背光按键板
1.1 关于此手册
本手册包含的内容有::
第一章: 介绍 – PT-90 的基本介绍
第二章: 入门指南 – PT-90 基本使用
第三章: 手持移动数据终端的操作 – 介绍 PT-90 的各项操作界面
第四章: 扫描功能
第五章: 实用工具
第六章: 应用工具
第七章: 通讯 – PT-90 各种的通讯连接方式
第八章: 概述 Microsoft Windows CE 6.0
第九章: 故障排除
第十章: 附录
®CE手持移动数据终端。PT-90 整合了许多特色功
User’s Manual 1
Page 6

1.2 用户及产品安全规范
请不要重压或撞击液晶显示屏,以免液晶显示屏损坏或人身伤害。如果液晶
显示屏破掉,请不要触摸渗出的液体,以免造成皮肤烧伤和感染。
虽然 PT-90 手持移动数据终端符合 IP65 防水防尘等级,请勿将 PT-90 长期曝
露在雨水或湿气集中的地方。超过 IP65 标准的使用环境可能会导致水或污染
物进入 PT-90 造成损坏。
请使用 PT-90 自带的电源适配器。使用未经验证的电源适配器可能导致设备
电器损害,甚至发生起火或电击的危险。
请确认只有经过 ARGOX 授权的经销商可以拆解或改装设备。一但擅自因为
人为错误处置导致设备或配件损坏,本公司将不承担保修责任。
请经常对重要数据资料进行备份。PT-90 可以透过数据传输线或传输基座(选
购)与电脑进行连接。ARGOX 并不对设备使用过程或是电池耗尽所产生的数
据遗矢或损坏负责。
电池如果不当使用会引起过热、爆炸、燃烧而造成严重损害。请参考下述的
安全警告:
警告:
♦ 不要将电池投入火中或加热电池。
♦ 不要将电池正负极反装使用。
♦ 不要将电池与一般金属物品存放在一起。
♦ 不要用锐器划、锤子砸、脚踩电池,或对其施加强烈的冲击或震动。.
♦ 不要在电池上直接焊接任何物品。
♦ 不要将电池接触任何液体,或使电池受潮。.
♦ 不要拆装或改造电池。电池包含安全及保护设计,如果被损坏,会导
致电池放热、爆炸或燃烧。
♦ 不要使用非原装充电器对电池进行充电。
♦ 如果电池泄漏并且液体不慎进入眼睛,不要揉受伤的眼睛。应立即用
大量清水冲洗,并立即就医。如果延误诊治,电池液可能对眼睛造成
损害。
User’s Manual 2
Page 7

为避免故障以及确保产品的正常运行,请注意下述使用说明:
一般使用
清洁指示
清洁手持移动数据终端
清洁基座
使用手持移动数据终端
不要将手持移动数据终端在极端的环境下使用,如阳光直晒、靠近热源或者
极为寒冷、潮湿或大量灰尘的地方。
不要将产品直接淋雨或在水附近及潮湿环境中使用。
不要让设备受到强烈撞击或从超出落摔承受的高度跌落。不要让机器受到其
他物理冲击。
请使用干软的布来擦拭设备,请不用使用湿布擦拭。
不要使用苯稀释剂或其他挥发性的化学品,以免造成设备键盘与外壳的变
形、老化。
定期清洁手持移动数据终端的扫描视窗使其保持良好的读取性能,但务必注
意不要刮伤视窗镜面。
避免直接碰触基座的充电触点。基座的充电触点应尽可能保持清洁以取得最
佳的充电容量。不要使用湿布清洁充电座,可能造成充电座故障。
基座使用
维修
请注意避免环境温度的变化。环境温度突变会导致设备外壳结露,在此情况
下操作设备有可能出现功能失常。如果设备外壳结露,请等到设备干燥后再
使用。
请将手持移动数据终端远离静电或磁场。
不要将东西叠放在手持移动数据终端上。不要将设备的键盘面朝下放置,以
免键盘开机键或[ENT]键误操作,可能会导致电池没办法充电或更改到手持
移动数据终端的设置。
不要放置 PT-90 手持移动数据终端以外的产品于基座上。
手持移动数据终端或基座没有用户可自行维修的内部零件。不要试图拆开手
持移动数据终端或基座。任何擅自拆装所造成的损坏,ARGOX 将不予负责
保修。如果有任何产品故障或使用问题无法透过本手册得到解决,请联系您
购买的经销商取得技术协助。
User’s Manual 3
Page 8

1.3 产品规格
性能
作业系统
CPU MARVELL PXA310 (806 MHz)
RAM 256MB RAM
ROM 256MB
显示
LCD 3.5” Color TFT LCD with touch panel
分辨率
扫描功能
扫描系统 激光扫描引擎
可读条码
键盘
29 keys /29 keys plus / 44 keys with backlight
通讯接口
标准接口
无线通讯(选购)
电源供应
主电池 手持终端 : Rechargeable Li-ion Battery 3900mAH, 3.7Vdc
充电 可透过基座或直接充电
* 电池必须在0~+40°C (+32°F to +104°F)进行充电过程。在低于0°C或高于+40°C下充电
时,电池性能将下降。
扩充槽
Micro SD card
Windows Embedded CE 6.0
240 x 320
Code 11, Code 39, Code 93, Code 128, Codabar, EAN-8, EAN13, Industrial 2/5, Interleaved 2/5, MSI plessey, UK plessey,
Telepen, UPC-A, UPC-E, Matrix 2/5, UPC/EAN General, IATA
2/5, TRI-OPTIC and RSS
USB 2.0 and RS-232
WPAN :Bluetooth Class 2, version 2.0
WLAN: 802.11b/g Wi-Fi
WWAN: EDGE /GPRS (TBD)
RFID HF: ISO 15693R/W, ISO 1443A/B R/W(TBD)
GPS: SiRF star III(TBD)
手持终端带握把: Rechargeable Li-ion Battery 4400mAH,
3.7Vdc
User’s Manual 4
Page 9

Physical and Environmental
操作温度
储存温度
电池充电温度
湿度
重量
落刷测试
ESD +/-15kVDC air discharge
工业等级
认证
Win-CE
MS Web Browser(Internet Explorer), Media Player, Microsoft
二次开发工具
Argox SDK Microsoft Visual Studio for smart device programming
应用程序
-10~50°C
-20~70°C
0~40°C
Max 80% RH <= 30°C
Approx. 380 g(battery included )
1.8 meters to concrete (Handset)
0.9 meters to concrete (Cradle)
+/- 8kVDC direct discharge (contact)
+/- 8kVDC indirect discharge (H & V)
IP65
CE, FCC, BSMI, NCC, CCC, SRRC
WordPad, Remote Desktop Connection, Transcriber, Windows
Explorer
User’s Manual 5
Page 10
2. 入门指南
本章节介绍 PT-90 的物理特性,如何安装及进行电池充电,如何移除及替换握把,以及
初次使用 PT-90。
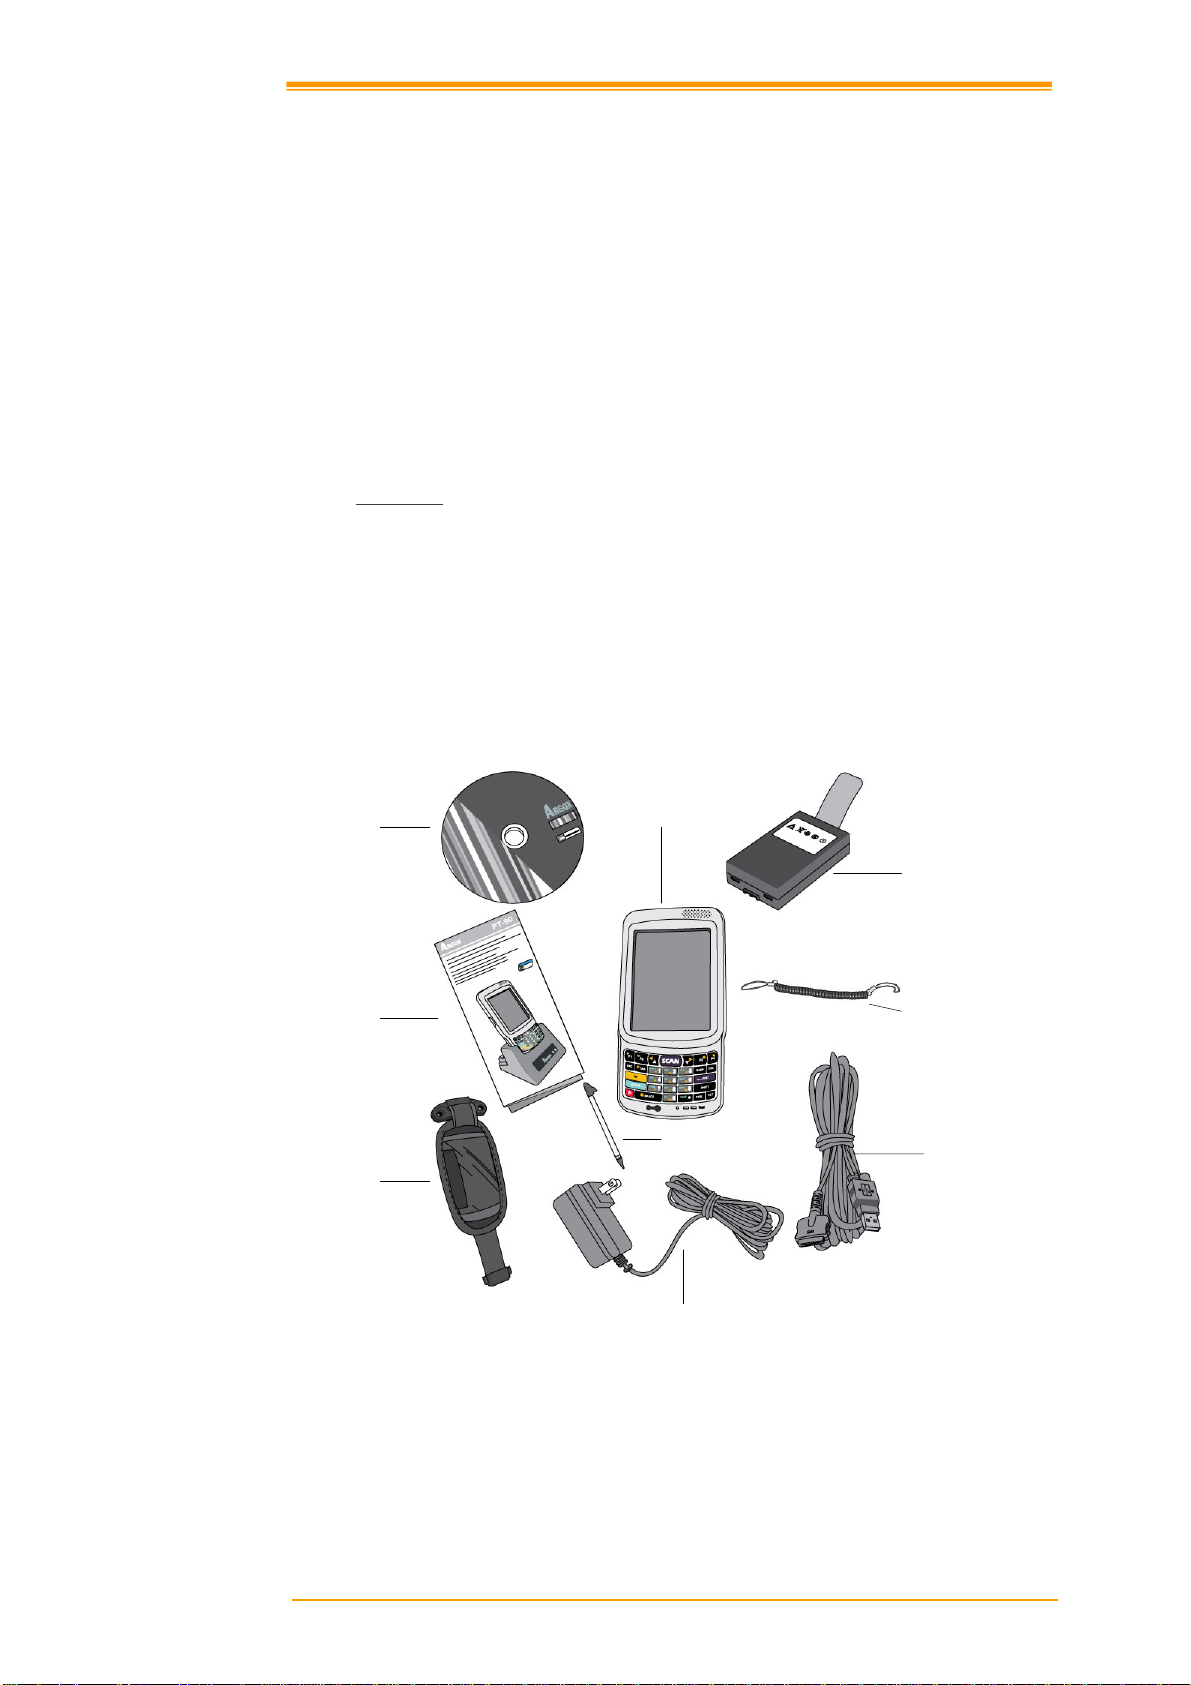
2.1 开箱检查
小心的移除 PT-90 包装中的保护材料并且妥善保管以供后续储存及运送使用。
根据客制化订单需求,PT-90 的包装方式分成下列两种:
2.1.1
ν PT-90
ν 电池 ν 光盘
ν USB 数据线 ν 栓笔绳
ν 电源供应器 ν 笔针
ν 手带
光盘
快速使用指南
基本包装
ν 快速使用指南
PT-90
电池
栓笔绳
手带
图
2-1
基本包装
User’s Manual 6
笔针
电源供应器
USB 数据线
Page 11
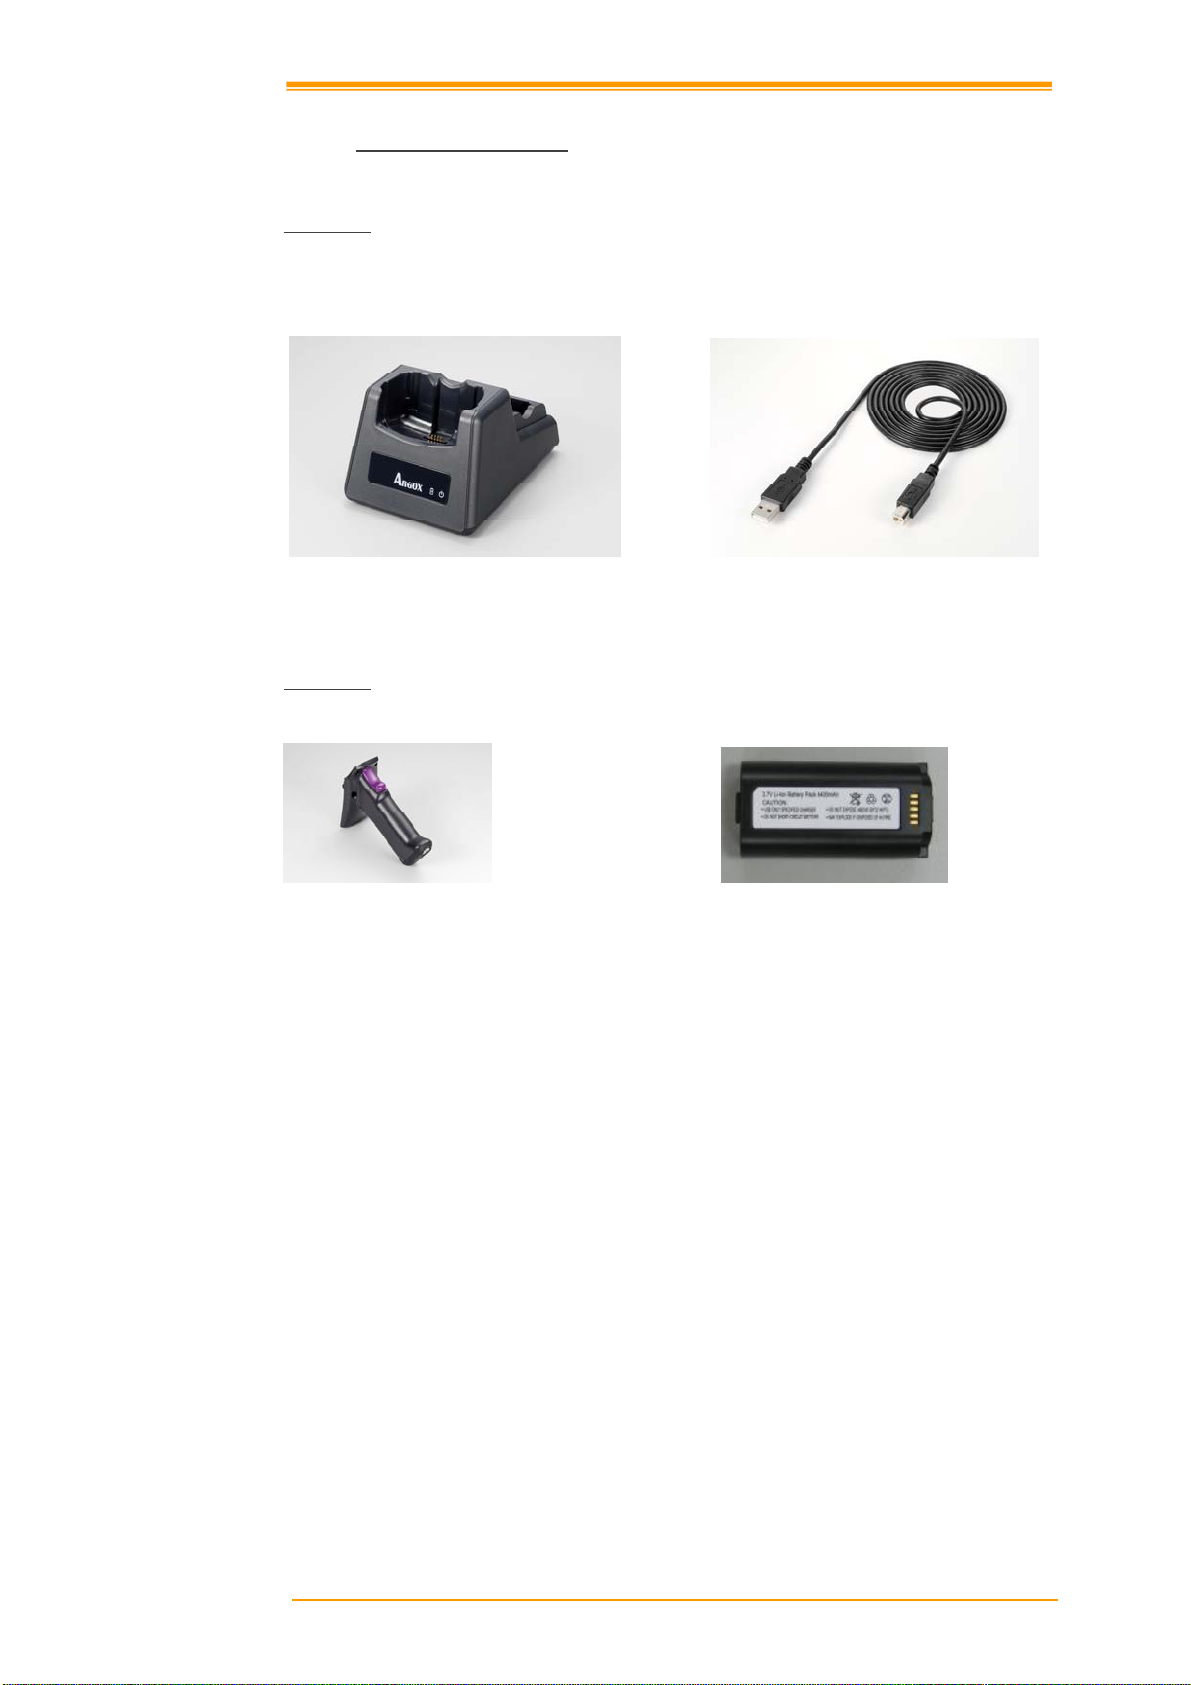
2.1.2
基座及握把包装(选购
)
基座包装
ν 电源供应器 ν 基座
图
2-2
握把包装
ν 握把 ν 4400mAH 锂电池
电源供应器
基座包装
基座
图
2-3
握把包装
检查包装内容是否完整完好。如有发现任何内容缺失或损坏,请即刻与您购买的经销商
联系。
User’s Manual 7
Page 12
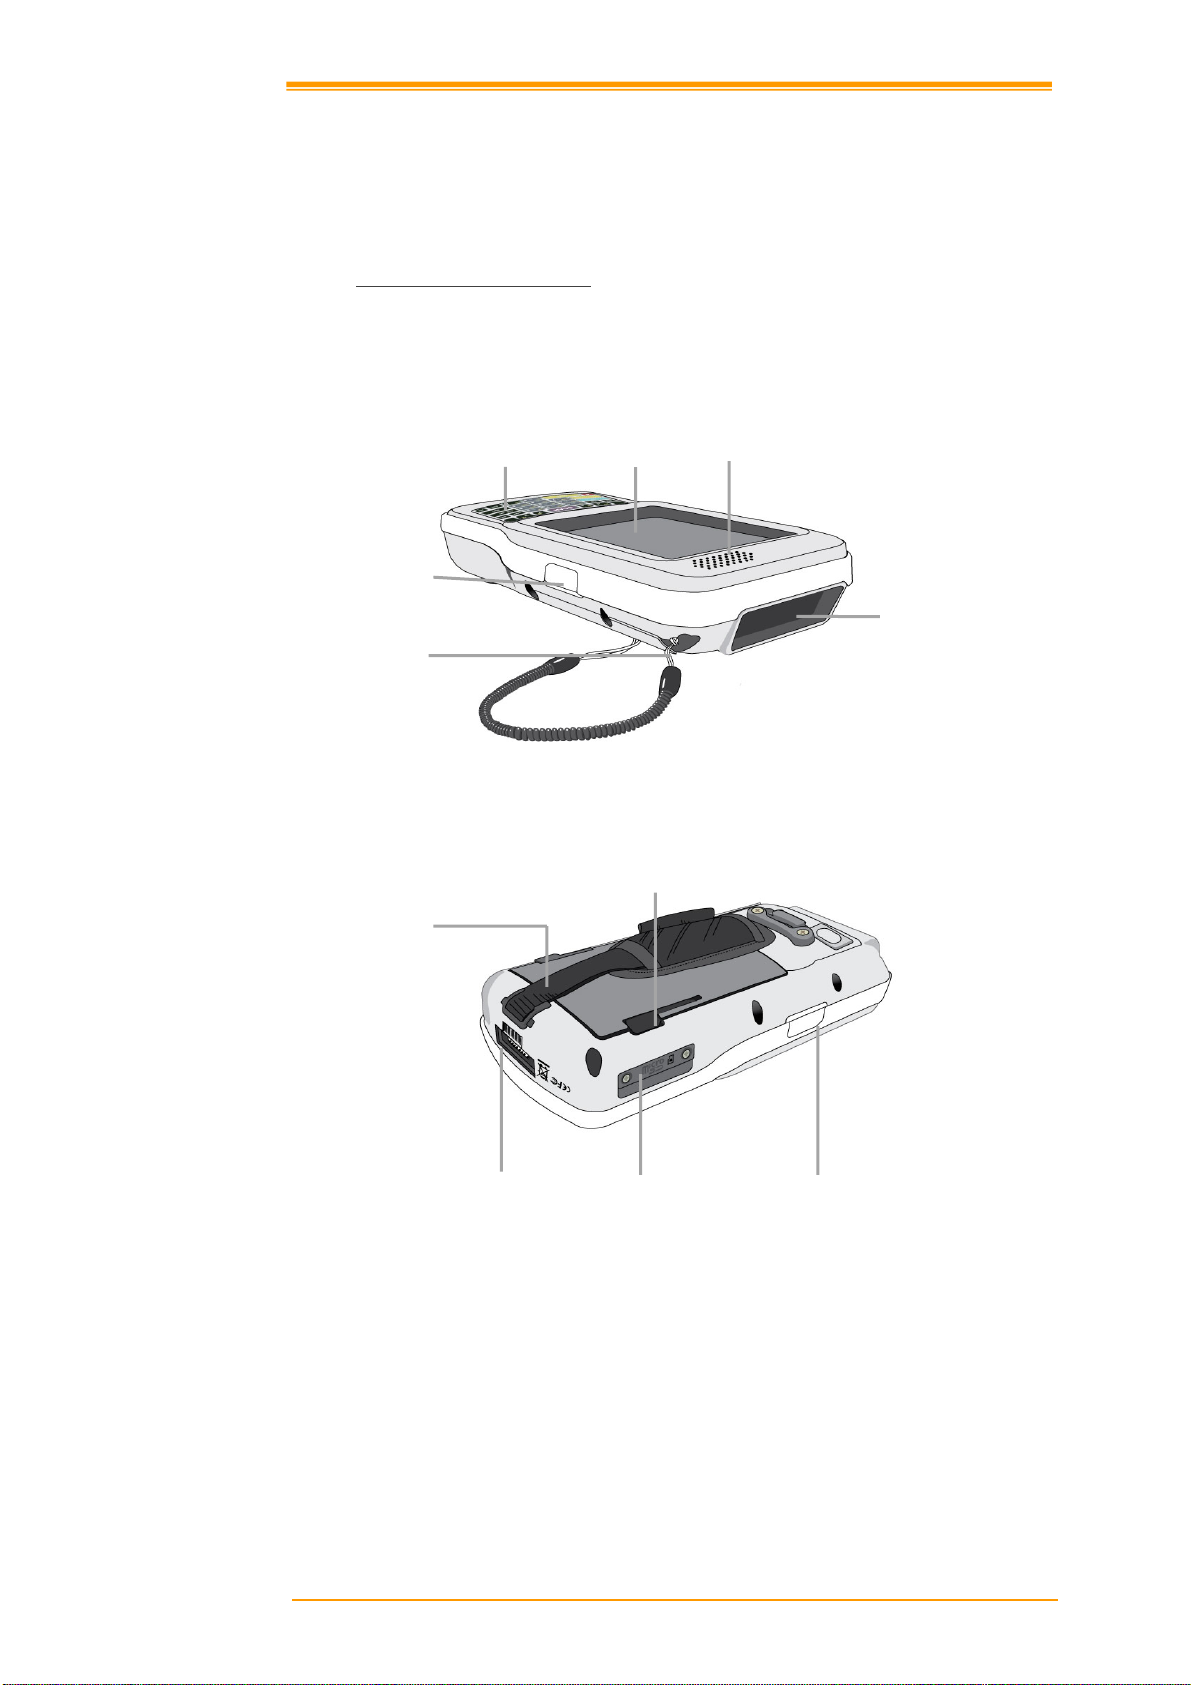
扫瞄键
触碰屏
2.2 详细视图
下面视图介绍 PT-90 各种按键、接口以及其他功能。.
2.2.1 PT-90
手持移动数据终端
PT-90 外观尺寸
159 mm (L) * 80.8mm (W) * 36mm (H)
键盘
笔针
图
2-4 PT-90
正面视图
手带
基座接口 Micro SD 存储卡插槽
图
2-5
背面视图
电池盖闩
扬声器
扫描视窗
扫描键
User’s Manual 8
Page 13
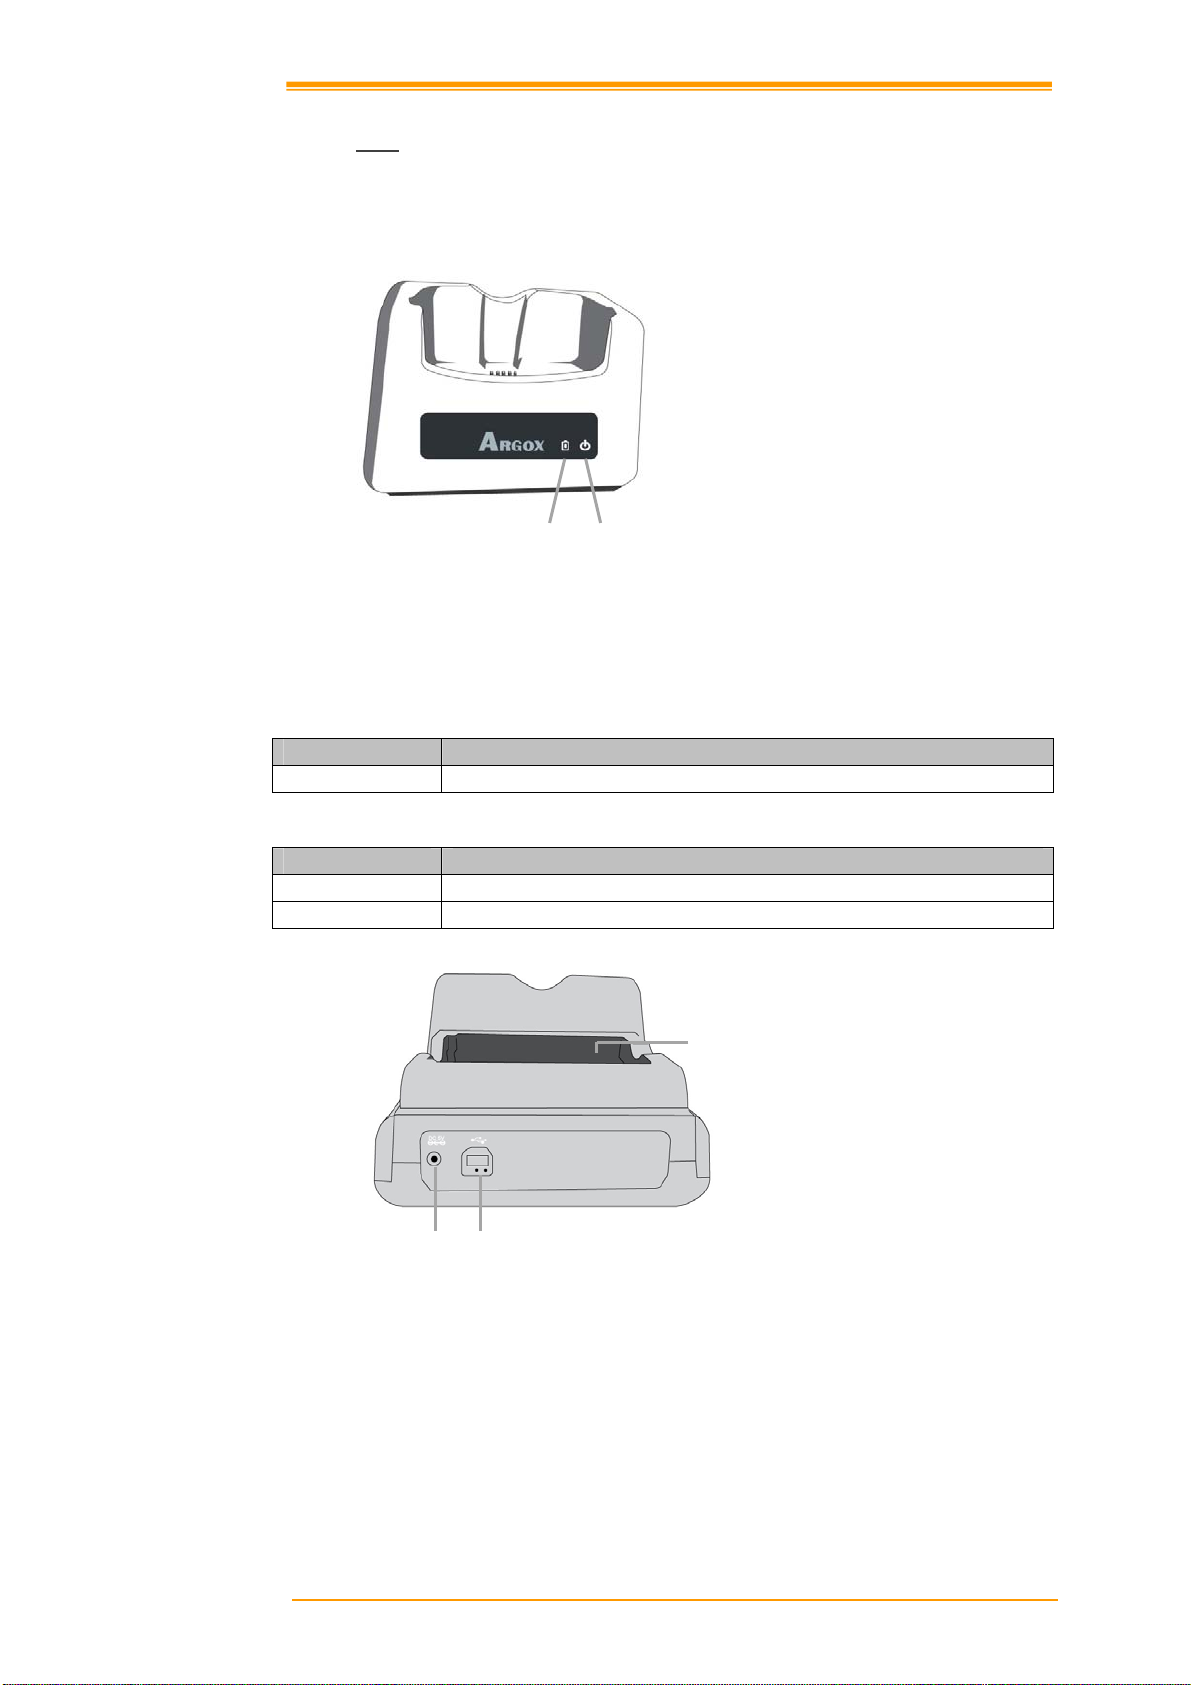
电源
2.2.2
基座
CRD-90 基座外观尺寸
147mm (L) x 112mm (W) x 83mm (H)
充电
图
2-6 CRD-90
正面视图
1. 手持移动数据终端插槽
将手持移动数据终端放在基座插槽中进行数据传输或充电。
2. 电源指示灯
LED 状态 描述
绿色 开机 (mobile computer not in cradle)
3. 充电指示灯
LED 状态 描述
红色 充电中
绿色 充电完成
充电槽
电源接口
图
2-7 CRD-90
4. 充电槽
个别电池充电使用
5. USB 及充电接口
连接手持移动数据终端的多功能插槽以进行资料传输或充电
6. 电源接口
插入电源供应器
传输接口
背面视图
User’s Manual 9
Page 14

2.3 安装、替换电池及充电
错误的电池使用会对手持移动数据终端或基座造成严重的损害。请依循下列电池使用说
明:
注意:
使用手持移动数据终端请务必使用充电完全的电池。
不要再开机状态下移除手持移动数据终端的主电池。.
手持移动数据终端未完成储存动作会造成数据丢失。
仅使用专用的电池。
当电池故障或有其它问题时,在更换新电池前,请确认使用的是
PT-90 专用电池。
电池充电请使用专用的充电座
ARGOX PT-90 的锂电池可以安装在手持移动数据终端上进行充电也
可以透过基座后端的电池专用槽进行充电。
电池的使用寿命是有限的,随着使用电池容量会逐渐降低。因此,
当您的电池需要经常性进行充电时,建议您可以考虑更换新的电
池。
手持移动数据终端移除主电池后,备用电池在充满电的状态下可以
维持记忆体(RAM)中的资料约 15 分钟。
请严格遵照电池安装、充电和更换的相关说明。
任何因为不正当使用电池所导致的产品损坏、故障或是数据遗失,
ARGOX 将不承担相应责任。
电池需求:
手持移动数据终端的操作需要主电池及备用电池两者并存。
主电池
主电池用于手持移动数据终端的主要操作及数据储存。当主电池电力过低时,请立即充
电或更换满载的电池。
User’s Manual 10
Page 15

备用电池
内置的备份电池主要作为备份使用。
如何在基座上对电池进行充电:
1. 确认主电池安装正确安装在手持移动数据终端。档手持移动数据终端放置在
基座上时,会自动对电池进行充电。
2. 如果您有单独采购 PT-90 电池,您可以直接用充好电的点出替换以继续使用
PT-90。将换下来没电的电池放上基座的充电槽进行充电。充电时基座上的
LED (CHG)会闪烁红色当充电完成 LED 指示灯则显示绿色。
何时更换电池或对电池进行充电:
下面两种情况必须更换电池或进行充电:
1. 当屏幕出现电池电力不足图标
2. 长期间没有使用手持移动数据终端后要在使用之前
注意: ♦ 主电池及备用电池第一次充电
备用电池完全充电约需 8 个小时。第一次充电请至少充电 8 个小时
以上以确保充电完全。
♦ 当电池进行充电时,手持移动数据终端的电源指示灯会亮红灯。当
充电完成后,电源指示灯会变为绿色。.
请尽速充电或更换电池
User’s Manual 11
Page 16
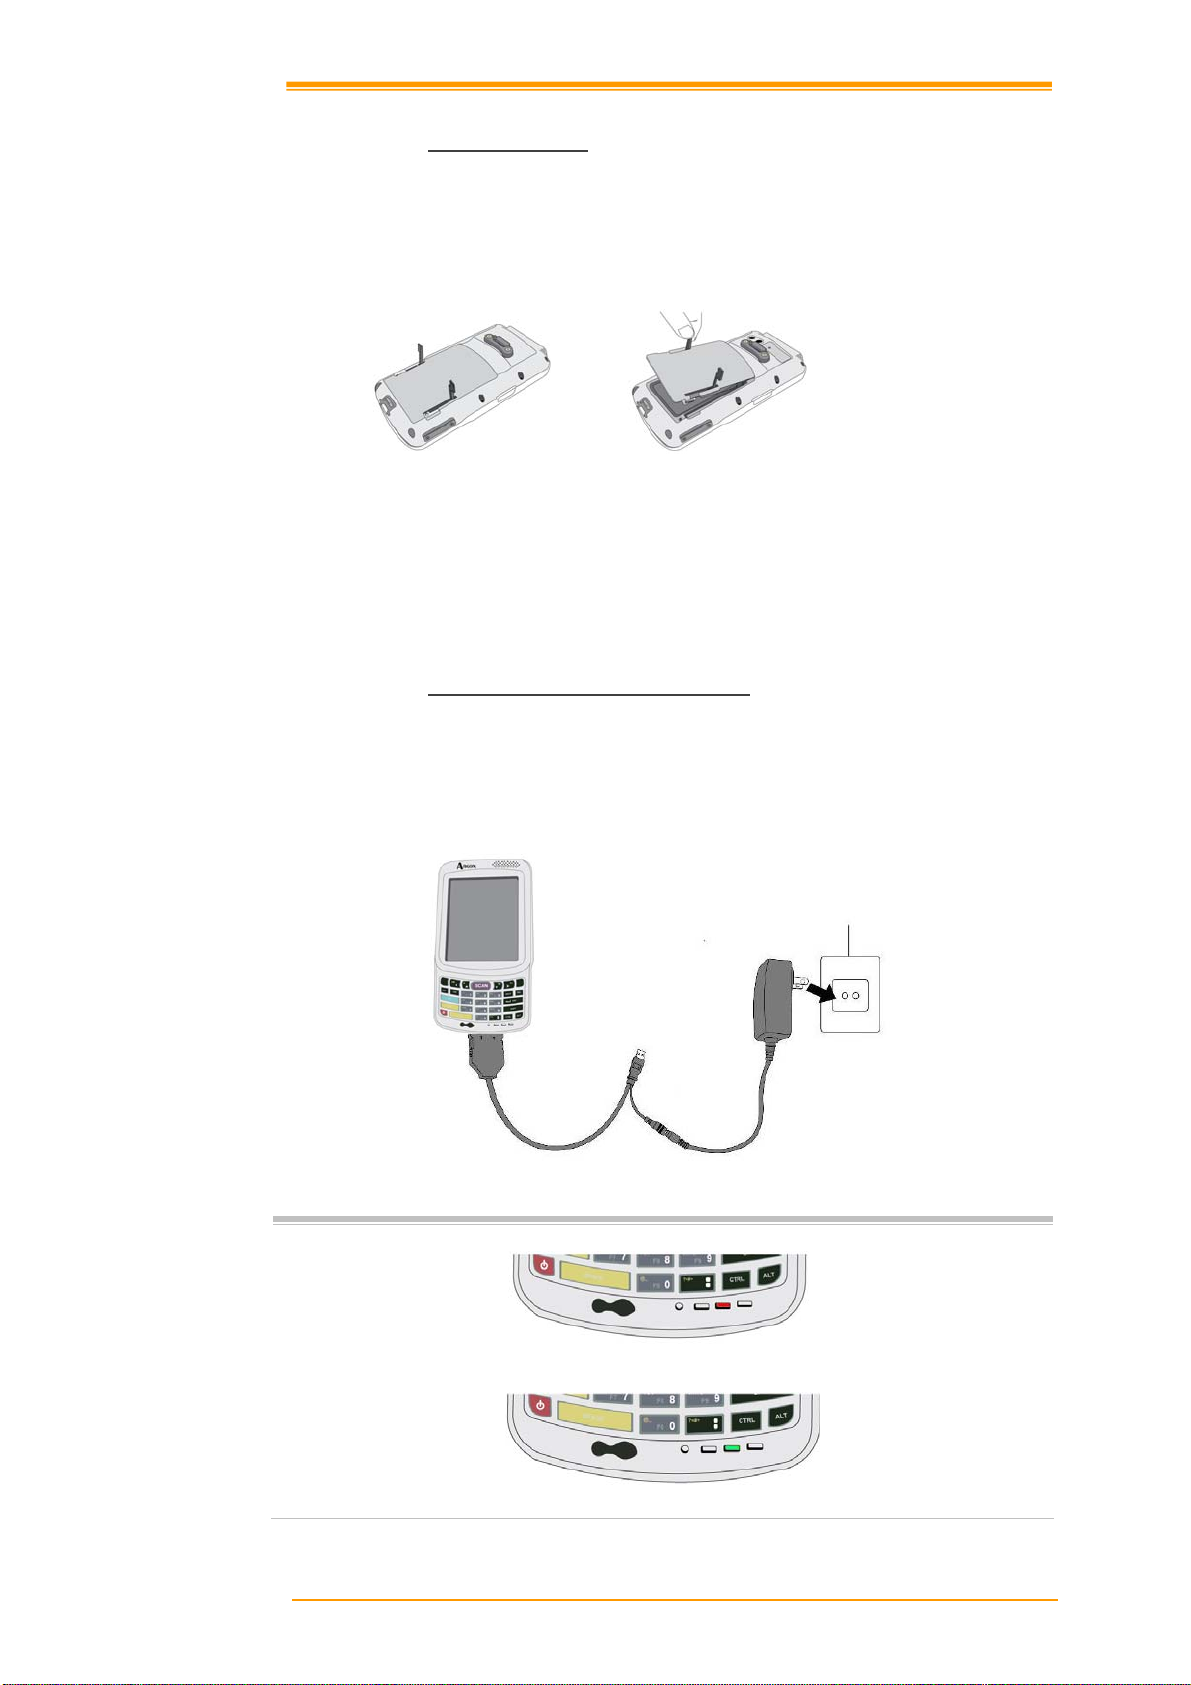
2.3.1
安装/替换主电池
移除并安装主电池
1. 按下 POWER 键,先将手持移动数据终端关机。
2. 如果手持移动数据终端有手带的话,请先松开手带。
3. 将电池盖卡栓移到开启位置并且移除电池盖。
图
2-8 安装 /
替换主电池
4. 将电池触电与主机解除后,将电池按进电池仓中。
5. 装上电池盖,将电池盖卡栓移回关闭位置。
2.3.2
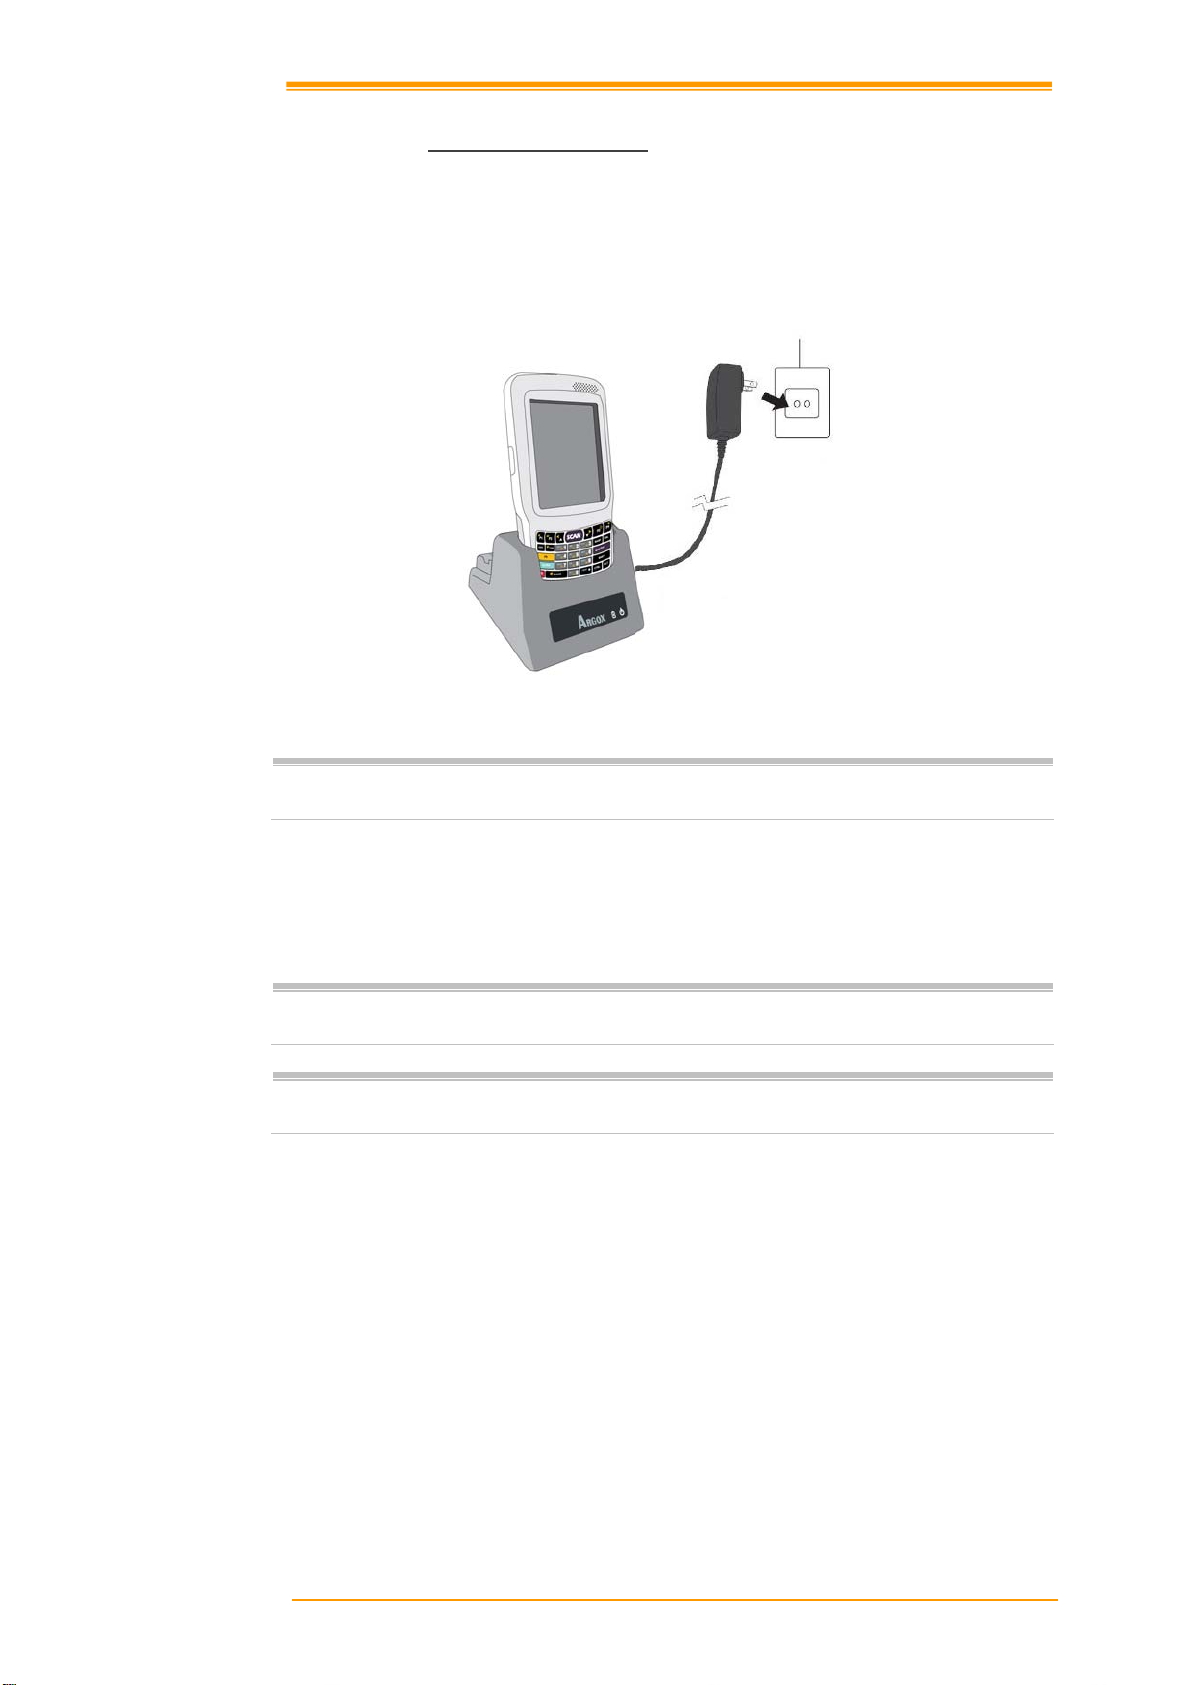
利用电池适配器对电池进行充电
r
使用 RS232 传输/充电线或 USB 传输/充电线
1. 将 PT-90 接上 RS232 传输/充电线或 USB 传输/充电线
2. 将电源供应器连接线上的电源接口,并将电源供应器插入插座中
图
2-9
电源供应器
注意: ♦ 进行充电时,手持移动数据终端的电源指示灯显示为红色。
♦ 当充电完成后,手持移动数据终端的电源指示灯显示为绿色。
User’s Manual 12
Page 17
2.3.3
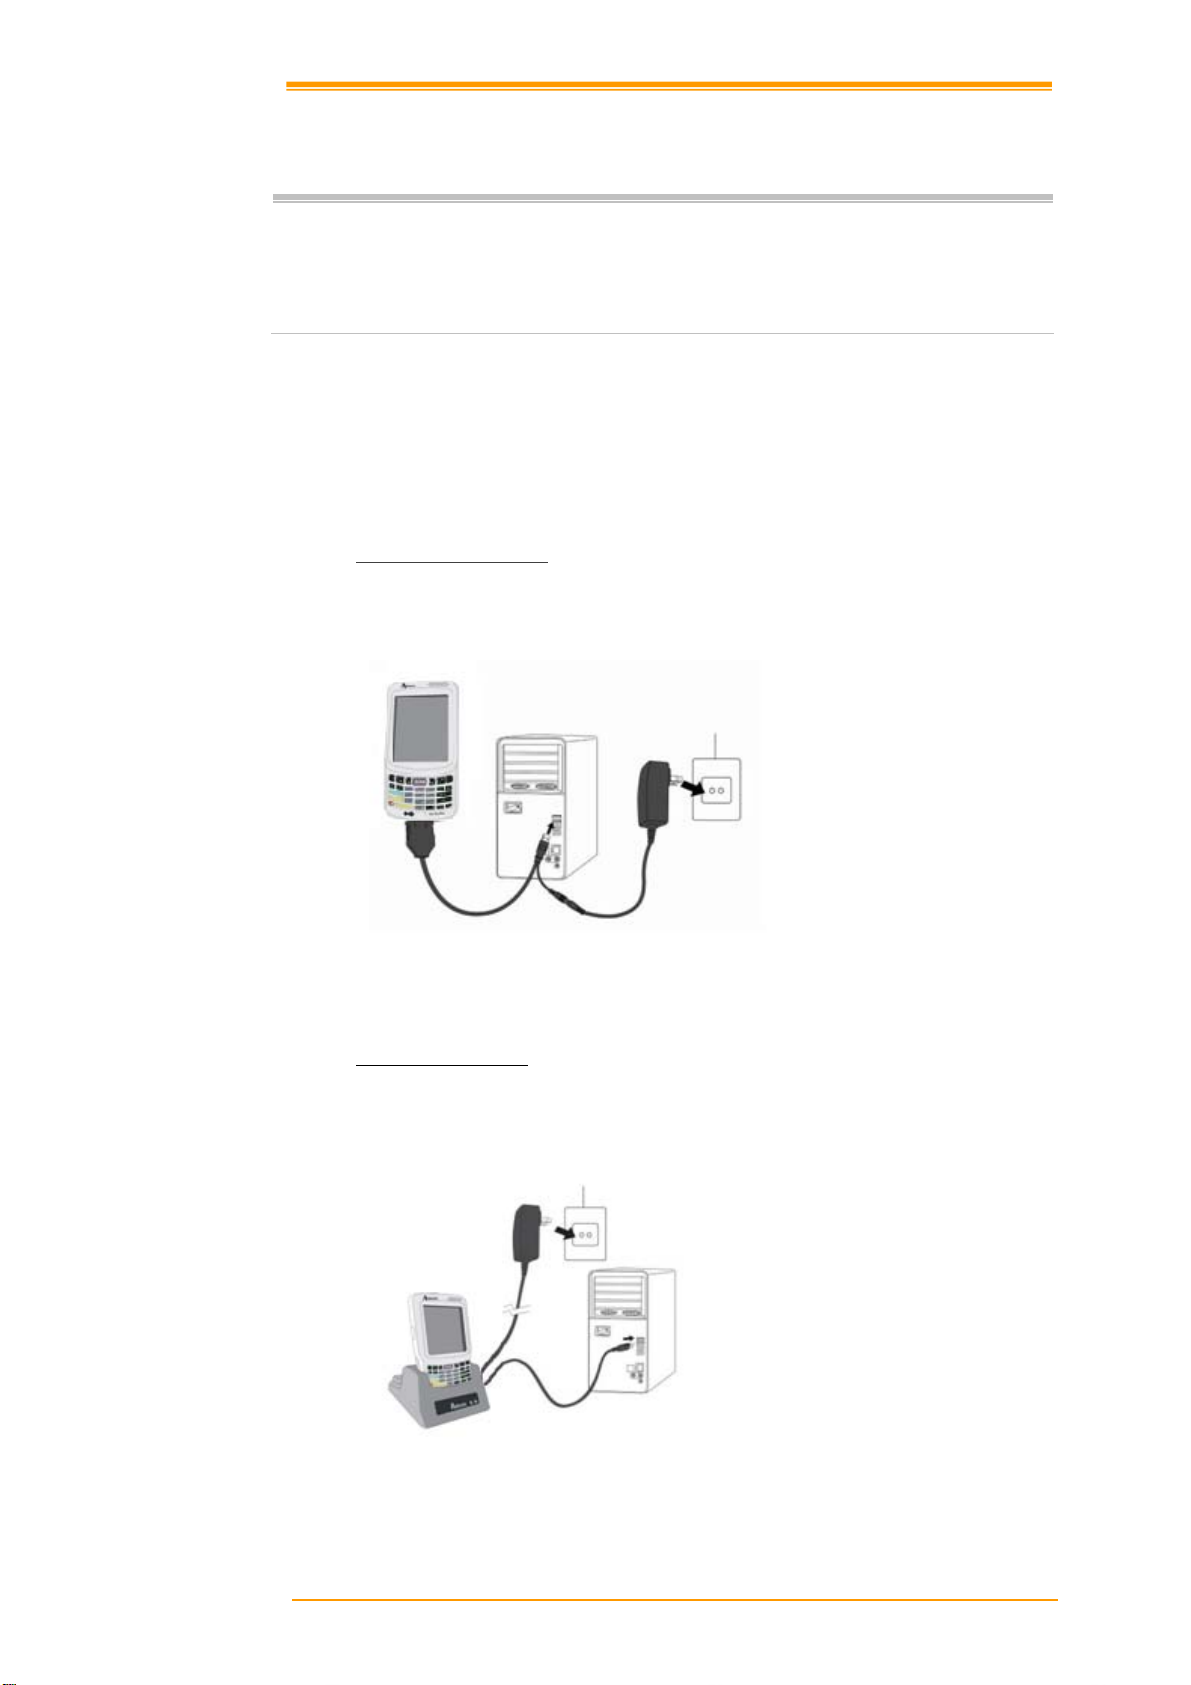
利用基座进行电池充电
a) 将主电源从手持移动数据终端上移除
1. 将电源供应器接上插座
2. 接上基座后面的电源接口
3. 将手持移动数据终端置放在基座上
图
2-10
利用基座充电
注意: ♦ 充电时,手持移动数据终端的电源指示灯显示为红色充电完成后,手持
移动数据终端的电源指示灯显示为绿色。
b) 将个别电池放入基座后方的独立电池充电槽
1. 将电源供应器接上插座
2. 接上基座后面的电源接口
3. 将个别电池放入基座后方的独立电池充电槽
注意: ♦ 电池在基座中的独立充电槽进行充电时,基座上的 LED 指示灯显示为红
色,当充电完成时 LED 指示灯则显示绿色。.
提醒:
请不要移除主电池过长的时间,否则有可能造成数据丢失。请记得移除主电
池前必须先将手持移动数据终端确实关机。
User’s Manual 13
Page 18
2.4 与主机连接
注意: ♦ 与任何电源设备连接请务必依照注意事项进行确认。
♦ 与主机连接前请先将手持移动数据终端关机。
♦ 由于 PT-90 特殊的接口脚位设计,请使用专用的传输线与主机连接。
♦ 不要自行更改 PT-90 专用的传输线。如果您需要特殊的数据传输线,请
联系您的经销商购买或取得技术支持。
主机连接 (资料传输)
手持移动数据终端允许透过 USB 和 RS-232 线与主机进行连接或者透过 CRD-90 基座进
行数据传输。
2.4.1
透过
USB /RS-232线
手持移动数据终端可以透过 USB /RS-232 线直接与主机连接。
图
2-11
透过数据线与主机连接
2.4.2
透过
CRD-90
基座
将手持移动数据终端置于基座上,透过 USB 线连接主机与 CRD-90 基座。
图
2-12
透过基座进行数据传输
User’s Manual 14
Page 19

3. 手持移动数据终端的操作
3.1 键盘描述
PT-90 键盘包含 1个扫描键在内有 29 键。请参考下列图示:
按键
ALPHA
On/ Off
ESC
TAB
BKSP
DEL
ENT
SHIFT
ALT
SCAN
CTRL
SPACE
P1~P4
29-键 29-键plus
图
3-1
键盘布局
功能
切换文数字输入模式
数字输入模式(预设输入模式)
英文小写输入 (a~z)
英文大写输入 (A~Z)
当手持移动数据终端在关机状态,按下 Power 键开机。反之,按下
Power 键关机。在开机状态下,要持续按住约两秒钟才会进行关机作
业。
离开并且会到上一层
制表键;在不同的选项、输入框或者链接中切换
回格键;往前删除一个字元
删除键
(29 键 plus 键盘上没有 DEL 键。)
回车键
上档键
换挡键
(29 键 plus 键盘上没有 ALT 键。)
当扫描功能开启时,启动扫描。
控制键
空格键
用户自行定义
User’s Manual 15
Page 20
3.2 功能键描述
功能键 是特别让用户自行定义常用功能的热键 (Hot-key)。一般会与其他键合
并使用。
可设定的组合功能键
按功能键一次 (进入功能键模式): 一但按下组合功能键之后就回复到正常输入
模式。
按功能键两次 (进入连续功能键模式).:直到再次按下功能键才会切换会正常出
入模式。
定义 功能
保留(使用者自定义)
+
保留(使用者自定义)
+
保留(使用者自定义)
+
保留(使用者自定义)
+
保留(使用者自定义)
+
保留(使用者自定义)
+
保留(使用者自定义)
+
保留(使用者自定义)
+
保留(使用者自定义)
+
保留(使用者自定义)
+
触摸屏定位点校准
+
调低音量
+
调高音量
+
触摸屏背光调暗
+
触摸屏背光调亮
+
左移
+
右移
+
键盘背光开启/关闭
+
Windows 开始菜单
+
User’s Manual 16
Page 21

3.3 在 PT-90 安装 Micro SD 卡
1. 以螺丝刀开启 Micro SD 卡槽盖
2. 以正确方向插入 Micro SD 卡
3. 阖上卡槽盖并固定两个螺丝.
安装 Micro SD 卡面朝下
图
3-2安装Micro SD卡
注意:
a. 如果 Micro SD 卡不正确的安装,则 Micro SD 卡本身以及内部存储的资料可能会
损坏。
b. 要取出 Micro SD 卡时,请先按“推”卡片。
User’s Manual 17
Page 22

3.4 PT-90 配置设定
3.4.1
触摸屏校准
按下 Power 键
出现 PT-90 欢迎画面,紧接着显示
Windows CE® 画面。
校准 PT-90
功能键 FN 和 ESC 可以显示触摸屏校准画
面,或是进入开始 → 设置 → 控制面板 →
图
3-3 Logo
笔针 → 校准中的菜单或选项进行设置。
图 3-4 校准-1
如果触碰屏的回应不正确或是笔针没有正确点击到屏幕上的目标,请依据下列方法重新
进行校准:
1. 用笔针点击屏幕上的校准单位(“+”的
位置),依序完成五个不同位置的校
准之后即完成校准。
2. 按下离开键或是点击屏幕上任一处
图 3-5 校准-2
User’s Manual 18
Page 23

3.4.2
您可以依据下面程序来调整屏幕亮度以便于在不同光线状况下的使用。
3.4.3
您可以依据下面程序来调整音效强度以便于在不同工作环境的使用。
亮度调整
按下
暗屏幕显示的亮度。
持续进行亮度调整,连续按下
或
亮度调整也可以通过开始→ 设置 → 控制面板 → 等待时间及亮度中的菜单
或选项进行设置。
音效调节
键以及 键来调亮屏幕显示的亮度。按下 键以及 键来调
键两次进入连续功能键模式。然后按
来调整屏幕亮度。结束之后,按下 键离开连续功能键模式。
按
度。
持续进行音效调整,连续按下
音效调节也可以透过开始 → 设置 → 控制面板→ 音量和声音中的菜单或选项
进行设置。
3.4.4
笔针位置如
PT-90 正面视图 (
注意: 切勿使用真正的钢笔、铅笔或其他尖锐物体来操控触摸屏,以免刮伤
使用笔针
在屏幕上选择菜单或开启应用程序
点击屏幕上的软键盘以输入资料
在屏幕上按住特定资料并拖拉来选取数笔资料.
键以及 键来调大音效的强度。按 键及 键则调降音效强
键两次进入连续功能键模式。然后按 或
来调整音效强度。结束之后按下 键离开连续功能键模式。
图
2-4 所示在 PT-90 后侧的手带旁。
第 8页
). 笔针作用类似於 PC 中的鼠标。使用笔针可以用来:
触摸屏。
User’s Manual 19
Page 24
3.5 资料输入
资料输入:
透过键盘
透过面板上的软键盘 (soft keyboard).
条码扫描输入资料栏位.
使用左/右侧的扫描键
使用 Microsoft ActiveSync 从主机端同步复制资料到 PT-90。更多关于
ActiveSync 的资讯,请参考第 7 章.
3.5.1
PT-90 键盘有 26个文字 (A-Z), 数字 (0-9), 功能键以及组合文字。键盘标准配置为黑底
白字。
3.5.2
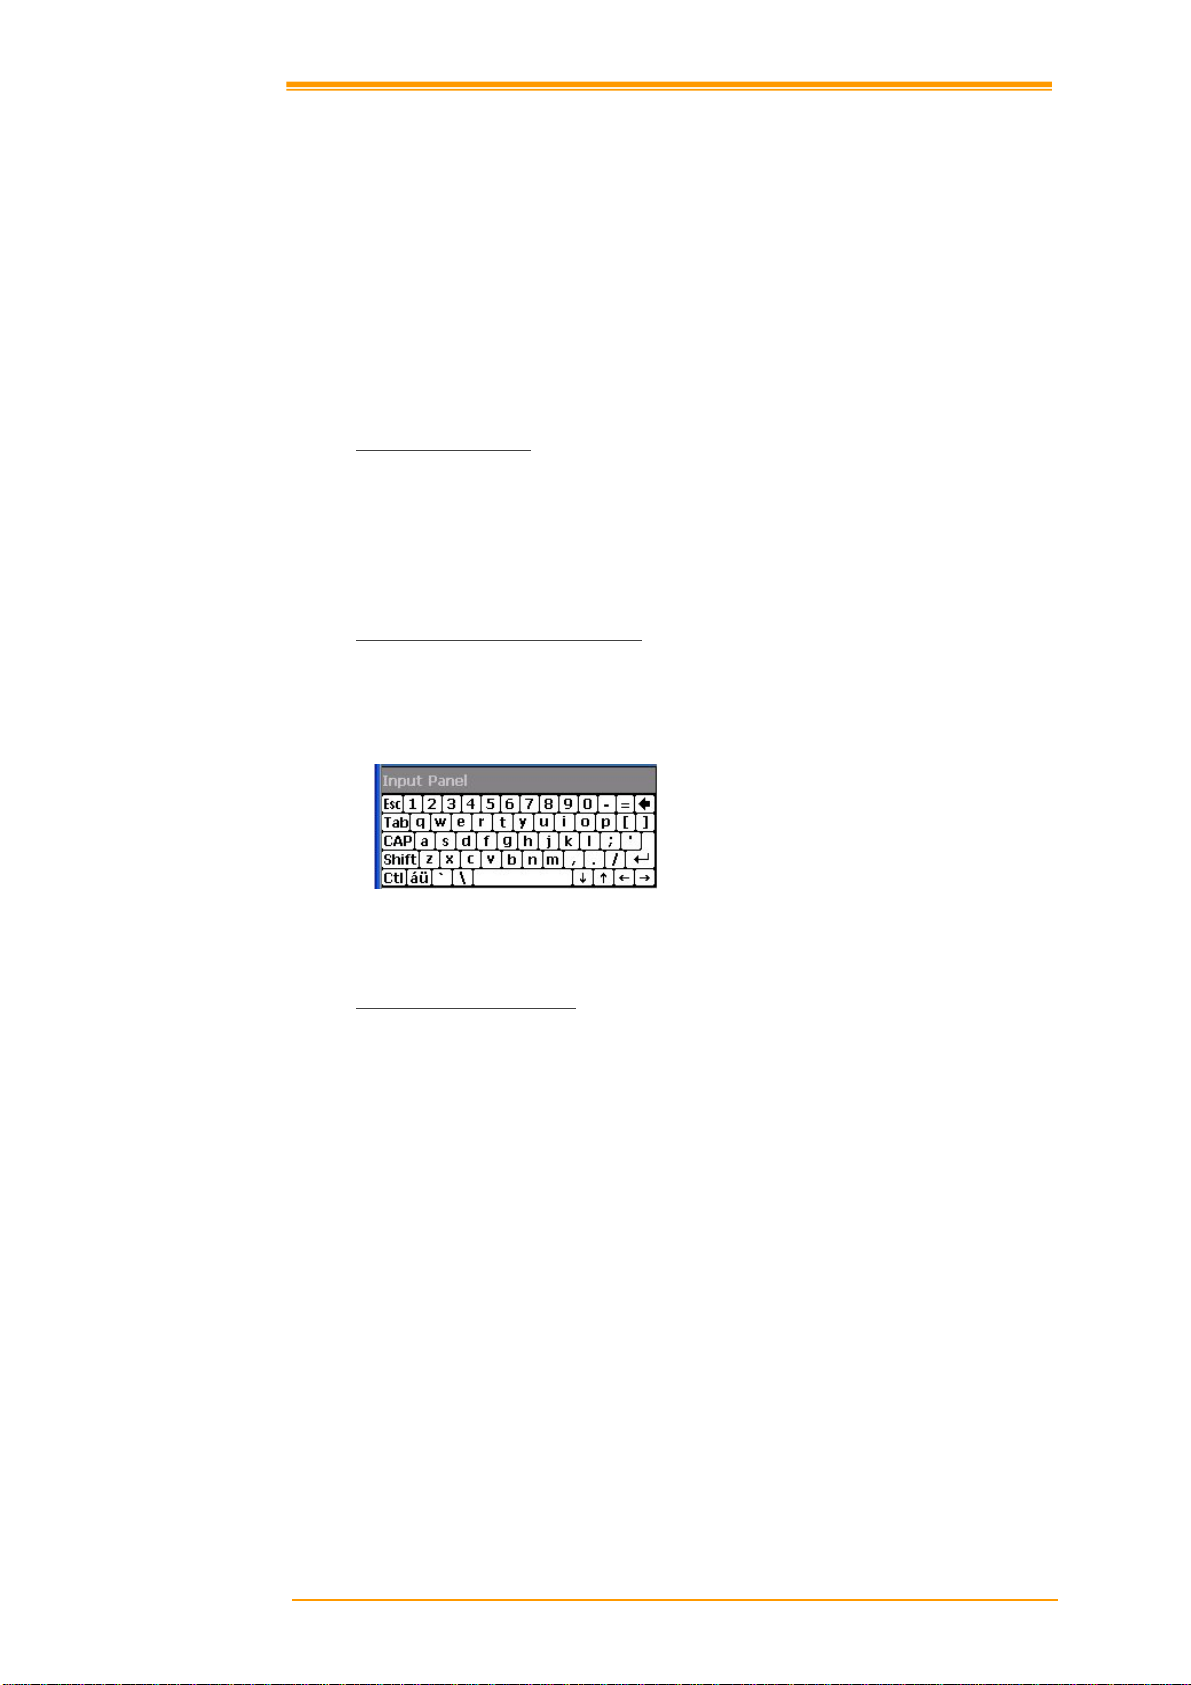
在任用应用程序中透过面板上的软键盘输入资料。按下任务栏上的图示启动输入键
盘,透过点击图示可以显示或隐藏软键盘。
3.5.3
透过键盘输入资料
透过面板上的软键盘输入资料
图
3-6
软键盘
透过条码扫描输入资料
PT-90 可以透过自带的条码扫描装置以扫描读取方式在资料栏位中输入资料。
User’s Manual 20
Page 25

3.6 电源管理
3.6.1
电源状态指示
检查主电池以及备用电池状态。
进入“电源选项”
如果“插头”图标或者“电池”图标出现在任务栏中,可用双击图示进入“电源属性"。
或者, 从 开始 选单选择 设置 → 控制面板 然后双击电源图标进入电源选项。
图
3-7
控制面板
确认电池状态:
电池选项中显示主电池以及备用电池的电力状态。
图
3-8
电源选项
User’s Manual 21
Page 26

五种不同的电源狀态图标用以表示电力状况。
图标 描述
没图标:
“插头”
“充电” :
“电量低”
“电量很低” :
当电量很低的图标出现时请立即充电。
如果充电后电量很低的图标还是出现,请联系您的经销商或 Argox 技术支持。
:
:
表示无外部电源接入,电量正常。
表示接着外接电源,但没有主电池或主电池毁损。
表示充电中。
表示无外部电源接入,电量低,需进行充电。
表示电池电量非常低,请立即备份,停止工作,进行充
电。
User’s Manual 22
Page 27

3.6.2
省电设置
PT-90 自动省电
当 PT-90 没有执行任务或是任务正在等待数据输入时会进入闲置模式。PT-90 在没有外
部电源接入的情况下,预设闲置超过 9 (1+3+5)分钟会进入省电模式。按下电源键重新
开启 PT-90 回到关机前的作业。
在电源选项中,选择配置,可以自行选择延迟时间。单选下拉选单可以选择 1, 2, 3, 4, 5,
10, 30 分钟或是从不自动进入省电模式。
在 PT-90 插入外部电源或放置在充电座上执行此功能,可以设定在使用外部电源情况下
非活动状态的等待时间以进入省电模式。
图
3-9
电源选项
-2
背光设置
由于 LCD 背光所消耗的电量相当高,如果不需要使用的情况下建议关闭 LCD 背光以节
省电耗。在背光开启的情况下,可以设置“自动关闭背光”功能。
改变背光设置, 选择 开始 → 设置 → 控制面板, 然后双击等待时间及亮度图标.
图
3-10
背光设置
User’s Manual 23
Page 28
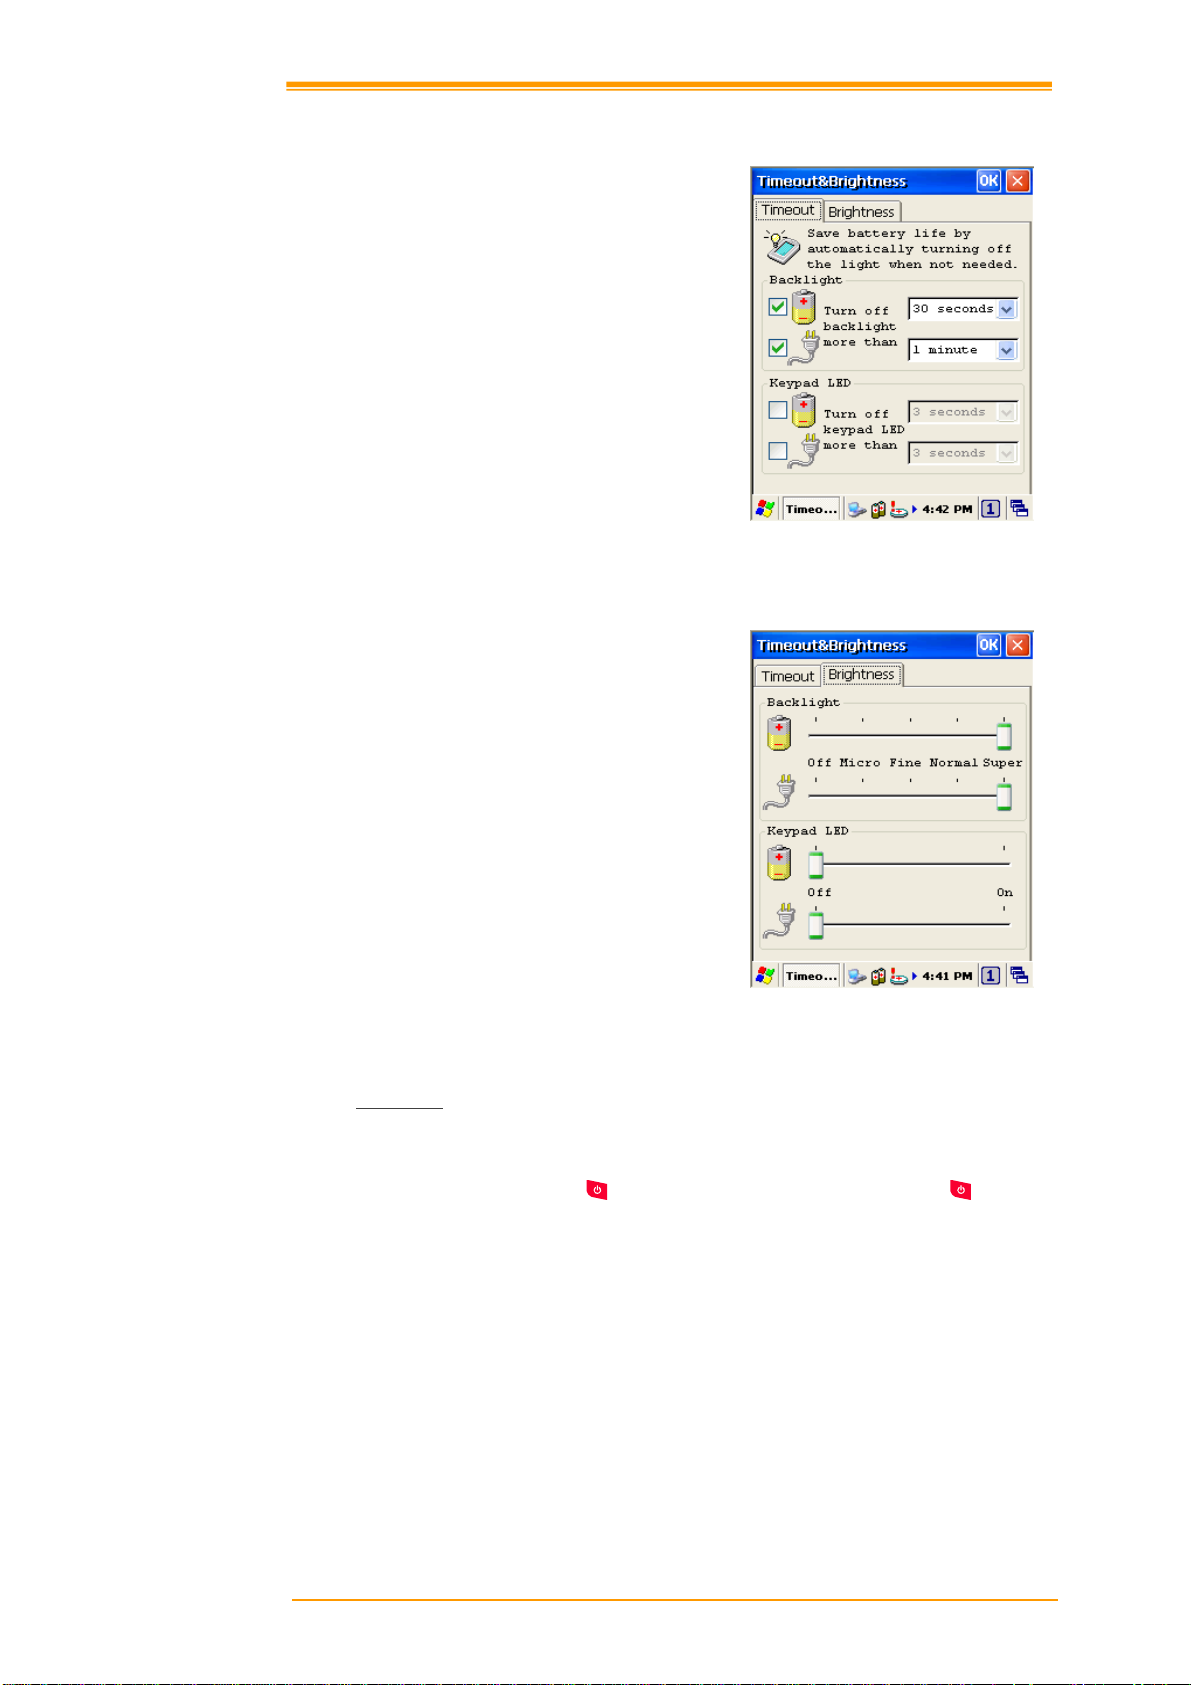
延迟时间设置:
取消“关闭背光”选项的勾选将持续开启
背光。勾选”关闭背光”并且设置背光的延
迟时间。在电池状态下,延迟时间为 15
秒, 3 秒, 1 分钟, 2 分钟以及 5 分钟;在外
接电源的情况下,延迟时间可设置为为设
置等待时间为 15 秒, 30 秒, 1 分钟, 2 分钟,
5 分钟, 10 分钟, 15 分钟和 30 分钟。
亮度设置
调整背光亮度。在接入外部电源的情况下
可以有五级背光亮度可以调节。
图
3-11
延迟时间
图
3-12
亮度设置
3.6.3
休眠模式
当 PT-90 闲置一段时间后会进入休眠模式。透过电源选项(参考配置页面)来调整延迟时
间。休眠状态类似关机,必须按下
键来让 PT-90 进入休眠,并再次按下 键来启
动 PT-90 回到工作状态。
在 PT-90 使用电池供电时,可透过电源选项控制视窗来切换休眠模式。休眠模式可以在
PT-90 未使用时节省电池电力损耗。
User’s Manual 24
Page 29

进入休眠模式:
下列操作可使 PT-90 进入休眠模式:
在开机状态按
当 PT-90 超过进入休眠的延迟时间内皆没有使用
当电池完全没电时.
点击 开始 → 休眠
键
图
3-13
3.6.4
休眠模式
恢复正常状态
点击此可以让 PT-90进入休眠模式
按下
键进入休眠或是回复正常状态(唤醒)。
唤醒 PT-90
预设的唤醒状况定义了 PT-90 所对应采取的唤醒动作。这些设置和出厂配置将可能改变
或更新。
状态 描述 唤醒方式
关机
当 PT-90 是透过按下
而进入休眠模式,此动
按 键
作会唤醒 PT-90。
自动关机 当 PT-90 因为自动省电进入休眠模式,此动作
按
键
会唤醒 PT-90。
3.7 重新启动 PT-90
一但 PT-90 停止对系统回应任何动作,您就必须进行重启。PT-90 有三种方式可以进行
重启- 热开机
热开机和冷开机会重新启动 PT-90, 所有未保存的资料将会丢失。Flash 中的设置资料会
被保留。
清洁启动则清除所有包括 flash 里头的应用程序及资料,并且将所有设置回复到出厂设
置。
User’s Manual 25
, 冷开机 和 清洁启动.
Page 30

3.7.1
当应用程序对系统没有回应时,必须执行热开机。
注意: RAM 将会重新初始化。
执行热开机:
1. 按下 Reset 键。
2. 稍后,出现 PT-90 初始开机画面。
3.7.2
冷开机会重启 PT-90 并且所有未储存的数据将可能丢失。只要在热开机无法解决问题的
情况下,建议执行冷开机。
注意: RAM 将会重新初始化。
执行冷开机:
1. 同时按下 Reset 及
2. 稍后,出现 PT-90 初始开机画面。
热开机
冷开机
键.
3.7.3
先执行热开机,如果 PT-90 仍然无法正常作业,再执行冷开机。
只要在想要清除所有设置,恢复到出厂设置的时候才执行清洁启动。
注册表 保存 保存 出厂值
Flash Disk
RAM data
RTC
注意: 进行清洁启动所有数据都会丢失。应用程序也可能遗失。建议先将
在 OS 中执行清洁启动:
1. 要执行出厂设置, 选择 开始 → 设置
2. 在清洁启动中勾选清除注册表以及磁
3. 出现 PT-90 初始开机画面。
4. 回到出厂预设值。
利用热键执行回复清洁启动:
1. 冷启动加上热键
2. 出现 PT-90 初始开机画面。
User’s Manual 26
清洁启动
→ 控制面板, 然后双击 系统资讯 图
标.
盘格式化后,按下设置。
(UP+ DOWN+SHIFT).
热开机 冷开机 清洁启动
保存 保存 清除磁碟
重新初始化 重新初始化 重新初始化
保存 清除 清除
90Utility.cab 此档案备份到 PT-90 的 SD 卡中,然后再做清洁启动。完成
后,作业系统会自动从 SD 卡执行 90Utility.cab。
图
3-14
清洁启动
Page 31

3.8 Flash 存储
Flash 内存是约 256MB 的可重复读写区域,可存放应用程序及数据资料。存储在 Flash
中的应用程序和档案不会收到 PT-90电力状况的影响而有丢失的风险。
注意: Flash 中所存储的资料在热/冷开机的情况下不会清除。如果要清除 Flash 中
的存储设定值建议执行回复出厂设置。
3.8.1 Flash
存储位置
所有的应用程序及数据都存储在 PT-90 的 Flash 中。
图
3-15
我的设备
3.8.2 Flash
存储大小
可用 Flash 存储容量的大小决定于系统韧
体所占用的大小。
选择 开始 → 设置 → 控制面板, 然后双
击 存储管理器 图标.
所显示的容量为 Flash 的总大小。
图
3-16 Flash
存储大小
User’s Manual 27
Page 32
3.9 蓝牙功能设置
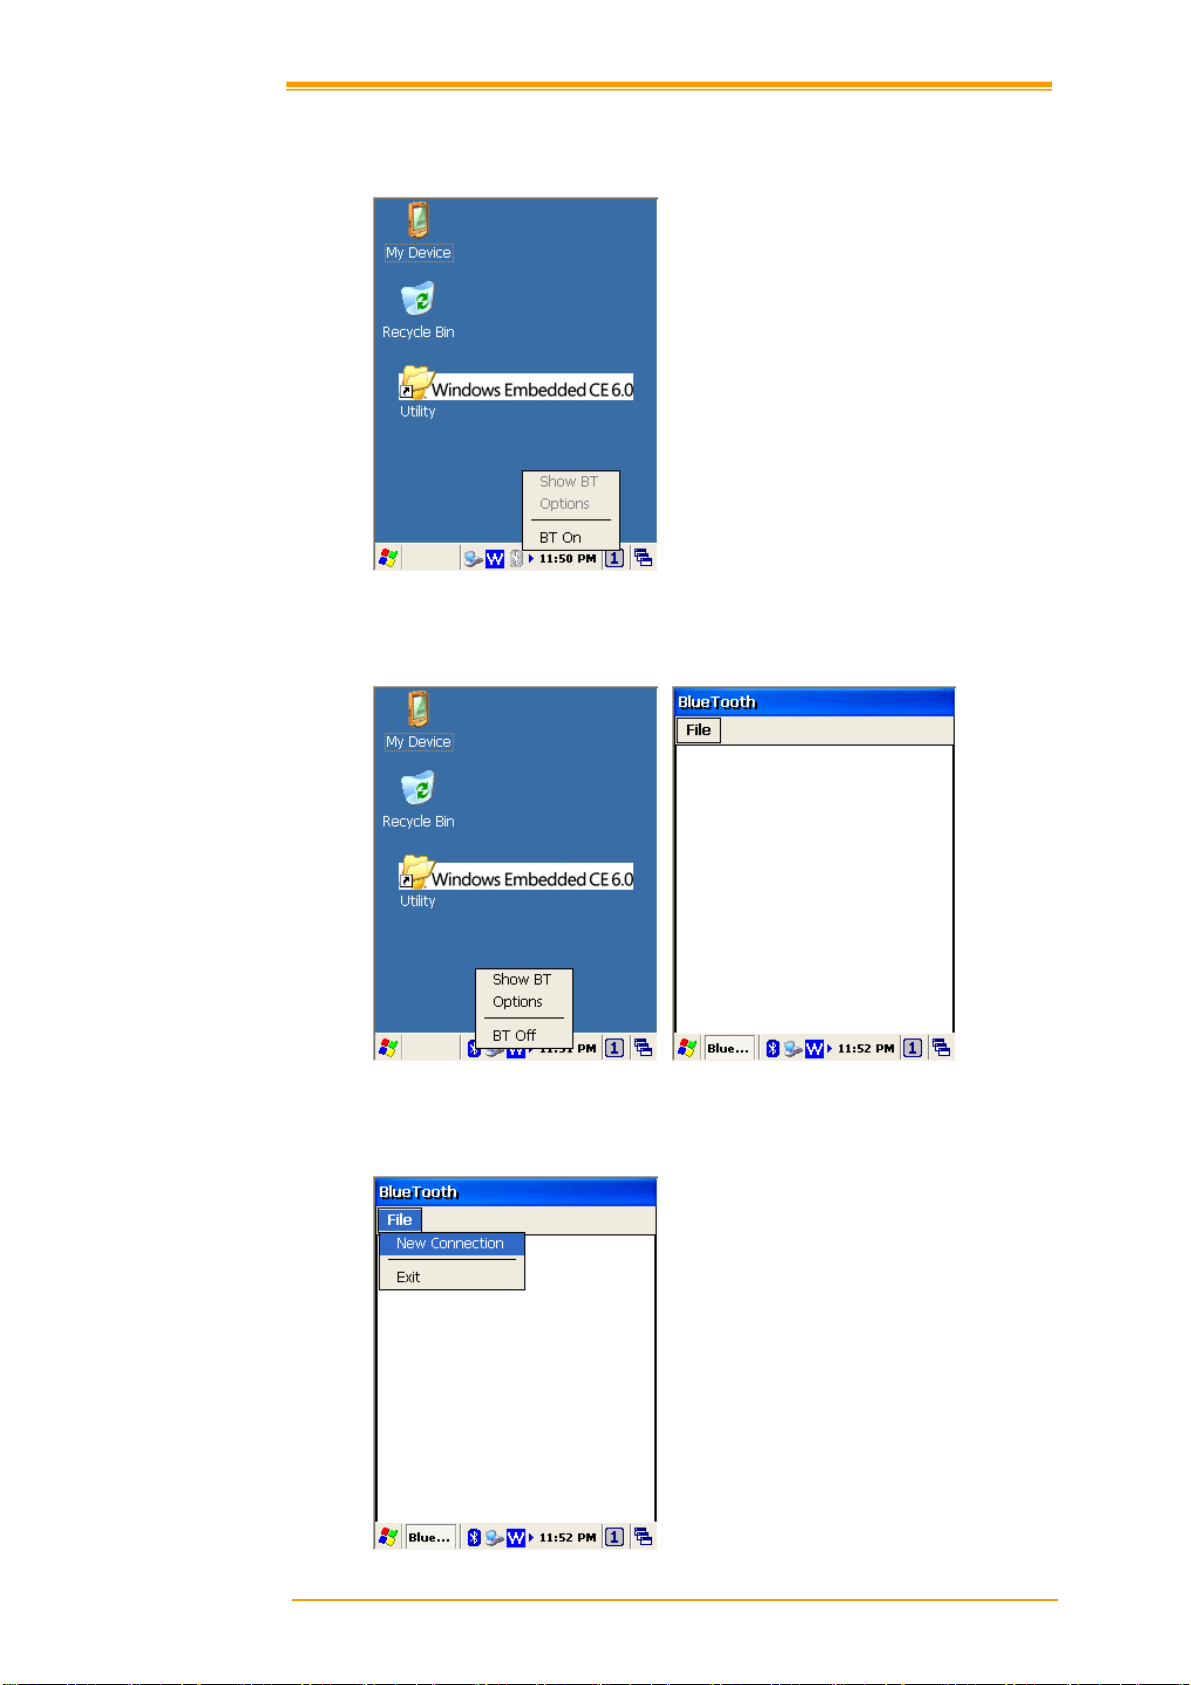
1. 请参照
图
3-17. 开启蓝牙功能。
图
3-17
开启蓝牙功能
2. 启动蓝牙之后,选则 打开蓝牙 如
图
3-18
图
3-18
打开蓝牙
3. 在蓝牙管理器的视窗中,选择档案 Æ 新建连接 如
图
3-19
蓝牙连接
User’s Manual 28
图 3-19.
Page 33
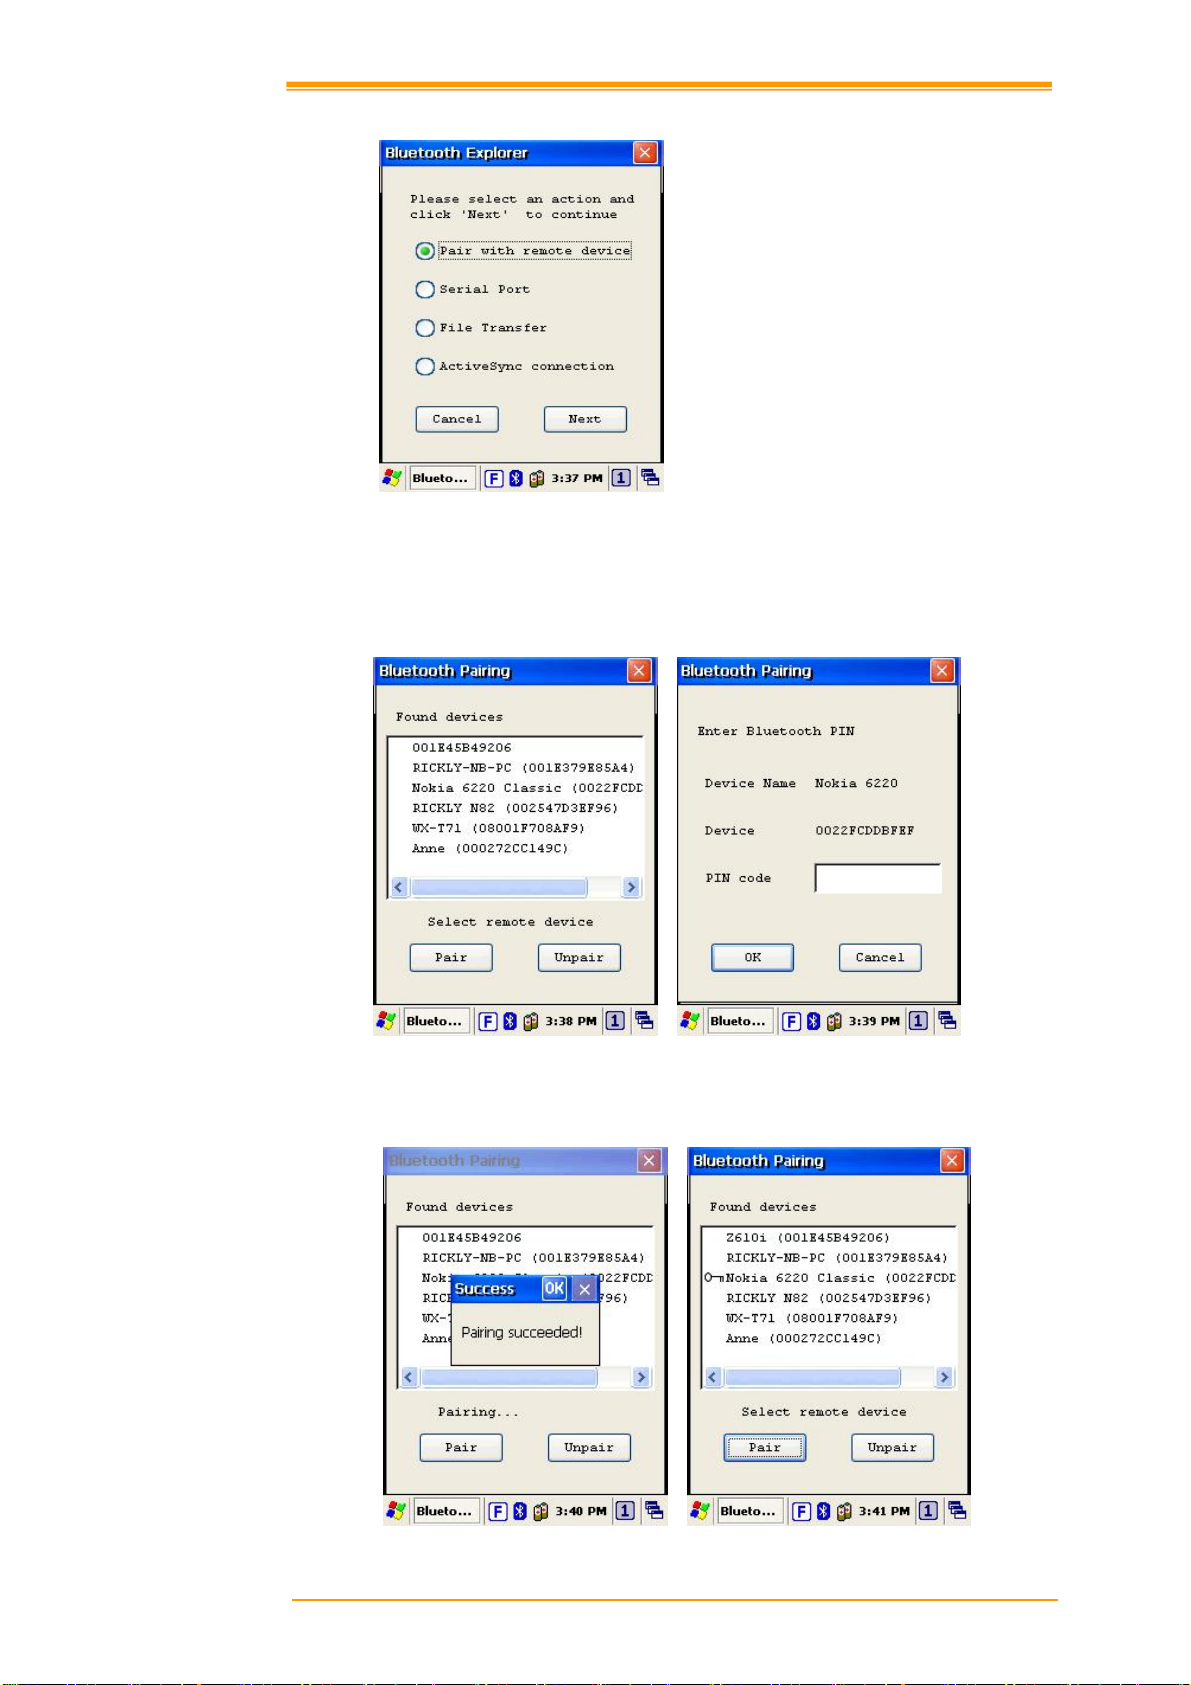
4. 蓝牙提供四种连接方式,如
图
3-20
蓝牙浏览器
5. 第一项连接方式为于远端装置配对连接,按下下一步。
PT-90 会开始搜索装置,选择要配对的装置后按下配对钮,需要输入蓝牙识别码
(PIN code)才能成功进行配对,如图
图 3-20.
3-21
。
图
3-21
蓝牙配对
6.
PT-90 与配对装置校对识别码之后,屏幕上会出现成功的对话框,如
图
3-22
蓝牙配对
-1
图
3-22。
User’s Manual 29
Page 34
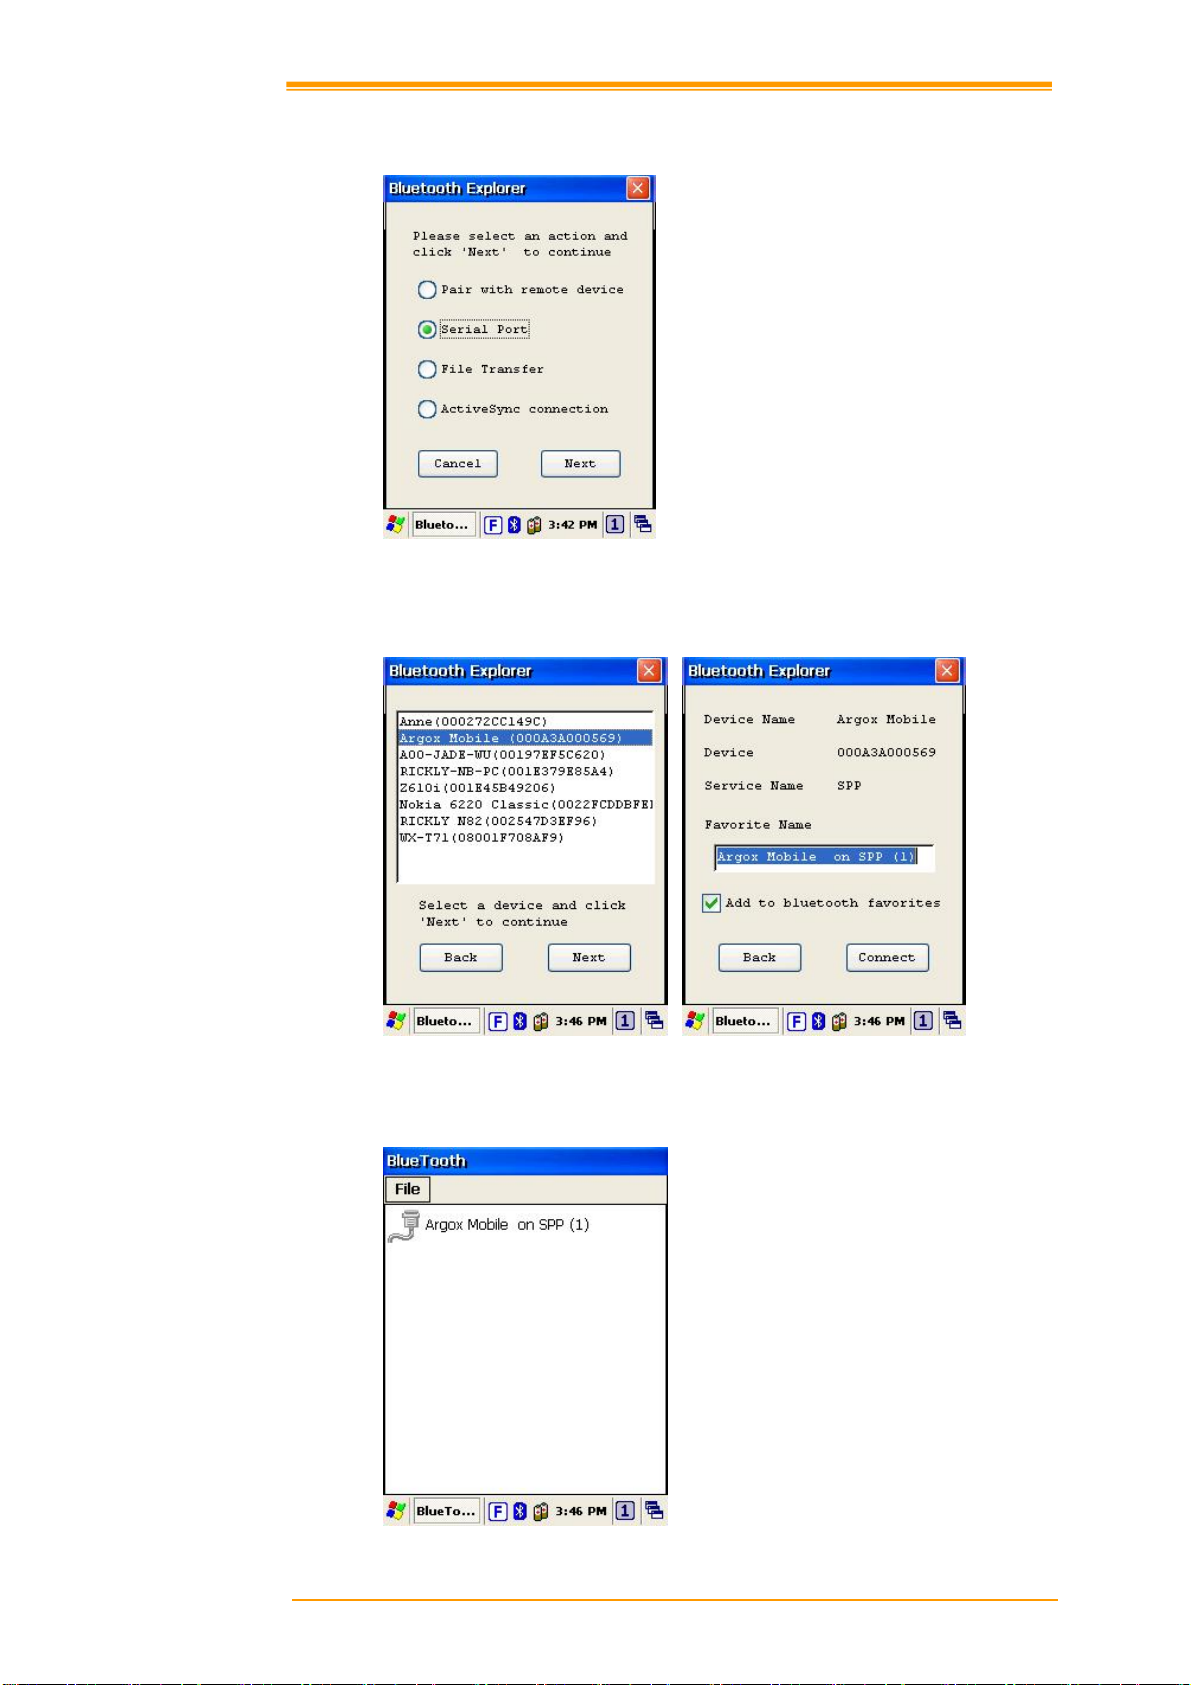
7. 第二个连接方式为串口通讯,可以像使用普通串口一样地进行数据传输,如
图
3-23
蓝牙浏览器
8. 选择下一步, PT-90 就会开始搜索装置,如图 3-24.
图
3-23.
Figure 3-24
蓝牙串口通讯
9. 按下 连接, 就会出现串行端口配置文件(SPP)的连接,如
图
3-25
蓝牙串口通讯
图
3-25.
User’s Manual 30
Page 35
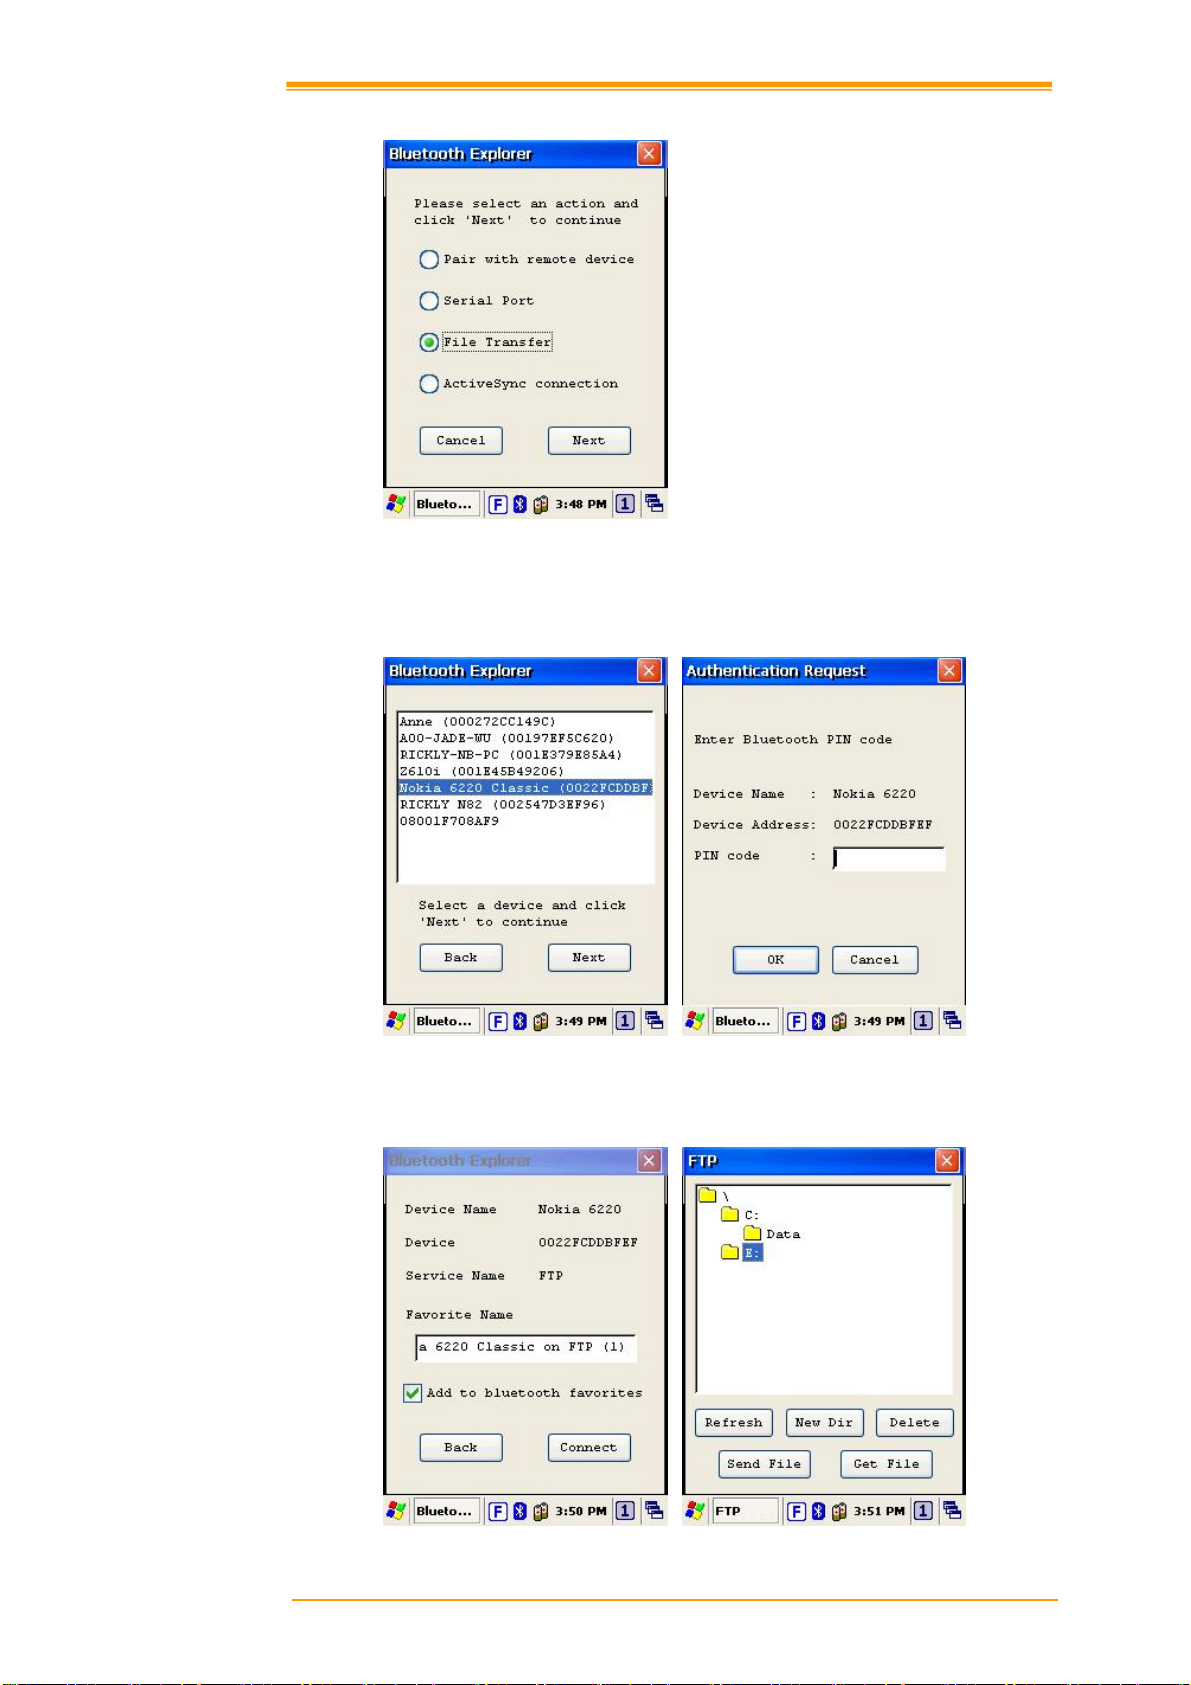
10. 第三个连接方式为文件传输如
图
3-26
图
3-26
蓝牙浏览器
11. 按下一步,开始搜索装置,选择要配对的装置需输入蓝牙识别码(PIN code)才能成
3-27
。
功进行配对,如图
图
3-27
蓝牙文件传输
-1
12. 校对识别码之后,成功完成连接,PT-90 会进入文件传输协议(FTP)模式,如
图
3-28
蓝牙文件传输
-2
图
3-28.
User’s Manual 31
Page 36
13. 在蓝牙管理器中, 会增加一个 FTP 连接如
图
3-29.
图
3-29
蓝牙文件传输
-3
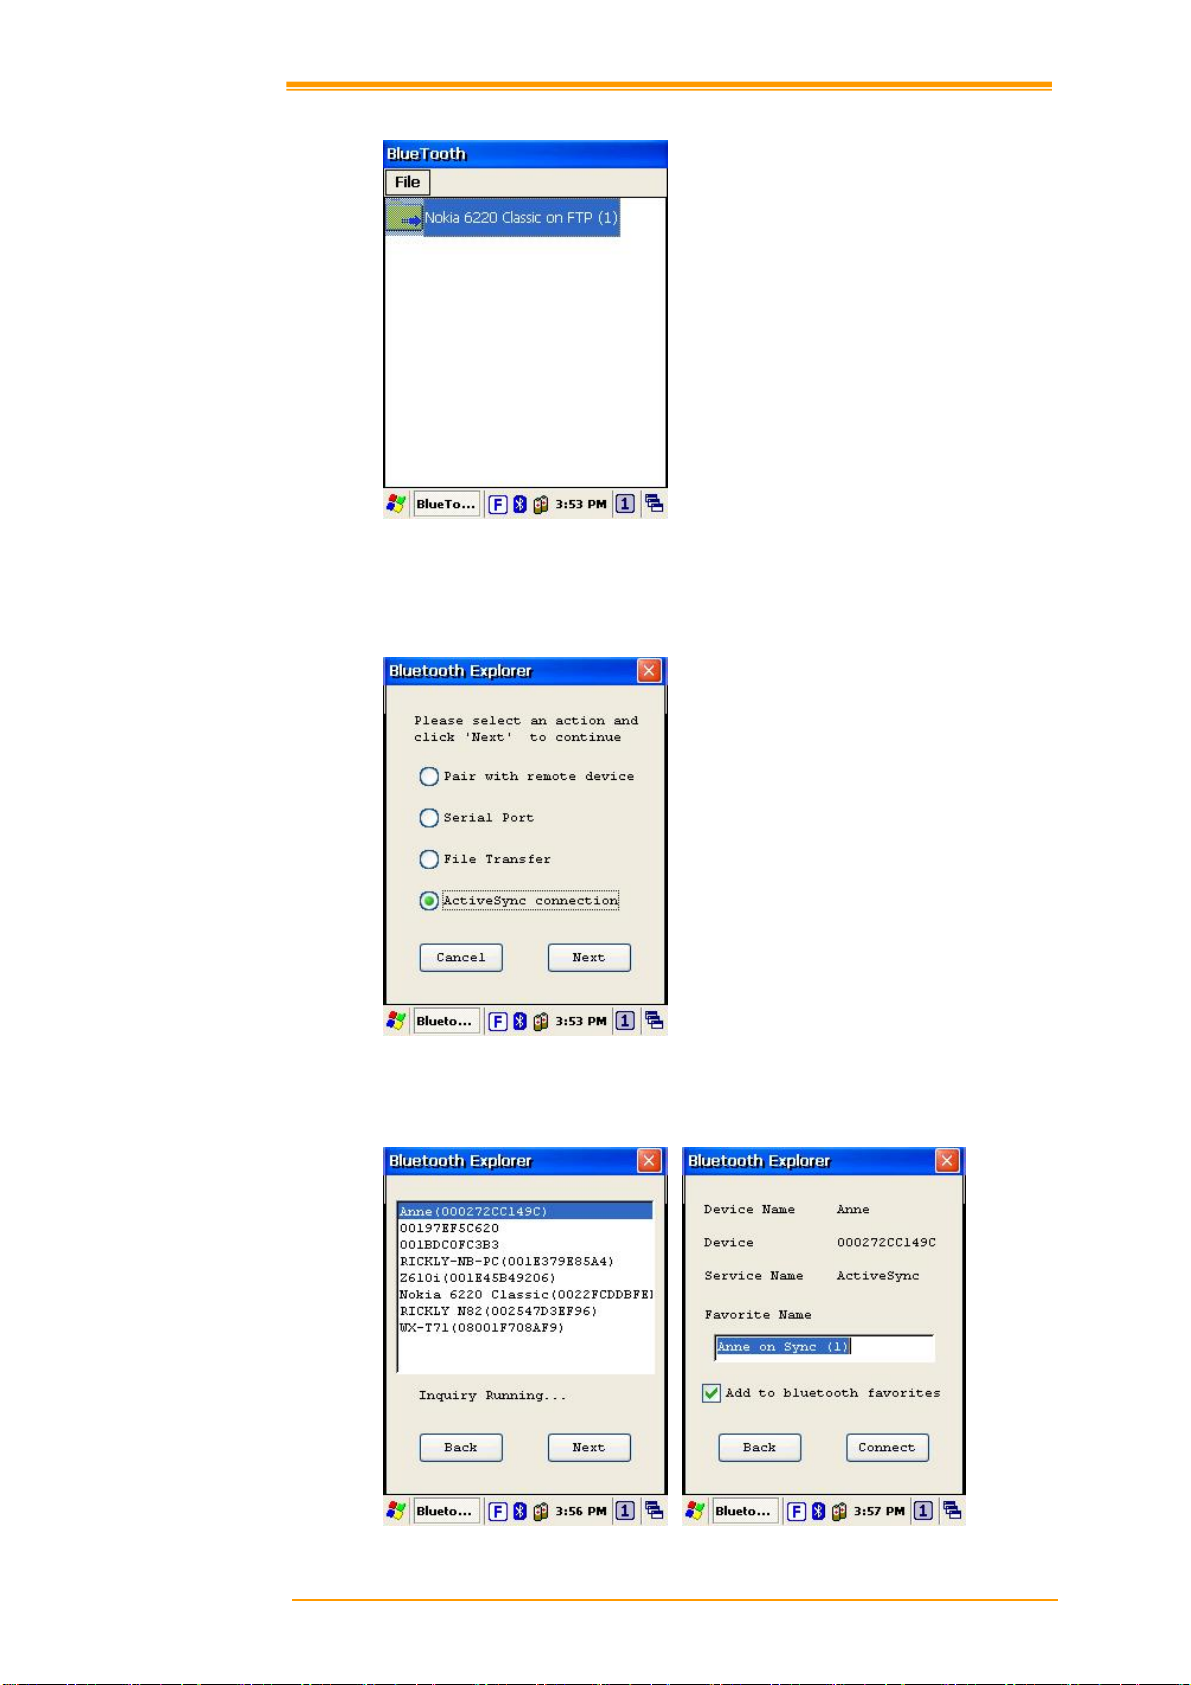
最后一个连接方式为 ActiveSync连接,. 为透过 ActiveSync 和电脑端进行通讯连
图
接,如
3-30.
图
3-30
蓝牙浏览器
14. 按下一步,开始搜索装置,如
图
3-31 蓝牙 ActiveSync
图
3-31.
User’s Manual 32
Page 37

15. PT-90蓝牙管理器会新增一个 ActiveSync连接,其将于电脑进行同步作业,如 图
3-32
.
图
3-32 蓝牙 ActiveSync
User’s Manual 33
Page 38

3.10 WLAN 无限设置
1. 启动 WLAN 设置, 弹出式窗口会出现在屏幕上,
图
3-33
图
3-33 WLAN设置
2. 如果上面的弹出式窗口没有出现,请双击屏幕上的无线 图标。
3. 选择欲连接的连线名称并且按下连接或直接双击连线名称。
图
以 BU01-WPA 为例; 按下连接后会出项属性视窗 (
3-34). 然后用户可以在该窗口
中设置无线加密(wireless Encryption)。
图
3-34
无线属性
完成设置后,按 OK 来取得跟无线 AP 的连接(无线应用服务器必须在连线之前设
置完成)。. 无线连接就可以成功连接使用。
4. 无线图标
图标 描述
无连线状态
信号强度
User’s Manual 34
Page 39

4. 扫描功能
PT-90 内置激光扫描头可以读取各类条码种类。扫描按键在 PT-90 的正中间,两侧也有
扫描键可以驱动扫描功能。
4.1 扫描设置
当面对不同的应用有需要变更预设的条码种类时,可以透过扫描设置来变更条码种类,
界定个扫描数据的分隔符,然后保存设置。
执行 桌面→ Utility→ Scan Configuration.exe 或是 开始→ 设置→ 控制面板→ 扫描设置.
图
4-1
扫描设置
-1
图
4-2
扫描设置
-2
User’s Manual 35
Page 40

图
4-3
扫描设置
-3
当您完成设置,按下 OK 确认,或恢复预设 来回到扫描出厂的预设设置。
4.2 扫描驱动
扫描驱动可以认您在 Microsoft Wordpad写字板中显示扫描数据. 开启扫描驱动以及手持
移动数据终端的扫描功能,然后读取条码。点击任务栏的扫描图标离开,关闭扫描功
能。.
图
4-4
扫描驱动
User’s Manual 36
Page 41

4.3 扫描测试
PT-90 有一个 Scan Test.exe 程序来测试条码扫描功能。Scan Test.exe 路径在桌面→
Utility→ Scan Test.exe.
此应用程序会在按下扫描键,读取条码后显示条码种类及数据。
图
4-5
扫描测试
4.4 读取条码
注意:
将手持移动数据终端对准目标条码的正中央,并使激光扫描所发射的光束适当大于条码
宽度,以获得最佳的条码读取效果,如下图扫描位置指示:
♦ 遵守各项操作注意事项。
♦ 确认手持移动数据终端有依照说明正确安装使用。
♦ 手持移动数据终端开机状态下不要移除主电池或备用电池,否则会
造成数据丢失。
♦ 不要直视扫描装置的 LED光束,或将其对他人眼睛照射
成功读取的扫描位置
不正确读取的扫描位置
User’s Manual 37
Page 42

扫描顺序是根据用户应用程序的定义规范。一般的扫描作业程序为:
将手持移动数据终端瞄准条码并且按下
将 LED 光束以上述正确的扫描位置对准条码。
成功扫描读取数据后,数据或显示在屏幕上。
“成功读取”意谓扫描模块可以有效地识别并解码条码数据。一般情况下,应用程序会设
定成功读取的识别信号。
如果无法正确读取,请遵照扫描指示说明重新再试一次。
当读取宽度较小或精度较高的条码时,请缩短手持移动数据终端与条码之间的距离。对
于宽度较大或精度较低条码,则必须将距离拉远,使 LED 光束可以完全覆盖条码。
键。
4.5 条码读取问题排解
当条码无法正常读取时,请尝试下面做法:
改变条码和手持移动数据终端之间的角度
改变条码和手持移动数据终端之间的距离
如果条码长度款过于 LED 光束,请移动手持数据终端里条码距离稍远一些
User’s Manual 38
Page 43

5. 实用工具
5.1 功能键设置
可以将您常用的应用程序或虚拟键定义为热键,F1 ~ F10 及 P1~P4. Function Key.exe
路径在桌面→ Utility→ Function_Key.exe.
1. 从清单上选择 F1~F10 或 P1~P4 。
2. 点击 定义 来定义应用程序或虚拟键。
3. 点击 应用 或 OK 确认功能键设定。t
4. 点击 预设 来恢复原始设定。
图
图
5-1
5-2
功能键设置
功能键定义
User’s Manual 39
Page 44
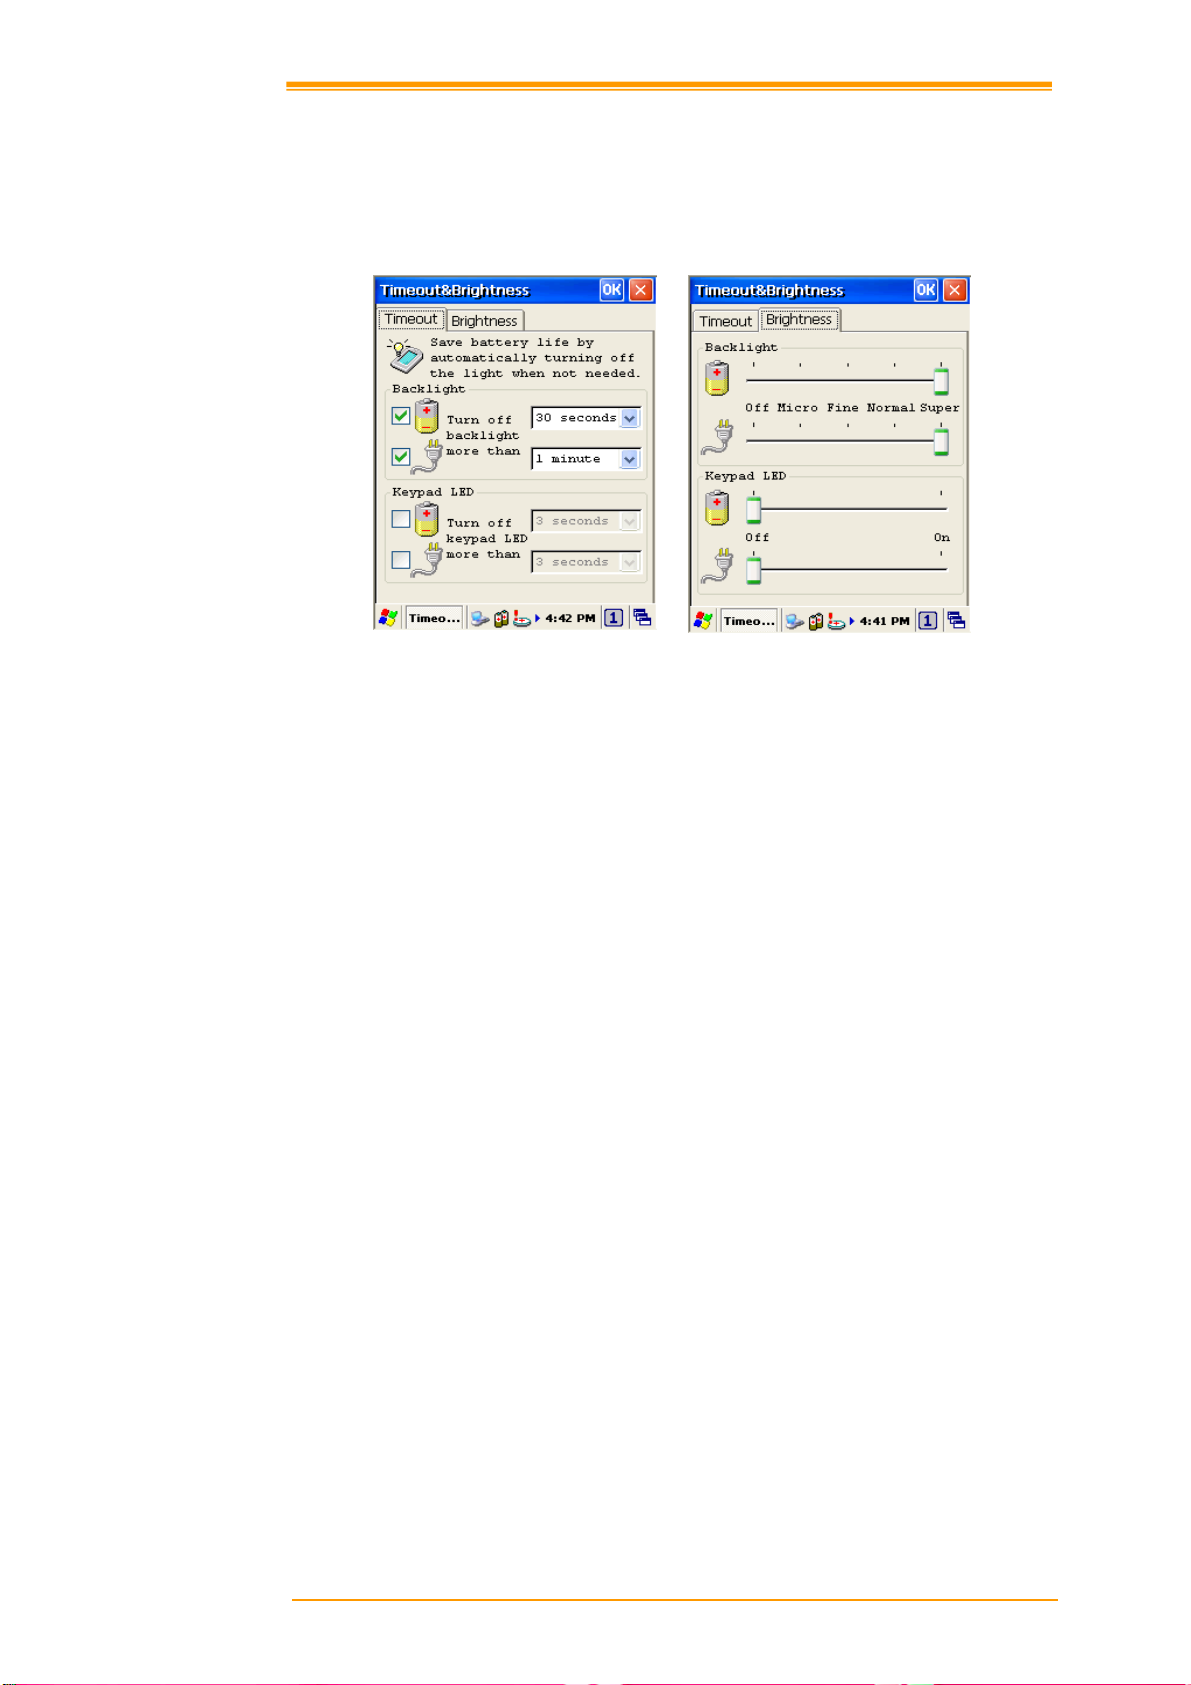
5.2 延迟时间 & 亮度设置
延迟时间&亮度设置是用来改变 LCD 屏幕背光以及键盘背光。如果您想要节省电耗可
以透过此程序来设置在电池以及外部电源状态下的 LCD 屏幕背光以及键盘背光。
图
5-3
延迟时间 &亮度设置
User’s Manual 40
Page 45
6. 应用工具
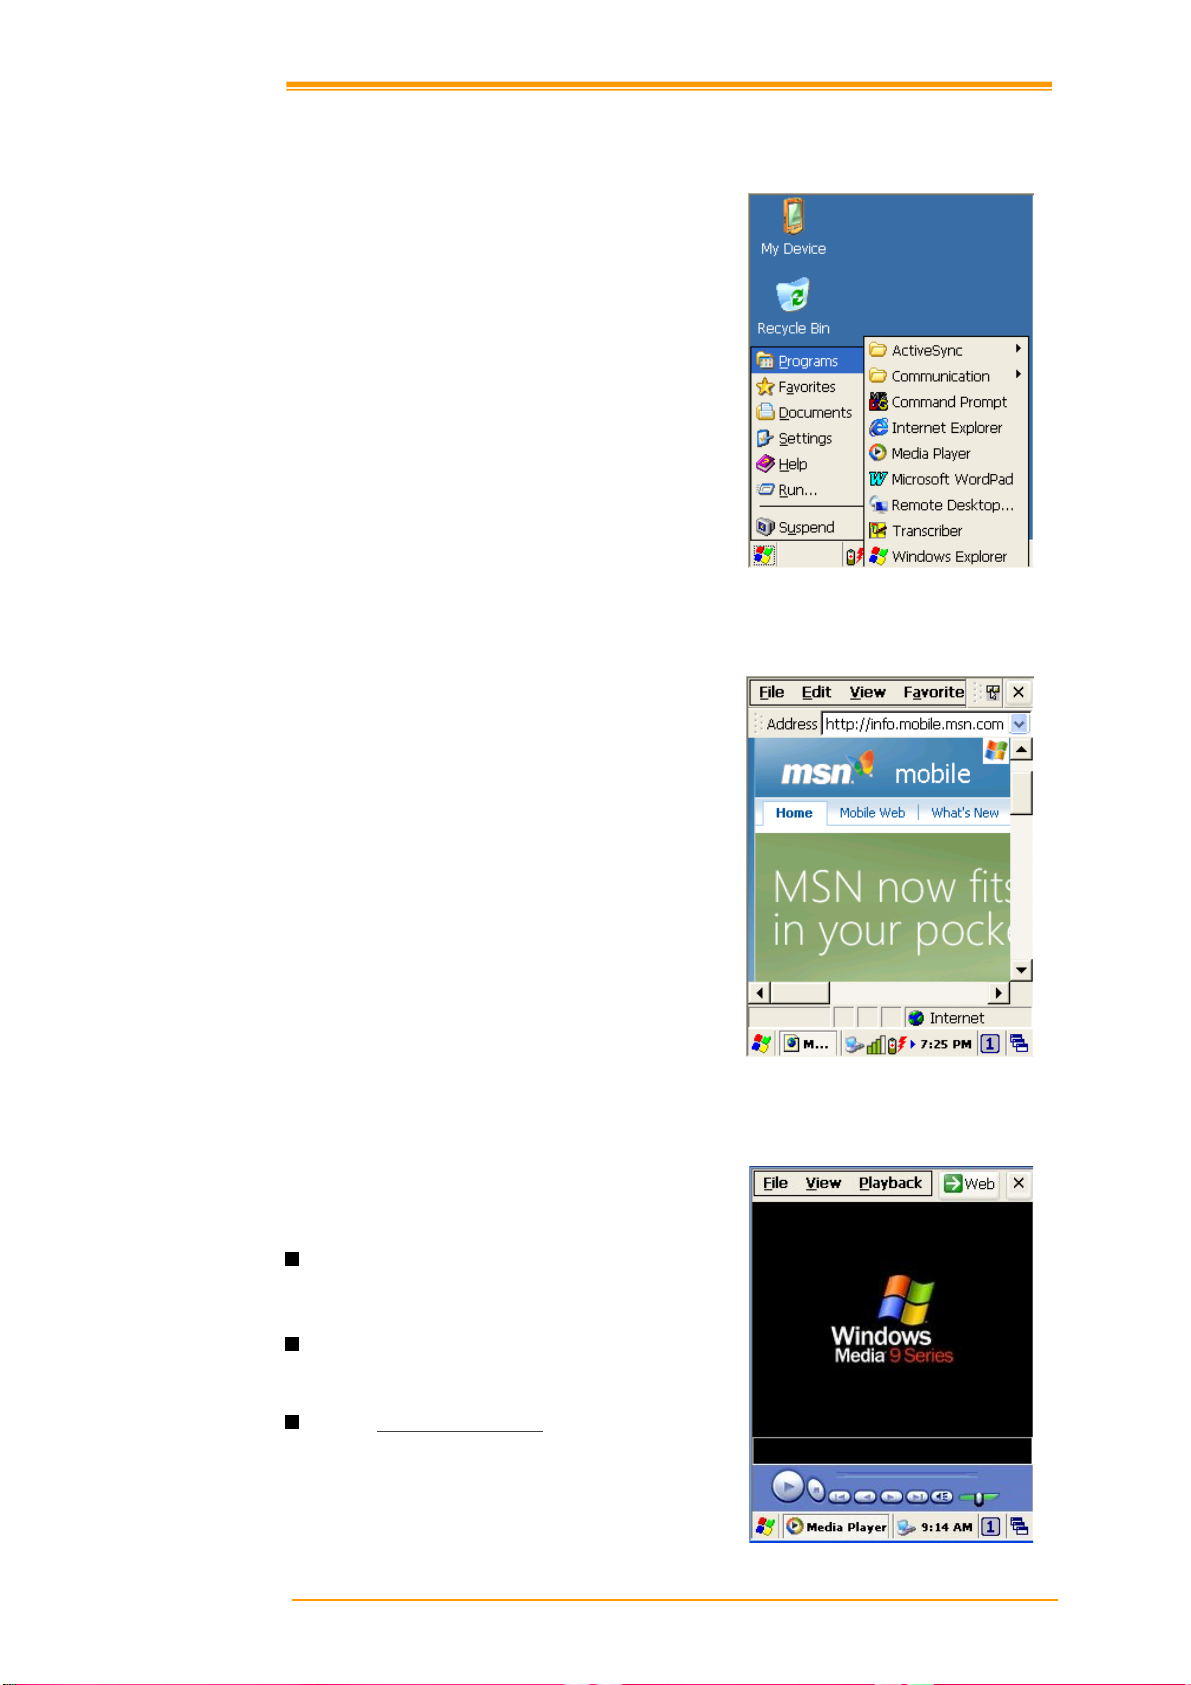
PT-90 包含的应用工具有 Internet Explorer
浏览器, Media player, Microsoft WordPad
写字板, 远端桌面联机, Transcriber 手写识
别以及档案总管。
6.1 Internet Explorer 浏览器
Figure 6-1 Software Applications
Internet Explorer 可以在设备上浏览网页。
您必须设定 WLAN 以连接上网络。
6.2 Media Player
PT-90 自带 Windows CE 所支持的 Media
Player。
从桌面 开始 → 程序 → Media Player f
打开 Media Player。
选择 文件 → 打开 来开启一个新的多
媒体档案。
请参考www.microsoft.com以取得进一
步的资讯或帮助。
图
6-2 Internet Explorer
User’s Manual 41
图
6-3 Media Player
Page 46
6.3 Microsoft WordPad 写字板
您可以跟在标准视窗作业中使用 Microsoft
Word 一样,在写字板中新建或编辑文件
或范例。可以以一般模式或大纲模式进行
作业。
WordPad 文件以 .pwd 档名储存,但您也
可以以其他副档名储存.rtf 或 .doc。
图
6-4 Microsoft Wordpad
6.4 远程桌面联机
远程桌面联机可以允许登录远端的
Windows Mobile computer Server 并使用该
Sever 上的所有应用程序。例如执行
Microsoft Pocket Word, 或是执行 Microsoft
Word。
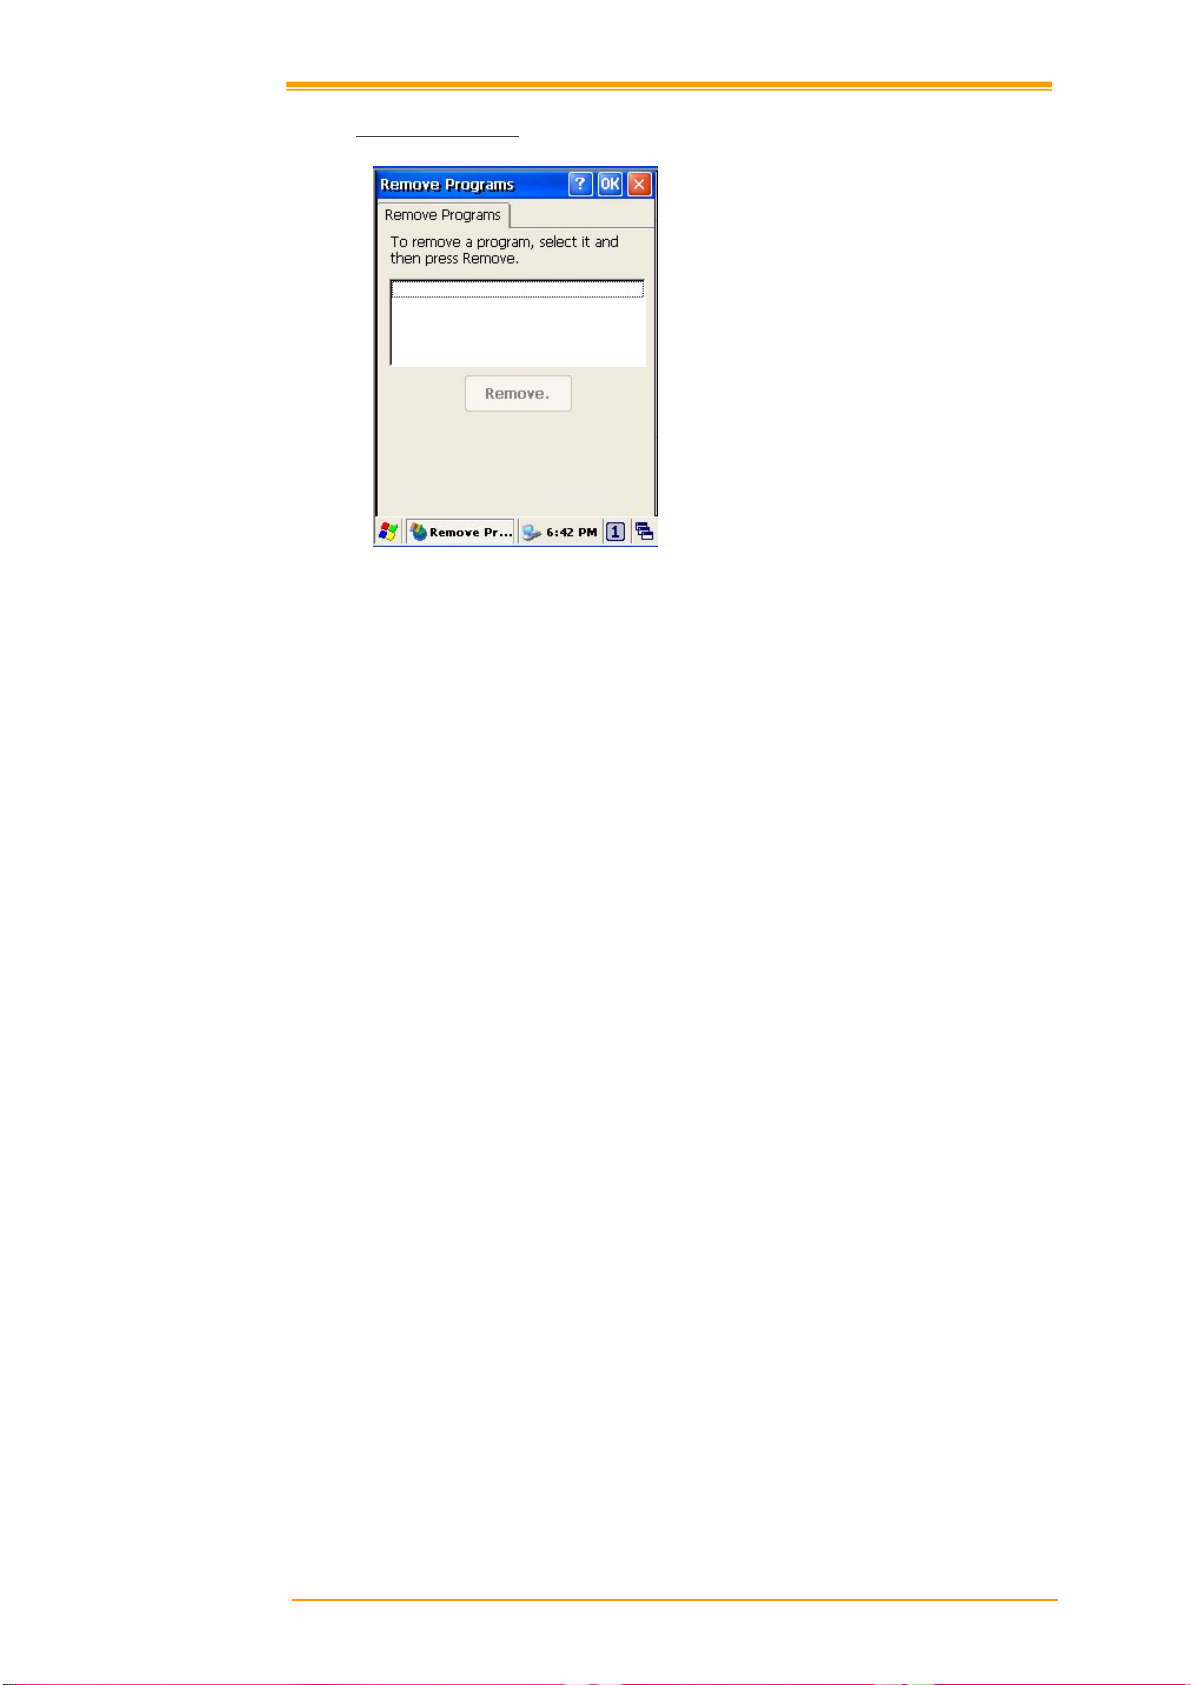
6.5 Transcriber 手写识别
特色:
Microsoft 手写识别是 Windows CE 装
置中的手写识别解决方案,可以识别
人工手写的草写体、印刷体和混合体
等。
字母形式选择器(letter Shapes
Selector )可以最佳化识别手写字体
Transcriber 手写识别在所有的
Windows CE 应用程序中都是以背景
工作的方式存在,因此并不会占用屏
幕空间。
Figure 6-5 Remote Desktop Connection
图
6-6 Transcriber
手写识别
User’s Manual 42
Page 47

6.6 Windows 档案总管
Windows 档案总管如同个人电脑中的功能
一样,显示及管理管理 PT-90 的档案和数
据夹,包括内建的内存与储存卡。
图 6-7 Windows
档案总管
User’s Manual 43
Page 48

7. 通讯
Argox PT-90可以透过串口或 USB 接口的数据线或基座与电脑进行通讯连接。本章将介
绍 PT-90 的通讯能力。
7.1 Microsoft ActiveSync
如果您的个人电脑使用 Windows XP 或 Windows 2000作业系统,可以下载并安装
Microsoft ActiveSync 来使电脑跟 PT-90 进行同步连接。下列的作业系统都可以使用
ActiveSync:
Windows 2000 Service Pack 4(SP4)
Windows XP SP1
Windows XP SP2
Windows XP SP3
ActiveSync 提供相当便利的界面并且可以从 Microsoft 网站上免费下载取得。
透过 Microsoft ActiveSync 可以:
在 PT-90 及电脑之间进行资料传输
有限的备份/复原功能.
安装 /反安装 PT-90 上的应用程序
注意: ♦ ActiveSync 只兼容于 Windows XP 或跟早之前的作业系统版本。关于
ActiveSync 的详细介绍请参考 Microsoft 网站。
7.2 Microsoft 移动设备管理中心
如果您的个人电脑使用 Windows Vista 或 Windows 7作业系统,可以下载并安装
Microsoft移动设备管理中心来使电脑跟 PT-90 进行同步连接。下列的作业系统都可以
使用 Microsoft移动设备管理中心:
Windows Vista
Windows 7
Microsoft移动设备管理中心可以从 Microsoft 网站上免费下载取得。
透过 Microsoft移动设备管理中心可以:
在 PT-90 及电脑之间进行资料传输
安装 /反安装 PT-90 上的应用程序.
注意: ♦ Microsoft 移动设备管理中心只兼容于 Windows Vista 和 Windows 7 作业
系统. 关于 Microsoft 移动设备管理中心的详细介绍请参考 Microsoft 网
站。
User’s Manual 44
Page 49

8. 概述 Microsoft Windows CE 6.0
本章节描述 PT-90 的操作系统 Microsoft Windows CE 6.0。
Microsoft Windows CE 6.0的介绍包含:
如何使用 Windows 桌面
如何使用任务栏
如何使用属性设置
8.1 Windows 桌面
当您开启 PT-90,您会看到类似 Windows
XP 的 Window CE 6.0 桌面。桌面包括各
种应用程序及文档的快捷方式以及任务
栏。
图
8-1 Window桌面
桌面包括各种应用程序及文档的快捷方式以及任务栏,包含下列图示说明:
我的设备:
显示 PT-90 的 内部配置以及其所包含的
资料夹及档案。
Figure 8-2
我的设备
User’s Manual 45
Page 50

回收站:
完全删除或者还原数据或资料。回收站暂存从档案总管或桌面所删除的资料、您可以
清空或还原回收站内的档案。
注意: 一旦您清空回收站,就无法还原先前在回收站内的数据或资料。
任务栏
Windows CE 6.0 的任务栏设计相当简洁,下图显示任务栏的主要配置:
图
8-3
任务栏
开始按钮
开始按钮是 PT-90 程序的使用起点。用笔针轻触开始,会带出许多菜单包括程序、我的
最爱、文档、设置、帮助和运行。如果您选择其中一个选项,详细的执行程序将会显示
在画面上。Windows CE 6.0的开始菜单相同与一般电脑中 Windows 的开始菜单。
图
8-4
开始按钮
User’s Manual 46
Page 51

8.2 任务栏
任务栏提供许多资询,包括输入法、电力、网络连线、正在执行程序的状态等。
选择 开始 → 设置 → 任务栏和开始菜单 可以从桌面打开任务栏和开始菜单。在一般设
置中,有 锁定任务栏, 自动隐藏 以及 显示时钟,勾选对应的确认框作为设置.
下面说明任务栏总各个图标的功能:
输入方式:
执行 键盘 或 手写识别, 按
程序 → 手写识别 来执行手写识别。取消输入方式,在此按下
按键并选择所需的输入方式。您也可以透开始 →
按键选择隐藏
输入面板。.
改变输入方式的设置,可以从开始 → 程序 → 输入面板 中选择您所希望的设置选项。
图
8-5
输入面板
手写识别:
When you want to key in characters when making a document or setting, start Transcriber.
Using the stylus to draw characters you want on the input panel, this program recognizes the
characters and transform them into typeface characters. To start the Transcriber, run the
program as the following order: 开始 → 程序 → 手写识别.
The picture below shows how the Transcriber works in keying in characters on Microsoft
Word Pad. When Microsoft Transcriber is running, you will see the
taskbar. When Microsoft Transcriber is active the
User’s Manual 47
icon shows a dark background.
icon located in the
Page 52

图
8-6
手写识别
键盘:
当输入面板的键盘执行时,
图8-7 键盘输入面板
大写/ 小写 切换:
按
键可以切换大小写输入。当设定大写输入时,按键上的文字只会显示大写。
Shift 键也是相同的功能设置。.
图标会显示在任务栏中。
图
8-8
键盘输入面板
-1
状态指示图示:
下表列出任务栏中状态区域显示的图标:
图标 描述
电池电力不足
电池充电中
透过 USB 与 PC 连接
WLAN 尚未连线
WLAN 连线的信号强度
功能键状态
Alt , Ctrl 及 Shift 状态
User’s Manual 48
Page 53

8.3 PT-90 属性设置
您可以在控制面板中针对 PT-90 的各项属性,如日期/时间、网络、显示、音量和声
音、电源、系统等进行设置。
Figure 8-9 Setting up
点击 开始 → 设置 → 控制面板 将出现控制面板的视窗。在菜单中的查看中,您可以选
择 大图标、小图标、详细信息或排列图标。
图
8-10
控制面板
User’s Manual 49
Page 54
8.3.1
证书可以查看设备使用到的各种被授权的证书。
Authorized certificate providers issue certificates that are valid for a specified period.
Windows CE manages several certificate storages.
证书
图
8-11 证书
1. Select Go to Start → Settings → Control Panel.
2. Double click a Certificates to run.
Select certificate storage for browsing or correcting through the storage tap list.
Trusted Authorities: Includes the top quality certificates.
My certificate: This saves the user’s personal certificate to identify the user.
Other Authorities: Middle certificate providers establish chains of reliability.
3. To add certificates or secret keys in the selected storage, press the Import button then
select the way to bring certificates or keys. You can select them from files or a mi cro SD
card.
4. To see details of selected certificates such as extension, expiration date, etc. press the
View button.
5. To delete the selected certificate from storage, press Remove button.
User’s Manual 50
Page 55

8.3.2
设置日期、时间、标准时区。
时间/日期
You can set standard time zone, year, day and time. Set as follows:
1. Press the down arrow in the standard time zone until it reaches your location. If the
2. Select Year and Month in the calendar. If the current year is not correct, press Year and
3. Press the correct date on the calendar.
4. Set time by keying in correct time in the current time box. The box shows AM/PM:
5. Press Apply to save the changes. Confirm if the time is correct.
日期/时间
Figure 8-12 Date/Time
previously set value is appropriate, move on to the following.
adjust. You can select the month using left and right arrows or the monthly tab that pops
up when pressed.
Hour: Minutes: Seconds. Press each and adjust time with arrows on the right.
User’s Manual 51
Page 56

8.3.3
Dialing Properties
1. In the When dialing from list, select the Location where you want to change settings.
2. To create a new location, select New. Enter the name of the location, and then select OK
3. Enter or Edit the area code and local country code as needed.
正在拨号
Figure 8-13 Dialing Properties -1
Figure 8-14 Dialing Properties -2
4. In Dial using, select Tone dialing or Pulse dialing. Most phone lines are tone.
5. To automatically disable call waiting, select Disable call waiting by dialing, select the
appropriate number sequence in the list, or enter a new sequence.
Editing dialing patterns
1. Using the codes listed, revise the dialing patterns as needed.
Notes:
User’s Manual 52
♦ If you need to use characters other than the ones listed here, use manual dialing.
♦ Hyphens and spaces in dialing strings are ignored.
♦ Some modems may not respond to the some characters, even though your device
lets you add them to the dial string.
Page 57

8.3.4
This screen lets you set the wallpaper image of the PT-90, or change the color of the
background screen. Call up the right button menu from desktop and select Properties and you
can check the Display Properties window.
Display
Change the desktop image of the background screen as follows:
1. Select the Background tab.
2. Click Browse to select an image file.
3. Press OK to apply the setting.
显示
Figure 8-15 Display Properties
User’s Manual 53
Page 58

8.3.5 Hot Function Key
Please refer to Function Key Setting above.
8.3.6 Input Panel
You can set up the Input method and Options.
Figure 8-16 Input Panel Properties
1. Select keyboard and press Options. The Soft Keyboard Options window appears.
2. Select the Size of the keys.
3. To Use gestures for Space, Backspace, Shift and Enter, click the gestures check box.
4. Click OK to save the changes of Soft Keyboard Options.
5. Click OK to save the setting of Input Panel Properties.
User’s Manual 54
Page 59

8.3.7 Internet Options
To use the Internet Options, make the following settings.
General
Click the General tab.
1. Define your own start page and search page on the tab.
2. It also can set the cache size.
3. Click Delete Browsing History button, it can clear temporary internet files, cookies or
history.
Figure 8-17 Internet Options -1
Connection
Click the Connection tab and set Internet connection methods.
1. To use a proxy server, click Internet Connection by Proxy Server check box and enter
the proxy address and port.
2. To ignore the proxy server when making access to local address, click No proxy server
for local address check box. This option is availab le only for the proxy server use. If you
use a wireless LAN card, click the LAN User manual dial check box.
Figure 8-18 Internet Options -2
User’s Manual 55
Page 60

Security
Under Security page, specify the security option for your browser.
Figure 8-19 Internet Options-3
Privacy
Under Privacy page, specify the cookies setting include of privacy level.
Figure 8-20 Internet Options-4
8.3.8 Keyboard
Repeat Tab
1. To change the amount of time between taps before repetition starts, adjust the Repeat
delay slider
2. To change the repeat rate, adjust the Repeat rate slider.
3. Test your new setting.
4. Tap OK to exit the Keyboard properties.
Figure 8-21 Keyboard Properties
User’s Manual 56
Page 61

8.3.9 Mouse
1. Double-click the checkerboard grid at a comfortable speed.
2. Double-click the Test icon to test your setting.
3. Tap OK to exit the Mouse properties.
Figure 8-22 Mouse Properties
8.3.10 Network and Dial-up Connection
You can directly link to the network via network (Ethernet, LAN) or phone (modern)
connection. You can send or receive emails or access available files on the network server
or search the Internet or Intranet.
Figure 8-23 Network and Dial-UP Connection
User’s Manual 57
Page 62

8.3.11 Owner
This function lets you set the PT-90 to display user information at start up, add information on
the user, and set up a Network ID.
Figure 8-24 Owner Properties
Identification
Enter information such as Name, Company, Address, company phone number, home
phone number in the user information tab. To display the owner information on the start
screen for system start, click the Display Owner Identification check box.
Notes
Enter additional user information or other information in the Notes box. To show notes on the
initial screen when the system starts, click Display Owner Notes check box.
Network ID
Windows CE 6.0 gains access to Network resources using the owner information. Enter the
information provided by Network manager such as User Name, Password, and Domain.
User’s Manual 58
Page 63

8.3.12 Password
You can set a password to keep unauthorized users from using the PT-90.
Figure 8-25 Password Properties
To set up a password:
1. Select the Password Setting tab.
2. Enter the password in the password box.
3. Re-enter the password in the password confirmation box.
4. To enable the password protection when the power on, click on the Enable password
protection at power-on.
You may encounter a request to enter the password if resume or warm/cold boot PT-90. If you
forget the password and enter the system you may have to do a clean boot. A clean boot erases
all files, data, as well as programs. Please consider using a password that is easy to remember
and leave a record easy to access. To deactivate a Password, delete the Password in the
password feature window.
User’s Manual 59
Page 64

8.3.13 PC Connection
You can set up a PC Connection to synchronize the device with a desktop PC. You can set
desktop USB and serial port connections. The following is the procedure required for changes
in PC Connection.
Begin with Windows CE 6.0. The PT-90 basicall y supports the Internet functions via USB. If
you set up a partnership with PC during ActiveSync, it provides `USB CONNECT link items
that enable an Internet connection through the USB connection:
Figure 8-26 PC Connection
1. Create a new connection in Go to Start → Settings → Network and Dial-up
Connections. Choose the direct connection as connection type. For detailed information,
refer to the < Network and Dial-up Connections > section. (
Page 57)
2. Select Go to Start → Settings → Control Panel → PC connection.
3. Select Change Connection icon.
4. Select the connection mode.
5. Click OK to save the setting.
To connect the PT-90 to a desktop PC, you must have Microsoft ActiveSync 4.5 for Windows
2000/XP or Microsoft Mobile Device Center 6.1 for Windows Vista/7 on your desktop PC.
User’s Manual 60
Page 65

8.3.14
请参考前面章节中关于电力管理的介绍。 (
电源选项
第
21
页
)
8.3.15 Regional Settings
Figure 8-27 Regional Setting Properties
You can set up region, numbers, currency, time, and date.
1. Select Go to Start → Settings → Control Panel.
2. Open Regional Settings icon.
3. Select the tab for information to change.
4. Select the < Preferred> option. Available features are dependent on which region you
have chosen in the region tab.(REMOVE)
User’s Manual 61
Page 66
8.3.16 Remove Programs
Figure 8-28 Remove Programs
To remove installed programs:
1. Select Go to Start → Settings → Control Panel.
2. Open the Remove Programs icon.
3. Select the program and click Remove to uninstall program.
4. Click Remove.
User’s Manual 62
Page 67

8.3.17 Scan Configuration
Please refer to the previous section on Scan Configuration.
8.3.18 Storage Manager
The storage manager lets you manage storage device. DSK1: NAND FLASH only allows the
users to check the store information. DSK2 shall be SD memory card. The storage manager
allow SD memory card to format, dismount or make new partition.
Figure 8-29 Storage Properties
1. Select the SD memory card form the storage information dropdown list.
2. To format the partitions of the selected disk, click Dismount button and then click
Format button.
3. After clicking the Create New button, key in the new partition names. The system
automatically creates new partitions to set up.
4. To delete a partition, select a partition and press the Delete button.
5. To see the features of the selected partitions, click the Properties icon.
Caution:
Formatting a disk erases all data, files, and programs.
If you insert extension Micro SD memory cards, Micro SD memory shows
as “SD Memory Card”.
User’s Manual 63
Page 68

8.3.19 Stylus
This screen sets Double-Tap sensitivity and calibration.
Figure 8-30 Stylus Properties
Double Tap
To set and test Double-Tap sensitivity:
1. Select Go to Start → Settings → Control Panel.
2. Activate the Stylus and select Double-Tap. Tap the grid and the color of the grid changes.
3. It automatically records the speed of the Double-Tap.
4. Double tap the bottom icon to test the double-tap sensitivity.
5. If the bottom icon does not change, adjust the setting using the grid icon above.
Calibration
If the PT-90 screen does not respond properly, adjust the screen with the calibration function.
To start Calibration:
1. Select Go to Start → Settings → Control Panel.
2. Activate the Stylus and select Calibration tap.
3. Press Recalibrate button and the adjustment process begins.
Caution:
User’s Manual 64
Sometimes touching the screen with the stylus triggers the right mouse function.
You can solve this problem by adjusting the double touch sensitivity.
Page 69

8.3.20 System
The System Properties window displays device information such as General, Memory,
Device Name and Copyrights.
General information contained in the window includes operating system data such as software
version, processor and memory etc.
Figure 8-31 System Properties
The memory of the PT-90 is used for storage and programs. Basic memory capacity is 256MB.
You can see the size of the memory cache used for running programs or storing data.
To check the Memory:
1. Select Go to Start → Settings → Control Panel.
2. Run the System and select the Memory tab.
3. The blue bar of the slider indicates the available memory capacity.
4. Left side is storage memory and the right is program memory.
The device name indicates the PT-90’s partnership relation when linked to the desktop
through ActiveSync.
To set up Device Name:
1. Select Go to Start → Settings → Control Panel.
2. Run the System and select the name of the device.
3. Enter the name of the device and its details.
User’s Manual 65
Page 70

8.3.21
The System Information properties window displays system information such as Info and
Clean boot.
Info page contained in the window includes operating system data such as CPU, ROM, RAM,
serial number (SN), hardware number (HW) and versi o n details.
Clean boot page allow users to clean registry and format user partition.
系统资讯
图
8-32
系统资讯
8.3.22
请参考先前 5.2 延迟时间和亮度的章节。.
8.3.23
Adjust volume and select sound.
Volume
To adjust the Volume of the system:
1. Select Go to Start → Settings → Control Panel.
2. Open Volume & Sounds icon and select the Volume tab.
3. Press the left / right arrow icon or move the slide bar to adjust a volume.
4. Click all items to activate the sound such as Events (warning, system events),
延迟时间和亮度
音量和声音
Applications, Notifications (alarms,reminders) , Key clicks and Screen taps.
User’s Manual 66
Page 71

Sounds
To set the Sounds:
1. Select go to Start → Settings → Control Panel.
2. Open Volume & Sounds icon and select Sounds tab.
3. Select an Event from the event list.
4. Select a sound from the event sound list.
5. To remove the sound from the selected event, choose (None).
6. To save the changes in another scheme, select Save As in another name and name the
sound scheme.
7. To remove the sound scheme, select the scheme and then Delete.
图
8-33 音量 & 声音
User’s Manual 67
Page 72

9. 故障排除
此章节说明当您在使用手持移动数据终端或基座遇到问题时该如何进行基本的故障排
除。
9.1 一般性问题
确认所有的安装正确
确认所有设备的电源供应状况 (包括主电池或备用电池)
手持终端的扫描读取视窗是否保持清洁?
手持移动数据终端传输接口是否有正确连接数据线?
条码是否可以正常读取? 如没有污损或无法判读?
如果问题在上述基本确认之后仍然存在,请确认下述的问题描述状况是否可以解决问
题,如果问题还是没办法解决的话,请联系您的经销商或 Argox 寻求技术支持:
http://www.argox.com/cn
如果 PT-90 手持移动数据终端需要维修,请确认序列号标签没有被撕毁或破坏。如需要
将 PT-90 返回经销商或 Argox 处进行维修,请务必使用原本的包装以降低运送过程中可
能发生的损坏。
9.2 条码读取操作问题
如果手持移动数据终端无法正常读取条码
条码读取问题
♦ 确认扫描应用程序有正确地安装且操作
♦ 执行扫描设置 修改条码读取设置
♦ 条码污损或无效,请换一个条码测试
♦ 电池需要充电或更换
9.3 手持数据终端问题
手持数据终端无法开机
♦ 电池需要充电或更换.
♦ 确认电池有正确安装.
手持数据终自动关机
♦ 调整 电源属性
♦ 电池需要充电或更换.
.
User’s Manual 68
Page 73

手持数据终端无法关机
♦ 如果手持终端在透过数据线进行资料传输,请确认电池未被耗尽。
♦ 如果手持终端正与外部电源连接,请断开连接。
♦ 执行热开机 – 警告 – 未储存的资料将会遗失。.
♦ 执行冷开机 – 警告 – 未储存的资料将会遗失.
♦ 执行清洁启动 – 警告 – 手持终端将恢复出厂预设值且未储存的资料将会遗失
萤幕空白
♦ 请确认手持数据终端已开机
♦ 调整萤幕亮度.
手持终端作业没有会应,或触碰屏输入回应不正确
♦ 重新校准屏幕
♦ 执行热开机 – 警告 – 未储存的资料将会遗失。.
♦ 执行冷开机 – 警告 – 未储存的资料将会遗失.
♦ 执行清洁启动 – 警告 – 手持终端将恢复出厂预设值且未储存的资料将会遗失
电池使用寿命减短
♦ 调整 电源属性 特别在其他功能还在使用的情况下
♦ 调整 LCD 或键盘的背光设置
♦ 更换新的电池 (电池一般寿面约 500 次充电.)
“
电池电力低” 讯息
♦ 请将手持终端充电至少 8 个小时
User’s Manual 69
Page 74

10. 附录: 透过 Micro SD 卡更新作业系统
透过 Micro SD 卡要升级或重新安装 PT-90 作业系统,您需要 CE600.bin 以及
90Utility.cab 这两个档案 (请联系 Argox Technical Support):
注意: 档名必须为 “CE600.bin”和 “90Utility.cab”– 不要更改命名。.
警告: 所有用户资料将被移除!
1. 将“CE600.bin”和“90Utility.cab”从 PC 复制到 Micro SD 卡的根目录下
2. 将 Micro SD 卡装上 PT-90
3. 将 PT-90 接上外部电源
4. 冷开机并且按热键 (FN+Dot.)进行更新
5. 按下 ENT 开始更新.
6. 更新过程约需 5~10分钟.
当完成更新后,PT-90 会自动以新的作业系统再次开机。
User’s Manual 70
 Loading...