

Page 1

Argox Bartender 10.0 UL Form-making User Guide
1
Argox Bartender 10.0 UL
Form-making User Guide
V2.02
2013/02/27
The contents of this manual are based on
BarTender 10.0 2863 and Seagull Driver 7.3.2_M-1
Page 2

Argox Bartender 10.0 UL Form-making User Guide
2
Table of Contents
1 What is the Form-making label file? .................................................................. 3
2 The Purpose of the Form-making label file ........................................................ 3
3 Supported Versions ............................................................................................ 3
4 Supported Languages......................................................................................... 4
5 Form-making conversion for BarTender ............................................................ 4
5.1 Argox ArgoKee/Printer (SRAM)............................................................ 4
5.2 Argox ArgoKee/Printer (FLASH)........................................................... 5
5.3 Argox READER (FLASH)..................................................................... 5
6 Downloading the Form-making label file........................................................... 6
6.1 Installing the driver ................................................................................ 6
6.2 Set baud rate .......................................................................................... 7
6.3 Create label and select output printer...................................................... 8
6.4 Download Form-making label file.......................................................... 9
6.4.1 Downloading to ArgoKee ........................................................... 9
6.4.2 Download to printer.................................................................. 12
7 Using the Form-making label file..................................................................... 12
7.1 Using ArgoKee to input data ................................................................ 12
7.2 Using PS/2 keyboard to enter the data. ................................................. 13
7.3 Using a scanner to input data................................................................ 13
8 Data variables in Form-making........................................................................ 14
8.1 TT/TD variable (Time/Date variable) ................................................... 14
8.2 V variable ............................................................................................ 21
8.3 Reference............................................................................................. 27
Page 3
Argox Bartender 10.0 UL Form-making User Guide
3
1 What is the Form-making label file?
The Form-making data format starts with the FS command, followed by a string
inside closed quotation marks “ ” for the form name and ends with the FE
command. Anything between FS and FE is the label content. An example of a
complete Form-making label file (i.e. the Form name is “EXPORT”) is provided
below:
ZN
FK"EXPORT"
FS"EXPORT"
I8,1,001
q1215
O
JF
ZT
Q900,37
KI81
N
FE
2 The Purpose of the Form-making label file
The label file can be stored in ArgoKee or the printer. The input data devices for
different storage devices are as follows:
2.1 ArgoKee
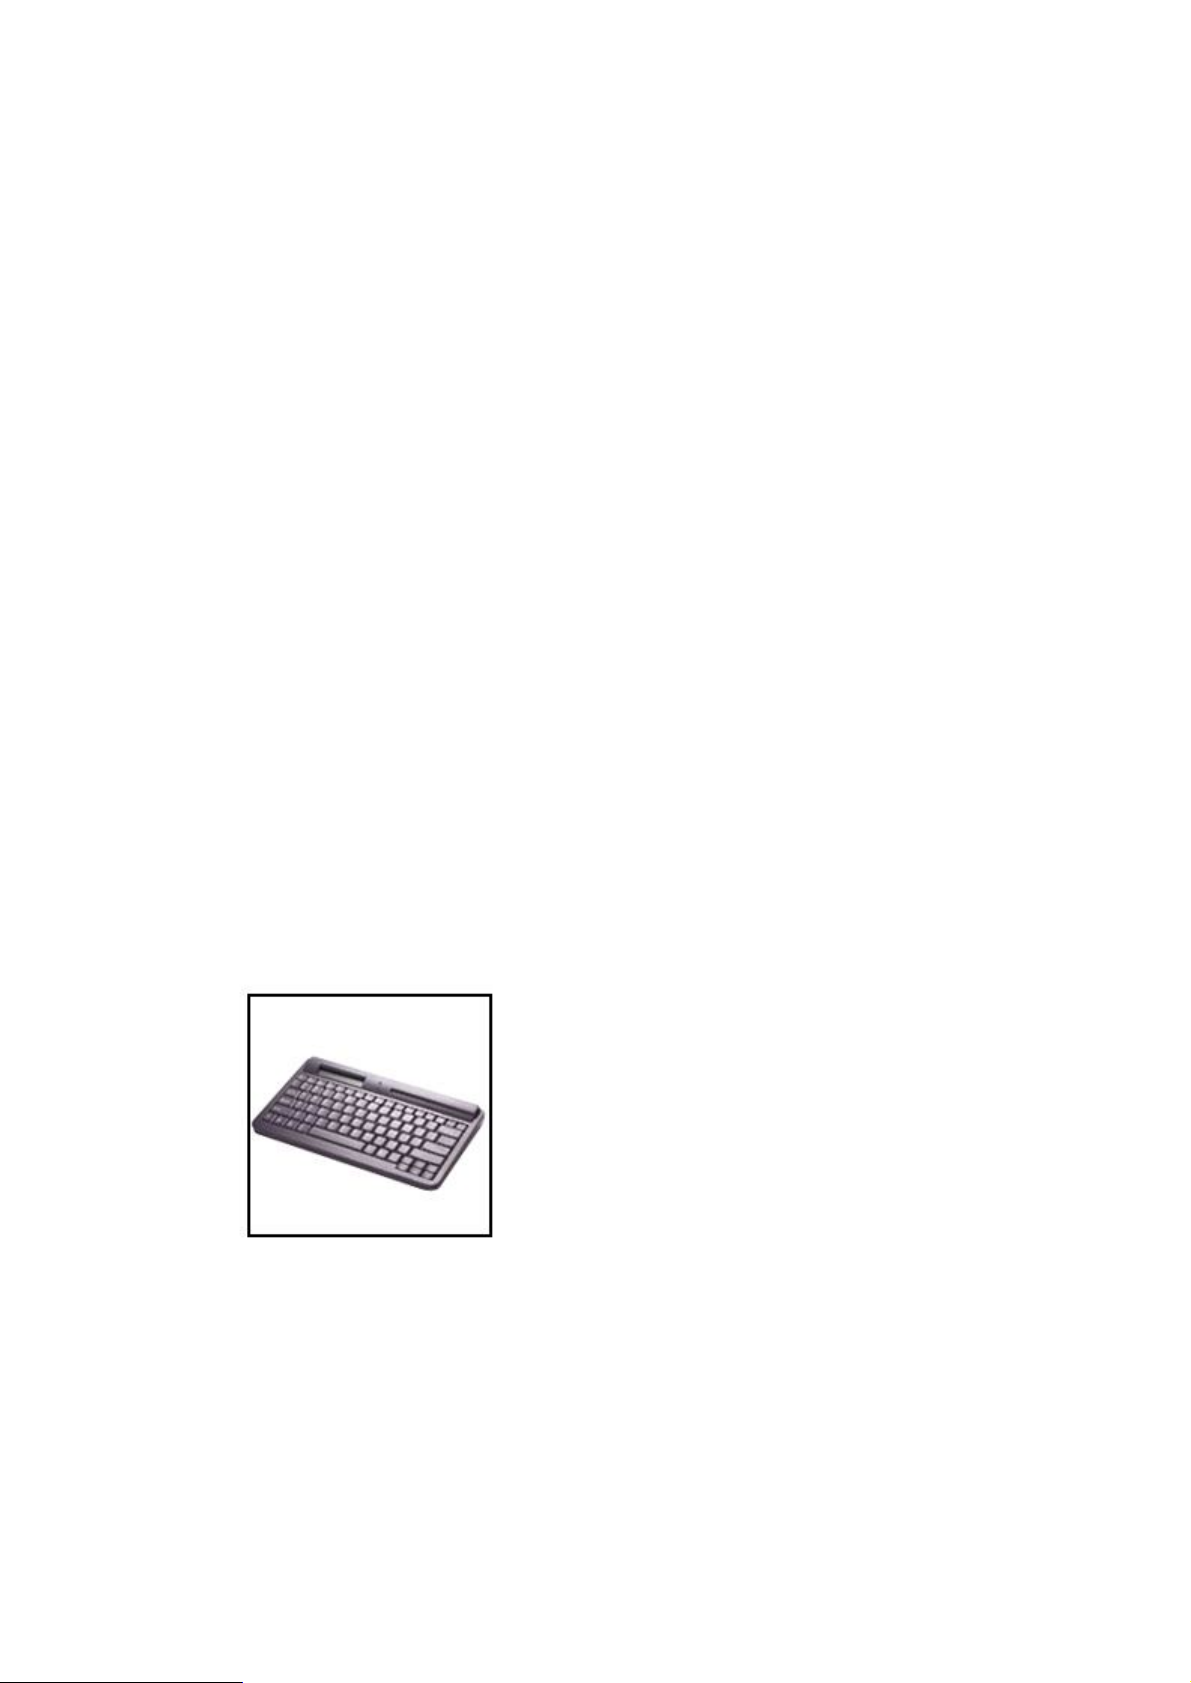
The device shown in the illustration below can be used for data input.
2.2 Printer
A PS/2 keyboard or scanner must be used as the data input device. A PC can also
be used to send commands directly to the printer for printing Form-making label
files.
3 Supported Versions
BarTender 9.30 2731 or later versions
Seagull Driver 7.2_M-1 or later versions
Page 4

Argox Bartender 10.0 UL Form-making User Guide
4
Attention: Make sure both devices software are the latest versions. If there an
error occurs during the data conversion, check the software versions first.
Attention: The different BarTender version may be the user interface will make
changes, please note the version number and use the corresponding help file.
4 Supported Languages
Currently, it is only supported PPLB. The Seagull Driver for PPLB must be used
for data conversion.
5 Form-making conversion for BarTender
Since the Form-making data format is different from the original emulation, it
must be converted using a different method/path. The converted path is “File ->
Export Printer Code Template”.
The three conversion methods currently offered by BarTender are “Argox
ArgoKee/Printer (SRAM)”, “Argox ArgoKee/Printer (FLASH)”, and
“Argox READER (FLASH)”.
A description and comparison of these methods will be provided below.
For example, the Argox X-3200 PPLB will be used below to create a 4 X 3 inch
blank label for data conversion, and :
5.1 Argox ArgoKee/Printer (SRAM)
5.1.1 Purpose
To be used with ArgoKee and printers.
5.1.2 Comparison
The data saved to ArgoKee will always be stored to FLASH. On the
other hand, the data saved to the printer will always be stored to RAM.
And those data saved in printers will therefore disappear when power is
lost.
Page 5

Argox Bartender 10.0 UL Form-making User Guide
5
5.1.3 Data conversion
ZN
FK"EXPORT"
FS"EXPORT"
I8,1,001
q1215
O
JF
ZT
Q900,37
KI81
N
FE
5.2 Argox ArgoKee/Printer (FLASH)
5.2.1 Purpose
To be used with ArgoKee and printers.
5.2.2 Comparison
Both data are stored to FLASH, so data will not disappear when power
is lost.
5.2.3 Data conversion
ZS
FK"EXPORT"
FS"EXPORT"
I8,1,001
q1215
O
JF
ZT
Q900,37
KI81
N
FE
ZN
5.3 Argox READER (FLASH)
5.3.1 Purpose
To be used with ArgoKee and printers.
5.3.2 Comparison
Both data are stored to FLASH. The difference the two devices, the
Page 6

Argox Bartender 10.0 UL Form-making User Guide
6
Form name for the “Argox ArgoKee/Printer (FLASH)” is always
“READER” with all capital letters. This option is mainly intended for a
scanner usage as the data input device. For this reason, it has one extra
command compared to “Argox ArgoKee/Printer (FLASH)”: “PA1,1”.
The command means print one copy only. If it is saved to ArgoKee, the
user will not be prompted to enter the number of copies after entering
the data. One copy will be printed directly.
5.3.3 Data conversion
ZS
FK"READER"
FS"READER"
I8,1,001
q1215
O
JF
ZT
Q900,37
KI81
N
PA1,1
FE
ZN
6 Downloading the Form-making label file
For example, the Argox X-3200 PPLB will be used below to create a 4 X 3 inch
blank label.
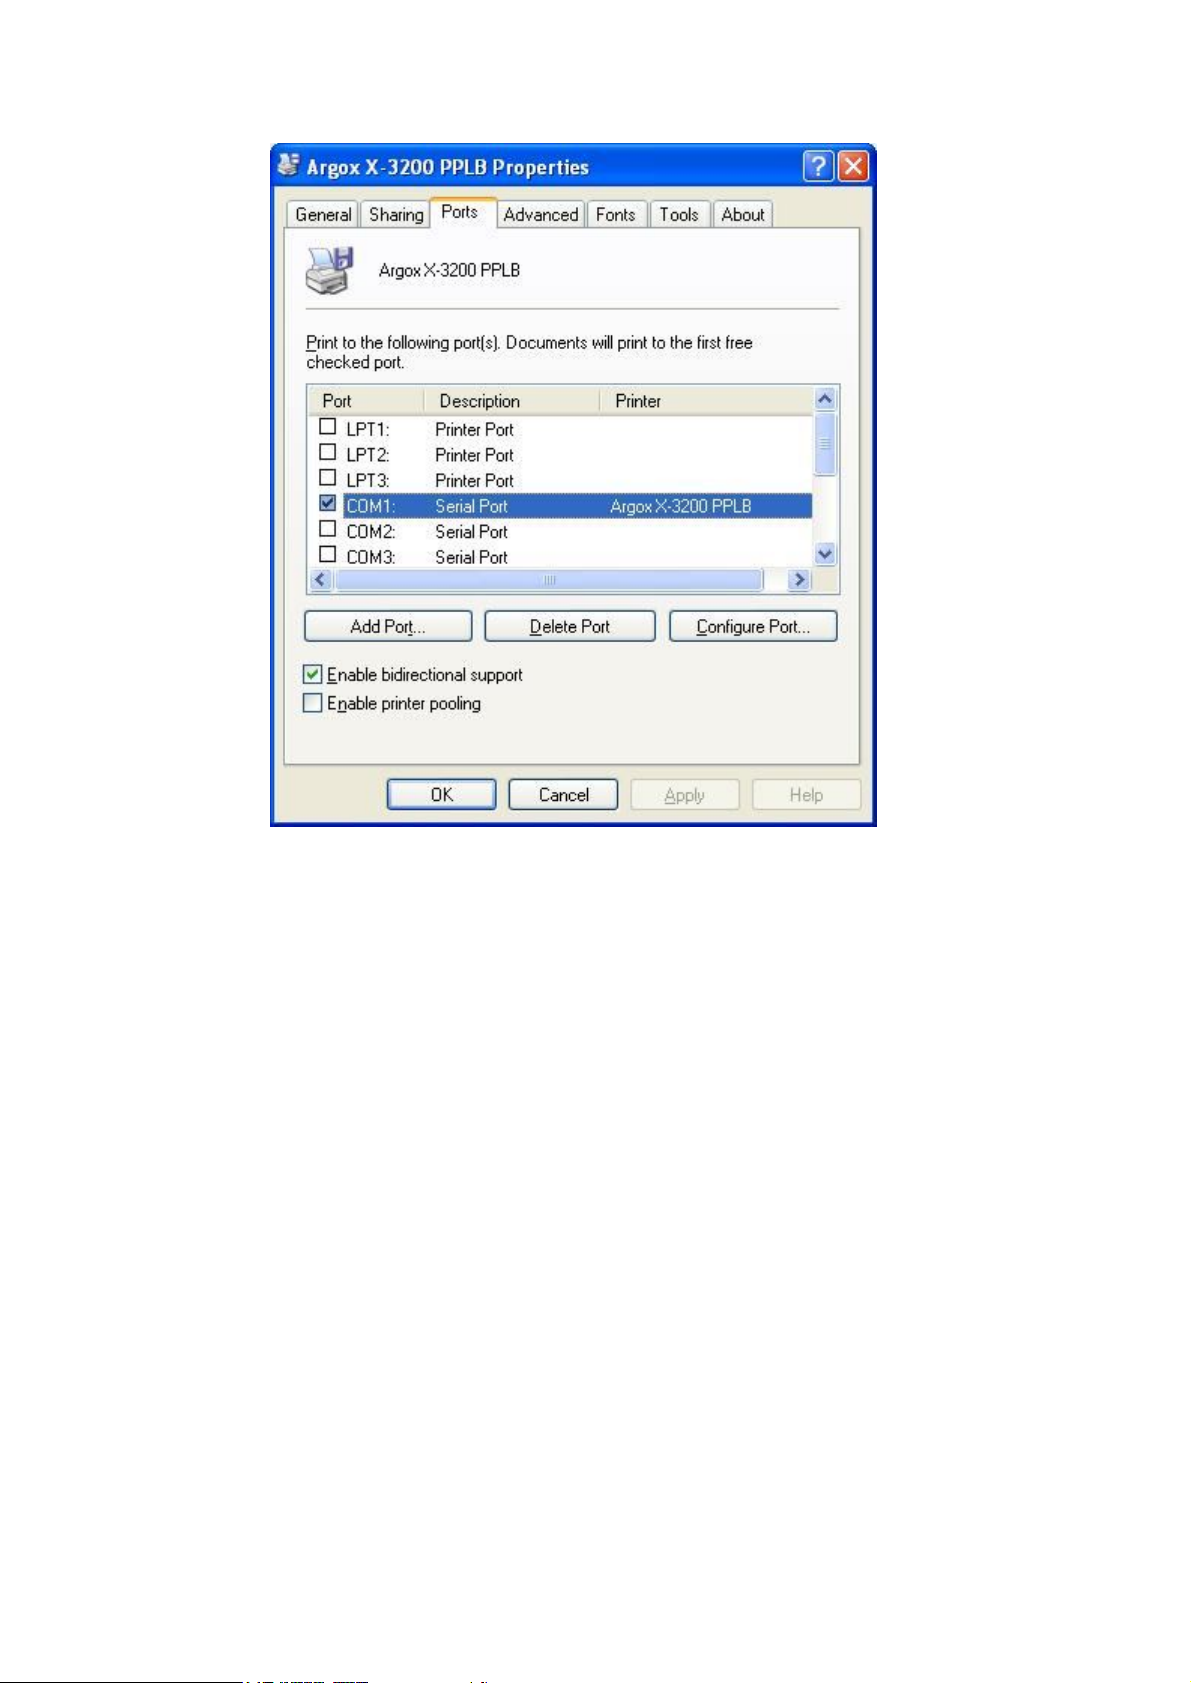
6.1 Installing the driver
Use the Seagull Driver to install the driver for Argox X-3200 PPLB. Set the
“Ports” as “COM1” and the printer details should be as shown below.
Page 7
Argox Bartender 10.0 UL Form-making User Guide
7
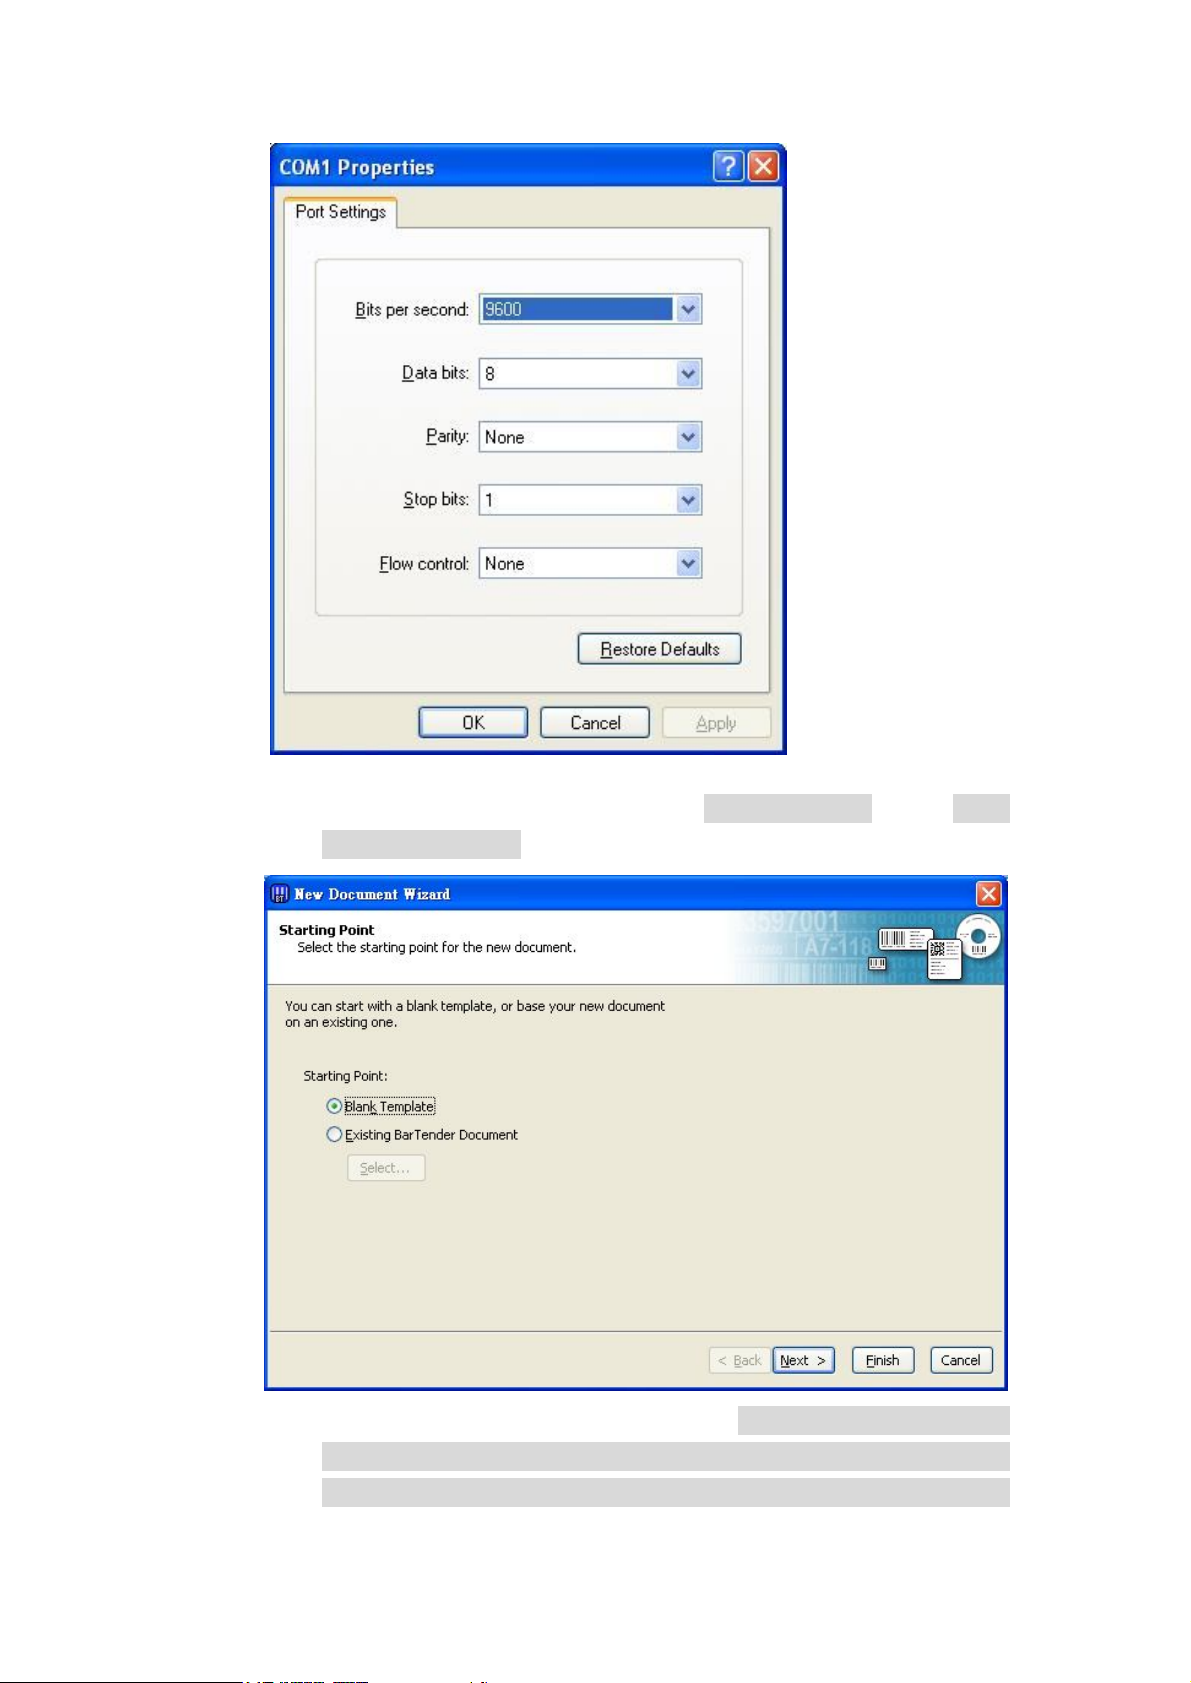
6.2 Set baud rate
The default baud rate for the printer and ArgoKee's COM Port is 9600, so
the COM Port for the PC, printer and ArgoKee should be set to the value
shown below. The illustration shows the three default settings and if one of
the settings is changed, the other two settings must be changed as well for a
proper connection. Details are beyond the scope of this manual.
Page 8
Argox Bartender 10.0 UL Form-making User Guide
8
6.3 Create label and select output printer
6.3.1 After launching BarTender, select “File -> New”. The “New
Document Wizard” window appears on the screen.
6.3.2 Follow the wizard's instructions to select “Starting Point -> Printer
Selection -> Stock Selection -> Items Per Page -> Side Edges ->
Printed Item Shape -> Printed Item Size -> Template Background
Page 9

Argox Bartender 10.0 UL Form-making User Guide
9
-> Finished!”. After completing the installation, select Argox X-3200
PPLB for creating a 4 X 3 inch blank label as shown below.
6.4 Download Form-making label file
The methods for downloading to ArgoKee and the printer mentioned in
section 2 are described below:
6.4.1 Downloading to ArgoKee
6.4.1.1 First, check that the transmission setting between the PC and
ArgoKee compatible with each other, then connect both COM
Port with the data cable. Next, press the "D" key on the ArgoKee
to enable data receive mode. The LCD on ArgoKee will now
show the message “LOADING FORM … (HOST ==>
K/BOARD)”.
6.4.1.2 Use the blank label file created in section 6.3 or another file that
has been prepared earlier, then select “File -> Print”. A window
will pop up as shown below. At the “Print -> Name” window,
select the “Argox X-3200 PPLB” printer, and then click
“Close”.
Page 10

Argox Bartender 10.0 UL Form-making User Guide
10
6.4.1.3 Under “File -> Export Printer Code Template”, run “Argox
ArgoKee/Printer (SRAM)” or ”Argox ArgoKee/Printer
(FLASH)”. The “Export Printer Code Template” window will
appear as shown below.
6.4.1.4 Select “More Options” and the following window appears on
the screen. The system defaults for “Template Fields” are:
Page 11

Argox Bartender 10.0 UL Form-making User Guide
11
“Format ID/Name” : “Type” => “Set By Driver”.
“Copies” and “Serial Numbers” : “Type” => “Set by Print
Dialog”.
Attention: To customize the Form name, at “Format ID/Name
-> Type”, select “Constant”, then enter the required name in
“Name/Value”.
After competed settings, click “OK”. Finally, click “Export”.
6.4.1.5 If the download is successful, ArgoKee's LCD will exit the
“LOADING FORM … (HOST ==> K/BOARD)” mode.
Otherwise, it will remain in the same mode.
Page 12

Argox Bartender 10.0 UL Form-making User Guide
12
6.4.1.6 During the above downloading process, if the system default was
used, then the Form name will be “EXPORT”. To verify if the
Form-making has been successfully loaded, press the “P” key on
ArgoKee to enter print mode. ArgoKee's LCD will display
“FORM SELECTION:”. Press the “Up/Down” keys to look for
the newly downloaded Form-making. If it exists, it means the
downloading process was successful.
6.4.2 Download to printer
6.4.2.1 First, make sure that the PC and the printer are both using the
right transmission settings, then connect both COM Port with the
data cable. Turn on the printer, then wait for the message
“READY (300,PPLB)” to appear on the printer's LCD.
6.4.2.2 Follow the steps in section 6.4.1.2.
6.4.2.3 Under “File -> Export Printer Code Template”, select “Argox
ArgoKee/Printer (FLASH)” or “Argox READER (FLASH)”.
6.4.2.4 Follow the steps in section 6.4.1.4.
6.4.2.5 The printer LCD will not show any messages if the download
was successful. There are several another methods to verify the
downloading status. Example: Sending a command to the printer,
or plugging in a PS/2 keyboard then checking via the printer
LCD.
6.4.2.6 During the above downloading process, if the system defaults
were used, then “Argox ArgoKee/Printer (FLASH)” will have
the Form name “EXPORT”. “Argox READER (FLASH)” will
have the Form name “READER”.
7 Using the Form-making label file
7.1 Using ArgoKee to input data
7.1.1 If “Argox ArgoKee/Printer (FLASH)” was used to download a
Form-making to ArgoKee, if the defaults were used, then ArgoKee will
contain a Form named “EXPORT”.
7.1.2 Connect ArgoKee to the printer using the COM Port cable. ArgoKee
now becomes an input device.
7.1.3 At ArgoKee's “S:SET -> EMULATION :”, use the “Up/Down” keys
to toggle the following settings: ”PPLA/PPLB/BASIC”. Switch to
“PPLB”, then press “Enter” to confirm. Now press “<ESC>” to exit
and reboot ArgoKee.
7.1.4 Once ArgoKee reboots, the LCD will display “PPLB MODE
SELECTION: P:PRINT, D:DL, S:SET”. Now, press “P” and the
Page 13

Argox Bartender 10.0 UL Form-making User Guide
13
ArgoKee LCD will display the name of a stored Form. Use the
“Up/Down” keys to browse the forms and press the “Enter” key to run
the selected Form. If data input is needed for Form, then ArgoKee will
enter data input mode. The printer LCD will display the “Prompt
Text”.
7.2 Using PS/2 keyboard to enter the data.
7.2.1 If “Argox ArgoKee/Printer (FLASH)” was used to download a
Form-making to the printer, if the defaults were used, then the printer
will contain a Form named “EXPORT”.
7.2.2 First, connect the PS/2 keyboard to the printer, then start the X-3200
PPLB. Wait for few moments, then the printer LCD will show the
message “READY (300,PPLB) <ESC> FOR KEYBD”. Press the
“<ESC>” key on the keyboard to enter the data.
7.2.3 The printer LCD will now show the name of a Form stored on the
printer. Use the “Up/Down” keys to browse all the Forms, then click on
the “Enter” key to execute the selected Form. If the Form being
executed requires a data input, the printer will enter data input mode
and display the “Prompt Text” on the LCD. The “Prompt Text” can
be modified in BarTender.
7.2.4 To leave the data input mode, simply disconnect the PS/2 keyboard and
turn off the printer.
7.3 Using a scanner to input data
7.3.1 If “Argox READER (FLASH)” was used to download a
Form-making to the printer, and if the defaults were used, then the
printer will contain a Form named “READER”.
7.3.2 Start the X-3200 PPLB, then in the printer Menu, set the “READER
INSTALLED” setting to “YES”, save, and then reboot.
7.3.3 After printer reboots, it will find a Form named “READER” in Flash
and run it. If the Form requires data input the printer will enter data
input mode and display the “Prompt Text” on the LCD. The “Prompt
Text” can be modified in BarTender.
7.3.4 Now connect the scanner to the printer using a PS/2 cable to allow data
input.
7.3.5 To exit the data input mode, press and hold the “CANCEL/RESET”
button on the printer before turning the printer on. Wait until the printer
LCD shows the string “RESET” before releasing the
“CANCEL/RESET” button. Only then will the printer exit the data
input mode.
Page 14

Argox Bartender 10.0 UL Form-making User Guide
14
8 Data variables in Form-making
The next chapter uses the X-3200 PPLB printer as an example. The following
simple examples will only require converted command data. There is one method
for acquiring the output command data.
The method: Use the “Printer Code Recording” function offered by Seagull
Driver. The path “Start -> Printers and Faxes -> Argox X-3200 PPLB ->
Properties -> Tools -> Logging Options -> Printer Code Recording”. Check
“Record Printer Code”, and then click “OK”. For more information, please
refer to the “Guide to Argox Printer Transmission Information.doc”.
To start before continuing on to the following example, follow the steps outlined
in section 6.4.1.2 to select the Argox X-3200 PPLB printer, create a 4 X 3 inch
blank label, and then convert it using the “Argox ArgoKee/Printer (FLASH)”
method.
8.1 TT/TD variable (Time/Date variable)
8.1.1 Select “Create -> Bar Code”, choose a barcode objects. In this case,
select “Code 39 (Full ASCII)”. Then click anywhere on the label to
create a “Bar Code Object”.
Page 15

Argox Bartender 10.0 UL Form-making User Guide
15
8.1.2 Right-click on the “Bar Code Object”, then in the newly opened
window, clicks “Properties”. The window for modifying the content
of the “Bar Code Object” will now appear.
8.1.2.1 Symbology and Size
Check the “Print Method -> Bar codes and human readable text
controlled by the printer” option. If this option is not available,
then the “TT/TD” variable output is not available.
The barcode type can be changed in the “Symbology” menu.
Page 16

Argox Bartender 10.0 UL Form-making User Guide
16
8.1.2.2 Font
An Argox font must be selected. A wrong selection will result the
“TT/TD” variable cannot be converted.
Page 17

Argox Bartender 10.0 UL Form-making User Guide
17
8.1.2.3 Data Sources
8.1.2.3.1 Data Source
Select “Change Data Source Type” within “Type” to
launch the “Change Data Source Type Wizard” popup
window. Choose “Clock” within “Type” and then click
“Finish”. Check the option “Use Printer’s Clock” on the
next screen otherwise the “TT/TD” variables cannot be
exported.
Page 18

Argox Bartender 10.0 UL Form-making User Guide
18
8.1.2.3.2 Data Type
If want to use the “TT” variable, please select “Time” from
“Type” and then click “Close”.
Page 19

Argox Bartender 10.0 UL Form-making User Guide
19
If want to use the “TD” variable, please select “Date” from
“Type” and then click “Close”.
8.1.2.4 Any other changes can also be set here. When done, click
“Close”.
8.1.3 Run “File -> Export Printer Code Template” to launch the “Export
Printer Code Template” popup window. Choose “Argox
ArgoKee/Printer (FLASH)” from “Print System” as shown below.
Page 20

Argox Bartender 10.0 UL Form-making User Guide
20
8.1.4 Carry out the steps from section 6.4.1.4. As an example, we changed
the Form name to “TIME”, then click “Export”.
8.1.5 Data conversion
8.1.5.1 TT variable
In accordance with “Type -> Time” setting in section 8.1.2.3.2, the
converted data will be:
ZS
FK"TIME"
FS"TIME"
I8,1,001
q1215
O
JF
ZT
Q900,37
KI81
N
TTh/Zm +
B971,663,2,3,4,10,150,B,TT
FE
ZN
8.1.5.2 TD variable
In accordance with “Type -> Date” setting in section 8.1.2.3.2, the
converted data will be:
ZS
FK"TIME"
Page 21

Argox Bartender 10.0 UL Form-making User Guide
21
FS"TIME"
I8,1,001
q1215
O
JF
ZT
Q900,37
KI81
N
TDmn/Odd/Oy2
B971,663,2,3,4,10,150,B,TD
FE
ZN
8.2 V variable
8.2.1 Run “Create -> Bar Code” and select any barcode object. For
example, select “Code 39 (Full ASCII)” and click anywhere on the
label to create a “Bar Code Object”.
8.2.2 Right-click on the “Bar Code Object”, then in the newly opened
window, clicks “Properties”. The window for modifying the content
of the “Bar Code Object” will now appear.
8.2.2.1 Symbology and Size
Page 22

Argox Bartender 10.0 UL Form-making User Guide
22
Check the “Print Method -> Bar codes and human readable text
controlled by the printer” option. If this option is not available,
then the “V/C” variable output is not available.
The barcode type can be changed in the “Symbology” menu.
8.2.2.2 Font
An Argox font must be selected. A wrong selection will result the
“V/C” variable cannot be converted.
8.2.2.3 Data Sources
8.2.2.3.1 Data Source
Select “Change Data Source Type” within “Type” to
launch the “Change Data Source Type Wizard” popup
window. Choose “Printer Code Template Field” within
“Type” and then click “Finish”.
Then in the “Field Name”, enter the desired “Prompt Text”
for ArgoKee or printer as shown below during data input. The
“Prompt Text” is “INPUT”.
8.2.2.3.2 Data Type
Select “Text” within “Type” and then click “Close”. The
“V/C” variables cannot be exported if this option is not
selected.
Page 23

Argox Bartender 10.0 UL Form-making User Guide
23
8.2.2.3.3 Transforms
This page currently supports “Prefix and Suffix” and
“Serialization” only.
8.2.2.3.3.1 Default
Fields are left blank by default, and then the variable
“V” is exported.
8.2.2.3.3.2 Prefix and Suffix
If this option is used, the variable “V” will be
exported. Please enter a custom string if necessary.
As shown below, “A” is set as the “Prefix” and “Z” is
set as the “Suffix”.
Page 24

Argox Bartender 10.0 UL Form-making User Guide
24
8.2.2.3.3.3 Serialization
In this page, the variable “C” can only be exported if
this option is used by itself.
Check “Serialization -> Serialize” otherwise the “C”
variable cannot be exported. Click “OK” when
finished.
Page 25

Argox Bartender 10.0 UL Form-making User Guide
25
8.2.2.4 Any other changes can also be set here. When done, click on
“Close”.
8.2.3 Carry out the steps from section 8.1.3-8.1.4. As an example, we
changed the Form name to “VARIABLE”, then click on “Export”.
8.2.4 Data conversion
8.2.4.1 Default
In accordance with setting in section 8.2.2.3.3.1, the converted data
will be:
ZS
FK"VARIABLE"
FS"VARIABLE"
I8,1,001
q1215
O
JF
ZT
Q900,37
KI81
N
V00,20,N,"INPUT"
Page 26

Argox Bartender 10.0 UL Form-making User Guide
26
B971,663,2,3,4,10,150,B,V00
FE
ZN
8.2.4.2 Add Prefix and Suffix
In accordance with setting in section 8.2.2.3.3.2, the converted data
will be:
ZS
FK"VARIABLE"
FS"VARIABLE"
I8,1,001
q1215
O
JF
ZT
Q900,37
KI81
N
V00,20,N,"INPUT"
B971,663,2,3,4,10,150,B,”A”V00”Z”
FE
ZN
8.2.4.3 Use Serialization
In accordance with setting in section 8.2.2.3.3.3, the converted data
will be:
ZS
FK"VARIABLE"
FS"VARIABLE"
I8,1,001
q1215
O
JF
ZT
Q900,37
KI81
N
ZN
C0,20,N,+1,"INPUT"
B971,663,2,3,4,10,150,B,C0
Page 27

Argox Bartender 10.0 UL Form-making User Guide
27
FE
ZN
8.3 Reference
8.3.1 Carry out the steps from section 8.2.1-8.2.2. In this example, the
“Object Name” of this “Bar Code Object” is “Bar Code 1”.
8.3.2 Run “Create -> Text” and select any text object. For example, select
“Single Line” and click anywhere on the label to create a “Text
Object”.
Page 28

Argox Bartender 10.0 UL Form-making User Guide
28
8.3.3 Right-click on the “Text Object”, then in the newly opened window,
clicks on “Properties”. The window for modifying the content of the
“Text Object” will now appear.
8.3.3.1 Font
An Argox font must be selected. A wrong selection will result the
corresponding variable cannot be converted.
8.3.3.2 Data Sources
8.3.3.2.1 Data Source
Select “Change Data Source Type” within “Type” to
launch the “Change Data Source Type Wizard” popup
window. Choose “Object Value” within “Type” and then
click “Next”.
Page 29

Argox Bartender 10.0 UL Form-making User Guide
29
Select the reference object from “Object Name” and pick the
preconfigured “Bar Code 1”. Choose the correct “Main
Data Source” for “Value” otherwise the corresponding
variables will not be exported.
Page 30

Argox Bartender 10.0 UL Form-making User Guide
30
8.3.3.3 Any other changes can also be set here. When done, click
“Close”.
8.3.4 Carry out the steps from section 8.1.3-8.1.4. As an example, we
changed the Form name to “REFERENCE”, then click “Export”.
8.3.5 Data conversion
ZS
FK"REFERENCE"
FS"REFERENCE"
I8,1,001
q1215
O
JF
ZT
Q900,37
KI81
N
V00,20,N,"INPUT"
B971,663,2,3,4,10,150,B,V00
A971,291,2,3,4,4,N,V00
FE
ZN
 Loading...