

Page 1

16
V 09/16
OPERATING INSTRUCTIONS
Read the instructions carefully before operating the appliance or carrying out maintenance
operations.
Observe all the safety instructions; failure to observe the instructions may lead to accidents and/or
damage. Store these instructions in a safe place for future reference.
CERAMIC ELECTRIC FIREPLACE
EN
Page 2

17
V 09/16
GENERAL SAFETY INFORMATION
Use this fireplace only as described in this manual. Any other use
not recommended by the manufacturer may cause fire, electric
shock or injury to persons.
Ensure that the mains power complies with the electrical requirements
of the fireplace (220-240V~/50Hz).
This appliance can be used by children aged from 8 years and
above and people with reduced physical, sensory or mental
capabilities or lack of experience and knowledge if they have been
given supervision or instruction concerning use of the appliance in a
safe way and understand the hazards involved.
Children shall not play with the appliance.
Cleaning and user maintenance shall not be made by children
without supervision.
This product is not a toy. Children under the age of 3 years must be
kept out of reach unless properly supervised, to ensure that they do
not play with the appliance.
Children aged between 3 and 8 years must only be able to turn the
appliance on/off, provided that the appliance has been placed in its
normal operating position, that instructions have been given on how
to use the equipment safely, and that its risks have been
understood.
Children aged between 3 and 8 years must not be able to plug in,
adjust, clean or perform any maintenance on the appliance.
WARNING: certain parts of this product may become very hot and
cause burns. Special care should be taken when children and
vulnerable people are nearby.
To avoid the risk of accidentally resetting the thermal protection, this
appliance must not be powered through an external switching
device, such as a timer, or connected to a circuit that is switched on
and off by the utility.
WARNING: Do not use the fireplace with a controller or any
other external device that activates the appliance
automatically, as there may be a risk of fire if the fireplace is
covered or incorrectly positioned.
Do not obstruct the air inlet and outlet grilles.
The appliance heats up significantly during operation and may
cause burns. Avoid unprotected contact with the hot surface.
Page 3

18
V 09/16
Keep flammable materials, such as furniture, cushions, blankets,
paper, cloths, curtains and suchlike at least 1 m from the front and
sides.
Disconnect the mains power when the appliance is not in use or
during cleaning.
Do not use the fireplace in dusty environments or in the presence of
flammable vapours (e.g. in workshops or garages).
Do not place anything on the product; do not hang wet garments on
the fireplace.
Use the fireplace in a well-ventilated area.
Avoid placing fingers or foreign objects in the air inlet/outlet grilles,
as this may cause electric shock or fire and may damage the
fireplace.
To prevent the risk of fire, do not block the grilles or tamper with
them in any way while the fireplace is in use.
Do not use the appliance if the power cord or plug are
damaged. Contact a service centre to replace a damaged power
cord, so as to avoid any safety risks.
Do not use the fireplace if it has fallen from a certain height or if it
has been damaged in any way. Contact a service centre to check
the fireplace or make any necessary electrical or mechanical
repairs.
The most common cause of overheating is the build-up of dust in
the appliance. Remove the accumulated dust by pulling out the plug
and cleaning the grilles using a vacuum cleaner.
Do not use any abrasive products to clean the appliance. Clean it
using a damp cloth (not wet) rinsed with soapy water. Remove the
plug from the socket before performing any maintenance.
To disconnect the appliance, set the switch to position 0 and
remove the plug from the socket. Pull on the plug only. Do not pull
on the cord when turning off the fireplace.
Do not place any objects on the cable and avoid bending the latter.
Extension cords are not advisable, as they may overheat and cause
the risk of fire. Never use a single extension cord to operate multiple
appliances.
Do not immerse the power cord, plug or any other part of the
appliance in water or other liquids.
Do not touch the plug with wet hands.
Do not place the fireplace above or near another heat source.
Page 4

19
V 09/16
WARNING: AVOID COVERING THE FIREPLACE TO PREVENT IT
FROM OVERHEATING.
The symbol below signals this warning:
The fireplace may cause the risk of fire if, during operation, it is
covered or comes into contact with flammable material including
curtains, drapery, blankets, etc. KEEP THE FIREPLACE AWAY
FROM THESE MATERIALS.
Do not connect the fireplace to the power supply until it has been
correctly assembled or positioned.
Do not run the cord under carpets. Do not cover the cord with
blankets, carpets or similar materials. Place the cord far away from
busy areas, or in a place where it cannot be pulled out accidentally.
Do not operate the fireplace in close proximity to bathtubs, showers,
sinks or pools.
Do not position the fireplace beneath a power socket.
Do not operate the appliance outdoors.
Upon initial start-up, the fireplace may emit a faint but harmless
smell. This smell is a normal effect of the initial heating up of the
internal heating elements, and should not recur later on.
WARNING:
THE ON/OFF SWITCH IS NOT THE ONLY METHOD OF
DISCONNECTING THE MAINS POWER.
ALWAYS UNPLUG THE APPLIANCE DURING MAINTENANCE
OPERATIONS, TRANSPORT OR WHILE IT IS NOT IN USE.
A fireplace contains parts that generate electrical arcs and sparks. It
must not be used in potentially dangerous areas such as those
subject to the risk of fire or explosion, or areas filled with chemical
substances or humidity.
Do not use the appliance on soft surfaces such as beds, where the
grilles may get covered. Always rest the fireplace on a flat and
stable surface when it is in operation, so as to prevent it from
toppling over. Arrange the cord so that the fireplace or other objects
do not rest on it.
Always unplug the appliance when it is not in use.
Turn the appliance off if unattended, in order to prevent accidents.
In the event of any anomalies (abnormal noise or a strange smell),
turn off the appliance immediately. Do not attempt to repair it but
take it to your local service centre.
Page 5
20
V 09/16
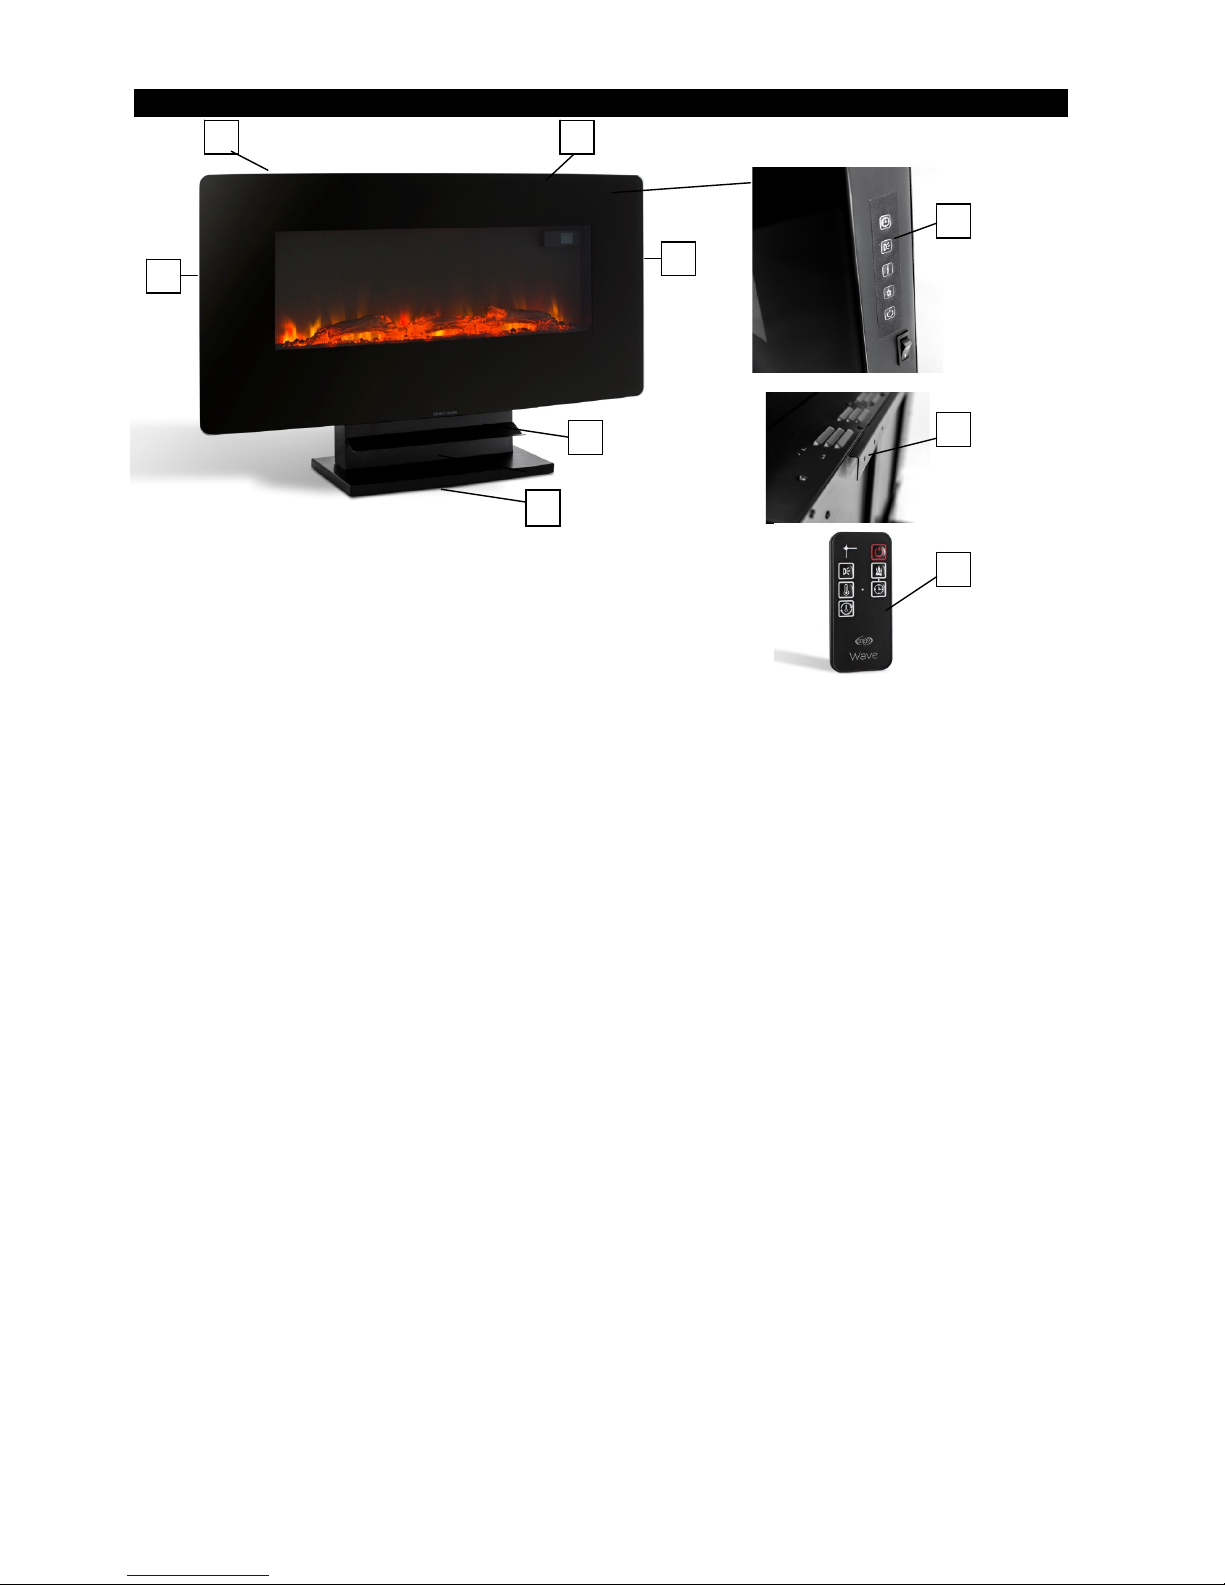
DESCRIPTION OF PARTS
1. Front panel in tempered glass
2. Upper air intake grille
3. Hot air delivery flap
4. Base
5. RGB LED side strip (can be deactivated)
6. Side control panel
7. Hooks for wall mounting
8. Remote control
1
3
4
6
7
8
5
5
2
Page 6

21
V 09/16
HOW TO INSTALL THE ELECTRIC FIREPLACE
The fireplace can be used on the floor, after installation of the rectangular base, or alternatively it can be wallmounted using the specific accessories supplied.
INSTALLATION KIT COMPONENTS
1. SCREWS - M4 x 8 mm x 12 2. LARGE PLUG x 5 3. SCREWS – M5 x 50 mm x 5
FIREPLACE COMPONENTS TO ASSEMBLE
1. Panel in tempered glass 2. Firebox 3. Wall mounting brackets
1. Firebox support structure 2. Front support bracket 3. Hot air outlet flap
1. Fireplace base plate 2. Firebox wood block 3. Remote control
CHOOSING A LOCATION FOR INSTALLATION
The fireplace circulates hot air by convection and creates a current of air in the surrounding area: the heat can thus
reach the walls near the fireplace. Avoid mounting the fireplace on walls with painted surfaces or delicate coatings.
Carefully check the solidity of the walls on which you want to hang the fireplace.
DO NOT
Mount the fireplace on the floor or ceiling.
Recess mount any part of the fireplace.
Run the power cord under a rug.
Position electrical appliances immediately above the fireplace (e.g. TV).
Position the fireplace in a place where curtains or drapes might cover the air intake grilles.
Position the fireplace next to a door that opens often, creating the risk of impact/damage.
Sit or stand on the fireplace.
Page 7

22
V 09/16
Use the appliance to dry clothing.
Use the appliance outdoors.
MINIMUM DISTANCES
between the top of the wall-mounted fireplace and the ceiling: 30 cm.
between the bottom of the wall-mounted fireplace and the floor: 20 cm.
from the sides of the fireplace: 10 cm.
from the front panel of the fireplace: 50 cm.
WALL MOUNTING
WARNING!
DO NOT CONNECT THE APPLIANCE TO THE MAINS POWER SUPPLY BEFORE INSTALLATION
Argoclima S.p.A. accepts no responsibility for any injury or damage that may result from improperly
performed installation / handling.
Finding the best place to mount the fireplace, considering the positioning of furniture and windows and compliance with
suggested distances.
To ensure safety, check that the wall and the fixing elements have the load capacity to support the weight of the
fireplace. The appliance should not be installed until drywall plastering and / or sanding and painting of walls have been
completed.
The wall where the appliance is to be mounted must be capable of long-term support of the total appliance load
and have sufficient strength to withstand phenomena such as earthquakes, vibrations, and other external
events. Plasterboard is not considered a structural material; we therefore recommend that you do not rely on
plasterboard fastenings to support the weight of the appliance.
Do not obstruct the appliance ventilation holes. The wall on which the appliance is mounted must be flat. Mount only on a
vertical surface. Avoid slanted surfaces. Mounting on anything other than a vertical wall may result in fire, damage or
injury.
Depending on the conditions of the wall, you may need to use extra fastening hardware in addition to that supplied. In
this case, the additional hardware and plugs must be of the same size and type as those supplied.
INSTRUCTIONS FOR WALL MOUNTING
The fireplace packaging contains all the accessories necessary for wall-mounting.
The procedure is as follows:
1. Remove the wall mounting bracket from the back of the unit as described in the figures: loosen the two screws
at the top of the two vertical bars of the wall bracket, then remove the bracket from the unit.
Mounting Bracket
Wall mounting
brackets
Page 8

23
V 09/16
2. Placing the bracket against the wall, use a pencil to mark the 4 points on the wall where you need to make the
holes for the rawlplugs. Adhere to the above minimum distances from the walls.
3. Using an electric drill (not supplied) at low speed, drill 4 holes of 5/16 inch diameter to a depth of at least 1.5 inches,
on the marked spots.
4. Insert 4 large plugs (2) into the holes with a hammer until they are flush with the wall.
5. Fasten the mounting bracket (3) to the wall using four M5 x 50 mm screws (3), as shown in the figures below.
6. Fit the firebox onto the hooks at the bottom of the mounting bracket, and push the top of the firebox onto the
mounting bracket as shown.
7. Hold the fireplace in position and secure it to the mounting bracket by replacing the two small screws that were
removed in step 2, as shown in the figures below.
Page 9

24
V 09/16
NOTE:
Pebbles and crystals provided as optional can be replaced by the block of wood.
8. Lift the glass panel into place, and then move it and secure it to the firebox, ensuring that the 2 hooks on the rear of
the upper part of the panel engage securely with the slots on the top of the firebox as shown (1).
NOTE: We recommend that this operation be performed by two people in order to avoid damage to the glass panel
or the firebox.
9. Grasp and fix the bottom part of the glass panel to the firebox (2), using two M4 x 8 mm screws (3) on both sides, as
shown in the figures below.
3
Side view
Rear view
Wall
Page 10

25
V 09/16
MOUNTING PORTABLE FIREPLACE
In the packaging the fireplace is also provided with a base for use as a portable device.
The procedure for assembly of the fireplace is as follows.
1. Align and fix the top support bracket of the firebox to the base with four M4 screws (1) and fully tighten the screws
with a Phillips screwdriver.
The top hooks locate at the front
Table top support
Table top base
2. Fix the flap to the front support bracket with two M4 x 8 mm screws (1), as shown.
3. Slide the front part onto the upper support bracket of the firebox and place the assembly on the base plate.
Front brace
Table top support
Table top base
Front brace
Heat Deflector
Upper firebox support
Firebox base
Hooks positioned frontally
Air flap
Front support
Front support
Upper support
Base
Page 11

26
V 09/16
4. Position the firebox on the upper support bracket so that the hooks of the support are inserted correctly into the slots
at the bottom of the firebox and the rear mounting holes overlap.
5. Insert 3 M4 x 8 mm screws (1) through the mounting holes and tighten securely with a Phillips screwdriver, as shown
in the figure below.
Firebox
Table top support
Firebox
Table top support
6. Lift the glass panel into place, and then move it and secure it to the firebox, ensuring that the 2 hooks on the rear of
the upper part of the panel engage securely with the slots on the top of the firebox as shown (1).
NOTE: We recommend that this operation be performed by two people in order to avoid damage to the glass panel
or the firebox.
7. Grasp and fix the bottom part of the glass panel to the firebox (2), using two M4 x 8 mm screws (3) on both sides, as
shown in the figures below.
Firebox
Firebox
Upper firebox support
Upper firebox support
3
Side view
Rear view
Wall
Page 12

27
V 09/16
Installation of the appliance on the base is now complete.
NOTE: Use the handle for transporting the appliance.
HOW TO USE THE FIREPLACE
Place the fireplace in the vertical position on a flat and stable surface. Use the carrying handles.
Connect the power cord to a suitable electric socket (220-240V~/50Hz).
This fire has LEDs (Light Emitting Diode) rather than conventional light bulbs. LEDS generate the same light levels
as conventional bulbs but consume only a fraction of the energy. LEDs are maintenance-free and will not require
replacement during the life of the product.
ON/OFF Switch
(on the right side).
Move the power switch to position "I" to put the unit on stand-by, ready for use.
Move the button to the “0” position to switch off the appliance.
Manual ON/OFF Switch
ON/OFF switch
Page 13

28
V 09/16
CONTROL PANEL REMOTE CONTROL
1.
2.
3.5.
4.
6.
4.
5.
2.
1.
3.
1. "POWER" button
2. Flame effect button
3. Sleep timer
4. Side RGB LED button
5. TEMPERATURE button: thermostat activation and temperature
control panel)
6. Temperature setting button (only on remote control)
CONTROL PANEL ON THE UNIT
TIMER button
When the unit is in operation, by pressing this
button you can set the running time from 1 to 8
hours, as indicated below. The display of the
unit will now show a timer icon and an indication
of the number of hours.
Key press No.
Hours
Display
1st 1 1H
2nd 2 2H
3rd 3 3H
4th 4 4H
5th 5 5H
6th 6 6H
7th 7 7H
8th 8 8H
9th 0 OFF
"POWER" button
Press the POWER button when the ON/OFF
switch is in position (I) to enable the operation of
the unit.
The display will show the flame symbol and
indication L1, corresponding to flame effect
1.
Press the POWER button to turn the unit off.
To completely switch off the appliance, turn the
ON/OFF switch to position 0.
TEMPERATURE Button
Turn on the room thermostat, with the last set
temperature shown; it allows you to set the
desired temperature in accordance with the
sequence below. Press and hold the button for a
few seconds until the display fluctuates, then
select the desired temperature. Wait for a few
seconds; when the display stops fluctuating the
temperature is set.
Key press Temperature
0 64°F/18°C
1 66°F/19°C
2 68°F/20°C
3 70°F/21°C
4 72°F/22°C
5 74°F/23°C
6 76°F/24°C
7 78°F/25°C
8 80°F/26°C
9 82°F/27°C
N OFF
FLAME EFFECT selection button
You can select the desired effect in accordance
with the following sequence; the display shows
the flame icon next to the selected effect:
1st press: amber flame (L1)
2nd press: amber and blue flame (L2)
3rd press: fuchsia and blue flame (L3)
4th press: flame with colours in rotation (L4)
5th press: OFF
ON/OFF
switch
Side LED button (can be deactivated)
You can select the desired colour in
accordance with the following sequence:
1st press: blue
2nd press: amber
3rd press: amber and blue
4th press: colours in rotation
5th press: OFF
Page 14

29
V 09/16
Use Lithium/Manganese button cells, model no. CR2025 -3 V, compliant with Battery Directive no. 2006/66/EC (supplied
with the remote control).
HOW TO INSERT / REMOVE THE REMOTE CONTROL BATTERIES (refer to the diagram below) Open the battery
cover on the back of the remote control (press and pull the rear cover). Place the battery inside the cover, making sure
the polarity is correct. Slot the cover back into position on the remote control.
INFORMATION FOR THE CORRECT DISPOSAL OF BATTERIES IN ACCORDANCE WITH EUROPEAN DIRECTIVE
2006/66/EC
Replace batteries when they are depleted. At the end of their life, batteries must be disposed of separately from unsorted
waste. They must be taken to designated recycling centres or returned to a retailer providing this service. Separate
disposal of batteries prevents potential negative effects on the environment and human health due to inadequate
disposal, and also allows for recovering and recycling their constituent materials, resulting in significant savings in terms
of energy and resources. The separate disposal obligation is underlined by the crossed-out dustbin symbol appearing on
the battery. Illegal disposal of the product by the user shall result in administrative sanctions being applied as per current
regulations.
OVERHEATING SAFETY DEVICE
In case of overheating, the safety system of the appliance automatically disables the heating elements and the motor, thus
shutting down the operation of the fireplace.
In this case:
remove the cause of the overheating (e.g. obstacles on the air intake/outlet grilles, dust deposits in the appliance, etc.);
allow the unit to cool for 15/20 minutes;
turn on the fireplace again and ensure it operates correctly.
If the procedure was followed properly and the unit still fails to operate, check the fuse in the wall socket. If this is not the
cause, contact a service centre.
REMOTE CONTROL
Flame effect (7
variations)
selection button
TIMER button
Side LED
selection/off button
Thermostat on/off
button
Temperature
selection button
"POWER" button
Page 15

30
V 09/16
POSSIBLE SOLUTIONS TO PROBLEMS
PROBLEM
POSSIBLE SOLUTION
The fireplace will not turn on
Ensure that the ON/OFF switch is at I.
Replace the fuse (13 amp) in the plug.
The fireplace does not emit heat
The fireplace is fitted with a thermostat to save energy. If the room temperature is higher
than the set temperature, the unit does not produce heat.
If you set a higher temperature, the fireplace will begin to emit heat.
The fireplace switches off after a
period of operation
Check that the temperature is not set at minimum. When the room temperature reaches
the set temperature, the fire goes out.
Make sure that the air inlet and outlet are not obstructed.
The fireplace is noisy A slight noise may be heard when the flame effect is active, caused by a motor that allows
the production of this effect. The noise will be perceptible only when there is no
background noise.
A higher level of noise is noticeable when you turn on the heating function, caused by the
fan that circulates the hot air.
The remote control is not working Ensure the battery is correctly positioned or replace it.
MAINTENANCE AND STORAGE
CAUTION: ALWAYS UNPLUG THE APPLIANCE BEFORE CLEANING OR MAINTENANCE OPERATIONS.
IMPORTANT: DO NOT IMMERSE THE FIREPLACE IN WATER.
Cleaning the outside surface of the appliance
Switch off the fireplace and unplug it before cleaning or moving the appliance.
Use a soft cloth to remove any dust from the product.
Should this not suffice, use a soft cloth dampened with water and neutral detergent at a temperature below 50 °C. Leave
the appliance to dry fully before using it again.
Do not use corrosive detergents or solvents such as petrol. Do not wash the appliance with water. When cleaning the
appliance, do not use oils, chemical substances or other items that may damage the surface.
Use a vacuum cleaner to remove dust from the air inlet/outlet grilles.
STORAGE
If the appliance is not used for prolonged periods, it must be stored together with this manual in its original packaging, in a
cool and dry place.
INFORMATION ON THE CORRECT DISPOSAL OF THE PRODUCT pursuant DIRECTIVE 2012/19/EU ON WASTE
ELECTRICAL AND ELECTRONIC EQUIPMENT”
At the end of its useful life, this appliance must not be disposed of together with household waste. We call your attention to
the crucial role played by the consumer in the reuse, recycling and other forms of recovery of such waste. The dismantled
appliance, with its components collected separately, must be delivered to the local waste disposal facility or returned to the
dealer free of charge when purchasing a new equivalent appliance. Sorted disposal of electric and electronic equipment
prevents potentially negative consequences on the environment and human health due to improper scrapping, and also
allows the constituent materials to be recovered and recycled, with significant savings in terms of energy and resources.
The sorted disposal requirement is indicated by the crossed waste bin label displayed on the appliance.
www.argoclima.com
 Loading...