

Page 1
MOVABLE AIR CONDITIONER
●
CLIMATIZZATORE PORTATILE
CLIMATISEUR MOBILE
●
MOBILES KLIMAGERÄT
ACONDICIONADOR PORTATIL
●
AR CONDICIONADO PORTÁTIL
OPERATING INSTRUCTIONS
●
ISTRUZIONI D'USO
NOTICE D’UTILISATION
●
BEDIENUNGSANLEITUNG
INSTRUCCIONES DE USO ● INSTRUÇÕES DE FUNCIONAMENTO
37.4252.039.00 04/2010
Save these instructions / Conservate queste istruzioni / Conserver cette notice d’utilisation
Bewahren Sie bitte diese Bedienungsanleitungen auf / Guardeis estas instrucciones / Guarde estas instruções
EG
I
F
D
E
P
Page 2
PRODUCT IDENTIFICATION...................................................................................... 2
SIGNALING LAMPS .................................................................................................. 3
BEFORE USING THE APPLIANCE............................................................................. 3
OPERATION ............................................................................................................... 4
USING THE REMOTE CONTROL UNIT..................................................................... 4
I
How to install batteries.............................................................................................. 4
I
Temperature sensor selector .................................................................................... 4
I
Operation with the remote control unit ...................................................................... 4
REMOTE CONTROL UNIT ......................................................................................... 5
HOW TO SET THE PRESENT TIME .......................................................................... 6
COOLING .................................................................................................................. 6
DEHUMIDIFYING (DRY)............................................................................................. 6
FAN ONLY................................................................................................................... 6
ADJUSTING THE FAN SPEED................................................................................... 6
SLEEP MODE.............................................................................................................. 6
SETTING THE TIMER................................................................................................. 7
SETTING THE 1 HR TIMER.............................................................................................7
DRAINING.................................................................................................................... 7
OPERATION WITHOUT THE REMOTE CONTROL UNIT.......................................... 8
TIPS FOR ENERGY SAVING..................................................................................... 8
TROUBLESHOOTING................................................................................................ 8
PORTHOLE KIT........................................................................................................... 9
CARE AND CLEANING .............................................................................................. 9
USEFUL ADVICE ........................................................................................................ 10
CONTENTS
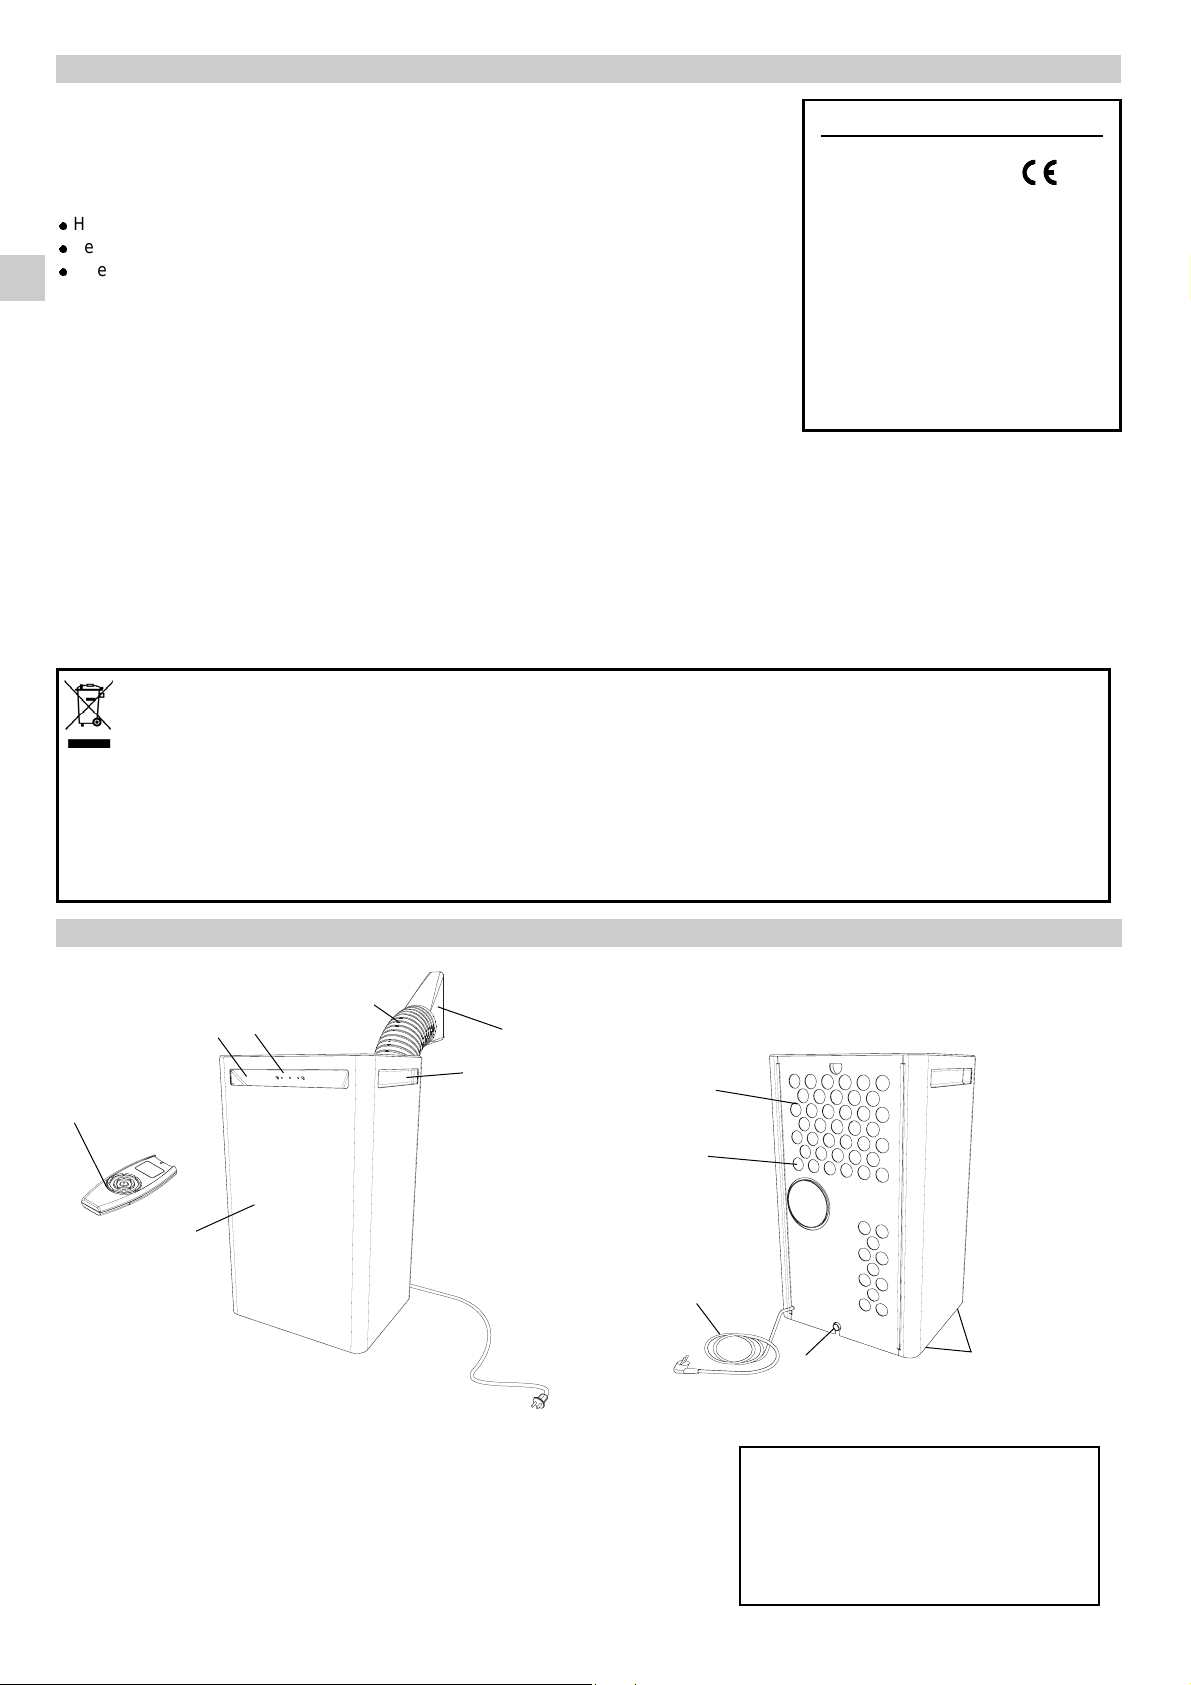
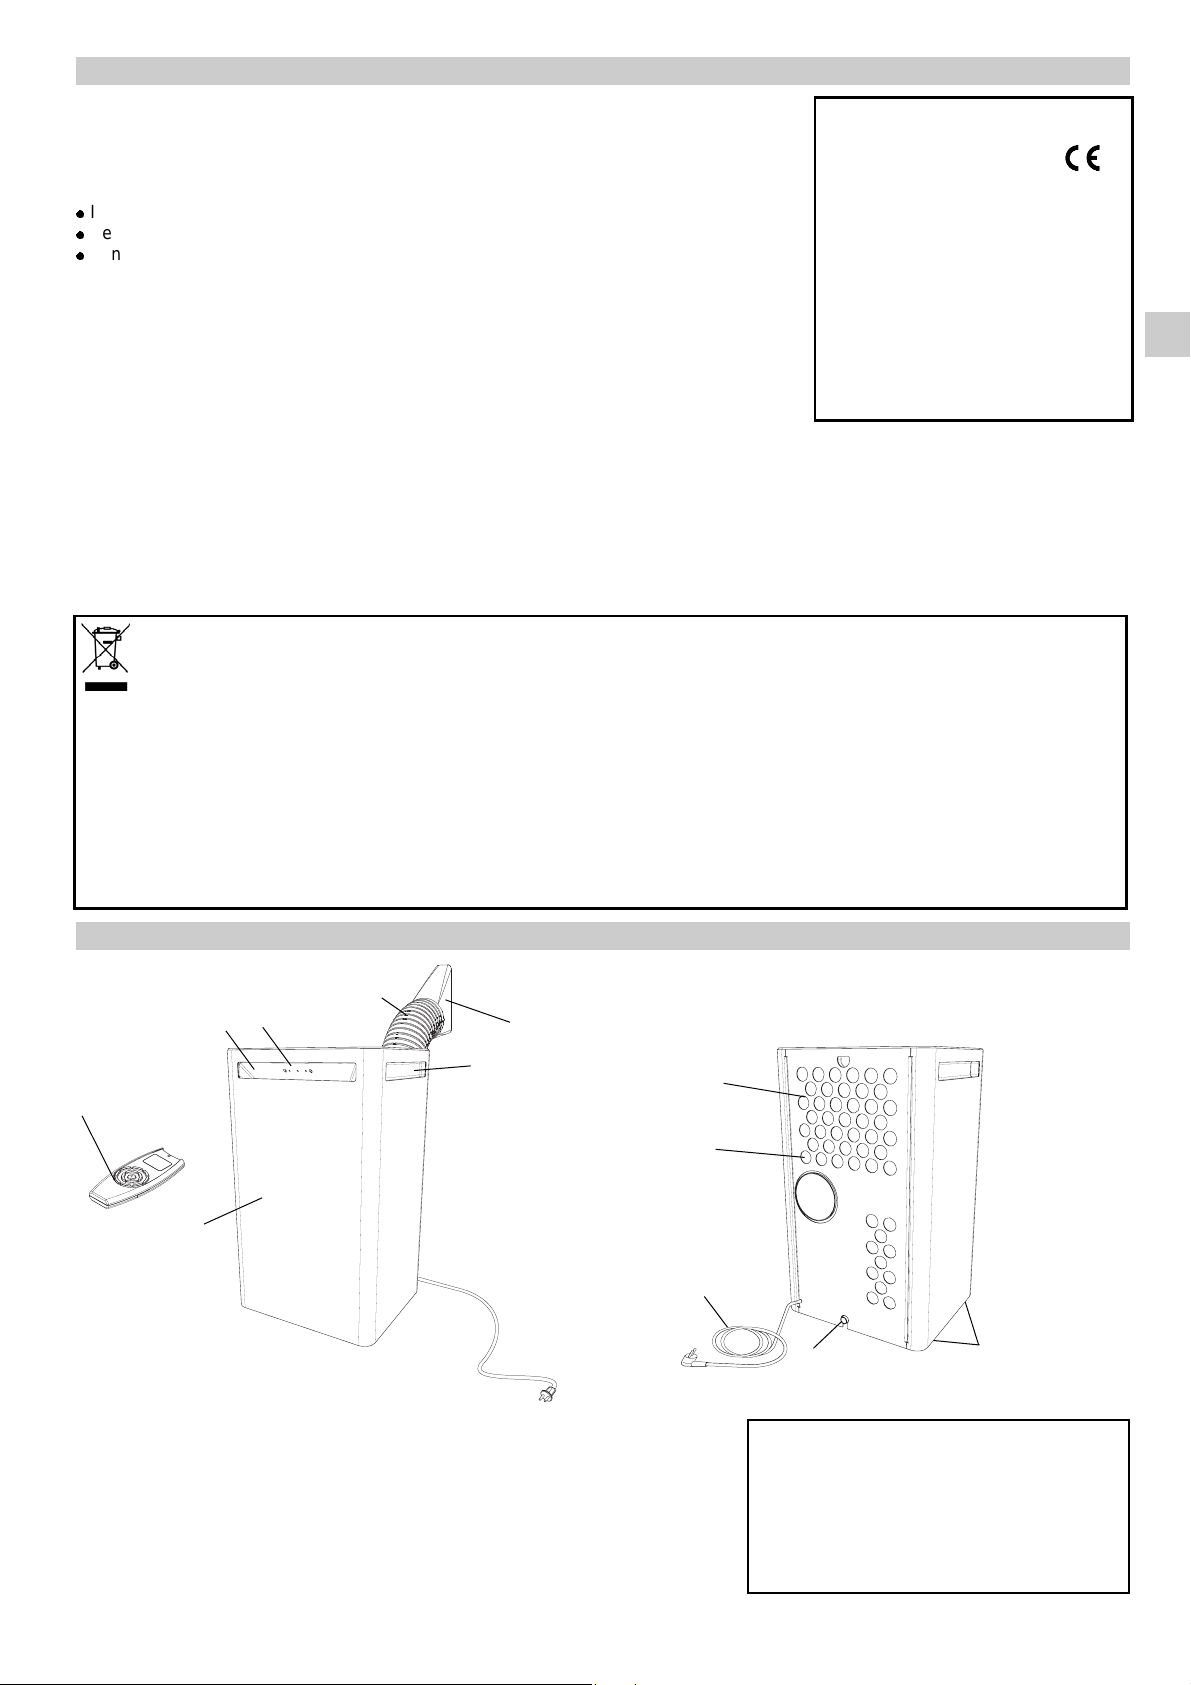
PRODUCT IDENTIFICATION
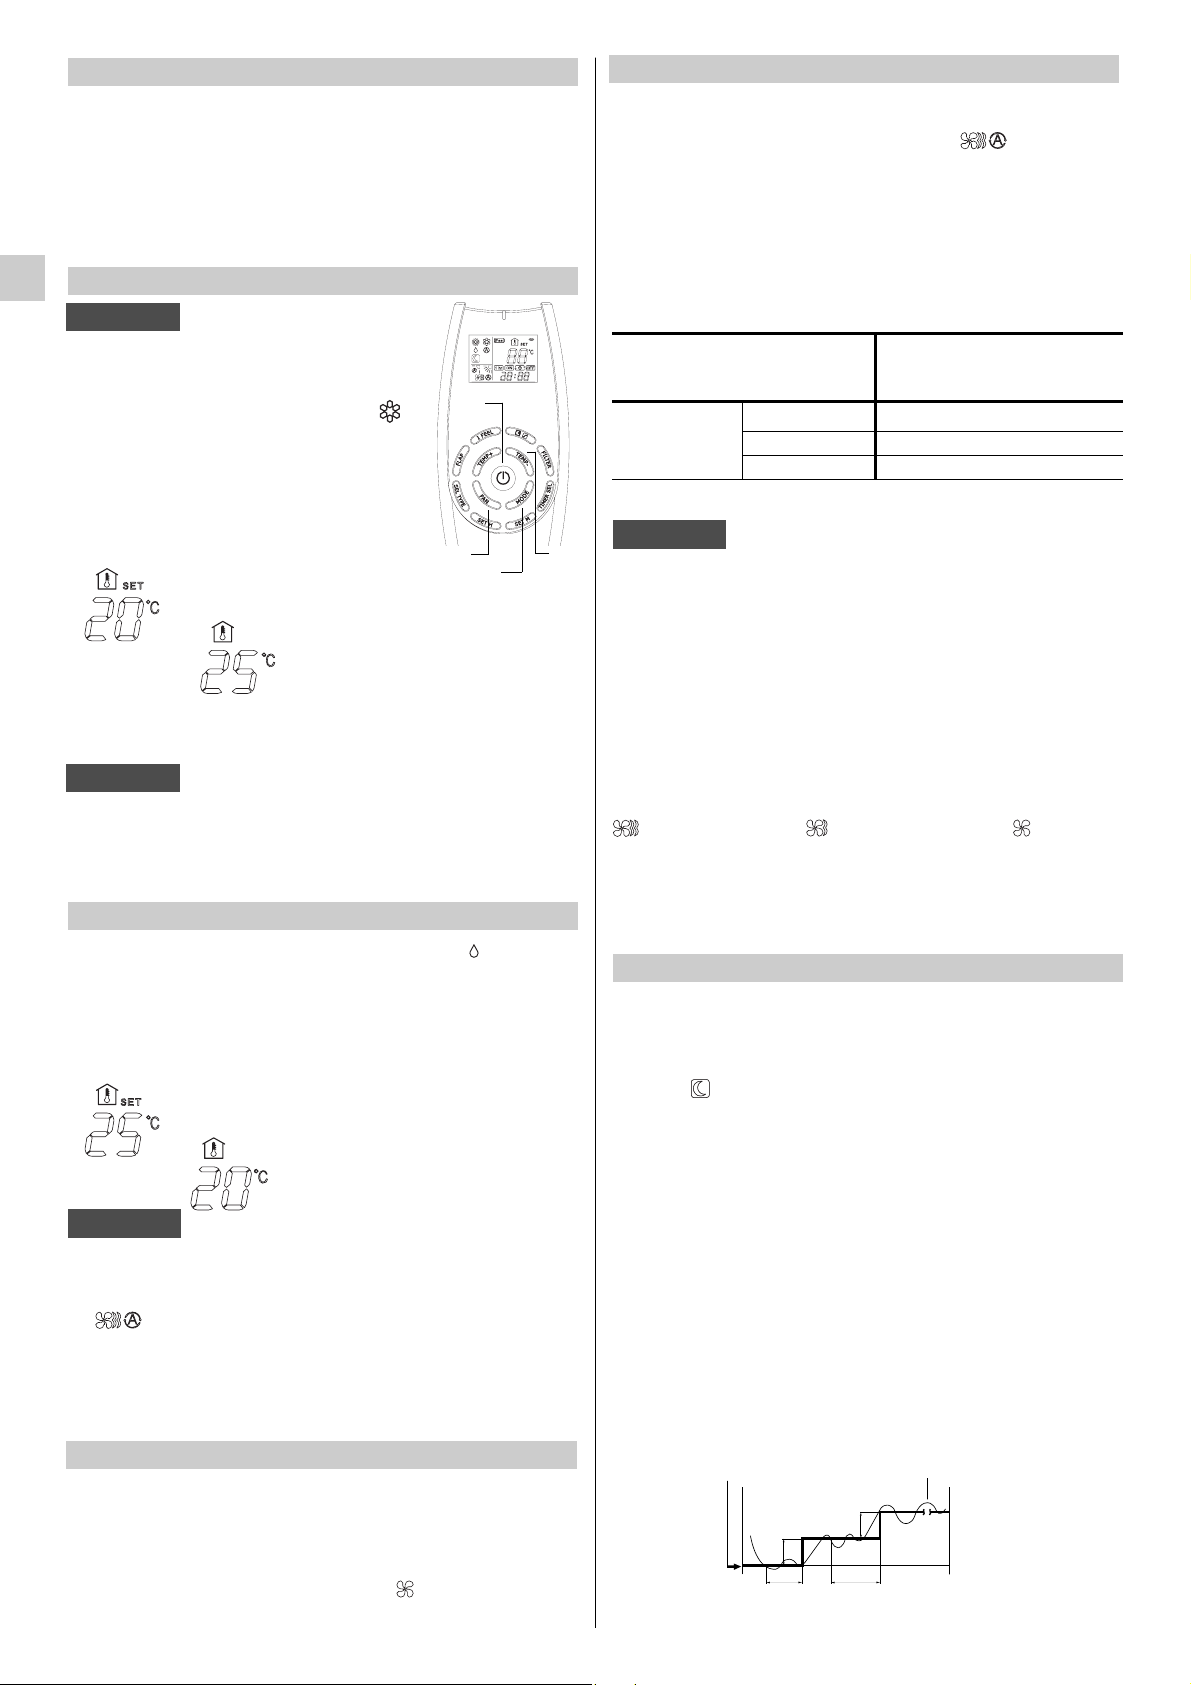
1. Wireless remote control unit
2. Signaling lamps
3. Air supply
4. Return air grille
5. Air filter
6. Aesthetic front panel
7.
Tube for condensate discharge
8. Electric cable with plug
9. Transportation wheels
10. Transportation handle (both sides)
11. Retractile flexible pipe
12. Terminal pipe fitting
2
DECLARATION OF CONFORMITY
This product is marked as it
satisfies Directives:
– Low voltage no. 2006/95/CE.
– Electromagnetic compatibility no.
89/336 EEC, 92/31 EEC and 93/68
EEC.
This declaration will become void in
case of of misusage and/or non
observance though partial of
manufacturer's installation and/or
operating instructions.
Operating limits:
Room Temperature:
Cooling: MIN: 16°C D.B. / 14°C W.B.
MAX: 35°C D.B. / 24°C W.B.
Dehumidification: MIN: 10°C D.B / 80% R.H.
MAX: 32°C D.B. / 80% R.H.
EG
INFORMATION FOR CORRECT DISPOSAL OF THE PRODUCT IN ACCORDANCE WITH THE EUROPEAN DIRECTIVE 2002/96/EC
At the end of its working life this equipment must not be disposed of as an household waste.
It must be taken to special local community waste collection centres or to a dealer providing this service.
Disposing of an electrical and electronic equipment and its batteries separately avoids possible negative effects on
the environment and human health deriving from an inappropriate disposal and enables its components to be recovered and recycled to obtain significant savings in energy and resources.
In order to underline the duty to dispose of this equipment and batteries separately, the product is marked with a
crossed-out dustbin.
12
2
11
10
4
5
7
8
9
1
3
6
Page 3

3
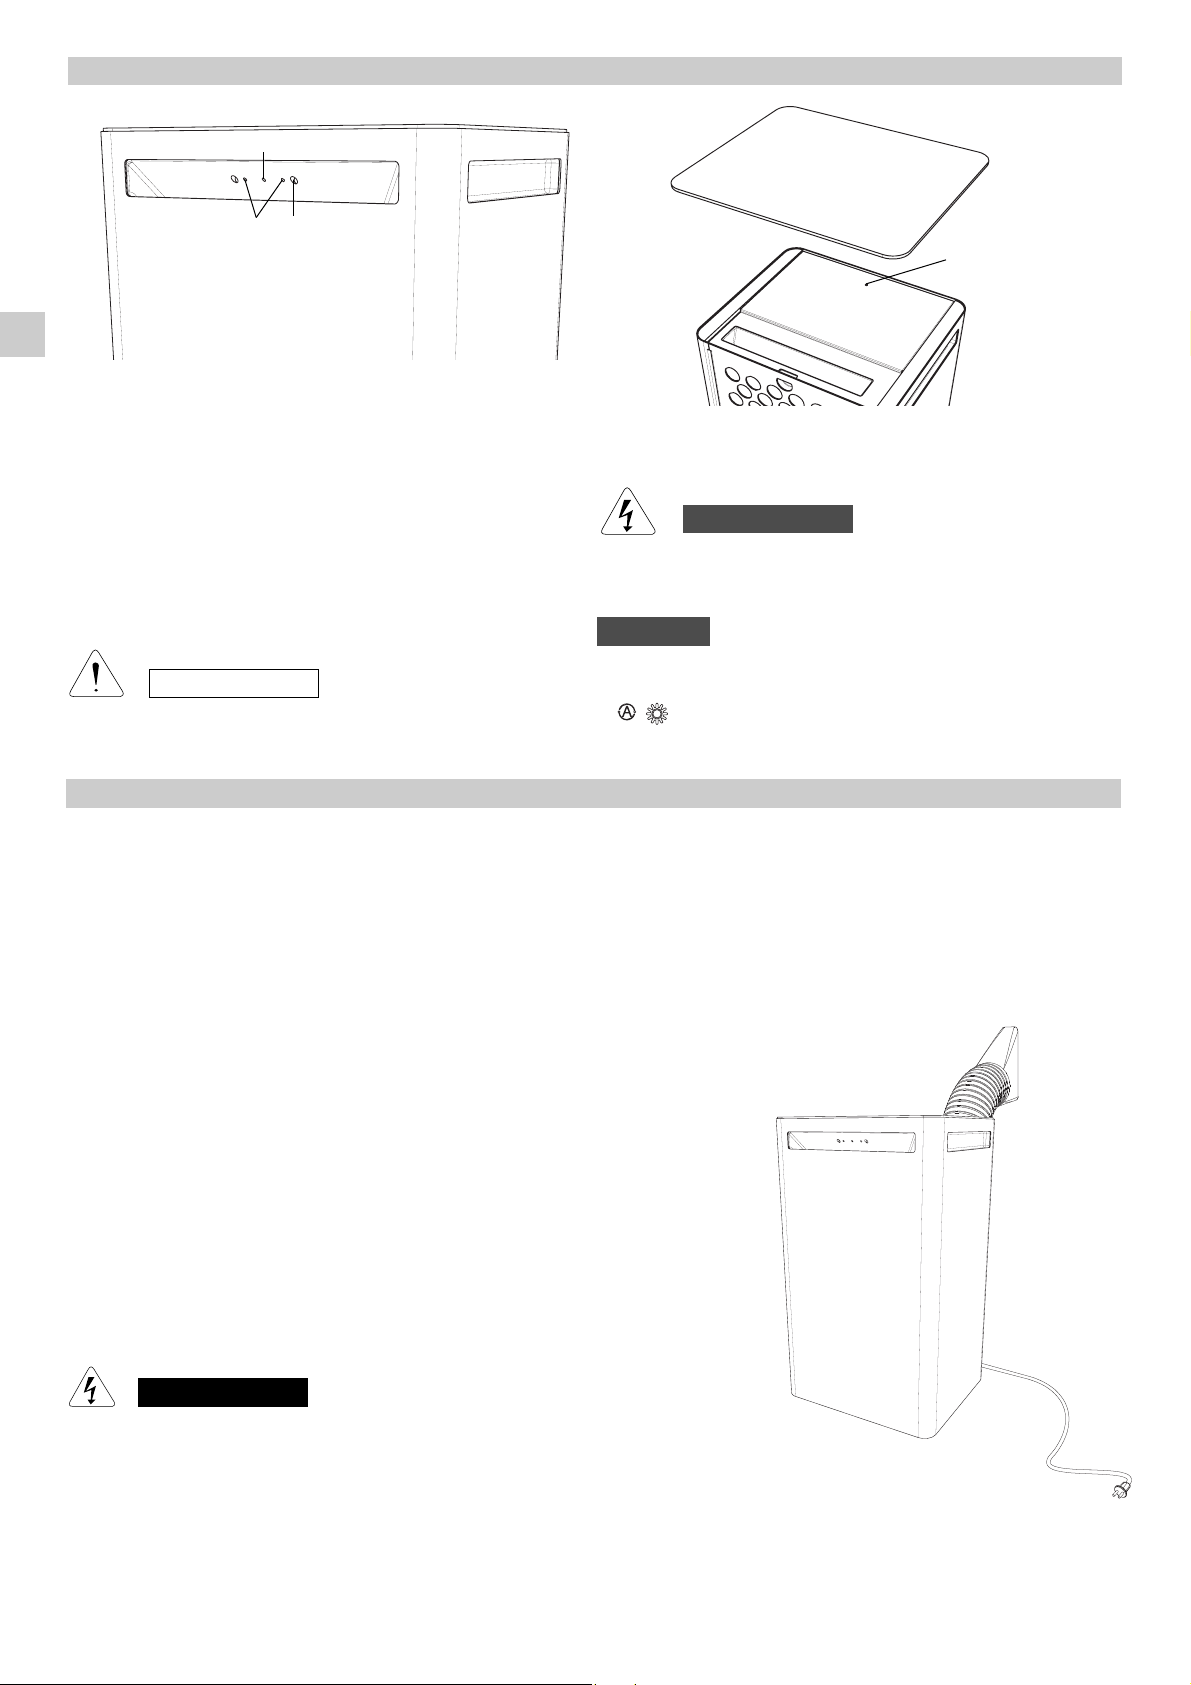
SIGNALING LAMPS
1. Receiver : receives signals transmitted from the remote
control.
2. OPERATION lamp: This lamp lights up during operation.
It blinks once to announce that the remote control signal
has been received and stored. It blinks continuously during
the protection modes (defrosting, etc.).
3. STANDBY lamp: This lamp lights up when the air condi-
tioner is connected to the power and ready to receive the
remote control command.
Water-level alarm: When the tank is full, the air conditioner
stops automatically and this lamp begins blinking.
The OFF position does not disconnect the power. Use the
main power switch to turn off power completely.
WARNING
BEFORE USING THE APPLIANCE
● Check that the power supply at the location where the air conditioner is going to be used is 220-240V ~ 50Hz .
● Make sure that the electrical installation is suitable to supply continuously current necessary for the air conditioner in addition to
that already used by other electric appliances (white goods, lighting). See the max electric input indicated on the name plate positioned on the air conditioner.
● The unit has to be connected according to the local electrical rules.
● Make sure that circuit breakers, fuses, etc, are of sufficient capacity to handle a start-up current of 20 A (generally less then 1
second).
● Do not install the air conditioner where it could be wetted by drops of water (i.e. in
laundries).
●
Make sure that the ON - OFF push-button switch on the control panel of the air
conditioner is in OFF position.
● Before connecting the air conditioner to a power socket, make sure that the sock-
et is provided with an earth connection in compliance with local codes.
● Never use the power plug as a mean to start or stop the air conditioner: always
use the ON/OFF push-button switch on the air conditioner control panel.
● Do not move the air conditioner during operation, turn it off and disconnect the
plug from the power supply. Verify and eventually discharge the condensate
water, through the discharge tube located on the rear of the unit.
● WARNING! Do not stick anything into the air outlet of the air conditioner. This is
very dangerous because the fan is rotating at high speed.
● WARNING!
The air conditioner is provided with a time-guard system, which does not allow
re-starting of compressor until after 3 minutes from a previous stop.
● Make sure that there are no obstacles around the unit affecting the free circulation
of air. Do not block the air intakes and outlet of the unit with curtains or other.
Never put objects on the top of the unit.
● The manufacturer assumes no responsibilities if the safety regulations or local
codes are not observed.
● Always unplug the unit from the power socket before moving or cleaning it.
● If the power cord is damaged, it must be replaced by the manifacturer, the service
agent or other qualified person to avoid a hazard.
● This air conditioner is not intended for use by persons (including children) with reduced phisical, sensory or mental capabilities, or
lack of experience and knowledge. unless they have been given supervision or instruction concerning use of the air conditioner
by a person responsible for their safety.
WARNING
CAUTION
EG
NOTE
The blinking of OPERATION and STANDBY lamps, indicates
that the operating mode selected ( ) is not compatible
with the unit. If this happen the air conditioner does not operate until the correct mode is selected.
1
2
3
4
4. Operation button (without remote control): Push the but-
ton, using a thin object e.g. a paper clip, to walk through the
OFF and COOL operation modes.
Page 4
4
OPERATION
COOLING
●
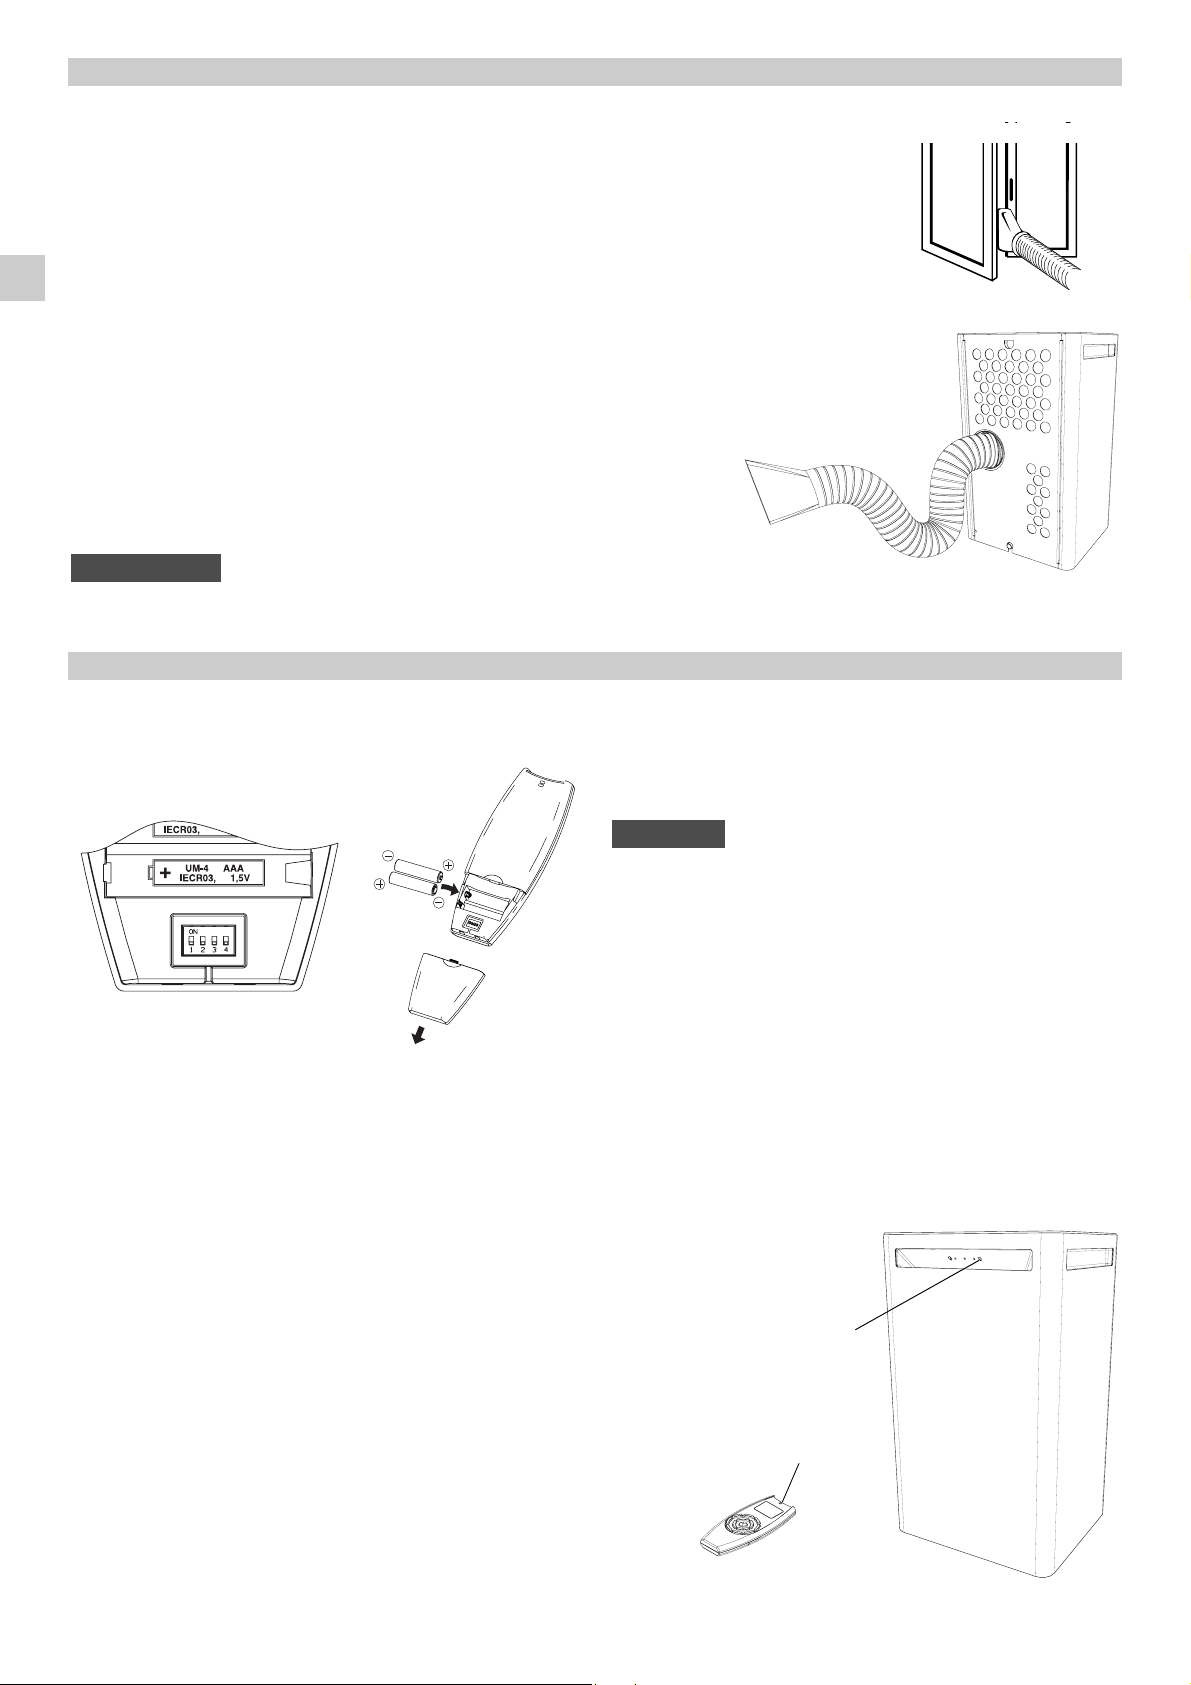
Place the air conditioner as near as possible to the window. Fit the flexible tube by
hooking it to the rear of the unit. Extend the flexible tube just enough to reach the
outdoor, passing under the window shutters set ajar.
●
In case there is a window sill towards the inside of the room, it might be better to
use the supplied outlet nozzle. Insert the nozzle into the free end of the flexible
tube.
●
Open the window and lock one of the shutters. Place the outlet nozzle between the
two shutters, held together with the supplied lace.
●
Avoid sharp bends or plies of the flexible tube.
●
In case of porthole utilise make a 135 mm diameter hole in the window pane.
When the air conditioner is in the dehumidification mode, it doesn’t cool the room.
When you use the air conditioner in the dehumidification mode, you don’t have to
use the flexible tube. For maximum dehumidification efficiency leave the rear
discharge outlet free to discharge directly into the room.
●
Remove the flexible tube by grasping it at the attachment point on the air
conditioner and twisting it until you release it from the blocking hooks.
DEHUMIDIFICATION (DRY)
HOW TO INSTALL BATTERIES
●
To remove the cover on the back of the remote control and
verifying that DIP SWITCH is set up like in figure:
USING THE REMOTE CONTROL UNIT
TEMPERATURE SENSOR SELECTOR
●
Under normal conditions the room temperature is detected
and checked by the temperature sensor placed in the remote controller (I FEEL icon displayed ).This function is designed to provide a personalised environment by transmitting
the temperature control command from the location next to
you. Therefore, when using this option, the remote control
should always be aimed, without obstruction, at the air conditioner.
The remote control unit sends the temperature signal at
any key pressing and automatically every five minutes. If,
due to some troubles, the signal from the remote is no longer detected, the air conditioner keeps operating using the
temperature sensor of the indoor unit to control the room
temperature. In this case, the temperature around the
remote control unit may differ from the temperature detected in the air conditioner position.
NOTE
OPERATION WITH THE REMOTE CONTROL UNIT
When using the remote control unit, always point the unit transmitter head directly at the air conditioner receiver.
EG
●
Insert two AAA alkaline batteries of 1,5 V-DC making sure
that point in the direction marked in the battery compartment.The displayed time flashes.
Press the SEL TYPE button.
Remote controller is now ready for operation.
●
The batteries last about six months. Depending on how
much you use the remote control unit.
Remove the batteries if you do not use the remote control
unit for more than one month.
Replace the batteries when the remote control unit lamp
fails to light, or when the air conditioner does not receive
the remote control unit signals.
●
The batteries of the remote control contain polluted substances exhausted batteries must be disposed according to
the laws in force (see paragraph “HOW TO REMOVE BATTERIES” at the end of the manual)
NO!
●
It is possible to disable the remote controller room sensor
pressing the I FEEL button. In this case the I FEEL icon on
the remote controller display lights off and the sensor placed in the air conditioner becomes active.
TRANSMITTER HEAD
REMOTE CONTROL UNIT
RECEIVER
This function is recommended in autumn and winter. If you use this mode in summer
you have to connect the flexible tube.
NOTE
Page 5
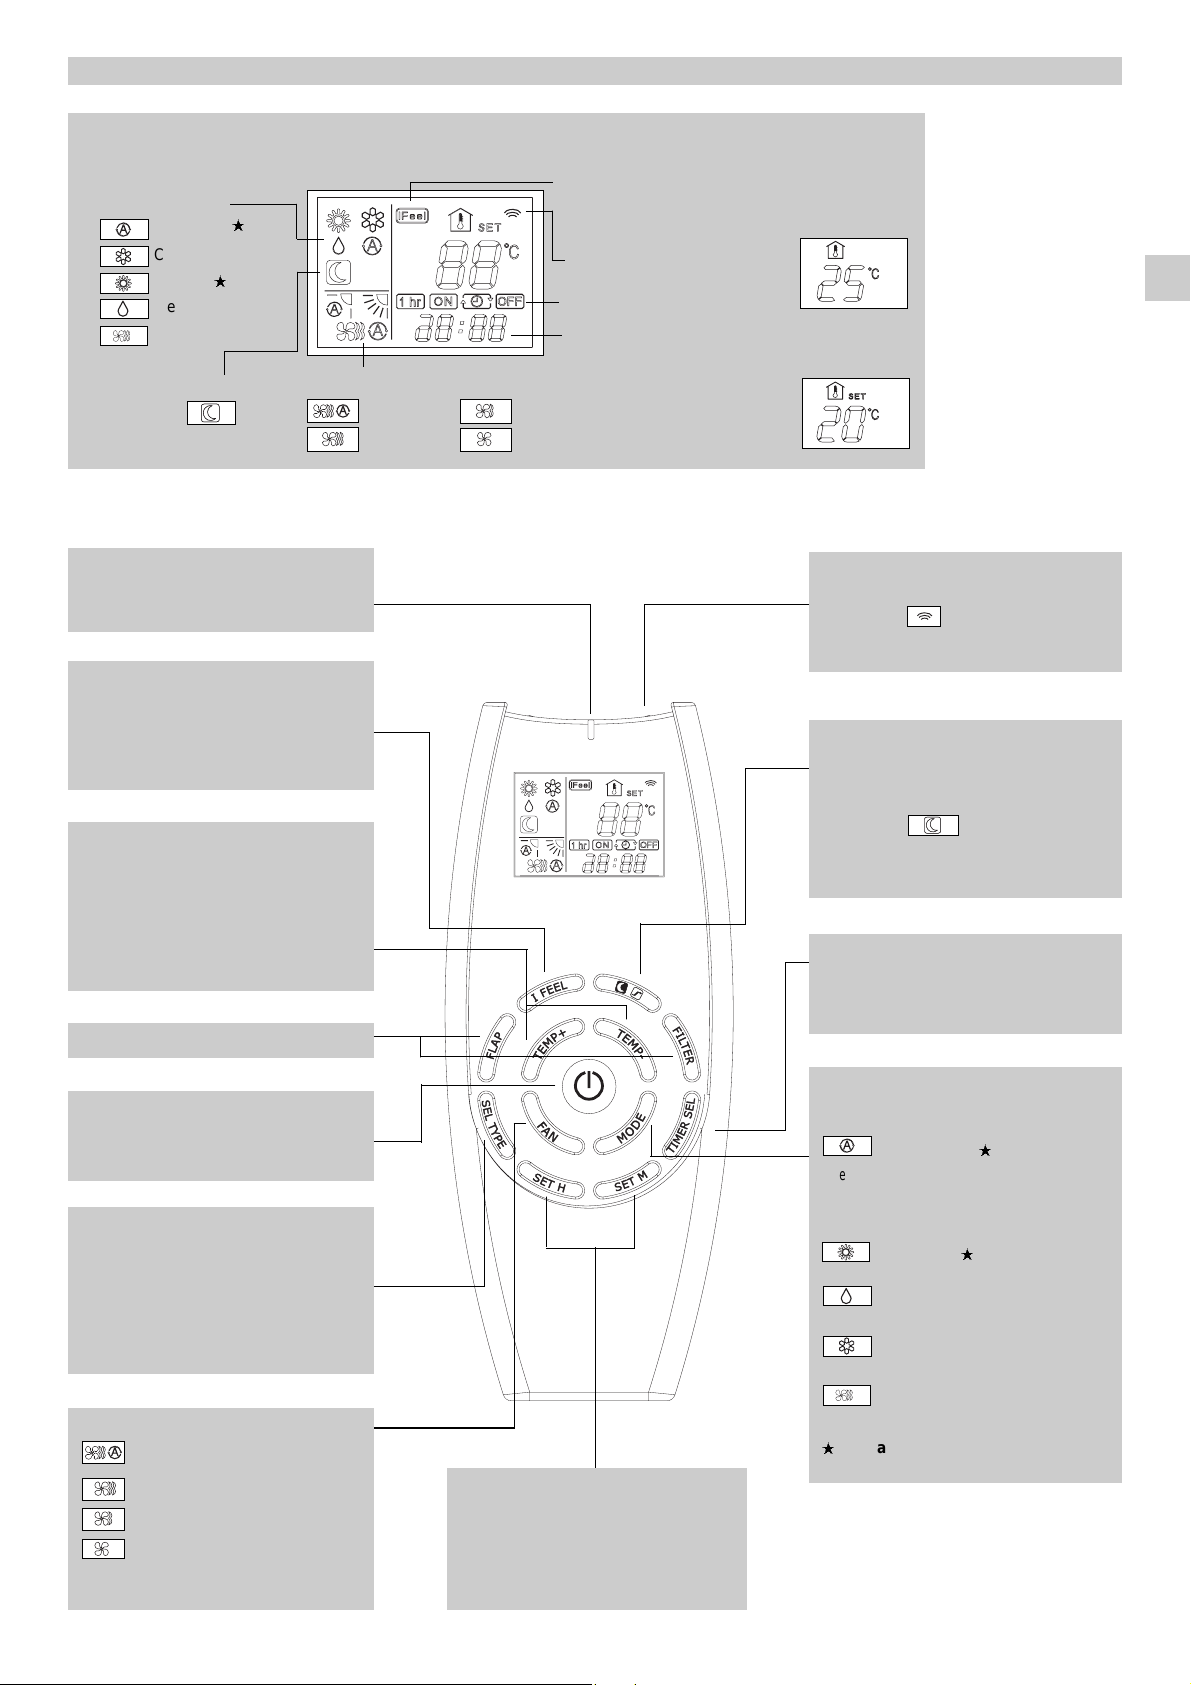
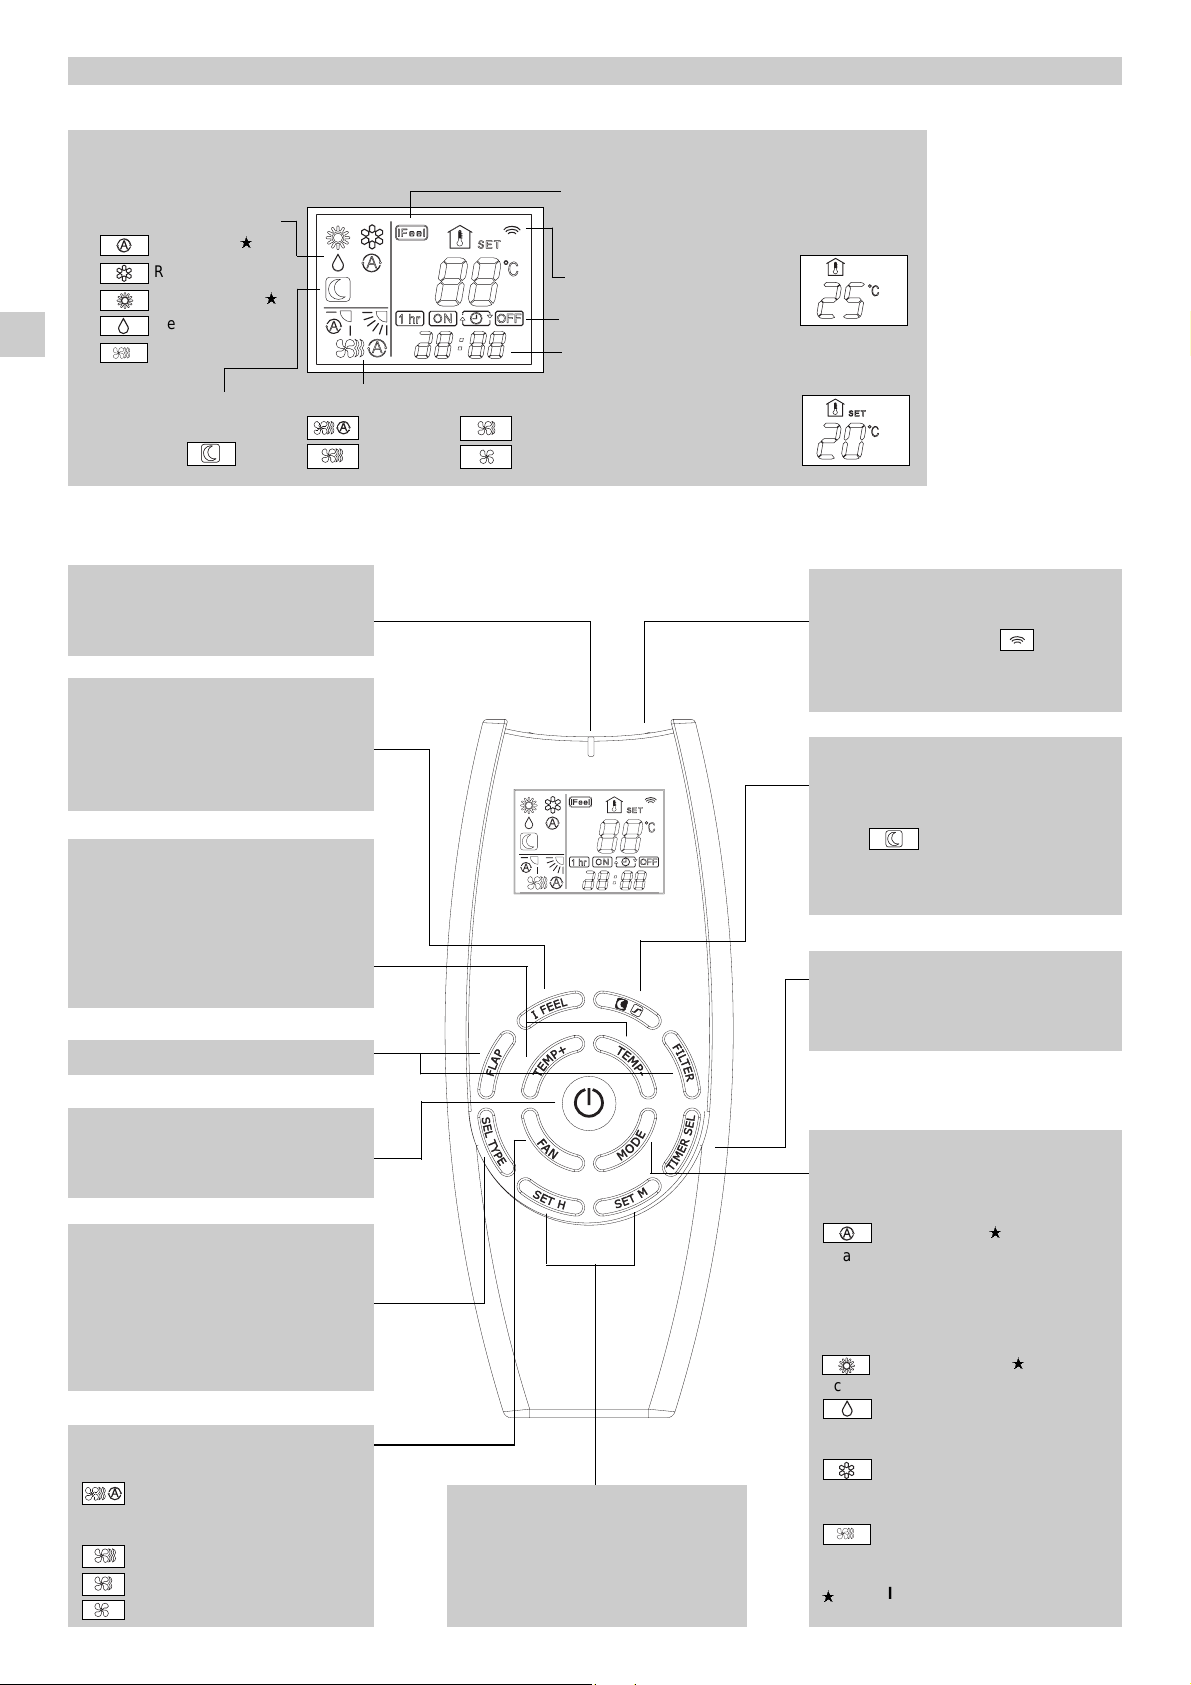
REMOTE CONTROL UNIT
EG
5
“NIGHT” BUTTON
For details, see "NIGHT MODE".
When you press this button in the COOL, HEAT or DRY
mode, the mark appears on the display and
the microcomputer in the remote control unit will adjust
the set temperature to save energy.
TRANSMITTER
When you press the buttons of the remote control unit,
the mark appears on the display to transmit the setting changes to the receiver in the air conditioner.
TEMPERATURE SETTING BUTTONS
TEMP - (cooler)
Press this button to decrease the set temperature.
TEMP + (warmer)
Press this button to increase the set temperature.
SENSOR
A temperature sensor inside the remote control unit
detects the room temperature.
“SEL TYPE” BUTTON
Press this button in order to:
• set the clock
• set the ON/OFF timer
For details refer to paragraphs “SETTING THE HOUR” and “SETTING THE
TIMER”.
TEMPERATURE SENSOR SELECTOR
Press the I FEEL button to modify the
active setting for room temperature
detection (from remote controller to air
conditioner and viceversa)
“FAN “ BUTTON
Fan speed is automatically
selected by the microcomputer.
High speed.
Medium speed.
Low speed.
TIMER AND PRESENT TIME SETTING
BUTTONS
With these buttons is possible to set the clock and the
timer. For details refer to paragraphs “ SETTING THE
HOUR” and “SETTING THE TIMER2.
ON/OFF BUTTON
This button turns the air conditioner ON and OFF.
“TIMER SEL” BUTTON
Press this button to select the type of timer
to activate.
For details refer to paragraph “SETTING
THE TIMER”.
DISPLAY
Information is displayed when the remote controller is switched on. If switched off, only the operating mode, the room
temperature and the clock are shown
Operation mode
Fan speed
High speed
Automatic
Medium speed
Low speed
Displayed when transmitting data
Set point temperature
I FEEL mode is active
(remote controller sensor active)
Night mode
Timer modes
Automatic
(
Cooling
Heating
(
Dehumidification
Fan
MODE SELECTOR BUTTON
Press this button to modify the air conditioner mode.
(automatic)
(
When this setting is selected, the air conditioner calculates the difference between the thermostat setting
and the room temperature and automatically switches
to the "cool" or "heat" mode.
(heating)
(
The air conditioner makes the room warmer.
(dry)
The air conditioner reduces the humidity in the room.
(cooling)
The air conditioner makes the room cooler.
(fan)
The air conditioner works only as a circulation fan.
(
Not active modality
INACTIVE BUTTONS
Clock
Room temperature
Page 6
6
The air conditioner disposes of the condensate water automatically at the HIGH and MEDIUM fan speed, on the contrary at
the LOW fan speed the condensate water is collected in the
tank.
1. Press the button SEL TYPE three times.
The time indication alone flashes.
2. Press the SET H button until the present time hour is
displayed.
Press the SET M button until the present time minutes are displayed. The display will automatically stop
flashing.
HOW TO SET THE PRESENT TIME
COOLING
DEHUMIDIFYING (DRY)
The above mentioned data make reference to air conditioner
operating when the sensor on the remote control unit is ON.
(Refer to temperature sensor selector). If the sensor on the unit
is being used then actual operation will slightly differ from that
described in the above tables.
The automatic speed is not available in FAN ONLY mode.
ADJUSTING THE FAN SPEED
MANUAL
If you want to manually adjust speed just set the FAN selector
as desired.
NOTE
1 hour 1 hour TIME
Setting temperature
Room temperature
COOLING AND DEHUMIDIFYING
SLEEP MODE
●
The SLEEP mode enables you to save energy.
1.Set the MODE selector to cool or dry.
2.Press the NIGHT button.
3.The mark appears on the display. Press the NIGHT
button again to release the NIGHT function.
What does the SLEEP mode mean?
In this mode, the air conditioner will cool or dry the room to the
set temperature, and then the thermostat will make the unit
pause. After about 1 hour, the air conditioner will automatically
reset the set temperature as follows (also refer to graph).
When the room temperature reaches the new set value, the
thermostat will cause the unit to pause. After about 1 hour the
temperature will be raised by 1°C. This enables you to save
energy without sacrificing your comfort.
FAN ONLY
WHEN DIFFERENCE BETWEEN
ROOM TEMPERATURE AND SET FAN SPEED
TEMPERATURE IS
Cooling and
2 °C and over
High
dehumidifying
Between 2 and 1 °C
Medium
modes:
Below 1 °C
Low
EG
NOTE
THE DISPLAY SHOWS THE SELECTED
TEMPERATURE.
AFTER 5 SECONDS FROM THE REQUIRED TEMPERATURE SETTING THE DISPLAY WILL SHOW
THE ROOM TEMPERATURE AGAIN.
4.Press the FAN button to select the fan speed.
1
4
3
2
Verify that the unit is connected to the
main power and the STANDBY lamp is
light up.
1.Set the MODE selector to COOL .
2.Press the ON/OFF button and switch the
air condioner ON.
3.Press the TEMP. buttons to set the desired temperature (the temperature range
is between 32 °C max. and 16 °C min.).
NOTE
1.
Set the MODE selector switch to “DRY” .
2. Press the ON/OFF button and switch the air condioner
ON.
3. Press the TEMP. buttons to set the desired temperature
(the temperature range is between 32 °C max. and 16 °C
min.).
THE DISPLAY SHOWS THE SELECTED
TEMPERATURE.
AFTER 5 SECONDS FROM THE REQUIRED TEMPERATURE SETTING THE DISPLAY WILL SHOW
THE ROOM TEMPERATURE AGAIN.
●
Use DRY operation when you want to reduce the humidity
in the room.
●
During DRY operation, the fan speed is automatically set to
or stops to prevent overcooling.
●
Dry operation is not possible if the indoor temperature
is 15 °C or less.
●
The humidity of the room (condensate water) will be collected
in the internal tank of the air conditioner.
NOTE
If you want to make air circulate without any temperature control, follow these steps:
1. Press the ON/OFF operation button and switch the air con-
ditioner ON.
2. Press MODE button until only the fan sign appears
on the display.
AUTOMATIC
Simply set the FAN selector to the position. A
microcomputer automatically controls the fan speed
when the AUTO mode is selected. When the air conditioner starts operating, the difference between the room
temperature and the set temperature is detected by the
microcomputer which then automatically switches the fan
speed to the most suitable level.
High speed Med. speed Low speed
1°C
1°C
Page 7

7
EG
2
1
4
3
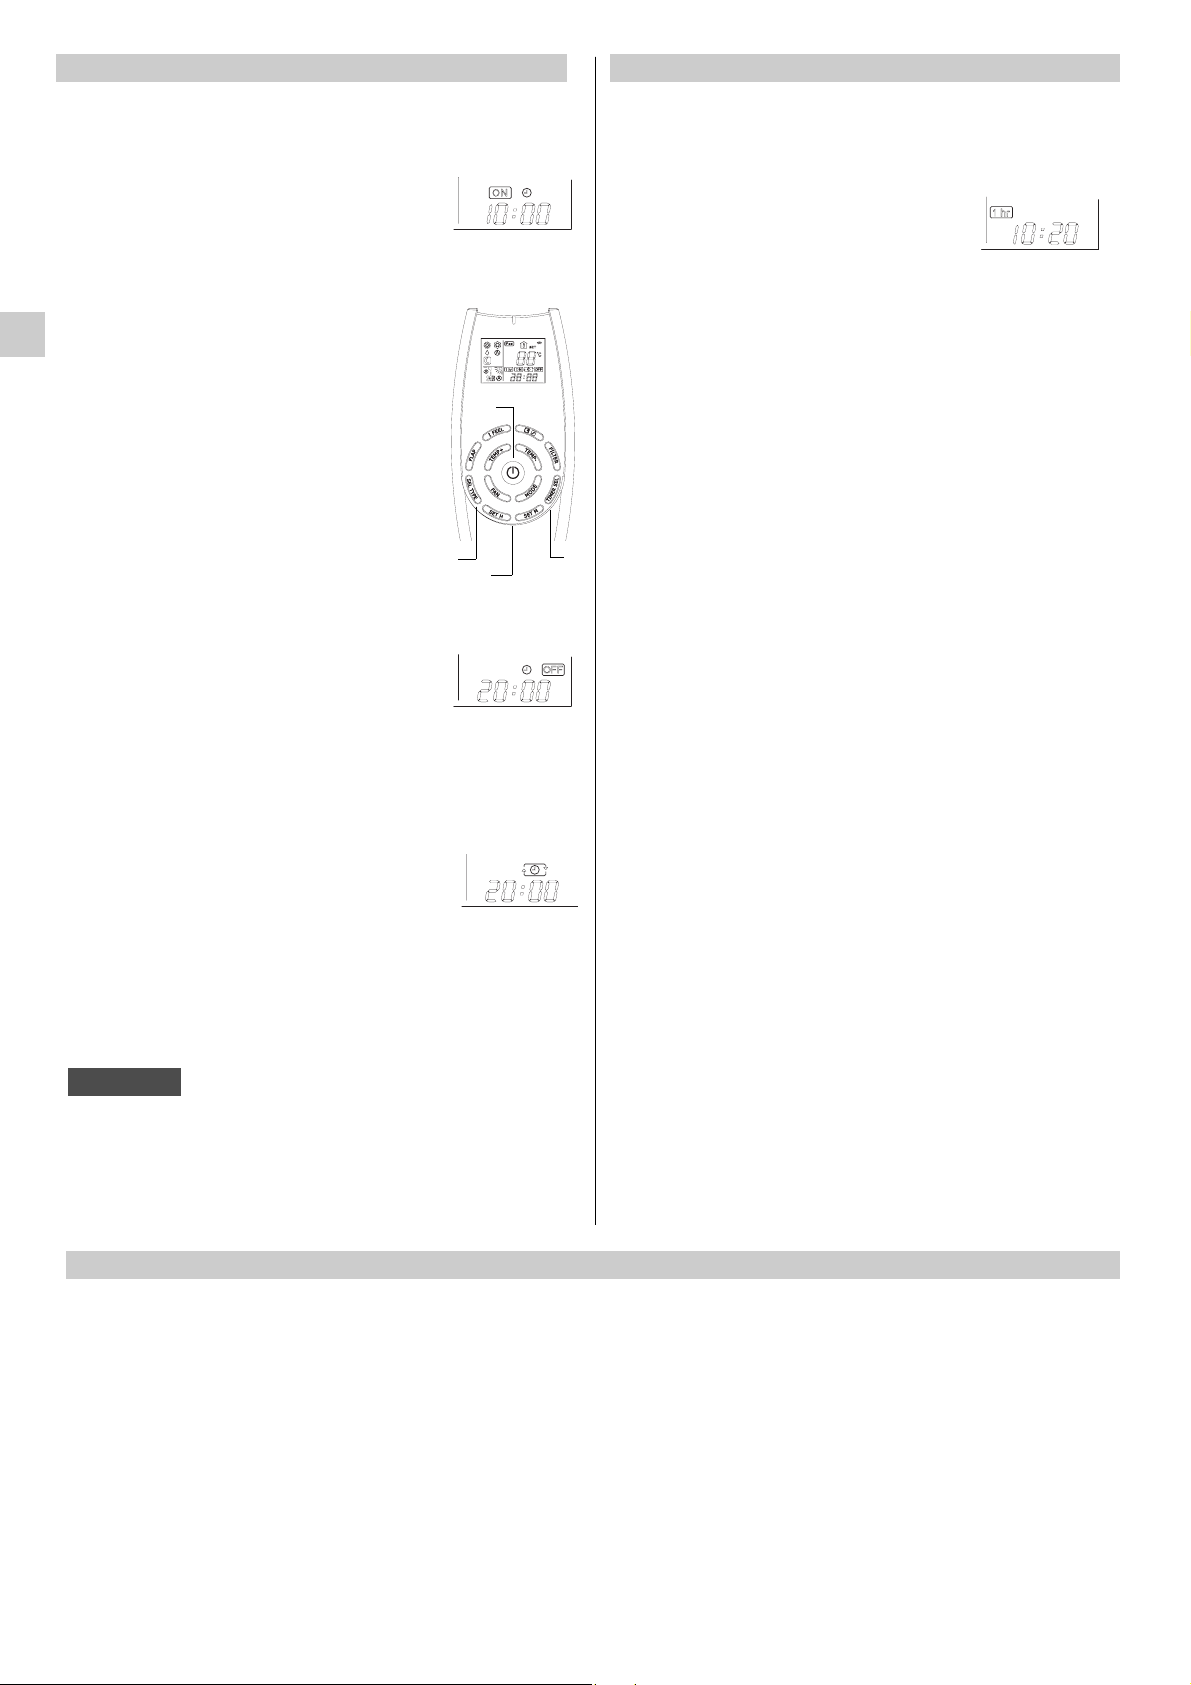
A) HOW TO SET THE ON TIME
1. Press the SEL TYPE button once.
The ON and time indications flash.
2. Press the SET H button until the desi-
gned hour is displayed.
Press the SET M button until the designed minutes are displayed. The display
will change automatically back to show
the present time after 10 sec.
3. Press the ON/OFF button to start the air
conditioner.
4. Press the TIMER SEL button to activate
the ON timer.
B) HOW TO SET THE OFF TIME
1. Press the SEL TYPE button twice.
The OFF and time indications flash.
2. Press the SET H button until the desi-
gned hour is displayed.
Press the SET M button until the designed minutes are displayed. The display
will change automatically back to show
the present time after 10 sec.
3. Press the ON/OFF button to start the air
conditioner.
4. Press the TIMER SEL button two times
to activate the OFF timer.
C) HOW TO SET A PROGRAM FOR DAILY
ON/OFF OPERATION (OR VICEVERSA)
1. Set the timer ON/OFF as shown in A)
and B).
2. Press the ON/OFF button to start the air
conditioner.
3. Press three times the TIMER SELECT
button to activate the DAILY timer.
SETTING THE TIMER
After timer setting, press PROGRAM button in order to check
the ON/OFF setting time.
When you set the timer, no signaling lamp appears on the unit;
please, refer to the remote control unit.
NOTES
SETTING THE 1 HOUR TIMER
This function causes the unit to operate for one hour at the set
conditions, regardless of whether the unit is on or off.
TIMER SETTING PROCEDURE.
• Press four times the TIMER SEL
button.The 1 HOUR TIMER mark will
appear on the display.
CANCELLATION PROCEDURE
• Press the ON/OFF button to turn the air
conditioner off.
• Wait for the indoor unit to stop operating.
• Press the ON/OFF button again to turn the
air conditioner on.
For continuous drainage: Switch off the unit and remove the main plug from the supply. Remove the rubber plug from the drain
pipe at the bottom rear of the air conditioner and connect a drain tube (20 mm inmer diameter) on to the drain pipe: Place the other
end in a normal drain.
Make sure that the tube is free from twists and bends. The tube must decline over its entire lenght.
Emptying the internal water container: Occasionally it is necessary to empty the internal water container. When the internal
water container is full the STANDBY lamp blinks.
Every time you move the unit to another room or when you store it, discharge the condensate water container, through the drain
pipe.
To empty the water container do the following action: put a container under the drain pipe at the bottom rear of the unit, remove the
rubber plug and allow the water container to drain. Replace the rubber plug onto the drain pipe and continue to use the air conditioner.
DRAINING
Page 8
The blinking of OPERATION
and STANDBY lamps, indicates that the operating mode
selected ( ) is not compatible with the unit. If this happen the air conditioner does
not operate until the correct
mode is selected.
8
If you have lost the remote control unit or it has troubles, follow
the steps below.
1. WHEN THE AIR CONDITIONER IS STOPPED
If you want to turn on the air conditioner push the operation button, using a thin object e.g. a paper clip.
The air conditioner will start in HIGH fan speed.
The temperature setting is 25°C.
NOTE
2. WHEN THE AIR CONDITIONER IS RUNNING
If you want to turn off the air conditioner push the operation button, using a thin object e.g. a paper clip, until the OPERATION
lamp is turned off.
Power failure during operation.
In the event of power failure, the unit will stop. When the power
is resumed, the unit will restart automatically after 3 minutes.
NOTE
DO NOT:
●
Block the air intake and outlet of the unit.
If they are obstructed, the unit will not work well, and may
be damaged.
●
Let direct sunlight into the room. Use sunshades,
blind or curtain.
DO:
●
Always try to keep the air filters clean. A clogged filter
will impair the performance of the unit.
●
To prevent conditioned air from escaping, keep windows,
doors and any other openings closed.
●
The flexible tube is correctly positioned without any sharp
bends nor plies.
●
The room temperature is above 16°C for cooling and dehumidification mode.
WARNING
• The blinking of STANDBY lamp (3) together with the stop of
the air conditioner indicate that the condensate water tank is
full.
• If your air conditioner does not work properly, first check the
following points before requesting service.
If it still does not work properly, contact your dealer or service
centre.
Trouble: the air conditioner does not run at all.
Possible cause:
1. Power failure.
2. Leakage breaker tripped.
3. Line voltage is too low.
4. Operation button is OFF.
5. Batteries in remote control unit have run down.
Remedy:
1. Restore power.
2. Contact service centre.
3. Consult your electrician or dealer.
4. Press the button again.
5. Replace batteries.
• The use of portable telephones near the air conditioner may
cause disturbance to its normal operation and must
be avoided. In case abnormal operation is noticed,
(OPR operation lamp lights (2) but the air conditioner will not
run) to restore normal operation turn-off electric supply for 60
seconds at least, by disconnecting the main switch or the
wall plug, then start again the air conditioner.
OPERATION WITHOUT THE REMOTE
CONTROL UNIT
TIPS FOR ENERGY SAVING
TROUBLESHOOTING
EG
NOTE
Trouble: The air conditioner does not operate, OPERATION
lamp (2) flashes and STANDBY lamp (3) is OFF.
Possible cause:
1. Defective coil sensor.
Remedy:
1. Contact service centre.
Trouble: The air conditioner does not operate, OPERATION
lamp (2) flashes and STANDBY lamp (3) is ON.
Possible cause:
1. Defective room sensor.
Remedy:
1. Contact service centre.
Trouble: Compressor runs but soon stops.
Possible cause:
1. Obstruction of the air intake grilles.
Remedy:
1. Remove obstruction.
Trouble: Poor cooling performance.
Possible cause:
1. Dirty or clogged air filters.
2. Heat source or many people in room.
3. Doors and/or windows are open.
4. Obstacle near air intake or air discharge port.
5. The set temperature on the remote control unit is too high.
Remedy:
1. Clean air filters to improve airflow.
2. Eliminate heat source if possible.
3. Shut them to keep the heat or cold out.
4. Remove it to ensure good airflow.
5. Set the right temperature on the remote control unit.
Trouble: Clicking sound is heard from the air conditioner.
Possible cause:
1. During operation, any plastic parts may expand or shrink
due to a sudden temperature change. In this event, a clicking sound may occur.
Remedy:
1. This is normal, and the sound will disappear when an even
temperature is settled.
OPERATION BUTTON
1
2
3
Page 9
9
EG
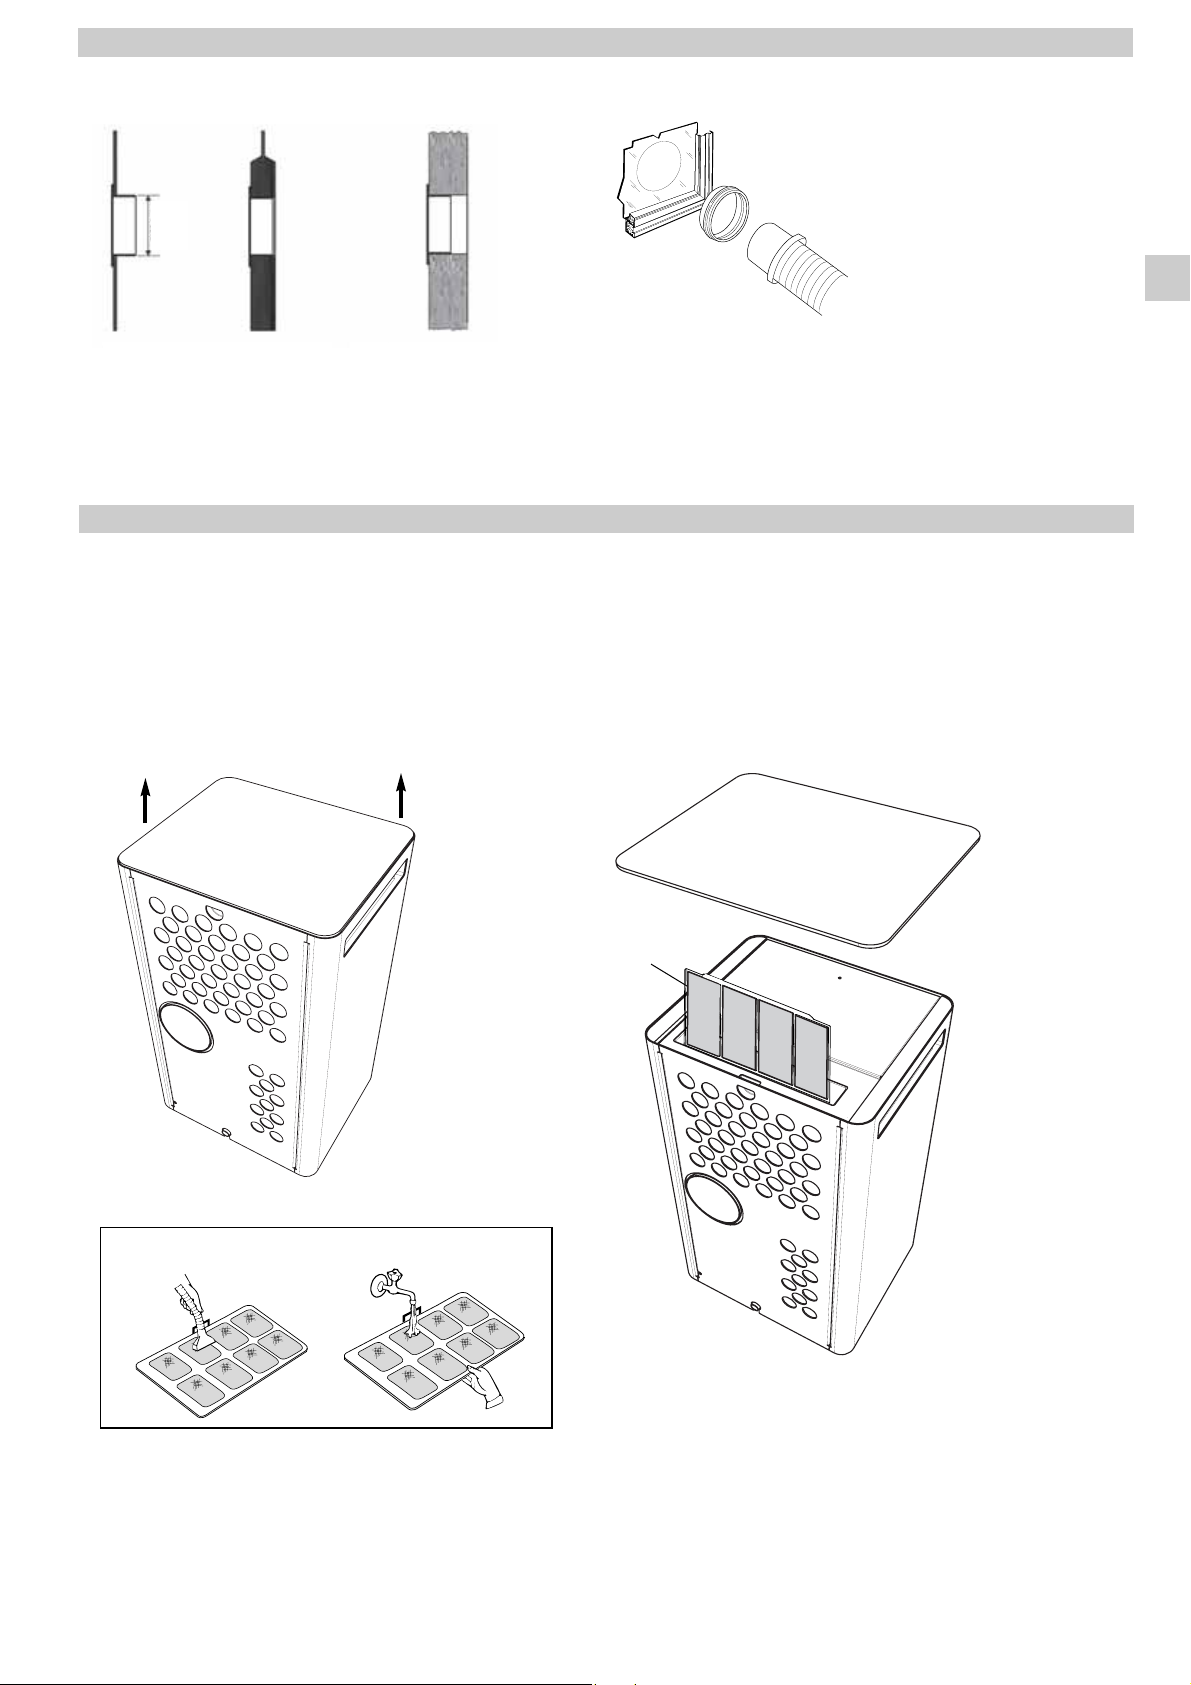
PORTHOLE KIT
ASSEMBLING
●
Make a hole in the window
pane.
●
Insert the porthole without the
plug.
●
Remove the terminal pipe
fitting of the warm air outlet
from the retractile flexible
pipe.
●
Bring the air conditioner near
the window and insert
the air outlet in the porthole.
If you want to utilise the air conditioner in several rooms, it is
possible to buy varies portholes for air discharge separately.
CARE AND CLEANING
WARNING! For safety’s sake, be sure to turn the air conditioner OFF and also disconnect it from the power supply before cleaning
it.
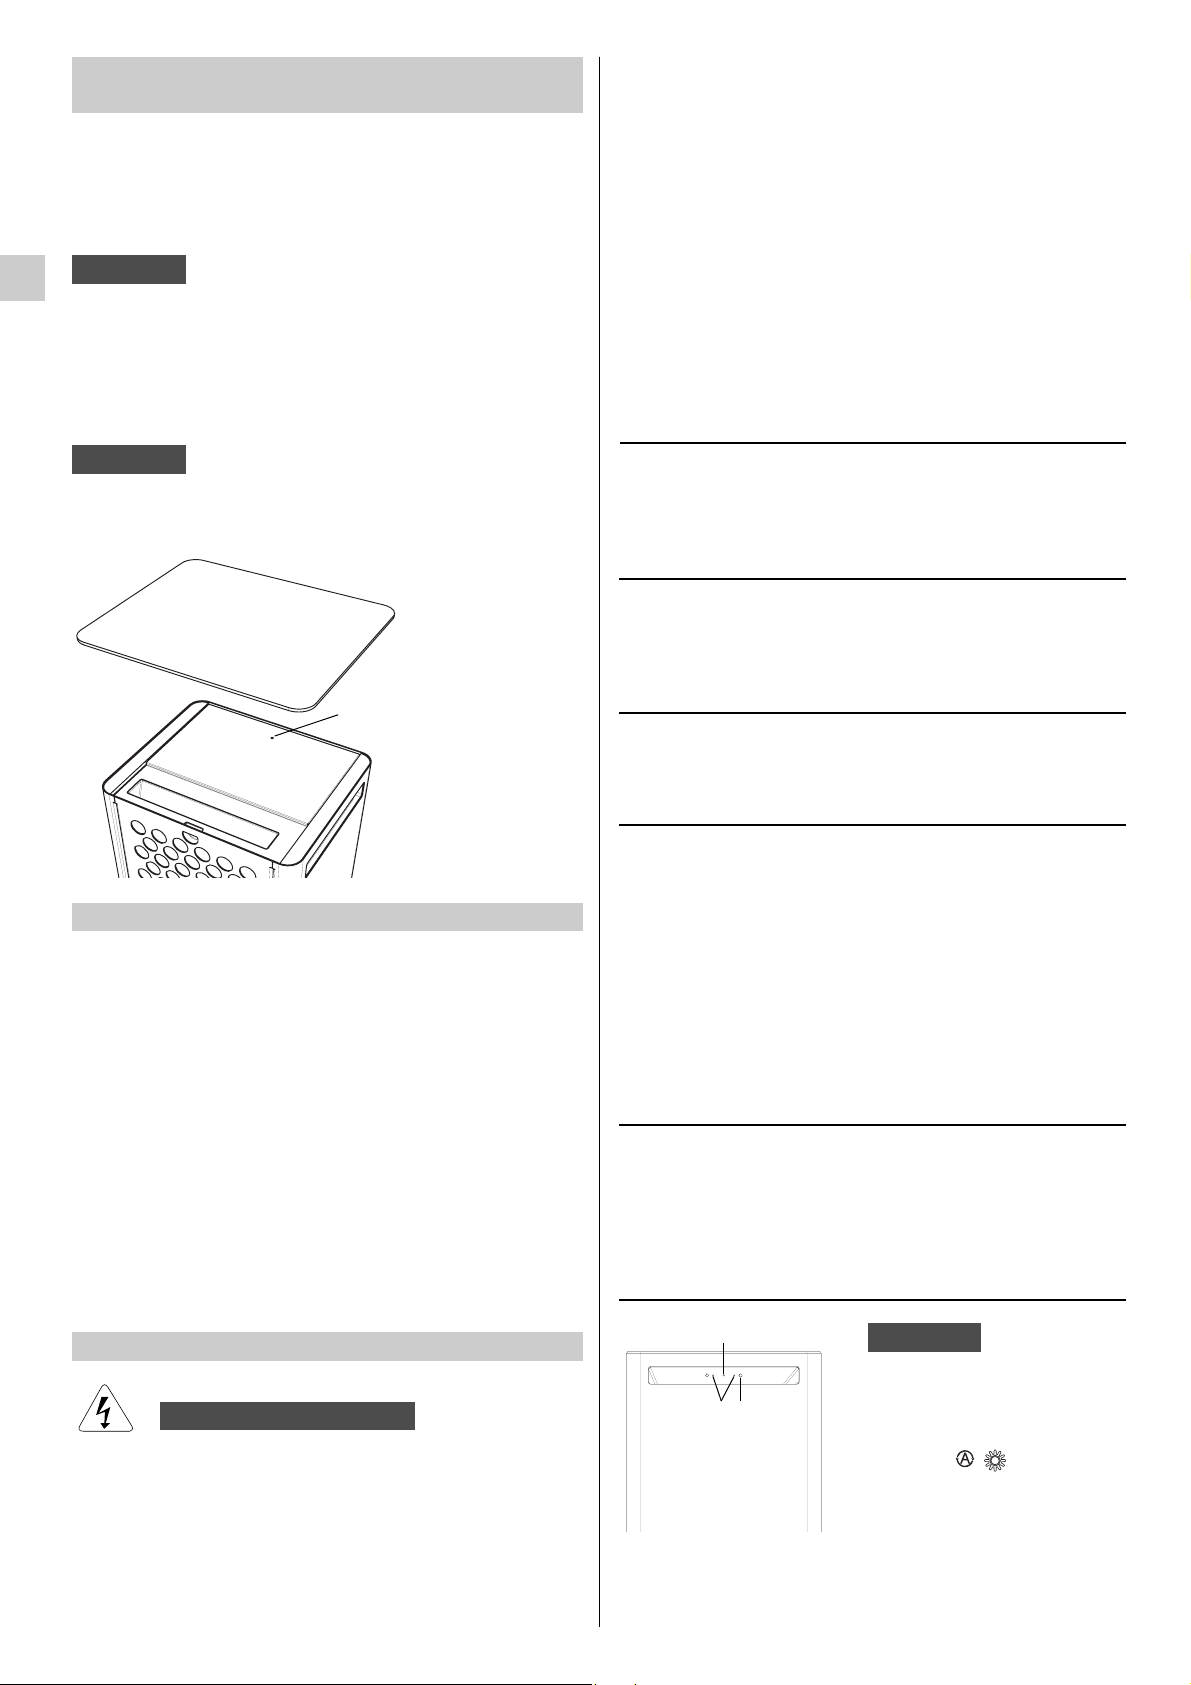
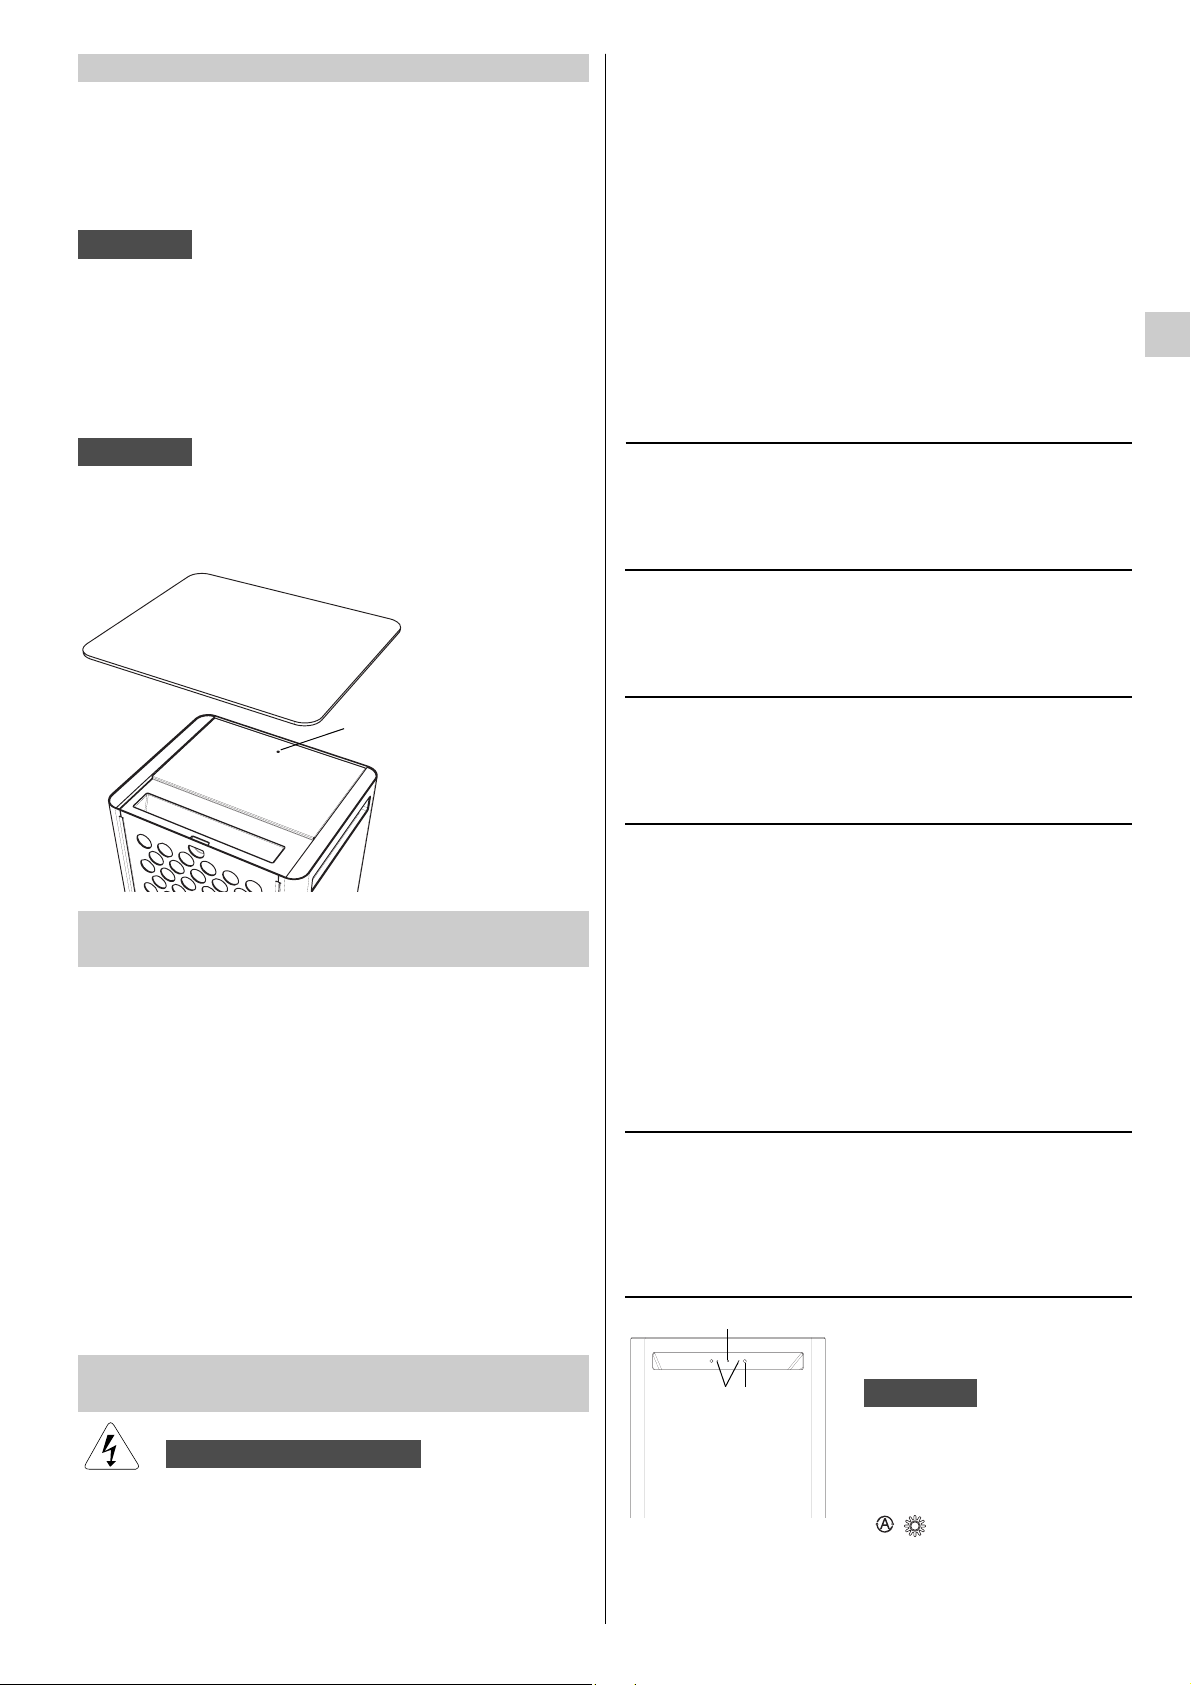
1. Cleaning of the Air Filter
The air filter must be checked at least once every two weeks operation. Operation with a dirty filter always causes a lower efficiency of the air conditioner and severe product damage.
The filter can be removed from the upper part of the unit, removing the upper panel and pulling upwards. Use a vacuum cleaner
to remove light dust. If there is sticky dust on the filter, wash it with lukewarm soapy water, then rinse in clean, cold water and dry
it before reinstallation.
135 mm
In the window pane
In the wooden
kickboard of a
french window
In the wall: you are
recommended to
insulate the section of
the wall using suitable insulation
FILTER CLEANING
Filter
Page 10
10
EG
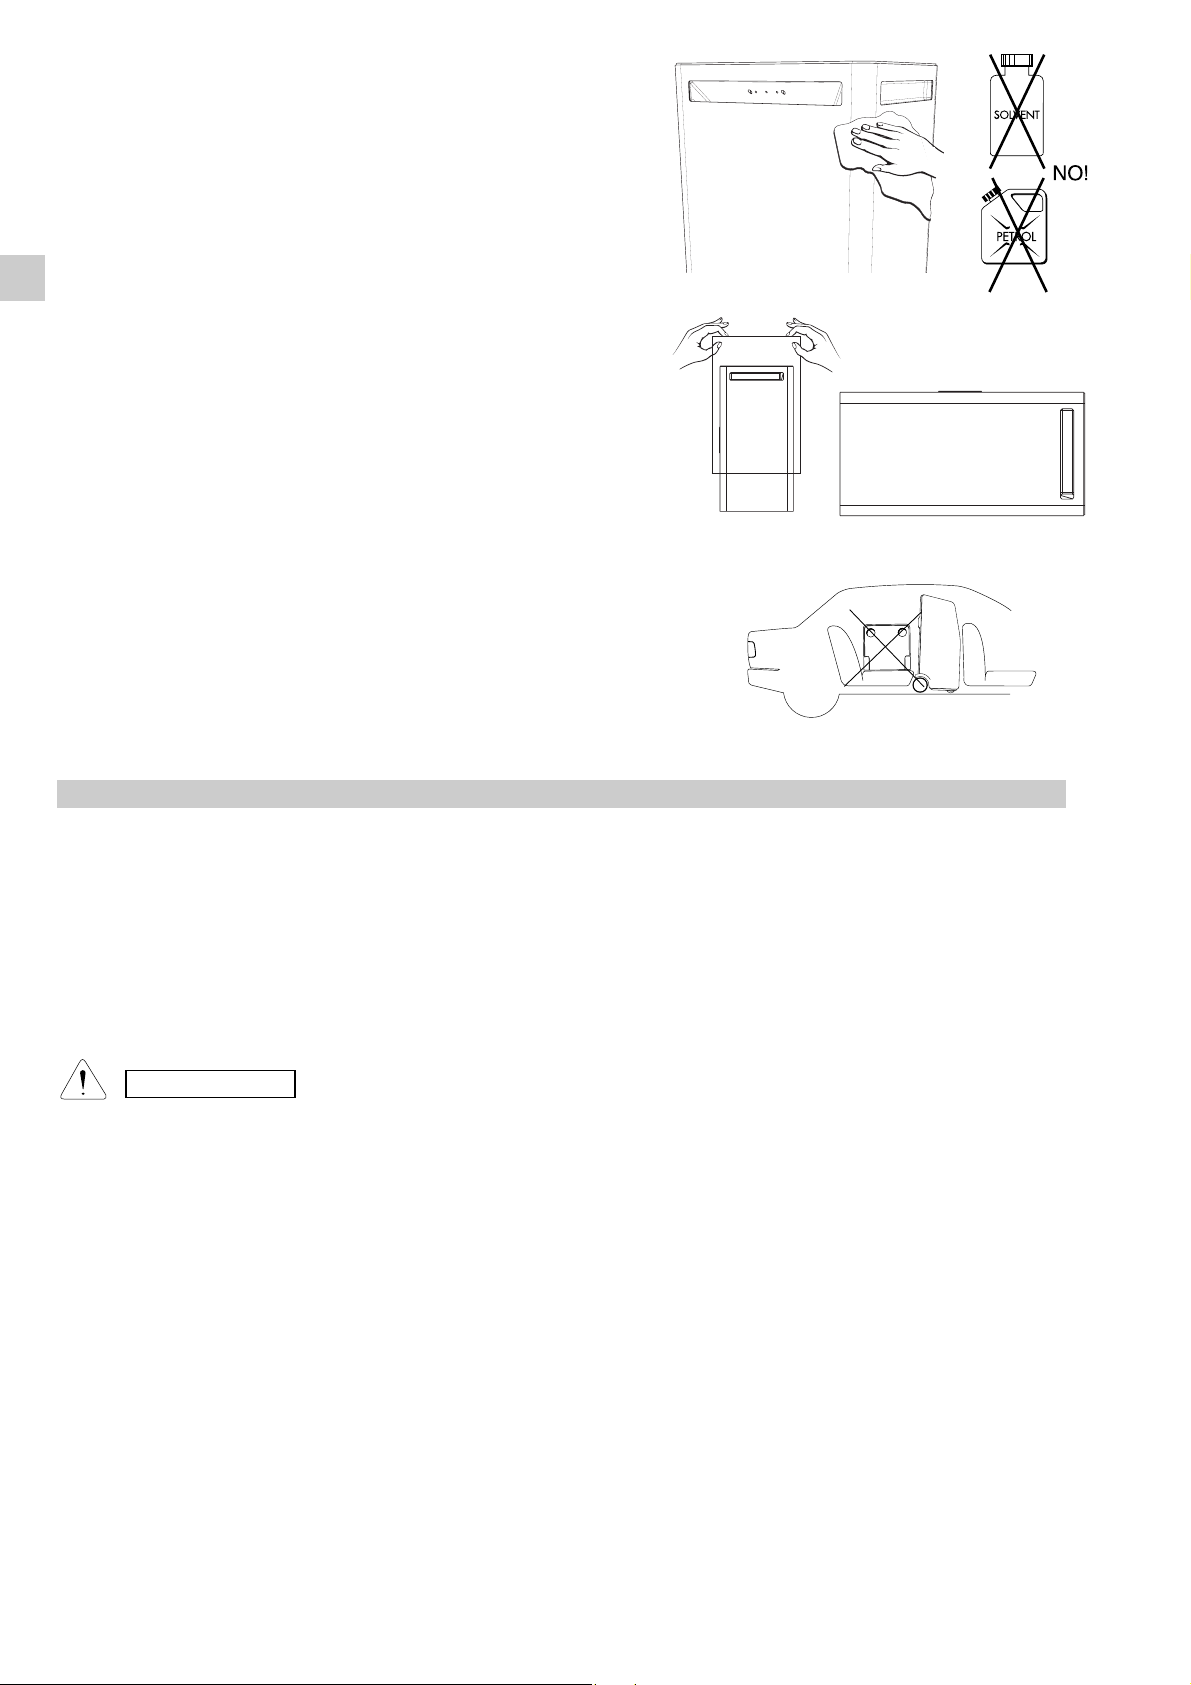
2. Cleaning of Casing.
To clean the air conditioner, wipe it with a clean soft cloth, lightly
moisted. In case it is stained, moisten the cloth with soapy water.
Never use solvents or harsh chemicals, nor very hot water. Do not
pour water over the air conditioner to clean it: this will damage the
internal components and cause an electric shock hazard.
3. Storage.
If you are not going to make use of the air conditioner for a long
period, before storing it away clean the air filters and verify that both
the internal water tanks are empty. Always store the unit
in the vertical position. Do not put heavy objects on top of the unit
and protect it with a cloth or a plastic bag.
4. Transport.
Keep the air conditioner in the vertical position during
transportation. If this is not possible, then lay it on the right side;
when at destination put the air conditioner back in the vertical position and wait at least 4 hours before using it for cooling
5. For your safety care check periodically the conditions of the
electric supply cable; in case you should notice any damage
due to usage, call the nearest After Sale Service to get the
cable replaced.
NO!
NO!
If your air conditioner doesn’t work properly, before requesting service, verify that:
●
the plug is properly inserted into the power socket;
●
the circuit breaker is in the ON position and fuses have not blown;
●
the air filter is not clogged;
●
the flexible tube is correctly positioned without any sharp bends nor plies;
●
the difference between room temperature and set temperature is over 1°C;
●
you have correctly carried-out the instructions contained in this manual.
USEFUL ADVICE
ATTENTION
The blinking of STANDBY lamp (3), together with the stop of the air conditioner indicate that the condensate water tank is full.
Page 11
I
INDICE
IL PRODOTTO............................................................................................................. 2
SEGNALAZIONI .......................................................................................................... 3
PRIMA DI USARE IL CLIMATIZZATORE.................................................................... 3
MODALITÀ D’USO ...................................................................................................... 4
USO DEL TELECOMANDO......................................................................................... 4
I
Inserimento delle batterie.......................................................................................... 4
I
Selettore del sensore di temperatura........................................................................ 4
I
Funzionamento con il telecomando .......................................................................... 4
TELECOMANDO ........................................................................................................ 5
COME REGOLARE L'OROLOGIO ............................................................................. 6
RAFFREDDAMENTO ................................................................................................. 6
DEUMIDIFICAZIONE................................................................................................... 6
VENTILAZIONE ........................................................................................................... 6
SCELTA VELOCITÀ' VENTILATORE.......................................................................... 6
PROGRAMMA NOTTURNO........................................................................................ 6
REGOLAZIONE DEL TIMER....................................................................................... 7
REGOLAZIONE DEL TIMER 1 ORA ........................................................................... 7
DRENAGGIO CONDENSA.......................................................................................... 7
FUNZIONAMENTO SENZA TELECOMANDO............................................................ 8
CONSIGLI PER IL MASSIMO COMFORT ED IL MINIMO CONSUMO ...................... 8
IDENTIFICAZIONE E SOLUZIONE PROBLEMI DI FUNZIONAMENTO .................... 8
KIT OBLÒ..................................................................................................................... 9
MANUTENZIONE E CURA ......................................................................................... 9
CONSIGLI UTILI ......................................................................................................... 10
DICHIARAZIONE DI
CONFORMITÀ
Questo prodotto è marcato
in quanto conforme alle Direttive:
– Bassa Tensione n. 2006/95/CE.
– Compatibilità Elettromagnetica n.
89/336 CEE, 92/31 CEE e 93/68
CEE.
Questa dichiarazione sarà nulla nel
caso di impiego diverso da quello
dichiarato dal Fabbricante e/o di
mancata osservanza, anche solo
parziale, delle istruzioni
d'installazione e/o d'uso.
IL PRODOTTO
1. Telecomando a raggi infrarossi
2. Segnalazioni
3. Mandata aria
4. Griglia aspirazione aria
5. Filtro Aria
6. Frontale estetico
7.
Tubo scarico condensa
8. Cavo elettrico con spina
9. Ruote trasporto
10. Maniglia trasporto
(su entrambi i lati)
11. Tubo flessibile retrattile
12. Raccordo terminale scarico aria calda
Condizioni limite di funzionamento:
Temperatura interna:
Raffreddamento:MIN: 16°C B.S. / 14°C B.U.
MAX: 32°C B.S. / 24°C B.U.
Deumidificazione:MIN: 10°C B.S / 80% U.R.
MAX: 32°C B.S. / 80% U.R.
12
2
11
10
4
5
7
8
9
1
2
INFORMAZIONE PER IL CORRETTO SMALTIMENTO DEL PRODOTTO AI SENSI DELLA DIRETTIVA
EUROPEA 2002/96/CE
Alla fine della sua vita utile questo apparecchio non deve essere smaltito insieme ai rifiuti domestici.
Deve essere consegnato presso appositi centri di raccolta differenziata oppure presso i rivenditori che forniscono
questo servizio.
Smaltire separatamente un apparecchio elettrico ed elettronico e le relative batterie consente di evitare possibili
effetti negativi sull’ambiente e sulla salute umana derivanti da uno smaltimento inadeguato e permette di recuperare
e riciclare i materiali di cui è composto, con importanti risparmi di energia e risorse.
Per sottolineare l’obbligo di smaltire separatamente queste apparecchiature e le batterie, sul prodotto è riportato il
simbolo del cassonetto barrato.
Lo smaltimento abusivo del prodotto da parte dell’utente comporta l’applicazione delle sanzioni amministrative previste dalla normativa vigente.
3
6
Page 12
GIG
SEGNALAZIONI
1. Ricevitore: riceve i segnali inviati dal telecomando.
2. Spia funzionamento (OPERATION): si accende quando
l’unità è in funzione.
Lampeggia una volta per avvisare che il segnale del
telecomando é stato ricevuto e memorizzato. Lampeggia
continuamente durante le funzioni di protezione (sbrinamento, ecc).
3. Spia attesa (STANDBY): Si accende quando il climatizzatore é collegato alla corrente ed é pronto a ricevere il
segnale dal telecomando.
Allarme livello acqua: Quando il serbatoio è pieno, il climatizzatore si arresta automaticamente e questa spia inizia a lampeggiare.
La posizione OFF non interrompe l’alimentazione elettrica.
Usate l’interruttore principale per isolare il climatizzatore
d’aria.
AVVERTIMENTO
PRECAUZIONE
PRIMA DI USARE IL CLIMATIZZATORE
● Verificare che la tensione monofase di alimentazione nel luogo di utilizzo sia di 220V-240V~ 50Hz.
● Assicuratevi che l'impianto elettrico sia in grado di erogare la corrente di esercizio necessaria per il climatizzatore oltre a quella
assorbita normalmente da altre utenze (elettrodomestici, illuminazione). Vedere gli assorbimenti massimi sulla
targhetta dati posta sul climatizzatore.
● L'allacciamento alla rete elettrica del climatizzatore deve essere eseguito in conformità alle norme d'installazione vigenti.
● Assicuratevi che interruttori automatici e valvole di protezione dell'impianto siano in grado di sopportare una corrente di spunto di
20 A, (normalmente per un tempo inferiore a 1 secondo).
● Evitare di installare il climatizzatore in locali dove potrebbe essere investito da spruzzi d'acqua (es. lavanderie).
●
Accertatevi che il pulsante marcia - arresto sul pannello di comando del climatizzatore sia nella posizione OFF.
● La presa dell'impianto deve essere sempre provvista di messa a terra efficiente.
● Non usare mai la spina come mezzo per arrestare o avviare il climatizzatore:
usare sempre il pulsante marcia/arresto sul pannello di comando dell'unità.
● Non movimentate il climatizzatore mentre é in funzione, spegnere e togliere la
spina dalla presa di corrente. Controllare ed eventualmente svuotare la condensa, tramite il tubo di scarico posto sul retro.
● PRECAUZIONE! Non inserite oggetti nel climatizzatore. É molto pericoloso
perché il ventilatore gira ad alta velocità.
● ATTENZIONE!
Il climatizzatore è dotato di un sistema di protezione del compressore dai
sovraccarichi che non consente la partenza del compressore se non sono
trascorsi almeno 3 minuti da un precedente arresto.
● Assicurare la libera circolazione dell'aria all'unità. Non ostruire con tendaggi o
simili le griglie di aspirazione e quella di mandata. La parte superiore deve essere
libera da qualsiasi ostacolo, non depositare oggetti sul climatizzatore.
● Il costruttore non si assume responsabilità alcuna nel caso in cui le norme di
sicurezza e antinfortunistiche non vengano rispettate.
● Prima di eseguire una qualsiasi operazione di spostamento o pulizia, assicuratevi
che la spina sia disinserita dalla presa di corrente.
● Non utilizzare il climatizzatore in presenza di cavi o spine danneggiate. Se il cavo
d’alimentazione è danneggiato dovrà essere sostituito dal produttore, dal venditore o da personale qualificato onde evitare rischi.
● Questo climatizzatore non è destinato a persone (bambini inclusi) con ridotte
capacità fisiche, sensoriali o mentali, oppure senza la necessaria esperienza e
conoscenza, a meno che non abbiano ricevuto la necessaria supervisione o formazione per l’uso del climatizzatore da una persona responsabile per la loro sicurezza.
AVVERTIMENTO
3
1
2
3
4
NOTA
Il lampeggio contemporaneo delle 2 spie OPERATION e
STANDBY, indica che il modo di funzionamento selezionato
( ) non é compatibile con l’unità in oggetto. Se ciò
accade il condizionatore non funziona fino al ripristino della
modalità corretta.
4. Tasto funzionamento (senza telecomando): Premere que-
sto tasto, con un oggetto sottile (es. un fermaglio), per passare da una funzione all’altra (OFF e COOL).
Page 13

I
4
MODALITÁ D'USO
RAFFREDDAMENTO
●
Avvicinate il più possibile il climatizzatore alla finestra. Inserite il tubo flessibile
agganciandolo, alla parte posteriore del climatizzatore. Estendete il flessibile quanto
basta per raggiungere l’esterno passando sotto i battenti accostati della finestra.
Accostate la finestra in posizione di minima apertura.
●
Se la finestra ha un davanzale verso l’interno può rendersi necessario l’uso
dell’apposito raccordo terminale fornito in dotazione. Inserite il raccordo
nell’estremità libera del flessibile.
●
Aprite la finestra e bloccate uno dei battenti con la maniglia. Appoggiate il raccordo
terminale al battente fisso, accostate l’altro battente della finestra e bloccatelo in
posizione usando l’apposito laccio.
●
Evitate curve troppo strette o pieghe del tubo flessibile.
●
Nel caso di utilizzo dell'obló eseguire un foro del diametro di 135 mm nel vetro
della finestra.
NO!
Il climatizzatore non raffredda l’ambiente quando funziona come deumidificatore.
Quando usate l’apparecchio come deumidificatore, non dovete collegare il tubo flessibile. Per ottenere la massima efficienza di deumidificazione lasciate l’attacco di
scarico posteriore libero di scaricare direttamente in ambiente.
●
Scollegate il tubo flessibile afferrandolo in prossimità del punto di attacco
sull’apparecchio e ruotandolo sino a liberarlo dai ganci di bloccaggio.
DEUMIDIFICAZIONE (DRY)
INSERIMENTO DELLE BATTERIE
● Rimuovere il coperchio sul retro del telecomando e verifica-
re che i quattro microinterruttori siano impostati come in
figura:
USO DEL TELECOMANDO
SELETTORE DEL SENSORE DI TEMPERATURA
● In condizioni normali la temperatura ambiente viene rilevata
e controllata dal sensore di temperatura posizionato
all’interno del telecomando (icona IFEEL attiva sul display).
Questa funzione permette di creare una temperatura
ambiente ottimale perché il telecomando trasmette la temperatura dalla posizione in cui vi trovate. Quindi, usando
questa funzione, il telecomando deve sempre essere indirizzato verso il condizionatore.
FUNZIONAMENTO CON IL TELECOMANDO
Indirizzare il telecomando con la testina del trasmettitore verso
il ricevitore posto sul condizionatore d’aria.
TESTINA DEL TRASMETTITORE
TELECOMANDO
RICEVITORE
Il telecomando trasmette il segnale della temperatura
ambiente alla pressione di ogni tasto ed automaticamente ogni cinque minuti.
Se, a causa di inconvenienti, l’unità non riceve il segnale del telecomando il condizionatore d'aria utilizza, per il controllo della temperatura ambiente, il sensore presente all’interno dell’unità. In questi casi la
temperatura vicino al telecomando può differire dalla
temperatura rilevata nella posizione del condizionatore d'aria.
NOTA
● Inserire due batterie da 1,5 V-DC tipo AAA alcaline rispet-
tando la polarità indicata sul telecomando.
L’indicazione dell’ora sul display lampeggia.
Premere il tasto SEL TYPE.
Il telecomando ora é pronto per funzionare.
● La durata media delle batterie è di sei mesi e dipende dalla
frequenza con cui si usa il telecomando.
Rimuovere le batterie nel caso di lungo inutilizzo del telecomando (oltre un mese).
Sostituire le batterie quando la spia di trasmissione dati del
telecomando non lampeggia oppure quando il condizionatore non risponde ai comandi del telecomando.
● Le batterie del telecomando contengono sostanze inquinan-
ti. Terminata la loro vita utile, devono essere smaltite
secondo le vigenti normative (v. paragrafo “COME RIMUOVERE LE BATTERIE” in fondo al manuale).
● E’ possibile disattivare il sensore di temperatura del teleco-
mando premendo il tasto I FEEL. In tal caso la relativa
icona sul display si spegne e diventa operativo il sensore
presente all’interno dell’unità.
Questa funzione è raccomandata in autunno e in inverno. Se si utilizza questa
modalità in estate bisogna collegare il tubo flessibile di espulsione dell’aria calda.
NOTA
Page 14
GIG
TELECOMANDO
5
PULSANTE “NIGHT”
(programma notturno)
Per i dettagli vedere “Programma notturno”.
Quando si preme questo pulsante il simbolo appare sul visore, e il
microprocessore del telecomando regolerà
la temperatura selezionata per risparmiare
energia.
TRASMETTITORE
Quando vengono premuti i pulsanti del
telecomando, il simbolo si accede
sul visore per trasmettere i cambiamenti
della regolazione al ricevitore del climatizzatore.
PULSANTI SELEZIONE TEMPERATURA
TEMP - (più freddo)
Premere questo pulsante per diminuire la
temperatura selezionata.
TEMP + (più caldo)
Premere questo pulsante per aumentare
la temperatura selezionata.
SENSORE
Un sensore di temperatura all’interno del
telecomando rileva la temperatura ambiente.
PULSANTE “SEL TYPE”
Premere questo pulsante per selezionare le funzioni:
• impostazione dell’ora
• impostazione del timer ON/OFF
Per dettagli vedere le sezioni “COME
REGOLARE L’OROLOGIO” e “REGOLAZIONE DEL TIMER”.
SELETTORE SENSORE
DI TEMPERATURA
Premere il pulsante I FEEL per modificare l’impostazione del sensore di temperatura attivo ( da telecomando a condizionatore e viceversa).
PULSANTE “FAN”
(velocità ventilatore)
La velocità del ventilatore viene
scelta automaticamente dal
microprocessore.
Alta velocità ventilatore.
Media velocità ventilatore.
Bassa velocità ventilatore.
PULSANTI REGOLAZIONE OROLOGIO
E IMPOSTAZIONE ORARIO TIMER
Premendo i pulsanti SET H / SET M è
possibile impostare l’ora e il timer.
Per dettagli vedere le sezioni
“COME REGOLARE L’OROLOGIO” e
“REGOLAZIONE DEL TIMER”.
PULSANTE ON/OFF (acceso/spento)
Il pulsante serve per mettere in funzione
o arrestare il climatizzatore.
PULSANTE “TIMER SEL”
Premendo il pulsante sul display viene attivata la procedura per l’impostazione del
timer. Per dettagli vedere esempio
“REGOLAZIONE DEL TIMER”.
VISORE
Visualizza le informazioni quando il telecomando è acceso.
Modo di funzionamento
Velocità ventilatore
Alta velocità
Automatico
Media velocità
Bassa velocità
Conferma trasmissione dati
al climatizzatore
Temperatura
impostata
Indica che il climatizzatore
funziona in modalità I FEEL
(sensore telecomando attivo)
Programma
notturno
Indica i tipi di
timer
Automatico
(
Raffreddamento
Riscaldamento
(
Deumidificazione
Ventilazione
PULSANTE MODO
DI FUNZIONAMENTO
Premere questo pulsante per modificare
il funzionamento del condizionatore.
(automatico)
(
Quando viene scelta la posizione “automatico” il microprocessore sceglie automaticamente tra raffreddamento e riscaldamento in base alla differenza tra la
temperatura ambiente e quella impostata sul telecomando.
(riscaldamento)
(
Il condizionatore riscalda il locale.
(deumidificazione)
Il condizionatore riduce l’umidità dell’aria
ambiente.
(raffreddamento)
Il condizionatore raffredda l’aria abbassando la temperatura del locale.
(ventilazione)
Il condizionatore funziona solo come
ventilatore.
(
Modalità non attiva
PULSANTI INATTIVI
Orologio
Temperatura
ambiente
Page 15

I
6
Il climatizzatore provvede a smaltire automaticamente l’acqua
di condensa alla ALTA e MEDIA velocità di ventilazione, mentre alla BASSA velocità la condensa viene raccolta nel serbatoio.
1. Premere tre volte il pulsante SEL TYPE.
L’indicazione dell’ora inizierà a lampeggiare.
2. Premere il pulsante SET H fino a visualizzare l’ora desiderata.
Premere il pulsante SET M fino a visualizzare i minuti desiderati.
L’indicazione dell’ora sul visore cesserà automaticamente di
lampeggiare dopo 10 secondi.
COME REGOLARE L'OROLOGIO
RAFFREDDAMENTO
DEUMIDIFICAZIONE
●
Usare la funzione deumidificazione quando volete ridurre
l’umidità dell’aria ambiente.
●
Con la funzione deumidificazione impostata, il ventilatore
automaticamente gira alla velocità o si ferma per
evitare di raffreddare troppo.
●
La funzione deumidificazione non può essere attivata quando
la temperatura interna è al di sotto di 15 °C.
●
L’umidità rimossa dall’ambiente (condensa) sarà raccolta nel
serbatoio interno del climatizzatore.
NOTA
I valori precisati sulla tabella si riferiscono al funzionamento del
condizionatore quando è abilitato il sensore sul telecomando
(v. selettore del sensore di temperatura).
I valori precisati variano leggermente nel caso sia abilitato il
sensore posizionato nell’unità.
La velocità non è attiva in modalità VENTILAZIONE.
SCELTA VELOCITÀ VENTILATORE
MANUALE
Per regolare manualmente la velocità del ventilatore agire sul
pulsante FAN scegliendo la velocità desiderata:
NOTA
1 ora 1 ora TEMPO
Temperatura impostata
Temperatura ambiente
RAFFREDDAMENTO E DEUMIDIFICAZIONE
PROGRAMMA NOTTURNO
●
Il programma notturno serve per risparmiare energia elettrica.
1.Premere il pulsante MODE per predisporre il
climatizzatore in
raffreddamento o deumidificazione.
2.Premere il pulsante NIGHT.
3.Il simbolo appare sul visore. Per rilasciare il program-
ma premere nuovamente il pulsante NIGHT.
Cos' è il Programma Notturno?
All’inizio il climatizzatore raffredda o deumidifica il locale fino
alla temperatura impostata, quindi si arresta. Dopo circa 1 ora
la temperatura impostata viene automaticamente modificata
come segue (v. grafico).
Il climatizzatore funziona fino alla nuova temperatura impostata,
quindi si arresta. Dopo circa 1 ora la temperatura impostata
viene nuovamente aumentata di 1°C . In questo modo si
risparmia energia senza pregiudicare il comfort notturno nel locale.
VENTILAZIONE
Se si vuole soltanto far circolare aria nel locale senza modificare
la temperatura, operare come segue:
1.Premere il pulsante MODE (modo di funzionamento) fino a
far apparire sul visore il simbolo VENTILAZIONE .
2.Premere il pulsante ON/OFF e mettere in funzione il
condizionatore.
DIFFERENZA TRA
TEMPERATURA AMBIENTE VELOCITÁ VENTILATORE
E TEMPERATURA IMPOSTATA
Raffreddamento
2 °C e oltre Massima
e Tra 2 e 1 °C Media
deumidificazione
Meno di 1 °C Minima
NOTA
Verificare che l’unità sia collegata alla rete
elettrica e che la spia STANDBY sia accesa.
1. Premere il pulsante MODE (modo di funzionamento) fino a far apparire sul visore il simbolo
RAFFREDDAMENTO .
2. Premere il pulsante ON/OFF e mettere in funzione il condizionatore.
3. Premere i pulsanti TEMP+/- per impostare la
temperatura desiderata (il campo di regolazione varia tra 32 °C massimo e 16 °C minimo).
NOTA
IL VISORE INDICHERÀ IL VALORE DELLA
TEMPERATURA SELEZIONATA.
TRASCORSI 5 SECONDI DALL’IMPOSTAZIONE DELLA TEMPERATURA DESIDERATA IL VISORE TORNERÀ A INDICARE LA TEMPERATURA AMBIENTE.
4. Premere il pulsante FAN per impostare la velocità ventilatore.
1
4
3
2
1. Premere il pulsante MODE (modo di funzionamento) fino a far
apparire sul visore il simbolo DEUMIDIFICAZIONE .
2. Premere il pulsante ON/OFF e mettere in funzione il condizionatore.
3. Premere i pulsanti TEMP+/- per impostare la temperatura desidera-
ta (il campo di regolazione varia tra 32 °C massimo e 16 °C minimo).
IL VISORE INDICHERÀ IL VALORE DELLA TEMPERATURA SELEZIONATA.
TRASCORSI 5 SECONDI DALL’IMPOSTAZIONE
DELLA TEMPERATURA DESIDERATA IL VISORE
TORNERÀ AD INDICARE LA TEMPERATURA
AMBIENTE.
AUTOMATICO
Impostare con il pulsante FAN la posizione “AUTOMATICO”
. Il microprocessore controllerà automaticamente la velocità del ventilatore. Quando il climatizzatore comincia a funzionare il sensore temperatura rileva la differenza tra la temperatura ambiente e la temperatura impostata e la trasmette al
microprocessore che automaticamente sceglie la velocità del
ventilatore più idonea.
Alta velocità Media velocità Bassa velocità
1°C
1°C
Page 16
GIG
7
REGOLAZIONE DEL TIMER
A) COME REGOLARE L’ORA DI PARTENZA
(ON)
1. Premere una sola volta il pulsante SEL
TYPE.
L’indicazione ON e quelle dell’ora inizieranno
a lampeggiare.
2.Premere il pulsante SET H fino a quando
viene visualizzata l’ora desiderata.
Premere il pulsante SET M fino a quando
sono visualizzati i minuti desiderati. L’indicazione sul visore ritornerà ad indicare l’ora
corrente dopo 10 secondi.
3.Premere il pulsante ON/OFF per mettere in
funzione il condizionatore.
4.Premere il pulsante TIMER SEL per impostare il timer sulla funzione ON TIME (partenza).
B) COME REGOLARE L’ORA DI FERMATA
(OFF)
1.Premere due volte il pulsante SEL TYPE.
L’ indicazione OFF e quella dell’ora inizieranno a lampeggiare.
2.Premere il pulsante SET H fino a quando
viene visualizzata l’ora desiderata. Premere il
pulsante SET M fino a quando sono visualizzati i minuti desiderati.
L’indicazione sul visore tornerà ad indicare
l’ora corrente dopo 10 secondi.
3.Premere il pulsante ON/OFF per mettere in
funzione il condizionatore.
4.Premere due volte il pulsante TIMER SEL
per impostare il timer sulla funzione “ON
TIME” (partenza).
C) COME REGOLARE IL PROGRAMMA
GIORNALIERO
ACCESO/SPENTO (O VICEVERSA)
1.Regolare il timer come illustrato ai punti A e B.
2.Premere il pulsante ON/OFF per mettere in
funzione il condizionatore.
3.Premere tre volte il pulsante TIMER SEL per
impostare il programma del timer
acceso/spento o viceversa.
Dopo la regolazione del timer, per verificare l’orario di impostazione in accensione/spegnimento (ON/OFF) premere il pulsante SEL
TYPE.
Quando si imposta il timer, non ci sono spie che segnalano l’impostazione; bisogna quindi fare riferimento al telecomando.
NOTE
2
1
4
3
OPERAZIONI DI IMPOSTAZIONE TIMER.
• Premere quattro volte il pulsante TIMER
SEL. Sul visore appare il simbolo del
TIMER 1 ORA.
CANCELLAZIONE DEL TIMER.
• Premere il pulsante ON/OFF per spegne-
re il condizionatore.
• Attendere che l’unità interna sia spenta.
• Premere di nuovo il pulsante ON/OFF per
riaccendere il condizionatore.
REGOLAZIONE DEL TIMER 1 ORA
Questa funzione permette al condizionatore di funzionare per 1
ora alle condizioni impostate, indipendentemente se questo sia
acceso o spento.
Per drenaggio continuo: Spegnete il climatizzatore e staccate la spina. Rimuovete il tappo dal tubo di scarico posteriore e collegatevi un tubo da 20 mm di diametro interno per il drenaggio della condensa: disponete l’altra estremità sopra ad un normale scolo.
Assicuratevi che il tubo sia esente da torsioni e curvature. Il tubo deve avere un andamento discendente.
Svuotamento contenitore: Occasionalmente può rendersi necessario lo svuotamento del contenitore interno per la raccolta della
condensa. Quando questo serbatoio è pieno, la spia STANDBY lampeggia.
Ogni volta che il climatizzatore deve essere spostato in un altro locale oppure riposto a fine stagione, svuotare il serbatoio, tramite
l’apposito tubo.
Per svuotarlo ponete un contenitore sotto il tubo posteriore di scarico, togliete il tappo di gomma e lasciate defluire l’acqua.
Richiudete lo scarico con il tappo e riprendete ad utilizzare il climatizzatore.
DRENAGGIO CONDENSA
Page 17
I
8
8
Se il telecomando non funziona o è stato smarrito, operare
come segue:
1.CLIMATIZZATORE FERMO
Se volete avviare il climatizzatore premere il tasto
funzionamento con un oggetto sottile (es. un fermaglio).
FUNZIONAMENTO SENZA TELECOMANDO
Il condizionatore si avvierà con la velocità alta del
ventilatore.
L’impostazione della temperatura é di 25°C.
NOTA
2.CLIMATIZZATORE IN FUNZIONE.
Se volete fermare il condizionatore premere il tasto funzionamento,
con un oggetto sottile (es. un fermaglio), fino allo spegnimento
della spia OPERATION.
Interruzione di corrente durante il funzionamento. Se si
verifica una interruzione di corrente, il climatizzatore d’aria si
arresta. Quando l’alimentazione elettrica viene ripristinata il
climatizzatore riparte automaticamente dopo 3 minuti.
NOTA
TASTO DI FUNZIONAMENTO
CONSIGLI PER IL MASSIMO COMFORT
ED UN MINIMO CONSUMO
EVITARE:
●
Di ostruire le griglie di mandata e aspirazione dell’unità, se
queste sono ostruite l’unità non lavora correttamente e
potrebbe danneggiarsi.
●
L’irraggiamento diretto in ambiente usando tende parasole
esterne oppure tirando le tende interne..
VERIFICARE:
●
Che i filtri aria siano sempre puliti. Un filtro sporco diminuisce
il passaggio dell’aria e riduce la resa dell’unità.
●
Che porte e finestre siano chiuse per evitare infiltrazione di
aria non condizionata.
●
Che il flessibile sia correttamente posizionato, senza pieghe
ne curve troppo strette.
●
Che la temperatura ambiente sia superiore a16°C per la funzione raffreddamento e in deumidificazione.
IDENTIFICAZIONE E SOLUZIONE
PROBLEMI DI FUNZIONAMENTO
AVVERTIMENTO
• La spia STANDBY (3) lampeggiante con il contemporaneo
arresto del climatizzatore sono dovuti al serbatoio di raccolta
condensa pieno.
• Se il vostro climatizzatore non funziona regolarmente, prima
di chiamare il Servizio Assistenza eseguite i controlli
sottoelencati. Se il problema permane, contattare
il Rivenditore o il Servizio Assistenza.
Difetto: Il climatizzatore è completamente fermo.
Possibile causa:
1. Alimentazione interrotta.
2. Interruttore automatico aperto o fusibile interrotto.
3. Tensione di linea troppo bassa.
4. Il pulsante di avviamento è nella posizione OFF.
5. Batterie del telecomando scariche.
Rimedio:
1. Ripristinare l’alimentazione.
2. Contattare il Servizio Assistenza.
3. Consultare il vostro elettricista.
4. Premere il pulsante di avviamento ON/OFF.
5. Sostituire le batterie.
• L’uso di telefoni cellulari in prossimità del climatizzatore
deve essere evitato perché può causare disturbi al regolare
funzionamento dello stesso. Qualora fosse notato questo
funzionamento anomalo (la spia di funzionamento (2) si
accende, ma il climatizzatore non funziona) ripristinare il normale funzionamento togliendo l’alimentazione elettrica per
circa 60 secondi, tramite l’interruttore generale o la spina,
quindi rimettete in funzione il climatizzatore.
Difetto: Il condizionatore non funziona, la spia OPERATION
(2) lampeggia e la spia STANDBY (3) è spenta.
Possibile causa:
1. Sonda batteria difettosa.
Rimedio:
1. Contattare il Servizio Assistenza.
Difetto: Il condizionatore non funziona, la spia OPERATION
(2) lampeggia e la spia STANDBY (3) è accesa.
Possibile causa:
1. Sonda aria difettosa.
Rimedio:
1. Contattare il Servizio Assistenza.
Difetto: Il compressore si mette in moto, ma dopo pochi minuti
si arresta.
Possibile causa:
1. Griglie di aspirazione ostruite.
Rimedio:
1. Rimuovere l’ostruzione.
Difetto: Il climatizzatore non raffredda.
Possibile causa:
1. Filtri sporchi o ostruiti.
2. Carico termico eccessivo.
3. Porte o finestre aperte.
4. Ostruzione in prossimità della ripresa o della mandata
d’aria.
5. Temperatura impostata sul telecomando troppo alta.
Rimedio:
1. Pulire i filtri.
2. Eliminare sorgenti di calore in eccesso.
3. Chiudere porte e finestre.
4. Rimuovere le ostruzioni per ripristinare una corretta circolazione d’aria.
5. Ritarare la temperatura impostata sul telecomando.
Difetto: Il climatizzatore emette dei leggeri scricchiolii.
Possibile causa:
1. Durante il funzionamento con il variare della temperatura le
parti in plastica subiscono delle dilatazioni che causano
questo inconveniente.
Rimedio:
1. Situazione da ritenersi normale; i leggeri scricchiolii percepiti
scompariranno allo stabilizzarsi della temperatura.
1
2
3
NOTA
Il lampeggio contemporaneo
delle 2 spie OPERATION, e
STANDBY, indica che il modo
di funzionamento selezionato
( ) non é compatibile con
l’unità in oggetto. Se ciò accade il condizionatore non funziona fino al ripristino della
modalità corretta.
Page 18

KIT OBLÓ
MONTAGGIO
●
Praticare un foro sul vetro
della finestra.
●
Inserire l'oblò privo di tappo
chiusura.
●
Togliere il raccordo terminale
scarico aria calda dal tubo
flessibile retrattile.
●
Avvicinare il climatizzatore
alla finestra e inserire il tubo
scarico aria nell'oblò.
Se si desidera usufruire del climatizzatore in vari locali è possibile acquistare più KIT OBLÓ scarico aria separatamente.
MANUTENZIONE E CURA
ATTENZIONE! Prima di procedere a operazioni di pulizia e manutenzione togliere la spina dalla presa di corrente.
1. Pulizia dei filtri d'aria
Il filtro deve essere controllato almeno una volta ogni due settimane di funzionamento. Il funzionamento con filtro sporco
o intasato causa sempre una diminuzione dell’efficienza del climatizzatore e può provocare inconvenienti gravi. Il filtro
può essere rimosso dalla parte superiore dell’unità, rimuovendo il pannello superiore e tirando verso l’alto. Usate un aspirapolvere per asportare la polvere. Se ciò non fosse sufficiente lavate il filtro con acqua tiepida leggermente saponata,
sciacquatelo con acqua fredda e lasciatelo asciugare prima di reinserirlo.
GIG
135 mm
PULIZIA FILTRO
Filtro
9
Nel vetro di
una finestra
Nel battente
di legno di
una porta
finestra
Nel muro: si consiglia
di isolare adeguatamente la porzione di
muro
Page 19

10
I
NO!
NO!
Se il climatizzatore non funziona, prima di richiedere l’intervento del Servizio Assistenza verificare che:
●
la spina sia correttamente inserita nella presa di corrente;
●
l’interruttore generale sia inserito e che non vi sia alcun fusibile interrotto;
●
il filtro aria sia pulito;
●
il flessibile sia correttamente posizionato, senza pieghe né curve troppo strette;
●
la differenza tra temperatura ambiente e temperatura impostata sia superiore a 1°C;
●
tutte le istruzioni contenute in questo manuale siano state osservate scrupolosamente.
CONSIGLI UTILI
ATTENZIONE
La spia STANDBY (3) lampeggiante con il contemporaneo arresto del condizionatore sono dovuti al serbatoio raccolta condensa pieno.
2. Pulizia involucro.
Per pulire il climatizzatore strofinatelo con un panno soffice,
leggermente inumidito. Per togliere eventuali macchie usate acqua
saponata. Non usate solventi, benzina o altri composti chimici
aggressivi, né acqua molto calda. Non versate acqua sul
climatizzatore per pulirlo: potreste danneggiare i componenti interni
o provocare un corto circuito.
3. Conservazione.
Quando prevedete di non utilizzare il climatizzatore per un lungo
periodo, prima di riporlo pulite ll filtro. Se mettete
l’apparecchio in un ripostiglio, abbiate cura di mantenerlo sempre in
posizione verticale. Non appoggiate oggetti pesanti sul piano
superiore e possibilmente proteggete il climatizzatore con un foglio
di plastica.
4. Trasporto.
Quando trasportate il climatizzatore, mantenetelo in posizione
verticale. Qualora ciò non fosse possibile, coricatelo sul fianco
destro; quando arrivate a destinazione rimettete subito l’apparecchio in posizione verticale e attendete almeno 4 ore prima di utilizzarlo in raffreddamento.
5. Per la vostra sicurezza abbiate cura di verificare periodicamente lo stato del cavo di alimentazione; qualora fosse danneggiato dall’uso, per la sostituzione, rivolgersi al Centro Assistenza.
Page 20

F
TABLE DE MATIERES
LE PRODUIT................................................................................................................ 2
VOYANTS.................................................................................................................... 3
AVANT D’UTILISER LE CLIMATISEUR...................................................................... 3
MODE D’EMPLOI ....................................................................................................... 4
UTILISATION DE LA TELECOMMANDE .................................................................... 4
I
Installation des piles.................................................................................................. 4
I
Sélecteur de la sonde de température...................................................................... 4
I
Fonctionnement avec la télécommande ................................................................... 4
TELECOMMANDE ...................................................................................................... 5
REGLAGE DE L’HEURE ............................................................................................. 6
REFROIDISSEMENT................................................................................................... 6
DESHUMIDIFICATION................................................................................................ 6
VENTILATION.............................................................................................................. 6
REGLAGE DE LA VITESSE DU VENTILATEUR ....................................................... 6
PROGRAMME NOCTURNE........................................................................................ 6
REGLAGE DU TEMPORISATEUR.............................................................................. 7
REGLAGE DU TEMPORISATEUR 1 HEURE............................................................. 7
DRAINAGE CONDENSAT........................................................................................... 7
FONCTIONNEMENT SANS LA TELECOMMANDE.................................................... 8
CONSEILS POUR LE CONFORT ET L’ECONOMIE DE L’ENERGIE ........................ 8
GUIDE DE DEPANNAGE ............................................................................................ 8
KIT HUBLOT................................................................................................................ 9
ENTRETIEN ET NETTOYAGE ................................................................................... 9
CONSEILS UTILES .................................................................................................... 10
LE PRODUIT
1. Télécommande à infrarouge
2. Voyants
3. Soufflage d’air
4.
Grille d’aspiration d’air
5. Filtre à air
6. Panneau frontal esthétique
7. Tuyau de drainage sortie de condensât
8. Câble électrique avec fiche
9. Roues pour le déplacement
10. Poignée pour le transport
(sur les deux côtés)
11. Tube flexible rétractile
12. Raccord terminal d’expulsion d’air
DECLARATION DE CONFORMITE
Ce produit est marqué
puisque il est conforme aux
Directives:
– Basse Tension n. 2006/95/CE.
– Compatibilité Electromagnétique
n. 89/336 CEE, 92/31 CEE et
93/68 CEE.
Cette declaration sera nulle en cas
d'une utilisation différente de celle
déclarée par le Constructeur et/ou
de la non-observation, même si
partielle des instructions d'installation
et/ou usage.
Limites de fonctionnement:
Température intérieure
:
Refroidissement: MIN: 16°C B.S. / 14°C B.H.
MAX: 32°C B.S. / 24°C B.H.
Déshumidification: MIN: 10°C B.S / 80% H.R.
MAX: 32°C B.S. / 80% H.R.
2
AVERTISSEMENT POUR L’ELIMINATION CORRECT DU PRODUIT AUX TERMES DE LA DIRECTIVE
EUROPEENNE2002/96/CE
Au terme de son utilisation cet équipement ne doit pas être éliminé avec les ordures ménagères.
Le produit doit être remis à l’un des centres de collecte sélective locaux ou auprès des revendeurs assurant ce service.
Eliminer séparément un équipement électrique et électronique et sus piles permet d’éviter des potentielles retombées
négatives pour l’environnement et la santé humaine dérivant d’une élimination incorrect et permet de récupérer les
matériaux qui le composent dans le but d’une économie importante en termes d’énergie et de ressources.
Pour rappeler l’obligation d’éliminer séparément ces équipements et les piles, le produit porte le symbole d’un caisson
à ordures barré.
12
2
11
10
4
5
7
8
9
1
3
6
Page 21

F
AVANT D’UTILISER LE CLIMATISEUR
● Vérifiez que la tension du réseau d’alimentation est bien de 220-240V ~ 50Hz.
● Assurez-vous que l’installation électrique est en mesure de débiter un courant nécessaire au climatiseur, en plus du courant nor-
malement utilisé pour d’autres usages (appareils électroménagers, éclairage). Voir la puissance absorbée sur la plaquette signalétique du climatiseur.
● L’unité doit être raccordée selon les normes et règlements électriques en vigueur.
● Assurez-vous que le disjoncteur de protection de l’installation est calibré pour supporter un courant de pointe de 20 ampères (nor-
malement pour un temps inférieur à une seconde).
● Ne pas installer le climatiseur dans un local, où il pourrait recevoir des projections d’eau (par exemple dans la buanderie).
●
Vérifiez que la touche marche-arrêt sur le tableau de commandes du climatiseur est sur la position OFF.
● La prise du climatiseur doit toujours être pourvue d’une prise de terre efficace.
● N’utilisez jamais la fiche pour arrêter ou mettre en marche le climatiseur; utilisez
toujours l’interrupteur prévu sur le tableau de commande de l’appareil.
● Ne pas transportez le climatiseur pendant le fonctionnement, arrêtez-le et
débranchez la fiche de la prise de courant. Vérifier et éventuellement vider l’eau
de condensation, par le tube de vidange placé à l’arrière.
● PRECAUTION ! Ne rien introduire dans le climatiseur. Cela est très dangereux
car le ventilateur tourne à grande vitesse.
● ATTENTION!: Le climatiseur est pourvu d’un système de protection du compres-
seur contre les surcharges qui l’empêche de fonctionner pendant trois minutes
après l’arrêt précédent.
● Assurez-vous que l’air puisse circuler librement autour de l’unité. Ne pas obstruer
avec des rideaux ou similaires les grilles d’arrivée et de sortie d’air. Ne pas déposer des objets sur le climatiseur.
● Le constructeur décline toute responsabilité dans le cas où les normes de sécuri-
té et de prévention contre les accidents ne seraient pas respectées.
● Avant de procéder au déplacement ou au nettoyage du climatiseur, débranchez
toujours la fiche de la prise de courant.
● Si le câble d’alimentation est endommagé, il doit être changé par le fabricant, son
service de maintenance ou une personne de qualification.
● Ce climatiseur n’est pas prévu pour être utilisé par des personnes (compris les
enfants) dont les capacités physiques, sensorielles ou mentales sont réduites, ou
des personnes dénouées d’expérience ou de connaissance,sauf si elles peuvent bénéficier, par l’intermédiaire d’une personne
responsable pour leur sûreté, d’une surveillance ou d’instruction préalable concernant l’utilisation du climatiseur.
DANGER!
VOYANTS
1. Récepteur : reçoit les signaux de la télécommande.
2. Voyant de fonctionnement (OPERATION): Il s’allume
quand le climatiseur est en marche.
Il clignote une fois pour indiquer que le signal de la
télécommande a été reçu et mémorisé. Il clignote
continuellement pendant les modes de protection
(dégivrage, ecc.).
3. Voyant d'attente (STANDBY) : Il s’allume quand le climatiseur est connecté à la courant et peut recevoir le signal de
la télécommande.
4. Bouton de fonctionnement (sans télécommande): Appuyer
ce bouton, avec un objet pointu, pour sélectionner le fonctionnement OFF et COOL.
La position OFF ne coupe pas l’alimentation électrique. Pour
arrêter complètement l’appareil, utiliser l’interrupteur
principal d’alimentation.
AVERTISSEMENT
ATTENTION
Lorsque les 2 lampes témoin OPERATION et STANDBY clignotent en même temps, cela signifie que le mode de fonctionnement sélectionné ( ) n'est pas compatible avec
l'unité en question et que donc, le climatiseur ne fonctionnera
que lorsque la modalité correcte aura été rétablie.
REMARQUE
3
1
2
3
4
Alarme condensâtes: Quand le réservoir est plein, le climati-
seur s'arrête automatiquement et ce voyant commence à clignoter.
Page 22

F
MODE D’EMPLOI
REFROIDISSEMENT
●
Approchez au maximum le climatiseur de la fenêtre. Introduire le tube flexible en
l’accrochant à l’arrière de l’unité. Tirez le tube flexible afin d’atteindre l’extérieur en
passant sous les battants entrouverts de la fenêtre.
●
Si la fenêtre a un rebord intérieur, il peut s’avérer nécessaire d’utiliser le raccord
terminal prévu à cet effet (fourni avec l’unité). Introduisez le raccord dans l’extrémité
libre du flexible.
●
Ouvrez la fenêtre et bloquez un des battants avec la poignée. Posez le raccord
terminal sur le battant fixe, rapprochez l’autre battant de la fenêtre et bloquez-le
dans cette position en utilisant le cordon ad hoc.
●
Evitez de trop courber ou plier le tube flexible.
●
Si vous utilisez le hublot, pratiquez un trou de 135 mm dans le carreau de la
fenêtre.
Quand le climatiseur fonctionne comme déshumidificateur, il ne rafraîchit pas la
pièce.
Quand vous utilisez l’appareil comme déshumidificateur, le tube flexible ne doit pas
être monté sur le climatiseur.
●
Décrochez le tube flexible en saisissant le point d’accrochage sur le climatiseur et
faites-le le tourner jusqu’au décrochage.
DESHUMIDIFICATION
●
Placer deux piles alcalines du format AAA de 1,5V-DC.
S’assurer que les piles sont bien installées dans le compartiment en respectant les pôles.L’affichage de l’heure sur le display clignote. Appuyer sur la touche SEL TYPE.
●
Les piles ont une autonomie d'environ six mois, en fonction
de la fréquence d'utilisation de la télécommande. Enlever les
piles, si vous prévoyez de ne pas utiliser la commande à distance pendant plus d'un mois.
●
Les piles de la télécommande contiennent des agents polluants. Une fois usées, les jeter en respectant la réglementation locale concernant les déchets (voir le paragraphe “COMMENT ENLEVER LES PILES” à la fin de cette notice).
UTILISATION DE LA TELECOMMANDE
SELECTEUR DE LA SONDE DE TEMPERATURE
●
En conditions normales, la température ambiante est détectée et contrôlée par la sonde de température placée dans la
télécommande (icône IFEEL active sur le display). Cette
fonction permette de personnaliser la temperature ambiante
en transmettant le signal de une position près vous. Donc, en
utilisant cette fonction, la télécommande doit toujours être
dirigé vers le climatiseur, sans obstacles.
FONCTIONNEMENT AVEC LA TELECOMMANDE
Diriger l’émetteur de la commande à distance vers le récepteur
placé sur le climatiseur.
La télécommande transmet le signal de la température
ambiante en appuyant sur n’importe quelle touche et automatiquement toutes les cinq minutes.
Si, à cause d’un inconvénient, l’unité ne reçoit pas le
signal de la télécommande, le conditionneur d’air utilisera
le capteur présent à l’intérieur de l’unité pour contrôler la
température ambiante.
Dans ce cas, la température proche de la télécommande
peut différer de la température relevée dans le conditionneur d’air.
REMARQUE
4
INSTALLATION DES PILES
● Pour enlever la couverture sur le dos de l'extérieur com-
mander et en vérifiant que le CONTACT DIP est établi
comme dans la figure:
NO!
●
On peut désactiver le capteur de température de la télécommande en appuyant sur la touche I FEEL, auquel cas, l’icône
relative sur le display s’éteint et c’est le capteur présent à
l’intérieur de l’unité qui devient opérationnel.
TETE DE L’EMETTEUR
TELECOMMANDE
RECEPTEUR
Cette fonction est recommandée en automne et en hiver. Si on l’utilize en été, il faut
monter le tube flexible.
NOTA
Page 23

F
TELECOMMANDE
BOUTON “NIGHT”
(Programme nocturne)
Pour les détails, voir "Programme nocturne".
Quand l'on appuie sur ce bouton en mode
REFROIDISSEMENT ou
DESHUMIDIFICATION,le signal s'af-
fiche et le microprocesseur de la télécommande régle automatiquement la température sélectionnée de façon à économiser l'énergie.
EMETTEUR
Lorsque l'on appuie sur les boutons de la
télécommande, le voyant clignote
pour transmettre la modification des réglages au récepteur du climatiseur.
BOUTONS DE REGLAGE DE LA TEM-
PERATURE
TEMP — (plus froid)
Appuyer sur ce bouton pour réduire la
température.
TEMP + (plus chaud)
Appuyer sur ce bouton pour augmenter
la température.
CAPTEUR (SENSOR)
Le capteur de température incorporé à la
télécommande détecte la température de
la pièce.
BOUTON “SEL TYPE”
Appuyer sur ce bouton pour sélectionnes les fonctions:
• réglage de l’heure
• réglage du temporisateur ON/OFF
Pour les détails voir “REGLAGE DE
L’HEURE” et “REGLAGE DU TEMPORISATEUR”.
SELECTEUR DE LA SONDE DE TEM-
PERATURE
Appuyer sur le bouton I FEEL pour modi-
fier l’affichage du capteur de température
actif (de la télécommande au climatiseur
et vice-versa).
BOUTON “FAN”
(Vitesse de ventilation)
Le microprocesseur choisit
automatiquement la vittesse de
ventilation.
Grande vitesse de ventilation.
Moyenne vitesse de ventilation.
Petite vitesse de ventilation.
BOUTONS POUR LE REGLAGE DE
L’HEURE ET DU TEMPORISATEUR
En appuyant les boutons SET H ou SET
M est activée le réglage de líheure et du
temporisateur. Pour les détails voir
“REGLAGE DE L’HEURE” et “REGLAGE
DU TEMPORISATEUR”.
BOUTON ON/OFF (enmarche/arrêt)
Ce bouton permet de mettre le climati-
seur en marche et de l'arrêter.
BOUTON “TIMER SEL”
En appuyant sur le bouton TIMER on active sur l’affichage la proceure pour le réglage ON/OFF du temporisateur.
Pour les détails, voir “RÉGLAGE DU TEMPORISATEUR”.
AFFICHAGE
Les informations sur le mode de fonctionnement s’affichent lorsque la télécommande est en fonction.
Mode de fonctionnement
Vitesse de ventilation
Grande vitesse
Auto
Moyenne vitesse
Petite vitesse
Confirme la transmission des données au
climatiseur et bloc de la telecommande
Température
selectionnee
Indique que le climatiseur fonctionne en mode I FEEL (capteur
télécommande actif)
Programme
nocturne
Indique les types des
temporisateurs
Auto
(
Refroidissement
Chauffage
(
Deshumidification
Ventilation
BOUTON MODE DE FONCTIONNEMENT
Appuyer sur ce bouton pour choisir le
mode de fonctionnement du climatiseur.
(auto)
(
Sur cette position le microprocesseur calcule automatiquement la différence entre
le réglage du thermostat et la température de la pièce, puis il commuté automatiquement sur le mode réfroidissement ou
chauffage.
(chauffage)
(
Le climatiseur réchauffe la pièce.
(deshumidification)
Le climatiseur réduit l’humidité de l’air de
la pièce.
(refroidissement)
Le climatiseur refroidit la pièce.
(ventilation)
Le climatiseur functionne uniquement en
ventilation.
(
modalité non active
BOUTONS INACTIFS
Horloge
heures/minutes
Température
ambiante
5
Page 24

PROGRAMME NOCTURNE
●
Le programme nocturne permet d'économiser l’énergie
électrique.
1. Appuyer sur le bouton MODE pour choisir le mode de
fonctionnement refroidissement ou déshumidification.
2. Appuyer sur le bouton NIGHT.
3. Le signal s'affiche. Pour libérer la fonction d'écono-
mie nocturne, appuyer à nouveau sur le bouton NIGHT.
Définition du programme nocturne
En mode d’économie nocturne, le climatiseur refroidit la pièce
ou fonctionne comme déshumidificateur jusqu’à la température
sélectionnée, puis le thermostat commute le climatiseur en
mode d’attente. Environ 1 heure plus tard, la température
sélectionnée est automatiquement modifiée comme suit. (Voir
graphique).
REGLAGE DE LA VITESSE DU VENTILATEUR
AUTOMATIQUE
Mettre le sélecteur FAN SPEED (vitesse du ventilateur) en
position . Le microprocesseur du climatiseur règle
automatiquement la vitesse du ventilateur. Quand le climatiseur
commence à fonctionner, la différence entre la température de
la pièce et la température sélectionnée est détectée par le
microprocesseur qui règle alors automatiquement le ventilateur
sur la vitesse qui convient.
F
6
Le climatiseur reste en marche jusqu’à ce que la température
de la pièce atteigne la nouvelle valeur sélectionnée, puis il est
commuté en mode d’attente. Environ 1 heure plus tard, la température sélectionnée est à nouveau relevée de 1 °C. Ceci permet d’économiser l’énergie sans sacrifier le confort dans la
pièce.
Grande vitesse Moyenne vitesse Petite vitesse
REFROIDISSEMENT
Vérifier que l’unité est connecté à l’alimentation électrique et que le voyant STANDBY
est allumé.
1. Appuyer sur le bouton MODE (Mode de fonctionnement) jusqu'à ce que le signal REFROIDISSEMENT apparaisse or l'affichage .
2. Appuyer sur le bouton ON/OFF pour mettre en
marche le climatiseur.
3. Appuyer sur les boutons TEMP+/- pour choisir la
température (la plage de réglage de la température est entre 32 °C max. et 16 °C min.).
REMARQUE
LA VALEUR DE LA TEMPERATURE SELECTIONNEE S’AFFICHE.
5 SECONDES APRES LA PROGRAMMATION DE
LA TEMPERATURE CHOISIE, SUR L’AFFICHAGE
APPARAIT DE NOUVEAU LA TEMPERATURE
AMBIANTE.
4.Appuyer sur le bouton FAN pour régler la vitesse de ventilation.
1
4
3
2
DESHUMIDIFICATION
1.Appuyer sur le bouton MODE (Mode de fonctionnement)
jusqu'à l’affichage du signal DESHUMIDIFICATION .
2.Appuyer sur le bouton ON/OFF pour mettre en marche le climatiseur.
3.Appuyer sur les boutons TEMP. pour choisir la température
(la plage de réglage de la température est entre 32 °C max.
et 16 °C min.)
LA VALEUR DE LA TEMPERATURE
SELECTIONNEE S’AFFICHE.
5 SECONDES APRES LA PROGRAMMATION DE
LA TEMPERATURE CHOISIE, SUR L’AFFICHAGE
APPARAIT DE NOUVEAU LA TEMPERATURE
AMBIANTE.
1. Appuyer trois fois sur le bouton SEL TYPE.
L’indication de l’heure seule clignote.
2. Appuyer sur le bouton SET H jusqu’a ce que l’heure
désirée s’affiche.
Appuyer sur le bouton SET M jusqu’à ce que les minutes
désirés s’affichent.
L’affichage de l’heure cesse automatiquement de clignoter
(à l’exception du symbol après 10 seconds.
REGLAGE DE L'HEURE
Le climatiseur élimine l’eau de condensation automatiquement
à la GRANDE et MOYENNE vitesse du ventilateur, tandis que
à la PETITE vitesse l’eau de condensation est recueillie dans le
réservoir.
REMARQUE
●
Utilisez la fonction déshumidification quand vous voulez
réduire l’humidité de l’air ambiant.
●
Avec la fonction déshumidification sélectionnée, la vitesse
du ventilateur ou s’arrêt pour éviter le trop refroidissement.
●
La fonction déshumidification ne peut pas être activée
quand la température extérieure est au-dessous de 15 °C.
●
L’humidité absorbée de la pièce (condensât) est recueillie
dans le réservoir intérieur.
REMARQUE
VENTILATION
Si l'on désire que l'air circule dans la pièce sans modifier la
température, effectuer les opérations suivantes:
1. Appuyer sur le bouton MODE (mode de fonctionnement)
jusqu’à l’affichage du signal VENTILATION .
2. Appuyer sur le bouton ON/OFF pour mettre en marche le
climatiseur.
DIFFERENCE ENTRE
TEMPERATURE AMBIANTE ET VITESSE DU VENTILATEUR
TEMPERATURE SELECTIONNEE
Refroidissement 2 °C et plus
Maximum
et Entre 2 et 1 °C
Moyenne
Déshumidification Moins de 1 °C
Minimum
Les valeurs précisées sur le tableau concernent le fonctionnement du climatiseur lorsque le capteur de la télécommande est
choisi (voir sélecteur du capteur de température).
Les valeurs précisées changent légèrement dans le cas où le
capteur placé dans l’unité est sélectionné.
La vitesse automatique ne pas active en mode VENTILATION.
REMARQUE
MANUEL
Pour régler la vitesse du ventilateur manuellement, il suffit de
mettre le sélecteur FAN SPEED (vitesse du ventilateur) sur la
position désirée.
1 heure 1 heure TEMPS
Température sélectionnée
Température ambiante
REFROIDISSEMENT ET DESHUMIDIFICATION
1°C
1°C
Page 25

F
7
REGLAGE DU TEMPORISATEUR
2
1
4
A) REGLAGE DE L’HEURE DE MISE EN
MARCHE (ON)
1. Appuyer une fois sur le bouton SEL TYPE.
Les indications d’arrêt (ON) et de l’heure
clignotent.
2.Appuyer sur le bouton SET H (heures)
jusqu’à ce que l’heure désirée s’affiche.
Appuyer sur le bouton SET M (minutes)
jusqu’à ce que les minutes désirées s’affichent. L’affichage revient automatiquement à
l’heure actuelle après 10 secondes.
3.Appuyer sur le bouton de marche/arrêt
(ON/OFF) pour mettre le climatiseur en marche.
4.Appuyer sur le sélecteur TIMER SEL pour
activer l’heure de mise en marche.
B) REGLAGE DE L’HEURE D'ARRET (OFF)
1.Appuyer deux fois sur le bouton SEL TYPE.
Les indications de marche (OFF) et de
l’heure clignotent.
2.Appuyer sur le bouton SET H (heures)
jusqu’à ce que l’heure désirée s’affiche.
Appuyer sur le bouton SET M (minutes)
jusqu’à ce que les minutes désirées s’affichent. L’affichage revient automatiquement
à l’heure actuelle après 10 secondes.
3.Appuyer sur le bouton de marche/arrêt
(ON/OFF) pour mettre le climatiseur en marche.
4.Appuyer deux fois sur le sélecteur TIMER
SELECT pour activer l’heure d’arret (OFF
TIME).
C) REGLAGE DE MISE EN
MARCHE/ARRET QUOTIDIEN
1.Régler les heures de mise en marche et
d’arrêt comme indiqué aux paragraphes A)
et B).
2.Appuyer sur le bouton de marche/arrêt
(ON/OFF) pour mettre le climatiseur en marche.
3.Appuyer trois fois sur le bouton TIMER SEL
pour mettre en service (ON/OFF) la minuterie combinée.
Après la programmation du temporisateur, appuyer sur le bouton PROGRAM pour vérifier l’heure de programmation de mise
en marche/arrêt (ON/OFF).
Quand vous réglez le temporisateur, aucun voyant s’allume sur
l’unité; seulement le télécommande indique le réglage.
REMARQUES
3
REGLAGE DU TEMPORISATEUR 1 HEURE
Cette fonction permet au climatiseur de travailler pendant 1
heure aux conditions sélectionnées, que le climatiseur soit en
fonction ou soit arrêté.
REGLAGE DU TEMPORISATEUR.
• Appuyer quatre fois sur le bouton TIMER
SEL. Le signal du TEMPORISATEUR 1
HEURE en mode de mise en marche
s'affiche.
ANNULATION DU REGLAGE.
• Appuyer sur le bouton ON/OFF pour arrê-
ter le climatiseur.
• Attendre que l'unité intérieure s'arrête.
• Appuyer de nouveau sur le bouton
ON/OFF pour remettre en marche le climatiseur.
Pour drainage continu: Eteignez le climatiseur et détachez la fiche. Enlevez le bouchon du tuyau de décharge postérieur et connectez un tuyau ayant un diamètre intérieur de 20 mm pour le drainage du condensât. Positionnez l'autre extrémité sur un écoulement
normal. Assurez-Vous que le tuyau est sans aucune torsion et courbure. Le tuyau doit avoir un cours descendant.
Vidange reservoir intérieur: Il peut
ê
tre nécessaire de vider le réservoir intérieur pour la récolte du condensât. Quand le réservoir est
plein, le voyant STANDBY commence à clignoter.
Chaque fois que le climatiseur doit être déplacer dans un autre local ou ranger à la fin de la saison, vider le réservoir, par le tube de
vidange.
Pour le vider, positionnez un récipient sous le tuyau postérieur de décharge, enlevez le bouchon en caoutchouc et laissez l'eau
s'écouler. Refermez la décharge avec le bouchon et commencez à utiliser le climatiseur de nouveau.
DRAINAGE CONDENSAT
Page 26

Lorsque les 2 lampes témoin
OPERATION et STANDBY clignotent en même temps, cela
signifie que le mode de fonctionnement sélectionné ( )
n'est pas compatible avec l'unité en question et que donc, le
climatiseur ne fonctionnera
que lorsque la modalité correcte aura été rétablie.
REMARQUE
F
Si la télécommande a été perdue ou si elle ne fonctionne pas,
procéder comme suit:
1. CLIMATISEUR ARRETE
Pour mettre le climatiseur en marche, appuyer le bouton
de fonctionnement avec un objet pointu.
Le climatiseur se mettra en marche avec la GRANDE vitesse du ventilateur.
Le réglage de la température est de 25°C.
REMARQUE
2. CLIMATISEUR EN MARCHE
Pour éteindre le climatiseur, appuyer le bouton de fonctionnement, avec un objet pointu, jusqu’à ce que le voyant OPERATION s’étende.
Coupure de courant pendant le fonctionnement.
En cas de coupure de courant, l’appareil s’arrête.
Quand l’alimentation est rétablie, l’appareil redémarre automatiquement après 3 minutes.
REMARQUE
EVITER:
●
D’obstruer les grilles d’arrivée et de sortie d’air de l’appareil.
Si elles sont bouchées, l’appareil ne fonctionnera pas de
façon satisfaisante et il risque d’être endommagé.
●
De laisser le soleil pénétrer à plein dans la pièce. Utiliser
des persiennes ou des rideaux.
VERIFIER:
●
Que les filtres à air soit toujours propre. Un filtre colmaté
diminue les performances de l’appareil
●
Que toutes les portes, les fenêtres et autres ouvertures
soient fermées pour éviter des infiltrations d’air non
réfrigéré.
●
Le tube flexible est placé correctement, ni trop plié, ni trop
courbé.
●
La température ambiante est supérieure à 16 °C pour le
mode refroidissement et déshumidification.
AVERTISSEMENT
• Le voyant STANDBY (3) qui clignote et l’arrêt simultané du
climatiseur indiquent que le réservoir de condensât est plein.
• Si le climatiseur ne marche pas correctement, effectuer les
vérifications suivantes avant d'appeler le Service Après
Vente. Si le problème persiste, prendre contact avec le vendeur ou le Service Après Vente.
Panne: Le climatiseur ne fonctionne pas du tout.
Cause possible:
1. Coupure de courant.
2. Disjoncteur activé.
3. Tension de ligne trop basse.
4. La touche de marche/arrêt de fonctionnement est position-
né sur OFF.
5. Les piles de la télécommande sont usées.
Remède:
1. Rétablir l’alimentation.
2. Prendre contact avec un service après-vente.
3. Consulter un électricien ou le vendeur.
4. Appuyer à nouveau sur la touche.
5. Remplacer les piles.
• Ne pas utiliser de téléphone portable près du climatiseur,
pour éviter des perturbations au bon fonctionnement de
celui-ci. Dans le cas où un fonctionnement anormal est
remarqué (le voyant de fonctionnement (2) s'allume, mais
l'unité extérieure ne fonctionne pas), rétablir le fonctionnement normal en coupant l'alimentation électrique pendant au
moins 60 secondes, au moyen du disjoncteur général ou de
la fiche, ensuite remettre en marche le climatiseur.
Panne: Le climatiseur ne fonctionne pas, le voyant OPERA-
TION (2) clignote et le voyant STANDBY (3) est éteinte.
Cause possible:
1. Sonde batterie défectueuse.
Remède:
1. Prendre contact avec un service après-vente.
Panne: Le climatiseur ne fonctionne pas, le voyant OPERA-
TION (2) clignote et le voyant STANDBY (3) est allumée.
Cause possible:
1. Sonde ambiante défectueuse.
Remède:
1. Prendre contact avec un service après-vente.
Panne: Le compresseur se met en marche mais il s’arrête
aussitôt.
Cause possible:
1. Il y a un obstacle devant les grilles d’aspiration d’air.
Remède:
1. Prendre contact avec un service après-vente.
Panne: Refroidissement insuffisant.
Cause possible:
1. Filtre à air sale ou obstrué.
2. Source de chaleur ou trop de monde dans la pièce.
3. Portes et/ou fenêtres ouvertes.
4. Obstacle devant l’arrivée ou la sortie d’air.
5. Température réglée sur la télécommande trop haute.
Remède:
1. Nettoyer les filtres à air afin d’améliorer la circulation d’air.
2. Si possible, éliminer la source de chaleur.
3. Les fermer pour empêcher la pénétration d’air froid ou
chaud.
4. Retirer l’obstacle pour assurer une bonne circulation d’air.
5. Régler de nouveau la température sur la télécommande.
Panne: Le climatiseur émet craquements.
Cause possible:
1. Pendant le fonctionnement, à la suite d’un changement de
température les pièces en plastique de l’appareil se dilatent
ou se rétrécissent, ce qui provoque un léger craquement.
Remède:
1. C’est normal et le bruit disparaît quand les températures du
climatiseur se sont stabilisées.
FONCTIONNEMENT SANS LA
TELECOMMANDE
GUIDE DE DEPANNAGE
CONSEILS POUR LE CONFORT
ET L’ECONOMIE DE L’ENERGIE
1
2
3
4
5
BOUTON DE
FONCTIONNEMENT
8
Page 27

F
KIT HUBLOT
MONTAGE
●
Pratiquez un trou dans le
carreau de la fenêtre.
●
Enchâssez le hublot sans le
bouchon.
●
Enlevez le raccord final de la
sortie d’air chaud du tuyau
flexible rétractable.
●
Approchez le climatiseur de la
fenêtre et enchâssez le tuyau
de sortie d’air dans le hublot.
Si on désire utiliser le climatiseur dans plusieurs locaux, Il est
possible d’acheter séparément plusieurs hublots pour l’expulsion de l’air.
ENTRETIEN ET NETTOYAGE
ATTENTION! Avant de procéder à des opérations de nettoyage et d’entretien, débranchez l’appareil.
1. Nettoyage du filtre à air.
Le filtre doit être contrôlé au moins une fois toutes les deux semaines (pendant les périodes de fonctionnement). Le fonctionnement avec un filtre sale ou obstrué provoque une diminution de l’efficacité du climatiseur et peut causer de graves problèmes.
On peut enlever le filtre de la partie supérieure de l’unité, en enlevant le panneau supérieur et en tirant vers le haut. Utilisez un
aspirateur pour éliminer la poussière. Si ce la n’ait pas suffisant, lavez le filtre à l’eau tiède et savonneuse, rincez-le à l’eau froide et séchez-le avant de le replacer.
135 mm
Dans le
vitre d’une
fenêtre
Dans le battant
en bois d’une
porte-fenêtre
Dans le mur: on conseille d’isoler la part
de mur d’une manière adéquate
NETTOYAGE DU FILTRE
Filtre
9
Page 28

NO!
F
10
2. Nettoyage de l’habillage.
Pour nettoyer le climatiseur, frottez-le avec un chiffon doux, légèrement humide. Pour enlever les taches éventuelles, utilisez de l’eau
savonneuse. N’utilisez jamais de dissolvants, essence ou autres
produits chimiques agressifs, ni de l’eau très chaude. Ne versez
jamais d’eau sur le climatiseur pour le nettoyer: vous pourriez
endommager les composants internes ou provoquer des décharges
électriques.
3. En cas de non utilisation.
Si vous prévoyez de ne pas utiliser le climatiseur pendant une
longue période, nettoyez les filtres et vérifiez que les réservoirs
intérieurs sont vide. Si vous rangez l’appareil dans un débarras,
prenez bien soin de le mettre en position verticale. Ne déposez pas
d’objets lourds dessus et si possible protégez- le avec une housse
en plastique.
4. Transport.
Quand vous transportez le climatiseur, maintenez-le autant que
possible en position verticale. Si cela s’avérait impossible, couchezle sur le côté droit; lorsque vous arrivez à destination, remettez au
plus vite le climatiseur en position verticale et attendez au moins 4
heures avant d’utiliser la fonction de refroidissement
5. Pour votre sécurité, vérifiez périodiquement les conditions du
câble d’alimentation électrique; dans le cas où il est endommagé par l’usage, adressez-vous au Service Après-Vente pour
le remplacement.
NO!
NO!
Si le climatiseur ne fonctionne pas, avant de faire appel au Service Après-Vente, vérifiez que:
●
la fiche est correctement branchée dans la prise de courant;
●
l’interrupteur général est enclenché et qu’aucun fusible soit brûlé;
●
le filtre à air est propre;
●
le tube flexible est placé correctement, ni trop plié, ni trop courbé;
●
la différence entre la température ambiante et la température fixée est supérieure à 1°C;
●
toutes les instructions contenues dans cette notice ont été scrupuleusement observées.
CONSEILS UTILES
ATTENTION
Le voyant STANDBY (3) qui clignote et l’arrêt simultané du climatiseur indiquent que le réservoir de condensât intérieur est
plein.
Page 29

D
2
INHALTSVERZEICHNIS
DAS PRODUKT ........................................................................................................... 2
ANZEIGEN .................................................................................................................. 3
VOR INBETRIEBNAHME ............................................................................................ 3
ANWENDUNGSHINWEISE ........................................................................................ 4
BENUTZUNG DER FERNBEDIENUNG...................................................................... 4
I
Einsetzen der Batterien............................................................................................. 4
I
Wahlschalter des Temperatursensors....................................................................... 4
I
Betrieb mit Fernbedienung........................................................................................ 4
FERNBEDIENUNG ..................................................................................................... 5
EINSTELLUNG DER UHR .......................................................................................... 6
KÜHLUNG ................................................................................................................... 6
ENTFEUCHTUNG ....................................................................................................... 6
VENTILATION.............................................................................................................. 6
WAHL DER VENTILATOR-GESCHWINDIGKEIT ....................................................... 6
NACHT-PROGRAMM.................................................................................................. 6
ZEITSCHALTUHR-EINSTELLUNG ............................................................................. 7
1-STUNDE ZEITSCHALTUHR-EINSTELLUNG .......................................................... 7
KONDENSATABLASS................................................................................................. 7
BETRIEBSWEISE OHNE FERNBEDIENUNG ............................................................ 8
RATSCHLÄGE FÜR HÖCHSTEN KOMFORT UND NIEDRIGSTEN VERBRAUCH .. 8
FESTSTELLUNG UND BEHEBUNG VON BETRIEBSSTÖRUNGEN ........................ 8
RUNDES FENSTER KIT.............................................................................................. 9
WARTUNG UND PFLEGE .......................................................................................... 10
NÜTZLICHE RATSCHLÄGE ....................................................................................... 10
KONFORMITÄTSERKLÄRUNG
Dieses Produkt ist mit
-Zeichen gekennzeichnet,
weil es den folgenden Richtlinien
entspricht:
– Niederspannungsrichtilinie
2006/95/CE.
– Elektromagnetische Verträglichkeit
89/336 EWG, 92/31 EWG und
93/68 EWG.
Bei falschem Einsatz des Gerätes
und/oder Nichtbeachtung auch nur
von Teilen der Bedienungsanleitung
und der Installatinsanweisungen wird
diese Erklärung ungültig.
DAS PRODUKT
1. Fernbedienung mit infrarot-Signalen
2. Anzeigen
3. Luftzufuhr
4. Luftansauggrill
5. Luftfilter
6. Aesthetisches Front Paneel
7. Kondenswasserflußrohr
8. Stromkabel mit Stecker
9. Transporträder
10. Transportgriff (beide Seiten)
11. Flexibler Abluftschlauch
12. Ausblasdüse
Betriebsgrenzen:
Raumtemperatur
:
Kühlung: MIN: 16°C T.K. / 14°C F.K.
MAX: 32°C T.K. / 24°C F.K.
Entfeuchtung: MIN: 10°C T.K / 80% R.F.
MAX: 32°C T.K. / 80% R.F.
HINWEIS FÜR DIE KORREKTE ENTSORGUNG DES PRODUKTS IN ÜBEREINSTIMMUNG MIT DER
EUROPÄISCHEN RICHTLINIE 2002/96/EG
Am Ende seiner Nutzzeit darf dieses Gerät nicht zusammen mit dem Hausmüll beseitigt werden.
Es darf zu den örtlichen Sammelstellen oder zu den Fachhändlern, die einen Rücknahmeservice anbieten, gebracht
werden.
Die getrennte Entsorgung eines elektrischen und elektronischen Gerätes und seiner Batterien vermeidet mögliche
negative Auswirkungen auf die Umwelt und die menschliche Gesundheit, die durch eine nicht vorschrichtsmäßige
Entsorgung bedingt ist. Zudem ermöglicht wird die Wiederverwertung der Materialen, aus denen sich das Gerät
zusammensetzt, was wiederum eine bedeutende Einsparung an Energie und Ressourcen mit sich bringt
Zur Erinnerung an die Verpflichtung, die diese Geräte und die Batterien getrennt zu beseitigen, ist das Produkt mit
einer durchgestrichen Mülltonne gekennzeichnet.
12
2
11
10
4
5
7
8
9
1
3
6
Page 30

D
3
ANZEIGEN
1. Empfänger: Empfängt die von der Fernbedienung gesen-
deten lnfrarot-Signale.
2. Betriebsleuchte (OPERATION): Leuchtet bei lnbetriebnahme der Einheit auf.
Sie blinkt einmal, um zu warnen, daß das Signal der
Fernbedienung empfangen und gespeichert werden ist. Sie
blinkt immerzu während der Schutzfunktionen (Abtauung,
etc.).
3. STANDBY Anzeige:
Sie leuchtet auf, wenn das Klimagerät zur Stromversorgung
verbunden ist und es fertig ist, das Signal von der
Fernbedienung zu empfangen.
4. Betriebstaste (ohne Fernbedienung): Diese Taste mit einer
Spitze drücken, um von einem Funktion zu dem anderen
(OFF und COOL) zu ändern.
Die Position OFF unterbricht nicht die Stromversorgung.
Den Hauptschalter zum Ausschalten des Klimagerätes
benutzen.
WARNUNG
VORSICHT
VOR INBETRIEBNAHME
● Überprüfen Sie, daß die einphasige Nennspannung am Anwendungsort 220/240V~ 50Hz ist.
● Vergewissern Sie sich, daß die elektrische Anlage einen eingemessene Betriebsstrom liefern kann, außer jenem der normalerweise
von den anderen Geräten (z.B. Haushaltgeräte, Beleuchtungen) verbraucht wird. Sehen die Bedarfsspitzen auf dem Datenschild vom
Klimagerät.
● Alle elektrische Anschlüsse müssen den örtlichen elektrischen Vorschriften entsprechen.
● Vergewissern Sie sich, daß die automatischen Schalter und die Schutzsicherungen der Anlage in der Lage sind, einen Zulaufstrom
von 20A zutragen (normalerweise weniger als 1 Sekunde Zeit lang).
● Das Klimagerät nicht an Orten aufstellen, in denen es von Wassertropfen naß gemacht werden könnte (z.B. in den Waschküchen).
●
Vergewissern Sie sich, daß der Ein/Aus-Taste (ON/OFF) auf dem Schaltpanel des Klimagerätes sich auf der Position OFF befindet.
● Vergewissern Sie sich, daß die Steckdose der elektrischen Anlage immer mit wirksamer
Erdung versehen ist.
● Verwenden Sie den Gerätestecker nicht zum Ein-und Ausschalten des Gerätes: benut-
zen Sie immer den Gerätebetriebstaste, die auf dem Kontrollpaneel gestellt ist.
● Während des Betriebs, transportieren Sie Das Klimagerät nicht, schalten Sie es aus und
ziehen Sie den Stecker aus der Steckdose. Kontrollieren und auslassen Sie das eventuelle Kondenswasser, durch den Kondenswasserrohr an der Rückseite der Einheit.
● VORSICHT ! Niemals Gegenstände in die Klimaanlage hineinstecken. Es ist sehr
gefährlich, da sich der Ventilator mit hoher Geschwindigkeit dreht.
● ACHTUNG! Das Klimagerät ist mit einer Startverzögerung für den Kompressor ausgerü-
stet. Der Kompressor startet 3 Minuten verzögert nach einem vorstehenden EIN/AUSSchaltvorgang.
● Vergewissern Sie sich, daß keine Hindernisse neben der Einheit den Luftumlauf unter-
brechen können. Den Luftzufuhr und Luftansauggrill der Einheit mit Vorhängen oder
ähnlich nicht versperren.Keine Gegenstände auf das Gerät legen.
● Der Hersteller haftet nicht für unsachgemäßen Gebrauch oder Mißachtung nationaler
Sicherheitsvorschriften.
● Vor jeder Bewegungs- oder Reinigungshandeln, den Stecker aus der Steckdose zie-
hen.
● Das Klimagerät nicht verwenden, wenn das Stromkabel oder der Stecker beschädigt
sind. Beschädigte Kabeln sind vom Hersteller, vom Kundenservice oder vom ähnlichen Fachleuten ersetzen zu lassen, um Gefahren auszuschließen.
● Dieses Klimagerät sollte nicht von Personen mit eingeschränkten körperlichen, sen-
soriellen und geistigen Fähigkeiten, Personen mit wenig Verfahrung und Kenntnis über dem Umgang mit dem Klimagerät und von
Kindern bedient werden. Im Bedarfsfall sind solche Personen von einer verantwortlichen Person entsprechend zu überwachen
oder einzuweisen.
WARNUNG
Das gleichzeitige Blinken der 2 Kontrolllampen OPERATION
und STANDBY besagt, dass die gewählte Betriebsart nicht
für die Einheitverfügbar ist ( ). In diesem Fall funktioniert die Klimaanlage erst wieder nach Neueinstellung der
korrekten Betriebsart.
HINWEIS
1
2
3
4
Wasserstand-Notanzeige: Wenn der Haupt-Behälter voll ist,
schaltet automatisch das Klimagerät aus und diese Anzeige
beginnt zu blinken.
Page 31

D
4
EINSETZEN DER BATTERIEN
● Die Abdeckung auf der Rückseite der Direktübertragung ent-
fernen steuern und überprüfend, daß DIP-SCHALTER wie in
Abbildung aufgestellt ist:
BENUTZUNG DER FERNBEDIENUNG
WAHLSCHALTER DES TEMPERATURSENSORS
● Unter Normalbedingungen wird die Raumtemperatur vom
Temperatursensor in der Fernbedienung ermittelt und kontrolliert (auf dem Bildschirm erscheint das FEELSymbol).Diese Funktion erlaubt die beste Raumtemperatur
zu haben, weil die Fernbedienung die Temperatur von dem
Platz überträgt, wo Sie sich befinden. Darum, indem Sie
diese Funktion benutzen, muß die Fernbedienung immer auf
dem Klimagerät richten werden.
BETRIEBSWEISE MIT FERNBEDIENUNG
Der IR-Sender der Fernbedienung auf den Empfänger auf dem
Klimagerät richten.
Die Fernbedienung überträgt bei jedem Tastendruck und
automatisch alle 5 Minuten ein Signal mit der
Raumtemperatur. Wenn das Gerät aus irgendeinem Grund
nicht das Signal von der Fernbedienung empfängt,
verwendet die Klimaanlage zur Überwachung der
Raumtemperatur den Sensor im Gerät. In solchen Fällen
kann die Temperatur in der Nähe der Fernbedienung von
der in der Umgebung des Geräts abweichen.
ANMERKUNG
ANWENDUNGSHINWEISE
KÜHLUNG
●
Das Klimagerät so nah wie möglich an das Fenster stellen. Den Abluftschlauch
stecken, indem er an der Rückseite des Gerätes angreift. Den Schlauch ausziehen, so weit es notwendig ist, und durch eine Fensteröffnung (zwischen den
Flügeln) stecken; das Fenster anlehnen.
●
Falls das Fenster ein Fensterbrett nach innen hat, benutzen Sie die mitgelieferte
Flachdüse. Die Flachdüse auf das Ende des Schlauches stecken.
●
Das Fenster öffnen und einen der Flügeln durch die Griffe befestigen. Die
Schlauchdüse zwischen den beiden mit Schlaufe fixierten Flügeln stecken.
●
Scharfes Abnicken des Schlauches vermeiden.
●
Wird die Seitelucke benutzt, ein Loch von 135 mm in das Fenster schneiden.
Wenn das Klimagerät als Entfeuchter benutzt wird, kühlt er den Raum nicht.
Wenn das Gerät als Entfeuchter benutzt wird, ist der Anschluß des Abluftschlauches
nicht notwendig. Die Schlauchanschlußöffnung auf der Rückseite einfach offen lassen, um eine große Entfeuchter Leistung zu erlangen.
●
Den Schlauch abnehmen, indem Sie den auf der Anschluß des Klimagerätes fassen und drehen Sie, um den auszuziehen.
ENTFEUCHTUNG
● Zwei Batterien von 1,5 V-DC Art AAA alkaline einsetzen. Die
Pole, wie auf der Fernbedienung angegeben, beachten.Die
Uhrzeitanzeige auf dem Bildschirm blinkt. Drücken Sie die
Taste SEL TYPE.
● Die mittlere Betriebsdauer der Batterien ist 6 Monate. Sie
hängt davon ab, wie oft die Fernbedienung benutzt wird. Die
Batterien bei längerer Nichtbenutzung der Fernbedienung
(mehr als 1 Monat) herausnehmen. Die Batterien auswechseln, wenn die Leuchtanzeige zur Signalübetragung von der
Fernbedienung nicht blinkt oder, wenn das Klimagerät auf die
Fernbedienungsbefehle nicht reagiert.
● Die Batterien der Fernbedienung enthalten verunreinigen
Substanzen. Die erschöpfte Batterien sollen gemäß der örtlichen Vorschriften beseitigt werden (sehen Sie Paragraph
“WIE DIE BATTERIEN ZU ENTFERNEN” am Ende dieser
Bedienungsanleitungen).
NEIN!
● Man kann den Temperatursensor durch Druck auf die FEEL-
Taste ausschalten. In dem Fall erlischt das entsprechende
Symbol auf dem Bildschirm und der Sensor im Innern des
Geräts wird eingeschaltet.
IR-SENDER
FERNBEDIENUNG
IR-EMPFÄNGER
Diese Funktion ist im Herbst und Winter empfohlen. Wenn Sie diese Betriebsweise
im Sommer benutzen, sollen Sie das Abluftschlauch anschließen.
NOTA
Page 32

D
5
FERNBEDIENUNG
TASTE “NIGHT” (Nacht-Programm)
Wegen Einzelheiten siehe "NachtProgramm". Wird diese Taste in der
Betriebsweise KÜHLUNG, oder ENTFEUCHTUNG gedrückt, erscheint das Zeichnen
auf dem Display. Der
Mikroprozessor der Fernbedienung reguliert die gewählte Temperatur in energisparender Weise.
SENDER
Wenn die Fernbedienungs-Tasten
gedrückt werden, leuchtet die
Lampe auf dem Display auf, um die
Einstellungsänderungen des Klimagerätes
überzutragen.
TEMPERATURWAHLTASTEN
TEMP— (kälter)
Diese Taste zur Senkung der gewählten
Temperatur drücken.
TEMP + (wärmer)
Diese Taste zur Erhöhung der gewählten
Temperatur drücken.
SENSOR
Ein Temperatursensor im Innern der Fernbedienung mißt die Raumtemperatur.
TASTE “SEL TYPE”
Drücken Sie diese Taste, um die folgende Funktionen zu wahlen:
• Einstellung der Uhr
• Timer ON/OFF Einstellung
Für Einzelheiten siehe Beispiel “EINSTELLUNG DER UHR” und “TIMER
EINSTELLUNG”.
WAHLSCHALTER DES TEMPERATURSENSORS
Drücken Sie die Taste I FEEL, um die
Einstellung des eingeschalteten
Temperatursensors zu verändern (von
Fernbedienung auf KLimaanlage und
umgekehrt).
TASTE “FAN”
(Ventilator-Geschwindigkeit)
Die Ventilator-Geschwindigkeit wird
automatisch vom Mikroprozessor
gewählt.
Hohe Ventilator-Geschwindigkeit.
MittlereVentilator- Geschwindigkeit.
NiedrigeVentilator-Geschwindigkeit.
TASTEN: EINSTELLUNG DER UHR
UND EINGABE DER TIMERZEIT
Durch Drücken der Taste “Program” wird
die Einstellung aktiviert. Für Einzelheiten
siehe Beispiel “EINSTELLUNG DER
UHR” und “TIMER EINSTELLUNG”.
TASTE ON/OFF (ein/aus)
Diese Taste dient zum Ein- und
Ausschalten des Klimageräts.
TASTE “TIMER SEL” (Timereinstellung)
Indem Sie die Taste TIMER drücken wird
auf dem Display dad Verfahren aktiviert,
um die ON/OFF Timer Einstellung.
Für Einzelheiten siehe Beispiel “TIMER
EINSTELLUNG”.
ANZEIGE
Zeigt Informationen an, wenn die Fernbedienung in Betrieb ist.
Betriebsweise
Ventilator - Geschwindigkeit
Hohe Geschwindigkeit
Automatisch
Mittlere Geschwindigkeit
Niedrige Geschwindigkeit
Datenverkehrsbestatigung
oder Fernbedienung Sperre
Eingegebene
Temperatur
Es zeigt an, dass die Klimaanlage in der
Betriebsart I FEEL funktioniert (der
Fernbedienungssensor ist eingeschaltet)
Nacht Programm
Zeigt die Timer Typen
Automatik
(
Kuhlung
Heitzung
(
Entfeuchtung
Ventilation
BETRIEBSWEISE TASTE
Diese Taste drücken, um die
Betriebsweise des Klimagerätes zu
ändern.
(Automatik)
(
Wird die Position "Automatik" eingestellt,
wählt der Mikroprozessor zwischen
Kühlung und Heizung aufgrund des
Unterschieds zwischen der
Raumtemperatur und der auf der
Fernbedienung eingestellten
Temperatur.
(Heizung)
(
Das Klimagerät erwärmt den Raum.
(Entfeuchtung)
Das Klimagerät senkt die Raumfeuchte.
(Kühlung)
Das Klimagerät kühlt die Luft und senkt
die Raumtemperatur.
(Ventilation)
Das Klimagerät funktioniert nur als
Ventilator.
(
INAKTIVE TASTEN
Orologio
Raumtemperatur
Nicht aktive Modalität.
Page 33

AUTOMATIK
Mit der Taste FAN SPEED die Position “AUTO” eingeben.
Der Mikroprozessor wird automatisch die VentilatorGeschwindigkeit kontrollieren. Beim Anlauf des Klimageräts wird
der Unterschied zwischen Raumtemperatur und eingegebener
Temperatur vom Temperatur-Sensor gemessen und zum
Mikroprozessor übertragen, welcher automatisch die geeigneteste Ventilator-Geschwindigkeit wählt.
VENTILATION
Will man lediglich die Luft im Zimmer umwälzen, ohne die
Temperatur zu verändern, ist wie folgt zu verfahren:
1. Die Taste MODE (Betriebsweise) drücken, bis das
Ventilationssymbol angezeigt wird.
2. Die Taste ON/OFF einmal drücken und das Klimagerät in
Betrieb setzen.
D
6
NACHT-PROGRAMM
●
Das Nacht-Programm dient zum Energiesparen.
1. Die Taste MODE drücken, um Kühlung oder Entfeuchtung
zu wählen.
2. Die Taste NIGHT drücken.
3. Das Symbol erscheint auf dem Display. Zum
Löschen desselben nochmals die Taste NIGHT drücken.
Was ist das Nacht-Programm?
Zu Beginn kühlt das Klimagerät den Raum oder arbeitet es als
Entfeuchter bis zur eingegebenen Temperatur dann hält es an.
Nach ca. 1 Stunde wird die eingegebene Temperatur automatisch wie folgt verändert (siehe graphische Darstellung).
Das Klimagerät arbeitet bis zur Erreichung der eingegebenen
Temperatur, dann bleibt es stehen. Nach ca. 1 Stunde wird die
eingegebene Temperatur erneut um 1 °C erhöht. Auf dieser
Weise wird Energie gespart, ohne auf den nächtlichen Komfort
im Raum verzichten zu müssen.
Hohe
Geschwindigkeit
Mittlere
Geschwindigkeit
Niedrige
Geschwindigkeit
1. Die Taste SEL TYPE dreimal drücken.
Die Stundenangabe beginnt zu blinken.
2. Die Taste SET H solange drücken, bis die gewünschte Stunde angezeigt wird. Die Taste SET M solange drücken, bis
die gewünschten Minuten angezeigt werden. Die Stundenanzeige auf dem Display hört nach 10 Sekunden automatisch zu blinken auf.
EINSTELLUNG DER UHR
MANUELL
Zur manuellen Einstellung der Ventilator-Geschwindigkeit die
Taste FAN SPEED betätigen und die gewünschte
Geschwindigkeit wählen.
KÜHLUNG
Nachprüfen, daß die Einheit an die
Stromversorgung verbunden ist und die
STANDBY Anzeige aufgeleuchtet ist.
1. Die Taste MODE (Betriebsweise)
drücken, bis das Zeichnen KÜHLUNG
auf dem Display erscheint.
2. Die Taste ON/OFF drücken und das
Klimagerät in Betrieb setzen.
3. Die Tasten TEMP+/- drücken, um die
gewünschte Temperatur einzugeben (Der
Einstellungsbereich liegt zwischen 16 °C
minimum und 32 °C maximum).
DER GEWÄHLTE TEMPERATURWERT
WIRD ANGEZEIGT.
5 SEKUNDEN NACH DER EINSTELLUNG DER
GEWÄHLTEN TEMPERATUR DIE
RAUMTEMPERATUR WIRD WIEDER ANGEZEIGT.
4. Die Taste FAN drücken, um die Ventilator-Geschwindigkeit
einzugeben.
1
4
3
2
ANMERKUNG
Das Klimagerät verbraucht das Kondenswasser automatisch,
wenn der Ventilator mit der hohen und mittleren
Geschwindigkeit läuft; wenn der Ventilator mit der niedrigen
Geschwindigkeit läuft, wird das Kondenswasser in dem
Behälter aufgenommen.
ANMERKUNG
ENTFEUCHTUNG
1. Die Taste MODE (Betriebsweise) drücken, bis das Zeichnen
ENTFEUCHTUNG auf dem Display erscheint.
2. Die Taste ON/OFF drücken und das Klimagerät in Betrieb
setzen.
3. Die Tasten TEMP+/- drücken, um die Raumtemperatur einzugeben (Der Einstellungsbereich liegt zwischen 32 °C
Maximum und 16 °C Minimum).
DER GEWÄHLTE TEMPERATURWERT WIRD ANGEZEIGT.
5 SEKUNDEN NACH DER EINSTELLUNG DER
GEWÄHLTEN TEMPERATUR DIE
RAUMTEMPERATUR WIRD WIEDER ANGEZEIGT.
●
Wählen Sie die Funktion "Entfeuchtung", wenn Sie die
Raumluftfeuchte senken wollen.
●
Wenn die Funktion "Entfeuchtung" gewählt wird, läuft der
Ventilator mit automatisch Geschwindigkeit oder
Anhalt, um nicht zu zu kühlen.
●
Die Funktion "Entfeuchtung" darf bei einer Innentemperatur
unter 15 °C nicht gewählt werden.
●
Die Luftfeuchte des Zimmers (Kondenswasser) wird in den
innere Kondenswasserbehälter vom Klimagerät aufgenommen.
ANMERKUNG
WAHL DER VENTILATOR-GESCHWINDIGKEIT
UNTERSCHIED ZWISCHEN
RAUMTEMPERATUR UND VENTILATOR-GESCHWINDIGKEIT
EINGEGEBENER TEMPERATUR
Kühlung
2 °C und mehr
Höchste
und
Zwischen 2 u. 1 °C
Mittlere
Entfeuchtung
Weniger als 1 °C
Niedrige
Die in der Liste genannten Werte beziehen sich auf das
Klimagerät, wenn der Sensor der Fernbedienung aktiviert wurde.
(Siehe “WAHLSCHALTER DES TEMPERATURSENSORS”).
Die Werte können sich ein wenig ändern, wenn der Sensor der
Inneneinheit aktiviert wird.
Die automatische Geschwindigkeit ist nicht verfuegbar im
Ventilationsmodus.
ANMERKUNG
1 Stunde 1 Stunde ZEIT
Eingegebene Temperatur
Raumtemperatur
KÜHLUNG UND ENTFEUCH
TUNG
1°C
1°C
Page 34

D
7
ZEITSCHALTUHR - EINSTELLUNG
2
1
4
A) WIE DIE EINSCHALT-UHRZEIT
EINZUSTELLEN IST (ON)
1. Nur einmal die Taste SEL TYPE drücken.
Die Anzeige ON und die Uhrzeit beginnen
zu blinken.
2. Die Taste SET H solange drücken, bis die
gewünschte Stunde angezeigt wird. Die
Taste SET M solange drücken, bis die
gewünschten Minuten angezeigt werden.
Die Anzeige auf dem Display zeigt die laufende Zeit wieder nach 10 Sekunden an.
3. Die Taste ON/OFF drücken, um das
Klimagerät zu starten.
4. Die Taste TIMER SEL viermal drücken,
um den Timer auf die Funktion “ON TIME”
einzustellen. (Start).
B) WIE DIE AUSSCHALT-UHRZEIT EINZUSTEL-
LEN IST
(OFF)
1. Zweimal die Taste SEL TYPE drücken.
Die Anzeige OFF und die Zeitanzeige
beginnen zu blinken.
2.
Die Taste SET H solange drücken, bis die
gewünschte Stunde angezeigt wird. Die Taste
SET M solange drücken, bis die gewünschten
Minuten angezeigt werden. Die Anzeige auf
dem Display zeigt nach 10 Sekunden wieder
die laufende Zeit an.
3. Die Taste ON/OFF drücken, um das
Klimagerät zu starten.
4. Die Taste TIMER SEL drücken, um den
Timer auf die Funktion “OFF TIME”
(Ausschalten) einzustellen.
C) WIE DAS TAGES-PROGRAMM EIN-
SCHALTEN/AUSSCHALTEN (ODER
UMGEKEHRT) EINZUSTELLEN IST
1. Den Timer wie unter den Punkten “A” und
“B” beschrieben einstellen.
2. Die Taste ON/OFF drücken, um das
Klimagerät zu starten.
3. Die Taste TIMER SEL dreimal drücken,
um das Programm des Timers eingeschaltet/ausgeschaltet, oder umgekehrt, einzustellen.
Nach der Timereinstellung die Taste SEL TYPE drücken, um
die eingegebene Ein/Aus-Uhrzeit zu kontrollieren.
Wenn die Zeitschaltuhr eingestellt wird, leuchtet keine Anzeige auf
der Einheit auf; Sehen Sie die Fernbedienung.
ANMERKUNGEN
3
1-STUNDE ZEITSCHALTUHR-EINSTELLUNG
Durch diese Einstellung läuft das Klimagerät eine Stunde lang,
sei es, daß es ein- oder ausgeschaltet ist.
TIMER-EINSTELLUNG.
•
Betätigen Sie 4 mal die Taste TIMER
SEL. Dann erscheint auf der Anzeige
das Symbol
1-STUNDE TIMER.
1-STUNDE TIMER-EINSTELLUNGS-LOESCHEN.
• Die Taste ON/OFF zum Ausschalten des
Klimagerätes drücken.
• Warten, bis das Klimagerät ausgeschaltet
ist.
• Nochmals die Taste ON/OFF zum
Wiedereinschalten des Klimagerätes
drücken.
Für Dauerablass: das
Klimagerät
abschalten und den Stecker heraus ziehen. Verschluß von der Ablaufleitung hinten abnehmen und
einen Schlauch mit 20 mm Innendurchmesser f
ü
r den Kondensatablass anschließen: das andere Ende über einen normalen Ablauf
halten. Sicherstellen, daß der Schlauch nicht verdreht und geknickt ist. Der Schlauch muß mit Gef
ä
lle nach unten gehalten werden.
Internen Behälter entleeren: Der interne Kondensatsammelbeh
ä
lter muß von Zeit zu Zeit abgelassen werden. Wenn dieser
Beh
ä
lter voll ist, beginnt die STANDBY Anzeige zu blinken.
Jedes Mal sollen Sie die Einheit zu ein anderes Zimmer bringen oder vor der Lagerung für einen längeren Zeitraum, entleeren Sie
den Kondensatsammelbeh
ä
lter durch dem Flußrohr.
Zum Ausleeren, ein Gef
ä
ß unter den Ablaufschlauch hinten halten, den Gummistopfen abnehmen und das Wasser auslaufen lassen.
Anschließend wieder den Stopfen anbringen und das
Klimagerät
einschalten.
KONDENSATABLASS
Page 35

D
8
Wenn die Fernbedienung nicht funktioniert oder verloren ging,
wie folgt vorgehen:
1. KLIMAGERÄT AUßER BETRIEB
Wenn Sie das Klimagerät in Betrieb setzen wollen, ist die
Betriebstaste mit einer Spitze zu drücken, um die gewünschte
Funktion auszuwählen.
BETRIEBSWEISE OHNE FERNBEDIE
NUNG
Das Klimagerät wird mit der hohe VentilatorGeschwindigkeit einschalten
Die Temperatur-Einstellung wird 25°C.
ANMERKUNG
2. KLIMAGERÄT IN BETRIEB
Wollen Sie das Klimagerät abstellen, ist die Betriebstaste mit einer Spitze zu drücken, bis zum Ausschalten der OPERATION
Anzeige.
Stromunterbrechung während des Betriebs.
Beim Auftreten einer Stromunterbrechung hält das Kilmagerät
an. Wird die Versorgung wiederhergestellt, schaltet sich das
Klimagerät nach 3 Minuten automatisch wieder ein.
ANMERKUNG
RATSCHLÄGE FÜR HÖCHSTEN KOMFORT
UND NIEDRIGSTEN VERBRAUCH
VERMEIDEN SIE:
●
Den Luftzufuhr und Luftansauggrill der Einheit zu versperren.
Sind diese nicht frei, arbeitet die Einheit nicht einwandfrei
und könnte Schaden erleiden.
●
Notfalls Sonnenschutz benutzen oder Vorhänge zuziehen,
um Sonnenbestrahlung des Raumes zu verhindern.
ÜBERPRÜFEN SIE:
●
Daß die Luftfilter immer sauber sind. Ein schmutziger Filter
vermindert den Luftdurchlauf und setzt die Leistung der
Einheit herab.
●
Daß Fenster und Türen geschlossen sind, um das
Eindringen nicht konditionierter Luft zu vermeiden.
●
Der Schlauch ordnungsgemäß verlegt ist, ohne Knick
●
Die Raumtemperatur höher als 16 °C für Kühlungbetrieb und
Entfeuchtungbetrieb ist.
FESTSTELLUNG UND BEHEBUNG VON
BETRIEBSSTÖRUNGEN
WARNUNG
• Das Blinken der STANDBY Anzeige (3) und das gleichzeitige
Anhalten des Klimagerätes bedeuten, daß die
Kondenswasserbehälter voll ist.
• Falls das Klimagerät nicht richtig funktioniert, führen Sie bitte
die unten aufgeführten Überprüfungen durch, bevor Sie den
technischen Kundendienst rufen. Falls die Störung bleibt,
wenden Sie sich an den Händler oder den Technischen
Kundendienst.
Störung: Das Klimagerät läuft überhaupt nicht.
Mögliche Ursache:
1. Keine Stromzufuhr.
2. Niederdruckschalter wurde ausgelöst.
3. Netzspannung ist zu niedrig.
4. Betriebstaste ist ausgeschaltet (OFF).
5. Batterien in der Fernbedienung sind erschöpft.
Abhilfe:
1. Für erneute Stromzufuhr sorgen.
2. Wenden Sie sich an eine Kundendienststelle.
3. Lassen Sie sich von Ihrem Elektriker oder Fachhändler
beraten.
4. Taste ON/OFF erneut drücken.
5. Batterien auswechseln.
• Der Gebrauch von mobilen Telefonen muß in der Nähe des
Klimagerätes vermieden werden, weil sie beim Betrieb des
Gerätes Störungen verursachen können. Im Falle einer
Betriebsstörung (die Betriebslampe (2) leuchtet, aber die
Außeneinheit läuft nicht) schalten Sie die Stromversorgung
für 60 Sekunden am Hauptschalter oder durch Ziehen des
Steckers ab und schalten das Gerät anschließend wieder
ein.
Störung: Das Klimagerät arbeitet nicht. die OPERATION
Lampe (2) blinkt und die STANDBY Lampe (3) ist ausgeschaltet.
Mögliche Ursache:
1. Fehlerhafter Sensor der Batterie.
Abhilfe:
1. Wenden Sie sich an eine Kundendienststelle.
Störung: Das Klimagerät arbeitet nicht, die OPERATION
Lampe (2) blinkt und die STANDBY Lampe (3) ist eingeschaltet.
Mögliche Ursache:
1. Fehlerhafter Luftsensor.
Abhilfe:
1. Wenden Sie sich an eine Kundendienststelle.
Störung: Kompressor läuft, kommt jedoch bald zum Stillstand.
Mögliche Ursache:
1. Ein Hindernis befindet sich vor der Luftansauggrille.
Abhilfe:
1. Hindernis entfernen.
Störung: Schlechte Kühlleistung.
Mögliche Ursache:
1. Luftfilter sind schmutzig oder zugesetzt.
2. Eine Wärmequelle oder viele Leute befinden sich im Raum.
3. Türen und/oder Fenster sind geöffnet.
4. Ein Hindernis befindet sich in der Nähe des Lufteinlasses
oder -auslasses.
5. Die mit der Fernbedienung geregelte Temperatur ist zu
hoch.
Abhilfe:
1. Luftfilter reinigen.
2. Die Wärmequelle möglichst abschalten.
3. Diese schließen, damit keine Wärme bzw. Kälte von außen
eindringt.
4. Hindernis entfernen, um einen unbehinderten Luftstrom zu
gewährleisten.
5. Regeln Sie wieder die Temperatur mit der Fernbedienubg.
Störung: Knackgeräusche werden vom Klimagerät gehört.
Mögliche Ursache:
1. Während dem Betrieb können plötzliche Temperaturwechsel
eine Ausdehnung bzw. ein Schrumpfen von Künststoffteilen
verursachen. In einem solchen Fall werden u.U.
Knackgeräusche gehört.
Abhilfe:
1. Dies ist normal, und die Geräusche wieder aufhören, wenn
eine beständige temperatur erreicht wird.
1
2
3
4
5
Das gleichzeitige Blinken der 2
Kontrolllampen OPERATION
und STANDBY besagt, dass
die gewählte Betriebsart nicht
für die Einheitverfügbar ist
( ). In diesem Fall funktioniert die Klimaanlage erst
wieder nach Neueinstellung
der korrekten Betriebsart.
HINWEIS
BETRIEBSTASTE
Page 36

D
9
RUNDES FENSTER KIT
MONTAGE
●
Das Fensterglas lochen.
●
Das runde Fenster ohne
Deckel einsetzen.
●
Die Ausblasedüse vom
Schlauch entfernen.
●
Das Klimagerät ans Fenster
nähern und das Auslaufrohr in
das runde Fenster einsetzen.
Wenn man das Klimagerät in mehreren Zimmer brauchen will, ist
es möglich mehrere runde Fenstern für Luftauslassen kaufen.
WARTUNG UND PFLEGE
VORSICHT! Vor Beginn der Reinigungs-und Wartungsvorgänge ist das Klimagerät abzuschalten und der Stecker aus der
Steckdose zu ziehen.
1. Filterreinigung.
Der Luftfilter muß wenigstens einmal alle 2 Betriebswochen überprüft und gereinigt werden. Der Betrieb mit schmutzigen oder
verstopften Filter kann die Leistung des Klimagerätes verkleinern. Der Filter kann an der Oberseite des Klimagerätes heraus
gekommen werden, indem Sie das Oberpaneel heben und den Filter nach oben ziehen. Zur Staubentfernung einen Staubsauger
benutzen. Sollte dies nicht ausreichen, den Filter mit lauwarmen Seifenwasser waschen, gut mit frischem Wasser abspülen und
vor dem Wiedereinsetzen trocknen lassen.
135 mm
Im Glas
eines
Fensters
Im Holzrahmen
einer
Fenstertür
In der Wand: es wird
empfohlen, den
Wandbereich entsprechend zu isolieren
FILTERREINIGUNG
Filter
Page 37

D
10
2. Gehäusereinigung.
Das Gehäuse nur mit weichem feuchtem Tuch abwischen. Wenn
das Gehäuse Flecken aufweist, mit etwas lauwarmen Seifenwasser
abwischen. Auf keinem Fall mit heißen Wasser, angreifenden chemischen Mitteln oder Benzin reinigen. Kein Wasser auf die Einheit
gießen. Es könnte die inneren Komponenten beschädigen oder
einen Kurzschluß verursachen.
3. Lagerung.
Vor der Lagerung für einen längeren Zeitraum den Filter reinigen
und vergewissern Sie sich, daß die innere Kondenswasserbehälter
leer sind. Das Gerät immer senkrecht lagern. Keine schweren
Gegenstände auf das Gerät legen und das Klimagerät mit einem
Plastik Beutel schützen.
4. Transport .
Das Gerät nur senkrecht transportieren. Falls dies nicht möglich ist,
das Gerät auf die rechte Seite legen. So bald wie möglich das
Gerät senkrecht wieder stellen. 4 Stunden warten, bevor es in
Betriebsart “Kühlung” gebraucht wird.
5. Aus Sicherheitsgründen das Stromkabel regelmäßig auf
Schäden überprüfen; wenn es beschädigt ist, lassen Sie es
durch einen Servicefachmann ersetzen.
FALSCH!
FALSCH!
FALSCH!
Falls das Klimagerät nicht funktioniert, vergewissern Sie sich, bevor den Eingriff des Technischen Kundendiensts verlangen, daß:
●
der Stecker richtig in der Steckdose eingesetzt ist;
●
der Hauptschalter eingeschaltet und keine Sicherung unterbrochen ist;
●
der Luftfilter sauber ist;
●
der Schlauch ordnungsgemäß verlegt ist, ohne Knick;
●
das Unterschied zwischen Umgebungstemperatur und Solltemperatur uber 1°C ist;
●
alle Anweisungen dieses Handbuches genau beachtet wurden.
NÜTZLICHE RATSCHLÄGE
ACHTUNG
Das Blinken der STANDBY Lampe (3) und das gleichzeitige Anhalten des Klimagerätes bedeuten, daß die
Kondenswasserbehälter voll ist.
Page 38

E
INDICE
EL PRODUCTO ........................................................................................................... 2
SEÑALIZACIONES...................................................................................................... 3
ANTES DE USAR EL
ACONDICIONADOR............................................................... 3
COMO USARLO ......................................................................................................... 4
USO DEL MANDO A DISTANCIA ............................................................................... 4
I
Como Colocar las pilas ............................................................................................. 4
I
Selector del sensor de temperatura.......................................................................... 4
I
Funcionamiento de la unidad con el mando a distancia ........................................... 4
MANDO A DISTANCIA ......................................................................................... ...... 5
AJUSTE DE LA HORA................................................................................................. 6
REFRIGERACION ....................................................................................................... 6
DESHUMIDIFICACION................................................................................................ 6
VENTILACION ............................................................................................................. 6
SELECCION DE LA VELOCIDAD DEL VENTILADOR .............................................. 6
PROGRAMA NOCTURNO .......................................................................................... 6
REGULACION DEL TEMPORIZADOR ....................................................................... 7
REGULACION DEL TEMPORIZADOR 1 HORA......................................................... 7
DRENAJE CONDENSACION...................................................................................... 7
FUNCIONAMIENTO DE LA UNIDAD SIN EL MANDO A DISTANCIA........................ 8
CONSEJOS PARA EL MAXIMO CONFORT Y AHORRO DE ENERGIA ................... 8
IDENTIFICACION Y SOLUCION DE PROBLEMAS.................................................... 8
KIT JUNTA ELASTICA................................................................................................. 9
MANTENIMIENTO Y LIMPIEZA ................................................................................. 9
CONSEJOS PACTICOS ............................................................................................. 10
EL PRODUCTO
1. Mando a distancia de rayos infrarrojos
2. Señalizaciones
3. Salida aire
4. Rejilla aspiración aire
5. Filtro aire
6. Painel frontal estético
7. Tubo de descarga de la condensación
8. Cable eléctrico con clavija
9. Ruedas fácil transporte
10. Asa de transporte (en ambos lados)
11. Tubo flexible plegable
12. Boquilla terminal expulsión aire
DECLARACION DE
CONFORMIDAD
Este Producto está marcado
porque responde a las Directivas:
– Baja Tensión n° 2006/95/CE.
– Compatibilidad Electromagnética
n° 89/336 CEE, 92/31 CEE y 93/68
CEE.
Esta declaración no tendrá efecto en
sólo caso de que se haga un uso
diferente al declarado por el
Fabricante, y/o por el no respeto,
incluso parcial, de las instrucciones
de instalación y/o de uso.
Limites de funcionamiento:
Temperatura interior:
Refrigeración: MIN: 16°C B.S. / 14°C B.H.
MAX: 32°C B.S. / 24°C B.H.
Deshumidifición: MIN: 10°C B.S / 80% H.R.
MAX: 32°C B.S. / 80% H.R.
2
ADVERTENCIA PARA LA ELIMINACIÓN CORRECTA DEL PRODUCTO SEGÚN ESTABLECE LA DIRECTIVA EUROPEA 2002/96/CE
Al final de su vida útil, este equipo no debe eliminarse junto a los desechos domésticos.
Debe entregarse a centros específicos de recogida diferenciada locales o a distribuidores que facilitan este servicio.
Eliminar por separado un equipo eléctrico y electrónico y su pilas significa evitar posibles consecuencias negativas
para el medio ambiente y la salud derivadas de una eliminación inadecuada y permite reciclar los materiales que lo
componen, obteniendo asi un ahorro importante de energía y recursos.
Para subrayar la obligación de eliminar por separado estos equipos y las pilas, en el producto aparece un contenedor
de basura tachado.
12
2
11
10
4
5
7
8
9
1
3
6
Page 39

● Comprobar que la tensión eléctrica monofásica nominal de alimentación sea de 220/240 V ~ 50Hz.
● Asegurarse que la instalación eléctrica sea dimensionada para la corriente necesaria al acondicionador aparte de la corriente
absorbida por otros aparatos. (electrodomésticos, luces, etc.). Véase las absorciones máximas indicadas en la placa de características del aparato.
● La conexión a la red eléctrica de la unidad debe ser realizada conforme a las normas locales de electricidad.
● Asegurarse que los interruptores automáticos y válvulas de protección de la instalación sean capaces de soportar una corriente de
arranque de 20 A (normalmente por un tiempo inferior a un segundo).
● Evitar instalar el acondicionador en lugares donde podría salpicarle el agua (como
por ejemplo las lavanderías).
●
Asegurarse que el pulsador arranque-parada situado en el panel de mandos esté
en posición OFF.
● El enchufe de la instalación deberá estar dotado de una toma de tierra eficaz.
● No utilizar nunca el enchufe para parar o poner en marcha el acondicionador:
usar siempre el interruptor del aparato.
● No transportar el acondicionador durante el funcionamiento, pararlo y desconectar
el enchufe eléctrico. Verificar y vaciar el agua de condensación, si existe, a través
del tubo de descarga posterior.
● PRECAUCION No introducir objetos en el acondicionador. Es muy peligroso por-
que el ventilador gira a alta velocidad.
● ATENCION!
El acondicionador está dotado de un sistema de protección contra sobrecargas
que impide el arranque del mismo si no han transcurrido por lo menos 3 minutos
desde la parada anterior.
● Asegurarse de que el aire circule libremente en la unidad. No obstruir la salida y
entrada del aire con cortinas o semejantes. No colocar nada encima del aparato
de modo que no obstaculice el paso del aire.
● El fabricante no se asume ninguna responsabilidad si no vienen respetadas las
normas de seguridad.
● Antes de proceder al desplazamiento o limpieza del acondicionador, desconectar
el enchufe eléctrico.
● No utilice el acondicionador si los cables o el enchufe están dañados. Si el cable de alimentación está dañado, deberá ser sustitui-
do por el fabricante, su revendedor o una persona cualificada a fin de evitar riesgos.
● Este acondicionador no está diseñado para ser utilizado por personas (incluidos los niños) con discapacidades físicas, sensoriales
o mentales o que carezcan de la experiencia y el conocimiento necesarios, salvo que hayan recibido la debida supervisión o capacitación para el uso del acondicionador por parte de una persona responsable de su seguridad.
E
SEÑALIZACIONES
1. Receptor: recibe las señales enviadas por el mando a dis-
tancia.
2. Testigo de funcionamiento (OPERATION): se enciende
cuando la unidad está funcionando.
El parpadea una vez para indicar que el señal del mando a
distancia a sido recibido y memorizado. El parpadea
continuamente durante las modalidades de protección
(descongelación, ecc.).
3. Testigo de espera (STANDBY): Se enciende cuando el
acondicionador está conectado a la corriente y listo para
recibir el señal del mando a distancia.
4. Botón de funcionamiento (sin mando a distancia): Pulsar
este botón, con la punta de un objeto agudo, para elegir los
modos de funcionamiento OFF y COOL.
La posición en OFF no desconecta el aparato. Es necesario
desenchufarlo para desconectarlo eléctricamente.
ADVERTENCIA
ANTES DE USAR EL ACONDICIONADOR
PELIGRO!
PRECAUCION
3
NOTA
Si los dos pilotos OPERATION y STANDBY parpadean al
mismo tiempo quiere decir que el modo de funcionamiento
seleccionado ( ) no es compatible con el equipo en
cuestion. Si esto sucede, el equipo de aire acondicionado no
funcionara hasta que no se restablezca el modo correcto.
1
2
3
4
Alarma del nivel del agua: Cuando el depósito está lleno, el
acondicionador se apaga automáticamente y este piloto se
enciende con intermitencia.
Page 40

E
4
COMO USARLO
REFRIGERACION
●
Acercar lo más posible el acondicionador a una ventana. Acoplar el tubo flexible
enganchándolo en la parte posterior del aparato. Estirar el tubo flexible cuanto sea
necesario para llegar al exterior y pasarlo entre los batientes de la ventana con la
mínima abertura indispensable.
●
Si la ventana tiene un alfeizar interno es aconsejable utilizar la boquilla terminal
suministrada con el aparato. Acoplar el terminal al extremo libre del tubo flexible.
●
Abrir la ventana y bloquear uno de los batientes con la manilla. Apoyar el terminal
del tubo al batiente fijo, acercar el otro batiente de la ventana y atar los dos batientes entre si.
●
Evitar curvas cerradas o pliegues en el tubo flexible.
●
Si se utiliza la junta elástica, hacer un agujero de ø135 en el cristal de la ventana.
Cuando el acondicionador funciona en deshumidificación, no enfría el ambiente.
Usando el acondicionador como deshumidificator, no debe conectarse el tubo flexible. Para obtener la máxima eficacia de deshumidificación dejar la expulsión aire
posterior libre para descargar directamente en la habitación.
●
Quitar el tubo flexible del acondicionador girándolo hasta soltarlo de los ganchos
de bloqueo.
DESHUMIDIFICACION
COMO COLOCAR LAS PILAS
● Para quitar la cubierta en la parte posteriora del telecontrol
controlar y verificando que el INTERRUPTOR DIP está instalado como en figura:
INSTALACION Y USO DEL MANDO A DISTANCIA
SELECTOR DEL SENSOR DE TEMPERATURA
● En condiciones normales, el sensor de temperatura colocado
dentro del mando a distancia (símbolo IFEEL activo en el
display) detecta y controla la temperatura ambiente. Esta
función tiene el objetivo de personalizar la temperatura
ambiente porque el mando a distancia transmite la temperatura desde el lugar cerca de ustedes. Por eso, utilizando esta
función, el mando a distancia debe ser dirigido siempre al
acondicionador, sin obstrucciones.
El mando a distancia transmita la señal de la temperatura
ambiente cuando se pulsa cada botón y, automáticamente,
cada cinco minutos. Si debido a inconvenientes el equipo
no recibe la señal del mando a distancia, el acondicionador utiliza el sensor interno para controlar la temperatura
ambiente. En estos casos la temperatura cercana al mando
a distancia puede ser diferente de la temperatura detectada en la posición del acondicionador.
NOTA
FUNCIONAMIENTO DE LA UNIDAD CON EL MANDO A
DISTANCIA
Al usar el mando a distancia, dirija la cabeza de transmisión
directamente al receptor del acondicionador.
● Colocar dos pilas alcalinas tipo AAA de 1,5 V-DC. Respetar
la polaridad indicada en el mando a distancia. La señalización de la hora en la pantalla parpadea. Pulse el botón SEL
TYPE.
● La duración media de las pilas es de seis meses y varía
según la frecuencia de uso del mando a distancia. Quitar las
pilas si el mando a distancia no va a ser utilizado durante un
período de tiempo prolongado (más de un mes). Sustituir las
pilas cuando el testigo de transmisión de datos no parpadea
o cuando el acondicionador de aire no responde al mando a
distancia.
● Las pilas del control contienen elementos contaminantes.
Cuando se descarguen deben tirarse según los requisitos
locales (ver el párrafo “COMO REMOVER LAS PILAS” à la
fin de este manual)
NO!
● Es possible desactivar el sensor de temperatura del mando a
distancia pulsando el botón I FEEL. En esto caso el símbolo
IFEEL en el visor se apaga y se activa el sensor de temperatura del acondicionador.
CABEZA DE TRANSMISION
MANDO A DISTANCIA
RECEPTOR
Esta función está recomendada en otoño y invierno. Si usted utiliza este modo de
funcionamiento en verano, hay que conectar el tubo flexible.
NOTA
Page 41

E
5
MANDO A DISTANCIA
PULSADOR “FAN”
(velocidad del ventilador)
La velocidad del ventilador es
seleccionada automáticamente
por el microprocesador.
Velocidad alta.
Velocidad media.
Velocidad baja.
PULSADOR “NIGHT”
(programa nocturno)
Para más información ver el apartado
“Programa nocturno”. Cuando se presiona
este pulsador en la modalidad REFRIGERACION O DESHUMIDIFICACION la
señal aparece en el visor y el
microprocesador del mando a distancia
regula la temperatura seleccionada para
ahorrar energía.
TRANSMISOR
Al presionar los pulsadores del mando a
distancia, el símbolo se enciende en el visor para transmitir los cambios
de regulación al receptor del acondicionador de aire.
PULSADORES DE SELECCION
TEMPERATURA
TEMP — (más frío)
Presionar este pulsador para disminuir la
temperatura seleccionada.
TEMP + (más calor)
Presionar este pulsador para aumentar
la temperatura seleccionada.
SENSOR
Este sensor de temperatura interna detecta
la temperatura ambiente.
PULSADOR “SEL TYPE”
Presionar este pulsador para seleccionar las funciones:
• regulación de la hora
• regulación del temporizador ON/OFF
Para mas información ver “REGULACION DEL RELOJ” y “REGULACION
DEL TEMPORIZADOR”.
SELECTOR DEL SENSOR DE TEMPERATURA
Presionar el pulsador I FEEL para modificar la programación del sensor de temperatura activo (desde el mando a distancia
al acondicionador o viceversa).
PULSADORES PARA LA REGULACION
DEL RELOJ Y DEL TEMPORIZADOR
Presionando los pulsadores SET H / SET
M se activa la regulación del reloj y del
temporizador.
Para mas información ver “REGULACION DEL RELOJ” y “REGULACION
DEL TEMPORIZADOR”.
PULSADOR ON/OFF (encendido/ apagado)
Pone en marcha el acondicionador o lo
para.
PULSADOR “TIMER SEL” (ajuste del
temporizador)
Presionando el pulsador TIMER SEL en el
visor se activa el procedimiento para la
regulación ON/OFF del temporizador.
Para más información ver el ejemplo
“REGULACION DEL TEMPORIZADOR”
VISOR
Visualiza las informaciones cuando el mando a distancia está encendido.
Modo de funcionamiento
Velocidad del ventilador
Velocidad alta
Automática
Velocidad media
Velocidad baja
Confirmación de la transmisión de
los datos al acondicionador
Temperatura
seleccionada
Indica que el acondicionador funciona
en modo I FEEL (sensor del mando a
distancia activado)
Programa
nocturno
Indica los tipos de programadores
Automático
(
Refrigeración
Calefacción
(
Deshumidificación
Ventilación
PULSADOR MODO DE FUNCIONAMIENTO
Presionar este pulsador para modificar
el funcionamiento del acondicionador.
(automático)
(
Al seleccionar la posición “automático”
el microprocesador selecciona automáticamente entre refrigeración y calefacción en base a la diferencia entre la
temperatura ambiente y la temperatura
introducida en el mando a distancia.
(calefacción)
(
El aire acondicionado calienta el local.
(deshumidificación)
El aire acondicionado reduce la humedad ambiente.
(refrigeración)
El acondicionador refrigera el aire
haciendo disminuir la temperatura del
local.
(ventilación)
Sólo se activa la función de ventilacón.
(
Modalidad no activa
BOTONES NO ACTIVADOS
Reloj
Temperatura
ambiente
Page 42

Verificar que la unidad está conectada a la
alimentación eléctrica y que el testigo
STANDBY está encendido.
1.Presionar el pulsador MODE (modo de
funcionamiento) hasta que aparezca en el
visor el símbolo REFRIGERACION .
2.Presionar el pulsador ON/OFF y poner en
marcha el acondicionador de aire.
3.Presionar los pulsadores TEMP+/- (3)
para introducir la temperatura deseada (el
campo de regulación varía entre 32 °C
máximo y 16 °C mínimo).
NOTA
4.Presionar el pulsador FAN para introducir la velocidad del
ventilador.
EL VISOR INDICARÁ EL VALOR DE LA
TEMPERATURA SELECCIONADA.
A LOS 5 SEGUNDOS DE INTRODUCIR LA TEMPERATURA DESEADA EL VISOR VOLVERÁ A INDICAR
LA TEMPERATURA AMBIENTE.
1
4
3
2
E
6
El acondicionador elimina el agua de condensación automáticamente a la ALTA y MEDIA velocidad del ventilador, mientras
a la BAJA velocidad el agua de condensación se recoge en el
depósito.
1. Presionar tres veces el pulsador SEL TYPE.
La hora indicada en el visor comienza a parpadear.
2. Presionar el pulsador SET H hasta que se visualiza la hora
deseada. Presionar el pulsador SET M hasta que se visualizan los minutos deseados. La hora indicada en el visor deja
de parpadear automáticamente después de 10 segundos.
AJUSTE DE LA HORA
REFRIGERACION
DESHUMIDIFICACION
●
Usar la función de deshumidificación para reducir la humedad ambiente del aire.
●
Con la función de deshumidificación accionada, el ventilador
gira a velocidad o se para para evitar la demasiada
refrigeración.
●
La función de deshumidificación no puede ser activada si la
temperatura interna no supera los 15 °C.
●
La humedad absorbida viene recogida en forma de agua
(condensación) en el depósito interior del acondicionador.
NOTA
Los valores indicados en la tabla hacen referencia al funcionamiento del acondicionador de aire cuando está habilitado el
sensor del mando a distancia (ver selector del sensor de temperatura). Los valores indicados varían ligeramente si está
habilitado el sensor de la unidad.
La velocidad automática no está activa en la modalidad de
VENTILACION.
SELECCION DE LA VELOCIDAD DEL VENTILADOR
AUTOMATICO
Activar con el pulsador FAN SPEED la posición
. El microprocesador controlará automáticamente la
velocidad del ventilador. Cuando el climatizador comienza a
funcionar el sensor de temperatura detecta la diferencia entre
la temperatura ambiente y la temperatura introducida y la
transmite al microprocesador, que automáticamente selecciona
la velocidad idónea del ventilador.
Velocidad alta Velocidad media Velocidad baja
MANUAL
Para regular manualmente la velocidad del ventilador utilizar el
pulsador FAN y seleccionar la velocidad deseada.
NOTA
1 hora 1 hora TIEMPO
Temperatura introducida
Temperatura ambiente
REFRIGERACION Y DESHUMIDIFICACION
PROGRAMA NOCTURNO
●
El programa nocturno sirve para ahorrar energía eléctrica.
1.Presionar el pulsador MODE para poner el acondicionador
de aire en refrigeración o deshumidificación.
2.Presionar el pulsador NIGHT.
3.El símbolo aparece en el visor. Para abandonar el pro-
grama presionar nuevamente el pulsador NIGHT.
¿Qué es el Programa Nocturno?
El acondicionador refrigera o deshumidifica el local hasta alcanzar la temperatura introducida y luego se para. A la hora aproximadamente la temperatura introducida se modifica automáticamente como se describe a continuación (ver gráfico).
El acondicionador funciona hasta alcanzar la nueva temperatura
introducida y luego se para. A la hora aproximadamente la temperatura introducida aumenta de nuevo automáticamente 1°C.
De este modo se ahorra energía sin perjudicar el confort nocturno del local.
VENTILACION
Si desea hacer circular el aire sin modificar la temperatura, proceda como sigue:
1.Presionar el pulsador ON/OFF y poner en marcha el acondicionador de aire.
2.Presionar el pulsador MODE (modo de funcionamiento)
hasta que aparezca en el visor solamente el símbolo VENTILACION .
NOTA
1.Presionar el pulsador MODE (modo de funcionamiento)
hasta que aparezca en el visor el símbolo DESHUMIDIFICACION .
2.Presionar el pulsador ON/OFF y poner en marcha el acondicionador de aire.
3.Presionar el pulsador TEMP+/- (3) para introducir la temperatura ambiente (el campo de regulación varía entre 32 °C
máximo y 16 °C mínimo).
EL VISOR INDICARÁ EL VALOR DE LA
TEMPERATURA SELECCIONADA.
A LOS 5 SEGUNDOS DE INTRODUCIR LA TEMPERATURA DESEADA EL VISOR VOLVERÁ A INDICAR
LA TEMPERATURA AMBIENTE.
DIFERENCIA ENTRE
TEMPERATURA AMBIENTE VELOCIDAD DEL VENTILADOR
Y TEMPERATURA INTRODUCIDA
Refrigeración 2 °C y superiores Máxima
y deshumidificación Entre 2 y 1 °C Media
Menos de 1 °C Minima
2 °C y superiores Máxima
Calefacción Menos de 2 °C Media
1°C
1°C
Page 43

E
7
REGULACION DEL TEMPORIZADOR
A) CÓMO REGULAR LA HORA DE INICIO
(ON)
1.Presionar una vez el pulsador SEL TYPE.
La indicación ON y la indicación de la hora
parpadean.
2.Presionar el pulsador SET H hasta visualizar
la hora deseada. Presionar el pulsador SET
M hasta visualizar los minutos deseados.
El visor vuelve a indicar la hora actual a los
10 segundos.
3.Presionar el pulsador ON/OFF para poner en
marcha el acondicionador de aire.
4. Presionar cuatro veces el pulsador TIMER
SEL para activar el temporizador en la función “ON TIME” (inicio).
B) CÓMO REGULAR LA HORA DE PARADA
(OFF)
1.Presionar dos veces el pulsador SEL TYPE.
La indicación OFF y las indicaciones de la
hora parpadean.
2.Presionar el pulsador SET H hasta visualizar
la hora deseada.
Presionar el pulsador SET M hasta visualizar
los minutos deseados. El visor vuelve a indicar la hora actual a los 10 segundos.
3.Presionar el pulsador ON/FF para poner en
marcha el acondicionador de aire.
4. Presionar el pulsador TIMER SEL para
poner el temporizador en la función “OFF
TIME” (parar).
C) CÓMO REGULAR EL PROGRAMA DIA-
RIO
ENCENDIDO/APAGADO (O VICEVERSA)
1.Regular el temporizador como se indica en los
puntos “A” y “B”.
2.Presionar el pulsador ON/OFF para poner en
marcha el acondicionador de aire.
3.Presionar tres veces el pulsador TIMER SEL
para introducir el programa del temporizador
encendido/apagado o viceversa.
2
1
4
3
Después de regular el temporizador presionar el pulsador SEL
TYPE para verificar el horario de encendido/apagado (ON/OFF)
introducido.
Cuando se regula el temporizador, no hay señalizaciones que indican el funcionamiento; ver el mando a distancia.
NOTAS
REGULACIÓN DEL TEMPORIZADOR 1 HORA
Esta función permite el funcionamiento del acondicionador de aire
durante 1 hora en las condiciones introducidas, indepedientemente de que se encuentre encendido o apagado.
OPERACIONES DE AJUSTE DEL TEMPORIZADOR.
•
Presionar cuatro veces el botón TIMER
SEL. En l
el visor aparece el símbolo del
TEMPORIZADOR 1 HORA encendido.
CANCELAR EL TEMPORIZADOR 1 HORA.
• Presionar el pulsador ON/OFF para apagar
el acondicionador de aire.
• Comprobar que la unidad interna está apagada.
• Volver a presionar el pulsador ON/OFF para
encender de nuevo el acondicionador de
aire.
Para el drenaje continuo: apagar y desenchufar el acondicionador. Quitar el tapón del tubo de descarga posterior y conectar un
tubo de diámetro interno de 20 mm para el drenaje de la condensaci
ó
n: poner la otra extremidad encima de un desaguadero normal.
Asegurase que el tubo no tenga torsiones ni curvaturas. El tubo debe ser orientado de manera descendiente.
Descarga del contenedor interno: de vez en cuando puede ser necesario vaciar el contenedor interno que recoge el agua de con-
densaci
ó
n. Cuando este tanque está lleno la luz STANDBY se enciende con intermitencia.
Cada vez que la unidad tiene que ser transportada en otros locales o antes de retirarla, descargar el contenedor de la condensación,
a través del tubo de descarga.
Para vaciarlo, poner un contenedor por abajo del tubo posterior de descarga, quitar el tap
ó
n de goma y dejar fluir el agua. Cerrar otra
vez el tubo de descarga mediante su tap
ó
n y volver a utilizar el acondicionador.
DRENAJE CONDENSACIÓN
Page 44

E
8
Si ha perdido el mando a distancia o éste está estropeado,
siga las siguientes instrucciones:
1. CUANDO EL ACONDICIONADOR SE HA PARADO.
Para poner en marcha el acondicionador de aire presionar el
botón de funcionamiento con la punta de un objeto agudo.
El acondicionador de aire fijará apagado con la velocidad
ALTA del ventilador.
La programación de la temperatura es 25°C.
NOTA
2. CUANDO EL ACONDICIONADOR ESTA FUNCIONANDO.
Para parar el acondicionador de aire presionar el botón de funcionamiento, con la punta de un objeto agudo, hasta apagar el
testigo OPERATION.
Interrupción de la corriente durante el funcionamiento.
Si se interrumpe la corriente, la unidad se parará. Al restablecerse aquella, la unidad se pondrá en marcha automáticamente pasados 3 minutos.
NOTA
EVITAR:
●
Obstruir la salida o entrada del aire; de lo contrario, la unidad no funcionará correctamente y puede estropearse.
●
Exponer la unidad directamente a la luz solar. Protéjala con
persianas, pantallas o cortinas.
PREFERIBLE:
●
Procure mantener los filtros siempre limpios.
Un filtro obstruido puede perjudicar el rendimiento de la unidad.
●
Para evitar infiltraciones de aire no acondicionado, mantenga puertas y ventanas cerradas.
●
El tubo flexible está correctamente posicionado, sin pliegues ni curvas demasiado cerradas.
●
La temperatura ambiente es superior a 16 °C para la refrigeración y la deshumidificación.
ADVERTENCIA
• Cuando el piloto STANDBY (3) lampagea e inmediatamente
después se apaga el acondicionador, se debe a que el depósito agua de condensación está lleno.
• Si su acondicionador de aire no funciona correctamente,
compruebe los siguientes aspectos antes de llamar al servicio de reparación. Si el problema no puede ser solucionado,
contacte con el Servicio de Asistencia.
Problema: El acondicionador de aire no arranca.
Posible causa:
1. Fallo en la corriente.
2. Rotura del fusible.
3. Voltaje demasiado bajo.
4. Botón ON/OFF en posición OFF.
5. Las pilas del mando a distancia están gastadas.
Solución:
1. Restablecer la corriente.
2. Contactar Servicio de Asistencia.
3. Consultar a su electricista.
4. Pulsar el botón ON/OFF.
5. Colocar pilas nuevas.
• Debe evitarse el uso de teléfonos celulares en proximidad
del acondicionador porque podría crear interferencias y
anomalías en su funcionamiento. Si se
detectase un funcionamiento anómalo (el piloto de funcionamiento (2) se enciende, pero la unidad no funciona) desactivar la alimentación eléctrica del mismo durante 60 segundos
y después volver a poner en marcha el acondicionador.
Problema: El acondicionador no arranca, la luz OPERATION
(2) lampagea y la luz STANDBY (3) está apagada.
Posible causa:
1. Sonda batería defectuosa.
Solución:
1. Contactar Servicio de Asistencia.
Problema: El acondicionador no arranca, la luz OPERATION
(2) lampagea y la luz STANDBY (3) está encendida.
Posible causa:
1. Sonda aire defectuosa.
Solución:
1. Contactar Servicio de Asistencia.
Problema: El compresor funciona pero se para en seguida.
Posible causa:
1. Rejillas de aspiración obstruidas.
Solución:
1. Eliminar la obstrucción.
Problema: Insuficiente frío.
Posible causa:
1. Filtros del aire sucios o obstruidos.
2. Fuente de calor cercana o habitación demasiado concurrida
3. Puertas y/o ventanas abiertas.
4. Obstrucción cerca de la entrada o salida del aire.
5. Temperatura reglada con el mando a distancia demasiado
alta.
Solución:
1. Limpiar los filtros de aire.
2. Eliminar la fuente de calor.
3. Cerrarlas para evitar corriente.
4. Eliminar para asegurar un buen flujo de aire.
5. Ajuste de la Temperatura reglada con el mando a distancia
Problema: El acondicionador produce ligeros crujidos.
Posible causa:
1. Durante el funcionamiento las partes de plástico sufren dilataciones/contracciones que causan este fenómeno.
Solución:
1. Situación totalmente normal; los ligeros crujidos desaparecerán cuando se alcanzara una temperatura regular.
1
2
3
4
5
FUNCIONAMIENTO DE LA UNIDAD SIN EL
MANDO A DISTANCIA
IDENTIFICACION Y SOLUCION DE
PROBLEMAS
CONSEJOS PARA EL MAXIMO CONFORT
Y AHORRO DE ENERGIA
NOTA
Si los dos pilotos OPERATION y
STANDBY parpadean al mismo
tiempo quiere decir que el modo
de funcionamiento seleccionado
( ) no es compatible con
el equipo en cuestion. Si esto
sucede, el equipo de aire acondicionado no funcionara hasta que
no se restablezca el modo correcto.
BOTON DE
FUNCIONAMIENTO
Page 45

E
9
KIT JUNTA ELASTICA
MONTAJE
●
Realizar un agujero en el cristal de la ventana.
●
Montar la junta elástica sin el
cierre en el agujero.
●
Desmontar la boquilla del tubo
flexible.
●
Acercar el acondicionador a la
ventana y embocar el extremo
cilíndrico del tubo flexible al
agujero.
Si se desea utilizar el mismo climatizador en varios locales
pueden adquirirse los “kit junta elástica / disco transparente”
que se necesiten.
MANTENIMIENTO Y LIMPIEZA
ATENCIÓN! Antes de realizar cualquier operación de limpieza y/o de mantenimiento desconectar la clavija de su enchufe.
1. Limpieza del filtro del aire.
El filtro debe ser controlado al menos una vez cada dos semanas de funcionamiento. El filtro sucio o obstruido causa una disminución de la eficacia del acondicionador y puede provocar graves inconvenientes. El filtro se puede remover desde la parte
superior del acondicionador, removiendo el painel superior y tirando hacia arriba. Utilizar una aspiradora para eliminar el polvo
almacenado. Si no fuese suficiente, lavar el filtro con agua templada ligeramente jabonosa, enjuagarlo con agua fría y secar
antes de volver a montarlo.
135 mm
En el vidrio
de una
ventana
En el batiente de
madera de una
puertaventana
En el muro: se aconseja aislar de manera
idónea la porción de
muro
LIMPIEZA DEL FILTRO
Filtro
Page 46

E
10
2. Limpieza de la envolvente.
Para limpiar el acondicionador basta frotarlo con un paño suave
ligeramente humedecido. Para eliminar manchas usar agua jabonosa. No usar disolventes, gasolina o otros compuestos químicos
agresivos ni agua demasiado caliente. No volcar agua sobre el
aparato para limpiarlo; se pueden dañar los componentes internos
o provocar un corto circuito.
3. Conservación.
Cuando se decide no utilizar el acondicionador por un largo período
de tiempo, antes de retirarlo limpiar los filtros y verificar que los
depósitos agua de condensación interior sean vacíos. Si desean
meter el aparato en un desván o similar, colocarlo siempre en posición vertical. No apoyar objetos pesados en la parte superior del
aparato. Si es posible, protegerlo con un saco de plástico o similar.
4. Transporte.
Si desea transportar el acondicionador, mantenerlo siempre que
sea posible en posición vertical. Si esto no fuese posible, ponerlo
en horizontal apoyándolo sobre el lado derecho; apenas llegado a
destino colocarlo de nuevo en posición vertical y esperar al menos
4 horas antes de utilizarlo en función de refrigeración.
5. Para una mayor seguridad aconsejamos verificar periódicamente el cable de alimentación; si éste presenta síntomas de
deterioro háganlo sustituir para el distribuidor o el Servicio
Asistencia.
NO!
NO!
Si el acondicionador no funciona, antes de llamar al Servicio Asistencia Técnica verificar que
●
la clavija está bien conectada al enchufe;
●
el interruptor general de corriente está conectado y los fusibles en perfectas condiciones;
●
el filtro del aire está limpio;
●
el tubo flexible está correctamente posicionado, sin pliegues ni curvas demasiado cerradas;
●
la diferencia entre la temperatura ambiente y la temperatura fijada es superior a 1°C;
●
todas las instrucciones contenidas en este manual han sido respetadas escrupulosamente.
CONSEJOS PRACTICOS
ATENCION
Cuando el piloto STANDBY (3) lampagea e inmediatamente después se apaga el acondicionador, se debe a que el depósito agua
de condensación está lleno.
Page 47

P
2
INDICE
O PRODUTO ............................................................................................................... 2
LAMPADAS ................................................................................................................. 3
ANTES DE USAR O APARELHO................................................................................ 3
FONCIONAMENTO .................................................................................................... 4
UTILIZAÇÃO DA UNIDADE DE CONTROLE REMOTO............................................. 4
I
Colocação das pilhas................................................................................................ 4
I
Selector do sensor de temperatura........................................................................... 4
I
Operação com a unidade de controle remoto........................................................... 4
UNIDADE DE CONTROLE REMOTO ........................................................................ 5
COMO AJUSTAR O RELÓGIO .................................................................................. 6
ARREFECIMENTO ..................................................................................................... 6
DESUMIDIFICAÇÃO.................................................................................................... 6
VENTILAÇÃO .............................................................................................................. 6
AJUSTE DA VELOCIDADE DO VENTILADOR........................................................... 6
PROGRAMA NOTURNO............................................................................................. 6
AJUSTE DO TIMER..................................................................................................... 7
AJUSTE DO TIMER 1 HORA ...................................................................................... 7
DRENAGEM DA CONDENSAÇÃO ............................................................................. 7
OPERAÇÃO SEM A UNIDADE DE CONTROLE REMOTO........................................ 8
SUGESTÓES PARA GARANTIR O MAXIMO CONFORTO E O MINIMO CONSUMO 8
POSSIVEIS CAUSAS E REPARAÇÃO DE AVARIAS................................................. 8
KIT DE ABERTURA..................................................................................................... 9
LIMPEZA E CUIDADOS ............................................................................................. 9
CONSELHOS ÚTEIS .................................................................................................. 10
DECLARAÇÃO DE
CONFORMIDADE
Este produto tem a marca
porque responde às Directrizes:
– Baixa tensão N° 2006/95/CE.
– Compatibilidade eletromagnética
n° 89/336/CEE, 92/31/CEE e
93/68/CEE.
Esta declaração será considerada
nula se a sua utilização for diferente
da do fabricante e/ou se não forem
seguidas, mesmo que parcialmente,
as instruções de instalação e/ou de
modo de emprego.
O PRODUTO
1. Unidade de controle remoto
2. Lâmpadas
3. Saída de ar
4. Grelha de entrada de ar
5. Filtro de ar
6. Painel frontal estético
7. Tubo para evacuação condensada
8. Cabo eléctrico com ficha
9. Rodas para transporte
10. Pega manual (Dos dois lados)
11. Tubo flexível
12. Acessórios para tubo terminal
Limites de funcionamento:
Temperatura interior:
Arrefecimento: MIN: 16°C B.S. / 14°C B.U.
MAX: 32°C B.S. / 24°C B.U.
Dehumidification: MIN: 10°C B.S / 80% U.R.
MAX: 32°C B.S. / 80% U.R.
ADVERTÊNCIA PARA A ELIMINAÇÃO CORRECTA DO PRODUTO NOS TERMOS DA DIRECTIVA
EUROPÉIA 2002/96/CE
No fim da sua vida útil, este equipamento não deve ser eliminado juntamente com o lixo doméstico.
Deve ser depositado nos centros especializados de recolha diferenciada locais ou nos revendedores que forneçam
este serviço.
Eliminar separadamente um equipamento eléctrico e electrónico e suas pilhas permite evitar possíveis conseqüências negativas para o ambiente e para a saúde pública resultantes de uma eliminação inadequada, além de que permite recuperar e reciclar os materiais constituintes para, assim, obter uma importante poupança de energia e de
recursos.
Para assinalar a obrigação de eliminar estes equipamentos e as pilhas separadamente, o produto apresenta a
marca de um bidão do lixo com uma cruz por cima.
12
2
11
10
4
5
7
8
9
1
3
6
Page 48

P
3
LAMPADAS
1. Receptor : recebe os sinais enviados pelo controle remoto.
2. Lâmpada OPERATION: Esta lâmpada acende-se quando
o sistema está em funcionamento.
Lampeja uma vez para avisar que o sinal do controle
remoto foi recebido e memorizado. Lampeja seguidamente
durante as funções de proteção (descongelamento, etc.).
3. Lâmpada STANDBY: Esta lâmpada acende-se quando o
condicionador está conectado à corrente e está pronto para
receber o sinal pelo controle remoto.
4. Selector de operação (sem a unidade de controle remoto):
Pressione o botão para selecionar os modos de operação
OFF e COOL.
A posição OFF não desliga o aparelho da alimentação motriz.
Para desligar o aparelho completamente, utilize o interruptor
da alimentação motriz.
ADVERTÊNCIA
PRECAUÇÃO
ANTES DE USAR O APARELHO
● Verifique se a tomada onde o aparelho de ar concionado vai ser ligado é de : 220 - 240 V - 50 Hz.
● Certifique-se que a inatalação eléctrica é apropriada para fornecer a corrente necessária ao seu aparelho em conjunto com os
outros aparelhos usados em sua casa (aparelhos de linha branca, candeeiros). Veja a potÍncia eléctrica máxima indicada na
placa que está clocada no seu aparelho.
● O aparelho tem que ser ligado de acordo com as normas eléctricas do local.
● Certifique-se de que, o circuito fechado,fusíveis,etc. tÍem suficiente capacidade para aguentar um arranque de 20A (geralmente
menos de um segundo)
● Não instale o ar condicionado onde possa ficar molhado ainda que só por salpicos
de água (ex:lavandarias).
● Assegure-se de que o botão do interruptor para Ligar/Desligar, está na posição de
desligado.
● Antes de ligar o seu ar condicionado certifique-se de que a tomada onde o vai ligar
tem ligação à terra de acordo com as nosmas do local.
● Nunca use a ficha eléctrica como uma forma de Ligar/Desligar oseu aparelho. Use
sempre o botão do painel de comandos.
● Não movimente o climatizador durante o funcionamento, desligue o interruptor e
retire a ficha da tomada. Controlar e descarregar a condensação eventual, através
do tubo de descarga colocado no lado traseiro.
● AVISO!
Não cole nem coloque nada na saída de ar do seu aparelho. A ventoínha roda a
grande velocidade e pode ser muito perigoso.
● AVISO!
O ar condicionado incorpora um sistema relógio que só permite o recomeço do seu
funcionamento após trÍs minutos depois da última paragem.
● Certifique-se de que não há qualquer obstáculo á volta do aparelho que afecte a
circulação de ar. Não bloqueie a saída do ar com cortinas ou outros objectos.
Nunca coloque nada em cima do aparelho.
● O fabricante não assume qualquer responsabilidade se as instrucções de
segurança não forem cumpridas.
● Por questões de segurança antes de limpar ou transportar o seu aparelho desligue sempre o interruptor e retire a ficha da toma-
da.
● Não utilizar o climatizador se os cabos ou as fichas estan danificados. Se o cabo de alimentação está danificado contacte o pro-
dutor, o revendedor ou pessoas qualificadas para evitar riscos.
● Este climatizador não é destinado a pessoas (meninos inclusos) com reduzidas capacidades físicas, sensoriais ou mentais, ou
sem a necessária experiência e conhecimento, se não há formação para a utilização do climatizador por uma pessoa responsável
para suas segurança.
ATENÇÃO
Se os indicadores luminosos OPERATION e STANDBY piscarem, ao mesmo tempo, significa que o modo de funcionamento seleccionado ( ) não é compatível com o equipamento em questão. Neste caso, o equipamento de ar condicionado não funcionará até que seja restabelecido o modo
correcto.
N.B.
1
2
3
4
Controlo de água: Quando o tanque de água estiver cheio o
aparelho de ar condicionado desliga-se automaticamente e
esta luz pisca.
Page 49

P
4
FUNCIONAMENTO
REFRIGERAÇÃO
● Coloque o ar condicionado o mais perto possível de uma janela. Ajuste o tubo
flexível prendendo-o na parte traseira do aparelho.Estenda o referido tubo até
alcançar a janela passando-o através da mesma com as persianas entreabertas.
● No caso de haver uma janela soleira na sala, talvez seja melhor usar a
extremidade do alimentador exterior.
● Coloque a extremidade na parte livre do tubo flexível.
● Abra a janela e feche uma das persianas. Coloque a extermidade exterior entre as
duas persianas.
● Evite que o tubo flexível faça uma curvatura.
● Faça uma abertura de 135 mm de diâmetro no vidro da janela.
Quando utilizar o ar condicionado no modo de desumidificação , não terá de usar o
tubo flexível. Para uma maior eficiência na desumidificação deixe a saída da parte
traseira descarregar livremente e directamente para a sala.
●
Retire o tubo flexível de exaustão da parte traseira do aparelho.
DESUMIDIFICAÇÃO
COLOCAÇÃO DAS PILHAS
●
Remover a tampa que está atrás do telecomando e verificar
que o 4 interruptores estejam na mesma posição indicada na
figura:
UTILIZAÇÃO DA UNIDADE DE CONTROLE REMOTO
SELECTOR DO SENSOR DE TEMPERATURA
●
Em condições normais, a temperatura ambiente é registrada
e controlada através do sensor que é posicionado no controle remoto (símbolo IFEEL activo no visor). Esta função permite de criar uma temperatura ambiente ótima pois o controle remoto transmite a temperatura da posição onde nos
encontramos. Então, usando esta função, o controle remoto
deve sempre ser direcionado para o acondicionador.
O telecomando transmita o sinal da temperatura ambiente
sempre que for premido um botão e, automaticamente, a
cada cinco minutos. Si devido a problemas o equipamento
não receber o sinal do telecomando, o acondicionador utiliza o sensor presente na unidade interna para controlar a
temperatura ambiente. Nestes casos a temperatura junto
do telecomando pode ser diferente da temperatura detectada na posição do acondicionador.
N.B.
OPERAÇÃO COM A UNIDADE DE CONTROLE REMOTO
Aponte sempre a cabeça da unidade transmissora diretamente
para o receptor no aparelho de ar condicionado.
●
Coloque duas pilhas AAA alcalinas de 1,5 V - DC cada.
A indicação da hora no painel pisca.
Prima o botão SEL TYPE.
●
As pilhas duram cerca 6 meses dependendo do uso da unidade de controle remoto. Retire as pilhas se a unidade não
for utilizada por mais de um mês. Substituir as pilhas quando
o visor na unidade de controle remoto deixar de acender ou
quando não for possível utilizar o controle remoto para
mudar os ajustes no aparelho de ar condicionado.
●
As pilhas do comando contém elementos poluentes. Quando
ficarem descarregadas devem destruir-se em locais próprios
e segundo as normais locais em vigor (ver o parágrafo
“COMO REMOVER AS PILHAS” ao fim de estas instruções).
NÃO!
●
E’ possivel disactivar o sensor de temperatura do telecomando carregando no botão I FEEL. Neste caso o relativo símbolo no visor apaga-se e activa-se o sensor no interno do acondicionador.
UNIDADE DE CONTROLE REMOTO
RECEPTOR
CABEÇA DA UNIDADE
TRANSMISSORA
Esta função é recomendada no outono e no inverno. Se usar este programa no
verão tem que ligar o tubo flexível de expulsão do ar quente.
N.B.
Page 50

P
5
UNIDADE DE CONTROLE REMOTO
BOTÃO “FAN”
(Velocidade do ventilador)
A velocidade do ventilador é
selecionada automaticamente
pelo micro processor.
Alta velocidade.
Velocidade média.
Velocidade baixa.
BOTÃO “NIGHT”
(programa noturno)
Veja “Programa Noturno” para maiores
detalhes.
Quando se pressiona este botão nas
funções de Arrefecimento e
Desumificação, o sinali mm apa-
rece no visor e a unidade de controle
remoto ajusta automaticamente a temperatura selecionada para poupar energia.
TRANSMISSOR
Quando é acionado o botão da unidade
de controle remoto, o símbolo aparece no visor e os dados para o reajuste
do aparelho de ar condicionado são transmitidos ao receptor.
BOTÕES DE AJUSTE DA TEMPERATURA
TEMP — (mais frio)
Pressione este botão para diminuir a
temperatura selecionada.
TEMP + (mais quente)
Pressione este botão para aumentar a
temperatura selecionada.
SENSOR DE
TEMPERATURA
Este sensor é posicionado na parte
interior da unidade de controle remoto e
serve para a leitura da temperatura
ambiente.
BOTÃO “SEL TYPE”
Pressionar este botão para selecionar
as funções:
• Programação da hora
• Programação do timer ON/OFF
Para detalhes ver as seções “COMO
REGULAR O RELÓGIO” e “REGULAGEM DO TIMER”.
SELECTOR SENSOR DE TEMPERATURA
Pressione o botão I FEEL para modificar a
programação do sensor de temperatura
activo (ou do telecomando ou do acondicionador).
BOTÕES DE REGULAGEM RELÓGIO
E PROGRAMAÇÃO HORÁRIO TIMER
Pressionado os botão SET H / SET M é
ativada a programação da hora e do
timer. Para detalhes ver as seções
“COMO REGULAR O RELÓGIO” e
“REGULAGEM DO TIMER”.
BOTÃO DE OPERAÇÃO (ON/OFF)
Este botão serve para ligar e desligar o
aparelho.
Botão “TIMER SEL” (programação
timer)
Pressionado o botão TIMER SEL no
display é ativado o procedimento para a
programação ON/OFF do timer.
VISOR
Mostra informações relativas às condições de operação quando a
unidade de controle remoto está ligada.
Modos de operação
Velocidad del ventilador
Alta
Operação automatica
Média
Baixa
Confirma trasmissão de dados
Temperatura
seleccionada
Indica que o acondicionador funciona
na modalidade I FEEL (sensor do telecomando activado)
Programa
noturno
Indica os timer
Automatico
(
Frio
Quente
(
Seco
Ventilaçao
BOTÃO SELECTOR DO MODO DE
OPERAÇÃO
Pressionar este botão para mudar o
modo de funcionamento do aparelho de
ar condicionado.
(Operação automatica)
(
Quando esta função é selecionada, o
microprocessor escolhe automaticamente entre aquecimento e arrefecimento
segundo a differença de temperatura
entre o ambiente e a temperatura
desejada.
(Aquecimento)
(
Nesta função, o aparelho aquece o
ambiente.
(Desumificação)
Nesta função, o aparelho reduz a humidade esistente no ambiente.
(Arrefecimento)
Nesta função, o aparelho esfria o ar e
abaixa a temperatura do ambiente.
(Ventilação)
Nesta função, o aparelho funciona
somente como ventilador.
(
Modos nao ativo
BOTÃOS INATIVOS
Relògio
Temperatura
ambiente
Page 51

P
6
O ar condicionado elimina a água condensada automaticamente
com a velocidade ALTA e MEDIA do ventilador, ao contrário
com a velocidade BAIXA o ar condicionado retira a água condensada dentro do deposito.
1. Pressione três vezes o botão SEL TYPE.
O indicador da hora começará a piscar.
2. Pressione o botão SET H até ver a hora desejada.
Pressione o botão SET M até ver os minutos desejados.
O indicador retornará automaticamente ao normal após 10
segundos.
COMO AJUSTAR O RELÓGIO
●
Use esta função quando quiser reduzir a humidade do
ambiente.
●
Durante esta operação, a velocidade do ventilador é automaticamente reduzida, e o ventilador muda a velocidade
ou pára para impedir congelamento.
●
A operação “DESUMIFICAÇAO” não pode ser ativada quando a temperatura interior é de 15° ou menos.
●
Na forma de água condensada, a humidade é levada ao tanque de água dentro do aparelho de ar condicionado.
N.B.
Os valores indicados na tabela reférem-se ao funcionamento
do aparelho quando é ativado o sensor na unidade de controle
remoto (veja selector do sensor de temperatura).
Tais valores variam ligeiramente no caso for ativado o sensor
na unidade.
A velocidade automática não está activa na modalidade de
VENTILAÇÃO
AJUSTE DA VELOCIDADE DO VENTILADOR
AUTOMÁTICO
Coloque simplesmente o selector de “FANSPEED” na posição
iiiiiiiiii . Um microcomputador, no aparelho de ar condicionado,
controla a velocidade de ventilação quando o modo “AUTOMATICO” é selecionado. Quando o aparelho de ar condicionado
começa a funcionar, o microcomputador detecta a diferença
entre a temperatura ambiente e a temperatura pré-ajustada e
automaticamente muda a velocidade do ventilador para o nível
apropriado.
Alta velocidade Média velocidade Baixa velocidade
MANUAL
Se desejar ajustar a velocidade do ventilador manualmente
durante a operação, coloque a selector “FAN” na posição
desejada.
N.B.
1 hora 1 hora TEMPO
Temperatura pré-selecionada
Temperatura ambiente
ARREFECIMENTO E DESUMIDIFICAÇAO
PROGRAMA NOTURNO
●
Esta função serve para poupar energia.
1.Pressione o botão “MODE” e selecione a função “ARREFECIMENTO”, ou “DESUMIDIFICAÇAO”.
2.Pressione o botão “NIGHT”.
3.O símbolo aparecerà no visor. Para desativar o pro-
grama, pressione novamente o botão “NIGHT”.
O que é o Programa Noturno?
Inicialmente o aparelho aquece ou desumidifica o ambiente até
a temperatura desejada e depois se desativa. Após cerca 1
hora, a temperatura é automaticamente modificada no seguinte
modo:
O aparelho funciona até atingir a temperatura desejada e
depois pára. Após 1 hora a temperatura é automaticamente
aumentada de 1° C. Isto lhe permite de poupar energia sem
sacrifício de conforto.
VENTILA
ÇÃO
No caso de quecer somente arejar o ambiente sem modificar a
temperatura, opere da seguinte maneira:
1.Pressione o botão “MODE” e selecione a função
“VENTILAÇÃO” .
2.Pressione o botão “ON/OFF” para ligar o aparelho.
QUANDO A DIFERENÇA ENTRE A
TEMPERATURA AMBIENTE E A VELOCIDADE DO VENTILADOR
TEMPERATURA PRÉ-AJUSTADA É
Arrefecimento e
2 °C ou mais
Alta
Desumidificaçao
Entre 2 e 1 °C
Média
Abaixo de 1 °C
Baixa
N.B.
ARREFECIMENTO
Verifique se a unidade está ligada à rededa
corrente elétrica e se a lâmpada STANDBY
está acesa.
1.Pressione o botão MODE e selecione a
função ARREFECIMENTO .
2.Pressione o botão de operação ON/OFF
para ligar o aparelho.
3.Pressione os botões de ajuste da temperatura TEMP+/- para mudar o ajuste da
temperatura até a temperatura desejada.
Gama de temperatura ajustável: 32 °
Max - 16 ° Min.
N.B.
4.Pressione o botão FAN para o ajuste da velocidade do venti-
lador.
O VISOR INDICARÀ O VALOR DA
TEMPERATURA DESEJADA.
APÓS 5 SEGUNDOS O VISOR VOLTA A INDICAR
A TEMPERATURA AMBIENTE.
1
4
3
2
DESUMIFICAÇÃO
1.Pressione o botão MODE e selecione a função “desu-
mificaçao” .
2.Pressione o botão ON/OFF para ligar o aparelho.
3.Pressione os botões TEMP+/- (3) para o ajuste da
temperatura ambiente. (Gama de temperatura ajustável: 32° Max. - 16° Min.)
EL VISOR INDICARÁ EL VALOR DE LA
TEMPERATURA SELECCIONADA.
A LOS 5 SEGUNDOS DE INTRODUCIR LA TEMPERATURA DESEADA EL VISOR VOLVERÁ A INDICAR LA TEMPERATURA AMBIENTE.
1°C
1°C
Page 52

P
7
AJUSTE DO TIMER
A)
COMO PROGRAMAR A HORA DE ATIVAÇÃO.
1.Pressione uma só vez o botão SEL TYPE.
A indicação ON e a das horas começarão a
piscar.
2.Pressione o botão SET H e o botão SET M
para selecionar a hora e os minutos desejados.
3.Pressione o botão ON/OFF para ligar o
aparelho.
4.Pressione o botão TIMER SEL para selecionar a função ON TIME (ativação)do
timer.
B)
COMO PROGRAMAR A HORA DE DESATI-
VAÇÃO.
1.Pressione duas vezes o botão SEL TYPE.
A indicação OFF e a das horas começarão
a piscar.
2.Pressione o botão SET H e selecione a
hora desejada. Faça o mesmo para selecionar os minutos desejados agindo da
mesma forma no botão SET M.
O visor voltarà a indicar a hora atual após
10 segundos.
3.Pressione o botão ON/OFF para ligar o
aparelho.
4.Pressione o botão TIMER SEL para selecionar a função OFF TIME (desativação) do
timer.
C) COMO AJUSTAR O PROGRAMA
DIÁRIO ACESO/APAGADO (OU VICEVERSA)
1.Ajuste o Timer como ilustrado em A e B.
2.Pressione o botão ON/OFF para ligar o
aparelho.
3.Pressione o botão TIMER SEL tres vezes
para selecionar o programa do Timer
aceso/apagado e vice-versa.
2
1
4
3
Após a programação do Timer, para verificar a hora selecionada
de ativação e desativação, pressione o botão SEL TYPE.
Quando se programa o timer, não esistem luzes que indicam a
fixação; tem que se fazer referência ao telecomando.
N.B.
AJUSTE DO TIMER DE 1 HORA
Esta função faz com que o aparelho funcione durante uma hora e
em seguida pare, independentemente do aparelho estar ligado ou
desligado quando este botão é pressionado.
PROCEDIMENTO DE ATIVAÇÃO:
•
Pressione quatro vezes o botão TIMER
SEL. No visor aparece o símbolo de
TIMER 1 HORA
.
PROCEDIMENTO DE DESATIVAÇÃO:
• Pressione o botão de operação ON/OFF
para desligar o aparelho.
• Espere que o aparelho deixe de funcionar
e, em seguida.
• Pressione o botão ON/OFF outra vez.
Para drenagem contínua: Desligue o aparelho e desligue a ficha da tomada. Retire a tampa do tubo de esgoto posterior e
adapte-lhe um tubo de 20 mm de diâmetro interno, para drenagem da condensa
ção
: coloque a outra extremidade do tubo num
esgoto normal.
Certifique-se de que o tubo n
ã
o está torcido e fica sem curvaturas. O tubo deve ter um percurso descendente.
Como esvaziar o recipiente interior: Ocasionalmente, pode ser necessário despejar o recipiente interior, onde é recolhida a
condensa
ção
. Quando este depósito está cheio, a luz STANDBY pisca.
Cada vez que o aparelho deve ser deslocado num outro lugar o guardado no fim da estação, esvaziar o recipiente por meio do
tubo de esgoto.
Para o despejar, coloque um recipiente debaixo do tubo de esgoto posterior, tire a tampa de borracha e deixe sair a água. Tape de
novo o tubo de esgoto e recomece a usar o aparelho.
DRENAGEM DA CONDENSAÇÃO
Page 53

P
8
Em caso de perda, dano do controle remoto, siga os seguintes
conselhos:
1. APARELHO DE AR CONDICIONADO DESLIGADO
Se quiser ligar o aparelho, pressione o botão de operação com
un objeto pontiagudo.
O condicionador de ar trabalhará com a ALTA velocidade do ventilador
.
O ajuste da temperatura é 25°C.
N.B.
2.APARELHO DE AR CONDICIONADO LIGADO
Se quiser desligar o aparelho, pressione o botão de operação,
com un objeto pontiagudo, até a lâmpada OPERATION se
apaga.
Se houver uma perda de corrente elétrica durante o
funcionamento do aparelho, este se desliga. Uma vez
restabelecida a condição original, o aparelho se ativa automaticamente após 3 minutos.
N.B.
NÃO FAÇA
●
Bloquear a entrada e saída de ar do aparelho. Se estiverem obstruídas, o aparelho não funcionará adequadamente
e poderá estragar-se.
●
Deixar luz solar direta na habitação. Use cortinas, venezianas, etc.
FAÇA
●
Procure manter os filtros de ar sempre limpos.
●
Para evitar a saída do ar condicionado, mantenha janelas,
portas e outras aberturas fechadas.
●
Procure manter o tubo flexível correctamente colocado.
●
A temperatura ambiente para o modo de refrigeração e
“Desumidificação”é de mais de 16 °C.
AVVERTIMENTO
• Quando o tanque de água estiver cheio o aparelho de ar
condicionado desliga-se automaticamente e a luz STANDBY
(3) pisca.
• Se o seu aparelho não funciona corretamente, verifique primeiro os seguintes pontos antes de solicitar assistência. Se
não conseguir solucionar o problema, contate o seu concessionário ou o serviço de assistência.
Defeito: O aparelho não funciona de maneira nenhuma.
Possível causa:
1. Falha de alimentação.
2. Disjuntor ativado.
3. Tensão da rede demasiado baixa.
4. O botão de operações está posicionado em “OFF”.
5. As pilhas do controle remoto estão gastas.
Possível solução:
1. Reponha a alimentação.
2. Contate o serviço de assistência.
3. Consulte um eletricista.
4. Pressione o botão outra vez.
5. Substitua as pilhas.
• O uso de telefones celulares nas proximidades do aparelho
de ar condicionado deve ser evitado porque pode causar
interferências e portanto um mal funcionamento do aparelho.
Quando essa anomalia acontecer (a lâmpada de funcionamento (2) acende-se mas a unidade exterior não funciona),
recomece o procedimento de operação após ter eliminado a
corrente do aparelho por cerca 60 segundos através do interruptor principal.
Defeito: O aparelho não funciona, a lâmpada OPERATION
(2) pisca e a lâmpada STANDBY (3) está apagada.
Possível causa:
1. Sonda bateria defeituosa.
Possível solução:
1. Contate o serviço de assistência.
Defeito: O aparelho não funciona, a lâmpada OPERATION
(2) pisca e a lâmpada STANDBY (3) está incendida.
Possível causa:
1. Sonda ar defeituosa.
Possível solução:
1. Contate o serviço de assistência.
Defeito: O compressor começa a funcionar, mas pára pouco
depois.
Possível causa:
1. Obstrução em frente das grelhas de entrada de ar.
Possível solução:
1. Retire a obstrução.
Defeito: Rendimento de arrefecimento deficiente.
Possível causa:
1. Filtros de ar sujo ou obstruído.
2. Fonte de calor ou demasiadas pessoas na habitação.
3. Portas e janelas abertas.
4. Obstáculos perto da entrada ou saída de ar.
5. Temperatura ajustada com a unidade de controle remoto
demasiado alta.
Possível solução:
1. Limpe o filtros de ar.
2. Elimine a fonte de calor.
3. Feche as janelas.
4. Retire os obstáculos para assegurar uma boa circulação de ar.
5. Ajustar novamente a temperatura com a unidade de controle remoto.
Defeito: Ouve-se estalido no aparelho de ar condicionado.
Possível causa:
1. Durante a operação as partes plásticas podem expandir ou
encolher devido à uma mudança súbita de temperatura.
Neste caso, pode-se ouvir um estalido.
Possível solução:
1. Os chios leves percebidos irão desaparecer com a estabilização da temperatura.
1
2
3
4
5
OPERAÇÃO SEM A UNIDADE DE
CONTROLE REMOTO
POSSÍVEIS CAUSAS E REPARAÇÃO
DE AVARIAS
SUGESTÕES PARA GARANTIR O MÁXIMO
CONFORTO E O MÍNIMO CONSUMO
Se os indicadores luminosos
OPERATION e STANDBY piscarem, ao mesmo tempo, significa
que o modo de funcionamento
seleccionado ( ) não é
compatível com o equipamento
em questão. Neste caso, o equipamento de ar condicionado
não funcionará até que seja
restabelecido o modo correcto.
N.B.
BOTÃO DE OPERAÇÃO
Page 54

P
9
KIT DE ABERTURA
Montagem:
● Faça uma abertura no vidro da
janela.
● Insira a vigia sem a ficha eléc-
trica.
● Remova o tubo terminal de
saída de ar quente do tubo
flexível.
● Coloque o ar condicionado
junto á janela e insira o tubo de
saída de ar na abertura.
Se quiser utilizar o ar condicionado em diferentes salas , é possível comprar vigias separadas para descargas de ar.
LIMPEZA E CUIDADOS
AVISO! Por questões de segurança antes de limpar o seu aparelho desligue sempre o interruptor e retire a ficha da tomada.
1. Limpeza do filtro purificador de ar
O filtro purificador tem que ser verificado em funcionamento pelo menos uma vez de duas em duas semanas. O funcionamento
com um filtro sujo retira eficiência ao seu aparelho e pode causar grave estragos. O filtro pode ser desmontado pela parte superiora do aparelho: remover o painel superior e puxe para cima. Use um aspirador para retirar a sujidade superficial.Se a sujidade
acumulada no filtro ficar pegajosa , lave-o com água e sabão, depois enxágue-o com água fria e depois de seco pode voltar a
instalá-lo.
135 mm
No vidro de
uma janela
No batente de
madeira de uma
porta-janela
Na parede: aconselha-se isolar devidamente a parte de
parede em causa
LIMPEZA DO FILTRO
Filtro
Page 55

P
10
2. Limpeza das Grelhas
Para limpar o ar condicionado passe-lhe com um pano levemente
humedecido que seja limpo e macio.Se o seu aparelho tiver
alguma mancha humedeça o pano em água e sabão.Nunca use
detergentes ásperos,nem água muito quente.Não despeche água
em cima do seu aparelho isso poderia causar danos irreparáveis
aos seus componentes internos assim como choques eléctricos
perigosos.
3. Arrumação
Se não vai usar o seu aparelho durante um largo período de
tempo, antes de o arrumar limpe os filtros e despeche a água
condensada acumulada nos depósitos, da forma atrás explicada.
Arrume sempre o seu aparelho na posição vertical. Nunca coloque
objectos pesados em cima do seu aparelho e proteja-o com um
pano ou com um plástico.
4. Transporte
Preferencialmente mantenha o ar condicionado na posição vertical
durante o transporte. Se isto não for possível, deite-o de lado direito; quando estiver no seu destino levante o ar condicionado para a
posição vertical e espere pelo menos 4 horas antes de o ligar.
5. Para sua segurança verifique periódicamente as
condições do cabo eléctrico; e em caso de estar danificado
contacte o Serviço de assistência técnica para substituição do
cabo.
NÃO!
NÃO!
NÃO!
Se o seu ar-condicionado não funciona bem , antes de chamar a assistência técnica, verifique :
● Se a ficha está bem inserida na tomada.
● Se o circuito está ligado e se os fusíveis não rebentaram.
● Se o filtro de ar não está obstruído.
● Se o tubo flexível está correctamente colocado.;
● A diferença entre a temperatura ambiente e a temperatura definida é superior a 1°C
● Todas as instruções deste manual de instruções foram bem observadas.
Se a luz STANDBY (3) pisca e o aparelho de ar condicionado desliga-se ao mesmo tempo o tanque de água está cheio.
CONCELHOS ÚTEIS
ATENÇÃO
Page 56

HOW TO REMOVE BATTERIES
● Remove the lid.
● Press the battery toward the negative end and lift it out by its positi-
ve end (as shown in the figure).
● Remove the other battery in the same way.
COME RIMUOVERE LE BATTERIE
● Rimuovere il coperchio.
● Premere la batteria verso il polo negativo ed estrarla dalla parte del
polo positivo (come mostrato in figura).
● Rimuovere l’altra batteria allo stesso modo.
COMMENT ENLEVER LES PILES
● Enlever le couvercle.
● Pousser la pile vers le pôle négatif et enlever le pôle positif
(comme représenté dans la figure).
● Enlever l’autre pile de la même manière.
WIE DIE BATTERIEN ZU ENTFERNEN
● Die Abdeckung entfernen.
● Drucken Sie die Batterie nach dem negativen Pol und entfernen Sie sie vom positiven Pol (wie in Abbildung
gezeigt ist).
● Entfernen Sie ebenso die andere Batterie.
COMO REMOVER LAS PILAS
● Remover la tapa.
● Apretar la pila hacia el polo negativo y remover el polo positivo (como en figura).
● Remover así también la otra pila.
COMO REMOVER AS PILHAS
● Remover a tampa.
● Premir a pilha para o polo negativo e remover a parte do polo positivo (como indicado na figura).
● Remover a outra pilha ao mesmo modo.
I
EG
F
D
E
P
Do not vent R410A into atmosphere: R410A is a fluorinated greenhouse gas, covered by Kyoto
Protocol, with a Global Warming Potential (GWP) = 1975.
Non disperdere R410A nell'atmosfera: R410A è un gas fluorinato a effetto serra, coperto dal
protocollo di Kyoto, con potenziale di riscaldamento globale (GWP) = 1975.
Ne déchargez pas R410A dans l'atmosphère : R410A est un gaz fluoré à effet de serre, couvert
par le protocole de Kyoto, avec un potentiel de chauffage global (GWP) = 1975.
Zerstreuen Sie R410A in Atmosphäre nicht: R410A ist ein fluoriertes Gas, abgedeckt durch
Kyoto Protokoll, mit einem globalen wärmenden Potential (GWP) = 1975.
No expulsar R410A a la atmósfera: el R410A es un gas fluorado de efecto invernadero, cubierto por el protocolo de Kyoto, con potencial de calentamiento global (GWP) = 1975.
Não exale R410A na atmosfera: R410A é um fluorinated gás, coberto pelo protocolo de Kyoto,
com um global Potencial Aquecendo-se (GWP) = 1975.
I
EG
F
D
E
P
F-GAS Regulation (EC) No. 842/2006
Page 57

EG
I
F
D
E
P
BLK BLACK
NERO
NOIR
SCHWARZ
NEGRO
PRETO
BLU BLUE
BLU
BLEU
BLAU
AZUL
AZUL
BRN BROWN
MARRONE
MARRON
BRAUN
MARRÓN
CASTANHO
GRN / YEL GREEN / YELLOW
VERDE / GIALLO
VERT / JAUNE
GRÜN / GELB
VERDE / AMARILLO
VERDE / AMARELO
GRY GREY
GRIGIO
GRIS
GRAU
GRIS
CINZENTO
ORG ORANGE
ARANCIONE
ORANGE
ORANGE
NARANJA
COR-DE-LARANJA
PNK PINK
ROSA
ROSE
ROSA
ROSA
COR-DE-ROSA
RED RED
ROSSO
ROUGE
ROT
ROJO
ENCARNADO
VLT VIOLET
VIOLA
VIOLET
VIOLETT
VIOLETA
VIOLETA
WHT WHITE
BIANCO
BLANC
WEISS
BLANCO
BRANCO
YEL YELLOW
GIALLO
JAUNE
GELB
AMARILLO
AMARELO
AZU LIGHT BLUE AZZURRO AZUR HIMMEL BLAU AZUL CLARO AZUL CLARO
SYMBOL EG
I
F
D
E
P
PC - DP CONDENSATE PUMP MOTOR
MOTORE POMPA CONDENSA
MOTEUR POMPE CONDENSATION
KONDENSWASSERPUMPE-MOTOR
MOTOR BOMBA DE AGUA MOTOR BOMBA DE AGUA
CM COMPRESSOR MOTOR
MOTORE COMPRESSORE
MOTEUR DE COMPRESSEUR
KOMPRESSORMOTOR
MOTOR DEL COMPRESOR
COMPRESSOR
C1, 2, 3,4 CAPACITOR
CONDENSATORE
CONDENSATEUR
KONDENSATOR
CONDENSADOR
CONDENSADOR
DEF THERMO DEFROST THERMOSTAT
TERMOSTATO SBRINATORE
THERMOSTAT DE DEGIVRAGE
ENTFROSTER-THERMOSTAT
TERMOSTATO DE DESCONGELACION
TERMOSTATO DE DESCONGELAÇAO
FLP FLAP MOTOR
MOTORE DEFLETTORE
MOTEUR DE VOLET
KLAPPENMOTOR
MOTOR DEL DEFLECTOR
MOTOR DA PLACA
LM LOUVER MOTOR
MOTORE DEFLETTORE
MOTEUR D’AUVENT
LUFTKLAPPENMOTOR
MOTOR CON ABERTURAS
MOTOR COM ABERTURAS LATERAIS
FMO OUTDOOR FAN MOTOR
MOTORE ESTERNO VENTOLA
MOTEUR DE VENTILATEUR EXTERIEUR
AUSSENLÜFTERMOTOR
MOTOR EXTERIOR DE LA TURBINA
MOTOR DA VENTOINHA EXTERIOR
FMI, FM INDOOR FAN MOTOR
MOTORE INTERNO VENTOLA
MOTEUR DE VENTILATEUR INTERIEUR
INNENLÜFTERMOTOR
MOTOR INTERIOR DE LA TURBINA
MOTOR DA VENTOINHA INTERIOR
IND. ASSY INDICATOR ASSY
GRUPPO INDICATORI
ENSEMBLE INDICATEUR
EANZEIGE-BAUGRUPPE
GRUPO DE INDICADORES GRUPO DE INDICADORES
MG MAGNETIC CONTACTOR
CONTATTORE MAGNETICO
CONTACTEUR MAGNETIQUE
MAGNETKONTGEBER
CONTACTOR MAGNÉTICO
CONTADOR MAGNÉTICO
NF NOISE FILTER
FILTRO RUMORE
FILTRE ANTI PARASSITE
LÄRMSCHUTZFILTER
FILTRO DEL RUIDO
FILTRO DE RUÍDO
OLR OVERLOAD RELAY
RELÉ SOVRACCARICO
RELAIS DE SURCHARGE
ÜBERLASTRELAIS
RELÉ DE SOBRECARGA
RELÉ DE SOBRECARGA
CE - PCB CONTROLLER
SCHEDA ELETTRICA
CARTE ELECTRONIQUE
STEUERGERÄT
CONTROLADOR
PAINEL ELÉTRICO
PR POWER RELAY
RELÉ ALIMENTAZIONE
RELAIS D’ALIMENTATION
LEISTUNGSRELAIS
RELÉ DE ALIMENTACION
RELÉ DA ALIMENTAÇAO
RP PUMP RELAY
RELÉ POMPA
RELAIS POMPE PUMPE
RELAIS
RELÉ BOMBA DE AGUA
RELÉ BOMBA
SSR SOLID STATE RELAY
RELÉ STATO SOLIDO
RELAIS A SEMI-CONDUCTEUR
FESTKÖRPERRELAIS
RELÉ DEL ESTADO SOLIDO
RELÉ DO ESTADO SÓLIDO
RA STARTING RELAY
RELÉ DI AVVIAMENTO
RELAIS DE DEMARRAGE
STARTRELAIS
RELÉ DE ARRANQUE
RELÉ DE ARRANQUE
SV SOLENOID VALVE
VALVOLA SOLENOIDE
ELECTROVANNE
MAGNETVENTIL
VALVULA SOLENOIDE
VALVULA SOLENOIDE
MS - FS SAFETY FLOAT SWITCH
INT. SICUREZZA A GALL.
INTERR. DE SECURITE A FLOTTEUR
SCHWEMM-SCHUTZSCHALTER
INTERR. DE SEGURIDAD DE FLOTADOR
INTERR. DE SEGURANÇA
ON-OFF SW ON-OFF SWITCH
INTERRUTTORE MARCIA/ARRESTO
TOUCHE MARCHE/ARRÊT
EIN/QUS TQSTE
BOTON ARRANQUE/PARADA INTERRUPTOR LIGAR/DESLIGAR
TH1, 2, THERMISTOR
TERMISTORE
THERMISTANCE
THERMISTOR
TERMISTOR
TERMISTOR
P TIMER
PROGRAMMATORE
PROGRAMMATEUR
ZEITSCHALT-UHR
PROGRAMADOR TIMER
TR1, 2 POWER TRANSFORMER
TRASFORMATORE DI POTENZA
TRANSFORMATEUR DE PUISSANCE
NETZTRANSFORMATOR
TRANSFORMADOR DE POTENCIA
TRANSFORMADOR DE CORRENTE
20S 4-WAY VALVE
VALVOLA 4 VIE
VANNE 4 VOIES
4-WEG-VENTIL
VALVULA DE 4 VIAS
VALVULA DE 4 VIAS
47C NEGATIVE PHASE RELAY
RELÉ A FASE NEGATIVA
RELAIS D’ORDRE DE PHASE
NEGATIVPHASENRELAIS
RELÉ DE FASE NEGATIVA
RELÉ DA FASE NEGATIVA
E
lectric wiring diagrams’ symbols /
Simboli schemi elettici
/ Symboles des schemas électriques /
Symbole der System-Schaltplanen
Símbolos de los esquemas eléctricos /
Símbolos
dos esquemas elétricos
Wires color legend
Legenda colori fili elettrici
Légende des couleurs des fils électriques
Beschriftung der Leitungs-Farben
Leyenda de los colores de los cable electricos
Legenda das côres dos fios elétricos
Page 58

S.A.C. printed in Italy
Via Varese, 90 - 21013 Gallarate - Va - Italy
Tel. +39 0331 755111 - Fax +39 0331 776240
www.argoclima.com
 Loading...