

Page 1
Arecont Vision HSG2 Installation Manual
0 | Page
Page 2
Arecont Vision HSG2 Installation Manual
1 | Page
HSG2 Installation Manual
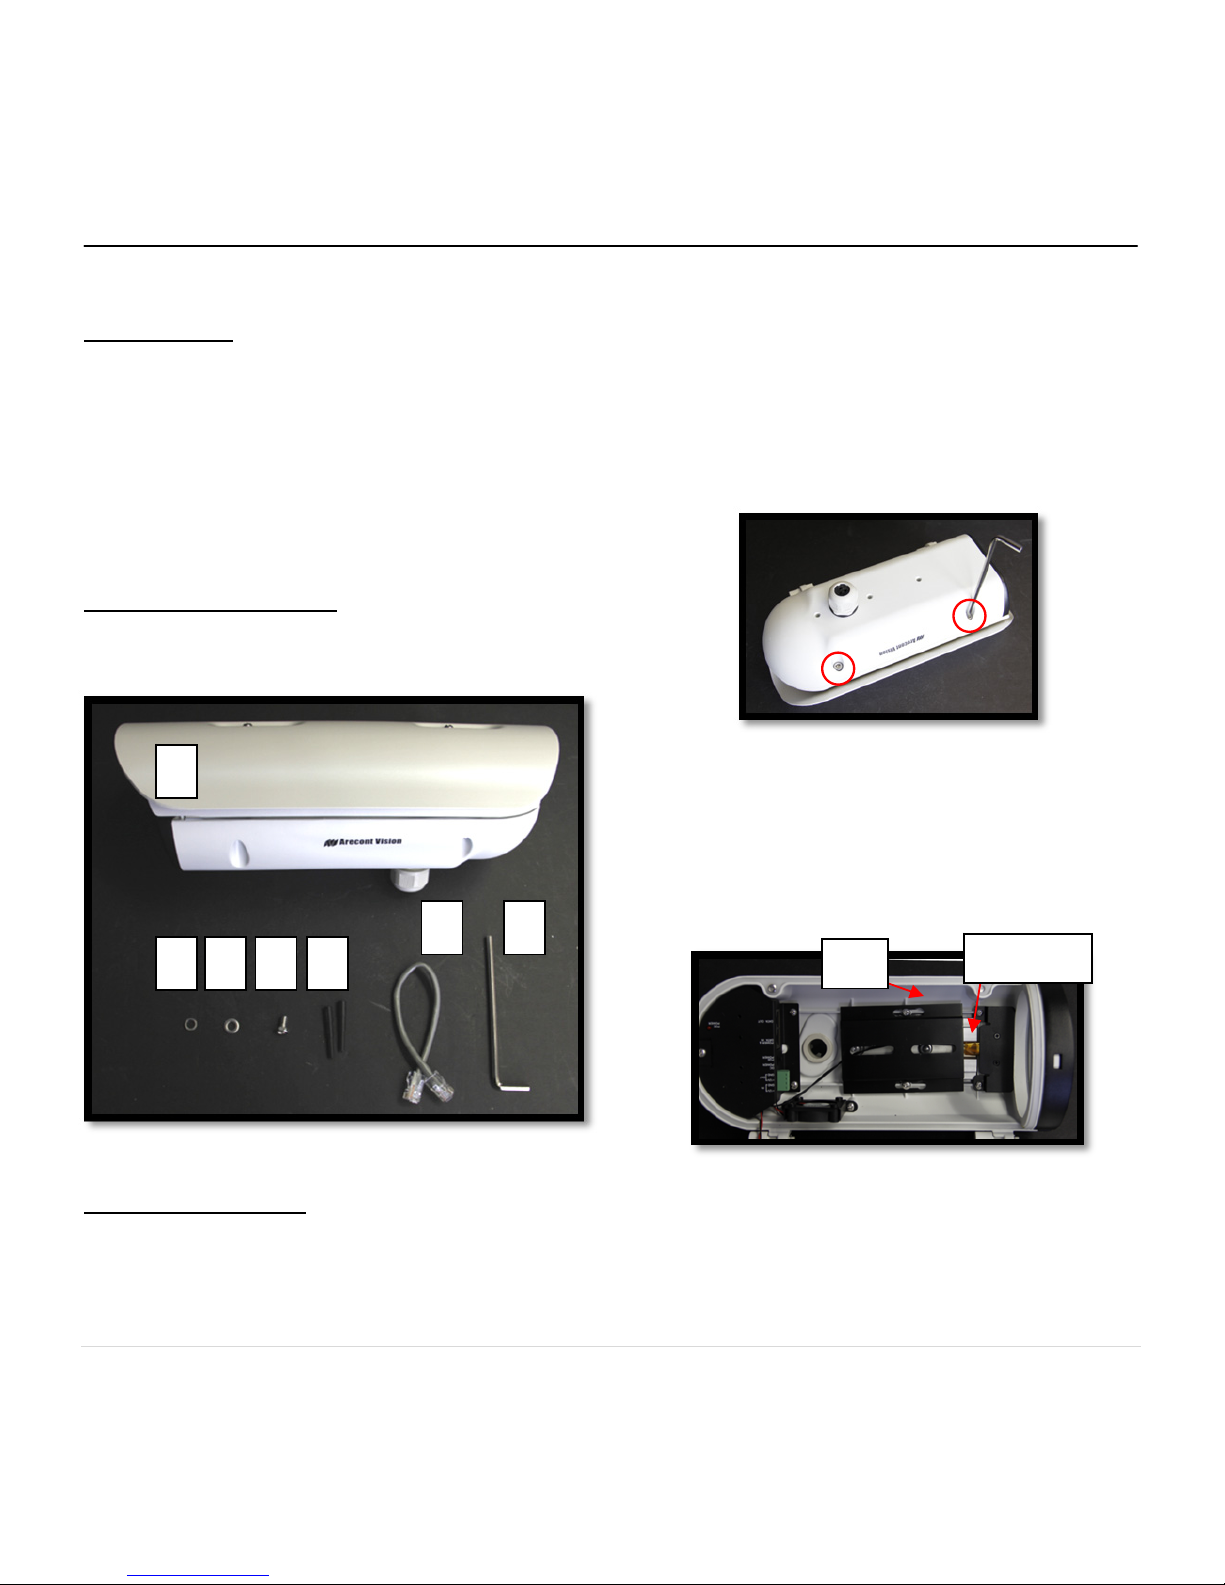
Inside the box:
A. Arecont Vision HSG2 Housing
B. Flat washer
C. Spring washer
D. Machine screw
E. Two (2) rubber plugs
F. RJ45 Cable
G. Two-sided hexagonal wrench
Not included but needed:
#1 Phillips head screwdriver
Image 1
Mounting the Camera:
1. Remove HSG2 housing and hardware from
the box.
2. Open the HSG2 housing by using the
provided wrench to loosen the two screws
shown in
Image 2.
NOTE: Do not remove screws from the
housing.
Image 2
3. Remove the tray from the housing shown in
Image 3.
Note: Please do not remove the heat sink
from the HSG2 housing.
Image 3
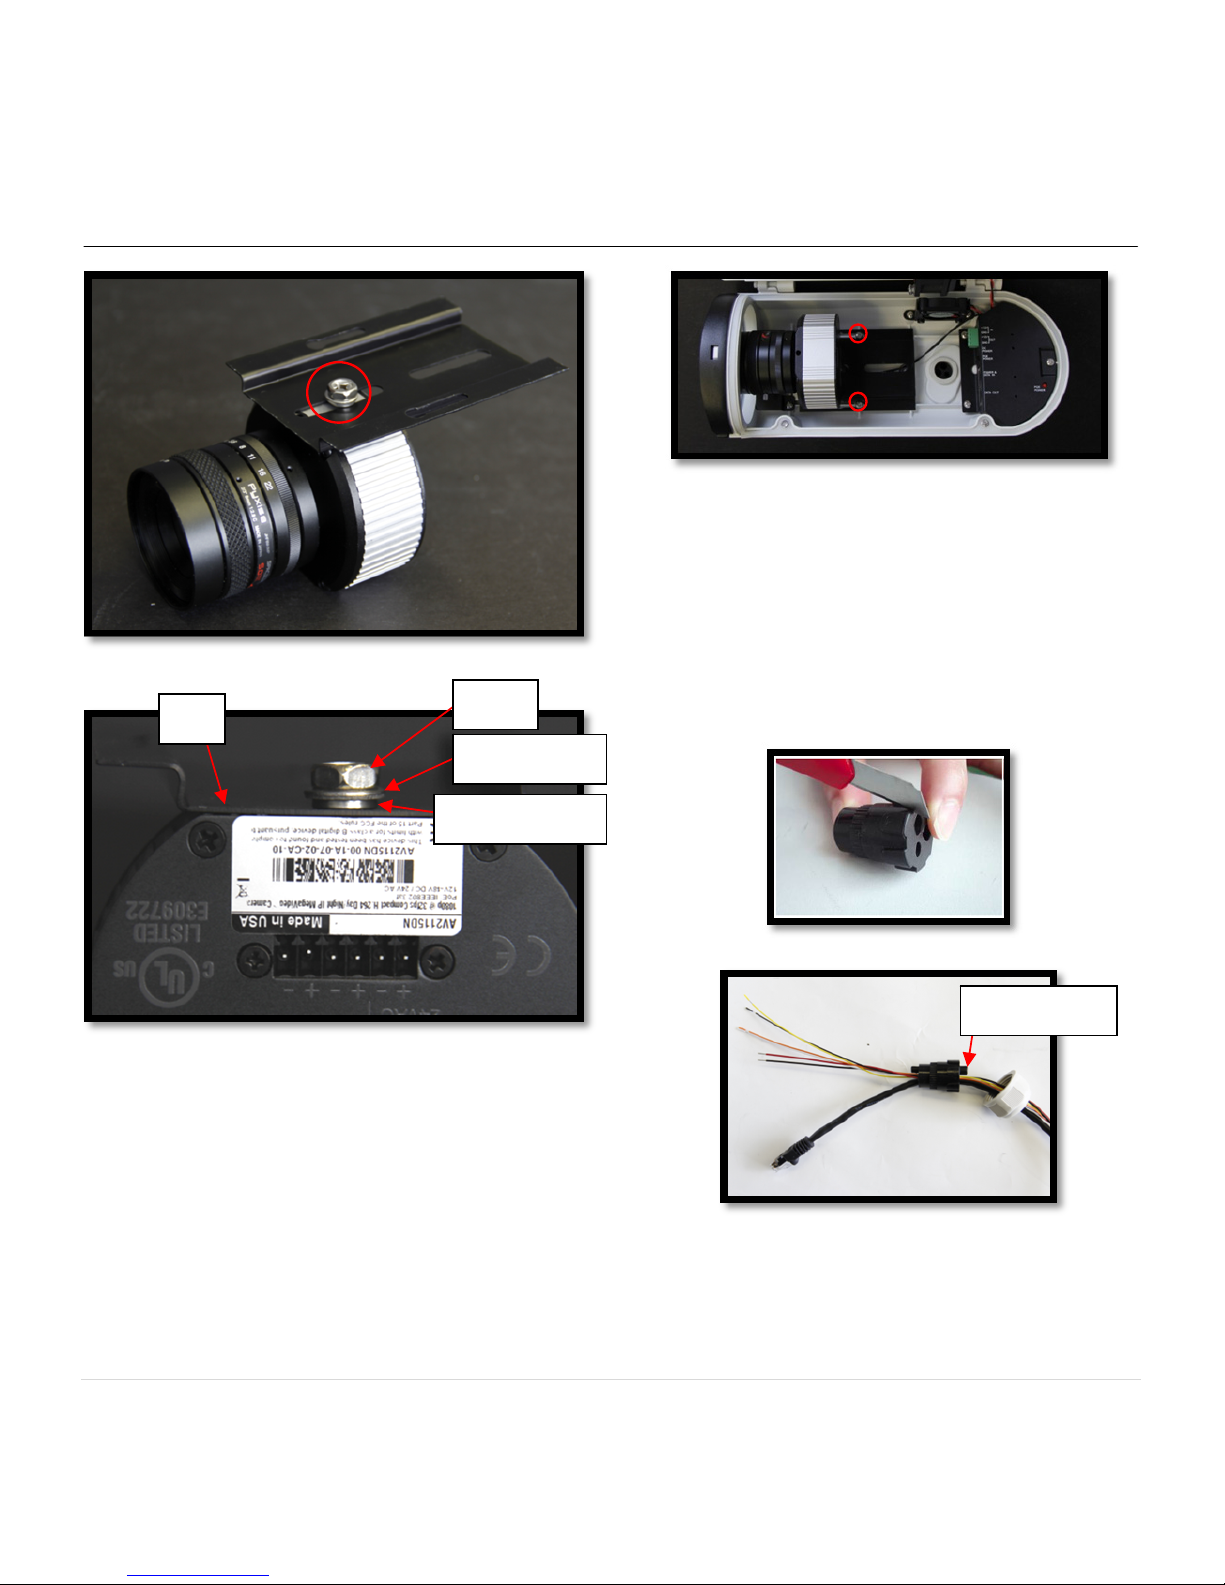
4. Use the provided screw, flat washer and
spring washer to attach Arecont Vision
MegaVideo® cameras on the tray shown in
Image 4-1 and Image 4-2.
F
ECADB
G
Tray
HeatSink
Page 3
Arecont Vision HSG2 Installation Manual
2 | Pa
g
e
Image 4-1
Image 4-2
5. Attach the tray onto HSG2 housing and
make sure the tray firmly contact with the
heat sink shown in Image 5.
Image 5
6. Remove the silicone cap from the housing,
cut the side part (if necessary) (Image 6) to
run the RJ45 cable, external power and digital
in/out cables through the silicone cap. Insert
the provided rubber plugs to cover
unnecessary holes in the silicone cap (Image
7)
Image 6
Image 7
Screw
FlatWasher
SpringWasher
Tray
RubberPlug
Page 4

Arecont Vision HSG2 Installation Manual
3 | Pa
g
e
Image 9
7. Run Ethernet cable, external power cable (if
necessary) and digital in/out cables (if
necessary) through the hole of HSG2 housing
and tighten all fittings to ensure a liquid-tight
seal. (Image 8)
Image 8
8. Plug the Ethernet cable into the HSG2 PoE
power & data input. (Image 9)
9. Use the provided RJ45 cable to connect
Arevont Vision’s MegaVide
®
camera to the
HSG2 PoE data output. (Image 9)
10. Switch HSG2 power source to PoE power
shown in Image 9. NOTE: If the camera is
powered via PoE, please skip step 11-12.
11. If the HSG2 housing is powered by an outside
power supply, 12VDC, connect the external
power to the HSG2 DC12V input (Image 9).
NOTE: HSG2 can support heater, 2 fans and
camera via either PoE or DC12V.
12. Switch the HSG2 power source to DC power
shown in Image 9.
13. Attach the HSG2 to the wall mount.
14. Power on the camera, adjust focus and tighten
the set screws on the chassis.
DC12VInput
PowerSource
Switchwer
PoEDataOutput
PoEDataInput
Page 5

Arecont Vision HSG2 Installation Manual
4 | Page
HSG2 Wall Mount (HSG2-WMT) Installation Instructions
Inside the box:
A. Wall mount
B. Pack of four (4) wood screws and four (4)
dry wall anchors
C. Two-sided Hexagonal Wrench
Not included but needed:
#2 Phillips head screwdriver
Image 10
1. Remove wall mount and hardware from the
box.
Image 11
2. Run the Ethernet cable and outside power
cable (if necessary) through the wall mount.
3. Install the HSG2 housing onto wall mount as
shown in image 11.
4. Attach the wall mount to the wall using drywall
screws or any optional hardware suitable for
the mounting surface.
5. For installation of the camera, please
reference “Mounting the Camera.”
B
C
A
Page 6

Arecont Vision HSG2 Installation Manual
5 | Page
HSG2 Junction Box Adapter (SV-JBA) for MD-WMT2 Installation Instruction
Caution:
Use of SV-JBA is recommended for outdoor
installation on hard surfaces requiring external
conduit.
Inside the box:
A. Junction Box Adapter
B. Pack of four (4) machine screws
C. One double-sided hex key
D. Pack of four (4) wood screws and four (4)
dry wall anchors
E. Mounting Template
Not included but needed:
#2 Phillips head screwdriver
HSG2-WMT ( HSG2 Wall Mount)
¾” NPT Conduit (if necessary)
Image 12
1. Remove the junction box and hardware from
the box.
Image 13
2. Remove the conduit plug by first removing the
socket set screw by using the provided hex
key.
3. Attach the junction box adapter to the wall
using drywall screws or any optional hardware
suitable for the mounting surface.
4. Run the Ethernet cable and outside power
cable (if necessary) through the junction box
adapter.
5. Attach HSG2 wall mount to the junction box
adapter as shown in Image 13.
6. Connect ¾” NPT conduit to the junction box
adapter.
7. For installation of the camera, please
reference “Mounting the Camera.”
B CA D E
Page 7

Arecont Vision HSG2 Installation Manual
12 | Pa
g
e
HSG2 Pole Mount Adapter (MD-PMA) Installation Instructions
Inside the box:
A. Pole Mount Adapter
B. 2x Compression Fittings
C. 2x Small Steel Straps
D. 2x Large Steel Straps
E. Pack of four (4) machine screws
Not included but needed:
#2 Phillips head screwdriver
MegaDome
®
Wall Mount, MD-WMT2
Image 14
1. Remove pole mount adapter, compression
fittings, steel straps and hardware from the
box.
2. Install compression fittings to pole mount
adapter as shown in Image 15.
3. Run the Ethernet cable and outside power
cable (if necessary) through the compression
fittings.
4. Attach the wall mount to pole mount adapter
as shown in Image 16.
5. Use the supplied two large or small steel
straps to attach the pole mount adapter to the
pole and tighten the compression screws as
shown in Image 16.
6. Attach HSG2 housing to wall mount adapter.
Please reference “Mounting the Camera,” if
needed.
7. Tighten the compression fittings to seal the
wiring holes.
Image 15
Image 16
A
B
C
D
E
SteelStrap
Page 8

Arecont Vision HSG2 Installation Manual
7 | Page
HSG2 Corner Mount Adapter (MD-CRMA) Installation Instructions
Inside the box:
A. Corner Mount Adapter
B. 2x Compression Fittings
C. Pack of four (4) machine screws
D. 2x Packs of four (4) wood screws and four
(4) dry wall anchors
Not included but needed:
#2 Phillips head screwdriver
MegaDome
®
Wall Mount, MD-WMT2
Image 17
1. Remove corner mount adapter, compression
fitting and hardware from the box.
2. Install compression fittings to corner mount
adapter as shown in Image 18.
3. Run the Ethernet cable and outside power
cable (if necessary) through the compression
fittings.
4. Attach Wall Mount Adapter to Corner Mount
Adapter as shown in Image 19.
Image 18
Image 19
5. Using the screws provided (or other hardware)
attach the corner mount adapter to an exterior
90° corner wall.
6. Attach the HSG2 housing to Wall Mount
Adapter. Please reference “Mounting the
Camera”, if needed.
7. Tighten the Compression Fittings to seal the
wiring holes.
A
B C D
Page 9

Arecont Vision HSG2 Installation Manual
8 | Pa
g
e
 Loading...