

Arecont Vision AV-C800-6T, AV-C800-8T, AV-CSCDX12T, AV-CSCDX16T, AV-CSCDX20T Installation Guide
...Page 1

ConteraCMR
ConteraCMR™ Cloud Managed Recorder Series
Part of Total Sol ution
Quick Installation Guide
™
This guide will assist you with the initial setup of your ConteraCMR™ cloud managed appliance and recording software. This guide
includes hardware setup, software setup, network conguration, and connecting your appliance to the ConteraWS™ Web Services Portal.
SETTING UP YOUR RECORDER FOR THE FIRST TIME
1 6
Plug the supplied power cord into the recorder.
Do not connect the plug to a power source at this time.
2
Connect the network cable intended for remote
connections to the Client NIC.
3
Connect the supplied keyboard and mouse using
the USB ports.
4
Connect a monitor using the HDMI or DVI-I ports.
Note: The Camera NIC is intended for use
with a dedicated camera network.
Note: For models with PoE ports, use the
Camera NIC to connect a camera network.
5
Connect the cameras to PoE ports, or the external
camera network.
Connect the power cord to a power source, and
then turn the recorder ON.
7
Windows Only - Sign in with default log in credentials:
Username: NVRAdmin
Password: dvr4321
8
Windows Only - Open the Contera Server login on
the desktop.
9
Log in to the Contera Server Recorder using the
default credentials:
Username: admin
Password: 1234
10
Follow the Setup Wizard to complete basic setup
of your system.
Network Information
Remote Communication Port 80 (8888 used if 80 is blocked)
Client NIC IP Address DHCP
Camera NIC (External Switch) 192.168.51.1 / 255.255.255.0 (Gateway and DNS blank)
Camera PoE 192.168.50.1, 192.168.50.2 (reserved for internal communication),
+1.818.937.0700 | www.arecontvision.com | avsales@arecontvision.com
192.168.50.11-26 (Reserved for Onboard PoE Camera Ports)
Page 2
ConteraCMR™ | Quick Installation Guide
Camera Management
Contera Server software makes it easy to add and congure IP cameras.
Contera recorders will detect cameras connected to the Camera NIC
Note: Third party cameras may ne ed to be congured using a third par ty
program before being added to the Se rver. Cameras that don’t suppor t ONVIF
can be congured to record via RTSP streaming.
Adding Auto-Detected Cameras:
Contera Server software automatically detects ONVIF Prole S compliant
cameras set to DHCP. Cameras not meeting these requirements must
be congured manually.
1. Click Setup , and then click Cameras.
2. Click Add Cameras.
3. For automatically detected cameras, select the camera(s) using the
check boxes, and then type the appropriate Username and Password.
4. Click Add.
Note: The recorder will automatically detect and add most cameras connected
to the on-board PoE switch as long as the cameras are set to DHCP.
Adding Cameras Manually:
1. Click Setup , and then click Cameras.
2. Click Add Cameras.
3. For cameras not automatically detected, click Add Cameras Manually.
4. Select the ONVIF or the RTSP protocol, and then type the appropriate
Title, IP Address, Username, and Password.
Note: When using RTSP, specify the individual URL streams for your cameras.
For instructions regarding these streams, consult the camera manual.
5. Click Add Cameras.
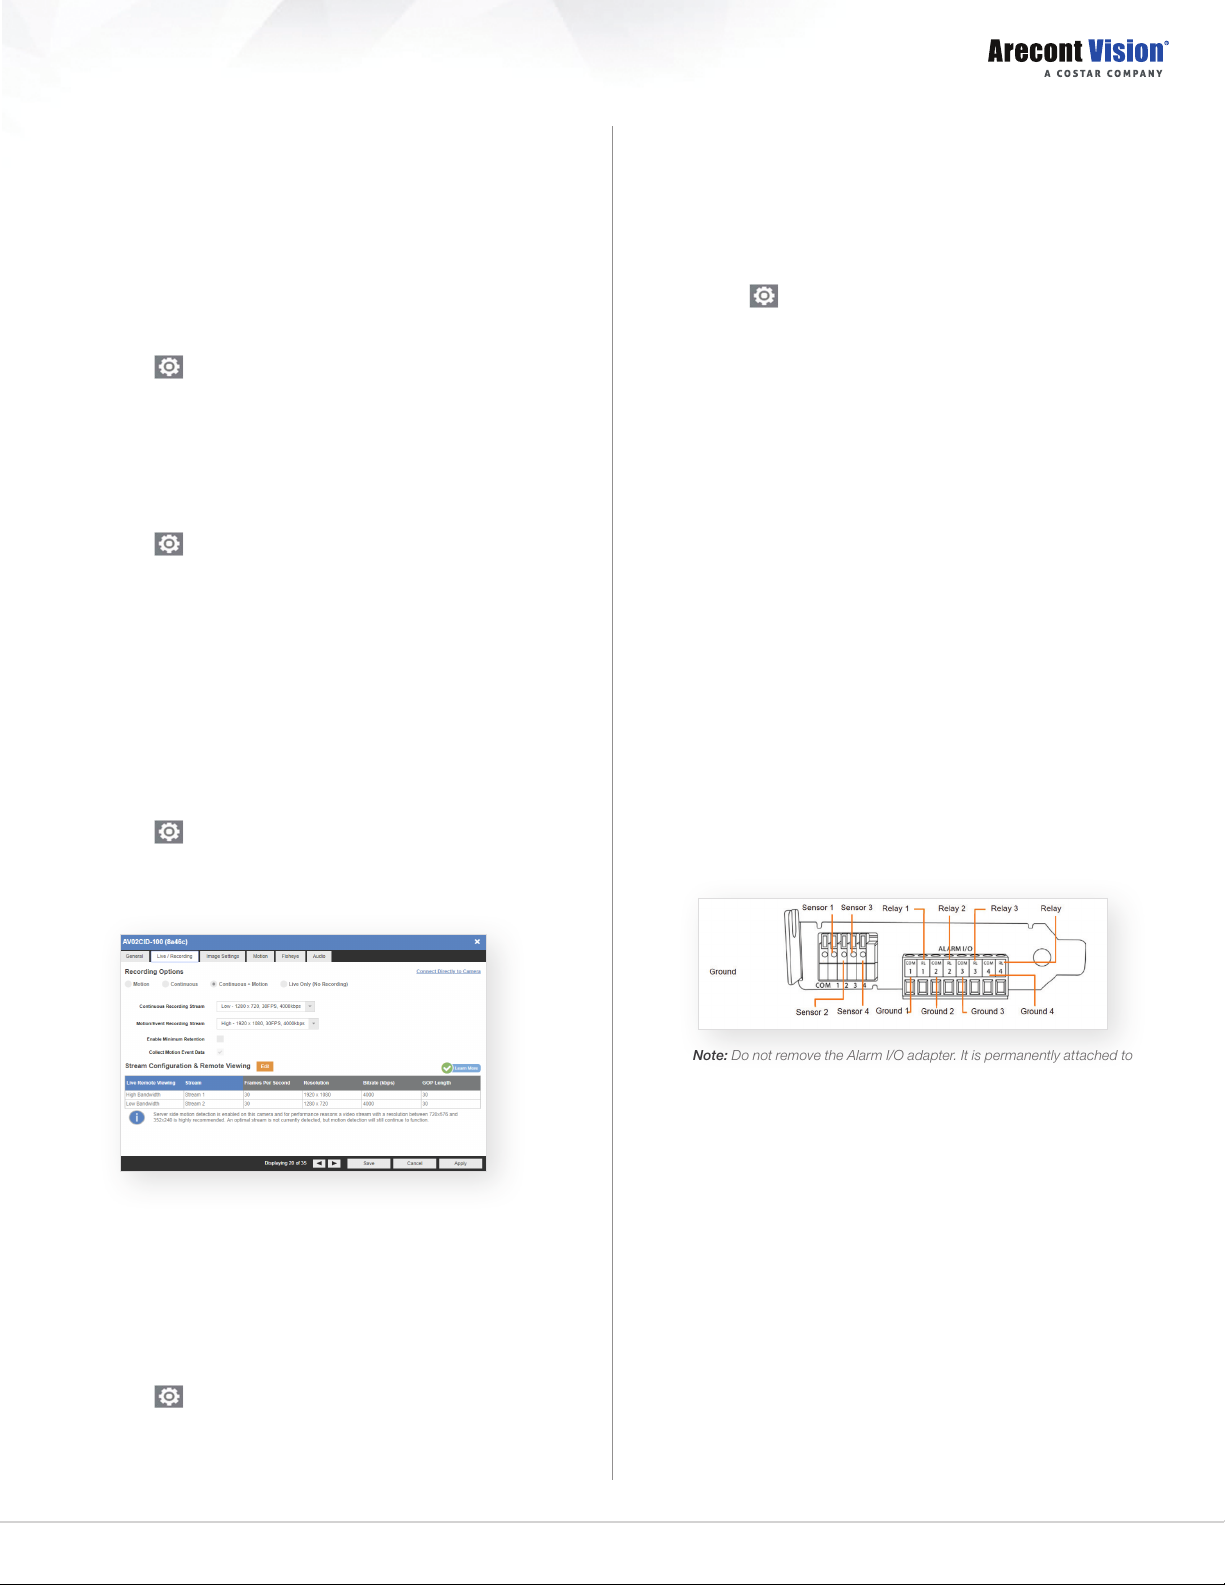
Conguring Recording Settings:
For optimal motion detection, cameras should be congured with a
secondary stream of 720x576 or lower. Contera will still detect motion using
a higher resolution stream if a 720x576 or lower stream is not available, but
this will consume more system resources.
1. Click Setup , and then click Cameras.
2. Select the desired camera, and then click the Live/Recording tab.
3. Congure the settings as desired.
Note: Continuous + Motion recording is the default setting for all cameras
upon connection to your recorder.
5. Click Exit to return to Contera Server software.
6. Follow the steps in the Adding Cameras Manually section, typing the
Static IP Address.
Note: Network Camera Manager can be launched from the Windows
desktop icon.
Conguring Arecont Vision Cameras with DHCP
(Linux models only):
1. Click Setup , and then click Support Tools.
2. Click Launch Support Tools.
3. Click AV IP Utility.
4. Select your desired cameras, and DHCP, and then click Apply.
5. Click Exit to return to Contera Server software.
6. Follow the steps in the Adding Auto-Detected Cameras section to add
the camera.
Note: Arecont Vision cameras on Windows can be congure d with DHCP by
launching Network Camera Manager from the Windows desktop icon.
Adding Third Party Cameras:
Third par ty cameras may require installing a manufacturer camera discovery
tool on a separate PC. Once the camera discovery tool is installed, follow
the steps for adding a camera with a static IP address or using DHCP as
outlined above.
Adding Cameras Not Supported by ONVIF:
You must add cameras that are not ONVIF-compliant using the RTSP
stream of the camera. Consult the manufacturer’s camera manual for more
detailed information regarding RTSP streams. When you know the URL for
the RTSP stream of your camera, follow the steps in the Adding Cameras
Manually section, selecting RTSP protocol.
Sensor/Relay Card
Contera Server version 1.2 or higher is required for use of the Sensor/Relay
Card. See page 36 of the Contera Server Software Manual for instructions
on setting up the Sensor/Relay Card on the software.
Advanced Camera Management
Cameras set to static IP addresses, third party cameras, and cameras not
supported by ONVIF may not be detected automatically. To congure
cameras not automatically detected by Contera Server software, follow the
steps below.
Conguring Arecont Vision® Cameras with a Static IP
Address (Linux models only):
1. Click Setup , and then click Support Tools.
2. Click Launch Support Tools.
3. Click AV IP Utility™.
4. Note the discovered IP address for the desired camera.
2
+1.818.937.0700 | www.arecontvision.com | avsales@arecontvision.com
Note: Do not remove the Alarm I/O adapter. It is permanently attached to
ensure full integrity of the connections. A small ne-tip screwdriver might be
neede d to access the lock screws on the adapter.
Advanced Network Setup
In some cases, advanced network settings may be applied to set up an
optimal local or remote connection. The following steps are optional. Please
contact an Arecont Vision support technician if you are unsure of your video
network.
Direct Connection:
With direct connection, network trafc bypasses the ConteraWS cloud relay
service, allowing for optimal connection speeds. This conguration requires
additional steps, including router conguration, to forward trafc to the
appropriate Contera recorder.
Note: Visit http://portforward.com/English/routers/port_forwarding/
for instructions on router conguration for direct connection.
1. Access the router used for Internet communication and forward TCP
port 80 to the internal address of the Contera Server recorder.
Page 3
ConteraCMR™ | Quick Installation Guide
2. Use a web browser to log in to your ConteraWS™ account. Click My
Recorders, and then click Edit in the row of your desired recorder.
3. Click Remote Network Settings, and then type the static IP or DDNS
entry for the router in the IP Address or Domain eld, and 80 in the
Port eld.
4. Click Save.
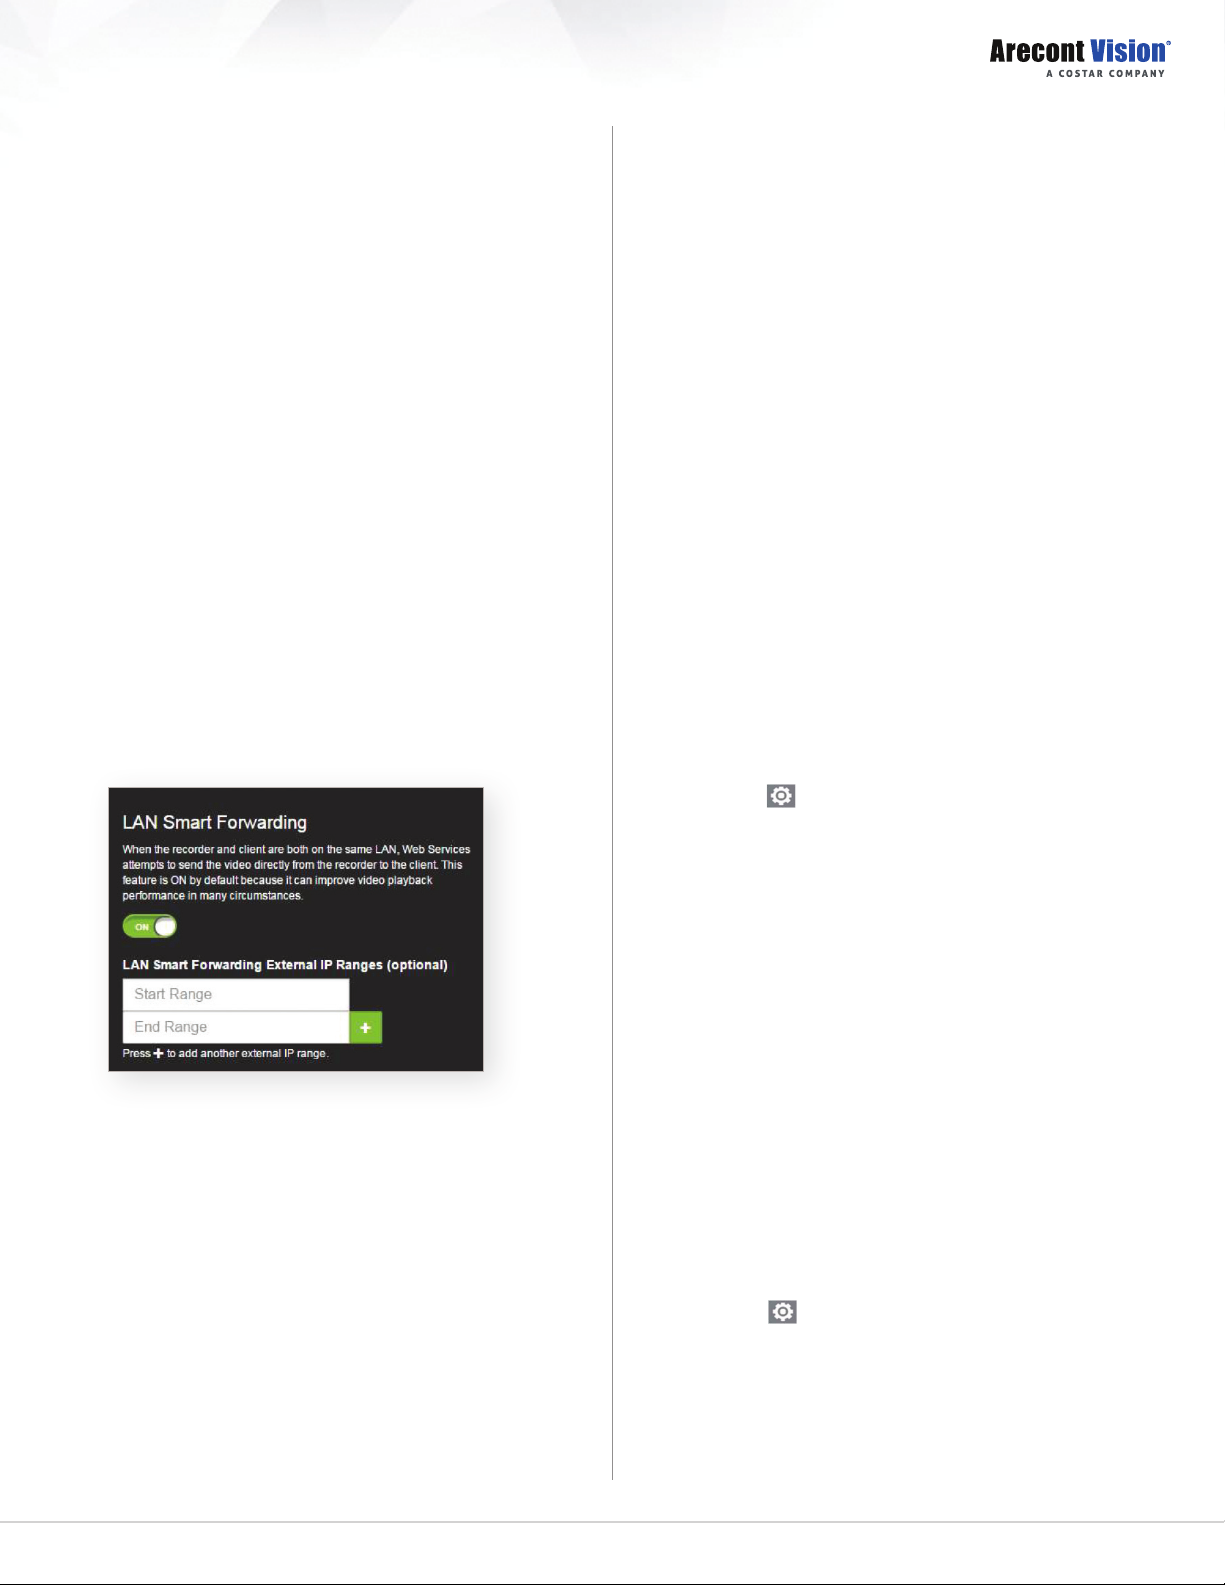
LAN Smart Forwarding:
To optimize local connections, ConteraWS uses a feature called LAN Smart
Forward (LSF). This feature allows ConteraWS to detect if the machine using
the remote client software is on the same local network. ConteraWS then
automatically switches from a cloud relay connection to a direct connection.
This ensures the fastest connection between client and recorder.
The following conditions are required for LAN Smart Forwarding:
• You must already have an ConteraWS account, and the appliance
must be connected to ConteraWS with LAN Smart Forwarding
congured (see the ConteraWS Web Services section for more
information).
• Both client and recorder use the same external IP address, or IP
addresses within an acceptable range.
• The Client NIC port must be used for the Internet connection.
To enable LAN Smart Forwarding:
1. Use a web browser to log in to your ConteraWS account, and then click
on your desired Company Account.
2. Click My Recorders, and then click Edit in the row of the desired recorder.
3. Click the Remote Network Settings tab.
4. Set LAN Smart Forwarding to On.
Note: If your recorder and client machines have different ex ternal IP
addresses, enter the IP range in which the client and recorde r reside.
ConteraWS Web Services (ArecontVision-WS.com)
1. On your Recorder, click Setup, and then navigate to the Remote
Services tab.
2. Click Web Services.
3. Type your Registration Code.
Note: If you do not have your Recorder Registration Code, you may enter your
ConteraWS Email and Password instead. It is recommended to use a Recorder
Registration Code if available though.
4. Click Connect.
ConteraWS Web Services Connection
ConteraWS Web Services is a cloud-based management solution which
allows you to administer all your users, recorders, and VMS installations from
one central location. To get the most out of your new web-managed recorder,
we strongly recommend connecting it to the Web Services portal.
Please note that all following instructions are executed at a Channel
Partner level. For more detailed instructions on how to operate at an End
User level, please consult the ConteraWS Software Manual, available at
www.arecontvision.com.
To begin using ConteraWS, you will need a Channel Partner ConteraWS
account. If you do not have one already, please contact Arecont Vision® at
www.arecontvision.com.
Connecting a Recorder to ConteraWS:
If you entered your Recorder Registration Code in the previous section, your
recorder will be automatically added to your ConteraWS Company Account.
Users associated with your Company Account and with the appropriate
permissions will now be able to remotely access the Server recorder.
Creating a Customer Account:
A Customer Account is an ConteraWS End User account created under
a Channel Partner account and managed by the Channel Partner. Customer
Accounts can only be created by the Channel Partner. Once created, the
Channel Partner can assign recorders to Customer Accounts and create End
User accounts.
1. Log in to your ConteraWS account from a web browser using your
registered Username and Password.
2. On the Management Portal, click Add New Account.
3. Enter an Account Name.
4. (Optional) Enter an Account ID, City, State/Province, and Time Zone.
5. Click Add Company Account.
Creating a Customer Account:
1. Log in to your ConteraWS account from a web browser using your
registered Username and Password.
2. Click Settings , and then click Users.
3. Click Add New User, and then enter the appropriate user information.
4. Click Add New User.
Note: This method creates users at the Channel Par tner level. To create users
at an End User level, complete step 1, then click Connect next to the Company
Account you wish to add users to, then complete steps 2-4.
Managing User Permissions:
User permissions are managed via assignment of individual users to User
Groups. User Groups are classications which grant users permissions
to access various aspects of a Channel Partner or Customer Account.
User and User Group Management should always be performed through
ConteraWS.
Three default permission levels are available:
• User – Basic Live View, Search, and Clip Share functionality.
• Super User – Live View, Search, Clip Sharing, Editing,
Deleting, and Recorder Management.
• Admin – All permissions, including full administrative
access and the ability to manage Users and User Groups.
Note: Default user group permissions cannot be edite d. Creating a new user
group will allow customization of available permissions.
Adding a User to a Group:
1. Log in to your ConteraWS account using a web browser using
your registered Username and Password.
2. Click Settings , then click User Groups.
3. In the row of your desired User Group, click Edit.
4. Click Users, and then click Add User.
5. Select the user you want to add to the User Group, and then click Save.
Note: Automatic ally include all user s in the Use r Group by checking the box so
labeled at the top of the list.
+1.818.937.0700 | www.arecontvision.com | avsales@arecontvision.com
3
Page 4

ConteraCMR™ | Quick Installation Guide
ConteraCMR
™
Adding a Group to a User:
1. Log in to your ConteraWS™ account using a web browser using your
registered Username and Password.
2. Click Settings , then click Users.
3. Click Edit next to the desired user.
4. Click Group Membership, and then click Add User to User Group.
5. Select the User Groups you want to include the user in, and then click
Save.
Removing a User from a Group:
1. Click Settings , and then click User Groups.
2. In the row of your desired User Group, click Edit.
3. On the Users tab, click the X next to the user to be removed.
Adding a New User Group:
1. Log in to your ConteraWS account using a web browser using your
registered Username and Password.
2. Click Settings , and then click User Groups.
3. Click Add New User Group.
4. Type a Name and Description for the User Group, and then click Create.
Modifying Group Level Permissions:
1. Log in to your ConteraWS account using a web browser using your
registered Username and Password.
2. Click Settings , and then click User Groups.
3. Click Edit next to the desired User Group.
4. Click one of the following and edit the desired permission:
• ConteraWS Permissions – These permissions pertain to Video Clips,
User Management, Recorders, Alerts, and Reports from
the ConteraWS website.
• Recorder Permissions – All Live View, Web Services, and Setup
functions are available through the ConteraVMS Thin Client,
ConteraVMS Thick Client, and ConteraMobile™ App.
• AV IP Utility™ Permissions – View and Manage Shared
Camera layouts for ConteraVMS.
Modifying Device Access:
1. Log in to your ConteraWS account using a web browser using your
registered Username and Password.
2. Click Settings , and then click User Groups.
3. Click Edit in the row of the desired User Group.
4. Click the Recorders/Cameras tab.
5. To add device access, click Add Recorder or Add Camera,
select the appropriate device groups or devices, and then click Add.
Note: To remove a device group or device, click the dropdown ar row next to a
device, then click Remove Recorder.
Note: Users who are also assigned to another group with permission to access
the recorder removed from this group will still be able to access the recorder.
Creating a Health Alert:
1. Log in to your ConteraWS account using a web browser using your
registered Username and Password.
2. Select Rules from the Alerts dropdown menu on the main navigation bar.
3. Click Add New Rule.
4. Name your alert rule and give it a Description as desired.
5. Click Add.
6. Dene the parameters of the alert rule.
7. Add Recorders, Cameras and Users to the alert rule as needed.
8. Click Save when nished.
Note: For more information about creating Aler ts, please refer to the
ConteraWS Software Manual available at www.arecontvision.com.
Creating a Report:
1. Log in to your ConteraWS account using a web browser using your
registered Username and Password.
2. Click Reports on the main navigation bar.
3. Click Add New Report, then select the Report Type you’d like to use
and click Next.
4. Enter a Report Name and Report Description.
5. Click Create.
6. Add Recorders and Users to your report.
7. Click Save when nished.
Note: For more information about creating Repor ts, please refer to
the ConteraWS Soft ware Manual available at w ww.arecontvision.com.
Viewing and Exporting Alert History:
1. Log in to your ConteraWS account using a web browser using your
registered Username and Password.
2. Select History from the Alerts dropdown menu on the main
navigation bar.
3. Click Show Filters.
4. Use the elds to specify which alerts to view.
5. Click Apply when nished.
6. Click Export.
7. Click Export again.
™
Go to: ArecontVision-WS.com
425 E. Colorado St. 7th Floor | Glendale, CA USA 91205 | +1.818.937.0700 | www.arecontvision.com | avsales@arecontvision.com
© 2018 Arecont Vi sion Costar, LLC. All rig hts reserved. Ar econt Vi sion and the Areco nt Vision logo are r egistered trade marks of the compan y.
AV IP Utility, Contera, ConteraCMR, Conter aIP, ConteraVMS, ConteraWS, and MegaI P are business use trademarks of the company.
* Except Contera NVR Appliance
Made in the USA
Rev 001.005
*
 Loading...