

Arecont Vision AV1600-0T2, AV1600-4T1, AV1600-8T0, AV800-0T2, AV800-2T1 Installation Guide
...Page 1
Quick Start Guide AV NVR PoE Network Video Recorder
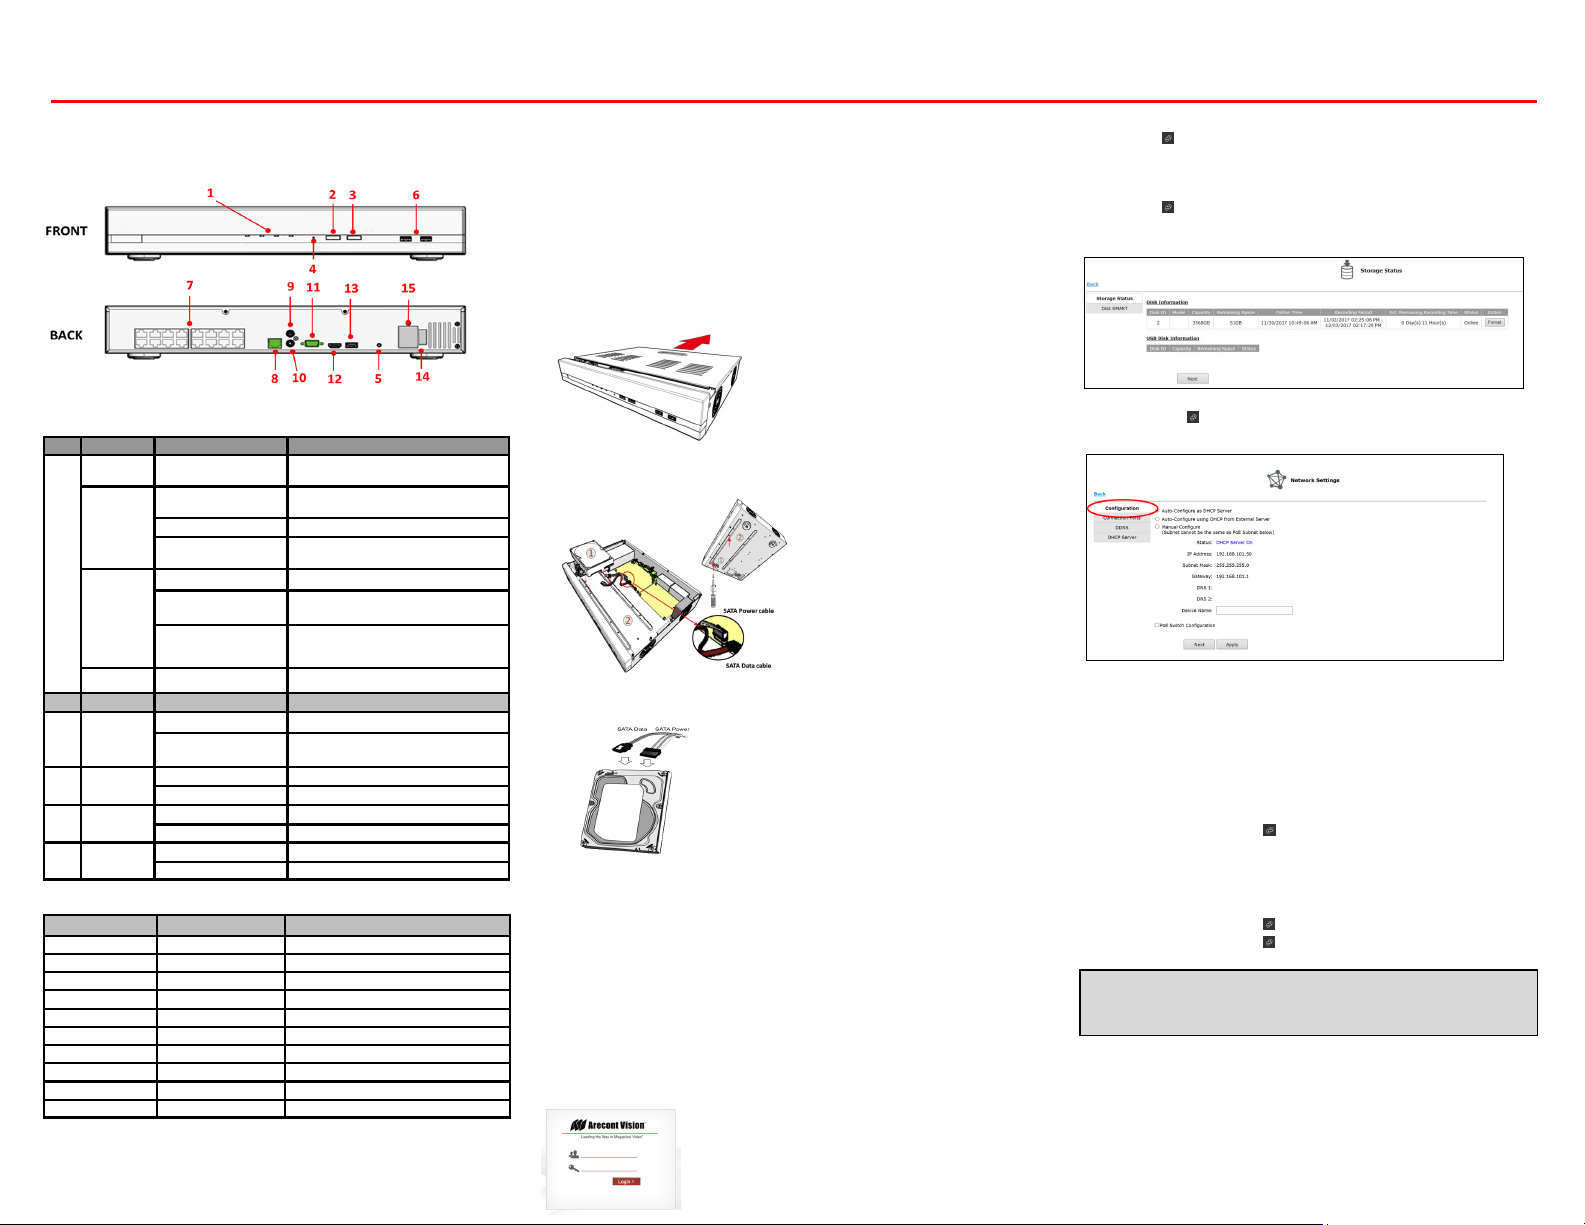
█ Hardware Overview
No. LEDs Status Definitions
Power
Solid Light Power on
Solid Light HDD functioning properly
Disk
Blinking Failed HDD
Off No HDD/ HDD is offline
1
Status
Alarm
Solid Light Operating properly
Blinking
( 100ms On/Off )
Continuous Blinking
(1000ms On/Off)
Restore factory default process/
Firmware update
Failed firmware update
Blinking System/Camera event occurs
No. Buttons Status Procedure
Stop Press to stop a buzzer
Mute
2
3 Record
4 Reset
5 Power
Restore display
defaults
Press and hold for 5 seconds
On Press and hold for 1 second
Off Press and hold for 1 second
Restore default Press and hold for 10 seconds
Restart Press and hold for 1 second
On/ Off Press and hold for 1 second
HW Force Off Press and hold for 10 second
No. Interfaces Definitions
6 USB
7 PoE
8 Ethernet
9 Audio Input
10 Audio Output
11 VGA
12 HDMI
13 USB
14 Power Switch
15 Power In
2x USB 2.0
PoE network interfaces
RJ-45 10M / 100M / 1000M
1-Ch, RCA
RCA
VGA output connector
HDMI output connector
1x USB 3.0
Power on /off
100~240V AC, 50/60Hz
█ Preparation
1. If you would like to install HDDs or expand your HDD capacity, please refer to “HDD
installation” section.
2. Connect supplied AC power cord to the power input (#15) on the NVR
3. Connect a Cat 5e cable to the LAN 1 port (#8) on the NVR
4. Connect a monitor to the HDMI (#12) or VGA (#11) interface on the NVR.
5. Connect supplied mouse to the USB port (#6 or #13) on the NVR
6. Connect your Audio in/ out devise to the Audio In (#9) / Out (#10) interface on the AV
NVR.
█ HDD Installation
1. Unscrew the two screws from the AV NVR cover
2. Connect SATA Power cable and SATA Data cable on the AV NVR’s main board, and
install HDDs on the NVR by securely fastening the four screws on each HDD.
3. Connect SATA Power cable and SATA Data cable to the HDD.
4. Re-install the AV NVR cover and securely fasten the six screws
█ Power on the NVR
1. Plug AC power cord into 100 to 240V AC outlet.
2. Turn power switch (#15) on.
3. Click power button (#5)
4. Power indicator (#1) should show a solid light.
█ Connect to the NVR
1. Use default IP address, 192.168.101.50, to connect to the AV NVR
2. Use the default username “admin” and password “admin” to login to the AV NVR.
NOTE: It’s highly recommended that you change the password during initial setup.
NOTE: You can have 4 to 31 characters including upper and lower case letters, digits for both
User Name and Password, and only allow four symbols: “.”, “@”, “_”, “-” .
█ (If needed) Format HDD
Visit Settings > Storage> Storage Status, and click “Format” to initialize the
HDD.
█ Set Time & Date
Visit Settings > Time & Date
█ Set Network Settings
1. Visit Settings > Network Settings
2. Select “Auto-Configure as DHCP Server” if you would like to enable DHCP.
█ Connect IP cameras
1. Plug cameras into PoE ports (#7)
NOTE: This product supports Smart Plug-and-Play, so cameras should be set up and
configured automatically in couple minutes.
2. SurroundVideo and MicroDome Duo cameras will take four and two channels, so
please make sure plug the next camera into the following ports. For example, if
one SurroundVideo camera plugs into Port#1, the next camera should plug into
Port#5 since the SurroundVideo camera has taken Channel#1, #2, #3, and #4.
3. ( If necessary) Visit Settings > Channel
4. ( If necessary) Add cameras by “Auto Search” or “Manually”.
█ Recording & Scheduling
1. The default setting for all channels is Event Record at all times.
2. ( If necessary) Visit Settings > Recording to update the settings
3. ( If necessary) Visit Settings > Scheduling to update the settings
NOTE: For more advanced video parameter settings, you will need
to visit the camera’s web interface. To do so you need to connect
your laptop/PC directly to the PoE ports.
Page 2

NVR Mobile Viewer User Guide AV NVR PoE Network Video Recorder
STEP 1 SET UP PORT FORWARDING
Configure port forwarding for the AV NVR HTTP port (default 80) and the streaming
port (default 9877) on your router/gateway.
STEP2 SET UP DDNS
1. Visit Settings > Network Settings > DDNS
2. Service Provider: The AV NVR supports “DynDNS” or “No-IP” DDNS services.
For more information, please visit www.dyndns.com & http://www.noip.com/
3. Domain Name: enter the domain name you registered with the DDNS service
4. Username: enter the username you registered with the DDNS service
5. Password: enter the password you registered with the DDNS service
SETP3 SET UP MOBILE APP (iOS. If using Android, please go to STEP 4.)
1. Download “NVR Viewer” from App Store
2. Run the APP, and ready to set up your AV NVR. You will see an empty Sever
List.
3. Tap “+” to add AV NVR manually
4. Specify your Name, IP address( or DDNS domain name), Port (HTTP port:
default 80), User Name and Password ( to access the NVR).
5. Tap the below icon to save the AV NVR info.
6. Now, you will see the AV NVR list on the Server List.
.
7. Tap the AV NVR on the Server List.
8. After connecting successfully, you will see the Channel List of the AV NVR
9. Tap the desired channel to see the live view.
10. Tap the below icon to save a snapshot.
11. Tap the below icon to do Keep Ratio, Audio, Playback, and Digital PTZ.
12. Tap “Event” on the Channel List page to search event.
13. Tap “Search” to search event manually, or tap “Recent Events” to search recent events
14. Tap any event to start playback.
15. Tap “Logout” on Channel List to logout AV NVR and back to Server List.
STEP4 SET UP MOBILE APP (Android)
1. Download “NVR Viewer” from Google Play
2. Run the APP, and ready to set up the AV NVR. You will see an empty NVR Overview.
3. Tap “+” to add a NVR manually.
4. Specify your Name, IP address( or DDNS domain name), Port (HTTP port: default 80),
5. Or, tap “Search” to search AV NVR in LAN, and select a NVR from the search result.
6. Tap “Detect” to connect the NVR.
only.
User Name and Password ( to access the AV NVR).
7. Tap “Save” to save this AV NVR to NVR Overview.
8. Now, you will see the AV NVR list on NVR Overview.
9. Tap left-hand side bar on the NVR Overview page, and you will see the icons for
Function Menu, System Information, NVR Overview, and Favorite Overview.
10. Tap “Function Menu”, and you will see the icons for Live View, Favorite View,
Playback, Event Playback, and Configuration.
11. In Live View or Favorite View, you can see the icons for Change NVR/ Favorite,
Single View, Quad View, and Keep Ratio.
12. You can change Channels/ Favorite by swiping the video from left to right.
13. Tap the video, and you will see the icons for Audio, Digital PTZ, PTZ, Snapshot,
and OSD.
 Loading...