

Page 1

AV100 Video System
USER MANUAL
AV100 Software Rev 5.6.4
Dec 20, 2010
AV100 SOFTWARE IS PROVIDED ON AS-IS BASIS. ARECONT VISION, LLC DISCLAIMS ALL
WARRANTIES WITH REGARD TO THIS SOFTWARE, INCLUDING ALL IMPLIED WARRANTIES OF
MERCHANTABILITY AND FITNESS. IN NO EVENT SHALL ARECONT VISION BE LIABLE FOR ANY
SPECIAL, INDIRECT OR CONSEQUENTIAL DAMAGES OR ANY DAMAGES WHATSOEVER RESULTING
FROM LOSS OF USE, DATA OR PROFITS, WHETHER IN AN ACTION OF CONTRACT, NEGLIGENCE OR
OTHER TORTUOUS ACTION, ARISING OUT OF OR IN CONNECTION WITH THE USE OR PERFORMANCE
OF THIS SOFTWARE.
Page 2
Table of Contents
Chapter I
Chapter I ---- Introduction
Chapter IChapter I
Introduction ................................
IntroductionIntroduction
ARECONT VISION AV100 VIDEO SYSTEM USER MANUAL
................................................................
................................................................
................................................................
................................................................
.................................... 4444
................................................................
ii
Product Contents ........................................................................................ 4
Product Overview ........................................................................................ 4
Camera Reference ...................................................................................... 5
Server Requirements .................................................................................. 7
Recommended Accessories ....................................................................... 8
Accessing Arecont Vision Cameras ............................................................ 8
Chapter II
Chapter II ---- AV100 Video Surveillance
Chapter II Chapter II
AV100 Video Surveillance Software
AV100 Video Surveillance AV100 Video Surveillance
Software Installation .................................................................................... 9
Configure Firewall ....................................................................................... 9
AV Application Manager ........................................................................... 12
Camera Installer ........................................................................................ 12
Basic Mode ............................................................................................... 12
Advanced Mode ........................................................................................ 14
Operating AV100 Video System ............................................................... 17
Software ................................
SoftwareSoftware
............................................................
................................................................
............................ 9999
........................................................
Toolbar…. ................................................................................................. 18
Settings…. ................................................................................................ 19
Selecting Full / Reduced Resolution Display ............................................ 20
Expsoure…. .............................................................................................. 24
Image Quality ............................................................................................ 25
Rate Control .............................................................................................. 27
Archive…. ................................................................................................. 28
Motion Detection ....................................................................................... 29
Privacy Mask............................................................................................. 31
Save To… ............................................................................................... 312
Advanced .................................................................................................. 33
Authentication ........................................................................................... 34
Remote Viewing ........................................................................................ 35
Arecont Vision 425 E Colorado St, 7th Floor Glendale, CA 91205 Revised 12/20/2010
www.arecontvision.com
www.arecontvision.com
www.arecontvision.comwww.arecontvision.com
Page 3
ARECONT VISION AV100 VIDEO SYSTEM USER MANUAL
iii
Day/Night .................................................................................................. 36
Auto-Iris… ................................................................................................. 36
Right-Click Menu ....................................................................................... 37
Language Selection .................................................................................. 39
Browsing Archives .................................................................................... 39
AVI Maker - Making video clips from the archive ...................................... 42
Viewing Your Recorded Video .................................................................. 45
FirmwareLoader – Upgrading Camera Firmware / Hardware in the Field . 46
Chapter IV
Chapter IV ---- Troubleshooting and Useful Tips
Chapter IV Chapter IV
Troubleshooting and Useful Tips ................................
Troubleshooting and Useful TipsTroubleshooting and Useful Tips
Connecting Directly to a Laptop or PC ...................................................... 47
Switches and Routers ............................................................................... 47
Low Sharpness ......................................................................................... 47
Frequently Asked Questions ..................................................................... 48
Chapter V
Chapter V ---- Regulatory Compliance
Chapter V Chapter V
Regulatory Compliance ................................
Regulatory ComplianceRegulatory Compliance
................................................................
................................................................
.............................................................
................................................................
............................................
................................................................
............................. 47
..........................................................
............ 54
........................
47
4747
54
5454
Terms and Conditions of Sale ................................................................... 54
Arecont Vision 425 E Colorado St, 7th Floor Glendale, CA 91205 Revised 12/20/2010
www.arecontvision.com
www.arecontvision.com
www.arecontvision.comwww.arecontvision.com
Page 4
Chapter
Chapter IIII ---- Introduction
Chapter Chapter
Introduction
IntroductionIntroduction
ARECONT VISION AV100 VIDEO SYSTEM USER MANUAL
Product Contents
Product Contents
Product ContentsProduct Contents
The
The Arecont Vision Megapixel Camera system packaging consists
Arecont Vision Megapixel Camera system packaging consists of the following:
TheThe
Arecont Vision Megapixel Camera system packaging consists Arecont Vision Megapixel Camera system packaging consists
•
Arecont Vision camera(s)
•
CD with AV100 software and manuals
Product Overview
Product Overview
Product OverviewProduct Overview
Arecont Vision offers AV100, a full-featured video surveillance software system, to complement its line of
megapixel IP cameras. AV100 supports full-motion, real-time, multi-camera viewing and policy-based
of the following:
of the following:of the following:
4
archiving, remote access to live and archived video via Internet Explorer, post-event zooming from digital
archives, simultaneous viewing of full-field of view and multiple zoomed images and a multitude of other
features that take advantage of unique functionality and performance of Arecont Vision cameras.
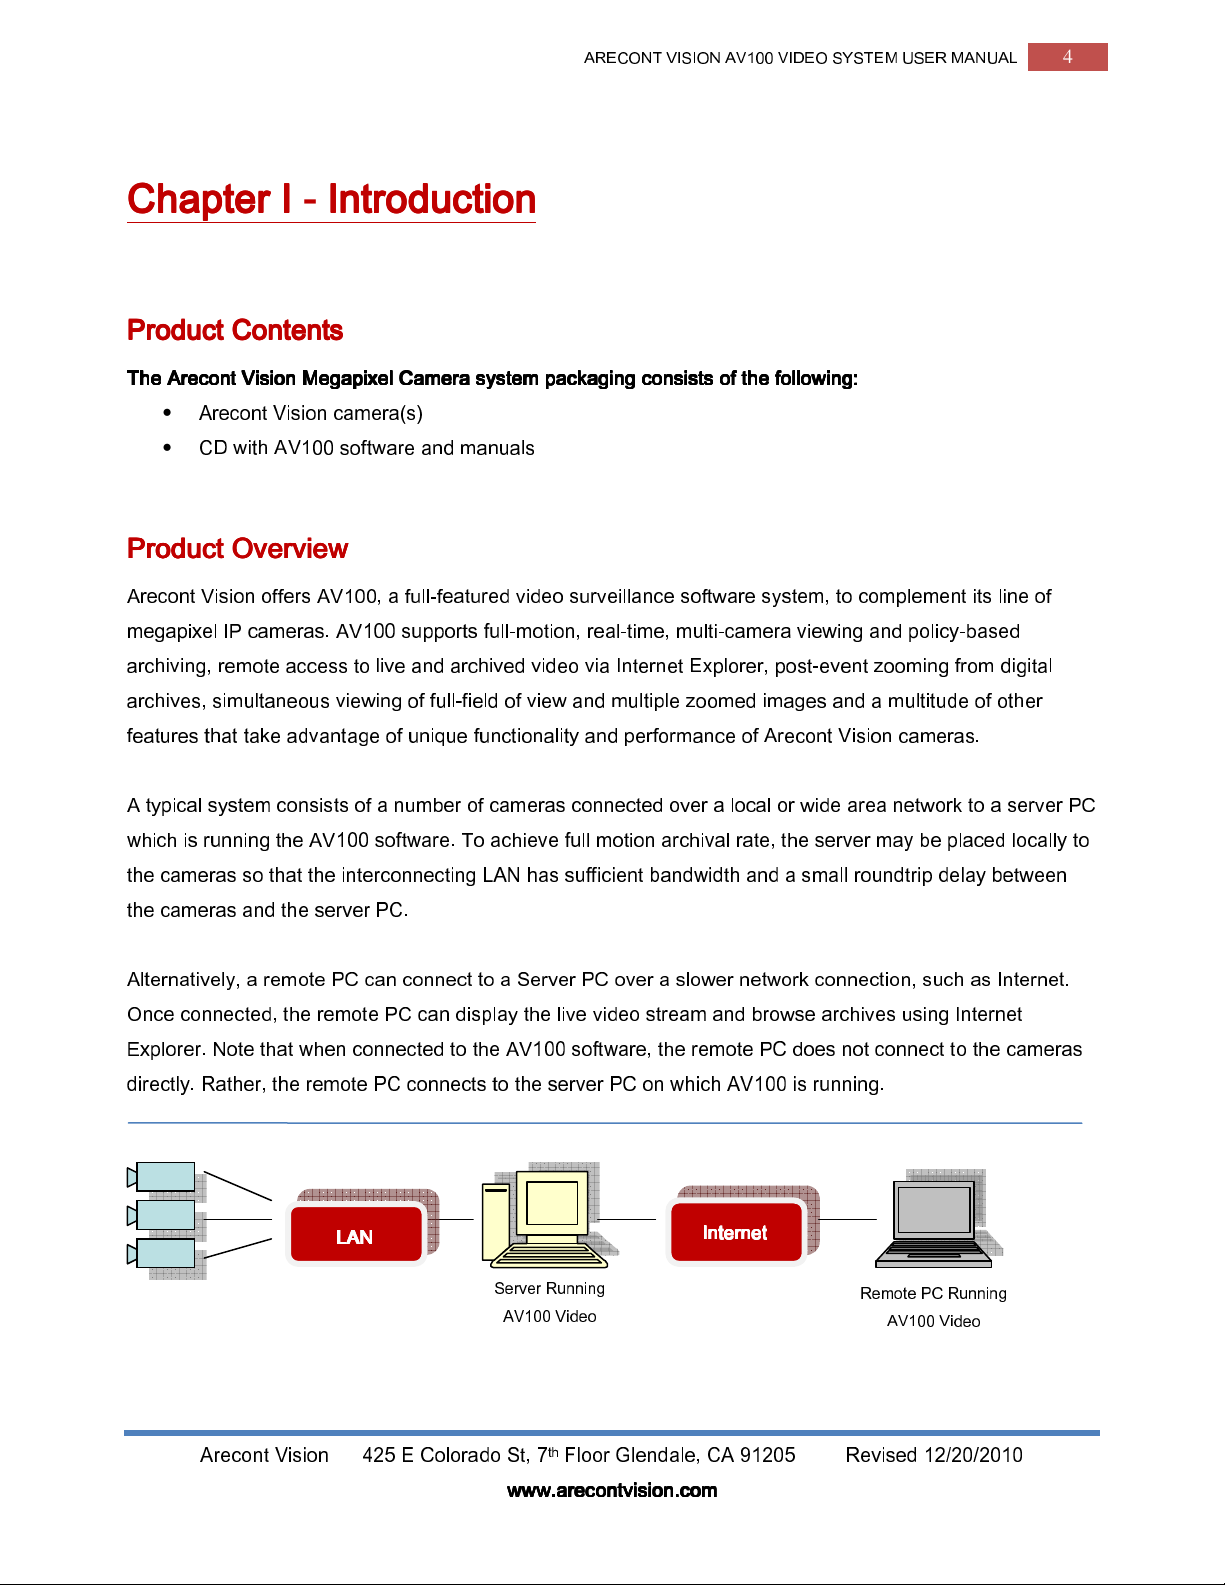
A typical system consists of a number of cameras connected over a local or wide area network to a server PC
which is running the AV100 software. To achieve full motion archival rate, the server may be placed locally to
the cameras so that the interconnecting LAN has sufficient bandwidth and a small roundtrip delay between
the cameras and the server PC.
Alternatively, a remote PC can connect to a Server PC over a slower network connection, such as Internet.
Once connected, the remote PC can display the live video stream and browse archives using Internet
Explorer. Note that when connected to the AV100 software, the remote PC does not connect to the cameras
directly. Rather, the remote PC connects to the server PC on which AV100 is running.
Figure1. System Configuration including a remote PC.
Internet
Internet
LAN
LAN
LANLAN
InternetInternet
Server Running
AV100 Video
Arecont Vision 425 E Colorado St, 7th Floor Glendale, CA 91205 Revised 12/20/2010
www.arecontvision.com
www.arecontvision.com
www.arecontvision.comwww.arecontvision.com
Remote PC Running
AV100 Video
Page 5
ARECONT VISION AV100 VIDEO SYSTEM USER MANUAL
Inspect the package and its contents for visible damage. If any components are damaged or missing, do not
use the unit; contact the supplier immediately. If you need to return the unit, you must ship it in the original
box.
Camera Reference
Camera Reference
Camera ReferenceCamera Reference
AV1300/1310/1305/1315/1355, AV2100/2110/2105/2155, AV2805/AV2815, AV3100/3110/3105/3155,
AV3130/AV3135, AV5100/5110/5105/5155, AV8180/8185, AV8360/8365, AV8360DN/8365DN and
AV10005 are megapixel resolution IP cameras capable of delivering crisp, low-noise images at video
frame rate.
AV1300/1310/1305/1315/1325/1355 is a 1.3-megapixel resolution camera with a maximum resolution of
1280 by 1024, achieving a maximum frame rate of 32 fps. AV1300 and AV1310 support MJPEG
compression only. AV1305, AV1315, AV1325 and 1355 support both MJPEG and H.264 (MPEG4 Part 10)
5
compression. AV1355 is a dome camera. AV1315 and AV1325 are f
standard and pass PSIA conformance tests.
AV2100/2110/2105/2155 is a 2-megapixel resolution camera with a maximum resolution of 1600 by 1200,
achieving a maximum frame rate of 24 fps. AV2100 and AV2110 support MJPEG compression only.
AV2105/2155 supports both MJPEG and H.264 (MPEG4 Part 10) compression. AV2155 is a dome
camera.
AV2805/2815/AV2825 is a 1080p resolution camera with a maximum resolution of 1920 by 1080,
achieving a maximum frame rate of 30 fps in AV2805 and 24 fps in AV2815 and AV2825.
AV2805/2815/AV2825 supports both MJPEG and H.264 (MPEG4 Part 10) compression.
AV2805/AV2815/AV2825 is f
tests.
AV3100/3110/3105/3155 is a 3-megapixel resolution camera with a maximum resolution is 2048 by 1536.
AV3100 is typically viewed at 1920 by 1200 resolution with a frame rate of up to 20 fps. AV3100 and
AV3110 support MJPEG compression only. AV3105 supports both MJPEG and H.264 (MPEG4 Part 10)
compression. AV3155 is a dome camera.
ully compatible with PSIA industry standard and passes PSIA conformance
ully compatible with PSIA industry
AV3130/3135 is a dual-sensor, day-night camera featuring a 3-megapixel color sensor paired with a 1.3-
megapixel monochrome sensor sensitive to near infrared illumination. When the scene is well illuminated
the 3-megapixel sensor is selected to deliver color images of up to 2048x1536 pixels. In low-light
conditions AV3130/3135 can automatically switch to the 1.3-megapixel (1280x1024) monochrome sensor,
enabling the delivery of clear imagery at illumination levels as low as 0.00 lux (infrared only).
Arecont Vision 425 E Colorado St, 7th Floor Glendale, CA 91205 Revised 12/20/2010
www.arecontvision.com
www.arecontvision.com
www.arecontvision.comwww.arecontvision.com
Page 6

ARECONT VISION AV100 VIDEO SYSTEM USER MANUAL
6
AV3130/3135 typically delivers 20 fps in day mode at 1920x1200 and over 30 fps in night mode. AV3135
supports both MJPEG and H.264 (MPEG4 Part 10) compression.
AV5100/5110/5105/5155 is a 5-megapixel resolution camera. Its maximum resolution is 2592 by 1944.
AV5100 is typically viewed at 2560 by 1600 resolution with the frame rate up to 12 fps. AV5100 and
AV5110 support MJPEG compression only. AV5105/5155 supports both MJPEG and H.264 (MPEG4
Part 10) compression. AV5155 is a dome camera.
AV8180/8185/AV8185DN is a quad-sensor 8-megapixel camera consisting of four 2-megapixel sensors
operating at up to 22 fps at 1600 by 1200 resolution. It is capable of providing 180 degree field of view.
AV8185 and AV8185DN support both MJPEG and H.264 (MPEG4 Part 10) compression. AV8180
supports MJPEG only.
AV8360/8365/AV8365DN is a quad-sensor 8-megapixel panoramic camera consisting of four 2-
megapixel sensors and operating at up to 22 fps at 1600 by 1200 resolution. It is capable of providing 360
degree field of view. AV8365 and AV8185DN support both MJPEG and H.264 (MPEG4 Part 10)
compression. AV8360 supports MJPEG only.
AV10005 is the first 10Megapixel / 1080P dual mode camera in the world and supports both MJPEG and
H.264 (MPEG4 Part 10) compression. AV10005 in 10Megapixel mode is viewed at 3648x2752 with the
frame rate up to 6fps; AV10005 in 1080p mode is viewed at 1920x1080 with frame rate up to 30fps.
AV10005 has binning technique to improve low light performance, increase sensitivity and produce better
SNR by combining and averaging pixels. AV10005 is f
pass PSIA conformance tests.
ully compatible with PSIA industry standard and
All cameras are equipped with a LAN connector and can deliver image data at a maximum data rate of up
to 55 Mbps and 70Mbps (AV10005 only). Images are sent over the network using TFTP, HTTP and
RTSP/RTP (available for H.264 camera models only) protocols.
All cameras feature:
All cameras feature:
All cameras feature:All cameras feature:
•
Automatic Exposure (AE) and Gain (AGC) control
•
Automatic backlight compensation
•
Automatic multi-matrix white balance
•
50/60Hz selectable flicker control
•
Electronic Zoom, Pan and Tilt (PTZ)
•
Programmable brightness, saturation, gamma, sharpness, windowing and decimation
•
Simultaneous delivery of full-field view and zoomed images at video frame rate
Arecont Vision 425 E Colorado St, 7th Floor Glendale, CA 91205 Revised 12/20/2010
www.arecontvision.com
www.arecontvision.com
www.arecontvision.comwww.arecontvision.com
Page 7
•
Multi-streaming: 8 non-identical streams
•
Electronic image rotation by 180 degrees
•
Regions of interest windowing down to 32x32 pixel window
•
Resolution windowing down to 1x1 pixels for JPEG and 2x2 pixels for H.264
(AV1315/AV1325/AV2815/AV2825/AV10005 only)
•
Programmable motion blur control for low-light mode
•
Moonlight mode – extended exposure and noise cancellation
•
Up to four regions of interest simultaneously for panoramic and digital PTZ view
•
On board motion detection with 64 detection zones
•
Optional auto iris
•
Optional day/night IR switching filter
Server
Server Requirements
ServerServer
Requirements
RequirementsRequirements
ARECONT VISION AV100 VIDEO SYSTEM USER MANUAL
7
We recommend a dedicated PC to receive the image streams from cameras for archiving and display. The
suggested minimum computer requirements are detailed for standard and high performance installations.
Standard
Standard PPPPerformance
StandardStandard
Minimal Requirement, for low
Minimal Requirement, for low----to
Minimal Requirement, for lowMinimal Requirement, for low
•
CPU: Core 2 Duo 2Ghz
•
RAM: 2 GB
•
Video Card: NVIDIA, 128 MB RAM
•
Network card: 100 base-T
•
OS: Windows XP
•
Storage Space: use storage/bandwidth calculator
Recommended Requirement, for
Recommended Requirement, for medium
Recommended Requirement, for Recommended Requirement, for
•
CPU: Core 2 Quad 2Ghz
•
RAM: 4 GB
•
Video Card: NVIDIA, 512 MB RAM
•
Network card: 1000 base-T
erformance
erformanceerformance
to----medium system load
toto
medium system load
medium system loadmedium system load
medium----to
mediummedium
to----high system load
high system load
toto
high system loadhigh system load
•
OS: Windows XP
•
Storage Space: use storage/bandwidth calculator
A PC with a single, slower CPU is sufficient in the case when images are to be archived, but not viewed live.
HDD size depends according to the desired capacity of the video archives (approximately 200Kbytes/image).
As an example, two 400GB drives will yield approximately 6 days of archiving capacity for an 8 camera
Arecont Vision 425 E Colorado St, 7th Floor Glendale, CA 91205 Revised 12/20/2010
www.arecontvision.com
www.arecontvision.com
www.arecontvision.comwww.arecontvision.com
Page 8
ARECONT VISION AV100 VIDEO SYSTEM USER MANUAL
8
system recording at 1 frame per second in JPEG mode, or over 30 days recording in h.264 mode.
Recommended Accessories
Recommended Accessories
Recommended AccessoriesRecommended Accessories
We
We tested
tested the following
WeWe
testedtested
Please note that the AV100 software requires a resolution of 1600x1200 or greater in order to properly
display all the on screen menus.
Accessing
Accessing Arecont Vision camera
Accessing Accessing
Arecont Vision camera
Arecont Vision cameras can be accessed and controlled by means of
Arecont Vision cameraArecont Vision camera
the following monitors
the following the following
•
Dell UltraSharp 2405FPW
24-inch Wide Aspect Flat Panel LCD Monitor with Height Adjustable Stand
(
www.dell.com
www.dell.com
www.dell.comwww.dell.com
•
Samsung’s 243T, 24 Inch LCD Display (
Arecont Vision camerassss
Arecont Vision cameraArecont Vision camera
•
AV100 Video System software
•
Third-party software utilizing Arecont Vision SDK (Software Development Kit). A list of compatible
monitors::::
monitorsmonitors
)
www.samsung.com
www.samsung.com
www.samsung.comwww.samsung.com
s can be accessed and controlled by means of::::
s can be accessed and controlled by means ofs can be accessed and controlled by means of
)
third-party software is available at our website
•
HTTP requests issued from Microsoft Internet Explorer, Mozilla Firefox, other web browsers and
third party HTTP software
•
RTSP/RTP-capable media players, such as Apple QuickTime, VLC or other third party RTSP/RTP
software (for camera models supporting H.264 compression).
www.arecontvision.com
www.arecontvision.com
www.arecontvision.comwww.arecontvision.com
.
Arecont Vision 425 E Colorado St, 7th Floor Glendale, CA 91205 Revised 12/20/2010
www.arecontvision.com
www.arecontvision.com
www.arecontvision.comwww.arecontvision.com
Page 9
ARECONT VISION AV100 VIDEO SYSTEM USER MANUAL
Chapter
Chapter II
Chapter Chapter
Software I
Software Installation
Software ISoftware I
To install AV100
To install AV100 video surveillance
To install AV100 To install AV100
1. Make sure your Windows XP/Vista/Windows 7 account has Administrative privileges.
2. Open “Control Panel\Add or Remove Programs” for Windows XP or “Control
3. Turn off all Anti-Virus Software and Windows Firewall.
4. Run Setup.exe and follow the directions to complete the installation.
5. Under Windows Vista, users must navigate to the installation directory, then open
II ---- AV100
AV100 Video Surveillance
IIII
AV100 AV100
nstallation
nstallationnstallation
video surveillance software:
video surveillance video surveillance
Panel\Programs\Uninstall Programs” for Windows Vista and Windows 7, remove old versions of
AV100 Video System software if any. There may be issues installing a newer version of AV100 over
an older version so make sure any older versions are removed prior to installing the newest version.
C:\ProgramFile\ArecontVision\VideoSurveillance\AVInstaller.exe (type choose Application).
Video Surveillance SSSSoftware
Video Surveillance Video Surveillance
software:
software:software:
oftware
oftwareoftware
9
Right-click on this file named “AVInstaller.exe”, choose “Properties -> Compatibility -> Privilege Level”
and enable the “Run this program as an administrator” option.
The setup process installs the software and places a shortcut “Arecont Vision Application Manager” on the
desktop and creates a group named “Arecont Vision/AV Video System” in the Start menu.
Configure Firewall
Configure Firewall
Configure FirewallConfigure Firewall
As you start AV applications, your PC may prompt you to permit access to the network.
AV
AV100
100 Video System includes
AVAV
Both executables are located in the AV100 installation folder. You should grant access to these two
applications when the firewall prompts you.
Video System includes below
100100
Video System includesVideo System includes
•
AVInstaller.exe: the camera finding and installation program
•
LocalMachine.exe: the viewing and archiving program
below applications that need access to the network
applications that need access to the network
belowbelow
applications that need access to the networkapplications that need access to the network
:
Arecont Vision 425 E Colorado St, 7th Floor Glendale, CA 91205 Revised 12/20/2010
www.arecontvision.com
www.arecontvision.com
www.arecontvision.comwww.arecontvision.com
Page 10
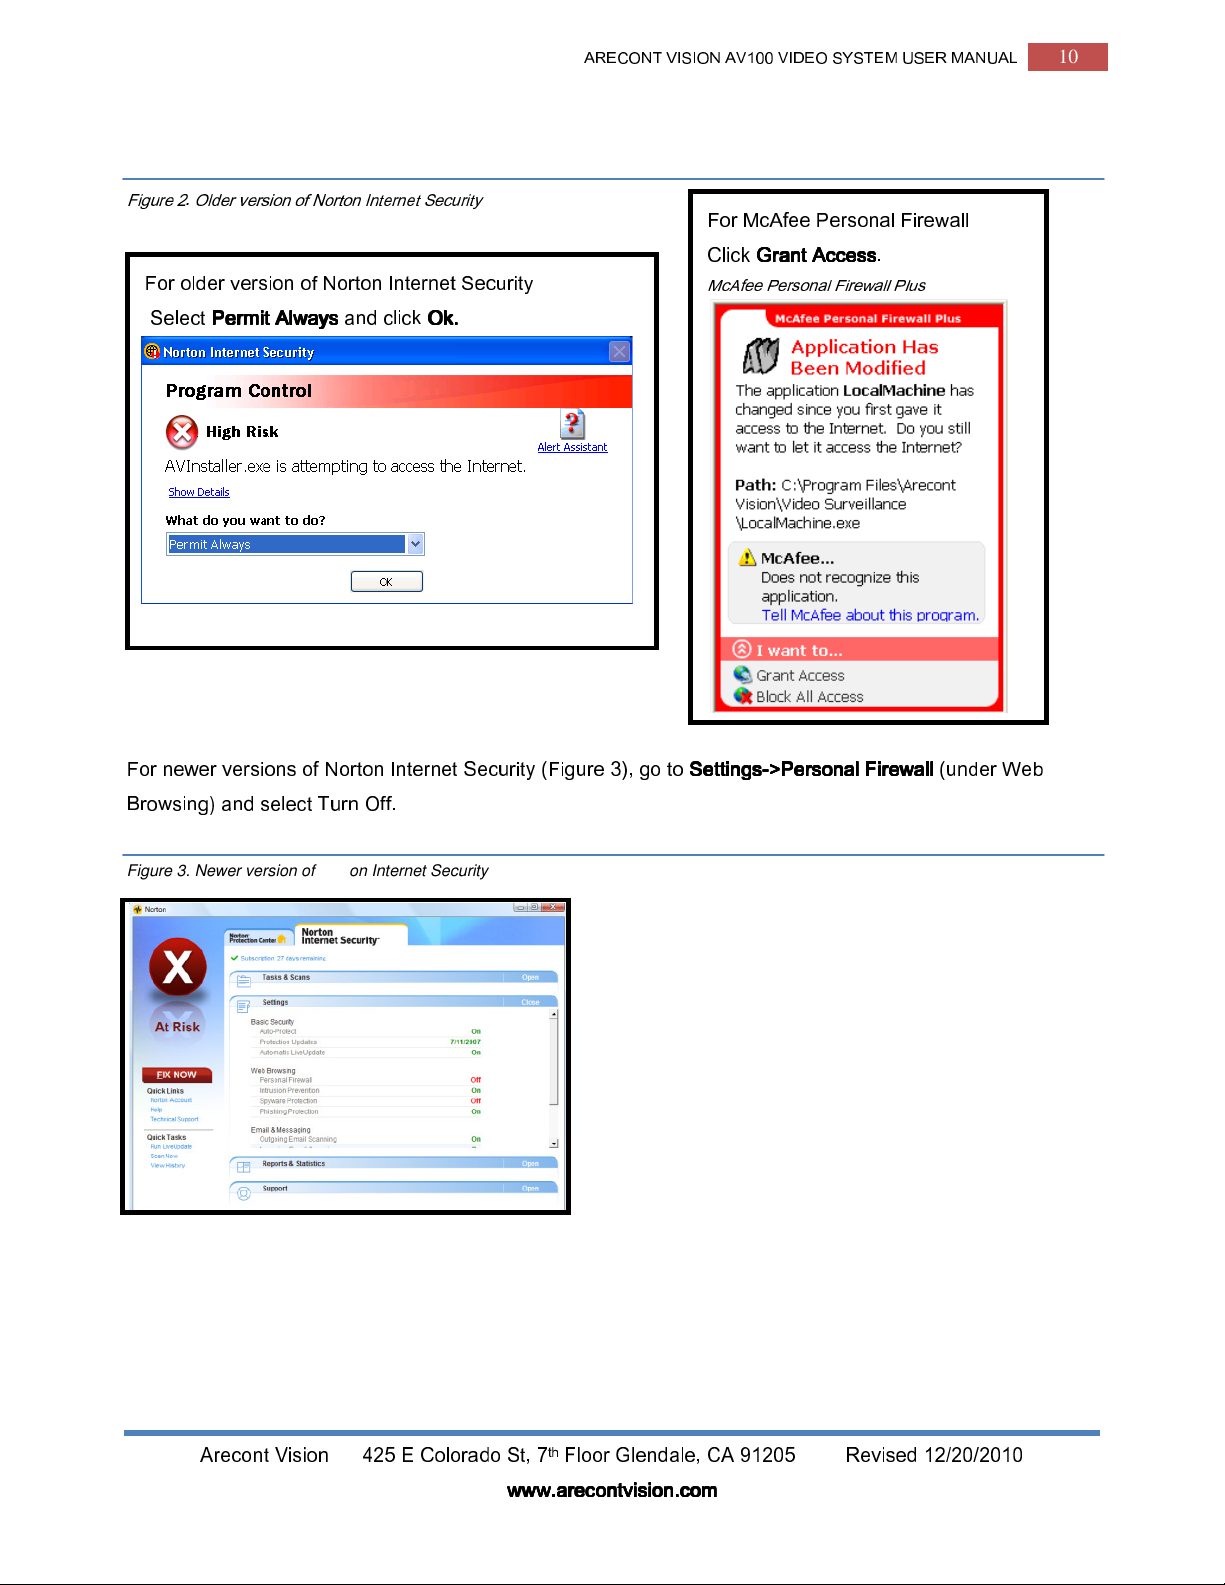
Figure 2. Older version of Norton Internet Security
For older version of Norton Internet Security
Select
Permit Always
Permit Always
Permit Always Permit Always
and click
Ok.
Ok.
Ok.Ok.
ARECONT VISION AV100 VIDEO SYSTEM USER MANUAL
For McAfee Personal Firewall
Click
Grant Access
Grant Access
Grant AccessGrant Access
McAfee Personal Firewall Plus
.
10
For newer versions of Norton Internet Security (Figure 3), go to
Browsing) and select Turn Off.
Figure 3. Newer version of Norton Internet Security
Settings
Settings---->Personal Firewall
SettingsSettings
>Personal Firewall
>Personal Firewall>Personal Firewall
(under Web
Arecont Vision 425 E Colorado St, 7th Floor Glendale, CA 91205 Revised 12/20/2010
www.arecontvision.com
www.arecontvision.com
www.arecontvision.comwww.arecontvision.com
Page 11
ARECONT VISION AV100 VIDEO SYSTEM USER MANUAL
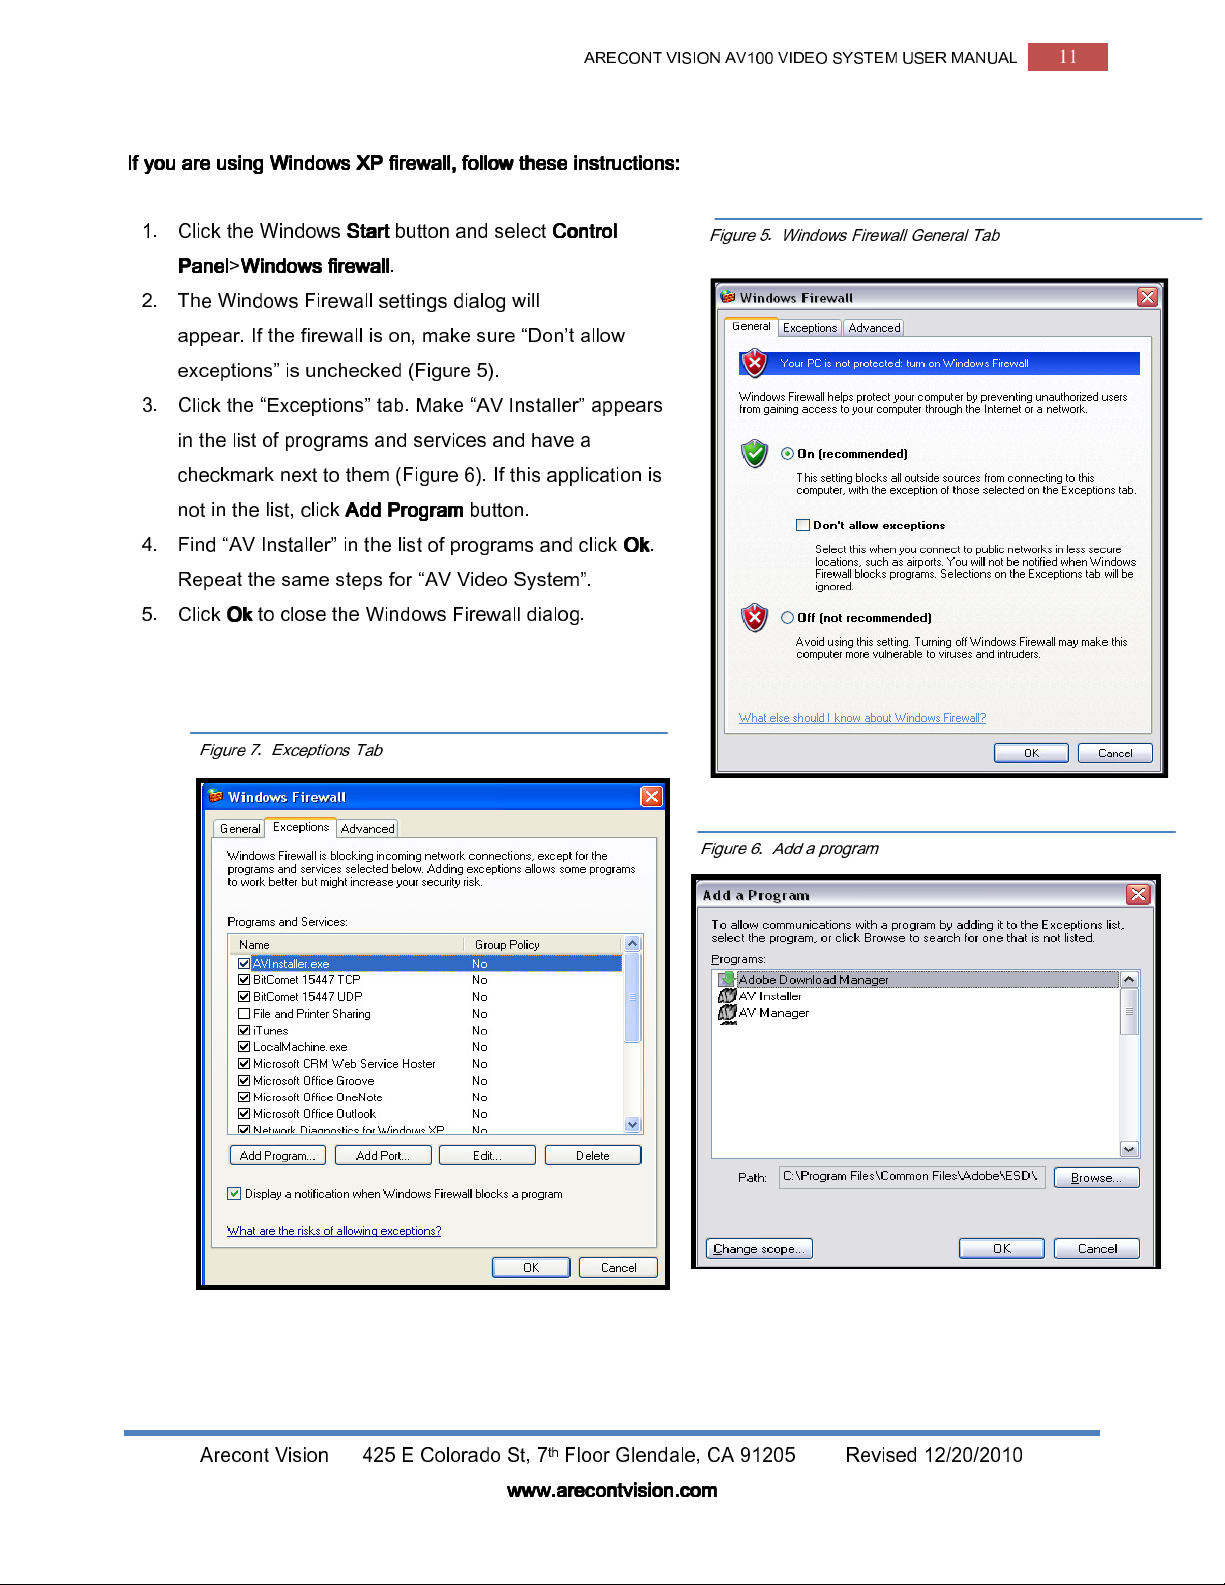
If you are using Windows XP firewall, follow these instructions:
If you are using Windows XP firewall, follow these instructions:
If you are using Windows XP firewall, follow these instructions:If you are using Windows XP firewall, follow these instructions:
11
1. Click the Windows
Panel
Panel>Windows firewall
PanelPanel
2. The Windows Firewall settings dialog will
appear. If the firewall is on, make sure “Don’t allow
exceptions” is unchecked (Figure 5).
3. Click the “Exceptions” tab. Make “AV Installer” appears
in the list of programs and services and have a
checkmark next to them (Figure 6). If this application is
not in the list, click
4. Find “AV Installer” in the list of programs and click
Windows firewall
Windows firewallWindows firewall
Start
Start
button and select
StartStart
.
Add Program
Add Program
Add ProgramAdd Program
button.
Control
Control
Control Control
Repeat the same steps for “AV Video System”.
5. Click
Ok
Ok
to close the Windows Firewall dialog.
OkOk
Figure 7. Exceptions Tab
Ok
Ok
OkOk
Figure 5. Windows Firewall General Tab
.
Figure 6. Add a program
Arecont Vision 425 E Colorado St, 7th Floor Glendale, CA 91205 Revised 12/20/2010
www.arecontvision.com
www.arecontvision.com
www.arecontvision.comwww.arecontvision.com
Page 12
ARECONT VISION AV100 VIDEO SYSTEM USER MANUAL
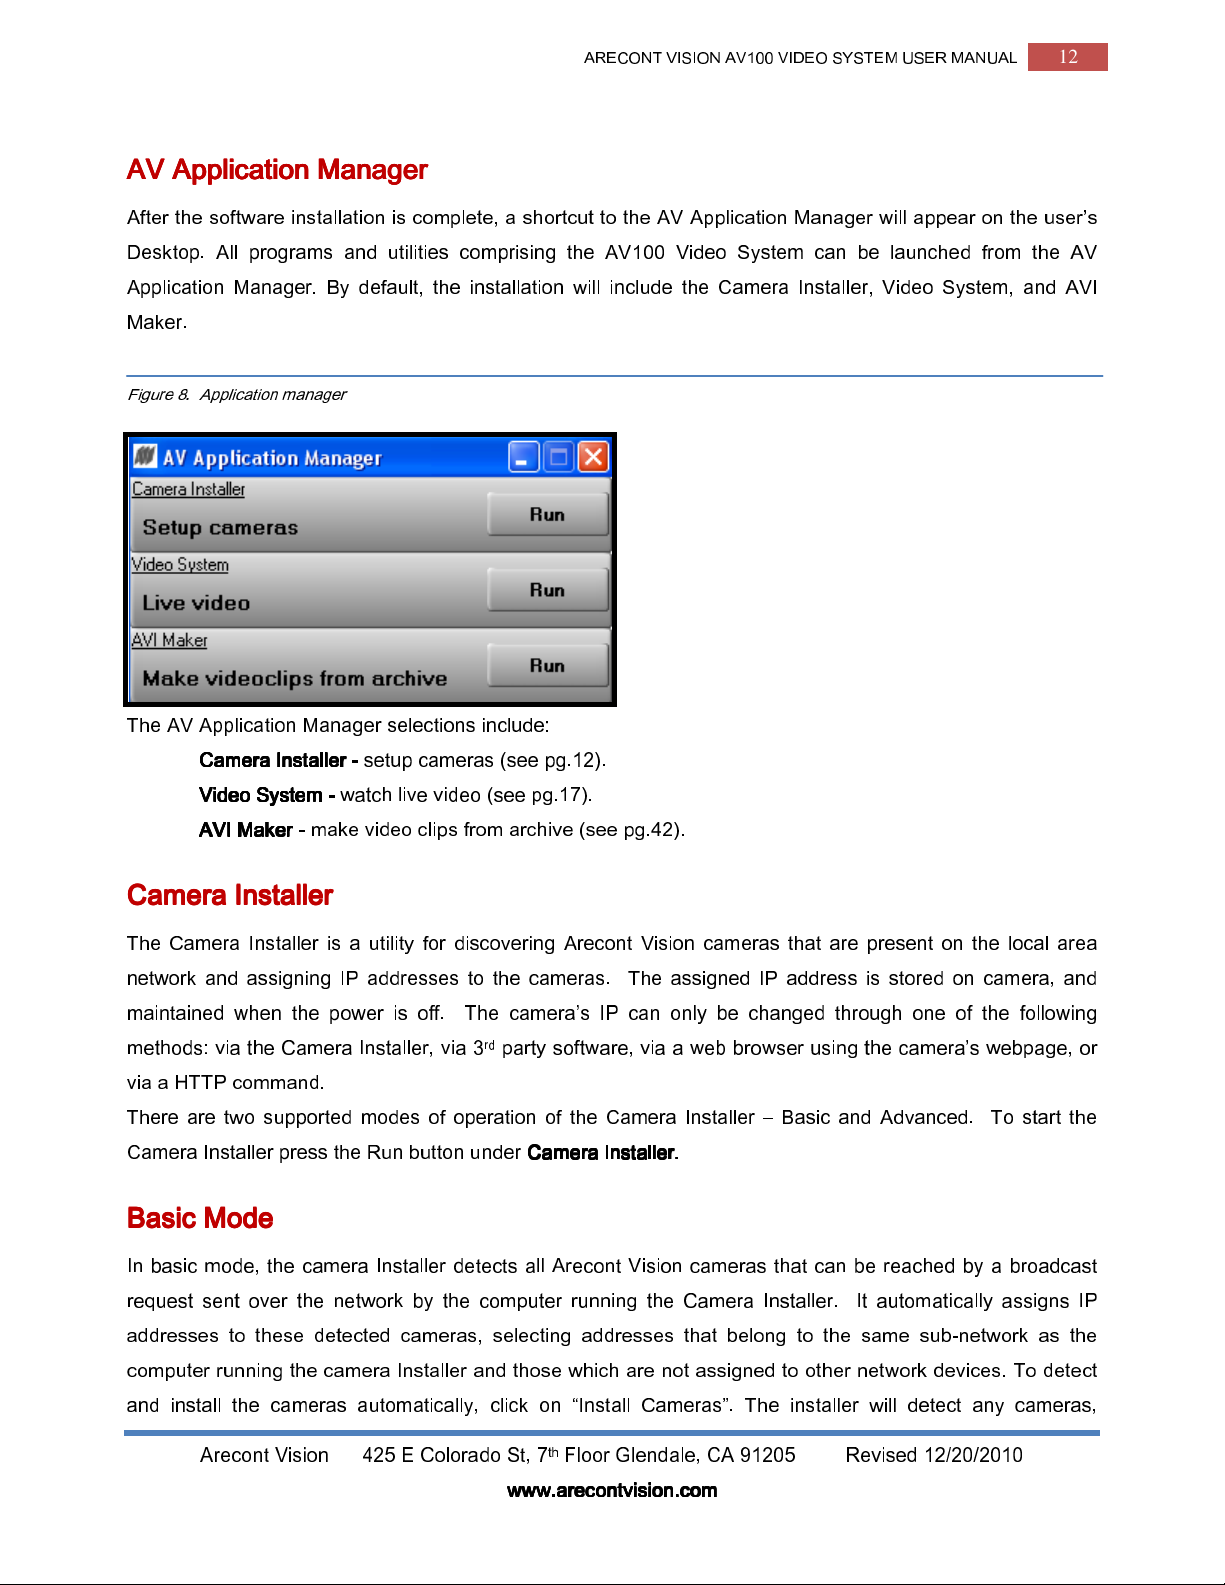
AV Application Manager
AV Application Manager
AV Application ManagerAV Application Manager
After the software installation is complete, a shortcut to the AV Application Manager will appear on the user’s
Desktop. All programs and utilities comprising the AV100 Video System can be launched from the AV
Application Manager. By default, the installation will include the Camera Installer, Video System, and AVI
Maker.
12
Figure 8. Application manager
The AV Application Manager selections include:
Video
Camera Installer
Camera Installer
Camera Installer Camera Installer
The Camera Installer is a utility for discovering Arecont Vision cameras that are present on the local area
network and assigning IP addresses to the cameras. The assigned IP address is stored on camera, and
maintained when the power is off. The camera’s IP can only be changed through one of the following
methods: via the Camera Installer, via 3rd party software, via a web browser using the camera’s webpage, or
via a HTTP command.
There are two supported modes of operation of the Camera Installer – Basic and Advanced. To start the
Camera Installer press the Run button under
Basic Mode
Basic Mode
Basic ModeBasic Mode
In basic mode, the camera Installer detects all Arecont Vision cameras that can be reached by a broadcast
Camera Installer
Camera Installer ----
Camera InstallerCamera Installer
Video System
System ----
Video Video
SystemSystem
AVI Make
AVI Makerrrr ----
AVI MakeAVI Make
watch live video (see pg.17).
make video clips from archive (see pg.42).
setup cameras (see pg.12).
Camera Installer.
Camera Installer.
Camera Installer.Camera Installer.
request sent over the network by the computer running the Camera Installer. It automatically assigns IP
addresses to these detected cameras, selecting addresses that belong to the same sub-network as the
computer running the camera Installer and those which are not assigned to other network devices. To detect
and install the cameras automatically, click on “Install Cameras”. The installer will detect any cameras,
Arecont Vision 425 E Colorado St, 7th Floor Glendale, CA 91205 Revised 12/20/2010
www.arecontvision.com
www.arecontvision.com
www.arecontvision.comwww.arecontvision.com
Page 13
ARECONT VISION AV100 VIDEO SYSTEM USER MANUAL
13
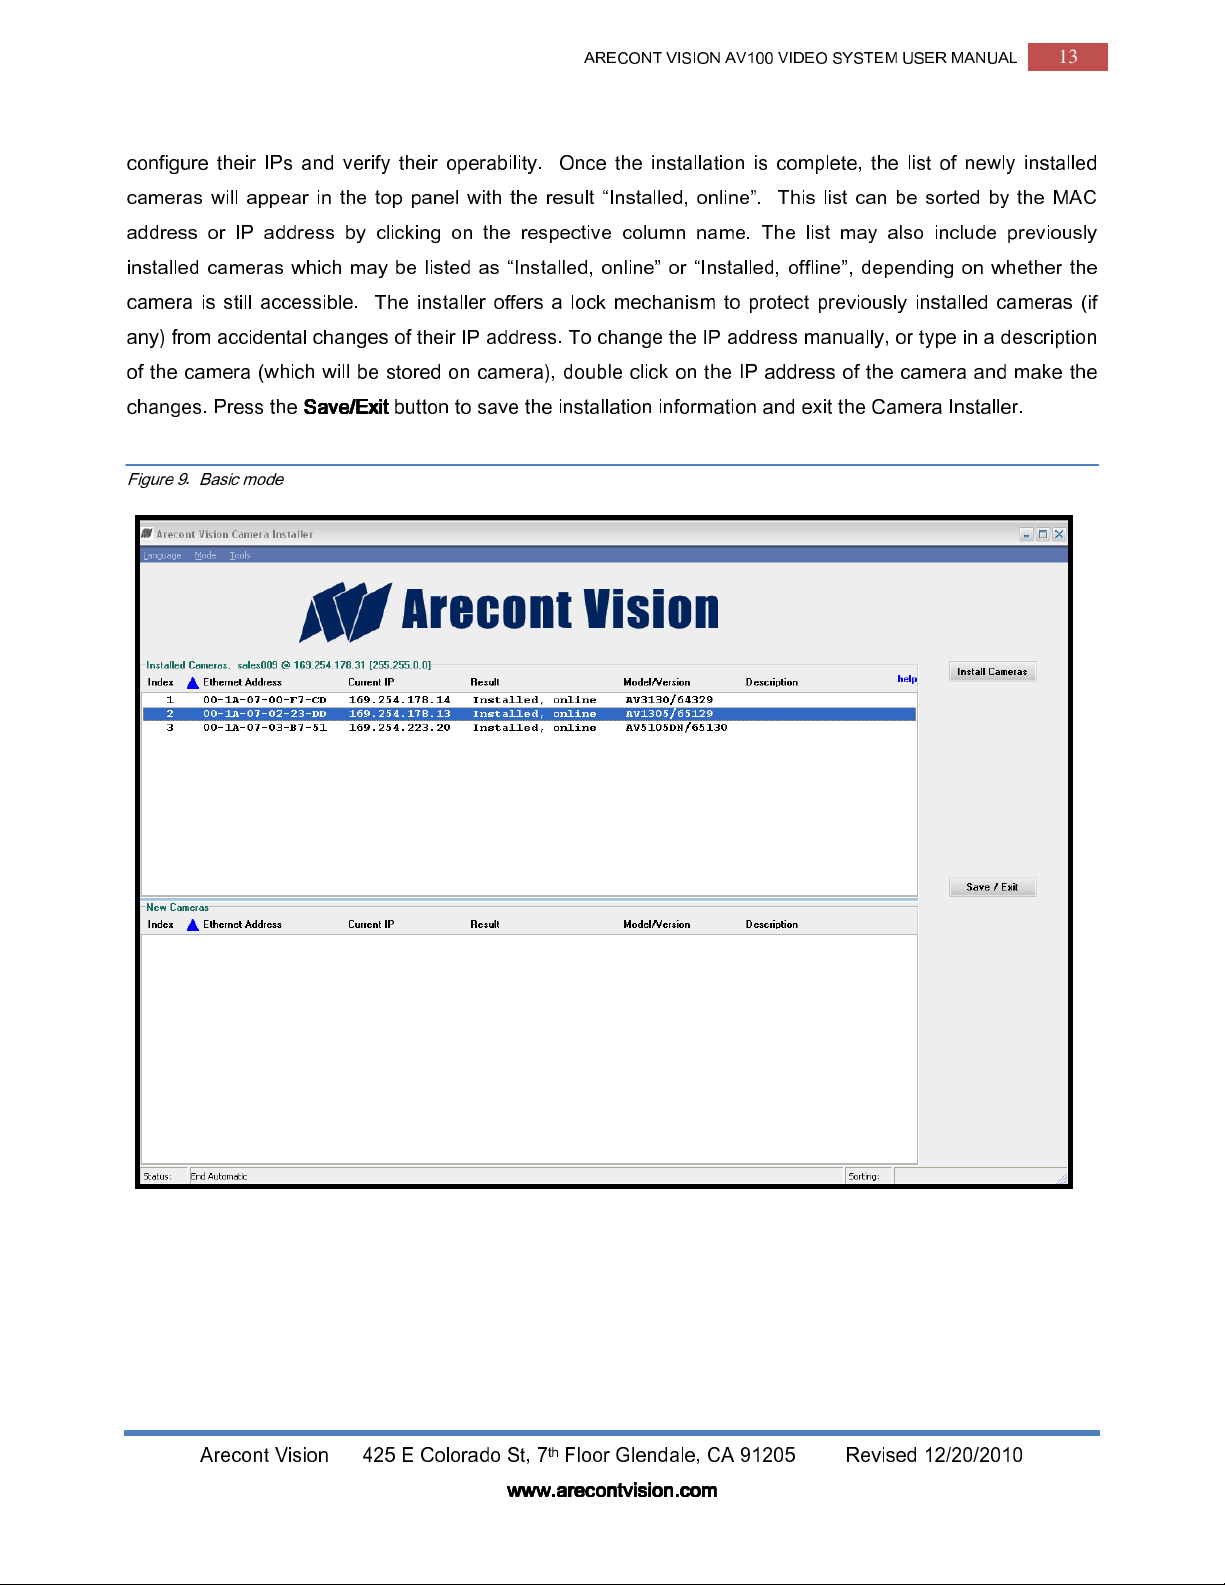
configure their IPs and verify their operability. Once the installation is complete, the list of newly installed
cameras will appear in the top panel with the result “Installed, online”. This list can be sorted by the MAC
address or IP address by clicking on the respective column name. The list may also include previously
installed cameras which may be listed as “Installed, online” or “Installed, offline”, depending on whether the
camera is still accessible. The installer offers a lock mechanism to protect previously installed cameras (if
any) from accidental changes of their IP address. To change the IP address manually, or type in a description
of the camera (which will be stored on camera), double click on the IP address of the camera and make the
changes. Press the
Figure 9. Basic mode
Save/Exit
Save/Exit
Save/ExitSave/Exit
button to save the installation information and exit the Camera Installer.
Arecont Vision 425 E Colorado St, 7th Floor Glendale, CA 91205 Revised 12/20/2010
www.arecontvision.com
www.arecontvision.com
www.arecontvision.comwww.arecontvision.com
Page 14
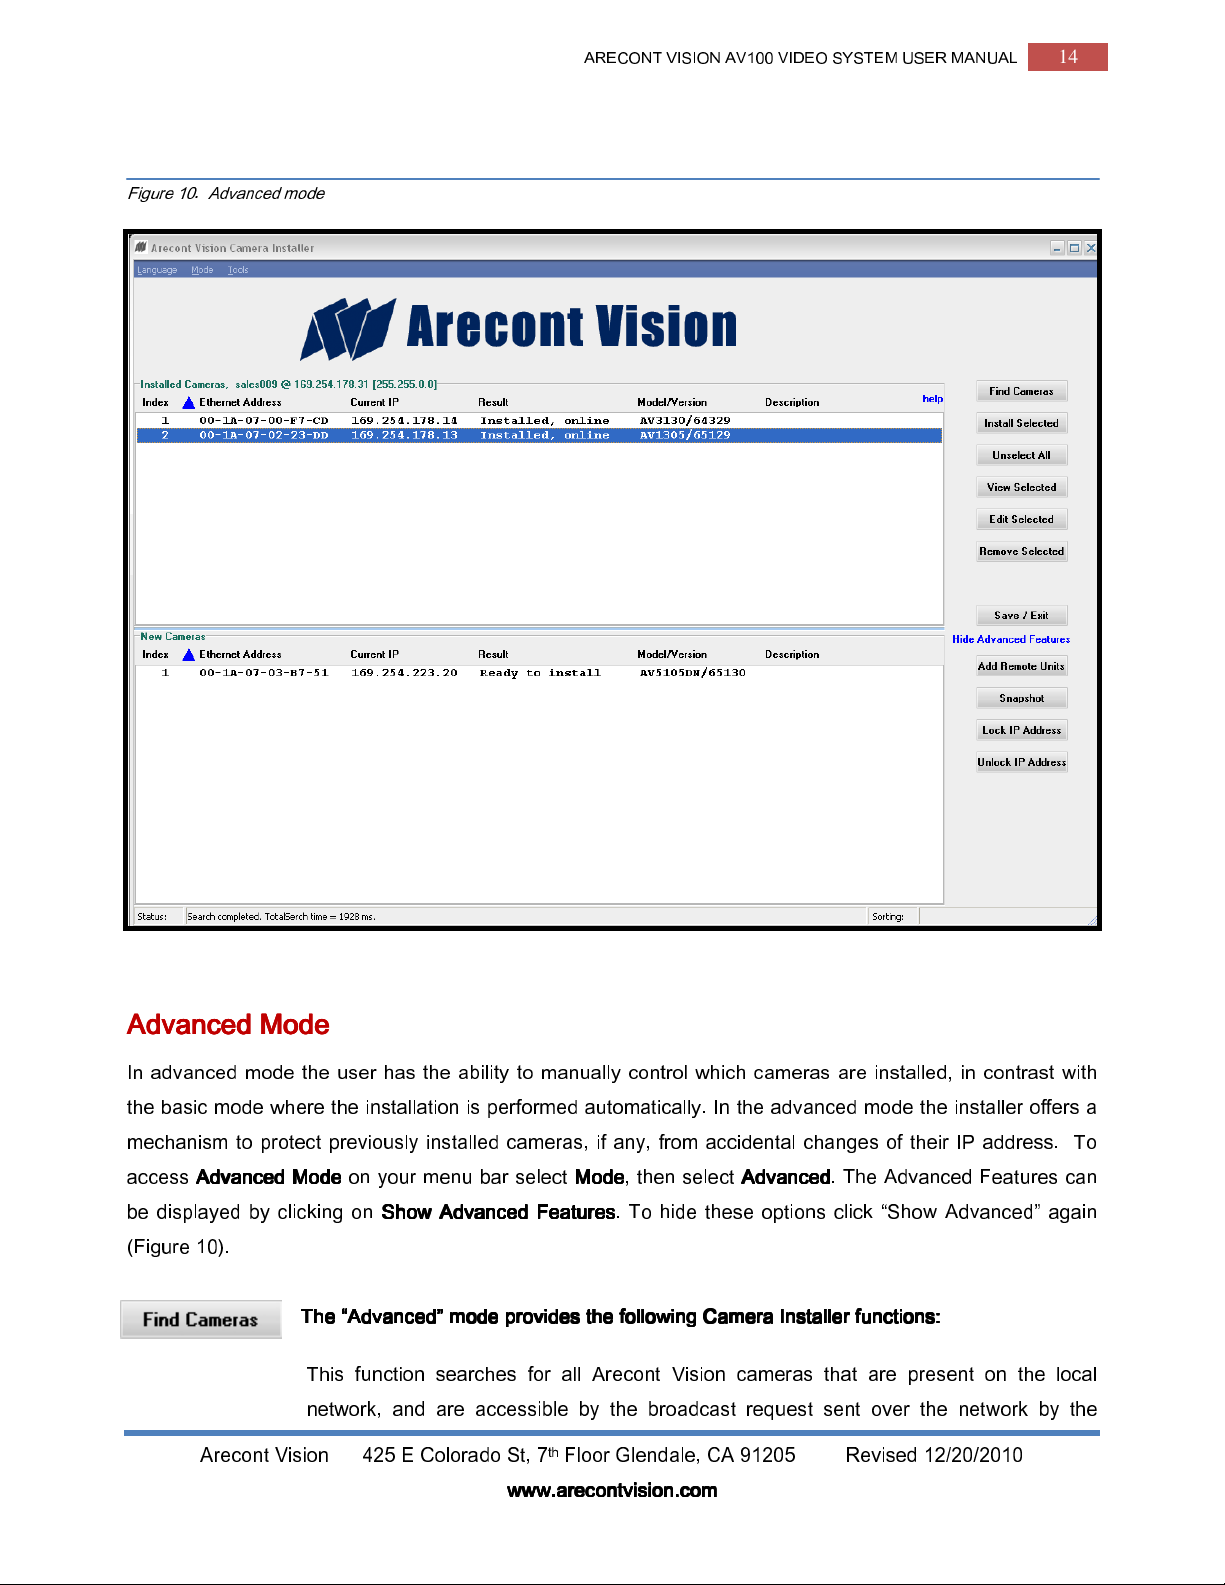
Figure 10. Advanced mode
ARECONT VISION AV100 VIDEO SYSTEM USER MANUAL
14
Advanced Mode
Advanced Mode
Advanced ModeAdvanced Mode
In advanced mode the user has the ability to manually control which cameras are installed, in contrast with
the basic mode where the installation is performed automatically. In the advanced mode the installer offers a
mechanism to protect previously installed cameras, if any, from accidental changes of their IP address. To
access
be displayed by clicking on
(Figure 10).
Advanced M
Advanced Mode
Advanced MAdvanced M
Arecont Vision 425 E Colorado St, 7th Floor Glendale, CA 91205 Revised 12/20/2010
ode
on your menu bar select
odeode
Show Advanced Features
Show Advanced Features
Show Advanced FeaturesShow Advanced Features
The “Advanced” mode provides the following
The “Advanced” mode provides the following Camera Installer
The “Advanced” mode provides the following The “Advanced” mode provides the following
This function searches for all Arecont Vision cameras that are present on the local
network, and are accessible by the broadcast request sent over the network by the
www.arecontvision.com
www.arecontvision.com
www.arecontvision.comwww.arecontvision.com
Mode
Mode
, then select
ModeMode
. To hide these options click “Show Advanced” again
Advanced
Advanced
AdvancedAdvanced
Camera Installer functions:
Camera InstallerCamera Installer
. The Advanced Features can
functions:
functions:functions:
Page 15
ARECONT VISION AV100 VIDEO SYSTEM USER MANUAL
Camera Installer. The top panel will list the previously installed cameras, if any, that may
be marked as “Installed, online” or “Installed, offline”; depending on whether the camera
is still accessible. The bottom panel will list any newly detected cameras that were not
previously installed, with the result “Ready to install”.
This function installs any cameras highlighted by the user in the bottom panel and
verifies their operation in a similar way to the Install Cameras function in Basic mode.
After the installation process is completed, the installed cameras will appear in the top
panel, while any cameras that were not highlighted will remain uninstalled in the bottom
panel. If no cameras were selected, the Installer will do nothing. The IP addresses of
the installed cameras in the top panel will not be changed during the installation of the
new cameras from the bottom panel. If the IP address of an installed camera was
changed by another computer on the network, the Installer will display red alert
message showing the previous and the changed IP address. Click “Save/Exit” to save
15
any newly installed cameras.
Undo selection of all highlighted cameras.
Opens a web-browser to view live video from the selected camera and configure the
camera settings using its webpage interface. This also allows for camera setting
configuration using the camera’s web page interface.
TIP:
TIP:
TIP: TIP:
same effect.
Opens an
camera description, which will then be stored in the camera’s memory.
TIP
TIP
TIPTIP
same effect.
Double-clicking the selected camera in “Result” or “Model/Version” column has the
Advanced
Advanced
AdvancedAdvanced
: Double-clicking the selected camera in “Current IP” or “Description” column has the
dialog to edit the selected camera’s IP address and/or type in
Uninstall the cameras highlighted in the top panel: the removed cameras will then
appear in the bottom panel. Press Save/Exit to save changes.
Saves the information about the installed cameras into a file “LocalMachine.ini” used by
AV100 Video System, and exports a plaintext list of cameras into a file “CameraList.txt”
Arecont Vision 425 E Colorado St, 7th Floor Glendale, CA 91205 Revised 12/20/2010
www.arecontvision.com
www.arecontvision.com
www.arecontvision.comwww.arecontvision.com
Page 16
ARECONT VISION AV100 VIDEO SYSTEM USER MANUAL
for third party software, then exits the Installer. These files are located by default in
“C:\Documents & Settings\All Users\Application Data\Video Application” in Windows XP
This option opens a dialog to add cameras manually. Remote units are cameras that
may not be present on the local area network or may not have been installed normally.
Users should use this feature only if the camera’s MAC and an available IP address is
known and connectivity has been verified.
Take snapshots for all installed cameras and display them. The displayed snapshots
can be saved or printed.
This option sets a lock on camera to protect its IP Address from being changed by the
Camera Installer or any other software, or manually, unless the lock is first removed. An
asterisk will appear next to the IP Address of any locked cameras. This option is
16
Tools
Tools
ToolsTools
available for firmware version 64116 or higher.
This option removes the lock set on camera as well as the asterisk next to the IP address.
An unlocked camera’s IP address can be then modified manually or by the camera
Installer, or any other software.
This option deletes .ini file which has camera settings saved in it.
This option opens command prompt window and disables firewall.
This option opens command prompt window and adds AV100 software to firewall
exceptions.
Arecont Vision 425 E Colorado St, 7th Floor Glendale, CA 91205 Revised 12/20/2010
www.arecontvision.com
www.arecontvision.com
www.arecontvision.comwww.arecontvision.com
Page 17
ARECONT VISION AV100 VIDEO SYSTEM USER MANUAL
Operating AV
Operating AV100
Operating AVOperating AV
Note: The AV100 Video System requires a license file for each Arecont Vision camera that is used for
archiving video. The license is tied to the unique MAC address of a particular camera. License files are
located in the C:\Program Files\Arecont Vision\Video Surveillance\license folder. However, for evaluation
purposes, AV100 will operate any number of Arecont Vision cameras without a license, displaying live video
with no archiving capabilities.
100 Vide
Videoooo System
100100
VideVide
System
System System
17
After the cameras are successfully installed, the AV100 Video System can be activated by clicking the
button next to
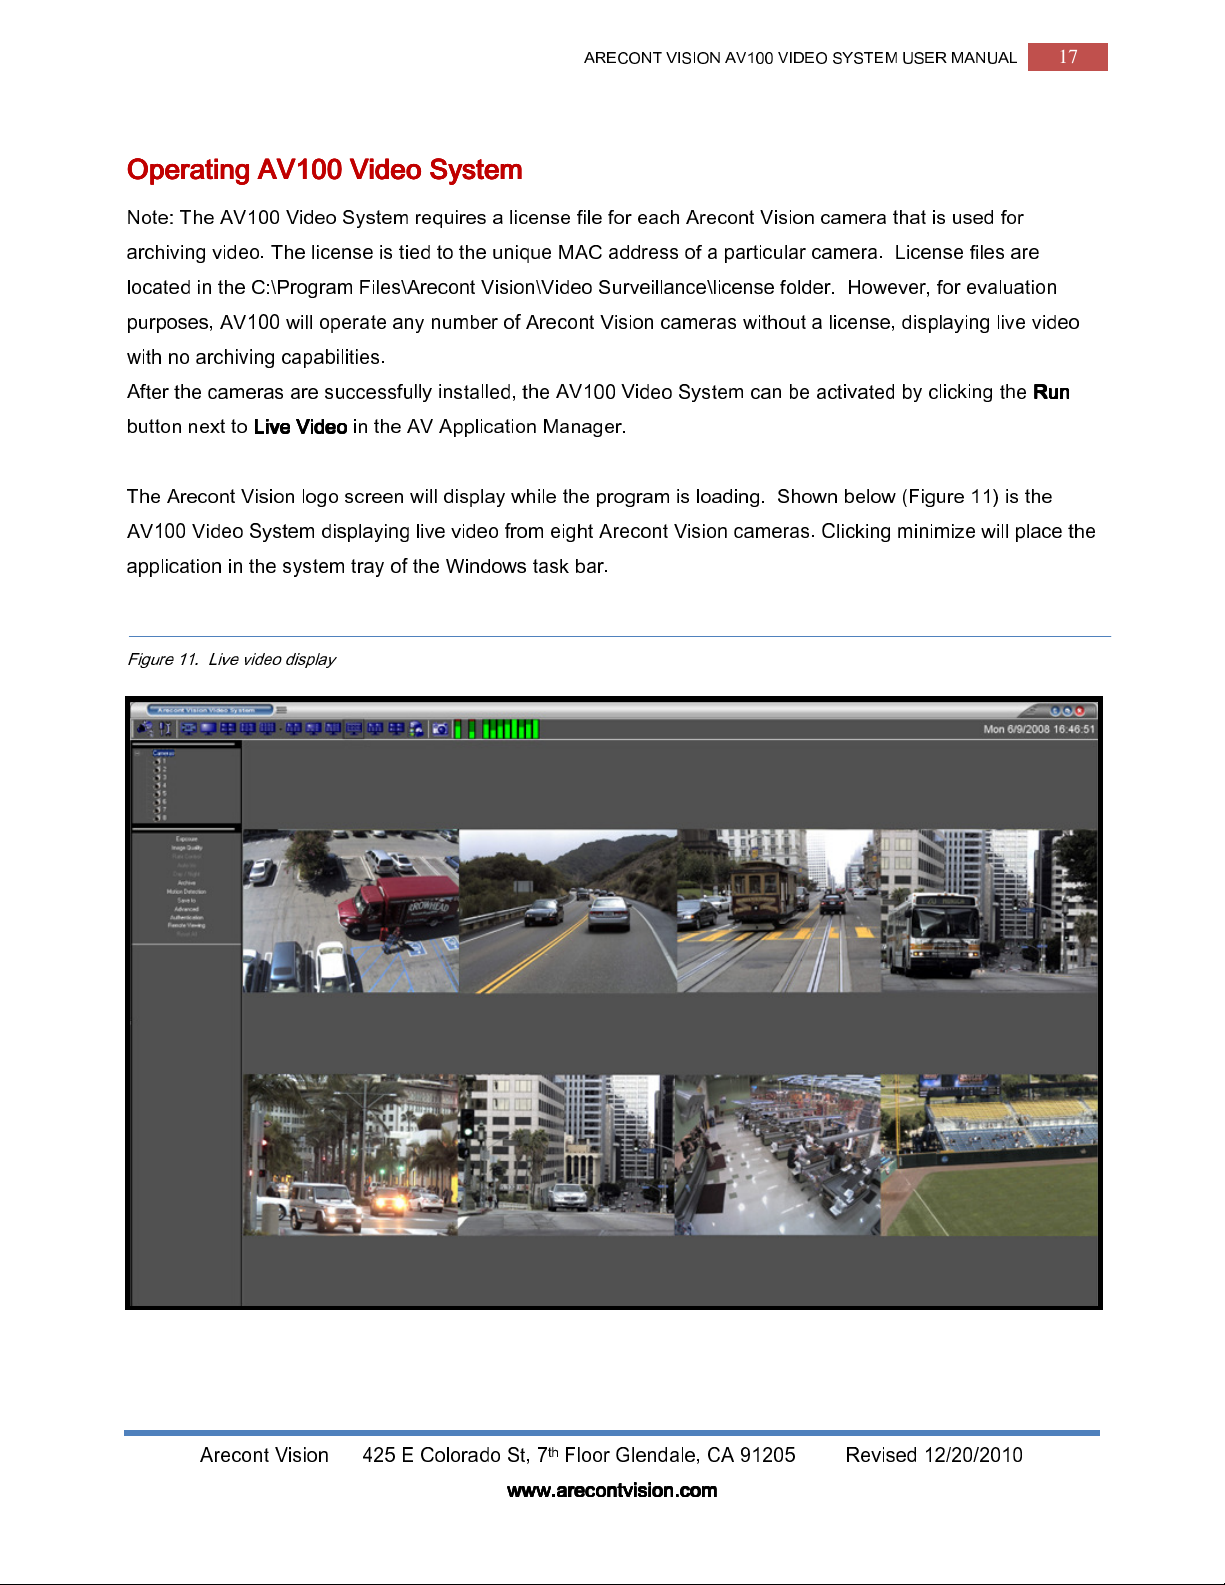
The Arecont Vision logo screen will display while the program is loading. Shown below (Figure 11) is the
AV100 Video System displaying live video from eight Arecont Vision cameras. Clicking minimize will place the
application in the system tray of the Windows task bar.
Figure 11. Live video display
Live V
Live Video
ideo
Live VLive V
ideo ideo
in the AV Application Manager.
Run
Run
RunRun
Arecont Vision 425 E Colorado St, 7th Floor Glendale, CA 91205 Revised 12/20/2010
www.arecontvision.com
www.arecontvision.com
www.arecontvision.comwww.arecontvision.com
Page 18
ARECONT VISION AV100 VIDEO SYSTEM USER MANUAL
Toolbar
Toolbar
ToolbarToolbar
The toolbar of the AV100 Video System is located in the upper portion of the screen above the video display
area. It contains the following icons:
Toggles a drop-down list of the installed cameras. Individual cameras are disabled / enabled by left
double-clicking on the camera number. When disabled, the live video image from the disabled
camera is replaced with a blue rectangle, and the camera number in the drop-down list is marked
with a red X.
Displays the Settings menu (see the Setting section on page 22).
18
Enables a full screen display without the toolbar and menus. Press escape or double click the
image to exit full screen mode.
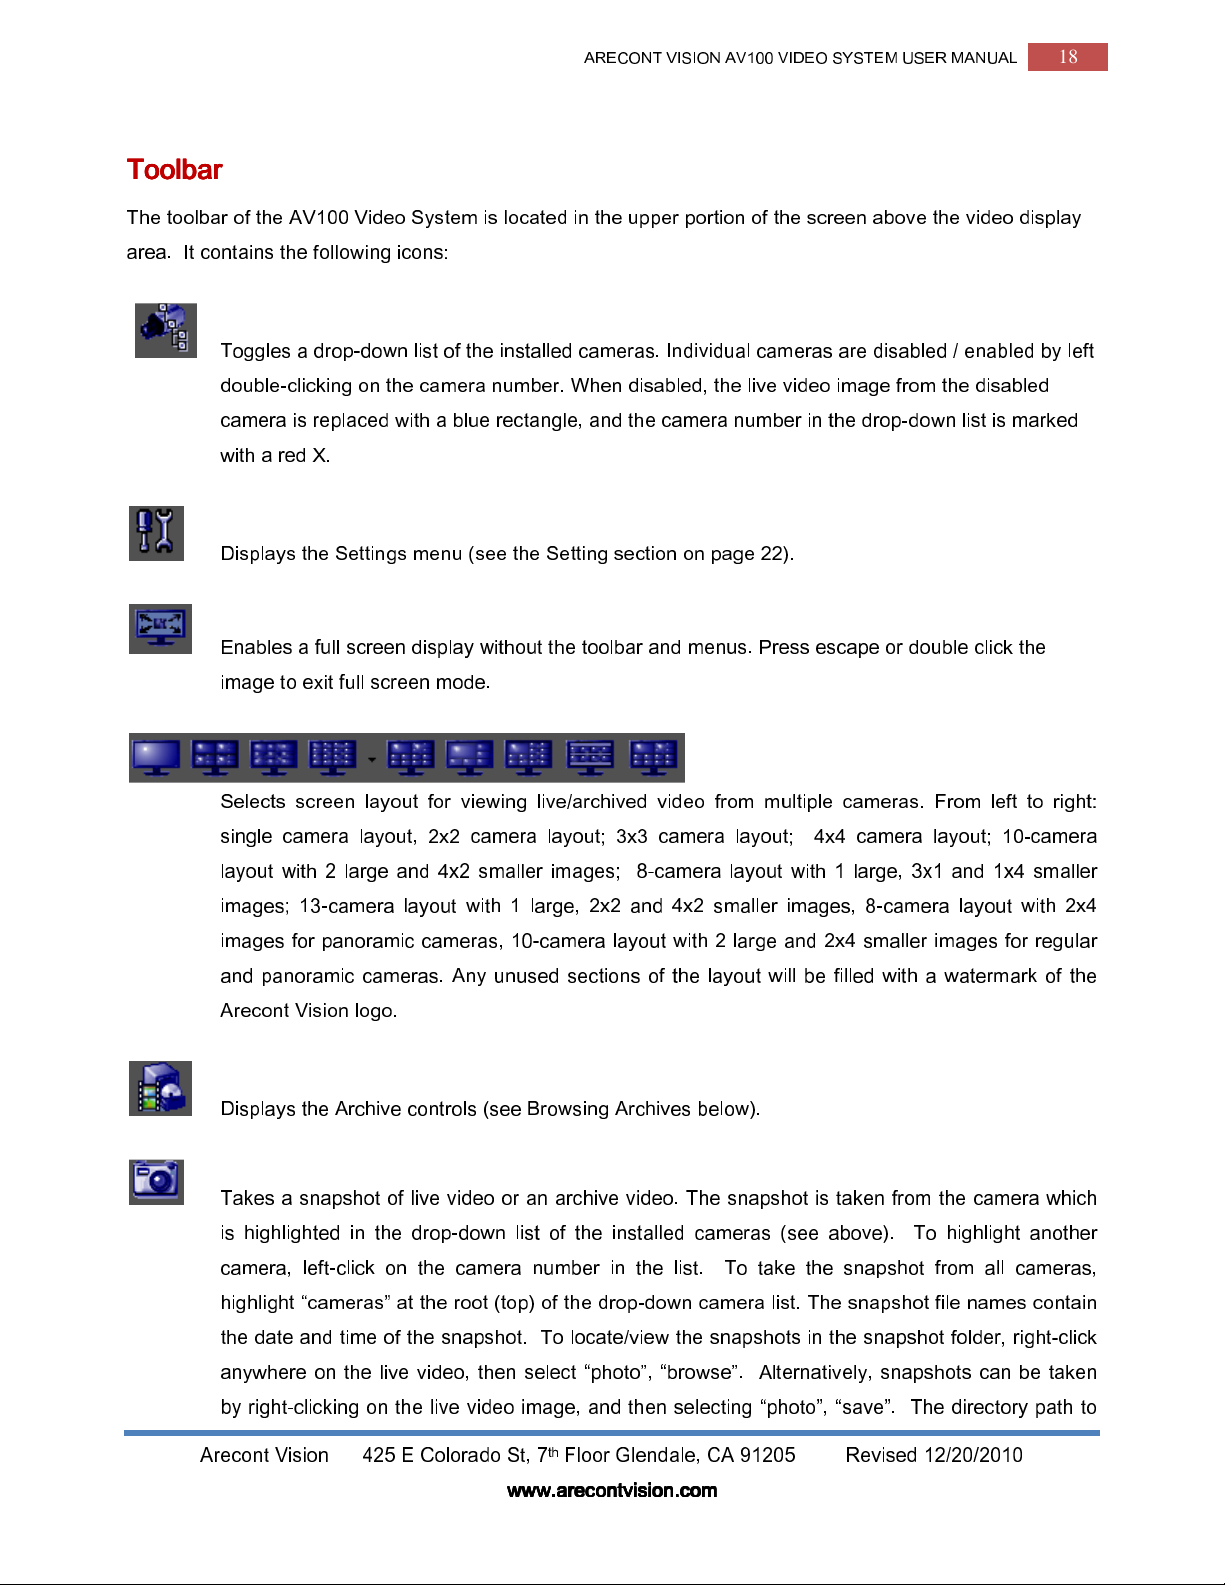
Selects screen layout for viewing live/archived video from multiple cameras. From left to right:
single camera layout, 2x2 camera layout; 3x3 camera layout; 4x4 camera layout; 10-camera
layout with 2 large and 4x2 smaller images; 8-camera layout with 1 large, 3x1 and 1x4 smaller
images; 13-camera layout with 1 large, 2x2 and 4x2 smaller images, 8-camera layout with 2x4
images for panoramic cameras, 10-camera layout with 2 large and 2x4 smaller images for regular
and panoramic cameras. Any unused sections of the layout will be filled with a watermark of the
Arecont Vision logo.
Displays the Archive controls (see Browsing Archives below).
Takes a snapshot of live video or an archive video. The snapshot is taken from the camera which
is highlighted in the drop-down list of the installed cameras (see above). To highlight another
camera, left-click on the camera number in the list. To take the snapshot from all cameras,
highlight “cameras” at the root (top) of the drop-down camera list. The snapshot file names contain
the date and time of the snapshot. To locate/view the snapshots in the snapshot folder, right-click
anywhere on the live video, then select “photo”, “browse”. Alternatively, snapshots can be taken
by right-clicking on the live video image, and then selecting “photo”, “save”. The directory path to
Arecont Vision 425 E Colorado St, 7th Floor Glendale, CA 91205 Revised 12/20/2010
www.arecontvision.com
www.arecontvision.com
www.arecontvision.comwww.arecontvision.com
Page 19

Settings
Settings
SettingsSettings
ARECONT VISION AV100 VIDEO SYSTEM USER MANUAL
the snapshot folder is specified in the Settings menu (see Settings), or using the Right-Click menu
under “Save To” (see Right-Click menu). By default, this is the directory C:\Documents and
Settings\(User Profile)\My Documents\My Pictures\Arecont Vision Photos.
Reports the current CPU usage and network usage. The first two LED bars on the left show the
CPU usage and total network usage, respectively. The rest of LED bars show the network usage
for each camera. The displayed values are relative to the camera which uses the most bandwidth,
displayed as 100% usage.
19
The settings menu (Figure 13) is displayed by clicking on the Settings button in the toolbar.
Figure 13. Settings menu
The settings menu is the top level menu for all settings provided in the
AV Video System.
Selecting one of the menu items opens up a lower level drop-down
menu containing detailed settings and options. Depending on the
camera model, some of the listed groups of settings may become
unavailable (for example, Day/Night settings are available only for the
AV3130, AV3135 and DN cameras). The bar between the camera list
and the settings area can be dragged up and down to resize the area.
The lower level menus contain a “Camera” field that displays the camera number which the settings are
applied to (Figure 14). The “Camera” field can be expanded to a drop-down list of all installed cameras to
select from. The list includes an “All cameras” option to apply settings to all cameras.
Arecont Vision 425 E Colorado St, 7th Floor Glendale, CA 91205 Revised 12/20/2010
www.arecontvision.com
www.arecontvision.com
www.arecontvision.comwww.arecontvision.com
Page 20

Figure 14. Display the camera number
ARECONT VISION AV100 VIDEO SYSTEM USER MANUAL
20
NNNNOTE
OTE
: Selecting “
OTEOTE
Selecting
Selecting Full
Selecting Selecting
Arecont Vision cameras offer two options for image resolution: full and reduced (quarter) resolution where the
image resolution is reduced by a factor of two in horizontal and vertical dimensions. Either resolution image
can also be cropped to any size.
In order to save bandwidth the images are displayed at a reduced resolution. The format of the reduced
resolution display is determined by the chosen screen layout (see
An individual camera image can be expanded to a full resolution display by double-clicking on the image.
The full resolution image can be scaled back to its reduced resolution display by double-clicking the image
again. The image size (in pixels) is displayed in the upper left corner of the image.
An alternative mode of viewing the full resolution content is the zoom window (see
Reset all
Reset all
Reset allReset all
Full /
/ Reduced Resolution
Full Full
/ /
” restores default settings for that camera
Reduced Resolution Display
Reduced ResolutionReduced Resolution
Display
DisplayDisplay
.
Toolbar
Toolbar
ToolbarToolbar
on pg.18).
ROI
ROI
ROIROI
, pg. 21).
Arecont Vision 425 E Colorado St, 7th Floor Glendale, CA 91205 Revised 12/20/2010
www.arecontvision.com
www.arecontvision.com
www.arecontvision.comwww.arecontvision.com
Page 21

Figure 12. Zoom window of screen snapshot
ARECONT VISION AV100 VIDEO SYSTEM USER MANUAL
21
ROI (Region of Interest)
ROI (Region of Interest)
ROI (Region of Interest)ROI (Region of Interest)
To zoom-in on a region of interest (ROI), draw a rectangle with the mouse (by left-clicking and holding down
the mouse button). A separate zoom window will open up showing live video of the selected area at full
resolution. A green outline of the selected area will appear in the underlying reduced resolution image.
Zooming in and out is performed by pressing Page Up and Page Down on the keyboard, or alternatively by
rotating the mouse wheel (if available). Panning of the zoomed area is performed by dragging the green
outline across the underlying camera image with the mouse (by left-clicking within the outline and holding
down the left mouse button) or alternatively with the keyboard arrow keys.
A maximum of three independent live regions of interest (ROI) windows can be opened per each camera.
NOTE
NOTE::::
Panoramic camera models AV8360/8365 and AV8180/8185 allow only one zoom window per channel
NOTENOTE
and no ROI settings.
Arecont Vision 425 E Colorado St, 7th Floor Glendale, CA 91205 Revised 12/20/2010
www.arecontvision.com
www.arecontvision.com
www.arecontvision.comwww.arecontvision.com
Page 22

ARECONT VISION AV100 VIDEO SYSTEM USER MANUAL
22
ROI can be configured by right-clicking on the green outline of a selected region of interest and selecting “ROI”
from the menu. A separate ROI sub menu will open.
•
Lock this ROI
Lock this ROI
Lock this ROILock this ROI
will freeze the ROI position in place and disable PTZ functions.
•
Delete this
Delete this ROI
Delete this Delete this
•
As New Camera
As New Camera
As New CameraAs New Camera
new numbers to the cameras starting at ROI-101. The virtual camera video can be archived
independently as any other camera, and its archival frame rate and video display frame rate can be
independently adjusted.
•
Archive/ View Settings
Archive/ View Settings
Archive/ View SettingsArchive/ View Settings
ROI
deletes the selected ROI and is the same as closing an ROI window.
ROIROI
creates a new video window of the selected ROI as a virtual camera, and assigns
opens up archival settings menu to set the rate of ROI archiving and viewing.
NNNNOTE
OTE::::
The actual number of frames per
OTEOTE
second / minute depends on camera
model, image resolution, exposure settings,
etc.
NOTE
NOTE::::
If both boxes are checked, the
NOTENOTE
displayed frame rate (the frame rate display
is enabled by pressing Ctrl-S) corresponds
to the view rate value.
Arecont Vision 425 E Colorado St, 7th Floor Glendale, CA 91205 Revised 12/20/2010
www.arecontvision.com
www.arecontvision.com
www.arecontvision.comwww.arecontvision.com
Page 23

ARECONT VISION AV100 VIDEO SYSTEM USER MANUAL
23
•
As Exposure Reference
As Exposure Reference
As Exposure ReferenceAs Exposure Reference
enables the on-camera auto-exposure system to use the brightness within
the ROI to adjust the overall brightness of the entire camera image while ignoring the brightness
outside of the ROI. A typical use of this feature is backlight compensation when the camera is facing
a window where bright backlight makes objects in the foreground appear dark. By positioning ROI
over the foreground object, and selecting “As Exposure Reference”, the foreground objects can be
made brighter.
•
Restore Auto
Restore Auto----Exposure
Restore AutoRestore Auto
Exposure
ExposureExposure
reverses the exposure control based on the ROI to a default exposure mode
based on a default window in the center of the image and its background. Exposure reference
settings persist when closing a particular ROI. Ensure that “Restore Auto-Exposure” is used prior to
closing an ROI window.
Arecont Vision 425 E Colorado St, 7th Floor Glendale, CA 91205 Revised 12/20/2010
www.arecontvision.com
www.arecontvision.com
www.arecontvision.comwww.arecontvision.com
Page 24

Exposure
Exposure
ExposureExposure
Figure 15. Exposure menu
ARECONT VISION AV100 VIDEO SYSTEM USER MANUAL
The
Exposure
Exposure
ExposureExposure
selected camera.
Illumination
Illumination
IlluminationIllumination
scene’s illumination. “Automatic” enables the camera to adjust for
illumination automatically while indoor/outdoor settings use presets
assuming the camera is indoors or outdoors.
Correction
Correction
Correction Correction
Lighting
Lighting
LightingLighting
(Figure 15) menu adjusts exposure related settings for the
adjusts the camera’s white balance computation based on the
aids in flicker control for AV5100/05 camera models.
prevents flicker caused by the oscillation frequency of indoor
24
lighting: European (50 Hz) or US/Japan (60 Hz).
Low Light Mode
Low Light Mode
Low Light ModeLow Light Mode
time refers to the amount of time the sensor is exposed to light. Short
exposures result in less light, giving darker images whereas longer
exposures can flood an image with light, giving washed out images in the
presence of a lot of light. Additionally, motion blur is reduced under short
exposures and increased under long exposures.
High Speed
High Speed
High SpeedHigh Speed
“Short Exposure” menu with values between 1 and 80ms. Low values will
reduce motion blur but may result in a noisier video. Ample illumination is
required to improve quality under very short exposures due to the lack of
captured light.
Speed
Speed
SpeedSpeed
exposure time will increase with low light conditions.
Balanced
Balanced
BalancedBalanced
low light conditions resulting in a higher exposure time.
adjusts performance under low light conditions. Exposure
enables a fixed exposure time, selectable from the
enables short exposures ranging from 10-80ms. The
enables medium exposures ranging from 20-80ms with
Quality
Quality
QualityQuality
blur may increase, but video will contain less noise under low light
conditions.
Moon Light
Moon Light
Moon LightMoon Light
mode will result in more motion blur for fast moving objects.
Arecont Vision 425 E Colorado St, 7th Floor Glendale, CA 91205 Revised 12/20/2010
www.arecontvision.com
www.arecontvision.com
www.arecontvision.comwww.arecontvision.com
enables longer exposures ranging from 40-200ms. Motion
enables exposures of up to 500 ms if necessary. This
Page 25

ARECONT VISION AV100 VIDEO SYSTEM USER MANUAL
Auto exposure On/Off
Auto exposure On/Off
Auto exposure On/OffAuto exposure On/Off
exposure maintains the user-set image brightness under changing lighting conditions. This must be enabled
to ensure the ‘Low Light Mode’ settings function.
Image Quality
Image Quality
Image Quality Image Quality
Figure 16-1. Image Quality menu
is an option to enable/disable the on-camera automatic exposure control. Auto
Select
adjusting image quality settings:
Compression Format
Compression Format
Compression FormatCompression Format
H.264. H.264 is only available on the xx05 series of Arecont Vision cameras
and offers an average of 1/5 to 1/10 the bandwidth usage of a standard Motion
Image Quality
Image Quality
Image QualityImage Quality
from the Setting menu to open up a lower-level menu for
offers two options for compressing the video: JPEG and
25
JPEG camera.
Frame Rate
Frame Rate
Frame Rate Frame Rate
requesting frames from the camera(s) for viewing only.
Quality
Quality
QualityQuality
JPEG and H.264 compression formats):
Brightness
Brightness
BrightnessBrightness
Sharpness
Sharpness
SharpnessSharpness
Saturation
Saturation
SaturationSaturation
Lower saturation gives a duller, faded image.
Red
Red/Blue
RedRed
camera’s automatic white balance computation. The effect is gradual and
takes 20-30 seconds for the camera to fully adjust to the new setting.
Gamma
Gamma
Gamma Gamma
dark and light areas of the image (requires firmware 64116 and hardware
adjusts the compression level for three display modes (applies to both
•
•
•
/Blue
/Blue/Blue
adjusts and displays the frame rate at which the software is
“Full View”
“Multi View” affects the display of multiple cameras.
“Zoom View” affects any ROI windows.
adjusts image brightness.
adjusts image sharpness or the crispness of an image.
adjusts image color saturation or the amount of color in an image.
adjusts the red/blue tint. This setting changes the target for
adjusts image contrast to reveal more or less shades of gray in the
affects the display and archive of full resolution video.
Arecont Vision 425 E Colorado St, 7th Floor Glendale, CA 91205 Revised 12/20/2010
64107).
www.arecontvision.com
www.arecontvision.com
www.arecontvision.comwww.arecontvision.com
Page 26

Figure 16-2. Image Quality menu
ARECONT VISION AV100 VIDEO SYSTEM USER MANUAL
Equalize Brightness
Equalize Brightness
Equalize Brightness Equalize Brightness
four sensors for the panoramic camera. This setting is only enabled for
panoramic cameras.
Equalize Color
Equalize Color
Equalize Color Equalize Color
sensors of the panoramic camera. This setting is only enabled for panoramic
cameras.
Enable Alignment
Enable Alignment
Enable Alignment Enable Alignment
individually for 180° panoramic camera. This setting is only enabled for
is an option for equalizing the image brightness of the
is an option for equalizing the image color across all four
is an option to adjust each sensor vertical position
26
AV8185DN.
Step 1: Select screen layout as 2x4. (See pg.18)
Step 2: Check “Enable Alignment” on the control panel.
Step 3: Move mouse cursor stay on the image that you want to alignment
Step 4: Press keyboard “Ctrl” + “UP” or “Ctrl” + “DOWN” to adjust vertical
position.
Size of Picture
Size of Picture
Size of PictureSize of Picture
Rotate 180
Rotate 180
Rotate 180Rotate 180
rotate it 180 degrees.
Binning in night mode
Binning in night mode
Binning in night mode Binning in night mode
sensitivity, produce better SNR and provide higher frame rate by combining
and averaging pixels of AV10005DN operated in low light environment. This
setting makes images become black and white instead of color.
Binning in day mode
Binning in day mode
Binning in day mode Binning in day mode
binning in day mode keeps image as color. This setting is only enabled for
AV10005 in 10 Megapixel mode.
1080P mode
1080P mode
1080P mode 1080P mode
adjusts image cropping.
is an option for flipping the image vertically and horizontally to
is an option to get better image quality, increase
is a similar option as binning in night mode. However,
is an option to change AV10005 as 1080p full HD mode and only
enabled for AV10005. AV10005 in 1080p mode is viewed at 1920x1080 with
Arecont Vision 425 E Colorado St, 7th Floor Glendale, CA 91205 Revised 12/20/2010
frame rate up to 30fps.
www.arecontvision.com
www.arecontvision.com
www.arecontvision.comwww.arecontvision.com
Page 27

Rate Control
Rate Control
Rate ControlRate Control
ARECONT VISION AV100 VIDEO SYSTEM USER MANUAL
27
Rate Control is an option available only for H.264 video streams which is enabled individually per camera. If
rate control is enabled, any image quality settings under Image Quality are ignored and the camera will
automatically adjust its video quality on a frame by frame basis to maintain the desired constant bit rate. The
video quality may deteriorate at very low bit rate settings.
There are
There are three options
There are There are
three options available
three options three options
•
Use bitrate
Use bitrate control in full view video
Use bitrate Use bitrate
•
Use bitrate control in multi view video
Use bitrate control in multi view video
Use bitrate control in multi view videoUse bitrate control in multi view video
resolution when viewing multiple cameras at once.
•
Use
Use bitrate control in archive video
bitrate control in archive video
Use Use
bitrate control in archive videobitrate control in archive video
The frame rate and bandwidth usage can be displayed by pressing Ctrl-S. If the last option is enabled,
the displayed values are calculated by adding the archival bit rate to the display bit rate for full resolution
or multi view resolution. In case the archival rate is set to the maximum frame rate, the displayed values
correspond to the archival rate settings.
NOTE
NOTE::::
NOTENOTE
light conditions, exposure settings, and amount of motion
Certain bit rate values may not be possible depending on the camera resolution, image cropping,
available for Rate Control:
available available
control in full view video
control in full view videocontrol in full view video
for Rate Control:
for Rate Control:for Rate Control:
enables a constant bit rate for live video display at full resolution.
enables a constant bit rate for live video display at a reduced
enables a constant bit rate for archiving.
.
Arecont Vision 425 E Colorado St, 7th Floor Glendale, CA 91205 Revised 12/20/2010
www.arecontvision.com
www.arecontvision.com
www.arecontvision.comwww.arecontvision.com
Page 28

ARECONT VISION AV100 VIDEO SYSTEM USER MANUAL
Archive
Archive
ArchiveArchive
Select
Archive
Archive
ArchiveArchive
settings. Please note that archival is only available with a license file.
(Figure 17) from the Setting menu.
Archive
Archive
Archive Archive
is a lower-level menu to configure video archival
Figure 17. Archive menu
Resolution
Resolution
Resolution Resolution
quarter resolution.
Filter
Filter
Filter Filter
selects between archiving the video at full resolution or at
is a group of archiving options:
Save all frames
Save all frames
Save all framesSave all frames
from the camera.
Save all and mark
Save all and mark motion
Save all and markSave all and mark
stream, marking the frames where motion was detected.
archives the entire video stream received
motion
motionmotion
archives the entire video
28
Save
Save motion frames only
motion frames only
Save Save
motion frames onlymotion frames only
detected by the on-camera motion detector and disables
archiving in the absence of motion.
Frequency
Frequency
FrequencyFrequency
The “Off” option disables the archive recording. The “Max” option sets
the archive frequency limited only by the camera and the network
(different for different camera models).
Continue after motion detected
Continue after motion detected
Continue after motion detectedContinue after motion detected
recording will continue after motion is detected when the camera is set
to “
Save motion frames only”
Save motion frames only”
Save motion frames only”Save motion frames only”
recording is done.
is a drop-down list of options for archive recording rate.
and the frame rate at which such
archives only when motion is
determines the duration for which
NNNNOTE
OTE::::
If new motion is detected during such after-motion recording, the rate of recording will revert to the
OTEOTE
one specified under “Frequency”.
Minimum free disk space
Minimum free disk space
Minimum free disk space Minimum free disk space
video recordings. With a setting of 10GB, archives will not be overwritten until the free space on the drive
goes below 10GB. It is recommended that at least 5GB of free space is always available.
Arecont Vision 425 E Colorado St, 7th Floor Glendale, CA 91205 Revised 12/20/2010
sets the minimum free disk space that is required on a disk to start overwriting old
www.arecontvision.com
www.arecontvision.com
www.arecontvision.comwww.arecontvision.com
Page 29

ARECONT VISION AV100 VIDEO SYSTEM USER MANUAL
Motion Detection
Motion Detection
Motion Detection Motion Detection
Motion detection is achieved by analyzing inter-frame brightness changes on a pixel-by-pixel basis. Clicking
“Motion Detection” from the left menu brings up the Motion Settings window, as seen in Figure 18. There are
two modes of Motion Detection supported in the AV100 Video System: a software mode and an on-camera
mode.
•
The software mode performs motion detection by processing the images after they are transmitted
from the camera to the computer. In contrast, the on-camera mode performs motion detection prior
to transmitting the images to the computer. As such, the on-camera motion detection setting allows
for a significant reduction in CPU load and network load when motion detection is enabled.
•
Motion detection is only enabled via the Archive settings when one of the two following options is
selected: “Save all and mark motion” or “Save motion frames only”. If the Archive is enabled for
“Save all frames”, motion detection is disabled. The Enabled/Disabled status is displayed in the
29
bottom right corner of the Motion Settings window.
•
Motion detection is computed independently in multiple detection zones on a square grid. There are
two grid size options, 64 or 1024 grid, and only AV1315, AV1325, AV2815, AV2825 and AV10005
support 1024 grid size. The actual grid for any particular model is determined by the chosen zone
size (a drop-down list in the lower right corner of the Motion Settings screen) and the camera’s pixel
resolution. The actual grid is displayed in the lower left corner. When motion is present, the Motion
Settings window displays green marks (selectable between crosses and boxes) in the zones where
motion occurs (Figure 18).
•
A motion privacy mask can be set up to block motion detection in some of the zones by drawing a
rectangle with the mouse (by left-clicking and holding down the mouse button). The privacy mask is
marked with red crosses. A more complex shape can be created by drawing multiple rectangles.
Erasing the mask (or part of the mask) is done by drawing a rectangle with the right mouse button.
Arecont Vision 425 E Colorado St, 7th Floor Glendale, CA 91205 Revised 12/20/2010
www.arecontvision.com
www.arecontvision.com
www.arecontvision.comwww.arecontvision.com
Page 30

Figure 18. Image of motion detection
ARECONT VISION AV100 VIDEO SYSTEM USER MANUAL
30
Motion detection settings apply only to the camera which number is displayed in the Camera field on the left
of the
Motion
Motion Settings
Motion Motion
Total Zones
Total Zones
Total ZonesTotal Zones
AV10005 support 1024 grid size.
Detected by
Detected by
Detected byDetected by
Settings
SettingsSettings
menu: use drop-down list to change the camera number. The settings are:
is an option to choose 64 or 1024 grid size and only AV1315, AV1325, AV2815, AV2825 and
provides two options for toggling between software motion detection and on-camera motion
detection.
Sensitivity
Sensitivity
SensitivitySensitivity
is a group of controls to adjust motion detection computation:
•
Level
Level
adjusts the inter-frame brightness change threshold that triggers motion detection. Lower
LevelLevel
settings may cause false motion detection due to noise. A higher setting will require a larger
brightness change on the moving object for motion detection.
Arecont Vision 425 E Colorado St, 7th Floor Glendale, CA 91205 Revised 12/20/2010
www.arecontvision.com
www.arecontvision.com
www.arecontvision.comwww.arecontvision.com
Page 31

ARECONT VISION AV100 VIDEO SYSTEM USER MANUAL
•
Detail
Detail
adjusts the size of the detectable objects within each motion detection zone. Lower
DetailDetail
settings may cause false motion detection due to noise. Higher settings require larger objects for
motion detection. This is useful when motion detection should only detect something of the size
of a car and ignore smaller objects like an animal.
•
Limit
Limit
serves as a guard against false triggering due to a sudden overall change in lighting that
LimitLimit
would trigger motion detection in a large number of zones simultaneously. For example, a bright
flash in the scene would not trigger motion detection. If the number of zones activated
simultaneously is larger than the “Limit” setting, motion detection will be blocked. This parameter
cannot exceed the number of zones in the grid (displayed in the lower left corner of Motion
31
Settings)
Privacy Mask
Privacy Mask
Privacy Mask Privacy Mask
Starting from firmware version 65154, a video privacy mask feature begins available on certain camera
models, including AV1315, AV1325, AV2815, AV2825 and AV10005. The privacy mask menu adjusts
privacy mask related settings for the selected camera shown in Figure 19. After enabled setting, a privacy
mask can be set up to block video in some of the zones by drawing a rectangle with the mouse. The blocked
areas on the video are shown in gray (Figure 20).
Figure 19. Privacy Mask Menu
.
Select Privac
for adjusting privacy mask settings:
Enabled
Enabled
Enabled Enabled
Editor Type
Editor Type
Editor Type Editor Type
mask on a region of interest (ROI), select “Apply Mask” and draw a
y Mask
y Mask
y Mask y Mask
is an option for enabling “Editor Type
offers four options for editing privacy mask. To apply privacy
from the Setting menu to open up a lower-level menu
””””
.
rectangle with the mouse (by left-clicking and holding down the mouse
button); To erase privacy mask on a region of interest (ROI), select “Erase
Mask” and draw a rectangle with the mouse (by left-clicking and holding
down the mouse button).
•
Not Editing
Not Editing
Not EditingNot Editing
•
Apply Mask
Apply Mask
Apply MaskApply Mask
•
Erase Mask
Erase Mask
Erase MaskErase Mask
•
Clear All
Clear All
Arecont Vision 425 E Colorado St, 7th Floor Glendale, CA 91205 Revised 12/20/2010
Clear AllClear All
www.arecontvision.com
www.arecontvision.com
www.arecontvision.comwww.arecontvision.com
disables privacy mask on a region of interest (ROI).
applies privacy mask on a region of interest (ROI).
Erases privacy mask on a region of interest (ROI).
Erases all privacy masks.
Page 32

Figure 20. Privacy Mask
ARECONT VISION AV100 VIDEO SYSTEM USER MANUAL
32
Save T
Save To
Save TSave T
Figure 21. Save to Menu
o
o o
The lower level Save to menu specifies the directory for video archives and
for snapshot images. Note that the name of archival directory should be the
same for all cameras; it is possible to specify different Hard Drives for each
camera.
Arecont Vision 425 E Colorado St, 7th Floor Glendale, CA 91205 Revised 12/20/2010
www.arecontvision.com
www.arecontvision.com
www.arecontvision.comwww.arecontvision.com
Page 33

Advanced
Advanced
AdvancedAdvanced
Select
Advanced
Advanced
Advanced Advanced
(figure 22) to set the following options:
Figure 22. Advanced menu
ARECONT VISION AV100 VIDEO SYSTEM USER MANUAL
Use DirectX if possible
Use DirectX if possible
Use DirectX if possibleUse DirectX if possible
card hardware for displaying images rather than using software processing. This
reduces the load on the CPU. The drop-down list “DirectX size” provides options
causes AV100 to use DirectX functions that utilize graphics
33
for the graphics area supported by DirectX –
to the resolution used for live video
Auto
Auto––––Startup
Startup
AutoAuto
StartupStartup
startup with its previous settings.
Show motion
Show motion
Show motionShow motion
enabling motion detection).
Use double packets
Use double packets
Use double packetsUse double packets
regular 1450 bytes for image transmission. This allows for increased image
transmission bandwidth but may lead to less stable performance on high traffic
networks.
Warning on disconnect
Warning on disconnect
Warning on disconnectWarning on disconnect
disconnected or temporarily lost. When disabled, the last captured frame will be displayed.
Static ARP
Static ARP
Static ARPStatic ARP
alternative is dynamic ARP, which is not supported by some older models of the Arecont Vision cameras.
Don’t update
Don’t update sensor window
Don’t update Don’t update
software level or in hardware (the image sensor). Enabling this option helps to avoid conflicts when multiple
is an option to enable a static link between the camera’s MAC address and its IP address. An
sensor window
sensor windowsensor window
is an option to display a red screen warning in place of live video that has been
is an option that determines how the changes to the image size are applied: at a
is an option to automatically start the AV Video System at Windows
marks areas where motion is detected in live video (requires
is an option to use data packets with 2904 bytes instead of the
.
the selected size should correspond
users are viewing the same camera (each user will be able to set a different image size). Alternatively,
disabling this option allows an increase in camera frame rate due to a smaller image size.
Panoramic Mode
Panoramic Mode
Panoramic ModePanoramic Mode
automatically position and display the four images on screen.
Language
Language
LanguageLanguage
selects the language which will be used throughout AV100.
Arecont Vision 425 E Colorado St, 7th Floor Glendale, CA 91205 Revised 12/20/2010
is used for panoramic camera model AV8180, AV8185, AV8360 and AV8365 to
www.arecontvision.com
www.arecontvision.com
www.arecontvision.comwww.arecontvision.com
Page 34

ARECONT VISION AV100 VIDEO SYSTEM USER MANUAL
AAAAuthentication
uthentication
uthenticationuthentication
Authentication allows for password protected access to AV100 Video System. There are three levels of
access available (Figure 23):
Figure 23. Authentication menu
a) “
Administrator
Administrator
AdministratorAdministrator
Adding, changing, and removing users is done via the
System.
b) “
Viewer
Viewer
ViewerViewer
not to the settings.
c) “
Only Live
Only Live
Only LiveOnly Live
Change, and Remove
Change, and Remove
Change, and RemoveChange, and Remove
” grants full access to all features of AV Video
” grants access to live video and browsing the archives, but
” grants access to live video only.
buttons on the bottom of the menu.
34
Add,
Add,
Add, Add,
If one or more user accounts were created, the AV Video System will
display a log-in dialog prompting for the user name and password upon
startup (Figure 24):
Figure 24. User authentication
Arecont Vision 425 E Colorado St, 7th Floor Glendale, CA 91205 Revised 12/20/2010
www.arecontvision.com
www.arecontvision.com
www.arecontvision.comwww.arecontvision.com
Page 35

ARECONT VISION AV100 VIDEO SYSTEM USER MANUAL
Remote Viewing
Remote Viewing
Remote ViewingRemote Viewing
AV100 has a built-in web server allowing Arecont Vision cameras and archives to be viewed remotely (Figure
25).
Figure 25. Remote viewing menu
To enable the built–in HTTP server, select
menu and do the following:
1. Select
Allow Remote Viewing.
Allow Remote Viewing.
Allow Remote Viewing.Allow Remote Viewing.
Remote viewing
Remote viewing
Remote viewing Remote viewing
from the
35
Setting
Setting
SettingSetting
2. On the bottom of the menu click
3. Start Internet Explorer and type in the address of the web server. For
example, if AV Video System is installed on a PC with IP address
200.168.1.102, type in the following address:
http
4. Then click
Upon successful connection a web page will open. Internet Explorer will
prompt to install an ActiveX component. Click on the webpage as
prompted to install ActiveX.
The main AV menu located on the left hand side of the IE window will provide
full access to each Arecont Vision camera. Selecting the Arecont Vision
camera of choice will display the option to disconnect as well as make changes
to settings such as the Resolution Speed, Archive, Zoom and viewing images in
separate windows.
Access from outside the local network will require that the server PC is
accessible on the selected port. Please ensure that any routers or firewalls
http://200.168.1.102:4250/guix.htm
://200.168.1.102:4250/guix.htm
httphttp
://200.168.1.102:4250/guix.htm://200.168.1.102:4250/guix.htm
Enter
Enter
to have Internet Explorer open that page.
Enter Enter
Apply
Apply
Apply Apply
then
Ok
Ok....
OkOk
have this port open for outside user access.
Right-clicking anywhere on the Explorer web page will provide access to the options menu:
Click
Save
Save
to take a snapshot image.
SaveSave
Click
Manage Servers
Manage Servers
Manage ServersManage Servers
Click
Auto Hide Menu
Auto Hide Menu
Auto Hide MenuAuto Hide Menu
Click
Settings
Settings
SettingsSettings
Arecont Vision 425 E Colorado St, 7th Floor Glendale, CA 91205 Revised 12/20/2010
to adjust camera and video settings.
to provide server information and allows changes to the servers.
to automatically hide the main menu.
www.arecontvision.com
www.arecontvision.com
www.arecontvision.comwww.arecontvision.com
Page 36

ARECONT VISION AV100 VIDEO SYSTEM USER MANUAL
Day/Nigh
Day/Nightttt
Day/NighDay/Nigh
Day/Night (Figure 26) settings apply only to dual-sensor cameras as well as single-sensor DN camera models
equipped with a switching IR filter.
Figure 26. Day/Night setting menu
Automatic
Automatic
AutomaticAutomatic
enables the camera to automatically switch from daylight
36
to nighttime conditions and vice versa based on the
settings.
Day
Day
forces day mode and disables night mode.
Day Day
Night
Night
forces night mode and disables day mode.
NightNight
Threshold
Threshold
ThresholdThreshold
(Note: for dual-sensor camera models the values are displayed in F-
Stops, while for single-sensor DN models the values are in terms of
camera gain):
adjusts the automatic switching of the camera
•
Switch At
Switch At adjusts the level of darkness to switch from day to
Switch AtSwitch At
night mode. Values to the left will cause the camera to switch
to night mode when there is still much light in the scene.
Values to the right will cause the camera to stay in day mode
much longer, requiring near darkness in order to switch.
•
Toggle Guar
Toggle Guardddd
Toggle GuarToggle Guar
switch from nighttime to daylight mode. Setting this to 0%
corresponds to “Switch At” set to 100%. Toggle Guard
should be adjusted to prevent the mode from toggling during
adjusts the level of brightness required to
Threshold
Threshold
ThresholdThreshold
transitional lighting.
Arecont Vision 425 E Colorado St, 7th Floor Glendale, CA 91205 Revised 12/20/2010
www.arecontvision.com
www.arecontvision.com
www.arecontvision.comwww.arecontvision.com
Page 37

ARECONT VISION AV100 VIDEO SYSTEM USER MANUAL
Auto
Auto----Iris
AutoAuto
The Auto-Iris menu allows you to monitor the state of the automatic DC iris. If the scene is too dark, the
camera will open the iris fully. This allows more light onto the sensor and will substantially improve the low-
light performance. If the scene is too dark when the camera is started, the camera will not close the iris until
there is enough illumination. Camera DC auto-iris can be configured using “Auto-Iris” menu (Figure 27):
Iris
IrisIris
37
Figure 27. Auto-Iris menu
The status of the auto-iris is displayed on a color panel at the
bottom of the Auto-Iris settings. There are six states possible:
•
Disabled
Disabled
DisabledDisabled
the
•
Evaluating
Evaluating
EvaluatingEvaluating
•
Too Dark:
Too Dark: The camera cannot close the iris because the
Too Dark:Too Dark:
: The auto-iris is either disabled by un-checking
Enabled
Enabled
EnabledEnabled
check box, or is not present.
: The camera is preparing to close the iris.
scene illumination is too low.
•
Closing
Closing
ClosingClosing
appropriate for the lens model.
•
Closed
Closed
ClosedClosed
•
Opening
Opening
OpeningOpening
Auto-iris will open the lens fully once the on-camera analog gains
exceed a certain level. The
auto-iris will open fully: the higher the gain, the later the auto-iris will
open as the illumination diminishes.
The iris can be disabled by un-checking
open the iris fully and have electronic auto-exposure working. This
configuration is identical to using a manual lens.
: The iris is closing down by the number of F-stops
: The iris is closed.
: The iris is opening.
ga
gain
in
scroll bar adjusts the point where the
gaga
inin
Enabled.
Enabled.
Enabled.Enabled.
The camera will
Arecont Vision 425 E Colorado St, 7th Floor Glendale, CA 91205 Revised 12/20/2010
www.arecontvision.com
www.arecontvision.com
www.arecontvision.comwww.arecontvision.com
Page 38

ARECONT VISION AV100 VIDEO SYSTEM USER MANUAL
Right
Right----Click
RightRight
Right-clicking anywhere within the AV100 Video System screen brings up an additional menu (Figure 28):
Click Menu
Click Click
Menu
MenuMenu
Figure 28. Additional menu within AV100 Video System screen
38
Settings
Settings
SettingsSettings
enables access to configuring the main settings groups as described in
Camera
Camera
Camera Camera
Miscellaneous
Miscellaneous
MiscellaneousMiscellaneous
enables access to a combined menu that includes:
•
Exposure
Exposure
ExposureExposure
•
Image Quality
Image Quality
Image QualityImage Quality
•
Rate Control
Rate Control
Rate Control Rate Control
•
Archive
Archive
ArchiveArchive
•
Day/Night
Day/Night
Day/NightDay/Night
•
Auto
Auto----Iris
AutoAuto
•
It also includes some options from
enables access to the following:
•
Authentication
Authentication
AuthenticationAuthentication
•
Save T
Save Toooo
Save TSave T
•
Advanced
Advanced
AdvancedAdvanced
•
Remote Viewing
Remote Viewing
Remote ViewingRemote Viewing
(see pg. 24)
(see pg.25)
(see pg.27)
(see pg.28)
(see pg. 36)
Iris
(see pg. 37)
IrisIris
(see pg.36)
(see pg.34)
(see pg.33)
(see pg.35)
Advanced
Advanced
AdvancedAdvanced
settings (see pg.33).
Settings
Settings
SettingsSettings
(see pg.19):
Motion
Motion
enables access to
MotionMotion
•
Printer
Printer
opens the
PrinterPrinter
Arecont Vision 425 E Colorado St, 7th Floor Glendale, CA 91205 Revised 12/20/2010
Motion Settings
Motion Settings
Motion SettingsMotion Settings
Print
Print Setup
Setup
Print Print
SetupSetup
(see pg.29).
menu.
www.arecontvision.com
www.arecontvision.com
www.arecontvision.comwww.arecontvision.com
Page 39

ARECONT VISION AV100 VIDEO SYSTEM USER MANUAL
•
Dump
Dump
logs camera settings to a file named LocalMachine.ini located in the installation directory.
DumpDump
When contacting Arecont Vision’s technical support, this file should be included.
•
Video
Video
displays live video in full-screen mode.
VideoVideo
•
Import License
Import License will import a specified license file so that the software’s archive functionality is
Import LicenseImport License
accessible.
•
Save to Flash
Save to Flash
Save to Flash Save to Flash
•
Factory Default
Factory Default
Factory Default Factory Default
saves camera setting to camera flash memory.
resets the camera setting without changing camera IP Address to factory settings.
Photo
Photo
enables saving and printing individual snapshots, as well as browsing:
PhotoPhoto
•
Save
Save
takes a snapshot of live video and saves it in the snapshot folder. The snapshot is taken
SaveSave
from the camera which is highlighted in the drop-down list of the installed cameras on the left
39
side (see
Toolbar
Toolbar
ToolbarToolbar
on pg.18). To highlight another camera, left-click on the camera number. To
take the snapshot from all cameras, highlight “cameras” at the top of the drop-down camera list.
•
Save/Print
Save/Print
Save/PrintSave/Print
•
Browse
Browse
BrowseBrowse
takes a snapshot and prints it instantly.
opens the snapshot folder for browsing.
Browse presents
Browse presents three
Browse presentsBrowse presents
•
•
•
three options:
options:
threethree
options:options:
Archive
Archive
ArchiveArchive
Photos
Photos
PhotosPhotos
snapshots location is
Pictures
Pictures\\\\Arecont Vision Photos
PicturesPictures
in the Settings menu (see
HHHHTTP
enables access to browsing archives (See
Browsing Archives
Browsing Archives
Browsing ArchivesBrowsing Archives
).
enables access to snapshots taken with the Arecont Vision cameras. The default
C:
C:\\\\Documents and Settings
Documents and Settings\\\\((((User Profile
C:C:
Documents and SettingsDocuments and Settings
Arecont Vision Photos
Arecont Vision PhotosArecont Vision Photos
TTP opens the default web browser to view the video stream from the selected camera via the
TTPTTP
, a different directory path to the snapshot folder can be specified
Settings
Settings
SettingsSettings
on pg.19).
User Profile))))\\\\My Documents
User ProfileUser Profile
My Documents\\\\My
My DocumentsMy Documents
My
My My
web browser.
Hide
Hide
minimizes the AV100 Video System application and hides it in the system tray of the Windows task bar.
HideHide
Log off
Log off
logs off the current user.
Log offLog off
Exit
Exit
exits the AV100 Video System application.
ExitExit
About
About
shows the version of the AV100 Video System software and additional information for each of the
AboutAbout
installed camera(s): version of firmware and hardware, MAC address, and IP address.
Arecont Vision 425 E Colorado St, 7th Floor Glendale, CA 91205 Revised 12/20/2010
www.arecontvision.com
www.arecontvision.com
www.arecontvision.comwww.arecontvision.com
Page 40

ARECONT VISION AV100 VIDEO SYSTEM USER MANUAL
Language Selection
Language Selection
Language SelectionLanguage Selection
The AV100 Live Video System supports user interfaces in Arabic, Chinese Simplified, Chinese Traditional,
English, Finnish, German, Japanese, Spanish, Russian and other languages. To select language press the
F2
F2
button to bring up the language menu (Figure 29).
F2 F2
Figure 29. Language menu
40
Browsing Archives
Browsing Archives
Browsing ArchivesBrowsing Archives
Archive browsing is enabled by pressing the button in the Toolbar, or via the right-click menu (see
Right
Right----Click Menu
Click Menu
RightRight
Click MenuClick Menu
Arecont Vision 425 E Colorado St, 7th Floor Glendale, CA 91205 Revised 12/20/2010
on pg.38).
www.arecontvision.com
www.arecontvision.com
www.arecontvision.comwww.arecontvision.com
Page 41

Figure 30. Archive screen
ARECONT VISION AV100 VIDEO SYSTEM USER MANUAL
41
Archive browsing controls are located on the bottom of the playback screen (Figure 30). Archives are best
viewed when the video is displayed in full-screen mode. The date-and-time stamp is located on the top left-
hand side of the image. The user can select playback speed and frame skipping, as well as the image quality.
If the archive was recorded using motion detection (see Motion Detection), browsing can be based on
detected motion by selecting “Motion” from the drop-down list under “Filter”.
Rewind - Starts archive video from the earliest recording
Fast Reverse – Jumps backward 5 minute intervals.
Play in Reverse – Plays the recorded archive continuously in reverse (H.264 archives will jump in
reverse in 1 minute intervals)
Play by Frame in Reverse – Steps backward one frame at a time.
Pause – Pauses the playback.
Play by Frame Forward – Steps forward one frame at a time.
Play – Plays the recorded archive continuously forward.
Fast forward – Jumps forward in 5 minute intervals.
Forward - Starts archive video from the end of recording.
Arecont Vision 425 E Colorado St, 7th Floor Glendale, CA 91205 Revised 12/20/2010
www.arecontvision.com
www.arecontvision.com
www.arecontvision.comwww.arecontvision.com
Page 42

ARECONT VISION AV100 VIDEO SYSTEM USER MANUAL
The slider on the bottom of the screen displays/positions the current frame position in the archive. It has a
date-and-time display located to the right side of the slider to reference a particular event.
Press the button on the Toolbar to take a snapshot from the archive. Alternatively, snapshots can be
42
taken by right-clicking on the video image, and then selecting
“photo”, “sa
“photo”, “save”.
“photo”, “sa“photo”, “sa
ve”.
ve”.ve”.
AVI Maker
AVI Maker ---- Mak
AVI Maker AVI Maker
The AVI Maker (Figure 31) is started by clicking the corresponding Run button in the AV Application Manager.
Please note that you will not have access to the AVI Maker if you do not have a license for archiving.
Figure 31. AVI Maker
Making
ing video clips from
MakMak
video clips from the
inging
video clips from video clips from
the archive
archive
the the
archivearchive
NOTE:
NOTE:
Make sure that the archive is not empty when making avi clips.
NOTE:NOTE:
Arecont Vision 425 E Colorado St, 7th Floor Glendale, CA 91205 Revised 12/20/2010
www.arecontvision.com
www.arecontvision.com
www.arecontvision.comwww.arecontvision.com
Page 43

ARECONT VISION AV100 VIDEO SYSTEM USER MANUAL
43
To make video clips from your archives click
Under “Click here to start”:
Loading an Archive
Loading an Archive
Loading an ArchiveLoading an Archive
1. Specify which drive contains the video archive under “Load Archive on Drive.” If AV100 has the
default settings, then C: would be the default archive drive. Otherwise type in the correct drive letter
in the edit box, including the colon, i.e. D:
2. Click . This will initiate a search on the specified drive for all available archives.
The archives will be listed in the combo-box, numbered according to the camera numbers they were
recorded with, starting with the smallest number.
3. Use the pull-down menu to select the desired camera/archive number.
4. Click . An image will appear on the screen corresponding to the earliest record
of your video archive. If no archive is found, the screen will remain blank.
5. To explicitly specify which folders to search for archive video click the
button and select folders that contain your video archive.
Selecting a Clip
Selecting a Clip
Selecting a ClipSelecting a Clip
Run
Run
on AVI Maker from AV Application Manager.
RunRun
1. To play archive press the play button , use the Speed scrollbar to increase or decrease the
speed of playback.
2. Select a specific time interval by pressing and then scroll the timeline scrollbar to the
desired point in time. Then, press under
to select the entire recorded archive.
3. To narrow down the time interval use the button. Clicking the button results
in the time scale changing from Hours to Minutes to Seconds. To reverse backwards from Seconds
to Minutes to Hours, use the button. Within each zoomed time scale, the start and end
point can be re-selected to fine-tune the selected time interval.
Exporting a Video
Exporting a Video
Exporting a VideoExporting a Video
1. VVVVideo Settings
ideo Settings
ideo Settingsideo Settings
•
•
offers three options:
Size of Frame
Size of Frame
Size of FrameSize of Frame
affects XviD and MSVC video codecs and does NOT affect MJPEG/H.264 format
Frame Period
Frame Period
Frame PeriodFrame Period
calculate the average frame period for selected archive. If the calculated number is longer
adjusts the AVI frame size relative to the archived frame size. This option only
adjusts the AVI frame rate (in milliseconds).
Click here to select your clip
Click here to select your clip....
Click here to select your clipClick here to select your clip
AviMaker
will automatically
Alternatively, use
than 1000 milliseconds,
Arecont Vision 425 E Colorado St, 7th Floor Glendale, CA 91205 Revised 12/20/2010
1000
millisecond will be used. If the actual archive frame rate varies
www.arecontvision.com
www.arecontvision.com
www.arecontvision.comwww.arecontvision.com
Page 44

ARECONT VISION AV100 VIDEO SYSTEM USER MANUAL
with time, the resulting video will be played accordingly faster or slower, depending on how
much the actual frame rate deviate from the average.
•
Timestamp
Timestamp
TimestampTimestamp
adds date/time information to the resulting video clip. Notice that it works
differently in case “MJPEG/H.264” codec is selected. When the selected archive is JPEG
44
format,
incorporate the timestamp, but the rest of the image will remain intact. When the selected
archive is in H.264 format, the timestamp option is ignored.
Video Compression
Video Compression offers
Video CompressionVideo Compression
MJPEG/H.264 (best quality) offers a video format as recorded in the archive without
decompression and recompression procedures. For this reason, this format offers best
video quality.
“XviD –
together with the AV100 Software and is typically installed during the AV100 software
installation). This codec has been found to produce reasonably good quality to
compression ratio.
“MSVC - standard” is a standard Microsoft video codec.
“Choose from codecs list” allows selection of any of the alternative codecs that are
installed on the computer. The drop-down list opens after “Make AVI” is clicked (Figure
32).
Figure 32. Video Compression
AviM
AviMaker
aker
AviMAviM
will decompress and recompress the top 64 lines of each frame to
akeraker
offers four
offersoffers
http://www.xvid.org/
http://www.xvid.org/
http://www.xvid.org/http://www.xvid.org/
four options
options for
fourfour
optionsoptions
” is a codec recommended by Arecont Vision (it is distributed
for creating
creating the AVI file
for for
creatingcreating
the AVI file::::
the AVI filethe AVI file
6. Click to start creating the video clip. If no records are available for the selected range of
dates or times a warning will be displayed.
7. In the
Save A
Save Assss
Save ASave A
window type in a file name for your new AVI file, then click Save
....
If “Codec List” was
selected under “Video Compression”, a drop-down list of available codecs will appear. Select a
codec from the list to proceed.
Arecont Vision 425 E Colorado St, 7th Floor Glendale, CA 91205 Revised 12/20/2010
www.arecontvision.com
www.arecontvision.com
www.arecontvision.comwww.arecontvision.com
Page 45

ARECONT VISION AV100 VIDEO SYSTEM USER MANUAL
8. The AVI Maker will begin to create the AVI and show the progress in the progress bar. Clicking ‘Stop’
will terminate the AVI creation.
Viewing
Viewing YYYYour
ViewingViewing
Figure 33. AVI Maker Video Playback
our Recorded
Recorded Video
our our
Recorded Recorded
Video
VideoVideo
45
To view your exported AVI, download the latest Apple Quick Time (v7.4.5 or higher) for Windows XP or
Vista from
1. Select the drive where you stored your video recording by pressing and locate the
2. Double Click on the video recording to start the player.
3. Click on the play button.
http://www.apple.com/quicktime/download/
http://www.apple.com/quicktime/download/
http://www.apple.com/quicktime/download/http://www.apple.com/quicktime/download/
recording.
Arecont Vision 425 E Colorado St, 7th Floor Glendale, CA 91205 Revised 12/20/2010
www.arecontvision.com
www.arecontvision.com
www.arecontvision.comwww.arecontvision.com
Page 46

Firmware Loader
Firmware Loader –––– Upgrad
Firmware Loader Firmware Loader
Upgrading
UpgradUpgrad
ARECONT VISION AV100 VIDEO SYSTEM USER MANUAL
ing Camera
Camera Firmware
ing ing
CameraCamera
Firmware /
Firmware Firmware
/ Hardware in the Field
Hardware in the Field
/ /
Hardware in the FieldHardware in the Field
46
All models of Arecont Vision cameras are field-upgradeable since firmware version 51821. Recent H.264
models support firmware upgrade directly through the on-camera webpage, as shown in the "Administration
Menu" section of Chapter III . However the webpage approach is not available on non-H.264 models, and it
can only upgrade one camera per time. The AV FirmwareLoader is a special utility for upgrading camera’s
firmware and/or hardware. It supports all camera models and can update multiple cameras by one click. In
case there is a camera that needs to be upgraded, you can contact your distributor to obtain the latest
firmware upgrade file and utility. Please don't forget to disable any recording software/NVR applications prior
to updating the firmware. Also it is strongly recommended to temporarily turn off Windows firewall and anti-
virus software during the upgrade since it is frequently seen that firewall and anti-virus software could
compromise the FirmwareLoader's ability to discover cameras without warning.
Figure 34. FirmwareLoader
Arecont Vision 425 E Colorado St, 7th Floor Glendale, CA 91205 Revised 12/20/2010
www.arecontvision.com
www.arecontvision.com
www.arecontvision.comwww.arecontvision.com
Page 47

425 E Colorado St, 7
To upgrade a camera:
Start the Application Manager, run
Start the AV Firmware Loader by clicking the corresponding
Manager. Alternatively, run FirmwareLoader.exe.
”. It may take up to a
found select the appropriate cameras to upgrade.
”
and the file extension
THE CAMERA MODEL YOU ARE UPGRADING IS INCLUDED IN THE FWUPDATE FILE NAME.
The firmware upgrade will start automatically. Do not disconnect the
the upgrade process. When th
Upgrade Hardware
Upgrade HardwareUpgrade Hardware
Upgrade Hardware
“hwupdate”, and the file extension is .bin. MAKE SURE
UPGRADING IS INCLUDED IN THE HWUPDATE FILE NAME.
The hardware upgrade will start automatically. Do not disconnect
upgrade process. When the upgrade is complete, a “Success!” message will be dis
IMPORTANT: DISCONNECTING THE POWER TO THE CAMERA DURING THE UPGRADE WILL
IMPORTANT: DISCONNECTING THE POWER TO THE CAMERA DURING THE UPGRADE WILL IMPORTANT: DISCONNECTING THE POWER TO THE CAMERA DURING THE UPGRADE WILL
IMPORTANT: DISCONNECTING THE POWER TO THE CAMERA DURING THE UPGRADE WILL
RESULT IN PERMANENT DAMAGE TO THE CAMERA.
RESULT IN PERMANENT DAMAGE TO THE CAMERA.RESULT IN PERMANENT DAMAGE TO THE CAMERA.
RESULT IN PERMANENT DAMAGE TO THE CAMERA.
USER MANUAL
Revised
Installer to make sure the cameras to be upgraded
button in the AV Application
minute to find any cameras. Once the cameras have been
” and choose the firmware upgrade file. The file name starts with
. MAKE SURE THAT
message will be displayed
and choose the hardware upgrade file. The file name starts with
THAT THE CAMERA MODEL YOU ARE
at any point during the
1.
are properly installed.
2.
ARECONT VISION AV100 VIDEO SYSTEM
the Camera
47
Run
Run
RunRun
3. Click “
Find Cameras
Find Cameras
Find CamerasFind Cameras
4. To upgrade the firmware:
•
Click “
Upgrade Firmware
Upgrade Firmware
Upgrade FirmwareUpgrade Firmware
“fwupdate”,
•
the "Result" column.
5. To upgrade the hardware:
•
Click “
•
"Result" column.
is .txt or .mb, depending on the model
e upgrade is complete, a “Success!”
”
camera
camera
at any point during
at
played at the
Arecont Vision
th
Floor Glendale, CA 91205
www.arecontvision.com
www.arecontvision.com
www.arecontvision.comwww.arecontvision.com
12/20/2010
Page 48

Chapter
Chapter IIIIV
ChapterChapter
Connecting Directly
Connecting Directly tttto
Connecting Directly Connecting Directly
In a typical scenario cameras are connected using network cables to a network switch. A camera can
also be connected to a PC or laptop directly by using a cross-over network cable between the camera
and PC.
When a camera is connected directly, you may need to change the TCP/IP configuration on your PC.
For example, the PC may need to be configured to use a static IP address.
When a PoE injector is used and connected directly to a PC, there are two networking cables. One
V ---- Troubleshooting
V V
Troubleshooting and
TroubleshootingTroubleshooting
o a
o o
a Laptop
Laptop or
a a
Laptop Laptop
ARECONT VISION AV100 VIDEO SYSTEM USER MANUAL
or PC
PC
oror
PCPC
and Useful Tips
and and
Useful Tips
Useful TipsUseful Tips
48
cable connects the PC to the PoE injector, while the other connects the injector to the camera. Only
one of these cables should be cross-over. The other cable must be a regular, straight through cable.
NNNNOTE
OTE::::
AV8360 cameras require a higher PoE power class (Class 3: from 6.49 to 12.95 Watt) than
OTEOTE
other Arecont Vision camera models.
Switches
Switches and
Switches Switches
Low Sharpness
Low Sharpness
Low SharpnessLow Sharpness
and Routers
Routers
andand
RoutersRouters
Note that some Gigabit switches and network adapters incompletely emulate 100BaseT signaling
levels and may not work correctly with high bandwidth 100BaseT equipment.
If the image sharpness appears to be low:
•
Check if the lens is in focus.
•
Check if the lens is appropriate for a megapixel camera.
•
Under the Image Quality menu decrease compression and increase sharpness.
•
Check if the lens iris is fully open or closed down too much. For best resolution and depth of
field the iris (depending on lens make and model) should be closed by 2-3 F-stop.
Arecont Vision 425 E Colorado St, 7th Floor Glendale, CA 91205 Revised 12/20/2010
www.arecontvision.com
www.arecontvision.com
www.arecontvision.comwww.arecontvision.com
Page 49

ARECONT VISION AV100 VIDEO SYSTEM USER MANUAL
Frequently Asked Questions
Frequently Asked Questions
Frequently Asked QuestionsFrequently Asked Questions
1.
1. How do I get online technical support for Arecont Vision
How do I get online technical support for Arecont Vision product
1.1.
How do I get online technical support for Arecont Vision How do I get online technical support for Arecont Vision
Create an account on our support portal located at http://support.arecontvision.com/. Once an account
has been created, a new ticket can be posted and one of our technical support team will follow up with
you promptly. To ensure timely responses, please make sure to login to the support portal to post any
replies to your open ticket.
products?
productproduct
s?
s? s?
2.
2. Wh
What information can I provide to AV customer support for a faster response to my issues?
2.2.
at information can I provide to AV customer support for a faster response to my issues?
WhWh
at information can I provide to AV customer support for a faster response to my issues?at information can I provide to AV customer support for a faster response to my issues?
49
- Arecont Vision camera MAC address and firmware release as shown in the
web page or AV100 software.
IIIIf the issue is related to networking and/or A
f the issue is related to networking and/or AV100 software
f the issue is related to networking and/or Af the issue is related to networking and/or A
- Switch or POE model number.
- Type of network cable eg Cat 5e (min and max distance of run)
- Type of power used (VDC, milliamps, Watts) or POE
- Computer Information:
- 100base-T or Gigabit card
- CPU speed, RAM, Video Card specs
- Hard disk size, and available free space.
-Please provide the lmlog.dat file and localmachine.ini file. This file can be found in XP under
“C:\Documents and Settings\All Users\Application Data\Video” and in Vista/Win7 under
“C:\Users\(YourUserName)\ApplicationData\Video Application”, or
“C:\Users\(YourUserName)\AppData\Local\VirtualStore\ProgramData\Video Application”
3.
3. How do I find out which version of the software is installed? What are the IP and MAC addresses of my
How do I find out which version of the software is installed? What are the IP and MAC addresses of my
3.3.
How do I find out which version of the software is installed? What are the IP and MAC addresses of my How do I find out which version of the software is installed? What are the IP and MAC addresses of my
cameras?
cameras?
cameras?cameras?
V100 software
V100 softwareV100 software
About
About
menu on camera
AboutAbout
You can find camera IP and MAC address using the AV100 Camera Installer utility. The same
information as well as the software version number is displayed in the AV100
35). To open the AV100
About
About
.
AboutAbout
Arecont Vision 425 E Colorado St, 7th Floor Glendale, CA 91205 Revised 12/20/2010
About
About
About About
dialog, right click anywhere in the live video application and select
www.arecontvision.com
www.arecontvision.com
www.arecontvision.comwww.arecontvision.com
About
About
dialog (Figure
AboutAbout
Page 50

ARECONT VISION AV100 VIDEO SYSTEM USER MANUAL
50
Figure 35. About dialog
4.
4. How much stor
How much storage space is required when using
4.4.
How much storHow much stor
The storage space requirements will vary depending on the compressibility of your imagery. Shown
below (Figure 36) is an example of a system running at 22 FPS. However, the user can specify the
archival frequency to be lower than the full frame rate. Most Arecont Vision cameras also provide highly
age space is required when using Arecont Vision camera
age space is required when usingage space is required when using
Arecont Vision cameras?
Arecont Vision cameraArecont Vision camera
s?
s?s?
sophisticated on-board motion detection. To further reduce the required storage the user has an option to
archive only those images that contain motion. Furthermore, Arecont Vision cameras support real-time
resolution changes and image windowing on a frame-by-frame basis. The user may wish to archive
windows of interest or reduced resolution images at the high frame rate while archiving full resolution
images at the lower frame rate. A bandwidth calculator is provided at http://www.arecontvision.com/sales-
tools.html to help with determining storage/bandwidth requirements.
Figure 36. Example of a system running at 22 FPS
Arecont Vision 425 E Colorado St, 7th Floor Glendale, CA 91205 Revised 12/20/2010
www.arecontvision.com
www.arecontvision.com
www.arecontvision.comwww.arecontvision.com
Page 51

ARECONT VISION AV100 VIDEO SYSTEM USER MANUAL
5.
5. What ports are used by Arecont Vision cameras
What ports are used by Arecont Vision cameras and AV100 software
5.5.
What ports are used by Arecont Vision camerasWhat ports are used by Arecont Vision cameras
and AV100 software?
and AV100 softwareand AV100 software
?
? ?
Arecont Vision cameras operate using TFTP on port 69, HTTP on port 80 or an alternative HTTP port of
8080 (default) and RTSP on port 554. The alternate HTTP port can be modified through the ‘Network’
portion of the camera’s web interface. AV100 software connects to camera TFTP port 69, and may use
port 4250 for HTTP server when remote viewing feature is enabled.
6.
6. Why is my Arecont Vision camera not
Why is my Arecont Vision camera not detecting
6.6.
Why is my Arecont Vision camera not Why is my Arecont Vision camera not
detecting in
detectingdetecting
in the Camera Installer?
the Camera Installer?
inin
the Camera Installer?the Camera Installer?
If the camera is not detected it may be because of the PC’s firewall settings. To allow Camera Installer
access to the network the user should configure the firewall properly. To configure the Windows firewall,
51
access the
Windows
Windows Security Center
WindowsWindows
Security Center
Security Center Security Center
in the Windows
Control Panel
Control Panel
Control PanelControl Panel
and click on
Windows Firewall.
Windows Firewall.
Windows Firewall. Windows Firewall.
In the Windows Firewall window (Figure 37), click the
exceptions. Once the selections have been made click
Exceptions
Exceptions
Exceptions Exceptions
OK
OK
OK OK
tab and AV Installer to the list of
and re-run the Camera Installer. If the
Camera Installer still cannot find the camera make sure that there are no hardware firewalls blocking the
connection on your network. Additionally, try isolating the camera and your PC from the rest of the
network if you are continuing to have difficulty detecting the camera.
Figure 37. Windows firewall
Arecont Vision 425 E Colorado St, 7th Floor Glendale, CA 91205 Revised 12/20/2010
www.arecontvision.com
www.arecontvision.com
www.arecontvision.comwww.arecontvision.com
Page 52

7.
7. Does your software include motion detection?
Does your software include motion detection?
7.7.
Does your software include motion detection?Does your software include motion detection?
Our software does include motion detection. Most Arecont Vision cameras also support on-board
motion detection that, in contrast to software motion detection, does not take up CPU cycles. The “on
camera” feature was implemented to reduce the overall network bandwidth so the camera itself will
not send images until motion is detected. The user can adjust 3 motion detection sensitivity settings
and specify up to 64 motion detection zones.
8.
8. What
What adjustments
8.8.
adjustments can be made
WhatWhat
adjustments adjustments
can be made to reduce motion blur?
can be madecan be made
to reduce motion blur?
to reduce motion blur?to reduce motion blur?
The shutter speed is automatically controlled by the camera. Motion blur may occur when the camera
operates at slow shutter speeds (long exposure times, such as the scene being relatively dark.
Arecont Vision cameras provide a number of options that allow the user to control auto-exposure
behavior when illumination is low.
The user can set the preferred exposure time that the camera will attempt to maintain as long as
ARECONT VISION AV100 VIDEO SYSTEM USER MANUAL
52
illumination level allows. This setting essentially allows the user to choose the tradeoff between gains
and exposure time at reduced light levels. There are 3 basic settings: Speed, Balance, and Quality
(Figure 15). These settings can be selected from “Low Light Mode” menu Mode list. The Speed
setting will result in higher image noise but will attempt to maintain 10ms exposure time for as long
as possible, reducing motion artifacts. The Quality setting will maintain 40 ms exposure time,
resulting in low-noise image with some motion blur in low light. The Balanced setting falls between
Quality and Speed.
There are also two special modes, High Speed and MoonLight™, which can be used for very fast
moving targets and very low illumination, respectively. High Speed mode allows the user to specify a
fixed exposure time in terms of milliseconds (from 1 to 80). While this will allow crisp video of fast
moving vehicles, the side effect of this setting is that low-light performance of the camera will be
significantly worse (up to 800 times) than in default mode. Therefore, High Speed should only be
used for well lit scenes.
The other special mode, MoonLight™ implements long exposure times of up to 0.5 seconds in
combination with proprietary noise cancellation technology. This mode allows viewing under
extremely low illumination conditions. It is important to note, that MoonLight™ is NOT digital frame
integration and will offer significantly better image quality than cameras that employ digital frame
integration. However, the motion blur will still be significant.
Arecont Vision 425 E Colorado St, 7th Floor Glendale, CA 91205 Revised 12/20/2010
www.arecontvision.com
www.arecontvision.com
www.arecontvision.comwww.arecontvision.com
Page 53

Setting the Low Light Mode to Speed is the first thing to try to eliminate motion blur. If that doesn't
produce enough improvement, the user may want to open the lens aperture more to allow more light
in. The user may also want to consider going with the camera equipped with auto-iris lens - the lens
will open automatically as illumination diminishes. If that is not sufficient, the user may want to
consider using a lower resolution camera. For example, the 2-megapixel AV2100 has larger pixels
and has better low-light sensitivity than the 3-mega pixel product, AV3100. If that still does not yield
sufficient low-light performance then, the user should consider the AV3130 day-night camera that
uses a monochrome sensor in low light conditions and is sensitive to 0.00 lux .
9.
9. Can image archival
Can image archival be configured for cyclic recording?
9.9.
Can image archivalCan image archival
be configured for cyclic recording?
be configured for cyclic recording?be configured for cyclic recording?
AV100 software will overwrite old files every few minutes once the available disk space reaches a
limit value that the end user can set. This value is set under the “Archive” menu in “Minimum Free
Disk Space” in the AV100 software.
ARECONT VISION AV100 VIDEO SYSTEM USER MANUAL
53
10.
10. Why do I get a license warning?
Why do I get a license warning?
10.10.
Why do I get a license warning?Why do I get a license warning?
A license is only needed for archiving video. This warning will display until the software is licensed. You
can obtain a license file by contacting your distributor or contacting
websales@arecontvision.com
websales@arecontvision.com....
websales@arecontvision.comwebsales@arecontvision.com
11.
11. How do I disable the auto startup of the Arecont Vision software?
How do I disable the auto startup of the Arecont Vision software?
11.11.
How do I disable the auto startup of the Arecont Vision software?How do I disable the auto startup of the Arecont Vision software?
Click on
Advanced
Advanced
AdvancedAdvanced
on the AV Software Settings and uncheck “Auto – Startup”.
12.
12. How do the Arecont Vision cameras utilize PTZ (Pan, Tilt, Zoom)?
How do the Arecont Vision cameras utilize PTZ (Pan, Tilt, Zoom)?
12.12.
How do the Arecont Vision cameras utilize PTZ (Pan, Tilt, Zoom)?How do the Arecont Vision cameras utilize PTZ (Pan, Tilt, Zoom)?
There is no mechanical PTZ. However, Arecont Vision cameras allow instantaneous electronic pan,
tilt and zoom by specifying PTZ window coordinates. Multiple users can each select their own
windows allowing for independent PTZ control. Users of AV100 software can create a zoom window
and use keyboard to move the zoom window around to achieve PTZ effect.
13.
13. How can I get the AV100 built
How can I get the AV100 built----in web server to work?
13.13.
How can I get the AV100 builtHow can I get the AV100 built
in web server to work?
in web server to work?in web server to work?
AV100 software has a built-in web server that allows multi-user remote access to live video and video
archives. This web server can be accessed from any web browser by typing:
HTTP://ip_address:port/guix.htm
HTTP://ip_address:port/guix.htm
HTTP://ip_address:port/guix.htmHTTP://ip_address:port/guix.htm
where ip_address is the IP address of the computer running AV100 and the port corresponds to the
port number set in the Remote Viewing menu. Please note that in order to access the AV100 server
remotely, the user should enable the server by checking the “Allow Remote Viewing” field and
selecting a port that is not blocked by their firewall. For increased security the default value of remote
access port is 4250, but any port may be selected for this purpose. Often, port 80 (HTTP port) is
Arecont Vision 425 E Colorado St, 7th Floor Glendale, CA 91205 Revised 12/20/2010
www.arecontvision.com
www.arecontvision.com
www.arecontvision.comwww.arecontvision.com
Page 54

ARECONT VISION AV100 VIDEO SYSTEM USER MANUAL
54
most likely to be open on a secured network as it is used by default for most web browsing. See page
37 for more details on configuring remote viewing.
14.
14. When I attempt to update the firmware on the
When I attempt to update the firmware on the Arecont Vision camera
14.14.
When I attempt to update the firmware on the When I attempt to update the firmware on the
receive the “Ack Timeout” message. Why do I get this error?
receive the “Ack Timeout” message. Why do I get this error?
receive the “Ack Timeout” message. Why do I get this error?receive the “Ack Timeout” message. Why do I get this error?
Arecont Vision camera with the firmware update option I
Arecont Vision cameraArecont Vision camera
If you get the timeout message take the following steps:
•
Make sure that no application, aside from FirmwareLoader.exe, is accessing the camera
during the update
•
•
Make sure that the camera is connected via switch and not with a cross-over cable
Re-run AV Installer prior to the upgrade to make sure the camera is accessible and there is
no IP conflict
15.
15. What is
What is Ethereal or Wireshark
15.15.
What is What is
Ethereal or Wireshark and where can I get it?
Ethereal or WiresharkEthereal or Wireshark
and where can I get it?
and where can I get it?and where can I get it?
Ethereal and Wireshark are network protocol analyzers. When camera exhibit network related issues,
for example connection issues, loss of frames, etc., our technical support team may need a network
traffic log captured by Ethereal or Wireshark to help trace the issues. Ethereal can be downloaded for
free at
http://www.ethereal.com/
http://www.ethereal.com/.
http://www.ethereal.com/http://www.ethereal.com/
.
Wireshark is available at
. .
with the firmware update option I
with the firmware update option I with the firmware update option I
http://www.wireshark.org/
http://www.wireshark.org/....
http://www.wireshark.org/http://www.wireshark.org/
16.
16. How can I download the latest copy of AV100 and th
How can I download the latest copy of AV100 and this manual?
16.16.
How can I download the latest copy of AV100 and thHow can I download the latest copy of AV100 and th
is manual?
is manual?is manual?
The latest copy of the software and manual are available as of this manual revision from
http://www.arecontvision.com
http://www.arecontvision.com
http://www.arecontvision.comhttp://www.arecontvision.com
under Support, in the Product Literature/Downloads section.
17.
17. When I start the AVI Maker to export a video, why do I only get one image?
When I start the AVI Maker to export a video, why do I only get one image?
17.17.
When I start the AVI Maker to export a video, why do I only get one image? When I start the AVI Maker to export a video, why do I only get one image?
The exact time must be selected (hour, minute, second). Please refer to the AVI Maker section of this
manual for further instructions.
18.
18. Where do I find H.264 demo movies on the we
Where do I find H.264 demo movies on the web site?
18.18.
Where do I find H.264 demo movies on the weWhere do I find H.264 demo movies on the we
H.264 demo videos are available upon request. Please access
b site?
b site? b site?
http://support.arecontvision.com/
request a video.
to
Arecont Vision 425 E Colorado St, 7th Floor Glendale, CA 91205 Revised 12/20/2010
www.arecontvision.com
www.arecontvision.com
www.arecontvision.comwww.arecontvision.com
Page 55

ARECONT VISION AV100 VIDEO SYSTEM USER MANUAL
Chapter
Chapter VVVV ---- Regulatory Compliance
Chapter Chapter
Regulatory Compliance
Regulatory ComplianceRegulatory Compliance
Terms and Conditions of Sale
Terms and Conditions of Sale
Terms and Conditions of SaleTerms and Conditions of Sale
1. Terms and Conditions.
1. Terms and Conditions.
1. Terms and Conditions.1. Terms and Conditions.
supersede any and all terms and conditions set forth in any documents issued by Purchaser,
including Purchaser’s purchase order. ANY ADDITIONAL, DIFFERENT OR CONFLICTING TERMS
AND CONDITIONS HEREBY ARE OBJECTED TO BY ARECONT VISION, LLC (“AV”), AND SHALL
BE OF NO FORCE AND EFFECT. No waiver or amendment of these terms and conditions shall be
binding on AV unless made in writing expressly stating that it is such a waiver or amendment and
This sale is subject to the terms and conditions set forth below, which
55
signed by AV.
2. Limited Warranty.
2. Limited Warranty.
2. Limited Warranty.2. Limited Warranty.
each Product shall be free from material defects in material and workmanship for a period of twelve
(12) months from the date of shipment (the “Warranty Period”); (b) during the Warranty Period, the
Products will materially conform with the specification in the applicable documentation; (c) all
licensed programs accompanying the Product (the “Licensed Programs”) will materially conform with
applicable specifications. Notwithstanding the preceding provisions, AV shall have no obligation or
responsibility with respect to any Product that (i) has been modified or altered without AV’s written
authorization; (ii) has not been used in accordance with applicable documentation; (iii) has been
subjected to unusual stress, neglect, misuse, abuse, improper storage, testing or connection; or
unauthorized repair; or (iv) is no longer covered under the Warranty Period. AV MAKE NO
WARRANTIES OR CONDITIONS, EXPRESS, IMPLIED, STATUTORY OR OTHERWISE, OTHER
THAN THE EXPRESS LIMITED WARRANTIES MADE BY AV ABOVE, AND AV HEREBY
SPECIFICALLY DISCLAIMS ALL OTHER EXPRESS, STATUTORY AND IMPLIED WARRANTIES
AND CONDITIONS, INCLUDING THE IMPLIED WARRANTIES OF MERCHANTABILITY, FITNESS
FOR A PARTICULAR PURPOSE, NON-INFRINGEMENT AND THE IMPLIED CONDITION OF
AV warrants to Purchaser (and only Purchaser) (the “Limited Warranty”), that: (a)
SATISFACTORY QUALITY. ALL LICENSED PROGRAMS ARE LICENSED ON AN “AS IS” BASIS
WITHOUT WARRANTY. AV DOES NOT WARRANT THAT (I) THE OPERATION OF THE
PRODUCTS OR PARTS WILL BE UNINTERRUPTED OR ERROR FREE; (II) THE PRODUCTS OR
PARTS AND DOCUMENTATION WILL MEET THE END USERS’ REQUIREMENTS; (III) THE
PRODUCTS OR PARTS WILL OPERATE IN COMBINATIONS AND CONFIGURATIONS
SELECTED BY THE END USER; OTHER THAN COMBINATIONS AND CONFIGURATIONS WITH
Arecont Vision 425 E Colorado St, 7th Floor Glendale, CA 91205 Revised 12/20/2010
www.arecontvision.com
www.arecontvision.com
www.arecontvision.comwww.arecontvision.com
Page 56

ARECONT VISION AV100 VIDEO SYSTEM USER MANUAL
PARTS OR OTHER PRODUCTS AUTHORIZED BY AV OR (IV) THAT ALL LICENSED PROGRAM
ERRORS WILL BE CORRECTED.
3. Exclusive Remedy; Limitation of Liability.
3. Exclusive Remedy; Limitation of Liability.
3. Exclusive Remedy; Limitation of Liability.3. Exclusive Remedy; Limitation of Liability.
Purchaser’s exclusive remedy for a breach of the Limited
Warranty shall be limited to repair or replacement of, or refund for, the non-conforming Product (at
AV’s sole option). Product returned to AV for non-compliance with this Limited Warranty shall be
returned in accordance with the “Rejection/Return” provisions below. Any refund shall be equal to
the actual purchase price for the applicable Product. IN NO EVENT SHALL AV BE LIABLE TO
PURCHASER FOR ANY INDIRECT, INCIDENTAL, SPECIAL OR CONSEQUENTIAL DAMAGES
RESULTING FROM AV’S PERFORMANCE OF FAILURE TO PERFORM, WHETHER DUE TO
BREACH OF CONTRACT OR WARRANTY, NEGLIGENCE OR OTHERWISE.
4. Repaired or Replaced Product.
4. Repaired or Replaced Product.
4. Repaired or Replaced Product.4. Repaired or Replaced Product.
The warranty for repaired or replaced Product shall be limited in
scope to the warranty set forth above, and shall have a duration of the greater of (i) the remaining
56
Warranty Period in the original warranty that was applicable to the original Product, extended by the
time elapsed between AV receiving notice of the non-conformity and Purchaser's receipt of the
repaired or replaced Product; or (ii) ninety (90) days following delivery to Purchaser's of the repaired
or replaced Product.
5. Shipment and Risk of Loss.
5. Shipment and Risk of Loss.
5. Shipment and Risk of Loss.5. Shipment and Risk of Loss.
All Products shipped by AV shall be packaged in AV’s shipping cartons
so as to prevent damage and shall be delivered to a common carrier FOB AV’s facility in Altadena,
CA, USA, at which time risk of loss shall pass to Purchaser. All freight, insurance, and other shipping
expenses, as well as expenses for any special packing requested by Purchaser and provided by AV,
shall be paid by Purchaser.
6. Licensed Programs.
6. Licensed Programs.
6. Licensed Programs.6. Licensed Programs.
Upon the sale of any Product to Purchaser, AV grants to such Purchaser a non-
exclusive, non-transferable, royalty-free license to (i) install copies of the Licensed Programs in
appropriate hardware; and (ii) use the Licensed Programs for their intended purpose. Purchaser
may make copies of any Licensed Programs only as necessary to exercise its rights authorized
hereunder and as necessary to backup the Licensed Programs.
7. Payment.
7. Payment.
7. Payment.7. Payment.
Payment shall be in U.S. Dollars, and shall be due and payable in accordance with the
terms set forth on the applicable AV Quotation. Payment shall be in an amount equal to the
purchase price for the applicable Product plus all applicable taxes, shipping charges, and other
charges to be borne by Purchaser.
Arecont Vision 425 E Colorado St, 7th Floor Glendale, CA 91205 Revised 12/20/2010
www.arecontvision.com
www.arecontvision.com
www.arecontvision.comwww.arecontvision.com
Page 57

ARECONT VISION AV100 VIDEO SYSTEM USER MANUAL
8. Rejection/Return.
8. Rejection/Return.
8. Rejection/Return.8. Rejection/Return.
All Products shall be deemed accepted by Purchaser twenty (20) business days
after receipt unless Purchaser rejects such Product within such twenty (20) business day period for
failure to comply with the Limited Warranty set forth in above. Upon such rejection, Purchaser shall
immediately notify AV of the rejection and shall, at AV’s option, return the Product or allow AV to
inspect the rejected Product and shall follow AV’s instructions regarding disposition of the rejected
Product. Prior to the return of any Product to AV as provided for hereunder, Purchaser shall obtain
from AV’s Technical Support Department a Return Material Authorization (“RMA”) number. Within ten
(10) business days after receiving an RMA number for the Product, Purchaser shall package the
Product in its original packing material or an equivalent and return such Product to AV or such other
location as AV may designate in writing. AV shall bear the cost of freight and insurance for the return
to AV. Purchaser shall enclose with the returned Product the applicable RMA form, and any other
documentation or information requested by AV. AV may refuse to accept returns of any Product not
packed and shipped as provided in this paragraph. Upon verification that the Product does not
comply with the Limited Warranty, AV shall repair, replace, or provide a refund for such Product, at
57
AV’s option, no later than thirty (30) days after the time AV receives from Purchaser written notice of
such return or rejection. AV shall be responsible for returning, at AV’s cost, repaired or replaced
Products to Purchaser.
9.
9. General Provisions.
General Provisions.
9. 9.
General Provisions.General Provisions.
Notwithstanding any other provision hereof, performance by AV shall be
excused to the extent that performance is rendered commercially unreasonable by acts of God, war,
fire, flood, riot, power failure, embargo, material shortages, strikes, governmental acts, man-made or
natural disasters, earthquakes, failure or limitation of supply, or any other reason where failure to
perform is beyond the reasonable control and not caused by the negligence of AV. The time for
performance shall be extended for the time period lost due to the delay. This Agreement shall be
governed by and construed under the laws of the State of California, USA, without reference to
conflict of laws. These terms and conditions, including those on the face page hereof (if any), set
forth the entire agreement and understanding of AV and Purchaser with respect to the sale and
distribution of Products, the Licensed Products and Parts and supersede all prior or
contemporaneous agreements relating thereto, written or oral, between the parties. Purchaser may
not assign its rights or delegate its obligations hereunder without the express written consent of AV.
Any assignment by Purchaser without such consent shall constitute a breach hereof by Purchaser.
Arecont Vision 425 E Colorado St, 7th Floor Glendale, CA 91205 Revised 12/20/2010
www.arecontvision.com
www.arecontvision.com
www.arecontvision.comwww.arecontvision.com
 Loading...