

Page 1
COOKER HOOD
GB
USER INSTRUCTIONS
DUNSTABZUGSHAUBE
D
GEBRAUCHSANWEISUNG
HOTTE PER CUISINE
F
MANUEL DUTILISATION
AFZUIGKAP
NL
GEBRUIKSAANWIJZING
CAMPANA EXTRACTORA
E
MANUAL DE UTILIZACIÓN
COIFA ASPIRANTE
P
MANUAL DO USUÁRIO
CAPPA ASPIRANTE
I
MANUALE DUSO
S
VENTILATOR
N
BRUKERVEILEDNING
DK
BRUGERVEJLEDNING
LIESITUULETIN
FIN
GR
ODHGIES CRHSEWS
RUS
OKAP
PL
INSTRUKCJE UZYTKOWNIKA
ODSAVAC
CZ
NÁVOD K POÙZITÌ
PARAELSZIV
H
HASZNÁLATI ÚTMUTATÓ
3LI0PENTA.1
Page 2

- 2 -
Page 3
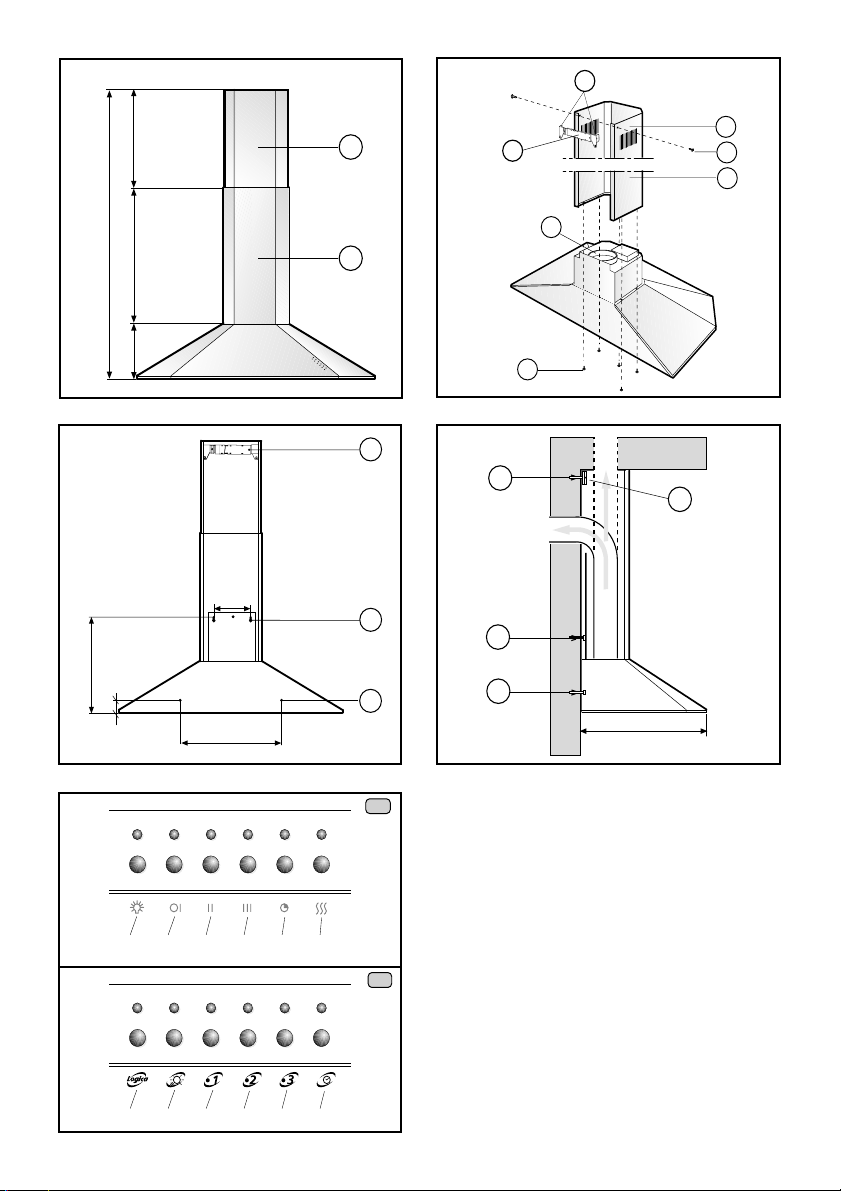
Fig.1
Fig.2
G
Fig.3
413
Max 500
Max 1238
Min 738
588
150
46
235
490
E
Z
L
F
Y
F
H
E
A
Fig.4
A
Z
C
C
D
D
500
Fig.5
1A
A B C D E F
1B
L A B C D E
- 3 -
Page 4

ENGLISH
GENERAL
Carefully read the following important information regarding installation
safety and maintenance. Keep this information booklet accessible for
further consultations. The appliance has been designed as a exhausting
version (external exhaust) or as a filter version (internal air recycle)
cooker hood.
SAFETY PRECAUTION
1. Take care when the cooker hood is operating simultaneously with an
open fireplace or burner that depend on the air in the environment and
are supplied by other than electrical energy, as the cooker hood removes
the air from the environment which a burner or fireplace need for
combustion.
The negative pressure in the environment must not exceed 4Pa (4x10
-5 bar).
Provide adequate ventilation in the environment for a safe operation of
the cooker hood.
Follow the local laws applicable for external air evacuation.
2. WARNING !
In certain circumstances electrical appliances may be a danger
hazard.
A) Do not check the status of the filters while the cooker hood
is operating
B) Do not touch the light bulbs after appliance use
C) Flambè cooking is prohibited underneath the cooker hood
D) Avoid free flame, as it is damaging for the filters and a fire
hazard
E) Constantly check food frying to avoid that the overheated
oil may become a fire hazard
F) Disconnect the electrical plug prior to any maintenance.
G) This appliance is not intended for use by young children or
infirm persons without supervision
H) Young children should be supervised to ensure they do not
play with the appliance
I) There shall be adequate ventilation of the room when the
rangehood is used at the same time as appliances burning gas
or other fuels
L) There is a risk of fire if cleaning is not carried out in accordance
with the instructions
INSTALLATION INSTRUCTIONS
• ELECTRIC CONNECTION
The appliance has been manufactured as a class II, therefore no earth
cable is necessary.
The connection to the mains is carried out as follows:
BROWN = L line
BLUE = N neutral
If not provided, connect a plug for the electrical load indicated on the
description label. Where a plug is provided, the cooker hood must be
installed in order that the plug is easily accessible.
An omnipolar switch with a minimum aperture of 3mm between
contacts, in line with the electrical load and local standards, must be
placed between the appliance and the network in the case of direct
connection to the electrical network.
• The appliance must be installed at a minimum height of 650 mm from
an cooker stove in case of a gashob or an electrical hob.
If a connection tube composed of two parts is used, the upper part must
be placed outside the lower part.
Do not connect the cooker hood exhaust to the same conductor used
to circulate hot air or for evacuating fumes from other appliances
generated by other than an electrical source.
• Exhaust must not be discharged into a flue which is used for exhausting
fumes from an appliance burning gas or other fuels
• MOUNTING THE COOKER HOOD TO THE WALL
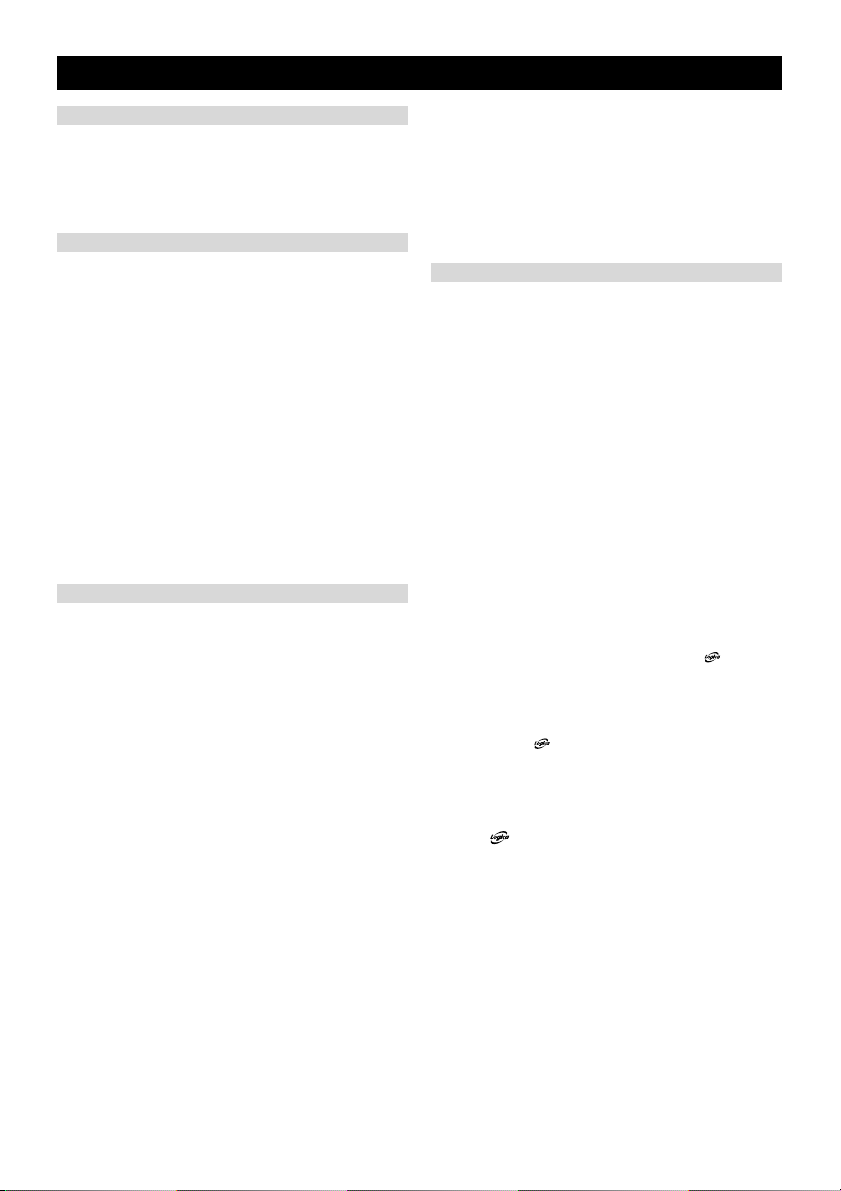
Drill holes A-C-D according to indications quoted in (fig. 3).
Use screws and screw anchors suitable for wall (e.g. reinforced
cement, plasterboard) for the mounting of the cooker hood.
Where screws and screw anchors are supplied ensure that they are
suitable for the type of wall where the cooker hood is to be mounted.
Lock in the flange connector Y to the cooker hood (fig. 2).
Affix the bracket Z to the wall via the drill holes A
Hang the cooker hood on the wall using the drill holes C.
Fasten the cooker hood using the fastening drill holes D.
• EXHAUSTING VERSION
Connect the flange Y to the discharge opening with a connecting tube
(do not carry out for filter version).
Insert the upper exhausting of the chimney E inside the lower section
F. Fix the lower of the chimney tothe hood by the screws H supplied
(fig. 2). Pull out the upper section up to bracket Z and fix the screws L
(fig. 2)In order to transform your cooker hood from suction version to
filter version, ask your local retailer for active carbon filters and then
carry out instructions for mounting filter version cooker hood.
• FILTERING VERSION
IInstall the cooker hood and the two connectors as described in the
paragraph mounting the exhausting version cooker hood.
To mount the filter connector refer to instructions included in the kit.
If the kit is not supplied, then order the kit as an accessory from your
local dealer. The filters must be fitted to the fan unit placed inside the
cooker hood. The air is replaced in the environment via the eyelets
impressed on the connector E.
USE AND MAINTENANCE
• It is recommended to operate the appliance prior to cooking.
It is recommended to leave the appliance in operation for 15 minutes
after cooking is terminated in order to completely eliminate cooking
vapours and odours.
The proper function of the cooker hood is conditioned by the regularity
of the maintenance operations, in particular, the active carbon filter.
• The anti-grease filters capture the grease particles suspended in the
air, and are therefore subject to clogging according to the frequency of
the use of the appliance.
In order to prevent fire hazard, it is recommendable to clean the filter
at a maximum of 2 months by carrying out the following instructions:
- Remove the filters from the cooker hood and wash them in a solution
of water and neutral liquid detergent, leaving to soak.
- Rinse thoroughly with warm water and leave to dry.
- The filters may also be washed in the dishwasher.
The aluminium panels may alter in colour after several washes. This
is not cause for customer complaint nor replacement of panels.
• The active carbon filters purify the air that is replaced in the
environment. The filters are not washable nor re-useable and must be
replaced at maximum every four months. The saturation of the active
carbon filter depends on the frequency of use of the appliance, by the
type of cooking and the regularity of cleaning the anti-grease filters.
• Clean the fan and other surfaces of the cooker hood regularly using
a cloth moistened with denatured alcohol or non abrasive liquid
detergent.
CONTROLS: 1A)ELECTRONIC 1B)LOGIC _(FIG.5)
A = LIGHT
B = OFF/SPEED I
C = SPEED II
D = SPEED III
E = AUTOMATIC STOP TIMER – 15 minutes
F = FILTER SATURATION RESET LIGHT
L = LOGIC
When the “filter saturation” light flashes, the anti-grease filters must
be washed.
When the light comes on without flashing, the anti-grease filters must
be washed and the carbon filters replaced (in case of operation whit the
recycling version).
When this operation has been completed, press the key to reset it.
The “automatic stop timer” delays stopping of the hood, which will
continue functioning for 15 minutes at the operating speed set at the
time this function is activated.
• LOGIC
a. AUTOMATIC LIGHT PLUS MOTOR OPERATION
Ensure that the cooker hood is in the OFF position and depress the
logic button. The motor starts up at the speed selection 1 and the lights
remain switched off. When the Logic function detects the presence of
a person or an increase in fumes and/or vapour, the lights turn on
automatically and the motor moves to speed selection 2. After 15
seconds the light switches off and the motor returns to the speed
selection 1. Depress the Logic button to disactivate the Logic function.
b. AUTOMATIC LIGHT OPERATION
Ensure that the the cooker hood is in the OFF position, depress the light
button and then the Logic button.
The lights switch on automatically when the Logic function detects the
presence of a person.
The light switches off after 15 seconds.
Depress the Logic button to disactivate the Logic function.
c. AUTOMATIC MOTOR OPERATION
Ensure that the the cooker hood is in the OFF position, depress the
motor start button on speed selection 1 or 2 and then the Logic button.
When the Logic function detects the presence of
a person or the increase of fumes and/or vapour
it will increase the motor speed automatically.
Depress the Logic button in order to disactivate the Logic function.
THE MANUFACTURER DECLINES ALL RESPONSIBILITY FOR
EVENTUAL DAMAGES CAUSED BY BREACHING THE ABOVE
WARNINGS.
- 4 -
Page 5
DEUTSCH
ALLGEMEINES
Diese Anleitung bitte aufmerksam durchlesen, da sie wichtige
Sicherheitshinweise zur Installation, zum Gebrauch und zur Wartung
enthält. Die Anleitung für eventuelle zukünftige Konsultationen
aufbewahren. Das Gerät wurde als Abzugshaube (die angesaugte Luft
wird nach aussen abgeleitet), Umlufthaube (die Luft wird in den Raum
zurückgeleitet) konzipiert oder als mit zentraler Absauganlage
entwickelt.
SICHERHEITSHINWEISE
1. Vorsicht ist geboten, wenn gleichzeitig eine Abzugshaube und ein
raumluftabhängiger Boiler oder ein offenes Feuer in Betrieb sind, die
von einer anderen Energiequelle als Strom versorgt werden, da die
Küchenhaube die Raumluft absaugt, die auch der Boiler oder das Feuer
zur Verbrennung benötigen. Der Unterdruck im Raum darf den Wert
von 4 Pa (4 x 10⁻⁵ bar) nicht übersteigen. Um einen sicheren Betrieb
der Abzugshaube zu gewährleisten, ist daher immer auf eine
ausreichende Belüftung des Raumes zu achten. Bei der Ableitung der
Luft nach aussen müssen die nationalen Vorschriften eingehalten werden.
2. ACHTUNG !
Elektrogeräte können unter gewissen Umständen gefährlich sein!
A) Niemals die Filter kontrollieren, wenn die Küchenhaube in
Betrieb ist.
B) Niemals die Lämpchen nach längerem Betrieb der
Küchenhaube anfassen.
C) Es ist verboten, Speisen unter der Abzugshaube zu
flambieren.
D) Offene Flammen sind unbedingt zu vermeiden, da diese die
Filter beschädigen und einen Brand verursachen können.
E) Beim Frittieren sind die Speisen ständig zu kontrollieren,
um die Entzündung des Öls zu vermeiden.
F) Wird das Netzkabel dieser Haube beschädigt, muss es in
einer vom Hersteller zugelassenen Werkstatt ersetzt werden,
da hierzu Spezialwerkzeug benöetigt wird.
G) Vor jeglichen Wartungsarbeiten unbedingt den Netzstecker
aus der Steckdose entfernen.
INSTALLATIONSANLEITUNG
• Elektroanschluss
Die Küchenhaube gehört zur Geräteklasse II, daher muss keine der
Leitungen geerdet werden. Der Anschluss an das Stromnetz ist
folgendermassen durchzuführen:
BRAUN = L Leitung
BLAU = Neutrale Linie
Falls nicht vorhanden, muss ein Normstecker mit den auf dem
Typenschild angegebenen Werten an das Kabel angeschlossen werden.
Wenn die Küchenhaube mit einem Netzstecker ausgestattet ist, muss
diese so installiert werden, dass der Stecker gut zugänglich ist.
Beim Direktanschluss an das Stromnetz muss zwischen Gerät und
Netz ein der Netzlast und den geltenden Vorschriften entsprechender
Mehrpolstecker mit einer Mindestöffnung von 3 mm zwischen den
Kontakten installiert werden.
• Das Gerät muss in einem Mindestabstand von 650mm über einer Gasoder elektrischen Kochfläche installiert werden.
Falls ein Verbindungsrohr verwendet wird, das aus zwei oder mehr
Teilen zusammengesetzt ist, muss der obere Teil über den unteren
gestülpt werden. Auf keinen Fall darf das Abluftrohr der Küchenhaube
an ein Rohr angeschlossen werden, in dem Warmluft zirkuliert oder
das zur Entlüftung von Geräten verwendet wird, die an eine andere
Energiequelle als an Strom angeschlossen sind.
• WANDMONTAGE DER DUNSTABZUGSHAUBE
Vor der Montage ist die Schutzfolie von der Dunstabzugshaube und vom
Filtereinsatz zu entfernen. Die Löcher A-C-D in die Wand bohren, dabei
müssen die angegebenen Abstände eingehalten werden (Abb. 3).
Für die unterschiedlichen Montagen müssen Schrauben und Dübel
verwendet werden, die für den jeweiligen Wandtyp geeignet sind ( z.B.
für Stahlbeton, Gips, etc.). Falls die Schrauben und Dübel der
Küchenhaube beigefügt sind, ist zu prüfen, ob diese für den Wandtyp
geeignet sind, an dem das Gerät installiert werden soll. Den
Anschlussflansch Y an die Küchenhaube anschliessen (Abb. 2).
Den Tragbügel Z in den Bohrlöchern A an der Wand befestigen.
Die Küchenhaube an die Wand hängen, dafür die Bohrlöcher C verwenden.
Die Küchenhaube endgültig fixieren, dabei die Sicherheitsbohrlöcher D
verwenden.
• ABLUFTVERSION
Den Flansch Y mit Hilfe eines Anschlussrohres an die Abluftöffnung
anschliessen (diesen Arbeitsschritt bei der Küchenhaube in Umluftversion
nicht ausführen!). Das obere Anschlußstück E in den unteren Anschluß
F (Abb.2). Das untere Anschlußstück F mit den beiliegenden Schrauben
H (Abb.2) an der Abzugshaube befestigen. Den oberen Anschluß bis zur
Halterung Z ausziehen und mit den Schrauben L befestigen (Abb.2).
Um die Küchenhaube von der Abzugsversion in die Umluftversion
umzuwandeln, müssen Sie bei Ihrem Fachhändler die Aktivkohlefilter
anfordern; dann die Montageanweisungen der Umlufthaube ausführen.
•
Filterversion
Die Küchenhaube und die beiden Anschlussringe, so wie im Abschnitt
über die Montage der Küchenhaube in Abluftversion angegeben,
montieren. Bei der Montage des Filterringes müssen die im Kit
enthaltenen Anleitungen genau beachtet werden. Falls das Kit nicht
mitgeliefert ist, muss dieses bei Ihrem Händler als Zubehörteil
angefordert werden. Die Filter müssen im Inneren der Küchenhaube
eingesetzt werden. Die Luft wird über die Schlitze, die sich im Ring E
befinden, in den Raum zurückgeleitet.
BENUTZUNG UND WARTUNG
• Es wird empfohlen, die Küchenhaube schon vor sämtlichen
Kochvorgängen der Speisen einzuschalten.
Es wir weiterhin empfohlen, das Gerät nach Beendigung des
Kochvorganges noch 15 Minuten weiterlaufen zu lassen, um die
vollständige Entlüftung der Kochdämpfe zu gewährleisten.
Das einwandfreie Funktionieren der Küchenhaube hängt entscheidend
von der Sorgfalt ab, mit der die Wartungsarbeiten durchgeführt werden,
insbesondere die des Fettfilters und die des Aktivkohlefilters.
• Die Fettfilter haben die Aufgabe, die Fettpartikel in der Abluft zu
binden; die Stärke der Verschmutzung hängt daher von der Häufigkeit
des Gebrauchs der Küchenhaube ab. Um eine mögliche Brandgefahr
zu verhindern, muss der Filter in jedem Fall spätestens alle zwei
Monate auf die folgende Weise gereinigt werden:
- Der Abzugshaube die Filter entnehmen und mit Wasser und einem
flüssigen Neutralreiniger abwaschen. Wenn notwendig, einweichen lassen.
- Dann gründlich mit lauwarmem Wasser abspülen und abtrocknen lassen.
- Die Filter können auch in der Geschirrspülmaschine gewaschen werden.
Nach mehrmaligem Waschen der Aluminiumfilter können
Farbveränderungen auftreten. Daraus resultiert jedoch kein Anspruch
auf einen kostenlosen Ersatz der Paneele.
• Die Aktivkohlefilter dienen dazu, die Luft zu reinigen, die wieder in
den Raum zurückgeführt wird. Die Filter sind weder waschbar noch
wiederverwertbar und müssen spätestens alle vier Monate
ausgewechselt werden. Die Sättigung der Aktivkohle hängt ab von der
mehr oder minder langen Benutzungsdauer der Küchenhaube, von der
Art der zubereiteten Speisen und von der Regelmässigkeit, mit der die
Reinigung des Fettfilters durchgeführt wird.
• Alle auf dem Lüftergehäuse und den anderen Teilen der Haube
angesammelten Rückstände sind regelmässig mit Spiritus oder
neutralem Flüessigkeitsreiniger ohne Scheuermittel zu entfernen.
• BEDIENUNG:1A)ELEKTRONISCHE 1B)LOGICA _(fig.5):
A = Taste BELEUCHTUNG
B = Taste OFF/ERSTE GESCHWINDIGKEIT
C = Taste ZWEITE GESCHWINDIGKEIT
D = Taste DRITTE GESCHWINDIGKEIT
E = Taste TIMER AUTOMATISCHES ANHALTEN nach 15 Minuten
F = Taste RESET KONTROLLEUCHTE SÄTTIGUNG FILTER
L = Taste LOGICA
Wenn die Kontrolleuchte “Sättigung Filter” aufblinkt, so müssen die
Fettfilter gewaschen werden. Wenn die Kontrolleuchte ohne zu blinken
aufleuchtet, so müssen die Fettfilter gewaschen und die Aktivkohlefilter
ausgewechselt werden (bei der Version mit Umwälzung). Anschließend
die Resettaste drücken. Die Funktion “Timer automatisches Anhalten”
verzögert das Anhalten der Haube, die 15 Minuten mit der zum Zeitpunkt
der Einschaltung dieser
• LOGICA
a. Automatiche Einschaltung der Beleuchtung plus Motor
Bei Ausschaltstellung der Haube auf den Druckknopf Logica drücken:
Der Motor läuft auf Stufe 1 an und das Licht dauert aus an.
Sobald Logica eine menschliche Anwesenheit oder die Zunahme des
Dunstes wahrnimmt, schaltet sie automatisch das Licht ein und den
Motor auf Stufe 2 um. Nach 15 Sekunden schaltet sie das Licht wieder
aus und den Motor auf Stufe 1 wieder um. Um Logica abzuschalten, auf
den entsprechende Druckknopf wieder drücken.
b. Automatiche Ein/Ausschaltung der Beleuchtung
Bei Ausschaltstellung der Haube auf den Licht- bzw. Logica- Druckknopf drücken: Nimmt Logica menschliche Anwesenheit wahr, so
schaltet sie automatisch das Licht ein und nach 15 Sekunden wieder
aus. Um Logica abzuschalten, auf den entsprechende Druckknopf wieder drücken.
c. Automatischer Anlauf des Motors
Bei Ausschaltstellung der Haube auf den Motor- (Stufe 1 oder 2) und
dann auf den Logica Druckknopf drücken: Sobald Logica eine menschliche Anwesenheit oder die Zunahme des Dunstes wahrnimmt, schaltet sie automatisch den Motor auf die höhere Stufe um. Um Logica
abzuschalten, auf den entsprechende Druckknopf wieder drücken.
FÜR SCHÄDEN, DIE AUF DIE NICHTBEACHTUNG DER OBEN
GENANNTEN ANWEISUNGEN ZURUCKZUFÜHREN SIND,
WIRD KEINERLEI VERANTWORTUNG ÜBERNOMMEN.
- 5 -
Page 6
FRANÇAIS
GÉNERALITÉS
Lire attentivement le contenu du mode d'emploi puisqu'il fournit des
indications importantes concernant la sécurité d'installation, d'emploi
et d'entretien. Le conserver pour d' ultérieures consultations. L'appareil a été réalisé comme hotte aspirante (évacuation air à l'exterieur)
ou filtrante (recyclage air à l'interieur).
CONSEILS POUR LA SÉCURITÉ
1. Attention, lorsque dans la même pièce vous utilisez simultanément
la hotte à évacuation avec un brûleur ou une cheminée alimentés par
une énergie autre que l'électricité, vous pouvez créer un problème
"d'inversion de flux". Dans ce cas la hotte aspire l'air nécessaire à leur
combustion. La dépression dans le local ne doit pas dépasser les 4 Pa
(4 x 10 -5 bar). Pour un fonctionnement en toute sécurité, n'oubliez pas
de prévoir une ventilation suffisante du local. Pour l'évacuation vers l'extérieur, veuillez vous référer aux dispositions en vigueur dans votre pays.
2. ATTENTION !
Dans des circonstances déterminées les électroménagers peuvent être dangereux.
A)Ne pas controler les filtres pendant que la hotte est en fonctionnement
B)Nepas toucher les lampes après un emploi prolongé de l'appareil
C)Il est interdit de cuire les aliments à la flamme sous la hotte
D)Eviter la flamme libre, parcequ'elle est nuisible pour les filtres
et dangereuse pour les incendies
E)Controler constamment les aliments frits pour éviter que
l'huile surchauffée/ne prenne feu
F)Avant d'effectuer n'importe quel entretien déconnecter la
hotte du réseau électrique.
INSTRUCTIONS POUR L'INSTALLATION
• Connexion électrique
L'appareil est construit en classe II, pour cela aucun cable ne doit être
connecté avec la prise terre. La connection avec le réseau électrique
doit être éxécutée comme suit:
MARRON = L ligne
BLEU = N neutre
Si elle n'a pas été prévue, monter sur le cable une fiche normalisée
pour la charge indiquée sur l'etiquette des caractéristiques. Si elle est
dotée d'une fiche, la hotte doit être installée en sorte que la fiche soit
accessible. En cas de connection directe avec le réseau électrique, il
est nécessaire d'interposer entre l'appareil et le réseau un interrupteur
omnipolaire avec une ouverture minimale entre les contacts de 3 mm,
proportionnel à la charge et correspondant aux normes en vigueur.
• L’appareil doit être installé à une hauteur minimum de 650 mm des
cuisinipres électriques. S'il doit être utilisé un tuyau de connection
composé de deux ou plusieurs parties, la partie superieure doit être
à l'exterieur de celle inférieure. Ne pas relier le tuyau d'échappement
de la hotte à un conduit dans lequel circule de l'air chaud ou employé
pour évacuer les fumées des appareils alimentés par une énergie
differente de celle électrique.
• FIXATION DE LA HOTTE SUR LE MUR.
Percer les trous A-C-D en respectant les cotes indiquées (fig. 3).
Pour les différents montages, utiliser les vis et chevilles à expansion
correspondant au type du mur (ex béton armé, plâtre, etc.).
Dans le cas où les vis et chevilles sont fournies d’origine avec le
produit, vérifier qu’elles correspondent bien au type de mur sur lequel
doit être montée la hotte. Bloquer la bride du raccord Y à la hotte (fig. 2).
Bloquer les supports Z sur le mur grâce aux trous A. Accrocher la
hotte au mur en utilisant les trous C. Pendre la hotte à la paroi en
utilisant les trous de sécurité D.
• VERSION ASPIRANTE
Raccorder, au moyen d’un tube intermédiaire, la bride Y au trou
d’évacuation (sauf pour la version filtrante). Enfiler le raccord supérieur
E à l’intérieur du raccord inférieur F (fig.2). Fixer le raccord inférieur
à la hotte en utilisant les vis H fournies (fig.2). Défiler le raccord
supérieur jusqu’à la bride Z et fixer avec les vis L (fig.2). Pour
transformer la hotte de la version aspirante à la version filtrante,
demander à votre revendeur les filtres au charbon actif et suivre les
instructions de montage de la version filtrante.
• VERSION FILTRANTE
Installer la hotte et les deux raccords comme indiqué dans le paragraphe
traitant du montage de la hotte en version aspirante.
Pour le montage du raccord filtrant se référer aux instructions contenues
dans le kit. Si le kit n’est pas en dotation, le commander au revendeur
comme accessoire. Les filtres doivent être appliqués sur le groupe
d’aspiration situé à l’intérieur de la hotte. L’air est rejeté dans la pièce
grâce aux orifices situés sur le raccord E.
EMPLOI ET ENTRETIEN
• Nous vous recommandons de mettre la hotte en route avant de com-
mencer à cuisiner. Les filtres doivent être appliqués sur le groupe
d'aspiration situé à l'intérieur de la hotte en les centrant et en les faisant
tourner de 90 degrés jusqu'au blocage. Le bon fonctionnement de la
hotte est lié à la fréquence des opérations d'entretien, et plus particulièrement à l'entretien du filtre anti-graisse et du filtre au charbon actif.
• Les filtres anti graisse ont pour rôle de retenir les particules grasses
en suspension dans l'air. Ils peuvent donc se boucher plus ou moins
rapidement selon l'usage de la hotte. Dans tous les cas, pour prévenir
un éventuel risque d'incendie, il est nécessaire de nettoyer au moins
tous les deux mois le filtre en suivant les indications suivantes:
- Retirer les filtres de la hotte et les laver avec de l'eau et un détergent
liquide neutre, laisser la saleté se décoller.
- Rincer abondamment à l'eau tiède et laisser sécher.
- Les filtres peuvent également être lavés dans le lave vaisselle.
Après plusieurs lavages des panneaux en aluminium, on peut constater un changement de leur couleur. Ceci n'ouvre pas droit à réclamation afin d'obtenir un éventuel changement des panneaux.
• Les filtres au charbon actif servent à filtrer l'air qui sera rejeté dans
la pièce. Les filtres ne sont ni lavables ni régénérables et doivent être
changés tous les trois mois au maximum. La saturation du charbon
actif dépend de l'utilisation plus ou moins prolongée de l'appareil, du
type de cuisine effectué et de la régularité avec laquelle est effectué le
nettoyage du filtre anti graisse.
• Nettoyer fréquemment tous les dépôts sur le ventilateur et les autres
surfaces, en utilisant un chiffon imbibé d'alcool dénaturé ou de détergents liquides neutres non abrasifs.
• COMMANDES: 1A)ÉLECTRONIQUES_1B)LOGIQUE _(fig.5):
A = touche ECLAIRAGE
B = touche OFF/PREMIERE VITESSE
C = touche DEUXIEME VITESSE
D = touche TROISIEME VITESSE
E = touche MINUTEUR ARRET AUTOMATIQUE 15
minutes
F = touche RETABLISSEMENT TEMOIN LUMINEUX SATURATION
FILTRES
L = touche LOGIQUE
Lorsque le témoin lumineux “saturation filtres” clignotte les filtres
antigraisse doivent être lavés.
Lorsque le témoin s’allume sans clignoter les filtres antigraisse doivent
être lavés et les filtres au charbon remplacés (dans le cas d’un
fonctionnement avec la version recyclage). Après cette opération, il
faut appuyer sur la touche permettant de le rétablir.
La fonction “minuter arrêt automatique” retarde l’arrêt de la hotte, qui
continuera de fonctionner à la vitesse de service en cours au moment
de l’activation de cette fonction, pendant 15 minutes.
• LOGIQUE
a. Fonctionnement automatique lumières plus moteur
Avec la hotte en position OFF, appuyer sur le bouton Logique
Le moteur démarre à la vitesse 1 et les lumières restent éteintes.
Quand Logique relève la présence d’une personne ou une
augmentation de fumée et/ou de vapeur, il allume
automatiquement les lumières et porte le moteur à la vitesse 2.
Après 15 secondes, la lumière s’éteint et le moteur retourne en vitesse 1.
Pour désactiver Logique il suffit d’appuyer sur le bouton
Logique.
b. Fonctionnement automatique lumières
Avec la hotte en position OFF, appuyer sur le bouton d’allumage des
lumières et ensuite sur le bouton Logique.
Quand Logique relève la présence d’une personne, il allume
automatiquement les lumières.
Après 15 secondes, la lumière s’éteint.
Pour désactiver Logique il suffit d’appuyer sur le bouton Logique.
c. Fonctionnement automatique moteur
Avec la hotte en position OFF, appuyer sur le bouton d’allumage du
moteur en vitesse 1 ou 2 et ensuite sur le bouton Logique.
Quand Logique relève la présence d’une personne ou une augmentation
de fumée et/ou de vapeur, il porte automatiquement le moteur à la
vitesse la plus élevée.
Pour désactiver Logique il suffit d’appuyer sur le bouton Logique.
NOUS DECLINOS TOUTE RESPONSABILITÉ POUR LES EVENTUELS DÉGATS PROVOQUÉS PAR L'INOBSERVATION DES
SUSDITES INSTRUCTIONS.
- 6 -
Page 7

NEDERLANDS
ALGEMEEN
De inhoud van dit boekje grondig doorlezen, daar het belangrijke informatie
bevat voor veilige installatie, gebruik en onderhoud. Het boekje bewaren
voor verdere raadpleging. Het apparaat is ontworpen als afzuigkap
(Iuchtafvoer naar buiten, waarbij gezorgd moet worden voor voldoende
luchttoevoer naar de keuken) of als filter (Iuchtrecirculatie binnen).
VEILIGHEIDSVOORSCHRIFTEN
Opletten indien tegelijkertijd een afzuigkap en een brander of haard
functioneren die afhankelijk zijn van de omgevingslucht en gevoed worden
door een andere energiebron dan de elektrische energie. De afzuigkap
kan de lucht die de brander of haard nodig heeft voor de verbranding aan
de omgeving onttrekken. De negatieve druk in de omgeving mag niet
boven de 4 Pa (4 x 10⁻⁵ bar) liggen. Voor een veilige werking dient u te
zorgen voor een goede ventilatie van de ruimte. Voor de afvoer naar
buiten moet u zich houden aan de geldende voorschriften die van toepassing
zijn in uw land.
2. WAARSCHUWING !
Onder bepaalde omstandigheden kunnen huishoudelijke
apparaten gevaarlijk zijn.
A) Probeer de filters niet te controleren als de afzuigkap in werking is
B) Raak de lampen niet aan als u het apparaat lange tijd achtereen
gebruikt heeft.
C) Het is verboden om onder de afzuigkap gerechten te flamberen
D) Laat de branders niet open en bloot branden, omdat dit
schadelijk is voor de filters en gevaarlijk is met het oog op brand.
E) Tijdens frituren constant opletten, om te voorkomen dat de olie
door oververhitting vlam zou vatten
F) Alvorens onderhoudswerkzaamheden aan het apparaat te
verrichten, de stroom uitschakelen.
INSTALLATIE INSTRUCTIES
ELEKTRISCHE AANSLUITING
Het apparaat is gemaakt in klasse II (dubbel geïsoleerd), het snoer hoeft
derhalve niet op een geaard stopcontact aangesloten te worden.
De aansluiting op het elektriciteitsnet moet als volgt uitgevoerd worden:
BRUIN = L fase
BLAUW = N nulleiding
Als deze niet reeds voorzien is moet u een stekker op het snoer aansluiten
die genormaliseerd is voor de belasting die op het typeplaatje is
aangegeven. Indien van stekker voorzien moet de afzuigkap zodanig
geïnstalleerd worden dat de stekker bereikbaar is.
In het geval van een rechtstreekse aansluiting op het elektriciteitsnet
moet u tussen het apparaat en het net een meerpolige schakelaar plaatsen
met een minimale opening tussen de contacten van 3 mm. Deze
schakelaar moet berekend zijn op de belasting vermeld op het typeplaatje
en moet aan de geldende voorschriften voldoen.
Het apparaat moet geïnstalleerd worden op minimaal 650 mm boven een
gaskookplaat of elektrische kookplaat. Indien een verbindingsbuis
bestaande uit twee of meer delen gebruikt wordt, dan moet het bovenste
gedeelte aan de buitenkant van het onderste gedeelte zitten.
Sluit de afvoer van de afzuigkap niet aan op een leiding waardoor warme
lucht circuleert of die gebruikt wordt voor de afvoer van rook van apparaten
die door een andere energiebron dan elektrische energie gevoed worden.
• MONTAGE VAN DE AFZUIGKAP AAN DE WAND.
De openingen A-C-D uitvoeren volgens de aangegeven waardes (fig. 3).
Voor de verschillende montages steeds schroeven en expansiepluggen
gebruiken die geschikt zijn voor het wandtype (bijv. beton, gyproc, enz.).
Indien de schroeven en de expansiepluggen met het produkt bijgeleverd
worden controleren dat deze geschikt zijn voor het wandtype waaraan
de afzuigkap bevestigd moet worden. De verbindingsflens Y aan de
afzuigkap verbinden (fig. 2). Staaf Z aan de muur bevestigen door
middel van de openingen A. De afzuigkap aan de wand hangen door
middel van de openingen C. Definitief de afzuigkap bevestigen door
middel van de veiligheidsopeningen D.
• ZUIGVERSIE
Flens Y door middel van een verbindingsbuis aan de afvoeropening
verbinden (niet uitvoeren voor de filterversie). Het bovenste
verbindingsstuk E in het onderste verbindingstuk F (fig. 2). Het onderste
verbindingstuk aan de afzuigkap hechten door de bijgesloten H
schroeven te gebruiken (fig. 2). Het bovenste verbindingsstuk tot staaf
Z schuiven en vastschroeven door middel van de schroeven L (fig. 2).
Om de zuigversie in filterversie te veranderen vraag aan uw verkoper
om de koolstoffilters en volg de aanwijzingen van de filterversie op.
• FILTERVERSIE
De afzuigkap en de twee verbindingsbuizen installeren zoals
aangegeven in het deel over de montage van de afzuigkap in de
zuigversie. Voor de montage van de filtrerende koppeling de
aanwijzingen uit de set raadplegen. Indien de set niet bijgesloten is
deze, als accessoire, bij Uw dealer bestellen. De filters moeten op het
zuigsysteem aan de binnenkant van de afzuigkap bevestigd worden.
De lucht wordt weer in de ruimte afgevoerd via de openingen verkregen
op het verbindingsstuk E.
GEBRUIK EN ONDERHOUD
· We raden aan de afzuigkap aan te zetten voordat u met de bereiding
begint. We raden aan de afzuigkap 15 minuten aan te laten nadat het eten
bereid is voor een optimale luchtverversing. Goede werking van de
afzuigkap hangt af van een regelmatig en grondig onderhoud, in het
bijzonder van het vetfilter en van het koolstoffilter.
· Vetfilters houden vetdeeltjes die in de lucht circuleren vast, en raken
daarom oververzadigd op onregelmatige tijden, afhankelijk van het gebruik
van het apparaat. In ieder geval moeten vetfilters minimaal eens in de 2
maanden gereinigd worden door de volgende handelingen uit te voeren:
· Filters uit de afzuigkap halen en grondig reinigen in een sopje van water
en neutraal afwasmiddel, op deze wijze het vuil verwijderend. Grondig
met lauw water afspoelen en laten drogen.
· De filters mogen ook in de vaatwasmachine gereinigd worden. Na
verschillende wasbeurten van de aluminium filters kunnen
kleurveranderingen optreden. Dit geeft echter niet het recht op vervanging
van de filters.
· De koolstoffilters zuiveren de lucht die weer in de ruimte teruggevoerd
wordt. Deze filters mogen niet gereinigd of gerecycled worden en moeten
minimaal eens in de vier maanden vervangen worden. De
koolstofverzadiging hangt af van een al dan niet intensief gebruik van de
afzuigkap, van het type keuken en van de regelmaat waarmee de vetfilters
gereinigd worden.
Regelmatig de ventilator en de andere oppervlakken schoonmaken met
een doek gedrenkt in alcohol of in neutrale krasvrije afwasmiddelen.
• BEDIENINGEN: 1A) ELEKTRONISCHE_1B) LICHT _(fig.5)
A = knop LICHT
B = knop UIT/EERSTE SNELHEID
C = knop TWEEDE SNELHEID
D = knop DERDE SNELHEID
E=knopTIMER AUTOMATISCHE ONDERBREKING na 15 minuten
F = knop RESET ALARM VERZADIGDE FILTERS
L= knop LICHT
Als het lampje ‘’verzadigde filters’’ flikkert moeten de vetfilters gereinigd
worden.Als het lampje brandt zonder te flikkeren moeten de vetfilters
gereinigd worden en de koolstoffilters vervangen worden (in geval van
luchthercirculatie).Nadat de filters vervangen en gereinigd zijn op de
knop drukken om de functie weer in te stellen.
De knop “timer/automatische onderbreking” zorgt ervoor dat de
afzuigkap niet meteen stopt, deze zal voor 15 minuten blijven
functioneren, op dezelfde snelheidsstand waarop de kap ingesteld stond.
• LICHT
a. Automatische werking licht en motor
Met de afzuigkap in de OFF stand de logica knop indrukken.
De motor zal starten op snelheid 1 en de lichten blijven uit.
Als Logica de aanwezigheid van een persoon of de toename van
rook en/of stoom waarneemt zal deze automatisch de lichten
aanzetten en de motor op snelheid 2 brengen.
Na 15 seconden zal het licht uitgaan en de motor zal weer op snelheid
1 draaien.
Om Logica uit te schakelen is het voldoende op de Logica knop
te drukken
b. Automatische werking van de lichten
Met de afzuigkap in de OFF stand de lichtknop indrukken en vervolgens
de Logica knop.
Als Logica de aanwezigheid van een persoon waarneemt zal deze
automatisch de lichten aanzetten.
Na 15 seconden zal het licht uitgaan.
Om Logica uit te schakelen is het voldoende op de Logica knop te
drukken.
c. Automatische werking van de motor
Met de afzuigkap in de OFF stand, de startknop van de motor indrukken,
snelheid 1 of 2, en vervolgens de Logica knop.
Als Logica de aanwezigheid van een persoon of de toename van rook
en/of stoom waarneemt zal deze automatisch de motor op de hoogste
snelheid brengen.
Om Logica uit te schakelen is het voldoende op de Logica knop te
drukken.
DE FABRIKANT IS NIET AANSPRAKELIJK VOOR SCHADE DIE
VOORTVLOEIT UIT HET NIET IN ACHT NEMEN VAN DE
BOVENSTAANDE VOORSCHRIFTEN.
- 7 -
Page 8

ESPAÑOL
GENERALIDADES
Lea atentamente el contenido del presente libro de instrucciones pues
contiene indicaciones importantes para la seguridad en la instalación,
el uso y el mantenimiento.(Consérvelo para un posible consulta
posterior). El aparato ha sido proyectado como campana de aspiración
(evacuación del aire hacia el exterior) o filtrante (reciclaje del aire en
el interior). A causa de su complejidad y su gran peso se recomienda
que la instalación la realice personal especializado.
SUGERENCIAS PARA LA SEGURIDAD
1.Preste atención si funcionan contemporáneamente una campana
aspirante y un quemador o una chimenea que toman el aire del ambiente y están alimentados por energía que no sea eléctrica, pues la
campana aspirante toma del ambiente el aire que el quemador o la
chimenea necesitan para la combustión. La presión negativa del local
no debe superar los 4 Pa (4 x 10 -5 bares). Para un funcionamiento
seguro, realice primero una adecuada ventilación del local. Para la
evacuación externa, aténgase a las disposiciones vigentes en su país.
2. ¡ ATENCIÓN !!
En determinadas circunstancias los electrodomésticos pueden
ser peligrosos.
A) No intente controlar los filtros cuando la campana esté
funcionando.
B ) No toque las lámparas después de un uso prolongado del aparato.
C ) Está prohibido cocinar alimentos a la llama debajo de la campana.
D) Evite las llamas libres, pues resultan perjudiciales para los
filtros y pueden provocar incendios.
E) Controle en todo momento los alimentos fritos para evitar
que el aceite caliente prenda fuego.
F) Antes de realizar cualquier operación de mantenimiento
desconecte la campana de la corriente eléctrica.
INSTRUCCIONES PARA LA INSTALACIÓN
• Instalación eléctrica
El aparato está construido en clase II, por lo tanto no se debe e conectar
ningún cable a la toma de tierra. La conexión a la corriente eléctrica
debe realizarse de la siguiente manera:
MARRÓN = L línea.
AZUL = N neutro.
Si no está incluido, monte en el cable un enchufe normalizado para la
carga indicada en la etiqueta de las caracteristicas. Si está provista de
enchufe,coloque la campana de tal manera que el enchufe quede en un
sitio accesible. En caso de conexión directa a la corriente eléctrica, es
necesario interponer entre el aparato y la red un interruptor omnipolar
con abertura mínima de 3mm, adecuado a la carga y que responda a
las normas vigentes.
• Debe instalarse el aparato a una altura mínima de 650 mm de las
placas de cocción.
Si debe usarse un tubo de conexión compuesto de dos o más partes,
la parte superior debe estar fuera de la parte inferior.
No conecte la descarga de la campana a un conducto en el que circúle
airecaliente o que sea utilizado para evacuar los humos de aparatos
alimentados por una energía que no sea eléctrica.
• MONTAJE DE LA CAMPANA A LA PARED
Realice los orificios A-C-D respetando las medidas indicadas( Fig 3).
Para los distntos montajes utilice tornillos y escarpias de expansión
aecuados al tipo de pared ( ejemplo hormigón, cartón-yeso, etc).
En caso de que los tornillos y las escarpias vengan adjuntos en el
producto asegúrese de que sean adecuados para el tipo de pared donde
se va a colocar la campana. Sujete la arandela de unión Y a la campana
( fig 2). Sujete la escarpia Z al muro con los orificios A. Enganche la
campana a la pared utilizando los orificios C. Sujete definitivamente
la campana utilizando los orificios de seguridad D.
• VERSIÓN ASPIRANTE
Conecte mediante un tubo de enlace la arandela Y al orificio de
descarga ( no debe realizarse en la versión filtrante). Introduzca la
junta superior E dentro de la junta inferior F (fig 2). Sujete la junta
inferior a la campana utilizandolos tornillos H adjuntos (fig 2). Introduzca
la junta superior hasta la escarpia Z y sujételo con los tornillos L (fig
2). Para transformar la campana de versión aspirante a versión
filtrante, solicite a su proveedor los filtros al carbón activo y siga las
instrucciones de montaje de la versión filtrante.
• VERSIÓN FILTRANTE
Instale la campan y los dos empalmes como aparece indicado en el
párrrafo que trata del montaje de la campana en la versión aspirante.
Para el montaje del anillo filtrante tenga en cuenta las instrucciones
que se encuentran en el kit. Si el kit no está incluido, pídalo a su
vendedor como accesorio. Los filtros deben ser colocados en el bloque
aspirante situado en el interior de la campana. El aire vuelve a circular
en el ambiente a través de las rejillas del empalme E.
USO Y MANTENIMIENTO
• Se aconseja poner en funcionamiento el aparato antes de cocinar
cualquier tipo de alimento. Se aconseja dejar funcionando el aparato
durante 15 minutos después de haber terminado de coninara los
alimentos, para una evacuación completa del aire viciaco. El buen
funcionamiento de la campana depende de la asiduidad con la cual se
realicen las operaciones de mantenimiento, sobre todo, del filtro
antigrasa, o del filtro al carbón activo.
• Los filtros antigrasa sirven para retener las partículas de grasa en
suspensión en el aire, por lo tanto se pueden obstruir en un espacio que
depende del uso que se haga del aparato.De todas formas para evitar
el peligro de posibles incendios, como máximo cada dos meses es
necesario limpiar el filtro observando las siguientes operaciones:
- Quite los filtros de la campana y lávelos con una solución de agua y
detergente líquido neutro dejando ablandar la suciedad.
- Aclare con abundante agua templada y deje secar.
- Se pueden lavar también los filtros en el lavavajillas
Después de algunos lavados los paneles de aluminio se puede verificar en los paneles de aluminio posibles alteraciones del color. Esto
no da opción a reclamaciones para una posible sustitución de los
paneles.
• Los filtros al carbón activo sirven para depurar el aire que volverá
a circular en el ambiente. Los filtros no son lavables o reciclables y
deben ser cambiados máximo cada cuatro meses. La saturación del
carbón activo, depende del uso más o menso prolongado del aparato,
dal tipo de cocina y de la regularidad con la cual se efectúe la limpieza
del filtro antigraso.
• Limpie frecuentemente todos los restos de grasa del ventilador y de
las otras superficies usando un paño humedo con alcohol etílico o
detergentes líquidos neutros no abrasivos.
• MANDOS : 1A) Electrónicos _1B) Lógica _(fig.5):
A= botón ILUMINACION.
B= botón OFF/ PRIMERA VELOCIDAD.
C= botón SEGUNDA VELOCIDAD.
D= botón TERCERA VELOCIDAD.
E= botón TIMER PARADA AUTOMáTICA 15 MINUTOS.
F= botón ACTIVACION LUZ DE SATURACION DE LOS FILTROS.
L=botón LÓGICA
Cuando la luz “ saturación filtros” se pone intermitente hay que lavar
los filtros.Cuando la luz se enciende sin ponerse intermitente, hay que
lavar los filtros antigrasa y cambiar los filtros al carbón ( en el caso
de la versión de recirculación del aire)Una vez realizada esta
operación, pulse de nuevo el botón para volver a activarlo. La función
“ timer parada automatica” retarda la parada de la campana, que
continuará a funcionar a la velocidad seleccionada en el momento del
encendido de esta función, 15 minutos.
• LÓGICA
a. Funcionamiento automático de luces y motor
Con la campana en posición OFF, apriete el botón Lógica y el motor
se pone en funcionamiento a velocidad 1 y las luces permanecen
apagadas. Cuando Lógica percibe la presencia de una persona o
un aumento de humo y o vapore, enciende automáticamente las
luces y el motor se pone a la velocidad 2 . Pasados 15 segundos la
luz se apaga y el motor vuelve a la velocidad 1. Para desactivar lágica
es suficiente con apretar el botón Lógica.
b. Funcionamiento automático luces.
Con la campana en posición OF, apriete el botón de encendido de las
luces y sucesivamente el botón Lógica. Cuando lógica percibe la
presencia de una persona enciende automáticamente las luces.
Pasados 15 segundos la luz se apaga. Para desactivar lógica es
suficiente apretar el botón Lógica.
c. Funcionamento automático motor
Con la campana en posición OFF, apriete el botón de encendido del
motor en velocidad 1 o 2 sucesivamente al botón Lógica Cuando
lógica percibe la presencia de una persona o un aumento de humo y
o vapor pone automáticamente el motor a la velocidad más alta.
Para desactivar la lógica es suficiente apretar el botón Lógica.
EL FABRICANTE NO SE HACE RESPONSABLE DE LOS DAÑOS
PRODUCIDOS POR EL INCUMPLIMIENTO DE ESTAS
ADVERTENCIAS.
- 8 -
Page 9

PORTUGUÊS
GENERALIDADES
Ler cuidadosamente o conteúdo do presente manual já que este fornece
indicações importantes referentes à segurança de instalação, de uso
e de manutenção. Conservar o manual para qualquer ulterior consulta. O aparelho foi projetado como coifa aspirante (evacuação de ar
para o externo) ou filtrante (recirculação ar interno).
ADVERTÊNCIAS PARA A SEGURANÇA
1. Prestar atenção se estão funcionando contemporaneamente uma
coifa aspirante e um queimador ou um fogão dependentes do ar ambiente e alimentados por uma energia que não a elétrica, já que a coifa,
aspirando, tira do ambiente o ar que o queimador ou o fogão necesitam
para a combustão. A pressão negativa no local não deve ser superior
a 4 Pa (4 x 10 -5 bar). Para um funcionamento seguro, providenciar
uma oportuna ventilação do local. Para a evacuação externa, ater-se
às disposições vigentes no seu País.
2. ATENÇÃO !
Em determinadas circunstâncias os eletrodomésticos podem
ser perigosos.
A) Não verificar os filtros com a coifa em operação.
B) Não tocar as lâmpadas após um uso prolongado do aparelho.
C ) É proibido cozinhar alimentos diretamente na chama sob a coifa.
D) Evitar a chama livre pois é danosa para os filtros e porque
pode causar incêndios.
E) Verificar constantemente os alimentos fritos para evitar que
o óleo super aquecido se incendeie.
F) Antes de efetuar qualquer manutenção, desligar a coifa da
rede elétrica.
ISTRUÇÕES PARA A INSTALAÇÃO
• Conexão elétrica
O aparelho é construído em classe II, portanto nenhum cabo deve ser ligado
à tomada de terra. A ligação à rede elétrica deve ser feito como segue:
MARROM = L fase
AZUL = N neutro
Se não for prevista, montar no cabo uma tomada normalizada para a
capacidade indicada na etiqueta características. Se tiver a tomada, a
coifa deve ser instalada de maneira tal que a tomada seja acessível.
Em caso de conexão direta à rede elétrica é necessário interpor entre
o aparelho e a rede um interruptor unipolar com abertura mínima entre
contatos de 3mm, dimensionado para a carga e de acordo com as
normas vigentes.
• O aparelho deve ser instalado a uma altura mínima de 650mm de
fogões. Tendo que ser usado um tubo de conexão composto de duas ou
mais partes, a parte superior deve ficar externamente àquela inferior.
Não conectar a descarga da coifa a um duto pelo qual circule ar quente
ou utilizado para evacuar fumos de aparelhos alimentados por uma
energia que não a elétrica.
• MONTAGEM DA COIFA À PAREDE
Executar os furos A-C-D respeitando as cotas indicadas (fig. 3).
Para as diversas montagens, utilizar parafusos e buchas de expansão
adequados ao tipo de parede (p. ex. cimento armado, gesso reforçado, etc.).
No caso em que os parafusos e as buchas sejam fornecidos em dotação
com o produto, certificar-se que sejam adequados ao tipo de parede
à qual será fixada a coifa. Bloquear o flange de junção Y à coifa (fig. 2).
Bloquear o suporte Z à parede por meio dos furos A. Pendurar a coifa
à parede utilizando os furos C. Fixar definitivamente a coifa utilizando
os furos de segurança D.
• VERSÃO ASPIRANTE
Conectar, por meio de um tubo de junção, o flange Y ao furo de descarga
(não executar na versão filtrante). Introduzir a junção superior E na
parte interna da junção inferior F (fig.2). Fixar a junção inferior à coifa
utilizando os parafusos H em dotação (fig.2). Deslocar a junção superior
até o suporte Z e fixá-la por intermédio dos parafusos L (fig.2). Para
transformar a coifa de versão aspirante em versão filtrante, solicitar
ao seu revendedor os filtros de carvão ativado e seguir as instruções
de montagem da versão filtrante.
• VERSÃO FILTRANTE
Instalar a coifa e as duas junções conforme indicado no parágrafo
referente à montagem da coifa na versão aspirante. Para a montagem
da junção filtrante, fazer referência às instruções contidas no kit. Se o
kit não fizer parte da dotação, encomendá-lo, junto ao seu revendedor,
como acessório.Os filtros devem ser aplicados ao grupo aspirante
que se encontra na parte interna da coifa. O ar é reintroduzido no
ambiente por meio das alças obtidas na união E.
USO E MANUTENÇÃO
• Recomenda-se por o aparelho em funcionamento antes de proceder
ao cozimento de qualquer tipo de alimento.
Recomenda-se deixar o aparelho em funcionamento por pelo menos
15 minutos após ter terminado o cozimento dos alimentos, de maneira
a permitir uma evacuação completa do ar viciado.
O bom funcionamento da coifa fica condicionado pela assiduidade
com a qual são efetuadas as operações de manutenção,
particularmente do filtro anti-gorduras e do filtro de carvão ativado.
• Os filtros anti-gorduras tem a função de captar as partículas de
gordura em suspensão no ar, portanto, estão sujeitos a entupimentos
em tempos variáveis em função do uso do aparelho.
Em todo o caso, para prevenir o perigo de eventuais incêndios, no
máximo a cada 2 meses, é necessário limpar o filtro executando as
seguintes operações:
- Tirar os filtros da coifa e lavá-los com uma solução de água e detergente líquido neutro, permitindo a saída da sujeira.
- Enxaguar em grande quantidade de água morna e deixar secar.
- Os filtros também podem ser lavados em máquina de lavar louças.
Após algumas lavagens dos painéis de alumínio, podem ser verificadas
alterações na cor dos mesmos. Este fato não dá direito a reclamações
para a eventual substituição dos painéis.
• Os filtros de carvão ativado servem para depurar o ar que será
reintroduzido no ambiente. Os filtros não são laváveis ou regeneráveis
e devem ser substitídos a cada quatro meses no máximo. A saturação
do carvão ativado depende do uso mais ou menos prolongado do
aparelho, do tipo de cozinha e da regularidade com que é efetuada a
limpeza do filtro anti-gorduras.
• Limpar com freqüência todos os depósitos no ventilador e nas demais
superfícies utilizando um pano umedecido em álcool desnaturato ou
detergentes líquidos neutros não abrasivos.
• COMANDOS: 1A) Eletrônicos _1B) Lógica _(fig.5):
A = botão ILUMINAÇÃO
B = botão OFF/PRIMEIRA VELOCIDADE
C = botão SEGUNDA VELOCIDADE
D = botão TERCEIRA VELOCIDADE
E = botão TIMER PARADA AUTOMÁTICA 15 minutos
F = botão RESET LED SATURAÇÃO FILTROS
L = botão LÓGICA
Quando o led “saturação filtros” piscar, os filtros de gordura devem
ser lavados.Quando o led acende-se sem piscar os filtros de gordura
devem ser lavados e os de carvão ativado substituídos (no caso de
funcionamento na versão recirculação).Uma vez completada esta
operação, pressionar o botão para resetar.
A função “timer parada automática” retarda a parada da coifa, que
continuará a funcionar à velocidade de exercício em curso no momento
em que foi atuada esta função, de 15 minutos.
• LÓGICA
a. Funcionamento automático luzes mais motor
Com a coifa na posição OFF, pressionar o botão lógica.
O motor parte na velocidade 1 e as luzes permanecem apagadas.
Quando Lógica detecta a presença de uma pessoa ou um
aumento de fumaça e/ou vapor, acende automaticamente as luzes
e leva o motor à velocidade 2.
Após 15 segundos a luz se apaga e o motor volta à velocidade 1.
Para desativar lógica, é suficiente pressionar o botão Lógica.
b. Funcionamento automático luzes
Com a coifa na posição OFF, pressionar o botão de acendimento das
luzes e, em seguida, o botão Lógica. Quando Lógica detecta a presença
de uma pessoa, as luzes acendem automaticamente. Após 15 segundos
a luz se apaga. Para desativar lógica, é suficiente pressionar o botão
Lógica.
c. Funcionamento automático motor
Com a coifa na posição OFF, pressionar o botão de acendimento do
motor na velocidade 1 ou 2 e, em seguida, o botão Lógica.
Quando lógica detecta a presença de uma pessoa ou um aumento de
fumaça e/ou vapor, leva automaticamente o motor à velocidade mais
alta. Para desativar lógica, é suficiente pressionar o botão Lógica.
DECLINA-SE DE QUALQUER RESPONSABILIDADE POR
EVENTUAIS DANOS PROVOCADOS PELA INOBSERVÂNCIA
DAS ADVERTÊNCIAS ACIMA.
- 9 -
Page 10

ITALIANO
GENERALITA'
Leggere attentamente il contenuto del presente libretto in quanto fornisce
importanti indicazioni riguardanti la sicurezza di installazione, d'uso
e di manutenzione. Conservare il libretto per ogni ulteriore
consultazione. L'apparecchio è stato progettato come cappa aspirante
(evacuazione aria all'esterno) o filtrante (riciclo aria all'interno).
AVVERTENZE PER LA SICUREZZA
1. Fare attenzione se funzionano contemporaneamente una cappa
aspirante e un bruciatore o un focolare dipendenti dall'aria dell'ambiente
ed alimentati da un'energia diversa da quella elettrica, in quanto la
cappa aspirando toglie all'ambiente l'aria di cui il bruciatore o il focolare
necessita per la combustione.La pressione negativa nel locale non
deve superare i 4 Pa (4 x 10 -5 bar). Per un funzionamento sicuro,
provvedere quindi ad un'opportuna ventilazione del locale. Per
l'evacuazione esterna attenersi alle disposizioni vigenti nel vostro
paese.
2. ATTENZIONE !
In determinate circostanze gli elettrodomestici possono essere
pericolosi.
A) Non cercare di controllare i filtri con la cappa in funzione
B) Non toccare le lampade dopo un uso protratto
dell'apparecchio
C) E' vietato cuocere cibi alla fiamma sotto la cappa
D) Evitare la fiamma libera, perchè dannosa per i filtri e
pericolosa per gli incendi
E) Controllare costantemente i cibi fritti per evitare che l'olio
surriscaldato prenda fuoco
F) Prima di effettuare qualsiasi manutenzione, disinserire la
cappa dalla rete elettrica.
ISTRUZIONI PER L'INSTALLAZIONE
• Collegamento elettrico
L'apparecchio è costruito in classe II, perciò nessun cavo deve essere
collegato alla presa di terra. L'allacciamento alla rete elettrica deve
essere eseguito come segue:
MARRONE = L linea
BLU = N neutro
Se non prevista, montare sul cavo una spina normalizzata per il carico
indicato nella etichette caratteristiche. Se provvista di spina, la cappa
deve essere installata in modo tale che la spina sia accessibile.
Nel caso di collegamento diretto alla rete elettrica è necessario
interporre tra l'apparecchio e la rete un interruttore onnipolare con
apertura minima tra i contatti 3 mm, dimensionato al carico e
rispondente alle norme vigenti.
• L'apparecchio deve essere installato ad un'altezza minima di 650mm
dai fornelli. Se dovesse essere usato un tubo di connessione composto
di due o più parti, la parte superiore deve essere all'esterno di quella
inferiore. Non collegare lo scarico della cappa ad un condotto in cui
circoli aria calda o utilizzato per evacuare fumi degli apparecchi
alimentati da un'energia diversa da quella elettrica.
• MONTAGGIO DELLA CAPPA ALLA PARETE
Eseguire i fori A-C-D rispettando le quote indicate (fig. 3). Per i vari
montaggi utilizzare viti e tasselli ad espansione idonei al tipo di muro
(es. cemento armato, cartongesso, ecc). Nel caso in cui le viti e i
tasselli siano forniti in dotazione con il prodotto accertarsi che siano
idonei per il tipo di parete in cui deve essere fissata la cappa. Bloccare
la flangia di raccordo Y alla cappa (fig. 2). Bloccare la staffa Z al muro
tramite i fori A . Appendere la cappa alla parete utilizzando i fori C.
Fissare definitivamente la cappa utilizzando i fori di sicurezza D.
• VERSIONE ASPIRANTE
Collegare, mediante un tubo di raccordo, la flangia Y al foro di scarico
(non eseguire nella versione filtrante). Infilare il raccordo superiore E
all’interno del raccordo inferiore F(fig. 2). Fissare il raccordo inferiore
alla cappa utilizzando le viti H in dotazione (fig. 2) sfilare il raccordo
superiore fino alla staffa Z e fissarlo tramite le viti L (fig. 2).Per
trasformare la cappa da versione aspirante a versione filtrante,
richiedere al vostro rivenditore i filtri a carbone attivo e seguire le
istruzioni di montaggio della versione filtrante.
• VERSIONE FILTRANTE
Installare la cappa e i due raccordi come indicato nel paragrafo
riguardante il montaggio della cappa nella versione aspirante. Per il
montaggio del raccordo filtrante fare riferimento alle istruzioni contenute
nel kit. Se il kit non è in dotazione, ordinarlo al Vs. rivenditore come
accessorio. I filtri devono essere applicati al gruppo aspirante posto
all’interno della cappa. L’ar ia è rimessa nell’ambiente attraverso le
asole ricavate sul raccordo E.
USO E MANUTENZIONE
• Si raccomanda di mettere in funzione l'apparecchio prima di
procedere alla cottura di un qualsiasi alimento. Si raccamanda di lasciar
funzionare l'apparecchio per 15 minuti dopo aver terminato la cottura
dei cibi, per un'evacuazione completa dell'aria viziata. Il buon
funzionamento della cappa è condizionato da una corretta e costante
manutenzione; una particolare attenzione deve essere data al filtro
antigrasso e al filtro al carbone attivo. Il filtro antigrasso ha il compito
di trattenere le particelle grasse in sospensione nell’aria, pertanto è
soggetto ad intasarsi in tempi variabili relativamente l’ uso
dell’apparecchio. Il filtro acrilico, che si trova appoggiato alla griglia,
va sostituito quando le scritte, visibili attraverso la griglia, cambiano
colore e l'inchiostro si espande; il nuovo filtro deve essere applicato in
modo tale che le scritte siano visibili attraverso la griglia dall'esterno
della cappa.
Nel caso in cui i filtri acrilici non abbiano le scritte, oppure siano
presenti filtri metallici o a pannello in alluminio, per prevenire il
pericolo di eventuali incendi, al massimo ogni 2 mesi è necessario
lavare i filtri eseguendo le seguenti operazioni:
• togliere il filtro dalla griglia e lavarlo con una soluzione di acqua e
detergente liquido neutro lasciando rinvenire lo sporco.
• Sciacquare abbondantemente con acqua tiepida e lasciare
asciugare.
I filtri metallici e/o pannello in alluminio possono essere lavati anche
in lavastoviglie.
Dopo alcuni lavaggi, se i filtri sono in alluminio o pannello in alluminio,
si possono verificare delle alterazioni del colore. Questo fatto non dà
diritto a reclamo per l'eventuale loro sostituzione. In caso di
inadempienza delle istruzioni di sostituzione e di lavaggio si può
verificare il rischio di incendio dei filtri antigrasso. I filtri al carbone
attivo servono per depurare l'aria che viene rimessa nell'ambiente. I
filtri non sono lavabili o rigenerabili e devono essere sostituiti ogni
quattro mesi al massimo. La saturazione del carbone attivo dipende
dall'uso più o meno prolungato dell'apparecchio, dal tipo di cucina e
dalla regolarità con cui viene effettuata la pulizia del filtro antigrasso
Pulire frequentemente tutti i depositi sul ventilatore e sulle altre
superfici, usando un panno inumidito con alcool denaturato o detersivi
liquidi neutri non abrasivi.
• COMANDI: 1A) ELETTRONICA 1B) LOGICA (Fig.5):
A= tasto ILLUMINAZIONE
B= tasto OFF/PRIMA VELOCITA
C= tasto SECONDA VELOCITA
D= tasto TERZA VELOCITA
E= tasto TIMER ARRESTO AUTOMATICO 15 minuti
F= tasto RESET SPIA SATURAZIONE FILTRI
L= tasto LOGICA
Quando la spia “SATURAZIONE FILTRI” lampeggia i filtri antigrasso
devono essere lavati. Quando la spia si accende senza lampeggiare
i filtri antigrasso devono essere lavati ed i filtri al carbone sostituiti (nel
caso di funzionamento nella versione ricircolo). Una volta completata
questa operazione, premere sul tasto per resettarlo. La funzione
“TIMER ARRESTO AUTOMATICO” ritarda l’arresto della cappa, che
continuerà a funzionare alla velocità d’esercizio in corso al momento
dell’accensione di questa funzione, di 15 minuti.
• LOGICA
a. Funzionamento automatico luci più motore
Con la cappa in posizione OFF premere il pulsante logica. Il motore si
avvia alla velocità 1 e le luci rimangono spente. Quando Logica rileva
la presenza di una persona o un aumento di fumo e/o vapore,
accende automaticamente le luci e porta il motore alla velocità 2.
Dopo 15 secondi la luce si spegne ad il motore torna sulla velocità 1.
Per disattivare logica è sufficiente premere il pulsante Logica
b. Funzionamento automatico luci
Con la cappa in posizione OFF,premere il pulsante di accensione delle
luci e successivamente il pulsante Logica. Quando logica rileva la
presenza di una persona accende automaticamente le luci. Dopo 15
secondi la luce si spegne. Per disattivare logica è sufficiente premere
il pulsante Logica.
c. Funzionamento automatico motore
Con la cappa in posizione OFF,premere il pulsante di accensione del
motore in velocità 1 o 2 successivamente il pulsante Logica.Quando
logica rileva la presenza di una persona o un aumento di fumo e/o
vapore porta automaticamente il motore alla velocità più alta. Per
disattivare la Logica è sufficiente premere il pulsante Logica.
SI DECLINA OGNI RESPONSABILITA' PER EVENTUALI DANNI
PROVOCATI DALLA INOSSERVANZA DELLE SUDDETTE
AVVERTENZE
- 10 -
Page 11

SVENSKA
OBSERVERA
Läs innehållet i detta instruktionshäfte noga då det tillhandahåller
viktig information vad beträffar säkerheten vid installation, användning
och underhåll. Spar häftet för eventuella framtida konsultationer.
Apparaten har utformats antingen som utsugningskåpa (extern
luftevakuering) eller filterkåpa (intern luftrecirkulation).
SÄKERHETSFÖRESKRIFTER
1. Var uppmärksam om utsugningskåpan fungerar samtidigt som en
brännare eller eldhärd som är beroende av omgivningsluften i rummet
och som drivs med annan typ av energi än elektrisk energi, eftersom
utsugningskåpan suger upp luft från rummet som brännaren eller
eldhärden är i behov av för sin förbränningsprocess. Undertrycket i
lokalen får inte överskrida 4 Pa (4 x 10 -5 bar). För att garantera
säkerheten rekommenderas därför en god ventilation av lokalen. Vad
beträffar det utvändiga utsläppet skall de i det aktuella landet gällande
normerna och föreskrifterna respekteras.
2. VARNING !
Elektriska hushållsmaskiner kan under vissa omständigheter
medföra risker.
A) Kontrollera aldrig filtren samtidigt som kåpan är i funktion
B) Rör inte lamporna om apparaten varit i funktion under en
längre tid
C) Det är förbjudet att grilla mat över öppen låga under kåpan
D) Undvik öppen låga, då sådan är skadlig för filtren och utgör
brandrisk
E) Vid frityrkokning måste spisen övervakas kontinuerligt för
att undvika att oljan överhettas och tar eld
F) Innan någon typ av underhållsarbete genomförs måste kåpan
kopplas ifrån det elektriska nätet.
INSTALLATIONS INSTRUKTIONER
• Elanslutning
Apparaten är av typklass II, och inga kablar skall därför jordanslutas.
Nätanslutningen skall utföras på följande sätt:
BRUN = L fas
BLÅ = N nolla
Om kabeln inte redan är försedd med en sådan skall en standard
stickpropp, avsedd för den på märkplåten angivna belastningen
monteras. Om kontakt finns skall kåpan installeras så att denna kontakt
är tillgänglig. I det fall apparaten ansluts fast till nätet, skall man montera
en flerfasig strömbrytare mellan apparaten och eluttaget, med ett
minst 3 mm brett luftgap mellan kontakterna, som är avsett för den
aktuella belastningen och uppfyller gällande normer.
• Apparaten skall installeras på minst 650 mm höjd från bänken. I det
fall ett anslutningsrör används som består av två eller flera delar,
måste den övre av delarna träs utanpå den undre delen. Anslut inte
kåpans utloppsrör till luftkanaler i vilka varmluft cirkulerar, eller
kanaler som används för att evakuera rök från apparater som drivs
med annan typ av energi än elektrisk energi.
• MONTERING AV KÅPAN PÅ VÄGG
Borra hålen A-C-D enligt de angivna måtten (fig. 3). Skruvar och
expansionspluggar som lämpar sig för typen av vägg (betong,
gipsskivor etc.)skall användas för de olika monteringsarbetena. I det
fall skruvar och expansionspluggar ingår i leveransen, kontrollera att
dessa lämpar sig för den typ av vägg på vilken kåpan skall monteras.
Fixera anslutningsflänsen Y vid kåpan (fig. 2). Fäst bygeln Z vid väggen
med hjälp av hålen A. Häng upp kåpan på väggen med hjälp av hålen C.
Fixera kåpan definitivt med hjälp av säkerhetshålen D.
• UTSUGNINGSVERSION
Anslut med hjälp av ett anslutningsrör flänsen Y med
utoloppsmynningen (skall inte utföras på filterversionen). Sätt i det
övre anslutningsröret E i det undre röret F (fig.2). Fixera det undre
anslutningsröret på kåpan med hjälp av de medföljande skruvarna H ( fig.2).
Dra det övre anslutningsröret till bygeln Z och fixera den vid denna
med hjälp av skruvarna L(fig.2).För att omvandla utsugningsversionen
till en filterversion, skall en återförsäljare kontaktas för köp av aktiva
kolfilter och nedan angivna instruktioner för montering av filterversion
följas.
• FILTERVERSION
Installera kåpan och de båda anslutningsrören enligt instruktionerna
i paragrafen för montering av kåpans utsugningsversion. Se
instruktionerna som finns i utrustningen för montering av
filteranslutningen. Om denna utrustning inte medföljer leveransen
skall en sådan beställas av er återförsäljare. Filtren skall sättas på
utsugningsenheten som sitter inuti kåpan. Luften leds ut i lokalen igen
genom öppningarna på anslutningsröret E.
ANVÄNDNING OCH UNDERHÅLL
• Det är tillrådligt att sätta apparaten i funktion innan någon typ av
matlagning förekommer. Det är tillrådligt att låta apparaten fungera i
ytterligare 15 min. efter matlagningen, för att eliminera allt matos.
Kåpans goda funktion beror på hur ofta underhållsarbetet utför, i
synnerhet vad beträffar fettfiltret och det aktiva kolfiltret.
• Fettfiltren renar luften från fettpartiklar, vilket innebär att de gror igen
efter viss tid, beroende på användningen av apparaten.
Det är under alla händelser nödvändigt att efter högst 2 månaders
användning rengöra filtret genom att utföra följande underhåll:
- Avlägsna filtren från kåpan och tvätta dem med neutralt flytande
rengöringsmedel och vatten så att smutsen löses upp.
- Skölj noga med ljummet vatten och låt torka
- Filtren kan även tvättas i diskmaskin.
Efter ett antal rengöringar av aluminiumfiltren kan färgförändringar
förekomma. Detta ger ingen rätt till klagomål eller ersättning av
ramarna.
• De aktiva kolfiltren renar luften som sedan åter leds ut i lokalen.
Filtren kan inte tvättas eller rensas för återanvändning och måste
bytas ut var 4:e månad. Det aktiva kolets mättningsgrad beror på hur
ofta fettfiltret rengörs.
• Rengör fläktens och närliggande ytor regelbundet med en trasa som
fuktats med denaturerad sprit eller neutralt flytande rengöringsmedel
utan slipverkan.
• MANÖVERFUNKTIONER:1A)Elektroniska_1B)Logiska _
(Fig.5):
A = knapp för BELYSNING
B = knapp OFF/FÖRSTA HASTIGHET
C = knapp ANDRA HASTIGHET
D = knapp TREDJE HASTIGHET
E = knapp TIMER FÖR AUTOMATISK AVSTÄNGNING EFTER 15
minuter
F = KONTROLLAMPA FÖR IGENGRODDA FILTER
L = knapp LOGISKA
När kontrollampan “ igengrodda filter “ blinkar skall fettfiltren tvättas.När
kontrollampan lyser utan att blinka skall fettfiltren tvättas och kolfiltren
bytas ut (vid funktion med recirkuleringsversion).När detta
arbetsmoment slutförs skall reset-knappen tryckas in. Funktionen“
timer för automatisk avstängning “fördröjer avstängningen av kåpan,
som fortsätter att fungera i 15 minuter med samma arbetshastighet
som vid påslagningen av denna funktion.
• LOGISKA
a. Automatisk funktion med belysning och motor
Tr yck på den logiska manöverknappen med kåpan i OFF position
Motorn startar med hastighet 1 och belysningen förblir släckt.
När den Logiska funktionen känner av en persons närvaro eller
vid ökad förekomst av rök och/eller ånga, tänder den automatiskt
belysningen och ökar motorns hastighet till 2.
Efter 15 sekunder släcks belysningen och motorn återgår till hatighet
1.
Den logiska funktionen stängs av genom att trycka på knappen
för Logisk Funktion.
b. Belysningens automatiska funktion
Tryck på knappen för att tända belysningen och därefter på knappen för
logisk funktion, med kåpan i OFF position.
När den logiska funktionen känner av en persons närvaro tänder den
automatiskt belysningen.
Efter 15 sekunder släcks belysningen.
Den logiska funktionen stängs av genom att trycka på knappen för
Logisk Funktion.
c. Motorns automatiska funktion
Tryck på knappen för att starta motorn med hastighet 1 eller 2 och
därefter på knappen för logisk funktion, med kåpan i OFF position.
När den Logiska funktionen känner av en persons närvaro eller vid
ökad förekomst av rök och/eller ånga ökar den automatiskt motorns
hastighet
Den logiska funktionen stängs av genom att trycka på knappen för
Logisk Funktion.
TILLVERKAREN FRÅNSÄGER SIG ALLT ANSVAR FÖR
EVENTUELLA SKADOR SOM ORSAKTS P.G.A. ATT
OVANSTÅENDE INSTRUKTIONER INTE RESPEKTERATS
- 11 -
Page 12

NORSK
GENERELT
Les denne bruksanvisningen nøye. Her gis viktig informasjon
angående sikker installering, bruk og vedlikehold av apparatet.
Ta vare på bruksanvisningen for fremtidige behov. Apparatet er
en ventilator som fører luften ut (utvendig avløp) eller filtrerer
/ resirkulerer den.
SIKKERHETS INFORMASJON
1. Vær forsiktig dersom en vifte med utvendig avløp benyttes i samme
rom som en brenner eller en ovn som ikke går på elektrisk strøm, da
viften trekker ut luften brennern eller ovnen trenger til forbrenningen.
Det negative trykket i rommet må ikke overstige 4 Pa (4 x 10 -5 bar).
For sikker bruk må man derfor sørge for tilstrekkelig ventilasjon av
lokalet. Avtrekket skal utføres i henhold til gjeldende forskrifter.
2. ADVARSEL !
Husholdningsapparater kan være farlige i visse situasjoner.
A) Ikke kontroller filtrene mens ventilatoren er i funksjon
B) Berør ikke lyspærene når apparatet har vært i funksjon over
lengre tid
C) Flamber aldri mat under ventilatoren
D) Unngå åpen flamme: det kan skade filtrene og føre til brann
E) Ved frityrsteking må du være tilstede hele tiden og passe på
at ikke oljen overopphetes og tar fyr
F) Før det foretas noen form for vedlikehold på ventilatoren,
må den frakobles strømnettet.
INSTALLASJONSVEILEDNING
• Elektrisk tilkobling
Apparatet er fremstilt i klasse II, ingen leder skal derfor kobles til jord.
Tilkobling til strømnettet utføres på følgende måte:
BRUN = L strømførende
BLÅ = N nulleder
Hvis strømledningen er uten plugg, monteres en plugg av
forskriftsmessig type, som svarer til strømstyrken som er oppgitt på
typeskiltet. Dersom den er utstyrt med plugg, må ventilatoren monteres
slik at pluggen er tilgjengelig. Ved direkte tilkobling til strømnettet, må
det monteres en flerpolet bryter med en kontaktåpning på minst 3 mm
mellom apparatet og strømnettet. Bryteren skal være tilpasset
strømstyrken og i overensstemmelse med gjeldende normer.
• Apparatet må installeres i en høyde av minst 650 mm fra toppen.
Dersom det benyttes en avtrekkskanal bestående av to eller flere
deler, skal den øvre delen tres utenpå den nedre. Koble ikke
ventilatoravtrekket til et rør der det passerer varmluft eller røyk fra
apparater som ikke går på strøm.
• INSTALLASJONSVEILEDNING
Lag hullene A-C-D ved å følge de oppgitte målene (fig. 3).Ved
montering, bruk skruer og plasthylser som passer til veggtypen (f.eks.
betong, gips etc.). Om skruer og plasthylser følger med apparatet, må
man forvisse seg om at de passer til veggen viften skal festes til. Fest
flensen Y til kjøkkenviften (fig. 2). Fest bøylen Z til veggen ved hjelp av
hullene A. Fest viften til veggen ved hjelp av hullene C. Avslutt festingen
av viften ved hjelp av sikkerhetshullene D.
• VERSJON MED UTVENDIG AVLØP
Ved hjelp av et koblingsrør, koble flensen Y til avløpsåpningen (utføres
ikke med filterversjonen). Stikk det øvre avtrekksrøret E inn i det
nedre F (fig. 2). Fest det nedre røret til ventilatoren ved hjelp av de
medfølgende skruene H (fig. 2). Trekk det øvre røret helt til bøylen Z
og fest det ved hjelp av skruene L (fig. 2). For å gjøre om viften med
utvendig avløp til filterversjon, må det anskaffes kullfiltre fra
forhandleren, og monteringsanvisningen for filterversjonen må følges.
• FILTERVERSJON
Monter kjøkkenviften og de to koblingsrørene som beskrevet under
avsnittet for montering av versjonen med utvendig utløp. Filterrøret
monteres i henhold til bruksanvisningen som følger med utstyret.
Dersom ikke utstyret leveres som standard, bestilles det som tilbehør
fra forhandleren. Filtrene skal festes til vifteenheten inne i ventilatoren.
Luften føres ut i rommet igjen gjennom åpningene på røret E.
avsluttet, slik at all matos blir fjernet. For at viften til enhver tid skal
virke tilfredsstillende, er det viktig at man utfører vedlikeholdet
regelmessig. Spesielt gjelder dette fettfilteret og kullfilteret.
• Fettfiltrenes oppgave er å fjerne fettpartiklene i luften. Filtrene vil
derfor med tiden bli skitne, avhengig av hvor ofte apparatet brukes.
I alle tilfeller er det nødvendig å rengjøre disse filtrene etter maks. 2
måneder for å unngå fare for brann. Gå frem på følgende måte:
- Ta filtrene ut av viften og legg dem i bløt i vann tilsatt et flytende,
nøytralt rengjøringsmiddel. Vent til fettet har løst seg opp.
- Skyll omhyggelig med lunkent vann og la filtrene tørke.
- Filtrene kan også vaskes i oppvaskmaskin.
Det kan hende aluminiumsplatene får en litt annen farge etter at de har
blitt vasket noen ganger. Dette gir imidlertid ikke rett til en eventuell
utskiftning i garantitiden.
• Kullfiltrene renser luften før den føres ut i rommet igjen. Filtrene kan
ikke vaskes eller brukes om igjen, og må skiftes ut minst hver 4.
måned. Hvor raskt kullfiltrene blir skitne avhenger av hvor ofte viften
brukes, hva slags mat som tilberedes og hvor ofte fettfilteret rengjøres.
• Fjern regelmessig alt fett på viften og andre overflater ved hjelp av en
klut fuktet med sprit eller et nøytralt, flytende rengjøringsmiddel som
ikke lager riper.
• KONTROLLER:1A)Elektroniske _1B)Logikk _(fig.5):
A = tast for BELYSNING
B = tast for OFF (AV) / FØRSTE HASTIGHET
C = tast for ANNEN HASTIGHET
D = tast for TREDJE HASTIGHET
E = tast for TIDSUR AUTOMATISK STOPP 15 minutter
F = tast for TILBAKESTILLING AV INDIKATORLAMPE FOR SKITNE
FILTRE
L = tast for LOGIKK
Når indikatorlampen for “skitne filtre” blinker, må fettfiltrene vaskes.
Når indikatorlampen lyser kontinuerlig uten å blinke, må fettfiltrene
vaskes og kullfiltrene skiftes ut (på versjoner med resirkulering av
luften).
Etter at denne operasjonen er utført, trykker man på tasten for å
tilbakestille den.
Med funksjonen “tidsur automatisk stopp” utsettes stans av ventilatoren,
som vil fortsette å gå i 15 minutter på samme hastighet som da
funksjonen ble aktivert.
• LOGIKK
a. Automatisk funksjon av lys pluss motor
Mens ventilatoren står på OFF trykker man på logikk-knappen
Motoren starter på hastighet 1 og lysene vil fortsatt være slått av.
Når Logikken registrerer tilstedeværelsen av en person eller en
økning av matos og/eller damp, vil lysene tennes automatisk og
motoren begynne å gå på hastighet 2. Etter 15 sekunder vil lyset
slukke og motoren igjen gå tilbake på hastighet 1. For å deaktivere
logikken, er det nok å trykke på Logikk-knappen
b. Automatisk funksjon av lys
Mens ventilatoren står på OFF, trykker man på knappen for tenning av
lysene og deretter på Logikk-knappen. Når Logikken registrerer
tilstedeværelsen av en person, vil lysene tennes automatisk. Etter 15
sekunder vil lyset slukke. For å deaktivere logikken, er det nok å trykke
på Logikk-knappen.
c. Automatisk funksjon av motor
Mens ventilatoren står på OFF, trykker man på knappen for igangsetting
av motoren på hastighet 1 eller 2, og deretter på Logikk-knappen. Når
Logikken registrerer tilstedeværelsen av en person eller en økning av
matos og/eller damp, vil motoren automatisk begynne å gå på den
høyeste hastigheten. Logikken kobles ut ved ganske enkelt å trykke på
Logikk-knappen.
PRODUSENTEN FRASKRIVER SEG ETHVERT ANSVAR FOR
SKADER SOM SKYLDES AT OVENNEVNTE RETNINGSLINJER
IKKE ER BLITT FULGT.
BRUK OG VEDLIKEHOLD
• Apparatet bør alltid settes igang før matlagingen starter.
Det anbefales å la viften virke i 15 minutter etter at matlagingen er
- 12 -
Page 13

DANSK
GENERELLE OPLYSNINGER
Læs indholdet i denne vejledning omhyggeligt eftersom den giver vigtige
oplysninger om sikkerhed under installering, brug og vedligeholdelse.
Opbevar vejledningen til senere brug. Apparatet er udviklet som
emhætte (udsugning af luft) eller som filter (intern luftcirkulation).
SIKKERHEDSADVARSLER
1. Udvis forsigtighed hvis der samtidigt er en emhætte og en brænder
eller en varmekilde i funktion, der afhænger af den omgivende luft eller
er forsynet med en energi, der ikke er elektrisk, fordi emhætten fjerner
den luft fra omgivelserne, som brænderen eller varmekilden har behov
for til forbrændingen. Det negative tryk i lokalet må ikke overskride 4
Pa (4 x 10 -5 bar). For at opnå sikker funktion skal man således sørge
for korrekt ventilation af lokalet. Hvad angår udførslen til de eksterne
omgivelser skal man overholde de gældende nationale regler.
2. ADVARSEL !
Under visse omstændigheder kan husholdningsapparater være
farlige.
A) Forsøg ikke at kontrollere filtrene med hætten i funktion
B) Rør ikke ved lamperne, når apparatet har været tændt i længere tid
C) Det er forbudt at flambere madvarer under hætten
D) Undgå at laden flammen være tændt uden gryder eller andet
ovenpå; dette vil være beskadigende for filtrene og eventuelt
kunne forårsage brand
E) Hold friturestegning konstant under overvågning for at
undgå, at olien ophedes for meget og bryder i brand
F) Inden der udføres vedligeholdelse af enhver type skal man
afbryde hætten fra el-nettet.
INSTALLERING
• Elektrisk tilslutning
Apparatet er bygget i klasse II og derfor skal der ikke tilsluttes noget
kabel til jordforbindelsen. Tilslutning til el-nettet skal udføres på følgende
måde:
BRUN = L linje
BLÅ = N neutral
Hvis det ikke allerede forefindes skal man montere et standardstik for
den forsyning, der er angivet på oplysningsetiketten. Hvis stikket findes
skal hætten installeres på en sådan måde, at det er tilgængeligt.
I tilfælde af direkte tilslutning til el-nettet er det nødvendigt at anbringe
en flerpolet afbryder mellem apparatet og nettet, med en
minimumsafstand mellem kontakterne på 3 mm, og med de rette
dimensioner for forsyningen, samt i overensstemmelse med de
gældende regler.
• Apparatet skal installeres i en højde på mindst 650mm fra.
Hvis der anvendes forbindelsesrør, der består af to dele eller flere
dele, skal den øverste del være udenfor den nederste.
Tilslut ikke hættens udslip til lederør, hvor der cirkulerer varm luft,
eller som er anvendt til bortføring af røg fra apparater, der forsynes
med en energi, der ikke er elektrisk.
• MONTERING AF EMHÆTTEN PÅ VÆGGEN
Lav hullerne A-C-D i væggen; overhold de angivne mål (fig. 3). Til de
forskellige monteringer skal man anvende skruer og ekspansionskiler,
der er egnet til murtypen (fx. armeret beton, gips, etc.). Hvis skruerne
og kilerne leveres med emhætten, skal man kontrollere at de er egnet
til den murtype, hvor emhætten skal monteres. Fastgør
forbindelsesflangen Y til emhætten (fig. 2). Fastgør beslaget Z til muren
ved hjælp af hullerne A. Hæng emhætten op på væggen ved hjælp af
hullerne C. Fastgør emhætten definitivt ved hjælp af sikkerhedshullerne D.
• SUGENDE UDGAVE
Forbind flangen Y til udslipshullet ved hjælp af et forbindelsesrør (denne
handling må ikke udføres ved den filtrerende udgave). Sæt den øverste
forbindelse E ind i den nederste forbindelse F (fig.2). Fastgør den
nederste forbindelse til hætten ved hjælp af skruerne H, der følger
med leveringen (fig.2). Træk den øverste forbindelse ud indtil beslag
Z og fastgør den ved hjælp af skruerne L (fig.2). For at ændre emhætten
fra den sugende udgave til den filtrerende udgave skal man henvende
sig til forhandleren for at få de aktive kulfiltre og følge
monteringsvejledningen for den filtrerende udgave.
• FILTRERENDE UDGAVE
Installér emhætten og de to forbindelser, som angivet i afsnittet for
montering af emhætten i den sugende udgave. Ved montering af den
filtrerende forbindelse skal man rette sig efter instruktionerne vedlagt
samlesættet. Hvis dette samlesæt ikke følger med leveringen, kan
det bestilles hos Deres forhandler som ekstraudstyr. Filtrene skal
monteres på sugeenheden inde i hætten. Luften sendes tilbage i lokalet
gennem slidserne på forbindelse E.
BRUG OG VEDLIGEHOLDELSE
• Det anbefales at man sætter apparatet i funktion inden man begynder
tilberedning af madvarer. Det anbefales at man laser apparatet fungere i 15 minutter efter at maden er blevet tilberedt, for at den mættede
luft kan blive fjernet helt. Korrekt funktion af emhætten afhænger af
hvor ofte der udføres vedligeholdelse; dette gælder specielt for filtret
til modvirkning af fedtafsættelse og det aktive kulfilter.
• Filtrene til modvirkning af fedtafsættelse har til opgave at tilbageholde
de fedtpartikler, der befinder sig i luften, og derfor vil tiden der forløber
inden disse filtre tilstoppes variere alt efter hvor ofte apparatet anvendes.
Under alle omstændigheder skal man - for at forhindre brandfare rense filtret efter højst 2 måneder ved at følge nedenstående
fremgangsmåde:
- Fjern filtrene fra emhætten og vask dem med en opløsning af vand
og flydende neutralt vaskemiddel for at fjerne snavset.
- Skyl grundigt efter med lunkent vand og lad filtrene tørre.
- Filtrene kan også vaskes i opvaskemaskinen.
Efter nogle afvaskninger af aluminiumspanelerne kan der forekomme
farveændringer. Denne omstændighed giver ikke ret til eventuel
udskiftning af panelerne.
• De aktive kulfiltre har til opgave at rense den luft der sendes tilbage
i lokalet. Filtrene kan ikke vaskes eller genbruges og skal udskiftes
efter højst fire måneder. Mætningen af det aktive kul afhænger af den
mere eller mindre længerevarende anvendelse af apparatet, af
køkkentypen, og af den hyppighed hvormed der udføres rengøring af
filtret til modvirkning af fedtafsættelse.
• Rengør hyppigt afsættelser på ventilatoren og de andre overflader
ved hjælp af en klud fugtet med denatureret alkohol eller neutralt
vaskemiddel i væskeform, der ikke indeholder slibende stoffer.
• BETJENINGSORGANER:1A) Elektroniske_1B) Logik _(fig. 5):
A = tast for BELYSNING
B = tast for OFF/FØRSTE HASTIGHED
C = tast for ANDEN HASTIGHED
D = tast for TREDJE HASTIGHED
E = tast for TIMER AUTOMATISK STOP 15 minutter
F = tast for RESET KONTROLLAMPE FILTERMÆTNING
L = tast for LOGIK
Når kontrollampen for ”filtermætning” blinker skal filtrene til
modvirkning af fedtafsættelse vaskes. Når kontrollampen tændes uden
at blinke skal filtrene til modvirkning af fedtafsættelse vaskes og
kulfiltrene skal udskiftes (i tilfælde af funktion med recirkulation). Når
denne handling er udført skal man trykke på tasten for at udføre reset.
Funktionen ”timer automatisk stop” forsinker standsning af hætten,
som vil fortsætte med at være tændt (i 15 minutter) med den
driftshastighed, der var i kraft i det øjeblik funktionen blev tilsluttet.
• LOGIK
a. Automatisk funktion af lys og motor
Tryk på logikknappen mens emhætten står på OFF.
Motoren vil starte på hastighed 1 og lysene vil fortsætte med at være
slukket.
Når Logikken aflæser tilstedeværelse af en person, eller en øget
mængde røg og/eller damp, tænder den automatisk lysene og stiller
motoren på hastighed 2. Efter 15 sekunder slukkes lyset og motoren
vender tilbage til hastighed 1. For at deaktivere logikken skal man
trykke på Logik-knappen.
b. Automatisk funktion af lysene
Mens emhætten står på OFF skal man trykke på knappen til tænding
af lysene, og derefter på Logik-knappen. Når logikken aflæser
tilstedeværelse af en person tænder den automatisk lysene. Efter 15
sekunder slukkes lyset. For at deaktivere logikken skal man trykke på
Logik-knappen.
c. Automatisk funktion af motoren
Mens emhætten står på OFF skal man trykke på knappen til tænding
af motoren på hastighed 1 eller 2, og derefter på Logik-knappen. Når
Logikken aflæser tilstedeværelse af en person, eller en øget mængde
røg og/eller damp, bringer den automatisk motoren op på den højeste
hastighed. For at deaktivere logikken skal man trykke på Logikknappen.
FABRIKANTEN FRALÆGGER SIG ETHVERT ANSVAR FOR
SKADER FORÅRSAGET AF MANGLENDE OVERHOLDELSE
AF OVENSTÅENDE ADVARSLER
- 13 -
Page 14

SUOMI
YLEISTÄ
Lue ohjekirja huolellisesti, sillä se sisältää tärkeätä tietoa laitteen
turvallisesta asennuksesta, käytöstä ja huollosta. Säilytä ohjekirja
tulevaa tarvetta varten.
Laite on suunniteltu liesituulettimeksi (ulkoinen poisto) tai suodattimeksi
(sisäilman kierrätys).
TURVAOHJEITA
1. Erityistä huomiota tulee kiinnittää siihen, ettei liesituuletin ole
käytössä samanaikaisesti kuin tulipesä tai liesi, jotka ovat riippuvaisia
huoneilmasta ja jotka käyttävät jotain muuta energianlähdettä kuin
sähköä. Liesituuletin poistaa huonetilasta ilmaa, jota tulipesä tai liesi
tarvitsevat polttamiseen.
Huonetilan negatiivinen ilmanpaine ei saa ylittää 4Pa (4 x 10 -5 bar).
Huonetilat on siis tuuletettava asianmukaisesti tuulettimen toiminnan
varmistamiseksi.
Ulkoista poistoa koskien tulee noudattaa asianomaisessa maassa
voimassaolevia määräyksiä.
2. HUOMIO !
Kotitalouskoneet voivat olla vaarallisia tietyissä olosuhteissa.
A) Suodattimia ei saa yrittää säätää tuulettimen ollessa käytössä
B) Lamppuihin ei saa koskea laitteen pitkäaikaisen käytön jälkeen
C) Tuulettimen alla ei saa valmistaa liekitettyjä ruokia
D) Tulen polttamista muuten kuin ruoanlaiton yhteydessä tulisi
välttää, sillä se vahingoittaa suodattimia ja voi aiheuttaa tulipalon
E) Valmistettaessa paistettuja ruokia tulee ruokaa koko ajan
vartioida, jotta ylikuumentunut öljy ei syty palamaan
F) Tuuletin on irrotettava sähköverkosta ennen
huoltotoimenpiteiden aloittamista
ASENNUSOHJEET
• Sähköinen liitäntä
Laite on rakennettu II-luokassa, eivätkä kaapelit sen vuoksi saa olla
liitettyjä maajohtoon. Liitännät sähköverkkoon on tehtävä seuraavalla
tavalla:
RUSKEA = L linja
SININEN = N neutraali
Tarvittaessa tulee kaapeliin asentaa standardipistoke, joka kestää
tuoteselosteessa mainitun kuormituksen. Jos laitteessa on pistoke,
kupu on asennettava siten, että pistokkeeseen pääsee käsiksi.
Liitettäessä suoraan sähköverkkoon täytyy laitteen ja verkon väliin
laittaa moninapainen virrankatkaisija, jossa kontaktien minimiväli on
3 mm ja on mitoitettu kuormituksen mukaan ja joka on
voimassaolevien määräysten mukainen.
• Laite on asennettava vähintään 650 mm korkeudelle.
Mikäli joudutaan käyttämään kaksi- tai useampiosaista liitosputkea,
on ylemmän osan oltava alemman ulkopuolella.
Poistoilmaa ei saa johtaa kuumailmahormiin tai hormiin, jota käytetään
savun poistamiseen laitteista, jotka toimivat jollakin muulla
energianlähteellä kuin sähköllä.
• KUVUN KIINNITTÄMINEN SEINÄÄN
Tee reiät A-C-D määrätyille korkeuksille ( kuva 3 ). Käytä eri asennusten
yhteydessä seinätyypille sopivia ( esim. sementti, kipsilevy ym. )
sopivia ruuveja ja paisuntatulppia.Varmista että laitteen varustukseen
kuuluvat ruuvit ja tulpat ovat sopivia seinätyypille, johon kupu
kiinnitetään. Kiinnitä laippa Y kupuun ( kuva 2). Kiinnitä liitin Z seinään
reikien A lävitse. Ripusta kupu seinään reikien C avulla . Kiinnitä kupu
lopullisesti paikalleen turvareikien D avulla.
• IMUKUPUVERSIO
Kytke laippa Y putkiliittimen avulla poiston aukkoon
( ei suodatinkupuversiossa). Työnnä ylempi poistoputki E alemman
poistoputken F sisään siten ( kuva 2 ). Kiinnitä alempi poistoputki
kupuun tarkoitukseen varattujen ruuvien H avulla ( kuva 2 ). Vie ylempi
poistoputki liittimeen Z asti ja kiinnitä se ruuvien L avulla ( kuva 2 ).
Jos haluat vaihtaa laitteen imukupuversiosta suodatinkupuversioksi,
kysy jälleenmyyjältäsi aktiivihiilisuodattimia ja noudata
suodatinkupuversion asennusohjeita.
• SUODATINKUPUVERSIO
Asenna kupu ja kaksi poistoputkea imukupuversion asennusohjeiden
mukaisesti. Noudata pakkauksessa olevia suodatinputken
asennusohjeita.Jos pakkaus ei kuulu vakiovarusteisiin, tilaa se
jälleenmyyjältäsi lisävarusteena. Suodattimet on sijoitettava kuvun
sisällä olevan imuyksikön keskelle. Ilma poistuu ulos poistoputkeen E
kaivettujen urien kautta.
KÄYTTÖ JA HUOLTO
• On suositeltavaa käynnistää laite jo ennen ruoanlaiton aloittamista.
On suositeltavaa antaa laitteen toimia vielä 15 minuuttia
ruoan valmistumisen jälkeen, jotta ruoan valmistuksen aikana
likaantunut ilma saadaan kokonaan pois huoneistosta.
Kuvun moitteeton toiminta riippuu siihen suoritettavien
huoltotoimenpiteiden suoritustiheydestä ja erityisesti
rasvasuodattimien ja aktiivihiilisuodattimien säännöllisestä
vaihtamisesta.
• Kuvun moitteeton toiminta riippuu suoritettavien huoltotoimenpiteiden
suoritustiheydestä ja erityisesti rasvasuodattimien ja
aktiivihiilisuodattimien säännöllisestä vaihtamisesta.
- Poista suodattimet kuvusta ja pese ne vettä ja neutraalia nestemäistä
pesuainetta sisältävällä liuoksella ja anna lian valua ulos.
- Huuhtele huolellisesti haalealla vedellä ja anna kuivua.
- Suodattimet voidaan pestä myös astianpesukoneessa.
Alumiinipaneleiden väri voi muuttua muutaman pesun jälkeen.
Valmistaja ei hyväksy tästä aiheutuvia valituksia eikä korvaa
paneleiden vaihtoa.
• Aktiivihiilisuodattimien tarkoituksena on uudelleen kierrätettävän
ilman puhdistaminen. Suodattimia ei voi pestä tai käyttää uudelleen ja
ne on vaihdettava uusiin vähintään neljän kuukauden välein. Aktiivihiilen
kyllästys riippuu kuvun käyttötiheydestä, keittiötyypistä ja
rasvasuodattimien puhdistustiheydestä.
• Puhdista säännöllisesti kaikki tuulettimen ja kuvun pinnoille kertyneet
epäpuhtaudet talousspriihin tai hankaamattomaan neutraaliin
pesunesteeseen kostutetulla pyyhkeellä.
• OHJAIMET: 1A)Elektroniset_1B)Logiikka _ (kuva 5):
A= Valaistuksen painike
B= OFF /ensimmäisen nopeuden painike
C= toisen nopeuden painike
D= kolmannen nopeuden painike
E= Automaattiajastin ( 15 min. )
F= Suodattimien tukkeutumisen merkkivalo
L= LOGIIKKA
Rasvasuodattimet on puhdistettava kun ”suodattimien tukkeutumisen
merkkivalo ” vilkkuu.Kun merkkivalo palaa jatkuvasti rasvasuodattimet
on puhdistettava ja hiilisuodattimet vaihdettava (suodatinkupuversiossa ). Paina painiketta näiden toimenpiteiden jälkeen, jolloin se
nollautuu.
”Automaattiajastin ” pysäyttää liesituulettimen 15 min. viiveellä.
Tuuletin jatkaa toimintaansa lähtönopeudellaan 15 min ajan painikkeen
painamisen jälkeen.
• LOGIIKKA
a. Valojen ja moottorin automaattitoiminta
Kapan ollessa asennossa OFF paina logiikkapainiketta
Moottori käynnistyy nopeudella 1 ja valot jäävät sammuksiin.
Kun Logiikka havaitsee henkilön läsnäolon tai savun ja/tai höyryn
lisääntymisen, se sytyttää automaattisesti valot ja asettaa
moottorin nopeuteen 2.
15 sekunnin kuluttua valo sammuu ja moottori palaa nopeuteen 1.
Logiikka deaktivoidaan painamalla Logiikka-painiketta
b. Valojen automaattitoiminta
Kapan ollessa asennossa OFF paina valojen sytytyspainiketta ja sen
jälkeen Logiikka-painiketta.
Kun Logiikka havaitsee henkilön läsnäolon, se sytyttää automaattisesti
valot.
15 sekunnin kuluttua valo sammuu.
Logiikka deaktivoidaan painamalla Logiikka-painiketta.
c. Moottorin automaattitoiminta
Kapan ollessa asennossa OFF paina moottorin päälle
kytkemispainiketta nopeudelle 1 tai 2 ja sen jälkeen Logiikka-painiketta.
Kun Logiikka havaitsee henkilön läsnäolon tai savun ja/tai höyryn
lisääntymisen, se säätää automaattisesti moottorin suuremmalle
nopeudelle.
Logiikka deaktivoidaan painamalla Logiikka-painiketta.
LAITTEEN VALMISTAJA EI OLE VASTUUSSA VAHINGOISTA,
JOTKA OVAT AIHEUTUNEET YLLÄMAINITTUJEN OHJEIDEN
LAIMINLYÖNNISTÄ.
- 14 -
Page 15

EΛΛHNIKA
ΓΕΝΙΚΑ
∆ιαβάστε προσεκτικά το περιεχµενο των οδηγιών, διτι παρέχει
σηµαντικές υποδείξεις που αφορούν την ασφάλεια της εγκατάστασης
της χρήσης και της συντήρησης. Φυλάξτε το φυλλάδιο για ενδεχµενες
συµβουλές. Η συσκευή έχει σχεδιασθεί ως απορροφητήρας απορρφησης
(εξωτερική εκκένωση του αέρα) ή φιλτραρίσµατος (εσωτερική
ανακύκλωση του αέρα).
ΥΠΟ∆ΕΙΞΕΙΣ ΑΣΦΑΛΕΙΑΣ
1.Προσοχή σε περίπτωση που λειτουργούν ταυτχρονα απορροφητήρας
απορρφησης και καυστήρας ή µια εστία που εξαρτούνται απ τον αέρα
του περιβάλλοντος και τροφοδοτούνται απ ενέργεια χι ηλεκτρική διτι
ο απορροφητήρας απορροφντας αφαιρεί απ το περιβάλλον τον αέρα
που έχουν ανάγκη για την καύση ο καυστήρας ή η εστία.
Η αρνητική πίεση στο χώρο δεν πρέπει να ξεπερνά τα 4 PA (4x 10⁻⁵ bar)
Για σίγουρη ασφαλές λειτουργία του απορροφητήρα, οφείλεται να υπάρχει
κατάλληλος αερισµς στο χώρο. Για την εξωτερική εκκένωση ακολούθησε
τις ισχύοντες προδιαγραφές της χώρας.
2. ΠΡΟΣΟΧΗ !
Σε ορισµένες περιπτώσεις οι ηλεκτρικές οικιακές συσκευές µπορεί να
είναι επικίνδυνες!
Α) Μην ελέγχετε ποτέ τα φίλτρα +ταν ο απορροφητήρας είναι σε
λειτουργία.
Β) Μην αγγίζετε την λάµπα µετά απ+ παρατεταµένη χρήση της συσκευής
C) Απαγορεύεται το µαγείρεµα φαγητών µε φλ+γες κάτω απ+ τον
απορροφητήρα
D) Να αποφεύγονται ανοιχτές φλ+γες γιατί καταστρέφονται τα φίλτρα
και υπάρχει κίνδυνος πυρκαγιάς
Ε) Ελέγχετε τα φαγητά κατά το τηγάνισµα για την αποφυγή
υπερθέρµανσης του λαδιού.
F) Σε περίπτωση που υποστεί βλάβη το καλώδιο του απορροφητήρα, θα
πρέπει αυτ+ να επισκευαστεί απ+ σέρβις εξουσιοδοτηµένο απ+ τον
προµηθευτή δι+τι απαιτούνται ειδικά εργαλεία.
G ) Πριν απ+ οποιαδήποτε επισκευή βγάζετε πρώτα οπωσδήποτε το καλώδιο
απ+ την πρίζα.
Ο∆ΗΓΙΕΣ ΕΓΚΑΤΑΣΤΑΣΗΣ
• Ηλεκτρική σύνδεση
Η συσκευή ανήκει στο τύπο ΙΙ, που σηµαίνει πως κανένα καλώδιο δεν
πρέπει να συνεθεί µε την γείωση. Η σύνδεση στο δίκτυο θα πρέπει να
γίνει ως εξής:
ΚΑΦΕ: γραµµή L
ΜΠΛΕ: N ουδέτερη γραµµή
Αν δεν υπάρχει ήδη ένα φις µοντάρετε στο καλώδιο ένα φις
προσαρµοσµένο στο ηλεκτρικ φορτίο που αναφέρεται στην
χαρακτηριστική ετικέτα. Αν υπάρχει ήδη, ττε ο απορροφητήρας θα
πρέπει να µονταριστεί, έτσι ώστε το φις να είναι σε προσιτ για τη χρήση
σηµείο. Σε περίπτωση άµεσης σύνδεσης µε το ηλεκτρικ δίκτυο είναι
αναγκαίο να παρεµβληθεί µεταξύ της συσκευής και του ηλεκτρικού
δικτύου ένας πολυπολικς διακπτης µε ελάχιστο άνοιγµα µεταξύ των
επαφών 3mm προσαρµοσµένο στο ηλεκτρικ φορτίο και να συµφωνεί µε
τα ισχύοντα πρτυπα.
• Η συσκευή οφείλει να µονταριστεί µε απσταση 650mm πάνω απ την
εστία. Σε περίπτωση που χρησιµοποιηθεί σωλήνας σύνδεσης το οποίο
αποτελείται απ δύο ή περισστερα κοµµάτια, θα πρέπει το πάνω µέρος
να περαστεί πάνω απ το κάτω µέρος. Σε καµία περίπτωση δεν πέπει ο
σωλήνας απορρφησης να συνδεθεί µε σωλήνα, ο οποίος χρησιµοποιείτε
για εκκένωση καπνού συσκευών που τροφοδοτούνται απ ενέργεια χι
ηλεκτρική.
. MOΝΤΑΡΙΣΜΑ ΤΟΥ ΑΠΟΡΡΟΦΗΤΗΡΑ ΣΤΟ ΤΟΙΧΩΜΑ
Ανοιξε τις οπες A-C-D διατηροντας τις αποστασεις που αναφερονται
(εικ.3). Για τα διαφορα µονταρισµατα χρησιµοποιησε βιδες και ουπα σε
διασπορα που να αρµοζει στον τυπο του τοιχου (π.χ. τσιµεντο, γυψοχαρτο
κ.λ.π.). Σε περιπτωση που οι βιδες και τα ουπα παρεχονται στον εξοπλισµο
µε το προιον σιγουρευσου οτι αρµοζουν στον τυπο του τοιχωµατος στο
οποιο πρεπει να στερεωθει ο απορροφητηρας. Μπλοκαρε την φλαντζα
συναρµογης Υ στον απορροφητηρα (εικ.2). Μπλοκαρε την βαση
στηριγµατος Ζ στον τοιχο δια µεσου των οπων Α. Κρεµασε τον
απορροφητηρα στο τοιχωµα χρησιµοποιοντας τις οπες C.
Στερεωσε οριστικα τον απορροφητηρα στο τοιχωµα χρησιµοποιοντας τις
οπες ασφαλειας D.
. ΤΥΠΟΣ ΑΠΟΡΡΟΦΗΣΗΣ
Συνδεσε δια µεσου ενος σωληνος συναρµογης, την φλαντζα Υ στην οπη
εξαγωγης (µην πραγµατοποιεις στον τυπο φιλτραρισµατος). Εισηγαγε το
ανωτερο ρακκορ συναρµογης Ε στο εσωτερικο του κατωτερου ρακκορ
συναρµογης F (εικ.2). Στερεωσε το κατωτερο ρακκορ συναρµογης στον
απορροφητηρα χρησιµοποιοντας τις βιδες Η που παρεχονται στον
εξοπλισµο (εικ.2) συρε το ανωτερο ρακκορ συναρµογης µεχρι την βαση
στηριγµατος Ζ και στερεωσε το µε τις βιδες L (εικ.2). Για να µετατρεψεις
τον απορροφητηρα απο τυπο απορροφησης σε τυπο φιλτραρισµατος,
ζητησε απο τον πωλητη σου τα φιλτρα ενεργου ανθρακα και ακολουθησε
τις οδηγιες µονταρισµατος του τυπου φιλτραρισµατος.
. ΤΥΠΟΣ ΦΙΛΤΡΑΡΙΣΜΑΤΟΣ
Εγκαταστησε τον απορροφητηρα και τα δυο ρακκορ συναρµογης οπως
αναφερεται στην παραγραφο που αφορα το µονταρισµα του απορροφητηρα
για τον τυπο απορροφησης. Για το µονταρισµα του ρακκορ συναρµογης
φιλτραρισµατος ακολουθησε τις οδηγιες που περιεχονται στο kit. Εαν το
kit δεν παρεχεται µε τον εξοπλισµο, να το παραγγειλεις απο τον πωλητη
σου σαν συµπληρωµατικο, τα φιλτρα πρεπει να εφαρµοσθουν στην οµαδα
απορροφησης η οποια βρισκεται στο εσωτερικο του απορροφητηρα. Ο
αερας επανερχεται στο περιβαλλον δια µεσου των σχισµων που υπαρχουν
στο ροκκορ συναρµογης Ε.
ΧΡΗΣΗ ΚΑΙ ΣΥΝΤΗΡΗΣΗ
•Συνιστούµε να θέσετε την συσκευή σε λειτουργία πριν απ το µαγείρεµα
και να την αφήνετε σε λειτουργία ακµα και 15 λεπτά έπειτα απ το
µαγείρεµα. Η άψογη λειτουργία του απορροφητήρα εξαρτάται απ την
συντήρηση της συσκευής και την αλλαγή του ειδικού φίλτρου.
•Τα φίλτρα κατά του λίπους συγκρατούν λιπαρά στοιχεία που αιωρούνται
στο αέρα, για αυτ ο χρνος έµφραξης των µεταβάλλεται ανάλογα µε
την χρήση της συσκευής. Για την αποφυγή κινδύνου πυρκαγιάς, οφείλετε
να καθαρίζετε το ειδικ φίλτρο µε τον εξής τρπο:
- Αφαιρέστε τα φίλτρα απ τον απορροφητήρα και καθαρίστε τα µε νερ
και καθαριστικ µέσο. Αν είναι ανάγκη αφήστε το για λίγο µέσα στο νερ.
- Έπειτα ξεπλύνετε µε χλιαρ νερ και στεγνώστε.
- Τα φίλτρα µπορούν να καθαριστούν και στο πλυντήριο πιάτων.
Ύστερα απ πολλές πλύσεις των αλουµινένιων φίλτρων υπάρχει περίπτωση
αλλαγής χρώµατος. Αυτ το γεγονς δεν δίνει το δικαίωµα διαµαρτυρίας
για τυχν αντικατάσταση των πλαισίων αυτν.
•Τα φίλτρα ενεργούν άνθρακα χρησιµεύουν για τον βιολογικ καθαρισµ
του αέρα που θα επανέρθει στο περιβάλλον. Τα φίλτρα αυτά δεν πλένονται
και πρέπει να αλλάζονται κάθε 4 µήνες το αργτερο. Ο κορεσµς του
ενεργού άνθρακα εξαρτάται απ την λίγο ή πολύ παρατεταµένη χρήση
της συσκευής απ τον τύπο της ηλεκτρικής κουζίνας και απ την
συχντητα µε την οποία γίνεται ο καθαρισµς του φίλτρου κατά του
λίπους.
• Καθαρίζετε το περίβληµα και τα άλλα µέρη του απορροφητήρα ανά
τακτά διαστήµατα µε ένα υγρ πανί µε καθαριστικ οινπνευµα ή µε
ουδέτερο καθαριστικ µέσο χι µε διαβρωτικά.
ΕΝΤΟΛΕΣ: 1A) ΗΛΕΚΤΡΟΝΙΚΗ 1B) LOGICA
Α= πληκτρο ΦΩΤΙΣΜΟΥ
Β= πληκτρο OFF/ ΠΡΩΤΗ TAXYTHTA
C= πληκτρο ∆ΕΥΤΕΡΗ ΤΑΧΥΤΗΤΑ
D= πληκτρο ΤΡΙΤΗ ΤΑΧΥΤΗΤΑ
Ε= πληκτρο TIMER ΑΥΤΟΜΑΤΟ ΣΤΑΜΑΤΗΜΑ 15 λεπτων
F= πληκτρο RESET ΕΝ∆ΕΙΞΗ ΚΟΡΕΣΜΟΥ ΦΙΛΤΡΩΝ
L= πληκτρο LOGICA
Οταν η ενδειξη “ΚΟΡΕΣΜΟΥ ΦΙΛΤΡΩΝ” αναβωσβηνει τα φιλτρα για τα
λιποι πρεπει να πλυθουν. Οταν η ενδειξη ειναι αναµµενη συνεχως τα
φιλτρα για τα λιποι πρεπει να πλυθουν και τα φιλτρα ανθρακα πρεπει να
αντικατασταθουν (στην περιπτωση λειτουργιας σε τυπο ανακυκλωσης).
Αφου πραγµατοποιηθει αυτη η εργασια, πατησε το πληκτρο για να κανεις
reset. Η λειτουργια “TIMER ΑΥΤΟΜΑΤΟ ΣΤΑΜΑΤΗΜΑ” καθυστερει το
σταµατηµα του απορροφητηρα, ο οποιος θα συνεχιζει να λειτουργει µε
την ταχυτητα που λειτουργουσε την στιγµη που ενεργοποιηθηκε αυτη
η λειτουργια, για 15 λεπτα.
LOGICA
α. Αυτοµατη λειτουργια φωτα και κινητηρα
Με τον απορροφητηρα σε θεση OFF, πατησε το πληκτρο Logica, ο
κινητηρας θετετε σε εκκινηση στην 1 ταχυτητα και τα φωτα µενουν
σβηστα. Οταν η Logica αντιλαµβανεται την παρουσια ενος προσωπου
η’ µια αυξηση καπνου και/η’ ατµου, αναβει αυτοµατα τα φωτα και φερει
τον κινητηρα στην ταχυτητα 2. Μετα απο 15 δευτερολεπτα το φως
σβηνει και ο κινητηρας επανερχεται στην ταχυτητα 1.
Για να αποενεργοποιησεις την Logica πατησαε το πληκτρο Logica.
b. Αυτοµατη λειτουργια φωτα
Με τον απορροφητηρα σε θεση OFF, πατησε το πληκτρο για να αναψουν
τα φωτα και αµεσως µετα το πληκτρο Logica. Οταν η Logica
αντολαµβανεται την παρουσια ενος προσωπου αναβει αυτοµατα τα
φωτα. Μετα απο 15 δευτερολεπτα το φως σβηνει. Για να
αποενεργοποιησεις την Logica αρκει να πατησεις το πληκτρο Logica.
c. Αυτοµατη λειτουργια κινητηρα
Με τον απορροφητηρα σε θεση OFF, πατησε το πληκτρο για να τεθει σε
λειτουργια ο κινητηρας στην ταχυτητα 1 η’ 2 και αµεσως µετα το πληκτρο
Logica. Οταν η Logica αντιλαµβανεται την παρουσια ενος προσωπου η’
µια αυξηση καπνου και/η’ ατµου φερει αυτοµατα τον κινητηρα στην πιο
µεγαλη ταχυτητα. Για να αποενεργοποιησεις την Logica αρκει να
πατησεις το πληκτρο Logica.
∆ΕΝ ΑΝΑΛΑΜΒΑΝΟΥΜΕ ΕΥΘΥΝΕΣ ΓΙΑ ΤΥΧΩΝ ΖΗΜΙΕΣ ΠΟΥ
ΠΡΟΚΑΛΟΥΝΤΑΙ ΑΠΟ ΤΗΝ ΜΗ ΤΗΡΗΣΗ ΤΩΝ ΣΥΜΒΟΥΛΩΝ ΠΟΥ
ΠΡΟΑΝΑΦΕΡΘΗΚΑΝ.
(Εικ.5):
- 15 -
Page 16

РУССКИЙ
ОБЩИЕ СВИДЕНИЯ
Внимательно прочитайте содержание данной инструкции,
поскольку содержит важные указания, относящиеся к
безопасности установки, эксплуатации и техобслуживания.
Сохраните инструкцию для любой дальнейшей консультации.
МЕРЫ ПРЕДОСТОРОЖОСТИ
1. Быть внимательным, если одновременно работает вытяжка и
горелка или очаг, нуждяющиеся в окружающем воздухе и
запитывающиеся иной энергией, кроме электрической. В таком
случае вытяжка удаляет из помещения воздух, нужный для
процесса сгорания в горелке или очаге.Отрицальное давление в
помещении не должно превышать Pa (4 x 10
и безопасной работы следует обеспечить вентиляцию помещения.
Для наружных выбросов соблюдать правила, действующие в
Вашей стране.
2. ВНИМАНИЕ !
A. не пытайтесь проверить фильтры на работающей
вытяжке
B. не трогайте лампочки после продолжительной работы
прибора
C. запрещается готовить пищу на огне под вытяжкой
D. избегайте открытого пламени, оно вредно для
фильтров и создает опасность пожара
E. держите под постоянным контролем жарящуюся
пищу, так как перегретое масло может воспламеняться
F. перед любим видом техухода отключить вытяжку от
электросети
ИНСТРУКЦИИ ПО УСТАНОВКЕ
• Прибор имеет класс II, поэтому к заземлению не надо
подсоединять никакой провод, подсоединение к электросети
выполняется следующим образом:
коричневый-L-линия
синий-N-нейтралный
Если на кабеле нет штепселя, установить штепсель,
расcчитанный на работу с нагрузкой, указанной на табличке
характеристик. Если вытяжка оснащена штепселем, она
устанавливается, при условиях, что штепсель будет доступным.
В случае прямого подсоединения к электросети нужно разместить
между прибором и сетью многоплюсный выключатель с зазором
контактов минимум 3 мм, расcчитанный на нужную нагрузку и
отвечающий действующим нормам.
• Прибор должен быть установлен на высоте минимум 650 мм от
контактов. Если применяется соединительная труба из двух и
более частей, то верняя часть должна располагаться снаружи
нижней части. Не соединять выброс из вытяжки с каналом
циркуляции горячего воздуха или с каналом, используемым для
отвода дыма от устройств, запытываемых иной энергией кроме
электрической.
• КРЕПЛЕНИЕ ВЫТџЖКИ К СТЕНЕ
Просверлите отверстия А-C-D согласно высотным отметкам (рис.3).
Для различных видов монтажей закрепите винтами и
расширительными пробками, соответствующими типу стены
(цемент, гиспкартон). В случае, если винты и расширительные
пробки входят в комплект поставки, убедитесь, что они подходят
для стены, к которой крепится вытяжка. Зафиксируйте
соединительный фланец Y к вытяжке (рис.2). Зафиксируйте
скобу Z к стене в соответствии с отверстиями A. Повесьте вытяжку
в соответствии с отверстиями C. Закрепите вытяжку в
окончательное положение согласно предохранительным
отверстиям D.
• ВЫТџЖНОЙ РЕЖИМ
Соедините посредством трубы фланец Y с отверстием для
выброса (только в вытяжном режиме). Введите соединение
верхнего дымохода Е в нижюю часть F (рис. 2). При этом прорези
должны располагаться внизу. Закрепите нижнее соединение к
вытяжке с помощью винтов Н, входящих в комплект (рис. 2).
Протащить верхнее соединение к скобе Z и зафиксируйте винтами
L (рис.2). Для мофификации вытяжки в фильтрующий режим,
требуйте у продавца угольных фильтров и придерживайтесь
инструкций.
• ФИЛЬТРИРУЮЩИЙ РЕЖИМ
Закрепите вытяжку и оба соединения согласно инструкциям по
установке прибора в вытяжном режиме. Для установки
фильтрующего соединения ссылаться на инструкцию,
содержавшуюся в комплекте инструмента В случае если набор
инструмента не входит в комплект, закажите у продавца.
Фильтры должы устанавливатся на вытяжной блоке
располагающмся внутри зонта Воздух попадает в помещение
–5
bar). Для надежной
через прорези на соединении E.
ЭКСПЛУАТАЦИЯ И ТЕХХОД
• Рекомендуется включить прибор перед началом приготовления
пищи.Рекомендуется оставить прибор включенным на 15 минут
после завершения приготовления, чтобы обеспечить полное
удаление загрязненного воздуха.
Правильная работа вытяжки зависит от регулярности, с которой
выполняется операции по обслуживанию, в особенности уход за
фильтрами для жира и за угольными фильтрами.
• Фильтры для жира служат для улавливания жировых частиц,
находящихся в воздухе, поэтому периодичность их засорения
зависит от использования прибора. В любом случае необходимо
прочистить фильтры максимум через 2 месяца, выполняя
следующие операции:
- Cнимите фильтры с вытяжкии промойте их в водном растворе
нейтрального моющего средства до растворения грязи.
- Промойте фильтры обыльным количеством теплой воды и
высушите их.
- Фильтры можно мыть также и в посудомоечной машине.
В связи с повторными промывками, на алюминовых панелях могут
произойти изменения по цвету. Подобной случай не является
основанием для выставления претензий на замену панелей
• Угольные фильтры служат для очистки воздуха, который
повторно попадает в помещение. Фильтры не моются и не
используются повторно, они заменяются после максимального
4х-месячного пользования. Насыщение угла зависит от времени
пользования вытяжки, вида кухни и периодичности с которой
осуществляется промывка фильтров для жира.
• Часто вытирайте все отложения с вентилятора и с других
поверхностей, используя ткань, смоченную в спирте-денатурате
или же используя неабразивные нейтральные жидкие моющие
средства.
• Органы управления:1A)Электронные_1B)Логические (рис.5):
A= кнопка освещения
B= кнопка нулевой – первой скорости
C= кнопка второй скорости
D= кнопка третей скорости
E= кнопка таймера автоматической остановки через 15мин
F= сигнальная лампа засорения фильтров от жира и угольных
фильтров.
L= кнопка Логические
Когда лампа “засорение фильтров” начинает мигать, это
означает, что необходимо промыть фильтры от жира. Когда лампа
включается без мигания необходимо промыть фильтры от жира
и заменить угольные фильтры (в случае работы вытяжки в
рециркуляционном режиме). Выполнив данные операции, нажмите
кнопку для включения. Функция “таймер автоматической
остановки”задерживает отключение вытяжки, которая
продолжает работу на скорости, выбранной при включении этой
функции через 15 минут.
• Логические
а. Автоматический режим лампочек и двигателя
При выключенном положении вытяжки нажать на кнопку
Логической функции. Двигатель запускается при скорости 1 и
лапмочки не загораются. В случае обнаружения присутствия
человека или увеличения дыма/паров, Логическая функция
автоматически включает лампочки и переводит двигатель на
скорость 2. Через 15 секунд лампочка гасится и двигатель
переходит на скорость 1. Для отключения Логической функции
достаточно нажать на кнопку Логической функции.
в. Автоматический режим лампочек
При выключенном положении вытяжки нажать на кнопку
включения лампочек и затем на кнопку Логической функции.
В случае обнаружения присутствия человека Логическая функция
автоматически включает лампочки.
Через 15 секуннд лампочка гасится.
Для отключения Логической функции достаточно нажать на
кнопку Логической функции.
с. Автоматический режим двигателя
При выключенном положении вытяжки нажать на кнопку
включения двигателя при скорости 1 или 2, затем на кнопку
Логической функции.
В случае обнаружения присутствия человека или увеличения
дыма/паров, Логическая функция автоматически переводит
двигатель на более высокую скорость.
Для отключения Логической функции достаточно нажать на
кнопку Логической функции.
ФИРМА НЕ НЕСЕТ НИКАКОЙ ОТВЕТСТВЕННОСТИ ЗА
УШЕРБ, ВЫЗВАННЫЙ НЕСОБЛЮДЕНИЕМ
ВЫШЕПРИВЕДЕННЫХ ПРЕДУПРЕЖДЕНИЙ.
- 16 -
Page 17

POLSKI
INFORMACJE OGÓLNE
Należy zapoznać się dokładnie z niniejszym tekstem, zawierającym
wskazówki, dotyczące bezpieczeństwa przy instalacji, eksploatacji i
konserwacji okapu kuchennego. Należy zachować niniejsze instrukcje
także dla późniejszych konsultacji. Urządzenie zostało zaprojektowane
jako okap wciągający (wydala powietrze na zewnątrz) lub
pochłaniający (oczyszcza powietrze w pomieszczeniu).
UWAGI O BEZPIECZEŃSTWIE
1. Nie należy używać jednocześnie okapu kuchennego i paleniska lub
kominka zależnych od powietrza w pomieszczeniu i niezasilanych
energią elektryczną, ponieważ okap zużywa powietrze potrzebne do
ich spalania. Ciśnienie ujemne w pomieszczeniu nie powinno
przekraczać 4 Pa (4 x 10
wentylację w pomieszczeniu, konieczną dla bezpiecznego
funkcjonowania urządzenia. Przy odprowadzaniu dymu na zewnątrz,
należy przestrzegać norm obowiązujących w waszym kraju.
2. UWAGA !
Elektryczny sprzęt gospodarstwa domowego w niektórych
okolicznościach może być niebezpieczny.
A) Nie kontrolować filtrów przy okapie funkcjonującym
B) Nie dotykać żarówek po dłuższym funkcjonowaniu
urządzenia
C) Nie wolno gotować potraw na otwartym ogniu
D) Nie stosować otwartego ognia, ponieważ może uszkodzić
filtry i spowodować pożar
E) Postępować ostrożnie przy smażeniu, aby przegrzany olej
nie zapalił się
F) Przed przystąpieniem do jakiejkolwiek czynności związanej
z konserwacją, wyłączyć okap z sieci elektrycznej.
INSTRUKCJE DO INSTALACJI
• Podłączenie elektryczne
Urządzenie skonstruowane jest według klasy II, dlatego przewody nie
muszą być uziemione. Podłączenie do sieci elektrycznej powinno być
przeprowadzone następująco:
BRĄZOWY = L linia
BŁĘKITNY = N zerowy
Jeżeli przewód nie posiada wtyczki, zamontować wtyczkę,
dostosowaną do obciążenia instalacji podanego na tabliczce
znamionowej. Jeżeli okap posiada wtyczkę, to należy zamontować go
tak, aby dostęp do wtyczki był łatwy. Przy bezpośrednim podłączeniu
do sieci elektrycznej, między urządzeniem i siecią należy umieścić
wyłącznik wielobiegunowy, ze stykami w odległości przynajmniej 3
mm, przystosowany do obciążenia i zgodny z obowiązującymi
normami.
• Należy zainstalować urządzenie w odległości przynajmniej 650 mm
od kuchni. Przy zastosowaniu rury łączącej składającej się z dwóch
lub kilku części, część górna rury musi znajdować się wewnątrz części
dolnej. Nie należy łączyć przewodu wyciągowego okapu z przewodem,
w którym krąży gorące powietrze lub z przewodem przeznaczonym
do odprowadzania dymu z urządzeń zasilanych energią inną niż energia
elektryczna.
• Montaż okapu do ściany
Wykonać otwory A-C-D, według podanych wartości (rys. 3). Przy
montażu okapu stosować śruby i kołki rozpierające dostosowane do
typu ściany (na przykład cement zbrojony, płyty gipsowe itd.) Jeżeli
okap wyposażony jest w śruby i kołki rozpierające, należy upewnić
się, aby były one dostosowane do typu ściany, do której będzie
mocowany okap. Umocować kołnierz złączny Y na okapie (rys. 2).
Umocować ramię podtrzymujące Z do ściany posługując się otworami A
Umocować okap do ściany posługując się otworami C. Umocować
ostatecznie okap, posługując się otworami bezpieczeństwa D.
• Wersja okapu jako wyciąg powietrza
Posługując się złączką rurową, połączyć kołnierz Y z otworem
odprowadzającym (nie dotyczy wersji filtrującej). Wsunąć złączkę
górną E do złączki dolnej F (rys. 2). Posługując się wkrętami H,
przymocować złączkę dolną do okapu (rys. 2). Wysunąć złączkę górną
aż do strzemiona Z i umocować ją posługując się wkrętami L (rys. 2).
Aby przekształcić okap z wersji wciągowej na filtrującą, należy
zaopatrzyć się u Waszego dostawcy w filtry węglowe i przeprowadzić
montaż okapu wegług instrukcji dotyczących wersji filtrującej.
• Wersja filtrująca
Instalować okap oraz dwie złączki według wskazówek podanych w
rozdziale, dotyczącym montażu okapu w wersji wciągowej. Przy
instalacji złączki filtracyjnej kierować się instrukcjami zawartymi w
zestawie narzędzi. Jeżeli taki zestaw nie jest zawarty w wyposażeniu
okapu, należy zwrócić się do Waszego sprzedawcy. Filtry muszą być
założone do części wyciągowej, wewnątrz okapu. Oczyszczone
powietrze wprowadzane jest ponownie do pomieszczenia poprzez
–5
bar). Należy więc zadbać o prawidłową
otwory na złączce E.
EKSPLOATACJA I KONSERWACJA
• Poleca się uruchomić okap przed gotowaniem wszelkich potraw.
Poleca się uruchomić urządzenie przed gotowaniem potraw i wyłączać
na około 15 min. po zakończeniu gotowania, aż wszystkie zapachy
zostaną odprowadzone. Dobre funkcjonowanie okapu zależy od
przeprowadzanej konserwacji, zwłaszcza filtru przeciwtłuszczowego
i filtru węglowego.
• Filtry przeciwtłuszczowe służą do pochłaniania cząstek tłuszczu
zawieszonych w powietrzu. Filtr ten powinien być czyszczony co 2
miesiące, postępując w następujący sposób:
- Wyjąć filtry z okapu i czyścić je wodą i detergentem płynnym
obojętnym.
- Dokładnie wypłukać filtry w letniej wodzie i wysuszyć.
- Filtry można czyścić także w zmywarce naczyń.
Na płytach aluminiowych po pewnym okresie czasu mogą pojawić
się zmiany w kolorze. Nie stanowi to jednak podstawy do reklamacji
o wymianę płyt.
• Filtry węglowe służą do oczyszczania powietrza. Filtry nie mogą
być czyszczone lub regenerowane, lecz muszą być wymieniane
przynajmniej co 4 miesiące. Zanieczyszczenie węgla aktywnego w
filtrze zależy od czasu używania urządzenia, od typu kuchni i od
regularności czyszczenia filtru przeciwtłuszczowego.
• Należy często czyścić osady na wentylatorze i na pozostałych
powierzchniach urządzenia, posługując się szmatką nawilżoną
denaturatem lub płynnym środkiem czyszczącym nieściernym.
•Układ sterowania: 1A)Stery elektroniczne_1B)Stery układu
logicznego _(RYS.5)
A= przycisk OŚWIETLENIE
B= przycisk WŁĄCZENIE/PIERWSZA PRĘDKOŚĆ
C= przycisk DRUGA PRĘDKOŚĆ
D= przycisk TRZECIA PRĘDKOŚĆ
E=przycisk REGULATOR CZASOWY AUTOMATYCZNEGO
WYŁĄCZENIA po 15 minutach
F= przycisk ZEROWANIE WSKAŹNIKA ZANIECZYSZCZENIA
FILTRÓW
L= przycisk Stery układu logicznego
Jeżeli wskaźnik „zanieczyszczenia filtrów” miga, oznacza to, że należy
wyczyścić filtry tłuszczu. Jeżeli wskaźnik zapali się lecz nie miga,
oznacza to, że należy wyczyścić filtry tłuszczu i wymienić filtry
węglowe (w wersji jako pochłaniacz). Po przeprowadzeniu takich
operacji, należy nacisnąć przycisk „c”, aby wyzerować wskaźnik.
Funkcja „regulator czasowy wyłączenia automatycznego” opóźni
wyłączenie okapu, który będzie funkcjonował przez 15 minut wg
regulacji prędkości, jaką posiadał w momencie włączenia takiej funkcji.
• Stery układu logicznego
a. Automatyczne funkcjonowanie światełek i silnika
Przy okapie w pozycji OFF nacisnąć przycisk “logica”.
Nastąpi uruchomienie silnika w prędkości 1 ale światełka nie zapalą
się. Jeżeli układ logiczny wykryje obecność osoby lub zwiększoną
emisję dymu i/lub pary, wtedy automatycznie zapali światełka i
przesunie silnik do prędkości 2.
Po upływie 15 sekund światełko wyłączy się a prędkość silnika
przejdzie do pozycji 1.
Aby wyłączyć układ logiczny, wystarczy nacisnąć przycisk “logica”.
b. Automatyczne funkcjonowanie światełek
Przy okapie w pozycji OFF, nacisnąć przycisk zapalający światełka
a następnie nacisnąć przycisk “Logica”. Jeżeli układ logiczny wykryje
obecność osoby, wtedy automatycznie zapali światełka. Po upływie
15 sekund światełka wyłączą się. Aby wyłączyć układ logiczny,
wystarczy nacisnąć przycisk “ logica ”.
c. Automatyczne funkcjonowanie silnika
przy okapie w pozycji OFF, nacisnąć przycisk uruchamiający silnik
w prędkości 1 lub 2 a następnie nacisnąć przycisk “logica”.
Jezeli uklad logiczny wykryje obecnosc osoby lub zwiekszona emisje
dymu i/lub pary, wtedy automatycznie zapali swiatelka i przesunie
silnik do predkosci zwiekszonej.
Aby wyłączyć układ logiczny, wystarczy nacisnąć przycisk “logica”.
DOSTAWCA UCHYLA SIĘ OD WSZELKIEJ ODPOWIEDZIALNOŚCI
ZA EWENTUALNE USTERKI, SPOWODOWANE
NIEPRZESTRZEGANIEM WYŻEJ WYMIENIONYCH WSKAZÓWEK.
- 17 -
Page 18

ČESKÁ VERZE
POLSCPOLSC
ÚVOD’
Přečtěte si pozorně obsah návodu, protože poskytuje důležité informace
týkající se bezpečné instalace, používání i údržby zařízení. Uchovejte
si návod pro jakoukoliv budoucí potřebu. Přístroj byl konstruován jako
odsávač par (s vnějším odvodem vzduchu) či jako filtr (vnitřní recykláž
vzduchu).
BEZPECNOSTNÍ OPATRENÍ
1. Vyžaduje se opatrnost, jestliže jsou současně v činnosti odsávač par
a jiný hořák nebo tepelné zařízení závisející na vzduchu místnosti a
napájené jinou energií než elektrickou, protože odsávač par spotřebovává
vzduch z okolí, který hořák nebo jiné tepelné zařízení potřebují ke
spalování. Negativní tlak nesmí překročit 4 Pa (4 x 10
bezpečnému provozu je tedy nutná odpovídající ventilace místnosti.
Při odvádění vzduchu do vnějšího prostředí je nutné se řídit platnými
předpisy Vaší země.
2. UPOZORNĚNÍ !
Za určitých okolností mohou být elektrické spotřebiče
nebezpečné.
A) Neprovádějte kontrolu filtrů se zapnutým spotřebičem
B) Nedotýkejte se žárovek, bylo-li zařízení déle v chodu
C) Je zakázáno upravovat pokrmy manipulí přímého ohně pod
fungujícím odsávačem
D) Vyvarujte se volnému plameni, je škodlivý pro filtry a mohl
by způsobit požár
E) Při smažení jídel zajistěte, aby se rozpálený olej nevznítil
F) Před provedením jakékoliv údržby vypněte přístroj z elektrické
sítě.
–5
bar). K
NÁVOD K INSTALACI
• Elektrické zapojení
Zařízení je vyrobeno v II. třídě, a proto žádný vodič nesmí být uzemněn.
Napojení k elektrické síti musí být provedeno následovně:
HNĚDÁ = L vodič
MODRÁ = N neutrální vodič
Na přívodní kabel, pokud ji již neobsahuje, namontujte zástrčku
normalizovanou pro příkon uvedený v technických charakteristikách
výrobku. V případě přímého zapojení na elektrickou síť je nezbytné
přístroj připojit přes vícepólový spínač s minimální vzdáleností 3 mm
mezi rozpojenými kontakty, dostatečně dimenzovaný a odpovídající
platným normám.
• Zařízení musí být instalováno v minimální výšce 650 mm nad anebo.
Vývod odsavače nesmí být napojen na vývod, ve kterém cirkuluje
teplý vzduch, nebo který je používán k odvádění kouře ze zařízení
napájených jinou energií než elektrickou.
• Montáž odsávače na stěnu
Vyvrtejte otvory A-C-D a respektujte přitom vyznačené míry (obr. 3).
Pro různý typ montáže používat vhodné šrouby či moždíky pro každý
typ stěny (např. beton, sádrokartón atd). V případě, že šrouby a
hmoždíky jsou součástí vybavení přístroje, ověřte si, za jsou vhodné
pro typ stěny, na kterou odsávač musí být upevněn. Upevněte spojovací
přírubu Y na odsávač (obr. 2).Upevněte podporu Z na stěnu
prostřednictvím otvorů A. Zavěste odsávač na stěnu prostřednictvím
otvorů C. Upevněte definitivně odsávač za pomoci bezpečnostních
otvorů D.
• Odsávací verze.
Prostřednictvím spojovací hadice spojit přírubu Y s výfukovým otvorem
(u filtrovací verze se tato operace neprovádí). Vsuňte horní spojku E
uvnitř dolní spojky F (obr. 2). Upevněte dolní spojku na odsávač a
použijte přitom šrouby H , kterými je přístroj vybaven. (Obr. 2). Vysuňte
horní spojku až k přírubě Z a upevněte ji šrouby L. (Obr. 2). K proměně
zařízení z odsávací na filtrovací verzi požádejte vašeho dodavatele o
filtry s aktivním uhlíkem a postupujte podle návodu k montáži filtrující
verze.
• Filtrovací verze.
Instalujte zařízení a obě spojky podle návodu uvedeného v odstavci o
montáži verze odsávací. Při montáži filtrující spojky postupujte podle
návodu v montážním souboru. Pokud montážní soubor není součástí
vybavení přístroje, objednejte si ho u Vašeho dodavatele jako
příslušenství. Filtry musí být umístěny do filtrovací zóny uvnitř
odsávače. Vzduch je opět zaváděn do místnosti očnicemi na spojce E.
POUŽITÍ A ÚDRŽBA
• Doporučujeme zapojení přístroje před přípravou jakéhokoliv vařeného
pokrmu.
Doporučujeme nechat odsávač zapnutý po 15 minut po dovaření jídel,
k úplnému odsátí spotřebovaného vzduchu.
Správné fungování odsávače závisí na pravidelném provádění údržby,
zvláště operací k čištění filtru proti mastnotám a filtru s aktivním uhlíkem.
• Úkolem filtru proti mastnotám je zadržovat částice tuků rozptýlené
ve vzduchu a proto se mohou ucpávat po různě dlouhé době v závislosti
na tom, jak často a jakým způsobem je odsávač používán.
V každém případě je zapotřebí filtry očistit alespoň jednou za 2 měsíce
a postupovat při tom následovně:
- Odstranit filtry z odsávace a umýt je v roztoku vody a neutrálního
tekutého cistícího prostredku a nechat rozpustit špínu.
- Opláchnout rádne pod vlažnou vodou a nechat uschnout.
- Filtry lze rovněž umývat v myčce nádobí.
Po několikerém umytí hliníkových panelů může dojít ke změně jejich
barvy. Tato skutečnost neopravňuje k reklamaci a žádosti o jejich
eventuální výměnu.
• Filtry s aktivním uhlíkem slouží k vyčištění vzduchu, který bude opět
uveden do prostředí. Filtry není možné mýt či obnovovat a musejí být
vyměňovány minimálně každé čtyři měsíce. Saturace aktivního uhlíku
závisí na délce použití odsávače, typu kuchyně a pravidelnosti čištění
filtru proti mastnotám.
• Očistit pravidelně všechny usazeniny na ventilátoru a ostatním
povrchu a použít k tomu hadr navlhčený v denaturovaném lihu nebo v
neutrálních, nebrusných tekutých čistících prostředcích.
• POVELY: 1A)Elektronické _ 1B)Logika _ (Obr.5):
A=przycisk OŚWIETLENIE
B=przycisk WLACZENIE/PIERWSZA
C=przycisk DRUGA PRĘDKOŚĆ
D=przycisk TRZECIA PRĘDKOŚĆ
E=przycisk REGULATOR CZASOWY AUTOMATYCZNEGO
WYŁĄCZENIA po 15 minutach
F = przycisk ZEROWANIE WSKAŹNIKA ZANIECZYSZCZENIA
FILTRÓW
L=przycisk LOGIKA
Jeżeli wskaźnik „zanieczyszczenia filtrów” miga, oznacza to, że należy
wyczyścić filtry tłuszczu.
Jeżeli wskaźnik zapali się lecz nie miga, oznacza to, że należy
wyczyścić filtry tłuszczu i wymienić filtry węglowe (w wersji jako
pochłaniacz).
Po przeprowadzeniu takich operacji, należy nacisnąć przycisk „c”,
aby wyzerować wskaźnik.
Funkcja „regulator czasowy wyłączenia automatycznego” opóźni
wyłączenie okapu, który będzie funkcjonował przez 15 minut wg
regulacji prędkości, jaką posiadał w momencie włączenia takiej funkcji.
• LOGIKA
A. AUTOMATICKÉ FUNGOVÁNÍ SVĚTEL S MOTOREM
Je-li odsávač v pozici OFF stiskněte tlačítko logika
Motor se uvede do chodu rychlostí 1 a světla
zůstanou zhasnutá.
Jestliže Logika zjistí přítomnost osoby anebo více kouře a/nebo páry,
automaticky zapne světla a uvede motor do rychlosti 2.
Po 15 vteřinách světlo zhasne a motor se vrátí
do rychlosti 1.
K odstavení logiky postačí stisknout tlačítko Logika
B. AUTOMATICKÉ FUNGOVÁNÍ SVĚTEL
Je-li odsávač v pozici OFF, stiskněte tlačítko zapínání světel a posléze
tlačítko Logika.
Jestliže loigka zjistí přítomnost osoby, zapne automaticky světla.
Po 15 vteřinách světlo zhasne.
K odstavení logiky postačí stisknout
tlačítko Logika.
C. AUTOMATICKÉ FUNGOVÁNÍ MOTORU
Je-li odsávač v pozici OFF, stiskněte tlačítko premere zapínání motoru
na rychlost 1 nebo 2
a poté tlačítko Logika.
Jestliže logika zjistí přítomnost osoby anebo více kouře a/nebo páry,
automaticky přivede motor do nejvyšší rychlosti
K odstavení Logiky postačí stisknout tlačítko Logika.
VÝROBCE ODMÍTÁ JAKOUKOLIV ZODPOVĚDNOST ZA ŠKODY
ZPŮSOBENÉ NEDODRŽENÍM UVEDENÝCH UPOZORNĚNÍ.
- 18 -
Page 19

MAGYAR
ÁLTALÁNOS TUDNIVALÓK
Kérjük, figyelmesen olvassa el útmutatónkat, mert fontos tudnivalókat
tartalmaz a készülék felszerelésére, használatára és karbantartására
vonatkozóan. Őrizze meg, mert a későbbiekben is szüksége lehet rá.
A készüléket elszívásra (a levegőnek a külső térbe juttatására) vagy
szűrőberendezésnek (a levegő belső visszaforgatására) tervezték.
BIZTONSÁGI FIGYELMEZTETÉSEK
1. Figyeljünk arra, hogyha nem villannyal működő és ugyanannak a
helyiségnek a légterét használó elszívó, kályha vagy tűzhely működik
egyszerre, akkor az elszívó esetleg kivonja a kályha vagy a tűzhely
égéséhez szükséges levegőt. A helyiség negatív nyomása 4 PA-nál nem
lehet nagyobb (4 x 10⁵bar). A biztonságos működés érdekében
gondoskodjunk a helyiség megfelelő levegőellátásáról. A szennyezett
levegő külső térbe való elvezetésekor tartsuk be az ide vonatkozó
előírásokat.
2. FIGYELEM !
Bizonyos körülmények között a háztartási gépek veszélyesek
lehetnek.
A) Ne nyúljunk a működésben levő elszívóba!
B) Hosszabb használat után ne érintsük meg az elszívó izzóit!
C) Az elszívó alatt ne készítsünk flambírozott ételeket!
D) Kerüljük a magas láng használatát, mert rongálja a szűrőket és
tűzveszélyes!
E) Ha zsírban, olajban sütünk, vigyázzunk, hogy ne hevítsük túl,
mert lángra lobbanhat!
F) A készüléket mindennemű karbantartás előtt áramtalanítsuk!
FELSZERELÉSI UTASÍTÁSOK
• Elektromos bekötés
A termék kéteres kábellel készült, vigyázzunk, hogy az egyik huzalt se
kössük a földvezetékbe.
A hálózatra való bekötésnél vegyük figyelembe a huzalok színét:
BARNA = L fázis
KÉK = N nullafázis
Amennyiben a terméken nincs csatlakozó, szereljünk rá egy, a feltüntetett
műszaki adatoknak megfelelő szabályos villásdugót. Amennyiben a
terméken van csatlakozó, akkor az elszívót úgy kell felszerelni, hogy a
csatlakozó elérhető helyen legyen. Ha a készüléket közvetlenül kötjük a
hálózatra, akkor iktassunk be a készülék és a hálózat közé egy legalább
3 mm-es, az áramerősségnek és az érvényes normáknak megfelelő
kapcsolót.
• A készüléket villanytűzhely felett min. 65 cm-re. Ha két vagy több
elvezető csövet kell összeszerelnünk, akkor az alsó csövet illesszük a
felső belsejébe. Az elszívó csövét ne vezessük olyan kéménybe,
amelyben meleg levegő áramlik, vagy amely nem villannyal működő
berendezés égéstermékét vezeti el.
• Az elszívóegység falra való rögzítése
A megadott arányok betartásával hozzuk létre az A-C-D furatokat (3.
ábra). A rögzítés egyes lépéseihez a fal minőségének (pl. vasbeton,
tégla, stb.) megfelelő expanziós csavarokat és tipliket használjunk .
Amennyiben a készülékhez csavarokat és tipliket is mellékeltek,
használatuk előtt győződjünk meg arról, hogy megfelelnek-e annak a
faltípusnak, ahová a búrát kívánjuk felszerelni. Rögzítsük az (Y)
összekötő karimát az elszívóhoz (2. ábra). A (A) furatokon keresztül
rögzítsük a (Z) kengyelt a falhoz. Az elszívót az (C) furatok
felhasználásával akasszuk a falra. Az elszívót rögzítsük véglegesen
a (D) biztonsági furatokon keresztül.
• A készülék elszívóként való használata
Egy csatlakozócsövön keresztül kössük az (Y) karimát a
kivezetőnyíláshoz (nem kell elvégezni a szűrő változat esetében).
A felső (E) csatlakozócsövet illesszük az alsó (F) (2. ábra). A mellékelt
(H) csavarok felhasználásával rögzítsük az alsó csatlakozócsövet az
elszívóhoz (2. ábra). A felső csatlakozócsövet hosszabbítsuk meg a
tartószerkezetig (Z) és rögzítsük a megfelelő csavarokkal (L) (2. ábra).
A z elszívó búrát szűrőként is használhatjuk, ha a kereskedőtől aktív
szénszűrőt szerzünk be és a szűrő változat beszerelési utasításait
követjük.
• A készülék szűrőként való működtetése
Az elszívó változat beszereléséről szóló részben leírt módon szereljük
be a búrát és a két csövet. A szűrôcsatlakozót a csomaghoz mellékelt
utasítás szerint szereljük fel. Ha a csomaghoz nem mellékeltek
útmutatót, akkor rendeljük meg a kereskedôtôl.
A szűrőket a búra belsejében lévő szívóegységre kell rögzíteni.
A visszaforgatott levegő az (E) csatlakozón létrehozott réseken jut
vissza a helyiségbe.
HASZNÁLAT ÉS KARBANTARTÁS
• Ajánlatos a készüléket az étel minőségétől függetlenül a főzés
megkezdése előtt mindig bekapcsolni Ajánlatos a főzés befejezése után
a készüléket még 15 percig működtetni, hogy az elhasznált levegőt teljes
egészében eltávolítsuk. Az elszívó hathatós működtetése attól függ, hogy
milyen rendszerességgel tisztítjuk a berendezést, milyen gyakran
cseréljük a zsír- és az aktív szénszűrőket.
• A zsírszűrők megkötik a levegőben lévő zsírszemcséket, melyek a
használattól függően idővel eltömítik a készüléket. Éppen ezért a
tűzveszély elkerülése érdekében legalább kéthavonként tisztítsuk meg
a szűrőket az alábbiak szerint:
- Vegyük ki a szűrőket az elszívóból és folyékony, semleges mosószeres
vízzel mossuk le a szennyeződést.
- Többszöri, langyos vízzel való leöblítés után hagyjuk megszáradni.
- A szűrőket mosogatógépben is tisztíthatjuk.
Az aluminiumlemezek tisztítása színváltozást okozhat. Ez nem hiba és
nem szükséges a cseréjük.
• A z aktív szénszűrő arra szolgál, hogy a visszaforgatott levegőt
megtisztítsa. A szűrőket nem lehet tisztítani vagy regenerálni és legalább
négyhavonta ki kell cserélni. Az aktív szén telítődése a készülék
használatának gyakoriságától, az ételek milyenségétől és a zsírszűrő
tisztításának gyakoriságától függ.
• Gyakorta távolítsuk el a ventillátorra és a készülékre rakódott
szennyeződést, ehhez használjunk denaturált szeszbe vagy folyékony,
semleges mosószerbe mártott, nem dörzshatású törlőt.
•VEZÉRLÉS: 1A) Elektronikus_1B) Logikai (5.ábra):
A=VILÁGÍTÁS
B=OFF/ELSŐ SEBESSÉG
C=MÁSODIK SEBESSÉG
D=HARMADIK SEBESSÉG
E=LEÁLLÍTÁS AUTOMATIKUS KÉSLELTETÉSE 15 perccel
F=SZŰRŐELTÖMŐDÉS KIJELZŐJÉNEK ÚJRAÁLLÍTÁSA
L=LOGIKAI
A zsírszűrőket ki kell mosni, amikor a “Szűrőeltömődés kijelzője”
villog.
Amikor a jelző kigyullad, de nem villog, akkor a zsírszűrőket ki kell
mosni és a szénszűrőket ki kell cserélni (amennyiben a készülék a
levegő visszaforgatásával üzemel).
Amikor elvégezte ezeket a műveleteket, a gomb megnyomásával ismét
kapcsolja be a kijelzőt.
A “Leállítás automatikus késleltetése” megakadályozza az elszívó
kikapcsolását és a búra a funkció bekapcsolásakor folyamatban levő
üzemsebességen fog működni még 15 percet.
• LOGIKAI
a. Automata fényjelzés: a motor működésbe lép
A kürtô OFF- állásban, nyomjuk meg a logikai gombot.
A motor működésbe lép, 1-es sebességgel, nincsen fényjelzés.
Amikor a logikai vezérlés személy jelenlétét érzékeli, vagy
megnövekedett füst-/ gôzkibocsátást, automatikusan
bekapcsolja a fényjelzôket, és 2-es sebességre kapcsolja át a
motort.
15 másodperc után a fény elalszik, és a motor visszakapcsol 1-es
sebességre.
A kikapcsoláshoz elegendô megnyomni a Logikai vezérlés
gombját.
b. Automata fényjelzés
A kürtô OFF- állásban, nyomjuk meg a fényjelzôk gombját, ezt követôen
pedig a Logikai vezérlés gombját.
Amikor a logikai vezérlés személy jelenlétét érzékeli
automatikusan bekapcsolja a fényjelzôket.
15 másodperc után a fény elalszik.
A kikapcsoláshoz elegendô megnyomni a Logikai vezérlés
gombját.
c. Automata motorműködés
A kürtô OFF- állásban, nyomjuk be a motort elindító gombot, 1-es
vagy 2-es sebességfokozattal, ezt követôen pedig a Logikai vezérlés
gombját.
Amikor a logikai vezérlés személy jelenlétét érzékeli, vagy
megnövekedett füst-/ gôzkibocsátást, automatikusan magasabb
sebességre kapcsol át.
A kikapcsoláshoz elegendô megnyomni a Logikai vezérlés gombját.
A HASZNÁLATI UTASÍTÁS BE NEM TARTÁSÁBÓL EREDŐ
KÁROKÉRT SEMMINEMŰ FELELŐSSÉGET NEM VÁLLALUNK.
- 19 -
Page 20

 Loading...