

Page 1
VITROCERAMIC HOB
GB
Operating instruction book
ELEKTRO-GLASKERAMIKMULDE
D
Gebrauchs-und montageanweisung
T ABLE VITROCERAMIQUE
F
Notice d'utilisation
GLASCERAMIEK PLAA T
NL
Gebruiksaanwijzingen
PLANO DE VIDRIO DE CERAMICA
E
Instrucciones de uso
PLANO VITRO-CERÂMICO
P
Intruções para de uso
PIANO VETROCERAMICA
I
Istruzioni per l'uso
KERAMISK GLASHÄLL
S
Användarhandbok
KERAMISK TOPP
N
Bruksanvisning
GLASKERAMISK KOGEPLADE
DK
Brugervejledning
ΕΠIφΑΝΕΙΑ ΥΑΛΟΚΕΡΑΜΙΚΗ
GR
Ο∆ΗΓΙΕΣ ΓΙΑ ΤΗΝ ΧΡΗΣΕΗ
ПАНЕЛЬ ИЗ СТЕКЛОКЕРАМИКИ
RUS
ИНСТРУКЦИИ ПО ЭКСПЛУАТАЦИИ
PłYTA CERAMICZNA
PL
Instrukcja obsługi
VAØIE ZE SKLOKERAMIKY
CZ
Návod k pou ití
PLACA STICLACERAMICA
RO
Instructiuni de utilizare
Cod. 94000STISPO200
Page 2

Page 3
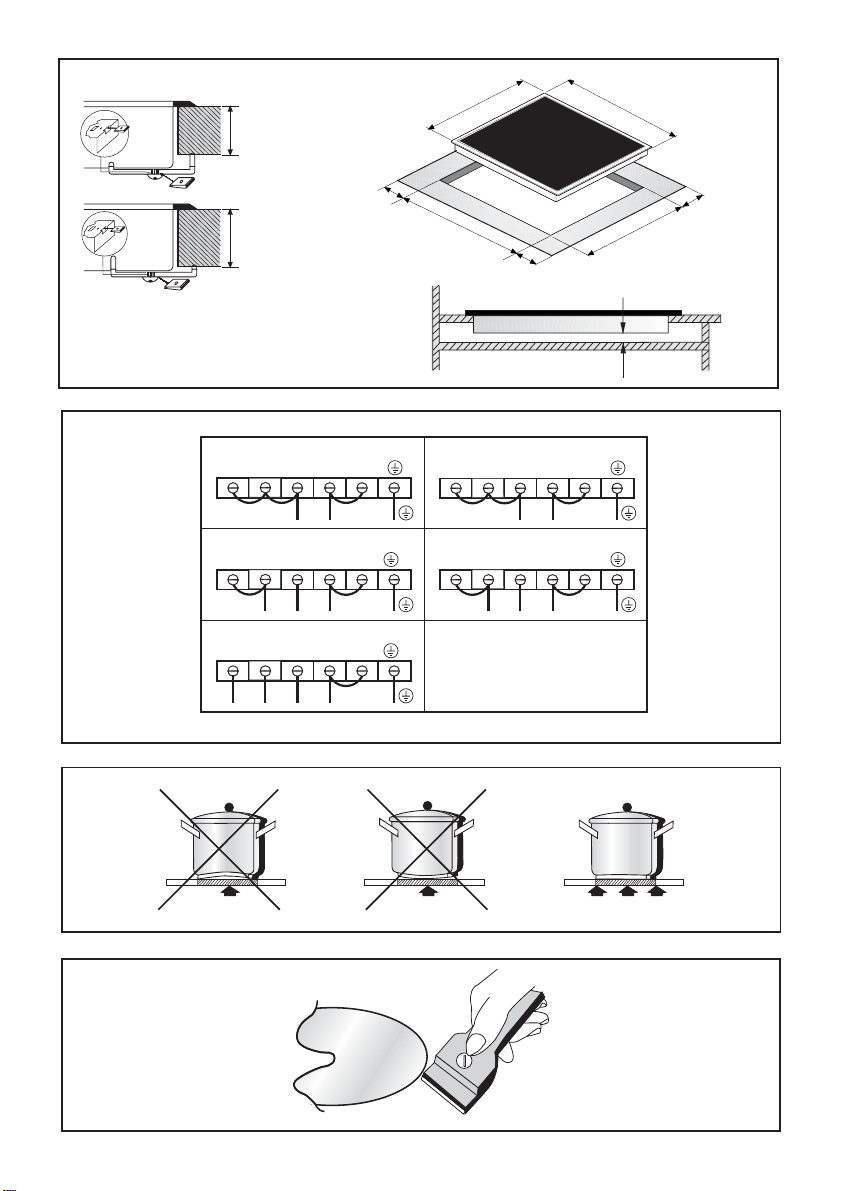
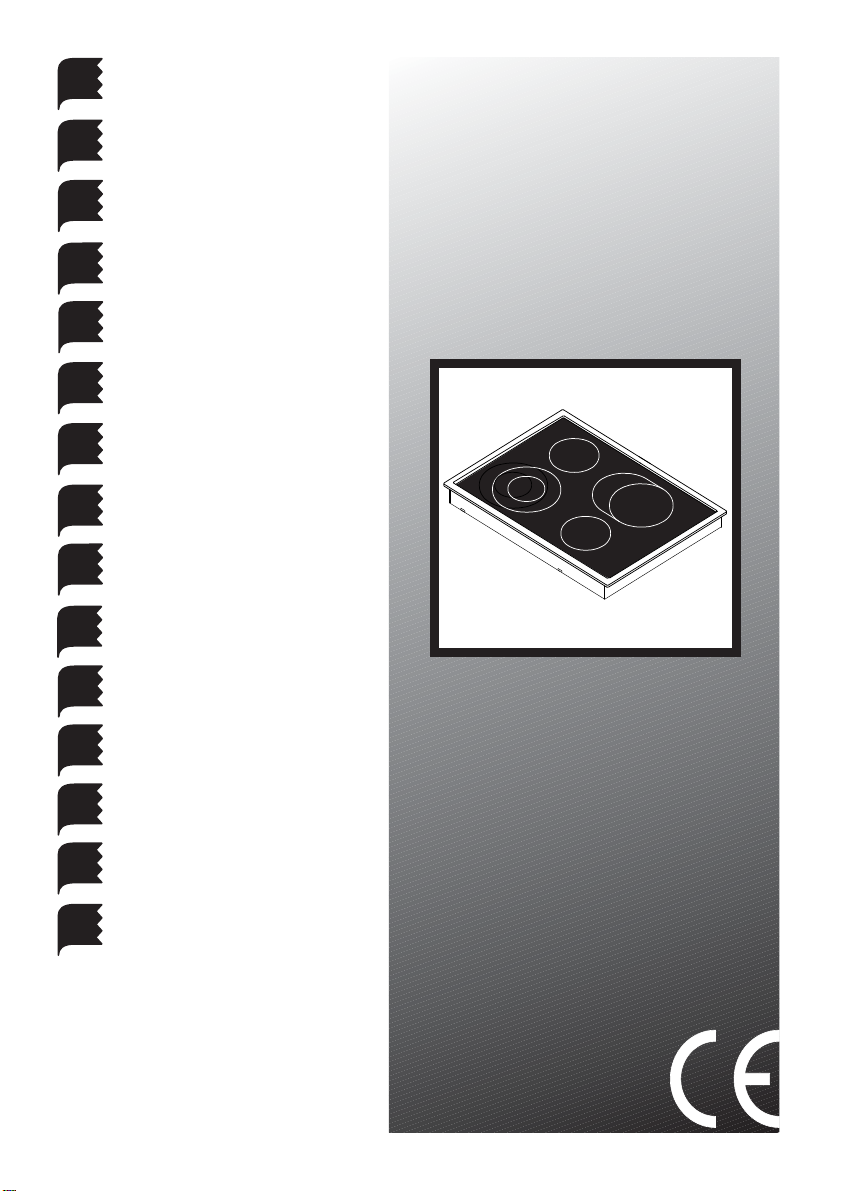
Fig.1
30 mm
40 mm
A
Min
C
50
510
560 - 750
Min
580 - 770
50
490
25
min.
B
53.5
Min
Fig.2
Fig.3
Fig.4
220-240 V~ H05RR-F 2.5mm
1
380-415 V2N~ H05RR-F 2.5mm
1
380-415 V3N~ H05RR-F 2.5mm
1
L1
L1
L2
4 432
LN
32
44
N
L2
44
32
L3
N
2
220-240 V2~ H05RR-F 2.5mm
2
220-240 V3~ H05RR-F 2.5mm
21
2
L1
2
4321
4
L1
L2
43
L3
L2
2
4
- 3 -
Page 4
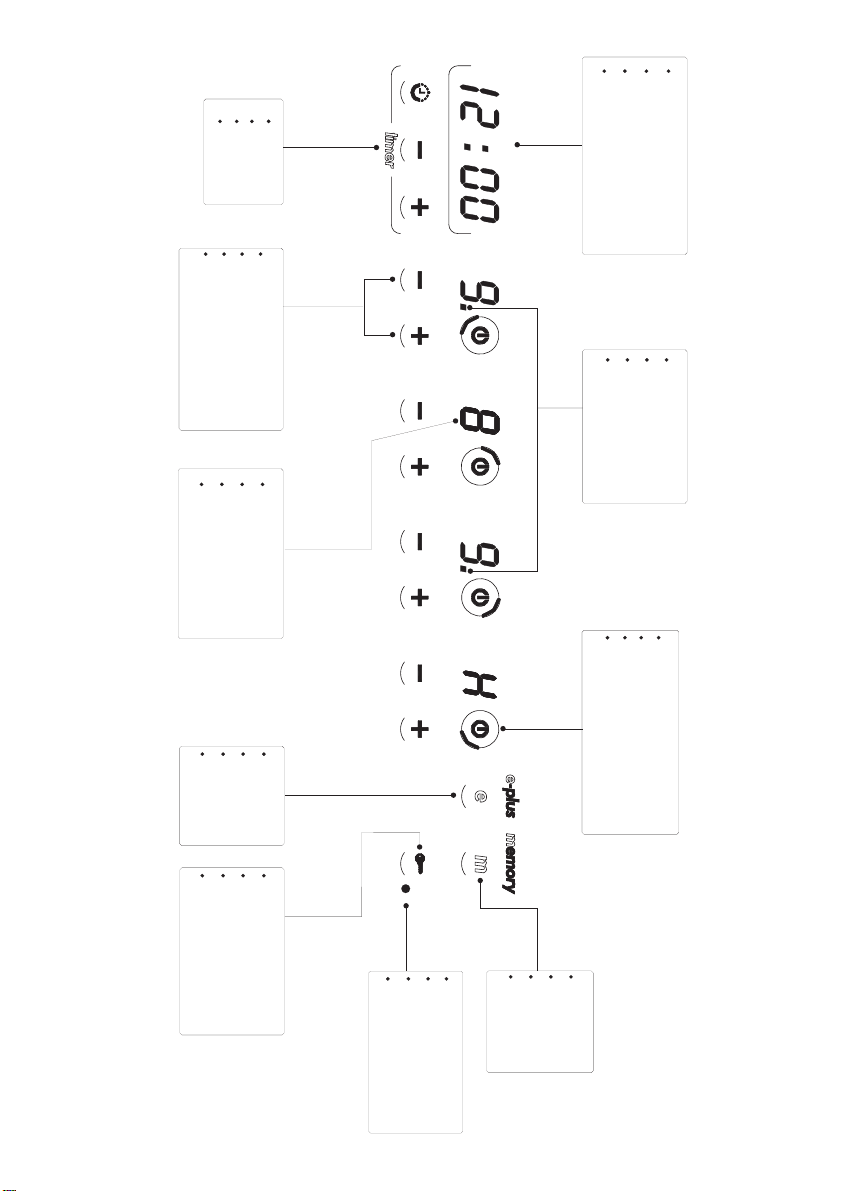
Fig.5
Area Timer
Tasti regolazione temperatura
on/off e indicatore zona di cottura
Display zona di cottura
Tasto e-plus Tasto chiave
Spia on/off tasto chiave
Tasto Memory
Spia zona estesa
Orologio / Timer / Count-down
Clock / Timer / Count-down
Uhr / Timer / Count-down
Moutre / Timer / Count-down
Extended zone led
Led erweiterte Kochzone
Voyant zone etendue
on/off and cooking zone display
on/off und kochzonen-Anzeiger
on/off et indicateur zone de cuisson
Memory Key
Taste Memory
Touche memoire
on/off led key lock
Led on/off u.Schlüsseltaste
Voyant on/off touche cle
Timer Zone
Zone Timer
Timer Zone
Keys for temperature reguletion
Taste Wärmeregulierung
Touches reglage temperature
Cooking zone display
Display kochzone
Display zone de cuisson
E-plus key key lock key
Taste e-plus Sicherheits-u.Schlüsseltaste
Touche e-plus Touche cle
- 4 -
Page 5

ENGLISH
GENERAL
Carefully read the contents of this leaflet since it provides important instructions regarding safety of installation, use and maintenance.
Keep the leaflet for possible future consultation. All the operations
relating to installation (electrical connections) must be carried out
by specialised personnel in conformity with the regulations in force.
SAFETY WARNINGS
It is recommended to use flat-bottom pans with a diameter equal
to or slightly larger than that of the heated area. Do not use pans
with a rough base to prevent scratching the heat surface of the
cooktop (Fig.3).
This appliance is not suitable for use by children or persons requiring supervision. Do not let children play with the appliance.
IMPORTANT
- Avoid spilling liquid, therefore to boil or heat liquids, reduce
the heat.
- Do not leave the heating elements on with empty pots and
pans or without receptacles.
- When you have finished cooking, switch off the relevant heating element with the control indicated below.
WARNING: If the surface is cracked, switch off the appliance
to prevent electric shock.
INST ALLA TION INSTRUCTIONS
These instructions address specialised installers and serve as a
guide for installation, adjustment and maintenance in conformity
with the laws and regulations in force.
If a built-in oven or any other appliance that generates heat
must be fitted directly under the glass-ceramic cooktop, THIS
APPLIANCE (oven) AND THE GLASS-CERAMIC COOKTOP
MUST BE SUITABLY INSULATED in such a way that the heat
generated by the oven, measured on the bottom right of the
cooktop, does not exceed 60°C. Failure to respect this precaution may determine improper functioning of the
TOUCHCONTROL system.
POSITIONING (Fig.1)
The domestic appliance is designed to be built into a worktop as
illustrated in the specific figure. Apply sealant around the entire
perimeter (cut-out dimensions Fig.1B). Fix the domestic appliance
on the worktop by means of the 4 brackets provided, taking the
thickness of the worktop into account (Fig.1A). If the lower part of
the appliance, after installation, is accessible via the lower part of
the cabinet then it is necessary to mount a separator panel respecting the distances indicated (Fig.1C). If the appliance is installed with an oven underneath then the separator is not necessary.
ELECTRICAL CONNECTIONS (Fig.2)
Before making the electrical connections, check that:
- the ground cable is 2 cm longer than the other cables;
- the system ratings meet the ratings indicated on the identification plate fixed on the lower part of the worktop;
- the system is fitted with efficient earthing compliant to the laws
and regulations in force.
Earthing is obligatory by law.
If the domestic appliance is not fitted with a cable and/or relevant
plug, use material suited to the absorption value indicated on the
identification plate and the operating temperature. At no point must
the cable reach a temperature 50°C higher than room temperature.
If wishing to make a direct connection to the mains, an omnipolar
switch must be interposed with a minimum opening of 3 mm be-
tween the contacts and suited to the load indicated on the plate
and conform to the regulations in force (the yellow/green ground
conductor must not be interrupted by the switch). When the appliance has been installed, the omnipolar switch must be easily reachable.
USE AND MAINTENANCE
MAINTENANCE
Remove any residues of food and drops of grease from the cooking surface using the special scraper supplied on request (Fig.4)
Clean the heated area as thoroughly as possible using SIDOL,
STAHLFIX or similar products and a cloth/paper, then rinse with
water and dry with a clean cloth.
Using the special scraper (optional) immediately remove any fragments of aluminium and plastic material that have unintentionally
melted on the heated cooking area or residues of sugar or food
with a high sugar content (Fig.4). In this way, any damage to the
cooktop surface is prevented.
Under no circumstances use abrasive sponges or irritating chemical detergents such as oven sprays or stain remov ers.
USE
If your appliance is predisposed then it will be possible to optimize
energy consumption via the intelligent handling of the turning on
and off of the cooking zones (hotplates). It is possible to set the
maximum power absorption to 4 diverse levels: 2.4 KW - 3.4 KW
- 4.4 KW - Pmax. The cook top is factory set with no power
limitation (Pmax).
· Multi Level Power Control (MLP)
In the installation phase, based on the available po wer in use , it is
possible to set the desired maximum power lev el absorbed in the
following way:
- Unblock the cooking surface by keeping pressed down the “ key
button” for 3 seconds until the “indicator light key” is switched
off.
- Press the button “E-plus” for 3 seconds: the watch’s display will
show the power level formulated among those available: 2.4 KW/
3.4 KW/4.4 KW and FULL.
- Press the buttons (+) or (-) to change level.
- Confirm the choice by pressing the “E-plus” key within 10 seconds else it will return to the initial state.
· “E-PLUS” function
During cooking it is possible to increase the maximum absorbed
power level by passing from the formulated level to the immediately superior one by pressing the button “E-PLUS” until the relative indicator light is switched on.
When the surface is switched off it returns to the pre-formulated
level.
Warning: normally the “E-PLUS” function is to be utilised when
the maximum absorbed power from the surface is inferior to the
available power in use.
· CONTROL AREA (Fig.5)
- At the first ignition the cook top will be in the safety position, that
is the “key button warning light on/off” will be switched on.
- To use the cook top it will be necessary to keep the “key button”
depressed for 3 seconds until the “key button warning light on/
off” switches off.
To turn on the desired heating element :
- depress the corresponding on/off key . The “led” of the “Cooking
zone display” will be visualized flickering .
- depress the key within 10 seconds - to go to position 4 or the +
key to go to position 9.
- To regulate the temperature of the cooking zone use the + or -
keys.
- If the hotplate is supplied with an extensive area, to switch the
second area on bring the “Display of the cooking area” to position 9 and press the button + for 2 sec: until the decimal point is
- 5 -
Page 6

switched on to confirm.
- To switch the hotplate off press the relative on/off button.
NOTE:( During operation it will be possible to block / unblock the
control zone by depressing the key button for 3 seconds).
· Timer Area (Fig.5)
The surface has the possibility to set the timer simultaneously on
every cooking area. The timer is a function that allows setting a
time (from 1 to 99 minutes) to automatically switch off the selected
cooking area.
- Press the “Timer” button f or 2 seconds: the display shows “00” in
the centre and it will show which element is active on the right and
left side.
- By continuing to press the “Timer” button the hotplate is selected
amongst those active.
- Press + or - to select the “Timer” value.
NOTE:
- If the “Timer” function has been imposed for more than one
cooking area, the “Timer Display” will sho w every 3 seconds the
remaining time for every programmed area.
- To cancel the “Timer” function, switch off the relative cooking
area.
· “MEMORY” function
This function allows the programming and ex ecution of one cooking cycle on every warming element.
Note:
- One cycle at a time can be carried out in registration or in
execution.
- The variations of power level for the times inferior to 15 sec. are
not registered.
- One cooking cycle with a maximum duration of 10 hours and a
maximum of 10 variations of the power level can be memorised.
· Memorisation of a cooking cycle
- Press the “Memory” button and then select the desired hotplate
by means of the relative “ON/OFF” button.
- Press the buttons + or - until the desired power is selected.
- To terminate the memorisation cycle press once again the button
“ON/OFF”.
· Executing a cooking cycle
- To execute a cooking cycle already memorised, it is sufficient to
press the “ON/OFF” button of the interested cooking area f ollowed
by the “Memory” b utton.
· Display
The cooking surface is supplied with a display that in normal function is a “WARCH” and can also carry out the “COUNTDOWN”
function when the surface is off.
· Regulation of the Watch
In the installation phase set the clock in the following way:
- Unblock the cooking surface by keeping the “key b utton” pressed
down for 3 seconds until the “indicator light button” is switched
off.
- Simultaneously press the buttons + and - under the display until
it begins flashing.
- Press + or - to set the desired time.
- Press the “Timer” button to confirm the selection.
· Countdown Function
- Unblock the cooking surface by keeping the “key b utton” pressed
down for 3 seconds until the “indicator light button” is s witched off.
- Press the “Timer” button until the writing “00” appears on the
display.
- Press + or - to select the number of the minutes.
- Press the “Timer” button to confirm the selection.
At the end of the set time, an acoustic signal will be activated.
· Safety Systems
1. In the instance where an object is placed over the controls, the
cook top will switch off and the auto-protection system will activate automatically, this occurs even in cases of liquid spills (wa-
ter, milk, etc.) over the controls zone.
2. The commands keyboard has an internal temperature sensor
that, in the case that the internal temperature reaches 90° (abnormal use conditions of the surface without pots) the surface will
automatically enter in an automatic system of temperature limitation: switching itself off automatically.
· RESIDUAL HEAT
WARNING : when a cooking zone is switched off, the surface of
the cook top has a very high and dangerous temperature level.
The danger is highlighted by the fact that the “cooking zone display” will flicker until the temperature of the surface will not decrease to under 50°C.
· WARNINGS :
When the cook top is used with the power limitation (power level
2,4 / 3,4 / 4,4)) the following operation will guarantee the preset
maximum power level absorbed :
A) After having switched on a number of cooking zones to their
maximum power (position 9) the cook top may not accept the switching on of another “Cooking zone” and will emit an acoustic sound.
Or, turn on the next cooking zone (heating element) at a diverse
temperature than that desired.
B) When a number of cooking zones are s witched on and there is
a desire to increase the temperature value, the cook top may not
accept the increase and will emit an acoustic sound.
C) After having switched on a number of cooking zones at an intermediate temperature value then when another element is
switched on then a few seconds delay may occur for the element
to light up.
THE MANUFA CTURER DECLINES ALL RESPONSIBILITY FOR
EVENTUAL DAMA GES CA USED BY BREA CHING THE ABO V E
WARNINGS.
- 6 -
Page 7

DEUTSCH
ALLGEMEINE INFORMA TIONEN
Lesen Sie bitte aufmerksam den Inhalt der vorliegenden Betriebsanleitung, weil sie wichtige Hinweise über die Installation, den
Gebrauch und die Wartung erteilt.
Bewahren Sie die Betriebsanleitung zum späteren Nachschlagen
auf. Alle mit der Installation im Zusammenhang stehende Vorgänge (Stromanschlüsse) sind laut gültiger V orschriften von F achpersonal auszuführen.
SICHERHEITSWARNUNGEN
Es werden Behälter mit ebenem Boden mit einem Durchmesser,
der gleich dem erhitzten Bereich oder etwas größer ist, empfohlen. Keine Behälter mit rauher Unterseite verwenden, damit die
Heizfläche des Kochfelds nicht zerkratzt wird (Abb .3).
Dieses Gerät ist nicht für Kinder oder Personen geeignet, die überwacht werden müssen. Darauf achten, daß Kinder nicht mit diesem Gerät spielen.
WICHTIG
- Vermeiden, daß Flüssigkeit überläuft; deshalb zum Kochen oder
Erhitzen von Flüssigkeiten die Hitzezufuhr v er ringern.
- Die Heizelemente nicht brennen lassen, wenn die Töpfe oder
Pfannen leer oder nicht vorhanden sind.
- Wenn das K ochen beendet ist, den zutreffenden Heizwiderstand
anhand der nachstehend angegebenen Bedienung ausschalten.
ACHTUNG: Falls die Oberfläche gesprungen ist, das Gerät
ausschalten, um etwaige Stromschläge zu vermeiden.
INSTALLATIONSANLEITUNG
Die vorliegenden Anweisungen sind für einen Fachinstallateur
gedacht und dienen als Führer für die Installation, Einstellung und
Wartung laut geltender Gesetze und Vorschriften.
Falls ein Einbaubackofen oder irgendein anderes, Hitze erzeugendes Gerät direkt unter dem Glasfaserkochfeld angebracht wird, MÜSSEN DIESES GERÄT (Backofen) UND DAS
GLASFASERKOCHFELD ZWECKENTSPRECHEND ISOLIERT
SEIN, so daß die vom Backofen erzeugte, rechts hinten am
Kochfeld gemessene T emperatur nicht mehr als 60°C beträgt.
Die mangelnde Einhaltung dieser V or sichtsmaßnahme könnte
zu Fehlfunktionen des TOUCHCONTROL-Systems führen.
AUFSTELLUNG (Abb.1)
Das Elektrogerät ist zur Einlassung in ein Arbeitsfeld konzipiert,
wie in der zutreffenden Abbildung zu sehen ist. Längs des ganz en
Umfangs (Schnittmaße Abb.1B) Isoliermaterial anbringen.
Das Elektrogerät anhand der mitgelieferten 4 Haltebügel am Arbeitsfeld befestigen und dabei die Dicke des Arbeitsf elds berüc ksichtigen (Abb.1A). Wenn das Unterteil des Geräts nach der Installation vom Unterteil des Schranks aus zugänglich ist, muss
eine Trennwand eingebaut werden, unter Einhaltung der vorgeschriebenen Abstände (Abb.1C). Wenn die Installation hingegen
unter einem Ofen erfolgt, ist dies nicht erforderlich.
STROMANSCHLÜSSE (Abb.2)
Vor der Verwirklichung der Stromanschlüsse folgendes sicherstellen:
- daß das Erdungskabel 2 cm länger als die anderen Kabel ist;
- die Anlagenmerkmale derartig sind, daß sie den Angaben auf
dem Typenschild entsprechen, das an der Unterseite des Arbeitsfeldes angebracht ist;
- die Anlage über eine wirksame, den geltenden V orschriften und
Gesetzesbestimmungen entsprechende Erdung verfügt.
Die Erdung ist laut Gesetz vorgeschrieben.
Falls das Elektrogerät nicht mit dem Kabel und/oder dem dazuge-
hörigen Stecker ausgestattet ist, für die auf dem Typenschild angegebene Entnahme und die Betriebstemperatur geeignetes Material verwenden. Das Kabel darf an keiner Stelle eine Temperatur erreichen, die 50°C höher als die Raumtemperatur ist.
Ist ein Direktanschluß an die Stromleitung gewünscht, muß ein
allpoliger Schalter mit 3 mm Mindestöffnung zwischen den Kontakten angebracht werden, der für die auf dem Schild angegebene
Last geeignet ist und den geltenden Vorschriften entspricht (der
gelb/grüne Erdungsleiter darf nicht durch den Umschalter unterbrochen sein).
Bei beendeter Gerätinstallation muß der allpolige Schalter leicht
erreichbar sein.
GEBRAUCH UND WARTUNG
WARTUNG
Eventuelle Speisereste und Fettspritzer mit dem auf Wunsch gelieferten, speziellen Schaber (Abb. 4) entfernen.
Den erhitzten Bereich mit Hilfe von SIDOL, STAHLFIX oder anderen ähnlichen Produkten und einem Papiertuch sorgfältig reinigen, dann mit Wasser nachwischen und mit einem trockenen Tuch
abtrocknen.
Bruchstücke von Aluminiumfolie und aus versehen z erschmolzenes
Material aus Kunststoff oder Rückstände von Zucker oder Speisen mit hohem Zuckergehalt sofort mit Hilfe des auf Wunsch gelieferten Schabers entfernen (Abb. 4). A uf diese Weise lassen sich
etwaige Beschädigungen der Kochfläche vermeiden.
Keinesfalls Scheuerschwämme oder angreifende chemische
Backofensprays oder Fleckenentf erner verwenden.
VERWENDUNG
Wenn Ihr Gerät entsprechend ausgestattet ist, kann durch eine
intelligente Steuerung der Ein- und Ausschaltung der Kochzonen
der Energieverbrauch optimiert werden. Die maximale Heizleistung
kann auf 4 Höhen eingestellt werden: 2.4 KW - 3.4 KW - 4.4 KW
- max. Das Koch feld ist ohne Besc hränkung der Heizleistung
(Höchstleistung) eingestellt.
• Multi Level Power Control (MLP)
Bei der Installation ist es möglich, je nach verfügbarer Stromleistung
die gewünschte Höhe der maximalen Heizleistung wie folgt einzustellen:
- Entsperren Sie das Kochfeld, indem Sie die Haupttaste 3 Sekunden lang gedrückt halten, bis sich die Hauptanzeigeleuchte
ausschaltet.
- Die Taste E-plus 3 Sekunden lang drücken: das Displa y der Uhr
zeigt dann die eingestellte Höhe der Heizleistung von den verfügbaren 2,4 KW/3,4 KW/4,4 KW und FULL an.
- Um die Höhe der Heizleistung zu verändern, auf die Tasten (+)
oder (-) drücken.
- Durch Drücken der Taste E-plus innerhalb von 10 Sekunden die
Auswahl bestätigen, sonst stellt sich wieder der anfängliche Wert
ein.
• Funktion “E-PLUS” :
Während des Kochvorgangs ist es möglich, den eingestellten W ert
der maximalen Heizleistung auf den nächsthöheren zu erhöhen,
indem man die Taste E-PLUS bis zum Einschalten der zugehörigen Anzeigeleuchte gedrückt hält.
Beim Ausschalten des Kochfeldes stellt sich wieder der v oreingestellte Wert ein.
Hinweis: Die E-PLUS-Funktion ist nor malerweise nur dann zu
verwenden, wenn die maximale Heizleistung des Kochfeldes unterhalb der am Stromanschluss verfügbaren Höchstleistung liegt.
• BEDIENFELD
· Beim ersten Einschalten befindet sich das Kochfeld in Sicherheitseinstellung, d.h. die Anzeigeleuchte der Haupttaste ist eingeschaltet.
· Um das Kochfeld in Benutzung zu nehmen, muß die Haupttaste
3 Sekunden lang gedrückt gehalten werden, bis sich die Anzeigeleuchte der Haupttaste ausschaltet.
- 7 -
Page 8

· Um die gewünschte Kochplatte einzuschalten:
- drücken Sie die entsprechende ON/OFF-Taste. Dann sehen Sie
die Anzeigeleuchte des Displays der Kochzone blinken.
- Drücken Sie innerhalb von 10 Sekunden die Taste – um auf
Position 4 zu gehen oder die Taste + um auf Position 9 zu gehen.
- Um die Temperatur der Kochzone zu regulieren, drüc ken Sie die
Tasten + oder –.
- Wenn die Kochplatte über eine zusätzliche Zone verfügt: zum
Einschalten der zweiten Zone das Display der Kochzone auf die
Position 9 einstellen und die Taste + 2 Sekunden lang gedrückt
halten: bis sich der Dezimalpunkt als Bestätigung einschaltet.
- Um die K ochplatte auszuschalten, die entsprechende Taste ON/
OFF betätigen.
HINWEIS:Während der Benutzung ist es möglich, das Bedienfeld
zu sperren bzw. entsperren, indem für 3 Sekunden die Haupttaste
gedrückt wird.
• Timer-Feld (Abb.5)
Bei diesem Kochfeld ist es möglich, gleichz eitig für jede K ochzone
den Timer einzustellen.
Der Timer ist eine Funktion, durch die eine Zeit (von 1 bis 99 Minuten) festgelegt werden kann, nach der sich die ausgewählte
Kochzone automatisch abschaltet.
- Die Taste Timer 2 Sekunden lang drücken: im Display erscheint
dann in der Mitte “00” und es wird angezeigt, welches Element
auf der rechten und linken Seite eingeschaltet ist.
- Durch weiteres Drücken der Taste Timer wählt man die Koch-
platte unter den eingeschalteten aus.
- Um den Timer-Einstellungswert auszuwählen, auf die Tasten
(+) oder (-) drücken.
Hinweis:
- Wenn die Funktion Timer für mehr als eine K ochzone eingestellt
wurde, zeigt das Timer Display alle 3 Sekunden die verbleibende
Zeit für jede programmierte Kochzone an.
- Um die Timer-Funktion abzubrechen, die entsprechende Koch-
zone ausschalten.
• Funktion “MEMORY”
Diese Funktion ermöglicht, auf jeder Kochstelle einen Kochzyklus
zu programmieren und durchzuführen.
HINWEISE:
- Es kann immer nur ein Zyklus zu einer Zeit entweder aufge-
nommen oder ausgeführt werden.
- V eränderungen der Heizstuf e für einen Zeitraum v on weniger als
15 Sekunden werden nicht aufgenommen.
- Es können Kochzyklen mit einer maximalen Dauer von 10 Stun-
den und mit höchstens 10 Veränderungen der Heizstufe aufgezeichnet werden.
• Aufzeichnung eines Kochzyklus:
- Die Taste Memory drücken, dann über die entsprechende ON/
OFF-Taste die ge wünschte K ochplatte auswählen.
- Auf die Tasten (+) oder (-) drücken, bis die gewünschte
Heizleistung ausgewählt ist.
- Um den Aufzeichnungszyklus zu beenden, erneut die Taste ON/
OFF drücken.
• Ausführung eines Kochzyklus:
- Um einen bereits aufgezeichneten Kochzyklus auszuführen, ge-
nügt es, die ON/OFF-T aste der jeweiligen K ochzone und anschließend die Memory-Taste zu drüc k en.
• Display:
Das Kochfeld ist mit einem Display ausgestattet, das in Normalbetrieb als UHR funktioniert und darüber hinaus die COUNT-
DOWN-Funktion ausführen kann, wenn das Kochfeld ausgeschaltet ist.
• Einstellung der Uhr:
Bei der Installation die Zeit wie folgt einstellen:
- Entsperren Sie das Kochfeld, indem Sie die Haupttaste 3 Se-
kunden lang gedrückt halten, bis sich die Hauptanzeigeleuchte
ausschaltet.
- Gleichzeitig auf die Tasten (+) und (-) unter dem Display drük-
ken, bis dieses anfängt zu blinken.
- Um die gewünschte Uhrzeit einzustellen, auf die Tasten (+) oder
(-) drücken.
- Die Timer-Taste drücken, um die Auswahl zu bestätigen.
• Count-Down Funktion:
- Entsperren Sie das Kochfeld, indem Sie die Haupttaste 3 Sekunden lang gedrückt halten, bis sich die Hauptanzeigeleuchte
ausschaltet.
- Die Timer-Taste drüc ken, bis “00” auf dem Display erscheint.
- Um die Minutenanzahl auszuwählen, auf die Tasten (+) oder (-)
drücken.
- Die Timer-Taste drücken, um die Auswahl zu bestätigen.
Nach Ablauf der eingestellten Zeit schaltet sich ein Tonsignal ein.
SICHERHEITSVORRICHTUNGEN
1. Im Falle, dass ein Gegenstand auf das Bedienfeld gestellt wird,
schaltet sich das Kochfeld aus und geht automatisch auf Selbstschutz, dies geschieht auch im Falle des Verschüttens von Flüssigkeit (Wasser, Milch etc.) über dem Bedienfeld.
2. Das Bedienfeld hat im Innern einen Temperatursensor, der im
Falle, dass die interne Temperatur 90° erreicht (kein normaler
Zustand, Benutzung des Kochfeldes ohne Töpfe), dazu führt, dass
das Kochfeld in ein System automatischer
Temper aturbeschränkung eintritt: und sich automatisch ausschaltet.
ACHTUNG: Wenn eine Kochzone ausgeschaltet wird, hat ihre
Oberfläche eine sehr hohe und gefährliche Temperatur.
Diese Gefahr wird dadurch angezeigt, dass das Display der K ochzone solange blinkt, bis die Temperatur an der Oberfläche unter
50°C gesunken ist.
• HINWEISE:
Wenn das Kochfeld mit einer Beschränkung der Heizleistung (Höhe
der Heizleistung 2,4 / 3,4 / 4,4) verwendet wird, können folgende
Funktionsweisen auftreten, um den eingestellten Wert der maximalen Heizleistung zu gewähren:
A) Nachdem einige Kochzonen bei maximaler Heizleistung (Pos.9)
eingeschaltet wurden, kann es passieren, dass das Einschalten
einer weiteren Kochzone nicht zugelassen und ein akustistisches
Signal aussendet wird oder aber dass die weitere Kochzone bei
einer anderen Temperatur einschaltet wird als gewünscht.
B) Wenn einige Kochzonen eingeschaltet sind und man die Temperatur erhöhen möchte, könnte das mit Ertönen eines akustischen
Signals vom Gerät verweigert werden.
C) Nachdem einige Kochzonen bei einer mittleren Temper atur eingeschaltet worden sind, kann es beim Einschalten einer weiteren
Kochzone passieren, dass sich die Zone erst mit einer Verspätung
von einigen Sekunden einschaltet.
FÜR SCHÄDEN, DIE AUF DIE NICHTBEA CHTUNG DER OBEN
GENANNTEN ANWEISUNGEN ZURUCKZUFÜHREN SIND,
WIRD KEINERLEI VERANTWORTUNG ÜBERNOMMEN.
- 8 -
Page 9

FRANÇAIS
CARACTÉRISTIQUES GÉNÉRALES
Lire attentivement le contenu du présent livret, étant donné qu’il
fournit d’importantes indications concernant la sécurité d’installation, d’utilisation et d’entretien.
Conserver le livret pour toute consultation ultérieure. Toutes les
opérations concernant l’installation (connexions électriques) doivent être effectuées par un personnel spécialisé en conformité avec
les normes en vigueur.
CONSIGNES POUR LA SÉCURITÉ
Il est préférable d’utiliser des récipients au fond plat a yant un diamètre égal ou légèrement supérieur à celui de la surface chauffée.
Il ne faut pas avoir recours à des récipients ayant une base rugueuse, afin d’éviter d’érafler la surface thermique du plan (Fig.3).
Cet appareil n’est pas prévu pour que les enfants s’en servent de
même que pour les personnes qui nécessitent d’un supervision.
Faire attention à ce que les enfants ne jouent pas av ec l’appareil.
IMPORTANT
- éviter les sorties de liquide, dans ce but, si on veut faire bouillir
ou chauffer des liquides, réduire l’alimentation de chaleur
- ne pas laisser les éléments chauffants mis sous tension avec
des casseroles et poêles vides ou bien sans récipients
- une fois que l’on a terminé de cuisiner, éteindre la résistance
relative au moyen de la commande indiquée ci-après
ATTENTION: Si la surface est fêlée, éteindre l’appareil, afin
d’éviter l’éventualité de décharges électriques.
INSTRUCTIONS POUR L’INSTALLATION
Les présentes instructions s’adressent à un installateur spécialisé
et servent de guide pour l’installation, le réglage et l’entretien en
conformité avec les lois et les normes en vigueur.
Si un four à encastrer ou n’importe quel autre appareillage
produisant de la chaleur doit être directement monté au-dessous du plan de cuisson en vitrocéramique, IL EST NÉCESSAIRE QUE CET APPAREILLA GE (four) ET LE PLAN DE CUISSON EN VITROCÉRAMIQUE SOIENT CONVENABLEMENT
ISOLÉS, de manière à ce que la chaleur produite par le four,
mesurée sur le côté droit du fond du plan de cuisson, ne dépasse pas 60°C. Le manque de respect de cette précaution
pourrait déterminer le fonctionnement erroné du système
TOUCHCONTROL.
POSITIONNEMENT (Fig.1)
L’appareil électroménager est réalisé pour être encastré dans un
plan de travail, suivant l’illustration sur la figure spécifique. Préparer la colle pour sceller le périmètre dans le sens de toute sa longueur (dimensions de la coupe Fig.1B).
Bloquer l’appareil électroménager sur le plan de travail au moyen
des 4 brides fournies, compte tenu de l’épaisseur du plan de travail (Fig.1A). Si la partie inférieure de l’appareil, après l’installation, est accessible par la partie inférieure du meuble, il faut monter un panneau de séparation en respectant les distances indiquées (Fig.1C). Ceci n’est pas nécessaire si l’installation se fait
sous un four.
CONNEXIONS ÉLECTRIQUES (Fig.2)
Avant d’effectuer les connexions électriques , s’assurer que:
- le câble électrique de la terre est bien de 2 cm plus long que
les autres câbles
- les caractéristiques de l’installation sont conformes aux indications sur la plaquette d’identification appliquée sur la partie
inférieure du plan de travail
- l’installation est dotée d’une mise à la terre efficace conforme
aux normes et aux dispositions de la loi en vigueur
La mise à la terre est obligatoire aux termes de la loi.
Au cas où l’appareil électroménager ne serait pas doté de câble
et/ou de la fiche relative, avoir recours à un matériel indiqué pour
l’absorption figurant sur la plaquette d’identification et pour la température de fonctionnement. En aucun point le câble ne doit atteindre une température de 50°C supérieure à la température
ambiante.
Si on souhaite une connexion directe à la ligne électrique, il est
nécessaire d’interposer un interrupteur omnipolaire, ayant un orifice minimum de 3 mm entre les contacts, s’adaptant à la charge
figurant sur la plaquette et conforme aux normes en vigueur (le
conducteur de terre jaune/vert ne doit pas être coupé par le commutateur).
Une fois l’installation de l’appareillage terminée, on doit pouvoir
arriver aisément à l’interrupteur omnipolaire.
UTILISA TION ET ENTRETIEN
ENTRETIEN
Éliminer tous résidus de nourriture éventuels ainsi que les gouttes
de graisse de la surface de cuisson à l’aide du racloir spécial fourni
sur demande (Fig.4).
Nettoyer le mieux possible l’emplacement chauffé en ay ant recours
à du SIDOL, STAHLFIX ou à d’autres produits similaires et à un
chiffon-papier, ensuite rincer à l’eau et sécher av ec un chiff on bien
propre.
Au moyen du racloir spécial (en option) éliminer immédiatement
de l’emplacement chauffé de cuisson les fragments de feuilles d’aluminium et la matière plastique qui ont fondu par mégarde ou les
résidus de sucre ou d’aliments ayant un contenu de sucre élevé
(Fig.4). De cette façon, tout dommage possible à la surface du
plan est évité.
En aucun cas il faut se servir d’éponges abrasives ou de détergents chimiques irritants tels que spray pour le four ou dégraisseurs.
EMPLOI
Si votre appareil est prédisposé, on peut optimiser la consommation d’énergie grâce à une gestion intelligente des allumages et
des arrêts des zones de cuisson. On peut établir la puissance
absorbée à 4 niveaux différents: 2.4 KW - 3.4 KW - 4.4 KW Pmax. La table de cuisson est prédisposée sans limites de
puissance (Pmax).
• Multi Level Power Control (MLP)
En phase d’installation, sur la base de la puissance disponible en
usage, on peut setter le niveau de puissance maximum absorbée
que l’on désire, de la manière suivante::
- Débloquer la table de cuisson en appuyant sur la “touche clé”
pendant 3 secondes jusqu’au moment où le “voyant clé” s’éteint.
- Appuyer sur la touche “E-plus” pendant 3 secondes: le display
de l’horologe indiquera le niveau de puissance établi parmi ceux
disponibles: 2.4 KW/3.4 KW/4.4 KW e FULL.
- Appuyer sur les touche (+) ou (-) pour changer le niveau.
- Confirmer le choix en appuyanat sur la touche “E-plus” dans les
10 secondes qui suivent, autrement on retourne à l’état initial.
• Fonction “E-PLUS” :
Pendant la cuisson, on peut augmenter le niveau de puissance
maximum absorbée en passant du niveau établi à celui
immédiatement supérieur en appuyant sur la touche “E-PLUS”
jusqu’à l’allumage du voyant correspondant.
Lorsque la table s’éteint, on retourne au niveau préétabli.
Conseil: normalement, la fonction “E-PLUS” doit être utilisée
lorsque la puissance maximum absorbée par la table est inférieure
à la puissance disponible en usage.
• ZONE COMMANDES
- Au premier allumage, la table de cuisson se trouv era en position
de sécurité, c-à-d avec le “Voyant on/off touche clé” allumé.
- Pour utiliser la table, il faut tenir appuyée la “ touche clé ”
pendant 3 secondes jusqu’à l’extinction du ” Voyant on/off tou-
- 9 -
Page 10

che clé ”
- Pour allumer la plaque désirée:
- appuyer la touche on/off correspondente. On verra le “led” du “
Display zone cuisson “ clignote.
- appuyer, entre 10 secondes, la touche - pour aller en position 4
ou bien la touche + pour aller en position 9.- Pour régler la
température de la zone de cuisson, agir sur les touche + ou -.
- Si la plaque est équipée d’une zone étendue, pour allumer la
deuxième zone, porter le “Diplay de la zone cuisson” à la position
9 et appuyer sur la touche + pendant 2 sec jusqu’au moment où le
point décimal s’allume comme confirmation.
- Pour éteindre la plaque, appuyer sur la relative touche “ON/OFF”.
NOTE:(Pendant le fonctionnement, on peut bloquer/débloquer la
zone commandes en appuyant la touche clé pendant 3 secondes).
• Zone Timer (fig.5)
La table a la possibilité de setter le timer simultanément sur chaque zone de cuisson.
Le timer est une fonction qui permet de fixer le temps (de 1 à 99
minutes) pour éteindre automatiquement la zone de cuisson sélectionnée.
- Appuyer sur la touche “Timer” pendant 2 secondes: le display
indiquera “00” au milieu et indiquera quel élement est actif sur le
côté droit et le côté gauche.
- En continuant à appuyer sur la touche “Timer”, on sélectionne
la plaque parmi celles actives.
- Appuyer sur (+) ou (-) pour sélectionner la valeur “Timer”.
Note:
- Si la fonction “Timer” a été étab lie pour plus d’une zone de cuis-
son, le “Display Timer” indiquera, toutes les 3 secondes, le temps
qui reste pour chaque zone programmée.
- Pour annuler la fonction “Timer”, éteindre la zone de cuisson
relative.
• Fonction “MEMORY”
Cette fonction permet la programmation et l’exécution d’un cycle
de cuisson sur chaque élément chauffant.
Notes:
- On peut exécuter un cycle à la fois, en enregistrement ou en
exécution.
- Les variations du niveau de puissance pour des temps inférieurs
aux 15 sec ne sont pas enregistrées.
- On peut mémoriser un cycle de cuisson d’une durée maximum
de 10 heures et avec un maximum de 10 variations du niveau de
puissance..
• Mémorisation d’un cycle de cuisson:
- Appuyer sur la touche “Memory” et ensuite sélectionner la pla-
que désirée avec la touche relative “ON/OFF”.
- Appuyer sur les touches (+) ou (-) jusqu’à la sélection de la puis-
sance désirée.
- Pour terminer le cycle de mémorisation, appuyer de nouveau sur
la touche “ON/OFF”.
• Exécution d’un cycle de cuisson:
- Pour exécuter un cycle de cuisson déjà mémorisé, il suffit d’ap-
puyer sur la touche “ON/OFF” de la zone de cuisson concernée
et ensuite sur la touche “Memory”.
• Display:
La table de cuisson est équipée d’un display qui, dans sa fonction
normale, est une “HOROLOGE” et peut en outre effectuer une
fonction de “COUNT-DOWN” lorsque la table est éteinte.
• Réglage de l’horologe:
En phase d’installation, établir l’heure de la manière suivante:
- Débloquer la table de cuisson en appuyant sur la “touche clé”
pendant 3 secondes jusqu’au moment où le “voyant clé” s’éteint.
- Appuyer simultanément sur les touches (+) et (-) en-dessous du
display jusqu’au moment où celui-ci commencera à clignoter.
- Appuyer sur (+) ou (-) pour établir l’heure souhaitée.
- Appuyer sur la touche “Timer” pour confirmer la sélection.
• Fonction Count-Down:
- Débloquer la table de cuisson en appuyant sur la “touche clé”
pendant 3 secondes jusqu’au moment où le“voyant c lé” s’éteint.
- Appuyer sur la touche “Timer” jusqu’au moment où l’écriture
“00” apparaît sur le display.
- Appuyer sur (+) ou (-) pour sélectionner le numéro des minutes.
- Appuyer sur la touche “Timer” pour confirmer la sélection.
A la fin du temps établi, un signal sonore serà activé
SYSTEMES DE SECURITE
1. Dans le cas où un objet est posé sur les commandes, la table
de cuisson s’éteint et la clé s’introduit automatiquement en se
portant en auto-protection; cela se produira également si des liquides sont versés (eau, lait, etc..) au-dessus de la zone commandes.
2. Le clavier commandes possède à l’intérieur un capteur de
température qui, dans le cas où la température interne atteint les
90° (conditions anormales d’utilisation de la table sans casseroles),
permet à la table d’entrer automatiquement dans un système de
limitation de température automatique: en s’éteignant donc
automatiquement..
• ATTENTION: lorsqu’une zone de cuisson est éteinte, sa surface
a une température très élevée et très dangeureuse.
Ce danger est mis en évidence par le fait que le “display de la
zone cuisson” clignottera jusqu’au moment où la température descendra en-dessous des 50°.
• PRECAUTIONS
Lorsque la table de cuisson est utilisée avec la limitatation de puissance (niveau de puissance 2,4 / 3,4 / 4,4) on peut obtenir le
fonctionnement suivant pour garantir le niveau de puissance maximum absorbée pré-établie:
A) Après avoir allumé quelques zones de cuisson à la puissance
maximum (pos.9), la table pourrait ne pas accepter l’allumage d’une
autre “ Zone cuisson ” en émettant un signal sonore.
Ou alors, allumer la zone de cuisson successive à un degré de
température différent de celui souhaité.
B) Lorsque l’on a quelques zones de cuisson allumées et que l’on
désire augmenter le degré de température, la table pourrait ne pas
accepter l’augmentation en émettant un signal sonore.
C) Après avoir allumé quelques zones de cuisson à un degré de
température intermédiaire au moment où une autre zone s’allume,
on peut voir que la zone s’allumera avec quelques secondes de
retard.
NOUS DECLINOS TOUTE RESPONSABILITÉ POUR LES
EVENTUELS DÉGATS PROVOQUÉS PAR L'INOBSERVATION
DES SUSDITES INSTRUCTIONS.
- 10 -
Page 11

NEDERLANDS
ALGEMENE INFORMA TIE
Lees de inhoud van dit boekje aandachtig door, want het verstrekt
belangrijke aanwijzingen over de veilige installatie, gebruik en onderhoud.
Bewaar het boekje om het later nog eens te kunnen raadplegen.
Alle installatiewerkzaamheden (elektrische aansluitingen) dienen
te worden verricht door gespecialiseerd personeel, in overeenstemming met de geldende voorschriften.
WAARSCHUWINGEN MET BETREKKING TOT
DE VEILIGHEID
Het wordt geadviseerd pannen te gebruiken met een vlakke bodem en met een diameter die gelijk is aan, of iets groter dan die
van de verwarmingszone. Gebruik geen pannen met een ruwe
bodem, om te voorkomen dat er krassen ontstaan op het thermische
oppervlak van de plaat (Afb.3).
Dit apparaat mag niet worden gebruikt door kinderen of volwassenen die toezicht nodig hebben. Let erop dat kinderen niet met het
apparaat spelen.
BELANGRIJK
- voorkom overkoken, pas daarom de warmtetoevoer aan bij het
koken of verwarmen van vloeistoffen
- laat geen verwarmingselementen ingeschakeld met een lege
pan of koekenpan, of zonder pan erop
- na het koken moet het desbetreffende verwarmingselement
worden uitgeschakeld met het hieronder aangegeven
bedieningselement
LET OP: als het oppervlak gebarsten is, moet het apparaat
onmiddellijk worden uitgeschakeld, om elektrische schokken
te vermijden.
INSTRUCTIES VOOR DE INSTALLATIE
Deze instructies zijn gericht aan een gespecialiseerd installateur
en dienen als richtlijn bij de installatie, de regeling en het onderhoud in overeenstemming met de geldende wetsvoorschriften en
normen.
Als een inbouwoven of een ander apparaat dat warmte afgeeft vlak onder de glaskeramieken kookplaat gemonteerd
moet worden, MOETEN DIT APPARAAT (oven) EN DE
GLASKERAMIEKEN KOOKPLAAT VOLDOENDE WORDEN
GEÏSOLEERD, zodat de warmte die veroorzaakt wordt door
de oven, gemeten rechts op de onderkant van de kookplaat,
een temperatuur heeft van maximaal 60° C. Veronachtzaming
van dit voorschrift zou foutieve werking van het
TOUCHCONTROL-systeem tot gevolg kunnen hebben.
PLAATSING (Afb.1)
Het elektrische huishoudelijke apparaat is bestemd voor inbouw
in een werkblad, zoals wordt geïllustreerd op de specifieke afbeelding. Breng afdichtmateriaal aan over de hele omtrek (afmetingen
van de uitsparing Afb.1B).
Zet het elektrische apparaat vast op het werkblad met de 4 bijgeleverde beugels, hierbij rekening houdend met de dikte van het
werkblad (Afb.1A). Als de onderzijde van het apparaat, na de installatie, vanuit de onderkant van de kast bereikbaar is moet een
scheidingsvlak gemonteerd worden door de aangegeven afstanden in acht te nemen (Fig.1C). Indien het onder een oven geïnstalleerd wordt is dat niet nodig.
ELEKTRISCHE AANSLUITINGEN (Afb.2)
Vergewis u ervan, voordat de elektrische aansluitingen tot stand
worden gebracht of:
- de elektrische aardkabel minstens 2 cm langer is dan de overige kabels;
- de installatie zodanig eigenschappen heeft dat wordt voldaan
aan de gegevens die vermeld staan op de typeplaat op de onderkant van het werkblad;
- de installatie naar behoren geaard is, in overeenstemming met
de geldende normen en wetsvoorschriften.
Aarding van het apparaat is bij de wet verplicht.
Als het elektrische apparaat geen kabel en/of bijbehorende stekker heeft, dient materiaal te worden gebruikt dat geschikt is voor
de stroomopname die wordt aangegeven op de typeplaat en dat
de bedrijfstemperatuur kan verdragen. De kabel mag nergens een
temperatuur van 50° C boven de omgevingstemper atuur bereiken.
Als u een rechtstreekse aansluiting op de elektriciteitsleiding wenst,
moet een alpolige schakelaar worden aangebracht met een opening van minstens 3 mm tussen de contacten, die geschikt is voor
de belasting die wordt aangegeven op de typeplaat en voldoet aan
de geldende normen (de geel/groene aarddraad mag niet worden
onderbroken door de schakelaar).
Na de installatie van het apparaat moet de alpolige schakelaar
gemakkelijk te bereiken zijn.
GEBRUIK EN ONDERHOUD
ONDERHOUD
Verwijder eventuele voedselresten en vetspatten van de kookvlakken met de speciale schraper die op bestelling geleverd wordt
(Afb.4). Maak het verw armde gebied zo goed mogelijk schoon met
behulp van SIDOL, STAHLFIX of soortgelijke producten en een
doek of papier, spoel vervolgens na met water en maak de plaat
droog met een schone doek. Verwijder fragmenten aluminiumfolie, gesmolten plastic, suiker of voedselresten met een hoog suikergehalte onmiddellijk van het verwarmde gebied met behulp van
de speciale schraper (optie) (Afb.4). Zodoende wordt elke mogelijk schade aan het oppervlak van de plaat voorkomen.
Gebruik in geen geval schuursponsjes of agressieve chemische
reinigingsmiddelen zoals ovensprays of vlekkenmiddelen.
GEBRUIK
Indien uw apparaat ervoor ingesteld is, kan het energieverbruik
geoptimaliseerd worden d.m.v. een weloverwogen beheer van de
aan- en uitschakeling van de kookzones. Het maximale opgenomen vermogen kan op 4 verschillende standen ingesteld worden:
2.4 kW - 3.4 kW - 4.4 kW - Pmax. Het vlak is zonder vermogens-
beperking ingesteld (Pmax).
• Multi Level Power Control (MLP)
Tijdens de installatie fase kan, naargelang het beschikbare vermogen, het niveau van de maximale opgenomen waarde naar wens
worden afgesteld op de volgende wijze:
- Deblokkeer de kookplaat door de “sleutelknop” 3 seconden lang
ingedrukt te houden totdat het “sleutelcontrolelampje” uitgaat.
- Druk 3 seconden lang op de “E-plus” knop: de display van de klok
vertoont het ingestelde vermogen uit de beschikbare mogelijkheden:
2.4 KW/3.4 KW/4.4 KW en FULL.
- Druk op de knoppen (+) of (-) om de stand te veranderen.
- Bevestig de keuze door binnen 10 seconden op de knop “E-plus”
te drukken anders keert de display weer terug in de beginstand.
• “E-PLUS” functie:
Tijdens het koken is het mogelijk het max. opgenomen vermogen te
verhogen door van de ingestelde stand tot de hogere stand over te
gaan door op de knop “E-PLUS” te drukken totdat het betreffende
lampje aangaat.
Als de plaat uitgeschakeld wordt keert deze weer terug in de vooringestelde stand.
Waarschuwing: gewoonlijk dient de “E-PLUS” functie gebruikt te
worden als het maximale opgenomen vermogen van de plaat lager
is dan het vermogen dat op de lijn beschikbaar is.
• Bedieningen
- Als de plaat voor de eerst keer gebruikt wordt is deze in de
veiligheidsstand, dus het ”Controlelampje on/off sleutelknop ” is
- 11 -
Page 12

aan.
- Om de kookplaat te gebruiken dient de “sleutelknop” 3 seconden
lang ingedrukt te worden totdat het ”Controlelampje on/off sleutel-
knop” uitgaat
- Om de gewenste plaat aan te zetten:
- druk op de betreffende on/off knop. De “led” van de “ Display kook-
zone“ gaat knipperen.
- druk binnen 10 seconden op de knop - om in stand 4 te gaan of op
knop + om in stand 9 te gaan.
- Om de temperatuur van de kookzone te regelen druk op de + of –
knop.
- Indien de plaat voorzien is van een uitgebreide zone zet, om de
tweede zone aan te zetten, de “Display v an de kookzone ” in stand
9 en druk 2 sec lang op de + knop: totdat het decimale punt ter
bevestiging aangaat.
- Druk op de betreffende on/off knop om de plaat uit te schakelen.
OPMERKING: Tijdens de werking is het mogelijk de bedieningszone te blokkeren/deblokkeren door 3 seconden lang op de sleutelknop te drukken.
• Timer zone (fig.5)
Het is mogelijk om tegelijkertijd de timer op iedere kookzone in te
stellen.
Met de timer kan een tijd ingesteld worden (van 1 tot 99 minuten)
voor de automatische uitschakeling van de geselecteerde kookzone .
- Druk 2 seconden lang op de knop “Timer”: de display weergeeft in
het midden “00” en geeft aan welk element, op de rechter en de
linker zijde, aan is.
- Door nogmaals op de knop “Timer” te drukken wordt, uit de inge-
schakelde platen, de plaat gekozen.
- Druk (+) of (-) om de “Timer” waarde te selecteren.
Opmerking:
- Als de functie “Timer” voor meer dan een kookzone is ingesteld,
vertoont de “Display Timer” om de 3 seconden de overblijvende
tijd voor iedere geprogrammeerde zone.
- Schakel de betreffende kookzone uit om de functie “Timer” te annuleren.
• “MEMORY” functie
Met deze functie is de programmering en de uitvoering van een kookcyclus, op elk verwarmend onderdeel, mogelijk.
Opmerking:
- Er kan een enkel cyclus in registratie of in uitvoering uitgevoerd worden.
- Afwisselingen van krachtniveau voor tijden korter dan 15 sec. zijn
niet geregistreerd.
- Er kan een kookcyclus van maximaal 10 uur gememoriseerd worden en met hoogstens 10 afwisselingen van krachtniveau.
• Het memoriseren van een kookcyclus:
- Druk op de knop “Memory”, selecteer vervolgens de gewenste
plaat door middel van de betreffende “ON/OFF” knop.
- Druk op de knop (+) of (-) totdat de gewenste kracht geselecteerd
wordt.
- Om de memory cyclus te beëindigen druk nogmaals op de “ON/
OFF” knop.
• Uitvoering van een kookcyclus:
- Om een al gememoriseerde kookcyclus uit te voeren druk op de
“ON/OFF” knop van de betreffende kookzone en vervolgens op de
“Memory” knop.
• Display:
De kookplaat is voorzien van een display die, in de normale stand,
de “KLOK” weergeeft en die bovendien de “COUNT-DOWN” func-
tie kan uitvoeren als de plaat uitgeschakeld is.
• Klokregeling:
Stel het uur, in tijdens de installatie fase , op de volgende wijze:
- Deblokkeer de kooplaat door de “sleutelknop” 3 seconden lang
ingedrukt te houden totdat het “sleutelcontrolelampje” uitgaat.
- Druk tegelijkertijd op de knoppen (+) en (-) onder de display totdat
deze begint te knipperen.
- Druk (+) of (-) om het gewenste uur in te stellen.
- Druk op de knop “Timer” om de selectie te bevestigen.
• Count-Down functie:
- Deblokkeer de kookplaat door de “sleutelknop” 3 seconden lang
ingedrukt te houden totdat het “sleutelcontrolelampje” uitgaat.
- Druk op de knop “Timer” totdat het opschrift “00” op de display
verschijnt.
- druk (+) of (-) om het aantal minuten te selecteren.
- Druk op de knop “Timer” om de selectie te bevestigen.
Na afloop van de geselecteerde tijd zal een geluidssignaal afgaan
Veiligheidssysteem
1. Als op de bedieningen een vreemd voorwerp geplaatst wordt gaat
de kookplaat uit en de sleutel wordt automatisch ingeschakeld zodat
de bescherming geactiveerd wordt, dit gebeurt ook als vloeistoffen
(water, melk, enz.) op de bedieningen gemorst worden.
2. Het bedieningsbord heeft aan de binnenkant een
temperatuursensor, als de binnentemperatuur de 90° bereikt (ongebruikelijke toestand, gebruik van de kookplaat zonder pannen) schakelt de kookplaat automatisch een systeem in voor de temperatuurbeperking: en zal dus automatisch uitgeschakeld worden.
ATTENTIE: als een k ookzone uitgeschakeld wordt, heeft de oppervlakte ervan een zeer hoge en gevaarlijke temperatuur.
Dit gevaar wordt door de “display van de kookzone ” weergegeven
die zal blijven knipperen totdat de oppervlaktetemperatuur onder de
50°C gedaald is.
• Waarschuwingen:
Als de kookplaat gebruikt wordt met de krachtbeperking (krachtniveau
2,4 / 3,4 / 4,4) kunnen de volgende beveiligingen plaats hebben om
het niveau van het maximale opgenomen vermogen te garanderen:
A) Na enkele kookzones op de maximale kracht (pos.9) aangezet te
hebben kan de plaat het aanzetten van een andere “ Kookzone ”
belemmeren en een geluidssignaal afgeven.
Of, de kookzone aanzetten op een andere temperatuur dan ge wenst.
B) Als enkele kookzones aan zijn en U wilt de temperatuur verhogen
zou de plaat deze toenamen kunnen belemmeren en een geluidssignaal afgeven.
C) Na enkele kookzones op een gemiddelde temperatuur aangezet
te hebben kan de plaat, op het ogenblik dat nog een andere zone
aangezet wordt, deze zone met vertraging van enkele seconden
aanzetten.
DE FABRIKANT IS NIET AANSPRAKELIJK VOOR SCHADE
DIE VOORTVLOEIT UIT HET NIET IN ACHT NEMEN VAN DE
BOVENSTAANDE VOORSCHRIFTEN.
- 12 -
Page 13

ESPAÑOL
GENERALIDADES
Lea atentamente el contenido de este libro que le proporcionará
importantes instrucciones en cuanto a la seguridad de instalación,
uso y mantenimiento.
ADVERTENCIAS PARA LA SEGURID AD
Se aconsejan recipientes de fondo plano, de diametro igual o
ligeramente superior a la del área de calentamiento. No utilice
recipientes de base rugosa que puedan rayar la superifice
vitrocerámica (Fig.3).
Este aparato no es apto para ser usado por niños ó personas que
precisen de supervisión. Estar atentos a que los niños no jueguen
en el área del aparato.
IMPORTANTE
- evite el derramamiento de liquidos, por tanto para hervir o
calentar liquidos, reduzca la alimentación del calor al punto
necesario.
- no deje sobre los elementos calefactores cazuelas o sartenes
vacías, ni tampoco elementos encendidos sin recipientes.
- Una vez terminado de cocinar, apague el elemento calefactor
mediante el mando correspondiente.
ATENCION: Si observa que la superficie está resquebrajada,
apague inmediatamente el aparato, desconectelo de la red, y
avise inmediatamente al Servicio de Asistencia Técnica.
INSTRUCCIONES P ARA LA INSTALA CION
Las presentes instrucciones están dirigidas a un instalador
especializado y sirven de guía para una correcta instalación,
regulación y mantenimeinto en conformidad con las leyes y normas
vigentes.
Si un horno de encastrar o cualquier otro aparato que genera
calor debe ser montado directamente debajo de la
Vitrocerámica, ES NECESARIO QUE TAL APARATO (Horno)
Y LA VITRO QUEDEN ADECUADAMENTE AISLADOS, de
modo que el calor generado por el horno (medido en la parte
derecha-frontal del fondo de la Vitro ), no supere los 60º C. La
falta de tal precaución podría producir un mal funcionamiento
del sistema TOUCHCONTROL.
POSICIONAMIENTO (Fig.1)
Este electrodomestico ha sido realizado para ser encastrado en
una encimera, tal y como ilustra la figura específica. Instalar el
material aislante de la dotación a lo largo de todo el perímetro del
orificio practicado para acoger la Placa (Fig.1B). Fijar el aparato a
la encimera mediante las 4 grapas, teniendo en cuenta el espesor
de la encimera (Fig.1A). Si despues de la instalación se puede
acceder a la parte inferior del aparato desde la parte inferior del
mueble es necesario montar un panel separador respetando las
distancias indicadas (Fig 1C). Si se instala debajo de un horno,
esto no es necesario.
CONEXIÓN ELECTRICA (Fig.2)
Antes de efectuar la conexión eléctrica, asegurese que:
- el cable eléctrico correspondiente a la toma a tierra sea 2
cm más largo que los otros dos.
- Las características de la acometida y tendido se puedan
corresponder con las necesidades indicadas en la placa de
características del aparato.
- La instalación esté dotadas de la correspondiente toma a
tierra, según normas y leyes vigentes.
La toma a tierra es obligatoria por ley.
En el caso que el aparato no estuviera dotado de cable y/o
correspondiente enchufe, utilice material adaptado a la absorción
eléctrica indicada en el Placa de caracteristicas, y a la temperatura
de funcionamiento. En ningún punto el cable debe alcanzar
temperatura de 50ºC superior a la temperatura ambiente.
Si se desea una conexión directa a la línea eléctrica, es necesario
interponer un interruptor omnipolar , con una apertura mínima de
3 mm entre contactos, apropiado a la carga indicada en la Placa y
conforme a normas vigentes (el conductor a tierra amarillo/verde
no debe ser interrumpido por el conmutador).
T erminada la instalación del aparato, el interruptor omnipolar debe
quedar siempre facilmente accesible.
USO Y MANTENIMIENTO
MANTENIMIENTO
Limpie de eventuales residuos la superficie utilizando una rasqueta
con hoja de afeitar (Fig.4).
Limpie las zonas de calentamiento, usando productos comerciales
(Sidol, Stahlfix, etc…) y un paño-papel de cocina, y enjuegue y
seque con un paño limpio.
Los eventuales fragmentos de papel-aluminio o material plástico
deben ser inmediatamente rascados y limpiados. Esto es tambien
válido para restos de azucar o pasteles y otros con alto contenido
de él. Así evitará posibles daños a la superficie vitrocerámica.
En ningun caso se deben usar estropajos abrasivos o detergentes
químicos irritantes, como sprays para horno o quitamanchas.
USO
Si su aparato está preparado para ello, es posible hacer que el
consumo energético sea optimo con una gestión de forma
inteligente del encendido y el apagado de la zona de cocción.
Se puede establecer la potencia máxima absorbida a 4 niveles:
2,4KW - 3,4 KW - 4,4 KW - Potencia max. La encimera no tiene
ningún limite de potencia. (Potencia max).
Multi Level Power Control (MLP)
Cuando se está instalando, según la potencia disponible, se puede poner en reset el nivel de potencia máxima absorbida deseado
de la siguiente manera:
- Ponga en marcha la encimera apretando el “botón llave” du-
rante 3 segundos hasta que se apague el “piloto llave”.
- Apriete el botón “E-plus” 3 segundos: el display del reloj mostrará el nivel de potencia establecido entre los que se encuentran
a disposición: 2,4KW/3,4KW/4M4KW y FULL.
- Apriete los botones [+] o [-] para cambiar nivel.
- Confirme su elección apretando el botón “E-plus” antes de 10
segundos, de lo contrario vuelve a la posición inicial.
Función “E-PLUS”:
Durante la cocción se puede aumentar el nivel de potencia máxima absorbida pasando del nivel establecido al nivel inmediatamente superior apretando la tecla “E-plus” hasta que se encienda el piloto correspondiente. Cuando la encimera se apaga se vuelve al nivel establecido.
Advertencia: normalmente la función “E-plus” se debe utilizar
cuando la potencia máxima absorbida de la encimera es inferior a
la potencia de la que se dispone.
AREA MANDOS
· Cuando se encienda por primera vez la encimera se encontrará
en una posición de seguridad, es decir ” piloto ON/OFF botón
llave” encendido.
· Para utilizar la encimera es necesario pulsar el “ botón llave ”
hasta que se apague el ” piloto ON/OFF botón llave”
· Para encender la placa que usted desee:
- pulse el botón on/off correspondiente. Se verá el “piloto ” del “
Display zona cocción “ intermitente.
- pulse en 10 segundos - para ir a la posición 4 o bien el botón
+ para ir a la posición 9.
- Para ajustar la temperatura de la zona de cocción vaya a los
botones + o -.
- 13 -
Page 14

- Si la placa posee otra zona de cocción, para encenderla ponga
el “display de la zona de cocción” en la posición 9 y apriete el
botón + durante 2 segundos: hasta que se encienda el punto
decimal que lo confirma.
- Para apagar la placa, apriete el correspondiente botón on/off.
NOT A:( Dur ante el funcionamiento se puede bloquear/desbloquear
la zona de mandos pulsando el botón llave durante 3 segundos.).
Area Timer (fig. 5).
Esta encimera puede poner en reset contemporáneamente el timer
en cada zona de cocción.
El timer es una función que permite establecer un tiempo [ de 1 a
99 minutos] para que se apague automáticamente la zona de cocción que se haya seleccionado.
- Apriete el botón “Timer” durante 2 segundos: el display señalará
“00” en el centro y mostrará el elemento que se ha puesto en
funcionamiento en el lado derecho o izquierdo.
- Si sigue apretando el botón “Timer” se selecciona la placa entre
las que se encuentran activas.
- Apriete [+] o [-] para seleccionar el valor “Timer”.
Nota:
- Si usted ha seleccionado la función “Timer” para más de una
zona de cocción, el “Display Timer” mostrará cada 3 segundos
el tiempo que queda para cada zona programada.
- Para eliminar la función “Timer”,apaga la zona de cocción correspondiente.
Función “MEMORY”
Esta función permite programar y realizar un ciclo de cocción en
cada zona de cocción.
Notas:
- Se puede realizar un ciclo cada vez grabándolo o realizándolo.
- Los cambios del nivel de potencia para tiempos inferiores a 15
segundos no aparecen.
- Se puede memorizar un ciclo de cocción que dure como máxi mo
10 horas y con un máximo de 10 cambios de potencia.
Memorización de un ciclo de cocción:
- Apriete el botón “Memory” y despues seleccione la placa que
desee con el correspondiente botón de “ON/OFF”.
- Apriete los botones [+] o [-] hasta seleccionar la potencia deseada.
- Para terminar el ciclo de memorización, apriete otra vez el botón
de “ON/OFF”.
Ejecución de un ciclo de cocción:
- Para realizar un ciclo de cocción que ya este memorizado solamente hay que apretar el botón “ON/OFF” de la correspondiente
zona de cocción y luego apretar el botón “Memory”.
Display:
La encimera está provista de un display que en función normal es
un “RELOJ” y además realiza la función de “CUENTA ATRAS”
cuando la encimera está apagada.
Ajuste del reloj:
Cuando este instalando la encimera, póngalo en hora de la siguiente manera:
- Ponga en marcha la encimera apretando el “botón llave” 3
segundos hasta aque se apague el “piloto llave”.
- Apriete a la vez los botones [+] y [-] debajo del display hasta que
elmismo se ponga intermitente.
- Apriete [+] o [-] para poner la hora deseada.
- Apriete el botón “Timer” para confirmar la selección.
Funciones de Cuenta-Atras:
- Ponga en marcha la encimera apretando el “botón llave”durante
3 segundos hasta que se apague el “piloto llave”.
-Apriete el botón “Timer”, hasta aque no aparezca escrito “00”
en el display.
- Apriete [+] o [-] para seleccionar los minutos.
- Apriete el botón “Timer” para confirmar la selección.
- Cuando se termine el tiempo que se haya establecido se pondrá
en marcha una señal acústica.
SISTEMAS DE SEGURIDAD
1. En el caso de que un objeto se ponga encima de los mandos , la
encimera se apagará y se pondrá automáticamente la llave quedando de esta manera en autoprotección, esto sucederá tambien
cuando se derramen líquidos [agua, de hojas eche,etc] en la parte
de arriba de la zona de mandos.
2. El panel de mandos posee internamente un sensor de temperatura que en el caso de que la temperatura interna alcance 90 grados [ condiciones anormales uso de la encimera sin cazuelas]
automáticamente la encimera entra en un sistema de reducción
de la temperatura automático: apagándose automáticamente.
ATENCION: cuando una z ona de cocción se apaga, su superficie tiene una temperatura muy elevada y peligrosa.
Esta peligrosidad aparece evidenciada por el hecho de que el
“display de la zona de cocción” se pondrá intermitente hasta que
la temperatura en la superficie no baje por debajo de los 50°C.
2.4 ADVERTENCIAS:
Cuando la encimera se utiliza con el límite de potencia (nivel de
potencia 2,4/3,4/4,4) se podrá tener los siguientes funcionamientos para garantizar el nivel de potencia máxima establecida:
A) Despues de encender algunas zonas de cocción al máximo [
pos.9], puede suceder que la encimera no acepte que se encienda
otra “Zona cocción” y para ello emitirá una señal acústica
B)Cuando se tienen algunas zonas de cocción encendidas y se
desea aumentar el valor de temperatura puede suceder que la
encimeraa no acepte ese aumento, para ello emitirá una señal
acústica..
C)Cuando se hayan encendido algunas zonas de cocción con un
valor de temperatura intermedio en el momento en que se enciende otra zona se puede comprobar que la zona se encenderá con
un retraso de algunos segundos.
SE DECLINA TODA RESPONSABILIDAD POR EVENTUALE
DAÑOS PROVOCADOS POR LA INOBSERVANCIA DE LAS
ANTERIORES ADVERTENCIAS.
- 14 -
Page 15

PORTUGUÊS
INDICAÇÕES GERAIS
Leia com atenção o conteúdo deste livro de instruções porque
contém indicações importantes que dizem respeito à segurança
de instalação, utilização e manutenção.
Conserve o livro de instruções para futura consulta. Todas as operações que dizem respeito à instalação (ligações eléctricas) devem ser feitas por pessoal especializado segundo as normas em
vigor.
AVISOS DE SEGURANÇA IMPORTANTES
Aconselhamos a utilização de recipientes com fundo plano e diâmetro igual ou ligeiramente superior ao das zonas de cozedura
aquecidas. Não use recipientes com base rugosa para evitar riscar a superfície térmica da placa (Fig.3).
Este aparelho não é indicado para ser utilizado por crianças ou
pessoas que precisem de supervisão de terceiros. Preste atenção para não deixar as crianças brincar com aparelho.
IMPORTANTE
- evite derramar líquidos na placa de cozedura. Para ferver ou
aquecer líquidos, reduza a alimentação de calor
- não deixe as zonas de cozedura ligadas sem nada em cima ou
com tachos e frigideiras vazios
- assim que acabar de cozinhar qualquer alimento, desligue a
resistência respectiva utilizando o comando que indicaremos
a seguir
ATENÇÃO! Se a superfície estiver rachada, desligue o aparelho para evitar choques eléctricos.
INSTRUÇÕES P ARA INSTALAÇÃO
As instruções que se seguem foram feitas para instaladores
especializados e servem de guia para instalação, regulação e manutenção de acordo com as leis e normas em vigor.
Se um forno encastrável ou qualquer outro aparelho que gere
calor tiver de ser montado imediatamente por baixo da placa
de fogão de vidro cerâmico, É NECESSÁRIO QUE ESSE APARELHO (forno) E A PLACA DE FOGÃO DE VIDRO CERÂMICO
SEJAM CONVENIENTEMENTE ISOLADOS, de modo a impedir que o calor gerado pelo forno, medido do lado direito do
fundo da placa de fogão, seja superior a 60°C. A não observância desta medida de precaução pode dar origem a mau
funcionamento do sistema TOUCHCONTROL .
COLOCAÇÃO DA PLACA EM POSIÇÃO (Fig.1)
Este electrodoméstico foi concebido expressamente para encastre
numa banca de cozinha, conforme mostrado na figura específica.
Coloque uma camada de material vedante a toda a extensão do
perímetro da placa de fogão (dimensões de corte Fig.1B).
Fixe o electrodoméstico ao tampo de cozinha com os 4 suportes
que fazem parte dos acessórios que acompanham o aparelho, tendo presente a espessura do tampo (Fig.1A). Se, após a instalação, a parte inferior do aparelho for acessível pela parte inferior
do móvel, é necessário montar um painel separador respeitando
as distâncias indicadas (Fig.1C). Caso se instale sob um forno
isso não é necessário.
LIGAÇÕES ELÉCTRICAS (Fig.2)
Antes de fazer as ligações eléctricas, assegure-se de que:
- o fio eléctrico de terra deve ser 2 cm mais comprido do que os
outros fios;
- as características da instalação eléctrica de sua casa
correspondem às indicações da chapa de identificação da placa de fogão aplicada na parte inferior da superfície de trabalho;
- a instalação eléctrica tem ligação à terra, que esta é eficiente
e que cumpre o disposto nas normas e regulamentos de lei em
vigor.
A ligação à terra é obrigatória por lei.
No caso do electrodoméstico não estar equipado com cabo eléctrico e/ou ficha respectiva, utilize material apropriado para a absorção indicada na chapa de identificação e para a temperatura
de funcionamento. O cabo eléctrico não pode atingir, em ponto
nenhum, temperaturas cuja diferença em relação à temperatura
ambiente seja igual ou superior a 50ºC.
Se desejar fazer ligação directa da placa à linha eléctrica, é necessário colocar de permeio um interruptor omnipolar com abertura entre os contactos de, pelo menos, 3 mm, que seja apropriado
para a carga indicada na chapa de identificação e que cumpra o
disposto nas normas em vigor (o condutor de terra amarelo/verde
não deve ser interrompido pelo comutador).
Concluída a instalação do aparelho, o interruptor omnipolar deve
ficar facilmente acessível.
UTILIZAÇÃO E MANUTENÇÃO
MANUTENÇÃO
Remova resíduos de alimentos e pingos de gordura da superfície
de cozedura, utilizando o raspador especial que poderá receber, a
pedido, a acompanhar o aparelho (Fig.4).
Limpe a zona aquecida da melhor maneira possível, utilizando
SIDOL, ST AHLFIX ou produtos análogos e um pano-papel. A seguir enxague muito bem com água e seque com um pano limpo.
Usando o raspador especial (opcional), remova imediatamente da
zona de cozedura quente, todos os fragmentos de papel de alumínio e material de plástico derretidos acidentalmente, bem como
quaisquer resíduos de açúcar ou de alimentos com alto teor de
açúcar (Fig. 4). Deste modo é possív el e vitar danos na superfície
da placa de cozedura.
Sejam quais forem as circunstâncias, nunca use esponjas abrasivas
nem detergentes químicos irritantes como sprays para forno ou
outros produtos para tirar manchas.
USO
Se o seu aparelho for predisposto é possível optimizar o consumo
energético graças a uma gestão inteligente dos acendimentos e
desligamentos das zonas de cozimento. Pode-se programar a
potência máxima absorvida em 4 níveis diferentes: 2.4 KW - 3.4
KW - 4.4 KW - Pmax. O plano é programado sem nenhuma
limitação de potência (Pmax).
• Multi Level Power Control (MLP)
Na fase de instalação, de acordo com a potência disponível, é possível ajustar o nível de potência máxima absorvida desejado do seguinte modo:
- Desbloquear o plano de cozimento mantendo pressionada a “tecla
chave” por 3 segundos até que se apague a “lâmpada piloto chave”.
- Pressionar a tecla “E-plus” por 3 segundos: o display do relógio
mostrará o nível de potência ajustado entre aqueles a disposição:
2.4 KW/3.4 KW/4.4 KW e FULL.
- Pressionar as teclas (+) ou (-) para mudar nível.
- Confirmar a escolha pressionando a tecla “E-plus” dentro de 10
segundos senão se retorna ao estado inicial.
• Função “E-PLUS”:
Durante o cozimento é possível aumentar o nível de potência máxima absorvida passando do nível ajustado àquele imediatamente
superior pressionando a tecla “E-PLUS” até o acendimento da relativa lâmpada piloto.
Quando do desligamento do plano retorna-se ao nível pré-ajustado.
Advertência: normalmente a função “E-PLUS” deve ser utilizada
quando a potência máxima absorvida pelo plano é inferior à potência disponível.
• Área comandos
- No primeiro acendimento o plano de cozimento se encontrará em
- 15 -
Page 16

posição de segurança, ou seja, a ”Lâmpada piloto on/off tecla
chave” acesa.
- Para utilizar o plano é necessário manter pressionada a “ tecla
chave ” por 3 segundos até que a ”Lâmpada piloto on/off tecla
chave ” se apague.
- Para acender a placa desejada:
- pressionar a tecla on/off correspondente. Se v erá o “led” do “ Display
zona cozimento “ lampejar.
- pressionar dentro de 10 segundos a tecla - para ir à posição 4 ou
então a tecla + para ir à posição 9.
- Para regular a temperatura da zona de cozimento agir nas teclas +
ou -.
- Se a placa for dotada de zona estendida, para acender a segunda
zona levar o “Display da zona cozimento” à posição 9 e pressionar
a tecla + por 2 seg: até o acendimento do ponto decimal como confirmação.
- Para desligar a placa pressionar a respectiva tecla on/off .
NOTA: Durante o funcionamento é possível bloquear/desbloquear a
zona comandos pressionando a tecla chave por 3 segundos.
• Área Timer (fig.5)
O plano tem a possibilidade de ajustar contemporaneamente o timer
em cada zona de cozimento.
O timer é uma função que permite fixar um tempo (de 1 a 99 minutos) para o desligamento automático da zona de cozimento seleccionada.
- Pressionar a tecla “Timer” por 2 segundos: o display mostrará
“00” no centro e mostrará qual elemento está activo no lado direito
e esquerdo.
- Continuando a pressionar a tecla “Timer” se selecciona a placa
entre aquelas activas.
- Pressionar (+) ou (-) para seleccionar o valor “Timer”.
Nota:
- Se a função “Timer” foi ajustada para mais de uma zona de
cozimento, o “Display Timer” mostrará a cada 3 segundos o tempo
restante para cada zona programada.
- Para anular a função “Timer”, desligar a relativa z ona de cozimento.
• Função “MEMORY”
Esta função permite a programação e a execução de um ciclo de
cozimento em cada elemento aquecedor.
Notas:
- Pode-se executar um ciclo por vez em ajuste ou em execução.
- As variações do nível de potência para tempos inferiores a 15 seg.
não são registradas.
- Pode ser memorizado um ciclo de cozimento de duração máxima
de 10 horas e com um máximo de 10 variações do nível de potência.
• Memorização de um ciclo de cozimento:
- Pressionar a tecla “Memory” e depois seleccionar a placa desejada através da relativa tecla “ON/OFF”.
- Pressionar as teclas (+) ou (-) até seleccionar a potência desejada.
- Para terminar o ciclo de memorização pressionar novamente a
tecla “ON/OFF”.
• Execução de um ciclo de cozimento:
- Para executar um ciclo de cozimento já memorizado é suficiente
pressionar a tecla “ON/OFF” da zona de cozimento interessada e
em seguida a tecla “Memory”.
• Display:
O plano de cozimento é dotado de um display que em função normal
é um “RELÓGIO” e também pode realizar a função de “COUNT-
DOWN” quando o plano está desligado.
• Regulação do relógio:
Na fase de instalação ajustar a hora do seguinte modo:
- Desbloquear o plano de cozimento mantendo pressionada a “tecla
chave” por 3 segundos até que a “lâmpada piloto chave” se apague.
- Pressionar contemporaneamente as teclas (+) e (-) do display até
que o mesmo comece a lampejar.
- Pressionar (+) ou (-) para ajustar a hora desejada.
- Pressionar a tecla “Timer” para confirmar a selecção.
• Funções Count-Down:
- Desbloquear o plano de cozimento mantendo pressionada a “tecla
chave” por 3 segundos até que se apague a “lâmpada piloto chave”.
- Pressionar a tecla “Timer” até que apareça a escrita “00” no
display.
- Pressionar (+) ou (-) para seleccionar o número dos minutos.
- Pressionar a tecla “Timer” para confirmar a selecção.
No fim do tempo ajustado se activará um sinal acústico
Sistemas de Segurança
1. Caso um objecto seja posicionado sobre os comandos, o plano
de cozimento desligará e inserirá automaticamente a chave permanecendo em auto-protecção; isto também ocorrerá em caso de derramamento de líquidos (água, leite, etc.) sobre a zona comandos.
2. O teclado comandos tem internamente um sensor de temperatura
que, caso a temperatura interna atinja 90° (condições anormais uso
do plano sem panelas) automaticamente o plano entra em um sistema de limitação de temperatura automático: desligando-se automaticamente.
ATENÇÃO: quando uma zona de cozimento é desligada, a sua superfície está a uma temperatura muito elevada e perigosa.
Esta periculosidade é evidenciada pelo fato que o “displa y da z ona
de cozimento” lampejará até que a temperatura sobre a superfície
tenha caído a menos de 50°C.
• Advertências:
Quando o plano cozimento é utilizado com a limitação de potência
(nível de potência 2,4 / 3,4 / 4,4) será possível realizar o seguinte
funcionamento para garantir o nível de potência máxima absorvida
prefixada:
A) Após ter acendido algumas zonas de cozimento à max potência
(pos.9) o plano poderia não aceitar o acendimento de mais uma
“Zona cozimento” emitindo um sinal acústico.
Ou ainda acender a zona de cozimento sucessiva com um valor de
temperatura diferente daquele desejado.
B) Quando se tem algumas zonas de cozimento acesas e deseja-se
aumentar o valor de temperatura, o plano poderia não aceitar o aumento emitindo um sinal acústico.
C) Após ter acendido algumas zonas de cozimento com um valor de
temperatura intermediário, no momento em que se acende mais uma
zona pode-se verificar que a zona se acenderá com um retardo de
alguns segundos.
DECLINA-SE DE QUALQUER RESPONSABILIDADE POR
EVENTUAIS DANOS PROVOCADOS PELA INOBSERVÂNCIA
DAS ADVERTÊNCIAS ACIMA.
- 16 -
Page 17

ITALIANO
GENERALITA'
Leggere attentamente il contenuto del presente libretto in quanto
fornisce importanti indicazioni riguardanti la sicurezza di
installazione, d'uso e di manutenzione.
Conservare il libretto per ogni ulteriore consultazione.Tutte le
operazioni relative all’installazione (connessioni elettriche) devono
essere effettuate da personale specializzato in conformità delle
norme vigenti.
AVVER TENZE PER LA SICUREZZA
Si consigliano recipienti a fondo piatto dal diametro uguale o
leggermente superiore a quello dell’area riscaldata. Non utilizzare
recipienti con base ruvida, per evitare di graffiare la superficie
termica del piano (Fig.3).
Questo apparecchio non è adatto per l'uso da parte di bambini o
persone che necessitano di supervisione. Fare attenzione che i
bambini non giochino con lapparecchio.
IMPORTANTE
- evitare le fuoriuscite di liquido, pertanto per bollire o riscaldare
liquidi, ridurre l’alimentazione di calore.
- non lasciare gli elementi riscaldanti accesi con pentole e padelle
vuote oppure senza recipienti.
- una volta terminato di cucinare, spegnere la relativa resistenza
tramite il comando indicato in seguito.
ATTENZIONE: Se la superficie è incrinata, spegnere
l'apparecchio per evitare l'eventualità di scosse elettriche.
ISTRUZIONI PER L'INST ALLAZIONE
Le presenti istruzioni sono rivolte ad un installatore specializzato
e fungono da guida per l’installazione, la regolazione e la
manutenzione in conformità delle leggi e delle norme vigenti.
Se un forno da incasso o qualsiasi altra apparecchiatura che
genera calore deve essere montato direttamente sotto il piano di cottura in vetroceramica, È NECESSARIO CHE TALE
APPARECCHIATURA (forno) E IL PIANO DI COTTURA IN
VETROCERAMICA SIANO ADEGUATAMENTE ISOLATI, in
modo tale che il calore generato dal forno, misurato sul lato
destro del fondo del piano di cottura, non superi i 60°C. Il
mancato rispetto di tale precauzione potrebbe determinare
l’errato funzionamento del sistema TOUCHCONTROL.
POSIZIONAMENTO (Fig.1)
L’elettrodomestico è realizzato per essere incassato in un piano di
lavoro, come illustrato nella figura specifica. Predisporre materiale
sigillante lungo l’intero perimetro (dimensioni del taglio Fig.1B).
Bloccare l’elettrodomestico sul piano di lavoro mediante i 4
sostegni, tenendo presente lo spessore del piano di lavoro (Fig.1A).
Se la parte inferiore dell'apparecchio, dopo l'installazione, è
accessibile dalla parte inferiore del mobile è necessario montare
un pannello separatore rispettando le distanze indicate (Fig.1C).
Se si installa sotto un forno questo non è necessario.
CONNESSIONI ELETTRICHE (Fig.2)
Prima di effettuare le connessioni elettriche assicurarsi che:
- il cavo elettrico della terra deve essere di 2 cm. più lungo rispetto
agli altri cavi;
- le caratteristiche dell’impianto siano tali da soddisfare le
indicazioni sulla targhetta identificativa applicata sulla parte
inferiore del piano di lavoro;
- l’impianto sia dotato di una messa a terra efficiente conforme
alle norme e alle disposizioni di legge in vigore.
La messa a terra è obbligatoria per legge.
Nel caso in cui l’elettrodomestico non sia dotato di cavo e/o della
relativa spina, utilizzare materiale adatto per l’assorbimento indicato
nella targhetta identificativa e per la temperatura di funzionamento.
In nessun punto il cavo dev e raggiungere una temperatura di 50°C
superiore alla temperatura ambiente.
Se si desidera una connessione diretta alla linea elettrica, è
necessario interporre un interruttore omnipolare, con un’apertura
minima di 3mm fra i contatti, appropriato al carico indicato nella
targhetta e conforme alle norme vigenti (il conduttore di terra giallo/
verde non deve essere interrotto dal commutatore).
Terminata l’installazione dell’apparecchiatura, l'interruttore
omnipolare deve essere facilmente raggiungibile.
USO E MANUTENZIONE
MANUTENZIONE
Rimuovere eventuali residui di cibo e gocce di unto dalla superficie di cottura utilizzando lo speciale raschietto fornito su richiesta
(fig.5).
Pulire l’area riscaldata nel miglior modo possibile utilizzando
SIDOL, ST AHLFIX o prodotti simili ed un panno-carta, quindi sciacquare con acqua e asciugare con un panno pulito.
Mediante lo speciale raschietto (opzional) rimuovere immediatamente dall’area riscaldata di cottura frammenti di fogli di alluminio
e materiale plastico scioltisi inavvertitamente o residui di zucchero o di cibi ad elevato contenuto di zucchero (fig. 5). In questo
modo si evita ogni possibile danno alla superficie del piano.
In nessun caso si devono utilizzare spugnette abrasive o detergenti chimici irritanti quali spray per forno o smacchiatori.
USO
Se il vostro apparecchio è predisposto è possibile ottimizzare il
consumo energetico grazie ad una gestione intelligente delle
accensioni e spegnimenti delle zone di cottura. Si può impostare
la potenza massima assorbita a 4 diversi livelli: 2.4 KW - 3.4 KW
- 4.4 KW - Pmax. Il piano è impostato senza nessuna
limitazione di potenza (Pmax).
• Multi Level Power Control (MLP)
In fase d’installazione, in base alla potenza disponibile in utenza,
è possibile settare il livello di potenza massima assorbita desiderato nel seguente modo:
- Sbloccare il piano di cottura tenendo premuto il “tasto chiave”
per 3 secondi fino allo spegnimento della “spia chiave”.
- Premere il tasto “E-plus” per 3 secondi:il display dell’orologio
mostrerà il livello di potenza impostato tra quelli a disposizione:2.4
KW/3.4 KW/4.4 KW e FULL.
- Premere i tasti (+) o (-) per cambiare livello.
- Confermare la scelta premendo il tasto “E-plus” entro 10 secondi altrimenti si ritorna allo stato iniziale.
• Funzione "E-PLUS" :
Durante la cottura è possibile aumentare il livello di potenza massima assorbita passando dal livello impostato a quello immediatamente superiore premendo il tasto “E-PLUS” fino all’accensione
della relativa spia. Allo spegnimento del piano si ritorna al livello
preimpostato.
Avvertenza:normalmente la funzione “E-PLUS” è da utilizzare
quando la potenza massima assorbita dal piano è inferiore alla
potenza disponibile in utenza.
• Area comandi (Fig.5)
- Alla prima accensione il piano di cottura si troverà in posizione
di sicurezza, cioè la” Spia on/off tasto chiave” accesa.
- Per utilizzare il piano è necessario tenere premuto il “ tasto chia-
ve” per 3 secondi fino allo spegnimento della ” Spia on/off tasto
chiave ”
- Per accendere la piastra desiderata:
- premere il tasto on/off corrispondente. Si vedrà il “led” del “
Display zona cottura “ lampeggiare.
- premere entro 10 secondi il tasto - per andare in posizione 4
oppure il tasto + per andare in posizione 9.
- 17 -
Page 18

- Per regolare la temperatura della zona di cottura agire su i tasti
+ o -.
- Se la piastra è dotata di zona estesa, per accendere la seconda
zona portare il “Diplay della zona cottura” alla posizione 9 e premere il tasto + per 2 sec: fino all'accensione del punto decimale
come conferma.
- Per spegnere la piastra premere il relativo tasto on/off.
NOTA: Durante il funzionamento è possibile bloccare/sbloccare
la zona comandi premendo il tasto chiave per 3 secondi.
• Area Timer (fig.5)
Il piano ha la possibilità di settare contemporaneamente il timer su
ogni zona di cottura. Il timer è una funzione che permette di fissare un tempo (da 1 a 99 minuti) per lo spegnimento automatico
della zona di cottura selezionata.
- Premere il tasto “Timer” per 2 secondi:il display mostrerà “00”
al centro e mostrerà quale elemento è attivo sul lato destro e sinistro.
- Continuando a premere il tasto “Timer” si seleziona la piastra
tra quelle attive.
- Premere + o - per selezionare il valore “Timer”.
Nota:
- Se la funzione “Timer” è stata impostata per più di una zona di
cottura , il “Display Timer” mostrerà ogni 3 secondi il tempo
rimanente per ogni zona programmata.
- Per annullare la funzione “Timer”, spegnere la relativa zona di
cottura.
• Funzione “MEMORY”
Questa funzione permette la programmazione e l’esecuzione di
un ciclo di cottura su ogni elemento riscaldante.
Note:
- Si può eseguire un ciclo alla volta in registrazione o in ese-
cuzione.
- Le variazioni del livello di potenza per tempi inferiori ai 15 sec.
non sono registrate.
- Può essere memorizzato un ciclo di cottura della durata massi-
ma di 10 ore e con un massimo di 10 variazioni del livello di potenza.
• Memorizzazione di un ciclo di cottura:
- Premere il tasto “Memory” e poi selezionare la piastra desidera-
ta tramite il relativo tasto di “ON/OFF”.
- Premere i tasti + o - fino a selezionare la potenza desiderata.
- Per terminare il ciclo di memorizzazione premere nuovamente il
tasto di “ON/OFF”.
• Esecuzione di un ciclo di cottura:
- Per eseguire un ciclo di cottura già memorizzato è sufficiente
premere il tasto “ON/OFF” della zona di cottura interessata e di
seguito il tasto “Memory”.
• Display:
Il piano di cottura è dotato di un display che in funzione normale è
un “OROLOGIO” ed inoltre può svolgere la funzione di “COUNT-
DOWN” quando il piano è spento.
• Regolazione dell'orologio:
In fase d’installazione impostare l’ora nel seguente modo:
- Sbloccare il piano di cottura tenendo premuto il “tasto chiave”
per 3 secondi fino allo spegnimento della “spia chiave”.
- Premere contemporaneamente i tasti + e - sotto il display finchè
lo stesso inizierò a lampeggiare.
- Premere (+) o (-) per impostare l’ora desiderata.
- Premere il tasto “Timer” per conf e rmare la selezione.
• Funzioni Count-Down:
- Sbloccare il piano di cottura tenendo premuto il “tasto chiave”
per 3 secondi fino allo spegnimento della “spia chiave”.
- Premere il tasto “Timer” finchè non compare la scritta “00” sul
display.
- Premere + o - per selezionare il numero dei minuti.
- Premere il tasto “Timer” per conf e rmare la selezione.
Al termine del tempo impostato si attiverà un segnale acustico.
SISTEMI DI SICUREZZA
1. Nel caso in cui un oggetto viene posizionato sopra i comandi, il
piano di cottura si spegnerà e si inserirà automaticamente la chiave andando in autoprotezione, questo accadrà anche in caso di
versamento di liquidi (acqua, latte, ecc.) al disopra della zona comandi.
2. La tastiera comandi ha internamente un sensore di temperatura
che , nel caso in cui la temperatura interna raggiunga 90°(condizioni anormali uso del piano senza pentole) automaticamente il
piano entra in un sistema di limitazione di temperatura automatico: spegnendosi automaticamente.
• RESIDUO CALORE
ATTENZIONE: quando una zona di cottura viene spenta, la sua
superficie ha una temperatura molto elevata e pericolosa.
Questa pericolosità è evidenziata dal fatto che il “display della z ona
di cottura” lampeggerà fino a che la temperatura sulla superficie
non sarà scesa sotto i 50°C.
• Avvertenze:
Quando il piano cottura viene utilizzato con la limitazione di potenza (livello di potenza 2,4 / 3,4 / 4,4) si potrà avere il seguente
funzionamento per garantire il livello di potenza massima assorbita prefissata:
A) Dopo aver acceso alcune zone di cottura alla max potenza
(pos.9) il piano potrebbe, non accettare l’accensione di un ulteriore “ Zona cottura ” emettendo un segnale acustico.
Oppure, accendere la zona di cottura successiva a un valore di
temperatura diversa da quello desiderato.
B) Quando si hanno alcune zone di cottura accese e si desidera
incrementare il valore di temperatura il piano potrebbe non accettare l’incremento emettendo un segnale acustico.
C) Dopo aver acceso alcune zone di cottura a un v alore di temperatura intermedio nel momento in cui si accende un’ulteriore zona
si può verificare che, la zona si accenderà con un ritardo di qualche secondo.
SI DECLINA OGNI RESPONSABILITA' PER EVENTU ALI D ANNI
PROVOCATI DALLA INOSSERVANZA DELLE SUDDETTE
AVVERTENZE
- 18 -
Page 19

SVENSKA
ALLMÄNT
Läs innehållet i detta häfte noggrant, då det ger viktiga anvisningar
om säkerhet vid installation, användning och underhåll.
Förvara häftet för framtida konsultation. Alla operationer som rör
installation (elektriska anslutningar) måste utföras av specialiserad personal och i överensstämmelse med gällande normer.
SÄKERHETSFÖRESKRIFTER
Det är tillrådligt att använda kokkärl med platt undersida och med
samma eller något större diameter än uppvärmningsytan. Använd
inte kokkärl med sträv botten för att förhindra att uppvärmningsytan repas (Fig.3).
Denna apparat bör inte användas av barn eller personer som behöver övervakning. Se till att barn inte leker med apparaten.
VIKTIGT
- förhindra att vätskor rinner över - sänk därför värmetillförseln
när du kokar eller värmer vätskor
- lämna aldrig värmeelementen påsatta med tomma kastruller
och stekpannor eller utan kokkärl
- när du är färdig med matlagningen, stäng av vederbörligt motstånd med den kontroll som anges längre fram
VIKTIGT: Om det finns sprickor på ytan, stäng av apparaten
för att undvika eventuella elektriska stötar.
INSTALLATIONSANVISNINGAR
Dessa instruktioner riktas till en specialiserad installatör och fungerar som vägledning för installation, justering och underhåll i enlighet med gällande lagar och normer.
Om en infogningsugn eller någon annan apparat ska monteras direkt under spishällen av glaskeramik MÅSTE DENNA
UTRUSTNING (ugn) OCH SPISHÄLLEN ISOLERAS PÅ LÄMPLIGT SÄTT, så att den värme som alstras av ugnen inte överstiger 60°C vid uppmätning på spisens nedre högra sida. Om
denna säkerhetsregel inte åtföljs kan det orsaka skador på
TOUCHCONTROL-systemet.
PLACERING (Fig.1)
Hushållsapparaten är konstruerad för infogning i en arbetsyta, på
det sätt som visas på specifik bild. Applicera tillslutningsmedel
längs hela omkretsen (skärdimensioner Fig.1B).
Fäst hushållsapparaten på arbetsytan med de fyra fästen som medföljer och kom ihåg att ta med arbetsytans tjocklek i beräkningen
(Fig.1A). Om apparatens undre del är åtkomlig från skåpets underdel efter installationen skall en avskärmningspanel monteras
enligt de indikerade avstånden (Fig.1C). Detta är inte nödvändigt i
det fall en ugn installeras under apparaten.
ELEKTRISKA ANSLUTNINGAR (Fig.2)
Innan du utför de elektriska kopplingarna, försäkra dig om att:
- den elektriska jordledningskabeln är 2 cm längre än de andra
kablarna;
- anläggningens egenskaper tillgodoser de indikationer som
anges på identifieringsplåten som är placerad på arbetsytans
nedre del;
- anläggningen har en effektiv jordledning som överensstämmer
med gällande normer och lagstiftning.
Jordledning är obligatorisk enligt lagen.
Om apparaten inte är utrustad med kabel och/eller lämplig kontakt, använd material som lämpar sig för den förbrukning som anges
på identifieringsplåten och för temperaturen under funktion. Ingen
del av kabeln får uppnå en temperatur på 50°C mer än rumstemperaturen.
Om du vill göra en direktanslutning till elnätet är det nödvändigt att
lägga in en flerpolig strömbrytare, med en minimiöppning på 3 mm
mellan kontakterna, avpassad för den last som anges på plåten
och som överensstämmer med gällande normer (den gul/gröna
jordledningen får inte brytas av kommutatorn).
Den flerpoliga strömbrytaren ska vara lätt tillgänglig när apparaten har installerats.
ANVÄNDNING OCH UNDERHÅLL
UNDERHÅLL
Avlägsna eventuella matrester och f ettdroppar på spisens yta med
hjälp av den specialskrapa som levereras på begäran (Fig.4).
Rengör uppvärmningsytan på bästa sätt med SIDOL, STAHLFIX
eller liknande produkter och en papperstrasa, skölj med vatten och
torka med en ren trasa.
Avlägsna omedelbart bitar av aluminiumfolie och plastmaterial, eller
sockerrester och matrester med hög sockerhalt som oaktsamt smält
på uppvärmningsytan, med hjälp av specialskrapan (tillbehör)
(Fig.4). På detta sätt undviker du alla möjliga skador på ytan.
Använd aldrig svampar som repar eller irriterande kemiska rengöringsmedel som ugnsspray eller fläckborttagningsmedel.
BRUK
Om apparaten har denna funktion kan energiförbrukningen reduceras till ett minimum tack vare kokzonernas logiska på- och
avslagningssystem. Den högsta absorberade eff ekten kan ställas
in på 4 olika nivåer: 2.4 KW - 3.4 KW - 4.4 KW - Pmax. Spishäl-
len är inställd utan effektbegränsning (Pmax).
• Multi Level Power Control (MLP)
I samband med installationen, kan man med utgångspunkt från den
disponibla matareffekten ställa in det maximala upptagna effektläget
på följande sätt:
- Frilägg spishällen genom att hålla “spärrtangenten” intryckt under 3 sekunder tills “spärrens kontrollampa” släcks.
- Tryck på tangenten “E-plus” under 3 sekunder: klockans display
visar det inställda effektläget av följande tillgängliga lägen 2.4 KW/
3.4 KW/4.4 KW och FULL.
- Tryck på (+) eller (-) tangenten för att ändra nivå.
- Bekräfta valet genom att inom 10 sekunder trycka på tangenten
“E-plus”, i annat fall återgår effektläget till det ursprungliga.
•”E-PLUS”- funktionen :
Under matlagningen är det möjligt att höja det maximala upptagna
effektläget till det närmast högre genom att trycka in “E-PLUS”-
tangenten tills den aktuella kontrollampan tänds.
När spishällen stängs av återgår den till det tidigare inställda läget.
Varning: “E-PLUS” funktionen används normalt när spishällens
maximala upptagna effekt är lägre än den disponibla matareffekten.
• Kontrollpanel
- När spishällen startas för första gången är säkerhetspositionen aktiverad, dvs. ”K ontrollampan för on/off- tangentens spärr” är tänd.
- Innan hällen sätts i bruk skall ”Spärr-tangenten” hållas intryckt i 3
sekunder tills ” Kontrollampan för on/off- tangentens spärr”
släcks.
- Gör på följande sätt för att slå på den önskade plattan:
- tryck på den aktuella on/off-tangenten . Lysdioden på “ kokytans
display “ börjar blinka.
- tryck på –tangenten inom 10 sekunder för att gå till position 4 eller
+tangenten för att gå till position 9.
- Kokytornas temperatur regleras med hjälp av + eller -tangenten.
- Om plattan är utrustad med en vidgad yta skall “Kokytans dis-
play” placeras i position 9 för att tända den större ytan. Därefter
trycks +tangenten in i 2 sekunder tills decimalen tänds som en bekräftelse.
- Tryck på den motsvarade on/off-tangenten för att stänga av plattan.
OBS: Under funktionens gång kan k ontrollpanelen spärras/friläggas
Genom att man trycker in spärr-tangenten under 3 sekunder.
- 19 -
Page 20

• Timer (fig.5)
Denna spishäll gör det möjligt att ställa in koktiden för varje enskild
kokyta.
Timern gör det möjligt att ställa in koktiden (från 1 till 99 minuter) och
slår automatiskt av den valda kokytan.
- T ryck in “Timer”-tangenten under 2 sekunder : mitt på displayen
visas siffrorna “00” och till höger och vänster indikeras den kokyta
som är aktiverad.
- Välj med intryckt “Timer”-tangent en av de aktiverade plattorna.
- Tryck på (+) eller (-) för att ställa in “Timer”-värdet.
OBS:
- Om “Timer”-funktionen är aktiverad för mer än en kokyta, visar
“Timerdisplayen” den restarande tiden för varje programmerad
kokyta var tredje sekund.
- Slå av den aktuella kokytan för att nollställa “Timer”-funktionen.
• “MEMORY”-funktionen
Denna funktion för det möjligt att programmera en matlagningscykel
för varje kokyta.
OBS:
- En enda registrerad eller pågående matlagningscykel kan ut-
föras åt gången.
- Effektlägesvariationer som underskrider 15 sekunder registreras
inte.
- En matlagningscykel på max. 10 timmar och högst tio effektläge-
svariationer kan programmeras in.
• Programmering av en Matlagningscykel:
- Tryck på “Memory”-tangenten och välj därefter önskad platta med
hjälp av den aktuella “ON/OFF”-tangenten.
- Tryck på (+) eller (-) tangenterna tills önskat effektläge erhållits.
- Tryck återigen ¨på “ON/OFF”-tangenten för att avsluta
programmeringscykeln.
• Fullföljande av en matlagningscykel:
- Tryck på “ON/OFF”-tangenten för den aktuella kokytan och däref-
ter på “Memory”-tangenten för att fullfölja en matlagningscykel som
programmerats in tidigare.
• Display:
Spishällen är utrustad med en display som fungerar som “KLOCKA”
under den normala funktionen och om så önskas som “COUNT-
DOWN” när spishällen är avstängd.
• Inställning av klockan:
Under installationsfasen skall klockan ställas på följande sätt:
- Frilägg spishällen genom att hålla “spärrtangenten” intryckt un-
der 3 sekunder tills “spärrens kontrollampa” släcks.
- T ryck samtidigt in (+) och (-)-tangenterna under display en tills denna
börjar blinka.
- Tryck på (+) eller (-)-tangenten för att ställa in önskad tid.
- Tryck på “Timer”-tangenten för att bekräfta inställningen.
• Count-Down-funktionen:
- Frilägg spishällen genom att hålla “spärrtangenten” intryckt un-
der 3 sekunder tills “spärrens kontrollampa” släcks.
- T ryck in “Timer” tangenten tills siffrorna “00” visas på displayen.
- T ryck på (+) eller (-)-tangenten för att ställa in önskat antal minuter .
- Tryck på “Timer”-tangenten för att bekräfta inställningen.
När den inställda tiden är slut hörs en ljudsignal
SÄKERHETSSYSTEM
1. I det fall ett föremål av något slag täck er spishällens kontrollpanel,
stängs spishällen av och spärren aktiveras automatiskt i säkerhetsläge, samma sak inträffar om vätskor (vatten, mjölk etc.) spills ut
över kontrollpanelen.
2. Kontrollpanelen har en invändig värmesensor som aktiveras när
den interna temperaturen överskrider 90° (onormalt bruk av spishällen utan kokkärl) och spishällen stängs av automatiskt när det
temperaturbegränsande systemet träder i funktion.
VIKTIGT: när en kokyta stängs av , är ytans temperatur myc ket hög
och utgör en fara.
Denna fara indikeras av att “kokytans displa y ” blinkar tills kokytans
temperatur sjunkit under 50°C.
• Varning:
När spishällen används med en effektlägesbegränsning (effektläge
2,4 / 3,4 / 4,4) kan man erhålla följande funktion för att garantera det
programmerade maximala upptagna effektläget:
A) Efter att ha slagit på ett antal kokytor med den maximala effekten
(pos.9) är det möjligt att det inte går att slå på ytterligare en “ Kok-
yta ” på spishällen, vilket indikeras av en akustisk signal .
I annat fall kan denna sista kokyta slås på med ett annat temperaturvärde än det önskade.
B) När flera kokytor är påslagna och man önskar höja temperaturvärdet är det möjligt att det inte går att höja temperaturen vilket
indikeras av en akustisk signal.
C) Efter att ha slagit på ett antal kokytor med medelhög temperatur
kan det uppstå en fördröjning med några sekunder när ytterligare en
kokyta slås på.
TILLVERKAREN FRÅNSÄGER SIG ALLT ANSVAR FÖR
EVENTUELLA SKADOR SOM ORSAKTS P.G.A. ATT
OVANSTÅENDE INSTRUKTIONER INTE RESPEKTERATS.
- 20 -
Page 21

NORSK
GENERELL INFORMASJON
Les nøye igjennom hele håndboken. Den gir deg viktige
opplysninger angående sikker installering, bruk og vedlikehold.
Ta godt vare på håndboken for senere konsultering. Alle inngrep
som har med installeringen å gjøre (elektriske koplinger) må utfø res
av spesialisert personale i følge gjeldende regler.
SIKKERHETSANBEFALINGER
Det anbefales å anvende kjeler med flat bunn og som har en b unn
med en diameter lik, eller litt større, enn det oppvarmete området.
Ikke ta i bruk kjeler/panner med ujevn bunn for å unngå riper på
den termiske toppen (Fig.3).
Dette apparatet er ikke tiltenkt for bruk av barn eller av personer
som trenger oppsyn. Pass på at barn ikke lek er med apparatet.
VIKTIG
- unngå at vœske renner over. Det er derfor viktig å skru ned
varmen for å koke eller varme opp vœske
- Ikke la varmeelementene vœre skrudd på med tomme kjeler
eller panner på, eller uten at det er noe på elementene i det
hele tatt
- når du er ferdig med å lage mat, skru av platen ved hjelp av
bryteren som vil bli forklart senere
ADV ARSEL: Om overflaten er sprukket, skru av apparatet for
å unngå eventuelle elektriske støt.
INSTALLERINGSANVISNINGER
De følgende anvisningene er tiltenkt en spesialisert installatør , og
de fungerer som en guide for installering, regulering og vedlikehold
i følge de gjeldende regler og normer.
Om en ovn for innbygging, eller en hvilken som helst annen
vare som produserer varme, må monteres direkte under
kjeramikktoppen, ER DET VIKTIG AT DENNE VAREN (ovnen)
OG KJERAMIKKTOPPEN ER RIKTIG ISOLERT, slik at den
varmen som produseres av ovnen (målt på høyre side i bunnen
av platetoppen) ikke overskrider 60°C. Om disse
forholdsreglene ikke blir respektert, kan det føre til at
TOUCHCONTROL-systemet ikke vil fungere på rett måte.
PLASSERING (Fig.1)
Hvitevaren er produsert for å kunne bli bygget inn i en benkemodul,
som illustrert i den spesifikke figuren. Legg på tetningsmateriale
langs hele kanten (dimensjoner som Fig.1B).
Blokker hvitevaren i benkemodulen ved hjelp av de 4 vedlagte
klemmene, og husk på tykkelsen på benkemodulen (Fig.1A).
Dersom undersiden av apparatet etter installasjon er tilgjengelig
fra undersiden av kjøkk enskapet, må det monteres en skilleplate i
henhold til de avstandsmålene som er oppgitt (Fig.1C). Dersom
det på undersiden installeres en ovn, er ikke dette nødvendig.
ELEKTRISKE KOPLINGER (Fig.2)
Før de elektriske koplingene blir utført må du forsikre deg om at:
- den elektriske jordledningen må vœre 2 cm. lenger i forhold til
de andre ledningene;
- det elektriske anleggets egenskaper er i overensstemmelse
med indikasjonene på spesifikasjonsplaten som er å finne på
innsiden av benkemodulen;
- anlegget er et jordet anlegg i overensstemmelse med gjeldende
normer og regler.
Jordingen er obligatorisk ved lov.
Om hvitevaren ikke er utstyrt med ledning og/eller riktig støpsel, ta
i bruk materiale som er tilegnet den elektriske absorpsjonen og
funksjonstemperaturen, indikert på spesifikasjonsplaten. Ledningen
må på ingen punkter nå en temperatur som er 50°C høyere enn
romtemperaturen.
Om man ønsker en direkte kopling til den elektriske linjen, så må
en omnipolar bryter anvendes, med en minimum 3 mm åpning
mellom kontaktene. Denne må passe og vœre tilegnet den
elektriske ladningen som er indikert på spesifikasjonsplaten og
overensstemme med gjeldende regler (jordlederen gul/grønn må
ikke vœre avbrutt av strømfordeleren).
Når installeringen av apparatet er ferdig utført må omnipolarbryteren
vœre lett tilgjengelig.
BRUK OG VEDLIKEHOLD
VEDLIKEHOLD
Fjern eventuelle matrester og fettflekker fra platetoppen med
spesialskrapen som blir levert etter forespørsel (Fig.4).
Rengjør det oppvarmete området på best mulig måte ved å anv ende
SIDOL, STAHLFIX eller lignende produkter og en papirklut, skyll
deretter med vann og tørk med en ren klut.
Fjern fragmenter av aluminiumspapir og plast som har smeltet
ubemerket, eller rester av sukker eller høy sukkerholdig mat (Fig.4)
umiddelbart fra den oppvarmete platetoppen med spesialskrapen
(optional). På denne måten unngår du enhver mulig skade på
platetoppen.
Slipe/skuresvamper eller kjemiske vaskemidler, slik som
rengjøringssprayer f or o vner eller flekkfjernere, må på ingen måte
anvendes.
BRUK
På noen versjoner er det mulig å optimalisere energiforbruket takket
være en intelligent styring av på- og av-slåing av kokesonene. Man
kan innstille det maksimale effektforbruket på 4 forskjellige nivåer:
2.4 KW - 3.4 KW - 4.4 KW - Pmax. Platetoppen er innstilt uten
noen effektbegrensning (Pmax).
• Multi Level Power Control (MLP)
Under installasjonsfasen er det på bakgrunn av tilgjengelig effekt
på strømforsyningen i boligen, m ulig å stille inn det ønskedd nivå
for maksimalt strømforbruk ved å gå frem på følgende måte:
- Frigjør platetoppen ved å holde inne “nøkkeltasten” i 2 sekunder, til “nøkkelsymbolet” slukker.
- Trykk på tasten “E-plus” i 3 sekunder: klokkens display vil vise
innstilt effektnivå blant de som er tilgjengelige: 2.4 KW/3.4 KW/
4.4 KW og FULL.
- Trykk på tasten (+) eller (-) for å endre nivået.
- Bekreft valget ved å trykke på tasten “E-plus” innen 10 sekunder, ellers må du gjenta prosedyren.
• Funksjonen “E-PLUS”:
Under tilberedningen er det mulig å øke nivået for maks. strømforbruk, og gå fra det innstilte nivået til neste nivå ved å trykke på
tasten “E-PLUS”, slik at tilhørende indikatorlampe tennes.
Når platetoppen slås av, går den tilbake til det tidligere innstilte
nivået.
Advarsel: normalt skal funksjonen “E-PLUS” benyttes når platetoppens maksimale strømforbruk er lav ere enn effekten på strømnettet i boligen.
• Betjeningspanel
- Når platetoppen slås på for første gang, vil den befinne seg i
sikkerhetsposisjon, dvs. ”Indikatorlys for nøkkeltast på/av” vil
være på.
- For å kunne bruke platetoppen, må man holde inne “nøkkel-
tasten” i 3 sekunder, til ”Indikatorlys for nøkkeltast på/a v” slukker
- Slik slår man på den ønskede kokesonen:
- trykk på tilhørende på/av-knapp. “Lysdioden” på “Display for
kokesone“ vil blinke.
- trykk innen 10 sekunder på tasten - for å velge stillingen 4 eller
tasten + for å velge stillingen 9.
- Regulering av temperaturen på kokesonen skjer ved hjelp av
tastene + eller -.
- Dersom platen er utstyrt med utvidet sone, slår man på den an-
- 21 -
Page 22

dre sonen ved å sette “Display for kokesone” på 9 og trykke på
tasten + i 2 sekunder: desimalpunktet vil begynne å lyse som
bekreftelse.
- Platen slås av ved å trykke på tilhørende på/av-tast.
MERK: Når platetoppen er i funksjon er det mulig å blokkere/frigjøre betjeningspanelet ved å trykke på nø kkeltasten i 3 sekunder .
• Innstilling av timer (fig. 5)
På platetoppen er det mulig å innstille samtidig timeren for hver
kokesone.
Timeren er en funksjon som gjør det mulig å fastsette et tidsrom
(mellom 1 og 99 minutter) for automatisk utkobling av den valgte
kokesonen.
- Trykk på tasten “Timer” i 2 sekunder. Displayet vil vise “00” i
midten og hvilket element som er i funksjon på høyre og venstre
side.
- Hvis man fortsetter å trykke på tasten “Timer”, velges en koke-
sone blant de som er i funksjon.
- Trykk på (+) eller (-) for å velge innstilling av “Timer”.
Merk:
- Dersom funksjonen “Timer” er blitt innstilt for mer enn en koke-
sone, vil “Timer-displayet” hvert 3. sekund vise gjen værende tid
for hver programmert sone.
- For å slette funksjonen “Timer”, slår man av tilhørende koke-
sone.
• Funksjonen “MEMORY” (minne)
Denne funksjonen muliggjør programmering og utføring av en
tilberedningssyklus på hver av kokesonene .
Merk:
- Det kan utføres en syklus av gangen under lagring eller ut-
føring.
- Variasjoner i effektnivå i tidsrom på under 15 sekunder vil ikke
registreres.
- Det kan lagres en tilberedningssyklus med en varighet på maks.
10 timer og med maks. 10 endringer av effektnivå.
• Lagring av en tilberedningssyklus:
- T rykk på “Memory ”-tasten og velg så ønsket ko kesone ved hjelp
av tilhørende “På/Av”-tast.
- Trykk på tasten (+) eller (-) for å velge ønsket effekt.
- For å avslutte lagringssyklusen, trykk om igjen på “På/Av”-tas-
ten.
• Utføring av tilberedningssyklus:
- For å utføre en tilberedningssyklus som allerede er lagret, er det
nok å trykke på “På/Av”-tasten for den aktuelle kokesonen og deretter på “Memory”-tasten.
• Display:
Platetoppen er utstyrt med et display som under normal funksjon
fungerer som “KLOKKE” og som dessuten kan brukes som “STOP-
PEKLOKKE” når platetoppen er slått av.
• Innstilling av klokken:
Under installeringsfasen innstilles riktig tid på følgende måte:
- Frigjør platetoppen ved å holde nede “nøkkeltasten” i tre sek-
under, til “nøkkel-indikatoren” slukker.
- Trykk samtidig på tastene (+) og (-) under displayet, til dette be-
gynner å blinke.
- Trykk på (+) eller (-) for å innstille ønsket tid.
- T rykk på “Timer”-tasten for å bekrefte valget.
• Stoppeklokke-funksjon:
- Frigjør platetoppen ved å holde nede “nøkkeltasten” i 3 sek-
under, til “nøkkel-indikatoren” slukker.
- T rykk på “Timer”-tasten til “00” vises på displayet.
- Trykk på (+) eller (-) for å velge antall minutter.
- T rykk på “Timer”-tasten for å bekrefte valget.
Når tiden er innstilt, vil det høres et lydsignal.
Sikkerhetssystemer
1. Dersom det plasseres en gjenstand på betjeningspanelet, vil
platetoppen slå seg av og nøkkelen vil koble seg inn automatisk,
for å beskytte platetoppen. Dette vil også skje dersom det søles
væske (vann, melk osv .) på betjeningspanelet.
2. Inne i betjeningspanelet er det en sensor, som dersom den innvendige temperaturen kommer opp i 90° (f. eks. dersom platetoppen slås på uten kokeredskap) automatisk aktiverer et system
for begrensning av temperaturen, som gjø r at platetoppen slår seg
av.
FORSIKTIG: Når en kokesone slås av, vil overflaten ha en veldig
høy temperatur som utgjør en fare.
Dette vil indikeres ved at “displayet for kokesonen” blinker inntil
temperaturen på overflaten er kommet under 50°C.
• Advarsel:
Når platetoppen brukes med effektbegrensning (effektnivå 2.4 /
3.4 / 4.4), kan funksjon skje på følgende måte for å sikre ov erholdelse av maks.-nivået for strømforbruk:
A) Etter å ha slått på noen kokesoner på maks. effekt (posisj. 9),
kan det hende platetoppen ikke godkjenner at det slås på en “Koke-
sone” til, og derfor avgir et lydsignal.
Man kan da eventuelt slå på neste kokesone med en temper aturinnstilling som er lavere enn den man ønsket.
B) Dersom noen av kokesonene er på og man ønsker å øke
temperaturinnstillingen, kan det hende platetoppen ikke godkjenner denne økningen og avgir et lydsignal.
C) Etter å ha slått på noen kokesoner på en middels temperatur og
man forsøker å slå på en kokesone til, kan det skje at kokesonen
slår seg på først etter noen sekunder.
PRODUSENTEN FRASKRIVER SEG ETHVERT ANSVAR FOR
SKADER SOM SKYLDES AT O VENNEVNTE RETNINGSLINJER
IKKE ER BLITT FULGT
- 22 -
Page 23

DANSK
GENERELT
Læs indholdet af denne brugsanvisning grundigt idet den giver vigtige anvisninger for hvad angår installationssikkerhed, brug og vedligeholdelse.
Gem disse anvisninger til enhver yderligere konsultation. Alle operationer relaterede til installationen (elektriske tilslutninger) skal
udføres af dertil uddannet personale efter de gældende regler.
SIKKERHEDSFORESKRIFTER
Det anbefales at benytte beholdere med flad bund med samme
diameter eller en lille smule større end det opvarmede område.
Brug ikke beholdere med ru bund, for ikke at ridse komfurets termiske overflade (Fig.3).
Dette apparat er ikke egnet til brug af børn eller personer som skal
holdes under opsyn. Pas på at børn ikke leger med apparatet.
VIGTIGT
- undgå at væske løber ud, nedsæt derfor v ed kogning eller opvarmning væsker varme tilførslen
- lad ikke varmeelementerne være tændte med gryder og pander tomme eller uden beholdere på
- når man er færdig med madlavningen, så sluk den relative resistens v.h.a. kontrolknappen vist i det følgende
ADVARSEL: Hvis overfladen er revnet, så sluk apparatet for
at undgå eventuelle elektriske stød.
INSTALLATIONSANVISNINGER
Disse anvisninger henvender sig til en uddannet installatør og fungerer som guide til installationen, reguleringen og vedligeholdelsen i overensstemmmelse med loven og gældende regler.
Hvis en indbygget ovn eller ethvert andet apparat som producere varme skal monteres direkte under den glaskeramiske
kogeplade, ER DET NØDVENDIGT AT DETTE APPARAT (o vn)
OG DEN GLASKERAMISKE KOGEPLADE ER P ASSENDE ISOLEREDE, således at varmen som genereres af ovnen, målt på
højre side af kogepladens bund, ikke overstiger 60°C. Manglende overholdelse af dette forbehold kan medføre en fejlfunktion af TOUCHCONTROL-systemet.
PLACERING (Fig.1)
Den hårde hvidevarer er lavet til at blive indbygget i et arbejdsbord, som illustreret i den særlige figur. Forbered forseglende
materiale langs hele omkredsen (udskærings størrelserne Fig.1B).
Fastsæt den hårde hvidevarer på arbejdsbordet v.h.a. de 4 spændestykker som medfølger , med hensyn tagen til tykkelsen af arbejdsbordet (Fig.1A). Hvis den nederste del af apparatet efter installeringen kan nås fra nedersiden af køkkenelementet, skal man montere en skilleplade i overensstemmelse med de anførte afstande
(Fig. 1C). Hvis der installeres under en o vn, er dette ikk e nødvendigt.
ELEKTRISKE TILSLUTNINGER (Fig.2)
Før udførelsen af de elektriske tilslutninger skal man sikre at:
- den el-ledning til jord skal være 2 cm. længere end de andre
ledninger;
- at anlæggets karakteristika er således at de overholder anvisningerne på identifikationspladen som sidder på den undersiden af arbejdsbordet;
- anlægget er udstyret med en effektiv jordforbindelse som er i
overensstemmelse med gældende regler og lovanvisninger.
Jordforbindelse er obligatorisk efter loven.
I tilfælde af at den hårde hvidevarer ikke er udstyret med ledning
og/eller relative stik, benyt materiale egnet til absorptionen angivet på identifikationspladen og til funktionstemperaturen. Ledningen må ikke nogen steder komme op på en temperatur som over-
stiger med 50°C temperaturen i lokalerne.
Hvis man ønsker en forbindelse direkte til det elektriske net, er det
nødvendigt at indskyde en afbryder, med en åbning på min. 3 mm
mellem kontakterne, egnet til belastningen angivet på pladen og i
overensstemmelse med gældende regler (jordlederen gul/grø n må
ikke afbrydes af omkobler).
Når installationen af apparatet er afsluttet, skal omnipolarafbryderen
være nem at få adgang til.
BRUG OG VEDLIGEHOLDELSE
VEDLIGEHOLDELSE
Fjern eventuelle rester af mad og fedtdråber fra kogefladen ved
hjælp af den særlige skraber som leveres ved forespø rgsel (Fig.4).
Rengør det opvarmede område bedst muligt ved hjælp af SIDOL,
STAHLFIX eller lignende produkter og med en klud-papir, skyl af
med vand og tør af med en ren klud.
Vha. den særlige skraber (optional) fjern øjeblikkeligt fra det opvarmede kogeområde stykker af stanniol og plastisk materiale som
ved et uheld er smeltet eller rester af sukker eller mad med et højt
sukkerindhold (Fig.4). På denne måde undgår man enhver mulig
beskadigelse af kogeoverfladen.
Benyt aldrig under nogen omstændigheder slibesvampe eller kemiske vaskemidler som er irriterende såsom ovnrens eller pletfjernere.
BRUG
Hvis apparatet er forberedt dertil, kan man optimere energiforbruget takket være en intelligent styring af tænding og slukning af
kogezonerne. Man kan indstille den maksimale optagne effekt på
4 forskellige niveauer: 2, 4 KW - 3,4 KW – 4,4 KW - Pmax. Koge-
fladen er indstillet uden nogen begrænsning af effekten
(Pmax).
• Multi Level Power Control (MLP)
Under installeringen er det – på grundlag af den forhåndenværende effekt – muligt at indstille det ø nskede niveau for max optagen
effekt på følgende måde:
- Ophæv blokeringen af kogefladen ved at holde “nøgletasten”
trykket i 3 sekunder, indtil “nøgle-kontrollampen” slukkes.
- Tryk på tasten “E-plus” i 3 sekunder: ur-displayet viser det indstillede effektniveau blandt dem der er til rådighed: 2,4 KW/3,4
KW/4,4 KW og FULL.
- Tryk på tasterne (+) eller (-) for at ændre niveauet.
- Bekræft valget ved at trykke på tasten “E-plus” indenfor 10 sekunder; i modsat tilfælde vender man tilbage til den indledende
tilstand.
• Funktionen „E-PLUS“ :
Under tilberedningen er det muligt at øge det maksimale optagne
effektniveau ved at skifte fra det indstillede niveau til niveauet
umiddelbart over ved at trykke på tasten “E-PLUS” indtil den tilhørende kontrollampe tændes.
Ved slukning af kogefladen v ender man tilbage til det forindstillede
niveau.
Advarsel: normalt skal funktionen “E-PLUS” anvendes, når den
maksimale effekt, som kogefladen optager, er lavere end den effekt, der er til rådighed på elnettet.
• Betjeningsområde
- Ved første tænding befinder kogefladen sig i sikkerhedsstilling,
d.v.s. at ”kontrollampen for on/off nøgletast” er tændt.
For at kunne anvende kogefladen skal man holde “nøgletasten”
trykket i 3 sekunder, indtil “nøgletast-kontrollampen on/off” slukkes.
- For at tænde den ønsk ede k ogeplade:
- tryk på den tilhørende on/off tast. Herefter blink er “lysdioden” f or
“ Display kogezone “.
- tryk indenfor 10 sekunder på tasten - for at skifte til position 4,
eller tasten + for at skifte til position 9.
- For at indstille temperaturen på kogezonen skal man benytte
- 23 -
Page 24

tasterne + eller -.
- Hvis kogefladen har en udvidet zone, skal man ved tænding af
den anden zone flytte “Display for kogezonen” til position 9 og
trykke på tasten + i 2 sek: indtil decimaltegnet tændes som bekræftelse.
- for at slukke pladen skal man trykke på den tilhø rende on/off tast.
BEMÆRK: under funktionen er det muligt at blokere/frigive
betjeningszonen ved at trykke på nøgletasten i 3 sekunder .
• Timer-område (fig.5)
Kogefladen giver mulighed for at indstille timer’en samtidigt på
hver kogezone.
Timer-funktionen giver mulighed for at indstille et tidsrum (fra 1 til
99 minutter) til automatisk slukning af den valgte kogezone.
- Tryk på tasten “Timer” i 2 sekunder: displayet viser “00” i mid-
ten, og viser hvilket element er aktivt i højre og venstre side.
- Hvis man fortsætter med at trykke på tasten “Timer” vælges
pladen blandt de tændte plader.
- Tryk på (+) eller (-) for at vælge værdien “Timer”.
Bemærk:
- Hvis funktionen “Timer” er indstillet for mere end én kogezone,
viser “Timer Displayet ” hver 3, sekund den resterende tid for
hver programmeret zone.
- For at annullere “Timer” funktionen, skal man slukke den be-
rørte kogezone.
• Funktionen “MEMORY”
Denne funktion giver mulighed for programmering og udfø relse af
en tilberedningscyklus på hvert varmelegeme.
Bemærk:
- Man kan udføre en cyklus ad gangen som registrering eller
udførelse.
- Ændringer i effektniveauet på under 15 sekunder registreres ikke.
- Der kan maksimalt gemmes en tilberedningscyklus på 10 timer,
og med højst 10 ændringer af effektniveauet.
• Gemning af en tilberedningscyklus:
- Tryk på tasten “Memory” og vælg derefter den ønskede plade
ved hjælp af den tilhørende tast for “ON/OFF”.
- Tryk på tasterne (+) eller (-) indtil man har valgt den ønskede
effekt.
- For at afslutte en cyklus for gemning skal man igen trykke på
tasten “ON/OFF”.
• Udførelse af en tilberedningscyklus:
- For at udføre en tilberedningscyklus, der allerede er gemt, skal
man blot trykke på tasten “ON/OFF” for den berørte kogezone, og
derefter på tasten “Memory”.
• Display:
Kogefladen er udstyret med et display, der ved normal funktion er
et “UR”, men som også kan have en funktion som “COUNT-
DOWN” (nedtælling), når kogefladen er slukket.
• Indstilling af uret:
Under installeringen skal uret indstilles på følgende måde:
- Ophæv blokeringen af kogefladen ved at holde “nøgletasten”
trykket i 3 sekunder, indtil “nøgle-kontrollampen” slukkes.
- Tryk samtidigt på tasterne (+) og (-) under displayet, indtil det
begynder at blinke.
- Tryk på (+) eller (-) for at indstille det ønskede klokkeslæt.
- Tryk på tasten “Timer” for at bekræfte valget.
• Funktioner for Count-Down:
- Ophæv blokeringen af kogefladen ved at holde “nøgletasten”
trykket i 3 sekunder, indtil “nøgle-kontrollampen” slukkes.
- Tryk på tasten “Timer”, indtil “00” vises på displayet.
- Tryk på (+) eller (-) for at vælge antallet af minutter.
- Tryk på tasten “Timer” for at bekræfte valget.
Når den indstillede tid udløber, udsendes der et lydsignal
SIKKERHEDSSSYSTEMER
1. Hvis der stilles en genstand på betjeningsanordningerne, sluk-
kes kogefladen, og nøglen indsættes automatisk, således at k oge-
fladen gå i en tilstand med autobeskyttelse; dette vil også være
tilfældet ved spild af væsker (vand, mælk, etc.) på betjeningsområdet.
2. Betjeningstastaturet har en internt temperatursensor, der i tilfælde af intern temperatur på 90º og opefter (unormale forhold,
brug af kogefladen uden gryder) stiller kogefladen på
specialfunktionen for automatisk begrænsning af temperaturen, og
slukker automatisk.
P AS PÅ: når en kogezone slukkes, har dens overflade en me-
get høj og farlig temperatur.
Denne farlige tilstand vises ved at “displayet for kogezonen” blinker så længe overfladetemperaturen er ov er 50°C.
• Advarsler:
Når kogefladen anvendes med effektbegrænsning (eff ektniveau 2,4
/ 3,4 / 4,4) kan der forekomme følgende funktion for at sikre det
forindstillede maksimale niveau for optagen effekt:
A) Efter at have tændt nogle kogezoner på max eff ekt (pos. 9) kan
kogefladen eventuelt ikke acceptere tænding af en yderligere “
kogezone ” og udsender et lydsignal.
Eller tænding af den efterfølgende kogezone på en temperatur,
der ikke er den ønskede .
B) Når man har tændt nogle kogezoner, og man ønsker at øge
temperaturen, kan kogefladen eventuelt ikke acceptere temperaturstigningen, og udsender et lydsignal.
C) Efter at have tændt nogle kogezoner på en mellemliggende
temperatur, kan det hænde, at tænding af en yderligere zone udføres med en forsinkelse på et par sekunder.
FABRIKANTEN FRALÆGGER SIG ETHVERT ANSVAR FOR
SKADER FORÅRSAGET AF MANGLENDE OVERHOLDELSE
AF OVENSTÅENDE ADVARSLER.
- 24 -
Page 25

EΛΛHNIKA
ΓΕΝΙΚΑ
∆ιαβάστε προσεκτικά το περιεχµενο αυτού του εγχειριδίου
αφού παρέχει σηµαντικέσ υποδείξεισ σχετικά µε την
ασφάλεια εγκατάστασησ, χρήσησ και συντήρησησ.
∆ιατηρείστε το εγχειρίδιο για µπορείτε να το συµβουλεύεστε
µελλοντικά. λεσ οι διεργασίεσ που σχετίζονται µε την
εγκατάσταση (ηλεκτρικέσ συνδέσεισ) πρέπει να εκτελούνται
απ προσωπικ ειδικευµένο σύµφωνα µε τουσ ισχύοντεσ
κανονισµούσ.
ΠΡΟΕΙ∆ΟΠΟΙΗΣΕΙΣ ΓΙΑ ΤΗΝ ΑΣΦΑΛΕΙΑ
Συνιστώνται σκεύη µε επίπεδη βάση και διαµέτρου ίσησ ή
ελαφρά µεγαλύτερησ εκείνησ τησ θερµαινµενησ περιοχήσ.
Μη χρησιµοποιείτε σκεύη µε βάση ανώµαλη, για την αποφυγή
ξυσίµατοσ τησ θερµικήσ επιφάνειασ (Εικ.3).
Η συσκευή αυτή δεν είναι κατάλληλη για τη χρήση απ µικρά
παιδιά ή άτοµα που χρειάζονται επιτήρηση. Προσέξτε να µην
παίζουν τα παιδιά µε τη συσκευή.
ΣΗΜΑΝΤΙΚΟ
- φροντίστε να µην συµβεί διαφυγή υγρού, ωστσο για να
βράσετε ή να θερµάνετε υγρά, µειώστε την τροφοδοσία
θερµτητασ
- µην αφήνετε τα θερµαντικά στοιχεία αναµµένα µε
κατσαρλεσ και τηγάνια κενά ή χωρίσ σκεύη
- αφού τελειώσετε το µαγείρεµα, σβήστε την αντίστοιχη
αντίσταση µέσω του χειριστηρίου που υποδεικνύεται στη
συνέχεια
ΠΡΟΣΟΧΗ: αν η επιφάνεια είναι ραγισµένη, σβήστε τη
συσκευή για να αποφευχθεί το ενδεχ*µενο ηλεκτροπληξίας.
Ο∆ΗΓΙΕΣ ΓΙΑ ΤΗΝ ΕΓΚΑΤΑΣΤΑΣΗ
Οι παρούσεσ οδηγίεσ απευθύνονται σε ειδικευµένο τεχνικ
εγκατάστασησ και αποτελούν οδηγ εγκατάστασησ, ρύθµισησ
και συντήρησησ σύµφωνα µε τουσ νµουσ και των ισχυντων
κανονισµών.
Αν ένας εντοιχιζ*µενος φούρνος ή οποιαδήποτε άλλη
συσκευή που παράγει θερµ*τητα πρέπει να µονταριστεί απ’
ευθείας κάτω απ* την υαλοκεραµική επιφάνεια
µαγειρέµατος, ΑΠΑΙΤΕΙΤΑΙ Η ΣΥΣΚΕΥΗ ΑΥΤΗ (φούρνος) ΚΑΙ
Η ΥΑΛΟΚΕΡΑΜΙΚΗ ΕΠΙΦΑΝΕΙΑ ΜΑΓΕΙΡΕΜΑΤΟΣ ΝΑ ΕΙΝΑΙ
ΚΑΤΑΛΛΗΛΑ ΜΟΝΩΜΕΝΕΣ, µε τέτοιο τρ*πο που η
παραγ*µενη θερµ*τητα απ* το φούρνο, µετρηµένη στο δεξί
πλευρ* της επιφάνειας µαγειρέµατος, να µη ξεπερνάει τους
60°C. Η µη τήρηση της προφύλαξης αυτής θα µπορούσε να
επιφέρει την εσφαλµένη λειτουργία του συστήµατος
TOUCHCONTROL.
ΤΟΠΟΘΕΤΗΣΗ (Εικ.1)
Η οικιακή ηλεκτρική συσκευή είναι κατασκευασµένη για να
εντοιχίζεται σε ένα πάγκο εργασίασ, πωσ απεικονίζεται στην
συγκεκριµένη εικνα. Προετοιµάστε µονωτικ υλικ κατά
µήκοσ τησ συνολικήσ περιµέτρου (διαστάσεισ κοπήσ Εικ.1B).
Ασφαλίστε την οικιακή ηλεκτρική συσκευή στην επιφάνεια
εργασίασ µέσω των 4 πείρων που παρέχονται, λαµβάνοντασ
υπψη το πάχοσ τησ επιφάνειασ εργασίασ (Εικ.1A). Εαν το
κατωτερο µεροσ τησ συσκευησ, µετα απο την εγκατασταση,
ειναι προσιτο απο το κατωτερο µεροσ του επιπλου ειναι
αναγκαιο να µονταρισθει ενα διαχωριστικο ταµπλο
διατηροντασ τισ ενδεικτικεσ αποστασεισ (Εικ.1C). Εαν η
εγκατασταση γινεται κατω απο ενα φουρνο αυτο δεν ειναι
αναγκαιο.
ΗΛΕΚΤΡΙΚΕΣ ΣΥΝ∆ΕΣΕΙΣ (Εικ.2)
Πριν εκτελέσετε τισ ηλεκτρικέσ συνδέσεισ βεβαιωθείτε τι:
- το ηλεκτρικ καλώδιο τησ γείωσησ πρέπει να είναι 2 cm
µακρύτερο σε σχέση µε τα άλλα καλώδια
- τα χαρακτηριστικά τησ εγκατάστασησ να είναι τέτοια που
να ικανοποιούν τισ υποδείξεισ τησ πινακίδασ
ταυτοποίησησ που βρίσκεται στο κάτω µέροσ τησ
επιφάνειασ εργασίασ
- η εγκατάσταση να διαθέτει µια αποτελεσµατική γείωση
σύµφωνη µε τουσ κανονισµούσ και τισ διατάξεισ του
ισχύοντοσ νµου.
Η γείωση είναι υποχρεωτική εκ του νµου.
Στην περίπτωση που η οικιακή ηλεκτρική συσκευή δεν
διαθέτει καλώδιο ή/και το αντίστοιχο βύσµα, χρησιµοποιήστε
υλικ κατάλληλο για την απορρφηση που αναφέρεται επί
τησ πινακίδασ ταυτοποίησησ και για τη θερµοκρασία
λειτουργίασ. Σε κανένα σηµείο το καλώδιο δεν πρέπει να
φτάνει σε θερµοκρασία κατά 50°C ανώτερη τησ
θερµοκρασίασ περιβάλλοντοσ.
Αν επιθυµείτε µια απ’ ευθείασ σύνδεση στην ηλεκτρική
γραµµή, θα πρέπει να παρεµβάλλετε έναν διακπτη
διαχωρισµού των φάσεων, µε ελάχιστο άνοιγµα των επαφών
3 mm, κατάλληλο για το φορτίο που αναφέρεται στην
πινακίδα και σύµφωνο µε τουσ ισχύοντεσ κανονισµούσ (ο
κιτρινο-πράσινοσ αγωγσ γείωσησ δεν πρέπει να διακπτεται
απ τον µεταλλάκτη).
Αφού ολοκληρωθεί η εγκατάσταση τησ συσκευήσ, ο
διακπτησ διαχωρισµού φάσεων πρέπει να είναι εύκολα
προσβάσιµοσ.
ΧΡΗΣΗ ΚΑΙ ΣΥΝΤΗΡΗΣΗ
ΣΥΝΤΗΡΗΣΗ
Αποµακρύνετε ενδεχµενα υπολείµµατα τροφήσ και
στίγµατα λίπουσ απ την επιφάνεια µαγειρέµατοσ
χρησιµοποιώντασ το ειδικ φτυαράκι που παρέχεται κατά
παραγγελία (Εικ.4).
Καθαρίστε τη θερµαινµενη επιφάνεια σο καλύτερα
µπορείτε χρησιµοποιώντασ SIDOL, STAHLFIX ή παρµοια
προϊντα και χαρτί κουζίνασ, κατπιν ξεπλύνετε µε νερ και
στεγνώστε µε ένα καθαρ πανί.
Με το ειδικ φτυαράκι (optional) αφαιρέστε αµέσωσ απ τη
θερµαινµενη περιοχή µαγειρέµατοσ κοµµατάκια
αλουµινχαρτου και πλαστικ υλικ που έλιωσε ή
υπολείµµατα ζάχαρησ ή τροφών µε υψηλ περιεχµενο
ζάχαρησ (Εικ.4). Με τον τρπο αυτν αποφεύγεται κάθε
δυνατή ζηµιά στην επιφάνεια µαγειρέµατοσ.
Σε καµία περίπτωση δεν πρέπει να χρησιµοποιούνται σκληρά
σφουγγαράκια ή χηµικά βίαια απορρυπαντικά πωσ spray
φούρνου ή ξελεκιαστικά.
ΧΡΗΣΗ
Εαν η δικησ σασ συσκευη ειναι προδιατεθειµενη ειναι
δυνατον να µειωσουµε την ενεργειακη καταναλωση χαρισ
σε ενα εξυπνο χειρισµο αναφλεξησ και σβησιµο τησ ζωνησ
µαγειρεµατοσ. Ειναι δυνατον να επιλεξουµε την µεγιστη
απορροφουµενη ισχυ σε 4 διαφορετικεσ βαθµιδεσ: 2.4 KW –
3.4 KW – 4.4 KW – Pmax. Η επιφανεια ειναι ρυθµιζοµενη χωρις
κανεαν περιορισµο της ισχυος (Pmax).
- Πολυ Level Power Control (MLP)
Στην φαση τησ εγκαταστασησ, αναλογα µε την διαθεσιµη ισχυ
χρησησ, ειναι δυνατον να καθορισεισ το µεγιστο οριο ισχυοσ
τροφοδοσιασ που ειναι επιθυµητο κατα τον ακολουθο τροπο:
- Ξεµπλοκαρε την επιφανεια ψησιµατοσ κρατοντασ πατηµενο
το “πληκτρο κλειδι” για ε δευτερολεπτα µεχρι να σβησει το
“ενδεικτικο λαµπακι λειδι”.
- Πατησε το πληκτρο “E-plus” για 3 δευτερολεπτα:το display
του ωρολογου θα δειξει την σταθµη τησ ισχυοσ που εχουµαι
επιλεξει µεταξυ εκεινων που υπαρχουν στην διαθεση: 2.4 KW/
3.4 KW/4.4 KW και FULL.
-Πατησε τα πληκτρα (+) η’ (-) για να αλλαξεισ σταθµη.
-Επικυρωσε την επιλογη πατοντασ το πληκτρο “E-plus” µεσα
σε 10 δευτερολεπτα αλλωσ ξαναγυριζει στην αρχικη
κατασταση.
-Λειτουργια “E-PLUS”:
Κατα την διαρκεια του ψησιµου ειναι δυνατον να αυξησεισ
- 25 -
Page 26

την σταθµη ησ µεγιστησ ισχυοσ τροφοδοσιασ περνοντασ απο
την σταθµη που εχεισ εισαγει στην αµεσοσ εποµενη
µεγαλυτερη πατοντασ το πληκτρο “E-plus” µεχρι να αναψει
το σχετικο ενδεικτικο λαµπακι.
Με το σβησιµο τησ επιφανειασ ξαναγυριζουµε στην σταθµη
που εχουµε εισαγει αρχικα.
Προειδοποιησεις: κανονικα η λειτουργια “E-PLUS” πρεπει
να χρησιµοποιηται οταν η µεγιστη ισχυσ του επιπεδου ειναι
µικροτερη απο την διαθεσιµη για την χρηση ισχυ.
-Περιοχη εντολων
-Στην πρωτη αναφλεξη η επιφανεια ψησιµατοσ θα βρεθει
στην θεση ασφαλειασ, δηλαδη το “ενδεικτικο λαµπακι on/off
πληκτρο κλειδι” αναµµενο.
-Για να χρησιµοποιησεισ την επιφανεια ειναι αναγκαιο να
κρατασ πατηµενο το “πληκτρο κλειδι” για 3 δευτερολεπτα
µεχρι να σβησει το “ενδεικτικο λαµπακι on/off πληκτρο
κλειδι”
- Για να αναψεισ το επιθυµητο ηλεκτρικο µατι:
- Πατησε το αντστοιχο πληκτρο on/off. θα φανει το “led” του
“display ζωνη ψησιµατος” να αναβωσβηνει.
- Πατησε µασα σε 10 δευτερολεπτα το πληκτρο - για να πασ
στην 4 θεση η’ το πληκτρο + για να πασ στην θεση 9.
- Για να ρυθµισεισ την θερµοκρασια τησ ζωνησ ψησιµατοσ
ενεργησε µε τα πληκτρα + η’ -
- Εαν το ηλεκτρικο µατι αποτελειται απο πολλεσ ζωνεσ, για
να αναψεισ την δευτερη ζωνη µετατοπισε το “Display της
ζωνης ψησιµατος” στην θεση 9 και πατησε το πληκτρο + για
2 δευτερολεπτα, µεχρι να αναψει το δεκαδικο σηµειο οπωσ
επιβεβαιωνεται.
- Για να σβησεισ το ηλεκτρικοµατι πατησε το σχετικο πληκτρο
on/off.
Σηµειωση: Κατα την διαρκεια τησ λειτουργιασ ειναι δυνατο
να µπλοκαρεισ/ξεµπλοκαρεισ την ζωνη εντολων πατοντασ το
πληκτρο κλειδι για 3 δευτερολεπτα.
- Περιοχη Timer (εικ.5)
Η επιφανεια εχει την δυνατοτητα να ρυθµιζει ταυτοχρονα
το timer σε καθε µια απο τισ ζωνεσ ψησιµατοσ.
Το timer ειναι µια λειτουργια που επιτρεπει να ορισεισ εναν
χρονο (απο 1 µεχρι 99 λεπτα) για το αυτοµατο σβησιµο τησ
επιλεγοµενησ ζωνησ ψησιµατοσ.
- Συνεχιζοντασ να πατασ το πληκτρο “Timer” για 2
δευτερολεπτα το display θα δειξει “00” στο κεντρο και θα
δειξει ποιο στοιχειο ειναι ενεργοποιηµενο στην δεξια και
αριστερα πλευρα.
- Πατησε (+) η’ (-) για να επιλεξεισ την τιµη “Timer”.
Σηµειωση:
- Εαν η λειτουργια “Timer” εχει ρυθµιστει για περισσοτερεσ
απο µια ζωνη ψησιµατοσ, το “Display Timer” θα δειχνει καθε
3 δευτερολεπτα τον χρονο που µενει για καθε
προγαµµατισµενη ζωνη.
- Για να ακυρωσεισ την λειτουργια “Timer”,σβησε την σχετικη
ζωνη ψησιµατοσ.
- Λειτουργια “MEMORY”
Αυτη η λειτουργια επιτρεπει τον προγραµµατισµο και την
εκτελεση
ενοσ κυκλου ψησιµατοσ σε καθε θερµενοµενο στοιχειο.
Σηµειωσεις:
- Ειναι δυνατον να εκτελεσεις καθε φορα ενα κυκλο σε
εγγραφη η’ σε εκτελεση.
- Οι µεταβολεσ τησ σταθµησ τησ ισχυοσ για χρονουσ
µικροτερουσ
των 15 δευτερολεπτων δεν ειναι εγγραφοµενεσ.
- Μπορει να µνηµονευθει ενασ κυκλοσ ψησιµατοσ τησ
µεγιστησ διαρκειασ των 10 ωρων και ενα µεγιστο των 10
µεταβολων τησ σταθµησ τησ ισχυοσ.
- Μνηµονευση ενος κυκλου ψησιµατος:
- Πατησε το πληκτρο “Memory” και µετα επελεξε το
επιθυµητο ηλεκτρικο µατι δια µεσου του σχετικου πληκτρου
του 2on/OFF”.
- Πατησε τα πληκτρα (+) η’ (-) µεχρι να επιλεξεισ την
επιθυµητη ισχυ.
- Για να βαλεισ τερµα στον κυκλο τησ µνηµονευσησ πατησε
το πληκτρο “ON/OFF”.
Εκτελεση ενος κυκλου ψησιµατος:
- Για να εκτελεσεισ ενα κυκλο ψησιµατοσ ηδη µνηµονευµενο
ειναι αρκετο να πατησεισ το πληκτρο “ON/OFF” τησ
ενδιαφερουσασ ζωνησ ψησιµατοσ και µετα το πληκτρο
“Memory”.
- Display:
Η επιφανεια ψησιµατοσ ειναι εφοδιασµενει απο ενα display
και σε κανονικεσ συνθηκεσ λειτουργιασ ειναι ενα “ωρολογιο”
και επιπλεον µπορει να λειτουργησει και σαν “COUNT-
DOWN” οταν η επιφανεια ειναι σβηστη.
Ρυθµιση ωρολογιου:
Στην φαση τησ εγκαταστασησ ρυθµισε την ωρα κατα τον
ακολουθο τροπο:
- Ξεµπλοκαρισε την επιφανεια ψησιµατοσ πατοντασ το
“πληκτρο κλειδι” για 3 δευτερολεπτα µεχρι να σβησει το “
ενδεικτικο φωτεινο λαµπακι κλειδι”.
- Πατησε συγχρονωσ τα πληκτρα (+) και (-) κατω απο το display
µεχρι που αυτο το ιδιο θα αρχισει να αναβωσβηνει.
- Πατησε (+) η’ (-) για να ρυθµισεισ την επιθυµητη ωρα.
- Πατησε το πληκτρο “Timer” για να επικυρωσεισ την επιλογη.
-Λειτουργια Count-Down:
- Ξεµπλοκαρε την επιφανεια ψησιµατοσ κρατοντασ πατηµενο
το “πληκτρο κλειδι” για 3 δευτερολεπτα µεχρι να σβησει το
“ενδεικτικο φωτεινο λαµπακι”.
- Πατησε το πληκτρο “Timer” µεχρι να εµφανιστει το “00”
στο display.
- Πατησε (+) η’ (-) για να επιλεξεισ τον αριθµο των λεπτων.
- Πατησε το πληκτρο “Timer” για να επικυρωσεισ την επιλογη.
Αφου τελειωσει η ρυθµιση του χρονου θα ενεργοποιηθει ενα
ακουστικο σηµα.
Συστηµατα Ασφαλειας
1. Σε περιπτωση που ενα αντικειµενο τοποθετηθει επανω στισ
εντολεσ, η επιφανεια ψησιµατοσ θα σβησει και θα εισαχθει
αυτοµατα το κλεδι πηγαινοντασ στην αυτοπροστασια, αυτο
θα συµβει και σε περιπτωση που χυθουν υγρα (νερο, γαλα,
κ.λ.π.) επανω στην ζωνη εντολων.
2. Το ταµπλο µε τα πληκτρα εντολων εχει εσωτερικα εναν
ηλεκτρινικο µηχανισµο θερµοκρασιασ και, σε περιπτωση που
η εσωτερικη θερµοκρασια φθασει τουσ 90° ( οχι κανονικεσ
συνθηκεσ χρησησ τησ επιφανειασ χωρισ χυτρεσ ) αυτοµατα
η επιφανεια µπαινει σε ενα συστηµα αυτοµατου περιορισµου
τησ θερµοκρασιασ: σβηνοντασ αυτοµατα.
ΠΡΟΣΟΧΗ: σε περιπτωση που µια ζωνη ψησιµατοσ θα
σβησει,η δικη τησ επιφανεια εχει µια θερµοκρασια πολυ
µεγαλη και επικινδυνη.
Αυτη η επικινδυνοτητα φαινεται απο το γεγονοσ οτι το
“display τησ ζωνησ ψησιµατοσ” θα αναβωσβηνει µεχρι που η
θερµοκρασια τησ επιφανειασ θα πεσει κατω απο τουσ 50°C.
-Προειδοποιησεις:
Οταν η επιφανεια ψησιµατοσ χρησιµοποιηται µε περιορισµο
ισχυοσ (σταθµη ισχυοσ 2,4 / 3,4 / 4,4 ) ειναι δυνατον να εχουµε
την ακολουθη λειτουργια για να εγγυηθει η σταθµη τησ
µεγιστησ ισχυοσ τροφοδοσιασ που εχει προκαθοριστει:
Α) Αφου εχεισ αναψει ορισµενεσ ζωνεσ ψησιµατοσ στην max
ισχυ (θεση 9) η επιφανεια µπορει, να µην δεχθει το αναµµα
µια αλλησ “ζωνης ψησιµατος” µε ενα ακουστικο σηµα.
Η’, να αναψει την εποµενη ζωνη ψησιµατοσ µε µια τιµη
θερµοκρασιασ διαφορετικη απο την επιθυµητη.
Β) Οταν εχουµε ορισµενεσ ζωνεσ ψησιµατοσ αναµµενεσ και
επιθυµουµενα αυξησουµε την τιµη τησ θερµοκρασιασ η
επιφανεια µπορει να δεχθει την αυξηση µε ενα ακουστικο
σηµα.
C) Επειτα απο το αναµµα µερικων ζωνων ψησιµατοσ σε µια
ενδιαµεση τιµη τησ θερµοκρασιασ την στιγµη που θελουµαι
να αναψουµαι καποια αλλη ζωνη επιβεβαιωνουµε οτι, η ζωνη
θα αναψει µε µια καθυστερηση καποιου δευτερολεπτου.
∆ΕΝ ΑΝΑΛΑΜΒΑΝΟΥΜΕ ΕΥΘΥΝΕΣ ΓΙΑ ΤΥΧΩΝ ΖΗΜΙΕΣ ΠΟΥ
ΠΡΟΚΑΛΟΥΝΤΑΙ ΑΠΟ ΤΗΝ ΜΗ ΤΗΡΗΣΗ ΤΩΝ ΣΥΜΒΟΥΛΩΝ
ΠΟΥ ΠΡΟΑΝΑΦΕΡΘΗΚΑΝ.
- 26 -
Page 27

РУССКИЙ
ОБЩИЕ СВЕДЕНИЯ
Внимательно прочтите настоящие инструкции, так как в них
даются важные указания по безопасности установки,
эксплуатации и техобслуживания.
Храните это руководство для консультации с ним в
дальнейшем. Все операции по монтажу (электросоединения)
должны выполняться квалифицированным персоналом в
соответствии с действующими нормами.
ПРЕДУПРЕЖДЕНИЯ ПО ТЕХНИКЕ
БЕЗОПАСНОСТИ
Рекомендуется пользоваться посудой с плоским дном и
диаметром, равным или слегка превышающим зону нагрева.
Не пользуйтесь посудой с шершавым дном, так как она может
поцарапать термопанель (Рис.3).
Детям и лицам, нуждающимся в надзоре, запрещается
пользоваться данным электроприбором. Следите, чтобы дети
не играли с плитой.
ВАЖНО
- предотвращайте выплескивание жидкости, вовремя
убавляя мощность нагрева при закипании или разогреве
жидкостей
- не оставляйте нагреватели включенными без посуды или
со стоящими на них пустыми кастрюлями и сковородками
- закончив приготовление пищи, выключите сопротивление
по процедуре, описанной далее
ВНИМАНИЕ: Если панель накренилась, отключите прибор
во избежание поражения электротоком.
ИНСТРУКЦИИ ПО УСТАНОВКЕ
Данное руководство предназначено для квалифицированного
монтажника, в нем даются указания по монтажу, регулировке
и обслуживанию в соответствии с действующим
законодательством и нормами.
Если прямо под электроплитой из стеклокерамики
устанавливается встроенная духовка или иные
теплоизлучающие приборы, то НЕОБХОДИМО
ПРАВИЛЬНО ИЗОЛИРОВАТЬ ЭТИ ПРИБОРЫ (духовку) ОТ
ПАНЕЛИ ИЗ СТЕКЛОКЕРАМИКИ. Тепло, образуемое
духовкой, при замере на правой стороне панели не
должно превышать 60°C. Несоблюдение данной
предосторожности может привести к сбоям в работе
системы СЕНСОРНОГО УПРАВЛЕНИЯ TOUCHCONTROL.
РАЗМЕЩЕНИЕ (Рис.1)
Электроприбор предназначен для встраивания в рабочую
поверхность, как показано на отдельном рисунке. Нанесите
герметик по всему периметру (размеры для резки Рис.1B).
Закрепите электроприбор на рабочей поверхности 4
кронштейнами, входящими в комплект поставки; учитывайте
толщину рабочей поверхности (Рис.1A). Если нижняя сторона
прибора доступна, после установки, с нижней стороны шкафа,
то необходимо смонтировать разделительную панель, при
соблюдении указанных размеров (Рис.1С). В этом нет
необходимости, если прибор устанавливается под духовкой.
ЭЛЕКТРОСОЕДИНЕНИЯ (Рис.2)
Перед выполнением электросоединений проверьте
следующее:
- электрокабель заземления должен быть на 2 см длиннее
других кабелей;
- характеристики электросистемы должны соответствовать
указаниям на табличке, закрепленной на нижней стороне
рабочей поверхности;
- электросистема должна быть оснащена исправным
заземлением, отвечающим требованиям действующих
норм и законов.
Заземление обязательно по закону.
Если электроприбор не имеет кабеля и/или штепселя,
используйте детали, которые соответствуют значениям по
потреблению энергии, указанным на табличке, и рабочей
температуре. Ни в какой точке электрокабель не должен
нагреваться до температуры, превышающей температуру
окружающей среды более, чем на 50°C.
Если нужно выполнить прямое подключение к электросети,
необходимо между прибором и сетью установить всеполюсный
выключатель с минимальным расстоянием в 3 мм между
контактами. Этот выключатель должен выдерживать нагрузку,
указанную на табличке, и соответствовать действующим
нормам (заземляющий желто/зеленый проводник
прерывается переключателем).
После окончания монтажа прибора всеполюсный выключатель
должен находиться в легкодоступном месте.
ЭКСПЛУАТАЦИЯ И УХОД
УХОД
Удалите остатки пищи и брызги жира с поверхности панели,
для этого пользуйтесь скребком, поставляемым по заказу
(Рис.4). Хорошо очистите зону нагрева с помощью SIDOL,
STAHLFIX или аналогичных средств и тряпки для уборки,
затем прополощите водой и вытрите чистой салфеткой.
Специальным скребком (по отдельному заказу) можно легко
и моментально удалить с нагреваемого участка остатки
алюминиевой фольги и пластика, которые случайно попали
на зону нагрева и расплавились, или остатки сахара и
продуктов с высоким содержанием сахара (Рис.4). Это
поможет избежать повреждения термопанели. Ни в коем
случае нельзя пользоваться абразивными губками или едкими
химическими чистящими средствами, например, аэрозолями
для чистки духовки или пятновыводителями.
ПОЛЬЗОВАНИЕ
Если Ваш прибор надлежаще подготовлен, то можно
оптимизировать расход энергии путем интеллектуального
управления циклом включения и выключения зон нагрева.В
частности, можно задавать наибольшую потребляемую
мощность на 4 различных уровня: 2.4 кВт – 3.4 кВт – 4.4 кВт –
“Pmax”. Плита настроена без какого-либо ограничения
мощности (“Pmax”).
Многоуровневое регулирование мощности (“Multi Level
Power Control”)
На фазе установки, в зависимости от располагаемой
потребителем мощности можно задавать максимальную
потребляемую мощность следующим образом:
- Разблокируйте плиту нажатием “общего выключателя” на
3 секунды, пока не гаснет “светодиод общего
выключателя”.
- Нажмите клавишу “E-plus” на 3 секунды: индикатор часов
покажет заданный уровень мощности из 4-х имеющихся в
распоряжении: 2.4 кВт/3.4 кВт/4.4 кВт и ПОЛНАЯ (FULL).
- Нажмите клавиши (+) или (-) для изменения уровня
мощности.
- Введите набранный уровень нажатием клавиши “E-plus” до
истечения 10 секунд; в противном случае имеет место возврат
в исходное состояние.
Функция “E-PLUS”
В процессе варки можно увеличить уровень максимальной
потребляемой мощности и тем самым перейдти к следющему
уровню нажатием клавиши “E-PLUS”, пока не зажжется
соответствующий светодиод.
При выключении плиты имеет место возврат к ранее
набранному уровню.
- 27 -
Page 28

Примечание: Функция “E-PLUS” используется обычно, когда
максимальная потребляемая мощность плиты ниже мощности,
располагаемой потребителем.
Функция управления
- При первом включении плита будет находиться в запасном
режиме, т.е. зажжен “Светодиод Вкл/Выкл общего
выключателя”.
- Для пользования плитой, нажмите “общий выключатель”
на 3 секунды, пока не гаснет “Светодиод Вкл/Выкл общего
выключателя”.
- Для включения желаемой конфорки:
- нажмите соответствующую клавишу Вкл/Выкл. Светодиод
“Индикатора зоны нагрева” начнет мигать.
- нажмите клавишу до истечения 10 сек – чтобы перейти к
положению 4, или клавишу “+” “–” чтобы перейти к положению
9.
- Для регулировки температуры зоны нагрева действуйте на
клавиши “+” или “-”.
- Если плита снабжена расширяемой зоной нагрева, то для
включения второй зоны переведите “индикатор зоны
нагрева” в положение 9 и нажмите клавишу “+” на 2 сек, пока
не зажжется светоиндикатор десятидиодного ряда, в
соответствии со вводом.
- Для выключения плиты нажмите соответствующую клавишу
Вкл/Выкл.
Примечание: В процессе работы возможно заблокировать/
разблокировать функцию управления нажатием общего
выключателя на 3 секунды.
Функция “Таймер” (Рис. 5)
Плита дает возможность настраивать таймер одновременно
на каждую зону нагрева.
Функция таймера позволяет зафиксировать выдержку
времени (в интервале с 1 по 99 минут) на автоматическое
выключение заданной зоны нагрева.
- Нажмите клавишу “Таймер” на 2 секунды: индикатор
покажет в середине “00”, что дает знать о том, какой
нагревательный элемент активирован справа и слева.
- Продолжав нажатие клавиши “Таймер”, выберите среди
активированных желаемую конфорку.
- Нажмите клавишу (+) или (-), чтобы задать значение
выдержки времени.
Примечание:
- Если функция “Таймер” была задана более чем на 1 зону
нагрева, “Индикатор Таймера” через каждые 3 секунды будет
показывать оставшееся время на каждую
запрограммированную зону.
- Для отмены функции “Таймер”, выключите
соответствующую зону нагрева.
Функция “ПАМЯТИ” (Memory)
Данная функция позволяет запрограммировать и выполнить
один цикл варки на каждый нагревательный элемент.
Примечания:
- Можно выполнить каждый раз по-одному циклу в
режиме запоминания или выполнения.
- Изменения уровния мощности продолжительностью ниже 15
сек не заносятся.
- Можно занести в память один цикл варки наибольшей
продолжительностью 10 часов и с 10-ю изменениями уровня
мощности максимально.
Запоминание одного цикла варки:
- Нажмите клавишу “Memory”, затем наберите желаемую
конфорку при помощи соответствующей клавиши “ON/OFF”.
- Нажмите клавиши (+) или (-), чтобы задать желаемую
мощность.
- Для завершения цикла запоминания нажмите вновь клавишу
“ON/OFF”.
Выполнение одного цикла варки:
- Для выполнения одного цикла варки, уже внесенную в
память, достаточно нажать клавишу “ON/OFF”
соответствующей зоны нагрева и вслед за этим клавишу
“Memory”.
Индикатор:
Плита снабжена индикатором, выполняющим, в нормальном
режиме, функцию “ЧАСОВ”, а также функцию “ОБРАТНОГО
СЧЕТЧИКА”, когда плита выключена.
Настройка часов:
На фазе установки отрегулируйте время следующим образом:
- Разблокируйте плиту нажатием “общего выключателя” на
3 секунды, пока не гаснет “светодиод общего
выключателя”.
- Нажмите одновременно клавиши (+) и (-) под индикатором,
пока последний не начнет мигать.
- Нажмите (+) или (-) для настройки желаемого времени.
- Внесите заданное время нажатием клавиши “Таймер”.
Функции обратного счетчика:
- Разблокируйте плиту нажатием “общего выключателя” на
3 секунды, пока не гаснет “светодиод общего
выключателя”.
- Нажмите клавишу “Таймер”, пока на индикаторе не появится
надпись “00”.
- Нажатием (+) или (-), наберите число минут.
- Внесите заданное число минут нажатием клавиши “Таймер”.
По истечении заданного времени сработает акустический
сигнал.
Системы безопасности
1. Если какой-либо предмет попадает на клавиши управления,
соответствующая зона нагрева выключится и автоматически
сработает общий выключатель, перейдя в режим самозащиты;
это произойдет также в случае вытекания жидкостей (воды,
молока, и т.д.) и их попадания в зону управления.
2. Клавишная панель управления имеет встроенный датчик
температуры, благодаря которому если внутренняя
температура достигнет 90є С (аномальные условия
пользования плитой без посуды) плита переводится в режим
автоматического ограничения мощности, автоматически
выключаясь.
ВНИМАНИЕ! После того, как она выключена, зона нагрева
продолжает иметь крайне высокую, опаснейшую температуру.
Об этой опасности дает знать мигание “индикатора зоны
нагрева”, пока температура на ее поверхности не будет ниже
50°C.
Общие сведения
При использовании плиты в режиме ограничения мощности
(уровни мощности 2,4 / 3,4 / 4,4), для обеспечения заданного
уровня наибольшей потребляемой мощности могут иметь
место следующие ситуации:
А) После того, как Вы включили несколько зон нагрева на
наиб. мощность, может произойти отказ в принятии команды
включения одной дополнительной зоны нагрева, с выдачей
акустического сигнала.
Или же, отказ в принятии команды на включение следующей
зоны нагрева на значение температуры, отличное от
желаемого.
B) Если некоторые зоны нагрева включены и Вы хотите
увеличить значение температуры, то может произойти отказ
в принятии команды наращивания температуры, с выдачей
акустического сигнала.
C) После того, как Вы включили несколько зон нагрева на
среднее значение температуры, то в момент включения одной
дополнительной зоны нагрева может произойти задержка на
несколько секунд в включении данной зоны нагрева.
ФИРМА НЕ НЕСЕТ НИКАКОЙ ОТВЕТСТВЕННОСТИ ЗА
УШЕРБ, ВЫЗВАННЫЙ НЕСОБЛЮДЕНИЕМ
ВЫШЕПРИВЕДЕННЫХ ПРЕДУПРЕЖДЕНИЙ.
- 28 -
Page 29

POLSKI
WSTĘP
Należy dokładnie zapoznać się z treścią niniejszej instrukcji, która
zawiera ważne informacje dotyczące bezpieczeństwa instalacji,
użytkowania i dokonywania napraw urządzenia.
Instrukcję należy zachować do wykorzystania w przyszłości.
Wszystkie prace związane z instalacją (połączenia elektryczne)
powinny zostać wykonane przez uprawniony, wykwalifikowany
personel, zgodnie z obowiązującymi przepisami.
INFORMACJE DOTYCZĄCE BEZPIECZEŃSTWA
Zaleca się używanie naczyń o płaskim dnie, o średnicy równej lub
nieznacznie większej od powierzchni nagrzewanej. Nie należy
używać naczyń o szorstkim dnie, które mogłyby spowodować
zarysowanie powierzchni termicznej urządzenia (rys. 3).
Urządzenie nie powinno być wykorzystywane przez dzieci lub
osoby, które wymagają specjalnej opieki. Nigdy nie należy
zezwalać, aby dzieci bawiły się urządzeniem.
UWAGA
- należy unikać przelewania się płynów - przy podgrzewaniu lub
gotowaniu płynów należy odpowiednio zmniejszyć dopływ
ciepła
- nie pozostawiać na rozgrzanym i włączonym urządzeniu naczyń
pustych. Nie należy także pozostawiać urządzenia włączonego
bez żadnych naczyń
- po zakończeniu gotowania należy wyłączyć urządzenie za
pomocą przełącznika, o którym mowa poniżej
UWAGA: Urządzenie nie powinno być wykorzystywane, jeżeli
powierzchnia grzewcza została uszkodzona - może to
spowodować porażenie prądem elektrycznym.
ZALECENIA DOTYCZĄCE INSTALACJI
Zalecenia te przeznaczone są dla wykwalifikowanego pracownika,
odpowiedzialnego za montaż, regulację lub naprawy urządzenia
zgodnie z obowiązującymi przepisami.
Jeżeli pod płytą grzewczą z elementów szklanych i
ceramicznych ma zostać zainstalowany piekarnik, PIEKARNIK
oraz PŁYTA GRZEWCZA MUSZĄ POSIADAĆ ODPOWIEDNIĄ
IZOLACJĘ, tak aby temperatura pochodząca od piekarnika,
mierzona na bocznej dolnej ściance płyty grzewczej nie
przekraczała 60°C. W przeciwnym wypadku system sterujący
TOUCHCONTROL może ulec uszkodzeniu.
MONTAŻ (rys.1)
Urządzenie przeznaczone jest do umieszczenia w zabudowie
kuchennej, zgodnie z poniższymi ilustracjami. Wzdłuż całego
obwodu urządzenia należy założyć uszczelkę (wymiary - patrz
rys.1B). Przymocować urządzenie do zabudowy kuchennej za
pomocą 4 dostarczonych elementów, biorąc pod uwagę grubość
płyty kuchennej (rys.1A). Jeżeli po zakończeniu instalacji możliwy
jest dostęp do dolnej części urządzenia od dolnej części szafki, to
należy zamontować panel oddzielający, w odległości podanej na
rys. 1C. Nie jest to wymagane, jeżeli urządzenie instalowane jest
pod piekarnikiem.
POŁĄCZENIA ELEKTRYCZNE (rys.2)
Przed przystąpieniem do wykonywania połączeń elektrycznych
należy upewnić się, że:
- przewód uziemiający jest o 2 cm dłuższy od pozostałych
przewodów;
- parametry sieci elektrycznej odpowiadają parametrom
wymienionym na tabliczce znamionowej znajdującej się na
dolnej stronie płyty;
- urządzenie może zostać uziemione zgodnie z obowiązującymi
normami i przepisami.
Zgodnie z obowiązującymi przepisami wykonanie uziemienia jest
obowiązkowe.
W przypadku, jeżeli urządzenie nie posiada przewodu i/lub
odpowiedniej wtyczki, należy wykorzystać elementy zgodne z
parametrami określonymi na tabliczce znamionowej oraz
temperaturą roboczą urządzenia. Temperatura przewodu nie może
w żadnym przypadku przekraczać o 50oC temperatury otoczenia.
Jeżeli wykonywane jest bezpośrednie podłączenie do sieci
elektrycznej, należy wykorzystać wyłącznik jednobiegunowy, o
minimalnej odległości styków wynoszącej 3 mm, zgodny z
parametrami określonymi na tabliczce znamionowej oraz
obowiązującymi normami (żółto-zielony kabel uziemiający nie może
być wyposażony w żaden przełącznik).
Należy pamiętać, że po zakończeniu instalacji wyłącznik
jednobiegunowy musi być łatwo dostępny.
UŻYTKOWANIE I NAPRAWY
NAPRAWY
Z płyty grzewczej należy usunąć jakiekolwiek pozostałości
pożywienia lub tłuszczu, wykorzystując w tym celu specjalny
skrobak dostarczany na zamówienie (rys.4). Wyczyścić
powierzchnię grzewczą używając produktów takich jak SIDOL,
STAHLFIX lub podobne oraz miękkiej ściereczki, następnie umyć
wodą i wytrzeć czystą ścierką. Za pomocą specjalnego skrobaka
(dostarczanego na życzenie) usunąć z powierzchni grzewczej
wszelkie pozostałości folii aluminiowych lub tworzyw sztucznych,
cukru lub produktów o dużej zawartości cukru (rys.4). Pozwala to
uniknąć jakichkolwiek dalszych uszkodzeń powierzchni grzewczej.
W żadnym wypadku nie wolno używać materiałów ściernych lub
produktów chemicznych w sprayu ani wywabiaczy plam.
UŻYWANIE
Jeżeli Wasze urządzenie zostało do tego przystosowane, to można
zoptymalizować zużycie energii poprzez racjonalne używanie
kuchenki. Można więc nastawić 4 różne poziomy maksymalnej mocy
pobieranej: 2.4 KW - 3.4 KW - 4.4 KW - Pmax. Płyta kuchenna nie
posiada ograniczenia mocy (Pmax).
Ustawienie mocy wielopoziomowej - Multi Level Power Control
(MLP)
W zależności od mocy do dyspozycjij, przy instalacji urządzenia
można ustawić żądany poziom maksymalnej mocy pobieranej. Aby
wykonać taką operację, należy postępować następująco:
- Odblokować płytę kuchenną trzymając naciśnięty “klawisz
kluczykowy” przez 3 sekundy, aż zgaśnie dioda
- Nacisnąć i trzymać przycisk “E-plus” przez 3 sekundy: na
wyświetlaczu zegara pojawi się poziom mocy, który został
ustawiony jeden z podanych niżej: 2.4 KW/3.4 KW/4.4 KW i FULL.
- Nacisnąć klawisze (+) lub (-), aby zmienić poziom mocy.
- Potwierdzić wybór naciskając przed upływem 10 sekund klawisz
“E-plus”; w przeciwnym razie nastąpi powrót do stanu
wyjściowego.
Funkcja “E-PLUS” :
W czasie gotowania można zwiększyć poziom maksymalnej mocy
pochłanianej, przechodząc z poziomu ustawionego do wyższego.
Aby wykonać taką operację, należy nacisnąć klawisz “E-PLUS” i
trzymać aż do zapalenia się diody.
Po wyłączeniu płyty kuchennej nastąpi powrót do poziomu
wyjściowego.
Panel sterowniczy
- Przy pierwszym włączeniu płyta kuchenna będzie się znajdowała
w pozycji zabezpieczonej, czyli dioda wyłącznika kluczykowego
on/off” będzie zapalona.
- Aby używać płytę, należy nacisnąć “wyłącznik kluczykowy” i
trzymać przez 3 sekundy, aż zgaśnie dioda przy klawiszu
kluczykowym on/off”
- Aby włączyć dany palnik należy:
- nacisnąć odpowiedni przycisk on/off. Na wyświetlaczu pojawi
- 29 -
Page 30

się migająca dioda, sygnalizująca, że dany palnik jest włączony.
- przed upływem 10 sekund nacisnąć klawisz - aby przejść do
pozycji 4 lub klawisz + aby przejść do pozycji 9.
- Aby regulować temperaturę palnika, należy posługiwać się
klawiszami + lub -.
- Jeżeli płyta wyposażona jest w dodatkowy obszar, wtedy, aby
włączyć taki obszar należy na wyświetlaczu przejść do pozycji 9,
po czym nacisnąć klawisz - przez 2 sekundy, aż pojawi się wartość
dziesiętna.
- Aby wyłączyć płytę, należy nacisnąć odpowiedni klawisz on/off.
NOTKA: Podczas funkcjonowania płyty, można zablokować /
odblokować panel sterowniczy, naciskając przez 3 sekundy klawisz
kluczykowy.
Regulator czasu “Timer” (rys. 5)
Płyta posiada funkcję, która umożliwia ustawienie czasu włączenia
jednocześnie kilku palników.
Regulator czasu jest to funkcja, pozwalająca na ustawienie czasu
(od 1 do 99 minut), po którym nastąpi automatyczne wyłączenie
wybranego palnika.
- nacisnąć klawisz “Timer” (Regulator czasu) i trzymać przez 2
sekundy: w środkowej części wyświetlacza pojawi się wartość
“00” a z lewej i prawej strony wyświetlacza sygnalizowany będzie
włączony palnik.
- Ponownie naciskając klawisz “Timer” (Regulator czasu) można
zmienić czas włączenia danego palnika.
- Aby wybrać wartość “Timer” (Regulator czasu), należy nacisnąć
klawisz (+) lub (-).
Notka:
- Jeżeli funkcja Regulatora została ustawiona dla kilku palników,
wtedy na “wyświetlaczu regulatora” co trzy sekundy pojawi się
informacja, dotycząca pozostałego zaprogramowanego czasu
włączenia palnika.
- Aby wyłączyć funkcję “Timer” (Regulator czasu), należy
wyłączyć odpowiedni palnik.
Funkcja “PAMIĘCI” - “MEMORY”
Taka funkcja pozwala na programowanie i realizację cyklu
gotowania za pośrednictwem elementów grzejnych.
Notki:
- Cykl gotowania może być wykonywany poprzez rejestrację
lub realizację.
- Przy cyklu krótszym niż 15 sekund, zmiany poziomu mocy
pobieranej nie będą rejestrowane.
- Można rejestrować cykl gotowania, którego maksymalny czas
trwania wynosi 10 godzin i w którym nie zachodzi więcej niż 10
zmian poziomów pobierania mocy.
Rejestrowanie cyklu gotowania:
- Nacisnąć klawisz “Memory” (“Pamięć), po czym wybrać żądany
palnik za pośrednictwem odpowiedniego klawisza “ON/OFF”.
- Za pomocą klawiszy (+) lub (-) wybrać żądaną moc.
- Aby zakończyćń rejestrację cyklu, ponownie nacisnąć klawisz
“ON/OFF”.
Realizacja cyklu gotowania:
- Aby zrealizować zarejestrowany cykl gotowania, wystarczy
nacisnąć klawisz “ON/OFF” danego palnika, po czym nacisnąć
klawisz “Memory” ” (“Pamięć).
Wyświetlacz:
Płyta kuchenna wyposażona jest w wyświetlacz, który normalnie
spełnia funkcję “ZEGARA” lub jeżeli płyta jest wyłączona, może
spełniać funkcję LICZNIKA CZASU (“COUNT-DOWN”).
Regulacja zagara:
Aby ustawić godzinę, przy instalacji urządzenia należy:
- Odblokować płytę kuchenną, naciskając “klawisz kluczykowy”
przez 3 sekundy aż do wyłączenia diody.
- Nacisnąć jednocześnie klawisze (+) i (-) znajdujące się pod
wyświetlaczem, aż klawisz kluczykowy zacznie migać.
- Nacisnąć (+) lub (-) aby ustawić żądaną godinę.
- nacisnąć klawisz “Timer” (“Regulator czasu”), aby potwierdzić
wybór.
Funkcje Licznika czasu (Count-Down):
- Odblokować płytę kuchenną naciskając “klawisz kluczykowy”
przez 3 sekundy, aż do wyłączenia diody
- Nacisnąć klawisz “Timer” (“Regulator czasu”), aż na
wyświetlaczu pojawi się napis “00”.
- Nacisnąć (+) lub (-), aby ustawić czas w minutach.
- Nacisnąć klawisz “Timer”, aby potwierdzić wybór.
Po upływie ustawionego czasu, włączy się sygnalizator akustyczny.
Systemy bezpieczeństwa
1. W wypadku, że jakiś przedmiot zostanie umieszczony na panelu
sterowniczym, to płyta kuchenna zostanie wyłączona i
automatycznie włączy się system zabezpieczający. Również w
wypadku, że na panel dostanie się płyn (mleko, woda itd.) włączy
się wyżej wymieniony system zabezpieczający.
2. Klawiatura wyposażona jest w wewnętrzny czujnik temperatury.
W wypadku, że temperatura wewnętrzna osiągnie 90°(w warunkach
użytkowania płyty bez garnków), wtedy nastąpi automatyczne
ograniczenie temperatury, przez wyłączenie płyty.
UWAGA: po wyłączeniu, palnik zachowuje przez jakiś czas wysoką
temperaturę, stając się niebezpiecznym.
Taki stan niebezpieczny będzie sygnalizowany na wyświetlaczu
przez zapalenie się migającego sygnalizatora przy odpowiednim
palniku, do momentu obniżenia się temperatury do 50°C.
Ostrzeżenia:
Kiedy płyta używana jest z ograniczeniem mocy (poziom mocy 2,4
/ 3,4 / 4,4) będzie mogła funkcjonować w następujący sposób, aby
umożliwić ustalony maksymalny pobór mocy:
A) Po włączeniu kilku palników na maksymalną moc (poz.9) płyta
może nie zaakceptować włączenia dodatkowego “ Palnika”. Będzie
to sygnalizowane sygnałem akustycznym.
Sygnalizowane będzie również włączenie następnego palnika na
temperaturę różną od wartości wymaganej.
B) Jeżeli po włączeniu kilku palników zamierzamy podnieść ich
temperaturę, to płyta może tego nie zaakceptować. Będzie to
sygnalizowane sygnałem akustycznym.
C) Po włączeniu niektórych palników na średnią temperaturę, w
chwili kiedy włączy się dodatkowy palnik, jego włączenie nastąpi z
opóźnieniem kilku sekund.
DOSTAWCA UCHYLA SIĘ OD WSZELKIEJ ODPOWIEDZIALNOŚCI
ZA EWENTUALNE USTERKI, SPOWODOWANE
NIEPRZESTRZEGANIEM WYŻEJ WYMIENIONYCH WSKAZÓWEK.
- 30 -
Page 31

ČESKÁ VERZE
POLSCPOLSC
VŠEOBECNĚ
Přečtěte si pečlivě obsah tohoto návodu, neboť přináší důležité
údaje týkající se bezpečné instalace, použití a údržby.
Uschovejte si návod pro případné budoucí konzultace. Všechny
činnosti týkající se instalace (elektrická připojení), musí být
vykonány pouze specializovaným personálem v souladu s platnými
normami.
BEZPEČNOSTNÍ UPOZORNĚNÍ
Doporučujeme použití hrnců s plochým dnem a s průměrem, který
je stejný nebo o něco větší, než průměr ohřívací plochy.
Nepoužívejte nádobí s drsným povrchem dna, aby nedošlo
k poškrábání termického povrchu varné desky (obr.3).
není vhodné, aby tento spotřebič používaly děti nebo osoby
vyžadující dohled. Dejte pozor, aby si děti nehrály se spotřebičem.
DŮLEŽITÉ
- vyhně se únikům tekutin, při vaření a ohřívání tekutin proto
snižte výkon ohřevu
- nenechávejte nažhavené plotny zapnuty, nachází-li se na nich
prázdné hrnce nebo pánve, nebo když na nich nic nestojí
- po ukončení vaření vypněte příslušný ohřívací odpor dále
uvedeným ovládacím prvkem
POZOR: je-li povrch nahnutý, vypněte spotřebič, aby se
zabránilo nebezpečí elektrického výboje.
NÁVOD NA INSTALACI
Tyto instrukce jsou určeny specializovaným instalatérům a
představují návod na instalaci a údržbu v souladu s platnými
normami.
Pokud zasouvací trouba nebo jakýkoliv jiný spotřebič
vydávající teplo musí být namontovaný přímo pod
sklokeramickou varnou desku, JE NEZBYTNÉ, ABY TENTO
SPOTŘEBIČ (trouba) A SKLOKERAMICKÁ VARNÁ DESKA
BYLY ODPOVÍDAJÍCÍM ZPŮSOBEM ODIZOLOVÁNY tak, aby
teplo vydávané troubou, měřeno z pravé strany při okraji varné
desky, nepřesáhlo 60°C. Nedodržení tohoto opatření může
mít za příčinu závadu na fungování systému TOUCHCONTROL.
UMÍSTĚNÍ (obr.1)
Tento elektrospotřebič může být zabudovaný do kuchyňské linky
tak, jak je to zobrazeno na příslušném obrázku. Umístěte těsnící
materiál po celém obvodu (detailní rozměry na obr.1B).
Elektrospotřebič upevněte k pracovní desce prostřednictvím 4
konzol z vybavení a mějte přitom na paměti tloušťku pracovní desky
(obr.1A). Jestliže je dolní část přístroje po montáži přístupná z dolní
části skříňky, je zapotřebí namontovat dělící panel a udržovat přitom
vyznačené vzdálenosti (Obr. 1C). Uvedená operace není nutná v
případě instalace pod troubou.
ELEKTRICKÁ PŘIPOJENÍ (obr.2)
Před vykonáním připojení se přesvědčte, zda:
- elektrovodič pro uzemění musí být o 2 cm. delší, než ostatní
vodiče;
- vlastnosti elektrické sítě jsou takové, aby odpovídaly
požadavkům označeným na výrobním štítku na svrchní straně
pracovní desky;
- je síť vybavena výkonným uzeměním, které odpovídá normám
a předpisům danými zákonem.
Uzemění je zákonem povinné.
V případě, že spotřebič není vybavený šňůrou a/anebo příslušnou
zástrčkou, použijte materiál odpovídající proudvému příkonu, jehož
hodnota je uvedena na výrobním štítku a odpovídající provozní
teplotě. V žádné části nesmí teplota šňůry překročit o 50°C
pokojovou teplotu.
Pokud si přejete přímé připojení k elektrické síti, je potřeba vložit
vícepólový spínač s minimálním rozevřením kontaktů 3 mm, který
by odpovídal zátěži uvedené na výrobním štítku a požadavkům
platných norem (žlutozelený vodič uzemění nesmí být přerušený
přepínačem).
Tento vícepólový spínač musí být po ukončení instalace snadno
dostupný.
POUŽITÍ A ÚDRŽBA
ÚDRŽBA
Případné zbytky potravy a kapky tuku setřete z povrchu varné desky
pomocí speciální škrabky, která je dodávána na požádání (obr.4).
Ohřívanou plochu očistěte co nejlépe za použití prostředků jako
SIDOL, STAHLFIX nebo podobných výrobků a papírového hadříku,
opláchněte vodou a osušte suchou hadrou.
Prostřednictvím speciální škrabky (na požádání) odstraňte z
ohřevné plochy okamžitě zbytky hliníku a umělohmotného
materiálu, který se tam bez povšimnutí rozpustil, nebo zbytky cukru,
nebo potravin s vysokým obsahem cukru (obr.4). Tímto způsobem
se vyhnete jakémukoliv možnému poškození povrchu varné desky.
V žádném případě nesmíte používat drátěnky nebo dráždivé
chemické prostředky, jako spray na čištění trouby nebo
odstraňovače skvrn.
POUŽITÍ
Jestliže váš přístroj je pro to seřízen, je možné dosáhnout snížené
spotřeby energie díky inteligentnímu zapínání a vypínání varných
zón. Je možno nastavit maximální spotřebu na 4 odlišné úrovně:
2.4 KW - 3.4 KW - 4.4 KW - Pmax. Plocha je nastavena bez
jakéhokoliv omezení výkonu (Pmax).
- Multi Level Power Control (MLP)
Při montáži na základě výkonu, který je uživateli k dispozici, je
možné nastavit žádanou úroveň maximálního absorbovaného
výkonu následujícím způsobem:
- uvolnit varnou plochu stlačením „klíčového tlačítka“ po dobu 3
vteřin, až do zhasnutí „klíčového světelného signálu“.
- Stlačte tlačítko „E-plus“ po dobu 3 vteřin: displej hodin ukáže
nastavenou úroveň výkonu mezi těmi, které jsou k dispozici: 2.4
KW/3.4 KW/4.4 KW a FULL.
- Stiskněte tlačítka (+) nebo (-) ke změně úrovně.
- Potvrďte volbu stisknutím tlačítka „E-plus“ během 10 vteř in, jinak
se vše vrátí do původního stavu.
-Funkce „E-PLUS“:
Během vaření je možné zvýšit úroveň maximálního nastaveného
výkonu na úroveň vyšší, stisknutím tlačítka „E-plus“ až do
rozsvícení příslušného světelného signálu.
Při vypnutí plochy se vše vrací do předem nastavené úrovně.
Upozornění: normálně funkce „E-PLUS“ je užívána když
maximální absorbovaný výkon je nižší než výkon k dispozici
uživatele.
Ovladače
- Při pr vním zapnutí se varná plocha nachází v bezpečnostní pozici,
to jest s zapnutým signálem on/off klíčové tlačítko.
- K použití varné plochy je zapotřebí mít stisknuté „klíčové tlačítko“
po dobu 3 vteřin až do zhasnutí „signálu on/off klíčové tlačítko“
- K zapnutí vyžádané plotýnky:
- Stiskněte příslušné tlačítko on/off. „Displej varné zony“ začne
blikat.
- Stiskněte během 10 vteřin tlačítko – byste se dostali na pozici 4
anebo tlačítko + , abyste se dostali na pozici 9.
- K regulaci teploty varné oblasti stiskněte talčítka + nebo -.
- Jestliže je plotýnka vybavena rozšířenou zónou, k zapnutí druhé
zóny zaveďte „Displej varné zony“ do pozice 9 a stlačte tlačítko
+ po dobu 2 vteřin: až do zapnutí desetinového místa jako potvrzení.
- K vypnutí plotýnky stlačte příslušné tlačítko on/off.
POZNÁMKA: Během fungování je možné zablokovat/odblokovat
zónu ovladačů klíčovým tlačítkem po dobu 3 vteřin.
- 31 -
Page 32

Area Timer (obr. 5)
Plocha může nastavit současně timer na všechny varné zóny.
Timer je funkce, která umožňuje nastavit čas (od 1 do 99 minut) k
automatickému vypnutí vybrané varné oblasti.
- Stlačte tlačítko „Timer“ po dobu 2 měsíců: displej ukáže „00“
uprostřed a ukáže který element je aktivní na pravé a levé straně.
- Stisknutím tlačítka „Timer“ se zvolí aktivní plotýnka.
- Stiskněte (+) nebo (-) k zvolení hodnoty „Timer“.
Poznámka:
- Jestliže funkce „Timer“ byla nastavena na více než jednu varnou
zónu, „Display Timer“ ukáže každé 3 vteřiny zbývající čas pro
každou vybranou plochu.
- Ke zrušení funkce „Timer“ vypněte příslušnou varnou oblast.
Funkce „MEMORY“
Tato funkce umožní naprogramování a provedení cyklu vaření na
každém ohřívacím elementu.
Poznámky:
- Lze možno provést jeden oddělený cyklus v záznamu či
provedení.
- Změny úrovně výkonu na dobu nižší než 15 vteřin nejsou
registrovány.
- Je možno dát do paměti cyklus varný s maximálním trváním 10
hodin a s maximálně 10 změnami úrovně výkonu.
- Uložení varného cyklu do paměti:
- Stiskněte tlačítko „Memory“ a pak zvolte vybranou plotýnku
příslušným tlačítkem „ON/OFF“.
- Stiskněte tlačítka (+) či (-) až do zvolení žádaného výkonu.
- K ukončení cyklu uložení do paměti stiskněte opět tlačítko „ON/
OFF“.
Provedení varného cyklu:
-K provedení již uloženého varného cyklu postačí stisknout tlačítko
„ON/OFF“ ve vybrané varné zóně a poté tlačítko „Memory“.
Displej:
-Varná plocha je vybavena displejem, který v normální funkci
funguje jako„HODINY“ a mimo to může vykonávat funkci „COUNT-
DOWN“ když je plocha vypnuta.
Regulace hodinek:
Při montáži nastavte čas následujícím způsobem:
-Odblokujte varnou plochu stisknutím „klíčového tlačítka“ po dobu
3 vteřin až do zhasnutí „klíčového světelného signálu“.
- Stiskněte současně (+) anebo (- ) pod displejem dokud tento
nezačne blikat.
- Stiskněte (+) a (-) k nastavení vybraného času.
- Stiskněte tlačítko „Timer“ k potvrzení volby.
Na závěr nastaveného času se ozve akustický signál.
Funkce Count-Down:
- Odblokujte varnou plochu stisknutím „Klíčového tlačítka“ po
dobu 3 vteřin až do zhasnutí „klíčového signálu“.
- Stiskněte tlačítko „Timer“ dokud se na displeji neobjeví nápis
„00“.
- Stiskněte (+) nebo (-) k nastavení minut.
- Stiskněte tlačítko „Timer“ k potvrzení volby.
Na závěr nastaveného času se ozve akustický signál.
Bezpečnostní systémy
1.V případě, že se na ovladače položí jakýkoliv předmět, varná
plocha se vypne a automaticky se zapojí klíč automatické ochrany
– k tomu dojde i v případě vylití tekutin (vody, mléka atd.) nad zónu
ovladačů.
2.Klávesnice ovladačů mu uvnitř tepelný senzor, který v případě,
že by vnitřní teplota dosáhla 90° (nenormální užívací podmínky
plochy bez hrnců) automaticky plocha vstoupí do systému
automatického omezení teploty: automaticky se vypne.
POZOR: V okamžiku, kdy se vypne jedna varná zóna, její povrch
má velmi vysokou a nebezpečnou teplotu.
Toto nebezpečí je potvrzeno skutečností, že „displej varné zony“
bude blikat dokud teplota povrchu nepoklesne pod 50°C.
Upozornění:
Je-li varná plocha používána s omezením výkonu (úroveň výkonu
2,4/, 3,4/, 4,4) bude možno dosáhnout následujícího fungování pro
zaručení úrovně maximálního předem nastaveného absorbovaného
výkonu:
A) Po zapnutí některých varných zón na maximální výkon (pozice
9) plocha by nemusela akceptovat zapálení další “Varné zóny” a
vydat akustický signál.
Anebo by mohla zapnout následující varnou zónu na teplotní
hodnotě odlišné od nastavené.
B) Když existuje několik zapnutých varných zón a chcete-li zvýšit
teplotní hodnotu, plocha by nemusela
Akceptovat zvýšení a vydat akustický signál.
C) Po zapnutí několik var ných zón na střední tepelnou hodnotu, v
okamžiku kdy dojde k zapnutí může dojít k
Tomu, že tato zóna se zapne s opožděním několika vteřin.
VÝROBCE ODMÍTÁ JAKOUKOLIV ZODPOVĚDNOST ZA
ŠKODY ZPŮSOBENÉ NEDODRŽENÍM UVEDENÝCH
UPOZORNĚNÍ.
- 32 -
Page 33

ROMANA
GENERALITĂŢI
Citiţi cu atenţie conţinutul prezentei broșuri deoarece furnizează
indicaţii importante privitoare la siguranţa instalării, la utilizare și
întreţinere.
Se va păstra broșura pentru a putea fi consultată ulterior.
Toate operaţiunile referitoare la instalare (conexiuni electrice)
trebuie să fie efectuate de personal specializat, în conformitate cu
normativele în vigoare.
INSTRUCŢIUNI PENTRU SIGURANŢĂ
Se recomandă recipiente cu fundul plat, cu diametrul egal sau puţin
mai mare decât al zonei încălzite. Nu se vor utiliza recipiente cu
baza aspră (cu rugozităţi), pentru a evita zgârierea părţii termice a
suprafeţei de lucru (Fig.3).
Nu se recomandă folosirea acestui aparat de către copii sau
persoane care necesită supraveghere. Copiii nu trebuie să se joace
cu aparatul.
IMPORTANT
- se va evita deversarea de lichide; de aceea, pentr u a fierbe sau a
încălzi lichidele, se va reduce alimentarea cu căldură
- nu se vor lăsa elementele de încălzire în funcţiune cu oale și tigăi
goale sau fără recipiente (vase)
- după ce se termină gătitul (prepararea mâncărurilor), se va
deconecta rezistenţa respectivă în modul indicat în continuare
ATENŢIE: Dacă suprafaţa este crăpată (ciobită), se va opri
aparatul pentru a evita eventuale descărcări electrice.
INSTRUCŢIUNI PENTRU INSTALARE
Prezentele instrucţiuni se adresează unui instalator specializat și
au rolul unui ghid pentru instalarea, reglarea și întreţinerea în
conformitate cu legile și normativele în vigoare.
Dacă un cuptor de interior sau orice alt aparat care generează
căldură trebuie să fie montat direct sub suprafaţa din material
ceramic destinată pregătirii mâncărurilor, ESTE NECESAR CA
ACEST APARAT (cuptorul) ȘI SUPRAFAŢA DIN MATERIAL
CERAMIC DESTINATĂ PREGĂTIRII MÂNCĂRURILOR SĂ FIE
IZOLATE CORESPUNZĂTOR, astfel încât căldura generată de
cuptor, măsurată pe partea dreaptă a bazei suprafeţei de lucru,
să nu depășească 60°C. Nerespectarea acestei condiţii ar
putea determina funcţionarea eronată a sistemului
TOUCHCONTROL.
AMPLASARE (Fig.1)
Aparatul electrocasnic este realizat pentru a putea fi montat într-o
suprafaţă de lucru, așa cum se arată în figura respectivă. Mater ialul
de sigilare ermetică se va amplasa de-a lungul întregului perimetru
(dimensiunile de tăiere în Fig.1B).
Se va fixa aparatul electrocasnic pe suprafaţa de lucru cu ajutorul
celor 4 cleme de fixare cu care este livrat, ţinând cont de grosimea
suprafeţei de lucru (Fig.1A). Daca partea inferioara al aparatului,
dupa instalare, este accesibila prin partea inferioara al mobilei este
necsar a se monta un panou separator respectand distantele indicate in (fig.1.C). Daca dedesubt se instaleaza un cuptor nu este
necesar.
CONEXIUNI ELECTRICE (Fig.2)
Înainte de efectuarea conexiunilor electrice, vă veţi asigura că sunt
respectate următoarele condiţii:
- conductorul electric de pământare trebuie să fie cu 2 cm mai
lung faţă de celelalte conductoare;
- caracteristicile instalaţiei trebuie să satisfacă indicaţiile de pe
plăcuţa de identificare aplicată pe partea inferioară a suprafeţei de
lucru;
- instalaţia trebuie să fie prevăzută cu o legătură eficientă de
pământare, conformă cu normele și cu dispoziţiile legale în vigoare
Legătura de pământare este obligatorie prin lege.
În cazul în care aparatul electrocasnic nu este prevăzut cu cablu
și/sau cu ștecherul aferent, se vor utiliza materiale corespunzătoare
pentru consumul indicat pe plăcuţa de identificare și pentru temperatura de funcţionare. Cablul nu trebuie să ajungă în nici un punct
la o temperatură cu 50°C mai mare decât temperatura mediului
înconjurător.
Dacă se dorește o legătură directă la reţeaua electrică, este necesar
să se monteze un întrerupător multipolar pentru faze și nul, cu o
deschidere minimă de 3 mm între contacte, adecvat pentru sarcina
indicată pe plăcuţă și conform cu normele în vigoare (conductorul
de pământare galben/verde nu trebuie să fie întrerupt de
comutator).
La terminarea instalării aparatului, întrerupătorul menţionat trebuie
să fie ușor accesibil.
UTILIZARE ȘI ÎNTREŢINERE
ÎNTREŢINERE
Se vor îndepărta eventualele reziduuri de mâncare sau picături de
grăsime de pe suprafaţa de lucru, utilizând un răzuitor furnizat la
cerere (Fig.4).
Se va curăţa zona încălzită cât mai bine posibil folosind SIDOL,
STAHLFIX sau alte produse similare împreună cu un șervet de
hârtie, apoi se va clăti cu apă și se va usca cu un șervet curat.
Cu ajutorul unui răzuitor (opţional) se vor îndepărta imediat din
zona încălzită de lucru fragmentele de foi de aluminiu și materiale
plastice topite din lipsă de atenţie, precum și resturi de zahăr sau
de mâncăruri cu conţinut ridicat de zahăr (Fig.4). În acest fel se va
evita orice posibilă deteriorare a suprafeţei de lucru.
În nici un caz nu se vor utiliza lavete abrazive sau detergenţi chimici corozivi, precum spray-urile pentru cuptor sau substanţele de
scos pete.
MOD DE FOLOSIRE
Daca sistemul dv. este predispus, este posibila optimizarea
consumului energetic datorita unei optime gestionari ale aprinderii
si stingerii din zona de coacere. Este posibila impostarea la puterea
maxima absorbita in 4 diverse nivele: 2,4 Kw – 3,4 Kw – 4,4 Kw –
P.max. Nivelul este impostat fara nici o limitare a puterii
(P.max).
• Multi Level Power Control (MLP)
A beszerelés során a rendelkezésre álló fogyasztói teljesítmény
alapján be lehet állítnai a kívánt maximális teljesítményfelvétel
szintjét a következo módon:
- Oldja ki a főzőlap reteszelését a “kulcs-szenzor” 3 másodpercig
tartó lenyomásával, amíg a “kulcs-jelzőlámpa” ki nem alszik..
- Érintse meg az “E-plus” szenzort 3 másodpercre: az óra kijelzője
megmutatja, hogy a rendelkezésre álló 2.4 KW/3.4 KW/4.4 KW
és FULL teljesítmény közül melyik van beállítva.
- A beállított teljesítményszint megváltoztatását a (+) és (-)
megérintésével érheti el.
- Igazolja vissza a választást az “E-plus” 10 másodpercen belüli
lenyomásával, különben a beállítás visszatér a kiinduló helyzetbe.
• “E-PLUS” funkció :
A főzés alatt a beállítotthoz képest egy fokozattal növelni lehet a
maximális teljesítményfelvételt, úgy, hogy az “E-PLUS”-t a hozzá
tartozó jelzőlámpa kigyulladásáig lenyomjuk.
A főzőlap kikapcsolásakor visszaáll az eredetileg beállított szint.
Figyelmeztetés:Az “E-PLUS” funkciót akkor érdemes használni,
ha a beállított maximális teljesítményfelvétel alacsonyabb, mint a
rendelkezésre álló fogyasztói teljesítmény.
• Kezelőfelület
- Az elso bekapcsoláskor a fozolap biztonsági állásban lesz, vagyis
a “kulcs-billenytu ON/OFF” jelzolámpa ég.
- Ahhoz, hogy a főzőlapot használhassa, tartsa 3 másodpercig
legnyomva a “kulcs-szenzort”, amíg a “kulcs szenzor on/off
- 33 -
Page 34

jelzőlámpa” ki nem alszik.
- A kívánt főzőlap bekapcsolásához:
- érintse meg a megfelelő szenzort. A “főzőzóna kijelző” LED-je
villog.
- érintse meg 10 másodpercen belül a - szenzort, ha a 4. állásba
akar lépni, vagy a + szenzort, ha a 9. állásba akar lépni.
- A főzőzóna hőfokának szabályozásához használja a + vagy –
szenzort.
- Ha a főzőlap állítható méretű főzőzónával rendelkezik, a második,
nagyobb méretű zóna bekapcsolását a következőképpen végezze:
állítsa a “főzőzóna kijelzőt” a 9. állásba és érintse meg a +-t 2
másodpercig: ameddig a tizedespont meg nem jelenik, az utasítás
visszaigazolásaként.
- A főzőzóna kikapcsolása a hozzá tartozó on/off szenzor
lenyomásával történik.
Megjegyzés: Üzemeltetés közben lehetoség van a kezelofelület
blokkolására ill. a blokkolás feloldására: érintse meg a kulcsszenzort 3 másodpercre.
• Időkapcsoló felület (fig.5)
A főzőlap valamennyi főzőzónáján egyidejűleg be lehet állítani a
főzési időt.
Az időkapcsoló olyan funkció, amely lehetővé teszi a kiválasztott
főzőzóna automatikus kikapcsolását a beállított időpontban (1-99
perc).
- Érintse meg a “Timer” szenzort 2 másodpercre: a kijelzőn “00”
látható középen, és megmutatja, melyik elem aktív jobb és
baloldalon.
- A “Timer” szenzor további megérintésével kiválasztható a
beállítandó főzőzóna az aktív zónák közül.
- A “Timer” érékének beállítását a (+) illetve (-) megérintésével
végezze.
Megjegyzés:
- Ha a “Timer” funkció több főzőzónánál is be van állítva, a
“Display Timer” (időkapcsoló kijelző) 3 másodpercenként jelzi a
hátralévő időt valamennyi programozott zónánál.
- A “Timer” funkció nullázásához kapcsolja ki a megfelelő
főzőzónát.
• “MEMORY” funkció
Ez a funkció lehetové teszi egy fozési ciklus programozását és
végrehajtását valamennyi fozozónán.
Megjegyzés:
- A ciklusokat egyenként lehet beprogramozni és végrehajtani.
- A 15 másodpercnél rövidebb teljesítmény-változásokat nem lehet
beírni.
- Maximum 10 óra időtartamú és maximum 10 teljesítmény-
változást magában foglaló főzési ciklus programozható.
• A főzési ciklus memóriába írása:
- Érintse meg a “Memory” szenzort és válassza ki a kívánt
főzőzónát a hozzá tartozó “ON/OFF” szenzor segítségével.
- A kívánt teljesítményt a (+) vagy (-) szenzor segítségével válassza
ki.
- A memóriába írási folyamat lezárását az “ON/OFF” szenzor
újabb megérintésével végezheti el.
• A főzési ciklus végrehajtása:
- Egy már beprogramozott (memóriába írt) főzési ciklus
végrehajtásához elegendő, ha megérinti az illető zóna “ON/OFF”
szenzorját, majd a “Memory” szenzort.
• Kijelző:
A fozolap kijelzovel rendelkezik, mely normál állásban “ÓRA”,
amikor pedig a fozolap el van zárva, képes “COUNT-DOWN”
(visszaszámlálás) funkciót elvégezni.
• Az óra beállítása:
Beszereléskor állítsa be az órát a következoképpen:
- Oldja ki a főzőlap blokkolását a “kulcs szenzor” 3 másodpercig
történő lenyomásával, mindaddig, amíg a “kulcs jelzőlámpa” ki
nem alszik.
- A kijelző alatti (+) és (-) szenzort egyidejűleg érintse meg, amíg
a kijelző villogni nem kezd.
- A kívánt időt a (+) vagy (-) lenyomásával lehet beállítani.
- A művelet visszaigazolásaként érintse meg a “Timer” szenzort.
• Count-Down (visszaszámlálás) funkció:
- Oldja ki a főzőlap blokkolását a “kulcs-szenzor ” 3 másdopercig
történő lenyomásával, mindaddig, amíg a “kulcs jelzőlámpa” ki
nem alszik.
- Érintse meg a“Timer” szenzort, famíg a kijelzőn meg nem jelenik
a “00” felirat.
- A perceket a (+) vagy (-) szenzork segítségével lehet beállítani.
- Érintse meg a “Timer” szenzort a művelet visszaigazolásaként.
A beállított idő végén hangjelzés lép működésbe.
BIZTONSÁGI BERENDEZÉSEK
1. Amennyiben egy tárgy kerül a kezelőfelületre, a főzőlap kialszik
és automatikusan lezár. Ugyanez történik, ha a kezelőfelületre
folyadék (tej, víz stb) ömlik.
2. A kezelő szenzorzet belső hőfok-érzékelővel rendelkezik:
amennyiben a belső hőmérséklet meghaladja a 90 fokot
(rendellenes használati körülmények, a főzőlap edények nélküli
használata), a főzőlapban bekapcsol az automatikus
hőfokkorlátozási rendszer és kikapcsol.
FIGYELEM: amikor egy főzőzónát kikapcsolunk, a felülete továbbra
is nagyon meleg, balesetveszélyes.
A balesetveszély mindaddig fennáll, amíg a “főzőzóna kijelző”
veszélyt jelző villogása ki nem alszik, ami akkor következik be, ha
a felületi hőfok 50 °C alá süllyed.
• Figyelmeztetés:
Amikor a főzőlapot teljesítménykorlátozó üzemmódban használjuk
(2,4 / 3,4 / 4,4 teljesítményszint) a választott maximális
teljesítmányfelvételt a következőképpen garantálhatjuk:
A) Miután néhány főzőzónát a maximális fokozatra (9. állás)
állítottunk, előfordulhat, hogy a főzőlap hangjelzés kíséretében
visszautasítja további “főző zónák” bekapcsolását.
Vagy pedig az újabb főzőzónákat a kívánttól eltérő hőmérsékletértékre kapcsolja.
B) Amikor néhány főzőzóna be van kapcsolva és növelni kívánjuk
a hőmérséklet értékét, előfordulhat, hogy a főzőlap hangjelzés
kíséretében visszautasítja a hőmérséklet emelését.
C) Miután néhány főzőzónát közepes fokozatra bekapcsoltunk,
amikor egy újabb zónát kapcsolunk be, előfordulhat,, hogy ez a
zóna néhány másodperces késéssel kapcsol be.
SE ABSOLVA DE ORICE RESPONSABILITATE PENTRU
ORICARE EVENTUALE DAUNE PROVOCATE DIN CAUZA
NEOBSERVARII AVERTENTELOR DE MAI SUS
- 34 -
Page 35

Page 36

Cod. 94000STISPO200
 Loading...