

Page 1

ISTRUZIONI PER L’USO
INSTRUCTIONS FOR USE
VENTILATORE A PIANTANA CON UMIDIFICATORE
STAND FAN WITH HUMIDIFIER
AR5M39
Il presente apparecchio può essere
utilizzato dai bambini a partire da 8 anni in su
e da persone dalle ridotte capacità siche,
sensoriali o mentali, oppure con mancanza
di esperienza e di conoscenza se a loro è
stata assicurata un’adeguata sorveglianza,
oppure se hanno ricevuto istruzioni circa
l’uso in sicurezza dell’apparecchio e hanno
compreso i pericoli correlati.
I bambini non devono giocare con
l’apparecchio. Le operazioni di pulizia e di
manutenzione non devono essere effettuate
dai bambini senza sorveglianza.
Se il cavo di alimentazione dovesse
essere danneggiato, deve essere sostituito
solamente presso i centri di assistenza
autorizzati dal costruttore.
Spegnere l’apparecchio e scollegarlo
Page 2

durante le operazioni di riempimento e
pulizia. Assicurarsi che il ventilatore sia
scollegato dalla rete di alimentazione prima
di togliere le griglie di protezione.
Avvertenze
ATTENZIONE: leggere attentamente il presente libretto in quanto
contiene importanti istruzioni per la sicurezza di installazione, uso
e manutenzione.
Istruzioni importanti da conservare per riferimenti futuri.
I bambini NON devono giocare con il dispositivo.
Questo apparecchio dovrà essere destinato solo all’uso per il quale è
stato espressamente concepito; qualsiasi impiego non conforme alle
indicazioni contenute nel presente manuale è da considerarsi improprio
e pericoloso. Il produttore non può essere ritenuto responsabile per
eventuali danni derivanti da utilizzo improprio e/o irragionevole.
Questo apparecchio NON è idoneo per impiego in ambienti con atmosfere
esplosive (con presenza di sostanze inammabili sotto forma di gas,
vapore, nebbia o polvere, in condizioni atmosferiche in cui, dopo
l’accensione, la combustione si propaga nell’aria).
Gli elementi dell’imballaggio (sacchetti in plastica, polistirolo espanso,
etc.) non devono essere lasciati alla portata di bambini o incapaci in
quanto rappresentano potenziali fonti di pericolo.
L’installazione/assemblaggio del dispositivo dovrà essere effettuata/o
secondo le prescrizioni del costruttore. Una errata procedura può
causare danni a persone, animali o cose, per i quali il costruttore non
può essere ritenuto responsabile.
Posizionare ed utilizzare l’apparecchio su un piano d’appoggio
orizzontale e stabile.
Prima di utilizzare l’apparecchio vericare visivamente l’integrità del
medesimo e del suo cavo di alimentazione. In caso di dubbi rivolgersi a
personale qualicato.
Prima di alimentare l’apparecchio accertarsi che i suoi dati di
targa (tensione e frequenza) siano rispondenti a quelli della rete di
distribuzione elettrica e che la presa sia idonea al terminale del cavo di
cui l’apparecchio è dotato.
Vericare che l’impianto elettrico utilizzato per l’alimentazione sia dotato
2
Page 3

delle adeguate protezioni a norma delle leggi in vigore.
NON alimentare l’apparecchio mediante prese multiple.
Evitare se possibile l’impiego di adattatori e/o prolunghe; qualora il loro
impiego si rendesse indispensabile utilizzare esclusivamente materiale
conforme alle vigenti norme di sicurezza e nel rispetto dei parametri
elettrici degli adattatori in questione.
L’apparecchio non deve essere acceso mediante temporizzatori esterni
e/o altri dispositivi di controllo remoto non espressamente previsti dal
presente manuale.
NON utilizzare né conservare il dispositivo in prossimità di fonti di calore
localizzate (caloriferi, stufe etc.).
NON immergere l’apparecchio in acqua o altri liquidi; in caso di caduta
accidentalmente in acqua NON cercare di recuperarlo ma innanzitutto
scollegare immediatamente il cavo di alimentazione dalla presa elettrica.
Utilizzando l’apparecchio per la prima volta, assicurarsi di aver tolto ogni
etichetta o foglio di protezione che ne impedisca il corretto funzionamento.
Collegare e scollegare il cavo di alimentazione con le mani asciutte e
reggendolo saldamente.
Prima di inserire la spina nella presa di corrente assicurarsi che il
pulsante di avviamento dell’apparecchio sia in posizione “OFF” (spento).
Svolgere sempre totalmente il cavo di alimentazione onde evitare
surriscaldamenti, evitare in ogni caso di tenderlo (non tirarlo, strattonarlo,
né utilizzarlo per trascinare il dispositivo cui è collegato).
Evitare di posizionare il cavo di alimentazione su superci abrasive
o taglienti o comunque in posizioni dove può essere facilmente
danneggiato.
NON ostruire né totalmente né parzialmente le prese d’aria nè inserirvi
oggetti all’interno.
Durante il funzionamento non toccare il dispositivo con parti del corpo
bagnate o umide, in ogni caso si consiglia di interporre fra se e il piano
di appoggio un elemento isolante (ad esempio indossando scarpe con
suola in gomma).
Durante l’uso l’apparecchio deve essere tenuto a distanza di sicurezza da
qualsiasi oggetto e/o sostanza inammabile o potenzialmente esplosiva.
In caso di funzionamento anomalo o di anomalie durante il funzionamento
spegnere subito l’apparecchio, scollegarlo dall’alimentazione, vericare
le cause delle anomalie riscontrate eventualmente con l’aiuto di personale
qualicato. Evitare in ogni caso di effettuare operazioni non previste dal
presente manuale d’uso (come smontarlo e/o modicarlo).
Ricordarsi di scollegare sempre il cavo di alimentazione del dispositivo
per periodi di inutilizzo prolungati, prima di riporlo e prima di effettuare
qualsiasi operazione di pulizia o manutenzione.
Conservare e utilizzare l’apparecchio esclusivamente in ambienti interni
o in ogni caso protetto da agenti atmosferici come pioggia, irraggiamento
3
Page 4

diretto del sole o polvere.
L’apparecchio non è progettato per l’uso o la conservazione in esterno.
La pulizia e manutenzione del dispositivo NON deve essere effettuata da
bambini senza la supervisione di un adulto.
Prima di scollegare l’apparecchio spegnerlo mediante l’apposito
comando sul pannello di controllo.
Allorché si decida di non utilizzare più un apparecchio di questo tipo, si
raccomanda di rendere innocue quelle parti dell’apparecchio che possono
costituire un pericolo per le persone o di smaltirle compatibilmente con le
normative vigenti in merito.
NON alimentare il dispositivo senza prima averlo correttamente
assemblato seguendo le istruzioni del presente manuale.
Posizionare l’apparecchio ad una adeguata distanza da oggetti o pareti
circostanti in modo tale che il suo funzionamento non possa essere
causa di danni accidentali.
NON utilizzare il dispositivo in prossimità di fornelli a gas o amme libere
in generale.
NON utilizzare il dispositivo in prossimità di tende o tessuti liberi.
NON appendere il ventilatore ad una parete od al softto salvo tale
modalità di installazione non sia espressamente prevista e spiegata nel
presente manuale.
NON coprire in alcun modo il dispositivo durante il funzionamento.
NON inserire oggetti o parti del corpo nella griglia di protezione della
ventola.
NON lasciare l’apparecchio incustodito per lunghi periodi durante il
funzionamento.
NON rimanere esposti per lunghi periodi al usso d’aria generato dal
dispositivo in funzione, può provocare danni alla salute.
Se il ventilatore deve essere immagazzinato per lungo tempo e non usato
regolarmente, riporre il ventilatore nel suo imballo originale e metterlo in
un luogo secco ed asciutto. Quando lo si usa per la prima volta dopo un
lungo periodo di inutilizzo, controllare che il ventilatore sia pulito e che le
pale del motore girino liberamente (a dispositivo non alimentato) senza
alcun freno.
AVVERTENZE PER LE BATTERIE:
1. TENERE LE BATTERIE FUORI DALLA PORTATA DEI BAMBINI.
L’ingestione può provocare ustioni chimiche, perforazione dei
tessuti molli e morte. Ustioni gravi possono insorgere entro 2 ore
dall’ingestione. Consultare immediatamente un medico.
2. Non permettere ai bambini di sostituire le batterie.
3. Inserire correttamente le batterie, facendo attenzione alle polarità (+ e
-) marcate sulle batterie e sull’apparecchio.
4. Le batterie non devono essere messe in cortocircuito.
4
Page 5

5. Non caricare le batterie.
6. Non forzare la scarica delle batterie.
7. Non utilizzare tra loro batterie nuove e usate o batterie di diverso tipo
o di diversi produttori.
8. Le batterie scariche devono essere rimosse immediatamente
dall’apparecchio e smaltite correttamente, secondo le leggi in vigore.
9. Non scaldare le batterie e non esporle a fonti di calore.
10. Non saldare direttamente le batterie.
11. Non smontare le batterie.
12. Non deformare le batterie.
13. Non buttare e non smaltire le batterie nel fuoco.
14. Non mettere a contatto con l’acqua o l’umidità, in particolare nel caso
in cui il contenitore della batteria dovesse essere danneggiato.
15. Non incapsulare e non modicare le batterie.
16. Conservare le batterie non utilizzate nel loro imballaggio originale
lontano da oggetti metallici. Se già rimosse dall’imballaggio, non
mischiare o mescolare le batterie.
17. Se si intende non utilizzare l’apparecchio per un periodo di tempo
prolungato, rimuovere le batterie. Pulire i contatti delle batterie e quelli
dell’apparecchio prima di inserire le batterie.
18. In caso di perdite dalle batterie, evitare qualsiasi contatto con il
materiale fuoriuscito; in caso contatto, sciacquare la parte interessata
con acqua e consultare un medico.
5
Page 6
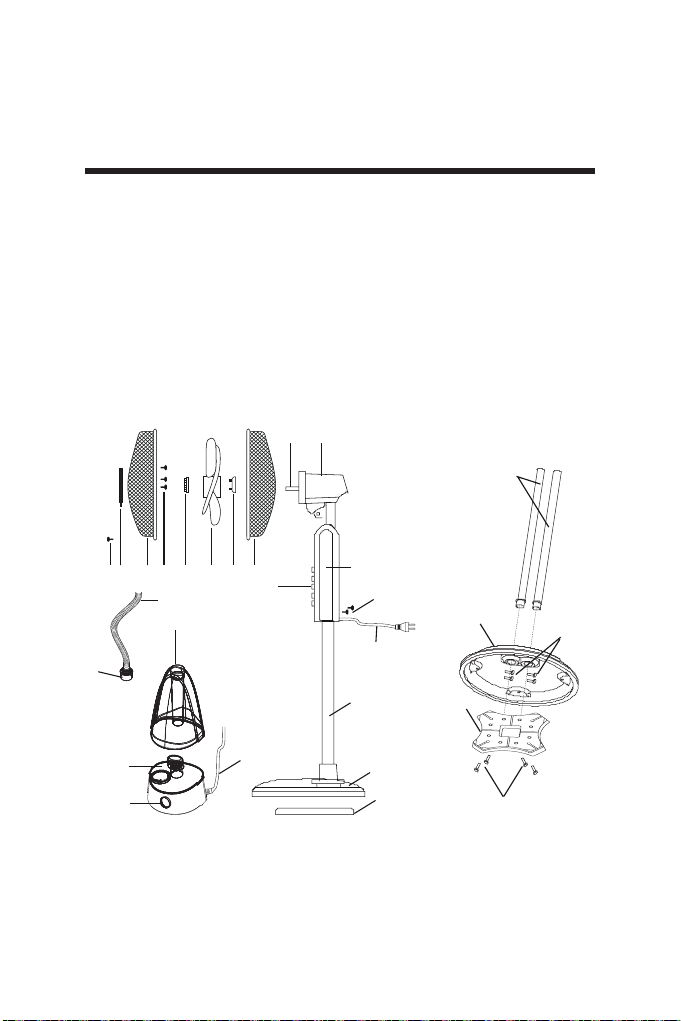
Informazioni tecniche
9 10
23
15
17
25
1 - Vite di sicurezza
2 - Borchia nebulizzante
3 - Griglia frontale
4 - Viti di ssaggio borchia
nebulizzante
5 - Ghiera di ssaggio ventola
6 - Ventola
7 - Ghiera di ssaggio griglia
posteriore
8 - Griglia posteriore
9 - Albero motore
10 - Corpo motore
11 - Pannello comandi
12 - Corpo principale
13 - Viti di ssaggio corpo principale
14 - Cavo di alimentazione
15 - Tubi di sostegno
16 - Base
17 - Peso per base
18 - Cavo alimentazione umidicatore
19 - Serbatoio umidicatore
20 - Corpo principale umidicatore
21 - Pannello comandi umidicatore
22 - Tubo per nebulizzazione
23 - Tappo umidicatore
24 - Viti di ssaggio tubi di sostegno
25 - Viti di ssaggio peso della base
1 23
4
20
21
6
567 8
22
19
11
18
12
13
14
15
16
17
16
24
Page 7

Assemblaggio
Svitare le viti di ssaggio (24) dai tubi di sostegno (15). Posizionare i
tubi di sostegno (15) negli appositi alloggiamenti della base (16) facendo
attenzione che i fori posti sul fondo dei tubi di sotegno e i fori presenti
negli alloggiamenti dei tubi sulla base siano coincidenti. Fissare i tubi di
sostegno (15) alla base (16) utilizzando le 4 viti (24) tolte in precedenza.
Posizionare il peso della base (17) sotto alla base (16). NB: il peso della
base ha una faccia piatta e una faccia curva; il lato piatto deve essere
appoggiato alla base. Fissare il peso della base (17) utilizzando le 4 viti
in dotazione (25).
Allentare le viti (13), inserire il corpo principale (12) sui tubi di sostegno
(15) e ssarlo stringendo le viti di ssaggio (13).
Posizionare il corpo principale umidicatore (20) nell’apposito
alloggiamento sulla base (16).
Fissare la borchia nebulizzante (2) sulla griglia frontale (3) facendo in
modo che il logo sulla borchia sia in posizione orizzontale parallela al
pavimento e ssarla utilizzando le viti in dotazione (4).
Svitare la ghiera di ssaggio della griglia posteriore (7) dall’albero motore
(9) ruotandola in senso antiorario,
Inserire la griglia posteriore (8) sull’albero motore (9) in modo che
la maniglia sia rivolta verso l’alto e che i fori/perni coincidano. Quindi
ssarla con l’apposita ghiera ssa griglia (7) ruotandola in senso orario.
Inserire la ventola (6) sull’albero motore (9) e ssarla ruotando in senso
antiorario l’apposita ghiera di ssaggio (5).
Aprire le clip della griglia anteriore (3) e posizionarla sulla griglia
posteriore (8) in modo che il logo sulla borchia nebulizzante sia in
posizione orizzontale parallela al pavimento.
Trovata la giusta posizione chiudere leclip e stringere la vite di sicurezza
(1).
Riempire il serbatoio (19) seguendo le istruzioni del paragrafo “COME
RIEMPIRE IL SERBATOIO” e posizionarlo sul corpo principale
dell’umidicatore (20).
Collegare il tubo per la nebulizzazione (22) alla borchia nebulizzante (2)
e nella parte inferiore, inserire il tappo umidicatore (23) sul serbatoio
(19).
La procedura di assemblaggio è completa.
7
Page 8
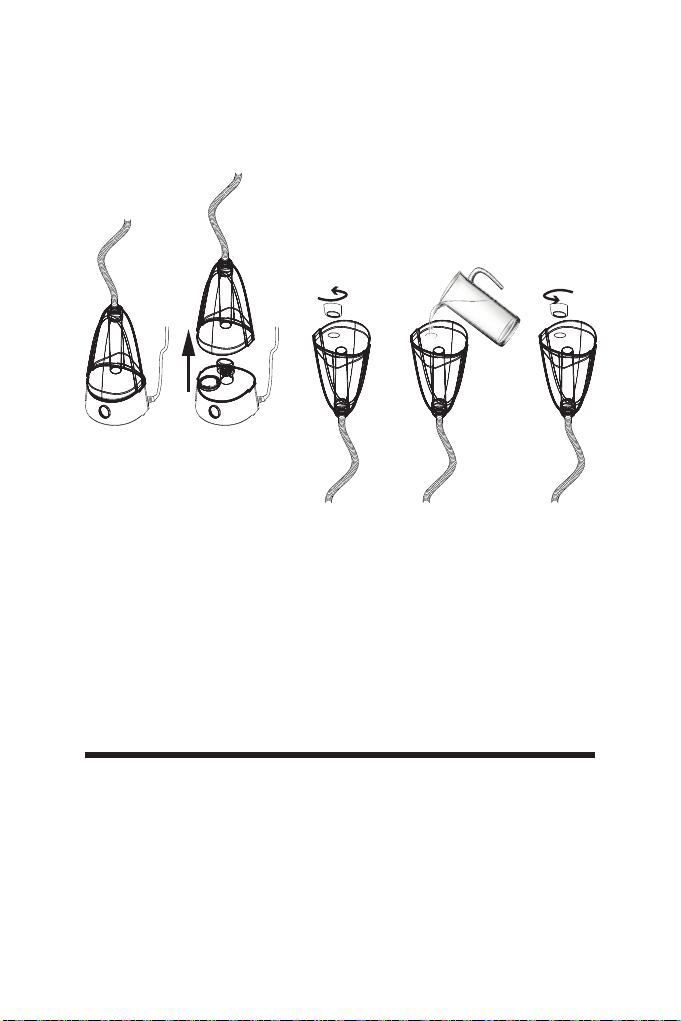
COME RIEMPIRE IL SERBATOIO
Spegnere l’umidicatore ruotando in senso antiorario la manopola
posta sul corpo principale dell’umidicatore alla posizione di minimo e
scollegarlo dalla rete di alimentazione elettrica.
Sollevare il serbatoio dell’umidicatore e capovolgerlo sottosopra.
Svitare il tappo presente sul fondo del serbatoio ruotandolo in senso
antiorario.
Inserire dell’acqua fredda pulita (precedentemente bollita) all’interno del
serbatoio.
In caso di acqua particolarmente dura nella vostra zona, utilizzate acqua
fredda demineralizzata (precedentemente bollita) o acqua distillata.
Chiudere il serbatoio con il tappo ruotandolo in senso orario.
Capovolgere il serbatoio e posizionarlo sul corpo principale
dell’umidicatore.
Istruzioni d’uso
Posizionare il ventilatore su una supercie piana, asciutta e stabile ed
inserire la spina del ventilatore in una presa di corrente adeguata; l’unità
emetterà un suono “BIP” e l’indicatore luminoso “POWER” si accende
sul pannello comandi ad indicare che il prodotto è collegato alla rete
elettrica. Il ventilatore nebulizzante è comandabile sia dal pannello
comandi (11) sia dal telecomando.
8
Page 9

Batterie
Il telecomando viene fornito con batteria (tipo CR2025); rimuovere la
plastica protettiva dal vano batteria del telecomando prima dell’utilizzo.
Quando la batteria è esaurita, essa deve essere sostituita con una dello
stesso tipo seguendo i disegni riportati sul retro del telecomando.
PANNELLO COMANDI ED INDICAZIONI LUMINOSE
Indicatori luminosi TIMER:
Indicatore luminoso di
oscillazione: OSC
Indicatore luminoso di
nebulizzazione: MIST
Indicatore luminoso di
corrente: POWER
Pannello comandi
OSC
MIST
POWER
OSC
1H0,5H 2H 4H
LOWHIGHMED
NORNAT SLEEP
OFF
TIMERON/SPEED
MIST
0,5H - 1H - 2H - 4H
Indicatori luminosi VELOCITA’:
Low - Med – High
Indicatori luminosi MODO DI
FUNZIONAMENTO
Nor - Nat – Sleep
Telecomando
Premere i seguenti pulsanti per selezionare la funzione desiderata:
ON/SPEED
(pulsante presente sia sul pannello comandi sia sul telecomando):
premere a ventilatore spento per accendere il prodotto. Premere a
ventilatore acceso per selezionare la velocità desiderata a scelta tra Low
(bassa velocità), Med (media velocità) e High (massima velocità).
Ad ogni pressione cambia velocità e i relativi indicatori luminosi si
accendono sul display.
OFF (pulsante presente sia sul pannello comandi sia sul telecomando):
premere a ventilatore acceso per spegnere il ventilatore. Tutti gli
indicatori luminosi si spengono ad eccezione dell’indicatore luminoso
denominato “Power” ad indicare che il ventilatore è collegato alla rete di
alimentazione elettrica.
9
Page 10

MODE (pulsante presente solo sul telecomando):
premere a ventilatore acceso per selezionare la modalità di
funzionamento desiderata a scelta tra NOR (Normale), NAT (Naturale)
e SLEEP (Notturna).
NOR (Normale) - il ventilatore funziona in base alla velocità impostata
NAT (Naturale) - il ventilatore funziona a velocità irregolare tra la velocità
minima e la massima impostata a simulazione di una brezza naturale.
SLEEP (Notturna) - il ventilatore funziona a velocità irregolare nel modo
seguente:
- Se la massima velocità (High) è selezionata: il ventilatore funziona
alla massima velocità in modo Naturale per 30 minuti trascorsi i quali
funzionerà alla media velocità in modo Naturale per altri 30 minuti
per passare inne alla bassa velocità in modo Naturale. Gli indicatori
luminosi di funzionamento relativi alle velocità si accendono/spengono
seguendo il modo di funzionamento.
- Se la media velocità (Middle) è selezionata: il ventilatore funziona alla
media velocità in modo Naturale per 30 minuti trascorsi i quali funzionerà
alla bassa velocità in modo Naturale. Gli indicatori luminosi di funziona
mento relativi alle velocità si accendono/spengono seguendo il modo di
funzionamento.
- Se la bassa velocità (Low) è selezionata: il ventilatore funziona in modo
Naturale alla bassa velocità creando una brezza naturale.
Ad ogni pressione del tasto MODE cambia modo di funzionamento e i
relativi indicatori luminosi si accendono sul display.
TIMER (pulsante presente sia sul pannello comandi sia sul telecomando):
premere a ventilatore acceso per impostare lo spegnimento differito
del ventilatore, in un intervallo tra 0,5 ore e 7,5 ore dal momento della
programmazione.
Ad ogni pressione il tempo aumenta di 0,5 ore. Le indicazioni luminose
relative al timer si accendono sul display: 0,5H, 1H, 2H, 4H.
Il tempo totale di funzionamento impostato prima dello spegnimento
automatico è dato dalla somma delle indicazioni accese (ad esempio
se tutti gli indicatori luminosi relativi al timer sono accesi il tempo di
funzionamento impostato prima dello spegnimento automatico è dato da:
0,5H (0,5 ore)+1H (1 ora)+2H (2 ore)+4H (4 ore)=7,5 ore).
Gli indicatori luminosi relativi al timer seguono la funzione e si spengono /
accendono in base al tempo di funzionamento rimanente.
Per disattivare la funzione timer premere il tasto timer no a che tutti gli
indicatori luminosi di funzionamento si spengono sul display, oppure
spegnere manualmente il ventilatore premendo il tasto Off.
OSC (pulsante presente sia sul pannello comandi sia sul telecomando):
premere questo pulsante per attivare l’oscillazione automatica da destra
10
Page 11

a sinistra.
Il relativo indicatore luminoso si accende sul display. Per disattivare
l’oscillazione automatica ripremere questo pulsante (il relativo indicatore
luminoso si spegne sul display).
MIST(pulsante presente sia sul pannello comandi sia sul telecomando):
premere questo pulsante per attivare la nebulizzazione. Attenzione:
prima di attivare questa funzione vericare che nel serbatoio ci sia
dell’acqua; in caso si necessitasse di aggiungere dell’acqua si prega di
vedere il paragrafo “COME RIEMPIRE IL SERBATOIO”.
Una volta che il serbatoio è stato riposizionato sul corpo principale
dell’umidicatore premere il pulsante MIST per attivare la funzione
di nebulizzazione. L‘indicatore luminoso posto sul pannello comandi
dell’umidicatore (21) si accende in colore verde. E’ possibile regolare
l’intensità di nebulizzazione ruotando la manopola di regolazione posta
sul pannello comandi dell’umidicatore (21): ruotandola in senso orario
l’intensità di nebulizzazione aumenta; ruotandola in senso antiorario
l’intensità di nebulizzazione diminuisce.
La nebulizzazione è visibile dalla borchia nebulizzante in pochi secondi
dopo aver premuto il pulsante.
Quando l’acqua è terminata la funzione nebulizzante si interrompe e
l’indicatore luminoso della manopola di regolazione si illumina in colore
rosso; si raccomanda di disattivare la funzione nebulizzante quando il
serbatoio è vuoto.
Quando la funzione è attiva il relativo indicatore luminoso è acceso sul
display, quando la funzione non è attiva l’indicatore luminoso è spento
sul display. La funzione nebulizzazione può essere attivata in modo
indipendente dalla ventilazione: è sufciente spegnere il ventilatore con il
pulsante Off e successivamente premere il tasto Mist.
INCLINAZIONE VERTICALE
E’ possibile orientare la testa del
ventilatore in senso verticale scegliendo
l’angolo desiderato. E’ sufciente regolare
la testa del ventilatore muovendola
delicatamente verso l’alto o verso il basso
secondo l’inclinazione desiderata.
11
Page 12

Manutenzione
Prima di eseguire le normali operazioni di pulizia spegnere il ventilatore
e scollegarlo dalla rete di alimentazione elettrica.
NON SMONTARE il ventilatore: questo ventilatore non è smontabile. Per
la pulizia esterna utilizzare un panno sofce ed asciutto.
NON immergere il ventilatore in acqua, nè spruzzarlo con liquidi di alcun
tipo.
NON utilizzare solventi o altri prodotti chimici per la pulizia.
Quando non utilizzato, dopo la pulizia conservare il ventilatore in un
luogo asciutto.
UMIDIFICATORE
PULIZIA GIORNALIERA
Per ridurre la formazione di batteri ed il deposito di calcare, svuotare ii
serbatoio e l’acqua residua nel corpo principale (20); risciacquare con
acqua pulita il serbatoio e le parti dell’umidicatore che sono a contatto
con l’acqua ed asciugarli con un panno morbido e pulito.
PULIZIA SETTIMANALE
Pulire il serbatoio dell’acqua dell’umidicatore almeno una volta a
settimana con detergente neutro e sciacquarlo con acqua pulita
eliminando tutti i residui.
Se la piastra di nebulizzazione presentasse dei residui di calcare, pulirla
con aceto ed attendere 2-5 minuti. Quindi, sciacquarla con acqua pulita.
Non utilizzare mai oggetti appuntiti o duri per la pulizia della piastra di
nebulizzazione.
Asciugare il serbatoio e le altre parti con un panno morbido e pulito.
12
Page 13

Smaltimento
BATTERIE - Rimuovere le batterie dall’apparecchio
prima dello smaltimento. Non gettare le batterie nei
riuti domestici. Lo smaltimento delle batterie deve
avvenire negli appositi contenitori o negli specici
centri di raccolta. L’adeguata raccolta differenziata
contribuisce ad evitare possibili effetti negativi
sull’ambiente e sulla salute.
Per rimuovere le batterie, seguire le indicazioni delle
Istruzioni d’uso.
SMALTIMENTO
Informazione agli utenti: ai sensi dell’art. 26 del
Decreto Legislativo 14 marzo 2014, n. 49 “Attuazione
della direttiva 2012/19/UE sui riuti di apparecchiature
elettriche ed elettroniche (RAEE)” Il simbolo del
cassonetto barrato riportato sull’apparecchiatura o
sulla sua confezione indica che il prodotto alla ne della
propria vita utile deve essere raccolto separatamente
dagli altri riuti. L’utente dovrà,pertanto, conferire
l’apparecchiatura giunta a ne vita agli idonei
centri comunali di raccolta differenziata dei riuti
elettrotecnici ed elettronici. In alternativa alla gestione
autonoma è possibile consegnare l’apparecchiatura
che si desidera smaltire al rivenditore, al momento
dell’acquisto di una nuova apparecchiatura di tipo
equivalente. Presso i rivenditori di prodotti elettronici
con supercie di vendita di almeno 400 m² è inoltre
possibile consegnare gratuitamente, senza obbligo di
acquisto, i prodotti elettronici da smaltire con dimensioni
inferiori a 25 cm. L’adeguata raccolta differenziata
per l’avvio successivo dell’apparecchiatura dismessa
al riciclaggio, al trattamento e allo smaltimento
ambientalmente compatibile contribuisce ad evitare
possibili effetti negativi sull’ambiente e sulla salute e
favorisce il reimpiego e/o riciclo dei materiali di cui è
composta l’apparecchiatura.
13
Page 14

GARANZIA
Condizioni
La garanzia ha validità 24 mesi dalla data d’acquisto.
La presente garanzia è valida solo se viene correttamente compilata ed
accompagnata dallo scontrino scale che ne prova la data di acquisto.
L’apparecchio deve essere consegnato esclusivamente presso un nostro
Centro Assistenza autorizzato.
Per garanzia si intende la sostituzione o la riparazione dei componenti
dell’apparecchio che risultano difettosi all’origine per vizi di fabbricazione.
Viene comunque garantita l’assistenza (a pagamento) anche a prodotti fuori
garanzia.
Il consumatore è titolare dei diritti applicabili dalla legislazione nazionale
disciplinante la vendita dei beni di consumo; questa garanzia lascia
inpregiudicati tali diritti.
La Casa costruttrice declina ogni responsabilità per eventuali danni a
persone, animali o cose, conseguenti ad uso improprio dell’apparecchio
e alla mancata osservanza delle prescrizioni indicate nell’apposito libretto
istruzioni.
Limitazioni
Ogni diritto di garanzia e ogni nostra responsabilità decadono se l’apparecchio
è stato:
-Manomesso da parte di personale non autorizzato.
-Impiegato, conservato o trasportato in modo improprio.
Sono comunque escluse dalla garanzia le perdite di prestazioni estetiche o
tali da non compromettere la sostanza delle funzioni.
Se nonostante la cura nella selezione dei materiali e l’impegno nella
realizzazione del prodotto che Lei ha appena acquistato si dovessero
riscontrare dei difetti, o qualora avesse bisogno di informazioni, Vi
consigliamo di telefonare al rivenditore di zona.
14
Page 15

This appliance may be used by children 8 years of
age and older and people with reduced physical,
sensory or mental capacities or with a lack of
experience and knowledge if they are adequately
supervised or have been instructed on the safe
use of the appliance and are aware of the related
dangers.
Children must not play with the appliance.
Cleaning and maintenance must not be performed
by children unless they are under supervision.
Cleaning and maintenance operations must not
be performed by children without supervision.
If the power cable gets damaged, it has to be
replaced only at a service centre approved by the
manufacturer.
Unplug the appliance during lling and cleaning.
Ensure that the fan is switched off from the supply
mains before removing the guard.
Warnings
ATTENTION : read this booklet carefully it contains important
instructions for a safe installation, use and maintenance.
Important instructions to be kept for future reference.
It is forbidden for the children to play with the device.
This device must be used only for the purpose it was expressly designed;
any use not complying with the instructions contained in the manual is
considered inappropriate and dangerous. The manufacturer is not
responsible for possible damages caused by the inappropriate and/or
unreasonable use.
This device is NOT suitable to use it in an explosive environment (in the
presence of ammable substances such as gas, vapor, mist or dust, in
atmospheric conditions when, after ignition, the combustion is spread in
15
Page 16

the air).
The packing materials (plastic bags, expanded polystyrene, etc.) must be
kept out of the reach of children or disabled persons since they represent
potential sources of danger.
This device must be used only for the purpose it was expressly designed;
any use not complying with the instructions contained in the manual is
considered inappropriate and dangerous. The manufacturer is not
responsible for possible damages caused by the inappropriate and/or
unreasonable use.
This device is NOT suitable to use it in an explosive environment (in the
presence of ammable substances such as gas, vapor, mist or dust, in
atmospheric conditions when, after ignition, the combustion is spread in
the air).
The packing materials (plastic bags, expanded polystyrene, etc.) must be
kept out of the reach of children or disabled persons since they represent
potential sources of danger.
The installation/assembly of the device will be made/ or according to the
indications of the manufacturer. A wrong procedure may cause damages
to persons, animals or objects, for which the manufacturer cannot be
considered responsible.
Place and use the device on a horizontal and stable surface.
Before use check the integrity of the device and power cable. In case you
are not sure contact a qualied person.
Before powering the device make sure the rating (voltage and frequency)
corresponds to the grid and the socket is suitable for the plug of the
device.
Make sure the power system is equipped with proper protection according
to the law in force.
DO NOT power the device using multiple sockets.
If possible, avoid the use of adapters and/or extension cables; if their
use is absolutely necessary, use only materials in compliance with the
current safety regulations and according to the electrical parameters of
the adapters.
The device must not be switched on using external timers and/or other
remote control devices which are not specied in this manual.
DO NOT use or store the device near heat sources (heaters, stoves etc.).
DO NOT dip the device in water or other liquids; in case the accidental fall
in the water DO NOT try to take it out, but rst of all unplug immediately
the power cable from the socket.
If you use the device for the rst time, make sure to remove any label or
protective sheet which blocks its proper functioning.
Plug and unplug the power cable with dry hands and hold it rmly.
Before plugging make sure the start button of the device is in the “OFF”
position (turned off).
16
Page 17

Always unplug the power cable to avoid the overheating and avoid
stretching it (do not pull it, tug it or use it to drag the device to which is
connected).
Avoid placing the power cable on abrasive or sharp surfaces or in
positions where it can be damaged easily.
DO NOT obstruct totally nor partially the air vents or inserts objects inside.
During the functioning do not touch the device with wet body parts, and
in any case it is recommended to have between you and the standing
surface, an isolating element (for example wearing shoes with rubber
soles).
During the use the device must be keep at a safety distance from any
object and/or ammable or potentially explosive substance.
In case of malfunction or anomalies during the functioning, switch off
the device immediately, turn off the power and check the cause of the
anomalies, if possible, with the support of a qualied person. Avoid
carrying out operations which are not specied in this manual (such as
disassembling and/or altering).
Always remember to unplug the power cable of the device if it is not used
for a long period, before storing, cleaning or performing any maintenance
operation.
Store and use the device only indoor or in any case protected from
weathering such as rain, direct radiation of the sun and dust. The device
is not design for the external use or storage.
The cleaning and maintenance of the device MUST NOT be done by
children without the supervision of an adult.
Before unplugging the device, switch it off, using the proper command on
the control panel.
DO NOT hang the fan on the wall or ceiling unless this type of installation
is provided and explained in this manual.
Place the device at a proper distance from the objects or surrounding
walls making sure that its functioning will not cause accidental damages.
DO NOT use the device near gas stoves or open ames in general.
DO NOT use the device near curtains or textiles.
DO NOT hang the fan on the wall or ceiling unless this type of installation
is provided and explained in this manual.
DO NOT cover the device during functioning.
DO NOT insert objects or body parts inside the protection grille of the fan.
DO NOT leave the device unsupervised for a long period during
functioning.
DO NOT expose yourself for a long period to the air ow generated by the
device because it can cause damage to the health.
If the fan must be stored for a long period and is not used regularly, place
the fan in its original packaging in a dry place. When you use it for the
rst time after a long period of inactivity, make sure the fan is clean and
17
Page 18

the motor blades turn feely (with the device not powered) without any
restraint.
WARNINGS ABOUT BATTERIES
1. KEEP BATTERIES OUT OF THE REACH OF CHILDREN.
Swallowing can lead to chemical burns, perforation of soft tissue,
and death. Severe burns can occur within 2 hours of ingestion. Seek
medical attention immediately.
2. Do not allow children to replace batteries.
3. Always insert batteries correctly with regard to polarity (+ and -)
marked on the battery and the equipment.
4. Do not short-circuit batteries.
5. Do not charge batteries.
6. Do not force discharge batteries.
7. Do not mix new and used batteries or batteries of different types or
brands.
8. Exhausted batteries should be immediately removed from
equipment and properly disposed of.
9. Do not heat batteries
10. Do not weld or solder directly to batteries.
11. Do not dismantle batteries.
12. Do not deform batteries.
13. Do not dispose of batteries in re.
14. A lithium battery with a damaged container should not be exposed
to water.
15. Do not encapsulate and/or modify batteries.
16. Store unused batteries in their original packaging away from
metal objects. If already unpacked, do not mix or jumble batteries.
17. Remove batteries from equipment if it is not to be used for an
extended period of time unless it is for emergency purposes.
18. Clean the battery contacts and also those of the equipment prior to
battery installation.
19. In case of leak from batteries, avoid any contact with it; in case of
contact, wash the affected part with water and seek medical attention.
18
Page 19

Technical informations
9 10
23
15
17
25
1 - Safety screw
2 - Misting adjustment plate
3 - Front grille
4 - Fixing screw of the misting plate
5 - Fan lock ring
6 - Fan
7 - Back grille lock ring
8 - Back grille
9 - Motor shaft
10 - Motor
11 - Control panel
12 - Main body
13 - Main body screws
1 23
4
20
21
567 8
22
19
18
14 - Power cord
15 - Supporting tubes
16 - Base
17 - Base weight
18 - Humidier power cord
19 - Humidier tank
20 - Humidier main body
21 - Humidier knob
22 - Misting tube
23 - Humidier cap
24 - Screws of supporting tubes
25 - Screws of weight of the base
11
12
13
14
15
16
17
16
24
19
Page 20

Assembling
Unscrew the screws (24) from the supporting tubes (15). Place the
supporting tubes (15) into the holes of the base (16) making sure that
the holes on the bottom of the support tubes and the holes in the tube
housings on the base are coincident. Ensure the supporting tubes (15)
on the base (16) by using the 4 screws (24) previously unscrewed.
Place the weight of the base (17) under the base (16). NB: the weight
of the base has a at face and a curved face; the at side must placed
against the base. Fix the weight of the base (17) using the 4 screws
supplied (25).
Loosen the screws (13), insert the main body (12) on the support tubes
(15) and x it by tightening the xing screws (13).
Place the humidier main body (20) in its housing on the base (16).
Fix the misting plate (2) in the front grid (3) making sure that the logo in
the center of the plate is horizontal, parallel to the oor and ensure it by
using the screw provided (4).
Unscrew the lock ring of the back grille (7) by rotating it counterclockwise,
from the motor shaft (9).
Insert the back grille (8) on the motor shaft (9) so that the grip is pointed
upwards and the holes/pins match. Then x it with the grille lock ring (7)
by rotating it clockwise.
Insert the fan (6) on the motor shaft (9) and x it by rotating the lock ring
(5) counterclockwise.
Open the clip of the front grille (3) and place it on the back grille (8)
making sure that the logo in the central stud is placed horizontal, parallel
to the oor.
Find the proper position to tighten the safety screw (1).
Fill up the tank (19) following the instructions from paragraph “HOW TO
FILL UP THE TANK” and place it on the main body of the humidier (20).
Connect the misting tube (22) to the misting adjustment knob (2) and in
the lower part insert the the humidier cap (23) on the tank (19).
The assembly procedure is complete.
20
Page 21

HOW TO FILL THE TANK
Turn the humidier off by rotating the humidier knob counteclockwise
and disconnect the power cable from the socket.
Lift the tank of the humidier and turn it upside down.
Unscrew the cap of the tank by rotating it counterclockwise.
Fill the tank with cold and clean water (previously boiled).
In case of hard water in your area, use cold demineralized water in the
water tank (previously boiled) or distilled water.
Close the tank with the cap by rotating it clockwise.
Turn over the tank and place it on the main body of the humidier.
Instructions for use
Place the fan on a at, dry and stable surface and plug it to a proper
socket; the unit will emit a “BIP” sound and the “POWER” light indicator
is on. The misting fan can be controlled both from the control panel (11)
and remote control.
Batteries
Remote control is supplied with battery inside (CR2025 type); remove
the plastic sheet from the battery cover before use remote control. When
the battery is over, it must be replaced with the same type following the
drawing on the back of remote control.
21
Page 22

CONTROL PANEL AND DISPLAY LIGHTS
TIMER light indicators:
Oscillation light
indicator: OSC
Misting light
indicator: MIST
Power light
indicator: POWER
Control panel
OSC
MIST
POWER
OSC
1H0,5H 2H 4H
LOWHIGHMED
NORNAT SLEEP
OFF
TIMERON/SPEED
MIST
0,5H - 1H - 2H - 4H
SPEED light indicators::
Low - Med – High
OPERATING MODE light
indicators:
Nor - Nat – Sleep
Remote Control
Press the following buttons to select the function you need:
ON/SPEED
(button present both on the control panel and on the remote control):
press it to turn on the fan. While the fan is on, press it to select the speed
you need and select between Low (low speed), Med (average speed)
and High (maximum speed).
Each time you press the button to change the speed the related light
indicators will be turned on, on the display.
OFF
(button is present both on the control panel and on the remote control):
press it to turn off the fan. All the light indicators are off except for the
“Power” light indicator which shows that the fan is connected to the mains
supply.
MODE
(button present on the remote control):
while the fan is on, press it to select the operating mode you need, by
selecting between NOR (Normal), NAT (Natural) and SLEEP (Night).
NOR (Normal) - the fan operates according to the set speed
NAT (Natural) - the fan operates at an irregular speed between the
minimum and the maximum set speed, simulating the natural breeze.
SLEEP (Night) - the fan operates at an irregular speed as follows:
22
Page 23

- If the maximum speed (High) is set: the fan operates at maximum speed
on Natural mode for 30 minutes, and then it operates at average speed
on Natural mode for another 30 minutes to nally pass to low speed
on Natural mode. The speed operating light indicators are turned on/off
according to the operating mode.
- If the average speed (Middle) is set: the fan operates at average speed
on Natural mode for 30 minutes and then it operates at low speed on
Natural mode. The speed operating light indicators are turned on/off
according to the operating mode.
- If the low speed (Low) is set: the fan operates at low speed on Natural
mode creating a natural breeze.
Each time is pressed, the MODE button changes the operating mode and
so the light indicators are turned on, on the display.
TIMER
(button present both on the control panel and on the remote control):
while the fan is on, press the button to switch off the fan in a range
between 0, 5 and 7, 5 hours from the programming moment.
Each time you press the button, the time increases with 0, 5 hours. The
timer light indicators are turned on, on the display (0,5H, 1H, 2H, 4H).
The total operating time set before the automatic switching off is given
by the light indicators (for example if all the timer light indicators are on
during the operating time set before the automatic switching off, the total
operating time is given by:
0,5H (0,5 hours)+1H (1 hour)+2H (2 hours)+4H (4 hours)=7,5 hours
The timer light indicators are turned off/ on according to the operating
time remained.
To disable the timer function press the button until all the operating light
indicators are off, or turn off the fan manually by pressing the Off button.
OSC
(button present both on the panel and on the remote control):
press this button to enable the automatic oscillation from right to left.
The relative light indicator is turned on, on the display. To disable the
automatic oscillation, press again the button (the related light indicator is
turned off on the display).
MIST
(button present both on the panel and on the remote control):
press this button to enable the misting. Attention: before enabling this
function make sure there is water in the tank; in case you need to add
water please see the paragraph “HOW TO FILL UP THE TANK” Once the
tank is replaced on the main body of the humidier, press MIST button to
23
Page 24

activate the mist function. The indicator light placed on the control panel
of the humidier (21) turns on in green color.
You can adjust the intensity of the misting by rotating the adjustment
knob placed on the control panel of the humidier (21): if you rotate it
clockwise the intensity increases; if you rotate it counterclockwise the
misting intensity decreases.
The misting comes out of the knob in a few seconds after pressing the
button.
When the water is out, the misting function is disabled and the light
indicator of the adjustment knob turns red; we recommend you to disable
the misting function when the humidier is off or the tank is empty.
When the function is enabled the related light indicator is turned on, on
the display, and when the function is disabled the light indicator is turned
off on the display. The misting function can be enabled independently
from the ventilation; it is enough to turn off the fan by pressing the Off
button and then to press the Mist button.
VERTICAL SLOPE:
You can vertically point the front of the fan
choosing the desired angle. It is sufcient
to move the front of the fan up or down
according to the desired slope.
Maintenance
Before carrying out the regular cleaning operations turn off the fan and
unplug it.
DO NOT disassemble the fan: this fan cannot be disassembled.
For external cleaning use a soft and dry cloth.
DO NOT dip the device in water, or splash it with any other liquids.
DO NOT use solvents or any other chemical products for cleaning it.
When you do not use it, after cleaning it, store the fan in a dry place.
HUMIDIFIER
DAILY CLEANING
To reduce bacteria and scale residues, empty the water tank and the
water residues in the main body (20); rinse with clean water the tank
and the other parts in contact with water and dry them with a soft and
clean cloth.
WEEKLY CLEANING
Clean the water tank of the dehumidier at least once a week with a mild
24
Page 25

detergent and rinse with clean water by removing all residues.
If the nebulizing plate has mineral water residue use vinegar and wait for
2-5 minutes. Then, rinse the nebulizing plate with clean water. Never use
sharp or hard objects to clean the nebulizing plate.
Dry the tank and the other parts in contact with water using a soft and
clean cloth.
25
Page 26

User Information
BATTERIES - Remove the batteries from the appliance
before its disposal. Do not dispose the batteries with
domestic waste. The batteries must be disposed of in
the appropriate containers or in the specic collecting
centre. Suitable segregated collection helps prevent
damage to the environment and to human health.
To remove batteries, refer to Instructions for use.
USER INFORMATION
“Implementation of Directive 2012/19/EU on Waste
Electrical and Electronic Equipment (WEEE)”,
pertaining to reduced use of hazardous substances in
electrical and electronic equipment, as well as to waste
disposal”.
The symbol of the crossed-out wheelie bin on the
equipment or on its packaging indicates that the
product must be disposed of separately from other
waste at the end of its service life.
The user must therefore take the dismissed equipment
to suitable separate collection centres for electrical and
electronic waste, or return it to the dealer in case they
purchase a new device of equivalent type, at a one-
to-one-ratio.
Suitable segregated collection of the equipment for
subsequent recycling, treatment or environmentally-
friendly disposal helps prevent damage to the
environment and to human health, and encourages
the re-use and/or recycling of the materials that make
up the equipment.
Abusive disposal of the product by the user shall result
in the application of administrative nes in accordance
with the laws in force.
26
Page 27

GUARANTEE
Terms and Conditions
The guarantee is valid for 24 months.
This guarantee applies only if it has been duly lled in and is submitted
with the receipt showing the date of purchase.
The guarantee covers the replacement or repair of parts making up the
appliance which were faulty at source due to manufacturing faults.
After the guarantee has expired, the appliance will be repaired against
payment.
The manufacturer declines any responsibility for damage to persons,
animals or property due to misuse of the appliance and failure to observe
the directions contained in the instructions.
Limits
All rights under this guarantee and any responsibility on our part will be
voided if the appliance has been:
- mishandled by unauthorized persons
- improperly used, stored or transported.
The guarantee does not cover damage to the outward appearance or any
other that does not prevent regular operation.
If any faults should be found despite the care taken in selecting the
materials and in creating the product, or if any information or advice are
required, please contact your local dealer.
27
Page 28

Poly Pool S.p.A. Via Sottocorna, 21/B
24020 Parre (Bergamo) - Italy
5M39.211119
Tel. +39 035 4104000 r.a. - Fax +39 035 702716
http://www.ardes.it - e-mail: polypool@polypool.it
MADE IN CHINA
 Loading...