

Page 1

IT ISTRUZIONI PER L’USO
EN INSTRUCTIONS FOR USE
FR MODE D’EMPLOI
DE BEDIENUNGSANLEITUNG
ES FOLLETO DE INSTRUCCIONES
CZ NÁVOD K POUŽITÍ
SK NÁVOD NA OBSLUHU
VENTILATORE PIANTANA
STAND FAN
VENTILATEUR
FAN STEHEN
VENTILADOR
VENTILÁTOR
VENTILÁTOR
AR5EA40PR
Il presente apparecchio può essere
utilizzato dai bambini a partire da 8 anni in su
e da persone dalle ridotte capacità siche,
sensoriali o mentali, oppure con mancanza
di esperienza e di conoscenza se a loro è
stata assicurata un’adeguata sorveglianza,
oppure se hanno ricevuto istruzioni circa
l’uso in sicurezza dell’apparecchio e hanno
compreso i pericoli correlati.
I bambini non devono giocare con
l’apparecchio. Le operazioni di pulizia e di
manutenzione non devono essere effettuate
Page 2

dai bambini senza sorveglianza.
Se il cavo di alimentazione dovesse
essere danneggiato, deve essere sostituito
solamente presso i centri di assistenza
autorizzati dal costruttore.
Assicurarsi che il ventilatore sia scollegato
dalla rete di alimentazione prima di togliere
le griglie di protezione.
2
Page 3
Avvertenze IT
ATTENZIONE: leggere attentamente il presente libretto in quanto
contiene importanti istruzioni per la sicurezza di installazione, uso
e manutenzione.
Istruzioni importanti da conservare per riferimenti futuri.
I bambini NON devono giocare con il dispositivo.
Questo apparecchio dovrà essere destinato solo all’uso per il quale è
stato espressamente concepito; qualsiasi impiego non conforme alle
indicazioni contenute nel presente manuale è da considerarsi improprio
e pericoloso. Il produttore non può essere ritenuto responsabile per
eventuali danni derivanti da utilizzo improprio e/o irragionevole.
Questo apparecchio NON è idoneo per impiego in ambienti con
atmosfere esplosive (con presenza di sostanze inammabili sotto forma
di gas, vapore, nebbia o polvere, in condizioni atmosferiche in cui, dopo
l’accensione, la combustione si propaga nell’aria).
Gli elementi dell’imballaggio (sacchetti in plastica, polistirolo espanso,
etc.) non devono essere lasciati alla portata di bambini o incapaci in
quanto rappresentano potenziali fonti di pericolo.
L’installazione/assemblaggio del dispositivo dovrà essere effettuata/o
secondo le prescrizioni del costruttore. Una errata procedura può
causare danni a persone, animali o cose, per i quali il costruttore non
può essere ritenuto responsabile.
Posizionare ed utilizzare l’apparecchio su un piano d’appoggio
orizzontale e stabile.
Prima di utilizzare l’apparecchio vericare visivamente l’integrità del
medesimo e del suo cavo di alimentazione. In caso di dubbi rivolgersi a
personale qualicato.
Prima di alimentare l’apparecchio accertarsi che i suoi dati di
targa (tensione e frequenza) siano rispondenti a quelli della rete di
distribuzione elettrica e che la presa sia idonea al terminale del cavo di
cui l’apparecchio è dotato.
Vericare che l’impianto elettrico utilizzato per l’alimentazione sia dotato
delle adeguate protezioni a norma delle leggi in vigore.
NON alimentare l’apparecchio mediante prese multiple.
Evitare se possibile l’impiego di adattatori e/o prolunghe; qualora il loro
impiego si rendesse indispensabile utilizzare esclusivamente materiale
conforme alle vigenti norme di sicurezza e nel rispetto dei parametri
elettrici degli adattatori in questione.
L’apparecchio non deve essere acceso mediante temporizzatori esterni
e/o altri dispositivi di controllo remoto non espressamente previsti dal
presente manuale.
NON utilizzare né conservare il dispositivo in prossimità di fonti di calore
3
Page 4

localizzate (caloriferi, stufe etc.).
NON immergere l’apparecchio in acqua o altri liquidi; in caso di caduta
accidentalmente in acqua NON cercare di recuperarlo ma innanzitutto
scollegare immediatamente il cavo di alimentazione dalla presa elettrica.
Utilizzando l’apparecchio per la prima volta, assicurarsi di aver tolto ogni
etichetta o foglio di protezione che ne impedisca il corretto funzionamento.
Collegare e scollegare il cavo di alimentazione con le mani asciutte e
reggendolo saldamente.
Prima di inserire la spina nella presa di corrente assicurarsi che il
pulsante di avviamento dell’apparecchio sia in posizione “OFF” (spento).
Svolgere sempre totalmente il cavo di alimentazione onde evitare
surriscaldamenti, evitare in ogni caso di tenderlo (non tirarlo, strattonarlo,
né utilizzarlo per trascinare il dispositivo cui è collegato).
Evitare di posizionare il cavo di alimentazione su superci abrasive
o taglienti o comunque in posizioni dove può essere facilmente
danneggiato.
NON ostruire né totalmente né parzialmente le prese d’aria nè inserirvi
oggetti all’interno.
Durante il funzionamento non toccare il dispositivo con parti del corpo
bagnate o umide, in ogni caso si consiglia di interporre fra se e il piano
di appoggio un elemento isolante (ad esempio indossando scarpe con
suola in gomma).
Durante l’uso l’apparecchio deve essere tenuto a distanza di sicurezza da
qualsiasi oggetto e/o sostanza inammabile o potenzialmente esplosiva.
In caso di funzionamento anomalo o di anomalie durante il funzionamento
spegnere subito l’apparecchio, scollegarlo dall’alimentazione, vericare
le cause delle anomalie riscontrate eventualmente con l’aiuto di personale
qualicato. Evitare in ogni caso di effettuare operazioni non previste dal
presente manuale d’uso (come smontarlo e/o modicarlo).
Ricordarsi di scollegare sempre il cavo di alimentazione del dispositivo
per periodi di inutilizzo prolungati, prima di riporlo e prima di effettuare
qualsiasi operazione di pulizia o manutenzione.
Conservare e utilizzare l’apparecchio esclusivamente in ambienti interni
o in ogni caso protetto da agenti atmosferici come pioggia, irraggiamento
diretto del sole o polvere.
L’apparecchio non è progettato per l’uso o la conservazione in esterno.
La pulizia e manutenzione del dispositivo NON deve essere effettuata da
bambini senza la supervisione di un adulto.
Prima di scollegare l’apparecchio spegnerlo mediante l’apposito
comando sul pannello di controllo.
Allorché si decida di non utilizzare più un apparecchio di questo tipo, si
raccomanda di rendere innocue quelle parti dell’apparecchio che possono
costituire un pericolo per le persone o di smaltirle compatibilmente con
le normative vigenti in merito. NON alimentare il dispositivo senza prima
4
Page 5

averlo correttamente assemblato seguendo le istruzioni del presente
manuale.
Posizionare l’apparecchio ad una adeguata distanza da oggetti o pareti
circostanti in modo tale che il suo funzionamento non possa essere
causa di danni accidentali.
NON utilizzare il dispositivo in prossimità di fornelli a gas o amme libere
in generale.
NON utilizzare il dispositivo in prossimità di tende o tessuti liberi.
NON appendere il ventilatore ad una parete od al softto salvo tale
modalità di installazione non sia espressamente prevista e spiegata nel
presente manuale.
NON coprire in alcun modo il dispositivo durante il funzionamento.
NON inserire oggetti o parti del corpo nella griglia di protezione della
ventola.
NON lasciare l’apparecchio incustodito per lunghi periodi durante il
funzionamento.
NON rimanere esposti per lunghi periodi al usso d’aria generato dal
dispositivo in funzione, può provocare danni alla salute.
Se il ventilatore deve essere immagazzinato per lungo tempo e non usato
regolarmente, riporre il ventilatore nel suo imballo originale e metterlo in
un luogo secco ed asciutto. Quando lo si usa per la prima volta dopo un
lungo periodo di inutilizzo, controllare che il ventilatore sia pulito e che le
pale del motore girino liberamente (a dispositivo non alimentato) senza
alcun freno.
AVVERTENZE PER LE BATTERIE:
1. TENERE LE BATTERIE FUORI DALLA PORTATA DEI BAMBINI.
L’ingestione può provocare ustioni chimiche, perforazione dei
tessuti molli e morte. Ustioni gravi possono insorgere entro 2 ore
dall’ingestione. Consultare immediatamente un medico.
2.Non permettere ai bambini di sostituire le batterie.
3. Inserire correttamente le batterie, facendo attenzione alle polarità (+ e
-) marcate sulle batterie e sull’apparecchio.
4.Le batterie non devono essere messe in cortocircuito.
5.Non caricare le batterie.
6.Non forzare la scarica delle batterie.
7. Non utilizzare tra loro batterie nuove e usate o batterie di diverso tipo
o di diversi produttori.
8. Le batterie scariche devono essere rimosse immediatamente
dall’apparecchio e smaltite correttamente, secondo le leggi in vigore.
9.Non scaldare le batterie e non esporle a fonti di calore.
10.Non saldare direttamente le batterie.
11.Non smontare le batterie.
12.Non deformare le batterie.
5
Page 6

13.Non buttare e non smaltire le batterie nel fuoco.
14. Non mettere a contatto con l’acqua o l’umidità, in particolare nel caso
in cui il contenitore della batteria dovesse essere danneggiato.
15.Non incapsulare e non modicare le batterie.
16. Conservare le batterie non utilizzate nel loro imballaggio originale
lontano da oggetti metallici. Se già rimosse dall’imballaggio, non
mischiare o mescolare le batterie.
17. Se si intende non utilizzare l’apparecchio per un periodo di tempo
prolungato, rimuovere le batterie.
18. Pulire i contatti delle batterie e quelli dell’apparecchio prima di inserire
le batterie.
19. In caso di perdite dalle batterie, evitare qualsiasi contatto con il
materiale fuoriuscito; in caso contatto, sciacquare la parte interessata
con acqua e consultare un medico.
6
Page 7
Informazioni tecniche
3
B
11
16
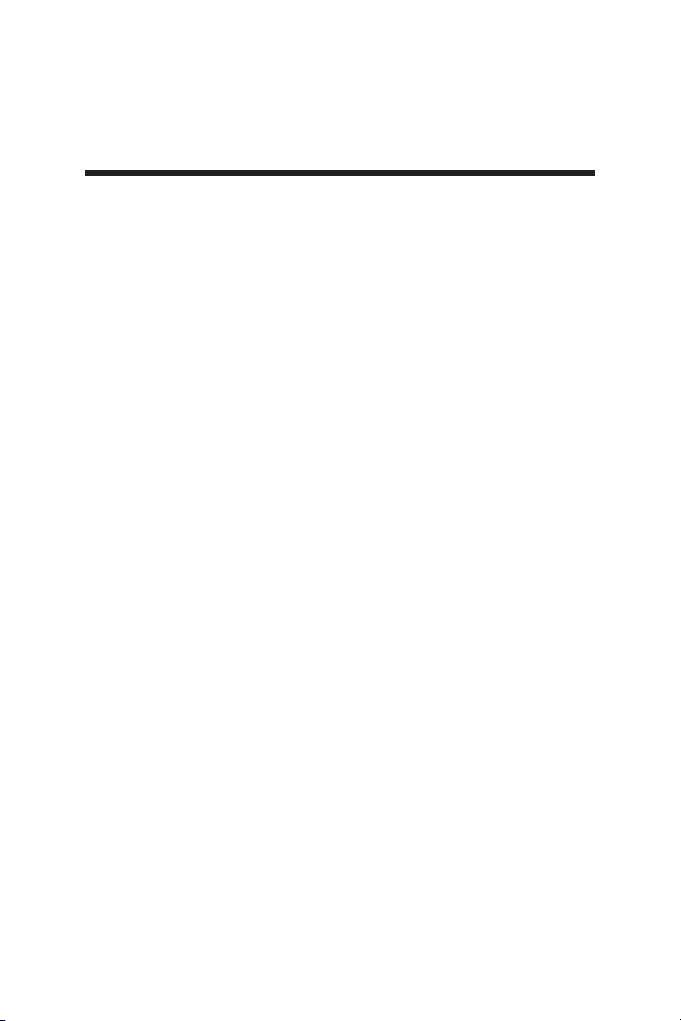
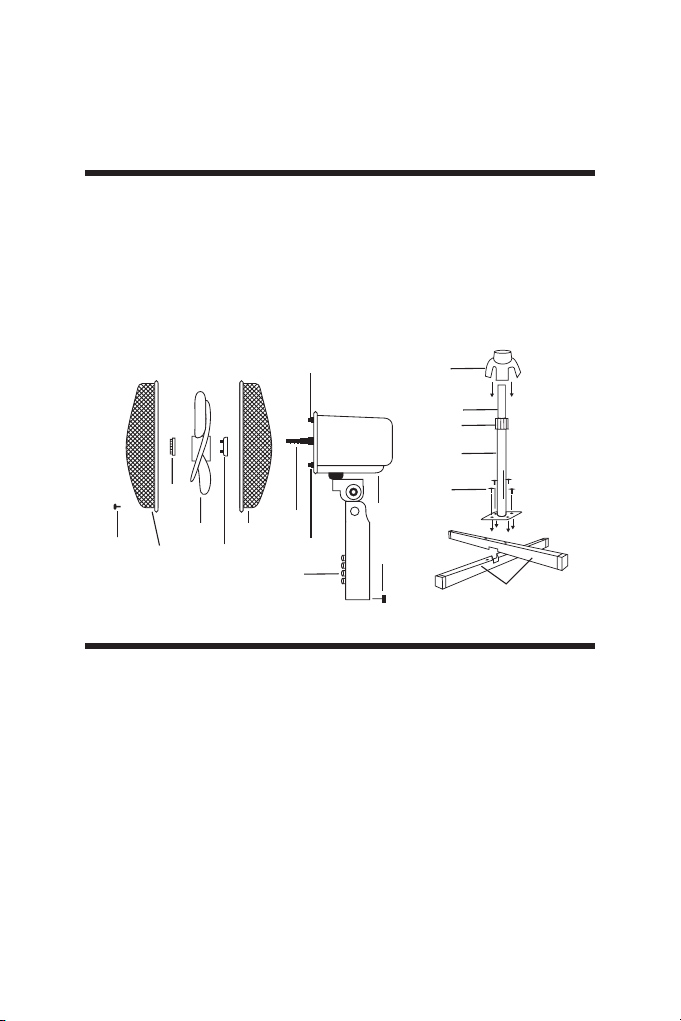
1. Griglia anteriore
2. Ghiera di ssaggio ventola
3. Vite di sicurezza
4. Ventola
5. Ghiera di ssaggio griglia
posteriore
6. Griglia posteriore
7. Albero motore
8. Corpo motore
9. Pannello comandi
10. Vite corpo principale
11. Piccola base decorativa
12. Asta di regolazione
13. Manopola regolazione altezza
14. Asta base
15. Viti per ssaggio asta base
(4 pcs.)
16. Base a croce
A-B. Pin di incastro della griglia
posteriore
12
13
14
2
4
1
5
7
6
A
9
15
8
10
Assemblaggio
1. Svitare le viti (15) dai due pezzi che formano la base a croce (16).
2. Incastrare i due pezzi che formano la base a croce (16) come mostrato
in gura
3. Svitare la manopola di regolazione altezza (13) dall’asta base (14) ed
inserire la piccola base decorativa (11).
4. Estrarre l’asta di regolazione (12) dall’asta base (14) quindi riavvitare
la manopola di regolazione altezza (13) sull’asta base (14).
5. Avvitare l’asta base (14) con le viti (15) svitate in precedenza sulla
base a croce (16).
6. Allentare la vite del corpo principale (10).
7. Inserire il corpo principale sull’asta di regolazione (12). Stringere la vite
(10) per assicurarlo.
7
Page 8

8. Svitare la ghiera di ssaggio della griglia posteriore (5) dall’albero
motore (7) ruotandola in senso antiorario.
9. Inserire la griglia posteriore (6) sull’albero motore (7) in modo che la
maniglia posta sul retro di essa sia rivolta verso l’alto e che i due pin di
incastro (A-B) si inseriscano sui fori della griglia posteriore. Avvitare la
ghiera di ssaggio (5) ruotandola in senso orario.
10. Inserire la ventola (4) sull’albero motore (7) e ssarla ruotando in
senso antiorario l’apposita ghiera di ssaggio (2).
11. Aprire le clip della griglia anteriore (1) e posizionarla sulla griglia
posteriore (6) in modo che il logo sulla borchia centrale sia in posizione
orizzontale parallela al pavimento.
12. Trovata la giusta posizione chiudere le clip e inserire la vite di
sicurezza griglia (3).
Istruzioni d’uso
Posizionare il ventilatore su una supercie piana, asciutta e stabile ed
inserire la spina del ventilatore in una presa di corrente adeguata; l’unità
emetterà un suono “BIP” ad indicare che il prodotto è collegato alla rete
elettrica.
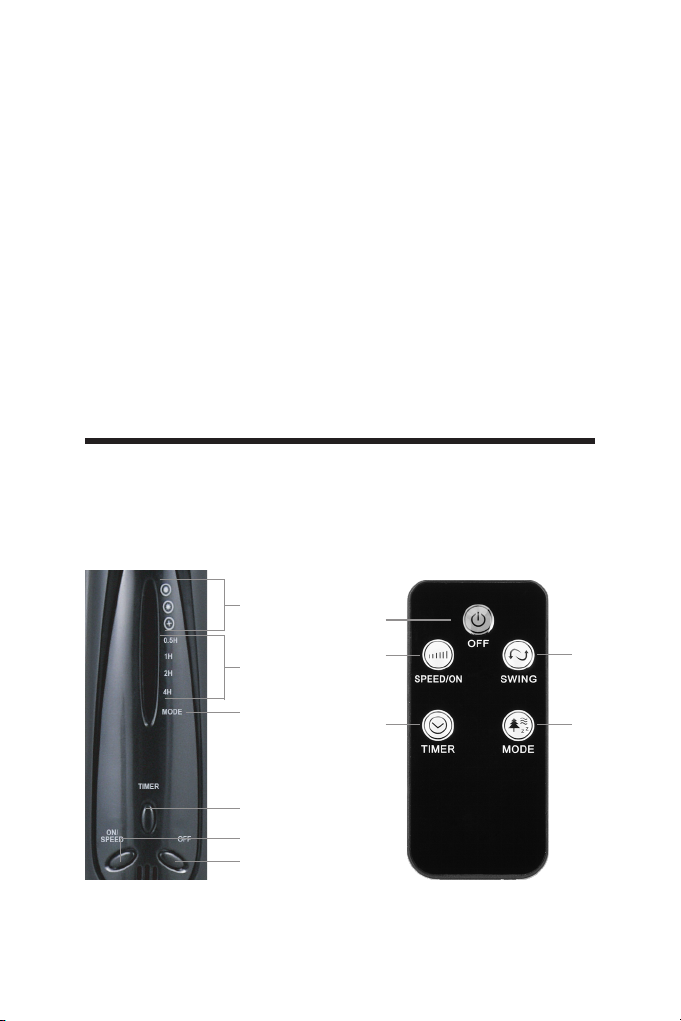
Il ventilatore è comandabile sia dal pannello comandi posto sul corpo
principale sia dal telecomando fornito in dotazione.
Pannello comandi Telecomando
X
Y
Z
D
B
8
A
A
B
D
E
C
Page 9

Pulsanti
A. Off
B. On/Speed
C. Mode
D. Timer
E. Swing
Batterie
Il telecomando viene fornito con batteria (tipo CR2025); rimuovere la
plastica protettiva dal vano batteria del telecomando prima dell’utilizzo.
Quando la batteria è esaurita, essa deve essere sostituita con una dello
stesso tipo seguendo i disegni riportati sul retro del telecomando.
Pulsante OFF(A):
Premere questo pulsante a ventilatore acceso per spegnere l’unità.
Pulsante ON/SPEED (B):
Premere questo pulsante a ventilatore spento per accendere l’unità.
Premere questo pulsante a ventilatore acceso per selezionare la velocità
desiderata a scelta tra minima, media o massima. Gli indicatori luminosi
di velocità (X) si accendo sul pannello comandi.
Pulsante MODE (C) - solo sul telecomando:
Premere questo pulsante a ventilatore acceso per selezionare la modalità
di funzionamento desiderata a scelta tra: normale (l’indicatore luminoso
(Z) si accende in colore rosso sul pannello comandi), naturale (l’indicatore
luminoso (Z) si spegne sul pannello comandi) o notturna (l’indicatore
luminozo (Z) si accende in colore verde sul pannello comandi).
Pulsante TIMER (D):
Premere questo pulsante a ventilatore acceso per programmare lo
spegnimento differito del ventilatore in un intervallo tra 0,5 ore e 7,5
ore dal momento della programmazione. Ad ogni pressione il tempo
aumenta di 0,5 ore e gli indicatori luminosi relativi al timer (indicati con
0,5H - 0,5 ore; 1H - 1 ora; 2H - 2 ore; 4H - 4 ore) si accendono sul
pannello comandi. Il tempo totale prima dello spegnimento automatico
è dato dalla somma delle indicazioni accese. Per eliminare la funzione
timer premere ripetutamente questo tasto no a che tutte le indicazioni
luminose relative al timer sono spente oppure spegnere manualmente il
ventilatore. Quando tutti gli indicatori luminosi sono spenti signica che il
timer non è stato impostato e che il prodotto funzionerà in modo continuo
no allo spegnimento manuale.
Indicatori luminosi
X. indicatori luminosi velocità
Y. indicatori luminosi timer
Z. indicatori luminosi modo di
funzionamento
9
Page 10
Pulsante SWING (E) - solo sul telecomando:
Premere questo pulsante a ventilatore acceso per attivare l’oscillazione
automatica da destra a sinistra. Per disattivare l’oscillazione premere
nuovamente questo tasto.
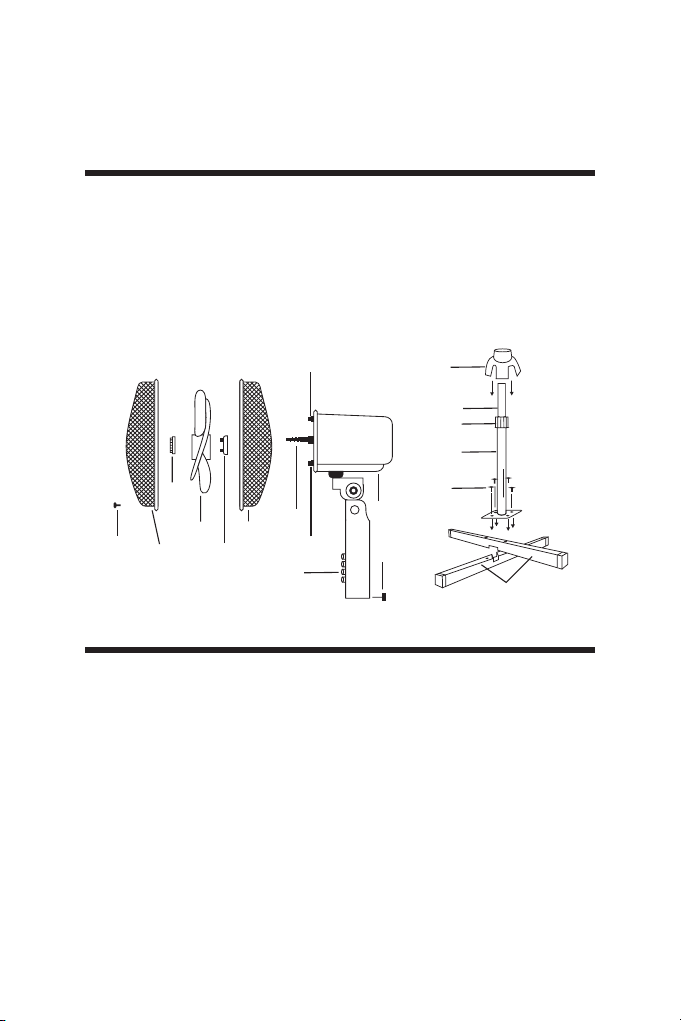
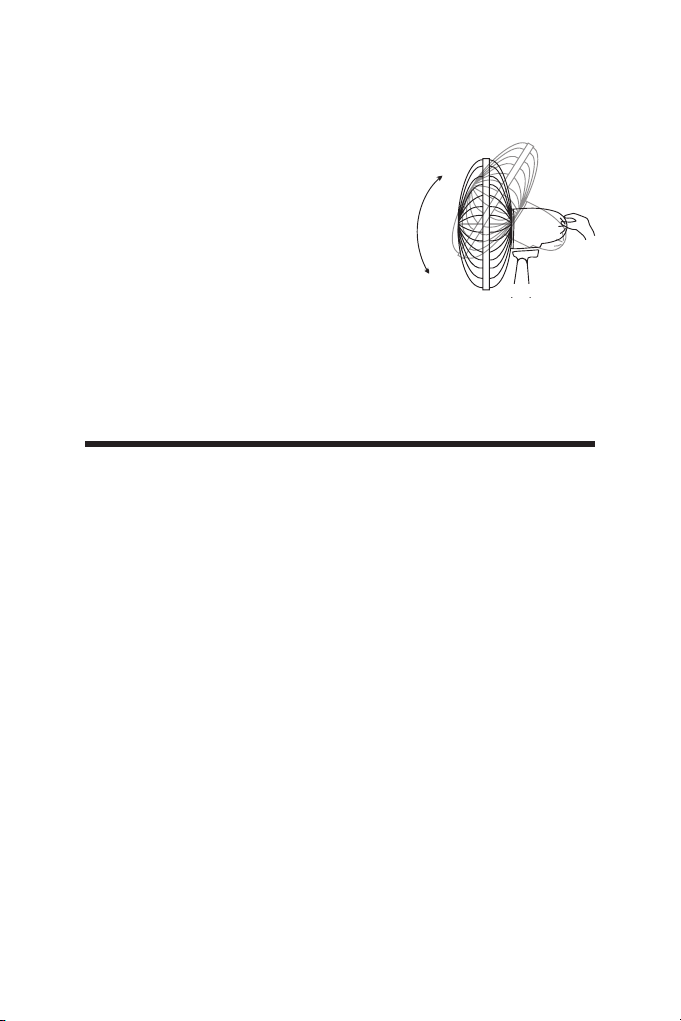
INCLINAZIONE VERTICALE
E’ possibile orientare la testa del ventilatore in
senso verticale scegliendo l’angolo desiderato.
E’ sufciente regolare la testa del ventilatore
muovendola delicatamente verso l’alto o verso
il basso secondo l’inclinazione desiderata.
REGOLAZIONE DELL’ALTEZZA
Allentare la manopola regolazione altezza (13), quindi regolate il
ventilatore all’altezza desiderata. Stringere bene la manopola una volta
regolata l’asta.
N.B: questa operazione deve essere sempre eseguita a ventilatore
spento.
Manutenzione
Prima di eseguire le normali operazioni di pulizia spegnere il ventilatore
e scollegarlo dalla rete di alimentazione elettrica.
Per la pulizia esterna utilizzare un panno sofce ed asciutto.
NON SMONTARE il ventilatore: questo ventilatore non è smontabile.
NON immergere il ventilatore in acqua, nè spruzzarlo con liquidi di alcun
tipo.
NON utilizzare solventi o altri prodotti chimici per la pulizia.
Quando non utilizzato, dopo la pulizia conservare il ventilatore in un
luogo asciutto.
10
Page 11

Smaltimento
BATTERIE - Rimuovere le batterie dall’apparecchio
prima dello smaltimento. Non gettare le batterie nei
riuti domestici. Lo smaltimento delle batterie deve
avvenire negli appositi contenitori o negli specici
centri di raccolta. L’adeguata raccolta differenziata
contribuisce ad evitare possibili effetti negativi
sull’ambiente e sulla salute.
Per rimuovere le batterie, seguire le indicazioni delle
Istruzioni d’uso.
SMALTIMENTO
Informazione agli utenti: ai sensi dell’art. 26 del
Decreto Legislativo 14 marzo 2014, n. 49 “Attuazione
della direttiva 2012/19/UE sui riuti di apparecchiature
elettriche ed elettroniche (RAEE)” Il simbolo del
cassonetto barrato riportato sull’apparecchiatura o
sulla sua confezione indica che il prodotto alla ne della
propria vita utile deve essere raccolto separatamente
dagli altri riuti. L’utente dovrà,pertanto, conferire
l’apparecchiatura giunta a ne vita agli idonei
centri comunali di raccolta differenziata dei riuti
elettrotecnici ed elettronici. In alternativa alla gestione
autonoma è possibile consegnare l’apparecchiatura
che si desidera smaltire al rivenditore, al momento
dell’acquisto di una nuova apparecchiatura di tipo
equivalente. Presso i rivenditori di prodotti elettronici
con supercie di vendita di almeno 400 m² è inoltre
possibile consegnare gratuitamente, senza obbligo di
acquisto, i prodotti elettronici da smaltire con dimensioni
inferiori a 25 cm. L’adeguata raccolta differenziata
per l’avvio successivo dell’apparecchiatura dismessa
al riciclaggio, al trattamento e allo smaltimento
ambientalmente compatibile contribuisce ad evitare
possibili effetti negativi sull’ambiente e sulla salute e
favorisce il reimpiego e/o riciclo dei materiali di cui è
composta l’apparecchiatura.
11
Page 12

GARANZIA
Condizioni
La garanzia ha validità 24 mesi dalla data d’acquisto.
La presente garanzia è valida solo se viene correttamente compilata ed
accompagnata dallo scontrino scale che ne prova la data di acquisto.
L’apparecchio deve essere consegnato esclusivamente presso un nostro
Centro Assistenza autorizzato.
Per garanzia si intende la sostituzione o la riparazione dei componenti
dell’apparecchio che risultano difettosi all’origine per vizi di fabbricazione.
Viene comunque garantita l’assistenza (a pagamento) anche a prodotti fuori
garanzia.
Il consumatore è titolare dei diritti applicabili dalla legislazione nazionale
disciplinante la vendita dei beni di consumo; questa garanzia lascia
inpregiudicati tali diritti.
La Casa costruttrice declina ogni responsabilità per eventuali danni a
persone, animali o cose, conseguenti ad uso improprio dell’apparecchio
e alla mancata osservanza delle prescrizioni indicate nell’apposito libretto
istruzioni.
Limitazioni
Ogni diritto di garanzia e ogni nostra responsabilità decadono se l’apparecchio
è stato:
-Manomesso da parte di personale non autorizzato.
-Impiegato, conservato o trasportato in modo improprio.
Sono comunque escluse dalla garanzia le perdite di prestazioni estetiche o
tali da non compromettere la sostanza delle funzioni.
Se nonostante la cura nella selezione dei materiali e l’impegno nella
realizzazione del prodotto che Lei ha appena acquistato si dovessero
riscontrare dei difetti, o qualora avesse bisogno di informazioni, Vi
consigliamo di telefonare al rivenditore di zona.
12
Page 13
This appliance may be used by children 8 years of
age and older and people with reduced physical,
sensory or mental capacities or with a lack of
experience and knowledge if they are adequately
supervised or have been instructed on the safe
use of the appliance and are aware of the related
dangers.
Children must not play with the appliance.
Cleaning and maintenance must not be performed
by children unless they are under supervision.
Cleaning and maintenance operations must not
be performed by children without supervision.
If the power cable gets damaged, it has to be
replaced only at a service centre approved by the
manufacturer.
Ensure that the fan is switched off from the supply
mains before removing the guard.
Warnings
ATTENTION : read this booklet carefully it contains important
instructions for a safe installation, use and maintenance.
Important instructions to be kept for future reference.
It is forbidden for the children to play with the device.
This device must be used only for the purpose it was expressly designed;
any use not complying with the instructions contained in the manual is
considered inappropriate and dangerous. The manufacturer is not
responsible for possible damages caused by the inappropriate and/or
unreasonable use.
GB
13
Page 14

This device is NOT suitable to use it in an explosive environment (in the
presence of ammable substances such as gas, vapor, mist or dust, in
atmospheric conditions when, after ignition, the combustion is spread in
the air).
The packing materials (plastic bags, expanded polystyrene, etc.) must be
kept out of the reach of children or disabled persons since they represent
potential sources of danger.
This device must be used only for the purpose it was expressly designed;
any use not complying with the instructions contained in the manual is
considered inappropriate and dangerous. The manufacturer is not
responsible for possible damages caused by the inappropriate and/or
unreasonable use.
This device is NOT suitable to use it in an explosive environment (in the
presence of ammable substances such as gas, vapor, mist or dust, in
atmospheric conditions when, after ignition, the combustion is spread in
the air).
The packing materials (plastic bags, expanded polystyrene, etc.) must be
kept out of the reach of children or disabled persons since they represent
potential sources of danger.
The installation/assembly of the device will be made/ or according to the
indications of the manufacturer. A wrong procedure may cause damages
to persons, animals or objects, for which the manufacturer cannot be
considered responsible.
Place and use the device on a horizontal and stable surface.
Before use check the integrity of the device and power cable. In case you
are not sure contact a qualied person.
Before powering the device make sure the rating (voltage and frequency)
corresponds to the grid and the socket is suitable for the plug of the
device.
Make sure the power system is equipped with proper protection according
to the law in force.
DO NOT power the device using multiple sockets.
If possible, avoid the use of adapters and/or extension cables; if their
use is absolutely necessary, use only materials in compliance with the
current safety regulations and according to the electrical parameters of
the adapters.
The device must not be switched on using external timers and/or other
remote control devices which are not specied in this manual.
DO NOT use or store the device near heat sources (heaters, stoves etc.).
DO NOT dip the device in water or other liquids; in case the accidental fall
in the water DO NOT try to take it out, but rst of all unplug immediately
the power cable from the socket.
If you use the device for the rst time, make sure to remove any label or
protective sheet which blocks its proper functioning.
14
Page 15

Plug and unplug the power cable with dry hands and hold it rmly.
Before plugging make sure the start button of the device is in the “OFF”
position (turned off).
Always unplug the power cable to avoid the overheating and avoid
stretching it (do not pull it, tug it or use it to drag the device to which is
connected).
Avoid placing the power cable on abrasive or sharp surfaces or in
positions where it can be damaged easily.
DO NOT obstruct totally nor partially the air vents or inserts objects
inside.
During the functioning do not touch the device with wet body parts, and
in any case it is recommended to have between you and the standing
surface, an isolating element (for example wearing shoes with rubber
soles).
During the use the device must be keep at a safety distance from any
object and/or ammable or potentially explosive substance.
In case of malfunction or anomalies during the functioning, switch off
the device immediately, turn off the power and check the cause of the
anomalies, if possible, with the support of a qualied person. Avoid
carrying out operations which are not specied in this manual (such as
disassembling and/or altering).
Always remember to unplug the power cable of the device if it is not used
for a long period, before storing, cleaning or performing any maintenance
operation.
Store and use the device only indoor or in any case protected from
weathering such as rain, direct radiation of the sun and dust. The device
is not design for the external use or storage.
The cleaning and maintenance of the device MUST NOT be done by
children without the supervision of an adult.
Before unplugging the device, switch it off, using the proper command
on the control panel.
DO NOT hang the fan on the wall or ceiling unless this type of installation
is provided and explained in this manual.
Place the device at a proper distance from the objects or surrounding
walls making sure that its functioning will not cause accidental damages.
DO NOT use the device near gas stoves or open ames in general.
DO NOT use the device near curtains or textiles.
DO NOT hang the fan on the wall or ceiling unless this type of installation
is provided and explained in this manual.
DO NOT cover the device during functioning.
DO NOT insert objects or body parts inside the protection grille of the fan.
DO NOT leave the device unsupervised for a long period during
functioning.
DO NOT expose yourself for a long period to the air ow generated by the
15
Page 16

device because it can cause damage to the health.
If the fan must be stored for a long period and is not used regularly, place
the fan in its original packaging in a dry place. When you use it for the
rst time after a long period of inactivity, make sure the fan is clean and
the motor blades turn feely (with the device not powered) without any
restraint.
WARNINGS ABOUT BATTERIES
1. KEEP BATTERIES OUT OF THE REACH OF CHILDREN.
Swallowing can lead to chemical burns, perforation of soft tissue,
and death. Severe burns can occur within 2 hours of ingestion. Seek
medical attention immediately.
2. Do not allow children to replace batteries.
3. Always insert batteries correctly with regard to polarity (+ and -)
marked on the battery and the equipment.
4. Do not short-circuit batteries.
5. Do not charge batteries.
6. Do not force discharge batteries.
7. Do not mix new and used batteries or batteries of different types or
brands.
8. Exhausted batteries should be immediately removed from
equipment and properly disposed of.
9. Do not heat batteries
10. Do not weld or solder directly to batteries.
11. Do not dismantle batteries.
12. Do not deform batteries.
13. Do not dispose of batteries in re.
14. Do not expose batteries to water or humidity, expecially in case their
container were damaged.
15. Do not encapsulate and/or modify batteries.
16. Store unused batteries in their original packaging away from
metal objects. If already unpacked, do not mix or jumble batteries.
17. Remove batteries from equipment if it is not to be used for an
extended period of time unless it is for emergency purposes.
18. Clean the battery contacts and also those of the equipment prior to
battery installation.
19. In case of leak from batteries, avoid any contact with it; in case of
contact, wash the affected part with water and seek medical attention.
16
Page 17
Technical informations
3
11
16
1. Front grille
2. Lock ring of the fan
3. Safety screw of the fan
4. Fan
5. Lock ring of the back grille
6. Back grille
7. Motor shaft
8. Motor
9. Control panel
10. Main body screw
11. Small decorative base
12. Adjustment rod
13. Height adjustment knob
14. Base rod
15. Screws for xing the base rod
(4 pieces)
16. Cross base
A-B. Locking pin for the rear grille
B
12
13
14
2
4
1
5
7
6
A
9
15
8
10
Assembling
1. Unscrew the screws (15) from the two parts which form the basis of
the cross (16).
2. Fit the two parts which form the basis of the cross (16) as is shown in
the picture.
3. Unscrew the height adjustment knob (13) from the base rode (14) and
insert the small decorative base (11).
4. Pull out the adjustment rod (12) from the base rod (14) then tighten the
height adjustment knob (13) on the base rod (14).
5. Tighten the base rod (14) with the screws (15) previoulsy unscrewed
from the cross base (16).
6. Loosen the screw of the main body (10).
7. Insert the main body on the adjustment rod (12). Tighten the screw
17
Page 18
(10) for xing it.
8. Unscrew the locking ring of the rear grille (5) from the motor shaft (7)
by turning it counterclockwise.
9. Insert the rear grille (6) on the motor shaft (7) making sure that the
handle on the back is facing upwards and the locking pins (A-B) are
matching the holes of the rear grille. Screw the locking ring (5) by
turning it clockwise.
10. Place the blade (4) on the motor shaft (7) and secure it by turning
counterclockwise the locking ring (2).
11. Insert the fan (4) on the motor shaft (7) and fasten the lock ring (2) by
turning it clockwise.
12. Open the clips of the front grille (1) and place it on the back grille (6)
making sure that the logo on the central stud is placed horizontally,
parallel with the oor.
13. Find the proper position to lock the clips and insert the safety screw
of the grille (3).
Instructions for use
Place the fan on a at, dry and stable surface, and insert the plug of the
fan in a socket; the unit will emit a short “BIP” sound indicating that power
is supplied.
For your convenience the unit can be operated by using control panel in
the main body or using remote control included.
Control panel Remote control
18
X
Y
Z
D
B
A
A
B
D
E
C
Page 19

Buttons
A. Off
B. On/Speed
C. Mode
D. Timer
E. Swing
Batteries
Remote control is supplied with battery inside (CR2025 type); remove
the plastic sheet from the battery cover before use remote control. When
the battery is over, it must be replaced with the same type following the
drawing on the back of remote control.
OFF Button (A):
Press this button when the unit is on, to turn it off.
ON/SPEED Button (B):
Press this button when the unit is off to turn it on.
Press this button when unit is on to select the desired speed: low speed,
medium speed or high speed; the related indicator light of speed (X) will
turn on in the control panel.
MODE Button (C) - only from remote control:
Press this button when unit is on to select the desired mode: normal (red
indicator light of mode (Z) will turn on in the control panel), natural mode
(the indicator light of mode (Z) will turn off in the control panel) or sleeping
mode (green indicator light of mode (Z) will turn on in the control panel).
TIMER Button (D):
When the unit is operating, you can set the timer to switch the fan off
automatically after the set time. Press this button repeatedly to select the
desired time period in half hours increments from 0,5 hours to 7,5 hours.
The related indicator light of timer (0,5H, 1H, 2H, 4H) will illuminate on
the control panel. When all the indicators light are off means that timer is
not setted and the unit will continuously work until you switch off manually
the unit.
SWING Button (E) - only from remote control:
Press this button when unit is on to activate the automatic oscillation
from left to right. To deactivate the automatic oscillation press again this
button.
Indicator light
X. indicator light of speeds
Y. indicator light of timer
Z. indicator light of mode
19
Page 20
VERTICAL SLOPE:
You can vertically point the front of the fan
choosing the desired angle. It is sufcient to
move the front of the fan up or down according
to the desired slope.
ADJUSTMENT HEIGHT.
Loosen the height adjustment knob (13), then set the desired height for
the fan. Tighten rmly the knob after adjusting the rod.
N.B: this operation must always be carried out while the fan is turned off.
Maintenance
Before carrying out the regular cleaning operations turn off the fan and
unplug it.
For external cleaning use a soft and dry cloth.
DO NOT disassemble the fan: this fan cannot be disassembled.
DO NOT dip the device in water, or splash it with any other liquids.
DO NOT use solvents or any other chemical products for cleaning it.
When you do not use it, after cleaning it, store the fan in a dry place.
20
Page 21
User Information
BATTERIES - Remove the batteries from the appliance
before its disposal. Do not dispose the batteries with
domestic waste. The batteries must be disposed of in
the appropriate containers or in the specic collecting
centre. Suitable segregated collection helps prevent
damage to the environment and to human health.
To remove batteries, refer to Instructions for use.
USER INFORMATION
“Implementation of Directive 2012/19/EU on Waste
Electrical and Electronic Equipment (WEEE)”,
pertaining to reduced use of hazardous substances in
electrical and electronic equipment, as well as to waste
disposal”.
The symbol of the crossed-out wheelie bin on the
equipment or on its packaging indicates that the
product must be disposed of separately from other
waste at the end of its service life.
The user must therefore take the dismissed equipment
to suitable separate collection centres for electrical and
electronic waste, or return it to the dealer in case they
purchase a new device of equivalent type, at a one-
to-one-ratio.
Suitable segregated collection of the equipment for
subsequent recycling, treatment or environmentally-
friendly disposal helps prevent damage to the
environment and to human health, and encourages
the re-use and/or recycling of the materials that make
up the equipment.
Abusive disposal of the product by the user shall result
in the application of administrative nes in accordance
with the laws in force.
21
Page 22

GUARANTEE
Terms and Conditions
The guarantee is valid for 24 months.
This guarantee applies only if it has been duly lled in and is submitted
with the receipt showing the date of purchase.
The guarantee covers the replacement or repair of parts making up the
appliance which were faulty at source due to manufacturing faults.
After the guarantee has expired, the appliance will be repaired against
payment.
The manufacturer declines any responsibility for damage to persons,
animals or property due to misuse of the appliance and failure to observe
the directions contained in the instructions.
Limits
All rights under this guarantee and any responsibility on our part will be
voided if the appliance has been:
- mishandled by unauthorized persons
- improperly used, stored or transported.
The guarantee does not cover damage to the outward appearance or any
other that does not prevent regular operation.
If any faults should be found despite the care taken in selecting the
materials and in creating the product, or if any information or advice are
required, please contact your local dealer.
22
Page 23

L’appareil peut être utilisé par des enfants âgés
d’au moins 8 ans et par des personnes ayant des
capacités physiques, sensorielles ou mentales
réduites, ou sans expérience ou les connaissances
nécessaires, à condition qu’elles soient sous
surveillance ou après que ces dernières aient
reçu des instructions sur l’utilisation en toute
sécurité de l’appareil et qu’elles aient compris les
risques inhérents à ce dernier.
Les enfants ne doivent pas jouer avec l’appareil.
Le nettoyage et l’entretien qui doit être effectué
par l’utilisateur ne doivent pas être effectués par
des enfants sans surveillance.
Si le câble d’alimentation devait être endommagé,
il faut le remplacer uniquement auprès des centres
d’assistance autorisés par le constructeur, an de
prévenir chaque risque.
Assurez-vous que le ventilateur est débranché de
la prise avant de retirer les grilles de protection.
23
Page 24

AVERTISSEMENTS FR
ATTENTION : lire soigneusement les avertissements contenus
dans le mode d’emploi qui fournit des indications importantes
concernant la securité de l’installation, d’usage et d’entretien.
Instructions importantes à conserver pour tout autre consultation.
Conservez la garantie, le ticket de caisse et le mode d’emploi pour tout
autre consultation.
Les enfants NE doivent PAS jouer avec l’appareil.
Cet appareil devra être destiné uniquement à l’utilisation pour laquelle
il a été conçu ; tout usage non conforme aux indications contenues
dans cette notice est impropre et dangereux. Le fabricant décline toute
responsabilité pour les dommages dérivant de l’utilisation impropre et/
ou déraisonnable.
Cet appareil N’est PAS conçu pour fonctionner en milieux à atmosphères
explosives (en présence de substances inammables sous forme de
gaz, vapeur, brouillard ou poussière, en conditions atmosphériques où,
après l’allumage, la combustion se propage dans l’air).
Les éléments de l’emballage (sachets en plastique, polystyrène expansé,
etc.) ne doivent pas être laissés à la portée des enfants ou de personnes
incompétentes car ils représentent des sources de danger potentiel.
L’installation/assemblage du dispositif devra être effectué(e) selon
les consignes du fabricant. Une mauvaise procédure peut provoquer
des dommages aux personnes, animaux ou choses, pour lesquels le
fabricant ne peut être retenu responsable.
Positionner et utiliser l’appareil sur un plan d’appui horizontal et stable.
Vérier, avant d’utiliser l’appareil, son état et celui du cordon
d’alimentation. En cas de doutes, s’adresser au personnel qualié.
S’assurer, avant d’alimenter l’appareil, que les données de la plaque
(tension et fréquence) correspondent à celles du réseau de distribution
électrique et que la prise est conforme à la che du câble de l’appareil.
Vérier que l’installation électrique utilisée pour l’alimentation est dotée
des protections conformes aux lois en vigueur. Il NE faut PAS alimenter
l’appareil avec des multiprises.
Éviter, si possible, l’utilisation d’adaptateurs et/ou de rallonges ; si leur
utilisation s’impose, utiliser exclusivement du matériel conforme aux
normes de sécurité en vigueur et respectueux des paramètres électriques
des adaptateurs en question.
L’appareil ne doit pas être allumé avec des temporisateurs externes et/
ou d’autres dispositifs de contrôle à distance non expressément cités
dans ce manuel.
Il NE faut PAS utiliser ni conserver le dispositif à proximité des sources
de chaleur localisées (radiateurs, poêles, etc.).
24
Page 25

Il NE faut PAS plonger l’appareil dans l’eau ou d’autres liquides ; s’il devait
tomber accidentellement dans l’eau, il NE faut PAS le récupérer avant
d’avoir débranché le cordon d’alimentation de la prise électrique. Pour
utiliser l’appareil pour la première fois, s’assurer d’avoir enlevé toutes les
étiquettes ou lm de protection qui en empêche le bon fonctionnement.
Brancher et débrancher le cordon d’alimentation avec les mains sèches
et en le tenant fermement.
Contrôler, avant de brancher la che à la prise, que le bouton de marche
de l’appareil est positionné sur « OFF » (éteint). Dérouler totalement le
cordon d’alimentation pour éviter les surchauffes, éviter de tirer dessus
(il ne faut pas le tendre, l’agiter ni l’utiliser pour traîner l’appareil auquel
il est branché).
Éviter de positionner le cordon d’alimentation sur des surfaces abrasives
ou tranchantes ou à des endroits où il peut facilement s’abîmer.
Il NE faut PAS obstruer totalement ni partiellement les prises d’air ou y
insérer des objets à l’intérieur.
Il ne faut pas toucher l’appareil avec les parties du corps mouillées ou
humides pendant le fonctionnement ; nous conseillons en tous les cas
de mettre, entre soi-même et le plan d’appui, un élément isolant (par
exemple en chaussant des chaussures avec la semelle en caoutchouc).
Pendant l’utilisation l’appareil doit être tenu à distance de sécurité de tout
objet et/ou substance inammable ou potentiellement explosive. En cas
de fonctionnement anormal ou d’anomalie pendant le fonctionnement,
éteindre immédiatement l’appareil, le débrancher de l’alimentation ;
vérier les causes des anomalies éventuellement rencontrées à l’aide de
personnel qualié. Il faut absolument éviter les opérations non prévues
dans ce mode d’emploi (démontage et/ou modication).
Débrancher l’appareil par le câble d’alimentation du dispositif durant les
périodes d’inutilisation prolongée, avant de le ranger et d’effectuer une
quelconque opération de nettoyage ou d’entretien.
Conserver et utiliser l’appareil exclusivement en milieux internes ou en
tous les cas, protégés des agents atmosphériques comme la pluie, les
rayons directs du soleil ou de la poussière.
L’appareil n’est pas conçu pour l’utilisation et la conservation à l’extérieur.
Le nettoyage et l’entretien de l’appareil NE doivent PAS être effectués
par des enfants sans la surveillance d’un adulte.
Avant de débrancher l’appareil, l’éteindre par la commande du panneau
de contrôle.
Si l’on ne souhaite plus utiliser ce genre d’appareil, nous recommandons
de neutraliser les éléments de l’appareil pouvant représenter un danger
physique ou de les éliminer conformément aux normes en vigueur en la
matière.
Il NE faut PAS alimenter le dispositif sans l’avoir d’abord correctement
assemblé d’après les instructions de ce manuel.
25
Page 26

Positionner l’appareil à une distance adéquate des objets ou des
murs autours pour que le fonctionnement ne puisse pas provoquer de
dommages accidentels.
Il NE faut PAS utiliser le dispositif à proximité de fourneaux à gaz ou de
ammes nues en général.
Il NE faut PAS utiliser le dispositif à proximité de rideaux ou tissus.
Il NE faut PAS accrocher le ventilateur à un mur ou au plafond, la seule
installation admise est celle expressément indiquée dans ce manuel.
Il NE faut en aucun cas couvrir l’appareil durant le fonctionnement.
Il NE faut PAS introduire d’objets ou des parties du corps dans la grille
de protection des hélices.
Il NE faut PAS laisser l’appareil trop longtemps sans surveillance pendant
le fonctionnement.
Il NE faut PAS rester trop longtemps exposé au ux d’air généré par le
dispositif en marche, peut provoquer des dommages à la santé.
Si le ventilateur doit être entreposé pour une longue période et non utilisé
régulièrement, remettre le ventilateur dans son emballage original et le
ranger dans un endroit sec. Pour l’utiliser la première fois après une
longue période d’inutilisation, contrôler que le ventilateur est propre et
que les aubes du moteur tournent (quand le dispositif est éteint) sans
aucun frein.
MISES EN GARDE POUR LES PILES :
1. GARDER LES PILES HORS DE LA PORTÉE DES ENFANTS.
L’ingestion peut provoquer des brûlures chimiques, une perforation
des tissus mous et la mort. Des brûlures graves peuvent survenir dans
les 2 heures suivant l’ingestion. Consulter un médecin immédiatement.
2.Ne pas laisser les enfants remplacer les piles.
3. Insérer les piles correctement en respectant les polarités (+ et -)
indiquées sur les piles et sur l’appareil.
4.Les piles ne doivent pas être court-circuitées.
5.Ne pas charger les piles.
6.Ne pas forcer les piles à se décharger.
7. Ne pas utiliser simultanément de piles neuves et usagées, ni de piles
de types ou de fabricants différents.
8. Les piles déchargées doivent être immédiatement retirées de l’appareil
et éliminées conformément aux lois en vigueur.
9.Ne pas chauffer les piles et ne pas les exposer à la chaleur.
10.Ne pas souder directement les piles.
11.Ne pas démonter les piles.
12.Ne pas déformer les piles.
13.Ne pas jeter les piles au feu.
14. Ne pas mettre en contact de l’eau ou de l’humidité, en particulier au
cas où le boitier de la pile serait endommagé.
26
Page 27

15.Ne pas capsuler ou modier les piles.
3
11
16
16. Ranger les piles non utilisées dans leur emballage d’origine, à l’écart
des objets métalliques. Si elles ont été déjà retirées de l’emballage,
ne pas mélanger les piles.
17. Si vous avez l’intention de ne pas utiliser l’appareil pendant une
période prolongée, retirez les piles.
18. Nettoyer les contacts des piles et ceux de l’appareil avant d’insérer
les piles.
19. En cas de fuite des piles, éviter tout contact avec le matériau qui fuit ;
en cas de contact, rincer la partie affectée avec de l’eau et consulter
un médecin
ASSEMBLAGE DU VENTILATEUR
1. Grille avant
2. Pièce de xation pour l’hélice
3. Vis de sécurité pour la grille
4. Hélice
5. Pièce de xation pour grille
arrière
6. Grille arrière
7. Axe
8. Moteur
9. Boutons de réglages
10. Vis de réglage pour partie
principale du ventilateur
11. Base décorative
12. Barre réglable
13. Molette pour régler la hauteur
14. Base
15. Vis *4 pour xer la base
16. Pied en croix
A-B. Ergots de positionnement
pour la grille
B
12
13
14
2
4
1
5
7
6
A
9
15
8
10
27
Page 28

1. Dévissez les vis (15) des deux parties qui forment le pied en croix (16).
2. Installez les deux parties pour former le pied en croix (16) comme
montré sur le schéma ci-dessus.
3. Dévissez la molette (13) pour ajuster la hauteur du ventilateur et
insérez la base décorative (11).
4. Sortez la barre ajustable (12) de la base (14) et serrez la molette de
réglage (13) sur la base (14).
5. Fixez la base (14) sur le pied en croix (16) avec les 4 vis.
6. Desserrez la vis de réglage (10).
7. Positionnez la partie supérieure du ventilateur sur la barre ajustable
(13) et resserrez la vis de réglage (10) pour la xer.
8. Dévissez de l’axe (7) l’anneau de verrouillage de la grille arrière (5) en
le tournant dans le sens contraire des aiguilles d’une montre.
9. Positionnez la grille arrière (6) sur l’axe (7). La poignée doit se trouver
sur le dessus et les ergots (A et B) doivent se positionner dans les
trous verticaux de la grille arrière. Vissez l’anneau de verrouillage (5)
en le tournant dans le sens des aiguilles d’une montre.
10. Insérez l’hélice (4) sur l’axe (7) et xez-le en tournant dans le sens
contraire des aiguilles d’une montre l’anneau de déverrouillage (2).
11. Ouvrez les clips de la grille avant (1) et placez-la sur la grille arrière (6).
Les trous pour la vis de sécurité de la grille avant et de la grille arrière
doivent coïncider pour passer la vis et xer les grilles ensemble.
28
Page 29

UTILISATION
Placez le ventilateur sur une surface plane, sèche et stable. Branchez le
ventilateur une prise.
Le ventilateur peut être commandé par le panneau de commande placé
sur le corps principal et par la télécommande fournie.
Panneau de commande Télécommande
X
Y
Z
D
B
A
Boutons
A. Off
B. On/Speed
C. Mode (uniquement sur la
télécommande)
D. Minuteur
E. Swing
A
B
D
Voyants
X. voyant VITESSE
Y. voyant MINUTEUR
Z. voyant MODE
E
C
29
Page 30

Piles
La télécommande est fournie avec une pile CR2025 3V; retirer le lm de
protection du compartiment à piles de la télécommande avant utilisation.
Lorsque la pile est usée, vous devez la remplacer par une autre du
même type.
Pour retirer la pile, suivre les gures au dos de la télécommande.
Touche OFF (A):
Pour éteindre l’unité quand le ventilateur est allumé.
Touche ON/SPEED (B):
Pour allumer l’unité quand le ventilateur est éteint. Appuyer sur cette
touche quand le ventilateur est allumé pour sélectionner la vitesse
souhaitée parmi celles disponibles;
le voyant relatifs au la vitesse (X) s’éclairent sur le panneau de
commande.
Touche MODE (C) seulement sur la télécommande:
Appuyer sur cette touche quand le ventilateur est allumé pour sélectionner
le mode de fonctionnement souhaité parmi ceux disponibles:
- Normal: voyant (z) rouge;
- Naturel: voyant (z) off;
- Nocturne: voyant (z) vert.
Touche MINUTEUR (D):
Appuyer sur cette touche quand le ventilateur est allumé pour
programmer l’arrêt différé du ventilateur à un intervalle compris entre 0,5
heure et 7,5 heures à partir du moment de la programmation. À chaque
pression le temps augmente de 0,5 heure et les voyants relatifs au
minuteur (indiqués par 0,5H - 0,5 heure ; 1H - 1 heure ; 2H - 2 heures ;
4H - 4 heures) s’éclairent sur le panneau de commande. Le temps total
avant l’arrêt automatique dépend de la somme des indications éclairées.
Pour éliminer la fonction du minuteur, appuyer plusieurs fois de suite sur
cette touche jusqu’à ce que tous les voyants du minuteur s’éteignent ou
éteindre manuellement le ventilateur. Si tous les voyants sont éteints,
cela signie que le minuteur n’a pas été conguré et que le produit
fonctionnera en mode continu jusqu’à l’arrêt manuel.
Touche SWING (E) seulement sur la télécommande:
Appuyer sur cette touche quand le ventilateur est éclairé pour activer
l’oscillation automatique de droite à gauche. Pour désactiver l’oscillation,
appuyer à nouveau sur cette touche.
30
Page 31

INCLINAISON VERTICALE:
Il est possible d’orienter verticalement la tête
du ventilateur en choisissant l’angle souhaité.
Il suft de régler la tête du ventilateur en la
déplaçant délicatement vers le haut ou vers le
bas selon l’inclinaison souhaitée.
AJUSTER LA HAUTEUR:
Attention! Seulement quand le ventilateur est éteint.
Dévissez la molette (13) pour ajuster la hauteur du ventilateur.
Ajuster la hauteur du ventilateur
Serrez la molette de réglage (13) sur la base (14).
NETTOYAGE ET ENTRETIEN
Eteindre et débrancher l’appareil de la prise avant assemblage ou
démontage. Nettoyez uniquement l’extérieur du ventilateur avec un
chiffon doux et sec.
Ne pas plonger le ventilateur dans de l’eau ou tout autre liquide, protégez-
le également des éventuelles éclaboussures d’eau.
Ne pas utiliser de solvants ou tout autre produit chimique pour le
nettoyage.
Après nettoyage, si vous n’utilisez pas le ventilateur, merci de le ranger
dans un endroit sec.
31
Page 32

DISPOSITION
PILES - Retirer les piles de l’appareil avant de
l’éliminer. Ne pas jeter les piles avec les ordures
ménagères. Les piles doivent être éliminées dans des
conteneurs spéciaux ou dans des points de collecte
spéciques. Une collecte séparée adéquate permet
d’éviter d’éventuels effets négatifs sur l’environnement
et la santé.
Pour retirer les piles, suivre les instructions dans le
MODE D’EMPLOI.
INFORMATIONS POUR LES UTILISATEURS
Mise en oeuvre de la Directive RAEE 2012/19/UE,
portant sur la réduction de l’utilisation de substances
dangereuses dans les appareils électriques et
électroniques, ainsi que sur l’élimination des déchets.
Le symbole de la poubelle barrée, qui se trouve sur
l’appareil ou son emballage, indique que le produit
en n de vie doit faire l’objet d’une collecte sélective,
séparée des autres déchets.
L’utilisateur devra donc coner l’appareil en n de
vie à un centre de collecte sélective des déchets
électroniques et électrotechniques ou le retourner
au revendeur lorsqu’il en achètera un neuf de type
équivalent, en raison d’un appareil usagé pour un
appareil neuf.
La collecte sélective correcte, en vue d’envoyer
l’appareil en n de vie au recyclage, à son traitement
et à son élimination de façon écologique, contribue à
éviter le risque d’effets négatifs sur l’environnement et
la santé et favorise la réutilisation et/ou le recyclage
des matériaux qui le composent.
L’élimination abusive du produit par l’utilisateur
implique l’application des sanctions administratives
prévues par le règlement en vigueur.
32
Page 33

GARANTIE
Conditions
La garantie est valable 2 ans à partir de la date d’achat.
Cette garantie n’est valable que si correctement remplie et accompagnée
par le ticket de caisse prouvant le jour de l’achat.
Pour garantie, on entend le remplacement ou la réparation des
composants de l’appareil défectueux à l’origine pour vice de fabrication.
Il est toutefois garantie l’assistance (payée) pour les articles hors
garantie.
La Maison de construction dégage toute responsabilité en cas de
dommages à personnes, animaux et choses, à la suite de l’utilisation
impropre de l’appareil et à la non-observation des règles indiquées dans
le mode d’emploi.
Limitations
Tout droit de garantie et toute notre responsabilité sont dégagés en cas
de:
- dommages provoqués par personnel non autorisé.
- emploi, conservation ou transport non adéquats.
Ils sont toutefois exclus de la garantie les pertes de performances
esthétiques ou telles qui ne compromettent pas le fonctionnement de
l’appareil.
Si malgré le soin dans la sélection des matériaux et les efforts dans la
réalisation du produit que vous venez d’acheter, vous remarquez des
défauts ou si vous avez besoin de renseignements, nous vous prions de
bien vouloir contacter le revendeur de votre zone.
33
Page 34

Dieses Gerät kann sowohl von Kindern ab 8
Jahren alsauch von körperlich, sensorisch oder
geistig eingeschränkten Personen bzw. Von
Personen ohne Erfahrung oder ohne Wissen
genutzt werden, wenn sie von einer geschulten
Person beaufsichtigt werden oder wenn sie
Anweisungen zum sicheren Einsatz des Geräts
erhalten haben und wenn sie die entsprechenden
gefahren verstanden haben.
Kinder dürfen mit dem gerät nicht spielen.
Reinigungs- und Wartungsarbeiten dürfen nur
von Kindern durchgeführt werden, wenn diese
älter als 8 Jahre sind und während der Arbeiten
beaufsichtigt werden.
Falls das Versorgungskabel beschädigt ist, dann
darf dieses nur durch einen, vom Hersteller
genehmigten, Kundendienst ausgetauscht
werden, um jegliches Risiko vorzubeugen.
Gerät vor dem Entfernen oder Anbringen
des Schutzgitters durch Herausziehen des
Netzsteckers vom Netz trennen.
34
Page 35

ANMERKUNGEN DE
Garantiebescheinigung, skalische Quittung und Bedienungsanleitung
für jede spätere Konsultation bitte aufbewahren.
Nach Entfernen der Verpackung vergewissere man sich der Integrität
des Gerätes und sollte man bei dieser Überprüfung sichtbare
Beschädigungen festestellen, das Gerät nicht benutzen und sich direkt
an qualiziertes Fachpersonal wenden.
Keinerlei Verpackungsteile für Kinder zugänglich zurücklassen, das
Gerät auch nicht als ein Spielzeug verwenden: es ist ein Elektrogerät
und als solches zu behandeln.
Bevor man das Gerät an die Netzspannung anschließt, stelle man sicher
daß die an der Steckdose liegende Spannung auch derjenigen des
Typenschildes des Gerätes entspricht.
Die Sicherheit dieses Gerätes ist nur dann gewährleistet, wenn das
Gerät auch an eine leistungsfähige Erdungsanlage angeschlossen ist.
Sollten Stecker und Steckdose nicht kompatibel sein, so lasse man
die Steckdose durch eine passende Steckdose ersetzen. Diese Arbeit
ist von einem qualizierten Fachmann durchzuführen. Keine Adapter
oder Verlängerungsschnuren verwenden die nicht den Forderungen
der gegenwärtig geltenden Sicherheitsnormen genügen oder die die
Stromgrenzwerte überschreiten.
Trennen Sie das Gerät vom Stromnetz, wenn es nicht verwendet wird.
Am Netzkabel oder am Gerät selbst nicht ziehen um Stecker aus der
Steckdose herauszuziehen.
Der Gebrauch irgendeines Elektrogerätes erfordert immer die Beachtung
einiger grundlegenden Regeln und zwar insbesondere:
- Man darf niemals das Gerät mit nassen oder feuchten Händen berühren.
- Das Gerät niemals barfuß benutzen.
- Das Gerät nicht den Witterungseinüssen ausgesetzt lassen (Regen,
Sonnenstrahlung).
- Gerät nicht Schlag-oder Stoßbeanspruchungen aussetzen.
Es ist zu empfehlen, das Netzkabel für seine ganze Länge abzuwickeln
um somit eventuelle Überhitzungen zu vermeiden.
Sollte man sich dafür entscheiden diesen Gerätetyp nicht mehr zu
benutzen, so ist es angebracht das Gerät unbenutzbar zu machen durch
Abschneiden des Netzkabels, natürlich nach dessen Abtrennung von der
Steckdose.
Bei Erscheinen einer Störung bzw. einem nicht einwandfreien Betrieb
des Gerätes hat man sofort den Stecker zu ziehen, keinerlei Eingriff am
Gerät vorzunehmen und sich an eine zugelassene Service-Werkstatt zu
wenden.
Das Gerät wurde für die Verwendung in häuslicher Umgebung entworfen
und gebaut, gemäß den Angaben in der Anleitung; deshalb gilt jede
35
Page 36

andere Verwendung als unsachgemäß und daher gefährlich.
Ausschließlich in trockener Umgebung im Innenbereich benutzen! Vor
Feuchtigkeit schützen!
Aus Sicherheitsgründen darf das Gerät nicht geöffnet werden.
Das Gerät darf nicht in Räumen benutzt werden, wo sich entzündliche
Dämpfe oder explosive Pulvern freisetzen könnten. Nicht in entzündlicher
oder explosiver Umgebung einsetzen!
Bei außerordentlichen Erscheinungen (z.B. ungewöhnliche Geräusche
aus dem Gerät oder Brandgeruch) ist das Gerät sofort auszuschalten
und vom Netz zu trennen.
Die Lufteintritte WEDER TEILWEISE NOCH VOLLKOMMEN abdecken.
Keine Gegenstände hineinstecken.
Das Gerät NICHT in der Nähe von Gasherden oder anderen offenen
Flammen verwenden.
Sich NICHT über längere Zeit dem Luftstrom aussetzen, der vom Gerät
erzeugt wird, denn dies kann der Gesundheit schaden.
Die Installation/der Zusammenbau der Vorrichtung muss entsprechend
den Anleitungen des Herstellers erfolgen. Ein falsches Verfahren kann
Personen, Tiere oder Gegenstände beschädigen, für die der Hersteller
nicht zur Verantwortung gezogen werden kann.
Falls das Gerät nach längerer Zeit wieder benutzt wird, kontrollieren,
dass der Ventilator sauber ist und sich die Rotorblätter frei drehen
können (nicht unter Stromzufuhr) und nicht bremsen.
Während des Gebrauches ist das Gerät auf einer ebenen Fläche zu
halten.
HINWEISE FÜR DIE BATTERIEN:
1. BATTERIEN AUSSER DER REICHWEITE VON KINDERN
AUFBEWAHREN. Bei Verschlucken können diese zu chemischen
Verbrennungen führen, Weichteile durchstechen oder zum Tode
führen. Es können innerhalb von 2 Stunden nach dem Verschlucken
schwere Verbrennungen auftreten. Sofort einen Arzt aufsuchen.
2. Kinder dürfen keine Batterien austauschen.
3. Die Batterien richtig einsetzen und dabei auf die Polaritäten (+ und -)
achten, die an den Batterien und dem Gerät angegeben sind.
4. Keinen Kurzschluss an den Batterien auslösen.
5. Die Batterien nicht wiederauaden.
6. Das entladen der Batterien nicht erzwingen.
7. Nicht gleichzeitig neue und gebrauchte Batterien oder Batterien
unterschiedlicher Art oder von verschiedenen Herstellern verwenden.
8. Entladenen Batterien müssen sofort aus dem Gerät genommen
werden und entsprechend den geltenden Gesetzen entsorgt werden.
9. Batterien nicht aufheizen und keinen Wärmequellen aussetzen.
10. Batterien nicht direkt verschweißen.
36
Page 37

11. Batterien nicht demontieren.
3
11
16
12. Batterien nicht verformen.
13. Batterien nicht ins Feuer werfen und dort entsorgen.
14. Nicht mit Wasser oder Feuchtigkeit in Kontakt bringen, vor allem, falls
der Batteriebehälter beschädigt werden sollte.
15. Batterien nicht verkapseln oder verändern.
16. Unbenutzte Batterien in ihrer Originalverpackung, weit entfernt
von Metallgegenständen, aufbewahren. Falls sie schon aus der
Verpackung genommen wurden, die Batterien nicht vermischen.
17. Falls das Gerät über einen längeren Zeitraum nicht verwendet wird,
die Batterien herausnehmen.
18. Die Kontakte von Batterie und Gerät reinigen, bevor die Batterien
eingelegt werden.
19. Falls die Batterien lecken, den Kontakt mit dem ausgetretenen
Material vermeiden; bei Kontakt mit Wasser abspülen und einen Arzt
konsultieren.
GERÄT MOTNAGE
B
12
13
14
2
4
1
1. Die beiden Bauteile, welche den kreuzförmigen Sockel (16) bilden,
ineinanderstecken, wie in der Abbildung dargestellt.
2. Die Sockelstange (14) mit den Schrauben (15) anschrauben, die zuvor
vom kreuzförmigen Sockel abgeschraubt wurden (16).
3. Den Griff der Höheneinstellung (13) von der Sockelstange (14)
abschrauben und die kleine Verzierung (11) einsetzen. Die verstellbare
5
7
6
A
9
15
8
10
37
Page 38

Stange (12) aus der Sockelstange (14) herausziehen, dann den
Griff der Höheneinstellung (13) wieder an der Sockelstange (14)
anschrauben.
4. Das Hauptteil in die verstellbare Stange (12) einführen. Die Schraube
(10) anschrauben.
5. Liegen Sie die Hinterseite der Gitter (6), an die Motor, die tragegriff
soll oben sein.
6. Dann schrauben Sie die Gitterbefestigung-Mutterschraube an. (5).
7. Drücken sie die Blätter (4) fast an die Motorwelle (7), sichern Sie es
mit die Nut (2).
8. Drücken Sie die Vorderseite der Gitter (1) an die Hinterseite (6),
sichern Sie es erst mit die Klemmen, dann mit die Schraube (3).
GEBRAUCHSANWEISUNG
Während des Gebrauches ist das Gerät auf einer ebenen Fläche zu
halten.
Der Ventilator kann sowie von der Steuertafel am Hauptteil, als auch
durch die mitgelieferte Fernsteuerung bedient werden.
Steuertafel Fernsteuerung
38
X
Y
Z
D
B
A
A
B
D
E
C
Page 39

Drucktasten
A. Off
B. On/Speed
C. Mode (nur an der
Fernsteuerung)
D. Timer
E. Swing
Batterien
Die Fernbedienung wird mit Batterien CR2025 3V geliefert; die
Schutzhülle des Batteriefachs vor Gebrauch entfernen.
Ist die Batterie leer, dann muss sie durch eine des gleichen Typs
ausgetauscht werden.
Gehen Sie zur Entnahme der Batterie entsprechend den Zeichnungen
auf der Rückseite der Fernbedienung.
OFF-Taste (A):
Diese Taste drücken, um den Ventilator auszuschalten.
ON-/SPEED-Taste (B):
Diese Taste drücken, um den Ventilator anzuschalten.
Diese Taste drücken, wenn der Ventilator angeschaltet ist, um die
gewünschte Geschwindigkeit einzustellen: Minimum, Medium oder
Maximum.
MODE-Taste (C), nur an der Fernsteuerung:
Diese Taste drücken, wenn der Ventilator eingeschaltet ist, um die
gewünschte Betriebsart zu wählen:
- Normal: Leuchtanzeige (Z) Rot;
- Natürlich: Leuchtanzeige (Z) OFF;
- NACHT: Leuchtanzeige (Z) Grün.
TIMER-Taste (D):
Diese Taste drücken, wenn der Ventilator eingeschaltet ist, um das
zeitversetzte Ausschalten des Ventilators zwischen 0,5 und 7,5 Stunden
ab der Programmierung einzustellen. Mit jedem Druck erhöht sich die
Zeit um 0,5 Stunden und die Leuchtanzeigen des Timers (angegeben
mit 0,5H - 0,5 Stunden; 1H - 1 Stunde; 2H - 2 Stunden; 4H - 4 Stunden)
erleuchten an der Steuertafel. Die Gesamtzeit vor dem automatischen
Ausschalten ergibt sich durch die Summe der erleuchteten Anzeigen.
Um die Timerfunktion zu löschen, diese Taste solange drücken, bis
alle Leuchtanzeigen des Timers ausgeschaltet sind oder den Ventilator
von Hand abschalten. Sind alle Leuchtanzeigen ausgeschaltet, dann
bedeutet dies, dass der Timer nicht programmiert wurde und dass das
Gerät fortlaufend funktioniert, bis es von Hand ausgeschaltet wird.
Leuchtanzeigen
X. Leuchtanzeigen des Geschwindigkeit
Y. Leuchtanzeigen des Timers
Z. Leuchtanzeigen des Betriebsart
39
Page 40

SWING-Taste (E), nur an der Fernsteuerung:
Diese Taste drücken, wenn der Ventilator angeschaltet ist, um die
gewünschte, automatische Oszillation von rechts nach links zu starten.
Um die Oszillation zu stoppen, diese Taste erneut drücken.
Die Kopfwinkle des Ventilators kann sehr leicht
eingestellt werden, die Schrauben müssen für
diese nicht löst oder anzogt werden sein.
HÖHENVERSTELLUNG
Den Griff der Höheneinstellung (13) lockern und den Ventilator auf die
gewünschte Höhe stellen. Nach der Einstellung den Drehknopf gut
anziehen.
MERKE: Dieser Vorgang wird immer mit stehendem Ventilator
ausgeführt.
REINIGUNG UND WARTUNG
Für den optimalen Betrieb sollte das Gerät in Intervallen abhängig vom
Grad der Verschmutzung, aber mindestens einmal pro Monat gereinigt
werden.
1. Vor der Reinigung Gerät ausschalten und anschließend durch
Herausziehen des Netzsteckers vom Netz trennen.
2. Achtung! Gittervorderteil nur in stromlosem Zustand des
Ventilators entfernen!
3. Außenoberäche des Gerätes mit einem feuchten Tuch reinigen.
Verwenden Sie keine aggressiven Reinigungsmittel. Es darf kein
Wasser ins Geräteinnere oder zu den elektrischen Bauteilen
eindringen!
4. Achtung! Schutzgitter nur in stromlosem Zustand des Ventilators
wieder anbringen!
5. Der Ventilator darf erst nachher wieder in Betrieb gesetzt werden!
NIEMALS DAS GERÄT IN WASSER TAUCHEN.
40
Page 41

BENUTZERINFORMATIONEN
BATTERIEN - Die Batterien vor der Entsorgung
aus dem Gerät nehmen. Die Batterien nicht in den
Hausmüll werfen. Die Batterien müssen in dafür
vorgesehenen Behältern oder Sammelzentren
entsorgt werden. Die richtige Entsorgung trägt dazu
bei, mögliche negative Auswirkungen auf Umwelt und
Gesundheit zu vermeiden.
Um die Batterien herauszunehmen, den Anleitungen
Folge leisten.
“Umsetzung der WEEE-Richtlinie 2012/19/EU
zur Beschränkung der Verwendung bestimmter
gefährlicher Stoffe in Elektro- und Elektronikgeräten
und zur Entsorgung von Elektro- und ElektronikAltgeräten”. Das auf dem Gerät oder auf der
Verpackung angebrachte Symbol der durchkreuzten
Abfalltonne weist darauf hin, dass das Produkt nach
Ende seines Nutzungslebens von anderen Abfällen
getrennt zu sammeln ist.
Daher muss der Benutzer das Gerät an seinem
Lebensende den geeigneten Sammelstellen
für die getrennte Sammlung elektronischer und
elektrotechnischer Abfälle zuführen oder es beim Kauf
eines neuen gleichwertigen Gerät eins zu eins dem
Händler zurückerstatten.
Eine angemessene getrennte Sammlung für die spätere
Zuführung des abgelegten Geräts zum Recycling, zur
Behandlung und zur umweltbezogen nachhaltigen
Entsorgung trägt dazu bei, mögliche negative
Auswirkungen auf die Umwelt und auf die Gesundheit
zu vermeiden und begünstigt die Wiederverwendung
und/oder das Recycling der Materialien, aus denen
das Gerät zusammengesetzt ist.
Eine gesetzeswidrige Entsorgung des Produkts
durch den Benutzer führt zur Auferlegung der nach
geltenden Vorschriften vorgesehenen administrativen
Sanktionen.
41
Page 42

GARANTIESCHEIN
Garantiebedingungen:
Die Garantie dauert 24 Monate vom Einkaufsdatum.
Dieser Garantieschein hat nur Gültigkeit, wenn er ordnungsgemäß
ausgefüllt und zusammen mit dem Kassenzettel vorgelegt wird.
Die Garantie umfaßt den Ersatz oder die Reparatur aller Komponenten
des Gerätes im Falle von Herstellungsfehlern.
Das Gerät wird ausschließlich nur von einem unserer autorisierten
Kundendienststellen zurückgenommen.
Außerdem garantieren wir für fachgerechte Dienstleistung (gegen
Bezahlung) auch außerhalb der Garantiezeit.
Die Herstellungsrma lehnt jede Verantwortung hinsichtlich Schäden
an Personen, Tieren oder Gegenständen ab, die durch unsachgemäße
Benutzung des Geräts oder Nichtbefolgen der beiliegenden
Bedienungsanleitung entstehen.
Einschränkungen:
Der Garantieanspruch bzw. unsere Verantwortlichkeit erlischt, wenn das
Gerät:
- von nicht autorisierten Personen demontiert wurde;
- in unsachgemäßer oder unnormaler Weise zum Einsatz kam,
aufbewahrt oder transportiert wurde.
Weiterhin sind von der Garantie alle äußeren Abnutzungserscheinungen
am Gerät, die die Funktion des Gerätes nicht beeinträchtigen,
ausgeschlossen.
Sollten, trotz der Sorgfalt bei der Auswahl der Materialien und trotz der
Bemühungen bei der Realisierung des Produktes, das Sie erst gerade
erworben haben, Defekte gefunden werden oder sollten Sie irgendwelche
Informationen benötigen, so empfehlen wir Ihnen, sich an den für Ihr
Gebiet zuständigen Fachhändler zu wenden.
42
Page 43

Este aparato puede ser utilizado por niños de 8 años
en adelante y por personas con las capacidades
físicas, sensoriales o mentales disminuidas o
con falta de experiencia o conocimiento siempre
y cuando se haya asegurado su adecuada
vigilancia o hayan recibido instrucciones acerca
del uso seguro del aparato y hayan comprendido
los correspondientes peligros.
Los niños no deben jugar con el aparato.
Las operaciones de limpieza y mantenimiento no
deben ser efectuadas por niños a menos que no
tengan más de 8 años y estén vigilados.
Si el cable de alimentación se dañara, debe ser
sustituido solamente en los centros de asistencia
autorizados por el fabricante, de modo de prevenir
todo riesgo.
Antes de quitar la pantalla protectora, asegùrese
de que el ventilador esté desconnectado de la
red de alimnetación.
43
Page 44

ADVERTENCIAS ES
ATENCION : leer atentamente las advertencias contenidas en el
presente folleto,ya que contienen importantes indicaciones acerca
de laseguridad de instalación, uso y mantenimiento. Instrucciones
importantes que hay que conservar para sucesivas consultas.
Conservar la garantía, el recibo y el presente folleto de instrucciones
para sucesivas consultas.
Los niños NO deben jugar con el dispositivo.
Este aparato deberá estar destinado solo al uso para el cual ha sido
expresamente creado; cualquier empleo no conforme con las indicaciones
contenidas en el presente manual es de considerar inadecuado y
peligroso. El fabricante no puede ser considerado responsable por
eventuales daños derivados por un uso inadecuado e/o irracional.
Este aparato NO es adecuado para empleo en ambientes con atmósferas
explosivas (con presencia de sustancias inamables bajo forma de gas,
vapor, neblina o polvo, en condiciones atmosféricas donde, después del
encendido, la combustión se propaga en el aire).
Los elementos del embalaje (bolsas de plástico, poliestireno expandido,
etc.) no deben ser dejados al alcance de niños o personas con
capacidades reducidas ya que representan potenciales fuentes de
peligro.
La/el instalación/ensamblaje del dispositivo deberá ser efectuada/o
según las prescripciones del fabricante. Un procedimiento errado puede
causar daños a personas, animales o cosas, de los cuales el fabricante
no puede ser considerado responsable.
Colocar y utilizar el aparato en un nivel de apoyo horizontal y estable.
Antes de utilizar el aparato vericar visualmente la integridad del mismo
y de su cable de alimentación. En caso de dudas dirigirse a personal
cualicado.
Antes de alimentar el aparato asegurarse de que sus datos de placa
(tensión y frecuencia) correspondan con los de la red de distribución
eléctrica y que la toma sea adecuada al terminal del cable del cual que
está dotado el aparato.
Vericar que la instalación eléctrica utilizada para la alimentación
esté dotada de las protecciones adecuadas de acuerdo con las leyes
vigentes. NO alimentar el aparato mediante tomas múltiples.
Evitar si es posible el empleo de adaptadores y/o alargadores; en caso
de que su empleo fuera necesario utilizar exclusivamente material
conforme con las normas vigentes de seguridad y en el respeto de los
parámetros eléctricos de los adaptadores en cuestión.
El aparato no debe ser encendido mediante temporizadores externos
y/u otros dispositivos de control remoto no expresamente previstos por
44
Page 45

el presente manual.
NO utilizar ni conservar el dispositivo cerca de fuentes de calor
localizadas (calentadores, estufas etc.).
NO sumergir el aparato en agua u otros líquidos; en caso de caída
accidentalmente en agua NO tratar de recuperarlo sino primero que
nada desconectar inmediatamente el cable de alimentación de la toma
eléctrica. Utilizando el aparato por primera vez, asegurarse de haber
quitado la etiqueta o la hoja de protección que impida el correcto
funcionamiento. Conectar y desconectar el cable de alimentación con
las manos secas y cogiéndolo rmemente.
Antes de conectar el enchufe en la toma de corriente asegurarse de que
el botón de encendido del aparato esté en posición “OFF” (apagado).
Desenrollar siempre totalmente el cable de alimentación con el n
de evitar recalentamientos, evitar en todo caso tenderlo (no halarlo,
tironearlo, ni utilizarlo para arrastrar el dispositivo donde está conectado).
Evitar colocar el cable de alimentación en supercies abrasivas o
cortantes o de cualquier modo donde pueda dañarse fácilmente.
NO obstruir ni total ni parcialmente las tomas de aire ni introducir objetos
en el interior.
Durante el funcionamiento no tocar el dispositivo con partes del cuerpo
mojadas o húmedas, en todo caso se recomienda colocar entre usted y
el nivel de apoyo un elemento aislante (por ejemplo utilizando calzado
con suela en goma).
Durante el uso el aparato debe ser tenido a distancia de seguridad
de cualquier objeto y/o sustancia inamable o potencialmente
explosiva. En caso de funcionamiento anómalo o de anomalías
durante el funcionamiento apagar rápido en aparato, desconectarlo
de la alimentación, vericar las causas de las anomalías detectadas
eventualmente con la ayuda de personal cualicado. Evitar en todo caso
efectuar operaciones no previstas por el presente manual de uso (como
desmontarlo y/o modicarlo).
Recordar siempre desconectar el cable de alimentación del dispositivo
por periodos de inutilización prolongados, antes de volver a colocarlo
y antes de efectuar cualquier operación de limpieza o mantenimiento.
Conservar y utilizar el aparato exclusivamente en ambientes internos
o en todo caso protegido de agentes atmosféricos como lluvia, rayos
directos del sol o polvo.
El aparato no está diseñado para el uso o la conservación en exteriores.
La limpieza y mantenimiento del dispositivo NO debe ser efectuado por
niños sin la supervisión de un adulto.
Antes de desconectar al aparto apagarlo mediante el respectivo mando
en el panel de control.
Cuando se decida no utilizar más un aparato de este tipo, se recomienda
hacer inocuas las partes del aparato que pueden constituir un peligro
45
Page 46

para las personas o eliminarlas compatiblemente con las normativas
vigentes al respecto.
NO alimentar el dispositivo sin primero haberlo ensamblado
correctamente siguiendo las instrucciones del presente manual.
Colocar el aparato a una distancia adecuada de objetos o paredes
circundantes de modo tal que su funcionamiento no pueda ser causa de
daños accidentales.
NO utilizar el dispositivo cerca de hornillas de gas o llamas libres en
general.
NO utilizar el dispositivo cerca de cortinas o tejidos libres.
NO colgar el ventilador a una pared o en el techo salvo que tal modalidad
de instalación no esté expresamente prevista y explicada en el presente
manual.
NO cubrir de ningún modo el dispositivo durante el funcionamiento.
NO introducir objetos o partes del cuerpo en la rejilla de protección del
aspa.
NO dejar el aparato sin vigilancia por largos periodos durante el
funcionamiento.
NO permanecer expuestos por largos periodos al ujo de aire generado
por el dispositivo en funcionamiento, puede provocar daños a la salud.
Si el ventilador debe ser almacenado y no usado regularmente por largo
periodo, colocar el ventilador en su embalaje original y ponerlo en un
lugar seco. Cuando se usa por primera vez después de un largo periodo
de inutilización, controlar que el ventilador esté limpio y que las palas
del motor giren libremente (con el dispositivo no alimentado) sin ningún
freno.
ADVERTENCIAS PARA LAS BATERÍAS:
1. MANTENER LAS BATERÍAS FUERA DEL ALCANCE DE LOS NIÑOS.
La ingestión puede provocar quemaduras químicas, perforación de los
tejidos blandos y la muerte. Al cabo de 2 horas de la ingestión pueden
presentarse quemaduras graves. Acuda inmediatamente a un médico.
2.Las baterías no pueden ser sustituidas por los niños.
3. Introduzca correctamente las baterías, prestando atención a la
polaridad (+ y -) marcadas en las baterías y en el aparato.
4.Las baterías no deben cortocircuitarse.
5.No cargar las baterías.
6.No forzar la descarga de las baterías.
7. No utilizar baterías nuevas junto con las usadas, tampoco utilice
baterías de otro tipo o de otros fabricantes.
8. Las baterías agotadas deben retirarse inmediatamente del aparato y
ser eliminadas correctamente, según las leyes vigentes.
9.No calentar las baterías ni exponerlas a fuentes de calor.
10.No soldar directamente las baterías.
46
Page 47

11.No desmontar las baterías.
3
11
16
12.No deformar las baterías.
13.No arrojar ni eliminar las baterías en el fuego.
14. No poner en contacto con agua ni humedad, especialmente si el
compartimiento de baterías estuviera dañado.
15.No encapsular ni modicar las baterías.
16. Conservar las baterías no usadas en su embalaje original, lejos de
objetos metálicos. Cuando se hayan retirado de su embalaje, no
mezcle las baterías.
17. En caso de que no se utilice el aparato durante un período de tiempo
prolongado, retire las baterías.
18. Limpie los contactos de las baterías y aquellos del aparato antes de
introducir las baterías.
19. En caso de pérdidas por las baterías, evite todo tipo de contacto con
el material vertido, en caso de contacto, enjuague la parte afectada
con agua y acuda a un médico
MONTAJE
1. Rejilla delantera
2. Anillo de bloqueo
3. Tornillo de seguridad
4. Hoja
5. Anillo de jación rejilla trasera
6. Rejilla trasera
7. Eje motor
8. Motor
9. Panel de Control
10. Tornillo cuerpo principal
11. Base decorativa
12. Palo
13. Mando de ajuste altura
14. Palo base
15. Tornillos para jar la base
del palo
16. Base
B
12
13
14
2
4
6
1
5
7
A
9
15
8
10
47
Page 48

1. Quitar los tornillos (15) de las dos piezas que forman la base de la
cruz (16).
2. Colocar las dos piezas que forman la base (16) como se muestra en
la gura.
3. Aojar el mando de ajuste altura (13) del palo base (14) y insertar la
pequeña base decorativa (11).
4. Retirar el palo (12) del palo base (14) y atornillar el ajuste de altura
(13) sobre el palo base (14).
5. Fijar el palo base (14) con los tornillos (15) desenroscados previamente
en la base en forma de cruz (16).
6. Aojar el tornillo del cuerpo principal (10).
7. Insertar el cuerpo principal del palo (12). Apretar el tornillo (10) para
jarlo.
8. Aojar el anillo de bloqueo (2) del eje motor (7) girándolo hacia la
derecha.
9. Aojar el anillo de jación rejilla trasera (5) del eje motor (7) girándo
hacia la izquierda.
10. Inserte la rejilla trasera (6) en el eje motor (7) de manera que la asa
trasera esté arriba y atornillar el anillo de jación rejilla trasera (5)
girándo hacia la derecha.
11. Conectar la hojar (4) en el eje motor (7) y jarla con su anillo de
bloqueo (2).
12. Abrir los clips de la parrilla delantera (1) y colocarla en la parrilla
trasera (6) modo que el logotipo está en posición correcta.
13. Cerrar los clips y colocar el tornillo de seguridad (3).
48
Page 49

MODO DE USO
Colocar y utilizar el aparato en un nivel de apoyo horizontal y estable.
Conectar el enchufe en una toma de corriente adecuada. El ventilador se
puede ordenar tanto desde el panel de mandos colocado en el cuerpo
principal como desde el telemando suministrado en dotación.
Panel de mandos Telemando
X
Y
Z
D
B
A
Botones
A. Off
B. On/Speed
C. Mode (solo en el telemando)
D. Timer
E. Swing
Baterías
El mando a distancia se suministra con batería CR2025 3V; retire el
plástico protector del compartimiento batería del mando a distancia
antes de usarlo.
Cuando la batería está agotada, debe ser sustituida por otra del mismo
tipo.
Para retirar la batería, siga lo indicado en los dibujos que guran en la
parte posterior del mando a distancia.
A
B
D
Indicador luminoso
X. indicador velocidad
Y. indicador TIMER
Z. indicador MODE
E
C
49
Page 50

Botón OFF (A):
Presionar este botón con el ventilador encendido para apagar la unidad.
Botón ON/SPEED (B):
Presionar este botón con el ventilador apagado para encender la unidad.
Presionar este botón con el ventilador encendido para seleccionar la
velocidad deseada a escoger entre: mínima, media o máxima (indicador
luminoso X).
Botón MODE (C) solo en el telemando:
Presionar este botón con el ventilador encendido para seleccionar la
modalidad de funcionamiento deseada a escoger entre:
- Normal: indicador luminoso (Z) rojo;
- Natural: indicador luminoso (Z) apagado
- Nocturna: indicador luminoso (Z) verde.
Botón TIMER (D):
Presionar este botón con el ventilador encendido para programar
el apagado diferido del ventilador en un intervalo entre 0,5 horas y
7,5 horas desde el momento de la programación. En cada presión el
tiempo aumenta 0,5 horas y los indicadores luminosos relativos al timer
(indicados con 0,5H - 0,5 horas; 1H - 1 hora; 2H - 2 horas; 4H - 4 horas)
se encienden en el panel de mandos. El tiempo total antes del apagado
automático es dado por la suma de las indicaciones encendidas. Para
eliminar la función timer presionar repetidamente esta tecla hasta que
todas las indicaciones luminosas relativas al timer estén apagadas o
apagar manualmente el ventilador. Cuando todos los indicadores están
apagados signica que el timer no ha sido congurado y que el producto
funcionará de modo continuo hasta el apagado manual.
Botón SWING (E) solo en el telemando:
Presionar este botón con el ventilador encendido para activar la
oscilación automática de derecha a izquierda. Para desactivar la
oscilación presionar nuevamente esta tecla.
INCLINACIÓN VERTICAL
Es posible orientar la cabecera del ventilador
en sentido vertical escogiendo el ángulo
deseado. Es suciente regular la cabecera
del ventilador moviéndola delicadamente
hacia arriba o hacia abajo según la inclinación
deseada
50
Page 51

Ajuste altura
¡Atención! solo cuando el ventilador está apagado.
Aojar el mando de ajuste altura (13) del palo base (14).
Ajustar altura.
Atornillar el ajuste de altura (13) sobre el palo base (14).
MANTENIMIENTO
Antes de limpiar el aparato desconectarlo de la toma de corriente y
dejarlo enfriar completamente.
Para limpiar el aparato utilizar un paño suave y ligeramente humedecido.
No utilizar absolutamente productos abrasivos o disolventes químicos.
No utilizar sustancias, líquidos o paños excesivamente mojados ya que
las posibles inltraciones podrían dañar el aparato de modo irreparable.
NO SUMERGIR JAMAS EL APARATO EN EL AGUA.
Antes de utilizarlo, compruebe que la rejilla de protección esté dien
cerrada.
51
Page 52

INFORMACIONES A LOS USUARIOS
BATERÍAS - Retire las baterías del aparato antes de
eliminarlas. No arrojar las baterías en los residuos
domésticos. Las baterías deben ser eliminadas en
los recipientes especícos o llevándolas a los centros
de recogida correspondientes. La recogida selectiva
adecuada contribuye a evitar los posibles efectos
negativos para el medio ambiente y la salud.
Para retirar las baterías, siga las instrucciones de las
INSTRUCCIONES DE USO.
“Aplicación de la Directiva RAEE 2012/19/EU, relativa
a la reducción del uso de sustancias peligrosas en los
aparatos eléctricos y electrónicos, como también de la
eliminación de residuos”.
El símbolo del basurero tachado presente en el
aparato o en la confección
indica que el producto, al nal de su vida útil, debe ser
recogido por separado de los otros residuos.
El usuario deberá, por lo tanto, entregar el aparato,
al nal de su vida útil, a los centros de recogida
diferenciada idóneos para residuos electrónicos y
eléctricos o entregarlo al revendedor al comprar un
nuevo aparato de tipo equivalente, en razón de uno
a uno.
La adecuada recogida diferenciada para el posterior
envío del aparato desmantelado a reciclaje,
tratamiento, eliminación ambientalmente compatible
del mismo, contribuye a evitar posibles efectos
negativos en el medio ambiente y en la salud y favorece
la reutilización y/o el reciclaje de los materiales que
componen el aparato.
La eliminación abusiva del producto por parte del
usuario comporta la aplicación de las sanciones
administrativas previstas por la normativa vigente.
52
Page 53
GARANTIA
Condiciones
La garantía tiene 24 meses de validez a partir de la fecha de compra.
La presente garantía es válida sólo si correctamente rellenada y
acompañada por el recibo donde consta la fecha de compra. En caso de
anomalia el aparato deberá ser entregrado al servicio ocial, junto con
este certicado de garantía.
La garantía comprende la substitución o reparación de las piezas que
componen el electrodoméstico que resultan dañadas por defectos de
fabricación.
Igualmente, se proporciona asistencia a cargo del cliente a productos no
cubiertos por garantía.
El Fabricante declina toda responsabilidad por eventuales daños a
personas, animales o cosas, derivado de un uso no apropiado del aparato
y del incumplimiento de las advertencias indicadas en el correspondiente
folleto de instrucciones.
Límites
Todo derecho de garantia y responsabilidad por parte nuestra caduca si
el aparato ha sido:
- abierto por personal no autorizado;
- empleado, conservado, transportado de manera inadecuada o anómala.
Se excluye de la garantía todo defecto estético o aquellos que no
comprometen la eciencia de su funcionamiento.
Si a pesar del cuidado en la elección de los materiales y el empeño en
la fabricación del producto que Ud. apenas ha comprado se vericaran
desperfectos o si Ud. precisara más información al respecto, le
aconsejamos contactar al revendedor de zona.
53
Page 54

Tento spotřebič mohou používat děti starší 8 let a
osoby se sníženými fyzickými, smyslovými nebo
duševními schopnostmi nebo s nedostatečnými
zkušenostmi a znalostmi pouze tehdy,
pokud se nacházejí pod dozorem odpovědné
osoby nebo pokud byly seznámeny se správným
a bezpečným používáním spotřebiče a jsou si
vědomy případných rizik s tím spojených.
Děti si nesmí hrát se spotřebičem.
Děti nesmí provádět čištění ani údržbu spotřebiče,
pokud se nenacházejí pod dozorem.
Děti nesmí provádět čištění ani údržbu spotřebiče
bez dozoru odpovědné osoby.
Poškozený napájecí kabel smí být vyměněn
pouze v autorizovaném servisním středisku.
Před demontáží ochranného krytu se ujistěte, že
je spotřebič odpojený od elektrické sítě.
VAROVÁNÍ CZ
UPOZORNĚNÍ: Pečlivě si přečtěte tento návod k obsluze, který
obsahuje důležité pokyny týkající se bezpečné instalace, použití a
údržby spotřebiče. Uschovejte tento návod pro případné použití v
budoucnu.
Děti si nesmí hrát se spotřebičem.
Tento spotřebič smí být používán pouze k účelům, ke kterým byl navržen;
jakékoliv použití, které není v souladu s pokyny obsaženými v tomto
návodu k obsluze, se považuje za nevhodné a nebezpečné. Výrobce
nenese odpovědnost za možné škody způsobené nevhodným a/nebo
54
Page 55

nepřiměřeným použitím.
Tento spotřebič NENÍ vhodný k použití v prostředí, kde hrozí nebezpečí
výbuchu (tam, kde se vyskytují hořlavé látky, jako je plyn, pára, mlha
nebo prach, za atmosférických podmínek, kdy se spaliny po zapálení
šíří ve vzduchu).
Obalové materiály (igelitové sáčky, polystyren atd.) musíte uchovávat
mimo dosah dětí nebo zdravotně postižených osob, protože představují
potenciální zdroj nebezpečí.
Instalace/montáž spotřebiče musí být provedena podle pokynů výrobce.
Špatný postup může způsobit poranění osob či zvířat nebo poškození
předmětů, za které výrobce nenese žádnou odpovědnost.
Umístěte spotřebič na horizontální a stabilní povrch.
Před prvním použitím spotřebiče zkontrolujte, zda nedošlo k poškození
napájecího kabelu nebo samotného spotřebiče během přepravy. Pokud
si nejste jistí, obraťte se na kvalikovanou osobu.
Před prvním připojením spotřebiče k elektrické síti se ujistěte, že
jmenovitý výkon (napětí a frekvence) spotřebiče odpovídá Vaší elektrické
síti a že zásuvka je vhodná pro zástrčku spotřebiče.
Ujistěte se, že napájecí systém je vybaven vhodnou ochranou podle
platných zákonů.
NEPŘIPOJUJTE spotřebič k vícenásobné zásuvce.
Pokud je to možné, vyvarujte se použití adaptérů a/nebo prodlužovacích
kabelů; pokud je jejich použití naprosto nezbytné, používejte pouze
materiály, které odpovídají současným
bezpečnostním předpisům a vyhovují elektrickým parametrům
spotřebiče.
Nepoužívejte spotřebič spolu s externím časovačem a/nebo jiným
zařízením dálkového ovládání, které není doporučeno v tomto návodu
k použití.
NEPOUŽÍVEJTE spotřebič ani ho neskladujte v blízkosti tepelných zdrojů
(ohřívačů, kamen atd.). NIKDY neponořujte spotřebič do vody nebo jiných
kapalin; pokud dojde k náhodnému pádu do vody, NEPOKOUŠEJTE se
spotřebič vytáhnout z vody, nýbrž nejprve vytáhněte síťovou zástrčku ze
zásuvky.
Před prvním použitím spotřebiče nezapomeňte odstranit veškeré štítky
nebo ochranné fólie, které brání ve správném fungování spotřebiče.
Zapojujte a odpojujte napájecí kabel suchýma rukama a držte ho přitom
pevně.
Před připojením spotřebiče k elektrické síti se ujistěte, že se tlačítko
startu spotřebiče nachází v poloze “OFF” (vypnuto).
Vždy odpojte napájecí kabel, abyste zabránili přehřátí spotřebiče.
Netahejte za napájecí kabel (netahejte za kabel, neodpojujte spotřebič
od elektrické sítě ani ho nepřemísťujte tahem za kabel).
Neveďte napájecí kabel po drsném nebo ostrém povrchu nebo místy,
55
Page 56

kde by mohlo dojít k jeho poškození.
NEBLOKUJTE zcela ani zčásti ventilační otvory spotřebiče ani do nich
nevkládejte žádné předměty.
Během provozu se nedotýkejte spotřebiče mokrými částmi těla. V
každém případě Vám doporučujeme mít mezi sebou a stojanem
spotřebiče izolační prvek (např. nosit obuv s gumovou podrážkou).
Během používání musíte udržovat spotřebič v bezpečné vzdálenosti od
jakéhokoliv předmětu a/nebo hořlavých či potenciálně výbušných látek.
V případě poruchy nebo neobvyklého chování během provozu okamžitě
vypněte spotřebič, odpojte ho od elektrické sítě a zjistěte příčinu poruchy.
Pokud je to možné, obraťte se na kvalikovanou osobu. Neprovádějte
úkony, které nejsou uvedeny v tomto návodu k obsluze (například
demontáž a/nebo úpravy spotřebiče).
Pokud spotřebič nebudete delší dobu používat, chcete ho uložit, vyčistit
nebo provést jakoukoliv údržbu, odpojte ho nejprve od elektrické sítě.
Uchovávejte a používejte spotřebič pouze v interiéru nebo v prostoru
chráněném před povětrnostními vlivy, jako je např. déšť, přímé sluneční
záření nebo prach. Spotřebič není určen k použití nebo skladování v
exteriéru.
Děti NESMÍ provádět čištění ani údržbu spotřebiče bez dozoru dospělé
osoby.
Před vytažením zástrčky ze zásuvky nejprve vypněte spotřebič stiskem
správného tlačítka na ovládacím panelu.
NEZAVĚŠUJTE ventilátor na stěnu nebo strop, pokud tento typ instalace
není uveden a popsán v tomto návodu k obsluze.
Umístěte spotřebič ve správné vzdálenosti od předmětů nebo okolních
stěn. Ujistěte se, že jeho provoz nepovede k náhodným škodám.
NEPOUŽÍVEJTE spotřebič v blízkosti plynových sporáků nebo
otevřeného ohně.
NEPOUŽÍVEJTE spotřebič v blízkosti závěsů nebo textilií.
NEZAVĚŠUJTE ventilátor na stěnu nebo strop, pokud tento typ instalace
není uveden a popsán v tomto návodu k obsluze.
NEZAKRÝVEJTE spotřebič během provozu.
NEVKLÁDEJTE dovnitř ochranné mřížky ventilátoru žádné předměty ani
části těla. NENECHÁVEJTE spotřebič během provozu delší dobu bez
dozoru.
NEVYSTAVUJTE SE delší dobu proudění vzduchu, které vzniká
provozem ventilátoru, neboť by mohlo dojít k poškození zdraví.
Pokud ventilátor delší dobu nebudete používat nebo ho nepoužíváte
pravidelně, umístěte ho do původního obalu a skladujte ho na suchém
místě. Před prvním použitím ventilátoru
po dlouhé době nečinnosti se ujistěte, že je ventilátor čistý a jeho lopatky
se volně otáčejí (při vypnutém spotřebiči).
56
Page 57

UPOZORNĚNÍ O BATERIÍCH
1. BATERIE UCHOVÁVEJTE MIMO DOSAHU DĚTÍ. Požití může vést
k chemickému popálení, perforaci měkkých tkání a k smrti. Těžké
popáleniny se mohou vyskytnout do 2 hodin po požití. Okamžitě
vyhledejte lékařskou pomoc.
2. Nedovolte dětem vyměňovat baterie.
3. Baterie vždy vkládejte správnou polaritou (+ a -) vyznačenou na baterii
a zařízení.
4. Baterie nezkratujte.
5. Baterie nenabíjejte.
6. Baterie nevyndávejte násilím.
7. Nemíchejte nové a použité baterie ani baterie různých typů nebo
značek.
8. Vybité baterie okamžitě vyjměte ze zařízení a správně zlikvidujte.
9. Baterie neohřívejte.
10. Nesvařujte ani nepájejte přímo u baterií.
11. Baterie nerozebírejte.
12. Baterie nedeformujte.
13. Baterie nevhazujte do ohně.
14. Lithiová baterie s poškozeným obalem nesmí být vystavena vodě.
15. Baterie neupravujte.
16. Nepoužité baterie skladujte v původním obalu mimo dosah kovových
předmětů. Pokud již jsou vybaleny, nemíchejte je s použitými
bateriemi.
17. Baterie vyjměte ze zařízení, pokud ho nebudete delší dobu používat.
18. Před instalací baterií vyčistěte kontakty baterií a zařízení.
19. V případě úniku elektrolytu z baterií, zabraňte jakémukoliv kontaktu s
elektrolytem; v případě kontaktu postižené místo opláchněte vodou a
vyhledejte lékařskou pomoc.
57
Page 58

MONTÁŽ
3
11
16
1. Přední mřížka
2. Zajišťovací kroužek vrtule
3. Zajišťovací šroub mřížky
4. Vrtule
5. Zajišťovací kroužek zadní mřížky
6. Zadní mřížka
7. Hřídel motoru
8. Motor
9. Ovládací panel
10. Šroub hlavní jednotky
11. Malá dekorativní základna
12. Nastavitelná tyč
13. Matice nastavení výšky
14. Tyč základny
15. Šrouby k upevnění základny
(4 ks)
16. Křížová základna
B
12
13
14
2
4
1
1. Uvolněte šrouby (15) ze dvou dílů kříže (16).
2. Spojte dva díly kříže (16) dle obrázku.
3. Odšroubujte matici nastavení výšky (13) z tyče základny (14) a
nasuňte malou dekorativní základnu (11).
4. Vytáhněte nastavovací tyč (12) z hlavní tyče (14), pak utáhněte
nastavovací matici (13) na tyči základny (14).
5. Utáhněte tyč základny (14) pomocí dříve uvolněných šroubů (15) z
křížové základny (16).
6. Uvolněte šroub hlavní jednotky (10).
7. Nasaďte hlavní jednotku na nastavovací tyč (12). Šroubem (10) ji
zajistěte.
8. Odšroubujte zajišťovací kroužek vrtule (2) z hřídele motoru (7)
otočením ve směru hodinových ručiček.
5
7
6
A
9
15
8
10
58
Page 59

9. Vyšroubujte zajišťovací kroužek zadní mřížky (5) z hřídele motoru (7)
otočením proti směru hodinových ručiček.
10. Nasaďte zadní mřížku (6) na hřídel motoru (7) a ujistěte se, zda
kolíček na zadní straně směruje nahoru a utáhněte ji zajišťovacím
kroužkem (5) otočením ve směru hodinových ručiček.
11. Nasaďte vrtuli (4) na hřídel motoru (7) a zajistěte kroužkem (2)
otočením proti směru hodinových ručiček.
12. Otevřete spony přední mřížky (1) a nasaďte ji na zadní mřížku (6),
ujistěte se, zda je logo uprostřed v horizontální poloze, paralelně k
podlaze.
13. Najděte správnou pozici k zajištění spon a zajistěte mřížky pomocí
šroubu (3).
POUŽÍVÁNÍ SPOTŘEBIČE
Umístěte spotřebič na horizontální a stabilní povrch.
Spotřebič můžete ovládat ovládacím panelem nebo pomocí dálkového
ovladače.
Ovládací panel Dálkový ovladač
X
Y
Z
D
B
A
A
B
D
E
C
59
Page 60

Tlačítka:
A. Tlačítko vypnutí
B. Tlačítko zapnutí / rychlosti
C. Tlačítko režimu
D. Tlačítko časovače
E. Tlačítko otáčení
Baterie
Dálkový ovladač se dodává s baterií (typ CR2025, 3V); Před použitím
dálkového ovladače vyjměte průhledný proužek z krytu baterie.
Když je baterie vybitá, musíte ji vyměnit za stejný typ.
Chcete-li baterii vyjmout, postupujte podle nákresu na zadní straně
dálkového ovladače.
Tlačítko OFF (A):
Když je spotřebič zapnutý, stisknutím tlačítka počítač vypnete.
Tlačítko ON / SPEED (B):
Když je spotřebič vypnutý, stisknutím tlačítka počítač zapnete.
Pokud stisknete toto tlačítko, když je jednotka zapnutá, zvolíte
požadovanou rychlost: nízká rychlost, střední rychlost nebo vysoká
rychlost (indikátor X).
Tlačítko MODE (C) - Dálkový ovladač:
Když je spotřebič zapnutý, stisknutím tlačítka zvolíte požadovaný režim:
- Normální: indikátor Červené (Z)
- Přirozený: indikátor OFF (Z)
- Spánku: indikátor zelený (Z)
Tlačítko TIMER (D):
Když spotřebič pracuje, můžete nastavit časovač, aby se ventilátor
automaticky vypnul po nastaveném čase. Opakovaným stisknutím tohoto
tlačítka zvolte požadovaný čas do vypnutí v půlhodinových krocích od
0,5 hodiny do 7,5 hodiny. Na ovládacím panelu se rozsvítí příslušný
indikátor (0,5 H, 1 H, 2 H, 4 H). Když indikátory nesvítí, znamená to, že
časovač není nastaven a spotřebič bude nepřetržitě pracovat, dokud ho
nevypnete manuálně.
Tlačítko SWING (E) - Dálkový ovladač:
Když je spotřebič vypnutý, stisknutím tlačítka aktivujete automatickou
oscilaci zleva doprava. Opětovným stisknutím tohoto tlačítka funkci
deaktivujete.
Indikátor
X. Rychlost
Y. TIMER
Z. MODE
60
Page 61

VERTIKÁLNÍ NÁKLON:
Přední část ventilátoru lze vertikálně nastavit
do požadovaného úhlu. Stačí posunout přední
část ventilátoru nahoru nebo dolů podle
požadovaného sklonu.
STAVITELNÁ VÝŠKA
Uvolněte matici nastavení výšky (13), pak nastavte požadovanou výšku
ventilátoru. Po nastavení matici pevně utáhněte.
Poznámka: Tuto činnost provádějte pouze při vypnutém ventilátoru.
ÚDRŽBA SPOTŘEBIČE
Před pravidelnou údržbou vždy nejprve vypněte spotřebič a odpojte
ho od elektrické sítě.
NEDEMONTUJTE ventilátor: Tento ventilátor nelze rozebrat. K čištění
ventilátoru použijte měkký a suchý hadřík.
NIKDY neponořujte spotřebič do vody ani jiné kapaliny.
NEPOUŽÍVEJTE k čištění spotřebiče rozpouštědla ani jiné chemické
přípravky.
Pokud spotřebič nebudete používat, uložte ho po vyčištění na suché
místo.
61
Page 62

INFORMACE PRO UŽIVATELE
BATERIE - Před likvidací baterie vyjměte ze zařízení.
Baterie nevyhazujte do domovního odpadu, odevzdejte
je do příslušných nádob nebo ve sběrném středisku.
Vhodná recyklace pomáhá předcházet poškození
životního prostředí a lidského zdraví.
Při vyjmutí baterií postupujte podle návodu k obsluze.
“Implementace směrnice 2012/19/EU o odpadních
elektrických a elektronických zařízeních (OEEZ)”
Tento symbol na produktech anebo v průvodních
dokumentech znamená, že použité elektrické a
elektronické výrobky nesmí být přidány do běžného
komunálního odpadu.
Ke správné likvidaci, obnově a recyklaci doručte tyto
výrobky na určená sběrná místa, kde budou přijata
zdarma. Alternativně v některých zemích můžete vrátit
své výrobky místnímu prodejci při koupi ekvivalentního
nového produktu.
Správnou likvidací tohoto produktu pomůžete zachovat
cenné přírodní zdroje a napomáháte prevenci
potenciálních negativních dopadů na životní prostředí
a lidské zdraví, což by mohly být důsledky nesprávné
likvidace odpadů. Další podrobnosti si vyžádejte od
místního úřadu nebo nejbližšího sběrného místa.
Při nesprávné likvidaci tohoto druhu odpadu mohou
být v souladu s národními předpisy uděleny pokuty.
Pro podnikové uživatele v zemích Evropské unie
Chcete-li likvidovat elektrická a elektronická zařízení,
vyžádejte si potřebné informace od svého prodejce
nebo dodavatele.
Informace k likvidaci v ostatních zemích mimo
Evropskou unii
Tento symbol je platný jen v Evropské unii.
Chcete-li tento výrobek zlikvidovat, vyžádejte si
potřebné informace o správném způsobu likvidace od
místních úřadů nebo od svého prodejce.
62
Page 63

ZÁRUČNÍ PODMÍNKY
Záruka na tento spotřebič představuje 24 měsíců od data zakoupení.
Nárok na záruku je možné uplatnit pouze po předložení originálu dokladu
o zakoupení výrobku (paragon, faktura) s typovým označením výrobku,
datem prodeje a čitelným razítkem prodejce. Záruka zahrnuje výměnu
nebo opravu částí spotřebiče, které se poškodí z důvodu poruch ve
výrobě spotřebiče. Po uplynutí záruční doby bude spotřebič opraven za
poplatek. Výrobce neodpovídá za poškození nebo úrazy osob, zvířat z
důvodu nesprávného použití spotřebiče a nedodržení pokynů v návodu
k použití. Výrobek je určen výhradně jako domácí spotřebič pro použití
v domácnosti. Smluvní záruka je 6 měsíců, pokud je kupující podnikatel
- fyzická osoba a spotřebič kupuje pro podnikatelskou činnost nebo
komerční využití (§ 429 Obchodního zákoníku). Záruka se snižuje dle
§ 619 odst. 2 občanského zákoníku na 6 měsíců pro: žárovky, baterie,
křemíkové a halogenové trubice.
Záruka se nevztahuje
- jakékoliv mechanické poškození výrobku nebo jeho části
- na vady způsobené nevhodným zacházením nebo umístěním.
- je-li zařízení obsluhováno v rozporu s návodem, případně zásahem
neoprávněné osoby.
- nesprávně používán, skladován nebo přenášen.
- na záruku 24 měsíců se nevztahují opravy, například: výměna žárovky,
trubice, čištění a odvápňování kávovarů, žehliček, zvlhčovačů, atd. Zde
bude účtováno servisem za smluvní cenu.
- pokud nebude při kontrole přístroje zjištěna žádná závada nebo
nebudou splněny záruční podmínky, uhradí režijní náklady spojené s
kontrolou nebo opravou výrobku kupující.
- zákazník ztrácí záruku při používání výrobků k profesionální či jiné
výdělečné činnosti v provozovnách.
- závada byla způsobena vnějšími a živelními podmínkami (např.
poruchami v elektrické síti nebo bytové instalaci)
- záruka se netýká poškození vnějšího vzhledu nebo jiných, které nebrání
standardní obsluze.
Pokud zboží při uplatňování vady ze strany spotřebitele bude zasíláno
poštou nebo přepravní službou musí být zabaleno v obalu vhodném pro
přepravu tak, aby se zabránilo poškození výrobku.
63
Page 64

Zodpovědný zástupce za servis pro ČR na značky:
ARDES, Guzzanti, Scarlett, Luxell, Graef
ČERTES spol. s r.o.
Donínská 83
463 34 Hrádek nad Nisou
Tel./fax 482771487 - příjem oprav- servis.
Tel./fax 482718718 - náhradní díly
Mobil: 721018073, 731521116, 608719174
Pracovní doba 8 - 16,30
www: certes.info, e-mail: certes@certes.info
Odesílatel: ............................................................................................................................................................................................
Datum/místo prodeje: ......................................................................................................................................................................
Popis závady: ......................................................................................................................................................................................
...................................................................................................................................................................................................................
Dátum/podpis: ...................................................................................................................................................................................
Záruka se nevztahuje.
Distributor
PRIVEST s.r.o.
Na Zlatnici 301/2
Praha 4, PSČ 147 00
www: www.privest.cz
Email: info@privest.cz
Telefon: (+420) 241 410 819
64
Page 65

Tento spotrebič môžu používať deti staršie
ako 8 rokov a osoby so zníženými fyzickými,
zmyslovými alebo duševnými schopnosťami
alebo s nedostatočnými skúsenosťami a
vedomosťami iba vtedy, ak sa nachádzajú
pod dozorom zodpovednej osoby alebo pokiaľ
boli oboznámené so správnym a bezpečným
používaním spotrebiča a uvedomujú si prípadné
riziká s tým spojené.
Deti sa nesmú so spotrebičom hrať.
Deti nesmú vykonávať čistenie ani údržbu
spotrebiča, pokiaľ sa nenachádzajú pod dozorom
zodpovednej osoby.
Poškodený prívodný kábel musí byť vymenený
iba v autorizovanom servisnom stredisku.
Pred demontážou ochranného krytu sa uistite, že
je spotrebič odpojený od elektrickej siete.
VAROVANIA
Upozornenie: Dôkladne si prečítajte tento návod na obsluhu, ktorý
obsahuje dôležité pokyny týkajúce sa bezpečnej inštalácie, použitia
a údržby spotrebiča. Uschovajte tento návod pre prípadné použitie
v budúcnosti.
Nedovoľte deťom hrať sa so spotrebičom.
Tento spotrebič sa môže využívať len na účel, na ktorý bol navrhnutý;
akékoľvek iné použitie je nesprávne a nebezpečné.
Výrobca nenesie žiadnou zodpovednosť za poškodenia spôsobené
nevhodným a/alebo nesprávnym použitím.
SK
65
Page 66

Toto zariadenie NIE JE vhodné na použitie v explozívnom prostredí (v
prítomnosti horľavých látok ako je benzín, výpary, hmla alebo prach, v
atmosférických podmienkach, kde sa po vznietení spaliny šíria ľahko
vzduchom).
Obalové materiály (plastové vrecká, polystyrén a pod.) držte mimo
dosahu detí alebo nespôsobilých osôb, pretože predstavujú riziko.
Inštalácia/zostavenie spotrebiča musí byť v súlade s pokynmi výrobcu.
Nesprávny postup môže viesť k zraneniu osôb, zvierat alebo k poškodeniu
majetku, za čo výrobca nenesie zodpovednosť.
Spotrebič postavte a používajte na horizontálnom a stabilnom povrchu.
Pred použitím skontrolujte stav spotrebiča a prívodného kábla.
V prípade pochybností kontaktujte kvalikovaného technika. Pred
pripojením spotrebiča k sieťovej zásuvke skontrolujte, či zodpovedajú
hodnoty napájania (napätie a frekvencia) spotrebiča s parametrami
elektrickej siete.
Uistite sa, že je elektrická sieť vybavená správnym uzemnením v súlade
s platnými predpisy.
NEPRIPÁJAJTE spotrebič k mnohonásobnej zásuvke.
Ak je to možné, vyhnite sa použitiu adaptérov alebo predlžovacích
káblov; ak je ich použitie nutné, používajte len tie, ktoré vyhovujú platným
bezpečnostným predpisom.
Spotrebič nezapínajte pomocou externých časovačov alebo iných
diaľkovo riadených systémov, ktoré nie sú uvedené v tomto návode.
Spotrebič NEPOUŽÍVAJTE ani neskladujte v blízkosti zdrojov tepla
(ohrievače, kachle a pod.).
Spotrebič NEPONÁRAJTE do vody ani iných tekutín; v prípade pádu do
vody HO NEVYŤAHUJTE, najskôr odpojte zástrčku od sieťovej zásuvky.
Pred prvým použitím spotrebiča odstráňte všetky obalové materiály a
štítky, ktoré by mohli brániť v správnej funkčnosti.
Kábel pripájajte a odpájajte len suchými rukami.
Pred pripojením sa uistite, že je tlačidlo zapnutia na spotrebiči v pozícii
„OFF“ (vypnuté).
Po použití odpojte zástrčku, aby ste zabránili prehriatiu (na prenášanie
spotrebiča nepoužívajte kábel).
Prívodný kábel neveďte cez ostré ani drsné plochy a v miestach, kde sa
môže ľahko poškodiť.
NEBLOKUJTE ani čiastočne vstup a výstup vzduchu a do spotrebiča
nevkladajte cudzie predmety.
Počas prevádzky sa nedotýkajte spotrebiča mokrými časťami tela a v
každom prípade odporúčame použitie izolačného materiálu medzi vami
a podlahou (napríklad obuv s gumovou podrážkou).
Počas použitia udržiavajte spotrebič v bezpečnej vzdialenosti od
predmetov a prípadne horľavých látok.
V prípade poruchy alebo neštandardnej prevádzky spotrebiča ho ihneď
66
Page 67

vypnite, odpojte od elektrickej siete a skontrolujte príčinu poruchy, ak je
to možné, s pomocou kvalikovanej osoby.
Nevykonávajte žiadne činnosti, ktoré nie sú popísané v tomto návode
(napríklad demontáž spotrebiča).
Pred čistením, uskladnením, vykonávaním údržby alebo ak nebudete
spotrebič používať dlhší čas, odpojte ho od elektrickej siete.
Spotrebič používajte a skladujte len vo vnútri alebo ho chráňte pred
slnkom, dažďom a prachom. Spotrebič nie je určený na použitie a
skladovanie vonku.
Čistenie a údržbu spotrebiča NESMÚ vykonávať deti bez dozoru dospelej
osoby.
Pred odpojením spotrebiča ho vypnite pomocou príslušného príkazu
alebo tlačidla na ovládacom paneli.
NEVEŠAJTE ventilátor na stenu a strop, ak nie je tento typ inštalácie
povolený výrobcom.
Spotrebič postavte do správnej vzdialenosti od predmetov alebo okolitých
stien tak, aby jeho funkcia nespôsobila poškodenie.
Spotrebič NEPOUŽÍVAJTE v blízkosti plynových sporákov alebo zdroja
otvoreného ohňa.
Spotrebič NEPOUŽÍVAJTE v blízkosti záclon a textílií.
Spotrebič počas prevádzky NEZAKRÝVAJTE.
Cez mriežku spotrebiča NEVKLADAJTE žiadne cudzie predmety.
Spotrebič počas prevádzky NENECHÁVAJTE dlhý čas bez dozoru.
NEVYSTAVUJTE sa na dlhý čas prúdeniu vzduchu z ventilátora, môže to
mať negatívny vplyv na vaše zdravie.
Ak nebudete spotrebič dlhší čas používať, uložte ho do originálneho
obalu na suchom mieste. Pred prvým použitím alebo po dlhodobom
odstavení skontrolujte, či je ventilátor čistý a lopatky ventilátora sa voľne
otáčajú (pri odpojenom napájaní).
UPOZORNENIA O BATÉRIÁCH
1. BATÉRIE UCHOVÁVAJTE MIMO DOSAHU DETÍ. Požitie môže
viesť k chemickému popáleniu, perforácii mäkkého tkaniva a k smrti.
Ťažké popáleniny sa môžu vyskytnúť do 2 hodín po požití. Okamžite
vyhľadajte lekársku pomoc.
2. Nedovoľte deťom vymieňať batérie.
3. Batérie vždy vkladajte správnou polaritou (+ a -) vyznačenou na batérii
a zariadení.
4. Batérie neskratujte.
5. Batérie nenabíjajte.
6. Batérie nevyberajte násilím.
7. Nemiešajte nové a použité batérie ani batérie rôznych typov alebo
značiek.
8. Vybité batérie by okamžite vyberte zo zariadenia a správne zlikvidujte.
9. Batérie neohrievajte
67
Page 68

10. Nezvárajte ani nespájkujte priamo pri batériách.
11. Batérie nerozoberajte.
12. Batérie nedeformujte.
13. Batérie nevhadzujte do ohňa.
14. Lítiová batéria s poškodeným obalom nesmie byť vystavená vode.
15. Batérie neupravujte.
16. Nepoužité batérie skladujte v pôvodnom obale mimo dosahu
kovových predmetov. Ak už sú vybalené, nezmiešajte ich s použitými
batériami.
17. Batérie vyberte zo zariadenia, ak ho nebudete dlhší čas používať.
18. Pred inštaláciou batérií vyčistite kontakty batérií a zariadenia.
19. V prípade úniku elektrolytu z batérií, zabráňte akémukoľvek kontaktu
s elektrolytom; v prípade kontaktu postihnuté miesto opláchnite
vodou a vyhľadajte lekársku pomoc.
68
Page 69

MONTÁŽ
3
11
16
1. Predná mriežka
2. Zaisťovací krúžok vrtule
3. Zaisťovacia skrutka mriežky
4. Vrtuľa
5. Zaisťovací krúžok zadnej
mriežky
6. Zadná mriežka
7. Hriadeľ motora
8. Motor
9. Ovládací panel
10. Skrutka hlavnej jednotky
11. Malá dekoratívna základňa
12. Nastaviteľná tyč
13. Matica nastavenia výšky
14. Tyč základne
15. Skrutky na upevnenie základne
(4 ks)
16. Krížová základňa
B
12
13
14
2
4
1
1. Uvoľnite skrutky (15) z dvoch dielov kríža (16).
2. Spojte dva diely kríža (16) podľa obrázka.
3. Odskrutkujte maticu nastavenia výšky (13) z tyče základne (14) a
nasuňte malú dekoratívnu základňu (11).
4. Vytiahnite nastavovaciu tyč (12) z hlavnej tyče (14), potom dotiahnite
nastavovaciu maticu (14) na tyči základne (14).
5. Dotiahnite tyč základne (14) pomocou skôr uvoľnených skrutiek (15) z
krížovej základne (16).
6. Uvoľnite skrutku hlavnej jednotky (10).
7. Naložte hlavnú jednotku na nastavovaciu tyč (12). Skrutkou (10) ju
zaistite.
8. Odskrutkujte zaisťovací krúžok vrtule (2) z hriadeľa motora (7)
otočením v smere hodinových ručičiek.
5
7
6
A
9
15
8
10
69
Page 70

9. Vyskrutkujte zaisťovací krúžok zadnej mriežky (5) z hriadeľa motora
(7) otočením proti smeru hodinových ručičiek.
10. Naložte zadnú mriežku (6) na hriadeľ motora (7) a uistite sa, že kolík
na zadnej strane smeruje hore a dotiahnite ju zaisťovacím krúžkom
(5) otočením v smere hodinových ručičiek.
11. Naložte vrtuľu (4) na hriadeľ motora (7) a zaistite krúžkom (2)
otočením proti smeru hodinových ručičiek.
12. Otvorte spony prednej mriežky (1) a naložte ju na zadnú mriežku
(6), uistite sa, že je logo uprostred v horizontálnej polohe, paralelne
k podlahe.
13. Nájdite správnu pozíciu na zaistenie spon a zaistite mriežky pomocou
skrutky (3).
POUŽITIE SPOTREBIČA
Spotrebič postavte a používajte na horizontálnom a stabilnom povrchu.
Spotrebič môžete ovládať ovládacím panelom alebo pomocou diaľkového
ovládača.
Ovládací panel Diaľkový ovládač
70
X
Y
Z
D
B
A
A
B
D
E
C
Page 71

Tlačidlá:
A. Tlačidlo vypnutia
B. Tlačidlo zapnutia / rýchlosti
C. Tlačidlo režimu
D. Tlačidlo časovača
E. Tlačidlo otáčania
Batérie
Diaľkový ovládač sa dodáva s batériou (typ CR2025, 3V); Pred použitím
diaľkového ovládača vyberte priehľadný prúžok z krytu batérie.
Keď je batéria vybitá, musíte ju vymeniť za rovnaký typ.
Ak chcete batériu vybrať, postupujte podľa nákresu na zadnej strane
diaľkového ovládača.
Tlačidlo OFF (A):
Keď je spotrebič zapnutý, stlačením tohto tlačidla ho vypnete.
Tlačidlo ON / SPEED (B):
Keď je spotrebič vypnutý, stlačením tohto tlačidla ho zapnete.
Ak stlačíte toto tlačidlo, keď je jednotka zapnutá, zvolíte požadovanú
rýchlosť: nízka rýchlosť, stredná rýchlosť alebo vysoká rýchlosť (indikátor
X).
Tlačidlo MODE (C) - Diaľkový ovládač
Keď je spotrebič zapnutý, stlačením tohto tlačidla zvolíte požadovaný
režim:
- Normálny: indikátor červená (Z);
- Prirodzený: indikátor OFF (Z);
- Spánku: indikátor zelená (Z).
Tlačidlo TIMER (D):
Keď spotrebič pracuje, môžete nastaviť časovač, aby sa ventilátor
automaticky vypol po nastavenom čase. Opakovaným stláčaním tohto
tlačidla zvoľte požadovaný čas do vypnutia v polhodinových krokoch od
0,5 hodiny do 7,5 hodiny. Na ovládacom paneli sa rozsvieti príslušný
indikátor (0,5H, 1H, 2H, 4H). Keď indikátory nesvietia, znamená to, že
časovač nie je nastavený a spotrebič bude nepretržite pracovať, pokým
ho nevypnete manuálne.
Tlačidlo SWING (E) - Diaľkový ovládač:
Keď je spotrebič vypnutý, stlačením tohto tlačidla aktivujete automatickú
osciláciu zľava doprava. Opätovným stlačením tohto tlačidla funkciu
deaktivujete.
Indikátor
X. rýchlosť
Y. TIMER
Z. MODE
71
Page 72

NASTAVENIE VERTIKÁLNEHO SKLONU
Môžete upraviť vertikálny sklon ventilátora.
Jednoducho nastavte ventilátor hore alebo
dolu do požadovaného sklonu.
NASTAVITEĽNÁ VÝŠKA
Uvoľnite maticu nastavenia výšky (13), potom nastavte požadovanú
výšku ventilátora. Po nastavení maticu pevne utiahnite.
Poznámka: Túto činnosť vykonávajte len pri vypnutom ventilátore.
ÚDRŽBA SPOTREBIČA
Pred pravidelnou údržbou vždy najskôr vypnite spotrebič a odpojte
ho z elektrickej siete.
Nedemontu jte ventilátor: Tento ventilátor nie je možné rozobrať.
Na čistenie ventilátora použite mäkkú a suchú handričku.
Nikdy neponárajte spotrebič do vody ani inej kvapaliny.
Nepou žíva jte na čistenie spotrebiča rozpúšťadlo ani iné chemické
prípravky.
Keď spotrebič nebudete používať, uložte ho po vyčistení na suché
miesto.
72
Page 73
INFORMÁCIE PRE POUŽÍVATEĽOV
BATÉRIE - Pred likvidáciou batérie vyberte zo
zariadenia. Batérie nevyhadzujte do domového
odpadu, odovzdajte ich do príslušných nádob alebo
v v zbernom stredisku. Vhodná recyklácia pomáha
predchádzať poškodeniu životného prostredia a
ľudského zdravia.
Pri vybratí batérií postupujte podľa návodu na obsluhu.
„Smernica 2012/19/EU o starých elektrických a
elektronických zariadeniach (OEEZ)“
Tento symbol na produktoch a/alebo na priložených
dokumentoch znamená, že sa pri likvidácii nesmú
elektrické a elektronické zariadenia miešať so
všeobecným domácim odpadom.
V záujme správneho obhospodarovania, obnovy a
recyklácie odvezte, prosím, tieto produkty na určené
zberné miesta, kde budú prijaté bez poplatku. V
niektorých krajinách je možné tieto produkty vrátiť
priamo miestnemu maloobchodu v prípade, ak si
objednáte podobný nový výrobok. Správna likvidácia
týchto produktov pomôže ušetriť hodnotné zdroje a
zabrániť možným negatívnym vplyvom na ľudské
zdravie a prostredie, ktoré môžu inak vzniknúť v
dôsledku nesprávneho zaobchádzania s odpadom.
Bližšie informácie o najbližšom zbernom mieste
získate na miestnom úrade.
V prípade nesprávnej likvidácie odpadu môžu byť
uplatnené pokuty v súlade s platnou legislatívou.
Pre právnické osoby v Európskej únii
Ak potrebujete zlikvidovať opotrebované elektrické a
elektronické zariadenia, bližšie informácie získate od
svojho miestneho predajcu alebo dodávateľa.
Informácie o likvidácii v krajinách mimo Európskej
únie
Tento symbol je platný len v Európskej únii. Ak si želáte
zlikvidovať toto zariadenie, obráťte sa na miestny úrad
alebo predajcu a poinformujte sa o správnom spôsobe
likvidácie tohto typu odpadu.
73
Page 74

ZÁRUČNÉ PODMIENKY
Záruka na tento spotrebič predstavuje 24 mesiacov od dátumu zakúpenia.
Nárok na záruku je možné uplatniť len po predložení originálu dokladu
o zakúpení výrobku (paragón, faktúra) s typovým označením výrobku,
dátumom predaja a čitateľnou pečiatkou predajcu. Záruka zahŕňa
výmenu alebo opravu častí spotrebiča, ktoré sa poškodia z dôvodu
porúch vo výrobe spotrebiča. Po uplynutí záručnej doby bude spotrebič
opravený za poplatok. Výrobca nezodpovedá za poškodenia alebo úrazy
osôb, zvierat z dôvodu nesprávneho použitia spotrebiča a nedodržania
pokynov v návode na obsluhu. Výrobok je určený výhradne ako domáci
spotrebič pre použitie v domácnosti. Zmluvná záruka je 6 mesiacov, ak je
kupujúci podnikateľ - fyzická osoba a spotrebič kupuje pre podnikateľskú
činnosť alebo komerčné využitie. Záruka sa znižuje podľa občianskeho
zákonníka na 6 mesiacov pre: žiarovky, batérie, kremíkové a halogénové
trubice.
Záruka sa nevzťahuje na
- akékoľvek mechanické poškodenie výrobku alebo jeho časti
- na chyby spôsobené nevhodným zaobchádzaním alebo umiestnením.
- ak je zariadenie obsluhované v rozpore s návodom, prípadne zásahom
neoprávnenej osoby.
- nesprávne používaný, skladovaný alebo prenášaný.
- na záruku 24 mesiacov sa nevzťahujú opravy, napríklad: výmena
žiarovky, trubice, čistenie a odvápňovanie kávovarov, žehličiek,
zvlhčovačov, atď. Tu bude účtované servisom za zmluvnú cenu.
- ak nebude pri kontrole zariadenia zistená žiadna porucha alebo nebudú
splnené záručné podmienky, uhradí režijné náklady spojené s kontrolou
alebo opravou výrobku kupujúci.
- zákazník stráca záruku pri používaní výrobkov na profesionálnej alebo
inej zárobkovej činnosti v prevádzkach.
- porucha bola spôsobená vonkajšími a živelnými podmienkami (napr.
poruchami v elektrickej sieti alebo bytovej inštalácii).
- záruka sa netýka poškodenia vonkajšieho vzhľadu alebo iných, ktoré
nebránia štandardnej obsluhe.
Ak tovar pri uplatňovaní poruchy zo strany spotrebiteľa bude zasielaný
poštou alebo prepravnou službou, musí byť zabalený v obale vhodnom
pre prepravu tak, aby sa zabránilo poškodeniu výrobku.
74
Page 75

Zodpovedný zástupca za servis pre SR
ČERTES SK, s.r.o.
Pažite č. 42
010 09 Žilina
tel./fax: +421 41 5680 171, 5680 173
mobil: +421 905 259213
+421 907 241912
Pracovná doba Po-Pia. 9:00 - 15:00
e-mail: certes.sk@gmail.com
certes@eslovakia.sk
Priezvisko/meno: ...............................................................................................................................................................................
Dátum/miesto predaja: ...................................................................................................................................................................
Popis poruchy: ....................................................................................................................................................................................
...................................................................................................................................................................................................................
Dátum/podpis: ...................................................................................................................................................................................
Distribútor
PRIVEST s.r.o.
Na Zlatnici 301/2
Praha 4, PSČ 147 00
www: www.privest.cz
Email: info@privest.cz
Telefon: (+420) 241 410 819
75
Page 76

Poly Pool S.p.A. Via Sottocorna, 21/B
24020 Parre (Bergamo) - Italy
Tel. +39 035 4104000 r.a. - Fax +39 035 702716
5EA40PR.081119
http://www.ardes.it - e-mail: polypool@polypool.it
MADE IN CHINA
 Loading...