

Arctic Cat DVX 300, ALTERRA TRV 550i, ALTERRA TRV 550 XT, 400 2x4, 1000i User Manual
...
User manual ATV

Arctic Cat user manual
● DVX 300 ● 700i TBX ● ALTERRA TRV 550i
● XC 450 ● 700 Diesel ● ALTERRA TRV 550 XT
● 400 2x4 ● 1000i ● ALTERRA 700i
● 400 4x4 ● 1000i TRV ● ALTERRA 700 XT
● 450i ● XR 550i XT ● ALTERRA TRV 700i
● 550i ● XR 700i ● ALTERRA TRV 700 XT
● 550i TRV ● XR 700i XT ● ALTERRA TRV 1000i
● 700i ● ALTERRA 550i ● ALTERRA TRV 1000 XT
● 700i TRV ● ALTERRA 550 XT
© 2017
Arctic Cat GmbH
Industriestraße 43
5600 St. Johann i. Pg.
Austria
Phone: +43 (6412) 20 140 0
Fax: +43 (6412) 20 140 111
Mail: office@arcticcat.eu
Homepage: www.arcticcat.eu
All rights reserved, especially the right of reproduction, distribution and translation. This document may not
be reproduced in any form (printing, photocopy, microfilm, or any other form) in whole or in part without the
express written permission of Arctic Cat GmbH or processed, duplicated or distributed using electronic systems.
Arctic Cat was supported by:
SORG Dokumentation GmbH & Co. KG
88239 Wangen im Allgäu/Germany +49 7522 7070-0
2

Introduction
Thank you for purchasing a high-quality all-terrain vehicle (ATV) from Arctic Cat. As
owner/user of the vehicle, make yourself thoroughly familiar with the basic procedure
instructions for operation, maintenance and storage. Read the user manual thoroughly before putting the vehicle into operation.
This user manual contains instructions for the operation of the vehicle and important
information on the storage in the off-season for driving.
In the event of larger repair or maintenance and repair work please contact an authorised Arctic Cat dealer.
All information and figures contained in this user manual are considered technically
correct at the time of this publication. Some figures are provided only for clarification
purposes and not for representing factual circumstances. As Arctic Cat continuously
refines and improves the products any retroactive liability is excluded.
The user manual is an integral part of the vehicle and shall be handed over with the
vehicle in the event of sale. If the vehicle changes hands, please contact the warranty
department of Arctic Cat GmbH, Industriestraße 43, 5600 St. Johann/Pg., Austria, to
ensure proper registration. This user manual has been prepared by the Service
department of Arctic Cat.
Parts and accessories
In the event of needing spare parts, oils or accessories for your Arctic Cat vehicle,
make sure that you only use ORIGINAL PARTS, OILS, AND ACCESSORIES FROM
ARCTIC CAT.
Only the original parts, oils, and accessories meet the requirements of your Arctic Cat
vehicle. You can find an exhaustive list of accessories in the current Arctic Cat accessories catalogue.
Your Arctic Cat dealer has a maintenance manual, as well as an illustrated manual
with images of the components, available as an aid for the care and maintenance of
your vehicle.
3

Contents
1 Safety instructions . . . . . . . . . . . . . . . . . . . . . . . . . . . . . . . . . . . . . . . . . . .7
1.1 Intended use. . . . . . . . . . . . . . . . . . . . . . . . . . . . . . . . . . . . . . . . . . . . . . . . .7
1.2 Security levels and symbols . . . . . . . . . . . . . . . . . . . . . . . . . . . . . . . . . . . . .7
1.3 General safety instructions. . . . . . . . . . . . . . . . . . . . . . . . . . . . . . . . . . . . . .8
1.4 Safety instructions for driving . . . . . . . . . . . . . . . . . . . . . . . . . . . . . . . . . . . .9
2 View of the vehicle . . . . . . . . . . . . . . . . . . . . . . . . . . . . . . . . . . . . . . . . . .11
2.1 Front left-hand view of the vehicle . . . . . . . . . . . . . . . . . . . . . . . . . . . . . . .11
2.2 Rear right-hand view of the vehicle . . . . . . . . . . . . . . . . . . . . . . . . . . . . . .12
2.3 Hanging label . . . . . . . . . . . . . . . . . . . . . . . . . . . . . . . . . . . . . . . . . . . . . . .13
2.4 Chassis plaque. . . . . . . . . . . . . . . . . . . . . . . . . . . . . . . . . . . . . . . . . . . . . .13
2.5 Warning signs. . . . . . . . . . . . . . . . . . . . . . . . . . . . . . . . . . . . . . . . . . . . . . .14
3 Serial numbers . . . . . . . . . . . . . . . . . . . . . . . . . . . . . . . . . . . . . . . . . . . . .16
4 Controls. . . . . . . . . . . . . . . . . . . . . . . . . . . . . . . . . . . . . . . . . . . . . . . . . . .18
4.1 Ignition switch. . . . . . . . . . . . . . . . . . . . . . . . . . . . . . . . . . . . . . . . . . . . . . .18
4.1.1 Ignition switch (not XR). . . . . . . . . . . . . . . . . . . . . . . . . . . . . . . . . . . . . . . .18
4.1.2 Ignition switch (XR/Alterra). . . . . . . . . . . . . . . . . . . . . . . . . . . . . . . . . . . . .19
4.2 Steering lock. . . . . . . . . . . . . . . . . . . . . . . . . . . . . . . . . . . . . . . . . . . . . . . .19
4.3 Battery cut off switch . . . . . . . . . . . . . . . . . . . . . . . . . . . . . . . . . . . . . . . . .20
4.4 Operator presence control (OPC). . . . . . . . . . . . . . . . . . . . . . . . . . . . . . . .20
4.5 Gear shift . . . . . . . . . . . . . . . . . . . . . . . . . . . . . . . . . . . . . . . . . . . . . . . . . .21
4.6 Drive selector switch. . . . . . . . . . . . . . . . . . . . . . . . . . . . . . . . . . . . . . . . . .21
4.7 Foot brake (main brake). . . . . . . . . . . . . . . . . . . . . . . . . . . . . . . . . . . . . . .22
4.8 Hand brake. . . . . . . . . . . . . . . . . . . . . . . . . . . . . . . . . . . . . . . . . . . . . . . . .23
4.10 Light switch. . . . . . . . . . . . . . . . . . . . . . . . . . . . . . . . . . . . . . . . . . . . . . . . .25
4.11 Indicator switch. . . . . . . . . . . . . . . . . . . . . . . . . . . . . . . . . . . . . . . . . . . . . .25
4.12 Warning light switch . . . . . . . . . . . . . . . . . . . . . . . . . . . . . . . . . . . . . . . . . .25
4.13 Horn button. . . . . . . . . . . . . . . . . . . . . . . . . . . . . . . . . . . . . . . . . . . . . . . . .26
4.14 Winch switch. . . . . . . . . . . . . . . . . . . . . . . . . . . . . . . . . . . . . . . . . . . . . . . .26
4.15 Starter button . . . . . . . . . . . . . . . . . . . . . . . . . . . . . . . . . . . . . . . . . . . . . . .26
4.16 Thumb throttle . . . . . . . . . . . . . . . . . . . . . . . . . . . . . . . . . . . . . . . . . . . . . .27
4.17 Power steering . . . . . . . . . . . . . . . . . . . . . . . . . . . . . . . . . . . . . . . . . . . . . .28
4.18 Gauge. . . . . . . . . . . . . . . . . . . . . . . . . . . . . . . . . . . . . . . . . . . . . . . . . . . . .28
4.18.1 Gauge (not XR) . . . . . . . . . . . . . . . . . . . . . . . . . . . . . . . . . . . . . . . . . . . . .28
4.18.2 Gauge (XR/Alterra). . . . . . . . . . . . . . . . . . . . . . . . . . . . . . . . . . . . . . . . . . .32
4.19 Rear view mirror . . . . . . . . . . . . . . . . . . . . . . . . . . . . . . . . . . . . . . . . . . . . .35
4.20 Seat release . . . . . . . . . . . . . . . . . . . . . . . . . . . . . . . . . . . . . . . . . . . . . . . .35
4.21 Clamp for safety flag. . . . . . . . . . . . . . . . . . . . . . . . . . . . . . . . . . . . . . . . . .35
4

Contents
5 First putting into operation . . . . . . . . . . . . . . . . . . . . . . . . . . . . . . . . . . 36
5.1 Notes regarding first putting into operation . . . . . . . . . . . . . . . . . . . . . . . . 36
5.2 Entering the registration PIN (POSR) . . . . . . . . . . . . . . . . . . . . . . . . . . . . 36
5.3 Running in the engine . . . . . . . . . . . . . . . . . . . . . . . . . . . . . . . . . . . . . . . . 38
5.4 Running in the brake pads . . . . . . . . . . . . . . . . . . . . . . . . . . . . . . . . . . . . 38
6 Driving . . . . . . . . . . . . . . . . . . . . . . . . . . . . . . . . . . . . . . . . . . . . . . . . . . . 39
6.1 Check list. . . . . . . . . . . . . . . . . . . . . . . . . . . . . . . . . . . . . . . . . . . . . . . . . . 39
6.2 Climbing on / climbing off . . . . . . . . . . . . . . . . . . . . . . . . . . . . . . . . . . . . . 39
6.3 Starting / switching off the engine . . . . . . . . . . . . . . . . . . . . . . . . . . . . . . . 40
6.3.1 Starting petrol engine . . . . . . . . . . . . . . . . . . . . . . . . . . . . . . . . . . . . . . . . 40
6.3.2 Starting diesel engine . . . . . . . . . . . . . . . . . . . . . . . . . . . . . . . . . . . . . . . . 41
6.3.3 Switching engine off . . . . . . . . . . . . . . . . . . . . . . . . . . . . . . . . . . . . . . . . . 41
6.4 Braking . . . . . . . . . . . . . . . . . . . . . . . . . . . . . . . . . . . . . . . . . . . . . . . . . . . 41
6.5 Parking . . . . . . . . . . . . . . . . . . . . . . . . . . . . . . . . . . . . . . . . . . . . . . . . . . . 42
6.6 Driving manoeuvres . . . . . . . . . . . . . . . . . . . . . . . . . . . . . . . . . . . . . . . . . 42
6.6.1 Driving around corners . . . . . . . . . . . . . . . . . . . . . . . . . . . . . . . . . . . . . . . 42
6.6.2 Dodging. . . . . . . . . . . . . . . . . . . . . . . . . . . . . . . . . . . . . . . . . . . . . . . . . . . 43
6.6.3 Driving slopes . . . . . . . . . . . . . . . . . . . . . . . . . . . . . . . . . . . . . . . . . . . . . . 43
6.6.4 Three-point turn. . . . . . . . . . . . . . . . . . . . . . . . . . . . . . . . . . . . . . . . . . . . . 44
6.6.5 Crossing stretches of water. . . . . . . . . . . . . . . . . . . . . . . . . . . . . . . . . . . . 45
6.6.6 Skidding and slipping . . . . . . . . . . . . . . . . . . . . . . . . . . . . . . . . . . . . . . . . 45
6.6.7 Driving in cold weather . . . . . . . . . . . . . . . . . . . . . . . . . . . . . . . . . . . . . . . 46
6.7 Adjusting the shock absorbers . . . . . . . . . . . . . . . . . . . . . . . . . . . . . . . . . 47
6.8 Loading the vehicle . . . . . . . . . . . . . . . . . . . . . . . . . . . . . . . . . . . . . . . . . . 48
6.9 Driving with trailer . . . . . . . . . . . . . . . . . . . . . . . . . . . . . . . . . . . . . . . . . . . 48
6.10 Removing and attaching passenger seat (only for TRV) . . . . . . . . . . . . . 49
6.11 Filling up . . . . . . . . . . . . . . . . . . . . . . . . . . . . . . . . . . . . . . . . . . . . . . . . . . 49
6.12 Transporting the vehicle . . . . . . . . . . . . . . . . . . . . . . . . . . . . . . . . . . . . . . 50
6.13 Towing the vehicle . . . . . . . . . . . . . . . . . . . . . . . . . . . . . . . . . . . . . . . . . . 50
6.14 Measures after an accident. . . . . . . . . . . . . . . . . . . . . . . . . . . . . . . . . . . . 52
7 Maintenance . . . . . . . . . . . . . . . . . . . . . . . . . . . . . . . . . . . . . . . . . . . . . . 53
7.1 General maintenance instructions. . . . . . . . . . . . . . . . . . . . . . . . . . . . . . . 53
7.2 Checking the engine oil level . . . . . . . . . . . . . . . . . . . . . . . . . . . . . . . . . . 53
7.3 Checking the coolant level . . . . . . . . . . . . . . . . . . . . . . . . . . . . . . . . . . . . 54
7.4 Checking shock absorbers for perfect condition . . . . . . . . . . . . . . . . . . . . 55
7.5 Checking the braking system . . . . . . . . . . . . . . . . . . . . . . . . . . . . . . . . . . 55
7.5.1 Checking the brake fluid level . . . . . . . . . . . . . . . . . . . . . . . . . . . . . . . . . . 55
7.5.2 Checking the parking brake . . . . . . . . . . . . . . . . . . . . . . . . . . . . . . . . . . . 56
7.5.3 Checking the brake lever lock . . . . . . . . . . . . . . . . . . . . . . . . . . . . . . . . . . 56
7.6 Checking protective rubber sleeves for perfect condition . . . . . . . . . . . . . 56
5

Contents
7.7 Battery . . . . . . . . . . . . . . . . . . . . . . . . . . . . . . . . . . . . . . . . . . . . . . . . . . . .57
7.7.1 Trickle charging . . . . . . . . . . . . . . . . . . . . . . . . . . . . . . . . . . . . . . . . . . . . .57
7.7.2 Charging. . . . . . . . . . . . . . . . . . . . . . . . . . . . . . . . . . . . . . . . . . . . . . . . . . .59
7.7.3 Jump start. . . . . . . . . . . . . . . . . . . . . . . . . . . . . . . . . . . . . . . . . . . . . . . . . .59
7.8 Tyres. . . . . . . . . . . . . . . . . . . . . . . . . . . . . . . . . . . . . . . . . . . . . . . . . . . . . .61
7.8.1 Checking the tyre pressure. . . . . . . . . . . . . . . . . . . . . . . . . . . . . . . . . . . . .61
7.8.2 Checking tyre condition . . . . . . . . . . . . . . . . . . . . . . . . . . . . . . . . . . . . . . .62
7.9 Lighting. . . . . . . . . . . . . . . . . . . . . . . . . . . . . . . . . . . . . . . . . . . . . . . . . . . .63
7.9.1 Replacing headlight lamp . . . . . . . . . . . . . . . . . . . . . . . . . . . . . . . . . . . . . .64
7.9.2 Replacing number plate lamp. . . . . . . . . . . . . . . . . . . . . . . . . . . . . . . . . . .64
7.9.3 Replacing rear indicator lamp, taillight lamp, or brake light lamp . . . . . . . .64
7.9.4 Replacing front indicator lamp and position light lamp . . . . . . . . . . . . . . . .65
7.10 Replacing fuses . . . . . . . . . . . . . . . . . . . . . . . . . . . . . . . . . . . . . . . . . . . . .65
8 Care . . . . . . . . . . . . . . . . . . . . . . . . . . . . . . . . . . . . . . . . . . . . . . . . . . . . . .66
8.1 Cleaning the vehicle. . . . . . . . . . . . . . . . . . . . . . . . . . . . . . . . . . . . . . . . . .66
8.2 Shutting down the vehicle. . . . . . . . . . . . . . . . . . . . . . . . . . . . . . . . . . . . . .67
8.3 Putting the vehicle into operation . . . . . . . . . . . . . . . . . . . . . . . . . . . . . . . .67
9 Technical data. . . . . . . . . . . . . . . . . . . . . . . . . . . . . . . . . . . . . . . . . . . . . .68
10 Registration information form. . . . . . . . . . . . . . . . . . . . . . . . . . . . . . . . .76
11 Index . . . . . . . . . . . . . . . . . . . . . . . . . . . . . . . . . . . . . . . . . . . . . . . . . . . . .77
6

Safety instructions 1
1 Safety instructions
Observe the safety instructions to ensure safe handling of the vehicle. Therefore, read
this user manual thoroughly. The safety instructions are emphasized optically in the
text.
NOTE
Different warning sign, which contain important safety information, are
attached to the vehicle. Every person using the vehicle shall have read and
understood this safety information before driving.
If a warning sign comes off or becomes illegible, please contact your Arctic Cat dealer
to obtain replacement.
1.1 Intended use
The vehicle has been designed and constructed for the common stresses in road traffic and off-road applications. The vehicle may only be steered by persons allowed to
do so by national law.
1.2 Security levels and symbols
This user manual contains different symbols. The symbols call attention to possible
risks or indicate protective measures.
The warning symbols are classified in the categories Danger, Warning, Caution, and
Attention.
DANGER
Indicates a hazard which, if not avoided, will lead to serious injury or death.
WARNING
Indicates a hazard which, if not avoided, could lead to serious injury or
death.
CAUTION
Indicates a hazard which, if not avoided, could lead to serious injuries.
ATTENTION
Indicates the measures to prevent material damage.
7

1 Safety instructions
Always observe this warnings and proceed particularly attentively and carefully when
performing the work steps marked in this way.
NOTE
This symbol indicates explanations whose compliance contributes to a better understanding and ideal operation of the vehicle.
1.3 General safety instructions
Observe that this vehicle IS NOT A TOY AND ITS OPERATION BEARS RISKS. This
vehicle behaves differently to other vehicles such as e.g. motorcycles or cars. Even
in the case of normal driving manoeuvres (e.g. steering, driving in the mountains, driving over obstacles), collisions and rollovers may occur if you do not take suitable precautions.
To prevent serious or mortal injuries, please observe the following:
● Read the user manual thoroughly and follow the instruction contained within.
Pay particular attention the warnings in this user manual and the adhesive labels
attached to the vehicle.
● Never use the vehicle without sufficient training. Take driving lessons. Beginners
should attend a driving course.
● Never drive this vehicle without the corresponding protective clothes (jacket,
trousers, helmet, protective eyewear, boots, and gloves). Always use protective
clothes that are in perfect condition and meet the legal requirements.
● Adapt the speed to the terrain, the visibility conditions and your experience.
● Never try to perform rides only on the rear wheels, jumps or other stunts.
● Always grip the handlebar with both hands.
● While driving, always place both of your feet on the footrests.
● Do not drive if your are incapable to participate in traffic due to the influence of
alcohol, medication, or drugs, or if you are both physically and mentally not in form
to drive the vehicle.
● Provide adequate ventilation when operating the engine in closed rooms. Do not
operate the engine in a closed room without a suitable extraction system.
● Parts such as e.g. exhaust system, cooler, engine, shock absorbers, and braking
system heat up during operation. Only touch these parts after they have cooled
down.
8

Safety instructions 1
1.4 Safety instructions for driving
● Always climb off on the uphill side. If the vehicle is standing exactly in the uphill
direction, you may climb off on both sides.
● Never drive the vehicle in terrain that is to steep for the vehicle or for your capabilities. Train on less steep slopes before driving steeper slopes.
● Never cross a slope that is so steep that the vehicle tilts heavily to one side.
● Always drive slowly and particularly carefully in unfamiliar terrain.
● Always pay attention to changing terrain conditions.
● Never drive over high obstacles such as e.g. rocks or fallen trees.
● Do not drive in rough, slippery and loose terrain before you have not acquired the
necessary capabilities.
● Always drive particularly carefully in rough, slippery and loose terrain.
● Follow the instructions for turning manoeuvres.
● First, train turning in level terrain and at slow speed.
● Avoid fast steering movements.
● Shift your weight towards the uphill side of the vehicle when turning.
● Never turn on a slope before you have not learned the turning manoeuvre.
● Perform turning manoeuvres on the slope with utmost caution.
● Drive slowly and very carefully on extremely slippery surfaces (e.g. ice).
● Never drive in fast-flowing stretches of water or in stretches of water whose depth
exceeds the height of the footrests.
● Observe that wet brakes increase the braking distance. Test the brakes as soon
as you have left the water. If necessary, brake several times to dry the brake pads.
● Never take passenger with you that are younger than 12 years.
● Do not take a passenger with you whose feet do not reach the footrests.
● Advise the passenger that he must allow you the possibility of unrestricted chang-
ing of your seating position while driving.
● Advise the passenger that he must place his feet on the footrests.
● Advise the passenger that he must hold on to the handles with the hands.
● Make sure that the passenger is wearing the specified protective clothes.
● Always use the tyre size and type specified in the user manual.
● Always ensure the specified tyre pressure and the adequate tyre tread depth.
● Do not drive with worn tyres.
● Check the perfect condition of the vehicle before every ride.
● Always observe the inspection and maintenance instructions, as well as the main-
tenance dates, specified in the service manual.
● Avoid high engine temperatures.
● If necessary, reduce the engine speed and the load, and select a suitable gear to
reduce the engine temperature.
● Inspect the cooler and the engine periodically for soiling, and carefully clean the
cooler and the engine if necessary.
● Have a specialist repair shop authorised by Arctic Cat remove heavy soiling of the
cooler.
9

1 Safety instructions
Notes on uphill driving:
● Never drive on uphill slopes of more than 25°.
● Check the terrain carefully before driving uphill.
● Never drive on slopes with slippery or loose ground.
● Shift your weight forwards.
● Never accelerate nor change the gear with a jerk. The vehicle could fall over back-
wards.
● Never drive over a hill top at high speed. There could be an obstacle, a steep
slope, another vehicle or a person hidden behind the hill top.
● Engage a suitable gear and drive uphill at a steady speed.
● When you start to slow down: shift your weight in uphill direction and brake.
● When you start rolling backwards: shift your weight in uphill direction and brake.
● Actuate the brake lock as soon as the vehicle is completely stationary.
Notes on downhill driving:
● Never drive on downhill slopes of more than 25°.
● Check the terrain carefully before driving downhill.
● Shift your weight backwards.
● Never drive down a hill at high speed.
● If possible, drive down the hill in a straight line.
10
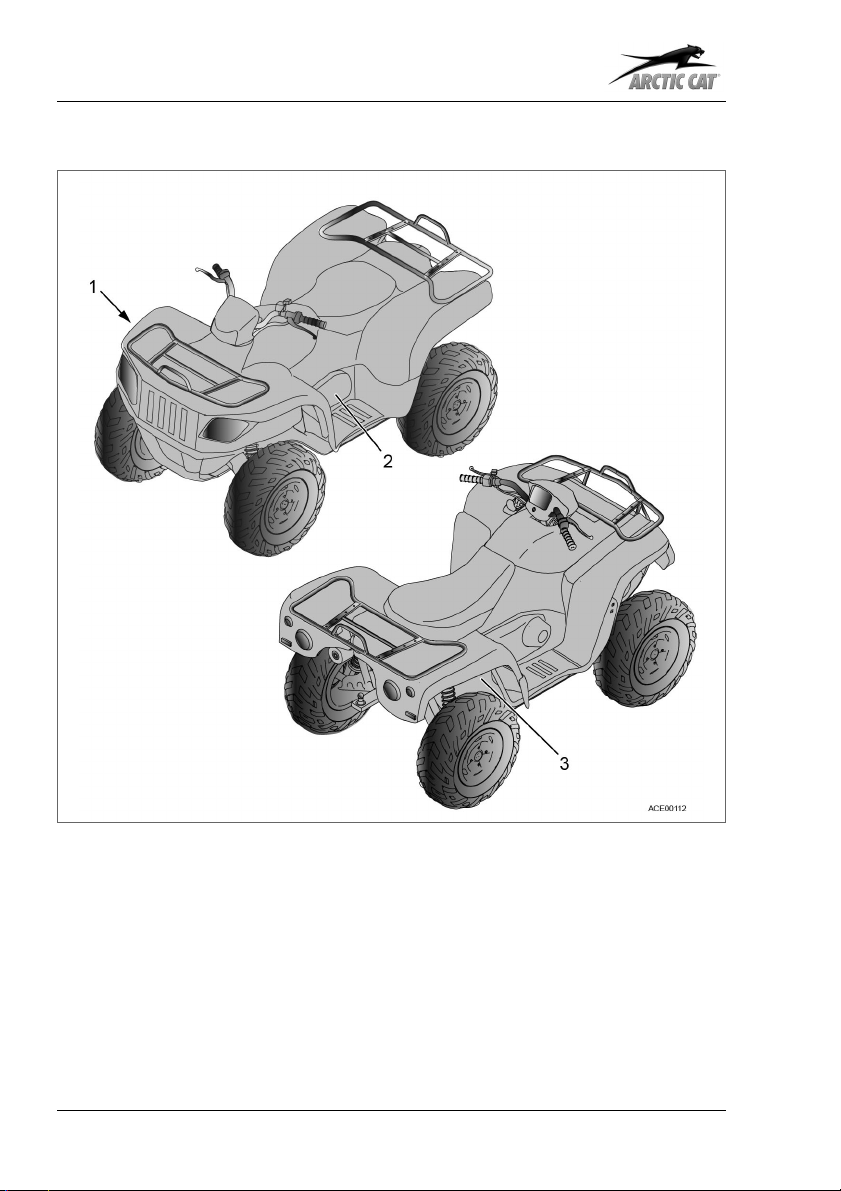
2 View of the vehicle
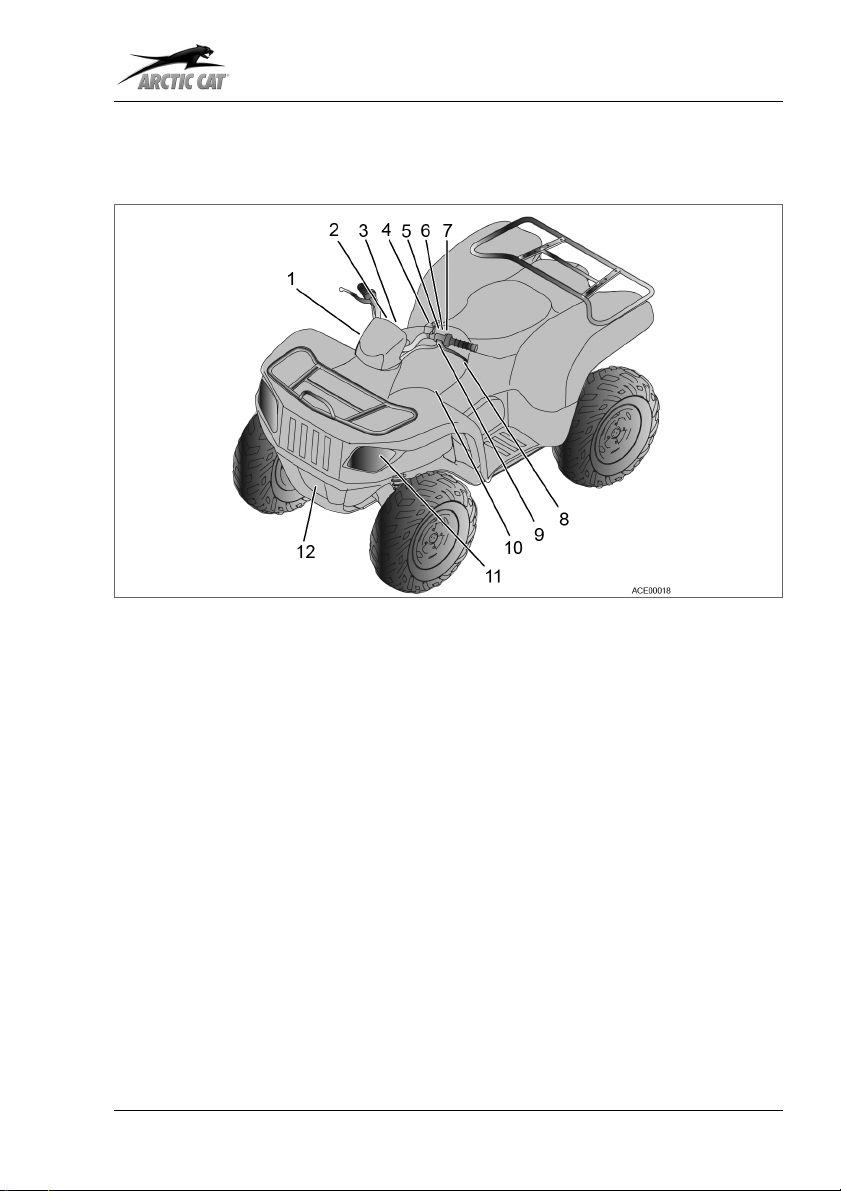
2.1 Front left-hand view of the vehicle
Fig. 1
View of the vehicle 2
1 12 V socket
2 Gauge
3 Ignition switch
4 Winch switch
5 Starter button
6 Indicator switch
7 Warning light switch
8 Hand brake lever
9 Brake lever lock
10 Shift lever
11 Headlight
12 Winch
11
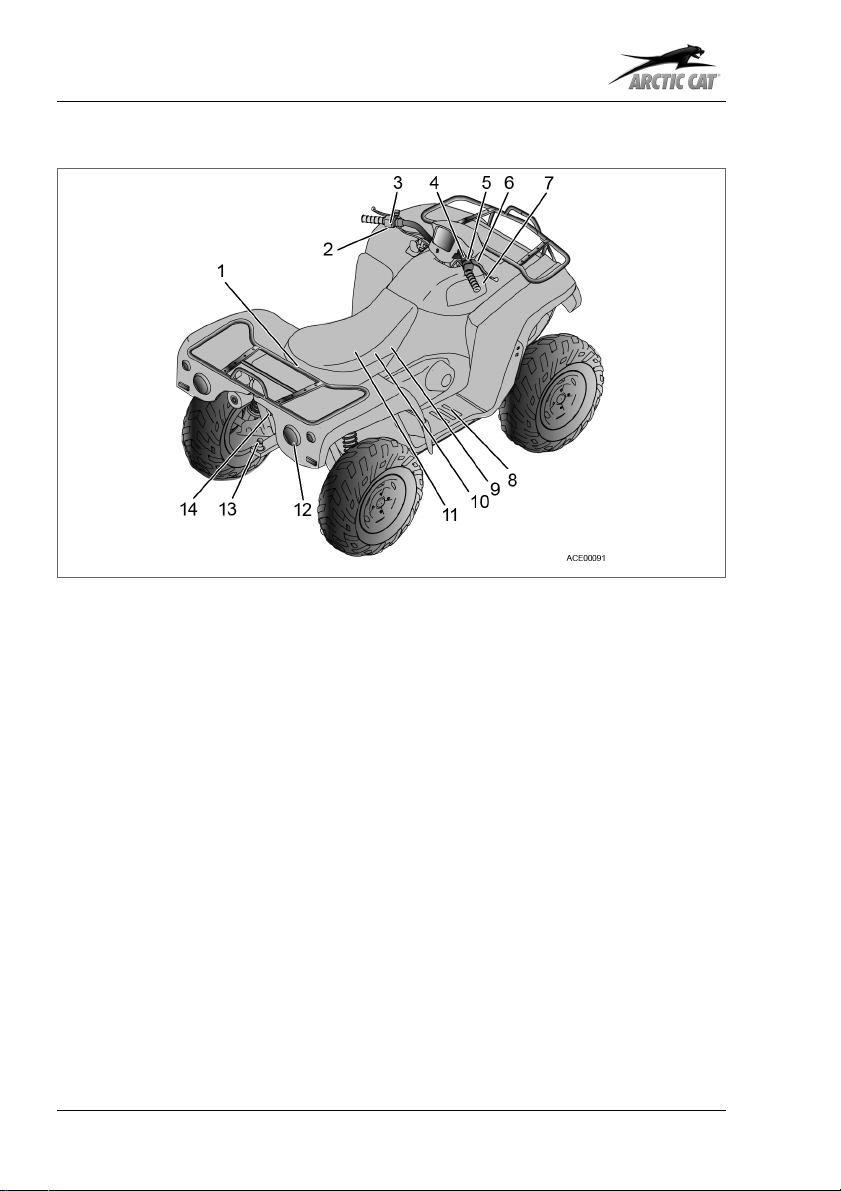
2 View of the vehicle
2.2 Rear right-hand view of the vehicle
Fig. 2
1Seat release
2 Horn button
3 Light switch
4 Drive selector switch
5 Throttle control
6 Parking brake
7 Fuses (only XR/Alterra)
8 Foot brake pedal (main brake)
12
9 On-board tool kit
(underneath the seat)
10 Fuses (underneath the seat)
11 Battery (underneath the seat)
12 Taillight / brake light
13 Hitch
14 Storage compartment
(only XR/Alterra)
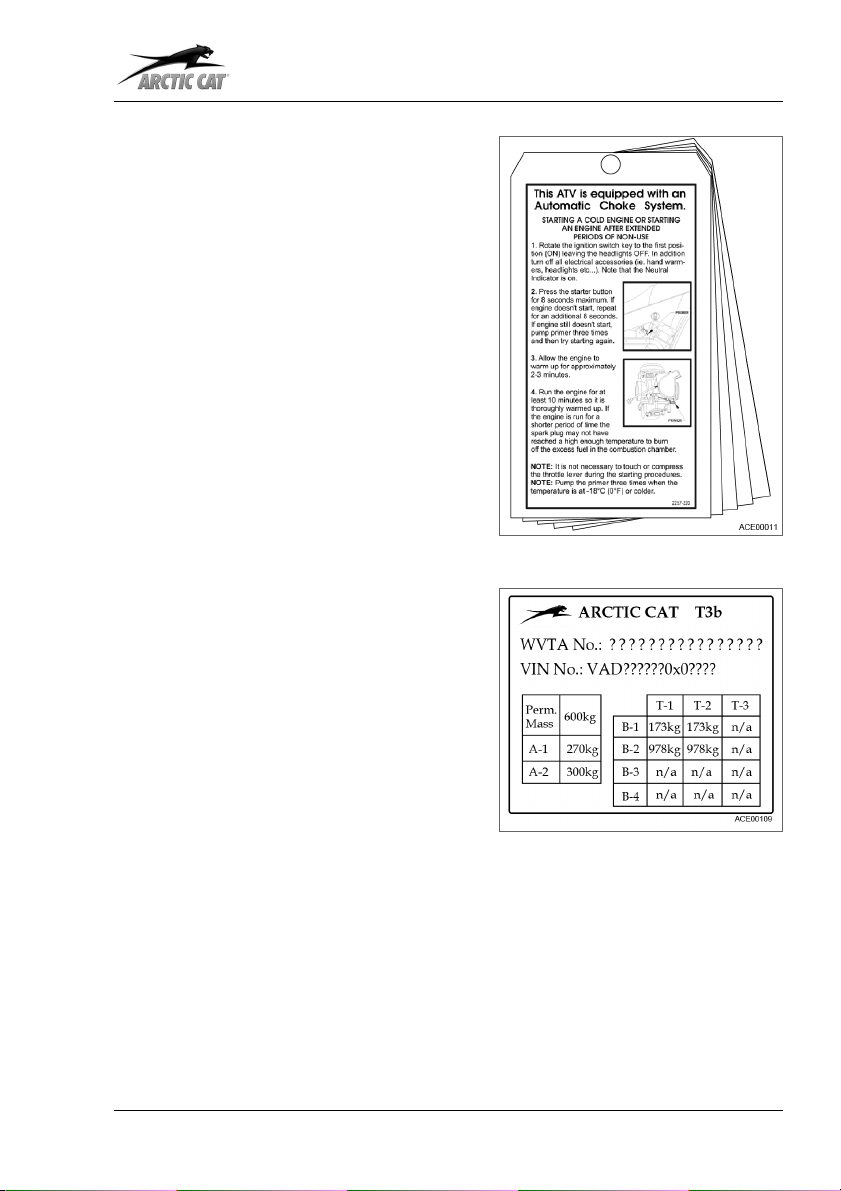
2.3 Hanging label
Arctic Cat vehicles are equipped with a
hanging label, which contains important
safety information. Every person using the
vehicle shall have read and understood
this information before driving.
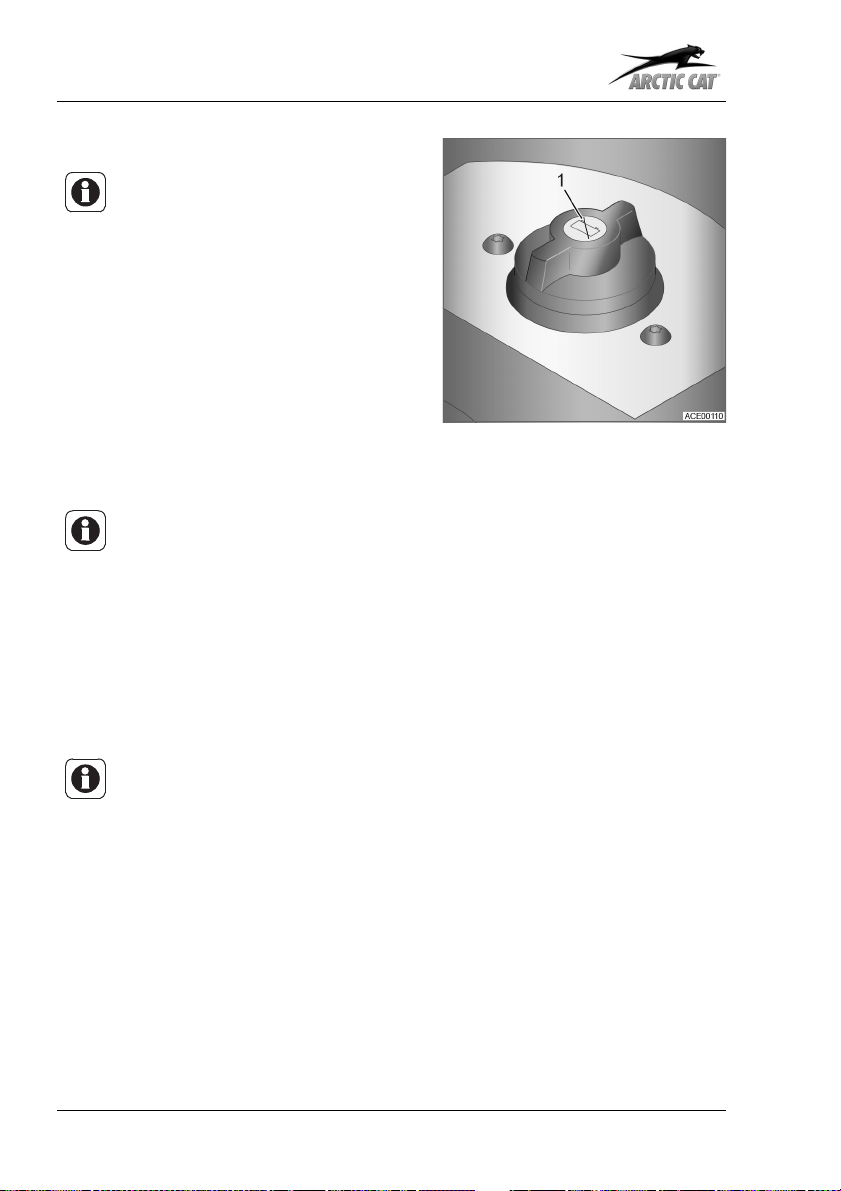
2.4 Chassis plaque
Arctic Cat vehicles with T3b approval are
equipped with a chassis plaque that contains the important vehicle data.
View of the vehicle 2
Fig. 3
The chassis plaque is attached to the
frame, and is located behind the right-hand
front wheel.
Fig. 4
13
2 View of the vehicle
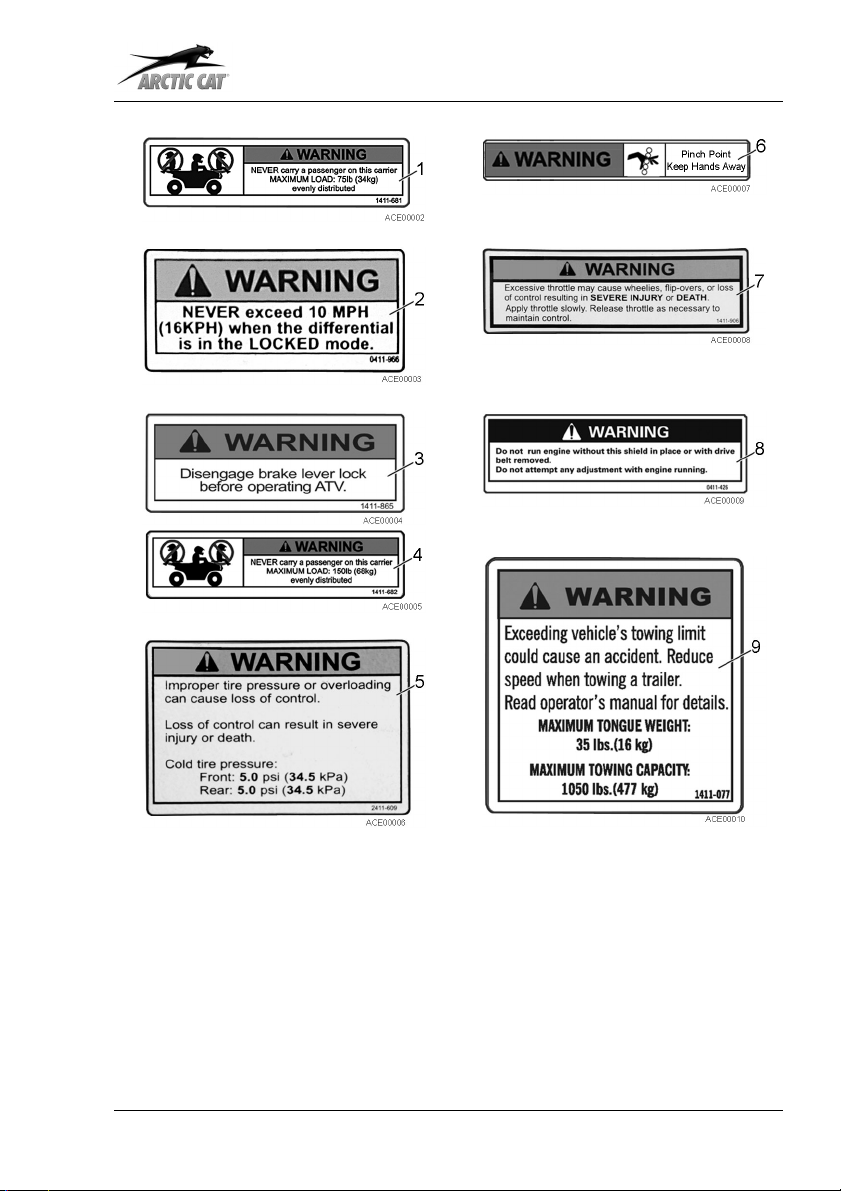
2.5 Warning signs
Different warning sign, which contain important safety information, are attached to the
vehicle. Every person using the vehicle shall have read and understood this information before driving.
The warning signs are considered permanent components of the vehicle. If a warning
sign comes off or becomes illegible, you can obtain replacement at the Arctic Cat
dealer.
NOTE
The arrangement and the contents of the signs may differ from the representation in this user manual. Individual labels might even not exist.
Fig. 5
14
View of the vehicle 2
15
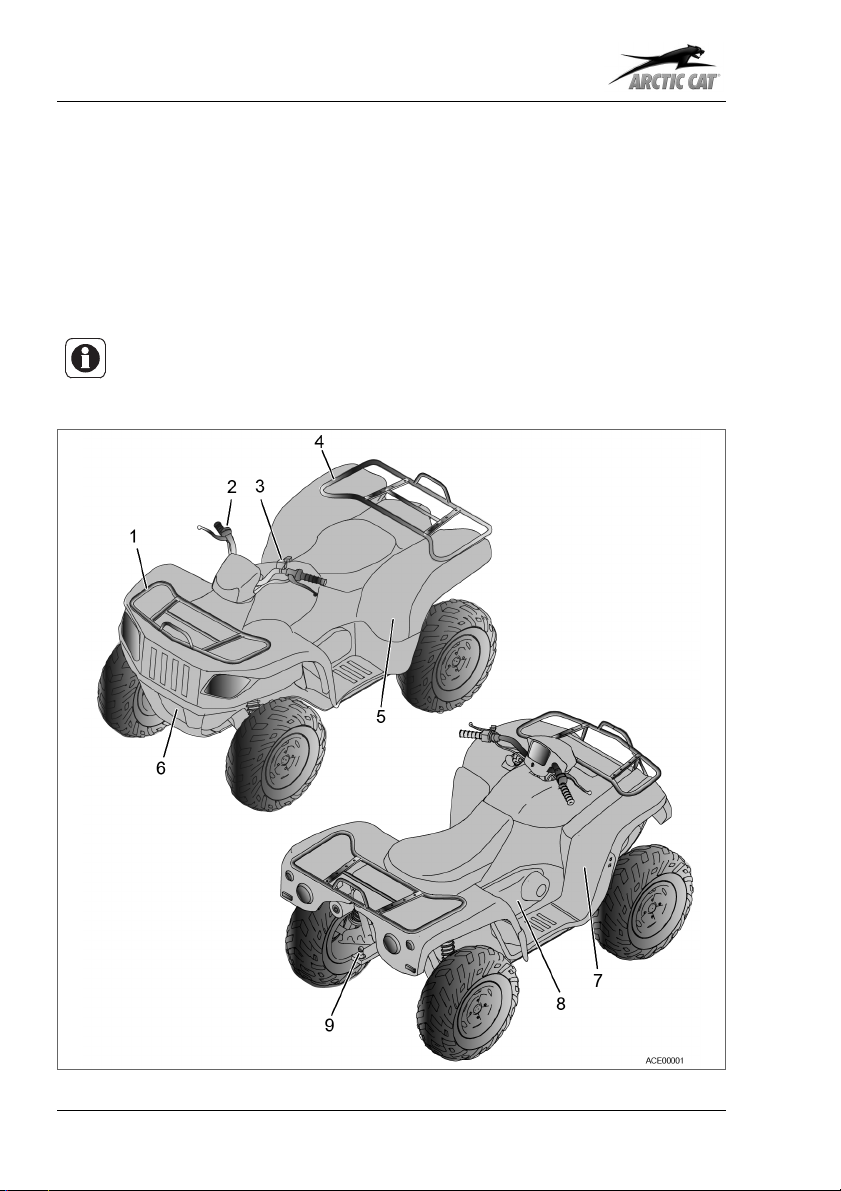
3 Serial numbers
3 Serial numbers
Fig. 6
The vehicle has two serial numbers:
– Vehicle identification number (VIN)
– Engine serial number (ESN)
The vehicle identification number (1), (3) is attached to the main chassis on the righthand side of the vehicle.
The engine serial number (2) is attached to the rear side of the engine housing.
16

Serial numbers 3
NOTE
The vehicle identification number and the engine serial number are required
for correct processing of warranty claims. Arctic Cat does not acknowledge
any warranty claims, if the vehicle identification number or the engine serial
number have been removed or changed in any way.
In the event of inquiries on spare parts, maintenance work, and accessory parts, or in
the event of warranty claims, specify the name of the vehicle, the vehicle identification
number, and the engine serial number to the dealer.
If an entire engine has to be replaced, the Arctic Cat dealer shall notify regarding an
update of the registration information.
Fill in the vehicle identification number and engine serial number in the following table.
Vehicle identification number:
Engine serial number:
17
4 Controls
4 Controls
4.1 Ignition switch
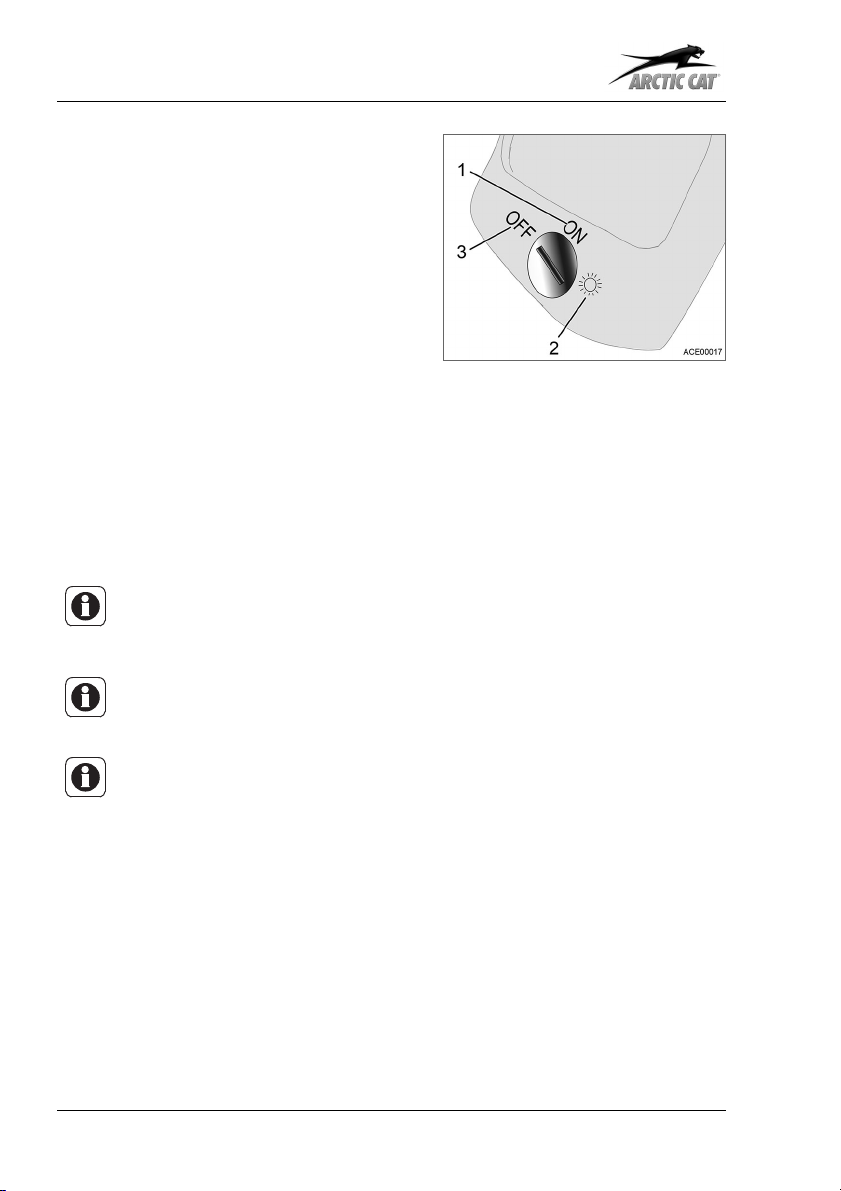
4.1.1 Ignition switch (not XR)
The ignition switch has three switch positions:
– OFF (3): All electrical circuits except for
the accessory connection are switched
off. The engine cannot be started. You
can remove the ignition key in this
switch position.
– ON (1): The ignition circuit is closed,
the position lights are switched on, and
you can start the engine. You cannot
remove the ignition key in this switch
position. Low beam and high beam are
switched off.
– LIGHT (2): The ignition circuit is closed, the position lights and low beam or high
beam are switched on. You cannot remove the ignition key in this switch position.
NOTE
In the case of vehicles delivered from the 01/01/2016, the functions of switch
position LIGHT (2) and switch position ON (1) are identical.
Fig. 7
NOTE
The accessory connection is supplied by the battery in any switch position.
NOTE
If the engine is not started within 5 minutes after switching on the ignition,
the error code P0635 will appear and flash on the gauge display. In this case,
turn ignition key into position OFF and into position ON again to be able to
start the engine.
If the error code P0635 continues to flash afterwards, contact an Arctic Cat specialist
repair shop authorised by Arctic Cat.
18
Controls 4
4.1.2 Ignition switch (XR/Alterra)
The ignition switch has three switch positions:
– OFF (1): All electrical circuits except for the accessory connection are switched
off. The engine cannot be started. You can remove the ignition key in this switch
position.
– RUN (2): The ignition circuit is closed and the engine can be in operation. All light-
ing functions are switched. You cannot remove the ignition key in this switch position.
– START (3): The ignition circuit is
closed and the starter is activated.
When releasing the ignition key, it will
return to the position RUN. You cannot
remove the ignition key in the position
START.
NOTE
The accessory connection is supplied by the battery in any switch
position.
4.2 Steering lock
The steering lock (1) is installed on the lefthand side underneath the front fender.
Locking the steering:
1. Turn handlebar to the left as far as it
will go.
2. Insert the key into the steering lock.
3. Turn key anti-clockwise and remove it.
Unlocking the steering:
1. Insert the key into the steering lock.
2. Turn key clockwise and remove it.
Fig. 8
Fig. 9
19
4 Controls
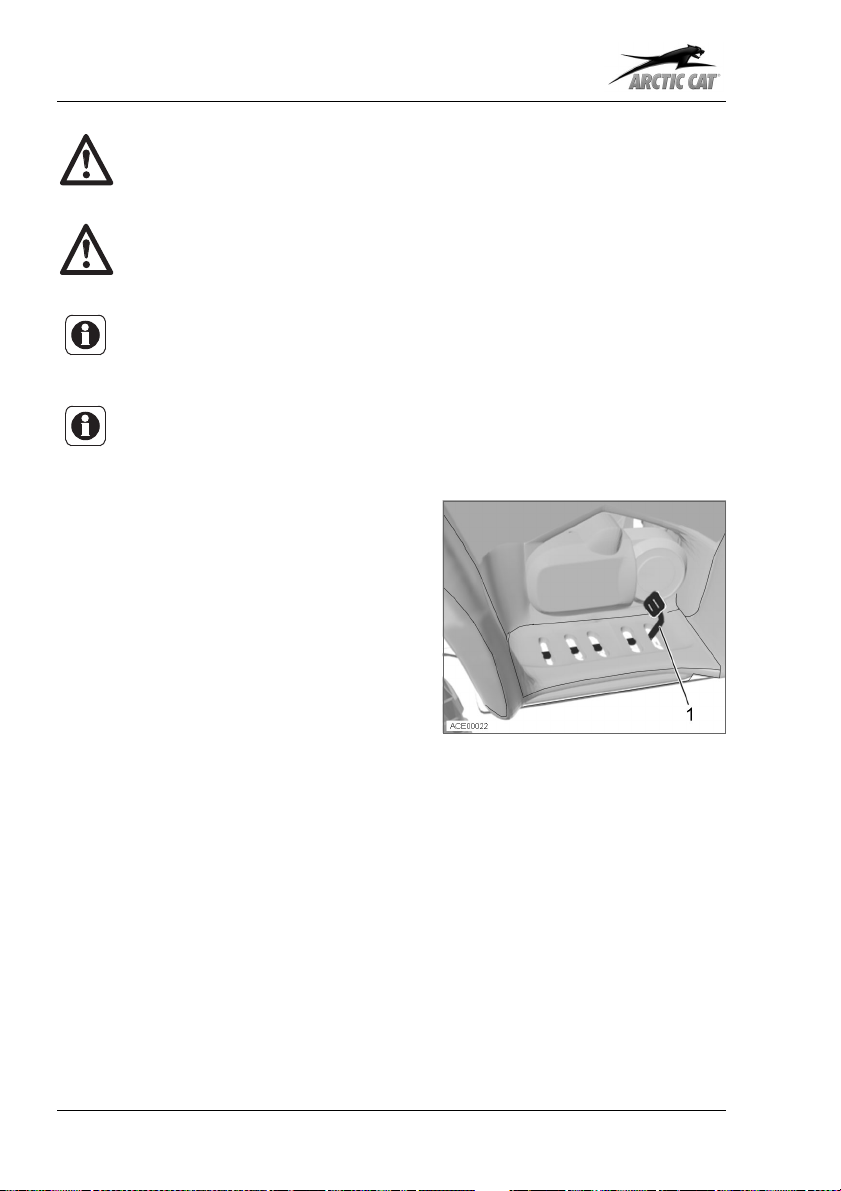
4.3 Battery cut off switch
NOTICE
Only applies to vehicles with T3b
approval.
With the battery cut off switch (1), all electrical circuits of the vehicle can be disconnected from the battery. Then, the electrical circuits cannot be switched on again
via the ignition switch.
The battery cut off switch (1) is located
underneath the seat.
Fig. 10
4.4 Operator presence control (OPC)
NOTICE
Only applies to vehicles with T3b approval.
After 10 seconds, the operator presence control (OPC) activates an alarm signal and
"OPC" appears on the gauge display when the following conditions are fulfilled:
● Ignition is switched on or the engine is running.
● Gear lever is in any gear position except P (park position).
● Thumb throttle is not actuated.
● No service brake is actuated.
NOTICE
When actuating the brake and/or the thumb throttle, or when moving the
gear lever to position P (park position), the alarm signal and the text in the
gauge display go out.
20
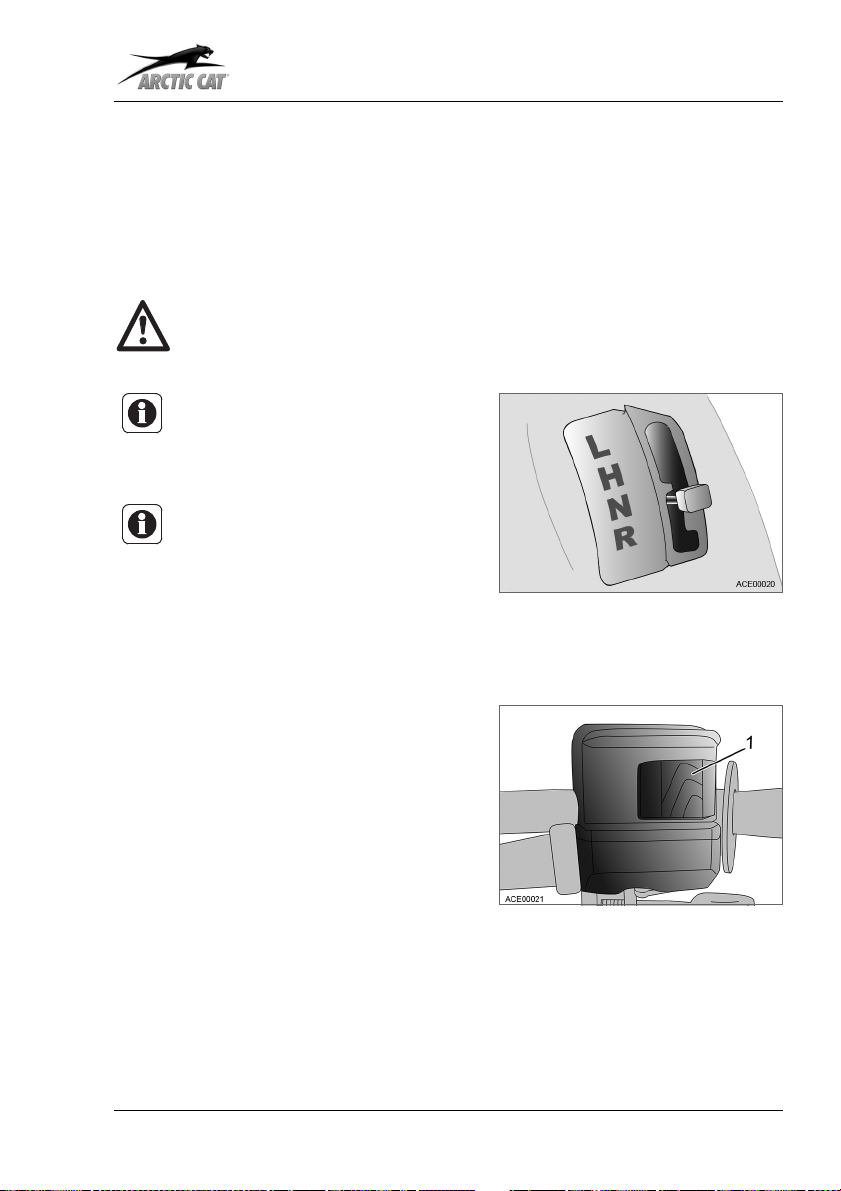
4.5 Gear shift
The vehicle has an automatic gearbox with four gear positions:
– L (LOW): forward gear for off-road driving
– H (HIGH): forward gear for driving on the road
– N (NEUTRAL): idle
– R (REVERSE): reverse gear
WARNING
Never switch the gear lever to gear position P (park position) while driving.
This may lead to serious accidents and serious damage to the vehicle.
NOTE
The vehicle can be equipped with
a fifth gear position P (park position).
NOTE
Only change the drive position
when the vehicle is stationary
and the engine is idling.
To select the desired drive position, move
the gear lever to the corresponding position in the shifting gate.
Fig. 11
Controls 4
4.6 Drive selector switch
The drive selector switch has three switch
positions:
– 2WD: driving with two-wheel drive
(rear-wheel drive)
– 4WD: driving with four-wheel drive
(all wheels)
– 4WD Lock: driving with four-wheel
drive and locked front differential
To select the desired function, move the
drive selector switch (1) to the corresponding position.
Fig. 12
21
4 Controls
WARNING
Do not drive faster than 16 km/h when the front differential is locked.
ATTENTION
Only connect or disconnect the front differential when the vehicle is
stationary.
NOTE
Use 4WD Lock only briefly to free yourself from a critical driving situation
(e.g. when driving out of a mud hole).
NOTE
Two-wheel drive is recommended for driving on flat, dry, and hard ground,
four-wheel drive for difficult conditions (e.g. ice, snow, or loose terrain).
4.7 Foot brake (main brake)
By pressing the foot brake pedal (1), the
brakes on all four wheels are actuated
hydraulically. The foot brake is the main
brake of the vehicle and shall be used for
every brake situation while driving.
22
Fig. 13
Controls 4
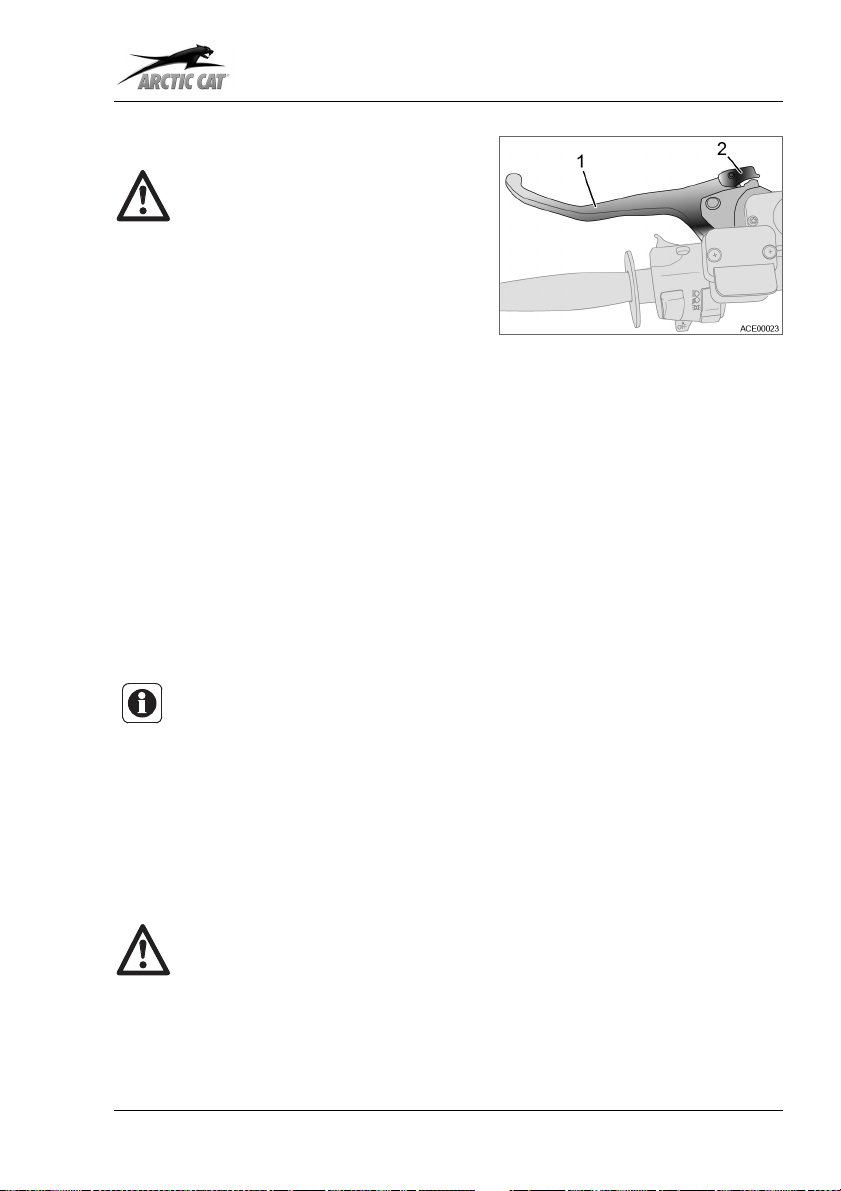
4.8 Hand brake
WARNING
The hand brake may become
ineffective when activated over a
longer period of time. This may
lead to accidents. Therefore,
never park the vehicle on an up
or down gradient with only the
hand brake blocked. Always
actuate the parking brake, too.
By pulling the hand brake lever (1) toward the handlebar, the brakes on all four wheels
are actuated hydraulically. The hand brake serves as addition to the foot brake (main
brake). The hand brake can also be used as parking brake.
Using the hand brake as parking brake:
1. Pull hand brake lever (1) two to three times towards the handlebar and then
release.
2. Push brake lever lock (2) towards the handlebar and hold.
3. Pull hand brake lever (1) until the brake lever lock (2) engages.
4. Release hand brake lever (1).
5. Check if the brake lever lock (2) has engaged correctly and the wheels are
locked.
Fig. 14
NOTE
When the brake lever lock (2) engages, a clicking noise is heard. The brake
lever (1) does not return to its starting position after releasing. The wheels
shall be locked. If this is not the case, have the vehicle serviced at an authorised Arctic Cat specialist repair shop.
Releasing the parking brake:
1. Pull hand brake lever (1) towards the handlebar.
2. Release hand brake lever (1). The hand brake lever returns to its starting position.
WARNING
Before driving, check if the hand brake is released.
23
4 Controls
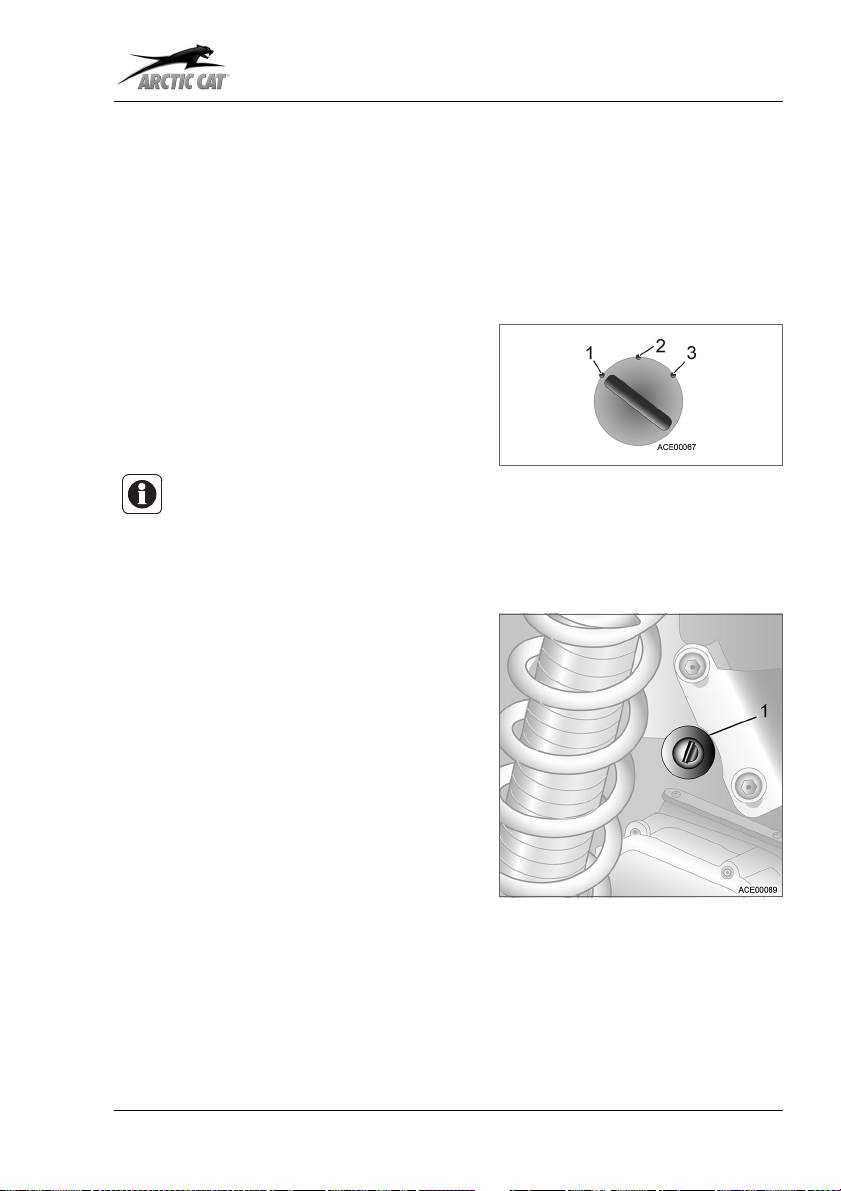
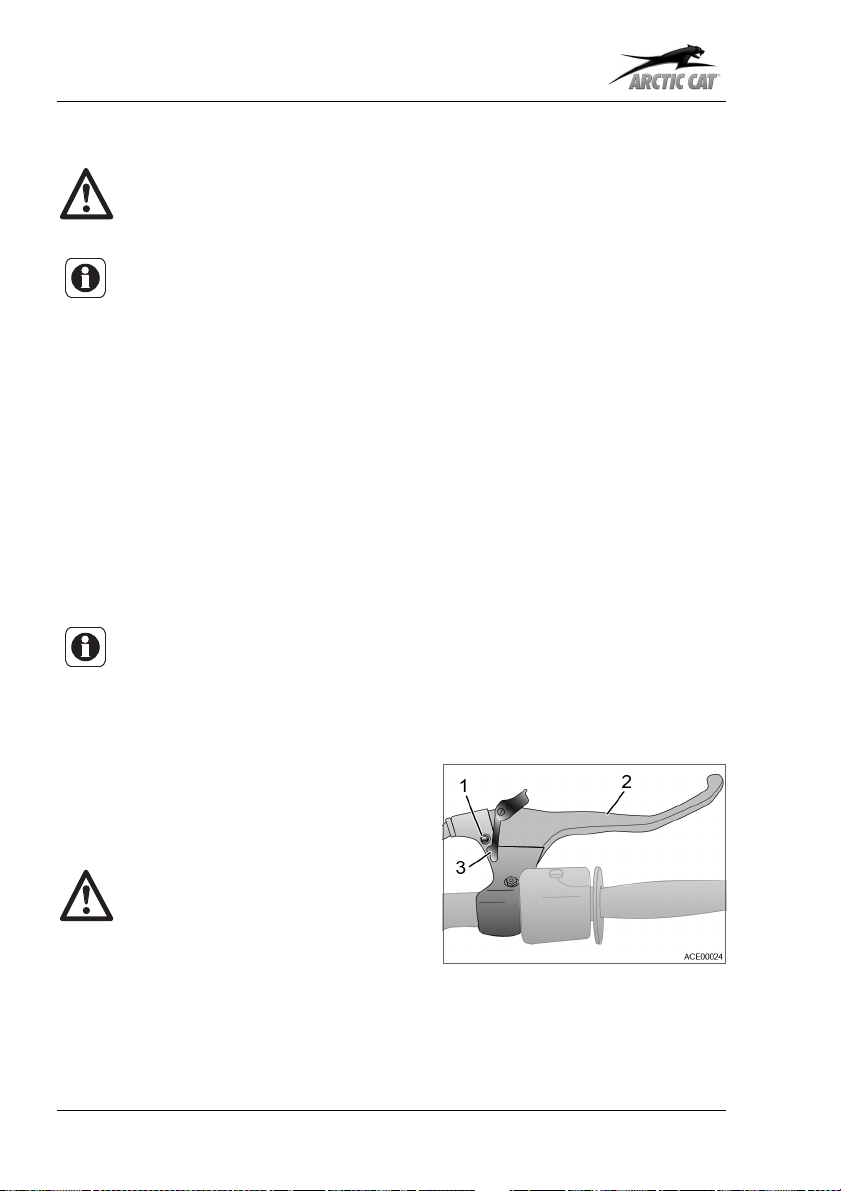
4.9 Parking brake
WARNING
Do not use parking brake as main brake.
NOTE
Models equipped with a "P" position, do not have any parking brake but a
hydraulic emergency brake.
If the main brake has failed, the brake on the right-hand side of the handlebar
may be used as an emergency brake.
By pulling the parking brake lever (2) in the 2WD function, the brakes of the rear axle
are actuated mechanically. After the brake lever lock (3) has engaged, the wheels are
permanently locked.
Activating the parking brake:
1. Pull parking brake lever (2) towards the handlebar
2. Push brake lever lock (3) to the side until it engages in the pin (1).
3. Release parking brake lever (2).
4. Check if the brake lever lock (3) has engaged correctly and the brake locks the
wheels.
NOTE
When the brake lever lock (3) engages, a clicking noise is heard. The parking brake lever (2) does not return to its starting position after releasing. The
wheels shall be locked. If this is not the case, have the vehicle serviced at
an authorised Arctic Cat specialist repair shop.
Releasing the parking brake:
1. Pull parking brake lever.
2. The parking brake lever returns to its
starting position.
WARNING
Before driving, check if the parking brake is released.
24
Fig. 15
 Loading...