

Page 1
Masina de spalat automata
Manual de utilizare
Washing Machine
User Manual
RO
EN
APLM2WFSU210411A
RO/EN
1911862400/ RO/ EN/ / 19.01.24 14:07
Page 2
Vă rugăm să citiți mai întâi acest manual de utilizare!
Stimate client,
Vă mulţumim că ați optat pentru acest Arctic produs. Sperăm că veți obține cele mai bune
rezultate de la produsul dumneavoastră, acesta a fost fabricat cu tehnologie de înaltă
calitate și de ultimă generație. Prin urmare, înainte de a utiliza produsul vă rugăm să citiți
cu atenție întregul manual de utilizare și toate documentațiile însoțitoare.
Urmați toate avertizările şi informațiile din manualul de utilizare. Astfel, vă puteți proteja pe
dumneavoastră și produsul dumneavoastră de eventuale pericole.
Păstrați manualul de utilizare. Dacă predați produsul altcuiva spre utilizare, puneți-i la
dispoziție și manualul de utilizare. Termenii pentru garanție, metodele de utilizare și
depanare a produsului dumneavoastră se regăsesc în manualul de instrucțiuni.
Simboluri și definiții
Acest manual de utilizare conține următoarele simboluri:
Pericole care poate cauza vătămare sau chiar moarte.
Informații importante sau sugestii utile despre utilizare.
Citiţi cu atenţie manualul de utilizare
Material reciclabil.
Avertizări referitoare la suprafețe fierbinți.
AVERTIZARE Pericolele vor provoca pagube produsului și în împrejurimile acestuia.
RO / 2
Page 3

Cuprins
1 Instrucțiunile privind siguranța ... 4
1.1 Utilizare prevăzută......................... 4
1.2 Siguranța copiilor, a persoanelor
vulnerabile și a animalelor de
companie .......................................
1.3 Siguranță electrică ........................ 5
1.4 Manevrarea în siguranță ............... 6
1.5 Instalarea în siguranță .................. 6
1.6 Utilizarea în siguranță ................... 8
1.7 Întreținerea și curățarea în
siguranță ........................................
2 Instrucțiuni importante de mediu 10
2.1 Conformitatea cu WEEE (Waste
electrical and electronic
equipment).....................................
2.2 Informații despre ambalaj............. 10
3 Specificații tehnice ....................... 11
4 Instalarea....................................... 12
4.1 Locul adecvat de instalare............ 12
4.2 Asamblarea panourilor inferioare
de acoperire...................................
4.3 Demontarea bolțurilor de fixare
pentru transport.............................
4.4 Conectarea la rețeaua de apă....... 13
4.5 Conectarea furtunului de
evacuare la canalizare ..................
4.6 Reglarea suporturilor..................... 14
4.7 Conexiunea electrică..................... 14
4.8 Pornirea.......................................... 15
5 Pregătirea preliminară.................. 15
5.1 Sortarea rufelor.............................. 15
5.2 Pregătirea rufelor pentru spălare . 15
5.3 Sugestii pentru economia de
energie și apă ................................
5.4 Încărcarea rufelor.......................... 16
5.5 Capacitatea corectă de încărcare 16
5.6 Utilizarea detergentului și a
balsamului .....................................
5.7 Sfaturi pentru spălare eficientă.... 19
5.8 Afișarea duratei programului........ 19
6 Operarea produsului .................... 20
6.1 Panou de control ........................... 20
6.2 Simbolurile de pe ecran ................ 21
6.3 Tabel pentru program și consum. 22
10
12
13
14
16
16
6.4 Selectarea programului ................. 24
6.5 Programe........................................ 24
6.6 Selectarea temperaturii................. 26
6.7 Selectarea vitezei de centrifugare 27
4
6.8 Selectarea funcției auxiliare.......... 27
6.8.1 Funcții auxiliare .......................... 28
6.8.2 Funcții/Programe selectate
prin apăsarea tastelor de
Funcție pentru 3 secunde ..........
6.9 Timpul de finalizare ....................... 29
6.10 Pornirea programului..................... 30
9
6.11 Blocarea ușii de încărcare............. 30
6.12 Modificarea selecțiilor după
începerea programului ..................
6.13 Anularea programului.................... 32
6.14 Finalizarea programului................. 32
7 Întreținerea și curățarea................ 32
7.1 Curățarea sertarului pentru
detergent ........................................
7.2 Curățarea ușii de încărcare și a
tamburului ......................................
7.3 Curățarea corpului și panoului de
comandă ........................................
7.4 Curățarea filtrelor de alimentare
cu apă .............................................
7.5 Evacuarea apei rămase și
curățarea filtrului pompei..............
8 Depanare ........................................ 34
9 DECLINAREA
RESPONSABILITĂȚII/
AVERTISMENT...............................
RO
EN
29
31
32
33
33
33
33
39
RO / 3
Page 4
1 Instrucțiunile privind siguranța
RO
Această secțiune include
instrucțiunile de siguranță
necesare pentru a preveni
pericolele de vătămare
corporală sau daunele
materiale.
Compania noastră nu răspunde
de daunele care pot să apară
dacă aceste instrucțiuni nu sunt
respectate.
• Operațiunile de instalare și
reparare trebuie să fie realizate
întotdeauna de către un
service autorizat.
• Folosiți numai piese de schimb
și accesorii originale.
• Nu reparați sau înlocuiți nicio
componentă a produsului
decât dacă acest lucru este
specificat în mod clar în
manualul de utilizare.
• Nu modificați produsul.
1.1 Utilizare prevăzută
• Acest produs este destinat
uzului casnic. Nu este destinat
uzului comercial și nu trebuie
folosit în alte scopuri.
• Produsul trebuie utilizat doar
pentru spălarea şi clătirea
rufelor a căror etichete permit
acest lucru.
• Acest aparat este destinat
utilizării în gospodărie și altor
utilizări similare. De exemplu:
– În bucătăriile pentru
personal ale magazinelor,
birourilor și în alte spații de
lucru;
– Ferme,
– De către clienții hotelurilor,
motelurilor și alte facilități
de locuire,
– Pensiuni, spații de tip hostel,
– Zone comune ale
apartamentelor sau
spălătorii
1.2 Siguranța copiilor, a persoanelor vulnerabile și a animalelor de companie
• Acest produs poate să fie
folosit de către copiii în vârstă
de cel puțin 8 ani și de către
persoanele cu capacități fizice,
senzoriale sau mentale
subdezvoltate sau lipsite de
experiență și cunoștințe numai
dacă sunt supravegheate sau
au fost instruite cu privire la
folosirea aparatului într-un
mod sigur pentru produs și în
legătură cu pericolele
asociate.
EN
RO / 4
Page 5
• Copiii cu vârsta mai mică de 3
ani trebuie să fie ținuți departe
de produs doar dacă aceștia
sunt supravegheați în
continuu.
• Produsele electrice sunt
periculoase pentru copii și
animalele de companie. Copii
și animalele de companie nu
trebuie să se joace cu
produsul, nu trebuie să se urce
pe acesta și nu trebuie să
pătrundă în interiorul său.
Verificați interiorul produsului
înainte de utilizare.
• Folosiți funcția de Blocare
pentru copii pentru a evita
intervenția copiilor în
funcționarea mașinii.
• În momentul când părăsiți
camera unde produsul este
localizat, nu uitați să închideți
ușa de serviciu. Copiii și
animalele de companie se pot
bloca înăuntru și se pot îneca.
• Copii nu trebuie să curețe sau
să efectueze operațiuni de
întreținere fără a fi
supravegheați de un adult.
• Țineți ambalajele departe de
copii. Risc de vătămare și
sufocare.
• Feriți de accesul copiilor toate
soluțiile, detergenții și aditivii
folosiți la utilizarea produsului.
• Pentru siguranța copiilor,
înainte de eliminarea
produsului tăiați cablul de
alimentare, dezactivați și
distrugeți mecanismul de
încuiere al ușii de încărcare.
1.3 Siguranță electrică
• În timpul procedurilor de
montare, întreținere, curățare
și reparare, produsul trebuie să
fie deconectat.
• Cablurile de alimentare
deteriorate, trebuie înlocuite de
un service autorizat prevenirea
posibilelor pericole.
• Nu ascundeți cablul de
alimentare sub produs sau în
spatele acestuia. Nu puneți
obiecte grele pe cablul de
alimentare. Nu îndoiți, nu
zdrobiți și nu țineți cablul de
alimentare în apropierea
surselor de căldură.
• Nu folosiți un prelungitor, un
triplu ștecher sau un adaptor
pentru a utiliza produsul.
• Priza trebuie să fie ușor
accesibilă. Dacă acest lucru nu
este posibil, un mecanism ce
respectă legislația în domeniul
electricității și care
deconectează toate
conexiunile de la rețeaua de
alimentare (siguranță,
RO
EN
RO / 5
Page 6
comutator, comutator principal
etc.) trebuie să existe în
instalația electrică.
• Nu atingeți priza cu mâinile
ude.
• Atunci când scoateți aparatul
din priză, nu țineți de cablul de
alimentare, ci de priză.
• Asigurați-vă că ștecherul nu
este ud, murdar sau prăfuit.
1.4 Manevrarea în siguranță
• Înainte de mutare, deconectați
produsul, îndepărtați
racordurile de admisie și
evacuare a apei. Evacuați apa
rămasă în produs.
• Produsul este greu, nu îl mutați
de unul singur. Nu țineți de
părțile mobile precum ușa de
încărcare a rufelor, atunci când
ridicați sau mutați produsul.
Tava superioară ar trebui să fie
bine fixată în cazul mutării.
• Produsul dumneavoastră este
greu; dacă implică transportul
pe scări, este nevoie de două
persoane pentru a fi
transportat cu grijă. Vă puteți
răni dacă produsul cade peste
dumneavoastră. În timpul
transportului, nu loviți și nu
scăpați produsul.
• Transportați produsul în
poziție verticală.
• Verificați cablul de alimentare
și furtunurile de alimentare și
evacuare, asigurându-vă că nu
au fost pliate, ciupite sau
strivite când produsul a fost
pus la locul său după
procedurile de instalare sau
curățare.
1.5 Instalarea în siguranță
• Pentru a pregăti produsul
pentru instalare, verificați
informațiile din manual și
instrucțiunile de instalare și
asigurați-vă că rețeaua
electrică, priza și rețeaua de
apă și scurgerea sunt potrivite.
În caz contrar, apelați la un
electrician și un instalator
calificat pentru a lua măsurile
necesare. Aceste operațiuni
sunt responsabilitatea
clientului.
• Verificați eventualele
deteriorări ale produsului
înainte de instalare. Înainte de
a instala produsul, verificați
dacă este deteriorat.
• Vă puteți răni dacă introduceţi
mâinile în fante neacoperite.
Astupați orificiile bolțurilor
pentru transportul în siguranță,
cu dopuri din plastic.
• Nu instalați și nu lăsați
produsul în locuri în care poate
fi expus condițiilor exterioare.
RO
EN
RO / 6
Page 7

• Nu instalați produsul în locuri
unde temperatura poate
scădea sub 0ºC.
• Nu așezați produsul pe
mochete groase sau suprafețe
similare. Există pericol de
incendiu din moment ce nu se
va aerisi pe dedesubt.
• Așezați produsul pe o
suprafață dreaptă și rigidă și
echilibrați-l de la piciorușele
reglabile.
• Conectați produsul la o priză
împământată, protejată printr-o
siguranță care respectă
valorile de pe eticheta de
evaluare. Asigurați-vă că
împământarea este făcută de
un electrician profesionist. Nu
utilizați produsul fără
împământare potrivită
conform reglementărilor
locale/naționale.
• Conectați produsul la o priză
cu valori de tensiune și
frecvență conforme cu valorile
indicate pe eticheta de
evaluare.
• Nu introduceți produsul în
prize desfăcute, sparte,
murdare, unsuroase sau în
prize care au ieșit din suporturi
sau socluri și există riscul de
contact cu apa.
• Utilizați setul nou de furtunuri
furnizat cu produsul. Nu
utilizați seturi vechi de
furtunuri. Nu faceți extensii ale
furtunurilor.
• Conectați direct la robinet
furtunul pentru admisia apei.
Presiunea apei de la robinet
trebuie să fie minim 0,1 MPa (1
bar) și maxim 1MPa (10 bari).
Pentru ca produsul să
funcționeze optim, debitul apei
la robinet trebuie să fie între 10
și 80 litri pe minut. Dacă
presiunea apei este peste
1MPa (10 bari), trebuie
montată o supapă de reducere
a presiunii. Temperatura
maximă admisă este de 25°C.
• Montați capătul furtunului de
evacuare a apei, la scurgerea
de la chiuvetă sau cadă.
• Așezați cablul de alimentare și
carcasa în locuri în care nu vor
cauza împiedicarea.
• Nu instalați produsul în spatele
unei uși, în dreptul unei uși
glisante sau în locuri în care
poate obstrucționa
deschiderea completă a ușii.
• Dacă pe produs va fi instalat
un uscător, asigurați-le cu
dispozitive potrivite de
conectare pe care le puteți
achiziționa de la unități
autorizate de service.
RO
EN
RO / 7
Page 8
• Dacă tava superioară este
îndepărtată, există riscul
contactului cu componente
sub tensiune electrică. Nu
îndepărtați tava superioară a
produsului.
• Așezați produsul la o distanță
de cel puțin 1 cm de marginile
mobilierului.
1.6 Utilizarea în siguranță
• Când utilizați aparatul, folosiți
numai detergenți, balsamuri și
aditivi potriviți pentru mașini
de spălat.
• Nu folosiți solvenți chimici pe
produs. Aceste materiale
prezintă un risc de explozie.
• Nu puneți în funcțiune produse
defecte sau deteriorate.
Decuplați produsul (sau opriți
siguranța la care este
conectat), opriți robinetul de
apă și apelați o unitate
autorizată de service.
• Nu așezați surse de aprindere
(lumânări aprinse, țigări etc.)
sau surse de căldură (fiare de
călcat, sobe, cuptoare, etc.) pe
sau lângă produs. Nu puneți
materiale inflamabile/
explozive lângă produs.
• Nu vă urcați pe produs.
• Dacă nu veți utiliza produsul o
perioadă lungă de timp,
decuplați produsul și opriți
robinetul.
• Detergentul/soluțiile de
întreținere pot ieși din sertarul
pentru detergent dacă acesta
este deschis în timpul
funcționării mașinii de spălat.
Este periculos contactul
detergentului cu pielea
dumneavoastră și ochii.
• Asigurați-vă că animalele de
companie nu pătrund în
produs. Verificați interiorul
produsului înainte de utilizare.
• Nu forțați deschiderea ușii de
serviciu blocate. Ușa se va
debloca de îndată ce spălarea
s-a finalizat. Dacă ușa nu se
deschide, aplicați soluțiile
menționate pentru eroarea
„Ușa de încărcare nu poate fi
deschisă” din secțiunea
Depanare.
• Nu spălați elemente
contaminate cu benzină,
kerosen, benzen, reductori,
alcool sau alte materiale
inflamabile sau explozive ori
chimicale industriale.
• Nu puneți în mod direct
detergent pentru curățare
uscată și nu spălați, nu
limpeziți și nu stoarceți rufe
contaminate cu detergent
pentru curățare uscată.
RO
EN
RO / 8
Page 9
• Nu introduceți mâinile în
tamburul aflat în rotație.
Așteptați până când tamburul
nu se mai rotește.
• Nu băgați mâinile sau obiecte
metalice sub mașina de spălat.
• Dacă spălați rufe la
temperaturi ridicate, apa
evacuată în urma spălării vă
poate afecta pielea dacă intră
în contact cu aceasta, de
exemplu când furtunul de
scurgere este conectat la
robinet. Nu atingeți apa
evacuată.
• Pentru a preveni formarea de
biofilm sau apariția mirosurilor
deranjante aveți în considerare
următoarele precauții:
– Asigurați-vă că încăperea în
care se află mașina de
spălat este bine ventilată.
– La finalul programului, vă
recomandăm să ștergeți
burduful și geamul ușii de
încărcare cu o cârpă curată
și uscată.
• Când spălați la temperaturi
ridicate geamul ușii de
încărcare va fi fierbinte.
Așadar, nu atingeți și nu
permiteți în special copiilor să
atingă geamul în timpul
spălării.
1.7 Întreținerea și curățarea în siguranță
• Nu spălați produsul cu aparat
de spălare cu presiune, prin
pulverizare de vapori, cu apă
sau turnând apă.
• Nu folosiți instrumente
ascuțite sau abrazive pentru a
curăța produsul. Nu folosiți
soluții casnice pentru curățare,
săpun, detergent, gaz, benzină,
diluant, alcool, lac etc. în
timpul curățării.
• Agenții de curățare cu conținut
de solvenți pot cauza fumuri
otrăvitoare ( de exemplu
solvenții de curățare. Nu
utilizați produse de curățare cu
conținut de solvenți.
• Când deschideți sertarul de
detergent pentru curățare,
înăuntru pot fi reziduuri de
detergent.
• În timp ce produsul este pus în
funcțiune, nu desfaceți filtrul
pompei.
• Temperatura din interiorul
mașinii poate ajunge până la
90 ºC. Pentru a evita riscul de
ardere, curățați filtrul abia
după ce apa din mașină s-a
răcit.
RO
EN
RO / 9
Page 10
2 Instrucțiuni importante de mediu
2.1 Conformitatea cu WEEE (Waste electrical and electronic equipment)
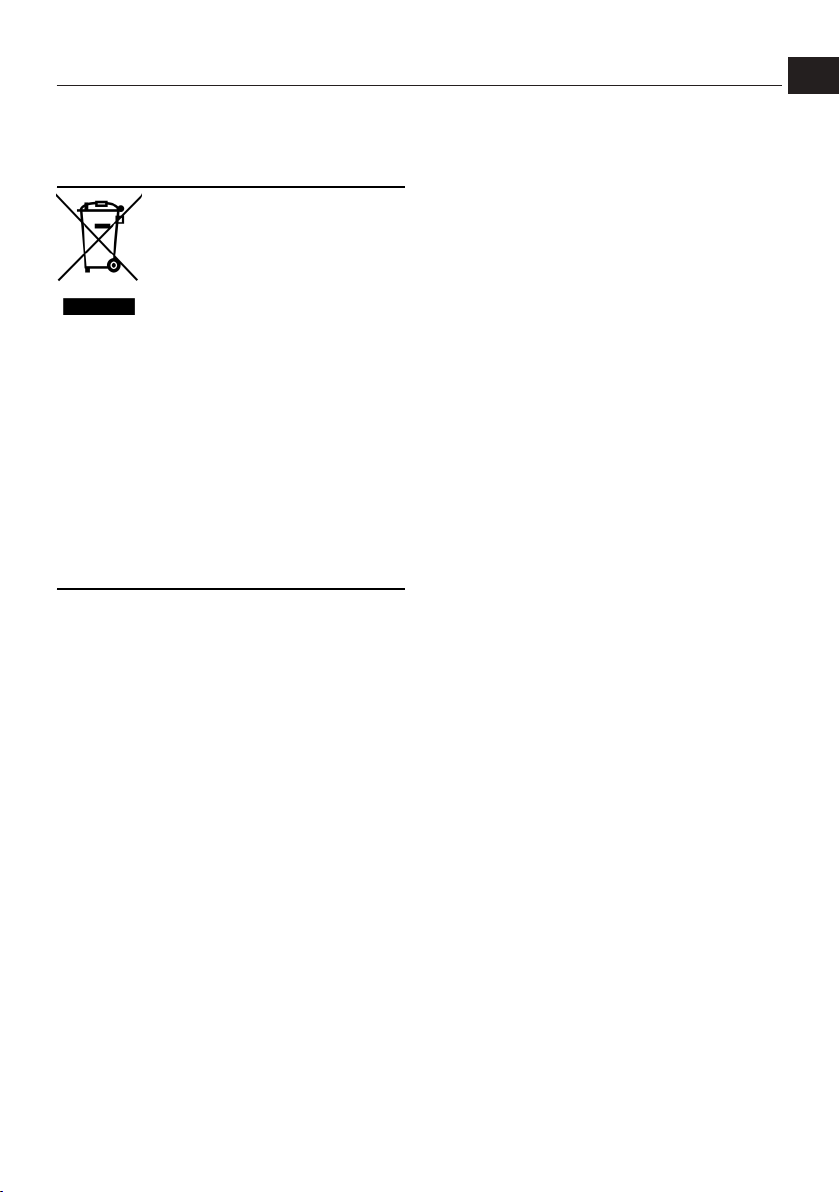
Acest produs este în
conformitate cu Directiva UE
privind DEEE (2012/19/UE).
Produsul este prevăzut cu un
simbol de clasificare pentru
deșeuri de echipamente
electrice și electronice (WEEE).
Acest produs a fost fabricat cu piese și
materiale de înaltă calitate, care pot fi
reutilizate și sunt adecvate pentru reciclare.
Nu aruncați produsul uzat împreună cu
deșeurile menajere și alte deșeuri la
sfârșitul duratei sale de viață. Predați-l la
centrul de colectare pentru reciclarea
echipamentelor electrice și electronice. Vă
rugăm să vă adresați autorităților locale
pentru a afla despre aceste centre de
colectare.
Conformitatea cu Directiva RoHS:
Produsul pe care l-ați achiziționat este
conform cu Directiva UE privind RoHS
(2011/65/EU). Acesta nu conține materiale
nocive și interzise specificate în Directivă.
RO
EN
2.2 Informații despre ambalaj
Materialele de ambalare a produsului sunt
fabricate din materiale reciclabile în
conformitate cu Reglementările naționale
privind mediul. Nu eliminați materialele de
ambalare împreună cu deșeurile menajere
sau alte deșeuri. Predați-le la punctele de
colectare a ambalajelor desemnate de
autoritățile locale.
RO / 10
Page 11
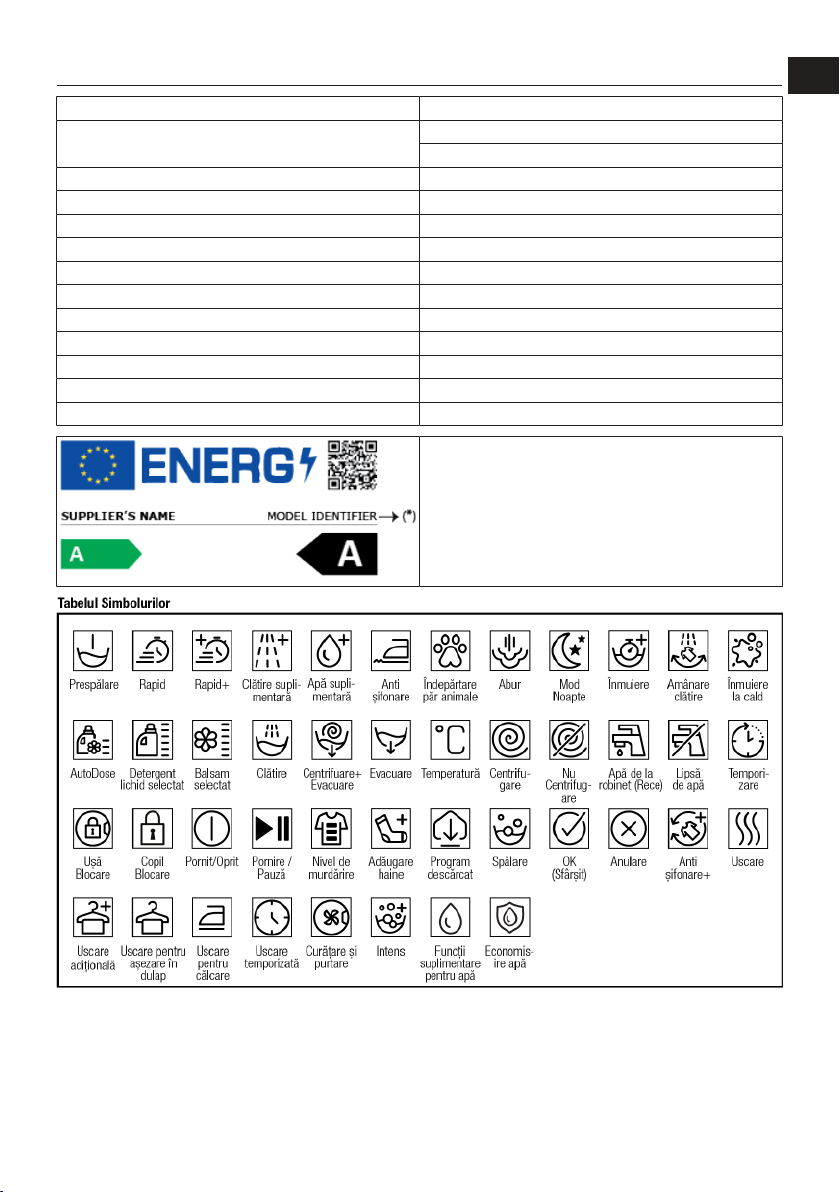
3 Specificații tehnice
Numele furnizorului sau marca comercială Arctic
Denumire model
Capacitate nominală (kg) 10
Viteza maximă de centrifugare (ciclu/min) 1400
Integrat No
Înălțime (cm)
Lățime (cm) 60
Adâncime (cm)
Admisie unică pentru apă / Admisie dublă pentru apă + / Conexiune electrică (V/Hz) 230 V / 50Hz
Curent total (A) 10
Putere totală (W) 2200
Codul modelului principal 1321
Informațiile despre model care sunt stocate în baza de
date a produselor pot fi obținute prin accesarea
următorului site web și căutarea identificatorului dvs. de
model (*) aflat pe eticheta energetică.
https://eprel.ec.europa.eu/
APLM2WFSU210411A
7005940001
84,5
58
RO
EN
RO / 11
Page 12
4 Instalarea
RO
Vă rugăm să citiți mai întâi
„Instrucțiunile pentru siguranță”!
Mașina de spălat va detecta
automat cantitatea de rufe din
interior atunci când selectați un
program.
În timpul instalării produsului,
înainte de prima utilizare, trebuie
efectuată calibrarea pentru a vă
asigura că cantitatea de rufe este
detectată în modul cel mai corect.
Pentru asta, selectați programul
Curăţare Tambur* și anulați funcția
de centrifugare. Porniţi programul
fără rufe. Aşteptaţi ca programul să
se termine, va dura în jur de 15
minute.
**Numele programului poate varia
în funcție de model. Pentru
selectarea programului potrivit,
puteți consulta secțiunea cu
descrierea programelor.
• Este responsabilitatea cumpărătorului să
pregătească instalaţiile electrice, de apă
curentă şi de canalizare care vor fi
folosite de maşina de spălat.
• Verificaţi cablul de alimentare şi
furtunurile de alimentare şi evacuare,
asigurându-vă că nu au fost pliate, ciupite
sau strivite când maşina a fost împinsă
la locul ei după instalare sau curăţare.
• Înainte de instalare, verificaţi dacă
produsul prezintă avarii vizibile. Înainte
de a instala produsul, verificați dacă este
deteriorat. Produsele avariate vă pun în
pericol siguranța.
• Greutatea totală a mașinii de spălat și a
uscătorului -cu încărcătură completăcând sunt plasate unul peste altul ajunge
la aproximativ 180 kilograme. Amplasați
produsul pe o pardoseală solidă și plană,
care poate să susțină această sarcină!
• • Nu amplasaţi produsul pe cablul de
alimentare.
• Nu montați produsul în locuri unde
temperatura poate scădea sub 0ºC.
Înghețarea poate deteriora produsul.
• Lăsați un spațiu minim de 1 cm între
produs și mobilier.
• Dacă veți instala produsul pe o suprafață
cu trepte, nu îl așezați niciodată aproape
de margine.
• Nu amplasați produsul pe nici un fel de
platformă.
• Nu așezați pe mașina de spălat surse de
căldură precum plite, fiare de călcat,
cuptoare, etc, și nu le folosiți pe produs.
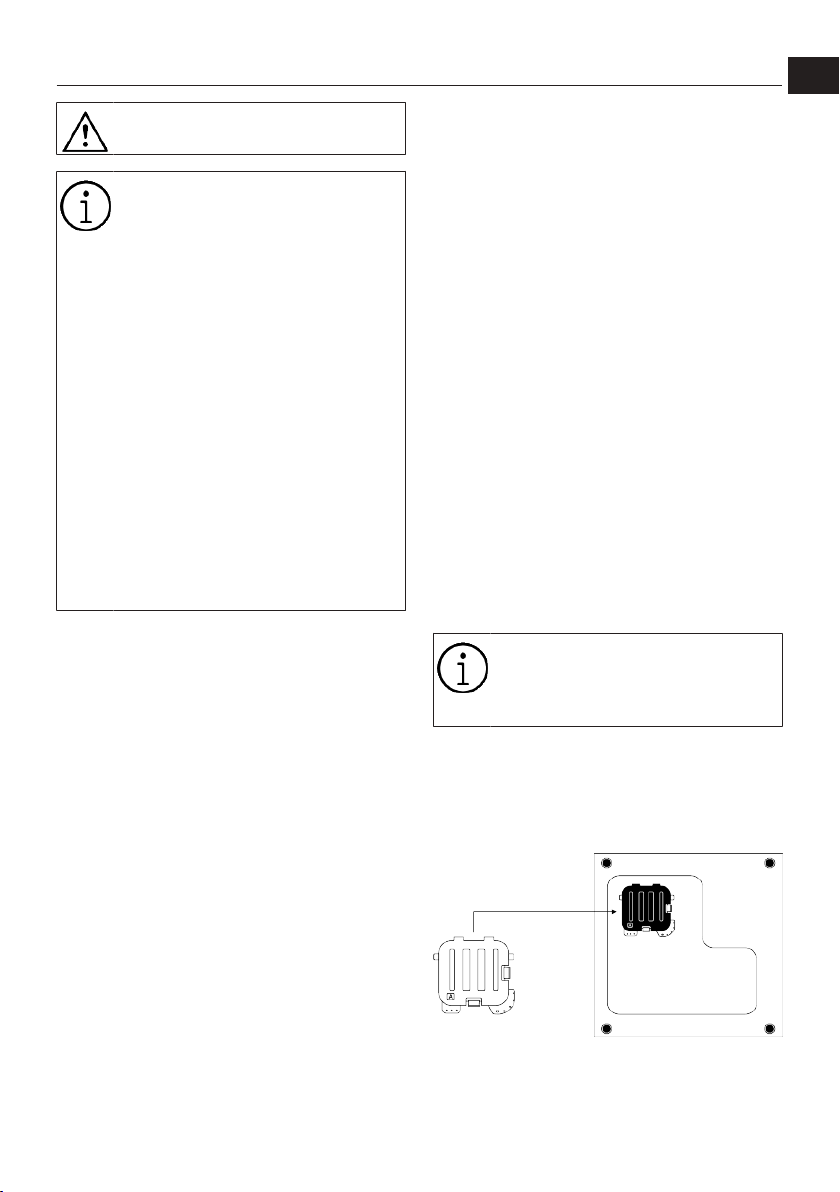
4.2 Asamblarea panourilor
inferioare de acoperire
La unele modele, părțile de bază ale
produselor sunt complet închise.
Aceste produse nu au dopuri și
capace.
• Pentru a crește confortul sonor al
produsului, atașați capacul A după
îndepărtarea buretelui de ambalare.
Capacul A
EN
4.1 Locul adecvat de instalare
• Amplasați produsul pe o podea rigidă și
plană. Nu îl amplasați pe un covor moale
sau pe alte suprafețe similare.
Amplasarea pe o suprafață
necorespunzătoare va cauza probleme
de zgomot și vibrații.
Înclinați mașina ușor pe spate. Fixați
agățătoarele Capacului A în panoul inferior
Finalizați asamblarea prin rotirea capacului.
RO / 12
Page 13
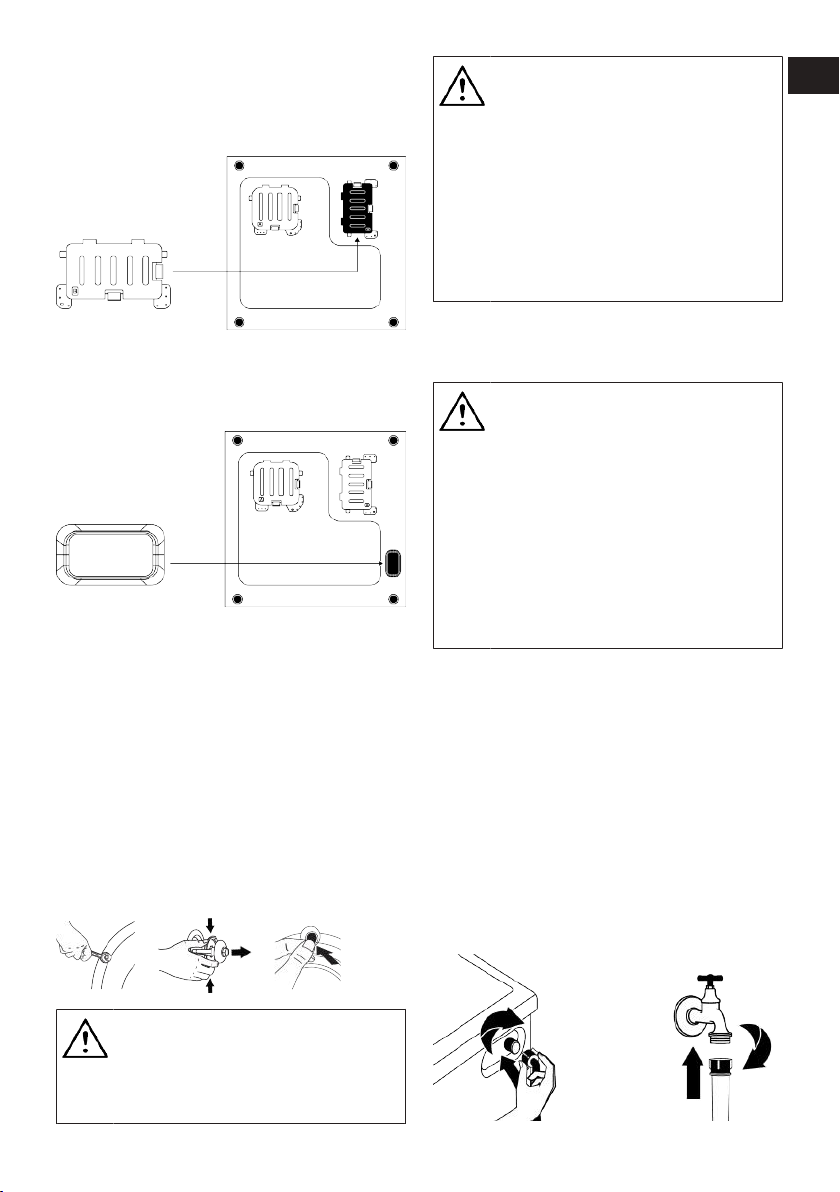
• Capacul B și dopul sunt opționale. Dacă
este disponibil, atașați capacul B și
dopul.
Capacul B
NOTIFICARE
Păstrați într-un loc sigur bolțurile de
siguranță pentru transport, pentru a
le refolosi la următoarea mutare a
produsului.
Montați bolțurile de siguranță
pentru transport în ordinea inversă
demontării.
Nu mutați produsul fără a monta
bolțurile de siguranță pentru
transport!
RO
EN
Fixați agățătoarele Capacului B în panoul
inferior Finalizați asamblarea prin rotirea
capacului.
Dop
Introduceți dopul prin împingerea acestuia
cu degetul.
4.3 Demontarea bolțurilor de fixare
pentru transport.
1. Desfaceți toate bolțurile de siguranță
pentru transport cu o cheie până când
acestea se rotesc liber.
2. Îndoiți partea interioară apăsând pe
zonele de prindere și trageți afară.
3. Montați capacele de plastic furnizate în
punga manualului de utilizare, în
orificiile panoului posterior.
4.4 Conectarea la rețeaua de apă
NOTIFICARE
Modelele cu o singură priză de apă
nu vor fi conectate la robinetul de
apă caldă. Într-o asemenea situație,
rufele vor fi deteriorate sau
funcționarea mașinii va fi întreruptă
de sistemul său de protecție.
Nu folosiți furtunuri de alimentare
cu apă vechi sau folosite pe un
aparat nou. Vor provoca scurgeri de
apă din mașina dumneavoastră iar
rufele dumneavoastră se vor păta.
1. Strângeți manual toate piulițele
furtunului. Nu folosiţi instrumente
pentru strângerea piuliţelor.
2. După conectarea furtunului, deschideți
complet robinetele și verificați dacă nu
există scurgeri în zonele de conectare.
Dacă detectaţi scurgeri, închideţi
robinetul şi desfaceţi piuliţa. Verificați
burduful și strângeți din nou piulițele cu
grijă. Pentru prevenirea posibilelor
scurgeri de apă și a daunelor asociate
cu acestea, mențineți robinetele închise
atunci când nu folosiți produsul.
NOTIFICARE
Demontați bolțurile de siguranță
pentru transport înainte de a utiliza
produsul! În caz contrar, produsul
se va avaria.
RO / 13
Page 14
4.5 Conectarea furtunului de evacuare la canalizare
1. Atașați capătul furtunului de evacuare
direct la canalizare, la chiuvetă sau la
cadă.
Casa dumneavoastră va fi inundată
dacă furtunul de evacuare la
canalizare se desface în timpul
evacuării apei. De asemenea, există
riscul de arsuri din cauza
temperaturilor ridicate de spălare!
Pentru a preveni aceste situații și a
vă asigura că produsul realizează
fără probleme procesele de
alimentare cu apă și evacuare a
apei, fixați bine furtunul de
evacuare.
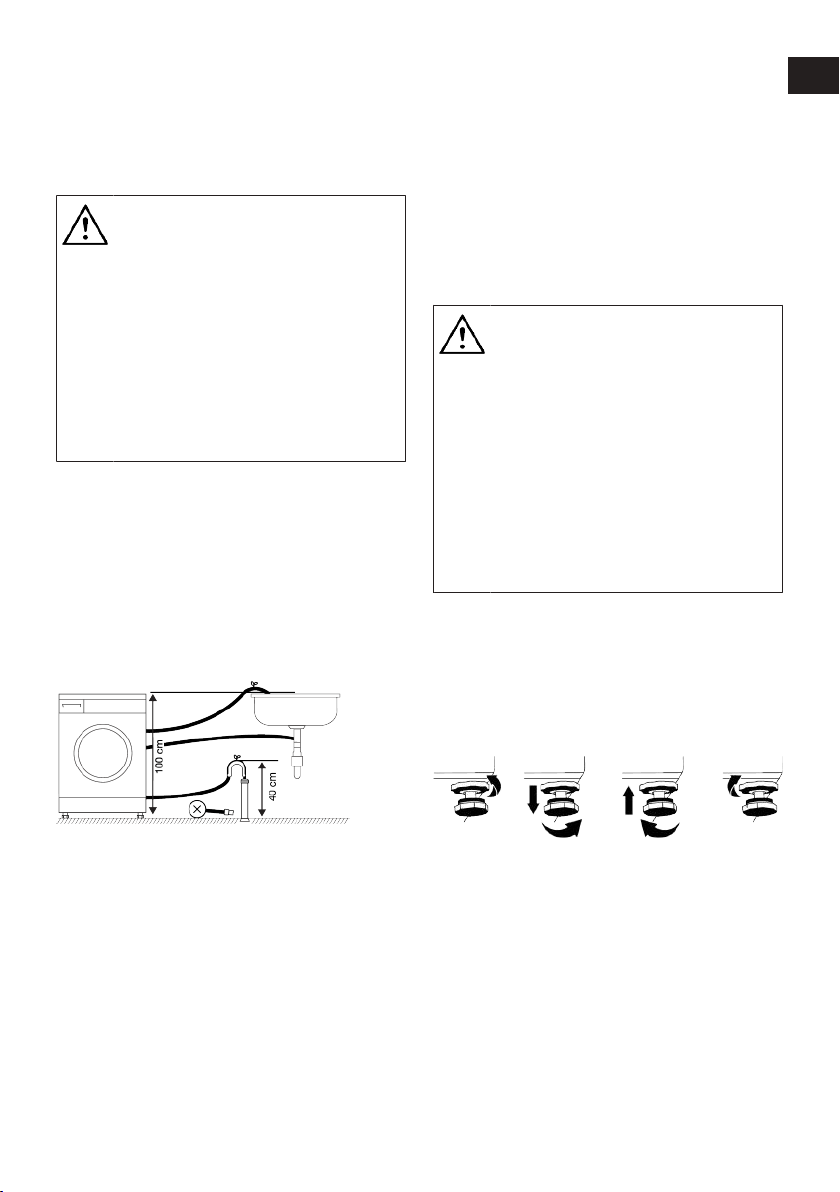
2. Conectați furtunul de evacuare la o
înălțime de cel puțin 40 cm și cel mult
100 cm.
3. Instalarea furtunului de scurgere a apei
la nivelul solului sau aproape de podea
(sub 40 cm) și apoi ridicarea acestuia,
va face dificilă evacuarea apei iar rufele
vor fi extrem de ude. Așadar, respectați
înălțimile descrise în figură.
6. • Dacă furtunul este prea scurt, adăugaţi
un furtun original de prelungire.
Lungimea totală a furtunului nu trebuie
să depășească 3,2 m. Pentru a preveni
scurgerile de apă, asigurați întotdeauna
conexiunea dintre furtunul de extensie și
furtunul de evacuare al aparatului cu o
clemă adecvată, astfel încât să nu se
desprindă și să provoace scurgeri.
4.6 Reglarea suporturilor
AVERTIZARE
Pentru ca produsul să funcțieze
mai silențios și fără vibrații, acesta
trebuie să fie orizontal și echilibrat
pe picioarele sale. Asigurați-vă că
aparatul este echilibrat prin
reglarea picioarelor. În caz contrar,
produsul se poate mișca din locul
acestuia și poate cauza sfărâmare,
probleme de sunet și vibrații.
Pentru a evita deteriorarea piulițelor
de blocare, nu folosiți unelte pentru
desfacerea acestora.
1. Desfaceţi manual piulițele de blocare ale
picioarelor.
2. Reglați picioarele până când produsul
este la nivel și echilibrat.
3. Strângeți manual toate piulițele de
blocare.
RO
EN
4. • Pentru a preveni scurgerea apei
reziduale înapoi în maşină şi pentru a
uşura evacuarea, nu introduceţi capătul
furtunului în apa reziduală şi nu îl
introduceţi mai mult de 15 cm în
canalizare. Dacă este prea lung, scurtaţil.
5. Capătul furtunului nu trebuie îndoit, nu
trebuie călcat și nu trebuie strivit între
canalizare și mașină. În caz contrar, vor
apărea probleme la evacuarea apei.
4.7 Conexiunea electrică
Conectați produsul la o priză împământată
și protejată cu o siguranță de 16 A.
Compania noastră nu va fi responsabilă
pentru pagubele rezultate în urma utilizării
produsului fără împământare, deși
reglementările locale prevăd utilizarea cu
împământare.
• Racordul trebuie să respecte
reglementările naționale.
RO / 14
Page 15
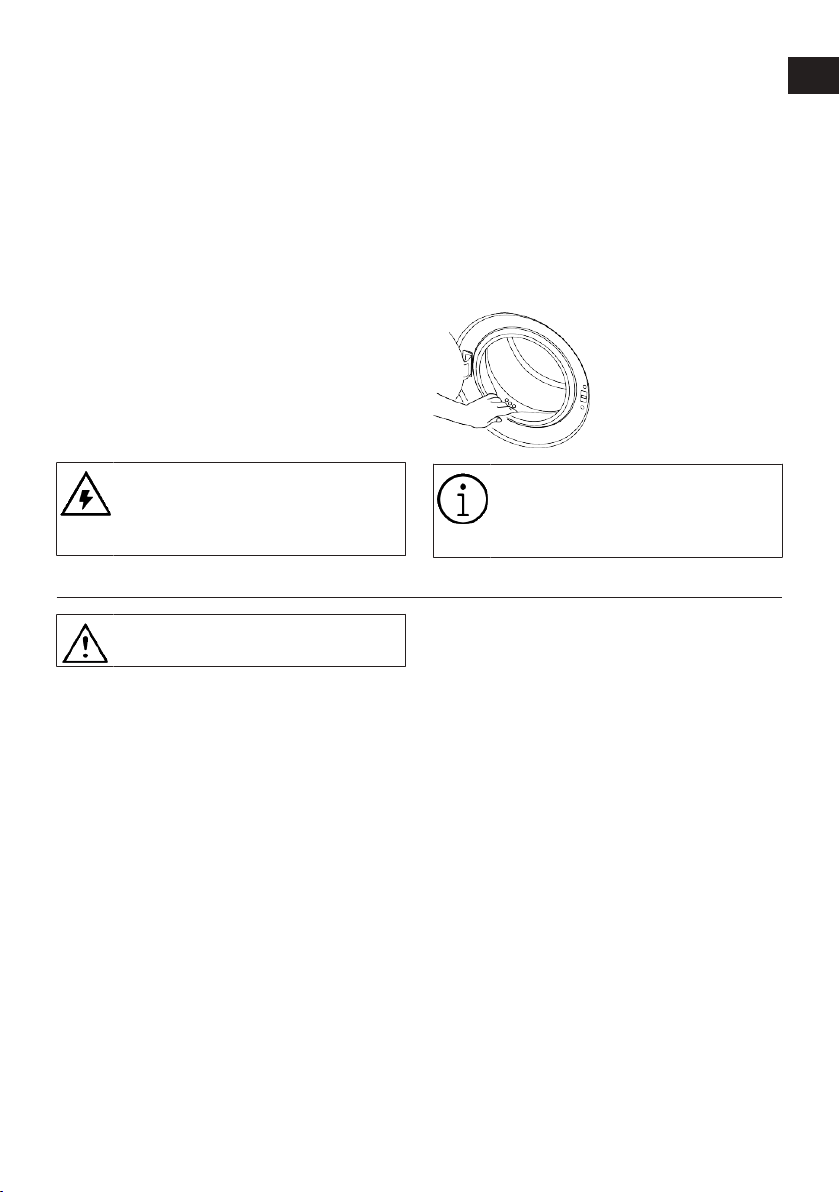
• Infrastructura cablurilor de conectare
electrică a produsului trebuie să fie
adecvată și potrivită cerințelor
produsului. Se recomandă utilizarea unui
dispozitiv de curent rezidual.
• • Ştecherul cablului de alimentare trebuie
să fie uşor accesibil după instalare.
• Dacă siguranța actuală sau întrerupătorul
existent are o capacitate mai mică de 16
amperi, apelați la un electrician calificat
pentru a instala o siguranță de 16 amperi.
• Tensiunea prizei trebuie să fie identică cu
tensiunea indicată în secțiunea
„Specificații tehnice”.
• • Nu conectaţi maşina folosind
prelungitoare sau triplu ştechere.
Supraîncălzirea și arderea pot fi cauzate
de cablul de conectare.
4.8 Pornirea
Înainte de a începe utilizarea produsului,
asigurați-vă că ați citit pregătirile descrise
în secțiunea „Instrucțiuni de mediu” și
„Instalare”. Pregătirea produsului pentru
spălarea rufelor, presupune să porniți mai
întâi programul Curățare tambur. Dacă
acest program nu este disponibil pentru
produsul dumneavoastră, aplicați metoda
descrisă în secțiunea „Curățarea ușii de
încărcare și a tamburului”.
RO
EN
Cablurile de alimentare deteriorate,
trebuie înlocuite de un service
autorizat pentru prevenirea
posibilelor pericole.
5 Pregătirea preliminară
Vă rugăm să citiți mai întâi
„Instrucțiunile pentru siguranță”!
5.1 Sortarea rufelor
• Sortați rufele în funcție de material,
culoare, grad de murdărire și temperatură
de spălare permisă.
• Respectați întotdeauna instrucțiunile de
pe etichetele articolelor de îmbrăcăminte.
5.2 Pregătirea rufelor pentru
spălare
• Rufele cu accesorii metalice precum
sutienele cu armătură, cataramele
curelelor sau nasturii din metal vor
deteriora produsul. Îndepărtați piesele
metalice sau spălați hainele într-un sac
pentru rufe sau o față de pernă.
• Scoateți toate obiectele din buzunare monede, pixuri și agrafe de birou;
întoarceți buzunarele pe dos și periați-le.
Aceste obiecte pot deteriora mașina sau
pot cauza probleme de zgomot.
Este posibil ca în mașină să existe
apă rămasă din timpul proceselor
de control al calității. Aceasta nu
afectează produsul.
• Puneți articolele mici precum șosetele de
copii și ciorapii de damă într-un săculeț
pentru rufe sau o față de pernă.
• Introduceți perdelele fără a le apăsa.
Îndepărtați accesoriile perdelelor.
Articolele pentru atașarea perdelelor vor
cauza tragerea și sfâșierea perdelelor.
• Închideți fermoarele, coaseți nasturii
desfăcuți, reparați rupturile.
• Produsele cu eticheta „Spălare la
mașină” sau „Spălare manuală” se spală
numai la un program adecvat.
• Nu spălați rufe colorate împreună cu rufe
albe. Articolele de îmbrăcăminte noi și
închise la culoare confecționate din
bumbac eliberează o cantitate mare de
colorant. Spălați-le separat.
• Petele dificile trebuie tratate
corespunzător înainte de spălare.
• Spălați rufele delicate și pantalonii întorși
pe dos.
• Rufele care au fost murdărite cu făină,
praf de var, lapte praf, etc. trebuie să fie
scuturate intens înainte de introducerea
RO / 15
Page 16
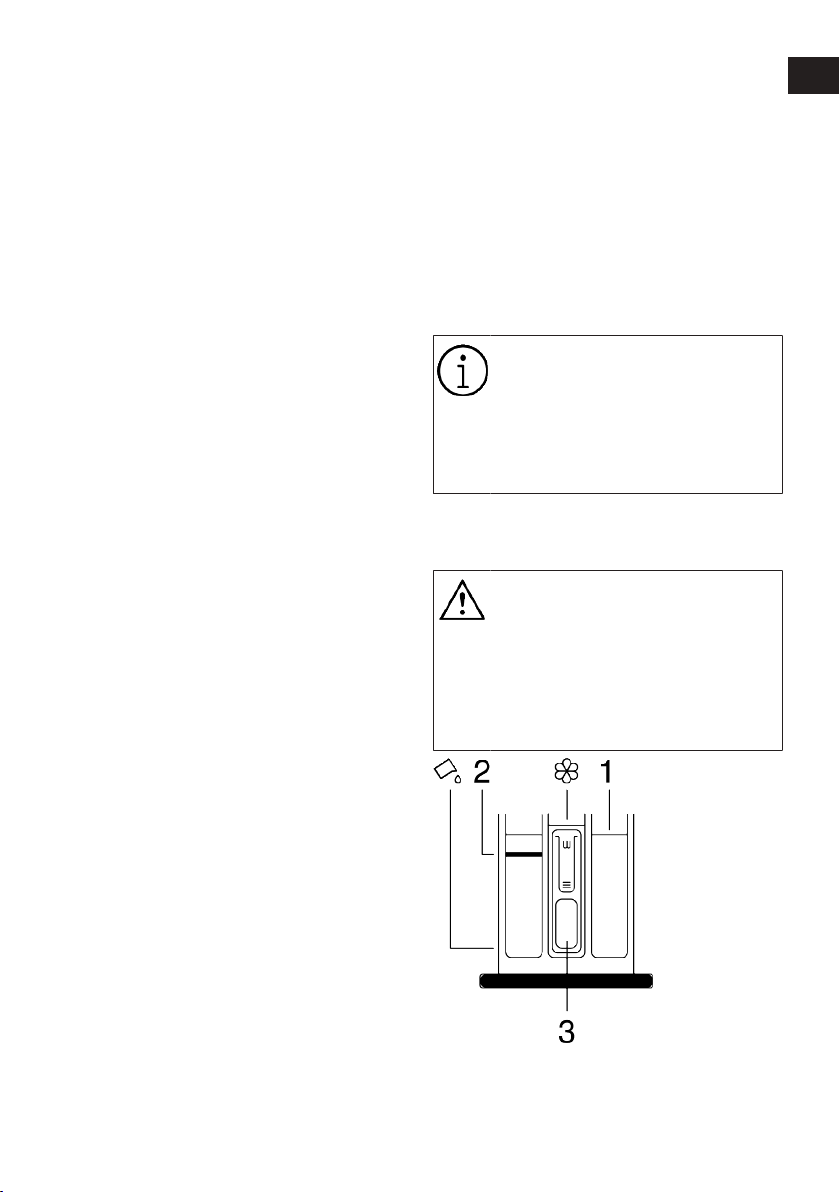
lor în mașină. Astfel de prafuri și pudre
de pe rufe se pot acumula în timp pe
componentele interne ale mașinii și pot
cauza avarii.
5.3 Sugestii pentru economia de energie și apă
Informațiile de mai jos vă vor ajuta să
utilizați mașina într-o manieră ecologică și
cu economie de energie/apă.
• Utilizați produsul la cea mai ridicată
capacitate de încărcare permisă pentru
programul pe care l-ați selectat, dar nu o
supraîncărcați. A se vedea „Tabelul de
program și consum”
• Respectați instrucțiunile privind
temperatura de pe ambalajul
detergentului.
• Spălați la temperaturi joase rufele cu
grad redus de murdărire.
• Folosiți programe mai scurte pentru a
spăla cantități mici de rufe cu grad redus
de murdărire.
• Nu folosiți ciclu de prespălare și
temperaturi mari pentru rufele care nu
sunt foarte murdare sau pătate.
• Dacă doriți să uscați rufele în mașina de
uscat rufe, selectați viteza de
centrifugare maximă recomandată
pentru programul de spălare.
• Nu utilizați o cantitate de detergent mai
mare decât cea recomandată pe
ambalajul acestuia.
aplicați soluțiile menționate pentru
eroarea „Ușa de încărcare nu poate fi
deschisă” din secțiunea Depanare.
5.5 Capacitatea corectă de încărcare
Capacitatea maximă de încărcare depinde
de tipul de rufe, gradul de murdărire și de
programul de spălare dorit.
Produsul reglează automat cantitatea de
apă în funcție de greutatea rufelor pe care
le introduceți în interior.
Urmați instrucțiunile din „Tabelul de
programe și consum”. Când este
aparatul este supraîncărcat,
performanța de spălare a
produsului va scădea. În plus, pot
apărea probleme legate de vibrații
și zgomot.
5.6 Utilizarea detergentului și a balsamului
AVERTIZARE
Când utilizați detergenți, balsamuri,
apret, înălbitor, și decoloranți, anti
calcar, citiți informațiile de pe
ambalaje furnizate de producător,
și urmați informațiile furnizate
pentru dozare. Folosiți un recipient
de măsurare, dacă este disponibil.
RO
EN
5.4 Încărcarea rufelor
1. Deschideți ușa de încărcare.
2. Introduceți articolele în mașină fără a le
înghesui.
3. Închideți ușa împingând-o până când
auziți un sunet de blocare. Asigurați-vă
că nu sunt rufe prinse în ușă. Ușa de
serviciu este blocată în timpul
programului de spălare. Ușa se va
debloca de îndată ce programul este
finalizat. Apoi deschideți ușa de
serviciu. Dacă ușa nu se deschide,
Sertarul pentru detergent este compus din
trei compartimente:
(1) pentru prespălare,
RO / 16
Page 17
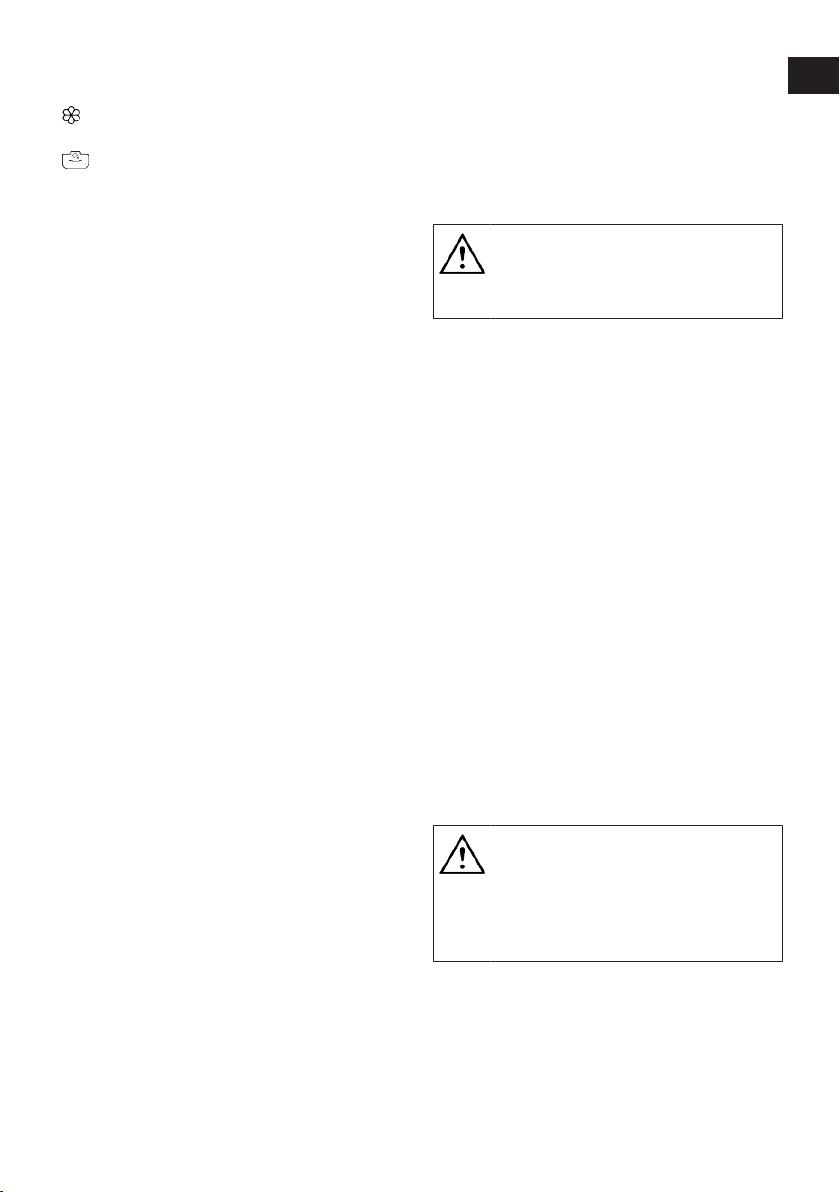
(2) pentru spălarea principală,
(3) pentru balsam,
( ) există un sifon în compartimentul
pentru balsam.
) există un dispozitiv pentru detergentul
(
lichid în cazul folosirii detergentului lichid în
compartimentul pentru spălare principală.
Detergent, balsam și alte substanțe de
curățare
• Adăugați detergent și balsam înainte de
începerea programului de spălare.
• Nu lăsați niciodată sertarul de detergent
deschis în timp ce programul de spălare
este în derulare.
• Dacă utilizați un program fără prespălare,
nu introduceți detergent în
compartimentul pentru prespălare
(compartimentul nr. „1”).
• Dacă utilizați un program cu pre spălare,
porniți mașina după ce ați adăugat
detergent pudră în compartimentele
pentru pre spălare și spălare principală
(compartimentele 1 și 2).
• Nu selectați un program cu prespălare,
dacă utilizați capsulă de detergent sau
bilă de dozare. Puneți capsula cu
detergent sau bila de dozare direct
printre rufe în interiorul produsului.
• Dacă utilizați detergent lichid, urmați
indicațiile din „Utilizarea detergentului
lichid” și nu uitați să puneți dispozitivul
pentru detergent lichid în poziția corectă.
Alegerea tipului de detergent
Tipul detergentului care trebuie folosit
depinde de programul de spălare și de tipul
și culoarea țesăturii.
• Utilizați detergenți diferiți pentru rufe
colorate și rufe albe.
• Spălați hainele delicate numai cu
detergenți speciali (detergent lichid,
șampon de lână etc.) pentru haine
delicate, folosind programele sugerate.
• Când spălați rufe și cuverturi în culori
închise se recomandă folosirea unui
detergent lichid.
• Spălați rufele din lână folosind programul
sugerat și un detergent special pentru
lână.
• Examinați descrierile programelor pentru
a identifica programele sugerate pentru
diverse textile.
• Toate recomandările cu privire la
detergenți sunt valabile pentru intervalele
de temperatură selectabile ale
programelor.
Trebuie utilizați numai detergenți,
balsamuri, aditivi potriviți pentru
spălare în mașini de spălat rufe.
Nu utilizați detergent praf.
Ajustarea cantității de detergent
Cantitatea de detergent depinde de
cantitatea de rufe, de gradul de murdărire și
de duritatea apei.
• Nu depășiți valorile recomandate de
dozare indicate pe pachetul detergentului
pentru a limita formarea excesivă de
spumă, probleme de limpezire
insuficientă, cât și pentru a proteja
mediul înconjurător și pentru a economisi
bani.
• Utilizați cantitate mai mică de detergent
atunci când spălați rufe mai puține sau
nu foarte murdare.
Utilizarea balsamului
Turnați balsam în compartimentul pentru
balsam al sertarului de detergent.
• Nu depășiți semnul nivelului (>max<)
aflat pe compartimentul balsamului.
• Dacă balsamul nu este fluid, diluați-l cu
apă înainte de a-l pune în compartimentul
pentru balsam.
AVERTIZARE
Pentru împrospătarea rufelor nu
utilizați detergent lichid sau alte
soluții de curățare decât dacă
acestea sunt potrivite pentru
utilizare în mașini de spălat.
RO
EN
RO / 17
Page 18
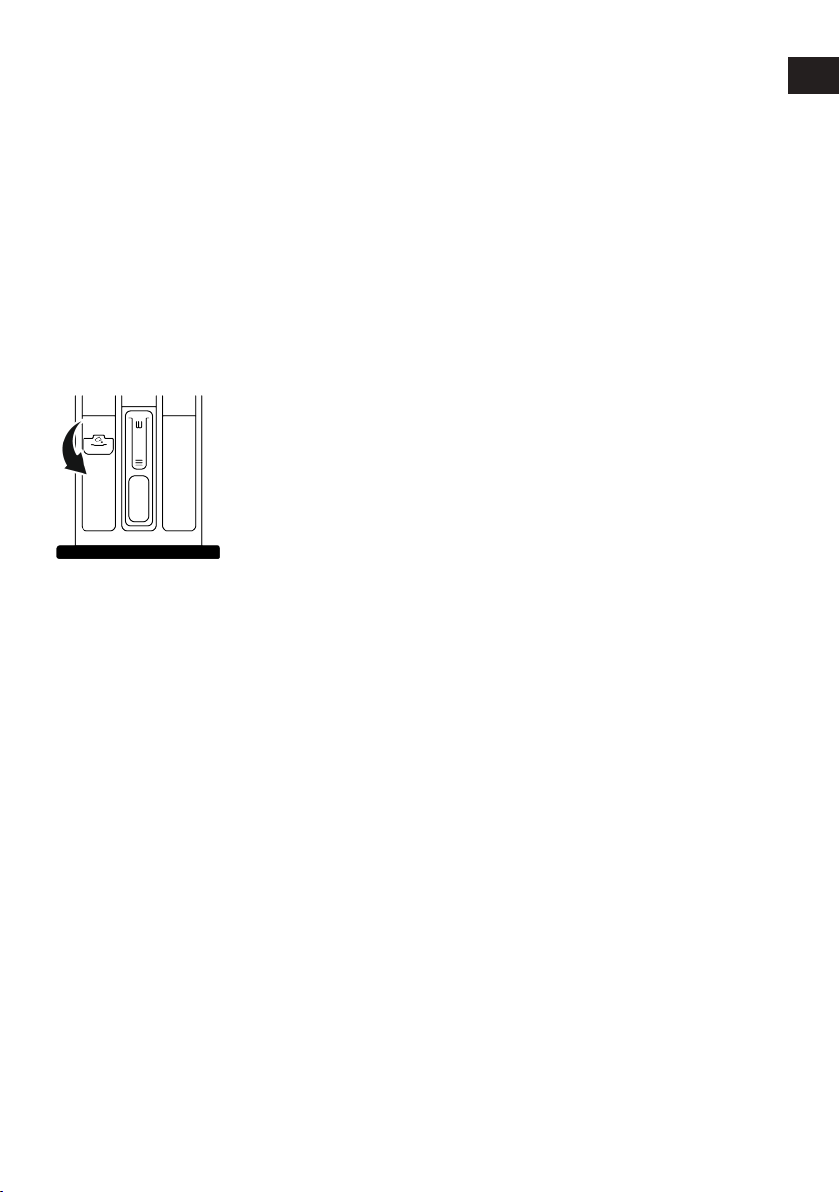
Utilizarea detergenților lichizi
Dacă produsul conține un dispozitiv
pentru detergentul lichid:
• Apăsați și rotiți dispozitivul în dreptul
indicatorului pentru momentul de
utilizare a detergentului lichid. Partea
care cade va reprezenta un obstacol
pentru detergentul lichid.
• Curățați-l cu apă aflat în poziție, sau după
caz îndepărtați-l din poziția sa. După
curățare, nu uitați să așezați dispozitivul
în compartimentul pentru spălarea
principală (compartimentul nr. „2”).
• Dispozitivul are trebui să fie sus dacă
utilizați detergent praf.
Utilizarea detergentului de tip gel sau
tablete
• Dacă detergentul este fluid iar produsul
dumneavoastră nu este prevăzut cu
compartiment pentru detergent lichid,
turnați detergentul de tip gel în
compartimentul pentru spălarea
principală la prima admisie cu apă. Dacă
produsul dumneavoastră este prevăzut
cu compartiment pentru detergent lichid,
turnați detergentul în compartiment
înainte de a acționa programul.
• Dacă detergentul gel nu este fluid sau
este sub formă de tablete de tip capsule
cu lichid, puneți-l direct în tambur înainte
de începerea spălării.
• Introduceți tabletele de detergent în
compartimentul pentru spălarea
principală (compartimentul nr. „2”) sau
direct în tambur înainte de spălare.
Utilizarea apretului
• Adăugați apret lichid, apret sub formă de
praf sau colorant de material în
compartimentul pentru balsam.
• Nu folosiți simultan balsam și apret în
același ciclu de spălare.
• Ștergeți interiorul mașinii cu o cârpă
umedă și curată după ce folosiți apret.
Utilizarea soluției anti calcar
• După caz, utilizați numai soluții anti
calcar potrivite pentru mașini de spălat.
Utilizarea înălbitorului și a decoloranților
• Selectați un program cu prespălare și
adăugați înălbitorul la începerea
prespălării. Nu puneți detergent în
compartimentul pentru prespălare. Ca
alternativă, selectați un program cu
limpezire suplimentară și adăugați
înălbitorul în timp ce mașina se
alimentează cu apă, în compartimentul
pentru detergent în cursul primului ciclu
de limpezire.
• Nu amestecați și nu utilizați înălbitor și
detergent deodată.
• Datorită faptului că înălbitorul provoacă
iritația pielii, utilizați numai cantități mici
(1/2 de ceașcă - aproximativ 50 ml) și
limpeziți rufele temeinic.
• Nu turnați înălbitor direct pe rufe.
• Nu utilizați înălbitorul pentru rufele
colorate.
• Când utilizați decoloranți cu oxigen activ,
selectați un program de spălare la
temperatură scăzută.
• Decoloranții cu oxigen activ pot fi utilizați
împreună cu detergenții. Oricum, dacă nu
au aceeași vâscozitate ca și detergentul,
mai întâi puneți detergent în
compartimentul nr. „2” al sertarului
pentru detergent și așteptați ca produsul
să limpezească detergentul în timpul
admisiei cu apă. Adăugați decolorantul în
același compartiment în timp ce mașina
continuă să tragă apă.
RO
EN
RO / 18
Page 19

5.7 Sfaturi pentru spălare eficientă
Haine
Culori deschise și albe Colorate
(Intervalul de temperatură
recomandat bazat pe
gradul de murdărire:
40-90 °C)
Poate necesita tratarea
prealabilă a petelor sau
prespălarea.
Detergenții praf sau lichizi
recomandați pentru rufe
Grad ridicat
de murdărire
Gradul de murdărire
(pete dificile
cum ar fi iarbă,
cafea, fructe și
sânge.)
Grad normal
de murdărire
(De exemplu,
urmele rămase
pe guler și
manșete)
Grad redus de
murdărire
(Fără pete
vizibile.)
albe pot fi folosiți în
dozele recomandate
pentru rufele cu grad
ridicat de murdărire. Se
recomandă folosirea
detergenților praf pentru
curățarea petelor de argilă
și pământ, precum și a
petelor sensibile la
înălbitori.
Detergenții praf sau lichizi
recomandați pentru rufe
albe pot fi folosiți în
dozele recomandate
pentru haine cu grad
normal de murdărire.
Detergenții praf sau lichizi
recomandați pentru rufe
albe pot fi folosiți în
dozele recomandate
pentru haine cu grad
redus de murdărire.
(Intervalul de
temperatură
recomandat bazat pe
gradul de murdărire:
rece -40°C)
Detergenții praf sau
lichizi recomandați
pentru rufe colorate pot
fi folosiți în dozele
recomandate pentru
rufele cu grad ridicat de
murdărire. Se
recomandă folosirea
detergenților praf pentru
curățarea petelor de
argilă și pământ, precum
și a petelor sensibile la
înălbitori. Trebuie utilizat
detergent fără conținut
de decolorant.
Detergenții praf sau
lichizi recomandați
pentru rufe colorate pot
fi folosiți în dozele
recomandate pentru
haine cu grad normal de
murdărire. Trebuie
utilizat detergent fără
conținut de decolorant.
Detergenții praf sau
lichizi recomandați
pentru rufe colorate pot
fi folosiți în dozele
recomandate pentru
haine cu grad redus de
murdărire. Trebuie
utilizat detergent fără
conținut de decolorant.
Negre/Culori
închise
(Intervalul de
temperatură
recomandat bazat
pe gradul de
murdărire: rece
-40°C)
Poate fi utilizat
detergent lichid
pentru rufe colorate
și negre/culori
închise, în dozarea
recomandată
pentru rufe foarte
murdare.
Detergenții lichizi
potriviți pentru rufe
colorate și culori
închise pot fi
folosiți în dozele
recomandate
pentru haine cu
grad moderat de
murdărire.
Detergenții lichizi
potriviți pentru rufe
colorate și culori
închise pot fi
folosiți în dozele
recomandate
pentru haine cu
grad redus de
murdărire.
Delicate/Lână/
Mătase
(Intervalul de
temperatură
recomandat bazat
pe gradul de
murdărire: rece
-30 °C)
Se recomandă
folosirea
detergenților
lichizi pentru rufe
delicate. Rufele
din lână și mătase
trebuie spălate cu
detergent special
pentru lână.
Se recomandă
folosirea
detergenților
lichizi pentru rufe
delicate. Rufele
din lână și mătase
trebuie spălate cu
detergent special
pentru lână.
Se recomandă
folosirea
detergenților
lichizi pentru rufe
delicate. Rufele
din lână și mătase
trebuie spălate cu
detergent special
pentru lână.
RO
EN
5.8 Afișarea duratei programului
Puteți vedea durata programului pe ecranul
mașinii dumneavoastră în timp ce selectați
programul. În funcție de cantitatea de rufe
încărcată în mașină, spuma, condițiile
dezechilibrate de încărcare, fluctuațiile de
alimentare cu curent, presiunea apei și
setările de program, durata programului se
ajustează automat în timpul funcționării
acestuia.
SITUAȚIE SPECIALĂ: La pornirea
programelor de Bumbac și Bumbac Eco,
ecranul indică durata pentru o încărcare pe
jumătate. Aceasta este cea mai frecventă
modalitate de utilizare. După acționarea
programului, în 20- 25 de minute mașina
detectează cantitatea reală de încărcare.
Dacă cantitatea încărcată detectată este
mai mare decât jumătate din cantitatea ce
poate fi încărcată, programul de spălare se
RO / 19
Page 20
va ajusta iar durata programului va crește
1
2 3 4
567891011
automat. Puteți urmări această schimbare
pe ecran.
6 Operarea produsului
Vă rugăm să citiți mai întâi
„Instrucțiunile pentru siguranță”!
6.1 Panou de control
RO
EN
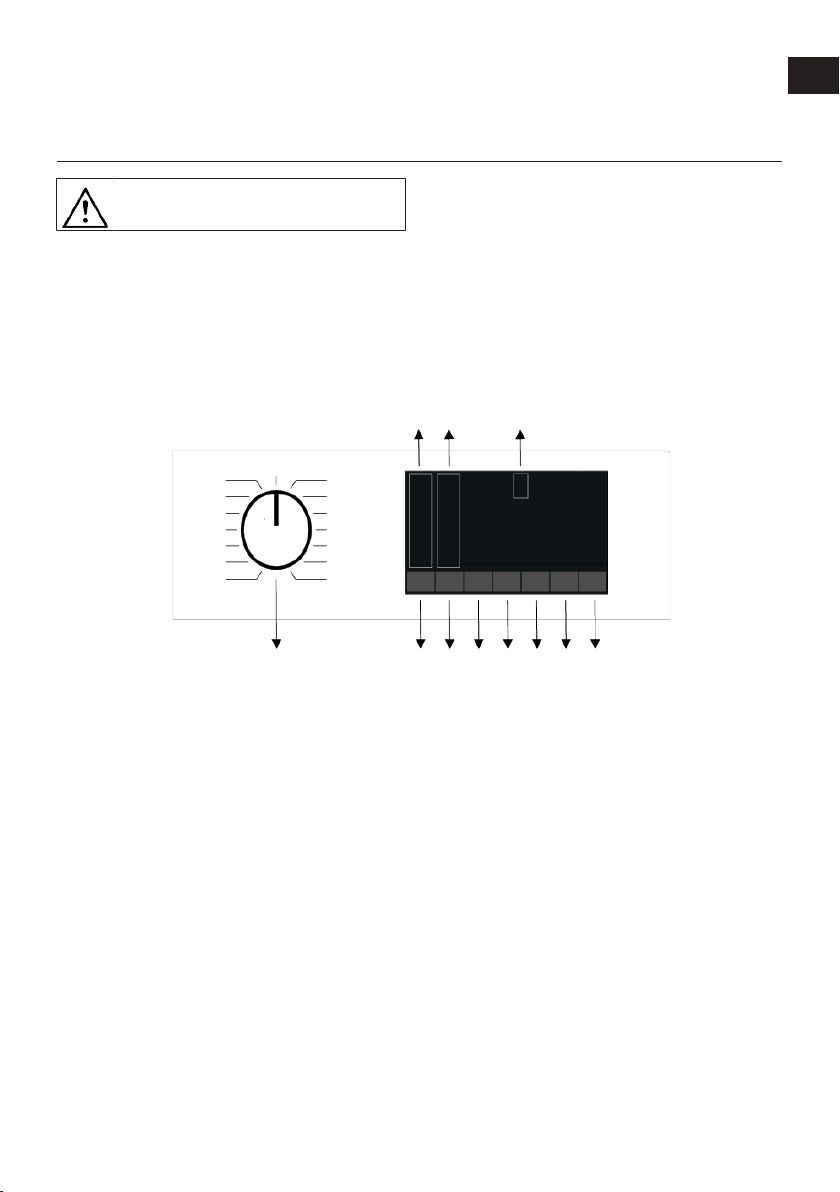
1 Buton selecție programe 2 Lumini de indicare a nivelului
temperaturii
3 Lumini de indicare a nivelului de
centrifugare
5 Buton Pornire / Pauză 6 Buton setare oră terminare
7 Buton Funcție auxiliară 3 8 Buton Funcție auxiliară 2
9 Buton Funcție auxiliară 1 10 Buton reglare viteză de centrifugare
11 Buton de setare a temperaturii
RO / 20
4 Ecran
Page 21
6.2 Simbolurile de pe ecran
1 2 3 4 5 6
7891011121314
RO
EN
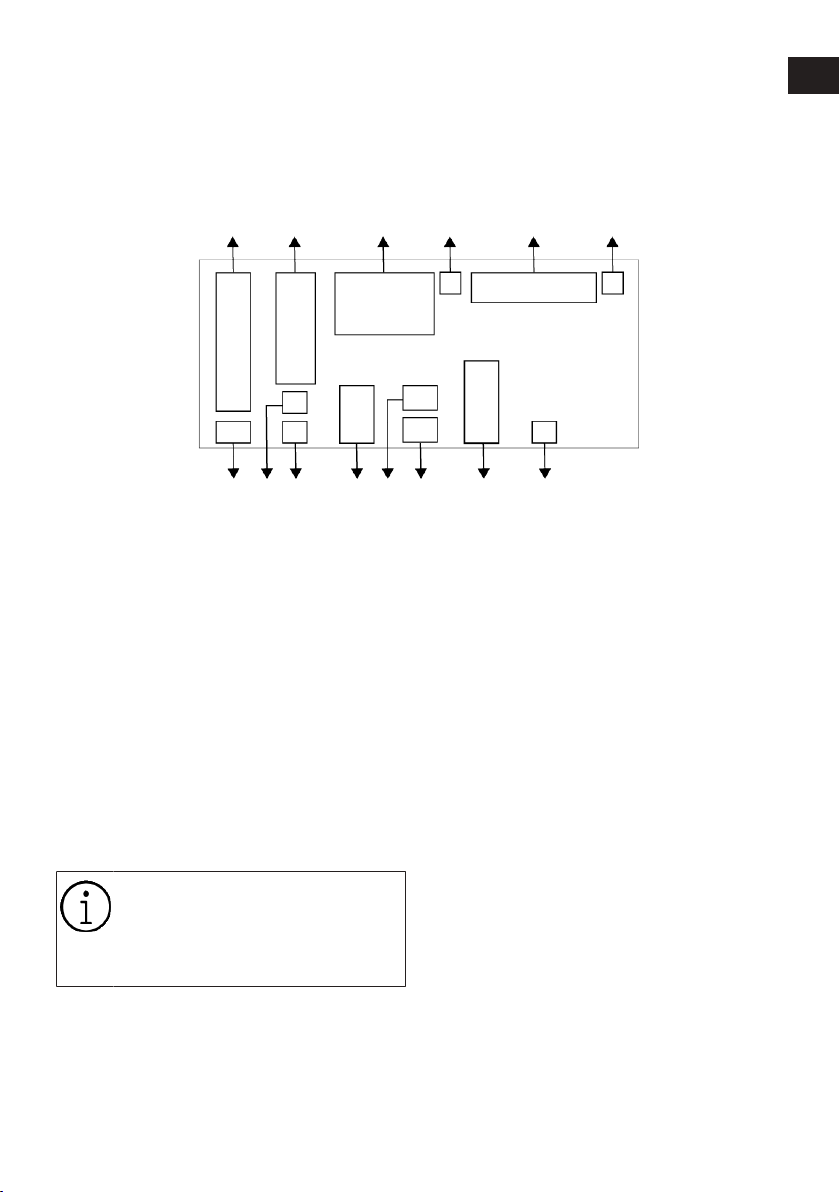
1 Indicator temperatură 2 Indicator viteză de centrifugare
3 Informații despre durată 4 Simbol blocare ușă activată
5 Indicator urmărire program 6 Indicator lipsă apă
7 Indicator pornire întârziată activată 8 Indicatoare Funcție auxiliară 3
9 Indicatoare Funcție auxiliară 2 10 Simbol activare blocare pentru copii
11 Indicatoare Funcție auxiliară 1 12 Indicator fără centrifugare
13 Indicator Amânare limpezire 14 Indicator apă rece
Elementele vizuale utilizate pentru
descrierea mașinii în această
secțiune sunt schematice și nu se
pot potrivi exact cu caracteristicile
mașinii dumneavoastră.
RO / 21
Page 22
6.3 Tabel pentru program și consum
RO
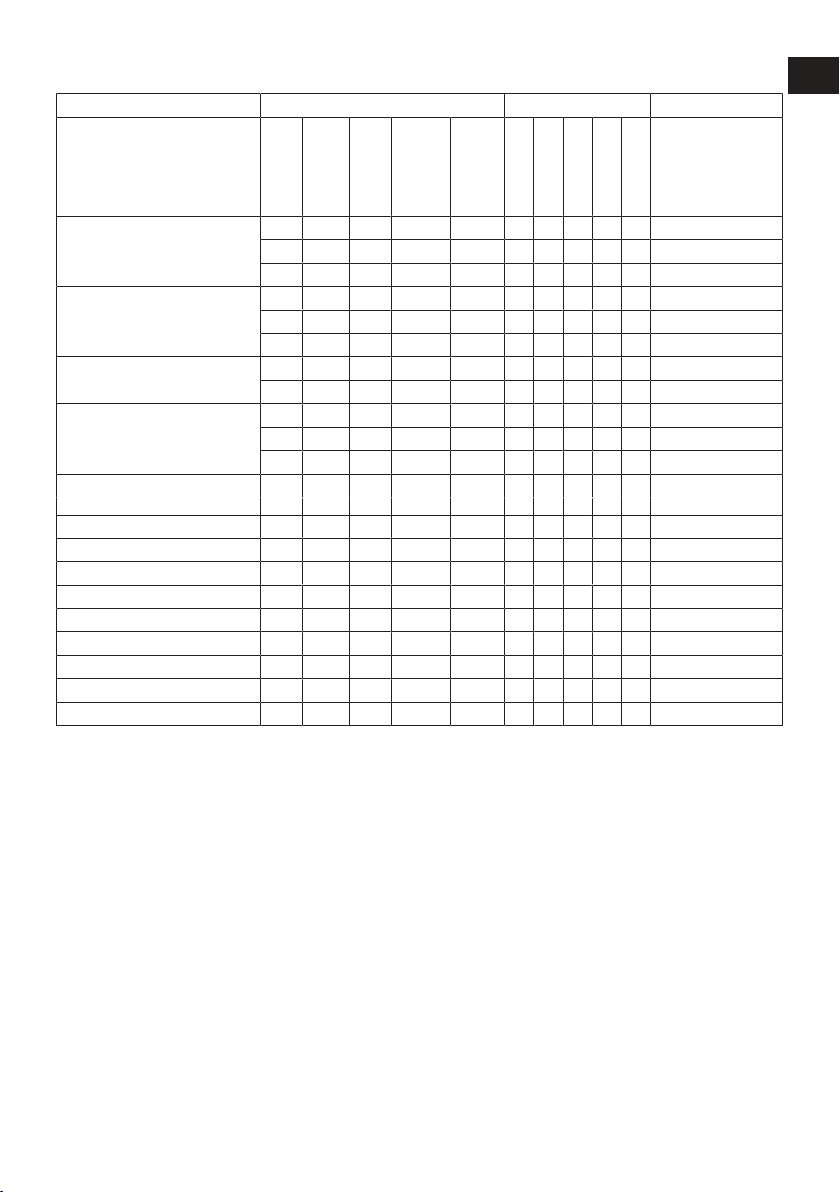
Funcții auxiliare
RO
EN
Program
Temperatură
(°C)
Încărcare
maximă (kg)
Consumul de
apă (l)
Consumul de
energie (kWh)
Viteza
maximă
Rapid/Intens
Prespălare
90 10 98 2,60 1400 • • • • • Rece - 90
Bumbac
Eco 40-60
Sintetice
Spalare rapidă / Expres 14'
Spalare rapidă / Expres 14' +
Rapid/Intens
Delicate/Lâna/Spălare Manuală
Jeans / Culori Inchise 40 5 86 0,74 1200 • • * Rece - 40
Mix 40 4 83 0,80 800 • • Rece - 40
Curăţare cuva 90 - 80 2,30 600 * 90
Antialergic+ 90 9 125 3,00 1400 * * 20-90
Anti-Pete 60 5 86 1,85 1400 • 30-60
Cămăşi 60 4 70 1,40 800 • * • • Rece - 60
Împrospătare cu abur
Spălare la rece - 5 55 0,30 1400
60 10 98 1,54 1400 • • • • • Rece - 90
40 10 95 1,03 1400 • • • • • Rece - 90
40*** 10
40*** 5
40*** 2,5
60 4 76 1,08 1200 • • • • • Rece - 60
40 4 74 0,62 1200 • • • • • Rece - 60
90 10 75 2,19 1400 • • Rece - 90
60 10 75 1,11 1400 • • Rece - 90
30 10 75 0,20 1400 • • Rece - 90
30 2 45 0,10 1400 • • Rece - 90
40 2 60 0,54 800 • Rece - 40
- 1 1,5 0,11 - *
67
0,820 1400 40-60
56 0,556
38 0,276
1400 40-60
1400 40-60
•
•
•
•••
•
•
•
Abur
Clătire
suplimentară
Economisire Apă
Temperatură (°C)
Rece
Rece
• : Selectabil.
* : Selectat automat, nu poate fi anulat.
*** : Programul Eco 40-60 este un program
de test conform selecției temperaturii la
40°C, din Regulamentul UE: UE/2019/2014
și EN 60456: 2016 / A11: 2020 standard.
- : A se vedea descrierea programului
pentru încărcare maximă.
RO / 22
Page 23
Înainte de prima utilizare, vă rugăm
citiți secțiunea pentru instalare din
manual.
Funcțiile auxiliare din tabel pot
varia conform modelului de
mașină.
Consumul de apă și energie poate
varia în funcție de presiunea,
duritatea și temperatura apei,
temperatura ambientală, tipul și
cantitatea rufelor, selectarea
funcțiilor auxiliare și a vitezei de
centrifugare cât și de schimbările
de tensiune electrică.
Schemele de selectare pentru
funcțiile auxiliare pot fi modificate
de către compania producătoare.
Noile scheme de selectare pot fi
adăugate sau îndepărtate.
Viteza de centrifugare a maşinii
dumneavoastră poate varia în
funcţie de program; aceasta nu
poate depăşi viteza maximă de
centrifugare a maşinii
dumneavoastră.
Nivelul zgomotului și cantitatea de
umiditate variază conform vitezei
de centrifugare, când este selectată
o viteză mai mare în etapa de
centrifugare, rufele vor fi mai puțin
umede dar vor produce mai mult
zgomot la finalizarea programului.
Puteți vedea timpul de spălare pe
ecranul mașinii dumneavoastră în
timp ce selectați programul. În
funcție de cantitatea de rufe pe
care ați încărcat-o în mașina
dumneavoastră, poate fi o diferență
de 1-1,5 ore între durata afișată pe
ecran și durata efectivă a ciclului
de spălare. Durata va fi actualizată
automat la scurt timp după
începerea spălării.
Selectați întotdeauna cea mai
scăzută temperatură
corespunzătoare. În ceea ce
privește consumul de energie, cele
mai eficiente programe sunt în
general, cele care spală la
temperaturi mai scăzute pe durată
mai lungă de timp.
RO
EN
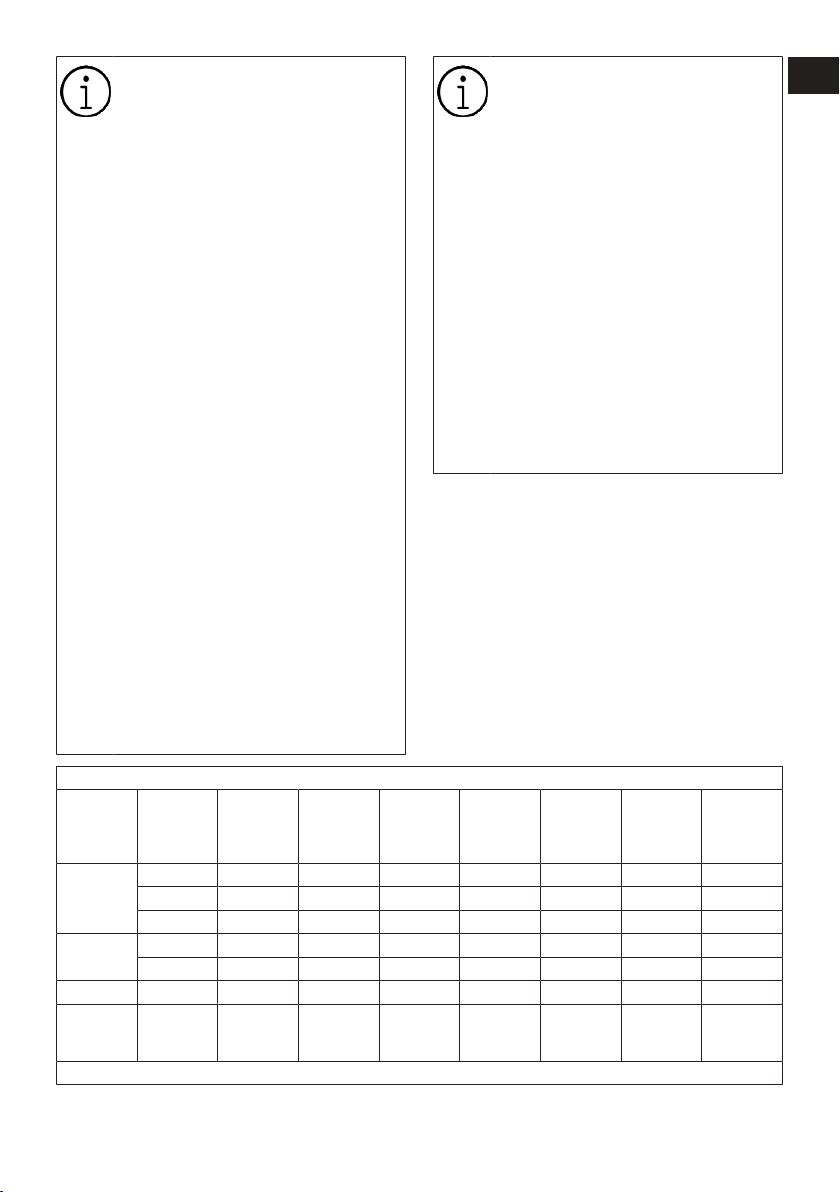
Valori de consum (RO)
Selectarea
temperaturi
i °C
Eco 40-60
Bumbac
Sintetice 40 1200 4 02:20 0,620 74,0 40 40
Spalare
rapidă /
Expres 14'
Valorile consumului pentru alte programe decât programul Eco 40-60 sunt doar ca referință.
Viteza de
centrifugar
e (ciclu/
min)
40 1400 10,0 03:48
40 1400 5 02:53
40 1400 2,5 02:53
20 1400 10 03:40 0,490 95,0 20 53,9
60 1400 10 03:40 1,540 98,0 60 53,9
30 1400 10 00:28 0,200 75,0 23 62
Capacitate
(kg)
Durata
programulu
i (h:min)
Consumul
de energie
(kWh/ciclu)
0,820 67,0 33 51,0
0,556 56,0
0,276 38,0 22 56,0
Consumul
de apă
(litru/ciclu)
Temperatur
a rufelor
(°C)
Procent de
umiditate
reziduală
(%)
31
53,8
RO / 23
Page 24
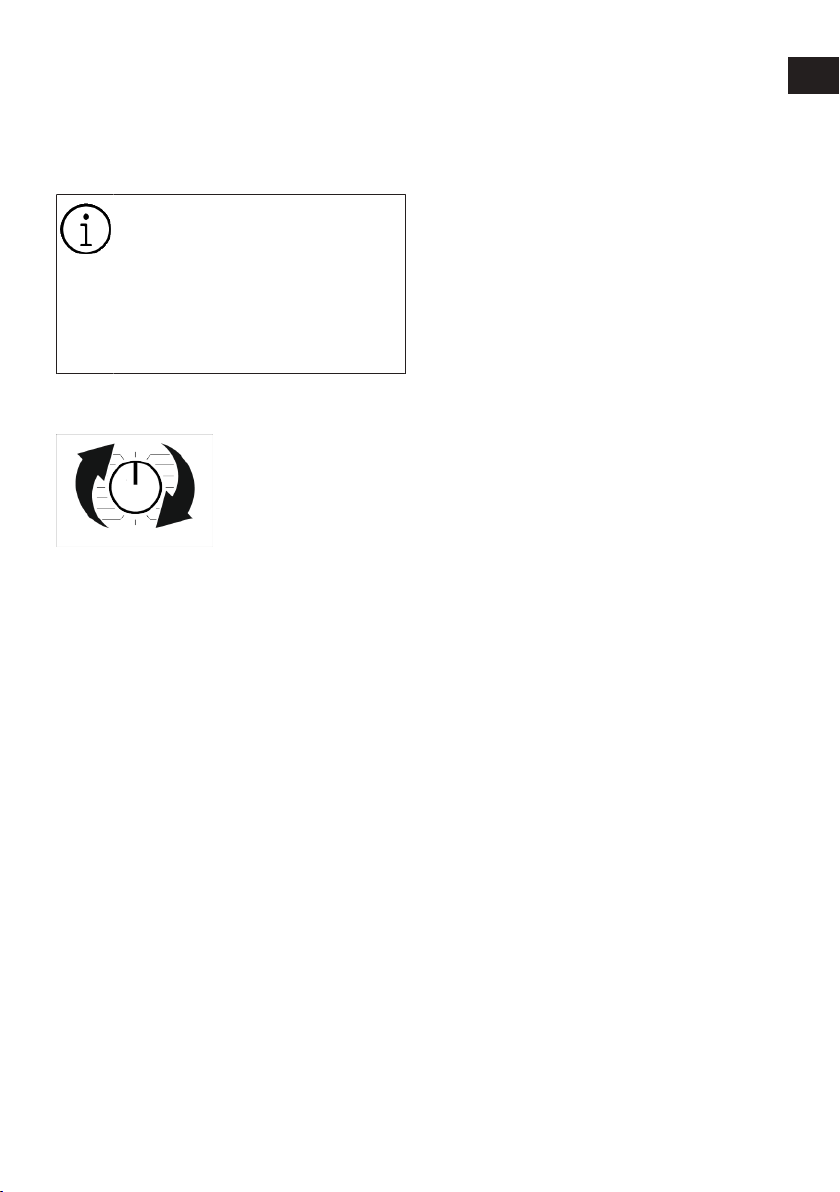
6.4 Selectarea programului
1. Selectați programul potrivit pentru tipul,
cantitatea și nivelul de murdărire a
rufelor conform „Tabelului de programe
și consum”.
Programele sunt limitate la cea mai
ridicată viteză de centrifugare
pentru acel tip de țesătură.
În momentul în care selectați un
program, aveți în vedere
întotdeauna tipul de țesătură,
culoarea, gradul de murdărire și
temperatura apei permisă.
2. Selectați programul dorit cu ajutorul
butonului Selecție program.
6.5 Programe
• SaveInAll
Aceasta asigură o utilizare mai eficientă a
detergentului, cu o puternică mișcare
mecanică în timpul spălării. Astfel,
păstrează calitatea spălării fără a fi nevoie
să încălziți rufele pentru o perioadă lungă
de timp și reduce consumul de energie.
Această tehnologie este utilizată pentru
programele care conțin simbolurile sau
culorile afișate pe panou.
• Eco 40-60
În programul ECO 40-60, puteți spăla rufe
din bumbac normal murdare, care sunt
indicate pentru a fi spălate împreună la 40°
C sau 60°C. Acest program este programul
standard de testare în conformitate cu
legislația UE privind proiectarea ecologică
responsabilă și etichetarea energetică.
Deși acest program necesită mai mult timp
pentru spălare decât alte programe, este
mai eficient în ceea ce privește consumul
de energie și apă. Temperatura reală a apei
poate fi diferită de temperatura de spălare
specificată. Atunci când spălați rufe în
cantități mai mici (de exemplu, ½ din
capacitate sau mai puțin), durata etapelor
programului poate fi scurtată automat. În
acest caz, consumul de energie și de apă
este și mai mult redus.
• Bumbac
Rufele rezistente din bumbac (cearceafuri,
lenjerie, prosoape, halate de baie, lenjerie
de corp etc.) se pot spăla cu acest
program. Atunci când este apăsat butonul
funcției de spălare rapidă, durata
programului este semnificativ mai scurtă,
dar performanța de spălare eficientă este
asigurată de mișcări de spălare intensive.
Dacă nu este selectată funcția de spălare
rapidă, sunt asigurate performanțe
eficiente de spălare și clătire pentru rufele
foarte murdare.
• Sintetice
Tricouri, bluze, țesături mixte sintetice/
coton etc. Vă puteți spăla rufele cu acest
program. Apăsarea butonului funcției de
spălare rapidă scurtează semnificativ
durata programului și oferă o performanță
de spălare eficientă pentru rufele care nu
sunt murdare. Dacă nu este selectată
funcția de spălare rapidă, sunt asigurate
performanțe eficiente de spălare și clătire
pentru rufele foarte murdare.
• Delicate / Lâna/Spălare Manuală
Utilizați acest program pentru a vă spăla
hainele din lână/delicate. Alegeți
temperatura corespunzătoare pentru
eticheta rufelor. Rufele dumneavoastră
sunt spălate cu mișcări foarte delicate,
astfel încât să nu se deterioreze.
• Antialergic+
Aplicarea unei etape cu abur la începutul
programului facilitează înmuierea
murdăriei.
Acest program include o durată de spălare
intensivă și lungă și o spălare la
temperaturi înalte antialergice și igienice
(haine pentru copii, lenjerie de pat, lenjerie
de pat, lenjerie de corp etc.), utilizați-o
pentru purtător. Prin aplicarea aburului
RO
EN
RO / 24
Page 25
înainte de program, încălzirea pe termen
lung și etapele suplimentare de clătire se
asigură un nivel ridicat de igienă.
• Stoarcere + Evacuare
Utilizați acest program pentru a îndepărta
apa de pe îmbrăcăminte/din interiorul
mașinii.
• Clătire
Se utilizează atunci când doriți să clătiți
sau să faceți un colaj separat.
• Împrospătare cu abur
Folosiți acest program pentru a reduce
cutele și pentru a reduce timpul de călcare
a rufelor mici, nepătate, din bumbac,
sintetice sau mixte.
Acesta nu este un program de
spălare Cu acest program, puteți
folosi detergent, înălbitor, agent de
îndepărtare a petelor etc. Nu
adăugați substanțe chimice.
• Cămăşi
Utilizați acest program pentru a spăla
cămășile din bumbac, din material sintetic
și sintetic. Acest program permite ca rufele
să se șifoneze mai puțin. La sfârșitul
programului se aplică abur pentru a susține
funcția de reducere a cutelor. Aburul și
profilul special de strângere aplicat la
sfârșitul programului reduc șifonarea
cămășilor dumneavoastră. Atunci când
este selectată funcția spălare rapidă, se
execută algoritmul de Pre-tratare.
• Aplicați produsul chimic de pretratare
direct pe rufe sau adăugați detergentul în
mașină în compartimentul pentru
detergent pudră împreună cu detergentul.
În acest fel, puteți obține performanța pe
care o obțineți la o spălare normală întrun timp mult mai scurt. Cămășile dvs. vor
rezista mai mult. Dacă aveți de gând să
folosiți funcția de cronometrare a
mașinii, nu utilizați produsul chimic de
prespălare. Substanța chimică de prespălare poate curge pe rufe, ceea ce
poate cauza formarea de pete pe rufe.
** Se recomandă să nu spălați cămășile cu
mai mult de 6 cămăși pentru a minimiza
nivelul de șifonare cu acest program. la
sfârșitul spălării atunci când spălați la
capacități mai mari de 6 unități; se pot
observa diferențe în nivelul de șifonare și
cantitatea de umiditate a cămășilor.
• Spalare rapidă / Expres 14'
Folosiți acest program pentru a spăla
hainele din bumbac puțin murdare și fără
pete într-un timp scurt. Dacă este selectată
funcția de spălare rapidă, durata
programului poate fi redusă la până la 14
minute. Dacă este selectată funcția de
spălare rapidă, trebuie să se spele maxim 2
(două) kg de rufe.
Jeans / Culori Inchise
•
Utilizați acest program pentru a păstra
culoarea hainelor dumneavoastră închise la
culoare sau a blugilor. Acest program
asigură o performanță ridicată de spălare
datorită mișcării speciale a tamburului,
chiar și la temperaturi scăzute. Se
recomandă utilizarea detergentului lichid
sau a șamponului pentru lână pentru culori
închise. Lână, etc. nu spălați hainele
delicate cu acest program.
• Curăţare cuva
Utilizați-l în mod regulat (la fiecare 1-2 luni)
pentru a curăța cazanul și pentru a asigura
o igienă corespunzătoare. Rulați programul
cu mașina complet goală. Pentru rezultate
mai bune, utilizați un decalcifiant (agent de
curățare a cazanului) potrivit pentru
mașinile de spălat cu funcția de detergent
pudră selectată. După terminarea
programului, lăsați ușa deschisă pentru a
permite ca interiorul mașinii să se usuce.
RO
EN
RO / 25
Page 26
Acesta nu este un program de
spălare Acesta este un program de
întreținere.
Nu rulați acest program cu ceva în
interiorul mașinii. Când încercați să
o porniți, mașina detectează
automat că există o sarcină în
interior: puteți încheia programul
sau continua programul în funcție
de modelul mașinii. Curățarea
activă nu va avea loc dacă
programul continuă.
• Mix
Puteți spăla rufele din bumbac și cele
sintetice cu acest program fără a le separa.
• Spălare la rece
Utilizați pentru a spăla rufele din bumbac/
sintetice cu grad normal de murdărie și
rezistență. Datorită algoritmului de spălare
specific programului, se asigură o spălare
eficientă fără a expune rufele la temperaturi
ridicate.
• Anti-Pete
Mașina dispune de un program special
pentru pete care asigură cea mai eficientă
îndepărtare a diferitelor tipuri de pete. Cu
acest program, spălați hainele de bumbac
necolorate și rezistente și nu spălați
niciodată hainele și hainele delicate și
colorate. Verificați întotdeauna eticheta
hainelor înainte de spălare (cămașă de
bumbac, pantaloni, pantaloni scurți, tricou,
potrivite pentru temperaturi ridicate și
perioade lungi de spălare; haine pentru
copii, pijamale, șorț de mâncare, față de
masă, cearșafuri, lenjerie, față de pernă,
prosop de baie și de plajă, prosop de masă;
șosete, lenjerie de bumbac etc. Hainele
sunt recomandate) cu programul Auto stain
se pot spăla 24 de tipuri de pete, care sunt
adunate în trei grupe diferite, care pot fi
selectate cu ajutorul cursorului "Spălare
rapidă". Mai jos puteți vedea grupurile de
pete care pot fi selectate cu tasta de setare
„Quick Wash (Spălare rapidă)". În funcție de
grupa de pete selectată, se rulează un
program special care a modificat timpul de
alimentare cu apă, ritmul de spălare, timpul
de spălare și clătire.
Mai jos puteți găsi grupele de pete care
pot fi selectate cu tasta de setare „Quick
Wash (Spălare rapidă)".
Atunci când nu este selectat „Quick
Wash (Spălare rapidă)”;
Transpirație, murdărie de pe guler,
alimente, maioneză, sos pentru salate,
machiaj, ulei de mașină, hrană pentru
bebeluși.
Atunci când „quick wash (spălare
rapidă)” este apăsat o dată;
Sânge, ciocolată, budincă, iarbă, noroi, ou,
unt, curry.
Atunci când se apasă de două ori „quick
wash (spălare rapidă)”;
Ceai, cafea, suc natural, ketchup, vin roșu,
cola, gem, cărbune
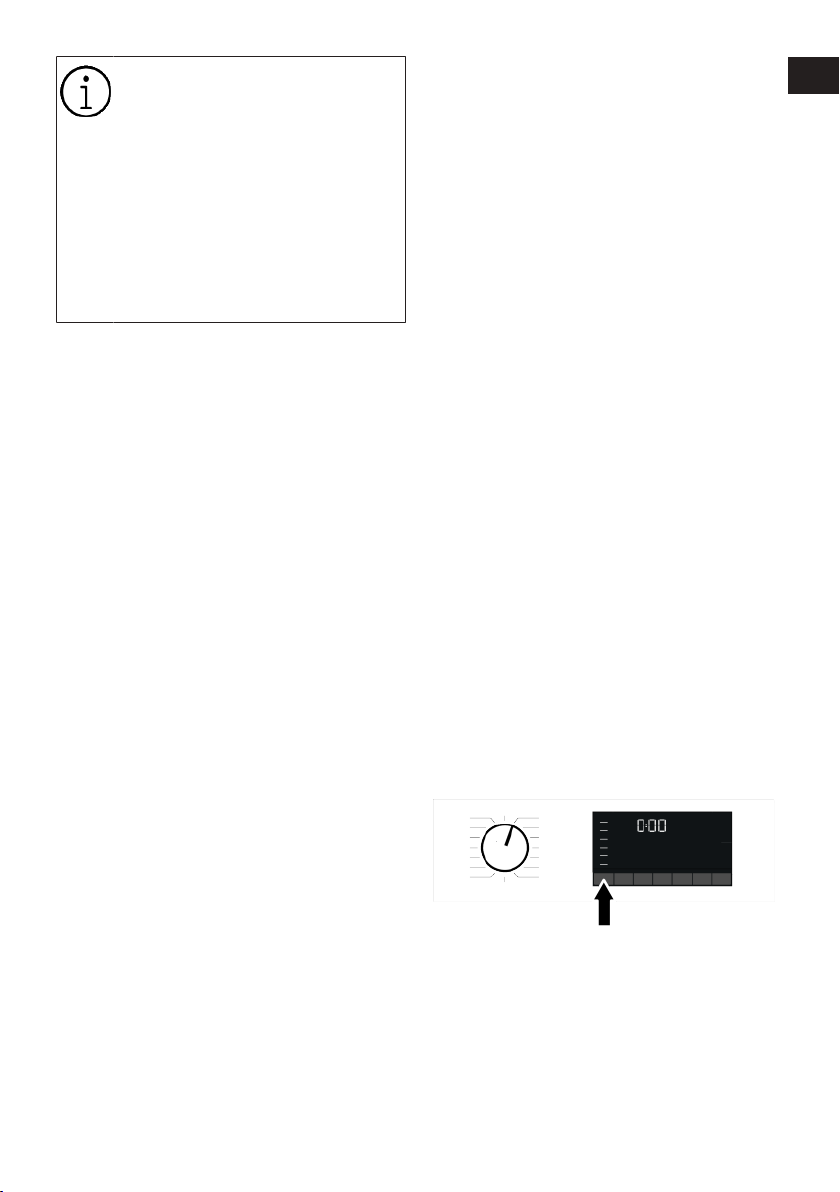
1. Selectați programul pentru pete.
2. Localizați pata pe care doriți să o
eliminați din grupele de mai sus și
selectați grupa corespunzătoare cu
ajutorul butonului de selectare rapidă a
funcției auxiliare.
3. Citiți cu atenție eticheta de pe
îmbrăcăminte și asigurați-vă că ați
selectat temperatura și viteza de
strângere corespunzătoare.
6.6 Selectarea temperaturii
În momentul în care un nou program este
selectat, temperatura recomandată pentru
program apare pe indicatorul de
temperatură. Este posibil ca valoarea de
temperatură recomandată să nu fie
temperatura maximă care poate fi
selectată pentru programul curent.
RO
EN
RO / 26
Page 27
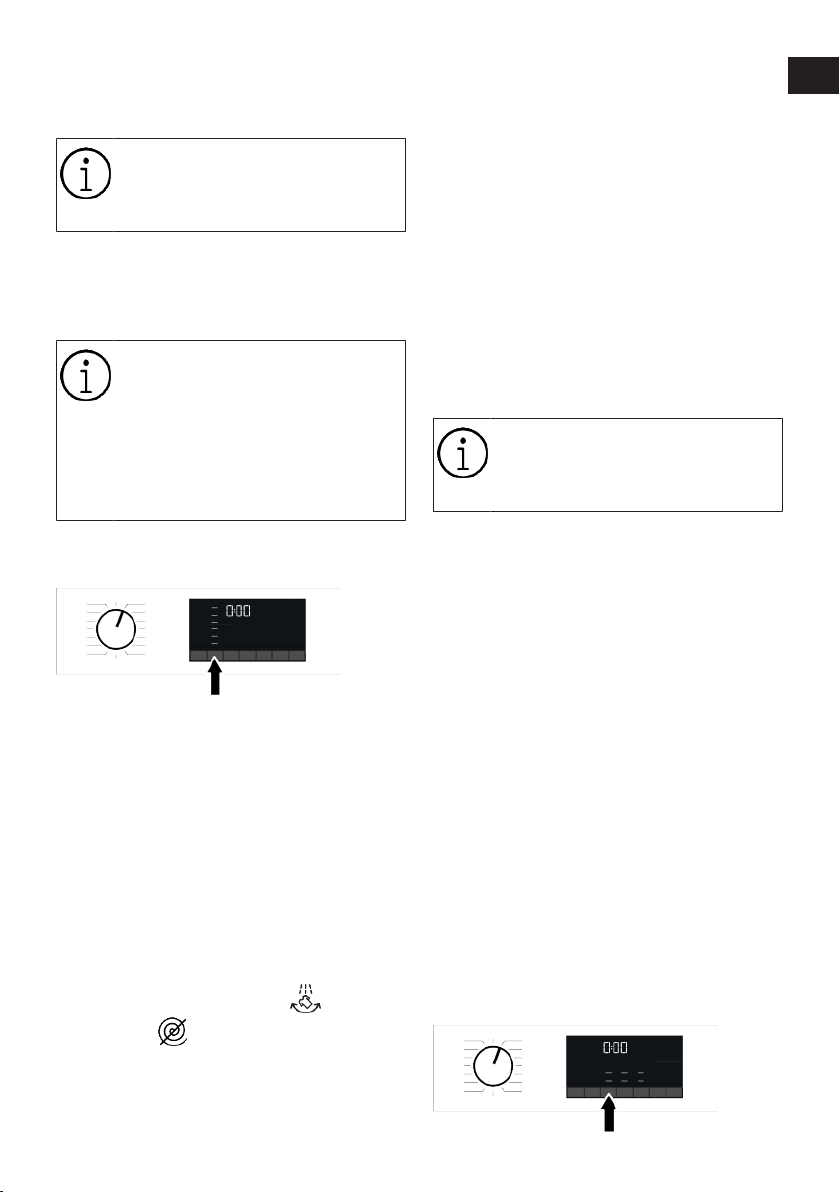
Apăsați pe butonul Reglare temperatură
pentru a modifica temperatura.
Temperatura va scădea treptat.
Nici o schimbare nu poate fi
efectuată în programe în momentul
când reglarea temperaturii nu este
permisă.
De asemenea, puteți schimba temperatura
după ce spălatul începe. Această
modificare poate fi efectuată dacă fazele
de spălare permit acest lucru.
Dacă rotiți către opțiunea de
spălare la rece și apăsați din nou
butonul Reglare temperatură,
temperatura maximă recomandată
pentru programul selectat apare pe
ecran. Apăsați pe butonul Reglare
temperatură pentru scăderea
temperaturii.
6.7 Selectarea vitezei de centrifugare
În momentul în care este selectat un
program nou, viteza de centrifugare
recomandată a programului selectat este
afișată pe indicatorul Spin Speed (viteză de
centrifugare). Este posibil ca valoarea
vitezei de centrifugare recomandată să nu
fie viteza maximă care poate fi selectată
pentru programul curent.
Apăsați pe butonul Reglare viteză de
centrifugare pentru a modifica viteza de
centrifugare. Viteza de centrifugare va
scădea treptat.
Apoi, în funcție de modelul produsului,
opțiunile „Amânare limpezire ” și „Fără
centrifugare ” vor apărea pe ecran.
Dacă nu doriți să descărcați rufele imediat
după ce programul este finalizat, puteți
utiliza funcția Limpezire în așteptare pentru
prevenirea șifonării rufelor în momentul în
care nu există apă în mașină.
Această funcție menține rufele în apa de
limpezire finală. Dacă doriți să centrifugați
rufele după funcția Limpezire în așteptare:
1. Reglați „Viteza de centrifugare”.
2. Apăsați Start/Pauză Programul va
reporni. Mașina va evacua apa și va
centrifuga rufele.
Dacă doriți să scurgeți apa la sfârșitul
programului fără stoarcere, utilizați funcția
Fără stoarcere.
Nici o schimbare nu poate fi
efectuată în programe în momentul
când reglarea vitezei de
centrifugare nu este permisă.
Dumneavoastră puteți modifica viteza de
centrifugare după ce spălarea a început
dacă pașii de spălare permit acest lucru.
Modificările nu pot fi efectuate dacă pașii
nu permit acest lucru.
Amânare limpezire
Dacă nu veți descărca hainele imediat după
terminarea programului, puteți utiliza
funcția Amânare Limpezire pentru a păstra
rufele în apa de limpezire finală, pentru a
preveni șifonarea acestora, atunci când nu
există apă în mașină. După această
procedură, dacă doriți să evacuați apa fără
centrifugarea rufelor, apăsați butonul
Pornire/Pauză. Programul se va relua și se
va termina după evacuarea apei.
Pentru centrifugarea hainelor ținute în apă,
reglați Viteza de Centrifugare și apăsați
butonul Pornire/Pauză. Programul va
reporni. Apa este evacuată, rufele sunt
centrifugate și programul se încheie.
6.8 Selectarea funcției auxiliare
RO
EN
RO / 27
Page 28
Selectați funcțiile auxiliare dorite înainte de
începerea programului. În momentul în care
un program este selectat, pictogramele
simbolului funcțiilor auxiliare care pot fi
selectate simultan, vor ilumina.
Când este apăsat un buton pentru
funcția auxiliară care nu poate fi
selectat în programul actual,
mașina de spălat va emite un sunet
de avertizare.
Unele funcții nu pot fi selectate
împreună. Dacă o funcție auxiliară
secundă intră în conflict cu prima
funcție care este selectată înainte
de pornirea mașinii, prima funcție
selectată va fi anulată, iar a doua
funcție selectată va rămâne activă.
O funcție auxiliară care nu este
compatibilă cu programul nu poate
fi selectată (vezi „tabel programe şi
consum”)
Unele programe au funcții auxiliare
care trebuie utilizate împreună.
Aceste funcții nu pot fi anulate.
6.8.1 Funcții auxiliare
• Rapid/Intens
Cu această funcție puteți reduce sau crește
perioada programului. În funcție de selecția
programului, pot fi diferențe de timp în
sensul creșterii sau reducerii. În cazul în
care ledul RAPID sau INTENSIV nu se
aprinde, se afișează durata
corespunzătoare programului pentru
îmbrăcămintea/rufele cu nivel normal de
murdărire.
În funcție de programul ales, caracteristica
intensivă poate fi selectată automat. În
acest caz, LED-ul de pe panou pentru
modul intensiv se va aprinde. Când spălați
rufe foarte murdare, puteți utiliza funcția
Intensivă pentru a obține o performanță
îmbunătățită de spălare.
Pentru rufele ușor murdare, puteți reduce
timpul de spălare prin apăsarea butonului
Rapid/Intensiv în cazul programelor pentru
care este selectată intensitatea. Dacă
apăsați butonul o dată, LED-ul se va stinge
și veți ajunge la durata potrivită
programului, pentru îmbrăcămintea/rufele
dumneavoastră cu un nivel normal de
murdărie. Când apăsați a doua oară același
buton, LED-ul se va aprinde, timpul se va
reduce puțin și va fi afișată durata minimă
a programului potrivită pentru rufele
dumneavoastră ușor murdare. Când
această funcție este selectată, durata
programelor poate fi redusă la 50%. În timp
ce durata se reduce, datorită etapelor
optimizate pentru spălare, mobilității și
consumului optim de apă dar și al
mecanicii de calitate ridicată, se obțin
performanțe înalte de spălare.
• Abur
Această funcție ajută la reducerea șifonării
rufelor dumneavoastră din bumbac,
material sintetic sau amestec, reducând
timpii pentru călcare, și îndepărtează petele
prin înmuierea acestora.
* În circumstanțele în care funcția de abur
este aplicată la finalizarea programului de
spălare, rufele dumneavoastră pot fi mai
calde la finalul spălării. Aceasta este o
situație firească datorită condițiilor de
operare ale programului.
Când activați funcția cu abur, nu
utilizați detergent lichid dacă nu
este prezent recipientul de
detergent sau caracteristica de
dozare a detergentului. Există riscul
de pătare a hainelor.
• Funcții suplimentare pentru apă
(Water Mode)
Această tastă de funcție auxiliară vă
permite să selectați funcțiile suplimentare
de economisire a apei, pre-spălare și clătire
suplimentară sau apă suplimentară, în
funcție de modelul mașinii. Puteți găsi
informații detaliate despre selecție în
descrierea funcției auxiliare respective.
• Economisire apă (SaveWater)
Selectați această funcție apăsând o dată
tasta funcției suplimentare WaterMode
pentru toate programele indicate ca
selectabile în tabelul Program și Consum.
RO / 28
RO
EN
Page 29
Această funcție este destinată rufelor ușor
murdare care necesită doar o cantitate
mică de detergent (consultați "Sfaturi
pentru o spălare corectă"). Aceasta permite
o spălare ecologică prin reducerea
cantității de apă utilizată, fără a diminua
performanța de spălare.
• Clătire suplimentară
Puteți utiliza această funcție pentru toate
programele indicate care pot fi selectate în
tabelul Program și Consum. Selectați
această funcție apăsând de două ori tasta
WaterMode pentru programele în care
poate fi selectată funcția suplimentară de
economisire a apei sau apăsând o dată
tasta WaterMode pentru programele în care
nu poate fi selectată funcția suplimentară
de economisire a apei.
Această funcție permite mașinii să
efectueze o limpezire suplimentară față de
limpezirea care a fost deja efectuată după
spălarea principală. În acest mod, riscul ca
pielea sensibilă (bebeluși, piele alergică
etc.) să fie afectată de urmele minime de
detergent de pe rufe poate fi redus.
6.8.2 Funcții/Programe selectate prin apăsarea tastelor de Funcție pentru 3 secunde
• Prespălare
Această funcție poate fi selectată apăsând
continuu butonul funcției auxiliare timp de
3 secunde
Prespălarea este necesară numai pentru
haine foarte murdare. Neutilizarea funcției
„Prespălare” va economisi energie, apă,
detergent și timp.
• Blocare pentru copii
Folosiți funcția Child Lock (Blocare acces
copil) pentru a evita modificarea setărilor
de către copii. Prin urmare puteți evita orice
modificări în funcționarea programului.
Puteți porni sau opri mașina
utilizând butonul Pornit / Oprit în
momentul în care funcția Blocare
copii este activă. În momentul în
care reporniți mașina, programul se
va relua de unde s-a oprit.
În momentul în care opțiunea
Blocare copii este activată, se
emite un avertisment audio dacă
butoanele sunt apăsate.
Avertismentul audio va fi anulat
dacă butoanele sunt apăsate de
cinci ori consecutiv.
Pentru activarea funcției de blocare
pentru copii:
Apăsați și mențineți butonul funcției
auxiliare timp de 3 secunde. După ce
numărătoarea inversă „3-2-1” de pe ecran
este finalizată, simbolul pentru blocare
acces copil apare pe ecran. La afișarea
acestui avertisment, puteți elibera butonul
funcției auxiliare nr. 3.
Pentru dezactivarea funcției de blocare
pentru copii:
Apăsați și mențineți butonul funcției
auxiliare timp de 3 secunde. După ce
numărătoarea inversă „3-2-1" de pe ecran
este finalizată simbolul pentru blocare
acces copil dispare de pe ecran.
6.9 Timpul de finalizare
Afișarea timpului
Când este selectată funcția pentru timp de
finalizare, timpul rămas până la activarea
programului, este afișat precum 1h, 2h, iar
după ce programul s-a activat timpul rămas
până la finalizare va fi afișat în ore și
minute ca de exemplu 01:30.
RO
EN
RO / 29
Page 30
Timpul programului poate să difere
de valorile din „Tabelul de program
și consum” depinzând de
presiunea, duritatea și temperatura
apei, temperatura ambientală,
cantitatea și tipul rufelor, funcțiile
auxiliare selectate și schimbările în
tensiunea normală.
După o anumită perioadă în care
funcția pentru timp de finalizare
este activată, mașina comută în
modul standby și unele LED-uri de
pe ecran sunt stinse. Dacă există
opțiuni introduse de utilizator, LEDurile se vor aprinde din nou.
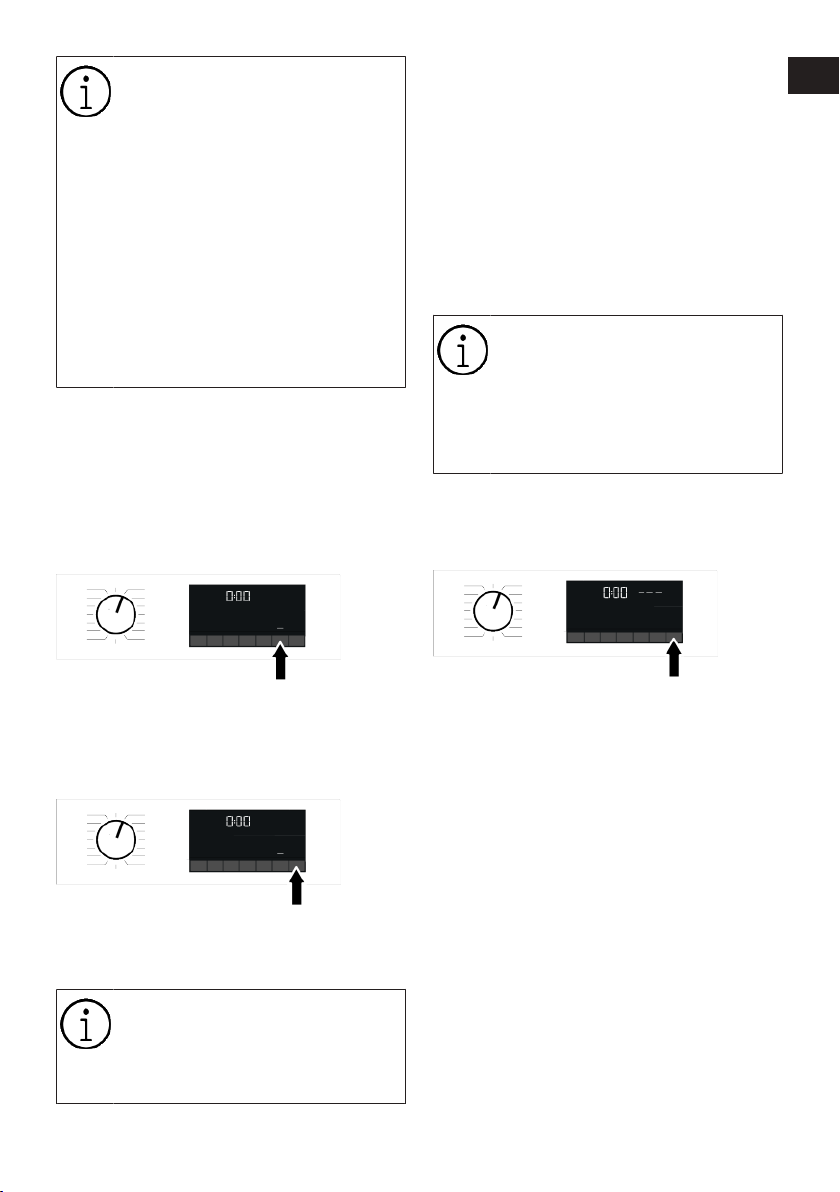
Cu funcția End Time(Timp de finalizare),
timpul de finalizare a programului poate fi
setat până la 24 de ore. După ce apăsați
butonul Timp de finalizare, este afișat
timpul estimat până la finalizarea
programului. Dacă funcția Timp de
Finalizare este configurată, indicatorul
Timp de finalizare este iluminat.
1. Deschideți ușa de încărcare, introduceți
rufele și adăugați detergentul etc.
2. Selectați programul de spălare,
temperatura, viteza de centrifugare și,
dacă este necesar, funcțiile auxiliare.
3. Setați timpul de finalizare dorit apăsând
butonul Timp de finalizare. Indicatorul
Timp de finalizare se aprinde.
4. Apăsați Start/Pauză Începe
numărătoarea inversă.
În timpul numărătorii inverse pot fi
adăugate rufe în mașină. La
finalizarea numărătorii inverse,
indicatorul Timp de finalizare se
oprește, ciclul de spălare începe și
pe ecran apare timpul pentru
programul selectat.
6.10 Pornirea programului
1. Apăsați Pornire/Pauză pentru pornirea
programului.
RO
EN
Pentru ca funcția Timp de finalizare să fie
activată și programul să fie finalizat la
sfârșitul perioadei specificate,
dumneavoastră trebuie sa apăsați butonul
Pornire / Pauză după reglarea timpului.
Dacă doriți să anulați funcția Timp de
finalizare, apăsați butonul On/Off (Pornire/
Oprire) pentru a opri și reporni mașina.
Când ați activat funcția Timp de
Finalizare, nu adăugați detergent
lichid în compartimentul de
detergent pudră nr. 2. Există riscul
de pătare a hainelor.
2. Butonul Pornire / Pauză care a fost
închis înainte, începe să ilumineze încet,
indicând începerea programului.
3. Uşa de serviciu este blocată. Simbolul
Ușă blocată apare pe ecran după ce ușa
de încărcare este blocată.
4. Luminile indicatorului urmărire program,
de pe ecran, vor prezenta pasul curent al
programului.
6.11 Blocarea ușii de încărcare
Ușa de serviciu a mașinii are un sistem de
blocare care împiedică deschiderea ușii de
încărcare în cazul în care nivelul apei este
nepotrivit.
Simbolul „Ușă blocată” apare pe ecran în
momentul când ușa de încărcare este
blocată.
RO / 30
Page 31
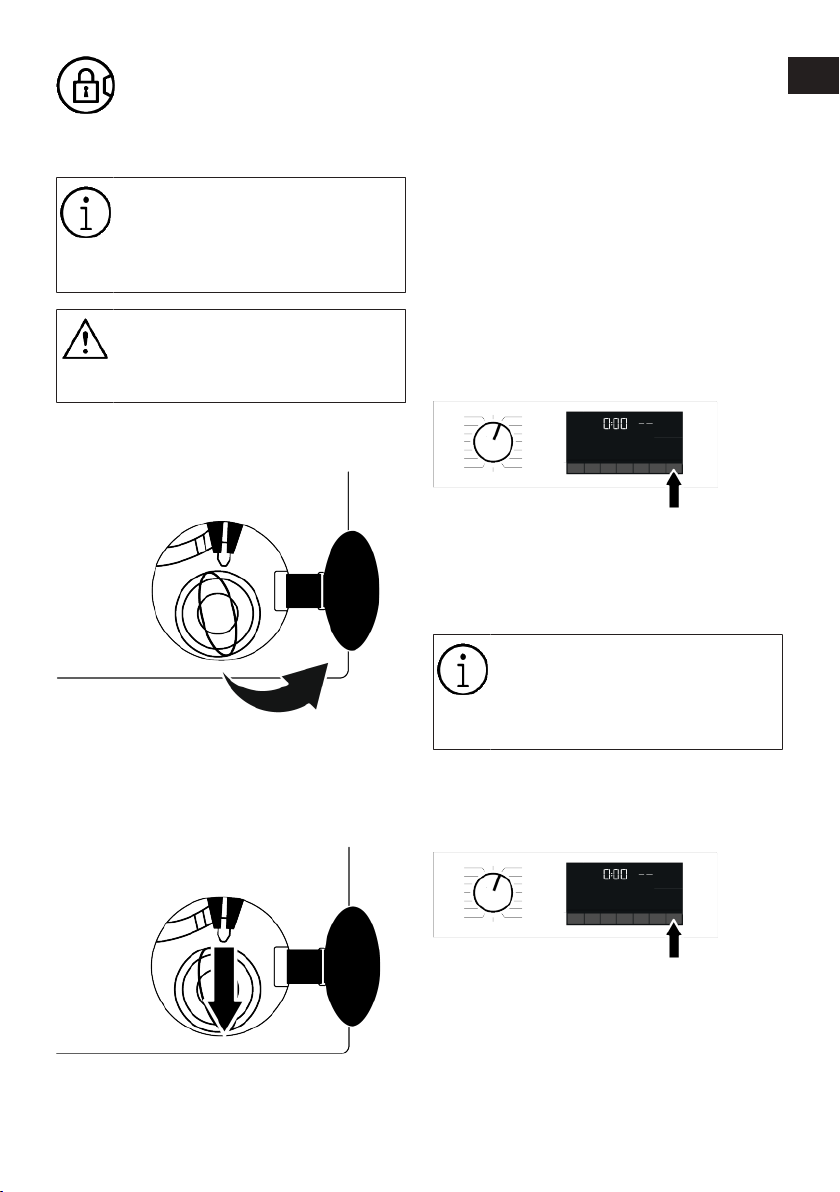
Deschiderea ușii de încărcare în cazul
unei căderi de curent:
În caz de pană de curent, puteți
folosi mânerul de urgență al ușii de
încărcare de sub capacul filtrului
pompei, pentru a deschide manual
ușa de încărcare.
Pentru a evita supra încălzirea apei
înainte de a deschide ușa de
încărcare, asigurați-vă că nu există
apă în interiorul mașinii.
1. Opriți și scoateți aparatul din priză.
2. Deschideți capacul filtrului pompei.
6.12 Modificarea selecțiilor după
începerea programului
Adăugarea rufelor după pornirea
programului:
Dacă nivelul apei din mașină este potrivit
când apăsați butonul Pornire/Pauză,
blocarea ușii va fi dezactivată și ușa se va
deschide, permițându-vă să adăugați
articole de îmbrăcăminte. Pictograma de
blocare a ușii de pe ecran se stinge când
blocarea ușii este dezactivată. După
adăugarea articolelor de îmbrăcăminte,
închideți ușa și apăsați din nou butonul
Pornire / Pauză pentru a relua ciclul de
spălare.
Dacă nivelul apei din mașină nu este
potrivit când apăsați butonul Pornire/
Pauză, blocarea ușii nu poate fi dezactivată
și simbolul de blocare a ușii rămâne aprins
pe ecran.
RO
EN
3. Trageți în jos cu o unealtă mânerul de
urgență al ușii de încărcare, și eliberați.
Apoi, deschideți, ușa de încărcare.
4. Dacă ușa de încărcare nu se deschide,
repetați pasul anterior.
Dacă temperatura apei din mașină
este mai mare de 50°C, nu puteți
dezactiva blocarea ușii din motive
de siguranță, chiar dacă nivelul apei
este potrivit.
Comutarea mașinii în modul pauză:
Apăsați butonul Pornire/Pauză pentru a
comuta mașina în modul pauză. Simbolul
Pauză va clipi pe ecran.
Modificarea selecției programului după
începerea programului:
Este permisă schimbarea programului în
timpul acționării programului curent
exceptând situația în care funcția Child
Lock (Blocare acces copil) este activată.
Această acțiune va anula programul curent.
RO / 31
Page 32
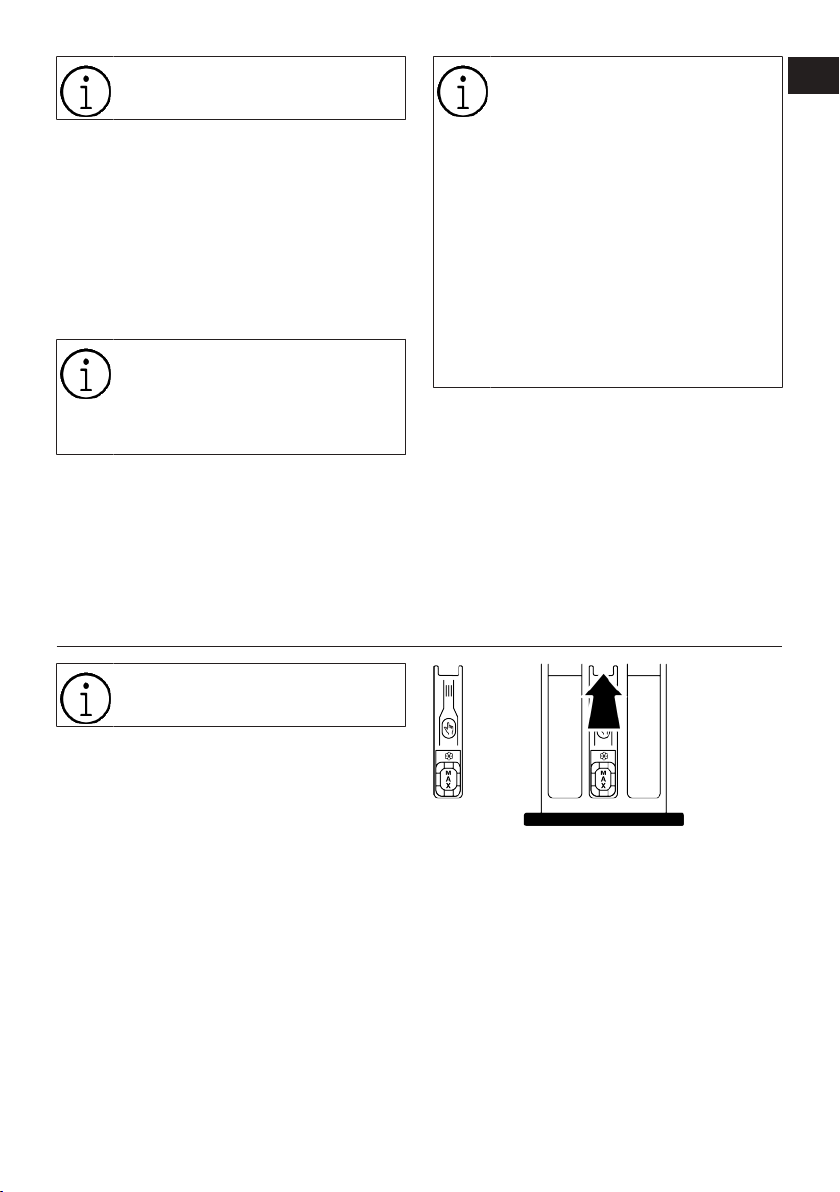
Programul selectat pornește din
nou.
Modificarea funcției auxiliare, vitezei și
temperaturii:
În funcție de faza în care a ajuns programul,
puteți anula sau activa funcțiile auxiliare.
Consultați, „Selectarea funcțiilor auxiliare”.
De asemenea, puteți modifica setările de
viteză și temperatură. Consultați, „Selectare
viteză centrifugare” și „Selectare
temperatură”.
Ușa de încărcare nu se va deschide
dacă temperatura apei din mașină
este ridicată sau nivelul apei este
deasupra pragului de deschidere a
ușii.
6.13 Anularea programului
Programul este anulat atunci când butonul
pentru selecția programului este rotit la un
program diferit sau mașina este oprită și
repornită cu ajutorul butonului de selectare
a programului
7 Întreținerea și curățarea
Dacă rotiți butonul de selectare a
programului când funcția Blocare
acces copil este activată,
programul nu se va anula. Mai întâi
trebuie să anulați funcția Blocare
acces copil.
Dacă doriți să deschideți ușa de
încărcare după ce ați anulat
programul, dar nu este posibil să o
deschideți deoarece nivelul apei din
mașină este deasupra pragului de
deschidere a ușii, rotiți butonul
Selectare program către programul
Pompă+Centrifugare și evacuați
apa din mașină.
6.14 Finalizarea programului
În momentul când programul este finalizat,
simbolul Finalizare apare pe ecran.
Dacă nu apăsați vreun buton timp de 10
minute, mașina va comuta către modul OFF
(OPRIT). Ecranul și toți indicatorii sunt
opriți.
Pașii finalizați ai programului vor fi afișați
dacă apăsați butonul Pornit/Oprit.
RO
EN
Vă rugăm să citiți mai întâi
„Instrucțiunile pentru siguranță”!
Durata de viață a produsului se prelungește
și problemele frecvente se vor reduce dacă
este curățat la intervale regulate.
7.1 Curățarea sertarului pentru
detergent
Curățați periodic (odată la fiecare 4 până la
5 cicluri de spălare) sertarul pentru
detergent așa cum este prezentat mai jos,
pentru prevenirea depunerilor de detergent
praf.
Curățați sifonul dacă s-a acumulat apă în
exces sau a rămas un amestec de balsam
în compartimentul pentru balsam.
1. Apăsați pe partea marcată a sifonului
din compartimentul pentru balsam apoi
trageți sertarul spre dumneavoastră
pentru a îl scoate.
2. Ridicați și îndepărtați sifonul din spate
așa cum este prezentat.
3. Limpeziți sertarul și sifonul în chiuvetă
cu apă caldă din abundență. Folosiți
mănuși sau o perie potrivită pentru a
evita contactul reziduurilor din sertar cu
pielea dumneavoastră.
RO / 32
Page 33
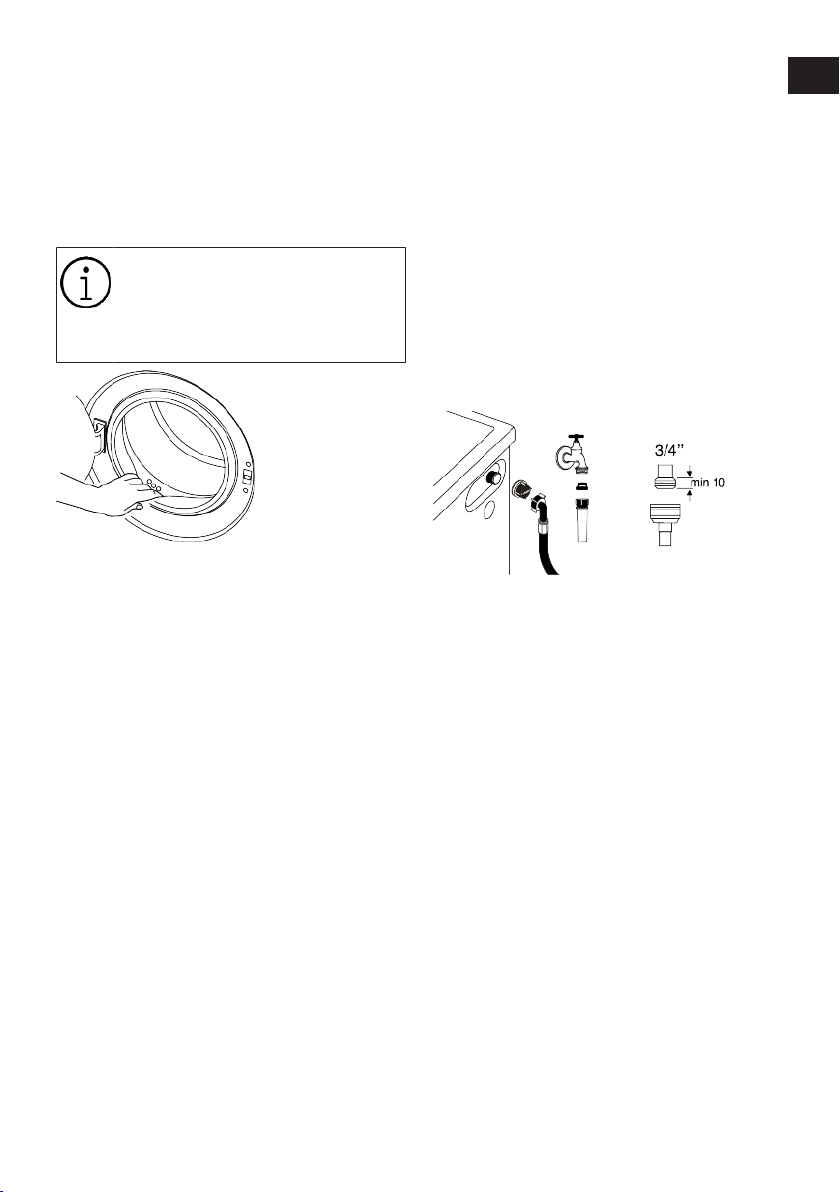
4. După curățare potriviți ferm sertarul și
sifonul înapoi în mașină.
7.2 Curățarea ușii de încărcare și a
tamburului
Pentru mașinile cu un program de curățare
a tamburului, consultați secțiunea
Utilizarea produsului.
Repetați procesul de Curățare
tambur la fiecare 2 luni.
NOTIFICARE: Folosiți o soluție
anticalcar adecvată pentru mașini
de spălat.
După fiecare spălare, asigurați-vă că în
produs nu au rămas substanțe străine.
Dacă orificiile din burduful ușii prezentate
în imagine sunt înfundate, eliberați-le
folosind o scobitoare.
Obiectele metalice străine vor provoca pete
de rugină în tambur. Curățați petele de pe
suprafața tamburului folosind substanțe de
curățare pentru oțel inoxidabil.
Nu folosiți bureți de oțel sau sârmă.
Acestea vor deteriora suprafețele vopsite,
cromate și din plastic.
Vă recomandăm să ștergeți burduful ușii cu
o cârpă uscată și curată la finalizarea
programului. Astfel vor fi înlăturate
reziduurile de pe burduful ușii mașinii
dumneavoastră de spălat și se va preveni
astfel apariția mirosurilor neplăcute.
7.3 Curățarea corpului și panoului
de comandă
Ștergeți corpul produsului folosind apă cu
săpun sau detergent ușor tip gel noncoroziv dacă este necesar, și uscați-l cu un
material textil moale.
Pentru curățarea panoului de control,
utilizați doar un material textil moale și
umed. Nu utilizați produse de curățare care
conțin înălbitor.
7.4 Curățarea filtrelor de alimentare cu apă
Există un filtru la capătul fiecărei valve de
admisie a apei montată în partea
posterioară a mașinii și, de asemenea, la
capătul fiecărui furtun de admisie a apei
unde acestea se conectează la robinet.
Aceste filtre previn pătrunderea
substanțelor străine și impurităților din apă
în produsul dumneavoastră. Filtrele trebuie
curățate dacă sunt murdare.
1. Închideți robinetele.
2. Demontați piulițele furtunurilor de
alimentare cu apă pentru a putea
accesa filtrele racordurilor de alimentare
cu apă și pentru a le curăța cu o perie
potrivită. Dacă filtrele sunt prea
murdare, scoateți-le din poziție cu un
clește și curățați-le.
3. Scoateți filtrele și garniturile din
capetele plate ale furtunurilor de
alimentare cu apă și curățați-le foarte
bine sub jet de apă.
4. Montați la loc cu grijă garniturile și
filtrele și strângeți manual piulițele
acestora.
7.5 Evacuarea apei rămase și curățarea filtrului pompei
Sistemul de filtre al produsului
dumneavoastră previne înfundarea
rotorului pompei cu obiecte solide cum ar fi
nasturii, monedele și fibrele de țesături în
RO
EN
RO / 33
Page 34
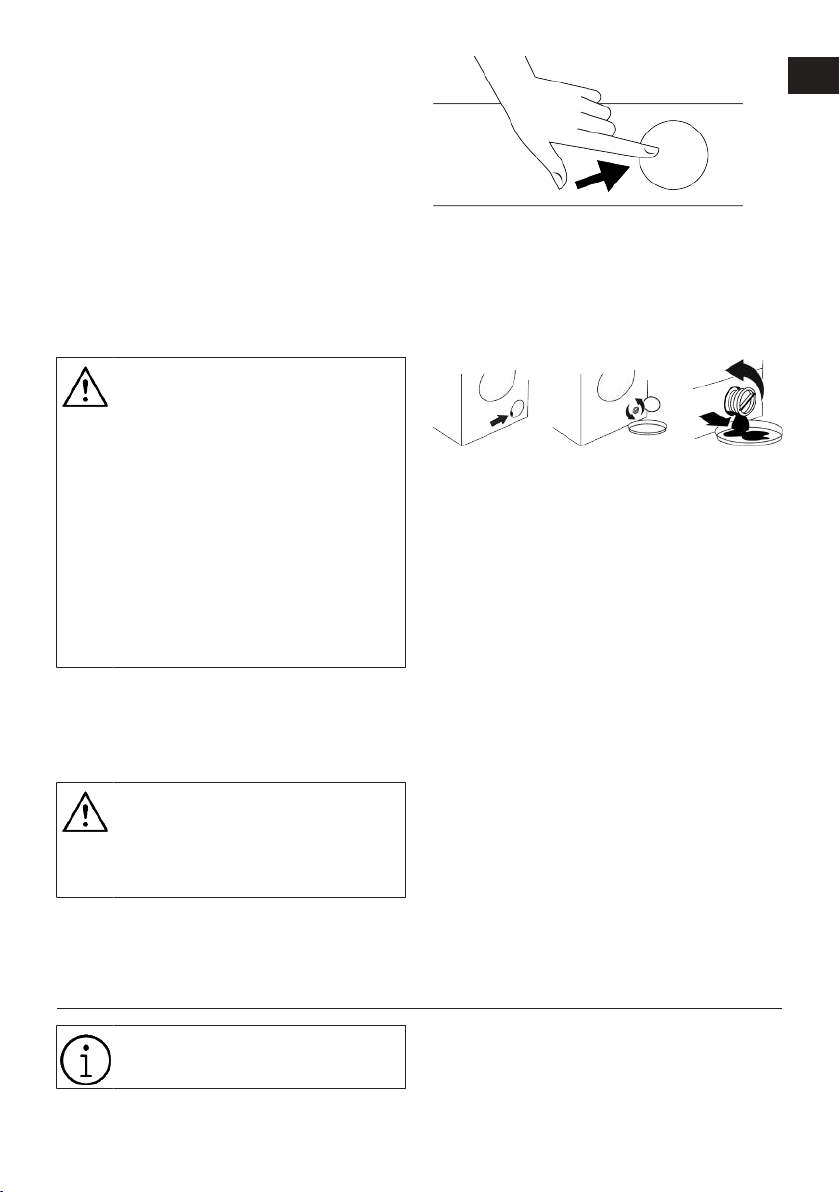
timpul evacuării apei în urma spălării.
Astfel, apa va fi evacuată fără probleme și
durata de funcționare a pompei va crește.
Dacă produsul nu evacuează apa din
interior, filtrul pompei este înfundat. Filtrul
trebuie curățat de fiecare dată când este
înfundat sau la fiecare 3 luni. Pentru
curățarea filtrului pompei, mai întâi trebuie
evacuată apa.
Suplimentar, înainte ca produsul să fie
transportat (de exemplu atunci când vă
mutați în altă locuință) apa trebuie
evacuată în totalitate.
NOTIFICARE:
Impuritățile rămase în filtrul pompei
pot deteriora produsul
dumneavoastră sau pot cauza
zgomote deranjante.
În zonele cu probabilitate de îngheț,
atunci când produsul nu este
folosit, robinetul trebuie închis,
sistemul de furtunuri trebuie
îndepărtat iar apa din interior
trebuie evacuată.
După fiecare utilizare, închideți
robinetul la care este conectat
furtunul principal.
Pentru a curăța filtrul murdar și pentru a
evacua apa:
1. Decuplați produsul de la priză pentru a
întrerupe alimentarea cu energie.
Temperatura apei din interiorul
produsului poate ajunge până la 90
ºC. Pentru a evita riscul de opărire,
curățați filtrul numai după ce apa
din produs s-a răcit
2. Deschideți capacul filtrului.
RO
EN
3. Urmați procedurile de mai jos pentru
evacuarea apei.
Dacă produsul nu este prevăzut cu un
furtun pentru evacuarea apei în caz de
urgență, pentru a evacua apa procedați
astfel:
• Amplasați un recipient mare la capătul
furtunului pentru a capta apa scursă din
filtru.
• Când filtrul pompei începe să prezinte
scurgeri de apă, slăbiți-l prin rotire (în
sens invers acelor de ceasornic)
Direcționați apa care se scurge în
recipientul din fața filtrului. Să aveți la
îndemână o cârpă pentru a șterge stropii
de apă.
• Când apa se scurge din produs, rotiți
complet filtrul pompei și îndepărtați-l.
1. Curățați reziduurile din filtru precum și
fibrele din jurul rotorului pompei, dacă
este cazul.
2. Înlocuiți filtrul.
3. În cazul în care capacul filtrului este
compus din două bucăți, închideți-l
apăsând lamela. Dacă este fabricat
dintr-o singură piesă, mai întâi fixați
lamelele pe partea interioară în locașul
lor și apoi apăsați pe partea superioară
pentru a închide.
8 Depanare
Vă rugăm să citiți mai întâi
„Instrucțiunile pentru siguranță”!
RO / 34
Page 35

Programele nu pornesc după ce ușa de
serviciu este închisă.
• Butonul Pornire/Pauză/Anulare nu a fost
apăsat. >>> Apăsați butonul Pornire/
Pauză/Anulare.
• În caz de încărcare excesivă închiderea
ușii poate fi dificilă. >>> Reduceți
cantitatea de rufe și verificați că ușa se
închide în mod corespunzător.
Programul nu poate fi pornit sau
selectat.
• Produsul s-a comutat în modul de
protecție a mașinii din cauza unei
probleme de alimentare (tensiune,
presiune apă etc.). >>> În funcție de
modelul produsului, selectați alt program
prin rotirea butonului Program Selection
(Selecție program) sau pentru anularea
unui program apăsați continuu pentru 3
secunde butonul On/Off (Pornit/Oprit).
Programul anterior va fi anulat. Observați
Anularea programului [}32]
Apă în interiorul mașinii de spălat.
• Este posibil ca în mașină să existe apă
rămasă din timpul proceselor de control
al calității. >>> Aceasta nu este o
defecțiune; apa nu este periculoasă
pentru mașină.
Mașina nu se alimentează cu apă.
• Robinetul este închis. >>> Deschideți
robineții.
• Furtunul de alimentare cu apă este îndoit.
>>> Neteziți furtunul.
• Filtrul de alimentare cu apă este înfundat.
>>> Curățați filtrul.
• Ușa de serviciu nu este închisă. >>>
Închideți ușa.
Mașina nu evacuează apă.
• Furtunul de evacuare al apei este
înfundat sau răsucit. >>> Curățați sau
întindeți furtunul.
• Filtrul pompei este înfundat. >>> Curățați
filtrul pompei.
Mașina vibrează sau face zgomot.
• Mașina nu este echilibrată. >>> Reglați
picioarele de pentru a echilibra produsul.
• O substanță solidă a pătruns în filtrul
pompei. >>> Curățați filtrul pompei.
• Bolțurile de fixare pentru transport nu au
fost demontate. >>> Demontați bolțurile
de fixare pentru transport.
• Cantitatea de rufe din mașină este prea
mică. >>> Adaugați mai multe rufe în
mașină.
• O cantitate excesivă de rufe a fost
introdusă în mașină. >>> Scoateți o parte
din rufele din mașină sau distribuiți-le
manual în mașină pentru a o echilibra.
• Produsul se sprijină de un articol rigid.
>>> Asigurați-vă că mașina nu se sprijină
de alte obiecte.
Există scurgere de apă prin partea
inferioară a mașinii.
• Furtunul de evacuare al apei este
înfundat sau răsucit. >>> Curățați sau
întindeți furtunul.
• Filtrul pompei este înfundat. >>> Curățați
filtrul pompei.
Mașina s-a oprit imediat după începerea
programului.
• Mașina de spălat s-a oprit temporar din
cauza tensiunii joase. >>> Își va relua
programul când tensiunea va ajunge la
un nivel normal.
Mașina evacuează apa imediat după
alimentare.
• Furtunul de evacuare nu se află la
înălțimea potrivită. >>> Conectați furtunul
de evacuare conform instrucțiunilor din
manualul de utilizare.
În timpul spălării nu se vede apa din
mașină.
• Apa se află în partea invizibilă a
produsului. >>> Aceasta nu este o
defecțiune.
Ușa de serviciu nu poate fi deschisă.
• Blocarea ușii de serviciu este activată
datorită nivelului apei din produs. >>>
Evacuați apa folosind programul
Evacuare sau Centrifugare.
• Mașina încălzește apa sau este în etapa
de centrifugare. >>> Așteptați terminarea
programului.
RO / 35
RO
EN
Page 36

• Ușa de serviciu poate fi blocată de
presiunea exercitată asupra sa. >>>
Prindeți mânerul și împingeți și trageți de
ușă pentru a o elibera și a o deschide.
• Dacă nu este alimentată, ușa de serviciu
a mașinii nu se va deschide. >>> Pentru a
deschide ușa de serviciu, deschideți
capacul filtrului pompei și trageți mânerul
de urgență poziționat în partea din spate
a acestui capac. Observați Blocarea ușii
de încărcare [}30]
Spălarea durează mai mult decât este
specificat în manualul de utilizare.(*) (*)
• Presiunea apei este scăzută. >>> Mașina
așteaptă până când este alimentată cu o
cantitate suficientă de apă, pentru a
preveni scăderea calității spălării din
cauza unei cantități insuficiente de apă.
Prin urmare, durata programului de
spălare crește.
• Tensiunea este scăzută. >>> Când
tensiunea este joasă, durata programului
de spălare este prelungită pentru a evita
spălarea necorespunzătoare.
• Temperatura de intrare a apei este
scăzută. >>> Durata de încălzire a apei
crește în sezonul rece. De asemenea,
durata programului de spălare crește
pentru a evita spălarea
necorespunzătoare.
• Numărul de limpeziri și/sau cantitatea de
apă de limpezire s-a mărit. >>> Mașina
crește cantitatea de apă de limpezire în
momentul când este necesară o
limpezire bună și adaugă un pas
suplimentar de limpezire dacă este
necesar.
• A apărut o spumă excesivă și sistemul
automat de absorbție a spumei a fost
activat datorită unei utilizări excesive a
detergentului. >>> Folosiți cantitatea
recomandată de detergent.
Durata programului nu efectuează
numărătoarea inversă. (Pe modelele cu
ecran) (*)
• Cronometrul se poate opri în timpul
alimentării cu apă. >>> Indicatorul
cronometrului nu arată numărătoarea
inversă până când mașina nu este
alimentată cu o cantitate suficientă de
apă. Mașina va aștepta până când există
o cantitate suficientă de apă pentru a
evita spălarea necorespunzătoare
cauzată de lipsa apei. Indicatorul
cronometrului va relua numărătoarea
inversă ulterior.
• Cronometrul se poate opri în timpul
încălzirii apei. >>> Indicatorul
cronometrului nu va acționa
numărătoarea inversă decât în momentul
în care mașina ajunge la temperatura
selectată.
• Cronometrul se poate opri în timpul
etapei de centrifugare. >>> Sistemul de
detectare automată a dezechilibrării a
fost activat datorită distribuirii inegale a
rufelor în mașină.
Durata programului nu efectuează
numărătoarea inversă. (*)
• Există o distribuire inegală în mașină. >>>
Sistemul de detectare automată a
dezechilibrării a fost activat datorită
distribuirii inegale a rufelor în mașină.
Mașina nu se comută la pasul de
centrifugare. (*)
• Există o distribuire inegală în mașină. >>>
Sistemul de detectare automată a
dezechilibrării a fost activat datorită
distribuirii inegale a rufelor în mașină.
• Mașina nu centrifughează dacă apa nu
este evacuată complet. >>> Verificați
filtrul și furtunul de evacuare.
• A apărut o spumă excesivă și sistemul
automat de absorbție a spumei a fost
activat datorită unei utilizări excesive a
detergentului. >>> Folosiți cantitatea
recomandată de detergent.
Performanța de spălare este slabă:
Rufele devin gri. (**)
• A fost folosită o cantitate insuficientă de
detergent pe o perioadă îndelungată de
timp. >>> Folosiți cantitatea de detergent
recomandată în funcție de duritatea apei
și cantitatea de rufe.
RO / 36
RO
EN
Page 37

• Spălarea a fost efectuată la temperaturi
scăzute pe o perioadă lungă de timp. >>>
Selectați temperatura corespunzătoare
pentru rufele care urmează a fi spălate.
• Cantitate insuficientă de detergent este
folosită împreună cu apa dură. >>>
Utilizarea unei cantități insuficiente de
detergent în apa dură provoacă aderarea
reziduurilor la rufe, care devin gri în timp.
După apariția nuanței de gri, aceasta este
dificil de îndepărtat. Folosiți cantitatea de
detergent recomandată în funcție de
duritatea apei și cantitatea de rufe.
• Este utilizată o cantitate prea mare de
detergent. >>> Folosiți cantitatea de
detergent recomandată în funcție de
duritatea apei și cantitatea de rufe.
Performanța de spălare este slabă:
Petele persistă sau rufele nu sunt albite.
(**)
• A fost utilizată o cantitate insuficientă de
detergent. >>> Folosiți cantitatea de
detergent recomandată în funcție de
duritatea apei și cantitatea de rufe.
• A fost încărcată o cantitate excesivă de
rufe. >>> Nu încărcați produsul în exces.
Introduceți cantitățile recomandate
în ,,Tabel de programe și consum".
• Selectare incorectă a programului și a
temperaturii. >>> Selectați programul și
temperatura corespunzătoare pentru
rufele care urmează a fi spălate.
• Este utilizat un tip incorect de detergent.
>>> Folosiți detergent original potrivit cu
produsul.
• Este utilizată o cantitate prea mare de
detergent. >>> Introduceți detergentul în
compartimentul corect. Nu amestecați
înălbitorul cu detergentul.
Performanța de spălare este slabă: Pete
uleioase apărute pe rufe. (**)
• Tamburul nu a fost curățat în mod
regulat. >>> Curățați regulat tamburul.
Pentru această procedură, consultați
Curățarea ușii de încărcare și a
tamburului [}33]
Performanța de spălare este slabă:
Rufele au un miros neplăcut. (**)
• Pe tambur s-au format mirosuri și straturi
de bacterii în urma spălării continue la
temperaturi joase și/sau cu programe
scurte. >>> Lăsați compartimentul pentru
detergent și ușa de serviciu întredeschise
după fiecare spălare. Astfel, se va evita
formarea unui mediu umed în mașină,
favorabil bacteriilor.
Culoarea rufelor este decolorată. (**)
• A fost încărcată o cantitate excesivă de
rufe. >>> Nu încărcare produsul în exces.
• Detergentul folosit este umed. >>>
Păstrați detergentul într-un recipient
închis și uscat și nu îl expuneți la
temperaturi excesive.
• O temperatură mai ridicată este
selectată. >>> Selectați programul și
temperatura în funcție de tipul și gradul
de murdărire al rufelor.
Mașina de spălat nu limpezește bine.
• Cantitatea, marca și condițiile de
depozitare ale detergentului folosit sunt
inadecvate. >>> Folosiți detergentul
potrivit pentru mașina de spălat și rufele
dumneavoastră. Păstrați detergentul întrun recipient închis și uscat și nu îl
expuneți la temperaturi excesive.
• Detergentul a fost introdus în
compartimentul incorect. >>> Dacă
detergentul este introdus în
compartimentul de prespălare fără a fi
selectat ciclul de prespălare, mașina va
introduce în cuvă acest detergent în
timpul etapei de clătire sau tratare cu
balsam. Introduceți detergentul în
compartimentul corect.
• Filtrul pompei este înfundat. >>>
Verificați filtrul.
• Furtunul de evacuare este îndoit. >>>
Verificați furtunul de evacuare.
Rufele devin rigide după spălare. (**)
• A fost utilizată o cantitate insuficientă de
detergent. >>> Folosirea unei cantități
insuficiente de detergent în apa dură
RO
EN
RO / 37
Page 38

poate duce în timp la rigidizarea rufelor.
Folosiți cantitatea de detergent
recomandată în funcție de duritatea apei.
• Detergentul a fost introdus în
compartimentul incorect. >>> Dacă
detergentul este introdus în
compartimentul de prespălare fără a fi
selectat ciclul de prespălare, mașina va
introduce în cuvă acest detergent în
timpul etapei de clătire sau tratare cu
balsam. Introduceți detergentul în
compartimentul corect.
• Detergentul s-a amestecat cu balsamul.
>>> Nu amestecați balsamul cu
detergentul. Curățați și spălați sertarul cu
apă fierbinte.
Rufele nu miros ca balsamul. (**)
• Detergentul a fost introdus în
compartimentul incorect. >>> Dacă
detergentul este introdus în
compartimentul de prespălare fără a fi
selectat ciclul de prespălare, mașina va
introduce în tambur acest detergent în
timpul etapei de limpezire sau tratare cu
balsam. Curățați și spălați sertarul cu apă
fierbinte. Introduceți detergentul în
compartimentul corect.
• Detergentul s-a amestecat cu balsamul.
>>> Nu amestecați balsamul cu
detergentul. Curățați și spălați sertarul cu
apă fierbinte.
Reziduuri de detergent în sertarul de
detergent. (**)
• Detergentul a fost introdus în sertarul ud.
>>> Uscați sertarul pentru detergent
înainte de a introduce detergentul.
• Detergentul s-a umezit. >>> Păstrați
detergentul într-un recipient închis și
uscat și nu îl expuneți la temperaturi
excesive.
• Presiunea apei este scăzută. >>>
Verificați presiunea apei.
• Detergentul din compartimentul principal
de spălare s-a umezit în timpul
alimentării cu apă pentru prespălare.
Orificiile din compartimentul pentru
detergent sunt blocate. >>> Verificați
orificiile și desfundați-le dacă este cazul.
• Există o problemă cu valvele sertarului
pentru detergent. >>> Contactați un agent
de service autorizat.
• Detergentul s-a amestecat cu balsamul.
>>> Nu amestecați balsamul cu
detergentul. Curățați și spălați sertarul cu
apă fierbinte.
• Tamburul nu a fost curățat în mod
regulat. >>> Curățați regulat tamburul.
Pentru această procedură, consultați
Curățarea ușii de încărcare și a
tamburului [}33]
Se formează spumă în exces în mașină.
(**)
• Se folosesc detergenți necorespunzători
pentru mașina de spălat. >>> Folosiți
detergent corespunzător pentru mașina
de spălat.
• Este utilizată o cantitate prea mare de
detergent. >>> Folosiți numai cantitatea
recomandată de detergent.
• Detergentul a fost păstrat în condiții
improprii. >>> Păstrați detergentul într-un
recipient închis și la loc uscat. Nu
păstrați detergentul în locuri excesiv de
călduroase.
• Se generează spumă excesivă din cauza
texturii țesăturilor cu ochiuri cum ar fi
tulul. >>> Folosiți cantități reduse de
detergent pentru acest tip de materiale.
• Detergentul a fost introdus în
compartimentul incorect. >>> Asigurațivă că puneți detergentul în
compartimentul corespunzător.
• Se alimentează prea rapid cu balsam.
>>> Posibilă problemă cu valvele sau
dozatorul de detergent. Contactați un
agent de service autorizat.
Spuma se revarsă din sertarul
detergentului.
• A fost folosit prea mult detergent. >>>
Amestecați o lingură de balsam cu ½ litru
de apă și turnați-l în compartimentul
principal al sertarului pentru detergent.
>>> Introduceți detergentul potrivit în
mașină pentru programe și cantitatea
maximă indicată în "Tabelul de programe
și consum". Dacă utilizați substanțe
RO
EN
RO / 38
Page 39
chimice suplimentare (agenți de eliminat
pete, înălbitori etc.), reduceți cantitatea
de detergent.
Rufele rămân umede la finalizarea
programului. (*)
• A apărut o spumă excesivă și sistemul
automat de absorbție a spumei a fost
activat datorită unei utilizări excesive a
detergentului. >>> Folosiți cantitatea
recomandată de detergent.
(*) Produsul nu se comută în etapa de
centrifugare în momentul când rufele nu
sunt distribuite în mod egal în tambur
pentru a preveni deteriorarea mașinii și
afectarea mediului înconjurător. Rufele
trebuie rearanjate și recentrifugate.
(**) Nu se aplică curățarea regulată a
tamburului. Curățați regulat tamburul.
Observați Curățarea ușii de încărcare și a
tamburului [}33]
Dacă nu puteți elimina problema, cu
toate că urmăriți instrucțiunile din
această secțiune, consultați dealerul dumneavoastră sau agentul de
service autorizat. Nu încercați
niciodată să reparați mașina
defectă pe cont propriu.
9 DECLINAREA RESPONSABILITĂȚII/AVERTISMENT
Unele defecțiuni (simple) pot fi gestionate
în mod adecvat de către utilizatorul final
fără nicio problemă de siguranță sau
utilizare nesigură, cu condiția ca acestea să
fie efectuate în limitele și în conformitate
cu instrucțiunile care urmează (consultați
secțiunea „Auto-reparare”).
Prin urmare, cu excepția cazului în care se
autorizează altfel în secțiunea „Autorepararea” de mai jos, reparațiile se
adresează reparatorilor profesioniști
înregistrați pentru a evita problemele de
siguranță. Un reparator profesionist
înregistrat este un reparator profesionist
căruia i s-a acordat acces de către
producător la lista de instrucțiuni și piese
de schimb ale acestui produs, în
conformitate cu metodele prevăzute în
Directiva 2009/125/CE.
Cu toate acestea, numai agentul de
service (adică reparatorii profesioniști
autorizați) pe care îl puteți contacta la
numărul de telefon din manualul de
utilizare/cardul de garanție sau prin
intermediul distribuitorului autorizat
poate furniza servicii în condițiile de
garanție. Prin urmare, vă rugăm să rețineți
că reparațiile efectuate de reparatori
profesioniști (care nu sunt autorizați de
Arctic ) anulează garanția.
Auto-repararea
Auto-repararea poate fi efectuată de către
utilizatorul final în ceea ce privește
următoarele piese de schimb: ușă,
balamale și garnituri de ușă, alte garnituri,
ansamblu de blocare a ușilor și periferice
din plastic, cum ar fi dozatoarele de
detergenți (o listă actualizată este de
asemenea disponibilă în support.arctic.ro
începând din 1 martie 2021)
În plus, pentru a asigura siguranța
produsului și pentru a preveni riscul de
vătămare corporală gravă, auto-repararea
menționată va fi efectuată urmând
instrucțiunile din manualul de utilizare
pentru auto-reparare sau care sunt
disponibile în support.arctic.ro Pentru
siguranța dumneavoastră, deconectați
produsul înainte de a încerca orice autoreparare.
Repararea și încercările de reparare ale
utilizatorilor finali cu piese care nu sunt
incluse în această listă și/sau care nu
respectă instrucțiunile din manualele de
utilizare pentru auto-reparare sau care sunt
disponibile în <variable linkid="120400652"
name="1017">WebAdress</variable> , pot
genera probleme de siguranță care nu pot fi
atribuite către support.arctic.ro și vor anula
garanția produsului.
Prin urmare, se recomandă insistent ca
utilizatorii finali să se abțină de la
încercarea de a efectua reparații care nu se
RO / 39
RO
EN
Page 40

încadrează în lista menționată de piese de
schimb, contactând în astfel de cazuri
reparatori profesioniști autorizați sau
reparatori profesioniști înregistrați. În caz
contrar, astfel de încercări ale utilizatorilor
finali pot cauza probleme de siguranță și
pot deteriora produsul și, ulterior, pot cauza
incendii, inundații, electrocutare și vătămări
corporale grave.
De exemplu, dar fără a se limita la acestea,
următoarele reparații trebuie adresate
reparatorilor profesioniști autorizați sau
reparatorilor profesioniști înregistrați:
motor, grup electropompă, placă principală,
placă de motor, placă de afișare,
încălzitoare etc.
Producătorul/vânzătorul nu poate fi tras la
răspundere în niciun caz în care utilizatorii
finali nu respectă cele de mai sus.
Valabilitatea pieselor de schimb ale mașinii
de spălat sau a uscătorului de rufe pe care
le-ați achiziționat este de 10 ani. În această
perioadă, vor fi disponibile piese de schimb
originale pentru menținerea mașinii a
uscătorului de rufe în stare de funcționare
bună.
RO
EN
RO / 40
Page 41

Când aparatul este oprit, prin apăsarea mai lungă a butoanelor 1 și 2 pentru funcție auxiliară va așată o
numărătoare inversă 3-2-1, precum și ciclurile de spălare complete ale aparatului.
După așarea ciclului de spălare complet, sunt așate codurile de eroare, dacă există. Vericați informațiile de pe
așaj în tabelul de mai jos.
Informații pe așaj Cauză Soluție
Eroare
SC
E5 Filtrul pompei poate înfundat.
E8 Este posibil ca mașina să nu preia apă.
E29
E17
E18
E12 Este posibil să existe apă în mașină.
E27 Vericați evacuarea apei din mașină.
E84 Conexiunea BLE nu poate stabilită.
Algoritmul de siguranță funcționează pe
aparat.
Plângerea dvs. nu este rezolvată în timpul
vericării.
Produsul s-a comutat către modul de
protecție a mașinii din cauza unei probleme
de alimentare (tensiune, presiune apă etc.).
După nalizarea ciclului de spălare, mașina
are spumă în exces în interior.
Ciclul de rotație nu este inițiat din cauza
unui dezechilibru al mașinii.
Așteptați ca scrierea să treacă. După apăsarea butoanelor 1 și
2 pentru funcție auxiliară, vericați informațiile de pe așaj.
Apelați agentul de service autorizat.
Curățați ltrul pompei.
Consultați secțiunea „Evacuarea apei rămase și curățarea
ltrului pompei”.
Încercați la ciclul de rotație. Dacă problema nu este rezolvată,
contactați departamentul de service.
• Deschideți robinetele.
• Asigurați-vă că nu există avarii în urma transportului.
• Vericați conexiunea furtunului de intrare a apei; dacă furtunul este
îndoit, îndreptați-l.
• Curățați ltrul pompei. Consultați secțiunea „Evacuarea apei rămase
și curățarea ltrului pompei”.
• Închideți capacul frontal al mașinii. Asigurați-vă că capacul este
blocat.
Porniți mașina încă o dată. Dacă problema nu este rezolvată, contactați
departamentul de service.
Pentru a anula programul, rotiți butonul de selectare a
programului pentru a selecta alt program. Programul anterior
va anulat. Consultați secțiunea „Anularea programului”.
Dacă problema persistă, contactați departamentul de service.
• Păstrați detergentul într-un recipient închis și la loc uscat. Nu
păstrați detergentul în locuri excesiv de călduroase.
• Folosiți cantități reduse de detergent pentru acest tip poros
de rufe, cum este tulul.
• Utilizați o cantitate de detergent adecvată cantității de rufe și
nivelului de pată.
• Folosiți numai cantitatea recomandată de detergent.
• Asigurați-vă că puneți detergentul în compartimentul
corespunzător.
• Utilizați programul Curățare tambur cu mașina goală.
Consultați programul „Curățarea tamburului”
Dacă mașina dvs. nu are programul de curățare a tamburului,
puteți utiliza programul Bumbac 90C.
• După utilizarea unui program scurt, fără detergent, vericați
mașina. Dacă problema persistă, contactați departamentul de
service.
Vericați rufele în mașină. Este posibil să nu e sucientă
cantitatea de rufe. Încercați prin creșterea cantității de rufe.
Rufele pot cauza un dezechilibru; sortați rufele manual și
distribuiți-le uniform în mașină.
Încercați din nou la ciclul de rotație.
Deconectați mașina.
Este posibil să existe apă sub mașină. Curățați apa de sub mașină.
Conectați din nou mașina.
Încercați să utilizați un ciclu scurt.
Dacă problema persistă sau observați scurgeri de apă de la unul
dintre furtunuri, închideți supapele și contactați departamentul de
service.
Consultați secțiunea „Conectarea furtunului de evacuare la
canalizare”
Vericați, încercați să o conectați. Consultați secțiunea
„Funcția HomeWhiz și funcția Remote Control”. Dacă problema
persistă, contactați departamentul de service.
Page 42
Washing Machine
User Manual
EN
APLM2WFSU210411A
EN
1911862400/ EN / 19.01.24 14:07
Page 43
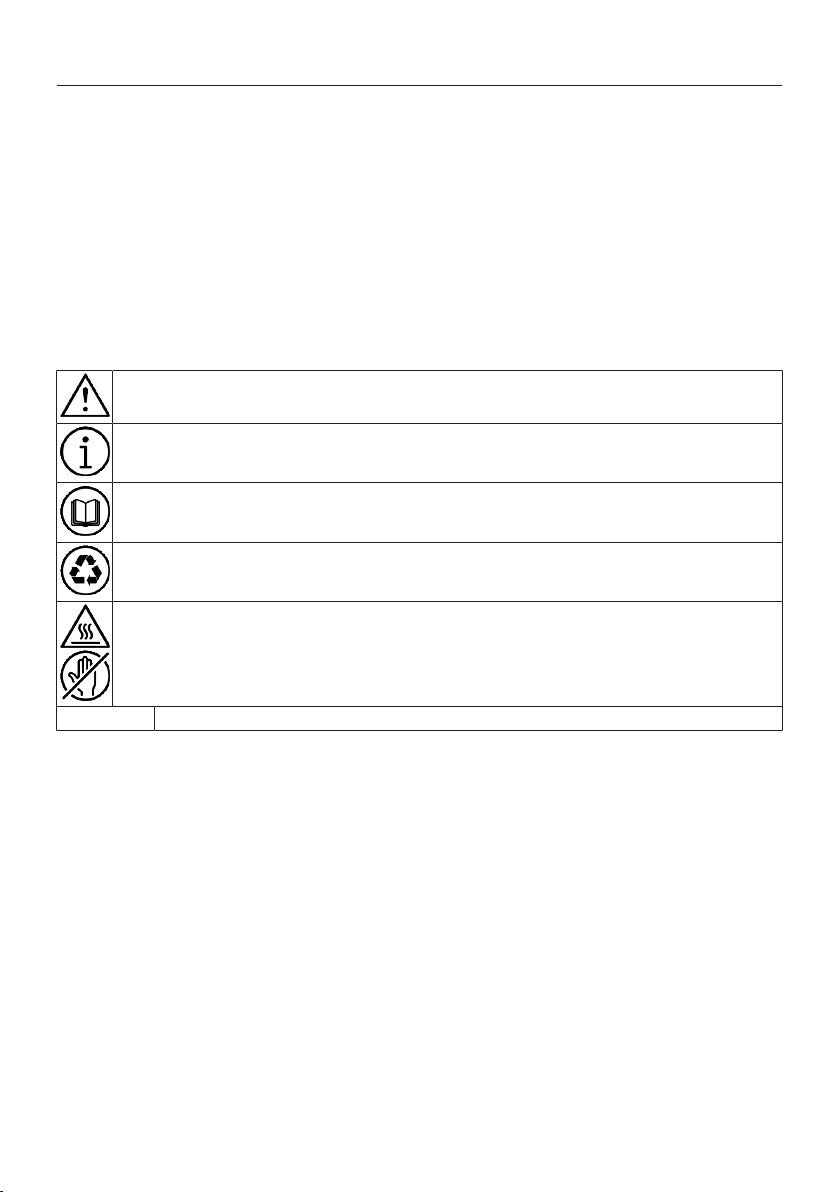
Please read this user manual first!
Dear Customer,
Thank you for choosing Arctic product. We hope that you get the best results from your
product which has been manufactured with high quality and state-of-the-art technology.
Therefore, please read this entire user manual and all other accompanying documents
carefully before using the product.
Follow all warnings and information in the user manual. Thus, you protect yourself and
your product against possible dangers.
Keep the user manual. If you hand over the product to someone else, provide the user
manual as well. Warranty terms, usage and troubleshooting methods of your product are in
user guide.
Symbols and Definitions
The following symbols are used in the user guide:
Danger that could result in death or injury.
Important information or useful hints about usage.
Read the user manual.
Recyclable materials.
Hot surface warning.
WARNING Danger that may result in property damage to the product or its environment.
EN / 42
Page 44

Table of Contents
1 Safety Instructions ....................... 44
1.1 Intended Use.................................. 44
1.2 Safety of Children, Vulnerable
Persons and Pets ..........................
1.3 Electrical Safety............................. 45
1.4 Handling Safety ............................. 46
1.5 Installation Safety.......................... 46
1.6 Operational Safety......................... 48
1.7 Maintenance and Cleaning Safety 49
2 Important Instructions for Envir-
onment...........................................
2.1 Compliance with WEEE Directive . 50
2.2 Package Information..................... 50
3 Technical Specifications.............. 51
4 Installation..................................... 52
4.1 Appropriate Installation Location. 52
4.2 Assembly of Bottom Panel Cov-
ers...................................................
4.3 Removing Transportation Safety
Bolts ...............................................
4.4 Connecting to Water Supply ......... 53
4.5 Connecting the Drain Hose to the
Drain ...............................................
4.6 Adjusting the Stands..................... 54
4.7 Electrical Connection .................... 54
4.8 Start Up .......................................... 55
5 Preliminary Preparation ............... 55
5.1 Sorting the Laundry ....................... 55
5.2 Preparing Laundry for Washing.... 55
5.3 Tips for Energy and Water Saving 56
5.4 Loading the Laundry...................... 56
5.5 Correct Load Capacity .................. 56
5.6 Using Detergent and Softener ...... 56
5.7 Tips for Efficient Washing ............ 58
5.8 Displayed Programme Duration ... 59
6 Operating the Product.................. 59
6.1 Control Panel ................................. 60
6.2 Symbols on the Display................. 61
6.3 Programme and Consumption
Table...............................................
6.4 Programme Selection ................... 64
6.5 Programmes.................................. 64
6.6 Temperature Selection.................. 66
6.7 Spin Speed Selection .................... 66
44
50
52
53
54
62
6.8 Auxiliary Function Selection.......... 67
6.8.1 Auxiliary Functions..................... 67
6.8.2 Functions/Programmes Selected by Pressing the Function
Keys for 3 Seconds ....................
6.9 End Time ........................................ 69
6.10 Starting the Programme................ 70
6.11 Loading Door Lock......................... 70
6.12 Changing the Selections After
Programme has Started ................
6.13 Cancelling the Programme ........... 71
6.14 End of Programme......................... 71
7 Maintenance and Cleaning ........... 72
7.1 Cleaning the Detergent Drawer..... 72
7.2 Cleaning the Loading Door and
the Drum.........................................
7.3 Cleaning the Body and Control
Panel...............................................
7.4 Cleaning the Water Intake Filters.. 72
7.5 Draining Remaining Water and
Cleaning the Pump Filter...............
8 Troubleshooting ............................ 74
9 DISCLAIMER / WARNING ............. 78
68
71
72
72
73
RO
EN
EN / 43
Page 45
1 Safety Instructions
RO
This section includes the safety
instructions necessary to prevent the risk of personal injury or
material damage.
Our company shall not be held
responsible for damages that
may occur if these instructions
are not observed.
• Installation and repair operations shall always be performed by Authorised Service.
• Use original spare parts and
accessories only.
• Do not repair or replace any
component of the product unless it is clearly specified in the
user manual.
• Do not modify the product.
1.1 Intended Use
• This product has been designed for domestic use. It is
not for commercial purposes
or it should not be used out of
its intended use.
• The product must only be used
for washing and rinsing of
laundry that are marked accordingly
• This appliance is intended to
be used in household and similar applications. For example;
– Personnel kitchens of stores,
offices and other work environments;
– Ranches,
– By customers of hotels, mo-
tels and other accommodation facilities,
– Bed and breakfasts, hostel-
like environments,
– Common areas of apartment
blocks or laundries.
1.2 Safety of Children, Vulnerable Persons and Pets
• This product may be used by
children aged 8 years and
older and persons with underdeveloped physical, sensory or
mental capabilities or lack of
experience and knowledge if
they have been given supervision or instruction concerning
use of the appliance in a the
product safe way and the hazards involved.
• Children under the age of 3
should be kept away unless
continuously supervised.
• Electrical products are dangerous for children and pets. Children or pets should not play
with, climb on top or inside the
product. Check inside the
product before use.
• Use child lock to prevent children from intervening with the
product.
EN
EN / 44
Page 46
• Do not forget to close the loading door when leaving the
room where the product is located. Children and pets may
get locked inside and drown.
• Children should not perform
cleaning and user maintenance works without an adult’s
supervision.
• Keep the packaging materials
away from children. Risk of injury and suffocation.
• Keep all detergents and additives used for the product away
from children’s reach.
• Cut the power cable and break
and deactivate the locking
mechanism of the loading
door before disposing of the
product for children’s safety.
1.3 Electrical Safety
• Product should be unplugged
during installation, maintenance, cleaning and repair procedures. Unplug the product or
turn off the fuse.
• Damaged power cables should
be replaced by the authorised
service in order to prevent possible danger.
• Do not tuck the power cord under the product or to the rear
of the product. Do not put
heavy items on the power
cord. Do not over bend, crush
and touch the power cable to
sources of heat.
• Only use the original cable. Do
not use cut or damaged
cables.
• Do not use an extension cord,
multi-plug or adaptor to operate your product.
• Extension cords, multi-socket
outlets, adapters or portable
power supplies can overheat
and cause a fire. Make sure
not to place power sockets
and portable power supplies
near or behind the product.
• The plug shall be easily accessible. If this is not possible,
a mechanism that meets the
electrical legislation and that
disconnects all terminals from
the mains (fuse, switch, main
switch, etc.) shall be available
on the electrical installation.
• Do not touch the plug with wet
hands.
• When unplugging the appliance, don't hold the power
cord, but the plug.
• Make sure the plug is not wet,
dirty or dusty.
• Never connect your product to
electricity saving devices. Such
systems are harmful to the
product.
RO
EN
EN / 45
Page 47
1.4 Handling Safety
• Unplug the product before
moving, remove the water outlet and water main connections. Drain any water left inside the product.
• This product is heavy, do not
handle it by yourself. It may
cause injuries if your product
falls on you. Do not hit and
drop the product while carrying.
• Do not hold parts such as the
laundry loading door to lift and
move the product. The upper
tray should be tightly fixed for
moving.
• Carry the product in an upright
position. If it cannot be carried
upright, tilt it to the right side in
frontal view.
• Make sure that the hoses as
well as the power cable are not
folded, pinched or crushed
after the product is fitted into
its place after installation or
cleaning procedures.
1.5 Installation Safety
• Check the information on the
manual and installation instructions to prepare the
product for installation and
make sure the electrical mains,
clean water mains and water
outlet are suitable. If not, call a
qualified electrician and
plumber to have them make
the necessary arrangements.
These operations are the responsibility of the customer.
• Prior to commencing the installation, be sure to switch off
the fuse to deactivate the
power supply for the line to
which the product will be connected.
• This product is intended for
use at altitudes not exceeding
2000 meters above sea level.
• Check for any damage on the
product before installing it. Do
not have the product installed
if it is damaged.
• Always wear personal protective equipment (gloves, etc.)
during product installation,
maintenance and repair. There
is a risk of injury.
• Injuries may occur if hands are
put into uncovered slots. Close
the holes of the transportation
safety bolts with plastic plugs.
• Do not install or leave the
product at locations where it
may be exposed to external environment conditions.
• Do not install the product at
locations where the temperature drops below 0 ºC.
RO
EN
EN / 46
Page 48

• Do not place the product on a
carpet or similar surface. It
would create fire hazard since
it cannot receive air from underneath.
• Place the product on a level
and hard surface and balance
with the adjustable legs.
• Connect the product to a
grounding plug protected by a
fuse suitable to the current values on the type label. Make
sure the grounding is carried
out by an expert electrician. Do
not use the product without
suitable grounding to local/national regulations.
• Plug the product in a socket
with voltage and frequency values suitable to those indicated
on the type label.
• Do not plug the product to
loose, broken, dirty, greasy
sockets or sockets that has
come out their seats or sockets with a risk of water contact.
• Use the new hose set provided
with the product. Do not re-use
old hose sets. Do not make additions to the hoses.
• Connect the water inlet hose
directly to the water tap. The
pressure from the tap should
be minimum 0.1 MPa (1 bar)
and maximum 1MPa (10 bars).
10 to 80 litres of water should
be running from the tap in a
minute in order for the product
to function properly. If the water pressure is above 1 MPa
(10 Bars), a pressure-reducing
valve should be fitted. The
maximum allowed temperature is 25°C.
• Fit the end of the water discharge hose to the dirty water
discharge drain, the sink or the
bathtub.
• Place the power cable and
hoses in locations without risk
of tripping.
• Do not install the product behind a door, a sliding door or at
another location that will prevent the door from opening
completely.
• If a drier is to be placed on the
product, fix with a suitable connection apparatus obtained
from the authorised service.
• There is a risk of contact with
electrical pieces when the upper trays is removed. Do not
dismantle the upper tray of the
product.
• Place the product at least 1 cm
away from the edges of furniture.
RO
EN
EN / 47
Page 49
1.6 Operational Safety
• When you are using the appliances, use only detergents,
softeners and supplements
suitable for washing machines.
• Do not use chemical solvents
on the product. These materials contain an explosion risk.
• Do not operate defective or
damaged products. Unplug the
product (or turn off the fuse it
is connected to), turn off the
water tap and call an authorised service.
• Do not place sources of ignition (burning candle, cigarettes, etc.) or sources of heat
(irons, furnaces, ovens, etc.) on
top of or near the product. Do
not put inflammable/explosive
materials near the product.
• Do not get on the product.
• Unplug the product and turn
off the tap if you will not be using the product for long periods.
• Detergent/maintenance materials may splash out of the detergent drawer if it is opened
while the machine is working
Contact of the detergent with
your skin and eyes is dangerous.
• Make sure pets do not climb
inside the product. Check inside the product before use.
• Do not force open the locked
loading door. The door will
open once the washing is completed. If the door does not
open, use the solutions for
“loading door does not open”
error in the Troubleshooting
section.
• Do not wash elements contaminated with gasoline, kerosene,
benzene, reducers, alcohol or
other inflammable or explosive
materials and industrial chemicals.
• Do not directly use dry cleaning detergent and do not wash,
rinse or spin laundry contaminated with dry cleaning detergent.
• Do not place your hands into
the rotating drum. Wait until
the drum no longer rotates.
• If washing laundry at high temperatures, the discharged
washing water would burn your
skin if in contact with your
skin, for ex. when the draining
hose is connected to the tap.
Do not touch the discharge water.
• Take the following precautions
to prevent formation of biofilm
and malodours:
RO
EN
EN / 48
Page 50
– Make sure the room where
the washing machine is
placed is well ventilated.
– Wipe the door gasket and
loading door glass with a dry
and clean cloth at the end of
the programme.
• The glass of the loading door
will heat up when washing at
high temperatures. Therefore,
do not touch the loading door
glass while washing, especially
children.
• Before disposing of worn out
and no longer usable items:
1. Unplug the power plug and
remove it from the socket.
2. Cut the power cable and dis-
connect it with the plug from
the appliance.
3. Break the locking mechanism
of the loading door to render
it inoperable.
4. Do not allow children to play
with the outdated product.
1.7 Maintenance and Cleaning Safety
• Before cleaning or servicing
the washing machine, unplug it
or cut the power at the fuse.
• If you need to move the
product for cleaning, do not
pull on the cover. The cover
can break and cause injury!
• Do not put hands, feet and
metal objects under or behind
your product. This can cause
jams, and any sharp edge can
cause personal injury.
• Use a clean, dry cloth to wipe
foreign material or dust from
the plug ends. When cleaning
the plug, do not use a wet or
damp cloth. Otherwise, there is
a risk of fire or electric shock.
• Do not wash the product with
pressure washers, by spraying
vapour, water or pouring water.
There is a risk of electrocution.
• Do not use sharp or abrasive
tools to clean the product. Do
not use household cleaners,
soap, detergent, gas, gasoline,
thinner, alcohol, varnish, etc.
while cleaning.
• Cleaning agents containing
solvents might reek poisonous
fumes( for ex. cleaning
solvent. Do not use cleaning
products containing solvents.
• There may be detergent
residues in the detergent
drawer when you open it for
cleaning.
• Do not dismantle the filter of
the discharge pump while the
product is running.
• The temperature in the machine may rise up to 90ºC.
Clean the filter after the water
RO
EN
EN / 49
Page 51
in the machine cools down in
order to avoid risk of getting
burnt.
2 Important Instructions for Environment
2.1 Compliance with WEEE Directive
This product complies with EU
WEEE Directive (2012/19/EU).
This product bears a classification symbol for waste electrical
and electronic equipment
(WEEE).
This product has been manufactured with
high quality parts and materials which can
be reused and are suitable for recycling. Do
not dispose of the waste product with normal domestic and other wastes at the end
of its service life. Take it to the collection
center for the recycling of electrical and
electronic equipment. Please consult your
local authorities to learn about these collection centers.
Compliance with RoHS Directive:
The product you have purchased complies
with EU RoHS Directive (2011/65/EU). It
does not contain harmful and prohibited
materials specified in the Directive.
RO
EN
2.2 Package Information
Packaging materials of the product are
manufactured from recyclable materials in
accordance with our National Environment
Regulations. Do not dispose of the packaging materials together with the domestic
or other wastes. Take them to the packaging material collection points designated
by the local authorities.
EN / 50
Page 52
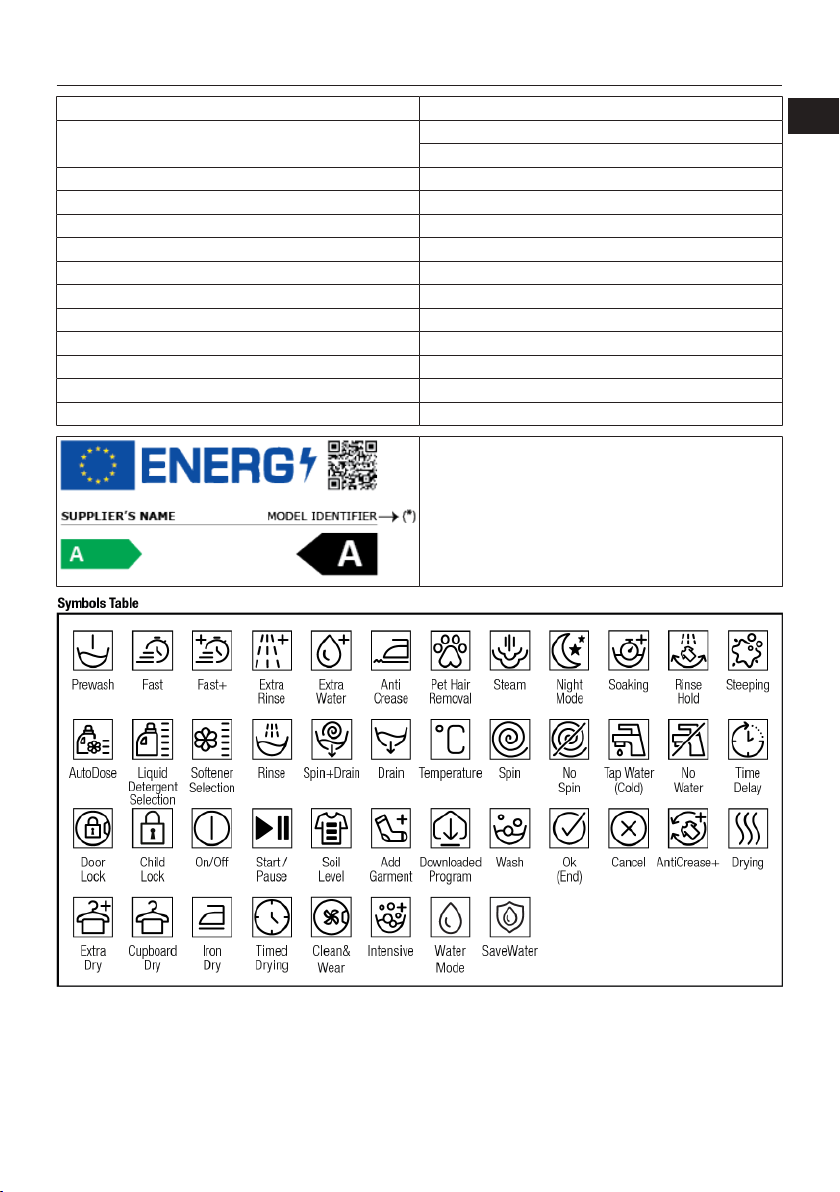
3 Technical Specifications
Manufacturer’s name or commercial brand Arctic
Model name
Rated Capacity (kg) 10
Maximum spin speed (cycle/min) 1400
Built-In No
Height (cm)
Width (cm) 60
Depth (cm) 58
Single Water inlet / Double Water inlet + / Rated voltage / Rated frequency in hertz (V/Hz) 230 V / 50Hz
Rated current (A) 10
Rated power (W) 2200
Main model code 1321
The model information as stored in the product database
can be reached by entering following website and searching for your model identifier (*) found on energy label.
https://eprel.ec.europa.eu/
APLM2WFSU210411A
7005940001
84,5
RO
EN
EN / 51
Page 53
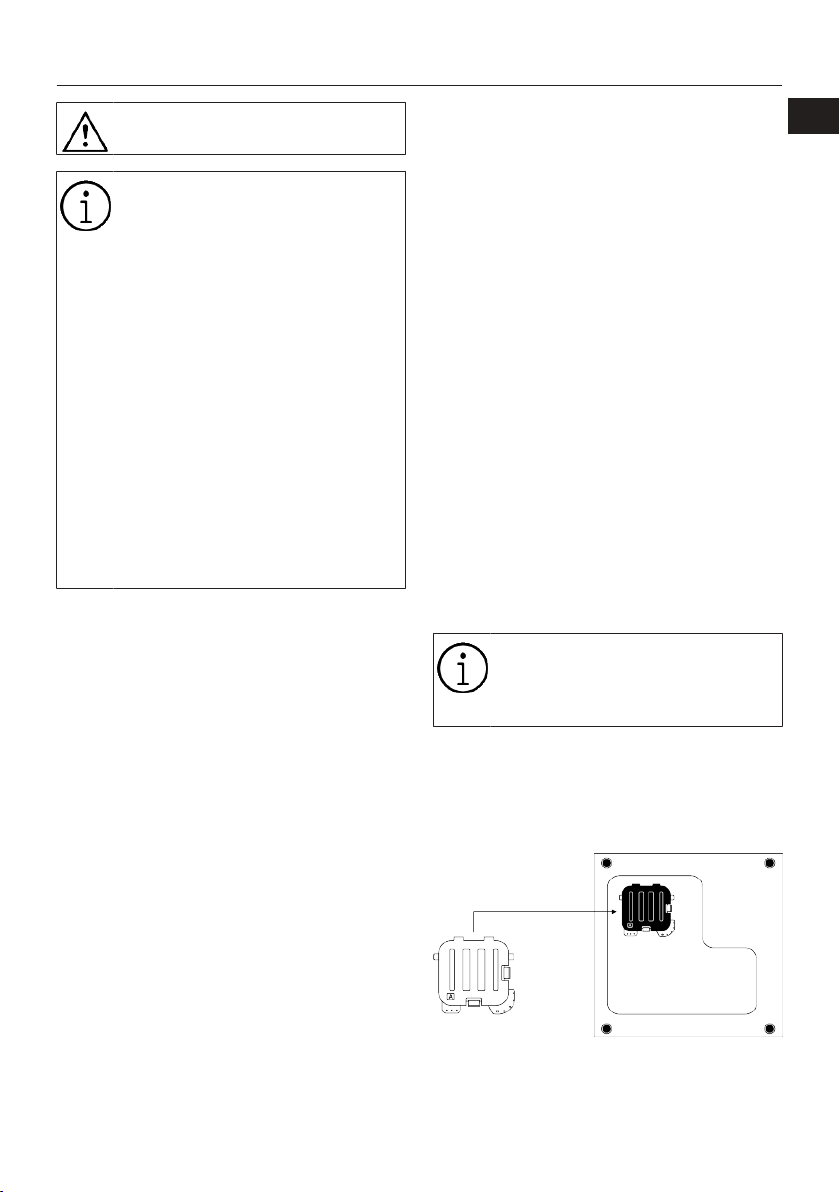
4 Installation
RO
Please read the “Safety Instructions” section first!
Your washing machine automatically detects the amount of laundry
placed inside when selecting a program.
While installing the product, before
the first use, calibration should be
done to ensure that the laundry
amount is detected in the most accurate way.
To do this, select the Drum Cleaning* program and cancel the spin
function. Start the program without
laundry. Wait for the program to finish, which will take about 15
minutes.
*The program name may vary depending on the model. For the appropriate program selection, review
the program descriptions section.
• Preparation of the location and electrical,
tap water and waste water installations
at the place of installation is under customer's responsibility.
• Make sure that the water inlet and dis-
charge hoses as well as the power cable
are not folded, pinched or crushed while
pushing the product into its place after
installation or cleaning procedures.
• Prior to installation, visually check if the
product has any defects on it. Do not
have the product installed if it is damaged. Damaged products cause risks for
your safety.
• Total weight of the washing machine and
the dryer -with full load- when they are
placed on top of each other reaches to
approx. 180 kilograms. Place the product
on a solid and flat floor that has sufficient load carrying capacity.
• Do not place the product on the power
cable.
• Do not install the product at places where
temperature may fall below 0 ºC. Freezing might damage your product.
• Leave a minimum space of 1 cm
between the product and the furniture.
• If you will install the product on a surface
with steps, never place it close to the
edge.
• Do not place the product on any platform.
• Do not place heat sources such as
cooker, irons, ovens, heater etc. on the
appliance and do not use them on the
product.
4.2 Assembly of Bottom Panel Cov-
ers
With some models, the base parts
of the products are completely
closed. These products do not have
plugs and covers.
• In order to increase the sound comfort of
the product, attach cover A after removing the package foam.
Cover A
EN
4.1 Appropriate Installation Location
• Place the product on a hard and level
floor. Do not place it onto a carpet with
high pile or other similar surfaces. Placing on an improper floor shall cause
noise and vibration problems.
Tilt the machine back slightly. Rest the tabs
of Cover A against the lower panel. Complete the assembly by rotating the cover.
EN / 52
Page 54
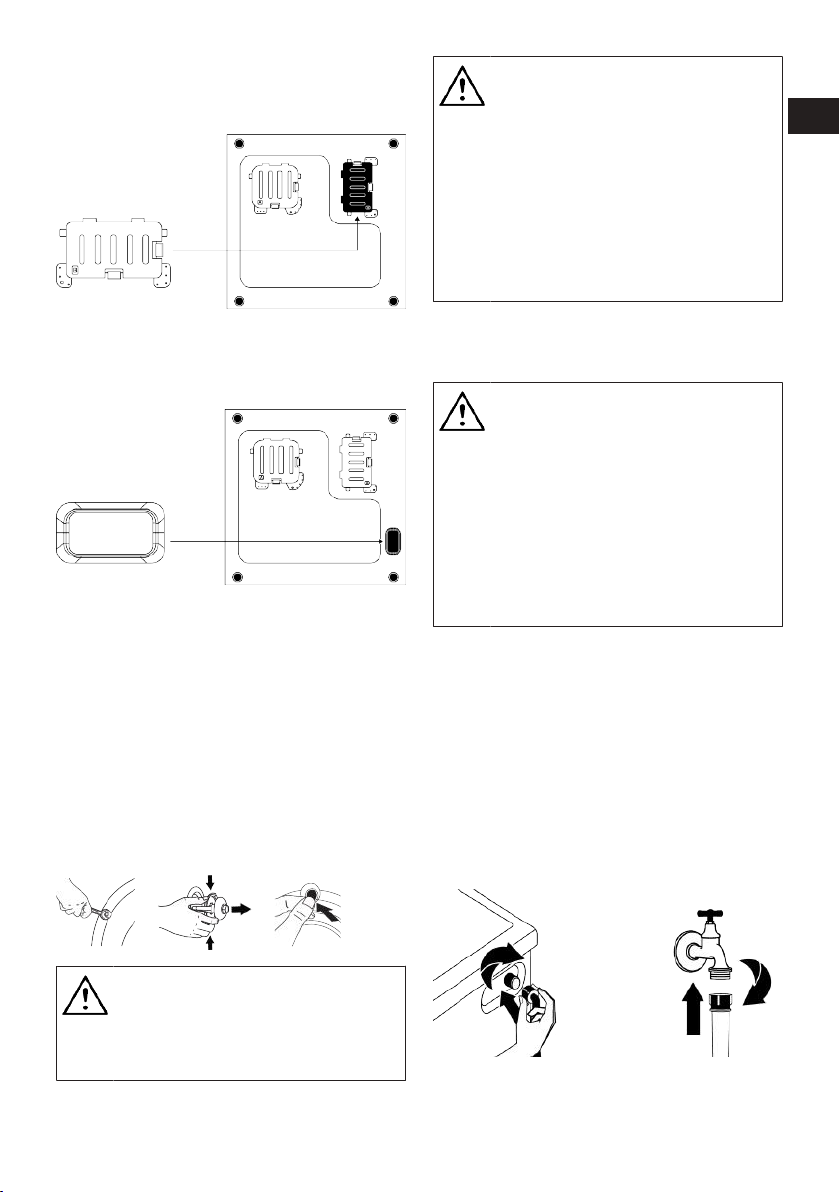
• Cover B and the Cap are optional. If avail-
able, attach cover B and the Cap.
Cover B
Rest the tabs of Cover B against the lower
panel. Complete the assembly by rotating
the cover.
Cap
Insert the cap by pushing it with your finger.
4.3 Removing Transportation Safety Bolts
1. Loosen all transportation safety bolts
with an appropriate wrench until they
turn freely.
2. Bend the inner part by pressing it at the
grip areas and pull the part out.
3. Attach the plastic covers supplied in the
User Manual bag into the holes on the
rear panel.
NOTICE
Keep the transportation safety
bolts in a safe place to reuse when
the product needs to be moved
again in the future.
Install the transportation safety
bolts in reverse order of the disassembly procedure.
Never move the product without the
transportation safety bolts properly
fixed in place.
4.4 Connecting to Water Supply
NOTICE
Models with a single water inlet
shall not be connected to the hot
water tap. In such a case the laundry will get damaged or the product
will switch to protection mode and
will not operate.
Do not use old or used water inlet
hoses on a new product. It may
cause water leakage from your machine and stain your laundry.
1. Tighten all hose nuts by hand. Never use
a tool when tightening the nuts.
2. Open the taps completely after making
the hose connection to check for water
leaks at the connection points. If any
leak occurs, turn off the tap and remove
the nut. Check the gasket and tighten
the nut carefully again. In order to prevent the water leaks and resultant damages, keep the taps closed when you do
not use the product.
RO
EN
NOTICE
Remove the transportation safety
bolts before operating the product.
Otherwise, the product will get
damaged.
EN / 53
Page 55
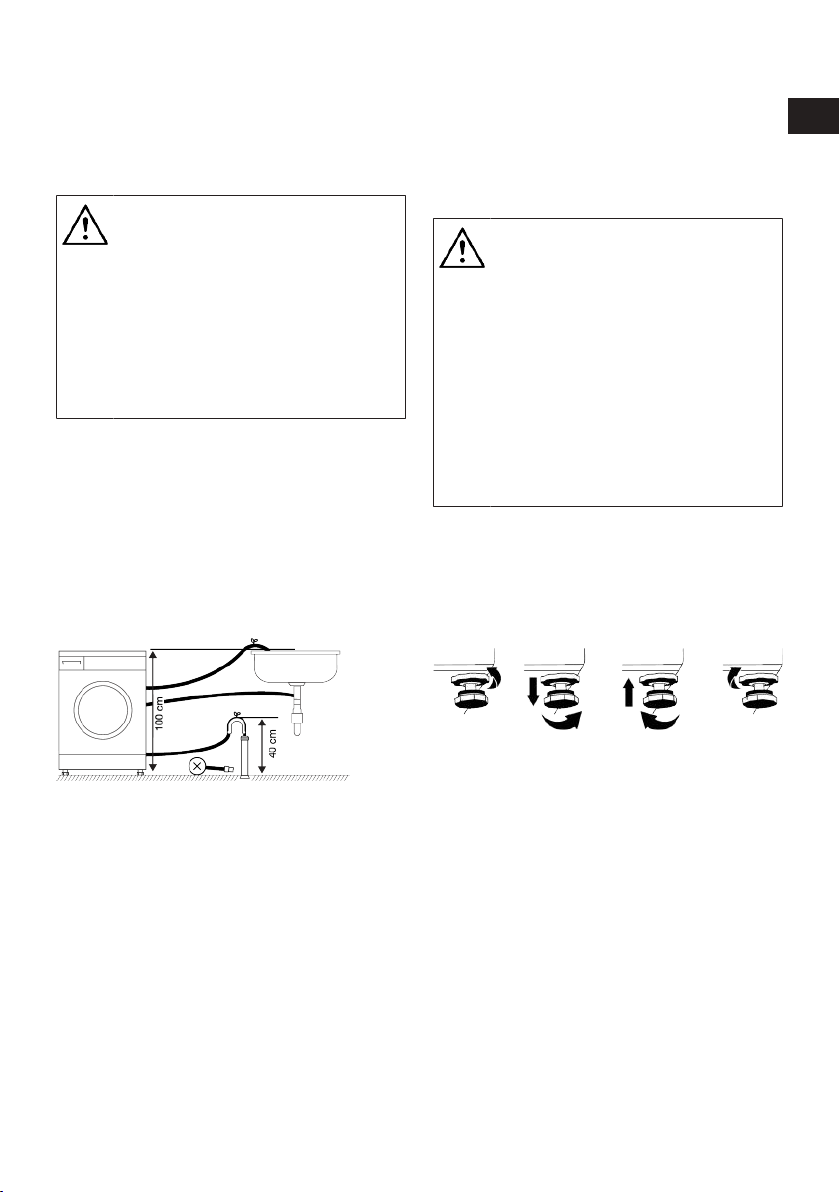
4.5 Connecting the Drain Hose to the Drain
1. Attach the end of the drain hose directly
to waste water drain, washbasin or
bathtub.
Your house will be flooded if the
water draining hose is dislocated
during water draining. There is also
a risk of burning due to the high
washing temperatures. In order to
prevent such situations and make
sure that the product performs water intake and drain processes
without any problem, fix the drain
hose securely.
2. Connect the drain hose to a minimum
height of 40 cm and a maximum height
of 100 cm.
3. Installing the water draining hose at
ground level or close to the floor (40 cm
below) and then raising it makes water
discharge difficult and the laundry may
come out extremely wet. Thus, follow
the heights provided in the figure.
leaks, always secure the connection
between the extension hose and the
draining hose of the product with a suitable clamp so that it does not come off
and cause leaks.
4.6 Adjusting the Stands
WARNING
In order to ensure that the product
operates more silently and vibration-free, it must stand level and
balanced on its feet. Ensure that
the product is balanced by adjusting the feet. Otherwise, the product
may move from its place and cause
crushing, noise and vibration problems.
To avoid damaging the lock nuts,
do not use any tools to loosen the
nuts.
1. Loosen the lock nuts on the feet by
hand.
2. Adjust the feet until the product stands
level and balanced.
3. Tighten all lock nuts again by hand.
RO
EN
4. To prevent the waste water to go back
into the product again and to ensure
easy drainage, do not immerse the end
of the hose into the waste water or do
not insert it into the drain for more than
15 cm. If it is too long, cut it short.
5. The end of the hose should not be bent,
it should not be stepped on and the
hose must not be pinched between the
drain and the product. Otherwise, water
discharge issues may emerge.
6. If the length of the hose is too short, use
it by adding an original extension hose.
The overall length of the hose shall not
be longer than 3.2 m. To prevent water
4.7 Electrical Connection
Connect the product to a grounded outlet
protected by a 16 A fuse. Our company
shall not be responsible for the damages
that shall be incurred due to using the
product without grounding according to
local regulations.
• Connection must comply with national
regulations.
• The electrical connection cable infrastructure of the product must be adequate and suitable for product requirements. It is recommended to use a residual current device.
• Power cable plug must be within easy
reach after installation.
EN / 54
Page 56
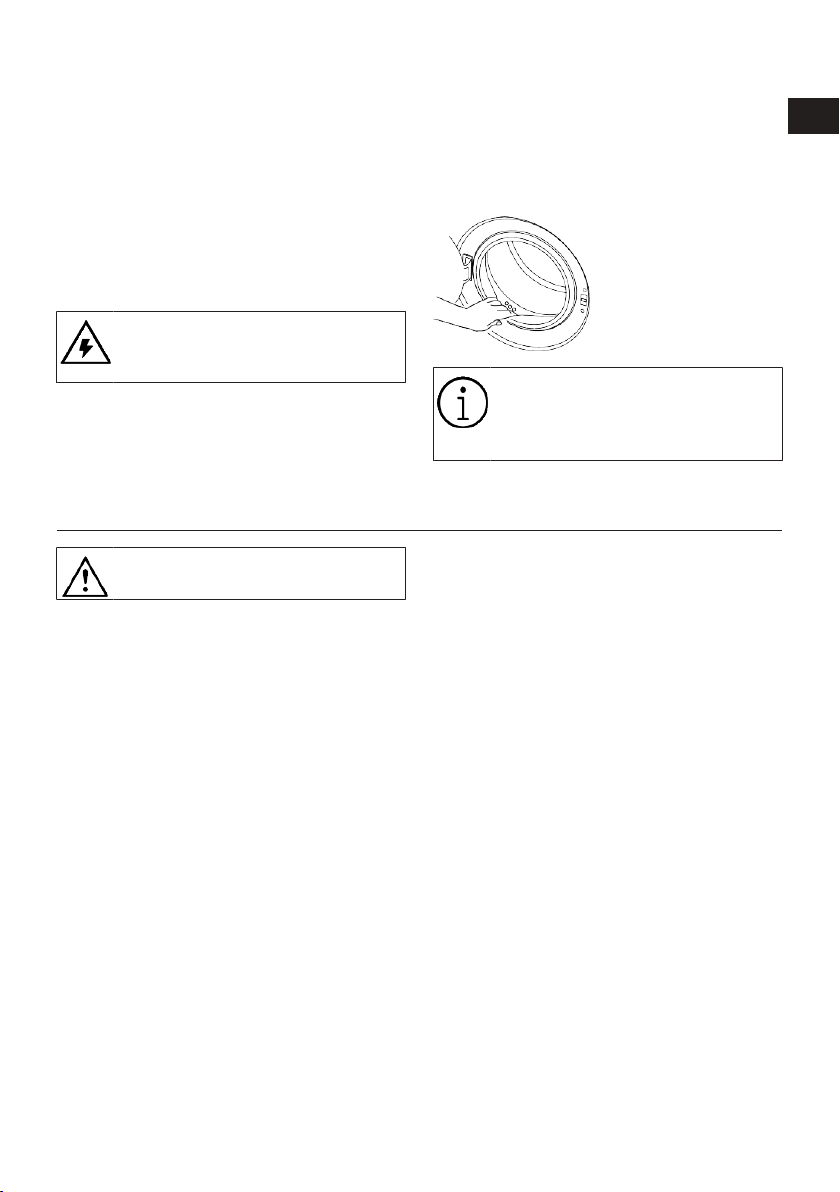
• If the current supply to the fuse or
breaker in the house is less than 16
Amps, have a qualified electrician install
a 16 amp supply.
• The voltage specified in the "Technical
specifications" section must be equal to
your mains voltage.
• Do not make connections via extension
cables or multi-plugs. Overheating and
burning may occur due to the connecting
cable.
Damaged power cables should be
replaced by the authorised service
in order to prevent possible danger.
4.8 Start Up
Before starting to use the product make
sure that the preparations described in section “Environmental instructions” and “In-
5 Preliminary Preparation
stallation”. To prepare the product for
washing laundry, perform first operation in
Drum Cleaning programme. If this programme is not available in your product, apply the method which is described in section "Cleaning the loading door and the
drum".
Some water has remained in the
product due to the quality control
processes in the production. It is
not harmful for the product.
RO
EN
Please read the “Safety Instructions” section first!
5.1 Sorting the Laundry
• Sort laundry according to type of fabric,
colour, and degree of soiling and allowable water temperature.
• Always observe the instructions given on
the garment care labels.
5.2 Preparing Laundry for Washing
• Laundry items with metal attachments
such as, underwiring, belt buckles or
metal buttons will damage the product.
Remove the metal pieces or wash such
clothes by putting them in a laundry bag
or pillow case.
• Take out all substances in the pockets
such as coins, pens and paper clips, and
turn pockets inside out and brush. Such
objects may damage the product or
cause noise problem.
• Put small size clothes such as infant’s
socks and nylon stockings in a laundry
bag or pillow case.
• Place curtains in without compressing
them. Remove curtain attachment items.
Curtain attachment items may cause
pulling and tearing on the curtain.
• Fasten zippers, sew loose buttons and
mend rips and tears.
• Wash “Machine washable” or “Hand
washable” labelled products only with an
appropriate programme.
• Do not wash colours and whites together.
New, dark coloured cottons release a lot
of dye. Wash them separately.
• Tough stains must be treated properly
before washing.
• Wash trousers and delicate laundry
turned inside out.
• Laundry that are subjected to materials
such as flour, lime dust, milk powder, etc.
intensely must be shaken off before placing into the product. Such dusts and
powders on the laundry may build up on
the inner parts of the product in time and
can cause damage.
EN / 55
Page 57
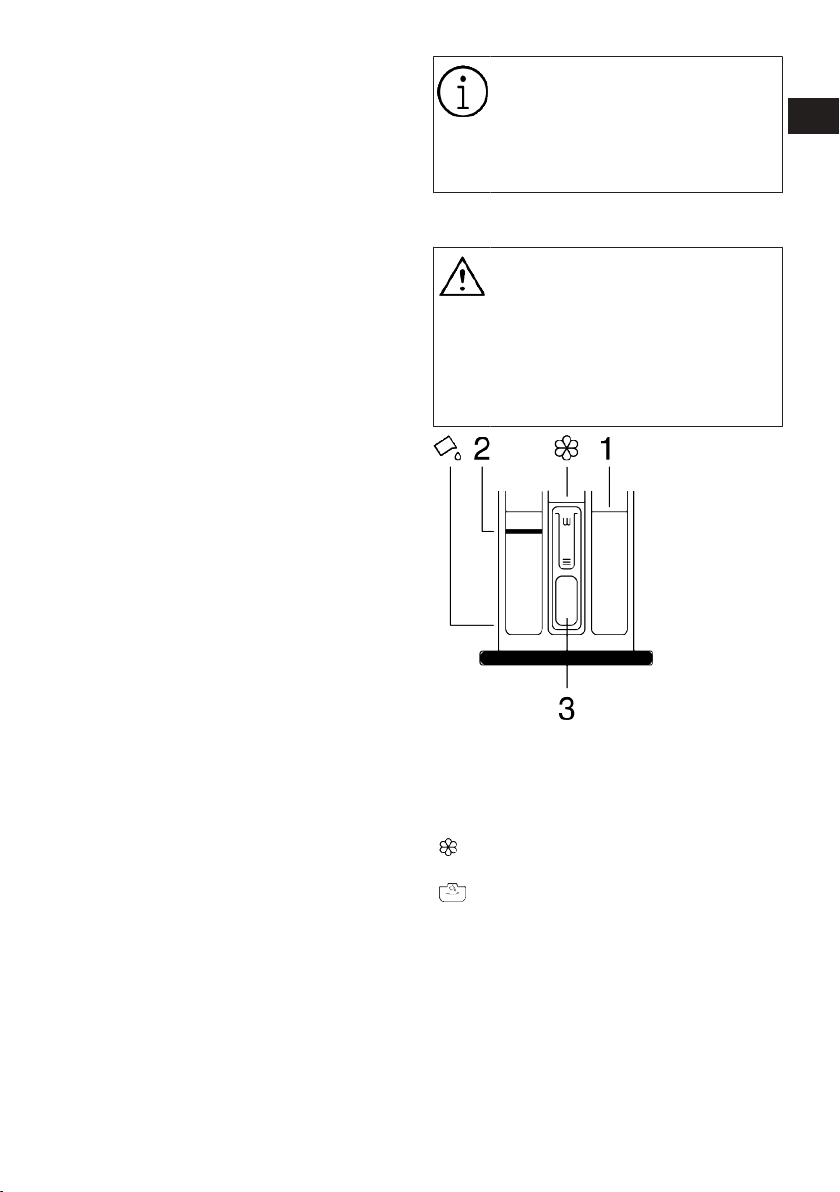
5.3 Tips for Energy and Water Saving
Following information will help you use the
product in an ecological and energy/waterefficient manner.
• Operate the product in the highest load
capacity allowed for the programme you
have selected, but do not overload. See
"Programme and consumption table"
• Observe the temperature instructions on
the detergent packaging.
• Wash slightly soiled laundry at low tem-
peratures.
• Use faster programmes for small quantit-
ies of lightly soiled laundry.
• Do not use prewash and high temperat-
ures for laundry that is not heavily soiled
or stained.
• If you plan to dry your laundry in a dryer,
select the highest spin speed recommended during washing process.
• Do not use more detergent than the re-
commended amount on the detergent
packaging.
5.4 Loading the Laundry
1. Open the loading door.
2. Put the laundry items into the product in
a loose manner.
3. Push the loading door to close until you
hear a locking sound. Ensure that no
items are caught in the door. The loading door is locked while a programme is
running. The door lock will open once
the programme is completed. Then you
can open the loading door. If the door
does not open, apply the solutions
provided for “Loading door cannot be
opened” error in the Troubleshooting
section.
5.5 Correct Load Capacity
The maximum load capacity depends on
the type of laundry, the degree of soiling
and the desired washing programme.
The product automatically adjusts the water amount according to the weight of the
laundry put inside it.
Follow the instructions in “Programme and consumption table”.
When the appliances is overloaded
product’s washing performance will
drop. Moreover, noise and vibration
problems may occur.
5.6 Using Detergent and Softener
WARNING
Read the manufacturer instructions
on the package while using detergents, softeners, starch, bleach and
decolourants, anti-limescale and
follow the dosage information
provided. Use a measuring cup, if
any.
The detergent drawer comprises of three
compartments:
(1) for prewash,
(2) for main washing,
(3) for softener,
( ) a syphon piece in the softener compartment,
( ) there is a liquid detergent apparatus
for liquid detergent use in the main washing compartment.
Detergent, Softener and Other Cleaning
Agents
• Add detergent and softener before starting the washing programme.
• Do not leave the detergent drawer open
when the washing programme is on.
EN / 56
RO
EN
Page 58
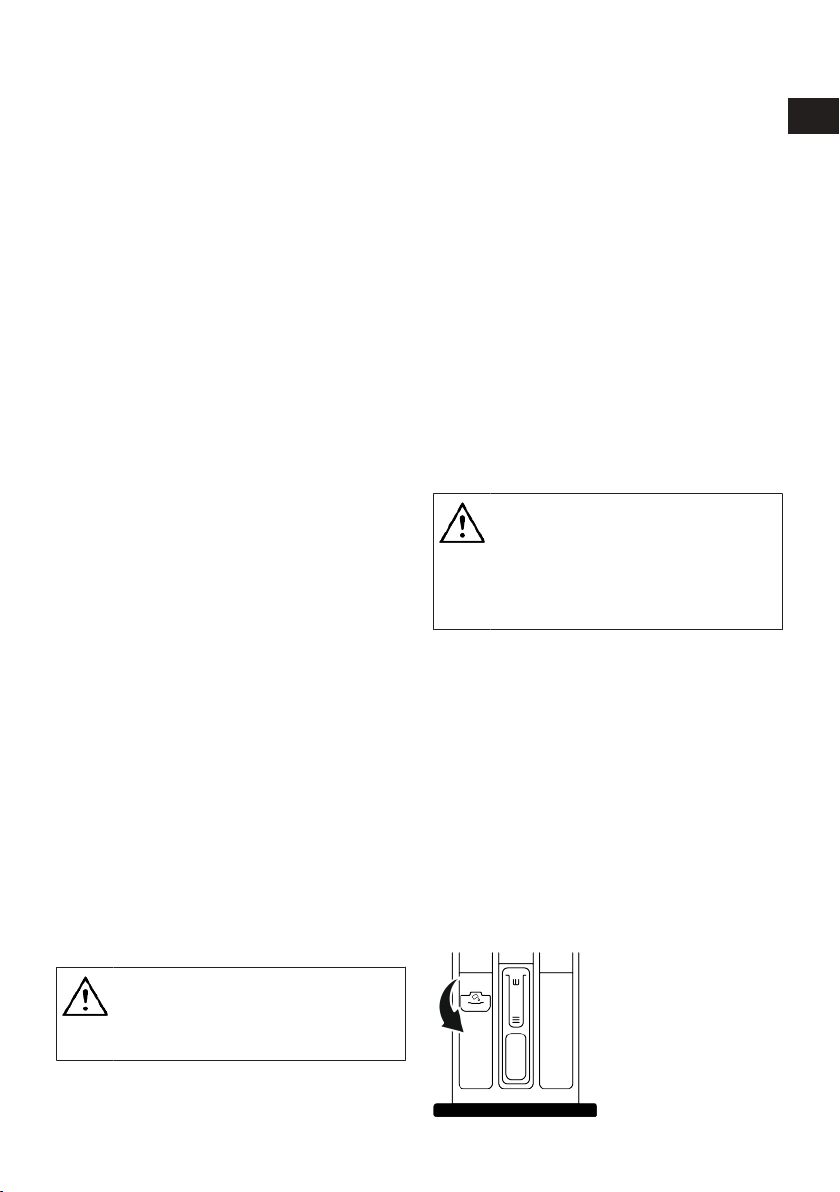
• If you are using a programme without
pre-washing, do not put detergent in the
pre-wash compartment (compartment
no. “1”).
• If you are using a program with prewash,
start the machine after adding powder
detergent to the prewash and main wash
compartments (compartments 1 and 2).
• Do not select a programme with prewashing if you are using a detergent pod
or dispensing ball. Place the detergent
pod or the dispensing ball directly among
the laundry in the product.
• If you are using a liquid detergent, follow
the directions under “Liquid detergent
use” and do not forget to bring the liquid
detergent apparatus to the correct position.
Choosing the Detergent type
Detergent type to be used depends on the
washing programme, fabric type and colour.
• Use different detergents for coloured and
white laundry.
• Wash your delicate clothes only with special detergents (liquid detergent, wool
shampoo, etc.) intended solely for delicate clothes and at suggested programmes.
• When washing dark coloured clothes and
quilts, it is recommended to use liquid
detergent.
• Wash woollens at suggested programme
with special detergent made specifically
for woollens.
• Please review the programme descriptions part for suggested programme for
different textiles.
• All recommendations about detergents
are valid for selectable temperature
range of programmes.
Adjusting the Detergent Amount
The amount of detergent depends on the
amount of laundry, how soiled they are and
the water hardness.
• Do not exceed the recommended dosage
values on the detergent packaging in order to eliminate excessive foam and poor
rinsing problems, to save money and protect the environment.
• Use less amounts of detergent for fewer
or less soiled laundry.
Using Softeners
Put the softener in the softener compartment of the detergent drawer.
• Do not exceed the (>max<) level sign in
the softener compartment.
• If the softener is not fluid, dilute with water before placing in the softener compartment.
WARNING
Do not use liquid detergents or
other materials with cleaning properties unless they are intended for
use in washing machines for
softening the laundry.
Using Liquid Detergents
If the Product Has a Liquid Detergent
Apparatus
• Press and rotate the apparatus at where
it is shown when you want to use liquid
detergents. The part falling below will
serve as a barrier for liquid detergent.
• Clean with water at its place or by removing from its place when it is necessary.
Do not forget to place the apparatus in
the main washing compartment (compartment no. “2”) after cleaning.
• The apparatus should be up if you will
use a powder detergent.
RO
EN
Only detergents, softeners and additives suitable for washing machines should be used.
Do not use soap powder.
EN / 57
Page 59
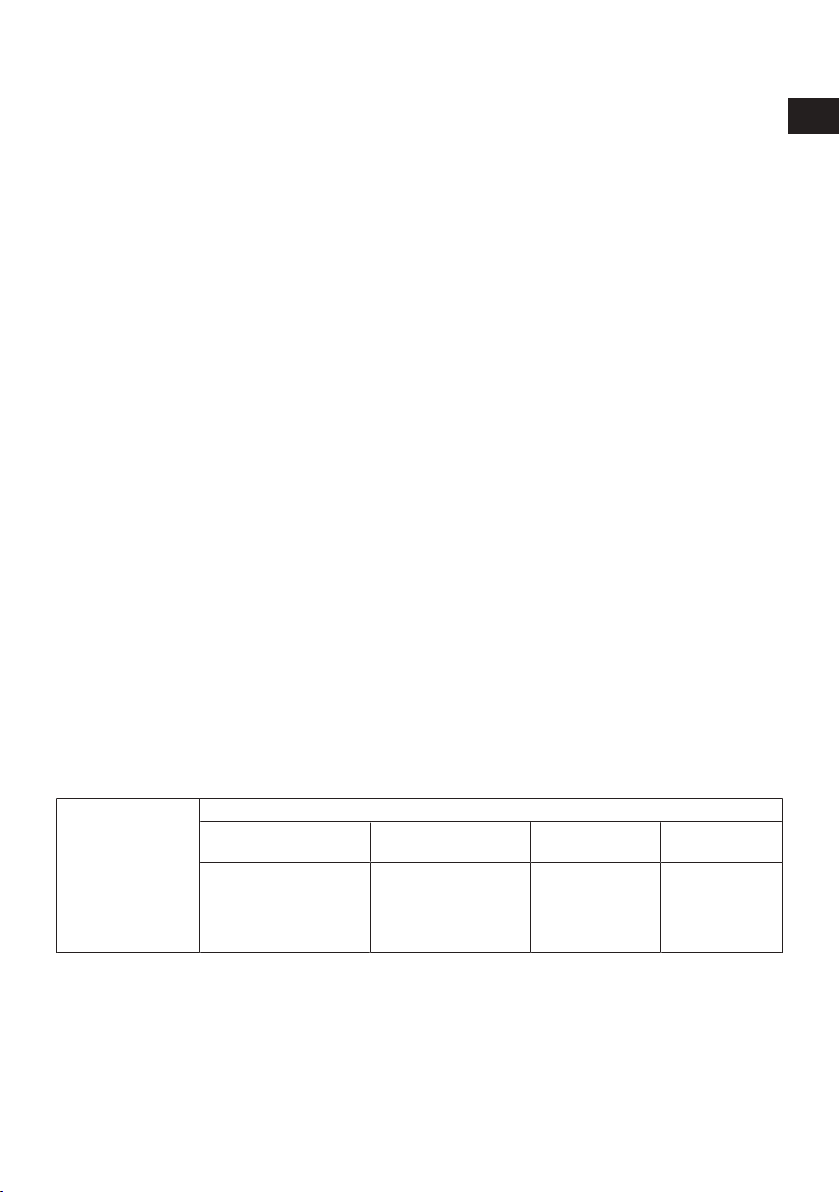
Use of Gel and Tablet Detergents
• If the detergent is fluid and there is no liquid detergent compartment in your
product, place the gel detergent in the
main washing detergent compartment in
first water intake. If your product has a liquid detergent compartment, fill the compartment with detergent before starting
the programme.
• If the gel detergent is not fluid or is in a
capsule liquid tablet, place directly inside
the drum before washing.
• Put the tablet detergent in the main
washing compartment (compartment no.
“2”) or directly inside the drum before
washing.
Using Starch
• Put in the liquid starch, powder starch or
fabric dye in the softener compartment.
• Do not use softener and starch in the
same washing programme simultaneously.
• Wipe the inside of the product with a
damp and clean cloth after using starch.
Using Anti-Limescale
• When necessary, only use anti-limescale
produced for washing machines.
Using Bleach and Decolourants
• Select a programme with pre-washing
and add bleach at the start of pre-washing. Do not put detergent in the pre-wash
compartment. As an alternative application, select a programme with additional
rinsing and add the bleach while the
product is receiving water to the detergent compartment in the first rinsing
step.
• Do not mix and use bleach and detergent
together.
• As bleach may cause skin irritation use
only small amounts (1/2 tea cups - approximately 50 ml and rinse the laundry
well.
• Do not pour bleach directly onto the laundry.
• Do not use bleach for coloured clothes.
• Select a programme with low temperature washing while using oxygen-based
decolourants.
• Oxygen-based decolourants can be used
together with detergents. However, if it
does not have the same viscosity as the
detergent, first place the detergent in
compartment no. “2” in the detergent
drawer and wait for the product to rinse
away the detergent during water intake.
Add the decolourant to the same compartment while the machine continues
taking in water.
RO
EN
5.7 Tips for Efficient Washing
Clothes
Light Colours and
Whites
(Recommended temperature range based on soil
level: 40-90 °C)
Colours
(Recommended temperature range based on
soil level: cool -40 °C)
EN / 58
Black/Dark Colours
(Recommended
temperature range
based on soil level:
cool -40 °C)
Delicates/Woollens/Silks
(Recommended
temperature
range based on
soil level: cool -30
°C)
Page 60
Soiling Level
Heavily Soiled
(difficult stains
such as grass,
coffee, fruits
and blood.)
Normally
Soiled
(For example,
stains caused
by body on collars and cuffs)
Lightly Soiled
(No visible
stains exist.)
It may be necessary to
pre-treat the stains or perform prewash.
Powder and liquid detergents recommended for
whites can be used at
dosages recommended
for heavily soiled clothes.
It is recommended to use
powder detergents to
clean clay and soil stains
and the stains that are
sensitive to bleaches.
Powder and liquid detergents recommended for
whites can be used at
dosages recommended
for normally soiled
clothes.
Powder and liquid detergents recommended for
whites can be used at
dosages recommended
for lightly soiled clothes.
Powder and liquid detergents recommended for
colours can be used at
dosages recommended
for heavily soiled
clothes. It is recommended to use powder detergents to clean clay
and soil stains and the
stains that are sensitive
to bleaches. Detergents
which do not contain decolourant should be
used.
Powder and liquid detergents recommended for
colours can be used at
dosages recommended
for normally soiled
clothes. Detergents
which do not contain decolourant should be
used.
Powder and liquid detergents recommended for
colours can be used at
dosages recommended
for lightly soiled clothes.
Detergents which do not
contain decolourant
should be used.
Liquid detergents
suitable for colours
and black/dark colours can be used at
doses recommended for heavily
soiled clothes.
Liquid detergents
suitable for colours
and black/dark colours can be used at
doses recommended for moderately
soiled clothes.
Liquid detergents
suitable for colours
and black/dark colours can be used at
doses recommended for lightly
soiled clothes.
Prefer liquid detergents produced
for delicate
clothes. Woollen
and silk clothes
must be washed
with special woollen detergents.
Prefer liquid detergents produced
for delicate
clothes. Woollen
and silk clothes
must be washed
with special woollen detergents.
Prefer liquid detergents produced
for delicate
clothes. Woollen
and silk clothes
must be washed
with special woollen detergents.
RO
EN
5.8 Displayed Programme Duration
You can view the programme duration on
the display of your machine while selecting
a programme. Depending on the amount of
laundry you have loaded into your machine,
foaming, unbalanced load conditions, fluctuations in power supply, water pressure
and programme settings, the programme
duration is automatically adjusted while the
programme is running.
6 Operating the Product
Please read the “Safety Instructions” section first!
SPECIAL CASE: At programme start of Cottons and Cotton Eco programmes, display
shows the duration of half load. It is the
most common use case. After programme
starts, in 20-25 minutes actual load is detected by the machine. And if the detected
load is higher than half load; washing programme will be adjusted accordingly and
programme duration increased automatically. You can follow this change on the display.
EN / 59
Page 61
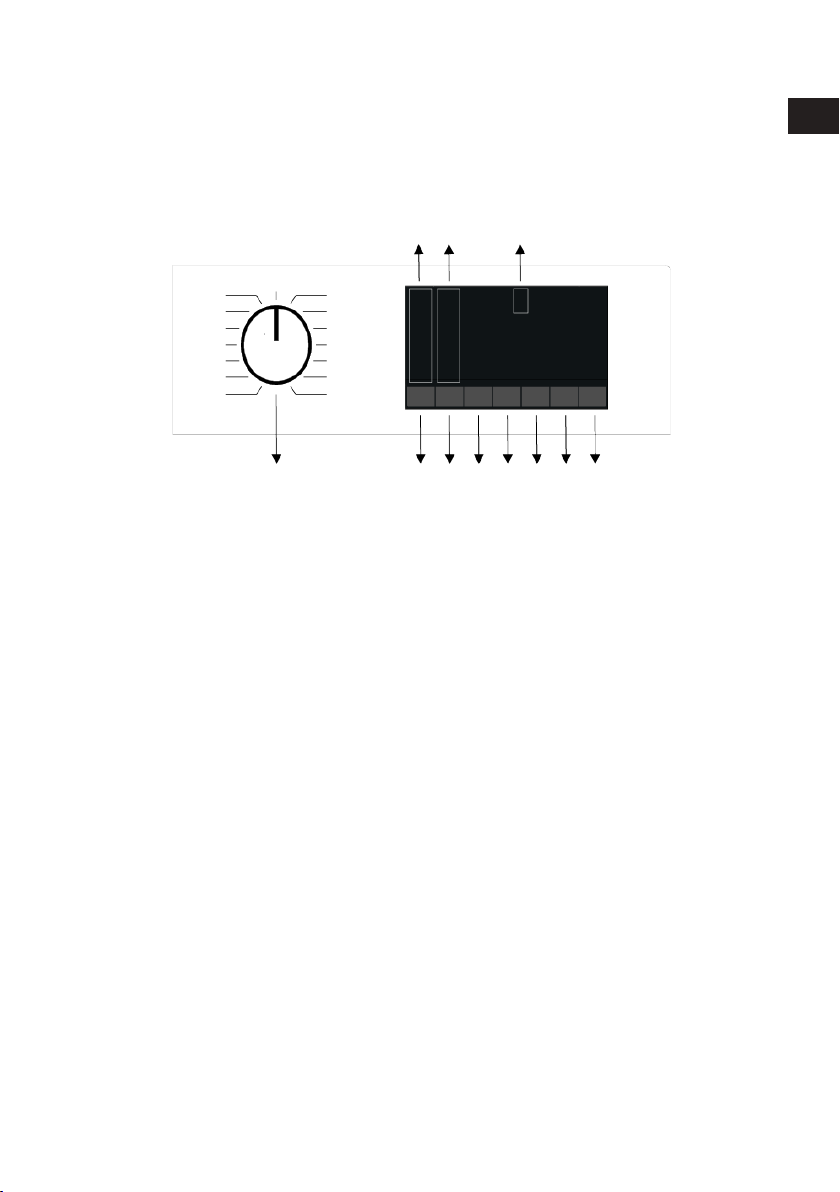
6.1 Control Panel
1
2 3 4
567891011
RO
EN
1 Programme Selection Button 2 Temperature Level Indicator Lights
3 Spin Level Indicator Lights 4 Display
5 Start/Pause Button 6 End Time Setting Button
7 Auxiliary Function Button 3 8 Auxiliary Function Button 2
9 Auxiliary Function Button 1 10 Spin Speed Adjustment Button
11 Temperature Setting Button
EN / 60
Page 62
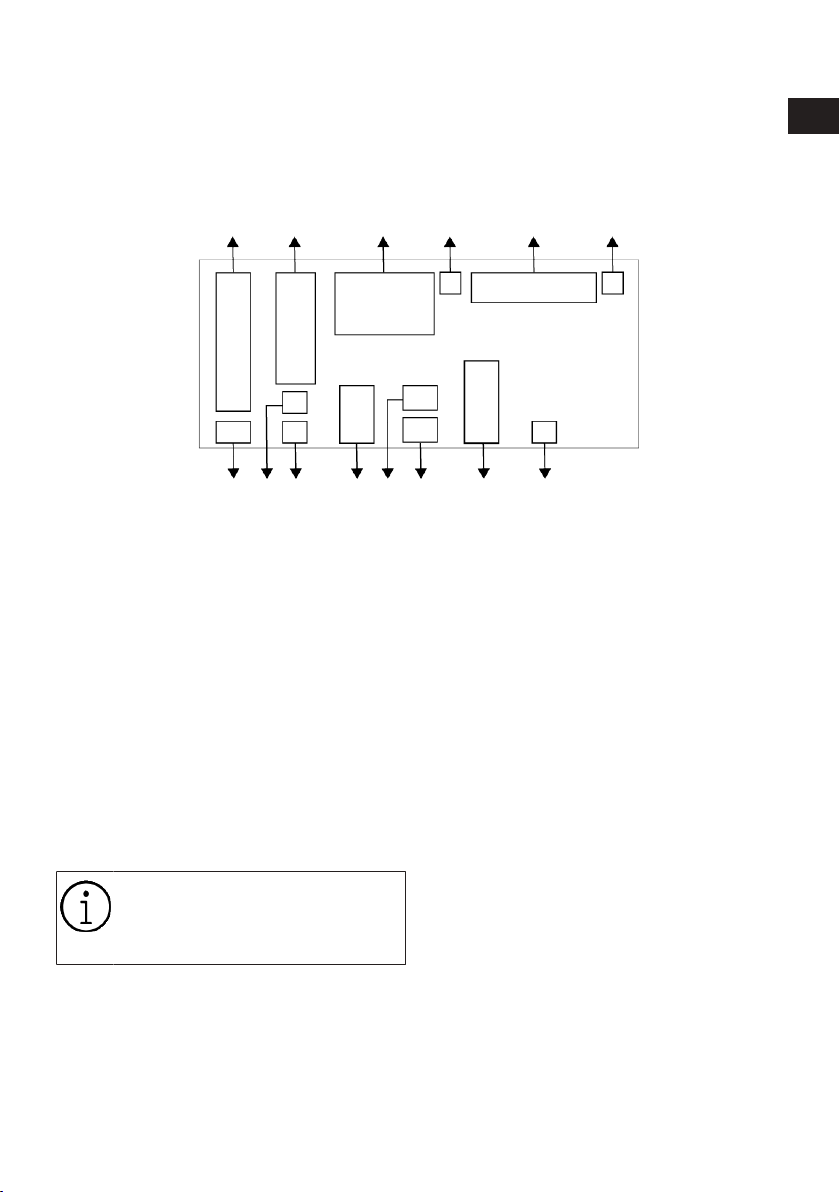
6.2 Symbols on the Display
1 2 3 4 5 6
7891011121314
RO
EN
1 Temperature Indicator 2 Spin Speed Indicator
3 Duration Information 4 Door Lock Is Engaged Symbol
5 Programme Follow-up Indicator 6 No Water Indicator
7 Delayed Start Enabled Indicator 8 Auxiliary Function Indicators 3
9 Auxiliary Function Indicators 2 10 Child Lock Enabled Symbol
11 Auxiliary Function Indicators 1 12 No Spin Indicator
13 Rinse Hold Indicator 14 Cold Water Indicator
The visuals used for machine description in this section are schematic and may not match exactly
with the features of your machine.
EN / 61
Page 63
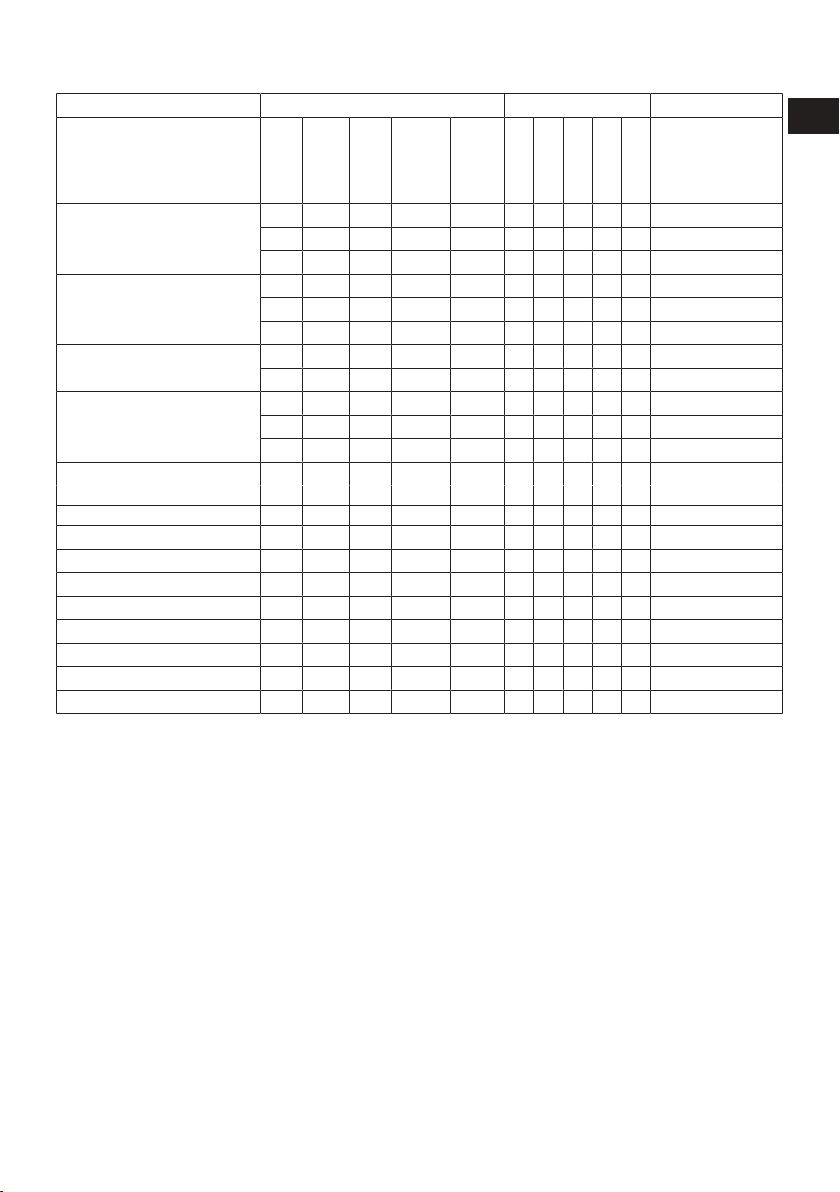
6.3 Programme and Consumption Table
EN
Auxiliary functions
RO
EN
Program
consumption
(lt)
°C
load (kg)
Maximum
Water
Energy
consumption
(kWh)
Max RPM
Fast/Intense
•
•
•
•
•
•
•
•
Prewash
Steam
Temperature
90 10 98 2,60 1400 • • • • • Cold - 90
Bumbac
Eco 40-60
Sintetice
Spalare rapidă / Expres 14'
Spalare rapidă / Expres 14' +
Fast/intense
Delicate/Lâna/Spălare Manuală
Jeans / Culori Inchise 40 5 86 0,74 1200 • • * Cold - 40
Mix 40 4 83 0,80 800 • • Cold - 40
Curăţare cuva 90 - 80 2,30 600 * 90
Antialergic+ 90 9 125 3,00 1400 * * 20-90
Anti-Pete 60 5 86 1,85 1400 • 30-60
Cămăşi 60 4 70 1,40 800 • * • • Cold - 60
împrospătare cu abur - 1 1,5 0,11 - *
Spălare la rece - 5 55 0,30 1400
60 10 98 1,54 1400 • • • • • Cold - 90
40 10 95 1,03 1400 • • • • • Cold - 90
40*** 10 67 0,820 1400 40-60
40*** 5 56 0,556 1400 40-60
40*** 2,5 38 0,276 1400 40-60
60 4 76 1,08 1200 • • • • • Cold - 60
40 4 74 0,62 1200 • • • • • Cold - 60
90 10 75 2,19 1400 • • Cold - 90
60 10 75 1,11 1400 • • Cold - 90
30 10 75 0,20 1400 • • Cold - 90
30 2 45 0,10 1400 • • Cold - 90
40 2 60 0,54 800 • Cold - 40
Extra rinse
SaveWater
Temperature °C
Cold
Cold
• : Selectable.
* : Automatically selected, cannot be cancelled.
*** : Eco 40-60 programme is a test programme according to 40 ° C temperature
selection, EU regulation EU / 2019/2014
and EN 60456: 2016 / A11: 2020 standard.
- : See the programme description for maximum load.
EN / 62
Page 64
Please read Installation section of
the manual before first use.
The auxiliary functions in the table
may vary according to the model of
your machine.
Water and energy consumption
may vary subject to the changes in
water pressure, water hardness and
temperature, ambient temperature,
type and amount of laundry, selection of auxiliary functions and spin
speed, and changes in electric
voltage.
Selection patterns for auxiliary
functions can be changed by the
manufacturer company. New selection patterns can be added or removed.
The spin speed of your machine
may vary according to the programme; this spin speed cannot exceed the max. spin speed of your
machine.
The amount of noise and humidity
varies according to the spin speed;
when the higher spin speed is selected during the spinning phase,
the laundry contains less moisture
but higher noise occurs at the end
of the programme.
You can see the washing duration
on the display of your machine
while selecting a programme. Depending on the amount of laundry
you have loaded into your machine,
there may be a difference of 1-1.5
hours between the duration shown
on the display and the actual duration of the wash cycle. Duration will
be automatically updated soon
after the washing starts.
Always select the lowest appropriate temperature. The most efficient
programmes in terms of energy
consumption are generally those
that wash at low temperatures for a
long time.
RO
EN
Consumption values (EN)
Temperature Selection °C
Eco 40-60
Bumbac
Sintetice 40 1200 4 02:20 0,620 74,0 40 40
Spalare
rapidă / Expres 14'
The consumption values given for programs other than the Echo 40-60 program are indicative only.
Tightening
Speed
(rpm)
40 1400 10,0 03:48
40 1400 5 02:53
40 1400 2,5 02:53
20 1400 10 03:40 0,490 95,0 20 53,9
60 1400 10 03:40 1,540 98,0 60 53,9
30 1400 10 00:28 0,200 75,0 23 62
Capacity
(kg)
Program
duration
(h:min)
Energy consumption
(kWh/
cycle)
0,820 67,0 33 51,0
0,556 56,0
0,276 38,0 22 56,0
Water consumption
(litres/
cycle)
Laundry
temperature (°C)
31
% Of remaining humidity (%)
53,8
EN / 63
Page 65
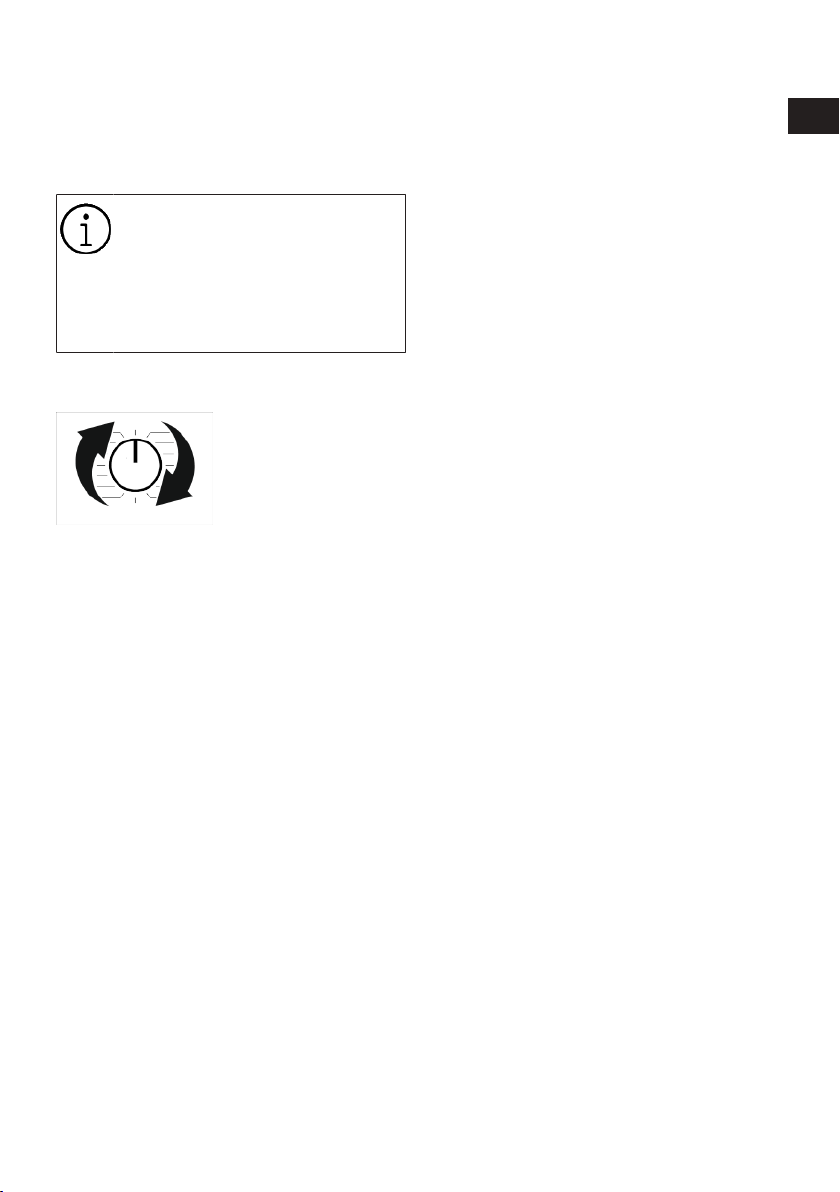
6.4 Programme Selection
1. Determine the programme suitable for
the type, quantity and soiling level of the
laundry in accordance with "Programme
and consumption table".
Programmes are limited with the
highest spin speed appropriate for
that particular type of fabric.
When selecting a programme, always consider the type of fabric,
colour, degree of soiling and permissible water temperature.
2. Select the desired programme with the
Programme Selection knob.
6.5 Programmes
• SaveInAll
It ensures more effective use of your detergent with high mechanical movement during washing. Thus, it preserves your washing quality without the need to apply to heat
your laundry for a long time and reduces
your energy consumption.
This technology is used in programs that
contain symbols or colours displayed on the
panel.
• Eco 40-60
In the Eco 40-60 programme, you may wash
normally soiled cotton laundry that are
specified to be washed together at 40°C or
60°C. This programme is the stand-ard test
programme according to the EU
environmentally friendly design and energy
labelling regulations.
Although this programme washes longer
than other washing programmes, it is more
efficient in terms of energy and water consumption. Actual water temperature may be
different from the stated wash temperature. When you load the machine with less
laundry (e.g. ½ capacity or less), periods in
EN / 64
programme stages may automatically get
shorter. In this way, energy and water consumption would be much less.
• Bumbac
You can wash your durable cotton laundry
(sheets, bedlinen, towels, bathrobes, underwear etc.) in this programme. When the
quick wash function button is pressed, programme duration becomes notably shorter
but effective washing performance is ensured with intense washing movements. If
the quick wash function is not selected, effective washing and rinsing performance is
ensured for your heavily soiled laundry.
• Sintetice
You can wash your laundry (such as shirts,
blouses, synthetic/cotton blended fabrics
etc.) in this programme. When the quick
wash function button is pressed, the programme duration will be shortened significantly and effective washing performance is
provided for your laundry that is not very
dirty. If the quick wash function is not selected, effective washing and rinsing performance is ensured for your heavily soiled
laundry.
• Delicate / Lâna/Spălare Manuală
Use to wash your woollen/delicate laundry.
Select the appropriate temperature complying with the tag of your clothes. Your laundry will be washed with a very gentle washing action in order not to damage the
clothes.
• Antialergic+
Applying a steam step at the beginning of
the programme allows to soften the dirt
easily.
Use this programme for your laundry (baby
clothes, bed sheets, bedlinen, underwear,
etc. cotton items) that requires an anti-allergic and hygienic washing at high temperature with intensive and long washing
cycle. The high level of hygiene is ensured
thanks to the steam application before the
programme, long heating duration and additional rinsing step.
RO
EN
Page 66
• Stoarcere + Evacuare
You can use this program to remove the
water on the garment/inside the machine.
• Clătire
Use when you want to rinse or starch separately.
• împrospătare cu abur
Use this programme to reduce the creases
and ironing times of a small amount of unspotted cotton, synthetic or mixed laundry.
This is not a washing programme.
Do not add chemicals such as detergent, bleach, stain remover, etc.
to the detergent drawer during this
program.
• Cămăşi
This programme is used to wash the shirts
made from cotton, synthetic and synthetic
blended fabrics altogether. It reduces
wrinkles. Steam is applied at the end of the
programme to help the wrinkle reducing
function. The special spin profile and
steam applied at the end of the programme
reduce the wrinkles on your shirts. When
the quick wash function is selected, the
Pre-treatment algorithm is executed.
• Apply the pre-treatment chemical on your
garments directly or add it together with
the detergent in the powder detergent
compartment. Thus, you can obtain the
same performance as you obtain with
normal washing in a much shorter period
of time. Usage life of your shirts increases. Do not use pre-wash detergent
if you are planning to use delay function
of your machine. Prewash detergent may
pour out on your clothes and cause
stains.
** It is recommended to operate the cycle
with no more than 6 shirts to minimize
wrinkles in your shirts using this cycle.
When washing more than 6 shirts, there
may be differences on the wrinkle levels
and humidity on shirts at the end of cycle.
• Spalare rapidă / Expres 14'
Use this programme to wash your lightly
soiled or unspotted cotton clothes in a
short time but not for towels or heavy cottons. The programme duration can be reduced down to 14 minutes when the quick
wash function is selected. When the quick
wash function is selected, maximum 2
(two) kg of laundry must be washed.
• Jeans / Culori Inchise
Use this programme to protect the colour
of your dark-coloured garments or jeans. It
performs high performance washing with
special drum movement even if the temperature is low. It is recommended to use liquid detergent or woollen shampoo for
dark coloured laundry. Do not wash your
delicate clothes containing wool or etc.
• Curăţare cuva
Regularly clean (once every 1 to 2 months)
the drum for ensuring the required hygiene.
Turn on the programme when the machine
is completely empty. For better results, use
powder anti-limescale (drum cleaning materials) suitable for washing machines
when the powder detergent function is selected. Leave the loading door half closed
after the programme ends for the inside of
the machine to dry.
This is not a washing programme.
This is a maintenance programme.
Do not turn this programme on
when there is something inside the
machine. When you attempt to operate, the machine automatically
senses that there is load inside, and
may quit or resume the programme
as per the model of your machine.
An effective cleaning is not
achieved if the programme is resumed.
• Mix
Use to wash your cotton and synthetic
clothes together without sorting them.
RO
EN
EN / 65
Page 67
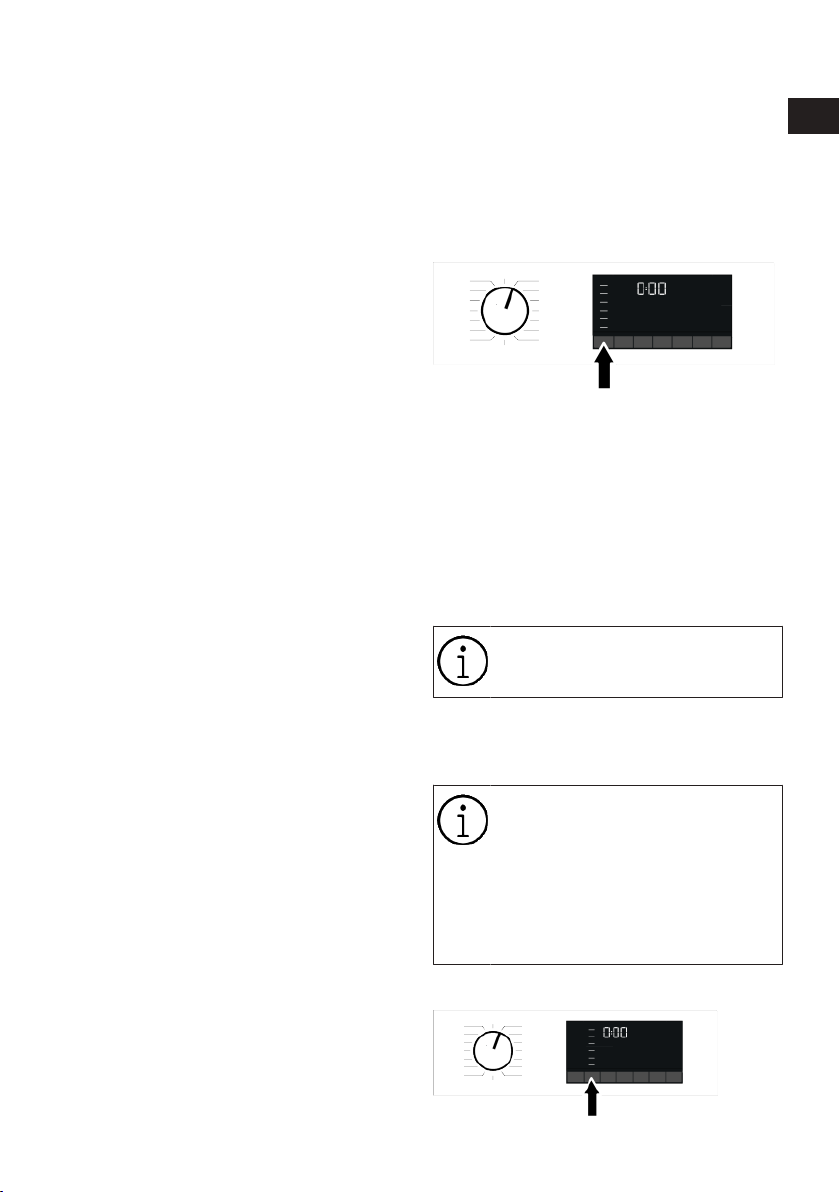
• Spălare la rece
Use to wash your medium dirty and durable
cotton/synthetic laundry. Thanks to the
washing algorithm specially developed for
the program, effective washing is ensured
without exposing the laundry to high temperatures.
• Anti-Pete
The machine has a special stain programme which enables the removal of different types of stains in the most effective
way. Use this programme only for durable
colourfast cotton laundry. Do not wash delicate and pigmenting clothes and laundry in
this programme. Before washing, make
sure to check garment tags (recommended
for cotton shirts, trousers, shorts, t-shirts,
baby clothes, pyjamas, aprons, table
clothes, bed sheets, duvet covers, pillowcases, bath-beach towels, towels, socks,
cotton underwear that are suitable for
washing at high temperature and for a long
time). In the automatic stain programme,
you can wash 24 types of stains divided
into three different groups according to
"Quick wash" function selection. You can
see stain groups that can be selected with
the “Quick Wash” button. Depending on the
selected stain group, a special washing
programme for which duration of rinse
hold, washing action, washing and rinsing
duration are modified.
Below you can find the soil groups that
can be selected with the “Quick Wash”
setting button:
When “Quick Wash” is not selected;
Sweat, collar dirt, food, mayonnaise, salad
dressing, make-up, machine oil, baby food.
When the “Quick Wash” button is
pressed once;
Blood, chocolate, pudding, grass, mud,
eggs, butter, curry.
When the “Quick Wash” button is
pressed twice;
Tea, coffee, juice, ketchup, red wine, cola,
jam, coal
1. Select the stain programme.
2. Select the stain you want to clean by
locating it in the groups above and selecting the related group with the quick
auxiliary function button.
3. Read the garment tag carefully and ensure that correct temperature and spin
speed are selected.
6.6 Temperature Selection
Whenever a new programme is selected,
the recommended temperature for the programme appears on the temperature indicator. It is possible that the recommended
temperature value is not the maximum
temperature that can be selected for the
current programme.
Press the Temperature Adjustment button
to change the temperature. Temperature
decreases gradually.
No change can be made in programmes where temperature adjustment is not allowed.
You can also change the temperature after
the washing starts. This change can be
made if the only washing steps allow it.
If you scroll to cold wash option
and press Temperature Adjustment
button again, the recommended
maximum temperature for the selected programme appears on the
display. Press the Temperature Adjustment button again to decrease
the temperature.
6.7 Spin Speed Selection
RO
EN
EN / 66
Page 68
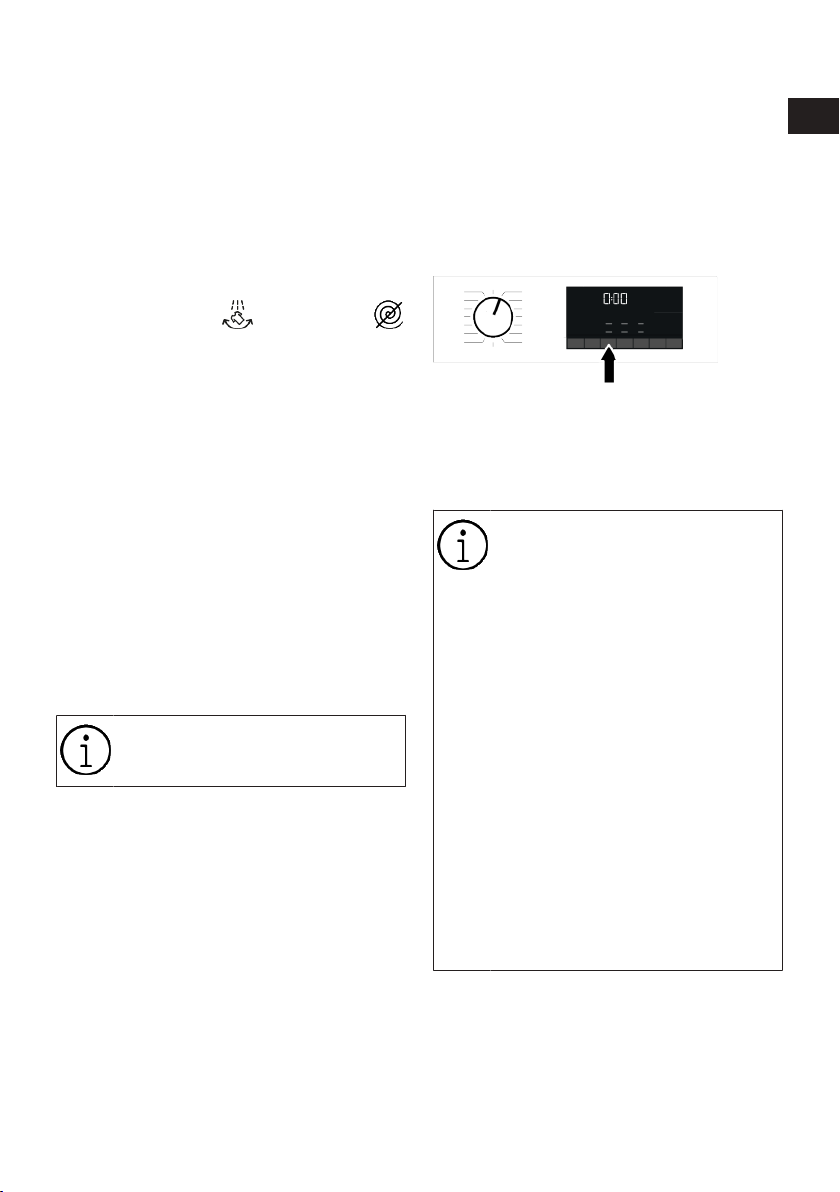
Whenever a new programme is selected,
the recommended spin speed of the selected programme is displayed on the Spin
Speed indicator. It is possible that the recommended spin speed value is not the
maximum spin speed that can be selected
for the current programme.
Press the Spin Speed Adjustment button to
change the spin speed. Spin speed decreases gradually.
Then, depending on the model of the
product, "Rinse Hold
" options appear on the display.
If you are not going to unload your laundry
immediately after the programme completes, you can use Rinse Hold function in
order to prevent them from getting wrinkled
when there is no water in the machine.
This function holds the laundry in the final
rinsing water. If you want to spin your laundry after the Rinse Hold function:
1. Adjust the Spin Speed.
2. Press Start / Pause. The programme will
resume. Machine drains the water and
spins the laundry.
If you want to drain the water at the end of
the programme without spinning, use No
Spin function.
No change can be made in programmes where spin speed adjustment is not allowed.
You can change the spin speed after the
washing starts if the washing steps allow it.
Changes cannot be made if the steps do
not allow it.
Rinse Hold
If you are not going to unload your clothes
immediately after the programme completes, you can use rinse hold function to
keep your laundry in the final rinsing water
in order to prevent them from getting
wrinkled when there is no water in the machine. Press Start/Pause button after this
process if you want to drain the water
" and "No Spin
without spinning your laundry. Programme
will resume and complete after draining the
water.
If you want to spin the laundry held in water, adjust the Spin Speed and press Start/
Pause button. The programme will resume.
Water is drained, laundry is spun and the
programme is completed.
6.8 Auxiliary Function Selection
Select the desired auxiliary functions before starting the programme. Whenever a
programme is selected, icons of the auxiliary function symbol that is selected together with it illuminates.
When an auxiliary function button
that cannot be selected with the
current programme is pressed, the
washing machine will make a warning sound.
Some functions cannot be selected
together. If a second auxiliary function conflicting with the first one is
selected before starting the machine, the function selected first
will be cancelled and the second
auxiliary function selection will remain active.
An auxiliary function that is not
compatible with the programme
cannot be selected (See "Programme and consumption table")
Some programmes have auxiliary
functions that must be operated
simultaneously. Those functions
cannot be cancelled.
6.8.1 Auxiliary Functions
• Fast/Intense
You can shorten or extend the programme
duration with this function. Depending on
the programme selection, there may be differences in time increases and decreases.
EN / 67
RO
EN
Page 69
In case the FAST or INTENSIVE led is not lit,
the appropriate programme duration is
shown for your normally soiled clothes/
laundry.
Depending on the programme selection, the
Intensive feature can be selected automatically. In this case, the Intensive LED on the
panel will be lit. You can use the Intensive
selection to achieve a better washing performance when washing heavily soiled
laundry.
You can reduce the time for your lightly
soiled laundry by pressing the Fast/Intensive button in the programmes which come
with intense being selected. When you
press the button once, the LED will turn off
and you will reach the appropriate programme duration for your normally soiled
clothes/laundry. When you press the same
button a second time, the fast LED will light
up, the time will decrease a little and it will
show the minimum programme duration,
which is suitable for your less soiled laundry. The duration of programmes may
shorten by 50% when this function is selected. Thanks to optimized washing steps,
high mechanical agility and optimal water
consumption, high washing performance is
achieved despite the shorter duration.
• Steam
This function helps to reduce the creases
of your cotton, synthetic and mixed clothes,
shorten the ironing time and remove the
dirt by softening.
* Under conditions where the steam function is applied at the end of the programme,
your laundry may be warmer at the end of
the washing. This is expected within the
programme working conditions.
When you activate the steam function, do not use liquid detergent if
there is no liquid container or liquid
detergent dosing feature. There is
the risk of staining of the clothes.
EN / 68
• Water Mode
This auxiliary function key allows you to select the additional functions of Water Saving, Pre-Wash, and Extra Rinse or Extra water depending on the model of your machine. You can find detailed information
about the selection in the description of the
respective auxiliary function.
• SaveWater
Select this function by pressing the Water
Mode additional function key once for all
programs indicated as selectable in the
Program and Consumption table.
This function is intended for lightly soiled
laundry that requires only a small amount
of detergent (see “Tips for Correct Washing”). It enables environmentally friendly
washing by reducing the amount of water
used, without compromising on washing
performance.
• Extra Rinse
You can use this function for all programs
indicated as selectable in the Program and
Consumption table. Select this function by
pressing the Water Mode key twice for programs where the additional Water Saving
function can be selected, or by pressing the
Water Mode key once for programs where
the additional Water Saving function cannot be selected.
This function enables the product to make
additional rinsing in addition to the one
already made after the main wash. Thus,
the risk for sensitive skins (babies, allergic
skins, etc.) to be effected by the minimal
detergent remnants on the laundry can be
reduced.
6.8.2 Functions/Programmes Selected by Pressing the Function
Keys for 3 Seconds
• Prewash
This function can be selected by pressing
and holding the related auxiliary function
button for 3 seconds.
A Prewash is only worthwhile for heavily
soiled laundry. Not using the Prewash will
save energy, water, detergent and time.
RO
EN
Page 70
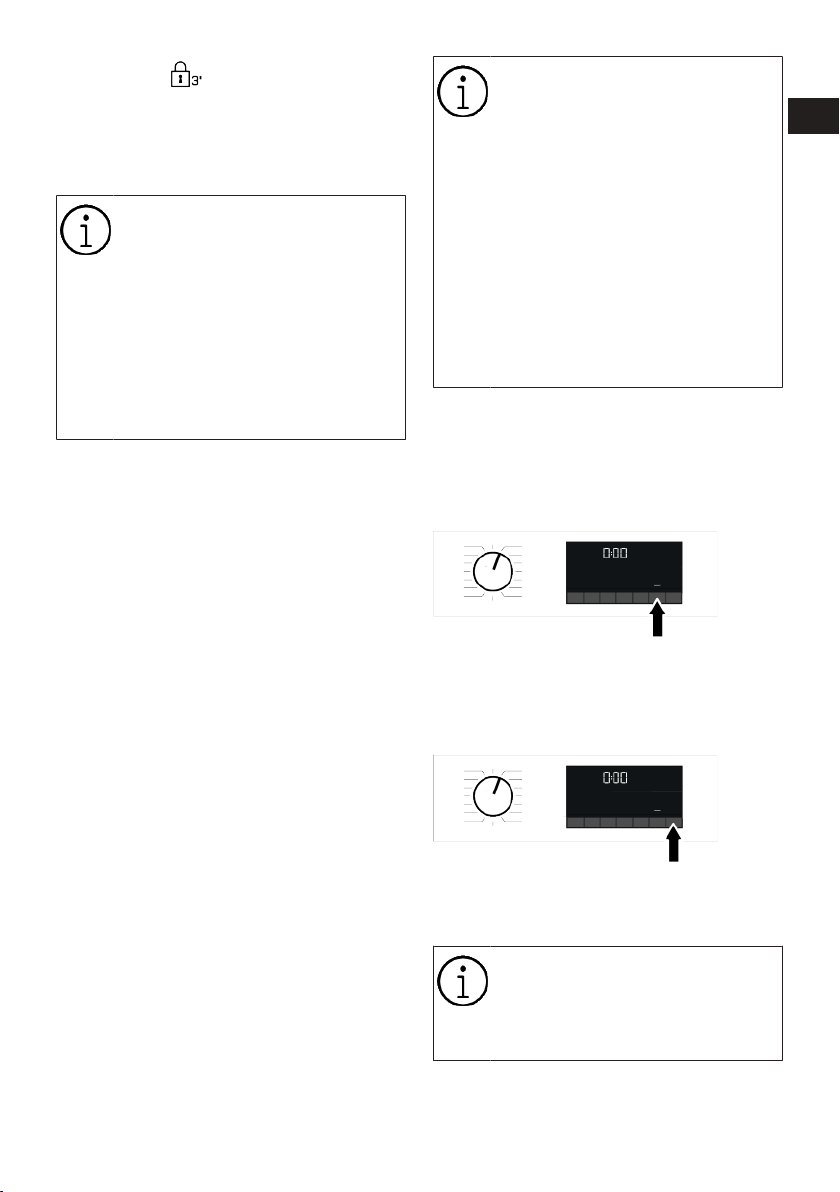
• Child Lock
Use Child Lock function to prevent children
from tampering with the machine. Thus you
can avoid any changes in a running programme.
You can switch on and off the machine with On / Off button when the
Child Lock is active. When you
switch on the machine again, programme will resume from where it
has stopped.
When the Child Lock is enabled, an
audio warning will be given if the
buttons are pressed. Audio warning
will be cancelled if the buttons are
pressed five times consecutively.
To activate the child lock:
Press and hold the related auxiliary function button for 3 seconds. After the countdown as “3-2-1" on the display is over, Child
Lock symbol appears on the display. When
this warning is displayed, you can release
the Auxiliary Function button 3.
To deactivate the child lock:
Press and hold the related auxiliary function button for 3 seconds. After the countdown as “3-2-1" on the display is over, Child
Lock symbol disappears.
6.9 End Time
Time display
When the end time function is selected, the
remaining time until the programme starts
is shown in hours such as 1h, 2h, and the
remaining time to complete the programme
after your programme starts is shown in
hours and minutes as in the 01:30 example.
Programme duration may differ
from the values in section "Programme and consumption table"
depending on the water pressure,
water hardness and temperature,
ambient temperature, amount and
the type of laundry, auxiliary functions selected and the changes at
the mains voltage.
After a certain period of time after
the end time function is activated,
the machine goes into standby
mode and some LEDs on the
screen turn off. If there is any user
input, the LEDs will turn on again.
With the End Time function, the end time of
the programme may be set up to 24 hours.
After pressing End Time button, the programme's estimated ending time is displayed. If the End Time is set, End Time indicator is illuminated.
In order for the End Time function is activated and the programme is completed at
the end of the specified time, you must
press Start/Pause button after adjusting
the time.
If you want to cancel End Time function,
press On/Off button to turn off and on the
machine.
RO
EN
When you have activated the End
Time function, do not add liquid detergent in the powder detergent
compartment no 2. There is the risk
of staining of the clothes
1. Open the loading door, place the laundry
and put detergent, etc.
EN / 69
Page 71
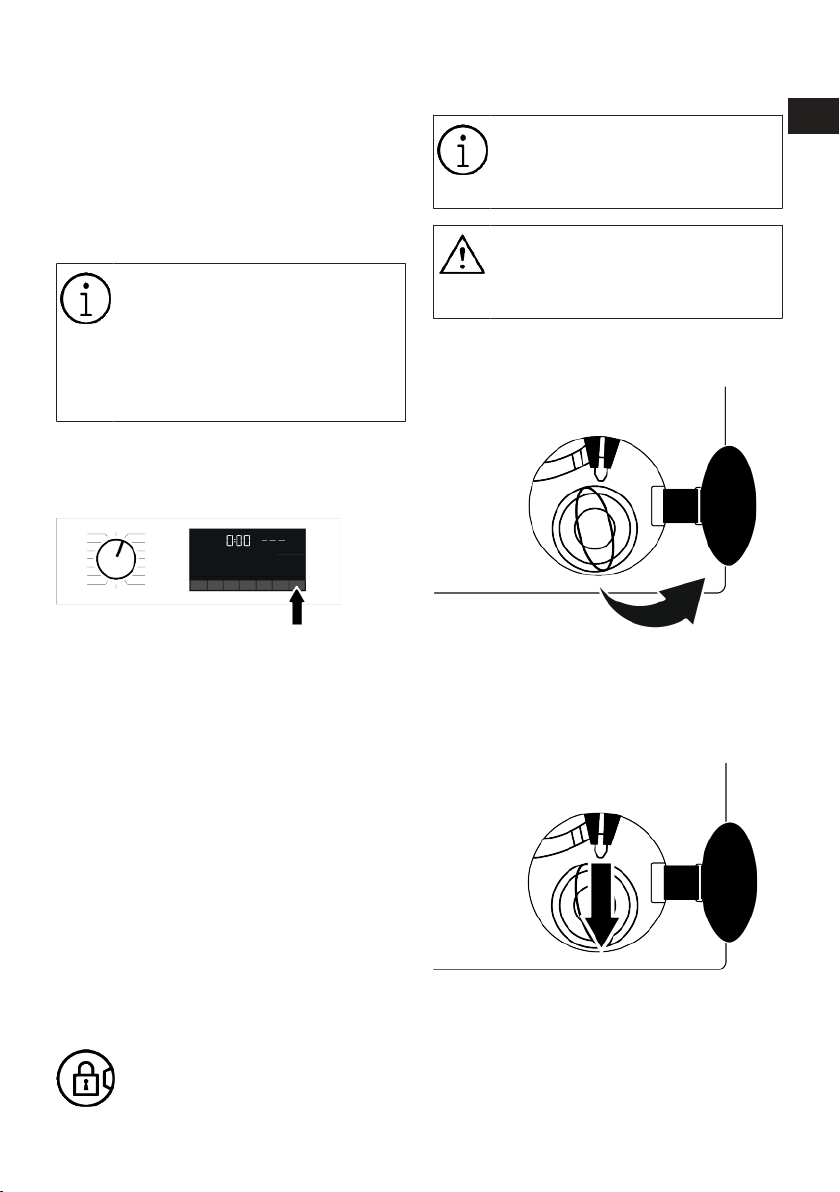
2. Select the washing programme, temperature, spin speed and, if required, the
auxiliary functions.
3. Set the End Time of your choice by
pressing the End Time button. End Time
indicator lights.
4. Press Start / Pause. Time countdown
starts.
Additional laundry can be added
into the machine during the End
Time countdown. At the end of the
countdown, End Time indicator
turns off, washing cycle starts and
the time of the selected programme appears on the display.
6.10 Starting the Programme
1. Press Start / Pause button to start the
programme.
Opening the loading door in case of
power failure:
In case of power failure, you can
use the loading door emergency
handle under the pump filter cap to
open the loading door manually.
To avoid any water overflow before
opening the loading door, make
sure there is no water left inside the
machine.
1. Turn off and unplug the appliance.
2. Open the pump filter lid.
RO
EN
2. The Start / Pause button's light which
was off before starts to illuminate
steadily now, indicating that the programme has started.
3. Loading door is locked. The door lock
symbol appears on the display after the
loading door is locked.
4. Programme follow-up indicator lights on
the display will show the current programme step.
6.11 Loading Door Lock
There is a locking system on the loading
door of the machine that prevents opening
of the loading door in cases when the water
level is unsuitable.
"Door Locked" symbol appears on the display when the loading door is locked.
3. Pull down the loading door emergency
handle with a tool and release. Then
open the loading door.
4. If the loading door does not open then
repeat the previous step.
EN / 70
Page 72
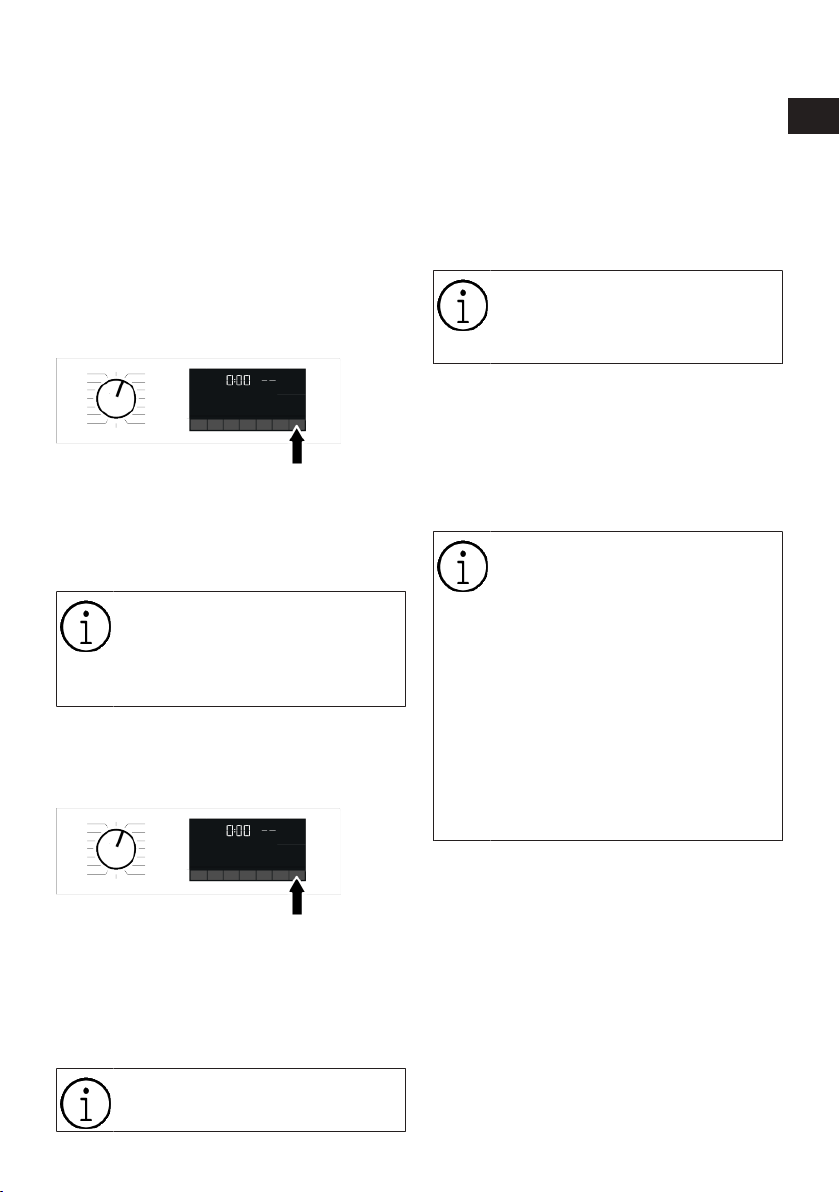
6.12 Changing the Selections After Programme has Started
Adding laundry after the programme has
started:
If the water level in the machine is suitable
when you press Start/Pause button, the
door lock will be deactivated and the door
will open, allowing you to add garments.
The door lock icon on the display goes off
when the door lock is deactivated. After
adding garments, close the door and press
Start/Pause button once again to resume
the washing cycle.
If the water level in the machine is not suitable when you press Start/Pause button,
the door lock cannot be deactivated and
the door lock icon on the display remains
on.
If the temperature of the water inside the machine is above 50°C,
you cannot deactivate the door lock
for safety reasons, even if the water
level is suitable.
Switching the machine to pause mode:
Press the Start/Pause button to switch the
machine to pause mode. Pause symbol will
flash on the display.
Changing the auxiliary function, speed
and temperature:
Depending on the step the programme has
reached, you can cancel or activate the auxiliary functions. See “Auxiliary function selection”
You can also change the speed and temperature settings. See ‘’Spin speed selection" and "Temperature selection".
The loading door will not open if the
water temperature in the machine
is high or the water level is above
the loading door baseline.
6.13 Cancelling the Programme
The programme is cancelled when programme selection knob is turned to a different programme or machine is turned off
and on again using the programme selection knob.
If you turn the programme selection
knob when the Child Lock is enabled, the programme will not be
cancelled. You should cancel the
Child Lock first.
If you want to open the loading
door after you have cancelled the
programme but if it is not possible
to open the loading door since the
water level in the machine is above
the loading door baseline, then turn
the Programme Selection knob to
Pump+Spin programme and drain
the water in the machine.
RO
EN
Changing the programme selection after
programme has started:
The programme change is allowed when
the current programme is running unless
the Child Lock is enabled. This action will
cancel the current programme.
The selected programme starts
anew.
6.14 End of Programme
End symbol appears on the display when
the programme is completed.
If you do not press any button for 10
minutes, the machine will switch to OFF
mode. Display and all indicators are turned
off.
Completed programme steps will be displayed if you press On/Off button.
EN / 71
Page 73
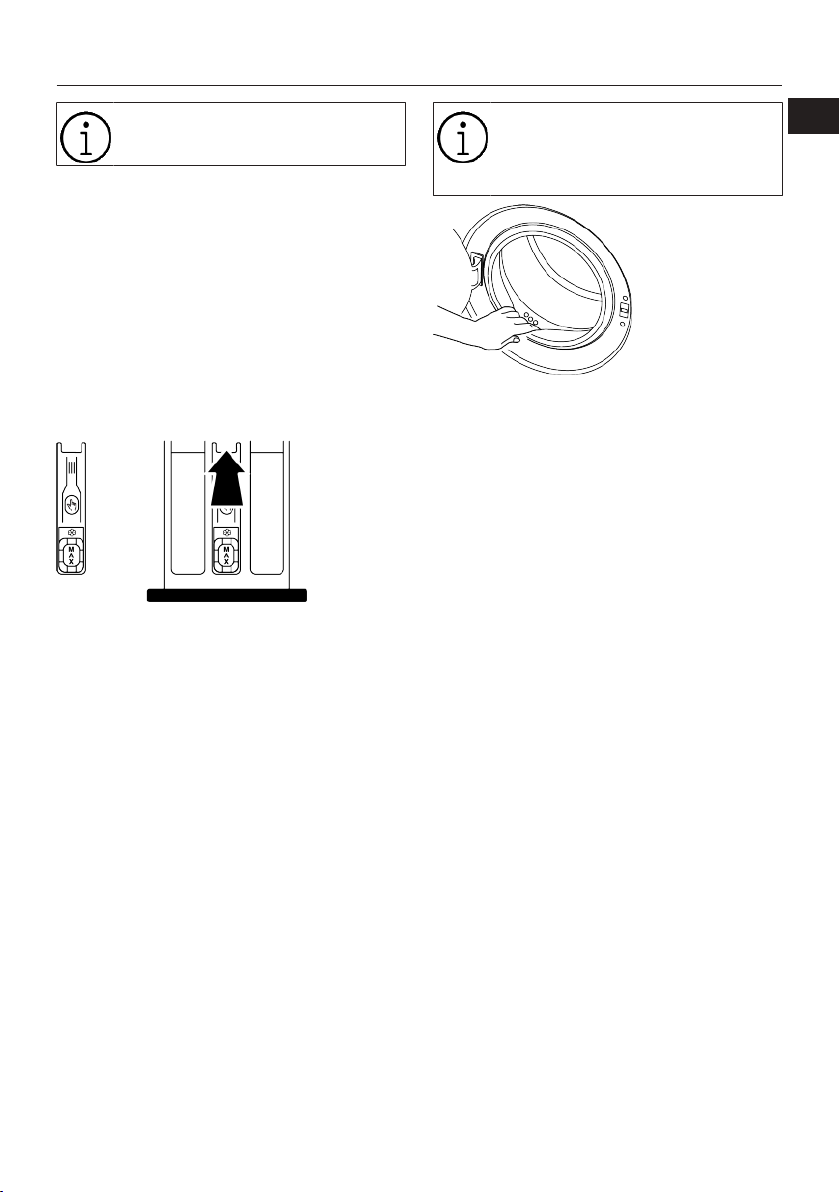
7 Maintenance and Cleaning
RO
Please read the “Safety Instructions” section first!
Service life of your product extends and frequently experienced problems will be reduced if it is cleaned at regular intervals.
7.1 Cleaning the Detergent Drawer
Clean the detergent drawer at regular intervals (once every 4 to 5 wash) as mentioned
below to prevent accumulation of powder
detergent.
Clean the syphon if excess amounts of water and fabric softener mixture remains in
the softener compartment.
1. Press the marked part of the syphon
within the softener compartment and
then pull the drawer towards yourself to
take it out.
2. Lift and remove the syphon from behind
as shown.
3. Rinse drawer and syphon in the sink
with plenty of warm water. Use gloves
or suitable brush to prevent contact of
residues in the drawer with your skin.
4. Firmly fit the syphon and the drawer
back after cleaning.
7.2 Cleaning the Loading Door and
the Drum
For products with drum cleaning programme, please see the Operating the
product section.
Repeat Drum Cleaning process in
every 2 months.
NOTICE: Use an anti-limescale
suitable for the washing machines.
After every washing make sure that no foreign substance is left in the product.
If the holes on the door gasket shown in the
figure is blocked, open the holes using a
toothpick.
Foreign metal substances will cause rust
stains in the drum. Clean the stains on the
drum surface by using cleaning agents for
stainless steel.
Never use steel wool or wire wool. These
will damage the painted, chrome coated
and plastic surfaces.
We recommend you to wipe the door gasket with a dry and clean cloth at the end of
the programme. This will remove residues
on the door gasket in your machine and
prevent formation of malodours.
7.3 Cleaning the Body and Control Panel
Wipe the body of the product with soapy
water or non-corrosive mild gel detergents
as necessary, and dry with a soft cloth.
Use only a soft and damp cloth to clean the
control panel. Do not use cleaning products
that contain bleach
7.4 Cleaning the Water Intake Filters
There is a filter at the end of each water intake valve at the rear of the product and
also at the end of each water intake hose
where they are connected to the tap. These
EN
EN / 72
Page 74
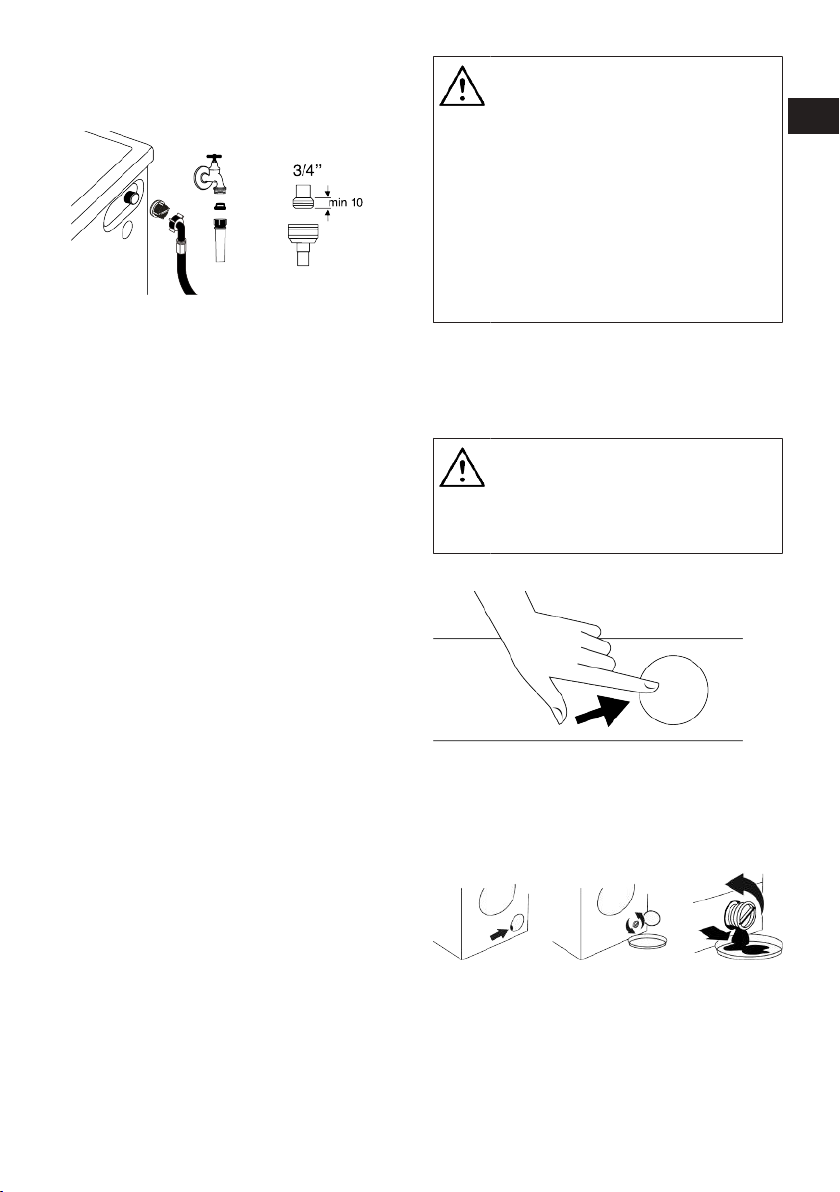
filters prevent foreign substances and dirt
in the water to enter the product. Filters
should be cleaned if they are dirty.
1. Close the taps.
2. Remove the nuts of the water intake
hoses to access the filters on the water
intake valves and clean them with an appropriate brush. If the filters are too
dirty, remove them from their places
with a pliers and clean in this way.
3. Take out the filters on the flat ends of
the water intake hoses together with the
gaskets and clean thoroughly under running water.
4. Replace the gaskets and filters carefully
and tighten their nuts by hand.
7.5 Draining Remaining Water and
Cleaning the Pump Filter
The filter system in your product prevents
solid items such as buttons, coins and fabric fibres clogging the pump impeller during
draining of washing water. Thus, the water
will be drained without any problem and the
service life of the pump will extend.
If the product fails to drain water inside it,
the pump filter is clogged. Filter must be
cleaned whenever it is clogged or in every 3
months. Water must be drained off first to
clean the pump filter.
In addition, prior to transporting the product
(e.g., when moving to another house) water
should be drained completely.
NOTE:
Foreign substances left in the
pump filter may damage your
product or may cause noise problem.
If you live in areas prone to frost, remember to turn off the water tap,
disconnect the main hose, and
drain the water from the product
when it's not in use.
After each use, turn off the tap to
which the mains hose is connected.
In order to clean the dirty filter and drain
the water:
1. Unplug the product to cut off the supply
power.
Temperature of the water inside the
product may rise up to 90 ºC. To
avoid the risk of scalding, clean the
filter after the water inside the
product is cooled down.
2. Open the filter cover.
3. Follow the below procedures in order to
drain water.
If the product does not have an emergency water draining hose, in order to
drain the water:
• Place a large container at the end of the
hose to collect the water from the filter.
• When the pump filter starts leaking water
loosen it by turning (opposite clockwise).
Fill the running water to the container you
placed in front of the filter. Keep a cloth
ready to clean the water that may spill.
RO
EN
EN / 73
Page 75
• Completely turn and remove the pump filter when the water in the product leaks
out.
1. Clean any residues inside the filter as
well as fibres, if any, around the pump
impeller region.
8 Troubleshooting
2. Replace the filter.
3. If the filter cap is composed of two
pieces, close the filter cap by pressing
on the tab. If it is one piece, seat the
tabs in the lower part into their places
first, and then press the upper part to
close.
RO
EN
Please read the “Safety Instructions” section first!
Programmes do not start after the loading door is closed.
• Start / Pause / Cancel button is not
pressed. >>> Press Start / Pause / Cancel
button.
• It may be difficult to close the loading
door in case of excessive loading. >>>
Reduce the amount of laundry and make
sure that the loading door is closed properly.
Programme cannot be started or selected.
• The product has switched to self-protection mode due to a supply problem (line
voltage, water pressure, etc.). >>> Depending on the product model, select another program by turning the Program Selection button or pressing and holding
the On/Off button for 3 seconds to cancel the program. Previous programme
will be cancelled. See Cancelling the Pro-
gramme [}71]
Water inside the product.
• Some water has remained in the product
due to the quality control processes in
the production. >>> This is not a failure;
water is not harmful to the product.
The product does not take water in.
• Tap is turned off. >>> Turn on the taps.
• Water inlet hose is bent. >>> Flatten the
hose.
• Water inlet filter is clogged. >>> Clean the
filter.
• Loading door is not closed. >>> Close the
door.
The product does not drain water.
• Water drain hose is clogged or twisted.
>>> Clean or flatten the hose.
• Pump filter is clogged. >>> Clean the
pump filter.
Product vibrates or makes noise.
• Product is standing unbalanced. >>> Adjust the stands to balance the product.
• A hard substance has entered into the
pump filter. >>> Clean the pump filter.
• Transportation safety bolts are not removed. >>> Remove the transportation
safety bolts.
• Laundry quantity in the product is too
little. >>> Add more laundry to the
product.
• Excessive laundry is loaded in the
product. >>> Take out some of the laundry from the product or distribute the
load by hand to balance it homogeneously in the product.
• Product is leaning on a rigid item. >>>
Make sure that the product is not leaning
on anything.
There is water leaking from the bottom
of the product.
• Water drain hose is clogged or twisted.
>>> Clean or flatten the hose.
• Pump filter is clogged. >>> Clean the
pump filter.
Product stopped shortly after the programme started.
• Machine has stopped temporarily due to
low voltage. >>> Product will resume running when the voltage restores to the normal level.
EN / 74
Page 76

Product directly drains the water it takes
in.
• Draining hose is not at adequate height.
>>> Connect the water draining hose as
described in the user manual.
No water can be seen in the product
during washing.
• Water is inside the invisible part of the
product. >>> This is not a failure.
Loading door cannot be opened.
• Loading door lock is activated because
of the water level in the product. >>>
Drain the water by running the Pump or
Spin programme.
• Product is heating up the water or it is at
the spinning cycle. >>> Wait until the programme completes.
• Loading door may be stuck because of
the pressure it is subjected to. >>> Grab
the handle and push and pull the loading
door to release and open it.
• If there is no power, loading door of the
product will not open. >>> To open the
loading door, open the pump filter cap
and pull down the emergency handle positioned at the rear side of the said cap.
See Loading Door Lock [}70]
Washing takes longer than specified in
the user manual. (*)
• Water pressure is low. >>> Product waits
until taking in adequate amount of water
to prevent poor washing quality due to
the decreased amount of water. Therefore, the washing time extends.
• Voltage is low. >>> Washing time is prolonged to avoid poor washing results
when the supply voltage is low.
• Input temperature of water is low. >>>
Required time to heat up the water extends in cold seasons. Also, washing
time can be lengthened to avoid poor
washing results.
• Number of rinses and/or amount of rinsing water have increased. >>> Product increases the amount of rinsing water
when good rinsing is needed and adds an
extra rinsing step if necessary.
• Excessive foam has occurred and automatic foam absorption system has been
activated due to too much detergent usage. >>> Use recommended amount of
detergent.
Programme duration does not countdown. (On models with display) (*)
• Timer may stop during water intake. >>>
Timer indicator will not countdown until
the product takes in adequate amount of
water. The product will wait until there is
sufficient amount of water to avoid poor
washing results due to lack of water.
Timer indicator will resume countdown
after this.
• Timer may stop during heating step. >>>
Timer indicator will not countdown until
the product reaches the selected temperature.
• Timer may stop during spinning step. >>>
Automatic unbalanced load detection
system is activated due to the unbalanced distribution of the laundry in the
product.
Programme duration does not countdown. (*)
• There is unbalanced load in the product.
>>> Automatic unbalanced load detection
system is activated due to the unbalanced distribution of the laundry in the
product.
Product does not switch to spinning
step. (*)
• There is unbalanced load in the product.
>>> Automatic unbalanced load detection
system is activated due to the unbalanced distribution of the laundry in the
product.
• The product will not spin if water is not
drained completely. >>> Check the filter
and the draining hose.
• Excessive foam has occurred and automatic foam absorption system has been
activated due to too much detergent usage. >>> Use recommended amount of
detergent.
RO
EN
EN / 75
Page 77

Washing performance is poor: Laundry
turns gray. (**)
• Insufficient amount of detergent has
been used over a long period of time. >>>
Use the recommended amount of detergent appropriate for water hardness and
the laundry.
• Washing has been made at low temperatures for a long time. >>> Select the
proper temperature for the laundry to be
washed.
• Insufficient amount of detergent is used
with hard water. >>> Using insufficient
amount of detergent with hard water
causes the soil to stick on the cloth and
this turns the cloth into gray in time. It is
difficult to eliminate graying once it happens. Use the recommended amount of
detergent appropriate for water hardness
and the laundry.
• Excessive amount of detergent is used.
>>> Use the recommended amount of detergent appropriate for water hardness
and the laundry.
Washing performance is poor: Stains
persist or the laundry is not whitened.
(**)
• Insufficient amount of detergent is used.
>>> Use the recommended amount of detergent appropriate for water hardness
and the laundry.
• Excessive laundry is loaded in. >>> Do
not load the product in excess. Load with
amounts recommended in the "Programme and consumption table".
• Wrong programme and temperature were
selected. >>> Select the proper programme and temperature for the laundry
to be washed.
• Wrong type of detergent is used. >>> Use
original detergent appropriate for the
product.
• Excessive amount of detergent is used.
>>> Put the detergent in the correct compartment. Do not mix the bleaching agent
and the detergent with each other.
Washing performance is poor: Oily
stains appeared on the laundry. (**)
• Regular drum cleaning is not applied. >>>
Clean the drum regularly. For this procedure, see Cleaning the Loading Door and
the Drum [}72]
Washing performance is poor: Clothes
smell unpleasantly. (**)
• Odours and bacteria layers are formed on
the drum as a result of continuous washing at lower temperatures and/or in short
programmes. >>> Leave the detergent
drawer as well as the loading door of the
product ajar after each washing. Thus, a
humid environment favourable for bacteria cannot occur in the machine
Colour of the clothes faded. (**)
• Excessive laundry was loaded in. >>> Do
not load the product in excess.
• Detergent in use is damp. >>> Keep detergents closed in an environment free of
humidity and do not expose them to excessive temperatures.
• A higher temperature was selected. >>>
Select the proper programme and temperature according to the type and soiling
degree of the laundry.
Washing machine does not rinse well.
• The amount, brand and storage conditions of the detergent used are inappropriate. >>> Use a detergent appropriate
for the washing machine and your laundry. Keep detergents closed in an environment free of humidity and do not expose them to excessive temperatures.
• Detergent was put in the wrong compartment. >>> If detergent is put in the prewash compartment although prewash
cycle is not selected, the product can
take this detergent during rinsing or
softener step. Put the detergent in the
correct compartment.
• Pump filter is clogged. >>> Check the filter.
• Draining hose is folded. >>> Check the
drain hose.
RO
EN
EN / 76
Page 78

Laundry became stiff after washing. (**)
• Insufficient amount of detergent is used.
>>> Using insufficient amount of detergent for the water hardness can cause
the laundry to become stiff in time. Use
appropriate amount of detergent according to the water hardness.
• Detergent was put in the wrong compartment. >>> If detergent is put in the prewash compartment although prewash
cycle is not selected, the product can
take this detergent during rinsing or
softener step. Put the detergent in the
correct compartment.
• Detergent was mixed with the softener.
>>> Do not mix the softener with detergent. Wash and clean the drawer with hot
water.
Laundry does not smell like the
softener. (**)
• Detergent was put in the wrong compartment. >>> If detergent is put in the prewash compartment although prewash
cycle is not selected product, the can
take this detergent during rinsing or
softener step. Wash and clean the drawer
with hot water. Put the detergent in the
correct compartment.
• Detergent was mixed with the softener.
>>> Do not mix the softener with detergent. Wash and clean the drawer with hot
water.
Detergent residue in the detergent
drawer. (**)
• Detergent was put in wet drawer. >>> Dry
the detergent drawer before putting in detergent.
• Detergent has gotten damp. >>> Keep detergents closed in an environment free of
humidity and do not expose them to excessive temperatures.
• Water pressure is low. >>> Check the water pressure.
• The detergent in the main wash compartment got wet while taking in the prewash
water. Holes of the detergent compartment are blocked. >>> Check the holes
and clean if they are clogged.
• There is a problem with the detergent
drawer valves. >>> Call the Authorised
Service Agent.
• Detergent was mixed with the softener.
>>> Do not mix the softener with detergent. Wash and clean the drawer with hot
water.
• Regular drum cleaning is not applied. >>>
Clean the drum regularly. For this procedure, see Cleaning the Loading Door and
the Drum [}72]
Too much foam forms inside the
product. (**)
• Improper detergents for the washing machine is used. >>> Use detergents appropriate for the washing machine.
• Excessive amount of detergent is used.
>>> Use only sufficient amount of detergent.
• Detergent was stored under improper
conditions. >>> Store detergent in a
closed and dry location. Do not store in
excessively hot places.
• Some meshed laundry such as tulle may
foam too much because of their texture.
>>> Use smaller amounts of detergent for
this type of item.
• Detergent was put in the wrong compartment. >>> Make sure you place the detergent in the appropriate compartment.
• Softener is being taken early by the
product. >>> There may be problem in the
valves or in the detergent drawer. Call the
Authorised Service Agent.
Foam is overflowing from the detergent
drawer.
• Too much detergent is used. >>> Mix 1
tablespoonful softener and ½ l water and
pour into the main wash compartment of
the detergent drawer. >>> Put detergent
into the product suitable for the programmes and maximum loads indicated
in the “Programme and consumption
table”. When you use additional chemicals (stain removers, bleaches and etc.),
reduce the amount of detergent.
RO
EN
EN / 77
Page 79
Laundry remains wet at the end of the
programme. (*)
• Excessive foam has occurred and automatic foam absorption system has been
activated due to too much detergent usage. >>> Use recommended amount of
detergent.
(*) The product does not switch to spinning
step when the laundry is not evenly distributed in the drum to prevent any damage to
the product and to its surrounding environment. Laundry should be rearranged and respun.
9 DISCLAIMER / WARNING
Some (simple) failures can be adequately
handled by the end-user without any safety
issue or unsafe use arising, provided that
they are carried out within the limits and in
accordance with the following instructions
(see the “Self-Repair” section).
Therefore, unless otherwise authorized in
the “Self-Repair” section below, repairs
shall be addressed to registered professional repairers in order to avoid safety issues. A registered professional repairer is a
professional repairer that has been granted
access to the instructions and spare parts
list of this product by the manufacturer according to the methods described in legislative acts pursuant to Directive 2009/125/
EC.
However, only the service agent (i.e. authorized professional repairers) that you
can reach through the phone number
given in the user manual/warranty card
or through your authorized dealer may
provide service under the guarantee
terms. Therefore, please be advised that
repairs by professional repairers (who
are not authorized by Arctic ) shall void
the guarantee.
Self-Repair
Self-repair can be done by the end-user
with regard to the following spare parts:
door, door hinge and seals, other seals,
door locking assembly and plastic peripher-
(**) Regular drum cleaning is not applied.
Clean the drum regularly. See Cleaning the
Loading Door and the Drum [}72]
If you cannot eliminate the problem
although you follow the instructions
in this section, consult your dealer
or the Authorised Service Agent.
Never try to repair a nonfunctional
product yourself.
als such as detergent dispensers (an updated list is also available in support.arctic.ro as of 1st of March 2021)
Moreover, to ensure product safety and to
prevent risk of serious injury, the mentioned
self-repair shall be done following the instructions in the user manual for self-repair
or which are available in support.arctic.ro
For your safety, unplug the product before
attempting any self-repair.
Repair and repair attempts by end-users for
parts not included in such list and/or not
following the instructions in the user manuals for self-repair or which are available in
support.arctic.ro , might give raise to safety
issues not attributable to support.arctic.ro ,
and will void the warranty of the product.
Therefore, it is highly recommended that
end-users refrain from the attempt to carry
out repairs falling outside the mentioned
list of spare parts, contacting in such cases
authorized professional repairers or registered professional repairers. On the contrary, such attempts by end-users may
cause safety issues and damage the
product and subsequently cause fire, flood,
electrocution and serious personal injury to
occur.
By way of example, but not limited to, the
following repairs must be addressed to authorized professional repairers or registered professional repairers: motor,
pump assembly, main board, motor board,
display board, heaters etc.
EN / 78
RO
EN
Page 80

The manufacturer/seller cannot be held liable in any case where end-users do not
comply with the above
The spare part availability of the washing
machine or washer-dryer that you purchased is 10 years. During this period, original spare parts will be available to operate the washing machine or washer-dryer
properly.
RO
EN
EN / 79
Page 81

When the appliance is turned off, pressing 1 and 2 auxiliary function buttons are pressed for a long time, a 3-2-1
countdown, and the total washing cycles completed on the appliance is displayed.
After the total washing cycle is displayed, the failure codes, if any, are displayed. Check the information on the screen
through the table below.
On-screen Information Cause Solution
Err Safety algorithm is run on the appliance.
Wait for the writing to pass. After pressing the auxiliary function
buttons 1 and 2, check the on-screen information.
SC
Your complaint is not solved during the
check.
Call the authorised service agent.
E5 Pump filter may be clogged.
Clean the pump filter.
See “Draining remaining water and cleaning the pump filter”
section.
Try in spin cycle. If the issue is not resolved, call the service.
E8 The machine may not be taking in water.
• Turn on the taps.
• Make sure there is no water outage.
• Check the water inlet hose connection, if there is any folding
on the hose, straighten it.
• Clean the pump filter. See “Draining remaining water and
cleaning the pump filter” section.
• Close the front cover of the machine. Make sure that the
cover is locked.
Run the machine one more time. If the issue is not resolved, call
the service.
E29
The product has switched to self protection
mode due to a supply problem (line voltage,
water pressure, etc.).
To cancel the programme, turn the Programme Selection knob
to select another programme. Previous programme will be
cancelled. See “Cancelling the programme” section.
If the issue persists, call the service.
E17
Excess foam is present in the machine after
the completed cycle.
• Store detergent in a closed and dry location. Do not store in
excessively hot places.
• Use smaller amounts of detergent for porous laundry like
tulle.
• Use amount of detergent appropriate to the amount of
laundry and the level of stain.
• Use only sufficient amount of detergent.
• Make sure you place the detergent in the appropriate
compartment.
• Run the Drum Cleaning programme with the machine empty.
See "Drum Cleaning" programme
If your machine does not include Drum Cleaning programme,
you can use Cotton 90C.
• After running a short programme without detergent, check the
machine. If the issue persists, call the service.
E18
Spin cycle is not initiated due to an
imbalance of the machine.
Check the laundry inside the machine. The amount of laundry
may not be sufficient. Try by increasing the amount of laundry.
The laundry may be causing an imbalance; sort out the laundry
by hand and distribute evenly inside the appliance.
Retry in spin cycle.
E12 There may be water inside the machine.
Unplug the machine.
There may be water under the machine. Clean the water under
the machine.
Plug the machine again.
Try running a short cycle.
If the issue persists or you see water leaking from one of the
hoses, close the valves and call the service.
E27 Check the water drain of the machine. See “Connecting the drain hose to the drain” section.
E84 BLE connection cannot be established.
Check it, try connecting it. See “HomeWhiz Feature and Remote
Control Function” section. If the issue persists, call the service.
Page 82

Page 83

Page 84

1911862400_AA_RO_EN
 Loading...