

Page 1

EN
Table of Contents
Package Contents.................................................................................................2
ARCHOS Indoor Module.........................................................................................3
ARCHOS Outdoor Module.......................................................................................5
ARCHOS Soil Module..............................................................................................6
Getting Stared......................................................................................................7
ARCHOS Weather Station- First Time Setup.............................................................8
ARCHOS Weather Station- Interface......................................................................10
ARCHOS Weather Station- Managing stations........................................................11
ARCHOS Weather Station- Managing modules........................................................15
Troubleshoting...................................................................................................16
For more information, please consult the FAQs of your product on www.archos.com. Make sure to read them before
considering any product return. Changes can occur in the procedures due to application updates.
Consult the declaration of conformity on http://www.archos.com/products/declaration_conformity.html
QSG_Weather Station_book.indd 1 05/01/2015 17:47:24
1
Page 2
EN
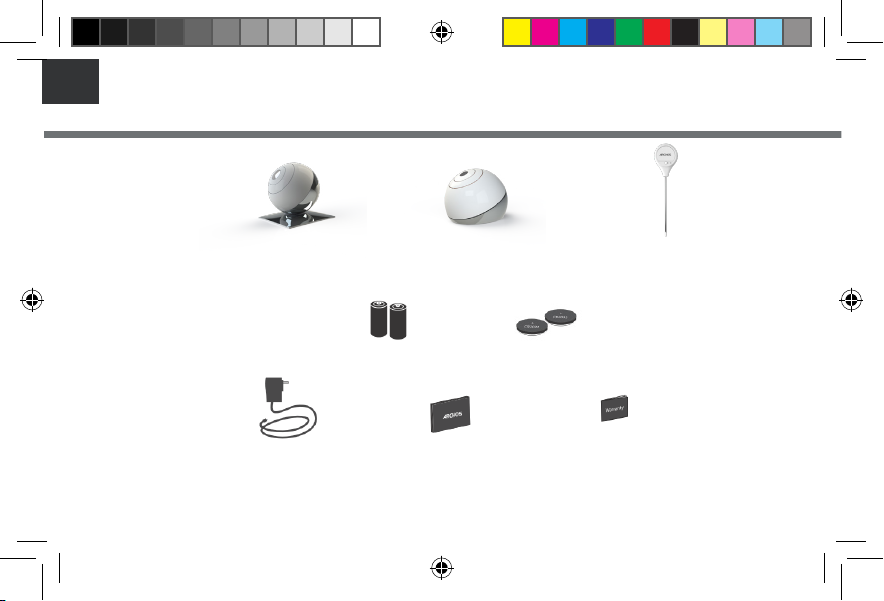
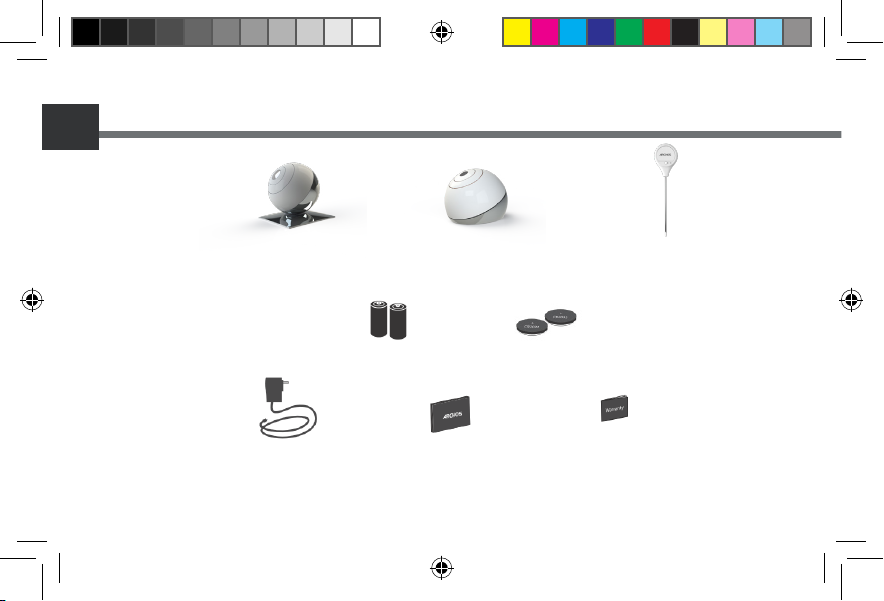
Package Contents
ARCHOS Indoor Module ARCHOS Outdoor Module
2 x AA batteries
AC Adapter QSG Booklet Warranty,
2
QSG_Weather Station_book.indd 2 05/01/2015 17:47:26
2x CR2032 batteries
ARCHOS Soil Module
Legal & Safety Booklet
Page 3

EN
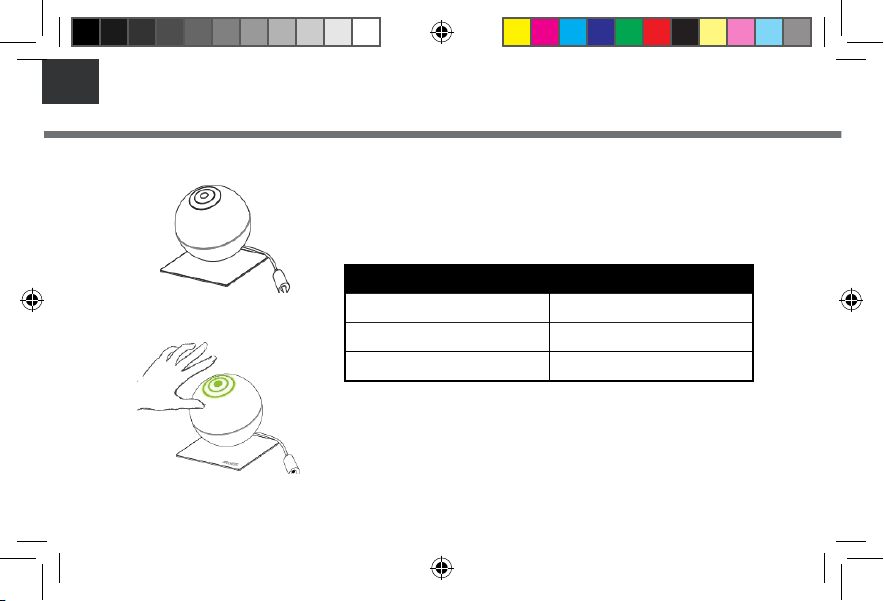
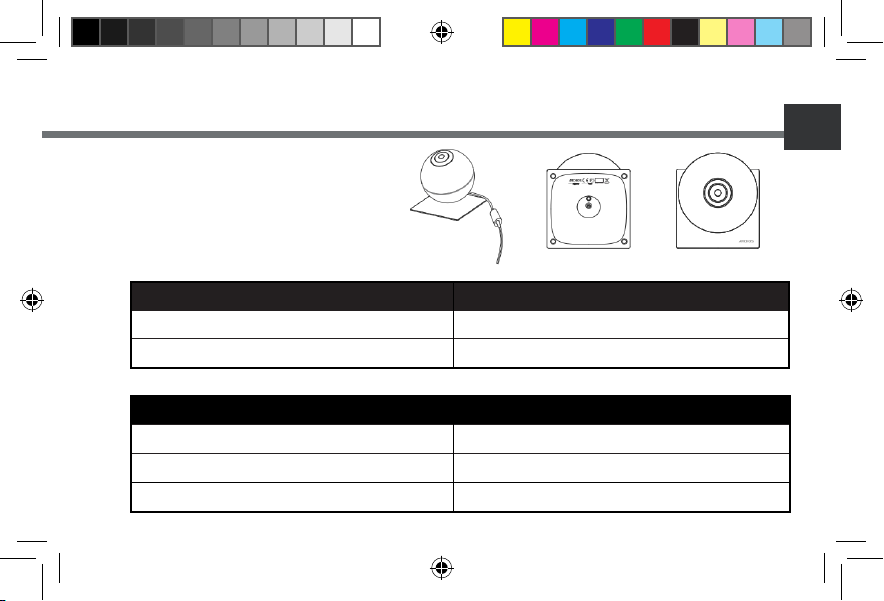
Description of the Indoor Module
1. Reset button
2. Pairing indicator & Air quality LED
3. Power Connector
ARCHOS Indoor Module
ACTION
Module in pairing mode and waiting to be connected to device
Mobile connected to module successfully
LED state indicators every time you want to reconnect your indoor module or during use.
ACTION
Module in pairing mode and attempting to connect
Blue LED Flash almost immediately after power on
Module attempting to connect or lost connexion
Module connect successfully
QSG_Weather Station_book.indd 3 05/01/2015 17:47:26
LED STATUS
LED blinks Blue
Blue LED always on
LED STATUS
LED blinks RED
Green LED on for 10s
3
Page 4
EN
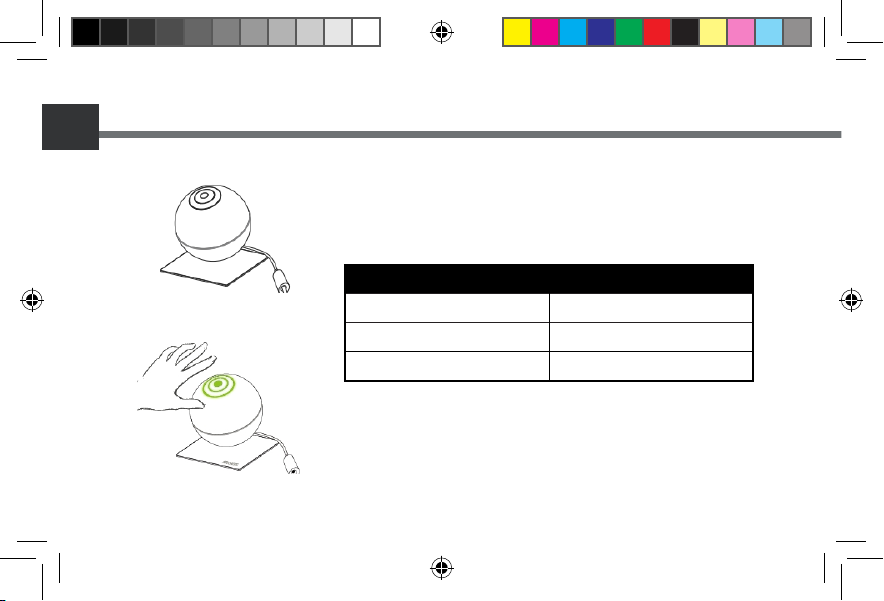
ARCHOS Indoor Module
LED state indicator
Pass your hand over the LED and check the CO2 level according to the LED color
to know your home air quality.
COLOR
Green
Yellow
Red
4
QSG_Weather Station_book.indd 4 05/01/2015 17:47:26
AIR QUALITY
Good Quality
Quality could be improved
Room should be ventilated
Page 5
EN
ARCHOS Outdoor Module
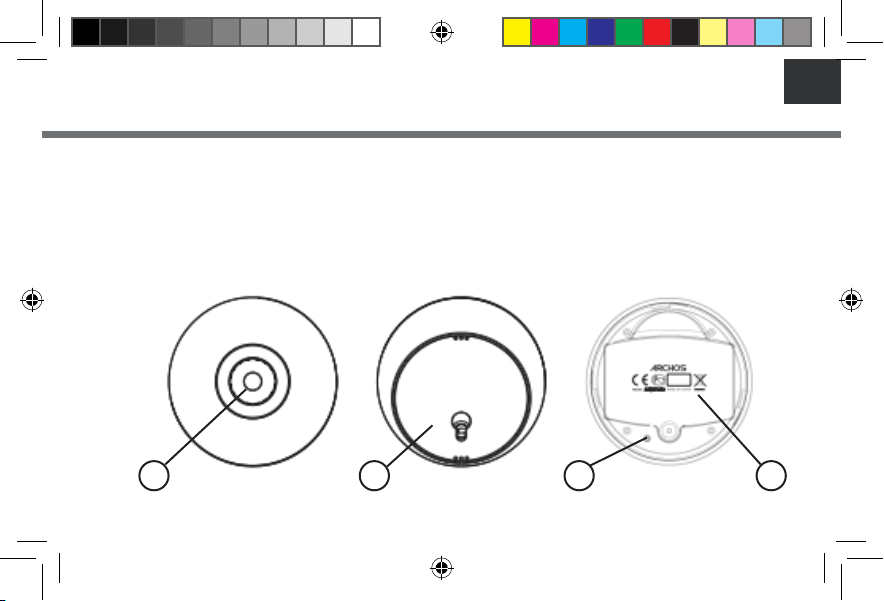
Description of the Outdoor Module
1. Pairing indicator
The pairing is done by inserting the batteries. If no success, use the reset button to activate the pairing mode.
2. Base
3. Reset button
4. Battery holder
2 3 41
QSG_Weather Station_book.indd 5 05/01/2015 17:47:26
5
Page 6

EN
ARCHOS Soil Module
Description of the Soil Module
1. Reset button
2. Temperature & Humidity captor
3. Batteries compartment
6
QSG_Weather Station_book.indd 6 05/01/2015 17:47:26
3
1
2
Page 7
EN
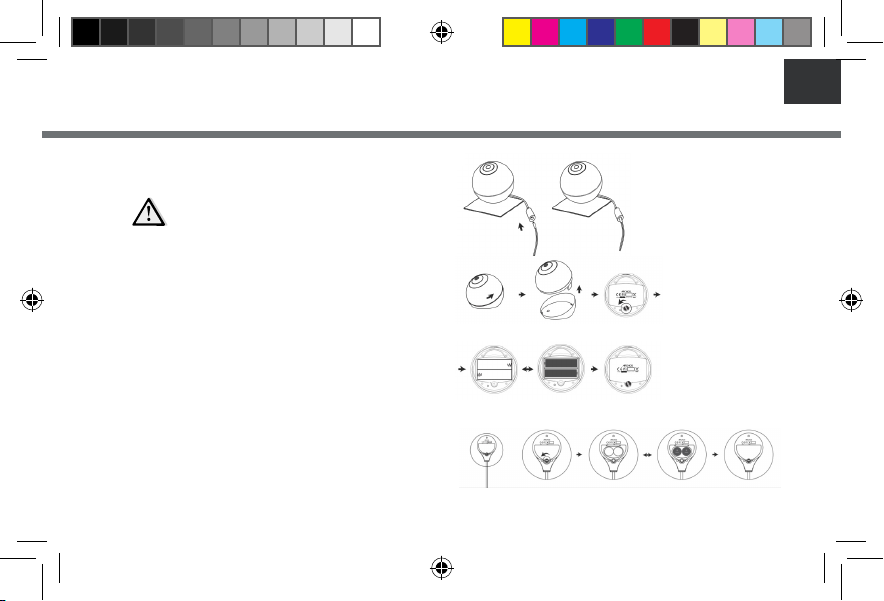
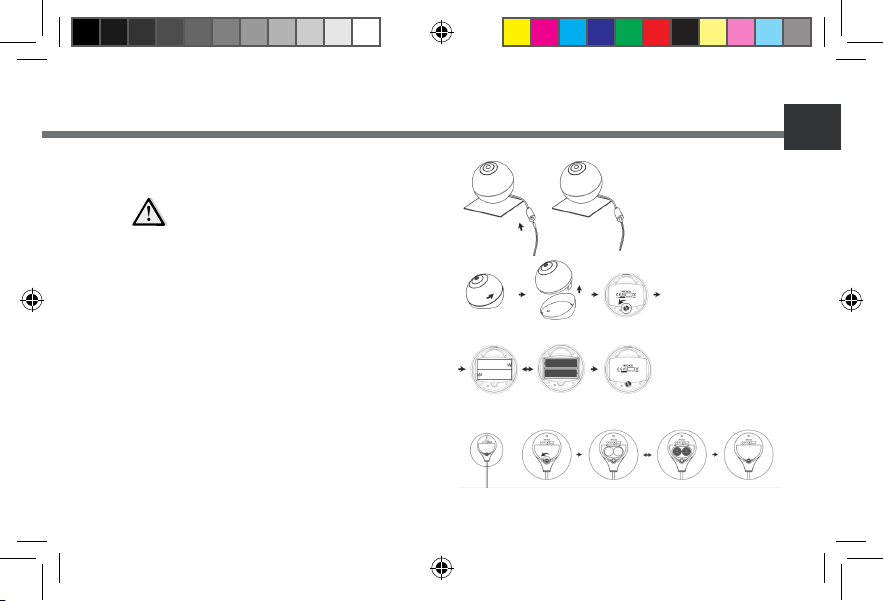
1. Connect your power cable into the Indoor
Module power connector.
Your main device has to be permanently
connected to the power supply
2. Download the ARCHOS Weather Station
Application from Google Play Store or Apple Store
and follow the conguration steps.
3. Put the Outdoor Module into service.
1. Unscrew the Outdoor module
2. Unscrew the Batteries compartment
3. Place two AA batteries
4. Screw back up compartment and close the
Module
Getting Started
1.
2.
4. Put the Soil Sensor into service
1. Unscrew the Batteries compartment
2. Place two CR2032 batteries
3. Screw back up
QSG_Weather Station_book.indd 7 05/01/2015 17:47:27
3.
7
Page 8
EN
ARCHOS WEATHER STATION- First Time Setup
The rst time you launch the app, you will need to connect your weather station.
1. Download the ARCHOS Weather Station App from Google Play or Apple Store
2. Switch on the WiFi on your smartphone or tablet.
3. Launch the ARCHOS Weather Stationapp
4. Look for Archos weather stations by clicking on Connect your Weather Station and then select yours.
A new Weather Station must be powered ON to be recognized by the application and once selected, the
LED must blink in blue. If it is not the case after a few minutes, perform a long press on the button below
the station until the light blinks in blue.
5. Select your Wi network and send the password to the weather station so that it can connect to internet.
6. Wait for your weather station to connect.
7. Register your weather station and set up your information: location, name
8
QSG_Weather Station_book.indd 8 05/01/2015 17:47:27
Page 9
EN
ARCHOS WEATHER STATION- First Time Setup
When your Weather Station is connected, add new sensors.
To pair the Outdoor Module
1. Make sure the two AA batteries are well placed in their support.
2. As soon as the batteries are in the module, it is in pairing mode.
3. Click on “add a new sensor” on your application.
4. Pairing success, if not try again the process and press the reset button.
To pair the Soil Module
1. Make sure the two CR2032 batteries are well placed in their support.
2. As soon as the batteries are in the module, it is in pairing mode.
3. Click on “add a new sensor” on your application .
4. Pairing success, if not try again the process and press the reset button.
QSG_Weather Station_book.indd 9 05/01/2015 17:47:27
9
Page 10
EN
ARCHOS WEATHER STATION - Interface
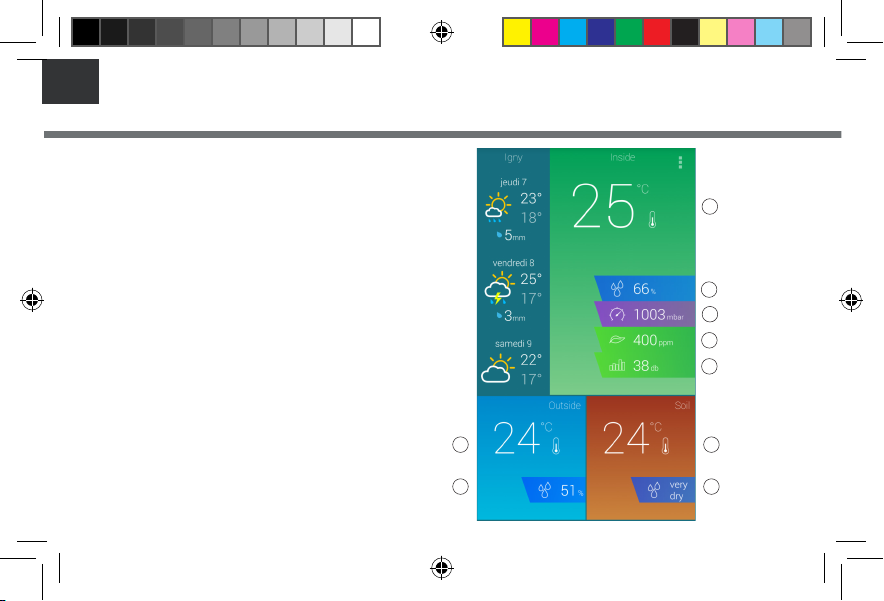
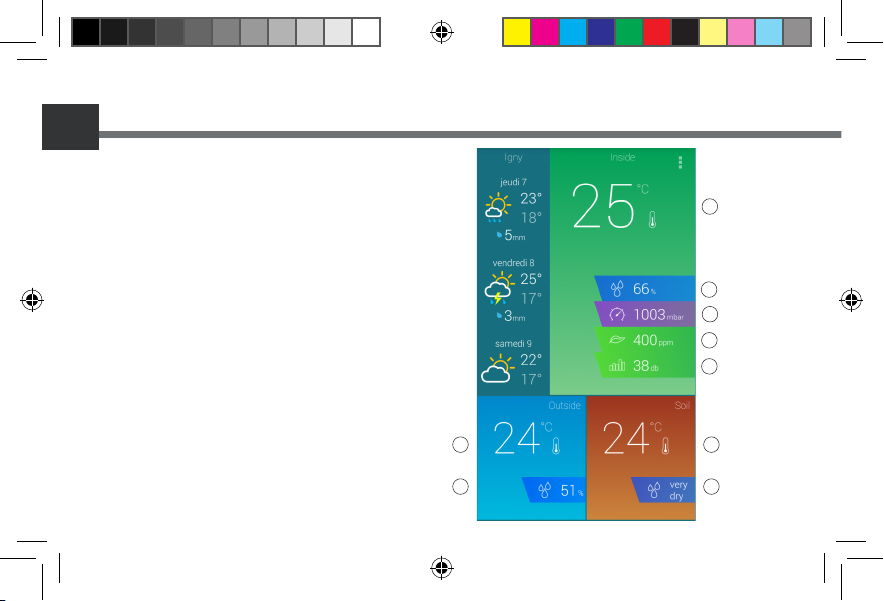
1.
1. Weather Forecast for the next 6 days
2. Indoor sensors
A. Temperature
B. Humidity
C. Atmospheric pressure
D. CO2 level
E. Noise level
3. Outdoor sensors
A. Temperature
B. Humidity
3.
4. Soil sensors
A. Temperature
B. Humidity
10
QSG_Weather Station_book.indd 10 05/01/2015 17:47:29
2.
A
B
C
D
E
4.
AA
BB
Page 11
EN
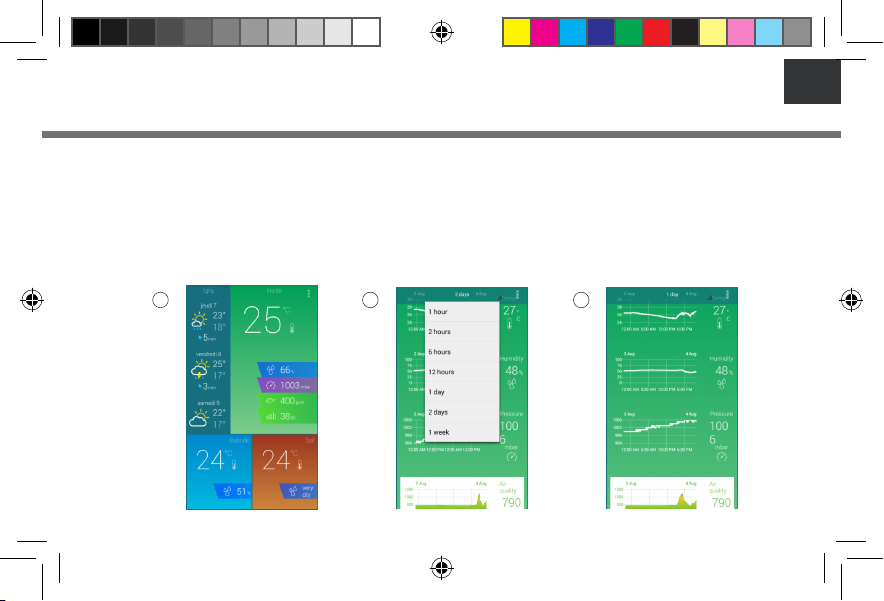
ARCHOS WEATHER STATION- Managing stations
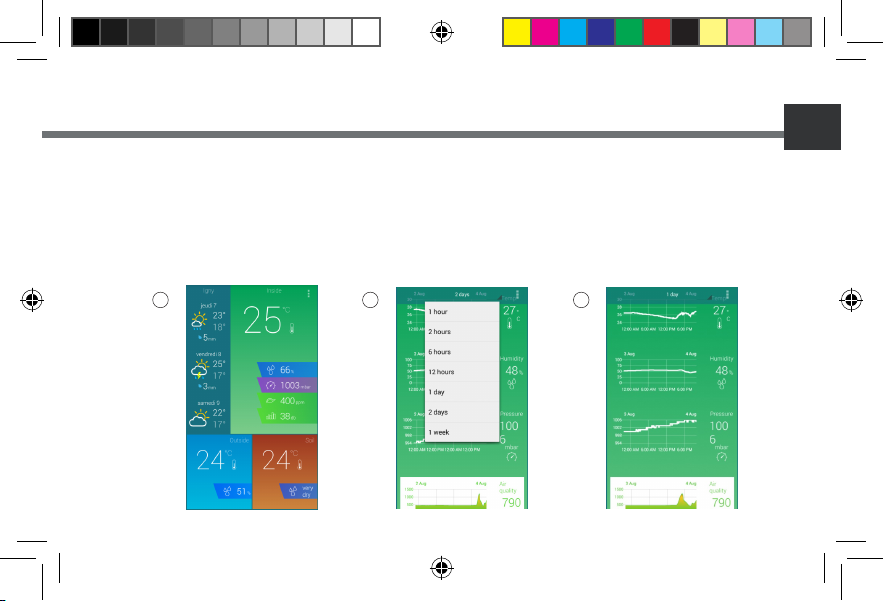
When your are connected on your Archos Weather Station Application, check your modules’
sensors data at any time.
1. Select the module sensor you’re interested in and tap its icon.
2. Select your scale (1h, 2h, 6h, 12h, 1day, 2 days, 1 week).
3. Follow the evolution over time and compare against previous days/months/years through all the graphics
provided by the application. Each sensor has its dedicated graph.
1 2 3
QSG_Weather Station_book.indd 11 05/01/2015 17:47:29
11
Page 12

EN
ARCHOS WEATHER STATION - Managing stations
You can add or remove Weather Stations at any time.
To add a Weather Station
1.Launch the Archos Weather Station app.
2. Tap (icon avec les 3 points) and select Station Manager.
3. Select Find stations.
4. You are redirected to the ARCHOS Weather Station home page.
5. Select Connect your Weather Station
6. Select the station you want to add.
7. Tap (icon 3 points) and switch between your stations by selecting the one you want.
12
QSG_Weather Station_book.indd 12 05/01/2015 17:47:32
2 3 5 6 7
Page 13

EN
ARCHOS WEATHER STATION- Managing stations
To remove a Weather Station from the App
1. Launch the Archos Weather Station app.
2. Select Station Manager on parameter menu.
3. Select a station with a long press on its name.
4. Select Unregister.
2 3 4
QSG_Weather Station_book.indd 13 05/01/2015 17:47:33
13
Page 14

EN
ARCHOS WEATHER STATION - Managing stations
To connect your Weather Station to another Wi network
1. Launch the ARCHOS Weather Station app.
2. Pass your hand over the Indoor Module to see the green light indicator of air quality.
3. Hold your hand over the Indoor Module for at least 15 seconds.
4. The Indoor Module will blinks blue and the station will turn in Access Point mode.
5. Tap (icon), select Station Manager and then Find stations.
6. Select your Wi network and send the password to the Weather Station so that it can connect to internet.
7. While your Weather Station is connecting, the Indoor Module blinks red.
8. No need to register your Weather Station again.
TIPS:
If you trigger this mode by
accident, you can wait without
doing any action on your ARCHOS
Weather Station and after few
minutes, it will automatically
reconnect
14
5
QSG_Weather Station_book.indd 14 05/01/2015 17:47:35
6
Page 15
EN
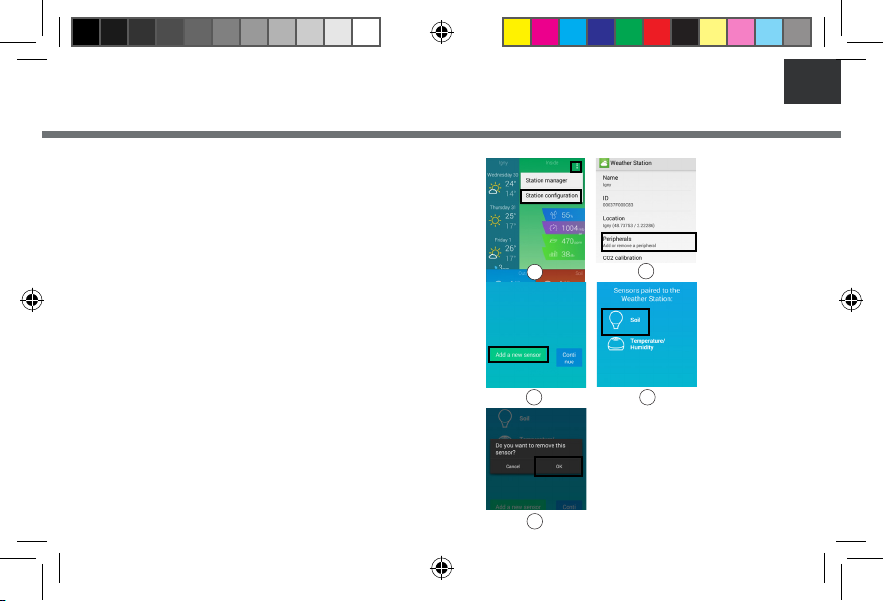
ARCHOS WEATHER STATION- Managing modules
To add/remove a ARCHOS Weather Station sensor
1. Launch the ARCHOS Weather app
2. Make sure the sensors are in pairing mode
3. Tap (icon) and select Station Conguration (gure1)
4. Select Add or Remove a peripheral (gure2)
To add a new sensor
1. Select Add a new sensor (gure3)
2. Success, if not, check if the batteries are inserted and try again
To remove a sensor
1. Press the icon of the sensor you want to remove (gure4)
2. Click on OK to remove your sensor (gure5)
1
3 4
2
5
QSG_Weather Station_book.indd 15 05/01/2015 17:47:37
15
Page 16

EN
Troubleshooting
Why can’t I connect to my Weather Station with my mobile device ?
Check if your mobile device and your Weather Station are both connected to the same WiFi.
Check if your device is paired to your Weather Station
Why aren’t my sensors responding ? No data or no updated data. Are they correctly paired to your Archos
Weather Station ? You can check this information in ‘Station Conguration’ < ‘Peripherals’Check if Wi is ON in your device.
Check if the batteries are not empty for the Outdoor module and soil sensor. In that case you need to change them.
Check if your sensors are enough close to your Indoor Module.
How can I restore my Weather Station to its default settings ?
Use the reset button under your ARCHOS Weather Station.
Go to your ARCHOS Weather application settings: ‘Station manager’< ‘Select a station’< ‘Unregister
16
QSG_Weather Station_book.indd 16 05/01/2015 17:47:37
Page 17

Inhaltsverzeichnis
Verpackungsinhalt....................................................................................................18
ARCHOS Innenmodul.................................................................................................19
ARCHOS Außenmodul................................................................................................21
ARCHOS Bodenmodul................................................................................................22
Erste Schritte............................................................................................................23
Ersteinrichtung der ARCHOS Weather Station..............................................................24
Benutzeroberäche der ARCHOS Weather Station.......................................................26
ARCHOS Weather Station - Stationsverwaltung...........................................................27
ARCHOS Weather Station - Modulverwaltung..............................................................31
Fehlerbehebung.......................................................................................................32
Weitere Informationen nden Sie in den FAQs für Ihr Produkt auf www.archos.com. Vor einer Rückgabe des Produkts,
diese unbedingt durchlesen. Aufgrund von Anwendungsaktualisierungen können sich Abläufe ändern.
Konsultieren Sie die Konformitätserklärung auf http://www.archos.com/products/declaration_conformity.html
QSG_Weather Station_book.indd 17 05/01/2015 17:47:37
DE
17
Page 18
DE
Verpackungsinhalt
ARCHOS Innenmodul ARCHOS Außenmodul
2 x AA-Batterien
Stromadapter QSG-Booklet Booklet für
18
QSG_Weather Station_book.indd 18 05/01/2015 17:47:38
2 x CR2032-Batterien
ARCHOS Bodenmodul
Garantie-, Rechts- und Si-
cherheitshinweise
Page 19
DE
Beschreibung des Innenmoduls
1. Reset-Taste
2. LED für Paarungsanzeige & Luftqualität
3. Stromanschluss
ARCHOS Innenmodul
VORGANG
Modul in Paarungsmodus und wartet auf Verbindung mit Gerät
Mobilgerät erfolgreich mit Modul verbunden
LED-Statusanzeigen bei Neuverbindung Ihres Innenmoduls oder während des Gebrauchs.
VORGANG
Modul in Paarungsmodus und Verbindungsversuch
Blaue LED blinkt kurz nach dem Einschalten
Modul versucht die verlorene Verbindung wiederherzustellen
Modul erfolgreich verbunden
QSG_Weather Station_book.indd 19 05/01/2015 17:47:39
LED-STATUS
LED blinkt blau
Blaue LED leuchtet dauerhaft
LED-STATUS
LED blinkt ROT
Grüne LED leuchtet 10 s auf
19
Page 20
DE
ARCHOS Innenmodul
20
QSG_Weather Station_book.indd 20 05/01/2015 17:47:39
LED-Statusanzeige
Fahren Sie mit Ihrer Hand über die LED und überprüfen Sie den CO2-Gehalt
anhand der LED-Farbe, um so die Luftqualität Ihres Eigenheims zu bestimmen.
FARBE
Grün
Gelb
Rot
LUFTQUALITÄT
Gute Qualität
Qualität könnte besser sein
Raum sollte gelüftet werden
Page 21

DE
ARCHOS Außenmodul
Beschreibung des Außenmoduls
1. Paarungsanzeige
Die Paarung erfolgt durch das Einlegen der Batterien. Ist die Paarung
nicht erfolgreich, den Paarungsmodus mit der Reset-Taste aktivieren.
2. Basis
3. Reset-Taste
4. Batteriefassung
2 3 41
QSG_Weather Station_book.indd 21 05/01/2015 17:47:39
21
Page 22

DE
ARCHOS Bodenmodul
Beschreibung des Bodenmoduls
1. Reset-Taste
2. Temperatur- & Feuchtigkeitsmesser
3. Batteriefach
22
QSG_Weather Station_book.indd 22 05/01/2015 17:47:39
3
1
2
Page 23
DE
Erste Schritte
1. Verbinden Sie das Netzkabel mit dem
Stromanschluss des Innenmoduls.
1.
Ihr Hauptgerät muss immer an die
Stromversorgung angeschlossen sein
2. Laden Sie die ARCHOS Weather Station
Application vom Google Play Store oder
2.
Apple Store herunter und folgen Sie den
Kongurationsschritten.
3. Nehmen Sie das Außenmodul in Betrieb.
1. Das Außenmodul aufschrauben
2. Das Batteriefach aufschrauben
3. Legen Sie zwei AA-Batterien ein
4. Das Fach wieder anschrauben und das Modul
schließen
3.
4. Das Erdmodul in Betrieb nehmen
1. Das Batteriefach aufschrauben
2. Zwei CR2032-Batterien einlegen
3. Wieder festschrauben
QSG_Weather Station_book.indd 23 05/01/2015 17:47:40
23
Page 24
DE
ARCHOS WEATHER STATION - Ersteinrichtung
Nach dem ersten Start der App muss die Weather Station verbunden werden.
1. Laden Sie die ARCHOS Weather Station App von Google Play oder Apple Store herunter
2. Das WLAN von Smartphone oder Tablet einschalten.
3. Die App ARCHOS Weather Station starten
4. Suchen Sie nach ARCHOS Weather Stations, indem Sie auf "Connect your Weather Station (Weather Station verbinden)"
klicken und Ihre Station auswählen.
Eine neue Weather Station muss eingeschaltet sein, damit sie von der Anwendung erkannt werden kann,
und einmal ausgewählt, muss die LED blau blinken. Blinkt die LED nach wenigen Minuten nicht, drücken
Sie die Taste auf der Unterseite der Station solange, bis sie blau blinkt.
5. Wählen Sie Ihr WLAN-Netzwerk und senden Sie das Passwort zur Wetterstation, damit diese mit dem Internet verbunden
werden kann.
6. Warten Sie, bis die Wetterstation verbunden ist.
7. Registrieren Sie Ihre Weather Station und geben Sie Ihre Daten ein: Standort, Name
24
QSG_Weather Station_book.indd 24 05/01/2015 17:47:40
Page 25

DE
ARCHOS WEATHER STATION - Ersteinrichtung
Sobald die Weather Station verbunden ist, fügen Sie neue Sensoren hinzu.
Paarung des Außenmoduls
1. Prüfen Sie, ob die AA-Batterien korrekt eingelegt sind.
2. Sobald sich die Batterien im Modul benden, wird der Paarungsmodus gestartet.
3. Klicken Sie in der Anwendung auf "Add a new sensor (Neuen Sensor hinzufügen)".
4. Paarung erfolgreich, wenn nicht, den Vorgang wiederholen und die Reset-Taste drücken.
Paarung des Bodenmoduls
1. Prüfen Sie, ob die CR2032-Batterien korrekt eingelegt sind.
2. Sobald sich die Batterien im Modul benden, wird der Paarungsmodus gestartet.
3. Klicken Sie in der Anwendung auf "Add a new sensor (Neuen Sensor hinzufügen).
4. Paarung erfolgreich, wenn nicht, den Vorgang wiederholen und die Reset-Taste drücken.
QSG_Weather Station_book.indd 25 05/01/2015 17:47:40
25
Page 26
DE
ARCHOS WEATHER STATION - Benutzeroberäche
26
QSG_Weather Station_book.indd 26 05/01/2015 17:47:42
1. Wettervorhersage für die nächsten
6 Tage
2. Innensensoren
A. Temperatur
B. Luftfeuchtigkeit:
C. Luftdruck
D. CO2-Gehalt
E. Geräuschpegel
3. Außensensoren
A. Temperatur
B. Luftfeuchtigkeit:
4. Bodensensoren
A. Temperatur
B. Luftfeuchtigkeit:
1.
3.
2.
A
B
C
D
E
4.
AA
BB
Page 27
DE
ARCHOS WEATHER STATION - Stationsverwaltung
Sobald eine Verbindung mit Ihrer ARCHOS Weather Station Application besteht, können die
Modulsensoren jederzeit überprüft werden.
1. Wählen Sie den Modulsensor von Interesse und tippen Sie auf dessen Symbol.
2. Wählen Sie Ihre Skala (1h, 2h, 6h, 12h, 1 Tag, 2 Tage, 1 Woche).
3. Folgen Sie der Entwicklung im Zeitverlauf und vergleichen Sie anhand der von der Anwendung bereitgestellten Graken vorherige Tage/Monate/Jahre. Für jeden Sensor wird eine eigene Grak angezeigt.
1 2 3
QSG_Weather Station_book.indd 27 05/01/2015 17:47:43
27
Page 28

DE
ARCHOS WEATHER STATION - Stationsverwaltung
Es können zu jedem Zeitpunkt Weather Stations hinzugefügt oder entfernt werden.
Hinzufügen einer Weather Station
1. Starten Sie die App ARCHOS Weather Station.
2. Tippen Sie auf (Symbol mit den 3 Punkten) und wählen Sie Station Manager.
3. Wählen Sie 'Find stations (Stationen suchen)'.
4. Sie werden zur Homepage von ARCHOS Weather Station weitergeleitet.
5. Wählen Sie "Connect your Weather Station (Weather Station verbinden)"
6. Wählen Sie die hinzuzufügende Station.
7. Tippen Sie auf (Symbol mit 3 Punkten) und wechseln Sie zwischen den Stationen, indem Sie die gewünschte Station
auswählen.
28
QSG_Weather Station_book.indd 28 05/01/2015 17:47:46
2 3 5 6 7
Page 29

DE
ARCHOS WEATHER STATION - Stationsverwaltung
Entfernen einer Weather Station von der App
1. Starten Sie die App ARCHOS Weather Station.
2. Wählen Sie Station Manager im Parametermenü.
3. Wählen Sie eine Station, indem Sie mehrere Sekunden auf deren Name drücken.
4. Wählen Sie "Unregister (Registrierung löschen)".
2 3 4
QSG_Weather Station_book.indd 29 05/01/2015 17:47:47
29
Page 30

DE
ARCHOS WEATHER STATION - Stationsverwaltung
1. Starten Sie die App ARCHOS Weather Station.
2. Fahren Sie mit der Hand über das Innenmodul für die Anzeige der grünen LED für die Luftqualität.
3. Halten Sie Ihre Hand mindestens 15 Sekunden lang über das Innenmodul.
4. Das Innenmodul blinkt jetzt blau und die Station wechselt in den Zugrispunktmodus.
5. Tippen Sie auf (Symbol), wählen Sie Station Manager und dann 'Find stations (Stationen suchen)'.
6. Wählen Sie Ihr WLAN-Netzwerk und senden Sie das Passwort zur Weather Station, damit diese mit dem Internet verbunden
werden kann.
7. Während die Weather Station verbindet, blinkt das Innenmodul rot.
8. Die Weather Station muss nicht neu registriert werden.
TIPPS:
Wird dieser Modus versehentlich
ausgelöst, ein paar Minuten
warten und keine Aktivität auf
der ARCHOS Weather Station
ausführen und diese wird neu
verbinden.
Verbindung Ihrer Weather Station mit einem anderen WLAN-Netzwerk
30
QSG_Weather Station_book.indd 30 05/01/2015 17:47:48
5
6
Page 31

DE
ARCHOS WEATHER STATION - Modulverwaltung
Hinzufügen/Entfernen eines ARCHOS Weather Station-Sensors
1. Starten Sie die App ARCHOS Weather
2. Die Sensoren müssen sich im Paarungsmodus benden.
3. Tippen Sie auf (Symbol) und wählen Sie "Station Conguration
(Stationskonguration)" (Abbildung 1)
4. Wählen Sie "Add or Remove a peripheral (Peripherie hinzufügen oder entfernen)" (Abbildung 2)
Neuen Sensor hinzufügen
1. Wählen Sie "Add a new sensor (Neuen Sensor hinzufügen)"
(Abbildung 3)
2. Erfolgreich, wenn nicht, Batterien auf korrektes Einlegen hin
überprüfen und neu versuchen.
Sensor entfernen
1. Drücken Sie auf das Symbol des zu entfernenden Sensors (Abbildung 4).
2. Klicken Sie auf OK, um den Sensor zu entfernen (Abbildung 5).
QSG_Weather Station_book.indd 31 05/01/2015 17:47:50
1
3 4
5
2
31
Page 32

DE
Fehlerbehebung
Warum ist eine Verbindung von der Weather Station zum Mobilgerät nicht möglich?
Überprüfen Sie, ob Mobilgerät und Weather Station mit dem selben WLAN verbunden sind.
Überprüfen Sie, ob Ihr Gerät mit der Weather Station gepaart wurde.
Warum reagieren meine Sensoren nicht? Es sind keine Daten oder keine aktualisierten Daten vorhanden. Wurden
die Sensoren korrekt mit der ARCHOS Weather Station gepaart? Diese Informationen können unter ‘Station Conguration’ <
‘Peripherals’ (Stationskonguration < Peripherie) überprüft werden. Prüfen Sie, ob WLAN in Ihrem Gerät aktiviert ist. Überprüfen
Sie den Ladezustand der Batterien von Außenmodul und Bodenmodul. Bei leeren Batterien diese ersetzen.
Überprüfen Sie, ob der Abstand Ihrer Sensoren zum Innenmodul zu groß ist.
Wie kann ich die Weather Station auf die Standardeinstellungen zurücksetzen?
Drücken Sie die Reset-Taste auf der Unterseite Ihrer ARCHOS Weather Station.
Önen Sie die Einstellungen der ARCHOS Weather Application: ‘Station manager’< ‘Select a station’< ‘Unregister (Station Manager < Station wählen < Registrierung löschen)
32
QSG_Weather Station_book.indd 32 05/01/2015 17:47:50
Page 33

ES
Índice
Contenido de la caja..................................................................................................34
Módulo de interior ARCHOS........................................................................................35
Módulo de exterior ARCHOS.......................................................................................37
Módulo de suelo ARCHOS...........................................................................................38
Primeros pasos..........................................................................................................39
Estación meteorológica ARCHOS- Conguración inicial.................................................40
Estación meteorológica ARCHOS- Interfaz...................................................................42
Estación meteorológica ARCHOS- Gestión de estaciones...............................................43
Estación meteorológica ARCHOS- Gestión de módulos..................................................47
Resolución de problemas...........................................................................................48
Para más información, consulte la sección de preguntas y respuestas de su producto en www.archos.com. Examínela
detenidamente antes de pensar en realizar cualquier devolución. Los procedimientos pueden variar dependiendo de las
actualizaciones del producto.
Consulte la declaración de conformidad en http://www.archos.com/products/declaration_conformity.html
QSG_Weather Station_book.indd 33 05/01/2015 17:47:50
33
Page 34

ES
Contenido de la caja
Módulo de interior ARCHOS Módulo de exterior ARCHOS
Módulo de suelo ARCHOS
2 pilas AA
Adaptador CA Folleto de inicio rápido Folleto de seguridad y
34
QSG_Weather Station_book.indd 34 05/01/2015 17:47:51
2 pilas CR2032
garantía legal
Page 35

ES
Descripción del módulo de interior
1. Botón Restablecer
2. LED de emparejamiento y calidad de aire
3. Conector de alimentación
Módulo de interior ARCHOS
ACCIÓN
Módulo en modo emparejamiento a la espera de conectarse a dispositivo
Móvil conectado correctamente al módulo
El piloto LED le informará del estado del dispositivo cada vez que vaya a conectar el módulo interior o durante el uso.
ACCIÓN
Módulo en modo emparejamiento e intentando conectarse
El LED emite un destello azul casi justo después de
PILOTO LED
El LED parpadea en azul
LED en azul siempre encendido
PILOTO LED
encender
Módulo intentando conectarse o fallo en conexión
Módulo conectado correctamente
QSG_Weather Station_book.indd 35 05/01/2015 17:47:51
El LED parpadea en rojo
El LED se enciende en verde durante 10 s
35
Page 36

ES
Módulo de interior ARCHOS
LED de indicador de estado
Pase la mano sobre el LED para comprobar el nivel de CO2 y conocer así la
calidad de aire en su hogar (en función del color del LED).
COLOR
Verde
Amarillo
Rojo
36
QSG_Weather Station_book.indd 36 05/01/2015 17:47:52
CALIDAD DEL AIRE
Buena calidad
Calidad mejorable
Ventile la habitación
Page 37

ES
Módulo de exterior ARCHOS
Descripción del módulo de exterior
1. Indicador de emparejamiento
El emparejamiento se realiza al insertar las pilas. Si no fuera así, apriete
el botón de restablecer para activar el modo de emparejamiento.
2. Base
3. Botón Restablecer
4. Portapilas
2 3 41
QSG_Weather Station_book.indd 37 05/01/2015 17:47:52
37
Page 38

ES
Módulo de suelo ARCHOS
Descripción del módulo de suelo
1. Botón Restablecer
2. Sensor de temperatura y humedad
3. Compartimento de pilas
38
QSG_Weather Station_book.indd 38 05/01/2015 17:47:52
3
1
2
Page 39

ES
Primeros pasos
1. Conecte el cable de alimentación a la toma de
alimentación del módulo de interior.
1.
El dispositivo principal debe estar conectado en
todo momento a la corriente eléctrica
2. Descargue la aplicación ARCHOS Weather
Station de Google Play Store o Apple Store y siga
2.
el asistente de conguración.
3. Habilite el módulo de exterior.
1. Desatornille el módulo de exterior
2. Desatornille el compartimento de pilas
3. Coloque dos pilas AA
4. Vuelva a atornillar el compartimento y cierre
el módulo
4. Habilite el sensor de suelo
1. Desatornille el compartimento de pilas
2. Coloque dos pilas CR2032
3. Vuelva a atornillar
QSG_Weather Station_book.indd 39 05/01/2015 17:47:53
3.
39
Page 40

ES
Estación meteorológica ARCHOS- Conguración inicial
La primera vez que abra la aplicación, deberá conectarla a la estación meteorológica.
1. Descargue la aplicación ARCHOS Weather Station de Google Play o Apple Store
2. Active la conexión WiFi en su smartphone o tableta.
3. Abra la aplicación ARCHOS Weather Station
4. Haga clic en "Connect your Weather Station" (Conectar estación meteorológica) y luego seleccione su estación Archos.
Para que la aplicación la reconozca, la nueva estación meteorológica debe estar encendida. Una vez seleccionada con la aplicación, el piloto LED parpadeará en azul. Si pasaran unos minutos y el piloto no parpadeara, mantenga apretado el botón en la
parte inferior de la estación hasta que la luz parpadee en azul.
5. Seleccione su red Wi y envíe la contraseña a la estación meteorológica para que pueda conectarse a internet.
6. Espere mientras la estación se conecta.
7. Registre su estación meteorológica e introduzca sus datos: ubicación, nombre
40
QSG_Weather Station_book.indd 40 05/01/2015 17:47:53
Page 41

ES
Estación meteorológica ARCHOS- Conguración inicial
Una vez la estación meteorológica conectada, añada los sensores.
Para emparejar el módulo de exterior
1. Asegúrese de insertar correctamente las dos pilas AA.
2. El modo de emparejamiento se activará al insertar las pilas en el módulo.
3. En la aplicación, haga clic en "add a new sensor" (añadir nuevo sensor).
4. Si el emparejamiento no es correcto, repita de nuevo el proceso y apriete el botón
de restablecimiento.
Para emparejar el módulo de suelo
1. Asegúrese de insertar correctamente las dos pilas CR2032.
2. El modo de emparejamiento se activará al insertar las pilas en el módulo.
3. En la aplicación, haga clic en “add a new sensor” (añadir nuevo sensor).
4. Si el emparejamiento no es correcto, repita de nuevo el proceso y apriete el botón
de restablecimiento.
QSG_Weather Station_book.indd 41 05/01/2015 17:47:53
41
Page 42

ES
Estación meteorológica ARCHOS - Interfaz
1. Previsión meteorológica para los
próximos 6 días
42
QSG_Weather Station_book.indd 42 05/01/2015 17:47:54
2. Sensores de interior
A. Temperatura
B. Humedad
C. Presión atmosférica
D. Nivel de CO2
E. Nivel de ruido
3. Sensores de exterior
A. Temperatura
B. Humedad
4. Sensores de suelo
A. Temperatura
B. Humedad
1.
3.
2.
A
B
C
D
E
4.
AA
BB
Page 43

ES
Estación meteorológica ARCHOS- Gestión de estaciones
Puede consultar los datos de los sensores de sus módulos en cualquier momento utilizando la
aplicación Archos Weather Station.
1. Seleccione el sensor del módulo que quiera ver y pulse en su icono.
2. Seleccione una franja temporal (1 h, 2 h, 6 h, 12 h, 1 día, 2 días, 1 semana).
3. Puede seguir la evolución a lo largo del tiempo y compararla con la de días, meses o años atrás mediante
las grácas que ofrece la aplicación. Cada sensor dispone de su gráca especíca.
1 2 3
QSG_Weather Station_book.indd 43 05/01/2015 17:47:55
43
Page 44

ES
Estación meteorológica ARCHOS- Gestión de estaciones
Puede añadir o quitar estaciones meteorológicas en cualquier momento.
Para añadir una estación meteorológica
1.Abra la aplicación Archos Weather Station.
2. Pinche en (icono de 3 puntos) y seleccione "Station Manager" (Gestor de estaciones).
3. Seleccione "Find stations" (Encontrar estaciones).
4. Se mostrará la página inicial de ARCHOS Weather Station.
5. Seleccione "Connect your Weather Station" (Conectar estación meteorológica)
6. Seleccione la estación que desee añadir.
7. Pinche en (icono de 3 puntos) para ver sus estaciones y seleccionar una.
44
QSG_Weather Station_book.indd 44 05/01/2015 17:47:57
2 3 5 6 7
Page 45

ES
Estación meteorológica ARCHOS- Gestión de estaciones
Para quitar una estación meteorológica de la aplicación
1. Abra la aplicación Archos Weather Station.
2. Seleccione "Station Manager" (Gestor de estaciones) en el menú de parámetros.
3. Para seleccionar una estación, mantenga pulsado sobre su nombre.
4. Seleccione "Unregister" (Dar de baja).
2 3 4
QSG_Weather Station_book.indd 45 05/01/2015 17:47:58
45
Page 46

ES
Estación meteorológica ARCHOS- Gestión de estaciones
Para conectar su estación meteorológica a otra red Wi
1. Abra la aplicación Archos Weather Station.
2. Pase la mano sobre el módulo de interior para ver el piloto verde de calidad de aire.
3. Mantenga la mano sobre el módulo de interior durante al menos 15 segundos.
4. El módulo de interior parpadeará en azul y la estación pasará a modo Punto de Acceso.
5. Pinche en (icono), seleccione "Station Manager" (Gestor de estaciones) y luego "Find stations" (Encontrar estaciones).
6. Seleccione su red Wi y envíe la contraseña a la estación meteorológica para que pueda conectarse a internet.
7. El módulo de interior parpadeará en rojo mientras la estación meteorológica se conecta.
8. No necesita volver a registrar la estación.
CONSEJOS:
Si activa este modo por accidente,
espere sin realizar ninguna acción
en la app ARCHOS Weather Station
y tras unos pocos minutos se
reconectará de forma automática
46
5
QSG_Weather Station_book.indd 46 05/01/2015 17:47:59
6
Page 47

ES
Estación meteorológica ARCHOS- Gestión de módulos
Para añadir o quitar un sensor de la estación meteorológica ARCHOS
1. Abra la aplicación ARCHOS Weather Station
2. Compruebe que los sensores estén en modo emparejamiento
3. Pinche en (icono) y seleccione "Station Conguration" (Conguración estación) (gura 1)
4. Seleccione "Add or Remove a peripheral" (Añadir o quitar periférico) (gura 2)
Para añadir un nuevo sensor
1. Seleccione Add a new sensor (Añadir nuevo sensor) (gura 3)
2. Si no funcionara, compruebe que las pilas estén insertadas correctamente y pruebe de nuevo
Para quitar un sensor
1. Pulse el icono del sensor que desee quitar (gura 4)
2. Haga clic en "OK" (Aceptar) para quitar el sensor (gura 5)
1
3 4
2
5
QSG_Weather Station_book.indd 47 05/01/2015 17:48:01
47
Page 48

ES
Resolución de problemas
¿Por qué no me puedo conectar a la estación meteorológica con mi dispositivo móvil?
Compruebe que tanto su dispositivo móvil como la estación meteorológica estén conectados a la misma WiFi.
Compruebe que su dispositivo esté emparejado con la estación meteorológica
¿Por qué los sensores no responden? Puede que no dispongan de datos o no haya ninguna actualización de datos.
¿Están emparejados correctamente con su estación meteorológica Archos? Puede consultar esto en "Station Congura-
tion" (Conguración de estación) < "Peripherals". Verique que la Wi esté activada en su dispositivo. Compruebe que las pilas
del módulo de exterior y del sensor de suelo no estén gastadas. Si lo estuvieran, cámbielas por otras nuevas.
Asegúrese de que los sensores estén lo sucientemente cerca del módulo de interior.
¿Cómo puedo restablecer la estación meteorológica a los parámetros de fábrica?
Apriete el botón de restablecer en la parte inferior de su estación meteorológica ARCHOS.
En los ajustes de la aplicación ARCHOS Weather, seleccione: "Station manager" (Gestor de estaciones) < "Select a station" (Seleccionar estación) < "Unregister" (Dar de baja)
48
QSG_Weather Station_book.indd 48 05/01/2015 17:48:01
Page 49

IT
Indice
Contenuto della confezione.......................................................................................50
Modulo interno ARCHOS ............................................................................................51
Modulo esterno ARCHOS............................................................................................53
Modulo al suolo ARCHOS............................................................................................54
Per iniziare...............................................................................................................55
Stazione meteorologica ARCHOS - Impostazioni iniziali...............................................56
Stazione meteorologica ARCHOS - Interfaccia.............................................................58
Stazione meteorologica ARCHOS - Gestione delle stazioni............................................59
Stazione meteorologica ARCHOS - Gestione dei moduli................................................63
Diagnosi dei guasti...................................................................................................64
Per maggiori informazioni, consultare le FAQ sul prodotto in www.archos.com. Si raccomanda di leggere queste informazioni
prima di decidere l'eventuale restituzione del prodotto. Le procedure possono cambiare a seguito di aggiornamenti dell'applicazione.
Consultare la dichiarazione di conformità su http://www.archos.com/products/declaration_conformity.html
QSG_Weather Station_book.indd 49 05/01/2015 17:48:01
49
Page 50

IT
Contenuto della confezione
50
QSG_Weather Station_book.indd 50 05/01/2015 17:48:02
Modulo interno ARCHOS Modulo esterno ARCHOS
2 batterie AA
Adattatore AC Guida Rapida Garanzia,
2 batterie CR2032
Modulo al suolo ARCHOS
Informazioni legali e
sulla sicurezza
Page 51

IT
Descrizione del modulo interno
1. Pulsante di reset
2. Indicatore di pairing e LED di
qualità dell'aria
3. Connettore elettrico
Modulo interno ARCHOS
AZIONE
Modulo in modalità di pairing e in attesa di essere collegato al dispositivo
Dispositivo mobile correttamente collegato al modulo
LED indicatori di stato ogni volta che si vuole ricollegare il modulo interno o durante l'uso.
AZIONE
Modulo in modalità di pairing e tentativo di
Il LED lampeggia con luce blu quasi immediatamente dopo l'inseri-
connessione
Il modulo sta tentando di connettersi o ha perso la
STATO DEL LED
LED lampeggiante blu
LED blu acceso sso
STATO DEL LED
mento dell'alimentazione elettrica
LED lampeggiante rosso
connessione
Il modulo si collega correttamente
QSG_Weather Station_book.indd 51 05/01/2015 17:48:02
LED verde acceso per 10 s
51
Page 52

IT
Modulo interno ARCHOS
LED indicatore di stato
Passare la mano sul LED e vericare il livello di CO2 in base al colore del LED per
valutare la qualità dell'aria dell'ambiente domestico.
52
QSG_Weather Station_book.indd 52 05/01/2015 17:48:02
COLORE
Verde
Giallo
Rosso
QUALITÀ DELL'ARIA
Buona qualità
La qualità è migliorabile
L'ambiente deve essere ventilato
Page 53

IT
Modulo esterno ARCHOS
Descrizione del modulo esterno
1. Indicatore di pairing
Il pairing avviene all'inserimento delle batterie. In caso contrario,
utilizzare il pulsante di reset per attivare la modalità di pairing.
2. Base
3. Pulsante di reset
4. Portabatteria
2 3 41
QSG_Weather Station_book.indd 53 05/01/2015 17:48:02
53
Page 54

IT
Modulo al suolo ARCHOS
Descrizione del modulo al suolo
1. Pulsante di reset
2. Sensore di temperatura e umidità
3. Vano batterie
3
1
2
54
QSG_Weather Station_book.indd 54 05/01/2015 17:48:02
Page 55

IT
Per iniziare
1. Collegare il cavo di alimentazione al connettore
elettrico del modulo interno.
Il dispositivo principale deve essere sempre
collegato all'alimentazione elettrica
2. Scaricare l'applicazione della stazione
meteorologica ARCHOS da Google Play Store o Apple
Store e seguire la procedura di congurazione.
3. Mettere in funzione il modulo esterno.
1. Aprire il modulo esterno
2. Aprire il vano batterie
3. Inserire due batterie AA
4. Richiudere il vano e chiudere il modulo
4. Mettere in funzione il sensore al suolo
1. Aprire il vano batterie
2. Inserire due batterie CR2032
3. Richiudere
QSG_Weather Station_book.indd 55 05/01/2015 17:48:03
1.
2.
3.
55
Page 56

IT
STAZIONE METEOROLOGICA ARCHOS - Impostazioni iniziali
La prima volta che si lancia l'applicazione è necessario collegare la stazione meteorologica.
1. Scaricare l'applicazione della stazione meteorologica ARCHOS da Google Play Store o da Apple Store
2. Attivare il WiFi sullo smartphone o sul tablet.
3. Lanciare l'app della stazione meteorologica ARCHOS
4. Cercare le stazioni meteorologiche Archos facendo clic su Connect your Weather Station e quindi selezionare la propria stazione.
Una nuova stazione meteorologica deve essere accesa per essere riconosciuta dall'applicazione e, una
volta selezionata, il LED deve lampeggiare con luce blu. Se questo non accade dopo alcuni minuti, mantenere la pressione sul pulsante sotto la stazione nché non si accende la luce blu lampeggiante.
5. Selezionare la propria rete WiFi ed inviare la password alla stazione meteorologica perché si possa connettere a Internet.
6. Attendere che la stazione meteorologica si connetta.
7. Registrare la stazione meteorologica e impostare i propri dati: luogo, nome
56
QSG_Weather Station_book.indd 56 05/01/2015 17:48:03
Page 57

IT
STAZIONE METEOROLOGICA ARCHOS - Impostazioni iniziali
Aggiungere nuovi sensori quando la stazione meteorologica è collegata.
Pairing del modulo esterno
1. Accertarsi che le due batterie AA siano ben posizionate nel proprio supporto.
2. Quando le batterie vengono inserite nel modulo, questo entra in modalità di pairing.
3. Fare clic su "add a new sensor" nell'applicazione.
4. Se il pairing non avviene, ripetere la procedura e premere il pulsante di reset.
Pairing del modulo al suolo
1. Accertarsi che le due batterie CR2032 siano ben posizionate nel proprio supporto.
2. Quando le batterie vengono inserite nel modulo, questo entra in modalità di pairing.
3. Fare clic su "add a new sensor" nell'applicazione.
4. Se il pairing non avviene, ripetere la procedura e premere il pulsante di reset.
QSG_Weather Station_book.indd 57 05/01/2015 17:48:03
57
Page 58

IT
STAZIONE METEOROLOGICA ARCHOS - Interfaccia
1. Previsione meteorologica per i 6
giorni successivi
2. Sensori interni
58
QSG_Weather Station_book.indd 58 05/01/2015 17:48:04
A. Temperatura
B. Umidità
C. Pressione atmosferica
D. Livello di CO2
E. Livello di rumore
3. Sensori esterni
A. Temperatura
B. Umidità
4. Sensori al suolo
A. Temperatura
B. Umidità
1.
3.
2.
A
B
C
D
E
4.
AA
BB
Page 59

IT
STAZIONE METEOROLOGICA ARCHOS - Gestione delle stazioni
Dall'applicazione della stazione meteorologica Archos è possibile controllare i dati dei sensori
dei moduli in qualsiasi momento.
1. Selezionare il sensore del modulo che interessa e toccare la relativa icona.
2. Selezionare la scala desiderata (1h, 2h, 6h, 12h, 1 giorno, 2 giorni, 1 settimana).
3. Seguire l'evoluzione nel tempo e confrontare i giorni/mesi/anni precedenti utilizzando i graci forniti
dall'applicazione. Ogni sensore ha un graco dedicato.
1 2 3
QSG_Weather Station_book.indd 59 05/01/2015 17:48:05
59
Page 60

IT
STAZIONE METEOROLOGICA ARCHOS - Gestione delle stazioni
È possibile aggiungere o rimuovere stazioni meteorologiche in qualsiasi momento.
Per aggiungere una stazione meteorologica
1. Lanciare la app della stazione meteorologica Archos
2. Toccare (icona con i 3 punti) e selezionare Station Manager.
3. Selezionare Find stations.
4. Si viene reindirizzati alla home page della stazione meteorologica ARCHOS.
5. Selezionare Connect your Weather Station.
6. Selezionare la stazione che si vuole aggiungere.
7. Toccare (icona con 3 punti) e passare da una stazione all'altra selezionando quella desiderata.
60
QSG_Weather Station_book.indd 60 05/01/2015 17:48:07
2 3 5 6 7
Page 61

IT
STAZIONE METEOROLOGICA ARCHOS - Gestione delle stazioni
Per eliminare una stazione meteorologica dalla app
1. Lanciare la app della stazione meteorologica Archos.
2. Selezionare Station manager nel menu parametri.
3. Selezionare una stazione esercitando una pressione prolungata sul suo nome.
4. Selezionare Unregister.
2 3 4
QSG_Weather Station_book.indd 61 05/01/2015 17:48:08
61
Page 62

IT
STAZIONE METEOROLOGICA ARCHOS - Gestione delle stazioni
Per collegare la stazione meteorologica a un'altra rete Wi
1. Lanciare la app della stazione meteorologica ARCHOS.
2. Passare la mano sul modulo interno per visualizzare l'indicatore luminoso verde di qualità dell'aria.
3. Tenere la mano sul modulo interno per almeno 15 secondi.
4. Si attiverà la luce lampeggiante blu del modulo interno e la stazione passerà in modalità Access Point.
5. Toccare (icona), quindi selezionare Station Manager e Find stations.
6. Selezionare la propria rete WiFi ed inviare la password alla stazione meteorologica perché si possa collegare a Internet.
7. Quando la stazione meteorologica sta eettuando il collegamento, si attiva la luce lampeggiante rossa del modulo interno.
8. Non è necessario registrare nuovamente la stazione meteorologica.
SUGGERIMENTO:
Se si attiva questa modalità
accidentalmente, è suciente
attendere qualche minuto e la
stazione meteorologica ARCHOS si
riconnetterà automaticamente
62
5
QSG_Weather Station_book.indd 62 05/01/2015 17:48:10
6
Page 63

IT
STAZIONE METEOROLOGICA ARCHOS - Gestione dei moduli
Per aggiungere/rimuovere un sensore della stazione meteorologica
ARCHOS
1. Lanciare la app meteorologica ARCHOS
2. Vericare che i sensori siano in modalità di pairing
3. Toccare (icona) e selezionare Station Conguration (gura 1)
4. Selezionare Add or Remove a peripheral (gura 2)
Per aggiungere un nuovo sensore
1. Selezionare Add a new sensor (gura 3)
2. Se l'operazione non ha successo, vericare che le batterie siano inserite e tentare nuovamente
Per rimuovere un sensore
1. Premere l'icona del sensore che si vuole rimuovere (gura 4)
2. Fare clic su OK per rimuovere il sensore (gura 5)
1
3 4
2
5
QSG_Weather Station_book.indd 63 05/01/2015 17:48:11
63
Page 64

IT
Diagnosi dei guasti
Perché non riesco a connettermi alla stazione meteorologica con il mio dispositivo mobile?
Vericare che il dispositivo mobile e la stazione meteorologica siano collegati alla stessa rete WiFi.
Vericare che sia avvenuto il riconoscimento tra il dispositivo e la stazione meteorologica
Perché i sensori non rispondono? Nessun dato o nessun dato aggiornato. Sono stati correttamente riconosciuti dalla stazione meteorologica Archos? È possibile vericare queste informazioni in ‘Station Conguration’ < ‘Periphe-
rals’Check se il Wi è attivo sul dispositivo. Vericare che le batterie di alimentazione del modulo esterno e del sensore al suolo
non siano scariche. In questo caso, è necessario sostituirle.
Vericare che i sensori siano sucientemente vicini al modulo interno.
Come si ripristinano le impostazioni predenite della stazione meteorologica?
Utilizzare il pulsante di reset sotto la stazione meteorologica ARCHOS.
Accedere alle impostazioni dell'applicazione meteorologica ARCHOS: ‘Station manager’< ‘Select a station’< ‘Unregister
64
QSG_Weather Station_book.indd 64 05/01/2015 17:48:11
Page 65

NL
Inhoudsopgave
Inhoud van de verpakking.........................................................................................66
ARCHOS binnenmodule..............................................................................................67
ARCHOS buitenmodule..............................................................................................69
ARCHOS grondmodule...............................................................................................70
Aan de slag...............................................................................................................71
ARCHOS Weather Station - Eerste installatie................................................................72
ARCHOS Weather Station - Interface...........................................................................74
ARCHOS Weather Station - Stations beheren...............................................................75
ARCHOS Weather Station - Modules beheren...............................................................79
Probleemoplossing...................................................................................................80
Raadpleeg voor meer informatie de veelgestelde vragen (FAQ's) over uw product op www.archos.com. Lees eerst de antwoorden op deze vragen voordat u het product terugstuurt. Als gevolg van updates van de toepassing kunnen de procedures
wijzigen.
Raadpleeg de verklaring van overeenstemming op http://www.archos.com/products/declaration_conformity.html
QSG_Weather Station_book.indd 65 05/01/2015 17:48:11
65
Page 66

NL
Inhoud van de verpakking
ARCHOS binnenmodule ARCHOS buitenmodule
ARCHOS grondmodule
2 x AA batterijen
AC-adapter Verkorte handleiding Garantie
66
QSG_Weather Station_book.indd 66 05/01/2015 17:48:12
2 x CR2032 batterijen
& veiligheidsinformatie
Page 67

NL
Beschrijving van de binnenmodule
1. Reset-knop
2. Pairing-lampje
3. Voedingsaansluiting
ARCHOS binnenmodule
BEWERKING
De module is in de pairing-modus en wacht op verbinding met het apparaat
Mobiel verbonden met module
LED-statuslampjes bij opnieuw verbinden van uw binnenmodule of tijdens gebruik.
BEWERKING
De module is in de pairing-modus en probeert verbinding te maken
Blauwe LED knippert vrijwel onmiddellijk na
LED-STATUS
De LED knippert blauw
Blauwe LED brandt voortdurend
LED-STATUS
inschakelen
De module probeert verbinding te maken of de verbinding is verbroken
Module is verbonden
QSG_Weather Station_book.indd 67 05/01/2015 17:48:13
De LED knippert rood
Groene LED brandt gedurende 10 sec.
67
Page 68

NL
ARCHOS binnenmodule
LED-statuslampje
Beweeg uw hand over de LED en controleer het CO2-niveau aan de hand van de
LED-kleur om de luchtkwaliteit in uw huis te bepalen.
KLEUR
68
QSG_Weather Station_book.indd 68 05/01/2015 17:48:13
Groen
Geel
Rood
LUCHTKWALITEIT
Goede kwaliteit
Kwaliteit kan beter
Ruimte moet worden geventileerd
Page 69

NL
ARCHOS buitenmodule
Beschrijving van de buitenmodule
1. Pairing-lampje
Pairing (koppelen) wordt uitgevoerd als de batterijen worden geplaatst. Als dit
niet het geval is, druk dan op de Reset-knop om de paring-modus te activeren.
2. Basis
3. Reset-knop
4. Batterijcompartiment
2 3 41
QSG_Weather Station_book.indd 69 05/01/2015 17:48:13
69
Page 70

NL
ARCHOS grondmodule
Beschrijving van de grondmodule
1. Reset-knop
2. Temperatuur- en vochtigheidssensor
3. Batterijcompartiment
3
1
2
70
QSG_Weather Station_book.indd 70 05/01/2015 17:48:13
Page 71

NL
Aan de slag
1. Sluit de voedingskabel aan op de
voedingsaansluiting van de binnenmodule.
Uw hoofdapparaat moet permanent zijn aangesloten
op het lichtnet.
2. Download de ARCHOS Weather Station app in
de Google Play Store of Apple Store en volg de
conguratiestappen.
3. Schakel de buitenmodule in.
1. Schroef de buitenmodule los.
2. Schroef het batterijcompartiment los.
3. Plaats twee AA batterijen.
4. Schroef het batterijcompartiment weer vast
en sluit de module
4. Schakel de grondmodule in.
1. Schroef het batterijcompartiment los.
2. Plaats twee CR2032 batterijen.
3. Schroef het batterijcompartiment weer vast.
QSG_Weather Station_book.indd 71 05/01/2015 17:48:14
1.
2.
3.
71
Page 72

NL
ARCHOS WEATHER STATION - Eerste installatie
Bij de eerste installatie van de app moet u verbinding maken met uw Weather Station.
1. Download de ARCHOS Weather Station App in de Google Play of Apple Store
2. Schakel WiFi in op uw smartphone of tablet.
3. Open de ARCHOS Weather Station App
4. Zoek naar Archos Weather Stations door op Connect your Weather Station [Verbinding maken met Weather Station] te
tikken en dan uw apparaat te kiezen.
Om te worden herkend door de applicatie moet het nieuwe Weather Station zijn ingeschakeld. Na de
selectie moet de LED blauw knipperen. Als dit niet gebeurt, druk dan na enkele minuten lang op de knop
onder het station totdat het lampje blauw gaat knipperen.
5. Kies uw WiFi-netwerk en stuur het wachtwoord naar het Weather Station zodat het apparaat verbinding kan maken met het
internet.
6. Wacht totdat uw Weather Station verbinding heeft gemaakt.
7. Registreer uw Weather Station en stel uw gegevens in: locatie, naam
72
QSG_Weather Station_book.indd 72 05/01/2015 17:48:14
Page 73

NL
ARCHOS WEATHER STATION - Eerste installatie
Wanneer uw Weather Station is verbonden, kunt u nieuwe sensoren toevoegen.
Pairing van de buitenmodule
1. Zorg ervoor dat de twee AA batterijen goed in hun houder zijn geplaatst.
2. Zodra de batterijen in de module zijn geplaatst, wordt de pairing-modus geactiveerd.
3. Klik op "add a new sensor" [nieuwe sensor toevoegen] in uw applicatie.
4. De paring is uitgevoerd. Zo niet, herhaal dan het proces en druk op de Reset-knop.
Pairing van de grondmodule
1. Zorg ervoor dat de twee CR2032 batterijen goed in hun houder zijn geplaatst.
2. Zodra de batterijen in de module zijn geplaatst, wordt de pairing-modus geactiveerd.
3. Klik op "add a new sensor" [nieuwe sensor toevoegen] in uw applicatie.
4. De paring is uitgevoerd. Zo niet, herhaal dan het proces en druk op de Reset-knop.
QSG_Weather Station_book.indd 73 05/01/2015 17:48:14
73
Page 74

NL
ARCHOS WEATHER STATION - Interface
1. Weersverwachtingen voor de
komende 6 dagen
2. Binnensensoren
A. Temperatuur
B. Vochtigheid
C. Luchtdruk
74
QSG_Weather Station_book.indd 74 05/01/2015 17:48:15
D. CO2-niveau
E. Geluidsniveau
3. Buitensensoren
A. Temperatuur
B. Vochtigheid
4. Grondsensoren
A. Temperatuur
B. Vochtigheid
1.
3.
2.
A
B
C
D
E
4.
AA
BB
Page 75

NL
ARCHOS WEATHER STATION - Stations beheren
Nadat u verbinding heeft gemaakt met de Archos Weather Station app kunt u op ieder moment
de sensorinformatie van de modules controleren.
1. Kies de gewenste modulesensor en tik op het pictogram van de sensor.
2. Kies de tijdsspanne (1 uur, 2 uur, 6 uur, 12 uur, 1 dag, 2 dagen, 1 week).
3. Volg de ontwikkeling gedurende de tijdsspanne en vergelijk deze met eerdere dagen/maanden/jaren
door middel van de graeken in de app. Iedere sensor heeft zijn eigen graek.
1 2 3
QSG_Weather Station_book.indd 75 05/01/2015 17:48:16
75
Page 76

NL
ARCHOS WEATHER STATION - Stations beheren
U kunt op ieder moment Weather Stations toevoegen en verwijderen.
Een Weather Station toevoegen
1. Open de Archos Weather Station app.
2. Tik op (pictogram met 3 punten) en kies Station Manager.
3. Kies Find stations [Stations zoeken].
4. U wordt doorverwezen naar de beginpagina van het ARCHOS Weather Station.
5. Kies Connect your Weather Station [Verbinding maken met Weather Station].
6. Kies het station dat u wilt toevoegen.
7. Tik op (pictogram met 3 punten) en schakel tussen uw stations door het gewenste station te kiezen.
76
QSG_Weather Station_book.indd 76 05/01/2015 17:48:18
2 3 5 6 7
Page 77

NL
ARCHOS WEATHER STATION - Stations beheren
Een Weather Station uit de app verwijderen
1. Open de Archos Weather Station app.
2. Kies Station Manager in het parametermenu.
3. Druk lang op de naam van een station om deze te kiezen.
4. Kies Unregister [Verwijderen].
2 3 4
QSG_Weather Station_book.indd 77 05/01/2015 17:48:20
77
Page 78

NL
ARCHOS WEATHER STATION - Stations beheren
Het Weather Station verbinden met een ander Wi-netwerk
1. Open de Archos Weather Station app.
2. Beweeg uw hand over de binnenmodule om de groene lamp voor de luchtkwaliteit te controleren.
3. Houd uw hand tenminste 15 seconden boven de binnenmodule.
4. Het lampje van de binnenmodule knippert blauw en het station schakelt over naar de toegangspuntmodus.
5. Tik op (pictogram), kies Station Manager en dan Find stations [Stations zoeken].
6. Kies uw WiFi-netwerk en stuur het wachtwoord naar het Weather Station zodat het apparaat verbinding kan maken met het
internet.
7. Terwijl uw Weather Station verbinding maakt, knippert het lampje van de binnenmodule rood.
8. Het is niet nodig om uw Weather Station opnieuw te registreren.
TIPS:
Als u deze modus onbedoeld
activeert, kunt u gewoon wachten
en geen bewerkingen uitvoeren
op uw ARCHOS Weather Station.
Na enkele minuten zal het station
opnieuw verbinding maken.
78
QSG_Weather Station_book.indd 78 05/01/2015 17:48:21
5
6
Page 79

NL
ARCHOS WEATHER STATION - Modules beheren
Een ARCHOS Weather Station sensor toevoegen/verwijderen
1. Open de Archos Weather Station app.
2. Zorg ervoor dat de sensoren zich in de pairing-modus bevinden.
3. Tik op (pictogram) en kies Station Conguration [Stationconguratie] (afbeelding 1).
4. Kies Add or Remove a peripheral [Randapparatuur toevoegen of
verwijderen] (afbeelding 2)
Een nieuwe sensor toevoegen
1. Kies Add a new sensor [Nieuwe sensor toevoegen] (afbeelding 3).
2. Als dit niet lukt, controleer dan of de batterijen goed zijn geplaatst
en probeer het nogmaals.
Een sensor verwijderen
1. Druk op het pictogram van de sensor die u wilt verwijderen (afbeelding 4).
2. Klik op OK om uw sensor te verwijderen (afbeelding 5).
1
3 4
2
5
QSG_Weather Station_book.indd 79 05/01/2015 17:48:24
79
Page 80

NL
Probleemoplossing
Waarom kan ik geen verbinding maken tussen mijn Weather Station en mijn mobiele apparaat?
Controleer of uw mobiele apparaat en uw Weather Station zijn verbonden met hetzelfde WiFi-netwerk.
Controleer of uw apparaat is gekoppeld (via pairing) met uw Weather Station.
Waarom reageren mijn sensoren niet? Geen gegevens of geen bijgewerkte gegevens. Zijn ze gekoppeld (via
pairing) met uw Archos Weather Station? U kunt deze informatie controleren bij "Station Conguration"> "Peripherals"
[Stationconguratie > Randapparatuur]. Controleer of Wi is ingeschakeld op uw apparaat. Controleer of de batterijen van de
buitenmodule en grondmodule niet leeg zijn. Vervang de batterijen als ze leeg zijn.
Controleer of uw sensoren zich niet te ver van de binnenmodule af bevinden.
Hoe kan ik de standaardinstellingen van mijn Weather Station herstellen?
Gebruik de Reset-knop onder het ARCHOS Weather Station.
Ga naar de instellingen van de ARCHOS Weather Station app: "Station manager"> "Select a station" > "Unregister" [Station
manager > Station kiezen > Verwijderen].
80
QSG_Weather Station_book.indd 80 05/01/2015 17:48:24
Page 81

PT
Índice
Conteúdo da Embalagem...........................................................................................82
Módulo Interior ARCHOS............................................................................................83
Módulo Exterior ARCHOS............................................................................................85
Módulo de Solo ARCHOS.............................................................................................86
Introdução................................................................................................................87
ARCHOS Weather Station - Primeira Conguração........................................................88
ARCHOS Weather Station - Interface...........................................................................90
ARCHOS Weather Station - Gestão de estações ............................................................91
ARCHOS Weather Station - Gerir módulos ...................................................................95
Resolução de Problemas............................................................................................96
Para mais informações, consulte as Perguntas Frequentes sobre o nosso produto em www.archos.com. Consulte-as antes de
considerar devolver o produto. Poderão ocorrer algumas alterações nos procedimentos devido a atualizações de aplicações.
Consulte a declaração de conformidade em http://www.archos.com/products/declaration_conformity.html
QSG_Weather Station_book.indd 81 05/01/2015 17:48:24
81
Page 82

PT
Conteúdo da Embalagem
Módulo Interior ARCHOS Módulo Exterior ARCHOS
Adaptador AC Manual QSG Manual
82
QSG_Weather Station_book.indd 82 05/01/2015 17:48:25
2 pilhas AA
2 pilhas CR2032
Módulo de Solo ARCHOS
de Garantia, Legal e Segurança
Page 83

PT
Descrição do Módulo Interior
1. Botão de reposição
2. Indicador de Emparelhamento e LED de
qualidade do ar
3. Conetor de Alimentação
Módulo Interior ARCHOS
AÇÃO
Módulo em modo de emparelhamento e a aguardar ligação ao dispositivo
Telemóvel ligado ao módulo com sucesso
LED de indicador de estado sempre que desejar voltar a ligar o seu módulo interior ou durante a ligação.
AÇÃO
Módulo em modo de emparelhamento e a tentar ligar
LED Azul intermitente quase imediatamente após
ESTADO DO LED
LED Azul intermitente
LED Azul sempre ligado
ESTADO DO LED
ligar
Módulo em tentativa de criar ligação ou ligação perdida
Módulo ligado com sucesso
QSG_Weather Station_book.indd 83 05/01/2015 17:48:25
LED VERMELHO intermitente
LED Verde durante 10s
83
Page 84

PT
Módulo Interior ARCHOS
LED de indicador de estado
Passe a mão por cima do LED e verique o nível de CO2 de acordo com a cor do
LED para descobrir a qualidade do ar da sua casa.
COR
Verde
Amarelo
84
QSG_Weather Station_book.indd 84 05/01/2015 17:48:26
Vermelho
QUALIDADE DO AR
Boa Qualidade
A qualidade pode ser melhorada
O quarto deve ser ventilado
Page 85

PT
Módulo Exterior ARCHOS
Descrição do Módulo Exterior
1. Indicador de Emparelhamento
O emparelhamento é feito ao inserir as pilhas. Se o emparelhamento não for conseguido, use o botão de reposição para ativar o modo de emparelhamento.
2. Base
3. Botão de reposição
4. Suporte das pilhas
2 3 41
QSG_Weather Station_book.indd 85 05/01/2015 17:48:26
85
Page 86

PT
Módulo de Solo ARCHOS
Descrição do Módulo de Solo
1. Botão de reposição
2. Sensor de Temperatura e Humidade
3. Compartimento das pilhas
3
1
2
86
QSG_Weather Station_book.indd 86 05/01/2015 17:48:26
Page 87

PT
Introdução
1. Ligue o cabo de alimentação ao conetor de
alimentação do Módulo Interior.
O seu dispositivo principal terá de car ligado a
uma fonte de alimentação de forma permanente
2. Instale a Aplicação ARCHOS Weather Station a
partir do Google Play ou Apple Store e siga todos os
passos da conguração.
3. Coloque o Módulo Exterior em funcionamento.
1. Abra o Módulo Exterior
2. Abra o compartimento das Pilhas
3. Coloque duas pilhas AA
4. Feche o compartimento e o Módulo
4. Coloque o Módulo de Solo em funcionamento.
1. Abra o compartimento das Pilhas
2. Coloque 2 pilhas CR2032
3. Feche o compartimento
QSG_Weather Station_book.indd 87 05/01/2015 17:48:27
1.
2.
3.
87
Page 88

PT
ARCHOS WEATHER STATION - Primeira Conguração
Quando lançar a aplicação pela primeira vez, terá de ligar a sua estação de meteorologia.
1. Instale a Aplicação ARCHOS Weather Station através do Google Play ou Apple Store
2. Ligue a ligação WiFi no seu telemóvel ou tablet.
3. Inicie a Aplicação ARCHOS Weather Station
4. Procure estações de meteorologia Archos ao clicar em Ligar na sua Estação de Meteorologia e selecione a sua.
Uma nova estação de neteorologia deverá estar LIGADA para ser reconhecida pela aplicação. Uma vez selecionada, o LED
deverá car azul intermitente. Se isto não acontecer passado alguns minutos, mantenha o dedo pressionado no botão na parte
QSG_Weather Station_book.indd 88 05/01/2015 17:48:27
inferior da estação até que a luz que azul intermitente.
5. Selecione a sua rede WiFi e envie a palavra-passe para a estação de meteorologia para que possa ligar à Internet.
6. Aguarde que a estação de meteorologia ligue à Internet.
7. Registe a sua estação de meteorologia e indique os seus dados: local, nome
88
Page 89

PT
ARCHOS WEATHER STATION - Primeira Conguração
Quando a estação de meteorologia estiver ligada, adicione novos sensores.
Para emparelhar o Módulo Exterior
1. Certique-se de que as duas pilhas AA estão bem colocadas no interior do compartimento.
2. Quando as pilhas estiverem colocadas no módulo, entrará em modo de emparelhamento.
3. Na aplicação, clique em "add a new sensor" (adicionar um novo sensor).
4. Emparelhamento concluído. Caso contrário, repita o processo e pressione o botão de reposição.
Para emparelhar o Módulo de Solo
1. Certique-se de que as duas pilhas CR2032 estão bem colocadas no interior do compartimento.
2. Quando as pilhas estiverem colocadas no módulo, entrará em modo de emparelhamento.
3. Na aplicação, clique em "add a new sensor" (adicionar um novo sensor).
4. Emparelhamento concluído. Caso contrário, repita o processo e pressione o botão de reposição.
QSG_Weather Station_book.indd 89 05/01/2015 17:48:27
89
Page 90

PT
ARCHOS WEATHER STATION - Interface
1. Previsão meteorológica para os
próximos 6 dias
2. Sensores interiores
A. Temperatura
B. Humidade
C. Pressão atmosférica
D. Nível de CO2
E. Nível de ruído
90
QSG_Weather Station_book.indd 90 05/01/2015 17:48:28
3. Sensores exteriores
A. Temperatura
B. Humidade
4. Sensores do solo
A. Temperatura
B. Humidade
1.
3.
2.
A
B
C
D
E
4.
AA
BB
Page 91

PT
ARCHOS WEATHER STATION - Gestão de estações
Quando estiver ligado à Aplicação Archos Weather Station, verique os dados dos sensores de
módulos em qualquer momento.
1. Selecione o sensor de módulo desejado e toque no seu ícone.
2. Selecione a escala (1h, 2h, 6h, 12h, 1 dia, 2 dias, 1 semana).
3. Siga a evolução ao longo do tempo e compare com dias/meses/anos anteriores através dos grácos
fornecidos com a aplicação. Cada sensor apresenta o seu próprio gráco.
1 2 3
QSG_Weather Station_book.indd 91 05/01/2015 17:48:29
91
Page 92

PT
ARCHOS WEATHER STATION - Gestão de estações
Poderá adicionar ou remover estações de meteorologia a qualquer momento.
Para adicionar uma estação de meteorologia
1. Lance a Aplicação Archos Weather Station.
2. Toque em (ícone com 3 pontos) e selecione o Station Manager (Gestor de Estações).
3. Selecione Find stations (Procurar estações).
4. Será redirecionado para a página principal da ARCHOS Weather Station.
5. Selecione Connect (Ligar) à Estação de Meteorologia
6. Selecione a estação que deseja adicionar.
7. Toque em (ícone com 3 pontos) e alterne entre as suas estações ao selecionar a estação desejada.
92
QSG_Weather Station_book.indd 92 05/01/2015 17:48:32
2 3 5 6 7
Page 93

PT
ARCHOS WEATHER STATION - Gestão de estações
Para remover uma Estação de Meteorologia da Aplicação
1. Lance a Aplicação Archos Weather Station.
2. Selecione o Station Manager (Gestor de Estações) no menu de parâmetros.
3. Mantenha o dedo pressionado no nome da estação para selecioná-la.
4. Selecione Unregister (Remover).
2 3 4
QSG_Weather Station_book.indd 93 05/01/2015 17:48:34
93
Page 94

PT
ARCHOS WEATHER STATION - Gestão de estações
Para ligar a sua estação de meteorologia a outra rede Wi-Fi
1. Lance a Aplicação Archos Weather Station.
2. Passe a mão pode cima do Módulo Interior para ver o indicador de luz verde de qualidade de ar.
3. Mantenha a mão por cima do Módulo Interior durante pelo menos 15 segundos.
4. O Módulo Interior irá car azul intermitente e a estação entrará no modo de Ponto de Acesso.
5. Toque em (icon), selecione Gestor de Estações e depois selecione Procurar estações.
6. Selecione a sua rede WiFi e envie a palavra-passe para a estação de meteorologia para que possa ligar à Internet.
7. Enquanto a estação de meteorologia efetuar a ligação, o Módulo Interior cará vermelho intermitente.
8. Não é necessário registar a sua estação de meteorologia de novo.
94
5
QSG_Weather Station_book.indd 94 05/01/2015 17:48:35
6
DICAS:
Se ativar este modo involuntariamente, poderá esperar sem
tomar qualquer ação na ARCHOS
Weather Station, e após alguns
minutos, ligar-se-á de novo
automaticamente
Page 95

PT
ARCHOS WEATHER STATION - Gerir módulos
Para adicionar/remover um sensor de ARCHOS Weather Station
1. Lance a aplicação ARCHOS Weather Station.
2. Certique-se de que os sensores estão no modo de emparelhamento
3. Toque em (ícone) e selecione Station Conguration (Conguração de
Estação) (gura 1)
4. Selecione Add or Remove a peripheral (Adicionar ou Remover um
periférico) (gura 2)
Para adicionar um novo sensor
1. Selecione Add a new sensor (Adicionar um novo sensor) (gura 3)
2. Se nenhum sensor tiver sido adicionado, verique se as pilhas estão
bem inseridas e tente novamente
Para remover um sensor
1. Pressione o ícone do sensor que deseja remover (gura 4)
Clique em OK para remover o sensor (gura 5)
1
3 4
2
5
QSG_Weather Station_book.indd 95 05/01/2015 17:48:38
95
Page 96

PT
Resolução de problemas
Porque é que não consigo ligar a minha estação de meteorologia ao meu dispositivo móvel?
Verique se o seu dispositivo móvel e a sua estação de meteorologia estão ambos ligados à mesma rede WiFi.
Verique se o seu dispositivo está emparelhado com a estação de meteorologia
Porque que é que os meus sensores não respondem? Sem dados ou dados não atualizados. Estão corretamente
emparelhados com a sua estação de meteorologia Archos? Pode vericar esta informação em "Station Conguration" <
"Peripherals" ("Conguração da Estação" < "Periféricos"). Verique se a rede WiFi está LIGADA no seu dispositivo. Verique se as
pilhas estão a funcionar no módulo Exterior e no sensor de solo. Se não funcionarem, terá de colocar novas pilhas.
Verique se os seus sensores estão sucientemente próximos do seu Módulo Interior.
Como posso repor as denições predenidas da minha estação de meteorologia?
Pressione o botão de reposição na parte inferior da estação de meteorologia.
Aceda às denições da aplicação ARCHOS Weather Station: "Station manager"< "Select a station"< "Unregister" ("Gestão de
estações" < "Selecione uma estação" < "Remover")
96
QSG_Weather Station_book.indd 96 05/01/2015 17:48:38
Page 97

RU
Оглавление
Комплектация.........................................................................................................98
Модуль ARCHOS для использования внутри помещения.........................................99
Модуль ARCHOS для использования вне помещения.............................................101
Модуль ARCHOS для контроля состояния почвы....................................................102
Начало работы......................................................................................................103
Метеостанция ARCHOS - начальная настройка.......................................................104
Метеостанция ARCHOS - интерфейс........................................................................106
Метеостанция ARCHOS - управление станциями....................................................107
Метеостанция ARCHOS - Управление модулями.....................................................111
Устранение неисправностей...................................................................................112
Для получения дополнительных сведений посетите раздел часто задаваемых вопросов (FAQs) на сайте www.archos.
com. Обязательно ознакомьтесь с представленными рекомендациями до принятия решения о возврате товара.
В связи с обновлением приложений указанные процедуры могут быть изменены.
Обратитесь к декларации о соответствии на http://www.archos.com/products/declaration_conformity.html
QSG_Weather Station_book.indd 97 05/01/2015 17:48:38
97
Page 98

RU
Комплектация
Модуль ARCHOS
для использования
внутри помещения
Батарейки AA - 2 шт.
Модуль ARCHOS для
использования вне
помещений
Батарейки CR2032 - 2 шт.
Модуль ARCHOS
для контроля
состояния почвы
Адаптер переменного тока Краткое руководство
пользователя
98
QSG_Weather Station_book.indd 98 05/01/2015 17:48:39
Информация о юридических
гарантиях и
и инструкции по безопасности
Page 99

RU
Модуль ARCHOS для использования внутри помещения
Описание модуля
1. Кнопка перезапуска
2. Индикатор подключения и светодиодный
индикатор качества воздуха
3. Разъем питания
ДЕЙСТВИЕ
Модуль находится в режиме установления соединения и
ожидает подключения к устройству
Мобильное устройство подключено успешно
Светодиоды загораются каждый раз, когда вы пытаетесь переподключить модуль, или если устройство используется.
ДЕЙСТВИЕ
Модуль находится в режиме установления соединения и
пытается подключиться к устройству.
Модуль пытается подключиться, либо подключение не
активно
Подключение модуля выполнено успешно
QSG_Weather Station_book.indd 99 05/01/2015 17:48:39
Синий светодиодный индикатор начинает мигать почти сразу же после
Зеленый светодиодный индикатор горит в течение 10 сек.
СОСТОЯНИЕ ИНДИКАТОРА
Светодиодный индикатор мигает синим светом
Синий светодиодный индикатор постоянно включен
СОСТОЯНИЕ ИНДИКАТОРА
включения питания
Светодиодный индикатор мигает красным светом
99
Page 100

RU
Модуль ARCHOS для использования внутри помещения
Светодиодный индикатор состояния воздуха
Для определения качества воздуха в вашем доме проведите рукой над
светодиодным индикатором и проверьте уровень CO2 в соответствии с
цветом светодиода.
ЦВЕТ
Зеленый
Желтый
Красный
КАЧЕСТВО ВОЗДУХА
Хорошее качество
Качество можно улучшить
Следует проветрить комнату
100
QSG_Weather Station_book.indd 100 05/01/2015 17:48:39
 Loading...