

Page 1
ENEN
Table of contents
Package Contents............................................................................................................................................................................
Getting Started..................................................................................................................................................................................
ARCHOS Mini-Cam...........................................................................................................................................................................
ARCHOS Weather Tag......................................................................................................................................................................
ARCHOS Movement Tag.................................................................................................................................................................
Description of the ARCHOS Smart Home Tablet.................................................................................................................
Through the Wizard........................................................................................................................................................................
Connecting to a WiFi network....................................................................................................................................................
The ARCHOS Home Interface.....................................................................................................................................................
ARCHOS Home - First Time Setup.............................................................................................................................................
Accessories Interface....................................................................................................................................................................
Managing Accessories..................................................................................................................................................................
Connecting with your Mobile Device.....................................................................................................................................
Progams............................................................................................................................................................................................
ARCHOS Home Interactions.......................................................................................................................................................
The AndroidTM Interface................................................................................................................................................................
Getting Familiar with AndroidTM................................................................................................................................................
Troubleshooting.............................................................................................................................................................................
For more information, please consult the FAQs of your product on www.archos.com. Make sure to read them before
considering any product return.
2
3
4
6
8
10
11
12
14
16
20
21
24
26
29
30
34
36
1
UserGuide_ARCHOS_Smart_Home_Tablet_book.indd 1 15/05/2014 16:05:13
Page 2

Warranty
Warranty
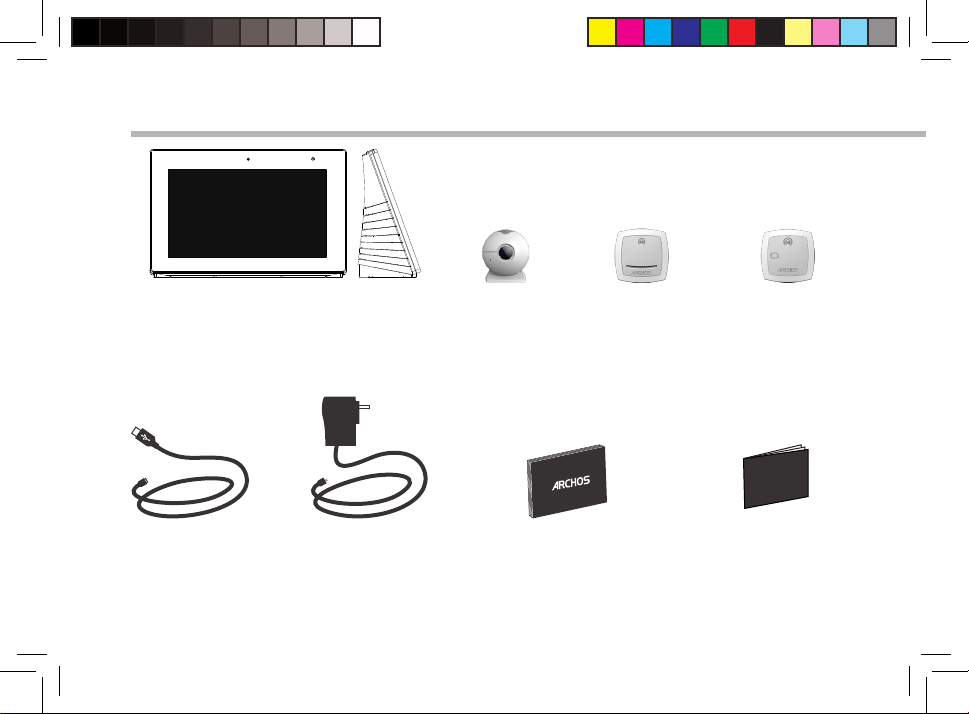
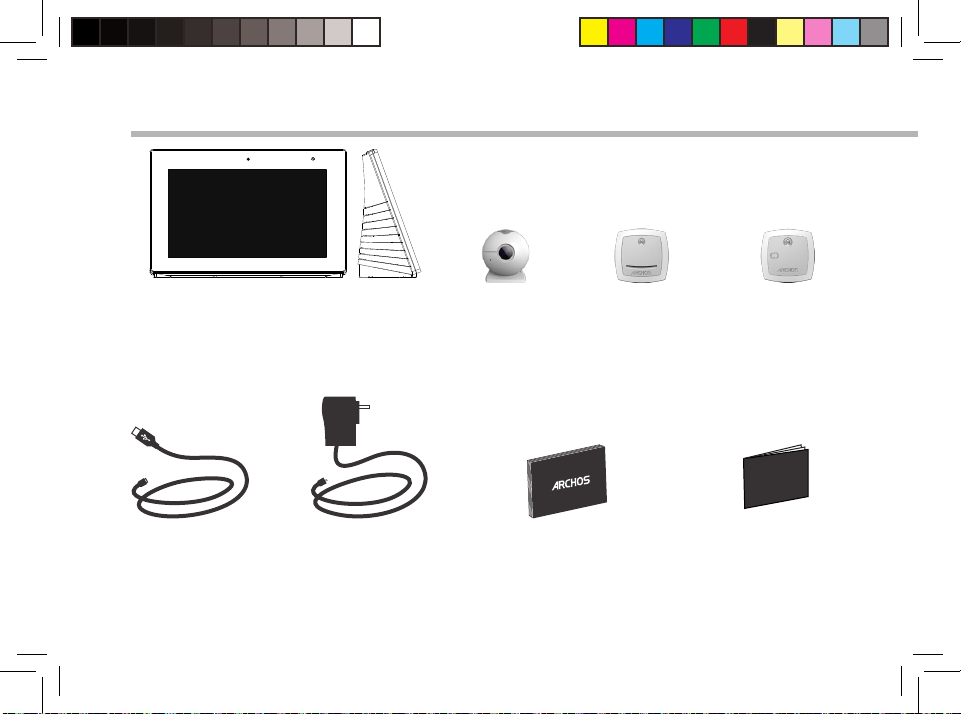
Package Contents
ARCHOS Smart Home Tablet
USB cable Charger QSG booklet Warranty,
Mini Cam
X 2
Weather Tag
X 2
Movement Tag
X 2
legal & safety booklet
2
UserGuide_ARCHOS_Smart_Home_Tablet_book.indd 2 15/05/2014 16:05:18
Page 3
EN
Getting Started
1
1. Connect your power cable into the power connector.
The Power indicator light is blue when the power cable is
plugged in. The device will start charging.
2. Press the ON/OFF button to turn on the device.
- You can use your ARCHOS whilst it charges.
- Let your device charge completely the rst time you use it.
- Use only the supplied charger.
2
TIPS:
To receive more complete service, please register your product.
From a computer, go to www.archos.com/register.
Your device should be connected to the power
connector whenever possible.
3
UserGuide_ARCHOS_Smart_Home_Tablet_book.indd 3 15/05/2014 16:05:19
Page 4
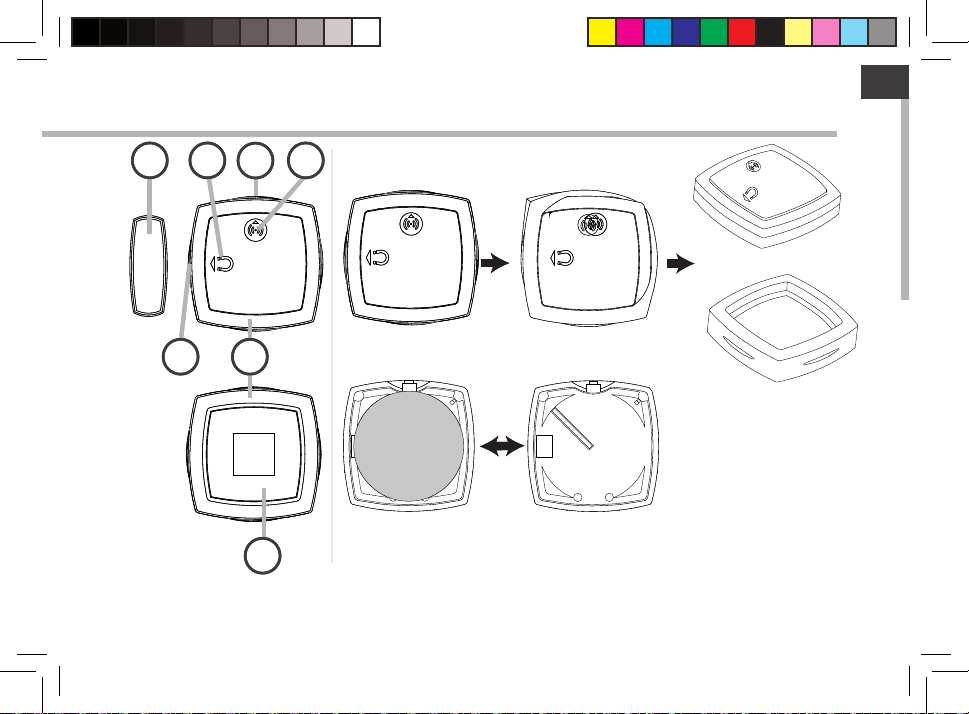
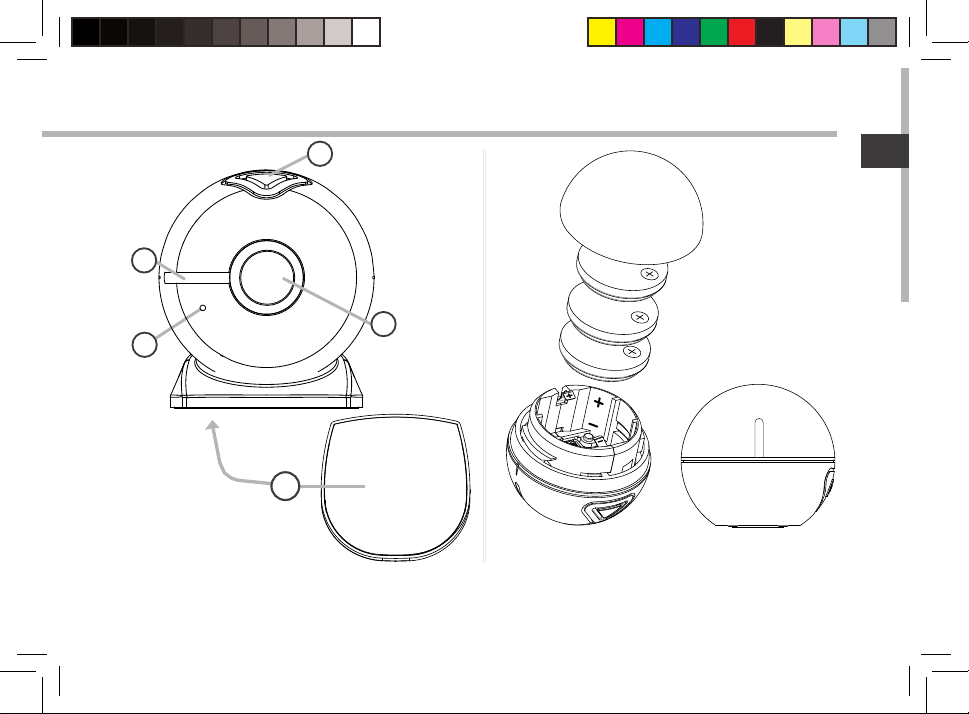
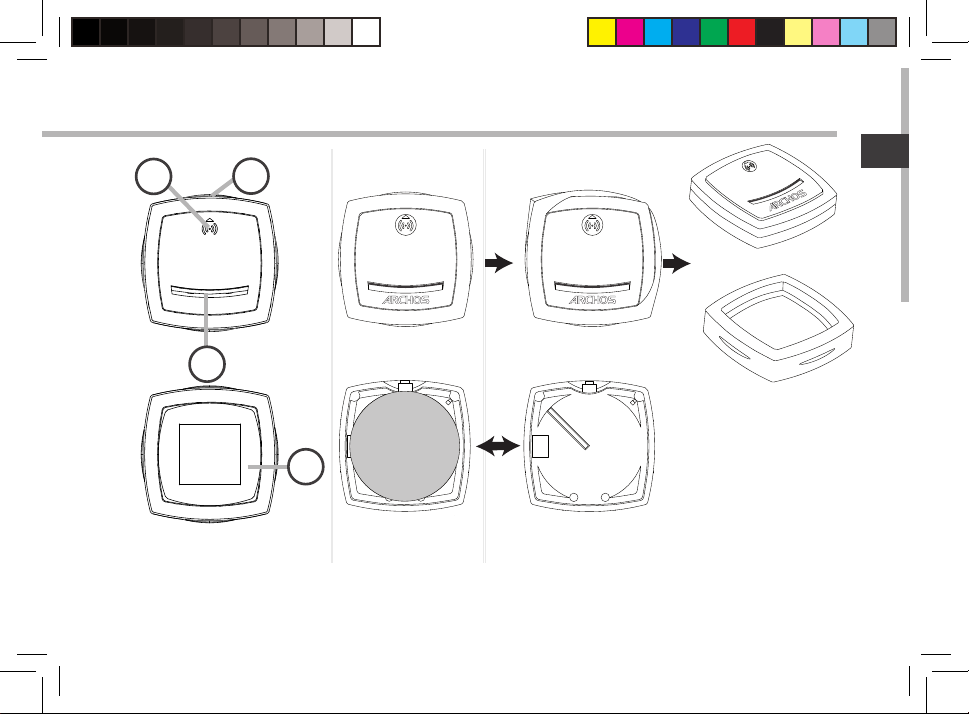
ARCHOS Mini-Cam
Description of the Mini Cam Putting into service the Mini Cam
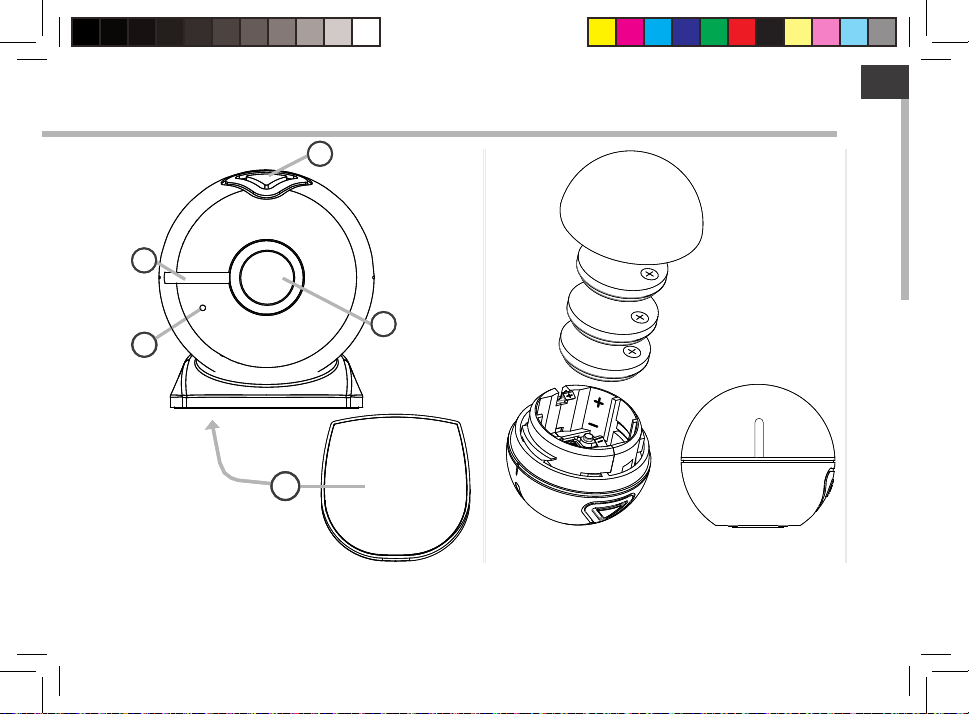
Pairing button
1
Pairing indicator
2
Camera lens
3
Microphone
4
Sticker
5
When you long press
the Pairing button
(5 seconds)
When you do a short
press on the Pairing
button
4
UserGuide_ARCHOS_Smart_Home_Tablet_book.indd 4 15/05/2014 16:05:19
LED blinks for 60 seconds The device is in pairing mode and is
LED blinks for 10 seconds The device is already paired but is
LED blinks 3 times The device is unpaired and disconnected.
LED is ON for 5 seconds The device is paired and connected.
LED blinks fast An over-the-air update is occuring.
Your camera functions with 3 Lithium cell CR 24 50
batteries.
1. Unscrew the camera ball.
2. Remove the insulation label “remove before use”.
3. Screw back up.
4. Place the camera on its stand.
Magnets keep it stable. You can move the camera to
point in any direction.
5. Remove the sticker on the stand to stick the device to
a wall or ceiling.
trying to connect to a tablet.
disconnected. It tries to connect.
Page 5
EN
1
1
2
2
3
3
4
4
5
5
5
UserGuide_ARCHOS_Smart_Home_Tablet_book.indd 5 15/05/2014 16:05:21
Page 6

ARCHOS Weather Tag
Description of the Weather tag Putting into service the Weather tag
Pairing indicator
1
Pairing button
2
Opening
3
Sticker
4
Your Weather Tag functions with a Lithium cell CR 24
30 battery.
1. Remove the rubber case.
2. Detach the top from the back case.
3. Remove the insulation label “remove before use”.
4. Replace the back case and rubber.
5. Remove the sticker on the back case to stick the
device to a wall.
When you long press
the Pairing button
(5 seconds)
When you do a short
press on the Pairing
button
6
UserGuide_ARCHOS_Smart_Home_Tablet_book.indd 6 15/05/2014 16:05:21
LED blinks for 60 seconds The device is in pairing mode and is
trying to connect to a tablet.
LED blinks for 10 seconds The device is already paired but is
disconnected. It tries to connect.
LED blinks 3 times The device is unpaired and disconnected.
LED is ON for 5 seconds The device is paired and connected.
LED blinks fast An over-the-air update is occuring.
Page 7

Picture to show how to change the battery
3V CR2430
+
3V CR2430
+
Picture to show how to change the battery
3V CR2430
+
Picture to show how to change the battery
3V CR2430
+
Picture to show how to change the battery
3V CR2430
+
EN
2
1
21
3
3
+
3V CR2430
4
4
7
UserGuide_ARCHOS_Smart_Home_Tablet_book.indd 7 15/05/2014 16:05:24
Page 8

ARCHOS Movement Tag
Description of the Movement tag Putting into service the Movement tag
Magnet
1
Magnet sensor
2
Magnet sensor indicator
3
Pairing button
4
Pairing indicator
5
Rubber case
6
Sticker
7
When you long press
7
the Pairing button
(5 seconds)
When you do a short
press on the Pairing
button
8
UserGuide_ARCHOS_Smart_Home_Tablet_book.indd 8 15/05/2014 16:05:24
LED blinks for 60 seconds The device is in pairing mode and is
LED blinks for 10 seconds The device is already paired but is
LED blinks 3 times The device is unpaired and disconnected.
LED is ON for 5 seconds The device is paired and connected.
LED blinks fast An over-the-air update is occuring.
Your Movement Tag functions with a Lithium cell CR
24 30 battery.
1. Remove the rubber case of the magnet receiver.
2. Detach the top from the back case.
3. Remove the insulation label “remove before use”.
4. Replace the back case.
5. Remove the sticker on the back case to stick the
device to a wall.
6. Remove the sticker on the magnet to stick it
opposite to the magnet position indicator.
trying to connect to a tablet.
disconnected. It tries to connect.
Page 9
Picture to show how to change the battery
3V CR2430
+
3V CR2430
+
Picture to show how to change the battery
3V CR2430
+
EN
Picture to show how to change the battery
3V CR2430
+
3
1
3
1
2
2
5
5
4
4
6
6
+
3V CR2430
7
7
9
UserGuide_ARCHOS_Smart_Home_Tablet_book.indd 9 15/05/2014 16:05:29
Page 10
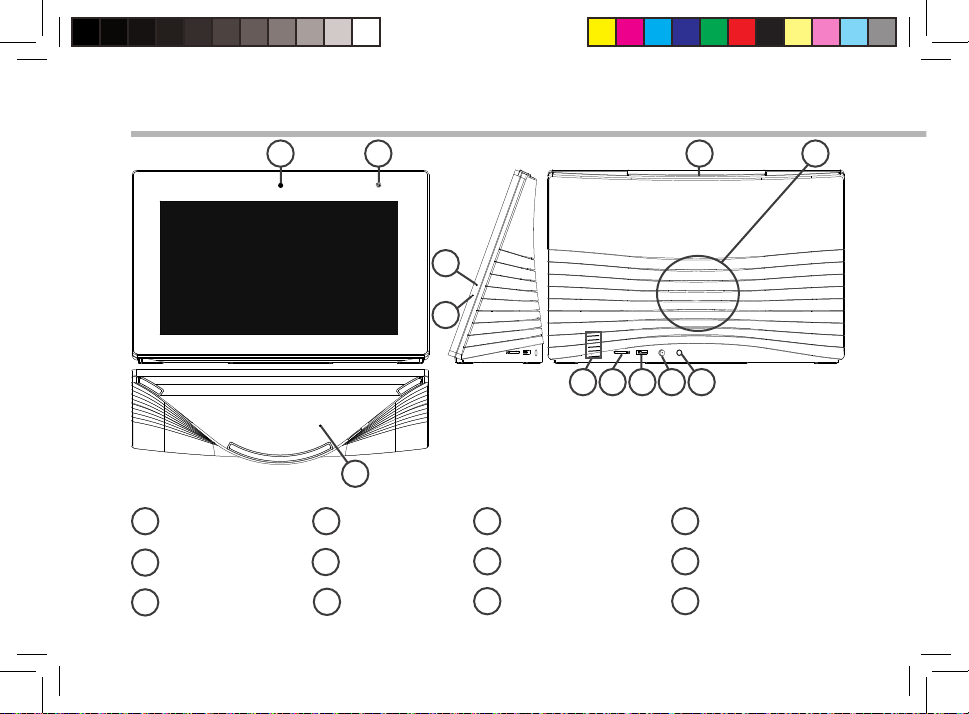
ARCHOS Smart Home Tablet
1
2
5 6
3
4
7
98 10 11
12
Webcam
1
Light sensor
2
Charging indicator
3
Microphone
4
ON/OFF button
5
Loudspeaker
6
Temperature sensor
7
Micro-SD card slot
8
Micro-USB port
9
Power connector
10
Headphone jack
11
Reset button
12
10
UserGuide_ARCHOS_Smart_Home_Tablet_book.indd 10 15/05/2014 16:05:32
Page 11
EN
Through the Wizard
The rst time you start up your ARCHOS, the installation wizard will help you set up your
device:
- Language
- WiFi connection
- Google account setup
- Location service options
- 3rd party apps
TIPS:
We recommend that you set up your device in the WiFi zone of the network that you will regularly be
using.
11
UserGuide_ARCHOS_Smart_Home_Tablet_book.indd 11 15/05/2014 16:05:32
Page 12
1
2
3
4
5
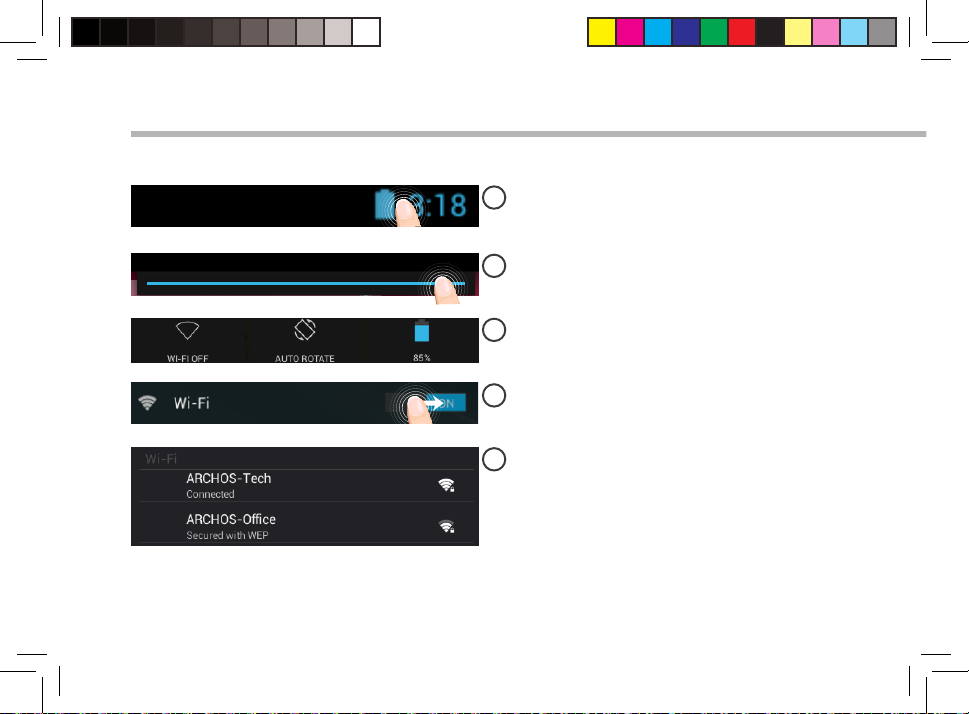
Connecting to a WiFi Network
CAUTION: Make sure that you are in a WiFi zone.
Touch and hold the time & battery icons to
reveal the status bar. A blue line is displayed.
Pull the blue line down to display the status
dashboard.
Touch "WiFi o" in the status dashboard. The
WiFi page will be displayed.
Slide the WiFi switch to "ON" positon.
The ARCHOS will scan for Wi networks in
range. Touch the name of network you want
to connect to.
Private networks are shown with a lock icon
and will require you to enter your password.
12
UserGuide_ARCHOS_Smart_Home_Tablet_book.indd 12 15/05/2014 16:05:33
Page 13
EN
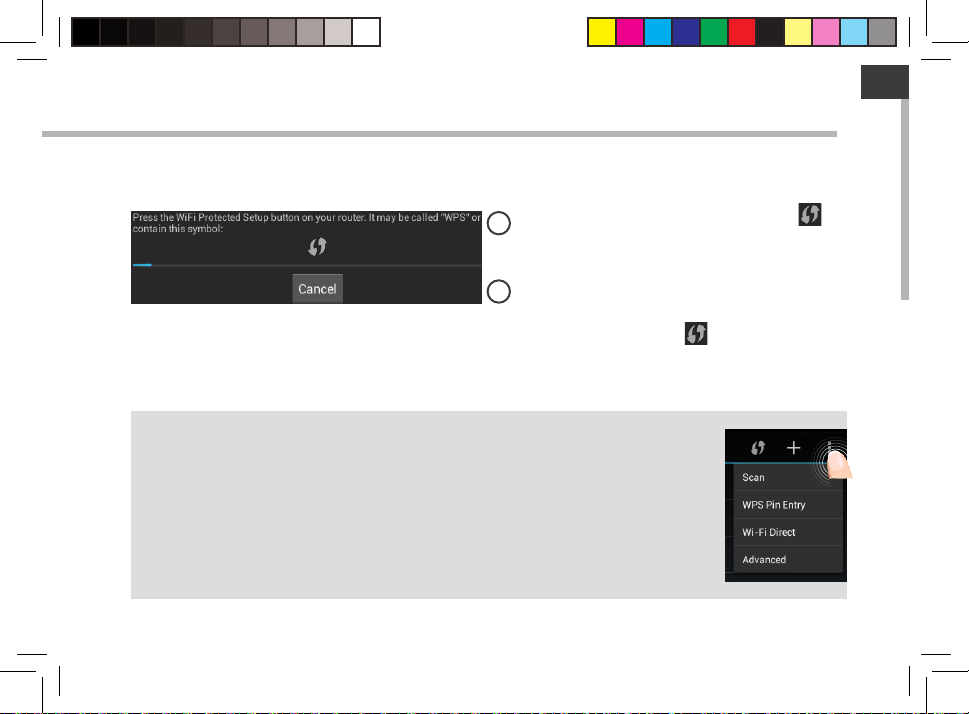
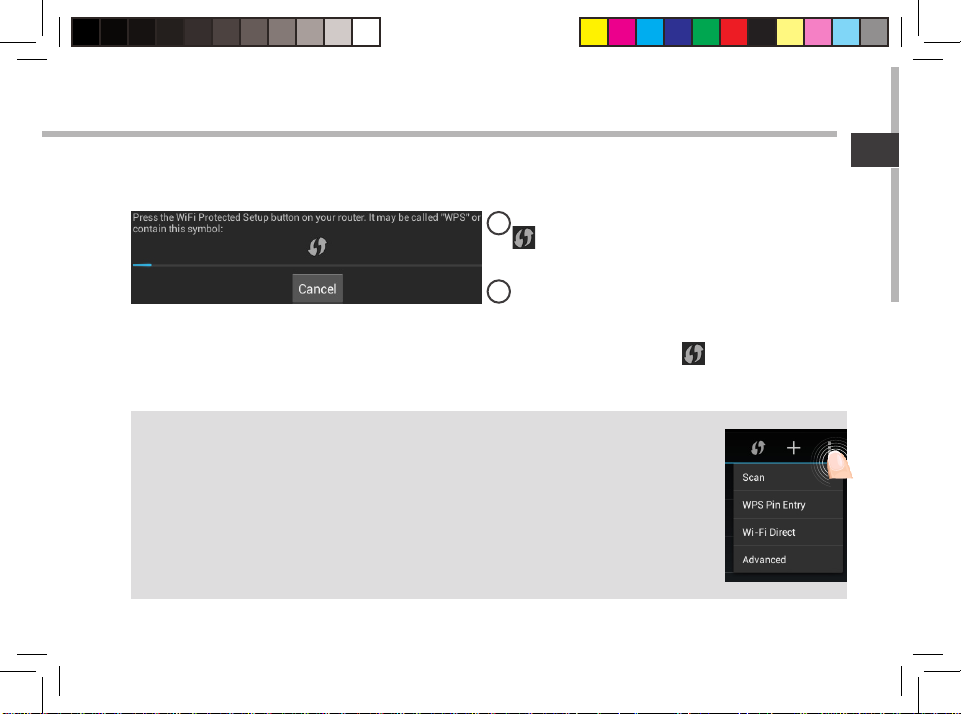
Quick connection
You can connect to your WiFi network through WiFi Protected Setup.
Press the WiFi Protected Setup button in
1
Settings > Wireless & networks.
In your Internet router, Press the WiFi
2
Protected Setup button called WPS or
containing the symbol
TIPS:
- When entering a WiFi password, we recommend that you select “Show password” so
you can see the characters you are typing. To get the correct WiFi password (or settings)
for the network, contact the WiFi network provider. If your WiFi is on and you are in range
of a network that you previously connected to, your ARCHOS will automatically attempt
to connect to it.
- To keep your WiFi connection ON when the device is on sleep, select the Menu icon in
the “WiFi” page. Then, select Advanced > Keep WiFi on during sleep > Always.
13
UserGuide_ARCHOS_Smart_Home_Tablet_book.indd 13 15/05/2014 16:05:33
Page 14
The ARCHOS HOME Interface
87
1
2
3
4
5
6
14
UserGuide_ARCHOS_Smart_Home_Tablet_book.indd 14 15/05/2014 16:05:33
Page 15
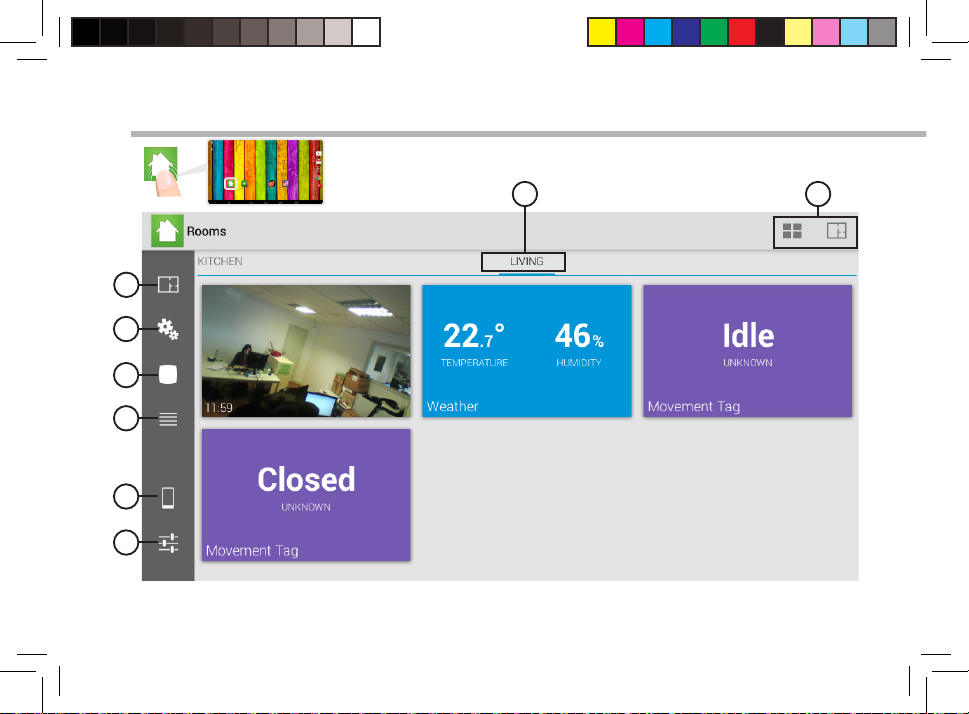
Rooms tab:
1
displays the rooms you have created to match the rooms of your house.
Programs tab:
2
displays the programs created with the paired objects.
All accessories tab:
3
displays all the accessories paired with the Archos Smart Home Tablet.
History tab:
4
displays the history of actions from the dierent accessories.
Connection tab:
5
allows you to connect devices and manage the home tablet from a distance.
General tab:
6
allows you to add notication accounts and manage settings.
Room displayed:
7
displays the accessories placed in that room. Slide right to display other rooms.
Menu bar:
8
displays contextual menu buttons according to the tab.
EN
15
UserGuide_ARCHOS_Smart_Home_Tablet_book.indd 15 15/05/2014 16:05:33
Page 16
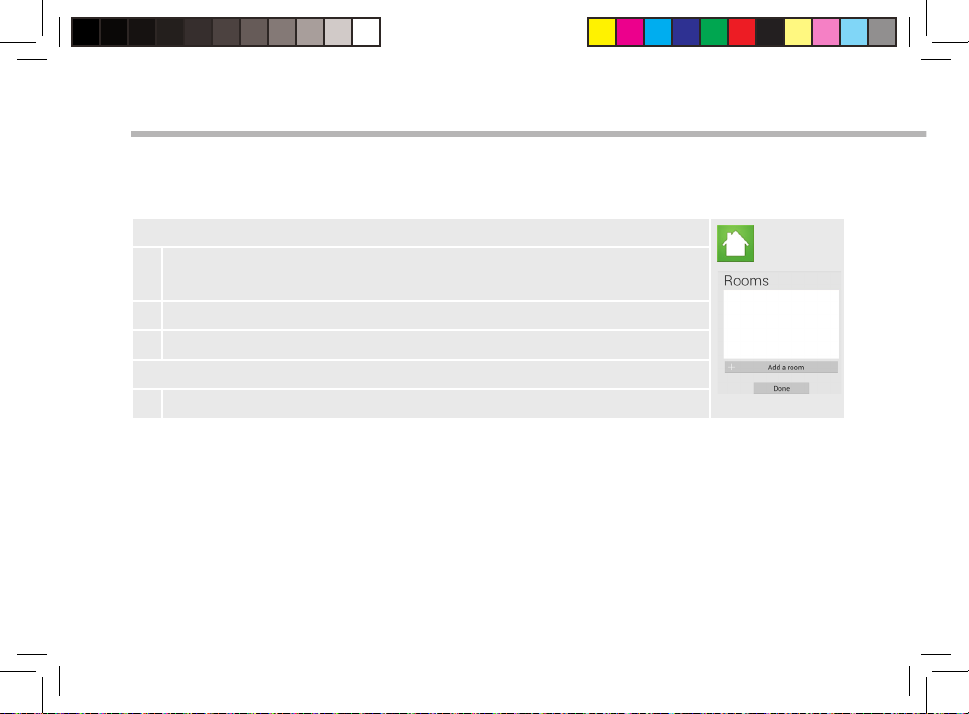
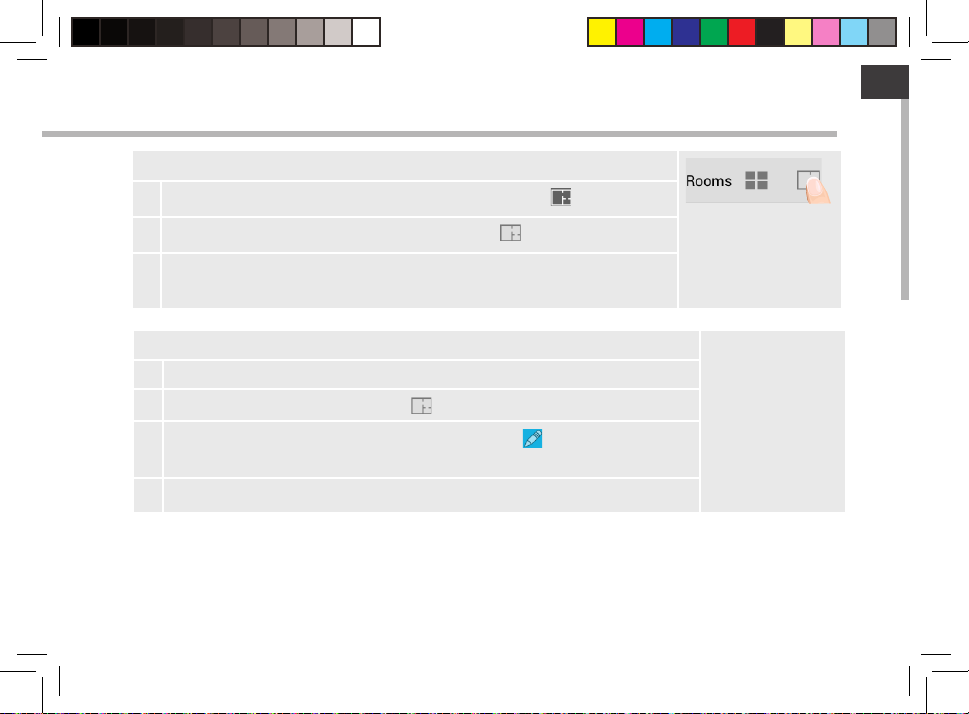
ARCHOS HOME - First Time Setup
The rst time you launch the app, you will need to create rooms. The rooms you create should
match the actual rooms where the accessories are placed.
ROOMS
To create a room
1 Launch the Archos Home app.
2 Select Add a room.
3 Type in a name for the room and select OK.
You can create as many rooms as you want.
4 When your have nished, select Done.
16
UserGuide_ARCHOS_Smart_Home_Tablet_book.indd 16 15/05/2014 16:05:34
Page 17
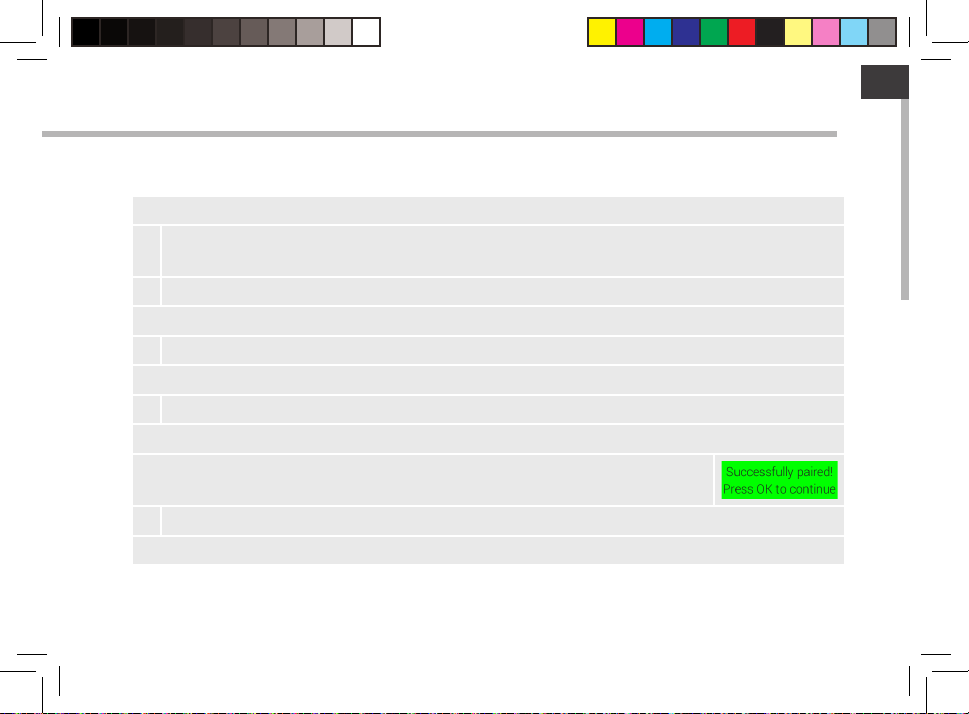
PAIRING
Once you have created rooms, the next step allows you to pair accessories with your tablet.
To pair an accessory
1 Check if Bluetooth is turned ON in the tablet. If not, restart it from Settings > Wireless &
Networks.
2 Select the desired accessory.
Make sure you have removed the insulation label “remove before use” in the batteries.
3 Press the pairing button of the accessory for 5 seconds.
The pairing indicator starts blinking.
4 Press the Start button on the tablet.
The pairing process begins.
If the pairing succeeds, the following message is displayed: Successfully
paired! Press OK to continue
5 Select OK.
You are oered to link the device with an existing room.
EN
17
UserGuide_ARCHOS_Smart_Home_Tablet_book.indd 17 15/05/2014 16:05:34
Page 18
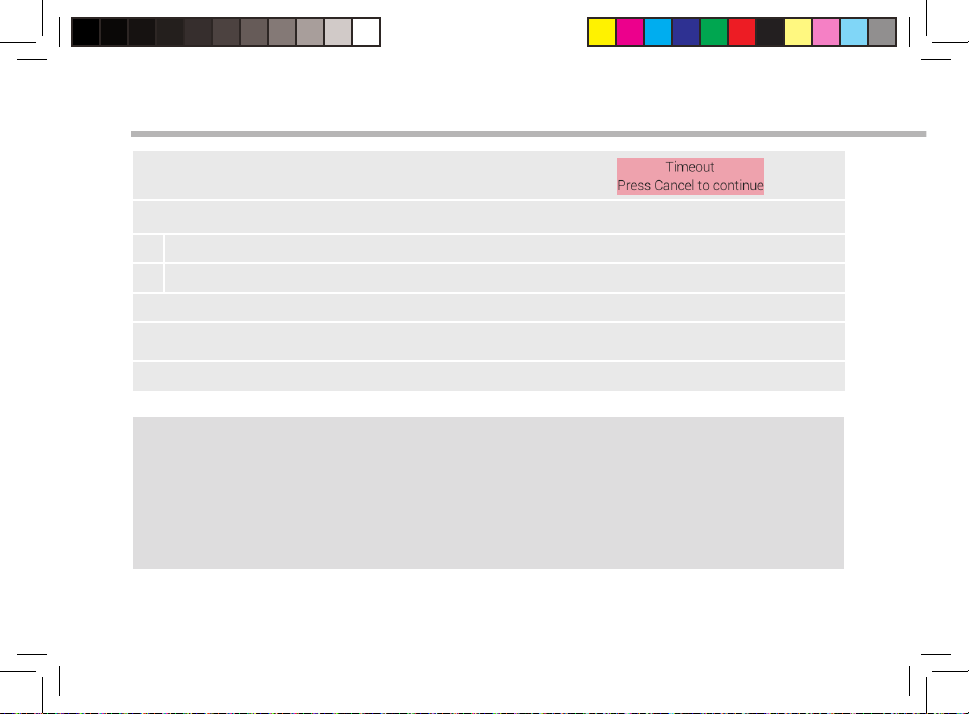
ARCHOS HOME - First Time Setup
If the pairing process fails, you have the following message:
Is Bluetooth turned ON in the tablet?
1 Select the Settings app on the tablet.
2 In the Wireless & networks section, restart Bluetooth.
Is the pairing indicator of the accessory blinking?
To turn it on, hold the pairing button of the accessory for 5 seconds.
You should restart the pairing.
TIPS:
When you long press the Pairing button (5 seconds)
LED blinks for 60 seconds: The device is in pairing mode and is trying to connect to a tablet.
When you do a short press on the Pairing button
LED blinks for 10 seconds: The device is already paired but is disconnected. It tries to connect.
LED blinks 3 times: The device is unpaired and disconnected.
LED is ON for 5 seconds: The device is paired and connected.
LED blinks fast: An over-the-air update is occuring.
18
UserGuide_ARCHOS_Smart_Home_Tablet_book.indd 18 15/05/2014 16:05:34
Page 19
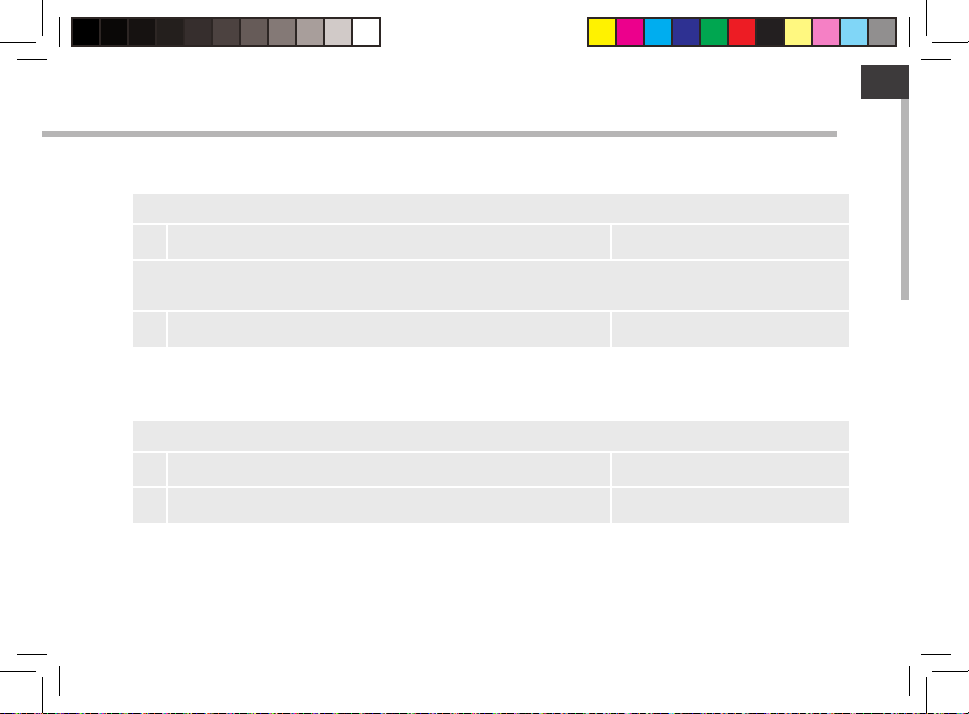
NAMING
After the pairing, you need to type in a name for the accessory.
To name an accessory
Type in a name corresponding to the accessory.
1
You should choose a name that helps you identify easily the accessory and its position in your
house.
Select OK.
2
LINKING
After the naming, you can select rooms in which you want to display the device.
To link an accessory to a room
Check the chosen room(s).
1
Select Done.
2
When you have nished the setup, your accessories are displayed in the All accessories tab.
EN
19
UserGuide_ARCHOS_Smart_Home_Tablet_book.indd 19 15/05/2014 16:05:34
Page 20
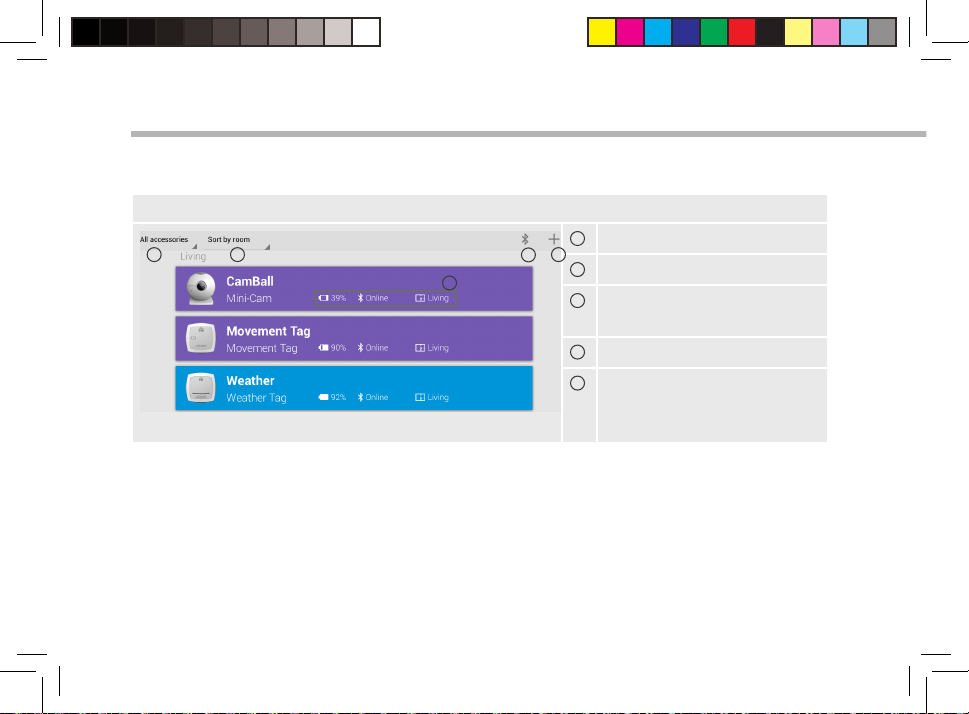
Accessories Interface
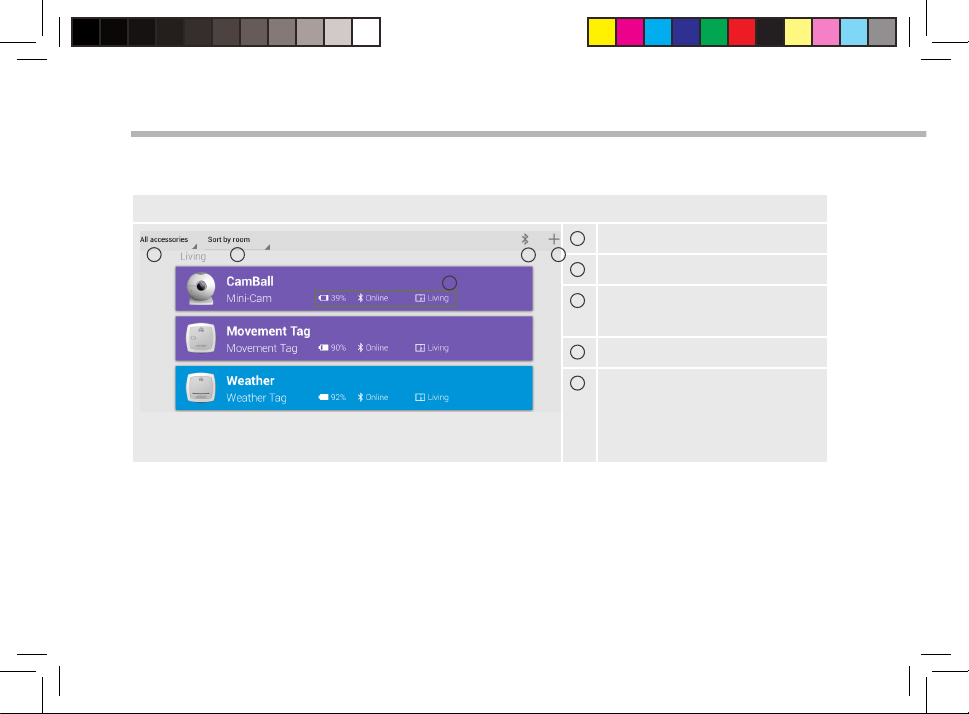
All accessories tab
1
21
5
3
20
UserGuide_ARCHOS_Smart_Home_Tablet_book.indd 20 15/05/2014 16:05:34
Name of the section
4
2
Type of sort
3
Bluetooth connection
quality
4
Adding more accessories
5
- Battery level
- Connection status
- Room in which it is
Page 21
Managing accessories
How can I create more rooms?
1
In the Archos Home app, select the Rooms section
2
In the Rooms section, select the Rooms icon
3 Select Add a room and type in the name of the room.
Select Done if you have nished.
in the menu bar.
EN
.
How can I modify an already created room?
1 In the Archos Home app, select the Rooms section .
2
In the Rooms section, select the icon in the menu bar.
3
Besides the name of each existing room, select to modify or delete
the room.
4 Select Done if you have nished.
21
UserGuide_ARCHOS_Smart_Home_Tablet_book.indd 21 15/05/2014 16:05:34
Page 22
Managing accessories
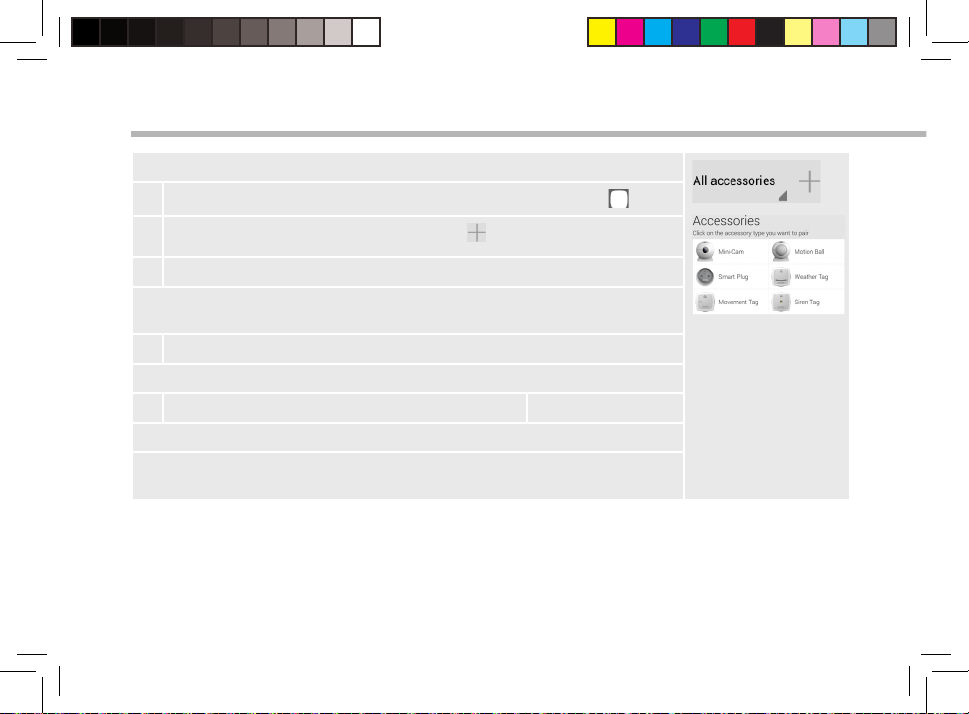
How can I pair more accessories?
1
In the Archos Home app, select the All accessories section .
2
In the All accessories section, select the icon in the menu bar.
3 Select the type of accessory you want to pair with the tablet.
Make sure you have removed the insulation label “remove before use” in
the batteries.
4 Press the pairing button of the accessory for 5 seconds.
The pairing indicator starts blinking.
5 Press the Start button on the tablet.
The pairing process begins.
Select OK if it succeeds or restart if it fails. See previous accessories
section.
22
UserGuide_ARCHOS_Smart_Home_Tablet_book.indd 22 15/05/2014 16:05:34
Page 23
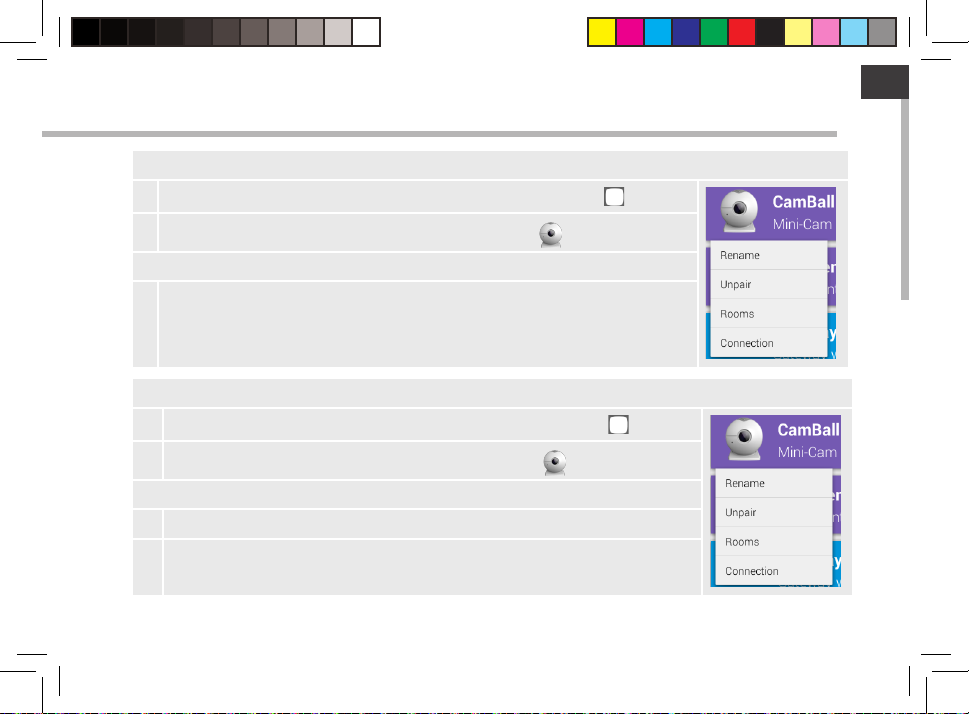
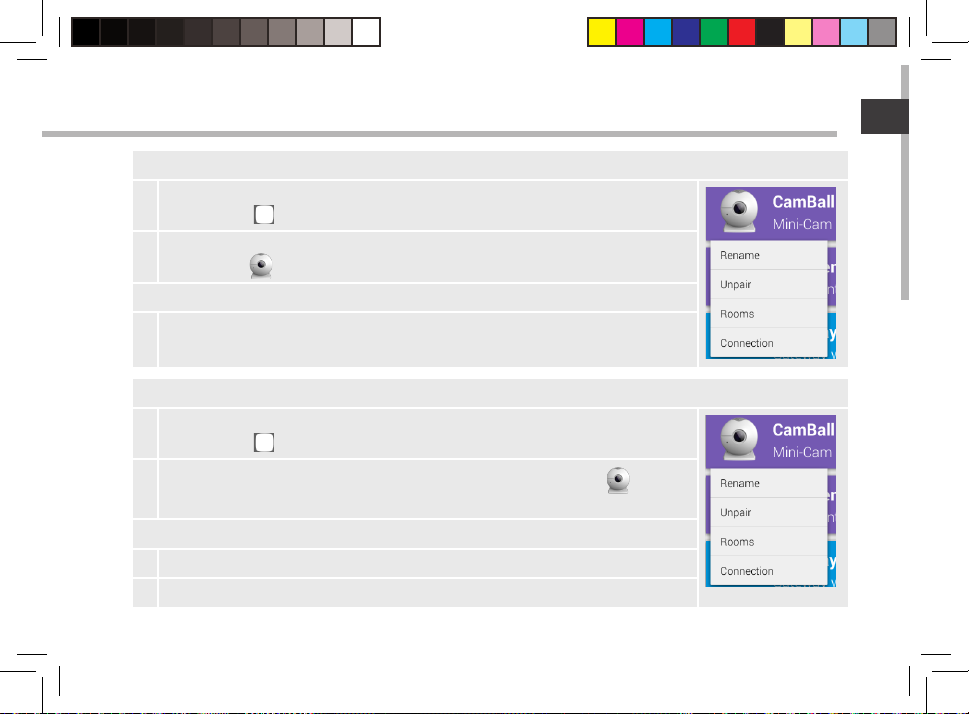
How can I rename an accessory?
1
In the Archos Home app, select the All accessories section .
2
In the All accessories section, select the accessory to be renamed.
A list of options is displayed.
3 Select Rename, then OK.
How can I link an accessory to a room?
1
In the Archos Home app, select the All accessories section .
2
In the All accessories section, select the accessory to be renamed.
A list of options is displayed.
3 Select “Rooms”.
4 Select the desired room(s), then OK.
EN
23
UserGuide_ARCHOS_Smart_Home_Tablet_book.indd 23 15/05/2014 16:05:35
Page 24
Connecting with your Mobile Device
You can manage your Archos Smart Home Tablet when not at home using a phone or tablet.
Downloading the app
1 Download the Archos Home app from Play Store or Appstore or ash the QR Code on
the box.
2 After the download, launch the application.
The rst time you launch the application, you have two options to connect to your Archos
Smart Home Tablet.
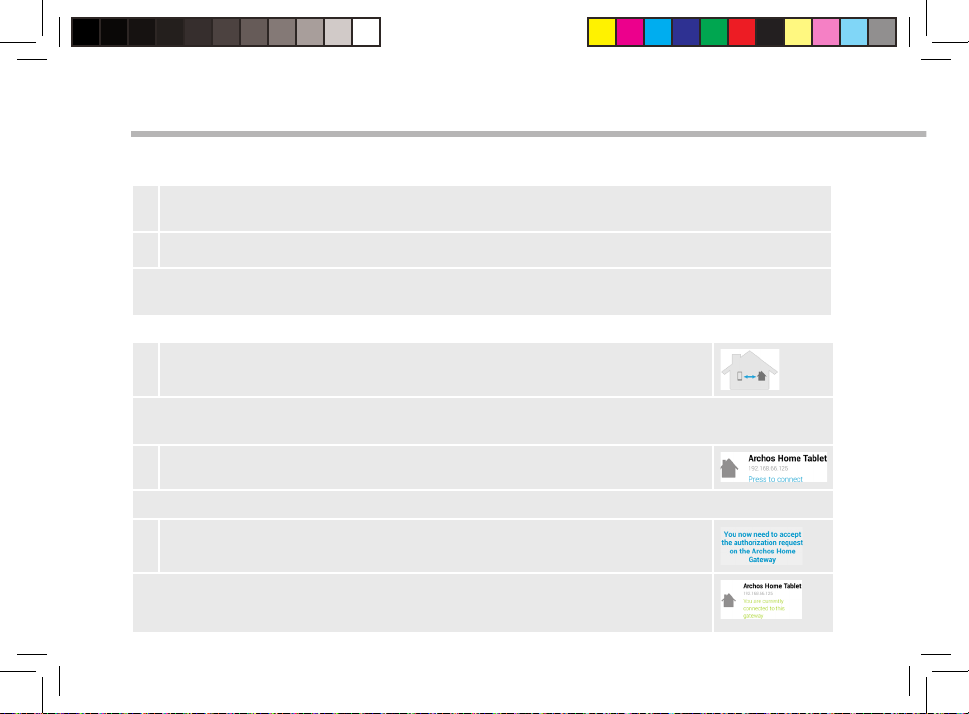
Connecting when on the same WiFi network
1 Select the option “if you are on the same home network than the
Archos Home Gateway”.
The message “Looking for the Archos Home Gateways in your local network” is
displayed. Once a Archos Home tablet is found on your network, it is displayed.
2 Press to connect.
A Pairing request is sent to the Home Tablet.
3 Select Allow on the Home Tablet to authorize the device.
The connection is in process. When your device is connected to the
Home Tablet, you can manage your home tablet from anywhere.
24
UserGuide_ARCHOS_Smart_Home_Tablet_book.indd 24 15/05/2014 16:05:35
Page 25
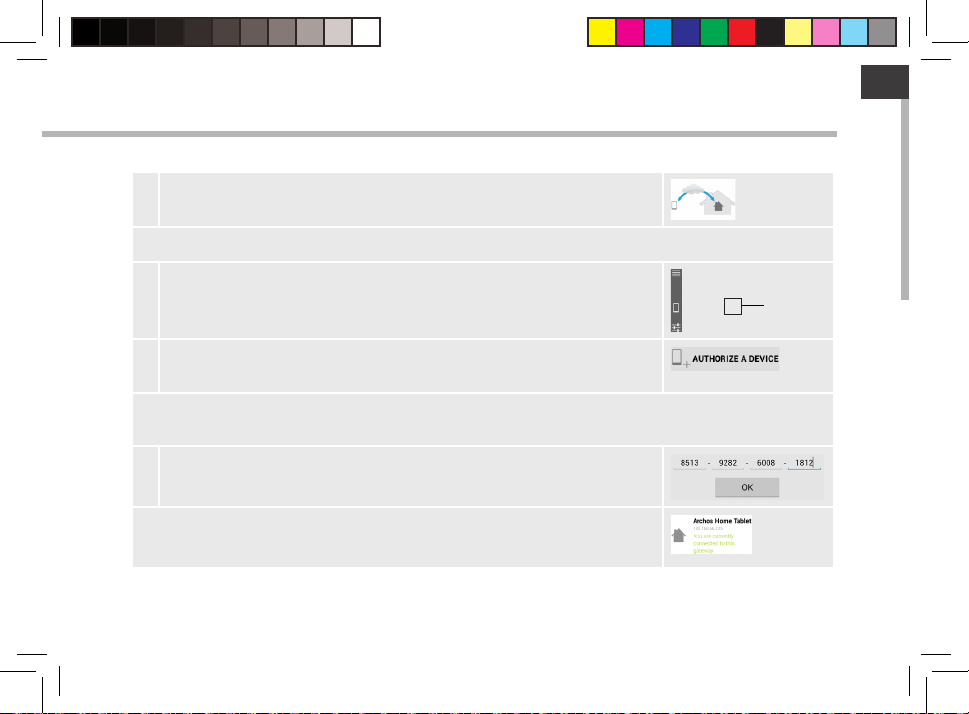
Connecting via a 3G network/an other WiFi network
1 Select the option “If you are on a remote connection”.
A code is requested to connect to the Home Tablet.
2 In the Home Tablet, launch the Archos Home app and select the
Connection tab.
3 In the Connection tab, select Authorize a device in the Menu
bar.
A 32-digits key is provided. It must be entered on the device that attempts to connect to
the Home Tablet.
4 Type in the 32-digits key as the requested code.
The connection is in process. When your device is connected to the
Home Tablet, you can manage your home tablet from a distance.
EN
25
UserGuide_ARCHOS_Smart_Home_Tablet_book.indd 25 15/05/2014 16:05:35
Page 26
Programs
When your accessories are paired to your Home Tablet, you can create programs.
A program is an action started by a trigger and scheduled at a period of time.
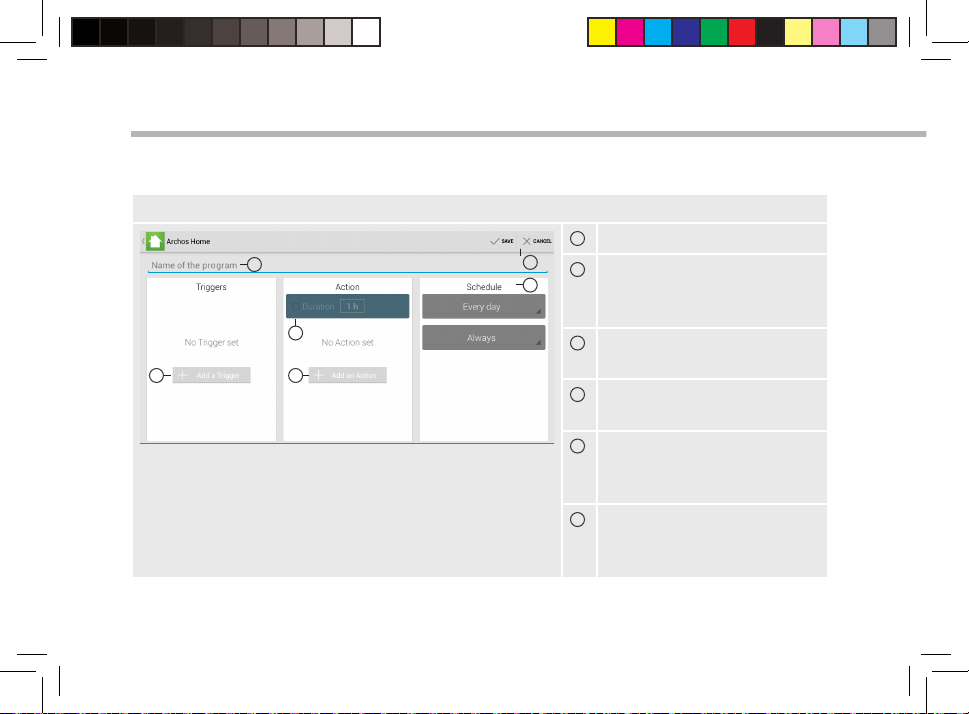
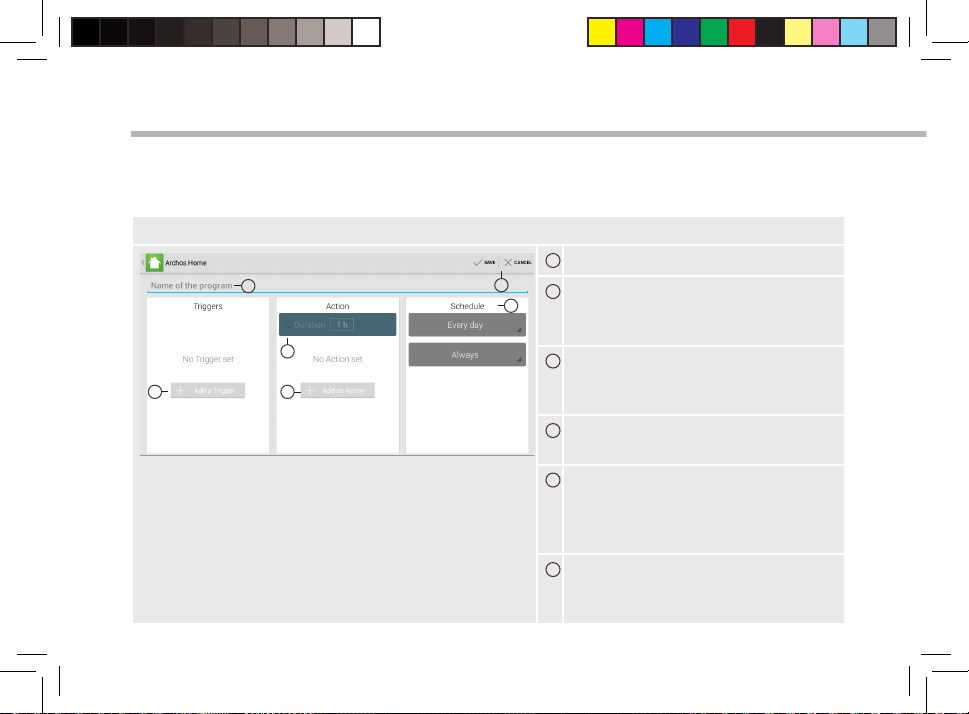
A Program interface
1
6
1
1
2 4
2
3
3
4
6
5
5
26
UserGuide_ARCHOS_Smart_Home_Tablet_book.indd 26 15/05/2014 16:05:35
Name of the program
2
A trigger is an event that
creates a sequence of
actions
3
A duration sets the timelimit of an action
4
An action is the result of a
triggering event
5
A schedule sets the period
of validity for the sequence
of actions
6
Save to validate the
program and Cancel to stop
the creation.
Page 27
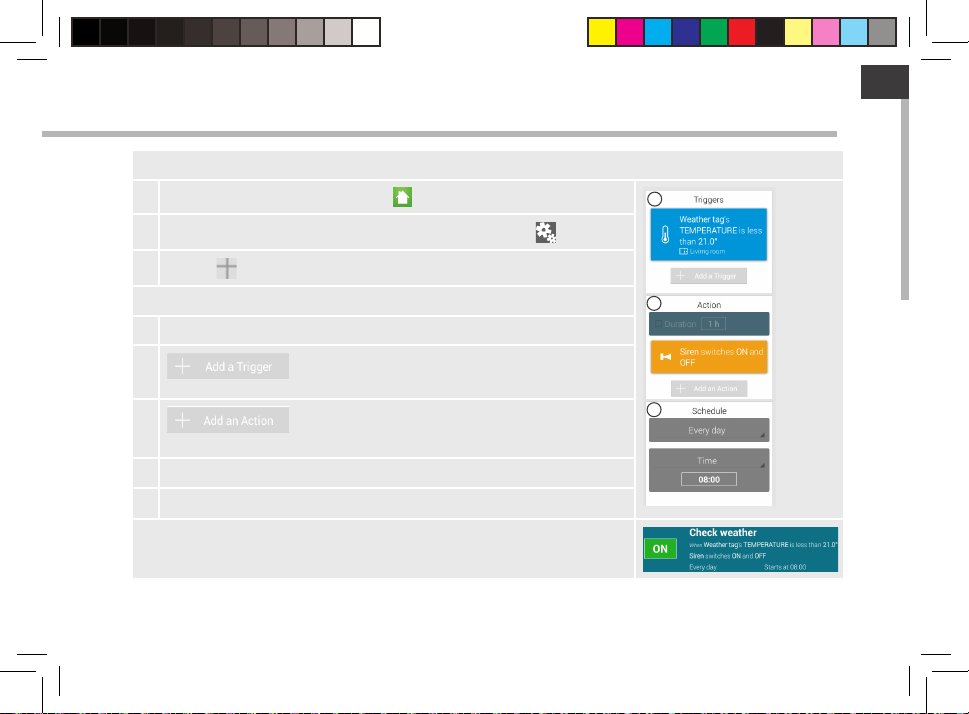
To create a program
1
Launch the Archos Home app .
2
In the Archos Home app, select the Programs tab .
3
Select in the Menu bar.
A window is displayed to create a program
4 Type in a name.
5
: it can be a schedule, a detection, a weather
event.
6
: it can be a notication, a snapshot, a video.
You can set a duration for the action
7 Dene a period of time when the event occurs.
8 Select SAVE.
The program is created and is active.
EN
5
6
7
27
UserGuide_ARCHOS_Smart_Home_Tablet_book.indd 27 15/05/2014 16:05:36
Page 28
Programs
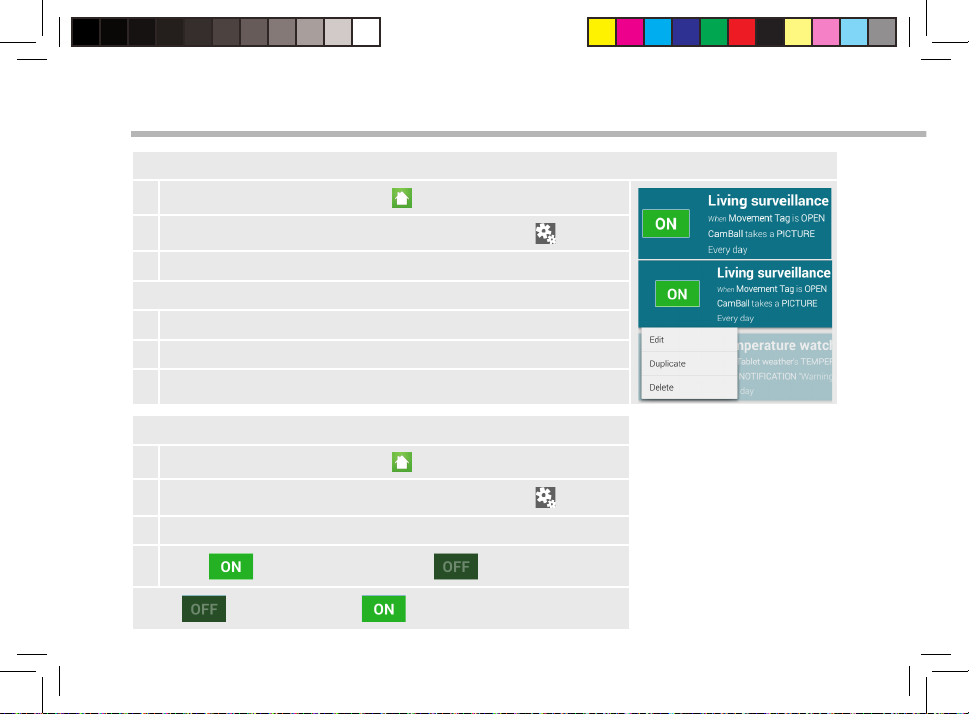
To modify a program
1
Launch the Archos Home app .
2
In the Archos Home app, select the Programs tab .
3 Select the program to be modied.
Options are displayed for the program.
4 Select Edit.
5 Make the modications needed.
6 Select SAVE.
To turn ON/OFF a program
1
Launch the Archos Home app .
2
In the Archos Home app, select the Programs tab .
3 Select the program to be turned on.
4
Press to turn o the program .
Press to turn it on back .
28
UserGuide_ARCHOS_Smart_Home_Tablet_book.indd 28 15/05/2014 16:05:36
Page 29
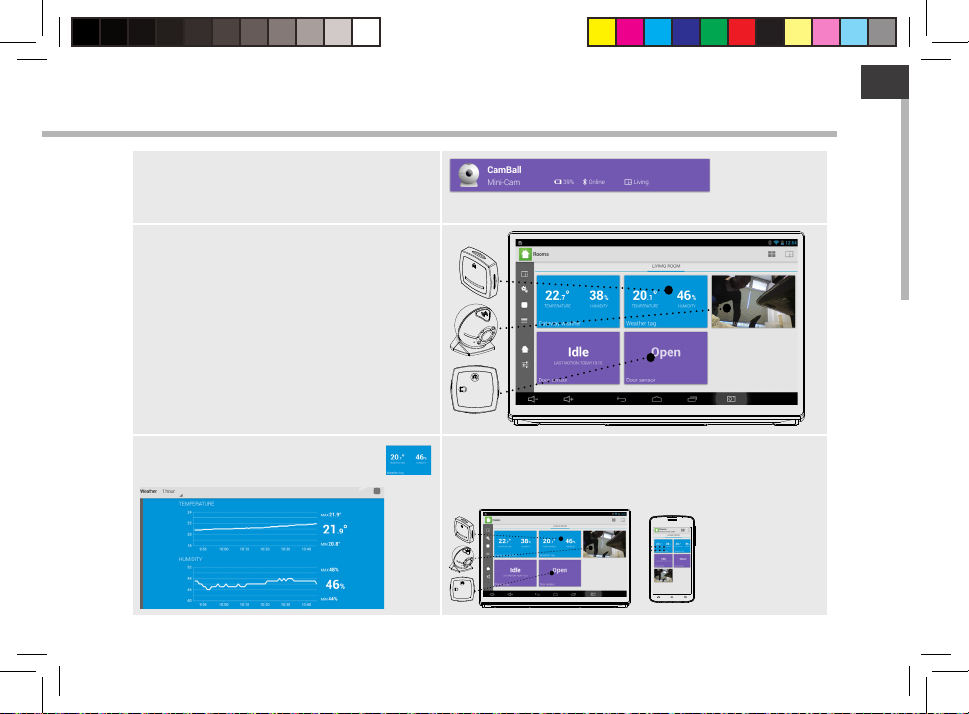
Archos Home Interactions
Your accessories are paired with your
Home Tablet. The data from each
accessory is displayed on the tablet.
Programs created on your tablet create
interactions between the tablet and
the accessories.
In the Rooms tab, each square of
information corresponds to a specic
accessory.
EN
Tap a square of information
to display history data.
Your phone helps manage your tablet and
the accessories from a distance through the
application Archos Home.
29
UserGuide_ARCHOS_Smart_Home_Tablet_book.indd 29 15/05/2014 16:05:43
Page 30
3
2
5
10
1
4 6
9
8
7
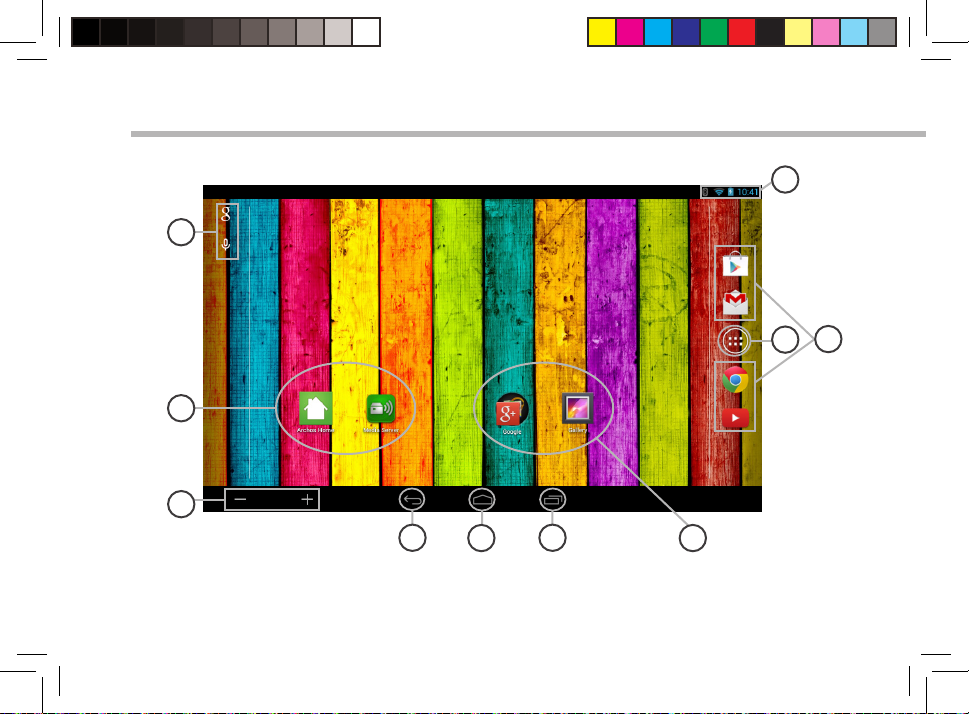
The AndroidTM Interface
30
UserGuide_ARCHOS_Smart_Home_Tablet_book.indd 30 15/05/2014 16:05:44
Page 31

EN
GoogleTM Search
1
>Touch “Google” for text search or touch the microphone icon for voice search.
ARCHOS apps
2
Volume buttons
3
Back button
4
Home button
5
Recent apps buttons
6
Google apps shortcuts
7
> Touch to start an application.
Permanent AndroidTM apps shortcuts
8
> Touch to start an application
All Apps button
9
> Touch this icon to show all the applications and widgets installed on your ARCHOS. All
your downloaded applications are here.
The status bar
10
> Displays notications and quick settings
31
UserGuide_ARCHOS_Smart_Home_Tablet_book.indd 31 15/05/2014 16:05:44
Page 32

1
2
3
4
5
6
7 8 9
The AndroidTM Interface
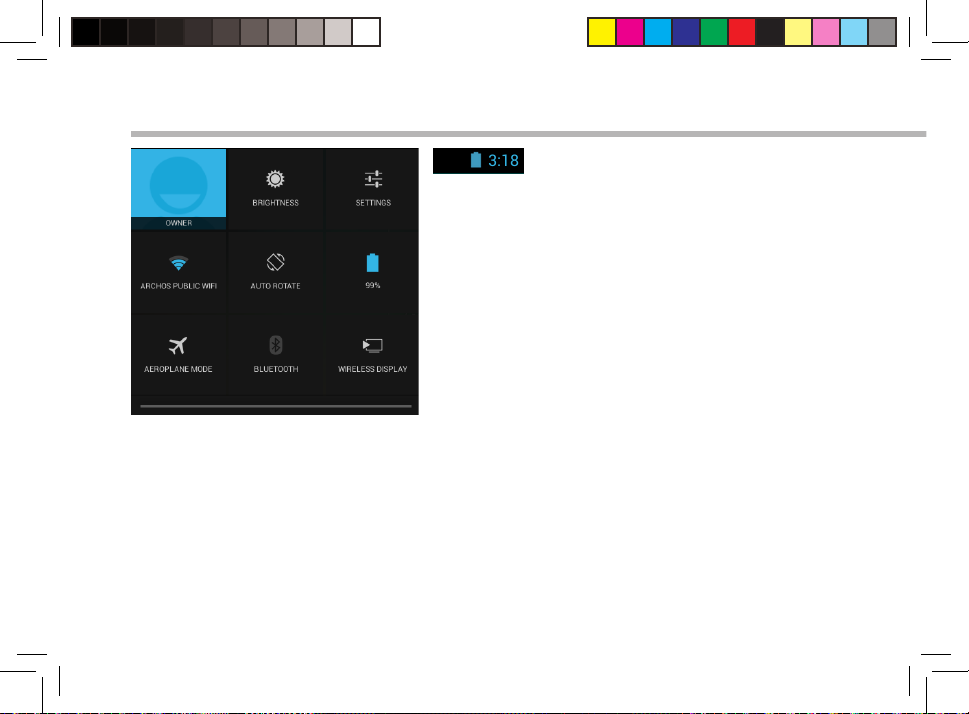
The Quick settings
Current user
(1)
New multi-user support for tablets lets different users have their own separate, customizable spaces on a
single device. Add users in Settings > Device.
(2)
You can share movies, YouTube videos, and anything that’s on your screen on an HDTV. You need to
connect a wireless display adapter to any HDMI-enabled TV to mirror what’s on your screen quickly and
easily.
1
To adjust the screen brightness.
2
To access all your settings.
3
To turn on/o your WiFi connection.
4
To activate/deactivate automatic screen
5
orientation as you turn your ARCHOS.
Percentage of battery remaining
6
To activate/deactivate all wireless connections,
7
especially when ying.
To display Bluetooth section
8
To enable wireless display
9
32
UserGuide_ARCHOS_Smart_Home_Tablet_book.indd 32 15/05/2014 16:05:45
(1)
(2)
Page 33

EN
The Recent Apps
Opens a list of thumbnail images of apps you’ve worked with recently:
Touch: to open an app.
Hold down: to display options
Swipe up or down: to close an app.
33
UserGuide_ARCHOS_Smart_Home_Tablet_book.indd 33 15/05/2014 16:05:45
Page 34

Getting familiar with Android
TM
The extended home screen:
Navigate between dierent home screen panels by swiping left and
right.
Moving a home screen item:
Touch and hold your nger onto it until the positioning gridlines
appear, then slide it to the desired location, and release your nger.
Removing a home screen item:
Touch and hold it, slide your nger towards the top of the screen and
drop it over the Remove icon.
Uninstalling an item:
From the All apps screens, touch and hold it, slide your nger towards
the top of the screen and drop it over Uninstall bin.
34
UserGuide_ARCHOS_Smart_Home_Tablet_book.indd 34 15/05/2014 16:05:47
Page 35

EN
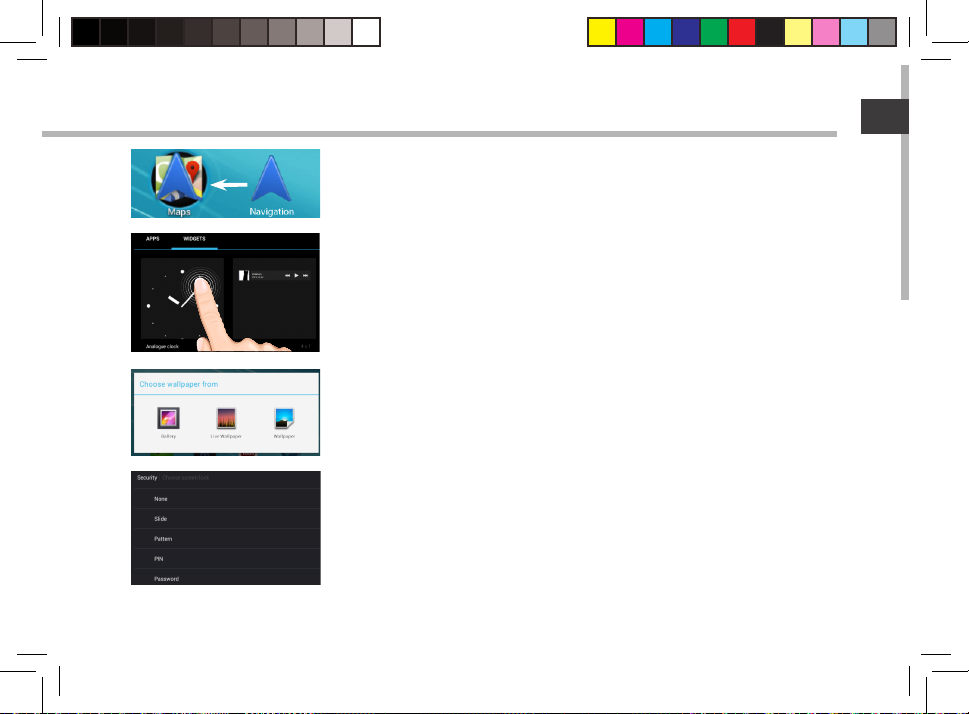
Creating application folders:
Drop one app icon over another on a home screen and the two icons
will be combined.
Widgets:
Touch the All Apps icon on your home screen. Touch Widgets at
the top of the screen. From the main Widgets screen, you can move
around widgets just as you do for app icons.
Changing your wallpaper:
Hold your nger on a home screen at an empty location, then choose
from the list.
Locking the touchscreen:
In Settings, scroll down and touch security. Touch Screen lock. Touch
the type of lock you would like to use. After you set a lock, a lock
screen is displayed whenever your screen wakes up, requesting the
pattern, PIN or other specied key.
35
UserGuide_ARCHOS_Smart_Home_Tablet_book.indd 35 15/05/2014 16:05:47
Page 36
Troubleshooting
What can i do in case of Bluetooth malfunctioning?
Go to Settings > Wireless & networks and select Bluetooth. Select Click to
resart Bluetooth.
Why i can’t connect to my Home Tablet with my mobile device?
You may be connected to a protected network using rewalls. In that case, you are prevented
from connecting to your Home Tablet.
Why aren’t my accessories responding?
Are they correctly paired to your Home Tablet?
Check if Bluetooth is ON in the tablet.
Check if the batteries are not empty. In that case, you need to change them.
How can i restore my device to its default settings?
1. When the device is turned o, plug the power cable into the power connector.
2. As soon as the ARCHOS bootlogo is displayed, press the reset button for 5 seconds with the
end of a paper clip.
The Android recovery interface is displayed.
3. Select an option with your nger.
4. Validate with the ON/OFF Button.
- Select “Wipe data/factory reset” and validate to restore your device to its default settings.
- Select “Yes -- delete all user data” and validate to remove all the user data.
- Select “Reboot system now” and validate to reboot the device.
36
UserGuide_ARCHOS_Smart_Home_Tablet_book.indd 36 15/05/2014 16:05:47
Page 37

Table des matières
FR
Contenu de la boîte.......................................................................................................................................................................
Mise en route...................................................................................................................................................................................
ARCHOS Mini-Cam.........................................................................................................................................................................
ARCHOS Weather Tag....................................................................................................................................................................
ARCHOS Movement Tag...............................................................................................................................................................
Description du ARCHOS Smart Home Tablet......................................................................................................................
Assistant de démarrage...............................................................................................................................................................
Se connecter à un réseau WiFi..................................................................................................................................................
L’intertace ARCHOS Home..........................................................................................................................................................
ARCHOS Home - Premiers Pas...................................................................................................................................................
L’interface des Accessoires..........................................................................................................................................................
Gérer les Accessoires....................................................................................................................................................................
Se connecter à la Home Tablet..................................................................................................................................................
Programmes.....................................................................................................................................................................................
Interactions avec l’ARCHOS Home...........................................................................................................................................
L’interface AndroidTM.................................................................................................................................................................
Se familiariser avec AndroidTM................................................................................................................................................
Dépannage......................................................................................................................................................................................
Pour plus d’informations, consultez-les FAQs sur www.archos.com. Consultez-les avant d’envisager un
éventuel retour du produit.
38
39
40
42
44
46
47
48
50
52
56
57
60
62
65
66
70
72
37
UserGuide_ARCHOS_Smart_Home_Tablet_book.indd 37 15/05/2014 16:05:47
Page 38
Warranty
Warranty
Contenu de la boîte
ARCHOS Smart Home Tablet
Câble USB
Chargeur Guide d’utilisation
Mini Cam
X 2
rapide
Weather Tag
X 2
Guide des garanties et
des mentions légales
Movement Tag
X 2
38
UserGuide_ARCHOS_Smart_Home_Tablet_book.indd 38 15/05/2014 16:05:48
Page 39

Mise en route
1
1. Connectez le câble d’alimentation à votre produit via le
connecteur d’alimentation. Le témoin de charge est bleu
lorsque le câble d’alimentation est branché. L’appareil
commence à se charger.
2. Appuyez sur le bouton ON/OFF pour allumer la tablette.
- Vous pouvez utiliser votre tablette pendant le chargement.
- Lors de la première utilisation, chargez complètement la batterie.
2
ASTUCES:
Pour bénéficier d’une assistance complète, enregistrez votre produit.
A partir de votre ordinateur, allez sur www.archos.com/register.
UserGuide_ARCHOS_Smart_Home_Tablet_book.indd 39 15/05/2014 16:05:49
- Utilisez uniquement le chargeur fourni.
Votre tablette doit rester connectée à son câble
d’alimentation.
39
FR
FR
Page 40

ARCHOS Mini-Cam
Description de la Mini Cam Mise en service de la Mini Cam
Bouton d’association
1
Témoin de fonctionnement
2
Objectif de la caméra
3
Micro
4
Sticker
5
un appui long sur le
bouton d’association
pendant 5 secondes
le témoin clignote pendant 60
secondes
Votre caméra fonctionne avec 3 piles Lithium cell CR 24 50.
1. Dévissez la caméra.
2. Enlevez l’étiquette isolante “remove before use”.
3. Revissez la caméra.
4. Placez la caméra sur son support.
Des aimants maintiennent la caméra. Vous pouvez orienter
la caméra vers n’importe quelle direction.
5. Enlevez le sticker apposé sur le support an de xer la
caméra sur un mur ou un plafond.
La caméra est en mode association et
tente de se connecter à la tablette.
un appui court sur le
bouton d’association
40
UserGuide_ARCHOS_Smart_Home_Tablet_book.indd 40 15/05/2014 16:05:50
le témoin clignote pendant 10
secondes
le témoin cligonte 3 fois La caméra est dissociée et déconnectée.
le témoin est allumé pendant 5
secondes
le témoin clignote rapidement Une mise à jour via WiFi est en cours.
La caméra est déjà associée à la tablette
mais est déconnectée. Elle tente de se
reconnecter.
La caméra est associée et connectée.
Page 41

1
2
3
4
5
41
UserGuide_ARCHOS_Smart_Home_Tablet_book.indd 41 15/05/2014 16:05:50
FR
Page 42

ARCHOS Weather Tag
Description de la Weather Tag Mise en service de la Weather Tag
Bouton d’association
1
Témoin de fonctionnement
2
Ouverture
3
Sticker
4
Votre Weather Tag fonctionne avec une pile Lithium
cell CR 24 30.
1. Enlevez l’enveloppe en caoutchouc.
2. Séparez le haut du boîtier du bas.
3. Enlevez l’étiquette isolante “remove before use”.
4. Remettez en place le boîtier en place et l’enveloppe.
5. Enlevez le sticker apposé sur le dos du boîtier pour
xer l’appareil sur un mur.
un appui long sur le
bouton d’association
pendant 5 secondes
un appui court sur le
bouton d’association
42
UserGuide_ARCHOS_Smart_Home_Tablet_book.indd 42 15/05/2014 16:05:50
le témoin clignote pendant
60 secondes
le témoin clignote pendant
10 secondes
le témoin cligonte 3 fois La caméra est dissociée et déconnectée.
le témoin est allumé pendant
5 secondes
le témoin clignote
rapidement
La caméra est en mode association et tente de
se connecter à la tablette.
La caméra est déjà associée à la tablette mais
est déconnectée. Elle tente de se reconnecter.
La caméra est associée et connectée.
Une mise à jour via WiFi est en cours.
Page 43

Picture to show how to change the battery
3V CR2430
+
3V CR2430
+
Picture to show how to change the battery
3V CR2430
+
FR
1
2
3
4
UserGuide_ARCHOS_Smart_Home_Tablet_book.indd 43 15/05/2014 16:05:50
43
Page 44

ARCHOS Movement Tag
Description du Movement Tag Mise en service du Movement Tag
Aimant
1
Détecteur d’aimant
2
Indicateur du détecteur
3
d’aimant
4
Bouton d’association
5
Témoin d’association
6
Enveloppe en caoutchouc
7
un appui long sur le
7
bouton d’association
pendant 5 secondes
un appui court sur le
bouton d’association
44
UserGuide_ARCHOS_Smart_Home_Tablet_book.indd 44 15/05/2014 16:05:50
le témoin clignote pendant
60 secondes
le témoin clignote pendant
10 secondes
le témoin cligonte 3 fois La caméra est dissociée et déconnectée.
le témoin est allumé pendant
5 secondes
le témoin clignote
rapidement
Votre Movement Tag fonctionne avec une pile Lithium
cell CR 24 30.
1. Enlevez l’enveloppe en caoutchouc de l’appareil.
2. Séparez le haut du boîtier du bas.
3. Enlevez l’étiquette isolante “remove before use”.
4. Remettez en place le boîtier et l’enveloppe.
5. Enlevez le sticker apposé sur le dos du boîtier pour xer
l’appareil sur un mur.
6. Enlevez le sticker apposé sur l’aimant pour le
positionner en face de l’indicateur du détecteur d’aimant.
La caméra est en mode association et tente de
se connecter à la tablette.
La caméra est déjà associée à la tablette mais
est déconnectée. Elle tente de se reconnecter.
La caméra est associée et connectée.
Une mise à jour via WiFi est en cours.
Page 45

Picture to show how to change the battery
3V CR2430
+
3V CR2430
+
FR
Picture to show how to change the battery
3V CR2430
+
3
1
2
5
4
6
7
45
UserGuide_ARCHOS_Smart_Home_Tablet_book.indd 45 15/05/2014 16:05:50
Page 46

Description de l’appareil
1
2
5 6
3
4
7
98 10 11
12
Webcam
1
Détecteur de luminosité
2
Témoin de charge
3
Micro
4
Bouton ON/OFF
5
Haut-parleur
6
Thermomètre intégré
7
Lecteur carte micro-SD
8
Port micro-USB
9
Connecteur d’alimentation
10
Entrée jack audio
11
Bouton Reset
12
46
UserGuide_ARCHOS_Smart_Home_Tablet_book.indd 46 15/05/2014 16:05:51
Page 47
L’assistant de démarrage
La première fois que vous allumez votre tablette, l’assistant de démarrage vous permet de
paramétrer votre appareil :
- Langue
- Connexion WiFi
- Paramètrage d’un compte Google
- Les options du service de localisation
- Applications tierces
ASTUCES :
Pour le paramétrage de votre appareil, nous vous recommandons de vous placer dans la zone WiFi du
réseau que vous utilisez régulièrement.
47
UserGuide_ARCHOS_Smart_Home_Tablet_book.indd 47 15/05/2014 16:05:51
FR
FR
Page 48

1
2
3
4
5
Se connecter à un réseau WiFi
ATTENTION : assurez-vous d’être dans une zone WiFi.
Sélectionnez les icônes Heure et Batterie
en maintenant votre doigt appuyé an
d’acher la barre de statuts.
Tirez vers le bas la barre bleue pour acher
le panneau des statuts.
Sélectionnez “WiFi éteint” dans le panneau
des statuts. L’écran “WiFi” s’ache.
Si le WiFi est éteint, faites-glisser
l’interrupteur WiFi sur la position "OUI".
Une fois que le WiFi est activé, la tablette
recherche des réseaux WiFi à portée.
Sélectionnez le nom du réseau auquel vous
voulez vous connecter.
Les réseaux privés sont achés avec un
cadenas. Ils nécessitent un mot de passe.
48
UserGuide_ARCHOS_Smart_Home_Tablet_book.indd 48 15/05/2014 16:05:51
Page 49

Connexion rapide
Vous pouvez vous connecter à votre réseau WiFi via le service WPS (WiFi Protected Setup).
Appuyez sur le bouton WPS dans
1
Paramètrages > Sans l et réseaux.
Sur votre routeur Internet, appuyez le
2
bouton WPS nommé WPS ou qui porte le
symbole
ASTUCES :
- Lorsque vous saisissez un mot de passe, nous vous recommandons de cocher
«Afficher mot de passe» afin de voir les caractères que vous saisissez. Pour obtenir le mot
de passe ou les paramètres du réseau WiFi, contactez le fournisseur d’accès à Internet.
Si votre WiFi est activé et que vous êtes à portée d’un réseau auquel vous vous êtes déjà
connecté, votre tablette tente d’établir automatiquement une connexion.
- Pour maintenir votre connexion WiFi active lorsque la tablette est en veille,
sélectionnez l’icône de Menu dans l’écran “WiFi”, puis sélectionnez Options avancées >
WiFi actif en veille > Toujours.
49
UserGuide_ARCHOS_Smart_Home_Tablet_book.indd 49 15/05/2014 16:05:51
FR
FR
Page 50

L’interface ARCHOS HOME
87
1
2
3
4
5
6
50
UserGuide_ARCHOS_Smart_Home_Tablet_book.indd 50 15/05/2014 16:05:52
Page 51

Onglet Pièces :
1
ache les pièces créées et qui correspondent aux pièces de votre maison.
Onglet Programmes :
2
ache les programmes créés en rapport avec les accessoires associés.
Onglet Tous les accessoires :
3
ache tous les accessoires associés avec l’Archos Smart Home Tablet.
Onglet Historique :
4
ache l’historique des actions des diérents accessoires.
Onglet Connexion :
5
permet de connecter des appareils utilisés pour commander la tablette à distance.
Onglet Général :
6
permet d’ajouter des notications et de gérer les paramètres.
Pièce achée :
7
ache les accessoires placés dans la pièce. Glissez l’écran vers la gauche ou la droite pour
acher les autres pièces.
Barre de menus :
8
ache des boutons de menu correspondant à l’onglet aché.
51
UserGuide_ARCHOS_Smart_Home_Tablet_book.indd 51 15/05/2014 16:05:52
FR
Page 52

ARCHOS HOME - Premiers Pas
La première fois que vous lancez l’application, vous devrez créer des pièces. Les pièces créées
doivent correspondre aux pièces où vous installez les accessoires.
PIECES
Pour créer une pièce
1 Lancez l’application Archos Home.
2 Sélectionnez Ajouter une pièce.
3 Nommez la pièce et sélectionnez OK.
Vous pouvez créer autant de pièces que vous voulez.
4 A la n, sélectionnez Terminé.
52
UserGuide_ARCHOS_Smart_Home_Tablet_book.indd 52 15/05/2014 16:05:52
Page 53

ASSOCIATION
Après la création de pièces, l’étape suivante vous permet d’associer des accessoires avec votre
tablette.
Pour associer un accessoire
1 Vériez que le Bluetooth est activé sur la tablette. Dans le cas contraire, redémarrez le à
partir de Paramètres > Sans l et réseaux.
2 Sélectionnez l’accessoire souhaité.
Assurez-vous d’avoir enlevé l’étiquette “remove before use” insérée entre les piles.
3 Appuyez sur le bouton d’association de l’accessoire pendant 5 secondes.
Le témoin d’association clignote.
4 Appuyez sur le bouton Démarrer sur la tablette.
L’association débute.
Si l’association réussit, le message suivant s’ache: Association réussie!
Appuyez sur OK pour continuer.
5 Sélectionnez OK.
Vous avez le choix de relier l’accessoire avec une pièce existante.
53
UserGuide_ARCHOS_Smart_Home_Tablet_book.indd 53 15/05/2014 16:05:52
FR
Page 54

ARCHOS HOME - Premiers Pas
Si l’association échoue, le message suivant s’ache :
Est-ce que le Bluetooth est activé?
1 Sélectionnez l’application Paramètres sur la tablette.
2 Dans la section Sans l & réseaux, redémarrez le Bluetooth.
Est-ce que le témoin d’association de l’accessoire clignote?
Pour le faire clignoter, appuyez sur le bouton d’association pendant 5 secondes.
Recommencez le processus d’association.
ASTUCES:
Un appui long sur le bouton d’association pendant 5 secondes :
Le témoin clignote pendant 60 secondes. La caméra est en mode association et tente de se connecter à
la tablette.
Un appui court sur le bouton d’association :
Le témoin clignote pendant 10 secondes. La caméra est déjà associée à la tablette mais est déconnectée.
Elle tente de se reconnecter.
Le témoin est allumé pendant 5 secondes. La caméra est associée et connectée.
Le témoin clignote rapidement. Une mise à jour via WiFi est en cours.
54
UserGuide_ARCHOS_Smart_Home_Tablet_book.indd 54 15/05/2014 16:05:52
Page 55

NOMMER
Après l’association, vous devez nommer l’accessoire.
Pour nommer un accessoire
Entrez un nom pour l’accessoire.
1
Choisissez un nom qui vous permet d’identier facilement l’accessoire ainsi que sa position.
Sélectionnez OK.
2
RELIER
Après avoir nommé l’accessoire, sélectionnez la pièce avec laquelle vous souhaitez la relier.
Pour relier un accessoire à une pièce
Sélectionnez la pièce ou les pièces choisies.
1
Sélectionnez Terminé.
2
A la n du paramètrage, vos accessoires s’achent dans l’onglet Tous les accessoires.
55
UserGuide_ARCHOS_Smart_Home_Tablet_book.indd 55 15/05/2014 16:05:52
FR
Page 56
Interface des accessoires
Onglet Tous les accessoires
1
21
5
3
56
UserGuide_ARCHOS_Smart_Home_Tablet_book.indd 56 15/05/2014 16:05:52
Nom de la section
4
2
Type de tri
3
Qualité de la connexion
Bluetooth
4
Ajouter plus d’accessoires
5
- Niveau de batterie
- Statut de la connexion
- Pièce dans laquelle
l’accessoire est
Page 57

Gérer les accessoires
Comment créer plus de pièces?
1
Dans l’application Archos Home, sélectionnez l’onglet Pièces .
2 Dans l’onglet Pièces, sélectionnez l’icône Pièces dans la barre de
menus.
3 Sélectionnez Ajouter une pièce et nommez la pièce.
Sélectionnez Terminé à la n.
Comment modier une pièce déjà créée?
1 Dans l’application Archos Home, sélectionnez l’onglet Pièces.
2
Dans l’onglet Pièces, sélectionnez l’icône dans la barre de menus.
3
A côté du nom de chaque pièce, sélectionnez pour modier ou
supprimer la pièce.
4 Sélectionnez Terminé à la n.
57
UserGuide_ARCHOS_Smart_Home_Tablet_book.indd 57 15/05/2014 16:05:53
FR
Page 58

Gérer les accessoires
Comment ajouter plus d’accessoires?
1 Dans l’application Archos Home, sélectionnez l’onglet Tous les
accessoires .
2
Dans l’onglet Tous les accessoires, sélectionnez l’icône dans la
barre des menus.
3 Sélectionnez le type d’accessoire à associer avec la tablette.
Assurez-vous d’avoir enlevé l’étiquette “remove before use” insérée entre
les piles.
4 Appuyez sur le bouton d’association de l’accessoire pendant 5
secondes.
Le témoin d’association clignote.
5 Appuyez sur le bouton Démarrer de la tablette.
L’association démarre.
Sélectionnez OK si l’association réussit. En cas d’échec, recommencez le
processus. Voir les sections précédentes sur les accessoires.
58
UserGuide_ARCHOS_Smart_Home_Tablet_book.indd 58 15/05/2014 16:05:53
Page 59
Comment renommer un accessoire?
1 Dans l’application Archos Home, sélectionnez l’onglet Tous les
accessoires .
2 Dans l’onglet Tous les accessoires, sélectionnez l’accessoire à
renommer .
Une liste d’options s’ache.
3 Sélectionnez Renommer, puis OK.
Comment relier un accessoire à une pièce?
1 Dans l’application Archos Home, sélectionnez l’onglet Tous les
accessoires .
2
Dans l’onglet Tous les accessoires, sélectionnez l’accessoire à
renommer.
Une liste d’options s’ache.
3 Sélectionnez “Pièces”.
4 Sélectionnez la pièce ou les pièces souhaitées, puis OK.
59
UserGuide_ARCHOS_Smart_Home_Tablet_book.indd 59 15/05/2014 16:05:53
FR
Page 60

Se Connecter avec son Appareil Mobile
Vous pouvez gérer l’Archos Smart Home Tablet à distance avec un téléphone ou une tablette.
Télécharger l’application
1 Télécharger l’application à partir du Play Store ou de l’Appstore ou bien utilisez le Flash
code sur la boîte.
2 Après le téléchargement, lancez l’application.
La première fois que vous lancez l’application, vous avez deux options pour vous connecter à
l’Archos Smart Home Tablet.
Se connecter à partir du même réseau WiFi
1 Sélectionnez l’option “Si vous êtes sur le même réseau WiFi que
l’ARCHOS Smart Home Tablet”.
Le message suivant s’ache : “Recherche du ARCHOS Smart Home Tablet sur votre
réseau”.
2 Appuyez sur Se connecter.
Une autorisation de connexion est envoyée à la tablette.
3 Sélectionnez Autoriser sur la tablette pour permettre à l’appareil de se
connecter à la tablette.
La connexion tente d’être établie. Lorsque votre appareil est connecté à la
tablette, vous pouvez gérer votre tablette à distance.
60
UserGuide_ARCHOS_Smart_Home_Tablet_book.indd 60 15/05/2014 16:05:53
Page 61

Se connecter via la 3G/à partir d’un réseau WiFi diérent
1 Sélectionnez l’option “A partir d’un réseau WiFi diérent”.
Un code est nécessaire pour se connecter à la tablette.
2 A partir de la tablette, lancez l’application Archos Home et
sélectionnez l’onglet Connexion.
3 Dans l’onglet Connexion, sélectionnez Autoriser un appareil à
partir de la barre de menus.
Une clè à 32 chires est fournie.
4 Saisissez la clè de 32 chires sur votre appareil mobile.
La connexion tente d’être établie. Lorsque votre appareil est
connecté à la tablette, vous pouvez gérer votre tablette à distance.
61
UserGuide_ARCHOS_Smart_Home_Tablet_book.indd 61 15/05/2014 16:05:53
FR
Page 62
Programmes
Lorsque vos accessoires sont associés à votre tablette, il est possible de créer des programmes.
Un programme est une action qui commence grâce à un élément déclencheur et qui a une durée
dans le temps.
L’interface d’un programme
1
Nom du programme
1
3
2 4
62
UserGuide_ARCHOS_Smart_Home_Tablet_book.indd 62 15/05/2014 16:05:54
6
2
5
Un élément déclencheur est
un événement qui cause une
succession d’actions
3
Dénir une durée permet de
déterminer l’occurence d’une
action
4
Une action est le résultat d’un
événement déclencheur
5
Dénir un calendrier permet de
déterminer le moment au cours
duquel la succession d’actions doit
être prise en compte
6
Enregistrer pour valider le
programme et Annuler pour
stopper la création.
Page 63

Pour créer un programme
1
Lancez l’application Archos Home .
5
2 Dans l’application Archos Home, sélectionnez l’onglet
Programmes .
3
Sélectionnez dans la barre de menus.
A window is displayed to create a program
6
4 Saisissez un nom.
5
une détection ou un événement météorologique.
6
: l’élement déclencheur peut être une date,
7
: l’action peut être une notication, une
photo, une vidéo. Vous pouvez xer la durée de l’action.
7 Dénissez un calendrier au cours duquel l’événement a lieu.
8 Sélectionnez Enregistrer.
Le programme est créé et est en marche.
63
UserGuide_ARCHOS_Smart_Home_Tablet_book.indd 63 15/05/2014 16:05:54
FR
Page 64

Programmes
Pour modier un programme
1
Lancez l’application Archos Home .
2 Dans l’application Archos Home, sélectionnez l’onglet
Programmes .
3 Sélectionnez le programme à modier.
Des options s’achent pour le programme.
4 Sélectionnez Modier.
5 Faites les modications nécessaires.
6 Sélectionnez Enregistrer.
Pour activer/désactiver un programme
1
Lancez l’application Archos Home .
2
Dans l’application Archos Home, sélectionnez l’onglet Programmes .
3 Sélectionnez le programme à activere.
4
Appuyez sur pour désactiver le programme .
Press to turn it on back .
64
UserGuide_ARCHOS_Smart_Home_Tablet_book.indd 64 15/05/2014 16:05:54
Page 65

Interactions dans l’Archos Home
Vos accessoires sont associées avec
votre tablette. Les données transmises
par chaque accessoire sont achées
sur la tablette.
Des programmes créés sur votre
tablette amènent des interactions
entre la tablette et les accessoires.
Dans l’onglet Pièces, chaque bloc
d’informations correspond à un
accessoire spécique.
FR
Appuyez sur un bloc d’informations
pour acher l’historique des données.
Votre appareil mobile permet de gérer votre
tablette ainsi que les accessoires tout en étant à
distance grâce à l’application Archos Home.
65
UserGuide_ARCHOS_Smart_Home_Tablet_book.indd 65 15/05/2014 16:05:58
Page 66

3
2
5
10
1
4 6
9
8
7
L’interface Android
TM
66
UserGuide_ARCHOS_Smart_Home_Tablet_book.indd 66 15/05/2014 16:05:58
Page 67

GoogleTM Search
1
> Sélectionnez “Google” pour saisir votre recherche ou l’icône microphone pour l’énoncer.
Applications ARCHOS
2
Boutons de volume
3
“Retour”
4
“Accueil”
5
“Applications récentes”
6
Raccourcis d’applications Google
7
> Sélectionnez une application pour l’ouvrir.
Raccourcis permanents d’applications Android
8
“ Toutes les Applications”
9
> Sélectionnez pour acher toutes les applications et les widgets installés sur votre
ARCHOS. Vous retrouverez toutes vos applications téléchargées.
Barre de statuts
10
> Elle ache les notications et permet l’accès aux réglages rapides.
67
UserGuide_ARCHOS_Smart_Home_Tablet_book.indd 67 15/05/2014 16:05:59
FR
Page 68
1
2
3
4
5
6
7 8 9
L’interface Android
TM
Les Réglages rapides
Ache l’icône de l’utilisateur actuel
(1)
Cette option permet à différents utilisateurs d’une même tablette d’avoir chacun son propre espace
personalisable. Ajoutez des utilisateurs à partir de Paramètres > Appareil.
(2)
Vous pouvez partager sur votre téléviseur HD des films, des vidéos de YouTube et tout autre média affiché
sur votre tablette. Il faut au préalable connecter un adapteur Wi-Di au port HDMI de votre téléviseur pour
dupliquer facilement et rapidement ce qui est affiché sur votre tablette.
1
Pour ajuster la luminosité de l’écran.
2
Pour accéder à tous vos paramètres.
3
Pour activer/désactiver votre connexion WiFi.
4
Pour activer/désactiver l’orientation automatique de
5
l’écran dès que vous tournez votre tablette.
Pourcentage de batterie restant
6
Pour activer/désactiver toutes les connexions sans
7
l. Par exemple, pour prendre l’avion.
Pour acher la section Bluetooth
8
Pour permettre l’achage sans l
9
68
UserGuide_ARCHOS_Smart_Home_Tablet_book.indd 68 15/05/2014 16:05:59
(1)
.
(2)
Page 69

Les Applications récentes
L’application ache une liste de vignettes des applications utilisées récemment.
Pour acher une application, sélectionnez-la.
Pour acher des informations, maintenez appuyé.
Pour fermer une application, faites-la glisser vers le
haut ou vers le bas.
69
UserGuide_ARCHOS_Smart_Home_Tablet_book.indd 69 15/05/2014 16:05:59
FR
Page 70

Se familiariser avec Android
TM
L’écran d’accueil étendu :
Naviguez entre les diérents écrans d’accueil en faisant glisser votre
doigt vers la gauche ou vers la droite.
Déplacer une icône de l’écran d’accueil :
Maintenez votre doigt appuyé sur l’icône jusqu’à ce que s’achent
les lignes de positionnement, puis faites-la glisser vers l’emplacement
souhaité, et relâchez.
Supprimer une icône de l’écran d’accueil :
Maintenez votre doigt appuyé sur l’icône, puis faites-la glisser vers le
haut de l’écran, et déposez-la sur l’icône "Supprimer".
Désinstaller une application :
A partir de l’écran "Toutes les applications", maintenez votre doigt
appuyé sur l’icône, puis faites-la glisser vers le haut de l’écran et déposezla sur l’icône "Désinstaller".
70
UserGuide_ARCHOS_Smart_Home_Tablet_book.indd 70 15/05/2014 16:05:59
Page 71
Créer des dossiers d’applications :
A partir d’un écran d’accueil, déposez une icône sur une autre pour
les rassembler.
Widgets :
Sélectionnez l’icône "Toutes les applications". Sélectionnez "Widgets"
en haut de l’écran. A partir de l’écran d’accueil des widgets, vous
pouvez déplacer les widgets de la même façon que vous procédez
avec les applications.
Changer le fond d’écran :
Maintenez votre doigt appuyé sur un emplacement vide de l’écran,
puis choisissez parmi la liste d’options.
Verrouiller votre tablette :
A partir du panneau des réglages rapides dans la barre de statut,
sélectionnez "Paramètres". Faites déler l’écran vers le bas, puis
sélectionnez "Sécurité". Sélectionnez "Verrouillage de l’écran".
Sélectionnez le type de verrouillage que vous voulez utiliser. Une fois
que vous avez sélectionné une option, un écran de verrouillage s’ache
chaque fois que votre écran est réactivé. Vous êtes alors invité à saisir le
schéma, le code PIN ou tout autre code spécié.
UserGuide_ARCHOS_Smart_Home_Tablet_book.indd 71 15/05/2014 16:05:59
71
FR
Page 72

Dépannage
Que puis-je faire en cas de dysfonctionnement du Bluetooth?
Allez dans Paramètres > Sans l et réseaux et sélectionnez Bluetooth.
Sélectionnez Cliquez pour redémarrer le Bluetooth.
Pourquoi je ne peux pas me connecter à ma tablette avec mon appareil mobile?
Il se peut que vous soyez connectés à un réseau protégé utilisant des pare-feux. Si c’est le cas, vous
ne pourrez vous connecter à votre tablette.
Pourquoi les accessoires n’interagissent plus avec la tablette?
Sont-ils correctement associés à votre tablette?
Vériez que le Bluetooth est activé sur la tablette.
Vériez que les piles ne sont pas à plat. Si c’est le cas, il faudra les changer.
Comment restaurer ma tablette aux valeurs d’usine?
1. Lorsque l’appareil est éteint, connectez le câble d’alimentation au connecteur d’alimentation.
2. Dès que le logo de démarrage ARCHOS s’ache, appuyez sur le bouton Reset pendant 5
secondes avec un trombone.
L’interface Android recovery s’ache.
3. Sélectionnez une option avec votre doigt.
4. Validez avec le bouton ON/OFF.
- Sélectionnez “Wipe data/factory reset” et validez pour restaurer votre appareil aux valeurs
d’usine.
- Sélectionnez “Yes -- delete all user data” et validez pour supprimer toutes les données utilisateur.
- Sélectionnez “Reboot system now” et validez pour redémarrer l’appareil.
72
UserGuide_ARCHOS_Smart_Home_Tablet_book.indd 72 15/05/2014 16:05:59
Page 73

Inhaltsverzeichnis
Verpackungsinhalt............................................................................................................................................................................
Erste Schritte......................................................................................................................................................................................
ARCHOS Mini-Cam.........................................................................................................................................................................
ARCHOS Weather Tag....................................................................................................................................................................
ARCHOS Movement Tag...............................................................................................................................................................
Beschreibung von ARCHOS Smart Home Tablet..................................................................................................................
Der Assistent......................................................................................................................................................................................
Verbindung zu einem WLAN-Netzwerk herstellen..............................................................................................................
Die ARCHOS Home-Benutzeroberfläche...............................................................................................................................
ARCHOS Home - Erstmalige Einrichtung...............................................................................................................................
Benutzeroberfläche Accessories [Zubehör]..........................................................................................................................
Verwaltung des Zubehörs............................................................................................................................................................
Verbindung zum Mobiltelefon...................................................................................................................................................
Programme......................................................................................................................................................................................
ARCHOS Home Interaktionen....................................................................................................................................................
Die AndroidTM Benutzeroberfläche.............................................................................................................................................
Erste Schritte mit AndroidTM.......................................................................................................................................................
Fehlerbehebung..............................................................................................................................................................................
Weitere Informationen finden Sie unter den FAQs unter www.archos.com. Bitte lesen Sie diese
Informationen sorgfältig, bevor Sie die Rückgabe eines Produkts erwägen.
UserGuide_ARCHOS_Smart_Home_Tablet_book.indd 73 15/05/2014 16:05:59
74
75
76
78
80
82
83
84
86
88
92
93
96
98
101
102
106
108
73
DE
Page 74
Warranty
Warranty
Beschreibung des Packungsinhalts
ARCHOS Smart Home Tablet
USB Kabel
Ladegerät Benutzerhandbuch Garantie, Impressum
Mini Cam
X 2
Weather Tag
X 2
Movement Tag
X 2
und Sicherheitshinweise
74
UserGuide_ARCHOS_Smart_Home_Tablet_book.indd 74 15/05/2014 16:06:01
Page 75

Erste Schritte
1
2
TIPP:
Um unseren Service voll nutzen zu können, empfehlen wir Ihnen, Ihr Produkt zu registrieren.
Für die Registrierung mittels Computer gehen Sie zu www.archos.com/register.
UserGuide_ARCHOS_Smart_Home_Tablet_book.indd 75 15/05/2014 16:06:03
1. Verbinden Sie Ihr Netzkabel mit dem Stromanschluss. Bei
eingestecktem Netzkabel leuchtet die Betriebsanzeige blau.
Das Gerät wird jetzt geladen.
2. Drücken Sie die EIN/AUS-Taste, um das Gerät einzuschalten.
- Während des Ladens können Sie Ihren ARCHOS wie
gewohnt weiter verwenden.
- Laden Sie Ihr Gerät vor der ersten Nutzung einmal
vollständig auf.
- Verwenden Sie nur das mitgelieferte Ladegerät.
Ihr Gerät sollte, wann immer möglich, mit dem
Stromanschluss verbunden werden.
75
DE
Page 76

ARCHOS Mini Cam
Beschreibung der Mini Cam Installation der Mini Cam
Paarungstaste
1
Paarungsanzeige
2
Kameraobjektiv
3
Mikrofon
4
Aufkleber
5
Bei langem Drücken
der Paarungstaste
(5 Sekunden)
Kurzes Drücken der
Paarungstaste
76
UserGuide_ARCHOS_Smart_Home_Tablet_book.indd 76 15/05/2014 16:06:03
LED blinkt 60
Sekunden
LED blinkt 10
Sekunden
LED blinkt dreimal Das Gerät wurde nicht gepaart und ist getrennt.
LED LEUCHTET 5
Sekunden
LED blinkt schnell Ein Over-the-Air-Update wird ausgeführt.
Die Kamera wird mit 3 Lithiumzellen CR 2450 betrieben.
1. Den Kameraball abschrauben.
2. Den Isolationsaufkleber "Remove before use [Vor
Verwendung entfernen]" entfernen.
3. Wieder festschrauben.
4. Die Kamera auf dem Fuß platzieren.
Stabilität wird hier durch Magneten erreicht. Die
Kamera kann in jede Richtung bewegt werden.
5. Entfernen Sie den Aufkleber auf dem Fuß, um das
Gerät an eine Wand oder Decke zu kleben.
Das Gerät bendet sich im Paarungsmodus und
versucht, zu einem Tablet zu verbinden.
Das Gerät wurde bereits gepaart, ist aber
getrennt. Es versucht, zu verbinden.
Das Gerät wurde gepaart und ist verbunden.
Page 77
1
2
3
4
5
77
UserGuide_ARCHOS_Smart_Home_Tablet_book.indd 77 15/05/2014 16:06:03
DE
Page 78

ARCHOS Weather Tag
Beschreibung von Weather Tag Installation von Weather Tag
Paarungsanzeige
1
Paarungstaste
2
Önen
3
Aufkleber
4
Bei langem Drücken
der Paarungstaste
(5 Sekunden)
Kurzes Drücken der
Paarungstaste
78
UserGuide_ARCHOS_Smart_Home_Tablet_book.indd 78 15/05/2014 16:06:03
LED blinkt 60
Sekunden
LED blinkt 10
Sekunden
LED blinkt dreimal Das Gerät wurde nicht gepaart und ist getrennt.
LED LEUCHTET 5
Sekunden
LED blinkt schnell Ein Over-the-Air-Update wird ausgeführt.
Weather Tag wird mit einer Lithiumzelle CR 2430
betrieben.
1. Das Gummigehäuse entfernen.
2. Das Oberteil des hinteren Gehäuses abnehmen.
3. Den Isolationsaufkleber "Remove before use [Vor
Verwendung entfernen]" entfernen.
4. Hinteres Gehäuse und Gummi wieder befestigen.
5. Entfernen Sie den Aufkleber auf dem hinteren
Gehäuse, um das Gerät an eine Wand oder Decke zu
kleben.
Das Gerät bendet sich im Paarungsmodus und
versucht, zu einem Tablet zu verbinden.
Das Gerät wurde bereits gepaart, ist aber
getrennt. Es versucht, zu verbinden.
Das Gerät wurde gepaart und ist verbunden.
Page 79
Picture to show how to change the battery
3V CR2430
+
3V CR2430
+
Picture to show how to change the battery
3V CR2430
+
DE
1
2
3
4
79
UserGuide_ARCHOS_Smart_Home_Tablet_book.indd 79 15/05/2014 16:06:03
Page 80

ARCHOS Movement Tag
Beschreibung von Movement Tag
Magnet
1
Magnetsensor
2
Magnetsensoranzeige
3
Paarungstaste
4
Paarungsanzeige
5
Gummigehäuse
6
Aufkleber
7
Bei langem Drücken
der Paarungstaste
(5 Sekunden)
Kurzes Drücken der
Paarungstaste
80
UserGuide_ARCHOS_Smart_Home_Tablet_book.indd 80 15/05/2014 16:06:03
LED blinkt 60
Sekunden
LED blinkt 10
Sekunden
LED blinkt dreimal Das Gerät wurde nicht gepaart und ist getrennt.
LED LEUCHTET 5
Sekunden
LED blinkt schnell Ein Over-the-Air-Update wird ausgeführt.
Installation von Movement Tag
Movement Tag wird mit einer Lithiumzelle CR 2430
betrieben.
1. Das Gummigehäuse vom Magnetempfänger entfernen.
2. Das Oberteil des hinteren Gehäuses abnehmen.
3. Den Isolationsaufkleber "Remove before use [Vor
Verwendung entfernen]" entfernen.
4. Hinteres Gehäuse wieder befestigen.
5. Entfernen Sie den Aufkleber auf dem hinteren Gehäuse,
um das Gerät an eine Wand oder Decke zu kleben.
6. Entfernen Sie den Aufkleber auf dem Zubehör, um es
gegenüber der Magnetpositionsanzeige aufzukleben.
Das Gerät bendet sich im Paarungsmodus und
versucht, zu einem Tablet zu verbinden.
Das Gerät wurde bereits gepaart, ist aber
getrennt. Es versucht, zu verbinden.
Das Gerät wurde gepaart und ist verbunden.
Page 81

Picture to show how to change the battery
3V CR2430
+
3V CR2430
+
3
Picture to show how to change the battery
3V CR2430
+
1
5
4
DE
2
6
7
81
UserGuide_ARCHOS_Smart_Home_Tablet_book.indd 81 15/05/2014 16:06:04
Page 82

Beschreibung des ARCHOS
1
2
5 6
3
4
7
98 10 11
12
Webcam
1
Lichtsensor
2
Ladeanzeige
3
Mikrofon
4
EIN/AUS-Taste
5
Lautsprecher
6
Temperatursensor
7
Micro-SD Kartenslot
8
Micro-USB-Anschluss
9
Stromanschluss
10
Kopfhöreranschluss
11
Reset-Taste
12
82
UserGuide_ARCHOS_Smart_Home_Tablet_book.indd 82 15/05/2014 16:06:05
Page 83

Installationsassistent
Wenn Sie Ihren ARCHOS das erste Mal in Betrieb nehmen, leitet Sie der
Installationsassistent durch einige Bildschirme, um Ihnen dabei zu helfen, die
grundlegenden Einstellungen vorzunehmen :
- Sprache
- WLAN Verbindung
- Einrichtung des Google-Kontos
- Standortdienst
- Anwendungen von Drittanbietern
TIPP:
Definieren Sie die Parameter des Gerätes für das WiFi (WLAN) Netzwerk, das Sie regelmäßig
verwenden.
83
UserGuide_ARCHOS_Smart_Home_Tablet_book.indd 83 15/05/2014 16:06:06
DE
Page 84

1
2
3
4
5
WiFi (WLAN) Verbindung
ACHTUNG: Stellen Sie sicher, dass Sie sich innerhalb einer WiFi(WLAN)-Zone aufhalten.
Berühren und halten Sie die Symbole für
Uhrzeit und Batterie, um die Statusleiste
freizulegen. Es wird eine blaue Linie angezeigt.
Ziehen Sie die blaue Linie nach unten, um
das Status-Dashboard anzuzeigen.
Tippen Sie auf “WiFi o [WLAN aus]” im StatusDashboard. Die WLAN-Seite wird jetzt angezeigt.
Wenn “WLAN” deaktiviert ist, schieben Sie
den WLAN-Schalter in die Position “EIN”.
Sobald "WLAN" eingeschaltet ist, sucht der
ARCHOS nach Netzwerken in Reichweite.
Berühren Sie den Namen des Netzwerks,
mit dem Sie verbunden werden möchten.
Gesicherte Netzwerke werden mit einem
Schlossß-Symbol angezeigt und erfordern
die Eingabe eines Passworts.
84
UserGuide_ARCHOS_Smart_Home_Tablet_book.indd 84 15/05/2014 16:06:06
Page 85
Schnellverbindung
Verbinden Sie mit Ihrem WLAN-Netzwerk über das WiFi Protected Setup.
Drücken Sie die Taste WiFi Protected Setup
1
unter Settings > Wireless & networks
[Einstellungen > Drahtlos und Netzwerke].
2
Drücken Sie im Internet-Router die Taste
WiFi Protected Setup, genannt WPS oder die
Taste mit dem Symbol .
TIPPS:
- Bei der Eingabe eines WLAN-Passworts empfehlen wir die Auswahl von "Show
password [Passwort anzeigen], damit die eingegebenen Zeichen sichtbar sind. Das
korrekte WLAN-Passwort (oder die Einstellungen) für das Netzwerk erhalten Sie vom
Netzanbieter Ihres WLANs. Ist Ihr WLAN eingeschaltet und Sie befinden sich im Bereich
eines Netzwerks, mit dem Sie zuvor schon einmal verbunden waren, wird Ihr ARCHOS
automatisch mit diesem Netzwerk Verbindung aufnehmen.
- Um die WLAN-Verbindung zu halten, während sich das Gerät im Standby-Modus
befindet, wählen Sie das Menüsymbol auf der Seite "WLAN". Wählen Sie dann Advanced
> Keep WiFi on during sleep > Always [Erweitert > WLAN Standby-Richtlinie > Immer].
85
UserGuide_ARCHOS_Smart_Home_Tablet_book.indd 85 15/05/2014 16:06:06
DE
Page 86

Die ARCHOS Home-Benutzeroberäche
87
1
2
3
4
5
6
86
UserGuide_ARCHOS_Smart_Home_Tablet_book.indd 86 15/05/2014 16:06:06
Page 87

Register Rooms [Räume]:
1
Anzeige der von Ihnen erstellten Räume, die den Räumen Ihres Hauses entsprechen.
Register Programs [Programme]:
2
Anzeige der ohne die gepaarten Objekte erstellten Programme.
Register All accessories [Zubehör]:
3
Anzeige des mit dem Archos Smart Home Tablet gepaarten Zubehörs.
Register History [Verlauf]:
4
Anzeige des Aktionsverlaufs des jeweiligen Zubehörs.
Register Connection [Verbindung]:
5
Erlaubt Ihnen das Verbinden von Geräten und die Verwaltung des Home Tablets per Fernzugri.
Registerkarte General [Allgemein]:
6
Erlaubt Ihnen das Hinzufügen von Benachrichtigungskonten und die Verwaltung der
Einstellungen.
Room displayed [Angezeigter Raum]:
7
Anzeige des in diesem Raum platzierten Zubehörs. Nach rechts schieben für die Anzeige anderer
Räume.
8
Menüleiste:
Anzeige kontextbezogener Menütasten entsprechend zum Register.
87
UserGuide_ARCHOS_Smart_Home_Tablet_book.indd 87 15/05/2014 16:06:06
DE
Page 88

ARCHOS HOME - Erstmalige Einrichtung
Nach dem ersten Start der App müssen Räume erstellt werden. Die von Ihnen erstellten Räume
müssen den tatsächlichen Räumen mit Zubehör entsprechen.
RÄUME
Erstellung eines Raums
1 Starten Sie die Archos Home App
2 Wählen Sie Add a room [Raum hinzufügen]
3 Einen Namen für den Raum eingeben und OK wählen.
Es können beliebig viele Räume erstellt werden.
4 Sobald Sie fertig sind, Done [Fertig] wählen.
88
UserGuide_ARCHOS_Smart_Home_Tablet_book.indd 88 15/05/2014 16:06:07
Page 89

PAARUNG
Nachdem Sie die Räume erstellt haben, muss das Zubehör mit Ihrem Tablet gepaart werden.
Paarung von Zubehör
1 Bluetooth muss im Tablet AKTIVIERT sein. Es kann über Settings > Wireless & Networks
[Einstellungen > Drahtlos und Netzwerke] aktiviert werden.
2 Wählen Sie das gewünschte Zubehör.
Der Isolationsaufkleber "Remove before use [Vor Verwendung entfernen]" muss entfernt sein.
3 Halten Sie die Paarungstaste des Zubehörs 5 Sekunden lang gedrückt.
Die Paarungsanzeige beginnt zu blinken.
4 Drücken Sie die Start-Taste auf dem Tablet.
Der Paarungsvorgang beginnt.
Nach erfolgreicher Paarung wird die folgende Meldung angezeigt; Paarung
erfolgreich! OK drücken, um fortzufahren
5 Wählen Sie OK.
Das Gerät kann mit einem vorhandenen Raum gepaart werden.
89
UserGuide_ARCHOS_Smart_Home_Tablet_book.indd 89 15/05/2014 16:06:07
DE
Page 90

ARCHOS HOME - Erstmalige Einrichtung
Schlägt die Paarung fehl, erhalten Sie die folgende Nachricht:
Ist Bluetooth im Tablet AKTIVIERT?
1 Wählen Sie im Tablet die App Settings [Einstellungen].
2 Im Bereich Wireless & Networks [Drahtlos & Netzwerke] Bluetooth neu starten.
Blinkt die Paarungsanzeige des Zubehörs?
Halten Sie die Paarungstaste des Zubehörs 5 Sekunden lang gedrückt, um sie einzuschalten.
Die Paarung neu starten.
TIPPS:
Bei langem Drücken der Paarungstaste (5 Sekunden)
LED blinkt 60 Sekunden lang: Das Gerät befindet sich im Paarungsmodus und versucht, zu einem Tablet
zu verbinden.
Kurzes Drücken der Paarungstaste
LED blinkt 10 Sekunden lang: Das Gerät wurde bereits gepaart, ist aber getrennt. Es versucht, zu
verbinden.
LED blinkt dreimal: Das Gerät wurde nicht gepaart und ist getrennt.
LED LEUCHTET 5 Sekunden lang: Das Gerät wurde gepaart und ist verbunden.
LED blinkt schnell: Ein Over-the-Air-Update wird ausgeführt.
90
UserGuide_ARCHOS_Smart_Home_Tablet_book.indd 90 15/05/2014 16:06:07
Page 91

BENENNUNG
Nach der Paarung muss ein Name für das Zubehör eingegeben werden.
Benennung eines Zubehörs
Geben Sie einen Namen für das Zubehör ein.
1
Es sollte ein Name ausgewählt werden, anhand dessen das Zubehör und dessen Position in
Ihrem Haus auf einfache Weise identiziert werden kann.
Wählen Sie OK.
2
VERBINDUNG
Nach der Benennung können die Räume ausgewählt werden, in denen das Gerät angezeigt
werden soll.
Verlinkung eines Zubehörs mit einem Raum
Die ausgewählten Räume markieren.
1
Done [Fertig] wählen.
2
Nach der Durchführung der Einrichtung wird Ihr Zubehör in der Registerkarte All accessories
[Zubehör] angezeigt.
91
UserGuide_ARCHOS_Smart_Home_Tablet_book.indd 91 15/05/2014 16:06:07
DE
Page 92

Benutzeroberäche Accessories [Zubehör]
Register All accessories [Zubehör]
1
21
5
3
92
UserGuide_ARCHOS_Smart_Home_Tablet_book.indd 92 15/05/2014 16:06:07
Name des Bereichs
4
2
Art der Sortierung
3
BluetoothVerbindungsqualität
4
Weiteres Zubehör
hinzufügen
5
- Ladezustand der Batterie
- Verbindungsstatus
- Betroener Raum
Page 93
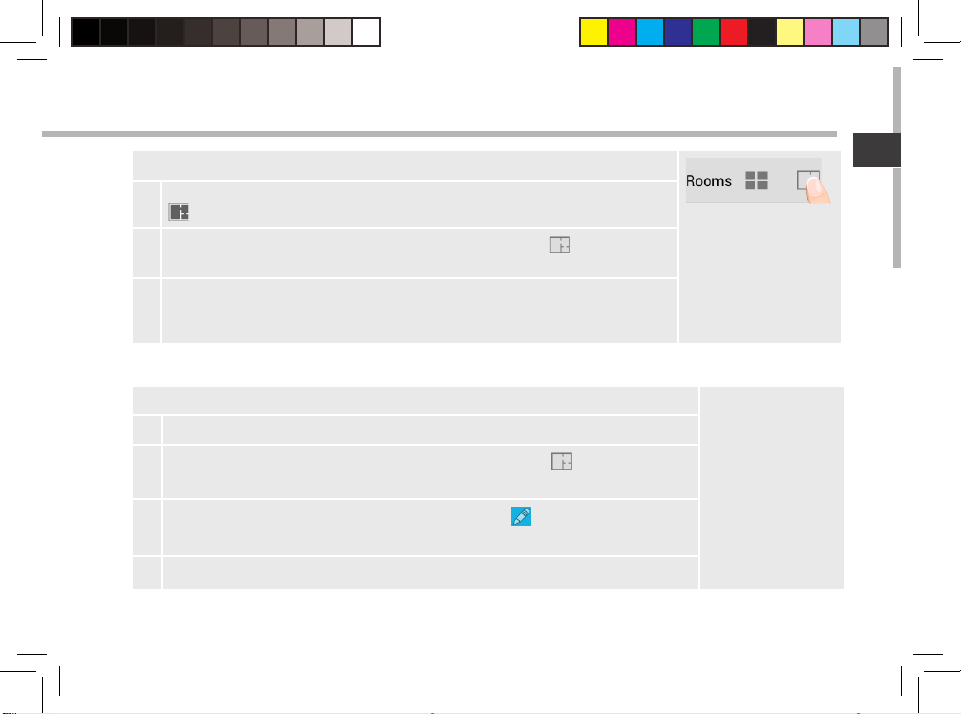
Verwaltung des Zubehörs
Wie kann ich weitere Räume erstellen?
1 Wählen Sie in der Archos Home App den Bereich Rooms [Räume]
.
2
Wählen Sie im Bereich Rooms [Räume] das Symbol
Menüleiste.
3 Wählen Sie Add a room [Raum hinzufügen] und geben Sie den
Namen des Raums ein.
Zum Abschließen Done [Fertig] wählen.
Wie kann ich einen bereits erstellen Raum bearbeiten?
1 Wählen Sie in der Archos Home App den Bereich Rooms [Räume] .
2
Wählen Sie im Bereich Rooms [Räume] das Symbol
Menüleiste.
3
Wählen Sie neben einem vorhandenen Raum
bearbeiten oder zu löschen.
4 Zum Abschließen Done [Fertig] wählen.
UserGuide_ARCHOS_Smart_Home_Tablet_book.indd 93 15/05/2014 16:06:07
in der
in der
, um den Raum zu
93
DE
Page 94
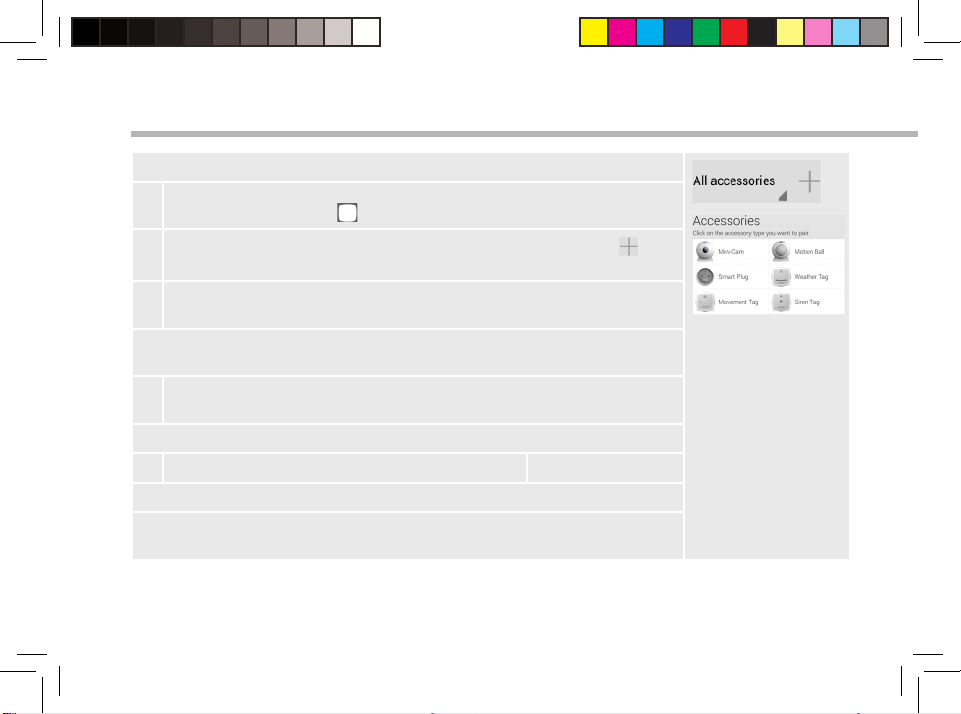
Verwaltung des Zubehörs
Wie kann ich weiteres Zubehör paaren?
1 Drücken Sie in der Archos Home App auf den Bereich All
accessories [Zubehör] .
2
Wählen Sie im Bereich All accessories [Zubehör] das Symbol in
der Menüleiste.
3 Wählen Sie die Art des Zubehörs aus, das mit dem Tablet gepaart
werden soll.
Der Isolationsaufkleber "Remove before use [Vor Verwendung
entfernen]" muss entfernt sein.
4 Halten Sie die Paarungstaste des Zubehörs 5 Sekunden lang
gedrückt.
Die Paarungsanzeige beginnt zu blinken.
5 Drücken Sie auf die Start-Taste auf dem Tablet.
Der Paarungsvorgang beginnt.
Wählen Sie OK bei erfolgreicher Paarung oder Restart [Neu starten] bei
nicht erfolgreicher Paarung. Siehe vorheriger Zubehörbereich.
94
UserGuide_ARCHOS_Smart_Home_Tablet_book.indd 94 15/05/2014 16:06:08
Page 95
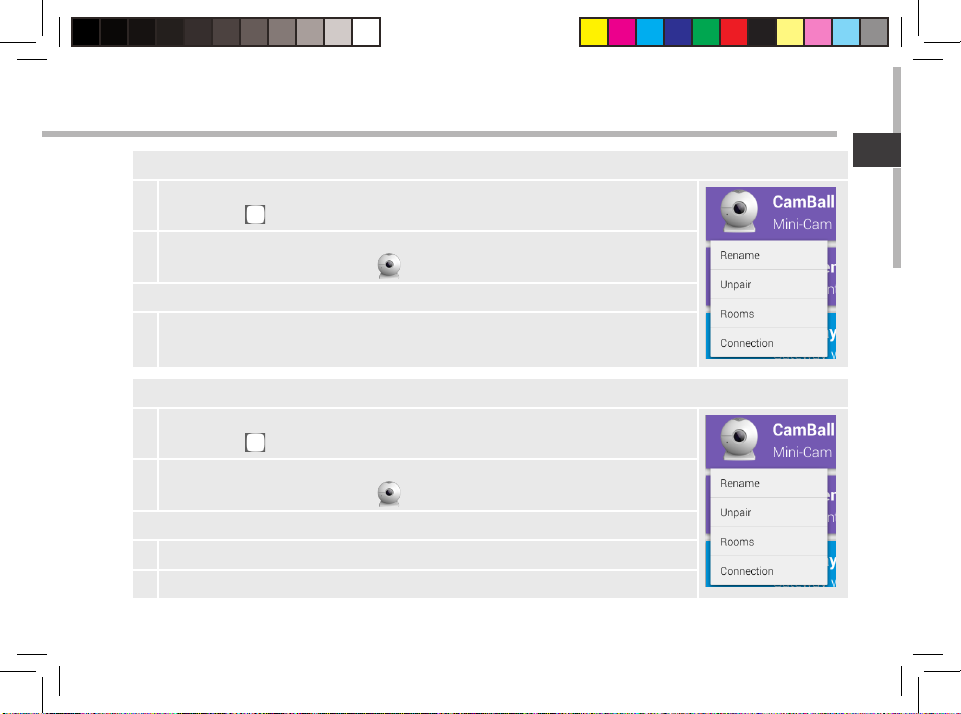
Wie kann ich ein Zubehör umbenennen?
1 Drücken Sie in der Archos Home App auf den Bereich All accessories
[Zubehör] .
2 Wählen Sie im Bereich All accessories [Zubehör] das
umzubenennende Zubehör aus.
Eine Liste der Optionen wird angezeigt.
3 Wählen Sie Rename [Umbenennen] und dann OK.
Wie kann ich ein Zubehör mit einem Raum verlinken?
1 Drücken Sie in der Archos Home App auf den Bereich All accessories
[Zubehör] .
2 Wählen Sie im Bereich All accessories [Zubehör] das
umzubenennende Zubehör aus.
Eine Liste der Optionen wird angezeigt.
3 Wählen Sie "Rooms [Räume]".
4 Wählen Sie die gewünschten Räume und dann OK.
95
UserGuide_ARCHOS_Smart_Home_Tablet_book.indd 95 15/05/2014 16:06:08
DE
Page 96

Verbindung zum Mobiltelefon
Das Archos Smart Home Tablet kann über ein Telefon oder Tablet per Fernzugri verwaltet
werden.
Herunterladen der App
1 Die Archos Home App kann im Play Store oder Appstore oder über den QR-Code
heruntergeladen werden.
2 Nach dem Download die Anwendung starten.
Nach dem ersten Start der Anwendung stehen zwei Möglichkeiten für die Verbindung zu
Ihrem Archos Smart Home Tablet zur Verfügung.
Verbindung im selben WLAN-Netzwerk.
1 Wählen Sie die Option “if you are on the same home network
than the Archos Home Gateway [ich bende mich im selben
Heimnetzwerk, wie das Archos Home Gateway]”.
Die Nachricht “Looking for the Archos Home Gateways in your local network [Suche
nach Archos Home Gateways im lokalen Netzwerk]” wird angezeigt. Sobald ein Archos
Home Tablet in Ihrem Netzwerk gefunden wird, wird es angezeigt.
Drücken, um zu verbinden.
Eine Paarungsanforderung wird an das Home Tablet gesendet.
96
UserGuide_ARCHOS_Smart_Home_Tablet_book.indd 96 15/05/2014 16:06:08
Wählen Sie Allow [Erlauben] im Home Tablet zur Autorisierung des
Geräts.
Page 97
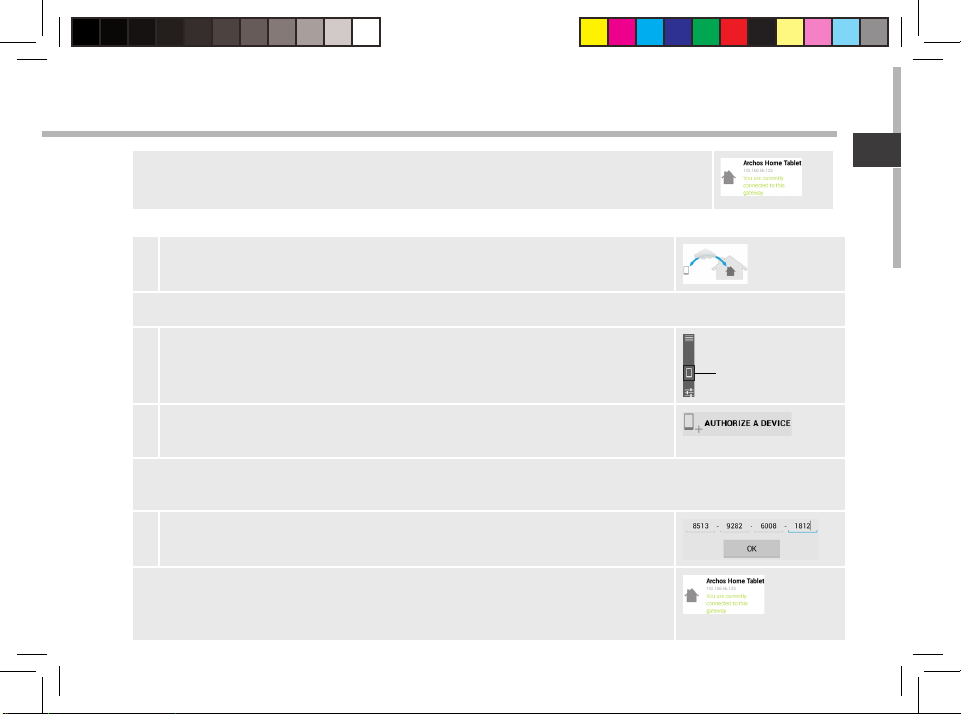
Die Verbindung wird aufgebaut. Sobald Ihr Gerät mit dem Home Tablet
verbunden ist, kann Ihr Home Tablet von jedem Ort aus verwaltet werden.
Verbindung über ein 3G-Netzwerk/ein anderes WLAN-Netzwerk
1 Wählen Sie die Option “If you are on a remote connection [Keine
Remote-Verbindung vorhanden}”.
Für die Verbindung zum Home Tablet wird ein Code angefordert.
2 Starten Sie im Home Tablet die Archos Home App und wählen Sie
das Register Connection [Verbindung].
3 Wählen Sie im Register Connection [Verbindung] Authorize a
device [Gerät autorisieren] in der Menüleiste.
Ein 32-stelliger Schlüssel wird angezeigt. Dieser muss in das Gerät eingegeben werden, das
Verbindung zum Home Tablet aufnehmen möchte.
4 Geben Sie den 32-stelligen Schlüssel ein.
Die Verbindung wird aufgebaut. Sobald Ihr Gerät mit dem Home
Tablet verbunden ist, kann Ihr Home Tablet aus der Entfernung
verwaltet werden.
UserGuide_ARCHOS_Smart_Home_Tablet_book.indd 97 15/05/2014 16:06:08
97
DE
Page 98

Programme
Nach der Paarung Ihres Zubehörs mit Ihrem Home Tablet können Programme erstellt werden.
Ein Programm ist eine Aktion, die durch einen Auslöser gestartet und für einen bestimmten
Zeitpunkt geplant wird.
Eine Programmbenutzeroberäche
1
Name des Programms
1
3
2 4
98
UserGuide_ARCHOS_Smart_Home_Tablet_book.indd 98 15/05/2014 16:06:08
6
2
5
Ein Auslöser ist ein Ereignis, dass eine
Reihe von Aktionen generiert
3
Mit Duration [Dauer] wird das
Zeitlimit einer Aktion festgelegt.
4
Eine Action [Aktion] ist das Ergebnis
eines auslösenden Ereignisses.
5
Mit Schedule [Zeitplan] wird der
Gültigkeitszeitraum der Aktionsfolge
festgelegt.
6
Mit Save [Speichern] wird das
Programm bestätigt und Cancel
[Abbrechen] wird die Erstellung
verwerfen.
Page 99

Erstellung eines Programms
1
Starten Sie die Archos Home App .
5
2 Drücken Sie in der Archos Home App auf das Register
Programs [Programme] .
3
Wählen Sie in der Menüleiste.
Ein Fenster für die Erstellung eines Programms wird angezeigt.
6
4 Geben Sie einen Namen ein.
5
Wetterereignis sein.
6
: Dieser kann Zeitplan, Erkennung oder
7
: Dieser kann Benachrichtigung,
Schnappschuss oder Video sein. Es kann eine Dauer für die
Aktion festgelegt werden.
7 Legen Sie einen Zeitraum fest, wann das Ereignis auftritt.
8 Wählen Sie SAVE [SPEICHERN].
Das Programm ist jetzt erstellt und aktiv.
99
UserGuide_ARCHOS_Smart_Home_Tablet_book.indd 99 15/05/2014 16:06:09
DE
Page 100

Programme
Änderung eines Programms
1
Starten Sie die Archos Home App .
2 Drücken Sie in der Archos Home App auf das Register
Programs [Programme] .
3 Wählen Sie das zu ändernde Programm aus.
Es werden Optionen für das Programm angezeigt.
4 Wählen Sie Edit [Bearbeiten].
5 Die gewünschten Änderungen durchführen.
6 Wählen Sie SAVE [SPEICHERN].
Ein Programm ein-/ausschalten
1
Starten Sie die Archos Home App .
2 Drücken Sie in der Archos Home App auf das Register
Programs [Programme] .
3 Wählen Sie das zu aktivierende Programm aus.
4
Drücken Sie , um das Programm auszuschalten .
100
Drücken Sie , um es wieder einzuschalten .
UserGuide_ARCHOS_Smart_Home_Tablet_book.indd 100 15/05/2014 16:06:09
 Loading...