

Page 1
1
Help & assistance
Congratulations for the purchase of an ARCHOS device! This quick start guide helps you
to start using your device properly. If you have more questions concerning the use of your
device, visit us at:
twitter.com/archos
www.facebook.com/archos
Blog
https://blog.archos.com/
http://faq.archos.com/
www.archos.com, click Support > After-sales support
www.archos.com, click Support > Downloads > Declaration of conformity
As we are often updating and improving our products, your device’s software may have a slightly
different appearance or modified functionality than presented in this quick start guide.
Page 2

2
Warranty
Unboxing
ARCHOS 50 Saphir
Charger adapter
Warranty, legal and safety notice
Charging cable
Quick start guide
Page 3
3
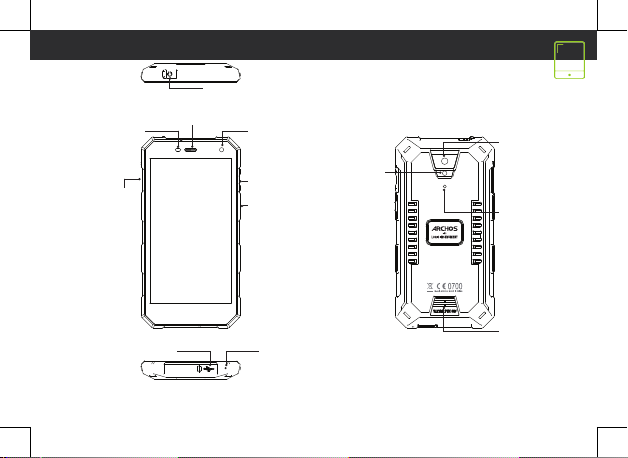
Light sensor
SIM card and
memory card
slots
Phone speaker
Micro-USB port
Describing your device
Headphone jack
Front camera
Volume
ON/OFF
Microphone
Back camera
Flash light
Noise
cancellation
Loudspeaker
Page 4

4
or or
1
1
2
2
Assembling
After you have unpacked your mobile phone box:
1. Remove the card tray by inserting the tool provided, into the tray release hole.
2. Insert 1 Nano SIM card into slot 1 and a micro SD Memory card into slot 2 OR 1 Nano SIM card into
slot 1 and 1 Nano SIM into slot 2 as shown in the diagram.
3. Replace the tray in the right position and push it inside to close.
4G/3G/2G slot 1 Nano SIM
3G/2G slot 2 Nano SIM
Memory Micro-SD
When inserting your SIM card or micro-SD card,
make sure to follow the illustration, otherwise you
may damage the slot or the card.
Page 5
5
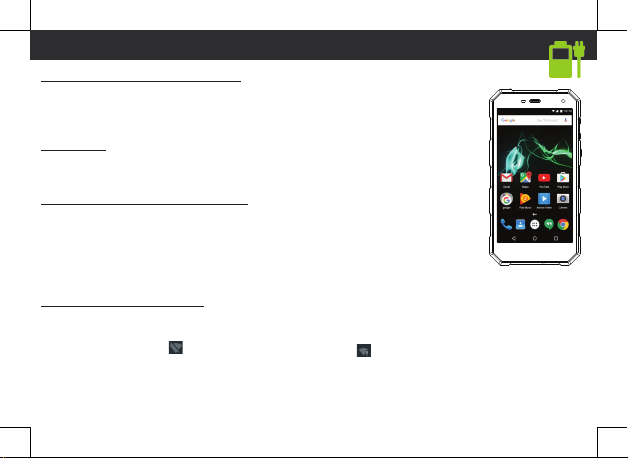
Starting up
Charging your battery completely
Plug the charging cable* in the Micro-USB port and the adapter in a power outlet.
Leave the device until the battery is fully charged.
*The USB cable provided with this device is specific to this device.
Turning ON
1. Press and hold the ON/OFF button to turn on the device.
2. Follow the instructions to set up your device.
Activating mobile date connection
1. Touch and pull down the status bar to display it.
2. Touch again the bar to reveal the quick settings.
3. Select the Settings icon.
4. In Wireless & networks, select Data usage, then the SIM card tab.
5. Slide the Mobile data switch to turn on/off.
Activating WiFi connection
1. Touch and pull down the status bar to display it.
2. Touch again the bar to reveal the quick settings.
3. Select the WiFi icon
4. Select “WiFi” below the WiFi icon.
5. Touch the name of network you want to connect to.
Private networks are shown with a lock icon and will require you to enter your
password.
to activate the WiFi connection .
Page 6

6
Troubleshooting
- My device is frozen: press the ON/OFF button for more than 10 seconds, then turn on the device.
- My device encounters dysfunctions: go to Settings > About phone > Check for update system to
check for updates. If your device is up-to-date, try to reset the device from Settings > Factory data
reset > Backup & restore. We recommend to save your files before resetting.
- My WiFi reception is too low: make sure you are not far from the WiFi hotspot. Update the firmware
of the device: http://www.archos.com/support. Reset and redefine your connection parameters.
Contact your WiFi connection provider.
- My device bootlogo is playing in a loop: you need to completely reset your device. Go to faq.archos.
com and select your device. In Backup & Recovery, select How to reinitialize my ARCHOS.
FOR MORE ANSWERS ABOUT YOUR TECHNICAL DIFFICULTIES, DO NOT HESITATE TO VISIT: FAQ.ARCHOS.
COM
Page 7

7
Contactez-nous
Félicitations! Vous venez d’acquérir un appareil ARCHOS! Ce guide de démarrage rapide vous aide à
bien débuter l’usage de votre appareil. Si vous avez d’autres questions sur l’usage de votre appareil,
visitez nos liens ci-dessous :
twitter.com/archos
www.facebook.com/archos
Blog
https://blog.archos.com/
http://faq.archos.com/
www.archos.com, click Support > After-sales support
www.archos.com, cliquez Support > Téléchargements > Déclaration de conformité
Comme nous mettons à jour et améliorons régulièrement nos produits, le logiciel de votre appareil
peut présenter une interface ou des fonctionnalités légèrement différentes de celles décrites dans
ce guide.
Page 8

8
Warranty
Déballage
ARCHOS 50 Saphir
Adaptateur
Livret des garanties et des
mentions légales et sécuritaires
Câble de charge
Guide d’utilisation rapide
Page 9

9
Caméra avant
Caméra avant
Combiné
Description de l’appareil
Prise jack
Capteur de luminosité
Volume
ON/OFF
Caméra arrière
Flash
Réduction du
bruit
Port micro-USB
Micro
Haut-parleur
Page 10

10
or or
1
1
2
2
Assemblage
Insertion de cartes et de la batterie
Après avoir déballé le téléphone :
1. Enlevez le cache en insérant l’outil fourni dans le trou du cache.
2. Insérez une carte Nano SIM dans l’emplacement 1 et une carte micro-SD dans l’emplacement 2 OU
2 cartes Nano SIM dans les emplacements 1 & 2.
3. Replacez le chariot dans son emplacement et enfoncez-le pour fermer.
4G/3G/2G emplacement 1 Nano SIM
3G/2G
Carte mémoire Micro-SD
emplacement 2
Nano SIM
Lorsque vous insérez une carte SIM ou
une carte micro-SD, conformez-vous au
schéma pour ne pas endommager la carte ou
l’emplacement.
Page 11

11
Démarrage
Charger la batterie
Branchez le câble de chargement dans le port micro-USB et connectez-le à son
chargeur. Avant la première utilisation, chargez complètement la batterie.
* Le câble USB fourni avec cet appareil est spécifique à cet appareil.
Allumer l’appareil
1. Maintenez le bouton ON/OFF pour allumer l’appareil.
2. Suivez les instructions à l’écran.
Activer la connexion données mobiles
1. Tirez vers le bas la barre de statuts afin de l’afficher.
2. Une fois affichée, touchez-la à nouveau pour accéder aux réglages rapides.
3. Sélectionnez l’icône Paramètres.
4. Dans la section “Sans fil et réseaux”, sélectionnez “Consommation de données”,
puis l’onglet de la carte SIM.
5. Faites glisser l’interrupteur Données mobiles pour activer/désactiver.
Activer la connexion WiFi
1. Tirez vers le bas la barre de statuts afin de l’afficher.
2. Une fois affichée, touchez-la à nouveau pour accéder aux réglages rapides.
3. Sélectionnez l’icône WiFi
4. Sélectionnez “WiFi” en bas de l’icône WiFi.
5. Sélectionnez le nom du réseau auquel vous voulez vous connecter. Les réseaux
privés sont affichés avec un cadenas. Ils nécessitent un mot de passe.
pour activer la connexion .
Page 12

12
Dépannage
- Mon téléphone ne répond pas: appuyez 10 secondes sur le bouton ON/OFF, puis rallumez l’appareil.
- Mon téléphone rencontre des problèmes : allez dans paramètres > A propos du téléphone > mise
à jour pour voir si aucune mise à jour n’est disponible. Si votre appareil est à jour, procédez donc à
une réinitialisation complète à partir de paramètres > sauvegarde et réinitialisation. N’oubliez pas de
sauvegarder vos fichiers avant la réinitialisation complète.
- Votre connexion WiFi est très faible : assurez-vous de ne pas être trop loin de la borne WiFi. Veuillez
mettre à jour votre produit si nécessaire. Paramétrez à nouveau votre connexion. Contactez votre
fournisseur d’accès.
- Le logo de démarrage tourne en boucle : vous devez réinitialiser complètement votre appareil. Allez
sur faq.archos.com et sélectionnez votre appareil. Dans Sauvegarde & réinitialisation, sélectionnez
Comment réinitialiser mon ARCHOS.
POUR PLUS DE RENSEIGNEMENTS SUR VOS PROBLÈMES TECHNIQUES, N’HÉSITEZ PAS À CONSULTER
LA PAGE : FAQ.ARCHOS.COM
Page 13

13
Unisciti a noi
Congratulazioni per aver acquistato un dispositivo ARCHOS. La presente guida rapida supporta
l’utente nel corretto utilizzo del dispositivo. Per ulteriori dettagli sull’uso del dispositivo, visitare:
twitter.com/archos
www.facebook.com/archos
Blog
https://blog.archos.com/
http://faq.archos.com/
www.archos.com, fai clic su Assistenza > Supporto post vendita
www.archos.com, fai clic Assistenza > Download > Dichiarazione di conformità
Poiché aggiorniamo e miglioriamo con frequenza i nostri prodotti, il software del dispositivo
potrebbe avere un aspetto leggermente differente o funzionalità modificate rispetto a quelle
mostrate nella presente Guida rapida.
Page 14

14
Warranty
Contenuto della confezione
ARCHOS 50 Saphir
Caricabatterie
Garanzia, note legali e sulla
sicurezza
Cavo di caricamento
Guida dell’utente
Page 15

15
Fotocamera
Slot per scheda
di memoria e SIM
Jack per auricolare
Altoparlanti
Descrizione del dispositivo
Sensore di luce
Volume
ON/OFF
Flash
Fotocamera
Riduzione del
rumore
Porta micro-USB
Altoparlanti
Microfono
Page 16

16
or or
1
1
2
2
Assemblaggio
Dopo aver estratto dalla confezione il telefono cellulare:
1. Inserire lo strumento fornito con il telefono nella fessura per rimuovere il cassettino.
2. Inserire una scheda Nano SIM nello slot 1 e una scheda di memoria micro SD nello slot 2 OPPURE
una scheda Nano SIM nello slot 1 e una scheda Nano SIM nello slot 2 come mostrato nello schema.
3. Riposizionare il cassettino e spingerlo per chiuderlo.
4G/3G/2G 1 Nano SIM
3G/2G
Scheda di memoria Micro-SD
2
Nano SIM
Quando si inserisce la scheda SIM o la scheda micro-SD,
assicurarsi di seguire quanto illustrato per evitare di
danneggiare lo slot o la scheda.
Page 17

17
Operazioni preliminari
Caricamento della batteria
Inserire il cavo di ricarica* nella porta micro-USB e collegarlo al caricabatterie.
Prima di utilizzare il dispositivo per la prima volta, caricare completamente la
batteria.
*Il cavo USB fornito con questo dispositivo è specifico per questo dispositivo.
Accensione
1. Tenere premuto il pulsante ON/OFF per accendere il dispositivo.
2. Seguire le istruzioni.
Connessione dati
1. Toccare e tirare verso il basso la barra di stato per visualizzarla.
2. Toccare di nuovo la barra per visualizzare le impostazioni rapide.
3. Selezionare l’icona “Settings” [Impostazioni].
4. In Wireless e reti, selezionare Uso dati, quindi la scheda della SIM card.
5. Scorrere il dito per attivare/disattivare l’opzione Connessione dati.
Connessione Wi-Fi
1. Toccare e tirare verso il basso la barra di stato per visualizzarla.
2. Toccare di nuovo la barra per visualizzare le impostazioni rapide.
3. Selezionare l’icona del Wi-Fi
4. Selezionare “Wi-Fi” sotto l’icona del Wi-Fi.
5. Toccare il nome della rete a cui l’utente desidera connettersi.
Le reti private vengono mostrate con un’icona di blocco e richiedono l’inserimento
della password.
per attivare la connessione Wi-Fi .
Page 18

18
Risoluzione dei problemi
- Il telefono è bloccato: premere sul pulsante ON/OFF per più di 10 secondi.
- Il dispositivo incontra disfunzioni: andare a Impostazioni> Info sul telefono> Verifica per il
sistema di aggiornamento per controllare gli aggiornamenti. Se il dispositivo è up-to-date, cercare di
ripristinare il dispositivo da Impostazioni> Ripristino dati di fabbrica> Backup e ripristino. Si consiglia
di salvare i file prima di resettare.
- Se la connessione Wi-Fi è troppo lenta: assicurarsi di trovarsi in prossimità dell’hotspot Wi-Fi.
Aggiornare il firmware del dispositivo: http://www.archos.com/support. Ripristinare e ridefinire i
parametri della connessione. Contattare il provider della connessione Wi-Fi.
- Il mio bootlogo dispositivo sta giocando in un ciclo: è necessario ripristinare completamente il
dispositivo. Vai a faq.archos.com e selezionare il dispositivo. In Backup & Recovery, selezionare Come
reinizializzare miei ARCHOS.
PER ULTERIORI SOLUZIONI RELATIVE A PROBLEMI TECNICI, VISITARE: FAQ.ARCHOS.COM
Page 19

19
Open Source Software Offer
The software bundled with this product includes software files subject to certain open source
license requirements. Such open source software files are subject solely to the terms of the relevant
open source software license. Such open source software is provided on an “AS IS” basis to the
maximum extent permitted by applicable law.
For the open source files contained herein, please access “Open source license” section located
at: Settings\About phone\Legal information on the device for the relevant copyright and licensing
terms. You may obtain a copy of Apache License, Version 2.0 at http://www.apache.org/licenses/
LICENSE-2.0. You may also obtain a copy of GNU General Public License, Version 2 at the Free
Software Foundation, INC, 51 Franklin Street, Fifth Floor, Boston, MA 02110-1301, USA.
Until the date that is three years after our last shipment of this product, you may obtain a copy
of the source code corresponding to the binaries for any GPL-Licensed file by contacting ARCHOS
customer service at http://www.archos.com and ARCHOS will send you a link to such source code or
will provide instructions to get the source on a physical medium.
This offer is valid to anyone in receipt of this information.
Page 20

20
National restrictions
This device is intended for home and office use in all EU countries (and other countries following the
EU directive 1999/5/EC) without any limitation except for the countries mentioned below:
Country Restriction Reason/remark
Bulgaria None General authorization required for outdoor use and public
France Outdoor use limited to
Italy None If used outside of own premises, general authorization is
Luxembourg None General authorization required for network and service
Norway Implemented This subsection does not apply for the geographical aera
Russian
Federation
Note: Frequencies 2454-2483.5MHZ are restricted to indoor use in France.
10 mW e.i.r.p. within the
band 2454-2483.5 MHz
None Only for indoor applications
service
Military Radiolocation use. Refarming of the 2.4 GHz band
has been ongoing in recent years to allow current relaxed
regulation. Full implementation planned 2012
required.
supply (not for spectrum)
within a radius of 20 km from the centre of Ny-Alesund
Page 21

21
SAR
After the laboratory measurements, the SAR values for this mobile are:
HEAD 0.551W/Kg; BODY 0.804W/Kg
Archos company (Contact address : ARCHOS SA 12 Rue Ampère 91430 Igny France) declares that
this device is in compliance with the essential requirements and other relevant provisions of
Directive 1999/5/EC: http://www.archos.com/support/download/conformity/CE_DOC_AC50SA.pdf
Par la présente, ARCHOS (adresse de contact : ARCHOS SA 12 Rue Ampère 91430 Igny France)
déclare que l’appareil est conforme aux exigences essentielles et aux autres dispositions
pertinentes de la directive 1999/5/CE. La déclaration de conformité peut être consultée sur le site :
http://www.archos.com/support/download/conformity/CE_DOC_AC50SA.pdf
 Loading...