

Page 1
English Language User Manual
Dear Customer,
Pocket Media Assistant PMA430™
Video Player & Recorder / Music & Audio / Wifi / Linux® / Personal Information Manager (PIM)
FR: Manuel d’utilisation complet (Français) sur le disque dur du PMA430.
ES: Manual completo (Español) en el disco duro del PMA430.
DE: Das komplette Handbuch (Deutsch) steht auf der Festplatte des PMA430 zur Verfügung.
IT: Manuale completo (Italiano) sul disco rigido di PMA430.
ARCHOS thanks you for your choice of this exciting PMA430™ Personal Media Assistant.
Based on the tried and tested Linux® operating system, you can now get all the entertainment
you want, right in the palm of your hand. This guide will explain to you the functions of the
PMA430™. This product is, in reality, a computer. Our engineers have packed this product
with many functions and capabilities*. The better you know how to use it, the more
enjoyment you will get from it. Remember, with the PMA430™, you can…
• Record video from your television, VCR, or any video source
• Play MPEG-4 movies
• Listen to and record digital music files
• Download images from a digital camera
• View photo images
• Play regular games as well as Mophun® based games
• Use it as an Internet browser or E-mail device
• Use it as a Personal Information Manager (calendar, appointments, address book, etc.)
• Add third party software for a variety of tasks
• Store any type of data file, it’s a portable hard drive too!
We wish you many years of enjoyment from your PMA430™ product. Don’t forget to check our
web site (www.archos.com category software), as we periodically update the ARCHOS
PMA430™ internal software to offer new functions and improved features.
The ARCHOS TEAM
*As our engineers are always updating and improving the software, your device’s
software may have a slightly different appearance or modified functionality than
presented in this manual.
Please visit our website to download the most recent manual and software for this product.
version 2.1
2
Page 2

TABLE OF CONTENTS
The complete manual in different languages is available on the hard drive of your PMA430 under
/Archos/Manuals.
1 Overview 8
1.1 Ports, Buttons, and Connectors ........................................................................................8
1.2 Overview of different screen areas .................................................................................. 10
1.3 Application tabs................................................................................................................10
1.4 The Touch Screen and Text Input.................................................................................... 11
1.5 Linux®, Qtopia™ and the PMA430 File System............................................................ 12
1.6 Updating the Operating System ....................................................................................... 13
Step 1 Download the file aimage.img..........................................................................13
ATTENTION Macintosh® Users .................................................................................14
Step 2. Read the History.txt File .................................................................................14
Step 3. Copy the aimage.img file to the PMA430 System Folder................................14
Step 4 Reset the PMA430 and set the time and date .................................................14
1.7 Changing the Language.................................................................................................... 15
1.8 Caring for the PMA430.................................................................................................... 15
1.9 Hardware Reset ................................................................................................................ 15
2 Connecting/Disconnecting the PMA430 to/from your PC............................................16
2.1 Connecting the PMA430 .................................................................................................. 16
2.2 Disconnecting the PMA430 from your Computer........................................................... 17
3 System Recovery ..............................................................................................................19
4 Music Application............................................................................................................21
4.1 Playing Music...................................................................................................................21
4.2 The ARCLibrary™ - Browsing by Artist, Album, or Title ............................................. 24
4.3 Putting Music onto your PMA430 ...................................................................................24
Installing Windows Media® Player (WMP) 9 ......................................................................... 26
4.4 Play Music through your Home Stereo............................................................................ 26
4.5 The Resume Functions ..................................................................................................... 26
4.6 Customizing the Equalizer ...............................................................................................27
5 AudioCorder Application................................................................................................28
6 MUSIC - Using iTunes™ with your PMA430 ...............................................................29
7 Photo Application ............................................................................................................30
7.1 Transferring pictures to your PMA430 ............................................................................ 31
8 Video Application ............................................................................................................32
8.1 The Resume Functions ..................................................................................................... 33
8.2 Display Format Settings ................................................................................................... 33
®
Windows
Macintosh
Button controls while a song is playing .......................................................................23
Synchronizing Music from Windows Media® Player (WMP) to the PMA430...............25
Synchronizing Music from Windows Media® Player (WMP) 9 to the PMA430............25
Synchronizing Music from Windows Media® Player (WMP) 10 to the PMA430.......... 25
Transferring your CD collection to the PMA430 ..........................................................25
Installing Windows Media® Player (WMP) 10.............................................................26
...............................................................................................................17
®
...............................................................................................................18
Display 33
Video 33
8.3 Playing Video Files from the Internet.............................................................................. 33
9 VideoCorder Application................................................................................................35
Manual Recording.......................................................................................................35
Fixed Time Recording.................................................................................................36
Scheduled Recordings................................................................................................36
9.1 Setting other Recording Parameters................................................................................. 37
9.2 Copy Protection................................................................................................................ 37
10 Set-up for scheduled video recordings ...........................................................................39
10.1 Part 1 : Choose your Category, Brand, and Model .......................................................... 39
10.2 Part 2: Testing the channel changer ................................................................................. 40
10.3 Part 3: Give your channels a name................................................................................... 40
11 File browser Application .................................................................................................42
12 Creating MPEG4 Video Files with your Computer......................................................44
How to create an MPEG4 video file............................................................................44
PC Tools ...............................................................................................................44
12.1 Installing the PC Software ............................................................................................... 44
Virtual Dub™ ..............................................................................................................45
MPG4 Translator ........................................................................................................45
MP3 Sound Codec......................................................................................................45
12.2 Using MPEG4 Translator ................................................................................................. 47
Select Source & Destination Files...............................................................................47
Change Settings .........................................................................................................47
Target & Priority..........................................................................................................48
Start ...............................................................................................................48
13 Personal Information Management (PIM) Applications..............................................50
13.1 Today ........................................................................................................................ 50
13.2 Calendar ........................................................................................................................ 50
13.3 Contacts ........................................................................................................................ 50
13.4 Todo List ........................................................................................................................ 50
14 Miscellaneous Applications .............................................................................................51
14.1 Clock ........................................................................................................................ 51
14.2 World Time ......................................................................................................................51
14.3 Calculator ........................................................................................................................ 51
14.4 Text Editor........................................................................................................................ 51
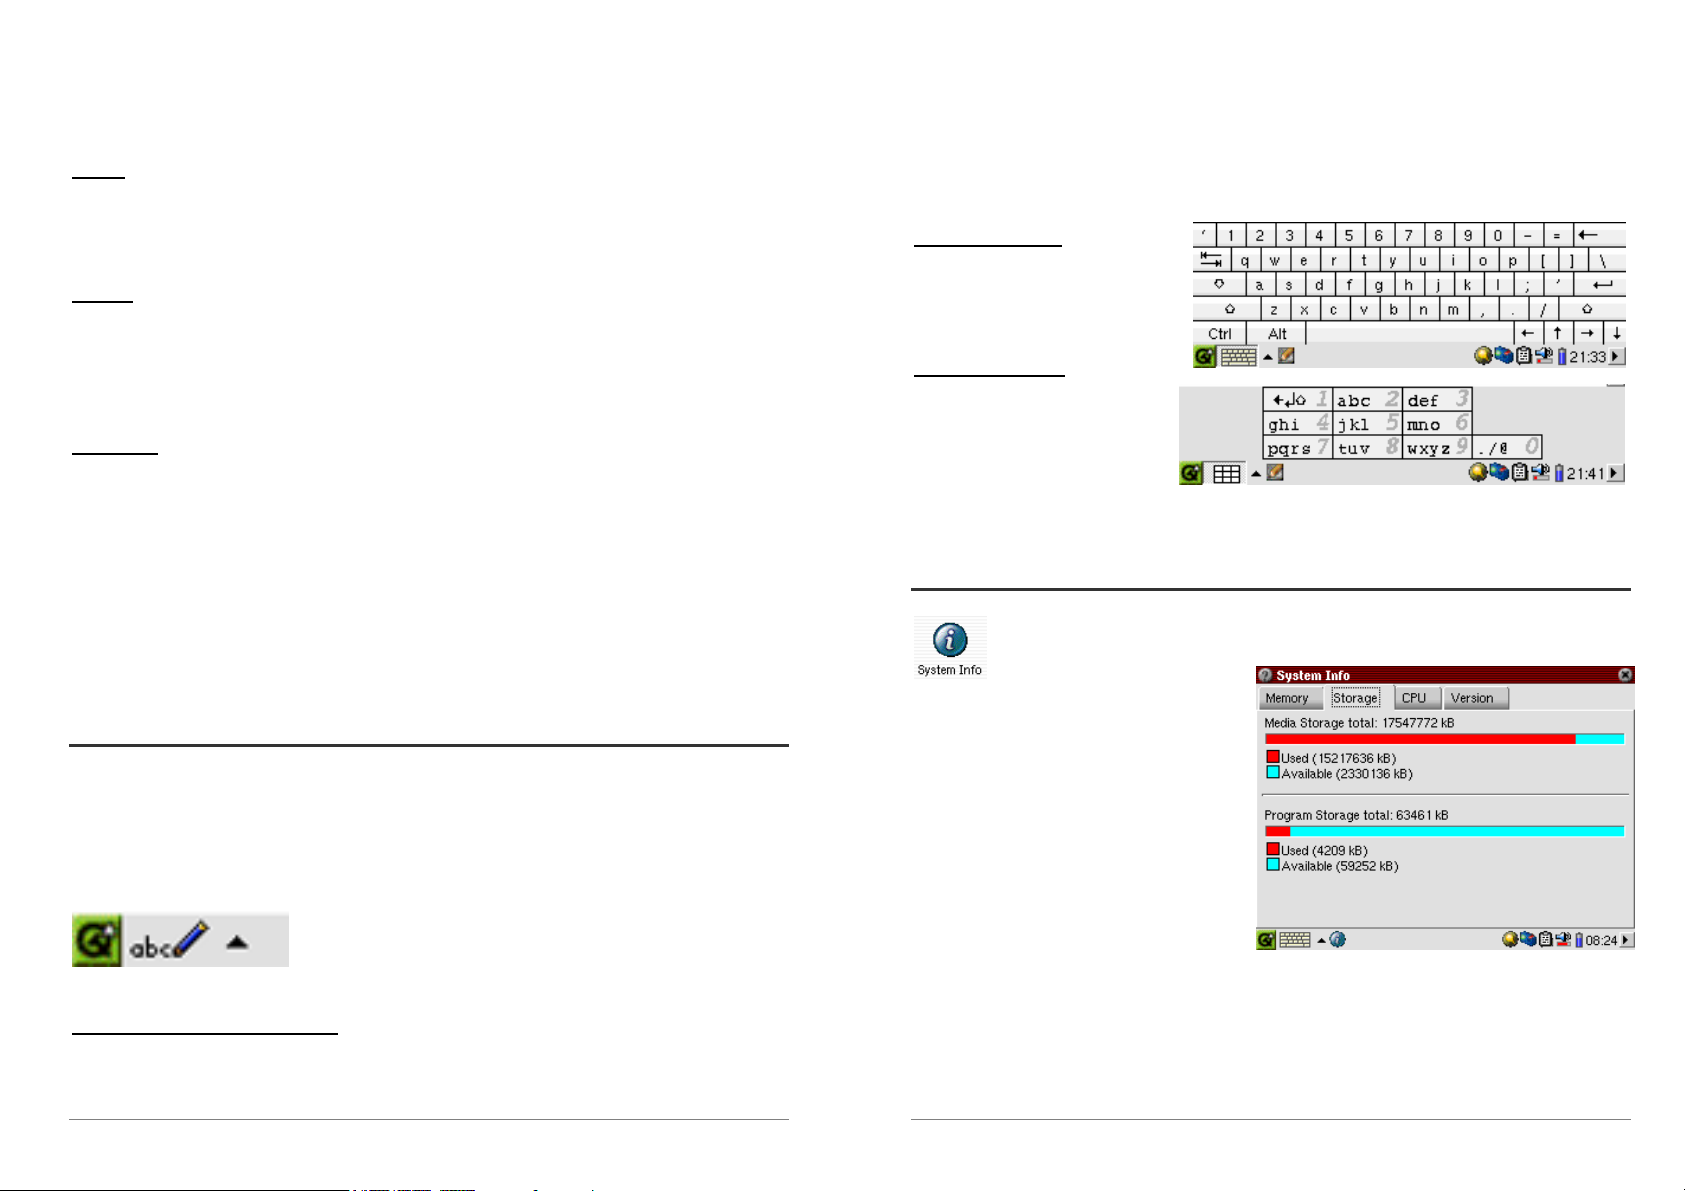
14.5 System Info....................................................................................................................... 52
14.6 Help Browser....................................................................................................................52
14.7 Mophun® ........................................................................................................................52
14.8 Terminal ........................................................................................................................ 52
14.9 Pdf Viewer........................................................................................................................ 52
15 Internet Applications.......................................................................................................53
15.1 E-Mail ........................................................................................................................ 53
15.2 Opera™ Browser.............................................................................................................. 53
16 Audio-Visual Settings ......................................................................................................55
16.1 TV Output ........................................................................................................................ 55
16.2 VideoCorder Settings ....................................................................................................... 55
16.3 Equalizer ........................................................................................................................ 55
3
4
Page 3

Hardware Settings ...........................................................................................................56
17
17.1 LCD Settings ....................................................................................................................56
17.2 Light & Power ..................................................................................................................56
17.3 Recalibrate ........................................................................................................................ 56
17.4 Network ........................................................................................................................56
Start the Network Application......................................................................................56
Choose your service................................................................................................... 56
Choose the IP Configuration Type..............................................................................57
Scan for active Access Points.....................................................................................57
Choose the Access Point............................................................................................58
Service Created..........................................................................................................58
Browsing the Web or Using E-mail .............................................................................59
Making an Infrared connection....................................................................................59
Account Tab ...............................................................................................................60
Modem tab ...............................................................................................................60
Network tab ...............................................................................................................61
18 Software & Other settings...............................................................................................62
18.1 Language ........................................................................................................................ 62
18.2 Security ........................................................................................................................ 62
18.3 Appearance ....................................................................................................................... 62
18.4 Launcher ........................................................................................................................ 62
18.5 Date/Time ........................................................................................................................ 62
18.6 Software Packages............................................................................................................ 63
18.7 Restart ........................................................................................................................63
18.8 Application Services ........................................................................................................ 63
18.9 Plug-in Manager ...............................................................................................................63
19 Installing & Using Qtopia™ Desktop.............................................................................65
19.1 Installation ........................................................................................................................65
19.2 Usage ........................................................................................................................ 65
19.3 Synchronizing with Microsoft® Outlook ........................................................................66
20 Technical Support............................................................................................................67
21 Troubleshooting ...............................................................................................................69
21.1 USB Device Connection issues........................................................................................ 69
21.2 Charging and Power issues .............................................................................................. 69
21.3 PMA430 locks up (freezes operation) or Stops ............................................................... 70
21.4 File issues, corrupted data, formatting, and partitioning ................................................. 70
Windows
Windows
®
ME Running Scan-Disk (Error Checking)...................................................71
®
XP & 2000 Running Check Disk Utility (ChkDsk)........................................71
22 Legal .................................................................................................................73
22.1 Warranty and Limited Liability ....................................................................................... 73
22.2 Warnings and Safety Instructions ....................................................................................73
22.3 FCC Compliance Statement ............................................................................................. 74
22.4 Electrostatic Discharge..................................................................................................... 74
22.5 Avoiding Hearing Damage .............................................................................................. 74
22.6 Copyright Notice ..............................................................................................................74
22.7 LCD Pixel Policy ............................................................................................................. 74
23 Index .................................................................................................................76
!!Backup the .zip folder!!!
You will find a file PMA400_Recovery.zip on the PMA430 hard drive in the folder
/Archos/PMA400_Recovery_zip. Please back this up onto your PC just in case you need to do a
complete system recovery in order to return your PMA430 to its original factory delivered state.
Sections of this documentation which will help you to backup this folder are
• Connecting/Disconnecting the PMA430 to/from your computer
• System recovery
5
6
Page 4
1 Overview
PART I
Introduction to the PMA430
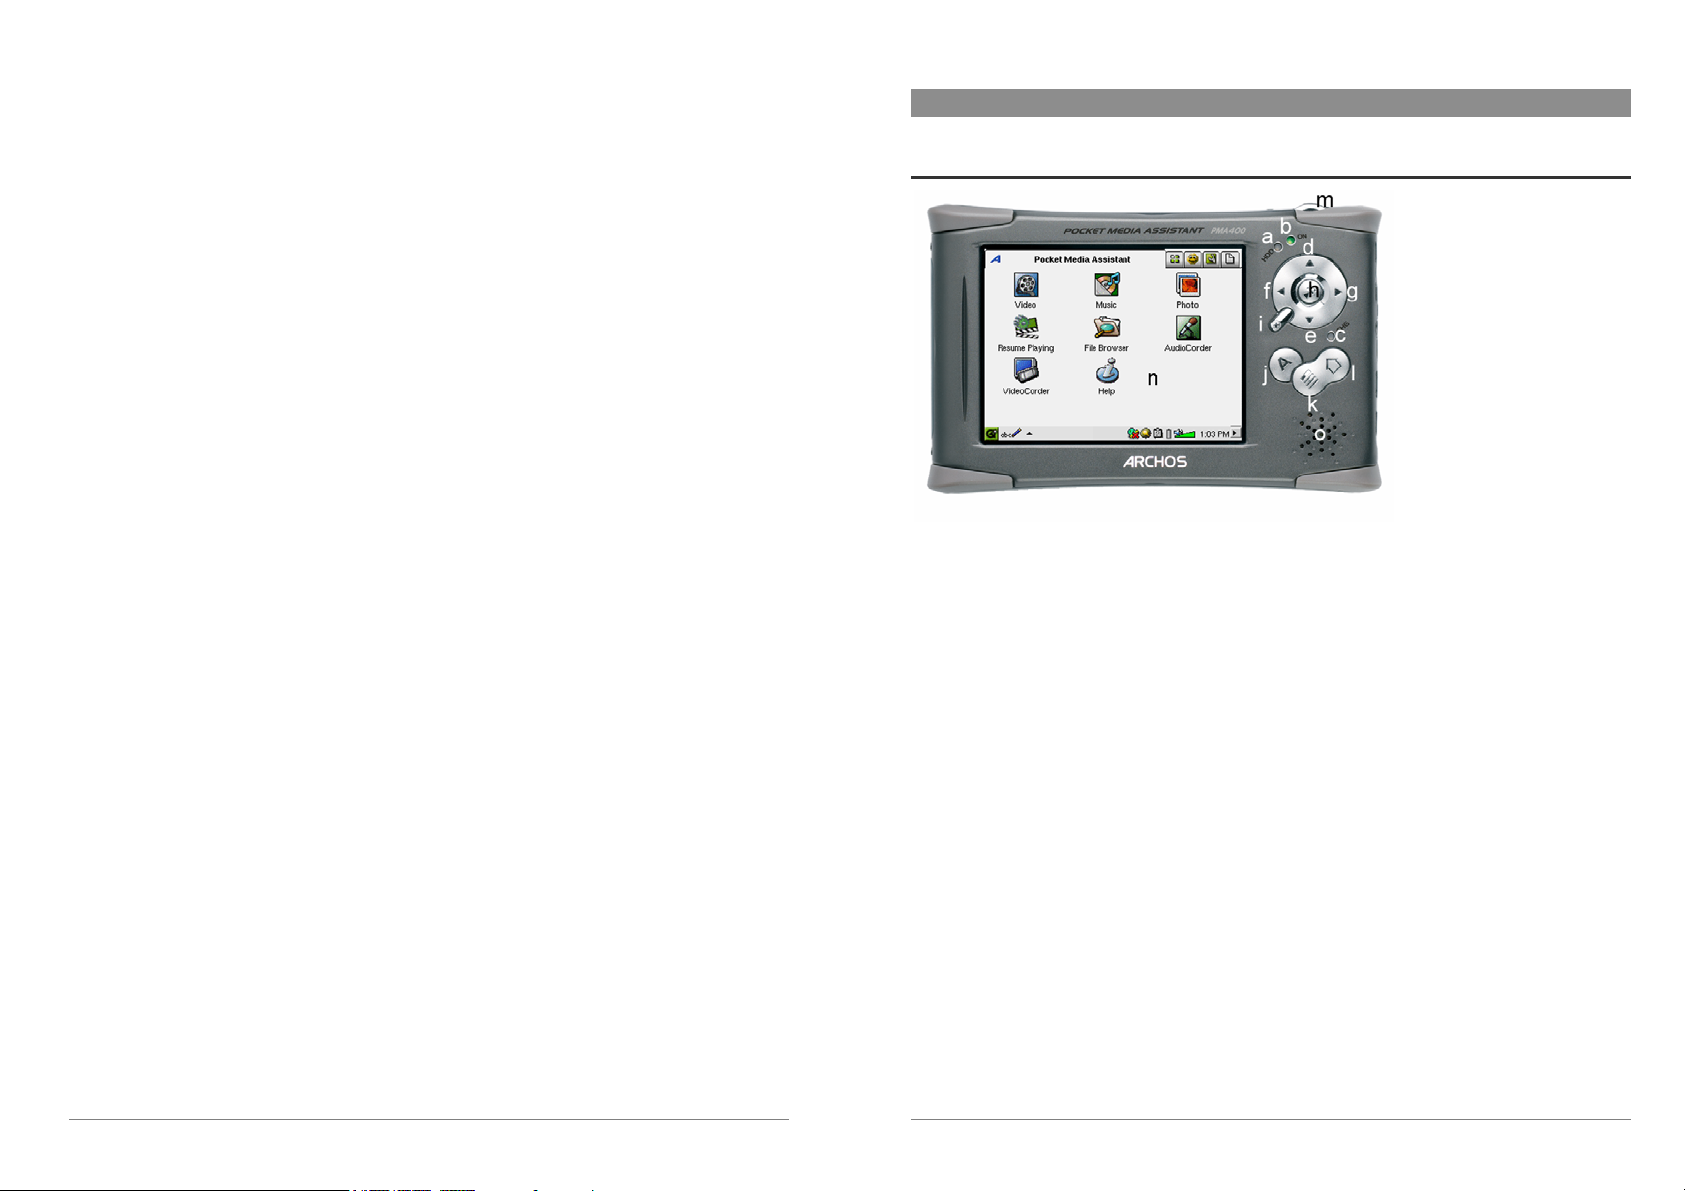
1.1 Ports, Buttons, and Connectors
Lights
a Hard drive activity indicator
b On indicator
c* Adapter/Charger Connected
Navigation pad
d Move UP (Increase volume when playing music or video)
e Move DOWN (Decrease volume when playing music or video)
f Move LEFT (Move to left window in dual browser)
g Move RIGHT (Open or move to right window in dual browser)
h On/Enter/Play – Hold for 3 seconds to turn on
i Escape/Stop/Standby – Hold for 3 seconds to put into standby mode
Additional buttons
j ARCHOS button - Switch between open applications
k Menu button –Open application tab option menus
l Home button – Return to main screen. Switch between the tabs.
m Hold 3 seconds to switch between internal and external display. A single short click
will be interpreted as a tab key in applications that use tabbing.
n TFT LCD Touch screen 320 x 240 pixels. Press lightly with the included stylus.
o built-in loud speaker
*When the PMA430 is charging, this light will start to blink when the battery is 90% charged. To charge the
battery to its full capacity, leave it plugged into the charger for at least one more hour.
7
8
Page 5
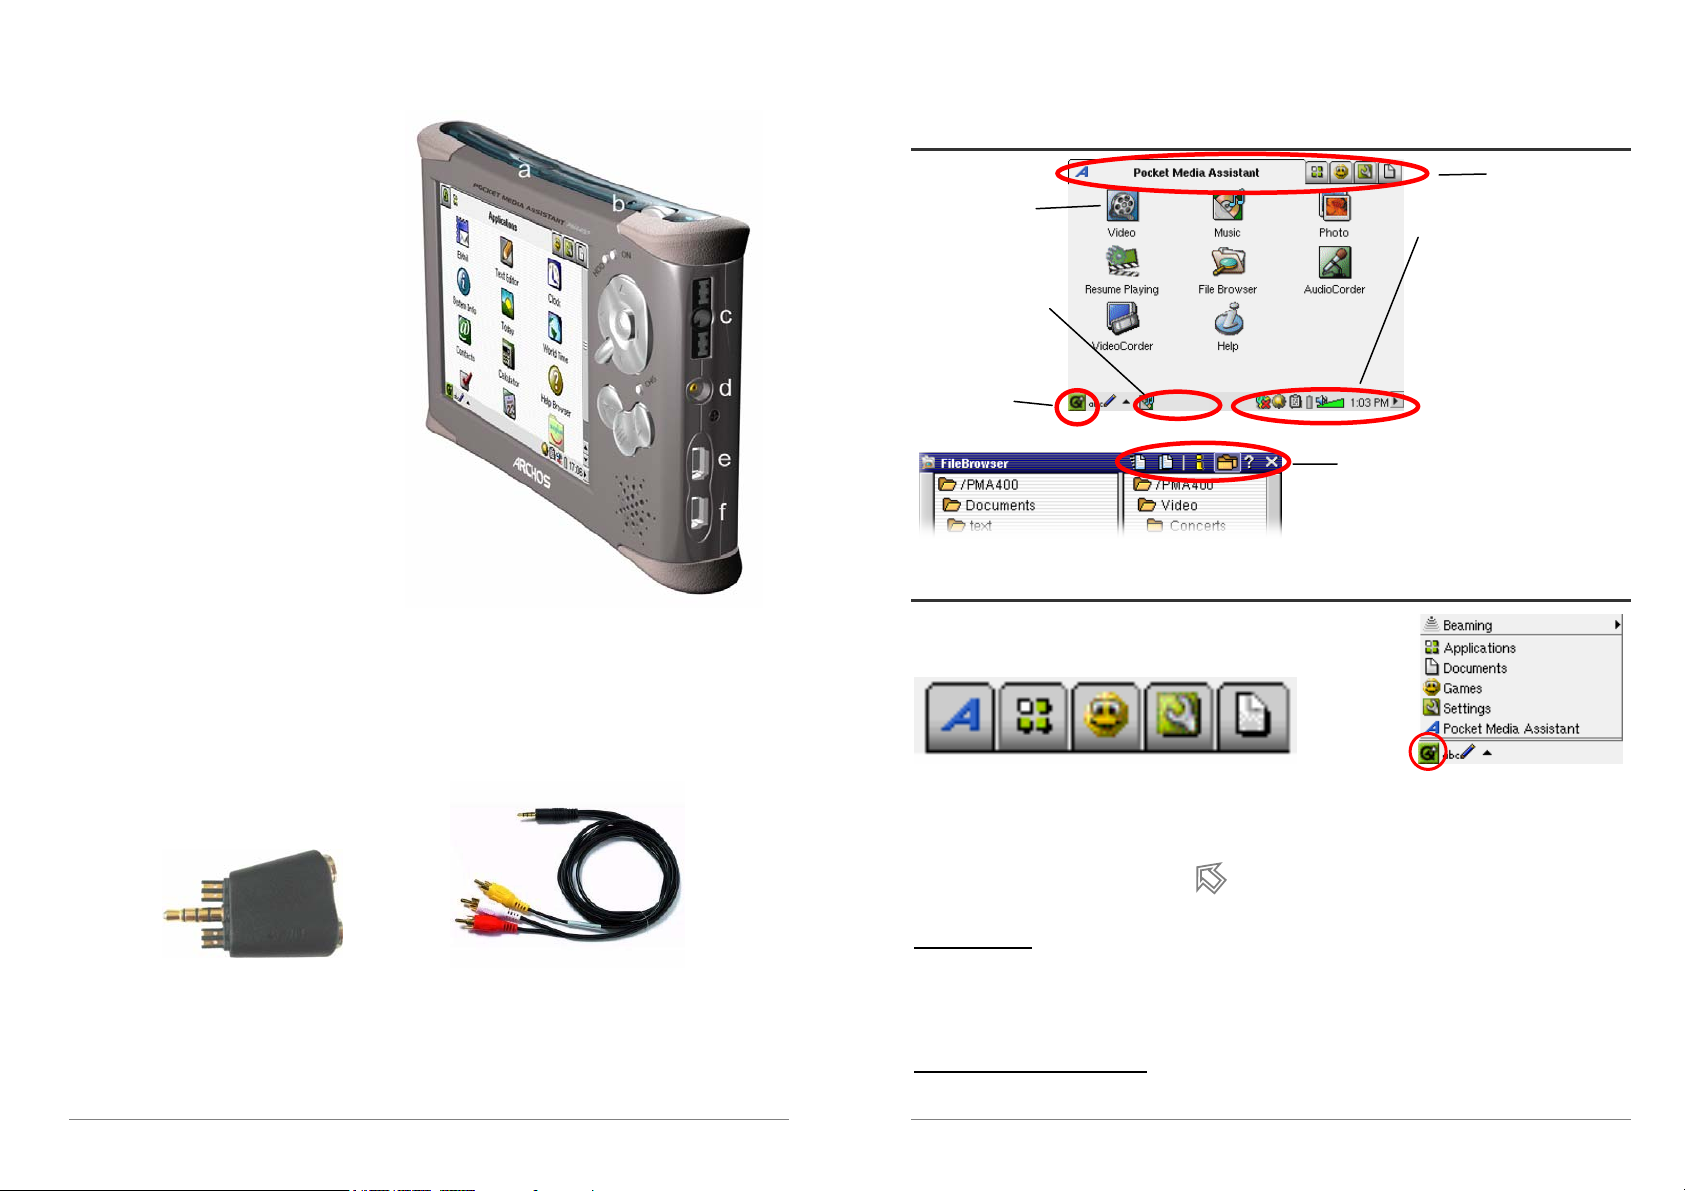
a Infrared communications port
b Microphone
c Headphone & AV in/out Multiconnect jack – connect headphones,
TV cradle, or optional adapter*.
d Power connector – use only the
provided ARCHOS AC
adapter/charger.
e USB 1.1 Host port – To attach
compatible USB devices to PMA430
f USB 2.0 Device port (USB 1.1
compatible) – use to see the PMA430
as hard drive on your computer
*The optional multi-connect adapter and AV cable allow for audio and video playing (AV Cable)
and recording (Adapter + Cable) without the TV Cradle from video and audio devices with video
out and line out.
Multi-connect Adapter AV Cable
1.2 Overview of different screen areas
Application tabs
Application
launcher icons Status bar
- Network connection
This area will show - Luminosity
icons for running - Cut/Copy/Paste menu
applications - Battery
- Volume & speaker
Qtopia menu - Clock
- Hide the status bar
(Upper) Menu bar
- This menu bar contains tool, information
and display icons, depending on the
application and file type.
1.3 Application tabs
ARCHOS Productivity Games Settings Documents Qtopia™ menu
The PMA430’s interface is partitioned into five main application sets, or tabs. You can change
from one tab to another by clicking on the tab itself with the stylus (the PMA430’s screen is touch
sensitive), clicking the Home button , or by selecting it from the Qtopia™ menu, on the
bottom left of the screen (see image on the right hand side).
Pocket AV Tab
From this tab, you can launch the music playing and recording applications, the video playing and
recording applications, the photo viewing application, the file management application, and a
resume playing application.
Productivity Applications Tab
9
10
Page 6
From this tab, you can launch applications such as E-mail, an Internet browser, a calendar, agenda,
contacts, and others.
the right of the input screen) will demonstrate to you how this is to be done, and will give you the
opportunity to train yourself.
Games
A number of games have been included with your device. Further, there is a Mophun® game
engine found in the games tab. This is a special game playing platform. You can check the
ARCHOS website for a list of available games to purchase.
Settings
This tab gives you access to the parameters which control the operation of your PMA430. They
include the clock and calendar, the interface language, a security password, and your network
parameters which allow you for example to use the built-in Wifi capabilities to connect to a
network and access the Internet.
Documents
This tab corresponds to the Documents folder which is the top level of the file hierarchy system
and where you will keep all your working documents. It displays all of your files that are located
in the Documents folder and its subfolders. On the bottom left, you can choose to show “All
Documents” (that is, all files) or select a certain file type (for example images or text files only).
Pease note that keeping a large amount of files in this folder can slow down the PMA430 or result
in messages such as “Memory Low” or “Memory Critical”, so you might want to consider creating
a folder (e.g. named “Data”) in the root directory of the PMA 430 to store the files you do not
access frequently.
1.4 The Touch Screen and Text Input
The PMA430 is equipped with a tactile screen. You can lightly press on it with your finger or use
the included stylus in order to launch an application or to interact with a program. There are three
methods to enter text or numbers into your PMA430 when an application calls for textual
information. If you need to enter text, click on the text entry button (1) and then choose your text
entry method (2).
(1) (2)
Method: Handwriting Recognition
You write your characters on the screen itself. You have to write your letters in a particular way in
order for the PMA430 to identify them correctly. The training tutorial (circled question mark on
Method: Keyboard
A standard keyboard is displayed
and you simply tap on the keys.
Method: Telephone
Enter text as if you are using a
telephone number pad. Click once
for the first letter, twice for the
second letter and so on.
1.5 Linux®, Qtopia™ and the PMA430 File System
Qtopia™ is the graphic layer on Linux® that
allows for a comfortable graphic user
interface instead of the traditional Linux®
command line input.
The hard drive of your PMA430 is
partitioned as FAT32, a file system used
also on Windows® based computers. A
small part of it is set aside as a storage space
for additional applications. These two
spaces are called Media Storage and
Program Storage respectively. The Media Storage, is where all of your music, videos, photos, and
any miscellaneous data files will be stored. When you connect your PMA430 to your computer via
the USB cable, it will appear as an external hard drive. Thus, you can very easily move files
between your PC and your PMA430 by opening the PMA430 in Windows® Explorer and
dragging and dropping files.
Your PMA430 runs on the Linux® operating system. This version of Linux®
however does not include all of the libraries needed to run, on say, a desktop
computer. It is a lean version.
11
12
Page 7
The Program storage area (64MB fixed size) is where new Linux® programs that you install onto
your PMA430. Because Linux® applications need to run in a Linux® formatted space, the
installation packages (file type .ipk) must be installed into the Program Storage area. You will
notice that when your device is mounted onto a PC as an external hard drive (or mass storage
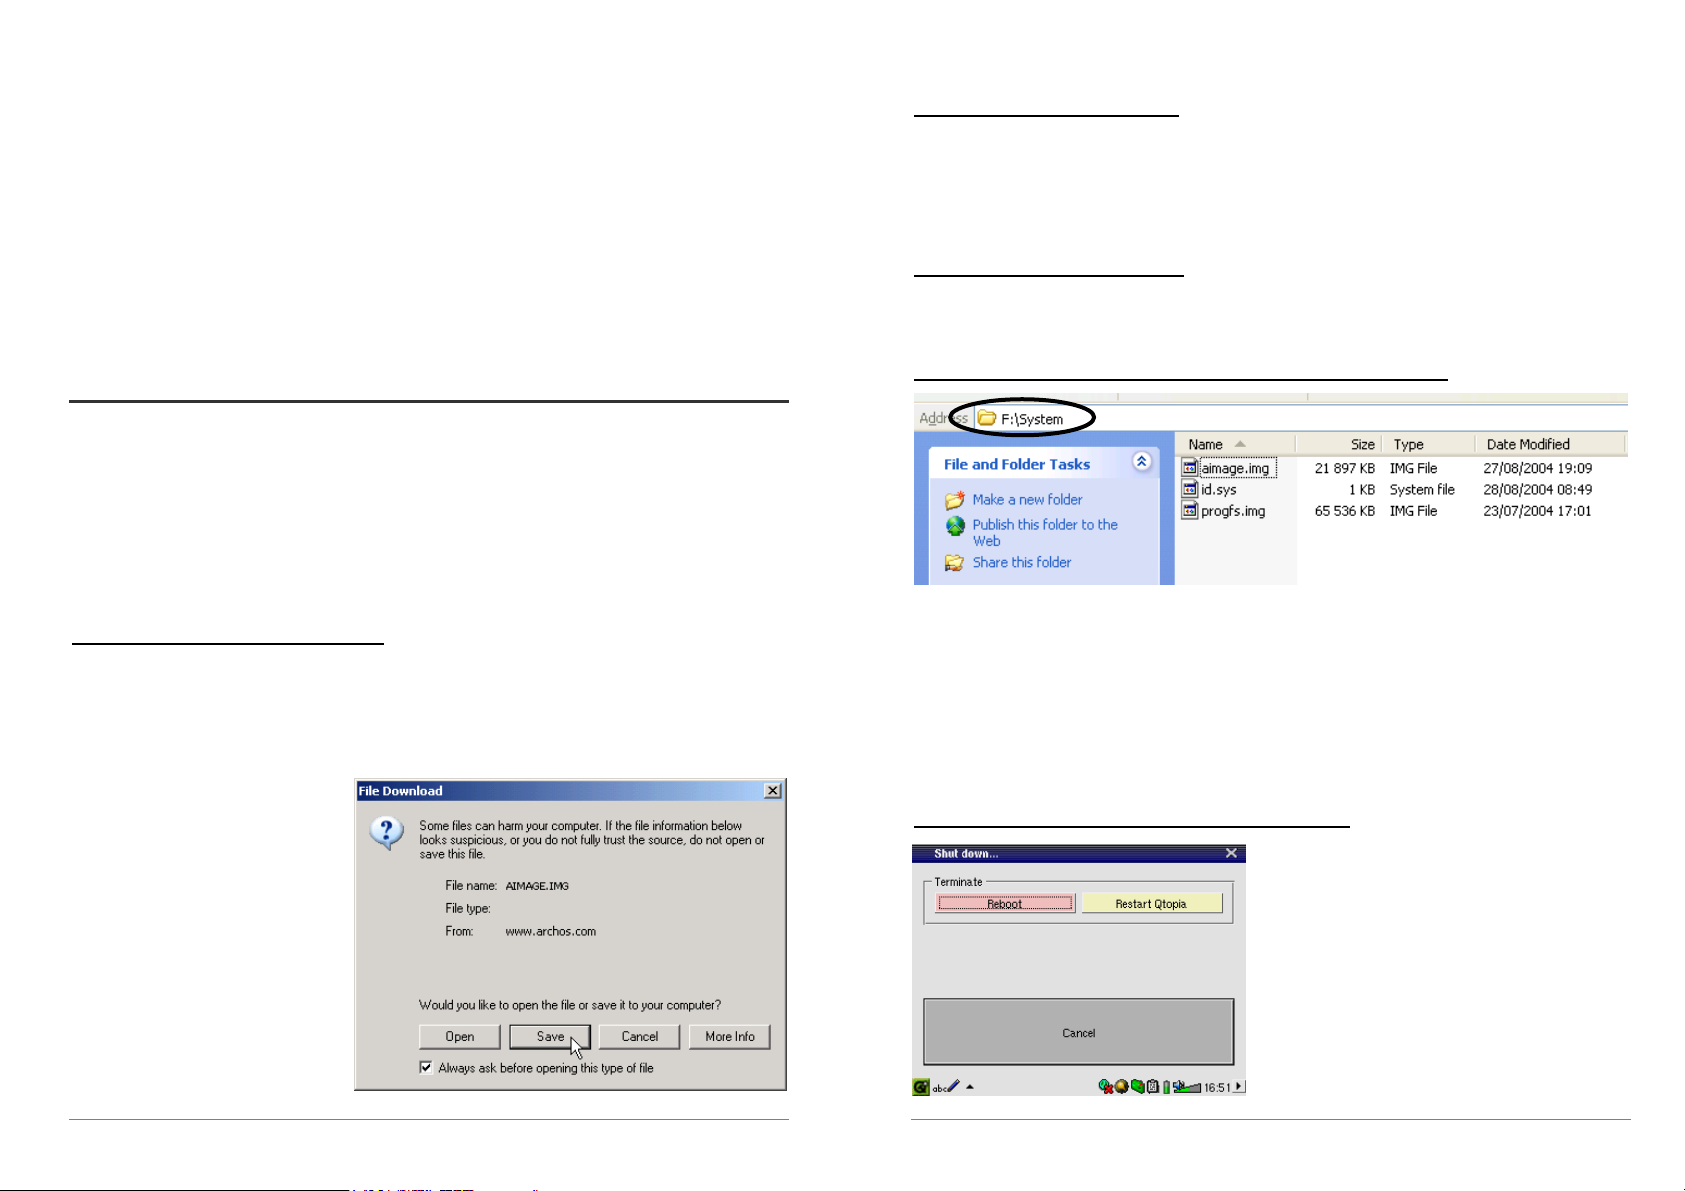
device), there is a 64MB file in the System folder called progfs.img. This stands for program file
space and is actually a simulated Linux® partition for your application programs. You should
therefore not delete this file/partition. In case that you need to do an entire system recovery
procedure, you should backup the progfs.img file to save all of your installed programs. After
completing the recovery procedure, you can then recover your programs by replacing this file.
ATTENTION Macintosh® Users
Macintosh® users should be especially careful when they download and save this file to their
Macintosh® computer. Do not double-click on it. Macs use .img files for a different purpose and
if you double click on this saved .img, it will try to open it. Instead, simply copy it from your
Macintosh to your PMA430’s System folder. Just drag and drop.
Step 2. Read the History.txt File
On the ARCHOS website, you will also find next to the OS download, a text file which details the
list of changes from the previous version of the OS.
1.6 Updating the Operating System
ARCHOS periodically updates the Operating System (OS) and makes available a free download
on the ARCHOS website (www.archos.com). Updates to the Operating System include new
features, feature improvements, and bug fixes. You should check to make sure that you are
running the most recent version of the OS. You can find information on the current version you
are running under Applications > System Info > Version. The most recent version available can
be dowloaded at www.archos.com under the heading Download > Software.
Step 1 Download the file aimage.img
Download the image file AIMAGE.IMG , which will probably be quite large – approximately 22
MB. (Note that over a telephone modem, downloading a file of this size will take at least an hour
and a half and possibly several hours.) When you click on the link to download the new OS file,
your browser may warn you that the contents of the download may harm your computer. This is
because the Windows
®
system does
not know what an .IMG file is. Be
assured that ARCHOS has made
every effort to ensure that the file
does not contain viruses. Click on
the Save button to download this
file to a convenient place, such as
My Documents, in order to later
copy this file to your PMA430. If
your PMA430 is connected to your
PC, you can even save it directly to
the System folder in your PMA430.
Step 3. Copy the aimage.img file to the PMA430 System Folder
Connect your PMA430 to your computer and then copy the AIMAGE.IMG file to the System
folder of the PMA430. Since there will be an older version of this file on your PMA430 already,
your computer will ask if you want to overwrite the current file. Click on Yes. Once this file is
copied, safely disconnect the PMA430 from the computer.
Attention: The aimage.img must always remain in the System folder of the PMA430. Even once
you have updated your PMA430, you must not remove that file.
Step 4 Reset the PMA430 and set the time and date
In order for the new software update to take
effect, you need to reset the PMA430. Disconnect
it from the computer and go to Settings >
Shutdown. Press the red “Reboot” button. The
PMA430 will turn off. Turn it back on now and it
will boot up the new operating system. You
should check to verify that the clock time and date
are correct after a reset.
13
14
Page 8
1.7 Changing the Language
2 Connecting/Disconnecting the PMA430 to/from your PC
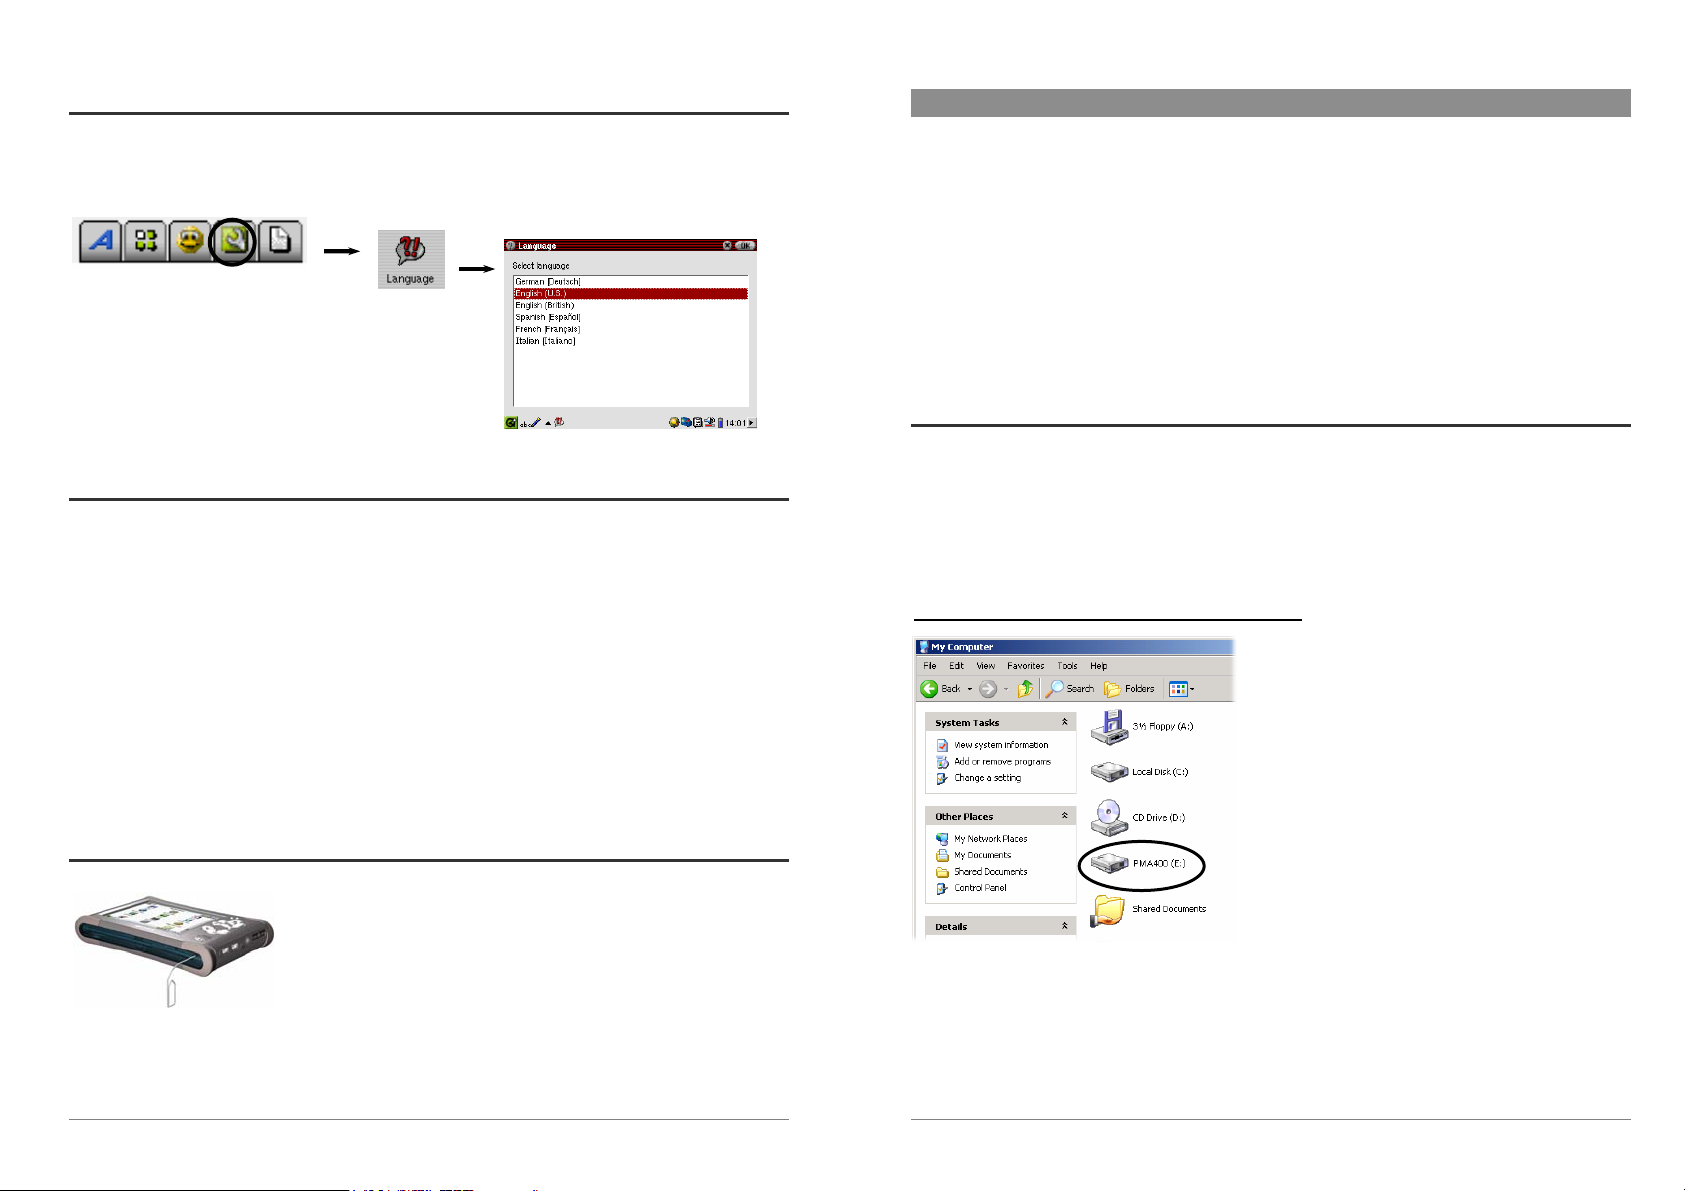
The PMA430 interface can be set to English (default), French, German, Italian, or Spanish. To
change the language, go to Settings then Language and select your desired language. Click OK
and wait a few moments. Your PMA430 will now use the new language.
1.8 Caring for the PMA430
The ARCHOS Video PMA430 is an electronic product that needs to be treated with great care.
• Do not subject it to shock.
• Do not subject it to heat. Keep it ventilated (especially when connected to a computer).
• Keep the PMA430 away from water and excessively humid areas.
• Keep the PMA430 away from high electromagnetic fields.
• Keep any connected cords to the PMA430 neatly arranged. This light product could fall
if a cable is accidentally pulled.
• Do not open up the PMA430. There are no user serviceable parts inside. Opening will
void your warranty.
1.9 Hardware Reset
In the event that your PMA430 freezes operation (due to
electrostatic phenomena for example), you can actuate a hardware
(cold) reset by placing a narrow object such as a paper clip into the
reset hole and pressing on the recessed reset button.
Note that when the PMA430 is connected to a computer, it will consume more energy, that is to
say, the battery will discharge faster than usual. If the PMA430 looses power while connected to
your computer you could damage your directory structure and/or loose data. Thus, you should
always use the AC adapter when connected to your computer. Be also careful to understand the
disconnection procedure since disconnecting incorrectly can lead to data loss or cause the
computer/PMA430 to freeze. The PMA430 is not compatible with Windows
or Windows
®
98. While connected as a hard disk to your computer, the PMA430 buttons are
®
NT, Windows® 95,
blocked and are no longer functional.
2.1 Connecting the PMA430
1) Use the power adapter to prevent the PMA430 from shutting off due to low power.
(This could cause damage to the contents of the hard disk if not done.)
2) Plug the USB cable into your running computer.
3) Turn on the PMA430 – wait until it completely boots up.
4) Plug the other end of cable into your now running PMA430.
Windows® ME, 2000, XP (Home/professional)
When connected, the PMA430 will be recognized
as a Mass Storage Class (MSC) Device and display
automatically within a few seconds of being
connected. You will see a new drive letter, such as
E: in My Computer called PMA400. You can now
use the hard disk called PMA400 like any other
hard disk. Simply access it using Windows®
Explorer to drag and drop files to and from the
PMA430’s hard drive. If it is not automatically
recognized, please refer to the troubleshooting
section at the back of this manual.
15
16
Page 9
Macintosh™ OS X (10.2 Jaguar and 10.3 Panther)
If you have OS 10.2, you must update to version 10.2.4 or higher.
This is a free update from Apple
®
Computer. You will not need any
special installation of software drivers or extensions. Simply plug the
PMA430 into your Macintosh as described above, and within a few
seconds, the PMA430 will be recognized as a Mass Storage Class
(MSC) device and mounted on the desktop. You can now use the
Hard disk called PMA400 like any other external hard disk.
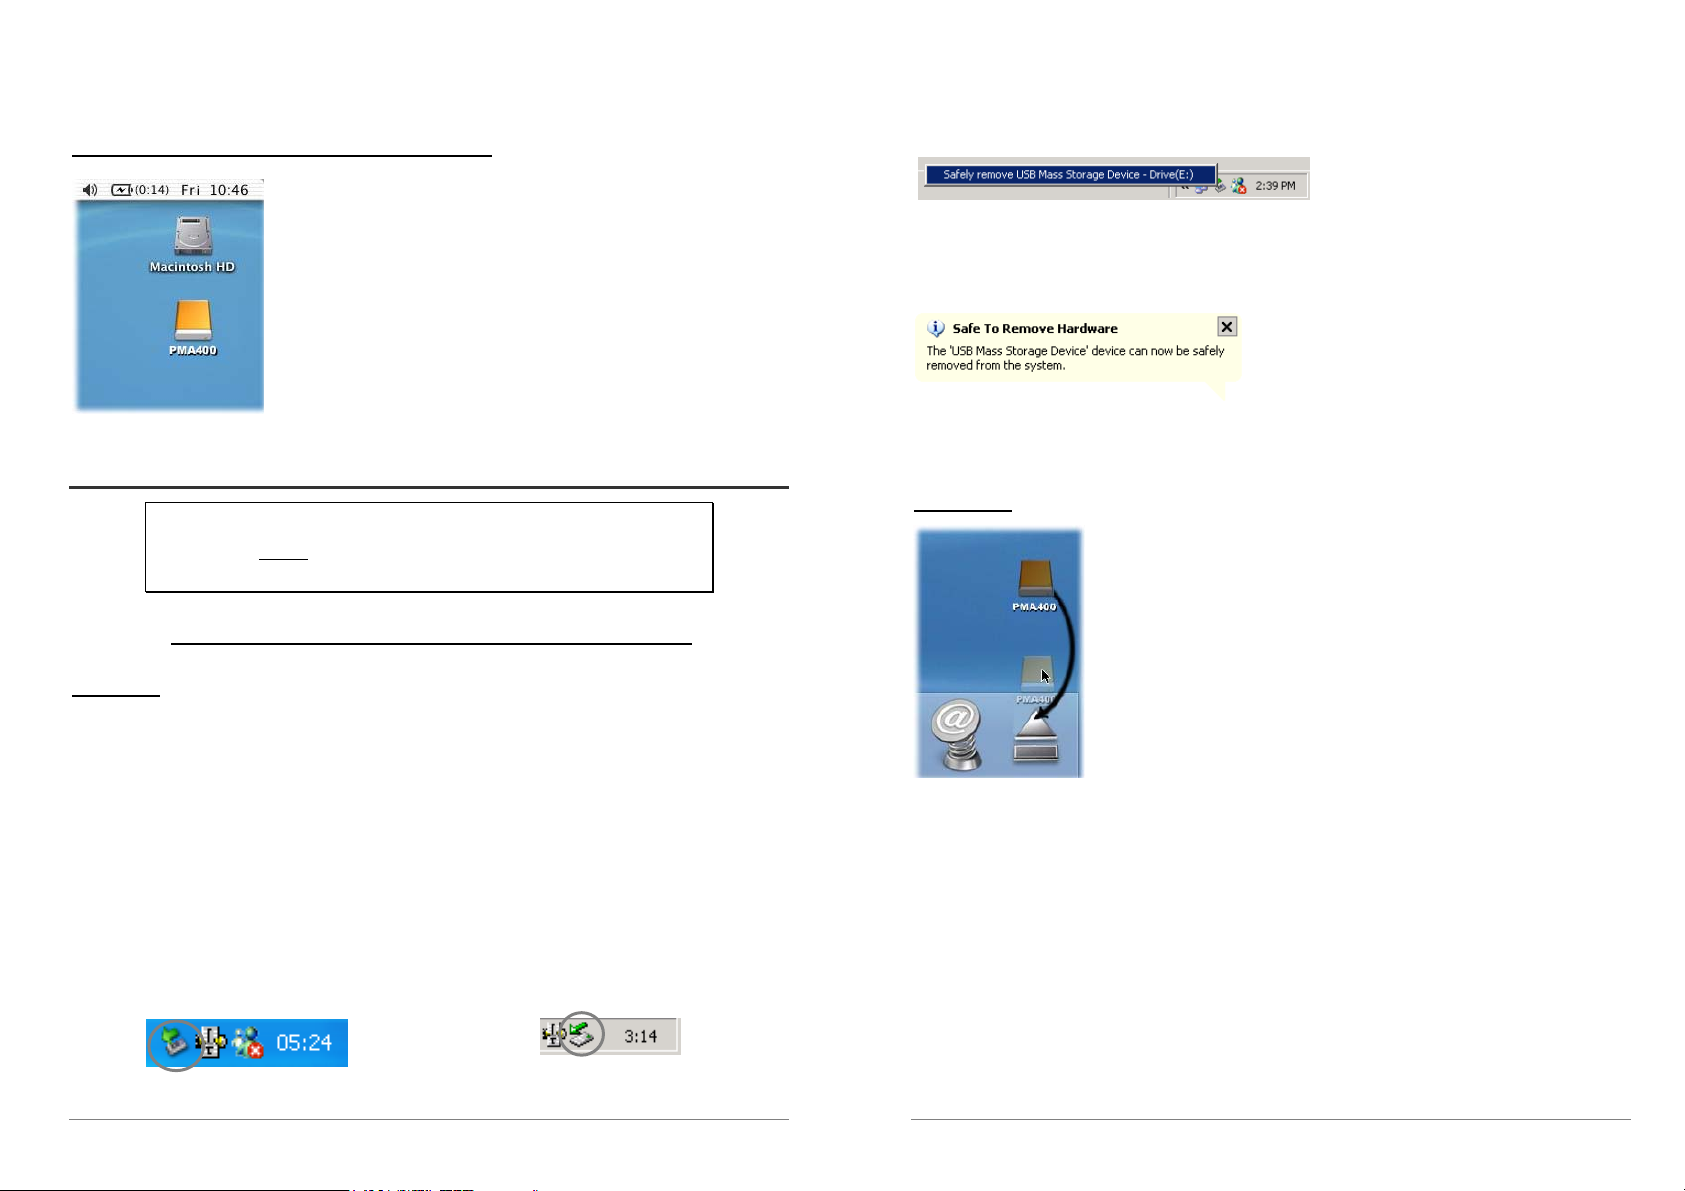
2.2 Disconnecting the PMA430 from your Computer
WARNING: You must properly remove (unmount) your PMA430 from
the computer before disconnecting the USB cable to avoid loss of data or
freezing the computer and/or the PMA430.
DO NOT SIMPLY PULL OUT THE USB CABLE AT ANY TIME!
Windows®
To safely disconnect the PMA430 hard disk, click on the system tray remove icon (green arrow as
shown below) and follow the instructions below. Wait until you get a message saying that you can
safely unplug the device before disconnecting the USB cable. Attention: The operating system
will not allow you to safely disconnect the PMA430 if a running application (such as Windows
®
Media
Player) is using one of the files. You will have to close all the open PMA430 files in any
running application as well as Windows Explorer
®
. Sometimes, you will even have to close the
application you have used to open files from the PMA430. Using the green disconnect arrow in the
system tray will then allow you to safely disconnect the PMA430.
2. Click on the icon to eject (unmount) the PMA 400 from the computer and select the ‘Safely
remove’ message.
Windows
®
XP
3. There will be a message indicating that it is now safe to disconnect the PMA430. You can now
go ahead and unplug the USB cable from the PMA430.
Windows
®
XP
Macintosh
®
Drag the PMA430 hard disk icon towards the trashcan, the trashcan will
become a big arrow as shown in the screen shot to the left. Drop the
hard disk icon onto the arrow. The hard disk icon will disappear from
the desktop. You can now safely unplug the USB cable from your
PMA430 and/or computer.
1. The safe remove icon is in the system tray next to the clock.
Windows® XP
17
Windows® 2000 & Windows® ME
18
Page 10
3 System Recovery
If for some reason you need to restore your PMA430 to its original factory condition, then you
need to perform a system recovery. A system recovery will erase personal files and programs that
you may have installed on your device. In order to be prepared for this situation, you should back
up the following files from your PMA, for example by storing them on your computer.
• The PMA400_recovery.zip from the folder /Archos/PMA_Recovery_zip
• The progfs.img from the System folder
• The sample music, video, and photos if you would like to keep them
• Any personal data of which you do not already have another copy. You might also want
to synchronize your calendar, Todo list and contact manager. On how to do this, see the
chapter on Qtopia
If you had not backed up the PMA400_recovery.zip file to your computer, you can download it
from the ARCHOS website. Be aware that it is a very large file, nearly 30 Megabytes.
To reset your PMA430 to factory condition (minus the sample music, video, and photos), you
should;
1) Connect your PMA430 to your computer.
2) Backup any personal data you can from your PMA430. Note that this might not always
be possible!
TM
Desktop Application.
PART II
THE ARCHOS ™ APPLICATIONS TAB
3) Do a complete format of the PMA430 hard drive
4) Copy the unzipped folder onto the newly formatted hard drive
Disconnect your PMA430 from your computer as normal and then do a hardware (cold) reset by
pressing the recessed reset button in the small hole on the bottom of your device. Your PMA430
will reboot as in factory condition minus the sample media files. You can now copy your personal
files and the installed programs back onto it (see the section Linux®, Qtopia™ and the PMA430
File System in the Overview chapter for more information on this) and synchronize your calendar
etc.
19
20
Page 11
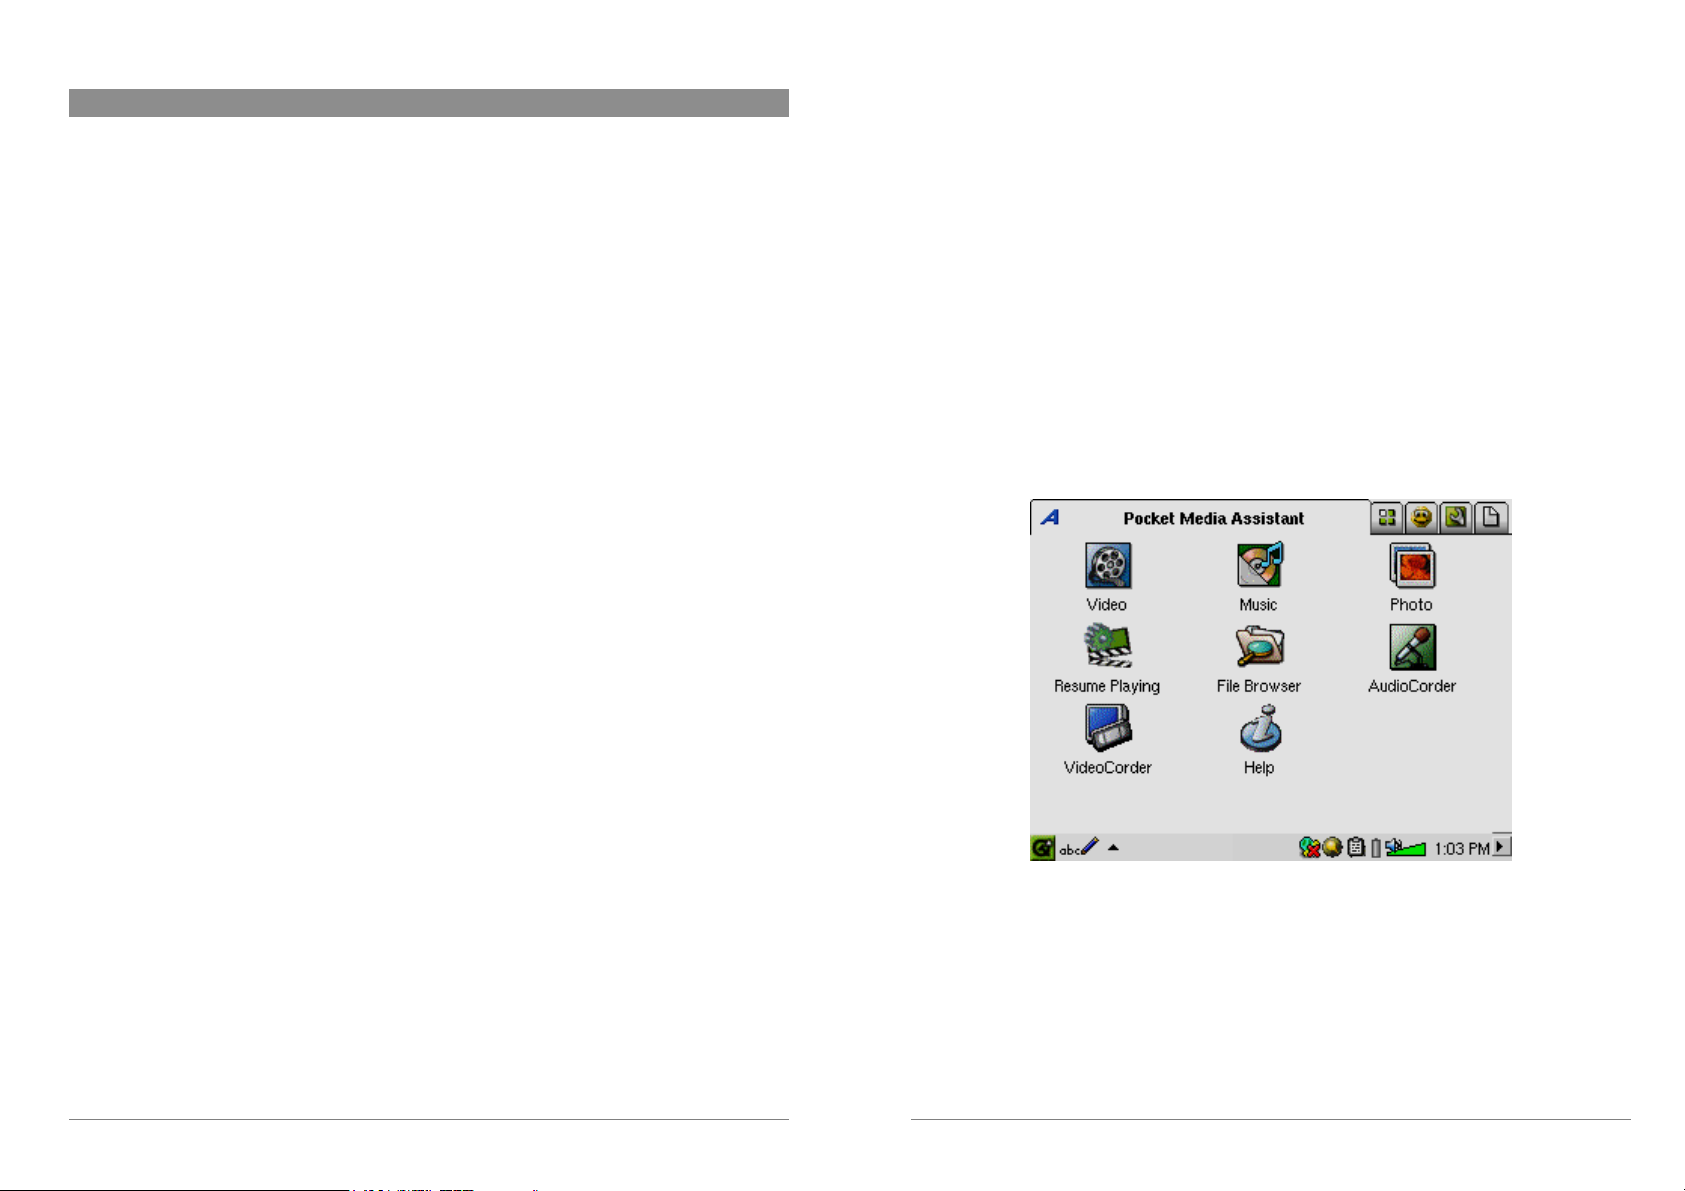
4 Music Application
4.1 Playing Music
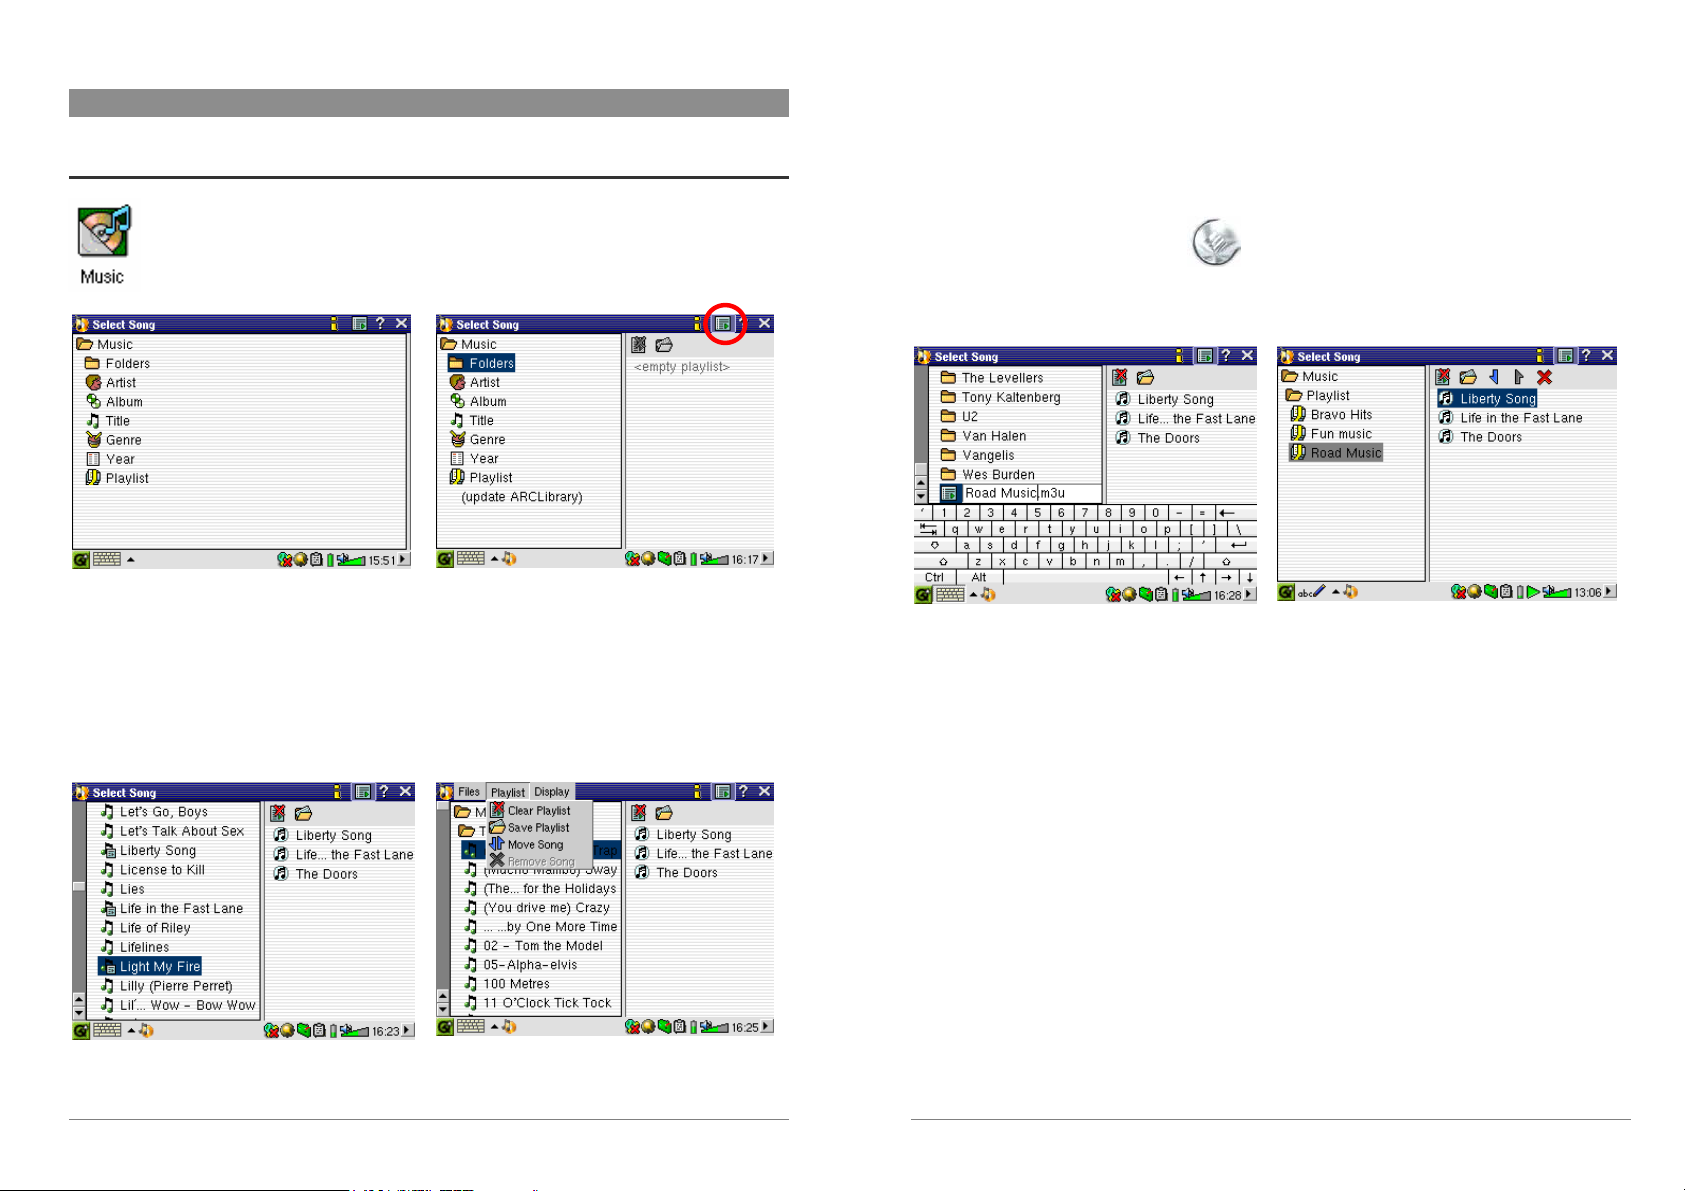
This is the music player application. When you click on this icon in the main screen,
you will be sent directly to the Music Browser. From the music browser you can
create a playlist of songs or you can just select songs to listen to.
3. In the left pane, highlight a song and click the
PLAY button. The song will be added to the Playlist.
To add a folder, click the menu button and select
“Add to Playlist” from the File menu.
4. Various playlist commands exist in the pull-down
menu or in the playlist window.
To navigate between File, Display and Playlist
menus, use the RIGHT and LEFT control of the
navigation pad.
1. Choose to access your music by browsing folders
or by music characteristics. When you play a song,
all songs from the group (for example, from the same
album) will be added to the Playlist and the selected
song will start playing.
2. To create a Playlist, click the RIGHT button and
the Playlist panel will appear. Alternatively, you can
tap the Playlist icon on the upper menu bar (see
the circle).
Note: If tracks are displayed in the right panel, this
means a Playlist is already open. Close this list by
clicking on the Playlist icon with the red cross.
21
5. When you save a playlist, it will be saved to the
Root folder. Using the File Browser, move the
Playlist into the Music folder. When you now update
the ARCLibrary it will then also be available in the
Playlist category.
The main screen of the music application is shown below. The icons in the bottom left corner let
you access the music browser screen (to add more songs into the currently playing list of songs),
the Playlist screen (to see what songs are in the current Playlist), and the Equalizer screen (to
adjust the sound quality).
6. Clicking the play button on a Playlist will load the
Playlist and then start playing the first song of the
list.
22
Page 12

Music Application Current File and Directory Status: Playing Help icon Close Application
4.2 The ARCLibrary™ - Browsing by Artist, Album, or Title
Song title* or file name
Album* or current folder
Artist* or parent folder
Next track to be played
*APIC Album picture
Song recording info
Play Order : Click on one
to activate
Turn on/off the built-in
speaker
Go to the Music Browser screen Show the current Playlist Show the Equalizer screen
*If the MP3 file contains these ID3 tag data
Button controls while a song is playing
Click once : Play the previous song in the
folder or playlist
Hold : Fast reverse through the song.
µ Stop Song and return music browser
Increase the Volume
Decrease the Volume
Click once : Play the next song in the
folder or playlist.
Hold : Fast forward through the song.
Play/pause/resume song
Hold : Go to the Music Browser.
(Press Esc to return to the main
music application screen.)
To lock the PMA430 buttons, hold down the ARCHOS button for 3 seconds. The message
“Buttons and screen locked” will appear. Pressing any buttons or the touch screen will now not
have any effect. In order to unlock the buttons and the screen, press the ARCHOS button again for
3 seconds.
Pressing the Home button for 3 seconds will switch on and off the external speaker.
The ARCLibrary is a database of all the songs
in the Music folder. Many music files contain
information to describe the music file, called
tags. Through these tags, the ARCLibrary let
you choose your music to play by artist,
album, song title, genre, or year. Depending
on the source of the file; not all these tags are
available. Files of the type .wav do not have
any tags because the format does not allow it.
After copying music files to the Music folder on your PMA430, disconnect it from your computer.
you will now have to go the music browser (just start the Music application) and select the menu
bar item Update ARCLibrary. The PMA430 will then check to see if there are new songs in the
music folder and add them to the database of known songs. You will now see your newly copied
music under the different characteristics. If your music files do not have the description tags then
they will be classified under unknown. The file name will be used in place of the title if there is
no song title tag.
4.3 Putting Music onto your PMA430
Your ARCHOS ™ product is designed to play PlaysForSure digital contents which means that
wherever you find music for sale on the Internet with this symbol, you will be able to transfer it
onto your PMA430 using Windows Media® Player. For more information on PlaysForSure online
stores, visit the website (www.playsforsure.com). The PMA430 is designed to work seamlessly
with Windows Media® Player (WMP) versions 9 and 10. The Windows Media® Player software
is used to download digital media content from the Internet to your computer and organize it. You
will also use it to sync (copy) the contents of your Windows Media® Player media library to your
ARCHOS ™ device.
Please note: In order for Windows Media® Player to recognize your PMA430 (in order to be able
to synchronize to it), you need to install a plug-in onto your computer. To do this, connect the
PMA430 to your computer, launch the Installer from your PMA430 (\Archos\PC
Installation\Setup.exe), click the + next to Archos Windows Media® Player plugin and double-
click Archos WMDM plugin.
23
24
Page 13

Synchronizing Music from Windows Media® Player (WMP) to the PMA430
Windows Media® Player (WMP) allows you to synchronize music between your computer and
PMA430: That means, it will add music files to your PMA430 so that you have the same digital
media on your PMA430 as you have in your Windows Media® Player library. The
synchronization in is one way, that is to say, copying tracks from your computer to your PMA430,
but not vice versa. You can choose to sync only certain songs or to sync your entire library.
Synchronizing Music from Windows Media® Player (WMP) 9 to the PMA430
Access the Copy to tab in WMP 9. On the left hand side, you should see music files
from your music library (saved on your computer) and on the right, the files and
folder on your PMA430. Check the files you want to copy to the PMA430. Make sure you have
selected the folder on the PMA430 into which you want to copy your music. In the top right corner
of WMP, you will find the Copy button which starts the synchronization process.
Synchronizing Music from Windows Media® Player (WMP) 10 to the PMA430
Access the Synchronise tab in WMP 10. If this is the first time you are using this option, WMP
will offer to set up automatic synchronisation of your music files. If this box is
checked, every time you connect you PMA430 to your computer, WMP will
automatically start up and check to see whether any of the music files on the
computer have not yet been copied to the PMA430. These files will then be copied
to your computer. If you choose to manually synchronise your files, you can always set up
automatic synchronization by clicking the Set up sync button.
On the left hand side, you should see music files from your music library (saved on your
computer) and on the right, the files and folder on your PMA430. Check the files you want to copy
to the PMA430. Make sure you have selected the folder on the PMA430 into which you want to
copy your music. On the tool bar, you will find the Start Sync button which starts the
synchronization process.
Attention: Files deleted from the WMP music library will also be deleted from the PMA430.
Transferring your CD collection to the PMA430
you place a music CD in your computer, Windows® will ask you if you would like to rip it.
Depending on the power of your computer, to rip a 60 minute CD, it will take anywhere from 10
minutes to 60 minutes. Once this is done, the album will become part of your music library.
Connect your PMA430 to your computer with the supplied USB cable. Now, you go to the Sync
tab and tell Windows Media® Player to synchronize that album to your PMA430. It will then
transfer that album to your PMA430.
Note: Some music CDs have a special copy protection system that will not allow Windows
Media® Player to make music files from them.
Installing Windows Media® Player (WMP) 9
If you have Windows® ME, and 2000, you should use Windows Media® Player 9. The easiest
way to install this software is to visit the Microsoft® Website and download the very latest
version, or install the version found on the PMA430 itself.
Installing Windows Media® Player (WMP) 10
You must be running Windows® XP (Service Pack 1 or higher) in order to install Windows
Media® Player 10. Please visit Microsoft’s website to download the very latest version of
Windows Media® Player 10.
4.4 Play Music through your Home Stereo
Instead of connecting the red and white AV Out cables of your TV Cradle to your television,
connect them directly to your stereo system’s auxiliary inputs. Then put your device into the TV
cradle to play your music. To avoid distortion, ensure that the output volume of the PMA430 not
too strong as this creates distortion.
You can also purchase the ARCHOS travel kit which gives includes an AV Cable. Just plug this
cable into the headphone jack of the PMA430 and the other end’s white and red plugs into the Aux
in, CD in, or line-in of your stereo system.
The process of transferring music from a CD into files for your
PMA430 is known as ‘ripping’. It is actually a transcoding
process, taking the CDA (CD Audio) format and converting it to
WMA or MP3 format which the PMA430 can read. There are
many music ripping programs on the market, but the easiest thing
to do is to use Windows Media® Player to do it. In fact, when
25
4.5 The Resume Functions
On the Pockets AV/ARCHOS tab, you will notice the Resume icon. Select this icon for
example after having switched off your PMA430 to continue playing the last played
audio or video file from where you left off.
26
Page 14

4.6 Customizing the Equalizer
To set the equalizer, tab the EQ button. You will now be able to adjust the PMA430’s five band
equalizer. Tab on the buttons on the left hand side to select a style,
and move the sliders to adjust
increase or decrease the
response for the given
frequency range
(Bass, Medium-Base,
Medium, Medium-Treble,
Treble). Modifying these
settings changes the sound in
real time.
The slider on the right
lets you change the
volume.
The bottom slider lets
you choose to send the
sound more to the left
or the right
speaker/headphone.
5 AudioCorder Application
With this application you can make digital audio recordings from the built-in
microphone (Int. Mic), a connected dynamic microphone (Ext. Mic), or from a
line level audio source (Line In) such as a cassette player, CD player, or the line
output of your home
stereo system. You can
use the red and white
cables (AV in) of your
TV Cradle to make line-
in recordings or you can
purchase the optional
ARCHOS travel kit
which will allow you to
make line-in recordings
with just a cable and
input adapter, thus
making recordings
anywhere, and without
the TV Cradle.
1 Choose your recording source, Internal microphone, external microphone, or line in.
2 Choose the quality of the recording (see technical specs for exact bitrates)
3 Choose the format of the recording. .wav recordings will not allow artist and album tagging.
4 If desired, you can set a fixed recording time.
5 Press to pause your recording. Press again to resume recording.
6 Press to start your recording.
7 Press to stop your recording.
8 Default names for the recording. Using the text input system, you change these.
9 Recording time left or available (left) and elapsed recording time (right).
10 VU meters for the recording level
11 Recording gain control
Your recording will be saved in the folder /Music/Recordings. You can use the File Browser
application to move or copy your files to a different location if desired. A recording will use the
field Title as the file name.
27
28
Page 15

6 MUSIC - Using iTunes™ with your PMA430
7 Photo Application
The easiest way to transfer music files between a Macintosh® computer and
your PMA430 is to use the Macintosh Finder™ to drag and drop the files to
and from your Macintosh
®
. Keep in mind that Macintosh® uses the AAC
format natively and that only your MP3, WAV, and WMA files will play on your ARCHOS
device.
However, for Macintosh
developed a special i-Tunes
®
users who do want to use the PMA430 with iTunes®, ARCHOS has
®
plug-in. You will find the folder iTunes plug-in in the ARCHOS
folder on the PMA430 as well as on the ARCHOS website. In this folder you will find a plug-in
for Mac OS 9.x and another folder for Mac OS 10.x. You will also find a JPEG image illustrating
where you need to copy the plug-in to. Once this is done, iTunes™ will recognize the PMA430 as
a ‘Device’.
To make your user experience easy as possible, please keep in mind the following.
1) Music purchased at Apple’s on-line music store are copy protected with a proprietary
encryption system. The ARCHOS device will not be able to play this purchased music. It will
happily play MP3 format files without problem.
2) When you create your Playlists with iTunes
have been copied to your PMA430), your Macintosh
®
(you can only create Playlists from songs that
®
will save these Playlists to the root
directory of your PMA430. It will not save them to the PMA430 Music directory. It would be
best to use the PMA430 itself to make Playlists and then save these Playlists to the Music or
some other convenient folder.
3) When you drag and drop MP3 files from your iTunes
®
library to your PMA430, the i-Tunes®
program will look at the ID3 tag information of the MP3 file, and create a folder on the root of
your PMA430 using the name of the Artist as the folder name. Then it will take the Album
name ID3 tag, and create a subfolder with that album as its name. Finally, it will take the MP3
song itself and place it into that album subfolder. Thus, although it is a clean structure of artists
and albums, i-Tunes
®
does not follow the PMA430 convention of placing the music into the
Music folder first.
This is the photo viewer application. When you click on this icon in the main screen,
you will be sent directly to the Photo Browser, which lets you look through your
photos. A thumbnail photo of the highlighted file name will be shown on the right
between the thumbnails of the file (or folder) just before and just after. You can hide
and display the thumbnail panel by clicking the RIGHT and LEFT controls or by
tapping on the Double-browser icon on the menu bar.
Click on the PLAY button and the highlighted file name will be displayed.
29
30
Page 16

Use the UP and DOWN buttons to view the previous or next photo in the folder. The LEFT and
Right controls also permit you to rotate the images. The menu bar above the photo provides the
following options, which are also available via the menu button.
Action Alternative button to use
Zoom in – show picture at actual size. PLAY
Zoom out – show multiple (2x2, 3x3, 4x4, 5x5)
pictures at a time.
Rotate the picture by 90° to the left. LEFT
ESC – to return to the standard
display size
Rotate the picture by 90° to the right. RIGHT
Display the picture in full-screen mode. To return
to the normal mode, tap the picture twice.
When zooming in on a picture, the image can be moved by touching the screen in order to see
those sections which do not appear in the window. The touch screen or the navigation pad can be
used for this purpose.
To display information on an image, use the menu button and select Info from the Display menu.
7.1 Transferring pictures to your PMA430
From a camera, you can transfer your pictures to your PMA430 by first putting them on your PC.
Then connect the PMA430 to your computer and paste your image files to the Photos folder of the
PMA430 hard drive. Another possibility is to connect your digital still camera to the USB Host
port using the included short USB Host cable adapter.
If your camera follows the Mass Storage Class (MSC) standard for USB connection, then your
camera will show up in the file browser as the folder /ExternalDevice. If you look in this folder
you will see your photos. See the chapter on the File Browser for instructions on how to copy
files. Attention: Not all digital cameras are MSC type devices, in which case you will have to
transfer your images to your computer first. Note also that you cannot transfer files from your
PMA400 to a camera!.
8 Video Application
This is the video viewer application. When you click on this icon in the main screen,
you will be sent directly to the Video Browser. To watch a video, you simply
highlight the video file and then click the PLAY button. Keep in mind that the
PMA430 will only play video files that are encoded in MPEG4 format (see section
Playing Video Files from the Internet below for details). Other files formats such as .mov, or .mpg,
will not automatically be playable. However, you can yourself convert certain files types, see the
chapter Creating MPEG4 Video Files with your Computer.
Select the desired video file and click PLAY. Click on the
To watch your video files on a television,
make sure you have connected your TV
Cradle correctly to your television (see the
TV Cradle manual) and then hold down on
the LCD/TV button on the top of the unit or
hold down the TV/LCD button on the
ARCHOS remote control for 3 seconds. If
you don’t see a clear color image, you may
have to set your PMA430 to your local
television standard (NTSC or
PAL) in Settings > TV Out. The screen overlay information will disappear after a
few seconds.
• Use the PLAY button to pause/resume the video.
• Use the UP/DOWN buttons to control the volume.
• Hold down the RIGHT/LEFT buttons to fast forward or fast reverse through the video.
button (top right) for file info.
31
32
Page 17

• Touch the screen to Hide / Show the overlaid video file information.
8.1 The Resume Functions
On the Pockets AV/ARCHOS tab, you will notice the Resume icon. Select this icon for
example after having switched off your PMA430 to continue playing the last played
audio or video file from where you left off.
Moreover, if you have stopped a video file in mid play, the next time you highlight that
video file, you will notice a movie clipboard icon in the upper menu bar. By clicking on
this icon, the video file will start from the place where you last stopped it.
8.2 Display Format Settings
While you are watching a video, you have the following menu items.
not play right away on your device. Due to certain “variations”, even when video files are
formatted in “MPEG4” they may not play right away. The PMA430 series can play video files of
type MPEG4 Simple Profile which have an MP3, PCM (standard .wav) or IMA-ADPCM
(compressed .wav) audio sound track. It can play such video files at a maximum size of 720 by
576 pixels (25 frames/second). The PMA430 will not directly play files of type .mov, .mpg,
.mpeg. If you have video files of these other types that you would like to view on your PMA430,
they will have to be converted first. You will have to use the software found in the ARCHOS
folder to re-encode them into the proper MPEG4 format with an MP3, PCM, or IMA-ADPCM
sound track. See the chapter Creating MPEG4 Video Files with your Computer for details..
Display
You can get file information about the video you are watching or set the audio equalizer.
Video
You will notice that you have a number of display format options.
These format options allow you to adapt videos recorded in different
formats for viewing on the internal LCD screen or on the TV. When
watching your video on the LCD, the default format is Maximise, on
the TV, it is Full. To choose the most appropriate format option for a
particular video file, you can change this setting at any time.
Full Show the entire image, do not cut off any part of it.
4:3 The image is cropped to have a 4 by 3 aspect ratio and enlarged until it fills the screen
16:9 The image is cropped to have a 16 by 9 aspect ratio and enlarged until it fills the screen horizontally
Max The size and aspect ratio is chosen automatically to give the best possible perception on the internal LCD.
8.3 Playing Video Files from the Internet
The number of encoding and compression schemes currently used to create video files is very
extensive and seems to change on a weekly basis. There are so many standards, formats, and
encryption methods that it is very possible that the video file you download from the Internet will
33
34
Page 18

9 VideoCorder Application
Fixed Time Recording
This is the video recorder application. Connect your TV Cradle to your home
entertainment system as shown in the TV Cradle manual. Once this is done, you
can use the VideoCorder application to make recordings like you do with a video
cassette recorder (VCR), either by manually starting and stopping the recording, for a fixed
amount of time, or scheduled for when you are away. When you click on this icon, you will go
directly to the pre-recording screen. From this screen you can instruct the PMA430 exactly how
and when you want your video recording to be made.
Manual Recording
If you click on the Record button on the bottom right of the screen, your recording will start. Click
on the Stop button next to it when you want to stop your recording. You will find your recorded
video in the folder /Video/recordings.
Use the RIGHT and LEFT buttons to adjust the volume level input, or drag the control on the left
bottom of the screen. You can see current sound levels on the VU meters in the center bottom of
the screen.
On the top left of the screen, you will see the recording signal type NTSC (North America) or
PAL (Europe), the input signal COMP (composite input – yellow connector) or S-VIDEO (S-
Video input), the Format 16:9, 4:3, or 2.35 (aspect ratio of recorded image), and the resolution
LCD (320x240 pixels) or TV (512 x 386 pixels).
Use the + and – buttons to adjust the length of the recording. As shown in this picture, the
recording was set for a fixed time of 5 minutes. When you click on the record button, the
PMA430 will start recording and stop automatically after 5 minutes. Notice the white and red
counters at the top right of the screen. They tell you how much time has elapsed and how much
time is left to record. You can increase or decrease this time even once your recording begins.
Fixed time recording of 5 Minutes
Scheduled Recordings
Click on the Add button to add another recording.
On the menu bar click the item Program Schedule. This will
open and show the current scheduled programs. You can add
new programs to record or modify (edit) the scheduled items
that have not yet started.
Scheduler with two items
35
36
Page 19

on a computer. Further, the playback of protected files will be limited to the built-in LCD screen
PMA430 will not play them back on an external television
-
Second scheduled recording being set
Once a recording is set, you can shut off the PMA430 and leave it in the TV cradle.
9.1 Setting other Recording Parameters
If you prefer, you can adjust the settings for your own specific
needs in the Recording Configuration screen and the Image
Configuration screen.
Note: Higher quality, higher resolutions and larger frame rates per second (fps or kbits) will result
in more pleasant pictures, but require more space in order to be saved on the disc.
Recording Configuration Screen Image Configuration Screen
9.2 Copy Protection
The PMA430 video recording system is designed to respect the copyright protection system. If
the source of your video is copy protected, the PMA430 will record in protected mode. You will
see a “P” icon on the recording screen (not playback) indicating that the file will be a protected
file. Protected files can only be played back on the PMA430 that created it. The file will not play
37
38
Page 20

10 Set-up for scheduled video recordings
In order for the PMA430 to turn on and off your video device and also change its
channels via its TV cradle, you need to set it up to send the correct infrared codes to
your video cassette recorder (VCR), cable box, or satellite receiver. If you do not
plan on making scheduled recordings, then you do not need to install the IR emitter
or set the infrared emitter code.
Before following the procedure of setting the emitter code, insure that your PMA430 is connected
in the TV Cradle and that the IR emitter cable is plugged in and placed in front of your tuner’s
(VCR, cable box, satellite receiver) infrared receiver. See the TV Cradle instructions for set-up
and for the exact placement of the emitter.
10.1 Part 1 : Choose your Category, Brand, and Model
In the Settings tab, go to the application VideoCorder Settings.
1. Select the category of device that you want the IR Emitter to control. You have the choice of
a VCR (video cassette recorder), Cable Box, or Satellite Receiver.
2. Select the brand of your device.
3. Select the first code in the list of codes.
Test: Power Toggle : When you click on this test button, the PMA430 will send a signal to the
TV Cradle, which will then send a signal out to the Infrared Emitter stuck to your device (TV,
VCR, Cable box) and turn your device on and off. Click this test button again and your device
should change from on to off or off to on. If pressing this button does not turn on and off your
device, choose the next code in the list, and try again. If none of the codes seem to work, check
that the infrared emitter is directly over the infrared sensor on your tuner device
10.2 Part 2: Testing the channel changer
Test: Channel Input : When you press the Test: Channel Input button the PMA430 will send a
signal through the cradle to the Infrared Emitter stuck to your device and change the channel. If
the Number of digits parameter is set to three, it will try to select channel 123. If that parameter is
set to 2, it will send the code for channel 12. If the test does not change the channel on your tuner,
go back to the IR Transmitter tab and try the next available code for your category and brand of
product.
Parameter Description
Use -/-- Key: Set this to On if normally, you have to press a key with this icon on your device’s remote
control in order to select a channel.
Number of digits Set the number of digits that your device can recognize for a channel. Example: Set to 3
if you need to choose a channel greater than channel 99.
Use Enter Key Set this to On if normally, you have to press the Enter key on your device’s remote
control after you enter the channel number. Example: If you normally press 1, 3, Enter
for channel 13, then you would need to set this parameter to On.
Delay after each
digit
10.3 Part 3: Give your channels a name
For your convenience, you can name any of the channels and the PMA430 will remember their
names.
Change the delay between the emission of each digit of a channel. You may need to
adjust this if the PMA430 seems to send only half the digits of a channel or more digits of
a channel. Example: Adjust the key delay and retest channel select if it sends channel
1 instead of 12 or sends 112 instead of 12.
39
40
Page 21

11 File browser Application
The file browser application allows you to view your files which are stored on the
PMA430 as well as on a connected Mass Storage Class (MSC) device, such as a
digital camera (see the section on Tranferring picture to your PMA430 in the
Photo application chapter) This application has the standard file and folder controls such as:
Rename Modify the name of a file or folder.
Channel naming screen
Note: In some rare cases, none of the infrared codes available for your device might
work for either the ON/OFF or channel changing functionality, or both.
Copy Make a copy of the file or folder.
Move Move the file or folder to a different directory.
Add to Documents Files which are not already under the Documents hierarchy are copied
here.
Delete… Remove the file or folder from the PMA430.
Create Folder Create a new folder in the selected directory or folder.
Select all Select all files and folders in the current directory.
All of these options are available in the menu.
In order to see file information (extension, date, size), use the corresponding menu items in the
Display menu.
When you open the application you will see the top level directory /PMA430 which is also known
as the root directory or root folder. All our files and folders will be stored inside this directory.
Click on the Double Browser icon on the top right of the menu bar or click the RIGHT button.
This will open second browser panel. In one panel, locate the file you want to copy; in the other,
open the folder into which you want to copy it. The active panel, showing a highlighted file or
folder name, is the source panel, and the other panel shows the destination folder. As files can be
copied or moved from either panel, it is important to pay attention to which panel is active.
41
42
Page 22

In this example, the menu
option Move, would move the
file Anderson Draft from the
folder
/PMA430/Documents/text/pl
ain to the folder
/PMA430/Video. The menu
command always applies to the
highlighted item. Remember
that the source window is the
one with the highlighted item,
and the destination window is
the other one. You can close
and open the second window with the LEFT and RIGHT buttons or by using the Folders icon on
the menu bar.
12 Creating MPEG4 Video Files with your Computer
How to create an MPEG4 video file
Please understand that video re-encoding is not always a simple one button process. Video
segments that come from your digital camcorder or which are freely available on the Internet are
encoded in many different ways. Your files are thus maybe not in a format the PMA430 can play
(see the section Playing Video Files from the Internet in the Video Application chapter for
more information). This is due to the relatively new nature of the ISO (International Standards
Organization) MPEG4 video format. Unlike its predecessors MPEG1 and MPEG2, there are a
number of levels in this format and thus not all MPEG4 video files will work on all MPEG4
players, and older MPEG1 and MPEG2 files must be re-encoded into this format. You can convert
these files using the software you received with your PMA430. You might find this process
initially complex, but once you have converted the first file, it will be a routine to convert other
files into a format that will play on your PMA430.
PC Tools
The PMA430 is delivered with two PC based programs that allow you to create MPEG4 Simple
Profile .AVI video files. They are the MP4 Translator and Virtual Dub™. The MP4 Translator
will call the Virtual Dub program and give it the correct parameters to encode your video from its
original format, .avi or .mpg (mpeg 1), and then encode it into an MPEG4 .AVI file. The file will
be scaled in order to be played back properly. You will also need an MP3 audio codec (available
freely on the Internet) in order to create the proper sound track for the movie.
12.1 Installing the PC Software
If your video file is not an MPEG4 Simple Profile .avi file of the proper size, you will need to re-
encode it using the following utilities. For the PMA430, you will need to create an AVI file that is
MPEG4 Simple Profile with a resolution up to 720 x 576 (depending on frame rate) and a sound
track that is stereo MP3 or WAV. A resolution of 320 x 240 is adequate for watching on the
internal LCD screen. However, videos that you intend to watch on an external TV, a resolution of
640 x 480 is recommended.
You will find an Installer to install MPEG Translator and Virtual Dub™ in the ARCHOS folder on
your PMA430. Please turn off any anti-virus software for the time of the installation and install the
programs in the following order.
MPEG 4 codec (Compression/Decompression)
43
44
Page 23

In order for MPEG4-Translator to compress the video in a file of the format MPEG-4 SP that the
Gmini™ can read, it requires an MPEG 4 codec to be installed on your computer.If you do not
have the approporiate codec installed, MPEG-4 Translator will tell you on start up which codec it
requires. You will be able to download it for free from the Internet.
Virtual Dub™
VirtualDub is an utility for transcoding one video file into another. This is a general purpose
transfer and cleanup utility which has many options allowing for even the most difficult video
translations. When you install it onto your PC from the PMA430, it will automatically unzip. It
will prompt you to save it to C:\Program Files\VirtualDub. You should use this default directory
location or will have to instruct the Mpeg4 translator program where to find it.
MPG4 Translator
This program, developed by ARCHOS , is a “Front-end” for the Virtual Dub program. It sets all
the parameters for Virtual Dub specifically to create a video file in the right size and format to be
read by the PMA430. When you run it for the first time, the MPEG4 Translator will need to locate
the Virtual Dub program. If you did not install Virtual Dub in the default location, it will ask you
to navigate to the directory where it was installed when you open MPEG4 Translator.
If you are unsure what codecs (audio and/or video) have
been installed on your computer, you can see the list by
going to the following location.
For Windows XP, click on Start > Settings >
Control Panel > Sounds and Audio Devices
Properties > Hardware > choose Audio Codecs,
then click on Properties. You will find a list here of all
the audio codecs that are installed on your computer.
Decoding of MPEG 2 video files is currently not
supported by MPG4 Translator. These are usually .mpg
or .mpeg format files, not the required AVI file. There
are other tools found on the Internet (FlaskMPEG,
Rippack, etc.) that may be downloaded in order to help you with these file types. A good starting
place is the website www.digital-digest.com.
MP3 Sound Codec
Remember, in order for the PMA430 to be able to play the video, it must have an MP3, PCM
(standard .wav), or ADPCM (compressed .wav) sound track. If the source video file did not have
one of these sound track formats then your destination file will have no sound. MPG4 translator
will signal this error condition. In order to keep the sound of your video, install an MP3 encoder
for Virtual Dub to use. There are MP3 codecs (usually packaged together as an encoder and
decoder) available on the Web for you to download. If you choose to use the LAME codec, make
sure that you have a version built with the ACM front-end. You can find other MP3 codecs on the
web by using the search terms ACM, MP3 and CODEC in your favorite web search engine. Once
this MP3 codec is installed into your system, MPEG4 Translator will be able to create final video
files with MP3 sound, even if the source video file does not have an MP3 sound track.
45
46
Page 24

12.2 Using MPEG4 Translator
To the left you see the image of the main MPEG4
Translator program. When you first run the
program, you will be notified if the required codec
has not been installed yet. You should download the
codec and install it on your computer. If the Virtual
Dub program has not been installed, you will also
be notified, and you should install it (found on the
PMA430 in the Archos\PC installation folder or
the Virtual Dub website). If you have placed the
Virtual Dub program in a folder other than the
installer default folder, it will ask you to locate the
program file.
Select Source & Destination Files
In the example above, a source file “24 hours of Lemans.avi” has been selected. You can see on
the bottom of the window its original characteristics (width 720, height 576, frame rate 30). Next,
you must then tell the program where to place (button: Set Destination file) the newly recoded
version of the file. You should give it a new descriptive name, such as shown above
Lemans_PMA_400.avi. Make sure you add the .avi extension. Don’t worry, the original file will
not be erased because the new file will have a different extension. If for some reason, you should
have selected the same extension and file name (for example to create a file optimized for the TV
and one for the LCD screen based on the same source file), a warning will be displayed and you
should change the destination file name.
Change Settings
Next, you can change the parameters (button: Change Settings) of the encoder to adjust the level
of quality of the final image. As for MP3
music, higher video bit rates mean higher
quality video, but will also take up more
space on your hard disk. A setting of 500
kbps is appropriate for the LCD screen; 900 kbps will give you a nice looking image for viewing
on a television. For near DVD quality, you can set it up to 1200 kbps.
Target & Priority
You should select the target as PMA430. You will see a Priority box appear. If for example you
are re-encoding a video file that is 800x600 in resolution and 30 frames per second, this is beyond
the maximum resolution that the PMA430 can play (see Video playback information in the
Technical Specifications at the end of this manual). Thus, the MPG4 Translator program will have
highest possible frame rate. You can see what the size and frame rate will be by looking at the
Video Image Size : Destination parameters. When choosing TV, it is understood that the output
will be optimized for a television, and not the built-in screen.
Start
Click on Start and the program will call Virtual Dub to start processing the video. Depending on
the power and speed of your computer, this could take at least real time (a 60 minute long video
to decrease the resolution.
Choosing LCD optimizes the
final video format for viewing
on the built in LCD screen.
Choosing the TV option will
optimize the movie to keep the
re-encoded in about 60 minutes) but probably much longer. As
shown to the left, you will see the progress as Virtual Dub
processes the video file.
The Start button might be greyed out for one of two reasons:
1) The source file is not a true AVI file. Even if the file name ends
with .avi, the internal file data determines if it is truly an AVI file.
2) The Virtual Dub program was not located when Mpeg4
Translator was started up. Close the program, restart it, and make
sure you locate the Virtual Dub program.
47
48
Page 25

PART III
THE PRODUCTIVITY APPLICATION TAB
13 Personal Information Management (PIM) Applications
The PIM applications are part of the Qtopia operating system which runs on your PMA430. You
will find detailed information on how to use these and those applications mentioned in the chapter
Miscellaneous applications in the online help provided by Qtopia. Open the Help application on
the ARCHOS tab and click on the House icon on the right side of the toolbar or access the Help
file installed with Qtopia Desktop on your PC (see the section Usage in the Installing and using
Qtoipia Desktop chapter).
All productivity applications have an ? icon in the menu bar to access the on-line help.
13.1 Today
Gives you an overview of the current day’s open tasks (Todo list application), unread or queued e-
mail, and any appointments or events you set up in the calendar.
13.2 Calendar
A standard calendar application that allows you set up appointments and events with alarms as
well as view the calendar by day, week, or month. This can be synchronized with the Qtopia™
Desktop application and Microsoft Outlook®. See the chapter on Qtopia™ Desktop for details.
Calendar events can be beamed via the infrared port to other infrared capable devices.
13.3 Contacts
A standard address book which allows a generous amount of information for each contact. This
can be synchronized with the Qtopia™ Desktop application and Microsoft Outlook®. See the
chapter on Qtopia™ Desktop for details. A contact can be beamed via the infrared port to other
infrared capable devices.
13.4 Todo List
A standard task list with priority levels and percentage of completion. This can be synchronized
with the Qtopia™ Desktop application and Microsoft® Outlook. See the chapter on Qtopia™
Desktop for details. A task item can be beamed via the infrared port to other infrared capable
devices.
49
50
Page 26

14 Miscellaneous Applications
14.5 System Info
These applications are part of the Qtopia operating system which runs on your PMA430. You will
find detailed information on how to use these and those applications mentioned in the chapter PIM
applications in the online help provided by Qtopia. Open the Help application on the ARCHOS
tab and click on the House icon on the right side of the toolbar or access the Help file installed
with Qtopia Desktop on your PC (see the section Usage in the Installing and using Qtoipia
Desktop chapter).
14.1 Clock
Acts as a clock, stopwatch, and alarm. If you would like to make your own custom alarm sound,
place a .wav file (8 or 16 bit PCM only) named alarm.wav (case sensitive) into the folder
/System. The alarm will wake up the PMA430 and then play the audio file. Make sure to leave
the built-in speaker checked to On in order to hear it.
14.2 World Time
Clock application that allows you to see the current time in 6 different time zones (Paris,Berlin,
Los Angeles, Tokyo, Hong Kong, Brisbane). Drag the stylus on the map to view the time in other
countries and cities.
14.3 Calculator
Standard calculator application with two modes, simple and scientific.
14.4 Text Editor
Gives information about memory and hard disk usage, CPU tasks, software version, product ID,
and WiFi MAC address (Media Access Control address, which is effectively an identifier for your
device when connected to the network).
14.6 Help Browser
Gives you access to the Help pages for the various applications. The help pages are also directly
accessible by clicking on the ? icon in the menu bar of each application.
14.7 Mophun®
This icon will give you access to Mophun® games that you have installed onto your PMA430.
You can check the ARCHOS website for these games. Note that if you have not installed any
Mophun® games, nothing will happen when you click this icon.
14.8 Terminal
The Terminal application is included for technically interested user. Through opening a command
line window, it gives them the possibility to execute a subset of Linux commands, for example to
install certain types of applications. Please not that the Terminal application is not supported by
the ARCHOS Helpline.
14.9 Pdf Viewer
The PDF viewer application allows you to open and read PDF files, such as the user manual, on
your PMA430.
Basic text editing program similar to Block Notes on a PC or Simple Text on a Mac. Attention,
there is no Save command. The text file is saved as you type. Click on the close file X icon in the
top right of the menu bar to exit. Text files can be beamed with via the infrared port to another
infrared capable device. Please note that newly created files will be saved in the Documents folder.
When this folder contains many files, this can slow don the PMA430 or result in messages such as
“Memory Low” or “Memory Critical”, so you might want to consider creating a folder (e.g. named
“Data”) in the root directory of the PMA 430 to store the files you do not access frequently.
51
52
Page 27

15 Internet Applications
In order to use these programs, you will need access to a local network which is connected to the
Internet. See the section Network in the Settings tab for details on setting up the connection
parameters and the choosing the hardware connection.
15.1 E-Mail
This is a standard e-mail application which allows for multiple accounts and POP3 or IMAP mail
boxes. The Network application in the settings
tab must be configured and a connection to the
network must be made (network icon in the
status bar on the bottom of the screen) in order
for this program to send and receive e-mails.
This application can handle only a limited
amount of embedded HTML in the message
field. Your e-mail server settings for incoming
and outgoing mail can be set to the same as
those of your home computer.
15.2 Opera™ Browser
This is an Internet browser application allowing
you to access and display web pages. The
Network application in the Settings tab must be
configured and a connection to the network must
be made (network icon in the status bar on the
bottom of the screen) in order to browse web
pages. This browser does not have plug-ins like
desktop computer browsers, thus web pages with
Flash™ animation, Active X™ controls, media,
or PDF files will not display. If it is possible,
Opera™ will ask you if you would like to download the file. You can then open the downloaded
file in an application for that particular file type. Pdf files can for example be viewed with an
included PDF viewer found on the Applications tab. Other files might need to be viewed on your
computer. There is a ? help icon in Opera™ menu bar which explains how to use the application.
PART IV
THE SETTINGS APPLICATIONS
53
54
Page 28

16 Audio-Visual Settings
17 Hardware Settings
16.1 TV Output
When your PMA430 is connected to a television either via the TV Cradle or with the optional
travel cable, you may need to adjust the TV output settings to PAL for European television
systems or to NTSC for North American television systems. Most all countries of the world use
one of these two formats.
You can set the still image display to Progressive if you find that still images flicker on your TV
screen. This is usually due to fine lines in the pictures and is not linked to the television nor the
PMA430. Setting the parameter to Progressive will eliminate such flickering but will also reduce
the perceived resolution.
16.2 VideoCorder Settings
If you decide to use the Infrared (IR) Emitter for scheduled television recordings (to change the
channels and turn on your TV tuner), you will need to set the infrared codes for your VCR, Cable
Box, or satellite receiver. See the chapter Set-up for scheduled video recordings for details on
how to do this.
16.3 Equalizer
Modifying the Equalizer settings allows you to set the sound quality. This is the same equalizer as
in the Music playing application.
17.1 LCD Settings
Changing this parameter llows you to to eliminate any LCD screen flickering.
17.2 Light & Power
Adjusting your screen settings when running on the battery can save power and extend the
autonomy of your device. In this section, you can set these values depending on whether your
PMA430 is running on battery or is connected via the Adapter/Charger to the mains.
17.3 Recalibrate
Run this application if it seems that the point you touch on the screen with the stylus does not
aligned with the button or control you want. This application will recalibrate the touch screen for
horizontal and vertical accuracy.
17.4 Network
This application is the key to making a network connection so that the E-mail and the Opera™
browser can be used. You can make a network connection three ways.
- Via the infrared port
- Via a wired USB to Ethernet adapter (must be an ARCHOS approved adapter)
- Via the built-in Wifi card
In this example, we will make a Wifi connection at a public Wifi access point.
Start the Network Application
Clicking on the Network application
will take you to the first screen where
you select the Services tab. Here is
where you can also see available
network connection services that have been set up.
Since we are creating the first service, the list is
naturally empty. Click on the button Add.
Choose your service
55
56
Page 29

This next screen allows you to choose your
hardware connection type.
access points could be available, but if the access point is not broadcasting its availability, the
Scan function will not ‘see’ it.
• Infrared port (IrDA)
• USB port (when an optional ARCHOS
USB/Ethernet cable is connected)
• built-in Wifi card.
Click on WirelessLAN and then click on
Add.
Choose the IP Configuration Type
Typically there are two types of Wifi
connections, one at home or work, and one
at a public Wifi hot spot. Public Wifi spots
will assign your device an IP number. You
simply select Configure IP automatically
and when the connection to the hot
spot/public Wifi point is made, it will assign
your PMA430 an IP address. On the other
hand, in a home network situation or in a
work environment (check with your system administrator), you might have to configure the IP
address by hand. In this case, click on Configure IP manually. Ask the person who set up your
Wifi network for an IP address for your PMA430 to connect to the local network.
Scan for active Access Points
The network type will usually be Infrastructure. If you want to connect Wifi devices to talk to
each other, such as for networked game playing, then choose the Ad Hoc option. This is a
connection between local devices. Click on Any Network if you just want to accept the first
network access point that your PMA430 can find.
Choose the Access Point
There may be more than one access
point in your vicinity. In this
example, there are two. Let’s choose
the one called Logan_Wifi. You will
notice that the connection quality is
lower than that of the access point
named WF500. This is because the
WF500 access point is getting a better
signal (probably due to less
obstructions between you and the
access point). The lower the quality of
the connection, the slower the data
transfer speed and thus the slower your web pages or e-mail will load. Highlight the access point
you want to use and click on Select. If the access point shows Encryption as Yes, than you will
have to contact the access provider or system administrator for the encryption (WEP) parameters,
which you can set on the WEP tab. Your connection is now set. Click on OK to exit.
Click now on the Wireless tab. You now
click on the Scan… button to scan for an
active WiFi access point that is
broadcasting. If you have a home network,
make sure that your WiFi device has the
SSID set to On. This means that your Wifi
access point is broadcasting a message
telling any device in the area that it is
available for a network connection. Several
57
Service Created
Your service has now been created. The next
time you go to the Services tab, you will see all
the services that you have previously created.
When you are connected to a network, you can
open the Network application and see the
current quality of the data transmission signals
by looking at the Current tab.
58
Page 30

Browsing the Web or Using E-mail
Now that you have a connection service set up, you should use the Network
Connect icon in the status bar at the bottom of the screen. The red X on the icon
means that you are not connected. Click on the icon and then choose which
service you would like to connect to. In our
example, we choose Logan_Wifi. It will take
a couple of seconds to connect and then show
the Connected network and
Wifi Card icons. You can
now launch the Opera™ web browser or use
your E-mail program. When you are not using these programs, it is recommended that you close
the network connection as it would otherwise discharge your battery faster. If one of these
applications says “Can’t find DNS server”, this is a sign that you have lost your Wifi connection.
Use the status bar icon to disconnect and then try reconnecting again.
Making an Infrared connection
Your PMA430 has an Infrared port which permits you to connect via a mobile phone to the
internet. Please be aware that a number of factors, such as your service provider and your mobile
phone manufacturer's parameters, influence the success of this connection.
You have 2 options for setting up an Infrared connection:
1) HSCSD/GSM connection
This is the standard way where the connection is made as a normal phone call at the speed of a
9,6k modem. For this connection, you require an Internet Service Provider (ISP) who will provide
you with information necessary to establish the connection, such as a user name, password and
access phone number.
2) GPRS connection
This relatively recent standard permits you to establish a direct digital connection which tends be
faster than the HSCSD/GSM connection. This connection is typically billed per megabyte
transferred rather than connection time. Some mobile phone providers require you to take a data
subscription service in order to use GPRS.
Setting up the connection follows a similar procedure as setting up the Wifi connection, as
described above. You need to select the “Dial-up – PPP IrDA”. You will require the following
information:
Account Tab
Name A name of your choosing to identify this connection
For a HSCSD/GSM connection:
For a GPRS connection:
Modem tab
AT-dial ATDT (dial tone) or ATDP (dial pulse) designate the dialing method. A
Speed If this parameter is available, set it to 115200 to match the PMA’s internal
Wait time Allows the server this amount of time for the modem connection. (GSM
Demand dialing The connection can be dialed and disconnected automatically (e.g. when
Username Your identifier provided by your Internet Service Provider (ISP)
Password The corresponding password, provided by your ISP
Phone The access phone number of your ISP
Username Contact your telephone service provider for a user name required by the
GPRS service. If this service does not require a user name, type 123.
Password Contact your telephone service provider for a password required by the
GPRS service. If this service does not require a password, type 123.
Phone A phone code provide by your phone’s manufacturer (ex. *99# for some
Nokia phones). You should find this in your phone manufacturer’s
manual under GPRS activation or through your GPRS data service
provider.
mobile phone uses ATDT. (GSM connection)
hardware configuration. (GSM connection)
connection)
starting OperaTM) or manually using the network connection icon on the Status
bar . Attention: when you set this parameter to Auto on/off, you have to make
the first connection manually.
59
60
Page 31

Network tab
18 Software & Other settings
The standard setup is to use the automatic detection of routing and name servers (DNS). In case
you are required to set any of these values, your ISP will provide this information.
18.1 Language
This setting lets you select the interface language of your PMA430. Options are: German, English
(U.S. or U.K.), Spanish, French and Italian.
18.2 Security
This setting lets you choose a password, which any user will have to enter when turning on the
device.
18.3 Appearance
Use this setting to stylize the windows, colors and fonts to your own liking.
18.4 Launcher
The tabs on your PMA430 are called launchers because you launch an application from them. You
can change the background color or image for each tab to your own particular liking.
18.5 Date/Time
Here, you can set the current time, time zone and date and to select a time format.
The time is expressed in hours and minutes. Tap onto the value you want to change and use the
arrows or the UP and DOWN controls to modify them.
To change the date, tap onto the black arrow on the right hand site of the date bar. This will open
the calendar. (insert screen shot?). You can use the arrows to navigate the months and year, and
tab onto the calendar to select a date.
The time format can be set to a 12 hour clock (0:00 to 12:59) or a 24 hour clock (0:00 to 23:59).
You can choose for the calendar to display Monday or Sunday as the first day of the week (menu
next to “Week starts on”).
The date format can be set to M/D/Y, D.M.Y, Y-M-D or D/M/Y.
You can also access these parameters by tapping on the time itself in the system status bar on the
bottom right of the screen. You should double check the time and date after a hardware reset and
after rebooting.
61
62
Page 32

18.6 Software Packages
Use this application to install or uninstall software packages. The .ipk extension is the standard
extension for application programs for the PMA430. Although .ipk files developed for other
devices might work on the PMA430, you should use.ipk files which have been specifically created
for the PMA430 to be sure that the program works correctly.
If you copy a .ipk installation file (created specifically for the PMA430) to your Documents
folder, then you can run this installer, select “Install from Documents” and choose the file to
install. Alternatively, you can just go to the Documents folder and double-click on an .ipk file
and it will launch this Software Packages application. Once the program has been install, the
PMA430 will notify you that the procedure has been completed.
You might want to try the option “Install from Network”. Once this new service has been put into
place, you will be able to download and install software packages over the Internet directly from
your PMA430. Refer to the section on Network in the Hardware settings chapter for information
on how to set up and start an internet connection.
18.7 Restart
This application allows you to perform a power down-reset of the PMA430 or a restart of the
system software only. This might be needed if the system software has become corrupted and is no
longer working properly. "Restart Qtopia" will just restart the system software, while "Reboot"
will completely power down the PMA430, allowing a full restart of the whole operating system.
PART V
Qtopia™ Desktop Application
18.8 Application Services
This application allows you to associate applications with certain file types. That is to say, you tell
your PMA430 which application to use to open files of the format. For example, if you have two
or three applications that can display JPEG images, then this program lets you select which
application will be launched when you double click on a JPEG image in the Documents folder.
18.9 Plug-in Manager
Warning!!! This program should be used with extreme care and only when you are familiar with
TM
Qtopia
data or possibly continue running but degrade its performance. Therefore, we strongly recommend
that you do not change any of these settings.
plug-ins. If you disable a plug-in, you could cause your machine to freeze and/or loose
63
64
Page 33

19 Installing & Using Qtopia™ Desktop
19.3 Synchronizing with Microsoft® Outlook
Qtopia™ Desktop is a personal information management (PIM) program developed by Trolltech
for Windows® based computers. You can use it alone as a manager for the PIM data on your
PMA430 or you can use it as a synchronization tool to synchronize your Microsoft® Outlook®
information with your PMA430.
19.1 Installation
In the Archos folder you will find a folder called /Qtopia_Desktop_Install. Copy this folder to
your desktop computer and run the installation program inside it. Once it is installed, it will add a
‘connection’ icon to the system tray of your PC. The icon shown here indicates that the PMA430
is not connected to the computer, and thus no
synchronization can take place.
19.2 Usage
Once you connect your PMA430 to your computer, it will be automatically recognized by your
Window® computer and the system tray will show the connection icon indicating that you can
now synchronize your PMA430 with your desktop computer.
You can either launch the Qtopia™ Desktop program itself to
have access to the calendar, Todo list, and contact manager, or
you can simply right click the icon in the system tray and select Sync. The data available through
the Qtopia™ Desktop program will be synchronized with the data on you PMA430.
By default, the setting to synchronize with Microsoft® Outlook is set. Thus, when you click on
Sync from the system tray icon or Sync All from the Qtopia™ Desktop application, your PIM data
will be synchronized between Outlook, Qtopia™ Desktop, and the PMA430. You can change
settings for which data takes precedence in case of conflicts.
Quick Sync from the System Tray Sync from the Qtopia™ Desktop Application
If you go to Settings in the File menu of Qtopia™ Desktop, you can uncheck the Outlook plug-in
if you do not want synchronization with it. It will then just synchronize with the Qtopia™
Desktop program.
There is a complete On-line help which explains each aspect of the program.
65
66
Page 34

20 Technical Support
In case you should encounter any technical difficulties using your product, we suggest you go
through these steps in order to resolve any issues as efficiently as possible:
1) Please remember that in addition to the printed USER GUIDE, there is the full
MANUAL on the hard drive of your device. This manual included much more detail,
and you will probably find the information you are looking for here. You might need to
refer to several sections in order to identify the section which addresses the difficulty
you are encountering. You might want to use the electronic copy of the manual and
search for terms within it using Acrobat Reader.
2) Look at the Trouble shooting section at the back of your manual. In this section, we have
included answers to some commonly asked questions.
3) Look at our Support section on the website (www.archos.com). Here, you will find
Frequently Asked Questions (FAQ) for our different products, and there is a chance that
somebody else has already asked your question.
4) If these steps did not help you in resolve your technical difficulty, you can always
contact us either via email or by calling the helpline. Telephone support will be provided
in the language of the countries listed below. For other countries, please use email
technical support.
DO NOT USE phone or e-mail support for marketing and sales questions. These
numbers are to aid those who have technical difficulties / malfunctions.
• For warranty and services purposes, keep your sales receipt for proof of purchase. The serial
number for the AV 700 model can be found in the battery compartment.
• If technical support (Telephone or E-mail) determines that your product needs to be returned,
please contact the place of purchase to have your product repaired or replaced (depending on
problem type). Customers who purchased directly from the Archos website should fill out the
RMA return request form on the website.
WWW.ARCHOS.COM
Worldwide Offices
United States & Canada Europe & Asia
ARCHOS Technology
3 Goodyear – Unit A
Irvine, CA 92618 USA
Phone: 1 949-609-1483
Fax: 1 949-609-1414
United Kingdom Germany
ARCHOS (UK) Limited
3 Galileo Park
Mitchell Close
West Portway Andover
SP103XQ Andover
United Kingdom
Phone: +44 (0) 1264 366022
Fax: +44 (0) 1264 366626
ARCHOS S.A.
12, rue Ampère
91430 Igny
France
Phone: +33 (0) 169 33 169 0
Fax: +33 (0) 169 33 169 9
ARCHOS Deutschland GmbH
Bredelaerstrasse 63
40474 Düsseldorf
Germany
Tel: +49 211 1520 384
Fax: +49 211 1520 349
Telephone Support
877-300-8879 (USA, Canada)
01 70 20 00 30 (France)
0207-949-0115 (UK)
069-6698-4714 (Germany)
Email Support: www.archos.com/support
09-1745-6224 (Spain)
02-4827-1143 (Italy)
020-50 40 510 (Netherlands)
01-601-5700 (Ireland)
67
68
Page 35

21 Troubleshooting
21.1 USB Device Connection issues
Answer: The specifications are under the condition that the screen backlight goes off after 30
seconds (for music) and the user does not access the machine, it just sits and plays. If you get
significantly less time from a full charge, call our technical support hot-line.
Problem: I cannot get my PMA430 to be recognized by the computer.
Solutions:
• If using a USB hub, try connecting without using the hub (some hubs are not powered and
may not work with the PMA430).
• If using a USB port in the front of your computer, try a USB port in the back. Front USB
ports are often from non-powered hubs.
• Do not connect to a USB port repeated through a keyboard.
• If using a laptop computer and a docking station, try connecting without the docking station.
• If the Files Allocation Table (FAT) gets corrupted, the PMA430 may not show up in
Windows XP for over one minute, and then it comes up as local drive. Use DOS Utility
ChkDsk as shown below.
• Windows
®
XP may recognize the PMA430 hard disk but yet not assign a drive letter to it.
Right click on My Computer and select Manage. Then select Storage, then Disk
Management. Within this window you may see the hard drive and be able to assign a drive
letter by right-clicking on the hard disk, and selecting the option Change drive letter and
paths… .
Problem: What do I do if I try to disconnect via the green arrow but keep getting “The device
‘Generic Volume’ cannot be stopped now. Try stopping the device again later.”
Answer: Shut off any program that might be accessing data on the PMA430, including Windows
®
Explorer. If this does not work, shut down all programs, wait 20 seconds, then try the green arrow
one or two times again. If this does not work, you should shut down the computer and disconnect
the USB cable once the computer is off.
21.2 Charging and Power issues
You do not need to fully discharge the batteries before recharging them.
Problem: A full battery charge does not last as long as the specifications suggest.
21.3 PMA430 locks up (freezes operation) or Stops
Problem: The PMA430 locks-up. None of the buttons work.
Solution: Do not press any more buttons and do not touch the screen for 3 – 5 minutes. If you
have a large file open in one of the applications or if multiple applications are simultaneously
running, and the screen buttons were very quickly pressed, the PMA430 may not have be able to
react quickly enough to all the inputs. Wait a few minutes then try to close each open application.
If this does not work, try holding down on the ESC button for 3 seconds to shut off the PMA430
and then turn it back on. If it will not shut off, you will have to do a reboot. Take a pin or paper
clip and press the reset button inside the pinhole on the bottom of the unit. The PMA430 will now
do a complete system reboot when turned on. This will take a few minutes. You may have lost
data in any open applications. Verify to make sure the time and date are correct after a full reboot.
21.4 File issues, corrupted data, formatting, and partitioning
Problem: On the PMA430, I find new file names and folder names that I never created or they
have strange gibberish names.
Answer: Most likely, the PMA430’s file allocation table (FAT) has been corrupted. This could
have been due to the PMA430 shutting down (due to low battery power) while reading or writing
to your computer via the USB connection. To fix a corrupted FAT problem, you should use the
Error Checking utility or the Check Disk utility explained at the end of this section. Attention:
Windows and Macintosh often write extra files to the hard disk such as finder.def or System
volume info. These are normal and will not harm the PMA430.
Problem: I have been using my PMA430 to transfer files back and forth between different
computers. Will defragmenting the PMA430 hard disk do any harm to it?
Answer: Defragmenting the PMA430 hard disk may be useful after having transferred many files
to and from the PMA430. It is never harmful to use the defragmenter on the PMA430. Make sure
no other program is running while using the Windows
®
defragmenter utility. Make sure you power
the PMA430 with the external power adapter during this procedure.
69
70
Page 36

Problem: I want to reformat the PMA430’s hard disk.
Answer: You can do this, but it will erase ALL of the data on your PMA430. Sometimes this may
be necessary if your FAT (File Allocation Table) becomes so corrupted that nothing seems to fix
your file problems. First, as explained below, you should run ScanDisk or the DOS chkdsk (Check
Disk) program to try to fix your problem. If this doesn’t fix your problem and you are sure you
must reformat the PMA430 hard disk, then see the system recover chapter for details.
Windows
®
ME Running Scan-Disk (Error Checking)
• Quit all running applications.
• Properly connect the PMA430 to your computer as explained in the chapter on
connecting to your computer.
• Make sure external AC adapter is powering the PMA430.
• Right click on the PMA430 hard disk in Windows
®
Explorer and select Properties.
• Select the Tools option and run the Error checking program
• Make sure you check the box to automatically fix errors.
• Be patient, this may take a while. Windows
®
may ask you to restart the computer to
make certain Windows files available. This is OK, click on Yes.
®
Windows
XP & 2000 Running Check Disk Utility (ChkDsk)
If you still have problems with the file system on your PMA430 you can try to fix it using the
DOS utility, check disk (chkdsk). Do the following;
• Make sure external AC adapter is powering the PMA430.
• Quit all running applications.
• Properly connect the PMA430 to your computer as explained in the disconnection
chapter.
• Wait patiently (up to 5 minutes) for Windows XP to show the local drive as mounted.
• Open a DOS window. Programs > Accessories > Command Prompt.
• At the prompt, type chkdsk e: /f . Use e: or f: or whatever drive letter is representing
your PMA430. The /f argument tells the program to automatically fix errors.
• Be patient, this may take a while.
• When it is finished, exit the DOS Window and properly disconnect the PMA430 from
your computer.
Storage Capacity
Computer Interface
Image Playback
Audio Playback
Audio Recording
Video Playback
Screen
Television output
Playback
Autonomy***
Scalability
Infrared Port
Wifi Port
AV Connections
Power source
Physical Dimensions
Temperature Range
Technical Specifications
30 Gigabytes*
Device: USB 2.0 High Speed (compatible USB 1.1)
Host: USB 2.0 Full Speed (compatible USB 1.1)
JPG, BMP, PNG, GIF images (Photo application)
Stereo MP3 decoding 30-320 kb/s CBR & VBR, WMA, WAV. WMA
copy protected (Windows Media Player 9 PDDRM)
Stereo WAV (PCM) & MP3 CBR low (96kb/s@32kHz), medium
(128kb/s@44.1kHz), high (192kb/s@48kHz)
Video Track: MPEG-4 Simple Profile compliant .AVI format up to
720x576 pixels @ 25fps. Sound track: MP3 or WAV (IMA-ADPCM).
3.5” color TFT LCD touch screen (QVGA) 320x240 pixels 262K colors
Video output switchable PAL (EU) or NTSC (US) standard
Up to 9 hours music, up to 4 hours video
Free Operating System updates downloadable from ARCHOS website
Beams standard, Palm OS, and quoted ascii.
IEEE 802.11b compatible, maximum bit rate 10Mb/s
Audio/video Multi-connect jack. Includes connections for audio/video
IN and audio/video OUT.
Removable Lithium-Ion battery pack
Use only the ARCHOS supplied charger/adapter.
127 x 79 x 21 mm (5.0 x 3.1 x .83 inches) 270 grams (9.6 oz.)
5 °C to 35 °C running ; -20 °C to 45 °C storage
System
Requirements
*1 GB = 1 billion bytes, formatted capacity is less.
**Files compatible with MPEG4-SP AVI only; MPEG-4: ISO/IEC standard by Moving Picture Experts Group; AVI:
audio/video file container by Microsoft®. DivX: has not been certified by DivX, Inc., may not read all DivX® 4.0& 5.0 files;
does not read Divx® 3.11 & 6.0 files.
***Depending on LCD brightness, use and access (start, stop, pause, etc.)
71
PC: Windows® ME, 2000, XP
Mac: OS X (10.2.4) or higher
72
Page 37

22 Legal
22.1 Warranty and Limited Liability
This product is sold with a limited warranty and specific remedies are available to the original purchaser in the
event the product fails to conform to the limited warranty. Manufacturer’s liability may be further limited in
accordance with its sales contract.
In general, the manufacturer shall not be responsible for product damages caused by natural disasters, fire, static
discharge, misuse, abuse, neglect, improper handling or installation, unauthorized repair, alteration or accident. In
no event shall the manufacturer be liable for loss of data stored on disk media.
MANUFACTURER SHALL NOT BE LIABLE FOR ANY SPECIAL, INCIDENTAL OR CONSEQUENTIAL
DAMAGES. EVEN IF INFORMED OF THE POSSIBILITY THEREOF IN ADVANCE.
ARCHOS licensor(s) makes no warranties, express or implied, including, without limitation, the implied
warranties of merchantability and fitness for a particular purpose, regarding the licensed materials. ARCHOS
’s licensor(s) does not warrant, guarantee or make any representations regarding the use or the results of the
use of the licensed materials in terms of its correctness, accuracy, reliability, correctness or otherwise. The
entire risk as to the results and performance of the licensed materials is assumed by you. The exclusion of
implied warranties is not permitted by some jurisdictions. The above exclusion may not apply to you.
In no event will ARCHOS ’s licensor(s), and their directors, officers, employees or agents
(collectively ARCHOS ’ licensor) be liable to you for any consequential, incidental or indirect
damages (including damages for loss of business profits, business interruption, loss of business
information, and the like) arising out of the use of inability to use the licensed materials even if
ARCHOS ’ licensor has been advised of the possibility of such damages. Because some jurisdiction
do not allow the exclusion or limitation of liability for consequential or incidental damages, the
above limitations may not apply to you.
Please see your sales contract for a complete statement of warranty rights, remedies and limitation of liability.
Furthermore, warranty does not apply to:
1. Damages or problems resulting from misuse, abuse, accident, alteration or incorrect electrical current
or voltage.
2. Any product tampered-with or damaged warranty seal or serial number label.
3. Any product without a warranty or serial number label.
4. Batteries and any consumable items delivered with or in the equipment.
22.2
CAUTION
To prevent risks of electric shock, this unit must only be opened by qualified service personnel.
Power off and disconnect the power supply cable before opening the unit.
WARNING
To prevent fire or shock hazard, do not expose the unit to rain or moisture.
Use of this product is for personal use only. Copying CDs or loading music, video, or picture files for sale or other
business purposes is or may be a violation of copyright law. Copyrighted materials, works of art, and/or
presentations may require authorization to be fully or partially recorded. Please be aware of all such applicable
laws concerning the recording and use of such for your country and jurisdiction.
Warnings and Safety Instructions
22.3 FCC Compliance Statement
This equipment has been tested and found to comply with limits for a Class B digital device, pursuant to Part 15 of
the FCC Rules. These limits are designed to provide reasonable protection against harmful interference in a
residential installation. This equipment generates, uses and can radiate radio frequency energy and, if not installed
and used in accordance with instructions, may cause harmful interference to radio communications. However,
there is no guarantee that interference will not occur in a particular installation. If this equipment does cause
harmful interference to radio or television reception, which can be determined by turning the equipment off and on,
the user is encouraged to try to correct the interference by one or more of the following measures:
• Reorient or relocate the receiving antenna.
• Increase the separation between the equipment and receiver.
• Connect the equipment into an outlet on a circuit different from that to which the receiver is connected.
• Consult the dealer or an experienced radio/TV technician for help.
CAUTION : Modifications not authorized by the manufacturer may void users authority to operate this device.
FCC Part 15 - Operation is subject to the following two conditions:
1. This device may not cause harmful interference;
2. This device must accept any interference received including interference that may cause undesired operation.
22.4 Electrostatic Discharge
Note: During electrostatic discharge, the product may be malfunctioning. Reset it to return it normal operation. The
PMA430 reset is actuated by pressing the button inside the reset pinhole found on the bottom of the device.
a paper-clip to access this button for example. The unit will power off. Restart normally. The device will go
through a complete system reboot which may take several minutes.
Use
22.5 Avoiding Hearing Damage
This product respects the current regulations for limiting the output volume of consumer audio devices to a safe
level. By listening to your device with headphones or earbuds at high volumes, you run the risk of permanent
damage to your ears. Even if you get used to listening at high volumes and it seems normal to you, you still risk
the possibility of damaging your hearing. Reduce the volume of your device to a reasonable level to avoid
permanent hearing damage. If you hear ringing in your ears, reduce the volume or shut off your device. This
device has been tested with the ARCHOS supplied earphones. Other manufactures earphones may produces
volume levels higher or lower than the ARCHOS delivered earphones.
22.6 Copyright Notice
Copyright ARCHOS© 2005 All rights reserved.
This document may not, in whole or part, be copied, photocopied, reproduced, translated or reduced to any
electronic medium or machine-readable form without prior consent, in writing, from ARCHOS . All brands and
products names are registered trademarks and the property of their respective owners. Specifications are subject
to change without notification. Errors and omissions accepted. Images and illustrations may not always match
contents. Copyright
Disclaimer of warranty: to the extent allowed by applicable law, representations and warranties of non-infringement of
copyrights or other intellectual property rights resulting from the use of the product under conditions other than as here above
specified, are hereby excluded.
®
ARCHOS . All rights reserved.
22.7 LCD Pixel Policy
74
Page 38

The LCD screen on your ARCHOS PMA430 unit has been manufactured to rigorous standards to provide a high
quality viewing experience. Nevertheless, your LCD screen may have slight imperfections. This is not particular to
the ARCHOS screen, but to all devices which have LCD screens regardless of the original manufacturer of the
LCD. Each product vendor guarantees that his screen will contain no more than a certain number of defective
pixels. Each screen pixel contains three dot elements (Red, Blue, and Green). One or all of the dots in a given
pixel may be stuck on or stuck off. A single dot stuck off is the least noticeable. All three dots of a pixel stuck on is
the most noticeable. ARCHOS guarantees that its PMA430 screen will have no more than 1 defective pixel
(regardless if that pixel has one or more defective dots). This means that during the period of guarantee for your
country or jurisdiction, if the screen on your product has two or more defective pixels, ARCHOS will repair or
replace your PMA430 product at its cost. Thus, one defective pixel is not grounds for replacement or repair of the
product.
23 Index
Address book
Contacts 13.3
ARCLibrary
Playing music 4.1
The ARCLibrary 4.2
ARCLibrary update
The ARCLibrary 4.2
Available disc space
System info 14.5
Backup
Linux®, Qtopia™ and the PMA430 File
System 1.5
System Recovery 3
Battery autonomy and consumption
Hardware settings - Browsing the Web or
Using E-mail 17
Light & Power 17.2
Connecting/Disconnecting the PMA430
to/from your PC 2
Bookmarks
The Resume Functions 4.5
The Resume Functions 8.1
Buttons not working
Music Application - Button controls while a
song is playing 4
Codecs
Installing the PC Software – MPEG-4
Codec 12.1
Installing the PC Software - MP3 Sound
Codec 12.1
Command line
Terminal 14.8
Compression
Putting Music onto your PMA430 4.3
Video Application 8
Creating MPEG4 Video Files with your
Computer 12
Connecting a USB device to your PMA
Transferring pictures to your PMA430 7.1
Date and time
Overview of different screen areas 1.2
Calendar 13.2
Clock 14.1
Date/Time 18.5
Deleting files
File browser Application 11
External speaker off/on
Music Application - Button controls while a
song is playing 4
File system
Linux®, Qtopia™ and the PMA430 File
System 1.5
File types
Application Services 18.8
Files: Moving or copying files
Putting Music onto your PMA430 Synchronizing Music from Windows
Media® Player 10 to the PMA430 4.3
Transferring pictures to your PMA430 7.1
File browser Application 11
Files: Music deleted from your device
Putting Music onto your PMA430 Synchronizing Music from Windows
Media® Player 10 to the PMA430 4.3
Find a particular song (Scan)
Music Application - The Music application
window 4
Free disc space
System info 14.5
Graphical user interface
Overview of different screen areas 1.2
Application tabs 1.3
Lock
Music Application - Button controls while a
song is playing 4
Memory low/critical
Application tabs - Documents 1.3
MPEG4 Translator
Creating MPEG4 Video Files with your
Computer 12
Music Browser
Playing music 4.1
The ARCLibrary 4.2
Music deleted/missing from your device
Putting Music onto your PMA430 Synchronizing Music from Windows
Media® Player 10 to the PMA430 4.3
Music files sorted by categories
Playing music 4.1
75
76
Page 39

Music lists (Playlists)
Playing music 4.1
The ARCLibrary 4.2
New Playlist does not display
The ARCLibrary 4.2
Operating system
Linux®, Qtopia™ and the PMA430 File
System 1.5
System Recovery 3
Operating system version
System info 14.5
PDF files
Pdf Viewer 4.9
Play songs randomly (Shuffle)
Music Application - The Music application
window 4
Playing only certain songs
Playing music 4.1
The ARCLibrary 4.2
Playing songs in a specific order (Playlist)
Playing music 4.1
The ARCLibrary 4.2
Playlists
Playing music 4.1
The ARCLibrary 4.2
PlaysForSure
Putting Music onto your PMA430 4.3
Programmed recordings
VideoCorder Application 9
Set-up for scheduled video recordings 10
Protected files
Music - Using iTunes™ with your PMA430
6
Copy Protection 9.2
Recovery
Linux®, Qtopia™ and the PMA430 File
System 1.5
System Recovery 3
Reminders
Today 13.1
Calendar 13.2
Todo List 13.4
Removing files
File browser Application 11
Renaming files or folders
File browser Application 11
Restarting your device
Updating the Operating System - Step 4
Reset the PMA430 and set the time and date
1.6
Hardware Reset 1.9
Restart 18.7
Screen not working
Music Application - Button controls while a
song is playing 4
Show songs added to device
The ARCLibrary 4.2
Shuffle
Music Application - The Music application
window 4
Software Installation
Software Packages 18.6
Sound
Playing music 4.1
Play Music through your Home Stereo 4.4
Customizing the Equalizer 4.6
VideoCorder Application - Manual
Recording 9
Creating MPEG4 Video Files with your
Computer 12
Time and date
Overview of different screen types 1.2
Calendar 13.2
Clock 14.1
Date/Time 18.5
To do lists
Today 13.1
Calendar 13.2
Todo List 13.4
Touch screen problems
Music Application - Button controls while a
song is playing 4
Recalibrate 17.3
Restart 18.7
Video playback settings
TV Output 16.1
Video quality
Customizing the Equalizer 4.6
VideoCorder Application - Manual
Recording 9
Creating MPEG4 Video Files with your
Computer 12
Audio-Visual Settings 16
Video recording
VideoCorder Application - Manual
Recording 9
VideoCorder Settings 16.2
Virtual Dub
Creating MPEG4 Video Files with your
Computer - PC Tools 12
Installing the PC Software - Virtual Dub™
12.1
Using MPEG4 Translator 12.2
Windows Media Player
Putting Music onto your PMA430 Synchronizing Music from Windows
Media® Player 10 to the PMA430 4.3
Writing text or notes
Text Editor 14.4
77
78
 Loading...